36
© Conservation Technology 04/08 EPDM ROOFING HANDBOOK

© Conservation Technology 04/08
EPDM ROOFING HANDBOOK

© Conservation Technology 04/08
Conservation Technology has provided state-of-the-art solutions for energy, water, and environmental conservation since 1984. This handbook describes our unique EPDM Roofing System which offers maintenance-free waterproofing for rooftop decks, green roofs, and other critical low-slope applications. For existing roofs and for new roofs with complicated flashings, please also see our ACRYLIC ROOFING HANDBOOK. For green roofs, please see our GREEN ROOF HANDBOOK.
CONTENTS OF THIS HANDBOOK: Introduction 1Preparation 2Basic Procedure 3Multiple Walls 8Details 10Folded Inside Corners 12Molded Inside Corners 13Taped Inside Corners 14
PRICING AND QUOTATIONS: Component pricing can be found on pages 2 through 5 (please note that prices and product specifications are subject to change without notice). For estimating purposes, assume that a complete system will cost approximately $3.00 per square foot delivered. If this is within your project budget and you are ready to order, we will be pleased to provide an exact quotation if you fax or email a drawing or simple sketch of your roof clearly showing the boundaries of the roof, the roof dimensions to the closest inch, the roof slope and drainage direction, a description of the conditions at each edge, and details about any penetrations such as pipes and skylights. Please provide the delivery address and a daytime telephone number so we can contact you with questions and estimated shipping charges.
ORDERS AND PAYMENT: To insure reliable long-term performance, we review every roof project in detail to determine the best way to fabricate the rubber sheet and to identify all required components. If you are ready to order but have not yet requested a quotation, we will require a roof sketch as described above to initiate the ordering process. We fabricate most roofs within two weeks; delivery takes a few days to the eastern US and about a week to the western US and Canada. Since all EPDM roofs are custom made, we require full payment when an order is placed. We accept Mastercard, VISA, Discover, American Express, checks, bank drafts, money orders, or wire transfers. Credit terms are available for dealers, as well as for contractors who purchase often.
HOURS OF OPERATION: We’re open Monday through Friday from 8:30 AM until 5:30 PM Eastern time, often longer. If our telephones are busy, leave a message and we will usually return your call the same day. Please remember to supply your telephone number and to indicate when you can be reached during both daytime and evening hours. You are welcome to pickup merchandise at our Baltimore warehouse (2233 Huntingdon Avenue, just south of the Johns Hopkins University campus), but please call first to verify your order is ready. We do not currently have a showroom.
SHIPPING: Roofs smaller than 400 square feet can usually ship by UPS; all others must ship by truck. Although our substantial discounts permit us to offer very reasonable rates to almost any point in North America, please note that truck shipments to residential addresses can be significantly more expensive than shipments to commercial addresses, and someone must be available to unload and inspect the merchandise. It’s always best to arrange for a commercial delivery address or to request shipment to the closest truck terminal (we can locate a terminal in your area). Although we rarely have shipping damage, it is essential that you inspect all truck shipments thoroughly before signing the freight bill, note any damage on the freight bill, and call us within one business day to report the damage. If you follow this procedure, we will guarantee free repair or replacement of any damaged items. If you fail to note damage before accepting a truck shipment, you may be denied this protection, so insist on taking the time for a thorough inspection.
RETURNS: Rubber sheet, adhesive, tapes, and caulk are not returnable unless defective. We will accept returns of most other components within 30 days provided they arrive in clean, unused condition, but you must first call for a return authorization and shipping instructions. We do not refund shipping charges, and we will charge a restocking fee.
WARRANTY: When applied according to our specifications, we offer all customers a 20-year warranty on Conservation Technology EPDM sheet . This is a pro-rated warranty against deterioration from weathering and does not include accessory components, labor, or shipping. For details, please request a copy of our written warranty.
GENERAL INFORMATION
Molded Outside Corners 15Taped Outside Corners 16Posts 17Skylights 18Outside Edges 20Inside Edges and Sills 21Edge Transitions 22Pipe Boots 23
Curved Penetrations 24Roof Drains 25Scupper Drains 26Overlap Seams 27Butt Seams 28Edges 29Coverings 30Components 32
CONSERVATION TECHNOLOGYtel: (800) 477-7724 fax: (410) 366-1202 email: [email protected]

© Conservation Technology 04/08
1
INTRODUCTIONThe Conservation Technology EPDM roofing system offers any homeowner, builder, or roofer the means to reliably and permanently waterproof low-slope roofs, rooftop decks, and green roofs. In most cases we custom fabricate a single sheet the size of each roof, eliminating the risks associated with field seaming. Installation is clean, simple, quick, and safe: no heating torches or hazardous adhesives are required. Conservation Technology EPDM will outperform and outlast most other quality waterproofing products on the market, including metals, rubber-modified bitumens (torch-down or self-stick “rubber roofs”), thermoplastics (TPO, Hypalon, polypropylene), as well as other types of EPDM rubber.
EPDM RUBBER: EPDM rubber is a class of synthetic rubbers made primarily from EPDM polymer, shorthand for Ethylene Propylene Diene Monomer). Although there are many ways to formulate EPDM rubber from EPDM polymer, all EPDM rubbers share a chemical structure that gives them extraordinary resistance to heat, cold, sunlight, and air pollution, ideal characteristics for a roofing membrane. EPDM will remain flexible throughout the coldest winters, it won’t crack or dry out in the hottest summers, and it will withstand permanently ponded water. It is ideal for roofs with poor drainage or where the waterproofing is to be covered by gravel, soil, decks, or pavers. In addition, since it is fully UV stable, it can be used for fully exposed applications provided the heat gain from a black surface is not an issue.
Although EPDM rubber has been used successfully to waterproof large commercial buildings for more than thirty years, the low-cost types of EPDM favored for commercial roofs offer many pitfalls for inexperienced installers. These EPDM roofing sheets shrink significantly as they age, creating stress at walls and edges that can tear the sheets or shorten their lives. Sheet sizes are limited, so field seaming is usually necessary. The mineral talc coating used in the manufacture of this type of EPDM makes it difficult to properly clean the sheets for effective seaming and flashing; adhesives and cleaners are often hazardous and restricted to professional applicators.
Conservation Technology EPDM is a premium-grade of EPDM rubber that is superior to other types of EPDM. For example, it has less than one-tenth the shrinkage of other EPDM, so if the roof is to be covered with a wood deck, masonry pavers, concrete, gravel, soil, or other heavy materials that will prevent the rubber from blowing away, the sheet can simply be laid on the roof and adhered for a few feet around the perimeter. The unique properties of Conservation Technology EPDM make it heat-weldable with our specialized equipment, so we can custom-fabricate a sheet of Conservation Technology EPDM to the size required for each roof, eliminating most field seams and minimizing waste. Since our sheet is free of talc, where flashing or field seaming is unavoidable, minimal cleaning will yield reliable results.
SYSTEMS APPROACH: The Conservation Technology EPDM roofing system is sold as a complete system of compatible components. Along with the custom-fabricated rubber sheet, we ship all materials required for successful installation including an easy to use water-base bonding adhesive, self-adhering rubber flashing, sturdy black alumimum perimeter termination bars, termination tapes, sealants, fasteners, and roof drains. The system is so simple that the first-time user can obtain a perfect job, as thousands have over the past twenty years.
Conservation Technology EPDM is fully root resistant as certified by the German FLL green-roof testing agency, so it does not require a supplemental root barrier when used as waterproofing for green roofs. We stock a full line of green roof components made by Optigreen of Germany, world leader in green roofs, and can provide a complete package including specialized fabrics, drainage products, edgings, engineered soils, and even plants. We can also supply height-adjustable paver supports to simplifiy construction of rooftop patios.
1
any combination of 5.5 ft wide strips of rubber can be fabricated to make rectangular, round, or L-shaped roofs
rubbersheet adhesive tapes drainsrubber flashing sealants

© Conservation Technology 04/08
2
PREPARATIONNew wood-framed roofs should be sheathed with exterior-grade plywood or with oriented strand board (OSB) attached with non-popping fasteners. Existing wood-framed roofs should be stripped, and in most cases it will be necessary to apply a new layer of plywood or OSB over the old sheathing. However, if stripping the roof reveals plywood in good condition, it may suffice to drive a ring-shank nail adjacent to each of the original fasteners so that the head of the ring-shank nail overlaps the original fastener to prevent popping.
New concrete roofs should be steel troweled and then cured 30 days before waterproofing. Old concrete roofs should be stripped, pressure washed, and patched. Contact us for advice about installing rubber over metal, foam, and other surfaces.
Before beginning, caulk large gaps and edge transitions, sand or grind protrusions, and round external edges to a 1/2” radius.
45
For wood roofs, rough-sand any splintering areas and rout or sand external roof edges a 1/2” radius. For concrete roofs,
grind all protrusions and form a 1/2” radius at external edges.
Sweep or vacuum well before beginning. Inspect workers’ shoes for embedded nails that
could puncture the rubber membrane
For both wood or concrete roofs, caulk all gaps greater than 1/4” as well as transitions between the roof and walls or skylights.
To assure proper bonding and flashing, apply EPDM only on dry sunny days when temperatures exceed 45°
For wood roofs, attach sheathing with non-popping fasteners such as ring-shank nails, threaded nails, or deck screws.

© Conservation Technology 04/08
3
BASIC PROCEDURE
Apply Termination Tape to connect the wall and roof tapes so the entire rubber perimeter is sealed.
Pull the rubber from the shipping box and drag it across the roof .
Apply Termination Tape to the wall just below the line. Do not remove the protective paper.
With a pencil or chalk line, mark the desired rubber perimeter on the wall and roof edges.
Apply Termination Tape to the roof edges just above the lines.
The following illustrations describe how EPDM rubber can be used to waterproof a simple shed roof with three sides open and a fourth side intersecting a wall. Although the procedures show the rubber fully adhered to the roof surface, when the rubber is to be covered with materials weighing at least five pounds per square foot such as floating wood decks, concrete pavers, gravel, or soil, it is only necessary to adhere the first few feet in from the edges, up the walls, and over the edges.
For safe delivery, we supply all rubber roof sheets folded and boxed. Since the rubber weighs about one-third of a pound per square foot, sheets up to 500 square feet can be carried by two people, but larger sheets can be quite heavy and difficult to manage. One solution is to rent a light-duty type crane (the type used to install commercial signs are relatively inexpensive). When using a crane, make certain the spot where the rubber is set down can handle the weight!

© Conservation Technology 04/08
4
Using a clean wood board, press the rubber firmly into the corner where the roof and wall meet.
Pull back the folded edge adjacent to the wall, taking care not to move the remainder of the sheet.
Using a paint roller, apply Bonding Adhesive to the exposed rubber, roof, and wall.
After the sheet is in postion, fold back the edge adjacent to the wall. Wait at least an hour for the rubber to “relax”.
After the adhesive is dry, carefully push back the sheet. To prevent wrinkles, avoid creasing in the leading edge.
Unfold the sheet by pulling it across the roof. Flipping the sheet will force air underneath so it floats into place.
© Conservation Technology 04/08
5
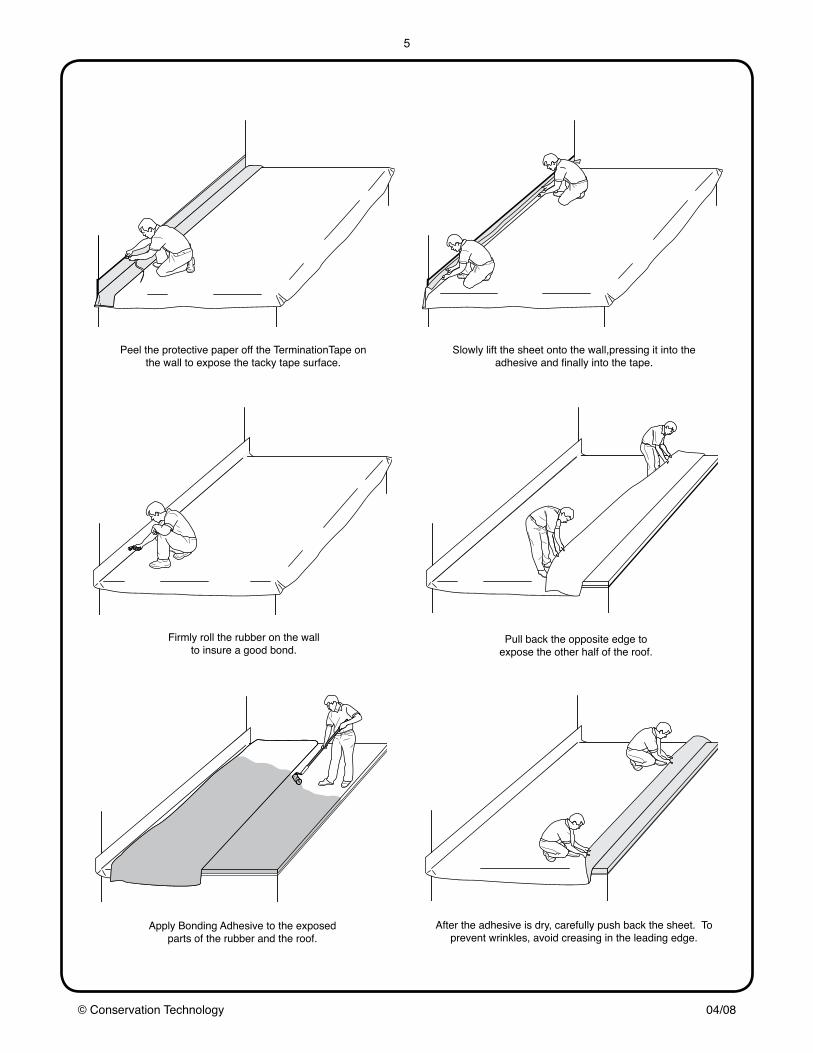
Slowly lift the sheet onto the wall,pressing it into the adhesive and finally into the tape.
Pull back the opposite edge to expose the other half of the roof.
After the adhesive is dry, carefully push back the sheet. To prevent wrinkles, avoid creasing in the leading edge.
Firmly roll the rubber on the wall to insure a good bond.
Apply Bonding Adhesive to the exposedparts of the rubber and the roof.
Peel the protective paper off the TerminationTape on the wall to expose the tacky tape surface.

© Conservation Technology 04/08
6
Reach under the overhanging rubber and strip the protective paper from the Termination Tape.
Form the rubber around the roof edge and press the rubber into the tape.
Clean the slit corners with toluene, naptha, or white gasoline.
Slit the corners of the rubber with a utility knife so the overhanging rubber can drop into place.
Firmly roll the rubber at the roof edge to insure a good bond.
Using a large roller or push broom, apply pressure to the surface of the rubber to assure proper bonding.

© Conservation Technology 04/08
7
Screw Wall Termination Bars through the rubber and Termination Tape.
Carefully trim the rubber to the underside of the termination bars with a sharp utility knife.
Screw the Drip-Edge Termination Bars throughthe rubber and Termination Tape.
Seal the slit corners with Uncured Laminate Tape. See EDGE TRANSITIONS.
Apply Silicone Caulk for EPDM to the back of the Drip Edge Termination Bars
Screw short lengths of Wall Termination Bars to connect the bars on the wall and edges, sealing the perimeter.
© Conservation Technology 04/08
8
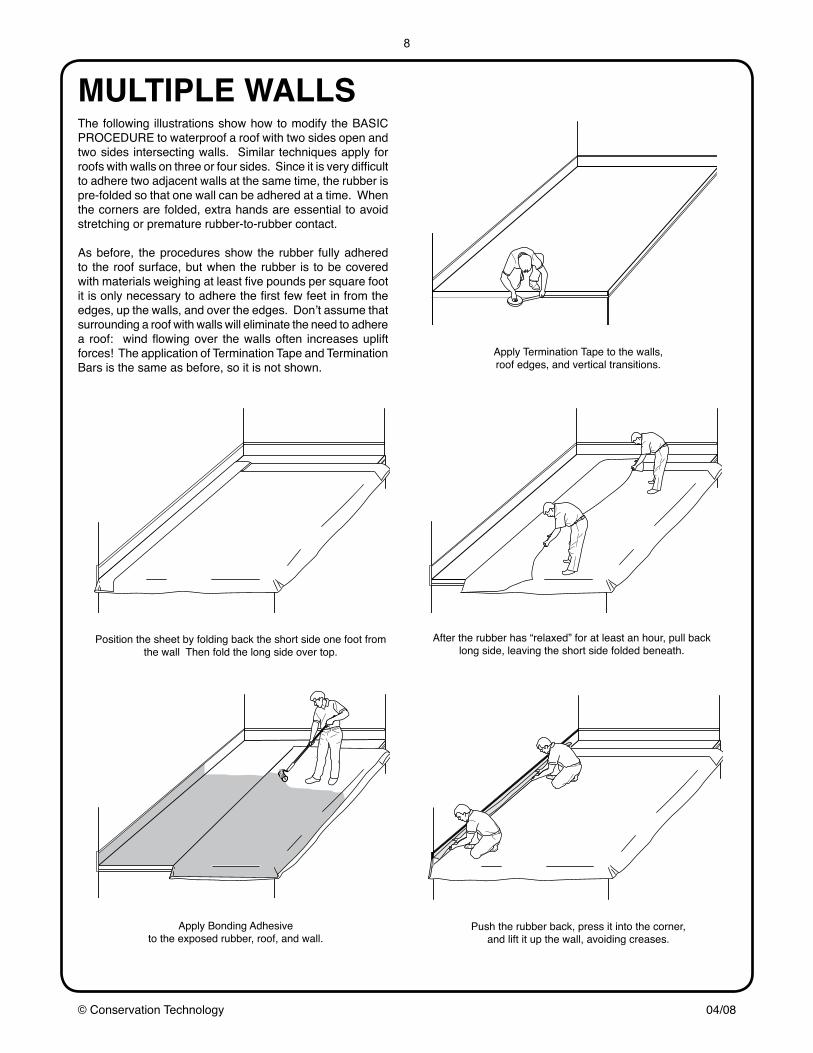
MULTIPLE WALLS
Apply Termination Tape to the walls, roof edges, and vertical transitions.
Apply Bonding Adhesive to the exposed rubber, roof, and wall.
Position the sheet by folding back the short side one foot from the wall Then fold the long side over top.
After the rubber has “relaxed” for at least an hour, pull back long side, leaving the short side folded beneath.
Push the rubber back, press it into the corner, and lift it up the wall, avoiding creases.
The following illustrations show how to modify the BASIC PROCEDURE to waterproof a roof with two sides open and two sides intersecting walls. Similar techniques apply for roofs with walls on three or four sides. Since it is very difficult to adhere two adjacent walls at the same time, the rubber is pre-folded so that one wall can be adhered at a time. When the corners are folded, extra hands are essential to avoid stretching or premature rubber-to-rubber contact.
As before, the procedures show the rubber fully adhered to the roof surface, but when the rubber is to be covered with materials weighing at least five pounds per square foot it is only necessary to adhere the first few feet in from the edges, up the walls, and over the edges. Don’t assume that surrounding a roof with walls will eliminate the need to adhere a roof: wind flowing over the walls often increases uplift forces! The application of Termination Tape and Termination Bars is the same as before, so it is not shown.

© Conservation Technology 04/08
9
Apply Bonding Adhesive to the exposed rubber and roof.
Apply Bonding Adhesive to the remaining rubber, roof, and side wall.
After the adhesive is dry, carefully push back the sheet. To prevent wrinkles, avoid creasing in the leading edge.
Pull back the other long side, leaving the short side folded beneath.
Pull back firmly on the short side until the adhesive already applied prevents further movement.
Push back short side, leaving an “ear” at the corner. See FOLDED INSIDE CORNERS or MOLDED INSIDE CORNERS.

© Conservation Technology 04/08
10
M
A D
C
OG
N
B
KE
LF
HJ
I
P
DETAILSAfter the basic installation process is completed, it’s necessary to seal edges, corners, protrusions, drains and other details. Most roof problems occur at these detail, so each must be done with great care. Use the drawing below as a key to finding the appropriate instructions on the pages that follow.
A Folded Inside Corner (p12)
D Molded Outside Corner (p15)
B Molded Inside Corner (p13)
E Taped Outside Corner (p16)
C Taped Inside Corner (p14)
F Post (p17)

© Conservation Technology 04/08
11
M Taped ProjectingTransition (p22)
I Taped Outside Edge (p20)
J Taped Inside Edge (p21)
H Folded Outside Edge (p20)
O Curved Penetrations (p24)N Pipe Boot (p23)
G Skylight (p18-19)
P Roof Drain (p25) Scupper Drain (p26)
L Taped Flush Transition (p22)K Taped Door Sill (p21)
Seams (p27-28)

© Conservation Technology 04/08
12
FOLDED INSIDE CORNERS
Position the rubber as shown and apply adhesive to the upper fold.
Lift the upper fold onto the wall.
Strip the protective paper from the Termination Tape
Press the rubber into the Termination Tape.
Apply adhesive to the other side.
Press the second side against wall, forming an “ear” at the corner.
Fold the ear against one wall, completely flattening the fold
Pinch the corner to bond the adhesive inside.
Screw a Terminaation Bar through both sides of the corner.
Caulk the top edge of the fold with Silicone Caulk for EPDM.
Lift the second side, avoiding contact near the corner.
The simplest and most reliable way to make inside corners is to fold the rubber and clamp it to the walls. However, this technique creates triangular “ears” that are subject to damage, require careful counter-flashing, and are not very attractive. We recommend folding corners on roofs with coverings that conceal and protect the folds, such as wood decks, pavers decks, or planting systems. If the corners will be visible or cannot be reliably counterflashed, cut the ears off and use molded corners.

© Conservation Technology 04/08
13
MOLDED INSIDE CORNERSMolded Inside Corners should be used where inside corners are permanently exposed, or where additional flashing must be applied above. We pre-apply seam tape to the horizontal flanges which extend 5” onto the roof and to the vertical flanges which extend 8” up the walls. Follow the first eight steps for FOLDED INSIDE CORNERS before beginning the procedures shown here. Position the corners carefully and work slowly to avoid creating gaps at the intersections of the roof and walls.
Cut off the “ear” close to the corner with a sharp utility knife.
Peel back the protection paper to expose the tape at the bottom corner.
Clean all surfaces with toluene, naptha, or white gasoline.
Holding the corner firmly in place, press to tack the corner to the roof.
Reach under and pull the protection paper towards the wall.
Reach under the other side and pull the protection paper towards the wall.
Roll all surfaces firmly, especially at the roof corners.
Press the molded corner firmly into the roof corner and continue pulling.
Clean the edges with toluene, naptha, or white gasoline.
Caulk around the molded corner with Silicone Caulk for EPDM
Press the molded corner firmly into the roof corner and continue pulling.

© Conservation Technology 04/08
14
TAPED INSIDE CORNERSInside corners that cannot be flashed with molded inside corners or by folding, such as the intersection of a sloped roof valley with a flat roof, can be sealed with multiple layers of Uncured Laminate Tape. This is a 6” wide self-adhesive lamination of uncured EPDM rubber and Butyl seam tape that has no “memory” so it can be permanently stretched into a three-dimensional corner. If the corner disc shown is stretched significantly, apply a second layer to compensate for thinning.
Clean all surfaces with toluene, naptha, or white gasoline.
Firmly press the center of the tape disc into the corner.
Cut a 4” round disc of Uncured Laminate Tape and remove the release paper.
Form the tape disc against all surfaces and their intersections.
Clean the surface of the tape disc
Unfold the tape slowly, avoiding bridging at the corner.
Clean the tape surface and apply a second overlapping tape.
Fully unfold the tape and press it into the second surface.
Firmly roll all surfacesof all tapes.
Caulk all edges with Silicone Caulk for EPDM.
Press a folded piece of Laminate Tape onto one surface, tacky surface out.

© Conservation Technology 04/08
15
MOLDED OUTSIDE CORNERSMolded Outside Corners are used to seal the outside corner formed when two walls project into a roof. We pre-apply seam tape to the horizontal flanges which extend 5” onto the roof and to the vertical flanges which extend 8” up the walls. Position the corners carefully and work slowly to avoid creating gaps at the intersections of the roof and walls. Note that Molded Outside Corners can only be applied to 90° corners: for other angles see TAPED OUTSIDE CORNERS.
Cut a 45° slit at the corner and adhere both sides to the wall.
Peel back the protection paper to expose the tape at the bottom corner.
Clean all surfaces with toluene, naptha, or white gasoline.
Holding the corner firmly in place, press to tack the corner to the roof.
Reach under and pull the protection paper towards one side.
Reach under the other side and pull the protection paper towards the side.
Roll all surfaces firmly, especially at the roof corners.
Continue to pull, pressing the molded corner firmly into the roof corner.
Clean the edges with toluene, naptha, or white gasoline.
Caulk around the molded corner with Silicone Caulk for EPDM
Continue to pull, pressing the molded corner firmly into the roof corner.

© Conservation Technology 04/08
16
TAPED OUTSIDE CORNERS
Cut the EPDM roof sheet at a 45° angle and adhere it up both walls.
Tape one wall with 2” of the tacky side folded out, extending 2” past the corner.
Clean the rubber carefully, both on the roof and the two walls.
Unfold the tape and bond it to the roof sheet.
Wrap the tape around the corner, stretching it to contact the roof and wall.
Tape the other wall, extending 2” past the corner.
After cleaning, shingle additional tapes to the desired height, overlapping 2”.
Unfold the tape and wrap it around the corner over the first tape.
Caulk the perimeter of the tape as well as the overlap seam.
Roll all surfaces firmly with a steel roof roller.
Clean the surface of the newly applied tape.
Outside corners of any angle can be flashed with Uncured Laminate Tape. This is a 6” wide self-adhesive lamination of uncured EPDM rubber and Butyl seam tape that has no “memory” so it can be permanently stretched around a three-dimensional corner. Since Uncured Laminate Tape becomes thinner as it stretches, an outside corner is always flashed with two pieces of tape, one applied to either wall, so the thickness is doubled where they overlap at the corner.

© Conservation Technology 04/08
17
Place a length of tape over the slit and pull the release paper.
Caulk the perimeter of the tape as well as the overlap seam.
Roll all surfaces firmly with a steel roof roller.
Tape the opposite wall the same way, wrapping around the opposite corners.
POSTS
Cut the post opening, slit to the edge of the sheet, and apply adhesive.
Tape one wall with 2” of the tacky side folded out, extending 2” past the corner.
Bond the sheet in place, then clean the surface.
Unfold the tape and bond it to the roof sheet.
Wrap the tape around the corner, stretching it to contact the roof and wall.
Clean both tape surfaces and apply tape on the third side.
Apply tape on the fourth and final side.
Posts have four outside corners and are flashed with a procedure similar to that described in TAPED OUTSIDE CORNERS. Uncured Laminate Tape, a 6” wide self-adhesive lamination of uncured EPDM rubber and Butyl seam tape, is applied to each of the four sides of the post and stretched around the corners. In cold weather, a hot air gun or hair dryer should be used to help stretch the tape. If the posts are set in from the roof edge, the rubber roof sheet must be slit and then patched.
© Conservation Technology 04/08
18
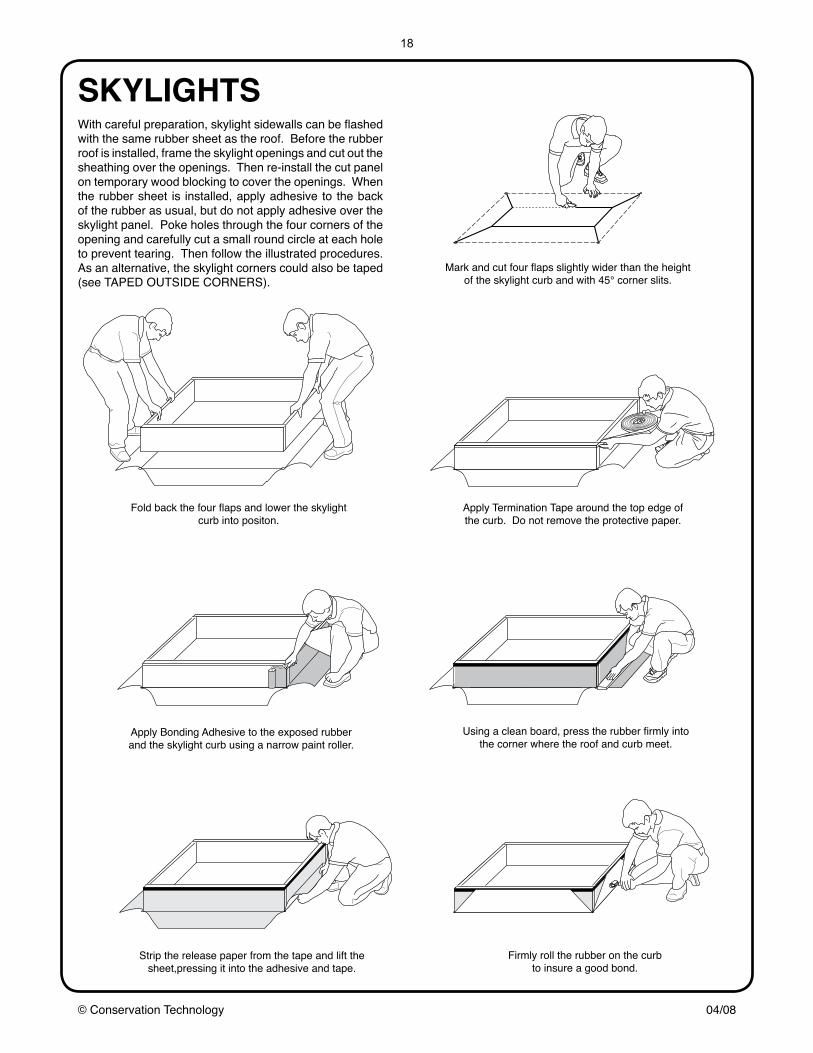
Firmly roll the rubber on the curb to insure a good bond.
Strip the release paper from the tape and lift the sheet,pressing it into the adhesive and tape.
SKYLIGHTS
Fold back the four flaps and lower the skylight curb into positon.
Mark and cut four flaps slightly wider than the height of the skylight curb and with 45° corner slits.
With careful preparation, skylight sidewalls can be flashed with the same rubber sheet as the roof. Before the rubber roof is installed, frame the skylight openings and cut out the sheathing over the openings. Then re-install the cut panel on temporary wood blocking to cover the openings. When the rubber sheet is installed, apply adhesive to the back of the rubber as usual, but do not apply adhesive over the skylight panel. Poke holes through the four corners of the opening and carefully cut a small round circle at each hole to prevent tearing. Then follow the illustrated procedures. As an alternative, the skylight corners could also be taped (see TAPED OUTSIDE CORNERS).
Apply Bonding Adhesive to the exposed rubber and the skylight curb using a narrow paint roller.
Apply Termination Tape around the top edge of the curb. Do not remove the protective paper.
Using a clean board, press the rubber firmly into the corner where the roof and curb meet.
© Conservation Technology 04/08
19
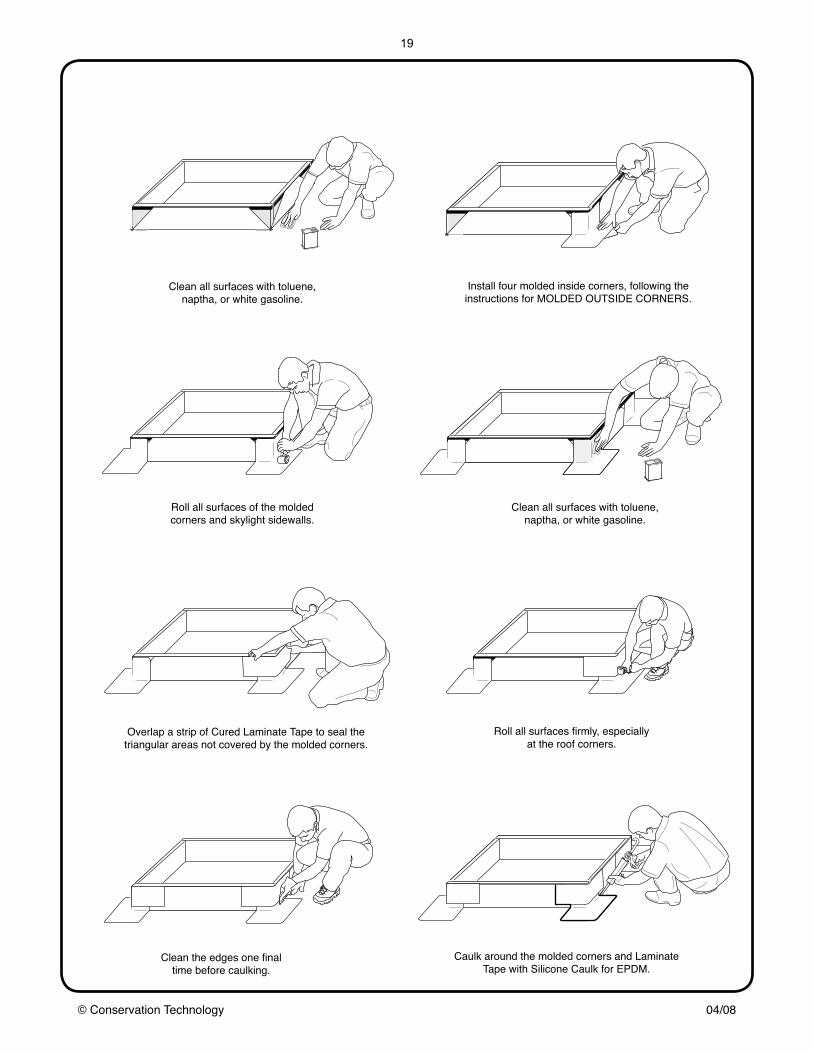
Clean all surfaces with toluene, naptha, or white gasoline.
Roll all surfaces of the molded corners and skylight sidewalls.
Caulk around the molded corners and Laminate Tape with Silicone Caulk for EPDM.
Overlap a strip of Cured Laminate Tape to seal the triangular areas not covered by the molded corners.
Roll all surfaces firmly, especially at the roof corners.
Clean the edges one final time before caulking.
Clean all surfaces with toluene, naptha, or white gasoline.
Install four molded inside corners, following the instructions for MOLDED OUTSIDE CORNERS.

© Conservation Technology 04/08
20
OUTSIDE EDGESFOLDED OUTSIDE EDGE: The simplest and most reliable way to seal the intersection of two outside edges is simply to bend the sheet over the edges and gather the excess rubber to form a triangular projection. Since bonding adhesive is applied to the underside of the rubber when the sheet is installed, the triangular projection becomes internally adhered. No external adhesive is required: just fold the projection to one side, secure it with a Termination Bar, and caulk the top.
TAPED OUTSIDE EDGE: As an alternative, the intersection of two outside edges can be cut and flashed with tape. Since bonding adhesive is applied to the underside of the rubber when the sheet is installed, once the excess rubber is trimmed all the rubber at the outside edge is fully adhered. A disc of Uncured Laminate Tape can be stretched and formed around all three surfaces at the corner: using a hot-air gun to soften the tape will make this process easier.
Fold the triangle to one side.
Clamp the folded rubber with a Termination Bar.
Caulk the opentop of the fold.
Form the tape so that it stretchesand bonds to all surfaces
Cut off the excess rubber. Cut a disc of Uncured Laminate Tape and position it over the corner.
Bend and adhere the rubber over both edges.
Gather the excess to form a triangular projection.
Cut the overhanging rubber at a 45° angle to both edges.
Fold and adhere the rubber over both edges, pressing into the tape.

© Conservation Technology 04/08
21
INSIDE EDGES AND SILLS
TAPED DOOR SILLS: If door sills can be flashed before the door frames are installed, the rubber roof membrane can create a drip pan under the door that will eliminate the possibility of water leakage. Frame the opening at least 6” higher than the roof surface with the sill plate sloping slightly towards the exterior. Adhere the rubber up the wall (covering the door opening), slit the rubber, form the rubber over the door sill, and seal both sides of the opening using Uncured Laminate Tape.
Lift the tape to make contact with the wall.
Form the tape over the edge so that it stretches and bonds to all surfaces.
Fold the rubber over the door sill and adhere it in place.
Position a strip of Uncured Laminate Tape so that it extends 2” over the roof edge.
Cut a vertical slit on both sides of the door opening.
TAPED INSIDE EDGES: An inside edge is created when two roof edges intersect at an angle less than 180°. In order to fold the rubber over both edges, the roof membrane must be cut at a 45° angle to both edges. A square of Uncured Laminate Tape placed on the roof surface, overhanging the roof edge, can be stretched and formed to make contact with all surfaces, sealing the corner slit. Bonding Adhesive, Termination Tape, and Termination Bars assure a watertight edge.
Place a square of Uncured Laminate Tape so that it extends 2” over the roof edge.
Begin to stretch the tape downward over the edge.
Finish forming the tape until it stretches and bonds to all surfaces.
Cut the overhanging rubber at a 45° angle to both edges.
Fold and adhere the rubber over both edges, pressing into the tape.

© Conservation Technology 04/08
22
EDGE TRANSITIONSTAPED FLUSH TRANSITION: A flush transition is created at the intersection between a roof and a wall where the two surfaces are flush. To fold the rubber up the wall and over the roof edge at the same time, the roof membrane must be slit at the corner. A square of Uncured Laminate Tape is folded in half with the taped side out and positioned to overhang the roof edge a few inches. The tape is unfolded to make contact with the wall and is then stretched and formed over the corner.
TAPED PROJECTED TRANSITION: A flush transition is created at the intersection between a roof and a wall where the wall extends beyond the roof. To fold the rubber up the wall and over the roof edge at the same time, the roof membrane must be slit at the corner. A square of Uncured Laminate Tape is folded in half with the taped side out and positioned to overhang the roof edge a few inches. The tape is unfolded to make contact with the wall and is then stretched and formed over the corner.
Fold a square of Uncured Laminate Tape and place it in the corner
Lift the tape to make contact with the wall
Form the tape over the edge so that it stretches and bonds to all surfaces
Form the tape over the edge so that it stretches and bonds to all surfaces
Fold a square of Uncured Laminate Tape and place it in the corner
Lift the tape to make contact with the wall
Slit rubber Fold rubber down and around wall
Slit rubber Fold rubber down and on wall
© Conservation Technology 04/08
23
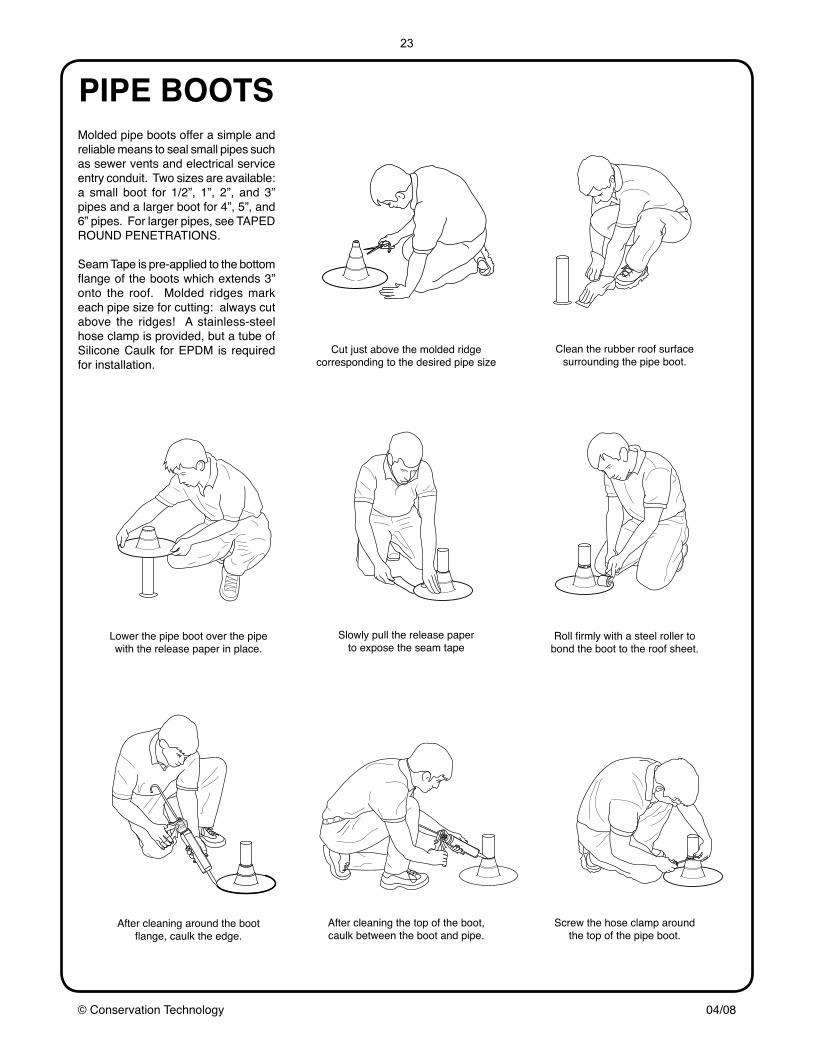
PIPE BOOTS
Clean the rubber roof surface surrounding the pipe boot.
Slowly pull the release paper to expose the seam tape
Screw the hose clamp around the top of the pipe boot.
Lower the pipe boot over the pipe with the release paper in place.
Roll firmly with a steel roller to bond the boot to the roof sheet.
Cut just above the molded ridge corresponding to the desired pipe size
After cleaning the top of the boot, caulk between the boot and pipe.
After cleaning around the boot flange, caulk the edge.
Molded pipe boots offer a simple and reliable means to seal small pipes such as sewer vents and electrical service entry conduit. Two sizes are available: a small boot for 1/2”, 1”, 2”, and 3” pipes and a larger boot for 4”, 5”, and 6” pipes. For larger pipes, see TAPED ROUND PENETRATIONS.
Seam Tape is pre-applied to the bottom flange of the boots which extends 3” onto the roof. Molded ridges mark each pipe size for cutting: always cut above the ridges! A stainless-steel hose clamp is provided, but a tube of Silicone Caulk for EPDM is required for installation.

© Conservation Technology 04/08
24
CURVED PENETRATIONS
Press the tape firmly in place, so it does not bridge at the bottom
Unfold the tape, stretching the flap to create a flange around the penetration.
Apply the first piece of tape with 2” of the tacky side folded out.
Clean the surface of the tape just applied.
Apply the second tape overlapping the first piece by 2”.
Clean the rubber surrounding the penetration
Caulk the joint between the penetration and the roof deck
Large round penetrations, such as ventilation pipes, can be sealed by overlapping several pieces of Uncured Laminate Tape. To waterproof higher than 4” from the roof surface, clean the base layer of tape and apply additional tape over top, overlapping two inches. If the penetration must be isolated from the roof for fire safety, such as is the case with prefabricated insulated metal chimneys, apply the tape to a vented metal flashing instead of directly to the penetration.
Unfold the second tape and press it firmly in place.
Clean the first two tapes and apply a third tape, overlapping both.
Roll all of the tapes to the roof and the penetration.
Caulk the perimeter on the roof and the penetration, plus all overlaps

© Conservation Technology 04/08
25
ROOF DRAINS
If the roof has no covering, lower the leaf dome into place.
Push a hex bolt halfway through each slit.
Make a small slit over each threaded brass insert.
Lower the clamping ring over the bolt heads and rotate the ring into position.
Cut out the rubber covering the center opening of the drain, using a utility knife.
Carefully tighten the leaf dome hex bolts.
Clean the under the rubber and apply a ring of Silicone Caulk for EPDM.
Start the hex bolts into the threaded inserts.
Install the drain body flush with the roof surface and glue EPDM over top, applying adhesive to the rubber and to the roof deck around the drain.
Tighten the clamping ring hex bolts, one turn at a time around the circle.
The simplest and most reliable way to get water off a roof is to let it run over an edge. Where this is not practical, such as for roofs surrounded on four sides by parapet walls, the next best choice is to use a roof drain designed for rubber roofs. We offer three superior quality PVC drains with sockets to fit 3”, 4”, or 6” PVC pipe, all with well-designed clamping rings that securely seal the rubber to the drain body. The center of a roof drain must be at least 8” from a wall or other change in slope.

© Conservation Technology 04/08
26
SCUPPER DRAINS
Position the drain guard unless it will interfere with the roof covering.
Trace the opening in the base and position the clamping plate on top.
Lift the rubber onto the wall and press it into place.
Tighten the screws securely to spread the caulk over the base plate flange.
Adhere the rubber, pressing firmly into the corner where the roof and wall meet.
Secure the drain guard with the two screws provided.
Carefully cut a slit through each hole in the clamping plate.
Thread the mounting screws throughthe slits and into the base plate flange.
Install the drain base flush and apply adhesive to the rubber and the roof.
Cut out the rubber within the clamping plate, exposing the opening below.
Scupper drains provide a means for water to flow off roofs surrounded by parapet walls. We offer thre superior quality cast-aluminum scupper drains with spigot ends that can be coupled to 2”, 3”, or 4” pipe. They can be installed in two positions: either with the outlet pipe passing through the parapet wall or with the outlet pipe passing through the roof deck. The center of a scupper drain should not be closer than 12” from a corner. When the adhesive has dried, apply Silicone
Caulk for EPDM to the drain base flange.

© Conservation Technology 04/08
27
OVERLAP SEAMS
Fold back the upper sheet far enough that it stays in place.
Apply seam tape to the top sheet, overlapping the edge 1/8” to 1/4”
Clean the underside of the top sheet and at least 6” of the bottom sheet
Lap one sheet over the other, overlapping 3” to 4”.
We generally eliminate field seaming by fabricating each roof as a single sheet. However, when seaming is unavoidable it is possible to permanently join two sheets of EPDM rubber in the field by applying Seam Tape between the sheets. Proper cleaning is essential: use only toluene, naptha, or white gasoline. Do not use any other solvents since they may prevent proper adhesion! After the tape is applied, the seam must be be rolled with considerable pressure using a 2” to 3” wide steel roller.
Roll the release paper of the seam tape.
Reach under and peel back the release tape, holding the top sheet in place.
Unfold the top sheet to its original position.
Firmly roll the seam, first diagonally and then parallel to the edge.

© Conservation Technology 04/08
28
BUTT SEAMS
Fold back one side.
Roll both sheets firmly to bond the adhesive.
Fold back the other side.
Fold back the two sheets and apply adhesive to the rubber and the roof.
An alternative to overlap seaming with Seam Tape is butt seaming with laminate tape. The two sheets of rubber are positioned edge to edge and 6” wide laminate tape is applied over the joint so that it overlaps each sheet by 3”. Proper cleaning is essential: use only toluene, naptha, or white gasoline. Do not use any other solvents since they may prevent proper adhesion! After the tape is applied, the seam must be be rolled with considerable pressure using a 2” to 3” wide steel roller.
Clean the surface of both sheets at least 6” on either side.
Firmly roll the surface of the Laminate Tape.
Apply 6” wide Cured Laminate Tape with the tacky side down, stripping the release
paper during application.
Use a sharp utility knife to cut the overlapping rubber.

© Conservation Technology 04/08
29
All edges of an EPDM roofing system must be sealed and mechanically clamped to prevent air and water entry during windy conditions. Air flowing over a roof creates both positive and negative pressure regions which force air and water into the smallest openings. Most membrane roof leaks can be traced to the failure to seal and secure roof edges. In high winds, membranes that have not been adequately terminated have been ripped off of roofs.
The simplest way to fasten and seal an external edge of a rubber roof is to bend the rubber over the roof edge and clamp it with our Drip-Edge Termination Bar, a sturdy black aluminum bar with an angled bottom that forces water to drip away from the fascia instead of down it. The roof edge must be formed to a 1/2” minimum radius to avoid stretching the rubber which will shorten its life. Apply Termination Tape, a tacky strip of uncured butyl rubber, to the fascia to prevent air and water entry behind the rubber. Remove the release paper from the tape, fold the rubber over the edge, and press the rubber firmly into the tape. Apply a thin bead of our special silicone caulk to the back of a termination bar to prevent water from running behind the bar, and screw the termination bars through the rubber and tape and into the fascia.
If a gutter is to be installed at the roof edge, first attach a spacer block made of rot-resistant wood or plastic flush with the roof surface. The edge termination procedure is the same as above: form a 1/2” minimum radius, apply Termination Tape, remove the release paper from the tape, fold the rubber over the edge, press the rubber firmly into the tape, apply caulk to the back of a Drip-Edge Termination bar, and screw the termination bars through the rubber and tape and into the spacer block. This detail will assure that the water running off the roof runs into the gutter, even if the back edge of the gutter is spaced somewhat from the fascia by the gutter mounting brackets. The bottom of the drip edge should always be above the flood line of the gutter to prevent capillary draw if there is gutter blockage.
Where rubber turns up a wood or stucco wall, it can be secured with a Wall Termination Bar, a sturdy black aluminum bar with a rectanglar cross-section. Before applying the bar, the rubber should always be adhered as described in our basic installation procedures. The edge termination procedure is similar to that used for drip edges: apply Termination Tape to the wall to prevent air and water entry behind the rubber, remove the release paper and press the rubber firmly into the tape, and screw the termination bar through the rubber and tape and into the wall. Then trim any excess rubber and apply a heavy bead of caulk between the top of the termination bar and the wall. The thin profile of Wall Termination Bars will not usually create a noticeable bulge when siding or other wall coverings overlap the rubber edge. However, if a wall covering is to be applied immediately and it has a continuous bottom trim detail that can securely clamp the rubber to the wall, it may be possible to eliminate the Wall Termination Bar and only use Termination Tape.
When rubber is to be terminated on a masonry wall, such as the side of a brick chimney, it may be more appropriate to use a Drip-Edge Termination Bar as shown in the second wall-termination illustration. Cut a groove into the masonry above the bar. Form an aluminum cap-flashing as shown, hook the flashing under the lip of the termination bar, insert the aluminum into the groove, wedge it in place, and seal the groove with polyurethane caulk.
We can provide custom design guidance for situations that don’t fit into one of the above simple categories. For example, the illustration at the right shows one method for flashing and terminating an EPDM membrane on a flat roof that intersects a descending sloped shingle roof, such as would be the case on a mansard roof. During construction, the flat roof sheathing is projected outward
over the sloped roof and a vertical filler strip is fastened to connect the two roofs. When the shingles are laid, a metal flashing strip is fastened over the topmost shingle and bent up the vertical filler strip (typically, the metal is covered with a decorative top shingle). The rubber is then taped and clamped over the metal flashing using Termination Bar Tape and a Wall Termination Bar.
EDGES

© Conservation Technology 04/08
30
While Conservation Technology EPDM is a tough material that can withstand frequent foot traffic and considerable abuse, it can be easily cut with a sharp object. When a roof is to be used as a recreational deck, it should always be covered with a hard wear surface. Covering the rubber will prolong its life by shielding it from the sun, can reduce heat transmission into the building, can protect the roof from falling branches, can improve the fire resistance of the roof, and can enhance the appearance of the building. Covering materials also prevent wind uplift, thereby eliminating the need to fully adhere rubber membranes. Following is a sampling of the dozens of surface treatments that can be effective:
CONTINUOUS WOOD DECKS: The simplest walk surface is a single wood deck that spans the entire roof. Typical construction might be 2 x 4 sleepers laid on edge with 2 x 6 deck boards screwed in place. Protective pads of scrap rubber should be placed between the sleepers and rubber roof. Posts and railings should be attached to the deck or the roof fascia and not through the roof. The deck perimeter should be anchored to the fascia or surrounding walls to prevent wind uplift and shifting.
PALLET DECKS: If easier access to the roof is desired, a wood deck can be build as a grid of pre-assembled deck sections or “pallets” that just sit on the rubber. Typical construction might be 2 x 4 frames measuring four feet square with 5/4 x 6 deck boards. Protective pads of scrap rubber should be placed between the sleepers and rubber: these can also be used to shim the pallets level. Posts and railings should be attached to the pallets or the roof fascia and not through the roof. The perimeter pallets should be attached to each other and anchored to the fascia or surrounding walls to prevent wind uplift and shifting.
PAVER DECKS: Roof pavers are high-strength concrete paver blocks measuring 18”x18”x1-3/4” or 24”x24”x 1-3/4” that are specifically formulated for rooftop patios and plazas. They can be laid on a base of gravel or on “pedestals”, molded plastic supports that lift the pavers off the roof and space them uniformly. Paver decks reflects heat and can also provide an inexpensive means to insulate low-slope roof: boards of extruded polystyrene insulation are simply laid over the rubber, a protection fabric is unrolled over the insulation, and the paver pedestals are placed over the fabric. The only drawback of the pavers is their weight, typically 25 pounds per square foot.
COVERINGS

© Conservation Technology 04/08
31
TILE ROOFS: Tile should never be applied directly to rubber because some setting compounds can damage rubber and even with safe compounds the tile will eventually crack. For a safe and durable installation, first apply a base of one-inch fine-aggregate concrete, often called “sand-mix” concrete, reinforced with a mesh or with fibers. After the base has dried, the tile can be laid using a standard thin-set compound. If the roof measures more than 20 feet in any direction, a plastic slip sheet such as our Tenoarm film should be laid between the concrete and rubber. and expansion joints should be created in the tile and concrete every 20 feet. Tile roofs are not recommended for regions with frequent winter freezing.
GRAVEL BALLASTED ROOFS: Gravel can be applied over a rubber membrane to reflect heat and to provide an inexpensive means to insulate a low-slope roof: boards of extruded polystyrene insulation are simply laid over the rubber, a protection fabric is unrolled over the insulation, and gravel is spread at the rate of 10 - 15 lbs per square foot. Gravel should be 1/2” to 1 1/2” in size, have rounded edges, and be thoroughly washed to remove all sand and grit.
GREEN ROOFS: Green roofs eliminate summer heat gain, delay and reduce stormwater runoff, provide wildlife habitat, and transform rooftops into garden space. One common type of green roof design consists of a water-storing protection fabric, a plastic water-holding drainage sheet, a soil-separation fabric, and a specially engineered green roof soil. Since Conservation Technology EPDM is root resistant, a separate root barrier is not required. Insulation can be applied over the membrane, just as with paver decks and gravel ballasted roofs. For more detailed information about green roofs, see our GREEN ROOF HANDBOOK.

© Conservation Technology 04/08
32
EPDM SYSTEM COMPONENTS
Rubber Membrane
Seam Tape
Bonding Adhesive
ILLUSTRATION DESCRIPTION
Laminate Tapes
Conservation Technology rubber membrane is a unique type of EPDM rubber formulated with optimal characteristics for high-end roofing. Unlike other EPDM rubbers, it has minimal shrinkage, is talc-free, and can be heat welded. It is also tested to be root resistant for use on green roofs. We custom fabricate single sheets to the size of each roof to eliminate the risk and labor of field seaming. The standard thickness is 60 mil (1.5mm) but other thicknesses are possible.
Send drawing for a quotation
Conservation Technology Bonding Adhesive is a water-base contact adhesive used to bond EPDM to roof decks and surrounding walls. It is applied with a 3/8” nap paint roller at the rate of 125 square feet per gallon. Allow both surfaces to dry until the color changes, carefully mate the surfaces without creating air bubbles, and apply pressure to make the bond. Bonding Adhesive can be stored one year in a cool place that does not freeze.
EPDM Bonding Adhesive, gallon, $42.00
Conservation Technology Seam Tape is a 3” wide tacky rubber tape used to make field seams between two rubber sheets. Clean both surfaces with a recommended solvent, apply the tape to one sheet, position the first sheet over the second sheet, pull the release tape, and roll the seam. Seam Tape can be stored in a sealed plastic bag for one year in a cool place that does not freeze.
Seam Tape, cut, per foot $1.20Seam Tape, 100 ft roll, $76.00
Conservation Technology Laminate Tapes are composites of rubber sheet to seam tape. Use Cured Laminate Tape for seams and repairs; use Uncured Laminate Tape for flashings. Laminate tapes can be stored in a sealed plastic bag for one year in a cool place that does not freeze.
Cured or Uncured Laminate Tape, 6 in wide, per foot, $2.80Cured Laminate Tape, 12 in wide, per foot, $5.60Cured or Uncured Laminate Tape, 6 in x 100 ft, $180.00Cured Laminate Tape, 12 in x 50 ft, $180.00
Termination Tape Conservation Technology Termination Tape is a tacky uncured rubber tape that measures 1/8” x 3/4”. It is applied to all edges of a roof to make an air and water seal between an EPDM rubber membrane and the underlying building surface. Typically it is compressed with a termination bar, in which case it also seals the termination bar screws. Termination Tapes can be stored in a sealed plastic bag for one year in a cool place that does not freeze.
Termination Tape, 50 ft roll, $12.00

© Conservation Technology 04/08
33
Molded Corners Conservation Technology Molded Corners are EPDM corners with pre-applied seam tape. We offer both inside and outside corners that extend 5” onto the roof and 8” up the wall. Clean the rubber with a recommended solvent, position the corner in place, pull the release tape, roll the surface, and caulk the edge. Molded Corners can be stored in a sealed plastic bag for one year in a cool place that does not freeze. Molded Inside Corner, $20.00Molded Outside Corner, $24.00
EPDM SYSTEM COMPONENTS ILLUSTRATION DESCRIPTION
Pipe Boots Conservation Technology Pipe Boots are molded rubber pipe flashings with pre-applied seam tape. Always cut the boot above the ridge for the appropriate the pipe size. Apply Silicone Caulk between the boot and the pipe before securing the stainless-steel hose clamp provided; also caulk around the base flange. PIpe Boots can be stored in a sealed plastic bag for one year in a cool place that does not freeze.
Pipe Boot, 1/2” - 3”, $26.00Pipe Boot, 4” - 6”, $32.00
Silicone Caulk for EPDM Conservation Technology Silicone Caulk for EPDM is a unique silicone compound modified to bond to EPDM rubber. It is used to seal around rubber flashings, to seal drain fittings to rubber, and to seal behind Drip-Edge Termination Bars. Always clean with a recommended solvent before application. The standard 11 ounce tubes fit any caulk gun and provide 20 - 30 ft of caulk bead. Silicone caulk can be stored for 6 months in a cool place that does not freeze.
Silicone Caulk for EPDM, 10.80
Conservation Technology Termination Bars clamp the membrane perimeter to prevent air and water entry. Wall Termination bars are rectangular in cross-section; Drip-Edge Termination Bars are angled. Both are 5 ft long and are made of black anodized aluminum with eight pre-punched holes for our black teflon coated stainless-steel screws.
Wall Termination Bar, $10.00Drip-Edge Termination Bar, $10.00Termination Bar Screw, #8 x 1-1/4”, $0.10
Termination Bars
Wall Drip-Edge
After bonding rubber with contact adhesive or flashing with rubber tapes, it is necessary to roll the sheet. To assure adequate pressure, we offer a professional-quality 2” wide steel roller specifically designed for membrane roofing. This is a heavy-duty ball-bearing roller that will give a lifetime of service.
Steel Roller, $19.80
Steel Roller
inside outside

© Conservation Technology 04/08
34
EPDM SYSTEM COMPONENTS ILLUSTRATION DESCRIPTION
Compact Paver Pedestals
Conservation Technology Adjustable Paver Pedestals support high-strength concrete roof pavers to make a durable rooftop patio surface. The paver height can be adjusted by rotating the top and bottom sections to engage the stepped “teeth” at the desired position; for greater heights, several pedestals can be stacked. These pedestals are both stronger and less-expensive than other adjustable systems.
Small Adjustable Paver Pedestal, 1-1/8 to 1-5/8”, $2.80Large Adjustable Paver Pedestal, 1-5/8” to 2-3/4”, $3.80
Roof Drain
Scupper Drain The Conservation Technology Scupper Drain installs in a parapet wall and connects to a drain pipe outside or below the parapet. The drain base is cast aluminum with a 2”, 3”, or 4” pipe spigots that connect to PVC pipe with flexible couplings. Caulk is applied between the base and the rubber sheet, and a molded clamping ring is screwed to the base.
Scupper Drain, 2”, $116.00Scupper Drain, 3”, $116.00Scupper Drain, 4”, $116.00
The Conservation Technology Roof Drain installs in a roof surface and connects to a drain pipe below. The drain base is injection-molded PVC with a 3”, 4”, or 6” pipe socket for glueing directly to PVC pipe. Caulk is applied between the base and the rubber sheet, and a precisely molded clamping ring is bolted to the base.
Roof Drain, 3”, $52.00 Roof Drain, 4”, $56.00 Roof Drain, 6”, $64.00
Adjustable Paver Pedestals
Pedestal Base Plate
Conservation Technology Compact Paver Pedestals support high-strength concrete roof pavers to make a durable rooftop patio surface where the total height is limited. The paver height can be adjusted slightly by adding shim plates (1/8”) between the top and bottom sections, but when pedestal heights of 1-1/8” or more are acceptable, we recommend using our adjustable pedestals.
Fixed Paver Pedestal, 5/8”, $2.20Pedestal Shim, $0.60
Conservation Technology Pedestal Base Plates are recommended for use under all of our paver pedestals. They allow pedestals to slide when there is differential movement between a paver deck and roof due to expansion and contraction, preventing stress in waterproofing membranes. They also distribute paver loads to prevent pedestal embedment in soft substrates such as asphalt, modified bitumen, or insulation board.
Paver Pedestal Base Plate, 8”, $1.60
large, assembled small, top and bottom
top, shim, bottom


