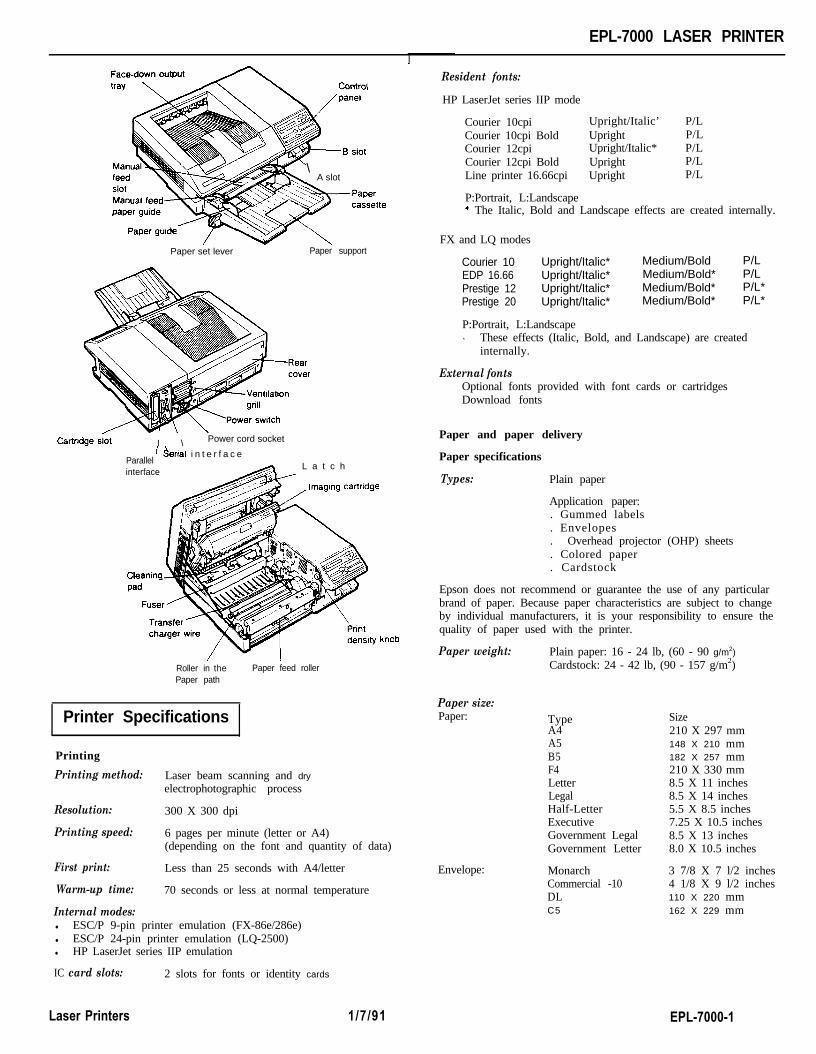
EPL-7000 LASER PRINTER \ A slot Paper set lever Paper support CartrIdge slot I \ Power cord socket Parallel I Aenal interface interface Latch I Cleanmg- lmagmg cartrldge Roller in the Paper path Paper feed roller Printer Specifications Printing Printing method: Laser beam scanning and dry electrophotographic process Resolution: Printing speed: 300 X 300 dpi 6 pages per minute (letter or A4) (depending on the font and quantity of data) First print: Less than 25 seconds with A4/letter Warm-up time: 70 seconds or less at normal temperature Internal modes: l ESC/P 9-pin printer emulation (FX-86e/286e) l ESC/P 24-pin printer emulation (LQ-2500) l HP LaserJet series IIP emulation IC card slots: 2 slots for fonts or identity cards Resident fonts: HP LaserJet series IIP mode Courier 10cpi Upright/Italic’ P/L Courier 10cpi Bold Upright P/L Courier 12cpi Upright/Italic* P/L Courier 12cpi Bold Upright P/L Line printer 16.66cpi Upright P/L P:Portrait, L:Landscape * The Italic, Bold and Landscape effects are created internally. FX and LQ modes Courier 10 Upright/Italic* Medium/Bold P/L EDP 16.66 Upright/Italic* Medium/Bold* P/L Prestige 12 Upright/Italic* Medium/Bold* P/L* Prestige 20 Upright/Italic* Medium/Bold* P/L* P:Portrait, L:Landscape * These effects (Italic, Bold, and Landscape) are created internally. External fonts Optional fonts provided with font cards or cartridges Download fonts Paper and paper delivery Paper specifications Types: Plain paper Application paper: . Gummed labels . Envelopes . Overhead projector (OHP) sheets . Colored paper . Cardstock Epson does not recommend or guarantee the use of any particular brand of paper. Because paper characteristics are subject to change by individual manufacturers, it is your responsibility to ensure the quality of paper used with the printer. Paper weight: Plain paper: 16 - 24 lb, (60 - 90 g/m 2 ) Cardstock: 24 - 42 lb, (90 - 157 g/m 2 ) Paper size: Paper: Envelope: Type A4 A5 B5 F4 Letter Legal Half-Letter Executive Government Legal Government Letter Monarch Commercial -10 DL C5 Size 210 X 297 mm 148 X 210 mm 182 X 257 mm 210 X 330 mm 8.5 X 11 inches 8.5 X 14 inches 5.5 X 8.5 inches 7.25 X 10.5 inches 8.5 X 13 inches 8.0 X 10.5 inches 3 7/8 X 7 l/2 inches 4 1/8 X 9 l/2 inches 110 X 220 mm 162 X 229 mm Laser Printers 1/7/91 EPL-7000-1
Transcript
EPL-7000 LASER PRINTER
\A slot
Paper set lever Paper support
CartrIdge slot I \ Power cord socket
ParallelI Aenal i n t e r f a c e
interface L a t c h
ICleanmg-
lmagmg cartrldge
Roller in thePaper path
Paper feed roller
Printer Specifications
Printing
Printing method: Laser beam scanning and dryelectrophotographic process
Resolution:
Printing speed:
300 X 300 dpi
6 pages per minute (letter or A4)(depending on the font and quantity of data)
First print: Less than 25 seconds with A4/letter
Warm-up time: 70 seconds or less at normal temperature
Internal modes:l ESC/P 9-pin printer emulation (FX-86e/286e)l ESC/P 24-pin printer emulation (LQ-2500)l HP LaserJet series IIP emulation
IC card slots: 2 slots for fonts or identity cards
Epson does not recommend or guarantee the use of any particularbrand of paper. Because paper characteristics are subject to changeby individual manufacturers, it is your responsibility to ensure thequality of paper used with the printer.
TypeA4A5B5F4LetterLegalHalf-LetterExecutiveGovernment LegalGovernment Letter
MonarchCommercial -10DLC5
Size210 X 297 mm148 X 210 mm182 X 257 mm210 X 330 mm8.5 X 11 inches8.5 X 14 inches5.5 X 8.5 inches7.25 X 10.5 inches8.5 X 13 inches8.0 X 10.5 inches
3 7/8 X 7 l/2 inches4 1/8 X 9 l/2 inches110 X 220 mm162 X 229 mm
Laser Printers 1/7/91 EPL-7000-1
EPL-7000 LASER PRINTER
Paper feed alignment and direction:Center alignment for all sizes.
Paper feed: Automatic or manual feed
Input paper supply (20 lb. or 75 g/m2 paper):250 sheets
250 sheets (with option)
Paper eject: Face-up or face-down selection.
Paper eject capacity (20 lb. or 7.5 g/m2 paper):Face-down 250 sheetsFace-up 100 sheets (with option)
Consumable products
Imaging cartridge (SO51003):storing temperature: 32 to 86°F (0 to 30°C)Storing humidity: 30 to 85% RHShelf life: Should be used within 18 months after
production.Life: Typical imaging cartridge life is about 6000
pages under the following conditions:Letter-or A4-size paper, continuous printing,and 5% print ratio. Examples of a 5% printratio are shown on the next page.
Printable area:
IPaper feeding direction
HP L-JET2P mode
71 2380 71
72 1648 7272 2050 71
75 2450 7575 2450 7575 1550 7575 2075 75
75 2450 7575 2300 7571 2380 71
75 1137 7575 1062 7571 1813 71
71 1199 71
5956596060
60
60
60
60
60
60
60
59
59
3407
2380
2936
3200
4100
2450
3050
3800
3050
3798
2750
2150
2604
2498
r
5956
60
60
60
60
60
60
60
60
60
60
59
59
t
Paper Size
A4
A5
B5
Letter
LegalHalf letter
Executive
G-Legal
G-LetterF4
Commercial 10
Monarch
C5
DL
FX and LQ emulation modes
x Y
2330 75 75 3358
2400 30 75 3358
1598 757 5 2330
2000 75 75 2886
2400 75 75 3150
2400 75 75 4050
1500 75 75 2400
2025 75 75 3000
2400 75 75 3750
2250 75 75 3000
2330 75 75 3748
2400 30 75 3748
1087 75 75 2700
1012 75 75 2100
1763 75 75 25541149 75 75 2448
[Units = dots at 300 dpl.)
e
75
5075
75
75
75
75
75
75
75
75
5075
75
7575
b Paper size
A4
A4 (80 columns)
A5
B5
Letter
Legal
Half letter
Executive
G-Legal
G-LetterF4
F4 (80 columns)Commercial 10
Monarch
C5
DL
75
75
75
75
75
7575
75
75
75
7575
7575
75
75
The number of pages that you can print with an imaging cartridgevaries depending on the type of printing you do. If you print afew pages at a time or print dense text exceeding the 5% printratio, your cartridge may print fewer pages.
Ozone filter (SO91001):Replace every six months.
Mechanical
Dimensions and weight:Height: 7.3 inches (185 mm)Width: 19.5 inches (495 mm)Depth: 15.0 inches (381 mm)Weight: approx. 18.2 Kg (40 lb.) including paper
cassette and imaging cartridge.
MPBF (Mean Prints Between Failures):30,000 sheets (3,000 per month X 10 months)
MTBF (Mean Time Between Failures):3,000 hours
(Units = dots at 300 dpi )
Range of paper width and length:
Special sizes: Any size within the usable paper size rangelisted above.
EPL-7000-2 1/7/91 laser Printers
EPL-7000 LASER PRINTER
Durability: 5 years or 180,000 sheets (3,000 per month X60 months); whichever comes first.
Data format
Electrical
Voltage:
Rated frequencyrange:
120 V model: 90 to 132 VAC
50 Hz to 60 Hz ± 3Hz
Word length: 7 or 8 bitsParity: none, odd or evenStop bits: 1 or 2Printer ready protocol: enabled (DTR and XON/XOFF protocol
set to ON.)
Power consumption: Less than 550 W
Insulation 2 MR minimumresistance:
Dielectric strength (between AC line and chassis):120 V model can withstand 1500 VAC rmsfor one minute or 1650 VAC rms for onesecond.
Controller hardware
CPU 68000, 12.5 MHz
R A M Standard: 0.5 MB (expandable up to 6 MB)
Environmental
Temperature: Operation: 50° to 95° F (10 to 35" C)Storage: 32° to 95° F (0° to 35° C)
Humidity:
Altitude:
Levelness:
Operation: 1.5 to 85 % RHStorage: 30 to 85 % RH
8200 feet (2500 meters) maximum
Should be kept level
Interface Specifications
Interface timing
The figure below shows the timing for the parallel interface.
The data format can be set using functions and menu options inSelecType.
Baud rate
300, 600, 1200, 2400, 4800, 9600, 19,200 bits per second.
Signal level
RS-232C: Conforms to EIA
Handshaking
The printer’s serial interface can use DTR (Data Terminal Ready)signal levels and XON/XOFF communication protocols eitherseparately or in combination. When the vacant area for data in theinput buffer drops to 128 bytes, the printer outputs an XOFF codeor sets the DTR signal level to low (MARK, indicating that itcannot receive more data).
Once the vacant area for data in the buffer recovers to 256 bytes,the printer outputs an XON code or sets the DTR flag to high(SPACE), indicating that it is again ready to receive data.
Error handling
A l character is printed if a parity error, framing error, or over-runerror is detected.-
Connector
D-sub 25-pin connector
i-
\
Senal Interface
Parallel Interface
Signal level: TTL compatible
Serial interface
The printer’s resident serial interface can be set for either RS-232Cor RS-422 operation. These interfaces have the followingcharacteristics.
Laser Printers 1/7/91 EPL-7000-3
EPL-7000 LASER PRINTER I
Op t ions
Lower paper cassette
Electrical
A C power supply: DC 24V supplied by the printer
Insulation resistance.- 10M ohm minimum
Dielectric strength (between AC line and chassis):Can withstand 3750 VAC rms for oneminute
Power consumption: 4W or less
Paper and paper delivery
Size: Letter (8 1/2 X 11 inches)
Weight: 16 - 24 lb. (60 - 90 g/m2)
Paper feed: Automatic feed delivery system. Traycapacity up to 250 sheets (20 lb. or 75g/m2 paper)
Feeding speed: For first sheet, 25 seconds or less (letter-size paper).For subsequent sheets, 6 pages per minute(letter-size paper).
Types: Plain paper, such as copier paper, memosheets, and letterheads
Mechanical
Dimensions and weight: Without the printer:Height: 3.7 inches (95.7mm)Width: 19.1 inches (487mm)Depth: 19.6 inches (500 mm)Weight: 11.0 lb. (5.0kg)
Face-up output tray
Dimensions and weight: Without the printer:Height: 7.7 inches (198mm)Width: 12.2 inches (311mm)Depth: 9.6 inches (246 mm)Weight: 1.5 lb. (0.7kg)
Paper eject 100 sheet (75 g/m2 or 20 lb. paper)capacity:
Application Software
HP LaserJet series IIP emulation mode
If you have not changed the factory setting, your printer is in HPemulation mode. Simply use your application program’s setupmenu to choose the first printer available from the list of printersbelow. They are listed in order of preference. (For more about HPemulation, see Appendix C.)
HP LaserJet series IIPTM
HP LaserJet series IITM
HP LaserJet PlusTM
HP LaserJet 500TM
HP LaserJetTM
If none of these printers are listed among your program’s options,select any printer that uses the HP Printer Command Language(PCL).
EPL-7000-4 1/7/91
Epson LQ and FX emulation modes
Make sure you have set the SelecType Level 2 MODE option toLQ or FX as described in Chapter 3. Then, use your applicationprogram’s setup menu to select a corresponding printer driver fromthe list below. They are listed in order of preference.
If none of the printers listed above are available from yourprogram, choose the first available of the following: EX, JX, LX,RX, MX, Epson printer, Standard printer, or Draft printer.
Font Cartridges
Font cartridges allow you to use many different styles of type inaddition to the internal fonts resident in your printer. The printerhas one slot for font cartridges, and a variety of font cartridges areavailable from your dealer.
Compatible font cartridges
The table below lists all font cartridges that are compatible withthe EPL-7000. The manual for each font cartridge contains samplesof the characters and symbol sets the font cartridge provides.
Note: Some of the fonts contained on optional font cartridgesare duplicated by the resident fonts in the printer. SeeAppendix B for sample fonts and character sets.
SupplierH P
Cartridge number Cartridge
92286A COURIER 192286B TMS PROPORTIONAL 192286C INTERNATIONAL 192266D PRESTIGE ELITE92286E LETTER GOTHIC92286F TMS PROPORTIONAL 292286G LEGAL ELITE92286H LEGAL COURIER92286J MATH ELITE92286K MATH TMS92286L COURIER P&L92286M PRESTIGE ELITE P&L92286N LETTER GOTHIC P&L92286P TMS RMN P&L92266Q MEMO 192266R PRESENTATIONS 192286T TAX 192266U FORMS Portrait92286V FORMS Landscape92286W 3-of-9/OCR A92266X EAN / UPC / OCR B
Pro collection#CO1 Great Start# CO 1 WordPerfect#CO2 Microsoft#CO3 Polished Worksheets#CO4 Persuasive Presentations#CO5 Forms Etc.#CO6 Ear Codes & More#CO7 Text EquationsXC08 Global Text
Alfatet MX-1 Maxi-One CartridgeAlfaiet PC Maxi-Pro Cartridge
JetFont SuperSetJetfont 12/30Jetfont 4-in-1JetFont SuperSet International
25 Cartridge in One Original Version25 Cartridge in One 172Headlines in a Cartridge
Supplier
Intercon
Cartridge number Cartridge
PHONT +PRO II P
0-!CAUTION: Use only the HP font cartridges listed abovein your EPL-7000. You cannot use other HP fontcartridges with this printer, or you may damage yourprinter.
You can use each font cartridge in only HP emulation mode. Seethe font card manual for information on the printer mode to use.To change the printer mode, use the SelecType Level 2 CHCONFIG option described in Chapter 3.
Inserting a font cartridge
Optional font cards are easy to use with your printer. You caninsert a font cartridge into the slots at the left back of the printer.Follow these steps to insert a font cartridge:
0!
L
CAUTIONS:l Never insert or remove a cartridge while the printer is
on line, in SelecType mode, or while the printer isresetting (after you press RESET).
l Be careful when you insert or remove a fontcartridge. You can damage the cartridge by trying toinsert it the wrong way or by using too much force.
l Do not touch the connector on the bottom of thecartridge or the connector in the printer’s cartridgeslots. You could damage the cartridge or printer.
1. If the CH P or CH S light is flashing, press FEED to print anydata remaining in the buffer.
2. Take the printer off line or turn off the power.
3. Hold the cartridge so that the label on the cartridge faced left,as shown below.
4. Press firmly until the cartridge snaps into place.
0! CAUTION: If the message REMOVE CARD appears onthe display, you inserted the cartridge when the printerwas on line or when the printer’s memory containeddata. If you see this message, remove the cartridge, pressCONTINUE; then return to step 1.
5. If the power is on, press ON LINE to set the printer on line. Ifthe power is off, simply turn on the printer.
Laser Printers 1/7/91 EPL-7000-5
EPL-7000 LASER PRINTER
Memory Options 1. Turn on the printer power and watch the display for thefollowing:
The EPL-7000 comes with .5 MB of standard RAM. If you want toshare the printer or if you regularly print complex pages usinggraphics and downloaded fonts, you may need to increase theRAM of your printer. You have three options for adding memoryto your printer:
l Increase the memory on the main controller board withmemory chip sets. You can install up to three chip sets for atotal of 2 MB of RAM.
. All the indicator lights on the panel light briefly
l The message ROM Check appears
l The message RAM Check x.x MB appears.
2. Make sure that the amount of RAM displayed by the RAMcheck status message matches the new total RAM memory asshown below:
l Add one of two available memory expansion boards. TheC822031 comes with .5 MB standard RAM, and the C822011comes with 2 MB standard RAM.
l Increase the memory on your memory expansion board withmemory chip sets. Install up to four chip sets to the .5 MBboard for a total of 2.5 MB additional RAM, or add up to fourchip sets to the 2 MB board for a total of 4 MB additionalRAM.
Board with 2 chip sets (8 chips)
Board with 3 chip sets (12 chips)
Note: You must first expand the memory on your controllerboard to the maximum 2 MB capacity before you can add anoptional memory board.
If the correct amount of RAM does not appear, turn off thepower and remove the board to check that the chip set is inthe correct sector and that each chip is well-seated in itssocket. If the RAM check message is still incorrect, contactyour service representative for assistance.
If insufficient memory is still a problem even after you increasethe memory with memory chip sets, you can install a memoryexpansion board as described in the next section.
The RAM chip sockets are located on the connector side of thecontroller board as shown below. Memory Expansion Boards
If you are having difficulty printing complex, graphics-intensivepages and you have already increased your printer’s controllerboard memory to the maximum 2 MB with memory chip sets, youmay need to install a memory expansion board.
As shown, there are three sectors, each with four chip sockets. Thechip sockets are easily identified by the IC number.
The .5 MB memory expansion board is an economical choice foradding memory to your printer. This board adds .5 MB ofadditional RAM to the printer. You can increase the base memoryon this board to a total of 2.5 by adding up to four memory chipsets. Combined with the 2 MB on your controller board, the .5 MBboard can increase total available RAM to 4.5 MB.
The 2 MB memory expansion board adds an extra 2 MB of RAMto your printer. In addition, you can increase the base memory onthe expansion board to a maximum of 4 MB by installing up tofour optional memory chip sets. Thus, you can increase printermemory to a maximum of 6 MB with the 2 MB board.
2 62 72 6
only after you have increased the printer’s controller
memory chip set. See Installing the memory chip set,
The three sectors must be filled in the order given below:
The procedure for adding additional memory to the memoryexpansion board is the same for either board. You can use thesame type of memory chip sets that you used to increase thememory on your controller board.
EPL-7000-6 1/7 /91 Laser Printers
EPL-7000 LASER PRINTER
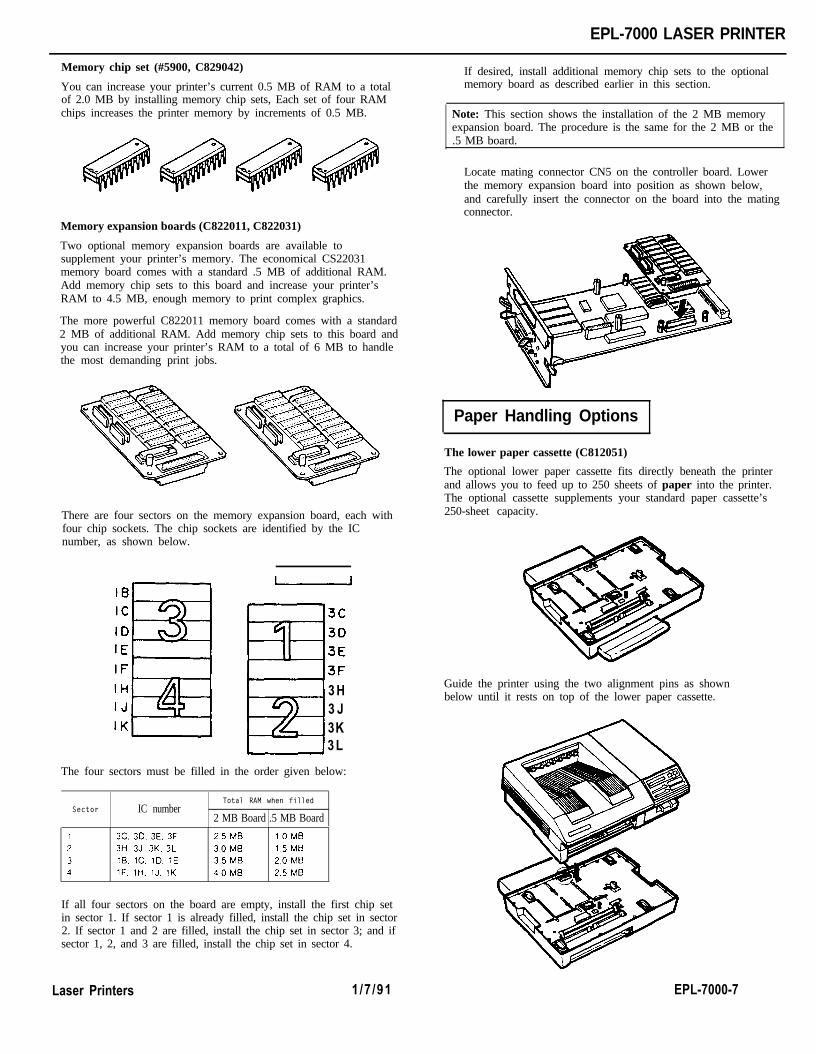
Memory chip set (#5900, C829042)
You can increase your printer’s current 0.5 MB of RAM to a totalof 2.0 MB by installing memory chip sets, Each set of four RAMchips increases the printer memory by increments of 0.5 MB.
Memory expansion boards (C822011, C822031)
Two optional memory expansion boards are available tosupplement your printer’s memory. The economical CS22031memory board comes with a standard .5 MB of additional RAM.Add memory chip sets to this board and increase your printer’sRAM to 4.5 MB, enough memory to print complex graphics.
The more powerful C822011 memory board comes with a standard2 MB of additional RAM. Add memory chip sets to this board andyou can increase your printer’s RAM to a total of 6 MB to handlethe most demanding print jobs.
There are four sectors on the memory expansion board, each withfour chip sockets. The chip sockets are identified by the ICnumber, as shown below.
3 H3 J3K3 L
The four sectors must be filled in the order given below:
3 1B. 1C. 1D. 1E 3.5 MB 2.0 ME4 1F. lti. 1J. 1K 40MB 2.5 ME
If all four sectors on the board are empty, install the first chip setin sector 1. If sector 1 is already filled, install the chip set in sector2. If sector 1 and 2 are filled, install the chip set in sector 3; and ifsector 1, 2, and 3 are filled, install the chip set in sector 4.
If desired, install additional memory chip sets to the optionalmemory board as described earlier in this section.
Note: This section shows the installation of the 2 MB memoryexpansion board. The procedure is the same for the 2 MB or the.5 MB board.
Locate mating connector CN5 on the controller board. Lowerthe memory expansion board into position as shown below,and carefully insert the connector on the board into the matingconnector.
Paper Handling Options
The lower paper cassette (C812051)
The optional lower paper cassette fits directly beneath the printerand allows you to feed up to 250 sheets of paper into the printer.The optional cassette supplements your standard paper cassette’s250-sheet capacity.
Guide the printer using the two alignment pins as shownbelow until it rests on top of the lower paper cassette.
Laser Printers 1/7 /91 EPL-7000-7
EPL-7000 LASER PRINTER
The face-up output tray (C812071)
The face-up output tray delivers paper face-up for immediateviewing of your printed output. Use the face-up output tray forprinting that requires a straight-through paper path, such as labels,heavy paper, and overhead transparencies.
Use the screwdriver to secure the drive unit to the printer.First, partially tighten the two diagonally positioned screws inthe sequence shown below. Repeat this gradual tighteningprocess until all screws are fully tightened.
To install the face-up tray, fit the notches of the tray over thepins of the drive unit, as shown below.
Status and Error Messages
This chapter supplies solutions to problems you may encounter.
If an error occurs, your best source of information is the display onthe control panel. The error messages displayed there tell you whatis wrong and, in some cases, indicate the actions you should taketo correct the problem. Status messages also appear on the displayduring the printer’s normal operation. They indicate the printer’scurrent status.
This section contains an alphabetical list of status and errormessages you may encounter and includes the steps you need totake to correct any problems.
Note: In some cases, the red CONTINUE light flashes when anerror is detected. This requires you to correct the problem andthen press the CONTINUE button to clear the error. However, ifthe AUTO CONT option in SelecType is set to ON, some errorsmay clear automatically even though the problem remains. Inmost instances, you should leave AUTO CONT set to OFF.
Status messages are preceded by [S], warning messages arepreceded by [W], and error messages are preceded by [E]. In somecases the message you see on your display also shows the printermode.
[E] ADD MEMORY FOR CH-XThe printer has insufficient memory available in the channeldisplayed. You may have changed the printer mode, increasedthe RX-BUFFER setting, or changed the MEMORY SHAREsetting. To correct the error, add memory. You can alsodecrease the RX-BUFFER setting or change the MEMORYSHARE setting in SelecType Level 2.
[E] CARD MEMORY OVERFLOWThis message indicates that the combined memoryrequirement of the cards in slots A and B exceeds 4 Mbytes.To correct this problem, remove one or more of the cards andthen press the CONTINUE button.
[S] COPY END X/XMultiple-copy printing is cancelled (you pressed the COPY ENDbutton when the printer was off line).
[E] COVER OPENThe printer cover is open or the imaging cartridge is notinstalled. Close the printer cover or install the imagingcartridge. Then press CONTINUE to continue printing.
[S] DATAThe printer has received data but is not yet printing, or theprinter has received data and is off line. To resume printing,press ON LINE if the printer is off line, or press the FEEDbutton.
[E] FEED JAMPaper is not feeding into the printer from the specifiedcassette or has jammed on its way into the printer. If thepaper is jammed at the paper cassette, open the printer case,remove the jammed paper from the standard paper cassette oroptional paper cassette and then close the printer. See Clearinga feed jam later in this chapter for more information.
[S] GRAPHIC DRAWINGGraphics are being created.
EPL-7000-8 1/7/91 Laser Printers
EPL-7000 LASER PRINTER
[El
PI
[El
[El
Fl
[El
[El
[El
[El
[El
[El
PI
ILLEGAL CARDA card or cartridge in a particular slot cannot be read. Theletter on the right side of the display indicates the slotcontaining the card or cartridge that cannot be read. Tocorrect this error, take the printer off line and then pressCONTINUE. If the error message remains, make sure the printeris off line and remove the card or cartridge. If the redCONTINUE light still flashes, press CONTINUE.
INITIALIZEThe printer is being initialized (reset) to the factory settings.
INSUFF. MEMORYThe printer has insufficient memory available for the task youhave given it. To correct the error, press CONTINUE. If themessage remains, press RESET or perform INITIALIZE asdescribed in Chapter 2.
This error can also be cleared by turning the printer off andback on again. However, it may be necessary to simplify thepage you are trying to print or add more memory to theprinter. See Appendix A for information on memory options.
PAGE BUFFER FULLText or graphics data has filled the printer’s buffer and anincomplete page is ejected. Press CONTINUE to clear the error.You may need to add more memory to the printer. SeeAppendix A for information on memory options.
PAPER FEEDINGThe printer is feeding paper.
PAPER JAMPaper is not being fed into the printer or paper is jammedinside the paper path. You need to open the printer and clearthe jammed paper as described, later in this chapter.
PAPER OUTThere is no paper in the standard paper cassette and theoptional lower paper cassette (if installed). Or, the paper setlever is in the manual position and you are not feeding pagescorrectly. Insert more paper into the selected paper cassette ormanually feed a sheet of a paper into the printer. See Chapter4 for more information on loading paper.
PAPER OUT SET AUTO XXXThere is no paper in any of the paper cassettes. The rightcolumn of the display prompts you to load the correct papersize into the paper cassette.
PAPER OUT SET OPT XXXThere is no paper in the optional lower paper cassette. Theright column of the display prompts you to load the correctpaper size into the paper tray of the lower paper cassette.
PAPER OUT SET STD XXXThere is no paper in the standard paper cassette. The rightcolumn of the display prompts you to load the correct papersize into the standard paper cassette.
PAPER SIZE ERRORThe paper size you selected with SelecType (or the defaultsize if you have not selected a size) does not match the paperloaded in the selected paper cassette. Press CONTINUE to clearthe error. Insert the correct paper or change the P-SIZE settingwith SelecType as described in Chapter 3.
PRINTINGThe printer has received data and is printing.
[Sl
Fl
ISI
[El
[El
[El
ISI
[Sl
[El
[El
[El
[El
PRINT STOP X/XThe printer stops printing during a multi-copy print operation.
REINSERT CARDIf this message appears on the display, YOU may have removeda font card or cartridge while the FEED light was still lit orwhile the printer was on line. To correct the error, make surethe printer is off line. Next, reinsert the card or cartridge intothe correct slot and press CONTINUE.
REMOVE CARDYou may have inserted a font card or cartridge while theprinter was on line or while the FEED light was on. Data stillremains in the printer’s buffer, To correct this error, take theprinter off line. Then remove the card or cartridge and pressCONTINUE. Before you reinsert the card or cartridge, make surethat all data in the buffer has been printed and that theprinter is off line. If the FEED light is on, press FEED to printout the remaining data.
RESELECT TRAYThe optional lower paper cassette is not installed and theINPUT option is set to OPT or AUTO. Install the optionallower paper cassette and then press CONTINUE. If you decidenot to use the optional lower paper cassette, simply pressCONTINUE and paper is automatically selected from thestandard paper cassette.
RESETThe printer is being reset to the previous settings in the macrospecified with LOAD MACRO option in SelecType Level 1.
ROM CheckThe printer is checking ROM.
SAVE MEMORY OVERFLOWIf this message appears when you are trying to save a macrowith the SAVE MACRO option in SelecType Level 1. theprinter does not have enough memory to save any additionalmacros. To correct this error, delete unused macros using theDELETE MACRO option in SelecType Level 1.
SERVICE REQ. CXXXA controller error has been detected. Write down the errornumber that appears in the right column of the display andturn off the printer. Turn the printer back on after a fewseconds to see if the error message still appears. If it does,turn off the printer, unplug the power cord from the electricaloutlet, and contact a qualified service person.
SERVICE REQ. E00XXA print engine error has been detected. Write down the errornumber that appears in the right column of the display andturn off the printer. Turn the printer back on after a fewseconds to see if the error message still appears. If it does,turn off the printer, unplug the power cord from the electricaloutlet, and contact a qualified service person.
SET FULL PRINTThis message may appear when you are trying to printgraphics or a mix of text and graphics. Press CONTINUE andthen change the FULL PRINT setting in SelecType Level 1.See Chapter 3 for more information about setting this option.
Laser Printers 1/7/91 EPL-7000-9
EPL-7000 LASER PRINTER
[S] STANDBY MODEWhen both CH P and CH S remain off for about thirty minutes,the printer enters standby mode and this message appears.press any panel button or send data to warm up the printer.You can turn off the standby mode by setting the SelecTypeLevel 2 STANDBY option to DISABLE.
[E] START UP ERRORIf this message appears when you turn on the printer, thepower may have been turned off while the printer wasperforming a save or reset operation, To clear this error, press1,1 or RESET to return the printer settings to their defaults.
[W] TONER LOW
[El TONER OUTThe imaging cartridge must be replaced. Replace the imagingcartridge as described in Chapter 6.
[El TRAY SET AUTO XXXThe paper size setting does not match the paper loaded in thespecified paper cassette. The right column of the displayindicates the expected paper size and the currently selectedcassette. You can either change the paper size setting or loadthe correct paper size. After you correct the paper mismatch,press CONTINUE.
[El TRAY SET OPT XXXThe paper size setting does not match the paper loaded in theoptional lower paper cassette. The right column of the displayindicates the expected paper size. After you correct the papermismatch, press CONTINUE.
[El TRAY SET STD XXXThe paper size setting does not match the paper loaded in thestandard paper cassette. The right column of the displayindicates the expected paper size. After you correct the papermismatch, press CONTINUE.
PI
PI
WAITPrinter is being reset after a START UP ERROR.
WARMING UP
The printer is almost out of toner. When you see thismessage, you can still print up to 25 more pages. The imagingcartridge must be replaced soon.
Printer is warming up.
SelecType
SelecType is divided into two levels as shown below. Level 1contains everyday printing and font selection functions, and Level2 contains functions that are less likely to be changed frequently,such as printer mode and printer configuration. A brief descriptionof each main menu option follows. See SelecType Options later inthis chapter for detailed descriptions of all SelecType options.
Prints a report listing the current printersettings.
Subconfiguration. Depending on the printermode, controls such features as symbol set andnumber of text lines.
System configuration. Saves Level 1 settings,displays the amount of memory remaining,changes top and left offsets, and controlsprinting of complex pages.
The SelecType function on the printer control panel allows you tocontrol many of the printer’s functions. Use SelecType’s menu-based system to change your printer’s configuration without usingDIP switches and to select most font and print options withoutusing software commands.
Your application program may send printer commands thattemporarily override the SelecType settings. If you are not gettingthe results you expect, check your application software settings.
SelecType Level 2 functions
TEST PRINT Prints two test patterns to check printeroperation.
CH CONFIG. Channel configuration. Sets up the operatingmode, interface configuration, and the size ofthe printer’s input buffer for each channel.
Note: New SelecType settings are in effect only until you turnoff the printer, unless you save them with the Level 1 SYSTEMCONFIG option or the Level 2 P-CONFIG.SAVE optiondescribed later in this chapter.
MEMORY SHARE Memory share. Specifies the proportion of theprinter’s memory shared between channel Sand P.
CH TIMEOUT Channel time out. If no data is sent during thespecified time period, the printer switches fromone channel to the other.
EPL-7000-10 1/7/91 Laser Printers
EPL-7000 LASER PRINTER
AUTO CONT. Automatic continue. Permits the printer tocontinue printing instead of stopping undercertain error conditions.
1 to 99BEEPER Turns the beeper on or off.
P-CONFIG. SAVE Printer configuration save. Saves all Level 2settings as defaults so they take effect eachtime you turn the printer on.
FACTORY RESET Returns all Level 1 and Level 2 settings to theirfactory settings.
Use this option to print up to 99 copies of your print job. Thefactory setting is 1. If you select a number above one, the displaykeeps count of the number of copies completed and the currentsetting. For example, if you set the copies option to 10 and 5copies are complete, the display shows 5/10.
VERSION Displays the version numbers of the printer’sfirmware components such as the controller andfont.
Testing the Printer
Follow these steps to select and run the test print:STANDBY Conserves power by reducing power to the
fixing heater when the printer is not used for30 minutes.
1. Hold down the SelecType button until the LEVEL 2 indicator lightgoes on and TEST PRINT appears on the display.
This section lists all the options available when you use SelecType.Most options are the same whether you’re working in L-JET2P,LQ, or FX emulation mode. Some of the options in Level 1,however, have a different function for each mode. These optionsare listed later in this chapter. See the Quick Reference Card for amap of all SelecType menus and options.
Level 1 options
When you press SelecType once to enter Level 1, one of the Level 1main menu options listed below appears on the display.
If you have entered SelecType before, TEST PRINT may not bethe first option to appear. If the Level 2 indicator is on, you canpress the up or down arrow until TEST PRINT appears on thedisplay. Then go on to step 2.
If you did not hold down the button long enough to enter Level 2,the LEVEL 1 indicator goes on. If this happens, press the SelecTypebutton once to exit SelecType and repeat step 1.
INPUTP-SIZE
COPIESORIENT.FONT
STATUSSHEETSUB CONFIG.SYSTEM CONFIG.
2. Press m once. The display reads as follows:
Each of these options is described below. An asterisk (*) indicatesthe factory default setting for each option.
3. To run the test, press I,( once more. The printer prints a testpattern of vertical lines and ejects the page face-down on topof the printer.
CAUTION: Never open the printer cover during printing
Note: If you have set the MEMORY SHARE option in Level 2,the display shows CH SELECT whenever you enter Level 1.After you select the channel, one of the main menu optionslisted above appears on the display.
Printing a Status Sheet
In addition to the test print patterns, you can print a status sheetthat lists printer settings for your selected channel.
OTHERA4A5
B5* LETTER
HALF LTLEGALGLT
GLGEXEF4
MONARCHC10DLC5
(Half Letter)
(Government Letter)(Government Legal)(Executive)
(Commercial 10)
Note: The status sheet prints the printer’s current settings. Ifyou change the macro number setting for the LOAD MACRO
prints out the new macro settings. MACRO 0 is the factory
Follow these steps to print the status sheet:
1. Make sure that your printer is plugged in and the power is on.
2. Press SelecType once to enter SelecType Level 1.
YOU cm choose any of the paper sizes shown above with the
P-SIZE option. The factory setting is LETTER.
Laser Printers 1/7 /91 EPL-7000-11
EPL-7000 LASER PRINTER
Note: If you have used SelecType before, and if the printer isset up to use both channels, the following option appears on thedisplay:
Press m or I,( to choose your channel, then go on to step 3.
3. Hold down m until STATUS SHEET appears on thedisplay.
+SjnTl-iS SHEET b
4. Press 1,1 to print the status sheet.
A portion of the status sheet printout is shown below
61 79 20 65 6E 63 SF 75 6E 74 65 72 20 61 6E 6420 74 66 65 69 72 20 6C 69 68 65 6C 79 20 73 6F
6C 75 74 69 6F 6E 73 2E 20 00 OA 00 OA 49 66 206, 6E 20 65 72 72 6F 72 20 6F 63 63 75 72 73 2C
20 79 6F 75 72 20 62 65 73 74 20 73 6F 75 72 6365 20 6F 66 20 69 SE 66 6F 72 60 61 74 69 6F 6E20 00 OA 69 73 20 74 66 65 20 6, 69 73 70 6C 6179 20 6F 6E 20 74 66 65 20 63 6F 6E 74 72 6F 6C20 10 61 6E 65 SC 2E 20 00 OA
Choosing a Paper Size
The printer can feed several sizes of paper automatically. To selecta paper size, simply change the paper size (P-SIZE) setting withSelecType. You may also need to adjust the paper guides on thepaper cassette to match the size of the paper you want to use.
Note: If you are using the optional lower paper cassette, seeAppendix A for instructions on selecting a paper size.
The table below lists all of the paper sizes on the SelecType menu.Not all the sizes in this table are marked on the paper cassette, justthe more commonly used paper sizes.
210 y 297 mm'48 . 210 mm182 T 257 mm8 112 n 11 mches5 112 ‘- 8 1.:2 rxnes8 112 q 14 Inches8 A 10 1’2 IfICheS
85 i 13mches7 114 x 10 l/2 Inches210 y 330 mm
110 x 220 mm162 * 229 mm
Dimensions
3 710 . 7 112 lnmes
4 118 A 3 142 'PC-es
Data dump mode is a special feature that makes it easy forexperienced users to find the cause of communication problemsbetween the printer and computer. The data dump mode producesan exact printout of the codes reaching the printer.
1. Make sure that the printer is turned off and is loaded withpaper.
2. Hold down the SelecType button while you turn on the printerMake sure you hold the button down until the message HEXDUMP appears on the display.
3. Run any program that causes the printer to print (either anapplication program or a program written in any programmmglanguage). Your printer prints out all of the codes sent to it inhexadecimal format as shown in the sample below.
You will probably use one paper size most of the time. For yourconvenience, you can use the SelecType Level 1 SAVE MACROoption so that the paper size you use most often is automaticallyselected whenever you turn on, reset, or initialize your printer. SeeChapter 3 for details.
Envelopes Manual or auto Face-up or face-awn
Transparencies Manual Face-up or face-down
labels Manual Face-up
Note: To print on letterhead paper, load the paper face-up with 1the top of the page entering the printer first.
EPL-7000-12 1/7/91 Laser Printers
EPL-7000 LASER PRINTER
Installation/Support Tips
Set Up
Install the font cartridge or the HPGL card only when thepower is off.
Do not use the memory share feature unless you haveinstalled optional memory, lf you set this option beforeadding memory, you could damage the printer.
The rear cover or the face-up output tray drive unit must beinstalled when you turn on the printer.
Software
1. When using software packages with the EPL-7000, select HPLaserJet series IIP as the printer. If this is not available, selectHP LaserJet series II. If neither is available, select HPLaserJet +.
2. If you are using a font cartridge, ensure that the software isset up to support it.
Laser Printers 1/7/91 EPL-7000-13
EPL-7000 LASER PRINTER
Compatibility Check Table for Font Cartridges
Laser Printers 1/7/91 EPL-7000-15
EPL-7000 LASER PRINTER
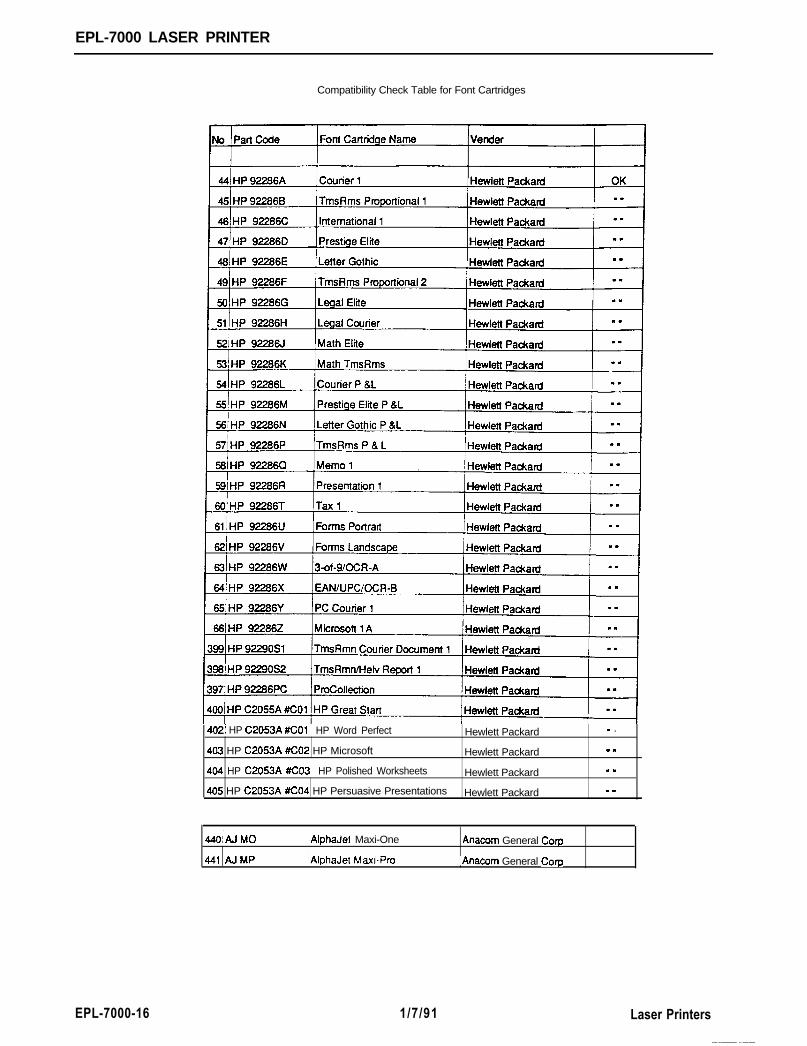
Compatibility Check Table for Font Cartridges
4021 HP C2053A #/CO1 HP Word Perfect Hewlett Packard . .
403 HP C2053A #CO2 HP Microsoft Hewlett Packard .I
404 HP C2053A #CO3 HP Polished Worksheets Hewlett Packard . .
405 HP C2053A #CO4 HP Persuasive Presentations Hewlett Packard .I