Page 1
Enterprise Print Manager User Guide
English Edition
Rev-0711
© 2011 Euro Plus d.o.o. & Niceware International LLC
All rights reserved.
www.nicelabel.com
www.nicelabel.com, [email protected]
Head Office Euro Plus d.o.o.
Ulica Lojzeta Hrovata 4c SI-4000 Kranj, Slovenia
tel.: +386 4 280 50 00
fax: +386 4 233 11 48
www.europlus.si
[email protected]
Page 2
COPYRIGHTS
Copyright © 1995-2011 Euro Plus d.o.o. All rights reserved.
www.europlus.si
www.nicelabel.com
Information in this document is subject to change without notice. The software described in this
document is furnished under a license agreement or nondisclosure agreement. The software may
be used or copied only in accordance with the terms of those agreements. No part of the
publication may be reproduced, stored in a retrieval system, or transmitted in any form or any
means electronically or mechanically, including photocopying and recording for any purpose
other than the purchaser's personal use without the written permission of Euro Plus d.o.o.
Euro Plus d.o.o.
Ulica Lojzeta Hrovata 4c
SI-4000 Kranj
Slovenia
www.europlus.si
TRADEMARKS
NiceLabel
, NiceLabel Pro
, NiceForm
, NiceWatch
, NiceMemMaster
, NiceData
,
NicePrint
, NiceDriver
, NiceLabel Portal
, NiceLabel Print Center
, Enterprise Print
Manager
, NiceWatch Server
and NiceWatch Enterprise
are trademarks or registered
trademarks of Euro Plus d.o.o. in the U.S.A. and other countries. Niceware
is a registered
trademark of Niceware International, LLC. Microsoft and Windows are registered trademarks of
Microsoft Corporation. Other brands and their products are trademarks or registered trademarks
of there respective holders and should be noted as such.
Page 3
Table of Contents
3
Enterprise Print Manager User Guide
Table of Contents
Table of Contents ............................................................................................................ 3
Introduction ..................................................................................................................... 5
Welcome to NiceLabel Enterprise Print Manager .............................................................. 5 Software_Products .............................................................................................................. 6
NiceLabel Print Center ................................................................................................................. 6 NiceLabel Software Products ....................................................................................................... 6 NiceLabel Suite ............................................................................................................................ 7 NiceWatch Enterprise .................................................................................................................. 8
About this Manual ............................................................................................................... 8
Typographical Conventions ................................................................................................ 8
Setting up Enterprise Print Manager ............................................................................ 10
Set up Enterprise Print Manager ....................................................................................... 10 EPM Installation ............................................................................................................... 10 Configure Enterprise Print Manager ................................................................................. 11
Configuration Settings location .................................................................................................. 13 Label Services ................................................................................................................... 14 Configure Authentication .................................................................................................. 15
Loging into EPM ........................................................................................................................ 16 Configure Archiving ......................................................................................................... 17
Using EPM ..................................................................................................................... 20
General .............................................................................................................................. 20 Enterprise Print Manager User Interface .................................................................................... 20 Welcome Page ............................................................................................................................ 20 System Overview ....................................................................................................................... 20
Centralized Printing Control ............................................................................................. 22 History ........................................................................................................................................ 22
Printing History .................................................................................................................................... 22 Error History ........................................................................................................................................ 23 Alert History ........................................................................................................................................ 23
Activity Details .......................................................................................................................... 24 Managing Printers ...................................................................................................................... 24 Managing Print Queues .............................................................................................................. 25 Managing Workstations ............................................................................................................. 25 Printer Errors .............................................................................................................................. 26 Printer Groups ............................................................................................................................ 26 Print Job Statuses ....................................................................................................................... 26 Problemsolving .......................................................................................................................... 27
Problem resolution flowchart ............................................................................................................... 28 Viewing Printer Status ............................................................................................................... 30
EPM Printing .................................................................................................................... 30
Page 4
Table of Contents
4
Enterprise Print Manager User Guide
Introduction to EPM Printing ..................................................................................................... 30 Web Printing Forms ............................................................................................................................. 31 Web Printing Customization URL Parameters..................................................................................... 31 URL parameter syntax ......................................................................................................................... 31
EPM Printing Wizard ................................................................................................................. 32 Select Printing Destination ................................................................................................................... 33 Select Printer ........................................................................................................................................ 33 Select Label .......................................................................................................................................... 33 Print Label ............................................................................................................................................ 33
Reports .............................................................................................................................. 33 Reports ....................................................................................................................................... 33
Printed Labels Report ........................................................................................................................... 34 Errors Report ........................................................................................................................................ 34 Compare Workload Report .................................................................................................................. 34 All Print Jobs Report ............................................................................................................................ 35 All Errors Report .................................................................................................................................. 35
Storage Server ................................................................................................................... 35 Document Storage ...................................................................................................................... 35
Administration ............................................................................................................... 37
Alert Configuration ........................................................................................................... 37
Configure Printer Groups .................................................................................................. 37 Portal Clients ..................................................................................................................... 38
Adding users .............................................................................................................................. 38 Global Variables ............................................................................................................... 39
Manage Licensing ............................................................................................................. 40 Activate New Products ............................................................................................................... 40 Upgrade Licenses ....................................................................................................................... 43 Adding Licences ........................................................................................................................ 44 License Modes ........................................................................................................................... 46
Manage NiceWatch Server ............................................................................................... 47 Manage Triggers ........................................................................................................................ 47 Monitor NiceWatch Server Events ............................................................................................ 49 View Event Details .................................................................................................................... 49 View Preferences ....................................................................................................................... 50
Technical Support ......................................................................................................... 52
Online Support .................................................................................................................. 52 Contact Information .......................................................................................................... 52
Page 5
Introduction
5
Enterprise Print Manager User Guide
Introduction
Welcome to NiceLabel Enterprise Print Manager
NiceLabel Enterprise Print Manager (EPM) is a web application used to remotely control the
label printing process in an enterprise environment. It comes as a module within the products of
the NiceLabel Enterprise Series:
NiceLabel Print Center, the enterprise solution for client-based label printing and
centralized system management.
NiceWatch Enterprise, the enterprise solution for centralized integration of multi-
threaded and high-volume label printing.
NiceLabel Portal, your online compliance labeling platform
End users can manage their workstation and printing devices (printers) in the EPM module, while
the printing administrator can use the EPM to control all NiceLabel Suite workstations, printers
and NiceWatch Server computers.
Figure: NiceLabel Enterprise Print Manager
Main features of Enterprise Print Manager are:
Page 6
Introduction
6
Enterprise Print Manager User Guide
Central print and event log: information on printed labels, executed
NiceWatch actions, errors, etc.
Central printing management: printer status, print job redirecting,
print job management, print queues
Multi-channel alerting and messaging services
NiceLabel Print Center and its client licensing
NiceWatch Enterprise licensing and management (when installed in the
same network)
NiceLabel Portal design and web printing licensing
Software_Products
NiceLabel Print Center
NiceLabel Print Center is an enterprise-level labeling solution with centralized control over all
NiceLabel clients in the network. The enterprise edition manages the printing process centrally
while label design and printing occurs locally on the client computers hosting NiceLabel Suite.
The NiceLabel Print Center software performs the following:
Centralized print and event logging.
Centralized control over printers and print queues (print jobs).
Centralized logging of executed NiceWatch actions.
Issuing alerts through email, NetSend, Instant Messenger, RSS feed, SMS or pager.
Flexible licensing for NiceLabel clients.
The NiceLabel Print Center includes two main components:
NiceLabel Enterprise Print Manager (EPM), installed on server.
NiceLabel Suite, installed on client computers.
The NiceLabel Print Center edition can be used with 32-bit and 64-bit Windows 2000 and
Windows 2003 server families.
NiceLabel Software Products
NiceLabel is a family of professional labeling software products that brings a complete bar code
printing solution and RFID smart label printing to desktop, mobile and enterprise users.
NiceLabel offers an easy-to-use interface and meets any label design and printing requirement for
Page 7
Introduction
7
Enterprise Print Manager User Guide
efficient label printing solutions to users in retail, logistics, healthcare, chemical, automotive and
other industries.
The NiceLabel family of products is divided into three series:
Standard series (Express, Pro, Suite, Network, Pocket NiceLabel)
Represent the most complete range of “standard” labeling software
Easy to use but offers powerful functions expected from advanced label designers
Tight control over printing process – NicePrintQueue & bi-directional drivers,
reprint functionality
Enterprise series (Products for enterprises and toughest demands)
NiceLabel Print Center
NiceWatch Enterprise
Developer series (Integration solution for software publisher - "print engine")
NiceLabel SDK
NiceLabel WebSDK
NiceLabel PocketSDK
NiceLabel Suite
NiceLabel Suite is a complete software solution for any kind of label design and print
requirement. Multiple connectivity options allow users to perform stand-alone printing or
integrate label printing into any network environment.
NiceLabel Suite offers interactive label printing capabilities such as integrating label printing into
existing applications (ActiveX) or non-programming embedding of label printing to existing
systems (NiceWatch).
NiceLabel Suite includes the following programs:
NiceLabel Pro: Main application for label design and printing.
NiceForm: Create your own custom designed data-entry applications without requiring
any programming skills.
NiceWatch: Integrate and automate label printing to any existing information system.
NiceMemMaster: Download fonts and graphics to the printer internam memory or
memory card for optimized label printing.
NiceData: Manage your databases.
NicePrint: Manage fast and easy label printing.
NicePrintQueue: manage your print jobs.
The NiceLabel Suite, Pro, Express and Pocket NiceLabel editions can be used with following 32-
bit and 64-bit Windows operating system: Windows 2000, Windows XP and Windows Server
2003.
For detailed information about a particular program please refer to the NiceLabel User Guide,
available on the NiceLabel Standard Series installation CD or User Guide and Manuals section of
the product web site at www.nicelabel.com.
Page 8
Introduction
8
Enterprise Print Manager User Guide
NiceWatch Enterprise
Centralized label printing middleware software that integrates the label printing process into
enterprise-level products, such as Enterprise Resource Planning (ERP) systems, Warehouse
Management Systems (WHS) and others.
The NiceWatch Enterprise performs the following:
Multi-threaded label printing execution to ensure fast and stable operation in heavy-load
environments (where a lot of print requests happen simultaneously).
Remote administration to view list of triggers, start and stop triggers.
Centralized logging of executed actions.
NiceWatch Enterprise includes the following modules:
NiceWatch Server
NiceLabel Enterprise Print Manager (EPM)
NiceWatch Server also includes one NiceLabel Pro license. You will use NiceLabel Pro for label
design.
The NiceWatch Enterprise edition can be used with 32-bit and 64-bit Windows 2000, Windows
XP, and Windows 2003 server families.
About this Manual
The NiceLabel Enterprise Print Manager User Guide helps you set up and use this module to
manage your NiceLabel printing solution.
The User Guide contains the following sections:
Introduction: Introduces you to the NiceLabel Enterprise Print Manager (EPM) module.
Setting Up Enterprise Print Manager: Learn how to set up EPM and configure its operation.
Using Enterprise Print Manager: Discusses the user interface of EPM and shows you how to
use it.
Technical Support: Contacting technical support.
Typographical Conventions
Text that appears in bold refers to menu names, file names like SETUP.EXE and buttons like the
OK button.
Text that appears in italic refers to confirming actions like Read only, locations like Folder or
software window names.
Page 9
Introduction
9
Enterprise Print Manager User Guide
Text enclosed in <Less-Than and Greater-Than signs> refers to keys from the desktop PC
keyboard like <Enter>.
Variables are enclosed in [brackets] like [variable].
Page 10
Setting up Enterprise Print Manager
10
Enterprise Print Manager User Guide
Setting up Enterprise Print Manager
Set up Enterprise Print Manager
In order for a successful Enterprise Print Manager implementation, your equipment must fulfill
the system requirements. To install and run this program, you need at least the minimum
configuration. For optimal performance, ensure that you have the recommended configuration.
Depending on the architecture of the solution as well as the hardware being used, the Enterprise
Print Manager and the database server (MS SQL) can be installed on the same or on a separate
system. The required server configuration is as follows.
Configuration for the Web server (EPM):
Computer with Intel or compatible Pentium class processor (1,6 GHz or faster)
1 GB of RAM or more
Hard disk with 1 GB of available disk space
Optical drive
One of the 32-bit or 64-bit Microsoft Windows Server operating system: Windows Server
2003, Windows Server 2003 R2, Windows Server 2008, Windows Server 2008 R2
Microsoft .NET framework 2.0 (for EPM), .NET framework 4.0 (for Web Printing server)
IIS6 or IIS 7
Note: For additional information about installation requirements, refer to the NiceLabel product
User Guide.
EPM Installation
You have received the installation CD in the product package. When you insert the CD in your
optical drive, the menu application will start automatically.
Note: You must be logged on the server with administrative rights to be able to perform the
software installation.
To install the NiceLabel Enterprise Print Manager, do the following:
1. To ensure complete installation, close all open applications before installing the software.
2. Insert the NiceLabel Portal CD in your CD-ROM drive. An installation window will open
automatically.
Note: If the installation wizard does not start automatically, go to the main CD directory of your
NiceLabel Portal CD and double-click the START.EXE file.
Page 11
Setting up Enterprise Print Manager
11
Enterprise Print Manager User Guide
1. Click on Install Server Components and select NiceLabel EPM in the next window. The
installation of NiceLabel Enterprise Print Manager will start.
2. Before the actual installation starts, the wizard verifies if the following prerequisite
components are installed on the server:
Microsoft IIS server is installed.
Microsoft .NET Framework 2.0
ASP.NET AJAX Extension
Note: If you use IIS 7, you must install IIS 6 Metabase Compatibility and IIS 6 Management
Console before installing NiceLabel software. See the NiceLabel Knowledge Base article KB168
for details.
If the last two components are not present in your system, the wizard will add them and then
continue with the installation. Follow the Setup Wizard prompts.
1. An EPM database must be created during setup. Setup searches for available SQL servers
in your network. Select the appropriate SQL server name and enter the instance name, if it
was set up with a non-default name (for example, SERVERNAME\SQLEXPRESS).
2. If the SQL Server is installed on a remote computer and the user you are currently logged
in doesn’t have the necessary administrative privileges, the install will ask you for
administrative privileges for that remote Windows Server. In this case, enter the
username/password.
Note: If you wish to install the EPM database to MS SQL running in a Microsoft cluster, you will
need to install the database separately from the main EPM installation. See the instructions in the
Setup\Troubleshooting folder on the NiceLabel Portal CD. Also, see NiceLabel Knowledge Base
article KB154.
1. The installer will add two Windows users to the server where MS SQL is installed. Local
user accounts EPM_USER and EPM_DBADMIN will be created during this installation.
The EPM web page will use (impersonate) the user EPM_USER to connect to the database.
2. EPM archives its database regularly. You can decide whether the database will be archived
on a daily or weekly basis.
Note: The average 100.000 sized print job takes around 150 Megabytes of space in the EPM
database. It is recommended to enable daily archiving if such an amount of daily print jobs are
regularly executed in your environment. You can change the archiving settings at any time after
installation.
1. When the EPM setup is completed leave the Run NiceLabel Enterprise Print Manager
check box selected. Click the Finish button and EPM will start.
Configure Enterprise Print Manager
NiceLabel settings on a standalone client are changed and stored locally on each workstation. In
an enterprise environment however, there might be a need to change all relevant settings
Page 12
Setting up Enterprise Print Manager
12
Enterprise Print Manager User Guide
centrally. NiceLabel client settings together with NiceLabel Enterprise Print Manager settings
can be managed on the server.
To open the Enterprise Print Manager Configuration utility, click Start, All Programs,
NiceLabel Enterprise Manager, Utilities, EPM Configuration.
Note: You need to use an account with administrator privileges to be able to change all settings
in the Enterprise Print Manager Configuration utility.
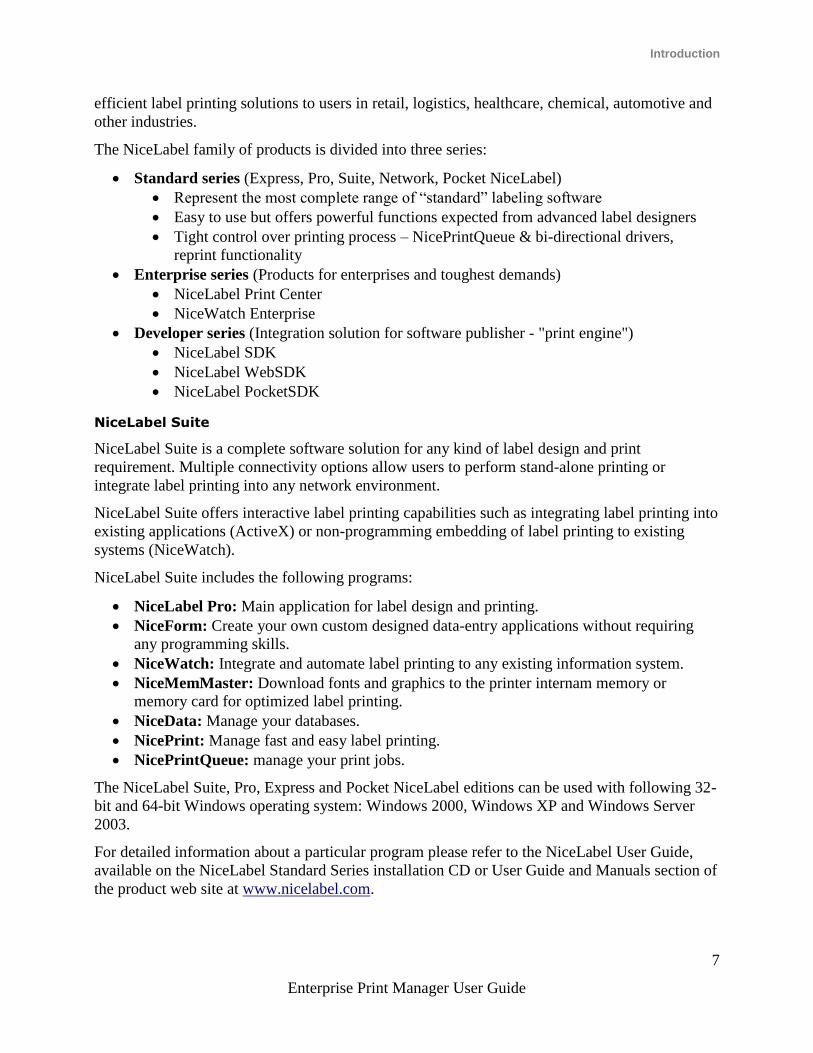
Click Monitor Events setting under the Enterprise Print Manager heading in the left column.
Here you can select which event types, occurring on the local machine are logged to the
Enterprise Print Manager database. Print Events, Error Events and NiceWatch Activity is logged
by default.
Figure: Configuring events to be monitored
In the Monitor Print Jobs section in the left column you can decide whether local print jobs are
reported to the Enterprise Print Manager (EPM) print job log or not. When the client machine
gets a license from an EPM server, the print job logging to server will be enabled.
Page 13
Setting up Enterprise Print Manager
13
Enterprise Print Manager User Guide
Figure: Configuring print job monitoring
Configuration Settings location
All Configuration settings are stored locally on each NiceLabel workstation by default. Another
option is to store the NiceLabel settings centrally on the Enterprise Print Manager (EPM) server.
If you want your settings to be stored locally, select the Local radio button in the Settings
location section.
Your NiceLabel workstation settings can be shared by other NiceLabel workstations in the
network. To do so, upload your optimized settings to the EPM server by clicking the Store to
Server button. To download your workstation settings to another machine, click the Retrieve
from Server button on that machine. Depending from where you opened the Configuration
dialog the new settings will be effective when you click the OK button or at the next start of
NiceLabel program.
If your company requires a strict settings enforcement policy (for example, all NiceLabel
workstations should use the same language), you can enable it by selecting Global (Automatic
synchronization). NiceLabel will synchronize the most current settings with the EPM server
every time you (or your users) start The NiceLabel software.
Page 14
Setting up Enterprise Print Manager
14
Enterprise Print Manager User Guide
Figure: Enterprise Print Manager Settings
Note: Most settings here can only be viewed but not changed if the current user does not have
administrator privileges.
Label Services
A service called Label Services is installed and started on each client after the NiceLabel
application installation. This service is monitoring the local printer and its print job status that
results in the local job log. Printer and job statuses are also sent to the NiceLabel Enterprise Print
Manager where the central print job log is updated. The print job log contains accurate
information about the printed jobs and printer statuses.
Note: Label Services service is using the TCP/IP ports 6758 and 6759 to communicate with
NiceLabel Enterprise Print Manager (EPM) and NicePrintQueue modules. You need to ensure
that any firewall applications installed on NiceLabel workstations allow this communication, so
NiceLabel client can report print jobs to NicePrint Queue and EPM.
You can control this service manually by using the Service Manager. The Label Services
supports following functionality that is not available if the service is stopped:
Page 15
Setting up Enterprise Print Manager
15
Enterprise Print Manager User Guide
Advanced Printing - feedback from windows print spooler about print job progress is
written to NiceLabel log file.
Communication between NiceLabel client and Enterprise Print Manager is active (sending
print job/event information from client to EPM).
Print Queue Manager can be used.
If any of the mentioned functions are not available, you can check the Label Services status on
the NiceLabel workstation. Open Administrative Tools in the Control panel and double-click
the Services icon. To start the service, right-click on the Label Services service in the right-pane
and select Start. Its status will change to Started.
Figure: Starting Label Services service
Configure Authentication
If security standards of your company require higher level of security to protect access to the
NiceLabel Enterprise Print Manager (EPM), you can use the NiceLabel authentication feature.
When the authentication feature is enabled, each user needs to enter the User Name and Password
to start working with NiceLabel.
To enable the NiceLabel authentication feature, do the following:
1. Go to Start, All Programs, NiceLabel Enterprise Manager, Utilities, EPM
Configuration to open the Enterprise Print Manager Configuration utility.
Page 16
Setting up Enterprise Print Manager
16
Enterprise Print Manager User Guide
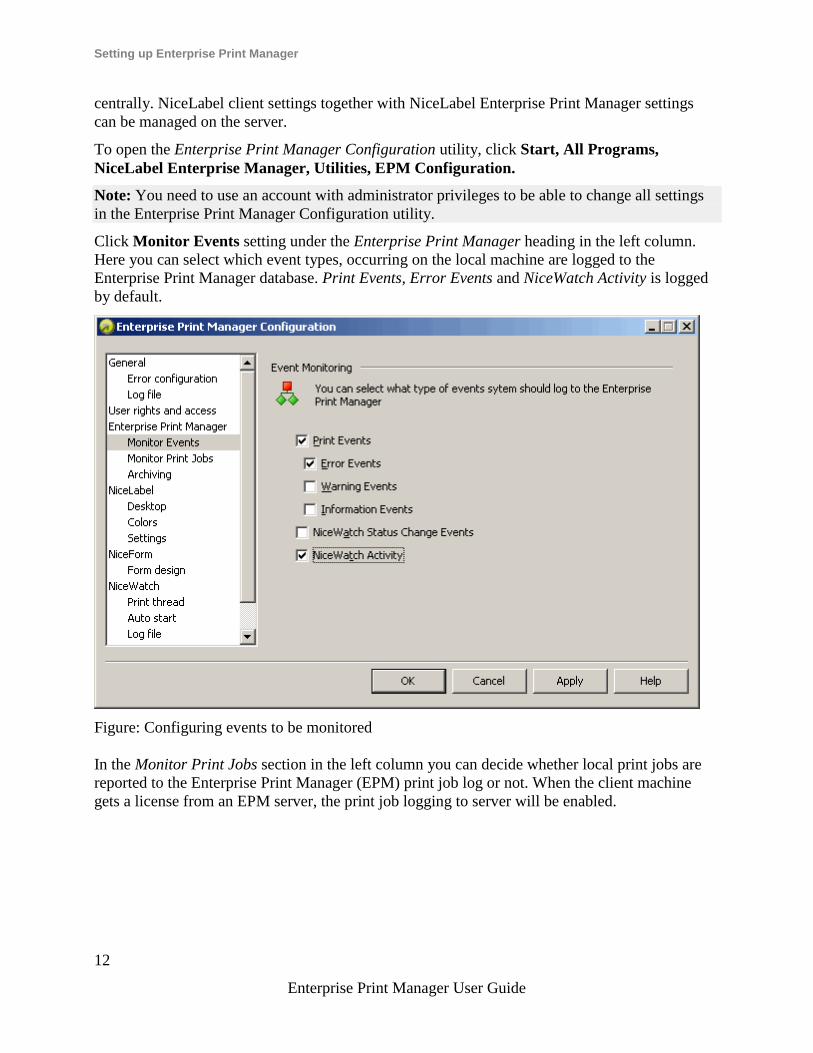
2. Select the User rights and access page in the Enterprise Print Manager group of settings.
3. Click the Authentication Mode button to open the Authentication mode dialog.
4. Select one of the possible authentication modes:
Windows authentication, using Windows authentication system.
Application authentication, using NiceLabel users, groups and profiles (for more
information please refer to NiceLabel Pro User Guide).
Note: Default NiceLabel Administrator password is NICE.
Mixed, using either entities created in Windows and in NiceLabel application.
Figure: NiceLabel Authentication mode
Note: Changed settings need to be saved in the EPM configuration database. For more
information please refer to Configuration Settings location sub topic.
Loging into EPM
After the correct authentication mode has been confirmed and replicated, the login dialog box is
shown every time the Enterprise Print Manager home page is accessed. You need to provide a
correct User Name and Password to be succesfully authenticated and gain access to the
NiceLabel EPM.
Page 17
Setting up Enterprise Print Manager
17
Enterprise Print Manager User Guide
Configure Archiving
NiceLabel activities like printing, event generation or alerting, are logged and written into the
NiceLabel Enterprise Print Manager (EPM) database. The amount of log data can reach several
Megabytes in large enterprise environments. If the EPM database grows too large it might
adversely affect the EPM performance. To limit the size of Print job log, Event log and Alert log
and to ensure consistent storing of the logs, log data is archived and deleted regularly.
During NiceLabel Enterprise Print Manager installation you can decide whether the database will
be archived on a daily or weekly basis.
Note: For example, 100.000 average sized print jobs take around 150 Megabytes of space in the
EPM database. It is recommended to do database archiving after every 100.000 to 200.000 print
jobs or simply enable daily archiving if such an amount of print jobs per day are regularly
executed in your environment.
To change the archiving settings, use the Configure Archive Task in the Enterprise Print
Manager Configuration utility.
To open the NiceLabel Archiving dialog, do the following:
1. Go to Start, All Programs, NiceLabel Enterprise Manager, Utilities, EPM
Configuration to open the Enterprise Print Manager Configuration utility.
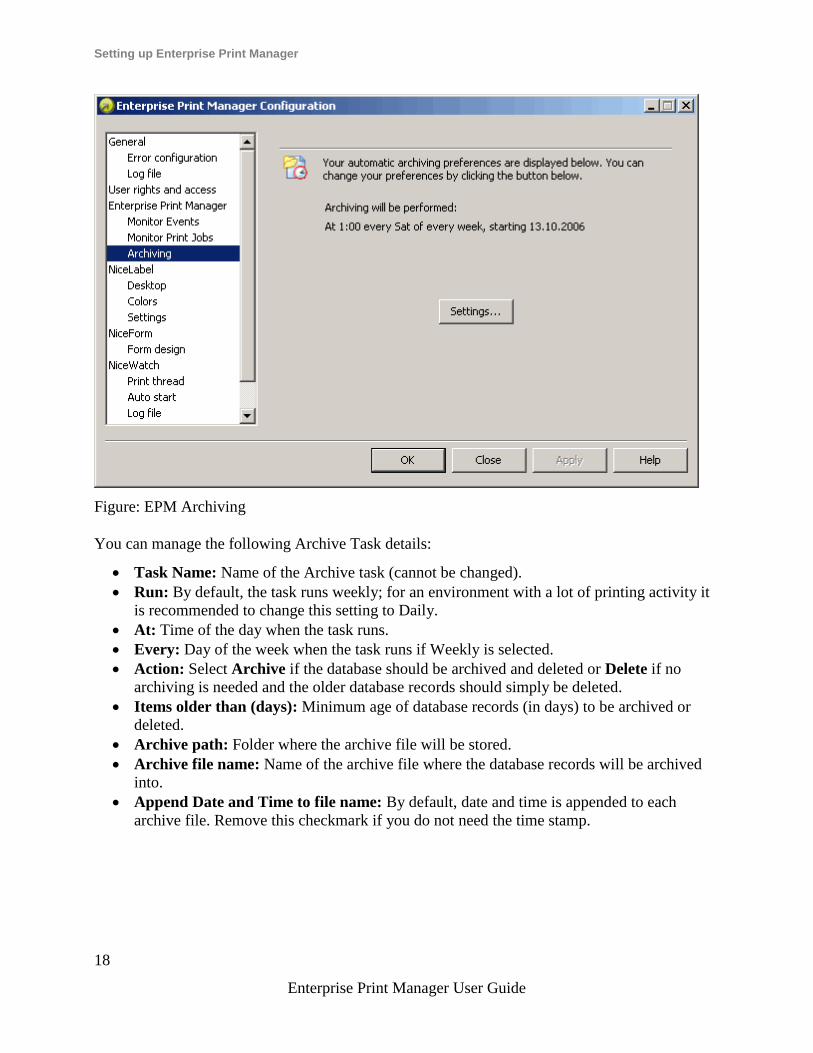
2. Select the Archiving page in the Enterprise Print Manager group of settings.
The default archiving time is displayed. Click Settings to view or change the Archive Task
details.
Page 18
Setting up Enterprise Print Manager
18
Enterprise Print Manager User Guide
Figure: EPM Archiving
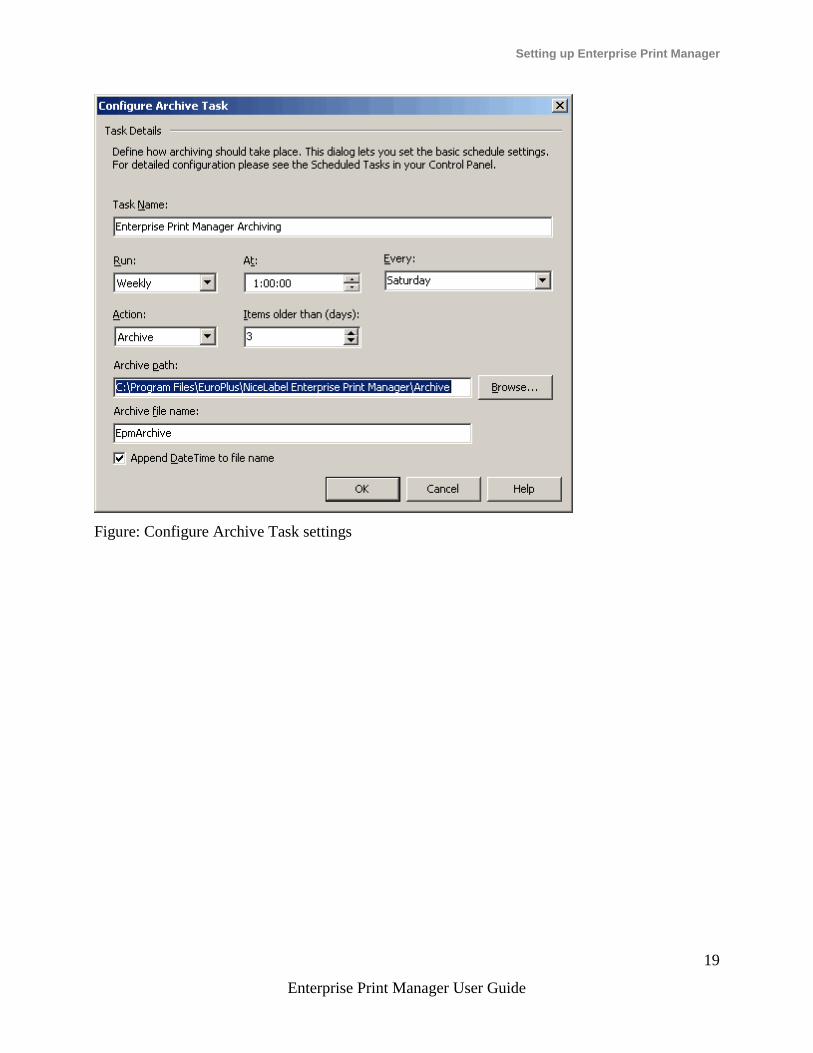
You can manage the following Archive Task details:
Task Name: Name of the Archive task (cannot be changed).
Run: By default, the task runs weekly; for an environment with a lot of printing activity it
is recommended to change this setting to Daily.
At: Time of the day when the task runs.
Every: Day of the week when the task runs if Weekly is selected.
Action: Select Archive if the database should be archived and deleted or Delete if no
archiving is needed and the older database records should simply be deleted.
Items older than (days): Minimum age of database records (in days) to be archived or
deleted.
Archive path: Folder where the archive file will be stored.
Archive file name: Name of the archive file where the database records will be archived
into.
Append Date and Time to file name: By default, date and time is appended to each
archive file. Remove this checkmark if you do not need the time stamp.
Page 19
Setting up Enterprise Print Manager
19
Enterprise Print Manager User Guide
Figure: Configure Archive Task settings
Page 20
Using EPM
20
Enterprise Print Manager User Guide
Using EPM
General
Enterprise Print Manager User Interface
The NiceLabel Enterprise Print Manager (EPM) application is designed as a web page, to
capitalize on the benefits of remote and centralized access offered by such application design. To
access the functions of EPM, click Start, All Programs, NiceLabel Enterprise Print Manager,
EPM Home Page on the EPM server.
You can also start Internet Explorer and point to the address of the server where NiceLabel
EPMis installed, for example: http://server/epm
where server is the name of the server that hosts the EPM.
The default screen of the Enterprise Print Manager is shown in a web browser window with tabs
for the functional areas Overview, Print Management, Storage Server, EPM Printing,
History, Reports and Administration. You can open an individual section of the application by
clicking on the corresponding tab. For example, if you want to see all printing-related events that
occurred in your environment, click the History tab.
Note: The visibility of tabs depends on the edition of NiceLabel Enterprise Series that you install.
For example, if a NiceWatch Enterprise is installed on the same network and licensed through
NiceLabel Enterprise Print Manager, an additional tab titled NW Enterprise is shown in the
NiceLabel EPM screen. You can use this interface to view triggers, events and preferences on the
NiceWatch Server.
Welcome Page
NiceLabel Enterprise Print Manager welcomes the user with a Welcome Page. This page offers
the user the most basic division of the EPM sections, catered to both first-time and basic users, as
well as advanced system administrators. The large buttons on the page lead the user into the
corresponding sections of the broad Enterprise Print manager system.
Choose the section that you most wish to visit, and click on the corresponding image. All EPM
functionalities will be available to you once you make this choice, you will only be directed to
the section that you have chosen.
System Overview
When you start the NiceLabel Enterprise Print Manager from the Start menu, the EPM Home
page opens. The EPM page shows a summary of the current system status including the
following information:
Page 21
Using EPM
21
Enterprise Print Manager User Guide
Demo mode: until you add the Enterprise product licenses, the EPM will work in Demo
Mode. When the licenses have been added, this information is not shown any more.
Current operational workstations: shows all NiceLabel workstations that are currently
connected to the EPM. Every workstation's license type is visible, as well as the most
recent errors detected. If you wish to see detailed information for any of the indications on
the Overview page, click on the Magnifier icon in front of the shown information.
Note: The Recently Printed column displays the number of print jobs submitted from each
workstation within the last hour.
License status: the type of Enterprise license is shown here, together with the total and
available number of licenses.
Note: NiceLabel workstations are using a NiceLabel Print Center client license only when
they are started and connected to the EPM. When they are stopped, the license is returned
back to the “license pool” and can be used by another workstation.
Quick links: you can click the quicklinks on the left side of the screen to quickly view
commonly used sub pages and manage the items in Document Storage, Print Queues, view
Printing, Event, Error and Alert history, Configure alerts, and manage Triggers, Events and
Preferences on the NiceWatch Server.
Recent errors: shows all errors that happened in the last twenty-four hour period.
The version of the currently installed NiceLabel Print Center product is shown in the
bottom right part of the window.
Figure: EPM System Overview
Note: If the NiceLabel client and NiceWatch Server products are running on the same computer,
this computer is listed twice in the section Current operational workstations (one line with
NiceLabel Print Center and another with NiceWatch Enterprise license).
Page 22
Using EPM
22
Enterprise Print Manager User Guide
Centralized Printing Control
History
EPM offers a detailed history log of all events in the printing system and a flexible sorting and
filtering system, which assists you in finding the events that you're interested in. The events can
either be displayed on a single list or split into the following categories:
Printing (all events directly related to print jobs)
Errors (printing errors)
Alerts (issued alerts)
Printing History
The Printing History page displays the list of past printing events. Each event includes
information regarding the source application of the print job, the workstation and user that
initiated it, which printer it was executed on, when the event took place, as well as the status of
the action.
The Printing History offers a comprehensive log of all printing activities performed in the past.
The powerful filter enables you to either choose from a preset selection of past timeframes to
choose from, or an advanced filter where you can accurately pinpoint the printing jobs you're
interested on the basis of their information.
The Reprint function is also available on this page, allowing you to reprint all jobs or a limited
selection of jobs from a past printing event. The reprint will be possible on printers, which are
visible to the workstation where the label file is located, or if the file is located on the Document
Storage Server, to printers visible to the EPM.
Note: When using the reprint functionality with remotely stored labels, the label path should be
entered in the UNC form (\\hostname\directorypath\resource) rather than a windows syntax with
a mapped drive to avoid conflicts when the user is logged on under a different windows account
from the one that performed the original print.
Clicking on one of the entries displays the information regarding the printing job:
See "Print Job Statuses" on page 26 (print job status)
Filename (label filename)
Solution name
Requested Quantity
Begin Print Time
End Print Time
Workstation
Printer
NiceLabel User
Page 23
Using EPM
23
Enterprise Print Manager User Guide
System User
Furthermore, the Label Jobs section below lists the variables for the printed labels, where
applicable, and the values of the variables that were used in the print job.
Error History
The Error History section provides an overview of logged printing errors in the system. Each
error is displayed with the information describing the type of error, the module that returned the
error, the workstation and user that submitted the job which returned the error, and the time of
occurrence.
Clicking on one of the entries displays the information regarding the error:
Status
Completed Module
Created
Workstation
NiceLabel User
System User
Info (basic error information)
Details (detailed error information)
In addition, the operation specific information is displayed:
Id (unique error Id)
Module
Severity
Type
Group
Info
Details
Alert History
All printing activities in NiceLabel applications are reported as events. Certain event types are
more important than others, for example errors. To be able to react quickly, it is important to be
notified as soon as errors happen. You can enable the NiceLabel Enterprise Print Manager to
issue alerts with different notification options. Alerts are created based on module, error type or
severity. Based on error importance or communication capabilities of the environment, alert
action can be an SMTP email, Net Send message, RSS 2.0 Feed, or an SMS message.
The Alert History section provides a list of issued alerts in the printing system. All alerts are
displayed, and the information available depends on the type of alert that was issued.
Page 24
Using EPM
24
Enterprise Print Manager User Guide
Clicking on an alert displays more detailed information about the alert's status, as well as a link to
the event that triggered the alert.
For more information about creating and configuring alerts, see See "Alert Configuration" on
page 37.
Activity Details
The activity details page displays more information about the selected activity. The label jobs are
listed below, and the jobs can be run or ever reprinted.
To reprint the job to another printer, do the following:
Click Label Print
Select Reprint on the right
Select the range to be reprinted and the printer to use for the reprint, and confirm your
settings.
Managing Printers
Printers on a workstation can be accessed through the Print Management tab. Expand a
workstation by clicking on the Plus symbol to the left of the workstation name, and the locally
connected printers of the workstation will be displayed.
The list of printers connected to the workstation also features a list of commands. The possible
commands are Pause, Resume, and Delete All Documents, and they are used to control or
remove outstanding print jobs for the selected printer.
The status messages display the status of printers, connected to the workstation. If any printer is
displaying an error status, the name of the printer appears in a bright red color.
Important: This table displays the momentary status of the print queues showing currently
processed print jobs. If you would like to see a list of print jobs that have been executed in the
past, see the History topic.
The following columns are shown:
Print Jobs: number of outstanding print jobs in the selected queue is shown here.
Paused: print queues can be paused to temporarily stop the printing and resumed to
continue the print process. If the printer is paused, a checkmark is shown in this column.
Offline: if printer has been switched off, this is signalled with the checkmark in this
column.
Native Driver: a checkmark in this column means that the printer is using a NiceDriver, a
driver written specifically for this model of thermal printer.
Network: typically, printers are attached locally to the parallel, serial or USB port on the
workstation. If a network shared printer is used by the workstation, it is marked with a
checkmark in this column.
Shared: if your local printer has been shared for concurrent use by other workstations, this
fact is represented with a checkmark in this column.
Page 25
Using EPM
25
Enterprise Print Manager User Guide
Status: a print queue status is displayed here. For list of possible statuses and their
explanation, see the Viewing Printer StatusSee "Viewing Printer Status" on page 30 topic.
Clicking on the Plus icon of an individual printer in this display opens a further table, which lists
the print jobs for the current printer. These can be paused, resumed, deleted, or moved up or
down in the priority list.
Note: Some network-attached printing devices can be managed through a web-based utility. If a
particular print queue is shown with the grey-coloured text, it represents a link to such a utility. If
you click on this link, a new browser window will open showing the printer's management web
page.
Managing Print Queues
To manage jobs waiting in a particular print queue within Print Management, click the Plus
icon next to the printer name. A list of all print jobs in the selected queue is shown in the bottom
under the printer name. Each print job condition is described in several columns of a table.
Columns have the following meaning:
Name: this is the file name of the label, designed and printed with the labelling application.
Owner: This is the user, who submitted the print job
Pages: number of pages sent to the printing device.
Quantity: number of times the selected label will be printed.
Paused: if the printing procedure has been paused, the checkmark will be shown here until
the job has been resumed.
Printing: print job is currently being printed on the printing device.
Submitted: date and time when the print job has been submitted.
Priority: jobs with high priority are printed before other jobs with normal or low priority.
To manage a particular print job, place a checkmark in front of the job. You can execute the
following actions on the selected job:
Pause and resume the job.
Delete the job.
Move print job to another printer in case the original printer is overloaded or stopped.
Move the job higher or lower in the priority list
Important: For this functionality, logging to Local MS Access database feature must be enabled
in the NiceLabel Configuration of the workstation, where the print job was issued.
Managing Workstations
The Print Management tab displays a list of workstations accessible by the EPM. The basic
workstation information displayed in the table includes currently queued print jobs, date and time
of the last printed job, and the status of the workstation's locally connected printers.
Note: If one of several locally connected printers is reporting an error, the workstation's status
will display a warning icon. Only if none of the locally connected printers are reporting any status
Page 26
Using EPM
26
Enterprise Print Manager User Guide
errors, the workstation's status will be marked with a green indicator. A yellow alert indicator is
displayed if insufficient information is provided and a final status cannot be declared.
Click on the Plus symbol before the workstation for which you wish to manage print queues. All
printers connected to the selected workstation are displayed in a subordinate table.
This section lists all locally connected printers, but does not list shared printers. The maximum
number of printers displayed at once is 5, and if the number of locally connected printers on the
workstation exceeds 5, the bottom of the printer list features a page selector, where you can
choose to display the sixth and consequent printers.
Expanding the view of a printer by clicking on the Plus symbol to the left of it displays the
current print queues for that printer.
Printer Errors
Printers with errors can be displayed separately for both the See "Managing Print Queues" on
page 25 and See "Printer Groups" on page 26 sections. Click the Print Management tab and
then Print Queues With Errors or Printer Groups With Errors.
The Print Queues With Errors page displays all workstations where one of the locally
connected printers is reporting an error in its print queues.
The Printer Groups With Errors page displays all printer groups, which contain a printer that is
reporting an error in its print queues.
Printer Groups
The Printer Groups section of Print Management offers insight into printer groups and statuses
of the printers they contain. The printer group is a user-created organizational concept, which
offers an abstract layer of insight into the status of the printer fleet. Printer groups can be created
at will, and all printers accessible by the EPM can be added to them, regardless of the
workstations they're locally connected to.
To create or edit printer groups, open the Administration tab. Click on the See "Configure
Printer Groups" on page 37 subsection, and a list of current printer groups will open. If no group
entries are displayed in the list, there are no created printer groups and you should create a new
one.
Print Job Statuses
The possible print job statuses are:
StartSpooling: print job has started to be sent to the printing device.
Spooling: print job is being sent to the spooler.
PartiallySpooled: part of the print job has been sent to the printing device; rest of the job is
still being processed.
Page 27
Using EPM
27
Enterprise Print Manager User Guide
Spooled: print job has been sent to the printing device without errors.
SpoolFailed: while print job has been sent to the printing device, an error has occurred.
Deleting: job has been deleted from the spooler.
Deleted: spooling process has been interrupted because the print job has been manually
deleted from the print queue.
Error: error condition on the printer - typical reason could be head opened on the printing
device.
Error - Printing: The error condition is due to a port conflict
Paused: this print job has been paused. Printing: print job is currently being printed on the
printing device.
Printed: print job has been successfully send to the printing device.
Restarting: complete print job will be resent to the printing device.
Queued: print job is in the waiting line in the spooler and will be sent to the printing
device, when it has finished processing the previous job.
Moved: print job has been moved from one printing device to another. This is particularly
useful if a printing device fails during execution of a current job. You can continue printing
the rest of the labels on another suitable printing device.
Problemsolving
EPM provides an accurate status of your printing environment and proactive notification in case
of imminent problems. When problem notification is received, either from a predefined alert or
from a user, you can use the EPM interface for finding and solving possible problems.
This topic presents typical errors that you might encounter in your environment. Recommended
steps are given that you (or your printing administrator) could take to solve the errors.
Possible problems:
1. Error during printing: printing has been executed from labelling application (NiceLabel
Pro, NiceWatch, NiceForm, NicePrint, NiceWatch Server), but the label is not printed.
2. Error on printing device: out of labels, out of ribbon, head open, etc.
3. Printer status: paused, off-line, printer turned off, etc.
4. Network error: networking cable not connected, networking infrastructure error, etc.
5. User error: printing the wrong label or to the wrong printing device.
6. User action: user deletes the print job from the spooler or NicePrintQueue, etc.
Steps for problem resolution:
1. In case a user has reported a problem and alerts are in use, the EPM administrator should
first check the status of his alerts and alerts defined by other users (Alerts –> History).
2. If an alert has been received, the administrator should click the Error Event link. If no alert
has been received, the administrator should search for an Event of type Error (Events –>
Errors). Error Event Log will open. Useful help here can be filtering and sorting feature of
EPM.
3. In the Error Event Log, details about error, workstation, date and time are shown, together
with a link to that particular Event. In the Event Details window the administrator gets
Page 28
Using EPM
28
Enterprise Print Manager User Guide
information about the module from which the printing has been issued, label details and
possible links to other error events. Also, here is the Job Details link.
4. If there is no Error Event, (just an ordinary Event), the Job Details should be inspected
about the Print Job status and separate label statuses (if several labels have been printed
inside printing batch (for example if counter has been used).
5. If there was no Error Event, the printing device status should be inspected (Printing ->
Print Queues –> Workstation)
Resolution paths:
Steps 1. to 4. can be used to track down possible problems 1., 5. or 6.
Step 5. can be used to track down possible problems 2., 3. or 4.
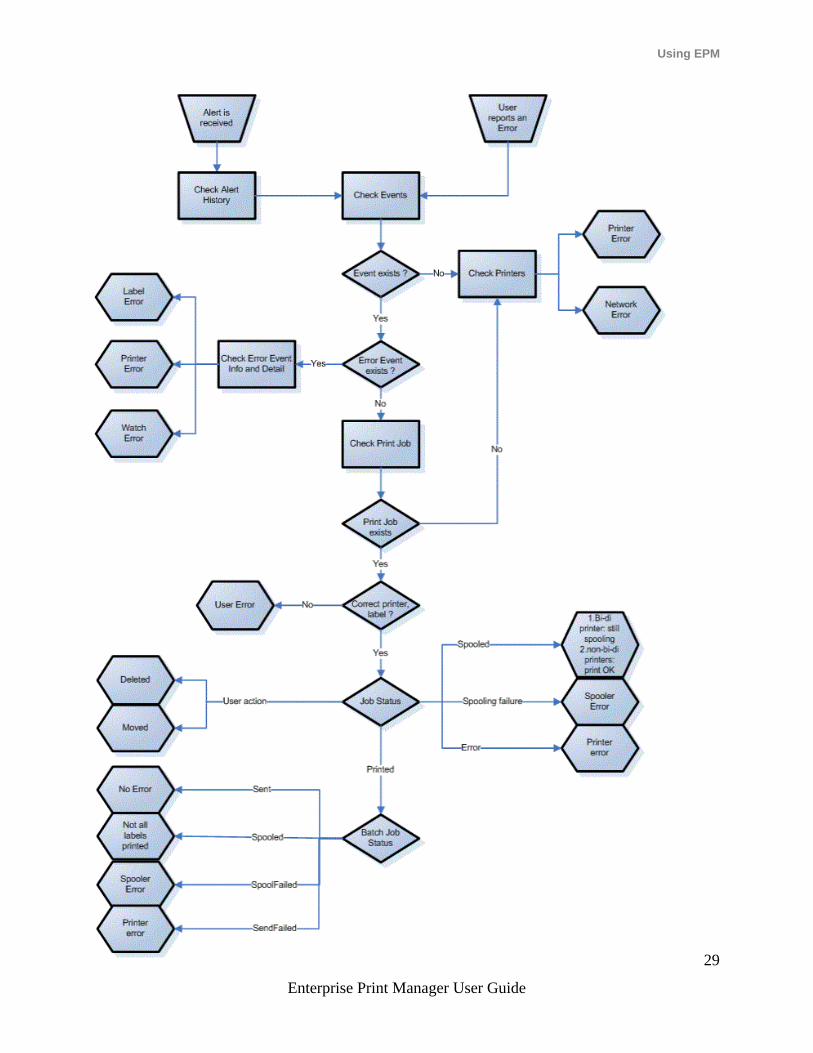
Problem resolution flowchart
To find out if your printing environment has an error and to pinpoint the reason, please follow the
problem resolution flowchart from top to bottom:
Page 29
Using EPM
29
Enterprise Print Manager User Guide
Page 30
Using EPM
30
Enterprise Print Manager User Guide
Figure: Problem resolution flowchart
Viewing Printer Status
You can diagnose the printing device status by observing the Status column while See "Managing
Printers" on page 24. Depending on the printer condition, this column might report any of the
following statuses:
Ready: printing device is prepared for printing.
Paused: printing device has been temporary paused. To continue printing, click the
Resume link.
Printing: the current print job is being printed.
Port conflict: when two or more bidirectional (bidir) printers are connected to the same
port, status checking option is disabled and Port conflict is shown. To avoid this status,
each bidir printer should be attached on its own port, or the bidir functionality should be
disabled in the printer driver.
Note: Two-directional communication means the printing device responds to the printer
driver reporting its status. Because various printer manufacturers use different
communication to the driver, such communication stream for one printing device type
might be misunderstood by another printing device type, so it could lead to unpredictable
conditions.
Error: error on the printer device. Typical reasons for the error status are print head open,
out of paper, out of ribbon, etc.
Not accessible: EPM could not reach the printer in order to retrieve a status report.
Printer error statuses are reflected on the parent printer group or workstation. If there is an error
on the printer, the whole printer group or workstation will be marked with the error. To view
printer groups or print queues, click the Printer Groups or Print Queues links. If you only wish
to display the groups or queues with errors, you can do so by selecting the Printer Groups with
Errors or Print Queues with Errors.
EPM Printing
Introduction to EPM Printing
Note: This functionality is available in NiceLabel Print Center edition.
NiceLabel Enterprise Print Manager includes a palette of powerful web printing features, which
are designed to fit the needs of both advanced and basic users. In order to satisfy both the highly
demanding user and ensure an appropriate simplicity of use for the beginner or occasional user,
Web Printing uses three direct and a Web Printing Wizard, which guides the user through all of
the required settings to complete a print job.
Page 31
Using EPM
31
Enterprise Print Manager User Guide
Note: All forms but the Web Printing Wizard can be adjusted to users with limited access.
Advanced options are available through the use of URL parameters, which allow the
administrator to limit a user's access to some of the parts in the wizard, or even preset some
settings for the user.
Web Printing Forms
There are three direct Web Printing forms available. They are fairly similar in appearance, and
their differences are primarily in the output they provide:
Print to Local Printer
Print to Server Printer
Create PDF file
The label and variable settings are largely the same for all 3 forms, requiring you to enter the
following information:
Label file name
Variable keyboard input (if required by the variables on the selected label)
Printing quantity
The Printer-based forms also require that you select the printer (local or remote) and/or the server
driver for the printer.
Web Printing Customization URL Parameters
The administrator can provide web request parameters, which enables him to provide users with
an URL link, including some or all of the settings for the web printing process. This is only
available for the Print to Local Printer, Print to Server Printer, and Create PDF File Web
Printing Forms.
URL parameter syntax
[Print Center
Server]/EPM/PrintCenter/EPMPrinting/Local.aspx?<parameter1>=<value1>
&<parameter2>=<value2>...
? separates the URL and parameters & separates parameters from each other = separates the parameter and it's value %20 indicates a space
Example:
http://myepmserver/EPM/PrintCenter/EPMPrinting/Local.aspx?FixedLo
calPrinter=CutePDF%20Writer&ShowFolders=true
Label Selection Parameters
Page 32
Using EPM
32
Enterprise Print Manager User Guide
LocationID: Oid of the folder, which is selected by default. The Oid can also be the label
Oid, which selects the folder containing the label.
LocationPath: path to the folder on the Storage Server, which is selected by default.
ShowFolders: specifies if the folder tree view is shown. By default this parameter is
“true”.
LabelID: Oid of the selected label. This or “LabelPath” parameter are required and must
be provided.
LabelPath: path to the label. This or “LabelID” parameter are required and must be
provided.
Local Printer Parameters
FixedServerPrinter: the server printer selection is fixed and cannot be changed by the
user. Instead of a drop-down control with available server printers, only ordinary text
declaring the selected printer is shown.
DefaultServerPrinter: the default selection of the server printer is done by this parameter.
The user can still change the selection of the server printer by choosing a different selection
in the drop-down control.
FixedLocalPrinter: the local printer, to which generated printer stream is sent, is fixed and
cannot be changed by the user. Instead of a drop-down control, only ordinary text listing
the selected local printer is shown.
DefaultLocalPrinter: the default selection of the local printer is provided by this
parameter. The user can still change the selection of local printer in the drop-down control.
Server Printer Parameters
FixedServerPrinter: the server printer selection is fixed and cannot be changed by the
user. Instead of a drop-down control with available server printers, only ordinary text
declaring the selected printer is shown.
DefaultServerPrinter: the default selection of the server printer is done by this parameter.
The user can still change the selection of the server printer by choosing a different selection
in the drop-down control.
EPM Printing Wizard
The EPM Printing Wizard includes 4 steps:
1. Select Printing Destination
2. Select Printer
3. Select Label
4. Print Label
All of these steps are accessible at any time during the course of the wizard. The menu on the left
side of the wizard allows the user to directly access any earlier or later steps and edit the settings
in those steps.
Page 33
Using EPM
33
Enterprise Print Manager User Guide
Select Printing Destination
1. Choose between printing to a Local Printer or printing to a Server Printer.
2. Click the green forward arrow in the bottom right of the form.
The print job is created either locally or in the server, and then sent out to the chosen printer.
Select Printer
1. Select the individual printer that you wish to print to.
2. Click the green forward arrow in the bottom right of the form.
Depending on your choice in the previous screen, you may see a limited set of choices, such as
no locally connected printers being displayed if you chose Server Printer in the previous screen.
Select Label
1. Browse to the Document Storage Server folder, which includes the label that you wish to
print.
2. Click on the folder and select the label in the list of thumbnails that is displayed or select
the label in the tree view, and click the green forward arrow in the bottom right of the form.
Print Label
1. Review the settings entered in previous steps
2. Enter any settings you may have missed on the previous wizard screens
3. Define the variable values for the label
4. Enter the quantity of the labels that you wish to print
5. Confirm the printing by clicking on the Print button.
Note: The Web Printing function in Enterprise Print Manager does not require any Nice software
to be installed on the computer accessing the manager. Web Printing tasks can be performed by
anyone who can access the Enterprise Print Manager website.
Reports
Reports
In a networked enterprise environment, cost management and work process planning are two of
the main leverages toward achieving an acceptable level of productivity and output, in order to
maximize return on investments. At the same time, process tracking and management is
exceedingly difficult in the traditionally fragmented label printing environments. Several printer
brands, individual near-obsolete and cutting-edge models proprietary and customized supporting
software...
Page 34
Using EPM
34
Enterprise Print Manager User Guide
All of these factors make centralized data collection a challenge, and even when this is achieved,
the data tends to be fragmented and impossible to present in a simple an intuitive shape.
Enterprise Print Manager offers elaborate reporting and graphical representation functions,
which allow you to diagnose issues in your printing infrastructure, track throughput in individual
parts of it, assess future needs for expansion or overstocked sections, and similar.
Printed Labels Report
The Printer Labels Report provides a graphical representation of the label printing activity for
individual segments of the system in a given time period.
Once the date range and primary grouping are selected, the page displays a bar graph
representation of printing activity for the selected primary grouping. It is possible to display the
comparative label printing totals for the following categories:
Printers
Workstations
Printer Groups
System Users
NiceLabel Users
Solution name
Errors Report
The Errors Report provides a graphical representation of the reported errors for individual
segments of the system in a given time period.
Once the date range and primary grouping are selected, the page displays a bar graph
representation of printing activity for the selected primary grouping. It is possible to display the
comparative error totals for the following categories:
Printers
Workstations
Printer Groups
System Users
NiceLabel Users
Solution name
Compare Workload Report
The Errors Report provides a graphical comparison of label printing workloads for individual
segments of the system in a given time period.
Once the date or date range is selected, the primary grouping should be set. Once the Compare
By grouping is selected, select the individual members of the group, and add them to the chart by
Page 35
Using EPM
35
Enterprise Print Manager User Guide
clicking on Add to Chart. This process can be repeated for as many individual segments as there
are in the system.
Note: It is not possible to compare members of different primary groupings.
It is possible to display the workloads for the following categories:
Printers
Workstations
Printer Groups
System Users
NiceLabel Users
Solution name
All Print Jobs Report
The All Print Jobs Report is a spreadsheet report of all print jobs logged by the EPM. It allows
the user to view all print jobs for a certain time period, and then limit the results to individual
groups.
The first selected group displays a dropdown category of data, and when a second group is
selected, it appears as subcategories inside the first group. It is possible to add more than two
groupings for the print jobs display.
This report is primarily intended to be used as exported data, and it offers the choice between
exporting the data to Excel or in CSV format.
All Errors Report
The All Errors Report is a spreadsheet report of all errors logged by the EPM. It allows the user
to view all errors for a certain time period, and then limit the results to individual groups.
The first selected group displays a dropdown category of data, and when a second group is
selected, it appears as subcategories inside the first group. It is possible to add more than two
groupings for the print jobs display.
This report is primarily intended to be used as exported data, and it offers the choice between
exporting the error data to Excel or in CSV format.
Storage Server
Document Storage
Enterprise Print Manager offers the Document Storage Server feature. The Document Storage
Server is a common file repository on the server, where users can store and retrieve label-related
files. While the basic functionality may resemble a shared location on a network, this storage is
Page 36
Using EPM
36
Enterprise Print Manager User Guide
on a web-based application, which means it is shared to a much broader public and accessible
from anywhere in the world. The label files stored in the Document Storage Server are also used
by the Enterprise Print Manager's Web Printing function.
NiceLabel clients that obtained the license from this EPM server can save and load files directly
from the Storage Server. For this purpose the document load/save dialog box in the client will
show link to the Storage Server in the Favorites. You can manually create a link to the Storage
Server using syntax: \\EPM_server_name@8080\DavWWWRoot. Because Storage Server is
based on WebDAV technology, you can expose it to the Internet users (re-configuration of the
company firewall is required), so any external NiceLabel user can use the files.
Storage folder structure
Groups of users working on the same labeling projects can create their own folder structure in the
Document Storage. Creating a New Project replicates the folder structure of Forms, Graphics,
and Labels inside the project folder. The files stored in these folders can be accessed by all users.
File types
The Document Storage Server supports all file extensions, not just NiceLabel-related file types.
Page 37
Administration
37
Enterprise Print Manager User Guide
Administration
Alert Configuration
Note: The feature is available in NiceLabel Print Center, NiceWatch Enterprise and NiceWatch
Enterprise Business Connector editions.
Alert configuration in EPM is done with the assistance of a Web wizard. The wizard guides you
through all of the essential settings in 4 steps, prompting the user to enter the needed settings for
each of the alert types.
The steps of the wizard are dynamic and change depending on the type of alert being created, as
each of the alert types requires a different set of information in order for it to be processed.
The 4 alert types are:
SMTP Mail: to receive an Email alert, you need to define the SMTP server and provide
the user name and password to connect to this server.
Net Send: In a domain environment, you need to enter the domain name, user name and
password in the additional settings. If the computer is not in a domain environment, you
need to enter credentials for a user account with appropriate rights for sending the Net Send
messages. Enter the name of the computer that should receive the message, and optionally,
the name of the computer from which the message is sent. User that was defined in the
additional setting should have privileges to send alerts from that computer.
RSS 2.0 Feed: this alert type is actually a link to the feed. Here you are creating a
“definition” for only those alerts that you (or another recipient) wish to see in the RSS feed
reader of your choice.
SMS (via Clickatell Gateway): SMS message is sent through Clickatell SMS Gateway
(http://www.clickatell.com). To send SMS alerts you need to open an account with them
and purchase a certain amount of credits. When you register with Clickatell, you get 10
credits for free.
Once the alert configuration is completed, the alert is saved and activated, and it monitors the
system for errors which it is set to report.
Once an error occurs, the alert sends a notification to the addressee, and the alert event is logged
in the History section. For more information on the event log, see See "History" on page 22.
Configure Printer Groups
Note: The feature is available in NiceLabel Print Center, NiceWatch Enterprise and NiceWatch
Enterprise Business Connector editions.
Page 38
Administration
38
Enterprise Print Manager User Guide
The printer group configuration section in the Administration section of the EPM allows the
user to create and modify printer groups.
To create a printer group:
Click Add Printer Group on the menu to the right of the list area
Enter the name of the printer group and a brief description of it
Click Add Printers under the group name in the list area
Choose the workstation to which the printer that you are adding is connected, select the
printer, and click on Add Printers
You can select several printers on multiple connected workstations, and then click on
Close.
The Printer group is not configured and ready to use. For more information on centralized
printing management and printer groups, see See "Printer Groups" on page 26.
Portal Clients
Note: This feature applies to NiceLabel Portal edition.
Before users can print their labels on the Web, the administrator must define them inside
EPM and assign the solution to them. All user management for Web printing users is handled in
this tab.
Adding users
To add new Web printing user click the Add new client, then define the properties.
Username: This is the user's name. It is not case-sensitive.
Windows user: If you select the user as Windows user, you do not have to enter the
password. In this usage scenario the user will not manually log into the Web Printing site
using login dialog box. Instead, he will log in some existing Web application that will later
send user credentials to Web Printing site. The login is handled by the existing application.
For more information about integration of Web Printing site into existing software, see the
NiceLabel Portal Installation Guide.
Password: EPM will allow you to enter simple password, but make sure to use password
of sufficient complexity, even more if you will open the Web Printing site on the Internet.
E-mail: The user's email. Not required information.
Solution: Browse for the solution file uploaded in the Storage Server in this EPM server.
You can define the user without specifying the solution name, but before the user can log
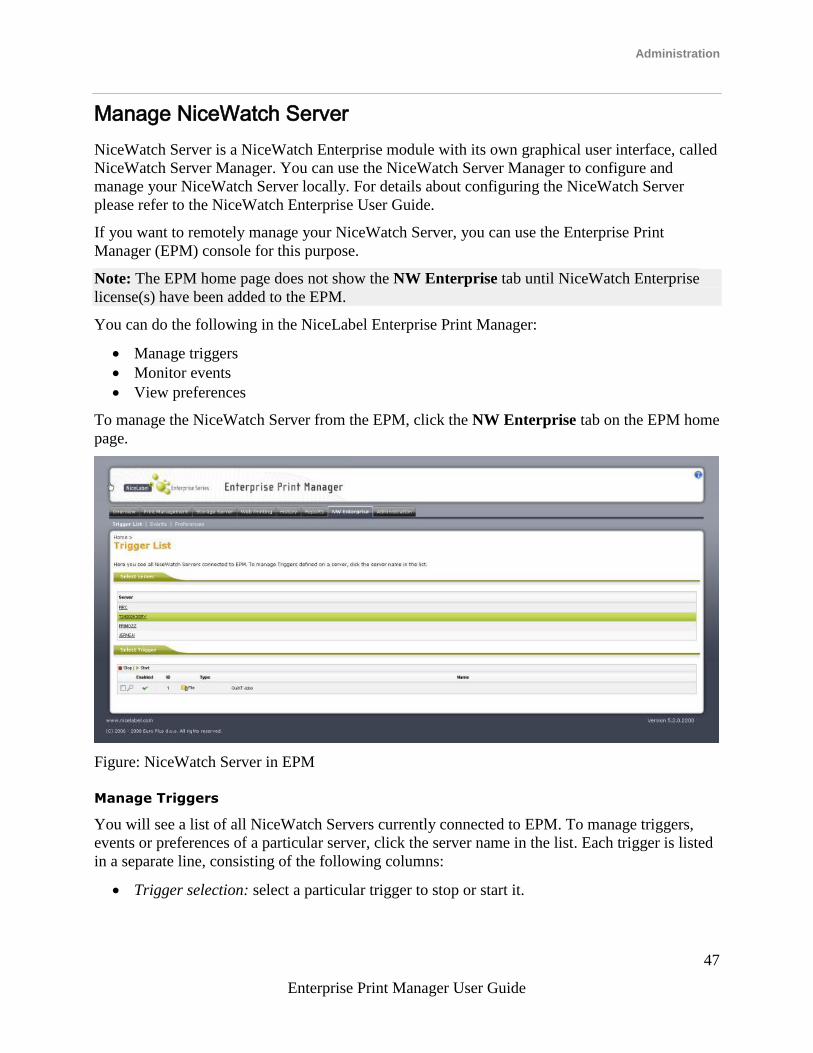
into the Web Printing site, the solution name must be defined. To create a solution file use
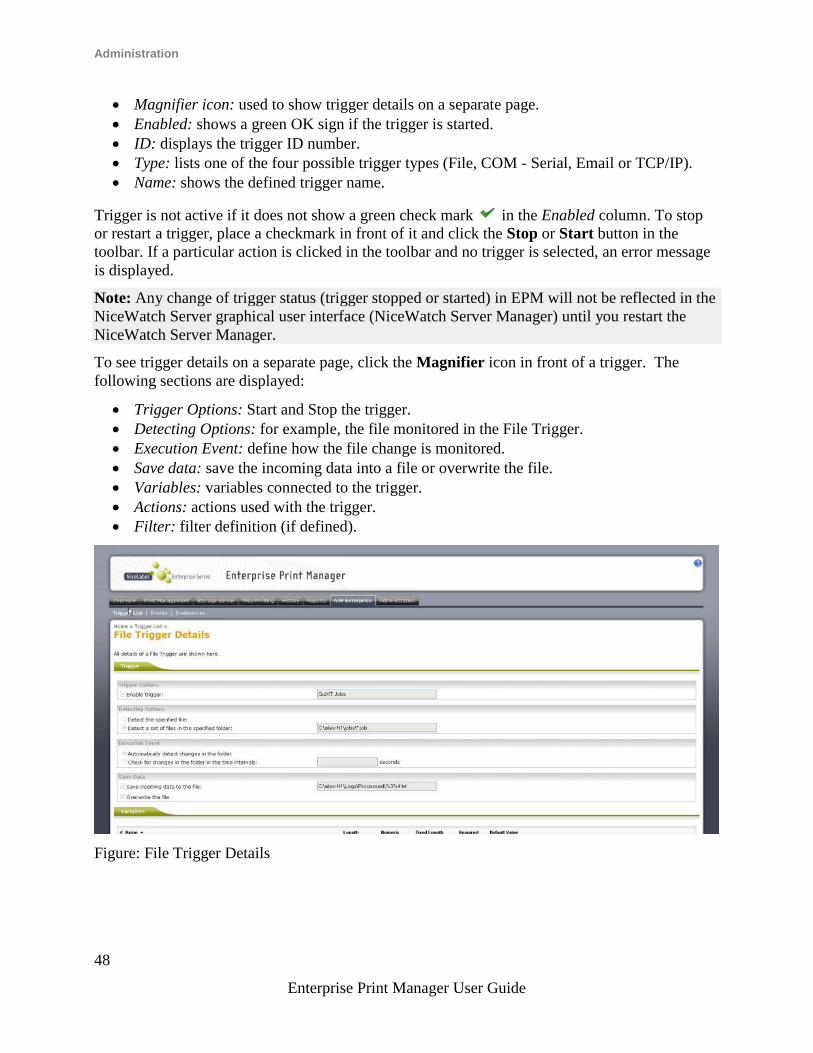
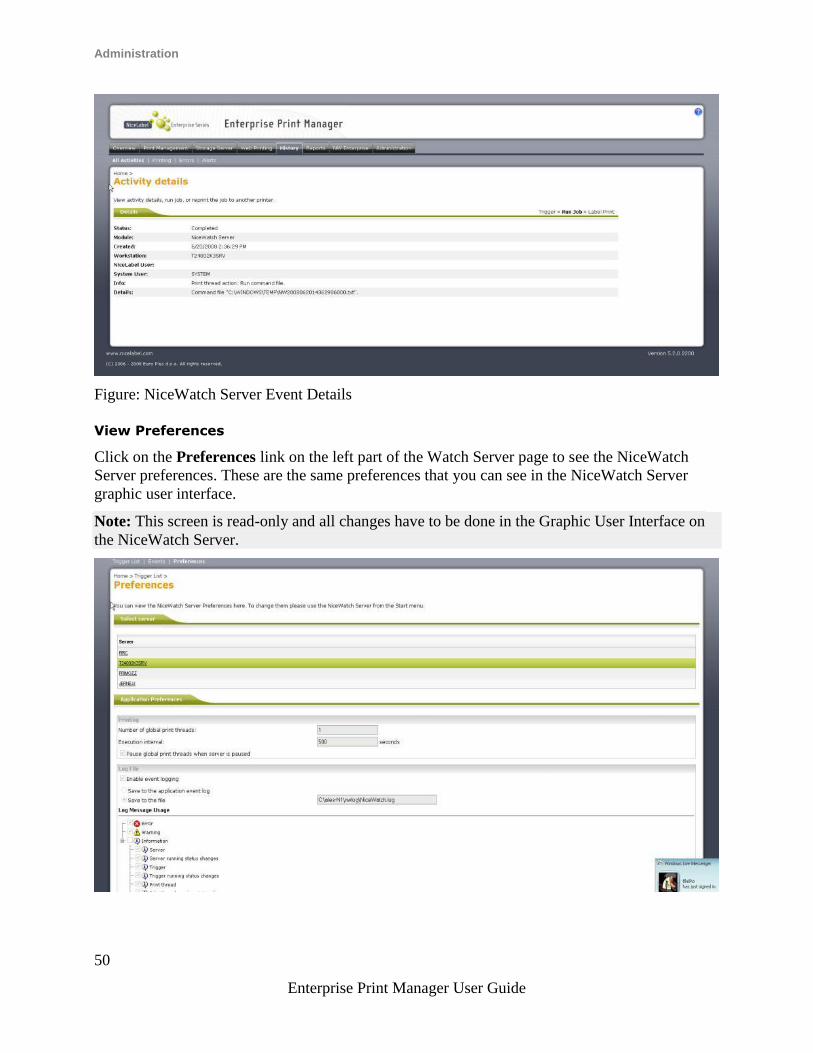
the application NiceLabel Solution Architect, see the NiceLabel Portal User's Guide.
Variables: When the user will log into the Web Printing Site and open his solution, you
can pre-define values of some variables in the form. For example, the same solution file
can be opened simultaneously by different users so they all have the same look and feel of
Page 39
Administration
39
Enterprise Print Manager User Guide
the printing application, while each user must have access to his data only. In this case, you
would define the same solution for each user and define starting value of the filter variable.
This variable is defined as a filter in the database table, displaying records that match the
defined criteria. Usually a criteria is a simple relation, such as field_name
= variable_value.
For example, to set variable filter to starting value 123, use the following syntax:
"my filter" = "123"
If variable name includes space, also include the variable name in double quotes:
Make sure to check for typo errors in the variable names and values. Also make sure to test
the application before you allow the user to log in. When the solution opens, there will be
no error message displayed, if you assign value to a non-existing variable.
Log printing activities: Enable this option to log all printing activities executed by the
Web printing users. The EPM will collect information coming from the printing
workstations, such as: name of the label, quantity of labels, printer name that printed labels,
values of all label variables, etc.
Active: Enable this option to activate the user and allow him to log in. Once the user is
active, he can log into the Web Printing site and run his solution. Once the user is active,
one license is taken from list of available Web printing licenses. The Web printing user can
log in from one workstation at a time. If the same user logs in on another workstation, the
first login is cancelled and session logged off.
Concurrent: This setting allows you to set the number of concurrent users using the single
account. Multiple licences will still be consumed, but the users will access the same Portal
solutions.
Global Variables
Note: This feature applies to NiceLabel Portal edition.
Global variables are shared between several Web printing users and solutions. Global variables
are defined outside the current solution and can be used between different solutions. The locking
mechanism takes care that each print request gets an unique value for the global variable.
Usually, global variables are used as unique counters. Each global variable has an unique internal
ID number, by which it is referenced in a solution.
Normally, the global variables will be published from the NiceLabel Solution Architect. You
don't have to create global variables manually. When you create the solution file, the NiceLabel
Solution Architect will analyze the selected label files and search for global variables. If found,
the Deploy step will provide an option to publish global variable to EPM server.
To create a new global variable manually (usually not needed), click Add new global variable.
To edit the existing global variable, click the pencil button. The variable properties will show:
Page 40
Administration
40
Enterprise Print Manager User Guide
ID: This is the internal ID number. If you create global variable manually, make sure it
matches the ID as defined in the configuration file of global variables on the design
workstation. See file GLOBALS.TDB in NiceLabel System folder.
Name: Variable name.
Description: Optional variable description.
Current value: This is the value the variable will use next time when needed. You can
change the default value, if needed.
Other options: definition of the variable properties
To delete the global variable, click the cross button. Removing global variable is irreversible
process. If you remove a global variable that is still in use in some solution, that solution will not
run anymore.
Manage Licensing
The Enterprise Print Manager (EPM) includes the functionality of a licensing server. You can
activate your NiceLabel Suite or NiceWatch Server computers by connecting them to the EPM.
After installation, EPM will operate in Demo mode. To be able to use it as a licensing server, you
have to add the appropriate NiceLabel Print Center, NiceWatch Enterprise, NiceWatch Enterprise
Business Connector, and NiceLabel Portal licenses into the EPM first.
Click the Administration tab to manage the NiceLabel licenses. Select the Licenses section.
Every activated product will be listed here. To see which NiceLabel clients are using a license
from the EPM, click the Plus icon in front of the product entry.
Use the Activate new product command on the right menu to activate additional products.
Activate New Products
Before you start the activation process, get familiar with the following terminology:
Key number: The sequence of 25 characters provided with the NiceLabel software.
Registration number: Unique number generated during the activation process. The
registration number validates the entered software key.
Activation code: Issued on the Activation web site. The activation code activates the
NiceLabel software on your computer.
To activate the Enterprise Print Manager server, do the following:
1. Open the EPM and click the Administration tab, then choose Licenses subsection. Select
the Activate new product link.
Page 41
Administration
41
Enterprise Print Manager User Guide
Figure: NiceLabel EPM Activation – Activate new product
2. On the Activation page, enter the required customer information and the Key Number that
was delivered in your product package.
Figure: NiceLabel EPM Activation - User Information
3. Click the Next button. The Product Activation page opens and the Registration number is
generated automatically. If the computer has an Internet connection, you can complete the
activation by clicking the Finish button.
Page 42
Administration
42
Enterprise Print Manager User Guide
If the computer where you started the activation procedure does not have Internet access, do the
following:
4. Write down the Key Number and the Registration Number.
5. Write down the Activation web page address.
Note: The activation web page address to activate the NiceLabel Print Center is
www.nicelabel.com/nlactivation_printcenter.html. The activation web page address for
the NiceWatch Enterprise is www.nicelabel.com/nlactivation_nwserver.html.
4. Go to a computer with Internet access and enter the Activation web page address
(http://www.nicelabel.com/nlactivation_printcenter.html) in Internet Explorer.
5. Enter the Key Number and the Registration Number. Enter other user information when
prompted.
6. Click on the ACTIVATE button to retrieve the Activation Code. Write it down.
Figure: NiceLabel Enterprise Activation web page
9. Go back to the computer where the EPM Product Activation page is still open.
10. Enter the Activation Code.
11. Click on the Finish button to complete the activation process.
Page 43
Administration
43
Enterprise Print Manager User Guide
Upgrade Licenses
Two types of license upgrade procedures are available in EPM. You can upgrade your existing
NiceLabel Enterprise product functionality or add additional client licenses to your existing
product.
To upgrade your existing NiceLabel Enterprise product functionality (for example, upgrade your
NiceWatch Enterprise to NiceWatch Enterprise Business Connector support), do the following:
1. In the Administration section, go to Licenses.
2. Select one of the products to upgrade.
3. Click the Upgrade link.
Figure: Upgrade license
4. Notice the Old Key Number and the Registration Number were already entered. Now enter
the Upgrade Key Number that was issued for your product upgrade.
5. If the computer has an Internet connection, you can complete the activation by clicking the
Automatic Activation button. Activation Code will be generated and your upgraded
product functionality will be activated.
If the computer where you started the upgrade procedure does not have Internet access, do the
following:
6. Write down the Old Key Number, Upgrade Key Number and the Registration Number.
7. Write down the Internet activation web address.
Note: The activation web page address to upgrade your existing NiceLabel product functionality
is www.nicelabel.com/nlactivation_upgrade.html.
6. Go to a computer with Internet access and enter the Activation web page address in the
Internet Explorer.
Page 44
Administration
44
Enterprise Print Manager User Guide
7. Enter the Old Key Number, Upgrade Key Number and the Registration Number. Enter
other user information when prompted.
8. Click on the ACTIVATE button to retrieve the Activation Code. Write it down.
Figure: NiceLabel Enterprise License Pack Activation web page
11. Go back to the computer where the EPM Upgrade License page is still open.
12. Enter the Activation Code.
13. Click on the Upgrade button to complete the activation process.
Adding Licences
To add licenses to your existing product (for example, add a License Pack with 10 additional
client licenses to your NiceLabel Print Center), do the following:
1. In the Administration section, go to Licenses.
2. Select one of the products to upgrade.
3. Click the Upgrade link and then select the Add licenses radio button.
Notice the Key Number and the Registration Number were already entered. Now enter
the License Pack Key Number that was issued for your License Pack.
Page 45
Administration
45
Enterprise Print Manager User Guide
If the computer has an Internet connection, you can complete the activation by clicking
the Automatic Activation button. Activation Code will be generated and your License Pack will
be activated.
If the computer where you started the upgrade procedure does not have Internet access, do the
following:
4. Write down the Key Number, License Pack Key Number and the Registration Number.
5. Write down the Activation web page address.
Note: The Activation web page address to add licenses to your existing product is
www.nicelabel.com/nlactivation_lp.html.
6. Go to a computer with Internet access and enter the Activation web page address in the
Internet Explorer.
7. Enter the Key Number, License Pack Key Number and the Registration Number. Enter
other user information when prompted.
8. Click on the ACTIVATE button to retrieve the Activation Code. Write it down.
Figure: NiceLabel Enterprise License Pack Activation web page
11. Go back to the computer where the EPM Upgrade License page is still open.
12. Enter the Activation Code.
Page 46
Administration
46
Enterprise Print Manager User Guide
13. Click on the Upgrade button to complete the activation process.
License Modes
NiceLabel licenses are stored centrally on the Enterprise Print Manager (EPM) server. The
License Manager module is monitoring the licenses in connection with EPM. When the
connection to EPM is available, the NiceLabel application operates in On-line Mode.
If the EPM is not available or not accessible, you can use the License Manager to enable the Off-
line Mode for clients. This mode is useful in environments where mobile label printing is
required or in events where server system failure would otherwise stop the label production.
To manage license modes, open the NiceLabel Suite or NiceWatch Server application. In the
menu bar, go to Help, Manage License, Open License Manager.
Figure: License Manager
Force Off-line Mode: If this setting is selected, the License Manager will not check for the
presence of the EPM and the application will automatically start in the off-line mode. When the
license lease expires, the application will stop running and you must renew the license by
switching off this option and re-connecting to the EPM. The off-line license expires after 15 days.
Note: For more information about License Manager please refer to NiceLabel Suite or
NiceWatch Enterprise User Guide.
Page 47
Administration
47
Enterprise Print Manager User Guide
Manage NiceWatch Server
NiceWatch Server is a NiceWatch Enterprise module with its own graphical user interface, called
NiceWatch Server Manager. You can use the NiceWatch Server Manager to configure and
manage your NiceWatch Server locally. For details about configuring the NiceWatch Server
please refer to the NiceWatch Enterprise User Guide.
If you want to remotely manage your NiceWatch Server, you can use the Enterprise Print
Manager (EPM) console for this purpose.
Note: The EPM home page does not show the NW Enterprise tab until NiceWatch Enterprise
license(s) have been added to the EPM.
You can do the following in the NiceLabel Enterprise Print Manager:
Manage triggers
Monitor events
View preferences
To manage the NiceWatch Server from the EPM, click the NW Enterprise tab on the EPM home
page.
Figure: NiceWatch Server in EPM
Manage Triggers
You will see a list of all NiceWatch Servers currently connected to EPM. To manage triggers,
events or preferences of a particular server, click the server name in the list. Each trigger is listed
in a separate line, consisting of the following columns:
Trigger selection: select a particular trigger to stop or start it.
Page 48
Administration
48
Enterprise Print Manager User Guide
Magnifier icon: used to show trigger details on a separate page.
Enabled: shows a green OK sign if the trigger is started.
ID: displays the trigger ID number.
Type: lists one of the four possible trigger types (File, COM - Serial, Email or TCP/IP).
Name: shows the defined trigger name.
Trigger is not active if it does not show a green check mark in the Enabled column. To stop
or restart a trigger, place a checkmark in front of it and click the Stop or Start button in the
toolbar. If a particular action is clicked in the toolbar and no trigger is selected, an error message
is displayed.
Note: Any change of trigger status (trigger stopped or started) in EPM will not be reflected in the
NiceWatch Server graphical user interface (NiceWatch Server Manager) until you restart the
NiceWatch Server Manager.
To see trigger details on a separate page, click the Magnifier icon in front of a trigger. The
following sections are displayed:
Trigger Options: Start and Stop the trigger.
Detecting Options: for example, the file monitored in the File Trigger.
Execution Event: define how the file change is monitored.
Save data: save the incoming data into a file or overwrite the file.
Variables: variables connected to the trigger.
Actions: actions used with the trigger.
Filter: filter definition (if defined).
Figure: File Trigger Details
Page 49
Administration
49
Enterprise Print Manager User Guide
Monitor NiceWatch Server Events
Click on the Events link on the left part of the EPM screen to see the NiceWatch Server events.
Those are the same events as displayed in the main events view (Events tab on top of the page).
The only difference is the events here are filtered through the workstation and through the
NiceWatch Server module.
Figure: NiceWatch Server Events
View Event Details
If you want to see details of a particular NiceWatch Server event, click the Magnifier icon in
front of that event. A new page displays the following event details:
Type: event type.
Module: module that issued this event.
Status: event status.
Created: date and time when the event was created.
Event Group: for example database errors, printer errors.
Event Severity: success, information, warning, error or question.
Info: information about the reason for this event, for example the trigger or the label file,
which was printed.
Details: other possible details.
Error Id.
Nice user: if Nicelabel authentication is enabled, the NiceLabel user working with the
application at the time of event.
System user: logged on Windows user.
In the lower part of the Event Details page, Event History heading shows the parent event(s) of
your current event. You can diagnose possible error reasons by observing the chain of events. If
you click on any event in the chain, you can see its details.
Page 50
Administration
50
Enterprise Print Manager User Guide
Figure: NiceWatch Server Event Details
View Preferences
Click on the Preferences link on the left part of the Watch Server page to see the NiceWatch
Server preferences. These are the same preferences that you can see in the NiceWatch Server
graphic user interface.
Note: This screen is read-only and all changes have to be done in the Graphic User Interface on
the NiceWatch Server.
Page 51
Administration
51
Enterprise Print Manager User Guide
Figure: NiceWatch Server Preferences
Note: For more information on NiceWatch Enterprise and triggers in particular please refer to the
NiceWatch Enterprise User Guide on the NiceLabel Enterprise Series CD or on the NiceLabel
homepage at www.nicelabel.com.
Page 52
Technical Support
52
Enterprise Print Manager User Guide
Technical Support
Online Support
You can find the latest builds, updates, workarounds for problems and Frequently Asked
Questions (FAQ) on the product web site at www.nicelabel.com. If you cannot solve the problem
on your own, please contact your local vendor or representative offices listed in the topic
Contact Information.
For more information please refer to:
Support FAQ: http://kb.nicelabel.com
NiceLabel FAQ: www.nicelabel.com/Learning-center/Sales-FAQ
NiceLabel Tutorials: www.nicelabel.com/Learning-center/Tutorials
NiceLabel Forums: forums.nicelabel.com
Contact Information
Head Office
Euro Plus d.o.o.
Ulica Lojzeta Hrovata 4c
SI-4000 Kranj
Slovenia
Tel: +386 4 280 50 00
Fax: +386 4 233 11 48
[email protected]
www.nicelabel.com
North American Office
Niceware International, LLC.
200 South Executive Drive, Suite 200
Brookfield, Wisconsin 53005
USA
Tel: (888) 894-NICE (6423)
Fax: (262) 784-2495
[email protected]
www.nicewareintl.com
Page 53
Technical Support
53
Enterprise Print Manager User Guide
German Office
NiceLabel Germany GMBH
Liebknechtstr. 29
63179 Obertshausen
Germany
Tel: +49 (0)6104 405 400
[email protected]
www.nicelabel.dehttp://www.nicewareintl.com/
China Office
GARDEN BUSINESS CENTER
Julu Rd. 889, Building 23
Office 8311
Shanghai 200040, PR China
Tel: +21-62490371
Fax: +21-62490372
[email protected]
www.nicelabel.cn