Viewing the Screen .................................................................. 20Top Screen Configuration ...............................................................................20
Checking the BT-350 Status ...........................................................................21
Synchronizing Data ................................................................. 24Types of Synchronization ................................................................................24
Editing User Information (Administrators Only) .................. 37Editing Information for Administrators .....................................................37
Setting Synchronization Folders (Administrators Only) ..... 40Start All for Multiple Devices .................................................. 41Troubleshooting ...................................................................... 42
Checking the Version of the BT-350 System Software .........................44
BT-350 USB Connection Settings .................................................................45
BT-350 USB Debugging Settings ..................................................................46
General Notes .......................................................................... 47Cautions ................................................................................................................47
Intellectual Property Rights ...........................................................................48
Contact List .............................................................................. 49
Symbols used in this guide
Indicates procedures which may result in damage or injury if sufficient care is not taken.
Indicates additional information and points which may be useful to know regarding a topic.
[ ]Indicates the icons, menu items, and BT-350 controller key names dis-played on the screen.
➡ Indicates a reference to related topics.
3
Epson Moverio Admin Functions
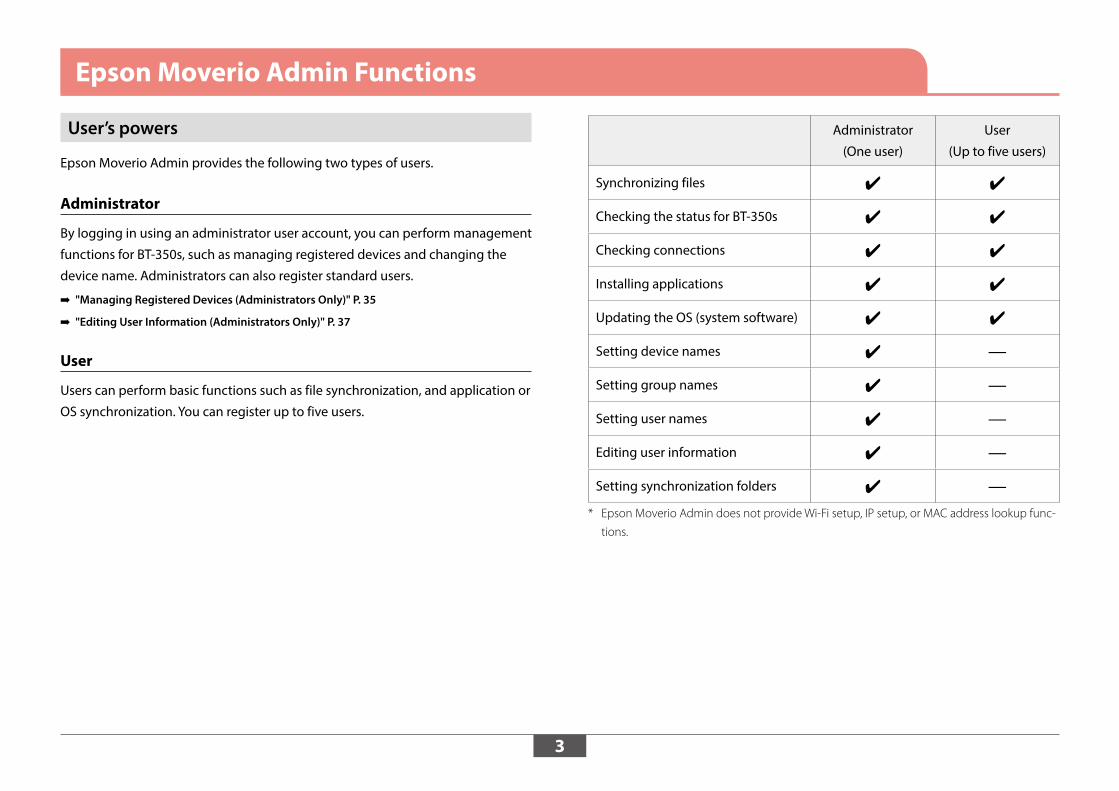
User’s powers
Epson Moverio Admin provides the following two types of users.
Administrator
By logging in using an administrator user account, you can perform management
functions for BT-350s, such as managing registered devices and changing the
device name. Administrators can also register standard users.
➡ "Managing Registered Devices (Administrators Only)" P. 35
➡ "Editing User Information (Administrators Only)" P. 37
User
Users can perform basic functions such as file synchronization, and application or
OS synchronization. You can register up to five users.
Administrator
(One user)
User
(Up to five users)
Synchronizing files ✔ ✔
Checking the status for BT-350s ✔ ✔
Checking connections ✔ ✔
Installing applications ✔ ✔
Updating the OS (system software) ✔ ✔
Setting device names ✔ —
Setting group names ✔ —
Setting user names ✔ —
Editing user information ✔ —
Setting synchronization folders ✔ —* Epson Moverio Admin does not provide Wi-Fi setup, IP setup, or MAC address lookup func-
tions.
4
Epson Moverio Admin Functions
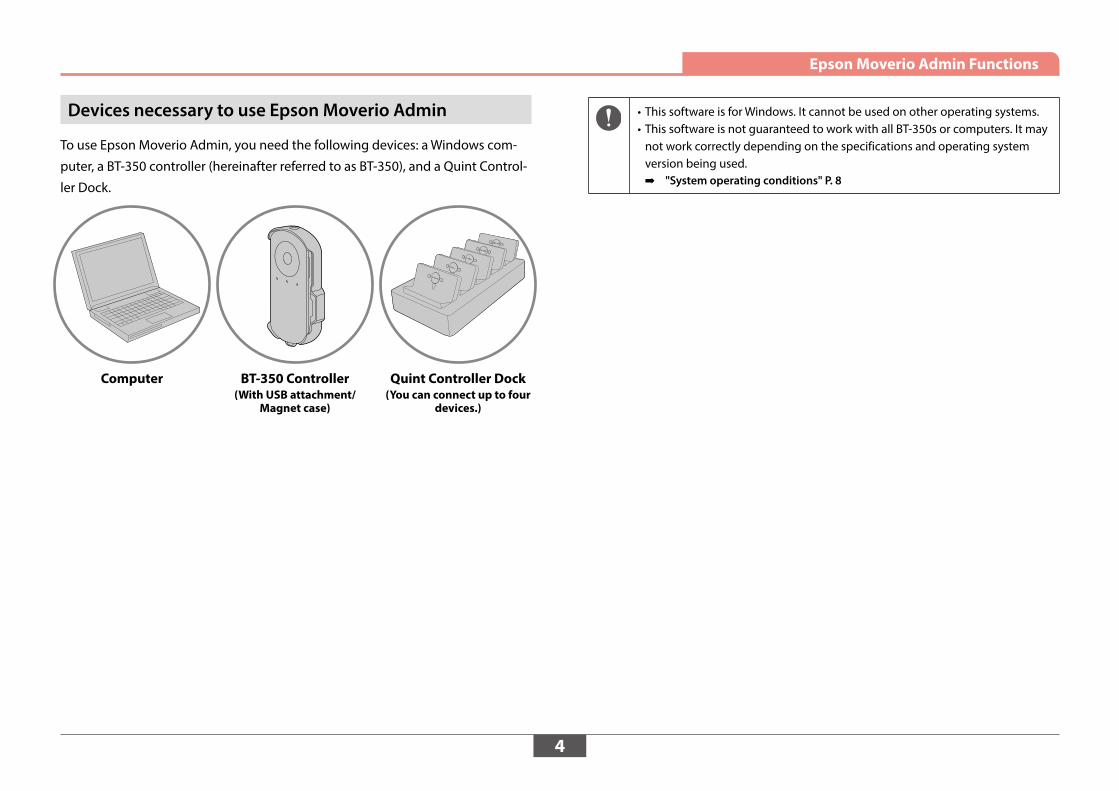
Devices necessary to use Epson Moverio Admin
To use Epson Moverio Admin, you need the following devices: a Windows com-
puter, a BT-350 controller (hereinafter referred to as BT-350), and a Quint Control-
ler Dock.
Computer BT-350 Controller(With USB attachment/
Magnet case)
Quint Controller Dock (You can connect up to four
devices.)
• This software is for Windows. It cannot be used on other operating systems.• This software is not guaranteed to work with all BT-350s or computers. It may
not work correctly depending on the specifications and operating system version being used.
➡ "System operating conditions" P. 8
5
Epson Moverio Admin Functions
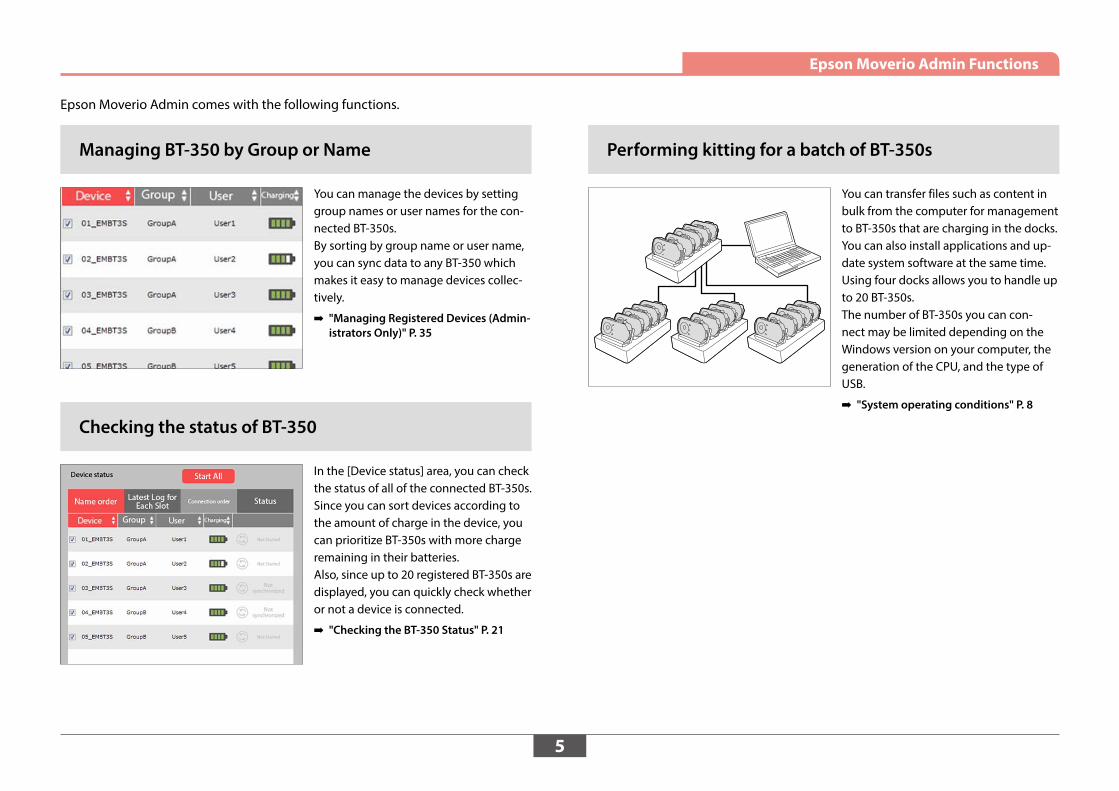
Managing BT-350 by Group or Name
You can manage the devices by setting group names or user names for the con-nected BT-350s.By sorting by group name or user name, you can sync data to any BT-350 which makes it easy to manage devices collec-tively.
➡ "Managing Registered Devices (Admin-istrators Only)" P. 35
Checking the status of BT-350
In the [Device status] area, you can check the status of all of the connected BT-350s.Since you can sort devices according to the amount of charge in the device, you can prioritize BT-350s with more charge remaining in their batteries.Also, since up to 20 registered BT-350s are displayed, you can quickly check whether or not a device is connected.
➡ "Checking the BT-350 Status" P. 21
Performing kitting for a batch of BT-350s
You can transfer files such as content in bulk from the computer for management to BT-350s that are charging in the docks. You can also install applications and up-date system software at the same time.Using four docks allows you to handle up to 20 BT-350s.The number of BT-350s you can con-nect may be limited depending on the Windows version on your computer, the generation of the CPU, and the type of USB.
➡ "System operating conditions" P. 8
Epson Moverio Admin comes with the following functions.
6
Software License Agreement
Seiko Epson Corporation (hereafter, “our company”) and the user of this software (hereafter, the customer) enter into the following license agreement for this software.
Article 1 (Rights of Use)The customer may only install and use this software on their own computer.
Article 2 (Prohibited actions such as Transferring or Lending the Software)1. The customer is prohibited from transferring (trading, donating, or exchanging) or loaning the right to use this software as conferred in Article 1 to a third party without prior written approval from our company.2. The customer is prohibited from renting this software, quasi-renting, or selling it second hand.
Article 3 (Period)1. This agreement is valid from the moment the customer begins using this software.2. The customer can terminate this agreement by relinquishing any software, manuals, and copies provided by our company, and by sending written proof of cessation of usage to our company.
Article 4 (Upgrading)1. Our company reserves the right to make changes to this software for the sake of improvement without providing prior notification to the customer.2. Our company will provide repair or free software version upgrades (hereafter, upgrades) for the sake of im-proving the software.3. Customers who receive upgrades lose the right to use this software and will be covered under the new agreement for the latest upgrade.
Article 5 (Disclaimer)1. Our company cannot accept any responsibility for damage caused through the use of this software.Make sure you backup any important files. Even if the customer uninstalls this software, immunity from respon-sibility is still applied. Furthermore, we do not guarantee the integrity, accuracy, certainty, or usefulness of the content of this software and this service.2. The customer assumes full responsibility and costs incurred for installing this software, as well as for using this service, and our company cannot guarantee the integrity, accuracy, and so on.3. According to the terms of use for this software, the customer uses this software under their own judgments and responsibility.4. There are times when customer information or customer related data may be lost due to device malfunc-tions, problems, blackouts, errors in the communication lines, and system faults due to acts of God. Our compa-ny cannot accept any responsibility for the disappearance, loss, or delay of customer information or customer related data caused by these situations.5. Our company cannot guarantee that transmitted files have not been infected by a computer virus. Our com-pany cannot accept any responsibility for loss or damage that occurs due to a transmitted file being infected by a computer virus.
Article 6 (Support period)1. One year after ending sales and distribution of this software, our company will end support for this software.2. When selling and distributing an upgraded version, sales and distribution for older versions of this software end unless they need to be continued for extenuating circumstances. One year after ending sales and distribu-tion of this software, support will also end for this software.
Article 7 (Prohibiting Changes and so on to this Software)Customers are prohibited from changing, adapting, reverse engineering, decompiling, disassembling or other-wise modifying the software for any reason.
Article 8 (Copyrights)Our company or the licensor owns all intellectual property rights, such as copyrights, related to this software. This software is protected under the Japanese Copyright Act and other related laws. The customer must treat this software as they would any other written works.
Article 9 (Others)The customer is prohibited from exporting this software or a copy of this software outside Japan by any means or purpose.
Article 10 (License Agreement)Our company reserves the right to change the content of this guide without prior notice to the customer.
Article 11 (Jurisdiction)For any disputes that occur in relation to this agreement, the customer and our company agree that the first hearing for legal determinations will be made by the courthouse having jurisdiction over the area in which the headquarters of our company resides.
7
Before Installing
Installing Epson Moverio Admin
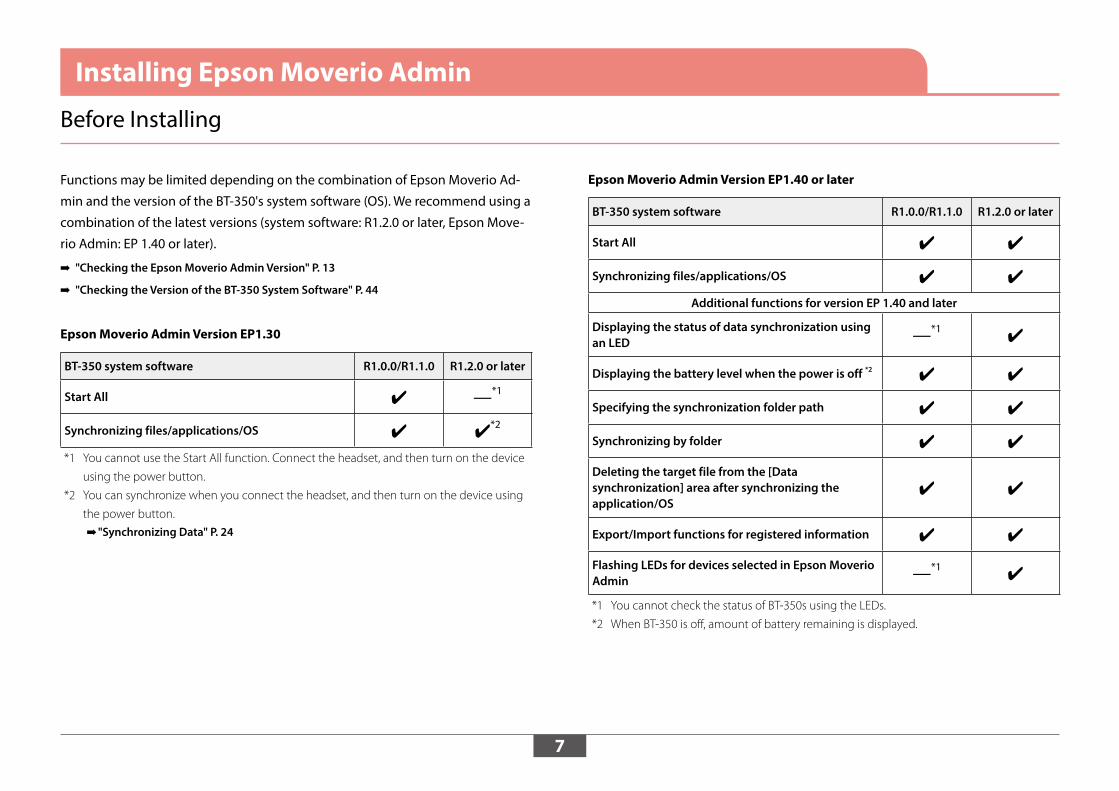
Functions may be limited depending on the combination of Epson Moverio Ad-
min and the version of the BT-350's system software (OS). We recommend using a
combination of the latest versions (system software: R1.2.0 or later, Epson Move-
rio Admin: EP 1.40 or later).
➡ "Checking the Epson Moverio Admin Version" P. 13
➡ "Checking the Version of the BT-350 System Software" P. 44
Epson Moverio Admin Version EP1.30
BT-350 system software R1.0.0/R1.1.0 R1.2.0 or later
Start All ✔ —*1
Synchronizing files/applications/OS ✔ ✔*2
*1 You cannot use the Start All function. Connect the headset, and then turn on the device
using the power button.
*2 You can synchronize when you connect the headset, and then turn on the device using
the power button.
➡ "Synchronizing Data" P. 24
Epson Moverio Admin Version EP1.40 or later
BT-350 system software R1.0.0/R1.1.0 R1.2.0 or later
Start All ✔ ✔
Synchronizing files/applications/OS ✔ ✔
Additional functions for version EP 1.40 and later
Displaying the status of data synchronization using an LED —*1
✔
Displaying the battery level when the power is off *2 ✔ ✔
Specifying the synchronization folder path ✔ ✔
Synchronizing by folder ✔ ✔
Deleting the target file from the [Data synchronization] area after synchronizing the application/OS
✔ ✔
Export/Import functions for registered information ✔ ✔
Flashing LEDs for devices selected in Epson Moverio Admin —*1
✔
*1 You cannot check the status of BT-350s using the LEDs.
*2 When BT-350 is off, amount of battery remaining is displayed.
8
Installing Epson Moverio Admin
Checking the Computers
System operating conditions
Epson Moverio Admin operates with computers that meet the following specifi-
cations.
OS Windows 7/8.1/10In Windows 7, there may be a limit to the number of USB devices that
can be recognized at one time.
CPU Intel Core i5 or fasterDepending on the CPU specifications, for models with a built-in fourth
generation Haswell, there may be a limit to the number of USB devices
that can be recognized at one time.
Memory 4 GB or more
Screen resolution
1280 x 768 dots or more
Free space on HDD
1GB or more
Connection interface
USB A connectorDepending on the number of USB devices connected to the computer,
there may be a limit to the number of USB devices that can be recog-
nized at one time.
Software required
.NET Framework 4SQL Server Compact 3.5 SP2(Installed automatically when the software is installed.)Make sure you install the necessary software to connect BT-350s to your
computer in advance.
➡ "Computer’s system environment" P. 9
• This software may not work correctly when the operating system for the com-puter is upgraded. Before upgrading your operating system, check the MOVERIO BT-350 techni-cal information Web site (https://tech.moverio.epson.com/en/bt-350/).
• The number of recognizable devices differs depending on whether BT-350s are on or off. The number of recognizable devices is lower when the power is on.
Checking the generation of your CPUYou can check the generation of your CPU from the system (processor) display on your computer's properties screen.See the table below to check the generation of your CPU using the text of your processor.<Example> Processor: Intel(R) Core(TM) i5-3337U CPU
Generation Code name Example text Identification method
First gener-ation
Nehalem Core i*-*** Three-digit number
Second generation
Sandy Bridge Core i*-2*** Four-digit number beginning with 2
Third gen-eration
Ivy Bridge Core i*-3*** Four-digit number beginning with 3
Fourth generation
Haswell, Haswell Refresh Core i*-4*** Four-digit number beginning with 4
Fifth gener-ation
Broadwell Core i*-5*** Four-digit number beginning with 5
Sixth gen-eration
Skylake Core i*-6*** Four-digit number beginning with 6
Seventh generation
Kaby Lake Core i*-7*** Four-digit number beginning with 7
Eighth gen-eration
Coffee Lake-s Core i*-8*** Four-digit number beginning with 8
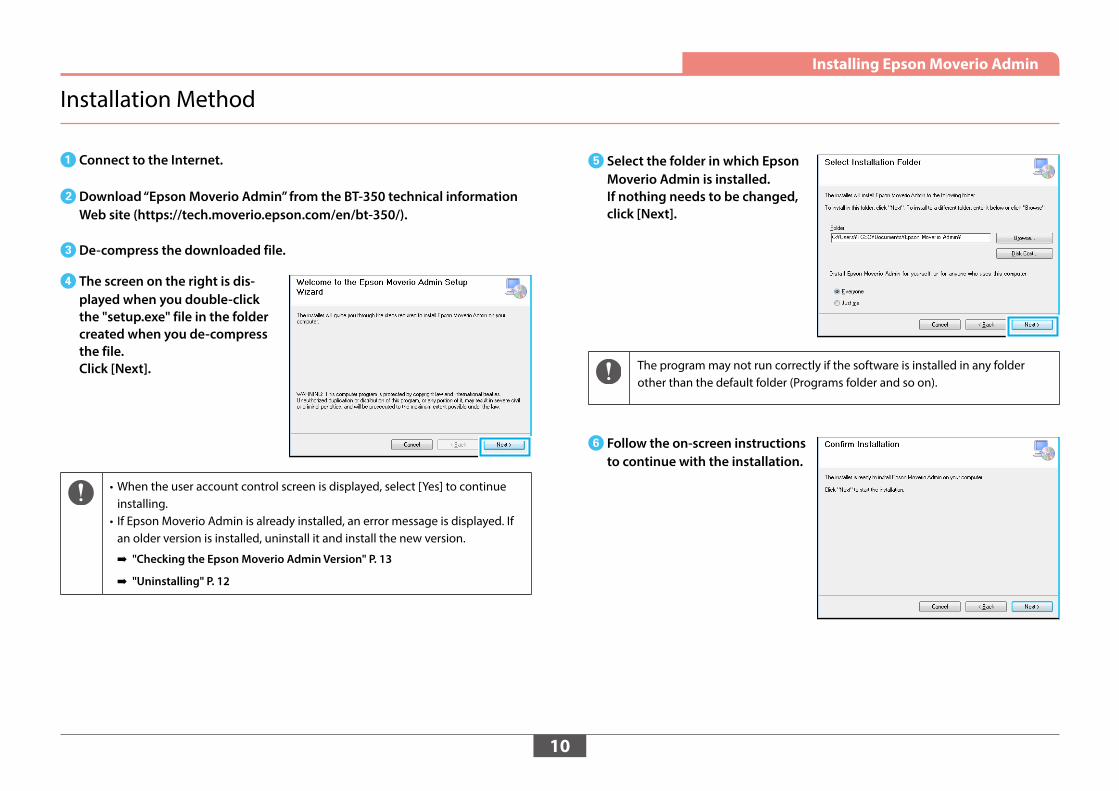
BDownload “Epson Moverio Admin” from the BT-350 technical information Web site (https://tech.moverio.epson.com/en/bt-350/).
CDe-compress the downloaded file.
DThe screen on the right is dis-played when you double-click the "setup.exe" file in the folder created when you de-compress the file. Click [Next].
• When the user account control screen is displayed, select [Yes] to continue installing.
• If Epson Moverio Admin is already installed, an error message is displayed. If an older version is installed, uninstall it and install the new version.
➡ "Checking the Epson Moverio Admin Version" P. 13
➡ "Uninstalling" P. 12
ESelect the folder in which Epson Moverio Admin is installed. If nothing needs to be changed, click [Next].
The program may not run correctly if the software is installed in any folder other than the default folder (Programs folder and so on).
FFollow the on-screen instructions to continue with the installation.
GInstallation is complete. Click [Close] to complete the installation.When installation is complete, the [Ep-
son Moverio Admin] icon is displayed
on the desktop.
12
Installing Epson Moverio Admin
Uninstalling
If you no longer need Epson Moverio Admin, or when you want to install a new
version, log in to your computer as an Administrator, and then follow the steps
below to delete.
AClick [Epson Moverio Admin] in [Programs and Features] from the Control Panel, and then select [Uninstall].
BSelect [Yes] on the confirmation screen.Uninstalling may take a few minutes.
When uninstalling is complete, the desktop icon is deleted.
Even after uninstalling, the "Epson Moverio Admin" folder created when in-stalling is not deleted (created in the Documents folder by default). Setting information is stored in the folder so that the settings can be imported when reinstalling.If you want to delete it completely, delete the "Epson Moverio Admin" folder from C:\Users\<user name>\Documents\Epson Moverio Admin after uninstall-ing.
13
Installing Epson Moverio Admin
Checking the Epson Moverio Admin Version
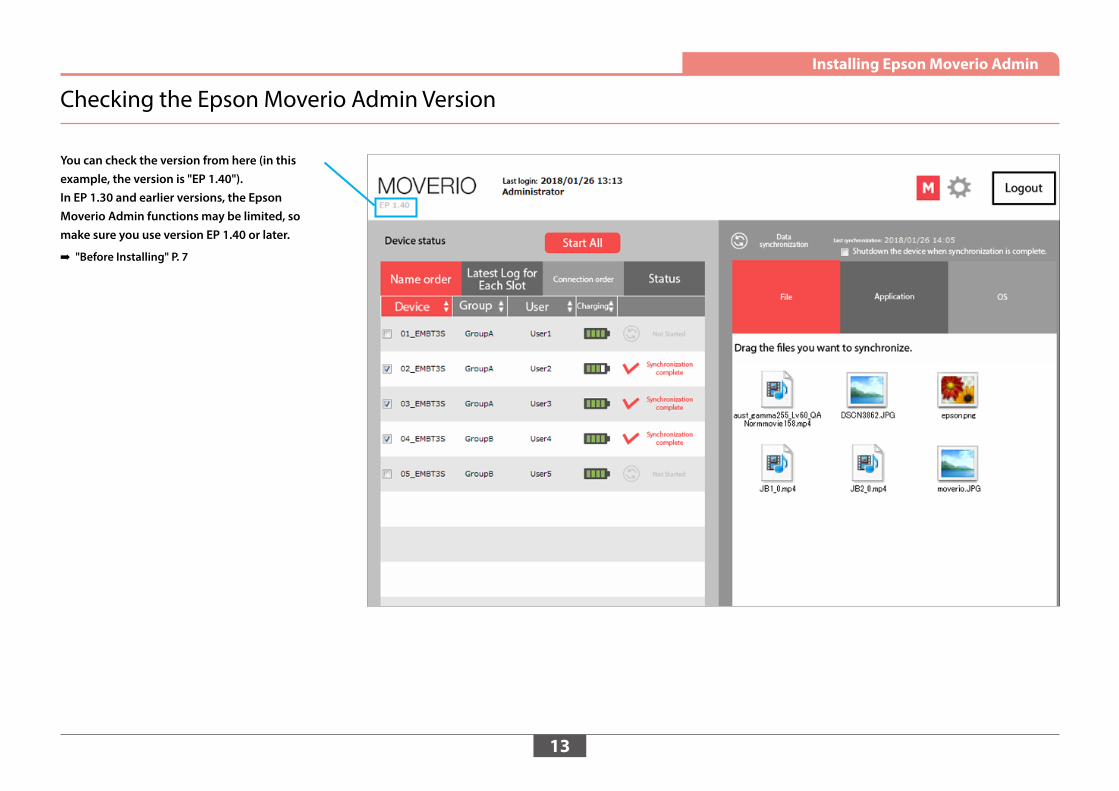
You can check the version from here (in this example, the version is "EP 1.40").In EP 1.30 and earlier versions, the Epson Moverio Admin functions may be limited, so make sure you use version EP 1.40 or later.
➡ "Before Installing" P. 7
14
Starting Epson Moverio Admin
Follow the steps below to connect devices, start Epson Moverio Admin, and then
register the BT-350 devices.
AConnect the docks to the computer as shown below.Do not connect BT-350 to the dock yet.
BClick the desktop icon to start Epson Moverio Admin.
COn the Login screen, enter your ID and password.Administrator user ID for initial login : moverio
Password for initial login : admin
The top screen is displayed after logging in.
➡ "Top Screen Configuration" P. 20
When starting up for the first time, you need to register the devices to display BT-350s
in the slot order. See the following page and make sure you register the devices.
➡ "Initial Startup Settings" P. 16
15
Starting Epson Moverio Admin
If you connect multiple BT-350s at the same time, a recognition error could oc-cur and charging and synchronization may not be possible, so be sure to note the following two points.• When connecting BT-350s to the docks, make sure you connect the docks to
the computer by following the steps on the previous page, and then connect BT-350s to the docks one-by-one.
• Do not connect or disconnect the USB cable from the computer while BT-350s are connected to the dock.
16
Starting Epson Moverio Admin
Initial Startup Settings
For the initial startup, make settings so that the screen for the [Latest Log for Each
Slot] tab and the slot order for the dock are the same.
Log in using an administrative user account and perform the following opera-
tions. ➡ "User’s powers" P. 3
Failing to do so makes it difficult to identify BT-350s because the display order
and the slot order will not match.
Recognizing BT-350s in slot order
You should recognize BT-350s from "Slot 1 of Dock 1" to "Slot 5 of Dock 4".
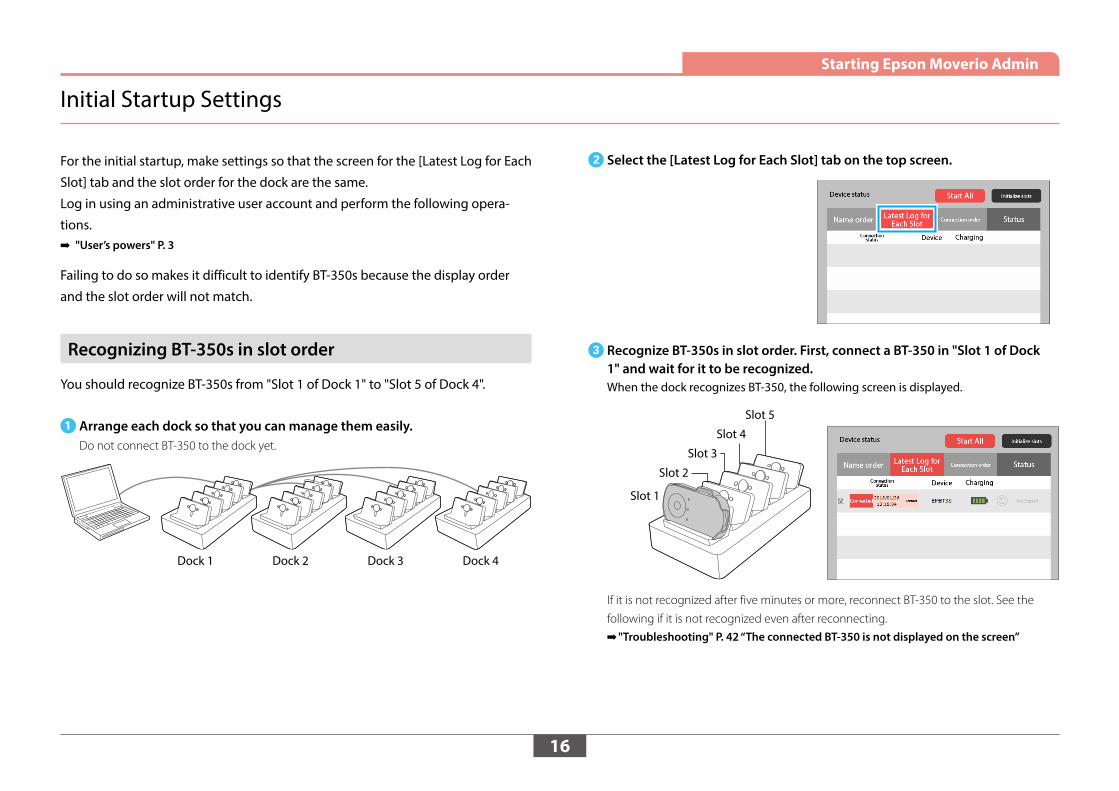
AArrange each dock so that you can manage them easily.Do not connect BT-350 to the dock yet.
Dock 1 Dock 2 Dock 3 Dock 4
BSelect the [Latest Log for Each Slot] tab on the top screen.
CRecognize BT-350s in slot order. First, connect a BT-350 in "Slot 1 of Dock 1" and wait for it to be recognized.When the dock recognizes BT-350, the following screen is displayed.
Slot 1
Slot 2
Slot 3
Slot 4
Slot 5
If it is not recognized after five minutes or more, reconnect BT-350 to the slot. See the
following if it is not recognized even after reconnecting.
➡ "Troubleshooting" P. 42 “The connected BT-350 is not displayed on the screen”
17
Starting Epson Moverio Admin
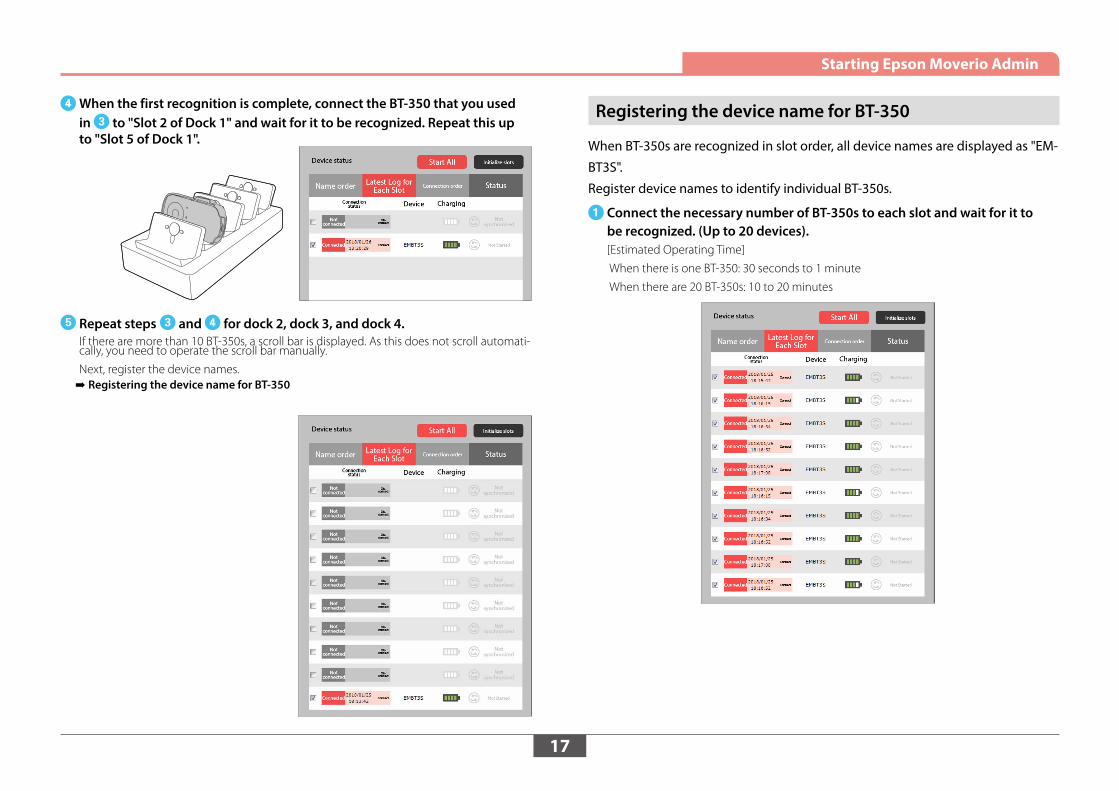
DWhen the first recognition is complete, connect the BT-350 that you used in C to "Slot 2 of Dock 1" and wait for it to be recognized. Repeat this up to "Slot 5 of Dock 1".
ERepeat steps C and D for dock 2, dock 3, and dock 4.If there are more than 10 BT-350s, a scroll bar is displayed. As this does not scroll automati-cally, you need to operate the scroll bar manually.
Next, register the device names. ➡ Registering the device name for BT-350
Registering the device name for BT-350
When BT-350s are recognized in slot order, all device names are displayed as "EM-
BT3S".
Register device names to identify individual BT-350s.
AConnect the necessary number of BT-350s to each slot and wait for it to be recognized. (Up to 20 devices).[Estimated Operating Time]
When there is one BT-350: 30 seconds to 1 minute
When there are 20 BT-350s: 10 to 20 minutes
18
Starting Epson Moverio Admin
BCheck that all of the BT-350s are displayed on the [Latest Log for Each Slot] tab, and then click the [ ] icon at the top-right of the screen.The [Settings] screen is displayed.
CClick [Manage registered devices].
DClick in the text area for Device name, and then enter a name.While editing, the BT-350's LED is lit red (or flashing), so that you can identify BT-350 being
edited.
If you want to manage by Group or User, you can also register them in this step.
➡ "Editing Device Names" P. 35
• The display order for BT-350s is not the slot order. While editing, BT-350's LED is lit red (or flashing), and you can enter the name you want to apply to the target BT-350.
• We recommend sticking the registration information (Device name, group name, user name) to the body of BT-350 with a sticker.
• By assigning names that begin with "01", "02", and so on, you can sort by device name on the [Name order] tab.
19
Starting Epson Moverio Admin
ERegister a Device name for all of BT-350s.
FWhen registering is complete, click [ ] at the top-right of the screen to return to the top screen.
Always use the USB ports that you used when you first connected the dock to the computer. If you use another USB port, the slot order may change.
20
Viewing the Screen
Top Screen Configuration
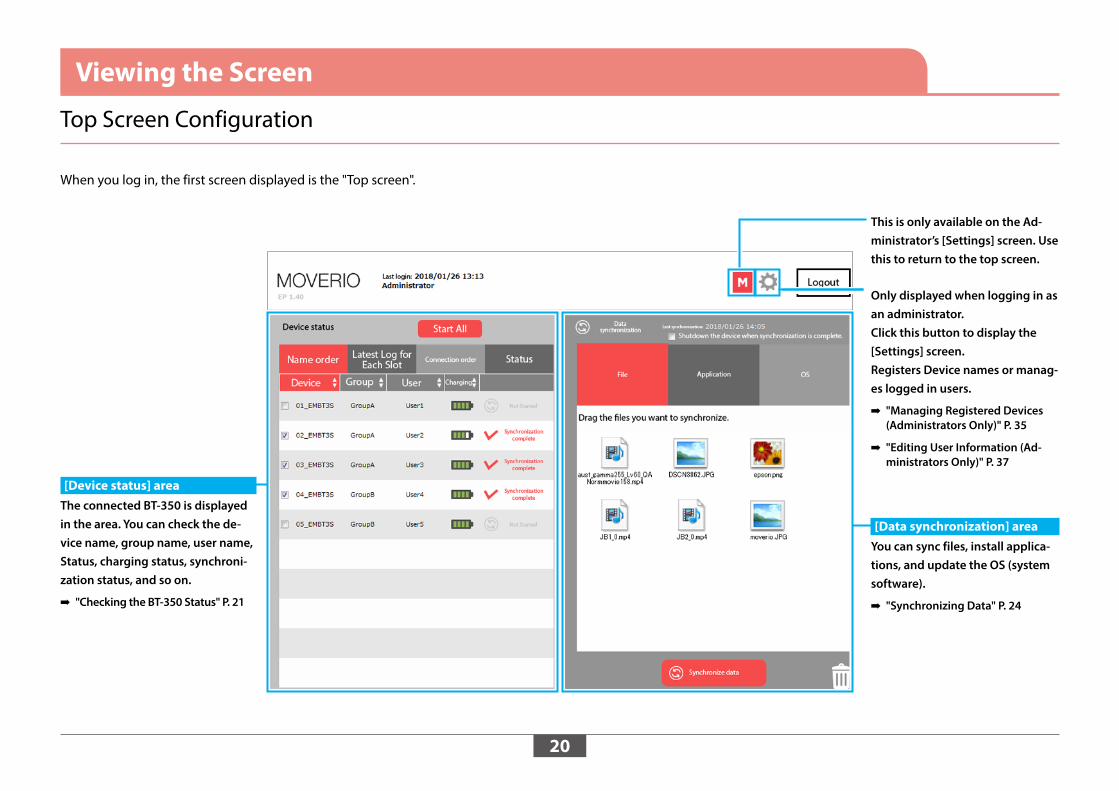
When you log in, the first screen displayed is the "Top screen".
Only displayed when logging in as an administrator.Click this button to display the [Settings] screen.Registers Device names or manag-es logged in users.
➡ "Managing Registered Devices (Administrators Only)" P. 35
➡ "Editing User Information (Ad-ministrators Only)" P. 37
This is only available on the Ad-ministrator’s [Settings] screen. Use this to return to the top screen.
[Data synchronization] areaYou can sync files, install applica-tions, and update the OS (system software).
➡ "Synchronizing Data" P. 24
[Device status] areaThe connected BT-350 is displayed in the area. You can check the de-vice name, group name, user name, Status, charging status, synchroni-zation status, and so on.
➡ "Checking the BT-350 Status" P. 21
21
Viewing the Screen
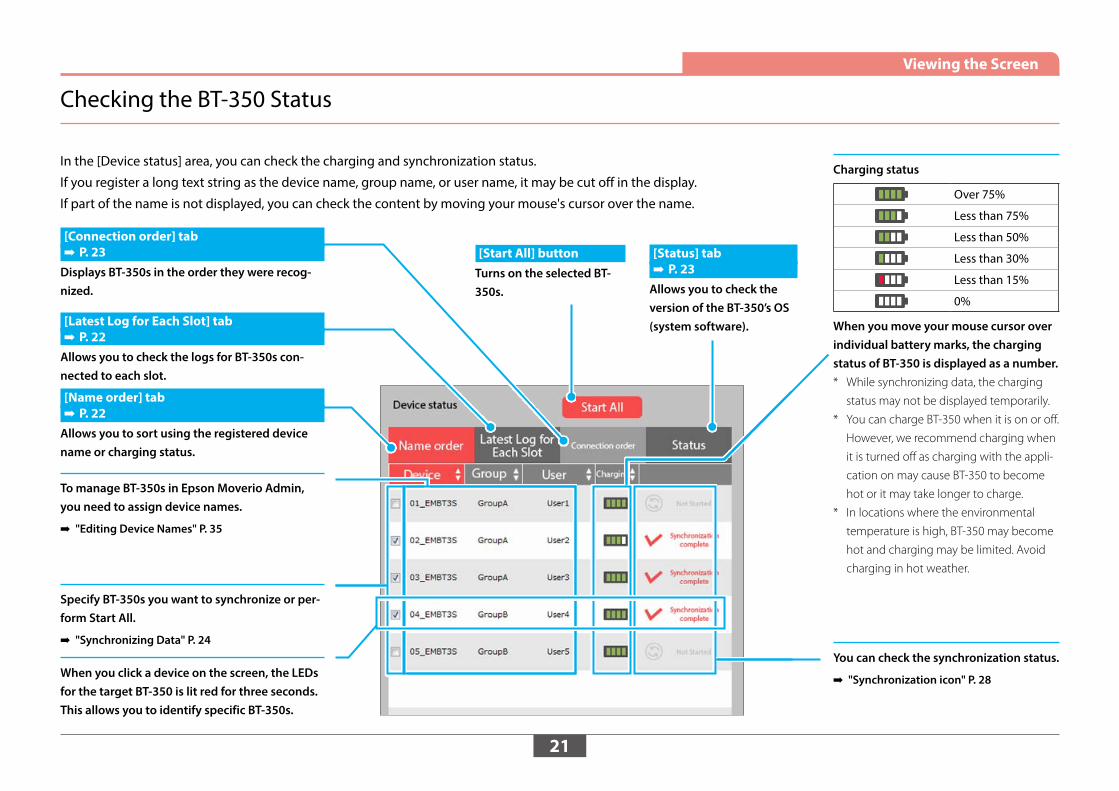
Checking the BT-350 Status
Charging status
Over 75%
Less than 75%
Less than 50%
Less than 30%
Less than 15%
0%
When you move your mouse cursor over individual battery marks, the charging status of BT-350 is displayed as a number.* While synchronizing data, the charging
status may not be displayed temporarily.
* You can charge BT-350 when it is on or off.
However, we recommend charging when
it is turned off as charging with the appli-
cation on may cause BT-350 to become
hot or it may take longer to charge.
* In locations where the environmental
temperature is high, BT-350 may become
hot and charging may be limited. Avoid
charging in hot weather.
To manage BT-350s in Epson Moverio Admin, you need to assign device names.
➡ "Editing Device Names" P. 35
Specify BT-350s you want to synchronize or per-form Start All.
➡ "Synchronizing Data" P. 24
When you click a device on the screen, the LEDs for the target BT-350 is lit red for three seconds. This allows you to identify specific BT-350s.
You can check the synchronization status.
➡ "Synchronization icon" P. 28
[Status] tab ➡ P. 23
Allows you to check the version of the BT-350’s OS (system software).
In the [Device status] area, you can check the charging and synchronization status.
If you register a long text string as the device name, group name, or user name, it may be cut off in the display.
If part of the name is not displayed, you can check the content by moving your mouse's cursor over the name.
[Connection order] tab ➡ P. 23
Displays BT-350s in the order they were recog-nized.
[Latest Log for Each Slot] tab ➡ P. 22
Allows you to check the logs for BT-350s con-nected to each slot.
[Start All] buttonTurns on the selected BT-350s.
[Name order] tab ➡ P. 22
Allows you to sort using the registered device name or charging status.
22
Viewing the Screen
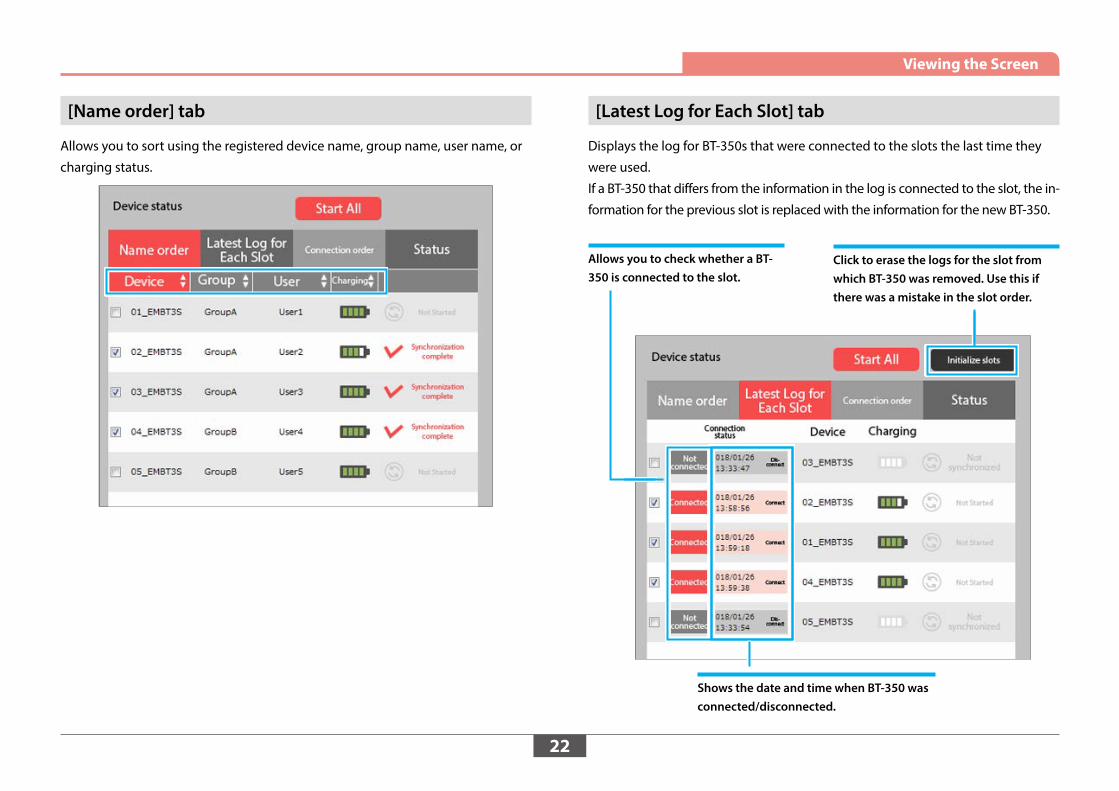
[Name order] tab
Allows you to sort using the registered device name, group name, user name, or
charging status.
Click to erase the logs for the slot from which BT-350 was removed. Use this if there was a mistake in the slot order.
Shows the date and time when BT-350 was connected/disconnected.
Allows you to check whether a BT-350 is connected to the slot.
[Latest Log for Each Slot] tab
Displays the log for BT-350s that were connected to the slots the last time they
were used.
If a BT-350 that differs from the information in the log is connected to the slot, the in-
formation for the previous slot is replaced with the information for the new BT-350.
23
Viewing the Screen
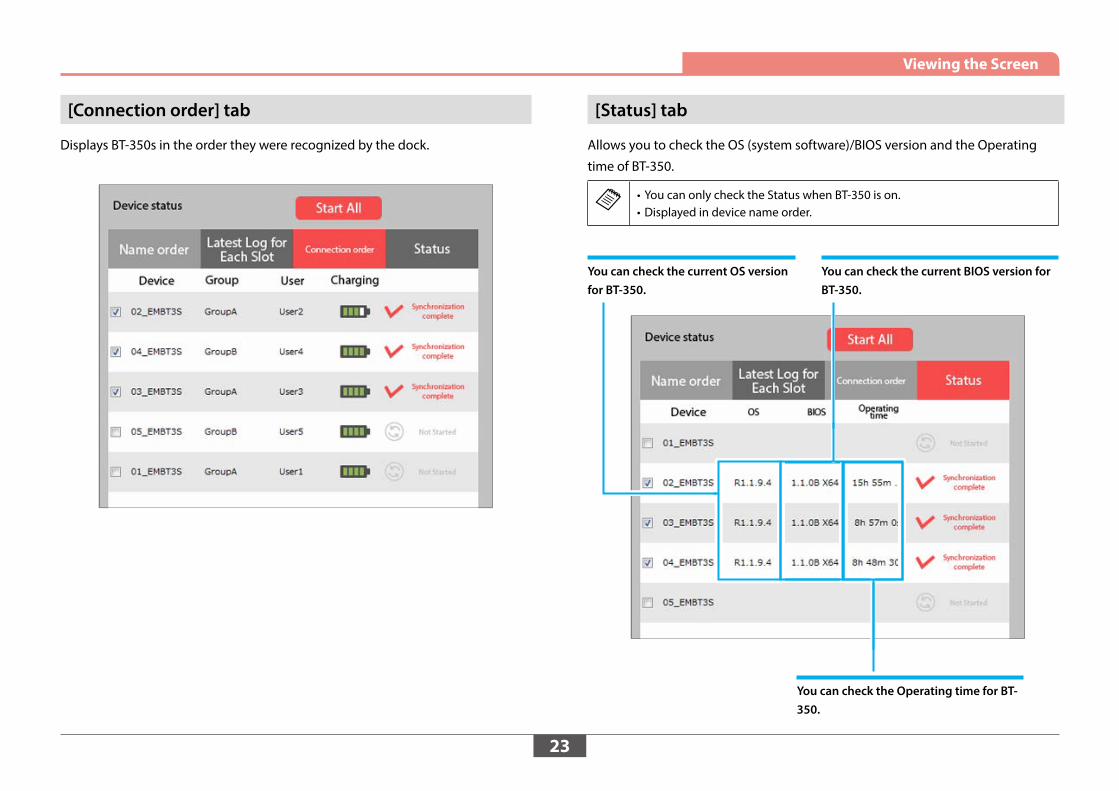
[Connection order] tab
Displays BT-350s in the order they were recognized by the dock.
You can check the current BIOS version for BT-350.
You can check the Operating time for BT-350.
You can check the current OS version for BT-350.
[Status] tab
Allows you to check the OS (system software)/BIOS version and the Operating
time of BT-350.
• You can only check the Status when BT-350 is on.• Displayed in device name order.
24
Types of Synchronization
Synchronizing Data
There are three types of data synchronization available for Epson Moverio Admin.
Tab name Synchronization content Synchronization data
File File synchronization/Folder synchro-nization
Files other than applica-tion or OS
Application Installing applications ***.apk
OS Update the OS (system software) for BT-350
EMBT3S_SUPK_(version_name).zip
When data is dragged into the [Data synchronization] area, the tab switches ac-
cording to the type of data being dragged.
In synchronization, all operations performed depend on the data in the [Data
synchronization] area.
• Do not change the file name for the OS (system software).• If the battery level for BT-350 is less than 30%, you cannot update the OS
(system software).
Synchronization Requirements
Your operating environment needs to meet the following conditions to synchro-
nize data in Epson Moverio Admin.
BT-350 • An available MTP (media transfer mode)
➡ "BT-350 USB Connection Settings" P. 45
• A USB debugging mode
➡ "BT-350 USB Debugging Settings" P. 46
• Necessary software installed on the computer
➡ "Computer’s system environment" P. 9
• Sufficient free storage space for data synchronization
Dock • One or more BT-350s are connected to the dock
• USB connected
Epson Moverio Admin The BT-350s are selected
25
Synchronizing Data
Synchronizing Data for BT-350
Before synchronizing data
Check the following before synchronizing data to BT-350.
This is only available for administrative users.
Target drive and folder settings
By default the target drive for data is the “Internal memory”, and the Target Folder
is “Eadmin/Files/”.
To change this, make changes on the [Settings] screen.
➡ "Setting Synchronization Folders (Administrators Only)" P. 40
Settings for Sync Mode
To delete the files in the target folder before synchronizing data, select [Sync
Mode].
By default this is set to off (recommended) to prevent accidental deletions.
➡ "Setting Synchronization Folders (Administrators Only)" P. 40
26
Synchronizing Data
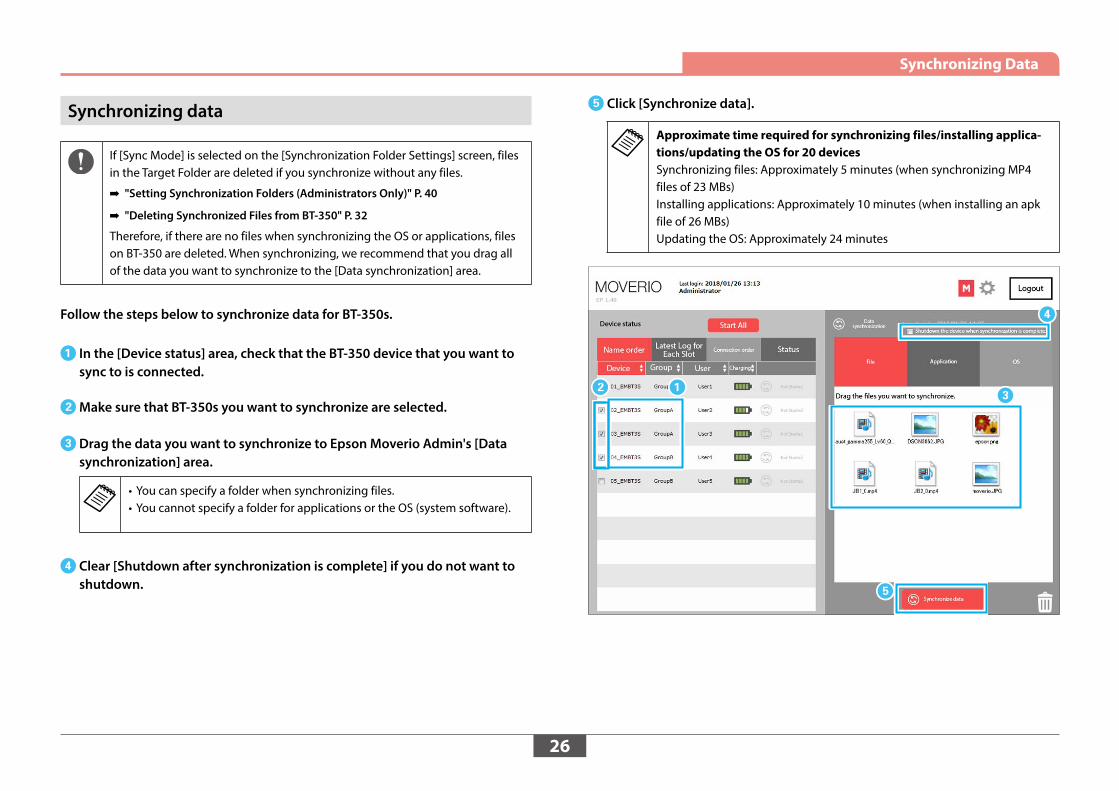
Synchronizing data
If [Sync Mode] is selected on the [Synchronization Folder Settings] screen, files in the Target Folder are deleted if you synchronize without any files.
➡ "Setting Synchronization Folders (Administrators Only)" P. 40
➡ "Deleting Synchronized Files from BT-350" P. 32
Therefore, if there are no files when synchronizing the OS or applications, files on BT-350 are deleted. When synchronizing, we recommend that you drag all of the data you want to synchronize to the [Data synchronization] area.
Follow the steps below to synchronize data for BT-350s.
AIn the [Device status] area, check that the BT-350 device that you want to sync to is connected.
BMake sure that BT-350s you want to synchronize are selected.
CDrag the data you want to synchronize to Epson Moverio Admin's [Data synchronization] area.
• You can specify a folder when synchronizing files.• You cannot specify a folder for applications or the OS (system software).
DClear [Shutdown after synchronization is complete] if you do not want to shutdown.
EClick [Synchronize data].
Approximate time required for synchronizing files/installing applica-tions/updating the OS for 20 devicesSynchronizing files: Approximately 5 minutes (when synchronizing MP4 files of 23 MBs)Installing applications: Approximately 10 minutes (when installing an apk file of 26 MBs)Updating the OS: Approximately 24 minutes
CAB
D
E
27
Synchronizing Data
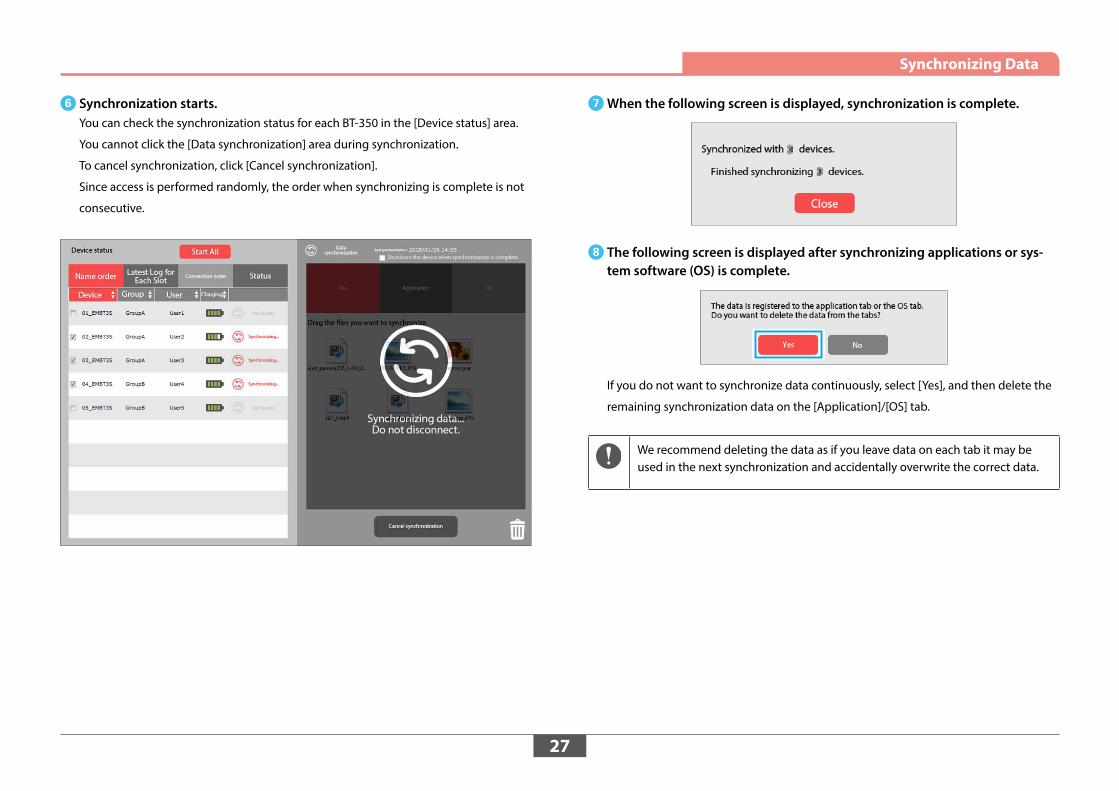
FSynchronization starts.You can check the synchronization status for each BT-350 in the [Device status] area.
You cannot click the [Data synchronization] area during synchronization.
To cancel synchronization, click [Cancel synchronization].
Since access is performed randomly, the order when synchronizing is complete is not
consecutive.
GWhen the following screen is displayed, synchronization is complete.
HThe following screen is displayed after synchronizing applications or sys-tem software (OS) is complete.
If you do not want to synchronize data continuously, select [Yes], and then delete the
remaining synchronization data on the [Application]/[OS] tab.
We recommend deleting the data as if you leave data on each tab it may be used in the next synchronization and accidentally overwrite the correct data.
28
Synchronizing Data
Synchronization icon
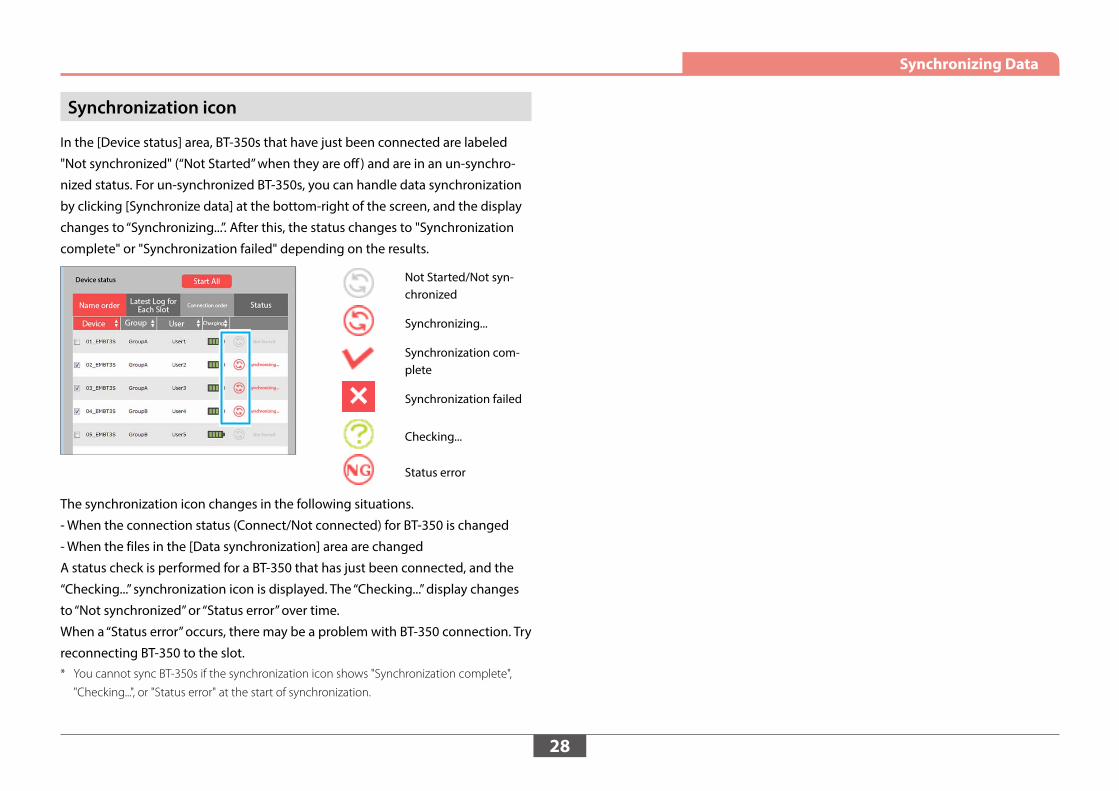
In the [Device status] area, BT-350s that have just been connected are labeled
"Not synchronized" (“Not Started” when they are off ) and are in an un-synchro-
nized status. For un-synchronized BT-350s, you can handle data synchronization
by clicking [Synchronize data] at the bottom-right of the screen, and the display
changes to “Synchronizing...”. After this, the status changes to "Synchronization
complete" or "Synchronization failed" depending on the results.
Not Started/Not syn-chronized
Synchronizing...
Synchronization com-plete
Synchronization failed
Checking...
Status error
The synchronization icon changes in the following situations.
- When the connection status (Connect/Not connected) for BT-350 is changed
- When the files in the [Data synchronization] area are changed
A status check is performed for a BT-350 that has just been connected, and the
“Checking...” synchronization icon is displayed. The “Checking...” display changes
to “Not synchronized” or “Status error” over time.
When a “Status error” occurs, there may be a problem with BT-350 connection. Try
reconnecting BT-350 to the slot.* You cannot sync BT-350s if the synchronization icon shows "Synchronization complete",
"Checking...", or "Status error" at the start of synchronization.
29
Synchronizing Data
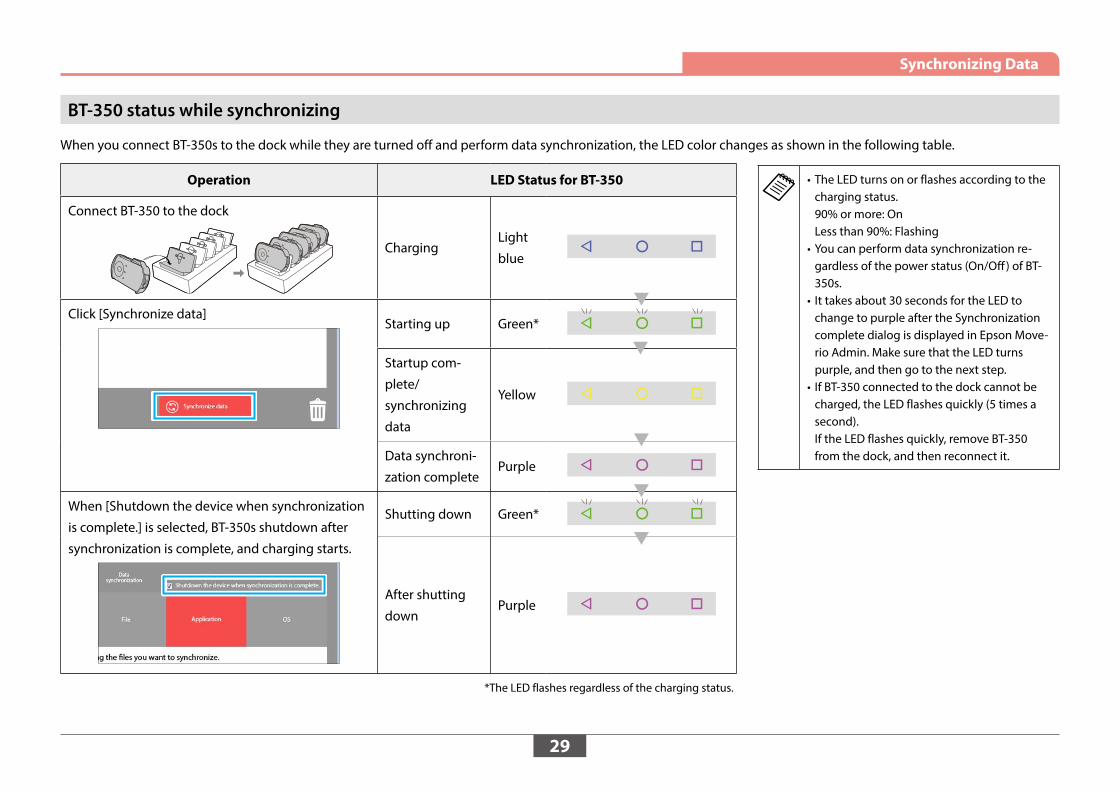
BT-350 status while synchronizing
When you connect BT-350s to the dock while they are turned off and perform data synchronization, the LED color changes as shown in the following table.
Operation LED Status for BT-350
Connect BT-350 to the dock
ChargingLight
blue
Click [Synchronize data]Starting up Green*
Startup com-
plete/
synchronizing
data
Yellow
Data synchroni-
zation completePurple
When [Shutdown the device when synchronization
is complete.] is selected, BT-350s shutdown after
synchronization is complete, and charging starts.
Shutting down Green*
After shutting
downPurple
• The LED turns on or flashes according to the charging status. 90% or more: On Less than 90%: Flashing
• You can perform data synchronization re-gardless of the power status (On/Off ) of BT-350s.
• It takes about 30 seconds for the LED to change to purple after the Synchronization complete dialog is displayed in Epson Move-rio Admin. Make sure that the LED turns purple, and then go to the next step.
• If BT-350 connected to the dock cannot be charged, the LED flashes quickly (5 times a second). If the LED flashes quickly, remove BT-350 from the dock, and then reconnect it.
*The LED flashes regardless of the charging status.
30
Synchronizing Data
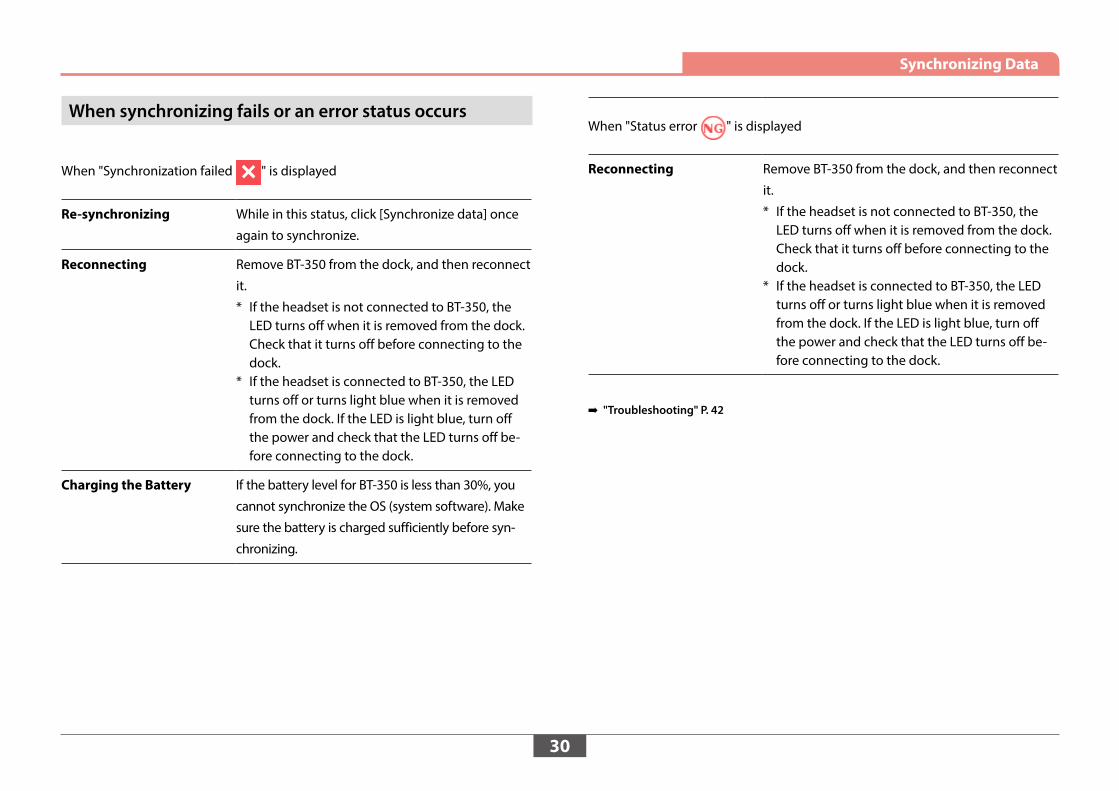
When "Status error " is displayed
Reconnecting Remove BT-350 from the dock, and then reconnect
it.
* If the headset is not connected to BT-350, the LED turns off when it is removed from the dock. Check that it turns off before connecting to the dock.
* If the headset is connected to BT-350, the LED turns off or turns light blue when it is removed from the dock. If the LED is light blue, turn off the power and check that the LED turns off be-fore connecting to the dock.
➡ "Troubleshooting" P. 42
When synchronizing fails or an error status occurs
When "Synchronization failed " is displayed
Re-synchronizing While in this status, click [Synchronize data] once
again to synchronize.
Reconnecting Remove BT-350 from the dock, and then reconnect
it.
* If the headset is not connected to BT-350, the LED turns off when it is removed from the dock. Check that it turns off before connecting to the dock.
* If the headset is connected to BT-350, the LED turns off or turns light blue when it is removed from the dock. If the LED is light blue, turn off the power and check that the LED turns off be-fore connecting to the dock.
Charging the Battery If the battery level for BT-350 is less than 30%, you
cannot synchronize the OS (system software). Make
sure the battery is charged sufficiently before syn-
chronizing.
31
Synchronizing Data
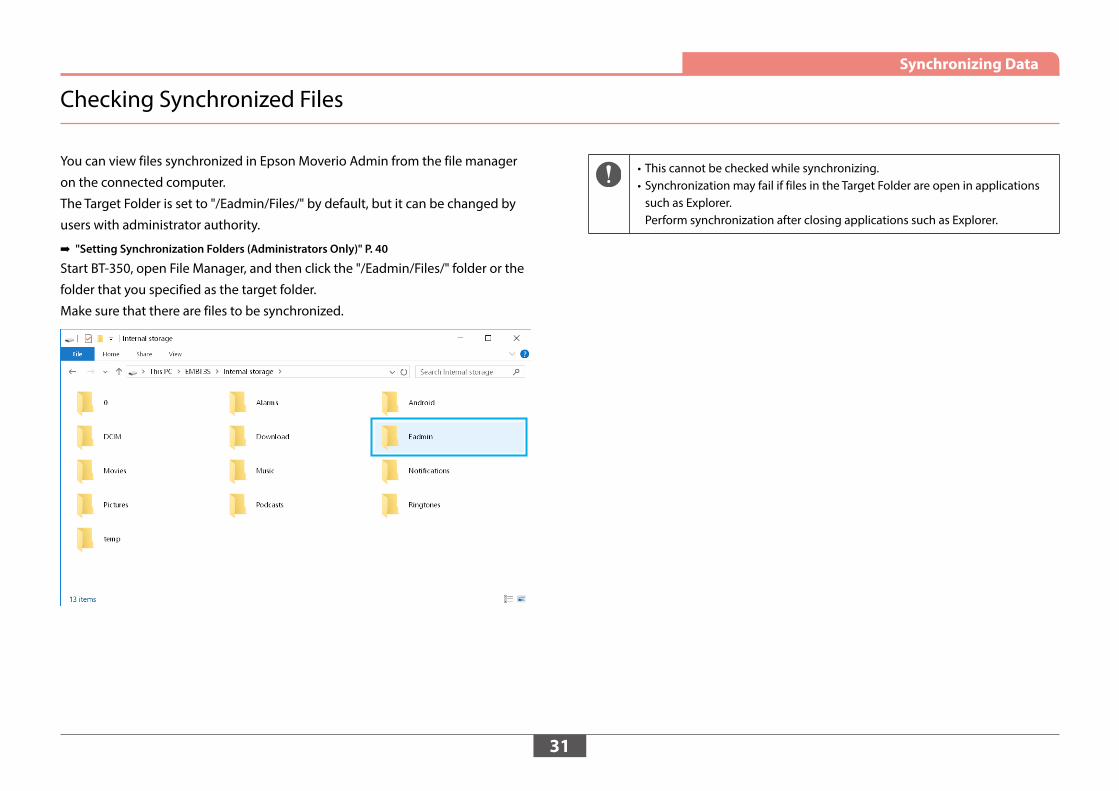
Checking Synchronized Files
You can view files synchronized in Epson Moverio Admin from the file manager
on the connected computer.
The Target Folder is set to "/Eadmin/Files/" by default, but it can be changed by
users with administrator authority.
➡ "Setting Synchronization Folders (Administrators Only)" P. 40
Start BT-350, open File Manager, and then click the "/Eadmin/Files/" folder or the
folder that you specified as the target folder.
Make sure that there are files to be synchronized.
• This cannot be checked while synchronizing.• Synchronization may fail if files in the Target Folder are open in applications
such as Explorer. Perform synchronization after closing applications such as Explorer.
32
Synchronizing Data
Deleting Synchronized Files from BT-350
If you repeatedly synchronize multiple files with BT-350s, there may not
be enough free space on BT-350s.
To delete synchronized files from BT-350, delete unnecessary files from the [File]
tab, and then synchronize the data.
Only deleting data from the [File] tab does not delete the files on BT-350. Make
sure you synchronize the data.
To delete files, you need to select [Sync Mode]. By selecting [Sync Mode], the status of the data in the [Data synchronization] area is reflected on BT-350s as it is. Therefore, note that if you perform data synchronization when the [File] tab is empty (no files) as shown below, all files are deleted.<Example>1. When synchronizing multiple files to BT-350s, add one new file to be syn-
chronized.2. Select [Sync Mode].3. Delete the file added in (1) from the [Data synchronization] area, and then
synchronize while the [Data synchronization] area is empty.4. All of the files are deleted from BT-350s.
ASelect [Sync Mode]. ➡ "Settings for Sync Mode" P. 25
➡ "Setting Synchronization Folders (Administrators Only)" P. 40
BIn the [Device status] area, check that the BT-350 device that you want to sync to is selected.
CSelect the files you want to delete, and then drag them to the trash or right-click and select "Delete" from the menu displayed.
DClick [Synchronize data] and wait for the synchronization to complete.
B
C
D
33
Synchronizing Data
• If you want to delete a specific file, delete it from the file manager on the connected computer.
• See the following to delete an application.
➡ "Uninstalling Applications Synchronized from BT-350" P. 34
34
Synchronizing Data
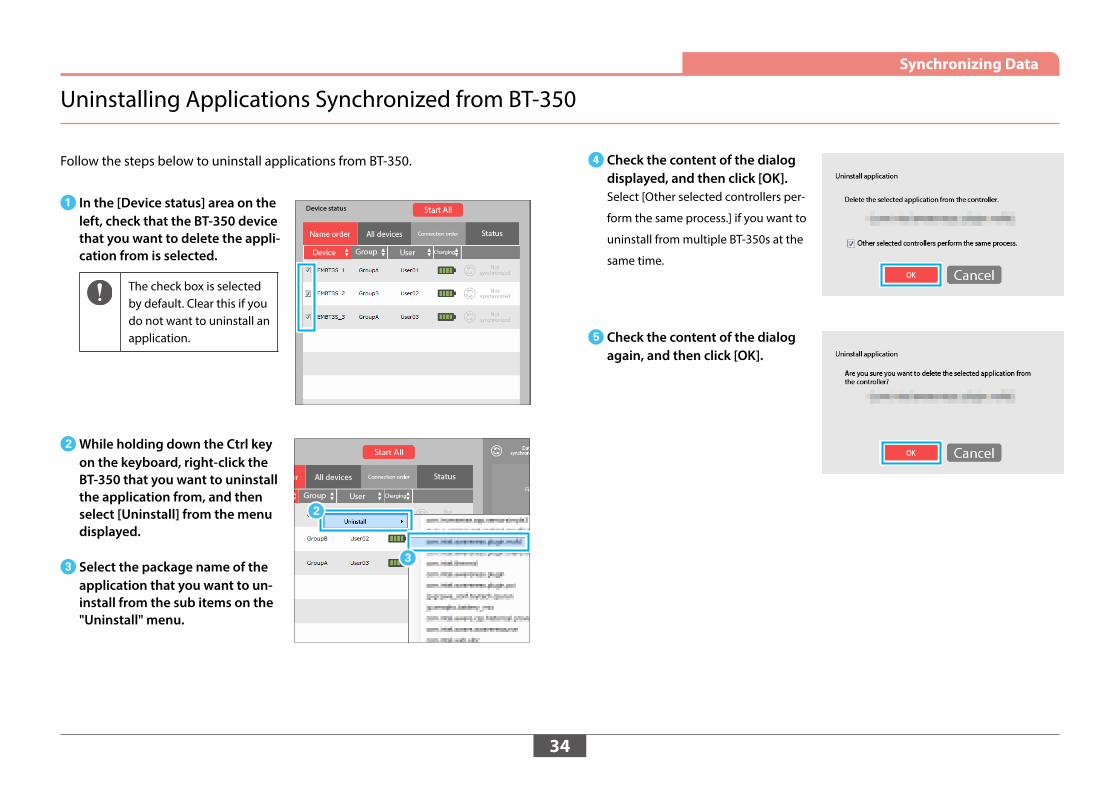
Uninstalling Applications Synchronized from BT-350
Follow the steps below to uninstall applications from BT-350.
AIn the [Device status] area on the left, check that the BT-350 device that you want to delete the appli-cation from is selected.
The check box is selected by default. Clear this if you do not want to uninstall an application.
BWhile holding down the Ctrl key on the keyboard, right-click the BT-350 that you want to uninstall the application from, and then select [Uninstall] from the menu displayed.
CSelect the package name of the application that you want to un-install from the sub items on the "Uninstall" menu.
B
C
DCheck the content of the dialog displayed, and then click [OK].Select [Other selected controllers per-
form the same process.] if you want to
uninstall from multiple BT-350s at the
same time.
ECheck the content of the dialog again, and then click [OK].
35
Editing Device Names
Managing Registered Devices (Administrators Only)
In Epson Moverio Admin, you can add "Device names", "Group names", and "User
names" to BT-350s and manage them.
A[ ] is displayed at the top-right of the screen when you log in to an ad-ministrator account. Click this icon to display the [Settings] screen.
Click [ ] to return to the top screen from the [Settings] screen.
BClick [Manage registered devices] on the [Settings] screen.
CClick on the area you want to change, and then enter the text. When you have finished making changes, press the Enter key to confirm them.
• The LED on BT-350 for the device name being edited (the device selected on the screen) turns red.
Make sure the LED on BT-350 you want to edit is red.
• You can enter up to the following number of characters for the Device name/Group/User.Device name : 50 charactersGroup : 20 characters
User : 20 characters
36
Managing Registered Devices (Administrators Only)
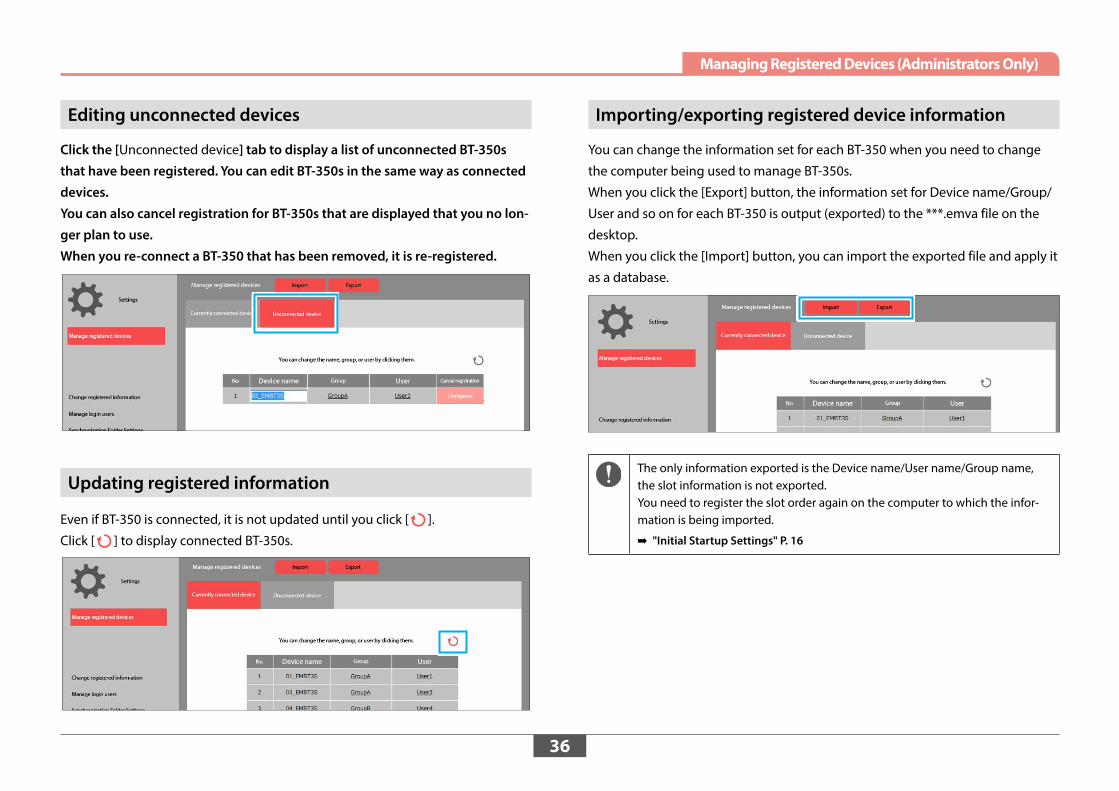
Editing unconnected devices
Click the [Unconnected device] tab to display a list of unconnected BT-350s that have been registered. You can edit BT-350s in the same way as connected devices.You can also cancel registration for BT-350s that are displayed that you no lon-ger plan to use.When you re-connect a BT-350 that has been removed, it is re-registered.
Updating registered information
Even if BT-350 is connected, it is not updated until you click [ ].
Click [ ] to display connected BT-350s.
Importing/exporting registered device information
You can change the information set for each BT-350 when you need to change
the computer being used to manage BT-350s.
When you click the [Export] button, the information set for Device name/Group/
User and so on for each BT-350 is output (exported) to the ***.emva file on the
desktop.
When you click the [Import] button, you can import the exported file and apply it
as a database.
The only information exported is the Device name/User name/Group name, the slot information is not exported.You need to register the slot order again on the computer to which the infor-mation is being imported.
➡ "Initial Startup Settings" P. 16
37
Editing Information for Administrators
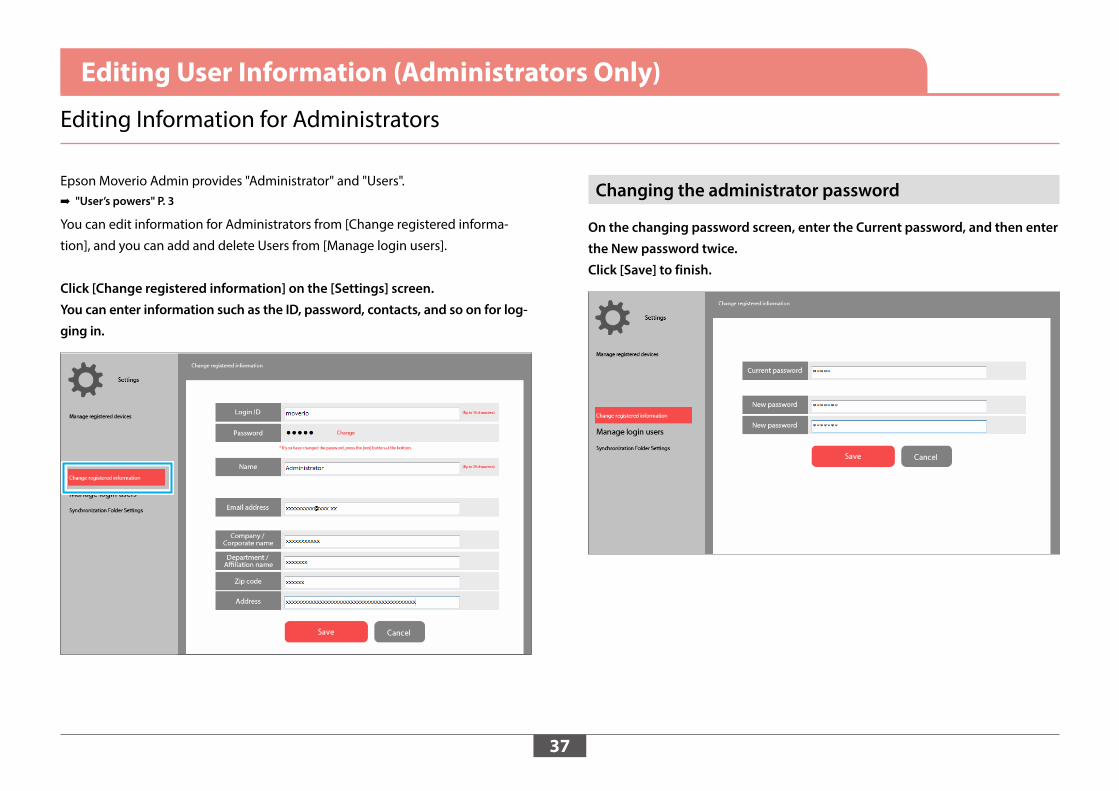
Editing User Information (Administrators Only)
Epson Moverio Admin provides "Administrator" and "Users". ➡ "User’s powers" P. 3
You can edit information for Administrators from [Change registered informa-
tion], and you can add and delete Users from [Manage login users].
Click [Change registered information] on the [Settings] screen.You can enter information such as the ID, password, contacts, and so on for log-ging in.
Changing the administrator password
On the changing password screen, enter the Current password, and then enter the New password twice.Click [Save] to finish.
38
Editing User Information (Administrators Only)
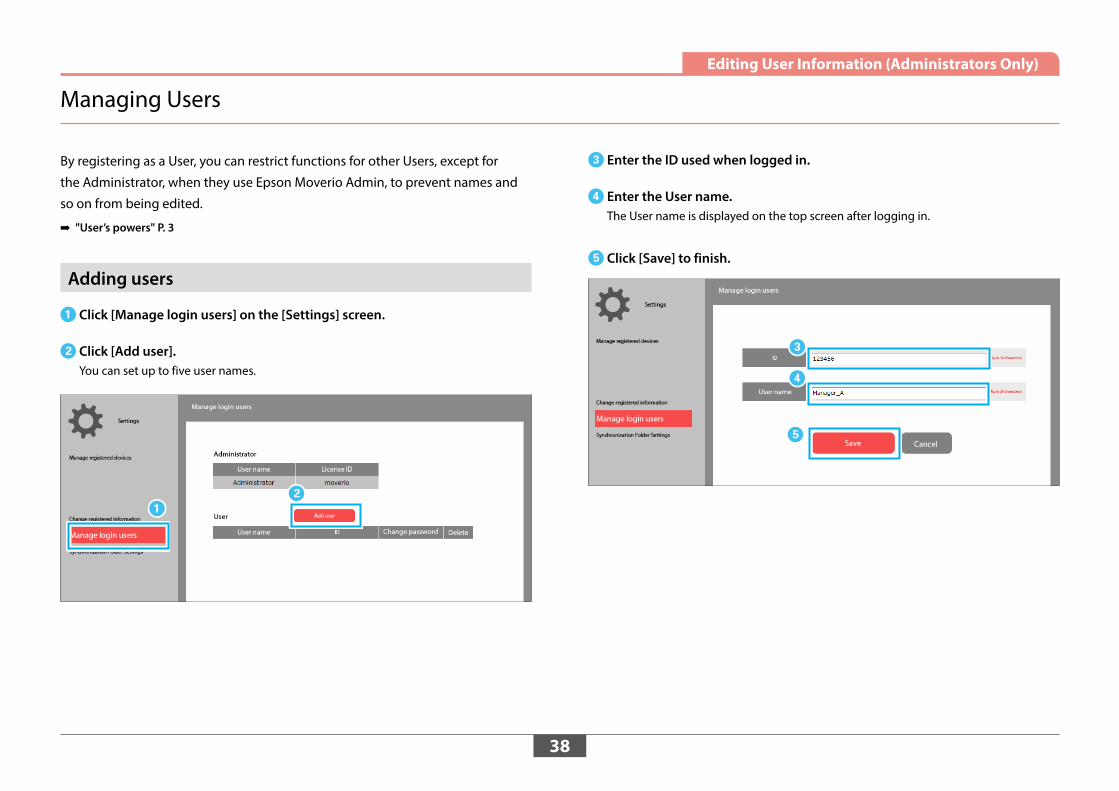
Managing Users
By registering as a User, you can restrict functions for other Users, except for
the Administrator, when they use Epson Moverio Admin, to prevent names and
so on from being edited.
➡ "User’s powers" P. 3
Adding users
AClick [Manage login users] on the [Settings] screen.
BClick [Add user].You can set up to five user names.
AB
CEnter the ID used when logged in.
DEnter the User name.The User name is displayed on the top screen after logging in.
EClick [Save] to finish.
E
C
D
39
Editing User Information (Administrators Only)
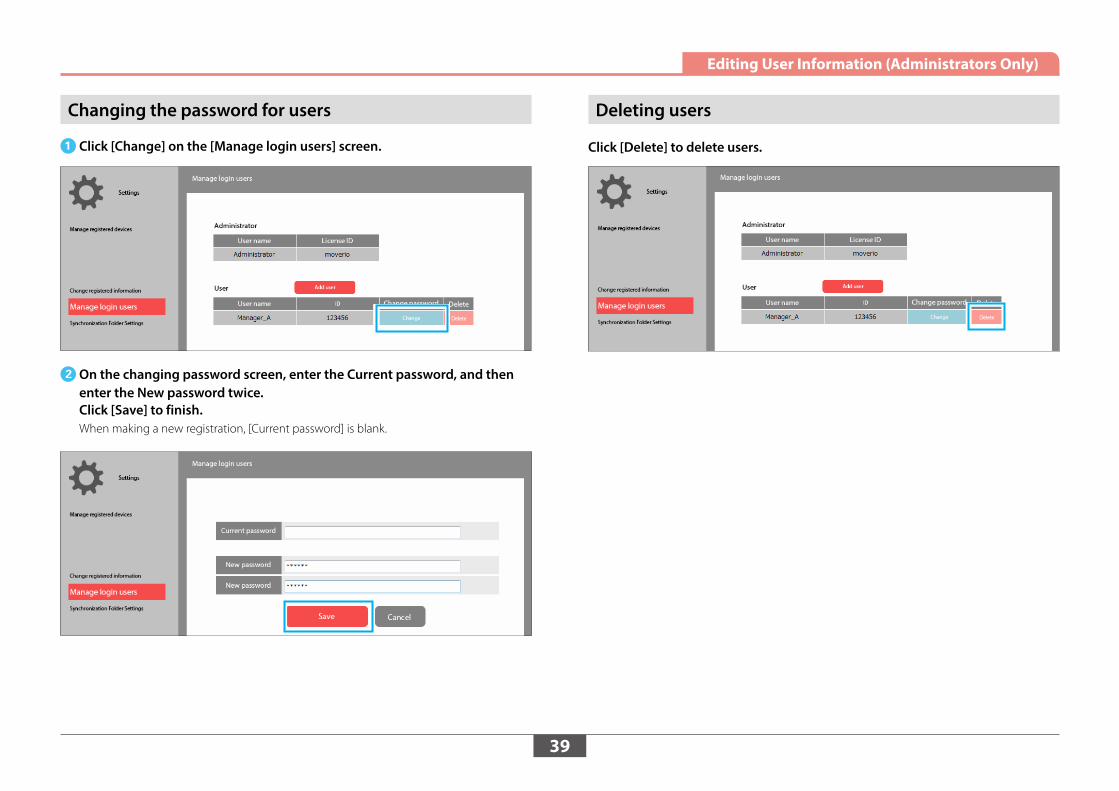
Changing the password for users
AClick [Change] on the [Manage login users] screen.
BOn the changing password screen, enter the Current password, and then enter the New password twice. Click [Save] to finish.When making a new registration, [Current password] is blank.
In “Synchronization Folder Settings”, you can select the storage device used for
file synchronization.
AClick [Synchronization Folder Settings] on the [Settings] screen.
BSelect the target for data transfer from [Internal memory] or [SD].
CSpecify the [Target Folder]. The default folder is "/Eadmin/Files/", but you can change this to any folder.
DTo delete the file in the target folder before synchronizing data, select [Sync Mode]. If you do not select this, make sure you add the files to the same folder.
EClick [Save] to finish.
B
C
DA
E
• You can only change synchronization storage for files. You cannot change the startup storage for OS (system software) or the instal-lation location of applications.
• If you specify [SD] as the [Target Drive], the SD card built into the BT-350 is set.
• Note the following when specifying the [Target Folder]. - Make sure the folder you specify is in a folder tree of less than 30 levels and
the full path is less than 255 characters. - You cannot specify “/temp/Apps/” or “/Moverio/local/”. - If the [Target Folder] field is blank, the settings cannot be saved. Make sure
you enter a folder name.• Depending on the specifications for the [Target Folder], note that the follow-
ing files will be deleted after synchronization. - When only a “/” is entered in [Target Folder]: The location directly under the
Target Drive is specified. If [Sync Mode] is selected in this status, all files on the Target Drive will be deleted.
- When a folder that exists by default (Photo, Music, and so on) on the sys-tem is specified as the Target Folder: If [Sync Mode] is selected, files before synchronization will be deleted.
41
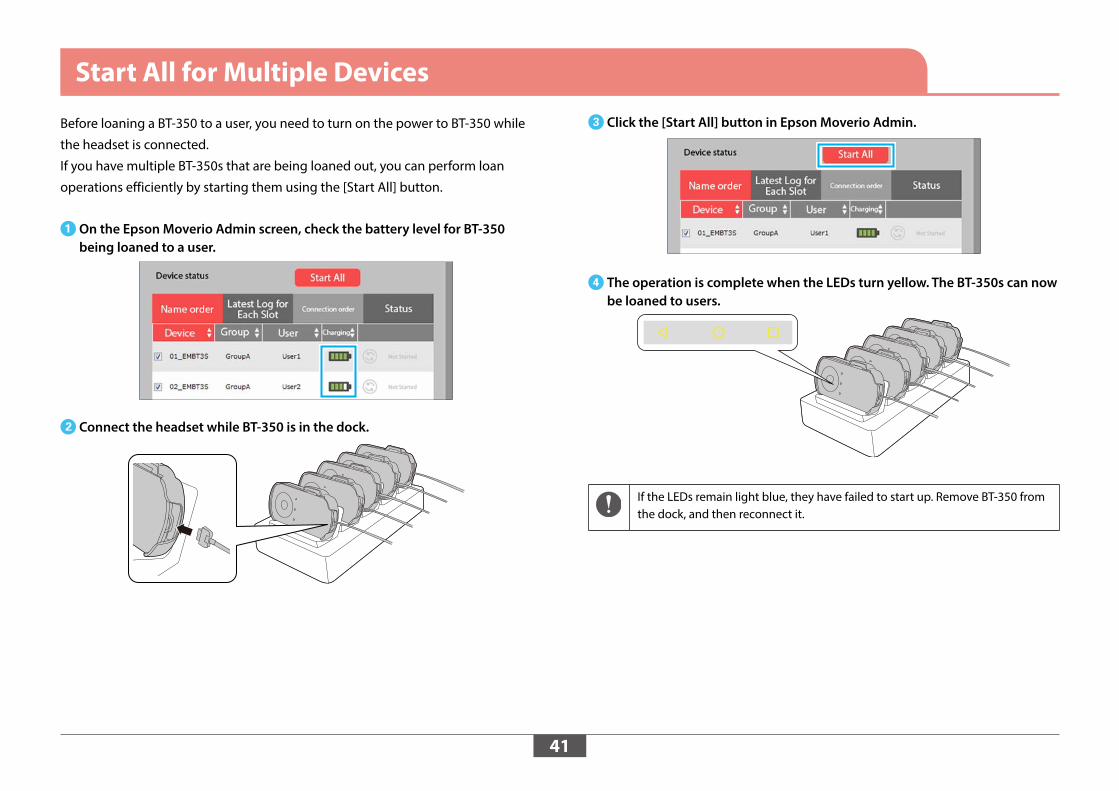
Start All for Multiple Devices
Before loaning a BT-350 to a user, you need to turn on the power to BT-350 while
the headset is connected.
If you have multiple BT-350s that are being loaned out, you can perform loan
operations efficiently by starting them using the [Start All] button.
AOn the Epson Moverio Admin screen, check the battery level for BT-350 being loaned to a user.
BConnect the headset while BT-350 is in the dock.
CClick the [Start All] button in Epson Moverio Admin.
DThe operation is complete when the LEDs turn yellow. The BT-350s can now be loaned to users.
If the LEDs remain light blue, they have failed to start up. Remove BT-350 from the dock, and then reconnect it.
42
Troubleshooting
For other technical information, see the MOVERIO BT-350 technical informa-tion site (https://tech.moverio.epson.com/en/bt-350/).
Cannot install
Before installing Epson Moverio Admin, you need to install .NET Framework4 and SQL Server Compact 3.5 SP2 on the computer. When these are not installed, the installer operates before this application is installed. (You need an Internet connection.)
The connected BT-350 is not displayed on the screen
BT-350 is not displayed in the list of Portable Devices in My Computer.
• Install the driver if there is a warning symbol (yellow triangle) on BT-350 in Device man-ager from the Control panel.
➡ "Computer’s system environment" P. 9
• If there is a disabled symbol (downward pointing arrow) on BT-350 in Device manager from the Control panel, enable the device in the right-click menu.
• Enable the Media device (MTP) for BT-350.
➡ "BT-350 USB Connection Settings" P. 45
• Remove BT-350 from the dock, and then reconnect it.
• Remove BT-350 from the dock, restart it, and then reconnect it to the dock. * You may need to restart your computer.
• Windows may not be able to recognize a large number of BT-350s all connected at the same time. This status occurs when too many BT-350s are connected to the dock that is connected to the computer. Remove BT-350s from the dock, and then reconnect them one by one.
The device is displayed in My Computer except for in the list of Portable Devices.
• Enable the Media device (MTP) for BT-350.
➡ "BT-350 USB Connection Settings" P. 45
• Check if the application is running in the BT-350's notification area.
A folder for synchronization has not been created in BT-350
When writing to the highest priority storage for BT-350, the storage may switch to virtual storage on BT-350. Set the Internal memory or the SD card.
➡ "Setting Synchronization Folders (Administrators Only)" P. 40
Synchronization fails
Remove BT-350 from the dock, restart it, and then reconnect it to the dock.* You may need to restart your computer.
The synchronization button is covered in the taskbar
Set the screen resolution to 1280 × 768 dots. You can also avoid this by using full-screen display.Depending on the screen resolution settings, the synchronization button may be covered by the taskbar. In this situation, you can perform operations by moving the taskbar to the left or right.You can reduce the screen size by moving the cursor to the edge of the screen.
Text in Epson Moverio Admin is cut off
If the text setting for Windows is set to large text, the text in Epson Moverio Admin is also large, and displayed text may be cut off. In this situation, set the text size to the default size or smaller.
Start All fails
• When the synchronization icon displays "Status Error", remove BT-350 from the dock, and then reconnect it.
• If the display for the synchronization icon is "Not Started", recognition has been per-formed, therefore select the target BT-350 and then click the [Start All] button again.
➡ "Synchronization icon" P. 28
BT-350s in the dock are not charging
If the LED is not flashing or is lit light blue, the device is not charging.Connect Epson Moverio Admin to the dock, reconnect BT-350 and check the amount that has charged.
BT-350s in the dock start up
BT-350s in the dock may sometimes start up. Remember to remove BT-350 and turn it off before reconnecting as it takes longer to charge while it is on.
BT-350s removed from the dock are still on
Normally, a BT-350 with no headset is off when it is removed from the dock. However, sometimes the LED does not turn off. In this situation, turn off the device, connect the headset, and then turn on BT-350 before use.
44
Troubleshooting
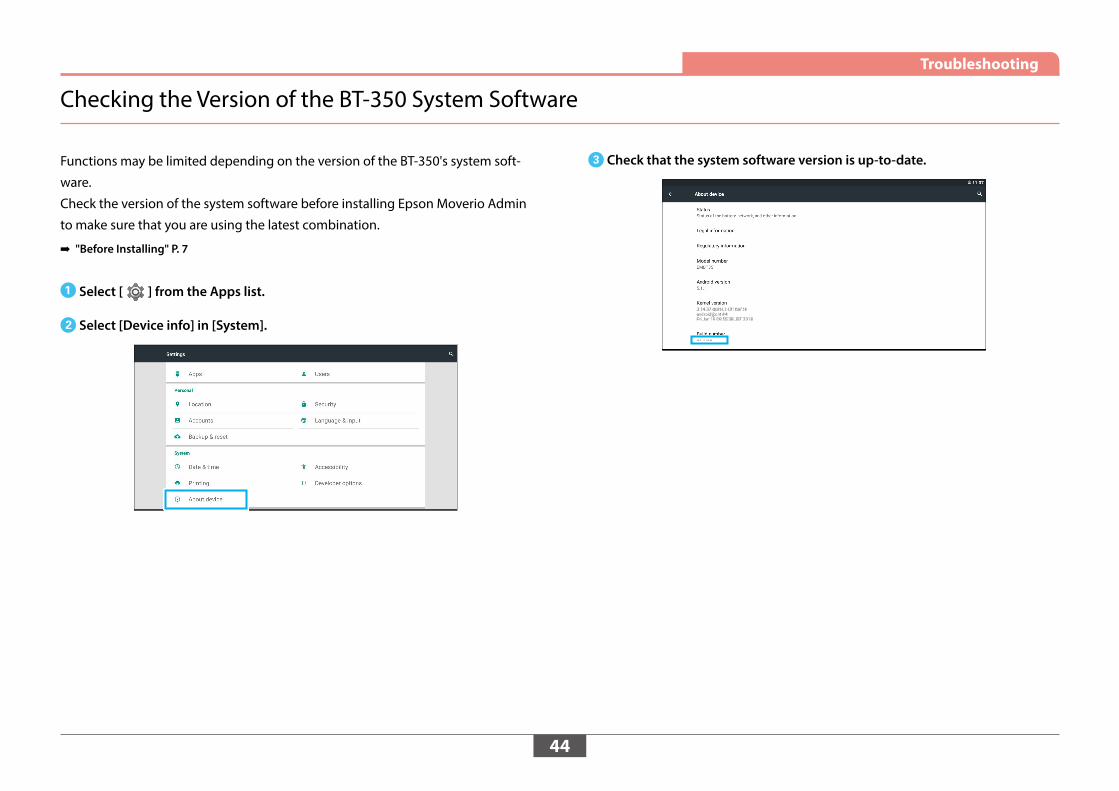
Checking the Version of the BT-350 System Software
Functions may be limited depending on the version of the BT-350's system soft-
ware.
Check the version of the system software before installing Epson Moverio Admin
to make sure that you are using the latest combination.
➡ "Before Installing" P. 7
ASelect [ ] from the Apps list.
BSelect [Device info] in [System].
CCheck that the system software version is up-to-date.
45
Troubleshooting
BT-350 USB Connection Settings
Make sure that the USB connection mode is set to “Media device (MTP)”.
ASelect [ ] from the Apps list.
BSelect [Storage] in [Device].
CSelect [USB computer connection] from [ ] at the top-right of the screen.
DMake sure [Media device (MTP)] is selected.
46
Troubleshooting
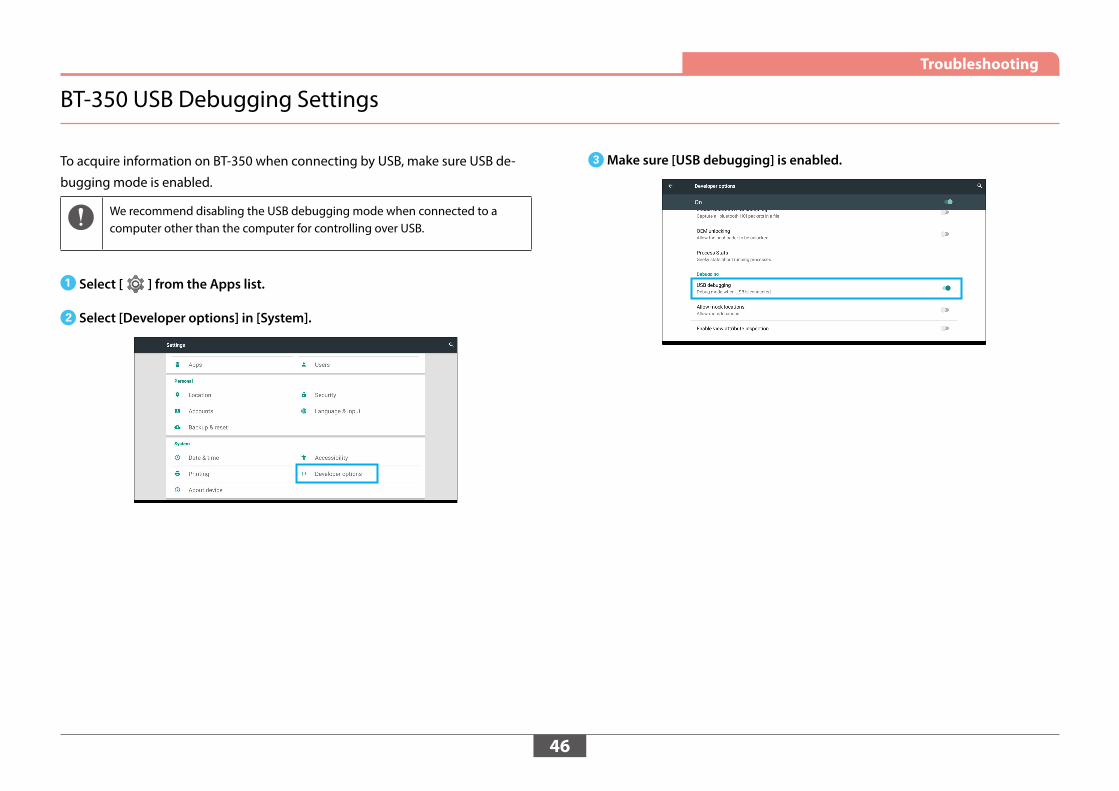
BT-350 USB Debugging Settings
To acquire information on BT-350 when connecting by USB, make sure USB de-
bugging mode is enabled.
We recommend disabling the USB debugging mode when connected to a computer other than the computer for controlling over USB.
ASelect [ ] from the Apps list.
BSelect [Developer options] in [System].
CMake sure [USB debugging] is enabled.
47
Cautions Notations
General Notes
(1) Do not reprint part or all of this guide without prior permission.(2) The content of this guide may change without notification in the future.(3) Every care has been taken to ensure the content of this guide is accurate; however, if
you have any queries or notice any errors, please contact us directly.(4) We cannot accept any responsibility for the results of using this device.(5) We cannot accept any responsibility for any damage caused if this device is not
handled correctly, if the contents of this guide are not followed, or if any repairs or changes are made to this device by any party other than Epson or an Epson certified partner.
(6) We cannot accept any responsibility for problems that occur by installing optional items, consumable items, or replacement parts that are not genuine Epson products or products that have been approved by Epson.
(7) Illustrations and screenshots used in this guide may differ from the actual device and software.
In this guide, the operating systems mentioned above are described as "Windows 7", "Windows 8.1", and "Windows 10" respectively. Additionally, Windows is used for Windows 7, Windows 8.1, and Windows 10 in general, and Windows is not used for all versions for Windows 7/8.1/10.
48
Intellectual Property Rights
Trademarks
Microsoft, Windows, and the Windows Logo are the trademarks or registered trademarks of the Microsoft Corporation in the United States and other countries.Intel and Intel Core are the trademarks of the Intel Corporation in the United States and other countries.Other product names used herein are also for identification purposes only and may be trademarks of their respective owners. Epson disclaims any and all rights in those marks.Software copyrights: As well as software owned by our company and licensors, this prod-uct also uses open source software.
OPEN SOURCE SOFTWARE LICENSE
As well as software owned by Epson, this product also uses open source software.The following provides information on the open source software used in this product.1. This product includes open source software programs according to the license terms of
each program. The open source software programs are without warranty; however, any malfunctions (including malfunctions caused by the open source software programs) that occur in this product do not influence the warranty conditions provided for this product.
2. We provide the source code of some open source software programs. If you desire to receive the source code above, please see the "http://www.epson.com" and contact the customer support of your region. We provide the source code until five (5) years after the release of this product. You shall comply with the license terms of each open source software program.
3. The open source software programs are WITHOUT ANY WARRANTY; without even the implied warranty of MERCHANTABILITY AND FITNESS FOR A PARTICULAR PURPOSE. See the license agreements of each open source software program for more details, which are described in the product.
4. You can find the complete license agreement in the "Epson Moverio Admin" folder (created in the Documents folder by default) \AndroidTool\NOTICE.txt.
49
This address list is current as of February 2018.
A more up-to-date contact address can be obtained from the corresponding website listed here. If you do not find what you need on any of these pages, please visit the main Epson home page at www.epson.com.
EUROPE, MIDDLE EAST & AFRICA
ALBANIAITD Sh.p.k.http://www.itd-al.com
AUSTRIAEpson Deutschland GmbHhttp://www.epson.at
BELGIUMEpson Europe B.V.Branch office Belgiumhttp://www.epson.be
BOSNIA AND HERZEGOVI-NANET d.o.o. Computer Engineeringhttp://www.net.com.ba
BULGARIAEpson Service Center Bulgariahttp://www.kolbis.com