89
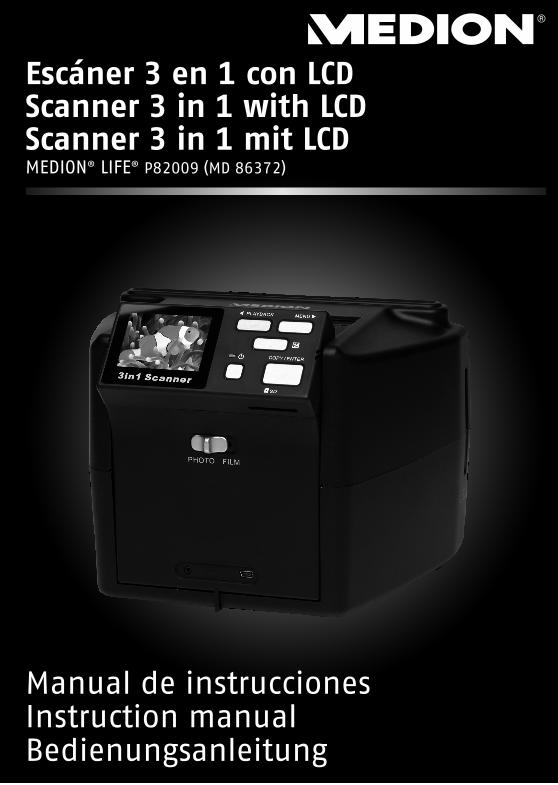
Bedienungsanleitung Instruction manual Manual de instrucciones Escáner 3 en 1 con LCD Scanner 3 in 1 with LCD Scanner 3 in 1 mit LCD MEDION® LIFE® P82009 (MD 86372)
| Date post: | 23-Aug-2019 |
| Category: |
Documents |
| Upload: | truongthien |
| View: | 213 times |
| Download: | 0 times |
III 0
8/11
BedienungsanleitungInstruction manualManual de instrucciones
Escáner 3 en 1 con LCDScanner 3 in 1 with LCDScanner 3 in 1 mit LCDMEDION® LIFE® P82009 (MD 86372)
Medion Service CenterVisonic S.A.
c/ Miguel Faraday, 6Parque Empresarial "La Carpetania", N-IV Km. 13
28906 Getafe, MadridEspaña
Hotline: 902196437 · Fax: 914604772E-Mail: [email protected]
www.medion.es
C
M
Y
CM
MY
CY
CMY
K
86372 ES ALDI ES Cover RC1.ai 1 70.71 lpi 45.00° 29.04.2011 08:25:0886372 ES ALDI ES Cover RC1.ai 1 70.71 lpi 45.00° 29.04.2011 08:25:08Prozessfarbe SchwarzProzessfarbe Schwarz

1
ES
DE
EN
Índice Acerca de las presentes instrucciones ................................................ 3
Los símbolos y palabras de advertencia utilizados en este manual de instrucciones ................................................................................................. 3
Uso conforme a lo prescrito .......................................................................... 4
Indicaciones de seguridad ................................................................. 5
El uso de este aparato comporta peligros para los niños y las personas discapacitadas. .............................................................................................. 5
Funcionamiento seguro ................................................................................ 5
Lugar de emplazamiento .............................................................................. 5
Temperatura ambiental ................................................................................ 6
Compatibilidad electromagnética ................................................................. 6
Seguridad en la conexión .............................................................................. 6
Copia de seguridad ....................................................................................... 6
No haga nunca reparaciones por su cuenta .................................................. 6
Volumen de suministro...................................................................... 7
Requisitos del sistema ................................................................................... 7
Esquema del aparato ......................................................................... 8
Puesta en funcionamiento ................................................................. 9
Conexión a la corriente ................................................................................. 9
Encender/apagar el aparato .......................................................................... 9
Colocar y retirar la tarjeta SD ........................................................................ 9
Funcionamiento ..............................................................................10
Aspectos generales ..................................................................................... 10
Escanear fotos ............................................................................................. 10
Diapositivas y negativos .............................................................................. 11
Corrección de la exposición ........................................................................ 12
Modo de fotografía ..........................................................................13
Escanear fotos ............................................................................................. 13
Menú de configuración del modo de fotografía .......................................... 14

2
Modo de diapositivas/negativos ...................................................... 17
Escanear diapositivas/negativos ................................................................... 17
Menú de configuración del modo de diapositivas/negativos ....................... 18
Modo de reproducción .................................................................... 22
Transferir los datos al ordenador .................................................... 25
Instalación del software .................................................................. 26
Limpieza y mantenimiento .............................................................. 27
Limpieza ...................................................................................................... 27
Reparación .................................................................................................. 27
Eliminación ..................................................................................... 28
Especificaciones técnicas ................................................................. 29

3
ES
DE
EN
Acerca de las presentes instrucciones Antes de la puesta en marcha del aparato, lea atentamente las presentes advertencias de seguridad. Preste atención a las advertencias que aparecen en el propio aparato y en las instrucciones de funcionamiento. Mantenga siempre a su alcance las instrucciones de funcionamiento. Si vende o cede el aparato a otra persona, entréguele sin falta también las presentes instrucciones y la tarjeta de garantía.
Los símbolos y palabras de advertencia utilizados en este manual de instrucciones
¡PELIGRO!¡Advertencia de peligro de muerte inminente! ¡ADVERTENCIA! ¡Advertencia de un posible peligro de muerte y/o graves lesiones irreversibles!
¡ATENCIÓN!¡Observe las indicaciones para evitar lesiones y daños materiales! ¡ATENCIÓN! ¡Observe las indicaciones para evitar daños materiales!
¡NOTA!Más información para el uso del aparato.
¡NOTA!¡Observe las indicaciones del manual de instrucciones!
¡ADVERTENCIA!¡Advertencia de peligro por descarga eléctrica!
Punto de enumeración / información acerca de sucesos durante el manejo
Instrucciones de manejo que realizar

4
Uso conforme a lo prescrito Este aparato sirve para digitalizar sus diapositivas o negativos. Las imágenes registradas se transfieren a un ordenador para seguir procesándolas y se guardan ahí. Con el software suministrado podrá modificar las imágenes registradas en formato digital. El aparato ha sido diseñado sólo para uso particular y no para fines comerciales.

5
ES
DE
EN
Indicaciones de seguridad
El uso de este aparato comporta peligros para los niños y las personas discapacitadas. Este aparato no ha sido concebido para ser utilizado por personas (incluyendo niños) con discapacidades físicas, sensoriales o psíquicas, o por aquéllas que no tengan la suficiente experiencia o conocimientos, a no ser que, para su propia seguridad, sean supervisadas por una persona responsable o reciban de ella las correspondientes instrucciones sobre su utilización. Para asegurarse de que los niños no jueguen con el aparato, vigílelos. No se debe permitir que los niños utilicen el aparato sin que sean vigilados. Guarde el aparato y los accesorios en un lugar fuera del alcance de los niños.
¡PELIGRO! Mantenga también los embalajes alejados de los niños. ¡Existe peligro de asfixia!
Funcionamiento seguro No introduzca objetos de ningún tipo por las ranuras y aperturas en el
interior del aparato. Esto podría provocar un cortocircuito eléctrico o incluso un incendio que dañaría su aparato.
Durante las primeras horas de funcionamiento, los aparatos nuevos pueden desprender un olor típico, inevitable pero no peligroso, que con el transcurso del tiempo disminuirá. Para contrarrestar la formación de olores, le recomendamos ventilar el espacio regularmente. En el desarrollo de este producto hemos asegurado que permanezca claramente por debajo de los valores límite vigentes.
Utilice exclusivamente el adaptador de red suministrado. En ningún caso trate de conectar el adaptador de red a otras tomas: podrían producirse daños.
Lugar de emplazamiento Mantenga su aparato y todos los componentes alejados de focos de
humedad y evite polvo, calor y rayos de sol directos para evitar eventuales fallos. Nunca utilice el aparato al aire libre.
Procure que la temperatura ambiente sea la adecuada. Para evitar cualquier caída del aparato, coloque todos los componentes
sobre una base estable, nivelada y libre de vibraciones al ponerlos en funcionamiento.
No se debe exponer el aparato a gotas de agua o salpicaduras. No coloque recipientes llenos de líquido (jarrones o similares) sobre el aparato. El recipiente puede volcar y el líquido puede perjudicar la seguridad eléctrica.

6
Temperatura ambiental El aparato puede funcionar a una temperatura ambiental de entre 10 C y
30°C y con una humedad relativa del 35 % - 80 % (sin condensación). Una vez apagado, el aparato puede guardarse a entre -10 C y 60 C y con
una humedad relativa del 20 % - 80 % (sin condensación).
¡ATENCIÓN! Después del transporte de su aparato, espere hasta que el aparato tenga la temperatura ambiental antes de ponerlo en funcionamiento. En caso de grandes variaciones de temperatura o humedad, por condensación puede formarse humedad dentro del aparato y ésta puede causar un cortocircuito eléctrico.
Compatibilidad electromagnética Al instalar el aparato hay que tener en cuenta las normas relativas a la compatibilidad electromagnética (CEM). Guarde por lo menos una distancia de un metro frente a fuentes de interferencias de alta frecuencia y magnéticas (televisor, altavoces, teléfono móvil, etc.) para evitar problemas de funcionamiento y pérdidas de datos.
Seguridad en la conexión Tenga en cuenta las siguientes indicaciones para conectar el aparato correctamente: Coloque el cable de forma que nadie pueda pisarlo ni tropezar con él. No ponga ningún objeto encima de los cables, ya que éstos podrían
dañarse.
Copia de seguridad ¡NOTA! Después de cada actualización de sus datos guarde siempre una copia de seguridad de los mismos en un medio de almacenamiento externo (p. ej., CD-R). Queda excluida cualquier responsabilidad por daños y perjuicios
debidos a la pérdida de datos y daños resultantes.
No haga nunca reparaciones por su cuenta
¡ADVERTENCIA! No intente en ningún caso abrir o reparar usted mismo el aparato. ¡Existe riesgo de descarga eléctrica!
Con el fin de evitar accidentes, en caso de mal funcionamiento del aparato diríjase al Medion Service Center o a otro taller especializado.
7
ES
DE
EN
Volumen de suministro Compruebe que el suministro esté completo, y, si no fuera éste el caso, avísenos dentro de un plazo de 14 días después de su compra. Con el pack adquirido ha recibido: Escáner digital Cepillo de limpieza Soporte de diapositivas Soporte de negativos Soporte de fotos 9 x 13 Soporte de fotos 10 x 15 Soporte de fotos 13 x 18 Cable de conexión USB Clavija de red USB Cable AV Software de edición de imágenes Instrucciones de funcionamiento y documentos de garantía
Requisitos del sistema Ordenador Ordenador compatible PC/AT
Potencia del procesador
A partir de la clase Pentium con 1,6 GHz o más
Sistema operativo Windows® XP SP3 / Vista SP1/7
Instalación Unidad de CD/DVD
Conexión Puerto USB

8
Esquema del aparato
1) Ranura para el soporte de fotos 2) Ranura para el soporte de diapositivas/negativos 3) Tecla EV: Ajuste del valor de exposición; en el menú: salida del menú 4) Tecla COPY/ENTER: En modo de escaneo: inicio del proceso de
escaneo; en el menú: confirmación de la selección 5) Ranura para tarjetas SD/SDHC 6) Conector USB 7) Salida AV 8) Conmutador de modo 9) Interruptor STANDBY 10) LED de funcionamiento 11) Pantalla LCD 12) Tecla /PLAYBACK: En el menú: control hacia la izquierda; en modo
de presentación de diapositivas: inicio de la reproducción 13) Tecla /MENU: En el menú: control hacia la derecha; en modo de
escaneo: acceso al menú

9
ES
DE
EN
Puesta en funcionamiento
Conexión a la corriente Conecte el cable USB con el adaptador de red USB. Enchufe el adaptador de red en una toma de corriente de fácil acceso. Conecte la miniclavija USB con el conector USB del frontal del aparato.
¡NOTA! Siempre que se conecta el aparato a la corriente eléctrica se pone en marcha el aparato automáticamente.
Encender/apagar el aparato Pulse la tecla STANDBY para encender el aparato. Vuelva a pulsar la tecla STANDBY para apagar el aparato.
Colocar y retirar la tarjeta SD Si no se encuentra colocada una tarjeta de memoria, las capturas se archivan en la memoria interna. Tenga en cuenta que la memoria interna está limitada a 32 MB. Por este motivo, utilice una tarjeta de memoria SD para aumentar la capacidad de memoria. Si se encuentra colocada una tarjeta de memoria, las capturas se archivan en la tarjeta de memoria. Inserte la tarjeta con los contactos hacia arriba en la ranura para tarjetas
hasta que encaje. Para retirar la tarjeta, empuje la tarjeta brevemente hacia arriba para
desbloquearla. La tarjeta saldrá un poquito y se la puede retirar.

10
Funcionamiento
Aspectos generales Manipule las fotos, diapositivas y negativos con especial cuidado. Cualquier impureza, arañazo y huella quedarán claramente visibles al escanearlos. Por ello debería evitar tocar la superficie de la imagen. Si es posible, limpie cuidadosamente los soportes antes de insertarlos en el escáner.
Escanear fotos Inserte la foto que desee escanear en uno de los tres soportes de fotos.
Seleccione el soporte cuyo tamaño se ajuste mejor al de la foto.
Inserte el soporte de fotos en la ranura para fotos. La parte delantera de la
imagen debe estar de cara a la parte delantera del aparato. Por el soporte de fotos, el aparato distingue de qué formato se trata y lo ajusta automáticamente. Para retirar el soporte de fotos, extráigalo con cuidado de la ranura.
¡NOTA! En el caso de fotos cuyo tamaño difiera del del soporte de fotos (p. ej., fotos de Polaroid), la foto puede torcerse o caerse del soporte al insertarla en el soporte o extraerla de éste, con lo cual se podría dañar el aparato y/o la foto. Para tales fotos hay que recortar una base de cartulina o papel con el tamaño de uno de los soportes de fotos y pegar la foto con adhesivo para fotos (a la venta en comercios especializados).
11
ES
DE
EN
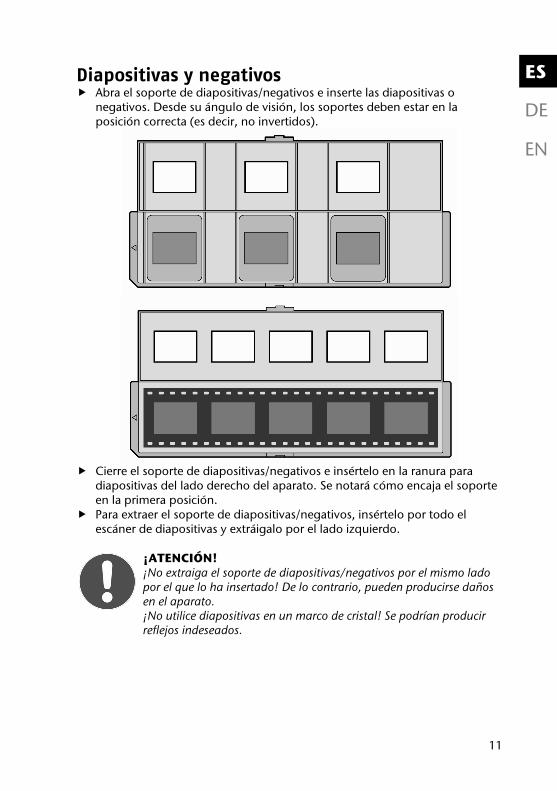
Diapositivas y negativos Abra el soporte de diapositivas/negativos e inserte las diapositivas o
negativos. Desde su ángulo de visión, los soportes deben estar en la posición correcta (es decir, no invertidos).
Cierre el soporte de diapositivas/negativos e insértelo en la ranura para
diapositivas del lado derecho del aparato. Se notará cómo encaja el soporte en la primera posición.
Para extraer el soporte de diapositivas/negativos, insértelo por todo el escáner de diapositivas y extráigalo por el lado izquierdo.
¡ATENCIÓN! ¡No extraiga el soporte de diapositivas/negativos por el mismo lado por el que lo ha insertado! De lo contrario, pueden producirse daños en el aparato. ¡No utilice diapositivas en un marco de cristal! Se podrían producir reflejos indeseados.

12
¡NOTA! El soporte de negativos cumple el estándar ISO. En caso de un formato no estandarizado, los orificios de transporte de una película podrían no coincidir con el soporte de negativos. En tal caso, podrían generarse bandas negras en el escaneo que, no obstante, pueden eliminarse fácilmente con un software de edición de imágenes. El soporte de diapositivas sujeta las diapositivas junto con el marco,
así que no hace falta sacarlas del marco.
Corrección de la exposición Mediante la corrección del valor de la exposición (EV = Exposure Value) se pueden ajustar las imágenes que sin un ajuste saldrían demasiado claras u oscuras. Se puede ajustar el valor en 9 niveles entre +2,0 y --2,0. En caso de condiciones de luz débil, utilice un valor positivo, y con luz fuerte, un valor negativo. Pulse la tecla para ajustar la corrección de la exposición o elija la opción
EV en el menú de configuración del modo de escaneo correspondiente.
Seleccione el valor que desee con las teclas PLAYBACK y MENU, y confirme la selección con la tecla COPY/ENTER.
13
ES
DE
EN
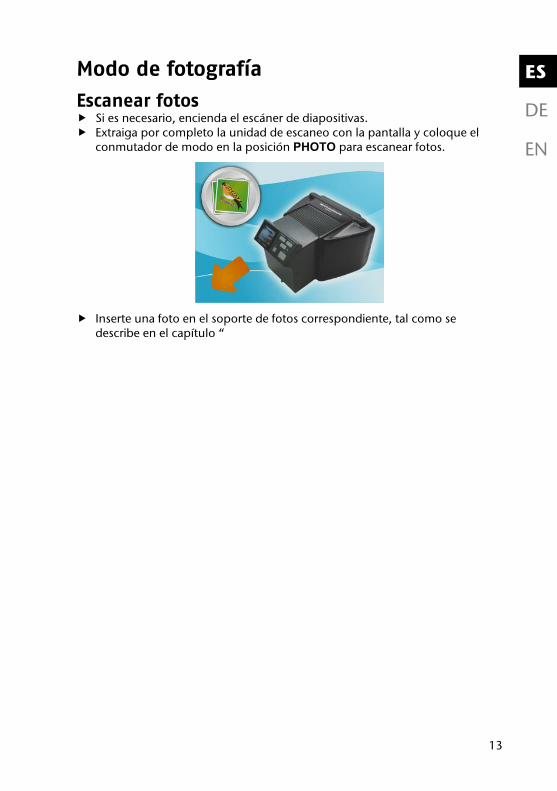
Modo de fotografía
Escanear fotos Si es necesario, encienda el escáner de diapositivas. Extraiga por completo la unidad de escaneo con la pantalla y coloque el
conmutador de modo en la posición PHOTO para escanear fotos.
Inserte una foto en el soporte de fotos correspondiente, tal como se describe en el capítulo “

14
Funcionamiento”, página 10, e inserte el soporte en la ranura de la parte superior del aparato.
El tamaño de la foto que se va a escanear se reconoce automáticamente y se ajusta en función del soporte de fotos utilizado. Ajuste la corrección de la exposición correspondientemente; para ello, pulse
la tecla y seleccione un valor entre +2.0 y -2.0. Pulse la tecla COPY/ENTER para escanear la foto que desee. La foto se
guardará en la memoria interna o en la tarjeta de memoria insertada.
Menú de configuración del modo de fotografía Acceda al menú de configuración con la tecla MENU. Seleccione la
opción que desee con las teclas PLAYBACK y MENU, y confirme la selección con la tecla COPY/ENTER.
Modo de captura (HOME)
Con esta opción volverá al modo de captura.
Formateo Con esta opción se formatea la memoria interna o la tarjeta de memoria (si hay una insertada).
Seleccione () para formatear la memoria o (X) para cancelar el proceso.
Salida de TV Seleccione la norma de televisión del televisor que tenga conectado.

15
ES
DE
EN
Seleccione la norma NTSC o PAL con las teclas PLAYBACK y MENU, y confirme la selección con la tecla COPY/ENTER.

16
Corrección de la exposición Seleccione en esta opción el valor de exposición adecuado para la captura.
Pulse la tecla para ajustar la corrección de la exposición o elija la opción EV en el menú de configuración del modo de escaneo correspondiente.
Seleccione el valor que desee con las teclas PLAYBACK y MENU, y confirme la selección con la tecla COPY/ENTER.

17
ES
DE
EN
Modo de diapositivas/negativos
Escanear diapositivas/negativos Si es necesario, encienda el escáner de diapositivas. Inserte por completo la unidad de escaneo con la pantalla y coloque el
conmutador de modo en la posición FILM para escanear diapositivas o negativos.
Inserte las diapositivas o la película de negativos en el soporte correspondiente, tal como se describe en el capítulo “

18
Funcionamiento”, página 10, e inserte el soporte en la ranura del lado derecho del aparato.
Pulse ahora la tecla MENU y seleccione la opción Tipo de película. Indique aquí si desea escanear diapositivas, una tira de imágenes en blanco
y negro o una tira de negativos. Ajuste la corrección de la exposición correspondientemente; para ello, pulse
la tecla y seleccione un valor entre +2.0 y -2.0. Ajuste la resolución que desee para el escaneo. Pulse la tecla COPY/ENTER para escanear las diapositivas o los negativos
que desee.
Menú de configuración del modo de diapositivas/negativos Acceda al menú de configuración con la tecla MENU. Seleccione la
opción que desee con las teclas PLAYBACK y MENU, y confirme la selección con la tecla COPY/ENTER.

19
ES
DE
EN
Modo de captura (HOME) Con esta opción volverá al modo de captura.
Tipo de película
Establezca con esta opción el tipo de película de la imagen que va a escanear. Podrá seleccionar entre diapositivas, película en blanco y negro, y película negativa.
Resolución
La resolución de la imagen escaneada se puede ajustar a 1800 ó 3600 DPI.

20
Formateo Con esta opción se formatea la memoria interna o la tarjeta de memoria (si hay una insertada).
Seleccione () para formatear la memoria o (X) para cancelar el proceso.
Salida de TV Seleccione la norma de televisión del televisor que tenga conectado.
Seleccione la norma NTSC o PAL con las teclas PLAYBACK y MENU, y confirme la selección con la tecla COPY/ENTER.

21
ES
DE
EN
Corrección de la exposición Seleccione en esta opción el valor de exposición adecuado para la captura.
Pulse la tecla para ajustar la corrección de la exposición o elija la opción EV en el menú de configuración del modo de escaneo correspondiente.
Seleccione el valor que desee con las teclas PLAYBACK y MENU, y confirme la selección con la tecla COPY/ENTER.
Inversión Esta opción permite girar la imagen 90° cada vez.
Seleccione la rotación de imagen que desee y confirme la selección con la tecla COPY/ENTER.
22
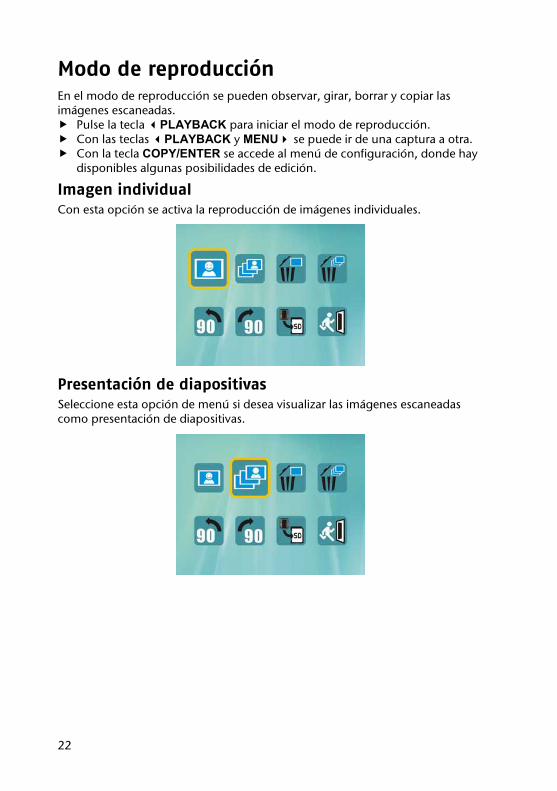
Modo de reproducción En el modo de reproducción se pueden observar, girar, borrar y copiar las imágenes escaneadas. Pulse la tecla PLAYBACK para iniciar el modo de reproducción. Con las teclas PLAYBACK y MENU se puede ir de una captura a otra. Con la tecla COPY/ENTER se accede al menú de configuración, donde hay
disponibles algunas posibilidades de edición.
Imagen individual Con esta opción se activa la reproducción de imágenes individuales.
Presentación de diapositivas Seleccione esta opción de menú si desea visualizar las imágenes escaneadas como presentación de diapositivas.

23
ES
DE
EN
Borrar Seleccione esta opción para borrar la imagen visualizada.
Borrar todo Con esta opción se borran todas las imágenes guardadas.
Girar 90° (en sentido antihorario) Con esta opción se puede girar la imagen escaneada 90° en sentido antihorario. Esta opción se puede repetir tantas veces como se desee.

24
Girar 90° (en sentido horario) Con esta opción se puede girar la imagen escaneada 90° en sentido horario. Esta opción se puede repetir tantas veces como se desee.
Copiar en una tarjeta SD Esta opción permite copiar en una tarjeta SD todas las imágenes escaneadas que haya en la memoria interna.
Salir Seleccione esta opción para salir del menú.

25
ES
DE
EN
Transferir los datos al ordenador Para transferir las capturas de la memoria interna, el escáner ofrece dos posibilidades. 1) Copiar todos los datos de la memoria interna en una tarjeta SD y utilizar
ésta para transferir los datos. 2) Conectar el escáner al ordenador con el cable USB suministrado. Si conecta el escáner directamente al ordenador mediante USB, se reconocerá como un soporte de datos intercambiable y los datos se podrán leer como de un soporte de datos intercambiable.

26
Instalación del software El programa suministrado es “ArcSoft MediaImpression”, un programa con el que se pueden editar las imágenes posteriormente. Tenga en cuenta los siguientes puntos para instalar el programa correctamente:
¡ATENCIÓN! Al instalar programas o controladores pueden quedar sobrescritos y/o modificados algunos archivos importantes. Para poder acceder a los archivos originales en caso de eventuales problemas después de la instalación, aconsejamos que efectúe una copia de seguridad de su disco duro antes de iniciar la instalación.
Inserte el CD suministrado que lleva la indicación “Software” para iniciar automáticamente la instalación.
Siga las indicaciones de la pantalla. Reinicie el ordenador tras instalar todos los controladores y el software. Si no funciona el inicio automático, es posible que la función de ejecución automática esté desactivada. En tal caso, proceda del siguiente modo: Abra el menú “Inicio” y seleccione la opción “Ejecutar”. Especifique la letra de la unidad de CD-ROM seguida de dos puntos y
“autorun.exe”. Siga las indicaciones de la pantalla. Reinicie el ordenador tras instalar todos los controladores y el software.
¡NOTA! Una vez terminada la instalación del software, en el ordenador encontrará nuevos grupos de programas con varios programas y archivos de ayuda. Para obtener ayuda directa para el programa activo en ese momento, pulse la tecla F1.

27
ES
DE
EN
Limpieza y mantenimiento
Limpieza Limpie la carcasa con un paño húmedo. Utilice el cepillo de limpieza suministrado para limpiar el campo de escaneo
de dentro. Elimine con cuidado el polvo que haya en el campo de escaneo con la
superficie aterciopelada del cepillo. No utilice disolventes ni productos de limpieza corrosivos o aerosoles.
¡ATENCIÓN! El cepillo de limpieza sólo debe insertarse en el aparato con el lado aterciopelado hacia abajo. De lo contrario, el cepillo puede atascarse en el aparato y rayar el campo de escaneo.
Reparación Rogamos que se dirija a nuestro Service Center en caso de problemas técnicos con su aparato. La reparación es competencia exclusiva de nuestros talleres autorizados.
28
Eliminación
Embalaje Su aparato está embalado para protegerlo contra eventuales daños durante el transporte. Los embalajes están hechos a partir de materiales que pueden desecharse de forma ecológica y ser entregados al circuito de reciclaje.
Aparato No tire bajo ningún concepto el aparato al final de su vida útil a la basura doméstica normal. Infórmese sobre las posibilidades de las que dispone para eliminarlo de forma respetuosa con el medio ambiente.

29
ES
DE
EN
Especificaciones técnicas Escáner Conexión USB 1.1 Sensor de imágenes Sensor CMOS de 5 megapíxeles Diafragma F = 5,5 Monitor LCD Pantalla LCD de 6,1 cm / 2,4" Resolución de escaneo 1.800 dpi (3.600 dpi interpolados) Dimensiones (largo x altura x anchura) 235 x 165 x 160 mm Memoria gráfica: Memoria interna de 32 MB Externa: Tarjeta SD/SDHC Sistema operativo Windows XP SP3 / Vista SP1/7
Fuente de alimentación USB Fabricante: Flypower Número de modelo: PS08IAFAK100UE Tensión de entrada: CA 100 - 240 V ~ 50/60 Hz, 0,2 A Tensión de salida: CC 5 V 1 A
¡Reservado el derecho a realizar modificaciones técnicas!

30
1
ES
DE
EN
Inhaltsverzeichnis Hinweise zu dieser Anleitung ............................................................ 3
In dieser Anleitung verwendete Symbole und Signalwörter .......................... 3
Bestimmungsgemäßer Gebrauch .................................................................. 4
Sicherheitshinweise ........................................................................... 5
Gefahren für Kinder und Personen mit eingeschränkter Fähigkeit, Geräte zu bedienen ...................................................................................................... 5
Betriebssicherheit .......................................................................................... 5
Aufstellungsort ............................................................................................. 5
Umgebungstemperatur ................................................................................ 6
Elektromagnetische Verträglichkeit ............................................................... 6
Sicherheit beim Anschließen ......................................................................... 6
Datensicherung ............................................................................................ 6
Niemals selbst reparieren .............................................................................. 6
Lieferumfang ..................................................................................... 7
Systemanforderungen .................................................................................. 7
Geräteübersicht ................................................................................. 8
Inbetriebnahme ................................................................................ 9
Stromanschluss ............................................................................................. 9
Gerät ein-/ausschalten .................................................................................. 9
SD-Karten einsetzen und herausnehmen ...................................................... 9
Bedienung .......................................................................................10
Allgemeines ................................................................................................ 10
Fotos scannen ............................................................................................. 10
Dias und Negative ....................................................................................... 11
Belichtungskorrektur ................................................................................... 12
Foto Modus ......................................................................................13
Foto scannen .............................................................................................. 13
Einstellungsmenü Foto-Modus ................................................................... 13

2
Dia- / Negativ-Modus ....................................................................... 16
Dia/Negativ scannen ................................................................................... 16
Einstellungsmenü Dia-/Negativ-Modus ....................................................... 16
Wiedergabe Modus .......................................................................... 20
Übertragen der Daten auf den Computer ........................................ 23
Installation der Software ................................................................. 24
Reinigung & Wartung ..................................................................... 25
Reinigung .................................................................................................... 25
Reparatur .................................................................................................... 25
Entsorgung ...................................................................................... 26
Technische Daten ............................................................................ 27

3
ES
DE
EN
Hinweise zu dieser Anleitung Lesen Sie vor Inbetriebnahme die Sicherheitshinweise aufmerksam durch. Beachten Sie die Warnungen auf dem Gerät und in der Be-dienungsanleitung. Bewahren Sie die Bedienungsanleitung immer in Reichweite auf. Wenn Sie das Gerät verkaufen oder weiter geben, händigen Sie unbedingt auch diese Anleitung und die Garantiekarte aus.
In dieser Anleitung verwendete Symbole und Signalwör-ter
GEFAHR!Warnung vor unmittelbarer Lebensgefahr! WARNUNG! Warnung vor möglicher Lebensgefahr und/oder schweren irreversiblen Verletzungen!
VORSICHT!Hinweise beachten, um Verletzungen und Sachschäden zu ver-meiden! ACHTUNG! Hinweise beachten, um Sachschäden zu vermeiden!
HINWEIS!Weiterführende Information für den Gebrauch des Geräts.
HINWEIS!Hinweise in der Bedienungsanleitung beachten!
WARNUNG!Warnung vor Gefahr durch elektrischen Schlag!
Aufzählungspunkt / Information über Ereignisse während der Bedienung
Auszuführende Handlungsanweisung

4
Bestimmungsgemäßer Gebrauch Dieses Gerät dient zur Digitalisierung Ihrer Dias oder Negative. Die Aufzeich-nungen werden auf einen Computer zur Weiterverarbeitung übertragen und dort gespeichert. Mit der mitgelieferten Software können Sie die Aufzeichnun-gen in digitaler Form verändern. Das Gerät ist nur für den privaten Gebrauch bestimmt und nicht zur gewerbli-chen Nutzung geeignet.

5
ES
DE
EN
Sicherheitshinweise Gefahren für Kinder und Personen mit eingeschränkter Fähigkeit, Geräte zu bedienen Dieses Gerät ist nicht dafür bestimmt, durch Personen (einschließlich Kinder) mit eingeschränkten physischen, sensorischen oder geistigen Fähigkeiten oder mangels Erfahrung und/oder mangels Wissen benutzt zu werden, es sei denn, sie werden durch eine für Ihre Sicherheit zuständige Person beaufsichtigt oder erhielten von Ihnen Anweisungen, wie das Gerät zu benutzen ist. Kinder sollen beaufsichtigt werden, um sicherzustellen, dass sie nicht mit dem Gerät spielen. Kinder darf der Gebrauch des Geräts nicht ohne Aufsicht erlaubt werden. Bewahren Sie das Gerät und das Zubehör an einem für Kinder unerreichbaren Platz auf.
GEFAHR! Halten Sie auch die Verpackungsfolien von Kindern fern. Es besteht Erstickungsgefahr!
Betriebssicherheit Führen Sie keine Gegenstände durch die Schlitze und Öffnungen ins Innere
des Gerätes. Dies könnte zu einem elektrischen Kurzschluss oder gar zu Feuer führen, was die Beschädigung Ihres Gerätes zur Folge hat.
Neue Geräte können in den ersten Betriebsstunden einen typischen, un-vermeidlichen aber völlig ungefährlichen Geruch abgeben, der im Laufe der Zeit abnimmt. Um der Geruchsbildung entgegenzuwirken, empfehlen wir Ihnen, den Raum regelmäßig zu lüften. Wir haben bei der Entwicklung dieses Produktes Sorge dafür getragen, dass geltende Grenzwerte deutlich unterschritten werden.
Verwenden Sie ausschließlich den mitgelieferten Netzadapter. Versuchen Sie nie, den Netzadapter an andere Buchsen anzuschließen, da sonst Schä-den verursacht werden können.
Aufstellungsort Halten Sie Ihr Geräte und alle Komponenten von Feuchtigkeit fern und
vermeiden Sie Staub, Hitze und direkte Sonneneinstrahlung, um Betriebs-störungen zu vermeiden. Betreiben Sie das Gerät nicht im Freien.
Sorgen Sie für eine geeignete Umgebungstemperatur. Stellen und betreiben Sie alle Komponenten auf einer stabilen, ebenen und
vibrationsfreien Unterlage, um Stürze des Gerätes zu vermeiden. Das Gerät darf nicht Tropf- oder Spritzwasser ausgesetzt werden. Stellen Sie
keine mit Flüssigkeit gefüllten Gefäße (Vasen oder ähnliches) auf das Gerät. Das Gefäß kann umkippen und die Flüssigkeit kann die elektrische Sicher-heit beeinträchtigen.

6
Umgebungstemperatur Das Gerät kann bei einer Umgebungstemperatur von 10°C bis 30°C und bei
einer relativen Luftfeuchtigkeit von 35% - 80% (nicht kondensierend) be-trieben werden.
Im ausgeschalteten Zustand kann das Gerät gelagert werden bei -10°C bis 60°C und bei einer relativen Luftfeuchtigkeit von 20% - 80% (nicht konden-sierend).
ACHTUNG! Warten Sie nach einem Transport des Gerätes solange mit der Inbe-triebnahme, bis das Gerät die Umgebungstemperatur angenommen hat. Bei großen Temperatur- oder Feuchtigkeitsschwankungen kann es durch Kondensation zur Feuchtigkeitsbildung innerhalb des Gerätes kommen, die einen elektrischen Kurzschluss verursachen kann.
Elektromagnetische Verträglichkeit Beim Anschluss des Gerätes müssen die Richtlinien für elektromagnetische Verträglichkeit (EMV) eingehalten werden. Halten Sie mindestens einen Meter Abstand von hochfrequenten und magneti-schen Störquellen (Fernsehgerät, Lautsprecherboxen, Mobiltelefon usw.), um Funktionsstörungen und Datenverlust zu vermeiden.
Sicherheit beim Anschließen Beachten Sie nachfolgende Hinweise, um Ihr Gerät ordnungsgemäß anzu-schließen: Verlegen Sie die Kabel so, dass niemand darauf treten oder darüber stolpern
kann. Stellen Sie keine Gegenstände auf die Kabel, da diese sonst beschädigt wer-
den könnten.
Datensicherung HINWEIS! Machen Sie nach jeder Aktualisierung Ihrer Daten Sicherungskopien auf externe Speichermedien (z.B. CD-R). Die Geltendmachung von Schadensersatzansprüchen für Datenver-lust und dadurch entstandene Folgeschäden wird ausgeschlossen.
Niemals selbst reparieren WARNUNG! Versuchen Sie auf keinen Fall, das Gerät selbst zu öffnen oder zu reparieren. Es besteht die Gefahr des elektrischen Schlags!
Wenden Sie sich im Störungsfall an das Medion Service Center oder eine andere geeignete Fachwerkstatt, um Gefährdungen zu vermeiden.

7
ES
DE
EN
Lieferumfang Bitte überprüfen Sie die Vollständigkeit der Lieferung und benachrichtigen Sie uns bitte innerhalb von 14 Tagen nach dem Kauf, falls die Lieferung nicht kom-plett ist. Mit dem von Ihnen erworbenen Paket haben Sie erhalten: Digitaler Scanner Reinigungsbürste Diapositiv-Halter Negativfilm-Halter Fotohalter 9x13 Fotohalter 10x15 Fotohalter 13x18 USB-Anschlusskabel USB-Netzstecker AV-Kabel Bildbearbeitungssoftware Bedienungsanleitung und Garantiedokumente
Systemanforderungen Computer PC/AT-kompatibler Computer Prozessorleistung ab Pentium Klasse mit 1,6 GHz oder mehr Betriebssystem Windows® XP SP3/Vista SP1/7 Installation CD-/DVD-Laufwerk Anschluss USB Schnittstelle

8
Geräteübersicht
1) Einschub für Fotohalter 2) Einschub für Diapositiv/Negativ-Halter 3) EV-Taste: Einstellung des Belichtungswerts; in den Menüs: verlassen der
Menüs 4) COPY/ENTER-Taste: Im Scan-Modus: auslösen des Scanvorgangs; in
den Menüs: bestätigen der Auswahl 5) SD/SDHC-Karten Einschub 6) USB-Anschluss 7) AV-Ausgang 8) Moduswahlschalter 9) STANDBY-Schalter 10) Betriebs-LED 11) LC-Display 12) /PLAYBACK-Taste: In den Menüs: Steuerung nach links/Im Diaschau-
Modus: Starten der Wiedergabe 13) /MENÜ-Taste: Im Menü: Steuerung nach rechts/Im Scan-Modus: auf-
rufen des Menüs

9
ES
DE
EN
Inbetriebnahme Stromanschluss Verbinden Sie das USB-Kabel mit dem USB-Netzadapter. Stecken Sie den Netzadapter in eine leicht zugängliche Steckdose. Verbinden Sie den Mini-USB-Stecker mit dem USB-Anschluss an der Geräte-
front. HINWEIS! Immer wenn das Gerät an das Stromnetz angeschlossen wird, startet das Gerät automatisch.
Gerät ein-/ausschalten Drücken Sie die STANDBY-Taste, um das Gerät einzuschalten. Drücken Sie die STANDBY-Taste erneut, um das Gerät auszuschalten.
SD-Karten einsetzen und herausnehmen Wenn keine Karte eingelegt ist, werden die Aufnahmen im internen Speicher abgelegt. Bitte beachten Sie, dass der interne Speicher auf 32 MB begrenzt ist. Verwenden Sie daher eine SD -Speicherkarte, um die Speicherkapazität zu er-höhen. Wenn eine Karte eingelegt ist, werden die Aufnahmen auf der Karte gespeichert. Stecken Sie die Karte mit den Kontakten nach oben in den Kartenschacht,
bis sie einrastet. Um die Karte zu entnehmen, drücken Sie die Karte kurz nach oben, um sie
zu entriegeln. Die Karte wird ein Stück heraus geschoben und kann ent-nommen werden.

10
Bedienung Allgemeines Behandeln Sie Fotos, Dias und Negative mit besonderer Vorsicht. Jede Ver-schmutzung, jeder Kratze und jeder Fingerabdruck wird auf dem späteren Scan deutlich erkennbar sein. Versuchen Sie daher, eine Berührung der eigentlich Bildoberfläche zu vermeiden. Falls möglich, säubern Sie die Medien vor dem Einlegen in den Scanner vorsichtig.
Fotos scannen Schieben Sie das Foto, das Sie scannen wollen, in einen der drei Fotohalter.
Wählen Sie den Halter, dessen Größe der des Fotos am ehesten entspricht.
Schieben Sie den Fotohalter in den Foto-Einschub. Die Vorderseite des Bildes
muss hierbei zur Vorderseite des Gerätes zeigen. Das Gerät erkennt am Fotohalter um welches Format es sich handelt und stellt dieses automatisch ein. Wenn Sie den Fotohalter entnehmen wollen, ziehen Sie ihn vorsichtig wie-
der aus dem Einschub heraus.
HINWEIS! Bei Fotos mit Formaten, die von der Größe des Fotohalters abwei-chen (z. B. Polaroids), kann das Bild beim Einlegen und Heraus-nehmen des Halter verkanten oder aus dem Halter herausfallen. Die kann zu Schäden am Gerät und/oder Foto führen. Schneiden Sie für solche Fotos eine Auflage aus Pappe bzw. Papier in der entsprechenden Größe eines der Fotohalter zurecht und kleben Sie das Foto mit Fotokleber (erhältlich im Fachhandel) auf.

11
ES
DE
EN
Dias und Negative Öffnen Sie den Dia- oder Negativ-Halter und legen Sie die Dais oder Negati-
ve ein. Von Ihrem Blickwinkel aus müssen die Medien in der korrekten Posi-tion liegen (also nicht seitenverkehrt).
Schließen Sie den Dia- oder Negativ-Halter und schieben Sie ihn in den
Diaschacht an der rechten Seite des Geräts. Der Halter rastet in der ersten Position spürbar ein.
Wenn Sie den Dia- oder Negativ-Halter wieder entnehmen wollen, schieben Sie ihn ganz durch den Diascanner und ziehen Sie ihn auf der linken Seite wieder heraus.
ACHTUNG! Ziehen Sie den Dia- oder Negativ-Halter auf keinen Fall an der Seite wieder heraus, an der Sie ihn hineingeschoben haben! Die kann zu Schäden am Gerät führen. Verwenden Sie keine Glasrahmendias! Diese können zu unerwünsch-ten Spiegelungen führen.

12
HINWEIS! Der Negativ-Halter entspricht dem ISO-Standard. Im Fall eines nicht standardisierten Formates stimmen die Förderlöcher eines Films möglicherweise nicht mit dem Negativ-Halter überein. Dies kann zu schwarzen Balken auf dem Scan führen, diese lassen sich mit einer Bildbearbeitungssoftware leicht entfernen. Der Diahalter fasst Dias mitsamt des Rahmens, die Dias müssen also nicht aus dem Rahmen entfernt werden.
Belichtungskorrektur Durch Korrektur des Belichtungswerts (EV = Exposure Value) können Sie Bilder anpassen, die ohne Einstellung zu hell oder zu dunkel würden. Sie können den Wert in 9 Stufen zwischen +2,0 und -2,0 einstellen. Verwenden Sie bei schwachen Lichtverhältnissen einen positiven Wert und bei starkem Licht einen negativen Wert. Drücken Sie die Taste ,um die Belichtungskorrektur einzustellen oder
wählen Sie im Einstellungsmenü des jeweiligen Scan-Modus die Option EV.
Wählen Sie mit den Tasten PLAYBACK und MENU, den gewünschten Wert und bestätigen Sie die Auswahl mit der Taste COPY/ENTER.

13
ES
DE
EN
Foto Modus Foto scannen Schalten Sie den Diascanner ggf. ein. Ziehen Sie die Scan-Einheit mit dem Display komplett heraus und schieben
Sie den Moduswahlschalter in die Position PHOTO, wenn sie Fotos einscan-nen möchten.
Legen Sie ein Foto wie im Kapitel „Bedienung“ auf Seite 10 beschrieben in einen entsprechenden Foto-Halter und schieben Sie diesen in den Einschub auf der Geräteoberseite.
Die Größe des zu scannenden Foto wird automatisch erkannt und eingestellt, je nachdem welchen Foto-Halter Sie benutzen. Stellen Sie die die Belichtungskorrektur dem Bild entsprechend ein, drücken
Sie hierzu die Taste und wählen Sie einen Wert zwischen +2.0 und -2.0. Drücken Sie in die Taste COPY/ENTER, um das gewünschte Foto zu scan-
nen. Das Foto wird im internen Speicher oder auf der eingelegten Speicher-karte gesichert.
Einstellungsmenü Foto-Modus Rufen Sie das Einstellungsmenü mit der Taste MENU auf. Mit den Tasten PLAYBACK und MENU wählen Sie die gewünschte Option aus und bestätigen die Auswahl mit der Taste COPY/ENTER.
Aufnahmemodus (HOME)
Mit dieser Option kehren Sie in den Aufnahmemodus zurück.

14
Format Mit dieser Option formatieren Sie den internen Speicher bzw. falls eine Spei-cherkarte eingelegt ist, diese Speicherkarte.
Wählen Sie (), um den Speicher zu formatieren oder (X), um den Vor-
gang abzubrechen.
TV-Ausgabe Wählen Sie hier die Fernsehnorm für ein angeschlossenes TV-Gerät aus.
Wählen Sie mit den Tasten PLAYBACK und MENU die gewünschte Norm NTSC oder PAL und bestätigen Sie die Auswahl mit der Taste CO-PY/ENTER.

15
ES
DE
EN
Belichtungskorrektur Wähle Sie in dieser Option den passenden Belichtungswerts für die Aufnahme aus.
Drücken Sie die Taste ,um die Belichtungskorrektur einzustellen oder wählen Sie im Einstellungsmenü des jeweiligen Scan-Modus die Option EV.
Wählen Sie mit den Tasten PLAYBACK und MENU, den gewünschten Wert und bestätigen Sie die Auswahl mit der Taste COPY/ENTER.

16
Dia- / Negativ-Modus Dia/Negativ scannen Schalten Sie den Diascanner ggf. ein. Schieben Sie die Scan-Einheit mit dem Display komplett herein und schie-
ben Sie den Moduswahlschalter in die Position FILM, wenn Sie Dias oder Negative einscannen wollen.
Legen Sie die Dias oder Negativfilme wie im Kapitel „Bedienung“ auf Seite 10 beschrieben in einen entsprechenden Halter und schieben Sie diesen in den Einschub an der rechten Geräteseite.
Drücken Sie nun die Taste MENU und wählen Sie den Punkt Filmtyp aus. Legen Sie hier fest ob Sie ein Dia, einen Schwarz/Weiß- oder einen Negativ-
Filmstreifen scannen möchten. Stellen Sie die die Belichtungskorrektur dem Bild entsprechend ein, drücken
Sie hierzu die Taste und wählen Sie einen Wert zwischen +2.0 und -2.0. Stellen Sie die gewünschte Auflösung für den Scan ein. Drücken Sie die Taste COPY/ENTER, um das gewünschte Dia oder Negativ
zu scannen.
Einstellungsmenü Dia-/Negativ-Modus Rufen Sie das Einstellungsmenü mit der Taste MENU auf. Mit den Tasten PLAYBACK und MENU wählen Sie die gewünschte Option aus und bestätigen die Auswahl mit der Taste COPY/ENTER.

17
ES
DE
EN
Aufnahmemodus (HOME) Mit dieser Option kehren Sie in den Aufnahmemodus zurück.
Filmtyp
Legen Sie mit dieser Option fest, welchen Filmtyp das zu scannende Bild hat. Sie können zwischen Dia, Schwarz/Weiß-Film und Negativfilm wählen.
Auflösung
Sie können die Auflösung des gescannten Bildes auf 1800 oder 3600 DPI einstellen.

18
Format Mit dieser Option formatieren Sie den internen Speicher bzw. falls eine Spei-cherkarte eingelegt ist, diese Speicherkarte.
Wählen Sie (), um den Speicher zu formatieren oder (X), um den Vor-
gang abzubrechen.
TV-Ausgabe Wählen Sie hier die Fernsehnorm für ein angeschlossenes TV-Gerät aus.
Wählen Sie mit den Tasten PLAYBACK und MENU die gewünschte Norm NTSC oder PAL und bestätigen Sie die Auswahl mit der Taste CO-PY/ENTER.

19
ES
DE
EN
Belichtungskorrektur Wähle Sie in dieser Option den passenden Belichtungswerts für die Aufnahme aus.
Drücken Sie die Taste ,um die Belichtungskorrektur einzustellen oder wählen Sie im Einstellungsmenü des jeweiligen Scan-Modus die Option EV.
Wählen Sie mit den Tasten PLAYBACK und MENU, den gewünschten Wert und bestätigen Sie die Auswahl mit der Taste COPY/ENTER.
Spiegeln Diese Option ermöglicht das Bild um jeweils 90° zu drehen.
Wählen Sie die gewünschte Bilddrehung und bestätigen Sie die Auswahl mit der Taste COPY/ENTER.

20
Wiedergabe Modus Im Wiedergabe-Modus können Sie die gescannten Bilder betrachten, drehen, löschen und kopieren. Drücken Sie die Taste PLAYBACK, um den Wiedergabe-Modus zu star-
ten. Mit den Tasten PLAYBACK und MENU können Sie zwischen den ein-
zelnen Aufnahmen wechseln. Mit der Taste COPY/ENTER gelangen Sie in das Einstellungsmenü, hier
finden Sie einige Bearbeitungsmöglichkeiten.
Einzelbild Mit dieser Option schalten Sie die Einzelbild-Wiedergabe ein.
Diashow Wenn Sie die gescannten Bilder als Diashow anzeigen wollen, wählen Sie diese Menüoption.

21
ES
DE
EN
Löschen Wählen Sie diese Option um das angezeigte Bild zu löschen.
Alle Löschen Mit dieser Option löschen Sie alle gespeicherten Bilder.
Drehen 90° (gegen den Uhrzeigersinn) Drehen Sie mit Hilfe dieser Option das gescannte Bild um 90° gegen den Uhr-zeigersinn. Dies können Sie beliebig oft wiederholen.

22
Drehen 90° (im Uhrzeigersinn) Drehen Sie mit Hilfe dieser Option das gescannte Bild um 90° im Uhrzeigersinn. Dies können Sie beliebig oft wiederholen.
Auf SD-Karte kopieren Diese Option ermöglicht es Ihnen alle gescannten Bilder im internen Speicher auf eine SD-Karte zu kopieren.
Exit Um das Menü zu verlassen wählen Sie diesen Menüpunkt.

23
ES
DE
EN
Übertragen der Daten auf den Computer Um die Aufnahmen aus dem internen Speicher zu übertrage, bietet Ihnen der Scanner zwei Möglichkeiten. 1) Kopieren Sie alle Daten aus dem internen Speicher auf eine SD-Karte
und nutzen diese zur Datenübertragung. 2) Schließen Sie den Scanner mit dem mitgelieferten USB-Kabel an den
Rechner an. Wenn Sie den Scanner direkt via USB an den Computer anschließen, wird die-ser wie ein Wechseldatenträger erkannt und die Daten können wie von einem Wechseldatenträger eingelesen werden.

24
Installation der Software Bei dem mitgeliefertem Programm handelt es sich um „ArcSoft MediaImpressi-on“, ein Programm mit dem Sie Ihre Bilder nachträglich bearbeiten können. Bitte beachten Sie folgende Punkte um die Installation des Programmes erfolg-reich durchzuführen:
ACHTUNG! Bei der Installation von Programmen oder Treibern können wichtige Dateien überschrieben und verändert werden. Um bei eventuellen Problemen nach der Installation auf die Originaldateien zugreifen zu können, sollten Sie vor der Installation eine Sicherung Ihres Festplatt-einhaltes erstellen.
Legen Sie die mitgelieferte CD mit der Aufschrift Software ein, um die Instal-lation automatisch zu starten.
Folgen Sie den Anweisungen auf dem Bildschirm. Starten Sie nach der Installation aller Treiber und Software ihren Computer
erneut. Sollte der automatische Start nicht funktionieren, ist wahrscheinlich die sog. „Autorun“ –Funktion deaktiviert, gehen Sie in diesem Fall wie folgt vor: Öffnen Sie das „Startmenü“ und wählen Sie den Eintrag „Ausführen“ aus. Geben Die nun den Laufwerksbuchstaben des CD-Rom-Laufwerkes ein,
gefolgt von einem Doppelpunkt und „autorun.exe“. Folgen Sie den Anweisungen auf dem Bildschirm. Starten Sie nach der Installation aller Treiber und Software ihren Computer
erneut.
HINWEIS! Ist die Softwareinstallation abgeschlossen, finden Sie neue Pro-grammgruppen mit diversen Programmen und Hilfsdateien auf Ihrem Computer. Um direkte Hilfe von dem gerade aktivem Pro-gramm zu erhalten, drücken Sie die F1-Taste.

25
ES
DE
EN
Reinigung & Wartung Reinigung Reinigen Sie das Gehäuse mit einem angefeuchteten Tuch. Verwenden Sie die mitgelieferte Reinigungsbürste, um das innenliegende
Scanfeld zu säubern. Wischen Sie vorsichtig mit der Samtoberfläche der Bürste den Staub vom
Scanfeld. Verwenden Sie keine Lösungsmittel, ätzende oder gasförmige Reinigungs-
mittel.
ACHTUNG! Achten Sie darauf, dass Sie die Reinigungsbürste nur mit der Samtseite nach unten in das Gerät schieben. Andernfalls kann sich die Bürste im Gerät verklemmen und das Scanfeld zerkratzen.
Reparatur Bitte wenden Sie sich an unser Service Center wenn Sie technische Probleme mit Ihrem Gerät haben. Die Reparatur ist ausschließlich unseren autorisierten Servicepartnern vorbehal-ten.

26
Entsorgung
Verpackung Ihr Gerät befindet sich zum Schutz vor Transportschäden in einer Verpackung. Verpackungen sind aus Materialien hergestellt, die um-weltschonend entsorgt und einem fachgerechten Recycling zugeführt werden können.
Gerät Werfen Sie das Gerät am Ende seiner Lebenszeit keinesfalls in den normalen Hausmüll. Erkundigen Sie sich nach Möglichkeiten einer umweltgerechten Entsorgung.

27
ES
DE
EN
Technische Daten Scanner Anschluss USB 1.1 Bild-Sensor 5 Megapixel CMOS-Sensor Blende F = 5,5 LCD Monitor 6,1 cm / 2,4“ LC-Display Scan-Auflösung 1800 dpi (3600 dpi interpoliert) Maße (L x H x B) 235 x 165 x 160 mm Bildspeicher: 32 MB interner Speicher Extern: SD- & SDHC-Karte Betriebssystem Windows XP SP3/Vista SP1/7
USB-Netzteil Hersteller: Flypower Modellnummer: PS08IAFAK100UE Eingangsspannung: AC 100 – 240 V ~ 50/60 Hz 0,2A Ausgangsspanung: DC 5V 1A
Technische Änderungen vorbehalten!

28
1
ES
DE
EN
Table of contents How to use these instructions ............................................................ 3
Symbols and key words used in these instructions ........................................ 3
Proper use .................................................................................................... 4
Safety instructions ............................................................................. 5
Dangers for children and people with reduced ability to operate machinery . 5
Operating safety ........................................................................................... 5
Setup location............................................................................................... 5
Room temperature ........................................................................................ 6
Electromagnetic compatibility ....................................................................... 6
Connecting the device safely ........................................................................ 6
Data backups ................................................................................................ 6
Never conduct repairs yourself ...................................................................... 6
Box contents ...................................................................................... 7
System requirements .................................................................................... 7
Equipment overview .......................................................................... 8
Initial operation ................................................................................ 9
Connecting the power supply ...................................................................... 9
Switching the device on/off .......................................................................... 9
Inserting and removing SD cards .................................................................. 9
Operation ........................................................................................10
General ....................................................................................................... 10
Scanning photos ......................................................................................... 10
Slides and negatives .................................................................................... 11
Correcting the exposure ............................................................................. 12
Photo mode .....................................................................................13
Scanning photos ......................................................................................... 13
Photo mode settings menu ......................................................................... 14
Slide/negative mode .......................................................................17
Scanning slides/negatives ........................................................................... 17
Slide/negative mode settings menu ............................................................ 18

2
Playback mode ................................................................................ 22
Transferring data onto your computer ............................................ 25
Installing the software .................................................................... 26
Cleaning and maintenance .............................................................. 27
Cleaning ...................................................................................................... 27
Repairs ........................................................................................................ 27
Disposal ........................................................................................... 28
Technical specifications ................................................................... 29

3
ES
DE
EN
How to use these instructions Read the safety instructions carefully before use. Note the warnings on the unit and in the operating instructions. Always keep the operating instructions close to hand. If you sell the unit or give it away, make sure to also provide these instructions and the warranty card.
Symbols and key words used in these instructions
DANGER!Warning: immediate life-threatening danger. WARNING! Warning: possible life-threatening danger and/or serious irreversible injuries.
CAUTION!Please follow these guidelines to avoid injuries and/or property damage. CAUTION! Please follow these guidelines to avoid property damage.
PLEASE NOTE!Additional information on using the device.
PLEASE NOTE!Observe any notes in the operating instructions.
WARNING!Warning: danger of electric shock.
Bullet point / information on events during operation
Tasks to be performed

4
Proper use This device lets you digitalise your slides or negatives. Scanned images are transferred to your computer for editing and stored there. The software included with the device lets you modify scanned images digitally. The device is intended for personal use only and is not suitable for commercial use.

5
ES
DE
EN
Safety instructions Dangers for children and people with reduced ability to operate machinery This device is not intended for use by people (including children) with reduced physical, sensory or mental abilities or those without experience and/or knowledge unless they are supervised by a person responsible for their safety or they have been instructed in its use. Children should be supervised to ensure that they do not play with the device. Children should not be allowed to use this device without supervision. Keep the device and its accessories out of the reach of children.
DANGER! Keep plastic packaging out of the reach of children as it can cause suffocation.
Operating safety Do not insert any items into the device through the slots and
openings. This could result in electric shock or even fire, which will damage your device.
During the first few hours of use, new appliances may give off a familiar, unavoidable but completely harmless smell, which will wear off with time. To reduce the amount of odour build-up, we recommend ventilating the room at regular intervals. We have taken appropriate measures in developing this product to ensure that legal limits are not exceeded.
Use only the power adapter supplied. Never try to connect the power adapter to other jacks as this may cause damage.
Setup location To avoid interference, keep the device and all its components away
from moisture and avoid placing it in a dusty area, near sources of heat or in direct sunlight. Do not use the appliance outside.
Ensure an appropriate room temperature. Set up and operate all components on a stable, level and vibration-free
surface to prevent the device from falling off. Keep the device away from dripping or spraying water. Do not place
objects containing water (such as vases) on the device. The object may tip over and the spilt liquid may impair the electrical safety of the product.
6
Room temperature The appliance can be operated at a room temperature of 10°C to 30°C
and a relative humidity of 35% - 80% (non-condensing). When switched off, the device may be stored at temperatures between
-10°C and 60°C and a relative humidity of 20% - 80% (non-condensing).
CAUTION! After transporting the device, wait until the device has reached room temperature before switching it on. Large changes in temperature or fluctuations in humidity can cause moisture to build up inside the device due to condensation, which can cause an electrical short circuit.
Electromagnetic compatibility You must comply with the European directives on electromagnetic compatibility (EMC) when connecting the device. Keep the device at least one metre away from high frequency or magnetic interference sources (televisions, loudspeakers, mobile telephones, etc.) to avoid malfunction and data loss.
Connecting the device safely To connect your device properly, follow these instructions:
Position the cable so that it cannot be stepped on or tripped over. Do not place any objects on the cable to avoid damaging it.
Data backups PLEASE NOTE! Always back up your data onto an external storage device (e.g. CD-R) after each update. We do not accept any liability for damage arising from loss of data or any resulting loss or damage.
Never conduct repairs yourself
WARNING! Never try to open or repair the appliance yourself, as this may cause electric shock.
In case of a failure, contact the MEDION Service Centre or other suitable repair shop.

7
ES
DE
EN
Box contents Please check your purchase to ensure that all items are included and contact us within 14 days of purchase if any components are missing. The following items are included in the box:
Digital scanner Cleaning brush Slide holder Negative film holder 9x13 photo holder 10x15 photo holder 13x18 photo holder USB cable USB power adapter AV cable Image editing software Operating instructions and warranty documents
System requirements Computer PC/AT compatible computer Processor Pentium class, 1.6 GHz or higher Operating system Windows® XP SP3/Vista SP1/7 Installation CD/DVD drive Connection USB interface

8
Equipment overview
1) Photo holder slot 2) Slide/negative holder slot 3) EV button: Used to set the exposure value / In menus: exit menu 4) COPY/ENTER button: In Scan mode: start scanning / In menus: confirm
selection 5) SD/SDHC card slot 6) USB port 7) AV output 8) Mode switch 9) STANDBY button 10) Operating LED 11) LC display 12) /PLAYBACK button: In menus: scroll left / In Slideshow mode: start
playback 13) /MENU button: In the menu: scroll right / In Scan mode: display
menu

9
ES
DE
EN
Initial operation Connecting the power supply Connect the USB cable to the USB power adapter. Plug the power adapter into an easy-to-access wall socket. Plug the mini USB cable into the USB port on the front of the device.
PLEASE NOTE! The device will start automatically once the power is turned on.
Switching the device on/off Press the STANDBY button to switch on the device. Press the STANDBY button again to switch off the device.
Inserting and removing SD cards If no memory card is inserted, photos will be stored in the internal memory. Please note that the internal memory is limited to 32 MB. To increase storage capacity, use an SD memory card. If a memory card is inserted, your photos will be stored on the card. Insert the card into the card slot with the contacts facing up until it snaps
into place. To remove the card, push up on it briefly to release it. The card will then
protrude slightly and can be removed.
10
Operation General Be sure to handle photos, slides and negatives with care. Any dirt, scratches or fingerprints will be clearly visible on the scan. Try to avoid touching the surface of the image. If possible, clean the medium before inserting it into the scanner.
Scanning photos Insert the photo you wish to scan into one of the three photo holders. Select
the holder that is closest to the size of the photo.
Insert the photo holder into the photo slot. The front side of the image must
be facing toward the front of the device. The device will recognize the size of the photo based on the selected holder and will automatically adjust its settings. To remove the photo holder, pull it out carefully from the slot.
PLEASE NOTE! If the photo is too small for the holder (e.g. polaroids), the photo may tilt or fall out of the holder when the holder is inserted or removed. This may damage the device and/or the photo. For small photos, create a template by cutting a piece of cardboard or paper to fit one of the photo holders and tape the photo onto the template using photo tape (available in specialty stores).

11
ES
DE
EN
Slides and negatives Open the slide or negative holder and insert the slides or negatives. Make
sure the slides or negatives are facing the right direction.
Close the slide or negative holder and insert it into the slide slot on the right
side of the device. To remove the slide or negative holder, push it all the way through the slide
scanner and pull it out from the left side.
CAUTION! Never remove the slide or negative holder from the same side where you inserted it. This can damage the device. Do not use glass slides. These can create unwanted reflections.
12
PLEASE NOTE! The negative holder meets the ISO standard. In the case of non-standard negative sizes, the perforations on the film may not line up with the negative holder. This can lead to black stripes on the scan, which can be easily removed with image editing software. The slide holder can accommodate slides including the frame, so you don't need to remove the slide from the frame.
Correcting the exposure By correcting the exposure value (EV), you can adjust pictures that would otherwise be too dark or too light. The EV can be set in 9 steps between +2.0 and -2.0. Choose a positive value for poor light conditions and a negative value for strong light. Press the button to correct the exposure or select the EV option from
the settings menu in Scan mode.
Using the PLAYBACK and MENU buttons, select the desired value and confirm your selection by pressing COPY/ENTER.
13
ES
DE
EN
Photo mode Scanning photos Switch on the slide scanner if necessary. Remove the scanning unit completely, including the display, and slide the
mode switch to the PHOTO position to scan photos.
Place the photo inside a matching photo holder as described in the section entitled “

14
Operation ” on page 10 and insert the holder into the slot on the top of the device. The size of the photo to be scanned is detected and the settings are adjusted automatically based on the selected photo holder. To correct the exposure level, press the button and select a value
between +2.0 and -2.0. Press the COPY/ENTER button to scan the desired photo. The photo is
saved in the internal memory or on the inserted memory card.
Photo mode settings menu Open the settings menu by pressing the MENU button. Using the PLAYBACK and MENU buttons, select the desired option and confirm your selection by pressing COPY/ENTER.
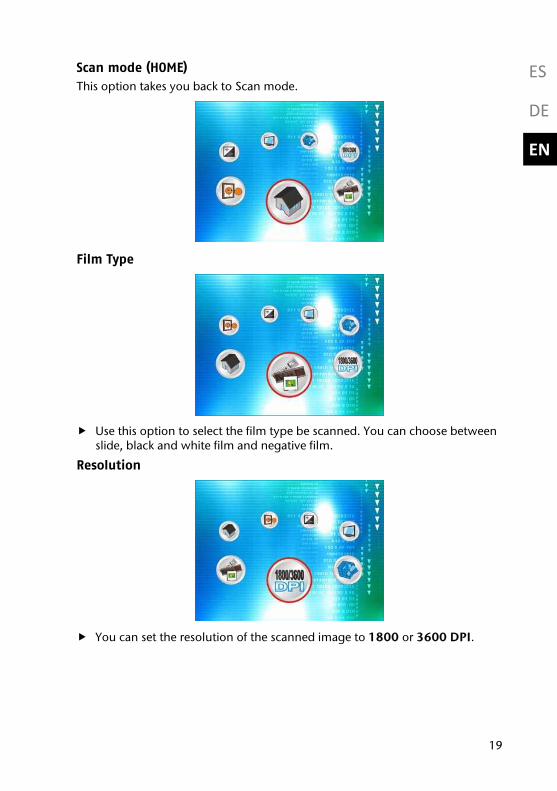
Scan mode (HOME)
This option takes you back to Scan mode.
Format This option lets you format the internal memory or inserted memory card.
Select () to format the memory or (X) to cancel.
TV output This option lets you select the appropriate TV standard for a connected TV.

15
ES
DE
EN
Using the PLAYBACK and MENU buttons, select either the NTSC or PAL standard and confirm your selection by pressing COPY/ENTER.

16
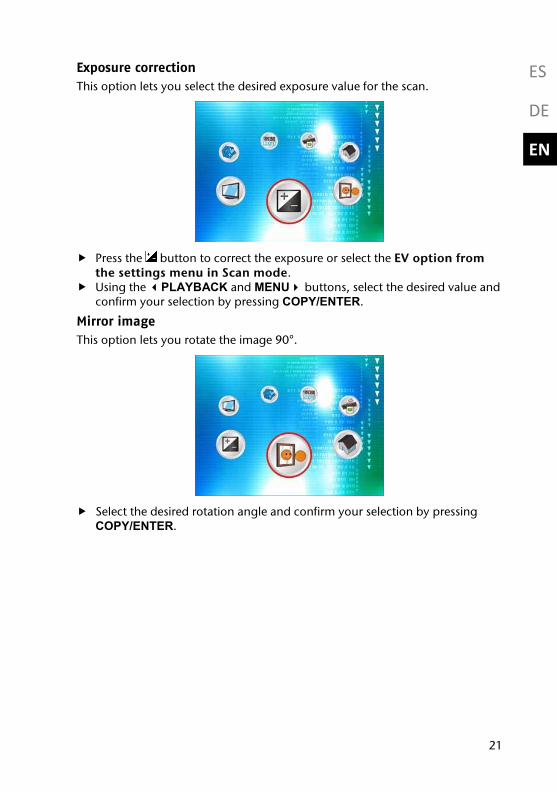
Exposure correction This option lets you select the desired exposure value for the photo.
Press the button to correct the exposure or select the EV option from the settings menu in Scan mode.
Using the PLAYBACK and MENU buttons, select the desired value and confirm your selection by pressing COPY/ENTER.

17
ES
DE
EN
Slide/negative mode Scanning slides/negatives Switch on the slide scanner. Insert the scanning unit completely, including the display, and slide the
mode switch to the FILM position to scan slides or negatives.
Place the slides or negatives inside a matching holder as described in the section entitled “

18
Operation ” on page 10 and insert the holder into the slot on the right side of the
device. Now press the MENU button and select Film Type. Select whether you’d like to scan a slide, a black and white film strip or a
negative film strip. To correct the exposure level, press the button and select a value
between +2.0 and -2.0. Set the desired resolution for the scan. Press the COPY/ENTER button to scan the desired slide or negative.
Slide/negative mode settings menu Open the settings menu by pressing the MENU button. Using the PLAYBACK and MENU buttons, select the desired option and confirm your selection by pressing COPY/ENTER.
19
ES
DE
EN
Scan mode (HOME) This option takes you back to Scan mode.
Film Type
Use this option to select the film type be scanned. You can choose between slide, black and white film and negative film.
Resolution
You can set the resolution of the scanned image to 1800 or 3600 DPI.

20
Format This option lets you format the internal memory or inserted memory card.
Select () to format the memory or (X) to cancel.
TV output This option lets you select the appropriate TV standard for a connected TV.
Using the PLAYBACK and MENU buttons, select either the NTSC or PAL standard and confirm your selection by pressing COPY/ENTER.
21
ES
DE
EN
Exposure correction This option lets you select the desired exposure value for the scan.
Press the button to correct the exposure or select the EV option from the settings menu in Scan mode.
Using the PLAYBACK and MENU buttons, select the desired value and confirm your selection by pressing COPY/ENTER.
Mirror image This option lets you rotate the image 90°.
Select the desired rotation angle and confirm your selection by pressing COPY/ENTER.

22
Playback mode In Playback mode, you can view, rotate, delete and copy scanned images. Press the PLAYBACK button to start Playback mode. Use the PLAYBACK and MENU buttons to scroll back and forth
between images. The COPY/ENTER button takes you to the settings menu, where you will
find several editing options.
Single image This option turns on single image playback.
Slideshow Select this menu option to display scanned images as a slideshow.

23
ES
DE
EN
Delete Select this option to delete the displayed image.
Delete all Use this option to delete all saved images.
Rotate 90° (counterclockwise) Use this option to rotate the scanned image 90° counterclockwise. You can repeat this action as many times as you like.

24
Rotate 90° (clockwise) Use this option to rotate the scanned image 90° clockwise. You can repeat this action as many times as you like.
Copy to an SD card This option lets you copy all scanned images from the internal memory to an SD card.
Exit Select this menu item to exit the menu.

25
ES
DE
EN
Transferring data onto your computer The scanner offers you two options for transferring scanned images from the internal memory to your computer. 1) Copy all data from the internal memory to an SD card and then use the
card to transfer the data. 2) Connect the scanner to the computer using the included USB cable. If you connect the scanner directly to the computer via USB, it will be recognized as removable media and you can import the data as you would from any other removable media.

26
Installing the software The ArcSoft MediaImpression software included with your scanner lets you edit your images once they are scanned. To install the software correctly, follow these steps:
CAUTION! Important files may be modified or overwritten when installing programs or drivers. Before installing the software, back up your original files so you can access them later if problems occur after installation. Insert the CD labelled ‘Software’ included with the scanner into
the CD-ROM drive. The installation will start automatically. Follow the instructions on the screen. After installing all drivers and software, restart your computer. If the installation fails to start automatically, the autorun function may be disabled. If so, follow these steps: Click the “Start” button and select “Run”. Enter the letter of the CD-ROM drive followed by a colon and
“autorun.exe”. Follow the instructions on the screen. After installing all drivers and software, restart your computer.
PLEASE NOTE! Once the installation is complete, you’ll find new program groups containing various programs and help files on your computer. To get help with the currently active program, press the F1 key.

27
ES
DE
EN
Cleaning and maintenance Cleaning
Clean the outside of the scanner using a soft, moist cloth. Use the cleaning brush included with your scanner to clean the scan
bed. Carefully wipe the scan bed with the velvet side of the brush to
remove dust. Do not use solutions, corrosive or gaseous cleansers.
CAUTION! Make sure the velvet side of the brush is facing downward before inserting it into the device. Otherwise the brush may become lodged in the device and scratch the scan bed.
Repairs Please contact our service centre if you have technical problems with your device. Repairs should only be performed by our authorised service partners.

28
Disposal
Packaging Your device has been packaged to protect it from becoming damaged in transit. The packaging is made of environmentally-friendly, recyclable materials.
Device At the end of its life, do not dispose of device with the household rubbish. Please enquire about options for environmentally-friendly disposal.

29
ES
DE
EN
Technical specifications Scanner Connection USB 1.1 Image sensor 5 megapixel CMOS sensor Aperture F = 5.5 LCD monitor 6.1 cm / 2.4” LC display Scan resolution 1800 dpi (3600 dpi interpolated) Dimensions (L x H x W): 235 x 165 x 160 mm Memory: 32 MB internal memory External: SD & SDHC card Operating system Windows XP SP3/Vista SP1/7
USB adapter Manufacturer: Flypower Model number: PS08IAFAK100UE Input voltage: AC 100 – 240 V ~ 50/60 Hz 0.2A Output voltage: DC 5V 1A
Subject to technical modifications.

III 0
8/11
BedienungsanleitungInstruction manualManual de instrucciones
Escáner 3 en 1 con LCDScanner 3 in 1 with LCDScanner 3 in 1 mit LCDMEDION® LIFE® P82009 (MD 86372)
Medion Service CenterVisonic S.A.
c/ Miguel Faraday, 6Parque Empresarial "La Carpetania", N-IV Km. 13
28906 Getafe, MadridEspaña
Hotline: 902196437 · Fax: 914604772E-Mail: [email protected]
www.medion.es
C
M
Y
CM
MY
CY
CMY
K
86372 ES ALDI ES Cover RC1.ai 1 70.71 lpi 45.00° 29.04.2011 08:25:0886372 ES ALDI ES Cover RC1.ai 1 70.71 lpi 45.00° 29.04.2011 08:25:08Prozessfarbe SchwarzProzessfarbe Schwarz


