29
e e S S e e r r v v i i c c e e Product Registration/Warranty Application User’s Guide

eeSSeerrvv ii ccee PPrroodduucctt RReeggiissttrraattiioonn//WWaarrrraannttyy AApppplliiccaattiioonn
UUsseerr’’ss GGuuiiddee

2 eService Product Registration/Warranty Application User’s Guide V1.3 (June 2005)
© 2004, 2005 ProQuest Business Solutions Inc. All rights reserved. Net-Compass is a trademark of ProQuest Business Solutions Inc. Microsoft is a registered trademark of Microsoft Corporation.
Contents 1. Getting Started ..........................................................................................................3
Logging In ...................................................................................................................3
eService User Interface Overview...............................................................................4
Entering Required Information ....................................................................................5
2. Product Registration.................................................................................................6
Creating a Product Registration ..................................................................................6
Finding a Product Registration..................................................................................11
3. Working with Warranty Claims ..............................................................................13
Dealer, Distributor, and Stihl Roles ...........................................................................13
Creating a Warranty Claim........................................................................................14
Finding a Warranty Claim by Number .......................................................................20
Searching for a Warranty Claim ................................................................................21
4. Working with Campaigns .......................................................................................23
Dealer, Distributor, and Stihl Roles ...........................................................................23
Viewing Campaigns ..................................................................................................24
Creating a Campaign Claim ......................................................................................25
5. Searching by Serial Number ..................................................................................27
6. Changing Your Password ......................................................................................29

eService Product Registration/Warranty Application User’s Guide V1.3 (June 2005) 3
1. Getting Started
Logging In Note: If you lose or forget your password, contact your system administrator. The administrator can give you temporary access to eService so you can create a new password.
1. Type your account number.
2. Type your user name.
3. Type your password.
4. Click the Log In button.

4 eService Product Registration/Warranty Application User’s Guide V1.3 (June 2005)
eService User Interface Overview
Feature Purpose
Register products for warranty claims.
Create and view dealer database information. Refer to the eService Dealer Information Application User’s Guide.
Create, submit, and view warranty claims. Create and view campaigns.
Open the Parts and Service application. Refer to the eService Parts and Service Application User’s Guide.
Available to Stihl administrators, distributor administrators, and dealer administrators. Refer to the applicable eService Administrator’s Guide.
[Log Out] Log out of eService.
Search for product and warranty claim information for a serial number.
Click the account/user name link to change your password.
Note: Use the eService user interface buttons and links to move between pages of information. Do not use the Microsoft® Internet Explorer Back button.

eService Product Registration/Warranty Application User’s Guide V1.3 (June 2005) 5
Entering Required Information When you enter information in windows throughout the application, you must enter information in fields that are yellow-highlighted.
In this example, the Dealer, Product Type, Model, and Serial No. fields are yellow-highlighted. You must enter information in all four fields before clicking the Submit button.
If you omit a field and click Submit, a message will indicate that you need to enter information in that field.

6 eService Product Registration/Warranty Application User’s Guide V1.3 (June 2005)
2. Product Registration
Creating a Product Registration 1. Select New Registration from the Product Registration menu.
2. The New Registration window is displayed.
Note: The Dealer text box appears in the window for Stihl and distributor administrators. Dealers and dealer administrators will not see the Dealer text box.
3. Stihl and distributor administrators: Type a dealer number.
4. Type the serial number.
5. Click Submit. The model selection window is displayed.
6. Select the model radio button or select a model from the list box
7. Click the New Registration button.

eService Product Registration/Warranty Application User’s Guide V1.3 (June 2005) 7
8. The Product Registration window is displayed.
9. Click to open the Calendar. Select the purchase month and year and click the day. The date will appear in the Purchased box.
10. Select the type of use and the appropriate radio button under “Are you registering a newly sold unit”.

8 eService Product Registration/Warranty Application User’s Guide V1.3 (June 2005)
11. Enter customer information.
If this is a new customer, type information in the Customer Information fields.
If the customer information is already available, click . The Search Customer Records window is displayed. Type search criteria. For example:
Click . Information for that customer is displayed.
Click to transfer this information to the Customer Information fields.
12. Answer the Safety Questions by clicking the appropriate radio buttons.
13. Click File Registration. The following prompt is displayed.
14. Click Yes to repeat the process for another product or No to complete the registration.

eService Product Registration/Warranty Application User’s Guide V1.3 (June 2005) 9
15. Verify that the product registration information is correct.
indicates that the customer selected a safety item.
indicates that the customer declined a safety item.
16. Click Save Registration. “Registration Saved” is displayed.
Note: See the next page for additional information about using this window.

10 eService Product Registration/Warranty Application User’s Guide V1.3 (June 2005)
Additional Information
To file a new claim for the unit, click File New Claim.
To delete the product registration for the unit, click Delete This Registration.
Note: When any claims filed against a product registration are open, the Delete This Registration button is not available.
If you click the Serial Number link under “Product Information”, the information you entered is displayed.
To file a new claim for the unit, click New Claim.

eService Product Registration/Warranty Application User’s Guide V1.3 (June 2005) 11
Finding a Product Registration 1. Select Look Up Registration from the Product Registration menu.
2. The Search Product Registrations window is displayed.
3. Fill in as much information as you can. As you type or select information, a check mark appears in each corresponding check box. For example:
Note: “Distributor Number is”, shown in the example above, does not appear as a search option for distributor administrators.

12 eService Product Registration/Warranty Application User’s Guide V1.3 (June 2005)
4. Click . The Search Results window is displayed.
Note: When a search produces a large number of results, click a column header (Req. No., Model, Serial No., Purchased, Dealer, or Distributor) to sort the list by that column.
5. Clicking the number in the Req.No. column displays complete Product Registration information.
The “Distributor” column shown in this example does not appear for distributor administrators.

eService Product Registration/Warranty Application User’s Guide V1.3 (June 2005) 13
3. Working with Warranty Claims
Dealer, Distributor, and Stihl Roles Certain warranty claim features are available depending on whether you are a dealer, dealer administrator, distributor, distributor administrator, or Stihl administrator. The following points summarize the differences.
• All users can create and submit warranty claims.
• Stihl administrators can approve warranty claims.
• Stihl administrators can deny warranty claims.
• Stihl administrators can return warranty claims to dealers for additional information.
• Stihl administrators and distributor administrators need to type a dealer number when creating a warranty claim for a dealer.
• Dealer administrators, distributor administrators, and Stihl administrators can add administrative notes to warranty claims.

14 eService Product Registration/Warranty Application User’s Guide V1.3 (June 2005)
Creating a Warranty Claim 1. Click the Warranty Claims button.
2. The Create New Warranty Claim window is displayed. Existing claims are listed in the appropriate sections of the window as shown below.
Type a larger number and click this icon to view claims for a longer range of days.
The ~ indicates that this is a campaign claim.
Click an icon to move to the corresponding section of the window.The Dealer Number text box is
only available to Stihl and distributor administrators.
Use this section to quickly search by claim number.

eService Product Registration/Warranty Application User’s Guide V1.3 (June 2005) 15
3. To reduce the window to the fields you need to fill in, click the New Claim link or select New Claim from the Warranty Claims menu.
4. Stihl and distributor administrators: Type a dealer number.
5. Select the claim type.
Note: Certain claim types require a serial number. When you select one of these types, the Serial number field turns yellow-highlighted.
6. If required, type the serial number.
Note: If you do not type a serial number, you must select a product type and model.
7. Select a product type. The applicable models will be listed in the Model list box.
8. Select a model.
9. Click .
Yellow-highlighted fields are required.

16 eService Product Registration/Warranty Application User’s Guide V1.3 (June 2005)
10. The Claim Information window is displayed.
Click this icon to fill in customer information.
Type a reference number here.

eService Product Registration/Warranty Application User’s Guide V1.3 (June 2005) 17
Note: The Administrative Notes field is only available to administrators. The buttons displayed below the form are different for dealers and Stihl administrators.
The following buttons are available to dealers.
The following buttons are available to Stihl administrators.
11. Type a reference number in the Reference Number field.
12. If this is a new customer, type the customer information.
13. If the customer information is available, click . The Search Customer Records window is displayed.
14. Type a keyword and click or click a page link or Next to find the customer. Then click . Information for that customer appears in Customer Information fields.
15. If necessary, click to view complete product registration information.

18 eService Product Registration/Warranty Application User’s Guide V1.3 (June 2005)
16. If necessary, click the serial number link to view additional information, including claim history, for the serial number.
17. Click to open the Calendar. Select the repair month and year and click the day. The date will appear in the Date Repaired box.
18. Select a repair code. The allowable labor minutes for the repair will be filled in automatically.
19. For the primary part that failed, type the quantity and part number and select a failure group and failure code.
20. For each part that was replaced, type the quantity and part number.
21. Click Add Parts to Claim. The parts you entered will be listed in the window.
Note: To delete a part, click the box preceding the part number to insert a check mark. Then click .
22. Type a brief explanation of the reason for the failure.
23. Review the information.
24. Click Save this Claim. “Claim was saved” will appear in the upper left corner of the screen.
eService Product Registration/Warranty Application User’s Guide V1.3 (June 2005) 19
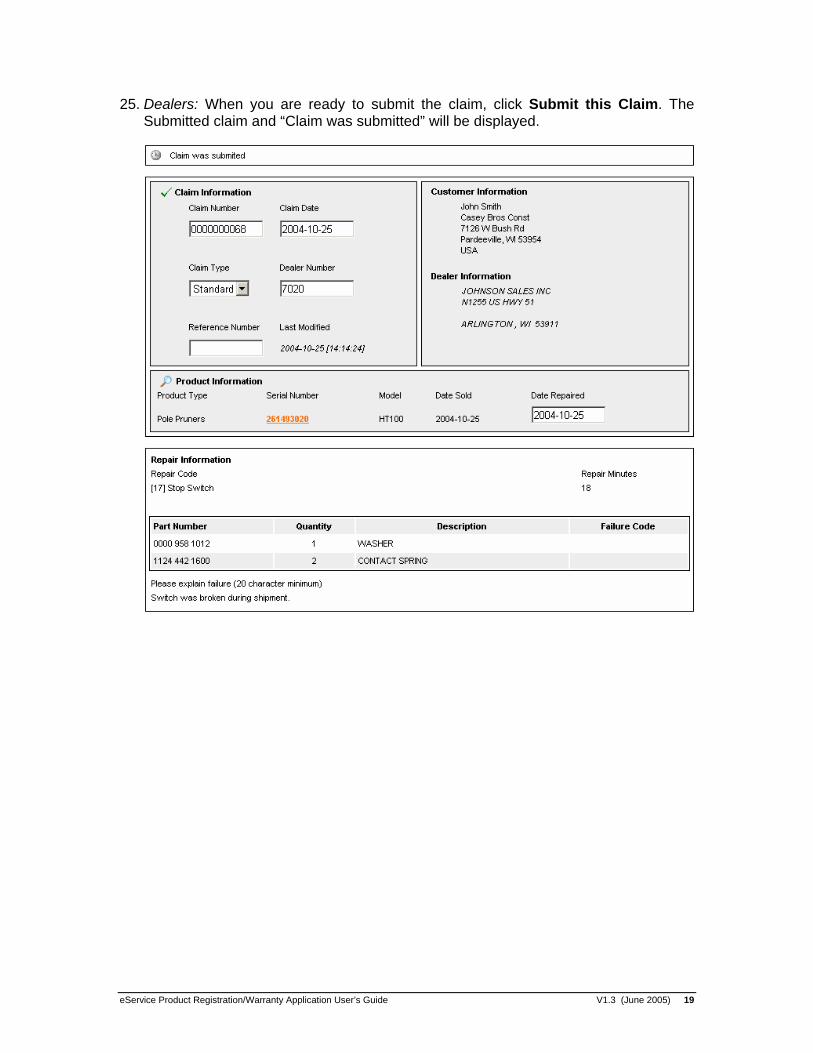
25. Dealers: When you are ready to submit the claim, click Submit this Claim. The Submitted claim and “Claim was submitted” will be displayed.

20 eService Product Registration/Warranty Application User’s Guide V1.3 (June 2005)
Finding a Warranty Claim by Number 1. Select View Claim by Claim Number from the Warranty Claims menu. The Find
Claim window is displayed.
2. Type the claim number in the text box.
3. Click to view the claim.

eService Product Registration/Warranty Application User’s Guide V1.3 (June 2005) 21
Searching for a Warranty Claim 1. Select Search Warranty Claims from the Warranty Claims menu.
2. The Warranty Claim Search window is displayed.

22 eService Product Registration/Warranty Application User’s Guide V1.3 (June 2005)
3. Click the check box that precedes each field you include in the search and fill in as much information as you can. For example:
4. Click . The Search Results window is displayed.
5. Click a claim number to view the warranty claim.
Note: If your search produces no results, click the Click Here to Search Again link and refine your search criteria.

eService Product Registration/Warranty Application User’s Guide V1.3 (June 2005) 23
4. Working with Campaigns
Dealer, Distributor, and Stihl Roles Certain campaign features are available depending on whether you are a dealer, dealer administrator, distributor, distributor administrator, or Stihl administrator. The following points summarize the differences.
• All users can view active campaigns.
• All users can create campaign claims.
• Stihl administrators can create campaigns.
• Stihl administrators can modify campaigns.
• Stihl administrators can delete campaigns.
• Stihl administrators can view, modify, and delete inactive campaigns.
24 eService Product Registration/Warranty Application User’s Guide V1.3 (June 2005)
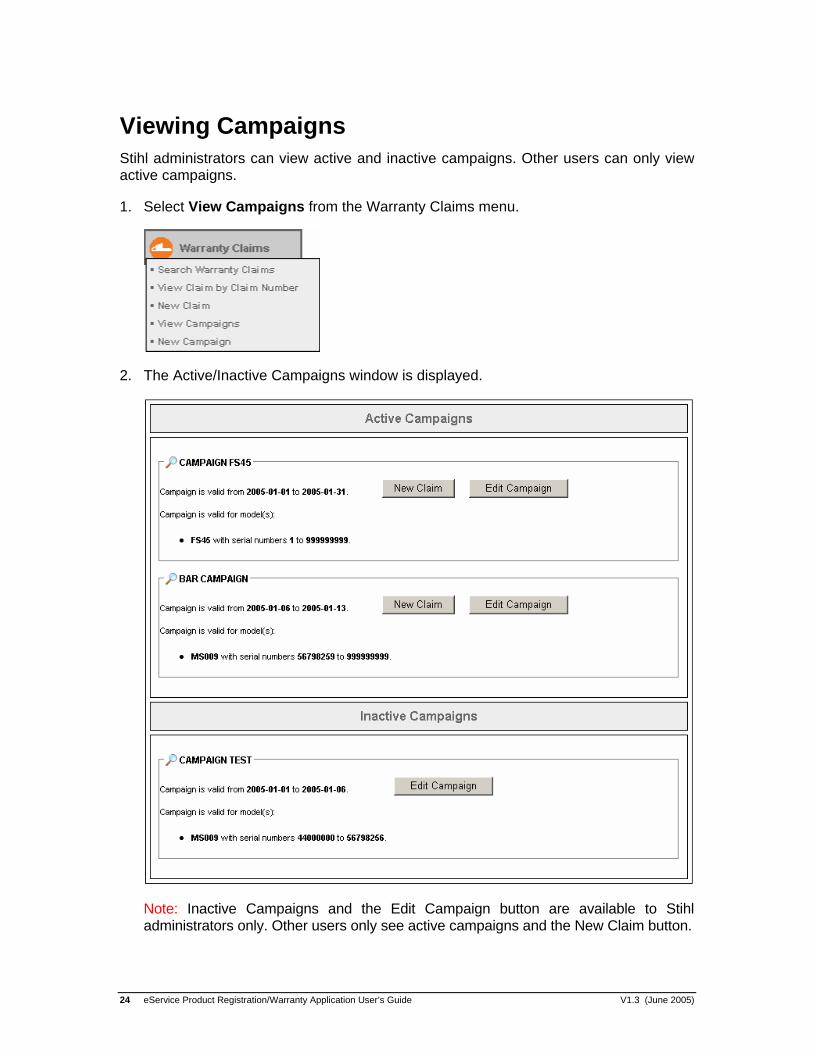
Viewing Campaigns Stihl administrators can view active and inactive campaigns. Other users can only view active campaigns.
1. Select View Campaigns from the Warranty Claims menu.
2. The Active/Inactive Campaigns window is displayed.
Note: Inactive Campaigns and the Edit Campaign button are available to Stihl administrators only. Other users only see active campaigns and the New Claim button.

eService Product Registration/Warranty Application User’s Guide V1.3 (June 2005) 25
Creating a Campaign Claim Use this procedure to create a claim for a specific campaign.
1. From a campaign in the Active/Inactive Campaigns windows, click the New Claim button. The Create New Campaign Claim window is displayed.
2. Select the repair type, repair date, and dealer number.
3. Type the applicable serial number and click the add button.
Note: When Dealer Stock Unit is selected as the repair type, you can add more than one serial number. Clicking the icon deletes the corresponding serial number.
4. Click . A window indicates that the claim has been created by showing in the Pass column.

26 eService Product Registration/Warranty Application User’s Guide V1.3 (June 2005)
5. Clicking the serial number link displays the claim.
6. Clicking the Campaign Name link displays information for the campaign.
Note: The Edit Campaign button is available to Stihl administrators only.

eService Product Registration/Warranty Application User’s Guide V1.3 (June 2005) 27
5. Searching by Serial Number Use the serial number search feature to quickly find product and warranty claim information for a serial number.
1. Type a serial number or a partial serial number in the Search Number search text box.
2. Click .
3. Product information and the warranty claim history are displayed.
Note: Any campaigns that apply to the serial number are also displayed.

28 eService Product Registration/Warranty Application User’s Guide V1.3 (June 2005)
4. Click a claim number link to display complete warranty claim information.

eService Product Registration/Warranty Application User’s Guide V1.3 (June 2005) 29
6. Changing Your Password You can easily change your password by clicking your user name and account number in the upper right corner of the screen.
1. Click the user name/account link. The Update User window is displayed.
2. Type your old password.
3. Type your new password twice.
4. Click Update User.
User name/account link


