EV Battery Monitor How I Made An Electric Vehicle Battery Monitoring System By Tim Wong I had been happily driving my electric car, a Soleq Evcort, for a few months when I found that my vehicle range had dropped based on the voltage sag under acceleration current load. After some investigation, I found that I had two batteries that was reversing so that its voltage was dropping from a nominal 6+V to 2.5V! This is, of course, not good for the battery (it never recovered). In retrospect, I should have broken the car in - it had been sitting for a long time. Anyway, the following is a record of my battery monitoring system. http://home.earthlink.net/~evtkw/ (1 of 9) [1/23/2007 12:11:22 PM]
Transcript
EV Battery Monitor
How I Made An Electric Vehicle Battery Monitoring System By Tim Wong
I had been happily driving my electric car, a Soleq Evcort, for a few months when I found that my vehicle range had dropped based on the voltage sag under acceleration current load. After some investigation, I found that I had two batteries that was reversing so that its voltage was dropping from a nominal 6+V to 2.5V! This is, of course, not good for the battery (it never recovered). In retrospect, I should have broken the car in - it had been sitting for a long time. Anyway, the following is a record of my battery monitoring system.
http://home.earthlink.net/~evtkw/ (1 of 9) [1/23/2007 12:11:22 PM]
EV Battery Monitor
I decided I wanted a system to measure and display each batteries voltage. I found that nobody made a production system, so I decide to build my own. I found Gordon Stalling's outstanding system, which I used as a starting point for my system. Superficially mine is very simmilar to his. Gordon's system is extremely well isolated by using opto isolators on the input. If I didn't want decimal voltage measurement, his would have been the way to go! See his system here:
● Gordon Stallings Battery Monitor
I decided to make a system that would be able to accurately measure the voltage of each battery
http://home.earthlink.net/~evtkw/ (2 of 9) [1/23/2007 12:11:22 PM]
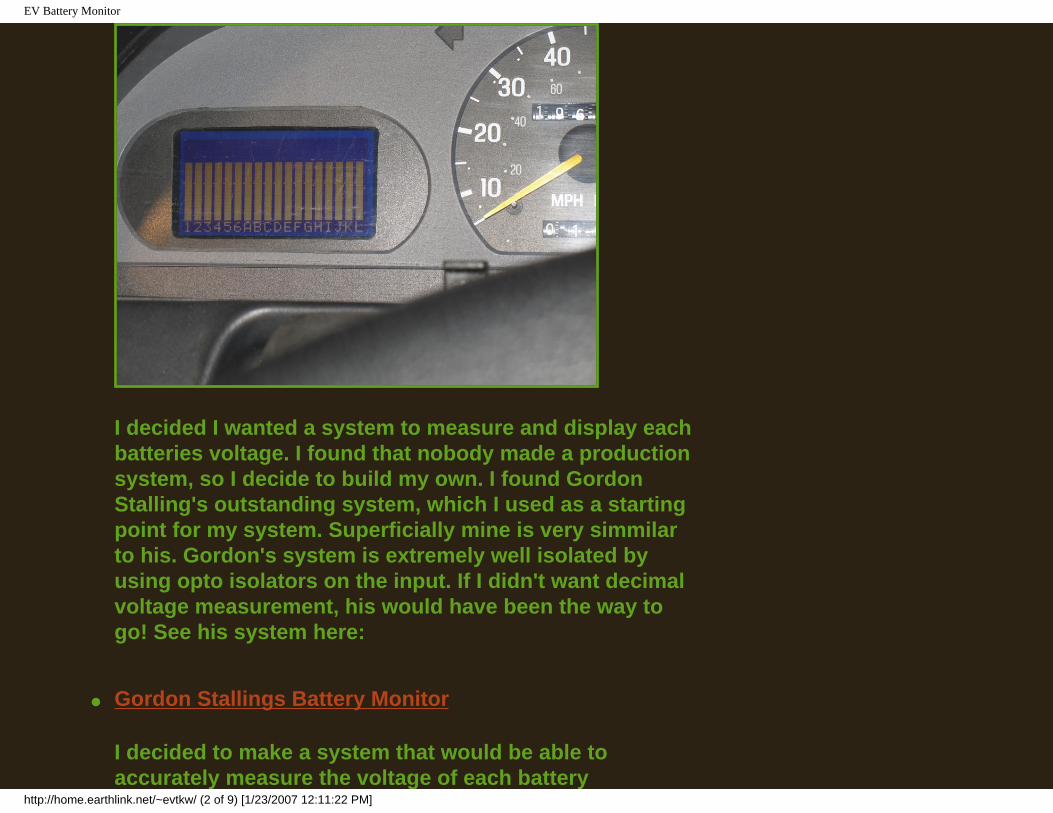
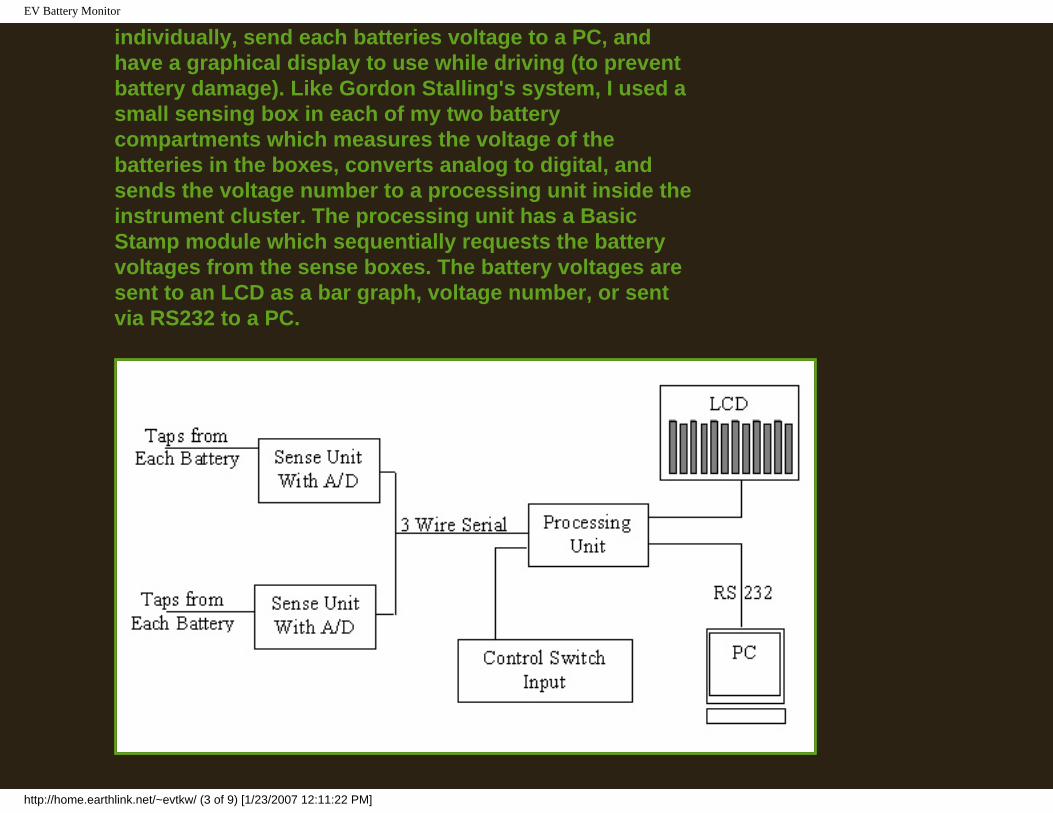
individually, send each batteries voltage to a PC, and have a graphical display to use while driving (to prevent battery damage). Like Gordon Stalling's system, I used a small sensing box in each of my two battery compartments which measures the voltage of the batteries in the boxes, converts analog to digital, and sends the voltage number to a processing unit inside the instrument cluster. The processing unit has a Basic Stamp module which sequentially requests the battery voltages from the sense boxes. The battery voltages are sent to an LCD as a bar graph, voltage number, or sent via RS232 to a PC.
http://home.earthlink.net/~evtkw/ (3 of 9) [1/23/2007 12:11:22 PM]
EV Battery Monitor
The system operates in three modes; bar graph, voltage, and data collection. In bar graph mode, the voltage of all batteries is plotted in a continuously updating bar graph. In voltage mode, the voltage of one battery is displayed to two decimal places, and each battery can be selected using a switch mounted on the dash. In data mode, the voltage of each battery can be sent to a PC via RS232. To switch modes, another switch is used. An on/off switch is used to turn on the system when the ignition is off - I use this to collect data while charging.
The sense boxes measure voltage using a differential amplifier that can measure a common mode voltage up to +/-250V. Voltages are measured between each positive tap. The analog voltage is converted to digital with a 10bit ADC. The processor box, containing a Basic Stamp processor, requests the voltages from each ADC (my system has three eight channel ADCs) with 3 wire serial, then, depending on what mode the system is in, presents the voltage to the LCD mounted inside the instrument panel or sends the data over RS232 to a PC.
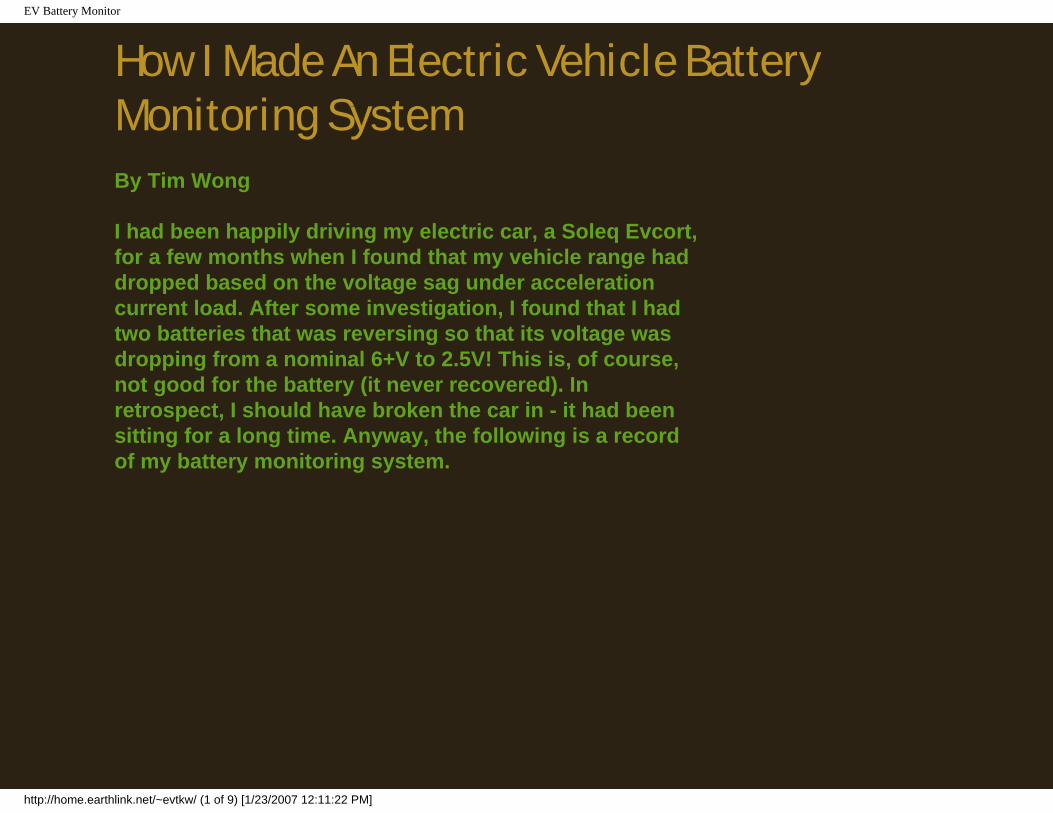
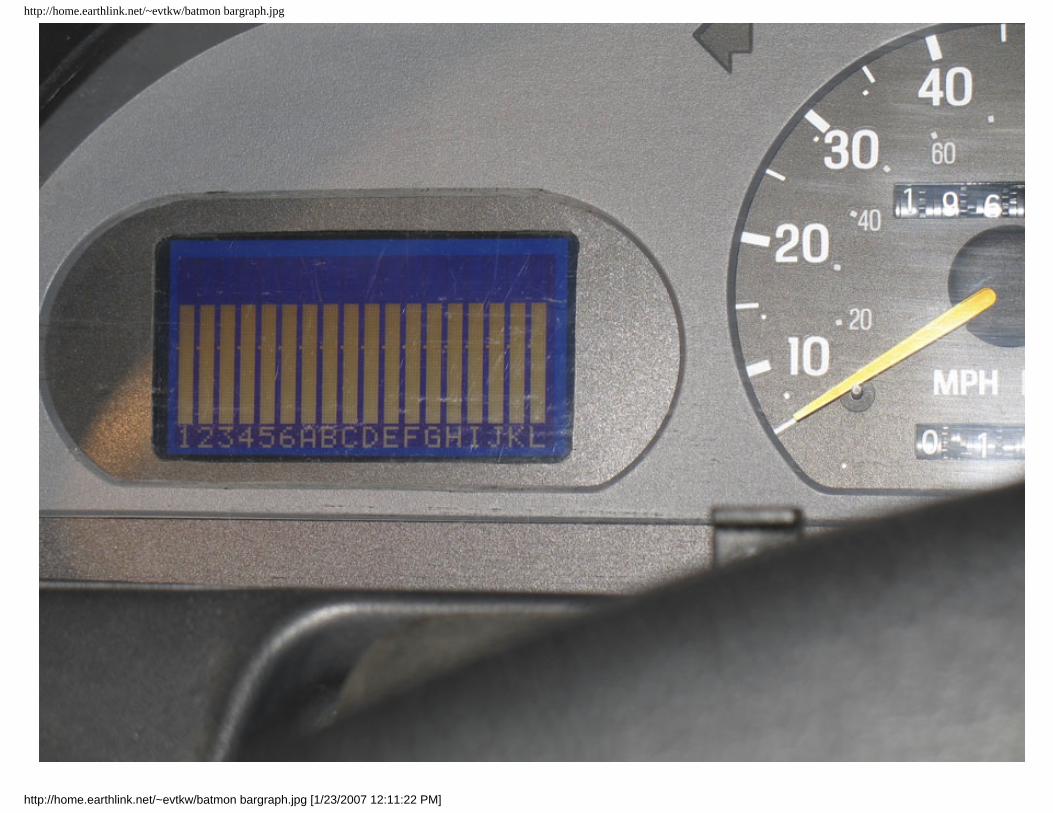
Here is a picture of my system in the bar graph mode. It updates in less than .5 sec, so I can watch and monitor the weakest battery. When driving long range, I keep the weakest battery above the line indicating 5.25V.
● LCD Display in Bar Graph Mode
http://home.earthlink.net/~evtkw/ (4 of 9) [1/23/2007 12:11:22 PM]
EV Battery Monitor
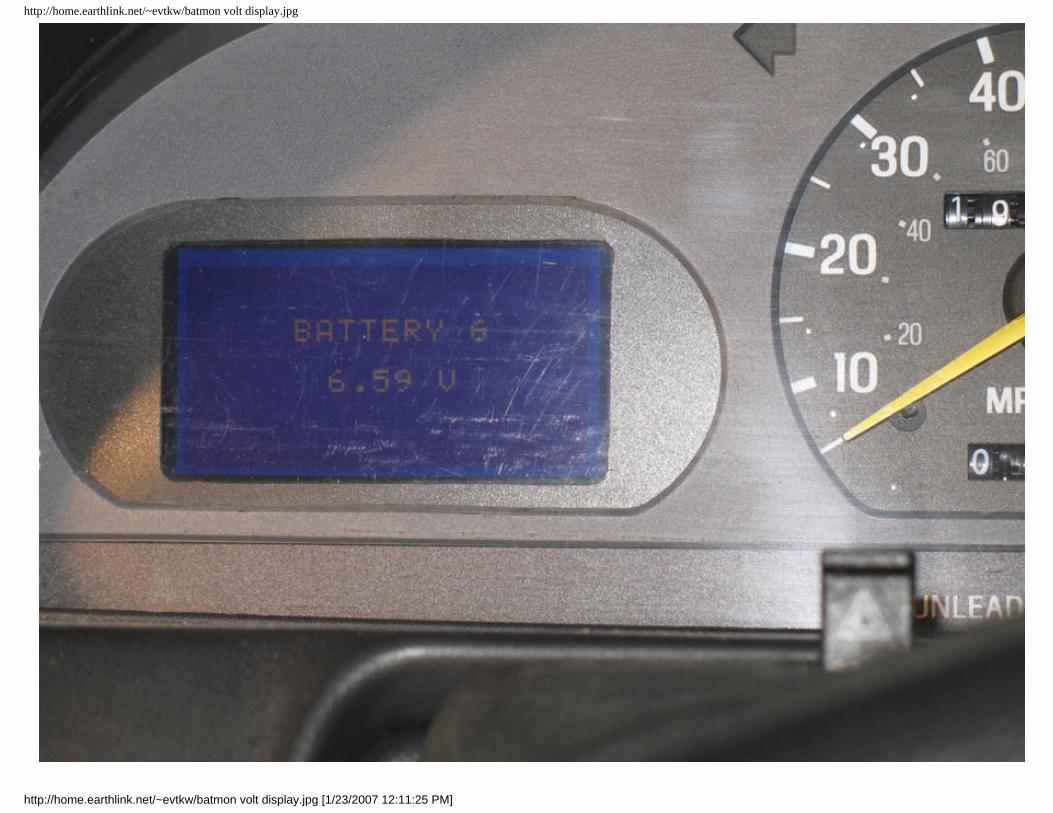
Here is a picture of the system in voltage mode - the selector switch scrolls through all the batteries. In very high or low temperatures, the accuracy is not good enough to have the second decimal place, but it always agrees exactly with my Fluke meter, even to .01V. From the specifications of the parts, it is good to around .05V.
● LCD Display in Voltage Mode
Here is a picture of the system in data collection mode - it can run in high speed or low speed. In low speed, the data comes every 23 sec, and high speed it is something like every .8 sec. I guess I should know exactly, but I don't use the high speed much - the bar graph is fine. If I had a laptop (which I don't) I could use high speed mode to monitor battery voltages while driving.
● LCD Display in Data Collection Mode
Here is a picture of some data collected during charging - I added all the battery voltages up to see the charge profile.
● Battery Pack Voltage during charging
I used expresspcb.com to make my boards - I don't know if they are great, but the boards were fast to arrive and worked well. My layouts were made in their free design
http://home.earthlink.net/~evtkw/ (5 of 9) [1/23/2007 12:11:22 PM]
EV Battery Monitor
program, which must be downloaded to view it. The process of having the boards made was very easy - the whole thing is done online, including file transfer, and the boards showed up in a few days. Here is the layout file for the processor board and the sense boards.
● Processor Board Layout File
● Sense Board Layout File
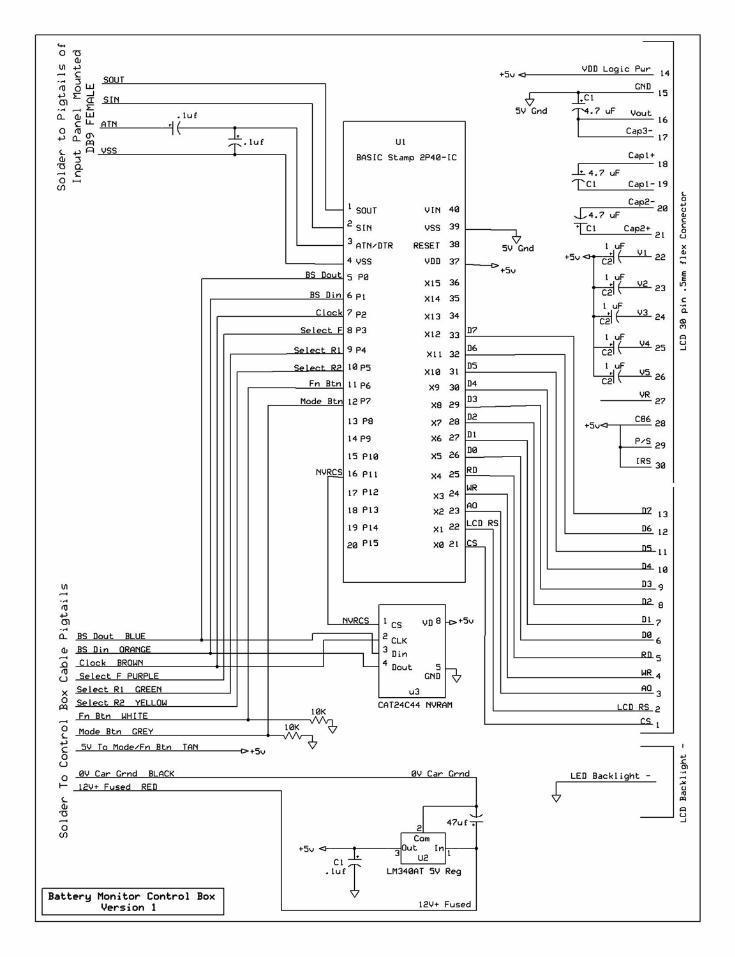
Here is the schematic for my processing unit. It is consists of a Basic Stamp with the drive circuitry for the Optrex LCD.
● Processing Unit Schematic
Here is the diagram for the sense box. The main input chip is the Linear Technologies LT1990 - use the LT1990A for higher resolution. Analog Devices chip AD629 is similar with less error, but is more expensive and also is not a direct replacement.
● Sense Box Schematic
Here is the diagram for my switch input to change menus and turn on the monitor when there is no key power and the connection to the 12V accessory battery:
http://home.earthlink.net/~evtkw/ (6 of 9) [1/23/2007 12:11:22 PM]
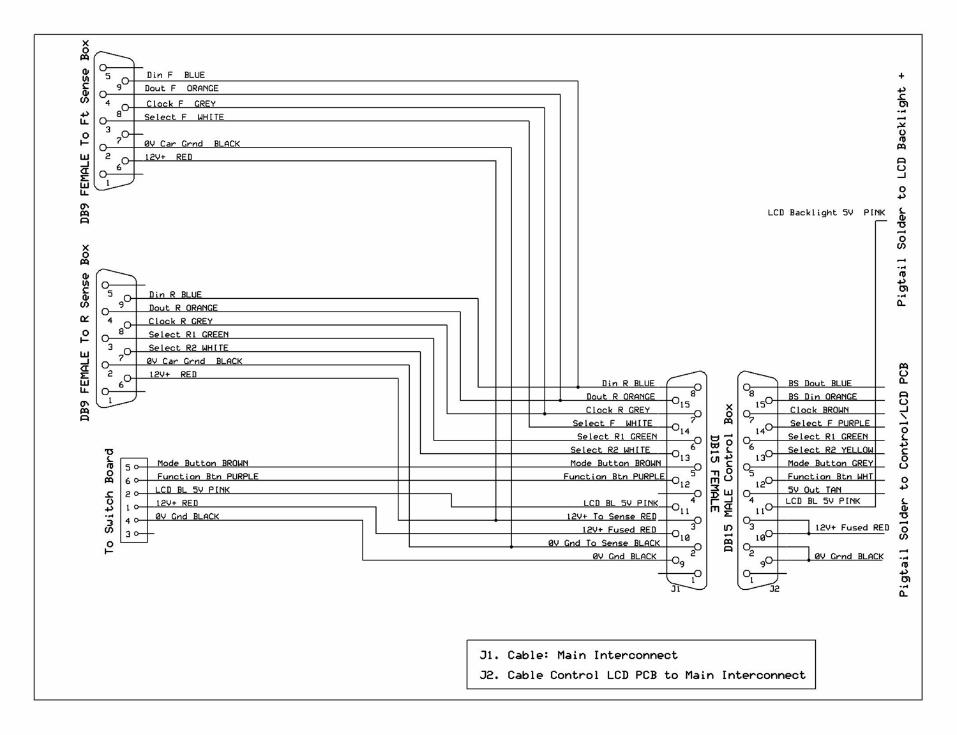
Here is the diagram for the cable connecting the control box to the sense box and the switch inputs:
● Control Box Wiring Harness Schematic
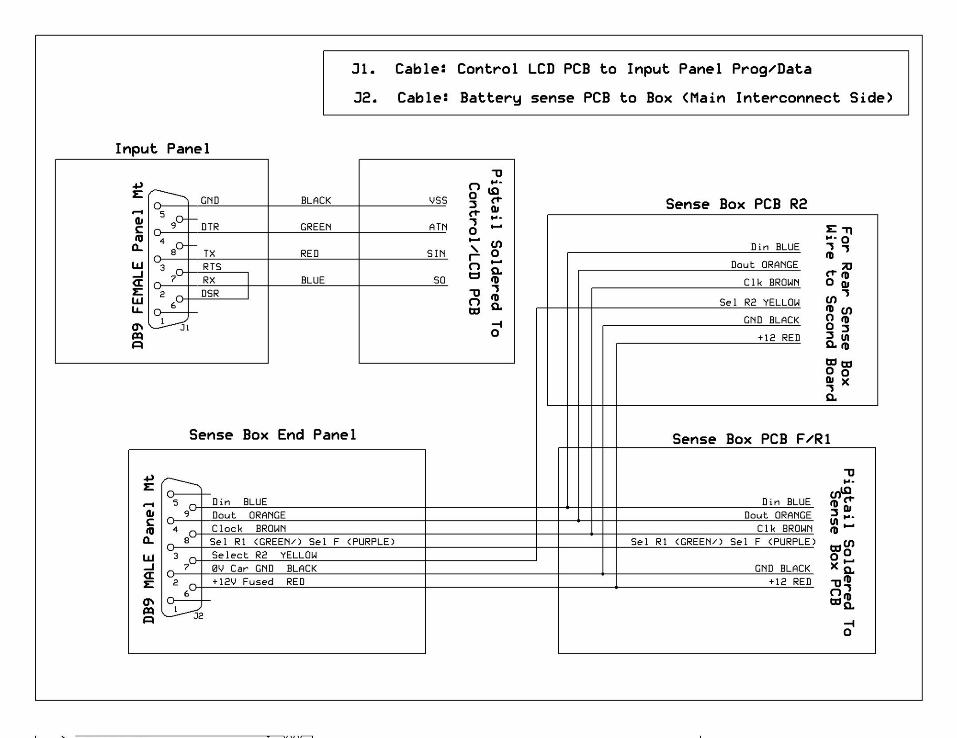
Here is the internal wiring for the sense box from the connector to the PCB:
● Sense Board to Connector Wiring Schematic
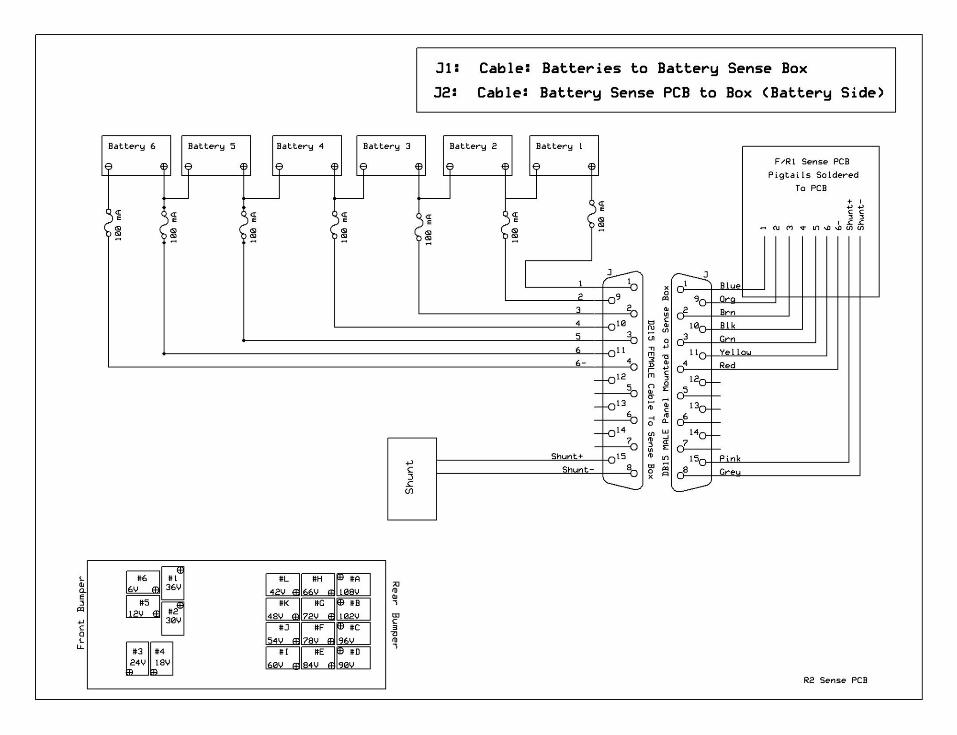
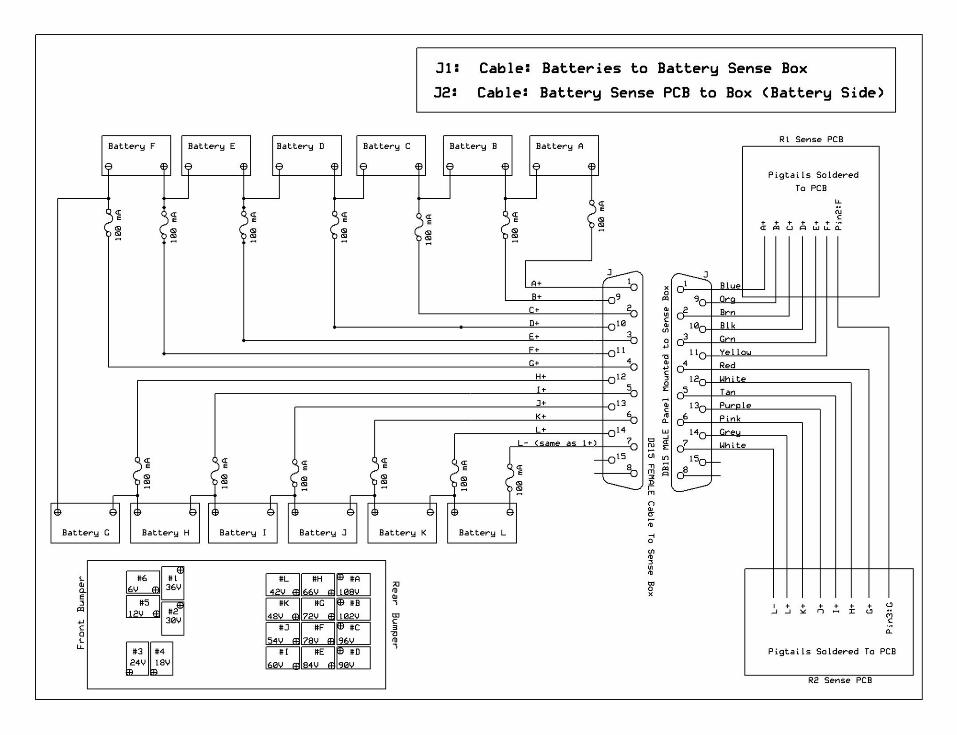
Here are the cables connecting the sense box to the batteries - one front and one rear box. The rear box has two sense boards that measure 6 batteries each, and the front box has one sense board. I have 18 batteries, obviously. The system is somewhat modular, so more boxes could be added by changing the software and making up a new cable - the serial communication between the Basic Stamp and the different ADC is controlled by a chip select, allowing for a modular system.
● 6 Front Battery Tap Cable Schematic
● 12 Rear Battery Tap Cable Schematic
http://home.earthlink.net/~evtkw/ (7 of 9) [1/23/2007 12:11:22 PM]
EV Battery Monitor
I had originally wanted to add one more LT1990 chip for current sensing - just tap off of the existing current measuring resistor (AKA shunt - this exists in most all electric vehicles). This would have been easy to do, and I am extremely annoyed now that I didn't do it. Just add another LT1990 to the layout of the sense board, add another voltage divider to match the Shunt, and reconfigure the LT1900 for 10x gain if needed, and then add the software to convert the Voltage reading to current. This reletively simple hardware change allows for all kinds of very useful additional functions including current sensing (obviously), real time power, energy or KWh meter, fuel gage, and probably other things I have forgotten. I feel stupid for, after putting in all this work to make the system, got lazy at the last 1% of work and left out this feature which cut the usefulness of my system monstrously.
Additionally, there are several unused outputs from the basic stamp which could have be used to shut off or control a charger or whatever, and the program memory is only 25% full.
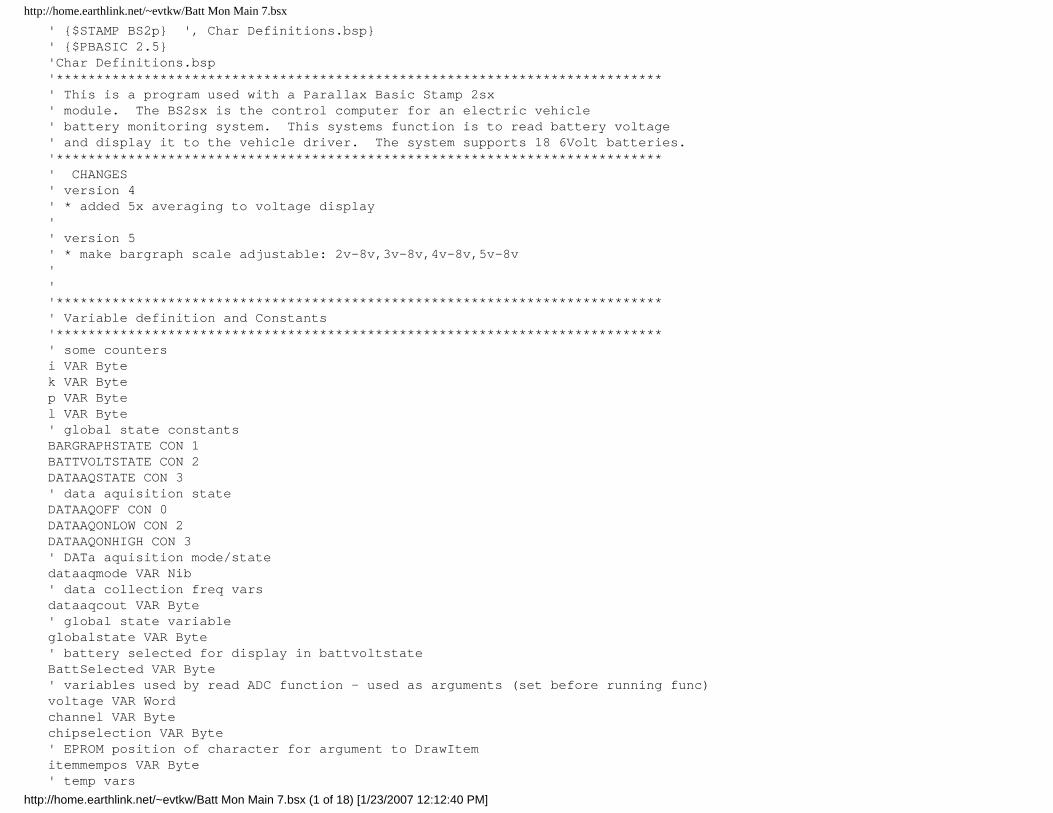
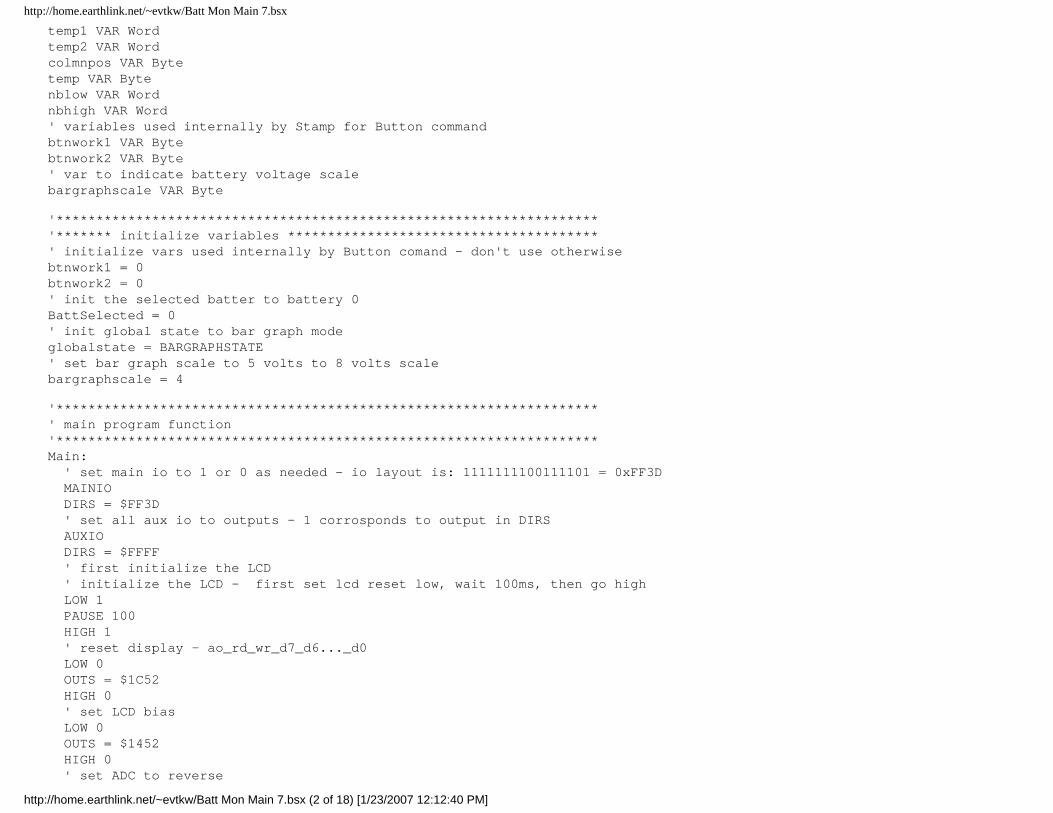
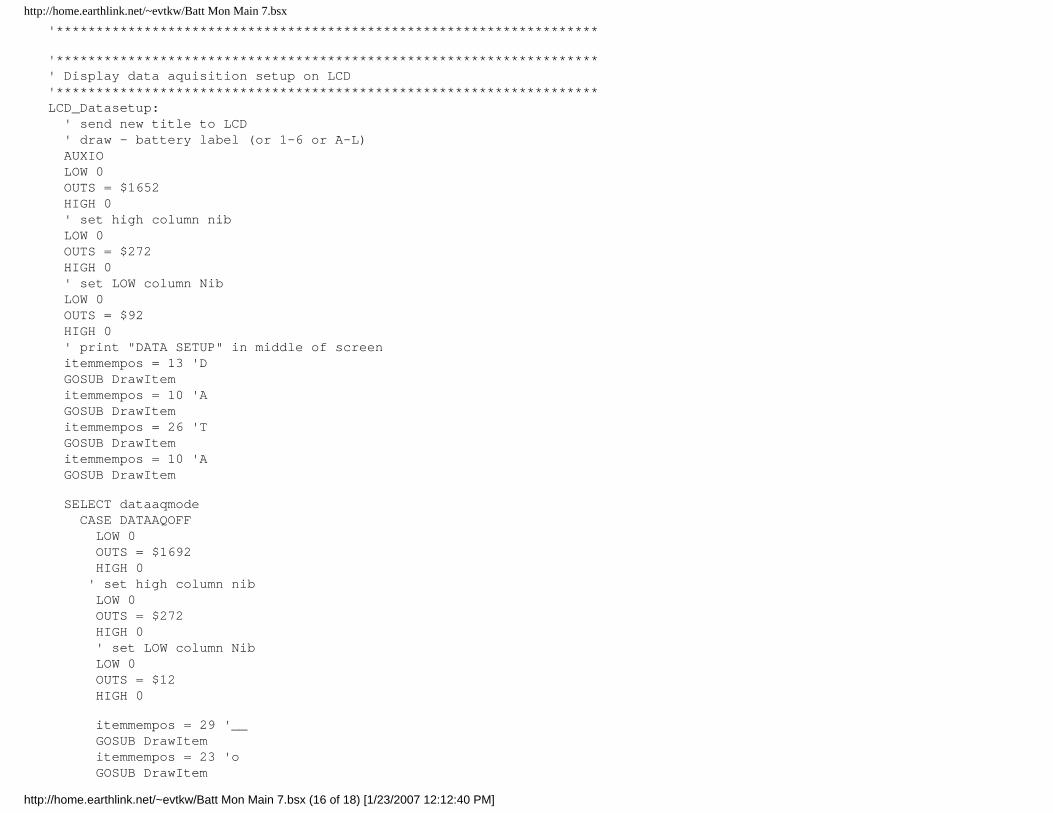
I used a Basic Stamp to avoid buying a development system - it uses RS232 from a PC with free development software to program the chip. The programming language is simple but proprietary. Here are the program files from my system, one for the main program and one variable file.
http://home.earthlink.net/~evtkw/ (8 of 9) [1/23/2007 12:11:22 PM]
EV Battery Monitor
● Main Basic Stamp Program Code File
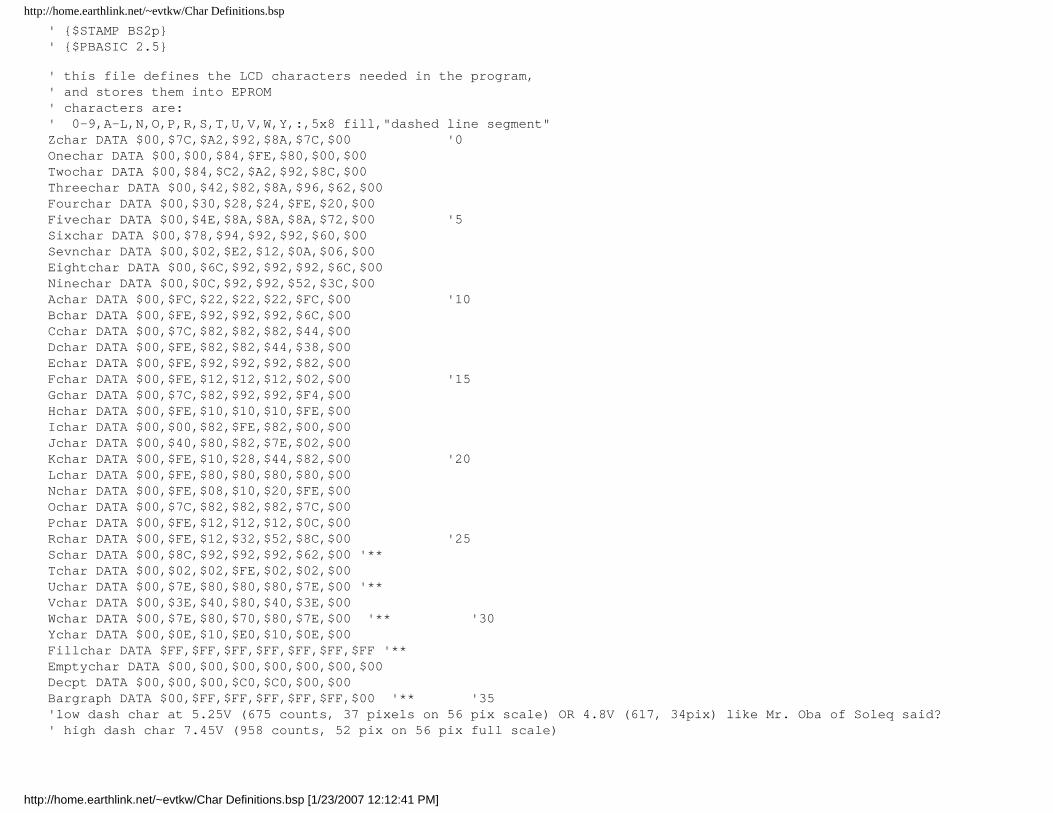
● Basic Stamp Character Definitions File
Here is the parts list for the system that I made. It is a bit messy, and may have errors, but it gives an idea of what parts I used.
● Battery Monitor Parts ListIn the end I have been happy with the results of this system. On paper it is reliable within about .05V, but it always matches my Digital Fluke Voltmeter to .01V. It is a bit expensive, but I think it was worth it. The system is relativeley modular - by adding more modules and changing the software, more batteries can be used. My system is set up for 6V batteries, but it could be adjusted with different resistors to be a 12V system. The main change I would make would be to add the current measurement and additional functions it affords.
If you ever use this information I would ask that you send me an email to tell me what you did, and also don't use it for financial gain. If you find a horrible flaw in the system or just have questions about it, I would also like to hear from you. My email is:
http://home.earthlink.net/~evtkw/batmon volt display.jpg
http://home.earthlink.net/~evtkw/batmon volt display.jpg [1/23/2007 12:11:25 PM]
http://home.earthlink.net/~evtkw/batmon data display.jpg
http://home.earthlink.net/~evtkw/batmon data display.jpg [1/23/2007 12:11:40 PM]
Soleq Evcort Battery Charger Voltage Curve at 9 Amp Setting
114
116
118
120
122
124
126
128
130
0 1 2 3 4 5 6 7 8 9 10 11
Time hours
Vol
tage
http://home.earthlink.net/~evtkw/Batt Mon Main 7.bsx
' {$STAMP BS2p} ', Char Definitions.bsp}' {$PBASIC 2.5}'Char Definitions.bsp'****************************************************************************' This is a program used with a Parallax Basic Stamp 2sx' module. The BS2sx is the control computer for an electric vehicle' battery monitoring system. This systems function is to read battery voltage' and display it to the vehicle driver. The system supports 18 6Volt batteries.'****************************************************************************' CHANGES' version 4' * added 5x averaging to voltage display'' version 5' * make bargraph scale adjustable: 2v-8v,3v-8v,4v-8v,5v-8v'''****************************************************************************' Variable definition and Constants'****************************************************************************' some countersi VAR Bytek VAR Bytep VAR Bytel VAR Byte' global state constantsBARGRAPHSTATE CON 1BATTVOLTSTATE CON 2DATAAQSTATE CON 3' data aquisition stateDATAAQOFF CON 0DATAAQONLOW CON 2DATAAQONHIGH CON 3' DATa aquisition mode/statedataaqmode VAR Nib' data collection freq varsdataaqcout VAR Byte' global state variableglobalstate VAR Byte' battery selected for display in battvoltstateBattSelected VAR Byte' variables used by read ADC function - used as arguments (set before running func)voltage VAR Wordchannel VAR Bytechipselection VAR Byte' EPROM position of character for argument to DrawItemitemmempos VAR Byte' temp vars
http://home.earthlink.net/~evtkw/Batt Mon Main 7.bsx (1 of 18) [1/23/2007 12:12:40 PM]
http://home.earthlink.net/~evtkw/Batt Mon Main 7.bsx
temp1 VAR Wordtemp2 VAR Wordcolmnpos VAR Bytetemp VAR Bytenblow VAR Wordnbhigh VAR Word' variables used internally by Stamp for Button commandbtnwork1 VAR Bytebtnwork2 VAR Byte' var to indicate battery voltage scalebargraphscale VAR Byte
'********************************************************************'******* initialize variables ***************************************' initialize vars used internally by Button comand - don't use otherwisebtnwork1 = 0btnwork2 = 0' init the selected batter to battery 0BattSelected = 0' init global state to bar graph modeglobalstate = BARGRAPHSTATE' set bar graph scale to 5 volts to 8 volts scalebargraphscale = 4
'********************************************************************' main program function'********************************************************************Main: ' set main io to 1 or 0 as needed - io layout is: 1111111100111101 = 0xFF3D MAINIO DIRS = $FF3D ' set all aux io to outputs - 1 corrosponds to output in DIRS AUXIO DIRS = $FFFF ' first initialize the LCD ' initialize the LCD - first set lcd reset low, wait 100ms, then go high LOW 1 PAUSE 100 HIGH 1 ' reset display - ao_rd_wr_d7_d6..._d0 LOW 0 OUTS = $1C52 HIGH 0 ' set LCD bias LOW 0 OUTS = $1452 HIGH 0 ' set ADC to reverse
http://home.earthlink.net/~evtkw/Batt Mon Main 7.bsx (2 of 18) [1/23/2007 12:12:40 PM]
http://home.earthlink.net/~evtkw/Batt Mon Main 7.bsx
LOW 0 OUTS = $1432 HIGH 0 ' set to normal common output LOW 0 OUTS = $1812 HIGH 0 ' set built in resistance - values 0x20 to 0x27. it sets contrast ratio base value LOW 0 OUTS = $492 HIGH 0 ' set LCD contrast. this is a two command operation - first send Volume Mode Set Cmd LOW 0 OUTS = $1032 HIGH 0 ' now send contrast value, the second part of the LCD contrast operation LOW 0 ' original, medium contrast' OUTS = $592 ' higher contrast OUTS = $592 ' maximum contrast' OUTS = $592 HIGH 0 ' set power mode - turn on internal pwr supply features - ' Volt Regulator, Volt follower,booster circuit LOW 0 OUTS = $5F2 HIGH 0 ' turn on display LOW 0 OUTS = $15F2 HIGH 0 ' initialize first state GOSUB InitBargraphLCD
' **** MAIN PROGRAM LOOP: Loop forever! ****** DO WHILE 1 ' case statement to select and run current program state SELECT globalstate CASE BARGRAPHSTATE ' run bar graph "funcitonality" ' read each voltage then display to LCD FOR chipselection = 3 TO 5 FOR channel = 0 TO 5 ' run function to get one battery voltage, with channel and chipselection as arguments GOSUB Read_ADC
http://home.earthlink.net/~evtkw/Batt Mon Main 7.bsx (3 of 18) [1/23/2007 12:12:40 PM]
http://home.earthlink.net/~evtkw/Batt Mon Main 7.bsx
'display current battery voltage bar on LCD, with channel and chip selection as input GOSUB LCD_Bargraph NEXT ' check mode button and call function to change state if button pressed MAINIO BUTTON 7, 1, 100, 50, btnwork1, 1, ModeButtonFn BUTTON 6, 1, 100, 50, btnwork2, 1, FunctionButtonFn NEXT CASE BATTVOLTSTATE ' single battery voltage state - read and display selected battery voltage ' read selected batteries voltage then display to LCD ' select ACD chip and channel chipselection = (BattSelected / 6) + 3 channel = BattSelected // 6 ' average 4 readings for noise rejection - good electronics design?! temp1 = 0 FOR l = 0 TO 4 ' run function to get one battery voltage, with channel and chipselection as arguments GOSUB Read_ADC temp1 = voltage + temp1 NEXT ' divid to get average voltage = temp1 / 5 'display current battery voltage numerically on LCD ' send one batteries voltage to LCD in decimal format ' change voltage to decimal and send out serial port ' this is a decimal approximation but accruate for 0-1024 to two decimal places ' I have to convert back to voltages based on a 10 bit 1024 count ADC, 3V voltage span, ' 10K / 6.04K resistor voltage divider .3765586x gain. ' Instrument amp gain = 100,000ohm/6040ohm + 1. ' formula is ' Display V = (Counts * 3)*(10,000 + 6040) / (1024 * 6040) ' simplified: ' Display V = Counts * 30 / 3856 ' To get voltage in a fixed point system do in this order ' V = Counts * 30 ' then go ' V = V / 3856 ' first get the integer part of the number temp1 = voltage * 30 ' draw - battery voltage, first set draw location page AUXIO LOW 0 OUTS = $1692 HIGH 0 ' set high column nib LOW 0 OUTS = $252
http://home.earthlink.net/~evtkw/Batt Mon Main 7.bsx (4 of 18) [1/23/2007 12:12:40 PM]
http://home.earthlink.net/~evtkw/Batt Mon Main 7.bsx
HIGH 0 ' set low column nib LOW 0 OUTS = $1B2 HIGH 0 ' print the whole part of voltage left of decimal point itemmempos = (temp1 / 3856) GOSUB DrawItem ' print decimal point itemmempos = 30 GOSUB DrawItem ' drwa numbers after decimal point. this is done by taking the number you want ' to devide, temp1, and taking the modulus of it with the dividor, 3856, then ' multiplying by 10. this number, call it X is saved for the next digit. the current digit ' is X / 3856. ' So IF I wanted TO GET the first digit of 2/3, Go: ' 2 // 3 = 2 ' 2 * 10 = 20 ' 20 / 3 = 6 (.66667, but this isn't here in fixed point) ' since 2/3 = .6666666667, the first digit is, correctly, 6 FOR p = 0 TO 1 ' first digit remainder of desired dividor * 10 temp1 = (temp1 // 3856) * 10 ' display just created digit on LCD of this value: itemmempos = (temp1 / 3856) GOSUB DrawItem NEXT
CASE DATAAQSTATE ' run data aquisition setup fun GOSUB DataAquisionSetup CASE ELSE ' unrecognized state - set to default globalstate = BARGRAPHSTATE ENDSELECT ' switch to main io MAINIO ' check mode button and call function to change state if button pressed BUTTON 7, 1, 100, 50, btnwork1, 1, ModeButtonFn ' check function button and call function to change data if button pressed BUTTON 6, 1, 100, 50, btnwork2, 1, FunctionButtonFn ' put a "label" marker to allow for returning from functions called by Button return_to_main_label: ' continue main loop LOOP ' end of main - program done. don't get here ever...END'********************************************************************
http://home.earthlink.net/~evtkw/Batt Mon Main 7.bsx (5 of 18) [1/23/2007 12:12:40 PM]
http://home.earthlink.net/~evtkw/Batt Mon Main 7.bsx
'********************************************************************' funciton update state when mode button pressed' ONLY FOR USE FROM MODE BUTTON INSTRUCTION FROM MAIN'********************************************************************ModeButtonFn: ' mode button pressed - clear lcd GOSUB ClearLCD ' now update state TO NEXT state IF (globalstate = BARGRAPHSTATE) THEN ' set flag to go to new state globalstate = BATTVOLTSTATE ' init new state GOSUB InitBattVolt ELSEIF (globalstate = BATTVOLTSTATE) THEN globalstate = DATAAQSTATE ' set data aquisition mode to off dataaqmode = DATAAQOFF ' ****update LCD for this state/function change GOSUB LCD_Datasetup ' reset the counter for high or low frequency data collection nblow = 0 ELSE ' in dataaq state - set state flag to bargraph globalstate = BARGRAPHSTATE ' initialze new state GOSUB InitBargraphLCD ENDIF ' return to maain - Return command doesn't work when called from button... GOTO return_to_main_labelRETURN'********************************************************************
'********************************************************************' function updatae variables accordingly when fucntion button pressed' ONLY FOR USE FROM FUNCTION BUTTON INSTRUCTION FROM MAIN'********************************************************************FunctionButtonFn: ' function button pressed- change data according to mode IF (globalstate = BARGRAPHSTATE) THEN ' increment scale counter bargraphscale = bargraphscale + 1 IF (bargraphscale >= 6) THEN bargraphscale = 3 ENDIF ELSEIF (globalstate = BATTVOLTSTATE) THEN ' in battery monitor state - increment the battery selected for display BattSelected = Battselected + 1
http://home.earthlink.net/~evtkw/Batt Mon Main 7.bsx (6 of 18) [1/23/2007 12:12:40 PM]
http://home.earthlink.net/~evtkw/Batt Mon Main 7.bsx
' roll over the number when at max battery IF (BattSelected > 17) THEN BattSelected = 0 ENDIF ' functio button hit and data updated ' redraw - Battery Label (or 1-6 or A-L) AUXIO LOW 0 OUTS = $1652 HIGH 0 ' set high column nib LOW 0 OUTS = $2B2 HIGH 0 ' set low column nib LOW 0 OUTS = $152 HIGH 0 ' draw selected battery label 1-6 A-L IF (BattSelected < 6) THEN itemmempos = BattSelected + 1 ELSE itemmempos = Battselected + 4 ENDIF GOSUB DrawItem ELSEIF (globalstate = DATAAQSTATE) THEN ' in data aquistiion state - increment data aquisition mode IF (dataaqmode = DATAAQOFF) THEN ' switch to low data aquisition rate dataaqmode = DATAAQONLOW ' set the frequency counter to low freq data collection nbhigh = 10000 'LOWDATAOUTPUTLOOPS ELSEIF (dataaqmode = DATAAQONLOW) THEN ' switch to high data aquisitoin rate dataaqmode = DATAAQONHIGH ' set the frequency counter to high freq data collection nbhigh = 0'HIGHDATAOUTPUTLOOPS ELSEIF (dataaqmode = DATAAQONHIGH) THEN dataaqmode = DATAAQOFF ' reset the counter for high or low frequency data collection nblow = 0 ENDIF ' update lcd GOSUB LCD_Datasetup ENDIF ' RETurn to maain - Return command doesn't work when called from button... GOTO return_to_main_labelRETURN
http://home.earthlink.net/~evtkw/Batt Mon Main 7.bsx (7 of 18) [1/23/2007 12:12:40 PM]
http://home.earthlink.net/~evtkw/Batt Mon Main 7.bsx
'********************************************************************' INitialize Bar Graph LCD'********************************************************************' this function will initialize the bar graph display by drawing hte' battery labels, scale markers, and over/under voltage linesInitBargraphLCD: ' clear LCD GOSUB ClearLCD ' draw dotted "range" lines at ' 5.25V (675 counts) AND 7.45V (958 counts)--- or 4.8V (617) like Mr. Oba of Soleq said? ' should I also draw voltage scale? or both? scale may take up too much space... AUXIO 'page LOW 0 OUTS = $16F2 HIGH 0 ' set high column nib LOW 0 OUTS = $212 HIGH 0 ' set low column nib LOW 0 OUTS = $12 HIGH 0 ' print the battery labels along bottom 1-6 FOR p = 1 TO 6 itemmempos = p GOSUB DrawItem NEXT ' BATTS A-L FOR p = 10 TO 21 itemmempos = p GOSUB DrawItem NEXTRETURN
'********************************************************************' function/state initlization of Batteries Voltage state'********************************************************************InitBattVolt: ' draw - battery label (or 1-6 or A-L) LOW 0 OUTS = $1652 HIGH 0 ' set high column nib LOW 0
http://home.earthlink.net/~evtkw/Batt Mon Main 7.bsx (8 of 18) [1/23/2007 12:12:40 PM]
http://home.earthlink.net/~evtkw/Batt Mon Main 7.bsx
OUTS = $252 HIGH 0 ' set low column nib LOW 0 OUTS = $52 HIGH 0 ' print "BATTERY" in middle of screen itemmempos = 11 'B GOSUB DrawItem itemmempos = 10 'A GOSUB DrawItem itemmempos = 26 'T GOSUB DrawItem itemmempos = 26 'T GOSUB DrawItem itemmempos = 14 'E GOSUB DrawItem itemmempos = 25 'R GOSUB DrawItem itemmempos = 28 'Y GOSUB DrawItem itemmempos = 29 'BLANK SPACE GOSUB DrawItem IF (BattSelected < 6) THEN itemmempos = BattSelected + 1 GOSUB DrawItem ELSE itemmempos = Battselected + 4 GOSUB DrawItem ENDIF ' draw "V" for voltage after numbers to be printed later ' draw - battery label (or 1-6 or A-L) LOW 0 OUTS = $1692 HIGH 0 ' set high column nib LOW 0 OUTS = $2B2 HIGH 0 ' set low column nib LOW 0 OUTS = $12 HIGH 0 itemmempos = 27 'V char GOSUB DrawItem ' draw decimal pointRETURN'********************************************************************
http://home.earthlink.net/~evtkw/Batt Mon Main 7.bsx (9 of 18) [1/23/2007 12:12:40 PM]
http://home.earthlink.net/~evtkw/Batt Mon Main 7.bsx
'********************************************************************' subroutine to read ADC'********************************************************************Read_ADC: ' this function has arguments - chipselection, for the ADC to select, ' and channel, for the channel on the selected ADC to be slected ' the args are set outside, so care has to be take when calling this funciton ' set to use main IO MAINIO ' set chip select output to enable Front, Rear1 or Rear2 ADC LOW chipselection ' create command - 11000 binary 0x18, setting start bit and the single ended bit ' channel is the channel that is to be converted and muxed - it is zero based ' write to select channel and convert SHIFTOUT 0, 2, MSBFIRST, [($18 | channel) \6] ' read channel 1 voltage: pins - 2=clock,0=dout, 1=din SHIFTIN 1, 2, MSBPOST, [voltage \11] ' set chip select back high HIGH chipselection' RANDOM voltage' voltage = voltage / 64 ' return to call fucntion RETURN
'********************************************************************' Clear LCD'********************************************************************ClearLCD: FOR p = 7 TO 0 AUXIO ' set to page LOW 0 OUTS = $1612 + (p << 5) HIGH 0 ' set column back to zero ' set high column nib LOW 0 OUTS = $212 HIGH 0 ' set low column nib LOW 0 OUTS = $12 HIGH 0 FOR i = 0 TO 127 LOW 0 OUTS = $16 HIGH 0
http://home.earthlink.net/~evtkw/Batt Mon Main 7.bsx (10 of 18) [1/23/2007 12:12:40 PM]
http://home.earthlink.net/~evtkw/Batt Mon Main 7.bsx
NEXT NEXTRETURN
'********************************************************************' Display current voltages in a bar graph on LCD'********************************************************************
LCD_Bargraph: ' display this many pixels: voltage count * (full scale #pixels) / 1024 AUXIO ' subtract off the equivalent of 3 volts from adc counts read to ' set scale to 3 volt minimum instead of 0 volt minimum - also set to 0 if ' it will be negative. 3 volts is 385 counts ' **if you want to use 2 volts instead use 257 counts. ' ** also could just cut off at 5.25 volts?! ' subtract off the desired scale positoin - the scale count bargrpahscale ' ranges from 3 to 5, and is user selectable with the fucnction switch. ' 128 counts is about 1 volt, so go bargraphscale x 128 and rescale based on ' that. ' first make sure i don't geT A negative number (it rolls over to 65535) IF (voltage > (bargraphscale * 128)) THEN' IF (voltage > 385) THEN ' voltage not less than min scale, subtract off scale temp1 = voltage - (bargraphscale * 128)' temp1 = voltage - 385 ELSE temp1 = 0 ENDIF ' calc pixels (temp1) = voltage in counts * full scale pixels / full scale ADC counts ' full scale adc counts varies based on bargraphscale temp1 = (temp1 * 56) / (1024 - (bargraphscale * 128))' temp1 = temp1 * 56 / (1024 - 385)
'***************************************************************************************** ' ******* should I round pixels based on the first decimal place...? TAKES TIME: ' see function LCD_OneBattery comments for rounding/decimal place calculation explination'' IF ((((voltage * 56) // 1024) * 10 / 1024) >= 5) THEN' IF ((((voltage * 56) // (1024 - (128 * bargraphscale))) * 10 / (1024 - (128 * bargraphscale))) >= 5) THEN' IF (temp1 < 55) THEN ' round pixel up one' temp1 = temp1 + 1' ENDIF' ENDIF '*****************************************************************************************
' calculate column for this battery colmnpos = ((((chipselection - 3) * 6) + channel) * 7)
http://home.earthlink.net/~evtkw/Batt Mon Main 7.bsx (11 of 18) [1/23/2007 12:12:40 PM]
http://home.earthlink.net/~evtkw/Batt Mon Main 7.bsx
' calculate the solid page incmrent i = 7 - (temp1 / 8) ' make the high and low nib column addres to write to display - which requires two cmds for this nblow = $12 + (colmnpos.LOWNIB << 5) nbhigh = $212 + (colmnpos.HIGHNIB << 5) IF (i <> 7) THEN ' write solid pages FOR p = 6 TO i ' set page, column to start LOW 0 OUTS = $1612 | (p << 5) ' set high column nib based on the battery currently printing HIGH 0 LOW 0 OUTS = nbhigh HIGH 0 LOW 0 ' set low column nib OUTS = nblow HIGH 0 'write $00 LOW 0 OUTS = $16 HIGH 0 ' write column FOR k = 0 TO 4 LOW 0 OUTS = $1FF6 HIGH 0 NEXT 'write $00 LOW 0 OUTS = $16 HIGH 0 NEXT ENDIF
' draw partial page that isn't whole solid page - it will be the last one on top ' set page, column to start LOW 0 OUTS = $1612 | ((i - 1) << 5) ' set high column nib based on the battery currently printing HIGH 0 LOW 0 OUTS = nbhigh HIGH 0 LOW 0 ' set low column nib
http://home.earthlink.net/~evtkw/Batt Mon Main 7.bsx (12 of 18) [1/23/2007 12:12:40 PM]
http://home.earthlink.net/~evtkw/Batt Mon Main 7.bsx
OUTS = nblow HIGH 0 ' first column is always blank LOW 0 OUTS = $16 HIGH 0 ' figure out how many pixels to write on top of full pages just written ' pixels extra are remainder of temp1/8 pages. temp1 is total pixels. ' since we are unfortunately drawing from bottom of lcd, do flip bits ' by taking FF and shifting it by the ammount of hte remainder. since ' storing in p, a byte, it should shift off end p = $FF << (8 - (temp1 // 8)) ' p is data, so shift to data section of IO, then use temp2 to send to io in for loop temp2 = $16 + (p << 5) FOR k = 0 TO 4 LOW 0 OUTS = temp2 HIGH 0 NEXT 'write $00 LOW 0 OUTS = $16 HIGH 0 ' now clear the pages above the pages written with a bar. IF (i <> 1) THEN i = i - 2 FOR p = i TO 0 ' set page, column to start LOW 0 OUTS = $1612 | (p << 5) ' set high column nib based on the battery currently printing HIGH 0 LOW 0 OUTS = nbhigh HIGH 0 LOW 0 ' set low column nib OUTS = nblow HIGH 0 ' draw spaces to blank out if column gets smaller FOR k = 0 TO 7 LOW 0 OUTS = $16 HIGH 0 NEXT NEXT ENDIF ' draw 5.25 low voltage line. 5.25V is 674.8 counts, so I will use
http://home.earthlink.net/~evtkw/Batt Mon Main 7.bsx (13 of 18) [1/23/2007 12:12:40 PM]
http://home.earthlink.net/~evtkw/Batt Mon Main 7.bsx
' 675 counts as the cutoff. also must subtract offset (128 counts x bargraphscale) ' set page, column to start ' if page is 5.25v page, write $xx, for 675 - (128 * bargraphscale) count line ' calculate page of 5.25v low limit line ' first get total pixels temp1 = ( (675 - (128 * bargraphscale)) * 56) / (1024 - (128 * bargraphscale)) ' get page #: page zero is on top, so have to invert number accordingly temp2 = 6 - (temp1 / 7) ' get extra pixels. pixel 7 is at bottom, so have to convert temp1 = 8 - (temp1 // 8) ' go to desired page just calculated LOW 0 OUTS = ($1612 | (temp2 << 5)) ' set column in var nbhigh ' set high column nib based on the battery currently printing HIGH 0 LOW 0 OUTS = nbhigh HIGH 0 LOW 0 ' set low column nib OUTS = nblow HIGH 0 ' write line LOW 0 ' this is a potential bug if changed - shift 4 will overwrite data if temp1 is 0 ' however, a "1" will be overwriten with a "1", and temp1 is, coicedentally, 0 OUTS = ($16 | (1 << (temp1 + 4))) ' done writing LCD - set the chip select to on, disabled HIGH 0 ' return to main loopRETURN'********************************************************************
'********************************************************************' Draw an item on dislpay:' 0-6,A-L,N,O,P,R,S,T,U,V,W,Y,:,5x8 fill' this information will be written into the eprom with the DATA command' in the consecutive order above, and is in the file "Char Definitions.bsp"'********************************************************************DrawItem: FOR k = 0 TO 6 AUXIO LOW 0 READ ((itemmempos * 7) + k), temp OUTS = $16 + (temp << 5) HIGH 0 NEXT
http://home.earthlink.net/~evtkw/Batt Mon Main 7.bsx (14 of 18) [1/23/2007 12:12:40 PM]
http://home.earthlink.net/~evtkw/Batt Mon Main 7.bsx
RETURN
'********************************************************************' function/state that selects data collection state'********************************************************************DataAquisionSetup: IF (dataaqmode = DATAAQOFF) THEN ' data aquision is off - do nothing ELSE ' in data aquisition state ' read adcs and send data out serial port if frequency count is reached IF (nblow >= nbhigh) THEN nblow = 0 ' read each voltage then send out the serial port for data collection ' for each ADC, 6 batteries per ADC - chip selects are on IO points 3-5 FOR chipselection = 3 TO 5 ' for each batter measured by each adc FOR channel = 0 TO 5 ' run function to get one battery voltage, with channel and chipselection as arguments GOSUB Read_ADC ' send voltage to serial port 115200 baud rate ' for 155200 use 16385. Formula is int(2,500,00/baud) - 20 +16384 ' for 19200 use 16494 ' this will just send out the current battery number to the serial port...
' change voltage to decimal and send out serial port ' this is a decimal approximation but accruate for 0-1024 to two decimal places ' ** check function LCD_OneBattery comments for more info ' first get the integer part of the number temp1 = voltage * 30 SEROUT 16, 16494, [DEC (temp1 / 3856), "."] FOR k = 0 TO 1 ' remainder * 10 temp1 = (temp1 // 3856) * 10 ' display just created digit SEROUT 16, 16494, [DEC1 (temp1 / 3856)] NEXT SEROUT 16, 16494, [" "] NEXT NEXT ' done sending 18 batteries - send carriage return to serial port SEROUT 16, 16494, [CR] ENDIF ' we are in data collection mode - increment data count for low/high freq control nblow = nblow + 1 ENDIF
RETURN
http://home.earthlink.net/~evtkw/Batt Mon Main 7.bsx (15 of 18) [1/23/2007 12:12:40 PM]
http://home.earthlink.net/~evtkw/Batt Mon Main 7.bsx
' this file defines the LCD characters needed in the program,' and stores them into EPROM' characters are:' 0-9,A-L,N,O,P,R,S,T,U,V,W,Y,:,5x8 fill,"dashed line segment"Zchar DATA $00,$7C,$A2,$92,$8A,$7C,$00 '0Onechar DATA $00,$00,$84,$FE,$80,$00,$00Twochar DATA $00,$84,$C2,$A2,$92,$8C,$00Threechar DATA $00,$42,$82,$8A,$96,$62,$00Fourchar DATA $00,$30,$28,$24,$FE,$20,$00Fivechar DATA $00,$4E,$8A,$8A,$8A,$72,$00 '5Sixchar DATA $00,$78,$94,$92,$92,$60,$00Sevnchar DATA $00,$02,$E2,$12,$0A,$06,$00Eightchar DATA $00,$6C,$92,$92,$92,$6C,$00Ninechar DATA $00,$0C,$92,$92,$52,$3C,$00Achar DATA $00,$FC,$22,$22,$22,$FC,$00 '10Bchar DATA $00,$FE,$92,$92,$92,$6C,$00Cchar DATA $00,$7C,$82,$82,$82,$44,$00Dchar DATA $00,$FE,$82,$82,$44,$38,$00Echar DATA $00,$FE,$92,$92,$92,$82,$00Fchar DATA $00,$FE,$12,$12,$12,$02,$00 '15Gchar DATA $00,$7C,$82,$92,$92,$F4,$00Hchar DATA $00,$FE,$10,$10,$10,$FE,$00Ichar DATA $00,$00,$82,$FE,$82,$00,$00Jchar DATA $00,$40,$80,$82,$7E,$02,$00Kchar DATA $00,$FE,$10,$28,$44,$82,$00 '20Lchar DATA $00,$FE,$80,$80,$80,$80,$00Nchar DATA $00,$FE,$08,$10,$20,$FE,$00Ochar DATA $00,$7C,$82,$82,$82,$7C,$00Pchar DATA $00,$FE,$12,$12,$12,$0C,$00Rchar DATA $00,$FE,$12,$32,$52,$8C,$00 '25Schar DATA $00,$8C,$92,$92,$92,$62,$00 '**Tchar DATA $00,$02,$02,$FE,$02,$02,$00Uchar DATA $00,$7E,$80,$80,$80,$7E,$00 '**Vchar DATA $00,$3E,$40,$80,$40,$3E,$00Wchar DATA $00,$7E,$80,$70,$80,$7E,$00 '** '30Ychar DATA $00,$0E,$10,$E0,$10,$0E,$00Fillchar DATA $FF,$FF,$FF,$FF,$FF,$FF,$FF '**Emptychar DATA $00,$00,$00,$00,$00,$00,$00Decpt DATA $00,$00,$00,$C0,$C0,$00,$00Bargraph DATA $00,$FF,$FF,$FF,$FF,$FF,$00 '** '35'low dash char at 5.25V (675 counts, 37 pixels on 56 pix scale) OR 4.8V (617, 34pix) like Mr. Oba of Soleq said?' high dash char 7.45V (958 counts, 52 pix on 56 pix full scale)