190
U.S. ARMY MEDICAL DEPARTMENT CENTER AND SCHOOL FORT SAM HOUSTON, TEXAS 78234-6100 EVACUATION IN THE FIELD SUBCOURSE MD0001 EDITION 200

U.S. ARMY MEDICAL DEPARTMENT CENTER AND SCHOOL FORT SAM HOUSTON, TEXAS 78234-6100
EVACUATION IN THE FIELD
SUBCOURSE MD0001 EDITION 200

DEVELOPMENT
This subcourse is approved for resident and correspondence course instruction. It reflects the current thought of the Academy of Health Sciences and conforms to printed Department of the Army doctrine as closely as currently possible. Development and progress render such doctrine continuously subject to change.
ADMINISTRATION
For comments or questions regarding enrollment, student records, or shipments, contact the Nonresident Instruction Section at DSN 471-5877, commercial (210) 221-5877, toll-free 1-800-344-2380; fax: 210-221-4012 or DSN 471-4012, e-mail [email protected], or write to: COMMANDER AMEDDC&S ATTN MCCS HSN 2105 11TH STREET SUITE 4192 FORT SAM HOUSTON TX 78234-5064 Approved students whose enrollments remain in good standing may apply to the Nonresident Instruction Section for subsequent courses by telephone, letter, or e-mail. Be sure your social security number is on all correspondence sent to the Academy of Health Sciences.
CLARIFICATION OF TRAINING LITERATURE TERMINOLOGY When used in this publication, words such as "he," "him," "his," and "men" are intended to include both the masculine and feminine genders, unless specifically stated otherwise or when obvious in context.
USE OF PROPRIETARY NAMES
The initial letters of the names of some products are capitalized in this subcourse. Such names are proprietary names, that is, brand names or trademarks. Proprietary names have been used in this subcourse only to make it a more effective learning aid. The use of any name, proprietary or otherwise, should not be interpreted as an endorsement, deprecation, or criticism of a product; nor should such use be considered to interpret the validity of proprietary rights in a name, whether it is registered or not. .

TABLE OF CONTENTS Lesson Paragraphs INTRODUCTION 1 TRIAGE AND EVACUATION FLOW Section I. Triage Procedures 1-1--1-5 Section II. Evacuation Flow 1-6 --1-12 Exercises 2 MANUAL CARRIES Section I. General 2-1--2-2 Section II. One-Man Carries 2-3--2-15 Section III. Two-Man Carries 2-16--2-22 Exercises 3 LITTERS AND LITTER CARRIES Section I. Litters 3-1--3-14 Section II. Dressing a Litter 3-15--3-18 Section III. Placing a Casualty on a Litter 3-19--3-24 Section IV. Litter Carries 3-25--3-38 Exercise 4 GROUND EVACUATION VEHICLES Section I. Ground Ambulances 4-1--4-7 Section II. Nonmedical Military Vehicles 4-8--4-13 Exercises 5 AEROMEDICAL EVACUATION Section I. Air Ambulances 5-1--5-8 Section II. High Performance Hoist Operations 5-9--5-15 Section III. Aeromedical Evacuation Request 5-16--5-23 Section IV. Preparing a Landing Site 5-24--5-33 Exercises 6 REMOVING CASUALTIES FROM TACTICAL VEHICLES 6-1--6-4 Exercises
MD0001 i
CORRESPONDENCE COURSE OF THE U.S. ARMY MEDICAL DEPARTMENT CENTER AND SCHOOL
SUBCOURSE MD0001
EVACUATION IN THE FIELD
INTRODUCTION
Other subcourses in the Health Care Specialist series provide instruction on treating various wounds and injuries. Many times, the last step given in the treatment instructions is to evacuate the casualty to a medical treatment facility. This subcourse describes procedures for evacuating casualties to a medical treatment facility or to a point where they can be picked up by an evacuation vehicle and transported to a medical treatment facility. Subcourse Components: This subcourse consists of six lessons. The lessons are as follows: Lesson 1, Triage and Evacuation Flow. Lesson 2, Manual Carries. Lesson 3, Litters and Litter Carries. Lesson 4, Ground Evacuation Vehicles. Lesson 5, Aeromedical Evacuation. Lesson 6, Removing Casualties from Tactical Vehicles. Credit Awarded: To receive credit hours, you must be officially enrolled and complete an examination furnished by the Nonresident Instruction Section at Fort Sam Houston, Texas. Upon successful completion of the examination for this subcourse, you will be awarded 12 credit hours. You can enroll by going to the web site http://atrrs.army.mil and enrolling under "Self Development" (School Code 555). A listing of correspondence courses and subcourses available through the Nonresident Instruction Section is found in Chapter 4 of DA Pamphlet 350-59, Army Correspondence Course Program Catalog. The DA PAM is available at the following website: http://www.usapa.army.mil/pdffiles/p350-59.pdf.
MD0001 ii

LESSON ASSIGNMENT LESSON 1 Triage and Evacuation Flow. TEXT ASSIGNMENT Paragraph 1-1 through 1-12. LESSON OBJECTIVES After completing this lesson, you should be able to: 1-1. Triage casualties on a conventional battlefield. 1-2. Triage casualties on an integrated battlefield. SUGGESTION After completing the assignment, complete the exercises at the end of this lesson. These exercises will help you to achieve the lesson objectives.
MD0001 1-1

LESSON 1
TRIAGE AND EVACUATION FLOW
Section I. TRIAGE PROCEDURES 1-1. INTEGRATED BATTLEFIELD Modern weapons are far more deadly and accurate than those used in past conflicts. The AirLand Battle doctrine, which is the Army's basic operational concept, involves preparing for an integrated battlefield in which conventional air and land weapons, nuclear weapons, biological weapons, chemical weapons, and directed energy (laser) weapons may be used. Military commanders will rely upon medical resources to treat, evacuate, and (when possible) return soldiers to duty. In the initial phases of battle, the soldiers who are evacuated, treated, and returned to duty may provide the tactical commander with his only source of trained combat replacements. 1-2. TRIAGE Triage means sorting. Triage is used to determine the sequence in which casualties are to be treated in order to maximize the number of survivors and to return to duty those soldiers with minor wounds. Triage is also used to determine the sequence in which casualties are to be evacuated. Triage is a continuous process that is performed at each medical treatment facility (MTF) through which the casualties pass. The goal of successful triage is to do the most good for the most people. Triage is usually performed by the most senior medical person available. 1-3. TRIAGE FOR TREATMENT (NONCHEMICAL ENVIRONMENT) When a medic (or any other person) has more than one casualty, he must decide which casualty to treat first. Some injuries require immediate treatment if the casualty is to live while others can go for a fairly long time without treatment before the casualty's condition deteriorates significantly. When chemical agents are not being used, casualties are triaged as being immediate, delayed, minimal, or expectant and are treated in that order. Triage assures that treatment is directed first toward casualties who have the best chance to survive based upon available medical personnel and supplies. Triage determines the order of treatment, not whether or not treatment is given. a. Immediate. A casualty in the immediate category requires immediate care if he is to survive. Once a casualty in the immediate category has been treated and the life-threatening or limb-threatening condition controlled (airway obstruction expelled, tourniquet applied, and so forth), the treatment of the casualty's other non-immediate injuries are delayed until the life/limb-threatening conditions of other casualties have been treated. Procedures used are short duration and use only essential medical resources. Examples of casualties in this category include casualties with:
MD0001 1-2

(1) An obstruction of the airway or respiratory distress. NOTE: A casualty with cardiopulmonary failure in a battlefield situation is categorized as expectant. (2) Bilateral femur fractures. (3) Massive external bleeding. (4) Shock. (5) Second and/or third degree burns of the face, neck, hands, feet, perineum, and/or genitalia, but with less than 85 percent of the body's surface burned. NOTE: A casualty with second or third degree burns of the face or neck will usually be in shock and have respiratory distress. (6) Penetrating chest injuries. b. Delayed. A casualty in the delayed category has less risk of death or loss of limb if treatment is delayed than a casualty in the immediate category. Examples of casualties in this category include casualties with: (1) Extensive soft tissue wounds requiring debridement. (2) Maxillofacial wounds without airway compromise. (3) Vascular injuries with adequate distal circulation. (4) An a vascular limb (damaged blood vessels in the limb resulting in the arm or leg having a poor blood supply or no blood supply). (5) Second and/or third degree burns on 20 to 85 percent of the casualty's body surface, but not including the face, neck, hands, feet, perineum, or genitalia. (6) Other open wounds, including an open head wound. (7) Fractures requiring operative manipulation, debridement, and fixation. c. Minimal. Casualties in the minimal category generally do not require evacuation to a MTF. These casualties can usually be treated with self-aid (casualty treats himself) or buddy-aid (casualty treated by a nonmedical soldier, such as a combat lifesaver). Treatment by the medic, if needed, can usually be performed quickly. Some of these casualties can be returned to duty. Others can be used by the medic to assist in providing care, defending the immediate area, or evacuating casualties. Examples of casualties in this category include casualties with:
MD0001 1-3

(1) Soft tissue wounds without profuse bleeding (minor lacerations and contusions). (2) Upper extremity fractures, fingers, dislocations, and sprains. (3) Second and/or third degree burns under 20 percent of the casualty's body surface and not involving the face, neck, hands, feet, perineum, or genitalia. (4) Combat stress (battle fatigue). d. Expectant. Casualties in the expectant category have life-threatening conditions that are beyond the capability of the medic to treat and only complicated and prolonged treatment offers any hope of improving life expectancy. This category is used only if resources are limited. Examples of casualties in this category include casualties with: (1) Massive head injuries with signs of impending death (unresponsive with penetrating head wounds). (2) Burns, mostly third degree, covering more than 85 percent of the body's surface area. (3) Mutilating wounds involving multiple structures. (4) Agonal respirations (ineffective gasping breaths). 1-4. TRIAGE FOR TREATMENT (CHEMICAL ENVIRONMENT) When a medic is triaging casualties in a chemical environment (chemical agents are being used), the triage categories change somewhat. In a chemical environment, casualties are triaged as being immediate, chemical immediate, delayed, minimal, or expectant and are treated in that order. Signs and symptoms of chemical agent poisoning are described in subcourse MD0534, Treating Chemical Agent Casualties in the Field. NOTE: When a casualty has chemical agent poisoning and conventional injuries, you will usually treat the chemical agent poisoning before treating the conventional injuries. If a casualty has arterial bleeding and is not classified as expectant, however, take immediate action to control the bleeding prior to or simultaneously with treating the casualty for chemical agent poisoning. a. Immediate. Casualties in the immediate category have a life-threatening condition (same as paragraph 1-3a) and do not have signs or symptoms of chemical agent poisoning.
MD0001 1-4

b. Chemical Immediate. Casualties in the chemical immediate category have no conventional injury, but show signs and/or symptoms of severe chemical agent poisoning (vomiting, labored breathing, coughing, sweating through protective clothing, not being able to follow simple commands like holding up right arm, and so forth). c. Delayed. Casualties in the delayed category have serious conventional injuries, which are not life threatening (paragraph 1-3b). The casualties may have signs and/or symptoms of mild chemical agent poisoning, but not severe chemical agent poisoning. d. Minimal. Casualties in the minimal category have minor conventional injuries (paragraph 1-3c) and do not have signs or symptoms of chemical agent poisoning. e. Expectant. Casualties in the expectant category have life-threatening conventional injuries that are beyond the capability of the medic to treat (paragraph 1-3d), have life-threatening conventional injuries with signs and/or symptoms of severe chemical agent poisoning, or have no respiration (not breathing) because of chemical agent poisoning. 1-5. TRIAGE FOR EVACUATION Hopefully, the number of casualties requiring evacuation will not exceed evacuation capabilities. However, you may need to decide which casualties are to be moved first if the number of litter teams is limited or if the vehicle or vehicles available cannot transport all of the casualties at the same time. Casualties to be evacuated are classified as urgent, urgent surgical, priority, routine, or convenience. Casualties classified as urgent or urgent surgical are evacuated first. Casualties classified as priority are evacuated next. Casualties classified as routine are evacuated last. A fourth category, convenience, can also be used if appropriate. General rules for triaging casualties for evacuation are given below. Each casualty must be triaged for evacuation based upon his present condition. For example, a casualty who had an airway obstruction and was originally classified as immediate may only require medical examination at the MTF to ensure that his throat was not injured. a. Urgent. Urgent category casualties usually consist of immediate and chemical immediate casualties. These casualties need to be evacuated (by air ambulance, if possible) as soon as possible (within 2 hours) in order to save life, limb, or eyesight. These casualties have treatable injuries that cannot be controlled by the medic. This includes: (1) Casualties whose condition(s) cannot be controlled and have the greatest opportunity for survival. (2) Cardio-respiratory distress.
MD0001 1-5

(3) Shock not responding to intravenous (IV) therapy. (4) Prolonged unconsciousness. (6) Head injuries with signs of increasing intracranial pressure. b. Urgent Surgical. Evacuation is required for patients who must receive far forward surgical intervention to save life and stabilize for further evacuation. This includes: (1) Decreased circulation in the extremities. (2) Open chest and/or abdominal wounds with decreased blood pressure (3) Penetrating wounds (gunshots, shrapnel) (4) Uncontrollable bleeding or open fractures with severe bleeding. (5) Burns on hands, feet, face, genitalia or perineum, even if under 20 percent of total body surface area. c. Priority. Priority category casualties usually consist of the more serious delayed casualties. These casualties need to be evacuated within four hours or their status will probably be upgraded to urgent. Examples of casualties in this category include casualties with: (1) Chest injuries, such as rib fractures without a flail segment (three or more adjacent ribs broken in two or more places). (2) Brief periods of unconsciousness. (3) Abdominal injuries with no decreased blood pressure. (4) Eye injuries that do not threaten eyesight. (5) Spinal injuries. (6) Soft tissue injuries and fractures (open or closed). d. Routine. Routine category usually consists of the less serious delayed casualties and minimal casualties requiring additional medical treatment and/or evaluation. The evacuation of these casualties can be delayed for up to 24 hours without serious deterioration of their conditions. Casualties in the expectant category are also placed in this category when evacuation means are limited. Examples of casualties in this category include casualties with:
MD0001 1-6

(1) Burns on 20 to 85 percent of body surface (but not on hands, face, feet, genitalia, and/or perineum) and casualty is responding to intravenous therapy. (2) Uncomplicated fractures, with or without minor open wounds. (3) Open wounds, including superficial chest wounds, without respiratory distress and without decreased blood pressure. (4) Psychiatric problems (combat stress/battle fatigue). e. Convenience. Evacuation of patients by medical vehicle is a matter of convenience rather than necessity. Examples are: (1) Minor open wounds. (2) Sprains and strains. (3) Minor burns under 20 percent of the total body surface area.
Section II. EVACUATION FLOW 1-6. EVACUATION SYSTEM The Army's system for evacuating sick, wounded, and injured personnel has been developed through many years of experience. The forerunner of today's evacuation system was developed by Dr. Letterman during the American Civil War. Today's evacuation system provides a continuous system of evacuation beginning at the point of injury and extending all the way to military and nonmilitary hospitals within the United States. The evacuation system relies upon the use of manual and litter carries, ground and air ambulances, non-medical vehicles which can be used to transport casualties, United States Air Force (USAF) fixed wing aircraft, and US Navy vessels to transport casualties to facilities where they can receive the appropriate care. a. Combat Medic. The first medical person to treat a casualty is usually the combat medic attached to the platoon or company. NOTE: The casualty may receive care in the form of buddy-aid from a fellow soldier or first aid from a combat lifesaver before the medic arrives. However, this care is not delivered by a medical person and is not classified as medical care. b. Casualty Collection Point. Casualties requiring additional medical treatment are usually taken to a collection point called a casualty collection point (CCP). Casualties usually reach the CCP by walking or by being carried (either manual carry or litter).
MD0001 1-7

c. Battalion Aid Station. Ground ambulances (usually M113s in heavy divisions) from the battalion aid station (BAS) collect casualties from the CCP’s and transport the casualties to the battalion aid station. At the BAS, the casualties are treated by members of the treatment squad. Casualties requiring additional medical treatment (not returned to duty) are evacuated to the forward support medical company (FSMC) or forward surgical team (FST). d. Ambulance Exchange Point. The forward support medical company (FSMC) is responsible for evacuating casualties who are not returned to duty from the BAS’s. Sometimes, both tracked (M113) and wheeled ambulances are used. The tracked ambulance evacuates casualties from the aid station and takes them to an ambulance exchange point (AXP). At the AXP, the casualties are transferred to a wheeled ambulance from the forward support medical company that completes the trip to the forward support medical company. e. Forward Support Medical Company. Casualties are evacuated from the BAS’s by ground and/or air ambulances from the FSMC. Casualties who cannot be treated by the FSMC and returned to duty are evacuated by air and/or ground ambulances to division medical treatment facilities or combat support hospitals in the theater of operations. f. Main Support Medical Company. Casualties are evacuated from the FSMC’s by ground and/or air ambulances from the division MTF. Casualties who cannot be treated by the division medical facility and returned to duty are evacuated by air and/or ground ambulances to an appropriate MTF in the Corps support area. g. Corps Medical Treatment Facilities. Corps level MTF's evacuate casualties from the division MTFs. Corps level facilities include the mobile Army surgical hospital (MASH), the combat support hospital (CSH), and the evacuation (Evac) hospital. Casualties that cannot be treated by corps level facilities and returned to duty are evacuated to a MTF in the communications zone (COMMZ). h. Communications Zone Medical Treatment Facilities. Communications zone level MTF's evacuate casualties from corps MTF's. The primary MTF of the COMMZ is the general hospital. Field hospitals and station hospitals are also located in the COMMZ. NOTE: The station hospital may eventually be eliminated. i. Zone of the Interior Medical Treatment Facilities. Casualties who require further medical treatment or who will not be returned to duty are evacuated from the general hospital in the COMMZ to a MTF in the zone of the interior (ZI). This is usually a military hospital [medical center (MEDCEN) or Army medical department activity (MEDDAC)], other federal hospital, or CMCHS (civilian/military contingency hospitalization system) hospital inside the United States (CONUS).
MD0001 1-8

NOTE: Figures 1-1 and 1-2 illustrate the US Army Medical Department's evacuation chain.
Figure 1-1. Medical facilities in a theater of operations.
MD0001 1-9

Figure 1-2. Normal evacuation chain.
MD0001 1-10
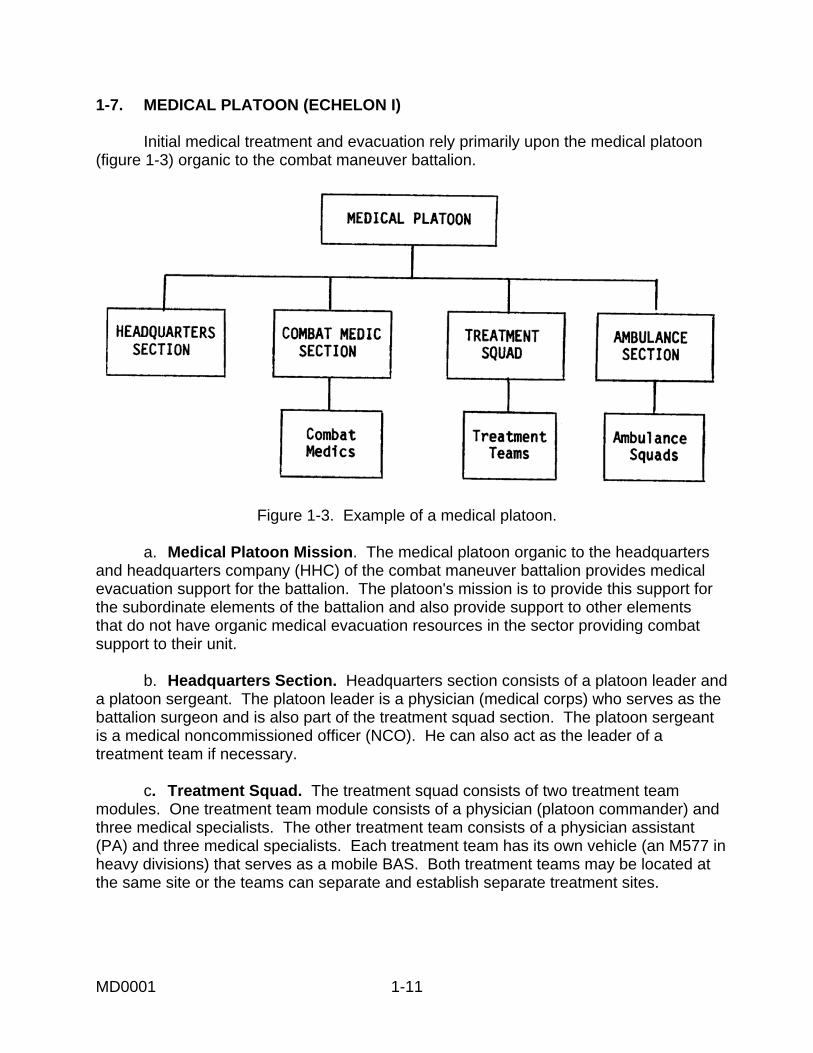
1-7. MEDICAL PLATOON (ECHELON I) Initial medical treatment and evacuation rely primarily upon the medical platoon (figure 1-3) organic to the combat maneuver battalion.
Figure 1-3. Example of a medical platoon.
a. Medical Platoon Mission. The medical platoon organic to the headquarters and headquarters company (HHC) of the combat maneuver battalion provides medical evacuation support for the battalion. The platoon's mission is to provide this support for the subordinate elements of the battalion and also provide support to other elements that do not have organic medical evacuation resources in the sector providing combat support to their unit. b. Headquarters Section. Headquarters section consists of a platoon leader and a platoon sergeant. The platoon leader is a physician (medical corps) who serves as the battalion surgeon and is also part of the treatment squad section. The platoon sergeant is a medical noncommissioned officer (NCO). He can also act as the leader of a treatment team if necessary. c. Treatment Squad. The treatment squad consists of two treatment team modules. One treatment team module consists of a physician (platoon commander) and three medical specialists. The other treatment team consists of a physician assistant (PA) and three medical specialists. Each treatment team has its own vehicle (an M577 in heavy divisions) that serves as a mobile BAS. Both treatment teams may be located at the same site or the teams can separate and establish separate treatment sites.
MD0001 1-11

d. Ambulance Squads. An ambulance squad module consists of four medical specialists and two ground ambulances. Two medical specialists are assigned to each vehicle. One medical specialist serves as the driver while the other medical specialist (assistant driver) provides medical care to casualties en route. The type of ground ambulances used depends upon the type of unit that the medical platoon supports. Examples of ground ambulances are given in Lesson 4. A medical platoon usually has two ambulance squad modules. Medical units with mechanized infantry and armor units have four ambulance squad modules. e. Combat Medic Section. The combat medic section consists of medical specialists attached to the companies/platoons of the unit. These combat medics provide initial medical care to wounded soldiers. Each combat medic attached to a combat unit is considered as a separate module. (1) Echelon I care emphasizes care needed to resuscitate and stabilize the casualty (such as maintaining an airway, stopping bleeding, and controlling shock) and to prepare the casualty for evacuation. Echelon I care includes emergency care provided by nonmedical soldiers and by medical platoon personnel. (2) Nonmedical soldiers provide basic self-aid and buddy-aid care. Some nonmedical soldiers, called combat lifesavers, have received additional training and can provide more advanced procedures (including initiating intravenous infusions to control shock) as a secondary mission when the military situation permits. (3) Medical treatment includes the treatment provided by the combat medics (aidmen), ambulance crews, and aid station personnel. 1-8. BRIGADE AND DIVISION EVACUATION (ECHELON II) Six modules provide unit- and division-level (including separate brigades and ACR’s) health care throughout the theater. The modules are the combat medic, treatment squad, ambulance squad, patient-holding squad, area support squad, and the forward surgical team (FST). The FST is organic to the airborne/air assault divisions and the ACR (light) and functions as an Echelon II asset. These health care modules form medical platoons, companies, and battalions. The modular design of Echelons I and II medical treatment assets allows for the rapid tailoring of agile, mobile emergency medical treatment (EMT), advanced trauma management (ATM), sick call, emergency and sustaining dental support, essential laboratory and x-ray services, and holding for patients awaiting evacuation or return to duty (RTD) within 72 hours. a. Area Support Squad. The area support squad consists of one dental officer (Dental Corps), a dental specialist, an X-ray specialist, and a medical laboratory specialist. Area support squads do not function independently.
MD0001 1-12

b. Patient Holding Squad. The patient holding squad consists of two practical nurses and two medical specialists. It is capable of holding and providing minimal care for up to 40 patients who will be returned to duty. c. Forward Surgical Team. The forward surgical team (FST) is designed to perform urgent initial surgery. When this modular-designed surgical capability is deemed necessary, the FST may augment other medical treatment units during stability operations and support operations. 1-9. ECHELON III HOSPITALIZATION Echelon III hospitalization includes the 296-bed combat support hospital (CSH) with attached FST’s. The CSH manages all types of patients and is normally employed in the corps forward and rear areas. The corps FST is usually attached to a corps hospital unless it is operationally deployed forward. The FST provides urgent, initial surgery and continued postoperative care of patients for approximately 6 hours. The FST provides additional surgical capability when attached to a CSH; however, its primary function is to provide Echelon II CHS within a division. 1-10. ECHELON IV HOSPITALIZATION Echelon IV hospitalization includes the 476-bed general hospital (GH) and the 504-bed field hospital (FH). The GH provides additional specialty care and surgical treatment for patients who require further stabilization prior to evacuation out of the theater. The GH is employed at echelons above corps (EAC). The FH provides reconditioning and rehabilitation for those patients who can return to duty within the time frame specified by the theater evacuation policy. The FH can be employed at EAC or in the combat zone (CZ). Echelon IV hospitalization also includes the medical company, holding (MCH). The MCH provides 1,200 convalescent care cots for reconditioning and rehabilitation. The MCH is employed at EAC in support of the FH; it may be employed in the CZ in direct support of the CSH. 1-11. ECHELON V HOSPITALIZATION Echelon V hospitalization includes the continental US (CONUS) or outside continental US (OCONUS) based DOD medical centers, Department of Veterans Affairs hospitals, and the National Defense Medical System (NDMS), which is composed of civilian hospitals. The Echelon V hospitalization system completes the definitive medical treatment and surgical care, and provides rehabilitation and convalescence for those patients from the theater.
MD0001 1-13

1-12. LEVELS OF MEDICAL CARE As a casualty is evacuated farther rearward in the evacuation chain, the primary medical treatment facilities become larger and capable of providing more extensive medical care. No casualty should be evacuated any farther to the rear than his physical condition or the military situation requires. The types of care available are usually classified as echelons I-V. Facilities that offer higher levels are also capable of performing the lower levels. For example, a facility which offers echelon III care can also perform echelon I and echelon II level care. a. Echelon I. Echelon I care emphasizes care needed to resuscitate and stabilize the casualty (such as maintaining an airway, stopping bleeding, and controlling shock) and to prepare the casualty for evacuation. Echelon I care includes emergency care provided by nonmedical soldiers and by medical platoon personnel. (1) Nonmedical soldiers provide basic self-aid and buddy-aid care. Some nonmedical soldiers, called combat lifesavers, have received additional training and can provide more advanced procedures (including initiating intravenous infusions to control shock) as a secondary mission when the military situation permits. (2) Medical treatment includes the treatment provided by the combat medics, ambulance crews, and aid station personnel. b. Echelon II. Echelon II care includes resuscitation and additional emergency measures as needed, but does not go beyond the measures dictated by the immediate necessities. The FST’s can provide echelon II care at the brigade level. c. Echelon III. Echelon III care is provided by a medical facility staffed and equipped to provide care for all categories of patients. The combat support hospital, mobile Army surgical hospital, and field hospital are examples of facilities providing echelon III care. d. Echelon IV/V. Echelon IV and echelon V care is provided by hospitals that are staffed and equipped for general and specialized medical and surgical care and for reconditioning and rehabilitation for return to duty. The general hospital in the communications zone and ZI (CONUS) hospitals are examples of facilities providing echelons IV-V care.
Continue with Exercises
MD0001 1-14

EXERCISES, LESSON 1 INSTRUCTIONS: Answer the following exercises by marking the lettered response that best answers the question or best completes the incomplete statement or by writing the answer in the space provided at the end of the exercise. After you have completed all the exercises, turn to "Solutions to Exercises" at the end of the lesson and check your answers. For each exercise answered incorrectly, reread the material referenced with the solution. In exercises 1 through 6, match the casualty description in Column I with the appropriate treatment category from column II. Categories in Column II may be used more than once.
COLUMN I (Casualty Description)
1. Casualty has a deep cut on his thigh with severe bleeding from the wound. There are no indications of chemical agent poisoning. 2. Casualty has an open head wound with lacerated brain tissue visible. Casualty is not breathing. 3. Casualty has an amputation of part of the hand, including the loss of two fingers. Bleeding is being controlled by a dressing applied by a nonmedical soldier and by manual pressure being applied by the casualty. Chemical agents are not being used. 4. Casualty has signs of severe chemical agent poisoning, but no other injuries. 5. A casualty has a fractured leg (no open wound) due to a fall. The casualty was briefly exposed to nerve agents, but is now wearing full protective gear and is responding to the nerve agent antidote which the casualty administered to himself. 6. A casualty has first and second degree burns on his back and buttocks (estimated at 12 percent of body
surface) with no other injuries.
COLUMN II (Category) a. Immediate. b. Chemical Immediate. c. Delayed. d. Minimal. e. Expectant.
MD0001 1-15

7. A casualty who is classified as expectant would normally be classified as ____for purposes of evacuation when evacuations means are limited. a. Urgent. b. Priority. c. Routine. 8. A casualty has an open "sucking" chest wound with respiratory distress and shock. His classification for evacuation is: a. Urgent. b. Priority. c. Routine. 9. A casualty can wait for over 2 hours for evacuation without endangering his life, limb, or eyesight. Delaying his evacuation for more than 4 hours, however, will probably endanger his life. His classification for evacuation is: a. Urgent. b. Priority. c. Routine. 10. A physician assistant (PA) in a medical platoon organic to a combat battalion will be part of a(n): a. Ambulance squad. b. Area support squad. c. Surgical squad. d. Treatment squad.
MD0001 1-16

11. Casualties requiring additional medical treatment are being evacuated from a battalion aid station to a forward support medical company. The evacuation
vehicle used to transport the casualties is normally provided by the: a. Battalion aid station. b. Forward support medical company. c. Combat support hospital. d. Evacuation hospital. 12. Which of the following offers the highest level of medical care? a. Battalion aid station. b. Area treatment squad. c. Combat support hospital. d. General hospital.
Check Your Answers on Next Page
MD0001 1-17

SOLUTIONS TO EXERCISES, LESSON 1 1. a (paras 1-3a(3), 1-4a) 2. e (paras 1-3d(1), 1-4e) 3. c (paras 1-3b, b(6)) 4. b (para 1-4b) 5. c (paras 1-3b(7), 1-4c) 6. d (paras 1-3c(3), 1-4d) 7. c (para 1-5d) 8. a (paras 1-3a(1), 1-5a, a(1)) 9. b (paras 1-5a, c) 10. d (para 1-7c) 11. b (paras 1-6d, e) 12. d (paras 1-10, 1-12, 1-12d)
End of Lesson 1
MD0001 1-18
LESSON ASSIGNMENT LESSON 2 Manual Carries. LESSON TEXT Paragraphs 2-1 through 2-22. LESSON OBJECTIVES After completing this lesson, you should be able to: 2-1. Identify which manual carry is preferred for a given situation. 2-2. Identify the procedures for performing the following one-man carries:
• Fireman's carry. • Arms carry. • Support carry. • Saddleback carry. • Pack-strap carry. • Pistol-belt carry. • Load bearing equipment carry. • Pistol-belt drag. • Neck drag. • Cradle drop drag.
2-3. Identify the procedures for performing the following two-man carries: Fore-and-aft carry.
Support carry. Arms carry. Two-hand seat carry. Four-hand seat carry.
SUGGESTION After completing the assignment, complete the exercises at the end of this lesson. These exercises will help you to achieve the lesson objectives.
MD0001 2-1

LESSON 2
MANUAL CARRIES
Section I. GENERAL 2-1. MANUAL CARRIES A manual carry is used to evacuate a casualty if a litter is not available, the time or materials needed to make an improvised litter are not available, and/or personnel needed to act as litter bearers are not available or cannot be spared. The use of a two-man carry is preferred to a one-man carry if a second bearer is available. a. In general, a casualty should not be moved before the required emergency care is given unless it is necessary to remove the casualty (and yourself) out of the line of fire or from a dangerous situation (from inside a burning building, for example). Examine the casualty for possible spinal injury before moving him. If a casualty with a possible spinal injury must be moved, keep his head, neck, and back in alignment. b. If possible, have another soldier evacuate the casualty while you care for other casualties. When soldiers in a combat situation are using manual carries to evacuate casualties, give preference to the carries that allow the bearers to carry and use their personal weapons. 2-2. GENERAL RULES FOR MANUAL CARRIES Manual carries are tiring for the bearers and increase the risk of the casualty suffering additional injury. Improper technique can result in injury to the bearer as well as additional injury to the casualty. Minimize the risk of muscle strain and sprains by following the rules given below. a. Use the body's natural system of levers when lifting or moving the casualty. b. Know your physical capabilities and limitations. c. Maintain solid footing when lifting and transporting a casualty. d. Use your leg muscles (not your back muscles) when lifting and lowering a casualty. e. Use your shoulder and leg muscles (not your back muscles) when carrying or dragging a casualty. f. If there are other bearers, work in unison and use deliberate, gradual movements. g. Rest frequently, or whenever possible, when transporting a casualty.
MD0001 2-2

Section II. ONE-MAN CARRIES 2-3. SELECTING AN APPROPRIATE ONE-MAN CARRY If a one-man manual carry is to be used, choose an appropriate carry based upon the casualty's condition (some carries are used only with a conscious casualty), the nature of the casualty's injuries (some carries are not used if the casualty's arm is fractured), the situation (you may need to crawl to avoid enemy fire), the distance to be covered (some carries are less tiring), the weight of the casualty, your strength and endurance, and obstacles that will be encountered (some carries leave one or both of your hands free to climb). In general, distances of less than 50 meters are considered to be short, between 50 and 300 meters are considered to be moderate, and more than 300 meters are considered to be long. The distances may vary based upon the casualty's weight and your strength and endurance. a. Fireman's Carry. The fireman's carry can be used to move a conscious or unconscious casualty. It is usually the preferred carry for quickly moving an unconscious or severely injured casualty a moderate distance and can be used for long distances. The fireman's carry leaves one of the bearer's arms free to carry a rifle, move around obstacles, and so forth. b. Arms Carry. The arms carry can be used to move a conscious or unconscious casualty. It is generally used with an unconscious casualty or a conscious casualty who cannot walk. The arms carry is very tiring and is only used for short distances. c. Support Carry. The support carry is only used with a conscious casualty who can walk or at least hop on one leg. The carry can be used to transport the casualty for a long distance if the casualty does not tire. d. Saddleback Carry. The saddleback carry is only used to move a conscious casualty who can put one or both of his arms around the bearer's neck. It is generally used to move the casualty for a moderate or long distance. e. Pack-Strap Carry. The pack-strap carry is generally used to carry a conscious or unconscious casualty for a moderate distance. The carry is not used if the casualty has a fractured arm. f. Pistol-Belt Carry. The pistol-belt carry can be used to move a conscious or unconscious casualty. It is the preferred carry for moving a casualty for a long distance. The carry leaves both of the bearer's hands free; therefore, it is especially useful if the bearer must use his rifle, climb banks, or move over obstacles. The carry also allows the bearer to creep through shrubs and move under low-hanging branches. If the casualty is conscious, he can carry a weapon since the carry leaves his hands free also.
MD0001 2-3

g. Load Bearing Equipment Carry. The load bearing equipment (LBE) carry can be used to move a conscious or unconscious casualty for a long distance. If the casualty is conscious and can put his arms around the bearer's neck, the carry leaves the bearer's hands free to carry his weapon, climb, and move around obstacles. h. Pistol-Belt Drag. The pistol-belt drag is used to move a conscious or unconscious casualty for a short distance. This carry is used when the bearer and the casualty must stay very close to the ground, such as moving a casualty during combat. i. Neck Drag. The neck drag is used to move a conscious or unconscious casualty for a short distance. This carry allows the rescuer to maintain a low silhouette, but not as low as the pistol-belt drag. The carry is generally used when moving behind a low wall, under a vehicle, or through a culvert. The neck drag is not used if the casualty has a fractured arm. j. Cradle Drop Drag. The cradle drop drag is generally used to move a conscious or unconscious casualty up or down steps or to quickly remove a casualty from a life-threatening situation. The carry is only used for short distances. 2-4. POSITIONING THE CASUALTY Some carries require the casualty to be prone (lying on his abdomen) when you begin; others require him to be supine (lying on his back). To turn the casualty either to the prone or supine position, follow the steps given below. Figure 2-1 shows a casualty being turned to a prone position; figure 2-2 shows a casualty being turned to a supine position. CAUTION: Check the casualty for possible spinal injury before turning the casualty. If possible, avoid moving any casualty with a suspected spinal injury. If the casualty must be moved, keep his head, neck, and back in alignment and keep movement to a minimum. a. Kneel at the casualty's uninjured side.
WARNING:
If you are in a chemical environment, squat, do not kneel. If you press your knee against the contaminated ground, you may force the chemical agent into your protective clothing, which will greatly reduce the protection time afforded by your protective clothing.
MD0001 2-4

b. Place the casualty's arms above his head. c. Cross his far ankle over the near ankle. d. Grasp the casualty's clothing at his far shoulder and hip (or thigh). e. Gently pull so the casualty rolls toward you. Continue until the casualty is turned over (either onto his abdomen or his back). f. Place the casualty's arms at his sides and straighten his legs.
Figure 2-1. Turning a casualty to a prone position.
Figure 2-2. Turning a casualty to a supine position.
MD0001 2-5

2-5. RAISING THE CASUALTY TO A STANDING POSITION Some one-man carries require the casualty be raised to a standing position. If the casualty is conscious, he may be able to stand with your assistance. If the casualty is unconscious or cannot stand, however, you can raise him to a standing position without his help. Two methods of raising the casualty from a prone position are presented in this subcourse. The method shown in figure 2-3 is normally used. The second (alternate) method shown in figure 2-4 is used if you believe this method will be safer for the casualty, because of the location of his injuries. a. Regular Method. (1) Position the casualty in a prone position (paragraph 2-4). (2) Straddle the casualty, slip your hands under his chest, and lock your hands together (figure 2-3 A). (3) Lift the casualty and begin walking backwards until he is on his knees (figure 2-3 B). (4) Continue walking backward until his legs are straight and his knees are locked, (figure 2-3 C).
(5) Walk forward and bring the casualty to a standing position (figure 2-3 D). Keep the casualty tilted slightly backward so his knees will remain locked. If his knees do not remain locked, walk backward until they lock and then move forward until the casualty is in the standing position. (6) Grasp one of the casualty's wrists and raise his arm. Use your other arm to keep the casualty in a standing position, (figure 2-3 E). (7) Move under the casualty's arm to his front, lower his arm, and hold the casualty around his waist. (8) Place one of your feet between the casualty's feet. Spread his feet so they are about 6 to 8 inches apart, (figure 2-3 F). b. Alternate Method. (1) Position the casualty in a prone position (paragraph 2-4). (2) Kneel on one knee (or squat) at the casualty's head, facing his feet.
MD0001 2-6

Figure 2-3. Raising a casualty to his feet (regular method).
MD0001 2-7

(3) Put your hands under his armpits, down his sides, and across his back, (figure 2-4 A.) (4) Rise, lifting the casualty to his knees, (figure 2-4 B). Take care to keep the casualty's head from snapping back while you are raising him to his feet. (5) Lower your arms, secure a hold on the casualty, and raise him to a standing position with his knees locked. (6) Put your arms around the casualty's waist and tilt his body slightly backward to keep his knees from buckling. (7) Place your foot between the casualty's feet and spread his feet so they are about 6 to 8 inches a part (figure 2-4 C). You and the casualty are now in the same position as the normal method of raising a casualty to his feet (figure 2-3 F).
Figure 2-4. Raising a casualty to his feet (alternate method).
MD0001 2-8

2-6. FIREMAN'S CARRY The fireman's carry (figure 2-5) is used to quickly move an unconscious or severely injured casualty for a moderate or long distance. The steps for performing the fireman's carry are given below. a. Raise the casualty to a standing position (figure 2-5 A). Use the procedures given in paragraphs 2-4 and 2-5, as needed. b. Grasp the casualty's wrist and lift his arm high over his head while continuing to support the casualty with your other arm, (figure 2-5 B). If the casualty has an injured arm, grasp the wrist of the uninjured arm. c. Bend at the waist and kneel (stoop if in a chemical environment), pulling the casualty over your shoulder. At the same time, slip your arm from his waist, pass the arm between the casualty's legs, and grasp behind the casualty's knee, (figure 2-5 C). d. Move the hand grasping the casualty's wrist toward the hand grasping the casualty's knee. e. Grasp the casualty's wrist with the hand at the casualty's knee, thus freeing the hand that was originally holding the wrist, (figure 2-5 D). f. Place your free hand on your knee and slowly rise to a standing position (figure 2-5 E). Use the hand on your knee to help you rise without straining your back. g. Adjust the casualty's body so his weight is distributed comfortably. h. Move forward, carrying the casualty. Use your free hand to carry the casualty's weapon, move around obstacles, and so forth.
MD0001 2-9

Figure 2-5. Fireman's carry.
MD0001 2-10

2-7. ARMS CARRY The arms carry (figure 2-6) is often used to move a casualty who cannot walk (conscious or unconscious) for a short distance. The arms carry is performed using the following steps. If the casualty is conscious, tell him what you are going to do. a. Raise the casualty to a standing position using the procedures given in paragraph 2-5. b. Slide one of your arms under the casualty's near arm, behind his back, and under his other arm. c. Move to the casualty's side, bend down, and place your other arm behind the casualty's knees. d. Lift the casualty from the ground and stand erect. e. Move forward, carrying the casualty high on your chest to lessen fatigue.
Figure 2-6. Arms carry.
MD0001 2-11

2-8. SUPPORT CARRY The support carry (figure 2-7) can only be used with a casualty who is conscious and can walk or at least hop on one leg. If the casualty can stand with assistance, you may use the alternate method. Otherwise, use the regular method (paragraph a). Tell the casualty what you are going to do so that he can work with you.
Figure 2-7. Support carry.
a. Regular Method. (1) Raise the casualty to a standing position using the procedures given in paragraph 2-5. (2) Grasp the casualty's wrist on his injured side with one hand while continuing to support the casualty with your other arm. (3) Lift the casualty's arm and move to his side so you are facing the same direction as the casualty. At the same time, draw his arm around your neck. (4) Move forward, allowing the casualty to use you as a crutch when he walks or hops. Adjust your walking motion to help the casualty maintain his balance. If the casualty tires, allow him to rest or use another manual carry to transport him.
MD0001 2-12
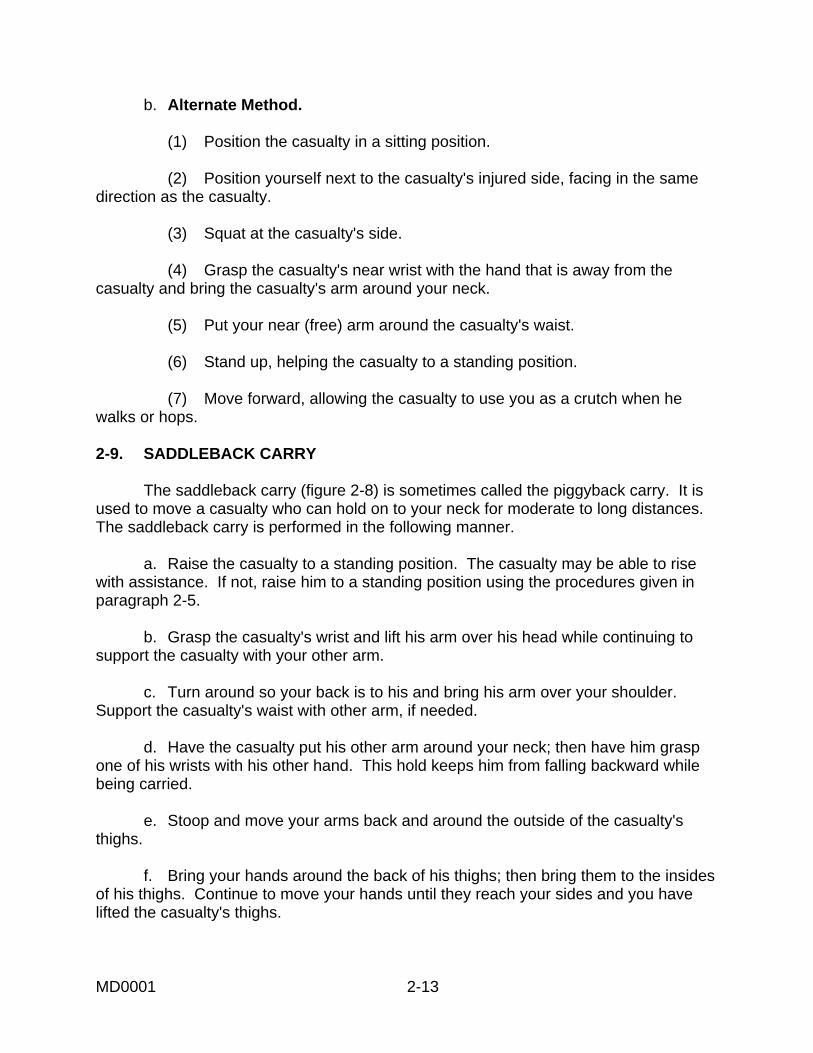
b. Alternate Method. (1) Position the casualty in a sitting position. (2) Position yourself next to the casualty's injured side, facing in the same direction as the casualty. (3) Squat at the casualty's side. (4) Grasp the casualty's near wrist with the hand that is away from the casualty and bring the casualty's arm around your neck. (5) Put your near (free) arm around the casualty's waist. (6) Stand up, helping the casualty to a standing position. (7) Move forward, allowing the casualty to use you as a crutch when he walks or hops. 2-9. SADDLEBACK CARRY The saddleback carry (figure 2-8) is sometimes called the piggyback carry. It is used to move a casualty who can hold on to your neck for moderate to long distances. The saddleback carry is performed in the following manner. a. Raise the casualty to a standing position. The casualty may be able to rise with assistance. If not, raise him to a standing position using the procedures given in paragraph 2-5. b. Grasp the casualty's wrist and lift his arm over his head while continuing to support the casualty with your other arm. c. Turn around so your back is to his and bring his arm over your shoulder. Support the casualty's waist with other arm, if needed. d. Have the casualty put his other arm around your neck; then have him grasp one of his wrists with his other hand. This hold keeps him from falling backward while being carried. e. Stoop and move your arms back and around the outside of the casualty's thighs. f. Bring your hands around the back of his thighs; then bring them to the insides of his thighs. Continue to move your hands until they reach your sides and you have lifted the casualty's thighs.
MD0001 2-13

Figure 2-8. Saddleback carry.
g. Straighten and clasp your hands together in front of you. Maintain your grip to keep from dropping the casualty. h. Adjust the casualty's weight to make the weight distribution more comfortable, then walk forward. 2-10. PACK-STRAP CARRY The pack-strap carry can be used to move a conscious or unconscious casualty for a moderate distance. Do not use the carry if the casualty has a fractured arm or wrist. The steps for performing the pack-strap carry are given below. a. Raise the casualty to a standing position using the procedures given in paragraph 2-5. b. Grasp one of the casualty's wrists and lift his arm above his head while continuing to support the casualty's waist with your other arm.
MD0001 2-14

c. Turn around so that your back is to the casualty. At the same time, bring the casualty's raised arm over your shoulder. Bend your knees somewhat so your shoulder fits under the casualty's arm and your back supports his weight. d. Release his waist, grasp his other wrist with your free hand, and bring that arm over your other shoulder (figure 2-9 A). Make sure you are holding both wrists so his hands are in natural palms down (palms toward your abdomen) position. Twisting the casualty's hands could result in injury to his wrists, elbows, or shoulders when he is lifted and carried. e. Bend forward and hoist the casualty as high on your back as possible so all of his weight is resting on your back (figure 2-9 B). f. Walk forward, keeping bent so the casualty's weight is balanced on your back and his feet are not dragging.
Figure 2-9. Pack-strap carry. 2-11. PISTOL-BELT CARRY The pistol-belt carry (figure 2-10) is used to move a conscious or unconscious casualty for a long distance while leaving your hands free to move around obstacles or climb banks. The carry is performed using the following steps. a. Position the casualty on his back. Use the procedures given in paragraph 2-4 to turn the casualty onto his back, if needed.
MD0001 2-15

b. Form a sling by joining two or three fully extended pistol belts together to form one large loop. If pistol belts are not available, use any material that will not break and will not cut or bind the casualty. For example, you can use a rifle-sling, two litter straps joined together, or two muslin bandages tied together. c. Slip the sling under the casualty with the top part of the loop under his lower back, the bottom part under his thighs, the belt buckles centered behind the casualty, and an end of the loop extending from each side (figure 2-10 A). d. Move the casualty's legs apart and lie between them on your back. e. Thrust your arms through the loop ends. Adjust the sling so the loop ends fit over your shoulders. f. Grasp the casualty's wrist and his trouser leg on his injured side (figure 2-10 B). g. Roll toward the casualty's uninjured side and onto your abdomen (figure 2-10 C). Both you and the casualty are now in a prone position. (Be sure to roll across the casualty's uninjured side, not his injured side.) h. Release the casualty's wrist and leg and push yourself up until you are on your knees (figure 2-10 D). i. Rise to a kneeling position with your hands on your knees for support (figure 2-10 E). j. Rise to your feet (figure 2-10 F). Lean forward to balance the casualty's weight. k. Adjust the casualty's weight to a more comfortable position, if needed, and walk forward. Your hands are free to carry a rifle or other object, climb obstacles, and so forth. (1) If the casualty is unconscious, and you do not have to carry anything in your hands, grasp his wrists (palms down) to help keep the casualty balanced while you are walking. (2) If the casualty is conscious, have him put his arms around your neck and grasp his wrist with one hand.
MD0001 2-16

Figure 2-10. Pistol-belt carry.
MD0001 2-17

2-12. LOAD BEARING EQUIPMENT CARRY Steps for performing three variations of the load bearing equipment (LBE) carry are given below. The first version is used only if the casualty is conscious and can stand. The LBE carry can be used to move the casualty for a long distance. a. Load Bearing Equipment Carry: Method 1 (Standing Casualty). (1) Loosen or have another soldier loosen all suspender straps on your LBE (figure 2-11 A). (2) Squat down in front of the standing casualty. (3) Have the casualty place one leg into the loop formed by your suspenders and pistol belt (figure 2-11 B). (4) Have the casualty place his other leg into the loop. (5) Have the casualty lean forward and put his arms over your shoulders (figure 2-11 C). This places his weight onto your back. (6) Stand up. Keep leaning forward to keep the casualty's weight balanced on your back. (7) Walk forward, staying somewhat bent forward to keep the casualty's weight balanced on your back. (a) If you do not need to carry anything, you may grip the casualty's wrists (same palms down position used in the pack-strap carry) to help maintain balance (figure 2-11 D). (b) If you need to use your hands, have the casualty use one hand to grasp his wrist (figure 2-11 E) or clasp his hands together. b. Load Bearing Equipment Carry: Method 2 (Using Your Load Bearing Equipment). (1) Position the casualty on his back (figure 2-12 A). Turn the casualty using the procedures given in paragraph 2-4, if needed. (2) Remove your LBE and loosen all suspender straps on the LBE. (3) Lift one of the casualty's legs and place it through the loop formed by the suspenders and pistol belt (figure 2-12 B); then do the same with the other leg.
MD0001 2-18

Figure 2-11. Load bearing equipment carry with standing casualty.
MD0001 2-19

(4) Move the LBE up until the pistol belt is behind the casualty's thighs (figure 2-12 C). (5) Lie on your back between the casualty's legs and work your arms through the LBE suspenders (figure 2-12 D). (6) Grasp the casualty's wrist on his injured side and roll toward his uninjured side (figure 2-12 E). Continue until you are in a prone position with the casualty on your back. (7) Push yourself to a kneeling position; then to a position in which you are kneeling on one knee. Maintain your hold on the casualty's wrist to help balance the casualty while you are rising. (8) Grasp the casualty's other wrist and bring that arm over your other shoulder (figure 2-12 F). (9) Place one hand on your raised knee for support; then rise to your feet. Lean forward to balance the casualty's weight as you rise. (a) If the casualty is conscious, have him lock his hands together or use one hand to grasp his other wrist while you are rising. (b) If the casualty is unconscious, release one wrist while you are rising; then secure the wrist again. (10) Walk forward, staying somewhat bent forward to keep the casualty's weight balanced on your back. (a) If the casualty is unconscious and you do not have to carry anything in your hands, grasp his wrists (palms down) to help keep the casualty balanced while you are walking. (b) If the casualty is conscious, have him grasp his wrist with one hand. (c) If the casualty is unconscious and you need to have your hands free, tie his wrists together using a muslin bandage, a field dressing, or similar material which will not cut his wrists (figures 2 12 G and H).
MD0001 2-20

Figure 2-12. Load bearing equipment carry using bearer's LBE.
MD0001 2-21

c. Load Bearing Equipment Carry: Method 3 (Using Casualty's Load Bearing Equipment). (1) Position the casualty on his back. Turn the casualty using the procedures given in paragraph 2-4, if needed. (2) Loosen the front two suspenders of the casualty's LBE (figure 2-13 A). (3) Spread the casualty's legs and lie on your back between the casualty's legs. (4) Slip your arms through the casualty's two front suspenders up to your shoulders (figure 2-13 B). (5) Grasp the casualty's wrist on his injured side and roll toward his uninjured side (figure 2-13 C). Continue until you are in a prone position with the casualty on your back. (6) Push yourself to a kneeling position (figure 2-13 D); then to a position in which you are kneeling on one knee (figure 2-13 E). Maintain your hold on the casualty's wrist to help balance him as you rise. (7) Grasp the casualty's other wrist and bring that arm over your other shoulder. (8) Place one hand on your raised knee for support; then rise to your feet. Lean forward to balance the casualty's weight as you rise. (a) If the casualty is conscious, have him lock his hands together or use one hand to grasp his other wrist while you are rising. (b) If the casualty is unconscious, release one wrist while you are rising; then secure the wrist again. (9) Walk forward, staying somewhat bent forward to keep the casualty's weight balanced on your back. (a) If the casualty is unconscious and you do not have to carry anything in your hands, grasp his wrists (palms down) to help keep the casualty balanced while you are walking. (b) If the casualty is conscious, have him grasp his wrist with one hand.
MD0001 2-22

(c) If the casualty is unconscious and you need to have your hands free, tie his wrists together using a muslin bandage, a field dressing, or other material that will not cut his wrists (figure 2-13 F).
Figure 2-13. Load bearing equipment carry using casualty's LBE.
MD0001 2-23

2-13. PISTOL-BELT DRAG The pistol-belt drag is used to move a conscious or unconscious casualty for a conscious or unconscious casualty for a short distance when the bearer and the casualty must very close to the ground. The steps for performing the pistol-belt drag are given below. a. Position the casualty on his back. Use the procedures given in paragraph 2-4 to turn the casualty onto his back, if needed. b. Form a sling by joining two or three fully extended pistol belts together to form one large loop. If pistol belts are not available, use any material that will not break, and will not cut or bind the casualty. For example, you can use a rifle-sling, two litter straps joined together, or two muslin bandages tied together. c. Slip the bottom of the loop across the casualty's chest, under his armpits, and under his shoulders (figure 2-14 A). d. Twist the remainder (top portion above the casualty's head) of the loop to form a figure 8 (figure 2-14 B). Adjust the loop so the buckles cross in the center of the figure 8. e. Lie on your side facing the casualty with your head in the same direction as the casualty's head. Support yourself on your elbow. f. Slip your lower arm (the arm on which you are resting) through the top loop of the figure 8 and bring the loop over your shoulder (shoulder nearest the ground). g. Roll toward the casualty and turn onto your abdomen (90 degree turn). The pistol belts are now across your chest and the loop is over the shoulder that is away from the casualty (figure 2-14 C). h. Crawl forward, dragging the casualty with you.
MD0001 2-24

Figure 2-14. Pistol-belt drag. 2-14. NECK DRAG The neck drag is used to move a conscious or unconscious casualty for a short distance when the rescuer needs to maintain a low silhouette (moving behind a low wall, under a vehicle, or through a culvert, for example). Do not use the neck drag if the casualty has a fractured arm or wrist. The neck drag is performed in the manner described below. a. Position the casualty on his back. Use the procedures given in paragraph 2-4 to turn the casualty onto his back, if needed. b. Tie the casualty's hands together with material that will not cut his wrists, such as a muslin bandage or a field dressing. Do not tie the materials tight enough to interfere with blood circulation. If the casualty is conscious, also have him interlock his fingers.
MD0001 2-25

c. Straddle the casualty's hips, facing the casualty's head. d. Kneel. e. Loop the casualty's arms around your neck. f. Crawl forward on your hands and knees, dragging the casualty beneath (figure 2-15). Make sure the casualty's head does not drag on the ground.
Figure 2-15. Neck drag. 2-15. CRADLE DROP DRAG The cradle drop drag is used to move a conscious or unconscious casualty a short distance. It is commonly used to move a casualty down steps or away from a life-threatening situation. The following steps are used to perform the cradle drop drag. a. Position the casualty on his back (paragraph 2-4). b. Kneel at the casualty's head, slide your hands (palms up) under his shoulders, and grasp the clothing under his armpits (figure 2-16 A). c. Rise to one knee with the casualty in a semi-sitting position (figure 2-16 B). Support the casualty's head by resting it against your arm or by bringing your elbows together and supporting the head on your forearms. d. Rise to a stooped position and walk backward (figure 2-16 C), dragging the casualty. If you go down steps or a short drop, support the casualty's head and shoulders and let his hips and legs drop from step to step (figure 2-16 D).
MD0001 2-26

Figure 2-16. Cradle drop drag.
Section III. TWO-MAN CARRIES
2-16. CHOOSING AN APPROPRIATE TWO-MAN CARRY Two-man carries are less tiring than one-man carries since the weight of the casualty is shared. Two-man carries are also more comfortable for the casualty and less likely to aggravate his injuries. If a two-man manual carry is to be used, choose an appropriate carry based upon the casualty's condition and the distance to be covered. In general, distances of less than 50 meters are considered to be short, distances between 50 and 300 meters are considered to be moderate, and distances of more than 300 meters are considered to be long. a. Two-Man Forward-and-After Carry. The two-man forward-and-after carry can be used to move a conscious or unconscious casualty. It is not as tiring as other carries; therefore, it is usually the preferred two-man carry for moving a casualty a long distance.
MD0001 2-27
b. Two-Man Support Carry. The two-man support carry can be used to transport either a conscious or an unconscious casualty. It is especially useful if the casualty is conscious and can walk if assisted. The carry can be used for long distances. A variation of the carry can be used if the casualty is taller than the bearers. c. Two-Man Arms Carry. The two-man arms carry can be used to move a conscious or unconscious casualty a moderate distance. If a casualty with a suspected spinal fracture must be moved immediately, a variation of this carry is used with one bearer supporting the casualty's head and neck and three or more bearers supporting the casualty's body and legs. Whenever possible, a spine board (Lesson 3) should be applied before moving a casualty with a suspected spinal injury. d. Two-Hand Seat Carry. The two-hand seat carry can be used to move a conscious or unconscious casualty. This carry is normally used to move a casualty a short distance. e. Four-Hand Seat Carry. The four-hand seat carry is only used with a conscious casualty who can help support himself while he is being carried. This carry is usually used to transport a casualty a moderate distance. It is especially useful in transporting a conscious casualty with a head or foot injury. 2-17. WORKING IN UNISON One major difference between one-man and two-man carries is the need for coordinated effort in the two-man carries. Before beginning the carry, the bearers should determine which bearer is to give the instructions so they will lift the casualty in unison and begin walking at the same time. Normally, the more experienced bearer is the leader. A combat medic who is not one of the bearers can give the instructions to the bearers when they begin the carry. 2-18. TWO-MAN FORWARD-AND-AFTER CARRY The two-man fore-and-aft carry can be used to move a casualty for a long distance. If the two bearers are of different height, the taller bearer supports the casualty's upper body and the shorter bearer supports the casualty's legs. a. The bearers position the casualty on his back with his arms by his sides (paragraph 2-4). b. Both bearers prepare to lift the casualty (figure 2-17 A). (1) The first (taller) bearer kneels at the casualty's head facing toward the casualty's feet. The bearer slides his hands under the casualty's armpits and across the casualty's chest. Then he locks his hands together over the casualty's chest.
MD0001 2-28

(2) The second (shorter) bearer spreads the casualty's legs apart and kneels between the casualty's legs with his back to the casualty's head. He then reaches around the outside of the casualty's legs, places his hands under (behind) the casualty's knees, and secures his grip. c. Once both bearers are prepared, the leader gives the command to lift the casualty. d. Both bearers rise together, lifting the casualty (figure 2-17 B). e. Upon the command of the leader, both bearers walk forward.
Figure 2-17. Two-man forward-and-after carry.
2-19. TWO-MAN SUPPORT CARRY The two-man support carry can be used to transport a casualty for a long distance. The carry has two versions. The regular version (figure 2-18 A) is especially useful when transporting a conscious casualty who can hop or walk with assistance. The second version (figure 2-18 B) can be used when the casualty is taller than the bearers and cannot walk. a. The bearers kneel on each side of the casualty and face the same direction as the casualty. b. Each bearer grasps the wrist of the casualty's near arm with his far (outside) hand.
MD0001 2-29

Figure 2-18. Two-man support carry.
c. Each bearer brings the casualty's arm around his (the bearer's) neck and maintains his grasp on the casualty's wrist. d. Each bearer puts his other arm (the inside arm near the casualty) around the casualty's waist. e. Upon the command from the leader, both bearers rise in unison, lifting the casualty. If the casualty is conscious, he can help the bearers lift his weight. The bearers' arms around the casualty's wrist should support most of the weight. (1) If the casualty is conscious, can walk or hop, and can hold on to the bearers' shoulders, the bearers can release the casualty's wrists (figure 2-18 A). (2) If the casualty is unconscious, the bearers do not release the casualty's wrists. (3) If the casualty is taller than the bearers, the bearers can remove their arms from around the casualty's waist and use them to lift and support the casualty's thighs (figure 2-18 B). This will keep the casualty's feet from dragging. f. Upon the command of the leader, both bearers walk forward. 2-20. TWO-MAN ARMS CARRY The two-man arms carry can be used to move a casualty a moderate distance. If the casualty is heavy or if the casualty's head or legs need additional support, more than two bearers may be required. a. The bearers position the casualty on his back (paragraph 2-4).
MD0001 2-30

b. The bearers place the casualty's arms on his abdomen. (1) If the casualty is conscious, have him use one hand to grasp his other wrist. (2) If the casualty is unconscious, tie his wrists together loosely using a muslin bandage, field dressing, or similar material. c. Both bearers position themselves on the same side of the casualty one at the casualty's chest and one at his thighs. d. Both bearers kneel on one knee and place their arms under the casualty (figure 2-19 A). (1) The bearer at the casualty's chest slips one arm beneath the casualty's shoulders and the other arm beneath his waist. (2) The bearer at the casualty's thighs slips one arm beneath the casualty's hips and the other arm beneath his knees. e. Upon command from the leader, both bearers shift their weight backward in unison and lift the casualty to knee level (figure 2-19 B), keeping the casualty as level as possible. f. Upon command from the leader, both bearers turn the casualty's front toward their chests. g. Upon command from the leader, both bearers rise to their feet in unison (figure 2-19 C). h. Upon command from the leader, both bearers move forward. The bearers should carry the casualty high on their chests to lessen fatigue.
MD0001 2-31

Figure 2-19. Two-man arms carry.
MD0001 2-32

2-21. TWO-HAND SEAT CARRY The two-hand seat carry (figure 2-20) is used to move a casualty a short distance. The carry is performed in the following manner. a. The bearers position the casualty on his back (paragraph 2-4). b. The bearers position themselves on opposite sides of the casualty's hips (facing each other) and kneel. c. Each bearer passes one arm under the casualty's back and the other arm under the casualty's thigh. d. The bearers grasp each other's wrists securely. e. Upon command from the leader, both bearers (still facing each other) rise in unison, lifting the casualty. f. Upon command from the leader, both bearers move forward.
Figure 2-20. Two-hand seat carry.
MD0001 2-33

2-22. FOUR-HAND SEAT CARRY The four-hand seat carry can be used if the casualty is conscious and can grasp the bearers' shoulders. The carry is used for moderate distances. a. Both bearers position themselves behind the casualty and face each other. b. Each bearer grasps his own left wrist with his right hand and grasps the other bearer's right wrist with his left hand. This forms the seat (packsaddle) for the casualty (figure 2-2l A). c. Have the casualty stand up or have another soldier help the casualty to a standing position. d. Both bearers lower their bodies so the seat is low enough for the casualty to sit (about even with the casualty's knees). e. Have the casualty sit on the bearers' forearms and place his arms around the bearers' shoulders for balance and support. f. Upon command from the leader, both bearers stand erect, lifting the casualty (figure 2-21 B). g. Upon command from the leader, both bearers move forward.
Figure 2-21. Four-hand seat carry.
Continue with Exercises
MD0001 2-34

EXERCISES, LESSON 2 INSTRUCTIONS: Answer the following exercises by marking the lettered response that best answers the question or best completes the incomplete statement or by writing the answer in the space provided at the end of the exercise. After you have completed all the exercises, turn to "Solutions to Exercises" at the end of the lesson and check your answers. For each exercise answered incorrectly, reread the material referenced with the solution. SPECIAL INSTRUCTIONS FOR EXERCISES 1 THROUGH 8. In exercises 1 through 8, match the name of the one-man carry on the left with the correct letter of the illustration on the right.
1. Arms carry. ____ 2. Fireman's carry. ____ 3. Neck drag. ____ 4. Pack-strap carry. ____ 5. Pistol-belt carry. ____ 6. Pistol-belt drag ____ 7. Saddleback carry. ____ 8. Support carry ____
MD0001 2-35

SPECIAL INSTRUCTIONS FOR EXERCISES 9 THROUGH 13. In exercises 9 through 13, match the two-man carry in the left column with the correct letter of the illustration in the right column. 9. Four-hand seat carry.___ 10. Arms carry. ___ 11. Fore-and-aft carry. ___ 12. Support carry (normal). ___ 13. Support carry (tall casualty). ___
14. Which one-man carries should only be used if the casualty is conscious? __________________________________________________________ 15. Which two-man carry should only be used if the casualty is conscious and can grasp the bearer's shoulders? __________________________________________________________ 16. Which one-man carries are used to move the casualty for distances of more than 300 meters? __________________________________________________________ 17. Which two-man carries are used to move the casualty for distances of more than 300 meters? __________________________________________________________
MD0001 2-36

18. Which one-man carries are not used if the casualty has a fractured arm? Do not list those carries that can be used if only one arm is fractured. __________________________________________________________ 19. Two soldiers are going to evacuate a casualty using the two-man fore-and-aft carry. One soldier is several inches taller than the other. Will the height difference affect the carry? a. Yes, the tall soldier should support the casualty's upper body. b. Yes, the tall soldier should support the casualty's legs. c. No. 20. You and another soldier are going to move a casualty using the two-man support carry. The casualty is unconscious and is considerably taller than you and the other bearer. How will this affect the way you and the other bearer perform the carry (as opposed to transporting a conscious, shorter casualty)? a. Each bearer will continue to grasp the wrist of the casualty's arm that is around his neck. b. Each bearer will use one arm to lift and support the casualty's thigh. c. You will use a cravat, field dressing, or similar material to tie the casualty's wrists together. d. Responses a and b above are correct. e. Responses a, b, and c above are correct. 21. What one-man carry is normally used when you need to move an unconscious casualty down a flight of stairs? __________________________________________________________
MD0001 2-37

22. You are moving an injured soldier using the pack-strap carry. The casualty's hands should be grasped so the: a. Palms of his hands are up (away from your body). b. Palms of his hands are down (toward your body). c. Palms of his hands are facing each other. d. Backs of his hands are pressed together. 23. You must move an unconscious casualty and keep both the casualty and yourself as close to the ground as possible. Which carry should you use? __________________________________________________________ 24. Which one-man carry is usually preferred for quickly moving an unconscious or severely injured casualty for a moderate distance? __________________________________________________________ 25. A casualty is lying on his back. You have dressed a wound on his left side. In order to turn him onto his abdomen, you should: a. Kneel at his left side, grab his far shoulder and hip, and pull so the casualty rolls onto his front. b. Kneel at his left side, grab his near shoulder and hip, and push so the casualty rolls onto his front. c. Kneel at his right side, grab his near shoulder and hip, and push so the casualty rolls onto his front. d. Kneel at his right side, grab his far shoulder and hip, and pull so the casualty rolls onto his front. 26. You must carry an unconscious casualty for a long distance. Also, you want to
have both hands free to climb a steep embankment. What carry should you use? __________________________________________________________
Check Your Answers on Next Page
MD0001 2-38

SOLUTIONS TO EXERCISES, LESSON 2 1. H (para 2-7) 2. C (para 2-6) 3. D (para 2-14) 4. F (para 2-10) 5. G (para 2-11) 6. E (para 2-13) 7. B (para 2-9) 8. A (para 2-8) 9. B (para 2-22) 10. D (para 2-20) 11. C (para 2-18) 12. A (para 2-19) 13. E (para 2-19) 14. Support carry, saddleback carry. (paras 2-3, 2-8, 2-9) 15. Four-hand seat carry. (paras 2-16, 2-22) 16. Fireman's, support, saddleback, pistol-belt, and LBE carries. (para 2-3) 17. Two-man fore-and-aft carry, two-man support carry. (para 2-16) 18. Pack-strap carry, neck drag. (paras 2-3, 2-10, 2-14) 19. a (para 2-18) 20. d (para 2-19e(2), e(3)) 21. Cradle drop drag. (paras 2-3j, 2-15)
MD0001 2-39

22. b (para 2-10d) 23. Pistol-belt drag. (paras 2-3h, 2-13) 24. Fireman's carry. (paras 2-3a, 2-6) 25. d (paras 2-4a, d, e) 26. Pistol-belt carry. (paras 2-3f, 2-11)
End of Lesson 2
MD0001 2-40

LESSON ASSIGNMENT LESSON 3 Litters and Litter Carries. LESSON ASSIGNMENT Paragraphs 3-1 through 3-38. LESSON OBJECTIVES After completing this lesson, you should be able to: 3-1. Identify standard litters and their uses. 3-2. Identify the procedures for making improvised
litters. 3-3. Identify the litter carries and their uses. 3-4. Identify the procedures for performing the
following:
● Four-man carry. ● Two-man carry. ● Litter post carry. ● Uphill/upstairs carry. ● Downhill/downstairs carry. ● Overhead carry. ● Low crawl. ● Litter rotation.
SUGGESTION After completing the assignment, complete the exercises of this lesson. These exercises will help you to achieve the lesson objectives.
MD0001 3-1

LESSON 3
LITTERS AND LITTER CARRIES
Section I. LITTERS 3-1. ADVANTAGES OF LITTERS When possible, use a litter to transport a casualty rather than a manual carry. A litter is more comfortable to the casualty and less likely to aggravate his injuries. The use of a litter makes evacuation easier and quicker. It also allows the casualty to be carried much farther than manual carries. A standard litter should be used when available. The Army uses several types of standard litters. Some of the litters used in the field are discussed in paragraphs 3-2 through 3-8. If no standard litter is available, improvise a litter if practical. Some improvised litters are discussed in paragraphs 3-9 through 3-14. Casualties are secured (strapped) to the standard or improvised litter during evacuation. 3-2. STANDARD COLLAPSIBLE LITTER The standard collapsible litter (figure 3-1) is the most widely used standard litter.
CLOSED AND STRAPPED
Figure 3-1. Standard collapsible litter.
MD0001 3-2

a. Components. The standard collapsible litter consists of: (1) Two straight, rigid, lightweight aluminum poles with four wooden handles attached to the ends of the poles. (2) A cover (bed) of cotton-duck-cloth. (3) Four stirrups, each bolted near the ends of the poles to support the litter when placed on the ground or floor. (4) Two spreader bars, one near each end of the litter at the stirrups. When opened, they extend across the width of the litter and hold the litter cover taut (figure 3-1 A). (5) Two litter securing straps (one strap attached to each pole) used to keep the litter closed when it is being stored (figure 3-1 B). b. Accessories. The standard collapsible litter usually comes with two or four patient securing straps (figure 3-2). Each strap consists of a 6-foot length of webbing (2 inches wide) and a buckle with a locking device and spring. These straps are used to secure the casualty to the litter. The casualty should always be secured to the litter while being transported manually (litter carry) and while being transported by a ground or air evacuation vehicle. c. Dimensions. The length of a litter with attached handles is 90 inches. When open, the litter bed measures 72 inches in length and slightly more than 22 inches across. The litter weights about 23 pounds.
Figure 3-2. Patient securing strap.
MD0001 3-3

3-3. CHEMICAL LITTERS The standard chemical litter (figure 3-3) consists of aluminum poles painted with chemical agent resistant coating. It conforms to all North Atlantic Treaty Organization
(NATO) standards and weighs about 15 pounds. The cover fabric is a honeycomb weave of monofilament polypropylene. The fabric will not absorb agent and is not degraded by decontamination fluids. It is flame retardant and rip resistant. It is treated to withstand weather and sunlight.
Figure 3-3. Chemical litter. 3-4. FOLDING ALUMINUM LITTER The folding aluminum litter (figure 3-4) is often used in airdrop and airborne operations. a. Components. The folding aluminum litter is very similar to the standard collapsible litter except that its poles are hinged in the middle (which allows the litter to be folded lengthwise) and the stirrups fold flat against the poles when the litter is collapsed and stored (figure 3-4 A). b. Accessories. The folding aluminum litter usually comes with two or four patient securing straps. c. Dimensions. The length of a litter is 90 inches when open, but is about 50 inches when the litter is folded lengthwise. When open, the litter bed measures 72 inches in length and slightly more than 22 inches across (figure 3-4 B). The litter weights about 25 pounds.
MD0001 3-4

Figure 3-4. Folding aluminum litter.
3-5. POLELESS, SEMIRIGID LITTER The poleless, semirigid litter (figure 3-5) is normally used to evacuate casualties in mountainous areas or from ships. The litter holds the casualty securely in place while he is being lowered or raised in a vertical position. a. Components. The poleless, semirigid litter consists of: (1) A bed of semi-rigid cotton duck cloth with wooden supports. (2) Four webbing handles, two at each end, which are grasped by the litter squad when performing a litter carry.
MD0001 3-5

Figure 3-5. Poleless, semirigid litter.
(3) Four loops through which two poles can be inserted to convert the litter into a more rigid litter. (4) A headpiece to support the casualty's head. (5) Seven straps to secure the casualty to the litter. b. Dimensions. The litter bed is about 72 inches by 22 inches. Its overall width is about 42 inches, but is about normal width when the flaps are folded over the casualty to keep him secure. The litter weights almost 19 pounds. 3-6. POLELESS, NONRIGID LITTER The poleless, nonrigid litter (figure 3-6) is the most versatile litter available for use in the field since it can be folded and carried by the combat medic. The litter is designed to accommodate litter poles, thereby becoming a rigid litter that can be used in evacuation vehicles. a. Components. The poleless, nonrigid litter consists of: (1) Nylon bed, which can be rolled up and carried. (2) Six carrying loops, three on each side, which can be grasped by the litter squad when performing a litter carry.
MD0001 3-6

Figure 3-6. Poleless, nonrigid litter. (3) Three adjustable restraining straps with buckles. (4) Crotch straps. b. Dimensions. The litter is about 78 inches in length and about 26 inches wide. The litter weights about 3.5 pounds. 3-7. STOKES METAL LITTER The Stokes metal litter (figure 3-7) affords maximum security for the casualty when the litter must be tilted during evacuation. The litter is used to hoist a casualty with spinal injury to a hovering helicopter that cannot land. This procedure is discussed in Lesson 5.
Figure 3-7. Stokes metal litter.
MD0001 3-7

a. Components. The Stokes metal litter consists of: (1) A steel, tubular frame. (2) A bed of wire mesh netting. (3) Wooden slats for supporting the casualty's back. (4) Webbing securing straps. b. Dimensions. The litter is almost 85 inches in length, 23.5 inches in width, and slightly more than 7 inches in height. The litter weights about 42.5 pounds. 3-8. SKED LITTER The SKED® litter (figure 3-8) is a compact and lightweight transport system used to evacuate a patient over land. This system can be used to rescue a patient in the water with the SKED Flotation system. It can also be rigged for hoist extraction by helicopter.
Figure 3-8. SKED litter.
3-9. IMPROVISED POLE AND PONCHO LITTER An improvised litter can be made using two tent poles and a poncho. Variations of this litter include using straight tree limbs or similar rigid objects for the poles and/or using a blanket instead of a poncho. When the casualty is placed on the litter, his weight holds the litter together. a. Open the poncho and lay it flat on the ground. b. Lay two poles across the poncho so the poncho is divided into thirds (figure 3-9 A).
MD0001 3-8
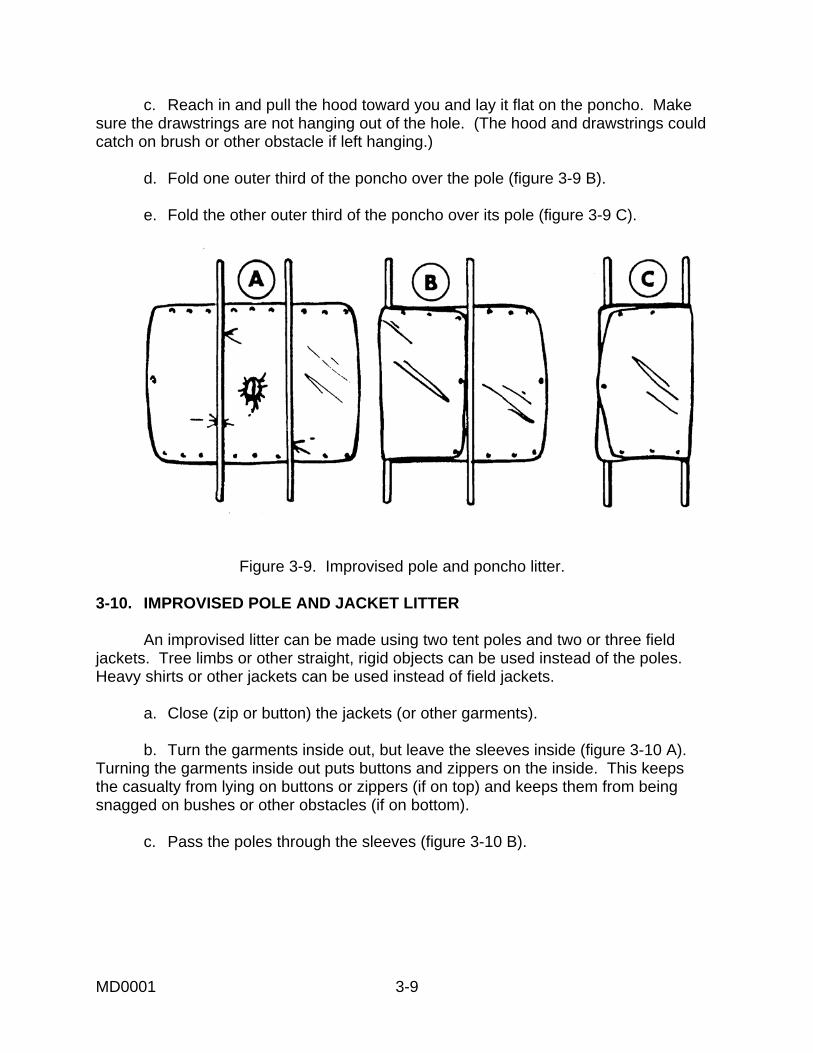
c. Reach in and pull the hood toward you and lay it flat on the poncho. Make sure the drawstrings are not hanging out of the hole. (The hood and drawstrings could catch on brush or other obstacle if left hanging.) d. Fold one outer third of the poncho over the pole (figure 3-9 B). e. Fold the other outer third of the poncho over its pole (figure 3-9 C).
Figure 3-9. Improvised pole and poncho litter.
3-10. IMPROVISED POLE AND JACKET LITTER An improvised litter can be made using two tent poles and two or three field jackets. Tree limbs or other straight, rigid objects can be used instead of the poles. Heavy shirts or other jackets can be used instead of field jackets. a. Close (zip or button) the jackets (or other garments). b. Turn the garments inside out, but leave the sleeves inside (figure 3-10 A). Turning the garments inside out puts buttons and zippers on the inside. This keeps the casualty from lying on buttons or zippers (if on top) and keeps them from being snagged on bushes or other obstacles (if on bottom). c. Pass the poles through the sleeves (figure 3-10 B).
MD0001 3-9

Figure 3-10. Improvised pole and jacket litter.
3-11. IMPROVISED POLE AND SACK LITTER An improvised litter can be made using two tent poles or similar rigid objects and two empty heavy fabric sacks, such as potato sacks (figure 3-11). a. Cut holes in the two corners of the closed end of each sack. b. Place the sacks lengthwise so the open end of the sacks are facing each other. c. Slide the poles or limbs through the holes. d. Overlap the open ends of the sacks about three inches to provide extra strength in the middle of the litter.
Figure 3-11. Improvised pole and sack litter.
MD0001 3-10

3-12. IMPROVISED BLANKET LITTER An improvised litter can be made using only a blanket, poncho, or similar material. The blanket is laid on the ground and two opposite edges of the blanket are rolled toward the middle (figure 3-12 A). When the casualty is placed on the blanket, the rolled edges are used as grips. Four or more litter bearers should be used when transporting a casualty using the blanket litter (figure 3-12 B).
Figure 3-12. Improvised blanket litter. 3-13. IMPROVISED DOOR OR BOARD LITTER A door, wide board, bench, ladder, or similar object may be used as a litter. If possible, pad the litter. Before placing the casualty on the litter, place an object under the head end of the litter. Elevating the end of the litter makes it easier for the bearers to grasp the end of the litter. After securing the casualty to the litter, lift the head end first to allow the bearers at the foot end to grasp their end of the litter. When lowering the litter to the ground, lower the foot-end first, then the head end. If the litter is to be lifted again, place an object under the head end. 3-14. IMPROVISED CHAIR LITTER A casualty can be transported while seated in a chair. After securing the casualty to the chair, one bearer grips the chair legs as far up the legs as possible and lifts. A second bearer supports the back of the chair.
MD0001 3-11

Section II. DRESSING A LITTER 3-15. PURPOSE OF THE DRESSING When possible, a litter should be dressed with one or more blankets to provide warmth, reduce the danger of shock to the casualty, and provide additional padding. The number of blankets used will depend upon the weather, the condition of the casualty, and the number of blankets available. Blankets should always be smoothed, neat, and free of wrinkles. No part of the blanket should overhang the litter. In a nuclear, biological, or chemical (NBC) environment, use an impermeable cover (such as a rubber poncho) to dress the litter in addition to using blankets if a Chemical Patient Protective Wrap is not available. The impermeable cover provides additional protection against contaminants when placed over the casualty. The procedures for dressing the litter with one, two, or three blankets is given in the following paragraphs. 3-16. ONE-BLANKET DRESSING The one-blanket dressing provides a padding of one blanket layer under the casualty and two layers over the casualty. a. Place the blanket diagonally across the litter (figure 3-13 A). b. Place the casualty on the blanket. c. Bring one side of the blanket over the casualty and tuck in excess material. d. Bring the other side over the casualty and tuck. e. Bring the excess blanket at the foot of the litter over his feet and tuck in the material (figure 3-13 B).
Figure 3-13. Litter dressed with one blanket.
MD0001 3-12

3-17. TWO-BLANKET DRESSING The two-blanket dressing provides a padding of four blanket layers under the casualty and two layers over the casualty. a. Place the first blanket centered lengthwise across the litter with the top edge of the blanket just beyond the head end of the bed of the litter (figure 3-14 A). b. Fold the second blanket into thirds lengthwise. Place it on top of the first blanket with the upper edge of the second blanket about 10 inches below the upper edge of the first blanket (figure 3-14 B). If the casualty is tall, place the second blanket lower on the litter. c. Open the folds at the bottom of the second blanket for about two feet (figure 3-14 B). d. Place the casualty onto the litter. e. Bring the bottom of the second blanket up over the casualty's feet and make a small fold between his feet to keep them separated; then tuck the two folds over and around his feet and ankles (figure 3-14 C). f. Bring one side of the first blanket over the casualty; then bring the other side of the first blanket over the casualty and tuck in excess (figure 3-14 D).
Figure 3-14. Litter dressed with two blankets.
MD0001 3-13

3-18. THREE-BLANKET DRESSING The three-blanket litter dressing provides four thickness of blanket underneath the casualty and four thickness on top of the casualty. a. Place the first blanket on the litter lengthwise so one edge of the blanket is even with the litter pole that is away from you and the upper edge of the blanket is even with the top (head) edge of the litter bed. b. Bring the blanket over the bed of the litter to the near pole; then fold the blanket at the near pole and take the remainder back over the litter. Let the excess blanket overhang the far pole (figure 3-15 A). Two thickness of blanket now cover the litter bed and one thickness is beyond the far pole. c. Place the second blanket on the litter lengthwise so one edge of the blanket is even with the litter pole that is near you and the upper edge of the blanket is even with the top (head) edge of the litter bed.
Figure 3-15. Litter dressed with three blankets.
MD0001 3-14

d. Take the blanket over the bed of the litter to the far pole; then fold the blanket at the far pole and bring the remainder back over the litter. Let the excess material overhang the near pole (figure 3-15 B). Four thickness of blanket now cover the litter bed (two from the first blanket and two from the second blanket), one thickness is beyond the far pole (from the first blanket), and one thickness is beyond the near pole (from the second blanket). e. Place the casualty on the litter. f. Fold the third blanket once lengthwise and place it on the casualty (figure 3-15 C). The third blanket provides two layers of thickness over the casualty. g. Fold the overhanging edges of the first and second blankets over the casualty (figure 3-15 D) and secure them in place with safety pins or litter straps. The casualty now has four thickness of blanket over him: two from the third blanket, one from the first blanket, and one from the second blanket.
Section III. PLACING A CASUALTY ON A LITTER 3-19. EVACUATING A CASUALTY BY LITTER Always check the casualty for possible spinal injuries (fractured spine, back, or neck or severe head trauma) before placing the casualty onto a litter. If you suspect a spinal injury, secure the casualty to a spine board (paragraph 3-25) before transporting the casualty. The spine board can serve as a litter, or it can be placed on a litter. Use care when placing any casualty onto the litter to avoid causing additional injury to the casualty. If four bearers are available, use the method presented in paragraph 3-20 to place a casualty onto a litter. If only three bearers are available, use the method presented in paragraph 3-21. If only two bearers are available, use a modified two-man arms carry (paragraph 3-22), a modified two-man fore-and-aft carry (paragraph 3-23), or the two-hand seat carry (paragraph 2-21) to place the casualty onto the litter. Some general rules are given in the following paragraphs. a. Perform Necessary Care Before Transporting. Make sure the casualty is breathing properly, open wounds have been dressed and bandaged, and fractures have been splinted before transporting the casualty (unless the casualty is being moved away from a life-threatening danger). b. Walk Around the Casualty. Walk around the casualty rather than stepping over him. If you step over the casualty, he may flinch or tighten his muscles and aggravate his injuries. In addition, mud or other debris may fall from your boots into his eyes or wound.
MD0001 3-15

c. Explain the Procedure to the Casualty. If the casualty is conscious, tell him what you are going to do. The explanation will help to calm his fears and obtain his cooperation. d. Have One Person in Charge. One person must be in charge of the litter team so actions will be performed in unison. If a combat medic is a member of the litter squad, he will function as the leader. If a medic does not function as the leader, then a combat lifesaver or other soldier can function as the leader of the litter squad. 3-20. PLACING A CASUALTY ON A LITTER USING THE FOUR-MAN MODIFIED ARMS CARRY If four bearers are available, the following method should be used to place a casualty on a litter. A casualty that has a suspected back injury must be evacuated without applying a spine board; therefore, a litter can be used. a. Position the casualty on his back with his arms at his sides. If possible, have the casualty clasp his hands together over his abdomen or grasp his wrist with one hand. Place the litter nearby where it will be within reach of the leader. b. One bearer (the leader) positions himself on one side of the casualty near the casualty's hips and the other three bearers position themselves on the other side of the casualty. c. All bearers kneel on one knee and prepare to lift the casualty (figure 3-16).
Figure 3-16. Four bearers preparing to lift a casualty.
MD0001 3-16

(1) The bearer near the casualty's feet (bearer 2) slips his arms under the casualty's legs. (2) The middle bearer (bearer 4) and the leader (bearer 1) pass their arms under the casualty's thighs and under the small of the back. They do not lock hands. (3) The bearer near the casualty's head (bearer 3) passes one hand under the casualty's near shoulder and slips the other arm under the casualty's neck and moves his hand so it is under the casualty's far shoulder. The second arm under the neck cradles and immobilizes the casualty's head during the lift. d. Upon command from the leader, the four bearers slowly lift the casualty in unison and place him on the raised thighs of the three bearers on the same side of the casualty (figure 3-17). e. Once the casualty rests securely on the bearers thighs, the leader removes his arms from the casualty and moves the litter beneath the casualty. f. The leader again moves to support the casualty's thighs and back. g. Upon command from the leader, the bearers slowly lower the casualty to the litter in unison and remove their arms from under the casualty.
Figure 3-17. Four bearers supporting a casualty.
MD0001 3-17

3-21. PLACING A CASUALTY ON A LITTER USING THE THREE-MAN MODIFIED ARMS CARRY If only three bearers are available, the following method should be used to place a casualty on a litter. a. Position the casualty on his back with his arms at his sides. If possible, have the casualty clasp his hands together over his abdomen or grasp his wrist with one hand. Place the litter nearby where it will be within reach of the leader. b. One bearer (the leader) positions himself on one side of the casualty near the casualty's hips and the other two bearers position themselves on the other side of the casualty. c. All bearers kneel on one knee and prepare to lift the casualty. (1) The bearer near the casualty's feet (bearer 2) slips his arms under the casualty's legs and thighs. (2) The bearer near the casualty's head (bearer 3) slips his arms under the small of the casualty's back and the casualty's shoulders. (3) The leader (bearer 1) slips one arm under the casualty's knees and the other arm under the casualty's back. d. Upon command from the leader, the bearers slowly lift the casualty in unison and place him on the raised thighs of the two bearers on the same side of the casualty. e. Once the casualty rests securely on the thighs of bearers 2 and 3, the leader releases his support of the casualty and moves the litter beneath the casualty (figure 3-18). f. The leader again moves to support the casualty's knees and back. g. Upon command from the leader, the bearers slowly lower the casualty in unison to the litter and remove their arms from under the casualty.
MD0001 3-18

Figure 3-18. Two bearers supporting a casualty while the leader positions the litter.
3-22. PLACING A CASUALTY ON A LITTER USING THE MODIFIED TWO-MAN ARMS CARRY a. Position the casualty on his back with his arms at his sides. Place the litter (standard or improvised) near and parallel to the casualty (figure 3-19).
Figure 3-19. Litter placed parallel to a casualty.
MD0001 3-19

b. Both bearers position themselves on the same side of the casualty (opposite side from litter) and kneel on one knee (figure 3-20 A). c. The bearer nearest the casualty's head slips his arms under the casualty's back and waist. d. The other bearer slips his hands under the casualty's hips and knees. e. Upon command from the leader, both bearers lift the casualty to knee level in unison (figure 3-20 B). f. The bearers move the casualty over the litter or have another soldier push the litter under the casualty. g. Upon command from the leader, both bearers lower the casualty onto the litter in unison.
Figure 3-20. Lifting a casualty using the modified two-man arms carry.
MD0001 3-20

3-23. PLACING A CASUALTY ON A LITTER USING THE MODIFIED FORWARD-AND- AFTER CARRY a. Position the casualty on his back with his arms at his sides. Place the litter (standard or improvised) near and parallel to the casualty. b. One bearer kneels behind the casualty's head, slips his arms under the casualty's arms and across the casualty's chest, and locks his hands together. c. The second bearer spreads the casualty's legs apart and squats or kneels between the casualty's legs and faces the first bearer. d. Upon command from the leader, both bearers rise in unison, lifting the casualty (figure 3-21). e. The bearers move the casualty over the litter. f. Upon command from the leader, the bearers lower the casualty onto the litter in unison.
Figure 3-21. Lifting a casualty using the modified two-man fore-and-aft carry.
MD0001 3-21

3-24. PLACING A CASUALTY ON A SPINE BOARD USING LOG ROLL TECHNIQUE A casualty should be checked for possible spinal injury before he is moved. When moving a casualty with a suspected spinal fracture, extra care must be taken to avoid causing additional injury that could result in paralysis or even death. Four or more soldiers should be used when moving the casualty. Whenever possible, a casualty with a suspected spinal injury should be placed on a spine board and secured to the board. The bearers can evacuate the casualty using the handholds on the long spine board or place the board on a litter. a. Position the casualty on his back with his arms at his sides. Place a long spine board or an improvised spine board near and parallel to the casualty. If time allows, place padding on the spine board where the casualty's neck, small of the back, knees, and ankles will rest. b. One bearer (usually the combat medic) kneels at the casualty's head facing the casualty, places his hands on each side of the casualty's head and jaw, and applies slight traction to manually immobilize the head and neck (figure 3-22).
Figure 3-22. Immobilizing the casualty's head and neck. c. Three (or more) bearers kneel at the casualty's side (the side away from the spine board), reach across the casualty, and grasp the casualty's shoulder and waist, hip and thigh, and knee and ankle (figure 3-23). d. The three bearers roll the casualty's body toward them slightly as the first bearer turns the casualty's head slightly to keep it in alignment with the spine.
MD0001 3-22

Figure 3-23. Placing a casualty on a long spine board.
e. The middle bearer releases his hold on the casualty's hip, grasps the near edge of the spine board, and slides it against the casualty. He then releases the board, reaches across the board, grasps the far edge, and holds the board in place so it will not slip as the casualty is placed on the board. (If another soldier is available, he can slip the spine board under the casualty without the bearer releasing his hold on the casualty.) f. The bearers slowly lower the casualty's side, allowing the casualty's back to rest on the spine board. The first bearer turns the casualty's head to keep it in alignment with the spine. g. The bearers secure the casualty's body to the spine board with patient securing straps and cravats (figure 3-24).
Figure 3-24. Casualty secured to a long spine board.
MD0001 3-23

Section IV. LITTER CARRIES 3-25. THE LITTER SQUAD A litter squad is normally composed of four bearers. The fatigue produced by long and frequent carries is increased when the weight of the loaded litter is shared by fewer than four men. The litter team, however, can be composed of more or fewer members based upon the military situation and the distance and terrain to be covered. This section gives instructions for performing some common carries using a four-man litter squad. In the illustrations, the bearers are numbered for ease of reference. The leader of the litter squad is bearer one. 3-26. OPENING A STANDARD COLLAPSIBLE LITTER If a standard collapsible litter is closed (collapsed) and secured with two litter securing straps, the following steps can be used to prepare the litter for use. a. Two bearers position themselves at the ends of the litter and lift the closed litter. b. The other two bearers position themselves on opposite sides of the litter near the middle, undo the litter securing straps (figure 2-25), and step back. They are not needed to complete the opening of the litter.
Figure 3-25. Undoing the litter securing straps.
MD0001 3-24

c. The two bearers at the ends grasp the litter-handles and pull the poles apart. d. One of the bearers holding the litter lowers his end of the litter to the ground and releases it. e. The other bearer raises his end until the litter is standing vertically and keeps the litter in this position. The bottom of the litter (the side with the spreader bars and stirrups) must face the bearer who released his end of the litter. f. The bearer who released his end locks the bottom spreader bar into the extended position by pushing on it with his foot as shown in figure 3-26. CAUTION: Use a foot, not hands, to push the spreader bar into a locked position. Using hands could result in accidental injury to the bearer's hand. g. The bearers then rotate the litter until it is again vertical with the unlocked spreader bar at the bottom. h. The bearer locks the bottom spreader bar into the extended position by pushing on it with his foot (figure 3-26). i. The bearers lower the litter to the ground so the litter rests on its stirrups. j. The bearers dress the litter (if appropriate), place the casualty onto the litter, and secure the casualty to the litter with patient securing straps. (1) If only two straps are needed, put one strap across the casualty's chest and the other across his legs just below the knees (figure 3-27 A). Extend them under the litter and buckle them against the litter pole. (2) If the terrain is rough, use two additional litter straps. Place one across the casualty's waist and the other across his thighs (figure 3-27 B). (3) If the casualty must be moved up or down steep slopes, use the third and fourth straps to secure the casualty's thighs individually (figure 3-27 C). Take the third strap over one thigh, under the other thigh, under the litter, and buckle against the litter pole. Apply the fourth strap in the same manner to secure the other thigh.
MD0001 3-25

Figure 3-26. Locking the spreader bar into position.
Figure 3-27. Securing a casualty with litter straps.
MD0001 3-26

3-27. COMMANDS The litter team must work as a single unit. They must lift, move, and lower the litter in unison. Teamwork makes the task easier for the bearers and the movement more comfortable for the casualty. It is the duty of the leader to make sure the squad works as a unit. The use of preparatory commands and commands of execution are helpful when training litter squads. These commands may or may not be needed in combat situations. a. Preparatory Command. A preparatory command tells the litter squad the movement or formation to be carried out and instructs the squad members to prepare for its execution. b. Command of Execution. A command of execution tells the squad to actually carry out the movement or formation. In this section, preparatory commands are in lower case with initial capital letters and commands of execution are in all capital letters. 3-28. RULES FOR TRANSPORTING A CASUALTY BY LITTER The following are general rules for transporting a casualty using a standard or improvised litter. a. Carry the litter with the casualty's feet toward the direction of travel when the ground is level or when going downhill. b. Carry the litter with the casualty's head toward the direction of travel when going uphill. c. If the casualty has a fracture of a lower extremity and does not have a head injury, the rules given in paragraphs a and b are reversed. The casualty is carried head first, when going downhill and feet first when going uphill. This prevents the weight of the body from pressing on the fracture. d. If the casualty has a fractured leg and a head injury, rules a and b are followed to keep the head elevated when going uphill or downhill. e. Secure the casualty to the litter. Improvise securing devices if patient securing straps are not available. f. The rear bearers must watch the front bearers and coordinate their movements with the front bearers to keep the litter steady and even. The command "STEADY" can be used to prevent undue haste and uneven movements.
MD0001 3-27

3-29. FOUR-MAN CARRY The four-man carry (figure 3-28) is the carry normally used to transport a litter casualty when the terrain is generally smooth and level. a. The bearers position themselves as described below prior to performing the carry. (1) The leader of the litter squad (bearer one) positions himself at the litter handle nearest the casualty's right shoulder, normally at the back of the litter. This position allows him to observe the casualty and to direct the three other members of the squad. In figure 3-28, bearer one is the leader of the litter squad. (2) The other three-squad members position themselves at the remaining litter handles. (3) All bearers face the direction of travel and kneel on one knee (the knee near the litter). b. On the preparatory command "Prepare to Lift," each bearer grasps his litter handle with the hand closest to the litter and places his other hand on his raised knee. c. On the command of execution "LIFT," all bearers rise together, lifting the litter and keeping it level. (1) Each bearer uses the hand on his knee to help support and balance himself as he rises. (2) Leg muscles, not back muscles, are used when lifting a litter. This helps to prevent back injury. d. After the bearers are standing, they are in position for the four-man carry. The command to proceed is "Four-Man Carry, MOVE." This command is also used to change to the four-man carry from another carry without lowering the litter.
MD0001 3-28

Figure 3-28. Lifting a litter for the four-man carry.
3-30. TWO-MAN CARRY The two-man carry (figure 3-29) is used to move the litter through narrow passages and over narrow trails, bridges, gangplanks, or catwalks. a. Upon the command "Two-Man Carry," the bearers position themselves to perform the carry. The following instructions assume the bearers begin in a regular four-man carry formation. (1) The bearer at the casualty's left shoulder (bearer three) switches his litter handle from his right hand to his left hand, steps between the litter handles, and grasps the litter handle held by bearer one.
MD0001 3-29

Figure 3-29. Two-man carry.
(2) The bearer at the casualty's right foot (bearer two) switches his litter handle from his left hand to his right hand, steps between the litter handles, and grasps the litter handle held by bearer four. (3) The bearer at the casualty's right shoulder (bearer one) release his handle and moves to a position in front of the litter. (4) The bearer at the casualty's left foot (bearer four) release his handle and moves to a position following the litter. b. Upon the command "MOVE," the bearers walk forward. c. If a bearer carrying the litter becomes tired, he can switch with a bearer not carrying the litter. d. After moving through the narrow passage, the command "Four-Man Carry, MOVE" is given to resume the original carry. Upon the preparatory command, the position changes given in paragraph a above are reversed. Upon the command of execution, the bearers move forward.
MD0001 3-30

3-31. TWO-MAN CARRY MODIFIED FOR A TUNNEL The two-man carry can be modified to move the litter through a tunnel or culvert. In the modified carry, the bearer carrying the front of the litter turns and faces the casualty. This bearer moves backward while moving the litter. All bearers crawl on their knees through the tunnel or culvert. 3-32. LITTER POST CARRY The litter post carry is used to move the litter over rough, uneven terrain and for low barbed wire. a. Upon the command "Litter Post Carry," the bearers position themselves to perform the carry (figure 3-30). The following instructions assume the bearers begin in a regular four-man carry formation. (1) Bearer at the casualty's left shoulder (bearer three) switches his litter-handle from his right hand to his left hand, steps between the litter-handles, and grasps the litter handle held by bearer one. (2) The bearer at the casualty's right foot (bearer two) switches his litter-handle from his left hand to his right hand, steps between the litter-handles, and grasps the litter handle held by bearer four. (3) The bearer at the casualty's right shoulder (bearer one) releases his handle, moves to a position at the casualty's right hip, and grasps the near litter pole. (4) The bearer at the casualty's left foot (bearer four) releases his handle, moves to a position at the casualty's left hip, and grasps the near litter pole. b. When given the command "MOVE," the bearers move forward slowly with the bearers at the sides keeping the litter steady and level. c. After moving across the rough terrain, the command "Four-Man Carry, MOVE" is given to resume the original carry. Upon the preparatory command, the position changes given in paragraph a above are reversed. The bearers then move forward carrying the litter on the command of execution.
MD0001 3-31

Figure 3-30. Litter post carry.
3-33. LITTER ROTATION When you must change the casualty's direction of travel (from feet first to head first or from head first to feet first), rotate the litter. The instructions below assume the rotation takes place while the bearers are in a four-man carry formation. a. Upon the command "Litter Post Carry, MOVE," the bearers position themselves as though they were going to perform the litter post carry (figure 3-30). The bearer at the front of the litter (bearer two turns his head and looks over his shoulder so he can observe the other bearers. b. Upon the command "Prepare to Rotate," the two bearers at the ends (bearers twoand three) release the handles and take one step away from the litter, leaving the bearers at the sides (bearers one and four) supporting the full weight of the litter (figure 3-31). c. Upon the command "ROTATE," bearers one and four move so as to rotate the litter 180 degrees counterclockwise. The bearers do not change their hold on the litter during the rotation. d. Once the rotation is completed, the bearers at the front and rear (bearers two and three) take a step toward the litter and grasp the litter handles again (figure 3-32). e. After the rotation has been completed, the command to have the litter squad perform the desired carry (uphill carry, downhill carry, two-man carry, or four-man carry) is given.
MD0001 3-32

Figure 3-31. Litter rotation: Preparing to rotate. Figure 3-32. Litter rotation: Rotation completed. 3-34. UPHILL/UPSTAIRS CARRY The uphill or upstairs carry (figure 3-33) is used to carry a litter up a hill or up a flight of stairs. a. Rotate the litter ("Litter Post Carry, MOVE; Prepare to Rotate, ROTATE") so the casualty's head (or feet, if appropriate) is in the direction of travel. b. Upon the command "Uphill Carry" (or "Upstairs Carry"), the bearers position themselves to perform the carry. (1) Bearer two looks forward and retains his grip on the two forward litter handles. (2) Bearer four releases his hold on the litter pole, moves to the rear of the litter, and grasps the right litter handle. (3) Bearer three releases that handle and moves to the side, retains his grasp on the other litter handle. (4) Bearer one (the squad leader) releases his hold on the side of the litter and moves in front of the other bearers.
MD0001 3-33

Figure 3-33. Uphill and upstairs carries. c. Upon the command "MOVE," the two bearers at the rear raise their end of the litter to keep the litter level and walk forward. d. Upon reaching the top of the hill, the bearers return to an appropriate carry, usually the four-man carry ("Litter Post Carry, MOVE; Prepare to Rotate, ROTATE; Four-Man Carry, MOVE").
MD0001 3-34

3-35. DOWNHILL/DOWNSTAIRS CARRY The downhill or downstairs carry (figure 3-34) is used to carry a litter down a hill or down a flight of stairs.
Figure 3-34. Downhill carry.
a. Upon the command "Downhill Carry" (or "Downstairs Carry"), the bearers position themselves to perform the carry. (1) From a four-man carry. The following instructions assume the litter squad is in a normal four-man carry and no rotation is needed. (a) The bearer at the casualty's left shoulder (bearer three) switches his litter handle from his right hand to his left hand, steps between the litter handles, and grasps the litter handle held by bearer one. (b) Bearer one releases his handle, moves to the front, and faces the litter. (c) The bearers supporting the front of the litter (bearers two and four) remain in their positions at the casualty's feet.
MD0001 3-35

(2) From a rotation. The following instructions assume a litter rotation has been performed (the casualty's direction of travel is being changed from head first going uphill to feet first going downhill, for example). The instructions assume the bearers are in the positions shown in figure 3-34. (a) Bearer four releases the side of the litter, moves to the front of the litter, and grasps the litter handle at the casualty's right foot (his normal position for a four-man carry). (b) The bearer at the front of the litter (bearer two) releases the litter handle to bearer 4; he switches the other handle to his right hand, and moves to his normal four-man carry position. (c) Bearer one releases his hold on the side of the litter, moves in front of the other bearers, and turns to face the bearers. (d) The bearer supporting the rear of the litter (bearer three) remains in the same position. b. Upon the command "MOVE," the bearers move downhill. The two bearers at the front raise their end of the litter to keep the litter level and steady. The squad leader (bearer one) supports the bearers two and four as needed. c. After completing the descent, the bearers change to an appropriate carry, usually the four-man carry. 3-36. OVERHEAD CARRY The overhead carry is used to move through deep trenches and ford streams. The following assumes the litter squad is in a four-man carry. a. Upon the command "Overhead Carry," the two bearers at the front of the litter (bearers two and four) turn to face each other and determine which is the taller. At the same time, the two bearers at the rear of the litter (bearers one and three) turn to face each other (figure 3-35) and determine which is the taller. b. On the command "MOVE," the bearers switch to the overhead carry (figure 3-36). (1) The bearers raise the litter over their heads, taking care to keep the litter level. (2) The taller of the two bearers at the front moves between the two litter poles, faces the direction of travel, grasps both litter handles as close to the cloth bed as possible, and supports the front of the litter.
MD0001 3-36

Figure 3-35. Bearers facing each other prior to overhead carry.
Figure 3-36. Overhead carry.
(3) The taller of the two bearers at the rear moves between the two litter poles, faces the direction of travel, grasps both litter handles as close to the cloth bed as possible, and supports the rear of the litter. (4) The shorter of the two bearers at the front moves under the litter behind the taller bearer, faces the direction of travel, and helps support the litter by grasping the stirrups or the litter poles. The stirrups are used compensate for a difference in height. (5) The shorter of the two bearers at the rear moves under the litter in front of the taller bearer, faces the direction of travel, and helps support the litter by grasping the stirrups or the litter poles, whichever provides the better handhold.
MD0001 3-37

c. When all four bearers are in position, they move forward, carrying the litter overhead. Should one of the bearers slip or fall (while crossing a stream, for example), the three remaining bearers can keep the litter in position. d. After completing the crossing or moving through the trench, the bearers change to an appropriate carry, usually the four-man carry. 3-37. LOW CRAWL The low crawl is used to maintain a low silhouette, such as moving under enemy fire or under low wire entanglements. The litter team moves to this carry from the four-man litter carry formation. a. On the preparatory command, "Low Crawl," the litter bearers lower the litter to the ground. b. On the command, "MOVE, the bearers lie on their sides so their heads are in the direction of travel and they are facing each other. c. On the command, "Ready," the bearers prepare to lift the litter. d. On the command, "LIFT," the bearers raise the litter off the ground (4 to 6 inches), move it forward (6 to 8 inches), and gently replace it on the ground. The bearers then crawl forward and position themselves for the next "Ready" command. e. These procedures are repeated until the obstacle is cleared. f. To recover, the command is, "Four-Man Carry, MOVE." 3-38. LOWERING THE LITTER The command to lower the litter from the four-man carry formation is "Lower, LITTER." On the command of execution, each bearer slowly kneels on the knee closest to the litter while placing his free hand on his other knee for balance and support. (The outside knee remains in an upright position.) When the litter is completely lowered and resting on the stirrups, the bearers are in the same positions as shown in the "Prepare to Lift" portion of figure 3-28. Once the litter is lowered, the bearers release the handles and stand up.
Continue with Exercises
MD0001 3-38

EXERCISES, LESSON 3 INSTRUCTIONS: Answer the following exercises by marking the lettered response that best answers the question or best completes the incomplete statement or by writing the answer in the space provided at the end of the exercise. After you have completed all the exercises, turn to "Solutions to Exercises" at the end of the lesson and check your answers. For each exercise answered incorrectly, reread the material referenced with the solution. 1. You and three other litter bearers are going to evacuate a casualty using the
normal four-man carry. You are going to direct the other bearers. Where should you position yourself?
_______________________________________________________________ 2. A soldier says, "All improvised litters require two rigid objects, such as tent poles
or tree limbs." Is he correct? a. Yes. b. No. 3. You are constructing a pole and sack improvised litter. You have cut the corners
of the closed ends of the sacks. How should the sacks be positioned on the pole? a. Both open ends should be toward the casualty's head. b. The closed ends of the sacks should be together. c. The open ends of the sacks should be together. d. Both closed ends should be toward the casualty's head. 4. Patient securing straps are used to secure a casualty to: a. A standard litter. b. An improvised litter. c. Either a standard or improvised litter.
MD0001 3-39

5. Which standard litter is easiest for the combat medic to fold, roll, and carry with him? _______________________________________________________________ 6. When using a door as a litter, place something under the ___ of the litter to make
lifting the litter easier. a. Head. b. Foot. 7. When you use three blankets to dress a litter, there should be _______ layers between the litter and the casualty and ______ layers over his body. 8. A litter casualty does not have a fracture of the lower extremity. When carrying the
casualty uphill, the casualty should be moved: a. Feet first. b. Head first. 9. A litter casualty has a fractured leg but no head injury. When carrying the casualty
uphill, the casualty should be moved: a. Feet first. b. Head first. 10. A litter casualty has a fractured leg and a head injury. When carrying the casualty
uphill, the casualty should be moved: a. Feet first. b. Head first.
MD0001 3-40

11. You must use a manual carry to place a casualty with a suspected back injury onto a litter. Which of the following is preferred? a. Four-man modified arms carry. b. Three-man modified arms carry. c. Modified two-man arms carry. d. Modified fore-and-aft carry. 12. The preferred method for locking the litter spreader bar of a standard litter into
place is to push it with your: a. Foot. b. Hand. c. Shoulder. 13. When a casualty with a suspected spinal injury is placed on a long spine board,
padding __________ be placed under his neck and the small of his back. a. Should. b. Should not. 14. Describe the procedure for making a litter using poles and a poncho. _______________________________________________________________ _______________________________________________________________ _______________________________________________________________ _______________________________________________________________ _______________________________________________________________
MD0001 3-41

15. Which litter carry is usually preferred when moving a casualty over rough, uneven terrain?
_______________________________________________________________ 16. Which litter carry is usually preferred when fording a stream? _______________________________________________________________ 17. A litter squad has been carrying a litter casualty using the uphill carry. The squad
now needs to use the downhill carry. Which of the following statements is true? a. The litter should be lowered to the ground before being rotated. b. The litter should be rotated without lowering it to the ground. c. The litter should not be rotated.
Check Your Answers on Next Page
MD0001 3-42

SOLUTIONS TO EXERCISES, LESSON 3 1. At the casualty's right shoulder. (para 3-29a(1)) 2. b (para 3-12) 3. c (para 3-11b) 4. c (para 3-1) 5. Poleless, nonrigid litter. (para 3-6) 6. a (para 3-13) 7. 4; 4 (para 3-18) 8. b (para 3-28b) 9. a (para 3-28c) 10. b (paras 3-28d, b) 11. a (para 3-20) 12. a (paras 3-26f, h) 13. a (para 3-24a) 14. Open the poncho and lay it flat on the ground. Lay two poles across the poncho so the poncho is divided into thirds. Position the hood and drawstrings so they will not catch on obstacles. Fold one outer third of the blanket over its pole. Fold the other outer third of the blanket over its pole. (para 3-9) 15. Litter post carry. (para 3-32) 16. Overhead carry. (para 3-36) 17. b (para 3-33)
End of Lesson 3
MD0001 3-43

LESSON ASSIGNMENT LESSON 4 Ground Evacuation Vehicles. LESSON ASSIGNMENT Paragraphs 4-1 through 4-13. LESSON OBJECTIVES After completing this lesson, you should be able to: be able to: 4-1. Identify the normal casualty loads for AMEDD ground ambulances, including the M113, M996, M997, M1010, and Stryker. 4-2. Identify the procedures for loading casualties onto AMEDD ground ambulances, including the M113, M996, M997, M1010, and Stryker. 4-3. Identify the normal casualty loads for nonmedical ground vehicles, including the M880, M890, M998, M1008, 2 ½-ton cargo truck, and Gator. 4-4. Identify the procedures for loading casualties onto nonmedical ground vehicles, including the M880, M890, M998, M1008, 2 ½-ton cargo truck, and Gator. 4-5. Identify the normal sequences for loading and unloading casualties for AMEDD ground ambulances and nonmedical ground vehicles used to transport casualties. SUGGESTION After completing the assignment, complete the exercises at the end of this lesson. These exercises will help you to achieve the lesson objectives.
MD0001 4-1

LESSON 4
GROUND EVACUATION VEHICLES
Section I. GROUND AMBULANCES 4-1. GENERAL Ground ambulances are motor vehicles designed to carry casualties. The ground ambulances operating in forward areas of the combat zone possess mobility and survivability comparable to the units being supported. Each ground ambulance normally has a crew of two medical specialists. The medical specialist assigned as the driver is responsible for care and maintenance of the vehicle, including reporting major defects to the motor sergeant. He also prepares the ambulance for loading and unloading casualties. The other medical specialist (the assistant driver) checks the casualties upon arrival at the pickup site and renders emergency medical treatment en route to the medical treatment facility. Medical specialists are trained to perform both functions and their duties are interchangeable. 4-2. GENERAL RULES FOR LOADING AND UNLOADING GROUND AMBULANCES Follow the rules listed below when loading and unloading litter casualties. They apply to ground ambulances and to nonmedical vehicles used to evacuate casualties. a. Use a litter team to load litter casualties. The litter team should follow any special instructions given by ambulance personnel. b. Load a litter casualty with his head toward the front of the vehicle unless: (1) The casualty is loaded crosswise. (2) The assistant driver wants the casualty's feet in the direction of travel. For example, a casualty with an injury to one side of his body may need to be loaded feet first so the injured side is readily accessible to the assistant driver. c. Load litter casualties from top to bottom. If the top litter slips or something falls from the litter while it is being loaded, there is no casualty underneath to be injured. d. Load litter casualties from right to left. e. Load casualties receiving IV fluids, having bulky splints, or with chest or abdominal wounds in the lower berths regardless of their triage category.
MD0001 4-2

f. Load the least seriously injured casualty first and the most seriously injured casualty last. (1) If casualties are picked up at more than one location, do not move a previously loaded litter casualty to make the most seriously injured casualty occupy the "last loaded, first unloaded" berth. (2) If casualties are to be unloaded in other than the normal sequence, the assistant driver tells the litter team in which order the casualties are to be unloaded. g. Secure each litter casualty to his litter. h. Secure each litter to the vehicle. i. Unload casualties in the reverse order in which they are loaded, unloading the most seriously injured casualty first. Unloading the lower berth first keeps the casualty in the lower berth from being injured should something fall from the upper berth during unloading. 4-3. M996 ARMORED AMBULANCE The M996 and M997 are armored high mobility multipurpose-wheeled vehicle (HMMWV) ambulances. The M996 (figure 4-1) is a diesel-powered vehicle designed over all types of roads and cross-country terrain. The ambulance is equipped with a gas-particulate filter unit (GPFU) for operations in an nuclear, biological, or chemical (NBC) environment. The M996 can carry two litter casualties or six ambulatory casualties or a mixed load of one litter casualty and three ambulatory casualties. Use a three-man litter team to load and unload litter casualties from the M996.
Figure 4-1. Truck, ambulance, 4x4, armored, M996.
MD0001 4-3

NOTE: When litter casualties are being transported, remove the litter rail extensions (figure 4-2) from the storage compartments and use them to help load the litters into the berths and unload litters. Details on how to prepare, use, and store the litter rail extensions are given in Field Manual 8-10-6, Medical Evacuation in a Theater of Operations.
Figure 4-2. M996 litter rail extension. a. Two-Litter Load. When two litter casualties are to be transported, load the casualties in the following order. (1) Right berth. (2) Left berth (more seriously injured casualty). b. Mixed Load. When a mixed load is to be transported, load the litter casualty in the right berth and the ambulatory casualties on the seat on the left. c. Ambulatory Load. Make sure the litters are in a stowed position and secured. Then seat the ambulatory casualties on the right and left sides. 4-4. M997 ARMORED AMBULANCE The M997 (figure 4-3) is a diesel-powered vehicle designed for use over all types of roads and cross-country terrain. The ambulance is equipped with a GPFU for operations in an NBC environment. It is also equipped with an air conditioner. The M997 can carry four litter casualties or eight ambulatory casualties or a mixed load of two litter casualties and four ambulatory casualties. Use a three-man litter team to load and unload litter casualties from the M997.
MD0001 4-4

Figure 4-3. Truck, ambulance, 4x4, armored, M997. NOTE: When litter casualties are being transported, remove the litter rail extensions from the storage compartments and use them to assist in loading the litters into the berths and unloading litters (figure 4-2). Details on how to prepare, use, and store the litter rail extensions are given in Field Manual 8-10-6, Medical Evacuation in a Theater of Operations. Splint sets are stored in the cargo net compartments. a. Four-Litter Load. When four litter casualties are to be transported, load the casualties in the following order. (1) Upper right berth (least seriously injured casualty). (2) Lower right berth. (3) Upper left berth. (4) Lower left berth (most seriously injured casualty). b. Mixed Load. When a mixed load is to be transported, load the casualties in the following order. (1) Upper right berth. (2) Lower right berth (more seriously injured litter casualty). (3) Ambulatory casualties seated on left side. c. Ambulatory Load. If the ambulance is configured for litters, fold the upper litter racks to their backrest position. Then load the ambulatory casualties on the right and left seats.
MD0001 4-5

4-5. M1010 TRUCK AMBULANCE The M1010 ambulance (figure 4-4) is a diesel-powered vehicle with air conditioning and an optional GPFU for NBC operations. The vehicle has a patient assist boom and block and tackle to assist in loading and unloading litter casualties. The M1010 truck ambulance is designed to carry four litter casualties or eight ambulatory casualties or a mixed load of two litter casualties and four ambulatory casualties.
Figure 4-4. Truck, ambulance, 1 1/4-ton, 4x4, M1010.
a. Four-Litter Load. When four litter casualties are to be transported, load the casualties in the following order. (1) Upper right berth (least seriously injured casualty). (2) Lower right berth. (3) Upper left berth. (4) Lower left berth (most seriously injured casualty). b. Mixed Load. When a mixed load is to be transported, load the casualties in the sequence given below. If only one litter casualty is loaded, the casualty is placed on either the upper or lower right berth. (1) Upper right berth. (2) Lower right berth (more seriously injured litter casualty). (3) Ambulatory casualties seated on left side. c. Ambulatory Load. When only ambulatory casualties are to be transported, the casualties sit on the right and left sides.
MD0001 4-6

4-6. M113 ARMORED PERSONNEL CARRIER An M113 armored personnel carrier (figure 4-5) is a standard evacuation vehicle. It is lightly armored to protect against small arms fire. It is highly maneuverable and capable of amphibious operation on inland lakes and streams. The vehicle can transport ten ambulatory casualties in its normal configuration. The vehicle can transport four litter casualties by removing the spall liner and installing the litter suspension kit. (Litter casualties cannot be safely moved if the litter suspension kit is not installed.) When litter casualties are transported, they are loaded in the following sequence. a. Upper right berth (least seriously injured casualty). b. Lower right berth. c. Upper left berth. d. Lower left berth (most seriously injured casualty).
Figure 4-5. Carrier, personnel, full-tracked, armored, M113.
MD0001 4-7

4-7. STRYKER MEDICAL EVACUATION VEHICLE a. The Stryker medical evacuation vehicle (MEV) is the primary ambulance platform for the Stryker Brigade Combat Team (SBCT). The MEV provides the mounting capability to transport four patients on standard NATO litters or six ambulatory patients, in addition to an ambulance team of three (see figure 4-6). The MEV provides protection for the patient and the medical team and enhances the medical care in a protected environment with adequate lighting and accessible medical equipment. The MEV provides essential force health protection. b. The MEV incorporates an automatic litter-lifting capability that improves on the M-113 ambulance that requires awkward lifting of the litters to the upper patient securing system. On the MEV, the medical only has to carry the litter to the back of the vehicle, load it onto a tray, and push it in. The vehicle will slide the litter over and then raise it up to the upper locked position. c. Patients are loaded in the following order. (1) Upper right berth (least seriously injured casualty). (2) Lower right berth. (3) Upper left berth. (4) Lower left berth (most seriously injured casualty).
Figure 4-6. Stryker MEV and standard crew.
MD0001 4-8

Section II. NONMEDICAL MILITARY VEHICLES 4-8. GENERAL If ambulances are not available, nonmedical vehicles can be used to evacuate casualties. Many of the vehicles available to combat unit can be used to evacuate casualties with little or no change. Some of these vehicles and their capacities are discussed in the following paragraphs. 4-9. M880/M890/M1008 CARGO TRUCK M880, M890, and M1008 cargo trucks (figure 4-7) are lightweight vehicles used to transport personnel or light general cargo. They can easily be adapted for use as carriers to evacuate up to five litter casualties each.
Figure 4-7. Truck, cargo, 1 1/4-ton, 4x4/4x2, M880/M890/M1008, with five litters. a. Prepare Vehicle for Use. Prepare the vehicle for evacuating litter casualties in the following manner. (1) Fold the fabric cover and metal bows forward (toward the truck cab) as an assembly and secure the assembly to the front bow. (2) Lower the tailgate. (3) Lower the seats and lock them in place.
MD0001 4-9

b. Load Litters. Load litter casualties in the following manner. Secure each litter to the vehicle as it is loaded into place. (1) First litter. Load the first litter crosswise across the sideboards close to the truck cab with the casualty's head behind the driver's seat. (2) Second litter. Load the second litter crosswise across the sideboards close to the first litter with the casualty's head behind the passenger's seat (head next to the first casualty's feet). (3) Third litter. Load the third litter crosswise across the sideboards close to the second litter with the casualty's head behind the driver's seat (head next to the second casualty's feet). [Loading casualties alternately head to foot is a commonly used method when casualties are loaded crosswise.] (4) Fourth litter. Load the fourth litter head first (toward the cab) on the right side of the bed of the truck. The stirrups keep the litter off the floor. (5) Fifth litter. Load the fifth litter head first on the left side of the bed of the truck. c. Secure Tailgate. Raise and fasten the tailgate. 4-10. M998 CARGO TRUCK (FOUR-MAN CONFIGURATION) The M998 cargo truck (figure 4-8), four-man configuration, can be used to transport three litter casualties.
Figure 4-8. Truck, cargo/troop carrier, 1 1/4-ton, 4x4, M998, with three litters.
MD0001 4-10

a. Prepare Vehicle for Use. Prepare the vehicle for evacuating litter casualties. (1) Remove the cargo cover and metal bows, then secure them. (2) Lower the tailgate. b. Load Litters. Load litter casualties in the following manner. Secure each litter to the vehicle as it is loaded into place. (1) First litter. Load the first litter crosswise across the sideboards close to the truck cab with the casualty's head behind the driver's seat. (2) Second litter. Load the second litter crosswise across the sideboards close to the first litter with the casualty's head behind the passenger's seat (head next to first casualty's feet). (3) Third litter. Load the third litter head first (toward the cab) on the right side of the bed of the truck. The stirrups will keep the litter off the floor. c. Check Tailgate. Leave the tailgate open. Make sure the two tailgate chain hooks are secure. 4-11. M998 CARGO TRUCK (TWO-MAN CONFIGURATION) The M998 cargo truck (figure 4-9), two-man configuration, can be used to transport five litter casualties.
Figure 4-9. Truck, cargo/troop carrier, 1 1/4-ton, 4x4, M998, with five litters.
MD0001 4-11

a. Prepare Vehicle for Use. Prepare the vehicle for evacuating litter casualties. (1) Fold the fabric cover and metal bows forward as an assembly and secure the assembly to the front bow. (2) Lower the tailgate. b. Load Litters. Load litter casualties in the following manner. Secure each litter to the vehicle as it is loaded into place. (1) First litter. Load the first litter crosswise across the sideboards close to the truck cab with the casualty's head behind the driver's seat. (2) Second litter. Load the second litter crosswise across the sideboards close to the first litter with the casualty's head next to first casualty's feet. (3) Third litter. Load the third litter crosswise across the sideboards close to the second litter with the casualty's head next to second casualty's feet. (4) Fourth litter. Load the fourth litter head first on the right side of the bed of the truck. (5) Fifth litter. Load the fifth litter head first on the left side of the bed of the truck. c. Check Tailgate. Leave the tailgate open. Make sure the two tailgate chain hooks are secure. 4-12. TWO AND ONE-HALF-TON AND FIVE-TON CARGO TRUCKS The 2 1/2-ton (figure 4-10) cargo truck and the 5-ton cargo truck can be used to transport up to 12 litter casualties each. a. Prepare Vehicle for Use. The following instructions are used with the M55A1 2 ½-ton, 6x6 cargo truck, but the same procedures generally apply to any other 2 ½-ton or 5-ton truck, including the family of medium tactical vehicles (FMTV) and light medium tactical vehicle (LMTV). (1) Roll the canvas cover to the front of the truck and secure it in a roll to the front bow. (2) Remove the three center bows and secure them to the canvas. (3) Lower the seats and the tailgate.
MD0001 4-12
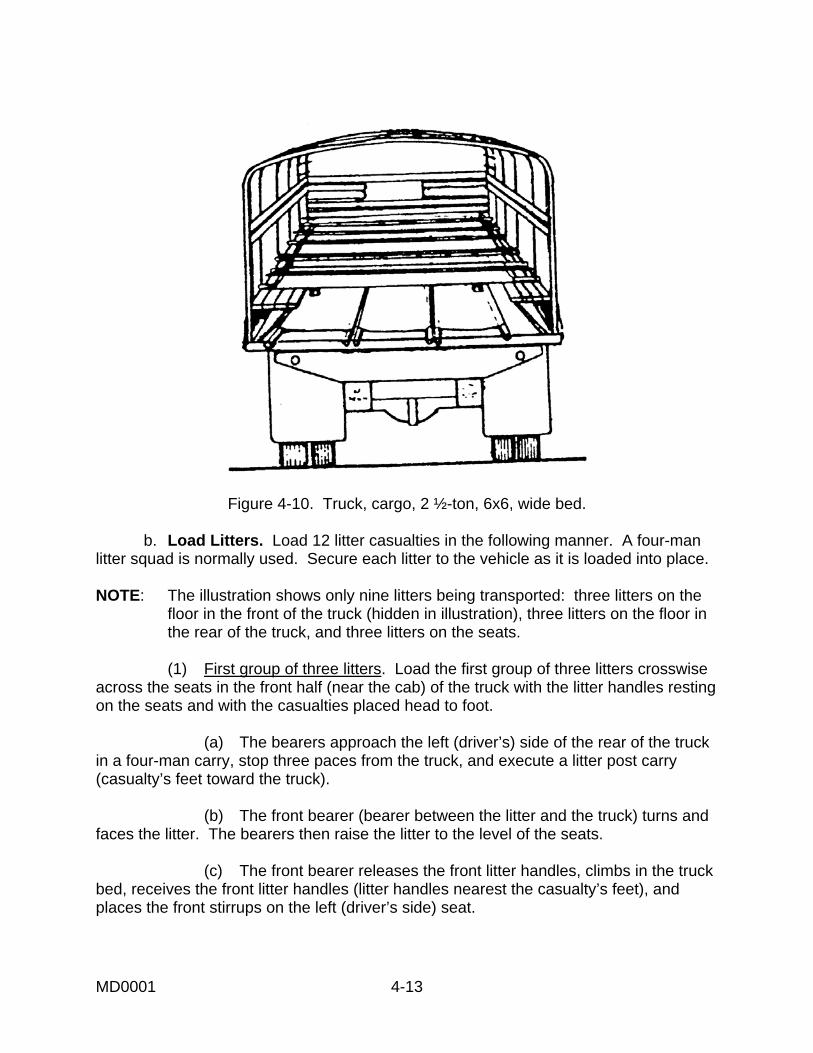
Figure 4-10. Truck, cargo, 2 ½-ton, 6x6, wide bed. b. Load Litters. Load 12 litter casualties in the following manner. A four-man litter squad is normally used. Secure each litter to the vehicle as it is loaded into place. NOTE: The illustration shows only nine litters being transported: three litters on the floor in the front of the truck (hidden in illustration), three litters on the floor in the rear of the truck, and three litters on the seats. (1) First group of three litters. Load the first group of three litters crosswise across the seats in the front half (near the cab) of the truck with the litter handles resting on the seats and with the casualties placed head to foot. (a) The bearers approach the left (driver’s) side of the rear of the truck in a four-man carry, stop three paces from the truck, and execute a litter post carry (casualty’s feet toward the truck). (b) The front bearer (bearer between the litter and the truck) turns and faces the litter. The bearers then raise the litter to the level of the seats. (c) The front bearer releases the front litter handles, climbs in the truck bed, receives the front litter handles (litter handles nearest the casualty’s feet), and places the front stirrups on the left (driver’s side) seat.
MD0001 4-13

(d) The bearers at the side of the litter work their way to the rear litter handles and support the rear of the litter (casualty’s head). The bearer at the foot of the litter releases his hold and moves to the right (passenger’s) side of the truck, but remains on the outside of the truck. (e) The bearer inside the truck moves his end of the litter to the right (passenger’s) side of the truck and transfers the litter handles to the bearer on the outside of the truck who places the litter handles on the seat on the right side of the truck. (f) At the same time, the two bearers at the rear of the litter position their end of the litter so the litter handles rest on the seat on the left side of the vehicle. The litter is now crosswise with the casualty’s head behind the driver’s seat. (g) The bearers move the litter toward the front of the truck until it is next to the cab of the truck. All litter handles rest securely on the seats. (h) The second litter is loaded in the same manner as the first, except the litter is loaded from the right (passenger’s) side and the casualty’s head is behind the passenger’s seat (next to the first casualty’s feet). (i) The third litter is loaded in the same manner as the first. (2) Second group of three litters. Load the second group of three litters lengthwise (head first) on the floor in the front half of the truck beneath the first group of litters. The stirrups will keep the litters off the floor. (a) The bearers approach the right (passenger’s) side of the rear of the truck in four-man carry formation, stop three paces from the truck, execute a litter post carry, and then rotate the litter (if needed) so the casualty’s head is toward the truck. (b) The front bearer (bearer between the litter and the truck) releases his litter handles and climbs in the truck bed. (c) The two bearers at the sides place the front stirrups on the right side of the truck bed. (d) The two bearers on the litter’s sides release their hold (leaving one bearer holding the foot end of the litter) and climb into the truck bed. (e) The bearers in the truck take the litter and move it under the litters on the seats and next to the right side of the truck. The bearers avoid sliding the litter along the bed of the truck whenever possible.
MD0001 4-14

(f) The fifth litter is loaded in the same manner as the fourth except the litter bearers position themselves at the center of the truck bed and place the litter in the center of the truck bed beneath the first three litters. (g) The sixth litter is loaded in the same manner as the fourth except the litter bearers position themselves at the left side of the truck bed and place the litter in the left side of the truck bed beneath the first three litters. (3) Third group of three litters. Load the third group of three litters crosswise across the seats in the rear half of the truck with the litter handles resting on the seats. Continue to alternate casualties. (a) Load the seventh casualty in the same manner as the second casualty (casualty’s head next to the third casualty’s feet). (b) Load the eighth casualty in the same manner as the first casualty (head behind driver and next to the seventh casualty’s feet). (c) Load the ninth casualty in the same manner as the second casualty (casualty’s head next to the eighth casualty’s feet). (4) Fourth group of three litters. Load the fourth group of three litters lengthwise (head first) on the floor in the rear half of the truck behind the second group of litters and beneath the third group of litters. (a) Load the tenth casualty on the right in the same manner as the fourth casualty, except the bearers do not climb in the truck bed. (b) Load the eleventh casualty in the center in the same manner as the fifth casualty, except the bearers do not climb in the truck bed. (c) Load the twelfth casualty on the left in the same manner as the sixth casualty, except the bearers do not climb in the truck bed. c. Secure Tailgate. Raise and fasten the tailgate as high as possible (about a 45o angle) to help secure the litters in place and prevent them from sliding out of the truck when it is in motion.
MD0001 4-15
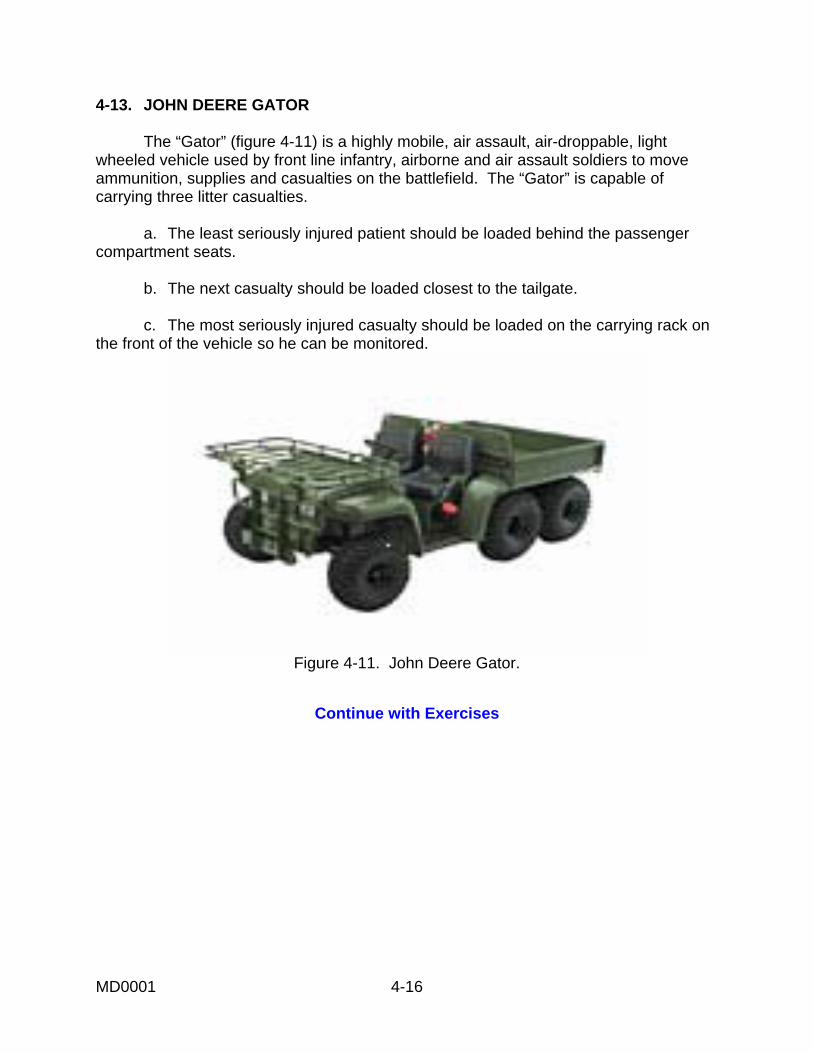
4-13. JOHN DEERE GATOR The “Gator” (figure 4-11) is a highly mobile, air assault, air-droppable, light wheeled vehicle used by front line infantry, airborne and air assault soldiers to move ammunition, supplies and casualties on the battlefield. The “Gator” is capable of carrying three litter casualties. a. The least seriously injured patient should be loaded behind the passenger compartment seats. b. The next casualty should be loaded closest to the tailgate. c. The most seriously injured casualty should be loaded on the carrying rack on the front of the vehicle so he can be monitored.
Figure 4-11. John Deere Gator.
Continue with Exercises
MD0001 4-16
EXERCISES, LESSON 4 INSTRUCTIONS: Answer the following exercises by marking the lettered response that best answers the question or best completes the incomplete statement or by writing the answer in the space provided at the end of the exercise. After you have completed all the exercises, turn to "Solutions to Exercises" at the end of the lesson and check your answers. For each exercise answered incorrectly, reread the material referenced with the solution. 1. You are loading litter casualties into an evacuation vehicle. The most seriously injured casualty is usually loaded: a. First. b. Last. 2. You are unloading litter casualties from an evacuation vehicle. The most seriously injured casualty should be unloaded: a. First. b. Last. 3. You are loading four litter casualties into an M113 evacuation vehicle. In what order should the berths be filled? ____________________________________________ ____________________________________________ ____________________________________________ ____________________________________________
MD0001 4-17

4. You are unloading four litter casualties from an M113 evacuation vehicle. In what order should the berths be unloaded? ____________________________________________ ____________________________________________ ____________________________________________ ____________________________________________ 5. When using a nonmedical vehicle to evacuate a litter casualty, make sure: a. The casualty is secured to the litter. b. The litter is secured to the vehicle. c. The casualty is secured to the litter and the litter is secured to the vehicle. 6. The M997 armored ambulance can carry up to _____ litter casualties or up to _______ ambulatory casualties. Its normal mixed load is _____ litter casualty(ies) and ______ ambulatory casualty(ies). 7. The John Deere Gator can carry ______ litter casualties. 8. When a litter casualty is loaded lengthwise, the casualty's ________ normally
pointing in the direction of travel. a. Feet are. b. Head is.
Check Your Answers on Next Page
MD0001 4-18

SOLUTIONS TO EXERCISES, LESSON 4 1. b (para 4-2f) 2. a (para 4-2i) 3. Upper right berth Lower right berth Upper left berth Lower left berth (para 4-6) 4. Lower left berth Upper left berth Lower right berth Upper right berth (paras 4-2i, 4-6) 5. c (paras 4-2g, h) 6. Four; eight; two, four (para 4-4) 7. 3 litter casualties (para 4-13) 8. b (para 4-2b)
End of Lesson 4
MD0001 4-19

LESSON ASSIGNMENT LESSON 5 Aeromedical Evacuation. LESSON ASSIGNMENT Paragraphs 5-1 through 5-33. LESSON OBJECTIVES After completing this lesson, you should be able to: 5-1. Identify the normal casualty loads for air ambulances (Blackhawk, Iroquois, and Chinook). 5-2. Identify the procedures for loading casualties into air ambulances. 5-3. Identify procedures for evacuating a casualty using a hoist. 5-4. Identify the information contained in an evacuation request. 5-5. Identify procedures for transmitting an evacuation request over radio, including the use of brevity codes. 5-6. Identify procedures preparing and marking a helicopter landing site. 5-7. Identify procedures for guiding a helicopter to a landing site. SUGGESTIONS After completing the assignment, complete the exercises at the end of this lesson. These exercises will help you to achieve the lesson objectives.
Additional information on electronic communications can be found in FM 24-1, Combat Communications.
MD0001 5-1

LESSON 5
AEROMEDICAL EVACUATION
Section I. AIR AMBULANCES 5-1. MISSIONS OF AIR AMBULANCES Helicopters are used as air ambulances for aeromedical evacuation in forward areas. Although they are mainly used to evacuate patients from medical treatment facilities, they can also be used to evacuate casualties from far-forward areas, especially if the distance to be traveled is great or the location is hard to reach by ground vehicle. Although the primary mission of Army air ambulance units is the evacuation of selected patients, they have secondary missions of moving medical personnel, providing air crash rescue, and transporting medical supplies, whole blood, and biologicals. 5-2. ADVANTAGES AND DISADVANTAGES OF AEROMEDICAL EVACUATION a. Advantages. Some advantages of aeromedical evacuation are given below. (1) Speed. Air ambulances travel faster than ground ambulances. (2) Terrain. Air ambulances can fly over terrain that makes ground evacuation difficult or impossible. (3) Range. Air ambulances can continue to more distant medical treatment facilities if nearby facilities are overcrowded or if the facilities are in the process of being moved. (4) Flexibility. Air ambulances can easily change their destinations to take casualties directly to facilities equipped to provide specialized treatment, thus reducing the time and number of transfers needed to deliver casualties to the appropriate treatment facility. b. Disadvantages. Some disadvantages of aeromedical evacuation are given below. (1) Overevacuation. A casualty should be evacuated to a medical treatment facility as far forward as possible that is equipped to adequately treat the casualty and return him to duty. The use of aeromedical evacuation sometimes results in casualties being evacuated too far to the rear, which can interfere with their return to duty. (2) Weather. Helicopter evacuation operations may be limited by fog, snow, low ceiling, sleet, high winds, lightning, sandstorms, and/or turbulence.
MD0001 5-2

(3) Enemy action. Enemy aircraft or enemy ground fire can result in a helicopter being disabled, especially while casualties are being loaded. (4) Friendly action. Artillery barrages and friendly air strikes can interfere with evacuation attempts. 5-3. GENERAL RULES FOR LOADING AND UNLOADING AIR AMBULANCES Helicopters are used as air ambulances for evacuation in forward areas. Each air ambulance has a medical specialist to take care of the casualties during evacuation. Follow the flight crew's instructions for loading, securing, and unloading casualties. Some general rules pertaining to the litter bearers who load and unload casualties are given below. a. Remain at least 50 feet from the helicopter until signaled to approach the helicopter by a member of the helicopter crew. b. Do not smoke anywhere near the helicopter. c. Secure loose objects (remove caps, blankets, I.V. tubing, radio antennae, and so forth) before approaching the helicopter. d. Approach the aircraft from the front at a 45º angle so you are in full view of the pilot. e. Keep a low silhouette when approaching the helicopter. f. Approach and leave the helicopter quickly, but do not run. g. Carry the litter parallel to the ground. h. Avoid the area near the tail rotor of the helicopter. If you must go from one side of the helicopter to the other, go around the front of the helicopter. Never go around the rear. i. When casualties are placed lengthwise (other than a mixed load on an Iroquois), position the casualties so their heads point forward (toward the front of the helicopter). j. Secure each litter casualty to his litter. k. Secure each litter to the aircraft. l. Load the litter casualty which will occupy the upper pan (tier) before loading the litter casualty occupying the lower pan (tier). This will keep a casualty from accidentally falling onto another casualty should his litter drop before it is secured.
MD0001 5-3

m. Load the most seriously injured casualty last. n. If a casualty has a special requirement, place him in the most appropriate location. (1) If the casualty will require in-flight emergency medical care, such as cardiopulmonary resuscitation, place the casualty in an upper pan (tier) rather than a bottom pan (tier) to facilitate access to the casualty. (2) If the casualty has a traction splint and is being evacuated in a Blackhawk helicopter, place the casualty in a bottom pan. (3) If the casualty has a traction splint applied and is being evacuated in an Iroquois helicopter, place the casualty directly on the floor. (4) If the casualty has an I.V. in place and is being evacuated in an Iroquois helicopter, place the casualty as low as possible (not in an upper tier). (5) Above all, follow instructions of the flight crew and flight medic. o. Unload litter casualties in the reverse order from the order in which they were loaded. The most seriously injured casualty is unloaded first. 5-4. UH-60A BLACKHAWK AIR AMBULANCE The Blackhawk utility helicopter (figure 5-1) is the primary air ambulance used in combat. The crew normally consists of a pilot, copilot, crew chief, and medical attendant. The normal patient loads for Blackhawk helicopters are given in the following paragraphs. However, the ultimate decision for the patient load rests with the pilot who must also consider weather and terrain.
Figure 5-1. UH-60A Blackhawk.
a. Medical Evacuation Kit. A medical evacuation (MEDEVAC) kit allows the Blackhawk helicopter to carry litter casualties. FM 8-10-6, Medical Evacuation in a Theater of Operations, gives directions for installing the kit. The litter support unit has a central pedestal that can be rotated 90º when loading and unloading litters.
MD0001 5-4

(1) The Blackhawk with MEDEVAC kit installed normally transports four litter casualties (two on each side) and one ambulatory casualty or seven ambulatory casualties or a mixed load of two litter casualties and four ambulatory casualties. In the four-litter configuration, the top litter pan on each side can be tilted to make loading and unloading litters easier. (2) The MEDEVAC kit also allows for additional litter casualties when needed. This configuration allows for six litter casualties (three on each side) and one ambulatory casualty or a mixed load of three litter casualties and four ambulatory casualties. In the six-litter configuration, the litter pans cannot be tilted. b. Medical Evacuation Kit with Internal Rescue Hoist. When an internal rescue hoist is used with the MEDEVAC kit, the casualty holding capacity of the air ambulance is reduced. The use of the internal rescue hoist is discussed in Section IV of this lesson. (1) The normal (four-litter) configuration is reduced to two litter casualties and one ambulatory casualty or four ambulatory casualties. (2) The six-litter configuration is reduced to three litter casualties and one ambulatory casualty or four ambulatory casualties. 5-5. LOADING LITTER CASUALTIES INTO THE BLACKHAWK AIR AMBULANCE a. Four-Litter Configuration. Use a four-man litter squad to load litter casualties. If one squad is used, load the upper right pan first, then the upper left pan, then the lower right pan, and finally the lower left pan (most seriously injured casualty). If two litter squads are available, litter casualties can be loaded on both sides simultaneously, beginning with the upper pan and then the lower pan. Some general instructions for loading casualties are given below. (1) Rotate the litter support unit 90o clockwise to make loading litters easier. (This action is normally performed by the helicopter flight crew.) (2) Lower the top litter pan on each side (figure 5-2). (This action is normally performed by the flight crew.) (3) Carry the litter casualty to the helicopter using a four-man carry. (4) Raise the litter to the level of the upper litter pan and place the stirrups at the end of the litter on the litter pan. Make sure the casualty is loaded so the casualty's head will be toward the front of the helicopter when the litter support assembly is returned to its normal position. (5) Slide the litter forward until the litter stirrups of both ends are secured on the litter pan. (The flight crew can help guide the litter and secure the litter as illustrated in figure 5-3.)
MD0001 5-5

Figure 5-2. Four-itter configuration (Blackhawk) with upper litter pan in tilt position.
Figure 5-3. Member of a Blackhawk flight crew helping to load a litter casualty.
MD0001 5-6

(6) Raise the top litter pan and secure the pan in position. (This action is normally performed by the helicopter flight crew.) (7) Secure the litter to the litter support assembly with the litter straps attached to the assembly. (This action is normally performed by the helicopter flight crew.) (8) Leave the helicopter as a team and obtain the next litter. (9) Continue to load and secure the casualties using the same general procedures. When a casualty is loaded into a lower position, the litter pan does not tilt. (10) After all four litters have been loaded, rotate the litter support unit 90o counterclockwise, lock the unit into the in-flight position, and close the cargo doors. (These actions are normally performed by the helicopter flight crew.) b. Six-Litter Configuration. Use a four-man litter squad to carry the litter casualties. If one squad is used, load the upper right pan first, then the upper left pan, then the middle right pan, then the middle left pan. Rotate the pedestal back to the locked position. The lower right pan and finally the lower left pan (most seriously injured casualty) are then loaded. If two litter squads are available, litter casualties can be loaded on both sides simultaneously, beginning with the upper pan. Some general instructions for loading casualties are given below. (1) Rotate the litter support unit 90o clockwise. (This action is normally performed by the helicopter flight crew.) (2) Carry the litter casualty to the helicopter using a four-man carry. (3) Raise the litter to the level of the upper litter pan and place the stirrups at the end of the litter on the litter pan. (The litter pan does not tilt in the six-litter configuration, so the overhead carry may be needed to load the upper pans.) Make sure the casualty's head will be in the direction of travel when the litter support assembly is returned to its normal position. (4) Slide the litter forward until the litter stirrups of both ends are secured on the litter pan. (The flight crew can help guide and secure the litter.) (5) Secure the litter to the litter support assembly with the litter straps attached to the assembly. (This action is normally performed by the helicopter flight crew.) (6) Leave the helicopter as a team and obtain the next litter.
MD0001 5-7

(7) Continue to load and secure the casualties using the same general procedures until the upper and middle pans have been filled. (8) After both top litter pans and both middle litter pans have been filled, rotate the litter support unit 90o counterclockwise and lock the unit into the in-flight position. (These actions are normally performed by the helicopter flight crew.) (9) Install the restraint assembly and tube assembly modification kits on each side of the litter support. (The pedestal cannot rotate with these kits in place.) (10) Load the two remaining litters between the restraints with the casualties' head toward the front of the helicopter. (11) Secure the last two litters to the helicopter. (This action is normally performed by the flight crew.) (12) Close the cargo doors. (This action is normally performed by the helicopter flight crew.) c. Mixed Load. If only two or three litter casualties are to be evacuated, load one side using the procedures given in paragraph a or b above, as appropriate. Remove the upper litter pan on the side not used to hold litters and reposition it just above the bottom pan on the same side. Three ambulatory casualties can sit on the litter support unit and a fourth ambulatory casualty can sit on a troop seat. Secure the ambulatory casualties with straps. Once all litter and ambulatory casualties have been loaded and secured, close and secure the cargo doors. 5-6. UH-1H/V IROQUOIS AIR AMBULANCE The Iroquois utility helicopter (figure 5-4), also called the Huey, is an older type of air ambulance. The Iroquois air ambulance can transport six litter casualties (three on each side) or nine ambulatory casualties or a mixed load of three litter casualties (placed crosswise at rear) and four ambulatory casualties (two on each side).
Figure 5-4. UH-1H/V Iroquois.
MD0001 5-8

5-7. LOADING LITTER CASUALTIES INTO THE IROQUOIS AIR AMBULANCE a. Six Litter Configuration. Use two four-man litter squads to load litter casualties when possible. If only one squad is used, load the upper right tier first, then the middle right tier, the lower right tier, the upper left tier, the middle left tier, and finally the lower left tier (most seriously injured casualty). If two litter squads are available, load litter casualties into both sides simultaneously, beginning with the upper tier. Some general instructions for loading casualties are given below. (1) Carry the litter casualty to helicopter using a four-man carry. (2) Turn so the casualty is even and parallel to the cargo compartment of the helicopter and his head is toward the front of the helicopter (figure 5-5).
Figure 5-5. Preparing to load the first casualty (right side) into an Iroquois air
ambulance with crewman ready to assist. (3) Lift the litter until the litter handles are even with the brackets that will support the litter handles. (4) The bearer at the casualty's inside shoulder (bearer between the helicopter and the casualty's head) gives his handle to a crew member, moves around the front of the litter, and takes the outside front litter handle. (5) The litter bearer who releases the outside front litter handle then moves his hands down the litter pole to the middle of the litter to help steady and support the litter.
MD0001 5-9

(6) The litter bearer at the casualty's inside foot (bearer between the helicopter and the casualty's feet) moves inside the cargo compartment while continuing to support his rear litter handle. (7) The litter bearer inside the helicopter and the assisting crewman holding the inside front handle place their handles in the inner litter support brackets while the litter bearers outside the helicopter at the front and rear of the litter slide their litter handles into the outer litter support brackets (figure 5-6).
Figure 5-6. Loading the first litter (right side) into an Iroquois air ambulance.
(8) The bearers and crewman make sure the litter handles are secured (locked) in the brackets and further secure the litter handles with the litter retaining straps found near each bracket. (9) The litter squad leaves the helicopter as a unit and obtains the next litter to be loaded. (10) The middle litter is loaded using the same procedures. (11) The lowest litter is loaded using similar procedures. The inside rear bearer cannot enter the cargo compartment, so he remains outside the helicopter while assisting the crew member in placing the litter in the brackets and securing the litter handles with litter retaining straps. (12) The other side is loaded using the same procedures. Figure 5-7 shows a casualty being loaded into the left side of the cargo compartment. Figure 5-8 shows an Iroquois air ambulance with all six litter casualties loaded.
MD0001 5-10

Figure 5-7. Loading the second litter (left side) into an Iroquois air ambulance.
Figure 5-8. Iroquois air ambulance with six litter casualties loaded.
MD0001 5-11

b. Mixed Load Configuration. Use a four-man litter squad to load litter casualties. Load the upper tier first, then the middle tier, and finally the lower tier (most seriously injured casualty). Note that the casualties are loaded crosswise, not with their head toward the front of the helicopter. Some general instructions for loading casualties are given in the following paragraphs. (1) Carry the litter casualty to helicopter using a four-man carry. (2) Turn so the casualty is perpendicular to the cargo compartment with the casualty's head toward the rear of the compartment. (3) Lift the litter until the litter handles at the casualty's head can be easily grasped by two crewmen in the rear of the cargo compartment. (4) The two crewmembers take the handles from the front bearers and guide the litter into the compartment (figure 5-9). The front bearers can move around the front of the helicopter to the opposite side and assist in supporting the litter and placing the litter handles in the brackets. If crewmembers cannot assist, the front bearers set the front stirrups on the floor of the helicopter, move around the front of the helicopter to the other side, and lift and secure the front litter handles.
Figure 5-9. Loading a litter into an Iroquois air ambulance (mixed load).
MD0001 5-12

(5) The rear bearers and crewmen raise and position the litter until the litter handles are even with the litter support brackets. (6) The crewmen or front bearers place the litter handles near the casualty's head in the litter support brackets and make sure the handles are locked in place. At the same time, the bearers at the rear of the litter place their handles in the litter support brackets near the casualty's feet and make sure the handles are locked in place. (7) The bearers/crewmen secure all four handles with the litter retaining straps found near each bracket. (8) The bearers leave the helicopter as a unit and obtain the next litter to be loaded. (9) The middle litter is loaded using the same procedures. (10) The lowest litter is loaded using the same procedures. (11) The bearers assist the ambulatory casualties to their seats (two on each side near the front of the compartment) and make sure the ambulatory casualties are secured to the aircraft. Figure 5-10 shows a Huey air ambulance with a mixed load. (12) The cargo compartment doors are closed and secured (usually done by crew members).
Figure 5-10. Iroquois air ambulance with a mixed load.
MD0001 5-13

5-8. CH-47 CHINOOK AIR AMBULANCE The Chinook (figure 5-11) is a cargo/transport helicopter that can be used to transport casualties. The Chinook's larger size allows it to transport more casualties at one time, but makes it unsuitable for use in smaller, more confined areas. The Chinook can carry up to 24 litter casualties or 33 ambulatory casualties or various combinations of mixed casualties. The aircraft is prepared for carrying litter casualties by folding the seats and installing litter poles similar to those in the Iroquois. Litter casualties are carried inside the aircraft through the lowered rear ramp and placed in the litter support brackets.
Figure 5-11. Chinook.
MD0001 5-14

Section II. HIGH PERFORMANCE HOIST OPERATIONS 5-9. THE HIGH PERFORMANCE HOIST The high performance utility hoist (figure 5-12) is usually internally mounted (mounted inside the helicopter), but can sometimes be mounted externally. The hoist basically consists of a 256-foot hoist cable (1/4 inch in diameter) with hook, an electric wench used to reel-out and reel-in the cable, a boom, and control devices. The hoist is used to lift casualties to the helicopter when a landing is not possible. The hoist can lift up to 600 pounds, depending upon the weather. Because there is a high degree of risk involved in a hoist operation, it should be used only when there is no other option. Hoist rescue may be required when casualties are in water, in a jungle, or in a mountainous area. The last 50 feet of the cable are color-coded.
Figure 5-12. The hoist system.
WARNING
The hoist operator must always wear a safety harness and lifeline when performing hoist operations.
MD0001 5-15

5-10. RESCUE DEVICES The high performance hoist has a hook that attaches to various rescue devices used to raise the casualty. These devices include the forest penetrator (sometimes called a jungle penetrator), Stokes litter, semirigid litter, and survivor's sling. When the casualty has an injury of the neck, spine, or pelvis, the Stokes litter is used to hoist the casualty. Once the casualty is ready to be hoisted, the helicopter will rise and lift the casualty off of the ground. The hoist operator does the rest. 5-11. STATIC ELECTRICITY Static electricity builds up on the hoist cable. If ground personnel grab the cable or lowered rescue device before the electrical charge is discharged, they could be shocked. Discharge the static electricity by allowing the cable or hook or the rescue device (if lowered with the cable) to touch the ground before attempting to touch the cable, hook, or device. 5-12. FOREST PENETRATOR The forest penetrator (figure 5-13) can be used to rescue casualties from land or from water. If the casualty is in water, a flotation device is attached to the penetrator. The forest penetrator is about 34 inches in length. It contains three seats (4.75 inches wide and 11.5 inches long) that are kept in the retracted positions by springs. The forest penetrator can lift up to three casualties at once, but it is more common to lift one at a time. It is not used for casualties with neck, spinal, or pelvic injuries.
Figure 5-13. Forest penetrator.
MD0001 5-16

a. The hoist operator in the helicopter attaches the forest penetrator to the hoist hook and lowers the forest penetrator to the ground. b. After the accumulated static electricity is discharged, the medic on the ground extends the seats, positions the casualty on a wing seat, secures the casualty with straps contained in the penetrator, and notifies the hoist operator that the casualty is ready to be lifted. c. After the hoist operator has raised the casualty, the operator places one arm around the casualty and penetrator. He then rotates the casualty so the casualty is facing away from the helicopter. d. The operator pulls the casualty into the helicopter compartment and lowers the penetrator so the support fluke rests on the deck (figure 5-14). The operator continues to lower the penetrator until the casualty is lying on his back on the deck.
Figure 5-14. Pulling the casualty inside the helicopter
e. The operator then releases the safety straps, lifts the penetrator off the casualty (figure 5-15), pulls the casualty completely inside the compartment, and secures the casualty.
MD0001 5-17

Figure 5-15. Releasing the casualty from the forest penetrator.
5-13. STOKES LITTER The Stokes (rescue) litter discussed in paragraph 3-6 can be used to lift a casualty with a suspected spinal injury. A flotation kit is attached to the litter if the casualty is in the water. The following procedures are used to lower and raise the Stokes litter. a. The hoist operator in the helicopter attaches the four hoist straps to the litter and attaches the other ends of the straps to the hoist hook. b. The operator attaches a tag (trailer) line to the litter and lowers the tag line to ground personnel below. The tag line is held by personnel on the ground to keep the litter from twisting and swinging while being lowered or raised. c. Once the ground personnel have the tag line, the operator lowers the Stokes litter (figure 5-16). d. After the litter touches the ground and the accumulated static electricity is discharged, the personnel on the ground disconnect the hoist straps from the hook (figure 5-17), place the casualty into the litter, secure the casualty to the litter, reconnect the hoist straps, and notify the hoist operator that the casualty is ready to be lifted. NOTE: Once the litter has been unhooked, the helicopter pilot usually raises the helicopter, repositions the helicopter so he can see the ground personnel, and lowers the helicopter until the hook is in position again.)
MD0001 5-18
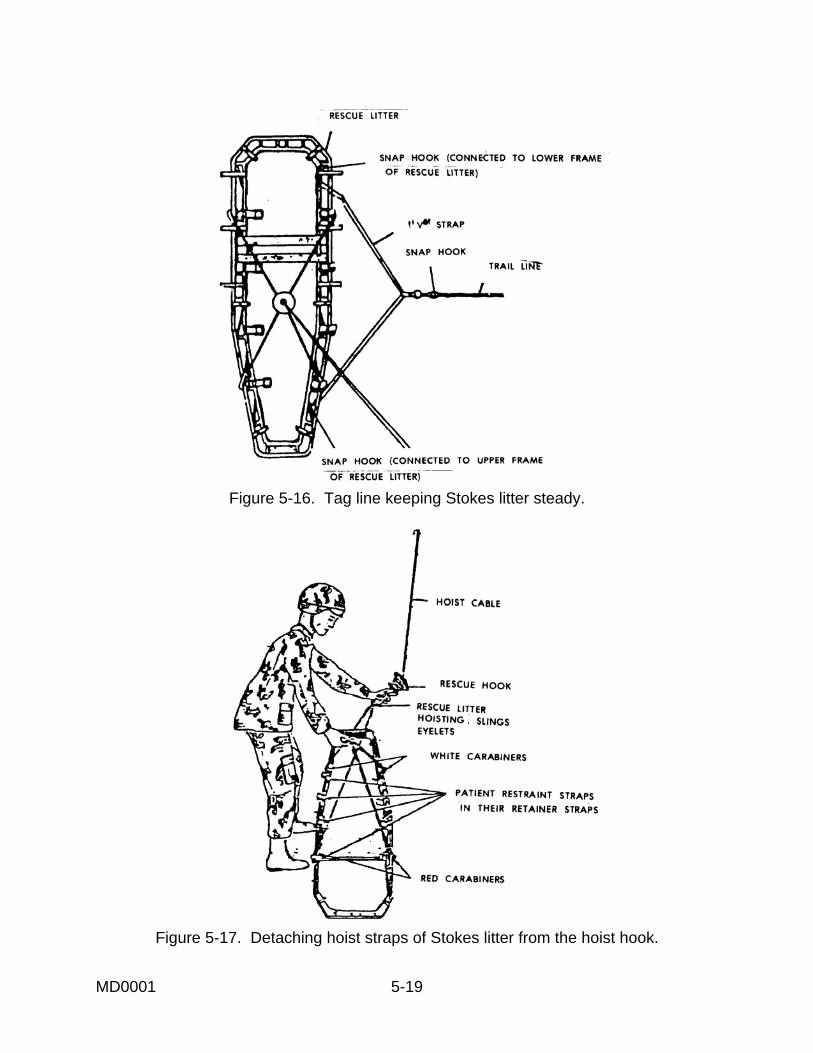
Figure 5-16. Tag line keeping Stokes litter steady.
Figure 5-17. Detaching hoist straps of Stokes litter from the hoist hook.
MD0001 5-19

e. As the litter is being hoisted, ground personnel use the tag line to keep the litter steady. Once the litter is at the opening, the ground personnel use the tag line to turn the litter so the casualty's head is toward the opening. f. The hoist operator lowers and guides the litter into the helicopter, secures the casualty inside the helicopter, and recovers the tag line. 5-14. SEMIRIGID LITTER The semirigid litter discussed in paragraph 3-4 can be used to lift a casualty. A spine board must be used if the casualty has a suspected spinal injury or a shoulder injury. If the casualty is in the water, a flotation device is attached to the litter. a. The hoist operator in the helicopter attaches the hoist hook to the ring at the top of the litter and a tag line to the ring at the bottom of the litter. b. The operator lowers the tag line and the litter to ground personnel below. c. After the litter and hook touches the ground and the accumulated static electricity is discharged, the personnel on the ground disconnect the litter from the hook, place the casualty into the litter, secure the casualty to the litter, reconnect the hoist hook, and notify the hoist operator that the casualty is ready to be lifted. NOTE: The helicopter pilot usually repositions the helicopter so he can see ground personnel while the litter is unhooked.) d. The casualty is raised in a vertical position. As the litter is being hoisted, ground personnel use the tag line to keep the litter steady. e. Once the litter is at the opening, the hoist operator lowers and guides the litter into the helicopter, secures the casualty inside the helicopter, and recovers the tag line. 5-15. SURVIVOR'S SLING The survivor's sling (figure 5-18) is also call the horse collar. It is a buoyant device that can be used over land or water. The device can also be used to lower the helicopter's medic to the ground or water when necessary. a. The hoist operator in the helicopter attaches the V rings at the ends of the webbing strap running through the cover of the sling to the hoist hook. b. The operator lowers the sling to ground personnel below.
MD0001 5-20

Figure 5-18. Survivor's sling with retainer straps pulled out.
c. After the sling and hook touches the ground and the accumulated static electricity is discharged, the personnel on the ground pull the retaining straps from the sling, place the casualty in the sling (sling is under casualty's arms), fasten the retaining straps to secure the casualty, and notify the hoist operator that the casualty is ready to be hoisted. d. After the casualty is raised, the hoist operator lowers and guides the casualty into the helicopter, being careful to not grasp the webbing handle on the sling. NOTE: Grabbing the webbing handle may raise the casualty's arms which could cause him to slip from the sling prematurely. e. The operator releases the safety strap and secures the casualty inside the helicopter.
Section III. AEROMEDICAL EVACUATION REQUEST 5-16. RADIO COMMUNICATION The field radio (usually an AN/PRC-119) is a common means through which an evacuation request is transmitted and through which personnel on the ground communicate with the air ambulance. Actual communication may be transmitted by a soldier trained in radio operation and procedures, but the medic should also know how to use the communications system. Figure 5-19 shows a sketch of an AN/PRC-119 with condensed operating instructions.
MD0001 5-21

1. Install battery(ies). 2. Connect TSEC/KY-57 or ANCD to radio (non-ICOM only).
3. Install antenna. 4. Connect handset H-250.
5. Record battery life condition on side of battery.
Figure 5-19. Field radio set AN/PRC-119 with instructions. a. Advantages of Radio Communications. The radio provides communications over bodies of water, impassable terrain, and from ground-to-air. Field radio sets are mobile and wireless. The AN/PRC-119 radio is capable of encrypted secure communications to prevent the enemy from intercepting messages. b. Disadvantages of Radio Communications. Radio communications are subject to natural interference (such as electrical storms) and manmade interference (jamming). 5-17. TERMINOLOGY Some terms used in electronic communication are defined below. Understanding the terms used and the cipher system is still important in the event COMSEC is compromised or unavailable. a. Net. A net is composed of those stations communicating together on the same frequency or channel.
MD0001 5-22

b. Net Control Station. The net control station opens the net and controls transmissions within the net, including entering the net (requesting permission to transmit) and leaving the net (signing off). c. Call Sign. Each station within a radio net has an individual call sign that identifies the station to other members of the net. A call sign consists of a letter-number-letter combination and is usually followed by a suffix, such as A2D-28. Sometimes an abbreviated call sign consisting of the last letter of the call sign and the suffix is used, such as D-28. d. Authentication. Authentication systems are used as a security precaution to determine if the receiving or transmitting station is actually a friendly station. The challenging party transmits a code to which the challenged party must give a proper reply. Authentication is performed in accordance with communications-electronics operation instructions (CEOI) procedures. e. COMMUNICATIONS-ELECTRONICS OPERATION INSTRUCTIONS. Communications-electronics operation instructions are a series of orders issued for the technical control and coordination of the signal communications of a command. f. COMMUNICATIONS-ELECTRONICS STANDING INSTRUCTION. Communications-electronics standing instruction is a series of instructions explaining the use of items included in the CEOI plus any other technical instructions required to coordinate and control the communications-electronics operations of the command. g. DRYAD. DRYAD is the unclassified term used to describe the numerical cipher/authentication system. h. Cipher System. A cipher system is any crypto system that, by means of a key, converts plain text into an unintelligible form and converts encrypted text back to plain text. i. In the Clear. Information transmitted in the clear is transmitted as plain text, not encoded or encrypted. j. AUTOMATED NET CONTROL DEVICE. Automated net control device (ANCD). 5-18. GENERAL RULES The following are some general rules for communicating over a radio. a. Preplan messages. Know what you are going to say before you begin to speak into the microphone. b. Listen before you transmit to make sure no conversation is already in progress on the net.
MD0001 5-23

c. Use communications security (COMSEC) procedures, such as DRYAD, when needed. d. Wait 3 seconds after pushing the transmit switch on the microphone before beginning the message. e. Speak slowly and distinctly at a normal voice level directly into the microphone, just as you would speak into a conventional telephone. f. Use appropriate prowords and phonetics (paragraph 5-19). g. Wait for the other station to acknowledge receipt of your message. h. Do not violate radio silence unless an emergency exists and the enemy knows you are in the area. i. Do not transmit coordinate locations or a person's name and rank unless the communication is secure or the information is encoded. j. Do not conduct unofficial conversations between operators, use profane or obscene language, employ unofficial ("C.B.") jargon, or transmit at speeds so rapid the receiving operator cannot write down the information. 5-19. PROWORDS AND PHONETICS Proper communication over a radio requires a knowledge of common prowords and how letters and numbers are communicated phonetically. a. Prowords. Procedure words (prowords) are pronounceable words or phrases that have been assigned specific meanings. They shorten messages and, thereby, reduce transmission time. Some frequently used prowords are given in Table 5-1. b. Phonetic Alphabet. The phonetic alphabet is used to clarify the spelling of difficult words and to clarify letter groups within the text of a message, such as giving a call signal. The words "bravo" and "delta," for example, are much less likely to be misunderstood than the letters "b" and "d" when pronounced. The standard phonetic alphabet is shown in Table 5-2. The underlined syllables are accented. c. Phonetic Numerals. Numerals are pronounced phonetically as given inTable 5-3. The underlined syllables are accented. Numbers are usually transmitted digit by digit, but exact multiples of one thousand may be spoken as such (numeral "tou-sand"). If the number is a decimal, the decimal point is pronounced as "day-see-mal." NOTE: Sometimes the decimal is called "point."
MD0001 5-24

PROWORD
MEANING
ALL (or WORD) The portion of the message to which I have reference is AFTER all (or the word) which follows _____.
ALL (or WORD) BEFORE The portion of the message to which I have reference is all (or the word) which precedes _____.
BREAK I hereby indicate the separation of the text from other portions of the message.
CALL SIGN The group that follows is a call sign.
CORRECT You are correct, or what you have transmitted is correct.
CORRECTION An error has been made in this transmission. Transmission will continue with the last word correctly transmitted (or the correct version is ___.).
DISREGARD THIS TRANSMISSION-OUT This transmission is in error. Disregard it. (Not used to cancel any message that has been completely transmitted and acknowledgment has been received.)
FIGURES Numerals or numbers follow.
FROM The originator of this message is indicated by the address designation immediately following.
I READ BACK The following is my response to your instruction to read back.
I SAY AGAIN I am repeating transmission or portion indicated.
I SPELL I shall spell the next word phonetically.
OUT This is the end of my transmission to you and no answer is required or expected.
OVER This is the end of my transmission to you and a response is necessary. Go ahead and transmit.
Table 5-1 Commonly used prowords. (continued)
MD0001 5-25

PROWORD
MEANING
READ BACK Repeat this entire transmission back to me exactly as received.
RELAY (TO) Transmit this message to addressees immediately following this proword.
ROGER I have received your last transmission satisfactorily.
SAY AGAIN Repeat all of your last transmission. (If followed by identification data, repeat portion indicated.)
SILENCE SILENCE SILENCE Cease transmission immediately. Silence will be maintained until instructed to resume. (When an authentication system is in force, the transmission imposing silence is to be authenticated.)
SILENCE LIFTED Silence is lifted. (When an authentication system is in force, the transmission lifting silence is to be authenticated.)
THIS IS This transmission is from the station whose designation immediately follows.
TIME That which immediately follows is the time or date/time group of this message.
TO The addressee(s) immediately following is (are) addressed for action.
VERIFY Verify entire message (or portion indicated) with the originator and send correct version.
WAIT I must pause for a few seconds.
WAIT-OUT I must pause longer than a few seconds.
WILCO I have received your message, understand it, and will comply. (Used only by the addressee. Since the meaning of ROGER is included in that of WILCO, the two prowords are never used together.)
WRONG Your last transmission was incorrect. The correct version is ______.
Table 5-1. Commonly used prowords. (concluded)
MD0001 5-26
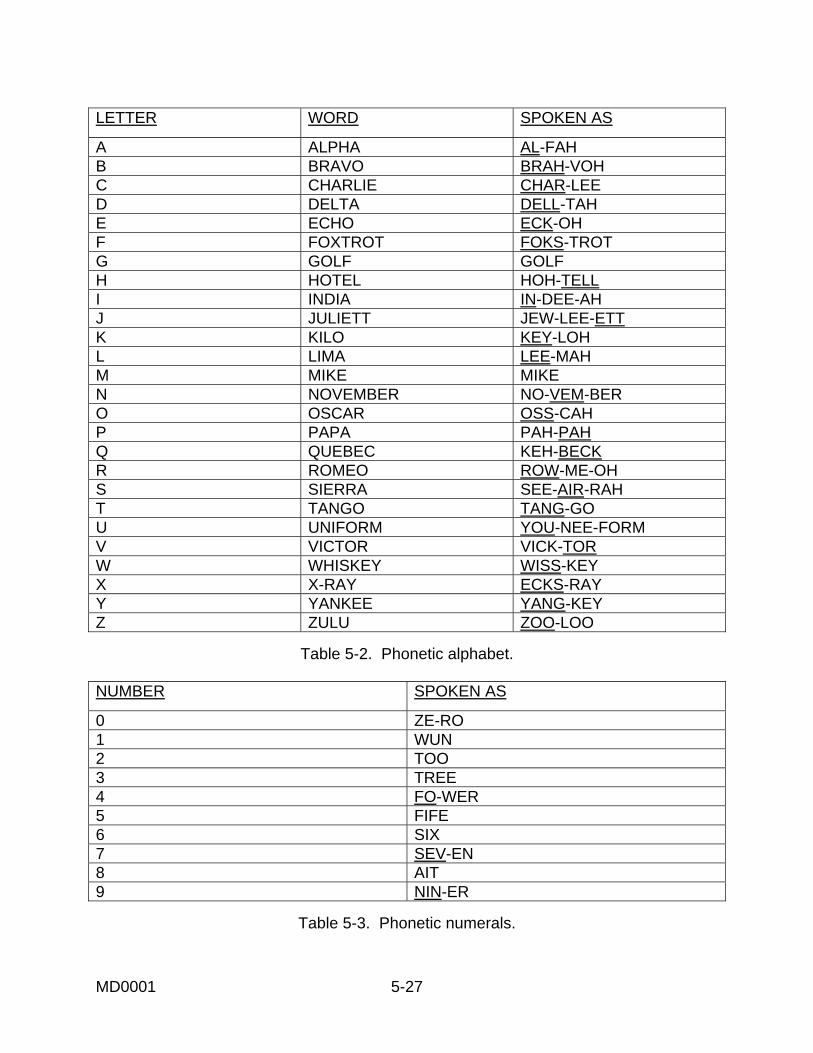
LETTER WORD SPOKEN AS
A ALPHA AL-FAH B BRAVO BRAH-VOH C CHARLIE CHAR-LEE D DELTA DELL-TAH E ECHO ECK-OH F FOXTROT FOKS-TROT G GOLF GOLF H HOTEL HOH-TELL I INDIA IN-DEE-AH J JULIETT JEW-LEE-ETT K KILO KEY-LOH L LIMA LEE-MAH M MIKE MIKE N NOVEMBER NO-VEM-BER O OSCAR OSS-CAH P PAPA PAH-PAH Q QUEBEC KEH-BECK R ROMEO ROW-ME-OH S SIERRA SEE-AIR-RAH T TANGO TANG-GO U UNIFORM YOU-NEE-FORM V VICTOR VICK-TOR W WHISKEY WISS-KEY X X-RAY ECKS-RAY Y YANKEE YANG-KEY Z ZULU ZOO-LOO
Table 5-2. Phonetic alphabet.
NUMBER SPOKEN AS
0 ZE-RO 1 WUN 2 TOO 3 TREE 4 FO-WER 5 FIFE 6 SIX 7 SEV-EN 8 AIT 9 NIN-ER
Table 5-3. Phonetic numerals.
MD0001 5-27

d. Examples. Paragraph 5-17c gives an example of a call sign. If this was the call sign of your station, you would identify yourself using prowords and phonetics as follows: "This is al-fah too dell-tah too ait." If abbreviated call signs were being used, you would say, "This is dell-tah too ait." Some other examples are given below. (1) 44 is pronounced as "fo-wer fo-wer." (2) 1957 is pronounced as "wun nin-er fife sev-en." (3) 400 is pronounced as "fo-wer ze-ro ze-ro." (4) 13,000 is pronounced as "wun tree tou-sand." (5) 268.5 is pronounced as "too six ait day-see-mal fife." 5-20. EVACUATION REQUEST INFORMATION Before you request an air ambulance to evacuate casualties, you need to obtain certain information that the air ambulance personnel must have before they begin their mission. Items "a" through "e" below must be known by air ambulance personnel before they begin their mission. Items "f" through "i" can be transmitted after the helicopter is airborne, but should be transmitted with the other information when known. The information needed for wartime and peacetime evacuation requests is described in the following paragraphs. a. Location of Pickup Site (Line 1). Using a map, determine the grid coordinates (eight digits) of the site where the helicopter will pick up the casualties. This information can often be obtained from your unit leader. This information allows the unit coordinating aeromedical evacuation to plan the helicopter's route so it can pick up casualties from more than one site if appropriate. b. Radio Frequency, Call Sign, and Suffix (Line 2). Your radio frequency, call signal, and suffix can be obtained from your radio operator, from the Signal Operating Instruction (SOI), or from the Automated Net Control Device (ANCD). This information is needed so the ambulance personnel can contact you while en route to obtain additional information (verify pick-up site marking, and so forth). c. Number of Patients by Precedence (Line 3). Based upon the actual evaluation of the casualties, determine how many are urgent, how many are urgent surgical, how many are priority, how many are routine, and how many are convenient. This information is used by the unit controlling evacuation to prioritize missions when more than one request is received. Definitions of these categories are given below. (1) Urgent. Emergency case that should be evacuated as soon as possible and within a maximum of 2 hours in order to save live, limb, or eyesight.
MD0001 5-28

(2) Urgent Surgical. Emergency case that should be evacuated within 2 hours to the nearest surgical unit. (3) Priority. Sick or wounded person requiring prompt medical care and who should be evacuated within 4 hours or his medical condition could deteriorate to such a degree that he could become an urgent precedence. (4) Routine. Sick or wounded person requiring evacuation, but whose condition is not expected to deteriorate significantly. Should be evacuated within 24 hours. (5) Convenient. Person who is being medically evacuated for medical convenience rather than necessity. d. Special Equipment Required (Line 4). Based upon actual evaluation of the casualties, determine what special equipment, if any, will need. The most common items for an air ambulance are hoist, Stokes litter, and forest penetrator. Another common special equipment requirement is a ventilator. This information is required so that the equipment can be placed on board the air ambulance prior to the start of the mission. e. Number of Patients by Type (Line 5). Based upon actual evaluation of the casualties, determine the number of casualties that will evacuated on a litter and the number of casualties that are able to sit (ambulatory). This information is needed to determine the appropriate number of air ambulances to be dispatched to the pickup site. The information is also needed to configure the vehicles to carry the casualties requiring evacuation. f. Security of Pickup Site/Number and Type (Line 6). (1) Wartime operations. In wartime operations, determine whether proposed pickup site is secure. This information is normally obtained from your unit leader based upon his evaluation of the situation. The information will help the unit controlling aeromedical evacuation to determine whether assistance (escort) is required to accomplish the mission. The situation is categorized as one of the following: (a) No enemy troops in area. (b) Possibly enemy troops in area; approach with caution. (c) Enemy troops in area; approach with caution. (d) Enemy troops in area; armed escort required. (2) Peacetime operation. In peacetime, collect information on the types of wounds (gunshot, shrapnel, and so forth), injuries (fractured leg, snakebite, and so forth), or
MD0001 5-29

illnesses based upon an evaluation of the casualties. If any casualty has serious bleeding, determine the casualty's blood type, if known. The information will help the unit controlling aeromedical evacuation to determine what, if any, special equipment or special supplies are needed. g. Method of Marking Pickup Site (Line 7). Determine how the pickup site is to be marked for identification by the helicopter pilot. The method is usually determined by your unit leader based upon the military situation and the materials available. Common methods of marking the pickup site are: (1) Panels. (2) Pyrotechnic signal. (3) Smoke signal. (4) Signal person. (5) Strips of fabric or parachute. (6) Tree branches, pieces of wood, or stones placed together. (7) Signal lamp or flashlight. (8) Vehicle lights. (9) Open flame. NOTE: The information is required to assist the evacuation aircraft crew in identifying the specific location of the pickup site. The color of the panels, smoke, or other markings should not be transmitted until the air ambulance contacts the unit just prior to arrival. For security reasons, the air ambulance crew should identify the color of the markings or smoke and the person on the ground should verify the color. h. Patient Nationality and Status (Line 8). Based upon information obtained from the casualties, determine which categories listed below are represented. The number of casualties in each category does not need to be determined. The information will help the unit coordinating the evacuation to identify which facilities should receive casualties and whether guards are needed. The categories are: (1) United States (US) military. (2) United States civilian. (3) Military other than US military.
MD0001 5-30

(4) Civilian other than US civilian. (5) Enemy prisoner of war (EPW). i. Chemical, Biological, Radiological Contamination/Terrain Description (Line 9). (1) Wartime operation. In wartime operations, determine if chemical contamination, biological contamination, and/or radiological contamination is present based upon the military situation. This information will assist the unit controlling aeromedical evacuation. If there is no chemical, biological, or radiological contamination present, this line is not transmitted. (2) Peacetime operation. In peacetime, determine the general terrain (flat, hilly, wooded, open, sloping, and so forth). If possible, identify the relationship of the landing area to prominent terrain features (mountain, lake, tower, and so forth) around the pickup site. This information can help helicopter personnel assess the avenue of approach. This information can be obtained from personnel at the site or by an area survey. 5-21. MAKING AN EVACUATION REQUEST Ensure that the radio transmission is sent by secure means on the AN/PRC-119. A special format (Table 5-4) has been developed to assist in requesting aeromedical evacuation. Rather than stating what type of information is being transmitted, a line number is given. Brevity codes are used to identify specific information being transmitted. The information is transmitted in sequence (line 1, then line 2, and so forth). Lines 1 through 5 must be transmitted before the evacuation mission begins. The remainder should be transmitted at the same time if possible, but can be transmitted to the helicopter en route. The request should be transmitted within 25 seconds. Procedures for making a MEDEVAC request are given in the following paragraphs. a. Gather the needed information (paragraph 5-20). b. Plan your message using the MEDEVAC format, including the proper encryption of the grid coordinates, radio frequency, and brevity information. c. Enter the radio net and make proper contact with the station controlling aeromedical evacuation. d. State, "I have a MEDEVAC request." e. Break for acknowledgment by the receiving station. f. Transmit the MEDEVAC request using proper procedures and proper letter and numeral pronunciation (paragraphs 5-18 and 5-19).
MD0001 5-31

TYPE OF INFORMATION INFORMATION TRANSMITTED
TRANSMITTED REMARKS/ SPECIAL INSTRUCTION
Location of Pickup Site Line 1 Letters included (Grid coordinates of pickup site)
To preclude misunderstanding, a statement should be made that grid zone letters are included in the message.
Radio Frequency, Call Sign and Suffix
Line 2 (Frequency of the radio at the pickup site) (Call sign and suffix)
The call sign and suffix is that of the person to be contacted at the pickup site.
Number of Casualties by Precedence
Line 3 (Number of casualties) (Brevity code)
Brevity Codes: A (Urgent--within 2 hours) B (Urgent surgical--within 2 hrs) C (Priority--within 4 hours) D (Routine--within 24 hours) E (Convenience) If two or more categories, insert the proword BREAK between each category. For example "Line tree, too char-lee, BREAK, wun dell-tah"
Special Equipment Required
Line 4 (Brevity code[s])
Brevity Codes: A (None) B (Hoist) C (Extraction equipment) D (Ventilator)
Number of Casualties by Type
Line 5 (Number of casualties) (Brevity code)
Brevity Codes: L (Litter) A (Ambulatory) If both types are included in the same request, insert the proword BREAK between the types. For example "Line fife, tree lee-mah, BREAK, wun al-fah"
Table 5-4. MEDEVAC request guide. (continued)
MD0001 5-32

TYPE OF INFORMATION INFORMATION
TRANSMITTED TRANSMITTED REMARKS/ SPECIAL INSTRUCTION
Security of Pickup Site (wartime)
Line 6 (Brevity code)
Brevity Codes: N (No enemy troops in area) P (Possible enemy troops in area; approach with caution) E (Enemy troops in area; approach with caution) X (Enemy troops in area; armed escort required)
Methods of Marking Pickup Site
Line 7 (Brevity code)
Brevity Codes: A (Panels) B (Pyrotechnic signal) C (Smoke signal) D (None) E (Other)
Casualty Nationality and Status
Line 8 (Brevity code)
Brevity Codes: A (Military, US) B (Civilian, US) C (Military, non-US) D (Civilian, non-US) E (Enemy prisoner of war) The number of casualties in each category is not transmitted.
NBC Contamination (wartime)
Line 9 (Brevity code )
Brevity Codes: N (Nuclear) B (Biological) C (Chemical) This line is included only when applicable. Do not transmit line 9 if no CBR contamination is present
Table 5-4. MEDEVAC request guide. (concluded)
MD0001 5-33

g. After transmitting the request, wait for acknowledgment of the transmission from the receiving station. h. Monitor the frequency given in line two of the request. The air ambulance will contact you on this frequency when needed. i. Prepare and mark the pickup site, if needed. 5-22. EXAMPLE OF A MEDICAL EVACUATION REQUEST Suppose you have two casualties from an antipersonnel mine explosion. Both are US soldiers. One is a litter casualty who needs to be evacuated for surgery as soon as possible in order to save his leg (urgent surgical). The other is ambulatory with a fractured arm. His condition is not expected to deteriorate significantly within the next 24 hours (routine). No special equipment is needed. Enemy troops may be in the area, but their presence is not known for sure. The landing site will be indicated by colored smoke when the air ambulance arrives. Your call sign and suffix is Q7Z94 and the unit coordinating the MEDEVAC is F3D81. You are located at grid coordinates GH13344126, which is also the pickup site. You will communicate with the air ambulance using radio frequency FM38.50 megahertz. One possible transmission is given in figure 5-20.
MD0001 5-34

Foks-trot tree dell-tah ait wun, THIS IS keh-beck sev-en zoo-loo nin-er fo-wer. I have a MEDEVAC request. OVER. Keh-beck sev-en zoo-loo nin-er fo-wer, THIS IS foks-trot tree dell-tah ait wun. Send your request. OVER. Foks-trot tree dell-tah ait wun, THIS IS keh-beck sev-en zoo-loo nin-er fo-wer. Line wun letters included, golf hoh-tell wun tree tree fo-wer fo-wer wun too six Line too, foks-trot mike tree ait day-see-mal fife ze-ro. keh-beck sev-en zoo-loo nin-er fo-wer. Line tree wun brah-voh BREAK wun dell-tah Line fo-wer al-fah Line fife wun lee-mah BREAK wun al-fah Line six pah-pah Line sev-en char-lee Line ait al-fah OVER. Keh-beck sev-en zoo-loo nin-er fo-wer, THIS IS Foks-trot tree dell-tah ait wun. ROGER. OUT.
Figure 5-20. Example of a MEDEVAC request.
MD0001 5-35

5-23. FIELD TELEPHONE This section has dealt primarily with the field radio. Sometimes, you may have access to a field telephone such as shown in figure 5-21.
Figure 5-21. Field telephone set TA-312/PT.
a. Installation. If the field telephone needs to be connected, make sure the field wire will not pull out once it is attached to the phone. (1) Remove about 1 inch of insulation from each of the field wires and fold back about 1/2 inch of the exposed wires. (2) Push down on one of the line button posts, insert the bared end of one wire into the binding post slot, and release the pressure. (3) Push down on the other line button post, insert the bared end of the remaining wire into the binding post slot, and release the pressure.
MD0001 5-36

b. Operation. (1) To make a call on the set, remove the handset, crank the handle equal to the appropriate number of rings (number of rings used instead of call signs) for the party to which you wish to speak. (2) Depress the switch assembly of the handset to speak; release the switch assembly to listen. (3) Replace the handset in the retaining bracket at the end of the transmission.
Section IV. PREPARING A LANDING SITE 5-24. GENERAL The unit requesting aeromedical evacuation is responsible for selecting a landing site that is as firm, level, secure, and as free from obstacles and debris as possible. Once the site is selected, it must be marked so the pilot of the air ambulance can locate the site. A signalman can be used to help guide the pilot in landing at the selected site. 5-25. SURFACE CONDITIONS Choose a firm surface as free from obstructions and debris as possible. a. The ground must be firm enough for the helicopter to land, load, and take off without bogging down. If firm ground cannot be found, let the pilot know of the situation so he can hover over the site while casualties are being loaded. b. Choose a landing site that is as free from tall trees, telephone and power lines, telephone poles, boulders, as possible. Anything that is over 18 inches high, wide, or deep that can not be removed from the area should be marked as an obstacle. The cleared area of the landing site cannot contain any obstacles. The site should be away from all living areas since the wash from the helicopter could blow over tents. c. Avoid dusty, sandy, and snow-covered surfaces when possible. Rotor wash from the helicopter may stir up the sand or snow and cause the pilot to lose visual contact with the ground. d. Remove loose debris and objects likely to be blown about by the wind from the rotor (cartons, tentage, and so forth) from the landing site. Loose debris kicked up by the rotor wash can cause damage to the blades or engines. Ensure that marker panels are either removed or adequately secured.
MD0001 5-37

5-26. SIZE Make sure there is sufficient space for the helicopter to land and take off. a. No Obstacles Present. (1) An Iroquois helicopter requires a relatively level landing area at least 35 meters in diameter. (2) A Blackhawk helicopter requires a landing area of 50 meters in diameter if there are no obstacles. (3) A CH-47 Chinook requires a landing site at least 80 meters in diameter if there are no obstacles. (4) This does not mean that a loaded helicopter can land and take off from an area the size given above. Most helicopters cannot go straight up or down when fully loaded. Therefore, a larger site and appropriate approach and departure routes are required. b. Obstacles Present. When obstacles are in the approach or departure route, a 10-to-1 ratio must be used to lay out the landing site. For example, during the approach and departure, if the helicopter must fly over trees that are 15 meters tall, then the landing site must be at least 150 meters long (10 x 15 =150). Figure 5-22 shows two other examples.
Figure 5-22. Landing site distance from obstacles.
MD0001 5-38

5-27. SLOPE Ground slope can be considered an obstacle. If the slope exceeds 7 degrees, observation and small utility helicopters (UH-1 Iroquois) will not be allowed to land and cargo aircraft will be issued an advisory. If the slope exceeds 15 degrees, no aircraft will be permitted to land. Always attempt to land the aircraft up-slope or side-slope (figures 5-23 and 5-24). Avoid landing an aircraft down-slope unless a last resort for a true emergency.
Figure 5-23. Helicopter landing up-slope.
Figure 5-24. Helicopter landing side-slope.
MD0001 5-39

5-28. SECURITY The landing site should offer some security from enemy observation and direct fire. A good landing site allows the helicopter to land and depart without exposing the helicopter to unneeded risks. Security is normally established around the entire landing site. 5-29. MARKING THE LANDING SITE IN DAYLIGHT The mission, capabilities, and situation of the unit requesting evacuation will determine when and how the landing site will be marked. Normally, the only mark or signals required are colored smoke and a signalman. VS-17 marker panels may be used to mark the landing site, but must be at least 50 feet from the touchdown point. a. Smoke. Smoke grenades that emit colored smoke can be used in daytime to identify the landing area when the helicopter is sighted. The radio operator should not tell the pilot what color smoke is being used. Rather, he should radio the helicopter pilot and inform him that "smoke is out." The pilot then identifies the color of the smoke and the personnel at the pickup site verify the color. This helps to prevent an enemy in the area who is listening to the radio transmission from using the same color smoke to lure the helicopter into an enemy-held position. b. Panels. When the tactical situation allows and materials are available, the landing site can be marked with the letter "H" made from identification panels or other appropriate marking material. (1) Place the panels at least 50 feet away from the touchdown point, not on the touchdown point. The panels are used by the pilots to find the landing zone. The actual touchdown point is selected by the pilot after surveying the surface for holes and other hazards. (2) Secure the panels to the ground to prevent them from being blown about by the rotor wash. Use firmly driven stakes to keep the panels taut. Piling rocks on the corners of the panels is not adequate. c. Wind Direction Indicator. If the tactical situation permits, a small wind sock or a rag tied to the end of a stick in the vicinity of the landing area will help the helicopter pilot to judge wind direction at the landing site. Wind direction can also be indicated by a soldier standing at the upwind edge of the site with his back to the wind and his arms extended forward. Smoke grenades can also be used to show wind direction.
MD0001 5-40

5-30. MARKING THE LANDING SITE AT NIGHT At night, the landing site and the touchdown point are marked by an inverted "Y" composed of four lights visible to the helicopter pilot (figure 5-25). Two lights are placed seven meters from the touchdown site on opposite sides of the site. A third light is placed 14 meters from the touchdown site perpendicular to the line formed by the first two lights. A fourth light is placed seven meters beyond the third light and in line with the touchdown point. a. Strobe lights, flashlights, lanterns, or vehicle lights may also be used to mark the landing site. The marking system used can be fully explained to the pilot when contact is made. b. Flare pots and other types of open flames should be used only as a last resort. They are usually blown out by the rotor downwash, can create a hazardous glare or reflection on the helicopter windshield, and can be a fire hazard if blown over. c. Lights are displayed for a minimum time only and are turned off immediately after the helicopter lands or when ordered to do so by the pilot.
Figure 5-25. Marking a landing site at night with lights.
MD0001 5-41

d. Unit SOP will determine what type of marking is used. In largely congested areas, the inverted Y touchdown marking may be indistinguishable from the abundance of other lights. In the tactical setting, it may be impractical and too time consuming to set up. Flashing lights and strobes may look like the muzzle flash from small arms fire under night vision conditions and may give away the location of the unit. A simple device like an infra-red chemical light on a string that can be spun over the head of the signal man may be the most effective method of signal. 5-31. MARKING OBSTACLES Mark obstacles at or near the landing site that cannot be removed and that may not be readily seen by the pilot (cables, wires, antennas, large rocks, and so forth). If possible, place a red light on top of the obstruction or mark the obstacle with brightly-colored or fluorescent cloth. If the combat situation makes it impractical to mark the tops of the obstacles, advise the pilot of their existence by radio. 5-32. OTHER LANDING AIDS As the air ambulance approaches, provide the pilot with tactical and security information and conditions that may affect the landing such as terrain, weather, landing site markings, and possible obstacles. Confirm information or answer any questions the pilot may have pertaining to the landing site. Continue to maintain communications with the pilot during the landing. a. Once the helicopter is within your area, the pilot will establish radio contact to obtain positive identification. Orientate the pilot to the landing site using the 12 o'clock method. [Twelve o'clock is always in the direction of the helicopter's flight.] Tell the pilot the direction of the landing zone (LZ) from his location. For example, if the landing zone is directly to the pilot's right, you might transmit, "The LZ is now at 3 o'clock to your position." b. The pilot can also use FM (frequency modulation) procedures to home in on a field radio transmitting between 30 and 70 megahertz. The FM field radio is limited to line of sight; therefore, the person using the field radio should remain as clear as possible of obstructions that could block the signal. If the pilot requests the operator to "key the microphone," the operator should depress the transmit button on the field radio for a period of 10 to 15 seconds. c. When the helicopter is approaching the landing site at night, personnel on the ground can request the pilot to turn on his beacon briefly. The ground personnel can then confirm the helicopter's location in relation to the landing site and guide the helicopter to the landing site.
MD0001 5-42

d. A soldier can stand on the upwind side of the landing site and use the directed beam of a signal lamp to flash a code to the incoming pilot. Once recognition is assured, the signal operator directs the beam of light downwind along the ground, bisecting the landing area. 5-33. ARM-AND-HAND SIGNALS Once the pilot has located the landing area, a signalman can guide the pilot to the touchdown site using standard arm-and-hand signals. The following assumes you are a giving guidance to a Blackhawk or Iroquois air ambulance. a. If the landing is being done at night or in decreased visibility, use lighted batons or flashlights so the pilot can see your signals. A lighted wand can be made by attaching a plastic wand to the end of a flashlight. Figures 5-27 through 5-33 show lighted wands being used. b. You should be to the right front of the helicopter so you can be easily seen by the pilot. The best position is 40 meters to the right front of the helicopter during day or night operations. c. Extend your arms above your head (figure 5-26) to indicate you are going to give arm-and-hand guidance signals. d. Use the hover signal (figure 5-27) when changing from one arm-and-hand signal to another. For example, suppose you are giving the helicopter pilot the "move ahead" signal. The helicopter is now in position directly over the landing area. Before giving the pilot the "move downward" signal, execute the "hover" signal to indicate a change in guidance instruction. e. Use the speed of your arm movements to indicate the desired speed of aircraft compliance with the signal. f. Execute the appropriate arm-and-hand signals (figures 5-27 through 5-33) as needed until the helicopter has landed.
MD0001 5-43
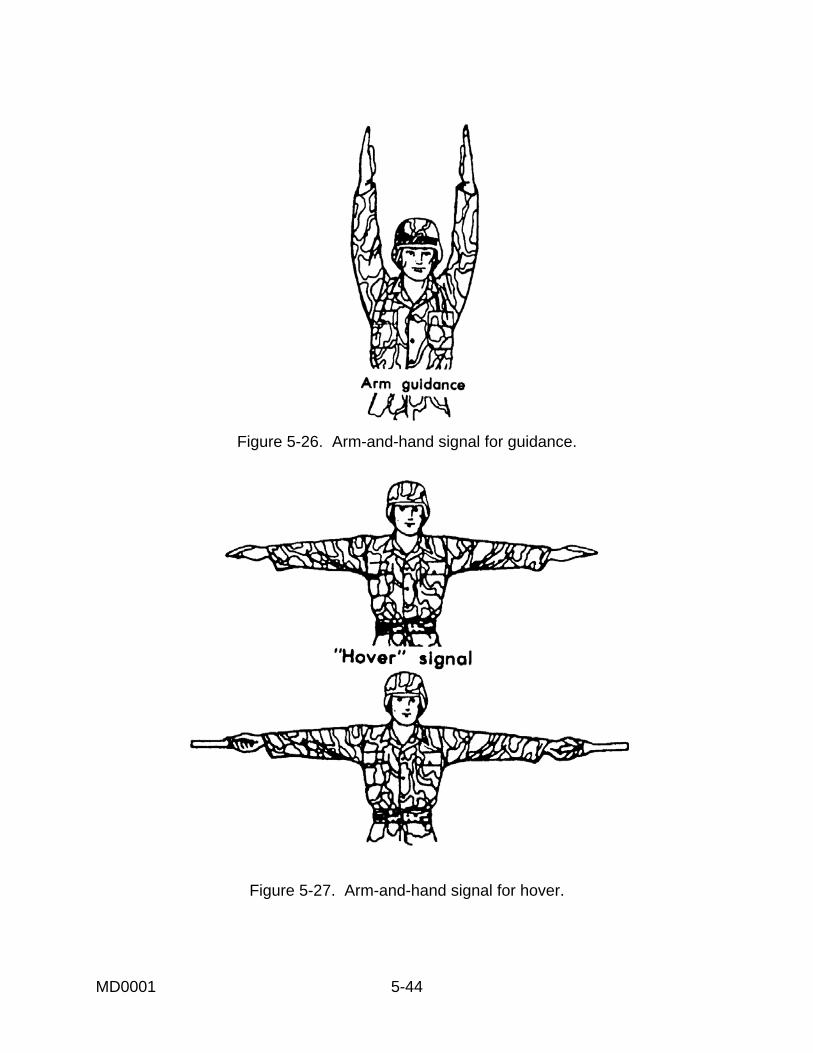
Figure 5-26. Arm-and-hand signal for guidance.
Figure 5-27. Arm-and-hand signal for hover.
MD0001 5-44

Figure 5-28. Arm-and-hand signal for moving to the right.
Figure 5-29. Arm-and-hand signal for moving to the left.
MD0001 5-45
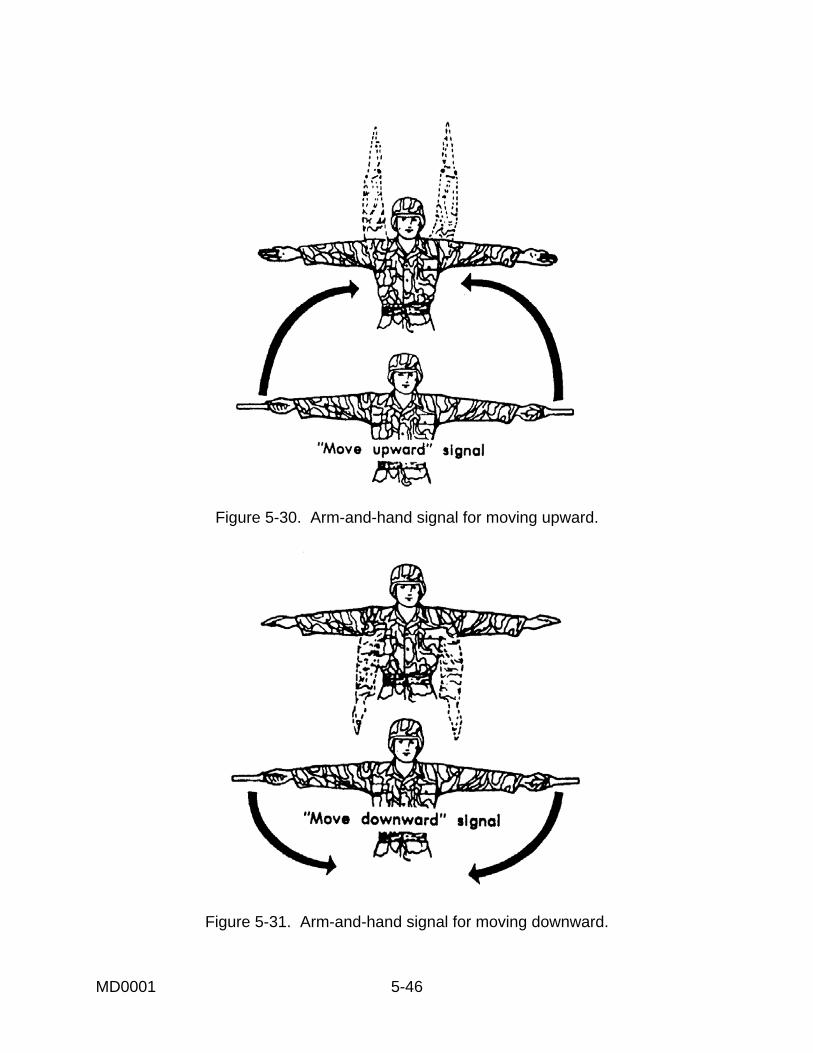
Figure 5-30. Arm-and-hand signal for moving upward.
Figure 5-31. Arm-and-hand signal for moving downward.
MD0001 5-46

Figure 5-32. Arm-and-hand signal for moving ahead.
Figure 5-33. Arm-and-hand signal for landing.
Continue with Exercises
MD0001 5-47

EXERCISES, LESSON 5 INSTRUCTIONS: Answer the following exercises by marking the lettered response that best answers the question or best completes the incomplete statement or by writing the answer in the space provided at the end of the exercise. After you have completed all the exercises, turn to "Solutions to Exercises" at the end of the lesson and check your answers. For each exercise answered incorrectly, reread the material referenced with the solution. 1. You are loading litter casualties into an air ambulance. The most seriously injured casualty should be loaded: a. First. b. Last. 2. When loading a litter into a Blackhawk air ambulance, you should approach from the ____ of the helicopter. a. Front. b. Rear. 3. Which of the following is/are disadvantages of using air ambulances to evacuate casualties? a. There is a tendency to evacuate the casualty farther to the rear than necessary. b. There is danger to the helicopter and its crew from friendly artillery. c. There is danger to the helicopter and its crew from enemy artillery. d. There is danger to the helicopter and its crew from bad weather conditions. e. All of the above.
MD0001 5-48

4. How many litter casualties can a Blackhawk air ambulance normally evacuate (no internal hoist installed, no ambulatory casualties)? ____________________________________________ 5. An Iroquois air ambulance can normally carry ____ ambulatory casualties or ____ litter casualties or a mixed load of ____ litter casualties and ____ ambulatory casualties. 6. Which air ambulance, when configured for litter casualties, has a central pedestal that rotates 90o to help facilitate the loading of litter casualties? a. CH-47 Chinook. b. UH-1H/V Iroquois (Huey). c. UH-60A Blackhawk. 7. When evacuating a casualty using a hoist and forest penetrator, you should let the penetrator touch the ground before touching the penetrator or the cable. Why? ____________________________________________ 8. Of a Stokes litter, semirigid litter, and survivor's sling, which can be used with a hoist to rescue a casualty in the water? a. A survivor's sling. b. A semirigid litter. c. A Stokes litter. d. A survivor's sling and a semirigid litter. e. They can all be used to rescue a casualty in the water.
MD0001 5-49

9. What proword means you have finished your transmission and a response from the receiving station is needed? ____________________________________________ 10. Of the nine lines of information in a wartime evacuation request, the first ___ lines must be transmitted before the helicopter begins its mission. 11. Assume you are calling in a MEDEVAC request using the MEDEVAC wartime guidelines given in this lesson. State what type of information is reported on each line of the request. Line 1. ___________________________________________________________ Line 2. ___________________________________________________________ Line 3. ___________________________________________________________ Line 4. ___________________________________________________________ Line 5. ___________________________________________________________ Line 6. ___________________________________________________________ Line 7. ___________________________________________________________ Line 8. ___________________________________________________________ Line 9____________________________________________________________ 12. Of the nine lines of information in a wartime evacuation request, which line is omitted if it is not applicable? ____________________________________________
MD0001 5-50

13. A "priority" casualty should be evacuated within: a. 1 hour. b. 2 hours. c. 4 hours. d. 8 hours. e. 24 hours. 14. An Iroquois helicopter requires a landing area in the form of a circle that is at least______ meters in diameter. A Blackhawk helicopter requires a landing area in the form of a circle that is at least ______ meters in diameter if no obstacles are present. 15. If obstacles are present, the approach or departure area for an Iroquois or Blackhawk must be at least ______ times longer than the obstruction is high. 16. The maximum degree of slope for a observation or small utility helicopter is _____ degrees. The maximum degree of slope for a larger utility helicopter is _____ degrees. 17. A common method of marking a landing area at night is to place ______ (number) lights in an inverted Y formation. 18. You are giving arm-and-hand signals to the pilot of an air ambulance. You are currently giving a "move right" signal and wish to change to a "move ahead" signal. What signal should you give just before the "move ahead" signal? ____________________________________________
Check Your Answers on Next Page
MD0001 5-51

SOLUTIONS TO EXERCISES, LESSON 5 1. b (para 5-3m) 2. a (para 5-3d) 3. e (para 5-2b) 4. Four. (para 5-4a(1)) 5. Nine; six; three, four (para 5-6) 6. c (para 5-4a) 7. To allow the static electricity to discharge into the ground. (para 5-11) 8. e (paras 5-13, 5-14, 5-15) 9. Over. (Table 5-1) 10. Five. (paras 5-21, 5-20) 11. Line 1. Grid coordinates of the pickup site. Line 2. Frequency of radio and radio call sign at pickup site. Line 3. Numbers of casualties grouped by categories of precedence. Line 4. Special equipment needed. Line 5. Number of litter casualties; number of ambulatory casualties. Line 6. Security at the pickup site. Line 7. How the pickup site will be marked. Line 8. Nationality and status of casualties. Line 9. Existence of chemical, biological, or radiation contamination. (para 5-20, Table 5-4)) 12. Line 9. (Table 5-4) 13. c (para 5-20c(2)) 14. 35, 50 (paras 5-26a, a(1)) 15. Ten (para 5-26b) 16. 7; 15 (para 5-27) 17. Four (para 5-30, fig 5-25) 18. Hover arm-and-hand signal (para 5-33d)
End of Lesson 5
MD0001 5-52

LESSON ASSIGNMENT LESSON 6 Removing Casualties from Tactical Vehicles. LESSON ASSIGNMENT Paragraphs 6-1 through 6-4. LESSON OBJECTIVES After completing this lesson, you should be able to: 6-1. Identify the general procedures for removing a casualty from a tactical vehicle. 6-2. Identify the procedures for removing casualties from an M1 tank. 6-3. Identify the procedures for removing casualties from an M2 BIFV. 6-4. Identify the procedures for removing casualties from an M3 CFV. SUGGESTIONS After completing the assignment, complete the exercises at the end of this lesson. These exercises will help you to achieve the lesson objectives.
View audiovisual tapes 706050 DA (1986), Extricate Wounded Crew From the M1 Tank, and 706051 DA (1987), Extricate Wounded Crew from M3, available through your Training Support Center (TSC). These audiovisual tapes are part of the Health Services Support of AirLand Battle series.
MD0001 6-1

LESSON 6
REMOVING CASUALTIES FROM TACTICAL VEHICLES 6-1. GENERAL PRINCIPLES In combat, you could be confronted with a situation in which the casualty to be treated and evacuated is inside a tactical vehicle. Armored vehicles that are disabled or stationary present an inviting target to the enemy. Also, a disabled vehicle which has been fired upon may explode due to the explosives and fuel carried in the vehicle. Two or more persons should aid in extricating (freeing) casualties to speed the rescue effort. When possible, lifesaving procedures, such as applying a tourniquet to control severe bleeding, and packaging procedures, such as applying a short spine board to a casualty with a fractured neck, should be performed before removing the casualty from the vehicle. The general principles listed below are applicable to all tactical vehicles and also to vehicle accidents that occur on city streets or on highways. Paragraphs 6-2 through 6-4 give instructions for specific tactical vehicles, but similar procedures can be used to remove casualties from other tracked and wheeled vehicles. a. Gain access to the casualty. If there is more than one casualty, perform a quick triage to determine which casualty should be removed first. b. Administer any lifesaving measures that are needed, if possible. NOTE: If the vehicle is on fire or in immediate danger of exploding, remove the casualty and yourself to safety before administering medical care.] c. Free the casualty. You may need to remove objects that are trapping the casualty in the vehicle. d. Prepare. Prepare (package) the casualty for extrication (apply spine boards, etc.), if needed and if the situation allows. e. Remove the casualty from the vehicle. f. Provide additional medical care, as needed. g. Transport the casualty to a medical treatment facility for further evaluation and treatment.
MD0001 6-2

6-2. REMOVING CASUALTIES FROM AN M1 TANK The procedures for removing casualties from the interior of an M1 tank by a medic (yourself) and one or more other soldiers (rescuers) are given below. Give the other soldiers instructions as needed. If members of the tank crew are able, have them assist in opening hatches and removing casualties from the tank. If you are the only rescuer available, use pistol belts or similar devices to lift the casualties from the tank. a. Try to contact the crew. Bang on the side with a rock, for example. b. Block the tank's track to prevent accidental movement. This can be accomplished by placing a small log inside the track. c. Mount the tank from the front of the tank's left side. (This is the safest area and allows the tank crew to see you). Consider all weapons to be armed. Do not move in front of any weapons or touch any of the antennas. Have the other soldiers (rescuers) mount the tank in the same manner. d. If the commander's hatch is popped up but not open, reach inside the hatch and pull the release handle while the rescuers pull on the hatch to open it. e. If the tank commander is injured and in his seat, reach in and grab the tank commander under his armpits. If possible, you should take one arm and have a rescuer take another arm. You may need to use pistol belts (similar to a pistol belt drag) to remove the soldier. Lift the commander out through the hatch and lay him on the turret. f. Quickly examine the commander and render any necessary lifesaving care or have one of the rescuers administer the care if time permits. g. Enter the tank through the commander's hatch. (You could not do this previously because the commander's body blocked your entry). h. Put the main gun on safe. (The greatest dangers to yourself and the casualties are movement and firing of the main gun.) i. If the tank is running: (1) Make sure the loader and the gunner is clear of the turret ring. (2) Warn the rescuers that you are going to transverse the turret. (3) Rotate the turret using the electrical controls or manual crank until the opening to the driver's compartment is fully exposed.
MD0001 6-3

(4) Lock the turret so it cannot move. (5) Reach into the driver's compartment and turn off the engine and the master switch. j. Triage the casualties and perform any needed lifesaving procedures if time permits. k. Package casualties (applies spine boards), if needed. l. Move the tank commander off and away from the tank. If two or more rescuers are assisting, they can perform this procedure while you remain in the tank. If you have only one rescuer helping, you will: (1) Exit through the hatch. (2) Have the rescuer assist you in lowering the casualty to the fender or storage compartment of the tank. (3) Lower yourself to the ground. (4) Have the rescuer turn the casualty so you can support the casualty's chest. (5) Grasp the casualty under his armpits and support his head (figure 6-1).
Figure 6-1. Lowering a casualty to the ground.
MD0001 6-4
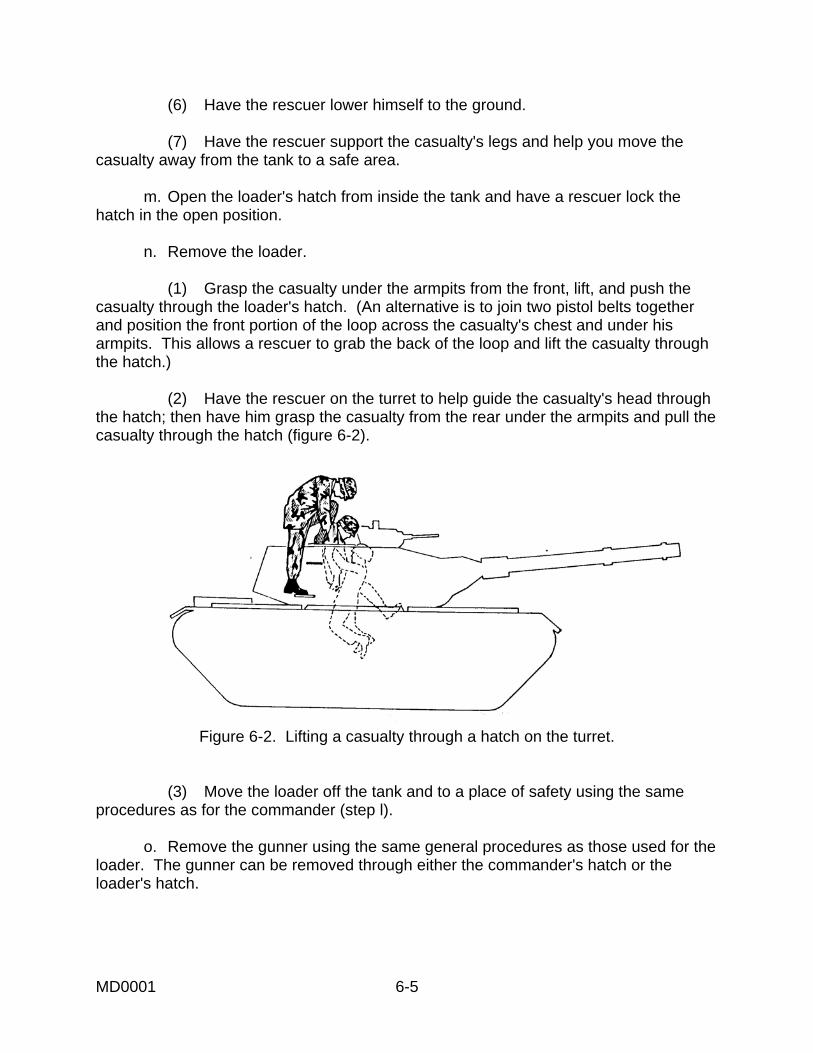
(6) Have the rescuer lower himself to the ground. (7) Have the rescuer support the casualty's legs and help you move the casualty away from the tank to a safe area. m. Open the loader's hatch from inside the tank and have a rescuer lock the hatch in the open position. n. Remove the loader. (1) Grasp the casualty under the armpits from the front, lift, and push the casualty through the loader's hatch. (An alternative is to join two pistol belts together and position the front portion of the loop across the casualty's chest and under his armpits. This allows a rescuer to grab the back of the loop and lift the casualty through the hatch.) (2) Have the rescuer on the turret to help guide the casualty's head through the hatch; then have him grasp the casualty from the rear under the armpits and pull the casualty through the hatch (figure 6-2).
Figure 6-2. Lifting a casualty through a hatch on the turret.
(3) Move the loader off the tank and to a place of safety using the same procedures as for the commander (step l). o. Remove the gunner using the same general procedures as those used for the loader. The gunner can be removed through either the commander's hatch or the loader's hatch.
MD0001 6-5

p. Remove the driver. If the driver is large or if you cannot open the driver's hatch, grasp the driver under his armpits, pull him into the turret compartment, and evacuate him through the commander's hatch or the loader's hatch on top of the turret. If the main gun or the turret overhang is not blocking the driver's hatch, he can be removed through the driver's hatch using the procedures given below. (1) Unlock the driver's hatch from inside the tank. (2) Climb onto the front of the tank and, with the assistance of a rescuer, open the driver's hatch. (3) Reach inside, position the casualty's arms across his chest, and grasp the casualty under one armpit. Have the rescuer grasp the casualty under the other armpit. (4) Lift the casualty and rotate the casualty until he is facing the rear of the tank (figure 6-3).
Figure 6-3. Removing the driver through the driver's hatch an M1.
(5) Continue to lift the driver from both sides until you can position the casualty in a sitting position on the rim of the hatch. (6) Lower yourself to the ground. (7) Have the rescuer turn the casualty so you can support the casualty's chest. (8) Grasp the casualty under his armpits and support his head. (9) Have the rescuer lower himself to the ground and support the casualty's legs. (10) Move the casualty away from the tank to a safe area.
MD0001 6-6

6-3. REMOVING CASUALTIES FROM AN M2 BRADLEY INFANTRY FIGHTING VEHICLE An M2 Bradley Infantry Fighting Vehicle (BIFV) is equipped with six exits-commander's hatch, gunner's hatch, driver's hatch, cargo hatch, ramp door, and ramp (figure 6-4). The procedures for removing casualties from the interior of an M2 BIFV by a medic (yourself) and one or more other soldiers (rescuers) are given below. Give the other soldiers instructions as needed. If members of the BIFV crew are able, have them assist in opening hatches and removing casualties from the tank. If you are the only rescuer available, use pistol belts or similar devices to lift the casualties through the hatches. Triage casualties, treat life-threatening conditions, and apply spinal splints as needed if you and the crew are not in immediate danger.
Figure 6-4. Exit points on and M2 BIFV.
MD0001 6-7

a. Try to contact the crew (bang on the side with a rock, and so forth). b. Block the tank's track to prevent accidental movement (place a small log inside the track, and so forth). c. Climb on the BIFV from the front of the vehicle's left side, unlock the driver's hatch from the outside, and open the hatch. Do not move in front of any weapons or touch any antennas. d. Reach in the driver's compartment and turn off the engine, make sure the range finder is in gear, and set the hand break. e. Raise the driver's seat to the upright position, unbuckle his seat belt, remove his helmet, and treat any life-threatening injuries. f. Remove the driver. When possible, evacuate the driver through the driver's hatch (instructions given below). If the driver’s hatch is blocked or if the tactical situation prevents its use, evacuate the driver through the troop compartment and out the ramp or ramp door. (1) If possible, have a rescuer enter the BIFV through the ramp door and proceed to the driver's compartment where he will assist you and another rescuer in removing the driver. (2) Join two pistol belts together and position the front portion of the loop across the driver's chest and under his armpits. (3) Lift the driver through the driver's hatch by pulling on the back of the pistol belt loop and lifting the casualty by his armpits while the rescuer inside the BIFV pushes and guides the driver through the hatch (figure 6-5). (4) Move the driver off the vehicle and to a place of safety. NOTE: If the BIFV is turned on its right side, four rescuers should support the driver on the outside to prevent further injury during the removal process (figure 6-6). If the BIFV is on its left side, only two soldiers may be needed because the driver's hatch will be near the ground.
MD0001 6-8

Figure 6-5. Removing the driver through the driver's hatch of a BIFV.
Figure 6-6. Removing the driver through the driver's hatch of a BIFV turned on its right side.
MD0001 6-9

g. Remove the vehicle commander and the gunner. (1) If the turret is operational and the gunner or the commander can rotate the turret, that soldier should rotate the turret until the turret opening is aligned with the turret shield door and then turn off the turret power drive to prevent the turret from accidentally moving during casualty removal. The commander and the gunner can then be pulled into the troop compartment, treated for life-threatening injuries, and removed through the ramp opening or the ramp door. (2) If the turret cannot be rotated, remove the commander and the gunner through the commander's hatch and the gunner's hatch. The gunner's hatch can be opened from the outside by prying on the hatch with a crowbar between the gunner's right periscope and the commander's left periscope. Use the mattock head as a pivot for the crowbar (figure 6-7). Treat the commander and the gunner for any life-threatening injuries; then lift them through the hatches using pistol belts in a manner similar to the driver and move them to a place of safety. h. Remove personnel in the troop compartment. Enter through the ramp door or the cargo hatch and lower the ramp. (This step may be accomplished by the rescuer who enters the vehicle to assist with removing the driver.) Treat any life-threatening conditions; then evacuate casualties out the ramp. If the ramp is inoperative, evacuated the casualties through the ramp door. If neither the ramp nor the ramp door can be used, evacuate the casualties through the cargo hatch. The cargo hatch is used only as a last resort because of the difficulty in evacuating casualties through the hatch.
Figure 6-7. Prying open the gunner's hatch on a BIFV.
MD0001 6-10

6-4. REMOVING CASUALTIES FROM AN M3 CAVALRY FIGHTING VEHICLE If possible, have two or more rescuers assist you in removing casualties from an M3 Cavalry Fighting Vehicle (CFV). Members of the crew may be able to assist you with turning off the engine, opening hatches, and removing injured crewmen. Triage casualties, treat life-threatening conditions, and apply spinal splints as needed unless you and the crew are in immediate danger. a. Try to contact the crew. b. Block the track to keep the vehicle from moving. c. Enter through the rear door. Evacuate soldiers in the main compartment, if present. If the rear door is locked, climb on the vehicle from the front of the vehicle's left side and try to enter through the driver's hatch, gunner's hatch, or commander's hatch. Do not move in front of any weapons or touch any antennas. Do not try to clear or make safe any weapons. d. Stop the engine by pulling the fuel cutoff; then turn off the engine accessory switch and the master switch. (This prevents weapons being fired and keeps the turret from moving due to shorts in the system.) e. Unlock the driver's hatch. f. Treat the driver and soldiers in the hull for any life threatening conditions; then remove them through the rear door. g. From the inside, unlock the loader's hatch, the turret door, and the commander's hatch. h. Open the commander's hatch, treat him for any life-threatening conditions, and remove him through the hatch. Assist from the inside while two rescuers lift the commander out of the hatch from the outside. Have the rescuers lower the commander to the ground and move him to a safe area away from the vehicle. i. Open the gunner's hatch, treat him for any life-threatening conditions, and remove him through the hatch. Have the rescuers lower the gunner to the ground and move him to a safe area away from the vehicle. j. Open the driver's hatch, treat him for any life-threatening conditions, and remove him through the hatch. Have the rescuers lower the driver to the ground and move him to a safe area away from the vehicle.
Continue with Exercises
MD0001 6-11

EXERCISES, LESSON 6 INSTRUCTIONS: Answer the following exercises by marking the lettered response that best answers the question or best completes the incomplete statement or by writing the answer in the space provided at the end of the exercise. After you have completed all the exercises, turn to "Solutions to Exercises" at the end of the lesson and check your answers. For each exercise answered incorrectly, reread the material referenced with the solution. 1. When rescuing casualties from an M1 tank, you should climb on the tank from the front ________ side of the tank, remove the ____________ and enter the tank through the ______________ hatch, put the ______________ on safe, rotate the turret until you have access to the ________________ compartment, lock the ______________ in place so it will not turn, and turn off the _____________ and the _______________________. 2. When preparing to evacuate casualties from a tactical vehicle, you should not go in front of any ____________ or touch the _____________. 3. When the driver is removed from a Bradley, he is lifted through the hatch: a. Head first. b. Feet first. 4. When possible, soldiers in the main compartment (hull) of an M3 CFV should be
evacuated through the: a. Commander's hatch. b. Driver's hatch. c. Gunner's hatch. d. Rear door.
MD0001 6-12

5. When evacuating casualties, you should treat life-threatening conditions: a. As you find them, regardless of the situation. b. As you find them unless you must immediately move the casualties and yourself away from an dangerous situation. c. Only after all casualties have been removed from the vehicle and moved to an area far away from the vehicle.
Check Your Answers on Next Page
MD0001 6-13

SOLUTIONS TO EXERCISES, LESSON 6 1. When rescuing casualties from an M1 tank, you should climb on the tank from the front left side of the tank, remove the commander and enter the tank through the commander's hatch, put the main gun on safe, rotate the turret until you have access to the driver's compartment, lock the turret in place so it will not turn, and turn off the engine and the master switch. (para 6-2) 2. weapons; antennas. (paras 6-2c, 6-3c, 6-4c) 3. a (para 6-3f, figures 6-5, 6-6) 4. d (para 6-4c) 5. b (para 6-1b, Note)
End of Lesson 6
MD0001 6-14


![I NDEX [rcnarchive.rcn.org.uk]rcnarchive.rcn.org.uk/data/VOLUME023-1899/INDEX.pdf · Medical Times. The ... Owen's College. Manchester Pauper's Choice. A ... I-L-Indian Army Nursing](https://static.documents.pub/doc/80x56/5b0c887e7f8b9af65e8c3b23/i-ndex-times-the-owens-college-manchester-paupers-choice-a-i-l-indian.jpg)


