Event Partner Training Topics: Raspberry Pi EP Training Topics: Raspberry Pi 8/2/2017 What is the Pi? The Raspberry Pi Foundation created the Raspberry Pi (RPi), a small, affordable computer that fits in the palm of your hand, to get kids around the world excited about coding. Since its release in 2012, The RPi has gone through several iterations. The newest version is the Raspberry Pi Model 3, a device that can help Event Partners cut costs and reduce the amount of time it takes to set up a field. This document will describe in detail how to download Tournament Manager onto the RPi, as well as how to launch it. Where to get the RPi Many vendors sell RPi, but buying from Amazon as part of a package deal is recommended. • 32 GB Raspberry Pi • 16 GB Raspberry Pi These packages come with 32 GB and 16 GB micro SD cards, respectively. The SD card needs to be at least 2 GB. These packages should also include the following: • HDMI cable • Micro SD card • USB – Micro SD card adapter • Raspberry Pi 2.5A USB Power Supply • 2 Heatsinks • Case for the Pi Setting up the Pi Once you have the RPi assembled in its case, you will also need one of each of the following: • A 1080p monitor (1920 x 1080p) for example like the ASUS V228H, or 1080p capable Projector such as the ViewSonic PJD7720HD • Ethernet cable • A router which is able to provide an IP address for the RPi via DHCP such as the LinkSys WRT1900ACS To get the RPi ready for tournament use, download Tournament Manager for RPi and then use a disk imager tool to prepare the SD. Installing Tournament Manager On the SD Card To Install the Tournament Manager for Pi software onto the micro SD card that you will use in your RPi, follow these simple steps: • Insert the micro SD card into your PC or Mac. Use the SD card slot or the USB SD card adapter. • Go to https://vextm.dwabtech.com/ and download the RPi version of Tournament Manager. • Download the diskimager software package that will be used to copy the Tournament Manager for RPi software onto your micro SD card. We recommend you use Etcher, which is compatible with both the PC and Mac and will write Zipped images directly to the SD card without first having to unzip the downloaded file.
Transcript
Event Partner Training Topics: Raspberry Pi
EP Training Topics: Raspberry Pi 8/2/2017
What is the Pi?
The Raspberry Pi Foundation created the Raspberry Pi (RPi), a small, affordable computer that fits in the palm of your hand, to get kids around the world excited about coding. Since its release in 2012, The RPi has gone through several iterations. The newest version is the Raspberry Pi Model 3, a device that can help Event Partners cut costs and reduce the amount of time it takes to set up a field. This document will describe in detail how to download Tournament Manager onto the RPi, as well as how to launch it.
Where to get the RPi
Many vendors sell RPi, but buying from Amazon as part of a package deal is recommended.
• 32 GB Raspberry Pi
• 16 GB Raspberry Pi
These packages come with 32 GB and 16 GB micro SD cards, respectively. The SD card needs to be at least 2 GB. These packages should also include the following:
• HDMI cable
• Micro SD card
• USB – Micro SD card adapter
• Raspberry Pi 2.5A USB Power Supply
• 2 Heatsinks
• Case for the Pi
Setting up the Pi
Once you have the RPi assembled in its case, you will also need one of each of the following:
• A 1080p monitor (1920 x 1080p) for example like the ASUS V228H, or 1080p capable
Projector such as the ViewSonic PJD7720HD
• Ethernet cable
• A router which is able to provide an IP address for the RPi via DHCP such as the
LinkSys WRT1900ACS
To get the RPi ready for tournament use, download Tournament Manager for RPi and then use a disk imager tool to prepare the SD.
Installing Tournament Manager On the SD Card
To Install the Tournament Manager for Pi software onto the micro SD card that you will use in your RPi, follow these simple steps:
• Insert the micro SD card into your PC or
Mac. Use the SD card slot or the USB
SD card adapter.
• Go to https://vextm.dwabtech.com/ and
download the RPi version of Tournament
Manager.
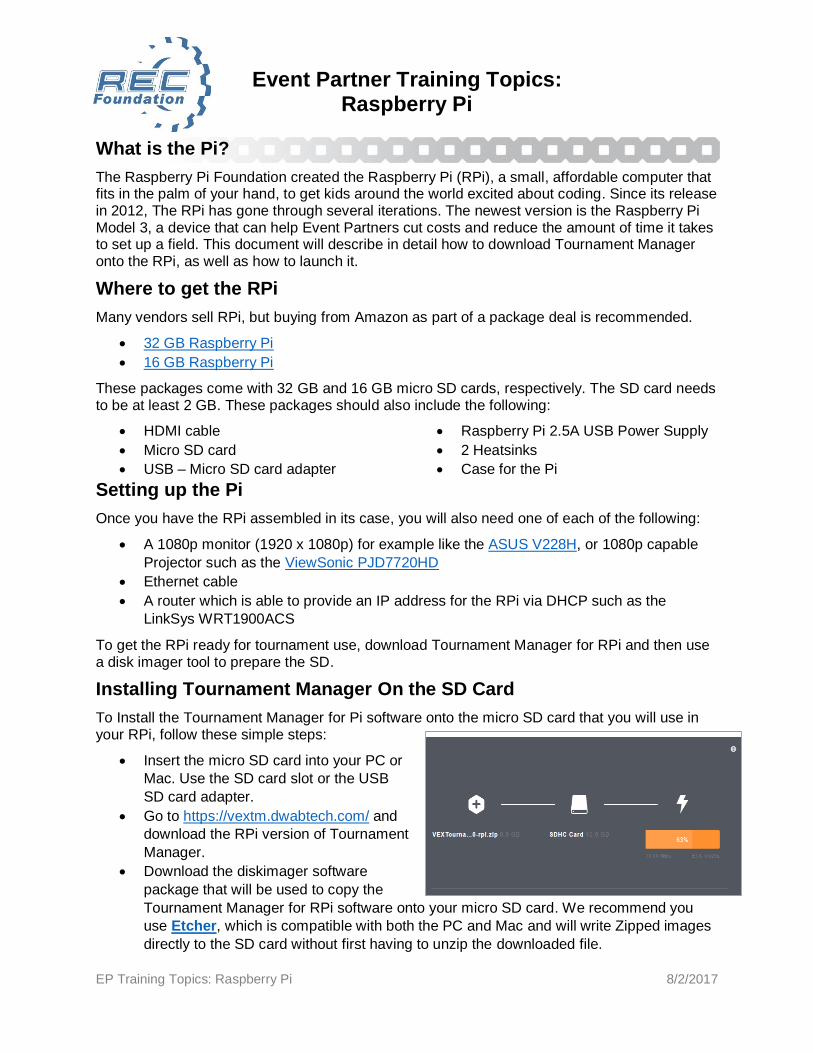
• Download the diskimager software
package that will be used to copy the
Tournament Manager for RPi software onto your micro SD card. We recommend you
use Etcher, which is compatible with both the PC and Mac and will write Zipped images
directly to the SD card without first having to unzip the downloaded file.
Note: Etcher does not require the unzipping step; it will take the ZIP file directly. Unzip it during the writing process and write to the SD card.
To select the image in Etcher, follow these steps:
• When Etcher opens, click the “Select Image” button.
• Browse to the downloaded Tournament Manager for RPi Zip file and select it.
• Select the SD card you inserted into your PC or MAC that you want to use to copy the
image.
• Click the Flash button to write the image to your SD card. IMPORTANT NOTE: All
previous data on the card will be lost.
• Once the flashing has completed, Etcher will verify the SD card. The SD card is ready to
be used in your RPi.
Using the Raspberry Pi
Now that you have a disk image on your Micro SD Card, it needs to be installed onto the RPi.
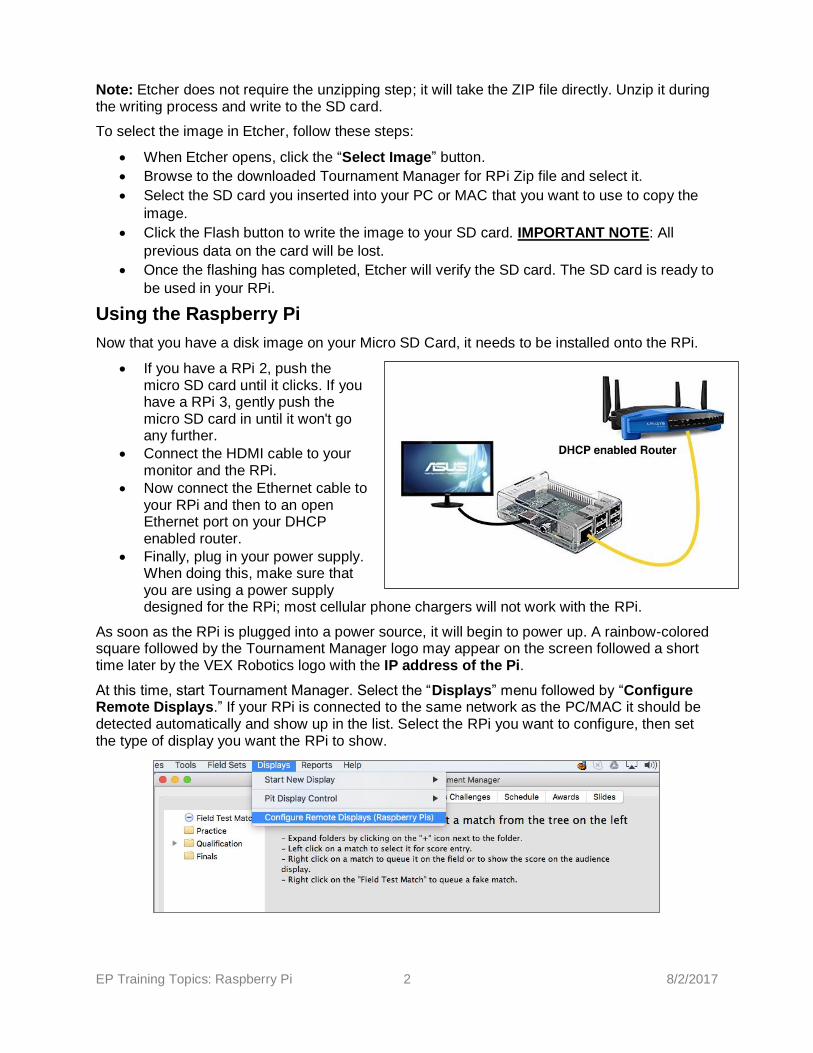
• If you have a RPi 2, push the micro SD card until it clicks. If you have a RPi 3, gently push the micro SD card in until it won't go any further.
• Connect the HDMI cable to your monitor and the RPi.
• Now connect the Ethernet cable to your RPi and then to an open Ethernet port on your DHCP enabled router.
• Finally, plug in your power supply. When doing this, make sure that you are using a power supply designed for the RPi; most cellular phone chargers will not work with the RPi.
As soon as the RPi is plugged into a power source, it will begin to power up. A rainbow-colored square followed by the Tournament Manager logo may appear on the screen followed a short time later by the VEX Robotics logo with the IP address of the Pi.
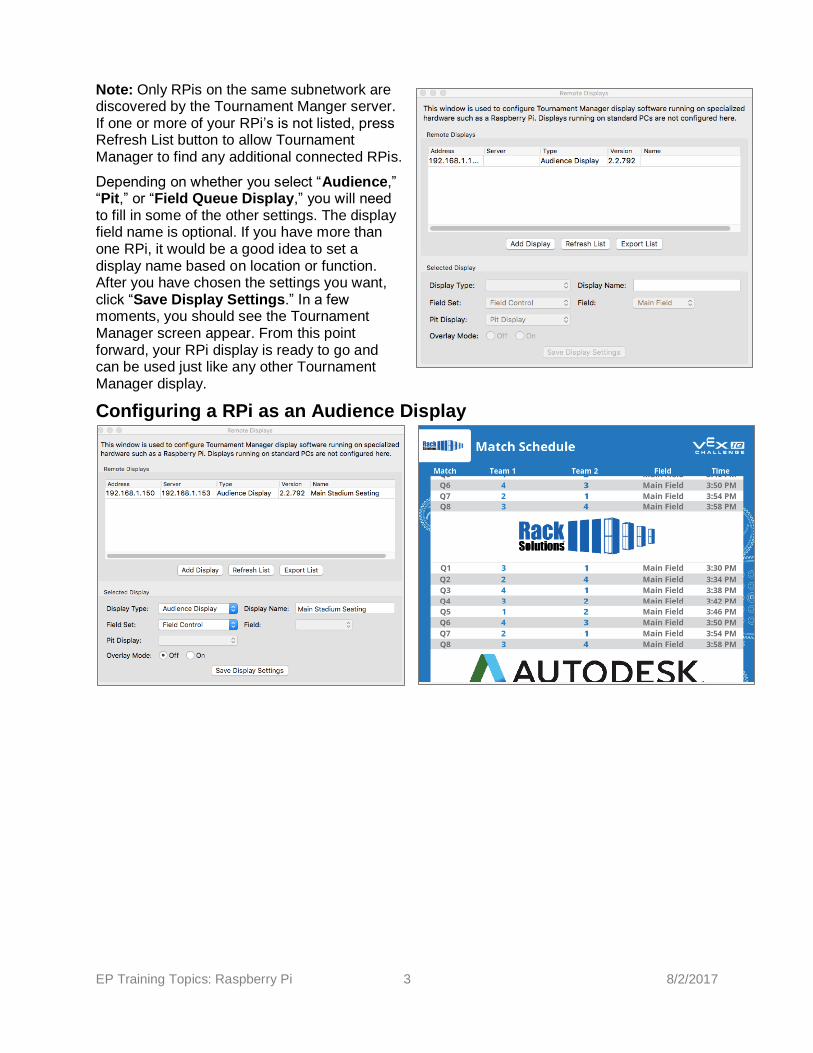
At this time, start Tournament Manager. Select the “Displays” menu followed by “Configure Remote Displays.” If your RPi is connected to the same network as the PC/MAC it should be detected automatically and show up in the list. Select the RPi you want to configure, then set the type of display you want the RPi to show.
EP Training Topics: Raspberry Pi 3 8/2/2017
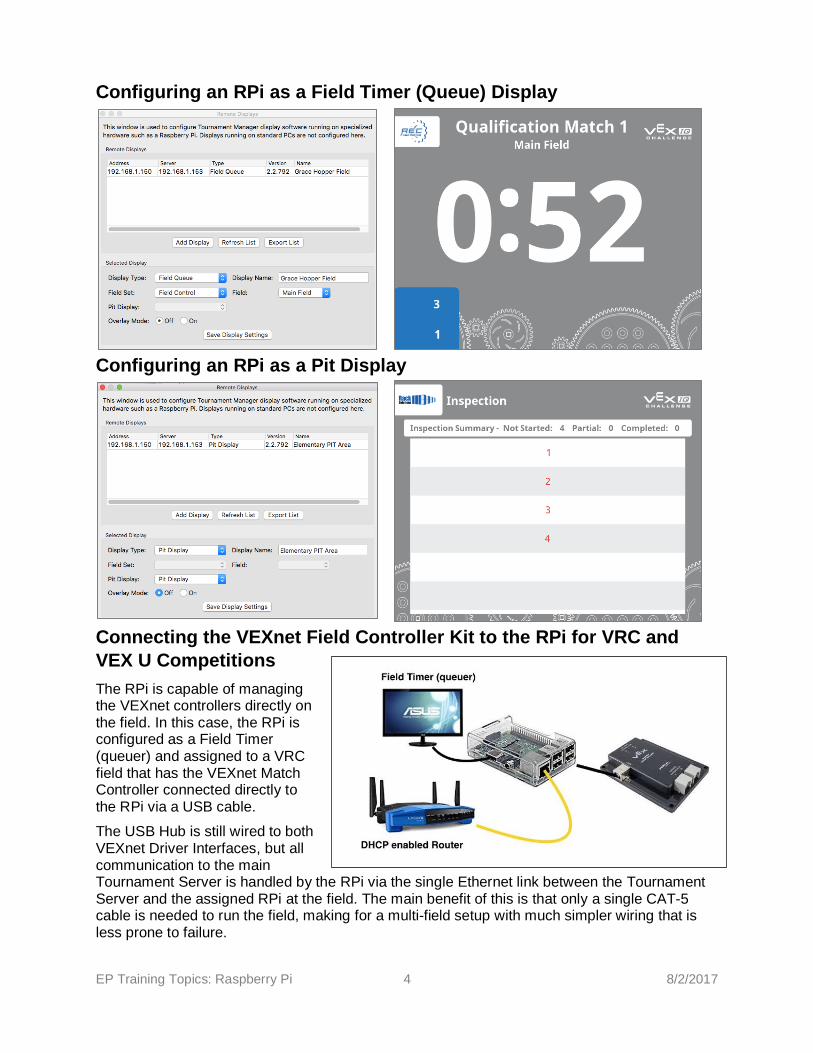
Note: Only RPis on the same subnetwork are discovered by the Tournament Manger server. If one or more of your RPi’s is not listed, press Refresh List button to allow Tournament Manager to find any additional connected RPis.
Depending on whether you select “Audience,” “Pit,” or “Field Queue Display,” you will need to fill in some of the other settings. The display field name is optional. If you have more than one RPi, it would be a good idea to set a display name based on location or function. After you have chosen the settings you want, click “Save Display Settings.” In a few moments, you should see the Tournament Manager screen appear. From this point forward, your RPi display is ready to go and can be used just like any other Tournament Manager display.
Configuring a RPi as an Audience Display
EP Training Topics: Raspberry Pi 4 8/2/2017
Configuring an RPi as a Field Timer (Queue) Display
Configuring an RPi as a Pit Display
Connecting the VEXnet Field Controller Kit to the RPi for VRC and
VEX U Competitions
The RPi is capable of managing the VEXnet controllers directly on the field. In this case, the RPi is configured as a Field Timer (queuer) and assigned to a VRC field that has the VEXnet Match Controller connected directly to the RPi via a USB cable.
The USB Hub is still wired to both VEXnet Driver Interfaces, but all communication to the main Tournament Server is handled by the RPi via the single Ethernet link between the Tournament Server and the assigned RPi at the field. The main benefit of this is that only a single CAT-5 cable is needed to run the field, making for a multi-field setup with much simpler wiring that is less prone to failure.
EP Training Topics: Raspberry Pi 5 8/2/2017
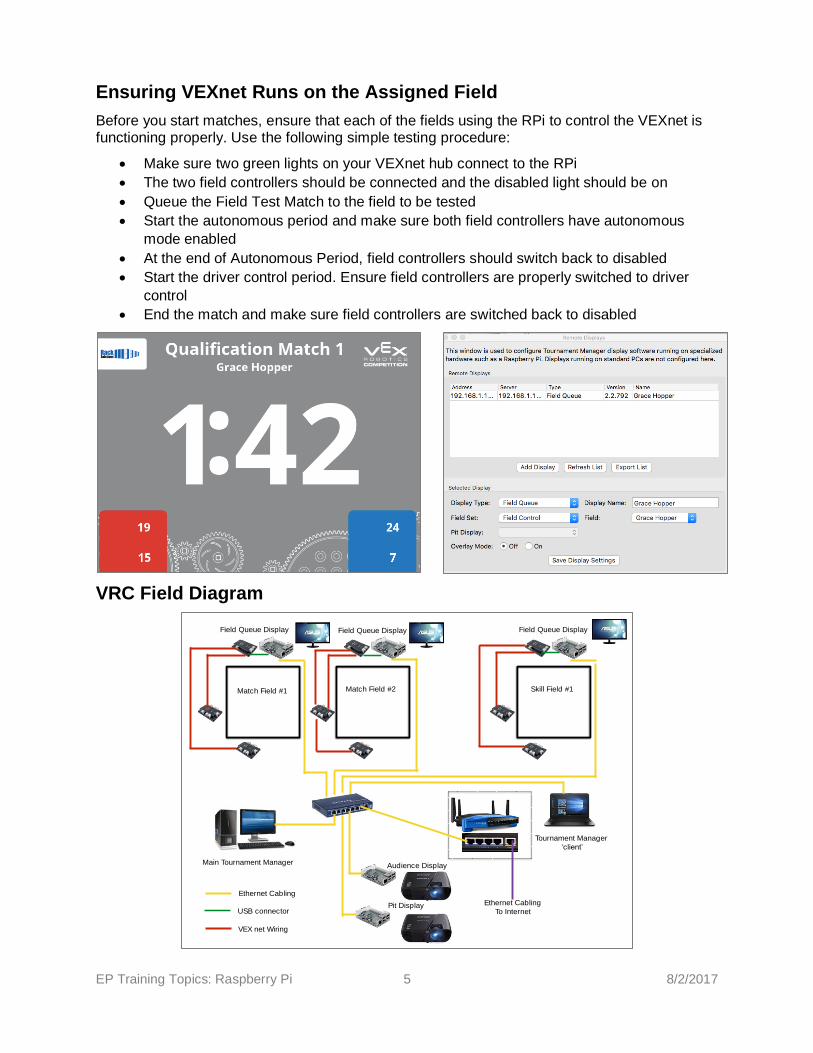
Ethernet Cabling
VEX net Wiring
USB connectorEthernet Cabling
To Internet
Match Field #1 Match Field #2 Skill Field #1
Main Tournament Manager
Tournament Manager
‘client’
Audience Display
Pit Display
Field Queue Display Field Queue Display Field Queue Display
Ensuring VEXnet Runs on the Assigned Field
Before you start matches, ensure that each of the fields using the RPi to control the VEXnet is functioning properly. Use the following simple testing procedure:
• Make sure two green lights on your VEXnet hub connect to the RPi
• The two field controllers should be connected and the disabled light should be on
• Queue the Field Test Match to the field to be tested
• Start the autonomous period and make sure both field controllers have autonomous
mode enabled
• At the end of Autonomous Period, field controllers should switch back to disabled
• Start the driver control period. Ensure field controllers are properly switched to driver
control
• End the match and make sure field controllers are switched back to disabled
VRC Field Diagram
EP Training Topics: Raspberry Pi 6 8/2/2017
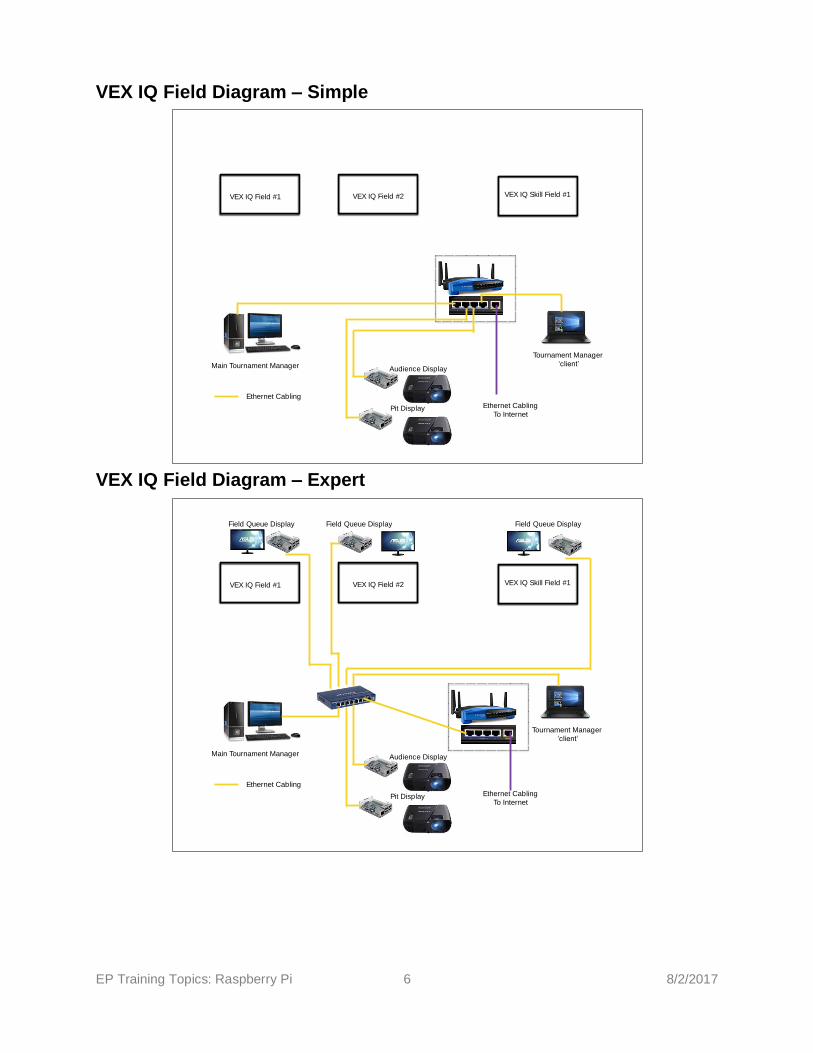
Ethernet Cabling
Ethernet Cabling
To Internet
VEX IQ Field #1 VEX IQ Field #2 VEX IQ Skill Field #1
Main Tournament Manager
Tournament Manager
‘client’
Audience Display
Pit Display
Field Queue Display Field Queue Display Field Queue Display
Ethernet Cabling
Ethernet Cabling
To Internet
VEX IQ Field #1 VEX IQ Field #2 VEX IQ Skill Field #1