21
PORTRAIT PHOTOGRAPHY Every Face Tells A Story
| Date post: | 22-Dec-2015 |
| Category: |
Documents |
| Upload: | julius-stephens |
| View: | 217 times |
| Download: | 2 times |

PORTRAIT PHOTOGRAPHY
Every Face Tells A Story

WHAT IS A PORTRAIT?
• A portrait is defined as a likeness of a person, especially of the person’s face
• A photographic portrait is understood to be a good quality image that not only captures a person’s physical likeness but also something of the person’s character

CAPTURING CHARACTER
Character is by definition:• The combination of qualities or
features that distinguishes one person, group, or thing from another
To capture character in a photograph consider the following:• Personality• Attitude• Unique mannerisms, features, or
traits of the person

Choose the environment
• Careful consideration the environment in which you are taking the portrait
• The environment contributes positively or negatively to the surroundings and background quality of the photograph
• It may also contribute to building the character quality of the portrait
WHERE TO START

Camera Angles• The angle at which you take the
portrait can change the impression given by that person
• Try many different angles to capture different view points
• Ask yourself, which angle works best to capture that individual portrait requirements?

Camera Angles
High Angle Portraits • Will emphasize the face
more than the body• Can help the subject
appear slimmer• Can make the person
appear smaller and create a feeling of vulnerability
Low Angle Portraits• Can make a person look
taller, or seem as if they are more powerful
• Not very flattering for most people (the body appears larger than the head and face)
• Often used for portraits of presidents, athletes and leaders

Camera Angles
Eye-Level Portraits • The most common
camera angle used in portrait photography
• Can make the viewer feel like he or she is in the same space as the subject
Canted Angle Portraits• The camera is tilted to one
side so that the picture plane is no longer parallel to the horizon
• Can create a feeling of excitement, imbalance, transition and instability

Facial Views
Simply put, facial view is what portion or angle of the face is showing towards the camera.
The four mains facial views used in portraiture are:• Full Face• 3/4 View• 2/3 View• Profile

Facial Views
Full face is where your subject’s nose is pointing directly towards the lens. You see equal amounts of both sides of their face.
3/4 view is where your subject turns their face just slightly in one direction until you cannot see the far ear any more.

Facial Views
2/3 view is where the subject continues to turn their head until the line of the nose is almost touching the outline of their cheek on the far side.
Profile is where the subject’s face is turned 90 degrees, with their nose pointing sideways. Only one eye and one side of their face can be seen.

Natural LightPros:• Beautiful overall light that cannot be achieved in a
studio environment• Beautiful background and surroundings that
cannot be accomplished in a studio (e.g. a garden or an interesting building)
• It’s free and accessible to everyone• It’s simple – you don’t have to learn how to use
studio lighting equipment
Cons:• You do not have full control over the lighting
conditions• Weather conditions can often be unpredictable
LIGHTING
Natural vs. ArtificialThere are definite benefits to both forms of lighting

Artificial LightPros:• Total control of the lighting situation• Combine many light sources along with other
equipment to create the desired effect.• Don’t have to worry about the weather• The environment can be created and left for
endless periods of time• Can be photographed at any time of the day• It’s a private environment
Cons:• Does not have the benefits of natural light
such as overall soft lighting• Desired lighting effects requires more work
and technical knowledge• More expense to have necessary equipment
and to maintain a studio space

STUDIO LIGHTING
3-Point LightingThree-point lighting is a standard method used in visual media such as photography, video, and film. By using three separate lighting positions, photographers can illuminate their subjects however they want, while also controlling (or eliminating) the shadows produced by direct lighting.
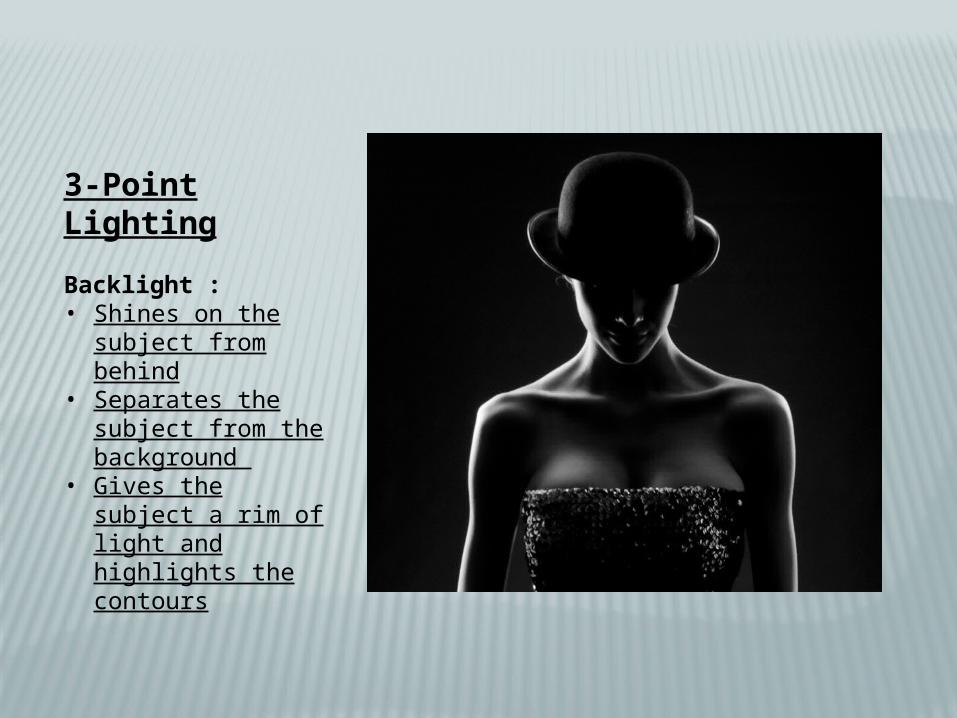
3-Point Lighting
Backlight :• Shines on the
subject from behind• Separates the
subject from the background
• Gives the subject a rim of light and highlights the contours

3-Point Lighting
Key Light :• Placed in front of
the subject and off to one side
• Serves as the main light source
• Creates dramatic shadows

3-Point Lighting
Fill Light :• Placed on the opposite side of the Key Light • Used to fill in the shadows • Usually a softer light and not as bright

3-Point Lighting
Used properly, three-point lighting has the power to transform an otherwise boring and flat image into a dynamic interesting image with a subject that “pops”.

3-Point Lighting
A Common Misconception with Three Point Lighting
You don’t really need three separate lights to use 3 point lighting. Here’s a common technique that actually requires zero lights…
Go outside in the late afternoon, when the sun is about 45 degrees up in the sky, and photograph a friend. Place your friend with their back to the sun, and put your camera in front of them. With the sun behind them, they’ll have a beautiful glow around their hair and shoulders. This gives the effect of the back light in a 3 point lighting setup. The sun is the back light.
Now have someone hold a reflector off to the side, out of the frame. Reflect some of the sunlight into your friend’s face. This reflected light acts like a key light to model their face.
What about the fill light? Nature will do its job. The sunlight will reflect off the grass, off the sidewalk, off the sky and clouds, creating an ambient light that will help fill in the shadows. See? You have now created a three point lighting setup without having to purchase any lights.

Portrait Photography Assignment – part 1
(Outside of class)Required Photographs:
Self Portrait• In this particular circumstance you will need assistances with
taking the photograph. • You are however responsible for setting up the environment,
lighting, and camera angles.• There will be a journal entry for this photograph that will
record the process of photographing your self portrait.
Portraits • Young person or a baby• Grown up with indication of their job or an
activity of interest• Person with a prized position
Total Number of Portraits: 4
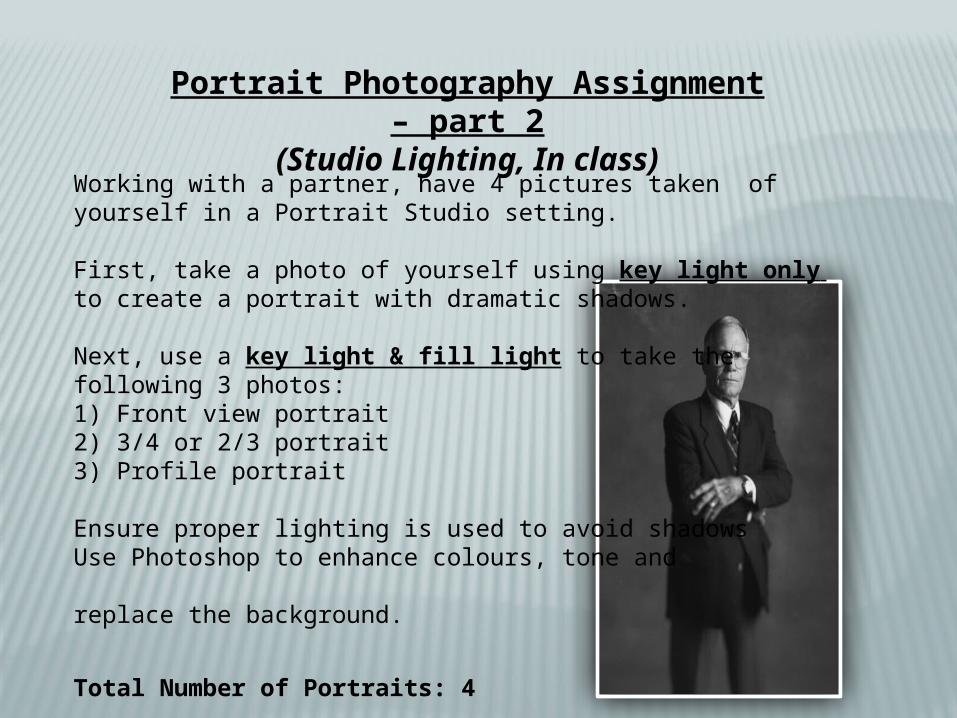
Portrait Photography Assignment – part 2
(Studio Lighting, In class)Working with a partner, have 4 pictures taken of yourself in a Portrait Studio setting.
First, take a photo of yourself using key light only to create a portrait with dramatic shadows.
Next, use a key light & fill light to take the following 3 photos:1) Front view portrait2) 3/4 or 2/3 portrait3) Profile portrait
Ensure proper lighting is used to avoid shadowsUse Photoshop to enhance colours, tone and replace the background.
Total Number of Portraits: 4

References for PhotographingArticlesUsing your compact camerahttp://www.phototechnique.com/how-to/using-compact-cameras-to-take-dslr-quality-images/
http://www.articlesnatch.com/Article/Portrait-Photography-Using-A-Compact-Camera/1776192
Video’s Framing and Point of Viewhttp://www.youtube.com/watch?v=eyqOEXGCQk0
Lightinghttp://www.youtube.com/watch?v=u9prcUCHlqMhttp://www.youtube.com/watch?v=Tin5q2-yPew
Tip’s and Inspirationhttp://www.youtube.com/watch?v=WAiEhOhr5l0


