ePlanner User Guide 1 Everyday Mathematics® ePlanner Contents Introduction Create Your Lesson Plan in Quick Start View Weekly Calendar Navigate within ePlanner View Lesson Plan Details Introduction The Everyday Mathematics® ePlanner is a digital tool that allows you to instantaneously lay out a full academic year of Everyday Mathematics lessons and view content on a lesson-by-lesson basis. In addition, ePlanner allows you to customize your lesson plans with the following options. Add a full grade level of Everyday Mathematics lessons to the calendar. View all resources for each lesson to help you plan and teach Add personal notes to yourself for any lesson. Set a Games Day at regular intervals throughout the year, if desired. Link directly to specific EM Games Online for every lesson. Set your calendar to reflect non-instructional days. Move or delete lessons from your customized lesson plan. Export your lesson plans into a spreadsheet. Email lesson plans to colleagues with your comments. Search for lesson plans by keyword or by lesson number. Link directly to other applications in the eSuite from the ePlanner page. Print daily, weekly, or monthly lesson plans. Print Everyday Mathematics blackline masters for every lesson, as well as class checklists to aid in assessment.
Transcript
ePlanner User Guide
1
Everyday Mathematics® ePlanner
Contents
Introduction
Create Your Lesson Plan in Quick Start
View Weekly Calendar
Navigate within ePlanner
View Lesson Plan Details
Introduction
The Everyday Mathematics® ePlanner is a digital tool that allows you to
instantaneously lay out a full academic year of Everyday Mathematics lessons and
view content on a lesson-by-lesson basis. In addition, ePlanner allows you to
customize your lesson plans with the following options.
Add a full grade level of Everyday Mathematics lessons to the calendar.
View all resources for each lesson to help you plan and teach
Add personal notes to yourself for any lesson.
Set a Games Day at regular intervals throughout the year, if desired.
Link directly to specific EM Games Online for every lesson.
Set your calendar to reflect non-instructional days.
Move or delete lessons from your customized lesson plan.
Export your lesson plans into a spreadsheet.
Email lesson plans to colleagues with your comments.
Search for lesson plans by keyword or by lesson number.
Link directly to other applications in the eSuite from the ePlanner page.
Print daily, weekly, or monthly lesson plans.
Print Everyday Mathematics blackline masters for every lesson, as well as
class checklists to aid in assessment.
ePlanner User Guide
2
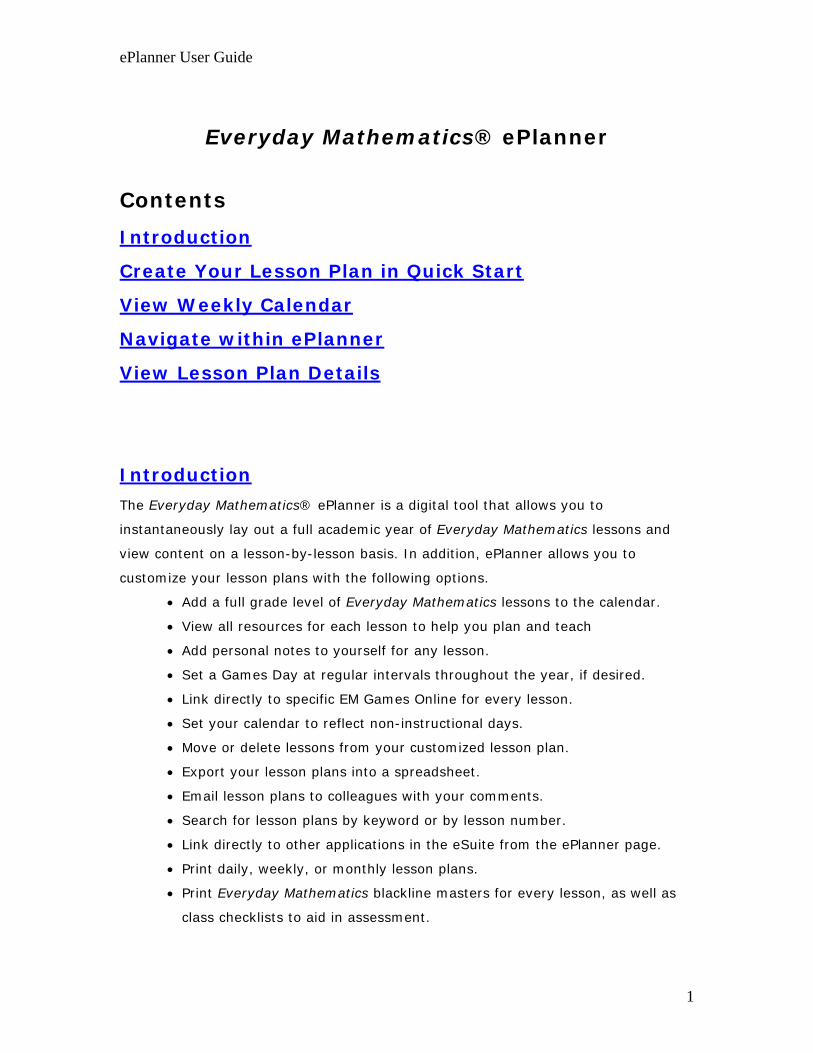
Create Your Lesson Plan in Quick Start
The first time you log into the eSuite, you will be asked to create your ePlanner. On
the Quick Start page you will have to do the following: select *Create a New Lesson
Plan*, set the grade level, name your lesson plan, establish a start date, and select
both non-instructional days and Games Days for your lesson plan.
Create Your Lesson Plan
Select Create a New Lesson Plan on the My Lesson Plans drop-down menu.
Click the Grade Level drop-down list to select a grade level for your lesson plan.
Then add your lesson plan name in the Lesson Plan Name field
Set Start Date
Add the start date of the school year in the Set Start Date field in MM/DD/YYYY
format. Or, click the calendar icon and select a date.
ePlanner User Guide
3
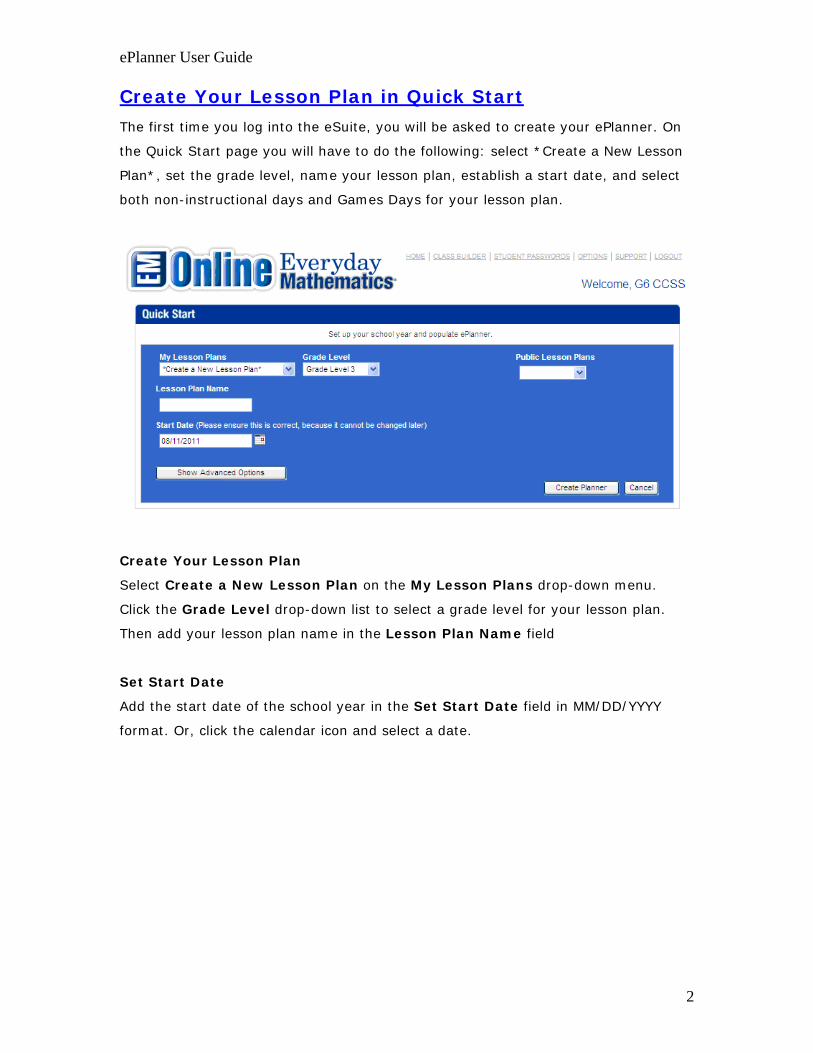
Show Advanced Options
To change the range of the lessons you want to appear in the ePlanner, click the
Show Advanced Options button. From the Set Start Lesson and Set End Lesson
drop-down menus, select your units and lessons. Select Update Lesson Plan to
change the Start and End lessons for your school year.
To close the advanced options, click the Hide Advanced Options button.
ePlanner User Guide
4
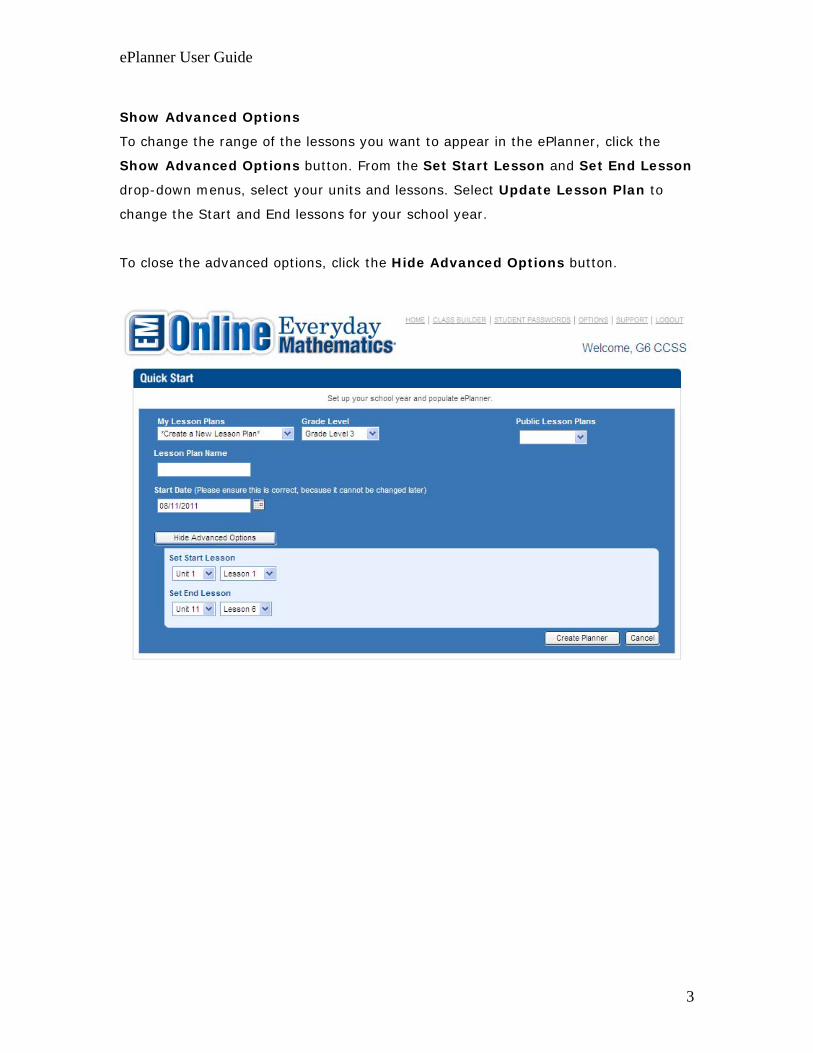
Add Color-Coded Non-Instructional Dates to Your Lesson Plan
1. Click the Create
ePlanner button to
show the blank school-
year monthly view. On
the calendar, click
specific dates that will
be designated as non-
instructional day(s).
The ePlanner will not
assign Everyday
Mathematics lessons
to non-instructional
days. Click a date to
open the Set Non-
Instructional Day(s)
pop-up window. The
start and end dates
default to your selected start date however you can adjust them accordingly.
Then select the Day Type from the drop-down menu. Click Save to set the Day
Type. Also, be sure to set Everyday Mathematics Game Days at regular intervals
throughout the school year. You can use the Day Type “Other” for Game Days.
2. To edit non-instructional days, click on the day. Type new dates in the Start Date
and End Date fields and/or select a different Day Type.
3. Click Save to add the color coded, non-instructional day(s) to the calendar, or
click Cancel to leave the calendar unchanged.
Remove a Non-Instructional Day
1. Click the non-instructional day on the calendar.
2. Click the Day Type drop-down menu, select Unassigned, and then click Save.
The date is now displayed as an Everyday Mathematics instructional day on your
calendar. (See instructions on page 10 for changing a non-instructional day back
to an instructional day.)
ePlanner User Guide
5
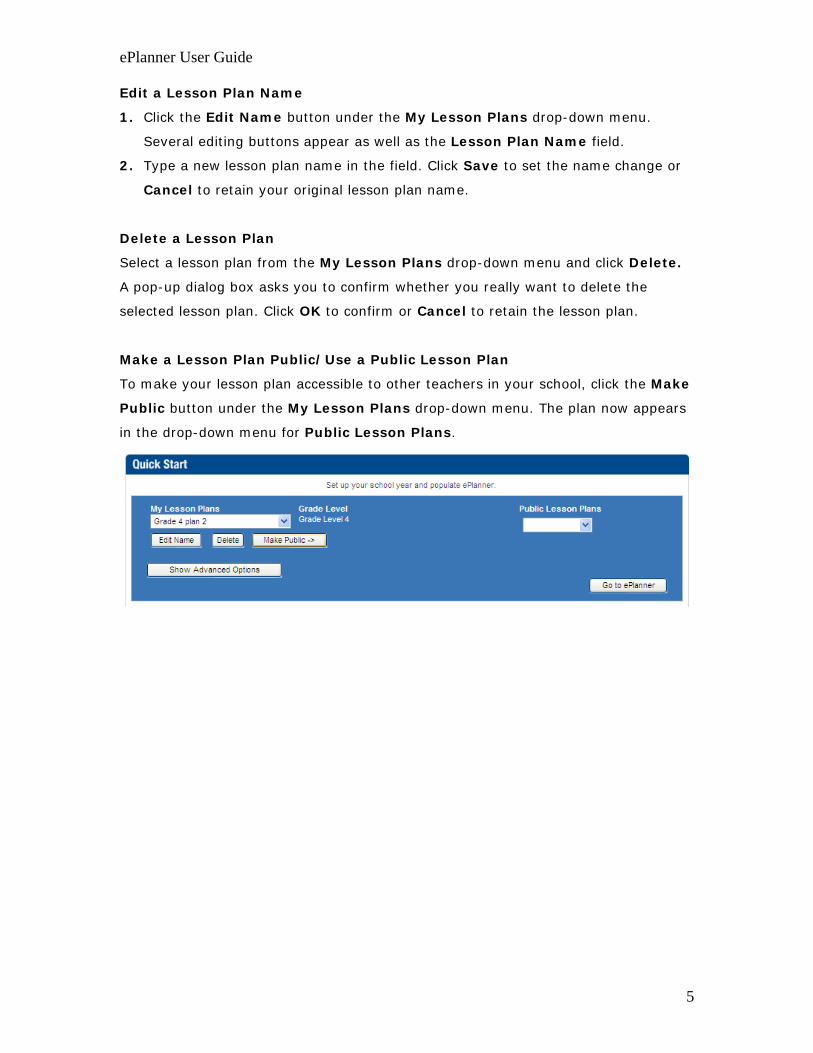
Edit a Lesson Plan Name
1. Click the Edit Name button under the My Lesson Plans drop-down menu.
Several editing buttons appear as well as the Lesson Plan Name field.
2. Type a new lesson plan name in the field. Click Save to set the name change or
Cancel to retain your original lesson plan name.
Delete a Lesson Plan
Select a lesson plan from the My Lesson Plans drop-down menu and click Delete.
A pop-up dialog box asks you to confirm whether you really want to delete the
selected lesson plan. Click OK to confirm or Cancel to retain the lesson plan.
Make a Lesson Plan Public/Use a Public Lesson Plan
To make your lesson plan accessible to other teachers in your school, click the Make
Public button under the My Lesson Plans drop-down menu. The plan now appears
in the drop-down menu for Public Lesson Plans.
ePlanner User Guide
6
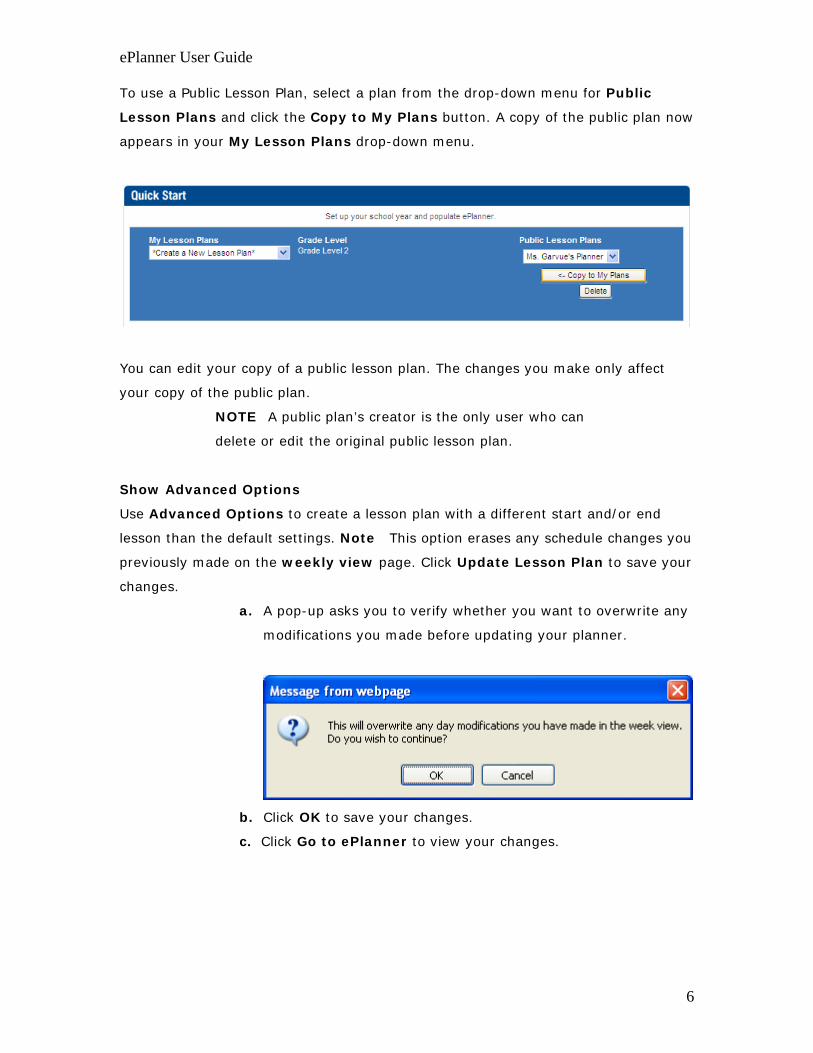
To use a Public Lesson Plan, select a plan from the drop-down menu for Public
Lesson Plans and click the Copy to My Plans button. A copy of the public plan now
appears in your My Lesson Plans drop-down menu.
You can edit your copy of a public lesson plan. The changes you make only affect
your copy of the public plan.
NOTE A public plan’s creator is the only user who can
delete or edit the original public lesson plan.
Show Advanced Options
Use Advanced Options to create a lesson plan with a different start and/or end
lesson than the default settings. Note This option erases any schedule changes you
previously made on the weekly view page. Click Update Lesson Plan to save your
changes.
a. A pop-up asks you to verify whether you want to overwrite any
modifications you made before updating your planner.
b. Click OK to save your changes.
c. Click Go to ePlanner to view your changes.
ePlanner User Guide
7
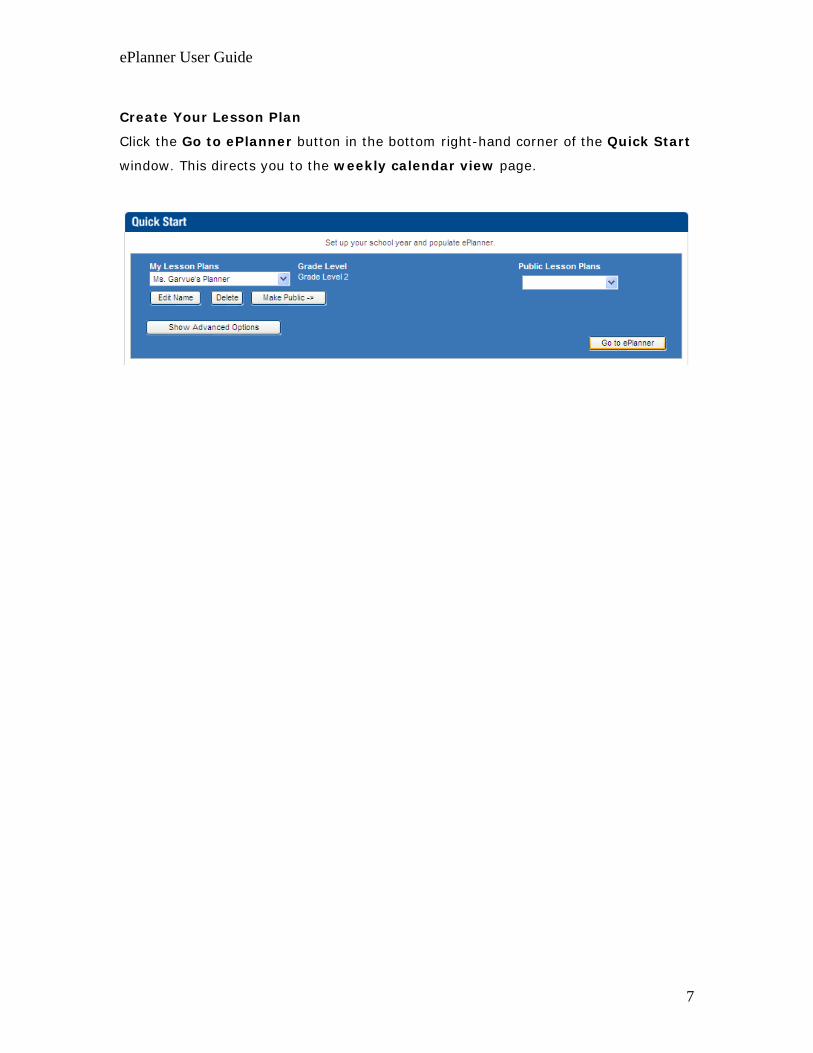
Create Your Lesson Plan
Click the Go to ePlanner button in the bottom right-hand corner of the Quick Start
window. This directs you to the weekly calendar view page.
ePlanner User Guide
8
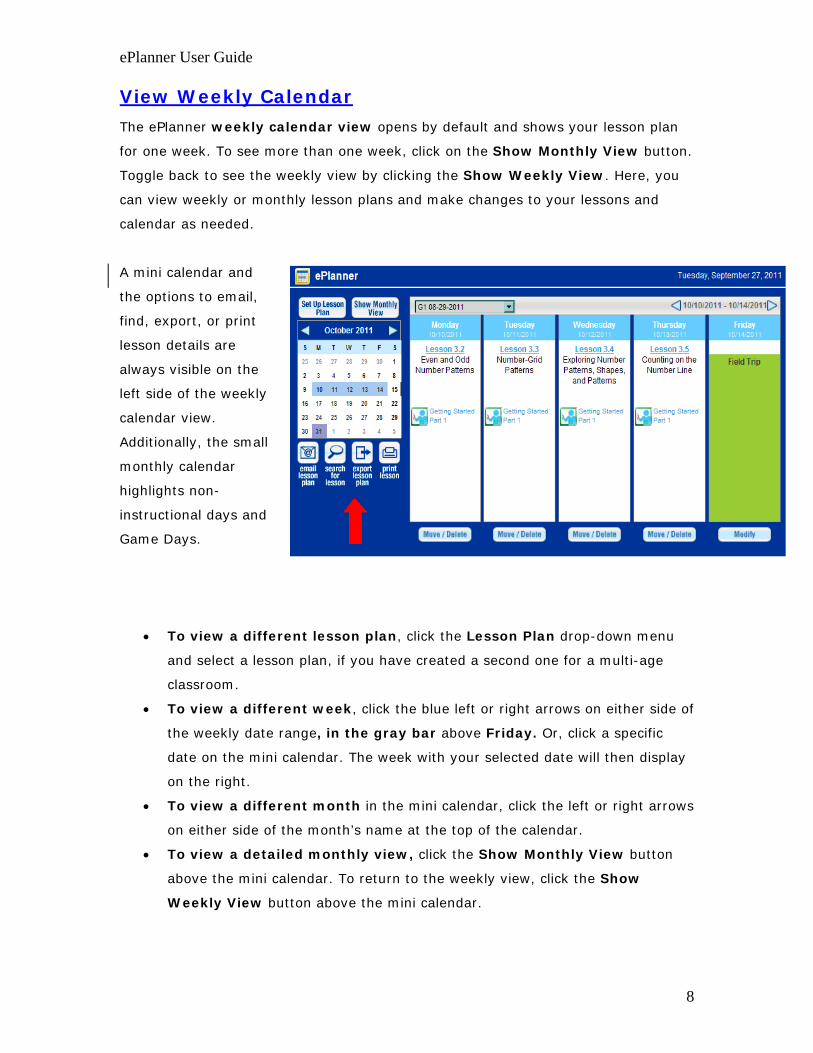
View Weekly Calendar
The ePlanner weekly calendar view opens by default and shows your lesson plan
for one week. To see more than one week, click on the Show Monthly View button.
Toggle back to see the weekly view by clicking the Show Weekly View. Here, you
can view weekly or monthly lesson plans and make changes to your lessons and
calendar as needed.
A mini calendar and
the options to email,
find, export, or print
lesson details are
always visible on the
left side of the weekly
calendar view.
Additionally, the small
monthly calendar
highlights non-
instructional days and
Game Days.
To view a different lesson plan, click the Lesson Plan drop-down menu
and select a lesson plan, if you have created a second one for a multi-age
classroom.
To view a different week, click the blue left or right arrows on either side of
the weekly date range, in the gray bar above Friday. Or, click a specific
date on the mini calendar. The week with your selected date will then display
on the right.
To view a different month in the mini calendar, click the left or right arrows
on either side of the month’s name at the top of the calendar.
To view a detailed monthly view, click the Show Monthly View button
above the mini calendar. To return to the weekly view, click the Show
Weekly View button above the mini calendar.
ePlanner User Guide
9
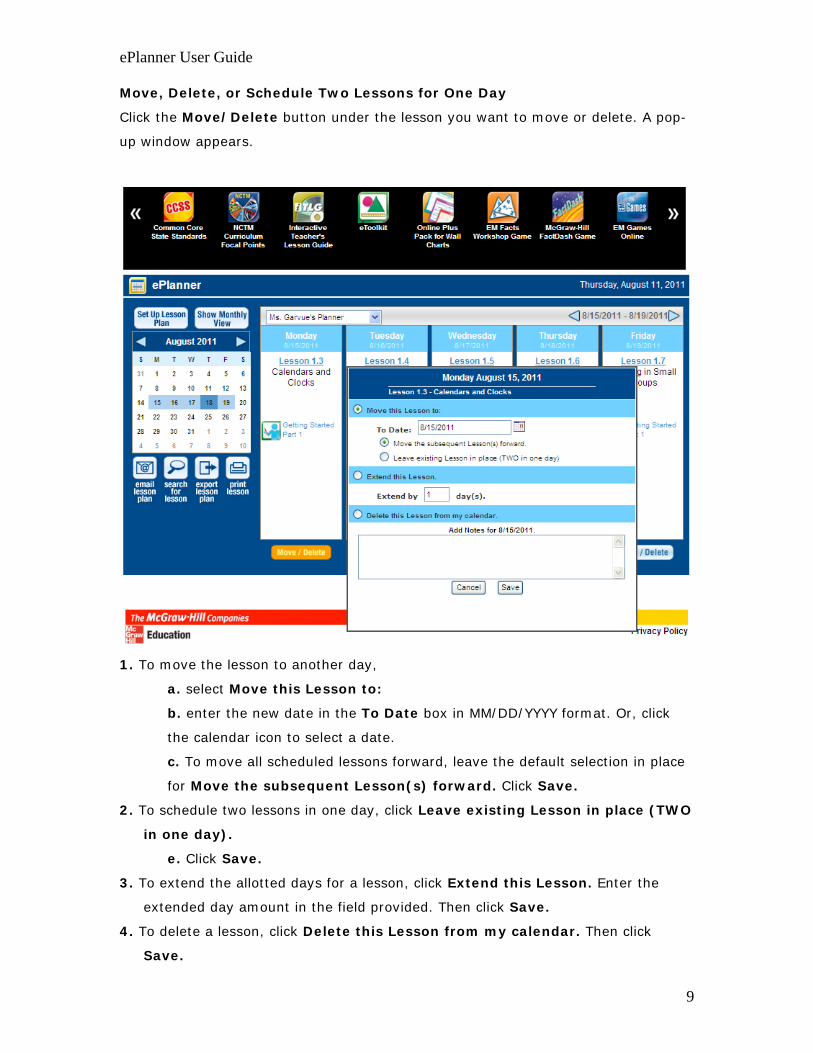
Move, Delete, or Schedule Two Lessons for One Day
Click the Move/Delete button under the lesson you want to move or delete. A pop-
up window appears.
1. To move the lesson to another day,
a. select Move this Lesson to:
b. enter the new date in the To Date box in MM/DD/YYYY format. Or, click
the calendar icon to select a date.
c. To move all scheduled lessons forward, leave the default selection in place
for Move the subsequent Lesson(s) forward. Click Save.
2. To schedule two lessons in one day, click Leave existing Lesson in place (TWO
in one day).
e. Click Save.
3. To extend the allotted days for a lesson, click Extend this Lesson. Enter the
extended day amount in the field provided. Then click Save.
4. To delete a lesson, click Delete this Lesson from my calendar. Then click
Save.
ePlanner User Guide
10
5. Enter any notes about the lesson in the Add Notes box.
6. Click Save to finalize your changes or Cancel to retain your original planner
details.
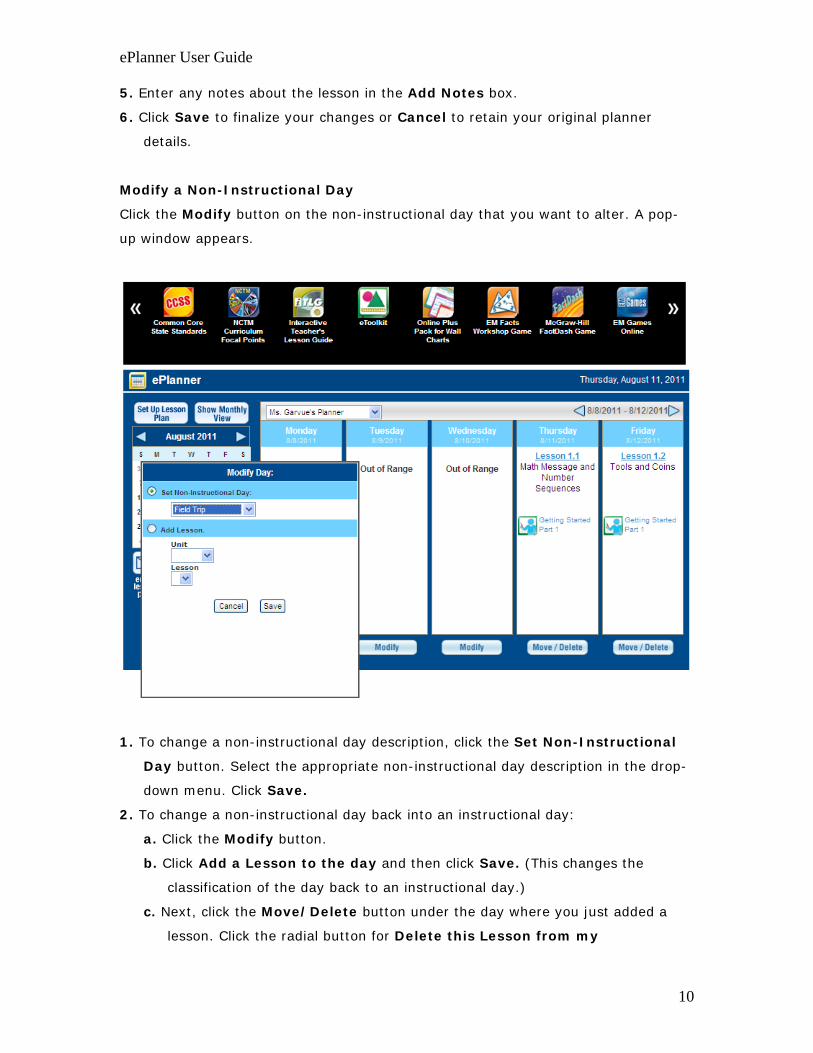
Modify a Non-Instructional Day
Click the Modify button on the non-instructional day that you want to alter. A pop-
up window appears.
1. To change a non-instructional day description, click the Set Non-Instructional
Day button. Select the appropriate non-instructional day description in the drop-
down menu. Click Save.
2. To change a non-instructional day back into an instructional day:
a. Click the Modify button.
b. Click Add a Lesson to the day and then click Save. (This changes the
classification of the day back to an instructional day.)
c. Next, click the Move/Delete button under the day where you just added a
lesson. Click the radial button for Delete this Lesson from my
ePlanner User Guide
11
calendar. Click Save. (This action removes the lesson, but leaves the day
classified as an instructional day.)
d. Click the Move/Delete button under the first day to the right of the now
empty day.
e. Click the radial button for Move this Lesson to:
f. Change the date to the now empty day, which should be the calendar day to
the immediate left.
g. Click the radial button for Move the subsequent Lesson(s) forward.
h. Click Save to finalize your changes or Cancel to retain your original planner
details.
3. Click OK in the dialog box to confirm your change.
Navigate within ePlanner
Email a Lesson Plan
To email a weekly calendar, monthly calendar, and with or without daily lesson
details click the Email Lesson Plan button underneath the monthly calendar.
In the resulting box, type the recipient’s email address and any additional comments
to send with the lesson plan in the provided boxes. Click Send Email.
ePlanner User Guide
12
Search for a Lesson
Click Search for a Lesson, underneath the monthly calendar. You can search by
keyword or lesson number. Click Keywords or Lesson Number to select your
search method.
For a Keywords search, enter your search criteria and click Show Lessons. Click
any lesson in your search results to view the lesson details.
For a Lesson Number search, select a Unit and a Lesson from the drop-down
menus. Select Show Lessons. The lesson detail view opens in another window.
ePlanner User Guide
13
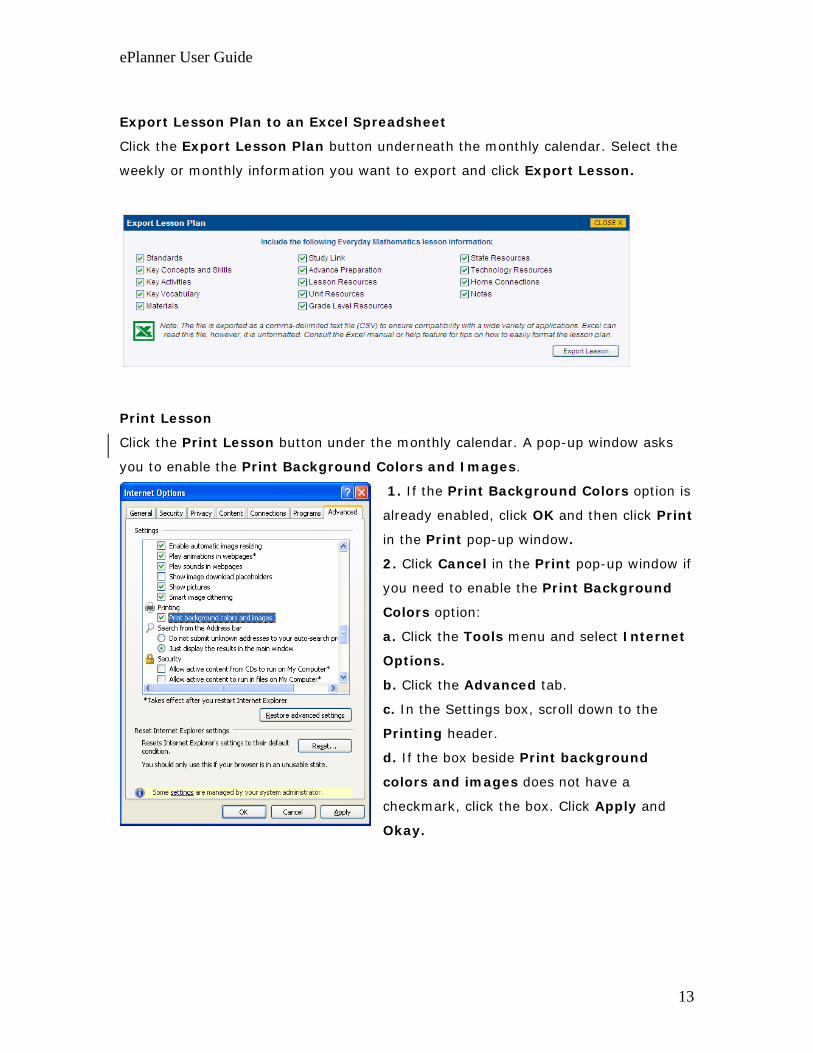
Export Lesson Plan to an Excel Spreadsheet
Click the Export Lesson Plan button underneath the monthly calendar. Select the
weekly or monthly information you want to export and click Export Lesson.
Print Lesson
Click the Print Lesson button under the monthly calendar. A pop-up window asks
you to enable the Print Background Colors and Images.
1. If the Print Background Colors option is
already enabled, click OK and then click Print
in the Print pop-up window.
2. Click Cancel in the Print pop-up window if
you need to enable the Print Background
Colors option:
a. Click the Tools menu and select Internet
Options.
b. Click the Advanced tab.
c. In the Settings box, scroll down to the
Printing header.
d. If the box beside Print background
colors and images does not have a
checkmark, click the box. Click Apply and
Okay.
ePlanner User Guide
14
View Lesson Plan Details
Click any blue lesson number on the weekly calendar view to view lesson details.
The lesson details will appear under the calendar. (You can click the light blue Hide
Detailed View link under the monthly view to close the details.)
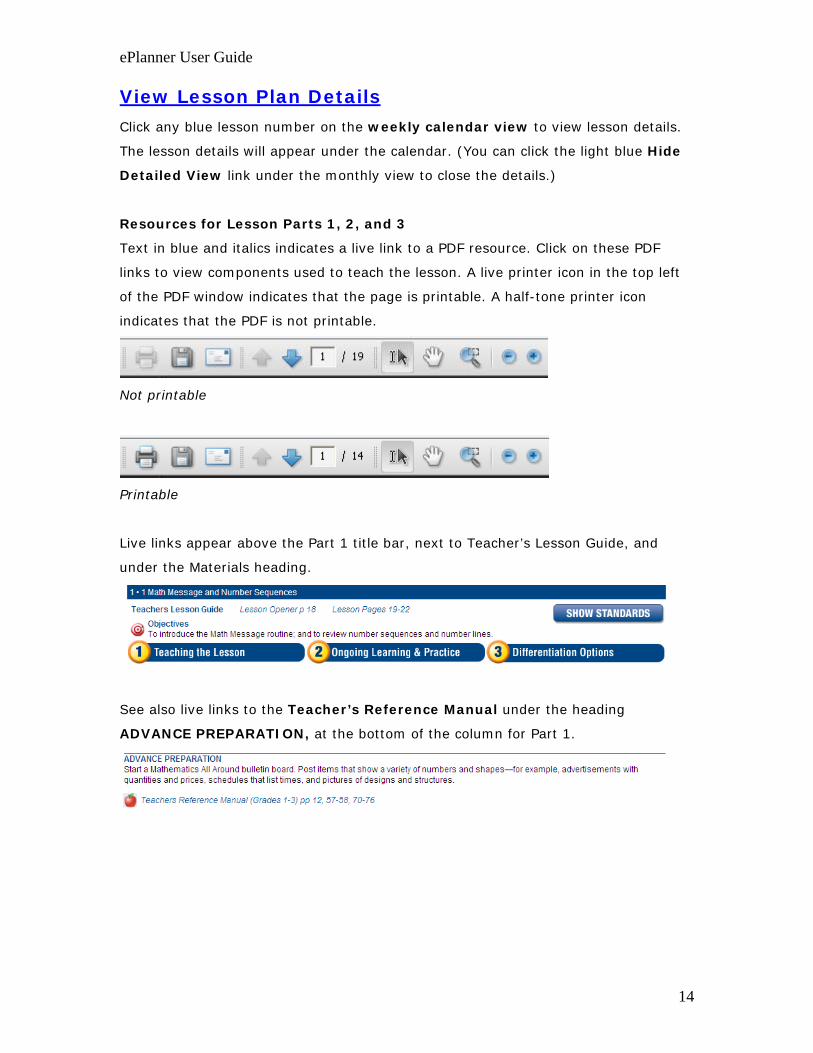
Resources for Lesson Parts 1, 2, and 3
Text in blue and italics indicates a live link to a PDF resource. Click on these PDF
links to view components used to teach the lesson. A live printer icon in the top left
of the PDF window indicates that the page is printable. A half-tone printer icon
indicates that the PDF is not printable.
Not printable
Printable
Live links appear above the Part 1 title bar, next to Teacher’s Lesson Guide, and
under the Materials heading.
See also live links to the Teacher’s Reference Manual under the heading
ADVANCE PREPARATION, at the bottom of the column for Part 1.
ePlanner User Guide
15
Ongoing Learning & Practice, and Differentiation Options
Text in blue and italics indicates a live link to a PDF resource. Click on these links to
view components used to teach the lesson. Live links appear under each blue activity
heading for these sections of the lesson.
Additional Resources
From the lesson detail view, scroll down to see additional links to PDFs that
supplement the lesson: Lesson Resources, Unit Resources, Grade Level Resources,
Spanish Language Resources, Technology Resources, Home Connections.
Note The file is exported as a comma-delimited text file (CSV) to ensure
compatibility with a wide variety of applications. Microsoft® Excel® can read this
file, but it is unformatted. Consult the Excel user guide or Help feature for tips on