1 C LAB MANUAL LENDI INSTITUTE OF ENGINEERING & TECHNOLOGY – DEPARTMENT OF CSE EXERCISE– 1A AIM : To learn OS Commands, To be Familiar of Editors - vi, Emacs Operating System : An operating system is a software program that enables the computer hardware to communicate and operate with the computer software. Some examples. Microsoft Windows 7 - PC and IBM compatible operating system. Microsoft Windows is the most common and used operating system. Ubuntu Linux - A popular variant of Linux used with PC and IBM compatible computers. OS Commands: Each command of OS can perform a fixed operation. Syntax: The commands in Linux have the following syntax $command options arguments Basic Commands: pwd command: ‘pwd’ command prints the absolute path to current working directory. $ pwd /home/raghu cal command: Displays the calendar of the current month. $ cal July 2012 Su Mo Tu We Th Fr Sa 1 2 3 4 5 6 7 8 9 10 11 12 13 14 15 16 17 18 19 20 21 22 23 24 25 26 27 28 29 30 31 echo command: This command will echo whatever you provide it. $ echo "linoxide.com" linoxide.co date command: Displays current time and date.
Transcript
1
C LAB MANUAL
LENDI INSTITUTE OF ENGINEERING & TECHNOLOGY – DEPARTMENT OF CSE
EXERCISE– 1A
AIM : To learn OS Commands, To be Familiar of Editors - vi, Emacs
Operating System : An operating system is a software program that enables the
computer hardware to communicate and operate with the computer software. Some examples.
Microsoft Windows 7 - PC and IBM compatible operating system. Microsoft
Windows is the most common and used operating system.
Ubuntu Linux - A popular variant of Linux used with PC and IBM compatible
computers.
OS Commands: Each command of OS can perform a fixed operation.
Syntax: The commands in Linux have the following syntax
$command options arguments
Basic Commands:
pwd command: ‘pwd’ command prints the absolute path to current working directory.
$ pwd
/home/raghu
cal command: Displays the calendar of the current month.
$ cal
July 2012
Su Mo Tu We Th Fr Sa
1 2 3 4 5 6 7
8 9 10 11 12 13 14
15 16 17 18 19 20 21
22 23 24 25 26 27 28
29 30 31
echo command: This command will echo whatever you provide it.
$ echo "linoxide.com"
linoxide.co
date command: Displays current time and date.
2
C LAB MANUAL
LENDI INSTITUTE OF ENGINEERING & TECHNOLOGY – DEPARTMENT OF CSE
$ date
Fri Jul 6 01:07:09 IS T 2012
tty command: Displays current terminal.
$ tty
/dev/pts/0
whoami command:This command reveals the user who is currently logged in.
$ whoami
raghu
Vi editor : vi editor is a visual editor used to create a file (or) to open a file (or0 to modify a file.
The command to work with visual editor is
$ vi filename.c
It can function in different modes.
Insert mode (I/i or A/a)
Execute command mode( shift :)
Escape mode( escape)
Insert mode : In this mode we can enter the data or modify content of a file . By pressing
(I/I or A/a) from escape mode we can come to insert mode.
Execute command mode : This is the mode from where we can apply the command mode
commands such as : wq save and quit
: q! quit without saving
In addition to these commands it can be applied on selected test such as copying, deleting lines
etc. From escape mode by pressing we can enter into execute command mode.
Escape mode : By default immediately after opening a file through vi editor the file will be in
escape mode. We can switch from one mode to another mode.
Emacs editor: emacs is a screen editor. Unlike vi, emacs is not an insertion mode editor,
meaning that any character typed in emacs is automatically inserted into the file, unless it
includes a command prefix.
Shift + :
3
C LAB MANUAL
LENDI INSTITUTE OF ENGINEERING & TECHNOLOGY – DEPARTMENT OF CSE
Commands in emacs are either control characters (hold down the <Ctrl> key while typing
another character) or are prefixed by one of a set of reserved characters: <Esc> or <Ctrl>-X. The
<Esc> key can be typed by itself (because it really is a character) and then followed by another
character; the <Ctrl> key must be held down while the next character is being typed. The
conventions for describing these characters (since it takes too long to type out the whole thing)
are ESC means <Esc> and C- means <Ctrl>. One other distinction between emacs and vi is that
emacs allows you to edit several files at once. The window for emacs can be divided into several
windows, each of which contains a view into a buffer. Each buffer typically corresponds to a
different file. Many of the commands listed below are for reading files into new buffers and
moving between buffers.
To use emacs on a file, type
$emacs filename
VIVA-VOCE QUESTIONS:
1. What is vi editor?
2. What are the different modes of vi editor?
3. What is pwd command?
4. What is cal command?
5. What is echo command?
4
C LAB MANUAL
LENDI INSTITUTE OF ENGINEERING & TECHNOLOGY – DEPARTMENT OF CSE
EXERCISE- 1B
AIM : Basic commands in Linux .
PWD : The pwd command used to know the current working directory. pwd stands for "present
working directory" .
Syntax : pwd
ubuntu@ubuntu:-$ ~/home/Desktop
MAN : This is a command used to get documentation or help on commands or man is used for
displaying Linux manual pages.
Syntax: $ man command
example: $ man mkdir
Displays the manual pages of mkdir .
LS: The ls command can show ('list') the files in your current directory. Used with certain
options, you can see sizes of files, when files were made, and permissions of files. Example: "ls
~" will show you the files that are in your home directory.
Syntax:ls
Example : $ls
Lendi administration hello.c prime.c add.c
CD: The cd command allows us to change directories. When you open a terminal you will be in
your home directory. To move around the file system we can use cd.
Syntax : cd directory name
5
C LAB MANUAL
LENDI INSTITUTE OF ENGINEERING & TECHNOLOGY – DEPARTMENT OF CSE
Example: $cd lendi
ubuntu@lendi :~$
CP: The cp command is used to copy files and directories. The copies become independent of
the originals (i.e., a subsequent change in one will not affect the other).
Syntax:cp sourcefile destinationfile
Example: cp prime.c primenumber.c
MV: The mv command can move a file to a different location or can rename a file.
Syntax : mv file_name file_name2 ( this command renames the file ).
example: mv prime.c prime1.c
RM: This command is used to remove or delete a file in your directory.
Syntax: rm filename
example: rm prime.c
MKDIR: The mkdir command is used to create directories.
syntax: mkdir directory name
example: mkdir lendi
RMDIR: The rmdir command used to l delete an empty directory.
Syntax: rmdir directory name
example: rmdir lendi
6
C LAB MANUAL
LENDI INSTITUTE OF ENGINEERING & TECHNOLOGY – DEPARTMENT OF CSE
CAT: cat command displays the content of a file and allows us to create single or multiple files,
view contents of file, concatenate files and redirect output into terminal or files.
Syntax: $ cat filemane ( displays the content of the file )
Example :$ cat hello.txt
Hello world !
Appending new data to existing file
syntax: $ cat newfilename ( creates a new file )
example : $ cat >> hello.txt
Welcome to the c programming lab in lendi engineering college.
$ cat hello.txt
Hello world !
Welcome to the c programming lab in lendi engineering college.
VIVA-VOCE QUESTIONS:
1. What is ls command?
2. What is cd command?
3. What is cat command?
4. What is cp command?
5. What is mkdir command?
Ctrl + D or ctrl + Z
7
C LAB MANUAL
LENDI INSTITUTE OF ENGINEERING & TECHNOLOGY – DEPARTMENT OF CSE
EXERCISE 1(C)
AIM: C Program to Perform Adding, Subtraction, Multiplication and Division of two numbers
From Command line.
DESCRIPTION: A c program that uses command line arguments to take parameters to perform
addition, Subtraction, Multiplication and Division. As the command line arguments are strings
,here we are using atoi( ) function which converts string to integer.
Command Line arguments are the arguments that are passed to the program when the
program is invoked to for execution. The prototype of main( ) when it supports command line
arguments is as follows:
int main(int argc,char *argv[ ])
ALGORITHM:
INPUT: 2 Numbers
OUTPUT: Addition, Subtraction, Multiplication and Division of those numbers
STEP-1: Start
STEP-2: a=atoi(argv[1])
STEP-3: b=atoi(argv[2])
STEP-4: Compute sum=a+b
STEP-5: Compute sub=a-b
STEP-6: Compute mul=a*b
STEP-7: Compute div=a/b
STEP-8: Display sum,sub,mul,div
STEP-9: Stop
8
C LAB MANUAL
LENDI INSTITUTE OF ENGINEERING & TECHNOLOGY – DEPARTMENT OF CSE
SAMPLE OUTPUT:
$ ./a.out 8 4
Sum=12
Sub=4
Mul=32
Div=2
VIVA-VOCE QUESTIONS:
1.What is command line argument?
2. What is the prototype of main( ) when command line arguments are supported.?
3. Function to convert string to integer?
4.What is the header file of atoi( )?
5.Write any C expression to perform any arithmetic operation.
9
C LAB MANUAL
LENDI INSTITUTE OF ENGINEERING & TECHNOLOGY – DEPARTMENT OF CSE
EXERCISE 2(A)
AIM: Write a C Program to Simulate 3 Laws at Motion
DESCRIPTION:
Newton’s First law An object at rest will remain at rest unless acted on by an unbalanced force.
An object in motion continues in motion with the same speed and in the same direction unless
acted upon by an unbalanced force. i.e if the force applied on the object is non-zero the object
can move in certain direction.
Newton’s Second law Acceleration is produced when a force acts on a mass. The greater the
mass (of the object being accelerated) the greater the amount of force needed (to accelerate the
object).
Force=Mass * Acceleration
Newton’s Third law For every action there is an equal and opposite re-action.
If force applied is F then its reaction will be -F in the opposite direction.
FIRST LAW
ALGORITHM:
INPUT: Force(one)
OUTPUT: A Message
STEP-1: Start
STEP-2:Read f
STEP-3:If f!=0 then display “The object is moving”
Otherwise display ”The Object is in the rest”
STEP-4:Stop
10
C LAB MANUAL
LENDI INSTITUTE OF ENGINEERING & TECHNOLOGY – DEPARTMENT OF CSE
SAMPLE OUTPUT:
Enter force
3
The object is moving
SECOND LAW
ALGORITHM:
INPUT: 2 Numbers(m,a)
OUTPUT: Force(one)
STEP-1: Start
STEP-2: Read m,a
STEP-3:Compute f=m*a
STEP-4: Display f
STEP-5:Stop
SAMPLE OUTPUT:
Enter mass and acceleration
3 4
Force = 12
THIRD LAW
ALGORITHM:
INPUT: One(Force)
OUTPUT: One (Force)
11
C LAB MANUAL
LENDI INSTITUTE OF ENGINEERING & TECHNOLOGY – DEPARTMENT OF CSE
STEP-1: Start
STEP-2:Read f
STEP-3: Compute f=-f
STEP-4: Display f
STEP-5:Stop
SAMPLE OUTPUT:
Enter force
3
F=-3
VIVA-VOCE QUESTIONS:
1. What is the associativity of assignment operator?
2. Write syntax of conditional statement?
3. What is the result of any relational expression?
4. How f=m*a can be evaluated?
5.What is the meaning of unary mainus?
12
C LAB MANUAL
LENDI INSTITUTE OF ENGINEERING & TECHNOLOGY – DEPARTMENT OF CSE
EXERCISE 2(B)
AIM: Write a C Program to convert Celsius to Fahrenheit and vice versa
DESCRIPTION: Temperature in Centigrade or Fahrenheit is taken and converted in to other
form using following formula.
TEMPERATURE CONVERSION TABLE
From To Formula
Fahrenheit (F) Celsius (C or o) (F - 32) * 5/9
Celsius (C or o) Fahrenheit (F) (C * 9/5) + 32
FAHRENHEIT TO CELSIUS CONVERSION
ALGORITHM:
INPUT: Fahrenheit (one)
OUTPUT: Celsius (one)
STEP-1: Start
STEP-2: Read f
STEP-3: Compute c=(f-32)*5/9
STEP-4: Display c
STEP-5: Stop
SAMPLE OUTPUT:
Enter temperature in Fahrenheit : 40
Temperature in Celsius=4.4
CELSIUS TO FAHRENHEIT CONVERSION
13
C LAB MANUAL
LENDI INSTITUTE OF ENGINEERING & TECHNOLOGY – DEPARTMENT OF CSE
ALGORITHM:
INPUT: Celsius (one)
OUTPUT: Fahrenheit (one)
STEP-1: Start
STEP-2: Read c
STEP-3: Compute f=9*c/5+32
STEP-4: Display f
STEP-5: Stop
SAMPLE OUTPUT:
Enter temperature in Celsius: 4.4
Temperature in Fahrenheit: 40
VIVA-VOCE QUESTIONS:
1. How an expression can be executed?
2. Explain how the expression f=9*c/5+32 is evaluated?
3. What is the priority of * ( multiplication ) operator?
4. What is the priority of / (Division) operator?
5. When an expression consisting of operators with same priority how they can be evaluated.
14
C LAB MANUAL
LENDI INSTITUTE OF ENGINEERING & TECHNOLOGY – DEPARTMENT OF CSE
EXERCISE 3(A)
AIM: Write a C Program to Find Whether the Given Year is a Leap Year or not.
DESCRIPTION: Divide the year with 4 if resultant remainder is zero then the year is leap year
otherwise it is a non-leap year. We can use if –else or conditional statement to write the program.
ALGORITHM:
INPUT: One Number
OUTPUT: A message
STEP-1: Start
STEP-2: Read a
STEP-3: If a%4= =0 then display “It is a leap year”
Otherwise “it is not a leap year”
STEP-4: Stop
SAMPLE OUTPUT:
Enter year: 2000
This is a leap year
Enter year: 2001
This is not leap year
VIVA-VOCE QUESTIONS:
1. Which operator can’t be used on float data?
2. What do you mean by decision making statement?
3. Write syntax for if-statement
4. What are the restrictions on % operator?
5. What is multi-way decision making statement?
15
C LAB MANUAL
LENDI INSTITUTE OF ENGINEERING & TECHNOLOGY – DEPARTMENT OF CSE
EXERCISE 3(B)
AI M: Write a C Program to Add Digits & Multiplication of digits of a number
DESCRIPTION: From the given number extract the digits then add them and multiply them.
We can extract a digit using % operator. Here while loop is preferable because this is the case of
event control loop.
ALGORITHM:
INPUT: A number
OUTPUT: Sum and multiplication of digits number
STEP 1: Start
STEP 2: Read n
STEP 3: Initialize temp=n; sum=0,mul=1
STEP 4: If temp>0 then go to STEP-5
Otherwise goto STEP-6
STEP 5:Compute dig<- temp%10
Compute sum<-sum+dig
Compute mul<- mul* dig
Compute temp<-temp/1 and go to STEP-4
Step 6: Display sum,mul
Step 7: Stop
16
C LAB MANUAL
LENDI INSTITUTE OF ENGINEERING & TECHNOLOGY – DEPARTMENT OF CSE
SAMPLE OUTPUT:
Enter your number: 123
Sum of digits: 6
Multiplication of digits: 6
VIVA-VOCE QUESTIONS:
1. What is loop?
2. What are different types of loop?
3. What is entry control loop?
4. Write syntax of while-loop.
5. What is event control loop?
17
C LAB MANUAL
LENDI INSTITUTE OF ENGINEERING & TECHNOLOGY – DEPARTMENT OF CSE
EXERCISE 4(A.I)
AIM: Write a C Program to Find Whether the Given Number is Prime Number.
DESCRIPTION: The number which is not having any factor from 2 to n/2 is called a prime
number. Computing the factors from 2 to n/2 and if there is no factor the number is prime
otherwise the number non-prime. Here for loop is preferred because it is the case of counter
control loop.
ALGORITHM:
INPUT: One Number
OUTPUT: A message
STEP-1:Start
STEP-2:Read n
STEP-3: Initialize i=2,flag=1
STEP-4: If i<=n/2 then go to STEP-5
Otherwise go to STEP-7
STEP-5: If n%i= =0 then flag=0 and go to STEP-7
STEP-6: Compute i=i+1 and go to STEP-4
STEP-7: If flag= =1 then display “Prime Number”
Otherwise display “Not a Prime Number”
STEP-8: Stop
18
C LAB MANUAL
LENDI INSTITUTE OF ENGINEERING & TECHNOLOGY – DEPARTMENT OF CSE
SAMPLE OUTPUT:
Enter a number:7
This is a prime number
Enter a number:9
This is not a prime number
19
C LAB MANUAL
LENDI INSTITUTE OF ENGINEERING & TECHNOLOGY – DEPARTMENT OF CSE
EXERCISE 4 (A.II)
AIM: Write a C Program to Find Whether the Given Number is Armstrong Number.
DESCRIPTION: The number for which the sum of the nth
powers of digits of given number is
equal to the number itself then it an Armstrong number .Where n is the number of digits of the
given number. Example : 153.
ALGORITHM:
INPUT: One Number
OUTPUT: A message
STEP-1:Start
STEP-2:Read n
STEP-3:Initialize temp=n,sum=0
STEP-4: If temp>0 then go to STEP-5
Otherwise go to STEP-7
STEP 5:Compute nd=nd+1
STEP-6: Compute temp=temp/1 and go to STEP-4
STEP-7:Compute temp=n
STEP-8: If temp>0 then go to STEP-9
Otherwise go to STEP-10
STEP 9:Compute dig=temp%10
Compute sum=sum+pow(dig,nd)
Compute temp=temp/1 and go to STEP-8
20
C LAB MANUAL
LENDI INSTITUTE OF ENGINEERING & TECHNOLOGY – DEPARTMENT OF CSE
STEP-10: If n= = sum then display this an armstrong number
Otherwise display this is not an armstrong number
STEP-7: Stop
SAMPLE OUTPUT:
Enter a number: 153
This an Armstrong number
Enter a number: 154
This not an Armstrong number
VIVA-VOCE QUESTIONS:
1. Write syntax of for loop?
2. What is prime number?
3. What is Armstrong number?
4. What is the prototype of pow( ) ?
5. What is pre-increment operator?
21
C LAB MANUAL
LENDI INSTITUTE OF ENGINEERING & TECHNOLOGY – DEPARTMENT OF CSE
EXERCISE 4(B)
AIM: Write a C program to print Floyd Triangle
DESCRIPTION: Display the numbers in the following format is the Floyd Triangle. Where
user can enter number of rows.
1
2 3
4 5 6
7 8 9 10
This can be implemented using nested looping.
ALGORITHM:
INPUT: One number
OUTPUT: Floyd Triangle
STEP-1:Start
STEP-2: Read n
STEP-3: Initialize a=1,i=1,j=1
STEP-4: If i<=n then go to STEP-5
Otherwise go to STEP-9
STEP-5:If j<=i then go to STEP-6
Otherwise go to STEP-8
STEP-6: Display a
22
C LAB MANUAL
LENDI INSTITUTE OF ENGINEERING & TECHNOLOGY – DEPARTMENT OF CSE
STEP-7:Compute a=a+1,j=j+1 and go to STEP-6
STEP-8:Display ”\n” , compute i=i+1 and go to STEP-4
STEP-9:Stop
SAMPLE OUTPUT:
Enter your number : 4
The Floyd Triangle
1
2 3
4 5 6
7 8 9 10
23
C LAB MANUAL
LENDI INSTITUTE OF ENGINEERING & TECHNOLOGY – DEPARTMENT OF CSE
EXERCISE 4(C)
AIM: Write a C Program to print Pascal Triangle
DESCRIPTION: A Pascal triangle represents the binomial coefficients of the binomials. Example Pascal
triangle is as follows.
1
1 1
1 2 1
1 3 3 1
Here user can take the number of rows. Here also we can use nest loops.
ALGORITHM:
INPUT: One number
OUTPUT: Pascal Triangle
STEP-1:Start
STEP-2: Read n
STEP-3: Initialize i=0,j=0
STEP-4: If i<=n then go to STEP-5
Otherwise go to STEP-11
STEP-5: If j<=(n-i-2) then display “\t” and go to STEP-6
Otherwise go to STEP-7
STEP-6:Compute j=j+1 and go to STEP-5
STEP-7: If j<=I then go to STEP-8
24
C LAB MANUAL
LENDI INSTITUTE OF ENGINEERING & TECHNOLOGY – DEPARTMENT OF CSE
Otherwise go to STEP-4
STEP-8: Compute n=fact(i)/fact(j)*fact(i-j)
STEP-9:Compute j=j+1
STEP-10:Display “\n” and go to STEP-7
STEP-11:Stop
SAMPLE OUTPUT:
Enter your number : 4
The Pascal Triangle
1
1 1
1 2 1
1 3 3 1
VIVA-VOCE QUESTIONS:
1. What is Floyd Triangle?
2. What is Pascal Triangle?
3. What is nested-loop?
4. What happens if the condition is omitted in the for-loop?
5. What is ‘\t’?
25
C LAB MANUAL
LENDI INSTITUTE OF ENGINEERING & TECHNOLOGY – DEPARTMENT OF CSE
EXERCISE 5 (A)
AIM: Write a C Program demonstrating of parameter passing in Functions and returning values.
DESCRIPTION: There are categories of functions depends on return value and parameters.
They are
1. Function with parameters and return value.
2. Function without parameters and with return value.
3. Function with parameters and without return value.
4. Function without parameters and without return value.
5. Function returns multiple values.
Example prototypes are: 1. int sum(int a,int b);
2. int sum( );
3. void sum(int a,int b);
4. void sum(void);
ALGORITHM:
A sample algorithm for int sum(int a,int b);
INPUT: 2 Numbers as arguments
OUTPUT: Sum of them
STEP-1:Start
STEP-2:Compute res= a+b
STEP-3:Return res
26
C LAB MANUAL
LENDI INSTITUTE OF ENGINEERING & TECHNOLOGY – DEPARTMENT OF CSE
A sample algorithm for main( )
STEP-1:Start
STEP-2: Read a,b
STEP-3:c=sum(a,b)
STEP-4: Display c
STEP-5: Stop
SAMPLE OUTPUT:
Enter two numbers: 4 5
Sum=9
VIVA-VOCE QUESTIONS:
1. What is function?
2. What are the types of functions based on parameters and return values?
3. How the execution of program will be when there is a function call?
4. What is return keyword?
5. What is user defined function?
27
C LAB MANUAL
LENDI INSTITUTE OF ENGINEERING & TECHNOLOGY – DEPARTMENT OF CSE
EXERCISE 5(B)
AIM: Write a C Program illustrating Fibonacci, Factorial with Recursion without Recursion
DESCRIPTION:
1. Fibonacci series is defined as fn=f(n-1)+f(n-2) where n>2 and f0=0 and f1=1.The example series
is 0,1,1,2,3,5,8…………..etc.
2. Defining a function in terms of itself is called recursive function.
3. Recursive definition of factorial: n!=n*(n-1)!
Factorial using recursion
ALGORITHM:
INPUT: One Number
OUTPUT: Factorial of the number
A sample algorithm for main( )
STEP-1:Start
STEP-2:Read n
STEP-3:result= fact(n)
STEP-4: Display result
STEP-5:Stop
int fact (int n) :
STEP-1: Start
STEP-2: if (n= =1) then return 1
else return n*fact(n-1)
28
C LAB MANUAL
LENDI INSTITUTE OF ENGINEERING & TECHNOLOGY – DEPARTMENT OF CSE
SAMPLE OUTPUT:
Enter your number: 5
Factorial of 5 is: 120
Factorial using non-recursion
ALGORITHM:
INPUT: One Number
OUTPUT: Factorial of the number
A sample algorithm for main( )
STEP-1:Start
STEP-2:Read n
STEP-3:result= fact(n)
STEP-4: Display result
STEP-5:Stop
int fact (int n) :
STEP-1: Start
STEP-2 initialize res=1,i=2
STEP-3:loop(i<=n)
res=res*i
i++
repeat loop
STEP-4: Return res
29
C LAB MANUAL
LENDI INSTITUTE OF ENGINEERING & TECHNOLOGY – DEPARTMENT OF CSE
SAMPLE OUTPUT:
Enter your number: 5
Factorial of 5 is: 120
Fibonacci series using recursion
ALGORITHM:
A sample algorithm for main( )
INPUT: A Number
OUTPUT: Fibonacci series up to n terms
STEP-1:Start
STEP-2:Read n
STEP-3:initialize i=0
STEP-4: loop(i<=n)
res= fib(i)
display res
i++
repeat loop
STEP-4: Stop
fib(int n):
STEP-1:Start
STEP-2: if(n= =0)
return 0
else if(n= =1)
return 1
else return fib(n-1)+fib(n-2)
30
C LAB MANUAL
LENDI INSTITUTE OF ENGINEERING & TECHNOLOGY – DEPARTMENT OF CSE
SAMPLE OUTPUT:
Enter the a number : 5
The Fibonacci series is: 0 1 2 3 5 8
Fibonacci series using non -recursive
ALGORITHM:
A sample algorithm for main( )
INPUT: A Number
OUTPUT: Fibonacci series up to n terms
STEP-1:Start
STEP-2:Read n
STEP-3:call fibseries(n)
STEP-4:Stop
fibseries(int n):
STEP-1:Start
STEP-2: Initialize f0=0,f1=1,term,i=2
STEP-3:Display f0,f1
STEP-4: loop(i>=n)
term=f0+f1
display term
f0=f1
f1=term
i++
repeat loop
STEP-5:Stop
31
C LAB MANUAL
LENDI INSTITUTE OF ENGINEERING & TECHNOLOGY – DEPARTMENT OF CSE
SAMPLE OUTPUT:
Enter the a number : 5
The Fibonacci series is: 0 1 2 3 5 8
VIVA-VOCE QUESTIONS:
1. What is iterative function?
2. What is recursive function?
3. What is the difference between iterative function and recursive function?
4. What is Fibonacci – series?
5. How recursive function can be executed?
32
C LAB MANUAL
LENDI INSTITUTE OF ENGINEERING & TECHNOLOGY – DEPARTMENT OF CSE
EXERCISE -6A
AIM: Write a C Program to make a simple Calculator to Add, Subtract, Multiply or Divide
Using switch…case
DESCRIPTION: switch case is multi way decision making statement.
Syntax:
switch (control variable)
{
case constant-1:
statement(s);
break;
case constant-2:
statement(s);
break;
…
case constant-N
statement(s);
break;
default:
statement(s);
}
Here for the problem we can take operator and operands from the user and based on the operator
the operation can be done. This was asked to do using switch-case
ALGORITHM:
STEP-1. Start
STEP-2: Initialize i=0
33
C LAB MANUAL
LENDI INSTITUTE OF ENGINEERING & TECHNOLOGY – DEPARTMENT OF CSE
STEP-3: read n
STEP-4: loop (n!=0)
r=n%2
a[i]=r
i++
n=n/2
Repeat loop
STEP-5: Display array a
STEP-6: stop
SAMPLE OUTPUT:
enter a,b values2 3
1.add
2.sub
3.mul
4.div
enter your choice1
2+3=5
enter a,b values2 3
1.add
2.sub
3.mul
4.div
enter your choice2
2-3=-1
enter a,b values2 3
34
C LAB MANUAL
LENDI INSTITUTE OF ENGINEERING & TECHNOLOGY – DEPARTMENT OF CSE
1.add
2.sub
3.mul
4.div
enter your choice3
2*3=6
enter a,b values2 3
1.add
2.sub
3.mul
4.div
enter your choice4
2/3=0.666667
35
C LAB MANUAL
LENDI INSTITUTE OF ENGINEERING & TECHNOLOGY – DEPARTMENT OF CSE
EXERCISE -6B
AIM: Write a C Program to convert decimal to binary and hex (using switch call function the
function)
DESCRIPTION: Base of binary number is 2 and digits are 0 and 1. Base of hexa decimal
number is 16 and digits are 0-9 and ‘A’-‘F’. Here we can use function to do conversion from
decimal to binary and hexadecimal using conversion techniques.
ALGORITHM: DTOH ( ) FUNCTION:
STEP-1. Start
STEP-2. Declare i=1, j, dec,rem, hexa[100],temp;
STEP-3. Read decimal number
STEP-4.while(dec!=0) do
4.1 rem=dec%16;
4.2 if(rem>9)
4.2.1 temp=rem+55;
4.3 else
4.3.1 temp=rem+48;
4.4 hexa[i++]=temp;
4.5 dec=dec/16;
STEP-5. print decimal to hexa is
STEP-6. for (j=i;j>0;j--) then
6.1 print hexa[j]
ALGORITHM: DTOB ( ) FUNCTION:
STEP-1. Start
STEP-2. Declare i=1,j,dec,rem, bin[100];
STEP-3. Read Decimal numbe
36
C LAB MANUAL
LENDI INSTITUTE OF ENGINEERING & TECHNOLOGY – DEPARTMENT OF CSE
STEP-4. while (dec!=0) do
4.1 rem=dec%2;
4.2 bin[i++]=rem;
4.5 dec=dec/2;
STEP-5. printf("\nDecimal; to binary");
STEP-6. for(j=i;j>0;j--) then
STEP-7. print bin[j]
SAMPLE OUTPUT:
1.Decimal to Hexa
2.Decimal to Binary
Enter your choice1
Enter the decimal number42
Decimal to Hexa is:2A
1.Decimal to Hexa
2.Decimal to Binary
Enter your choice2
Enter the Decimal number42
Decimal to binary0101010
VIVA-VOCE QUESTIONS:
1. What is Armstrong number?
2. How convert decimal number in to binary?
3. The operator to get remainder in division process?
4. What is array?
5. What is the functionality of power( )?
37
C LAB MANUAL
LENDI INSTITUTE OF ENGINEERING & TECHNOLOGY – DEPARTMENT OF CSE
EXERCISE -7
AIM: Write a C Program to compute the values of sin x and cos x and ex values using Series
expansion. (Use factorial function)
DESCRIPTION:
The expansions of the series
1. sin(x): x - (1/3!)x3 + (1/5!)x5 - (1/7!)x7+…
2. cos(x): 1 - (1/2!)x2 + (1/4!)x4 - (1/6!)x6+…
3. ex= 1 + x + x2/2! + x3/3! + x4/4! + ...
Here we can use factorial function and for loop to compute the series.
6.1 read Enter name of the subject and marks respectively
STEP-7. Print Displaying Information
STEP-8. for(i = 0; i < noOfRecords ; ++i) then
STEP-9. Print (ptr+i)->subject, (ptr+i)->marks
STEP-10. Stop
SAMPLE OUTPUT:
Enter number of records: 2
Enter name of the subject and marks respectively:
51
C LAB MANUAL
LENDI INSTITUTE OF ENGINEERING & TECHNOLOGY – DEPARTMENT OF CSE
Programming
22
Enter name of the subject and marks respectively:
Structure
33
Displaying Information:
Programming 22
Structure 33
52
C LAB MANUAL
LENDI INSTITUTE OF ENGINEERING & TECHNOLOGY – DEPARTMENT OF CSE
EXERCISE- 9C
AIM: Write a C Program to Add Two Complex Numbers by Passing Structure to a Function
DESCRIPTION: C program to add two complex numbers: this program calculate the sum of
two complex numbers which will be entered by the user and then prints it. User will have to
enter the real and imaginary parts of two complex numbers. In our program we will add real
parts and imaginary parts of complex numbers and prints the complex number, i is the symbol
used for iota. For example if user entered two complex numbers as (1 + 2i) and (4 + 6 i) then
output of program will be (5+8i). A structure is used to store complex number.
ALGORITHM:
STEP-1. Start
STEP-2. Create structure with complex
STEP-3. Declare real, imag
STEP-4. Read comple and imaginary pares
STEP-5. Print temp.real = n1.real + n2.real;
STEP-6. Print temp.imag = n1.imag + n2.imag;
STEP-7. Stop
SAMPLE OUTPUT:
For 1st complex number
Enter real and imaginary part respectively: 2.3
4.5
For 2nd complex number
Enter real and imaginary part respectively: 3.4
5
Sum = 5.7 + 9.5i
VIVA-VOCE QUESTIONS:
1. What is the Structure?
2. What is the Union?
3. What is the difference between structure and union?
4. What is the Dynamic memory Allocation?
53
C LAB MANUAL
LENDI INSTITUTE OF ENGINEERING & TECHNOLOGY – DEPARTMENT OF CSE
5. What is the Bit Field?
6. What is the Use of typedef ?
54
C LAB MANUAL
LENDI INSTITUTE OF ENGINEERING & TECHNOLOGY – DEPARTMENT OF CSE
EXERCISE 10(A)
AIM: Write a C Program to Access Elements of an Array Using Pointer
DESCRIPTION: A pointer is a variable which stores the address. One can access the value at
the address by using value at the address operator(*).First read the array and then assign the
address of the array to a pointer and access its value using value at the address. As per C
language
a[i]=*(a+i)
ALGORITHM:
INPUT: Read N Numbers using array
OUTPUT: Print N Numbers using pointers
STEP-1: Start
STEP-2: Read array a[500],n
STEP-3: Initilaize i=0
STEP-4: Loop 1(i<n)
Read a[i]
i++
Repeat loop1
STEP-5: Loop 2(i<n)
Print using pointer *(a+i)
i++
Repeat loop2
STEP-6: Stop
55
C LAB MANUAL
LENDI INSTITUTE OF ENGINEERING & TECHNOLOGY – DEPARTMENT OF CSE
SAMPLE OUTPUT:
$ ./a.out
Enter the range : 5
Enter the elements in the array : 23 10 56 78 12
Elements in the array using pointer: 23 10 56 78 12
VIVA-VOCE QUESTIONS:
1. How we can read or print the array elements?
2. How can we represent an array using a pointer?
3. What is the difference between array and pointer?
4.Write pointer in terms of an array?
5.How can we retrieve address to an array?
56
C LAB MANUAL
LENDI INSTITUTE OF ENGINEERING & TECHNOLOGY – DEPARTMENT OF CSE
EXERCISE 10(B)
AIM: Write a C Program to find the sum of numbers with Arrays and Pointers.
DESCRIPTION: First assign the address of array to a pointer. Then access the elements of the
array using pointers and add them. Here we can use arrays, pointers, for loop to make the
program.
ALGORITHM:
INPUT: Read N Numbers using array
OUTPUT: Print sum of N Numbers using pointers
STEP-1: Start
STEP-2: Read array a[500], pointer *p, n
STEP-3: Initilaize i=0,sum=0
STEP-4: Loop 1(i<n)
Read a[i]
i++
Repeat loop1
STEP-5: Store array in pointer p=a
STEP-6: Loop 2(i<n)
Sum=sum+ *p
p++
i++
Repeat loop2
STEP-7: Display sum
STEP-8: Stop
57
C LAB MANUAL
LENDI INSTITUTE OF ENGINEERING & TECHNOLOGY – DEPARTMENT OF CSE
SAMPLE OUTPUT:
$ ./a.out
Enter the range : 5
Enter the elements in the array : 1 2 3 4 5
The sum of elements using pointer: 15
VIVA-VOCE QUESTIONS:
1. Define Pointer with Syntax and example?
2. What is the procedure to store an array address to a pointer?
3. What are the uses of Pointers?
4. What is a pointer value and address?
5. How are Pointer Variables initialized?
58
C LAB MANUAL
LENDI INSTITUTE OF ENGINEERING & TECHNOLOGY – DEPARTMENT OF CSE
EXERCISE 11(A)
AIM: Write a C program to find sum of n elements entered by user. To perform this program,
allocate memory dynamically using malloc() function.
DESCRIPTION: First read the number elements then allocate memory for those many
elements using dynamic memory using memory allocation function malloc( ) and pointers. Now
we can access the elements and do summation of them.
malloc( ): this is the dynamic memory allocation function used to allocate block of memory.
Header: #include<stdli.h>
Prototype: void* malloc(int n);
ALGORITHM:
INPUT: Read N Numbers using malloc( )
OUTPUT: Print sum of N Numbers using pointers
STEP-1: Start
STEP-2: Read pointer *p, n
STEP-3: Allocate p=(int*)malloc(n*sizeof(int))
STEP-4: Initilaize i=0,sum=0
STEP-5: Loop 1(i<n)
Read p+i
i++
Repeat loop1
STEP-6: Loop 2(i<n)
Sum=sum+ *p
p++
i++
59
C LAB MANUAL
LENDI INSTITUTE OF ENGINEERING & TECHNOLOGY – DEPARTMENT OF CSE
Repeat loop2
STEP-7: Display sum
STEP-8: Stop
SAMPLE OUTPUT:
$ ./a.out
Enter the range : 5
Enter the elements in the array : 1 2 3 4 5
The sum of elements using pointer: 15
VIVA-VOCE QUESTIONS:
1. What are the functions used in dynamic memory management?
2. What is the header file of malloc( )?
3. What is the invalid pointer Arithmetic?
4. What is the purpose of free?
5. What are the pointer declarations used in C?
60
C LAB MANUAL
LENDI INSTITUTE OF ENGINEERING & TECHNOLOGY – DEPARTMENT OF CSE
EXERCISE 11(B)
AIM: Write a C program to find sum of n elements entered by user. To perform this program,
allocate memory dynamically using calloc() function. Understand the difference between the
above two programs.
DESCRIPTION: First read the number elements then allocate memory for those many
elements using dynamic memory using memory allocation function calloc( ) and pointers. Now
we can access the elements and do summation of them.
calloc( ): this is the dynamic memory allocation function used to allocate memory to array of
elements. And makes them initialized to zeros.
Header: #include<stdli.h>
Prototype: void* calloc(int n,int size);
ALGORITHM:
INPUT: Read N Numbers using calloc( )
OUTPUT: Print sum of N Numbers using pointers
STEP-1: Start
STEP-2: Read pointer *p, n
STEP-3: Allocate p=(int*)calloc(n,sizeof(int))
STEP-4: Initilaize i=0,sum=0
STEP-5: Loop 1(i<n)
Read p+i
i++
Repeat loop1
STEP-6: Loop 2(i<n)
Sum=sum+ *p
p++
61
C LAB MANUAL
LENDI INSTITUTE OF ENGINEERING & TECHNOLOGY – DEPARTMENT OF CSE
i++
Repeat loop2
STEP-7: Display sum
STEP-8: Stop
SAMPLE OUTPUT:
$ ./a.out
Enter the range : 5
Enter the elements in the array : 1 2 3 4 5
The sum of elements using pointer: 15
VIVA-VOCE QUESTIONS:
1. What is the difference between malloc( ) and calloc( ) Functions?
2. What is the header file of calloc( )?
3. What is pointer address Arithmetic?
4. What is the purpose of realloc?
5. What is a pointer to pointer?
62
C LAB MANUAL
LENDI INSTITUTE OF ENGINEERING & TECHNOLOGY – DEPARTMENT OF CSE
EXERCISE 12(A)
AIM: Implementation of string manipulation operations with library function.
Copy
Concatenate
Length
Compare
DESCRIPTION: : The string library consists of strcpy( ), strcat( ), strlen( ), strcmp( ) functions
Copy: It is used copy one string to the other.
Header: #include<string.h>
Prototype: strcpy(char* destination,char* source)
Concatenate: The string library consists of strcat( ) function which is used to concatenate or
combine one string with the other.
Header: #include<string.h>
Prototype: strcat(char* source,char* destination)
In the above destination is appended to the source.
Length: Length of the string is the number of characters in the string.The string library consists
of strlen( ) function which is used to get length of the string.
Header: #include<string.h>
Prototype: int strlen(char* string)
Returns : Length of the string.
String Comparission: The string library consists of strcmp( ) function which is used to compare
two strings and results their relation.
Header: #include<string.h>
Prototype: int strcmp(char* source,char* destination)
63
C LAB MANUAL
LENDI INSTITUTE OF ENGINEERING & TECHNOLOGY – DEPARTMENT OF CSE
Return Value: Returns 0 if they are equal
Otherwise returns asscii difference between characters where they
differ.
ALGORITHM:
INPUT: 3 Strings
OUTPUT: Copied String, String length, Concatenated String and Compared Strings
STEP-1: Start
STEP-2: Read s1,s2,s3
STEP-3: Compute l1= strlen(s1)
STEP-4: Print l1
STEP-5: Compute s=strcpy(s3,s1)
STEP-6: Print s
STEP-7: Compute e= strcmp(s1,s2)
STEP-8: if e==0 go to step 9 otherwise go to step 10
STEP-9: Display “strings are equal”
STEP-10: Display “Strings are not equal”
STEP-11: Display “after concatenation of two strings s1 and s2 is “ strcat(s1,s2)
STEP-12: Stop
SAMPLE OUTPUT:
$ ./a.out
Enter three strings
64
C LAB MANUAL
LENDI INSTITUTE OF ENGINEERING & TECHNOLOGY – DEPARTMENT OF CSE
Lendi
Engineering
College
Length of s1 is 5 After copying 1st string into 3rd string is Lendi The two Strings s1 and s2 are not equal After adding first two string LendiEngineering
VIVA-VOCE QUESTIONS:
1. Define a String?
2. Header used for String Functions?
3. List String Handling Functions or String Manipulation Functions?
4.What is the return type of strcmp( ) and strlen( )?
5.How many arguments are there in strcat( ) and strcpy( ) functions?
65
C LAB MANUAL
LENDI INSTITUTE OF ENGINEERING & TECHNOLOGY – DEPARTMENT OF CSE
EXERCISE 12(B)
AIM: Implementation of string manipulation operations without using library function.
Copy
Concatenate
Length
Compare
DESCRIPTION: :
Copy: As the string terminates with the null character(‘\0’) take each character from the first
string until you get null character and make it copied to corresponding position of the second
string. So that the strings are copied.
ALGORITHM:
INPUT: 1 String
OUTPUT: Copied one String to other.
STEP-1: Start
STEP-2: Read a string s1
STEP-3: Initialize i=0
STEP-4: If s1[i]!=‟\0” then
s2[i]=s1[i]
Increment i
STEP-5: Otherwise s2[i]=‟\0”
STEP-6: Print s2
STEP-7: Stop
66
C LAB MANUAL
LENDI INSTITUTE OF ENGINEERING & TECHNOLOGY – DEPARTMENT OF CSE
SAMPLE OUTPUT:
$ ./a.out
Enter a string : malayalam
The copied string is malayalam
Concatenate: String concatenation is appending second string at the end of first string. First
reach end of the first string from where copy second string into first string.
ALGORITHM:
INPUT: 2 Strings
OUTPUT: Two Strings will Append
STEP-1: Start
STEP-2: Read strings s1,s2
STEP-3: Initilaize i=0, j=0
STEP-4: Loop 1(s1[i]!=’\0’)
i++
Repeat loop1
STEP-5: Loop2 (s2[j]!=’\0’)
s1[i]=s2[j]
i++
j++
Repeat loop2
STEP-6: s1[i]=’\0’
STEP-7: Display s1
STEP-8: Stop
67
C LAB MANUAL
LENDI INSTITUTE OF ENGINEERING & TECHNOLOGY – DEPARTMENT OF CSE
SAMPLE OUTPUT:
$ ./a.out
Enter string a: rose
Enter string b: flower
The edited string is: roseflower
Length: Length of the string is the number of characters in the string. Scanning the string
character by character and make the count until you get null character.
ALGORITHM:
INPUT: 1 String
OUTPUT: Length of the String
STEP-1: Start
STEP-2: Initialize len=0
STEP-3: Read the string s1
STEP-4: Initialize I=0
STEP-5: If s1[i]!=‟\0‟ otherwise go to
STEP-6: Increment len
STEP-7: Display len
STEP-8: Stop
SAMPLE OUTPUT:
$ ./a.out
Enter a string : malayalam
The length of the string is 9
68
C LAB MANUAL
LENDI INSTITUTE OF ENGINEERING & TECHNOLOGY – DEPARTMENT OF CSE
String Comparission: If the lengths of the strings are same then we can go for comparison of
them. Such that the strings are compared character by character until end or there is no match.
ALGORITHM:
INPUT: 2 Strings
OUTPUT: Compare two Strings
STEP-1: Start
STEP-2: Read strings s1,s2
STEP-3: Initilaize i=0,temp=0
STEP-4: Loop 1(s1[i]!=’\0’|| s2[i]!=’\0’)
If(s1[i]!= = s2[i])
temp=i
i++
Repeat loop1
STEP-5: If (temp= = i)
Display the two strings are equal
STEP-6: Otherwise
Display the two strings are not equal
STEP-7: Stop
SAMPLE OUTPUT:
$ ./a.out
Enter the string1 : malayalam
Enter the string2 : malayalam
The two strings are equal
69
C LAB MANUAL
LENDI INSTITUTE OF ENGINEERING & TECHNOLOGY – DEPARTMENT OF CSE
VIVA-VOCE QUESTIONS:
1. What is the difference between strings and arrays?
2. What is \0 in a string?
3. What is null character in a string?
4.What is the meaning of character array?
5.What is the difference between character array and integer array?
70
C LAB MANUAL
LENDI INSTITUTE OF ENGINEERING & TECHNOLOGY – DEPARTMENT OF CSE
EXERCISE 13(A)
AIM: Write a C programming code to open a file and to print its contents on screen.
DESCRIPTION: It is the program to display the content of the file. First open the file using
fopen( ) and read the file character by character using fgetc( ) until end of the file is reached and
after reading charters display them using printf( ).
fopen( ): This is the function to open a file.
Header: #include<stdio.h>
Prototype: FILE* fopen(char* fname,char* mode)
Return: On success return FILE pointer and On failure returns NULL.
fgetc( ): Used to read a character from an opened file.
Header: #include<stdio.h>
Prototype: int fgetc(FILE* fp)
Return:On success returns next character and EOF on error or end of the file.
ALGORITHM:
INPUT: One file
OUTPUT: Displaying the file content.
STEP-1:Start
STEP-2:Read filename for source
STEP-3: Open source file in read mode into fp
STEP-4:If fp equal to NULL then
Display file not opened, go to step 8
Else
71
C LAB MANUAL
LENDI INSTITUTE OF ENGINEERING & TECHNOLOGY – DEPARTMENT OF CSE
Loop (char= fgetc(fp1)) != EOF )
Display char
repeat Loop
STEP-6: Close file pointer (fp)
STEP-7:Stop
SAMPLE OUTPUT:
$ ./a.out
Enter the file : x.txt
The content of the file
This is my first file handling program.
VIVA-VOCE QUESTIONS:
1.What is the file mode to read a file?
2. What is the header file of file handling functions?
3. Give the syntax to open a file?
4.What is the usage of fgetc( ) function?
5What is EOF?
72
C LAB MANUAL
LENDI INSTITUTE OF ENGINEERING & TECHNOLOGY – DEPARTMENT OF CSE
EXERCISE 13(B)
AIM: Write a C program to copy files.
DESCRIPTION: This is the program to copy file content in to another file. Open the first file in
read mode and second file in write mode. Read first file character by character using fgetc( )
until end of the file and write the read character into second file using fputc( ).
fputc( ): This is the function used to write a character into an opened file.
Header: #include<stdio.h>
Prototype: int fputc(char ch,FILE* fp)
Return: On success return character written and On failure returns EOF.
ALGORITHM:
INPUT: Two files source and destination
OUTPUT: Source file content are copied to destination file
STEP-1:Start
STEP-2:Read filename for source
STEP-3:Read filename for destination
STEP-4:Open source file in read mode into fp1
STEP-5: Open destination file in write mode into fp2
STEP-6: If fp1 or fp2 equal to NULL then
Display file not opened, go to step 9
Else
Loop (char= fgetc(fp1)) != EOF )
fputc(char, fp2)
73
C LAB MANUAL
LENDI INSTITUTE OF ENGINEERING & TECHNOLOGY – DEPARTMENT OF CSE
repeat Loop
STEP-7:Close file pointer(fp1)
STEP-8:Close file pointer (fp2)
STEP-9:Stop
SAMPLE OUTPUT:
$ ./a.out
Enter the file1: source.c
Enter the file2: Destination.c
Contents are successfully copied.
VIVA-VOCE QUESTIONS:
1.What is the file mode to write a file?
2. What are the file management functions available in C
3. Give the syntax to close a file?
4.What is the usage of fputc( ) function?
5.What is the difference between text file and binary file?
74
C LAB MANUAL
LENDI INSTITUTE OF ENGINEERING & TECHNOLOGY – DEPARTMENT OF CSE
EXERCISE 14(A)
AIM: Write a C program merges two files and stores their contents in another file.
DESCRIPTION: The process of combining two files into third file is said as merging the files.
First open first two files in read mode and third file in write mode. Then Copy first file content
into to third file followed by second file.
ALGORITHM:
INPUT: Three files source1, source2 and destination
OUTPUT: Source files content are merged into destination file
STEP-1:Start
STEP-2:Read filename for source 1
STEP-3: Read filename for source 2
STEP-4:Read filename for destination
STEP-5: Open source file 1 in read mode into fp1
STEP-6: Open source file 2 in read mode into fp2
STEP-7: Open destination file in write mode into fp3
STEP-8:
If fp1 or fp2 or f3 equal to NULL then
Display file not opened, go to step 12
Else
Loop 1 (char= fgetc(fp1)) != EOF )
fputc(char, fp3)
Repeat Loop1
75
C LAB MANUAL
LENDI INSTITUTE OF ENGINEERING & TECHNOLOGY – DEPARTMENT OF CSE
Loop 2 (char= fgetc(fp2)) != EOF )
fputc(char, fp3)
Repeat loop2
STEP-9:Close file pointer(fp1)
STEP-10:Close file pointer (fp2)
STEP-11: Close file pointer (fp3)
STEP-12: Stop
SAMPLE OUTPUT:
$ ./a.out
Enter the file1: source1.c
Enter the file2: source2.c
Enter the file3: Destination.c
Contents are successfully merged in destination file.
VIVA-VOCE QUESTIONS:
1.What is the file mode to append a file?
2. What are the file modes in C?
3. What are the different types of files?
4.How many arguments are there in fopen( ) function and explian?
5.What is the function to close all files?
76
C LAB MANUAL
LENDI INSTITUTE OF ENGINEERING & TECHNOLOGY – DEPARTMENT OF CSE
EXERCISE 14(B)
AIM: Write a C program to delete a file.
DESCRIPTION: Deleting a file means removing the file. This can be done using
remove ( ).
remove ( ): This is the function used to delete a file.
Header: #include<stdio.h>
Prototype: int remove(char * filename)
Return Value: On success zero and -1 on failure
ALGORITHM:
INPUT: Path of the file to be deleted
OUTPUT: A message whether the file is deleted or not.
STEP-1:Start
STEP-2: Read file path in p
STEP-3: Display file path
STEP-4: x= remove (p)
STEP-5: If (x==0)
Display file is deleted successfully
Otherwise
Display file deletion error
STEP-6:Stop
SAMPLE OUTPUT:
$ ./a.out
77
C LAB MANUAL
LENDI INSTITUTE OF ENGINEERING & TECHNOLOGY – DEPARTMENT OF CSE
Enter the file: x.txt
File is deleted successfully
VIVA-VOCE QUESTIONS:
1.What is the function to delete a file?
2. What is the header file of remove( ) function?
3. What is the error function in files?
4.How many arguments are there in remove( ) function and explian?
5.What is the return type of remove( ) function?
78
C LAB MANUAL
LENDI INSTITUTE OF ENGINEERING & TECHNOLOGY – DEPARTMENT OF CSE
EXERCISE 15(A)
AIM: System Assembling, Disassembling and identification of Parts / Peripherals
INTRODUCTION TO COMPUTER:
Computer is an electronic device which takes the input information from the input device
and generates the output information and it will be displayed on the output. It enables arithmetic
computations, data processing, information management (storage) and knowledge reasoning in
an efficient manner. The word computer is derived from the word compute which means „to
calculate. So a computer generally considered to be calculating device that perform operations at
very faster rates.
BLOCK DIAGRAM OF COMPUTER
Basically the computer system has three major components. These are
System Unit
Central Processing Unit (Processor)
79
C LAB MANUAL
LENDI INSTITUTE OF ENGINEERING & TECHNOLOGY – DEPARTMENT OF CSE
Memory Unit. (Main memory and Auxiliary storage).
Input Unit.
Output Unit
INPUT UNIT
This unit contains devices with the help of which we enter data into computer. This unit
makes link between user and computer. The input devices translate the information into the
form understandable by computer.
CPU (CENTRAL PROCESSING UNIT)
CPU is considered as the brain of the computer. CPU performs all types of data
processing operations. It stores data, intermediate results and instructions (program). It controls
the operation of all parts of computer.
CPU itself has following three components
ALU(Arithmetic Logic Unit)
Memory Unit
Control Unit
ALU (ARITHMETIC LOGIC UNIT)
This unit consists of two subsections namely
Arithmetic section
Logic Section
Arithmetic Section
Function of arithmetic section is to perform arithmetic operations like addition,
subtraction, multiplication and division. All complex operations are done by making repetitive
use of above operations.
Logic Section
Function of logic section is to perform logic operations such as comparing, selecting,
matching and merging of data.
80
C LAB MANUAL
LENDI INSTITUTE OF ENGINEERING & TECHNOLOGY – DEPARTMENT OF CSE
MEMORY OR STORAGE UNIT
It stores all the data and the instructions required for processing.
It stores intermediate results of processing.
It stores final results of processing before these results are released to an output device.
All inputs and outputs are transmitted through main memory (RAM).
CONTROL UNIT
It is responsible for controlling the transfer of data and instructions among other units of
a computer.
It manages and coordinates all the units of the computer.
It obtains the instructions from the memory, interprets them, and directs the operation of
the computer.
It communicates with Input / Output devices for transfer of data or results from storage.
It does not process or store data.
OUTPUT UNIT:
Output unit consists of devices with the help of which we get the information from
computer. This unit is a link between computer and users. Output devices translate the
computer's output into the form understandable by users.
ROM AND RAM
A ROM chip is non-volatile storage and does not require a constant source of power to
retain information stored on it. When power is lost or turned off, a ROM chip will keep the
information stored on it. A RAM chip is volatile and requires a constant source of power to
retain information. When power is lost or turned off, a RAM chip will lose the information
stored on it. Other differences between a ROM and a RAM chip include:
A ROM chip is used primarily in the start up process of a computer, whereas a RAM chip
is used in the normal operations of a computer after starting up and loading the operating
system.
Writing data to a ROM chip is a slow process, whereas writing data to a RAM chip is a
faster process. A RAM chip can store multiple gigabytes (GB) of data, up to 16 GB or
81
C LAB MANUAL
LENDI INSTITUTE OF ENGINEERING & TECHNOLOGY – DEPARTMENT OF CSE
more per chip. A ROM chip typically stores only several megabytes (MB) of data, up to 4
MB or more per chip.
AIM: To identify the peripherals of a computer.
Hardware is the physical appearance of the devices or tools. It is what which we can
touch and feel. Computer Hardware consists of the Monitor, CPU, Keyboard, Mouse and all
other devices connected to the computer either externally or internally.A typical computer
(personal computer, PC) consists of a desktop or tower case (chassis) and the following parts:
1. Cabinet:
a. It is used to install all hardware devices like(mother board, SMPS, HDD,CD
ROM, FDD)
b. It has Start, Restart Button, Led‟s, Audio and USB Connecters are available at
front side.
2. Monitor:
a. Monitor of a computer is like a television screen.
b. It displays text characters and graphics in colors or in shades of grey.
c. The monitor is also called as screen or display or CRT (cathode ray tube).
In the monitor the screen will be displayed in pixels format.
i. 800 by 600 pixels
ii. 1024 by 768 pixels
3. Key Board: a. Key board is like a type writer, which contains keys to feed the data or information into the
computer
b. Keyboards are available in two modules. These are
i. standard key board with 83-88 keys
ii. Enhanced key board with 104 keys or above
4. Mouse:
a. Every mouse has one primary button (left button) and one secondary button (right
button).
82
C LAB MANUAL
LENDI INSTITUTE OF ENGINEERING & TECHNOLOGY – DEPARTMENT OF CSE
b. The primary button is used to carry out most tasks, where as secondary button is used in
special cases you can select commands and options.
5. Printer:
a. A device that prints images (numbers, alphabets, graphs, etc…) on paper is known as Printer.
b. We have different types of printers to take printouts. These are as follows:
i. Dot matrix printer
ii. Inkjet printer
iii.Laser printer
6. Speakers:
a. Speakers make your system much more delightful to use entertain you while you are
working on computer
7. Scanner :
a. Scanner used to scan images and text
8. System board/Motherboard
a. This is the major part of the PC hardware
b. It manages all transactions of data between CPU peripherals.
c. which holds the Processor, Random Access Memory and other parts, and
has slots for expansion cards
d. It is rectangle shape
9. Socket 478:
a. It use 478 – PIN MICROPGA package it is used installing CPU
b. It is square type design.
83
C LAB MANUAL
LENDI INSTITUTE OF ENGINEERING & TECHNOLOGY – DEPARTMENT OF CSE
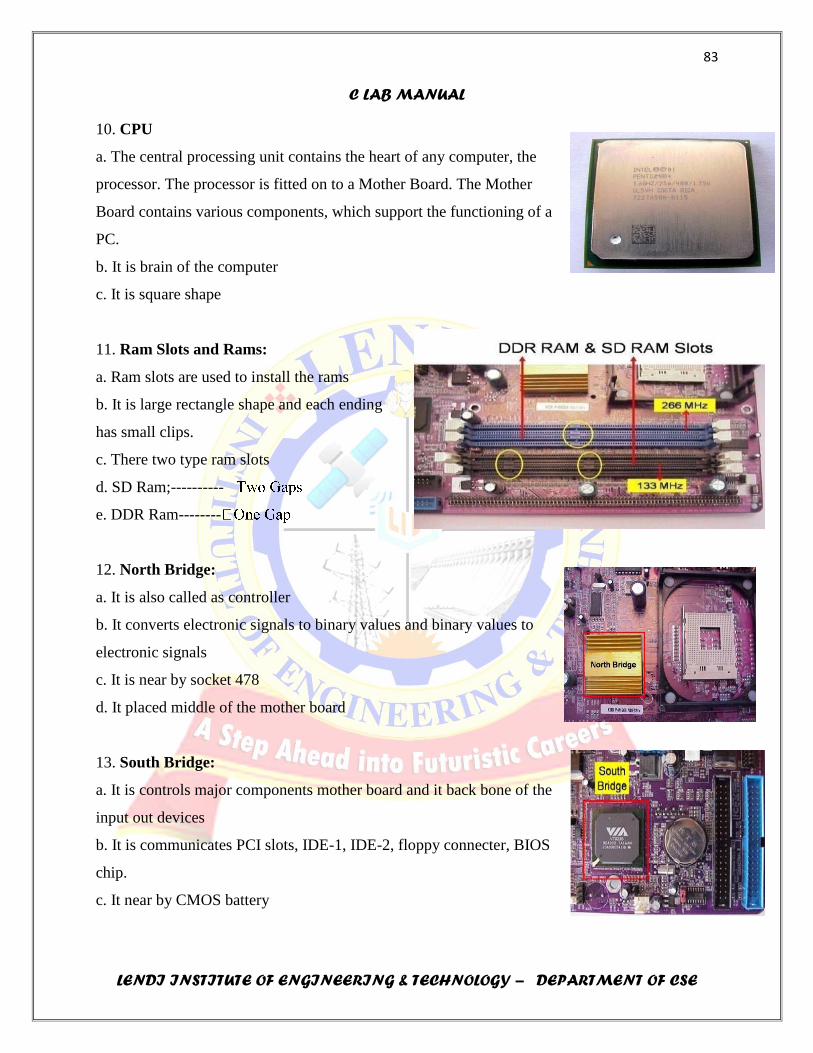
10. CPU
a. The central processing unit contains the heart of any computer, the
processor. The processor is fitted on to a Mother Board. The Mother
Board contains various components, which support the functioning of a
PC.
b. It is brain of the computer
c. It is square shape
11. Ram Slots and Rams:
a. Ram slots are used to install the rams
b. It is large rectangle shape and each ending
has small clips.
c. There two type ram slots
d. SD Ram;----------
e. DDR Ram--------
12. North Bridge:
a. It is also called as controller
b. It converts electronic signals to binary values and binary values to
electronic signals
c. It is near by socket 478
d. It placed middle of the mother board
13. South Bridge:
a. It is controls major components mother board and it back bone of the
input out devices
b. It is communicates PCI slots, IDE-1, IDE-2, floppy connecter, BIOS
chip.
c. It near by CMOS battery
84
C LAB MANUAL
LENDI INSTITUTE OF ENGINEERING & TECHNOLOGY – DEPARTMENT OF CSE
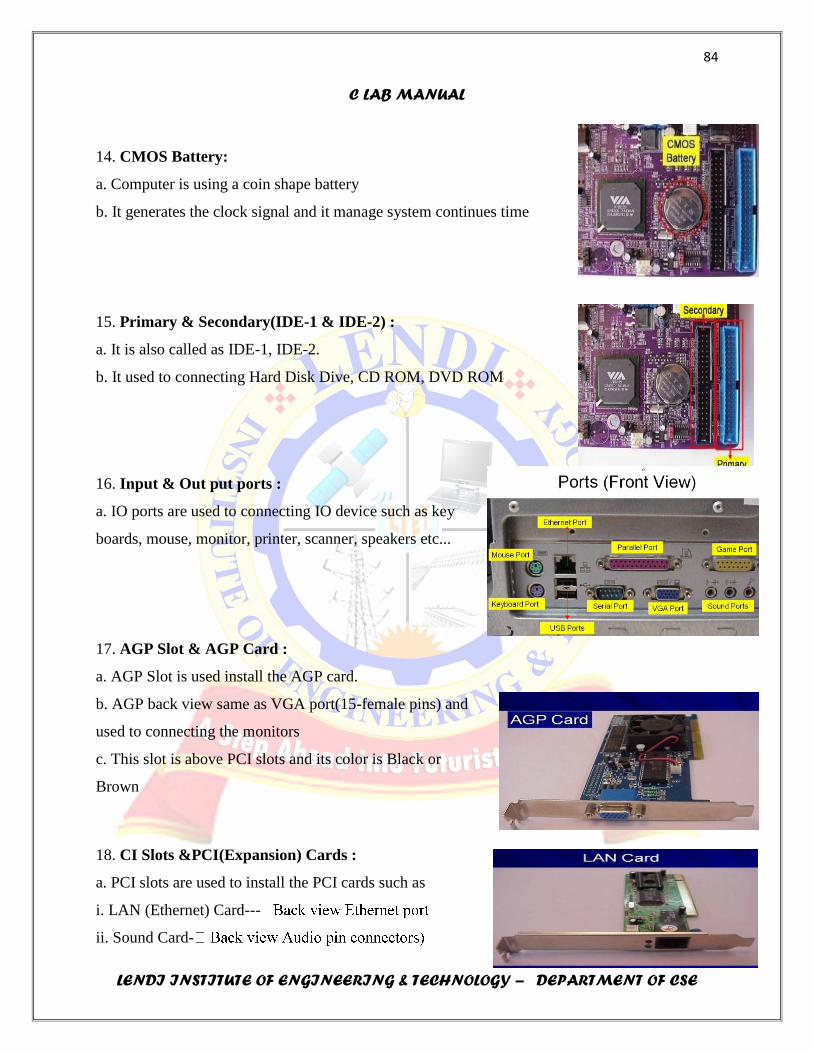
14. CMOS Battery:
a. Computer is using a coin shape battery
b. It generates the clock signal and it manage system continues time
15. Primary & Secondary(IDE-1 & IDE-2) :
a. It is also called as IDE-1, IDE-2.
b. It used to connecting Hard Disk Dive, CD ROM, DVD ROM
16. Input & Out put ports :
a. IO ports are used to connecting IO device such as key