16
Dental Radiography Series Exposure and Processing for dental film radiography.

Den
tal R
adio
grap
hy S
erie
s
Exposure and Processingfor dental film radiography.

Like drugs, sharp instruments and other hazardous materials in the dental office, x-ray radiation must be handled carefully.
You can produce radiographs of superior quality with minimum exposure by following the five basic rules:
1. Switch to a faster film or film/screen system. For intraoral x-rays, INSIGHT. For extraoral x-rays, EVG, T-MAT G/RA with
LANEX Regular Screens.
2. Establish correct exposure time. Over- or underexposing Dental Film can create poor
density and contrast radiographs. This results in poor quality film and unnecessary radiation to the patient.
Quality diagnostic radiographs are essential in the practice of dentistry. Equally important is the need to keep expo-sure to a minimum for both the patient and the dental professional. To achieve quality radiographs with mini-mum exposure is your professional responsibility.
3. Maintain an adequate darkroom. Sensitivity of dental film demands strict attention to
darkroom conditions.
4. Process films properly. Excellent image quality requires strict attention
to recommended procedures, including time and temperature processing and daily replenishment of chemicals. Always observe good safety practices: wear rubber gloves, a rubber apron and glasses when mixing, replenishing, changing or disposing of chemicals.
5. Mount and view radiographs correctly. Viewing conditions are extremely important in
interpreting radiographs.
This document describes a planned and systematic approach to exposing and processing film radiographs; such an approach is essential for effective quality assurance.

Establish Correct Exposure Time 4 Be aware of the problem
6 Consult exposure guidelines for intraoral projections
8 Record correct exposure times for your machine Radiation and x-ray system and general compliance information Manufacturer’s responsibility
9 Radiation protection
Maintain an Adequate Darkroom 10 Eliminate light leaks Install an adequate safelight
11 Use quality processing chemicals For optimum results use Carestream Dental chemistry 12 Regulate water temperature Tips for automatic processors
Process Films Properly 12 Automatic processing recommendations for intraoral radiographs Practice good housekeeping
13 Unwrap films carefully At the end of each work day, as appropriate for your processor Maintain automatic processors Tips for manual processors Manual processing recommendations for intraoral radiographs
14 Use correct time-temperature development Practice good housekeeping Unwrap and clip films carefully Develop film properly
15 At the end of the each work day Mount and view radiographs correctly Follow good viewing practices

4
Establish Correct Exposure TimeBe aware of the problemAll persons are exposed to radiation in their daily lives. The National Council on Radiation Protection (NCRP) (1987a; 1987b; 1987c; 1989c; 1989d). NCRP has estimated the mean effective dose equivalent from all sources in the United States as 3.6 mSv y-1 (Figure 1). Approximately 3 mSv of this arises from naturally-occurring sources; these sources have been present since the beginning of the Earth. Only 0.6 mSv comes from man-made sources, most of which is from diagnostic exposure in the healing arts. Recent data from Switzerland indicate that dental x-rays contribute approximately one percent of the total dose from the healing arts (Aroua et al., 2002). Thus, dental radiation is a minor contributor to total population burden. However, appropriate measures are necessary to maintain dental radiation exposures ALARA.1
The total (rounded) is 3.6 mSv y-1. About 3 mSv of this is from naturally-occurring sources: 2 mSv from inhalation of radon and its radioactive decay products; 0.27 mSv from cosmic radiation; 0.28 mSv from radioactive materials in our surrounding earth, building materials, etc.; and 0.39 mSv from radioactive sources within our bodies. Most man-made radiation comes from diagnostic exposure in the healing arts (~0.5 mSv), with small quantities from occupational sources, consumer products such as smoke detectors and luminous watch dials and miscellaneous sources such as cosmic radiation exposure during air travel as a passenger (NCRP (1987b).
0.27 Cosmic
0.28 Terrestrial
0.39 Internal
0.39 Diagnostic X-ray
0.14 Nuclear Medicine
0.01 Occupational
0.08 Consumer Products
2.0 Radon
Figure 1 - U.S. average annual effective dose equivalent (per capita) from all sources in 1987
1NCRP (2004). National Council on Radiation Protection and Measurements. General Considerations, NCRP Report No. 145, (2), 7.
0.01 Miscellaneous

5
No individual shall be permitted to receive an occupational effective dose in excess of 50 mSv in any 1 y. The numerical value of the individual worker’s lifetime occupational effective dose shall be limited to 10 mSv times the value of his or her age in years.
Occupational equivalent dose shall not exceed 0.5 mSv in a month to the embryo or fetus for pregnant individuals, once pregnancy is known.
Mean nonoccupational effective dose to frequently or continuously exposed members of the public shall not exceed 1 mSv y-1 (excluding doses from natural background and medical care); infrequently exposed members of the public shall not be exposed to effective doses greater than 5 mSv in any year.2
Table 1 - Occupational doses in the healing arts industry, U.S., 1980a
Occupational Subgroup Number of Workers Mean Annual Whole-Body Dose (mSv)
Totalb Exposedc Totalb Exposedc
Hospital 126,000 86,000 1.4 2.0
Medical offices 155,000 87,000 1.0 1.8
Dental 259,000 82,000 0.2 0.7
Podiatry 8,000 3,000 0.1 0.3
Chiropractic 15,000 6,000 0.3 0.8
Veterinary 21,000 12,000 0.6 1.1
Total 584,000 276,000 0.7 1.5
aKumazawa et al., 1984.bAll workers with potential occupational exposure.cWorkers who received a measurable dose in any monitoring period during the year.
United States data at 5 y intervals from 1960 to 1980 plus that projected for 1985 were reported as dosimeter readings (Kumazawa et al., 1984) World estimates from 1975 to 1995 were reported as effective doses and are plotted at each 5 y interval (UNSCEAR, 2000). Dental workers to do not generally wear leaded aprons, so differences between dosimeter readings and effective doses may be small (Appendix C).
Dental facility design, x-ray equipment performance and operating procedures shall be such that no individual exposure exceeds these recommended dose limits.
Facility design, x-ray equipment performance and operating procedures should be established to maintain patient, occupational and public exposures as low reasonably achievable, economic and social factors being taken into account (the ALARA principle).3
3NCRP (2004). National Council on Radiation Protection and Measurements. Gen-eral Considerations, NCRP Report No. 145, (2), 10.
Figure 2 - Decline in mean occupational doses over recent decades for workers in all healing arts combined and dentistry.
2NCRP (2004). National Council on Radiation Protection and Measurements. Dose Limits, NCRP Report No. 145, (2.1), 9.
6
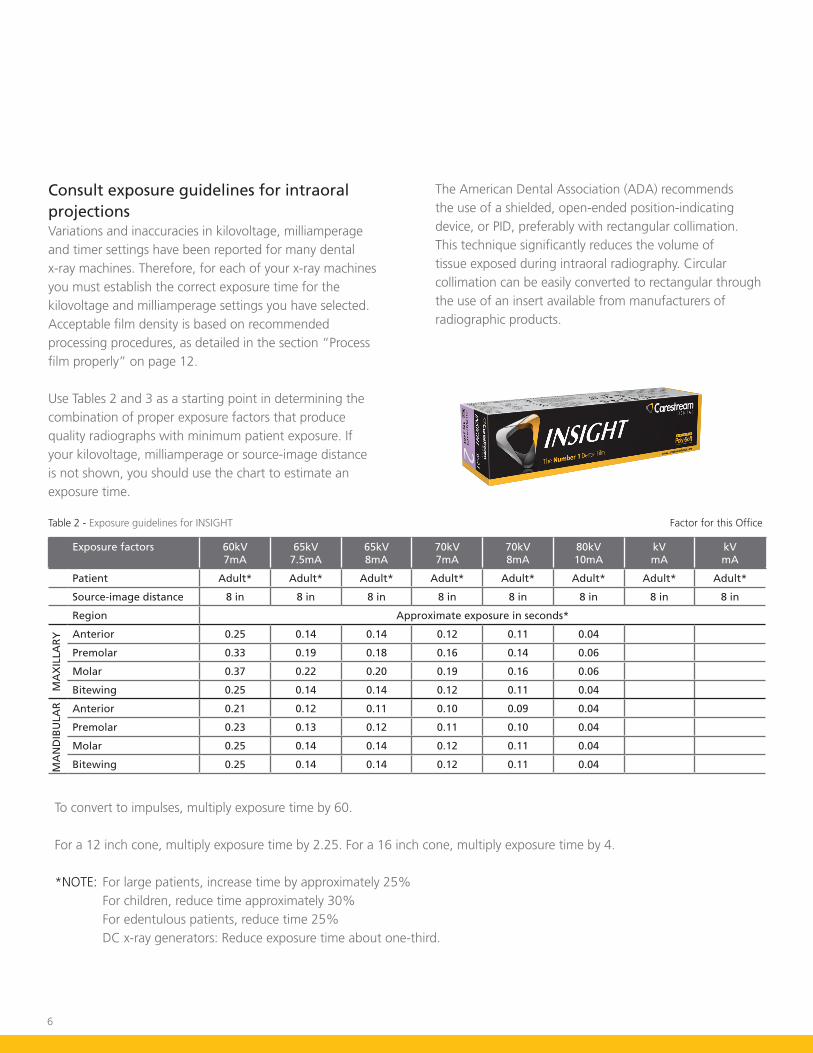
Consult exposure guidelines for intraoral projectionsVariations and inaccuracies in kilovoltage, milliamperage and timer settings have been reported for many dental x-ray machines. Therefore, for each of your x-ray machines you must establish the correct exposure time for the kilovoltage and milliamperage settings you have selected. Acceptable film density is based on recommended processing procedures, as detailed in the section “Process film properly” on page 12.
Use Tables 2 and 3 as a starting point in determining the combination of proper exposure factors that produce quality radiographs with minimum patient exposure. If your kilovoltage, milliamperage or source-image distance is not shown, you should use the chart to estimate an exposure time.
The American Dental Association (ADA) recommends the use of a shielded, open-ended position-indicating device, or PID, preferably with rectangular collimation. This technique significantly reduces the volume of tissue exposed during intraoral radiography. Circular collimation can be easily converted to rectangular through the use of an insert available from manufacturers of radiographic products.
Table 2 - Exposure guidelines for INSIGHT
Exposure factors 60kV 7mA
65kV 7.5mA
65kV 8mA
70kV7mA
70kV8mA
80kV10mA
kV mA
kVmA
Patient Adult* Adult* Adult* Adult* Adult* Adult* Adult* Adult*
Source-image distance 8 in 8 in 8 in 8 in 8 in 8 in 8 in 8 in
Region Approximate exposure in seconds*
Anterior 0.25 0.14 0.14 0.12 0.11 0.04
Premolar 0.33 0.19 0.18 0.16 0.14 0.06
Molar 0.37 0.22 0.20 0.19 0.16 0.06
Bitewing 0.25 0.14 0.14 0.12 0.11 0.04
Anterior 0.21 0.12 0.11 0.10 0.09 0.04
Premolar 0.23 0.13 0.12 0.11 0.10 0.04
Molar 0.25 0.14 0.14 0.12 0.11 0.04
Bitewing 0.25 0.14 0.14 0.12 0.11 0.04
MA
XIL
LAR
YM
AN
DIB
ULA
R
To convert to impulses, multiply exposure time by 60.
For a 12 inch cone, multiply exposure time by 2.25. For a 16 inch cone, multiply exposure time by 4.
*NOTE: For large patients, increase time by approximately 25% For children, reduce time approximately 30% For edentulous patients, reduce time 25% DC x-ray generators: Reduce exposure time about one-third.
Factor for this Office

7
Table 3 - Exposure guidelines for Ultra-speed
Exposure factors 60kV 7mA
65kV 7.5mA
65kV 8mA
70kV7mA
70kV8mA
80kV10mA
kV mA
kVmA
Patient Adult* Adult* Adult* Adult* Adult* Adult* Adult* Adult*
Source-image distance 8 in 8 in 8 in 8 in 8 in 8 in 8 in 8 in
Region Approximate exposure in seconds*
Anterior 0.55 0.32 0.30 0.27 0.24 0.10
Premolar 0.73 0.43 0.40 0.37 0.32 0.13
Molar 0.82 0.48 0.45 0.41 0.36 0.14
Bitewing 0.55 0.32 0.30 0.27 0.24 0.10
Anterior 0.46 0.27 0.25 0.23 0.20 0.08
Premolar 0.50 0.29 0.28 0.25 0.22 0.09
Molar 0.55 0.32 0.30 0.27 0.24 0.10
Bitewing 0.55 0.32 0.30 0.27 0.24 0.10
MA
XIL
LAR
YM
AN
DIB
ULA
R
To convert to impulses, multiply exposure time by 60.
For a 12 inch cone, multiply exposure time by 2.25. For a 16 inch cone, multiply exposure time by 4.
*NOTE: For large patients, increase time by approximately 25% For children, reduce time approximately 30% For edentulous patients, reduce time 25% DC x-ray generators: Reduce exposure time about one-third.
Factor for this Office

8
Record correct exposure times for your machineAfter exposing films at the selected exposure times and processing as recommended, view the finished radiographs. If they are too light or too dark, adjust exposure times accordingly. After you have established correct exposure factors for your machine, enter them below.
Kilovoltage settings _________________Milliamperage settings ______________Impulses or seconds ________________
Using:____________ 8” position-indicating device____________ 12” position-indicating device____________ 16” position-indicating device
NOTES: The exposure settings may have to be altered to compensate for such factors as size of the patient, age of the patient and region of the mouth being radiographed.
The end of the position-indicating device should be positioned as close to the patient’s face as possible.
Radiation and x-ray system safety and general compliance informationSafetyOccupational workers associated with x-ray work must be familiar with the recommendations of the Center for Devices and Radiological Health (CDRH), the National Council on Radiation Protection (NCRP), the International Commission on Radiation Protection (ICRP), and State and local regulators. Be sure that all personnel authorized to operate the x-ray system are familiar with the established regulations of the authorities named above. All personnel should be monitored to ensure compliance with recommended procedures.
Current sources of information include:• NCRP Report 145: Dental X-Ray Protection
• NCRP Report 147: Structural Shielding Design for Medical Imaging Facilities
• Current recommendations of the International Committee on Radiation Protection
• State or local requirements for Radiation protection
Although exposure to high levels of x-radiation may pose a health risk, x-ray equipment does not pose any danger when properly used. Be certain all operating personnel are properly educated concerning the hazards of radiation. Persons responsible for the system must understand the safety requirements and special warnings for x-ray operation. Review this manual and the manuals for each component in the system to become aware of all safety and operation requirements.
CAUTION: Ensure exposure parameters are properly adjusted within safety limits.
Occupational Exposure limits:
Whole body: 5 rem/year
Extremity: 50 rem/year
Declared Pregnant occupational Worker: 0.5 rem/gestation period
Manufacturer’s responsibilityAlthough this equipment incorporates protection against x-radiation other than the useful beam, practical design does not provide complete protection. Equipment design does not compel the operator or assistants to take the necessary precautions; nor does it prevent the possibility of improper use (authorized or unauthorized persons carelessly, unwisely, or unknowingly exposing themselves or others to direct or secondary radiation). Allow only authorized, properly trained personnel to operate this equipment.
Be certain that all individuals authorized to use the equipment are aware of the danger of excessive exposure to x-radiation.

9
Radiation protectionBecause exposure to high levels of x-radiation may pose a health risk, operators must ensure that they use all available methods to reduce their radiation dose to a level that is As Low As Reasonably Achievable, the so-called ALARA philosophy. This includes protecting themselves from the primary beam as well as scattered radiation. Protection from excessive amounts of exposure is accomplished using a combination of engineering and administrative controls.
• Shielding – Ensure sufficient shielding is present in the primary barriers protecting operators and the general public from the primary beam as well as scatter. Primary barriers may include walls, windows, doors, and protective enclosures housing the control panels. A properly qualified professional such as a Health Physicist or Medical Physicist should be consulted to determine the proper shielding thickness, configuration and construction of the x-ray facility, based on the expected operational parameters of the x-ray system.
• Portable Barriers and Lead Aprons – Portable barriers and lead aprons may be needed to protect personnel from scattered radiation if operators need to be in close contact with the patient. Ensure the shielding and aprons have sufficient lead equivalence, as determined by a qualified health or medical physicist and are maintained properly for maximum benefit.
• Distance – It is recommended to increase distance from an x-ray unit when operating, therefore it is important to have controls outside of the operatory.
• Procedures – always follow the procedures of your institution to ensure proper protection.
• Training – only trained personnel should be permitted to operate this x-ray equipment. Most regulatory agencies require that medical diagnostic procedures only be done by properly licensed individuals. Consult your state or local agencies for more information.
• Radiation Survey – The exterior of the x-ray facility (i.e., outside of the primary protective barrier) and control room should be monitored periodically to ensure that dose rates meet design objectives for allowable radiation exposures. Only calibrated equipment should be used by a qualified health or medical physicist for this survey.
• Personal Monitoring – Occupational workers using x-ray equipment should be monitored for radiation exposure to ensure that established controls are functioning properly and procedures are being followed. A common method of monitoring is use of personal monitoring dosimeter.
Personal monitoring dosimeters use x-ray sensitive materials enclosed in a holder that incorporates metal filters of varying degrees of transparency to x-ray radiation. Even though this device only measures the radiation reaching the area of the body on which it is worn, it provides an indication of the amount of radiation received. personal monitoring dosimeters can also be used as area dosimeters on the outside perimeter of the x-ray facility and control room to verify dose rates. personal monitoring dosimeters are available from a number of distributors. Consult your institution’s Radiation Safety Officer for further information.
IMPORTANT: Locate the x-ray system control panel behind protective shielding or lead screens for radiation protection to the operator, while maintaining visual and audible contact with the patient.

10
Maintain an adequate darkroomA well-equipped and properly configured darkroom helps assure high-quality radiographic images. To get your darkroom into shape, be sure to do the following:• Eliminate light leaks.
• Install proper safelighting.
• Use quality processing chemicals.
• Regulate water temperature.
Eliminate light leaksLight leaks cause fogging of films during processing, with substantial loss in detail and contrast.
To detect light leaks:1. Close and lock door.
2. Turn off all lights.
3. Let your eyes adjust to the dark for at least five minutes.
4. Look for light leaks.
5. Mark light leaks with chalk.
To eliminate light leaks:• Seal light leaks with black masking tape or
weatherstripping.
• Use double doors or heavy curtains.
DARKROOM TIP
Do you have a light leak?
Is your safelight too bright?
Take this simple test in your darkroom: With the door closed, regular lights out and safelight on, remove film from covering and place raw, unexposed film on the countertop. Place a coin on top of the film, wait two minutes and then process the film. If you see the coin outline on the processed film, your darkroom is too bright.
Install an adequate safelightA proper safelight provides ample lighting during processing, yet it is safe for sensitive film. Safelighting that is too bright will fog films.
Conventional lamps are available in several sizes and styles to accommodate your requirements. A frosted 15W bulb is recommended. All lamps should be equipped with a GBX-2 safelight filter. The deep ruby red filter is appropriate for all intraoral and extraoral dental x-ray films.
Recommendations for safelighting:• Place safelight at least 4’ (1.2 m) from the area where
film will be handled.
• Keep safelighting exposure as short as practical.
For conventional safelights:• Always use a frosted light bulb with wattage of 15W
or less.
• A GBX-2 safelight filter or ruby red safelight filter is recommended for use with both intraoral and extraoral dental films.
• The safelight filter is properly installed in the lamp when you can read the “GBX-2” on the surface of the filter.
• Check for cracked or faded filter and replace the filters as necessary.
11
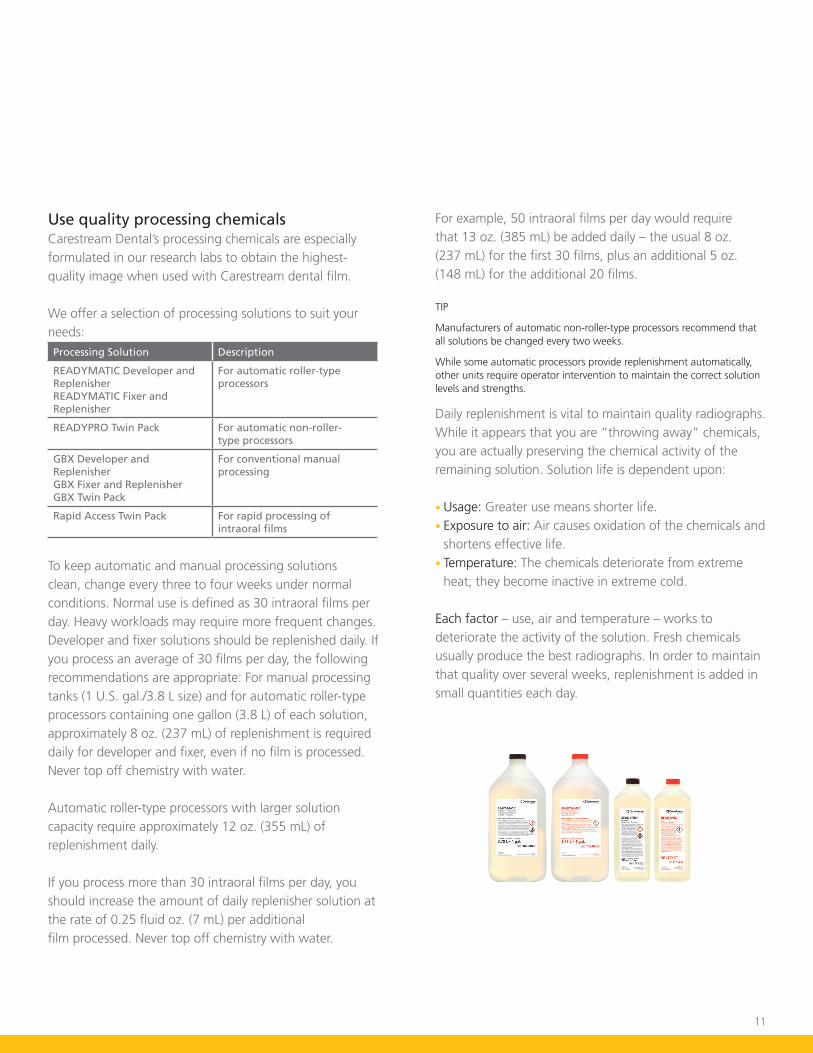
Use quality processing chemicalsCarestream Dental’s processing chemicals are especially formulated in our research labs to obtain the highest-quality image when used with Carestream dental film.
We offer a selection of processing solutions to suit your needs:Processing Solution Description
READYMATIC Developer and ReplenisherREADYMATIC Fixer and Replenisher
For automatic roller-type processors
READYPRO Twin Pack For automatic non-roller-type processors
GBX Developer and ReplenisherGBX Fixer and ReplenisherGBX Twin Pack
For conventional manual processing
Rapid Access Twin Pack For rapid processing of intraoral films
To keep automatic and manual processing solutions clean, change every three to four weeks under normal conditions. Normal use is defined as 30 intraoral films per day. Heavy workloads may require more frequent changes. Developer and fixer solutions should be replenished daily. If you process an average of 30 films per day, the following recommendations are appropriate: For manual processing tanks (1 U.S. gal./3.8 L size) and for automatic roller-type processors containing one gallon (3.8 L) of each solution, approximately 8 oz. (237 mL) of replenishment is required daily for developer and fixer, even if no film is processed. Never top off chemistry with water.
Automatic roller-type processors with larger solution capacity require approximately 12 oz. (355 mL) of replenishment daily.
If you process more than 30 intraoral films per day, you should increase the amount of daily replenisher solution at the rate of 0.25 fluid oz. (7 mL) per additional film processed. Never top off chemistry with water.
For example, 50 intraoral films per day would require that 13 oz. (385 mL) be added daily – the usual 8 oz. (237 mL) for the first 30 films, plus an additional 5 oz. (148 mL) for the additional 20 films.
TIP
Manufacturers of automatic non-roller-type processors recommend that all solutions be changed every two weeks.
While some automatic processors provide replenishment automatically, other units require operator intervention to maintain the correct solution levels and strengths.
Daily replenishment is vital to maintain quality radiographs. While it appears that you are “throwing away” chemicals, you are actually preserving the chemical activity of the remaining solution. Solution life is dependent upon:
• Usage: Greater use means shorter life.• Exposure to air: Air causes oxidation of the chemicals and
shortens effective life.• Temperature: The chemicals deteriorate from extreme
heat; they become inactive in extreme cold.
Each factor – use, air and temperature – works to deteriorate the activity of the solution. Fresh chemicals usually produce the best radiographs. In order to maintain that quality over several weeks, replenishment is added in small quantities each day.

12
Regulate water temperatureWater requirements vary among processors. Most processors need only cold water, a few need tempered water, and some need no water at all. If necessary, have some kind of temperature adjustment control for the incoming water.
Provide for constant water flow in the wash compartment during film processing. Automatic non-roller-type processors need water changed daily to avoid stagnation.
Tips for automatic processorsThe correct automatic processing equipment and proper procedures contribute to the quality of the radiograph. While automatic processing equipment will mechanically perform many of the procedures done during manual processing, follow the manufacturer’s recommendations for optimal results.
Process Films ProperlyFollow a set routine
At the beginning of each work day, as appropriate for your processor:1. Check to be sure there is a sufficient amount of chemicals in both replenishment containers, or add dental developer and replenisher and/or dental fixer and replenisher directly to working solutions.2. Turn power on.3. Turn water on to begin stabilizing the solution temperatures.4. In roller transport systems, insert one or more sheets of Carestream Dental’s roller transport cleanup film.
The amount of time required to complete the processing cycle and the temperature setting for the developer varies from processor to processor and is set by the manufacturer.
Automatic processing recommendations for intraoral radiographsIn the equipment available today, the time required for the complete cycle ranges from 4 minutes at 85 °F (29.5 °C) to 6-1/2 minutes at room temperature. Temperature and time in developer are inversely related: the higher the temperature, the shorter the time in the developer.
READYMATIC chemicals can be used in slower systems at room temperature as well as in faster systems at higher temperatures.
These values are provided only as examples to illustrate the relationship between cycle time and temperature. Follow the manufacturer’s recommendations when setting up your processor.
RECOMMENDED PRODUCTS
Intra-oral film: INSIGHT and Ultra-speed
Processing chemicals: READYMATIC Developer and Replenisher READYMATIC Fixer and Replenisher READYMATIC Chem Pack READYPRO Twin Pack
Practice good housekeeping• Wipe up spilled solutions immediately.• Clean rollers or transport
system as recommended by the processor manufacturer; rinse thoroughly before reinstalling in processor as residual cleaners may contaminate fresh chemicals.
• Run Carestream Dental’s roller transport cleanup film after you have turned the processor on to remove foreign matter (such as flecks of lint) that may have accumulated on the rollers during previous use. Use each sheet only once.

13
Unwrap films carefullyNOTE: Before unwrapping film, turn off the room light and turn on the safelight.
Observe these rules for unwrapping films:• Keep hands clean and dry.• Handle films by the edges to
avoid finger marks and abrasions.• Insert film in unit to begin
processing cycle using processor manufacturer’s recommendations on timing and placement.
At the end of each work day, as appropriate for your processor1. Turn off water to processing unit.2. Turn off power to processing unit or place in
standby mode.
Maintain automatic processorsAutomatic processors can do an excellent job of processing films, but they require an effective quality assurance program. You should follow a set routine to assure maximum performance, and establish a time schedule for the following regular maintenance:
• Check proper solution temperature.
• Maintain proper solution levels.
• Maintain activity of solutions by replenishing daily. Never add or top off with water.
• Perform routine preventive maintenance.• Keep working parts clean.• Use Carestream Dental’s roller transport clean-up film
each day. These are single use clean up sheets.
Tips for manual processorsProcess films properlyFollow a set routineAt the beginning of each work day:1. Turn on water to begin
stabilizing the solution temperatures.
2. Uncover chemicals. 3. Bring solutions to proper
levels by adding and replenishing as recommended.
4. Use a film hanger to check solution levels. Solutions must completely cover the section that holds the film; do not use clips that will not be fully immersed in the solution.
5. Stir the solutions thoroughly to establish an even temperature and concentration; use separate stirring rod for each solution (plastic or stainless steel rods – never wood).
Manual processing recommendations for intraoral radiographsQuality radiographs begin with the selection of film and processing solutions. It is important to remember that Carestream Dental products work best when used together. They have been the choice of dentists for many years.
The emulsion on Carestream Dental’s film is a precise coating of dry chemicals waiting to interact with our robust processing chemicals. INSIGHT and Ultra-speed in combination with GBX Developer and Fixer were formulated to produce optimal image quality.
In manual processing, attention to good housekeeping practices and processing guidelines are essential.

14
Practice good housekeeping• Wipe up spilled solutions immediately.• Wash hangers after each use (pay particular attention to
hanger clips).• Always use clean, dry hangers.
RECOMMENDED PRODUCTS
Intra-oral film: INSIGHT and Ultra-speed
Processing chemicals: GBX Developer and Replenisher GBX Fixer and Replenisher
Unwrap and clip films carefullyNOTE: Before unwrapping film, turn off the room light and turn on the safelight.
Observe these rules for unwrapping and clipping films:• Keep hands clean and dry.• Handle films by the edges
to avoid finger marks and abrasions.
• Attach films securely to the hanger.
• Do not allow solutions to splash on unprocessed films.
The information contained in Table 4 is extracted from publication 8666 and is available for use in your darkroom. To download it, visit www.carestreamdental.com.
Develop film properlyDevelopPrepare developer and fixer solutions according to the directions on the container. Set the timer according to the processing chart (Table 4). Immerse films (attached to a film hanger) quickly into the developer solution, dislodging air bubbles by vigorously moving the film hanger in the solution for 5 seconds. Do not agitate film during development. Remove the hanger from the developer when the timer sounds. Do not drain excess developer back into the developer tank.
RinseImmerse the film into the rinse tank for 30 seconds with continuous agitation.
FixNOTE: Do not turn on the darkroom light during fixing.Fix for 2–4 minutes with intermittent agitation (5 seconds agitation every 30 seconds). Allow excess fixer to drain back into the fixer tank before washing.
WashWash films for 10 minutes in clean running water (approximately eight volume changes per hour). Do not leave the films in the wash water for extended periods of time (over 12 hours) because damage to the image may occur.
Develop Rinse Fix Wash
GBX Developer and Replenisher
Fresh running water GBX Fixer and Replenisher
Clean running water (approx 8 volume changes per hour)
Temperature Time Temperature Time Temperature Time Temperature Time
68 °F (20 °C)70 °F (21 °C)72 °F (22 °C)76 °F (24.5 °C)80 °F (26.5 °C)
5 min4½ min4 min3 min
2½ min
60–85 °F(15.5–29.5 °C)
30 sec(agitate
continuously)
60–85 °F(15.5–29.5 °C)
2-4 min or twice the
clearing time, (intermittent
agitation)
60–85 °F(15.5–29.5 °C)
10 min
Use correct time-temperature development
Table 4 - Manual development guidelines for Intraoral Radiographs
TIPS
q Check temperature of developing solution. If possible, adjust temperature to the approximate setting 68–80 °F (20–26.5 °C).
q Consult time-temperature chart for recommended developing time.
q Set timer.

15
DryDry in a dust-free area at room temperature or suitable drying cabinet. The temperature of the drying area should not exceed 120 °F (49 °C).
At the end of each work day1. Turn off water2. Cover chemicals
Mount and view radiographs correctly• Use an opaque mount.
• Keep hands clean and dry to avoid scratching and marring the image. Thin, light cloth gloves can be worn.
• Handle radiograph by edges.
• Use a viewbox to facilitate correct mounting.
• Label mounts properly for identification.
Follow good viewing practices• Always use a viewbox for viewing radiographs.
• Viewbox must have uniform lighting.
• A variable light-intensity viewbox is best.
• Use cardboard template on viewbox to eliminate distracting light around the mount.
• Use a magnifying glass.
• View radiographs in subdued room lighting.
Notes

Would you like to know more?For more information call 800.933.8031 or visit carestreamdental.com.
Other Publications in the Dental Radiography Series• Guidelines for Prescribing Dental Radiographs• Radiation Safety in Dental Radiography• Successful Intraoral Radiography• Successful Panoramic Radiography• Quality Assurance in Dental Film Radiography
NCRP Report No. 145, “Radiation Protection in Dentistry” (2003). Reprinted with permission of the National Council on Radiation Protection and Measurements.
© Carestream Health, Inc., 2016.Carestream, INSIGHT, Ultra-speed, READYMATIC and READYPRO are trademarks of Carestream Health. 8170 1216 CHSP-8543; Rev: 5


