381
Expertise at Your Fingertips™ Exsys ® Corvid Knowledge Automation Expert System Software Developer’s Guide © Copyright Exsys Inc. 2010

Expertise at Your Fingertips™�
Exsys® Corvid Knowledge Automation Expert System Software Developer’s Guide
© Copyright Exsys Inc. 2010

Exsys Corvid Knowledge Automation Expert System Development Manual
This manual, as well as the software described in it, is furnished under license and may be used or copied only in accordance with the terms of such license. The content of this manual is furnished for informational use only, is subject to change without notice, and should not be construed as a commitment by Exsys Inc. Exsys Inc assumes no responsibility of or liability for any errors or inaccuracies that may appear in this documentation. Except as permitted by such license, no part of this publication may be reproduced, stored in a retrieval system, or transmitted, in any form or by any means, electronic, mechanical, recording, or otherwise, without the prior written permission of Exsys Inc.
Any references to company names in samples or exercises are for demonstration purposes only and are not intended to refer to any actual organization.
Exsys, the Exsys logo, Corvid, the Corvid logo, Exsys RuleBook, the Exsys RuleBook logos and WINK (WHAT I Need to Know) are either registered trademarks or trademarks of Exsys Inc in the United States and /or other countries.
Notice to U.S. government end users. The software and documentation are “commercial items,” as that term is defined at 48 C.F.R. §2.101, consisting of “commercial computer software” and “commercial computer software documentation,” as such terms are used in 48 C.F.R. §12.212 or 48 C.F.R. §227.7202, as applicable. Consistent with 48 C.F.R. §12.212 or 48 C.F.R. §§227.7202-1 through 227.7202-4, as applicable, the commercial computer software and commercial computer software documentation are being licensed to U.S. government end users (A) only as commercial items and (B) with only those rights as are granted to all other end users pursuant to the terms and conditions set forth in the Exsys standard licensing agreement for this software. Unpublished rights reserved under the copyright laws of the United States.
Exsys Inc.
6301 Indian School Rd. NE
Suite 700
Albuquerque, NM 87110
U.S.A.
www.exsys.com
All rights reserved.

Table of Contents
1: Corvid Overview ........................................................... 1
Exsys Inc. ...............................................................................................................................1 Object Structure ......................................................................................................................1 Logic Blocks............................................................................................................................1 Fast Web-Enablement Through Java Delivery ........................................................................2 Exsys Corvid Servlet Runtime.................................................................................................2 Applet Delivery..........................................................................................................................................................2
Servlet Delivery.........................................................................................................................................................3
Standalone Application Delivery ..............................................................................................................................3
Development for the Corvid Servlet Runtime ................................................................................................3
2: What are Expert Systems? .......................................... 5
Emulate Interaction with Human Experts.................................................................................5 Interactive Expert Knowledge Delivery ....................................................................................5 Expert System Benefits...........................................................................................................6
3: Where Corvid Interactive Expert Systems Are Most Effective......................................................................... 7
Best Type of Problem..............................................................................................................7 Decision Support ......................................................................................................................................................7
Product Selection / Recommendation .....................................................................................................................7
Configuration.............................................................................................................................................................7
Problem-Solving Diagnostics ...................................................................................................................................8
Data Analysis ............................................................................................................................................................8
Customer/Product Support.......................................................................................................................................8
Background Monitoring ............................................................................................................................................8
Inconsistency Detection ...........................................................................................................................................8
Process Control ........................................................................................................................................................8
Smart Questionnaires...............................................................................................................................................8
4: Corvid Concepts........................................................... 9
Heuristics and Rules ...............................................................................................................9 Inference Engine.....................................................................................................................9 Backward Chaining / Forward Chaining ..................................................................................10 Confidence..............................................................................................................................10 Corvid Variables......................................................................................................................11 What is a Corvid Variable..........................................................................................................................................11
Variable Types...........................................................................................................................................................11
Variable Names and Prompts ................................................................................................................................. .12
Variable Properties and Methods............................................................................................................................ .12
System User Interface of How Variables Are Asked.............................................................................................. .12
Corvid Logic Blocks ................................................................................................................ 13 MetaBlocks and Product Selection.......................................................................................... 15 Corvid Action Blocks ............................................................................................................... 16 Answers and Actions ............................................................................................................................................... .16
Corvid Command Blocks ........................................................................................................ 18 Validation................................................................................................................................ 19 Spell Checking........................................................................................................................ 19 Printing Corvid Systems.......................................................................................................... 20 Controlling The User Interface ................................................................................................ 20 Questions.................................................................................................................................................................. .21
Results ...................................................................................................................................................................... .21
The Interface Command Builder ............................................................................................................................. .21
Formatting................................................................................................................................................................. .22
Images and Links to Text......................................................................................................................................... .22
Embedding Variables............................................................................................................................................... .22
Corvid Java Runtime Applet System Delivery ......................................................................... 22 Running in the Development Environment ............................................................................................................. .22
Controlling the Applet............................................................................................................................................... .23
Trace Applet ............................................................................................................................................................. .23
Extra PARAM to Pass Data..................................................................................................................................... .23
Adding Other HTML Code ....................................................................................................................................... .23
Moving your Corvid System to the Web ................................................................................................................. .24
5: Working with Variables.................................................25
What is a Corvid Variable? ..................................................................................................... 25 Adding a Variable ................................................................................................................... 25 Show Advanced Options ......................................................................................................................................... .26
Adding Variables ...................................................................................................................................................... .27
Name ........................................................................................................................................................................ .27
Type .......................................................................................................................................................................... .27
Tab Groups............................................................................................................................. 29 Prompt Tab............................................................................................................................. 29 Main Prompt ............................................................................................................................................................. .30
External Source........................................................................................................................................................ .30
Alternate Prompts .................................................................................................................................................... .30
To Be Tab............................................................................................................................... 31 To Be Rules.............................................................................................................................................................. .31
Adding To Be Rules ................................................................................................................................................. .32
Editing the To Be List............................................................................................................................................... .32

Stop Derivation on To Be ..........................................................................................................................................32
Options Tab ............................................................................................................................33 Final Results Display Flag.........................................................................................................................................33
Never Ask - Use a Default Value ..............................................................................................................................33
Backward Chaining Options......................................................................................................................................33
Show Previous Input or Default Value......................................................................................................................34
Check for PARAM Data.............................................................................................................................................35
Initialize ......................................................................................................................................................................35
Number of Values......................................................................................................................................................36
External Data Source ................................................................................................................................................36
"After Ask" CGI Command ........................................................................................................................................36
Link Tab ..................................................................................................................................37 Ask With Tab ..........................................................................................................................37 Use .............................................................................................................................................................................37
Arrange.......................................................................................................................................................................39
Use Images for Prompts and Values........................................................................................................................43
Other Commands ......................................................................................................................................................44
Prompt and Value Format .........................................................................................................................................44
Also Ask Tab...........................................................................................................................44 Reorder Variables in Also Ask List ...........................................................................................................................45
Separate "Also Ask" Questions with an Image ........................................................................................................45
Servlet Tab .............................................................................................................................45 Static List Tab .........................................................................................................................46 Value ..........................................................................................................................................................................46
Optional Short Text....................................................................................................................................................46
Add to List ..................................................................................................................................................................47
Replace ......................................................................................................................................................................47
Up / Down Buttons.................................................................................................................................................... 47
Alternate Text............................................................................................................................................................ 47
External Source ........................................................................................................................................................ 47
Where........................................................................................................................................................................ 47
Delete ........................................................................................................................................................................ 48
Dynamic List Tab ....................................................................................................................48 Spreadsheet Column................................................................................................................................................ 48
Collection Variable.................................................................................................................................................... 48
Get Values From a URL........................................................................................................................................... 49
External Applet ......................................................................................................................................................... 49
Continuous Tab.......................................................................................................................49 Numeric Variables .................................................................................................................................................... 49
String Variables ........................................................................................................................................................ 49
Date Variables .......................................................................................................................................................... 50
Collection Tab .........................................................................................................................51

Preload from External Source ................................................................................................................................. 51
Initialize with a List ................................................................................................................................................... 52
Limit Number of Items in List ................................................................................................................................... 52
Confidence Tab ...................................................................................................................... 52 Input .......................................................................................................................................................................... 52
Calculation................................................................................................................................................................ 53
Other Controls ........................................................................................................................ 54 Edit Name ................................................................................................................................................................. .54
Delete........................................................................................................................................................................ .55
Where ....................................................................................................................................................................... 55
Find ........................................................................................................................................................................... 55
Sort............................................................................................................................................................................ 55
Copying an Existing Variable .................................................................................................. 55 Headers, Footers and Default Formats .................................................................................................................. 56
6: Variable Properties and Methods.................................57
What are Properties ................................................................................................................ 57 Static List Properties ............................................................................................................... 57 No Property .............................................................................................................................................................. .58
.FULL - Prompt and Full Text of all Values Set ...................................................................................................... .58
.NUM - Number of First Value set ........................................................................................................................... .58
.COUNT - Number of Values Set ............................................................................................................................ .58
.SVALUE - Short Text of all Values Set.................................................................................................................. .59
.VALUE - Full Text of all Values Set ....................................................................................................................... .59
.CHECK # or .CHECK Value - True if Value is Set............................................................................................... .59
Dynamic List Properties .......................................................................................................... 60 No Property .............................................................................................................................................................. .60
.FULL - Full Text of Prompt and all Values Set ...................................................................................................... .60
.NUM - Number of First Value Set .......................................................................................................................... .60
.COUNT - Number of Values Set ............................................................................................................................ .61
.MAX - Total Number of Values ............................................................................................................................. .61
.VALUE - Text of all Values Set .............................................................................................................................. .61
.CHECK # or .CHECK value - True if Value is Set ............................................................................................... .61
.LIST # - Text of Value #.......................................................................................................................................... .62
.INCLUDES Text - True if Text is a Value .............................................................................................................. .62
.NOTINCL text - True if Text is NOT in the List...................................................................................................... .62
Continuous Variable Properties .............................................................................................. 62 No Property .............................................................................................................................................................. .63
.VALUE - Value Converted to a String.................................................................................................................... .63
.FORMAT fmtStr - Formatted Output of Value ....................................................................................................... .63
.PFORMAT fmtStr - Formatted Output ................................................................................................................... .64
Format Properties for Date Variables ..................................................................................................................... .64

MSEC - Convert Date to Milliseconds......................................................................................................................65
DOW - Convert Date Variable to Day of Week........................................................................................................65
Collection Variable Properties .................................................................................................65 No Property ................................................................................................................................................................66
.FULL Separator - Prompt and all Values Set..........................................................................................................66
.VALUE # - All Values Assigned ...............................................................................................................................66
.COUNT - Number of Values ....................................................................................................................................66
.FIRST - First Item in List ..........................................................................................................................................66
.LAST - Last Item in List ............................................................................................................................................67
.ITEM # - Item # as a String ......................................................................................................................................67
.CONCAT Separator - Concatenate to a String.......................................................................................................67
.TOP # - Top # Items...............................................................................................................................................68
.INCLUDES Text - TRUE if Text is in the List .........................................................................................................68
.NOTINCL Text - TRUE if Text is NOT in the List....................................................................................................68
Collection Variable Methods....................................................................................................69 Adding an Item to the Start or End of the List ..........................................................................................................70
.ADD - Add to End of List .........................................................................................................................................70
.ADDFIRST - Add to the Top of List ........................................................................................................................70
.ADDVAR - Adding the Value of a Variable .............................................................................................................70
.ADDVARFIRST] [var] - Add the Variable to Top ..................................................................................................71
.ADDSORTED - Add a Value Sorted .......................................................................................................................71
.ADDFILE - Read Values from a File .......................................................................................................................72
.COPY- Copy Values from Another Collection ........................................................................................................74
Assigning Values to a Group of Variables................................................................................................................75
Replace Values in an Ordered Collection ................................................................................................................76
.REMOVE - Remove a Value from the List ..............................................................................................................77
Removing Items by Number .....................................................................................................................................77
.DROPFIRST - Remove First Value From the List ..................................................................................................77
.DROPLAST - Remove Last Value From the List....................................................................................................78
.CLEAR - Remove All Values From the List ............................................................................................................78
Collection Variable "Vector" Methods and Properties ..............................................................78 Return Entry Referenced by Index ...........................................................................................................................79
Assign Values to Variables Based on an Index .......................................................................................................79
Replace a Value Based on an Index ........................................................................................................................80
Return the Values of a Collection Variable as a Tab-Delimited String ...................................................................80
Confidence Variable Properties...............................................................................................80 No Property ................................................................................................................................................................80
.PROMPT - Just the Prompt for the Variable...........................................................................................................81
.VALUE - Value Converted to a String .....................................................................................................................81
.FORMAT fmtStr - Formatted Output of Value ........................................................................................................81
.PFORMAT fmtStr - Formatted Output.....................................................................................................................82
.LOCKED - TRUE if Value was Locked....................................................................................................................82

TIME and AGE Properties ...................................................................................................... 83 .TIME - Time the Value was Set ............................................................................................................................. .83
.AGE - Milliseconds Since the Value was Set ........................................................................................................ .83
PROMPT Property - Just the Prompt for the Variable ............................................................. 83 HOW Property ........................................................................................................................ 83 DISPLAY_WITH_RESULTS Property..................................................................................... 84
7: Working With Logic Blocks……………………………...85
Adding a Logic Block .............................................................................................................. 85 Nodes and Rules .................................................................................................................... 86 Trees ...................................................................................................................................... 86 Rule View Window and Logic Block Navigation ...................................................................... 87 Adding Nodes to a Logic Block ............................................................................................... 90 Starting a New Block................................................................................................................................................ .90
Subsequent Nodes................................................................................................................................................... .90
Using a Right Click................................................................................................................................................... .92
Building the Nodes................................................................................................................................................... .92
Variable List ............................................................................................................................................................. .92
Building Nodes......................................................................................................................................................... .94
Adding Static List Nodes ......................................................................................................................................... .94
Adding Expression Nodes....................................................................................................................................... .98
Date Comparison Operators ................................................................................................................................... 103
Assign a value based on various curve types………………………………………………………107 String Parsing Functions……………………………………………………………………………...110
Remove Specified Characters from the Start and End of a String........................................................................110
Return the Numeric Index........................................................................................................................................110
Search and Replace ................................................................................................................................................110
Reverse a String ......................................................................................................................................................111
Test if a String Matches a Pattern...........................................................................................................................112
Build a String by Replacing Parameters in a Pattern.............................................................................................112
Create a Tab-delimited String Based on Tokens ................................................................................................... 113
Create a Tab-delimited String Based on a Pattern String .....................................................................................114
Convert a String to a Number.................................................................................................................................. 114
Expression Syntax Checking .................................................................................................. 115 Adding Collection Nodes......................................................................................................... 115 Adding an Item to the Start or End of the List ........................................................................................................117
Adding the Value of a Variable................................................................................................................................117
Add a Value Sorted..................................................................................................................................................118
Add a File, with Conditional Inclusion .....................................................................................................................119
Copy Values from Another Collection .....................................................................................................................121
Assigning Values to a Group of Variables ..............................................................................................................121
.ASSIGNAFTER] "Index_str", [Var1], [Var2]...........................................................................................................121

Replace Values in an Ordered Collection ...............................................................................................................122
Remove a Value from the List..................................................................................................................................123
Remove First Value From the List ...........................................................................................................................123
Remove Last Value From the List ...........................................................................................................................123
Remove All Values From the List ............................................................................................................................124
Adding Command Nodes ........................................................................................................124 Moving and Editing Nodes - Selecting Nodes .........................................................................125 Logic Block Controls - Editing Controls ...................................................................................125 Controlling Tree Display ..........................................................................................................126 MetaBlocks .............................................................................................................................126 Setting Up a MetaBlock............................................................................................................................................126
Changing Block Order.............................................................................................................127 Merge Function .......................................................................................................................128 Adding Trees and Rules..........................................................................................................129 Trees vs. Rules.........................................................................................................................................................129
IF THEN IF ................................................................................................................................................................130
8: Working with Action Blocks…………………………....133
Question Buttons ....................................................................................................................136 Action Buttons.........................................................................................................................137 Add Heading Buttons ..............................................................................................................138 Undo Button............................................................................................................................138 Convert to Logic Block Button .................................................................................................138 Delete Block Button ................................................................................................................138 Starting Corvid ..........................................................................................................................................................139
Starting a System .....................................................................................................................................................140
Using Variables that Already Have a Value ............................................................................................................146
Adding Another Question .........................................................................................................................................149
Adding Headings ......................................................................................................................................................149
Using the Goto Label Action ....................................................................................................................................150
Running the System .................................................................................................................................................152
Formatting the Questions.........................................................................................................................................156
Formatting Individual Variables ...............................................................................................................................159
Fielding the System..................................................................................................................................................159
9: Working with Command Blocks………………………161
What is a Command Block ......................................................................................................161 Adding a Command Block.......................................................................................................161 Command Nodes ....................................................................................................................161 IF Commands .........................................................................................................................163 WHILE Loops..........................................................................................................................163 FOR Loops .............................................................................................................................163

Adding Executable Commands............................................................................................... 164 Variables Tab - Deriving and Assigning Values....................................................................... 164 Set - Assign a Value ................................................................................................................................................165
Derive a Value..........................................................................................................................................................165
Blocks Tab - Executing Blocks................................................................................................ 166 Running Logic Blocks ..............................................................................................................................................166
Running Command Blocks ......................................................................................................................................166
Reset Tab - Clearing Data and Blocks .................................................................................... 167 Clearing Variables167
Clearing Blocks ........................................................................................................................................................167
External Tab - Calling External Programs and Data................................................................ 168 Calling External Programs.......................................................................................................................................168
The WRITE Command.............................................................................................................................................168
The READ Command ..............................................................................................................................................169
The CLOSE Command............................................................................................................................................171
Calling Database or CGI Programs ........................................................................................................................171
Control Tab - Controlling the Flow of Execution ...................................................................... 172 Allow / Exclude .........................................................................................................................................................172
Sleep Command ......................................................................................................................................................172
Special Command: EMPTY_CELL=........................................................................................ 173 Special Command: NO_PARSE_ERRORS ............................................................................ 173 Special Command: NO_RESOURCE_CHECK....................................................................... 174 Special Command: COMMENT: ............................................................................................. 174 Special Command: ALLOW_TABS_IN_COLLECTIONS......................................................... 174 Special Command: QUIT_MB................................................................................................. 174 Special Command: DO_NOT_LOOK_AHEAD........................................................................ 175 Special Commands to Reduce Exsys Corvid Servlet Runtime Resources .............................. 176 Results Tab - Displaying Results and HTML Pages................................................................ 177 Using A Results Command File ..............................................................................................................................177
HTML Page ..............................................................................................................................................................177
System Done Message............................................................................................................................................177
Title Tab - Displaying a Title Screen ....................................................................................... 178 Report Tab - Building and Displaying Reports ........................................................................ 178 Report Server Programs..........................................................................................................................................178
Writing a Report File ................................................................................................................................................181
Displaying a Report File...........................................................................................................................................182
Deleting a Report File ..............................................................................................................................................182
Moving and Editing Nodes - Selecting Nodes ......................................................................... 183 Controlling Tree Display.......................................................................................................... 184
10: Controlling the User Interface………………………..185
Where Interface Commands Can Be Used ............................................................................. 185

Title ............................................................................................................................................................................185
Asking Questions......................................................................................................................................................185
Results ......................................................................................................................................................................186
The Interface Command Builder .............................................................................................186 Moving Applet Screen Commands ..........................................................................................................................187
Formatting Text.......................................................................................................................188 Example ....................................................................................................................................................................189
Images and Links in Text ........................................................................................................189 Text Link....................................................................................................................................................................189
Changing Hypertext Link Color................................................................................................................................190
Embedding Graphics................................................................................................................................................190
Using FRAMES to Display Information....................................................................................191 Writing to Frames when a Question is Asked.........................................................................................................192
Displaying HTML Pages from an Application..........................................................................................................192
Edit Fields for Passwords.........................................................................................................................................193
Button Controls .......................................................................................................................193 Embedding Other Variables ....................................................................................................194 Checking How Many Confidence Variables are Over a Threshold Value.............................................................196
Display Tab ...............................................................................................................................................................197
Instead Tab ...............................................................................................................................................................198
Format Tab................................................................................................................................................................199
Link Tab.....................................................................................................................................................................199
Image Display .........................................................................................................................199 File Display .............................................................................................................................200 Background Color ...................................................................................................................200 SAMELINE option for Applet Screens .....................................................................................200 Placing the Radio Button or Checkbox to Right of Text ...........................................................201 FORMAT Commands in Text Strings ......................................................................................202 <BR> .........................................................................................................................................................................202
<FORMAT...>............................................................................................................................................................202
Previewing Screens that Ask for User Input ............................................................................204 Resource Files and Multiple Language Support ......................................................................205 Fielding a System with Resource Files....................................................................................207
11. Corvid Systems on HP iPAQ………………………….209
Testing J9 ...............................................................................................................................214 Installing Corvid ......................................................................................................................214 Terminating Corvid..................................................................................................................215 Optimizing a KB to Run on iPAQ.............................................................................................215 Other Windows Mobile Devices...............................................................................................................................215
12: Running a Knowledge Base…………………………..217
Checking the System ..............................................................................................................217

Corvid Java Applet Runtime.................................................................................................... 217 The CVR File ............................................................................................................................................................217
The HTML Page.......................................................................................................................................................217
The Runtime Window...............................................................................................................................................217
Stopping the Run .....................................................................................................................................................218
Controlling the Applet ............................................................................................................. 218 KB Default Format....................................................................................................................................................218
Background Color ....................................................................................................................................................218
Runtime HTML Template.........................................................................................................................................218
Applet Size and Position..........................................................................................................................................219
Trace Applet .............................................................................................................................................................219
Limit Server to a Specific IP Address......................................................................................................................220
Undo Levels..............................................................................................................................................................220
Extra PARAM to Pass Data.....................................................................................................................................221
Adding Other HTML Code .......................................................................................................................................222
Browser to Use.........................................................................................................................................................222
Save the CVR File in Another Directory .................................................................................................................222
Using a Separate HTML Page to Run Systems.....................................................................................................223
Do Not Make CGI Calls ...........................................................................................................................................223
General Tab..............................................................................................................................................................223
Moving to a Web Server ......................................................................................................... 223 Running Standalone ............................................................................................................... 225 Standalone as a Java Application ...........................................................................................................................226
Testing an Application..............................................................................................................................................227
Runtime Applet Handles Focus and Keyboard Navigation....................................................................................227
Running with the Corvid Servlet Runtime................................................................................ 227 Embedding Corvid Systems in Emails .................................................................................... 227
13: Validation…………………………………………………231
Validation Testing ................................................................................................................... 231 Set Run Mode ..........................................................................................................................................................231
Forward Chain Logic or Action Blocks....................................................................................................................232
Derive Output Variables...........................................................................................................................................232
Run a Specific Command Block..............................................................................................................................232
Set Each Variable Value Ranges............................................................................................................................233
Select the Output .....................................................................................................................................................234
Setting Warnings .................................................................................................................... 235 Running the Tests................................................................................................................... 235 Exit / Clean Up .........................................................................................................................................................236
Practical Applications of Validation ......................................................................................... 236 Save / Load Files .................................................................................................................... 237 Building Custom Validation Command Block (Advanced) ....................................................... 237

14: Printing The System…………………………………...239
Printing ...................................................................................................................................239 Logic Blocks..............................................................................................................................................................239
Command Blocks......................................................................................................................................................239
Rules .........................................................................................................................................................................240
Format .......................................................................................................................................................................240
Printing One Block ..................................................................................................................240
15: MetaBlocks for Product Selection Systems……….241
Overview.................................................................................................................................241 MetaBlocks .............................................................................................................................241 MetaBlock Spreadsheet ..........................................................................................................242 Tab Delimited............................................................................................................................................................242
Headings and Data...................................................................................................................................................242
MetaBlock Logic......................................................................................................................243 Notes .........................................................................................................................................................................243
MetaBlock Sample System .....................................................................................................243 User Requirements...................................................................................................................................................244
Data Spreadsheet ...................................................................................................................245 Defining the MetaBlock ...........................................................................................................246 Adding the Logic .....................................................................................................................246 Expanding the Block.................................................................................................................................................248
Controlling Weighting Factors..................................................................................................................................248
Factors that Eliminate Products...............................................................................................................................250
Adding a Command Block........................................................................................................................................250
Adding a Spreadsheet..............................................................................................................................................250
Displaying the Results ..............................................................................................................................................251
System Maintenance...............................................................................................................252
16: Interfacing to External Programs…………………....253
Overview.................................................................................................................................253 Where to Use External Interface Commands……………………………………………………….253 Types of External Data Commands...….………...……………………………………………….….258 URL / Exernal Program ............................................................................................................................................259
XML ...........................................................................................................................................................................259
Database...................................................................................................................................................................260
PARAM Data..............................................................................................................................................................260
APPLET Data.............................................................................................................................................................261
URL / External Program Command Details ............................................................................261 URL Syntax...............................................................................................................................................................262
Format of Returned Data .........................................................................................................................................263

Types of Retirned Data............................................................................................................................................264
XML Command Details .......................................................................................................... 266 Intro to XML and XPath ...........................................................................................................................................266
Building XML Commands ........................................................................................................................................269
XML Filename ..........................................................................................................................................................270
XPath Command......................................................................................................................................................271
XPath Modifiers ........................................................................................................................................................273
XML Command Samples.........................................................................................................................................274
Embedded XML Commands ................................................................................................................................... 276
Using an XML File for MetaBlock Data...................................................................................................................276
Obtaining MetaBlock Data Using XPath Commands.............................................................................................277
Building MetaBlock XML Interface Files .................................................................................................................278
Using XML Commands with the Applet Runtime ................................................................................................... 281
Database Command Details................................................................................................... 282 How the Corvid Database Interface Works ............................................................................................................282
Server Files Required for the Database Interface.................................................................................................. 284
Building Corvid Database Commands....................................................................................................................284
The Database "Command File" Tab .......................................................................................................................286
The Database "Commands Tab..............................................................................................................................289
Complex Commands with Replaceable Field Names............................................................................................295
Options Tab ..............................................................................................................................................................299
Commands that Change the Database ..................................................................................................................301
Editing Commands...................................................................................................................................................301
Batch Command Option ..........................................................................................................................................302
Using a Database Command for a MetaBlock Data "File" ....................................................................................302
Installing the CorvidDB Servlet................................................................................................................................303
Turning Off Database Calls During Development.................................................................................................. 304
PARAM Command Details...................................................................................................... 305 PARAM Data ............................................................................................................................................................305
APPLET Command Details..................................................................................................... 306 Custom Java Applets ...............................................................................................................................................306
APPLET Window......................................................................................................................................................306
How to Create a Custom Applet..............................................................................................................................307
Returned Data ..........................................................................................................................................................309
The External Applet Tag ..........................................................................................................................................309
Uses for External Applets ........................................................................................................................................310
17: Create and Add Custom Functions to Corvid……..311
Functions ................................................................................................................................ 311 The Custom Function.............................................................................................................. 311 Modifying the CUSTOM Function ...........................................................................................................................311
How to Compile Custom.java.................................................................................................. 312 Adding it to the .jar File ............................................................................................................................................313

Modifying the Evaluate Method ...............................................................................................313 How Parameters are Passed ..................................................................................................316 Adding a Destroy Method........................................................................................................316 Corvid Servlet Runtime ...........................................................................................................316 Corvid API Commands............................................................................................................317 CUSTOM and BACK...............................................................................................................318
18: Using the Exsys Corvid Servlet Runtime…………..319
Installing and Starting the Corvid Servlet Runtime ..................................................................319 The Servlet License File...........................................................................................................................................320
Starting the Servlet ...................................................................................................................................................320
Cookies .....................................................................................................................................................................321
Passing Data at Startup ...........................................................................................................................................321
Browser BACK Button ..............................................................................................................................................322
Emulating the Servlet Interface from the Development Environment....................................................................322
Moving to the Corvid Servlet Runtime .....................................................................................323 Servlets .....................................................................................................................................................................323
Templates .................................................................................................................................................................323
Specifying the System Default Template to Ask Questions...................................................................................325
Specifying the Individual Variable Template to Ask Questions..............................................................................325
Templates to Display Results ..................................................................................................................................325
Final Screen Template .............................................................................................................................................326
Sample Templates ..................................................................................................................326 Templates to Ask Questions ...................................................................................................328 The Servlet Template Form .....................................................................................................................................328
<FORM...> Tag.........................................................................................................................................................329
Section to Ask Questions .........................................................................................................................................331
Also Ask ....................................................................................................................................................................332
Controls .....................................................................................................................................................................333
Corvid_REPLACE Text ............................................................................................................................................334
Numeric, String and Date Variables ........................................................................................................................335
Simple Text Edit Box ................................................................................................................................................336
Password Edit Box ...................................................................................................................................................336
Larger, Multiline Edit Box .........................................................................................................................................336
Static and Dynamic List Variables ...........................................................................................................................337
Corvid_REPEAT.......................................................................................................................................................338
Alternate Static List Value Text................................................................................................................................340
Checkbox / Radio Button .........................................................................................................................................341
Corvid_ASK and [.PROPERTY] ..............................................................................................................................341
Static and Dynamic List Control Types ...................................................................................................................341
Simple Set of Checkboxes or Radio Buttons ..........................................................................................................342
Value Lists and Dropdown Lists ..............................................................................................................................343
Simple Buttons..........................................................................................................................................................344

The Submit Button ...................................................................................................................................................345
UNDO and RESTART buttons ................................................................................................................................345
The Browser BACK button ......................................................................................................................................346
TRACE......................................................................................................................................................................347
Conditional Inclusion................................................................................................................................................347
Corvid Commands ...................................................................................................................................................348
Using Image Maps to Ask Questions......................................................................................................................349
Eliminating the OK Button .......................................................................................................................................350
Templates to Display Results.................................................................................................. 351 Forms........................................................................................................................................................................351
Displaying Variables in Results ...............................................................................................................................351
Collection Variable Values.......................................................................................................................................353
Title and Information Screens ................................................................................................................................. 354
Links to Other Pages ...............................................................................................................................................355
JavaScript, XML, CSS, Etc......................................................................................................................................355
Final Screen .............................................................................................................................................................356
Default Final Screen Template................................................................................................................................356
Using Report Commands when Asking Questions ................................................................................................356
EMAIL Functions......................................................................................................................................................356
Email Commands for Server Authentication...........................................................................................................358

1: Exsys Corvid Overview 1
1: Corvid Overview Exsys Inc. Exsys Corvid is a revolutionary approach to developing and fielding on-line knowledge automation expert system advice. For the first time, it is possible to convert complex decision-making processes into an interactive form that can be easily incorporated into a Web page.
Exsys Inc developed Corvid. We are the company that first brought practical expert system development to the PC in 1983, and first brought expert systems to the Web in 1996. Exsys Inc’s founder, Dustin Huntington, and our software developers have decades of experience in the artificial intelligence field and in designing practical expert system development tools. The original Exsys Developer software is the longest lived such tool on the market, with continuous use in business and industry for over 17 years. Corvid resulted from a broad and intensive examination of what is needed to build and field expert systems in today’s Internet oriented world. Corvid was designed to produce a unique powerful tool that would allow businesses to develop and field powerful online advice applications easily.
Corvid brings a unique and realistic approach to expert system development - object structure, Logic Blocks, Action Blocks and practical Java delivery.
Object Structure In examining how to enable users to most effectively build expert systems, many approaches were considered. Exsys tools have traditionally used a pure rule-based approach to logic and this has proven to be extremely effective for thousands of users. Some other expert system tools have taken a rigorously object-oriented approach, which results in a much more difficult and complex development environment. An object-oriented approach is very effective for programming, but it often does not fit well for human decision making processes. Most decisions are thought of, and described, by people as “If…. Then…” type logic. Often this does not easily convert to a class hierarchy or object-oriented approach, and does not match the way they think about the decision-making process.
While many decision-making problems do not fit well philosophically into an object-oriented methodology, there are tremendous benefits to using object-structured components. This difference between true object-oriented programming and object-oriented structured programming is what has made Microsoft’s Visual Basic (VB) so popular. VB is not a true object-oriented programming language, though it provides many object-based features. This simplification has allowed VB to be used by more programmers than practically all other languages combined.
Corvid is based on the VB model. It provides an object-oriented structure that makes it easy to build systems using methods and properties of Variables, while not requiring the developer to change the way they think and describe their decision-making steps and logic. The result is a very flexible and powerful development environment that can easily be learned. Corvid has 7 types of Variables that provide a wide range of functions. The powerful Collection Variable allows data to be “collected” from multiple runs and enables many new capabilities. A variety of methods and properties for all of the Variables allow them to be used in new and unique ways to solve problems and display results.
Logic Blocks Corvid introduces a new concept in managing decision-making logic - Logic Blocks. In other previous Exsys tools, there are tree logic diagrams and individual If/Then rules. Many systems require multiple trees and rules to collectively provide a decision-making step, making it somewhat difficult to organize the logic. Corvid’s Logic Blocks are a superset of rules and trees, with some new features not found in either. A Logic Block can be any combination of rules and trees that have a related function. This allows the logic to be organized into blocks that behave as objects. A Logic Block can be anything from an entire knowledge base to a single rule - it all depends on what the problem calls for.
Logic Blocks can be run via forward or backward chaining. They can even be associated with a spreadsheet file to apply the logic in the block sequentially to each row. This enables a selection system to be built that has all the “generic” logic

1: Exsys Corvid Overview 2
in blocks and all the product details in a spreadsheet file. Updating the system is as simple as changing the spreadsheet to have new data. Product selection problems have never been simpler - especially for situations where the product details are frequently changing such as inventory or pricing.
Logic Blocks are built and maintained in a very visual development environment that is easy to learn and use. The underlying knowledge representation in the block is still an If/Then rule, making it easy to read and understand, but a Logic Block provides a way to organize and use the rules in a way not previously possible.
Fast Web-Enablement Through Java Delivery The Web offers the ideal way to reach people. It is the gateway to the new economy and the primary conduit to prospects, customers, partners and employees. Exsys Corvid offers a revolutionary way to deploy interactive expert systems on Web sites. This brings your top-level sales, support and advisory expertise to your Web site to help site visitors make quick, correct and consistent decisions. Corvid systems run in a window from within an existing Web page so the site visitor is not linked away or distracted.
In 1996, Exsys Inc. was the first to offer Web-enabled expert system runtime programs. The approach used was to run on the server as a CGI program and build HTML pages dynamically. This works well, but is a little complicated and sometimes does not integrate easily into today’s computing environment. Corvid offers a new way to deliver your systems via a Java applet. Other companies have tried Java runtimes, but they have tended to be very large and slow to download. Often they either have very limited interface design options or require that the system developer also be a Java programmer.
Corvid applications are delivered by a small (~100k) applet that allows robust interface design options. You just select how a question is to be asked and what text or graphics to associate with it. If multiple questions need to be asked together, you just make a list and it will happen. Questions can be asked through a variety of controls, styles and can include JPG or GIF images. Since the system is running as an applet, you can use HTML for the rest of the page surrounding the applet. Corvid supports many ways to add links to other pages from graphics and text. When the system reaches its conclusion, you have even more flexibly in how results are displayed. The combination of graphics and text makes it easy to build systems with a sophisticated look and feel, and which can be integrated into existing Web sites.
The Corvid applet is small and fast for users to download. It provides all the functionality required for the vast majority of systems. In addition, if special system features are required, the Corvid applet can communicate with other applets on the page for special functions. If you wish to front end Corvid from another program or content manager associated with a database, you can pass data into the applet on startup. For data only available on the server, or best calculated on the server, Corvid can access CGI, ASP and JSP pages to perform server-side calculations.
Corvid is a new generation of expert system development tool. Adding expert decision-making knowledge to a Web site has never been easier.
Exsys Corvid Servlet Runtime The Exsys Corvid Servlet Runtime is an alternative method of Web based delivery and a compliment to the Exsys Corvid applet runtime. The servlet runtime allows Corvid systems to be run via a server-side Java servlet with all user interaction through HTML screens and forms.
The same Corvid systems can be delivered by applet, servlet or run as an application. All delivery methods will continue to be supported in future releases of Corvid. The Corvid Servlet Runtime is NOT a replacement for the applet runtime, but is an alternative that is very effective for delivering many types of expert systems.
Applet Delivery When delivered with the Corvid applet runtime, a system is run using a Java applet that is part of a Web page. This approach is very easy for developers to implement since it does not require any special functionality or processing on the part of the server. All knowledge base files, and the applet to run them, are simply served to the client machine. All the processing is done on the client machine, with no additional load on the server. Fielding systems can be done from any

1: Exsys Corvid Overview 3
Web server. In addition, systems can be run locally simply by opening the associated HTML page in a browser. The disadvantage of the applet approach is that it requires downloading the applet and all knowledge base files to the client machine. For large systems, or slow connections, this forces the end user to wait while a system loads. Also the Browser must support Java applets, which is not usually a problem for browsers on PCs, but can be a problem for "mini-browsers" running on palmtops or other wireless devices. Servlet Delivery When delivered with the new Corvid Servlet Runtime, all processing is done on the server with only HTML pages sent to the client machine. The Corvid servlet is a Java program that is run via a servlet engine such as Tomcat on the server. The servlet engine automatically handles multiple users. When the servlet engine needs to communicate with the user to ask a question or display results, it builds a customized HTML page using a template file, that is part of the system, combined with session specific data and variables. This page is sent to the user's browser as HTML. Since the Corvid servlet engine is already running, starting a new session is very quick and the user does not have to wait for an applet and knowledge base to download. In addition, the full power of HTML (and any extensions supported by the browser such as XML, JavaScript, etc) can be used to design the user interface screens. This allows for far more complex and sophisticated interfaces to be built than can be done using the Corvid applet approach. The exact look-and-feel of a site can be matched and the expert systems can be transparently integrated into Web sties.
Since the servlet is running on the server, there is both increased security for the system and easier interfacing to other server programs. For example, in the applet version, obtaining information from a database requires a separate call back to the server, with appropriate security to obtain the data, which is then sent back to the applet. In the servlet version, the Corvid Servlet Runtime can simply access the database directly.
Standalone Application Delivery Systems can also be fielded as Java applications. This is not a Web based delivery, but allows the program to be integrated into non-web architectures. This is also especially effective for background processing of data streams and those situations that call for running the expert system in a non-Web environment. Corvid supports the same options for standalone delivery of systems in a Java environment.
Development for the Corvid Servlet Runtime Corvid provides an enhanced development environment for building and testing systems for servlet delivery. The logic and command flow of the system is handled in exactly the same way as for applet or servlet delivery.
The only major difference in delivery is the design of the user interface. The Applet Runtime and Java applications still use the Java based Corvid screen commands to design screens. This flexible approach allows designing screens with images, text, various controls and image maps to ask questions and present results. For Servlet delivery, template screens are used to define the user interface. These templates combine standard HTML with special Corvid replaceable parameters. The templates can be designed with any of the popular HTML design tools. Templates can be designed to be "generic" and apply to a wide range of user interface questions. Many systems only require 2 template files to be run via the Servlet Runtime. Default templates provided with the Corvid Servlet Runtime allow all systems to be run via the servlet engine immediately. These sample templates show a variety of styles and make it easy to add different types of interfaces to a system. The sample templates can be opened in any standard HTML page design tool and edited to meet the requirements of a particular system.
The Corvid development environment allows the designing and testing of templates even in a non-server environment. The development tool can emulate the servlet mode and show the user interaction that will take place using the HTML templates. This allows full development and testing of the system and its templates before moving the system to the server.
Installing the Corvid Servlet Runtime is very simple for servers that support Java Servlets. The server must have Tomcat or a comparable Java servlet engine installed. Just move the Corvid Servlet Runtime .war file to the server, and have the servlet engine install the Corvid servlet. Then move the knowledge base files and templates to the server and the system can be run with a simple URL call or link.

1: Exsys Corvid Overview 4
The Corvid Servlet Runtime opens many new possibilities for expert system development and implementation. The ability to create end user interfaces that are pure HTML provides a highly attractive and flexible way to field powerful Corvid expert system applications.

2: What Are Expert Systems? 5
2: What are Expert Systems? Emulate Interaction with Human Experts Expert systems are computer programs that emulate the interaction that a person would have asking a human expert for advice or a recommendation. Most decision-making processes can be broken down into many small parts. The human expert often makes decisions almost automatically and does not consciously think about each small step to solve problems or reach conclusions. However, they become apparent when the reason for the decision is explained to someone else, or the decision process is taught to others.
A decision may be based on various facts that individually would not be conclusive, but when combined together lead to a specific decision or diagnosis. Other decisions may be based on high-level logic that is driven by lower level facts, which are combined together. These smaller decision-making factors are called heuristics - though it is less intimidating to just think of them as “rules of thumb”.
How an expert explains a solution to other people When experts explain how to make a decision to other people they typically explain it with the rules of thumb that they have learned lead to a correct conclusion. For example, if a decision is being made about investing, a top-level rule might be, “If the customer has a high risk tolerance, and requires rapid growth to reach their objectives, Mutual Fund X would be a good choice.” This could be a valid rule, but unless you know if “the customer has a high risk tolerance”; you can’t make use of it. If you wanted to learn how to make the best decision, you would ask the expert, “How do you know if the customer has a high risk tolerance?" This would lead to other rules, “If the customer has a risk tolerance ranking of greater than 15, then they have a high risk tolerance" and “If the customer's portfolio… then they have a high risk tolerance”. These new rules of thumb allow you to determine if the “high risk tolerance” part of the first rule is valid.
If a person spends enough time with the expert, and remembers everything they say, they will get all of the knowledge they need to make the decisions themselves. However, that can be a long and often difficult process, and thousands of people may need to be able to make similar decisions. Maybe the expert can write a book advising how to make the best decisions, but that also takes time both for the expert to write it, and for people to read it and reach conclusions that are pertinent to them.
How an expert system provides recommendations When developing an expert system, the decision-making knowledge and procedures of the human expert are converted to “rules”, a form of logical representation that the computer can process. The rules are analyzed by the expert system inference engine, which combines the individual rules together to solve a much larger problem. The system asks the user questions, and analyses the information provided to determine what additional information is needed to make a decision. Unnecessary questions are not asked, but relevant areas are examined in depth. When all of the data is provided, the system reaches its conclusion, which may include several recommendations with differing degrees of confidence or likelihood. As with a human expert, the system can logically explain the basis for its conclusions.
Interactive Expert Knowledge Delivery Corvid expert systems are interactive tools for top-level knowledge access and dissemination. Expert knowledge of how to solve a problem is often scarce and valuable - it can be a company's greatest asset and key competitive differentiator. Expert systems capture this knowledge and allow its dissemination to others. Most other approaches to knowledge distribution just provide people with information, and rely on them to read, understand, and convert it to usable knowledge on their own - in effect, self-teaching themselves to be an expert. The problem is that realistically, most people do not remember all that they are shown. It is difficult to teach people how to solve problems of even average complexity. And, most importantly in today’s rapidly changing world, people don’t have time to learn all of the problem-solving aspects they need.
Expert systems are different in that they directly deliver knowledge to people - "know-how", advice, and recommendations - rather than just information. This enables people to solve complex decision-making problems without training or having to learn the underlying logic. As an example, think of going to the doctor - the doctor asks a few questions, does a few tests to get data, and prescribes a medicine or therapy. The patient does not need to understand anatomy or the details

2: What Are Expert Systems? 6
of how the diagnosis was done - they have their answer. This is the power that expert systems provide - direct delivery of knowledge to the people that need it, when they need it.
Ideally, people would have immediate contact with human experts in every area of specialty that they might need, 24 hours a day. But this can’t happen. Experts are scarce, busy and often difficult to reach, and many decisions can’t wait for access to an expert. Expert systems provide a very effective and efficient way to provide people - prospects, customers, employees and even advisors themselves, with a way to have access to top-level expert decision-making knowledge and advice for specific problems. This expert knowledge can be delivered via the Web and made constantly and consistently available worldwide.
Expert System Benefits The range of problems that can be handled by expert systems is vast. Applications can be developed with Exsys Corvid software for any problem that involves a selection from among a definable group of choices where the decision is based on logical steps. Expert systems can help automate anything from complex regulations, to aiding customers in selecting from among a group of products, or diagnosis of problems with a piece of equipment - any area where a person or group has special expertise needed by others. This automated dissemination of knowledge is the biggest benefit of expert systems.
Most organizations have ways to disseminate data. Corvid expert systems provide a way to disseminate knowledge through intranets and the Internet. Once a Corvid application is built and put on-line, the problem-solving skill it contains is available to everyone. On an intranet, staff with minimal training can immediately perform at a much higher level by using expert systems. On the Web, anyone can access the systems. They can provide traffic-building interaction to your site, assist potential customers in selecting your products, and reduce the load on support staff.
In addition, expert systems provide many other benefits in consistency, documentation and preservation of knowledge:
Standardize the conclusions for a given set of data. For situations where there are many people answering the same questions, it is highly desirable that everyone give the same, consistent answer for the same input data. Expert systems guarantee that this will happen, and allow the distribution of the same high level of expertise with minimal or no training. Even novice staff can immediately be performing at a higher level. This applies very well to businesses with advisory staff like financial services, help desks, and regulatory organizations.
Free human experts from repetitive, routine jobs and interruptions in order to do activities an expert system cannot do. Expert systems are very powerful tools, but they do not think. Expert systems cannot come to novel or innovative solutions - only people can. However, most experts spend most of their time answering routine, well-understood, questions. These are the best areas to convert and automate with expert systems. This frees the human experts to concentrate on the complex problems and creativity that cannot be done by an expert system.
Codify and document problem-solving techniques for future users. Most organizations have people that are experts on some subject or domain, but the expert has never documented how they make their decisions. Having the expert build an expert system documents and preserves the steps they use to make their decisions.
Allow the problem-solving skills of several people to be combined. In addition to documenting the steps a single expert may use, having a group of experts build a system separates the consensus opinion from individual views. This can be very informative and is a great way to establish consistent policy and regulatory compliance.
The goal of a particular knowledge-based expert system project may be a combination of several of the above. The best problems to attack with expert systems are those that are well understood - the type of problems the human specialist answers frequently. Typically these problems can be rapidly converted into expert systems with immediate payback.

3: Where Corvid Interactive Systems Are Most Effective 7
3: Where Corvid Interactive Expert Systems Are Most Effective Best Type of Problem To get the best use of expert knowledge in advisory systems, the problem-solving logic should:
Be well understood and documented Be based on logical steps/procedures/business rules Not involve intuition, guesses, or be based on arbitrary “personal taste” decisions
Some of the Most Successful Categories
Decision Support Business intelligence and advice is becoming a strategic part of many companies' assets, and a key competitive advantage. Many types of decisions and recommendations can be converted into interactive advisory systems. They provide business users with the ability to access, analyze, and share information stored in a company’s databases and other data sources. Effectively disseminating and providing access to expert systems greatly increases a firm’s potential in many ways. Advice is deployed much faster within a company, and outside the company to customers, partners, and suppliers. This makes the knowledge and expertise of the best people widely available to others, and is an ideal way to disseminate specialized skills with minimal training. They are also effective at helping group structures reach consensus in decision-making processes.
Regulatory Compliance Though the knowledge in this area can be very complex, regulations are generally documented in a form very similar to the IF/THEN form of business rules. Regulatory systems insure that all possible relevant regulations are considered and all policies followed consistently. These systems provide significant cost savings by helping companies stay within industry compliance, protect employees, avoid potential fines, and possible bad publicity. Whether online or run as a download, compliance advisory systems provide a more personalized and confidential environment and interface.
Product Selection / Recommendation Selecting which products best meet a customers needs and requirements can be a very intricate process. But it is one that can be expressed in logic rules relating to customer needs and product specifications. Unlike case-based or “learning” approaches, expert systems can handle conflicting requirements and always give a recommendation of the best fit, even when all customer desires can not be met. Advisory systems also make it possible for staff to identify cross-selling opportunities and be able to sell a much broader, more complex product line.
Configuration Configuring complex equipment with many pieces is very complex. Determining which pieces are required and which are incompatible requires detailed knowledge and analysis. This is an ideal problem for an expert system, which can guarantee valid and complete configurations. The system can also explain the reason for its recommendation. Different aspects can come into play at the same time, for instance: inventory, current pricing and customer requirements. The expert system also enables comparison of “what if” scenarios.

3: Where Corvid Interactive Systems Are Most Effective 8
Problem-Solving Diagnostics When experts identify malfunctions or interpret complex data, they quickly look for symptoms indicative of particular problems. The knowledge of how to handle these problems is ideal for conversion into an advisory system. There are usually key domain experts throughout a business enterprise. Those with less expertise often repeatedly interrupt them to answer common questions. Advisory systems free up experts to handle more complex problems and projects by making this knowledge accessible by employees or customers that need it. These systems are also beneficial in capturing and codifying the problem-solving expertise of these best people that may be retiring or changing jobs.
Data Analysis There are many types of data analysis, which require both numeric analysis and complex logic analysis of the data. Expert systems are an ideal way to deal with such problems. The purely numeric analysis can be handled internally, or it can be interfaced to other external programs. The addition of powerful rule-based logic analysis makes it possible to handle very complex problems that were previously impractical. Persons interacting with the systems then don’t require the extensive knowledge of interpreting the data. The expert system analysis process can also be completely embedded within other systems to appear invisible to end-user.
Customer/Product Support These problems are in most ways similar to diagnostic problems, but often go beyond the diagnosis of a malfunction and include following a precise sequence or specific policy and procedures. Many other types of “help desk” software give a guess at a possible solution - the expert system approach will consistently give the best recommendation. They only ask pertinent questions instead of forcing a customer to go through a long list of Q&As to come up with a solution. Advisory systems within help desks help bring less experienced staff up to speed quickly without repeated training or interruptions. They also insure everyone’s answers are consistent. Online customer help systems provide a more personalized environment and interface, and their automation helps free advisors to provide value-added “emotional” support.
Background Monitoring In addition to being interactive, expert systems logical processing power can be run in the background to monitor data streams. They can be constantly analyzing the data streams (often real-time) for developing problems, special opportunities, or other information that should be immediately brought to someone’s attention. They are especially useful for identifying very uncommon problems that few know how to solve, and can prevent what could be catastrophic results. These systems can also alert a person or another system to very rare situations that normally would be too monotonous or expensive to monitor.
Inconsistency Detection Expert systems can check data against policies and procedures to detect inconsistencies that may indicate problems like fraud or other irregularities. The ability of the expert systems to handle complex logic allows such systems to be much “smarter”, both in detection and in recognition of illegitimate actions that might trigger other systems.
Process Control Expert systems have a long, proven history of use in controlling processes to detect and correct problems before they become serious. From DuPont to Eastman Chemical, many of the major industrial companies rely on expert systems. They run invisibly in the background to analyze various data tags throughout a process and alert operators of potential problems.
Smart Questionnaires One of the common uses of expert systems is to make questionnaires more intelligent. The logic of an expert system leads to asking only pertinent questions that have been determined to be relevant, due to answers already provided. All relevant questions are asked, and no irrelevant questions are asked. This produces a far superior user interface. In addition, the data can be analyzed as it is be collected, and the system can provide appropriate follow-up forms or reports on the fly.

4: Corvid Concepts 9
4: Corvid Concepts Heuristics and Rules In expert system terminology, each of the expert's “rules of thumb” is a heuristic. That is a specific small fact that tells how to make a part of a decision. The combination of all the heuristics allows the overall decision-making problem to be solved. In our brain, we combine these individual heuristics intuitively and systematically. We don’t have to stop and say, “now I need to know this, to help make this decision…”, our brain just does it. A large part of building an expert system is identifying the individual decision steps and converting them into a form that a computer can use.
There are many ways of describing the heuristics for a decision-making process, but the one that has proven the most effective and efficient is the IF/THEN rule. This is a rule where there is an IF part that can be tested to be true or false based on the data for a specific case or situation. When the IF part is true, the statements in the THEN part are also considered true. This is how a basic rule is written.
IF It is raining THEN You should wear a raincoat
With Exsys Corvid, these rules are very similar to the form that you would use to explain the heuristic using English and algebra. For example, “If the investment customer has a high risk tolerance and requires rapid growth to reach their objectives, Mutual Fund X would be a good choice.”
In a rule this would become:
IF The customer has high-risk tolerance AND Meeting objectives requires rapid growth THEN Mutual Fund X is a good choice
This rule shows a small amount of syntax, but it is still very easy to read and understand what it means. If you built similar rules for each of the heuristics in the decision-making process, you would have the logic for the expert system.
Inference Engine Our brain processes and combines the heuristics intuitively. Unfortunately, a computer is nowhere near as effective as our brain. In Exsys Corvid a special program called an “Inference Engine” is used to analyze and combine the individual rules to solve the larger problem. The Inference Engine determines:
1. What possible answers there are to the problem
2. What data is needed to determine if a particular answer is appropriate
3. If there is a way to derive or calculate the needed data from other rules
4. When enough data is available to eliminate a possible answer, and stop asking unnecessary questions related to it
5. How to differentiate between remaining answers
6. Which answer is most likely, based on the rules
It is the Inference Engine that makes If/Then rules in an expert system very different from simple If/Then commands in a computer language such as Visual Basic or C++. Rules are not equivalent to lines of code; they are facts that are automatically combined in various ways by the Inference Engine. This makes the expert system approach far more powerful, effective and maintainable for knowledge delivery than traditional programming techniques.

4: Corvid Concepts 10
Backward Chaining / Forward Chaining The way in which the Inference Engine combines the rules is called backward chaining. Backward chaining is “goal driven”. Setting appropriate goals is part of the expert system development process, but typically the top-level goals are the possible answers to the problem or potential recommendations. The Inference Engine can determine what it needs to meet a particular goal including determining when that goal is met or that a goal cannot be met.
The Inference Engine analyses what data is needed to determine if the first possible goal is appropriate for the user. To make this determination, the system requires data on the specific situation being analyzed. This data can come from other rules, external sources such as databases and spreadsheets, and asking the user additional questions. Using the previous example rule, suppose the first goal is to determine if the expert system should recommend Mutual Fund X.
The Inference Engine checks the rules to find one that would be relevant to making this decision:
IF The customer has high-risk tolerance AND Meeting objectives requires rapid growth THEN Mutual Fund X is a good choice
The Inference Engine has found a potentially useful rule, but without more data it cannot determine if this rule should be used. To make a further determination, it needs to know if “The customer has a high risk tolerance”. Determining if this statement is true becomes the new goal of the Inference Engine. The original goal is not forgotten, but it is temporarily superseded by the new goal. The Inference Engine now looks for a rule that can tell it something about risk tolerance.
It finds:
IF The customer's risk ranking is greater than 15 THEN They have a high-risk tolerance
To use this rule, the Inference Engine needs to know the customers risk tolerance ranking score, which becomes the new top-level goal. This might come from a database, a different program or other rules. The Inference Engine would determine where and how to get the needed data. This process of having one goal requiring data, which leads to another goal, can be repeated many times. This “chain” of goals going backwards from the highest level to the lowest level is what gives backward chaining its name.
As data becomes available, lower level goals are met and are dropped off the chain until the Inference Engine is able to determine which of the conditions for the initial top-level goal are met, and the recommendation is presented to the user. A typical one-on-one consultation with an expert takes several paths before reaching a conclusion, but without asking redundant questions. Backward chaining in expert systems emulates this process.
The Corvid Inference Engine also supports another way to run the Inference Engine - forward chaining. Forward chaining is data driven, rather than goal driven. Running the Inference Engine in this mode is done when there is a body of data already available and you just want to use the logic in the rules to analyze it. In this case the rules are tested sequentially to see what conclusions result. Forward chaining is somewhat faster for some problems, but the questions are not as focused and it is not as good an emulation of a session with a human expert.
Confidence Another powerful feature of Exsys Corvid is that the rules can include a “confidence factor” for a particular answer. This enables expert systems to make multiple recommendations with differing degrees of confidence to reach a "best fit" in its conclusion. While in some cases, it is possible to give a specific recommendation with absolute precision; the real world is not often so clear-cut. Often multiple recommendations are simultaneously possible and the system ranks them and presents them to the user.
The ability to handle confidence factors in expert systems provides a much more effective way to build systems that emulate the real world and give the type of recommendations that human experts would. Exsys provides many different ways to handle and utilize confidence values.
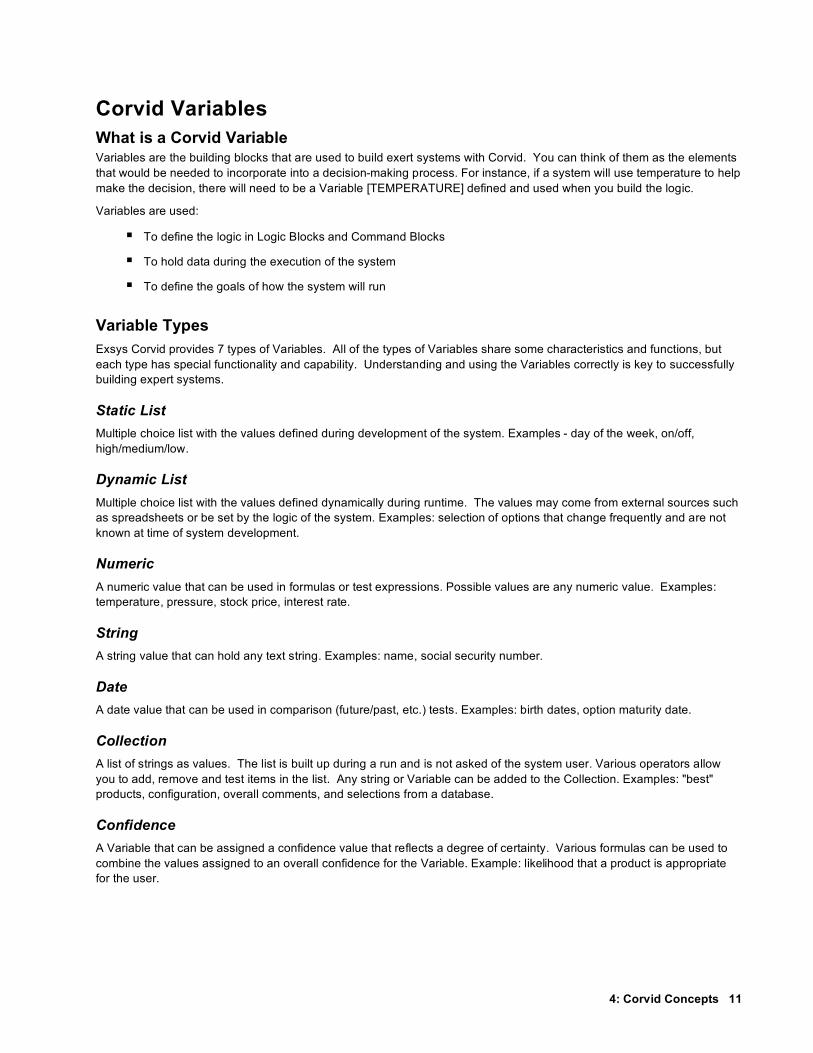
4: Corvid Concepts 11
Corvid Variables What is a Corvid Variable Variables are the building blocks that are used to build exert systems with Corvid. You can think of them as the elements that would be needed to incorporate into a decision-making process. For instance, if a system will use temperature to help make the decision, there will need to be a Variable [TEMPERATURE] defined and used when you build the logic.
Variables are used:
To define the logic in Logic Blocks and Command Blocks
To hold data during the execution of the system
To define the goals of how the system will run
Variable Types Exsys Corvid provides 7 types of Variables. All of the types of Variables share some characteristics and functions, but each type has special functionality and capability. Understanding and using the Variables correctly is key to successfully building expert systems.
Static List Multiple choice list with the values defined during development of the system. Examples - day of the week, on/off, high/medium/low.
Dynamic List Multiple choice list with the values defined dynamically during runtime. The values may come from external sources such as spreadsheets or be set by the logic of the system. Examples: selection of options that change frequently and are not known at time of system development.
Numeric A numeric value that can be used in formulas or test expressions. Possible values are any numeric value. Examples: temperature, pressure, stock price, interest rate.
String A string value that can hold any text string. Examples: name, social security number.
Date A date value that can be used in comparison (future/past, etc.) tests. Examples: birth dates, option maturity date.
Collection A list of strings as values. The list is built up during a run and is not asked of the system user. Various operators allow you to add, remove and test items in the list. Any string or Variable can be added to the Collection. Examples: "best" products, configuration, overall comments, and selections from a database.
Confidence A Variable that can be assigned a confidence value that reflects a degree of certainty. Various formulas can be used to combine the values assigned to an overall confidence for the Variable. Example: likelihood that a product is appropriate for the user.

4: Corvid Concepts 12
Variables are added to the system and edited using the Variable Edit Window, which has many options. The left side is to find and select the Variable desired. The top set of tabs is for features common to all types of Variables. The lower set of tabs is for features unique to each type of Variable.
Backward Chaining Goals
Variables are used in many ways within Exsys Corvid. All Variables can hold data, but also any Variable can be a backward chaining goal. In Corvid the system developer has complete freedom to assign and use the Variables as needed. If a system calls for a static list as the goal, it can be done simply by adding a command. Most systems use either Confidence or Collection variables as the goals, but there is not a limitation.
Variable Names and Prompts Each Variable has a name and at least 1 prompt. The name is usually a shorter way to refer to the Variable and is the form used in the Logic Blocks. The prompt is a longer text explaining what the variable means and is used when asking the system user for input or in displaying results. Corvid allows multiple prompts to be specified for a Variable along with a “flag” Variable that selects among them.
In this way, it is easy to have a system that can be run in multiple languages just by adding several prompts. This can also be used to build a system that can be run by users with different levels of experience - an expert level that asks questions in more technical terms, and a novice level that asks questions phrased in simpler "layman's" terms. This can be especially useful when a company’s professional advisors, as well as their clients run a system.
Variable Properties and Methods In addition to the normal value that a Variable is assigned from user input, external data sources, or the logic in the rules; each type of Variable has a variety of properties and methods that allow other information to be obtained or set. Variables are specified by their name in square brackets: [name]
To specify a property, the name is followed by .property. For example, if you have a static list Variable named [Desired_features], and you allow the user to select multiple items from a list, [Desired_features.COUNT] would return the number of selected items. [Desired_features.TIME] would return the time that the value was set.
Methods are represented in the same way, but often have a parameter besides the name of the method. For example, the Collection Variable type has many methods for working on the list of values to add, extract and delete items.
System User Interface of How Variables are Asked When the logic of a system requires that the value for a Variable be asked of the system user, it is done via the Java Corvid Runtime Applet. Corvid provides a wide range of options in how a question is asked (radio button, check box, edit field, drop-down list, etc.), how these are formatted, what questions are asked together, and enables other text or graphics to be added to the question.

4: Corvid Concepts 13
Corvid Logic Blocks Exsys Corvid introduces a unique new way to define, organize and structure rules into logically related blocks. These Logic Blocks are blocks made up of rules that can be defined by tree diagrams or stated as individual rules. Each block may contain many rules or only a single one. Logic Blocks provide a convenient way to use a group of related rules from within the expert system.
Blocks are created and edited in the Corvid Logic Block window.
The indentation in a block indicates the level of the IF condition in a rule. For example, expressing the single rule:
IF
The customer has a high- risk tolerance
AND Meeting objectives requires rapid growth
THEN
Mutual Fund X is a good choice
would look like this in a Logic Block.
The horizontal blue arrow indicates the THEN part. The indention of the first two lines and vertical gray bar indicate IF parts. The shorter Variable name is used in the Logic Block, rather than the longer prompt text.
When the rule is fully expanded by Shift - Right clicking on a THEN node, it will use the full Variable prompt text and match the original text as shown here in Rule View.
In practice the Logic Block would be more likely to have some degree of tree structure and cover multiple related rules. The following Logic Block handles more criteria of objectives and goals. The green angle and vertical lines indicate groups of values for the same Variable, and help organize the block and make sure that all relevant values are considered.

4: Corvid Concepts 14
This Logic Block is equivalent to the following 4 rules:
IF The customer has high-risk tolerance
AND Meeting objectives requires rapid growth
THEN Mutual Fund X is a good choice
IF The customer has high-risk tolerance AND Meeting objectives requires only medium or slow growth THEN Mutual Fund Z is a good choice IF The customer has medium risk tolerance THEN Mutual Fund Y is a good choice AND Mutual Fund X is a poor choice IF The customer has low risk tolerance THEN Mutual Fund X is a poor choice
It is also easy to see the structure of a particular rule by right clicking on a THEN condition. This highlights the rule’s IF conditions in blue. For example, for rule 2 it would display:
In addition to the Logic Block, which shows the overall structure of the logic, the Rule View displays the If/Then rule currently being worked on. This is displayed in English and algebra, making it easy to develop, maintain and verify a system.
A Logic Block can contain multiple trees and/or individual rules that are logically related. The block allows the rules to be used as a group and makes maintenance of complex systems and changes in logic much easier to do.

4: Corvid Concepts 15
MetaBlocks and Product Selection The MetaBlock option for the Logic Block provides a way to build generic logic that can be applied to the rows of a spreadsheet.
The rules, nodes and expressions in a MetaBlock have all of the features of any other Logic Block, but can also include special MetaBlock values that come from a spreadsheet. After each row is processed, certain data may be saved or cleared depending on the nature of the system.
This is particularly effective in building product selection systems. For example, if the price of a specific product is higher than the customer's budget, you can assign a value to a Confidence Variable that indicates it is not an appropriate product to recommend. Other rules, considering features requested by the user, might push this Confidence back up to the point where the product is recommended if it were a particularly good match on other desired features. If this were done, it could be displayed with a Note indicating, “It is more than the budget, but a good fit for desired features” - a good emulation of an effective salesperson.
In Corvid, Variables are marked with [ ]. In a MetaBlock, the formulas can also include data from the spreadsheet marked with { }. The label in the { } is just the column heading from the spreadsheet. The associated value for the row will be used in the formula. For example, the value of {COST} comes from a spreadsheet column, which has data on products.
There is one product per row and the price may be different for each row. For the rows where the price is over the budget, this rule will fire:
IF {COST} > [CUSTOMER_BUDGET] THEN [SELECT_THIS_PRODUCT] = -100
When a Logic Block is made a MetaBlock, the logic in the block will be run multiple times - one for each data row in the spreadsheet. The value of the Variable [CUSTOMER_BUDGET] will be asked only once, but {COST} will be set for each row.
The MetaBlock logic is applied sequentially to each row in a spreadsheet and in most systems certain Variables will have a value set just for that row. This may be a ranking on how good a specific product is for the system user's needs, comments about the product, or other Variables that give a value during the system's analysis.

4: Corvid Concepts 16
Corvid Action Blocks Action Blocks are a very simple way to build systems that use a procedural approach to solve a problem by asking a series of questions. The basic approach is a procedural, forward chaining approach, but the answers to a question may allow skipping some other questions, or may require asking additional questions. This works very well for smart questionnaires, but can also be used for many other types of problems that do not involve deeply nested rules.
Action Blocks use a spreadsheet style approach to describing the logic of a process. This works well for many types of problems, and is quite useful for “smart questionnaire” systems. Other types of decision-making problems that require more complex logic or backward chaining should be built with the Corvid Logic Blocks.
The rows in the Action Block define specific actions to take when the end user selects particular values for variables. Each full row corresponds to an IF/THEN rule, though some rules have multiple THEN assignments, which are each on a separate row.
Each row has 6 columns:
Label This is a name for a related group of rows. Labels are used to refer to a specific row in the spreadsheet for some Actions.
Question This is the Prompt text of a variable, and normally will be asked of the end user.
Value For Static List variables, this is one or more of the values for that variable. For other types of variables, it is a Boolean test that will evaluate to True or False. These are the same as nodes (conditions) in the IF part of a Logic Block.
Action This is the action to take if the value condition is true is true. Actions can set values, skip over following questions, run other Action or Logic Blocks, etc.
To This is the item that the Action applies to. This will either be a variable or a block in the system.
Content Some Actions require an additional parameter.
Answers and Actions The fundamental way that Action Blocks work is really quite simple.
1. Specify a Corvid variable that will be asked of the end user. (The input for the variable can also come from other sources, but the typical approach is to ask the user.)
2. For each possible value of a Static List variable the user could select, or for various Boolean tests on the value of other types of variables, associate one or more actions that can set values, skip over questions, run other blocks, etc.
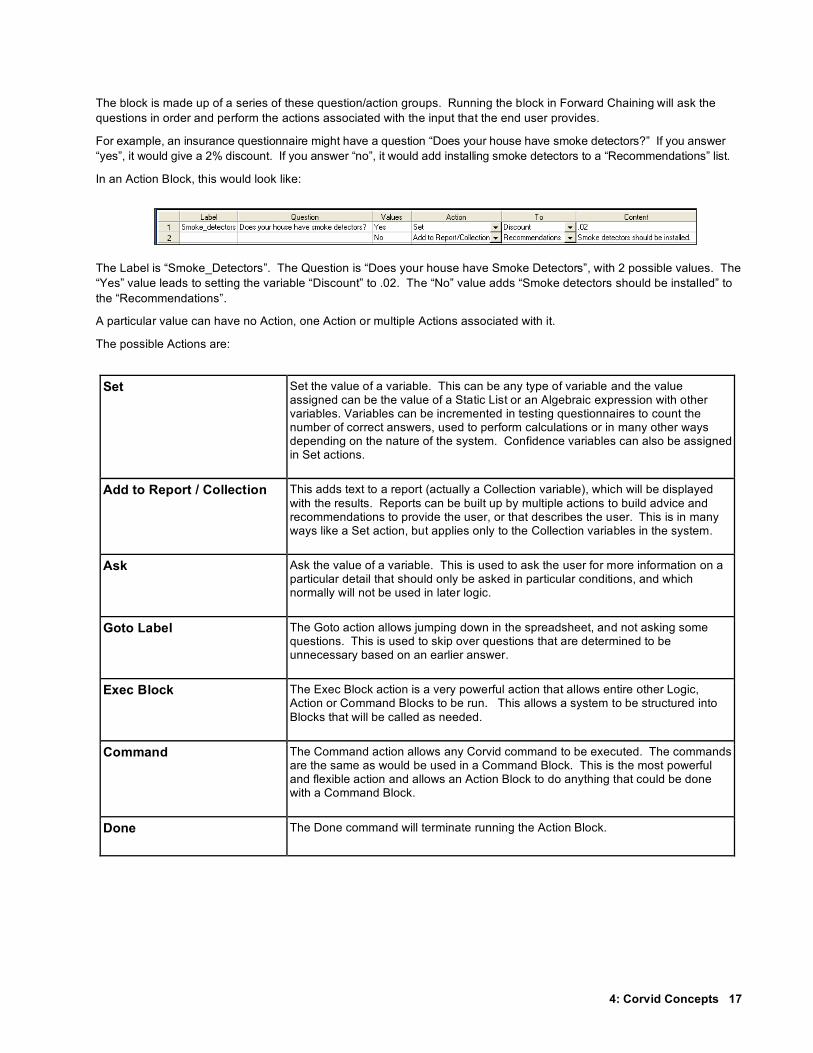
4: Corvid Concepts 17
The block is made up of a series of these question/action groups. Running the block in Forward Chaining will ask the questions in order and perform the actions associated with the input that the end user provides.
For example, an insurance questionnaire might have a question “Does your house have smoke detectors?” If you answer “yes”, it would give a 2% discount. If you answer “no”, it would add installing smoke detectors to a “Recommendations” list.
In an Action Block, this would look like:
The Label is “Smoke_Detectors”. The Question is “Does your house have Smoke Detectors”, with 2 possible values. The “Yes” value leads to setting the variable “Discount” to .02. The “No” value adds “Smoke detectors should be installed” to the “Recommendations”.
A particular value can have no Action, one Action or multiple Actions associated with it.
The possible Actions are:
Set Set the value of a variable. This can be any type of variable and the value assigned can be the value of a Static List or an Algebraic expression with other variables. Variables can be incremented in testing questionnaires to count the number of correct answers, used to perform calculations or in many other ways depending on the nature of the system. Confidence variables can also be assigned in Set actions.
Add to Report / Collection
This adds text to a report (actually a Collection variable), which will be displayed with the results. Reports can be built up by multiple actions to build advice and recommendations to provide the user, or that describes the user. This is in many ways like a Set action, but applies only to the Collection variables in the system.
Ask Ask the value of a variable. This is used to ask the user for more information on a particular detail that should only be asked in particular conditions, and which normally will not be used in later logic.
Goto Label
The Goto action allows jumping down in the spreadsheet, and not asking some questions. This is used to skip over questions that are determined to be unnecessary based on an earlier answer.
Exec Block
The Exec Block action is a very powerful action that allows entire other Logic, Action or Command Blocks to be run. This allows a system to be structured into Blocks that will be called as needed.
Command
The Command action allows any Corvid command to be executed. The commands are the same as would be used in a Command Block. This is the most powerful and flexible action and allows an Action Block to do anything that could be done with a Command Block.
Done
The Done command will terminate running the Action Block.

4: Corvid Concepts 18
Corvid Command Blocks Command Blocks control how a system operates, what actions to take and what order to perform actions. The Logic Blocks in a system have the detailed logic of how to make a decision, but these must be invoked from a Command Block. Most fundamentally Command Blocks control what Variables the system will try to derive values for, and what Logic Blocks will be used to do that.
Command Blocks control the procedural flow of the system including how the system chains, executes the Logic Blocks, loops, and displays results.
Command Blocks can be a single command that starts backward chaining on all Confidence Variables; up to more complex systems that involve While and For loops, conditional branching, forward chaining, displaying intermediate results, etc.
The Command Block provides a graphical development interface to describe the procedural operations, no matter how complex they get. Command Blocks are built and edited in the Corvid Command Block window. This widow displays the command structure in a visual interface. Conditional branches and loops are color coded and easy to see.
The Command Builder window enables a wide variety of commands to be easily built with a few mouse clicks - no complex syntax to learn, understand and remember. Using this dialog helps insure that the commands are syntactically correct.
Variables Tab - Builds commands that set or drive the value for a Variable, or force the Variable to be asked of the user.
Blocks Tab - Builds commands that run a Logic Block in forward chaining mode or as a Command Block.
Reset Tab - Allows data or blocks to be cleared for reuse. This is usually only required in Command Blocks that use WHILE or FOR loops.
External Tab - Allows commands to be added that call other applets.
Control Tab - Provides ways to control the flow of execution and include/exclude blocks from the backward chaining.
Results Tab - Provides two ways to display the results of a system - a default results screen or a file display.
Title Tab - Allows the Interface Commands to be added that can be called to display a title at the start of a system run session.

4: Corvid Concepts 19
Validation Systematically testing a large Corvid system can be difficult due to the large number of possible combinations of input. Corvid provides a way to automate the process of systematically testing the system. This can be used to check for various types of errors in the rules (e.g. combinations of input that do not produce any results), along with values that would be a problem in the context of a particular system (e.g. a variable being set to a value greater than 100, when that should not be possible).
The validation tests are setup from the validation window.
Test parameters can also be saved to allow testing to be repeated when needed.
The Validation window also allows individual Blocks to be tested so subsets of the rules can be validated.
Spell Checking Corvid provides a spell checking function for edit boxes where standard English text is expected. These include the Prompt and Values of a variable, text added to a collection variable and other places where English text is entered.
As text is entered in these edit boxes, if any words appear to be incorrectly spelled, they will be highlighted with a wavy red line.
Misspelled words can be directly fixed in the edit box, or you can click F7 to display the spell checker window.
This window makes suggestions and allows editing, ignoring and learning the misspelled words. Since normally only a phrase or few sentences are being corrected at any time, the only buttons needed are “Change” and “Ignore”, or the “Add” button to add the word the to dictionary.

4: Corvid Concepts 20
Printing Corvid Systems When printing the Variables, Blocks and rules in a system the following Print window is displayed:
All Variables or specific Variables can be printed containing all of their parameters including a "Cross Reference" listing. All Logic Blocks or specific blocks can also be printed. This also applies to Command Blocks.
The printout of the Logic Blocks shows the nodes in the Block in black and also, for each Then node, all of the associated IF nodes in gray. This makes it much easier to understand the logic and check the system.
Often it is desirable to examine the actual rules produced by the Logic Blocks. This is easier for domain experts not familiar with Corvid's block structure to review the rules, which are just English or algebra. When the rules are printed, the full text of the prompts and values is used, rather than the Variable names and the short value text as is used in the Logic Blocks.
Controlling The User Interface The Corvid Runtime program interacts with the users by displaying the system title, asking questions, and displaying messages or results. Corvid provides a set of Interface Commands that allow text and graphics to be formatted and included in these displays. The Interface Commands also support ways to link text and graphics to other URLs and HTML pages.

4: Corvid Concepts 21
Questions Most of the parameters for how questions are asked are set in the widow for editing questions. This dialog defines controls such as checkboxes, radio buttons, etc. and it allows for information or graphics to be added and displayed before, during, or after a question is asked.
Results The results are entered from the Command Builder window. The Interface Commands for the default results screen are displayed in the edit box. Alternate result screens can also be created and stored in a file.
The Interface Command Builder Interface Commands are built in the Display Commands window.
There are 5 main types of Interface Commands that can be entered:
Variables Displays some information on a Variable, or uses the Variable to control the display of the other information
Images Displays a JPG or GIF images
Text A specific text string is added to the display window with a specified format. Text may be linked to another HTML page
File Displays the text in a file
Buttons Controls the buttons included on a screen
Color Controls the background color
Each of these main types of commands has options that are controlled by the tabbed dialog in the lower right.
Display Tab Provides ways to control when and how a Variable will be displayed. Multiple options can be used simultaneously
Instead Tab Provides a way to use Variables in the system to control the display of other items or text graphics
Format Tab Allows the text to be formatted for font, color, size, alignment, etc.
Link Tab Provides a way to easily associate a URL link with the displayed item, which the system user can click on

4: Corvid Concepts 22
Formatting All of the display Interface Commands can have associated format commands. These are set in the Edit Format window. This window controls: font, color, position, text wrap, text width, indenting, list display, text box area, and defaults for format parameters.
Images and Links to Text Any text can contain HREFcommands to add links from graphics and text strings. These commands behave just as they do in HTML. And can also be used in other text in the system such as prompts for questions. When the user clicks on one of these links, the Corvid Runtime will open a new browser window and display the specified URL.
Embedding Variables Any text can have the text of another Variable embedded in it, and the properties of the Variable can be also be embedded. For example:
[[NAME]], what is …
When the system runs, the [[NAME]] is replaced by the actual name.
Corvid Java Runtime Applet System Delivery Exsys Corvid offers a revolutionary way to deploy interactive expert systems on Web sites. When a system is completed, it is delivered to users via a Java applet. The applet is small (approximately 160k) and downloads to browsers quickly.
Running in the Development Environment When a Corvid system is run in the development environment, the Corvid editor dynamically builds an HTML file and then uses this to run the Corvid Java Runtime in a browser window. This allows the system to be run in the same environment that it would run over the Web and it enables the developer to test the system as it is being built.
Each time the system is run from the development environment Corvid:
1. Dynamically creates an HTML page to run the system with the appropriate applet code
2. Opens a window running Microsoft Internet Explorer
3. Runs the system using Java in the IE window

4: Corvid Concepts 23
Controlling the Applet The properties for running the Corvid Java Applet in the development environment are set using the Properties window.
Title and Author, text defaults for the entire system, and background colors can be easily set. There is a default format template that comes with the Corvid package, or a special system default can be set for the application. The Corvid Runtime applet can be added to any HTML page, either the default page or a custom page for the system. Outside the applet area, a customized page can be as simple or complex as needed with any HTML text, images, controls, images, animation, etc.
The "Runtime Applet" box provides applet size and position specifications including: width, height, alignment, and vertical and horizontal spaces between applets or the trace window applet.
Trace Applet When developing a system it can be very useful to be able to watch the exact steps the system takes to reach a conclusion. This is particularly helpful when validating a system that is not behaving as expected. Corvid allows you to add the Corvid Trace Applet on the HTML page and all trace information will be displayed. The Corvid Runtime sends messages to the Trace Applet on the steps it has taken, rules that have fired, how data has been derived, etc. At the end of the run, details on how each Variable received its value are sent to the Trace Applet. This history of the run can be examined and searched to see why and how the system came to the conclusions it did. It is also a way to see certain error messages. This can be especially helpful when there is more than one person involved in developing the system. The trace applet can be run either in development mode or when the system is fielded on the Web.
Extra PARAM to Pass Data One of the ways to set a value for a Variable is to pass its value in when the applet is called through the applet PARAM option. When the applet is added to an HTML page, various named identifiers can be given values that can be accessed from within the applet. When Corvid builds the call to the applet, it uses this to provide certain information to the applet.
The PARAM option provides a way to pass data using dynamically built HTML pages created through Java Script or an HTML page content manager. These pages can obtain data from other sources before the applet is called. For example, based on a users login, there may be certain personalization data available, which could be passed directly into the Corvid application and incorporated dynamically without having to re-ask the system user. In some cases, the applet could just appear on the users browser window and reach its conclusions without asking any questions.
Adding Other HTML Code Sometimes it is beneficial to add other HTML code following the applet call. This is especially useful when adding another applet that the Corvid Runtime will communicate with. This can be done by creating a custom template file to run the screen or by adding, deleting or editing HTML lines.
The Corvid Runtime Applet can also communicate with any other applets on the page, to obtain data, present results or add special functionality.

4: Corvid Concepts 24
Moving your Corvid System to the Web When a system is moved to the Web, the page built by Corvid can be moved to the server to run the system, or the applet call code from this page can be copied to another HTML page to run the system.
All that is required to incorporate a Corvid expert system to a Web site is adding a few lines to the HTML page, and putting the runtime applet and special knowledge base files on a server.
Example:
<APPLET CODE = "Corvid.Runtime.class" NAME = "CorvidRuntime" ARCHIVE = "ExsysCorvid.jar" WIDTH = 700 HEIGHT = 500 HSPACE = 0 VSPACE = 0 ALIGN = middle > <PARAM NAME = "KBNAME" VALUE = "my_kb.cvR"> <PARAM NAME = "KBWIDTH" VALUE = "700"> </APPLET>
That's all it takes - no special system access, no code to run on the server, no CGI access. The server can be any type - NT, UNIX, LINUX, etc. The Corvid development environment even generates this code for you automatically. Each time the system is run from the development environment Corvid:
1. Dynamically creates a HTML page to run the system with the appropriate applet code 2. Opens a window running Microsoft Internet Explorer 3. Runs the system using Java in the IE window
When you test your system during development, you are running it in the same way as your end users will over the Web. If you want to debug a system that is not behaving as expected, just add the Corvid Trace Applet in the HTML page and all trace information will be displayed in that applet.
If data is known before the Corvid applet is called, you can add PARAM values for variables in the call to the applet, and the system will not need to ask them of the end user.
The Corvid Runtime Applet can also communicate with any other applets on the page, to obtain data, present results or add special functionality.

5: Working With Variables 25
5: Working with Variables What is a Corvid Variable? Variables are the building blocks that are used to build expert systems with Corvid.
Variables are used:
To define the logic in the Logic Blocks
To hold user data during a session
To define the goals of how the system will run
There are 7 types of variables:
Static List Multiple choice list with the values defined during development of the system. Examples - day of the week, on/off, high/medium/low.
Dynamic List Multiple choice list with the values defined dynamically during runtime. The values may come from external sources such as spreadsheets or be set by the logic of the system. Examples: selection of options that change frequently and are not known at time of system development.
Numeric A numeric value that can be used in formulas or test expressions. Possible values are any numeric value. Examples: temperature, pressure, stock price, interest rate.
String A string value that can hold any text string. Examples: name, social security number.
Date A date value that can be used in comparison (future/past, etc.) tests. Examples: birth dates, option maturity date.
Collection A list of strings as values. The list is built up during a run and is not asked of the system user. Various operators allow you to add, remove and test items in the list. Any string or Variable can be added to the Collection. Examples: "best" products, configuration, overall comments, selections from a database.
Confidence A Variable that can be assigned confidence value that reflects a degree of certainty. Various formulas can be used to combine the values assigned to an overall confidence for the Variable. Example: likelihood that a product is appropriate for the user.
All of the Variables have certain features and functions in common and each has its own special features and capabilities. When and how to use the specific types of Variables will be clearer when you get to building Logic Blocks, but for now, think of them as the elements that would be needed to incorporated into a decision-making process. If your system will use a temperature to help make the decision, you will need a variable [TEMPERATURE] defined and used to build the logic.
Adding a Variable Variables are added to the system and edited by clicking on the Variable icon:
or by selecting “Variables” under the “Windows” menu item.
Note: All Corvid variables are indicated by placing their name in [ ].

5: Working With Variables 26
This will display the Variable Editing window:
This window has many options. The left side is to find and select the variable desired. The top set of tabs is for features common to all types of variables. The lower set of tabs is for features unique to each type of variable.
Show Advanced Options The “Show Advanced Options” button at the bottom of the window controls the display of many controls on the window for special options that are rarely needed.
Clicking the “Show Advanced Options” to select it will change the window to:
This displays many additional controls, but they are for rarely used capabilities such as obtaining the variable prompt text from a database. While these controls are required in some cases, for the vast majority of systems, these additional controls can be confusing and unnecessary. It is recommended that the “Show Advanced Options” checkbox remain unselected unless you need one of the special advanced controls.
This manual will discuss and illustrate all the controls, including the advanced controls. The advanced controls will be hidden or disabled unless the “Show Advanced Options” checkbox is selected. Because of this, some of the screen illustrations may look different from what you see in the window.
If you need one of the advanced controls that are described, and either do not see it on the window or it is disabled, click the “Show Advanced Options” checkbox.

5: Working With Variables 27
Adding Variables To add a new variable click the “New” button. This will display the new variable dialog:
Enter a valid variable name, select its type and click OK.
Name All variables have a name and a prompt. The prompt is the text that will be used to ask the user for a value for the variable, and display the value of the variable with results. The prompt will be entered later in the main variable window.
The variable name is a short text that will be used to refer to the variable in the Logic Blocks, formulas, commands, etc. The name should be easy to recognize and understand and as short as practical. During the building of the system, you will often have to select variables from a list. The easier it is to find and recognize the variable quickly, the easier your development work will be.
Variable names can contain any character, including non-English characters, except the following:
~ ! @ ^ & * ( ) - + = " ' ? > < . , / : ; { } | \ `[ ]
In addition, “white space” characters (space and tab) are not allowed in variable names, and Corvid will automatically convert them to the underscore character “_”. If the name entered contains any of the illegal characters,
The naming convention for the system is entirely up to you. Names can be of any length, though it is a good idea to keep them short. Most drop down lists only display about 40 characters, so it is a good idea (but not required) to keep the names less than 40 characters.
When using names, they can be sorted several ways - order entered, alphabetically, or by type. These can be used to help make it easier to find variables. For example, if several variables all relate to a pump named PUMP A, you could start all those variables with “PUMP_A…” and the alpha sort would put them together.
The name of the variable can be changed later during development if required, and Corvid will automatically change all occurrences of it.
Type When a new variable is added, it is assigned a type. The type can be changed later, provided the variable is not in use in the Logic Blocks of the system. Simply click on the tab for the type of variable that you want to change to. Corvid will check that the variable is not in use and change the type for you. If you change type after the variable is defined, make sure to change any previous parameters that are not appropriate for the new type. (For example, if you change a Static List variable to a numeric variable, make sure to change the “Ask With” options from radio buttons to an edit field that is appropriate for a numeric variable.)

5: Working With Variables 28
Static List Static lists are multiple-choice lists that can be defined during development. They are one of the most used of all variable types and should be used whenever it is possible to identify all of the possible options that the user can answer. This makes user input easier since they just select an item off a list rather than entering a text string or number. It also greatly reduces the need to check user input for correct syntax, valid data, etc.
Using a static list also makes it easier to assure that the logic of the system covers all possible user input, since automatic validation of the Logic Blocks can detect if the logic is complete.
Some examples of static lists are: the days of the week, presence or absence of a diagnostic symptom, state of an item (“The light is on/off”), etc. Remember in addition to asking questions, static list values can be set by the logic of system. (“The investor’s risk tolerance is high/medium/low”)
Dynamic Lists In many ways dynamic lists look like static lists, but the values are set during runtime rather than during development. This can be very powerful, but makes a system more complicated to build. Dynamic lists should only be used when the actual multiple choice options that you want to present to the user can not be specified during development, but will be known at runtime. This may be due to frequently changing data, or lists of options that are built during the run in a collection variable. Dynamic lists can also be used in conjunction with MetaBlocks and spreadsheets to limit input to valid spreadsheet values.
Numeric Variable Numeric variables are just variables that have a numeric value. These are a very commonly used variable type. Unlike Static List variables, the possible values for a Numeric Variable are continuous. (If there are only a few specific values that are possible, it may be better to use a Static List). The variable can be used in formulas to test the value, or in assignments to assign a calculated value. Some examples of numeric variables are temperature, pressure, stock price, interest rate, etc.
String Variable String Variables are variables that have a string value. The value is just treated as a string and can be displayed, embedded in text or added to Collection variables. String variables are usually used for text such as user’s name, social security number, phone number or other non-numeric data.
Date Variable Date Variables are variable that have a value, which is a date. This value can be set, used in comparison with other dates, embedded in text and included in results.
Collection Variable Collection variables are variables that have list of strings as their value. The list is built up during a run and is not asked of the user. Collection variables provide a very powerful way to make lists that the system can display or work on. Collection variables are particularly useful when combined with MetaBlocks for product selection systems to keep lists of the selected items. Collection variables also provide a way to operate on the lists by testing if an item is in the list, extracting the first/last item from the list, sorting the list, etc. Collection variables are an advanced feature and are discussed in greater detail later.
Confidence Variable Confidence Variables have a value that is a confidence value. The value for the variable can be set by multiple sources and rules. The various values set combine together to produce an overall confidence. This confidence value may be used in other calculations or to produce a sorted list of the most likely recommendations from the system. Most expert systems will have at least some confidence variables. (However, it is quite possible to build an expert system in Corvid without any confidence variables by using other variable types as goals).
Setting various parameters for the variable controls the way that the confidence values are combined. Unlike previous Exsys expert system tools, the confidence system used is associated with the variable, not the entire system. This allows the confidence variables to use different modes as needed.

5: Working With Variables 29
Tab Groups The top set of tabs allows setting parameters that are found in all variable types:
These can be set for all variables in the system.
The lower set of tabs each apply to only a specific type of variable:
The tab corresponding to the variable’s type will be selected. If the variable has not yet been used in the logic of the system, its type can be changed by clicking on a different tab. If the variable is in use, its type cannot be changed.
The “Continuous” Tab applies to Numeric, String and Date variables. These are related types and can be changed even when the variable is in use.
Prompt Tab All variables have a prompt that describes in detail what the variable means. This is used both for asking the user to input a value for the variable and when results are displayed. The prompt is set by clicking on the Prompt tab. This will appear as:
or if the “Show Advanced Options” checkbox is selected it will appear as:
5: Working With Variables 30
Main Prompt The Prompt or “Main Prompt” describes what the variable means. This is entered in the green edit box. This is the text that will be displayed if the user is asked for the value for the variable, or if it is displayed with the results. This prompt can be as long as required and can use any characters. For example, the name of the variable might be a short [PUMP_A_TEMP]; the prompt might be “The temperature in of Pump A’s input stream measured mid-flow in degrees Celsius”
Corvid supports having multiple prompts for a variable. This makes it easy to support multiple languages, or levels of complexity of a question in one system. However, the Main Prompt is the one used for development. (The alternate prompts are only used at runtime.)
If the variable is only internal, and will neither be asked nor displayed, the prompt text will never actually be seen by the end user. However, for most variables the prompts will define the content of the user interface and are very important.
External Source Corvid supports a way to have the text of the prompt acquired from external sources such as a database, another applet or CGI program. At runtime, if the prompt is needed, the external call would be made and the value it returns used as the prompt. For details of using external calls, see he chapter, “Interfacing to External Data”.
Alternate Prompts In addition to the main prompt, there can be alternate prompts in other languages or alternate ways to ask the user for the value of the variable. For example, the system could have two modes - expert and novice. In expert mode, it would ask shorter and more technical questions that an expert could answer while in novice mode it would ask simpler more explanatory questions.
To add alternate prompts:
1. Select a key variable that indicates what prompt to use 2. Enter the alternate prompts
Key Variable The key variable indicates which prompt to use when there are multiple prompts. The key variable is selected by clicking on the drop down list and selecting a variable. The key variable must be either:
A numeric variable that will return an integer value
A property of a variable that will return an integer value
A Static List variable - in which case the number of the first selected value is used.
The value returned must be between 1 and the total number of prompts.
If a numeric variable is selected, the value of that variable will select the prompt. A value of 1 will use the Main Prompt. A value of 2, the second prompt (which is the first alternate prompt), etc.
If a static list variable is used as the key variable, the first value set will select the prompt. If value 1 is selected, the Main Prompt will be used. If value 2 is selected, the second prompt, etc. The use of a Static List variable makes it easy to have a multiple choice question at the start of a run select the language.
If alternate prompts are used in a system, it is a very good idea to have them all use the same key variable.
Note: An alternate, and usually much better, way to handle multiple languages is through Resource Files, which are discussed later in the manual. Resource files are the recommended way to build systems that run in multiple languages, and the Alternate Prompt/Value approach is provided primarily for compatibility with system built using early versions of Exsys Corvid.

5: Working With Variables 31
Alternate Prompts The alternate prompts are entered in the edit region at the bottom of the Prompt page. The number above the edit region indicates which prompt is being entered. (Remember #1 is the Main Prompt, so the numbers start at 2). Like the Main Prompt, the alternate prompts can be any length and any text.
If a single key variable is used for all prompts, make sure that the alternate prompts are consistent. For example, alternate prompt 2 is always Spanish and alternate prompt 3 is always French, etc.
To Be Tab Corvid provides ways to build very complex logic and rule structures. However, experience has shown that many of the variables in typical expert systems only require very simple logic to derive the value. It is certainly possible to add rules to do this derivation, but the result is often many very small rules that tend to clutter the system and which can be more difficult to maintain. The To Be commands provide an alternate way to derive the value for a variable in a quick easy way that is directly associated with the variable.
Note: Most variables do NOT need To Be rules. To Be rules should not be used if:
The value for the variable should be asked of the user
The logic for the derivation of the value requires more than a single IF test
The value for the variable will come from an external applet or be passed into the Corvid Runtime on startup
To add To Be commands, click on the “To Be” tab.
To Be Rules The derivation rules set in To Be should be short and simple - a single IF test and, an assignment of a value to the variable if that IF test is true. The IF test can be complex and include Boolean operators, but if that is required, the logic is probably better done in the Logic Blocks.
For example, there is a Static List variable:
The heater is
1 Running
2 Not running
and you have a temperature variable [TEMP]. If you know that if the value of [TEMP] is less than 50, the heater is not running; and you know that if the value of [TEMP] is 100 or more, then the heater is running. (For values between 50 and 100, you are not sure about the heater and would have to use other means to establish a value)

5: Working With Variables 32
The value for the heater variable could be set in the Logic Blocks, or you can use To Be rules:
IF [TEMP] < 50 THEN Heater = Not_running IF [TEMP] >= 100 THEN Heater = Running
Adding To Be Rules To add a To Be rule:
1. Enter a Boolean expression in the “IF Expression” edit box. This must be an expression that evaluates to TRUE or FALSE (e.g. [X] > 0) and can be based on any of the variables in the system. Alternatively, the expression can be built by clicking on the “Build” button. This will bring up the Expression building dialog window. This is discussed in greater detail in the Logic Block chapter.
2. Go to the “Then Set Value” field. If the variable that is having the value set is a Static List, click on the drop down and select a value to assign when the IF test is true. If the variable is not a Static List, enter the value to assign in the edit field.
3. Click the “Add” button and the rule will be added to the To Be list.
Editing the To Be List To delete a rule from the To Be List, highlight the rule by clicking on it, and click “Delete”. The rule will be removed from the list.
To Edit a Rule, highlight the rule by clicking on it, and click “Edit”. The text of the rule will be moved to the IF and THEN edit fields. Make any changes and then either click:
“Replace” to replace the selected rule with the edited rule,
OR
“Add” to add the new rule while also keeping the original rule.
Stop Derivation on To Be The To Be rules can be used independently or in conjunction with the Logic Blocks. A variable can have its value set by both To Be rules and Logic Blocks. This is controlled by the “Stop derivation if To Be command sets a value” check box. If this check box is selected, and a To Be rule sets a value, the Logic Blocks that could also set a value for the variable will NOT be tested. If the box is unchecked, these Logic Blocks would be used. If the To Be commands do not set a value, the rules will be used in either case.

5: Working With Variables 33
Options Tab There are a variety of parameters that determine how a variable behaves when it needs to be asked. Clicking on the Options Tab sets these.
Final Results Display Flag The “Final Results Display” checkbox indicates if the variable should be included in certain result displays. When the results for a run are displayed, there are a variety of options for selecting which variables should be included. In some cases this can be a simple selection such as “All Confidence variables”. However, sometimes this approach leads to including a few extra variables that should not be displayed. Using the “Final Results” flag enables fine-tuning of the variables displayed via more general commands.
Never Ask - Use a Default Value When a variable cannot be derived from the Logic Blocks or To Be rules, it must be asked of the user. In some cases, rather than ask the user, a default value can be assigned. This is often the case where a variable normally has a standard value, but under certain conditions may have a different value. The Logic Blocks and To Be rules only need to handle the special conditions. If they do not assign some other value, the default value will be used.
For example, suppose there is a system that has a variable that indicates the state of a component:
The state of the component is Low Normal High
While the “state” has meaning internally in the logic of the system, it is not something that the user could provide. Instead the system would have logic to derive if the state was high or low based on data. If these rules did not fire, the state is assumed to be “Normal”. To have the “Normal” value set automatically without asking the user, it should be made the default value.
To set a default value:
1. Check the “Never Ask - use default value” checkbox
2. If the variable is a Static List, click on the drop down and select one of the values. If the variable is not a Static List, enter the value in the edit field.
Backward Chaining Options Backward chaining can be controlled in 3 ways, which can be specified individually for each variable. A variable can be set to:
Stop backward chaining as soon as any value is assigned to it - even if there are other rules that could be tested.
For Static List Variables, skip redundant rules - those are rules that would not provide any additional information even if they fired.
Not use backward chaining to derive a value.

5: Working With Variables 34
These options are controlled from the Variables window, on the Options Tab:
The “Stop after first value is set” option will end backward chaining as soon as any rule fires that sets a value for the variable. This can be very useful and greatly reduce the number of rules that are tested.
For example, suppose you have a Numeric variable that may be set to any of several values, but you know that it will only be set to a single one. Using the “Stop after first” option will NOT test any other rules to derive a value after any rule fires. If the option were not set, all the possibly relevant rules would be tested.
“Stop after first” should only be used in cases where:
The variable will only be assigned a single value
The variable is not being used for control to force a group of rules to fire
The system is being run in Backward Chaining (DERIVE command)
A related option is the “Skip redundant rules” option. This applies only to Static and Dynamic List variables. A rule is redundant if it would not add any information to what is already known about a particular variable.
For example, suppose there is a Static List variable, “The color is”, with possible values “red”, “blue” and “green”. If from other rules or commands, the system already has set the fact that “The color is blue”. A rule that only had “The color is blue” in the THEN part would be redundant. It would not add any new information on [COLOR], so there is no reason to try to use it. Using the “Skip redundant” option would cause this rule to be skipped when the system already knows the color is “Blue”. On the other hand, a rule with the “The color is red” in the THEN part would not be redundant and would be tested. If that rule fired, the [COLOR] would be “red” and “blue”.
“Skip redundant” is generally a good option to set for Static and Dynamic List variables unless they are being used to control when a block of rules fire. If a variable is being used to force a rule that also sets other values, then it may be necessary to fire even redundant rules, but that is not a typical situation.
The “Do NOT Derive” option is rarely needed, and is primarily for variables that are incremented in many places in a system. For example, if there is are several rules of the form:
IF … THEN [COUNT] = [COUNT] + 1
where each rule increments the variable [COUNT]. The first rule that fires will try to set [COUNT] to [COUNT] +1. To do this, it needs the value of [COUNT]. Backward chaining would cause the other rules that could set a value for [COUNT] to be called. This process would be repeated for each of the rules that fired. This complex backward chaining is legal, and will eventually unwind to the correct answer, but it is not needed. Using the “Do NOT Derive” option would prevent the chaining and, provided [COUNT] was initialized to 0, would simply increment it for each rule that fires. This is especially needed for cases where this type of rule is used in a MetaBlock. Since MetaBlocks can ONLY be called in forward chaining mode, using them for backward chaining would cause an error.
Remember, if the “Do NOT Derive” option is selected for a variable, it cannot be used as a system goal. The command DERIVE [COUNT] would not cause the rules that might set a value for [COUNT] to be called. Instead, [COUNT] would receive its initial value, or if there is none, it would be asked of the user.
Show Previous Input or Default Value When the BACK button is pressed to return to a previous question, the input the user provided will be displayed and set as the default value. This allows a user to step back several questions, change an answer and, then just click “OK” for the answers that have not changed.

5: Working With Variables 35
This option is controlled by the checkbox “Display current value on BACK and ASK” in the Properties widow. If this checkbox is selected, previous values will be selected. If not selected, Corvid will behave as it did prior to Ver 1.2. The default for all systems built with Ver 1.1 and before is to have this option turned OFF - the system will continue to behave as it did previously. The default for all new systems created with ver 1.2 and beyond is to have this option turned on.
In addition to displaying the previous input data when BACK is selected, this option can also be used to set a default value for a question that the user can accept or change. To do this, set a Default Value in the variable’s Options page.
To set a Default Value for a question that is to be asked:
For Static List variables, select a value from the dropdown list. For Numeric or String Variables, enter a value in the edit box.
When the question is asked, this value will be marked as selected. If the user just clicks “OK” the value will be used. Note: Make sure the “Display current value on BACK and ASK” checkbox on the Properties page is selected.
If you wish the default value to be automatically used without asking, and without giving the user a chance to change it, select a value and click the “Never Ask” checkbox. In this case, the variable will not be asked of the user. This should be used primarily in cases where other rules may set a value, but if those rules do not fire, the default should be used automatically.
Check for PARAM Data A variable can be assigned a value that is passed in when the applet is called. This is done by setting a PARAM value in the applet call on the starting HTML page, and checking the "Check for PARAM data" box for the variable. Normally, the applet call to start the runtime is:
<APPLET CODE = "Corvid.Runtime.class" NAME = "CorvidRuntime" ARCHIVE = "ExsysCorvid.jar" WIDTH = 700 HEIGHT = 400 HSPACE = 0 VSPACE = 0 ALIGN = middle > <PARAM NAME = "KBNAME" VALUE = "my_system.cvR"> <PARAM NAME = "KBWIDTH" VALUE = "700"> </APPLET>
The value for a variable can be added by adding other PARAM lines before the </APPLET> command. If there is a variable named "[CUSTOMER]", for the customer name, and this name is obtained from a database or "personalization" software that dynamically builds the HTML page, the value for [CUSTOMER] could be passed into the expert system with:
<PARAM NAME = "[CUSTOMER]" VALUE = "John Smith"> As many values as are needed can be passed in with the applet call. To have a variable check the PARAM data for a value, select the "Check for PARAM data" check box. If this box is not checked, PARAM data will not be looked for. The variable name MUST be in [ ].
Initialize A variable can be assigned a value at the start of a run with “Initialize”. This value will be assigned to the variable before any Logic or Command Blocks are used. For example, suppose you have a counter for some item. You want the counter to start at 0. This could be done in the Command Block, but it is easier to do it via Initialize.

5: Working With Variables 36
To initialize a variable:
1. Check the “Initialize to” checkbox
2. For Static List variables, pull down the list and select a value. For Numeric or String variable, enter a value into the associated edit field to use to initialize the variable. For String variables, the string does NOT need to be in quotes.
Number of Values The number of values options applies only to Static or Dynamic List variables. They control how many values in the list can be simultaneously selected either by the user or set by the logic of the system. Selecting more than the allowed number is reported as an error.
There are 3 options:
1. Allow only a single value
2. Allow any number of values
3. Allow only up to a specific number of values
The first and second options are used far more often than the third, but it is available for special cases.
Note: If there is a limit on the number of values, and the logic of the system tries to assign values that exceed this limit, it will be reported as an error and the values over the limit will not be assigned.
External Data Source Rather than directly asking the user, the value for a variable can be obtained from external sources such as a database, another applet or CGI program. At runtime, if the value is needed, the external call would be made and the string it returns used as the value for the variable. For details of using external calls, see the “Interfacing to External Data” chapter.
“After Ask” CGI Command A CGI command (usually a database command) can be associated with a variable. Immediately after the variable is asked of the user, this command will be executed. This allows writing user supplied data out to a database as the user answers questions.
This command can be combined with database calls to get the value for a variable. A SELECT command can be set to ask the user for the value if it cannot be found in the database. (This is done by setting the O=Z option for the database SELECT command.) If the user is asked for the data, it will then be immediately written to the database. This is particularly useful in 2 cases:
1. If the user breaks off a session, they can recover their data since the second time through, the database will be able to provide the input.
2. If there are multiple expert system modules, they can easily use the database as a blackboard. Any module can ask a question which becomes available to all the other modules.
To add the “After Ask” command, go to the variable’s Options tab. At the bottom of the window, click the “Database Cmd” button to build the command. In addition to database commands, any other CGI program can be called.
Since the command is simply a URL, it can also be used to access the Corvid v2 servlet database interface programs.
Note: Initialized values are different from Default values. The initialize value is set at the start of a run BEFORE any logic or Command Blocks fire. The default value is used AFTER the Logic Blocks and To Be rules have been tested, and is used only if they fail to set a value.

5: Working With Variables 37
Link Tab The Link Tab is used to link a URL to the text of the prompt for the variable.
Whenever the variable prompt is displayed to ask a question or present information in the Java Runtime, it will be marked as a link. Clicking on it will open a new browser window displaying the linked URL.
Click on the “Link” tab:
There are three options:
1. Use a full URL - Enter a full URL. This is used if the page to be displayed is not one of the files associated with the Corvid expert system.
2. Use a relative URL - Enter the URL relative to the base address that is specified when the Corvid applet is called. Normally the Corvid expert system (.cvR) file and all associated files (MetaBlock spreadsheets, HTML pages, etc.) should all be in the same directory on the server and can be accessed off the same base address.
3. No link - this is the default
If you click on the View button, the specified HTML file will be displayed in a window.
Ask With Tab If the value of a variable is needed and it cannot be derived from the logic or other sources, it must be directly asked of the user. This is done from within the Java Corvid Runtime applet. There are many options on how this question is asked. These options are set from the Ask With tab. Once the options are set for a variable, they will be used when the variable is asked singly or in combination with other variables.
Click on the “Ask With” tab:
Use There are various controls that can be used to ask for the variable’s value. The type of control can be selected by clicking on the appropriate radio button under “Use”.
Some controls only make sense with particular types of variables. The Edit Box control should only be used with Numeric, String and Date variables and should never be used with Static or Dynamic List variables. Likewise the radio button, check box, button, list and drop down require a list of possible values and should not be used with Numeric, String or Date variables.
Radio Button This will group the values for the variable as radio buttons. Only one value can be selected from the group since selecting one will deselect any other value already selected. This is an excellent way of automatically enforcing Static List variables that can only have a single value.

5: Working With Variables 38
Checkbox The check box control is very similar to the radio button, but allows multiple values to be simultaneously selected.
Giving the Last Value in a Check Boxes Special Meaning Frequently a question may involve selection of several items from a list, or selecting a single value of "None of the above". In some cases, selecting a value(s) in addition to the "None of the above" can confuse the logic. It is possible to write logic to detect the input error and deal with it (re-ask the question, report an error, etc.). The alternative is to use radio buttons, but then only a single value could be selected. For some situations, multiple values were required.
The question can be designed so that either a selection can be made from the list, or the last value can be selected - but not both. This guarantees no conflicting answers at the question level and can greatly simplify the logic of the system.
To do this:
When the system is run, the checkboxes will be displayed as usual. The user can select any value(s) except the last value. If the last value is selected, the preceding checkboxes for that variable will be un-checked and disabled. The other checkboxes will not be able to be selected unless with final value checkbox is un-selected, at which time the other checkboxes will again be enabled.
The final value can be anything that should not be selected in addition to any of the other values. This is typically "None of the above" or "Does not apply", but this option can be used in any case where the final value has special significance. Only the final value in the list can be selected to override the others.
List The list control displays a list of values that the user can select among. A number of values will be displayed and the user can scroll to others in the list. The width is automatically set in the Corvid Runtime to fit the widest value text. This control should not be used if the text of the values is very long. The number of values displayed on the screen is controlled by the Value Format specified for the variable.
Drop Down The drop down control is similar to a list, but only a single value is displayed. Clicking on the control drops down the full list and allows the user to select a value. As with the list control, the width is set to match the longest value text and should not be used when this text is quite long.
Edit Box The edit box is a control that allows the user to enter any text as the value for the variable. This should be used only with Numeric, String and Date variables. The Corvid Runtime will do some validation of the input data and additional tests can be specified for the specific variable. The width of the edit box is controlled by the Value Format commands.
Text edit boxes used to ask for user input can be multiple lines. Use the “Control Rows=” field on the Format window. The format for the Variable’s value will control the size of the edit box.
Buttons Static and Dynamic List variable questions can be asked using buttons. When buttons are used to ask a question, a click on any of the buttons immediately sets the associated value and the system continues the analysis of the data. This is very effective for many types of systems. However, buttons should only be used if the value text is fairly short and will easily fit on the button. When buttons are used, there will be no associated "OK" button.

5: Working With Variables 39
To use buttons, select the "Button" radio button in the "Use" group under the "Ask With" tab for the variable. The buttons can be arranged like any other control - one per line, all on one line, n per line, etc.
Buttons should generally not be used if there are multiple questions on one screen (built with the "Also Ask" options). Buttons can be used, but a click on the button will set the value associated with the button and also any other radio buttons, check boxes, lists or edit regions that also have values set on the screen. When a question is asked with buttons, there is no "OK" button. This can actually make for a very flexible screen design, but remember that one of the buttons must be clicked on to input the data from the screen.
Image Maps Image maps are a very flexible way to ask questions using graphics. These are discussed in detail below.
Arrange There are several options on how the controls for value input should be arranged relative to the prompt. In addition to the arrangement control, indenting, font, style, color, etc. are controlled by the Value Format command string.
Same as Prompt The value controls will be put immediately after the prompt on the same line. This is particularly useful for edit boxes and drop down lists.
One Per Line The values will be displayed one item per line under the prompt for as many lines as required. This is particularly useful for radio buttons and check boxes with long value text.
N Per Line This is similar to One per Line, but puts several values on each line. This can be convenient for saving space when there are many values each with short text. Entering a value in the edit field specifies the number on the line.
All on One Line All of the values will be put on a single line under the prompt. This should be used only when there are a fairly small number of values and the text of each is short.
Image Maps An image map is a JPG or GIF image file that has “hot spot” regions associated with it. This image map can be used to ask the end user for data via the Corvid Java Runtime applet. A click on a hot spot assigns a value to a variable, or links to another page.
Image maps provide a very flexible and powerful way to control the user interface. Since the developer has control over every pixel and hot spot region, highly customized screens can be created. This is especially effective where graphics are required or a very specific look-and-feel is needed. Hot spots can be used to set values for Static or Dynamic Lists, Numeric and String variables, as well as link to other HTML pages. Numeric variables can use formulas to have the hot spot region function similar to a slide bar with the value assigned to the variable determined by where in the hot spot the user clicks both horizontally and vertically. An image map can have overlapping hot spots setting values for multiple variables simultaneously.

5: Working With Variables 40
Adding an Image Map An image map can be associated with a variable using the Variable dialog window. Select a variable and click the “Ask With" tab.
If the variable has an associated image map, the “Image Map” radio button will be selected. To add an image map, click the “Edit Map” button. This will both select the “Image Map” radio button, and give you the opportunity to select and edit the image map.
The Image Map editing window will be displayed.
If there is already is an associated image file it will be displayed in the edit region on the right. Any currently defined hot spots will be displayed on it.
To select the image file to use either:
Enter the name of the file in the “Image File” edit box and click the “Load” button.
Click the “Browse” button and select a file
The image file must be either a JPG or GIF image. This file can be created in any image editing software. Since it will eventually be downloaded from the server to the client machine to run the system, it should be kept as small as practical.
If the image is too large for the edit region, resize the window by pulling down on the lower right corner.
Adding Hot Spots Once an image file is added, the next step is to add hot spots and define the action to take when the end user clicks on them.
Adding hot spots is a simple click and drag operation. Just position the mouse cursor on the image at one corner of where you would like a hot spot. Press the left mouse button down, drag to form a rectangle, and release the mouse button. This will create a rectangle on the image.
When a new hot spot rectangle is added, it will automatically be selected. This is indicated by a different color (which varies with the background color) and small square “handles” in the corner of the hot spot region. To select a region, just click in it. To select multiple regions, hold the “Ctrl” key and click in each region. There are also other ways to select regions discussed below.
To move a selected region, just move the cursor into the region, press the left mouse button down and drag the region to a new location. Only a single region can be moved at a time. To resize a selected region, move the mouse cursor over one of the corner “handles” and drag the corner to a new size.
Associating an Action with a Hot Spot When the end user clicks on a hot spot, some action will take place. Either a Corvid variable(s) will have a value assigned or linked URL page will be displayed in a separate page or named frame on the same page.
Select one or more regions that are to have the same value or link.

5: Working With Variables 41
To have a click assign a value:
In the “On Click” group, select a variable from the drop down list.
If the variable is a Static List, its values will be added to the lower “Value” drop down list. Select a value from the list.
If the variable is a Numeric or String variable, just enter the value to assign in the edit box under “Value”. This value can also include a formula using “X” and “Y as described below.
To have a click display a HTML page:
In the “On Click” group, select the “link to” radio button.
Either enter a URL of the page in the edit region
or, browse to the URL address of the page
If just the URL is specified, a click will display the page in a new browser window. To display the page in a named frame, add a comma and the frame name after the URL. For example, the link "my_page.html" would display my_page in a new browser window. "my_page.html, frm2" would display the page in a frame named "frm2" on the same page as the applet.
All selected regions will be set to the same action. The same image map can have regions that set values for multiple variables and regions can overlap.
Using Formulas If the hot spot is to assign a value for a numeric variable, a formula can be used to indicate where in the hot spot the user clicked. This enables a hot spot to function similar to a slider, where the user can select a value in a continuum between ranges. This is done by entering a formula in the edit box for the value.
The formula can include "X" and "Y". X is a value between 0 and 1 indicating the percent of the maximum horizontal value selected. Y is a value between 0 and 1 indicating the percent of the maximum vertical value selected. The values will always be between 0 and 1 and will be based on the size of the hot spot. For example, if the formula used was 10*X, and the user clicked in the middle of the hot spot, the value would be 10 * (.5). If the image uses both vertical and horizontal information, the formula can include both X and Y.
For example, the image might include a continuous range of colors, and the user will select a particular color. This could be done by placing many small regions on a "color bar" and having each assign a value, but then a small change in position across hot spots could significantly change the value selected. Instead, use a numeric variable and a formula such as 100*X. This will give a numeric value that can be used in the logic to describe the color. The value will change gradually depending on where the user clicks.
Displaying and Finding Regions The controls in the “Find” group provide other ways to find, select and examine regions. If a variable is selected from the drop down list in the “Find” group and then a value is selected from the list (for static list variables) or entered (for string or numeric variables), all regions that are associated with that value will be highlighted and selected. This can be a quick way to check the regions for each value of a variable.
If a variable is selected and the “Select All Values” button is clicked, all regions that will assign any value to that variable will be selected.
Clicking the “Select All” button will select all regions in the image map.
The “<” and “>” buttons sequentially select the previous or next region. Clicking these buttons allows stepping through the hot spot regions.
5: Working With Variables 42
Editing Regions When a single region is selected, the associated variable/value or link is displayed in the upper “On Click” group. Changing the variable/value in the “On Click” group will change it for all hot spot regions currently selected.
Also, the coordinates of the region are displayed in the “Coordinates” group. These coordinates are the pixel positions of the left/right (X) and bottom/top (Y) pixel coordinates of the region. The values can be directly edited to provide very specific control of the region.
Clicking the “Delete Selected” button will delete all selected regions.
Using Image Maps for Single Variables Image maps can be used to ask a wide range of questions.
To just ask for a value for Static List variable:
Create a JPG or GIF image that has pictures or text that describe the possible answers
Under the "Ask With" tab, click the "Edit map" button
Select the image file
Click and drag a rectangle on the area of the image that represents a specific value
In the pull down list of values in the "On Click" group, select the associated value
Repeat #4 and #5 for each other value of the variable
To ask for a value for a String or Numeric variable:
Create a JPG or GIF image that has pictures or text that describe the possible input strings
Under the "Ask With" tab, click the "Edit map" button.
Select the image file
Click and drag a rectangle on one of areas of the image that represent a specific value
Enter the associated value in the Edit region under "Value" in the "On Click" group.
Repeat #4 and #5 for each other value
To ask for a value for Numeric variable using a formula
Create a JPG or GIF image that has a rectangular part of the image that indicates a continuous range of some property that the user can select among
Under the "Ask With" tab, click the "Edit map" button
Select the image file
Click and drag a rectangle on a selection area to be used to set a value
Enter a formula in the Edit region under "Value" in the "On Click" group. This formula should use X if the range goes horizontal and Y if the range goes vertical.
The formula will produce a range of values as X (or Y) goes from 0 to 1. These values should be used in the logic of the system.
5: Working With Variables 43
Using an Image Map to Ask for Multiple Variables An image map can contain hot spots that are associated with multiple variables. The hot spot regions can overlap. A click in overlapping regions will set BOTH values. This opens up a wide range of more complex uses.
There are several things to consider when building multi-variable image maps:
Determine what variable is the primary variable that causes the image map to be displayed. This is also the variable that must eventually be given a value by the image map. (If the user clicks on the image map in an area that does not set a value for the primary variable, even if it sets values for other variables, the image map will be redisplayed to again ask for a value for the primary variable.
Do you want a single click to set multiple variables?
If the variables on the map are independent (not overlapping), consider if the system echo back the values set as the user clicks on the map.
The simplest type of multi-variable image map is one that always sets the primary variable and may also set other variables. For example, the system might be asking what state the user's location is in, using a map with the company's various facilities across several states. The [STATE] variable would be the primary variable and would be set by a click anywhere on the map. In addition, you might have several specific major facilities on the map. These would have small hot spots associated with the variable [FACILITY] so that a click directly on a facility hot spot would set both [STATE] and [FACILTIY] variables. If click was not on one of the specific facilities, only the [STATE] variable would be set and the system would later ask for the value for [FACILTIY] in another question.
A more complex image map may use non-overlapping hot spots. A click on some areas may set a value for some variable(s), but not the primary variable. In this case, the system still needs the value for the primary variable and will redisplay that image map. The data that was assigned to the other variable can be echoed back by using the "Other Graphics" commands on the "Ask With" tab to display the values of the other variables on the same screen that asks for data. While normally used to display graphics or text, any Screen Commands can be entered to be displayed before or after the image map - including commands to display the value of variables. Just select the variables to be displayed in the command builder. If these variables have no value, they will not be displayed. However, once given a value, they will be echoed back. This allows the user to select multiple values from the image and have immediate feedback on the values selected. When a hot spot is selected that sets a value for the primary variable, all the values will be taken and used. If an image map is used in this way to display the values, clicking the "Back" button will step back one "click" at a time.
Use Images for Prompts and Values In addition to Image Maps, where an image is used to ask an entire question graphically, images can be used in place of the Prompt and Value text for a question. Normally the prompt and values will be displayed as text using a font, color, style, etc. specified by the Prompt or Value Format command string. However, in some cases, it is preferable to present them as an image file to show graphical information or have more control on the user interface.
To do this:
1. Check the “Use Image Files” checkbox
2. Select JPG or GIF format for the files
3. Create an image file for the prompt named VARNAME.JPG or VARNAME.GIF, where VARNAME is the name of the variable.
4. For each value, create an image file for the value named VARNAME_VALUENAME.JPG or VARNAME_VALUENAME.GIF.
5. Store the various image files in the same directory as the Corvid knowledge base file.
For example, if you have a Static List variable named [TEMP] and it has two values named COLD and HOT, you would create a JPG file named TEMP.JPG to use for the prompt and files TEMP_COLD.JPG and TEMP_HOT.JPG for the values. When the variable needed to be asked, these images would be automatically used rather than the text.
When using images for the values only the Radio Button or Checkbox options can be used. If there is only an image for the prompt, any of the controls can be used.

5: Working With Variables 44
Other Commands When a variable is asked, it may be desirable to display graphics or text (in addition to the prompt) to explain the question or just for design emphasis. This can be done with the Other Commands list. The commands used are any of the Corvid display commands.
To add display commands that are displayed before the question prompt and values, click “Before” and click “Edit”. Build the commands in the display command building window.
To add display commands that are displayed after the question prompt and values, click “After” and click “Edit”. Build the commands in the display command building window.
Using the Other Commands option can be very useful. It gives great control to the user interface and allows the intermediate status of the system to be displayed as questions are asked.
Once the Before and After commands are added to a variable, they will be used whenever that variable is asked - either individually or in “Also Ask” groups associated with others.
Prompt and Value Format Corvid provides a wide range of ways to format and control text. This is done via Format Control strings. The Format commands are covered in the User Interface chapter.
To edit the format for the Prompt or Value, click the “Edit “ button next to the appropriate edit box.
Also Ask Tab Often it is desirable to ask multiple questions at the same time on the same screen. Corvid makes this very easy. Click on the “Also Ask” tab:
To specify that other variable should be asked at the same time as the current variable:
1. Click on the drop down list
2. The variables in the system will be displayed.
3. Select a variable to be asked on the same screen.
4. Click “Add” and the variable will be added to the Also Ask list
When the primary variable being defined is asked, the variables in the Also Ask list will also be asked following the primary variable and in the order of the list. The variables will each be asked using their “Ask With” parameters (including any Before and After display commands).
If a variable in the Also Ask list has already had its value asked (or set by logic) it would NOT be re-asked. If when the user responds to the multiple questions presented, they do not answer some of the questions, those questions will be re-asked when (and if) they are required in the system.

5: Working With Variables 45
Reorder Variables in Also Ask List Variables in the Also Ask list are placed on the screen in the same order as they occur in the list. To change the order, use the Move Up and Move Down buttons.
Select a variable(s) in the list and click Move Up to move the variable up in the list. Select a variable(s) in the list and click Move Down to move the variable down in the list.
Separate "Also Ask" Questions with an Image When "Also Ask" is used to ask multiple questions on the same screen, the questions can be separated by a JPG or GIF image. The same image must be used for all questions in the system.
To select the image to use, click the "Questions Defaults" button from the Variables window. This will display the window for setting the default format for questions.
The bottom of this window now has an option to select the JPG image. Either enter the image name or click the "Select" button to browse to the file. If the JPG file is in the same folder as the other application files, only the JPG file name needs to be entered, without a path. If the "Select" button is used, the file name will be automatically converted to drop the path.
Servlet Tab The Servlet tab is used to set the HTML template to use when running the system with the Exsys Corvid Servlet Runtime.
In addition, extra HTML code can be added that will be used in a generic template when this variable is asked.
The details of using the Exsys Corvid Servlet Runtime are in Appendix 3.

5: Working With Variables 46
Static List Tab
If a variable is a “Static List” type variable, the Static List tab will be selected.
This will appear as:
or if the “Show Advanced Options” checkbox is selected, it will appear as:
Static List variables have a list of possible values that are used to define the logic of the system and which the user can select among.
Defining the text for values is very similar to defining the prompt for the variable. Like the prompt, there is a short name, a main text, optional alternate texts to support multiple languages, and an optional way to obtain the text from an external applet. There can be any number of values.
Value The text for the value is the text that describes that value. This can be any length and use any characters.
The Value text will be appended to the Prompt for the variable to build a statement. The text that will also be presented to the user if the system needs to ask for the value for the variable.
Optional Short Text In addition to the Value text, each value can have an optional short text.
When conditions are built in the Blocks, the syntax
variable_name = value
is used in many places. If the value text is quite long, this can be difficult to read. In some cases, a long value text is needed to precisely explain what the value means, or to provide options in a multiple-choice list. When the length of the value text would make the conditions difficult to read, an Optional Short Text can be added, and the conditions will be built using:
variable_name = Short_text
There is no requirement to add a short text, and if one is not entered, the text of the value, with illegal characters removed, will be used.
The short text can contain any characters except:
~ ! @ ^ & * ( ) - + = " ' ? > < . , / : ; { } | \ `[ ]

5: Working With Variables 47
Spaces also cannot be included, and will be automatically replaced by the underscore “_” character. Any of the illegal characters, will be deleted.
The short text should be clear and easy to understand but be as short as practical.
Often the short text is a piece of the overall Full Text. It is easy to copy a portion of the full text into the short text by:
1. Enter the Value text
2. Highlight the section of the Value text that should be used for the short text using the mouse. (If nothing is selected, the entire Full Text will be copied to the Short Text.)
3. Click the “Use Selected” button. This will copy the selected text to the Short Text and change any spaces into the _ character.
Add to List Once a Value, and optionally a Short Text, has been entered, clicking the “Add to List” button will add the value to the list of values for the variable.
If there is no Optional Short Text, the item in the list will just be the value. If there is a Short Text, it will be displayed as:
Short_Text : Value Text
As many values as needed can be added to the list, but each Value and Optional Short Text must be unique.
Replace If the new value is to replace a value currently in the list, rather than being added to the list, enter the Value (and optionally Short Text), select the value to replace by clicking on it to select it, and click the “Replace” button.
Up / Down Buttons To reorder the values in the list, click on a value to select it. Then click the Up and Down buttons to move that value up or down in the list. The order of the value in the list is the order that they will be displayed in multiple-choice lists when the end user selects a value.
Alternate Text “Alternate #” label indicates the alternate text number. The arrows to the right of the number control this. (Do not confuse this with the Value # at the top of the dialog.)
When the variable is asked, the same Key Variable used for the Prompt is also used As with the Prompt, each value can also have an alternate text to support multiple languages, or level of question complexity. The alternate value text is added in the “Alternate Text” edit box.
To select alternate value text, make sure that if Alternate Prompt #2 is in a particular language, that all of the Alternate Value #2’s are also consistent.
External Source Corvid supports a way to have the text of the value acquired from external sources such as a database, another applet or CGI program. At runtime, if the value text is needed, the external call would be made and the value it returns used as the text. For details of using external calls, see the “Interfacing to External Data” chapter.
Where The Where button will display a dialog window showing where the specific value is used in the system.
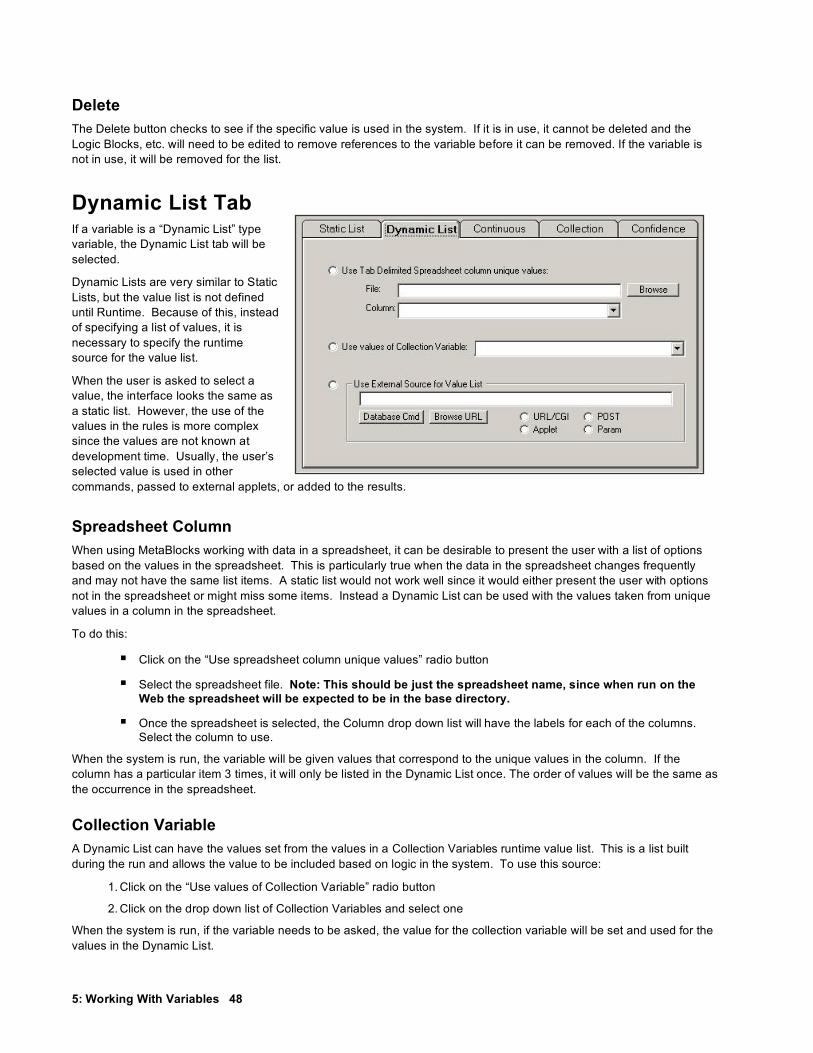
5: Working With Variables 48
Delete The Delete button checks to see if the specific value is used in the system. If it is in use, it cannot be deleted and the Logic Blocks, etc. will need to be edited to remove references to the variable before it can be removed. If the variable is not in use, it will be removed for the list.
Dynamic List Tab If a variable is a “Dynamic List” type variable, the Dynamic List tab will be selected.
Dynamic Lists are very similar to Static Lists, but the value list is not defined until Runtime. Because of this, instead of specifying a list of values, it is necessary to specify the runtime source for the value list.
When the user is asked to select a value, the interface looks the same as a static list. However, the use of the values in the rules is more complex since the values are not known at development time. Usually, the user’s selected value is used in other commands, passed to external applets, or added to the results.
Spreadsheet Column When using MetaBlocks working with data in a spreadsheet, it can be desirable to present the user with a list of options based on the values in the spreadsheet. This is particularly true when the data in the spreadsheet changes frequently and may not have the same list items. A static list would not work well since it would either present the user with options not in the spreadsheet or might miss some items. Instead a Dynamic List can be used with the values taken from unique values in a column in the spreadsheet.
To do this:
Click on the “Use spreadsheet column unique values” radio button
Select the spreadsheet file. Note: This should be just the spreadsheet name, since when run on the Web the spreadsheet will be expected to be in the base directory.
Once the spreadsheet is selected, the Column drop down list will have the labels for each of the columns. Select the column to use.
When the system is run, the variable will be given values that correspond to the unique values in the column. If the column has a particular item 3 times, it will only be listed in the Dynamic List once. The order of values will be the same as the occurrence in the spreadsheet. Collection Variable A Dynamic List can have the values set from the values in a Collection Variables runtime value list. This is a list built during the run and allows the value to be included based on logic in the system. To use this source:
1. Click on the “Use values of Collection Variable” radio button
2. Click on the drop down list of Collection Variables and select one
When the system is run, if the variable needs to be asked, the value for the collection variable will be set and used for the values in the Dynamic List.
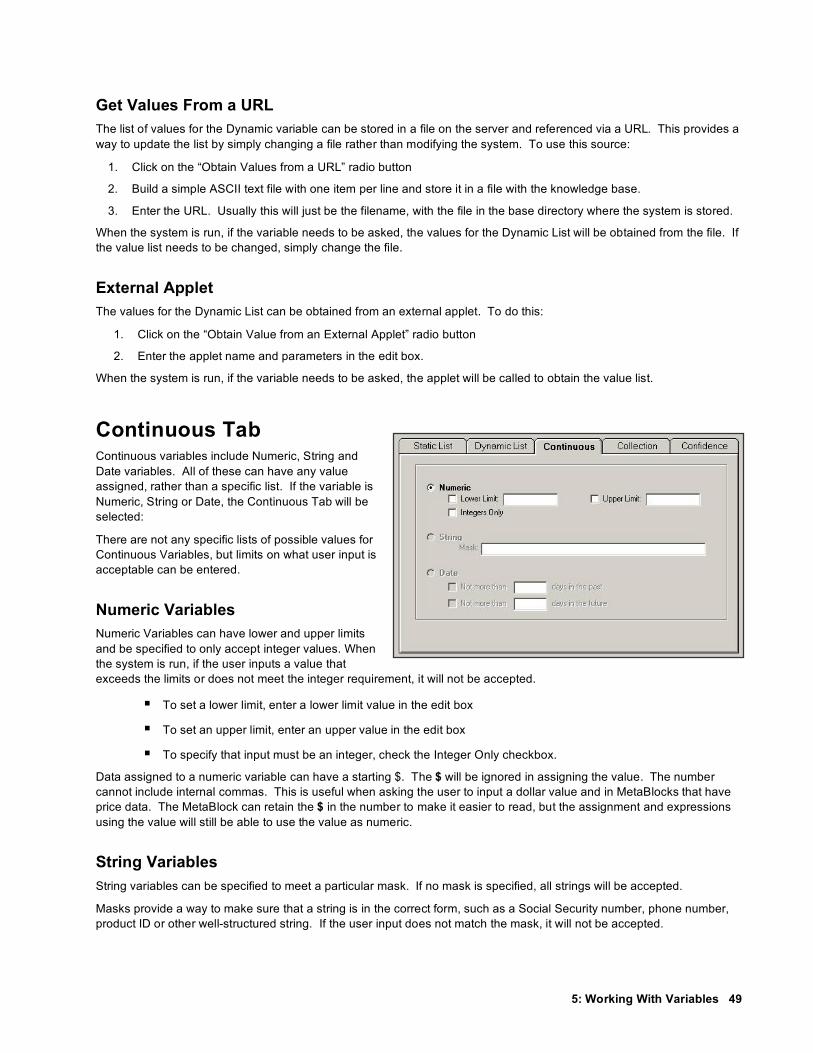
5: Working With Variables 49
Get Values From a URL The list of values for the Dynamic variable can be stored in a file on the server and referenced via a URL. This provides a way to update the list by simply changing a file rather than modifying the system. To use this source:
1. Click on the “Obtain Values from a URL” radio button
2. Build a simple ASCII text file with one item per line and store it in a file with the knowledge base.
3. Enter the URL. Usually this will just be the filename, with the file in the base directory where the system is stored.
When the system is run, if the variable needs to be asked, the values for the Dynamic List will be obtained from the file. If the value list needs to be changed, simply change the file.
External Applet The values for the Dynamic List can be obtained from an external applet. To do this:
1. Click on the “Obtain Value from an External Applet” radio button
2. Enter the applet name and parameters in the edit box.
When the system is run, if the variable needs to be asked, the applet will be called to obtain the value list.
Continuous Tab Continuous variables include Numeric, String and Date variables. All of these can have any value assigned, rather than a specific list. If the variable is Numeric, String or Date, the Continuous Tab will be selected:
There are not any specific lists of possible values for Continuous Variables, but limits on what user input is acceptable can be entered.
Numeric Variables Numeric Variables can have lower and upper limits and be specified to only accept integer values. When the system is run, if the user inputs a value that exceeds the limits or does not meet the integer requirement, it will not be accepted.
To set a lower limit, enter a lower limit value in the edit box
To set an upper limit, enter an upper value in the edit box
To specify that input must be an integer, check the Integer Only checkbox.
Data assigned to a numeric variable can have a starting $. The $ will be ignored in assigning the value. The number cannot include internal commas. This is useful when asking the user to input a dollar value and in MetaBlocks that have price data. The MetaBlock can retain the $ in the number to make it easier to read, but the assignment and expressions using the value will still be able to use the value as numeric.
String Variables String variables can be specified to meet a particular mask. If no mask is specified, all strings will be accepted.
Masks provide a way to make sure that a string is in the correct form, such as a Social Security number, phone number, product ID or other well-structured string. If the user input does not match the mask, it will not be accepted.

5: Working With Variables 50
Masks Masks are specified by a string that indicates what character(s) are acceptable. Note: This same mask syntax is used in various places in Corvid to indicate a group of variables or blocks.
Syntax Matches
? Matches any character
* Matches the rest of the string, including spaces
Character Matches itself
# Matches any digit 0-9
{abc} Matches any single character in the { }
{X-Z} Matches any single character between X and Z
For example:
To match a Social Security number, use ###-##-####
To match a product ID number that must start with an X or Y, followed by a number between 1 and 5 and then any other numbers, use {XY}{1-5}*
To match a 4 character string starting with Z, use Z???
Date Variables Date variables can have limits set that require the date be no more than a specific number of days in the future or past.
To limit the number of days in the past:
1. Check the “No more than X days in the past” check box
2. Enter the number of days in the edit box
To specify that the date must be within X days in the future:
1. Check the “No more than X days in the future” check box 2. Enter the number of days in the edit box
The format for input and output of Date variables depend on the localization of the Java Virtual Machine in your computer. This handles the various ways of representing time and dates among different countries.
Input When directly inputting a date for a Date variable the Java DateFormat.SHORT or DateFormat.LONG syntax can be used. The exact meaning of this will depend on the localization of your computer. For standard US localization the formats supported are:
M/D/Y as numbers - year can be 4 digits or 2 digits (e.g. 5/23/01 6/23/1999) mmm dd, yyyy - where mmm is a short form of the month name (e.g. Dec 25, 2001) M D, YYYY - where M is the full name of the month (e.g. August 21, 1952) Number of milliseconds since Jan 1, 1970 - (This format is supported in all localizations)

5: Working With Variables 51
Setting Date Variables with NOW() and NOWMSEC() A Date variable can be set using the built-in function NOW(). This will set the month day and year - but not hour or second. To set a time to the precise second, use the NOWMSEC() function. For example, if you have a date variable [D]:
SET [D] now() Will set [D] to the current day with the time set to midnight
SET [D] NOWMSEC() Will set [D] to the current day and the current time
NOWMSEC() can also be used to set a future date
SET [D] NOWMSEC() + (24*60*60*1000) To set a date exactly 24 hours from now
Note: Remember this is milliseconds, so the factor of 1000 must be added.
When assigned to a String variable, NOW() assigns a date string in the form: Month, day, year H:M:S. This can be used in a string variable and will reflect the exact time to the second. Remember, if NOW() is assigned to a Date variable, the day will be set, but due to the date formats supported, the time will be set to midnight. If you wish to set a Date variable to the current time to the second, assign it NOWMSEC().
NOWMSEC() returns a number that is the number of milliseconds since the start of 1970. This is a numeric and can be used in numeric variables or calculations. NOWMSEC() can also be assigned to a Date variable and will set the time to the second. NOWMSEC() can also be assigned to Numeric variables to perform calculations.
Collection Tab If a variable is a “Collection” type variable, the Collection tab will be selected.
The value for a Collection variable is a list of strings. Items can be added to the list or removed from the list by the logic of a system. There are also ways to check that an item is (or is not) in the list. Collection variables are often used with MetaBlocks to keep track of selected items.
Most Collection variables start empty and have values added by the system, however it is possible to start with some items in the value list. There are many methods and properties associated with Collection variables that enable lists to be created and worked with.
Preload from External Source The values in the collection can be obtained from an external source such as a database. To do this:
1. Check the “Preload from External Source at Runtime” checkbox
2. Enter the appropriate parameters into the edit box. See the “Interfacing to External Data” chapter for details.
When the system runs, the external source will be called to load values into the Collection variable.

5: Working With Variables 52
Initialize with a List To specify a list of strings to use as the initial value of the collection:
1. Check the “Initialize with” checkbox
2. Enter a string in the lower edit box
3. Click the “Add” button to add it to the list above
4. Repeat #2, #3 until all values are added in the list
To delete a value from the list, select the value and click “Delete”
Limit Number of Items in List Most Collection variables can have any number of items in the list. However, in some cases, it may be desired to limit the number in the list. To do this:
1. Check the “Maximum number of item in Collection” checkbox
2. Enter the maximum number that can be in the list in the edit box
3. Select what to do when the limit is reached - either drop the bottom item, drop the top item or report an error.
Confidence Tab If a variable is a “Confidence” type variable, the Confidence tab will be selected.
A Confidence variable is intended to calculate an overall confidence value for the variable. Usually, this is the confidence or likelihood that the variable’s prompt is an appropriate recommendation or solution to the problem that the expert system solves. Confidence variables can also be used in other ways, but in all cases, the variable will be given one or more numeric values which will be combined via a formula to produce the overall confidence value.
In earlier Exsys products, a system would have a single confidence mode that applied to all of the Confidence variables in a system. In Corvid, each variable can have its own way of handling confidence. This allows multiple techniques to be combined as needed.
During a run, the confidence variable will be assigned values by various Logic Blocks and rules. The values assigned may be single values or calculated from formulas. When a new confidence variable is added to a system, the type of input it receives and how this input is combined to produce an overall confidence, needs to be specified.
Input There are three parameters that can be set to limit the values assigned to a Confidence variable: minimum, maximum and integer. If a value is assigned to the variable that is less than the minimum, the minimum value will be used. Likewise, if the assigned value exceeds the maximum, the maximum will be used. If “Integers only” is specified, the assigned value will be rounded to an integer.

5: Working With Variables 53
If no limits are specified, any value can be assigned to the variable.
To set a minimum limit, enter the minimum value to accept in the edit box
To set a maximum limit, enter the maximum value to accept in the edit box
To limit assigned values to integers, check the “Accept only Integers” checkbox
Calculation The calculation parameters control how the values assigned to the variable will be combined to a single overall confidence value.
Method The first parameter is what formula to use to combine the values. Click on the drop down list and select the method to use:
Sum - the values are added together. Positive values increase the confidence, negative values decrease the confidence
Average - values are add together and then divided by the number of values
Independent probability - values are combined as if they were independent probabilities. If there are values X and Y, the combined value will be 1 - ((1-X) * (1-Y))
Dependent probability - values are combined as if they were independent probabilities. If there are values X and Y the combined value will be X * Y
Multiply - values are multiplied. This is basically the same as the dependent probability mode, but here there is no assumption that the values actually represent probabilities, and the values can be any in any range. For example, a rule could lead to doubling the confidence by giving it a value of 2, or halving the value by giving it a value of .5. Values in this system should be positive values.
MAX - returns the largest value assigned
MIN - returns the smallest value assigned
Mycin - This is one of the traditional approaches for combining confidence, often called the Mycin method.
Confidence values are assigned ranging from -1 meaning absolutely certain to not be valid, to 1 meaning absolutely certain to be valid.
These values are combined by the following formulas:
If the current confidence is 1 (absolutely certain to be valid) and a -1 is assigned, the result is 0.
If the current confidence is >= 0 and the value to assign is >= 0 then the new confidence is (value to assign) + (current confidence * (1 - value to assign))
If the current confidence is < 0 and the value to assign is < 0 then the new confidence is (value to assign) + (current confidence * (1 + value to assign))
Otherwise, the new confidence is ((value to assign) + (current confidence)) / (1- min(abs(value to assign), abs(current confidence))
This confidence mode is useful since it allows combination of factors that indicate a goal is valid along with factors that indicate that the goal is not valid. The output is always a number between -1 and 1.

5: Working With Variables 54
Limits Like the input, minimum and maximum limits can be set for the calculation. If a calculated value is less than the minimum, the minimum limit will be used. If the value is higher than the maximum, the maximum will be used. The calculated value can also be rounded to an integer.
To set a minimum limit, enter the minimum value to accept in the edit box
To set a maximum limit, enter the maximum value to accept in the edit box
To limit assigned values to integers, check the “Round to Integer” checkbox
Locking Rules In some cases, it is desirable to lock the confidence value if a particular condition is met. The Locking Rules allow this to be done.
Locking rules are added in the ”Lock value if” section by writing a Boolean expression with “#” followed by a “:” and the value to lock to. # is replaced with the name of the Confidence being assigned to. If the expression is TRUE, the confidence value for the variable is locked at the specified value and will not be changed by any further assignments.
For example, if the locking test is “[#] >= 10 : 10”, then any assignment of a value of 10 or greater will lock the confidence value at 10. If the locking test was “[#]<0 : -1” then any assigned value of 0 or less would lock the confidence value at -1. Properties can be used in the expression, such as [#.VALUE].
Locking tests can be used to override previous values for a Confidence variable. This is useful in methods such as Average where it may be desired to have special meaning given to a specific high value rather than just averaging it in.
Make Parameters the Default The same parameters often are used for multiple confidence variables in a system. This allows the confidence values for that group of variables to be defined and used in a consistent way. To have the parameters that are set for one Confidence variable be applied to others as they are defined, check the “Make Parameters the Default” checkbox. As additional Confidence variables are added, the same parameters will be used. Parameters for existing confidence variables will NOT be changed.
Other Controls There is a set of controls on the Variables window for finding a particular variable, controlling the display list and setting defaults. Edit Name This allows the name of a variable to be changed throughout the system. To change a variable’s name:
Select the variable by clicking on it.
Click the “Edit Name” button. This will display a dialog for changing the name:
Enter the new name and click “OK”. The variable will be changed throughout the system. A window will display all of the places where the change was made.
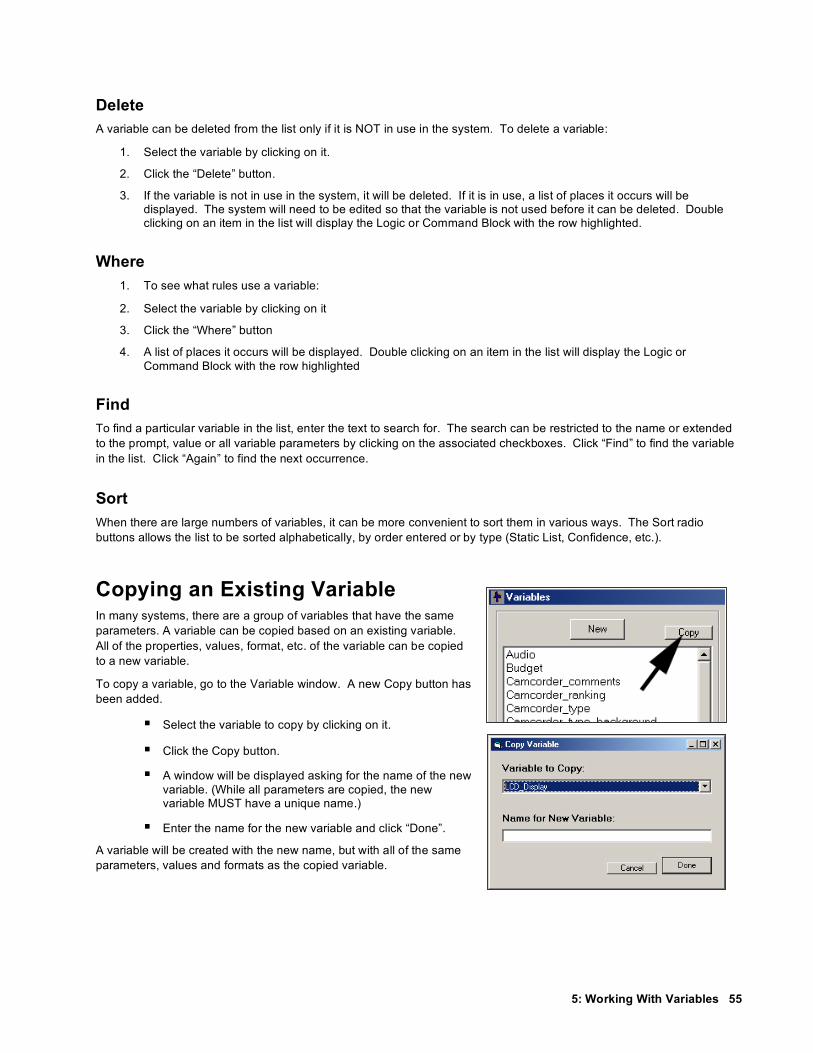
5: Working With Variables 55
Delete A variable can be deleted from the list only if it is NOT in use in the system. To delete a variable:
1. Select the variable by clicking on it.
2. Click the “Delete” button.
3. If the variable is not in use in the system, it will be deleted. If it is in use, a list of places it occurs will be displayed. The system will need to be edited so that the variable is not used before it can be deleted. Double clicking on an item in the list will display the Logic or Command Block with the row highlighted.
Where 1. To see what rules use a variable:
2. Select the variable by clicking on it
3. Click the “Where” button
4. A list of places it occurs will be displayed. Double clicking on an item in the list will display the Logic or Command Block with the row highlighted
Find To find a particular variable in the list, enter the text to search for. The search can be restricted to the name or extended to the prompt, value or all variable parameters by clicking on the associated checkboxes. Click “Find” to find the variable in the list. Click “Again” to find the next occurrence.
Sort When there are large numbers of variables, it can be more convenient to sort them in various ways. The Sort radio buttons allows the list to be sorted alphabetically, by order entered or by type (Static List, Confidence, etc.).
Copying an Existing Variable In many systems, there are a group of variables that have the same parameters. A variable can be copied based on an existing variable. All of the properties, values, format, etc. of the variable can be copied to a new variable.
To copy a variable, go to the Variable window. A new Copy button has been added.
Select the variable to copy by clicking on it.
Click the Copy button.
A window will be displayed asking for the name of the new variable. (While all parameters are copied, the new variable MUST have a unique name.)
Enter the name for the new variable and click “Done”.
A variable will be created with the new name, but with all of the same parameters, values and formats as the copied variable.

5: Working With Variables 56
Headers, Footers and Default Formats Formatting options that apply to all variables can be set for the system. Click the “Default” button. This will display a dialog for adding headers, footers and default formats for all variables.
Headers Headers are display commands that will be added at the top of each screen that asks for the value of a variable or variables. Adding headers is an easy way to make all screens look the same. A header may be a graphic, text or any list of display commands. The commands can even display variable values and information already known in the system.
If a screen asks multiple variables, the header will be displayed only once.
To add header commands:
1. Click the “Header” radio button
2. Click the “Edit” button
3. Add/Edit commands using the Interface Command Builder
Footers Footers are very similar to headers but are displayed at the bottom the screens asking for the values for variables. Footers can be any display commands. They are added the same as header, but click the “Footer” radio button. A screen can have both Header and Footer commands.
Prompt Format The default format for all Prompts when asking questions can be set by clicking the “Edit” button” next to Prompt Format. Enter the format options and click “OK”. The format will apply to all Prompts when asking questions - not when displaying data. This default Prompt Format can be superceded by specifying a Prompt format for a specific variable on that variable’s “Ask With” page.
Value Format The default format for all Static List and Dynamic List variable values can be set by clicking the “Edit” button” next to Value Format. Enter the format options and click “OK”. The format will apply to all values when asking questions - not when displaying data. This default value format can be superceded by specifying a Value format for a specific variable on that variable’s “Ask With” page.

6: Variable Properties and Methods 57
6: Variable Properties and Methods What are Properties All of the variables in a system have a value. However, they also have other properties, which provide additional information about the value or provide ways to format the value. These other properties are obtained by using the notation:
[varname.property]
The property may be a single word, or a word plus a modifier.
Each variable has a default value that is used when there is no property specified. This value is used when the variable name is used:
[varname]
Whenever assigning a value to a variable, the normal form, [var_name], is used. In Corvid, all properties are read-only. A value can only be assigned to the variable itself. The values of the properties are derived from that variable’s value. For example, the Confidence variable [X] could be assigned a value of 5, but [X.LOCKED] could not be directly assigned a value. The LOCKED property would be automatically assigned by the value assigned to [X] in conjunction with the locking rules for [X]. Properties can be used:
When displaying results In expressions Embedded in text with [[ ]]
In addition to properties, there are methods that allow you to act on a variable’s value in certain ways. Methods only apply to Collection variables and control how values are added to the Collection variables value list. These methods are used when building THEN nodes for Collection variables.
Static List Properties Static Lists are variables with a fixed set of possible values. Each value has a short text and a full text, which may be different.
For the examples below, there is a Static List variable:
Name = [PRICE] Prompt = The price of the item is Value 1: Short Text: high Full Text: significantly higher than the customer’s budget Value 2: Short Text: at_budget Full Text: about equal to the customer’s budget Value 3: Short Text: low Full Text: significantly less than the customer’s budget
The system has assigned value 2 for this variable from rules in the Logic Blocks.

6: Variable Properties and Methods 58
No Property If there is no property specified, the text output is the full text of the prompt followed by the full text of any values set, connected with “AND”. This is the default text and is equivalent to using the .FULL property.
Example:
[PRICE] would output:
The price of the item is about equal to the customer’s budget
.FULL - Prompt and Full Text of all values set The property .FULL causes the text output to be the full text of the prompt followed by the full text of any values set connected with “AND”.
Example:
[PRICE.FULL] would output:
The price of the item is about equal to the customer’s budget
.NUM - Number of first value set The property .NUM causes the text output to be the number of the FIRST value set.
Example:
[PRICE.NUM]
would output:
2
This number can be used in math expressions, such as
[PRICE.NUM] > 1
or
[X] = [Z] + [PRICE.NUM]
.COUNT - number of values set The property .COUNT causes the text output to be the count of the values set.
Example:
[PRICE.COUNT] would output:
1 since only a single value had been set.
This number can be used in math expressions, such as
[PRICE.COUNT] > 2
or
[X] = [Z] + [PRICE.COUNT]

6: Variable Properties and Methods 59
.SVALUE - Short text of all values set The property .SVALUE causes the SHORT text to be output for each value set
Example:
[PRICE.SVALUE]
would output:
at_budget This can be useful for passing shorter data between applets.
.VALUE - Full text of all values set The property .VALUE causes the FULL text to be output for each value set
Example:
[PRICE.VALUE]
would output:
about equal to the customer’s budget
This can be useful for passing shorter data between applets.
.CHECK # or .CHECK value - True if value is set The property .CHECK followed by a number or short text of a value returns “1” if that value is set and “0” if it is not.
Examples:
[PRICE.CHECK 1]
would output:
0
[PRICE.CHECK 2]
would output:
1
[PRICE.CHECK at_budget]
would output:
1
The return values of “1” and “0” are equivalent to TRUE and FALSE and can be used to build complex Boolean test expressions.
Note: If the short text of the value form is used, the text is NOT in quotes. The short text form should generally be preferred since editing of the system can change the number for a value, but is much less likely to change the short text associated with it.
6: Variable Properties and Methods 60
Dynamic List Properties Dynamic lists are variables with a set of possible values that are established at runtime, either from the logic of the system or from an external source such as a spreadsheet. Each value only has a full text, with no associated short text.
For the examples below, there is a Dynamic List variable that is part of a “car recommendation” system for a used car dealer. The variable will let the end user select the type of car they desire, but will only offer types of cars that are currently on the dealer’s lot. This information is stored in a spreadsheet.
Name = [CARS_ON_THE_LOT] Prompt = The type of car desired is a
The values for this variable are set dynamically at runtime from a spreadsheet of the types of cars currently available. The values set at runtime are:
Value 1: Sedan Value 2: SUV Value 3: Convertible
The user has selected value 2.
No Property If there is no property specified, the text output is the full text of the prompt followed by any values set connected with “AND”. This is the default text and is equivalent to using the .FULL property.
Example:
[CARS_ON_THE_LOT]
would output:
The type of car desired is SUV
.FULL - Full text of prompt and all values set The property .FULL causes the text output to be the prompt followed by the text of any values set connected with “AND”.
Example:
[CARS_ON_THE_LOT.FULL] would output:
The type of car desired is a SUV
.NUM - Number of first value set The property .NUM causes the text output to be the number of the FIRST value set.
Example:
[CARS_ON_THE_LOT.NUM] would output:
2 This number can be used in math expressions, such as
[CARS_ON_THE_LOT.NUM]> 1
or
[X] = [Z] + [CARS_ON_THE_LOT.NUM]

6: Variable Properties and Methods 61
.COUNT - Number of values set The property .COUNT causes the text output to be the count of the values set.
Example:
[CARS_ON_THE_LOT.COUNT]
would output:
1 since only a single value had been set.
This number can be used in math expressions, such as
[CARS_ON_THE_LOT.COUNT] > 2
or
[X] = [Z] + [CARS_ON_THE_LOT.COUNT]
.MAX - Total number of Values This property returns the total number of values in the variable’s list. (To get the number of selected values, use .COUNT)
.VALUE - Text of all values set The property .VALUE causes the text of the value to be output for each value set
Example:
[CARS_ON_THE_LOT.VALUE] would output:
SUV This can be useful for passing shorter data between applets.
.CHECK # or .CHECK value - True if value is set The property .CHECK followed by a number or text of a value returns “1” if that value is set, and “0” if it is not.
Example:
[PRICE.CHECK 1] would output:
0
[PRICE.CHECK 2] would output:
1
[PRICE.CHECK SUV] would output:
1 The return values of “1” and “0” are equivalent to TRUE and FALSE and can be used to build complex Boolean test expressions.
Note: If the text of the value form is used, the text is NOT in quotes. The text form allows rules to be built for specific items that might be in the list.

6: Variable Properties and Methods 62
.LIST # - Text of value # The property .LIST # causes the text of the value # to be output regardless if the value was set or not
Example:
[CARS_ON_THE_LOT.LIST 1]
would output:
Sedan
.INCLUDES text - True if text is a value The property .INCLUDE text will output “1” if the text matches any value in the variable’s value list, and “0” if it does not.
Example:
[CARS_ON_THE_LOT.INCLUDES SUV ] would output:
1 [CARS_ON_THE_LOT.INCLUDES Wagon ]
would output:
0
.NOTINCL text - True if text is NOT in the list The property .NOTINCL text is the opposite of .INCLUDES. It will output “0” if the text matches any value in the variable’s value list, and “1” if it does not.
Example:
[CARS_ON_THE_LOT.INCLUDES Sedan ] would output:
0
[CARS_ON_THE_LOT.INCLUDES Wagon ] would output:
1
Continuous Variable Properties The Continuous variables include Numeric, String and Date Variables.
For the examples below:
[PRICE] is a numeric variable with prompt The price of the item is and a value 123.45 [NAME] is a string variable with a prompt The user name is and a value of Bob

6: Variable Properties and Methods 63
No Property If there is no property specified, the text output is the full text of the prompt followed by the value. This is the default text and is equivalent to using the .FULL property.
Example:
[PRICE] would output:
The price of the item is 123.45
.FULL - Full text of prompt and all values set The property .FULL causes the text output to be the prompt followed by the values.
Example:
[PRICE.FULL] would output:
The price of the item is 123.45
.VALUE - Value converted to a string The property .VALUE causes the value to be output, without the prompt.
For Date variables, the .VALUE property is the date converted to the number of seconds since Jan 1, 1970. This number of seconds can be used to perform calculations to determine the number of days, years, etc between dates.
Example:
[PRICE.VALUE] would output:
123.45
[NAME.VALUE] would output:
Bob
.FORMAT fmtStr - Formatted output of value The property FORMAT allows a numeric variable’s value to be formatted to control the number of digits to the right of the decimal, leading, and trailing 0’s, etc. Note: if the formatted value is to be used as a numeric, it must be only numbers, plus, minus and period. Otherwise it will be a string value.
The format string fmtStr, is a string that specifies the format and follows the standard Java Decimal Format syntax:
Character Meaning 0 A digit # A digit, but don’t show leading or trailing spaces . Location of decimal separator , Location of grouping separator ; Separates format for positive and negative numbers - Negative prefix % Multiply by 100 and show as percent Other Char Echo in output string

6: Variable Properties and Methods 64
For example:
[PRICE.FORMAT ###]
would output
123
[PRICE.FORMAT 0000.##] would output
0123.45
[PRICE.FORMAT $###.##] would output
$123.45
[PRICE.FORMAT $###.##;($###.##)] would output
$123.45 but if the value were -555.23, it would output
($555.23)
.PFORMAT fmtStr - Formatted output The property PFORMAT allows a numeric value to be formatted to control the number of digits to the right of the decimal, leading, and trailing 0’s, etc. This value is output with the prompt.
The format string fmtStr, is the same as in the .FORMAT property.
For example:
[PRICE.PFORMAT $###.##]
would output
The price of the item is $123.45
Format Properties for Date Variables Date variables have special output format properties:
[D] or [D.FULL]
will output the date in the default format (normally date and time)
[D.VALUE]
will output the number of MILLISECONDS since Jan 1, 1970
[D.FORMAT fmtStr]
will output the date formatted by the format string.

6: Variable Properties and Methods 65
The meaning of the fmtStr is dependent on the system localization. The options are:
DATE_SHORT The shortest form of a date (e.g. 4/5/01)
DATE_MEDIUM A longer form (e.g. 05-Apr-01)
DATE_LONG A long form of the date (e.g. April 5, 2001)
DATE_FULL The longest form of the date (e.g. Thursday, April 5, 2001)
TIME_SHORT The shortest form of a time (e.g. 2:20pm)
TIME_MEDIUM A longer form (e.g. 2:20:34pm)
TIME_LONG A long form of the time (e.g. 2:20:34PM MDT)
TIME_FULL The longest time format (e.g. 2:20:34 o'clock PM MDT)
The fmtStr can combine any DATE_* with any TIME_* or just a DATE_* or just a TIME_*. If both DATE and TIME are specified, they should be separated by a space in the fmtStr.
For example:
[D.FORMAT DATE_MEDIUM TIME_SHORT]
would output a medium format date string with a short format time string.
[D.PFORMAT fmtStr]
will output the date formatted by the format string, but preceded by the prompt of the variable.
MSEC - Convert Date to Milliseconds The property MSEC returns the number of milliseconds since Jan 1, 1970. This can be used to do calculations of time between dates stored in Date variables. This is applicable only to Date variables.
DOW - Convert Date Variable to Day of Week The property DOW returns a number corresponding to the day of the week. Sunday=1, Monday=2…Saturday=7. This can be used in logic that needs to know the day of week based on a date. This is applicable only to Date variables
Collection Variable Properties A Collection Variable is a variable that can be assigned a list of values. These values are added with the Collection variable methods.
For the examples below:
[DOG] is a Collection variable with prompt The best breed of dog for you is and a list of values set by the rules:
Beagle
Labrador Retriever
Golden Retriever

6: Variable Properties and Methods 66
No Property If there is no property specified, the text output is the full text of the prompt followed by the values concatenated together with a space between them. This is the default text and is equivalent to using the .FULL property with no separator text.
Example:
[DOG] would output:
The best breed of dog for you is Beagle Labrador Retriever Golden Retriever
.FULL Separator - Prompt and all values set The property .FULL causes the text output to be the prompt followed by the values. If the optional separator string is added, this will be included between values. The separator word will be padded on each side with a space. If the separator word in not included, the values will be separated by a space.
Example:
[DOG.FULL OR] would output:
The best breed of dog for you is Beagle OR Labrador Retriever OR Golden Retriever
.VALUE # - All values Assigned The property .VALUE causes the text output to be the values. If the optional separator ‘#’ is added, this will be included between values. The separator word will be padded on each side with a space. If the separator word in not included, the values will be separated by a space.
Example:
[DOG.VALUE ]
would output:
Beagle Labrador Retriever Golden Retriever
[DOG.VALUE OR]
would output:
Beagle OR Labrador Retriever OR Golden Retriever
.COUNT - Number of values The property .COUNT causes the text output to be the number of values in the value list.
Example:
[DOG.COUNT] would output:
3
.FIRST - First item in list The property .FIRST causes the text output to be the first item in the value list.
Example:
[DOG.FIRST]

6: Variable Properties and Methods 67
would output:
Beagle
.LAST - Last item in list The property .LAST causes the text output to be the last item in the value list.
Example:
[DOG.LAST] would output:
Golden Retriever
.ITEM # - Item # as a string The property .ITEM # causes the text output to be the item number # in the value list. If the list does not have # items in it, the text output will be an empty string.
Example:
[DOG.ITEM 2] would output:
Labrador Retriever
.CONCAT Separator - Concatenate to a string The property .CONCAT causes the text output to be the list of values.
The syntax is [coll.CONCAT str] where str is an optional separator string, which will be included between values. The separator string will be padded on each side with a space. If the separator string is not included, the values will be separated by a space. This is similar to the .FULL property, but does not include the prompt.
Example:
[DOG.CONCAT AND] would output:
Beagle AND Labrador Retriever AND Golden Retriever
The optional separator string can include the following line control characters:
\n New Line
\r Carriage Return
\t Tab
If the separator string is in quotes, the exact quoted string (without the quotes) will be used to separate values. If the string is not in quotes, the values will be separated by a space, str, and a space.
For example, if there is a collection variable [coll], with values "aaa", "bbb", "ccc" and no prompt text:
[Coll] aaa bbb ccc (values separated by tab)
[coll.concat AND] aaa AND bbb AND ccc
[coll.concat "AND"] aaaANDbbbANDccc

6: Variable Properties and Methods 68
[coll.concat "\r\n"] aaa
bbb
ccc (one value on each line)
.TOP # - Top # items The property .TOP # causes the text output to be the top # items from the list of values. The values will be separated by a space. This is most useful if the values in the Collection Variable were sorted.
Example:
[DOG.TOP 2] would output:
Beagle Labrador Retriever
.INCLUDES text - TRUE if text is in the list The property .INCLUDE text will output “1” if the text matches any value in the variable’s value list and “0” if it does not. The entire text must match, but it is not case sensitive.
Example:
[DOG.INCLUDES Beagle ]
would output:
1
[DOG.INCLUDES Poodle ] would output:
0 INCLUDES can accept an embedded variable as the value to test against.
For example:
[THINGS.INCLUDES [[test_str]] ]
where [THINGS] is a collection variable, and [test_str] is a string to test to see if it is one of the items in the collection.
.NOTINCL text - TRUE if text is NOT in the list The property .NOTINCL text is the opposite of .INCLUDES. It will output “0” if the text matches any value in the variable’s value list and “1” if it does not.
Example:
[DOG.NOTINCL Beagle ] would output:
0
NOTE: In versions of Corvid prior to ver 3.0, simply using the value of a collection variable would concatenate the values with a carriage return/line feed between values. For internal consistency, this has changed to values separated by a tab. If an older system relied on having a collection variable output one value per line, you will need to modify the system to add .CONCAT "\r\n" to the collection variable. In some operating systems, the \r may not be needed.

6: Variable Properties and Methods 69
[DOG.NOTINCL Poodle ]
would output:
1
The properties that return True or False can be used in IF nodes or other Boolean tests. They can be built from the Logic Block Command Building window.
Select the type of test from the radio button and then enter the test value. For example to build a NOTINCL property, click the "Does NOT Contain" radio button and enter the value to search for.
Collection Variable Methods In addition to the properties of Collection variables, there are methods for adding values to the variable’s value list. These methods are usually called in the THEN part of Logic Blocks.
The syntax of the Collection variable methods is:
[var.METHOD] data
The methods indicate what to do with the data that follows the closing ].
The best and easiest way to add Collection variable methods is from the Logic Block command building window. This is automatically displayed when adding a Collection variable to the THEN part of a Logic Block.
Select the method to use from the pull down list next to "Command:"

6: Variable Properties and Methods 70
Adding an Item to the Start or End of the List Select "Add an item to the start/end of the list" from the command pull down list. The item will be added to the end of the list unless the "Add as first item in list" checkbox is selected.
Selecting the "Do not add if identical item is already in the list" causes Corvid to check if the item to add is already in the list. If it is, no action is taken. To be excluded, an item must exactly match the text of an item already added to the collection.
.ADD - Add to end of list The method .ADD adds the text following the ] to the end of the list of values.
[X.ADD] Albuquerque
would add the string Albuquerque as the last item in the value list.
.ADDFIRST - Add to the top of list The method .ADDFIRST adds the text following the ] to the top of the list of values.
[X.ADDFIRST] San Francisco
would add the string San Francisco as the first item in the value list.
.ADDVAR - Adding the Value of a Variable Select "Add the value of a variable" from the command pull down list. The item will be added to the end of the list unless the "Add as first item in list" checkbox is selected.
Selecting the "Do not add if identical item is already in the list" causes Corvid to check if the item to add is already in the list. If it is, no action is taken.
The method .ADDVAR adds the value of the variable [var] to the end of the list.
The [var] string can include properties for a variable.
[X.ADDVAR] [CITY]
would add the value of [CITY] as the last value in the list.
[X.ADDVAR] [PRICE.FORMAT $###.##]
would add the value of [PRICE] formatted by the format string as the last item in the Collection variable’s value list.
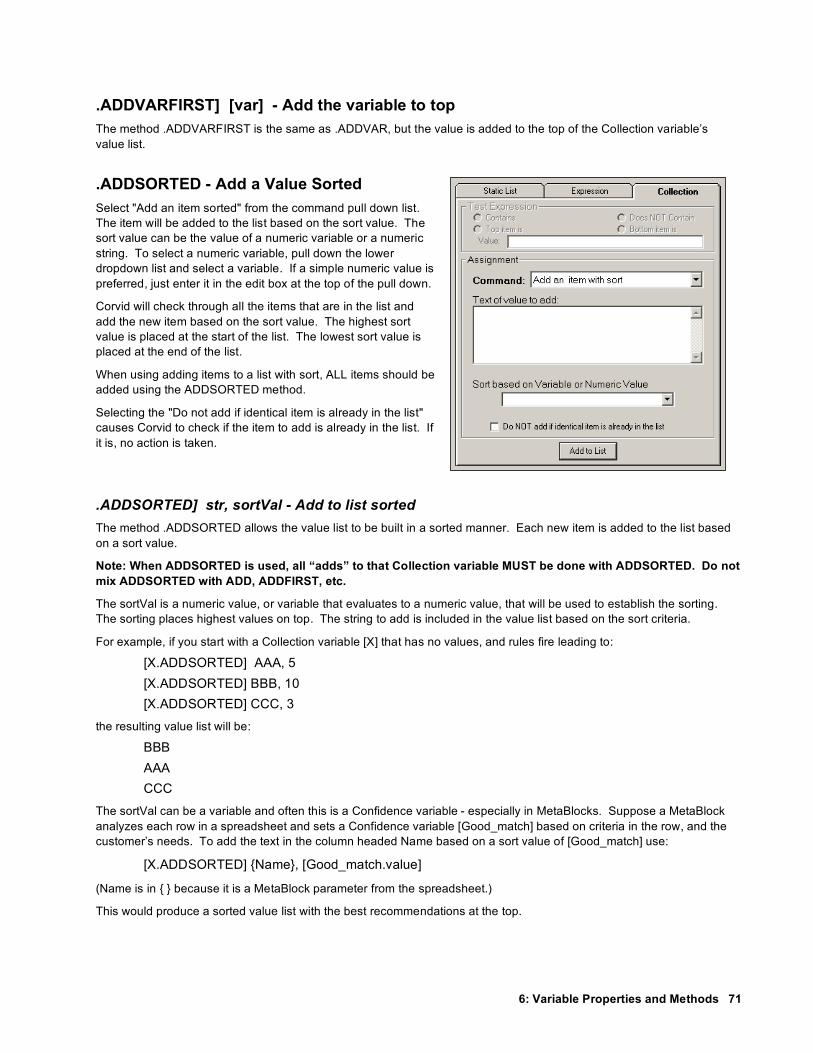
6: Variable Properties and Methods 71
.ADDVARFIRST] [var] - Add the variable to top The method .ADDVARFIRST is the same as .ADDVAR, but the value is added to the top of the Collection variable’s value list.
.ADDSORTED - Add a Value Sorted Select "Add an item sorted" from the command pull down list. The item will be added to the list based on the sort value. The sort value can be the value of a numeric variable or a numeric string. To select a numeric variable, pull down the lower dropdown list and select a variable. If a simple numeric value is preferred, just enter it in the edit box at the top of the pull down.
Corvid will check through all the items that are in the list and add the new item based on the sort value. The highest sort value is placed at the start of the list. The lowest sort value is placed at the end of the list.
When using adding items to a list with sort, ALL items should be added using the ADDSORTED method.
Selecting the "Do not add if identical item is already in the list" causes Corvid to check if the item to add is already in the list. If it is, no action is taken.
.ADDSORTED] str, sortVal - Add to list sorted The method .ADDSORTED allows the value list to be built in a sorted manner. Each new item is added to the list based on a sort value.
Note: When ADDSORTED is used, all “adds” to that Collection variable MUST be done with ADDSORTED. Do not mix ADDSORTED with ADD, ADDFIRST, etc.
The sortVal is a numeric value, or variable that evaluates to a numeric value, that will be used to establish the sorting. The sorting places highest values on top. The string to add is included in the value list based on the sort criteria.
For example, if you start with a Collection variable [X] that has no values, and rules fire leading to:
[X.ADDSORTED] AAA, 5 [X.ADDSORTED] BBB, 10 [X.ADDSORTED] CCC, 3
the resulting value list will be:
BBB AAA CCC
The sortVal can be a variable and often this is a Confidence variable - especially in MetaBlocks. Suppose a MetaBlock analyzes each row in a spreadsheet and sets a Confidence variable [Good_match] based on criteria in the row, and the customer’s needs. To add the text in the column headed Name based on a sort value of [Good_match] use:
[X.ADDSORTED] {Name}, [Good_match.value]
(Name is in { } because it is a MetaBlock parameter from the spreadsheet.)
This would produce a sorted value list with the best recommendations at the top.

6: Variable Properties and Methods 72
.ADDFILE - Read Values from a File Select "Add items from a file" form the command pull down list. Select the file to copy from in the middle edit box, or click the Browse button and browse to the file. The file can be local for a standalone or Corvid Servlet Runtime system, but most files will be reference by a URL off a Web server. The file can be on any server, provided it is accessible through a URL. To test this, enter the URL in your browser and the file should be displayed.
If running with the Corvid Servlet Runtime, a URL or a path relative to the knowledge base files on the server can reference the file. The easiest approach is to put it in the same folder as the .cvr file for the system, and just reference it by name with not path.
Each item from the file is added to the end of the list. Selecting the "Do not add if identical item is already in the list" causes Corvid to check if each item to add is already in the list. If it is, no action is taken.
An optional key string can be used to select a portion of the file to add. If a key string is added, only the section of the file between key markers will be added. The markers are HTML comments, and generally used with HTML, but can be used in any file.
<!-- Corvid_KEY=key_str --> text to add <!-- Corvid_KEY_END=key_str -->
All text between the marker <!-- Corvid_KEY=key_str --> and the closing
<!-- Corvid_KEY_END=key_str --> will be added to the file. Since the start and end markers are associated with a specific key, they can overlap, and can also include Corvid_IF conditional inclusion sections. If no "key" is specified, the entire contents of a file will be added to the Collection Variable.
This provides a very simple and effective way to use a file as a report template. The logic of a system can determine when and if a particular file should be included. The file itself can be divided into nested sections that are included only if a test condition is met. The file text can use embedded Corvid variables to include actual system values. The format of the file can be simple text, HTML commands, an RTF document or any other form of text file.
Once the Collection Variable has had one (or more) files added to it, the variable value can be displayed or (in stand-alone mode) output to a file on disk and displayed with a word processor or browser. (Java security prevents an applet from writing to the local disk, so only standalone systems running as applications can create and display RTF or HTML files.)
The file should be a text file, including RTF and HTML files. The text in the file can contain embedded Corvid variables in [[ ]], and properties of variables indicated by [[name.property]].
The value of the variable will be used to replace the [[ ]] expression at the time the file is read. Normally variables that do not have a value will lead to the value being derived or asked. If the current value should be used, with out any attempt to ask or derive a value, use [[*name]].
Conditional Inclusion of Text The file that is included with the ADDFILE method can be any ASCII text file, simple text, HTML code or an RTF document. Sections can be marked with "key" markers, or sections of the file can be included or excluded based on test expressions. To do this, the file must be divided into individual lines.
6: Variable Properties and Methods 73
The syntax for conditional inclusion of text is:
#Corvid_IF expression text to include #Corvid_ENDIF
NOTE: The inclusion test commands must be on separate lines and be the only text on the line.
The text to include can be any length and any number of lines.
The test expression is any Corvid expression that evaluates to TRUE or FALSE, such as:
([X] > 0) [DAY.CHECK Monday] [NAMES.INCLUDES Bob] [X] > [Z]+5
The expression can include Corvid variables and properties.
Inclusion tests can be nested. Each #Corvid_IF must have a matching #Corvid_ENDIF. The #Corvid_ENDIF corresponds to the first preceding Corvid_IF that does not have a matching Corvid_ENDIF. If a block of text contains other #Corvid_IF tests, the block included/excluded will be all of the text to the point of the #Corvid_ENDIF that matches the initial #Corvid_IF
For example:
#Corvid_IF test1 aaa bbb #Corvid_IF test2 ccc #Corvid_ENDIF ddd #Corvid_ENDIF eee
If test1 is TRUE and test2 is TRUE, the lines included would be:
aaa bbb ccc ddd eee
If test1 is TRUE and test2 is FALSE, the lines included would be:
aaa bbb ddd eee

6: Variable Properties and Methods 74
If test1 is FALSE, the entire block will be excluded, and test2 will never be tested. The lines included would be:
eee
The file to include must be designed so that various sections of text can be included or excluded. This is easy to do with text, HTML and RTF documents. Either HTML or RTF can be used to format the report being built. If RTF is used, the file will need to be viewed in a program that supports RTF documents such as a word processor. This can be done in stand-alone mode by writing the report out and then calling a word processor to display it. If HTML is used, the document can be written out and displayed in a Web browser or other program that supports HTML.
Files with #Corvid_IF in the Middle of the Text
The normal #Corvid_IF approach works well for data files where the #Corvid_IF and following expression are always on a single line. However, if the contents of an HTML page are being added, the line breaks have no meaning and many HTML editors will add or remove line breaks. This can result in the #Corvid_IF being in the middle of a line, which can lead to errors in parsing. To solve this, the option:
BREAK_ON_Corvid_IF
can be added to the command following the name of the file to add. For example:
[COLL.ADDFILE] DATA.TXT BREAK_ON_Corvid_IF
With this option, the #Corvid_IF and #Corvid_ENDIF commands can be at any place in the text of the file. To make it clear where the Boolean expression for the #Corvid_IF ends, the expression must be in parentheses ( ).
.COPY- Copy Values from Another Collection Select "Copy the items from a Collection" from the command pull down list. All the Collection variables in the system will be displayed. Select a Collection variable from the list. Each item from that variable's value list will be added, in order, to the end of the current variable's value list.
Selecting the "Do not add if identical item is already in the list" causes Corvid to check if the item to add is already in the list. If it is, no action is taken.
.COPY] [ColVar] - Copy a Collection Value List
The method .COPY adds the values in one Collection variable to the end of the values in another Collection variable.
If there are two Collection variables, [A] and [B]
[A.COPY] [B]
would add each of Collection variable [B] value’s to [A]’s value list as individual items.
Note: To add a Collection variable’s values as a single item, use the .ADDVAR with the .CONCAT property set for the variable being added.

6: Variable Properties and Methods 75
Assigning Values to a Group of Variables
.ASSIGNAFTER] "Index_str", [Var1], [Var2]…
This command allows a collection variable to be used as an ordered group or series of vectors. Values can be assigned to a group of variables based on their order in the collection. This enables a Collection variable to be used as a simple database with all values in memory.
Select "Assign from an index Point" from the command pull down list. Enter an index value to find in the Collection's value list. Make a list of variables to assign subsequent values to. This is done by selecting a value from the lower drop down list and clicking the "Add" button. The "Delete" button removes a variable from the list. The Up and Down buttons allow reordering the list, by moving the selected variable up or down in the list.
This method assumes that the values in the Collection variable are ordered in such a way that the position in the list relative to an index has specific meaning.
For example, suppose the items in the Collection variable's value list are arranged so that there is a part ID, followed by the part cost, followed by the part weight. This pattern is repeated for many parts:
Part 1425 23.67 5 lb Part 88765 199.45 7.5 lb Part 15543 53.82 1.2 lb
Using the ASSIGNAFTER method allows a group of values to be assigned with a single method. For example:
[Col.ASSIGNAFTER] "Part 88765",[PRICE],[WEIGHT]
would search the value list to find the first occurrence of a value "Part 88765". The next value in the list (199.45) would then be assigned to the variable [PRICE] and the one after that ("7.5 lb") assigned to the variable [WEIGHT].
There can be any number of variables in the list. The values assigned should be of a type consistent with the variable - numeric variables should be assigned numeric values. The values in the Collection can be built dynamically, read from a file or set by any other means.

6: Variable Properties and Methods 76
Replace Values in an Ordered Collection
.REPLACEAFTER] "Index_str", #, "replacement_str"
This command works with ASSIGNAFTER to allow a collection variable to be used as an ordered group or series of vectors. This method allows values in the list to be changed dynamically. Values in the list can be replaced based on their order in the collection. This enables a Collection variable to be used as a simple database with all values in memory.
Select "Replace from an index Point" from the command pull down list. Enter an index value to find in the Collection's value list. Enter the number of values PAST the index value that you wish to replace. Enter the replacement value. This is a string, but can include the value of variables by embedding them in [[ ]].
This method assumes that the values in the Collection variable are ordered in such a way that the position in the list relative to an index has specific meaning.
For example, suppose the items in the Collection variable's value list are arranged so that there is a part ID, followed by the part cost, followed by the part weight. This pattern is repeated for many parts:
Part 1425 23.67 5 lb Part 88765 199.45 7.5 lb Part 15543 53.82 1.2 lb
The REPLACEAFTER method allows changing a value, such as the PRICE. For example:
[Col.REPLACEAFTER] "Part 88765",1,"188.23"
would search the value list to find the first occurrence of a value "Part 88765". It would then go 1 value farther in the list and change the value to 188.23.
The values in the Collection can be built dynamically, read from a file or set by any other means.

6: Variable Properties and Methods 77
.REMOVE - Remove a Value from the List
Select "Remove an Item" from the command pull down list. Enter the text of the item to remove.
.REMOVE] item - Remove an item
The method .REMOVE removes the item from the value list. If the items are not in the list, it has no effect.
[X.REMOVE] beagle
would remove the item beagle from the list if it was there.
Removing Items by Number It has been possible to remove an item from a Collection variable if you knew the text of the item to remove, but it has not been possible to remove a specific numeric item from the list when the text was not known.
The command:
[Col.REMOVE] #X
will remove item number X from the collection.
For example:
[Col.REMOVE] #5
will remove the 5th item from the Collection variable’s value list.
If there is an item with text “#X” (where X is the number), then that item will be removed regardless of the numeric position, and the numeric item will not be removed – this is to preserve previous behavior. To avoid this, do not use items in the collection with text “#1”, “#2”, etc.
.DROPFIRST - Remove First Value From the List Select "Remove first Item" from the command pull down list.
.DROPFIRST - Drop first item off list
The method .DROPFIRST will remove the top item off the list, making the next item the top item. If there is nothing in the list, the command has no effect.

6: Variable Properties and Methods 78
.DROPLAST - Remove Last Value From the List
Select "Remove last Item" from the command pull down list.
.DROPLAST - Drop last item off list The method .DROPLAST will remove the last item off the list. If there is nothing in the list, the command has no effect.
.CLEAR - Remove All Values From the List
Select "Clear List (Remove all items)" from the command pull down list.
.CLEAR - Remove all items in the list
The method .CLEAR removes all items from the list.
Collection Variable "Vector" Methods and Properties Exsys Corvid has a way to use Collection variables that allow them to emulate vectors or simple flat file databases. This is done by structuring the data in the Collection variable so that it has a repeating pattern. The pattern should have an entry, which is an identifier followed by repeating set of entries that have other data in a specific order.
For example, suppose you want to have data with the name, zip code and phone number of a group of people. The entries in the SampleData Collection variable could be:
Bob 87110 505-889-9494 Fred 11234 315-555-3334 Mike 96785 444-222-8888 …
The structure allows referencing specific items of data in the Collection using the Collection variable methods.

6: Variable Properties and Methods 79
Return Entry Referenced by Index [COL.GETAFTER indexStr, num]
indexStr The index entry to find in the Collection num The number of entries past the index to return
Finds first occurrence of indexStr in the Collection variable's value list, returns the value of the entry in the collection value list num values from the index. The value is returned as a string.
indexStr must be a single quoted string. The string in the quotes cannot contain any additional quotes. It cannot be an expression, but can be a variable in [[ ]]. Note, when using a variable in [[ ]] for indexStr, the full string must still be in quotes.
num must be an integer number or a variable in [[ ]] that evaluates to a numeric value. num cannot be an expression. num normally would not be greater than the number of items of structured data, but is allowed to be any value
For example, using the SampleData collection above:
[SampleData.GETAFTER "Fred", 2]
returns second value after the index value "Fred". This would be the phone number "315-555-3334". Due to the structure of the data, you know this is the phone number for Fred.
The following are legal uses of GETAFTER:
[SampleData.GETAFTER "Mike", 2] [SampleData.GETAFTER "[[IDStr]]", 2] [SampleData.GETAFTER "[[IDStr]]", [[x]] ]
To have either parameter set by an expression, set another Corvid variable first, and then use [[ ]] to embed that variable. For example:
SET [X] ([z] + [N]/3) [SampleData.GETAFTER "abc", [[X]] ]
Assign Values to Variables Based on an Index [COL.ASSIGNAFTER] indexStr, [varname1], [varname2], [varname3] …
indexStr The index entry to find in the Collection varname# The name of a variable
Finds first occurrence of indexStr in the Collection variable's value list. Then assigns the next value in the list to variable [varname1], the second to [varname2], etc. Each is assigned a value consistent with its type of the variable. If the type of varname# is Collection, the value will be added to the value list for that variable.
indexStr must be a string in quotes. The string in the quotes cannot contain any additional quotes. It cannot be an expression, but can be a variable in [[ ]]. Note, when using [[ ]] replacement for indexStr, the full string must be in quotes.
varname# is the name of the variable to assign to. The name can be with or without [ ], their use is recommended to make it clearer that variables are being assigned. There can be any number of variables.
If the string indexStr is not found, no assignments are made.
For example, using SampleData from above:
[SampleData.ASSIGNAFTER] "Mike", [zip], [phone]
finds the first occurrence of "Mike" in the value list. Then assigns the next values to the variable [zip] and the one after that to the variable [phone].

6: Variable Properties and Methods 80
Replace a Value Based on an Index [COL.REPLACEAFTER] indexStr, num, newStr
indexStr The index entry to find in the Collection num The number of entries past the index to replace newStr The value to assign to the selected entry
Finds first occurrence of indexStr in the Collection's value list, then goes further down the list num values and replaces the current value with newStr.
For example, using SampleData above:
[SampleData.REPLACEAFTER] "Mike", 2, "505-555-6666"
sets the second entry after the value "Mike" from the Collection variable SampleData to "505-555-6666".
indexStr and newStr must be a strings in quotes, " ". They cannot be expressions, but can be variables in [[ ]]. Note, when using [[ ]] replacement for indexStr, the full string must be in quotes.
num must be an integer number or a variable in [[ ]]. Num cannot be an expression.
Return the Values of a Collection Variable as a Tab-Delimited String [COL.TABDELIM]
Returns the values of the Collection's value list as a tab-delimited string. This string can be used in string parsing and replacement functions.
For example, if Collection variable [COL] has values "aaa", "bbb", and "ccc".
[COL.TABDELIM] would return "aaatabbbbtabccc", where tab is the tab character.
Confidence Variable Properties Confidence variables are used to calculate the likelihood or confidence of a particular item being an appropriate solution or recommendation of the system.
For the examples below:
[Good_Fit] is a Confidence variable with the prompt “The likelihood that the item is appropriate for the intended use is” with an overall value of 82.5
No Property If there is no property specified, the text output is the full text of the prompt followed by the value. This is the default text and is equivalent to using the FULL property.
Example:
[Good_Fit] would output: The likelihood that the item is appropriate for the intended use is 82.5

6: Variable Properties and Methods 81
.FULL - Full text of prompt and all values set The property .FULL causes the text output to be the prompt followed by the values. Example:
[Good_Fit.FULL]
would output:
The likelihood that the item is appropriate for the intended use is 82.5
.PROMPT - Just the prompt for the variable The property .PROMPT causes the text output to be the prompt without an associated values.
Example:
[Good_Fit.PROMPT] would output:
The likelihood that the item is appropriate for the intended use is
.VALUE - Value converted to a string The property .VALUE causes the value to be output, without the prompt.
Example:
[Good_Fit.VALUE] would output:
82.5
.FORMAT fmtStr - Formatted output of value The property FORMAT allows the value to be formatted to control the number of digits to the right of the decimal, leading, and trailing 0’s, etc.
The format string fmtStr, is a string that specifies the format and follows the standard Java DecimalFormat syntax:
Character Meaning
0 A digit
# A digit, but don’t show leading or trailing spaces
. Location of decimal separator
, Location of grouping separator
; Separates format for positive and negative numbers
- Negative prefix
% Multiply by 100 and show as percent
Other Char Echo in output string

6: Variable Properties and Methods 82
For example:
[Good_Fit.FORMAT ###]
would output
82
[Good_Fit.FORMAT 0000.##]
would output
0082.5
[Good_Fit.FORMAT ***##]
would output
***82
[PRICE.FORMAT ###.##;(###.##)]
would output
82.5 but if the value were -82.5, it would output
(82.5)
.PFORMAT fmtStr - Formatted output The property PFORMAT allows a numeric value to be formatted to control the number of digits to the right of the decimal, leading and trailing 0’s, etc. This value is output with the prompt.
The format string fmtStr, is the same as in the .FORMAT property.
For example:
[Good_Fit.PFORMAT ###] would output
The likelihood that the item is appropriate for the intended use is 82
.LOCKED - TRUE if value was locked The property .LOCKED will return “1” (True) if the value for the Confidence variable has been locked by the locking rules. If it has not been locked, “0” will be returned.

6: Variable Properties and Methods 83
TIME and AGE Properties The TIME and AGE properties apply to all variables regardless of type.
These are used to document when a value was set and measure how old the data is.
.TIME - Time the value was set The property .TIME will return a string stating exactly when the value for the variable was last set or changed.
For example:
[PRICE.TIME] would return when the value was set:
Fri Sep 08 14:37;20 MST 2000 This can be useful in documenting when a system was run
.AGE - Milliseconds since the value was set The property .AGE will output the number of milliseconds since the value of the variable was set or last changed. This can be useful for systems that have access to real-time data streams. If a value is determined to be too old, it can be cleared and replaced with a new value.
PROMPT Property - Just the prompt for the variable The property .PROMPT causes the text output to be the prompt without an associated value.
Example:
[Good_Fit.PROMPT]
would output:
The likelihood that the item is appropriate for the intended use is
This is usually used for Confidence variables, but can be used for any variable type.
HOW Property The HOW property applies to all variables regardless of type.
The .HOW property will output a full explanation of how the value for a variable was set. This is the same explanation that is set to the end of the Trace file. This text can be used in result screen to explain how conclusions were reached.
Note: the .HOW text can be quite long if a variable was set in various places by various rules.

6: Variable Properties and Methods 84
DISPLAY_WITH_RESULTS Property The property DISPLAY_WITH_RESULTS will return 1 or 0 based on the “Display with Results” flag for that variable. This can be used in tests to select only variables that have the flag set.
Example:
[x.DISPLAY_WITH_RESULTS]
will return 1 if the display with results option was set for variable X, and 0 if it was not.
This property can be used with any type of variable, and can be used as an alternate way to flag a group of related variables.

7: Working With Logic Blocks 85
7: Working With Logic Blocks Corvid introduces a new concept in managing decision-making rules - Logic Blocks. A Logic Block can be any combination of rules and decision trees that have a related function. This allows a block to be organized to have all the logic for an aspect of a problem. A block can be anything from an entire knowledge base to a single rule - it all depends on what the problem calls for.
Logic Blocks can be run via forward or backward chaining and can even be associated with a spreadsheet file to apply the rules in the block sequentially to each row in the spreadsheet. For example, combined with Collection variables, this enables a product selection system to be built that has all the “generic” logic in blocks, and all the product details in a spreadsheet file. Updating the system is as simple as changing the spreadsheet file to have new data. Selection problems have never been simpler - especially for situations where the product details are frequently changing, such as price, features or availability.
Logic Blocks are built and maintained in a very visual development environment that is easy to learn and use. The fundamental representation in the block is an If/Then rule, making it easy to read and understand, but the Logic Block provides a way to organize and use the rules in a way not previously possible.
Adding a Logic Block A Logic Block is added to a system by clicking on the Logic Block icon:
Or by selecting, “Logic” from “Block” under the “Windows” menu.
This will display a Logic Block editing window:
The drop down list at the top of the window will display the name of the Logic Block being displayed. When a new window is added, it will have a name “Logic Block #” where # is the number of the block in the system. This name can be kept, but usually it is better to give the block a name more indicative of the logic in the block.
To change the name, just select the “Logic Block #” text with the mouse and enter new text in the edit field. To select another Logic Block already in the system, pull down the list control at the top of the window and select the Logic Block to display.
If the Ctrl key is held down when you click the Logic Block button, the most recently closed Logic block will be displayed.

7: Working With Logic Blocks 86
Nodes and Rules Logic Blocks are made up of branching nodes that describe the logic of the system. The individual nodes represent the IF and THEN conditions that are used to build an If/Then rule.
For example, the rule:
IF Test 1 AND Test 2 in Logic Block node form would be: THEN Result
IF nodes are indicated by a vertical bar (or a grouping symbol), and THEN nodes are indicated by an arrow. The indenting shows which nodes “depend” on others to form a rule. These nodes are called the Parent nodes. The Parent nodes are logically ANDed together in the rule. The small + and - signs in the boxes allow the tree to be expanded or compacted depending on what parts you wish to view or work on.
Trees Logic Blocks typically are not just a single rule, but instead are a group of related rules. In many cases these rules form a tree diagram. Tree diagrams help in assuring that all possible cases are covered in the system.
For example:
represents three rules:
IF Test 1 = True THEN Result = A IF Test 1 = False AND Test 2 = True THEN Result = B IF Test 1 = False AND Test 2 = False THEN Result = C

7: Working With Logic Blocks 87
The green angle brackets indicate groups of related values for a single question.
To make it easier to read the trees, a Shift Right Click on any node highlights the parent nodes and makes the logic clear.
A Shift Right click on “Result C” shows:
In addition, the Rule View will display a window with the associated rule:
The text in the Logic Block is the shorter text of the variable’s name and short value
text or a formula. In the Rule View window, the full text of the variables prompt and full value text is used.
To examine the parent node of several nodes, move the Rule View window off the Logic Block. Each time you Shift Right click on a node, the parent nodes will be highlighted, and the full rule will be displayed in the Rule View window.
Logic Blocks are capable of more complex logic than a normal tree diagram and a single block may contain multiple trees and individual rules.
Rule View Window and Logic Block Navigation The Rule View makes it easier to see and understand the rule structure in the Logic Blocks. A Rule View window displays the full text version of the node selected in the Logic Block.
The Rule View is always displayed whenever a Logic Block is being edited. A click on any node in the Logic Block will display the full text of the associated rule in the Rule View Window and will highlight the associated nodes in the Logic Block.
Buttons allow moving to the next (or previous) rule in the block. Other buttons allow stepping through the block one node at a time. These buttons are in both the Logic Block and the Rule View Window so the logic can be examined either with full text or within the block structure.
Clicking the Next Rule button (> under Rule), will display the full text of the next rule in the Rule View window. A rule is defined as the next IF node that could have a THEN node added below it. If any THEN nodes have been added at that point, they will be included. The Block will show the same nodes highlighted.
The same buttons are at the bottom of the Logic Block and Rule View windows. Either set will select rules/nodes in both windows. If you prefer to view the full text, work from the buttons in the Rule View window. If changes need to be made, just switch to the Logic Block to make the changes. If you prefer to always work in the Logic Block, use the buttons there.
The Compress check box displays the Logic Block trees in such a way as to display the maximum number of nodes from the selected rule. Any branches that are not part of the selected rule will be compressed. This does not change the display in the Rule View window, but can make it much easier to see the rule structure in the Logic Block window for deeply nested trees.

7: Working With Logic Blocks 88
For example, in the Corvid tutorial a small tree was built for the “Changing the Light bulb” problem. To see the rules, open the main tree and click on the first THEN node:
The first rule is highlighted and the full text of the rule is displayed in the Rule View window.
Clicking on the Next Rule buttons displays:
This is the next point in the system where a THEN node could be added. In this case you do not have any THEN nodes here.
Clicking the Next Rule button again displays:
The rule is highlighted in the block and the full text displayed in the Rule View.
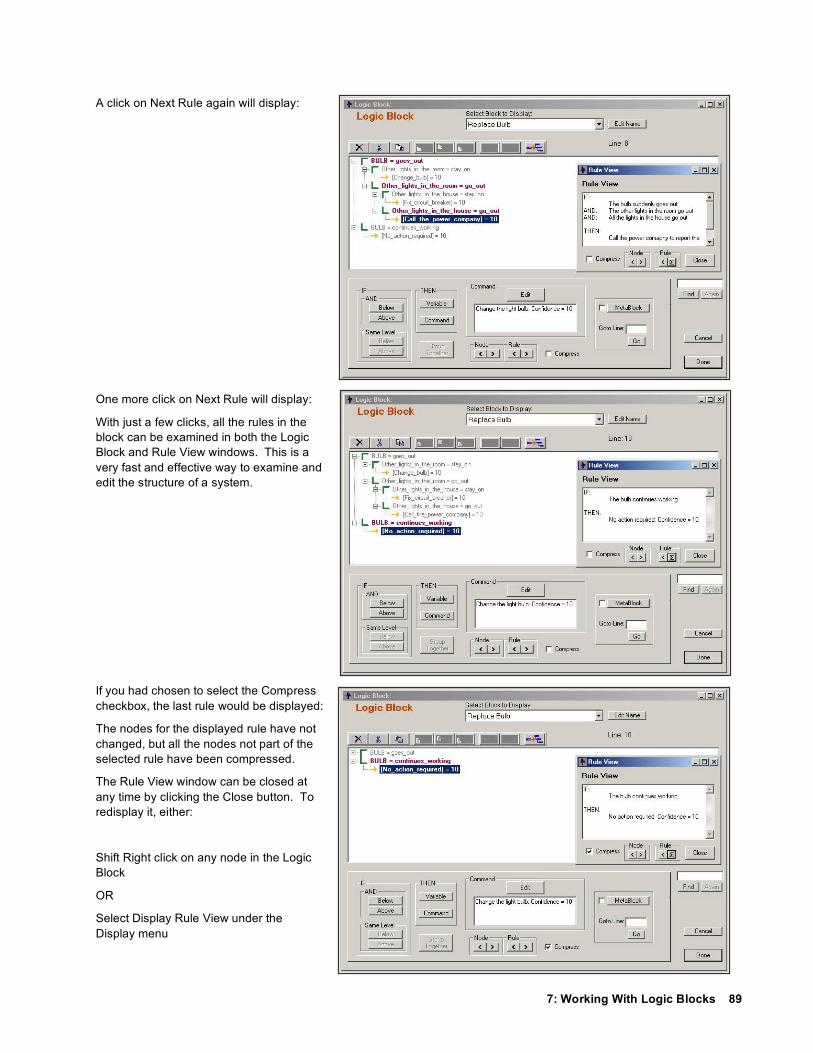
7: Working With Logic Blocks 89
A click on Next Rule again will display:
One more click on Next Rule will display:
With just a few clicks, all the rules in the block can be examined in both the Logic Block and Rule View windows. This is a very fast and effective way to examine and edit the structure of a system.
If you had chosen to select the Compress checkbox, the last rule would be displayed:
The nodes for the displayed rule have not changed, but all the nodes not part of the selected rule have been compressed.
The Rule View window can be closed at any time by clicking the Close button. To redisplay it, either:
Shift Right click on any node in the Logic Block
OR
Select Display Rule View under the Display menu
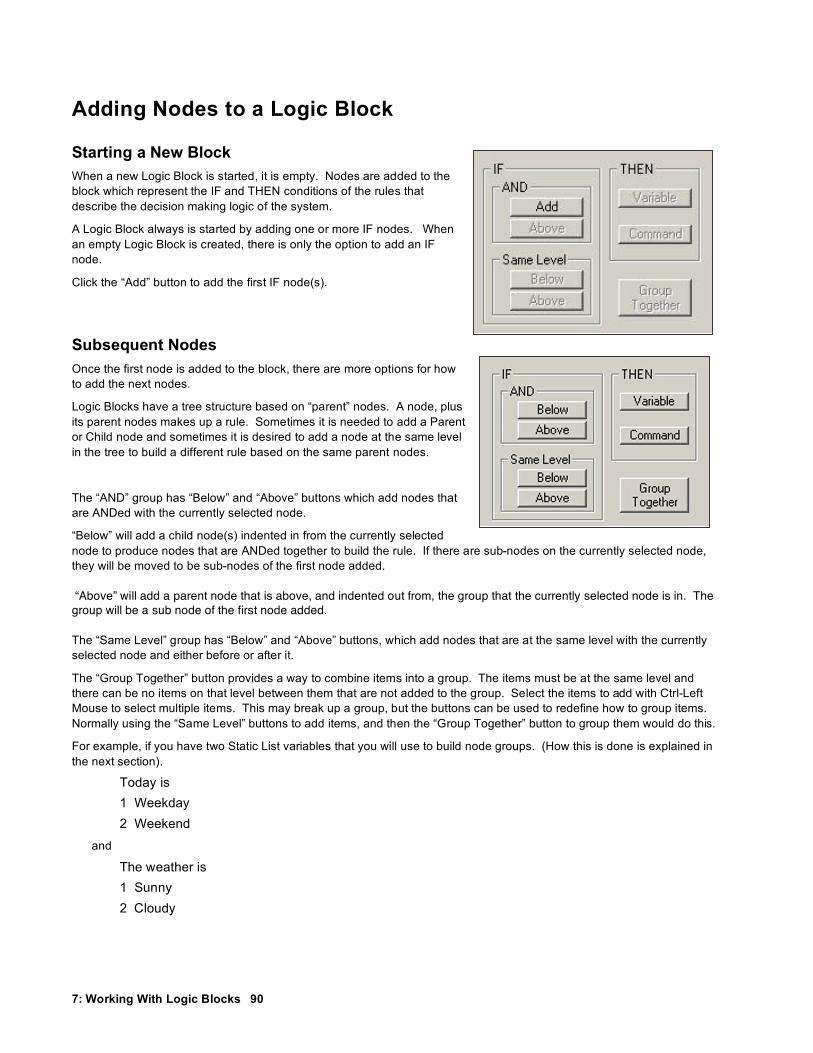
7: Working With Logic Blocks 90
Adding Nodes to a Logic Block
Starting a New Block When a new Logic Block is started, it is empty. Nodes are added to the block which represent the IF and THEN conditions of the rules that describe the decision making logic of the system.
A Logic Block always is started by adding one or more IF nodes. When an empty Logic Block is created, there is only the option to add an IF node.
Click the “Add” button to add the first IF node(s).
Subsequent Nodes Once the first node is added to the block, there are more options for how to add the next nodes.
Logic Blocks have a tree structure based on “parent” nodes. A node, plus its parent nodes makes up a rule. Sometimes it is needed to add a Parent or Child node and sometimes it is desired to add a node at the same level in the tree to build a different rule based on the same parent nodes.
The “AND” group has “Below” and “Above” buttons which add nodes that are ANDed with the currently selected node.
“Below” will add a child node(s) indented in from the currently selected node to produce nodes that are ANDed together to build the rule. If there are sub-nodes on the currently selected node, they will be moved to be sub-nodes of the first node added. “Above” will add a parent node that is above, and indented out from, the group that the currently selected node is in. The group will be a sub node of the first node added.
The “Same Level” group has “Below” and “Above” buttons, which add nodes that are at the same level with the currently selected node and either before or after it.
The “Group Together” button provides a way to combine items into a group. The items must be at the same level and there can be no items on that level between them that are not added to the group. Select the items to add with Ctrl-Left Mouse to select multiple items. This may break up a group, but the buttons can be used to redefine how to group items. Normally using the “Same Level” buttons to add items, and then the “Group Together” button to group them would do this.
For example, if you have two Static List variables that you will use to build node groups. (How this is done is explained in the next section).
Today is 1 Weekday 2 Weekend
and
The weather is 1 Sunny 2 Cloudy

7: Working With Logic Blocks 91
In tree form the first variable would be:
The first node is selected.
Using the “AND:Below” button to add the second variable’s values would produce:
The nodes are ANDed together.
Starting with the same original tree containing only the first variable, using the “AND:Above” button would produce a parent node:
The “Same Level” buttons allow nodes to be added at the same level, rather than being ANDed with the selected nodes.
Starting with the same original tree containing only the first variable, using the “Same Level:Below” button would produce:
Starting with the same original tree containing only the first variable, using the “Same Level:Above” button would produce:
Each set of nodes that were added was a group marked by the angle icons. Normally a group is made up of a set of related nodes that cover all possible user input. However, groups can be made up in other ways. To make all the items into one group, select each node with Ctrl-Clicks and click on the “Group Together” button. This will produce:

7: Working With Logic Blocks 92
Using a Right Click Clicking on a node with the Right mouse button will select that node and display a menu of options for that node.
Just select the action to take from the menu. This is a convenient and fast way to add nodes. The menu actions are exactly the same as clicking on the corresponding buttons in the window.
Building the Nodes Adding nodes to the Logic Block is done with the “Add to Block” dialog window.
There are three main types of nodes that can be built:
Static lists
Expressions
Tests or actions on a Collection variable
Variable List The left side of the window is for finding and specifying a variable to use. The list displays all the variables active at the moment. Under that is a region that displays the prompt of the variable currently selected.
Since in a large system, there can be many variables, the other controls on the left provide a way to limit the variables displayed in the list and allow specific variables to be found.
Include There is a checkbox for each of the variable types in the “Include” box. Only variables of the types checked will be displayed in the list. For many systems, this allows the display list to be quickly reduced to the variables desired.
Sort The “Sort” options provide a way to either sort the variables alphabetically by name, or in the order that they were added to the system.
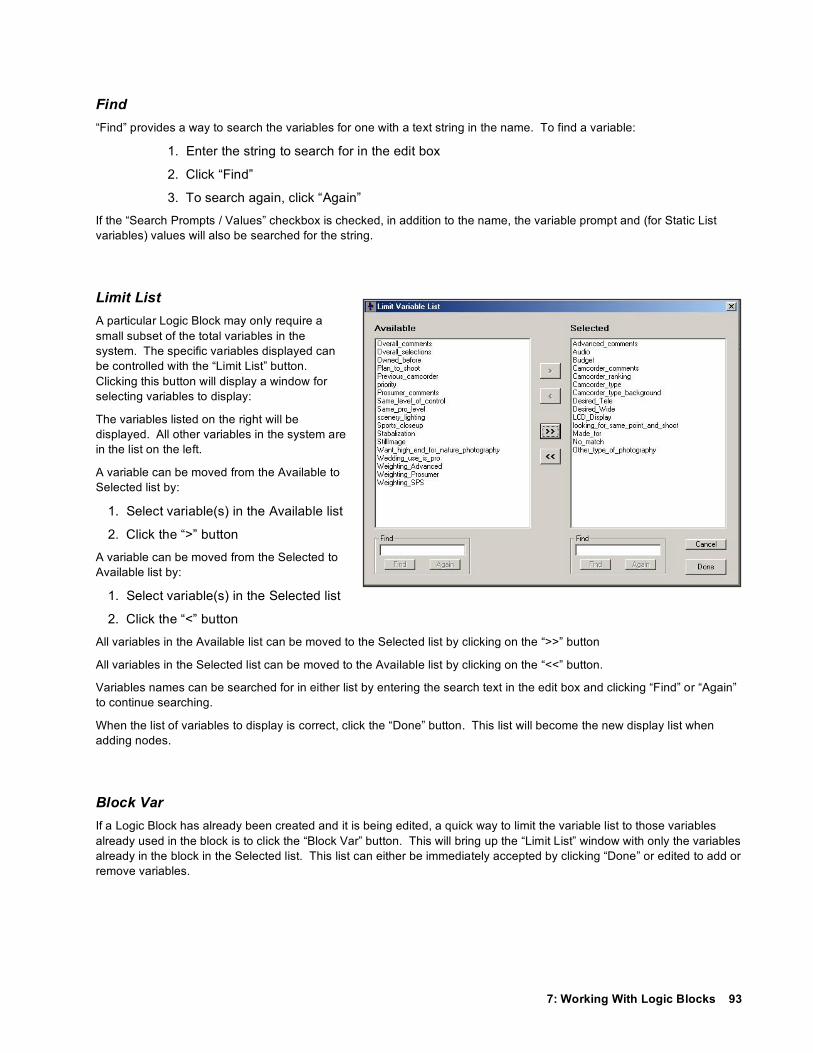
7: Working With Logic Blocks 93
Find “Find” provides a way to search the variables for one with a text string in the name. To find a variable:
1. Enter the string to search for in the edit box
2. Click “Find”
3. To search again, click “Again”
If the “Search Prompts / Values” checkbox is checked, in addition to the name, the variable prompt and (for Static List variables) values will also be searched for the string.
Limit List A particular Logic Block may only require a small subset of the total variables in the system. The specific variables displayed can be controlled with the “Limit List” button. Clicking this button will display a window for selecting variables to display:
The variables listed on the right will be displayed. All other variables in the system are in the list on the left.
A variable can be moved from the Available to Selected list by:
1. Select variable(s) in the Available list
2. Click the “>” button
A variable can be moved from the Selected to Available list by:
1. Select variable(s) in the Selected list
2. Click the “<” button
All variables in the Available list can be moved to the Selected list by clicking on the “>>” button
All variables in the Selected list can be moved to the Available list by clicking on the “<<” button.
Variables names can be searched for in either list by entering the search text in the edit box and clicking “Find” or “Again” to continue searching.
When the list of variables to display is correct, click the “Done” button. This list will become the new display list when adding nodes.
Block Var If a Logic Block has already been created and it is being edited, a quick way to limit the variable list to those variables already used in the block is to click the “Block Var” button. This will bring up the “Limit List” window with only the variables already in the block in the Selected list. This list can either be immediately accepted by clicking “Done” or edited to add or remove variables.
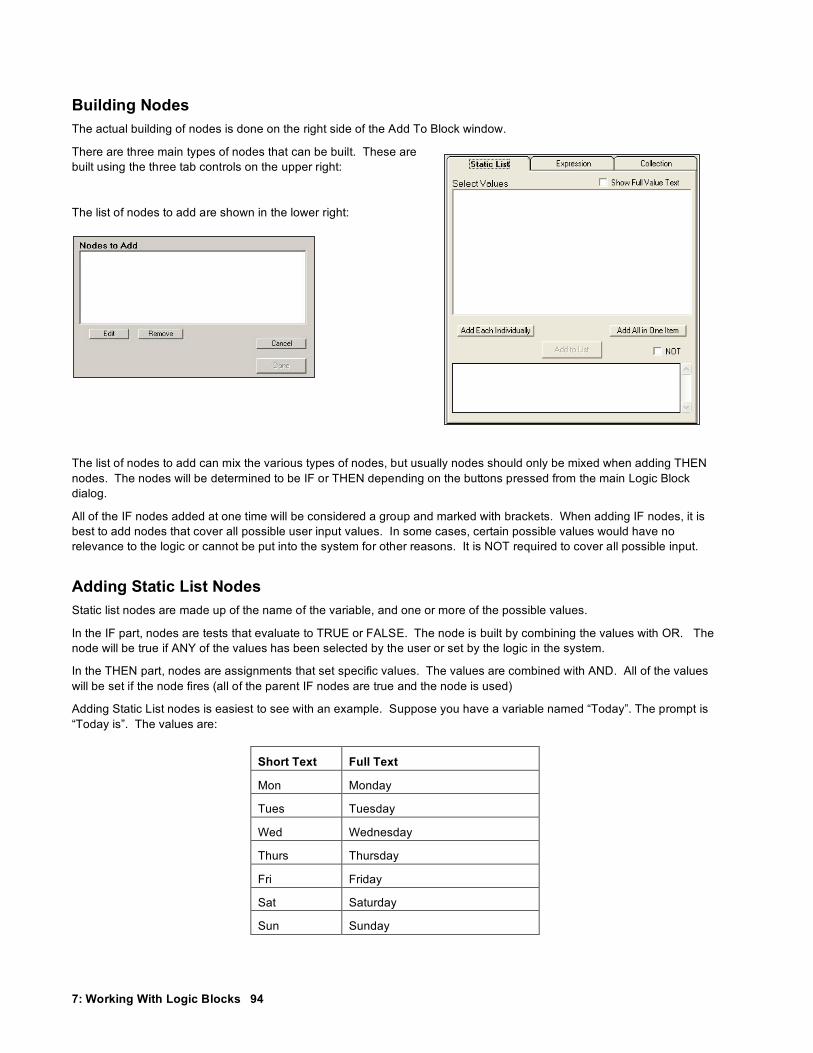
7: Working With Logic Blocks 94
Building Nodes The actual building of nodes is done on the right side of the Add To Block window.
There are three main types of nodes that can be built. These are built using the three tab controls on the upper right:
The list of nodes to add are shown in the lower right:
The list of nodes to add can mix the various types of nodes, but usually nodes should only be mixed when adding THEN nodes. The nodes will be determined to be IF or THEN depending on the buttons pressed from the main Logic Block dialog.
All of the IF nodes added at one time will be considered a group and marked with brackets. When adding IF nodes, it is best to add nodes that cover all possible user input values. In some cases, certain possible values would have no relevance to the logic or cannot be put into the system for other reasons. It is NOT required to cover all possible input.
Adding Static List Nodes Static list nodes are made up of the name of the variable, and one or more of the possible values.
In the IF part, nodes are tests that evaluate to TRUE or FALSE. The node is built by combining the values with OR. The node will be true if ANY of the values has been selected by the user or set by the logic in the system.
In the THEN part, nodes are assignments that set specific values. The values are combined with AND. All of the values will be set if the node fires (all of the parent IF nodes are true and the node is used)
Adding Static List nodes is easiest to see with an example. Suppose you have a variable named “Today”. The prompt is “Today is”. The values are:
Short Text Full Text
Mon Monday
Tues Tuesday
Wed Wednesday
Thurs Thursday
Fri Friday
Sat Saturday
Sun Sunday

7: Working With Logic Blocks 95
Clicking on the variable “Today” in the variable list on the left will bring the “Static List” tab to the front and load the variable’s values.
The logic required by the system dictates how you group the values into nodes. Values that are logically equivalent should be combined in the same node. Otherwise, the Logic Block will need duplicate logic to handle each of the equivalent nodes. (This is not illegal, but it is poor design and makes maintenance more difficult.)
To build a node:
1. Select one or more values from the list (Use standard Shift Click or Ctrl Click to select multiple items)
2. Click “Add to List”.
When the values are selected, the lower display shows the full text of the node being built to assist in making sure that this is the intended node. This is built using the full variable prompt and full text of the values selected.
The full text of the values can be displayed in the value list by checking the “Show Full Value Text” checkbox. However, values are limited to 1 line, and a long value text will go off the right side of the box.
When the “Add to List” button is clicked, the node is added to the lower node list:
This process is continued until all of the desired nodes are built.
If the same logic applied to Mon-Wed, those values could be selected and added as the second node.

7: Working With Logic Blocks 96
Add Each / Add All There are two buttons for quickly adding the remaining values to the node list. The “Add Each Individually” button will add one node for each of the values remaining in the value list. Clicking it would produce:
The “Add All in One Item” button adds all of the remaining values in the list as a single node. Clicking it would produce:
Adding Nodes Quickly To add nodes more quickly:
To select a single value for a node, double click on the value
To select multiple values:
1. Drag across the values or use Shift-Click to select a group
2. If other nodes need to be added or deleted, Ctrl-Click on them
3. Click “Add to List”
If all remaining values should be added as a group, click “Add All in One”
If each remaining value should be a separate node, click “Add Each Individually”
Deleting the Nodes from the List Once a node has been added to the node list, it can be changed by:
1. Selecting the node
2. Click the “Delete” button
This will remove the node from the list and add the values back into the value list.
How the Nodes Appear in the Logic Block To add the nodes to the Logic Block, click the “Done” button.
All of the IF nodes added together will be displayed as a group in the Logic Block. This makes it easier to see where the values for the specific variable start and end.
The node grouping:
will appear as:
The grouping brackets are red to indicate that there are no THEN nodes under these IF nodes. An IF node that has no THEN does not provide any information to the system, and will not produce a rule. When a THEN node is added under these IF nodes, the brackets will change to green.

7: Working With Logic Blocks 97
Using NOT for Static List Nodes Static List tests in Logic Block's IF nodes can use NOT. This is done by selecting one or more values and checking the NOT checkbox when building the node:
If the checkbox is checked, the test will be built as:
color NOT blue
which displays in the Rule View window as “color NOT blue” and in the tree as “color != blue”.
NOT can be used with multiple values, such as “color != red, blue” which displays in the Rule View window as “color NOT red OR blue”.
Meaning the node is True if color is neither red nor blue.
Using NOT can clarify the statement of some logic, particularly when there are many values and the rule needs to test that a particular one is not selected.
Adding THEN Nodes Adding THEN Static List nodes is very similar to adding IF nodes. The same screens are displayed and the same methods used to select values. However, the node has a very different meaning. In the IF part, the group of nodes represents a test. Based on data the system has (or asks of the user), each IF node will be tested and determined to be either TRUE or FALSE. TRUE nodes allow the system to progress out that branch; FALSE nodes will stop the system from going out that branch.
THEN nodes are assignments of value when all of the THEN node’s parent nodes are TRUE.
For example, using the nodes you built previously for day of the week:
Add a new variable for where someone should go. There are many ways to do this and many more factors that could be considered, but for now keep it simple and just use Static List variables. Add a new static list variable named DRIVE_TO with a prompt “Drive to the” and values:
Click on the “Today = Sat, Sun” node in the tree to highlight it:
Short Value text Full Value Text
Main Office main office in the city
Branch Office branch office down the street
Beach beach

7: Working With Logic Blocks 98
Click on the “Variable” button in the “THEN” box. This will bring up the same “Add to Block” window, but this time it is in a THEN mode.
Click on the variable “Drive_to”:
Double click on “Beach” (or select “Beach” and click “Add to List”). Since this is a THEN node, you do not need to add any other values, so just click “Done” and the node is added to the Logic Block.
The blue arrow next to the new node indicates it is a THEN node. Also, the top section of the group bracket has changed from red to green indicating this is a valid If/Then rule.
Repeating this for the other two nodes would produce:
Adding Expression Nodes Expression IF nodes are made up of one or more expressions using variables, functions and operators that evaluate to TRUE or FALSE. Expression THEN nodes are assignments of value to specific numeric, string or date variables.
The expressions can make use of the methods and properties of variables.
Expression nodes are added from the “Expression” tab:
Expressions are entered in the edit box, and then added to the “Nodes to Add” list by clicking on the “Add to List” button. The items in the “Nodes to Add” list are added to the Logic Block only when the “Done” button is clicked.
Variables in Expressions Variables in expressions are indicated by the name of the variable in square brackets [name] or [name.property] if a property of the variable is being used.
For example, if there is a variable named WEIGHT, there could be an expression:
[WEIGHT] < 100
If there was a Static List variable named FAVORITES, there could be an expression:
[FAVORITES.COUNT] > 3
In this case, the property “COUNT” is used which returns how many values are selected in the variable’s value list.
Only Numeric and Confidence variables can be used in numeric expressions without using a property. Numeric variables default to a numeric value. For all other types of variables, one of the properties must be selected that will return a numeric value or a Boolean value.

7: Working With Logic Blocks 99
Building an Expression An expression can be built simply by typing in the expression or Corvid can help you by providing lists of variables, functions and MetaBlock parameters.
Variables
Clicking on the “Variable” button under the “Expression” tab, will display a list of the variables in the system:
Click on a variable in the list on the left side. All of the properties for that variable will be displayed on the right. If a property is desired, click on it. Then click “OK”. If no property or method is required, just double click on the variable.
A few properties require a numeric parameter. These have a # in the property. If one of these is selected, fill in the value of # in the edit box.
The variable will be added to the expression editing box at the current cursor point, in [ ].
The list of variables can also be displayed by pressing Ctrl-Alt-V.
Functions
The list of functions supported in Corvid can be displayed by clicking on the “Function” button. Simply select the function needed and click OK, or double click on the function. The function will be added to the edit box and can then be edited.
MetaBlock Parameters
If the node is being added to a Logic Block that is a MetaBlock, and the MetaBlock file is specified, clicking on the “MetaBlock” button will bring up a list of the active MetaBlock parameters (spreadsheet column headings) that can be used in formulas. For information on MetaBlocks, see the “Working with MetaBlocks” chapter.
Expression Syntax
Expressions may contain:
decimal numbers
integers
numbers with decimal point, and in the exponential form (e.g., 5, 3.14, 1.2e3, 1.2e+3, 1.2e-3, etc.). Note: The exponential form should use a lower case “e”, since uppercase “E” means the built-in mathematical constant for the base of natural logarithms.
parenthesis ( )
arithmetic operation signs +, -, *, /, the power sign ^ and the remainder after integer division %
The power sign ^ is used to raise a number to a power. For example 3^2 is 3 squared or 9
X % Y returns the remainder after X is divided by Y the maximum integer number of times. 7 % 3 = 1
logical operation signs <, <=, >, >=, !=, ==, ~=, !, |, &
names of built-in functions with arguments in brackets separated by commas (e.g., sin(x), log(x) ) Blank spaces in the expression are ignored. Parentheses are used for function arguments and for grouping (to change the order of operations). Any function argument can be an expression itself, with any level of nesting.

7: Working With Logic Blocks 100
Operation Precedence The precedence order is the usual one: raising to a power has the highest priority and is followed by division and multiplication. All the rest is evaluated left to right. However, you are encouraged to use parenthesis wherever appropriate to avoid confusion.
Example: a / b * c is understood as (a / b ) * c. If you wish to have a / (b * c), either use brackets or write a / b / c (which, in its turn, is not interpreted as a / (b / c)).
Logical Operations The supported logical operators are:
less than <
less or equal <=
greater than >
greater or equal >=
equals ==
not equals !=
approx equal ~=
NOT !
AND &
OR |
The operation signs may not follow each other unless they make up another operator. Do not write something in the style 2--1. Use parenthesis here instead: 2 -(-1).
A logical expression is evaluated as 1 if it is true and as 0 if it is false.
It is a good idea to always use parenthesis to ensure desired precedence and priority with respect to arithmetical operations. In general, arithmetical operations are assigned higher priority than the logical ones.
Examples:
2 + 1 < 2 is interpreted as (1 + 2) < 2 (= 0), and not as 2 + (1 < 2) (= 3). 1 < 2 < 3 is evaluated as (1 < 2) < 3 i.e. (1 < 2) < 3= 1 < 3 = 1. At the same time 3 > 2 > 1 is evaluated as (3 > 2) > 1, i.e. (3 > 2) > 1= 1 > 1 = 0.
Approximately Equal ~= String ~= String performs a case insensitive string comparison of the 2 string expressions
For example, "hello world" ~= "Hello WORLD" is true
"hello world" ~= HelloWORLD" is false

7: Working With Logic Blocks 101
Numeric ~= Numeric tests if two numerics are approximately equal.
The deviation allowed depends on the size of the numbers involved. For positive numbers, it tests if the difference of the 2 numbers is within .005% of their sum. The actual algorithm allows negative numbers too.
For example, 1000000000 ~= 1000100001 is true 1000000000 ~= 1000100006 is false For example, 1.000000000 ~= 1.000100001 is true 1.000000000 ~= 1.000100006 is false
The actual algorithm used is:
d = ( |x| + |y| ) * 0.00005 if max(x,y) - min(x,y) < -d then return -1 if d < max(x,y) - min(x,y) then return 1 else return 0
Functions and Constants The following list describes the meaning and syntax of built-in functions and constants. Numeric functions:
SIN(x) Sine of angle in radians
COS(x) Cosine of angle in radians
TAN(x) Tangent of angle in radians
ATAN(x) Arc tangent in radians
ASIN(x) Arc sine in radians
ACOS(x) Arc cosine in radians
SQRT(x) Square Root
ABS(x) Absolute Value
EXP(x) e raised to the power x
LN(x) Natural Logarithm
LOG(x) Base 10 Logarithm
FLOOR(x) Integer value less than x
INT(x) Integer part of x
FRAC(x) Fractional part
RANDOM() Random number between 0 and 1
MIN(x, y, z,...) Minimum of list of values
MAX(x, y, z,...) Maximum of list of values
RAD(x) Degrees to Radian Conversion
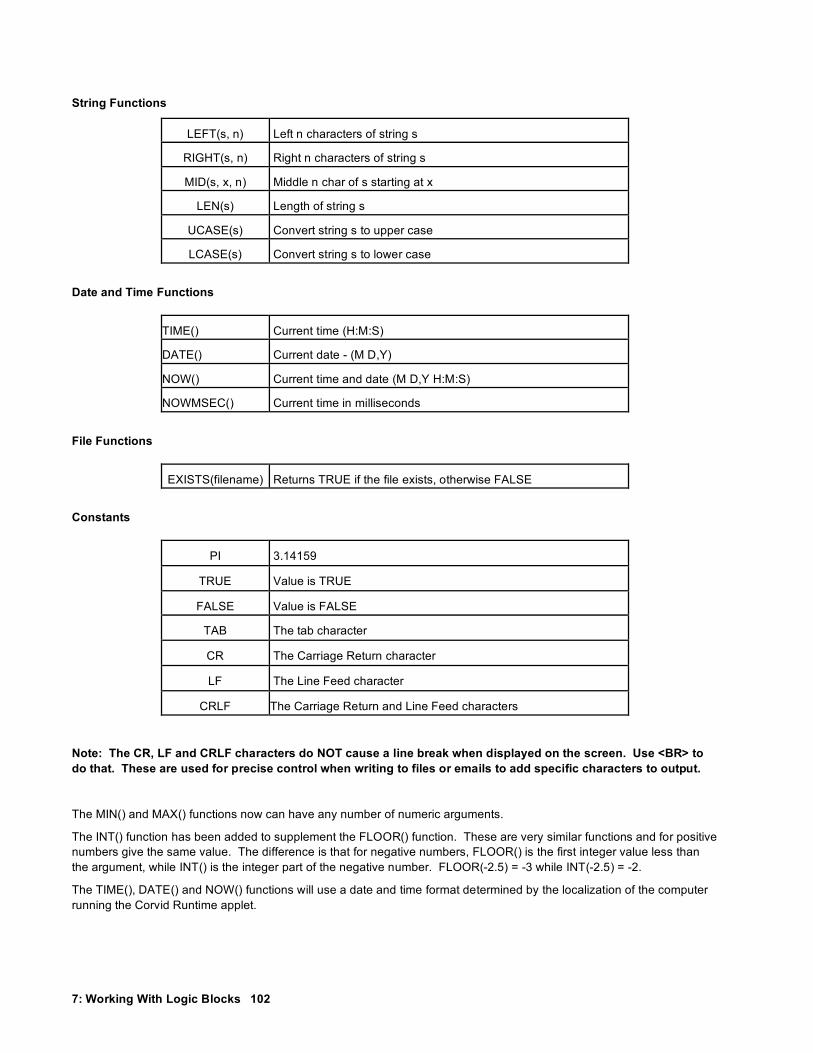
7: Working With Logic Blocks 102
String Functions
LEFT(s, n) Left n characters of string s
RIGHT(s, n) Right n characters of string s
MID(s, x, n) Middle n char of s starting at x
LEN(s) Length of string s
UCASE(s) Convert string s to upper case
LCASE(s) Convert string s to lower case
Date and Time Functions
TIME() Current time (H:M:S)
DATE() Current date - (M D,Y)
NOW() Current time and date (M D,Y H:M:S)
NOWMSEC() Current time in milliseconds
File Functions
EXISTS(filename) Returns TRUE if the file exists, otherwise FALSE
Constants
PI 3.14159
TRUE Value is TRUE
FALSE Value is FALSE
TAB The tab character
CR The Carriage Return character
LF The Line Feed character
CRLF The Carriage Return and Line Feed characters
Note: The CR, LF and CRLF characters do NOT cause a line break when displayed on the screen. Use <BR> to do that. These are used for precise control when writing to files or emails to add specific characters to output.
The MIN() and MAX() functions now can have any number of numeric arguments.
The INT() function has been added to supplement the FLOOR() function. These are very similar functions and for positive numbers give the same value. The difference is that for negative numbers, FLOOR() is the first integer value less than the argument, while INT() is the integer part of the negative number. FLOOR(-2.5) = -3 while INT(-2.5) = -2.
The TIME(), DATE() and NOW() functions will use a date and time format determined by the localization of the computer running the Corvid Runtime applet.

7: Working With Logic Blocks 103
Special Functions
A in B The syntax:
A in B
can be used in expressions where A and B are strings. This returns true if the string B contains the string A, and false otherwise. This is the same as the <instr> command (which is also supported) but A in B is easier to read.
The comparison is case sensitive – a lower case letter will NOT match an upper case letter. To do a comparison that is not case sensitive, force both strings to upper case with the UCASE() function. (e.g. UCASE([s]) in UCASE([t]) would check to see if the string value of [s] is in [t] ignoring case.)
This can be used anywhere a Boolean expression is allowed.
Example:
"hello" in "hello world" would return true
“x” in “abc” would return false
“a” in “ABC” would return false – cases do not match
“abc” in [s] would return true is the value of the string variable [s] contains the string “abc”
Date Comparison Operators Date values can be compared using '<', '>' and '=' or '==' and '!=' and '~='. The date times compared are precise to a millisecond.
[date1] < [date2] is true if date1 occurs before date2
[date1] > [date2] is true if date1 occurs after date2
[date1] = [date2] is true if date1 is at the same time as date2
For example:
[date1] < [date2]
Note: This is identical to doing: [date1.msec] < [date2.msec]
REPLACECONTENTS(sourceStr, openStr, closeStr, replacementStr, case_sensitive, number_to_replace, exclude) Searches a string and replaces occurrences of a search string with a replacement string. The search string is identified by the starting and ending strings, rather than by the full string as is used in the REPLACE() function. (To do a simple replacement of one string for another, use the simpler REPLACE( ) function.)
sourceStr The string to search
openStr The substring that marks the start of the search string
closeStr The substring that marks the end of the search string
replaceStr The string to use to replace the search string
case_sensitive An optional parameter
By default, all matches of the search string are case sensitive (must match upper/lower case). To have the match be case insensitive, set this parameter to “FALSE” or the numeric value of 0. A value of “TRUE”, a numeric value other than 0, or not including this parameter would make the matching test case sensitive.

7: Working With Logic Blocks 104
numToReplace An optional parameter
The default is to replace all occurrences of the search string with the replaceStr. If only a specified number of occurrences of the search string should be replaced, set the numToReplace parameter to the numeric value of the number of cases to replace. A value of 0 or a negative value means to replace all occurrences. If the value is not an integer, it will be rounded down to an integer. If this parameter is included, the case_sensitive parameter must also be included.
exclude An optional parameter
If the optional 'exclude' is true, the text matching the 'openStr' and 'closeStr' is part of the text replaced. If the optional 'exclude' is false, the text matching the 'openStr' and 'closeStr' is not part of the text replaced and remains in the returned string. By default exclude is true.
Returns a string with all (or the first numToReplace) occurrences of the search string replaced with replaceStr. The search string is defined as any string starting with the openStr, followed by any characters, followed by the closeStr.
The search is case sensitive unless case_sensitive is “FALSE”.
Both case_sensitve and numToReplace are optional. If they are omitted, the search will be case sensitive and will replace all occurrences.
The function does not search in the replacement string recursively, so
replacecontents (“ll”, “l”, , “l”, “lll”)
is “ll” and not “llllll...” infinitely.
sourceStr, openStr, closeStr and replaceStr are strings and should either be the value of a string variable, a string expression or just a string in “ ”. The parameters case_sensitive and exclude are optional, and if present is a Boolean, including “TRUE” or “FALSE” or a numeric value (0=FALSE). The parameter numToReplace is optional, and if present is a numeric value.
For example:
replacecontents(“abcdefghijk”, “cd”, “gh”, “XXX”) returns “abXXXijk”
replacecontents(“abcdefghijk”, “cd”, “gh”, “XXX”, TRUE, 0, FALSE) returns “abcdXXXghijk”
replacecontents(“abcdefabcdef”, “b”, “e”, “XXX”, TRUE, 0) returns “aXXXfaXXXf”
replacecontents(“abcdefabcdef”, “b”, “e”, “XXX”, TRUE, 1) returns “aXXXfabcdef”
replacecontents(“abcdefABCDEF”, “b”, “e”, “XXX”) returns “aXXXfAXXXF”
replacecontents(“abcdefABCDEF”, “b”, “e”, “XXX”, false) returns “aXXXfABCDEF”

7: Working With Logic Blocks 105
ROUND(val, fraction) Rounds a value off to the nearest integer, or if a fraction is specified, to the nearest value of that fraction.
val The number to round
fraction An optional parameter
The fractional value increment to round off to. The fraction does not have to be less than 1, but it does have to be positive and non-zero.
ROUND(x) Rounds x to nearest integer
ROUND(x, y) Rounds x to the nearest multiple of y
Examples:
ROUND(10.6)=11
ROUND(10.6, 0.5)=10.5
ROUND(10.7, 0.25)=10.75
ROUND(17.339, 0.1)=17.3
ROUND(256, 100)=300
PARSETEST(sourceStr, patternStr) sourceStr The source string
patternStr The pattern to parse with
PARSETEST() has the same syntax and parameters same as PARSE() but does NOT actually parse the string, instead it returns True or False if the PARSE() function can be successfully performed. This is used in cases where actually executing the PARSE() function could lead to a syntax error. Instead call PARSETEST first, and only call PARSE() if PARSETEST returns TRUE.
DATE(str) Date(…) can be used to create a date value in an expression without having to create a date variable. Date(s) can be used for a date where s is a string representation of the date. The syntax of the string expression parameter can be any of the formats in the Regional Settings.
Examples:
DATE("March 1, 2005”)
DATE("3/1/2005")
DATE(nowmsec( )) creates a Date for the current date and time
DATE(2005, 3, 1) creates a Date subexpression given the numeric components of the date: year, month, day
DATE(2005, 3, 1, 11, 00, 00) creates the date "March 1, 2005 11:00:00"
DATE(2005, 3, 1, 11, 00, 00, 1) creates the date 1 millisecond after "March 1, 2005 11:00:00"
DAYSDIFF(date1, date2)

7: Working With Logic Blocks 106
DAYSDIFF(date1, date2)
Returns the absolute integer number of calendar days between two dates. The order of the dates is not important and the function will always return a positive number. The number of days is always rounded up. If the date interval includes any portion of a day, that day is counted. Two dates on the same day will return 0.
Examples:
DAYSDIFF([today], [tomorrow]) = 1
DAYSDIFF([one_second_before_midnight], [one_second_after_the_same_midnight]) = 1
because the calendar day starts at midnight.
DAYSDIFF([now], [5_minutes_from_now]) = 0
until the time is within 5 minutes of midnight, at which time it will return 1 since the time period would be over 2 different days.
CREATEDATE(date, y_offset, m_offset, d_offset) CREATEDATE will return the new date based on a starting date and an offset of years, months and days. The offsets can be positive or negative.
Date The starting date
y_offset The number of years to add
m_offset The number of months to add
d_offset The number of days to add
Each of the offsets must be an integer, but can be 0 or negative.
Examples:
CREATEDATE([today], 0, 0, 1) will return tomorrow
CREATEDATE([today], 0, 0, 45) will return a date 45 days from now
CREATEDATE([today], 1, -1, 0) will return the date 11 calendar months from now because 1 year - 1 month = 11 months

7: Working With Logic Blocks 107
Assign a Value Based on Various Curve Types Functions allow a value to be defined by several standard statistical curve types. This is particularly useful in assigning confidence values that implement membership function fuzzy logic. The actual membership functions can be defined by the curves:
line([var], x1, y1, x2, y2)
The line is defined by the two points (x1, y1) and (x2, y2). The value returned will be the Y value for the specific X coordinate defined by the value of the variable [var]. The line extends infinitely in both directions with the same slope. The line cannot be vertical (i.e. x1 can not be equal to x2)
For example: line([X], 1,1, 3,3) will return a value of 2 when the variable [X] is 2.
lineSegs ([var], x1, y1, x2, y2, ….)
The LineSeg() function behaves very much like line(), but allows the line to be made up of a series of connected line segments. There can be as many line segments as needed to define the graph. The function will return the Y value for the specific X coordinate defined by the value of the variable [var]. This may fall in any line segment.
Individual segments can have the Y value increase or decrease, (positive or negative slope), but must be connected and the X values must not decrease. A [var] value less than x1 or greater than the highest X value will return a value based on the extrapolation of the first or last segment. The first or last segment cannot be vertical, but vertical segments are allowed internal to the graph. The value on the vertical segment will be the Y value of the first point with that x value.
bell(var, mean, standardDeviation)
The bell() function implements a standard bell curve (Gaussian Distribution) defined by a mean and standard deviation. The function used is:
bell( )= (1 / sqrt(2 * PI * sd^2)) * E^(-1 * (x - mean)^2 / (2 * sd^2))
This is a very useful function for assigning probabilities based on a Gaussian. The mean is the center of the peak. The larger the sd (standard deviation), the wider (more spread out) the bell shape.

7: Working With Logic Blocks 108
exponential(var, base, xd, yd, r)
The exponential () function implements an exponential curve. The function used is:
exponential( )= (base ^ (r * x - xd)) + yd
yd shifts the graph up (or down for negative values)
if (r*x - xd) is negative, then the graph is mirrored about the y-axis
y=base when (r*x-xd)=1 and yd=0 The base affects the y position and how fast the graph grows.
xd shifts the graph right (or left for negative values)
logarithm(var, base, xd, yd, r)
The logarithm () function implements a logarithmic curve. The function used is:
logarithm( )= log base(r * x - xd) + yd
yd shifts up (or down if negative)
xd shifts right (or left if negative)
The bigger the base, the faster it flattens out (as you move to the right)
IF Nodes Expression nodes in the IF part, are Boolean expressions - an expression that evaluates to TRUE or FALSE. The expression can be built from either:
An expression that compares 2 numeric values with <, >, =, <=, >= or !=
A property of a variable that returns TRUE or FALSE
An expression node in the IF part does not have to be associated with a specific variable. From the “Add to Block” window, just click on the “Expression” tab and enter an expression. Alternatively, clicking on a numeric, string or date variable in the list will bring the “Expression” tab to the front and copy the variable into the edit box.
When adding IF nodes, any number of nodes can be added as a group. In most cases, the group should cover all possible end user input and provide the branching in the tree. For example, adding two nodes “[X] > 0” and “[X]<=0” covers all possible values of X. In some cases, there may be many nodes required to cover all cases. In other cases, the logic of the system may not require that all cases be covered.
It is also not required to have all nodes mutually exclusive. The nodes could be:
[X] > [Y] [X] > [Y] + 5 [X] > [Y] + 10
If the value of X is Y+7 the first 2 nodes will be true. This can be used in cases where if X is greater than Y, the system does something. If the value is also greater than Y+5, it does something more, etc.

7: Working With Logic Blocks 109
The selection and grouping of expression nodes is completely up to you and the requirements of the logic of the system being built. Unlike Static List nodes, there is no preset list of values that typically must be used. The expressions in a group can use many variables if that is required.
Expression nodes can be combined with any other types of nodes in the Logic Block. For example, to use the sample system, you only want to go to the beach if the temperature is over 80, otherwise you want to go to a movie.
Adding these nodes you would get:
Then Nodes When adding a THEN expression node, it is an assignment of value to a variable.
Click on the variable to assign a value to in the variable list. This will cause “[varname] =” to appear in the editing window.
Enter the expression to assign right of the “=”. This can be any expression and is NOT restricted to expressions that evaluate to TRUE or FALSE. All of the options for displaying variables, functions and MetaBlock parameters are available as they were in the IF node.
If the variable selected is a String variable, the expression will be evaluated and converted to a string. This string will be assigned to the variable as its value.
Remember, except for Confidence variables, the new value will overwrite any existing value that the variable has. The expression [X] = [Y] + 1 will overwrite the current value of [X]. It is legal to include the same variable being assigned a value on the right of the “=”. The expression:
[X] = [X] + 1
is syntactically legal (and frequently used) to add 1 to the current value of X.
String Expressions Strings can also be used to build expressions based on comparison with other strings. The comparison is case insensitive (upper and lower case letters are equivalent). The operators are:
A = B True if string A is the same as string B
A >= B True if A is the same or alphabetically greater than B
A <= B True if A is the same or alphabetically less than B
A > B True if A is alphabetically greater than B
A < B True if A is alphabetically less than B
A != B True if string A is not the same as string B
A <INSTR> B True if string A is a substring of string B
For example:
[StringVar] = “abc”
[StringVar1] < [StringVar2]
[StringVar1] <INSTR> “ABCDEFGH”

7: Working With Logic Blocks 110
String Parsing Functions Parsing functions make it much easier to parse text and build complex reports.
Remove Specified Characters from the Start and End of a String trim(sourceStr, trimCharSet) sourceStr The string to search trimCharSet A string containing the characters to remove Returns the sourceStr, but with every character in trimCharSet deleted from the start and end of the source string. Occurrences of trim characters in the middle of the string (between non-trimmed characters) are not deleted. Both sourceStr and trimCharSet are strings and should either be the value of a string variable, a string expression or just a string in " ". For example: trim(" # hello ##;", " #;") returns "hello" trim("abcdefghijk", "jbak") returns "cdefghi" trim("abcdefghijk", "jbeak") returns "cdfghi"
Return the Numeric Index Returns the numeric index of the first character in a string that is in a search string.
findchr(sourceStr, searchCharSet)
sourceStr The string to search
searchCharSet A string containing the characters to search for
Returns the numeric index of the first character in sourceStr that is in searchCharSet. If no character from searchCharSet is found, 0 is returned. The index of the first character in sourceStr is 1.
Both sourceStr and searchCharSet are strings and should either be the value of a string variable, a string expression or just a string in " ".
For example: findchr("abcdefghij", "bx") returns 2 findchr("abcdefghij", "xyz") returns 0 findchr("abcdefghij", "bcf") returns 2
Search and Replace Search a string and replaces occurrences of a search string with a replacement string.
replace(sourceStr, searchStr, replaceStr, case_sensitive, numToReplace)
sourceStr The string to search
searchStr The pattern string to replace
replaceStr The string to use to replace the searchStr

7: Working With Logic Blocks 111
case_sensitive An optional parameter.
By default, all matches of the searchStr are case sensitive (must match upper/lower case). To have the match be case insensitive, set this parameter to "FALSE" or the numeric value of 0. A value of "TRUE", a numeric value other than 0, or not including this parameter would make the matching test case sensitive.
numToReplace An optional parameter.
The default is to replace all occurrences of the searchStr with the replaceStr. If only a specified number of occurrences of the searchStr should be replaced, set the numToReplace parameter to the numeric value of the number of cases to replace. A value of 0 or a negative value means to replace all occurrences. If the value is not an integer, it will be rounded down to an integer. If this parameter is included, the case_sensitive parameter must also be included.
Returns a string with all (or the first numToReplace) occurrences of searchStr replaced with replaceStr. The search is case sensitive unless case_sensitive is "FALSE".
Both case_sensitve and numToReplace are optional. If they are omitted, the search will be case sensitive and will replace all occurrences.
The function does not search in the replacement string recursively, so replace("l", "l", "ll") is "ll" and not "llllll..." infinitely.
sourceStr, searchStr and replaceStr are strings and should either be the value of a string variable, a string expression or just a string in " ". The parameter case_sensitive is optional, and if present is a Boolean, including "TRUE" or "FALSE" or a numeric value (0=FALSE). The parameter numToReplace is optional, and if present is a numeric value.
For example:
replace("abcdefghij", "def", "xyz") returns "abcxyzghij" replace("abcdefabcdef", "abc", "xyz") returns "xyzdefxzydef" replace("abcdefabcdef", "abc", "xyz", TRUE, 1) returns "xyzdefabcdef" replace("abcdefABCdef", "ABC", "xyz", TRUE) returns "abcdefxyzdef" replace("abcdefABCdef", "ABC", "xyz", FALSE) returns "xyzdefxyzdef"
Reverse a String reverse(sourceStr)
sourceStr The string to reverse
Returns the sourceStr reversed.
For example:
reverse("abc") returns "cba"
This makes it possible to perform actions on the right side of the source string using a function that acts on the left side of the source.
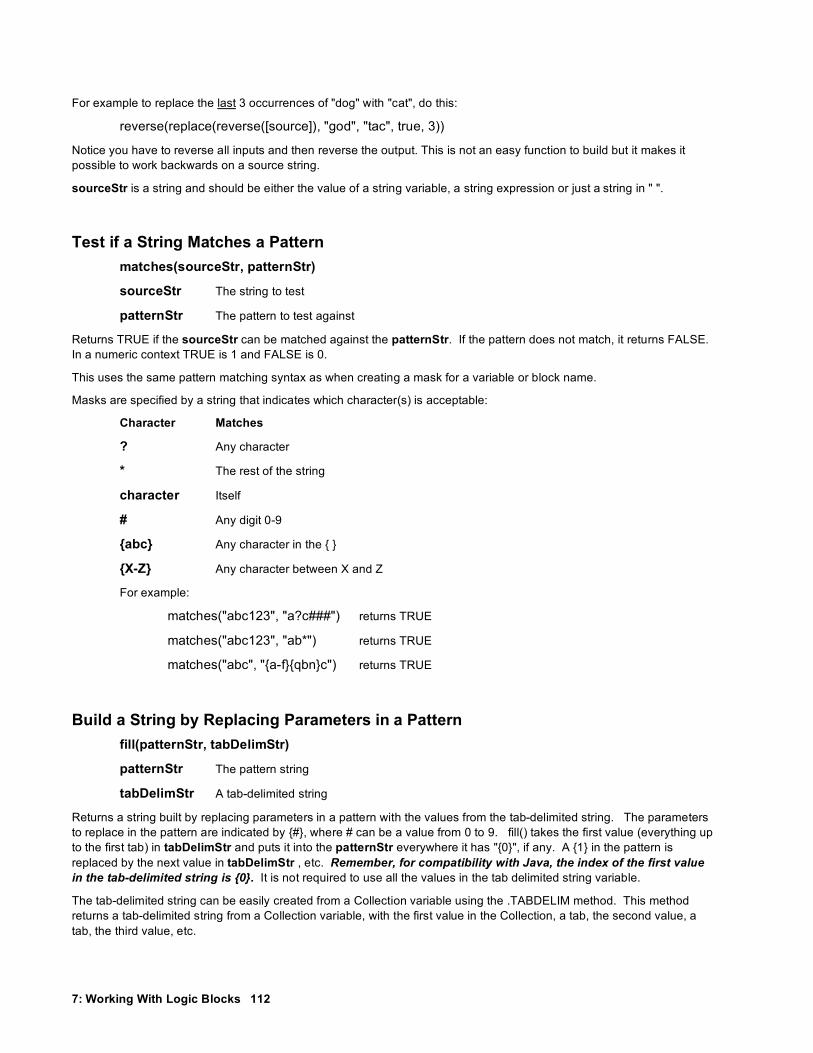
7: Working With Logic Blocks 112
For example to replace the last 3 occurrences of "dog" with "cat", do this:
reverse(replace(reverse([source]), "god", "tac", true, 3))
Notice you have to reverse all inputs and then reverse the output. This is not an easy function to build but it makes it possible to work backwards on a source string.
sourceStr is a string and should be either the value of a string variable, a string expression or just a string in " ". Test if a String Matches a Pattern matches(sourceStr, patternStr)
sourceStr The string to test
patternStr The pattern to test against
Returns TRUE if the sourceStr can be matched against the patternStr. If the pattern does not match, it returns FALSE. In a numeric context TRUE is 1 and FALSE is 0.
This uses the same pattern matching syntax as when creating a mask for a variable or block name.
Masks are specified by a string that indicates which character(s) is acceptable:
Character Matches
? Any character
* The rest of the string
character Itself
# Any digit 0-9
{abc} Any character in the { }
{X-Z} Any character between X and Z
For example:
matches("abc123", "a?c###") returns TRUE
matches("abc123", "ab*") returns TRUE
matches("abc", "{a-f}{qbn}c") returns TRUE Build a String by Replacing Parameters in a Pattern fill(patternStr, tabDelimStr)
patternStr The pattern string
tabDelimStr A tab-delimited string
Returns a string built by replacing parameters in a pattern with the values from the tab-delimited string. The parameters to replace in the pattern are indicated by {#}, where # can be a value from 0 to 9. fill() takes the first value (everything up to the first tab) in tabDelimStr and puts it into the patternStr everywhere it has "{0}", if any. A {1} in the pattern is replaced by the next value in tabDelimStr , etc. Remember, for compatibility with Java, the index of the first value in the tab-delimited string is {0}. It is not required to use all the values in the tab delimited string variable.
The tab-delimited string can be easily created from a Collection variable using the .TABDELIM method. This method returns a tab-delimited string from a Collection variable, with the first value in the Collection, a tab, the second value, a tab, the third value, etc.

7: Working With Logic Blocks 113
For most versions of Java that are used for applets, the index number values can only be from 0 to 9. If you are running your system as an application, or using the Servlet Runtime and have Java ver 1.4.0 or higher, the index numbers can be greater than 9.
The collection_var_name can be just the name, or the name in square brackets. If it is a string constant, be sure to put it in quotes.
For example:
fill("Use the {0} to fix the {1} to prevent {2}", "[collection_var.TABDELIM]")
If the Collection variable [collection_var] had values:
wrench
valve
a leak
water
fill("Use the {0} to fix the {1} to prevent {2}", [collection_var.tabdelim]) would return "Use the wrench to fix the valve to prevent a leak"
If the tabDelimStr string has fewer number of entries than the # specified in the {#}, it does not replace the {#}. It is not necessary to use every entry of the collection variable and they do not have to be used in numeric order.
Create a Tab-Delimited String Based on Tokens tokenize(sourceStr, breakSet, skipSet, trimSet)
sourceStr The source string
breakSet The characters to break on
skipSet The characters to skip
trimSet Optional parameter. The characters to trim
Returns a tab-delimited string based on tokens created from the sourceStr. It can be a complicated command to use, but very powerful. This can be used to add values to a Collection variable.
The algorithm used to generate tokens is: Copy characters from the sourceStr into the current token until you find a character in breakSet and then skip any characters from the skipSet. The search for the next token starts with the last character that was not skipped. If you do not want to include the break character in the token, put that break character in the skipSet. The trimSet string is optional, but if present it behaves as if trim() was applied to each individual token.
For example: (In these examples tab is the tab character)
tokenize("one two three four", " ", " ") returns "onetabtwotabthreetabfour"
tokenize("c:/aaa/bbb/ccc.dat", ":/", "/") returns "c:tabaaatabbbbtabccc.dat"
tokenize("abc:12345.67", ":.", ":.") returns "abctab12345tab67"
tokenize(" #abc:12345.67m", ":.", ":.", " #m") returns "abctab12345tab67"
The tab-delimited string can be assigned to a Collection variable using the .ADD or .ADDFIRST methods. Each item in the tab-delimited string will be added to the Collection variable in turn. If .ADDFIRST is used, each item will become the new first item in the value list.
If the Collection variable [Collection_var] is empty, and [S] is a string variable:
[S] = tokenize("one two three four", " ", " ")
[Collection_var.ADD] [[S]]
will result in [Collection_var] having 4 values, "one", "two", "three", "four"

7: Working With Logic Blocks 114
[Collection_var.ADDFIRST] [[S]]
will result in [Collection_var] having 4 values, "four", "three", "two", "one"
Note: The variable [S] must first be assigned the values from TOKENIZE and then its value added to the collection. Using: [Collection_var.ADD] tokenize("one two three four", " ", " ") will not work because the .ADD method does not evaluate the string being added.
Create a Tab-Delimited String Based on a Pattern String parse(sourceStr, patternStr)
sourceStr The source string
patternStr The pattern to parse with
Returns a tab-delimited string based on parsing the source string relative to the patternStr. This tab-delimited string can be assigned to a Collection variable. The operation is the reverse of the fill() function. This command is a very effective way to parsing structured text strings such as error messages.
The tab-delimited string is generated by a patternStr, which is a text string with markers in it. The markers are indicated by {#} where # is a number starting with 0. There can be multiple {#} markers, but the # must be sequential integers and must start with 0. The order of the {#} in the string is not required to be in numeric order.
Parse() finds a match between the sourceStr and the patternStr and where {#} occurs, the matching sub-string becomes a tab delimited element of the returned string. If the pattern cannot be matched to the source or if the {#}'s do not start with 0 or skips one, then it returns an empty string.
The patternStr should have no extra { or } characters. It must have an equal number of closing brackets '}' as opening brackets '{ '.
For example:
Parse("10 part#12345 at $12.35", "{0} part#{1} at ${2}") returns "10tab12345tab12.35"
Parse("ERROR 99-bad widget:12345", "ERROR {0}-{1}:{2}") returns "99tabbad widgettab12345"
Convert a String to a Number num(sourceStr)
sourceStr The string to convert
Returns a number created by converting a string representation of a number to a numeric. This is needed primarily when a string (such as one obtained from a tokenize() call) needs to be used as a numeric in a calculation. Instead of assigning the string to a "dummy" numeric variable, which will automatically convert it, the string can be used directly.
For example, if:
[Coll.Add] Parse("10 part#12345 at $12.35", "{0} part#{1} at ${2}")
is used to assign values to a Collection variable, [Coll] will have values "10", "12345", "12.35". To calculate the total price, you could multiply the first item in [Col] (the number of items) times the last item (the price per item). However, since these would be strings, they cannot be directly multiplied without converting them to numbers. To do the calculation, use the num() function:
[Total_price] = num([Coll.first]) * num([Coll.last])
If you are simply assigning a string value to a numeric variable, it is not necessary to call the num() function since the nature of the assignment will automatically convert the string to a numeric. For example, if there is a numeric variable [x], [x] = [Col.first] would be legal and assign the numeric value 10 to [x]. The alternative [x] = num([Col.first]) could also be used, but the num() is not required. The num() function is only needed when a string value needs to be converted to a number for a calculation.

7: Working With Logic Blocks 115
Remember, when adding values, strings can be "added" which will concatenate them. In the above example:
[x] = num([Col.first]) + num([col.last]) will give [x] a value of 22.35 (10 + 12.35)
If the num() were not included:
[x] = [Col.first] + [col.last] would concatenate the strings and give [x] a value of 1012.35 ("10" + "12.35" => "1012.35" converted to a number)
Expression Syntax Checking When an expression is added in the development environment, Corvid checks the syntax to make sure it is correct.
If an error is detected in the expression syntax, a warning widow will be displayed.
The widow displays the error detected. The expression can be modified in the edit box and then rechecked for syntax. If the expression is now syntactically correct, it will be accepted and used.
Among other things, the Syntax Checker detects undefined variables. It is best to define all variables before they are used in expressions. An expression with undefined variables can be accepted by clicking the “Use As Is” button, but be sure to add the variable before the system is run.
In rare cases, an expression may appear incorrect, but due to “creative” uses of MetaBlock parameters or embedded variables, will be valid at runtime. If the Syntax Error window is displayed and you are sure the expression is correct, click the “Use As Is” button to accept the expression. Be sure to check any such expressions at runtime to verify that they are evaluated without problem.
When editing an expression, clicking on the Variables button will display a list of the variables defined in the system and their properties. Selecting from the Variables window will insert the variable at the cursor point in the expression. The Functions button will display a list of supported functions and insert them at the cursor point.
Multiple Nodes In the IF part, multiple expression nodes are added to form a group that covers all relevant user input. In the THEN part, multiple nodes can be added, but this is done only for ease of entry. It is faster to add multiple nodes while in the “Add to Block” window than adding them one at a time from the Logic Block window. Each of the nodes added together will be in the same THEN part of a rule and have the same parent nodes.
Adding Collection Nodes Collection IF nodes are made up of Collection variables with properties that evaluate to TRUE or FALSE. Collection THEN nodes are Collection variables methods that perform some operation on the collection of values.
Collection nodes are added from the “Collection” tab. The options presented are quite different for IF nodes and THEN nodes.

7: Working With Logic Blocks 116
Adding IF nodes When adding an IF node, the options are all tests that will evaluate to TRUE or FALSE:
The value for a Collection variable is a list of strings that have been initialized or added by other logic in the system. In the IF part the values in this list can be tested.
A string is entered in the edit box. The test options are:
Contains Returns TRUE if the list contains this string as one of the list items, otherwise returns FALSE
Does Not Contain Returns FALSE if the list contains this string as one of the list items, otherwise returns TRUE
Top Item Is Returns TRUE if the top item in the list matches the search string, otherwise returns FALSE
Bottom Item Is Returns TRUE if the last item in the list matches the search string, otherwise returns FALSE
All comparisons are case insensitive - capitalization of the letters does not matter. However, the comparisons are with an entire item in the list - matching with a portion of an item does not count as a match.
To add an IF node, select the type of test and click “Add to List”. As with all IF nodes, it is often desired to make a group of nodes that cover various possible related situations. For example, the same string could be checked with the “Contains” and “Does Not Contain” options to build 2 related nodes. Using Expressions with Collection Variables The various options used in the Collection node dialog are just properties of Collection variables. In some cases, it may be easier to build an expression using these same properties. This is particularly true for more complex logic. For example, it is easy to build a test to see if a Collection variable NAMES includes “Bob” in the list: This will build the node:
[NAME.INCLUDES Bob]
which will evaluate to TRUE or FALSE. However, if you want to know if either Bob or Fred are in the NAMES list, it can not be done from the Collection tab, and should be done instead from the Expressions tab. There the expression node:
[NAME.INCLUDES Bob] | [NAME.INCLUDES Fred]
can be built and added to the system.
Adding THEN Nodes In the THEN part, Collection nodes are methods that assign an item to the list, or remove items from the list.
Text and other variable values can be added to the Collection variables value list. Items can be removed, and items can be added and sorted.
The best and easiest way to add Collection variable methods is from the Logic Block Command Building window. This is automatically displayed when adding a Collection variable to the THEN part of a Logic Block.
Select the method to use from the pull down list next to "Command:"

7: Working With Logic Blocks 117
Adding an Item to the Start or End of the List Select "Add an item to the start/end of the list" from the command pull down list. The item will be added to the end of the list unless the "Add as first item in list" checkbox is selected.
Selecting the "Do not add if identical item is already in the list" causes Corvid to check if the item to add is already in the list. If it is, no action is taken.
.ADD - Add to end of list The method .ADD adds the text following the ] to the end of the list of values.
[X.ADD] Albuquerque
would add the string Albuquerque as the last item in the value list.
.ADDFIRST - Add to the top of list The method .ADDFIRST adds the text following the ] to the top of the list of values.
[X.ADDFIRST] San Francisco
would add the string San Francisco as the first item in the value list. Adding the Value of a Variable Select "Add the value of a variable" from the command pull down list. The item will be added to the end of the list unless the "Add as first item in list" checkbox is selected.
Selecting the "Do not add if identical item is already in the list" causes Corvid to check if the item to add is already in the list. If it is, no action is taken. .ADDVAR] [var] - Add the value of the variable The method .ADDVAR adds the value of the variable [var] to the end of the list. The [var] string can include properties for a variable.
[X.ADDVAR] [CITY]
would add the value of [CITY] as the last value in the list.
[X.ADDVAR] [PRICE.FORMAT $###.##] would add the value of [PRICE] formatted by the format string as the last item in the Collection variable’s value list. .ADDVARFIRST] [var] - Add the variable to top The method .ADDVARFIRST is the same as .ADDVAR, but the value is added to the top of the Collection variable’s value list.

7: Working With Logic Blocks 118
Add a Value Sorted Select "Add an item sorted" from the command pull down list. The item will be added to the list based on the sort value. The sort value can be the value of a numeric variable or a numeric string. To select a numeric variable, pull down the lower dropdown list and select a variable. If a simple numeric value is preferred, just enter it in the edit box at the top of the pull down.
Corvid will check through all the items that are in the list and add the new item based on the sort value. The highest sort value is placed at the start of the list. The lowest sort value is placed at the end of the list.
When using adding items to a list with sort, ALL items should be added using the ADDSORTED method.
Selecting the "Do not add if identical item is already in the list" causes Corvid to check if the item to add is already in the list. If it is, no action is taken.
.ADDSORTED] str, sortVal - Add to list sorted The method .ADDSORTED allows the value list to be built in a sorted manner. Each new item is added to the list based on a sort value.
Note: When ADDSORTED is used, all “adds” to that Collection variable MUST be done with ADDSORTED. Do not mix ADDSORTED with ADD, ADDFIRST, etc.
The sortVal is a numeric value, or variable that evaluates to a numeric value, that will be used to establish the sorting. The sorting places highest values on top. The string to add is included in the value list based on the sort criteria.
For example, if you start with a Collection variable [X] that has no values, and rules fire leading to:
[X.ADDSORTED] AAA, 5 [X.ADDSORTED] BBB, 10 [X.ADDSORTED] CCC, 3
the resulting value list will be:
BBB AAA CCC
The sortVal can be a variable and often this is a Confidence variable - especially in MetaBlocks. Suppose a MetaBlock analyzes each row in a spreadsheet and sets a Confidence variable [Good_match] based on criteria in the row, and the customer’s needs. To add the text in the column headed Name based on a sort value of [Good_match] use:
[X.ADDSORTED] {Name}, [Good_match.value]
(Name is in { } because it is a MetaBlock parameter from the spreadsheet.)
This would produce a sorted value list with the best recommendations at the top.

7: Working With Logic Blocks 119
Add a File, with Conditional Inclusion Select "Add items from a file" form the command pull down list. Select the file to copy from in the middle edit box, or click the Browse button and browse to the file. The file can be local for a standalone or Corvid Servlet Runtime system, but most files will be reference by a URL off a Web server. The file can be on any server, provided it is accessible through a URL. To test this, enter the URL in your browser and the file should be displayed.
If running with the Corvid Servlet Runtime, a URL or a path relative to the knowledge base files on the server can reference the file. The easiest approach is to put it in the same folder as the .cvr file for the system, and just reference it by name with not path.
Each item from the file can be added to the end of the list. Selecting the "Do not add if identical item is already in the list" causes Corvid to check if each item to add is already in the list. If it is, no action is taken.
An optional key string can be used to select a portion of the file to add. If a key string is added, only the section of the file between key markers will be added. The markers are HTML comments, and generally used with HTML, but can be used in any file.
<!-- Corvid_KEY=key_str -->
text to add
<!-- Corvid_KEY_END=key_str -->
All text between the marker <!-- Corvid_KEY=key_str --> and the closing
<!-- Corvid_KEY_END=key_str --> will be added to the file. Since the start and end markers are associated with a specific key, they can overlap, and can also include Corvid_IF conditional inclusion sections. If no "key" is specified, the entire contents of a file will be added to the Collection Variable.
This provides a very simple and effective way to use a file as a report template. The logic of a system can determine when and if a particular file should be included. The file itself can be divided into nested sections that are included only if a test condition is met. The file text can use embedded Corvid variables to include actual system values. The format of the file can be simple text, HTML commands, an RTF document or any other form of text file.
Once the Collection Variable has had one (or more) files added to it, the variable value can be displayed or (in stand-alone mode) output to a file on disk and displayed with a word processor or browser. (Java security prevents an applet from writing to the local disk, so only standalone systems running as applications can create and display RTF or HTML files.)
The file should be a text file, including RTF and HTML files. The text in the file can contain embedded Corvid variables in [[ ]], and properties of variables indicated by [[name.property]].
The value of the variable will be used to replace the [[ ]] expression at the time the file is read. Normally variables that do not have a value will lead to the value being derived or asked. If the current value should be used, with out any attempt to ask or derive a value, use [[*name]].
Conditional Inclusion of Text The file that is included with the ADDFILE method can be any ASCII text file, simple text, HTML code or an RTF document. Sections can be marked with "key" markers, or sections of the file can be included or excluded based on test expressions. To do this, the file must be divided into individual lines.

7: Working With Logic Blocks 120
The syntax for conditional inclusion of text is:
#Corvid_IF expression text to include #Corvid_ENDIF
NOTE: The inclusion test commands must be on separate lines and be the only text on the line.
The text to include can be any length and any number of lines.
The test expression is any Corvid expression that evaluates to TRUE or FALSE, such as:
([X] > 0) [DAY.CHECK Monday] [NAMES.INCLUDES Bob] [X] > [Z]+5
The expression can include Corvid variables and properties.
Inclusion tests can be nested. Each #Corvid_IF must have a matching #Corvid_ENDIF. The #Corvid_ENDIF corresponds to the first preceding Corvid_IF that does not have a matching Corvid_ENDIF. If a block of text contains other #Corvid_IF tests, the block included/excluded will be all of the text to the point of the #Corvid_ENDIF that matches the initial #Corvid_IF
For example:
#Corvid_IF test1 aaa bbb #Corvid_IF test2 ccc #Corvid_ENDIF ddd #Corvid_ENDIF eee
If test1 is TRUE and test2 is TRUE, the lines included would be:
aaa bbb ccc ddd eee
If test1 is TRUE and test2 is FALSE, the lines includes would be:
aaa bbb ddd eee
If test1 is FALSE, the entire block will be excluded, and test2 will never be tested. The lines included would be:
eee

7: Working With Logic Blocks 121
The file to include must be designed so that various sections of text can be included or excluded. This is easy to do with text, HTML and RTF documents. Either HTML or RTF can be used format the report being built. If RTF is used, the file will need to be viewed in a program that supports RTF documents such as a word processor. This can be done in stand-alone mode by writing the report out and then calling a word processor to display it. If HTML is used, the document can be written out and displayed in a Web browser or other program that supports HTML.
Copy Values from Another Collection Select "Copy the items from a Collection" from the command pull down list. All the Collection variables in the system will be displayed. Select a Collection variable from the list. Each item from that variable's value list will be added, in order, to the end of the current variable's value list.
Selecting the "Do not add if identical item is already in the list" causes Corvid to check if the item to add is already in the list. If it is, no action is taken.
.COPY] [ColVar] - Copy a Collection Value List The method .COPY adds the values in one Collection variable to the end of the values in another Collection variable.
If there are two Collection variables, [A] and [B]
[A.COPY] [B]
would add each of Collection variable [B] values to [A]’s value list as individual items.
Note: To add a Collection variable’s values as a single item, use the .ADDVAR with the .CONCAT property set for the variable being added.
Assigning Values to a Group of Variables .ASSIGNAFTER] "Index_str", [Var1], [Var2].. This command allows a collection variable to be used as an ordered group or series of vectors. Values can be assigned to a group of variables based on their order in the collection. This enables a Collection variable to be used as a simple database with all values in memory.
Select "Assign from an index Point" from the command pull down list. Enter an index value to find in the Collection's value list. Make a list of variables to assign subsequent values to. This is done by selecting a value from the lower drop down list and clicking the "Add" button. The "Delete" button removes a variable from the list. The Up and Down buttons allow reordering the list, by moving the selected variable up or down in the list.
This method assumes that the values in the Collection variable are ordered in such a way that the position in the list relative to an index has specific meaning.

7: Working With Logic Blocks 122
For example, suppose the items in the Collection variable's value list are arranged so that there is a part ID, followed by the part cost, followed by the part weight. This pattern is repeated for many parts:
Using the ASSIGNAFTER method allows a group of values to be assigned with a single method.
For example:
[Col.ASSIGNAFTER] "Part 88765",[PRICE],[WEIGHT]
would search the value list to find the first occurrence of a value "Part 88765". The next value in the list (199.45) would then be assigned to the variable [PRICE] and the one after that ("7.5 lb")assigned to the variable [WEIGHT].
There can be any number of variables in the list. The values assigned should be of a type consistent with the variable - numeric variables should be assigned numeric values. The values in the Collection can be built dynamically, read from a file or set by any other means.
Replace Values in an Ordered Collection .REPLACEAFTER] "Index_str", #, "replacement_str"
This command works with ASSIGNAFTER to allow a collection variable to be used as an ordered group or series of vectors. This method allows values in the list to be changed dynamically. Values in the list can be replaced based on their order in the collection. This enables a Collection variable to be used as a simple database with all values in memory.
Select "Replace from an index Point" from the command pull down list. Enter an index value to find in the Collection's value list. Enter the number of values PAST the index value that you wish to replace. Enter the replacement value. This is a string, but can include the value of variables by embedding them in [[ ]].
This method assumes that the values in the Collection variable are ordered in such a way that the position in the list relative to an index has specific meaning.
For example, suppose the items in the Collection variable's value list are arranged so that there is a part ID, followed by the part cost, followed by the part weight. This pattern is repeated for many parts:
The REPLACEAFTER method allows changing a value, such as the PRICE.
For example:
[Col.REPLACEAFTER] "Part 88765",1,"188.23"
would search the value list to find the first occurrence of a value "Part 88765". It would then go 1 value farther in the list and change the value to 188.23.
The values in the Collection can be built dynamically, read from a file or set by any other means.
.
Part 1425 23.67 5 lb Part 88765 199.45 7.5 lb Part 15543 53.82 1.2 lb
Part 1425 23.67 5 lb Part 88765 199.45 7.5 lb Part 15543 53.82 1.2 lb

7: Working With Logic Blocks 123
Remove a Value from the List Select "Remove an Item" from the command pull down list. Enter the text of the item to remove.
.REMOVE] item - Remove an item The method .REMOVE removes the item from the value list. If the item is not in the list, it has no effect.
[X.REMOVE] beagle
would remove the item beagle from the list if it were there.
Remove First Value From the List Select "Remove first Item" from the command pull down list.
.DROPFIRST - Drop first item off list The method .DROPFIRST will remove the top item off the list, making the next item the top item. If there is nothing in the list, the command has no effect.
Remove Last Value From the List Select "Remove last Item" from the command pull down list.
.DROPLAST - Drop last item off list The method .DROPLAST will remove the last item off the list. If there is nothing in the list, the command has no effect.
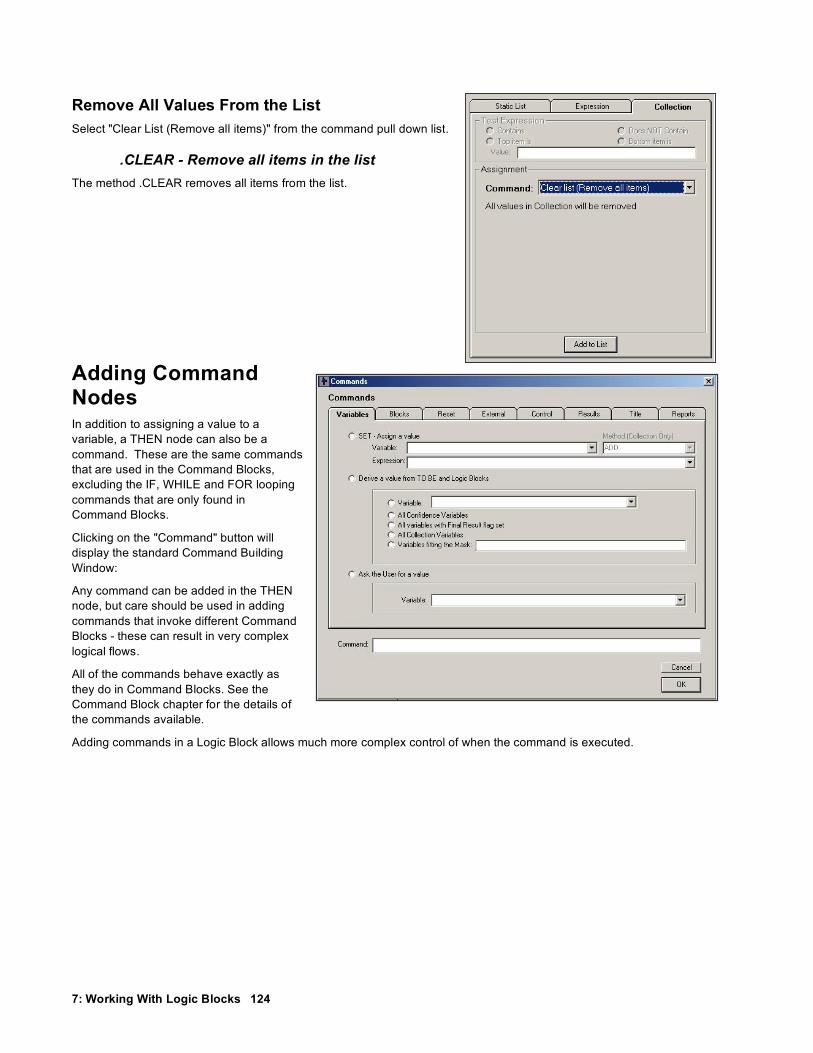
7: Working With Logic Blocks 124
Remove All Values From the List Select "Clear List (Remove all items)" from the command pull down list.
.CLEAR - Remove all items in the list The method .CLEAR removes all items from the list.
Adding Command Nodes In addition to assigning a value to a variable, a THEN node can also be a command. These are the same commands that are used in the Command Blocks, excluding the IF, WHILE and FOR looping commands that are only found in Command Blocks.
Clicking on the "Command" button will display the standard Command Building Window:
Any command can be added in the THEN node, but care should be used in adding commands that invoke different Command Blocks - these can result in very complex logical flows.
All of the commands behave exactly as they do in Command Blocks. See the Command Block chapter for the details of the commands available.
Adding commands in a Logic Block allows much more complex control of when the command is executed.

7: Working With Logic Blocks 125
Moving and Editing Nodes - Selecting Nodes A node can be selected by the following actions:
Left Click Selects the node and deselects all other nodes
Shift – Left Click Selects the node and all its subnodes
Ctrl – Left Click Selects the node without deselecting other nodes. If the node is already selected, it is deselected.
Shift – Ctrl – Left Click
Selects the node and all its subnodes without deselecting other nodes
Right Click Selects the node and deselects all other nodes. Displays a popup menu allowing easy access to the editing options available.
Shift – Right Click Selects the node and all its parent nodes. This is primarily used to see the rule structure. At the same time, displays the node and its parent nodes in the Rule View window.
Logic Block Controls - Editing Controls The nodes in a Logic Block can be edited and moved with the buttons on the control bar:
Delete Deletes all selected nodes. This operation also removes all selected nodes and sub-nodes off the selected nodes. If the sub-nodes are to be saved, first Copy them, delete the parent node, and paste the sub-nodes back in.
Cut Deletes all selected nodes and subnodes. The deleted nodes are saved for pasting.
Copy Saves a copy of the selected nodes for pasting
Paste Below Pastes any saved nodes under the selected node, at the same level in the tree
Paste Above Pastes any saved nodes above the selected node, at the same level in the tree
Paste Indented Pastes any saved nodes as subnodes to the selected node
Undo Moves back one step in the tree editing
Redo Redoes the last step that was removed via undo. This can only be done to one level of undo
Expand / Compress Expands all compressed nodes, or if already expanded, compresses all nodes. Individual nodes can be expanded or compressed by clicking on the small + or -boxes at the left of the node.

7: Working With Logic Blocks 126
Controlling Tree Display The display of a Logic Block tree is controlled by the menu items under “Display”.
Font Larger Makes the font size used to display the tree two points larger
Font Smaller Makes the font size used to display the tree two points smaller
Indent larger Increases the amount that sub-nodes are indented from their parent node. Increasing the indent level can make the tree easier to read, but allows fewer levels to be displayed without scrolling.
Indent Smaller Decreases the amount that sub-nodes are indented from their parent node
Single Selection Sets the tree to a mode where only one item in a group will be expanded at a time. In this mode, if there are 3 branches, each with sub-nodes, and the first branch is expanded to be worked on - expanding the second branch would automatically compress the first branch. This can be useful for large trees since it automatically closes the sections not being worked on. Some users find this very convenient, others find it quite distracting. It can be turned on or off by selecting the menu item.
MetaBlocks The MetaBlock option for a Logic Block provides a way to build generic logic that can be applied to the rows of a spreadsheet. This is particularly effective in building product selection systems.
When a Logic Block is made a MetaBlock, the logic in the block will be run multiple times - once for each data row in the spreadsheet. The rules, nodes and expressions in a MetaBlock have all of the features of any other Logic Block, but can also include special MetaBlock values that come from a spreadsheet. The data from the spreadsheet is indicated by {name} where “name” is the column heading in the spreadsheet. After the each row is processed, certain data may be save or cleared depending on the nature of the system.
For example, in a product selection system, you might have a rule:
IF {PRICE} > [CUSTOMER_BUDGET] THEN [SELECT_THIS_PRODUCT] = -100
This says if the price of a product is higher than the customer’s budget, you assign a confidence value of -100 to [SELECT_THIS_PRODUCT] which is a Confidence variable that measures how appropriate a product would be to recommend.
The value of {PRICE} comes from the spreadsheet, which has price data on products. There is one product per row and the price may be different for each row. For rows where the price is over the budget, this rule will fire.
Setting up a MetaBlock When the MetaBlock checkbox is selected, the MetaBlock dialog is displayed: First, select the spreadsheet file to use. This should be a tab-delimited spreadsheet. This can be built in many ways, but the easiest is to build the spreadsheet in a program such as Excel and save a tab-delimited version for use with Corvid.

7: Working With Logic Blocks 127
To do this:
1. Open the spreadsheet in Excel
2. Click “Save As” under the File Menu
3. In the “Save as type” field, select “Text (Tab Delimited)”
4. Give the file a name and save. (It is best to save this in the same directory as your Corvid knowledge base.)
This will build a file that Corvid can read and which will work across all operating systems and servers.
The spreadsheet should have the product specific data that the Logic Block will need.
Once a spreadsheet file is selected, the column heading will be displayed in the MetaBlock dialog. This is to help you make sure this is the correct file.
Variables to Clear The MetaBlock logic will be applied to each row in the spreadsheet sequentially. In most systems, certain variables will have a value set just for that row. This may be a ranking of how good that specific product is for the end user’s needs, comments about the product, or other variables that give a value during the calculation. Such variables should have their value cleared and reset for each row.
To do this, just add them to the “After each Row, Clear Variables” list:
1. Select a variable in the lower drop down list
2. Click Add
To remove a variable from the list, select it in the top list and click “Delete”.
For more information on using MetaBlocks, see the “Working with MetaBlocks” chapter.
Changing Block Order The order of the Logic Blocks in the system determines which Blocks will be used first. In a Forward Chaining system, the blocks are fired in the order they were added to the system. In Backward Chaining, the Blocks used to derive a value are tested in the order that they were added to the system.
In many cases, the Block order is not important, but some systems require that the Blocks be fired in a particular order. To change the order of the Logic Blocks, select “Reorder Logic Block” under the “Run” Menu option. This will display a window that shows the current Logic Block order.
To change the order of the Blocks:
Click on the name of a Block to select it.
Either click “Move Up” to move the Block towards the top of the list, OR click “Move Down” to move the Block towards the bottom of the list.
Once the Blocks are in the desired order, click the Done button.
Note: Block order applies to the entire system. If a system needs to run blocks in a special way for one case, set the Block order for Backward Chaining and then use the Command Language commands to force blocks to be run in a specific order for special cases.

7: Working With Logic Blocks 128
Merge Function It is possible to merge separate Corvid systems into a single system. This is particularly useful if there are multiple developers working on a single application. Each developer can build their section, and then the sections can be merged together.
To use the “Merge” function:
1. Load the main system as usual
2. From the File menu, select Merge and load the second system
Merge will combine the Variable, Logic Blocks and Command Blocks from the second system to the system already loaded.
If a second system has an item (Variable, Logic Block or Command Block) with a different name from the already loaded system, it will simply be added to the system. If there is already a variable with the same name, the existing variable and its various properties and settings will be used, and the new variable will not be added.
If there are any potential conflicts, an error and warning screen will be displayed. Some conflicts are fatal errors, and the systems cannot be merged until they are corrected. In this case shown below, an Error dialog window will be displayed explaining the error.
Usually in this case, it is best to make a copy of the system to be merged, make the required changes, and then merge the systems.
In other cases the problems may be more minor and can be accommodated in the merge, but require changes. In these cases, they will appear in the Warnings textbox explaining the changes. If the changes are acceptable, click the "Merge Systems" button. If the changes are unexpected and unwanted, click the "Cancel Merge" button, make any needed changes and then merge the systems.
Merge is most useful when having multiple developers building a single system. Typically, there will be variables (and sometimes Logic Blocks) that are shared by all the developers. To make this easier to implement:
Start by building a small system that has all the variables that should be shared among the developers. These should have their parameters set to be appropriate for all developers. If there are some underlying Logic Blocks that will also be shared, these should be added.
Make copies of the initial system for each developer to use as a starting point. There should be a defined
objective for each developer, such as derive the value for a particular shared variable, implement a particular part of a procedure, or create a Logic Block to perform particular actions.
Each developer can now add their own variables, Logic Blocks and Command Blocks to their copy of the
system. A specific naming convention should be used for any Variables or Blocks that the developer adds to make sure they have a different name from any that other developers may add. The variable that each developer adds should be used only by that developer, since they may have different intended meaning from a variable of the same name added by another developer. Only the shared variables from the initial system should be used by all the developers unless there is consensus among the developers on new shared variables).
Each developer will probably have a Command Block for their rules. If these are all the same block, it is easy
to convert this to the merged system. If there are multiple different Command Blocks, they will either need to be called from a main Command Block, or "cut and pasted" to make a single Command Block.
Once the systems are merged, they should be tested thoroughly by all developers to make sure any changes
in the Command Block or in Logic Block order has changed the way the system operates.

7: Working With Logic Blocks 129
Adding Trees and Rules A Logic Block is a superset of trees and rules. A block can contain a single rule or many trees and rules - it all depends of what is required for the system. The Logic Block is simply a way to group related logic and be able to call it as a block.
Trees vs. Rules In Corvid, there is no real of a difference in logic between trees and rules, and it actually can be confusing to think of them as different types of “things”. It is best to think of rules as very small trees, and trees as groups of related rules.
For example, the rule:
IF The weather is sunny THEN Wear shorts
This could be expressed in a Logic Block as:
To expand the logic and include:
IF The weather is cloudy THEN Wear jeans
add another individual rule in the block:
This was built by:
1. Selecting “Weather = Sunny” in the original rule
2. Clicking the “Same Level:Below” button under IF
3. Building a node with just “Weather = Cloudy”
4. Clicking the “Variable” button under THEN
5. Building a node assigning “Wear = Jeans”
This produces 2 rules.
The same logic could have been represented as a tree:
This was built by:
1. Starting a new Logic Block
2. Clicking “Add” in the IF part and selecting 2 values “Weather = Sunny” and “Weather = Cloudy” to build 2 branches
3. Clicking on “Weather = Sunny”
4. Clicking the “Variable” button under THEN
5. Building a node assigning “Wear = Shorts”
6. Clicking on “Weather = Cloudy”
7. Clicking the “Variable” button under THEN
8. Building a node assigning “Wear = Jeans”

7: Working With Logic Blocks 130
The only difference is that now the two “Weather” nodes are marked as related. Shift - Right Clicking on the “Wear” nodes will display the same rules for either approach to the problem and will run the same.
Now suppose that this logic is appropriate only for the weekend and other days you have to wear a suit. In the first approach using individual rules, you would need to add the additional logic in several places.
This starts to be difficult to see the underlying logic.
Using trees, the same logic would be:
This is easier to read and understand the underlying logic. The structure of the tree version is also easier to expand to more cases, but either approach would produce the same result.
Rules are best for situations where there are specific rules for unique situations. Trees are best for situations where there are many related rules. Often it is best to mix them. For example, to add a rule that “If it is sunny, a hat should always be worn”. Working this logic into the above tree structure would require adding it in 2 places (Adding a “Sunny” IF node under “Workday” and if it is sunny adding a “Hat” recommendation, and adding a “Hat” recommendation under “Weekend/ Sunny”).
It is far easier to just add a separate rule under the tree.
This was built by:
1. Selecting “Today = Weekend” in the original tree
2. Clicking the “Same Level:Below” button under IF
3. Building a node with just “Weather = Sunny”
4. Clicking the “Variable” button under THEN
5. Building a node assigning “Wear = Hat”
This new rule is independent of the tree and will fire if it is sunny, regardless of the day of the week. The rule and tree belong in the same block since they both are related to what to wear. Mixing rules and trees should be done to keep the logic as clear and simple as possible.
IF THEN IF One additional feature of the structure in Logic Blocks is the ability to add a THEN node and still continue the tree with more IF nodes. This is a very convenient way to include a THEN node once, rather than putting it in many branches of a tree. For example, suppose on the weekend, you wear a tee shirt regardless of the weather, this could be added as:
The blue arrow next to “Wear Tee Shirt” indicates it is a THEN node. However, IF nodes continue off it. To do this:
1. Build the “Today =” branches and add the “Business Suit” node as you did before.
2. Select the “Today = Weekend” node and click “Variable” under THEN.
3. Add a single THEN node assigning “Wear = Tee Shirt”
4. Select the “Wear = Tee Shirt” node and click the “IF:Below” button.
5. Add the 2 values for “Weather = Sunny” and “Weather=Cloudy” and complete these nodes as before.

7: Working With Logic Blocks 131
The “Wear = Tee Shirt “ is included only once, but it will apply to all the branches built off it. Clicking on “Wear = Jeans” displays the Rule View:
The “Wear Tee Shirt” condition is marked with “>>>” indicating that it does not depend on all of the IF conditions, and is part of an IF/THEN/IF tree.
Note: When an IF/THEN/IF is used in a backward chaining system, the middle THEN part will fire only if one of the variables in the middle THEN nodes needs to be derived. The middle THEN nodes will NOT automatically fire just because the final THEN nodes fire. In a forward chaining system, the middle THEN nodes will fire if the final THEN nodes fire.

7: Working With Logic Blocks 132

8: Working With Action Blocks 133
8: Working with Action Blocks
Action Blocks provide another way to describe decision-making logic. They are an alternative to Logic Blocks for certain types of systems, and can often be used in conjunction with Logic Blocks. The best way to see how Action Blocks work and how easy they are to use, is to go through the Action Block Tutorial later in this chapter.
Action Blocks are a way to represent simple forward-chaining logic. They are ideal for:
Smart questionnaires
Surveys
Dichotomous keys
Anywhere a more structured approach to the user interaction is needed.
Overview Action Blocks contain a series of questions, along with either possible values that may be selected, or Boolean expressions that will be true or false based on the user’s input. Each value/expression can have one or more associated actions to take, such as setting values, skipping over some questions, running other Logic, Action or Command Blocks, executing Corvid commands, etc. This is a very simple way to describe logic that can be rapidly learned, and it is applicable to a wide range of problems – especially when combined with capabilities of Logic Blocks where needed.
To add an Action Block to a system, click the “A” icon.
This will open a new Action Block:

8: Working With Action Blocks 134
The Action Block has 6 columns:
Label A unique label for the question. This is used in “GoTo” actions that skip over some questions.
Question The question to ask of the end user. This is the prompt of the variable being used.
Values For Static List variables, the possible values that the user would select. These may be grouped if several values should produce the same actions. For other variables, this column will list one or more Boolean expression built using the variable. Based on the user input, these expressions will be true or false. The expressions do not have to be mutually exclusive (more than one can be true at the same time).
Action The action to take when the value/expression in the Value column is true. A single value may have multiple associated actions. There are various types of actions, which may require one or two additional items of data.
To If the Action is done to something, it is listed here. For example, an action to execute a Logic Block, would list the Logic Block to run in the To column.
Content Some actions require both a To and a Content value. For example, if the action is to set the value of a variable, the To column would be the variable and the Content column would be the value to assign.
To add the first question to the Acion Block, click the “Add Question” button. This will display the same window for adding conditions as is used in Logic Blocks. The various Values are selected, just as when adding nodes to a Logic Block. For example, if the “Add Each Individually” button is clicked for a Static List variable, each value will be added individually. Click the “Done” button to add the list to the Action Block.

8: Working With Action Blocks 135
Looking at the question:
Label The default label Corvid assigns is the name of the variable being used. Labels must be unique in an Action Block and if the same variable is used multiple times, the label assigned will be the name of the variable followed by a number to make it unique. This label is only used in GoTo actions, so usually the label text is not too important, however it can be edited later.
Question This is the prompt text of the variable being used. It is the text that will be used when asking the end user for input. This text cannot be directly edited here, but can be changed from the Variables window.
Values These are the values (either individual or grouped) or Boolean expressions built in the “Add to Block” window.
Action These are the actions to take if the end user selects the associated value, or provides input that makes the Boolean expression true. When a new question is added, each of the Actions is “None”.

8: Working With Action Blocks 136
To select an action to take if the Value is selected, click the drop down arrow in the associated Action cell:
This will display the possible actions that can be taken:
None No action will be taken if the value is selected. No value or To or Content is required.
Add to Collection
Add a string to a Collection variable. This is a convenient way to build up text based on the user’s input. This text can be simple statements for a report, or complex HTML commands to dynamically build a custom web page for the user. The Collection variable to use is entered in the To column and the text to add is entered in the Content column.
Goto Label Skip to the specified label. This allows skipping over questions. If the user’s input indicates some of the following questions are irrelevant, this is a convenient way to jump over them. You can only use Goto to move down the list – not back to a previous question. The label to go to is selected from a drop down list in the To column. Since the next question in the list is automatically the next one to ask, the Goto label list only includes questions more than 1 question down in the list. Nothing is needed in the Content column.
Exec Block Immediately execute the specified Logic, Action or Command Block. The block to execute is selected from a drop down list in the To column. Nothing is needed in the Content column.
Set Assign a value to a variable. This can be used to set the value to any variable in the system. If a variable has a value set, and the variable appears later in the list, the assigned value will be used rather than asking the user for input. The variable to assign is entered in the To column and the value to assign is entered in the Content column.
Ask Ask the system user for the value of a variable. This can be used to obtain additional information that is not explicitly used as part of the system logic, but which may be included in reports etc. The variable to ask is entered in the To column. Nothing is needed in the Content column.
Command Execute a single Corvid command. The command is built with the Command Builder window and entered in the Content column. Nothing is needed in the To column.
Done - Exit Exit the Action Block even if there are more questions in the block. Nothing is needed in the To or Content columns. Only the Action Block is exited – not the entire system. Control will go back to the command that caused the action Block to be called.
Question Buttons When a cell is clicked in the block, it will select a question and an action. Highlighting colors will indicate the question, value and action(s) selected. These highlight colors can be selected in the “General” tab of the Properties window.
There is a group of buttons for adding/editing questions in the block.

8: Working With Action Blocks 137
Add Question Add a new question to the end of the list as the last one
Insert Add a new question at the currently selected row in the block
Replace Add a new question replacing the currently selected question
Delete Delete the currently selected question
Edit Open the Variable window to edit the Prompt and other properties of the variable associated with the selected question. Remember changing the properties of a variable change it everywhere the variable is used.
Cut Delete the currently selected question, but keep a copy that can be pasted
Copy Make a copy of the selected question that can be pasted
Paste Paste the question from the previous cut or copy
Move Up Move the question and all its values up in the list
Move Down Move the question and all its values down in the list
Edit Label Edit the selected label. This is active only if the click to select the question was on the Label column.
Change Value Grouping
Open a window to change the grouping of the values. This allows reordering, combining or splitting up groups of values. The actions associated with the first value will remain associated with the new first value, the actions with the second value will remain associated with the new second value, etc. If there are fewer new groupings, extra actions will be deleted. If there are more new groupings, the additional ones will have “None” as the associated action.
Action Buttons There are also a group of buttons for adding and editing Actions:
Add Action Add a new action below the currently selected action. It will be set to “None”.
Copy Copy the current action to be pasted
Cut Delete the current actions, but keep a copy that can be pasted
Paste Paste the action from the last cut or copy
Delete Delete the selected action
Up Move the action up in the list. This applies only when a Value has more than one action.
Down Move the action down in the list. This applies only when a Value has more than one action.
Applies to all Action for Selected Value
This check box makes the Cut, Copy and Delete buttons apply to all the actions for the selected Value.

8: Working With Action Blocks 138
Add Heading Buttons The Add Heading button will add a heading line. Heading lines have no effect on the logic, but make it easier to segment the questions. Clicking the button will display the heading window.
Enter the heading to add, and select to add it to the end or to insert it at the currently selected question.
Undo Button The Undo button allows you to undo your last actions. You can undo up to 5 steps back.
Convert to Logic Block Button The Convert to Logic Block button will permanently convert the Action Block to an equivalent Logic Block. This will allow you to edit and enhance it as a Logic Block. Once converted the Logic Block cannot be converted back to an Action Block. The Undo command cannot be used to step back to the Action Block once it is converted. The new Logic Block will have the same name as the Action Block. The Action Block will be deleted once it is converted.
Delete Block Button The Delete Block button will delete the current Action Block.
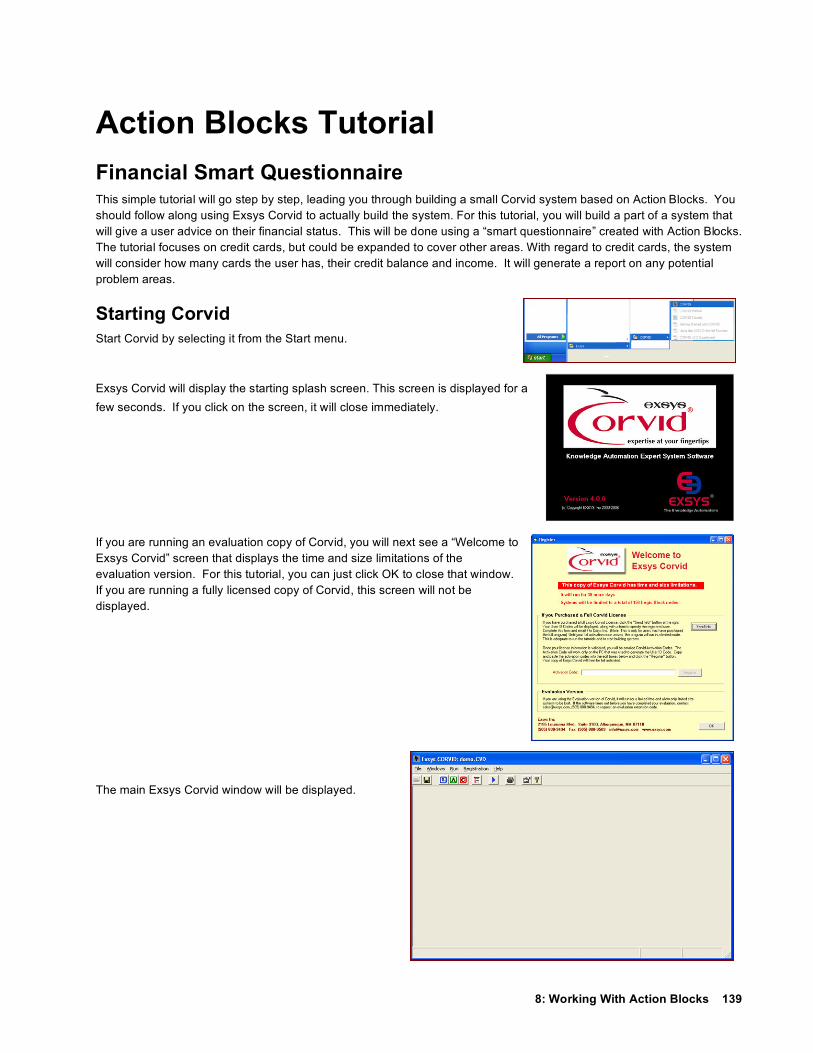
8: Working With Action Blocks 139
Action Blocks Tutorial Financial Smart Questionnaire This simple tutorial will go step by step, leading you through building a small Corvid system based on Action Blocks. You should follow along using Exsys Corvid to actually build the system. For this tutorial, you will build a part of a system that will give a user advice on their financial status. This will be done using a “smart questionnaire” created with Action Blocks. The tutorial focuses on credit cards, but could be expanded to cover other areas. With regard to credit cards, the system will consider how many cards the user has, their credit balance and income. It will generate a report on any potential problem areas.
Starting Corvid Start Corvid by selecting it from the Start menu.
Exsys Corvid will display the starting splash screen. This screen is displayed for a few seconds. If you click on the screen, it will close immediately.
If you are running an evaluation copy of Corvid, you will next see a “Welcome to Exsys Corvid” screen that displays the time and size limitations of the evaluation version. For this tutorial, you can just click OK to close that window. If you are running a fully licensed copy of Corvid, this screen will not be displayed.
The main Exsys Corvid window will be displayed.

8: Working With Action Blocks 140
Starting a System Open Corvid and select “New” from the “File” menu. Name the system “AB_demo”. It can be put in any convenient directory, or create a new one.
Adding Variables The system will need some variables to ask questions of the user, perform calculations and build reports.
Click on the Variables icon on the command bar to display the Variables window.
The Variables window is used to add and edit variables in the system.
Make sure the “Show Advanced Options” checkbox is NOT selected.
Variables can be used to directly ask the user for information that will be used in the system, for internal use to do calculations, hold values or build reports. The questions you want the system to ask the user are:
• Do you have credit cards? • How many cards do they have? • What is the total balance on the cards? • What is your annual income?
In addition, checking account questions will be used to start the next section.
The system also needs a variable to hold the ratio of debt to annual income, and a variable to build a report on status.
Each variable has:
A Name that describes the variable. Names should be short, but descriptive and clear. Names cannot include spaces and some other special characters, but Corvid will automatically convert any illegal characters to underscores. (Underscores are not visible to the systems user.)
A Prompt to use when asking the user for data or in reports. A Type that determines what type of value will be assigned to the variable. The most common types of Corvid
variables are:
• Static List - Has a multiple choice list of values
• Numeric - Assigns a value that is a number
• Collection - Assigns pieces of text that will build up a report
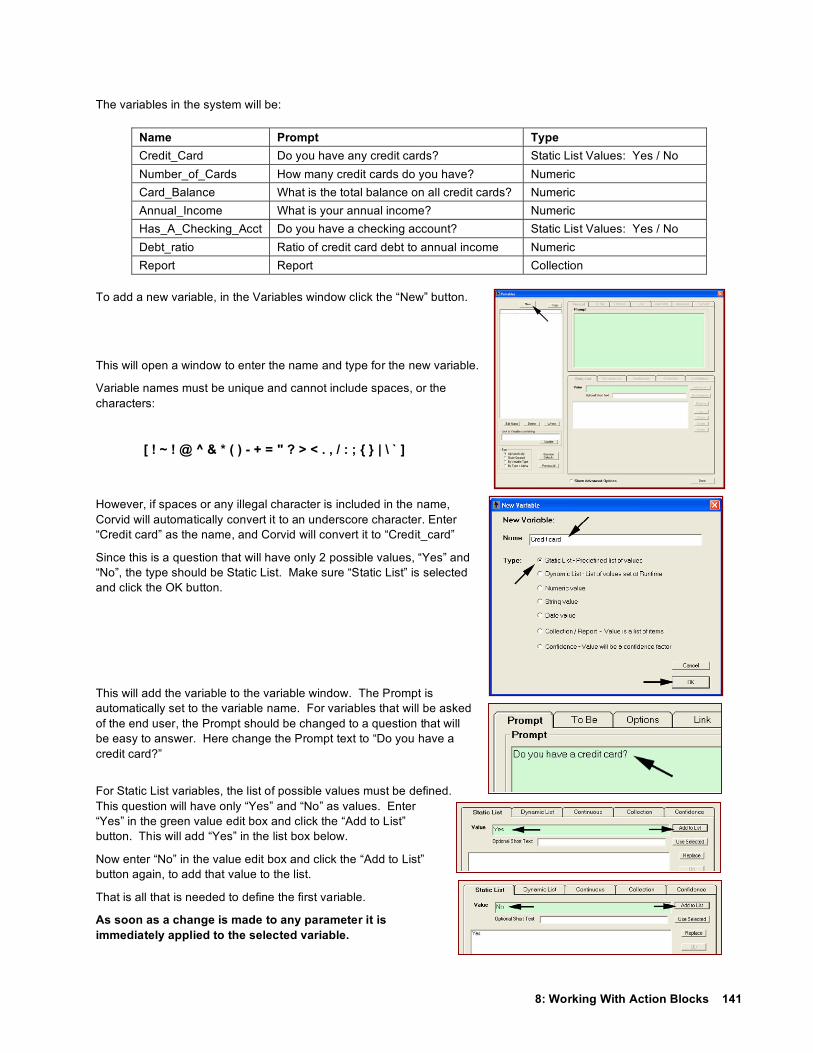
8: Working With Action Blocks 141
The variables in the system will be:
Name Prompt Type Credit_Card Do you have any credit cards? Static List Values: Yes / No Number_of_Cards How many credit cards do you have? Numeric Card_Balance What is the total balance on all credit cards? Numeric Annual_Income What is your annual income? Numeric Has_A_Checking_Acct Do you have a checking account? Static List Values: Yes / No Debt_ratio Ratio of credit card debt to annual income Numeric Report Report Collection
To add a new variable, in the Variables window click the “New” button.
This will open a window to enter the name and type for the new variable.
Variable names must be unique and cannot include spaces, or the characters:
[ ! ~ ! @ ^ & * ( ) - + = " ? > < . , / : ; { } | \ ` ]
However, if spaces or any illegal character is included in the name, Corvid will automatically convert it to an underscore character. Enter “Credit card” as the name, and Corvid will convert it to “Credit_card”
Since this is a question that will have only 2 possible values, “Yes” and “No”, the type should be Static List. Make sure “Static List” is selected and click the OK button.
This will add the variable to the variable window. The Prompt is automatically set to the variable name. For variables that will be asked of the end user, the Prompt should be changed to a question that will be easy to answer. Here change the Prompt text to “Do you have a credit card?”
For Static List variables, the list of possible values must be defined. This question will have only “Yes” and “No” as values. Enter “Yes” in the green value edit box and click the “Add to List” button. This will add “Yes” in the list box below.
Now enter “No” in the value edit box and click the “Add to List” button again, to add that value to the list.
That is all that is needed to define the first variable.
As soon as a change is made to any parameter it is immediately applied to the selected variable.
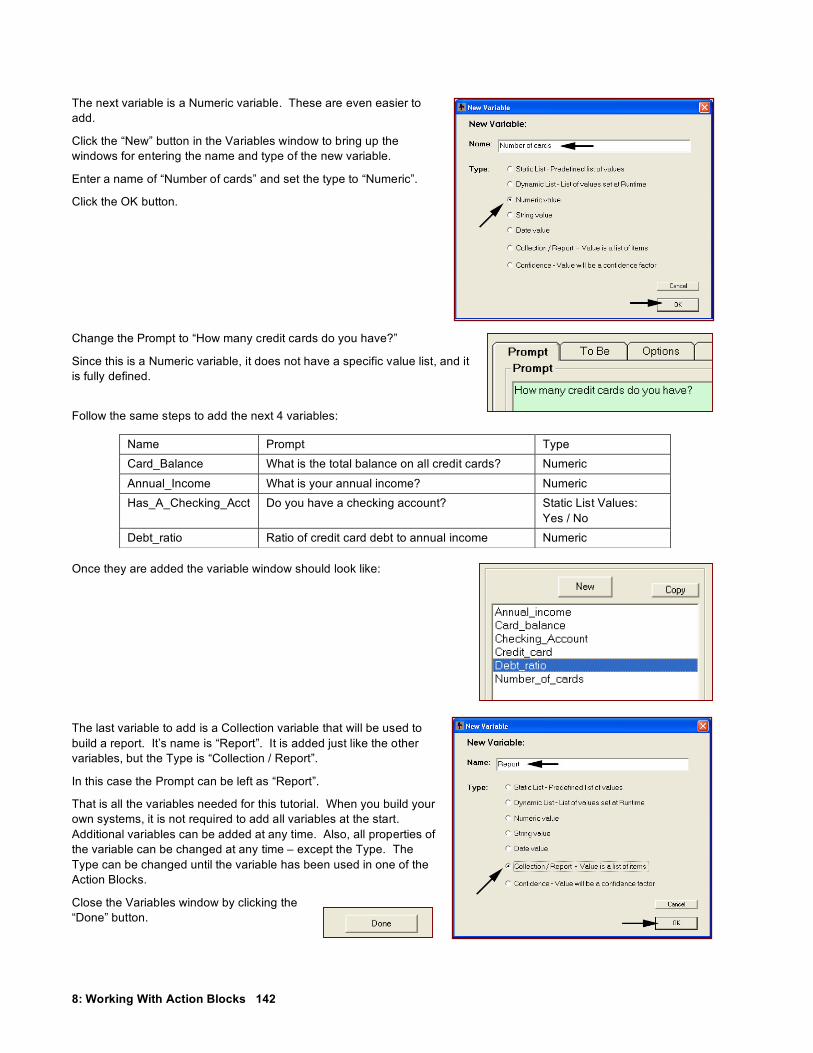
8: Working With Action Blocks 142
The next variable is a Numeric variable. These are even easier to add.
Click the “New” button in the Variables window to bring up the windows for entering the name and type of the new variable.
Enter a name of “Number of cards” and set the type to “Numeric”.
Click the OK button.
Change the Prompt to “How many credit cards do you have?”
Since this is a Numeric variable, it does not have a specific value list, and it is fully defined.
Follow the same steps to add the next 4 variables:
Once they are added the variable window should look like:
The last variable to add is a Collection variable that will be used to build a report. It’s name is “Report”. It is added just like the other variables, but the Type is “Collection / Report”.
In this case the Prompt can be left as “Report”.
That is all the variables needed for this tutorial. When you build your own systems, it is not required to add all variables at the start. Additional variables can be added at any time. Also, all properties of the variable can be changed at any time – except the Type. The Type can be changed until the variable has been used in one of the Action Blocks.
Close the Variables window by clicking the “Done” button.
Name Prompt Type Card_Balance What is the total balance on all credit cards? Numeric
Annual_Income What is your annual income? Numeric Has_A_Checking_Acct Do you have a checking account? Static List Values:
Yes / No Debt_ratio Ratio of credit card debt to annual income Numeric

8: Working With Action Blocks 143
Building Rules in an Action Block Now that the variables are entered, the next step is to build the rules in the Action Block.
Open a new Action Block by clicking on the Action Block icon on the command bar.
Click on the “Add Question” button to add the first question in the block.
This will display the window for adding content to both Action Blocks and Logic Blocks. The variables in the list are ordered alphabetically. Since the variables were entered in roughly the order that you plan to use them, it would be more convenient to arrange them in the order that they were entered.
To do this, in the “Sort” control group in the lower left, click the “Order Entered” radio button. This will display the list in the order that they were added.
Click on the “Credit_card” variable in the list to select it.
The “Yes” and “No” values for the variable are displayed in the right list box.
You want a separate rule for each value. Click the “Add Each Individually” button.
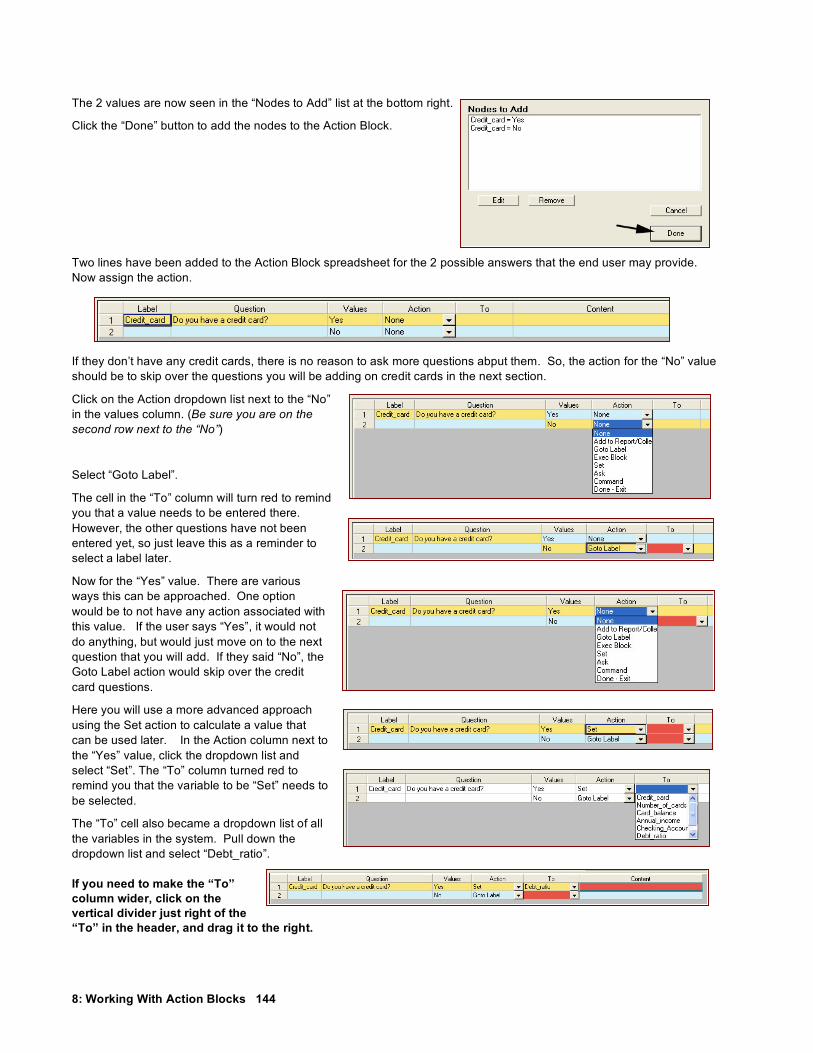
8: Working With Action Blocks 144
The 2 values are now seen in the “Nodes to Add” list at the bottom right.
Click the “Done” button to add the nodes to the Action Block.
Two lines have been added to the Action Block spreadsheet for the 2 possible answers that the end user may provide. Now assign the action.
If they don’t have any credit cards, there is no reason to ask more questions abput them. So, the action for the “No” value should be to skip over the questions you will be adding on credit cards in the next section.
Click on the Action dropdown list next to the “No” in the values column. (Be sure you are on the second row next to the “No”)
Select “Goto Label”.
The cell in the “To” column will turn red to remind you that a value needs to be entered there. However, the other questions have not been entered yet, so just leave this as a reminder to select a label later.
Now for the “Yes” value. There are various ways this can be approached. One option would be to not have any action associated with this value. If the user says “Yes”, it would not do anything, but would just move on to the next question that you will add. If they said “No”, the Goto Label action would skip over the credit card questions.
Here you will use a more advanced approach using the Set action to calculate a value that can be used later. In the Action column next to the “Yes” value, click the dropdown list and select “Set”. The “To” column turned red to remind you that the variable to be “Set” needs to be selected.
The “To” cell also became a dropdown list of all the variables in the system. Pull down the dropdown list and select “Debt_ratio”.
If you need to make the “To” column wider, click on the vertical divider just right of the “To” in the header, and drag it to the right.

8: Working With Action Blocks 145
Now add the value to assign to the variable Debt_ratio. For this system, the debt ratio is the balance on all the cards divided by the annual income. The variables Card_balance and Annual_income were already added to the system to do this calculation.
In Corvid, expressions can include the value of any variable by putting the name of the variable in double brackets [ ]. Corvid supports standard algebraic operators along with many functions. All that is needed here is division. The expression:
[Card_balance] / [Annual_income]
will calculate the value of the variable Debt_ratio.
Click on the Content column in the row for the “Yes” value.
Whenever a row is selected, the lower right section of the window displays the question, value, action and content.
The content text can be entered either directly in the spreadsheet, or in the Content edit box. In most cases, it is easier to add and build expressions in the edit box because a special window to add variable names can be called. This makes it easier to build expressions and reduced the chance of a typographical error.
Click in the Content edit box to put the cursor there. The expression youwant to add is:
[Card_balance] / [Annual_income]
This can be just typed in, but use the window for filling in the variable’s name.
Hold the Ctrl and Alt keys down and hit the “V” key (Ctrl-Alt-v). This will display a window that will add the name of the variable to the expression.
Click on “Card_balance”. The properties for the variable will be displayed on the right, but you do not need those at the moment. Click OK. You can also just double click on “Card_balance”, which is quicker in cases where a property is not needed.
The name of the variable in [ ] will be added to the expression window. Don’t worry about the red underline of the name, that is the spelling checker, which will be discussed later.
The cursor should now be just right of the closing ]. Type in the division sign /
Now hit Ctrl-Alt-v again to bring up the variable window and double click on “Annual_income”. This will add that variable to the content field.
Notice that any text entered in the Content edit box also appears in the Content cell in the spreadsheet.

8: Working With Action Blocks 146
You now have the 2 actions for the first question. If the user answers “Yes”, Corvid will evaluate the expression and assign the result to the variable Debt_ratio. To do this Corvid will need to know the values of the variables Card_balance and Annual_income. Because these values are needed to do the calculation, Corvid will automatically ask the user for the values. Whenever the value of a variable is needed, Corvid will do whatever is necessary to get the value. Here Corvid will ask the user for the information. If you had provided other rules to derive the value, or provided a way to obtain the information from an external source such as a database, that would be used instead, but here the user will be asked.
It is important to remember that Corvid will ask the user questions to obtain the data it needs, when it needs it, but will only ask if it is necessary and can’t get the information from other sources.
Using Variables that Already Have a Value Now add some rules that make use of the debt_ratio that was calculated in the first rule. If the user answers “No” to the first question, the Goto Label will skip over this question.
To add a new question at the end of the list, click the “Add to End button.
This will display the same windows you used before to add the IF conditions. This time you want to consider the value of the numeric variable Debt_ratio, and test which range it falls into.
Click on the variable Debt_ratio in the left list to select it. Since it is a numeric variable, the “Expression” tab is automatically selected and the variable name in [ ] is copied over there so it can be used to build a Boolean expression.
Since the expressions you are building will become the IF parts of rules, they must be tested to evaluate to true or false. The first test if the ratio is less than 20% (.2).
To do this enter < .2 after the variable name. Then click the “Add to List” button. The test will appear in the “Nodes to Add” list.

8: Working With Action Blocks 147
In order to consider various values of the variable, you will add 3 tests:
[debt_ratio] < .2
([debt_ratio] >= .2) & ([debt_ratio] < .3)
[debt_ratio] >= .3
In Corvid, as with most computer languages, the & is a logical AND. It combines 2 Boolean tests, and will be true only if both of the individual tests are true.
You have already added the first. Now to add the second. Go back to edit box under the Expression tab, and type in the second expression.
Remember: Variables can be added to the expression by clicking the “Variables” button or using Ctrl-Alt-V to display the variables window.
Once ([debt_ratio] >= .2) & ([debt_ratio] < .3) is entered, click the “Add to List” button.
Whenever an expression is entered, Corvid checks the syntax to make sure it is correct. If there are no errors, it will be added. If any errors are found, Corvid will display a window indicating the error so you can make corrections. If the expression was correct, you should not see this window. If it is displayed, correct the text and click the “Recheck”. (In this sample one of the parenthesis was left off.)
Now add the third expression, [debt_ratio] >= .3 and click the “Add to List” button. The list of added nodes should look like:
Click the “Done” button to add the tests to the Action Block.
Now you will start building up a report based on the information the user tells you. To do this click on the Action column in line 3 next to [debt_ratio] < .2 and select the Action “Add to Report/Collection”.
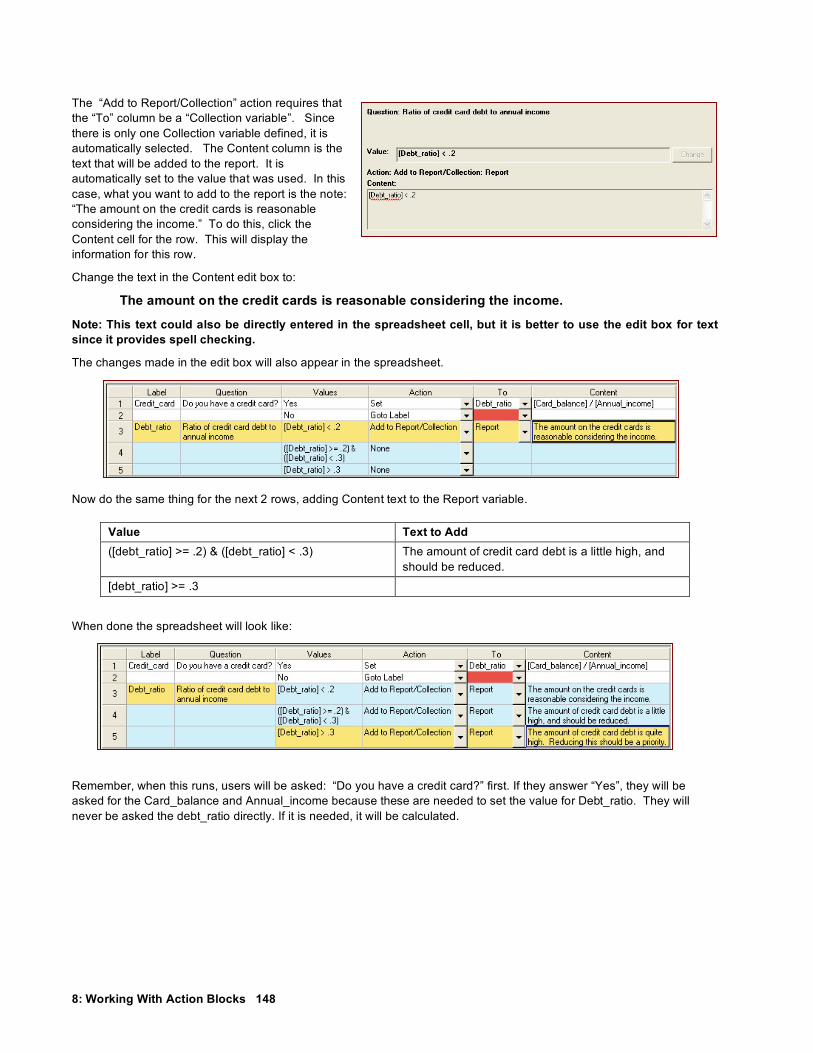
8: Working With Action Blocks 148
The “Add to Report/Collection” action requires that the “To” column be a “Collection variable”. Since there is only one Collection variable defined, it is automatically selected. The Content column is the text that will be added to the report. It is automatically set to the value that was used. In this case, what you want to add to the report is the note: “The amount on the credit cards is reasonable considering the income.” To do this, click the Content cell for the row. This will display the information for this row.
Change the text in the Content edit box to:
The amount on the credit cards is reasonable considering the income.
Note: This text could also be directly entered in the spreadsheet cell, but it is better to use the edit box for text since it provides spell checking.
The changes made in the edit box will also appear in the spreadsheet.
Now do the same thing for the next 2 rows, adding Content text to the Report variable.
Value Text to Add ([debt_ratio] >= .2) & ([debt_ratio] < .3) The amount of credit card debt is a little high, and
should be reduced. [debt_ratio] >= .3
When done the spreadsheet will look like:
Remember, when this runs, users will be asked: “Do you have a credit card?” first. If they answer “Yes”, they will be asked for the Card_balance and Annual_income because these are needed to set the value for Debt_ratio. They will never be asked the debt_ratio directly. If it is needed, it will be calculated.

8: Working With Action Blocks 149
Adding Another Question Now you will add one more question on the number of cards the user has. You will use the Number_of_cards variable that was added at the start of the system.
Click the “Add to End” button and in the window for building test conditions, add 3 tests:
[Number_of_cards] <= 6
([Number_of_cards] > 6) & ([Number_of_cards] <= 10)
[Number_of_cards] > 10
Now for each value expression, add some text to the Report. For each, select the Action “Add to Report/Collection” and add the text:
Value Text to Add [Number_of_cards] <= 6 The number of credit cards is reasonable. ([Number_of_cards] > 6) & ([Number_of_cards] <= 10)
The number of credit cards is a little high.
[Number_of_cards] > 10 The number of credit cards is quite high. It would be a good idea to consolidate on a few cards and gradually close the ones that are not needed.
The spreadsheet should now look like:
Adding Headings That is all you will do with credit cards in this demo. If the system was to examine many aspects of the user’s finances, it could cover credit cards, checking accounts, loans, investments, IRAs, etc. For this demo, we will just show how to start the next section, but you will not fully build it.
Headings are a way to divide up the spreadsheet to make it more readable. They do not have any effect on the logic of the system.
To add a heading, click the “Add Heading” button at the bottom left corner of the Action Block window.

8: Working With Action Blocks 150
This will display a window asking for the text of the heading and asking if the heading should be added at the end of the list of questions or added before the currently selected question.
Enter the text “Checking Account” and select to add to the end of the list. Click the “OK” button to add the heading to the Action Block.
The heading appears in the Question column and is the only text on row 9.
Using the Goto Label Action There is only one step left in the Action Block (at least for this tutorial). The spreadsheet still has the red cell on row 2. Red cells indicate a cell that requires some input. Here you are not able to select the label to go to, since you do not have the other questions in place.
Now add a question under the “Checking Account” heading.
Click the “Add to End” button. Select the variable Checking_account, and click the “Add Each Individually” to add a row for each value, and click the “Done” button.

8: Working With Action Blocks 151
The spreadsheet should now look like:
This demo does not fill out the section on the Checking Account, but now you have a row to go to from row 2. If the user answers they do not have a credit card, you want to skip the other credit card questions and go to the Checking_Account question.
To do this, click the “To” column in row 2 and select the label for row 10 “Checking_Account”.
That completes the Action Block for this tutorial.

8: Working With Action Blocks 152
Running the System Now you can run the system. To run a system, click the blue triangle icon in the command bar.
At this point you get a warning that there is no Command Block.
All systems MUST have a Command Block to run. For systems that require particular ways to run the rules, the Command Block must be built in the Command Block building window. However, here all you want to do is run the Action Block in forward chaining and display the results. Corvid can automatically build a simple Command Block to do this. Click the “Forward Chaining” radio button and then the “Build Command Block” button.
The simple Command Block it will build can be later edited if needed. Corvid reminds you that the default Command Block is not ideal for all systems, but it will work well in this case, so click the OK button.
Now that there is a Command Block, Corvid will build an HTML page that uses the applet runtime to load and run the system. The HTML page is displayed in a browser window. Actually, this page is the same core program as in Internet Explorer but without browser navaigation buttons. Note: Exsys Corvid systems can be run in any browser that supports Java.
The blue portion of the window is just a standard HTML template that can be easily modified with any HTML editor. The white rectangle is the Corvid Applet Runtime that is running the system.
As expected the first question asks if you have a credit card. Click the “Yes” radio button and then the OK button.
Corvid now asks about the balance on the credit cards. This is needed to set the Debt_ratio variable. Input 5000 and click OK. Note: do not use commas.

8: Working With Action Blocks 153
The system also needs the annual income to set Debt_ratio, so that is asked next. Input 65000 and click OK.
The last credit card question the system needs to ask is the number of credit cards. Enter 5 and click OK.
The system now moves on to the checking account questions. Since there are not really any rules for this section, you can select either answer and click OK.
The system now displays a default “Results” screen. This screen shows the values of all the variables used in the system. The first 5 are the variables that were asked directly of the user. The next line is the Debt_ratio that the system calculated. The last 2 lines are the report that the system generated.
Try running the system with other values to see how the system produces different results based on the input.
While the Results screen has all the data, it is not formatted the way you would want in a system that was going to be fielded. You will next see how to format both the questions and the results.
Formatting the Results When using the Corvid Applet Runtime, screens are formatted using the Corvid Screen Commands. These allow formatting text and images when asking questions and presenting results. (When using the optional Corvid Servlet Runtime, screens are designed using HTML, which provide the commands needed for highly complex screens.)
First you will change the results screen. The default Command Block you built uses the “default” results screen. In it’s simplest form, it just has the value of every variable used in the session. This can be changed by selecting “Set RESULT Default” under the Corvid “Windows” menu.
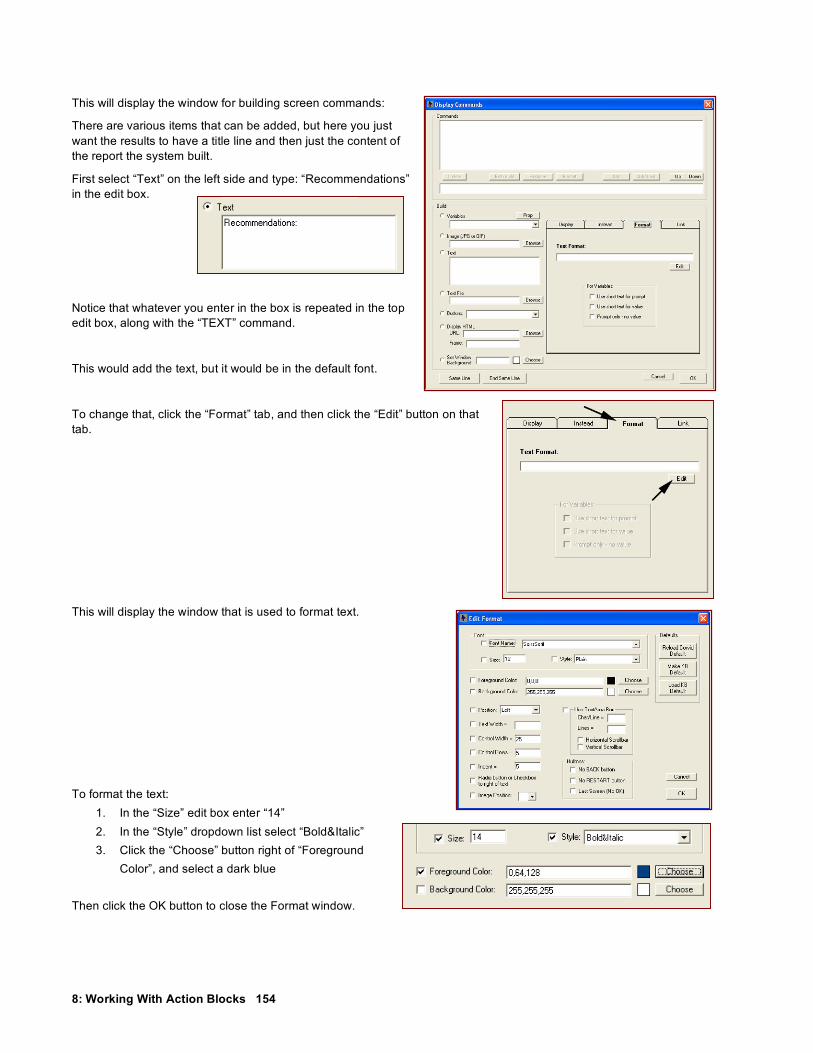
8: Working With Action Blocks 154
This will display the window for building screen commands:
There are various items that can be added, but here you just want the results to have a title line and then just the content of the report the system built.
First select “Text” on the left side and type: “Recommendations” in the edit box.
Notice that whatever you enter in the box is repeated in the top edit box, along with the “TEXT” command.
This would add the text, but it would be in the default font.
To change that, click the “Format” tab, and then click the “Edit” button on that tab.
This will display the window that is used to format text.
To format the text: 1. In the “Size” edit box enter “14” 2. In the “Style” dropdown list select “Bold&Italic” 3. Click the “Choose” button right of “Foreground
Color”, and select a dark blue
Then click the OK button to close the Format window.

8: Working With Action Blocks 155
The Screen Command window should now have the full command in the edit box. Click the “Add” button to add it to the command list:
The command list now has the first command.
Now add a space below the title. Go back into the “Text” edit box and type a space. This will add a blank line to the results. The command TEXT “ ” will be displayed in the top edit window. Click the “Add” button to add it to the list.
Now to add the content of the variable REPORT that was built during the run. To do this go to the dropdown under “Variables”, scroll to the bottom and select “[Report]”.
Note: Some of the variable options are individual variables and some are types. If you want all the variables of a particular type, they can be added as a group. Here only the single variable REPORT is needed.
This could be formatted with the same format commands as were added to text, but here just click the “Add” button to add it to the command list.
The command list should look like:
Click the “OK” button to close the Screen Command window.

8: Working With Action Blocks 156
Run the system by clicking the Blue Triangle in the command bar. Input some values and the results will now look like:
This is an improvement. Next format the way the questions are asked.
Formatting the Questions One final step in the system is to format the way questions are asked. There are several ways to do this. Individual questions can be individually formatted, but you will use a technique that changes the look of all the questions in a consistent way that is easy to implement.
Currently the questions are asked in the default format.
To change this, open the Variables window by clicking on the Variables icon on the tool bar.
This will open the Variables window. Click the “Question Defaults” button.
This will open a window for setting the default formatting for all questions.
This window allows you to set the formatting and design for the parts of the question screen. A question screen has 5 parts, although some are optional.
Header Optional text and images displayed at the top of the screen.
Question The format for the question prompt. A screen may have a single question or may have multiple questions.
Values The format for the values. This is also controlled by the type of control used to ask the question.
Separator An optional image that is placed between questions when there are multiple questions on the same screen.
Footer Optional text and images displayed at the bottom of the screen.

8: Working With Action Blocks 157
For this system, you will add a header line, format the question prompt and indent the values.
First click on the “Header” radio button, and then click the “Edit” button.
This will display the same window as you used for designing the Results screen. Enter the text “Financial Appraisal System” in the “Text” edit box. Click the “Format” tab to select it and click the Edit button.
This is the same window used before to format text. Set the “Size” to 14 and the “Style” to Bold. Click the “Choose” button next to “Foreground Color” and select a dark green.
Then Click “OK”.
Click the “Add” button to add the command to Command list.
Then click the “OK” button to close the screen command window. This will put the command in the Header list.
Now click the “Edit” button to the right of “Prompt Format”. This will display the text formatting window again, but this time it is to set the format for the Prompt.

8: Working With Action Blocks 158
Set the “Style” to Bold&Italic, and a dark blue foreground color.
Then click “OK”.
Now click the edit button next to the “Value Format”.
This time slightly indent the value controls from the Prompt.
Change the “Indent” value from 5 to 15.
Click the OK button.
This formatting will be applied to each question, presenting a consistent look-and-feel that can easily be edited later.
Click the “OK” button to return to the Variables window, and then click “Done” to return to the main Corvid window.

8: Working With Action Blocks 159
Now run the system again by clicking the Blue Triangle in the tool bar. This time your question screen shows the formatting that you set.
Experiment with other formatting options to see how they change the question and results screens.
Formatting Individual Variables Setting the default format parameters for the system is all that is needed for most applications. However, if there are individual questions that need modifications to the formatting:
1. Open the Variables window.
2. Click on the variable you want to format to select it.
3. Click on the “Ask With” tab
4. At the bottom of the tab are the same type of format controls for the Prompt and Value formats. If format commands are added here, they will be used in addition to any that come from the Question Defaults that were set. (The format options chosen here will supersede the defaults, however if not superseded, the defaults will still apply. For example, if the default format for the prompt is 14 point, Bold and Red, and here you change the color to blue, the 14 point Bold will still apply.)
Fielding the System Every time you run the system, Corvid builds all the files needed to field the system on a server. If you named the system “AB_demo”, Corvid will have built 4 files:
AB_demo.CVD – The Corvid system file. This is used to edit and maintain the system.
AB_demo.cvR – The Corvid Runtime file used to run the system.
AB_demo.cvRu – An alternate form of the runtime file for some older browsers (rarely needed)
AB_demo.html – The HTML page that the system runs in.
You will also find the file ExsysCorvid.jar in the same folder. This is the Corvid Applet Runtime program. It was copied to the folder by Corvid when the system was run.
If you move the files: AB_demo.cvR, AB_demo.cvRu, AB_demo.html, ExsysCorvid.jar to a web server and use your browser to go to the AB_demo.html page, your system will run over the Web.
The HTML page can be edited with any HTML editor. Make sure not to modify the APPLET tag on the page, but all the other content of the page can be modified as needed. As long as the APPLET tag is in the page, it will run the system.

8: Working With Action Blocks 160

9: Working With Command Blocks 161
9: Working with Command Blocks What is a Command Block Command Blocks control how a system operates, what actions to take and in what order to perform actions. The Logic Blocks in a system contain the detailed logic of how to make a decision, but these must be invoked from a Command Block. Every system MUST have a Command Block.
Most fundamentally, Command Blocks control what variables the system will try to derive values for and what Logic Blocks will be used to do that. Many systems use Confidence variables as the goals. If that has been done, the simple command “DERIVE CONF “ is all that is needed to have the system derive a value for all Confidence variables using all possible Logic Blocks and backward chaining.
Other systems have much more complex Command Blocks that involve While and For loops, conditional branching, running some Logic Blocks in forward chaining mode, displaying intermediate results, etc. The Command Block provides a graphical interface to describe the procedural operations, no matter how complex they get.
Adding a Command Block Command Blocks are added by clicking on the Command Block button:
or by selecting “Command Block” under the “Window” menu.
This displays the Command Block editing window:
If the Ctrl key is held down when you click the Command button, the most recently closed Command block will be displayed. If no blocks have been previously closed, a Ctrl click on the Command Block button will display the Starting Command Block. A click on the Command block button without the Ctrl key will display a new Command block.
When a new Command Block is added, it will be named “Command Block #”, where # will be the number of the Command Block in the system. This name can be kept or changed to another name by editing the name text in the edit box. Other Command Blocks already in the system can be selected from the pull down list.
Note: If a system has only one Command Block (the case in most systems), keeping the name “Command Block” is useful to separate it from the Logic Blocks.
Command Nodes There are two main types of command nodes:
Executable commands
Looping/branching commands

9: Working With Command Blocks 162
Executable Commands Executable commands are ones that can be directly executed. These typically involve:
Assigning a value to a variable
Invoking the Logic Blocks to derive the value for a variable
Executing a Logic or Command Block
Clearing or resetting a variable
Executable commands are added using:
These controls allow a command to be added before or after the currently selected command, or the currently selected command can be edited. For a new Command Block, only a single “Add” button will be active since there are no commands to add “before” or “after”.
Each command can also have an associated comment. This is entered in the “Comment” edit field. The comment text has no effect on execution, but can make the Command Block much easier to read. To add a comment, click on a command node to select it and enter the comment. The comment will automatically be added to the command in the block.
Commands are built with the “Command Builder” window and automatically added to the block. A command in the block can be replaced by selecting the node, and clicking the “Edit” button. The edited command will replace the selected command in the block.
Looping/Branching Commands Loops can be added to a Command Block. “While” and “For” loop commands are supported, along with “If” tests for conditional execution of sections of the command file.
The looping commands are added with:
When a loop command is added to the block, color-coding and indentation indicate it. To mark the end of the code in a loop or conditional IF test, select the loop node and click the “End Control Group” button.
The commands indented under the loop control will execute in the loop or if the conditional IF test is met.
For example, a Command Block might look like:
In this case, there is a FOR loop assigning the variable [X] values from 1 to 20 with a step of 4. The value of the variable [Y] is set to the value of [X] plus the value of variable [Z] (which would be derived or asked of the user.). The “DERIV CONF” command causes all confidence variables to have their values derived from the Logic Blocks. This may involve asking for data, testing rules, setting values and any other operation performed by the Logic Blocks. If the value for Confidence variable [ConfVar] is greater than 75, the results screen will be displayed, and if not, all the Confidence variables will have their values reset to “unknown”. Since this is the end of the FOR group, [X] will be increased by the step amount and the process will repeat until [X] has a value greater than 20, at which time a results screen based on the file “All_OK” will be displayed.
The Command Blocks give a wide range of control on how a system functions. The commands make use of the Logic Blocks and variables in the system that uses the Logic Blocks.

9: Working With Command Blocks 163
IF Commands IF commands provide a way to conditionally execute commands based on a Boolean expression.
To add an IF command:
1. Click on the “IF” Button 2. The standard expression builder window will be displayed. (This is the same window as when expressions are added to
Logic Blocks.) Enter a Boolean expression. This can include any variables or properties. 3. Click “Done”. 4. The command “IF expression” will be added to the Command Block. 5. If not already selected, click on the IF command to select it. 6. Add other commands to be executed if the expression is true. These will be indented under the IF command. 7. When all other commands have been added, click on the IF command and click the “End Control Group” button. This will
end IF group and additional commands will not be indented.
When executing, the Boolean expression will be tested. If it evaluates to TRUE, the indented commands will be executed. If it is FALSE, the first command after the indented group will be executed.
WHILE Loops WHILE loops provide a way to repeatedly execute a group of commands as long as a Boolean expression is true.
To add an WHILE command:
1. Click on the “WHILE” Button 2. The standard expression builder window will be displayed. (This is the same window as when expressions are added to
Logic Blocks.) Enter a Boolean expression. This can include any variables or properties. 3. Click “Done”. 4. The command “WHILE expression” will be added to the Command Block. 5. If not already selected, click on the WHILE command to select it. 6. Add other commands to be executed if the expression is true. These will be indented under the WHILE command. 7. When all other commands have been added, click on the WHILE command and click the “End Control Group” button.
This will end WHILE group and additional commands will not be indented.
When executing, the Boolean expression will be tested. If it evaluates to TRUE, the indented commands will be executed. At the end of the indented commands, the expression will be again evaluated. If still true, the group of commands will be executed again. The commands will be repeatedly executed until the expression evaluates to FALSE. If the expression is FALSE, the first command after the indented group will be executed.
It is important to make sure that the indented commands will eventually make the condition false or the loop will run forever. Usually this is done by changing the value of one of the variables used in the expression.
FOR Loops FOR loops provide a way to execute a set of commands for various values of a variable. There are two types of FOR loops - one using numeric variables and one using the values of a collection variable.
The most common one uses a numeric variable. This variable is given a starting value and end point. The variable is set to the starting value and the indented commands are executed. The variable is then incremented and the indented commands executed again. This continues until the variable reaches its ending value. The increment can be changed for the default value of 1 to any other number.
The “From”, 'To:” and “Step” fields can be a variable, an embedded variable or a numeric expression. The “To” and “Step” expressions are reevaluated each loop, so changing the value of variables used in these fields can affect the number of times the loop is performed.

9: Working With Command Blocks 164
A second type of FOR is the FOR EACH. This uses the values in a collection variable. A string variable is sequentially set to the each value of the collection variable and the indented rules are executed.
To add an FOR command:
1. Click on the “FOR” Button. The standard FOR command builder window will be displayed:
2. Click the top radio button to build a FOR x=# to # type FOR command. Select the numeric variable to assign values to and enter starting and ending values. The step increment will be 1 unless an options Step value is entered.
3. Click the lower radio button to build a FOR EACH loop. Select a string variable to assign values to and a collection variable to use the values from.
4. Click “OK”
The command: FOR command will be added to the Command Block.
If not already selected, click on the FOR command to select it.
Add other commands to be executed if the expression is true. These will be indented under the FOR command.
When all other commands have been added, click on the FOR command and click the “End Control Group” button. This will end FOR group and additional commands will not be indented.
Adding Executable Commands Executable commands can be directly typed into the command edit box, but it is better to click the “Build Command” button and use the Command Builder dialog window:
This is a very useful dialog that allows a wide variety of commands to be built. Using the dialog will help to make sure that the commands are syntactically correct.
Variables Tab - Deriving and Assigning Values The Variables tab is used to build commands that set or derives the value for a variable, or force the variable to be asked of the user.

9: Working With Command Blocks 165
Set - Assign a Value To set the value of a variable in the command file, use the SET option:
1. Click the SET radio button
2. Select the variable to assign a value to in the drop down list (The variable must have already been added to the system.)
3. Enter the expression to assign in the edit box. The expression can include variables (including the variable being assigned to) and any operator or function.
4. While building the expression, pressing Ctrl-Alt-V will display a list of the variables in the system and their properties. If a variable is selected from the list, it will be added to the expression at the cursor point.
When the command is executed, the expression will be evaluated and assigned to the variable.
When using the SET command for Static List variables there are several options, (where # is the number of a value and Short_text is the name for the value):
SET [SL] # # # SET [SL] #, #, # SET [SL] Short_text Short_text Short_text SET [SL] Short_text, Short_text, Short_text SET [SL] “Short_text” “Short_text” “Short_text” SET [SL] “Short_text”, “Short_text”, “Short_text”
Derive a Value One of the most commonly used commands is to derive the value for a variable or group of variables. These variables become the “Goal” of the system and the To Be commands and backward chaining in the Logic Blocks set their value. Either a single variable or group of variables can be specified.
Single Variable For a single variable, Click the ”Variable” radio button and select the variable in the drop down list.
Confidence Variables
Many systems derive values for Confidence variables. Clicking “All Confidence Variables” can derive the value of all Confidence variables.
Collection Variables
If the system uses Collection variables as the “goals”, clicking “All Collection Variables” can derive all Collection variables.
Grouping Variables
If only a specific group of variables should be derived, one way is to add several DERIVE commands - one for each variable. The alternative is to group the variables. There are two ways to do this.
The value of a variable can be directly asked of the user. Normally this is only done when the system needs to use the variable and the value cannot be derived or obtained any other way. However, the Command Block enables a variable to be forced to be asked at a specific point.
To ask as single variable, click the “Asking the User for the Value” radio button and select the variable in the drop down list.

9: Working With Command Blocks 166
Blocks Tab - Executing Blocks The Blocks tab is used to build commands that run a Logic Block in forward chaining or a Command Block. Logic blocks cannot be directly called to run in a backward chaining mode since backward chaining requires a “goal”. Backward chaining is used when a variable is specified to be derived. Then the appropriate Logic Blocks are used in a backward chaining mode. Running Logic Blocks Logic blocks can be selected to run in forward chaining mode. In this mode, the nodes in the tree are tested sequentially from the top. There is no specific “goal” being derived. As data is needed to determine if the IF nodes are true, it will be asked of the user, or derived from other Logic Blocks.
The Logic Block(s) to run can be specified in 3 ways:
1. To run all Logic Blocks in the system, click the “All Logic Blocks” radio button. The blocks will be executed in the order that they were added to the system. If the order of execution is important, it may be better to use multiple commands, one for each Logic Block.
2. To run a specific Logic Block, click the “Logic Block” radio button and select the block to run from the drop down list.
3. To run a group of Logic Blocks, use a naming convention for the blocks that enables them to be referred to using a name mask. For example, to run all blocks that start with “STATUS”, the mask would be STATUS*.
If the checkbox labeled “Allow needed variables used in the Block to be derived” is checked, “ALLOW_DERIVE” will be added to the command. In that case, if the Block being run in Forward Chaining uses a variable that has it’s value set in another Block, Corvid will attempt to derive the value of the variable through backward chaining. If the checkbox is not selected, and a variable is needed that does not have a value or some other way to obtain a value (e.g. database), then the variable will be directly asked of the user even if there is a way to derive it from another Logic Block. Running Command Blocks A Command Block can also call another Command Block. This is usually done within a conditional IF test in the called Command Block. The called Command Block will execute its commands and return to the next line in the calling Command Block when:
The called Command Block reaches the end of its command list
A RETURN command is executed in the called Command Block
The Command Block(s) to run can be specified 3 ways:
1. To run all Command Blocks in the system, click the “All Command Blocks” radio button. . The blocks will be executed in the order that they were added to the system. If the order of execution is important, it may be better to use multiple commands, one for each Command Block.
2. To run a specific Command Block, click the “Command Block” radio button and select the block to run from the drop down list.
3. To run a group of Command Blocks, use a naming convention for the blocks that enables them to be referred to using a name mask. For example, to run all blocks that start with “TEST”, the mask would be TEST*.

9: Working With Command Blocks 167
Reset Tab - Clearing Data and Blocks The Reset tab allows data or blocks to be cleared for reuse. This is usually only required in Command Blocks that use WHILE or FOR loops.
A variable that has its value set by either asking the user or testing all possible Logic Blocks and To Be tests, has a “final” value that can be used in other expressions, etc. If the value of a variable is dependent on other variables, and those variables can change value, the variable should be cleared and recalculated.
Likewise, once a Logic Block has been used, it will not be reused unless it is cleared and reset.
Note: MetaBlocks clear and reset the block for each row of the associated spreadsheet and have a list of variable to clear. These are defined in setting up the MetaBlock - not from a Command Block.
Clearing Variables Variables may be cleared individually or as a group.
Each of the types of variables in a system can be cleared as a group by clicking on the appropriate radio button. This would be most commonly done for either Confidence or Collection variables.
Clicking on the “Variable” radio button and selecting the variable from the drop down list can clear an individual variable.
A group of variables named so that they fit a mask pattern can be cleared by clicking on “Variable fitting the mask” radio button and entering the mask pattern to use.
It is also possible to clear only “old” data - that is data more than some specified number of seconds old. This would be used primarily in cases where the system was monitoring some real-time data stream. If it was felt that data more than 1 minute old should be refreshed, check the “Only variables with value more than __ seconds old” checkbox, and enter 60 in the edit field. This option must be used WITH one of the radio buttons that indicates which variables to clear. The time stamp for a variable is set when its value is set, not when the system started. (The age of a variable can also be accessed in greater precision using the .AGE property for variables.)
Clearing Blocks Blocks can be cleared to be reused. Either a single block or a group of blocks may be specified.
Selecting the appropriate radio button can clear all Logic or Command Blocks.
Clicking on the “Block” radio button and selecting the block from the drop down list can clear a single specific block. A group of blocks can be cleared if they have been named in a way that allows them to fit a mask pattern. Click on the “Blocks fitting the Mask” radio button and enter the mask pattern.
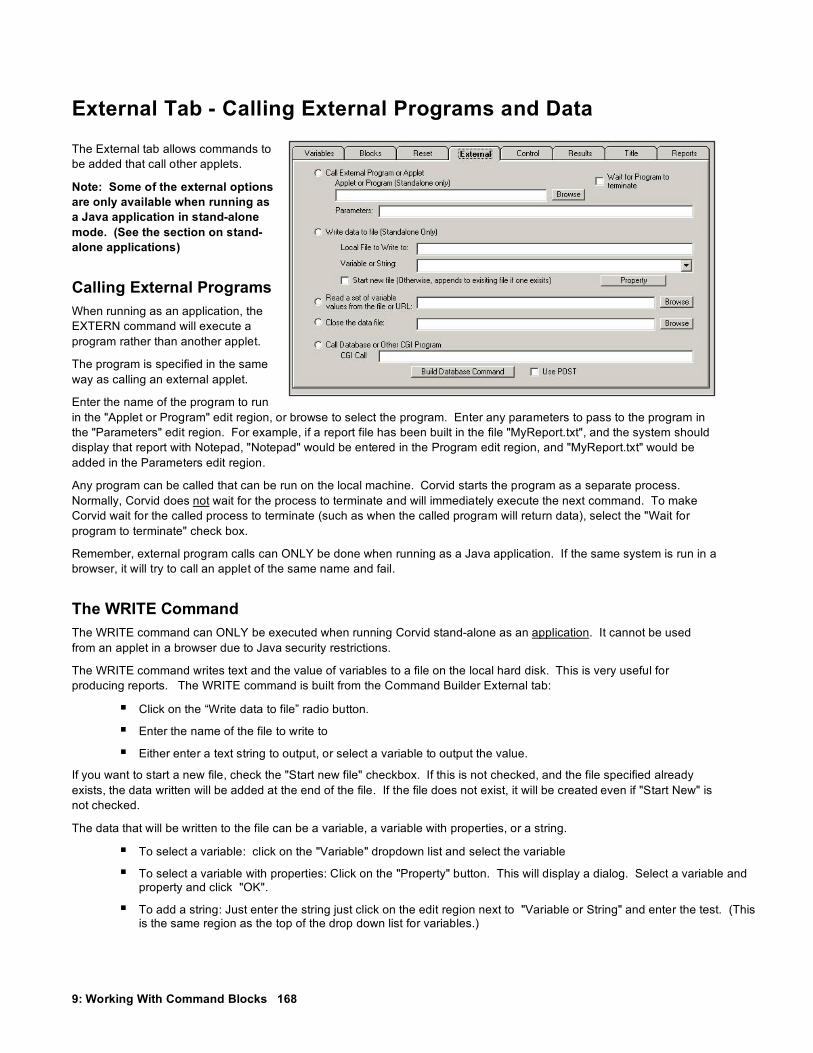
9: Working With Command Blocks 168
External Tab - Calling External Programs and Data
The External tab allows commands to be added that call other applets.
Note: Some of the external options are only available when running as a Java application in stand-alone mode. (See the section on stand-alone applications)
Calling External Programs When running as an application, the EXTERN command will execute a program rather than another applet.
The program is specified in the same way as calling an external applet.
Enter the name of the program to run in the "Applet or Program" edit region, or browse to select the program. Enter any parameters to pass to the program in the "Parameters" edit region. For example, if a report file has been built in the file "MyReport.txt", and the system should display that report with Notepad, "Notepad" would be entered in the Program edit region, and "MyReport.txt" would be added in the Parameters edit region.
Any program can be called that can be run on the local machine. Corvid starts the program as a separate process. Normally, Corvid does not wait for the process to terminate and will immediately execute the next command. To make Corvid wait for the called process to terminate (such as when the called program will return data), select the "Wait for program to terminate" check box.
Remember, external program calls can ONLY be done when running as a Java application. If the same system is run in a browser, it will try to call an applet of the same name and fail.
The WRITE Command The WRITE command can ONLY be executed when running Corvid stand-alone as an application. It cannot be used from an applet in a browser due to Java security restrictions.
The WRITE command writes text and the value of variables to a file on the local hard disk. This is very useful for producing reports. The WRITE command is built from the Command Builder External tab:
Click on the “Write data to file” radio button.
Enter the name of the file to write to
Either enter a text string to output, or select a variable to output the value.
If you want to start a new file, check the "Start new file" checkbox. If this is not checked, and the file specified already exists, the data written will be added at the end of the file. If the file does not exist, it will be created even if "Start New" is not checked.
The data that will be written to the file can be a variable, a variable with properties, or a string.
To select a variable: click on the "Variable" dropdown list and select the variable
To select a variable with properties: Click on the "Property" button. This will display a dialog. Select a variable and property and click "OK".
To add a string: Just enter the string just click on the edit region next to "Variable or String" and enter the test. (This is the same region as the top of the drop down list for variables.)
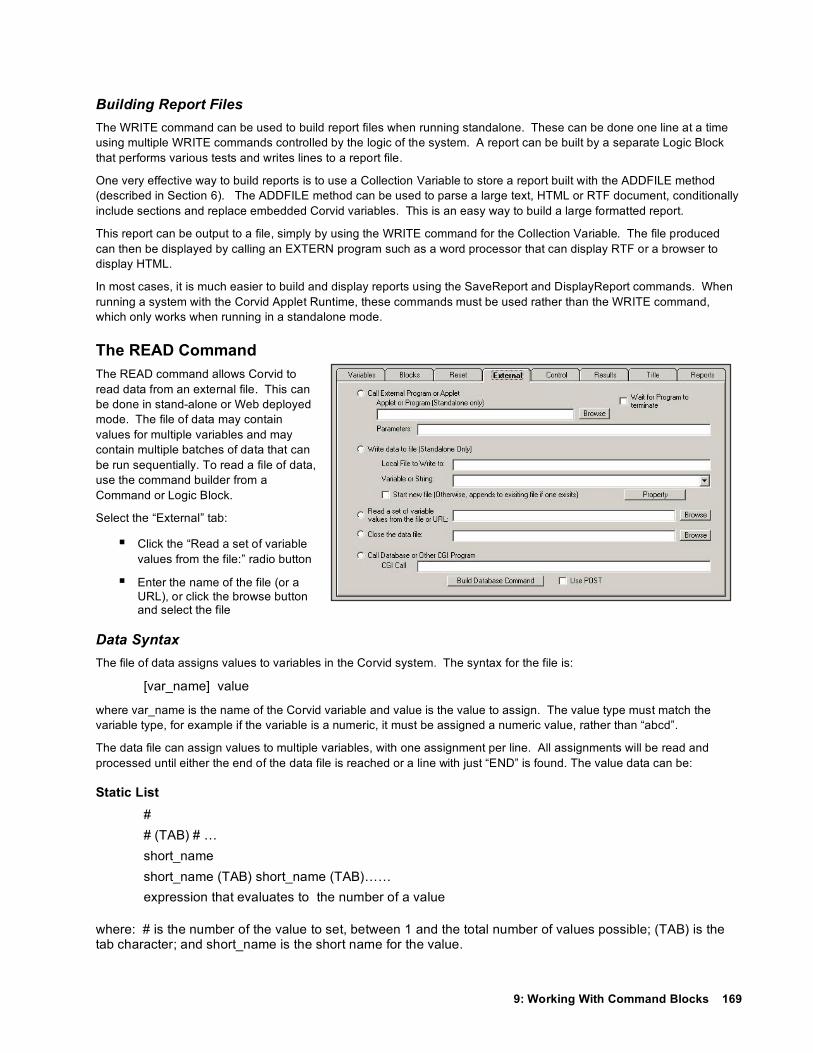
9: Working With Command Blocks 169
Building Report Files The WRITE command can be used to build report files when running standalone. These can be done one line at a time using multiple WRITE commands controlled by the logic of the system. A report can be built by a separate Logic Block that performs various tests and writes lines to a report file.
One very effective way to build reports is to use a Collection Variable to store a report built with the ADDFILE method (described in Section 6). The ADDFILE method can be used to parse a large text, HTML or RTF document, conditionally include sections and replace embedded Corvid variables. This is an easy way to build a large formatted report.
This report can be output to a file, simply by using the WRITE command for the Collection Variable. The file produced can then be displayed by calling an EXTERN program such as a word processor that can display RTF or a browser to display HTML.
In most cases, it is much easier to build and display reports using the SaveReport and DisplayReport commands. When running a system with the Corvid Applet Runtime, these commands must be used rather than the WRITE command, which only works when running in a standalone mode.
The READ Command The READ command allows Corvid to read data from an external file. This can be done in stand-alone or Web deployed mode. The file of data may contain values for multiple variables and may contain multiple batches of data that can be run sequentially. To read a file of data, use the command builder from a Command or Logic Block.
Select the “External” tab:
Click the “Read a set of variable values from the file:” radio button
Enter the name of the file (or a URL), or click the browse button and select the file
Data Syntax The file of data assigns values to variables in the Corvid system. The syntax for the file is:
[var_name] value
where var_name is the name of the Corvid variable and value is the value to assign. The value type must match the variable type, for example if the variable is a numeric, it must be assigned a numeric value, rather than “abcd”.
The data file can assign values to multiple variables, with one assignment per line. All assignments will be read and processed until either the end of the data file is reached or a line with just “END” is found. The value data can be:
Static List # # (TAB) # … short_name short_name (TAB) short_name (TAB)…… expression that evaluates to the number of a value
where: # is the number of the value to set, between 1 and the total number of values possible; (TAB) is the tab character; and short_name is the short name for the value.

9: Working With Command Blocks 170
Dynamic List # # (TAB) # … expression that evaluates to the number of a value
where: # is the number of the value to set, between 1 and the total number of values possible; and (TAB) is the tab character.
Numeric Number expression that evaluates to a number.
String String expression that evaluates to a string
Date String Expression that evaluates to a date string
Confidence Number or expression that evaluates to a number valid for the confidence mode
Collection String String (TAB) string (TAB) …. Multiple strings, one per line
where:(TAB) is the tab character
Multiple Batches of Data The data file can contain multiple batches of data. These batches must be separated by a line with “END” on it. When a READ command is executed, all lines in the file will be read until the end of the file, or an END command is reached. When an END command is encountered, the next READ command will start at the first line after the END command.
For example, if the file to read data from was:
[A] 1 [B] 5 END [A] 7 [B] 22 END
The first READ command would set [A] to 1 and [B] to 5. The commands after the READ command would then be executed. The next READ command would set [A] to 7 and [B] to 22.
There are several ways to work with files that have multiple batches of data. If there is always a fixed number of records, there can be a matching number of READ commands or a FOR loop can be used. If the number of batches of data in the file may vary, the best approach is to use a WHILE command.

9: Working With Command Blocks 171
The WHILE test expression can be a READ command. If the READ command successfully reads data from the file, it will return TRUE. If the READ command is unable to read additional data, due to reaching the end of the file, it will return FALSE. This enables the WHILE command to be a “While there is more data to read…”. For example, if you have a data file, input_data.dat, that may have multiple batches of data you can process the file with:
WHILE (READ “input_data.dat”) Commands to analyze the data Usually, commands to clear some variables // End Commands to execute after the full file is read
Note: Many systems will set the values of various variables during the processing of each set of data. Be sure to clear these variables before the next set of data is read.
Usually a READ is used in a WHILE or FOR loop to process the entire file with no additional user interaction. However, if a system may require user input when certain values are read from the READ file, the "Back" button should not be used. Any questions that could be asked in this way should have the "back" button disabled with the "No Back" option.
Note: In a WHILE (READ “filename”) command, the filename MUST be in quotes.
The CLOSE Command When the end of a READ input file is found, the file is closed. However, there may be other times that the file should be closed for other reasons, or to restart the input at the top of the file.
Selecting the CLOSE command can do this. On the Eternal tab, select the “Close the data file” radio button and enter the name of the file.
When this command is executed, the file will be closed. If there is a subsequent READ command for the same file, it will start with the FIRST batch of data in the file.
Unless there are READ commands with multiple batches of data, the CLOSE command should rarely be needed.
Calling Database or CGI Programs Database commands or calls to CGI programs can be made from the command block. For the details on this type of external command, see the “Interfacing to External Data” chapter.

9: Working With Command Blocks 172
Control Tab - Controlling the Flow of Execution The Control tab provides ways to control the flow of execution with GOTO and include/exclude blocks from backward chaining.
Return / Terminate The RETURN command will return from a Command Block that has been called by another Command Block with the EXEC command. When a called Command Block returns, the next line executed will be the line following the EXEC command.
If the Command Block has not been called by another block, RETURN will function the same as EXIT and terminate the run.
The Terminate (EXIT) command will terminate the run.
Allow / Exclude The ALLOW and EXCLUDE commands provide a way to limit the blocks used in backward chaining. In some cases, this is desired when deriving the value for a variable.
The default is for all Logic Blocks to be used to derive value in backward chaining. If some Logic Block should be excluded, click on “Exclude All” or the “Exclude Block” radio button and select the block to exclude. Any backward chaining will ignore the excluded blocks, until they are ALLOWed.
Note: Using “Exclude All” effectively disables backward chaining and will force variables to be derived only via To Be commands or asked.
To allow an excluded block to again be used, click on “Allow All” or the “Allow Block” radio button and select the block to allow.
Sleep Command Systems being run to monitor processes often are designed to run periodically (e.g. every 10 minutes) to check for certain conditions. If the system detects a problem, it performs some action, but normally the system determines there is no problem, waits a length of time and runs again.
To simplify this type of system, the SLEEP command has been added. The command is added from the "Control" tab of the Command Builder window. Simply select the "Sleep" radio button and enter the number of milliseconds to sleep for. The string entered can be a formula using Corvid variables. The formula can include Corvid variables. A formula is also convenient when specifying a longer time period by explicitly specifying hours, minutes, seconds and milliseconds. For example, to sleep for 2 hours, enter 2*60*60*1000.
When the system is "sleeping" it uses no processor resources. When the SLEEP command is executed, the system processing will stop for the specified time. At the end of the time, the commands following the SLEEP command will be executed.
The SLEEP command is a special purpose command that should rarely be needed except in process monitoring situations.

9: Working With Command Blocks 173
Special Commands There are a variety of “Special Commands” that can be used to perform actions or set options needed in some systems. Many of the special commands change the default way that the Exsys Corvid Runtimes work, so they should be used with care and only when required by a particular system.
Special Commands are added like any other Command Block command. Go to the “Control” tab. At the bottom of the window is a dropdown list of special commands.
Each command in the list has the command and a brief description of what the command does. Selecting a command and clicking the “?” button will display more information on that command. Some commands require additional parameters. If the selected command requires a parameter, a prompt for the parameter will be displayed, and the parameter can be added in the edit box.
Special Command: EMPTY_CELL=… This command specifies what value should be used for an empty cell in the data for a MetaBlock. Normally, the value of an empty cell is an empty string, " ", and the " " will be added wherever the MetaBlock parameter is embedded.
The EMPTY_CELL command is particularly useful in cases where the MetaBlock file is also used for other purposes, or comes from a database and is likely to have blank fields. The command allows setting a value for use as a MetaBlock that will make sense in the context of the expert system.
For example: If there are 3 columns in the MetaBlock (A, B and C) and the system should concatenate the 3 values together in a string variable [S]:
[S] = "{A}{B}{C}"
If the value of column A is 1 and C is 2, but B was blank, the value that would be assigned to [S] would be 1" "2 (which is illegal and would result in an error message)
If the intention was to have a blank cell taken as 0, then adding the special command at the start of the Command Block:
EMPTY_CELL=0
would cause the blank cells to be assigned 0 and [S] would be "102".
The value used for the EMPTY_CELL can be just the string following the =, or it can be a string in quotes " ". If the value to be set for the empty cell is a space, or has leading/trailing spaces, then it must be in " ".
For example: To have the blank cells replaced by a space, use:
EMPTY_CELL=" "
Special Command: NO_PARSE_ERRORS A variable name in double square brackets [[ ]] can be used to embed the value of the variable in other strings. Normally, if Corvid finds a [[ ]] expression that does not match a system variable or one of the special “variables” such as [[~input]], it will report an error.
Any occurrence of "[[ ]]" will cause Corvid to handle it as an embedded variable. In some cases, it is necessary to use files that have "[[ ]]" in them that are not associated with Corvid variables. This can happen when using a PDF document as a template to build a form.
9: Working With Command Blocks 174
Adding the command:
NO_PARSE_ERRORS
at the start of the Command Block, will cause Corvid to NOT report embedded [[ ]] that do not match variables as errors. Any embedded [[var]] that matches a variable will be replaced by the value of that variable. Any other [[ ]] that is found will not be modified.
This command should be used with caution since it turns off error reporting and any typo in a variable name that was intended to be embedded will also not be reported.
Special Command: NO_RESOURCE_CHECK Resource files use [< … >] to mark the text that is replaced by the resource file. All external files are checked for such links when they are read. If the “[<” is in the file for other syntactical reasons, such as binary data in a PDF or other file, the “[<” will be misinterpreted and will lead to an error.
Adding the command:
NO_RESOURCE_CHECK
at the start of the Command Block, will cause Corvid to NOT check for “[<” in the system.
Note: This command will disable using any resource file with the system.
Special Command: COMMENT: The COMMENT: command allows comments to be added to a Command Block. Select the command from the dropdown list and enter the comment to add. Comments are ignored when the system runs.
Special Command: ALLOW_TABS_IN_COLLECTIONS Normally when a string that contains tabs is added to a collection variable, the string is broken at the tabs and each item is added separately For example:
[coll.ADD] aaatabbbbtabccc
here tab is the tab character, would add 3 items to the collection: aaa, bbb and ccc.
However, in some cases, such as dynamically building a tab-delimited file, it is desired to leave the tabs in place and add only a single item to the collection. To do this, use the special command:
ALLOW_TABS_IN_COLLECTIONS=TRUE
Once this command is executed, whenever a string is added to a collection variable, it will retain the tabs. If the system later needs to have tabs handled in the standard way (breaking on the tabs and adding multiple items), use the special command:
ALLOW_TABS_IN_COLLECTIONS=FALSE
This will return Corvid to the default way of handling of tabs.
Special Command: QUIT_MB When a Logic Block uses a MetaBlock, it runs the rules against each row of the MetaBlock. Normally after all MetaBlock rows have been processed, the “best” options are selected based on their score. However, to terminate a MetaBlock without running every row, the command:
QUIT_MB

9: Working With Command Blocks 175
can be used. Unlike the other special commands, this would be a command used within the Logic Block, rather than in the Command Block. It could be used if one of the items in the MetaBlock received such a high score that there was no point in looking at the other options.
It can also be used when the MetaBlock is actually being used as a look-up table and it only needs to find the first match.
For example:
If: {PartNum} = [Part_Number] Then: [Part_Name] = "{PartName}" QUIT_MB
This would ask the user for a part number that would be stored in the variable [Part_Number]. This would be compared to the rows in the spreadsheet to find a matching value in the PartNum column. When the match is found, the string variable [Part_Name] is assigned the corresponding value from the PartName column. At this point the lookup has done all it needs to, so the QUIT_MB can be used to stop processing of subsequent rows.
Special Command: DO_NOT_LOOK_AHEAD In certain special cases when backward chaining Corvid v3.2 (and earlier), could ask a question that was not actually required. This could happen if a Static List Variable had its value set either by being asked or derived, and it was also used in other than the top node of a rule that was also used in backward chaining. If the value set for the variable made the node False, the nodes above the Static List node would still be tested, even though they were actually not needed.
For example, consider the two rules:
If: The color is Blue Then: ConfVar = 5
If:
The temperature is Hot AND: The color is Red Then: ConfVar = 8
If the system backward chains to set the value of Confidence variable ConfVar, the first rule will be tested. This will lead to asking the value of [Color]. If the user inputs “Blue”, the first rule will fire. The If nodes in the second rule will then be tested in order. This will lead to asking [Temperature]. However, since there is already enough information to know that the 2nd node is false, this question is not needed. The 2nd rule would not fire, and it would not change the results, but it would lead to an unnecessary question.
Corvid checks for this type of situation and will not ask the unnecessary question. In rare cases, this may change the way existing systems run, but the difference is to not ask an unnecessary questions. For virtually all systems this is the better option, but if a system relied on the earlier behavior to force questions to be asked in a particular order, and that behavior is preferred, the special command:
DO_NOT_LOOK_AHEAD
can be added to the command file to preserve earlier behavior.

9: Working With Command Blocks 176
Special Commands to Reduce Exsys Corvid Servlet Runtime Resources The Exsys Corvid Servlet Runtime maintains a session for each concurrent user of the system. If there are large numbers of users, or a system is running on a server with very limited resources, it can be desirable to reduce the resources used by each session. There are 2 special commands to do this. (Note: These commands have no effect on the Java applet runtime that uses client-side resources)
When the Servlet Runtime runs, it keeps track of the history of the session to use if the [var.HOW] property is called. Few systems actually use the .HOW property and in a large, complex system there can be a significant resource savings in not keeping the history data. If a system does not need .HOW, adding the special command:
DO_NOT_ALLOW_HOW
at the start of the Command Block will tell the runtime to not keep the history data.
If a session does not have any user activity (e.g. answering a question) for a certain amount of time, the servlet engine (Tomcat™, Websphere®, etc.) will terminate the session and free the session resources. Unfortunately, the servlet engine does not know when the user has finished, so the session can stay active for some time after the user is actually done. The default time is set by the servlet engine, but is often 30 minutes. This means that the session resources will not be released for that length of time. The time can be reduced by using the special command:
TERMINATE_IF_INACTIVE: #min
This can be set to a lower value (shorter length of time) to free up resources sooner for other system users. The value should be set to be long enough for a typical user to respond to any screen that requires a response. A final screen that presents results and does not require a response, will still remain displayed indefinitely, as that does not require additional session resources.
This command can also be used to immediately free resources before the display of the final results. This can be done by adding:
TERMINATE_IF_INACTIVE: 1
just before the final RESULTS command. Doing this will release the resources in 1 minute. After that, the user will not be able to go back into the session using the Back button on their browser.
Some servlet engines may support using TERMINATE_IF_INACTIVE: 0, before the final RESULTS commands, but behavior can be unpredictable and a value of 1 is recommended rather than 0.

9: Working With Command Blocks 177
Results Tab - Displaying Results and HTML Pages
The Results tab provides two ways to display the results of a system.
Default Results Screen All systems can have a default results screen. This is defined using Interface commands. These are listed in the “Display Default” edit box. The Interface commands are explained in the “Controlling the User Interface” chapter.
To use the default results screen, click the “Display Default Results Screen” radio button.
The default Results commands can also be edited from the “Set RESULTS Default” item under the “Windows” menu.
Using A Results Command File In addition to the default results screen, a file of interface commands can also be used. This file is created using the “New” and “Edit” button to call the interface Command builder.
To use a file of results commands, click on the “Display Results with File” radio button and enter the name of the file to use.
Note: When the system is run, this results file must be moved to the server and will be accessed via a URL.
HTML Page A HTML page can also be displayed. Enter the address of the page. The page will be displayed in a new Browser window.
System Done Message At the end of a run, if the starting Command Block ends with a results screen that does not include a “LastScreen” option, the system will automatically display a “System Done” message and a restart button. This prevents systems that simply end with a blank screen in the applet window.
To change this to your own screen,
1. Create a file and build a screen using the Screen Commands. This can either be the default results screen or screen commands in a separate file.
2. Include a “LastScreen” option for any text item on the screen or as a Display Command.
3. Display the screen as the last item in the Command Block.
It is also possible to change the screen that is displayed for the “System Done” message. Design a screen and store it in a file. Add the command “DONE_SCR=filename” anywhere in the Command Block. This command is not part of the Command Builder and would have to be added by directly typing it into the edit box in the Command Builder window.

9: Working With Command Blocks 178
Title Tab - Displaying a Title Screen The Title tab allows the Interface commands to be added that can be called to display a title at the start of a session.
All systems can have a title screen. This is defined using Interface commands. These are listed in the edit box. The Interface commands are explained in the “Controlling the User Interface” chapter.
To use the title screen, click the “Display System Title” radio button.
When this command is executed, the Interface Commands will be executed.
Report Tab - Building and Displaying Reports The security applied to Java applets does not allow them to write to the local (client) hard disk or printer. This prevents an applet from writing a report that can be printed. To solve this, Corvid writes the report back to the server and then displays it from there. This is allowed by Java security and is a very effective way to handle reports. A report can be allowed to be viewed by others when that is required.
The “Reports” tab on the command builder controls all report functions.
There are 2 main operations that must be done to see a report - building the report, and displaying the report. Both of these operations are done via CGI programs on the server. There is also an optional third operation to delete the report. This can be done from Corvid, or directly on the server.
Report Server Programs All of the report functions call programs on the server. There are two options - CGI programs or servlets.
If using the CGI approach the server must be configured to be able to run a Java application. That means that the Java Virtual Machine must be available. To check if this is available on your server, or to have it installed, contact your system administrator.
If using the servlet approach, the server must support Java servlets.
Either approach can be used and will produce the same reports, but the servlet approach is recommended for speed and efficiency.
The following instructions are for installing both approaches. Either can be used and ONLY ONE need be installed. If your systems do not use the report commands, it is not necessary to install either server program.

9: Working With Command Blocks 179
Installation of the CGI Report Program
1. Install Java on the server such that CGI programs can run it. If you do not have Java, it can be downloaded for free from 'http://java.sun.com'. The 'SDK' allows you to compile and run Java programs. The 'Runtime' only allows you to run Java programs (which is all you will need for Corvid.). When you install it, be sure to install it such that CGI programs can run it. In some Windows systems this means you must be logged in as 'Administrator' and install it for all users (or at least IUSER_...).
2. Put the 'CorvidReport.exe' file in the CGI folder on the server.
Note: The .exe files provided on the disk are for MS Windows. If your server is UNIX or Linux, compile the CorvidReport.c and CorvidDeBug.c files provided on the disk and use the executables produced in place of the CorvidReport.exe and CorvidDeBug.exe provided on the disk. In most UNIX systems, the .exe extension is not needed and should not be used.
The server has a special folder that holds the CGI programs. For IIS on Windows this folder is usually 'C:\Inetpub\Scripts' or 'C:\Inetpub\wwwroot\cgi-bin'. For Apache, it is usually a folder named 'cgi-bin'. The location of the folder is configurable so it could be anywhere. See the server's administrator for more information. You will put all the '.exe' files in the CGI folder.
3. Put the program 'CorvidDeBug.exe' in the CGI folder and run it from your browser by using either (depending on your server):
http://your_host/cgi-bin/CorvidDeBug.exe
or
http://your_host/Scripts/CorvidDeBug.exe
where "your_host" is the name of your sever. It will tell you the path to the 'CWD'. Put all the '.class' files and '.cfg' files in the 'CWD' folder.
Put the following files in the 'CWD' folder as indicated by 'CorvidDeBug.exe':
CorvidReportCgi.class
CorvidReportCore.class
For security reasons, it is best to then delete the CorvidDeBug.exe file from the server.
4. Create the 'CorvidJH.cfg' file in the 'CWD'. The 'CorvidJH.cfg' file specifies the location of the Java executable that you want to use. If 'java.exe' is in the path, then this file is not needed. The file line should be the full path to the Java executable including the file itself. For example, it could be:
C:\j2sdk1.4.1\bin\java.exe
An optional second line allows you to temporarily disable the CLASSPATH environment variable. This is needed only if you have more than one version of Java installed and the CLASSPATH is for the other version. To disable the CLASSPATH, the second line should be:
O=C
That is the letter O, not a zero. (Other options may be supported in the future.)
5. Create the 'CorvidReport.cfg' file in the 'CWD'. The first line of this text file is the location where the reports should be saved. For example it could be:
C:\reports
Notice it is the name of the folder and does not have end with "\" or "/".
6. Test it in your browser using the URL:
http://your_host/cgi-bin/CorvidReport.exe

9: Working With Command Blocks 180
Replace "your_host" with the registered name or IP address of your server and "cgi_bin" with the correct CGI folder name for your server (see step #2). If unsure of these, contact your system administrator.
This will return an error message "OP is missing" - this is OK. The error is because all parameters were not passed, but does indicate that the program is in the correct location.
7. When the test in step #6 works, you are ready to try it in your expert system. In a Command Block or a THEN command, open the 'Commands' window and select the 'Reports' tab. In the 'Program to Call' grouping, in the edit box type either (depending on which worked in step #3):
http://your_host/cgi-bin
or
http://your_host/Scripts
and select the 'Call via CGI program' radio button. Build the rest of the Save Report command. Make sure everything is the same in the 'Program to Call' grouping when you build the Display Report command and Delete Report commands.
Installation of the Servlet Report Program
1. Install a servlet engine, such as Tomcat, on the server if it is not already installed. You can use any servlet engine that supports '.war' files. Tomcat is available at 'http://jakarta.apache.org/tomcat/index.html'.
2. Put the 'CorvidRpt.war' file in the appropriate folder for the servlet engine and activate it. For example, in Tomcat you usually put the .war file in the 'webapps' folder before you start or restart Tomcat. (Check with your system administrator if unsure how to install .war files.)
3. The .war files will create a CorvidRpt folder when it is installed. Create a 'CorvidReport.cfg' file in the 'CorvidRpt' folder. The first line of this text file is the location where the reports should be saved. For example it could be:
C:\reports
Notice it is the name of the folder and does not have end with "\" or "/".
4. Test the installation. In your browser, go to the URL:
http://your_host:8080/CorvidRpt/corvidreportservlet
where "your_host" is the name of your server. Some systems do not require the "8080" - check with your system administrator for the syntax for calling servlets on your server.
You will see a form that can be used to test the installation.
In the 'Save Report' section:
a. Type the word "Exsys" in the 'code 1' slot b. Type "This is a report" in the 'report' slot c. Click the Submit button.
You will see a file name that starts with "Exsys" and ends in ".html".
Copy the filename to the clipboard by selecting it and clicking "Ctrl-C"
Click the browser's Back button to return to the form
In the 'Display Report' section:
a. Type "Exsys" into the 'code 1' slot b. Paste the file name you just copied into the 'code 2' slot c. Click the Submit button
You should see the sentence "This is a report". If you get an error message saying it could not find the 'CorvidReport.cfg' file, note the path to the file in the error message and put the 'CorvidReport.cfg' file at that location.

9: Working With Command Blocks 181
5. When the test in step #4 works, you are ready to try it in your expert system. In a Command Block or a THEN command, open the 'Commands' window and select the 'Reports' tab. In the 'Program to Call' grouping, in the edit box enter:
http://your_host:8080/CorvidRpt/corvidreportservlet
and select the 'Call via servlet' radio button. Build the rest of the Save Report command. Make sure everything is the same in the 'Program to Call' grouping when you build the Display Report command and Delete Report commands.
Writing a Report File To write a report, select the Report tab and click the “Write and Save Report” radio button. You will need 2 Corvid variables to write a report - a Collection variable that contains the text of the report, and a string variable that will contain the identifier of the report file built on the server. Corvid will automatically build the full CGI command. The returned ID will automatically be saved in the string variable.
Collection Variable with the Report Text The text of the report is built in a Collection variable. This text can be built dynamically as the system runs or built from a template using the ADDFILE method. With ADDFILE, a template of the report can be built which has conditional inclusion of lines and embedded variables using [[ ]]. This can be a very convenient way to build the text of the report. The text itself can be normal text, HTML or RTF. Both HTML and RTF provide ways to add formatting to the report file.
When the “Write Report” command is called, the entire text of the Collection variable will be posted to the CGI program. This must occur in a short time, so the complete text of the report must be in the Collection variable before the “Write Report” command is called. To build a command, select the Collection variable to be written out from the “Write Collection Var” dropdown list.
String Variable to Save the ID The “Write Report” command will return an ID for the report file built on the server. This command will be stored in a String variable. This ID will be required to access and display the report from the server. Normally a special dedicated string variable should be used for this purpose. To build a command, select the String variable that will store the ID from the “Save ID in” dropdown list.
Access Limitation by IP Address When a report is built, the author can control who can later access the report. The default is to limit this to only the IP address that originated the report. This limits access to the report to the user that created it. In some cases, it is desirable to share a report among others, or to have an expert system that dynamically builds a Web page that can be accessed by anyone. This can be done by selecting the access level from the “Report can be accessed by” dropdown list. The options control how many numbers in the IP address must match. If the originator is selected, the IP must match exactly. An IP address is made up of #.#.#.# The # may be 1 to 3 digits. Each # is a group. The author can select how many groups must match. If an office has the same first 3 groups, it can be set to allow anyone in the office to access the report file.
Making Reports Timeout The report can be made to time out. The report will only be accessible by ANYONE (including the originator) for a certain number of minutes. This provides an additional level of security since the file cannot be accessed after the time limit. The time limit should be selected to be long enough to allow the user to finish with the data. This can be very effective if the expert system is using real-time data and the report conclusions may not be valid after some period of time.
When the time limit expires, the report will NOT be automatically deleted from the server. (To do that requires a server program that is periodically run to remove files more than a specific age.) Instead, if the Corvid display file command is called, the access will be refused the file will be deleted.
To add a time limit, enter a number of minutes in the “Timeout” edit box.

9: Working With Command Blocks 182
Limiting the Calling URL As an additional security feature, a limit can be applied to specify the URL making the call to display the report. This can prevent someone from calling a report that has no other access limitations from another Web page. To specify the URL, enter a URL in the “Limit access to only specific URL”.
Displaying a Report File Displaying a report is much easier than building it. All you need is the String variable that has the ID for the report. The report can be displayed in a new browser window or a named frame on the same page as the applet.
To display a report, click the “Display Saved Report” radio button. Select the string variable with the ID from the dropdown list. Select to display in a new browser window or frame.
Deleting a Report File It is not required to delete a report, but it can be a practical way to make sure the report is gone and the server is not getting full. Remember that once the report is gone, it cannot be displayed unless it is rebuilt.
To delete a report, click the “Delete Report File” radio button and select the string with the ID for the report from the dropdown list.
Building and Testing Reports in Development Mode The ability to generate HTML reports at the end of a system is a very powerful and useful capability in Corvid. However, report generation requires running CGI programs on a server. In many cases, the development environment may not be connected to the server. Having to move systems to a server for testing reports can make adding or enhancing a report capability difficult.
To solve this problem, it is now possible to run and test reports without server access. To do this:
1. Run in Application Mode.
The system will need to create temporary files on the local hard disk. Java applets cannot write to the local disk due to Java security restrictions. Because of this, it is necessary to run as a Java application. This will allow you to write to the hard disk. Once the system is completed, it will still be able to be run as an applet from the server, using the server programs for the reports.
To run as an application, go to the Properties window. Either select “Properties” under the “File” menu or click on the Properties icon on the tool bar:
In the Properties window, click the Test Run tab and select to run as an application. To run as an application, java.exe will have to been installed on the computer. Click on the “Select java.exe” button and browse to where java.exe is installed.
2. Select your Browser
The report file will typically be generated using HTML. It will need to be viewed in a browser window. Next to “Browser Program”, click the Browse button and select the browser program you would like to use to view the report. Note: the browser will not be used to run the system. Since it will be running as an application, it will not be run in a browser window.

9: Working With Command Blocks 183
IMPORTANT: When the Browser program is selected, the radio button “Specific Browser” will automatically be set. This is the option to run as an applet in a specific Browser program. Click the “Application” radio button to reselect it.
3. Build the Report
Build the report using the normal SaveReport commands. For the development environment, only the ID variable and Collection variable being output matter. However the CGI name and other parameters should be set to whatever they will be when the system is moved to the server. In this way, no changes should be needed to move the finished system to the server. When the system runs, Corvid will automatically detect that it is being run as an application and process the SaveReport command to build a temporary report file in the C:\Windows\temp directory on your computer.
If for some reason, your system does not have a C:\Windows\temp directory, or you wish to save the temporary report files in a different directory, add the command:
TempDir= dir
to the Command Block prior to the SaveReport command. This command should be added by typing it into the Command Builder edit box. The directory dir should end with a /. For example, to save the reports in myDir, use:
TempDir=C:/myDir/
4. Display the Report
Build the normal DisplayReport command with the Command Builder. Corvid will detect that the program is running as an application and display the file created in step #3 based on the ID variable that contains the report file name. The report will be displayed in a browser window, using the browser program that was specified.
5. Moving to the Server
Once the report capability is working as desired, open the Properties window and click the “Default Corvid window” or “Specific Browser” radio button to switch back to applet mode. The system can then be moved to the server. (See the Corvid manual for details on running Corvid’s server-side programs for report display.)
The “Delete report” command is ignored in the Development environment, so the report files will need to be manually deleted occasionally. They will have names of CorvidRpt#####, where #### is a long number to make the file name unique. They will be in the C:\windows\temp directory, unless the TempDir= command was used.
Moving and Editing Nodes - Selecting Nodes A node can be selected by the following actions:
Left Click Selects the node and deselects all other nodes
Shift – Left Click Selects the node and all its subnodes
Ctrl – Left Click Selects the node without deselecting other nodes. If the node is already selected, it is deselected.
Shift – Ctrl – Left Click Selects the node and all its subnodes without deselecting other nodes.
Right Click Selects the node and deselects all other nodes. Displays a popup menu allowing easy access to the editing options available.
Shift Right Click Selects the node and all its parent nodes.

9: Working With Command Blocks 184
Command Block Controls The nodes in a Command Block can be edited and moved with the buttons on the control bar:
Delete Deletes all selected nodes. This operation deletes all selected nodes and their subnodes. If the subnodes are to be saved, first copy them, select the parent node and use delete.
Cut Deletes all selected nodes and subnodes. The deleted nodes are saved for pasting.
Copy Saves a copy of the selected nodes for pasting.
Paste Below Pastes any saved nodes under the selected node, at the same level in the tree.
Paste Above Pastes any saved nodes above the selected node, at the same level in the tree.
Paste Indented Pastes any saved nodes indented below the selected node. This can only be used to paste nodes under an loop control (IF, While, FOR)
Undo Moves back one step in the tree editing.
Redo Redo the last step that was removed via Undo. This can only be done once to reset one level of Undo.
Expand/Compress Expands all compressed nodes, or if already expanded, compresses all nodes. Individual nodes can be expanded or compressed by clicking on the small + or - boxes at the left of the node.
Controlling Tree Display The menu items under “Display” control the display of a Command Block.
Font Larger Makes the font used to display the tree two points size larger.
Font Smaller Makes the font used to display the tree two points size smaller.
Indent Larger Increases the amount that subnodes are indented from their parent node. Increasing the indent level can make the tree easier to read, but allows fewer levels to be displayed without scrolling.
Indent Smaller Decreases the amount that subnodes are indented from their parent node.
Single Selection Sets the tree to a mode where only one item in a group will be expanded at a time. In this mode, if there are 3 branches, each with subnodes, and the first branch is expanded to be worked on - expanding the second branch would automatically compress the first branch.
This can be useful for large trees since it automatically closes the sections not being worked on. Some users find this very convenient, others find it quite distracting. It can be turned on or off by selecting the menu item.

10: Controlling the User Interface 185
10: Controlling the User Interface
Where Interface Commands Can Be Used The Corvid Runtime program communicates with the end user to display the system title, ask questions and display messages or results. Corvid provides a set of Interface commands that allow text and graphics to be formatted and included in these displays. The Interface Commands also support ways to link text and graphics to other URLs and HTML pages. The Interface commands used in all these cases are the same.
Corvid Servlet Runtime This chapter covers the ways to build user interfaces for the Corvid Applet Runtime. An alternative is to use the Corvid Servlet Runtime. The servlet approach uses HTML and templates to define the user interface. This opens up many additional design possibilities. For the details of using the Corvid Servlet Runtime, see section 17.
Title The system title screen is defined by a set of Interface commands. These are entered in the Command Builder window under the “Title” tab and displayed when the TITLE command is executed in a Command Block.
To enter Interface Commands for the Title, click on the “Edit” button.
Asking Questions Most of the parameters for how questions are asked are set in the window for editing questions:
The “Use” part of the dialog is for defining what control to use to ask the question - checkbox, radio button, etc.
The section labeled “Other Graphics” allows Interface Commands to be added that will be displayed before or after the actual question controls. This allows information or graphics to be added to the question. These will be displayed any time the question is asked, including being asked due to an “Also Ask” list from another variable.
To add Interface commands which are used before the question:
1. Click the “Before” radio button.
2. Any existing interface commands to use before the question will be displayed.
3. Click the “Edit” button to change the interface commands.

10: Controlling the User Interface 186
To add Interface commands that are used after the question:
1. Click the “After” radio button.
2. Any existing interface commands to use after the question will be displayed.
3. Click the “Edit” button to change the interface commands.
The “Prompt Format” and “Value Format” edit fields allow the formatting of the text used in the question. These formats are the same as the formats used for text in the Interface Commands.
Results The results commands are entered from the Command Builder window:
The Interface Commands for the Default Results screen are displayed in the edit box. To change these, click the “Edit” Button. If the Default Results screen has no commands, the command “Variables” will be used which displays all variables that had their value set.
Alternate results screens can also be created and stored in a file. This file should be in the same directory as the knowledge base. To edit these, select the file can click the “Edit” button at the bottom of the screen.
In addition, the default RESULT commands can also be set directly by selecting “Set RESULT Default” from the main “Windows” menu.
The Interface Command Builder Interface commands are built in the Interface Command building window.
The list of commands being edited is displayed in the top list. To edit an individual command:
Double click on the command in the list and it will be copied to the editing box. Alternatively, click on the command and then click on the “Edit” button. (The Command can be directly edited in the edit box, but this requires knowledge of the syntax. It is better to edit with the other controls on the window.)
Once the command is edited, you have three options:
Click on “Replace” to replace the selected command in the list with the new command.
Click “Add” to add the new command before the selected command in the list
Click “Add Last” to add the new command to the end of the list.
To delete a command in the list, select the command and click “Delete”.

10: Controlling the User Interface 187
The Format button that allows you to directly change the format associated with text, images or variables in a single step. Simply select the line you wish to format, click the Format button, make the change and click OK. This makes it faster and easier to design screens especially when several lines require the same format.
There are 5 main types of Interface Commands that can be entered:
Variables displays some information on a variable, or use the variable to control display of other information
Image displays a JPG or GIF image
Text displays text with formatting
File displays the text in a file
Color controls the background color
Each of these types of commands has options that are controlled by the tabbed dialog in the lower right. Some of the options apply only to one type of command. This is especially true of variables.
Moving Applet Screen Commands The order of screen commands for an applet screen can be quickly changed. Click a command to select it and then click the "Up" or "Down" buttons to move it in the list.
Text Display A specific text string is added to the display window with a specified format.
To add the text:
1. Click the “Text” radio button
2. Enter the text to display in the associated edit box
3. Click on the “Format” tab and select how to format the text
4. If you wish to have this text link to another URL or HTML page, click on the “Link” tab and enter the link. (A link can also be incorporated into the text itself by using an HREF.)
5. Click on the “Add”, or “Add Last” button to add the command to the list.

10: Controlling the User Interface 188
Formatting Text All of the display Interface Commands can have associated format commands. These are set in the Format dialog window.
Font This sets the font style and size seen on the Browser at runtime. The styles in the list are those supported portably by Java. These will display appropriately when run using the Corvid Java Runtime on any operating system.
Color The foreground and background color for text can be set by either entering the RGB value in the edit box or clicking on the “Choose” button to select a color using the standard Windows color chooser dialog. The color selected is displayed as a small square to the left of the “Choose” button.
Position Screen items can be aligned on the left, right or center of the screen.
Text Width Text can be wrapped at any width. Enter the number of pixels to wrap in the edit box. If the WIDTH value is greater than the text or image width, the text or image will be padded with spaces out to the specified WIDTH value.
Control Width This option only applies when formatting an edit control to ask a question. It sets the width of an edit field.
Indent Indents the text or graphic the specified number of characters
Show only Top N Items This option is used only when displaying Collection Variables and allows displaying on the top N items in the list rather than the entire list.
Text Area Box The text area options are a way to control the display of what may be a large amount of text. It creates a box of a specified size. The specified text is put in that box with horizontal and vertical scroll bars as needed. The text must be plain text without any formatting commands or links.
Defaults There are overall Corvid defaults for all of the format parameters. Clicking the “Reload Corvid Default” button can reset these defaults. In addition, if a set of parameter values is chosen for the specific knowledge base, these can be saved by clicking on the “Make KB Default” button, and reloaded later by clicking on the “Load KB Default” button.
Buttons Most windows have 3 control buttons - OK, Back and Restart . The “Back” button allows the user to go back to a previous question. “Restart” takes the user back to the beginning of a run. By default, the “Back” and “Restart” buttons appear on all screens except the first.
To NOT have a “Back” button on a screen select the “No BACK Button” check box for any text on the screen. The main time this should be done is for questions asked during the running of a MetaBlock after spreadsheet rows have been processed.

10: Controlling the User Interface 189
To not have a “Restart” button on a screen select the “No RESTART Button” check box for any text on the screen.
The last screen in a system is usually a display of results. By default this will have an “OK” button, but there is nowhere else for the system to go. In these cases, use the “Last Screen (No OK)” check box. This will convert the “OK” button into the “Restart” button and give the user the opportunity to rerun the system. (This can also be used if there is a screen that indicates that the user should, or can, continue with the system.)
Example
Images and Links in Text In addition to the normal text in a “text” Interface command, there are several HTML commands that can also be included in any text to embed graphics and links into the text string.
<A HREF=”link”>text</A>
<IMG SRC=”image”>
<A HREF=”link”><IMG SRC=”image”></A>
These commands behave just as they do in HTML. These commands are not supported when running standalone as a Java application since the program cannot make calls back to the browser.
Note: Other optional parameters that are supported for these commands in HTML are NOT supported in the Corvid Runtime applet.
These commands can also be used in other text in the system such as the prompts for questions.
Text Link Using:
<A HREF=”link”>text</A>
in the text below will highlight the text section. A click on that text will display a new browser window displaying the URL link.
For example, if the text is:
The recommended product is the <A HREF= ”http://www.mysite.com/products/X123.html”> X123 </A>. It would meet your requirements very well.
This would be displayed as:
The recommended product is the X123. It would meet your requirements very well.
A click on “X123” would bring up a browser window displaying the URL.

10: Controlling the User Interface 190
Changing Hypertext Link Color When a section of text is marked as an HTML link, the default way that Corvid displays it is to make the text blue with a white background. For some color schemes and designs, it is better to change this to another combination of colors. To do this the commands:
Hypertext_color= RBG_color
Hypertext_bg_color= RBG_color
allow the foreground text and background colors to be changed. These should be added to the Command block somewhere before the screens using the links are displayed. The RGB_Color is the standard red, blue and green values separated by commas.
For example:
Hypertext_color=255,0,0
Hypertext_bg_color=128,128,128
would display the links as red text on a gray background.
The hypertext color commands apply until another “Hypertext_color” command is encountered. A system can change the colors as often as needed.
The HYPERTEXT_COLOR commands can be built from the “Special Command” menu on the “Control” tab of the Command builder.
Embedding Graphics Using:
<IMG SRC=”image”>
allows a graphics image to be included in the text. The image should be a jpg image. This can be very useful in building the text for Collection variables in MetaBlocks. Collection variables can only accept text strings, but if the string is an IMG SRC command, it will display as an image in the results screen. This is also an alternate way to use images to ask questions by using an IMG SRC in the prompt for the variable. (There is also an easier way to do this just by specifying that an image should be used for the prompt.)
For example, the text:
<IMG SRC=”pictures/X123.jpg”> The X123 would be a good choice would display the pictures of the X123 followed by the text “The X123 would be a good choice”.
Positioning an IMG SRC Command at the Start of a String If a string starts with an IMG SRC command, Corvid will display the image to the left of the text. The "ImagePos=" format command allows the image to be placed in other locations. The default is to have the image to the left of the text. This is ImagePos=W (Image is west of the text). Options are ImagePos=N (Image is north, above, text) and ImagePos=E (Image is east, left, of text).

10: Controlling the User Interface 191
Embedding Graphics with Links Using:
<A HREF=”link”><IMG SRC=”image”></A>
displays a graphics image and links to a URL if the user clicks on the image.
For example:
<A HREF= ”products/X123.html”> <IMG SRC=”pictures/X123.jpg”> </A>.
The X123 would meet your requirements very well.
would display a picture of the X123 product followed by the text “The X123 would meet your requirements very well.”. A click on the picture would start a new browser window displaying the URL.
Using FRAMES to Display Information Exsys Corvid provides a variety of ways to have links display an HTML page. This can be done via HREF commands in strings, image maps, and links assigned to a control. Normally, when a link is clicked on, it will open a new browser window to display the associated page. It is now possible to display the linked HTML page in a named frame on the same page as the applet. This allows explanatory information to appear on the same page as the applet itself. This enables some powerful design options. To use frames in this way:
1. Create a top-level page that defines at least 2 frames on a page - one for the applet to run in and one (or more) to display information and links.
This can be as simple as:
<html> <FRAMESET cols="50%,50%"> <FRAME SRC="kb_name.html"> <FRAME SRC="References.html" name="myRefs"> </FRAMESET> </html>
In this example, the frame running the applet is the one that contains kb_name.html, where kb_name is the name of the system. In this way, as you change the parameters for the runtime execution, Corvid will automatically rebuild the new kb_name.html that will be run in the frame. The second frame can display any HTML file, but must be given a name using "name=". This is the name that will be used to refer to the frame in the Corvid commands. The initial HTML page assigned to this frame (in this case, References.html) will be displayed when the system loads.
This top-level frame page should be given a name. This can be anything except kb_name.html. A convenient name to use is kb_name_FRM.HTML.
2. In the Properties page, select the "Test Run" tab and enter the frame HTML page to run as the "Specific URL".
Corvid will still rebuild the kb_name.HTML page for each run, but will load the frame layout page specified. (This page loads kb_name.HTML in its top frame.)
3. When adding links in the system, they can be displayed in a new browser window, or the named frame. Links always specify the URL for the page to link to. If a comma and the name of a frame follow the link URL, the URL will be displayed in the frame. For example:
A link of "details.html" would be displayed in a new browser window. A link of "details.html, myRefs" would be displayed in the myRefs frame on the same page.
The frame can be specified in links built for controls, image maps and HREF commands.

10: Controlling the User Interface 192
For example, an HREF to display details in the frame might be:
<A HREF=”details.html, myRefs”>References</A>
there can be multiple frames on the page. Provided that each frame has a name, HTML pages can be displayed in it.
Note: Do not display a link in the frame that has the Corvid applet in it.
Once an HTML page is displayed in a frame, links FROM that page will also be displayed in the same frame. (There are ways to display the links from one frame in another frame using Java Script.)
Writing to Frames when a Question is Asked A frame can be used to display additional information about a variable being asked. When the question is displayed in the applet, other frames automatically display the additional details or pictures that might be needed to answer the question. This is a convenient way to display information that some users may need without requiring that the user click a link to ask for "More information".
To do this: Select the variable from the Variables dialog
window. Click on the "Ask With" tab Click the "Edit" button in "Other Graphics".
These can be either "Before" or "After" and can be added to any other commands already there.
This will display the Screen Command builder. Select the "Display HTML" radio button.
Enter the URL of the page to display or click "Browse" and select it. Enter the name of the frame to display the URL in. If no frame is specified, the URL will be displayed in a new browser window - depending on the design, this may be a better option in some cases.
Click the "Add" button to add the "DISPLAY_HTML" command to the list. If there are other commands, it does not matter where the DISPLAY_HTML command goes since it does not affect the other commands. Then click "OK" to add the command to the variable's list of other graphics commands.
When the variable is displayed, the "Other graphics commands" will be executed. The DISPLAY_HTML command will not effect how the applet asks the questions, but will display the requested HTML page in a frame (or a new browser window).
NOTE: The DISPLAY_HTML page can also be used in the same way anywhere screens commands are used - title, results, questions, displayed command file, etc. The DISPLAY_HTML command will immediately display the specified page in a new browser window or frame.
Displaying HTML Pages from an Application When running the Corvid Runtime as a Java Application (not applet), it was not possible to display an HTML page using DISPLAY_HTML or links in text. (It was possible to specifically call a browser program, with a URL, but this made the system run differently when run in Applet and Application modes.)
The command: USE_EXT_BROWSER= file Causes the specified browser program to be used to display pages when running as an application. Any URL from a DISPLAY_HTML or HREF link associated with text or an image will cause the URL to be displayed using the specified browser program – even if the system is not being run online.

10: Controlling the User Interface 193
The browser program name should be a full path either from the root, or relative to the local directory of the system. This command has no effect when running as an applet.
The command should be added to the Command block somewhere prior to the display of the page or command that uses the link.
The USE_EXT_BROWSER command can be built from the “Special Command” menu on the “Control” tab of the Command builder.
Edit Fields for Passwords Edit fields that are used to ask for passwords can be set to echo back only asterisks rather than the actual password. To do this, create a screen to ask for the value of a string variable that will hold the password. Go to the "Ask With" tab for that variable and in the "Value Format" edit box enter PASSWORD.
If there are other value format commands replace them with "PASSWORD".
When the variable is asked, the edit box will echo ****** as the user types their input.
Button Controls The commands that control if Undo and Restart buttons are added to a screen are built from the main Display Command Builder window.
To add a command to a screen from the Display Command builder:
Select the Buttons radio button. Select the appropriate command from the dropdown list.
No Undo Button - The screen will not include an UNDO button.
No Restart Button - The screen will not include a RESTART button.
Last Screen - The screen will not include an OK button, and instead will have a RESTART button centered in the screen. This is intended for the last screen in the system where the user’s only option is to RESTART.
One Line - Displays the OK, UNDO and RESTART buttons in a single line.
Align Left - Displays all the buttons on the left side of the screen. (The "Align Left" cannot be used in conjunction with the "Same Line" option.)
More than one button command can be added to a screen. A button command anywhere on a screen affects the entire screen. Button commands can be used in headers or footers to apply to all questions in the system.
The Button options from the Format window are still supported and can still be used.
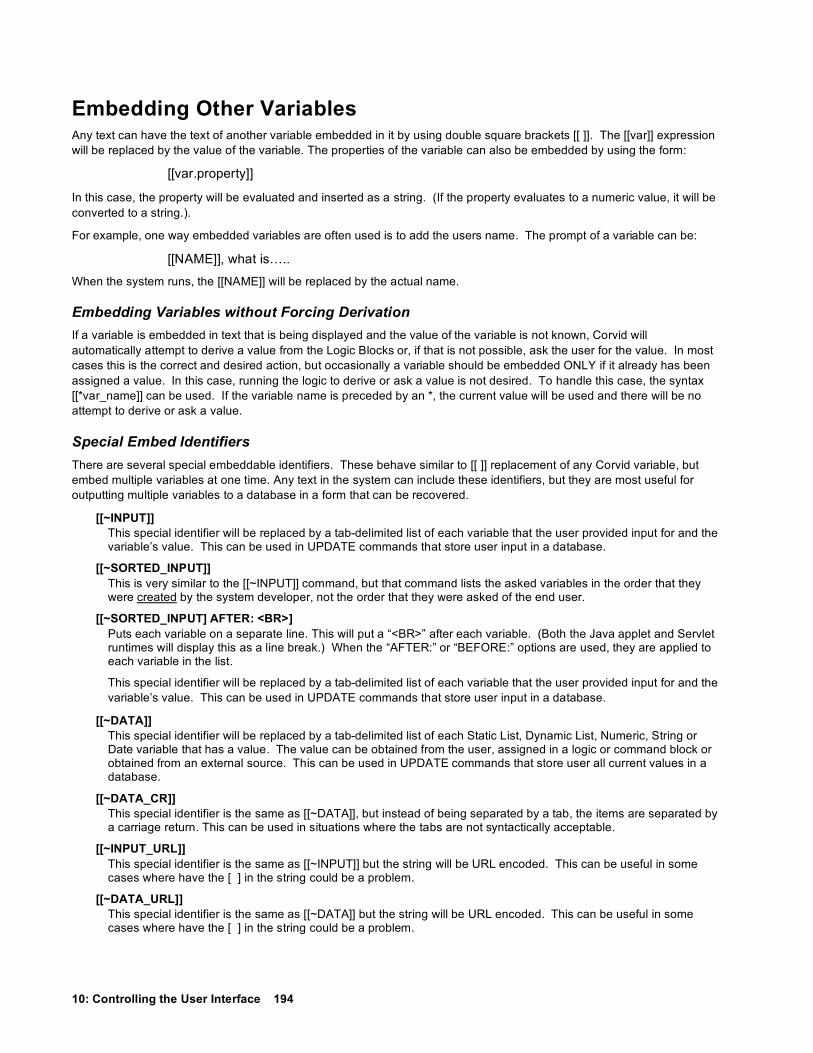
10: Controlling the User Interface 194
Embedding Other Variables Any text can have the text of another variable embedded in it by using double square brackets [[ ]]. The [[var]] expression will be replaced by the value of the variable. The properties of the variable can also be embedded by using the form:
[[var.property]]
In this case, the property will be evaluated and inserted as a string. (If the property evaluates to a numeric value, it will be converted to a string.).
For example, one way embedded variables are often used is to add the users name. The prompt of a variable can be:
[[NAME]], what is…..
When the system runs, the [[NAME]] will be replaced by the actual name.
Embedding Variables without Forcing Derivation If a variable is embedded in text that is being displayed and the value of the variable is not known, Corvid will automatically attempt to derive a value from the Logic Blocks or, if that is not possible, ask the user for the value. In most cases this is the correct and desired action, but occasionally a variable should be embedded ONLY if it already has been assigned a value. In this case, running the logic to derive or ask a value is not desired. To handle this case, the syntax [[*var_name]] can be used. If the variable name is preceded by an *, the current value will be used and there will be no attempt to derive or ask a value.
Special Embed Identifiers There are several special embeddable identifiers. These behave similar to [[ ]] replacement of any Corvid variable, but embed multiple variables at one time. Any text in the system can include these identifiers, but they are most useful for outputting multiple variables to a database in a form that can be recovered.
[[~INPUT]] This special identifier will be replaced by a tab-delimited list of each variable that the user provided input for and the variable’s value. This can be used in UPDATE commands that store user input in a database.
[[~SORTED_INPUT]] This is very similar to the [[~INPUT]] command, but that command lists the asked variables in the order that they were created by the system developer, not the order that they were asked of the end user.
[[~SORTED_INPUT] AFTER: <BR>] Puts each variable on a separate line. This will put a “<BR>” after each variable. (Both the Java applet and Servlet runtimes will display this as a line break.) When the “AFTER:” or “BEFORE:” options are used, they are applied to each variable in the list.
This special identifier will be replaced by a tab-delimited list of each variable that the user provided input for and the variable’s value. This can be used in UPDATE commands that store user input in a database.
[[~DATA]] This special identifier will be replaced by a tab-delimited list of each Static List, Dynamic List, Numeric, String or Date variable that has a value. The value can be obtained from the user, assigned in a logic or command block or obtained from an external source. This can be used in UPDATE commands that store user all current values in a database.
[[~DATA_CR]] This special identifier is the same as [[~DATA]], but instead of being separated by a tab, the items are separated by a carriage return. This can be used in situations where the tabs are not syntactically acceptable.
[[~INPUT_URL]] This special identifier is the same as [[~INPUT]] but the string will be URL encoded. This can be useful in some cases where have the [ ] in the string could be a problem.
[[~DATA_URL]] This special identifier is the same as [[~DATA]] but the string will be URL encoded. This can be useful in some cases where have the [ ] in the string could be a problem.

10: Controlling the User Interface 195
For example, if a system has asked the values for numeric variables [X] and [Y], which the user has assigned values of 5 and 9 respectively. The command:
SET [S] “[[~INPUT]]”
would assign the string variable [S] the string “[X] 5 tab [Y] 9”. This could be used in a database call to store the data.
Additional Text for [[ ]] When building complex reports, it is sometimes necessary to have additional text added when a variable is embedded to control lines, format etc. However, if the variable was not set by the system and has no value, the additional text should not be added.
For example, suppose that there are 3 variables that each might have been set by a system [X], [Y] and [Z], and the ones that have a value are to be displayed in a HTML page with one item per line.
If the report contained:
[[X]]<BR>[[Y]]<BR>[[Z]]<BR>
this would work as long as all 3 variables have a value. If one did NOT have a value, the [[X]] would not be used but the <BR> would still be included. This would result in extra blank lines.
To handle this situation, Corvid supports several options for [[ ]].
[[var]str] [[var]str] will be replaced by the value of variable var followed by the text of string str. If var has no value, str will not be added. To handle the case above, use:
[[X]<BR>][[Y]<BR>][[Z]<BR>]
This will add the <BR> after each variable that has a value, but not include a <BR> when the variable has no value.
[[var]BEFORE:str] [[var]BEFORE:str] will be replaced by the value of variable var preceded by the text of string str. If var has no value, str will not be added.
[[var]BEFORE:str AFTER:str2] [[var]BEFORE:str AFTER:str2] will be replaced by the value of var preceded by the text of string str and followed by the text of string str2. If var has no value, str and str2 will not be added.
[[var]AFTER:str] [[var]AFTER:str] is legal syntax, but the same as [[var] str]. Note: INPUT] AFTER: ___] will only insert the “AFTER” string specified. If you want a tab inserted, it must be added to the “AFTER” string as “\t” (e.g [[INPUT] AFTER: <BR>\t] )
Just [[~INPUT]] with no “AFTER” command will separate the variable/value pairs with a tab.
These [[ ]] options can be used in any text where the previous [[ ]] could be used. In all cases, the var portion can include a property. For example: [[X.VALUE] BEFORE: <BR>]
Adding < and > in BEFORE: and AFTER:
Embedded variables using the BEFORE: and AFTER: options to add text to the variable, can use < and > for the < and > symbols. For example:
[[~SORTED_INPUT] AFTER: <BR>]
is equivalent to: [[~SORTED_INPUT] AFTER: <BR>] The < and > characters can still be used. Using < and > makes it easier to work with some HTML editors, to edit templates that have embedded Corvid variables.

10: Controlling the User Interface 196
Checking How Many Confidence Variables are Over a Threshold Value When building reports that display Confidence variables, it can be very useful to know how many variables were set to a value over a certain threshold. This can also be used to make sure that at least one Confidence variable was set and will be displayed. The special embedded variable:
[[~NumConfOver x]]
where X is the threshold value will return the number of confidence variables that have a value greater than the threshold. (Note: This is “greater than” not “greater than or equal to”. Values equal to X will not be counted.)
If no Confidence variables are over the threshold, the [[~NumConfOver x]] will be replaced by “0”. Otherwise it will be replace by the integer number of values over the threshold. This variable can be included in any expression, or other place where it would be legal to have the [[~NumConfOver x]] replaced by an integer value.
Embedding information on Java system properties Java has many “system properties” that provide information on the user’s configuration, OS, language etc. A special embeddable command allows you to automatically obtain this information when needed.
[[~SYSPROP java_system_property_name]]
java_system_property_name = The name of a java property
[[~SYSPROP java_system_property_name]] will embed the string for that operating system property. Some system properties may not be available when running as an applet because the Security Manager will not allow it.
For example:
To write the contents of the collection variable [NOTES] into a notes.txt file on the users home directory (i.e. MyDocuments) use:
WRITE [[~SYSPROP user.home]][[~SYSPROP file.separator]]notes.txt [NOTES]
You could also have the Applet determine the user’s default language and set a value for the Alternate Prompt Key Variable
IF “[[~SYSPROP user.language]]” = “en” THEN [Alternate_prompt_key]=1
IF “[[~SYSPROP user.language]]” = “fr” THEN [Alternate_prompt_key]=2 Some of the more common useful system properties are:
Key Meaning file.separator File separator (for example, "/") java.class.version Java class version number java.home Java installation directory java.vendor Java vendor-specific string java.vendor.url Java vendor URL java.version Java version number line.separator Line separator os.arch Operating system architecture os.name Operating system name os.version Operating system version path.separator Path separator (for example, ":") user.dir User's current working directory user.home User’s home directory user.language User’s language setting

10: Controlling the User Interface 197
Variable Display There are many special options for displaying the values of variables. In addition, the formatting options available for text, also apply when displaying variable values.
To display the value of a variable or group of variables, first select the “Variables” radio button on the Interface command builder.
To select a group of variable(s) to display:
1. Click on the drop down list.
2. The first items in the list are the overall types of variables in the system: “Collection”, Confidence”, “Numeric” etc. In addition, the first item is “Variable” which means all variables in the system.
3. Once a group of variables is selected, it can be made more specific by other optional commands.
To select a single variable, either
1. Enter the name of the variable.
2. Click on the drop down list, go past the overall groups to the list of specific variables and select the desired one.
3. Click on the “Prop” button and select the desired variable.
To select a variable and a property:
1. Click on the “Prop” button
2. Select a variable and property
3. Click “OK”.
Note: An overall property to use can also be added to a single or group of variables using other commands.
Display Tab The Display tab provides ways to control when and how a variable will be displayed. Multiple options may be used simultaneously.
Value Test The display can be set to include only variables that past a Boolean test of the value. This applies ONLY to numeric and Confidence variables. Either a specific Numeric or Confidence variable must have been selected, or the overall group “Numeric” or “Confidence” must be selected.
To enter a test, enter a Boolean expression that includes “#” where the name of the variable should be. The “#” will be replaced with the variable’s name and the expression will be evaluated. If the test is true, the variable will be displayed. If it is false, the variable will not be displayed.
For example: If only confidence variables that received a value greater than 50 should be displayed:
1. Select the group “Confidence” for the variable
2. Enter “[#] > 50” for the test
The test expression can include properties. Just use the [#.property] in the expression. For example, to select only Static List variables that have 2 or more values selected, use [#.COUNT] >= 2.

10: Controlling the User Interface 198
Final Results Flag A quick way of grouping variables to display is to use the “Display with Final Results” flag. This is set in the variable editing window under the “Options” tab. Select a group of variables (either all variables with “Variables” or one of the variable type options (Confidence, Static List, etc), and then limit the display to only those that have the flag set.
User Provided the Answer Sometimes it is desirable to display all of the input that was provided by the user. This can be done by selecting the “Variables” group to start with all variables and then check the “User provided the value” box. This will limit the display to only those variables that were directly asked of the user. Variables that had values derived from the logic will not be included.
Sort Confidence Values This option allows a group of confidence variables to be sorted by value. (This applies ONLY to Confidence variables.) Many systems use Confidence variables as the possible options that the system will select among. The logic assigns each variable a value. To view the Confidence variables arranged in order:
1. Select the group “Confidence” in the variable list
2. Click on the “Sort Confidence Variables” checkbox
3. Select how to sort: Ascending (Lowest value first), or Descending (highest value first)
Property An individual variable can be selected to display with an associated property, but if a group of variables has been selected, there is no direct way to add the property in the variable edit box. Instead, select a group of variables (“Collection”, “Confidence”, etc.), and add the property to apply to each of the variables in the “Property” edit box.
For example, to display all Collection variables as concatenated strings, rather than lists:
1. Select “Collection” as the variable
2. Check the Property checkbox
3. Enter “CONCAT” as the property to apply to each variable
Instead Tab The Instead tab provides a way to use variables in the system to control the display of other items of text or graphics.
If the variable selected would be displayed, instead the alternate text, image or file is displayed.
1. The variable is selected in the standard way (Click the “Variable” radio button on the Display Command builder dialog and select a variable or a group of variables.)
2. Determine under what conditions the variable will be displayed. This may be due to the logic of the system or display limits added under the “Display” tab.
3. Select what should be displayed if the variable passed the test(s) - text or image or file.
If text is used, just enter the text in the edit box
If an image is used, enter the address of the image. Remember that when the system runs, this address will be a URL relative to the base address of the system on the server.
If displaying a file, the file should be a simple ASCII text file. Enter the location of the file. Remember that when the system runs, this location will be a URL relative to the base address of the system on the server.

10: Controlling the User Interface 199
Format Tab The same formatting options are available for the text from the variable as from directly outputting text. These options are set on the Format tab.
Clicking on edit can set the normal format options. This will display the Format dialog.
In addition, when a variable is being displayed, the prompt can be limited to only the short text for the prompt (Variable name). For static lists, the value text can be limited to only the short text for the values.
In some cases, it is desirable to only display the prompt with no value, this can be done by checking the “Prompt only” checkbox. (This is useful when logic has selected only certain Confidence variables by giving them values over a threshold, but the actual value assigned has no real meaning to the end user. It is better to just display the selected variable’s prompt without a value.)
Link Tab The Link tab provides a way to easily associate a URL link with the displayed item.
To add a link, just click on the “Link to URL” radio button and enter the URL in the edit box.
When the item is displayed and the user clicks on it, it will bring up a new browser window displaying the URL specified.
Image Display To display an image, select the image radio button. Enter the image URL.
Format commands for position and indent apply to images.

10: Controlling the User Interface 200
File Display To display the text in a file, select the file radio button and enter the URL of the file. The format commands for text also apply to the contents of the file.
Background Color The background color for the window can be set by selecting the “Background” radio button and choosing a color with the standard Windows color chooser.
The format options do not apply to this command.
SAMELINE option for Applet screens When using the Applet Runtime screen commands, each item is placed on a new line. An option allows multiple items to be placed on the same line.
The command "SAMELINE" can be added into a list of applet screen commands. All items following the SAMELINE command will be placed on the same line until a SAMELINE_END command or another SAMELINE command is encountered. For example the commands:
Text "AAA"
Text "BBB"
Text "CCC"

10: Controlling the User Interface 201
would display as
The commands: SAMELINE
Text "AAA"
Text "BBB"
Text "CCC"
SAMELINE_END
would display as:
This is particularly useful for adding text on the same line as images.
The SAMELINE and SAMELINE_END commands can be rapidly added to a screen by clicking the buttons at the bottom of the applet screen command window.
Click the "Same Line" button, and then the "Add" or "Insert" button to add the command to the command list. The "End Same Line" button will likewise add the SAMELINE_END command.
When using the SAMELINE command, remember that the line height will be the height of the tallest item on the line. Also, adding many items on the line will cause the applet display width to be larger than the width allowed for the applet window. This will cause a horizontal scroll bar to be displayed at the bottom of the applet window and will require scrolling to see the entire image. In some cases this may be desirable, but it is generally better to only have the vertical scroll on the right side of the applet window.
Placing the radio button or checkbox to right of text In languages that read right to left, it is often necessary to place the radio button or check box to the right of the associated text, rather than to the left as in English. Many aspects of screen design are handled automatically by Java, which uses the localization of the computer to determine how to place items. However, Corvid directly controls the placement of the radio button and checkbox. An option in the "Edit Format" window allows the developer to control this placement.
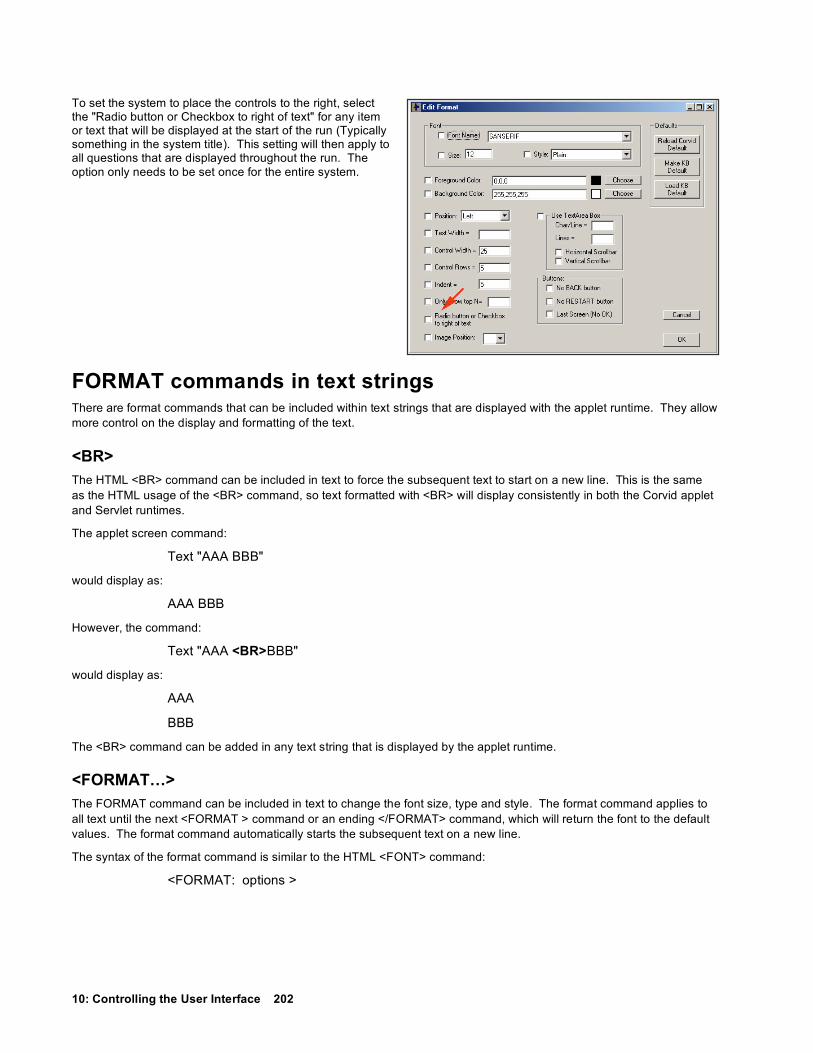
10: Controlling the User Interface 202
To set the system to place the controls to the right, select the "Radio button or Checkbox to right of text" for any item or text that will be displayed at the start of the run (Typically something in the system title). This setting will then apply to all questions that are displayed throughout the run. The option only needs to be set once for the entire system.
FORMAT commands in text strings There are format commands that can be included within text strings that are displayed with the applet runtime. They allow more control on the display and formatting of the text.
<BR> The HTML <BR> command can be included in text to force the subsequent text to start on a new line. This is the same as the HTML usage of the <BR> command, so text formatted with <BR> will display consistently in both the Corvid applet and Servlet runtimes.
The applet screen command:
Text "AAA BBB"
would display as:
AAA BBB
However, the command:
Text "AAA <BR>BBB"
would display as:
AAA
BBB
The <BR> command can be added in any text string that is displayed by the applet runtime.
<FORMAT…> The FORMAT command can be included in text to change the font size, type and style. The format command applies to all text until the next <FORMAT > command or an ending </FORMAT> command, which will return the font to the default values. The format command automatically starts the subsequent text on a new line.
The syntax of the format command is similar to the HTML <FONT> command:
<FORMAT: options >

10: Controlling the User Interface 203
The options can be any combination of: SIZE=# The point size of the text, e.g. SIZE=12
NAME=type The type of font to use. Java applets have very few portable type styles. The type can be "Sanserif", "Serif" or "Dialog". These will be converted to an appropriate font for the computer running the applet. e.g NAME=Sanserif
STYLE=Plain The style of the font. The style can be "Plain", "Bold", "Italic" or "Bold&Italic". Note: "Bold&Italic" has no spaces. e.g. STYLE=Bold
FCOLOR=#,#,# The text color stated as an RGB value. For example, to have black text, use FCOLOR=0,0,0. To have red text, use FCOLOR=255,0,0
BCOLOR=#,#,# The background color for the text. As with FCOLOR, the color is started as the RGB value. To have a white background use BCOLOR=255,255,255
An example:
To make the text 14 point, bold and blue, use:
<FORMAT SIZE=14 STYLE=BOLD FCOLOR=0,0,255 >
To return to the default format, use the command </FORMAT>.
The applet screen command:
Text "AAA BBB"
would display as:
AAA BBB
However, the command:
Text "AAA <FORMAT SIZE=16 STYLE=Bold>BBB"
Would display as:
AAA
BBB Note: the <FORMAT> command always puts the following text on a new line.
When adding individual items of text to an applet screen, the format options provide great flexibility. The <FORMAT..> command is most useful when formatting text in a report that is dynamically built in a Collection Variable and later displayed in an applet window. For example, if [RPT] is a Collection Variable being used to build a report, the commands:
[RPT.ADD] <FORMAT: SIZE=18 STYLE=BOLD FCOLOR=0,0,255>
[RPT.ADD] [[Rpt_title]]
[RPT.ADD] </FORMAT>
[RPT.ADD] [[Author]]

10: Controlling the User Interface 204
would add the title of the report (from the [Rpt_title] variable) and the author (from the variable [Author]). When displayed in a window, the report would display the title in 18 point, bold, blue, and the author in the default font for the display.
Author Name
Previewing Screens that Ask for User Input The screens used to ask the user for input can be previewed without running the full system. Either a single screen, or all question screens can be displayed. Any formatting, headers, footers, and Also Ask options will be displayed.
Previewing is done by Corvid automatically building a temporary Command Block that asks the specific variable(s) and then running the system using that Command Block. The system will run with whatever options are chosen for how to run the system. This includes running as an application/applet, using a specific browser, and the applet size. To be able to preview a system, the system must be able to be run.
Both types of previews are done from the Variables window. To see a single screen, select the variable and click the Ask With tab. Click the Preview button on that tab.
To preview all screens, click on the Preview button under the variable list, just above the Done button.
This will show all screens that could be used to ask the end user for data. Only Static List and Continuous (numeric, string and date) variables will be asked. (Collection and Confidence variables are never asked of a user and Dynamic List variables are not defined until runtime.) If a variable has associated Also Ask variables, these will be displayed. If a variable has a default initial value, it will be displayed. Variables that have default values to use instead of asking, or initial values, would never be asked of the user and will not be displayed.
To go to the next variable, just provide any answer. However, input must be within any limits that are set for the variable or the question will be reasked. For example, if a numeric variable is set to only accept values between 0 and 10, and you input 12, the variable will be reasked.
If there are Also Ask variables on a screen, they do not need to be answered - only the main controlling variable. The Also Ask variables will be asked again later individually. If input was provided for them earlier, they will still be asked, but will show the earlier input as a default value.
The “preview all variables” option is a very convenient way to check the look of the entire system without having to go through all possible paths to display all variables. It is a good idea to check the look of all questions on at least the common browsers.
Add a Custom Button To Run a Command Block A button can be added to each question screen to perform some special action. The button is associated with a Command block in the system. If the button is clicked, that Command block will be executed. This is done by adding the command:
SPECIAL_BUTTON "button_label" "command_block_name"
to the Command block. The button will appear on the lower right side of the applet window. The button can be turned off when not needed by using the command: SPECIAL_BUTTON_OFF

10: Controlling the User Interface 205
Later in the Command block, for example, the command:
SPECIAL_BUTTON "Save data and exit" "SaveDataCmds"
would add a button:
Clicking the button would run the Command block “SaveDataCmds”.
The called Command block should be used for functions such as saving data, or sending data to another program. It should NOT modify the values of variables currently in use, especially in a backward chaining system. Normally the called Command block should end or terminate the system. The SPECIAL_BUTTON command can be built from the “Special Command” menu on the “Control” tab of the Command builder.
Resource Files and Multiple Language SupportWhen building systems that are to run in multiple languages, “Resource Files” can be used to store text used in the system in a separate file. As the system runs, the resource file can be used to provide any text needed by the system.
The text in the resource file can be edited with a standard text editor without going through the Corvid development environment. This allows the text in a system to be translated to various languages, with the end user interface controlled by the resource file used. It also allows editing the text in a system without having to work through Corvid, and with no chance that system logic might be modified.
The default resource file for a system is KBName.res This can be changed by a command to any name desired.
Text that comes from the resource file is indicated in a way very similar to embedded variables. Resource file markers are indicated by:
[<marker>]// comment
where the marker is listed in the resource file by:
[<xxx>] = text to use The optional “//comment” is used to remind the developer of the text being included, or if resources are used for multiple languages, the comment can be the text in the developer’s preferred language. If “[<marker>]// comment” is used in Corvid, the “//” and all text following will be ignored, and will not appear when the system is run.
Selecting the Resource File The default resource file for a system is KBName.res, where “KBName” is the name of the system. If another resource file is preferred, the command:
RESOURCE=filename
can be used in a Command Block or Logic Block, however this should be done before text from the resource file is needed. If a system uses resource files to run in multiple languages, it can select the appropriate resource file with rules such as:
IF: Language = English
THEN RESOURCE=MySystem_English.res
IF: Language = Spanish
THEN RESOURCE=MySystem_Spanish.res

10: Controlling the User Interface 206
The language default for the users computer can be obtained with the Corvid command to get Java system properties. [[~SYSPROP user.language]] will return the language setting for the user’s computer. This allows the language to be set automatically by are rule such as:
IF: “[[~SYSPROP user.language]]” = “fr” THEN RESOURCE=MySystem_French.res
Resource File Markers Any text in a system in [<…>] is used as a marker for text to obtain from the resource file. When the marker [<xxx>] is found, the resource file will be searched for a line that starts with:
[<xxx>] =
The text following the “=”, and all following lines will be used, up to the end of the file, or the next line that starts with “[<”. If there are multiple lines, they will be concatenated with a space.
The marker can have an optional comment indicated by:
[<marker>]// comment
Note that the // must immediately follow the >]. The “//” and any text following will be ignored, and the full “[<marker>]// comment” will be replaced by the text from the resource file.
The use of comments allows a developer to include text that will remind them of the meaning of the marker.
It is legal to have more than one marker in a text string, for example:
[<marker1>] and [<marker2>]
In this case, only the last marker on the line can use comments. Building a Resource File Corvid provides an easy way to automatically build resource files, and also to import text from a resource file into a system so that it will no longer need the external resource file.
Under the File menu, the command “Build Resource File” will use system text to build a resource file. Selecting this option will display a warning that building the resource will permanently change system text. If you select to proceed, it will ask for a filename for the resource file. Unless a system will have multiple resource files in different languages, it is best to select the default name.
It will then provide options for which text to export:
Variable prompts and value
All string assignments
Checking “Variable Prompts” will export all variable prompts; and for static lists, the text of the values to the resource file.
The resource file marker for a variable prompt is:
[<varName>]
where “varName” is the name of the variable.
The resource file marker for a Static List variable value is:
[<varName_valueShortText>]
All exported resources will be commented with the original text.

10: Controlling the User Interface 207
Selecting “All String Assignments” will export all value assignments to a string variable, or strings added to a collection variable to resources. The resource marker will be named based on the node number, and will be commented with the original text.
If a resource file already exists, markers matching the existing markers will be replaced. Other markers in the resource file will be kept, and new markers will be added.
In addition to the resources added automatically, any text string in a Corvid system that could use [[..]] can be made into a resource by using [<..>], and making a corresponding entry in the resource file. The marker name can be any name not already in use. Changes to the resource file should be made with a plain text editor such as Notepad. (Do not use MS Word to edit the resource file unless you make sure to save the file as plain text.) Importing a Resource File The “Import Resource” option will take a Corvid system using a resource file, and replace all the resource references in the system with the actual text from the resource file. Any resources not found in the resource file will be reported as errors. All variable strings and nodes are checked. External resources (other files read in, etc.) are not checked.
To import a resource file, under the File menu select “Import Resource File”. The system will ask for the name of the resource file to import and will then replace the resource markers with the actual text from that file.
Any place that [<marker>] is found it will be replaced with text from the resource file. If used, the optional “//comment” will be stripped off. All text following the // will be deleted.
Fielding a System with Resource Files When a system using a Resource File is fielded, the resource file must be placed on the server in the same folder as the system .CVR file.

11: Corvid Systems on HP iPAQ 208

11: Corvid Systems on HP iPAQ 209
11. Corvid Systems on HP iPAQ The HP iPAQ is a very convenient, small platform for the distribution of expert systems. Running systems using a browser and Internet connection has always been possible using the Corvid Servlet Runtime, but Corvid allows running locally on the iPAQ without Internet connection. This requires that special software be installed on the iPAQ to provide Java support along with the Corvid Runtime and application files.
The iPAQ is not a regular PC - it has limitations and a different operating system. These differences and limitations must be considered in fielding systems on an iPAQ. The biggest differences are screen size and some special Corvid functions. Once they are redesigned for the smaller screen, many systems will run the same on the iPAQ as they do on a PC.
There are two ways to run Corvid systems on an iPAQ.
1. Connected to the Internet
This requires that the Corvid system be run using the optional Exsys Corvid Servlet Runtime, and that the iPAQ have the necessary hardware and software to connect to the Internet via a browser. In this case, the system can be run exactly as if it was being run from a PC. Just browse to the appropriate URL to start the system. If this is the expected delivery mode, the user interface screens and templates for the system should be designed for the small screen size of the iPAQ. The iPAQ browser does not need to support Applets or Java because the Corvid Servlet Runtime creates normal Web pages to ask the questions and display the results.
Note: This approach requires a PDA with Internet access and a browser. No special Java software needs to be installed. The PDA may connect to the Internet via 'WiFi' or via a Bluetooth connection to your cell phone.
2. Running Standalone – Not Connected to the Internet
You can install a Java Virtual Machine (JVM) on the iPAQ and run Corvid as a Java Application. The JVM must support at least Personal Profile 1.0 (though when Personal Profile 1.1 is available it is preferred). The iPAQ does not require Internet access to run systems in this mode. This document provides instructions on how to obtain and install the appropriate JVM software, install the Corvid Runtime and system files and run the systems.
System Screen Design The iPAQ has a very small screen (currently 240x320 pixels), whereas the normal PC sold today typically has at least 1024x768 pixels. So, the screen has only about 10% of the pixels of a modest PC monitor. The user interface for the system needs to be designed with this size in mind. You should reduce the size of any images (.jpg or .gif) that will be displayed. Don't put too much text on the screen. For the times when you need large images or extensive text, Corvid will add scroll bars as needed, but working with large images on an iPAQ is not very convenient.
Since screen space is limited, user interface screens to ask questions or display results should be made as small as practical. Question prompts and values should be kept short. Formatting such as the “Indent” command that use extra space should be avoided. Images should be small and limited to ones that provide necessary information.
Specify the iPAQ’s screen width and height in pixels in the “Properties” window under “Applet Options”.

11: Corvid Systems on HP iPAQ 210
This will allow Corvid to display the text efficiently and with minimum scrolling. It also allows you to see how the screens will look on the iPAQ when the system is run and tested from Corvid on the PC.
ImagesThe Java JVM for the iPAQ currently supports only JPG and GIF images. Animated GIFs are not currently supported, but will show the first image without animation. Image maps can be used to ask questions and can be a very effective way to use the limited space. Image maps require building the image in a program such as Photoshop. “Hotspots“ to set values can then be added to the images in the Corvid editor. This gives complete control of screen layout, allows effective integration of text and images and lets the user select an answer by simply clicking on an image or text hotspot.
The iPAQ supports color. It does not have the range of color values that are found on a typical PC, but it is adequate enough to display most images effectively.
Operating System’s Windowing System The iPAQ's operating system, 'Windows Mobile', does not allow multiple overlapping windows. It shows one 'window' only and the window always fills the whole screen. You cannot pop-up other windows using the DISPLAY_HTML command.
Closing and Terminating Programs The Corvid Runtime window on the iPAQ has a close widget (the X in the top right) but the iPAQ does not really terminate the program - it only hides it.
IMPORTANT: Since the close widget (X) does NOT terminate the program on the iPAQ, it can run out of memory. It is important to use the Corvid “Restart” button to start a new run. (Do not disable the “Restart” button in systems.) If there are multiple copies running, free the memory by terminating the unwanted program copies.
To actually terminate a program, do this:
Start -> Settings -> System -> Memory -> Running Programs

11: Corvid Systems on HP iPAQ 211
Must Run as Application Since the Websphere JVM does not currently include a plug-in for PIE (Portable Internet Explorer) or Internet Explorer Mobile, you must run as an Application instead of an Applet. Therefore, you cannot use the DISPLAY_HTML command to pop-up other windows, and you cannot display Framesets or specify frame names in hypertext links.
Memory The current HP iPAQs support at least 64 Megs of RAM. While this is plenty for Corvid it is far less than a typical PC and you should minimize the amount you use. For example, unless you use the HOW property, it is a good idea to add the:
DO_NOT_ALLOW_HOW
special command as the first command in your Command block. This will reduce the memory usage as the system runs.
Speed The iPAQ is slower than a normal PC. The speed depends on how many images are displayed and how many questions are on the screen. Screens that display almost instantly on a PC may take 3-10 seconds on the iPAQ. Images are particularly slow. Asking multiple questions on the same screen takes more time since each question is drawn individually. The same applies to the Results screen. To minimize the wait, keep screens short and simple. When multiple questions are asked on the same screen, the user can be reading and answering the first questions while the later ones are being drawn.
KeyboardThe iPAQ does not have a keyboard. When you need to type text, click in the edit box that will receive the text and hit the keyboard icon and a keyboard is drawn on the screen. Use the stylus to click on the appropriate keys to enter the test. Close the keyboard by clicking on the keyboard icon again. If several questions in a row require the keyboard, you can leave it open. You can hit the keyboard's Enter key to activate the OK button at the bottom of Corvid's question screens.
Select the program and click the 'Stop' button.
You can also stop all programs by performing a 'soft reset' by using the stylus to push the reset button on the bottom of the iPAQ.

11: Corvid Systems on HP iPAQ 212
EXTERN, DISPLAY_HTML, Links The Windows Mobile operating system does not have a command to execute an external program and capture or redirect the input or output, therefore Java on the iPAQ also does not support this functionality. This means you cannot:
Call an external program via the EXTERN command Use the DISPLAY_HTML command to display a page in a window Use hypertext links to display pages.
READ and WRITE Commands The READ command is supported by the iPAQ operating system, so you can read data from text files. The WRITE command also works and allows files to be written out to the iPAQ. If you do not specify a path, the file is assumed to be in the root folder. To find the root folder, open File Explorer and hit the 'Up' button until it no longer changes.
Database Calls (Corvid_DB) Applications that require database access should not be run on the iPAQ in application mode. These can be used when running systems in a browser window connected to the Internet.
Reports Corvid cannot display Reports using the SaveReport / DisplayReport commands when running as an application on the iPAQ. These commands require connection to a server, and they can be used when running in a browser window connected to the Internet.
Emails The email functions are only supported in the Corvid Servlet Runtime. They cannot be used on the iPAQ unless it is running a system connected to the Internet using a browser window.
Installing the Java Virtual Machine In theory the Corvid Applet Runtime can be run with any Java Virtual Machine that supports the iPAQ and provides adequate Java functionality. At the current time, the recommended JVM is IBM’s Websphere Everyplace Micro Environment (WEME). This is also frequently referred to as “J9” which was an earlier name.
Other JVMs may be released in the future, and provide comparable support. Be careful, many things are somewhat loosely called "Java" (e.g. J2ME, Personal Profile and MIDP) Currently, you cannot get full Java for a Windows Mobile PDA or iPAQ. Many do not provide adequate functionality to run Corvid, however Corvid will work with “Personal Profile 1.0” with “CDC 1.0”, or “Personal Profile 1.1” with “CDC 1.1”. It will not run with CLDC.
These instructions are for the IBM Websphere JVM.
Websphere Everyplace Micro Environment (WEME) is available for many devices and processors. There is an evaluation download page at:
http://www-128.ibm.com/developerworks/websphere/zones/wireless/weme_eval_runtimes.html
This provides evaluation versions of Websphere Everyplace Micro Environment for many platforms. Since this is a highly dynamic area with new models of the iPAQ and new processors being released frequently, it is recommended that you test an evaluation version first. If you wish to continue using Websphere Everyplace Micro Environment or to deploy it with a developed application, you must purchase a license from IBM. Currently WEME only costs a few dollars per copy. Some versions of WEME are sold individually by various resellers. IBM sells WEME in bulk. The WEME download site has a link to contact IBM for purchasing options. If you are trying to run Corvid systems on other devices, there may be a version of Websphere Everyplace Micro Environment on the download page that will work for your system. However, you will need at least “Personal Profile 1.0” with “CDC 1.0” (though Personal Profile 1.1 and CDC 1.1 are preferred).

11: Corvid Systems on HP iPAQ 213
For the current generation of iPAQs, (e.g. 24xx series), the correct Websphere Everyplace Micro Environment version to down load is:
WebSphere Everyplace Micro Environment 6.1 - CDC 1.1/Foundation 1.1/Personal Profile 1.1 for Windows Mobile 5.0/ARM.
This is currently about 2/3rds of the way down the first list. Look for “Windows Mobile 5.0” in the first column, “ARM” in the second column, and ” CDC 1.1, Foundation 1.1, Personal 1.1” in the third column. This is currently listed as for the “Dell Axim x51”, but it is the correct version for the iPAQ.
Download this version to your PC. Follow the instructions that come with it.
For Windows Mobile 5.0 follow the instructions in the 'install.pdf' document in the section labeled:
“Deploying J9 to Windows Mobile 5.0” The install program will be similar to: (though the specific file name may be different as new versions of the JVM are released):
ibm-weme-wm50-arm-pproll-6.1.0-20060321-073315-939.exe
In the first dialog (window), the installer should say it is installing Websphere 6.1 or higher for
Windows Mobile 5.0 ARM Personal Profile 1.1
This message could be different but make sure it is for 'Personal Profile 1.0 or 1.1'.
The install program you download will install on your PC, not your iPAQ. You must move J9 to the iPAQ. The IBM install instructions can be confusing. With the current version, copy the 'bin', 'lib', and 'examples' folders from:
C:\Program Files\IBM\WEME\runtimes\61\wm50-arm-ppro11\weme-wm50-arm- ppro11_6.1.0.20060317-111429.zip
on your PC to the '\J9\PPRO11' folder on your iPAQ.
To create the '\J9\PPRO11' folder, in ActiveSync on the PC:
Click on the 'Explore' icon.
Click on the iPAQ icon. Notice it opens a pseudo folder for the root folder (\) of the iPAQ.
Create the 'J9' folder. (You can right mouse click in the pseudo-root folder and select 'New' 'Folder' and rename it to 'J9'.)
Open the 'J9' folder and create the 'PPRO11' folder.
Copy the folders from the Zip file to this folder. (You may have to copy them from the Zip pseudo folder to drive C: before coping to the iPAQ folder on the PC.) ActiveSync will do a 'Copy & Convert' as it moves them to the iPAQ. You can now run the sample application that comes with J9.

11: Corvid Systems on HP iPAQ 214
Testing J9 On the iPAQ, browse to the '\J9\PPRO11\examples' folder and click on the purple circle icon labeled 'GolfScoreTracker'. After a few seconds you should see a window with the title 'New Game'. If the program starts, J9 is working. Hit the close widget and follow the earlier instructions to terminate the program, 'New Game'. If this example does not start, there is some problem with the install of J9, or with the version of J9 installed. If this example does not work, Corvid will not work – so you must get it to successfully run before proceeding.
Installing Corvid To run a Corvid Java application on the iPAQ, you need to copy all the KB files that are necessary to run on a PC and create a '.lnk' file. First, gather all the Corvid files together on your PC. So you need at least these files:
ExsysCorvid.jar yourKBname.cvR
You also need any files that your KB uses. If your KB displays images or reads files, they will also need to be copied to the iPAQ.
You have to create the '.lnk' file to run the program. To do so, open Notepad on the PC and type this all on one line.
Note: Be sure to make the changes described below to reflect the ways files are arranged and named on your iPAQ.
255#"\J9\PPRO11\bin\j9.exe" "-jcl:ppro11" "-cp" "\My Documents\Personal\ExsysCorvid.jar" "Corvid.Runtime" "My Documents\Personal\ " yourKBname.cvR
Change "\J9\PPRO11\bin\j9.exe" to match your location of the "j9.exe" program, if you copied the 'bin' folder to a different folder. It is recommended you use the "j9.exe” program because it will display the J9 Console where error messages and Trace can be displayed. Once you are sure you have tested your KB, you can switch "j9.exe” to "j9w.exe" which will not display the J9 Console.
Replace "\My Documents\Personal\ExsysCorvid.jar" with the folder location (on the iPAQ) of the '.jar' file.
Replace "\My Documents\Personal\ " with the folder location of the '.cvR' file. It is recommended that all files go in the same folder as the '.jar' file. Notice the space before the close quote is intentional because the slash is a meta character that will escape the quote if the space is missing. Some systems may require you to delete the first ‘\’.
“yourKBname“ is the name of your Corvid system.
Technically, the leading number should be the exact count of the number of characters after the "#" but always using "255" seems to work. If the leading number is less than the command, the command will be truncated and an error will occur.
Note: The entire line must not exceed 255 characters (regardless of the leading number). The line must not end with a Carriage Return or Line Feed or EOF (End Of File) character, so use Notepad and do not hit the Enter key.
Now copy all the files to the iPAQ. Because a copy performs a 'Copy & Convert', you may have to copy the files to the 'Program Files' folder on the iPAQ first and then move them to the desired folder. To do so, on your PC, open the iPAQ root folder (see above). Open 'Program Files' and copy the files to that folder. When it is done, on the iPAQ, open File Explorer and hit the 'Up' command until you are at root (\) and then open 'Program Files'. Use the stylus to drag over all the files to be moved and click-and-hold on any one and wait for the menu. Select 'Copy' and hit 'Up' and open 'My Documents' and 'Personal' and scroll to the bottom and click-and-hold on an empty spot and select 'Paste'. Run your KB by clicking on the purple circle icon, which is your '.lnk' file. If it does not run correctly, write down any error messages that are in the J9 Console. They will tell you what is wrong.

11: Corvid Systems on HP iPAQ 215
Terminating Corvid As explained earlier, clicking the “X” icon to close Corvid only hides it. To actually close the program and release the memory, see the instructions on page 6 on “CLOSING AND TERMINATING PROGRAMS”.
Optimizing a KB to Run on iPAQ Many systems can be simply moved over and run on the iPAQ, but if that is the intended method of delivery a few steps should be taken:
Design your KB such that all files are in a single folder. With all files in a single folder, you do not need to specify paths to any file and you do not have to change the path when you move the KB to different folders or computers.
Design it to be run as an Application.
Test it on your PC using Java (this was installed on your PC when you installed J9). In the Corvid editor, click the 'Properties' tool bar button and under the 'Test Run' tab checkmark 'Application'. Click “Java.exe'” and browse to:
C:\Program Files\IBM\WEME\runtimes\61\wm50-arm-ppro11\_jvm\jre\bin\java.exe
or wherever your Java program is located. Run by clicking the Run icon (the blue triangle icon). If you wish to terminate the run early, click on the Java Console window and type Ctrl-c.
Under the 'Applet Options' in the 'Properties' window in the Corvid editor, specify the Applet Width and Height. Currently 240 X 320 pixels.
Resize your images to be as small as practical.
Reduce or eliminate the indents in text.
Add this to the start of your Command block:
DO_NOT_ALLOW_HOW
Other Windows Mobile Devices There are a variety of other Windows mobile devices on the market ranging from PDAs to cell phones. Some of these are similar in design to the iPAQ, others are quite different with different CPU chips. IBM Websphere Everyplace Micro Environment is available for a variety of processors and should allow Corvid systems to run on some of these devices. Due to the diversity of devices that change every day, Corvid has not been tested on all these devices. To check if Corvid can be run on a particular device:
Go to the IBM Websphere Everyplace Micro Environment download page and see if a JVM is available for the processor used in the device.
The version MUST be at least “Person Profile 1.0” with “CDC 1.0” (CLDC will not work).
If one is found, download the JVM and install it along with the Corvid Runtime (ExsysCorvid.jar) and system files. The installation should be relatively close to the instructions for the iPAQ for Windows Mobile devices. (There may be differences in how files are moved to the device.)
Test run the system. The window size and other parameters may be different for these devices from the iPAQ.

12: Running a Knowledge Base 216

12: Running a Knowledge Base 217
12: Running a Knowledge Base Checking the System Corvid will check a system for a wide variety of syntactical and possible logical errors. To do this, select the “Check the System” items under the “Run” menu. A window will display the errors and warnings that are found.
Not everything that is reported is necessarily an error. For example, if there is a static list variable and not all values are used in a group, the validation system will warn you. It may be that due to other logic, some values are not needed in this group and were intentionally left out. It is also possibly an error since there is not a branch for each possible value.
It is a good idea to check a system and look over the errors reported. They are indexed by Logic Block name and row number.
Corvid Java Applet Runtime When a Corvid knowledge base is run in the development environment the Corvid editor dynamically builds an HTML file, and then uses this to run the Corvid Java Runtime in a browser window. This allows the system to be run in the same environment that it would be run over the Web.
To run a system, click on the Run icon or select “Start Run” under the “Run” menu item.
The CVR File Each time a system is run, a file is created named kb_name.cvR, where kb_name is the name of the knowledge base. This .cvR file is used by the Corvid Java Runtime. When the system is moved to a Web server, the CVR file is the file that must be moved.
Note: The file that the Corvid Development Tool uses is a .CVD file. This file has more information than the CVR and is used only by the Corvid Development Tool.
The CVD file is updated ONLY when the system is saved. The CVR file is updated whenever the system is run. Consequently, if a system is loaded and modified, but NOT saved - and it is run, the run will include the modifications. If the system is not saved, the modifications will be lost, since the CVD file will not have been updated. However, the CVR file will still reflect the modifications, and if this CVR was moved to a Web server, it would contain the modification. Whenever a system is saved, a new CVR file is also created. Only move a CVR file to a server when it is generated at the same time as the associated CVD file through a “Save”.
Java requires that a copy of the Corvid Runtime Java applet be available to the CVR file. If there is not a copy in the correct location, Corvid will automatically make a copy.
The HTML Page To run the Corvid Java Runtime, an HTML page is dynamically created. This page includes an applet call for the Corvid Java Runtime. This page is automatically created and is named kb_name.HTML, where kb_name is the name of the system. This will be in the same directory as the kb_name.CVD and kb_name.cvR files.
Corvid uses a default template to build this HTML page. This page can be modified using the Parameters dialog discussed below.
When a system is moved to the Web, this page can be moved to the server to run the system, or the code calling the applet from this page can be copied to another HTML page to run the system.
The Runtime Window The Corvid development environment opens a browser window. This window is the Microsoft Internet Explorer window without the controls for “back”, “forward”, etc. The window is passed the kb_name.HTML page to display. Since this page includes the applet call, the system is run via the Corvid Java Applet.
The window used in Corvid does not have the “Back”, “Forward” and other web navigation control since you do not need those to just run the logic of the system. Naturally, they will be available when a system is run over the Web in a full browser. To see how this will look in a standalone environment, a full browser (Microsoft Internet Explorer or Netscape) can be opened, and enter the address of the page, starting with the drive ID.
12: Running a Knowledge Base 218
(Note: Do not include http://, just enter the full address of the kb_name.HTML file on the computer - e.g. “C:/Corvid/mysystem.HTML”)
If you are connected to the Web, the browser will both be able to run the system and perform navigation.
Stopping the Run The browser window opened by Corvid is modal. It will remain the only window you can use while it is running. To stop the run, click on the X in the upper right corner of the window running the system to close it. This will stop the run and return to the Corvid Development Tool.
Controlling the Applet The properties for running the Corvid Java Applet in the development environment are set using the Parameters dialog. Click on the Properties icon or select “Properties” under the “File” menu.
This will display the Properties window. Select the Applet Options tab.
Title and Author A title and author for the system can be entered. These are not displayed in the runtime, but identify the system when it is opened in the development environment.
KB Default Format The default format for all text in the system can be set. Clicking on the “Edit” button will display the standard format editing dialog. The parameters set will override the system defaults. Any format parameters set in specific display commands will override the values set here.
If all text in the system should be 12 point with blue letters on a yellow background, this is a convenient place to set these values once for the entire system.
Background Color Clicking on the “Build” button and selecting a color can set the background for all display windows. Also, if the RGB value for the color is known, it can be directly entered in the edit box. This color will be used for the overall background. In addition, each item added has its own background color. If these are to match, also enter the desired background color in the “KB Default Format”.
Runtime HTML Template The Corvid Runtime applet code can be added to any HTML page. The default is to use the file Corvid_Run_Template.HTML, which is part of the Corvid package. This is a very simple page. To use this page, click the “Use Default” radio button. A custom HTML page allows you to see the applet included in a page more like the one it will be fielded with. Click the “Use Custom” radio button and enter the name of the HTML page to use. This can be any HTML, but MUST include the text:
Corvid_RUNTIME_APPLET at the point where the applet should be inserted. This can be built with any HTML editor, just include “Corvid_RUNTIME_APPLET” as if it were text to display on the page. Corvid will automatically read this page when a system is run. Corvid will replace the text Corvid_RUNTIME_APPLET with the actual applet code and build a file kb_name.HTML that will be passed to the browser window.

12: Running a Knowledge Base 219
Note: Since Corvid will use the file to build kb_name.HTML, do not name the template file kb_name.HTML.
The custom page can be as simple or complicated as needed and include any HTML text, images, controls etc outside of the applet area. Once Corvid has built the kb_name.HTML, this file can be posted on the web, or the code for the applet call can be copied to another HTML page.
Applet Size and Position The “Runtime Applet” box provides a way to specify the size and position of the Corvid Java Runtime applet. The position on the HTML page is governed by the HTML command on that page, but the actual space allocated to the applet is controlled by the applet call. The size to use is largely determined by the design of the Interface Commands to ask questions and present results. The applet will use scroll bars if graphics do not fit, but it is better to choose a size that will work without scrolling. Some systems take a large part of the screen, others only ask short questions and have simple results. The applet can even be a small ”banner” size window provided the formatting has been designed for this size
Corvid systems run in banner size windows offer unique approach to banners that are not simply links to a site, but actually are interactive, producing advice and recommendations.
Width Enter the width of the window to assign to the applet in pixels
Height Enter the height of the window to assign to the applet in pixels
Align Select how to align the applet window on the page - center, left or right
Vspace Enter the vertical space between applets on the page in pixels. This is important only if there are multiple applets or the trace window is being used.
Hspace Enter the horizontal space between applets on the page in pixels. This is important only if there are multiple applets.
Trace Applet When developing a system, it can be very useful to be able to watch the exact steps the system takes to reach a conclusion. This is particularly true when the system is not coming to the conclusion that was expected and an error in the logic needs to be found.
Corvid provides a simple way to do this. Click on the “Add Trace Applet” button and when the system is run, a second applet for tracing will be added to the normal Corvid Runtime.
The Corvid Runtime sends messages to the trace applet on steps it has taken, rules that have fired, how data has been derived, etc. This history of the run can be examined to see why and how the system came to the conclusions it did. It is also a way to see certain error messages.
The trace applet has a text box along with “Find” and “Again” buttons. To search the trace for a particular variable or text, enter the variable name in the edit box and click “Find”. To check again, click “Again” this will scroll the trace to the occurrences of that variable or text in the display.
Note: The trace applet will significantly slow down the performance of the Corvid Runtime - especially on systems using MetaBlock and many iterative runs. It is very useful for finding a problem in the logic, but should be turned off if performance becomes an issue.
The trace window allows trace to be turned on or off during a run. This is useful for large systems or MetaBlock systems that have extensive traces which can greatly slow down system performance. In these cases, click the “Trace” radio button to turn off trace until a section is reached that should be displayed. If there an error is reported in the trace, it will be displayed even if the Trace is turned off.
Trace to Java Console In addition to tracing to the Corvid Trace applet, the trace messages can be sent to the Java console. This is very useful when running as an application (in which case, the trace applet is not accessible), or for tracing without changing the runtime screen.
12: Running a Knowledge Base 220
Tracing to the Java console can be done with or without tracing to the trace applet.
To trace to the Java console, open the Properties window, select the Applet Options tab and click the Trace to Java Console checkbox.
It is not necessary to click the Add Trace Applet box, though this can be done if you wish to trace to both places.
Unlike the Trace applet, tracing to the Java console will not turn red when an error is reported and does not have the find buttons. Depending on your browser, tracing to the console may be faster than the trace applet, but systems that produce a large trace (such as MetaBlock systems) may slow down considerably with either approach.
Viewing the Java console depends on your browser. The default Corvid runtime program does not allow you to view the Java console. You need to select running in a specific browser on the Properties window and then view the Java console in that browser. In Netscape the Java console is available by default.
In Microsoft Internet Explorer, the Java console is off by default and not on the menu options. To turn it on (highly recommended), go to “Internet Options” under the Tools menu. Select the Advanced tab and scroll down to the “Microsoft VM” heading. Check all the boxes under this heading.
Close and restart IE and a Java Console option will now be under the View menu.
Exsys Corvid reports errors to the Java console, as does Java itself. If a system is not running correctly, the Java console should be checked to see it there are any error messages that might help. This should be done even when not tracing to the Java console.
Limit Server to a Specific IP Address A system can be limited to only be distributed by a specific server. This can be used to prevent unauthorized distribution of a system, or copies of a system being moved to other servers.
When a system is limited to a specific IP address, it will check the IP address of the server that served the knowledge base CVR file. Unless it matches the specified IP, it will terminate.
Note: Other references in the system for links, images, etc. can come from other servers if needed. The IP lock is only for the CVR file.
This option is primarily for cases where the developer wants to prevent the system from being downloaded and run locally, or run from other than a specific server. A system that is limited to an IP can NOT be run locally in development mode or as an application. The limit option should be left off until the final version is built for distribution via the Web server.
To limit the system to a specific server IP address:
1. Open the Properties window and select the Applet Options tab 2. Select the checkbox "Only allow to be run from IP" to selected it 3. Enter the IP address of the server in the 4 boxes.
For example, if the IP address for a server is 111.222.333.444, enter the 111 in the first box, the 222 in the second, etc. Do not enter the periods. If you do not know the IP address for your server, contact your system administrator.
Undo Levels When running a system, the Corvid Runtime allows the user to step back either with the “Back” button in the applet window, or the Browser “Back” button if using the Servlet Runtime. To support “Back”, the Corvid Runtime must maintain data about the session for each question that is asked. This takes up memory and increases resource utilization. Normally this is not a problem, but for very large systems, or when running on hardware with limited resources (e.g. a palmtop computer such as the iPAQ), the number of steps “Back” can be limited. This allows a system to reduce resources. The buttons at the lower left of the Param tab allow the Undo Levels to be set to “Unlimited” or a specific value. If “Unlimited” is chosen, the system will support “Back” all the way to the first question. If a specific level is chosen, the “Back” button can be pressed that many times to step back in the run.

12: Running a Knowledge Base 221
Extra PARAM to Pass Data One of the ways to set a value for a variable is to pass its value in when the applet is called. This is done through PARAM. Open the Properties Window and select the Param tab.
When an applet is added to a HTML page, various named identifiers can be given values that can be accessed from within the applet. When Corvid builds the call to the applet it uses this to provide certain information to the applet such as the name of the knowledge base to run. The applet call will have a line similar to:
<PARAM NAME = "KBNAME" VALUE = "my_system.cvR">
This assigns the value “my_system.cvR” to an identifier “KBNAME”. The applet can obtain the value of “KBNAME” to know what system to run.
In addition to the PARAM that Corvid automatically adds, you can add others to pass in values for variables. If the NAME specified is the name of a Corvid variable in [ ], the value from the PARAM command will be used, instead of asking the user.
For example, if there is a Corvid variable [USER_NAME], and the system already knows the user’s name from other sources, adding:
<PARAM NAME = "[USER_NAME]" VALUE = "Bob Smith">
Would cause the runtime to assign “Bob Smith” to the variable [USER_NAME].
Note: The [ ] must be used around the variable name in the PARAM line.
Adding PARAM lines is done in the development environment to emulate the applet call being dynamically built on an HTML page during runtime and passing in data. If the goal is just to assign a value to a Corvid variable, there are much easier ways to do it from within Corvid. The PARAM lines provide a way to pass data using dynamically built HTML pages created through Java Script or an HTML page content manager (such as Cold Fusion). These pages can obtain data from databases or other sources before the applet is called. This data can then be passed into the Corvid system. For example, based on a users login, there may be certain data on the user available from a database. This information could be passed directly into the application without Corvid asking it of the user.
Adding the PARAM lines To add a PARAM line:
1. Enter the full PARAM line in the edit box at the bottom the area labeled “Extra Corvid Runtime Params” 2. Click the “Add” button to add it to the PARAM list
To delete a PARAM line:
1. Select the line to delete by clicking on it 2. Click the “Delete” button
To edit a PARAM line:
1. Select the line by clicking on it and click “Edit” or double click on the line to edit 2. This will move the line to the edit box 3. Make changes and click “Replace” to replace the old line with the edited one, or “Add” to add the new line while
keeping the original one.

12: Running a Knowledge Base 222
Adding Other HTML Code Sometimes it is desired to add other HTML code following the applet call. This is usually due to adding another applet that the Corvid Runtime will communicate with. Any time additional HTML is required, creating a Custom Template file to build the runtime HTML screen can do it. If it is preferred to use the default screen or the added applet call frequently changes, it may better to add the extra HTML lines.
Open the Properties Window and select the Other HTML tab.
Adding the HTML lines To add a HTML lines:
1. Enter the HTML code in the edit box at the bottom the area labeled “Other HTML to Add After Applet” 2. Click the “Add” button to add it to the list
To delete an HTML line:
1. Select the line to delete by clicking on it 2. Click the “Delete” button
To edit an HTML line:
1. Select the line by clicking on it and click “Edit” or double click on the line to edit. This will move the line to the edit box.
2. Make changes and click “Replace” to replace the old line with the edited one or “Add” to add the new line while keeping the original one.
Browser to Use By default, Exsys Corvid uses its own browser window program. This is actually Microsoft Internet Explorer running in a window with no controls for “Back”, “Forward”, etc. This is a convenient and fast program to use to test systems. However, other browser programs can be selected to use. Open the Properties Window and select the test Run tab.
To use the default Exsys Corvid window, click on the “Default Corvid Window” radio button. To use another browser, click on the “Browser Program” radio button and select the program to use. When a system is run, this browser program will be called and passed the name of the HTML page that Corvid builds. Since each browser is a little different, it is a good idea to test a system on at least the common browser programs.
Save the CVR File in Another Directory The Properties page has an option allowing you to specify the name and location for the CVR file that is built when the system is run. This should be used only when your development environment has direct access to a server, and the system is being run on the server to test database, report or other CGI functions. To specify the name of the CVR file, open the Properties window, select the Test Run tab and enter a name, or click “Browse” and select a file. While the CVR file will be built in the specified directory, the HTML file will not, so this is usually only used in conjunction with the option to also run a specific HTML file.

12: Running a Knowledge Base 223
Using a Separate HTML Page to Run Systems When a system is run, Exsys Corvid automatically builds an HTML page to run the system. This page is named kb_name.HTML, where kb_name is the name of the system. In certain cases, it is desired to run the system using a different HTML page.
There are 3 cases where this is desired:
The system has been moved to a server and you wish to run the server copy rather than the local copy
You have a custom designed page that you wish to use
You are using a screen design using frames and the top-level page needs to be called (This is discussed in more detail below.)
To run a specific HTML page:
Go to the Properties page by clicking on the Properties icon on the tool bar or select "Properties" under the "File" menu.
In the lower right "Development Tests Run Using" group, check "Specific URL" and enter the name of the page to use, or click "Browse" and select the page.
Note: The page is local, the address should be relative to the base address of the system - for example, if the page "My_page.html" should be used, and it is in the same directory as the system .CVD file, just enter "My_page.html". If the "Browse" button is used, this will be done automatically. If the address is not local, it should start with "HTTP:" and be a full URL address.
Do Not Make CGI Calls A system making use of external interfaces or reports needs to call the server and run CGI programs. When working with a machine that is not connected to the server, clicking on the “Do not make CGI calls” checkbox can disable the calls to CGI programs. In this way, the system can still be run, but any call to a CGI program will be ignored.
General Tab The “general” tab on the properties window allows setting the colors used in Action Blocks and enables/disablers spell checking.
To change the colors, click the “Build” button next to the color and select a new color. The colors can be reset to the default colors by clicking the “Restore Defaults” button.
If you do not wish to use the spell checker, deselect the “Enable Spell Checking” edit box. The spell checker only has an English dictionary, so if when working in other languages, it is better to disable it.
Moving to a Web Server Moving an Exsys Corvid system to a web server is quite easy. You will need to move your system files, make sure they are in path arrangement that meets Java’s security requirements and change the path specifications in the applet calls,
1. The files you will need to move to the server are:
ExsysCorvid.jar
Your_Kb.cvR (You do not need to move the .CVD file)
Any image or data files called by your system

12: Running a Knowledge Base 224
2. Java security restricts what directories an applet can read. This makes Java a very secure environment, but does require that files be arranged appropriately. A Java applet can ONLY access files in the same directory as the applet’s Server directory or in directories below that directory. Consequently, it is usually best to put ExsysCorvid.jar in a directory and create a subdirectory off that directory for all the other files specific to the system. (Alternatively, they can all be put in the same directory, but if there is more than one system, this can get confusing.)
3. The applet call will need to be edited to reflect the locations on the server. Whenever Exsys Corvid runs in the development environment, it builds a HTML page with an applet call that works on the development machine. A typical applet call in the development environment looks like:
<APPLET CODE = "Corvid.Runtime.class" NAME = "CorvidRuntime" ARCHIVE = "ExsysCorvid.jar" WIDTH = 600 HEIGHT = 450 HSPACE = 0 VSPACE = 0 ALIGN = middle > <PARAM NAME = "KBNAME" VALUE = "kb_name.cvR"> <PARAM NAME = "KBWIDTH" VALUE = "600"> </APPLET>
This can be moved to a server provided the ExsysCorvid.jar file and system .cvR files are in the same directory as the calling HTML page.
To simplify moving systems to other directories and servers, it is recommended that the .Jar, .cvR and calling HTML page all be in the same directory. This will make moving systems MUCH easier and the KBBase and Codebase lines are not required in the applet call.
Exsys Corvid always copies the runtime program ExsysCorvid.jar to the directory with the CVR file and builds the HTML page in that same directory. This makes the KBBase and Codebase lines unnecessary. While not required, the KBBase and Codebase functions are still supported and can be used when required. They are added to the applet call, but are commented out. If needed, convert “DELETE_CODEBASE” to “CODEBASE” and remove the “<!-- --> around the KBBase parameter.
To move systems to a server, just copy the ExsysCorvid.jar, system.cvR and system.HTML files to the your server, along with any graphics or text files used by the system. Then call the HTML page on your server.
If the .Jar or .cvR file must be kept in a different directory, a “CODEBASE” path can be added. This will be a HTTP address, rather than the local FILE address. This would be something like:
CODEBASE = http://www.mysite.com/Corvid
Likewise the location of the system CVR file needs to be specified the same way.
<PARAM NAME = "KBBASE" VALUE = "http://www.mysite.com/Corvid/MyDir/" >
With these changes, you should be able to run the system from any directory on the web server.

12: Running a Knowledge Base 225
It is a Java requirement that the CVR file MUST be in the same or a sub-directory from the JAR file.
For example, if the directory structure of drive C is:
Drive C
|_ MyFiles
|_ ExpertSystems
|_ System1
|_system1.cvR
|_ System2
|_ System3
To run a Corvid application system1.cvR from the directory System1, either:
1. Put the HTML page with the applet call, the ExsysCorvid.jar file and the .cvR file all in the System1 directory and remove the CODEBASE and KBBASE lines from the applet call.
2. Put the ExsysCorvid.jar file in the ExpertSystems directory. Put the HTML page with the applet call and system1.cvR in the System1 directory. Either:
Make the CODEBASE = "C:Myfiles\ExpertSystems". Make the KBBASE= "System1\". Make the CODEBASE = "../". Make the KBBASE= "System1\".
If there are several expert systems, updating is easier when there is a single JAR file in a parent directory. Also, if multiple systems are likely to be run in the same session, having a single JAR file will allow it to be cached and downloaded only once.
If you have a problem running a system, open the Java console window on your browser. If it reports a “Security Exception”, it is probably because the files are not arranged appropriately. Check that the system files are in the same or a subdirectory of the form ExsysCorvid.jar and that the applet calls are correct for your site on the server. If you are running on UNIX remember that file names are case sensitive. Check that all filenames and paths exactly match.
Running Standalone Exsys Corvid can be run in a batch mode to process data from external sources, or in situation where it is better to run as a Java application rather than an applet.
When a Corvid system is run “standalone”, it can mean two different things:
Standalone in a Browser Typically, a Corvid system is run from a Web server that uses an HTML page calling the applet to run the system on the client machine. The client machine downloads the applet, the knowledge base CVR file, and any other image, data or link files required from the server. These are then run in the client machine using Java.
As long as all the files are on a local machine, it is NOT necessary to have a server. If the URL references to the files are appropriate for the local machine, the system can be run by having a browser program display the HTML page that calls the applet. Note: This is different from the earlier Exsys Web Runtime Engine associated with Exsys Developer, where for full system functionality on a local machine, a server (e.g. Personal Web Server) had to be installed on the local machine.

12: Running a Knowledge Base 226
If the files associated with a system are copied to a local machine that has a browser that supports Java, the system can be run. The files required are:
ExsysCorvid.jar - the Corvid Java Runtime
Kb_name.cvR - the system knowledge base file, where kb_name is the name of your system
Kb_name.HTML - the HTML page to run the system. Corvid automatically builds this.
Any image, data, MetaBlock or linked files that the system uses. The .cvR file must be in the same directory as the ExsysCorvid.jar or a directory below it. Make sure that the path names specified are correct. Usually this is best done by putting all the files in a single directory and just using the file name without a path. All filenames will be based off the directory to the ExsysCorvid.jar file. Linked HTML pages can be anywhere, even across the Web provided that the browser has a Web connection.
To run the system locally, just start the Browser (with or without a Web connection) and enter the local path and name of the Kb_name.HTML file. The browser may require that you specify the file with a full path starting with drive ID (e.g. “C:\my_kb\my_system.html”). Do not use “HTTP:” if you are running locally.
Being able to run Corvid systems in a browser based stand-alone mode allows systems to be run even when there is no web connection, such as laptops in the field, at maintenance sites or remote locations.
For frequently run systems, an icon can be created that will call the browser and pass the name of the HTML page that runs the system.
Standalone as a Java Application Java makes a very important distinction between “applets” and “applications” - even though the same program may function both ways. An applet is a Java program that can run in a browser. This is designed to be part of an HTML page. Since such applets can suddenly start running on your machine just because you browsed to a page, Java imposes VERY strict security limitations on what an applet can do. An applet can not access the files on your local machine - it can not read or create files on your local hard disk, and can not access the printer. This protects you from very destructive programs that would otherwise be possible via applets, but it does limit what an applet can do. It is these limitations that prevent the Corvid applet from being able to print reports directly.
Fortunately, Java provides another way to run programs as “applications”. These are run outside of a browser and are installed and run like any other program on your computer. Since the user has control on running an application, it is not subject to the same security restrictions as an applet, and can access local files and other programs on the computer. This enables it to be used to process batch data and write reports.
A Java program can be designed to be run both as an applet or an application, depending on how it is started. Exsys Corvid is designed to run both ways.
To run Corvid as an application, you will need a Java virtual machine. To check for this, search your computer for "java.exe". If you do not find this, you can download the program for free from SUN Microsystems web site at www.sun.com. Note: You may need to download a full set of Java development tools to get java.exe, but it is free.
To run Corvid as an application, use:
java -cp ExsysCorvid.jar Corvid.Runtime path cvr_file
where "path" is the full path to the directory the CVR file is in. cvr_file is the name of the CVR file, with the .cvR extension. Note: there is a space between the path and the cvr file. The path will be used as the base directory and all references to files for images, etc will be made off this base path. For example, to run "My_system.cvR" located in "c:\my_apps":
java -cp ExsysCorvid.jar Corvid.Runtime c:\my_apps\ My_system.cvR
Note: If the path has spaces, it will be necessary to put it in quotes. Since \" is a special character in Java, you must end with \ " (A back slash, a space and a quote) Applications run standalone will exit:
when the EXIT command is executed when the end of starting Command Block is reached

12: Running a Knowledge Base 227
Testing an Application A Corvid system that makes use of the special functions only available to Applications (WRITE and EXTERN), cannot be run as an applet in a browser that is used to test most Corvid systems. Corvid provides a way to test systems as an Application. To do this:
1. Click the Properties icon or select "Properties" from the "File" menu
2. Select the "Run as Application" radio button.
When the system is run, it will run as an Application.
The application will terminate when the end of the starting command block is reached or an EXIT command I encountered.
To close the application, close the associated DOS window that starts the application. This is easiest done by clicking on the X in the upper right of the DOS window.
Runtime Applet Handles Focus and Keyboard Navigation The runtime applet supports keyboard navigation. When a screen is displayed, the focus will be set to the first control on the screen. If the control is an edit box, typing will immediately go to that edit box.
Hitting the Enter key from any question control is the same as clicking the OK button. The exception to this is when multi-line edit boxes are used, since the Enter key indicates to move to the next line.
The Tab key moves focus to the next control. For radio buttons, check boxes and lists, the space bar selects the item that has focus.
The Undo and Restart buttons can be selected with the Tab key. If they have focus, clicking the Enter key is the same as clicking on them. Otherwise, the Enter key is the same as clicking the OK button.
Running with the Corvid Servlet Runtime Another option for distributing systems is the Corvid Servlet Runtime. This allows the user interface screens to be designed using HTML, providing a far wider range of interface and integration options. In addition, no Java applet is required. This both saves time in download, and does not require the user computer to support Java applets. The instructions for using the Corvid Servlet Runtime are in Section 17.
Embedding Corvid Systems in Emails In addition to being able to generate an email from a Corvid system, a Corvid system can be embedded within an email. This allows a new level of interactive content and fast recommendation/problem-solving response for emails. Potential customers can be sent product selection expert systems that will assist them in making purchasing decisions. They can be used in auto-reply emails for technical or product support as first-level help desk response. Also, Exsys Corvid W.I.N.K.™ (What I Need to Know) systems can be emailed allowing the recipient to select the information or content that is most appropriate to their needs. The user can interact directly with the Corvid system in the email without having to link off to another site.
Embedding a Corvid system is quite easy to do provided the email includes HTML and the recipient can accept HTML emails. They can be handled as HTML elements, included in tables, etc. All that is required is to embed a Corvid applet call within the email with the location of Corvid applet referenced correctly.

12: Running a Knowledge Base 228
To do this:
1. Build a system using Corvid and select to run it as an applet. 2. Use Notepad, or a similar editor, to open the file generated by Corvid named Kbname.HTML, where Kbname is
the name of your system. 3. In the file copy the actual applet call. This is the section between the <applet> and </applet> tags. It should look
something like: <APPLET CODEBASE = "./" CODE = "Corvid.Runtime.class" NAME = "CorvidRuntime" ARCHIVE = "ExsysCorvid.jar" WIDTH = 700 HEIGHT = 400 HSPACE = 0 VSPACE = 0 ALIGN = middle > <PARAM NAME = "KBBASE" VALUE = "" > <PARAM NAME = "KBNAME" VALUE = "Kbname.CVR"> <PARAM NAME = "KBWIDTH" VALUE = "700">
The expert system would be running here but your browser has Java Applets disabled or does not support Java Applets.
</APPLET>
4. Normally the applet parameter "CODEBASE" provides the path from the server location of the HTML page containing the applet call to the location of the ExsysCorvid.jar file. These are typically in the same folder, so the normal CODEBASE is "./" which indicates they are in the same folder.
Place the ExsysCorvid.jar file and all system files on your server just as if they were to be opened by a normal HTML page. You should be able to run the system by going to the kbname.html page on the server. In an email, there is no base HTML page, so there is no server location to work off of. Consequently, the CODEBASE parameter must be the full path to the location of the ExsysCorvid.jar file on the server. For example:
CODEBASE = "http://www.myserver.com/mySystem"
Notice that the CODEBASE should start with "http://" and specify the folder where ExsysCorvid.jar is located. (The Corvid Runtime will automatically look for the ExsysCorvid.jar file in that folder.)
Also, the directory is stated in terms of the Web server, not the actual directory structure of the server. The "http://www.myserver.com" references a folder on the server that may be many levels deep in the actual directory structure. In the example, "mySystem" would be a folder in that directory. This is exactly the same as referencing a page or image on the server for use in a Web Site.
5. Copy ExsysCorvid.jar, the Kbname.CVR, Kbname.CVRU and any other files required by your Corvid system to the selected directory.
6. Create an HTML email (check your email program for how to do this), and add the modified applet call. <APPLET CODEBASE = "http://www.myserver.com/mySystem" CODE = "Corvid.Runtime.class" NAME = "CorvidRuntime" ARCHIVE = "ExsysCorvid.jar" WIDTH = 700

12: Running a Knowledge Base 229
HEIGHT = 400 HSPACE = 0 VSPACE = 0 ALIGN = middle > <PARAM NAME = "KBBASE" VALUE = "" > <PARAM NAME = "KBNAME" VALUE = "Kbname.CVR"> <PARAM NAME = "KBWIDTH" VALUE = "700"> The expert system would be running here but your browser has Java Applets disabled or does not support Java Applets. </APPLET>
7. The various parameters for the system can be set as needed. The WIDTH and HEIGHT for your system may be different can be changed. These control the size of the applet window in the email.
8. The email can now be sent. When the recipient opens the email they will see a fully functioning expert system in the applet window, along with any other HTML information or images that were included.
Note: if the recipient does not accept HTML in emails, they will not be able to view the system. In this case, an alternate plain text email can be added that will provide a link to a Web page to run the system.

12: Running a Knowledge Base 230

13: Validation 231
13: Validation Validation Testing Testing a system thoroughly is an important part of any Corvid development project. The nature of Knowledge Automation systems that can analyze many different combinations of user input to provide situation specific advice makes testing a system thoroughly a challenge.
Even a medium size system can have hundreds of thousands of possible combinations of input – far too many to attempt to input by hand. Corvid’s validation function enables automating very large numbers of tests, along with setting various warning tests to check for specific types of issues in the system. Validation testing also allows a specific Logic Block or subset of a system to be tested, allowing thorough testing of even large systems.
Once the parameters for the validation test are set, the tests run automatically without additional user input. Corvid will display the number of tests that will have to be run based on the selected parameters, and will display the progress as the tests are being executed. For larger tests, they can be allowed to run over night or longer as needed. A file is generated with any errors and problems that are detected and special system warnings that are generated.
The validation test parameters can also be saved to a file, so that the same tests can be run again later to check any modifications to the system.
Validation checks that a system is not producing internal errors and that any Warning tests are not triggering. However, it does not “understand” that actual validity and correctness of the rules in the system. It is the responsibility of the developer to make sure that the actual logic and advice given is correct. The automated validation testing will greatly simplify performing large numbers of tests, but only the author and domain expert can assure that a system is giving the correct answers and advice.
To run validation tests, select “Validation” from the “Run” menu. This will display the Validation testing window to set:
The scope of the testing (specific Logic Block to entire system)
The range of values to use in performing tests
The specific conditions that should trigger warnings
Set Run Mode The Run Mode controls the section of the system that will be tested. In some cases, testing the entire system would take too long, and individual sections can be tested independently. For example, a specific Logic Block may be used to set the value for a variable based on user input. It may be easier to test this block separate from the rest of the system to make sure it is setting the correct values. This allows focusing on this detail without the influence of the rest of the system. Once that part is validated, it can be used in a more extensive test.
To set the Run Mode, select either:
Specific Logic or Action Blocks to run in forward chaining
To derive the values of the variables selected for output
To run a specific Command Block

13: Validation 232
Forward Chain Logic or Action Blocks This should be used for systems that run specific Logic or Action Blocks in forward chaining to set the value for one or more variables. If a system is structured so that individual Logic or Action Blocks perform independent functions, they can be validated independently. If a system uses backward chaining, or uses many Logic Blocks to set the values of individual variables, one of the other Run Modes should be selected. This mode is often a good choice for systems that only use Action Blocks since those are always run in forward Chaining.
Click the “Forward Chain Logic or Action Blocks” radio button.
The list below the button will display all the Logic and Action Blocks in the system.
Click one or more Logic/Action Blocks. (Use Shift-Click and Ctrl-Click to select multiple blocks)
As blocks are selected, Corvid will automatically display the list of all the variables used in the IF conditions in the block(s). These are all the variables that control the selection in the block(s) and are the only variables needed to test the block(s). The test values for these variables will be set below.
Derive Output Variables This mode allows full control over what variables will be tested and what variables will be derived. It uses backward chaining to derive the values for the variables selected in the “Output” section at the bottom of the window. Since any of the variables in the system may be needed to derive certain other variables, the full set of variables can be used for the tests.
Select the “Derive Output Variables” radio button
In the “Output” section, select the variables that should be derived via backward chaining. This can be groups of variables (e.g. all confidence variables) or specific variables.
When this option is set, Corvid will display all the variables in the variable list in the middle, allowing complete flexibility in setting variables that may be needed by the logic, or to be passed to external programs.
Run a Specific Command Block This is the most powerful of the modes, since it allow full control on the range and scope of the validation tests. Usually, a special “Validation Command Block” will be generated that can combine running specific blocks, deriving variables and other operations as needed. Sometimes this is just a modified version of the Command Block used for normal runs.
To add a special command block of command to use for validation, just build the command block like any other command block, but do NOT make it the Starting Command Block. When running in validation, Corvid will make a temporary Starting Command Block which will call this block.
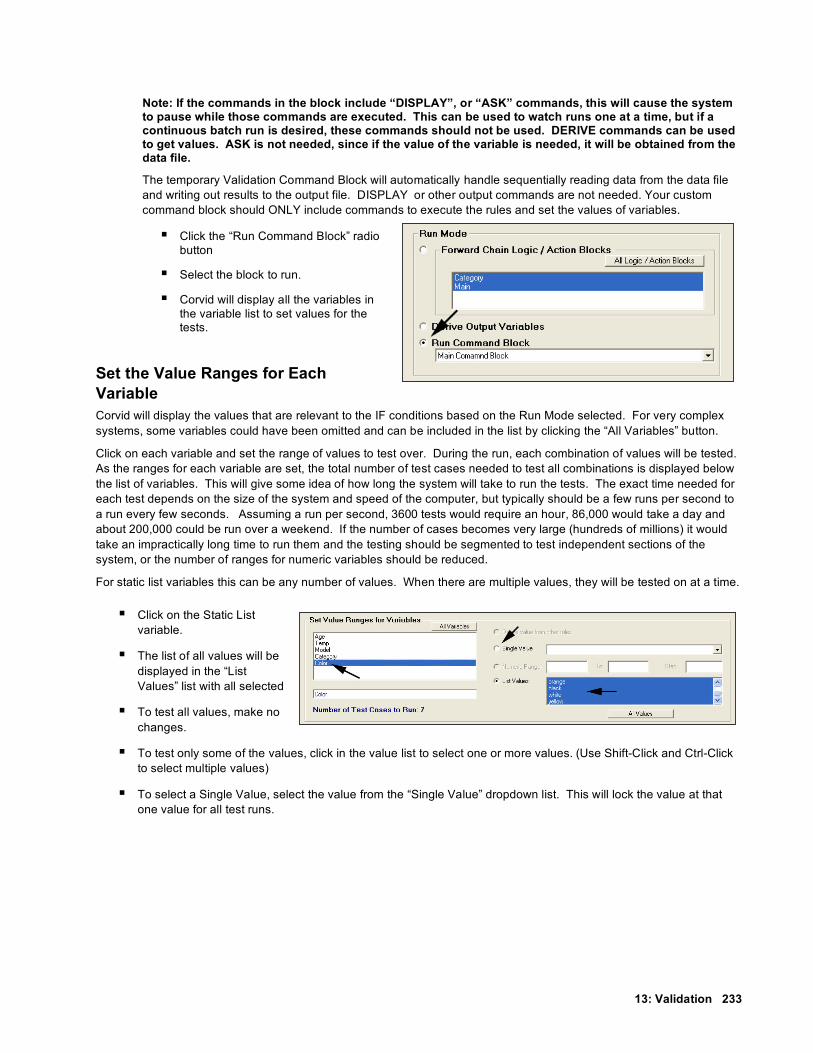
13: Validation 233
Note: If the commands in the block include “DISPLAY”, or “ASK” commands, this will cause the system to pause while those commands are executed. This can be used to watch runs one at a time, but if a continuous batch run is desired, these commands should not be used. DERIVE commands can be used to get values. ASK is not needed, since if the value of the variable is needed, it will be obtained from the data file.
The temporary Validation Command Block will automatically handle sequentially reading data from the data file and writing out results to the output file. DISPLAY or other output commands are not needed. Your custom command block should ONLY include commands to execute the rules and set the values of variables.
Click the “Run Command Block” radio button
Select the block to run.
Corvid will display all the variables in the variable list to set values for the tests.
Set the Value Ranges for Each Variable Corvid will display the values that are relevant to the IF conditions based on the Run Mode selected. For very complex systems, some variables could have been omitted and can be included in the list by clicking the “All Variables” button.
Click on each variable and set the range of values to test over. During the run, each combination of values will be tested. As the ranges for each variable are set, the total number of test cases needed to test all combinations is displayed below the list of variables. This will give some idea of how long the system will take to run the tests. The exact time needed for each test depends on the size of the system and speed of the computer, but typically should be a few runs per second to a run every few seconds. Assuming a run per second, 3600 tests would require an hour, 86,000 would take a day and about 200,000 could be run over a weekend. If the number of cases becomes very large (hundreds of millions) it would take an impractically long time to run them and the testing should be segmented to test independent sections of the system, or the number of ranges for numeric variables should be reduced.
For static list variables this can be any number of values. When there are multiple values, they will be tested on at a time.
Click on the Static List variable.
The list of all values will be displayed in the “List Values” list with all selected
To test all values, make no changes.
To test only some of the values, click in the value list to select one or more values. (Use Shift-Click and Ctrl-Click to select multiple values)
To select a Single Value, select the value from the “Single Value” dropdown list. This will lock the value at that one value for all test runs.

13: Validation 234
For numeric variables, a range of values is defined with a stating value to an ending value with an option increment value (an increment of 1 is used if none is specified). Numerics can also have a single value specified.
Click on a Numeric variable to select it
Enter a Starting value, Ending value and optional Step value (If no Step is entered, 1 will be used). The variable will be tested at values of: start value, start value + Step, start value +2*step, etc until the value is higher than the ending value.
If only a single value is needed, which will lock the variable at this value for all tests, click the “Single Value” radio button and enter the value in the edit box.
It is very easy to have the total number of tests grow rapidly if there are many numeric variables with a small step value. If the number of tests is impractically large, this may be the cause. Consider the logic of the system in setting the range for numeric variables.
If a numeric variable is only tested in a limited way such as a simple test like “[TEMP]>100”. All that is needed is to have values of the variable [TEMP], below, at and above 100. So a range of 90 to 110 with a step of 10 is all that is needed. If the variable is used in complex calculations and needs to be tested across a wide range of values, then a wider range will be needed. In selecting ranges, try to have values across the range of values where it will cause various rules to fire and try to have the step hit on values that cause the logic trigger different rules.
For all other types of variables, enter a single value. Corvid does not allow testing across ranges of string values or date values. These can be implemented by using a custom command block and reading files of data, but more often a higher level variable can be used. For example, if the number of days between 2 dates is used in the logic, work with the numeric variable that has the value and test that over ranges. Validating the this variable is correctly getting its value from 2 dates can be checked by hand.
If the value of the variable is derived from other variables, when it is selected the “Derive value from other rules” radio button will be selected. If for some reason, this is not correct (such as it is not always derived), this option can be overridden by selecting one of the other radio buttons and forcing a range of values.
Make sure that all variables relevant to the Run Mode selected have ranges or values for each variable. If the test runs require the value for a variable and it does not have a range or value, Corvid will ask for the value of the variable. This allows watching the tests run and selecting values individually, but for automated running, make sure all variables have value ranges set.
Select the Output Validation tests produce a file of information on the runs. This is a standard text file that can be examined and searched with a text editor. There are many options for the content put in the file.
Normally, the output will include the input values set. which shows which value in each of the variable ranges was used for that test. In addition it can include the values set for:
All List, Numeric, String and Date variables
The value for all Confidence Variables
The value for all Confidence variables over a threshold value
The value for all Collection Variables
The value for specific variables that have been added to the “Specific Variables” list

13: Validation 235
Just click the check boxes for the type(s) of variable to include. To add specific variables, select the variable from the dropdown list and click “Add”. Each run will contain the input values along with whatever data is selected for output. This can be examined by the domain expert to make sure the results are correct. It can also be searched using a text editor to find specific values and look at the input which produced them. Another way to use the validation file is to generate output that includes all variables. This file can then be saved. In the future if changes are made to the system, the same validation tests can be run and the 2 output files compared. Any differences between the file can be used to highlight changes in the system recommendations due to the new logic. In addition to the other output, if Corvid encounters any errors such as “division by zero”, invalid values, etc. those will also be reported.
Setting Warnings While the output file of all input and output data fully documents how the system runs, it may be too voluminous to be easily worked with – especially if it requires hundreds of thousands of tests to run the validation. Often it is much more effective to watch for specific possible problems. In place of the normal output variable list, specific warning tests can be set. Warnings can be set to check for various tests.
No Confidence variable has a value over x
A variable has a specific value
Any Boolean test involving system variables To add a warning:
Select the type of test
Enter the parameters for that test. - For Confidence variable tests, enter the threshold value
- For Variable values, for Static List variables, select the value from the dropdown list. For all others enter a value.
- For Boolean tests, enter any valid Boolean test. This can be a complex test using Corvid variables, AND/OR. Any Boolean expression that could be used in the rules can be used here.
Click the Add button There can be as many warnings as desired. If the warnings are to be used in addition to the output of other variables, then the session input data should be included for each test case. If it is preferred to run the tests without other data, and only report cases where one of the Warnings trigger, selecting the “Only include Session if there is a Warning” checkbox will cause the run to include ONLY sets of input data in the output that produce a warning. If this checkbox is selected, no input will be produced (even if other Output options are set) unless there is a warning.
Running the Tests Once all the test parameters are set, there are a few steps that are needed before the tests are run.
1. The tests are run using the Corvid Applet Runtime running as a Java Application. This requires that Java.exe be installed on the computer. If the “Select Java.exe” button has a red border around it, either Java in not installed, or the path the java.exe has not been selected. Click the “Select Java.exe” button and browse to where java.exe is located. (This will probably be “Program Files/java/versionNumber/bin/java.exe, where versionNumber is the version of Java installed). If Java has not been installed on the computer, it can be downloaded for free from Sun Microsystems at http://www.java.com. (This site changes frequently, but look for the JRE for Windows). Once Java is installed, set the path to it as described above.

13: Validation 236
2. When running tests, Corvid creates input and output data files. The default filenames are kbname.testdata and kbname.ValOutput. These can be changed if desired by entering new names, or clicking the “Browse” buttons next to the Output and Data files edit boxes. 3. When the system completes the validation run, the output file is displayed using Notepad to allow searching. If a different text editor is preferred, it can be selected by clicking the “Browse” button next to the “Display Results With” edit box. The program chosen should be one that the display text files. 4. Once the parameters are set, click the “Run Tests” button. Corvid will build the data file, add a special validation command block to the system and run it in application mode. The java console window will show the progress of the system. When done the results will be displayed in the display program that was selected. 5. The validation report should always be searched for the word “ERROR” and “WARNING”. Corvid will automatically include any error or warning message in the output file, regardless of output parameters. Looking for these word allows quickly finding the input that produced the error. (Note: If only sessions triggering specific warning tests are output, session that produced errors, but did not trigger the warning test will not be output.)
Exit / Clean Up When done, click the “Exit” button. This will remove the temporary variables and command block that was added to the system. Note: This is important to remove temporary variables that Corvid automatically adds to run validation.
Practical Applications of Validation Validation can be used in many ways. Here are a few examples:
A Corvid system will diagnose a problem and recommend an action to take. This is done using Confidence variables for the possible recommendations. The system has been designed so that any set of input should produce at least one Confidence variable with a value greater than 5. To make sure this is true, run validation to warn if a Confidence variable does not get a value over 5.
1. Open the Validation window
2. In “Run Mode” select “Derive Output Variables”
3. In “Output” select “All Confidence Variables” (If Confidence variables are used for other purposes than the possible pieces of advice, select the “Advice” Confidence variables individually.)
4. Set the ranges for the variables to test over a wide range of possible user inputs. (Remember to check the number of cases that need to be run to make sure it is not excessive.)
5. In the “Warn IF” section, click “No Confidence Variable assigned a value over” and enter “5” in the edit box. (Again, make sure Confidence variables are not used for other purposes in the system. If they are it would be necessary to write a more complex Boolean test for the “Advice” variables.)
6. Select “Only include session if there is a warning” to have the output only include the problem cases.
7. Make sure java.exe is selected.
8. Click “Run Tests”
9. When done, if any problem cases are reported, check the logic and make any needed corrections.
A system is designed to configure a machine and calculate a price. Expected prices are a few thousand dollars. A user reports that when they ran the system, it gave a price of only $10, but they can’t remember the input they used to get the clearly incorrect answer. To find possible causes, follow the same steps as above, but in step #3 set the system to derive the variable [PRICE], and in step #5 add a “Warn If” Boolean test for [PRICE] < 100.

13: Validation 237
A system is completed and ready to be fielded, but needs a final test.
1. Make a copy of the main starting Command Block
2. Edit the copy to remove ASK and DISPLAY commands
3. Set the Validation Run Mode to run the new command block
4. Search the output validation file for the words “ERROR” and “WARNING”. If they are found, check the input that produced them to see why that combination is producing an error.
Save / Load Files The validation parameters set can be saved to / loaded from files with the “Save” Load” buttons. This has the ranges for each of the variables set, warnings, etc. Saving the data allows rerunning the validation tests – however, if the variable’s name or values are changed it may invalidate the saved data. If a set of saved parameters is loaded to a system that has been edited, remember that while it will detect some changes that may have been made in the system, the values should be checked to make sure they are still consistent with the new system.
Building Custom Validation Command Block (Advanced) When the “Run” button is clicked, Corvid will build the data file and a custom command block to execute the tests. Corvid adds some temporary validation variables and a special command block that will sequentially read the data file and output the report. If you wish to build a special validation command block to allow you to customize it to run specific validation tests:
1. Click the “Run Command Block” radio button in the “Run Mode”
2. Select any Command Block (this will be changed later), here we just want the variable list
3. In the variable list, set the ranges for all variables that will be needed in the custom tests
4. Select a name for the data file and Click the “Just Build Data File” button.
5. Click the “Just Build Command Block” button. Corvid will display a message that the Command Block “Validation Test Commands” has been built. Click OK.
6. Click the “Exit Validation” button
7. Corvid will ask if the system should be left in Validation Mode. Select “Yes”
8. You will be reminded to return to the Validation window to remove temporary validation variables. Click OK
9. When the Validation widow disappears, open the Command Block ‘Validation Test Commands”.
10. Most of the commands in the block should NOT be modified. The 4th line is an EXEC command. This command can be replaced by other commands to run your system. The other commands handle reading and writing data. It is recommended that they not be modified, but can be for customized validation functions. However, using the “Run Command Block” option in the “Run Mode” is a better option for virtually all cases.
11. Set the “Validation Test Commands” as the “Starting Command Block” and set the system to run as an “Application”
12. Run the system
13. The output file will be created, but not automatically opened. Open it with a text editor.
14. When done, reopen the Validation window and click “Exit Validation” to have Corvid remove the temporary variables and command blocks.

13: Validation 238

14: Printing The System 239
14: Printing The System Printing
To print the variables, blocks and rules in a system select “Print” under the “File” menu or click on the print icon.
This will display the print dialog:
Variables To print the variables in a system either click the “All Variables” radio button or the “Specific Variables” radio button, and select the variables to print.
The printout will contain the variables and all its parameters
To print one variable per page, check the “One Per Page” checkbox.
To add a cross reference listing of all the places where the variable is used in the system, check the “Cross Reference” checkbox.
Logic Blocks To print the Logic Blocks in a system either click the “All Logic Blocks” radio button or the “Specific Logic Blocks” radio button, and select the Logic Blocks to print.
The printout is best printed to a color printer, since some information is highlighted with color, but a black and white printer will also work.
The line number of the node in the block is displayed on the left. IF conditions are in black. THEN conditions are in blue.
The parent nodes that combine to make up a rule are displayed whenever there is a THEN node(s). These are displayed in light gray prior to the last IF node. The combination of the parent nodes (in gray), the last IF node (in black), and the THEN nodes (in blue) make up a rule. In a large tree, the parent nodes may be far up the page or on a earlier page, repeating the parent nodes in gray makes it much easier to read the full set of IF conditions required for the THEN nodes to fire.
To turn off the display of the parent nodes, uncheck the “Add Full Rule Before THEN” checkbox. This will make the tree printout smaller, but will not be as easy to read.
Command Blocks To print the Command Blocks in a system click the “All Command Blocks” radio button or the “Specific Command Blocks” radio button, and select the Command Blocks to print.

14: Printing The System 240
Rules Often it is desirable to examine the actual rules produced by the Logic Blocks. For domain experts not familiar with Corvid’s block structure, it is much easier to understand and review rules, which are just English and algebra. When the rules are printed, the full text of the prompts and values is used, rather than the variable names and short value text as is used in the Logic Blocks.
To print the rules, click the “Print Rules in IF / THEN Form” checkbox. This will print the rules in the order that they occur in the Logic Blocks. To print one rule per page, check the “One Rule Per Page” checkbox.
Each rule is given a label “Block:xxx Row:###”. The block is the name of the block that the rule came from. The row number is the number of the first THEN condition in the rule. This number corresponds to the numbering on the Logic Block printout.
Format The Format box allows a left margin to be set. The “Step Indent” value is the amount each node in a block is indented from its parent node.
The font size is selected from the drop down list.
Printing One Block The Print command off the menu bar or icon prints the rules saved in the system. Changes to blocks that are currently being edited in a Logic Block or Command Block window will not be printed until the changes are saved and the window is closed.
To print a block being edited, click the “Print” button on the Logic Block or Command Block window. This will just print that particular block.

15: Using MetaBlocks for Product Selection Systems 241
15: Using MetaBlocks for Product Selection Systems Overview MetaBlocks provide a way to build systems that put generic decision-making information in Logic Blocks that interact with spreadsheet files that contain all of the detailed product data. This approach makes it easy to update and maintain a system by adding or deleting products in the spreadsheet or changing product features or data.
This type of advisory system provides a probabilistic “best fit” recommendation of products to meet a user’s overall needs. The results are quite different from a database approach, which requires a match on every feature. When the user’s desired features conflict, such as a high-end feature with a low price, the system does not just report “No match found”. Instead it presents an explanation that the feature requires going to higher priced products, and present those products with a note that they cost more than the users desired price point, but would be a better fit to their needs. This approach is MUCH more like the interaction with a human salesperson and much more informative, interactive and motivating in decisions.
MetaBlocks can be used for many types of systems, but they are best for selection problems that involve frequently changing properties or features of the items being selected among.
Simple product selection problems where the features rarely change may be better done written in Logic Blocks. It is somewhat more complex to make generic logic and separate it from the data. This is very beneficial if the data changes frequently, but not if the data is static, and there are a relatively small number of possible items.
There are several steps in setting up such a system, and they are not complicated once MetaBlocks are understood.
MetaBlocks Any Logic Block can be made a MetaBlock by clicking on the MetaBlock button on Logic Block window.
This will display the dialog for setting the MetaBlock Parameters.
MetaBlocks are a combination of logic, data and procedural steps. The logic is contained in the Logic Block, the data in the spreadsheet and the procedures set by the MetaBlock dialog.
The Logic Block is run in forward chaining. This is a data driven mode. The rules in the block are processed sequentially from top to bottom. This is repeated once for each data row in the spreadsheet. However, backward chaining is used to derive the values of any Corvid variables, which may involve running other Logic Blocks. The data in the system comes from 2 sources - normal Corvid variables which are set like any other system, and data from a spreadsheet which is indicated by {} and which is updated as each row in the spreadsheet is processed. The Corvid variables are typically set only once, except for those that are cleared.

15: Using MetaBlocks for Product Selection Systems 242
The procedural control is set by which Corvid variables are cleared and what data is saved after each row. The data to clear is specified in the list on the right of the MetaBlock dialog. The data to save is defined in the Logic Block itself. Typically, each row of data sets a Confidence variable that indicates how appropriate a product in that row is for the user. This variable should be cleared after each row so each row is independent. There may also be other variables that are used to do the calculations on each row that should also be cleared.
After the spreadsheet has been fully processed, there should be some variable(s) that contains the results. Typically this is a collection variable but other approaches are also possible. This result is displayed to the end user.
MetaBlock Spreadsheet The MetaBlock spreadsheet holds the detailed product data. The rules in the Logic Block will be applied to this data one row at a time. The spreadsheet should hold all of the information on the products that will be relevant to making a decision among them.
Tab Delimited The spreadsheet MUST be a tab-delimited spreadsheet. This is easy to build in a product such as Microsoft Excel. Just save a copy as a tab delimited. To do this:
1. Build the spreadsheet in Excel
2. Select “Save As” under the File menu
3. In the “Save as Type” drop down list, select “Text (Tab delimited)”
4. Save the file with a unique name in the directory where your Corvid system is being built. (This is actually not required, but makes it easier when collecting the files to move to the server.)
Many other programs also support building tab-delimited files.
Headings and Data The first row in the spreadsheet MUST include headings for each column the system will be using. These heading will be used in the Logic Block to indicate what value to take from the spreadsheet.
In the Logic Block, an identifier in { } will be replaced by the value from the spreadsheet where the column matches that identifier in {}. For example, if there is a rule with an IF test:
{Price} > 14
and a spreadsheet:
Product Price Weight
A123 12.35 1.5
B999 15.97 3.2
The first time the rules run, {PRICE} will be 12.35 and the rule will be false, the next row, {PRICE} will be 15.97 and the rule will be true.
The data in each column can be numeric or text. However, it is always included in the Corvid formula or command as if it were a string. This allows it to be added to a numeric formula or a command. The {..} will be replaced with the exact text in the column. When a spreadsheet is selected, the headings are displayed in the MetaBlock dialog. They can also be displayed when building formulas in a Logic Block that has been assigned a MetaBlock spreadsheet, by clicking on the MetaBlock button when building formulas.

15: Using MetaBlocks for Product Selection Systems 243
String Tests When the spreadsheet contains text strings and the Boolean test expression is comparing the value in the spreadsheet with a known value, both the MetaBlock parameter and the test string must be in quotes.
For example, if the spreadsheet on cars had a “Manufacturer” column, an IF condition in the rules might test if the value in that column was “Ford”. To do this use:
“{Manufacturer}” = “Ford”
Note that the MetaBlock parameter in { } must also be in “ “. This is because the { } parameter is replaced with the value in the spreadsheet column. The quotes are needed to make it a syntactically correct expression in Corvid.
If the string value were being tested against the value of a string variable [S], the expressing would be:
“{Manufacturer}” = [S]
When the data in the spreadsheet is a number, then the quotes are not needed and an expression such as:
{Price} > 14 can be used.
MetaBlock Logic The logic in the MetaBlock is built like any other Corvid Logic Block. The block should contain rules that allow it to take data on the user’s requirements for the product and determine how well this matches the features of the product in the spreadsheet row being analyzed.
One way to do this is to use a Confidence Variable set to use “Sum” as the way to combine confidence values to arrive at the final confidence. (There are also many other ways to do this.)
The “Sum” approach to combining confidence values allows rules to be built that add or subtract “points” from the Confidence variable depending on how well the product matches the users requirements. If a product is very far off on a feature, a large number of points can be subtracted, effectively eliminating the product from consideration. On the other hand, adding points for being a good match in other areas may make up for subtracting some points for one mismatch. This can be weighted in various ways. At the end, the “best” matches can be presented, even though none may be an exact match to all desired features.
At the bottom of the MetaBlock, there should be a few rules that determine if and how the product information should be saved. This is usually done using a Collection Variable. If a product has the Confidence variable reach a value over some threshold, the information on the product is added to the Collection variable, sorted by the Confidence value. This results in a Collection variable holding a sorted list of the best products to display to the end user.
Notes One of the most appealing aspects of MetaBlocks is that Notes can be added to provide the sort of information that a real salesperson might add. The Notes are generally kept in a Collection Variable that is cleared at the end of each spreadsheet row. Rules in the block can add comments based on product and user requirements to the Collection variable, which can be saved for products that may be recommended.
Notes can also be used to add images, HTML links, or product descriptions to the results making for much more useful and personalized recommendations
MetaBlock Sample System The best way to understand MetaBlocks is to see one built. This example system is a simple restaurant selector. Restaurants are an excellent example of a product where there can easily be conflicting user requirements, and “best fit” compromises are often the best solutions. This is an emulation of the advice that would be given by a concierge on what restaurant to go to based on price, type of food, and type of occasion. It only considers a few of the factors that a real system would, but shows the concepts for building a MetaBlock system. These concepts apply to all product selection systems.

15: Using MetaBlocks for Product Selection Systems 244
User Requirements The first part of building a product selection system is to define what user requirements the system is going to consider and support. Also, consider which requirements can be directly asked of the user or derived from other logic in the system, asking the user simpler questions.
In this case, the system will consider:
Price Type of food Restaurant Atmosphere
Open or closed that night
Desired price range and type of food can be directly asked of the user. For this system will derive what type of atmosphere is desired by asking about what type of occasion it is to determine if the restaurant should be quite and intimate or a loud party atmosphere. (Obviously, just this part of the system could get quite large, and it is simplified a bit.)
First add a Corvid Numeric variable for the price you are willing to pay:
[Budget]
Prompt: The maximum price I want to pay for an individual dinner
This will be directly asked of the user.
There are 2 ways to handle the type of food, either:
Add a single Static List variable with values that list the types of foods the system is going to support, OR
Add a Static List variable for each type with values of: - Must have - Would like to have - Don’t care for
The latter approach allows better matching with the restaurant since weighting can be given to the strong preferences and is the approach used.
The system will offer: Steak, Seafood, Vegetarian, Asian (Japanese, Chinese and Vietnamese) and, since Exsys Inc is headquartered in Albuquerque, New Mexican.
All of the “types of food” questions are put on a single screen with radio buttons to select the answers.
The spreadsheet will rank each restaurant on its offering of these types of food on a scale of 0 - 5. A value of 0 indicates that type of food is not available, a value of 5 indicates that this really the restaurants main (or only) type of food.
For atmosphere, there are 3 variables:
[NOISE]
[PRIVACY]
[FORMAL]
[NOISE] is a measure of how noisy or quiet the restaurant should be. This is given a value of 0 - 5, where 0 is a very quiet restaurant ideal for talking to fellow diners without interruption or competing sounds and 5 is a very noisy party atmosphere.
[PRIVACY] is a measure of how private the restaurant should be. This will also be given a value of 0 - 5, where 0 is a crowded restaurant where conversations can be easily overheard and 5 is very private, suitable for discussions that should not be overheard.
[FORMAL] is a measure of how formal the dress should be. This will be give a value of 0 - 5 where 0 is very informal and 5 is a formal restaurant, jacket and tie required

15: Using MetaBlocks for Product Selection Systems 245
The spreadsheet will contain data on how each restaurant is ranked in these factors. The desired values for these variables will be set by rules in other Logic Blocks that base the value on the type of occasion you are going to the restaurant for.
There is a Logic Block, named “Atmosphere”, that sets the desired values for [NOISE], [PRIVACY], and [FORMAL] for several types of occasions - types of business meetings, dates, and other occasions. The logic shown here is quite simplified, but it shows how to set the internal parameters used to select a restaurant based on simpler questions that can be directly asked of the user. In a full system, many other types of events and factors would be considered.
Since this new Logic Block sets the values for [NOISE], [PRIVACY], and [FORMAL], it will be called automatically to derive the values and then use them in the MetaBlock.
Noise: 0 = Very quiet, 5 = very noisy, party
Privacy: 0 = Very open, 5 = very private Formal: 0 = Shoes and Shirt, 5 = Jacket and Tie
There is one more major requirement to add - is the restaurant open. Most of the restaurants in the system are open everyday, but some are closed Sunday and some close Monday. This will be included in the system with a large number of points. It does not matter how great the restaurant is, if it is not open, it is excluded.
Data Spreadsheet The spreadsheet will need to contain data on each of the restaurants in the system. To store this you create a spreadsheet with column headings:
Name - The name of the restaurant Address - The address and phone number Cost - The typical price of a dinner Noise - A ranking of how noisy the restaurant is: 0 -5 Privacy - A ranking of how private the restaurant is: 0 -5 Formal - A ranking of how formal dress is at the restaurant: 0- 5 Steak - A ranking of the availability of steak: 0 -5 Seafood - A ranking of the availability of seafood: 0 -5 Vegetarian - a ranking of the availability of vegetarian meals: 0 -5 Asian - A ranking of the availability of Asian cuisine: 0 -5 Mexican - A ranking of the availability of Mexican cuisine: 0 -5 Closed Sunday - A “1” if closed on Sunday, otherwise a “0” Closed Monday - A “1” if closed on Monday, otherwise a “0” Image - A JPG image for the restaurant Notes - Other comments on the restaurant
This spreadsheet will hold all of the details on the restaurants. This makes it easy to update the information and add restaurants.

15: Using MetaBlocks for Product Selection Systems 246
Defining the MetaBlock The next step is to build rules in a new Logic Block that you will make a MetaBlock.
This will use 3 new variables:
1. The first is a Confidence variable that will be used to calculate how likely the restaurant is to meet the users requirements. This variable will be named [Ranking] and will use the “Sum” method of combining confidence values.
2. A new Collection variable named [Comments] will hold comments on the individual restaurant being analyzed. 3. Another Collection variable named [Best_Choices] will be used to store the best selections.
When the system runs, it will clear [Ranking] and [Comments] after each row since their value is recalculated for each row. These are the only variables you need to clear since all others stay the same for the entire system, or, for [Best_Choices], are built during the processing of many rows in the system.
To build the MetaBlock:
1. Start a new Logic Block named “Restaurant MB”
2. Make the block a MetaBlock by clicking on the “MetaBlock” button
3. In the MetaBlock dialog:
Select the restaurant spreadsheet
Pull down the variable list on the right and select Ranking
Click the “Add” button
Pull down the variable list on the right and select Comments
Click the “Add” button Note: A Logic Block that is made a MetaBlock can be named anything, but using the name of the spreadsheet followed by “MB” makes it easy to recognize that this is a MetaBlock and what it does.
Adding the Logic Now add the actual logic. Most MetaBlock systems have multiple trees in the block. - remember all of the logic that is to be applied to the spreadsheet must be in the same block. Other logic that derives values can be in other blocks.
The first factor to consider is price. There is a Numeric variable in the system [Budget]. This will be used to ask the user what is the maximum they want to pay. There is also a column in the spreadsheet labeled “Cost” which is the typical cost of a meal in the specific restaurant.
If the cost is within the budget, add points to the [Ranking] variable. If the cost is higher than the budget subtract points from [Ranking]. The number subtracted should increase as the cost gets higher above the [Budget].
The number of points to add or subtract and the formula you use to increase this amount as the cost gets higher are some of the ways that various factors can be weighted in the system.
For example, a simple approach is to say if the typical cost is less than the budget, give the restaurant 50 points and if it is over budget, deduct 50 points. This is simple, but if the cost is one cent over budget it deducts as many points as if it were $100 over budget -not a very reasonable approach.
A better approach would be to always start with 100 points. If the cost is over budget, deduct 5 points for every dollar over budget. In rules this would be:
IF [BUDGET] >= {Cost} THEN [Ranking] = 100

15: Using MetaBlocks for Product Selection Systems 247
IF [BUDGET] < {Cost} THEN [Ranking] = 100 - (5 * ({Cost} - [Budget]))
Note: Remember Corvid variables are in [ ]. Data from the spreadsheet is indicated by the column heading in { }.
This makes a smooth transition. All restaurants under budget get 100 points. Those slightly over get somewhat less. Until at $20 over budget, it assigns 0 points. Restaurants more than $20 over budget get negative points.
The degree to which the system will recommend over budget restaurants is controlled by how many points are deducted for every dollar over budget. In restaurants the prices of different items can vary, so it does not severely penalize a restaurant for being somewhat over budget. (In other types of product selection systems, price might be a very important factor where being over budget would lead to a greater number of points being deducted.)
Another approach is to use a non-linear formula that will deduct many more points for prices significantly above budget. One simple way to do this is to deduct the square of the amount above budget. This grows very rapidly.
For this system, use the linear formula above. In the Logic Block “Restaurant MB”, you add the rules:
Adding Comments The rules will start the variable [Ranking] off with 100 points for restaurants under budget, going to 0 points for restaurants that are $20 over budget, and negative points for even more expensive restaurants. But remember, there are other factors that still have to be considered, and the system will be showing the user the “Best” selections based on the overall consideration of all factors.
The other factors could add enough points that even a restaurant well over budget may be the best. (Perhaps the budget is unrealistic - a quiet romantic evening for $5)
It is a good idea to ALWAYS assume that a product (restaurant in this case) MAY turn out to be a “best choice”, even if it is ranked low in one area.
If other factors push an over budget restaurant into the “Best” category, the system should warn the user that dinner would be more expensive than they were planning. To do this, build a set of comments in the Collection variable [Comments] while going through the rules. These comments apply only to the individual restaurant and are cleared after each row of the spreadsheet. (This variable was already defined and added to the MetaBlock parameters to be cleared.)
To add a note to the Collection variable, you use the .ADD method to add a string. The string added can contain information from the spreadsheet by simply using the {…} notation.
If the price of dinner is $10 - $20 more than requested, add a note that dinner will be “more expensive than requested”, and if more than $20 over, add a note that it will be “Considerably more than requested.” In both cases you will include the typical cost of the dinner from the spreadsheet.
Note: These new nodes were added at the same level as the first. These are a separate tree, though in the same Logic Block. They were added by clicking on the top node to selected it and then clicking the “Same Level-Below” button in the IF button group.
As the spreadsheet data is analyzed, many notes can be added to the [Comments] variable. This is a very useful and easy way to provide the user with personalized information very specific to their requests.

15: Using MetaBlocks for Product Selection Systems 248
Expanding the Block The next step is to add rules for the other factors in the decision. First the [Noise], [Privacy] and [Formal] factors. Each of these is ranked on a 0-5 scale for what would be most appropriate based on the occasion. The spreadsheet also has columns with the same names, which indicate the restaurant’s score in each of these areas on the same 0-5 scale.
The system adds 35 points if the restaurant’s “noise” ranking and the user’s desired ranking exactly match. For ones that don’t match, it starts with 30 points and takes 15 points off for each point that they are different. (For example, if you want a restaurant with a ranking of 2 and the actual ranking is 2, you give 35 points. If the actual ranking is 1 or 3, give 15 points. If 0 or 4 give 0 points. If 5, give -15 points.)
Note: There are many ways these factors can be worked into the system. The way to do it and number of points added control how heavily weighted these factors are in the overall recommendation.
In addition, since a little too quiet is usually OK, but too noisy can be a real problem, add a warning to the user if the restaurant is likely to be too noisy when there is more than 2 ranking steps difference. This is also done for privacy and formality.
Add the [Noise] factor to the “Restaurant MB” Logic Block:
The [Privacy] ranking is handled the same as [Noise]. For [Formal], the weighting this less heavy with fewer points added or subtracted. A warning is added if the restaurant may be significantly more formal than they may be expecting.
With these rules added you have:
Controlling Weighting Factors Now you need to add the factors on what type of food is desired. The weighting put on the food selection varies with the occasion. When just going out for no occasion, the finding the type of food you most want is important. If it is a business meeting, the atmosphere is more important than the specific type of food. This could results in a fairly large tree, but instead set a [Food_Points] variable based on the occasion. This only needs to be done once, since it is defined by the occasion and will be the same for all restaurants. This will be added to the “Atmosphere” tree, rather than the MetaBlock.
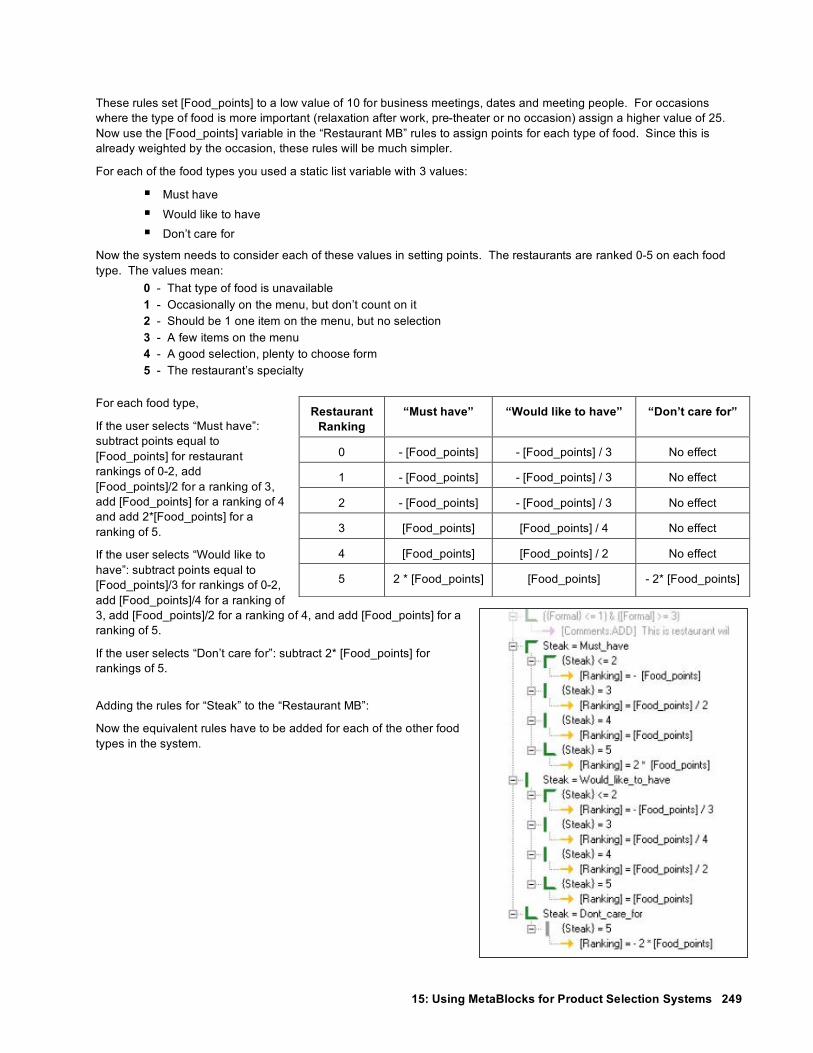
15: Using MetaBlocks for Product Selection Systems 249
These rules set [Food_points] to a low value of 10 for business meetings, dates and meeting people. For occasions where the type of food is more important (relaxation after work, pre-theater or no occasion) assign a higher value of 25. Now use the [Food_points] variable in the “Restaurant MB” rules to assign points for each type of food. Since this is already weighted by the occasion, these rules will be much simpler.
For each of the food types you used a static list variable with 3 values:
Must have
Would like to have Don’t care for
Now the system needs to consider each of these values in setting points. The restaurants are ranked 0-5 on each food type. The values mean:
0 - That type of food is unavailable 1 - Occasionally on the menu, but don’t count on it 2 - Should be 1 one item on the menu, but no selection 3 - A few items on the menu 4 - A good selection, plenty to choose form 5 - The restaurant’s specialty
For each food type,
If the user selects “Must have”: subtract points equal to [Food_points] for restaurant rankings of 0-2, add [Food_points]/2 for a ranking of 3, add [Food_points] for a ranking of 4 and add 2*[Food_points] for a ranking of 5.
If the user selects “Would like to have”: subtract points equal to [Food_points]/3 for rankings of 0-2, add [Food_points]/4 for a ranking of 3, add [Food_points]/2 for a ranking of 4, and add [Food_points] for a ranking of 5.
If the user selects “Don’t care for”: subtract 2* [Food_points] for rankings of 5.
Adding the rules for “Steak” to the “Restaurant MB”:
Now the equivalent rules have to be added for each of the other food types in the system.
Restaurant Ranking
“Must have” “Would like to have” “Don’t care for”
0 - [Food_points] - [Food_points] / 3 No effect
1 - [Food_points] - [Food_points] / 3 No effect
2 - [Food_points] - [Food_points] / 3 No effect
3 [Food_points] [Food_points] / 4 No effect
4 [Food_points] [Food_points] / 2 No effect
5 2 * [Food_points] [Food_points] - 2* [Food_points]

15: Using MetaBlocks for Product Selection Systems 250
Factors that Eliminate Products The last factor that has to be added is a check to see if the restaurant is open. If it is not, it should be eliminated regardless of how good a fit it is. Add a variable [Day_of_week] that asks what day of the week the user plans to go to the restaurant. If the day selected is a day the restaurant is closed, it will deduct 1000 points, which will effectively eliminate it from consideration. To get data for this, use the “Closed Monday” and “Closed Sunday” columns in the spreadsheet.
Saving the Data Now the system has all the rules needed to rank each restaurant, and set the value of the variable [Ranking] to measure how good a fit the restaurant is to the user’s requirements. There is also a Collection variable [Comments] with specific comments on the restaurant.
This data needs to be saved in the overall Collection variable [Best_Choices] before the next row in the spreadsheet is analyzed. To not include potential bad fits, the system only includes restaurants that received a [Ranking] value of greater than 0. Selecting this cutoff point depends on how many restaurants there are in the system and the likelihood that some will have received a fairly high [Ranking] value. If it is very likely that at least a few would get rankings of over 50, cutoff could be set higher. Another option is to just include all restaurants in the list thereby guaranteeing that there will always have a “best” selection. For this system use the cutoff of a ranking of 0.
There are several items of information on the restaurant in the spreadsheet that were not used in the analysis - name, address, notes and image. The image is a JPG image for the restaurant. This could be a photo of the restaurant, a sign or some other image to use. This image can be simply displayed or could be made into a link to the restaurant’s home page. The “Notes” column in the spreadsheet is a place where a short description of the restaurant or special comments can be added.
To save all this data, first add the image to the start of the comments as an IMG SRC command. (To make this a link, you would use an HREF command.) Then add the “Notes” to the end of the comment and then add the name and address.
The ADDFIRST method puts the IMG SRC command as the first item in the list. The following ADD methods put the other information at the end. The last line is VERY important. It is the one that saves the data. It concatenates all of the comments on the individual restaurant together and adds it as a single item in the collection variable [Best_Choices] with sorting based on the [Ranking] variable.
As each row is analyzed, all of the information is added to [Best_Choices]. This list of restaurants is sorted by the ranking the restaurant received. After each row [Ranking] and [Comments] are cleared automatically since by the MetaBlock.
Adding a Command Block The command file for this MetaBlock based system is simple. Create a new Command Block and add:
The FORWARD command is set from the BLOCK tab. Just select the MetaBlock to run. When the block needs other information, it will derive it from the other block(s) in the system. Adding a Spreadsheet The spreadsheet used for the data now needs to be populated. Setup the spreadsheet restaurant.xls as a Microsoft Excel spreadsheet and then save it as a tab delimited file in restaurant.txt. This file is in the SAMPLES/RESTAURANT directory. The spreadsheet lists some of best restaurants in Albuquerque.

15: Using MetaBlocks for Product Selection Systems 251
Displaying the Results After the system runs, the system needs to display the results. Setting the correct RESULTS commands does this. The variable [Best_Choices] may have a few or many items depending on how many were found that met the selection criteria. The system could display all of them, but instead it only shows the top 5 recommendations by using the [Best_Choice.TOP 5] property.
Each restaurant selected will have a JPG image and a block of text that includes the comments, the spreadsheet note about the restaurant and the address. This text can vary in length. One very effective way to format this is to use TEXTBOX format option. The TEXTBOX format allows specifying a part of the results window that can display any amount of text. The number of rows in the TEXTBOX can be set. If there is more text than fits in the window, a small scroll bar is displayed for the box.
The TEXTBOX is defined from the format window for the results command.
Textboxes are a built in Java control and must follow the constraints that the control has. All text must be a single size, font and color. IMG SRC and HREF commands cannot be put in the textbox.
Since the comments start with an IMG SRC command, and this cannot got in the text box, Corvid automatically displays the image and then puts the rest of the text in the TEXTBOX.
Each restaurant has an associated JPG image. This could be a picture of the restaurant, the typical food, etc. For this system, the JPGs are just the name of the restaurant. These are all the same size (in this case 175x175 pixels).
The default formats were set to make the prompt text blue and slightly larger font. The [Occasion], [Budget], and [Day_of_week] questions have been put on a single screen, as have all of the “type of food” questions.
When you run the system, the first question is:
Answer that you are looking for a restaurant for a business meeting on a Wednesday in the $35 or less range. The next question is:
Click on the “Casual” radio button and “OK”.

15: Using MetaBlocks for Product Selection Systems 252
This leads to the type of food questions. Answer that you would prefer steak, but seafood is also OK, and you would like a New Mexican style.
The system has now come back with its recommendations, a list of the top 5 restaurants based on the criteria you set. This system can be run with other input from the Samples/Restaurant directory.
System Maintenance Once a system is finished, there are always maintenance issues. The first step is to have users test the system and see if they agree with the results. If they don’t, it is likely to indicate that the weighting given to various factors (price, food type, etc) need to be reconsidered. It may also be that the rankings given for the individual restaurants in the spreadsheet need to be looked at.
Once the system is running as desired, it is very easy to maintain. All that is required to add a new restaurant is to add it to the spreadsheet. The system will then automatically consider it. If something changes at a restaurant (such as menu or pricing), just update its rankings on the spreadsheet.
Even adding a whole new cuisine is just a matter of adding a new variable in the system, adding a few rules to work that factor into the rankings and adding a new column in the spreadsheet - less than an hours work.
Product selection systems in Corvid are very easy to maintain and allow even complex logic to be incorporated into the decision process.

16: Interfacing to External Programs 253
16: Interfacing to External Programs 16.1 Overview Corvid systems can interface to resources and programs external to the Corvid Runtime program to obtain data, perform special actions and integrate into an overall IT environment.
There are a variety of places that a Corvid system can call external resources. Usually this is done to obtain data, such as reading from a database, but can involve many other actions and types of programs. External interface commands can be added to:
Get the value for a variable(s) at Runtime
Get the value list for a Dynamic List variable
Get initialization values for a Collection Variable
Set the Prompt text for a variable
Set the text for a Static List variable value(s)
Execute a command after the end user provides input
Execute a External Interface command in a Logic or Command Block
Obtaining a MetaBlock data file
All of these have a similar interface to build the associated command. The types of commands that can be used are:
URL: Calling a URL or local file to perform actions and return data (Section 16.4)
XML: XPath commands to read data (Section 16.5)
Database: SQL Commands to read or write data (Section 16.6)
PARAM: Reading data from the Applet tag (Section 16.7)
Applet: Calling a Java Applet to perform actions and return data (Section 16.8)
16.2 Where to Use External Interface Commands There are various places in the Corvid Development environment where external interface commands can be added. In general, any type of external interface command that returns the correct type of data can be used.
Whenever an external interface command can be used, there is an associated “Edit” button, which will display a window to build the command with tabs for XML, Database, Applet, Parameter and URL external interface options. The external interface commands are displayed in text boxes next to the “Edit” button. It is possible to directly edit the command in the edit box, but since most commands have fairly complicated syntax, it is much easier to build/edit the command by clicking the “Edit” button.

16: Interfacing to External Progams 254
Note: Most external interface commands are found on the Variables window and are considered “Advanced Options”.
To enable these command options, make sure the “Advanced Options” check box is selected at the bottom of the variables window.
Setting the Value for a Variable This is the most common use of external data sources. In the Variables window, go to the Options tab. Click the “Edit” button next to “External Source for Value” and build a command.
When the value of the variable is needed, rather than asking the end user, the external source for the data will be used. This allows systems to automatically obtain some, or all, of their values from external sources. The external source/program called must return a value for at least the variable associated with the command, and can return data for other additional variables. The returned value must be consistent with the variable type (e.g. a numeric variable needs to have a numeric value returned, a static list needs to have a value number or short text returned)
Setting the Value List for a Dynamic List Variable
In the Variables window, select a Dynamic List variable. In the “Dynamic List” tab, one of the options for the value list is an external source. Click the “Edit” button next to the “Use External Source for Value List” and build a command.
When the Dynamic List variable is asked or included in a report, the associated value list will be obtained from the external source.

16: Interfacing to External Programs 255
Initializing a Collection Variable In the Variables window, select a Collection variable. In the “Collection” tab, one of the options is to initialize the value list from an external source. Click the “Edit” button in the “Preload from an External Source at Runtime” and build the command.
Collection variables preloaded with values from an external source will call the external source to initialize the collection before the variable is used in the system. This can be convenient to provide starting content for a report, or to load the collection with items that will be analyzed in by the Corvid system. The value returned from the external program can be a single string, or multiple strings separated by a tab or line feed character. When there are multiple strings, they will be assigned in order as multiple items in the collection value list. A single string will be assigned as a single value in the collection value list.
Prompt Text for a Variable
In the Variable Window, select the Variable that will get its Prompt from the external source. Go to the Prompt tab. Click “Edit” in the “External Source for Prompt Text” and build a command.
When the prompt text for the variable is needed to ask the user a question or to include the variable in a report, the text will be obtained from the external source. The external source should return a single string for the associated variable.
Systems that run in multiple languages, or need to have prompts that change dynamically, can use an external source for the Prompt text. XML can be a convenient way to handle systems with multiple prompts. Corvid also provides internal support for up to 5 prompts based on a key variable, and resource files are often a more convenient way to handle systems that run in multiple languages.
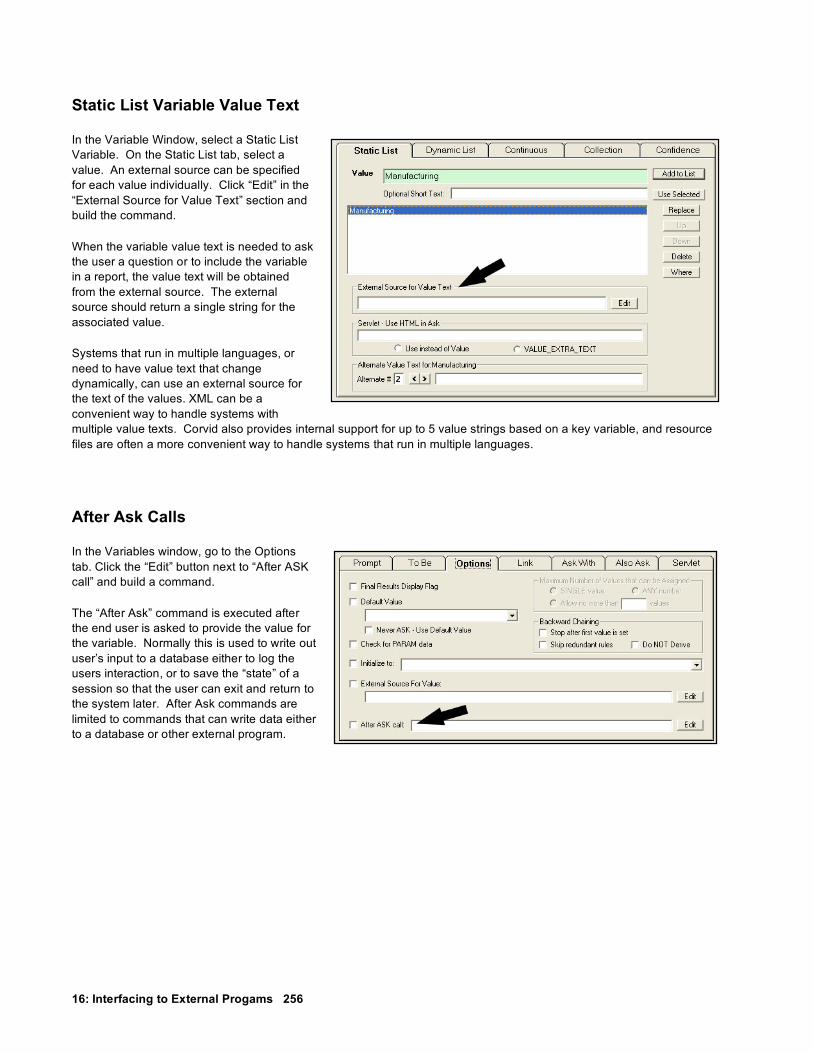
16: Interfacing to External Progams 256
Static List Variable Value Text In the Variable Window, select a Static List Variable. On the Static List tab, select a value. An external source can be specified for each value individually. Click “Edit” in the “External Source for Value Text” section and build the command.
When the variable value text is needed to ask the user a question or to include the variable in a report, the value text will be obtained from the external source. The external source should return a single string for the associated value.
Systems that run in multiple languages, or need to have value text that change dynamically, can use an external source for the text of the values. XML can be a convenient way to handle systems with multiple value texts. Corvid also provides internal support for up to 5 value strings based on a key variable, and resource files are often a more convenient way to handle systems that run in multiple languages.
After Ask Calls In the Variables window, go to the Options tab. Click the “Edit” button next to “After ASK call” and build a command.
The “After Ask” command is executed after the end user is asked to provide the value for the variable. Normally this is used to write out user’s input to a database either to log the users interaction, or to save the “state” of a session so that the user can exit and return to the system later. After Ask commands are limited to commands that can write data either to a database or other external program.

16: Interfacing to External Programs 257
External Interfaces in Commands
In addition to the options for using external interface commands with variables, they can also be used as commands, either in a Command Block or Logic Block. When building a command in the Command Builder window, the “External” tab provides various options for external commands.
External Sources for MetaBlock Data
When building MetaBlock systems, the MetaBlock data file is normally a static tab delimited spreadsheet file, however, such systems can incorporate dynamic data by using an external source for the MetaBlock data. This is done from the MetaBlock window, which allows adding database and XML sources for the data.

16: Interfacing to External Progams 258
16.3 Types of External Data Commands Exsys Corvid supports 5 types of external interface commands:
External Interface Command Window All of the external data commands are built from the External Data Sources window. This is displayed by clicking the “Edit” button next to any of the options that can use external data sources.
This window displays how the external command will be used, such as “[X]: External source to get variable value”.
The text of the command in an edit box. This text is read only and cannot be directly edited. All command parameters and changes are entered in the edit boxes under each command type tab. This makes it easier to build commands and reduces the chance for syntax errors.
The tabs allow selecting the various types of commands.
Under each tab are the options for building that type of command.
For most options using external data, any of the command types can be used. However, system architecture and delivery mode will determine what is best for a particular application. The commands “Param” and “Applet” can only be used with the Corvid Applet Runtime. Some command types require additional server programs or resources.
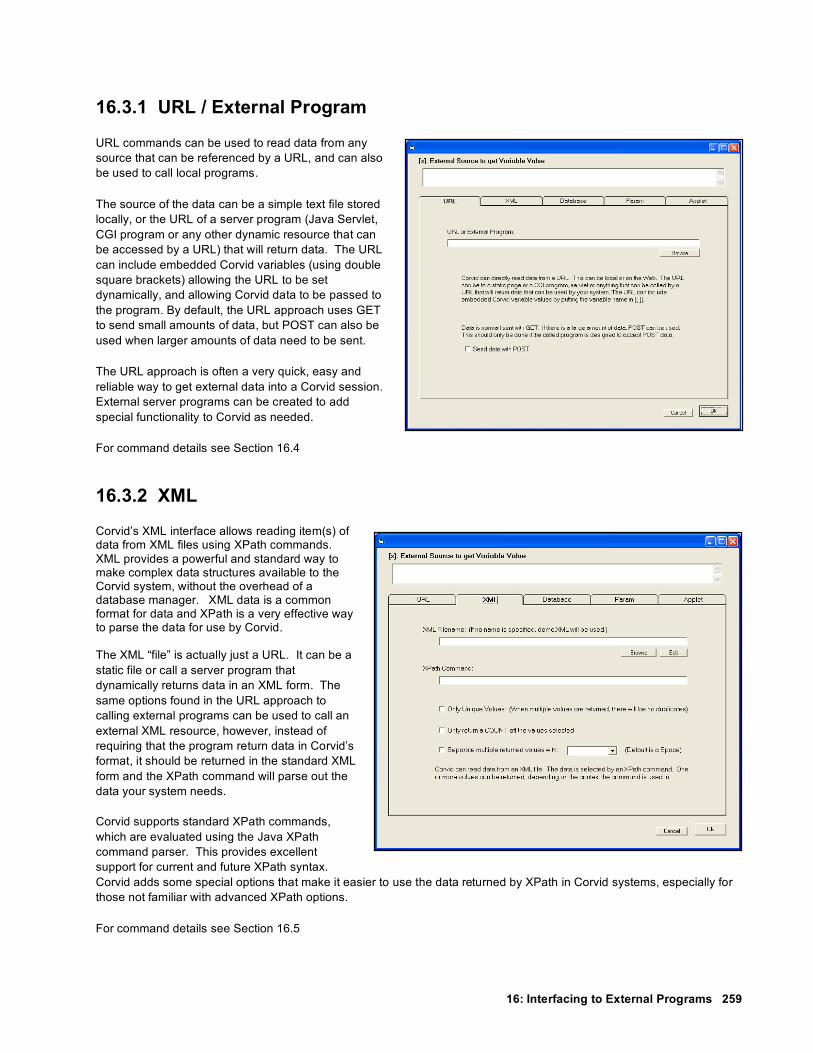
16: Interfacing to External Programs 259
16.3.1 URL / External Program URL commands can be used to read data from any source that can be referenced by a URL, and can also be used to call local programs.
The source of the data can be a simple text file stored locally, or the URL of a server program (Java Servlet, CGI program or any other dynamic resource that can be accessed by a URL) that will return data. The URL can include embedded Corvid variables (using double square brackets) allowing the URL to be set dynamically, and allowing Corvid data to be passed to the program. By default, the URL approach uses GET to send small amounts of data, but POST can also be used when larger amounts of data need to be sent.
The URL approach is often a very quick, easy and reliable way to get external data into a Corvid session. External server programs can be created to add special functionality to Corvid as needed.
For command details see Section 16.4
16.3.2 XML Corvid’s XML interface allows reading item(s) of data from XML files using XPath commands. XML provides a powerful and standard way to make complex data structures available to the Corvid system, without the overhead of a database manager. XML data is a common format for data and XPath is a very effective way to parse the data for use by Corvid. The XML “file” is actually just a URL. It can be a static file or call a server program that dynamically returns data in an XML form. The same options found in the URL approach to calling external programs can be used to call an external XML resource, however, instead of requiring that the program return data in Corvid’s format, it should be returned in the standard XML form and the XPath command will parse out the data your system needs. Corvid supports standard XPath commands, which are evaluated using the Java XPath command parser. This provides excellent support for current and future XPath syntax. Corvid adds some special options that make it easier to use the data returned by XPath in Corvid systems, especially for those not familiar with advanced XPath options.
For command details see Section 16.5

16: Interfacing to External Progams 260
16.3.3 Database Database commands are some of the most flexible and commonly used external data commands. Corvid can interface with any ODBC/JDBC compliant database to read and write data. Standard SQL commands can be used to select and read data. The values of Corvid variables can be sent to the database to be stored, or used in commands that select items of data to return to Corvid. Database commands can be used with both the Corvid Servlet Runtime and the Corvid Applet Runtime, however the Applet Runtime requires server support for database commands in the form of a Java Servlet provided with Corvid. The Corvid database interface provides a convenient way to integrate Corvid expert systems into corporate databases and IT infrastructure.
For command details see Section 16.6
16.3.4 PARAM Data The Corvid Applet Runtime provides a way to run Corvid expert systems in a browser window. An HTML “Applet” tag defines where and how the Corvid Runtime will be displayed in the HTML page. This applet tag can also contain “PARAM” data to set the value for Corvid variables. The PARAM external interface makes it easy to access this PARAM data from within the system.
PARAM data is most useful for systems that dynamically build the HTML pages that contain the Corvid Runtime, such as with Cold Fusion, but can be used anytime there is data that should be sent to specific Corvid sessions or which should be used to configure the sessions to reflect changing situations.
The PARAM approach can only be used with the Corvid Applet Runtime.
For command details see Section 16.7
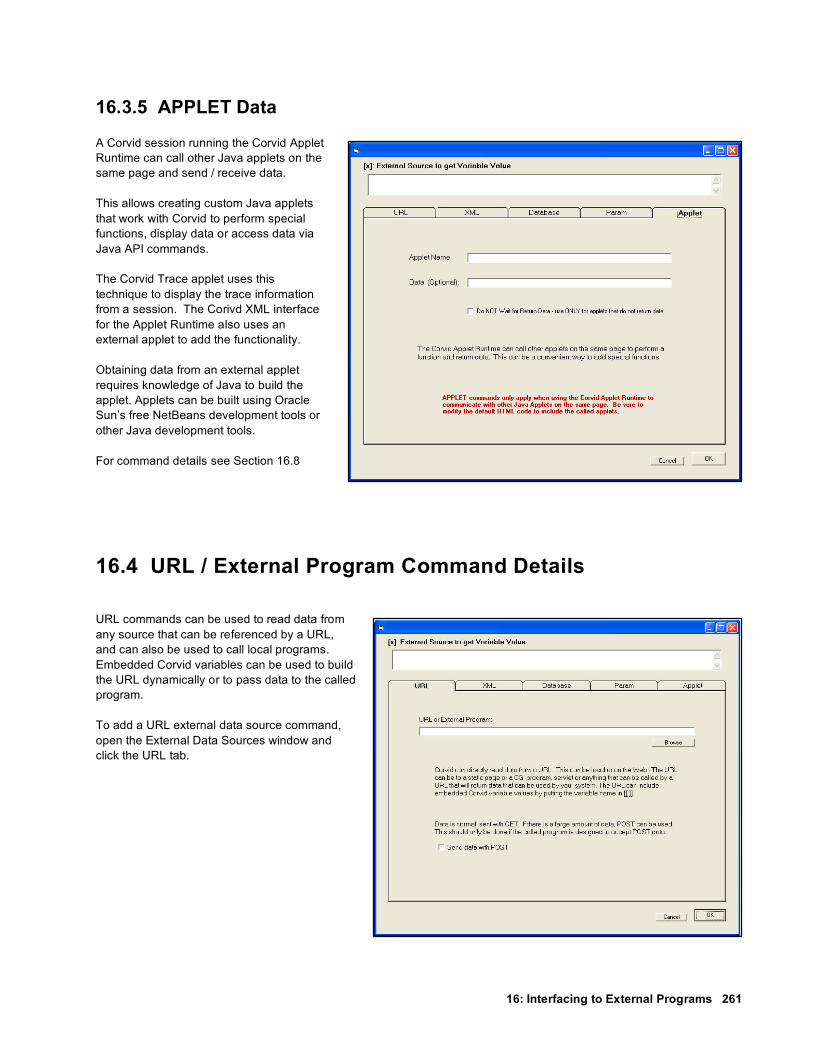
16: Interfacing to External Programs 261
16.3.5 APPLET Data A Corvid session running the Corvid Applet Runtime can call other Java applets on the same page and send / receive data. This allows creating custom Java applets that work with Corvid to perform special functions, display data or access data via Java API commands. The Corvid Trace applet uses this technique to display the trace information from a session. The Corivd XML interface for the Applet Runtime also uses an external applet to add the functionality. Obtaining data from an external applet requires knowledge of Java to build the applet. Applets can be built using Oracle Sun’s free NetBeans development tools or other Java development tools. For command details see Section 16.8
16.4 URL / External Program Command Details
URL commands can be used to read data from any source that can be referenced by a URL, and can also be used to call local programs. Embedded Corvid variables can be used to build the URL dynamically or to pass data to the called program. To add a URL external data source command, open the External Data Sources window and click the URL tab.

16: Interfacing to External Progams 262
16.4.1 URL Syntax The URL / External Program tab is used to build commands to:
Read a static file of data Call a web program (CGI, Servlet, ASP, etc) that returns data Pass data to a web resource
Reading a static file of data is the simplest type of external interface URL and is the basis for many other external interface techniques. In this case, the file is just a simple text file containing the content to return. Generally, the text file is located in the same folder as the system CVR file and can be referenced just by name.
For example: If there is a data file, MyData.txt, that the system needs, it can be put in the same folder as the CVR file. In the system, the URL to reference to it is just: MyData.txt
If the file is relative to the system CVR file, Corvid automatically builds the full URL for it. URL addresses that do NOT start with “http” are automatically taken as relative to the folder that the system CVR file is in. Data files can also be in a subfolder by including the subfolder name, such as DataFiles/MyData.txt If the file is not in the same folder or a subfolder of the CVR file, it must be referenced by a full URL address, starting with “http://”. Any address that starts with “http://” is taken as an absolute address and not relative to the CVR file. These addresses must be full URL addresses, the same as if they were entered in a browser program.
In most cases, static files of data needed by a system should be kept in the same folder as the system CVR file. This makes it easy to keep the files together and to move them between servers or run standalone. Full URL addresses starting with “http://” are needed for servlet, CGI and other programs on a different server.
When calling server programs such as Java servlets or CGI programs, the URL would be the same as would be entered in a web browser. The URL can include parameters to pass data to the called program, such as calling a servlet to get the price of a specific part:
http://www.myServer.com/PriceServlet?part=X123 To pass the value of Corvid variables in the URL, include them in double square brackets, such as:
http://www.myServer.com/PriceServlet?part=[[Selected_Part]] Any Corvid variable names in double square brackets will be replaced by the variable’s value before the URL is called. This can be used for parameters passing data, or even part of the base URL address itself.
Remember: Double square bracket embedding can lead to backward chaining to derive the variable’s value. To use the immediate value without backward chaining, use [[*varname]]. The asterisk before the name will use the current value without any attempt to derive or backward chain to get a “final” value.
Any URL that could be entered in a browser window can be used. Normally, the called URL will return data, however some external interfaces such as After Ask do not expect anything to be returned and the URL may be used to just send data. GET and POST
When Corvid sends data to a program via a URL, it uses the GET approach. This sends the data on the URL, but only allows a limited number of characters to be sent. The limit depends on both the browser and server, but is generally 1000-2000 characters or more. For most uses, this limit is not an issue. However, if a system needs to send a large amount of data to the server, check the “Send data with POST” check box. POST allows any amount of data to be sent, but the receiving program must be designed to receive data using POST. Unless it is necessary to send a very large amount of data, and the receiving program is designed to work with POST, it is best to use the default GET approach.

16: Interfacing to External Programs 263
16.4.2 Format of Returned Data To Corvid, the data returned is just text returned from calling a URL. It does not matter to Corvid if the data is from a static file or dynamic content returned from a servlet, CGI program, ASP or other on-line resource. All that matters is that the content is in the correct form.
The returned data MUST just be text. It should not have a header or that will be interpreted as part of the data. Likewise, a HTML page should not be used because it will have various tags wrapped around the text of the data.
To create static files of data, use a program such as Notepad that produces simple text files. Do not use a word processor such as MS Word unless you make sure to save the file as “text”.
Most external interface calls expect to receive a returned data string that will be used for a single purpose, such as the prompt text for a variable or the value to assign to a specific variable. Some calls expect to receive back multiple items of data, but still for a single purpose - such as the list of possible value options for a Dynamic List variable or multiple items to add to a Collection variable. In these cases, the format of the data returned is just the content needed with no additional identifier information. This can be in the static file, or returned from the program called by the URL.
External calls to set the value of a variable can set the value of a single variable or multiple variables in the same call. The returned data can be either:
A single value with no identifier, in which case it will be assigned to the variable associated with the external call.
One or more name / value pairs that identify a variable followed by the data to assign to that variable. The variable identifier is the name of the variable in square brackets, followed by a space and the value to assign to that variable. There can be multiple name / value pairs, one per line. The returned data can set the value for any variables in the system, but should also always set the value of the variable associated with the external call.
Example: an external URL call to set the value for numeric variable [X] could return just
123
which would set the value of [X] to 123. Alternatively, it could return
[X] 123
which would also set [X] to 123. However, using the second form, it could return
[X] 123 [Temp] 77 [Price] 99.99
which would set the values of [X], [Temp] and [Price] in a single call. If [X] was associated with the external call, returning
456 [Temp] 77 [Price] 99.99
which would set the values of [X] to 456. Since that data does not have an identifier it would be assigned to the associated variable. The values of [Temp] and [Price] would also be set.

16: Interfacing to External Progams 264
16.4.3 Types of Returned Data The format of the data returned for a variable depends on the type of variable.
Static List Variables
The number of the value. (FIrst value = 1, second = 2, etc) The short text, or if there is no short text, the full text of the value More than one value number or short text separated by the TAB character A numeric expression that evaluates to the number of a value
Example: Static List variable [Color] with values “Red”, ‘Blue” and “Green”
Returning Sets 1 Red [Color] 1 Red [Color] Blue Blue 2 3 (separated by Tab) Blue, Green [Color] Red Green (separated by Tab) Red, Green [Color] 1+1 Blue
Dynamic List Variables
The number of the value. (FIrst value = 1, second = 2, etc) More than one value number separated by the TAB character A numeric expression that evaluates to the number of a value
Example: Dynamic List variable [Car] with values “Chevy”, “Ford” and “Honda”
Returning Sets 1 Chevy [Car] 1 Chevy 2 3 (separated by Tab) Ford, Honda [Color] 1+1 Ford
Numeric Variables
A numeric value. An expression that evaluates to a numeric value
Example: Numeric variable [Price]
Returning Sets
45.23 45.23 [Price] 99.95 99.95 [Price] 90 + 10 100

16: Interfacing to External Programs 265
String Variables
A string value without quotes
Example: Numeric variable [Name]
Returning Sets abcde abcde [Name] Exsys Exsys
Date Variables
A string date value. This can be a full date “July 5, 2010” or shorter forms such as “1/5/99” or the number of milliseconds since Jan 1, 1970. Dates can also include the time.
Remember: All date values are interpreted by the local settings for dates on the machine running Corvid. This is the server settings for the Servlet Runtime and the client machine settings for the Corvid Applet Runtime. Different countries use different formats for dates. Dates such as “1/2/10” can be ambiguous since the 1 is the month in some countries and the 2 is the month in others. When assigning dates, the long form (e.g. July 5, 2010 1:23PM) is best to use since it is unambiguous. To set the variable to the current date, “now()” can be used, but this can also be done in Corvid and does not require an external call. Using "now()" with the Servlet Runtime will set the time for the server. The Applet Runtime will set the time for the client PC.
Example: Date variable [Start_date]
Returning Sets July 5, 2010 July 5, 2010 [Start_date] 5/12/10 May 12, 2010 (in the US) now() The current date and time Aug 21, 2008 4:52PM Aug 21, 2008 4:52PM
Confidence Variables
A numeric value consistent with the confidence mode An expression that evaluates to a value consistent with the confidence mode
Remember: The value assigned must be consistent with the confidence mode settings of the variable. A variable that expects a value between 0 and 1, must be given a value in that range. Confidence values assigned will be combined with any other values assigned to the variable based on the confidence mode settings.
Example: Confidence variable [Conf]
Returning Sets 5 5 combined with any other values [Conf] .25 .25 combined with any other values [Conf] 5 + 10 15 combined with any other values
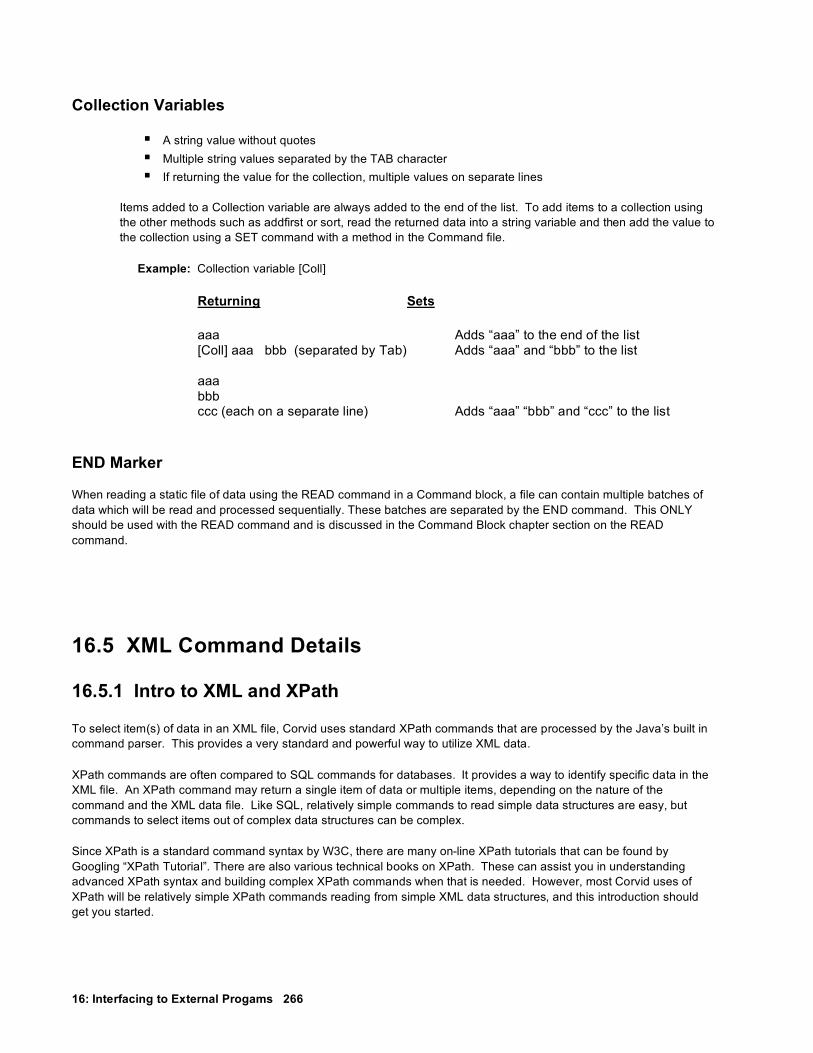
16: Interfacing to External Progams 266
Collection Variables
A string value without quotes Multiple string values separated by the TAB character If returning the value for the collection, multiple values on separate lines
Items added to a Collection variable are always added to the end of the list. To add items to a collection using the other methods such as addfirst or sort, read the returned data into a string variable and then add the value to the collection using a SET command with a method in the Command file.
Example: Collection variable [Coll]
Returning Sets aaa Adds “aaa” to the end of the list [Coll] aaa bbb (separated by Tab) Adds “aaa” and “bbb” to the list aaa bbb ccc (each on a separate line) Adds “aaa” “bbb” and “ccc” to the list
END Marker
When reading a static file of data using the READ command in a Command block, a file can contain multiple batches of data which will be read and processed sequentially. These batches are separated by the END command. This ONLY should be used with the READ command and is discussed in the Command Block chapter section on the READ command.
16.5 XML Command Details
16.5.1 Intro to XML and XPath To select item(s) of data in an XML file, Corvid uses standard XPath commands that are processed by the Java’s built in command parser. This provides a very standard and powerful way to utilize XML data.
XPath commands are often compared to SQL commands for databases. It provides a way to identify specific data in the XML file. An XPath command may return a single item of data or multiple items, depending on the nature of the command and the XML data file. Like SQL, relatively simple commands to read simple data structures are easy, but commands to select items out of complex data structures can be complex.
Since XPath is a standard command syntax by W3C, there are many on-line XPath tutorials that can be found by Googling “XPath Tutorial”. There are also various technical books on XPath. These can assist you in understanding advanced XPath syntax and building complex XPath commands when that is needed. However, most Corvid uses of XPath will be relatively simple XPath commands reading from simple XML data structures, and this introduction should get you started.

16: Interfacing to External Programs 267
Simple XPath Commands XPath commands provide a way to specify one or more items in an XML data file. XML data is organized by nested “tags”, much like the tags in HTML, but far more flexible. XML is a complex subject, and there are many books devoted to it. This is only a VERY simplistic look at how data can be stored in XML and how XPath commands can read that data. XML data is defined by elements that structure the data. An element is indicated by a tag, a name in < > such as <myData>, <Name>, <Price>, etc, similar to the way HTML is structured. The data for the element is everything between the tag and its closing tag, which is just the tag name in </ ...>. (Note the backslash / in the closing tag). So, a price of 123.45 would be entered as:
<price> 123.45 </price>
Closing tags must match the immediately preceding unclosed tag. Elements can contain data or they can contain other elements. This ability to put elements in elements is what allows data to be structured with XML. For example, there might be information on a part:
<part> <part_ID>X351</part_ID> <price> 3.45 </price> <color> blue </color> <color> green </color> <size> 1 inch </size>
</part> Here there is a “part” element with other elements describing part, ID, price, color(s) and size, each within their own tag. Each closing tag matches the preceding unclosed tag. The </part> tag closes the opening <part> tag since all the tags between them are already closed. Note that there are 2 <color> elements. There can be multiple occurrences of some elements. This allows the <part> element to include multiple color options for the part. XML files have an associated “schema” that defines what elements can occur where, when there can be multiple occurrences of an element, nesting, etc. This simple introduction does not cover schema, but this important part of XML is well covered in XML books. Programs for building and managing XML files check the XML data against the schema to make sure it is correctly structured. Corvid does not check a file against its schema and it is the developer’s responsibility to make sure that the XML data files provided are structurally correct. In addition to the nested elements, individual elements can have attributes to provide other information and ways to select data. For example, to add data on the part material, we could either add a tag for it:
<part>
<part_ID>X351</part_ID> <price> 3.45 </price> <color> blue </color> <color> green </color> <size> 1 inch </size> <material> plastic </material>
</part> or add an attribute inside a the part tag.
<part material=”plastic”> <part_ID>X351</part_ID> <price> 3.45 </price> <color> blue </color> <color> green </color> <size> 1 inch </size>
</part>

16: Interfacing to External Progams 268
Both provide information on the material, but are referenced in different ways in the XPath command. Also, the first approach using a tag, would potentially allow adding multiple materials. The second approach would be better if we wanted to have multiple similar parts, some of plastic and some of some other material, each with their own <part> tag.
A full list of parts would be made up of data on many individual parts each in its own <part> tag with its associated elements:
<part_list> <part> .... </part> <part> .... </part> <part> .... </part>
</part_list> This nesting of tags can get quite complex depending on the nature of the data. The structure can be recursive, so that there might be a <person> element containing various elements with information on that person. One of those might be <children> containing a list of other <person> elements for each child, each of which could also have <children> elements containing more <person> elements, etc. Such a structure could be very complex, and the concept of “parent”, “child” and “sibling” nodes is key to navigation in such complex structures. Advanced XPath commands can be used to select data even in complex structures, but here we will only look at simple XPath commands.
Simple XPath commands look much like a directory path on a computer. In the simplest form, there are element names separated by “/” traversing the tree-like structure defined by the nested elements.
In the simple part example:
<part> <part_ID>X351</part_ID> <price> 3.45 </price> <color> blue </color> <color> green </color> <size> 1 inch </size> <material> plastic </material>
</part> The XPath command /part/price would return the value 3.45. /part/size would return “1 inch”. However, /part/color would return both values “blue green”. This is because multiple values are allowed and the command does not differentiate between them. Working with a more complex list of parts:
<part_list> <part> .... </part> <part> .... </part> <part> .... </part>
</part_list>

16: Interfacing to External Programs 269
The command /part_list/part/price would return a list of the prices for all the parts. To get the price of a single part would require specifying an individual part. XPath provides many ways to do this. When there are multiple items, specific one(s) can be selected by putting a selection test in [ ]. The simplest selection test is just the number of the element when there are multiple occurrences of the element: For example:
/part_list/part[1]/price
would return the price value for the first part in part_list. The XPath command /partList/part[2]/price would return the price value for the second part.
The selection test can also be a boolean expression on the associated values.
/part_list/part[part_ID=”X351”]/price
would return the price of the part with the part_ID of “X351”, regardless of where it was in the list.
Commands can also return multiple values:
/part_list/part[color=”blue”]/part_ID
would return a list of the part_IDs for all parts that are available in blue.
/part_list/part[price > 3.00]/part_ID
would return a list of the part_IDs for all parts that cost more than $3.
There is MUCH more to XPath commands, but even this simple syntax allows many XML files to be parsed and used with Corvid systems.
16.5.2 Building XML Commands Corvid can read data from XML files or data sources. An XPath command is used to select the data used by Corvid. To add a XML external data source command, open the External Data Sources window and click the XML tab.
Corvid XML commands are made up of 3 parts:
The name of the XML file / URL to use (in quotes)
The XPath command to select one or more values
Modifiers for the returned data, making it easier to use it with Corvid
XML(“Filename” XPath_command Modifiers)

16: Interfacing to External Progams 270
16.5.3 XML Filename The filename for the XML file can be local to the Corvid system CVR file or a URL referencing a file or program somewhere on a network or the web that returns XML data.
The XML filename is optional, however if it is not specified, the file KBName.xml will be used (where KBName is the name of the system CVD/CVR file) and the file must be in the same folder as the system CVR file. The file name must be in quotes.
The filename can be either:
A static file of XML data A URL to a web program (CGI, Servlet, ASP, etc) that returns XML data
Reading XML data from a static file is the simplest type of XML file reference. In this case the file is just a file containing the data in an XML form. If the XML file is located in the same folder as the system CVR file, it can be referenced just by name.
For example: If there is a data file MyXMLData.xml that the system needs, it can be put in the same folder as the CVR file. In the system, the “XML FIlename” is just MyXMLData.xml.
All filenames are actually URLs. If the file is relative to the system CVR file, Corvid automatically builds the full URL for it. Filenames that do NOT start with “http” are automatically taken as relative to the folder that the system CVR file is in. XML files can also be in a subfolder by including the subfolder name, such as DataFiles/MyXMLData.xml.
If the file is not in the same folder or a subfolder of the CVR file, it must be referenced by a full URL address, starting with “http://”. Any address that starts with “http://” is taken as an absolute address and not relative to the CVR file. These addresses must be full URL addresses, the same as if they were entered in a browser program.
In most cases, static XML files needed by a system should be kept in the same folder as the system CVR file. This makes it easy to keep the files together and move them between servers or to run standalone. Full URL addresses starting with “http://” are used for servlet, CGI and other server resources that will return XML data.
To pass the value of Corvid variables in the URL, include them in double square brackets, such as:
http://www.myServer.com/PartListXMLData?Model=[[Selected_Model]]
Any Corvid variable names in double square brackets will be replaced by the variable’s value before the URL is called. This can be used for parameters passing data, or even part of the base URL address itself.
Remember: Double square bracket embedding can lead to backward chaining to derive the variable’s value. To use the immediate value without backward chaining, use [[*varname]]. The asterisk before the name will use the current value without any attempt to derive or backward chain to get a “final” value.
Any URL that could be entered in a browser window can be used, however, the called URL MUST return data in an XML form. Corvid does not check the returned data against a schema, but an incorrectly structured file will probably lead to runtime errors or incorrect operation. It is the developer's responsibility to assure that the called program is returning syntactically valid XML data.

16: Interfacing to External Programs 271
Edit: To view or edit the XML file, click the “Edit” button. This will open the file with the XML editor specified in the Properties window. The default is to use Notepad, but later versions of MS Word can be used to display XML with formatting, or a true XML editor such as EditiX can be used.
To specify the program to use to view XML, go to the Properties window “General” tab.
Under “XML Editor Program to Use”, click “Browse” and select a program. The XML programs can be used to assist in building XPath commands, editing data and checking data against schema as needed.
16.5.4 XPath Command The XPath command can be anything from a simple command to return one item of data to a complex command returning many items. The nature of how the external interface command is used determines how Corvid will handle the returned data, and if Corvid expects one or multiple items of data. An individual command can only return data for one purpose. Unlike some external commands, a single XML command cannot set the value for multiple variables. The XPath command can include the values of any Corvid variables by simply putting them in the command in double square brackets - [[...]]. Corvid will replace the [[...]] with the value of the variable before evaluating the XPath command. For example, to add a command to find all the parts over a price stored in a Corvid variable [Min_Price]:
/part_list/part[price > [[Min_price]] ]/part_ID
Note: when using double square bracket embedded variables within XPath syntax that also uses square brackets, be sure to put a space between the Corvid [[..]] and any XPath [ or ] characters. Having 3 brackets together can result in ambiguous expression. As long as the Corvid variable [[..]] has spaces around it, it will work correctly. So the above XPath command would be OK, but
/part_list/part[price > [[Min_price]]]/part_ID
would not since it has 3 bracket characters together without any spaces. The Corvid embedded variables will be replaced by their value before the command is parsed as an XPath command, so the Corvid brackets will not confuse the XPath parser. When using Boolean tests to select items of data, spaces in the XML data can be an issue. Sample XML data: <part_list>
<part> <part_ID>A111</part_ID> <price> 3.45 </price> <color> blue </color> <material> plastic </material> </part> <part> ... </part> <part> ... </part> </part_list>
16: Interfacing to External Progams 272
If the boolean test is numeric, spaces do not matter and part_list/part[price > 5]/part_ID will work correctly to select the part_IDs for the part where the price is greater than 5. It does not matter if the data in the <price> tag has spaces around it. However, for boolean expressions using string matching such as: part_list/part[part_ID >"A111"]/price The data in the <part_ID> tag must NOT have spaces around it. This is particularly important when setting the value list for a Dynamic List variable from the XML data and then using the value in other boolean tests to get other tags. Whenever a tag will be used in a boolean expression matching strings, make sure there are no spaces around the data. When matching a string, the string must be indicated by " or '. Either: part_list/part[part_ID >”A111”]/price or part_list/part[part_ID >'A111']/price would be legal syntax. If using " causes a parsing problem in some situations, try using ' instead. The XPath command is any legal XPath command that can be evaluated by the Java XPath parser. This supports quite complex XPath syntax when needed.
Note for Advanced XPath Users: Corvid expects the data returned from the XPath command to be a string. Because of this, Corvid automatically adds “.text()” to the XPath command. Normally this is correct and allows the developer to just specify the XML elements(s) without needing to explicitly convert it to a string. However, for complex XPath commands, it may not be valid to just add “.text()” to the end of the command. Corvid will NOT add the “.text()” to the XPath command if it ends in “)”. So complex commands not needing “.text()” should be put in parenthesis. For example:
/part_list/part[1]/price
would automatically have “.text()” added and would work correctly. (/part_list/part[1]/price) would not work since the “.text()” would not be added, but (/part_list/part[1]/price.text()) would work correctly.
16: Interfacing to External Programs 273
16.5.5 XPath Modifiers Corvid’s special modifiers make it easier to use data returned from XPath commands in Corvid. These are much easier to use than building a complex XPath command to return the same data. Modifier: Corvid supports 3 modifiers that can be applied to the returned data:
UNIQUE COUNT SEP=” “
UNIQUE UNIQUE will parse the returned data and remove redundant values. This is used when the XPath command may have multiple occurrences of the same value, and what the Corvid system needs is the unique values. For example, you might want to get a list of the materials used for the parts in the list:
/part_list/part/material would return the list of materials, but it would include “plastic” once for each part made of plastic, potentially many times. This would also apply to each other material. Adding the modifier:
/part_list/part/material UNIQUE causes Corvid to reduce the list to only include unique materials before returning the data. This could be used to set the value options for a Dynamic List variable, allowing the end user to choose from the materials actually in the parts list without redundancy. COUNT COUNT will return a count of the number of data items returned. /part_list/part/part_ID COUNT
would return a count of the number of parts in the list. COUNT can be used with UNIQUE to provide a count of the unique values: /part_list/part/material UNIQUE COUNT would return a count of the number of materials used for all the parts in the list. SEP=”...” SEP= provides control of the character/string used to separate individual values when multiple values are returned. This is needed only if the command will return multiple values, and those values are to be used as a single string. When XML commands are used in a context that expects multiple values, such as defining a list of values for a dynamic list variable, Corvid does not require the “SEP=” since the context of the use determines how the values will be used. The default separation character for multiple values is a new line. To change this to “ & ”, use SEP=” & “. For example: /part_list/part/material UNIQUE SEP=" & " would return a single string, list all the materials in the part list such as: plastic & aluminum & steel The separator string is used only between values and does not appear at the end of the string. Any string can be used in the SEP=” “, but tabs and line feeds cannot be typed into the edit box. To create a string with a TAB between the values, use SEP=”TAB”. The default separator for multiple values is a new line.

16: Interfacing to External Progams 274
16.5.6 XML Command Samples This is a small sample XML file and some sample XPath commands: XML File: <part_list>
<part> <part_ID>A111</part_ID> <price> 3.45 </price> <color> blue </color> <color> green </color> <size> 1 inch </size> <material> plastic </material> </part> <part> <part_ID>B222</part_ID> <price> 7.95 </price> <color> black </color> <size> 2 inch </size> <material> aluminum </material> </part> <part> <part_ID>C333</part_ID> <price> 9.55 </price> <color> black </color> <size> 4 inch </size> <material> steel </material> </part> <part> <part_ID>D444</part_ID> <price> 4.55 </price> <color> blue </color> <color> green </color> <size> 2 inch </size> <material> plastic </material> </part>
</part_list> Sample XPath Commands: Selecting a part name by its numerical place in the list. /part_list/part[1]/part_ID Returns the Part_ID of the first part: A111 Selecting a part price by its part_ID. /part_list/part[part_ID=”C333”]/price Returns the price of the part with a Part_ID of “C333”: 9.55
16: Interfacing to External Programs 275
Getting a list of the part_ID of all the parts in the list. /part_list/part/part_ID Returns a list of all the Part_IDs: A111 B222 C333 D444 Getting a list of the part_ID of all the parts in the list as a single string separated by &. /part_list/part/part_ID SEP=" & " Returns: A111 & B222 & C333 & D444 Getting a list of the materials used for parts in the list. /part_list/part/material Returns: plastic aluminum steel plastic Getting a list of the materials used for parts in the list without repeated items. /part_list/part/material UNIQUE Returns: plastic aluminum steel Getting a count of the number of materials used in the list. /part_list/part/material UNIQUE COUNT Returns: 3 Getting a count of the number of parts in the list. /part_list/part/part_ID COUNT Returns: 4

16: Interfacing to External Progams 276
16.5.7 Embedded XML Commands In addition to using XML commands associated with specific variable actions such as setting the value of a variable, XML commands can be embedded in any text in a Corvid system. This can be done any place a double square bracket replacement could be used. The syntax for embedded XML commands is the same as XML commands to get other data, but the command is surrounded by <#<...>#>. <#<XML “Filename” XPath_cmd Modifiers>#> The filename is optional, but if not included the KBName.xml will be used, where “KBName” is the name of the system. In this case, the XML file must be in the same folder as the system CVR file. Filenames NOT starting with “http://” will be considered to be an address relative to the folder with the CVR. Names starting with “http://” will be full addresses to files anywhere on the web. If a file name is used, it must be in quotes. The XPath command MUST be in quotes, and can be any XPath command that could be used to get data. The optional Modifiers UNIQUE, COUNT and SEP=”..” can be used. Embedded XML commands can be used in any text in a Corvid system such as Prompts, content in reports, explanations to the end user, etc. For example, a report might include a comment that: The current part inventory includes parts made of X different materials This could be added to a report by using the embedded XML command in the text to add the count of the materials currently used: The current part inventory includes parts made of <#<XML “partInventory.xml” /part_list/part/material UNIQUE COUNT >#> different materials 16.5.8 Using an XML File for MetaBlock Data XML data can also be used to provide the data for Corvid systems that use MetaBlocks. This allows an XML file to be used in place of a tab-delimited spreadsheet. The XML “file” used can be either a static file or a URL that returns XML data. If a URL is used, it must return the same XML data each time it is called during the session. Selecting to use XML data is done from the MetaBlock properties window. (This is displayed by clicking the “MetaBlock” button on a Logic Block window). Click the “XML Interface” button to use an XML file. (This will build a MetaBlock source file for the XML Interface. If an XML interface file has already been created, just click the “Edit” button to make any changes to it.
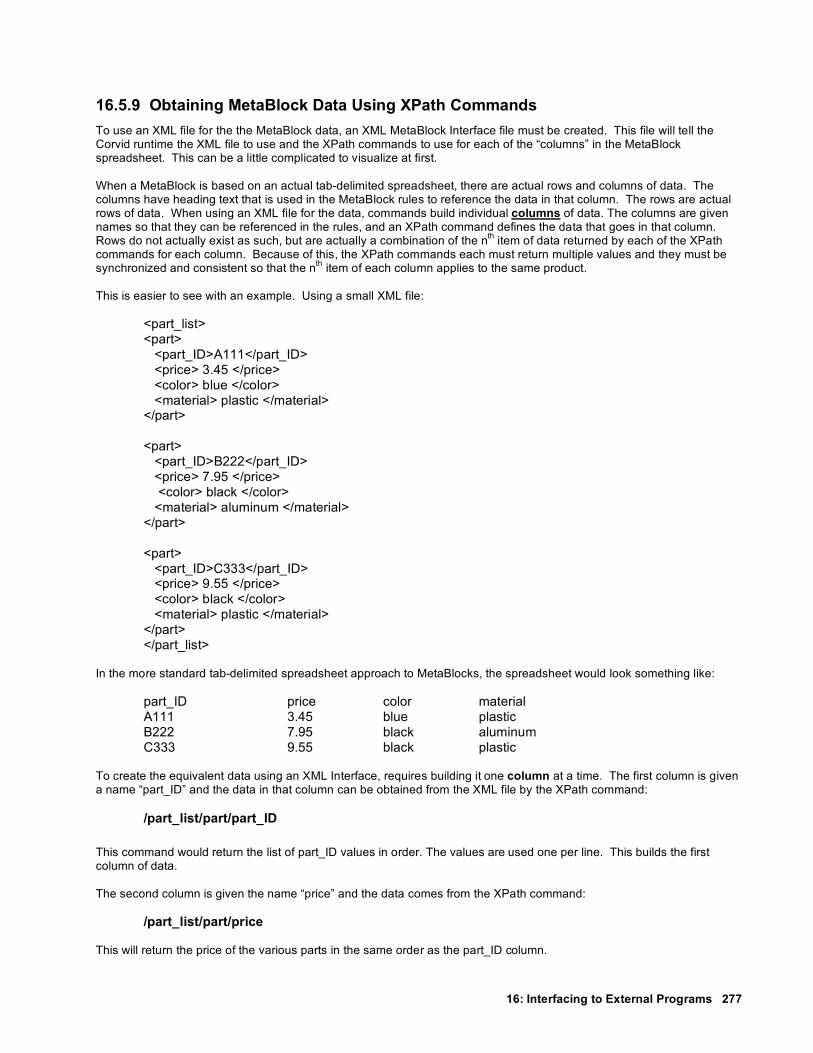
16: Interfacing to External Programs 277
16.5.9 Obtaining MetaBlock Data Using XPath Commands To use an XML file for the the MetaBlock data, an XML MetaBlock Interface file must be created. This file will tell the Corvid runtime the XML file to use and the XPath commands to use for each of the “columns” in the MetaBlock spreadsheet. This can be a little complicated to visualize at first. When a MetaBlock is based on an actual tab-delimited spreadsheet, there are actual rows and columns of data. The columns have heading text that is used in the MetaBlock rules to reference the data in that column. The rows are actual rows of data. When using an XML file for the data, commands build individual columns of data. The columns are given names so that they can be referenced in the rules, and an XPath command defines the data that goes in that column. Rows do not actually exist as such, but are actually a combination of the nth item of data returned by each of the XPath commands for each column. Because of this, the XPath commands each must return multiple values and they must be synchronized and consistent so that the nth item of each column applies to the same product. This is easier to see with an example. Using a small XML file: <part_list> <part> <part_ID>A111</part_ID> <price> 3.45 </price> <color> blue </color> <material> plastic </material> </part> <part> <part_ID>B222</part_ID> <price> 7.95 </price> <color> black </color> <material> aluminum </material> </part> <part> <part_ID>C333</part_ID> <price> 9.55 </price> <color> black </color> <material> plastic </material> </part> </part_list> In the more standard tab-delimited spreadsheet approach to MetaBlocks, the spreadsheet would look something like:
part_ID price color material A111 3.45 blue plastic B222 7.95 black aluminum C333 9.55 black plastic
To create the equivalent data using an XML Interface, requires building it one column at a time. The first column is given a name “part_ID” and the data in that column can be obtained from the XML file by the XPath command: /part_list/part/part_ID This command would return the list of part_ID values in order. The values are used one per line. This builds the first column of data. The second column is given the name “price” and the data comes from the XPath command: /part_list/part/price This will return the price of the various parts in the same order as the part_ID column.

16: Interfacing to External Progams 278
The same can be done for the “color” and “material” columns. Note, it is NOT required to have the column names match the XML element names, but it is easier and more understandable if this is done. The XML Interface to build the MetaBlock data is:
Column Name XPath Command for the Column Data part_ID /part_list/part/part_ID price /part_list/part/price color /part_list/part/color material /part_list/part/material
This will build exactly the same MetaBlock data for Corvid to use, but the raw data can be maintained, edited and stored as XML data. Note: Each of the elements under “part” only have a single value. This makes it much easier to use the data for a MetaBlock since if one part had multiple “color” elements, the command would return an extra data element for that column and break the synchronization with the other columns. It is possible to use XML files with multiple occurrences of an element, but it requires a more advanced technique discussed below. 16.5.10 Building MetaBlock XML Interface Files The MetaBlock XML Interface specification is kept in a text file. This file specifies the XML file to use and the XPath command for each column in the spreadsheet. This file is built and edited from the MetaBlock XML Interface window that is displayed by clicking the “XML Interface” button on the MetaBlock window. The XML interface specification is kept in a text file. This file specifies the XML file to use and the command for each column in the spreadsheet. Enter/browse the name of the XML data file. Then enter MB column names in the left column and associated XPath commands in the right column. Interface File An interface file needs to be selected or created. The recommended file extension for this file is .mbx, but any name can be used. If there is already a interface file created, enter the name and click “Load” or browse to the file and select it. This will load the file and its parameters. If there is no file, click “New” and enter a name for the file. XML Data File
Select the XML data file that will be used. Either enter the name of the file as a URL or browse to the file. Any XML file or URL reference that could be used in other XML commands can be used. Clicking “Edit” will open the XML file using the XML Editor program specified in “Properties” to view or edit the file.

16: Interfacing to External Programs 279
Column Names Enter the name of the each of the “columns” in the MetaBlock. These can be directly typed into the boxes on the screen. These will be the column references used in the MetaBlock logic - the names in { }. The names can be anything clear and unique, but it is often easier if the names match the element names in the XML data. Columns do NOT need to be created for every element in the XML data, only for the ones that will actually be needed in the MetaBlock logic and rules. XPath Commands Next to each column name enter an XPath command that will return the data for that column. It is VERY important that the XPath commands return consistent data across the columns. That is, the nth item in each column MUST all apply to the same product. This is easy to do for simple XML files such as in the example above. Just make sure the XPath command will return data from the same higher-level elements in the XML data. In the example, the first column XPath command was /part_list/part/part_ID This will return one “part_ID” data item for each part element in the part_list. The other XPath commands must match. The “price” column uses the XPath command: /part_list/part/price This will return also return one “price” data item for each part element in the part_list. To have the “rows” of data in the MetaBlock all be related and have meaning, it is very important that this consistency be maintained. Enter an XPath command to get the data for each of the columns entered. The XPath command can include embedded Corvid variables and selectors to restrict the data returned such as: /part_list/part[price > [[Min_price]] ]/part_ID However, these MUST be used consistently in all commands to make sure the data returned is consistent, and the “price” data would have to be: /part_list/part[price > [[Min_price]] ]/price
If the “price” data was instead something like: /part_list/part/price
it could return more data items and that data might not be in sync with the part_ID command. This would cause the MetaBlock to work incorrectly and give incorrect recommendations. Multiple Occurrences of an Element All XPath commands should return single data items for each “record” or higher level XML element. If the element has multiple instances of an internal element, it will return multiple values. For example, in the earlier sample XML data, there were multiple occurrences of the “Color” element. This is legal XML provided it is allowed by the schema for the file, but it will confuse the MetaBlock interface. If there are multiple elements for some “parts”, it will throw the sync of the returned data. If the data is structured this way, and it needs to be used in the system, build the MetaBlock using only the elements that will return a SINGLE value for each “part”. Then in the actual Logic Block rules use embedded XML data embedding (using <#<XML...>#>) to get the other data that can return multiple values using some unique reference to the record. The <#<XML will return the values as a single string that can be used in expressions or to build reports.

16: Interfacing to External Progams 280
For example, in the MetaBlock specification use:
/part_list/part/part_ID
to get the “part_ID” column data which is a single unique reference to each “part”. This column data is used in the associated Logic Block by the column name in { }
{part_ID} which will be replaced by the value for the current working “row” in the MetaBlock. The associated “Color” value might have multiple values. Creating a "color" column would be out of sync with the other columns. Instead, use an embedded XML expression in the Logic Block expression: <#<XML "partdata.xml" /part_list/part[ part_ID='{part_ID}' ]/color sep=" " >#> This will return the color values for that part as a string that may have one or multiple values. This string can be used in boolean tests to check for particular colors, or can be used as text to add to a collection variable as part of a report. This makes the actual MetaBlock logic more complex and difficult to read, but can be an effective way to handle more complex XML data. As long as at least one column is defined that returns unique single values, the embedded XML commands can recover any other data in the XML file that is needed.
NOTE: Embedded XML expression for "color" can ONLY be used in the actual MetaBlock rules in the Logic Block. It CANNOT be used in the XPath commands used to select column data in the XML MetaBlock specification file.
Use Single XPath Command A quick way to build consistent commands for simple XML files is with the “Use Single XPath Command” option. This can only be used if the names of the columns exactly match the XML element names, including upper/lower case letters. Enter a XPath command up to the final element name in the “Use Single XPath Command” edit box and click the “Update” button. Corvid will replace the XPath command for each column with the text entered, followed by the column name. In the example, enter:
/part_list/part/
and click “Update”. The XPath commands for each column would become “/part_list/part/” followed by the column name entered. These would be:
/part_list/part/part_ID /part_list/part/price /part_list/part/color /part_list/part/material
This works ONLY when the column name matches the XML element name and each item only returns single values; but is a very convenient way to build commands for correctly structured files.
Delete and Move Commands To delete a row in the XML MetaBlock specification, click on the row to select it and click the “Delete” button. Rows can be moved and reordered by selecting them and then clicking the “Move Up” and “Move Down” button - however, the order of the columns has no effect on how a MetaBlock will run. If more rows are needed in the XML MetaBlock specification file, click the “Add Blank Rows to End” button.
Save When the XML MetaBlock specifications are input, click the “Save” button to return to the MetaBlock window. The columns entered will be displayed in that window and can be used in building the Logic Block.

16: Interfacing to External Programs 281
16.5.11 Using XML Commands with the Applet Runtime The Corvid Servlet Runtime has the XML command functionality built into it. However, the Corvid Applet Runtime does not. Instead the Applet Runtime uses a special “helper applet” program to process the XML commands. This reduces the overhead both in size and Java requirements for the Corvid Applet Runtime. In most cases, the special steps Corvid takes to process XML commands in the Applet Runtime are transparent to the developer and users of the system. However, in some cases developers must make special modifications to their HTML pages and the files distributed with their system. When a system using XML commands is run with the Applet Runtime, Corvid must add a special XML Interface applet to the HTML page used to run the system. The code for this applet is:
<APPLET CODEBASE = "./" CODE = "EXSYS_XML_Interface.xml_lookup.class" NAME = "EXSYS_XML_Interface" ARCHIVE = "EXSYS_XML_Interface.jar" WIDTH = 0 HEIGHT = 0 HSPACE = 0 VSPACE = 0 ALIGN = middle > </APPLET>
This can be put anywhere on the HTML page, but just before the Corvid Runtime Applet tag is suggested. The EXSYS_XML_Interface.jar file must also be included in the folder of files for the system, along with the ExsysCorvid.jar, system CVR file and any other associated files. When Corvid builds the default system HTML file to run the system during development, it checks to see if XML commands are used. If they are, Corvid automatically adds the XML Interface applet tag and copies EXSYS_XML_Interface.jar to the correct folder. For most systems, no special additional actions are needed to use XML commands with the applet runtime. However, while Corvid checks the places where XML commands would typically be used, it does not check for embedded XML commands in strings or external files. If XML commands are used in such places and Corvid does not automatically include the XML Interface Applet, go to the “Properties” window “Test Run” tab. Check the “Add Exsys XML Interface Applet” check box. With this checked, Corvid will always add the XML applet. If a custom HTML page is created to field the system, the XML Interface Applet tag must be added to that window.
16: Interfacing to External Progams 282
XML Interface System Requirements: The Corvid Applet Runtime will work with virtually any version of Java, however the XML Interface Applet requires Java v1.6 or higher. When Applet systems using the XML commands are distributed, the end user must have Java 1.6 or higher or the XML Interface Applet will not work. For the vast majority of machines, this will not be a problem, but end users with older versions of Java that have not upgraded may not be able to run systems with XML Commands. If this may be a problem for your target end users, the best solution is to use the Corvid Servlet Runtime, which puts no limits on the end user’s machine.
16.6 Database Command Details
16.6.1 How the Corvid Database Interface Works The Corvid Database Interface is a little more complicated than the other external interfaces due to Java and security issues that have to be addressed in allowing the Corvid Applet to communicate with a server database. While these issues really only apply to the Corvid Applet Runtime, to make systems more portable between the Corvid Applet Runtime and Corvid Servlet Runtime, the same basic approach is used in both delivery modes.
Servlet Support Requirement: The Corvid Applet Runtime cannot directly access a database on a server or execute SQL commands. The actual execution of the database commands is done by a special Corvid Database Interface servlet running on the server. This Java servlet program is provided with Exsys Corvid, but does require a server that supports Java Servlets via Tomcat, Glassfish, Websphere or other “Servlet Container”. Without this server-side program, the Corvid Applet Runtime can not use database commands.
Note – Another factor to consider: Since a Java Servlet and a “servlet container” such as Tomcat are required for systems using database commands from the Applet Runtime, it may make more sense to just use the Corvid Servlet Runtime for systems using database commands. The Corvid Servlet Runtime provides the higher levels of security for systems that use database commands and provides many more user interface and delivery options.
Database Command File: The Corvid Applet Runtime calls the server-side Corvid Database Interface program to execute SQL commands. If the Corvid Database Interface program simply accepted SQL commands sent to it and executed them, this would open serious security vulnerability since anyone knowing the correct URL could execute any SQL command on a database. To prevent this, the Corvid Database Interface only will execute specific SQL commands stored in a file on the server. These commands should be limited to only what the system needs. The Corvid Database Interface is passed the identifier for a command in the file along with any parameters that command needs. The Corvid Database Interface looks up the SQL command in the command file associated with the identifier, checks that the parameters passed match correctly and executes the SQL command.

16: Interfacing to External Programs 283
1. The Corvid Applet Runtime running on the end user’s computer sends a Corvid Database command identifier and parameters to the Corvid Database Interface Servlet running on the server. This is only the identifier for a SQL command and not the command itself.
2. The Corvid Database Interface program looks the identifier up in the SQL Command File to find the associated SQL command
3. The actual SQL command and any restrictions on parameters is returned to the Corvid Database Interface program. Any parameters passed from the Corvid Applet Runtime are validated against the parameter restrictions.
4. The parameters passed are combined with the SQL Command to produce a full SQL command that can be executed against the database. In some cases, this may add data to the database, but often it obtains data from the database.
5. The data is returned to the Corvid Runtime Applet. Important Security Concerns: The SQL Command File approach used with the Corvid Applet Runtime greatly limits the SQL commands that can be executed on your database. However, someone with the correct knowledge COULD execute the commands in the SQL Command File.
If this presents an unacceptable security problem for your database, you should run your system with the Corvid Servlet Runtime and not install the Corvid Database Interface (CorvidDB.war).
The Corvid Servlet Runtime will only execute your Corvid application and cannot be called to execute any SQL commands directly, even if they are in the SQL command file.

16: Interfacing to External Progams 284
16.6.2 Server Files Required for the Database Interface Various files are needed depending on your server, database and which Corvid Runtime is being used (Servlet or Applet).
1. There must be some database software installed on the server. It can be any brand that supports ODBC or JDBC connections, such as MySQL, Access, Oracle, SQL Server and almost all other standard databases.
2. There must be a database file that you will be using with your Corvid system.
3. The server needs to support Java Servlets. This requires a “Servlet Container” such as Tomcat, Glassfish or
IBM Websphere. Java servlets are required for the database interface even if the rest of your system is being run with the Corvid Applet Runtime.
4. If the system is being run with the Corvid Applet Runtime, the servlet interface CorvidDB must be installed. This
is done by having the Servlet Container deploy the file CorvidDB.war. In the case of Tomcat, this is done by putting CorvidDB.war in the Tomcat webapps folder. (If unsure how to deploy java servlets on your system, contact your system administrator.) NOTE: If your system is being run with the Corvid Servlet Runtime, CorvidDB.war is NOT needed and SHOULD NOT BE INSTALLED on the server.
5. Your KB system files (.CVR) and any associated files. If you are running with the Corvid Applet Runtime, the KB
system files MUST be on the same server as you have running the CorvidDB servlet. (Java security prevents you from having the Corvid KB system files on one server, but calling the CorvidDB servlet on another server.) The system files should be in a subfolder off “root” or other folder that can serve normal HTML web pages. The standard location of “root” on some popular servers are:
IIS \inetpub\wwwroot Apache wwwroot Tomcat webapps/ROOT 16.6.3 Building Corvid Database Commands Because of the SQL Command file approach Corvid uses, building Corvid database commands has 2 steps:
1. Defining the SQL command with its identifier, parameters and restrictions. This goes in the Corvid SQL Command File that will be put on the server.
2. Building the command used in the actual Corvid system that refers to the command by its identifier and sets the parameters using the values of Corvid variables.
In addition, the overall database interface properties such as ODBC/JDBC driver, DNS and sometimes passwords need to be setup. These operations are done from the External Interfaces window on the “Database” tab. The “Database” tab has 3 additional tabs on the right side. First “Command File” is to define the name of the SQL Command File that will hold the commands and be put on the server, along with the Driver, connection DSN and password information when that is needed.
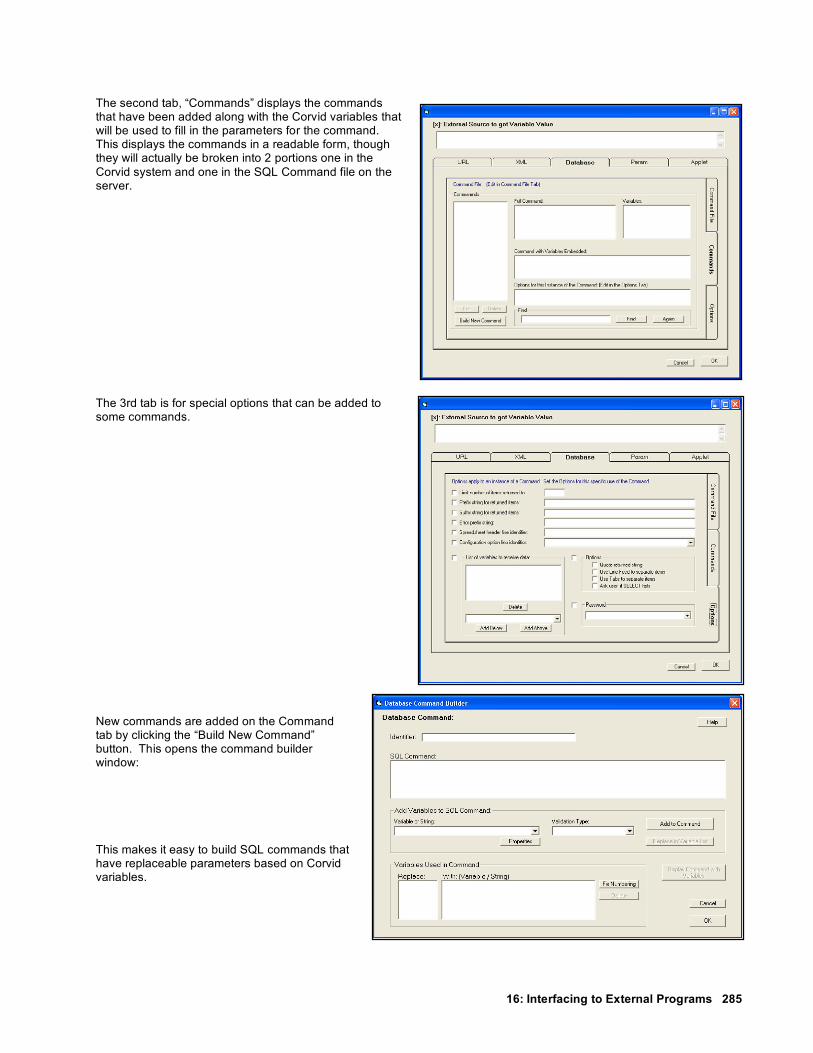
16: Interfacing to External Programs 285
The second tab, “Commands” displays the commands that have been added along with the Corvid variables that will be used to fill in the parameters for the command. This displays the commands in a readable form, though they will actually be broken into 2 portions one in the Corvid system and one in the SQL Command file on the server.
The 3rd tab is for special options that can be added to some commands.
New commands are added on the Command tab by clicking the “Build New Command” button. This opens the command builder window:
This makes it easy to build SQL commands that have replaceable parameters based on Corvid variables.

16: Interfacing to External Progams 286
16.6.4 The Database “Command File” Tab
The database “Command File” tab is used to set the name of the SQL Command file and connection information, that will be used by all of the database commands for the system.
The information on the Command File tab is required whenever adding database commands to a system.
Command File The first step is to create or open the command file that will hold the connection information along with the allowed SQL commands. All the commands and options will write to this file so the file must be created or selected before going to the other tabs.
Most systems only have a single command file. However, multiple command files can be used for systems that connect to multiple databases using different DSNs.
Remember, the command file will be moved to the server.
When using the Corvid Applet Runtime, the command file should be put in the CorvidDB folder created when CorvidDB. war deploys. If using the Corvid Servlet Runtime, the command file is put in the same folder as the system CVR file.
In most cases, the copy of the file being edited is a local copy. If there is already a file on the server, you may need to download it to have the latest version of the command file. After changes are made, be sure to move the edited file up to the server for the changes to take effect.
To open an existing file, click “Browse” and select it, or enter the name of the file and click “Load Commands”.
Once a file is opened, to save it with a different name, click the “Save As” button.
To create a new file, click “New”. A dialog will be displayed asking for the connection information:
Fill in the connection information as described below. This information can later be edited on the Command File tab. Command files normally have a .cdb file extension.

16: Interfacing to External Programs 287
Driver Enter the driver for your database. In most cases, this will be the Java ODBC/JDBC driver:
sun.jdbc.odbc.JdbcOdbcDriver This will be pre-filled in the driver field. Use this unless your database requires something different. (Check with your System Administrator if this driver does not work with your system.) This driver will be used by the Corvid Database Interface. It is not a driver that you need to install.
Connection To use an ODBC connection to your database, a DSN must be created. This must be a System DSN. Other types of DSN will not work. Your DSN must have a name. In the “Connect” edit box enter:
jdbc:odbc:Your_DSN_Name In MS WIndows, DSNs are created from the control panel. Go to the “Start” button and select “Control Panel”. Select “Performance and Maintenance” and then “Administrative Tools” (In XP, just directly select “Administrative Tools” from the Control Panel). Then select “Data Sources (ODBC)”
This will open the window for creating a DSN.
1. Click on the “System DSN” tab
2. Click the “Add” button.
3. Select your database type:

16: Interfacing to External Progams 288
4. Give the DSN a name: This can be anything you wish. Remember this name as you will need it in the Corvid Database Connection information. Depending on your database, there may also be various other parameters to set
5. Back in the Corvid Database Interface
Connection window, for the “Connection” enter:
jdbc:odbc:MyDSN
where “MyDSN” is the name you gave to the DSN.
Login / Password If the database requires a login and password, enter them, otherwise leave these fields blank. If a login/password is entered, it will be stored in the Database Command file. This file will be on the server, and it should be handled with whatever security limitations and precautions are appropriate for the password. If there are security concerns about either having the login/password in a file on the server, or in having these essentially hard coded into the system, you can have the end user provide them. To do this:
1. You must be running the system with the Corvid Servlet Runtime. (This technique will not work with the Corvid Applet Runtime.)
2. In your system, create Corvid string variables for the login and/or password.
3. In the database connection window, for the login / password enter the name of the string variable in double
square brackets with the .VALUE property.
4. In your system, add a command in the command block to force the login / password variables to be asked before any database calls are made. (If this is not done, the variables will be asked when the first database call is made, which may not be the order of questions desired for your end user interface)
This way, the user will be asked to provide the login and/or password and nothing sensitive is hard coded in the file. If they cannot provide the password, the database commands will not execute, but the rest of the system will run. For example, create Corvid string variables [TheLogin] and [ThePassword] and have these asked of the end user before any database calls are made. In the connection data window, for the login use [[TheLogin.value]] and for the password use [[ThePassword.value]]

16: Interfacing to External Programs 289
16.6.5 The Database “Commands” Tab The "Commands" tab displays the SQL commands in the command file. These are the only commands your system will be able to execute. Commands are made up of standard SQL along with Corvid variables. For a particular database call, one of the commands is selected. Adding database calls to a system is a combination of defining a command that can be used, and then associating it with a particular database action such as getting the value of a variable. The SQL command to execute can be any SQL command starting with SELECT, UPDATE, INSERT, DELETE, ALTER, CREATE, DROP. In addition, some databases and drivers may allow other SQL commands. First, a command must be added. This is done by clicking the “Build New Command” button, which displays the Database Command Builder. As described at the start of the database interface section, in order to provide a greater level of security when using the database interface from the Corvid Applet Runtime, the actual SQL commands are stored in a file on the server. These commands are a combination of standard SQL and replaceable parameters. The Corvid Applet Runtime only sends the name of the command to execute and the parameter values. It is only possible to execute the specific commands in the server database command file. This allows the database to be accessed by the client-side applet, while limiting the potential for other unauthorized users to execute other commands. (For greater security, it is recommended that systems needing the database interface use the Corvid Servlet Runtime rather than the Corvid Applet Runtime.) Building a database command calls for entering a combination of SQL and parameters that will get their value from Corvid variables. The Database Command Builder makes this easy. The process is best illustrated by an example of building a command to get the price of a part from the database.
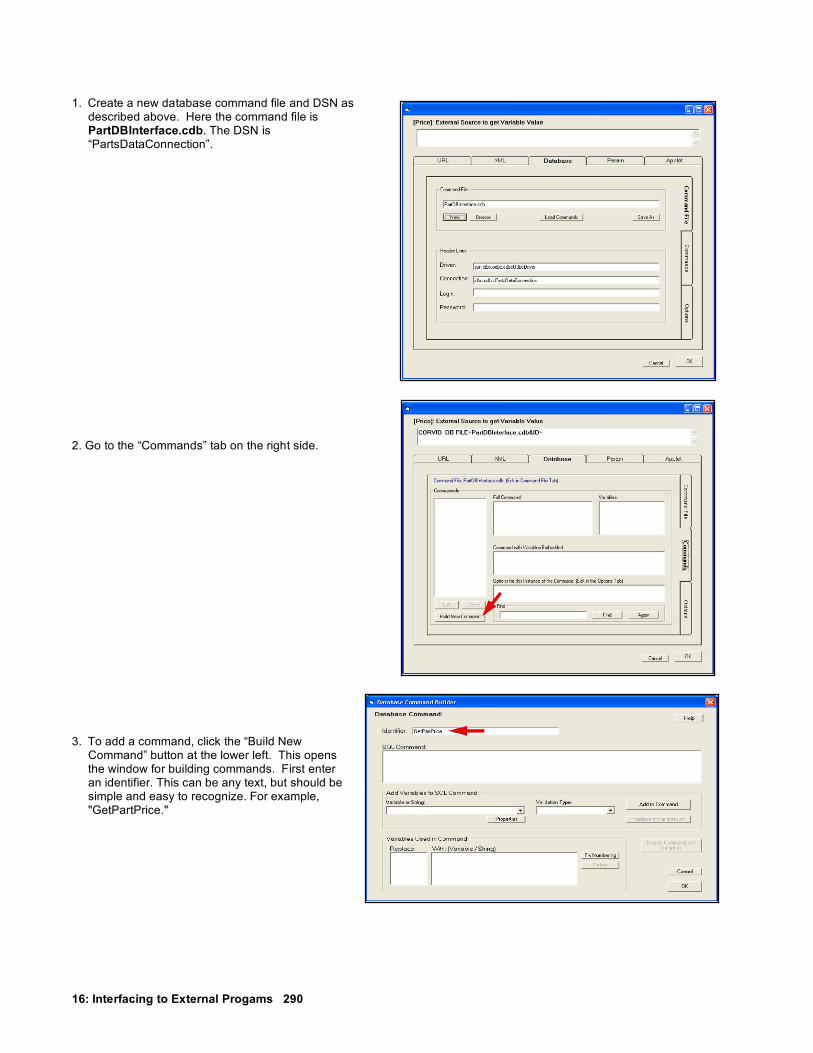
16: Interfacing to External Progams 290
1. Create a new database command file and DSN as described above. Here the command file is PartDBInterface.cdb. The DSN is “PartsDataConnection”.
2. Go to the “Commands” tab on the right side. 3. To add a command, click the “Build New
Command” button at the lower left. This opens the window for building commands. First enter an identifier. This can be any text, but should be simple and easy to recognize. For example, "GetPartPrice."

16: Interfacing to External Programs 291
4. In the "SQL Command" edit box start entering the SQL command. This can be any SQL command starting with SELECT, UPDATE, INSERT, DELETE, ALTER, CREATE, DROP. (In addition some databases and drivers may allow other SQL commands.) Here we want the command: SELECT Price FROM PartData WHERE Part='partID' “partID” will be the name of the part and will come from a Corvid variable. Enter the portion of the SQL command up to where the Corvid variable value would be added. Here this will be: SELECT Price FROM PartData WHERE Part='
5. Now add a replaceable parameter in the
SQL command and associate a Corvid variable with it. The replaceable parameters in the SQL are denoted by curly brackets { }. The brackets contain a letter and a number. The letter indicates the type checking and restrictions that should be applied to the parameter value, and the number is the number of the parameter in the command (e.g. the first parameter is “1”, the second is “2”, etc). These numbers match the list of variables that Corvid will provide in making the call. To add the replaceable parameter, go to the “Add Variables to SQL Command” section and click the “Variable or String” drop down list. This will display a list of the Corvid variables in the system. Select the variable to use. Here this is the string variable [PartID]. (Note: Instead of selecting a variable, a string can be typed into the edit box. This is used with commands that can be called in different ways and it is easier to just have a parameter be a string. This is illustrated in more detail in the next example.)

16: Interfacing to External Progams 292
6. Now select the Validation Type for the parameter value. Validation types allow you to restrict the type of value that the command will accept. When using the Corvid Applet Runtime this is one more layer of protection against inappropriate use of the command. When using the Corvid Servlet Runtime, strongly limiting the value is less important unless there are ways for the end user to directly type in values that will be passed to the command. However, setting the Validation Type is always a good idea. To set the Validation Type, click the drop down list.
The Validation Types are:
S String. Allows any alphanumeric characters. Quotes and ticks will not be allowed. The value will
automatically be URL decoded.
N Numeric. Allows only the characters 0-9, '+', '-" and '.'
F Field. Must be a valid syntax for a database field name. The existence of the field in the database is not checked until the command is actually executed. Allows only alphanumeric characters and ' _').
X No validation. String just passed through.
Some of the letters do not do type checking but instead do some form of conversion:
T Convert EQ,NE,LT,LE,GT,GE to =,<>,<,<=,>,>= respectively.
V Unknown value type. If it contains all numeric characters, it will be handled as a numeric. Otherwise, it will have ticks ‘ ‘ put around it and handled as a string. If you use V, you must not use a string that contains only digits or it will think it is a numeric and not tick it. The V is used when you have something like, "WHERE {F#} ={V#}". Since you do not know what field will be used, you do not know what the field type will be. By using V it will automatically tick it if it looks like a string value.

16: Interfacing to External Programs 293
Here we can use the String type since the part name is alphanumeric.
7. Once the Validation Type is selected, click the “Add to Command” button.
The replaceable parameter {S1} will be added to the SQL command and the lower list box will show that {S1} corresponds to [PartID]. In the {S1} the “S” indicates the validation type is String and the “1” indicates this is the first replaceable parameter in the SQL command.
If the SQL command required additional replaceable parameters, you would continue entering the SQL command up to the next command and then add that Corvid variable the same way. Here all that is needed to close the ' around the {S1}. Replaceable parameters are just replaced by the value passed. If SQL syntax calls for ticks or quotes around a value, those must be added in the command around the replaceable parameter.
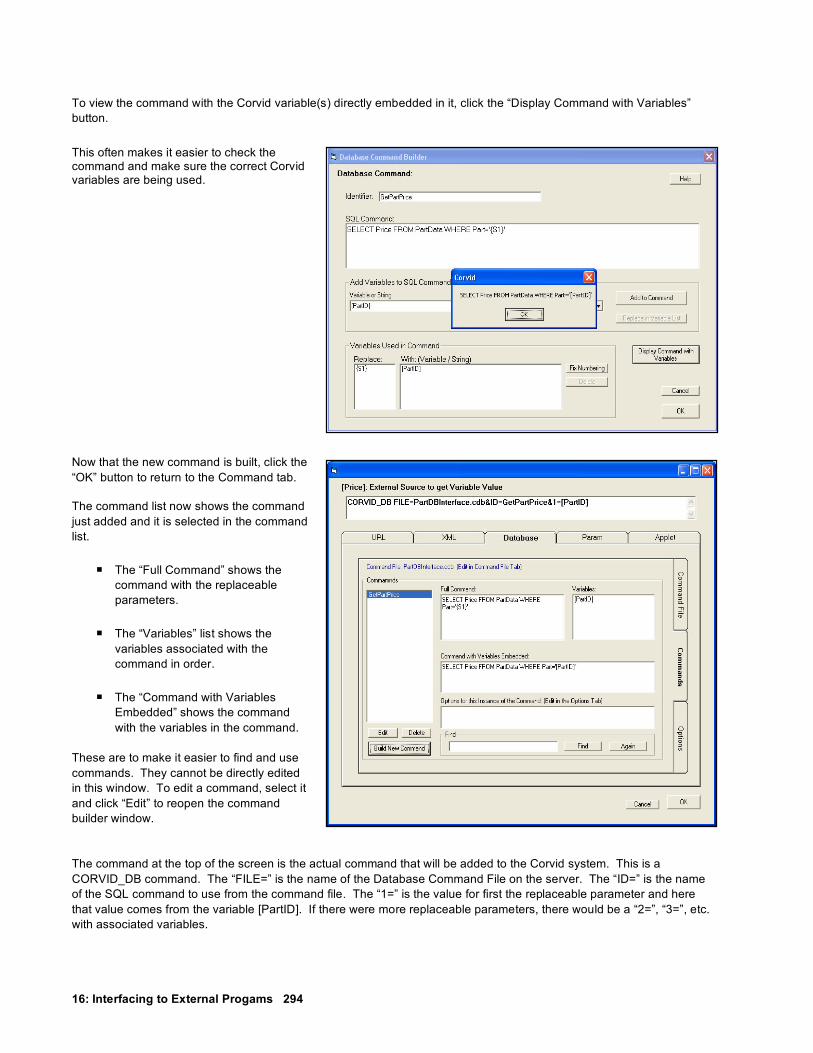
16: Interfacing to External Progams 294
To view the command with the Corvid variable(s) directly embedded in it, click the “Display Command with Variables” button.
This often makes it easier to check the command and make sure the correct Corvid variables are being used. Now that the new command is built, click the “OK” button to return to the Command tab. The command list now shows the command just added and it is selected in the command list.
The “Full Command” shows the command with the replaceable parameters.
The “Variables” list shows the
variables associated with the command in order.
The “Command with Variables Embedded” shows the command with the variables in the command.
These are to make it easier to find and use commands. They cannot be directly edited in this window. To edit a command, select it and click “Edit” to reopen the command builder window. The command at the top of the screen is the actual command that will be added to the Corvid system. This is a CORVID_DB command. The “FILE=” is the name of the Database Command File on the server. The “ID=” is the name of the SQL command to use from the command file. The “1=” is the value for first the replaceable parameter and here that value comes from the variable [PartID]. If there were more replaceable parameters, there would be a “2=”, “3=”, etc. with associated variables.

16: Interfacing to External Programs 295
Clicking “OK” returns the external data interface command to wherever the interface command was built from: As many database commands as needed may be added to the system in the same way. When done, be sure to move the command file (here, “PartDBInterface.cdb”) to the server. (For the Corvid Applet Runtime, put the Command File in the CorvidDB folder created when the CorvidDB.war servlet deploys. For the Corvid Servlet Runtime, put it in the same folder as the system CVR file.)
16.6.6 Complex Commands with Replaceable Field Names This example shows how to add a more complex command. Suppose the system needs to look up information on a customer's address, but to help make sure it is the actual customer the system will check both their name and one other item of information that the customer can select. This second item can be their customer ID, home zip code or last order number. Also, the information on the customer’s address is stored in different fields in the database and these should be read individually. This requires building a SQL command that has replaceable parameters for:
The field to read The customer’s name The second field to check The value for the second field
By building the command with replaceable parameters, this can be used in multiple ways.
The full SQL command will be: SELECT {F1} FROM customerData WHERE CUSNAME='{S2}' AND {F3}='{S4}' Remember that the replacement parameters are numbered. The numbers correspond to the parameters passed on the URL line. The letters indicate the type of data. In this case the validations are “F” which checks that the value is a valid field name for the database, and “S” which allows an alphanumeric string.
{F1} The field to return data from. This will be a string based on how the command is used.
{S2} The name of the customer. This will come from the String variable [Name]
{F3} The name of the second field to check. This will come from a Static List variable [ID_Type]
{S4} The value that the second field must match. This will come from the string variable [ID_data]

16: Interfacing to External Progams 296
The first use of this command will be to get the "Address" field, though the same command can then be used later to get other fields from the database. To build the command, go to the External Interface window, Database tab and click “Build New Command” Enter the portion of the SQL command up to the first replaceable parameter – "SELECT".
This time, since the field name is static and does not come from a variable (although it could), just type in the field name “Address” and select the “F” validation type since this is a field name. Click “Add to Command”. Continue adding the next portion of the SQL command up to the next replaceable parameter.
This time the replaceable parameter does come from a Corvid variable, so select the variable, [Name], from the drop down list and the “S” type for a string value. Add this to the command and continue out to the next replaceable parameter.

16: Interfacing to External Programs 297
This time the replaceable parameter is again a field name, but it is limited to specific options in the Static List variable [ID_Type]. Select that variable and the “F” validation type for a field. This can continue to the final replaceable parameter.
After the end user selects the second field they want to use, the system will ask for the value for that field and store it in the variable [ID_Data]. This is used for the last replaceable parameter in the command.
Click OK to add this command to the command list.
Click OK to add the CORVID_DB command as the external interface command to get the value for the variable [Address].

16: Interfacing to External Progams 298
Notice that the actual command in the system is: CORVID_DB FILE=customerData.cdb&ID=GetField&1=Address&2=[Name]&3=[ID_Type]&4=[ID_Data]
The command in the SQL Command File can be used to get the value of any field in the database just by making a small change in the command. If there is a variable [City] that should be set by the “City” field in the database, just copy the command, but change “Address” to “City”
CORVID_DB FILE=customerData.cdb&ID=GetField&1=City&2=[Name]&3=[ID_Type]&4=[ID_Data] Since the replaceable parameters can be changed as needed, SQL commands can be designed so that they can be used in multiple ways.
Important Security Considerations: If database field names are made into replaceable parameters, and the Corvid Applet Runtime is used, users can potentially read any field in the database. Remember, the URL to the database interface servlet can be typed by hand into a browser, therefore you cannot control what the parameters will be. If replaceable field names are used, it is possible for users to access any field in the database. If this causes security concerns, the field names should be "hard coded" into specific individual commands in the SQL Command Table and called by name rather than using “generic” commands. You should limit the allowed SQL commands to allow ONLY as much as you are willing to expose to outside users. If the database contains sensitive information, the Corvid Servlet Runtime should be used. Even with the Corvid Servlet Runtime, the replaceable field names should be set by logic in the system, such as specific values from a Static List, rather than using a string value that the user types in.

16: Interfacing to External Programs 299
16.6.7 “Options” Tab Each command can have a variety of options. To set these options click on the Options tab. Options apply to the individual use of the command, so a single command can be used multiple times with different options. The command that the options apply to is displayed at the top of the window. To select a different command, click the “Commands” tab, select a command and return to the “Options” tab. A command can have multiple options. Limit Number of Items Returned: NR=# Sets the number of items of data being returned from a SELECT command. The default is to return all data from the command, but in some cases it may be useful to limit this to only a particular number. If there is no NR= command, the default is to return all data items. If NR= is used, the value must be greater than 0. This command should only be used with a SELECT command. Prefix String: PF= This is a string that will be added before each row/record's data. It is a way to format data and add text as needed before the returned value. The string will be part of a URL and should be URL encoded. For example, a returned item of data added to a HTML report might need to have an HTML tag wrapped around it. Usually there are other ways to handle this when the variable value is added, but this approach can be convenient. Suffix String: SF= This is a string that will be added after each row/record's data. Like the Prefix String, this is a way to format data and is often used in conjunction with a prefix string. The string specified should be URL encoded. Error Prefix String: E= Normally if the SQL command produces an error, the returned error message will start with "Error: " but this option allows you to specify an additional prefix for the error string so your system can detect and handle the error in a more customized way. Remember this is a prefix, so you will still get the full text of the error message. For situations where having the database call fail is likely, and not an error (e.g. not all fields in the database are populated), use the O=Z option to return no data and no error. This will cause Corvid to instead ask the value of the variable from the user.

16: Interfacing to External Progams 300
Spreadsheet Header Line: SS= In some cases, it is desirable to return data from the database in the form of a tab-delimited spreadsheet. This is particularly useful for MetaBlocks that use real-time data from a spreadsheet. A MetaBlock requires a tab-delimited spreadsheet with the first line having only column header information. These column headers are referenced in the MetaBlock logic. A SELECT command can return a number data in tab-delimited form, arranged by field and one record per row. The SS= command provides a convenient way to add a header to this data. Using databases with MetaBlocks is described in section 16.6.10. Variables to Receive Data: V= Allows database calls to set the value for multiple Corvid variables. When a SELECT command returns the values from multiple fields, these can be assigned to multiple Corvid variables. This option should only be used with database commands to set the actual value of a variable, and not with other database calls such as those used to set prompt text, or commands not using SELECT. If the SELECT command returns multiple values and this option is NOT used, the values will all be assigned to the same variable associated with the command. The only type of variable that is usually assigned values this way is a Collection variable. The Corvid variables that will be assigned values are displayed in the list in the “List of variables to receive data” section. The order of the variables must be the same as the order of the fields specified in the SELECT command. To add a variable to the list, select the Corvid variables from the lower drop down list. Click the “Add Below” button to add the new variable below the variable currently selected in the list. Click the “Add Above” button to add the new variable above the variable currently selected in the list. If there is nothing in the list, either button can be clicked to add the first item. To delete a variable in the list, select it and click “Delete”. Make sure the variables in the list are in the same order as the data items that will be returned. Also make sure that the returned data is correct for the variable’s type. In the command that will be built, the individual Corvid variables will be separated by a "-" and NOT include [ ]. For example,
SELECT Address, City, State FROM …. WHERE ... will return 3 fields from the record that is found. To put the 3 values in 3 string variables [ADDR], [CITY] and [ST], add these 3 Corvid variables to the list. The configuration option added to the command will be: V=ADDR-CITY-ST Other Special Options: O= Special options are a string of characters that cause different pre-programmed behavior. For example, "O=TQZ" adds 3 behaviors. Note: there is no period between individual options. The available options are:
Q Put quotes around the entire return data string. T Instead of using line feeds to separate the row/record data use a tab. N Instead of using a tab to separate the column/field data use a line feed. Z If the database SELECT statement fails, return an empty string. This will force Corvid to ask the value of the variable
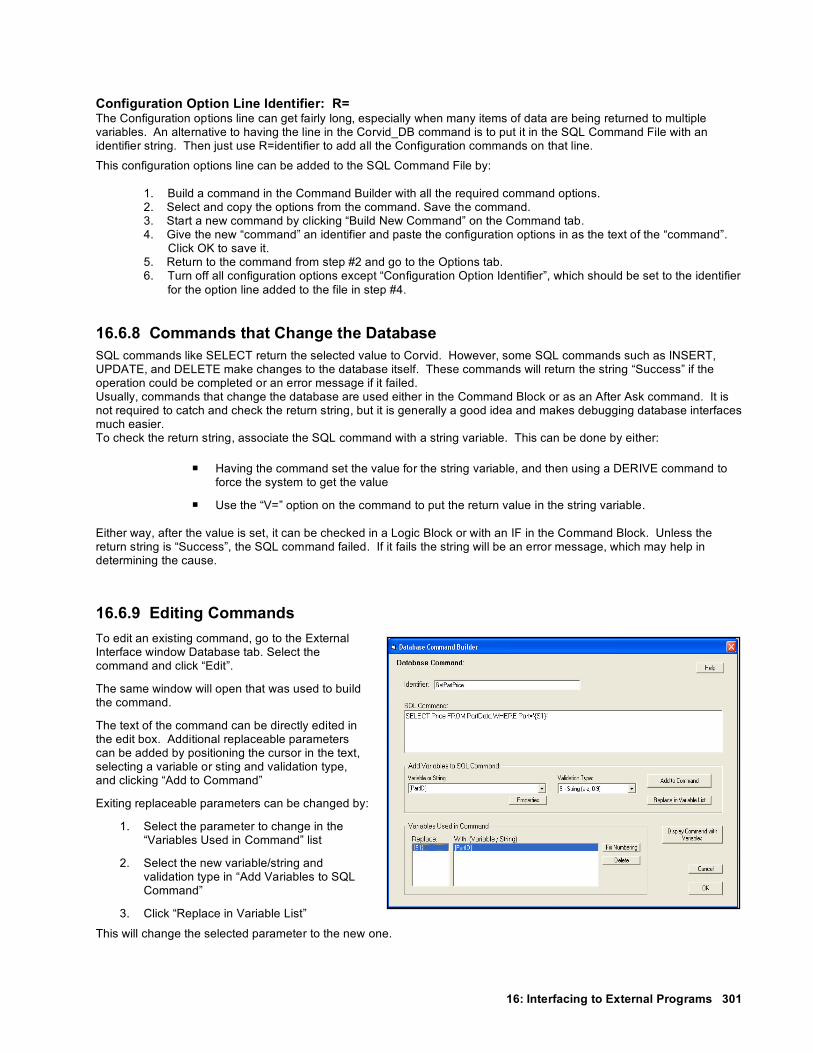
16: Interfacing to External Programs 301
Configuration Option Line Identifier: R= The Configuration options line can get fairly long, especially when many items of data are being returned to multiple variables. An alternative to having the line in the Corvid_DB command is to put it in the SQL Command File with an identifier string. Then just use R=identifier to add all the Configuration commands on that line.
This configuration options line can be added to the SQL Command File by:
1. Build a command in the Command Builder with all the required command options. 2. Select and copy the options from the command. Save the command. 3. Start a new command by clicking “Build New Command” on the Command tab. 4. Give the new “command” an identifier and paste the configuration options in as the text of the “command”. Click OK to save it. 5. Return to the command from step #2 and go to the Options tab. 6. Turn off all configuration options except “Configuration Option Identifier”, which should be set to the identifier for the option line added to the file in step #4.
16.6.8 Commands that Change the Database
SQL commands like SELECT return the selected value to Corvid. However, some SQL commands such as INSERT, UPDATE, and DELETE make changes to the database itself. These commands will return the string “Success” if the operation could be completed or an error message if it failed. Usually, commands that change the database are used either in the Command Block or as an After Ask command. It is not required to catch and check the return string, but it is generally a good idea and makes debugging database interfaces much easier. To check the return string, associate the SQL command with a string variable. This can be done by either:
Having the command set the value for the string variable, and then using a DERIVE command to force the system to get the value
Use the “V=” option on the command to put the return value in the string variable. Either way, after the value is set, it can be checked in a Logic Block or with an IF in the Command Block. Unless the return string is “Success”, the SQL command failed. If it fails the string will be an error message, which may help in determining the cause.
16.6.9 Editing Commands To edit an existing command, go to the External Interface window Database tab. Select the command and click “Edit”. The same window will open that was used to build the command. The text of the command can be directly edited in the edit box. Additional replaceable parameters can be added by positioning the cursor in the text, selecting a variable or sting and validation type, and clicking “Add to Command” Exiting replaceable parameters can be changed by:
1. Select the parameter to change in the “Variables Used in Command” list
2. Select the new variable/string and
validation type in “Add Variables to SQL Command”
3. Click “Replace in Variable List”
This will change the selected parameter to the new one.
16: Interfacing to External Progams 302
After editing there can be unused variables left in the “Variables Used in Command” list. To delete unneeded ones, select them and click “Delete”. Adding new parameters in the middle of the command can make the numbering of the replaceable parameters not be in numeric order. It is not required that the numbering of the replaceable parameters be in numeric order as long as the variables/strings in the CORVID_DB command match correctly. However, it is easier to read the command if it is in numeric order, and clicking the “Fix Numbering” button will make any changes needed to put it in numeric order.
16.6.10 Batch Command Option A single database command can perform several SQL commands by starting a list of commands with the word BATCH, and separating the commands with a semicolon.
1. When building the SQL command, type the word "BATCH" in front of the list of SQL commands.
2. Type 2 or more SQL commands into the SQL command edit box. Separate each command with a semicolon ";" character. The last entry does not need to end with a semicolon ";", however a final semicolon will be ignored if present.
(e.g: BATCH UPDATE ...; INSERT ...; UPDATE ...; INSERT ...; DELETE ...)
Replaceable parameters can be added anywhere in any of the individual commands. The only SQL commands allowed in the BATCH list are INSERT, UPDATE, and DELETE. However, some databases and drivers also allow ALTER, CREATE, DROP and other similar commands. The SELECT command is not allowed in a BATCH. For example, suppose an expert system needs to add two rows of data to the table. For the SQL command enter a command structured like:
BATCH INSERT INTO table_name VALUES ( 123 , 'Bill Smith' , '10 Main Street'); INSERT INTO table_name VALUES ( 456 , 'Tom Green' , '86 Central Avenue')
However the actual names and values would normally be replaceable parameters from Corvid variables.
Be sure to assign the returned value to a String variable, such as [database_status]. If all commands were successful, then [database_status] will be "Success". If any error occurred, [database_status] will have a single error message.
If an error occurs in one of the SQL commands, the remaining SQL commands may or may not be performed. The behavior depends on your driver. Different driver manufacturers handle errors in different ways. 16.6.11 Using a Database Command for a MetaBlock Data “File” MetaBlock systems analyze data in a tab delimited data file. Usually, this is a static file of data, but that can be replaced by a CORVID_DB command that returns data in the form of a tab delimited file. Since the Corvid Runtime reads the entire MetaBlock data file and stores it internally, only one database call is required to get all the data. To build a MetaBlock system that gets its data from a database:
1. Create a static file of data that has the correct structure and column labels that the system will need. This can be created in a text editor such as Notepad, or built in a spreadsheet program like Excel and saved as a tab-delimited file. Add a few rows of test data to use in building the MetaBlock rules. Save this Sample File.
2. Create a new Logic Block and click the “MetaBlock” check box. Enter the name of the Sample File as
the source for the MetaBlock data. Build the rules as described in the MetaBlock section of the manual. Test the system with the sample data in the file to make sure it runs correctly.

16: Interfacing to External Programs 303
3. When everything is working correctly, click on the “MetaBlock” check box to open the MetaBlock window again. This time, select "Database Command" as the source. This will open the window for adding database commands.
4. The command to get the data in the form needed by the MetaBlock is a standard SQL command, but
adding the header line requires using one of the command Options. This is done by creating a special line in the database command file with the header information and then adding that to a separate SQL command as on Option.
5. Add a MetaBlock header line to the Database Command File. To do this:
Click "Build New command". Enter an identifier (e.g. MetablockHeader). In "SQL Command" enter the tab delimited header line. Copy and paste this from
the top line of the static Sample File. It can also be entered directly. (If entered directly, tab moves to the next edit field and Ctrl-tab must be used to enter a tab in the edit box).
Make note of the Identifier that was used and click OK to save the header in the DB command file.
6. Back in the database Command tab, "Build New command" Add a command to select the needed columns of data from the DB. These must EXACTLY match the columns in the static sample data header. If the header line defines 3 columns, the SQL command must return 3 items of data for each row. This can be done by a SELECT command listing the field names of the data needed. (e.g. SELECT Part, Price, Material FROM Table1). The SQL command can use WHERE.. with replaceable parameters to limit the data returned if needed. Click OK to add the new command to the command list.
7. With the command just added selected.
Click the Options tab. Click "Spreadsheet header line identifier" and enter the header identifier. This is the identifier name from step #5.
Still on the Options tab, also click "Use tabs to separate items" Click OK to save the command
The source for the MetaBlock data will be "database" and the edit field will have the CORVID_DB... command. When the command is executed, the Corvid Runtime will call the SQL command, which will return the specified fields of data for each applicable record in the database. Corvid will automatically convert the data returned into the form needed by the MetaBlock. The header row will be added and the values will be chopped into rows that match the column headers. The number of header columns defines how the data will be broken into rows, so it is very important that the “Select” identifiers match the column headers.
16.6.12 Installing the CorvidDB Servlet If your system is run with the Corvid Applet Runtime and uses database calls, it requires the installing the CorvidDB servlet provided with Exsys Corvid. If your system will be run with the Corvid Servlet Runtime, the Corvid DB servlet is NOT needed and should not be installed.
1. Your server must support running Java Servlets. This requires a “Servlet Container” such as Apache Tomcat, Glass fish, IBM Webshere or similar program. Check with your server administrator if you are unsure if this support is provided.
2. The CorvidDB.war file is distributed with Exsys Corvid and can be found in the “Program Files/Exsys/Corvid/ServerPrograms” folder.

16: Interfacing to External Progams 304
3. Put the 'CorvidDB.war' file in the appropriate folder for your servlet engine and activate it. For example: In Tomcat you usually put the .war file in the 'webapps' folder before you start or restart Tomcat. (Check with your system administrator for details on installing servlets on your system.)
4. Be sure the database is installed on the server and a DSN is created on the server as a "System DSN". If the expert system is to write to the database, make sure the DSN does not have 'read only' selected.
5. Put the '.cdb' file in the 'CorvidDB' folder created when the CorvidDB.war file deploys. The .cdb file was created in the folder you specified when you built the database command.
6. Test from your browser. Go to the URL http://your_host:8080/CorvidDB/corviddbservlet. (Where
"your_host:8080" is the address to run the installed servlet. Check with your system administrator for the naming conventions on your server.) This will display a form page where you can test your database commands.
7. In your system, make sure the URL to CorvidDB is specified when building CORVID_DB commands.
16.6.13 Turning Off Database Calls During Development Most external interface sources are easy to implement in the development environment since they apply to both applet and servlet runtimes, or only require having a file in the system folder. However, database interfaces (especially ones using the Corvid Servlet Runtime) can require changing the commands in a system during development and then restoring them when the system is fielded. Often it is easier to simply disable the database commands in the development environment. If the system only uses the database to set the values of variables, this will just result in these values being asked of the end user. To disable the database commands during development and testing:
Go to the Properties window Select the “Test Run” tab Check the “Do NOT make
external CGI or Database calls. Ask instead”
When ready to deploy the system to an environment that provides the database support, uncheck this box and be sure to test in the full database environment. Some systems that have complex database interactions (such as Blackboards), will not function without full database support and can not be run with this option.

16: Interfacing to External Programs 305
16.7 PARAM Command Details 16.7.1 PARAM Data When using the Corvid Applet Runtime, an applet tag is automatically added to the HTML page used to run the system. This tag looks similar to:
<APPLET CODEBASE = "./" CODE = "Corvid.Runtime.class" NAME = "CorvidRuntime" ARCHIVE = "ExsysCorvid.jar" WIDTH = 700 HEIGHT = 400 HSPACE = 0 VSPACE = 0 ALIGN = middle > <PARAM NAME = "KBBASE" VALUE = "" > <PARAM NAME = "KBNAME" VALUE = "MySystem.cvR"> <PARAM NAME = "KBWIDTH" VALUE = "700"> </APPLET>
Within the tag are “PARAM” name/value pairs that are used to pass the name of the Corvid system and applet window width into the runtime. PARAMs are a standard way to set values that can be accessed from within the applet. PARAMs have a name and a value. Both the name and value are in quotes. In addition to the required PARAM name/value pairs that Corvid automatically adds, other PARAM name/value pairs can be added to the applet tag. The value of any PARAM is available in the system by referencing the name in a Corvid PARAM command. Additional PARAM name/value pairs should be added after the ones Corvid automatically adds. For example, adding:
<PARAM NAME = "TODAYS_SPECIAL" VALUE = "X123">
to the PARAM list would make this data available in the system.
PARAM commands can be used in the same places any of the other external data source commands can be used. To add a PARAM command, go to the External Data Source window and select the “Param” tab. Enter the PARAM Name - this must match exactly in both spelling and case.
The PARAM command will set the associated value.
PARAM commands can only be used with the Applet Runtime and have no meaning with the Corvid Servlet Runtime. They provide an easy way to modify data in a system just by changing the text of the HTML page used to run the system. There can be any number of PARAM name/value pairs. If the HTML page is dynamically generated, such as with Cold Fusion, these PARAM values can be set when the page is
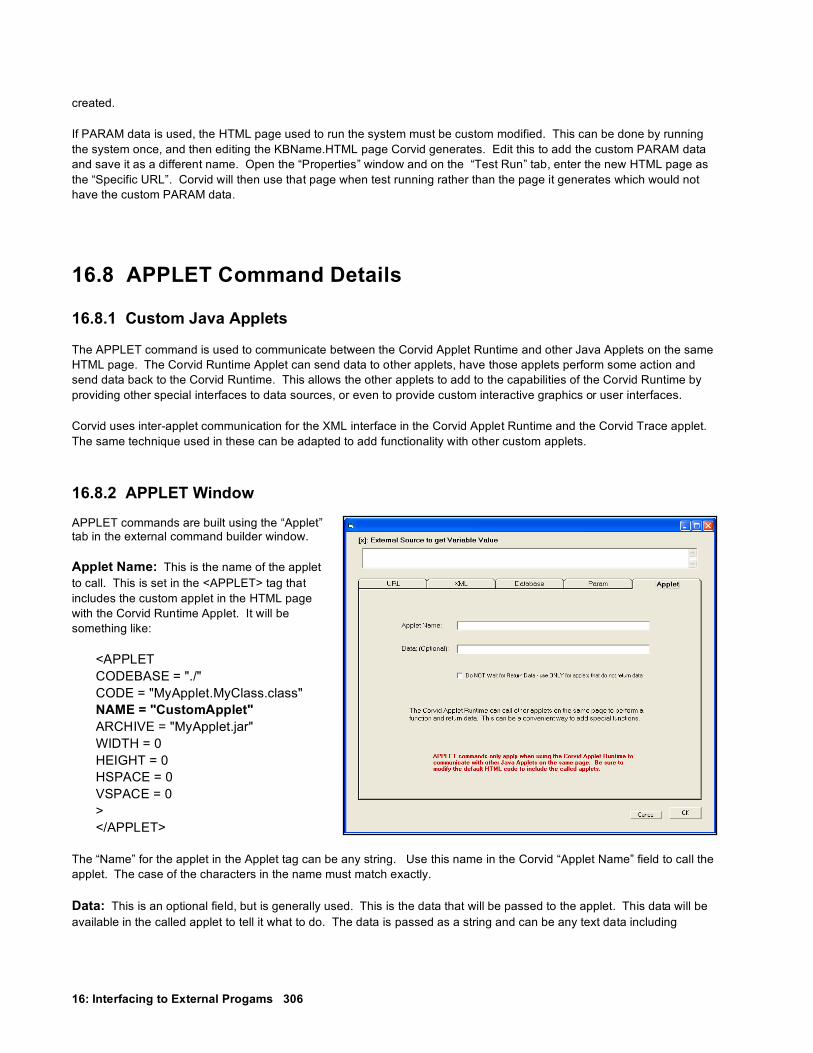
16: Interfacing to External Progams 306
created.
If PARAM data is used, the HTML page used to run the system must be custom modified. This can be done by running the system once, and then editing the KBName.HTML page Corvid generates. Edit this to add the custom PARAM data and save it as a different name. Open the “Properties” window and on the “Test Run” tab, enter the new HTML page as the “Specific URL”. Corvid will then use that page when test running rather than the page it generates which would not have the custom PARAM data.
16.8 APPLET Command Details
16.8.1 Custom Java Applets The APPLET command is used to communicate between the Corvid Applet Runtime and other Java Applets on the same HTML page. The Corvid Runtime Applet can send data to other applets, have those applets perform some action and send data back to the Corvid Runtime. This allows the other applets to add to the capabilities of the Corvid Runtime by providing other special interfaces to data sources, or even to provide custom interactive graphics or user interfaces.
Corvid uses inter-applet communication for the XML interface in the Corvid Applet Runtime and the Corvid Trace applet. The same technique used in these can be adapted to add functionality with other custom applets.
16.8.2 APPLET Window APPLET commands are built using the “Applet” tab in the external command builder window.
Applet Name: This is the name of the applet to call. This is set in the <APPLET> tag that includes the custom applet in the HTML page with the Corvid Runtime Applet. It will be something like:
<APPLET CODEBASE = "./" CODE = "MyApplet.MyClass.class" NAME = "CustomApplet" ARCHIVE = "MyApplet.jar" WIDTH = 0 HEIGHT = 0 HSPACE = 0 VSPACE = 0 > </APPLET>
The “Name” for the applet in the Applet tag can be any string. Use this name in the Corvid “Applet Name” field to call the applet. The case of the characters in the name must match exactly.
Data: This is an optional field, but is generally used. This is the data that will be passed to the applet. This data will be available in the called applet to tell it what to do. The data is passed as a string and can be any text data including

16: Interfacing to External Programs 307
spaces. Corvid variables in double square brackets can be used to pass Corvid system data to the called applet. If multiple values are to be passed, pass them in a way that will allow the called applet to parse out the various items.
For example: An applet to do a table lookup would need to be passed the name of the table and the value to look up. The name of the table might be static and the value to look up might be in the Corvid variable [X]. The data could be:
“MyDataFile.txt” [[X.VALUE]]
The quotes around the file name make it easy for the called applet to parse that out of the string (even if the filename contained spaces), and the value of the variable [X] would be embedded in the string.
There is no limit to the length of the string or number of variables passed in it.
Do Not Wait Option: Most called applets will perform some function and return data. In that case, be sure this option is NOT checked. However, applets can also be used to just display data or store it some custom way. Corvid does this with its built-in Trace applet which is sent trace data as Corvid runs, but which does not send anything back.
Normally, when Corvid calls an external applet, it waits for that applet to send data back. If this will not happen, be sure to check the “Do Not Wait” check box. In that case, Corvid will pass the data to the applet and continue running.
For example: A custom graphing applet could be called to display information from a Corvid system repeatedly monitoring a process. Each time the Corvid system would finish a check, it would write data to the graphing applet, which would display the data, but not send anything back to Corvid.
16.8.3 How to Create a Custom Applet Building a custom applet requires a knowledge of Java and a development environment such as the free Oracle Sun Netbeans tool. This manual is not meant to explain the Java language or how to build applets, and only covers the special techniques used by Corvid to communicate with the applet to send and receive data.
Inter-applet communication can be done in various ways. Advanced techniques like pipes can be used when applets need to be in constant communication running in parallel, but Corvid applications call an applet, and must then wait for data before they can continue processing. This results in a more sequential process that does not require the complexity of setting up pipes. Corvid uses a VERY simple and reliable technique that can be added to an applet in just a few lines of code, and uses standard applet methods that are accepted by all compilers.
Corvid passes data to the called applet using the applet.getName() and applet.setName() methods. This may at first seem like an odd way to pass data, but it works extremely well and is very easy to implement.
In the custom applet:
Create a boolean variable running that will indicate if the applet has finished its initialization.
Create a string variable origName to hold the original name of the applet. This is set in the first time init() is called.
public class GetMyData extends Applet { boolean running = false; // has the system done the first init? String origName; // Original system name
16: Interfacing to External Progams 308
The init() method for the applet gets called when the applet first starts on the page and again when it is called by Corvid to do something. To differentiate these calls, the running variable is used.
public void init() { if (running == false) {
origName = this.getName(); running = true; // any other code needed for init } else { processDataRequest(this.getName()); this.setName(origName); }
When the applet first starts, running will be false. The original name of the applet is saved so it can be reset later, running is set to true and any other initialization code is executed. When Corvid calls the applet, init() will be called again (by Corvid) and this time since running is true, the processDataRequest() will be executed to do whatever the applet does to get and return data to Corvid, and the name is reset to the original name. This last step is important since without it Corvid will not be able to identify the applet for subsequent calls.
The processDataRequest() uses the getName() method to get the data sent from Corvid. Corvid will have already set this to the “data” string specified by the APPLET command in the Corvid system. When called by Corvid, the “name” of the applet will actually be the data sent from Corvid. This very simple technique allows large amounts of data to be sent in a very easy and reliable manner.
The processDataRequest() code is passed the data string from Corvid. This will be whatever string was specified in the Data field when the APPLET command was built. Any embedded Corvid variables will have been replaced by their values, and processDataRequest() must do whatever parsing is needed to separate out values. The data passed can then be used to do whatever the applet is designed to do, including obtaining data. Data may be obtained automatically from other sources invisibly, or an end user interface may be displayed for user interaction.
Once the applet has determined the data to send back to Corvid, it should use the returnDataToCorvid() method. This will pass the data back and tell Corvid to continue processing.
public void returnDataToCorvid(String s) { // return data to Corvid Applet corvidRuntime; corvidRuntime = getAppletContext().getApplet("CorvidRuntime"); corvidRuntime.setName(s); corvidRuntime.start(); }
This uses essentially the same technique to send data back as was used to pass data in. The corvidRuntime.setName() sets the data so that Corvid can recover it using a getName() command. The corvidRuntime.start() methods has a boolean flag that indicates it is waiting for an applet to return data, and calling it here tells Corvid to read the data and continue processing. Very large amount of data can be passed back if needed.

16: Interfacing to External Programs 309
16.8.4 Returned Data
The syntax for the returned data is similar to all other external data sources. If the context of the external call indicates only a single string is expected (such as setting the Prompt text for a variable), the returned string will be used in that way. If the external call is to set the value for a variable, the returned data must set the value for that variable but can also set the value for other variables at the same time. If the returned data is to set the value for the calling variable, it only needs to be the value to assign. For example, if the external call to the applet was to set the value for the numeric variable [X], the returned data could just be: 123 and [X] would be set to that value. Note: The type of the variable determines what data is acceptable. If the string “abc” was returned for a numeric variable, it would produce an error. Static List variables can be set by either the number of the value, or the short text of the value. So a Static List variable [color] with value “red”, “blue” and “green” could have return data or either “1” or “red” set the first value. For Static List variables, to set multiple values separate them with a comma - so “1,2” would set the values red and blue. To return data for multiple variables, the form: [varname] value must be used, and the individual variable/value pairs must be separated by a tab. The return string: [x] 123 tab [s] abc tab [color] red would set [X] to 123, [s] to “abc” and [color] to red. In the Java code this would be: returnDataToCorvid(“[x] 123\t[s] abc\t[color] red”) 16.8.5 The External Applet Tag The applet being called must be added to the HTML page used to run the system. It must be on the same HTML page as the Corvid Runtime Applet. The applet tag will be something like:
<APPLET CODEBASE = "./" CODE = "MyApplet.MyClass.class" NAME = "CustomApplet" ARCHIVE = "MyApplet.jar" WIDTH = 0 HEIGHT = 0 HSPACE = 0 VSPACE = 0 > </APPLET>
The name is the name used to call the applet from Corvid. The “CODE=” is the main class in the applet. The Archive is the .jar file for the applet. The width and height values depend on if the applet will be used to display information, and how the applet should be displayed on the page. If the applet has no direct user interaction, these values can be “0” and the applet will be invisible, but will still run. If the applet displays data, or has some user interaction, set these values appropriately to whatever size is required. The applet can be anywhere on the page.

16: Interfacing to External Progams 310
The HTML page that Corvid generates must be modified in a text editor or HTML editor to add the additional applet tag. Once a custom page has been created, you can have the system automatically run with this custom HTML page during development by:
Open the “Properties” window Go to the “Test Run” tab In the “Specific URL” edit box, enter the name of the custom HTML page or browse to it
When the system is run, Corvid will use the custom HTML page that has the other applet included.
16.8.6 Uses for External Applets There are many uses for external applets to enhance the capabilities of Corvid. The most common use is to have an applet perform some special function or interface not built in to the Corvid Runtime. Corvid uses this approach itself for the XML interface when using the Corvid Applet Runtime. The XML interface is built into the Corvid Servlet Runtime, but since it significantly increases the size and Java requirements of the Corvid Applet Runtime, and it is not needed in most systems, it makes more sense to have it as a separate applet that can be included and called as needed.
External applets can also be used to do complex mathematical operations not easily handled within Corvid. For example, if a Fourier transform was needed, it would be better to pass the data to an external applet that could implement the transform algorithm in Java rather than trying to do it in Corvid.
External applets can also be used to display data or even interactively ask questions of the end user. Data can be passed to an applet that could graph it or display it in ways not possible from within the Corvid Applet Runtime.
It is even possible to have the actual Corvid Applet Runtime invisible and to do all the user interaction through external applets. This is complicated and requires a good knowledge of Java, but can be done to create special interfaces not otherwise possible with the Corvid Applet Runtime.

17: How to Create and Add Custom Functions to Corvid 311
17: How to Create and Add Custom Functions to Corvid Functions: Corvid recognizes many functions, which can be used in expressions. (e.g. Sin( ), MIN( …), LOG( )). Some are the standard mathematic or trigonometric functions, others are more specialized ones for parsing, or building strings and dates.
Functions typically have 1 or more parameter and return a value. The value can be a number, string or date, which can be used in Boolean expressions or variable assignments.
The Custom Function: In addition to the standard functions Corvid supports, it also recognizes a special function called “CUSTOM”. The CUSTOM function allows running your own Java code that has been added to the Corvid Runtime program. This can be used to add special mathematical functions, interfaces to other programs or data sources, or any other special functionality that is needed, and which can be programmed in Java.
The CUSTOM function can be passed any number of parameters of any type(s). CUSTOM always returns a string, though this can be converted to a numeric or date if that is needed. Some CUSTOM functions may just perform an action. While not all functions are used to obtain data, all will must the string “Success” or “Error” to let Corvid know if the function was completed successfully. For example:
CUSTOM(“MyFunction”, [x], [y], 5)
could be used. The parameters to CUSTOM are the single string “MyFunction”, Corvid variables [X] and [Y] and value 5.
The parameter list for CUSTOM can be made up of any number of parameters, but it is recommended that the first parameter be a string which identifies the custom function, followed by the parameters for that function all separated by commas. So there might be:
CUSTOM(“MyFirstFunction”, [x], [y], 5)
CUSTOM(“MySecondFunction”, [z])
The Custom command will pass the parameter strings to your java code. It is the responsibility of that code to parse the strings, recognize the command and handle the parameters appropriately.
Modifying the CUSTOM Function: The CUSTOM function is handled by Java code in the file Custom.java. This file is provided with Corvid.
Until you customize it, the Custom function just echoes the string that was passed to it. For example, this SET Command would set [s] to "hello world":
SET [s] CUSTOM("hello") + " world"
The Java code to do this is in the Custom.java file, which was complied and integrated into the Corvid Runtime. Adding your own CUSTOM functions requires modifying the Custom.java file, compiling it and replacing the existing custom class in the Corvid Runtime with the one you create.

17: How to Create and Add Custom Functions to Corvid 312
To do this, you need to know how to program in Java and you need a Java compiler. Basically, you will replace the 'execute' method in the 'Custom.java' file and compile it, and replace the old 'Custom.class' with the new 'Custom.class'. Here are the steps.
NOTE: Many of the commands below are case sensitive. Do not type any leading tab when entering your commands.
If you do not already have a Java compiler, you can get a very good, free one from Sun Microsystems.
Go to:
http://java.sun.com/
find and download the Java SDK. Install it. (The compile instructions assume that you are using the SUN Java compiler)
Create a scratchpad folder where you can work on the files: Create the folder: C:\scratch
and copy the files:
C:\Program Files\Exsys\Corvid\Custom.java
C:\Program Files\Exsys\Corvid\ExsysCorvid.jar
to the scratch folder. (You can name this scratch folder anything you want and it can be in any drive, but those changes must be propagated through these instructions.)
Modify the 'Custom.java' file: Open the 'Custom.java' file in a plain text editor, such as Notepad. Find the 'execute' method and make your changes. For the first time compiling, make no changes. This will make sure that the steps to compile and add the class in the Corvid Runtime are working. Once you learn how to compile it, you can make the functional changes that are explained later. Open the 'Custom.java' file in a plain text editor, such as Notepad. Find the 'execute' method and make your changes. For the first time compiling, make no changes. This will make sure that the steps to compile and add the class in the Corvid Runtime are working. Once you learn how to compile it, you can make the functional changes that are explained later.
How to Compile Custom.java Compile the 'Custom.java' file: Open a 'Command Prompt' window by clicking on Start -> All Programs -> Accessories -> Command Prompt. Type:
C:
CD \scratch
SET CLASSPATH=C:\scratch\ExsysCorvid.jar;.
javac Custom.java
If the last command returns without printing any message, then it was successful.
If the last command prints an error message saying:
'javac' is not recognized as an internal or external command, operable program or batch file.
then you need to specify its path, like this:
\path\javac Custom.java
where you must replace "path" with whatever is the path to the 'javac.exe' program.

17: How to Create and Add Custom Functions to Corvid 313
It usually is installed to:
C:\Program Files\Java\jdk1.5.0_06\bin\javac.exe
or:
C:\j2sdk1.4.2\bin\javac.exe
where "jdk1.5.0_06" or "j2sdk1.4.2" will be different - it will reflect your Java's version number.
Be sure to include the period, ".", at the end of the SET command. If you already have a CLASSPATH, you may need to do this SET command instead of the one above:
SET CLASSPATH=%CLASSPATH%;C:\scratch\ExsysCorvid.jar;.
For maximum compatibility, compile into Java version 1.0. So, if you want your applet or application to run in all versions of Java, do this:
javac -target 1.0 Custom.java
but Java v1.0 is missing many handy API (features) and very few people are running Internet Explorer 4 or Netscape 3, so you may want to target version 1.1 or 1.4. If you target 1.4, your users must use the Java Plug-in. Using the higher versions of Java will allow you to use more of the capabilities of Java, and if you are interfacing to an external data source via an API, you may be required to use a higher version of Java.
Adding it to the .jar File The file 'Custom.class' should now exist. Put it into the '.jar' file by typing these commands:
mkdir Corvid
copy Custom.class Corvid
jar uvf ExsysCorvid.jar Corvid\Custom.class
You should get a message saying it is adding the file. If it could not find the 'jar' program, specify the same path that you used for 'javac'. Perform the 'mkdir' command only once. If you make additional customizations and recompile, skip that step.
You are done. Use this customized 'ExsysCorvid.jar' file instead of the original one.
Warning: If you edit the '.CVD' file, Corvid will automatically replace your '.jar' file with the original from “Program Files/Exsys/Corvid” which it considers to be the “Correct” one. To avoid this you will need to either:
Copy your .jar file to “Program Files/Exsys/Corvid” (However, this will make the modified jar file the “correct” one for all systems. If the modification makes the file significantly larger, or requires a higher version of Java or external classes, this may not be desirable)
Now every KB that you edit will have the customized '.jar' file copied to the KB's folder.
or
Be sure to replace the .jar file Corvid copies to the directory with your modified version.
Modifying the Evaluate Method Once the compile steps are working with the default Custom.java file, you can add your own code to modify the 'evaluate' method. The evaluate method is passed an array of Strings.
evaluate(String[] args)

17: How to Create and Add Custom Functions to Corvid 314
If your expression calls the CUSTOM function passing parameters (of any type), the parameters will be evaluated and converted to the string equivalent. If your call to CUSTOM included Corvid variables, (e.g. CUSTOM(“MyFunction”, [x]), the parameter passed will be the string equivalent of the value of the variable. All parameters will be evaluated and converted to a string representation and put into the String array, 'args'.
While there is only one custom command, it can perform any number of functions by including a custom command name in the parameters. Suppose you want 'Encrypt' and 'Decrypt' commands. Their use in an expression could look like this:
Custom("ENCRYPT", [plain_message])
Custom("DECRYPT", [encoded_message])
If [plain_message] has the value "Hello world!", then the 'evaluate(String[])' method will be passed the strings "ENCRYPT","Hello world!". It is up to your code in the 'evaluate' method to interpret the strings that are passed. For this example, 'evaluate' could expect the first array element to be the name of the command and the second to be the string to be encrypted or decrypted. So your evaluate method would look like this:
public String evaluate(String[] parameters) {
try {
if (parameters[0].equals("ENCRYPT")) {
// your code to encrypt parameters[1] and return it goes here.
} else if (parameters[0].equals("DECRYPT")) {
// your code to decrypt parameters[1] and return it goes here.
} else throw new Exception("Unknown custom function.");
} catch (Exception e) {
e.printStackTrace();
assocCLRuntime.ShowTrace("ERROR: " + e);
return "ERROR"; // Or: assocCLRuntime.API_DoCmd("EXIT");
}
}
The evaluate() methods return a String which is also what the CUSTOM() function will return (evaluate to) in your expression. But if you want CUSTOM() to return a Numeric, then use this workaround: In evaluate(), convert the numeric to a String and return it and in your expression, do this:
NUM(CUSTOM(...))
The NUM() function converts the String back to a Numeric.
The CUSTOM code can make use of the Corvid API commands to obtain data about Corvid variables, execute Corvid commands, and write information to the Trace file and other operations. The API commands are discussed below.
If you want CUSTOM() to assign many values to many variables, you could do either of these:
You could return a Tab delimited String and assign that to a variable and then use FILL() to isolate each piece and assign it to the appropriate variable.
You can use the Corvid API to assign the values to the appropriate variables.

17: How to Create and Add Custom Functions to Corvid 315
For example:
public String evaluate(String[] parameters) {
try {
if (parameters[0].equals("ParseDate")) {
/* This function is passed a Date in msec and isolates the Year, Month, and Day and assigns those to variables with the same names. */
// convert the msec from a string to a double to a Date
Date d = new Date(Double.valueOf(parameters[1]).longValue());
// create a Calendar
GregorianCalendar gc = new GregorianCalendar();
gc.setTime(d);
// get year, month, day
int year = gc.get(Calendar.YEAR);
int month = gc.get(Calendar.MONTH) + 1;
int day = gc.get(Calendar.DAY_OF_MONTH);
// assign to the KB's variables (which must be defined)
assocCLRuntime.API_DoCmd("SET [Year] " + year);
assocCLRuntime.API_DoCmd("SET [Month] " + month);
assocCLRuntime.API_DoCmd("SET [Day] " + day);
} else throw new Exception("Unknown custom function.");
// no exception was thrown so return "SUCCESS"
return "SUCCESS";
} catch (Exception e) {
e.printStackTrace();
assocCLRuntime.ShowTrace("ERROR: " + e);
return "ERROR";
}
}
In your expression in your KB, do something like this:
IF CUSTOM("ParseDate", [my_date.MSEC]) == "SUCCESS"
THEN…
The Custom command will cause [Year], [Month], and [Day] to be assigned values so they can be used.
Note: The variables [Year], [Month], and [Day] must be defined in the KB since they are hard coded. Alternatively, you could pass the names of the 3 variables as parameters to CUSTOM() and in API_DoCmd() concatenate their names into the Cmd string.

17: How to Create and Add Custom Functions to Corvid 316
The Custom object will be constructed at the start of the run of the expert system or if the user hits the Restart button. If you need to Initialize or setup anything, do it in the constructor.
How Parameters are Passed The parameters passed to the Custom function can be any String, Numeric, Date, or Boolean expressions and can be comprised of any other functions that Corvid's expression evaluator understands, including Custom(). The parameter expressions are evaluated and converted to strings and assembled into a string array.
They will be converted into strings:
String parameters will be evaluated and used as-is. Numeric, Date, and Boolean parameters will be automatically converted to Strings of some form. Dates will be the number of milliseconds since 1970, like the [*.MSEC] property, but converted to a string. Booleans will be "1" if true and "0" if false.
Numerics will be in 'English(United States)' format regardless of the user's locale. So 123+(1/4) will be passed as the string "123.25". Very large or small numerics may be written in scientific notation, like this: "1.2325E2".
The parameters will be evaluted by Corvid's expression evaluator BEFORE calling the Custom object's evaluate() method.
Adding a Destroy Method A destroy() method can be added to the Custom object and should be used if there is any "cleanup" to be done such as disconnecting from data sources, closing files, etc. The destroy() method would be called only once when the system terminates.
Corvid Servlet Runtime If you want to customize 'CORVID.war' instead of 'ExsysCorvid.jar', you do almost the same as above except you use a different 'Custom.java' file and you use the 'CORVID.war' file. The Custom.java file is located at:
C:\Program Files\Exsys\CORVID\Servlet_Runtime\Custom.java
Instead of:
mkdir Corvid
copy Custom.class Corvid
jar uvf ExsysCorvid.jar Corvid\Custom.class
do this:
mkdir WEB-INF
cd WEB-INF
mkdir classes
cd classes
mkdir exsys
cd \scratch
copy Custom.class WEB-INF\classes\exsys
jar uvfm CORVID.war META-INF\MANIFEST.MF WEB INF\classes\exsys\Custom.class

17: How to Create and Add Custom Functions to Corvid 317
Corvid API Commands The custom object’s evaluate() method can perform any calculations using Java. To access data from the expert system, a set of API methods can be used. These can obtain data from the system, or force operations to be performed. The API commands are methods of the assocCLRuntime object that is passed to the Custom object when it is created.
The list of API commands is short, since the API_DoCmd can execute any Corvid command or block, and provides a tremendous range of commands and functionality.
For example:
assocCLRuntime.API_ShowTrace("This is my message for trace");
would add the message "This is my message for trace" to the trace data.
CustStr = assocCLRuntime.API_GetValue("X");
would return the value of the variable [X] as a string which is assigned to the Java variable CustStr.
.API_AskVar (varName) Asks the variable named [varName]. When this is called, variable [varName] will be asked and assigned the value entered.
.API_DoCmd (cmd)
Executes the command cmd, where cmd is any single legal command block command (Excludes IF, WHILE, FOR). This is a very powerful command since it allows doing essentially anything that can be done in Corvid. This can be simple commands such as SET to commands to execute special command blocks that may perform many operations.
.API_GetValue(varName)
Returns the value of variable [varName] as a string. The string varName, can include properties of the variable. For example:
.APIGetValue(“x”)
.APIGetValue(“color.Prompt”)
.API_AssignValue(varName, str)
Assigns string value str to variable [varName]. If varName is a Collection variable and str is tab delimited, each value will be added in order. Collection variable values will be added to the end of the value list. If a Collection variable method such as sort, etc. is needed, use API_DoCmd with the appropriate command. For numeric and date variable, type conversion is automatic provided the string can be converted to the specified type.
.API_ShowTrace( str) Add string str to the system Trace. If str starts with "ERROR:" the system will display the string as an error message.
.PostRequest
When used in the Corvid Servlet Runtime, returns the HttpServletRequest. For example, this can be used to have functions in your Custom class add a capability to get the value of cookies, information on the user’s browser, or to check the IP address of the user.

17: How to Create and Add Custom Functions to Corvid 318
NOTE: the API methods API_DoCmd and API_AskVar can lead to complex backward chaining and other operations. These should be used with care. In general, these operations are best performed from within a CORVID Command Block rather than in the Custom code. They are supported to handle very special situations, but these should be rare.
CUSTOM and BACK The operation done in a custom() function should be dependent only on input data and NOT be dependent on the state of the system. This is due to the possibility that the user may have pressed the BACK button on the system to return to an earlier part of the session. CORVID automatically handles the value updating of CORVID variables to handle the BACK operation. However it will NOT make any changes to the Custom object to return it to an earlier state.
For example, suppose your system has custom([x], [y]), which performs some calculation based only on the CORVID variables [x] and [y]. Selecting the BACK button could lead to an earlier state of the system where [x] or [y] might have a different value. Since the value of the custom function is dependent ONLY on the values of [x] and [y], it will return the correct value regardless of where in the system it is called. The use of the BACK button would not cause any problems.
However, a custom function could perform an operation that maintained its state in some way. An example of this would be to have the string passed to custom( ) be written to a list stored in a file. Each time custom( ) is called, another item would be added to the list. If BACK was selected, the system would NOT know this and would NOT automatically return the list to its earlier state. This limitation on the use of custom( ) should be considered in any system that implements it.
18: Using the Exsys Corvid Servlet Runtime 319
18: Using the Exsys Corvid Servlet Runtime The Exsys Corvid Servlet Runtime is a powerful way to deliver Corvid expert systems to end users. It is a Java servlet that can be installed on a server. The Servlet Runtime incorporates the proven Corvid Inference Engine allowing it to be run on the server, with all user interface screens to ask questions or present data generated dynamically in HTML. This opens many design options. Since all processing is done on the server, with no applet to download, the amount of material that needs to be downloaded to the client is greatly reduced. System security is enhanced, since all system files reside only on the server.
The Corvid Servlet Runtime is in addition to the earlier Corvid Runtime applet for Web delivery, and stand-alone Java applications. The same Corvid system can be run via the applet, or servlet runtime programs or run as a stand-alone application. This provides a wide range of flexibility for Web or non-Web delivery of systems, depending on what is required.
Running a system with the Exsys Corvid Servlet Runtime simply requires adding HTML templates that will be used to ask questions and display results - the logic of the system remains the same. The system can then be moved to a server and run. To simplify the process, a variety of sample templates are provided for different styles of user interface. These templates are HTML files and can be edited using any standard HTML editor.
Installing and Starting the Corvid Servlet Runtime The Corvid Servlet Runtime is a Java Servlet. It is provided as a .war file. Copy this file to the appropriate location on your server. In the case of Tomcat, this is the webapps folder under the Tomcat folder. If you are not sure where or how to install the file, check with your system administrator or servlet engine (e.g. Tomcat) documentation.
You will then need to have the server install the servlet. In Tomcat, this simply requires stopping and restarting Tomcat. Again, if you are unsure, check with your system administrator for how this is done on your server. This will create a folder named Corvid. In Tomcat this is in the webapps folder. (On some systems, it is necessary to delete the old Corvid folder before installing a new one.)
Your knowledge base files will need to be referenced relative to this Corvid folder. It is recommended that you not put your knowledge base files in the Corvid folder, since in at least some cases, this will cause problems when reinstalling a new .war file.
A convenient place for the knowledge bases is in a folder at the same level as the Corvid folder in the webapps folder. Create a folder named Corvid_apps and move the knowledge base .CVR file, the HTML screens and templates used by that system and any other files that the system may need (e.g. MetaBlock spreadsheets, data files). If your system policies prevent you from creating a folder at this level, it can be anywhere on the server that can be referenced from the Corvid folder.
Any files needed by the system that are referenced as URL links (e.g. images, linked pages) need to be put in a section of the server (or another server) that is able to serve Web pages. This is generally NOT the same section of the server that holds servlet files. It should be the portion of the server that would be used if a normal Web page were to be added to your site. (Check with your system administrator if unsure about the location.) The reason for this is that Corvid will be building HTML pages using templates. These HTML pages will be sent to the end user's browser. It is that browser, which will convert the links for images, etc. into the page displayed on the screen, and that browser needs to be able to obtain those images from a server. To do this, the images must be in a section of the server that can serve the image files to the browser.
It is not necessary to move the CVRU file to the server since any version of Java that supports servlets will be able to read the compressed .CVR file. It is also not necessary to move the .CVD file to the server. Unless the folder is in a location on the server that is secure and cannot be accessed externally, the CVD file should not be placed on the server.
18: Using the Exsys Corvid Servlet Runtime 320
The Servlet License File The Corvid Runtime Servlet is licensed for a specific server IP address. This is implemented with a file that holds license codes that activate the servlet on a particular server IP address. The license file can hold multiple license codes, but one must match the IP of the server that is calling the servlet. If a server is referenced by multiple IP addresses, such as an external IP and a different internal LAN IP address, each should have a license code in the file. Each license code is a numeric string and each should be on a different line in the file.
The default name for the license file is CorvidLicenseCodes.txt, and normally it should be in the same folder as the .war file is placed.
The license codes are obtained from Exsys Inc. They are provided based on the license(s) purchased. If you have purchased the Corvid Servlet Runtime, you will be sent a code when the Corvid Servlet Runtime license agreement is returned to Exsys Inc. All that should be needed is to place the code sent by Exsys Inc in the CorvidLicenseCodes.txt file in the same folder as the .war file.
Temporary licenses can be provided in some cases allowing the Corvid Servlet Runtime to be tested and evaluated.
Technical Note: The Corvid Servlet Runtime checks in two folders for the license file. The Java code the Java code getServletContext().getRealPath is used to find the location of the servlet on the server. Different servlet engines return different relative addresses for this Java command. To compensate for this, Corvid looks in the returned folder and the folder above it. One of these should be the location where the .war file is located, and a convenient place for the license file.
If your system cannot find the license file, there is another option. The license file can be place anywhere on the server and given any name. It then must be called once when the servlet runtime is installed using the normal call to start the servlet runtime, but with LICENSE=fileID added:
www.myServer:8080?LICENSE=fileID&KBNAME=….
The fileID is the full URL to the license file and should by URL encoded if needed. The fileID can start with file: or http: depending on where the license file is stored. If this approach is used, it only has to be called ONCE after the servlet is installed for each IP address that is used. The license info will carry over for that IP until the servlet runtime is reinstalled.
Starting the Servlet The call to start a Corvid system is done with a simple URL. The syntax is:
servlet_engine_path/Corvid/corvidsr?KBNAME=cvr_file
The servlet_engine_path depends on how your servlet engine references the servlets it has installed. For Tomcat "servlet_engine_path" is something like http://myServer:8080. “Corvid/corvidsr” will call the actual Corvid servlet. On most servers this is case sensitive.
Using the folder arrangement recommended above, the link to start a system would be:
http://myServer:8080/Corvid/corvidsr?KBNAME=../MyApps/MySystem.cvr
The "../" is a reference off the Corvid folder in Tomcat. In this case it moves down one level and into the MyApps folder, which is where the application files are stored. If your folder is in a different location, use as many "../" as needed to move to the correct level and then up into the correct folder.
NOTE: The application files MUST be referenced off the location of the Corvid folder. The application files (.cvr) can NOT be referenced by a URL address or a full path. This assures that only Corvid applications on your server are run using your Corvid Runtime and server resources.
The link that is used to start the Corvid system can be placed anywhere a URL link is legal - off text, image, image maps, etc on other pages.

18: Using the Exsys Corvid Servlet Runtime 321
Cookies Cookies are small packets of data that are passed invisibly between a servlet and the end user's browser. They are a very useful way to pass data, but can also be used to pass sensitive or confidential user data back to a server. Because cookies can be used in undesirable ways by some sites, most browsers have an option to prevent cookies. You can not be sure that all users will have their browser configured to accept cookies, unless your application will be distributed only in a know environment (e.g. intranet or standard company configuration). Most systems that will allow access to anyone on the Web should not use cookies to provide maximum compatibility.
The Corvid Servlet Runtime permits cookies, but does not require them. If a Corvid application is part of a larger system that requires cookies, cookies can be used with Corvid and they will remain active.
All Java servlets that are interactive need to send session information back to the servlet to let it know which user is returning data. In addition, Corvid has other session data that it needs to send back. The Corvid Servlet Runtime can do this via cookies, or by adding information to the URL. The default is to NOT use cookies. This will result in some extra text in the URL, but will not effect the operation of the system. If you would rather use cookies to send this data, select the "Use Cookies" option on the Properties window Servlet tab for the system.
If this option is checked, cookies will be used to pass data. If a user has their browser set to not accept cookies, the system will not work on that browser. Unless there are specific reasons why you need to use cookies, it is strongly recommended that this option not be checked.
Passing Data at Startup Initial data can be passed to the Corvid Servlet Runtime when it is started using the URL. The normal link to start the Corvid Servlet Runtime is:
http://myServer:8080/Corvid/corvidsr?KBNAME=../MyApps/MySystem.cvr
Data can be passed to Corvid by adding it to the end of the URL. The format is:
[VarName]=value
where “VarName” is the name of the Corvid variable to assign the value to and “value” is the value to assign to it. If the value includes any characters that need URL encoding, they must be encoded (This includes spaces and characters used in filenames). The data assignment is separated from the KBNAME string by "&". If there are multiple items of data to assign, they should be separated by "&", without any spaces.
For example, to pass the value of variables [X] and [Y] at startup:
http://myServer:8080/Corvid/corvidsr?KBNAME=../MyApps/sys.cvr& [X]=1&[Y]=5
Static List variables can be assigned the number of a value or the short text of the value.
This ability to pass data at startup allows integration of the Corvid Servlet Runtime with other pages on a site. Those pages could be used to ask questions with a form, or interface to content management or personalization software, which could provide the information to the expert system.
If a form external to Corvid is used to start the system, it should use the GET method to pass the data as part of the URL. When such a system is done, the results page should link back to the initial form to start another system, giving the user a chance to change their initial input data on the form.

18: Using the Exsys Corvid Servlet Runtime 322
Browser BACK button When running the servlet version, the user interacts with the system via their browser, with the individual HTML pages generated dynamically from templates. The BACK button on the user's browser can be used to go back to an earlier page.
With the applet version, the Corvid applet is part of a particular page and the BACK button will take you to the previous page, which does not have the applet. When running with an applet, the UNDO button within the applet provides the effect of the browser BACK button. In the servlet, the browser BACK button will take you back to a previous question in the system. The input on that screen can be changed and then the system will continue from that point. All input that came after that screen will be "forgotten". Servlets also support an UNDO button on the page that can be used in place of the browser Back button.
In the Corvid Servlet Runtime, the BACK button can only be used while still in the system. If a user finishes a session, goes on to other web pages and then tries to go back to the system, the session may no longer be active. It depends on the server and how long it maintains the particular session as active. Once the server terminates a particular session, a user cannot go back into it and will have to start the session over to rerun it.
Emulating the Servlet Interface from the Development Environment Actually running with the Corvid Servlet Runtime requires that the system be run from a server that supports Java servlets (e.g. Apache Tomcat), with the Corvid Servlet Runtime installed, and the appropriate system files in the correct location. This is the way the final system will be delivered, but is not the way most development computers are configured.
Normally when a Corvid system is run from the Corvid editor, it is via the applet Runtime. During development of the system logic, it should still be run as an applet, even if the intended end delivery is via the servlet. The first step in any expert system development project is to get the logic correct. For this stage, it is much better to not be concerned about details of user interface and concentrate on getting the logic complete and correct. If the system will be delivered only via servlet, just use the default applet screens to ask questions and display results.
Once the logic is correct the next issue when delivering the system via the Corvid Servlet Runtime is the templates that will define the user interface. This aspect of the system can be tested from the development environment. The Corvid editor can run the system in a mode that asks the questions using the same templates and HTML screens that will be used by the servlet. These screens are built using the same templates as will be used by the servlet.
Corvid builds the screen and displays it using the Corvid browser. The Corvid Editor then waits until the user has provided some input, then closes the Corvid browser and continues processing. This results in the questions window opening and closing with each question - this will not be seen when run with the servlet on a server. This is only to let you test and refine the servlet question and result screens.
Any system that is intended for servlet delivery should be tested on the actual server. The emulation mode that Corvid uses, will work identically for most systems. However, systems that do special server-side processing, which are affected by the way a servlet saves state, or which use a different server operating system that may be case sensitive, could operate differently. Also, the emulation mode uses local values for replaceable parameters such as Corvid_SERVLET and those should be carefully tested on the server.
Note: The servlet emulation requires running as a Java application. You will need to have java.exe installed. If you have not already done so, click the "Select Java.exe" button and browse to where you have installed Java.exe. If you have not installed Java, you will first need to do that.
To run in the emulation mode, open the Properties window, click the "Test Run" tab and select the "Servlet Emulation" radio button.
Once the "Servlet Emulation" is selected, just click the usual blue RUN triangle icon to run. When you run in the servlet emulation mode, there will be a black "MSDOS" window displayed which will display trace messages if trace is turned on. There will also be a white Java

18: Using the Exsys Corvid Servlet Runtime 323
application window where Corvid is actually running as an application. All user interaction will be via HTML screens built dynamically and displayed via the Corvid Browser window. The browser window will open and close as each question or report is displayed. (When running with the actual Corvid Servlet Runtime, the browser window will stay open and only the content will change.)
The screens displayed are the same HTML as would be displayed from the servlet. However, since the emulation mode cannot process database or other server-side processing calls, these will have to be asked directly of the user.
NOTE: To cancel a session, you must close the MSDOS window. This is usually a black "DOS" window. Just click on the "X" in the upper right of the window to close it. If you close the HTML window that is asking the question, it will just pop back and re-ask the same question. Closing the MSDOS window will cancel the run. After you close the MSDOS window, you may need to also close the window asking the question if it is still open. Once the MSDOS window is closed, the question window will not pop back up.
Moving to the Corvid Servlet Runtime In the Corvid Applet Runtime all screens are designed using the Corvid Screen Commands for questions, results and other informational screens displayed by the system. Any applet screens/commands that have been added to a system will remain in the system and be used when the system is run via the Applet Runtime. However, the Screen Commands apply only when running a system with the Corvid Applet Runtime.
When running a Corvid system via the Servlet Runtime, each screen that the system displays to the users is built using a "Template" screen that is designed using HTML and special Corvid commands and parameters. Modifying a system to run via the Servlet Runtime involves simply providing a template screen to be used for each screen the user could see. Since most templates are designed to be generic with replaceable parameters, a single template can apply a standard design to all the questions in a system. Typically a system can be delivered with the Corvid Servlet Runtime by just adding 2 templates - a template that is used to ask questions and a template that is used to display results. Many more templates can be added if the user interface design requires it, but most systems can be run using only 2 templates.
The template screens are designed using a combination of HTML and special Corvid commands and parameters to build an HTML form. Sample templates are provided with various styles of user interface. These can be edited with any HTML editor. The templates can also include JavaScript, XML or any other commands that are supported by your browser.
The Exsys Corvid Servlet Runtime program needs to be installed on a server that supports Java servlets, such as Apache or IIS with Jakarta Tomcat and any other comparable servers that support servlets. Since the servlet is in Java, it does not matter if the server is UNIX, LINUX, MS Windows or OSX. All that is required is that the server support Java servlets.
Servlets Servlets are Java programs that run on the server. In many ways they are similar to CGI programs, but remove many of the disadvantages presented by CGI. Servlets are run using a servlet engine such as Tomcat, though there are many other servlet engines. The servlet engine installs the servlet and makes it available to be called. The user calls the servlet using a special URL address and passes it information. The servlet processes the information and typically sends back an HTML screen to the user. In the case of the Corvid Servlet Runtime delivering an expert system, there may be a succession of screens asking questions or displaying results. Each screen adds information and continues the session.
Since there may be many users simultaneously running sessions, the servlet is responsible for keeping track of each user and their data. Java servlets have built-in capabilities to simplify this task. However, each screen presented to the end user must contain certain information that allows the data to be sent back to the Corvid servlet with an identification of the individual user. This information is automatically added to the template.
Templates The Corvid Servlet Runtime communicates with the end user via HTML forms. These forms are built using template files that define the page design and tell the system what HTML controls to use to ask questions or display results. The Corvid Servlet Runtime processes the data it has and, using the inference engine, determines what variable to ask next. To ask the user a question, the system must display an HTML page on the user's browser window. Using a template file, the Corvid Servlet Runtime builds this HTML page. The template has Corvid commands and replaceable parameters that are processed by the

18: Using the Exsys Corvid Servlet Runtime 324
Corvid Servlet Runtime to produce the HTML screen sent to the user. When the user responds to the question presented, the data is sent back to the servlet. This adds to the information in the session, which then determines the next question to ask. This process continues until the results are displayed and the session is completed.
Building Systems for Servlet Delivery Building a system in Corvid for delivery via servlet or applet is essentially the same except for the user interface. The logic of the system is designed exactly the same way using the Logic and Command Blocks. Regardless of delivery mode, the first step is always to get the logic of the system working correctly. This can be done with the simple default applet screens. Make sure the system asks the appropriate questions and arrives at the correct conclusion. If there are errors in the logic, correct them before spending time on the user interface - there is no point in delivering a system that is not giving the correct results.
Once the system is arriving at the correct results, it is time to add the user interface. This is where the steps for servlets are quite different from those for applets and stand-alone systems. Servlet delivery requires that template files be added that define how questions will be asked and how results will be displayed. Sample templates are provided and custom templates can easily be created. Applet delivery requires that Corvid Screen Commands be added to the system to define the look and controls used to ask questions within the applet. A system can be designed to run in both servlet and applet modes by adding both Custom Screen commands for applet delivery and templates for the Servlet. These are added in different ways and will not conflict with each other.
Templates To make a system work with the Corvid Servlet Runtime requires adding the appropriate templates. Templates are a very powerful tool and have many options. The first step is to learn how to add a template to a system. It is easiest to start with the predefined sample templates. The next step is to understand the syntax for building your own templates. To get the most out of templates requires some knowledge of HTML and Corvid commands, however many systems can be delivered by simply editing one of the sample templates with a standard HTML editor.
Whenever the Corvid Servlet Runtime needs to ask the user for the value of a variable, it uses a template to build the screen. In most cases the template will be a generic template that can be used for many questions, giving them all the same look-and-feel and making maintenance easy. In special cases, such as a question asked with an image map unique to that question, there can be a special template made for that specific question.
A generic template is one that will work for most (or all) of the variables asked of the user. This template is defined to be the system default template and will be used to ask the end user for the value of any variable that does not have an associated template that overrides it. Any variables that require a different template can have a template associated them. A specific template associated with a variable will take precedence over the system default template.
In addition there is an overall Corvid default template that will be used for any system where no template is specified as the system default and no individual templates are associated with variables. This overall default provides a very simple and generic interface and is intended to be used only to test a system before other templates are designed, or if you are having trouble running a system and want to use the simplest template available.
Order of priority of template use: 1. Template associated with the variable being asked 2. Knowledge base system default template 3. The overall Corvid default template screen
The overall Corvid default template is installed by the WAR file, which installs the Corvid Servlet Runtime. It will be in the same directory as the Corvid servlet. This file should not be modified - it is the last option for asking questions. To give a system a different look-and-feel, create or select a template and make it the system default template.
A set of sample templates is provided with Corvid. These illustrate different template styles and approaches. A quick way to build an attractive template for a system is to select one of the sample templates that you like. Then open that template in an HTML editor and modify it for your system by adding text or images specific to your system. This modified template can then be used as the system default for your system.

18: Using the Exsys Corvid Servlet Runtime 325
Specifying the System Default Template to Ask Questions The knowledge base system default template file is set from the Properties window. Click on the "Servlet" tab. This will display a window for setting the knowledge base defaults.
In this window you can select a system default template. If a template already exists, click on the Browse button in the "Default Template to Ask Questions" box and select the template to use.
If you wish to edit the template file or create a new one from within Corvid, you will need to use an external HTML editor. To do this, first you must select the HTML editor you prefer. This can be anything from a sophisticated HTML editor such as Adobe GoLive to something as simple as Notepad. (Microsoft FrontPage can also be used, but since it tends to add many Microsoft specific commands, it is not recommended unless you will be fielding the system only on a Microsoft server.)
Click the Browse button in the HTML Editor box and locate the editor you wish to use. Once an HTML editor is selected, you will be able to click the New/Edit button for a template and it will open a new file with your selected HTML editor, or if a template file has already been selected, it will be opened for editing.
NOTE: The template files can have any name and extension - including .HTML. Your templates do not need to have an .HTML extension but some HTML editors will only work correctly if you give the template an .HTM or .HTML extension.
Specifying the Individual Variable Template to Ask Questions In addition to the system default template, any variable can have an individual template specified to use when asking the user to input the value for that variable.
When a variable is selected in the Variable window, there is a tab labeled "Servlet". The Servlet tab allows assigning a specific template to be used when asking the user for the value of the variable. Enter the template for the variable in the "Template to Use" edit box. This can be selected by browsing to a file. If an HTML editor has been specified in the Properties page, you can use it to edit the template or create a new one by clicking the "New/Edit" button. If you had a template selected and then decide to just use the default, click the "Use Default" button, which will clear the edit window and change some internal settings. Note: The Use Default button only needs to be used to clear an existing template. If the edit box is empty, the system default template will be used.
Templates to Display Results In addition to the templates used to ask questions, most systems will have at least one template that is used to display the system results. This is typically associated with the Corvid Command Block command "RESULTS" or "DISPLAY". The commands may have Corvid Screen Commands associated with them, but these apply only when running with the applet runtime. The Servlet runtime requires a template, which is specified by "SERVLET=template_file" following the RESULTS or DISPLAY command, where template_file is the name of the template to use.

18: Using the Exsys Corvid Servlet Runtime 326
This command can be built from the command builder for the RESULTS command:
When building a command, enter the name of the Servlet Template file to use for the RESULTS and DISPLAY commands.
When running with the Corvid Applet Runtime or as a standalone application, the "SERVLET=" part is optional and will be ignored. The system will use the Corvid Screen Commands associated with the command.
When running with the Servlet runtime, the Corvid Screen Commands will be ignored and the template will be used. If there is no "SERVLET=template_file" added to a RESULTS command, Corvid will automatically use a very generic template that displays the values of all variables in the system. This can be used for testing a system before developing the RESULTS template for the system. The default template is installed with the Corvid Servlet Runtime and should NOT be modified since it is the template that the system will use when no other can be found.
Final Screen Template In addition to the RESULTS template, a Final screen template can be added to a system. This is a screen that will be displayed when the system has completed the run. In most systems this will not be necessary since a RESULTS screen will be displayed at the end of the run. If it allows only a "Restart" or exit from the system, there will be no way to reach the Final screen. However, if you wish to have a screen after the results or if there are multiple ways to exit a system and the results might not be displayed, then the Final screen can be used.
To add a final screen to a system, open the Properties window and select the Servlet tab.
In the "HTML Page to Display at End of Run" box enter the name of the template to use. The Browse button allows selecting an existing file. If a HTML editor has been specified, the "New/Edit" button allows creating a new template, or editing the one that is selected.
If the system requires a Final screen, and none is specified, a very generic screen will be displayed. This is an overall Corvid default and should not be modified.
Sample Templates As a first step, a system can be run with one of the sample templates provided with Corvid. These provide a variety of user interfaces. The intention of the samples is to provide a template that works well at providing a particular look-and-feel and which can be easily edited with a standard HTML editor. It is expected that you will want to modify the templates to include text or graphics for the system subject, your company, contact links etc. The template is intended to be a place to start
Templates can include images just like any other HTML page, and like any other page, the image files must be located on a Web server. There are various ways to handle the issue of the location of image files, but for the sample templates the easiest approach is to use the copies of the templates and images that are on the Exsys Web site. This requires that you be on-line, but is a fast and easy way to try out sample templates that have all links in the correct location.
Currently there are 9 sample templates, but more will be added in the future. The easiest way to look at the templates is to go to http://www.exys.com/servlettemplates and click on the various sample styles displayed. The individual templates can be viewed as normal HTML pages. Find a template that you want to use. Copy the URL for that template and paste it in your system as the system default template. (Directions to follow.)

18: Using the Exsys Corvid Servlet Runtime 327
Remember that the replaceable parameters are not converted to their associated variable text until runtime. For example, a template may look like:
When this is run, the upper VARIABLE_PROMPT and the edit box below will be used to ask for numeric or string variables. VARIABLE_PROMPT will be replaced by the prompt text for the variable and the user will be able to enter their input in the edit box. The second VARIABLE_PROMPT and the VARIABLE_VALUE_TEXT below it will be used for static and Dynamic List variables. That VARIABLE_PROMPT will be replaced by the prompt for the variable and the VARIABLE_VALUE_TEXT will be replaced by a set of lines with check boxes, each with the text of one of the possible values.
For example, if the above template were used to ask the numeric variable [TEMP] with the prompt "The temperature today is:", it would look like:
If a Static List variable [WEATHER] was asked with the same template, where the variable prompt was "The weather today is" with values "sunny", "cloudy", "rainy", and "snowy", it would look like:
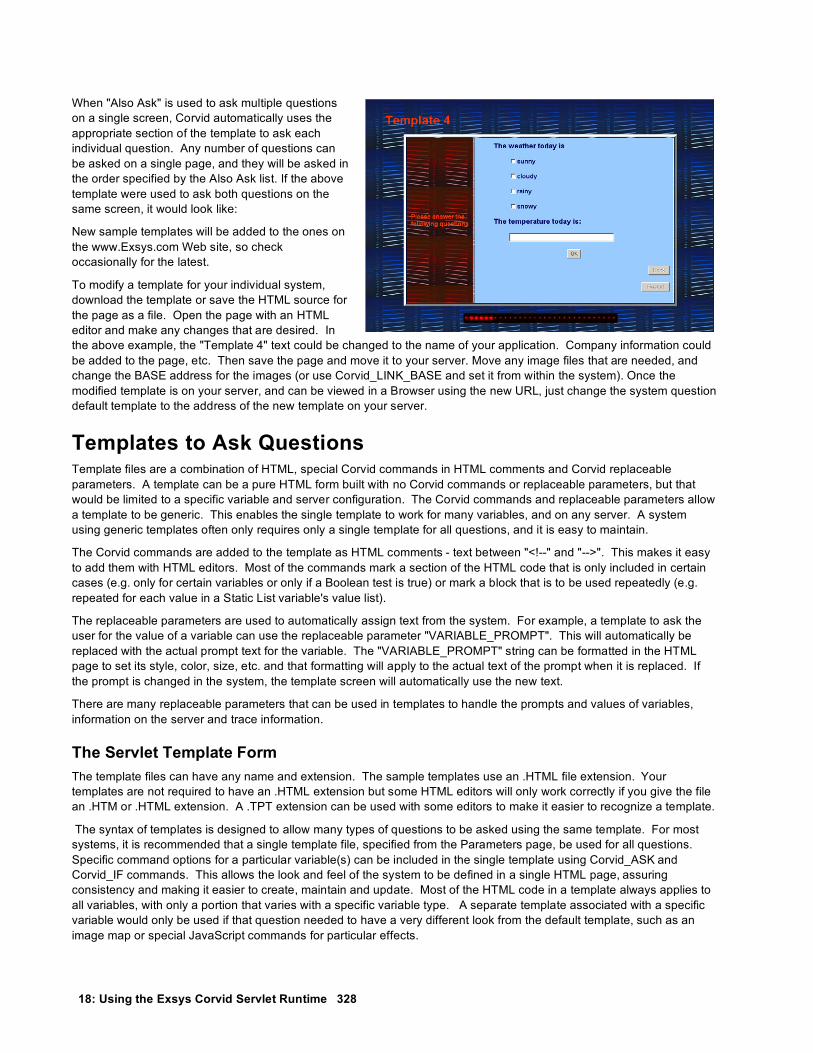
18: Using the Exsys Corvid Servlet Runtime 328
When "Also Ask" is used to ask multiple questions on a single screen, Corvid automatically uses the appropriate section of the template to ask each individual question. Any number of questions can be asked on a single page, and they will be asked in the order specified by the Also Ask list. If the above template were used to ask both questions on the same screen, it would look like:
New sample templates will be added to the ones on the www.Exsys.com Web site, so check occasionally for the latest.
To modify a template for your individual system, download the template or save the HTML source for the page as a file. Open the page with an HTML editor and make any changes that are desired. In the above example, the "Template 4" text could be changed to the name of your application. Company information could be added to the page, etc. Then save the page and move it to your server. Move any image files that are needed, and change the BASE address for the images (or use Corvid_LINK_BASE and set it from within the system). Once the modified template is on your server, and can be viewed in a Browser using the new URL, just change the system question default template to the address of the new template on your server.
Templates to Ask Questions Template files are a combination of HTML, special Corvid commands in HTML comments and Corvid replaceable parameters. A template can be a pure HTML form built with no Corvid commands or replaceable parameters, but that would be limited to a specific variable and server configuration. The Corvid commands and replaceable parameters allow a template to be generic. This enables the single template to work for many variables, and on any server. A system using generic templates often only requires only a single template for all questions, and it is easy to maintain.
The Corvid commands are added to the template as HTML comments - text between "<!--" and "-->". This makes it easy to add them with HTML editors. Most of the commands mark a section of the HTML code that is only included in certain cases (e.g. only for certain variables or only if a Boolean test is true) or mark a block that is to be used repeatedly (e.g. repeated for each value in a Static List variable's value list).
The replaceable parameters are used to automatically assign text from the system. For example, a template to ask the user for the value of a variable can use the replaceable parameter "VARIABLE_PROMPT". This will automatically be replaced with the actual prompt text for the variable. The "VARIABLE_PROMPT" string can be formatted in the HTML page to set its style, color, size, etc. and that formatting will apply to the actual text of the prompt when it is replaced. If the prompt is changed in the system, the template screen will automatically use the new text.
There are many replaceable parameters that can be used in templates to handle the prompts and values of variables, information on the server and trace information.
The Servlet Template Form The template files can have any name and extension. The sample templates use an .HTML file extension. Your templates are not required to have an .HTML extension but some HTML editors will only work correctly if you give the file an .HTM or .HTML extension. A .TPT extension can be used with some editors to make it easier to recognize a template.
The syntax of templates is designed to allow many types of questions to be asked using the same template. For most systems, it is recommended that a single template file, specified from the Parameters page, be used for all questions. Specific command options for a particular variable(s) can be included in the single template using Corvid_ASK and Corvid_IF commands. This allows the look and feel of the system to be defined in a single HTML page, assuring consistency and making it easier to create, maintain and update. Most of the HTML code in a template always applies to all variables, with only a portion that varies with a specific variable type. A separate template associated with a specific variable would only be used if that question needed to have a very different look from the default template, such as an image map or special JavaScript commands for particular effects.

18: Using the Exsys Corvid Servlet Runtime 329
Most templates include an HTML form. (Other types of templates that are not forms, which use links to return data are discussed later.) The template is a normal HTML page and can use any HTML design or layout that is desired. The Corvid commands in the template are added as HTML comments - text between "<!--" and "-->".
The form section of the template is used to ask the user a question using radio buttons, check boxes, lists, edit boxes etc. The user's input is sent back to the Corvid Servlet Runtime, which will process the data and continue the run. The HTML outside of the form section usually does not use Corvid commands and can be any HTML design.
There are 5 main sections to the form:
1. First, the section needs the standard HTML code that indicates the section of the page is a FORM. The first line of the form should be:
<FORM METHOD="POST" ACTION="Corvid_SERVLET">
The text "Corvid_SERVLET" is a replaceable parameter that is set by the system. This is explained below.
2. The body of the form will usually have one or more sections marked with Corvid_ASK commands that indicate sections of HTML code that should be used to ask certain variables. The command "Corvid_ASK" allows a section of the form to be specified for use by particular types of variables (e.g. numeric), specific named variables (e.g. all variables that start with "XYZ", an individual variable, or all variables not covered by one of the other Corvid_ASK sections.
Within the Corvid_ASK section, there are usually replaceable parameters that are entered as normal HTML text, but which will be replaced with the Prompt and Value, etc. from the variable.
3. Optionally, there can also be sections of the form that are included with Corvid_IF commands. This allows a Boolean test expression to be used to determine if a section of the template should be included. For example, if a certain Confidence variable has been given a value, you may wish to notify the user immediately or ask a question in a different way.
4. A SUBMIT button(s) must be part of the form. This submits the data or sends other data to indicate a BACK or RESTART button has been pressed. There must be at least one submit button on the form.
5. The closing </FORM> tag indicating the end of the form.
If you are familiar with HTML forms, the template can be built using a simple text editor such as Notepad, but it is generally easier to use an HTML editor.
<FORM…> Tag The <FORM…> tag indicates the start of the form. The <FORM> tag must include a METHOD="POST" and "ACTION=Corvid_SERVLET".
<FORM METHOD="POST" ACTION="Corvid_SERVLET">
All data should be sent back from Corvid forms using POST. This assures that any amount of user input can be sent, even if large blocks of text are entered in an edit box, or there are many questions on a screen.
The ACTION="Corvid_SERVLET" tells the page where the Corvid servlet is located so that it can send the data back. Corvid_SERVLET is a replaceable parameter that is set for the system on Servlet tab of the Properties page. This will be the address where the servlet is installed on the server. It will end in "/Corvid/corvidsr", and will be something similar to:
"http://www.my_server:8080/Corvid/corvidsr"

18: Using the Exsys Corvid Servlet Runtime 330
When a system is moved to a server, the address of the Corvid Runtime Servlet for that machine is entered on the Properties page and will automatically be used to replace the value of the text "Corvid_SERVLET" when it is found in any template. Using Corvid_SERVLET, rather than hard coding the address in the template, allows the system to be moved to another server simply by changing one entry on the Properties page.
The <FORM> tag must be in the BODY section of the page. For example, a simple page might start:
<html> <head> <title>My Corvid System</title> </head> <body bgcolor="#ffffff"> <form method="post" action="Corvid_SERVLET">
There could also be any HTML code for site look and feel between the <BODY> tag and the <FORM> tag. There could be code to display text, images, setup tables, links, standard colors, styles or other content not specific to the running of the expert system. The form itself can also be an entry in a table to provide a particular arrangement or layout.
Referencing Image Files The template file often will incorporate image files or other files from the server. Normally an HTML page is a physical page on a server, and images can be put in the same folder or a subfolder. This allows the images to be referenced using the location of the page as a base address. For example, if a page uses an image named "my_image.jpg" and that image is in the same folder (directory) as the page, it can just use "my_image.jpg" and the Browser will automatically look in the same folder as the page. However, a page displayed from the Corvid Runtime Servlet is created dynamically and does not really have a physical location on the server. Consequently, image files cannot be specified by relative location to a page and a more detailed URL address is required. In addition, the template file does not need to be in a location on the server that allows Web browsing (though it can be), however, the image files MUST be in a section that is accessible via Web browsers.
The image files in a template can be referred to in several ways.
Full URL
If you know where the image is located on a server, just include the full URL to that image. This requires that the image be in a location that can be referred to by a URL - entering the URL in a Web browser must display the image.
For example:
<IMG SRC="http://www.mysite.com/images/myImage.jpg">
Use BASE to set a Base URL for Images
If all the images are in one folder (or subfolders of a folder) you can use the
<BASE href="…">
tag in the template. The <BASE> tag indicates the location to use for all images and links. Any image file or link that is not specified by a full URL starting with "http://" will use this base address as the starting location. The BASE tag must occur in the HEAD section of the template - that is between the <HEAD> and </HEAD> tags. The base URL can be hard coded such as:
<BASE href="http://www.mysite.com/images/">

18: Using the Exsys Corvid Servlet Runtime 331
Alternatively, the replaceable parameter Corvid_LINK_BASE can be used.
<BASE href="Corvid_LINK_BASE">
This makes it easier to move systems to other servers or change the location of the image files. The Corvid_LINK_BASE parameter is set from the Servlet tab in the Properties window.
For example, if all the images in the template are in "http://www.mysite.com/images/", just use
<BASE href="Corvid_LINK_BASE"> in each template and in the Properties page enter "http://www.mysite.com/images/" for the value of Corvid_LINK_BASE. This value will be used to replace Corvid_LINK_BASE where it is used in the templates. If the images are then moved to a different location, just changing the Corvid_LINK_BASE value will change the value in all templates when they are used.
Section to Ask Questions Templates can be designed to ask various types of questions - multiple choice questions for Static and Dynamic Lists, and edit fields for numeric or string variables. In addition, the formatting for some variables may be different for others and multiple variables may be asked on the same screen. The template syntax makes it easy to incorporate all of these into a single template.
Within the template's FORM section, there can be sections of code that are used for specific Corvid variable(s).
The section of code for a particular variable is marked with Corvid commands.
<!-- Corvid_ASK VarID --> … <!-- ASK_END -->
Note that these are HTML comments. The command must start with <!-- and end with -->. HTML editors allow adding comments to the HTML, and the Corvid commands can be added using that feature of the editors.
The Corvid_ASK command through the associated ASK_END command, MUST be in the FORM portion of the page - that is between the <FORM> and </FORM> tags.
The VarID indicates which variable(s) the Corvid_ASK code applies to. The allowed values for VarID are:
VARIABLE All variables
STATIC_LIST All Static List variables
DYNAMIC_LIST All Dynamic List variables
CONTINUOUS All numeric, string and date variables
NUMERIC All numeric variables
STRING All string variables
DATE All date variables
[VARNAME] The specific variable varname
[VARMASK] All variables fitting the mask pattern

18: Using the Exsys Corvid Servlet Runtime 332
If a mask pattern is used, the standard Corvid mask characters are used:
CHARACTER MATCHES
? Matches any character
* Matches the rest of the string
character Matches itself
# Matches any digit 0-9
{abc} Matches any single character in the brackets { }
{X-Z} Matches any single character between X and Z
A template file typically will have multiple Corvid_ASK sections, and MUST have a section that applies to each variable that will be asked using the template. For each variable that is asked using the template, the first Corvid_ASK section which has a matching VarID will be used and all other Corvid_ASK sections will be ignored for that variable - even if they would also have matched. For example, if there were 3 sections in this order:
<!-- Corvid_ASK [COLOR] --> Section 1 <!-- ASK_END -->
<!-- Corvid_ASK [C*] --> Section 2 <!-- ASK_END -->
<!-- Corvid_ASK STATIC LIST--> Section 3 <!-- ASK_END -->
The variable [COLOR] would use section 1 code, and ignore sections 2 and 3. A variable starting with "C", but not [COLOR], would use section 2 and ignore section 1 and 3. All static list variables that did not start with "C" would use section 3 and ignore section 1 and 2.
One convenient way to make sure a template will work for all variables is to end with a <!-- Corvid_ASK VARIABLE --> section. This will apply to all variables that have not already matched a Corvid_ASK command in the page.
Care must be taken since Static List and Numeric variables typically need very different formats and controls for the questions. If a system has numeric, string, date, Static List and Dynamic List questions, it can be handled with 2 sections:
<!-- Corvid_ASK CONTINUOUS --> Section 1 <!-- ASK_END -->
<!-- Corvid_ASK VARIABLE --> Section 2 <!-- ASK_END -->
Section 1 will be used for all numeric, string and date questions. Section 2 will be used for all variables that are not Continuous, so it will be used for all Static and Dynamic List variables. Naturally, you might want to have more variation and have a separate section for each type.
Also Ask The Servlet Runtime supports the "Also Ask" feature of Corvid, which allows multiple questions to be easily asked on one screen. As with the Applet Runtime, just go to the Also Ask tab on the variable's properties and select the other variables to ask at the same time. When the selected variable is asked, each variable in the Also Ask list will be asked on the same screen. In the servlet version, all questions will be asked with the same template associated with the initial variable being asked. That template MUST have sections appropriate for each variable that will be asked in the Also Ask group. That means there must be a Corvid_ASK section that will match each variable in the Also Ask list.
The Corvid_ASK sections for each Also Ask variable in the template screen can be in any order. Corvid will check all the Corvid_ASK sections for each variable and use the first matching section. The initial variable will be asked with its appropriate Corvid_ASK section, followed in order by each of the Also Ask variables asked with their matching Corvid_ASK sections.

18: Using the Exsys Corvid Servlet Runtime 333
For example, using the Corvid_ASK section: <!-- Corvid_ASK [COLOR] --> Section 1 <!-- ASK_END --> <!-- Corvid_ASK [C*] --> Section 2 <!-- ASK_END --> <!-- Corvid_ASK STATIC LIST--> Section 3 <!-- ASK_END -->
If a system asks the variable [COLOR] which has an Also Ask list of [INPUTS], [OUTPUTS] and [COST]. Where [INPUTS] and [OUTPUTS] are static list variables, the screen would have:
[COLOR] asked Section 1 used to ask [COLOR] [INPUTS] asked with Section 3 [OUTPUTS] asked with Section 3 [COST] asked with Section 2
Also Ask uses the template for the initial variable to ask all variables in the Also Ask list - even if that is not the template associated with those individual Also Ask variables. This allows a variable to be asked in different ways. If the variable [COST] is asked as an Also Ask from [COLOR], it will use the section of the template associated with [COLOR] that matches [COST]. If no input is provided for [COST], and the value is needed by the system, it would be re-asked using the template associated with [COST]. The second time [COST] is asked, you could use a different template that reminds the user that this input was not previously provided. (This ability to ask a question different ways can easily be done in the servlet version, but is not easy to do using applets.)
Controls Within a Corvid_ASK section is the definition of how to ask the user for that specific type of variable. This can include the type of control to use, formats, colors, fonts, etc. Various HTML commands can be used for radio buttons, check boxes, lists, edit boxes, etc. This is done using the standard HTML tags such as <INPUT...>, <SELECT ...>, <TEXTAREA…>. These can be built and formatted using an HTML editor, but MUST be within the associated <!-- Corvid_ASK --> … <!-- ASK_END --> commands.
The exact syntax of the various HTML control tags is discussed below. In all cases except buttons, the NAME= parameter must be the name of the variable being asked, in brackets-[ ]. This is the identifier that will be used for the user's input when the data is sent back to the Corvid Servlet Runtime.
For example, to ask for a string value that will be returned for variable [X], you could use:
<input type="text" name="[X]">
The value input would be assigned to variable "[X]".
For a template associated with a single variable, the name can be hard coded in the template. This works for a screen associated only with [X], but to allow a more generic screen, Corvid will automatically replace the string VARIABLE_NAME with the name of the variable being asked. This can be done anywhere in a Corvid_ASK section, but is most useful associated with name= parameter. The command:
<input type="text" name="[VARIABLE_NAME]">
could be used for any numeric, string or date variable. If it were used for the variable [TEMP], the parameter VARIABLE_NAME would be replaced with "TEMP" to produce:
<input type="text" name="[TEMP]">
If used for variable [COST], it would produce:
<input type="text" name="[COST]">
NOTE: The variable name MUST be in [ ]. The parameter VARIABLE_NAME will be replaced by just the name of the variable, so be sure to put square brackets [ ], around the VARIABLE_NAME.
The name= parameter identifies the data that is returned to Corvid. In addition, the control needs a label to indicate what input is to be entered.

18: Using the Exsys Corvid Servlet Runtime 334
A template for a single variable can "hard code" this into the screen. For example:
The weight of the item is <input type="text" name="[WEIGHT]">
However, it is better to make a Corvid_ASK section that can be used for multiple variables. To allow this, the replaceable parameter VARIABLE_PROMPT will be replaced with the prompt text for the variable being asked. If there are multiple prompts (e.g. different languages), Corvid will select the appropriate one based on the key variable. So, if the Corvid_ASK section has:
VARIABLE_PROMPT <input type="text" name="[VARIABLE_NAME]">
it can be used to ask any numeric, string or date variable. The prompt for the variable will be followed by an edit box. The value entered will be assigned to the appropriate variable.
Any of the HTML options for formatting text can be used for the prompt. Whatever formatting (size, color, font, etc.) is applied to the text "VARIABLE_PROMPT" will be applied to the actual prompt text when it is replaced. Any additional options for the <INPUT tag can also be used to format the edit field.
To build the command with an HTML editor, use the text VARIABLE_PROMPT and VARIABLE_NAME when building the control, and format them with the HTML editor. Whatever format you set for the text VARIABLE_PROMPT is the format that will be used when "VARIABLE_PROMPT" is replaced by the actual prompt.
Note: When formatting replaceable parameters such as "VARIABLE_PROMPT", be sure to do it in a way that leaves "VARIABLE_PROMPT" as a single text string. If "VARIABLE_" was made red and "PROMPT" made blue, the string "VARIABLE_PROMPT" would be broken and not replaced.
The replaceable parameters VARIABLE_NAME and VARIABLE_PROMPT should only be used within a Corvid_ASK section. They must have the context of a specific variable to have meaning. The Corvid_ASK section can be quite general, such as Corvid_ASK VARIABLE, but the variable being asked by that section will still set the context.
Corvid_REPLACE Text The replaceable parameter VARIABLE_PROMPT is just replaced by the prompt for the variable. However, each variable can have additional HTML code added to the template. This is done from the Servlet tab for the variable in the Corvid_REPLACE section.
Corvid_REPLACE strings can be any text or HTML code that you wish to have added to the template. This allows a single template to be customized to for various questions. There can be up to 10 Corvid_REPLACE stings for each variable, and each of the 10 can have up to 5 alternates for different languages or user interfaces.
To use Corvid_REPLACE, click on the Servlet Tab for the variable. The counter next “Corvid_REPLACE_” will display “1”. Enter any text or HTML code that you want to add to the template. In the template add the text “Corvid_REPLACE_1” as text. When the template is used for the variable, the text “Corvid_REPLACE_1” will be replaced by the text that was entered.
To add a second Corvid_REPLACE, click the “>” arrow. This will change the counter to “2”. Enter text that will be used to replace the string “Corvid_REPLACE_2” in the template. This can be done for up to 10 CORIVD_REPLACE strings. If a particular variable does not have a matching Corvid_REPLACE string, the “Corvid_REPLACE_#” in the template will be replaced by a blank.
The Corvid_REPLACE text can be any text or HTML code, but should not include Corvid commands such as Corvid_IF.
For example, suppose you wish to keep the prompt text for your variables simple, but some variables should display an image before the prompt. The template could include:
Corvid_REPLACE_1 <BR> VARIABLE_PROMPT

18: Using the Exsys Corvid Servlet Runtime 335
To add an image before the prompt for some variables, just make the Corvid_REPLACE_1 string “<IMG SRC=…>”. When the variable is asked, the Corvid_REPLACE_1 will display the image followed by the prompt. If there is no Corvid_REPLACE_1, it will be replaced by a blank.
(Note: This could also be done by adding the IMG SRC command to the prompt text itself, but that would make the prompt more difficult to read, and would result in the image being displayed wherever the prompt is used. The Corvid_REPLACE approach allows the image to be shown when the questions are asked, but the prompt can be used without the image in reports.)
The Corvid_REPLACE can as long as needed, but must syntactically be able to be placed into the template at the appropriate point.
Multiple Languages: Each of the 10 Corvid_REPLACE strings can have up to 5 variations for different languages. If the prompt for the variable has an “Alternate Prompt Key Variable” selected on the Prompt tab, the “Prompt Key Var Value” options will be enabled at the bottom of the Servlet tab. For each Corvid_REPLACE, click the arrows next to the “Prompt Key Var Value” to select the number to match the alternate prompts. Then enter the Corvid_REPLACE string. When the variable is asked, the CORIVD_REPLACE_# that matches the key variable value will be used.
Numeric, String and Date Variables When asking for numeric, string or date variables, the user's input will be a text string. This may be a numeric value, a date or just text. HTML provides controls allowing the user to input text in edit boxes. (If the variable only has specific values, you could use a list or set of radio buttons, but if that is the case, the variable probably should be a Static List.)
Within the <FORM section of the template, there must be a Corvid_ASK command that matches the variable. This can be:
<!-- Corvid_ASK VARIABLE -->…<!-- ASK_END -->
Section will be applied to all variables. Make sure to handle any Static List or Dynamic List variables in a Corvid_ASK section above this.
<!-- Corvid_ASK CONTINUOUS -->…<!-- ASK_END --> Section will be applied to all numeric, string and date variables
<!-- Corvid_ASK NUMERIC -->…<!-- ASK_END --> Section will be applied to all numeric variables
<!-- Corvid_ASK STRING -->…<!-- ASK_END --> Section will be applied to all string variables
<!-- Corvid_ASK DATE -->…<!-- ASK_END --> Section will be applied to all date variables
<!-- Corvid_ASK [VarName] -->…<!-- ASK_END --> Section will be applied to the specific variable VarName
<!-- Corvid_ASK [VarMask] -->…<!-- ASK_END -->
Section will be applied all variables matching the mask. Make sure to handle any Static List or Dynamic List variables that match the mask in a Corvid_ASK section above this.
Within the Corvid_ASK section for Continuous variables, there are 3 standard HTML controls that can be used which allow the user to type in text. (These are standard HTML commands, not a unique feature of Corvid, and more details on these commands can be fond in a manual on HTML.)
Simple Text Edit Box <input type="text" name="[VARIABLE_NAME]">
This allows a single line of text, which will be assigned to the variable. The tag allows an optional size="#" parameter that sets the size of the edit field, where # is a numeric value. The positioning of the edit field is done using HTML formatting commands outside of the tag. The prompt for the variable can be displayed to the left of this tag or above it and should use the VARIABLE_PROMPT replaceable parameter.

18: Using the Exsys Corvid Servlet Runtime 336
For example, a template section that would work for all numeric variables:
<!-- Corvid_ASK NUMERIC --> VARIABLE_PROMPT <input type="text" name="[VARIABLE_NAME] size="12"> <!-- ASK_END -->
Using this to ask for the temperature would look like:
Password Edit Box <input type="password" name="[VARIABLE_NAME]">
This also allows a single line of text, which will be assigned to the variable. It is similar to the simple edit box above, but the edit box will echo back "*" or some meaningless symbol instead of the user's input. This hides the text that is typed in and should be used for passwords. The tag allows an optional size="#" parameter that sets the size of the edit field, where # is a numeric value. The positioning of the edit field is done using HTML formatting commands outside of the tag. The prompt for the variable can be displayed to the left of this tag or above it and should use the VARIABLE_PROMPT replaceable parameter.
Variable values are sent back to the servlet using POST, which is relatively secure compared to GET which makes the value part of the URL. However, Corvid does not encrypt the information itself and if the user is providing highly sensitive password information, a secure server connection should be used for added protection.
For example, to ask for the value of all variables starting with "PASSWORD":
<!-- Corvid_ASK [PASSWORD*] --> VARIABLE_PROMPT <input type="password" name="[VARIABLE_NAME]> <!-- ASK_END -->
Using this to ask for a password would look like:
Larger, Multiline Edit Box <textarea name="[VARIABLE_NAME]" cols="#" rows="#"> </textarea>
This allows inputting multiple lines of text, and handles scrolling etc. The value entered will be assigned to the variable. The cols="#" parameter that sets the number of columns in the edit box (width) and rows="#" sets the number of rows, where # is a numeric value. The positioning of the edit field is done using HTML formatting commands outside of the tag. The prompt for the variable can be displayed to the left of this tag or above it and should use the VARIABLE_PROMPT replaceable parameter.
Note that the tag requires the closing </textarea> tag to mark the end. If you wish to have text already in the edit box when it is displayed, put it before the </textarea> marker. In most cases you will want, the edit field will be blank and there will be no text between <textarea…> and </textarea>.
For example you could display a comment generated by the system to see if the user wishes to add to it. The system generated note is in the variable [SysComment] which is included with double square bracket, [[ ]], embedding. The user's modified note will be sent to the variable [UserNote] (In this case hard coded into the template):
Please enter any notes you wish to add: <textarea name="[UserNote]" cols="60" rows="5"> [[SysComment]]</textarea>.

18: Using the Exsys Corvid Servlet Runtime 337
To ask for the value of all string variables:
<!-- Corvid_ASK STRING --> VARIABLE_PROMPT <BR> <textarea name="[VARIABLE_NAME]" cols="60" rows="5"> </textarea> <!-- ASK_END -->
Using this to ask for a note would look like:
Static and Dynamic List Variables Asking for the value of a numeric or string variable is relatively simple since there is a single control (edit box) and the user just enters text which is returned to Corvid. Static and Dynamic List variables have a set of defined possible values that the user must select among. This requires multiple controls (check boxes or radio buttons) or a list with multiple entries. HTML code must be generated for each of the possible values. Corvid templates have special commands to allow generic Corvid_ASK sections to be used to handle any number of values associated with a variable.
When asking the user for input on a Static List or Dynamic List variable that has multiple values, the INPUT and SELECT tags can be used to build controls.
As with all controls except buttons, the "name=" parameter for the control must be the name of the variable being asked, in brackets, [ ]. In addition each control (check box, radio button or value in a list) has a "value=" parameter. This must be associated with the matching value for the variable. The "value=" parameter for a control MUST be the number of the associated value or the short text of the associated value. Since Dynamic List variables do not have a short text for the values, they can only use the value number.
For example, if there is a variable [WEATHER] and the 3rd value is "Rain or sleet", with short text for the value "rain", the following check box controls could be used:
<input type="checkbox" value="rain" name="[COLOR]">Rain or sleet or
<input type="checkbox" value="3" name="[COLOR]">Rain or sleet
Note that even if the numeric value is used, it is a string in quotes.
To ask a question that provides the user with a group of values to select among, requires a set of check boxes or radio buttons, each with the same name, but different values. The template for a Static List variable can be "hard coded" into the template screen. To ask for [COLOR] which could have short value text of "Red" or "Blue", you could use:
The color is <input type="checkbox" value="red" name="[COLOR]">Reddish <input type="checkbox" value="blue" name="[COLOR]">Bluish
These checkboxes would return the value "red" or "blue" for the variable [COLOR]. The labels for the checkboxes would be "Reddish" and "Bluish".
In practice, having to build a screen for each variable, and keep it up-to-date would be very tedious. Instead generic templates can be designed for all Static and Dynamic List variables.

18: Using the Exsys Corvid Servlet Runtime 338
The replaceable parameters VARIABLE_PROMPT and VARIABLE_NAME can be used to make generic templates. To handle Static List variables, there are 3 additional replaceable parameters:
VARIABLE_VALUE_TEXT The full text of a value VARIABLE_VALUE_NUM The number of a value VARIABLE_VALUE_SHORT The short text of a value (Static List only)
With these a generic form of the tag can be written:
<input type="checkbox" name="[VARIABLE_NAME]" value="VARIABLE_VALUE_SHORT"> VARIABLE_VALUE_TEXT or
<input type="checkbox" name="[VARIABLE_NAME]" value="VARIABLE_VALUE_NUM"> VARIABLE_VALUE_TEXT
All that is missing is a way to apply this generic tag once for each value in the value list of a Static or Dynamic List variable. Corvid provides 2 ways to do this.
Corvid_REPEAT The first is the Corvid_REPEAT command. This is added to the Corvid_ASK section of HTML code for a Static or Dynamic List variable with:
<!-- Corvid_REPEAT --> … <!-- REPEAT_END -->
The code between the Corvid_REPEAT and REPEAT_END commands will be repeated for each value in the variable's value list. The parameters VARIABLE_VALUE_TEXT, VARIABLE_VALUE_SHORT and VARIABLE_VALUE_NUM can be used in the Corvid_REPEAT section. They will be replaced with the associated value data. The first time through the Corvid_REPEAT, they will be given data from the first value. The second time through, the second value, etc for each value in the variable's value list.
So if [COLOR] has a prompt "The color is" and values:
Value Short Text Full Value Text red Reddish blue Bluish green Greenish
using:
<!-- Corvid_ASK STATIC_LIST --> VARIABLE_PROMPT <BR> <!-- Corvid_REPEAT --> <input type="checkbox" value="VARIABLE_VALUE_SHORT" name="[VARIABLE_NAME]">VARIABLE_VALUE_TEXT <BR> <!-- REPEAT_END --> <!-- ASK_END -->
would produce:
The color is <BR> <input type="checkbox" value="red" name="[COLOR]">Reddish <BR> <input type="checkbox" value="blue" name="[COLOR]">Bluish <BR> <input type="checkbox" value="green" name="[COLOR]">Greenish <BR>

18: Using the Exsys Corvid Servlet Runtime 339
This will look like:
This same section could be used to ask any Static List variable with any number of values since all parameters will be obtained from the values in the system. This has rather simplistic formatting, but has all the elements to ask any Static List. If one Static List variable has 2 values and another 20, it does not matter, the appropriate number of checkboxes will be created for each.
If you look at the template with an HTML editor, it will look like:
There is only a single check box because the HTML editor does not understand the Corvid_REPEAT command, which in HTML is just a comment. The text VARIABLE_PROMPT or VARIABLE_VALUE_TEXT could be formatted for color, size, font, style, etc and that formatting would apply when the variable's values were filled in.
If the template was formatted in the HTML editor to look like:
When it was applied to the above variable, the formatting would be applied to the actual text and it would look like:
VALUE # The Corvid_REPEAT command makes it easy to design templates that include a control for each value in the list and is very useful when all the values are to be asked the same way. This is normally the case, but if you wish to apply some different formatting or add HTML code to some values and not others, there is a second way to build screens for Static and Dynamic List variables.
The code for each specific value can be specified using:
<!-- VALUE # -->
where # is the number of the value.
All code between <!-- VALUE 1 --> and <!-- VALUE 2 --> will be to display value number 1. All replaceable parameters will be set according to the variable's first value. Then all code between <!-- VALUE 2 --> and <!-- VALUE 3 --> will be built according to the second value, etc. until the next HTML comment is reached.
Unlike a Corvid_REPEAT, you must know the maximum number of possible values and design the template accordingly. The template MUST have as many value # sections as the MAXIMUM number that any variable asked with that template will have. If a variable does not have as many values as there are value # sections in the template, the code in the sections that are higher than the number of values for that variable will be ignored.
For example to decrease the font size of the text for each of 3 values value:
<!-- Corvid_ASK STATIC_LIST --> <font size="6"> VARIABLE_PROMPT<BR></font>
<!-- VALUE 1 --> <input type="checkbox" value="VARIABLE_VALUE_SHORT" name="[VARIABLE_NAME]"><font size="5"> VARIABLE_VALUE_TEXT </font><BR>
<!-- VALUE 2 --> <input type="checkbox" value="VARIABLE_VALUE_SHORT" name="[VARIABLE_NAME]"><font size="4"> VARIABLE_VALUE_TEXT </font><BR>

18: Using the Exsys Corvid Servlet Runtime 340
<!-- VALUE 3 --> <input type="checkbox" value="VARIABLE_VALUE_SHORT" name="[VARIABLE_NAME]"><font size="3"> VARIABLE_VALUE_TEXT </font><BR>
<!-- ASK_END -->
This will work for variables that have 3 or less values. If the system had variables with more than 3 values, more VALUE # sections would need to be added.
If you look at this in an HTML editor, or browser, it will look like:
Unlike a Corvid_REPEAT template, there is a line for each possible value. If this were applied to a Static List variable, it would look like:
In most cases, this type of formatting is not needed and a Corvid_REPEAT is easier to use. However for special design situations, a VALUE # approach can be very useful. It is often used for putting values into a table, for example to have multiple rows with 2 values each. (There is also a way to do this with Corvid_REPEAT and Corvid_IF)
A Corvid_ASK section can use either Corvid_REPEAT or VALUE #, but not both in the same section. Different Corvid_ASK sections in the same template can use either Corvid_REPEAT or VALUE #.
The parameters VARIABLE_VALUE_TEXT, VARIABLE_VALUE_NUM, and VARIABLE_VALUE_SHORT should only be used within a Corvid_REPEAT or VALUE # section. They do not have any context or meaning outside of these sections.
Alternate Static List Value Text When using Static List variables with a servlet template, you can have HTML code that is associated with individual values and used only when the variable is asked by the servlet runtime. This text can be used in place of, or in addition to, the value text in replacement of VARIABLE_VALUE_TEXT parameters.
The text is set from the Static List tab:
Text can be entered in the "Servlet - Use HTML for Value in Ask" edit field. This way graphics or other HTML commands can be added, without having to embed the code into the value text. This makes the text easier to read, while still allowing more complex screens.
Text can be added for each value individually. This text can be marked to be used in addition to the value text, or instead of the value text when asking a question by selecting the appropriate radio button to the right of the edit box. When the "In addition" radio button is selected, the text will be added before the normal value text. When "Instead" is selected, the value will be used instead of the value text.
The text should be normal HTML and should not include any Corvid commands or replaceable parameters.

18: Using the Exsys Corvid Servlet Runtime 341
For example:
To add a graphical element, such as an arrow, before each value in the list:
Add an IMG SRC tag, such as <IMG SRC="arrow.jpg"> in the edit box and click the "In Addition" radio button. This will need to be done for each value in the value list.
To keep the value text easy to read, use a jpg image in place of the text when asking the question from the servlet:
For value 1, add an IMG SRC tag, such as <IMG SRC="img1.jpg"> in the edit box and click the "Instead" radio button. Repeat for each value in the value list with the image file appropriate to that value.
Checkbox / Radio Button In many systems, some variables are only allowed to have a single value and should use radio buttons (or lists), and should not use checkboxes that may allow more than one value to be selected at the same time. Other variables can accept multiple values and should use checkboxes. To allow the template to be generic, always design with checkboxes unless radio buttons should always be used. For those variables that are limited to only a single value, Corvid will automatically convert the checkboxes to radio buttons for that variable. Variables that can have multiple values will use the checkboxes.
A variable is set to allow only a single value from the Variable window by clicking the Options tab. Set the "Maximum Number of Value that be Assigned" to "Single Value". Then any Corvid_ASK section that is specified for "checkbox" will automatically have it converted to "radio".
Corvid_ASK and [.PROPERTY] Any text in the Corvid_ASK section can include a property of the variable associated with that section. Any property can be added generically by using [.property]. This is converted to [varname.property] for the variable being asked. This can be used as text to display or in expressions.
For example to generically have the Corvid_ASK section tell the user how many values they can choose from, you could use the [varname.COUNT] property that returns the number of values that the variable has.
<!-- Corvid_ASK STATIC_LIST --> Select among the [[.COUNT]] values below. <BR><BR> VARIABLE_PROMPT <BR> <!-- Corvid_REPEAT --> <input type="checkbox" value="VARIABLE_VALUE_SHORT" name="[VARIABLE_NAME]">VARIABLE_VALUE_TEXT <BR> <!-- REPEAT_END --> <!-- ASK_END -->
NOTE: Only properties that are defined when the question is asked should be used. A property such as .COUNT is defined during development, however a property such as .VALUE may only be known after the question is asked and should NOT be used in the screen to ask the question. This could result in an infinite loop.
Static and Dynamic List Control Types There are really only 2 HTML tags that are used for Static and Dynamic List variables, but they have optional parameters to produce more controls.

18: Using the Exsys Corvid Servlet Runtime 342
Simple Set of Checkboxes or Radio Buttons <input type="checkbox" value="VARIABLE_VALUE_SHORT" name="[VARIABLE_NAME]">VARIABLE_VALUE_TEXT<BR>
This adds a single checkbox for a value. It should be used in a Corvid_REPEAT or VALUE # section to handle the multiple values that a variable may have. In this case the <BR> is used to have each value on a new line. If all values should be on the same line, the <BR> should be omitted.
The template can always be designed with type="checkbox". This will automatically be converted to type="radio" if the variable only allows a single value to be set.
If the system has Dynamic List variables that may be asked using the template, the replaceable parameter VARIABLE_VALUE_SHORT should be changed to VARIABLE_VALUE_NUM since Dynamic List variables do not have short value text and must be referenced by number. For example, to ask for the value of all Static List variables:
<!-- Corvid_ASK STATIC_LIST --> VARIABLE_PROMPT <BR> <!-- Corvid_REPEAT --> <input type="checkbox" value="VARIABLE_VALUE_SHORT" name="[VARIABLE_NAME]">VARIABLE_VALUE_TEXT <BR> <!-- REPEAT_END --> <!-- ASK_END -->
Using this to ask for the variable [COLOR] would look like:
If the <BR> in the Corvid_REPEAT section was removed to put all values on one line, it would look like:
For more complex formatting of the values, such as multiple rows with 2 values each, use VALUE # in a table, such as:
VARIABLE_PROMPT<BR> <table border="0" cellpadding="0" cellspacing="2" width="462"> <tr> <!-- VALUE 1 ---> <td><input type="checkbox" value="VARIABLE_VALUE_SHORT" name="[VARIABLE_NAME]"> VARIABLE_VALUE_TEXT </td> <!-- VALUE 2 ---> <td><input type="checkbox" value="VARIABLE_VALUE_SHORT" name="[VARIABLE_NAME]"> VARIABLE_VALUE_TEXT </td> </tr> <tr> <!-- VALUE 3 ---> <td><input type="checkbox" value="VARIABLE_VALUE_SHORT" name="[VARIABLE_NAME]"> VARIABLE_VALUE_TEXT </td>
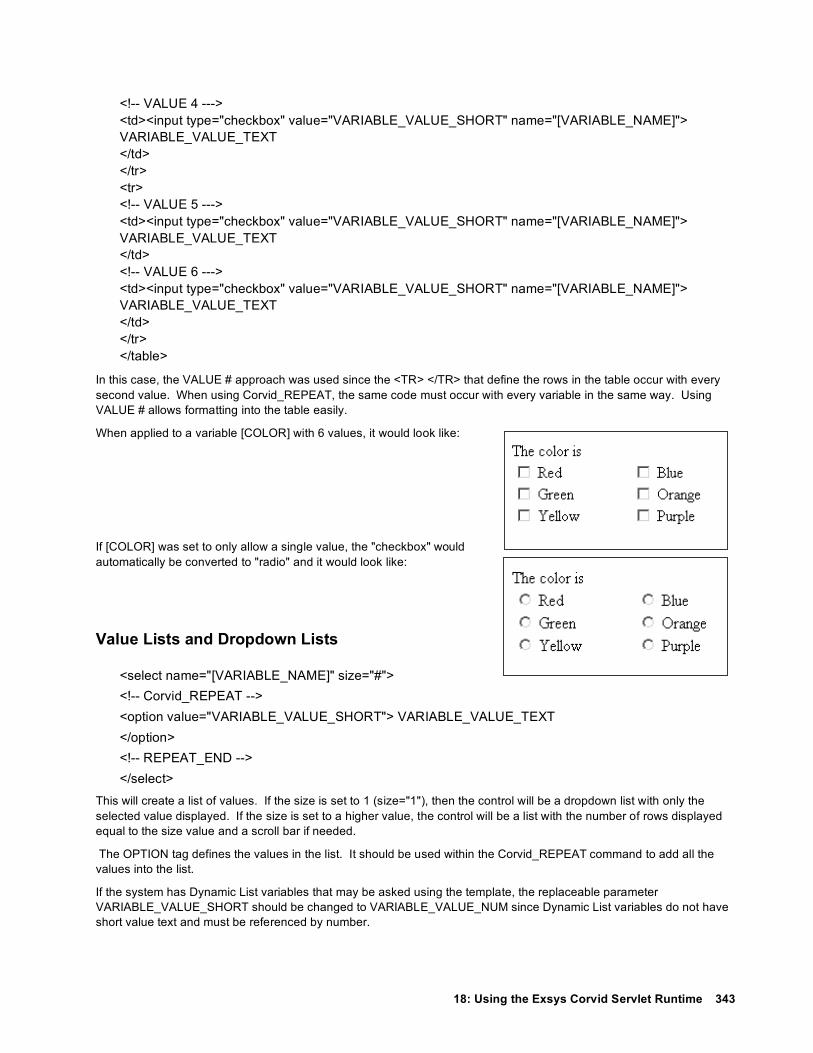
18: Using the Exsys Corvid Servlet Runtime 343
<!-- VALUE 4 ---> <td><input type="checkbox" value="VARIABLE_VALUE_SHORT" name="[VARIABLE_NAME]"> VARIABLE_VALUE_TEXT </td> </tr> <tr> <!-- VALUE 5 ---> <td><input type="checkbox" value="VARIABLE_VALUE_SHORT" name="[VARIABLE_NAME]"> VARIABLE_VALUE_TEXT </td> <!-- VALUE 6 ---> <td><input type="checkbox" value="VARIABLE_VALUE_SHORT" name="[VARIABLE_NAME]"> VARIABLE_VALUE_TEXT </td> </tr> </table>
In this case, the VALUE # approach was used since the <TR> </TR> that define the rows in the table occur with every second value. When using Corvid_REPEAT, the same code must occur with every variable in the same way. Using VALUE # allows formatting into the table easily.
When applied to a variable [COLOR] with 6 values, it would look like:
If [COLOR] was set to only allow a single value, the "checkbox" would automatically be converted to "radio" and it would look like:
Value Lists and Dropdown Lists
<select name="[VARIABLE_NAME]" size="#"> <!-- Corvid_REPEAT --> <option value="VARIABLE_VALUE_SHORT"> VARIABLE_VALUE_TEXT </option> <!-- REPEAT_END --> </select>
This will create a list of values. If the size is set to 1 (size="1"), then the control will be a dropdown list with only the selected value displayed. If the size is set to a higher value, the control will be a list with the number of rows displayed equal to the size value and a scroll bar if needed.
The OPTION tag defines the values in the list. It should be used within the Corvid_REPEAT command to add all the values into the list.
If the system has Dynamic List variables that may be asked using the template, the replaceable parameter VARIABLE_VALUE_SHORT should be changed to VARIABLE_VALUE_NUM since Dynamic List variables do not have short value text and must be referenced by number.

18: Using the Exsys Corvid Servlet Runtime 344
For example, to ask for the value of all Static List variables:
<!-- Corvid_ASK STATIC_LIST --> VARIABLE_PROMPT <BR> <select name="[VARIABLE_NAME]" size="1"> <!-- Corvid_REPEAT --> <option value="VARIABLE_VALUE_SHORT"> VARIABLE_VALUE_TEXT </option> <!-- REPEAT_END --> </select> <!-- ASK_END -->
Using this to ask for the variable [COLOR] would look like:
Clicking on the down arrow next to "Red" would drop down to display the other values that could be selected.
If the same code had the size= parameter changed to size="4", a list control would be produced:
When a list is used, and the size= parameter is greater than 1, "multiple" should be added after the size= to indicate that multiple values can be selected from the list.
<select name="[VARIABLE_NAME]" size="1" multiple>
If the variable only allows a single value to be selected, Corvid will automatically remove the "multiple" and build a list control that only allows a single value. Adding "multiple" makes a more generic control that will work correctly for all Static and Dynamic List variables. If all the variables in a system only allow a single value the "multiple" option can be left off.
Simple Buttons VARIABLE_PROMPT<BR> <!-- Corvid_REPEAT --> <input type="submit" value="[VARIABLE_NAME]=VARIABLE_VALUE_NUM" name="VARIABLE_VALUE_TEXT"> <!-- REPEAT_END -->
Most of the question controls require that the user select a value from a list or by checking an item, and then click the OK button. This approach has the advantage that the user can review their selection and make changes before submitting it. However, for some systems, a better end user interface is one that just allows the user to click on a button and have the system immediately take the input. This is especially true if the system asks multiple Yes/No or True/False questions.
This type of interface can be implemented by using buttons created by <input type="submit". The syntax for the buttons is somewhat different than any of the other controls. The value associated with the control must be the string:
“[VarName]=value”
where VarName is the name of the Corvid variable and value is the value to assign. For Static List variables, value can be the value number or the short text of the value. A generic way to do this is to use:
value="[VARIABLE_NAME]=VARIABLE_VALUE_NUM"

18: Using the Exsys Corvid Servlet Runtime 345
The name= parameter of the control is what defines the label for the button. If the variables have relatively short value text, this text can just be put on the button with:
name="VARIABLE_VALUE_TEXT"
For example:
If the text is too long to put on the button, it can be put next to the button, with the button having an "*", image or some other generic label. This can be done with:
VARIABLE_PROMPT<BR> <!-- Corvid_REPEAT --> VARIABLE_VALUE_TEXT <input type="submit" value="[VARIABLE_NAME]=VARIABLE_VALUE_NUM" name="X"> <!-- REPEAT_END -->
Note, when using buttons to ask a question the OK button is not needed and should not be used. The UNDO and RESTART buttons can be used.
The Submit Button Each template that uses a form (except those using buttons to ask the question) must have a submit button to send the data back to the servlet engine and continue processing of the system. The typical submit button is:
<input type="submit" name="OK" value="OK">
The NAME= parameter for the button should be "OK". The VALUE= parameter will be the label on the button. It can be text such "Enter", "Submit", "Continue" or any other text that you would like to use.
If the system needs to work in multiple languages, a double square bracket, [[ ]], replacement can be used for the name of the button. This variable would be set to a value appropriate to the language. Such as:
<input type="submit" name="OK" value="[[OK_Btn_label.VALUE]]">
All submit buttons must be part of the form. They must occur in the HTML between the <form…> and </form> tags.
The last screen in a system (typically a result screen) may have no "OK" button, and instead have only a RESTART button or a link back into your overall web site. This is legal in any case where there is no further processing to be done by the system, and the only action the user can take is to restart another session, or go to another page.
UNDO and RESTART buttons There are 2 special submit buttons - UNDO and RESTART. A template that uses a form can optionally contain both UNDO and RESTART buttons. If the UNDO button is clicked, Corvid will move back to the previous question in the system and allow the user to change their answer. RESTART will return to the start of the system and, in effect, start a new session.

18: Using the Exsys Corvid Servlet Runtime 346
Both buttons are SUBMIT buttons with the following syntax:
<input type="submit" name="…" value="…">
and MUST have
name="~UNDO" for the UNDO button name="~RESTART" for the RESTART button
The VALUE= parameter that defines the label on the button can be anything you wish. For example:
<input type="submit" name="~UNDO" value="Step Back">
<input type="submit" name="~RESTART" value="Start Over">
As with the OK button, these buttons must be part of the form and occur in the HTML between the <form…> and </form> tags. Often the question templates will have OK, UNDO and RESTART buttons, but only a RESTART on the results template.
If the final screen in the system (typically the results) has an OK button, it will take the user to the Final Screen set in the properties window (or the Corvid default if none is set.) The Final Screen can display any other information, but should not contain an OK. At most it should contain a RESTART button, or just a link to other parts of the site.
When a template has an UNDO or RESTART button, Corvid checks that it is a valid option at the time. Corvid will automatically disable the UNDO button when there is no UNDO available, and will disable RESTART on the first screen of the system. This allows a generic question template to include OK, UNDO and RESTART even though there are times when some may not be active.
~EXEC_CMD_BLOCK – Executing Command Blocks A button can be added to a screen with the name:
~EXEC_CMD_BLOCK=BlockToRun
such as:
<input type="submit" name="~EXEC_CMD_BLOCK=BlockToRun" value="label">
If the user clicks on this button, the Command Block “BlockToRun” will be immediately executed.
This can be used to implement special features such as “Save and Exit”. The code:
<input type="submit" name="~EXEC_CMD_BLOCK=SaveAndExit" value="Save And Exit">
would add a “Save and Exit” button to a screen that would call a special command block “SaveAndExit” which could write the input data to a database and exit the run.
Normally the called command block will terminate the run.
The Browser BACK button The Browser BACK button can be used to move back to a previous question. Corvid embeds a hidden value in each page to identify if the user pressed the BACK button one or more times. This allows them to step back to an earlier question in the system, change answers and continue the session.
To do this, the Corvid servlet stores certain data on the server about the session. The amount of time that the server keeps this data varies with the installation of the servlet engine. If a user waits a long time (typically over an hour) and then tries to go back to an earlier Corvid session, the needed data may no longer be available and BACK will not work. Likewise, bookmarks for a particular question will not work and will instead result in a restarting the system.
If it necessary for the user to return to a session days later and have access to their earlier data, that data will need to be stored to a database for permanent storage and recovered when the user returns.

18: Using the Exsys Corvid Servlet Runtime 347
TRACE There are 2 special replaceable parameters that can be used to display the Corvid system trace. These should be used only when developing the system and removed before final release.
The parameter Corvid_TRACE will be replaced by the full trace information. This is the same trace that would be echoed to the trace window in the applet version.
1. In the knowledge base, select the "Add Trace Applet / Enable Trace in Servlet" checkbox in the Properties window. This turns trace on.
2. In the templates that you wish to include a trace, add the replaceable parameter "Corvid_TRACE" where the trace is to be displayed. This can be anywhere in the page, but normally this is at the bottom of the page after the end of the form (</FORM> tag) but before the end of the body (</BODY> tag)
The trace will be displayed in the same font and color as specified for the Corvid_TRACE parameter, however if an error is detected, the trace color will be changed to red. The background selected for the trace should allow it to be readable if it changes to red.
Corvid_TRACE will put the entire trace up to that point in the screen. This can get rather long for some systems (especially MetaBlock systems). To see a shorted version of the trace, use the replaceable parameter Corvid_TRACE_CLEAR. This will display the trace, but will skip earlier portions. This can be easier to read, while still including the main information for the last step. Another way to do trace is to trace to the servlet log file. Selecting “Trace to Java Console” in the Properties window for the system can do this. Since often there is no Java console for the servlet, the trace is echoed to the log and can be read there. This should ONLY be used in development and ONLY when there is only a single user running the system. If there are multiple users, the traces will intermingle producing a very difficult to read trace.
If the trace only needs to be seen only occasionally, another approach can be used. A SUBMIT button similar to the UNDO or RESTART button can be added to the template as part of the form. This button should have:
<input type="submit" name="…" value="Display Trace"> where
name="~TRACE" displays the entire trace
name="~TRACE_CLEAR" displays the trace up to that point and then clears it
When the TRACE button is hit, the next screen will display the trace up to that point and then return to the system. The ~TRACE_CLEAR will display the trace and then erase earlier portions.
Conditional Inclusion Sections of a template file can be included based on a conditional test. This can be done in both templates to ask questions and those to display results. This is done using:
<!-- Corvid_IF expr --> … <!-- END_IF -->
The expression expr can be any Corvid expression that will evaluate to true or false. (e.g. [X] > 0). If the expression is true, all the code up to the associated END_IF will be included. If the expression is false, all code up to the associated END_IF will be ignored and not included in the page produced.
Corvid_IF blocks can be nested, but each must have an associated END_IF. (In place of END_IF, IF_END can also be used for consistency with other commands.)
The Corvid_IF can be either in a Corvid_ASK section, or outside of it, but must be either entirely in or outside the section.
The following are legal:
<!-- Corvid_IF expr --> <!-- Corvid_ASK var --> ... <!-- ASK_END --> <!-- END_IF -->

18: Using the Exsys Corvid Servlet Runtime 348
<!-- Corvid_ASK var --> ... <!-- Corvid_IF expr --> …. <!-- END_IF --> ... <!-- ASK_END --> <!-- Corvid_IF expr --> ... <!-- END_IF --> <!-- Corvid_ASK var --> ... <!-- ASK_END -->
The following are NOT legal because they cross Corvid_ASK sections:
<!-- Corvid_IF expr --> <!-- Corvid_ASK var --> <!-- END_IF --> ….. <!-- ASK_END --> <!-- Corvid_ASK var --> <!-- Corvid_IF expr --> … <!-- ASK_END --> <!-- END_IF -->
The expression in the Corvid_IF can be any Boolean expression using Corvid variables. The HTML code within the Corvid_IF section will be included if the expression is true and ignored if the expression is false.
The expression in the Corvid_IF should NOT contain variables that do not have values and which would need to be asked of the user. Since the expression will be evaluated midway through the generation of the page, Corvid can not simply change and ask another page, which would mix the 2 pages.
The variables used in the expression should be asked or derived at the start of the system before they are needed. For example, the system might initially ask if the user is running from a palmtop computer. If the answer is YES, simple screens formatted for a smaller size might be used. If the answer was no, full screens could be used.
Corvid Commands The same Corvid commands that are executed in a Command Block can be executed from within the template. Just include:
<!-- Corvid_CMD command -->
where command is any single command that is legal in a Command Block. The Command Block commands FOR, WHILE, FOR_EACH and IF are not allowed since they can only be used in the context of the Command Block. The commands can use any Corvid variables and their properties. To assign a value, use the SET command.
For example, if you want to keep track of how many times a question is asked, a specific template could be associated with the variable. It could include:
<!-- Corvid_CMD SET [COUNT] ([COUNT] + 1) -->

18: Using the Exsys Corvid Servlet Runtime 349
You could then initialize [COUNT] to 0 at the start of the system and use the value of [COUNT] in a Corvid_IF statement to control how the question is asked. For example, if a question was not answered the first time, the system could automatically ask it in more detail the next. This could also be used to provide more details if the user input was not in a valid format to be accepted. For example, if a date variable had to be reasked, it could ask with more detail on the expected input format. You could even build a system with an attitude by adding something like:
<!-- Corvid_IF [COUNT] > 5 --> I've asked this [[COUNT]] times - how about an answer!<BR> <!-- END_IF -->
NOTE: Any Corvid command can be included in the template, including ones that control the logical functioning of the system. However, ONLY commands related to the appearance of the user interface SHOULD be used. Including commands that control the logic will cause a system to run differently in the servlet mode than when run as an applet (which would not use the template). It would also be much more difficult to understand why the system was doing something, which might be dependent on a particular screen being displayed, complicating development and maintenance.
Using Image Maps to Ask Questions In most cases, the HTML screens that ask a user to answer a question are forms that use POST to return the data to the servlet. However, a system can use simple HTML links to return data to the servlet. This includes image maps and individual images or text that have associated HTML links.
The key in doing this a link that calls back to the Corvid Servlet Runtime, with information that identifies the session and the data to be returned. Corvid provides a simple replaceable parameter that allows you to do this easily:
Corvid_SERVLET_GET
The parameter Corvid_SERVLET_GET will be replaced by a call to the Corvid Servlet Runtime along with information that will identify the place in the session. The link back to the Corvid Servlet Runtime must NOT be hard coded, since the additional information will not be know until the system is run.
Since the GET approach will be used to send the data, the parameter has the _GET extension. This approach adds the data to the URL that is used. When returning data via GET, Corvid adds some additional information, which is normally passed as hidden fields in the POST data sent by the forms. The URL back to the Corvid servlet is specified by the value set for Corvid_SERVLET in the Properties window user the Servlet tab.
To use Corvid_SERVLET_GET, just add a normal link to an image map, image or text that returns a value to Corvid. Then make the link "Corvid_SERVLET_GET " followed by the name of the variable in [ ], an "=", and the value to assign. If there are multiple values, separate them with "&". There should not be any spaces between data. If there are spaces or other characters in the value that require URL encoding, they should be encoded.
For example, the link off an image (or section of an image map) that sets the value of [X] to 5 might be:
href="Corvid_SERVLET_GET [X]=5"
Corvid will replace the Corvid_SERVLET parameter with the associated value, plus a "?", the session identification, an "&", and the data you provide.
For Static List variables, the value assigned can be a numeric value that is the number of the value, or the short text of the value. For Numeric variables, the value would be numeric. For string variables, the value would be a string. It would not need to be in quotes, but might need URL encoding.
For a generic screen that asks a question and assigns the value 5, you could alternatively use:
href="Corvid_SERVLET_GET [VARIABLE_NAME]=5"
This would be unusual since almost all cases that would use this technique will require a specific page or image map. Normally image map screens are not used generically and are associated with only a single variable, so using the actual name is not a problem. However, using VARIABLE_NAME in templates does allow the variable's name to be changed in the system without having to edit the template.

18: Using the Exsys Corvid Servlet Runtime 350
If you wished to return data for more than one variable, you can make a list of values separated by "&", for example to set [X] to 5 and [Y] to 2:
href="Corvid_SERVLET_GET [X]=5&[Y]=2"
Remember not to add any spaces and to URL encode any characters that require it.
An example of a page that uses an image map to ask a question is:
<html> <head> <title>Image Map Demo</title> </head> <body> <BASE href="Corvid_LINK_BASE"> <div align="center"> <img src="MyImage.gif" width="620" height="120" border="0" usemap="#map1162e6c"> <map name="map1162e6c"> <area shape="rect" coords="497,29,613,115" href="Corvid_SERVLET_GET [X]=1"> <area shape="rect" coords="377,31,488,114" href="Corvid_SERVLET_GET [X]=2"> <area shape="rect" coords="255,29,368,114" href="Corvid_SERVLET_GET [X]=3"> <area shape="rect" coords="138,27,249,111" href="Corvid_SERVLET_GET [X]=4"> <area shape="rect" coords="12,27,126,114" href="Corvid_SERVLET_GET [X]=5"> </map> </div> </body> </html>
This image map has 5 regions with links. A click on any of the regions will set the value of the variable [X].
Using image maps is quite easy with an HTML editor and allows very advanced user interfaces to be created. An alternative to an image map is to have several image files (jpg or gif) on a page with the same type of Corvid_SERVLET_GET link off them. A click on any of the images would set the associated value. This provides another way to ask questions with images.
Eliminating the OK button Another way that links can be used is to build a screen that has no OK button. In the forms approach to templates, the user selects an answer and then must take the second step of clicking the OK button to submit the data. There are advantages to this since the user has a chance to review and correct any incorrect selections. However, in some systems the desired interface is to have the system immediately take the user's input and continue the session. This happens automatically with image maps and approaches that use the link approach to return data.
For example, if a system asked a serried of "Yes/No" questions, graphics could be used with links that would return that data. This can even be used generically, provided that the variables in the system are designed to use the values of "Yes" and "No" consistently.
A simple screen that would use this approach is:
<html> <head> <title>Link Demo</title> <BASE href="Corvid_LINK_BASE">

18: Using the Exsys Corvid Servlet Runtime 351
</head> <body > <!-- Corvid_ASK STATIC_LIST --> VARIABLE_PROMT<BR><BR> <a href="Corvid_SERVLET_GET [VARIBLE_NAME]=YES"> <img src="yes.jpg"> </a> <a href="Corvid_SERVLET_GET [VARIBLE_NAME]=NO"> <img src="no.jpg"> </a> <!-- ASK_END --> </body> </html>
This template could be associated with any Static List variable that had "Yes" and "No" as the possible values. The system will display the text of the prompt and 2 images for "Yes" and "No". A click on either image would immediately return the data to the Corvid Servlet Runtime.
Templates to Display Results Corvid templates provide a flexible way to display the system results and recommendations in a variety of ways. It is easy to build very attractive Results screens, and with the powerful commands available even very complex screens can be built. Templates to display results are in many respects very similar to the templates to ask questions. The main difference is that instead of presenting multiple options for the user to select among, the template must display the appropriate items of information as a result or recommendation.
Forms As with question templates, most results screens and reports should be HTML forms. This means that they have a
<form method="post" action="Corvid_SERVLET"> content <input type="submit" name="OK" value="OK"> </form>
where the content is the actual report or results. The
method="post" action="Corvid_SERVLET"
is required to return to the Corvid servlet engine so it can continue processing the system.
Any report or information screen that is displayed before the system is finished MUST be a form and MUST include an OK button. A screen displayed at the end of a run often will not have an OK button, but will generally have a RESTART button or a link to some other page.
The only exception to using a form is a screen displayed at the very end of a run, where the end user is not going to be given an option to restart the system. In that case, the screen does not need to be a form, but can still use all of the Corvid servlet commands for building the report. Such a screen should have some way for the user to navigate through links to other parts of the site.
Displaying Variables in Results The intent of a results screen is to display the values of certain variables that had values set during a run, and to format this data in specific ways. Results and reports typically display Confidence or Collection variables set during a session, though other types of variables can also be included.
18: Using the Exsys Corvid Servlet Runtime 352
The easiest way to display results is to embed the individual variables, with [[ ]] embedded in the text. This allows any data in the system to be displayed.
For example, if the goal of a system was to set the value for [AMOUNT] based on various factors and logic, and that value was all the user needed to know, a Results screen could just contain the text :
"The amount to add is [[AMOUNT.VALUE]]"
If this was part of a Result template, the derived value of [AMOUNT] would be embedded. Note that the .VALUE property is used to have only the value added. Otherwise, the prompt and value would be displayed. If the prompt for [AMOUNT] was the string you wish to use in the results, just [[AMOUNT]] could be used with no additional text.
Using double square bracket, [[ ]], embedding is sometimes a very effective way to build reports. However, most of the time there are a large number of possible variables to display, and only certain ones should be displayed. For example, all the confidence variables that received a value of greater than 50.
Corvid provides a way to have a section of the template that is repeated for multiple variables. This is done using:
<!-- FOR_EACH VarID --> … <!-- EACH_END --> This allows a section of the template to be applied to each variable specified by the VarID. The values of VarID are the same as those used in Corvid_ASK when asking a question, plus additional values to display Collection and Confidence variables.
The VarID indicates which variable(s) the code applies to. The allowed values are:
VARIABLE All variables
STATIC_LIST All Static List variables
DYNAMIC_LIST All Dynamic List variables
CONTINUOUS All numeric, string and date variables
NUMERIC All numeric variables
STRING All string variables
DATE All date variables
CONFIDENCE All Confidence Variables
CONFIDENCE_ASCENDING All Confidence Variables, sorted in order of value, with lowest values first
CONFIDENCE_DECENDING All Confidence Variables, sorted in order of value, with highest values first
COLLECTION All Collection variables
[VARNAME] The specific variable varname
[VARMASK] All variables fitting the mask pattern
Replaceable parameters can be used for FOR_EACH. The most useful parameters are:
VARIABLE_PROMPT The prompt of the variable.
[.PROPERTY] Evaluated as [Var.PROPERTY] for all the legal properties of the variable.
Within the FOR_EACH, a Corvid_IF test can be used to select only certain variables.
For example, to display all the Confidence variables that received a value of greater than 20:
<!-- FOR_EACH CONFIDENCE --> <!-- Corvid_IF ([.VALUE] > 20) --> [[.FULL]]<BR> <!-- END_IF --> <!-- EACH_END -->

18: Using the Exsys Corvid Servlet Runtime 353
When this runs, the code between FOR_EACH and EACH_END will be applied to each Confidence variable in turn. The Confidence variables will be tested in the order that they are defined in the system. The first Confidence variable will have [.VALUE] replaced by [ConfVar1.VALUE] and evaluated, where ConfVar1 is the name of the first Confidence variable. If the value is greater than 20, the [[.FULL]] will be replaced by [[ConfVar1.FULL]]. This will be replaced by the text of the confidence variable and its assigned value. The same lines of code will be repeated for each Confidence variable. Each one with a value greater than 20 will be included in the report. To have the Confidence values sorted with ones with the highest confidence values displayed at the top, just change "CONFIDENCE" in the FOR_EACH to "CONFIDENCE_DECENDING".
To display the values of all variables in the system, just use:
<!-- FOR_EACH VARIABLE --> [[.FULL]]<BR> <!-- EACH_END -->
Collection Variable Values Collection variables are a powerful tool for handling expert system results. The Collection variable provides a freeform way to combine and sort recommendations and build reports. One very powerful technique is to assign string values to a Collection variable that are HTML commands. This allows the value of the Collection variable to be a block of HTML that can just be double square bracket, [[ ]], embedded in the report. This technique can be used to create complex interfaces such as building a table that displays the results. Just build the table in a collection variable as the system runs and then embed the value in the report. For some complex formatting, this can be much easier than using FOR_EACH commands.
The individual values in a Collection variable can be displayed using commands very similar to the way Static List values are handled in Corvid_ASK screens.
The Corvid_REPEAT command can be used to step through each value in a Collection variable's value list. The syntax is the same as in screens to ask questions:
<!-- Corvid_REPEAT --> … <!-- REPEAT_END -->
however, here it is used with a FOR_EACH command to define the variable it applies to. (NOTE: The FOR_EACH must be used even if there is only a single Collection variable being displayed. The FOR_EACH defines the context for the Corvid_REPEAT)
Within the Corvid_REPEAT for Collection variables, replaceable parameters can be used to obtain the text of the individual value, the number of the value and the "score" the value was given if the Collection variable had values added with .ADDSORTED.
VARIABLE_VALUE_TEXT Text of the specific individual value
VARIABLE_VALUE_NUM Number of the individual value
VARIABLE_VALUE_SORT Sort value (Value must have been added to the Collection with ADDSORTED)
For example, to display all the values in a Collection variable [Comment] as a numbered list:
<!-- FOR_EACH [Comment] --> <!-- Corvid_REPEAT --> VARIABLE_VALUE_NUM: VARIABLE_VALUE_TEXT <BR> <!-- REPEAT_END --> <!-- EACH_END -->
If [Comment] had values "aaa", "bbb", and "ccc", this would display:
1: aaa 2: bbb 3: ccc
The "FOR_EACH [Comment]" is required even though there is only a single variable to set the context for the Corvid_REPEAT.

18: Using the Exsys Corvid Servlet Runtime 354
If the values in a Collection variable [Notes] had been added sorted, the values with a sort value of greater than 25 could be displayed with:
<!-- FOR_EACH [Notes] --> <!-- Corvid_REPEAT --> <!-- Corvid_IF (VARIABLE_VALUE_SORT > 25) --> VARIABLE_VALUE_TEXT <BR> <!-- END_IF --> <!-- REPEAT_END --> <!-- EACH_END -->
A second way to display specific values in a Collection variable is with the VALUE # command. This is very similar to the way specific values are reference when asking for Static List values with Corvid_ASK. The syntax is:
<!-- VALUE # -->
In a FOR_EACH section for a Collection variable, all code between <!-- VALUE 1 --> and <!-- VALUE 2 --> will apply to the first value in the Collection variable's value list. All code between <!-- VALUE 2 --> and <!-- VALUE 3 --> will apply to the second value in the list, etc. If there is no matching value for the one specified, the section will be skipped.
For example, to display the first 3 values of Collection variable [Notes] in decreasing font size:
<!-- FOR_EACH [Notes] --> <!-- Value 1 --> <font size="5"> VARIABLE_VALUE_TEXT <BR> <!-- Value 2 --> <font size="4"> VARIABLE_VALUE_TEXT <BR> <!-- Value 3 --> <font size="3"> VARIABLE_VALUE_TEXT <BR> <!-- EACH_END -->
If [Notes] had values "aaa", "bbb", "ccc", this would display:
aaa bbb ccc
Title and Information Screens Title and information screens can be displayed in a system.
The command to display a title screen is the TITLE command in a Command Block, and other HTML screens can be displayed with the DISPLAY_HTML command. While these commands are similar in intent, they are handled quite differently in Corvid.
The TITLE command is intended to display a title screen. This is defined with Corvid Screen Commands that are used only in the applet runtime. The command can have a "SERVLET=" parameter added which provides the name of the template to use for the title when running with the servlet runtime. This template can use all of the commands that are supported for templates, including conditional inclusion of sections, display of variables, etc. The TITLE command should be used with the appropriate template. This template should be a form with "action=Corvid_SERVLET" and an OK submit button.
For the servlet version, there could be multiple TITLE commands, since each has a "servlet=" parameter that could specify a different template. However, when run with the Applet Runtime, there is only one title screen specified with the Corvid screen commands, and it would be used each time the TITLE command was used, regardless of "servlet=" parameter. If you wish to have a system that will run the same with either applet or servlet runtime, only use a single TITLE command.

18: Using the Exsys Corvid Servlet Runtime 355
The DISPLAY_HTML command can also be used to display an HTML title or other informational screen. Unlike the TITLE or RESULTS command, screens displayed with the DISPLAY_HTML command are not parsed for Corvid commands. The screen is just displayed. This is to allow compatibility between the applet and servlet runtimes. In the applet runtime a DISPLAY_HTML command simply opens the specified page in a new browser window. In the servlet version, the page is simply displayed in the user's browser. However, to allow the displayed page to return to the Corvid servlet, there must be a form and action command. If the page has no form, the Corvid servlet will automatically add an OK button at the bottom of the page. This will have the link to return to the servlet.
If placing the OK button at the bottom of the page is not desired, the page MUST have a form in the page. If a <FORM> tag is found, Corvid will not add its own OK button. To add your own form, the displayed page should have:
<form method="post" action="Corvid_SERVLET"> content <input type="submit" name="OK" value="OK"> </form>
The "value="OK" sets the label for the button and can be any name. It is also possible to use an image map or link to return. (See the section on image maps for details.) In that case, include a <FORM> and </FORM> tag, but no content in the form. If this is done, Corvid will not add its own OK button.
Remember that if a form is added to an informational page, it will not work correctly when run with the applet, so for most cases it is better to allow Corvid to add the OK button when using the servlet. This allows the same page to be used with both applet and servlet runtimes.
Links to Other Pages Any of the screens displayed by the Corvid servlet can include links to other HTML pages. However, only the page displayed by the Corvid Servlet Runtime will have the embedded information needed to return to the servlet engine. If a link takes the user to another page using the same browser window, they will need to use their Back button on their browser to return to the page displayed by the servlet to continue the session. Consequently, it is best to have links open a new page in a separate browser window. This will allow the links to be viewed, but keeps the page that will continue the session available.
It is easy to have a link open the page in a new window by using:
target="_blank"
in the link.
For example:
<a href="page_to_display.html" target="_blank">link text</a>
JavaScript, XML, CSS, Etc. Any of the templates that are used by Corvid can contain JavaScript, XML or any other code that is supported by the browser. The script can include any of the replaceable Corvid parameters. It can appear in Corvid_REPEAT or other blocks. Corvid only processes the specific Corvid commands, such as Corvid_ASK, Corvid_IF, Corvid_REPEAT and the replaceable parameters. It does not parse or "understand" any of the code that may be between these commands. It simply echoes it back out, with any replacements. To Corvid, it does not matter if the code between commands is HTML, XML, JavaScript or any other code that may appear in the future.
The use of JavaScript in the templates allows some very complex effects. Likewise the ability to integrate XML with the replaceable parameters allows system results and data to be converted to, and passed as, XML.
Remember that the processing is being done on your server, so do not include any server-side script that could cause security problems.

18: Using the Exsys Corvid Servlet Runtime 356
Final Screen A screen that will be displayed at the end of the run can be specified in the Properties window, Servlet tab. This provides a simple way to display results or other information. In most cases, it is better to do this in the Results screen, but if there are several ways to terminate a session, the overall Final Screen may be desirable. This can be a simple "Thank you for running …" screen with no link back into the system, or one that includes a RESTART button to start a new session.
The screen can use any of the Corvid commands that are supported in templates. Replaceable parameters can be assigned. This screen can be used as a results screen, but if that is done, the system will not have a result screen when run with the applet runtime. If you wish to run the system in both modes, always use the RESULT command that is supported in both applet and servlet environments.
Default Final Screen Template If there is no final screen template specified, a system default template will be used. This is a generic template that displays all the variables in the system. This file is automatically installed by the war file that installs the Corvid servlet. It should not be modified or deleted since it is the last option if another Final Screen is not specified. In most systems, this screen would not be used once the system is fielded, but can be useful for development.
To have the system not display the Final Screen, end the controlling command block with a RESULTS, or other command that displays a screen which does not allow the session to continuing processing. This is typically a screen with only a RESTART button or one with no form, and only a link to another part of your web site.
Using Report Commands when Asking Questions Any of the report commands can be included in templates, which are used to ask questions. For example, to display all the variables that currently have a value on a screen that asks a question use:
The data in the system so far is: <BR> <!-- FOR_EACH VARIABLES --> [[.FULL]]<BR> <!-- EACH_END --> <BR><BR> Now tell me:<BR> <!-- Corvid_ASK STATIC_LIST --> ………… <!-- ASK_END -->
This can be a way to provide the user with intermediate feedback.
EMAIL Functions Exsys Corvid has the ability to have a system automatically compile, generate and send an email. Running a system with the Corvid Servlet Runtime is required for this capability. The EMAIL functions are not supported in the applet runtime.
Building the email commands is done from the "Email" tab in the command builder.
There are typically 6 steps to sending an email, and 6 commands are needed. All, except the actual EMAIL_SEND command apply until they are changed by another command. Each is a separate command in a Command or Logic Block and must be added individually.

18: Using the Exsys Corvid Servlet Runtime 357
1. Set the email server Click the "Email Server" radio button and enter the name of the mail server (e.g. mail.mysite.myserver.net". This server will be used for all emails until another Email server command is executed. This will build an EMAIL_SERVER command. The mail server should be a standard mail server, such as used to send other emails. It must allow emails to be sent from a servlet program.
2. Set the Address for the sender Click the sender address radio button and enter an email address. This address is used only if the recipient selects to reply to the email. Typically this is your email address, though a special address can be used. If the recipient’s address is not valid, or the email fails for some other reason, the mail server will send the failure message to this address. This will build an EMAIL_FROM_ADDRESS command. 3. Set the Recipient's address Click the Recipient Address radio button and enter the address to send the email to. This must be a valid address or the email will bounce, typically with a message sent back to the sender address. This will build an EMAIL_TO_ADDRESS command.
4. Set the Subject Click the "Subject" radio button and enter the subject line for the email. This will build an EMAIL_SUBJECT command.
5. Set the content type Click the "Content Type" radio button and enter the type for the message. The two most common types are "text/plain" (normal text emails) and "text/html" (an email that has HTML code in it). Note: not all email programs, or recipients, accept HTML emails. This will build an EMAIL_CONTENT_TYPE command.
6. Select the message and send it. Click the "Send Message" radio button and enter the message to send. This will build an EMAIL_SEND command. Often the message is the content of a Corvid variable, particularly collection variables. To add a variable(s) to the message, click the "Variables" button and select the variable to add. Unlike the other email commands which set parameters that are used later, this actually sends the email using the message specified and parameters that have already been set. All other parameters must be specified before the EMAIL_SEND is executed. When a variable is used for the message it should be added in double square brackets - [[varname]]. The message can also contain any text or HTML commands with multiple Corvid variables embedded in it using [[ ]].
For example, to send a simple email, whose text is stored in a string variable [MESSAGE]. Add the following commands to a Command Block: (This will require building 6 separate commands from the Email tab.)
EMAIL_SERVER mail.mysite.myserver.net EMAIL_FROM_ADDRESS [email protected] EMAIL_TO_ADDRESS [email protected] EMAIL_SUBJECT A message from this Corvid system EMAIL_CONTENT_TYPE text/plain EMAIL_SEND [[MESSAGE]]
To send this same message to a second person, all that is needed is another EMAIL_TO_ADDRESS and EMAIL_SEND command. The other parameters would stay the same.
EMAIL_TO_ADDRESS [email protected] EMAIL_SEND [[MESSAGE]]
Collection variables are a convenient way to build messages to send. This can be text, where each item in the collection should be sent as a single line. To build the message with a new line character between lines, use [[COLLECTION_VAR.concat "\n"]]
Messages can also use HTML codes to format the message. Most modern email programs can accept HTML messages, but some recipients may have turned this capability off. If you are sending HTML, it is a good idea to have the Corvid system ask if the recipient can (or wants) to accept HTML emails and select either a text or HTML message appropriately.

18: Using the Exsys Corvid Servlet Runtime 358
An HTML email has the same content as an HTML Web page except:
If an HTML email has been built in a Collection Variable, it can be included in the EMAIL_SEND as [[COLLECTION_VAR.concat ]] without the "\n", since the HTML does not care if the entire message is on one line.
The email commands are simple to use and very powerful. A system that builds a report for a user, can simply email it to them rather than presenting a long HTML page. Information on sessions can be emailed to a developer to check system use, or warn of problems detected by the system. Emails can be built easily by using templates and the ADDFILE command. The template file added can use [[ ]] double square bracket replacement for multiple variable and conditional inclusions of sections of text, based on the values of other variables. This allows a template to build a complex and customized report. This is added to a collection variable and then used as the message to send.
For example:
SET [REPORT_COLLECTION.ADDFILE] ReportTemplate.tpt EMAIL_SERVER mail.mysite.myserver.net EMAIL_FROM_ADDRESS [email protected] EMAIL_TO_ADDRESS [email protected] EMAIL_SUBJECT A message from this Corvid system EMAIL_CONTENT_TYPE text/html EMAIL_SEND [[REPORT_COLLECTION.concat]]
Email Commands for Server Authentication Some email servers require authentication of the user’s ID and password to send mail. To handle these, there are 2 special email commands.
These are built from the same Command Building Window as other email commands.
The section at the bottom of the window allows entering the user name and password.
As with all the other email commands these are added to the Command Block one command at a time, and the command applies to all subsequent email commands until it is changed.
Most email servers will NOT require these commands, and they should ONLY be used if needed. Hard coding a password into a system should be used only as a last resort. If a system requires using passwords, it is best to setup a dedicated email account specifically for the system so that the password cannot be used in other contexts.

Exsys Corvid Manual Index 359
Index ~ ~DATA, 282
~INPUT, 282
A ABS, 101
ACOS, 101
Action, 1, 16-17, 40, 133-139, 142-144, 147, 149-152, 223, 231-232, 293
Action Block, 1, 16-17, 133-136, 138-139, 142-144, 147, 149, 150-152, 223, 231-232
Action Blocks, 1, 16, 133, 139, 142-143, 223, 231-232
Action Buttons, 137
Advanced Options, 26, 29, 46, 140
AFTER, 194-195
After Ask, 36
All on One Line, 39
Allow, 6, 36, 166, 172
ALLOW_TABS_IN_COLLECTIONS, 174
Also Ask, 39, 44-45, 185, 204, 292, 296-297
Also Ask Tab, 44
ALTER, 256, 258
Alternate Prompts, 30-31
API Commands, 281
PostRequest, 281
API Commands
API_AskVar, 281-282
API_AssignValue, 281
API_DoCmd, 278-279, 281-282
API_GetValue, 281
API_ShowTrace, 281
APPLET, 24, 35, 159, 218, 224, 228-229, 253, 268
ASIN, 101
ASK, 35, 233, 237, 293, 295-302, 304-306, 308, 311-312, 315, 320
Ask With Tab, 37
Asking Questions, 185, 320
ATAN, 101
Average, 53-54
B BACK, 34-35, 188, 282, 286, 293, 310
BACK button, 282
Background Color, 21, 23, 40, 187-188, 190, 200, 203, 218
Backward Chaining, 10, 12, 33-34, 127, 282
Batch Command, 258
Batches of Data, 170
BCOLOR, 203
BEFORE, 194-195, 280
Block Order, 127
Block Var, 93
BR, 102, 194-195, 202, 298, 301-306, 308-309, 313, 315-318, 320
Branching, 162
Buttons, 21, 38-39, 47, 87, 188, 193, 308
C Calendar days, 106
CGI, 2, 24, 30, 36, 47, 171, 178-183, 222-223, 253-256, 258, 260-263, 265-273, 287
CGI Programs, 171, 269, 270
Checkbox, 38, 43, 202, 305
Clearing Blocks, 167
Clearing Variables, 167
CLOSE Command, 171
CODEBASE, 224-225, 228, 268
Collection, 281
Collection Tab, 51
Collection Variable, 1, 12, 28, 48, 65, 68-69, 72, 78, 80, 116, 119, 165, 169, 181, 188, 203, 234, 243, 253, 317, 322
Command Block, 11, 17-18, 20, 35, 55, 124, 128, 133, 136, 152-153, 161-167, 172-177, 180-181, 183-185, 204-205, 226, 231-233, 237, 239, 240, 250, 253, 256, 282, 288-289, 310, 312, 318, 321-322
Command Nodes, 124, 161
Command Table, 255-256, 258
COMMENT, 174
Conditional Inclusion of Text, 72, 119
Confidence Tab, 52
Confidence Variable, 15, 18, 28, 80, 165, 196, 198, 234, 236, 243, 316

Exsys Corvid Manual Index 360
CONFIDENCE_ASCENDING, 316
CONFIDENCE_DECENDING, 316-317
Configuration, 7, 259, 266-267
Configuration Options, 259
Connect string, 259
Constants, 101-102
Content, 16, 134, 136, 145, 148, 321
content type, 321
Continuous Tab, 49
Control Tab, 18, 172
Control Width, 188
Cookies, 285
Corvid Servlet Runtime, 2, 185, 227, 280, 283, 287
Corvid.Runtime.class, 24, 35, 224, 228
Corvid_ASK, 292-293, 295-306, 308, 311-312, 315-320
Corvid_CMD, 312
Corvid_DB, 212, 254-258, 260, 267
Corvid_ENDIF, 73-74, 120
Corvid_IF, 72-74, 119-120, 292-293, 298, 304, 311-313, 316, 318-319
Corvid_KEY, 72, 119
Corvid_REPEAT, 302-309, 317-319
Corvid_REPLACE, 298-299
Corvid_SERVLET_GET, 313-315
CorvidDB2, 260-261
CorvidDBApp, 263
CorvidDBCgi, 261
CorvidDBCore, 261, 263
CorvidDBMid, 261, 263
CorvidDeBug, 179, 260-261
CorvidReport, 179-180
CorvidReportCgi, 179
CorvidReportCore, 179
CorvidRpt, 180-181, 183
CorvidRuntime, 24, 35, 224, 228
COS, 101
CR, 102
CREATE, 256, 258
CREATEDATE, 106
CRLF, 102
CSS, 319
Curve types, 107
CUSTOM, 275, 278-279, 282
Custom Function, 275
CVD, 159, 217, 223, 277, 283
CVR, 207, 217, 220, 222, 224-226, 228-229, 283
CVRU, 228, 283
D DATA, 74, 194, 268
DATA_CR, 194
DATA_URL, 194
Database, 36, 171, 212, 254, 256, 259-264, 266
Database Interface, 254, 260, 262-264
Database Interface Programs, 260
DATE, 65, 102, 105, 295, 299, 316
Date comparison, 103
Date Variable, 28, 50-51, 62, 64-65, 299
DATE_FULL, 65
DATE_LONG, 65
DATE_MEDIUM, 65
DATE_SHORT, 65
DateFormat, 50
Day of Week, 65
DAYSDIFF, 105-106
Decision Support, 7
Default Value, 33-35
DELETE, 224, 256, 258
Dependent probability, 53
Derive, 34, 165, 232, 234, 236
Destroy Method, 280
Diagnostics, 8
DISPLAY, 84, 192, 210-212, 233, 237, 289, 290, 318-319
DISPLAY_HTML, 192, 210-212, 318-319
Displaying Results, 177
DO_NOT_ALLOW_HOW, 176, 211, 215
DO_NOT_LOOK_AHEAD, 175
Driver String, 259
DROP, 256, 258
Drop Down, 38

Exsys Corvid Manual Index 361
Dynamic List Tab, 48
Dynamic List Variable, 301
E Edit Box, 37-38, 299-300
Editing Controls, 125
Email, 320-322
EMAIL Functions, 320
Email server, 321-322
EMAIL_CONTENT_TYPE, 321-322
EMAIL_FROM_ADDRESS, 321-322
EMAIL_SEND, 320-322
EMAIL_SERVER, 321-322
EMAIL_SUBJECT, 321-322
EMAIL_TO_ADDRESS, 321-322
Embed Identifiers, 194
Embedding Variables, 22, 194
EMPTY_CELL, 173
Evaluate Method, 277
Exclude, 172
Exec Block, 17, 136
Executable Commands, 162, 164
EXISTS, 102
EXP, 101
Expression Nodes, 98
Expression Syntax, 99, 115
ExsysCorvid.jar, 24, 35, 159, 214-215, 223-226, 228, 276-277, 280
External Data, 30, 36, 47, 51, 171, 253
External Programs, 168, 269
External Source, 30, 47, 51, 253
External Tab, 18, 168, 253
F FALSE, 32, 59, 61, 73-74, 94, 97-98, 102-104, 108-109,
111-112, 115-116, 120, 163, 171, 174
FCOLOR, 203
Final Results Display, 33
Final Results Flag, 198
Final Screen, 290, 310, 320
Final Screen Template, 290, 320
FLOOR, 101-102
Font Larger, 126, 184
Font Smaller, 126, 184
Footers, 56
FOR, 281
FOR Loops, 163
FOR_EACH, 312, 316-318, 320
FORM METHOD, 293
Formatted output, 63-64, 81-82
Formatting, 22, 56, 153, 156, 159, 188, 209
Forward Chaining, 10, 17, 127, 152, 166
FRAC, 101
Frames, 192
FRAMESET, 191
Functions, 99, 101-102, 107, 110, 115, 128, 275
G GET, 253-254, 285, 300, 313
GIF, 2, 21, 39-40, 42-43, 45, 187, 210
Goto Label, 17, 136, 144, 146, 150
Group Together, 90-91
H Headers, 56, 156-157, 267
Heading Buttons, 138
Heuristics, 5, 9
Hot Spots, 40
HREF, 22, 187, 189, 191-192, 250-251
HTML Template, 218
HTTP Header, 270
Hypertext, 190
I IF, 281
IF Nodes, 108
IF THEN IF, 130
Illegal characters, 27, 46-47, 140-141
Image Maps, 39, 42-43, 313
Images, 21-22, 39-40, 42-43, 45, 187, 189-190, 199, 209, 210-211, 245, 294, 313-314
IMG SRC, 189-191, 250-251, 294, 299, 305
Indent, 126, 158, 184, 188, 209, 240
Independent probability, 53
Inference Engine, 9-10, 283
INPUT, 194-195, 297-298, 301

Exsys Corvid Manual Index 362
INPUT_URL, 194
INSERT, 256, 258-259
Instead Tab, 21, 198
INT, 101-102
Interface Command Builder, 21, 56, 186
Interface Commands, 18, 20-22, 178, 185-188, 219
Internet, 1, 6, 22, 24, 152, 209, 211-212, 217, 220, 222, 277
IP address, 180-181, 220, 261, 272, 281, 284
iPAQ, 209-215, 220
J Java, 1-3, 12, 22-24, 37, 39, 50, 63, 72, 81, 112-113,
119, 152, 168, 176, 178-179, 182, 188-189, 192, 194, 196, 201, 203, 206, 209-210, 212,…….
214-215, 217-221, 223-229, 235, 251, 254, 260-261, 263, 269-270, 275-276, 277, 281, 283-287, 311
Java application, 192, 209, 226, 235
Java Console, 215, 219, 220, 311
Java system properties, 196, 206
JavaScript, 3, 287, 292, 319
JPG, 2, 21, 39, 40, 42-43, 45, 187, 210, 245, 250-251
K KBNAME, 24, 35, 221, 224, 228-229, 284-285
KBWIDTH, 24, 35, 224, 228-229
Key Variable, 30, 47, 196, 299
L Label, 16-17, 134-135, 137
LCASE, 102
LEFT, 102
LEN, 102
LF, 102
LICENSE, 284
Limit List, 93
Line, 39, 67, 102, 193, 196, 201, 214, 267
lineSegs, 107
Link Color, 190
Link Tab, 21, 37, 199
Links, 22, 189, 191, 212, 319
List, 11, 16-17, 25, 27-28, 30-38, 41-49, 52, 55-57, 60, 70, 74, 77-78, 90, 92-98, 109, 116-117, 121, 123-124, 134, 140-142, 146-147, 165, 169-170, 175, 194, 197-198, 204, 206, 233-235, 244, 253, 270-
271, 285, 291-292, 295-296, 299, 301-308, 313, 315-318
LN, 101
Locking Rules, 54
LOG, 101, 275
Logarithm, 101
Logic Blocks, 1-2, 11-18, 20, 25, 27-28, 31-33, 48, 52, 57, 69, 85-90, 92-99, 109, 115-116, 124-130, 133-134, 138, 143, 161-163, 165-167, 169, 172, 174-175, 194, 205, 217, 231-232, 239-240, 241-248, 269, 320
Logical operations, 100
Login, 259
Looping, 161-162
M Masks, 49-50, 112, 167, 299
Matches, 50, 112, 296
MAX, 53, 61, 101-102
Merge, 128
MetaBlocks, 15, 28, 34, 37, 48-49, 51, 71, 99, 109, 115, 118, 126-127, 167, 173-175, 188, 190, 219-220, 226, 241-248, 250, 253, 267, 270, 283, 311
Methods, 12, 57, 69, 78
MID, 102
Milliseconds, 50-51, 65, 83, 102, 172, 280
MIN, 53, 101-102, 275
Monitoring, 8
Multiple Language Support, 205
Mycin, 53
N N Per Line, 39
Never Ask, 33, 35
NO_PARSE_ERRORS, 173-174
NO_RESOURCE_CHECK, 174
Nodes, 86, 90, 92, 94, 96-98, 109, 115, 125, 144, 146, 183
NOW, 51, 102
NOW(), 51, 102
NOWMSEC, 51, 102
NOWMSEC(), 51, 102
Num, 80
NumConfOver, 196
Numeric Variable, 28, 49
Exsys Corvid Manual Index 363
O Object Structure, 1
Object-oriented, 1
OK button, 141-142, 152, 154, 158, 193, 211, 227, 308-309, 310, 314-315, 319
One Per Line, 39
Operation precedence, 100
Optional Short Text, 46-47
Options Tab, 33-34
Output Variables, 232, 236
P PARAM, 23-24, 35, 221, 224, 228-229, 253
Parse, 114
PARSETEST, 105
PASSWORD, 193, 300
pattern string, 110, 112, 114
PDA, 209, 212
PDF, 173-174
PI, 102, 107
POST, 253-254, 272, 293, 300, 313
Printing, 20, 239-240
Process Control, 8
Product Selection, 7, 15, 241
Product Support, 8
Prompt Tab, 29
Properties, 12, 23, 35, 54, 57, 60, 62, 64-65, 78, 80, 83, 136, 182-183, 191, 209, 215, 218, 220-223, 227, 260-262, 268, 281, 285-286, 289-290, 293-295, 311, 313, 320
Property
ADD, 70-71, 113-114, 117-118, 174, 203, 247, 250
ADDFILE, 72, 74, 119, 169, 181, 322
ADDFIRST, 70-71, 113-114, 117-118, 250
ADDSORTED, 71, 118, 317
ADDVAR, 70-71, 74, 117, 121
ADDVARFIRST, 71, 117
AGE, 83, 167
ASSIGNAFTER, 75-76, 79, 121-122
CHECK, 59, 61, 73, 120
CLEAR, 78, 124, 311
CONCAT, 67, 74, 121, 198
COPY, 74, 121
COUNT, 12, 34, 58, 61, 66, 98, 197, 305, 312-313
DISPLAY_WITH_RESULTS, 84
DOW, 65
DROPFIRST, 77, 123
DROPLAST, 78, 123
FIRST, 58, 60, 66, 171
FORMAT, 63-65, 70, 81-82, 117, 202-203
FULL, 58-60, 63-64, 66-67, 80-81, 316-317, 320
HOW, 83, 176, 211
INCLUDES, 62, 68, 73, 116, 120
LAST, 67
LIST, 62, 295-297, 302-303, 305-306, 308, 315-316, 320
LOCKED, 57, 82
MAX, 53, 61, 101-102
MSEC, 65, 279-280
NOTINCL, 62, 68-69
NUM, 58, 60, 278
PFORMAT, 64-65, 82
REMOVE, 77, 123
REPLACEAFTER, 76, 80, 122
SVALUE, 59
TIME, 12, 65, 83, 102
TOP, 68, 251
VALUE, 24, 35, 54, 59, 61, 63-64, 66, 81, 195, 221, 224, 228-229, 253, 291, 303-307, 309-310, 316-318
Q Question Buttons, 136
QUIT_MB, 174-175
R RAD, 101
Radio Button, 12, 21, 27, 37-41, 43, 48-49, 55-56, 69, 143, 152, 157, 164-169, 171-172, 177-178, 180-183, 185-187, 192-193, 197-201, 218-219, 222, 227, 232-234, 237, 239, 244, 251, 253-254, 260, 269, 286, 293, 297, 299, 301, 304-306, 321
RANDOM, 101
READ Command, 169, 269
Regulatory Compliance, 7
Replace, 32, 47, 76, 80, 122, 137, 180, 186, 214, 221-

Exsys Corvid Manual Index 364
222, 256, 261, 263, 266, 316, 320
REPLACECONTENTS, 103
Replacing Parameters, 112
Report Files, 169
Report Tab, 178
Reports, 17, 178, 180-182, 212
Reset Tab, 18, 167
RESOURCE, 205-206
Resource File, 205-207
Results, 18, 21, 33, 84, 153, 157, 177, 186, 198, 211, 236, 251, 289, 315-316, 320
Results Screen, 177
Results Tab, 18, 177
Reverse, 111
RIGHT, 102
ROUND, 105
Rule View Window, 13-14, 87-89, 97, 125, 131
S Same as Prompt, 39
SAMELINE, 200-201
Search and Replace, 110
Security, 49-50, 196, 225, 258, 272-273
SELECT, 15, 36, 126, 256-258, 266-267, 297, 301
Server Authentication, 322
Servlet License File, 284
Servlet Runtime, 2-4, 45, 72, 113, 119, 153, 176, 185, 209, 212, 220, 227, 254-255, 260, 262, 281, 283, 284-288, 290, 293, 296-297, 313, 315, 319-320
Servlet Tab, 45, 298
SET, 51, 79, 165, 195, 275-277, 279, 281, 312, 322
SIN, 101
Single Selection, 126, 184
Sleep, 172
Smart Questionnaires, 8
Sort, 55, 92, 143, 198, 281, 317
SORTED_INPUT, 194-195
Special Commands, 173, 176
Special Functions, 103
Spell Checking, 19, 223
Spreadsheet, 48, 242, 245, 250, 267
SQL, 255-259, 261-267
SQRT, 101
Standalone, 3, 209, 225-226
Static List Tab, 46
Static List Variable, 33, 175
String Expressions, 109
String Parsing, 110
String to a Number, 114
String Variable, 28, 35, 49, 181
STYLE, 203
Sum, 53, 243, 246
SYSPROP, 196, 206
System Done, 177
System Properties, 196
T TAB, 102, 169-170
TABDELIM, 80, 112-113
Tab-delimited, 80, 112-114, 126, 174, 194, 242, 267-268
TABLE, 256, 268
TAN, 101
Templates, 3, 218, 222, 261-262, 287-290, 292, 295, 315
Terminate, 172
TERMINATE_IF_INACTIVE, 176
Testing, 182, 214, 227, 231, 270
Text Area Box, 188
THEN Nodes, 97, 116
TIME, 12, 65, 83, 102
TIME_FULL, 65
TIME_LONG, 65
TIME_MEDIUM, 65
TIME_SHORT, 65
Title Screen, 178
Title Tab, 18, 178
To Be, 31
To Be Rules, 31, 32
To Be Tab, 31
Trace, 23-24, 83, 214, 219-220, 278, 311
Trace Applet, 23, 24, 219-220, 311
Tree diagrams, 86
Tree Display, 126, 184

Exsys Corvid Manual Index 365
Trees, 86, 129, 130
TRUE, 32, 54, 59, 61, 68, 73, 82, 94, 97-98, 102-105, 108-109, 111-112, 115-116, 120, 163, 171-174
U UCASE, 102-103
Undo, 125, 138, 184, 193, 220, 227
Undo Button, 138, 193
UPDATE, 194, 256, 258
URL, 3, 21-22, 36-37, 40-41, 49, 72, 119, 169, 177, 179-180, 182, 187, 189, 191-192, 194, 196, 198-199, 200, 209, 223, 225, 253-255, 257-258, 261-262, 265-267, 269-272, 283-285, 287, 290, 292, 294, 300, 313-314
URL Encoding, 272
V Validation, 19, 231, 232-234, 236-237, 256
Validation Testing, 231
Value Ranges, 233
Variable Display, 197
VARIABLE_PROMPT, 291-292, 298-303, 305-306, 308-309, 316
VARIABLE_VALUE_NUM, 302, 304, 306-309, 317
VARIABLE_VALUE_SHORT, 302-308
VARIABLE_VALUE_TEXT, 291, 302-309, 317-318
Variables in Expressions, 98
Vector, 78
W Warnings, 128, 235
Web Server, 223, 225
Websphere, 176, 211-213, 215
Weighting Factors, 248
Where, 7, 47, 55, 185, 262, 297
WHILE, 281
WHILE Loops, 163
Windows Mobile Devices, 215
WINK, 2
WRITE Command, 168, 212
© Exsys Inc. www.exsys.com


