+ All Categories
Home > Documents > EXTAVIA · EXTAVIA® Injection Training Manual Indication EXTAVIA® (interferon beta-1b) is a...

EXTAVIA · EXTAVIA® Injection Training Manual Indication EXTAVIA® (interferon beta-1b) is a...

Date post: 01-Apr-2019
Category:
Upload: trinhkiet
View: 216 times
Download: 0 times
Share this document with a friend
44
EXTAVIA ® Injection Training Manual Indication EXTAVIA ® (interferon beta-1b) is a prescription medicine used to reduce the number of relapses in people with relapsing forms of multiple sclerosis (MS). This includes people who have had their first symptoms of multiple sclerosis and have an MRI consistent with MS. EXTAVIA will not cure MS but may decrease the number of flare-ups of the disease. Important Safety Information Do not take EXTAVIA (interferon beta-1b) if you are allergic to interferon beta-1b, to another interferon beta, to human albumin, or to mannitol. Please see additional Important Safety Information on pages 10 and 11. Click here for full Prescribing Information. Click here for Medication Guide.
Transcript

EXTAVIA® Injection Training Manual Indication

EXTAVIA® (interferon beta-1b) is a prescription medicine used to reduce the number of relapses in people with relapsing forms of multiple sclerosis (MS). This includes people who have had their first symptoms of multiple sclerosis and have an MRI consistent with MS. EXTAVIA will not cure MS but may decrease the number of flare-ups of the disease.

Important Safety Information

Do not take EXTAVIA (interferon beta-1b) if you are allergic to interferon beta-1b, to another interferon beta, to human albumin, or to mannitol.

Please see additional Important Safety Information on pages 10 and 11. Click here for full Prescribing Information. Click here for Medication Guide.

2

Important Safety Information

Do not take EXTAVIA (interferon beta-1b) if you are allergic to interferon beta-1b, to another interferon beta, to human albumin, or to mannitol.

EXTAVIA can cause serious side effects, including:

Liver Problems Including Liver Failure. Symptoms of liver problems may include yellowing of your eyes, itchy skin, feeling very tired, flu-like symptoms, nausea or vomiting, bruising easily, or bleeding problems. Your healthcare provider will do blood tests to check for these problems while you take EXTAVIA.

Serious Allergic Reactions. Serious allergic reactions can happen quickly and may happen after your first dose of EXTAVIA or after you have taken EXTAVIA many times. Symptoms may include difficulty breathing or swallowing, swelling of the mouth or tongue, rash, itching, or skin bumps.

Depression or Suicidal Thoughts. Call your healthcare provider right away if you have any of the following symptoms, especially if they are new, worse, or worry you: thoughts about suicide or dying, new or worse depression (sinking feeling or sadness), new or worse anxiety (feeling uneasy, nervous, or fearful for no reason), trouble sleeping (insomnia), acting aggressive, being angry, or violent, acting on dangerous impulses, hallucinations, other unusual changes in behavior or mood.

Please see additional Important Safety Information on pages 10 and 11.

Click here for full Prescribing Information.

Click here for Medication Guide.

3 3

Contents

What You Will Need __________________________________________________ 6

— Important Points to Keep in Mind About Your Supplies _______________ 8

— Overview of Dosing and Dose Titration _____________________________ 9

Selecting Your Injection Site ___________________________________________ 13

Step 1: Preparing the Solution for Injection ______________________________ 16

Step 2: Choosing an Injection Technique ________________________________ 21

— Manual Injection _________________________________________________ 24

— Using the EXTAVIA Auto-Injector II (optional) ________________________ 27

Step 3: After Your Injection ____________________________________________ 34

Rotating Injection Sites _______________________________________________ 37

Helpful Tips _________________________________________________________ 41

4 4

I’m Ready To Start Treatment With EXTAVIAAs you get started, you may find the following tips helpful:

Set up a permanent storage area in a convenient location out of the reach and

sight of children so that your EXTAVIA and other supplies are always easy to find.

EXTAVIA should be stored at room temperature

Try to give yourself the injection at the same time each day you inject EXTAVIA.

This makes it easier to remember and to plan a block of time when you will not

be interrupted

Prepare each dose only when you are ready for an injection. After mixing

EXTAVIA, you should administer the injection immediately. If for some reason

you are not able to inject EXTAVIA immediately, you can keep the syringe in the

refrigerator for up to 3 hours before using it. Do not freeze EXTAVIA

What You Will Need

What Yo

u Will N

eed

Please see additional Important Safety Information on pages 10 and 11. Click here for full Prescribing Information. Click here for Medication Guide.

6 6

EXTAVIA vial (with EXTAVIA powder for dissolving and injecting)

Prefilled syringe (0.54% sodium chloride) set into a plastic tray, which will be used when assembling the EXTAVIA vial, syringe, and vial adapter

Vial adapter with attached 27-gauge needle

2 Alcohol wipes

Blister pack tray

What You Will NeedEach shipment of EXTAVIA contains 15 blister packs, which is enough medicine

for 30 days of therapy. The following components are included in each blister

pack and will be needed during the administration of EXTAVIA:

You may also receive the EXTAVIA Auto-Injector II (optional) if your health care provider (HCP) has requested one for you. If you did not, and you’d like to try one, ask your HCP for more information or call the Go Program™ at 1-866-EXTAVIA (398-2842)

NOTE: Do not use the EXTAVIA blister pack, any of its components, or the Auto-Injector II if you notice that the packaging is damaged or shows signs of tampering. If the seal has been broken, return the entire pack to the pharmacy.

Please see additional Important Safety Information on pages 10 and 11. Click here for full Prescribing Information. Click here for Medication Guide.

7 7

In addition, you will also need:

Cotton balls or gauze pads (available at your local pharmacy)

Special containers made for the disposal of used needles, syringes, and vials

(called sharps containers), which may be provided by your specialty pharmacy

at little or no cost. In addition, these containers are covered by many individual

prescription insurance plans

Check with your HCP or specialty pharmacy for information that will help you

dispose of used needles, vials, and associated sharps containers

8 8

Please see additional Important Safety Information on pages 10 and 11. Click here for full Prescribing Information. Click here for Medication Guide.

Important Points to Keep in Mind About Your Supplies

Keep your syringes, sharps container, and EXTAVIA supplies out of the reach

and sight of children

Never share or reuse syringes or needles

Always use a sterile (aseptic) technique as described in this manual

Always place the used needles, vials, and syringes in your sharps container

Do not use EXTAVIA if the seal to the blister pack or vial is broken. If the seal

is broken, the product may not be safe for you to use

Do not use EXTAVIA after the expiration date shown on the blister pack, box,

or vial. If your EXTAVIA has expired, return it to your pharmacy

Do not leave the blister pack where others might tamper with it

Do not open the blister pack or take out any items until right before you are ready

to use them

Check to make sure the rubber cap on the prefilled syringe is firmly attached

9

Recommended Titration EXTAVIA Dose Volume

Weeks 1-2 25% 0.0625 mg 0.25 mL

Weeks 3-4 50% 0.125 mg 0.5 mL

Weeks 5-6 75% 0.1875 mg 0.75 mL

Weeks 7+ 100% 0.25 mg 1 mL

Adapted from EXTAVIA US Prescribing Information.

Overview of Dosing and Dose Titration EXTAVIA is given by injection under the skin (subcutaneous injection)

every other day

Many people begin with a lower dose of EXTAVIA and work up to the

recommended dosage of 0.25 mg every other day, over the course

of several weeks (dose titration)

Your HCP may instruct you to titrate your dose over time based on

the table below

Do not take EXTAVIA 2 days in a row

Always use a new, unopened vial of EXTAVIA and syringe for each injection.

Throw away any unused medicine. Do not reuse vials, syringes, or needles

If you miss a dose of EXTAVIA, take your next dose as soon as you remember

or are able to take it. Take your next injection 2 days after that dose. If you are

not sure when you should take your next dose, call your HCP

Schedule for Dose Titration

Please see additional Important Safety Information on pages 10 and 11.

Click here for full Prescribing Information.

Click here for Medication Guide.

10 10

Indication

EXTAVIA® (interferon beta-1b) is a prescription medicine used to reduce the number of relapses in people with relapsing forms of multiple sclerosis (MS). This includes people who have had their first symptoms of multiple sclerosis and have an MRI consistent with MS. EXTAVIA will not cure MS but may decrease the number of flare-ups of the disease.

Important Safety Information

Do not take EXTAVIA (interferon beta-1b) if you are allergic to interferon beta-1b, to another interferon beta, to human albumin, or to mannitol.

EXTAVIA can cause serious side effects, including:

Liver Problems Including Liver Failure. Symptoms of liver problems may include yellowing of your eyes, itchy skin, feeling very tired, flu-like symptoms, nausea or vomiting, bruising easily, or bleeding problems. Your healthcare provider will do blood tests to check for these problems while you take EXTAVIA.

Serious Allergic Reactions. Serious allergic reactions can happen quickly and may happen after your first dose of EXTAVIA or after you have taken EXTAVIA many times. Symptoms may include difficulty breathing or swallowing, swelling of the mouth or tongue, rash, itching, or skin bumps.

Depression or Suicidal Thoughts. Call your healthcare provider right away if you have any of the following symptoms, especially if they are new, worse, or worry you: thoughts about suicide or dying, new or worse depression (sinking feeling or sadness), new or worse anxiety (feeling uneasy, nervous, or fearful for no reason), trouble sleeping (insomnia), acting aggressive, being angry, or violent, acting on dangerous impulses, hallucinations, other unusual changes in behavior or mood.

Other possible serious side effects with EXTAVIA include:

Heart Problems. EXTAVIA may worsen heart problems including congestive heart failure. Symptoms of heart problems may include swollen ankles, shortness of breath, decreased ability to exercise, fast heartbeat, tightness in chest, increased need to urinate at night, not being able to lay flat in bed.

(cont’d on next page)

11

Important Safety Information (cont’d)

Injection Site Problems. Serious skin reactions can happen in some people, including areas of severe damage to skin and the tissue below the skin (necrosis). These reactions can happen anywhere you inject EXTAVIA. Symptoms of injection site problems may include swelling, redness, or pain at the injection site, fluid drainage from the injection site, breaks in your skin or blue-black skin discoloration. Change your injection site each time you inject EXTAVIA as it will lessen the chance of you having a serious skin reaction. Avoid injecting EXTAVIA into an area of the skin that is sore, reddened, infected, or has other problems.

Flu-like Symptoms. EXTAVIA can cause flu-like symptoms including fever, chills, tiredness, sweating, and muscle aches when you first start to use it. These symptoms may decrease over time. Taking medicines for fever and pain relief on the days you are using EXTAVIA may help decrease these symptoms.

Seizures. Some people have had seizures while taking EXTAVIA, including people who have never had seizures before. It is not known if the seizures were related to MS, to EXTAVIA, or to a combination of both. If you have a seizure after taking EXTAVIA call your healthcare provider right away.

Blood Problems. You may have a drop in the levels of infection-fighting white blood cells, red blood cells, or cells that help you form blood clots. If drops in levels are severe, they can lessen your ability to fight infections, make you feel tired or sluggish, or cause you to bruise or bleed easily.

Risk to Pregnancy: EXTAVIA can harm your unborn baby. EXTAVIA may cause you to lose your baby (miscarry). If you become pregnant while taking EXTAVIA call your healthcare provider right away. You and your healthcare provider should decide if you should continue to take EXTAVIA.

Most Common Side Effects: The most common side effects of EXTAVIA include low white blood cell count, increases in your liver enzymes, headache, increase in your muscle tension, pain, rash, problems sleeping, stomach pain, and weakness. These are not all the possible side effects of EXTAVIA.

Tell your healthcare provider if you have any side effect that bothers you or that does not go away. Tell your healthcare provider about all the medicines you take and your medical conditions.

Click here for full Prescribing Information.

Click here for Medication Guide.

Selecting Your Injection Site

Selecting

Your

Injection S

ite

13 13

Selecting Your Injection SiteBefore you start, you will need to decide where to inject yourself (see Rotating

Injection Sites on page 37). You’ll need to rotate the injection site after every

injection, so that each site can recover post-injection. If some areas are too difficult

for you to reach, ask a friend or family member who has been trained to help you.

Here are a few tips to help you get started:

Keep track of where and when you gave yourself your last injection—consider

using an injection site rotation guide, like the one included in this kit. This will

help you keep track of sites used for injection

You should inject EXTAVIA subcutaneously, into the fatty layer between the skin

and the muscle

The best areas for injections are where the skin is loose and soft, and away

from joints, nerves, and bones. These spots may include the abdomen, arms,

thighs, or buttocks (see page 38). Do not use the area near your belly button

or waistline. If you are very thin, use only the thigh or outer surface of the arm

Important Safety Information

Do not take EXTAVIA (interferon beta-1b) if you are allergic to interferon

beta-1b, to another interferon beta, to human albumin, or to mannitol.

Please see additional Important Safety Information on pages 10 and 11. Click here for full Prescribing Information. Click here for Medication Guide.

14

Selecting Your Injection Site (cont’d)

Important: Do not inject into areas where you can feel lumps, bumps, firm knots,

or pain, or any area that is sore, red, infected, discolored, indented, scabbed, or

where the skin is broken

You should not choose the same area for 2 injections in a row. If one of your

injection sites becomes swollen and painful, the area looks infected or does not

heal within a few days, the area has fluid draining from it, or you notice any breaks

in your skin or blue-black discoloration of your skin along with a break in your skin,

call your HCP and talk to him or her about choosing other injection sites

Please see additional Important Safety Information on pages 10 and 11.

Click here for full Prescribing Information.

Click here for Medication Guide.

Preparing the Solution for Injection

Prep

aring the S

olutio

n fo

r Injection

16 16

1

2

Step 1: Preparing the Solution for InjectionWhether you decide to inject manually or use an auto-injector, the steps used to

reconstitute EXTAVIA are the same. Instructions for using the EXTAVIA Auto-Injector II

can be found on pages 27 to 32.

Assembling the EXTAVIA Syringe

Wash your hands well with soap and water before opening

the blister pack. Open the blister pack by peeling off the label,

take out all the items, and place them on the mat provided

in the EXTAVIA Starter Kit, available through the EXTAVIA Go

Program at 1-866-EXTAVIA (398-2842). Make sure the blister

pack containing the vial adapter is sealed and the rubber cap

on the prefilled syringe is firmly attached. Take the blister pack

that the components came in, turn it over, place the vial in

the round space (vial holder) provided, and place the prefilled

syringe in the U-shaped trough.

Pick up the vial containing the EXTAVIA powder and open it by

lifting off the cap, using your thumb.

3 Place the vial back in the vial holder. Clean the top of the

EXTAVIA vial with an alcohol wipe. Be sure to move the wipe

in only 1 direction, then leave the wipe on top of the vial.

Please see additional Important Safety Information on pages 10 and 11. Click here for full Prescribing Information. Click here for Medication Guide.

6

5

4

17

Take the vial adapter, which is sealed in plastic, and peel

off the label. Do not remove or touch the adapter, so that it

stays sterile. Remove the alcohol wipe from the top of the

vial, and put the vial adapter, still in its plastic pack, on top

of the vial and push down with your thumb and forefinger

until it pierces the rubber top of the vial and snaps in

place. Remove the plastic from the vial adapter by holding

it by the edges and pulling straight up.

Insert the prefilled syringe into the vial adapter, and turn

it slowly in a clockwise direction until the turning becomes

more difficult. Then, do not turn further because the

assembly could be damaged and result in leakage.

Using a twist-and-pull motion, take off the rubber cap from

the prefilled syringe. Do not touch the prefilled syringe

tip or the end of the vial adapter. Throw away the rubber

cap. Keeping the vial adapter attached to the vial, remove

the vial from the vial holder. Be careful not to pull the vial

adapter off the top of the vial.

Please see additional Important Safety Information on pages 10 and 11.

Click here for full Prescribing Information.

Click here for Medication Guide.

18 18

1

2

Dissolving the EXTAVIA Solution

Holding the syringe vial assembly, slowly push the plunger

of the prefilled syringe all the way in. This will transfer all

of the solvent in the syringe to the vial. Continue to keep

your thumb on the plunger during the mixing process;

otherwise, the plunger may return to its original position

after you let go.

With your thumb still on the plunger, gently swirl the

solution around in the vial until all the EXTAVIA powder is

completely dissolved. Make sure the solution in the vial is

clear, not discolored, and does not contain any particles. If

there is any discoloration or particles in the solution, throw

out the entire syringe vial assembly and start over.

NOTE: Never shake the vial, as this can cause the solution to foam. If foam does form, keep the plunger pushed in and wait for it to settle.

Important Safety Information

EXTAVIA can cause serious side effects, including:

Depression or Suicidal Thoughts. Call your healthcare provider right away if you

have any of the following symptoms, especially if they are new, worse, or worry

you: thoughts about suicide or dying, new or worse depression (sinking feeling or

sadness), new or worse anxiety (feeling uneasy, nervous, or fearful for no reason),

trouble sleeping (insomnia), acting aggressive, being angry, or violent, acting on

dangerous impulses, hallucinations, other unusual changes in behavior or mood.

4

3

5

19

With your thumb still on the plunger, turn the syringe vial

assembly over so the vial is upside down (on top). Slowly

pull back on the plunger to withdraw the entire contents

of the vial into the syringe.

With the syringe vial assembly turned so the needle end

is facing up, remove any air bubbles by gently tapping the

syringe and pushing the plunger to the 1 mL mark on the

syringe (or to the amount prescribed by your doctor). If too

much solution goes into the vial, return to Step 3.

Once the solution is drawn, hold the syringe vial assembly

with the needle facing up and unscrew the plastic vial

adapter cap from the syringe by twisting to the left.

NOTE: If for some reason you are not able to inject EXTAVIA® (interferon beta-1b) immediately, you can keep the syringe in the refrigerator for up to 3 hours before using it. Be sure the needle cap is on properly while the syringe is in the refrigerator and DO NOT FREEZE the solution. If more than 3 hours pass, throw out the medication in a sharps container and prepare a new injection using a new blister pack.

Please see additional Important Safety Information on pages 10 and 11.

Click here for full Prescribing Information.

Click here for Medication Guide.

Choosing an Injection Technique

Cho

osing

an Injectio

n Technique

21 21

Step 2: Choosing the Injection Technique That’s Right for YouYou have a choice of injection techniques when administering EXTAVIA.

Manual Injection EXTAVIA Auto-Injector II

Do not try to inject yourself until you have discussed with your HCP the right

way to give the injection and you understand how to prepare and perform the

injection. If you have any questions or concerns about using EXTAVIA, ask your

HCP, and remember, the EXTAVIA Go Program is here for you. The Go Program

offers one-on-one injection training with an EXTAVIA Field Nurse at your home

or another designated location.

Instructions for both techniques are included in this manual. Please read the

instructions carefully and follow them step-by-step. Your HCP will help you through

the process to make sure you are able to inject yourself properly when at home.

Please see additional Important Safety Information on pages 10 and 11. Click here for full Prescribing Information. Click here for Medication Guide.

22

For more information, visit www.EXTAVIA.com or call 1-866-EXTAVIA (398-2842) 8 am – 9 pm Eastern Time, Monday through Friday*†

* Excludes public holidays. † In the event of an urgent issue after hours, you can leave a message at the call center, and a Go Program Navigator will return your call within approximately 30 minutes.

Step 2: Choosing the Injection Technique That’s Right for You (cont’d)

Please see additional Important Safety Information on pages 10 and 11.

Click here for full Prescribing Information.

Click here for Medication Guide.

Manual Injection

Manual Injectio

n

24 24

MixJect® is a registered trademark of Medimop Medical Projects Ltd., a subsidiary of West Pharmaceutical Services, Inc.

1

2

Manual Injection

The following steps describe how to manually inject EXTAVIA. If you are using the

EXTAVIA Auto-Injector II, please turn to pages 27 to 32 for further instructions.

Clean the injection site with a sterile alcohol wipe, starting

at the injection site and moving outward using a circular

motion. Allow the site to dry completely.

Remove the cap from the needle.

Important Safety InformationInjection Site Problems. Serious skin reactions can happen in some people, including areas of severe damage to skin and the tissue below the skin (necrosis). These reactions can happen anywhere you inject EXTAVIA. Symptoms of injection site problems may include swelling, redness, or pain at the injection site, fluid drainage from the injection site, breaks in your skin or blue-black skin discoloration. Change your injection site each time you inject EXTAVIA as it will lessen the chance of you having a serious skin reaction. Avoid injecting EXTAVIA into an area of the skin that is sore, reddened, infected, or has other problems.

Please see additional Important Safety Information on pages 10 and 11. Click here for full Prescribing Information. Click here for Medication Guide.

25

4

3

5

Gently pinch the skin together where you cleaned it (to

raise it up a little). Hold the syringe like a pencil or dart,

and push the needle straight up and down into your skin

at a 90º angle with a quick, dart-like motion. The tip of

the syringe will rest against your skin. Once the needle is

in your skin, slowly pull back on the plunger.

If no blood appears in the syringe, slowly push the

plunger all the way in until the syringe is empty. Always

make sure that your syringe is empty and that you

have received the full and correct amount of EXTAVIA.

Remove the needle from the skin.

Throw away the syringe, needle, and vial in your

sharps container.

NOTE: If blood appears in the syringe it means that you have entered a blood vessel. Do not inject EXTAVIA® (interferon beta-1b). Withdraw the needle and discard it in your sharps container. Repeat the steps to prepare your dose using a new blister pack. Choose and clean a new injection site.

NOTE: Some people find it helpful to gently massage the injection site with a cotton ball or gauze pad after the injection.

Please see additional Important Safety Information on pages 10 and 11.

Click here for full Prescribing Information.

Click here for Medication Guide.

Using the EXTAVIA® (interferon beta-1b)

Auto-Injector II

Using the

EX

TAV

IA A

uto-Injector II

For more information, visit www.EXTAVIA.com or call 1-866-EXTAVIA (398-2842) 8 am – 9 pm Eastern Time, Monday through Friday*†

* Excludes public holidays. † In the event of an urgent issue after hours, you can leave a message at the call center, and a Go Program Navigator will return your call within approximately 30 minutes.

27 27

The EXTAVIA Auto-Injector II is designed to help make injection more convenient.

What are some reasons to use the EXTAVIA Auto-Injector II vs traditional manual injection?

The EXTAVIA Auto-Injector II can help you reach recommended injection

sites that are difficult to reach with manual injection.

Some people may feel anxious or uncomfortable with injecting themselves,

but the EXTAVIA Auto-Injector II keeps the syringe and needle hidden from

view. You just place the syringe inside the EXTAVIA Auto-Injector II, then place

the EXTAVIA Auto-Injector II on the injection site and press the release button.

The needle and EXTAVIA are then automatically injected.

You have the option to inject with the EXTAVIA Auto-Injector II if your HCP has requested one for you.

Using the EXTAVIA Auto-Injector II (optional)

If you did not receive the EXTAVIA Auto-Injector II, and would like to

try one, ask your HCP for more information or call the EXTAVIA Go

Program to speak with a Go Program Navigator.

Please see additional Important Safety Information on pages 10 and 11. Click here for full Prescribing Information. Click here for Medication Guide.

28

EXTAVIA Auto-Injector II Safety Guidelines

The EXTAVIA Auto-Injector II must only be used with the 2.25 mL glass syringe

with the attached vial adapter device for dissolving the powder drug in a

prefilled syringe, as supplied with your EXTAVIA

The EXTAVIA Auto-Injector II is for your use only

The EXTAVIA Auto-Injector II should only be used for subcutaneous injections

with the EXTAVIA prefilled syringe

Do not operate the EXTAVIA Auto-Injector II with an empty syringe or you might

damage the syringe

The EXTAVIA Auto-Injector II must not be used with syringes containing less

than 0.25 mL of fluid

Never share or reuse needles

Always use a sterile (aseptic) technique, as described in this manual

Always place the used needles, syringes, and vials in your sharps container

Please see additional Important Safety Information on pages 10 and 11.

Click here for full Prescribing Information.

Click here for Medication Guide.

29 29

1

2

Setting Up the EXTAVIA Auto-Injector II

Before injecting with the EXTAVIA Auto-Injector II, make sure you’ve correctly

assembled the syringe vial assembly and reconstituted the solution as shown

on pages 16 to 19.

Hold the syringe housing vertically and place the wide end

of the syringe housing on a flat surface. Place the yellow

plunger of the injector body against the top of the syringe

housing. Push the injector body firmly into the syringe

housing until the spring locks it in place; take care not to

touch the release button.

Remove the injector body from the syringe housing.

Using the EXTAVIA Auto-Injector II (cont’d)

30

4

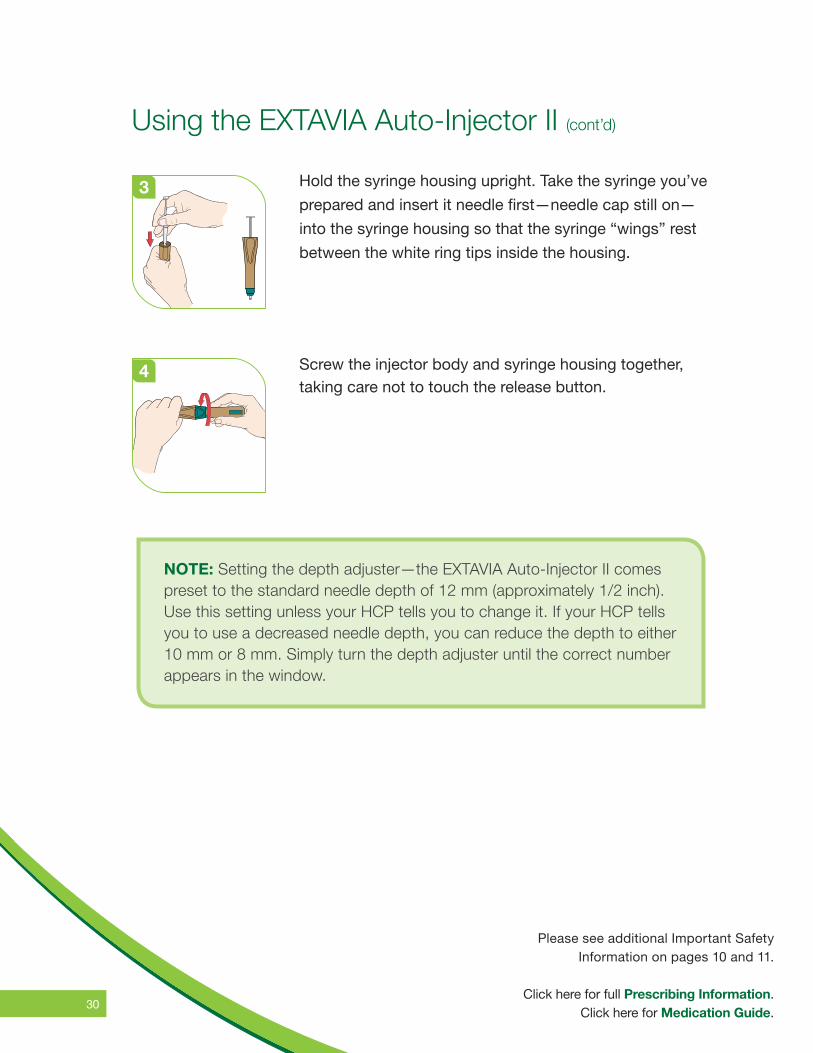
3 Hold the syringe housing upright. Take the syringe you’ve

prepared and insert it needle first—needle cap still on—

into the syringe housing so that the syringe “wings” rest

between the white ring tips inside the housing.

Screw the injector body and syringe housing together, taking care not to touch the release button.

NOTE: Setting the depth adjuster—the EXTAVIA Auto-Injector II comes preset to the standard needle depth of 12 mm (approximately 1/2 inch). Use this setting unless your HCP tells you to change it. If your HCP tells you to use a decreased needle depth, you can reduce the depth to either 10 mm or 8 mm. Simply turn the depth adjuster until the correct number appears in the window.

Using the EXTAVIA Auto-Injector II (cont’d)

Please see additional Important Safety Information on pages 10 and 11.

Click here for full Prescribing Information.

Click here for Medication Guide.

31 31

1

2

3

Injecting With the EXTAVIA Auto-Injector II

Clean the injection site with a sterile alcohol wipe using a

circular motion, starting at the injection site and moving

outward. Allow the site to dry completely.

Once set at the correct depth (see note on page 30),

remove the needle cap by pulling it straight off, being

careful not to bend the needle. Do not twist the needle

cap as this may loosen the needle itself from the syringe.

Place the EXTAVIA Auto-Injector II against your skin at a

90º angle so you can see the yellow indicator window.

Apply slight downward pressure to the injector body so

that the green and beige parts of the EXTAVIA

Auto-Injector II meet to release the safety lock on the

release button. You can use your other hand to stabilize

the EXTAVIA Auto-Injector II to avoid pressing down too

firmly on your skin.

Important Safety Information

Serious Allergic Reactions. Serious allergic reactions can happen quickly and may

happen after your first dose of EXTAVIA or after you have taken EXTAVIA many

times. Symptoms may include difficulty breathing or swallowing, swelling of the

mouth or tongue, rash, itching, or skin bumps.

32

4

5

Press the release button. The needle will insert into the skin

and the contents of the syringe will inject automatically.

Keep holding the EXTAVIA Auto-Injector II against your skin

to allow the injection to finish. Watch the yellow indicator

window. The injection is complete when the black lines in

the window have stopped moving after about 10 seconds. If

you cannot see the black lines, simply wait 10 seconds.

Once the injection is complete, remove the EXTAVIA Auto-

Injector II from the injection site carefully by pulling it straight

out. Be careful: the needle is exposed at the injector tip.

NOTE: Do not hold the EXTAVIA Auto-Injector II at a different angle unless directed by your HCP. Unlike a regular injection, you do not have to pinch your skin when using the EXTAVIA Auto-Injector II unless you have very little fatty tissue under your skin.

NOTE: Some people find it helpful to gently massage the injection site with a cotton ball or gauze pad after the injection.

Using the EXTAVIA Auto-Injector II (cont’d)

Please see additional Important Safety Information on pages 10 and 11.

Click here for full Prescribing Information.

Click here for Medication Guide.

After Your Injection

After Yo

ur Injection

Please see additional Important Safety Information on pages 10 and 11. Click here for full Prescribing Information. Click here for Medication Guide.

34 34

Step 3: After Your InjectionWhether you are injecting EXTAVIA manually or with the EXTAVIA Auto-Injector II,

there are some steps you should take after injection:

Always make sure that your syringe or Auto-Injector II is empty and that you

have received the full and correct amount of EXTAVIA

Gently massage the injection site with a cotton ball or gauze pad

To prevent needle-stick injury and spread of infection, do not try to recap

the needle

Safely discard used needles, syringes, and vials in your sharps container

Important Safety Information

Serious Allergic Reactions. Serious allergic reactions can happen quickly and may

happen after your first dose of EXTAVIA or after you have taken EXTAVIA many

times. Symptoms may include difficulty breathing or swallowing, swelling of the

mouth or tongue, rash, itching, or skin bumps.

Please see additional Important Safety Information on pages 10 and 11. Click here for full Prescribing Information. Click here for Medication Guide.

35

Step 3: After Your Injection (cont’d)

If you are using the EXTAVIA Auto-Injector II, take special care to do the following:

While holding the EXTAVIA Auto-Injector II in a horizontal position, unscrew the

injector body from the syringe housing and remove the used syringe. Do not

attempt to recap the used needle

The external components of the EXTAVIA Auto-Injector II should be cleaned

with a damp cloth. Do not boil or immerse your EXTAVIA Auto-Injector II in water

Place the EXTAVIA Auto-Injector II into its carrying case for safekeeping and

always keep it out of reach and sight of children

Please see additional Important Safety Information on pages 10 and 11.

Click here for full Prescribing Information.

Click here for Medication Guide.

Rotating Injection Sites

Ro

tating Injectio

n Sites

Please see additional Important Safety Information on pages 10 and 11. Click here for full Prescribing Information. Click here for Medication Guide.

37

Rotating Injection SitesThis rotation guide will help you vary and keep track of your injection sites.

You should always write the date and location of each injection to make sure you’ve

completed a full cycle. A full cycle consists of 8 injection areas, 1 to 8, shown on

the next page.

Each area is further subdivided into top, middle, and bottom for a total of

24 injection sites. Choose a different site each time you inject, and do not choose

the same area for 2 injections in a row. This will give each site a chance to recover.

Talk to your HCP if the injection site:

Is swollen and painful

Looks infected or does not heal within a few days

Has fluid draining from it

Has a break in the skin or blue-black discoloration along with a break in the skin

Please see additional Important Safety Information on pages 10 and 11.

Click here for full Prescribing Information.

Click here for Medication Guide.

38 38

Buttock

Thigh

Abdomen

Arm

Thigh

Abdomen

Arm

Buttock

4''–6'' from elbow and shoulder

4''–6'' from groinand knee

2'' from belly button

Injection Sites

IF YOU ARE VERY THIN, USE ONLY THE THIGH OR OUTER SURFACE OF THE ARM FOR INJECTION.

39

Rotating Injection Sites (cont’d)

The Treatment Calendar included in this kit will help you vary and

keep track of your injection sites.

Please see additional Important Safety Information on pages 10 and 11.

Click here for full Prescribing Information.

Click here for Medication Guide.

Helpful Tips

Help

ful Tip

s

41 41

Please see additional Important Safety Information on pages 10 and 11. Click here for full Prescribing Information. Click here for Medication Guide.

Tips to Help Reduce Injection Site ReactionsTherapies that are injected can cause injection site reactions such as redness,

pain, or swelling. Serious skin reactions, including infections or severe damage

to skin and tissue below skin (necrosis), can occur. If you experience any of these

skin reactions, contact your HCP.

To minimize the likelihood of severe injection site reactions, you should always

rotate your injection site with each dose. Consider these other tips to help reduce

injection site reactions:

Always wash your hands before preparing the injection

Use a sterile and unused needle that hasn’t touched anything (do not wipe the

needle with anything, including alcohol)

A cooling gel pack can help soothe the injection site before and after each injection

Never put ice directly on the skin; there should always be a barrier between

skin and ice

Use an alcohol wipe to clean the injection site; make sure it is dry before injecting

Do not inject EXTAVIA where you have red spots, or hard or sore areas

Always insert and remove the needle quickly and at a 90° angle to the skin

42

Tips to Help Manage Flu-like SymptomsMost people have flu-like symptoms (fever, chills, sweating, muscle aches, and

tiredness) when taking EXTAVIA. These symptoms may lessen or go away over

time. Consider injecting EXTAVIA before bed, so you can sleep through any

immediate flu-like symptoms. Talk to your HCP about whether you should

take a nonprescription medicine for pain or to lower fever before or after you

take your dose of EXTAVIA.

Important Safety Information

Flu-like Symptoms. EXTAVIA can cause flu-like symptoms including fever, chills,

tiredness, sweating, and muscle aches when you first start to use it. These

symptoms may decrease over time. Taking medicines for fever and pain relief on

the days you are using EXTAVIA may help decrease these symptoms.

Please see additional Important Safety Information on pages 10 and 11.

Click here for full Prescribing Information.

Click here for Medication Guide.

43 43

Important Tips for TravelTravel can be stressful, particularly when you are managing your treatment along

with your itinerary. But with preparation, travel can be relaxing and rewarding.

The following are some useful recommendations for traveling with EXTAVIA:

See your HCP 4 to 6 weeks prior to departure to discuss your EXTAVIA

treatment plan

Obtain a travel authorization letter from your HCP on office letterhead.

It should outline existing medical conditions, medications prescribed (including

generic names), and equipment required, such as syringes or a sharps container

Carry a copy of your EXTAVIA prescription, including the generic name

Pack your EXTAVIA in carry-on luggage in the original containers. Ensure

sufficient quantities of medications for the entire trip, plus extra in case of

unexpected delays. When crossing time zones, medications should be taken

based on elapsed time, not time of day

When traveling domestically, all medications (for instance, pills or injectables)

and associated supplies (syringes, sharps disposal container, preloaded

syringes, etc) are allowed through the security checkpoint once they have

been screened. Before traveling, however, you should check for the current

regulations on traveling with medication, because they can change

For more information, visit www.faa.gov and www.cdc.gov.

www.EXTAVIA.com

EXTAVIA is a registered trademark of Novartis AG.GO PROGRAM is a trademark of Novartis AG.

Novartis Pharmaceuticals CorporationEast Hanover, New Jersey 07936-1080 ©2015 Novartis 1/15 EXD-1297229-A


Recommended