26
Eye of the Serpent AFF2 Conversion by SkinnyOrc
| Date post: | 01-Apr-2018 |
| Category: |
Documents |
| Upload: | trankhuong |
| View: | 218 times |
| Download: | 1 times |

Eye of the Serpent
AFF2 Conversion by
SkinnyOrc

eing a conversion of the adventure module
Eye of the Serpent.
Introduction
Eye of the Serpent (UK5) is an AD&D adventure module for 4-6 1st level PCs, published by
TSR in 1984. This conversion for Advanced Fighting Fantasy 2 requires the original module
and this can be purchased at the Dungeon Masters Guild.
The conversion is suitable for four starting AFF2 characters and can be scaled for larger parties
by increasing the number of monsters by the same percentage. Six characters would be a 50%
increase so opponent numbers would likewise increase by 50%. Due to the low level of the
original module it is not recommended to run this adventure for significantly more experienced
characters.
The adventure may be located anywhere in the temperate regions with mountains and forests,
such as the lower reaches of the Icefinger Mountains in northern Allansia. The river that
features in the adventure is not large enough to be marked on the maps of Titan.
Circle of Protection From Lawyers
Dungeons & Dragons, D&D, AD&D, UK5 Eye of the Serpent, and all associated copyrights,
trademarks and registered names are the property of Wizards of the Coast LLC. These are used
without permission and no challenge to their status should be implied from their use.
Acknowledgements
This conversion is written with heartfelt thanks to Graeme Morris, the author of this and many
of my other favourite D&D adventures. Without his amazing talent the worlds I have enjoyed
gaming in would have been far less vivid and exciting.
Module Adjustments
As written, Eye of the Serpent begins with the player characters being carried in the talons of
a pair of Rocs to the summit of a mountain where they are left in a giant nest. They must then
find their way down the mountain, discovering its secrets on the way, including the works of a
long gone clan of dwarves. At the foot of the mountain there is a confrontation with a tribal
cleric that leads to the hidden lair of a group of duergar (evil dwarves, separate from the
previous dwarven inhabitants).

It is suggested that instead the adventure starts at the bottom of the mountain and the PCs are
given a mission that requires them to climb it. This has multiple benefits. Firstly being carried
there by the Rocs is hard to believe and will make the players feel railroaded. Secondly, as
there are multiple branching paths down the mountain, originally only around a third of the
encounters were likely to be used. The adjusted plot means the party go both up and down the
mountain, allowing more of the module to be played. Lastly as the true nature of the Serpent’s
Eye is most likely to be discovered at the top of the mountain this happened almost
immediately. By raising the question of the Serpent’s Eye at the beginning of the adventure
and the answer only coming part way through, it keeps the players guessing and makes solving
the mystery much more satisfying.
The module includes a mechanism to block each route at key points using paths that reach dead
ends, have collapsed and so on. The intention was to allow the DM to use encounters tailored
for a Ranger, Druid or Monk PC, but it also provides a way to have the players experience
different parts of the mountain on the way down.
There are two points where this is particularly useful. The first is whether the PCs use the ice
tunnel at R6 or go to Geyser Lake via the ice covered cliff at R4. This is important because the
Duergar lair is relocated to Geyser Lake and will likely be missed if the ice tunnel is used in
both directions. Therefore a party who ascended using the ice tunnel will find it collapsed if
they return this way. The second is which side of the Grafenvolk Dale the party return to, and
so which side of Weed Lake they pass on, as this affects a large number of encounters. The
path at R9 or R8/13 can be made unpassable by a rock slide to achieve this.
The Director may also choose to put some dead ends or blocked ways in while going in either
direction; the mountain is a dynamic and difficult environment so this is all part of the
experience. In the marshes there are many crisscrossing paths that look very similar, some of
which suddenly dwindle to nothing. Retracing a route used before here can be all but
impossible.
The other major change suggested is relocating the duergar lair from the foot of the mountain
to most of the way up it. The lair is described as a temple in the shape of a snake built by the
original dwarven inhabitants of the area but since occupied by a group of duergar. It seems
unlikely the Grafenvolk dwarves would build so far from their home. It also seems impossible
the duergar could live so close to humans without being detected, given their fondness for
slaughter and enslavement. Relocating the lair solves both issues. It also makes a nice addition
to the secrets to uncover on the mountain and the ending to the adventure works perfectly well
without it. The new location of the duergar lair is on the east side of Geyser Lake, near the
waterfall down to the Grafenvolk Dale.
AFF does not have an evil race of dwarves equivalent to the duergar. There are some references
to the Mirewater dwarves having an evil nature, but they are not a separate race in the way
duergar are to dwarves or dark elves to elves. What is more, the duergar lair includes their
women and children, creating a moral grey area not typical for AFF. Is it acceptable to kill the
women and children of a race that is an enemy of humanity, or does it make the characters just

as evil? Replacing the duergar with the more beast like n'yadach and having the children attack
(the duergar women already did so) makes this a little more black and white. However the
Director could instead choose to replace the duergar with evil dwarves, perhaps even the
corrupted remnants of the Grafenvolk.
Lastly, this conversion replaces the nomadic human tribesmen with more civilised villagers.
This could be discarded if preferred, as long as the tribe is currently camped at the bottom of
the mountain. However the villagers probably fit most people’s campaign better, depending of
course where they choose to set the adventure. As a result, the priest Arn Flowmane is less
rustic than depicted in the module. He also has no idea of the serpent associations of Rushmere
Rock and has huge hounds rather than a giant snake as a guardian there.
As a bit of an aside, the name Grafenvolk I believe is German for noble people. So it seems
more like a human name for the original dwarven inhabitants than what this clan called
themselves. Also it seems unlikely the Grafenvolk would have worshiped serpents, so it is
suggested the crystal serpent spiral staircase was built to be decorative and the complex it is
part of was originally living quarters rather than a temple.
Running The Adventure
The module says it will take several days to travel down the mountain, making it twice that to
climb up and down it. This seems excessive given the scale of the map. It also makes it too
easy for the players as there will only be a couple of encounters each day. The more often the
party is able to eat and rest, the more they recover from the encounters (but note Random
Encounters below). A good guideline would be for a day to pass every six encounter locations.
But if the players are finding things too difficult, have less encounters per day by making it
take longer to travel between them. The opposite also works well.
Numbered encounters for the mountain are listed below in reverse order as the party will be
beginning at the bottom. Where the encounter name has changed the original is given in
brackets. The module can be used for boxed description text and it will be noted here in the
few instances where these need to be adjusted. Likewise the module has descriptions of each
region of the valley.
While most encounters on the mountain are only moderately challenging even for a starting
adventurers the party is likely to be worn down by the frequency of them. Not all the encounters
inevitably involve a fight and the Director should be careful to allow smart play to avoid it.
Likewise the treasures are modest but will add up, although the n’yadach lair will be quite
rewarding.
Treasures and their values are listed for each encounter but the Director must refer to the
module for their locations and descriptions. Any treasures or magical items not mentioned in
the following encounter descriptions are not present in the AFF2 conversion of this adventure.
Unless otherwise noted, all monster armour and weapons have normal effectiveness but are
crudely made. They are heavy (count as two items for encumbrance) and only have value as
scrap if sold (a quarter listed values for the item type).
SKILL tests are noted in this adventure as SKILL/LUCK tests, as a reminder that players may
opt to test against LUCK instead of SKILL. This is as per page 48 of the AFF2 Rulebook.
Where this adventure states one side gains surprise this is +6 to Attack Strength and +2 to
Damage Roll for one round as per the AFF2 Rulebook, page 64. Surprised parties have no
actions and as a result cannot cause damage and do not get outnumbering bonuses.
Random Encounters
The following replace the random encounters in the module and are for use if the PCs camp on
the mountain where their fire might be seen. Whenever attacked in the night the lack of rest
means characters only recover 2 STAMINA rather than the usual 4. This should encourage
them to choose their campsite more carefully next time!
Safe locations include the cave on the ledge (33), the cave behind the waterfall (27), bat cave
(20), the eyrie tower (16), the island at Weed Lake (14), the n'yadach lair (next to 7) and ice
cave (6). Of course any unfriendly inhabitants will need to be killed or driven off first.
The goblin tower in the Slough Mire (31), spiral staircase (26) and the forge (19), are safe from
wild animals but the goblins frequent these areas. There is a 50% chance any time the characters
spend more than a few hours in these locations that four goblins arrive (stats as below). The
goblins will not expect to find the characters here and will be surprised the first round. They
flee if they can to raise the alarm, and to save their own miserable hides of course.
Of the night time encounters below, the grizzly bear may be met anywhere within the
Grafenvolk Dale and Barrow Sward, and the wolf pack in any non-marsh area. The goblin war
party might be encountered anywhere on the mountain from the Grafenvolk Dale down. Giant
leeches can be found in either marsh area. In the Ice Heights the snow tiger (encounter 3) may
be attracted to the party’s campsite if not already stalking them. It waits until someone heads
to the edge of the firelight to relieve themselves or all but a sentry are asleep.
Grizzly Bear
This is a particularly large and cantankerous brown bear and will not be pleased to find a group
of adventurers in its range. It will rear up in front of them to its impressive full height, growling
aggressively. If the party think fast and throw it one meal worth of food it will eat and wander
off again. Otherwise it will attack, and once injured will become so enraged it will fight to the
death.

Grizzly Bear (BtP 18) 1 2 3 4 5 6 7
SKILL: 9 Weapon: Large Bite/Claw 2 3 3 3 4 4 5
STAMINA: 16 Armour: Light 0 0 0 1 1 1 2
Attacks: 2 Special: +1 Damage Roll
Wolf Pack
The wolf pack have found the hunting difficult since the goblins arrived and are hungry enough
to attack a small group of humans camped for the night. The PCs will hear the wolves’ howls
before they see them and have a little time to form a plan. There are five wolves including the
large alpha male (STAMINA 8), a smallish pack but enough the party would be wise to not
simply fight them all (the Director may advise they know this). Better options include focusing
on the alpha or swinging flaming branches to drive them off. Throwing food may also work
but a lot will be needed for the whole pack! If the alpha or any two are slain or seriously
wounded the pack will flee.
5 Wolves (OotP 120) 1 2 3 4 5 6 7
SKILL: 7 Weapon: Small Bite 2 2 3 3 3 3 4
STAMINA: 6 Armour: Light 0 0 0 1 1 1 2
Attacks: 1 Special: None
Goblin War Party
The goblins are a war party looking for the PCs in response to their incursion here. They will
be attempting to sneak up on the camp but are rather disorganised and should be heard by any
characters keeping watch. Allow an Awareness test each round, due to the strength of the war
party it would be dangerous for them to gain surprise against the characters. Even then it will
be costly for the PCs to see them off without using magic.
4 Goblins (OotP 60) 1 2 3 4 5 6 7
SKILL: 5 Weapon: Shortsword 1 2 2 3 3 3 4
STAMINA: 5 Armour: Leather Hauberk & Small Shield 0 1 1 1 2 2 4
Attacks: 1 Special: None
4 Goblin Archers (OotP 60) 1 2 3 4 5 6 7
SKILL: 5 Weapon: Shortbow/Shortsword 1 2 2 3 3 3 4
STAMINA: 5 Armour: Leather Hauberk 0 1 1 1 1 1 2
Attacks: 1 Special: None
If the hobgoblins were encountered and escaped they will be leading the group, replacing a like
number of goblin archers.
Giant Leeches
In the unlikely event the characters choose to camp in a marsh outdoors, in the middle of the
night four giant leeches crawl silently across the damp earth. A sentry has normal Awareness
chances to notice them but maybe not before some have found a sleeping source of
nourishment. The leeches have SKILL 1 and STAMINA 1 so they are easily dispatched in a
straight fight. However, any leech successfully surprising its intended victim attaches itself for
1 STAMINA damage and then another per round up to 3 points before dropping off full. Pulling
it off does 1 further STAMINA, or they can test for LUCK to kill the leech with a knife without
hurting themselves, again for 1 STAMINA on a fail. Salt will remove the leeches painlessly.
This may also be used as an extra daytime encounter at one of the frequent points where the
path dips into the marsh and they are briefly forced to wade. The leeches will be difficult to see
in the murky water. Any characters failing an Awareness test will have a leech attach to their
leg, through a gap in their armour if necessary.
The Beginning
The inhabitants of Trenhurst village and the surrounding farmsteads have long had a tradition
that a fabulous gem known as “The Serpent’s Eye” is to be found at the peak of nearby Hardway
Mountain. There are stories of those who have gone in search of this treasure but without
success. In more recent times the villagers, with the encouragement of local priest Arn
Flowmane, have turned this into a test of redemption for criminals and others who have lost
their honour. They must climb Hardway Mountain and return with the Eye or perish in the
attempt. None have returned from this quest.
There have always been those in Trenhurst who thought this virtual death sentence barbaric.
Matters reached a head when the son of Village-Master Eldrid Regenmaer was found in a
compromising position with the miller’s daughter. Flowmane in his traditional role as judge
pronounced it a crime worthy of banishment to Hardway. The young man has not returned and
Regenmaer wishes to hire the PCs to search for him and bring back proof of his fate. It is up to
the Director how contact is made so it suits their campaign, but possibilities include a notice in
an inn with directions to the village or a direct approach by Regenmaer as they pass through
Trenhurst.
A fast flowing river, known to the locals as the Rushmede, runs next to the village. It is
unnavigable this far up so the PCs will arrive by road. They are met by Regenmaer in the village
square and he discusses his proposal here in the open as a small crowd gathers to listen. He
will offer them 8gp per character to search for his son, with another 8gp each if they return
with proof of his fate. He can bargained up to a maximum of 12gp. He will also say it is believed
dwarves used to inhabit the mountain and there may still be treasure there for those daring
enough to take it. They will also be provided with wool cold weather clothing, rope, provisions
and any other normal equipment the Director feels is reasonable. Let the players complete the
negotiations and ask any questions they have.
Before long an authoritative voice rings out from the back of the crowd, “Heresy!”. The crowd
turns and parts to reveal an old man in dark grey robes, pinned with a metal broach of a skull
with a circular mouth as if blowing.

The priest of the storm god Sukh, Arn Flowmane, sees the mountain as the sacred ground of
his deity and the character’s mission as desecration. He has a heated and very public argument
with Regenmaer, and with the PCs if they join in. Regenmaer however has made up his mind
and Flowmane will eventually storm off, muttering of the wrath of Sukh.
The party will be provided with comfortable beds for the night and a substantial breakfast,
before setting out. The journey to the foot of the mountain takes about a day and will be
uneventful. After a night camped the stars they will wake ready to begin their climb up
Hardway Mountain.
Slough Mires Encounters
34. Wild Cats
The wild cats will only be encountered the first time the party passed through the forest. If
avoided they will be nowhere to be seen on subsequent visits.
2 Wild Cats 1 2 3 4 5 6 7
SKILL: 8 Weapon: Small Bite/Claw 2 2 3 3 3 3 4
STAMINA: 6 Armour: None
Attacks: 1 Special: None
33. Enemies on the Ledge
The Ogre is a local resident who has intimidated a few of the goblins that have moved into the
area into fetching and carrying for him. He will throw large rocks if the party enter the cave (as
Improvised Weapon but add the +1 damage). The goblins have crude shortswords.
4 Goblins (OotP 60) 1 2 3 4 5 6 7
SKILL: 5 Weapon: Shortsword 1 2 2 3 3 3 4
STAMINA: 5 Armour: Leather Hauberk 0 1 1 1 1 1 2
Attacks: 1 Special: None
Ogre (OotP 90) 1 2 3 4 5 6 7
SKILL: 8 Weapon: Large Club 1 2 2 4 4 4 5
STAMINA: 10 Armour: Leather Hauberk 0 1 1 1 1 1 2
Attacks: 2 Special: +1 Damage Roll
Apart from his oversized club and crude animal skin armour the ogre only carries the earring
(1gp) and 6sp in coins. The hidden hatpin is worth 2gp and a LUCK point to the finder. The
goblins have volunteered anything of value they were carrying to the ogre.

32. Mist Mephit
If the Director chooses to make this encounter more challenging the mephit will successfully
gate in a second mist mephit before attacking. However it should be kept in mind that the
mephit has dangerous special abilities.
The mephit will not close for melee, alternately flying past to use its breath and then
disappearing into the mist for a round. Missile attacks against it on the round it is visible are at
-4 (-2 small target, -1 moving target, -1 obscured by mist). The mephit’s breath has a 3m range
and causes 2 STAMINA damage (no armour roll) plus blindness for 1-4 rounds, but is avoided
completely if the character passes a SKILL/LUCK test. A character avoiding the gas can take
no other action. Once it has used all three breath attacks it screams in frustration and assumes
gaseous form to escape (see the module New Monsters section for more details of special
abilities).
Mist Mephit (Module New Monster) 1 2 3 4 5 6 7
SKILL: 8 Weapon: Small Claw 2 2 3 3 3 3 4
STAMINA: 7 Armour: None
Attacks: 1 Special: -1 Damage Roll, Gas Breath, Gate Mephit, Wall of Fog, Gaseous Form
Treasures are mixed coins 2gp, armband 4gp and helm 3gp.
31. Goblin Tower (Bullywug Tower)
The goblins are part of a large band that recently made its home in the Grafenvolk Dale. They
are starting to raid the humans who live below the mountain, but that means passing back and
forth through the Slough Mires. The slykk were making a nuisance of themselves and so a
crude tower was built here to protect the way through the swamp.
However right now many of the goblins are out of the valley, and so the slykk have taken the
opportunity to besiege the tower. The tower is really just a thick stone wall with a wooden
platform just below the top, but it gives the goblins sufficient cover that missile attacks against
them are at -3. The slykk have found that coming too close to the goblin’s bows is unwise.
4 Goblin Archers (OotP 60) 1 2 3 4 5 6 7
SKILL: 5 Weapon: Shortbow/Shortsword 1 2 2 3 3 3 4
STAMINA: 5 Armour: Leather Hauberk 0 1 1 1 1 1 2
Attacks: 1 Special: None
There is not a continual light gem hanging from the ceiling. The bag contains mixed coins to a
total value of 6gp, loot left here by goblin raiding parties before heading out again.

30. Lizard Keepers
4 Slykk (OotP 106) 1 2 3 4 5 6 7
SKILL: 6 Weapon: Shortsword 1 2 2 3 3 3 4
STAMINA: 5 Armour: None
Attacks: 1 Special: None
Giant Lizard (OotP 75) 1 2 3 4 5 6 7
SKILL: 10 Weapon: Large Bite 2 3 3 3 4 4 5
STAMINA: 11 Armour: Light 0 0 0 1 1 1 2
Attacks: 1 Special: None
The jewellery carried by the slykk is worth 5sp each.
29. Road Block
5 Slykk (OotP 106) 1 2 3 4 5 6 7
SKILL: 6 Weapon: Shortsword 1 2 2 3 3 3 4
STAMINA: 5 Armour: None
Attacks: 1 Special: None
The jewellery carried by the slykk is worth 5sp each.
28. Killer Frogs
4 Giant Frogs (BtP 56) 1 2 3 4 5 6 7
SKILL: 5 Weapon: Large Bite 2 3 3 3 4 4 5
STAMINA: 6 Armour: None
Attacks: 1 Special: None
27. Cave Behind the Waterfall
A giant slug hides here during the day and hunts in the swamp at night, but has no reluctance
to ambush anything passing through the cave. When the party arrives it is on the ceiling and
difficult to see amongst the folds of the rock. There is an unpleasant smell in the cave but with
no obvious cause. If a character investigates the man like shape the slug stretches down to
attack, with surprise if the character fails an Awareness test at -2. It only spits if the characters
back off from it or it is attempting to escape and they follow.
Giant Slug (OotP 105) 1 2 3 4 5 6 7
SKILL: 7 Weapon: Large Bite 2 3 3 3 4 4 5
STAMINA: 15 Armour: Medium 0 0 1 1 2 2 3
Attacks: 4 Special: Spits acid
The buttons are worth 3sp each and the buckle 2gp.

Barrow Sward Encounters
26. Spiral Stairway
Treat this pack of normal rats in the same way as a flock of common bats. The pack has as
many attacks as there are PCs and reducing it to zero STAMINA means they have scattered.
Rat Pack (OotP 19) 1 2 3 4 5 6 7
SKILL: 6 Weapon: Small Bite 2 2 3 3 3 3 4
STAMINA: 4 Armour: None
Attacks: 1/PC Special: None
25. Burial Mound
The mound is visible from the other side of the river if the characters are observant, and the
river is easily fordable here. While the al-mi’raj use it as a burrow they are currently further
west across the meadow, as shown on the module map. The glyph of warding causes 4
STAMINA damage, halved if the character passes a SKILL/LUCK test.
Poltergeist (OotP 94) 1 2 3 4 5 6 7
SKILL: 9 Weapon: 1 point 1 1 1 1 1 1 1
STAMINA: 0 Armour: None
Attacks: 1 Special: Immune to damage
The earrings are worth 5sp each, the bangle 2gp and the pendant 4gp. The box is worth 15gp,
and the bloodstone gems 2gp each. A character finding the bloodstones gains 1 LUCK.
24. Al-Mi’raj Meadow
The al-mi’raj are easily avoided so long as not approached too closely, but if they are the males
fight with almost suicidal bravery. However they will make blustering if slightly comical
displays in order to warn the party off before this happens. It is possible to skirt around them
to get to the gateway at 22.
6 Al-Mi’raj Males (FF 11) 1 2 3 4 5 6 7
SKILL: 7 Weapon: Small Horn 2 2 3 3 3 3 4
STAMINA: 6 Armour: None
Attacks: 1 Special: None
23. Spiders’ Lair
The web is handled as per Giant Spider in Out of the Pit. The spider’s bite is venomous in
addition to normal damage, treat as Spider Venom as detailed on page 53 of the AFF2 rulebook.

Giant Spider (OotP 108) 1 2 3 4 5 6 7
SKILL: 9 Weapon: Large Bite 2 3 3 3 4 4 5
STAMINA: 8 Armour: Light 0 0 0 1 1 1 2
Attacks: 2 Special: Venomous
The rotted shield does not have the image of a snake painted on it. The buckle is worth 2gp and
the figurine 10gp.
Grafenvolk Dales Encounters
22. Gateway into the Valley
Bark Biter (BtP 16) 1 2 3 4 5 6 7
SKILL: 9 Weapon: Small Tendril 2 2 3 3 3 3 4
STAMINA: 8 Armour: Light 0 0 0 1 1 1 2
Attacks: 3 Special: Large bite after 3 hits
The pommel is worth 6gp and contains a single dose of Potion of Speed (2 actions per round
for 10 rounds).
21. Strange Companions
Denzelian (FF 25) 1 2 3 4 5 6 7
SKILL: 9 Weapon: None
STAMINA: 9 Armour: Heavy 0 1 2 2 3 3 4
Attacks: 1 Special: Harmless, Eats stone, Repulsive smell
Iron-Eater (OotP 70) 1 2 3 4 5 6 7
SKILL: 4 Weapon: None
STAMINA: 5 Armour: None
Attacks: 1 Special: Surprise on 1-5, Destroys armour
There is a single gem worth 6gp.
20. Bat Cave
Common Bat Flock (OotP 19) 1 2 3 4 5 6 7
SKILL: 4 Weapon: Small Bite/Claw 2 2 3 3 3 3 4
STAMINA: 4 Armour: None
Attacks: 1/PC Special: None
19. Abandoned Mine
The first three goblins are in the room as described. Characters must make a Dodge test to
avoid the burning coals flung by one of the goblins or take 3 STAMINA damage with armour
applying. The other goblins come through whichever door the party did not one round later.

6 Goblins (OotP 60) 1 2 3 4 5 6 7
SKILL: 5 Weapon: Shortsword 1 2 2 3 3 3 4
STAMINA: 5 Armour: Leather Hauberk 0 1 1 1 1 1 2
Attacks: 1 Special: None
The goblins are each carrying 6sp. The parchment is a Scroll of Neutralisation (effect as a
Potion of Anti-poison).
18. Hunting Party
The second hobgoblin is just behind the one with the dogs and has an arrow notched to his
longbow. The hobgoblins lead the band of goblins. They are usually at the mines but are taking
some time away for a bit of fun. The hobgoblins are cunning creatures and if in serious danger
will surrender, offering to help the party if they are spared. They will then take the first
opportunity to escape.
2 Hobgoblins (OotP 75) 1 2 3 4 5 6 7
SKILL: 6 Weapon: Longbow/Sword 2 3 3 3 3 4 5
STAMINA: 6 Armour: Chainmail Cuirass 0 0 1 1 2 2 3
Attacks: 1 Special: None
The dogs have a lot of wolf blood, as described under Wolfhound in Out of the Pit. However
as Wolfhound usually means a hound bred to kill wolves, that term and Wolf Dog should
probably be swapped.
3 Hunting Dogs (OotP 120) 1 2 3 4 5 6 7
SKILL: 7 Weapon: Small Bite 2 2 3 3 3 3 4
STAMINA: 6 Armour: None
Attacks: 1 Special: None
The hobgoblins are each carrying 4gp worth of mixed coins.
17. The Wood
The needlemen will probably surprise the party on the first round due to their ability to
camouflage amongst the many trees (Awareness tests at -6). If the party avoids the ambush
award 1 LUCK to the character responsible. They appear humanoid but are in fact a form of
intelligent plant life, able to fire several pine needle like projectiles from their body at anyone
up to 7m away. The needlemen’s bodies are tough and fibrous (hence Medium Armour) but
take triple damage from magical effects. They will flee if either is reduced to 4 STAMINA.
2 Needleman (FF 67) 1 2 3 4 5 6 7
SKILL: 8 Weapon: Large Needles 2 3 3 3 4 4 5
STAMINA: 10 Armour: Medium 0 0 1 1 2 2 3
Attacks: 1 Special: Camouflage
The amber is worth 4gp (the second needleman has only pinecones).
The bloodthorn near the needlemen’s home is replaced by a strangleweed, a dangerous creature
the characters are probably best avoiding. With approximately fifty tendrils, it can attack all
the PCs at once. Strangulation for an automatic 1 STAMINA per round occurs for anyone
within the 6m range of the tendrils as it is impossible to avoid them all.
Strangleweed (OotP 111) 1 2 3 4 5 6 7
SKILL: 8 Weapon: None
STAMINA: 13 Armour: None
Attacks: 50 Special: Tendrils strangle for 1 STAMINA per round
The rod is fine dwarven workmanship and worth 9gp.
16. Eyrie
The entire flock of six ravens attacks if the party look like they are attempting to enter the
tower. They flee if two of their number are killed, taking refuge at 16c to defend the nests.
Raven Flock (BtP 107) 1 2 3 4 5 6 7
SKILL: 9 Weapon: Small Beak 2 2 3 3 3 3 4
STAMINA: 13 Armour: None
Attacks: 6 Special: -2 Damage Roll
The pit trap at 16b has no spikes so use normal falling rules for a 3m drop (AFF2 page 49).
The belt pouch contains 7sp. The tapestry is worth 10gp but bulky (3 equipment slots), and the
mirror 1gp. The earrings are worth 5sp each, the gem 1gp, the silver and gold thread 1gp, and
the stone on a chain 5sp.
15. Snake-in-the-Grass
Poisonous Snake (OotP 107) 1 2 3 4 5 6 7
SKILL: 5 Weapon: Small Bite 2 2 3 3 3 3 4
STAMINA: 2 Armour: Light 0 0 0 1 1 1 2
Attacks: 1 Special: Poison (+2 Damage Roll)
The chest contains 70sp and three rings worth 3sp each.
14. Island in the Lake
Ghost (BtP 57) 1 2 3 4 5 6 7
SKILL: 9 Weapon: None
STAMINA: 8 Armour: None
Attacks: 1 Special: Ghostly touch, Immune to normal weapons
Without noticing and disabling the pit trap at 14a a LUCK test is needed by anyone standing
on it to avoid dropping to the spikes at the bottom for 1-3 STAMINA damage. Unless the
tripwire at 14c was spotted and disabled the lead character must pass a LUCK test or be hit for
normal crossbow damage with an armour roll.
Swilbosh is a dwarf, the last of the Grafenvolk. He is old and more than a little potty, carrying
out a guerrilla campaign against the Mudclaws (or Muckdwellers as he calls them) and more
recently the goblins. Making his friendship is a real boon for the party and earns everyone 1
LUCK. His tower is the safest place for them to rest in the valley and he knows all the old
dwarven works in the valley, as well as something of the current inhabitants. Of course it may
not occur to him to volunteer anything useful!
Swilbosh is not his real name and if asked he just says “It’s the noise the Muckdwellers make
when I pop ‘em with this!”, proudly hefting his warhammer. The dwarf ghost is a relative and
Swilbosh sometimes has one sided conversations with it.
Dwarf - Swilbosh (OotP 43) 1 2 3 4 5 6 7
SKILL: 7 (9*) Weapon: Warhammer 2 3 3 3 3 3 4
STAMINA: 14 Armour: Chainmail Cuirass 0 0 0 1 2 2 3
Attacks: 1 Special: LUCK 10
Special Skills: Crafting – Wood Carving (3), Awareness (3), Sneaking (3), Armour (2), *Weapon – Clubs
(2), Mountain Lore (2), Climbing (1), Swimming (1), Hunting (1), Underground Lore (1), Dwarfish (4),
Common Speech (3)
The Director may decide to have Swilbosh join the party, either at their invitation or simply by
following them. Being used to surviving by stealth he will seem to have wandered off as often
as not, and this can be used to control how much assistance he provides as well as for comedy
value. Swilbosh will not climb the mountain higher than the Ice Lake or go lower than the
Barrow Sward.
The statuettes are worth 3sp each. There are 10gp in coins and the hatpin is worth 6gp. There
is no hidden emerald.
13. Muckdwellers
8 Mudclaws (OotP 85) 1 2 3 4 5 6 7
SKILL: 5 Weapon: Small Claws 2 2 3 3 3 3 4
STAMINA: 4 Armour: None
Attacks: 1 Special: None
The statuette is worth 3sp. The mixed coins are worth 25sp, the bracelet 2gp, and the wire 1gp.
12. Valley of Bones
This particularly large Baddu-Beetle has lived here for many years, burying itself in the scree
to ambush passing creatures. It gains surprise on its initial attack unless an observant character
notices it (Awareness tests at -4). If the party avoids the ambush award 1 LUCK to the character
responsible. It spits acid at one PC hitting it in melee each round, causing 2 STAMINA with a
SKILL test for half.
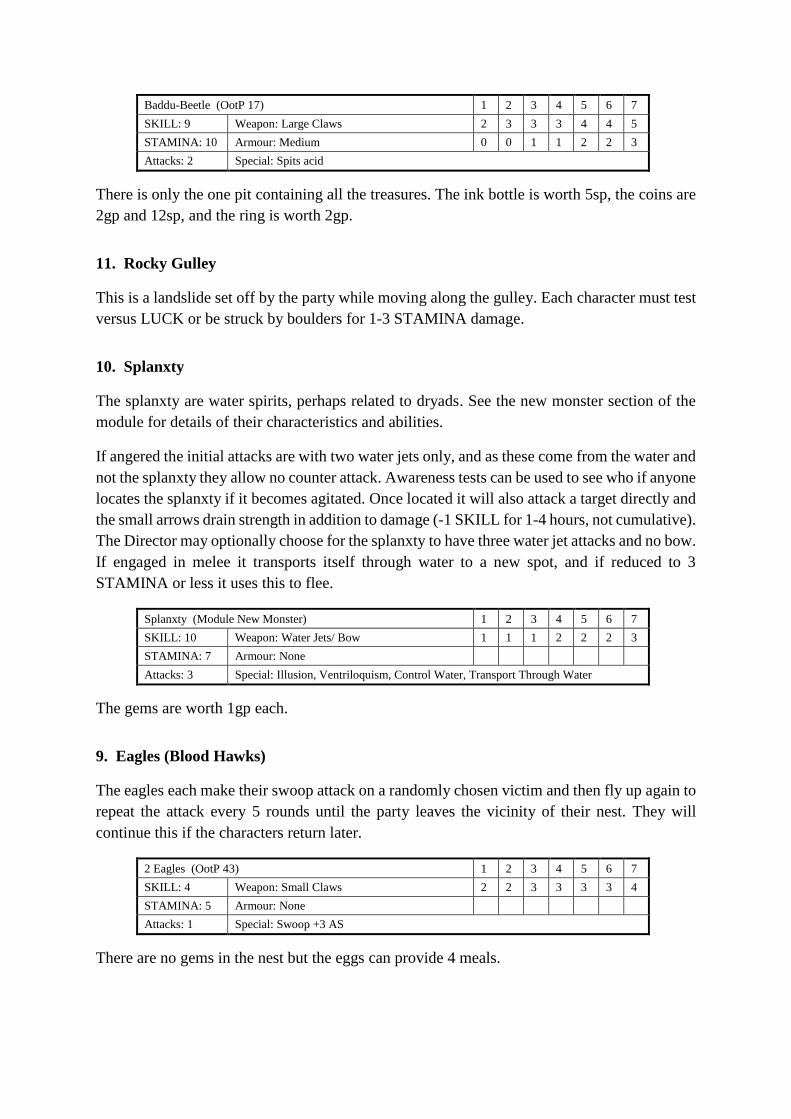
Baddu-Beetle (OotP 17) 1 2 3 4 5 6 7
SKILL: 9 Weapon: Large Claws 2 3 3 3 4 4 5
STAMINA: 10 Armour: Medium 0 0 1 1 2 2 3
Attacks: 2 Special: Spits acid
There is only the one pit containing all the treasures. The ink bottle is worth 5sp, the coins are
2gp and 12sp, and the ring is worth 2gp.
11. Rocky Gulley
This is a landslide set off by the party while moving along the gulley. Each character must test
versus LUCK or be struck by boulders for 1-3 STAMINA damage.
10. Splanxty
The splanxty are water spirits, perhaps related to dryads. See the new monster section of the
module for details of their characteristics and abilities.
If angered the initial attacks are with two water jets only, and as these come from the water and
not the splanxty they allow no counter attack. Awareness tests can be used to see who if anyone
locates the splanxty if it becomes agitated. Once located it will also attack a target directly and
the small arrows drain strength in addition to damage (-1 SKILL for 1-4 hours, not cumulative).
The Director may optionally choose for the splanxty to have three water jet attacks and no bow.
If engaged in melee it transports itself through water to a new spot, and if reduced to 3
STAMINA or less it uses this to flee.
Splanxty (Module New Monster) 1 2 3 4 5 6 7
SKILL: 10 Weapon: Water Jets/ Bow 1 1 1 2 2 2 3
STAMINA: 7 Armour: None
Attacks: 3 Special: Illusion, Ventriloquism, Control Water, Transport Through Water
The gems are worth 1gp each.
9. Eagles (Blood Hawks)
The eagles each make their swoop attack on a randomly chosen victim and then fly up again to
repeat the attack every 5 rounds until the party leaves the vicinity of their nest. They will
continue this if the characters return later.
2 Eagles (OotP 43) 1 2 3 4 5 6 7
SKILL: 4 Weapon: Small Claws 2 2 3 3 3 3 4
STAMINA: 5 Armour: None
Attacks: 1 Special: Swoop +3 AS
There are no gems in the nest but the eggs can provide 4 meals.
The Ice Heights
The mountain itself is a challenge in its upper reaches. There are a few locations such as R1,
R4 and R7 where there are steep and icy slopes to climb. This can be handled using standard
AFF2 climbing and falling rules, with a modifier of -4 (45’-60’ Slope and Unstable or
Slippery). It is likely at least one character will slip, but as long as they think to rope themselves
to each other they will be unfortunate to be hurt.
As the party make their way higher up the mountain the Director can mention that they feel the
air getting cooler. Once in the Ice Heights they will need their cold weather clothing but suffer
no ill effects as long as they keep moving. If the party are spending too long in one place you
may want to tell them they are starting to feel cold again.
While a few mentions of the dropping temperatures will keep the players on their toes, the real
danger is once night falls. The ground is too rough to travel after dark and once they stop
moving a fire and shelter are needed to avoid hypothermia and STAMINA loss. When night
falls is up to the Director, but following the six encounters per day guideline it is impossible to
reach the summit and return without spending a night in the Ice Heights. If anything, it takes
longer to travel between locations here due to the steepness and difficult conditions.
The Director should warn the players as darkness approaches so they can consider their choices.
They will need to find shelter from the limited possibilities, setting up a dramatic situation
searching as the light fails. The best options are the n’yadach lair, the caves in the ice tunnel
(encounter 6), or the side-valley to the north of the Geyser Lake, in that order. The side-valley
near the Ice Lake (encounter 4) is also a possibility, although the musk oxen would need to be
driven away first (flaming torches will be effective for this). The Director may allow them to
push on a little in the dark to a place of safety but it will cost a STAMINA point or two each.
The next issue will be building a fire. If the players have not thought to collect firewood
beforehand they will need to do so in the dark. There are scattered pine trees with dead wood
suitable for burning around the Ice Lake and Geyser Lake but it will take a while to find enough
for the night. Characters looking for firewood here after dark will take 4 STAMINA damage
split between the number of characters searching. Note that if the snow tiger (encounter 3) is
stalking the party it will take this opportunity to attack someone on their own. The only location
above the snow line where a fire is not needed is the N’yadach Lair, which is always a
comfortable temperature due to the geothermal heating.
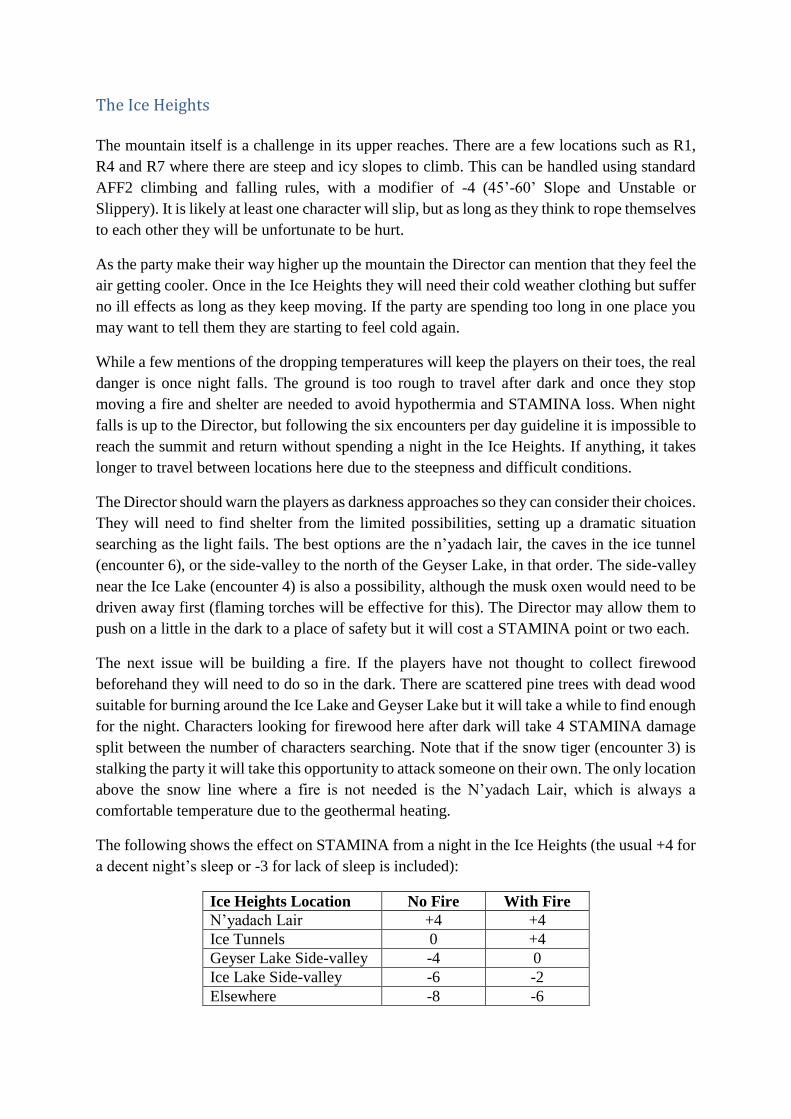
The following shows the effect on STAMINA from a night in the Ice Heights (the usual +4 for
a decent night’s sleep or -3 for lack of sleep is included):
Ice Heights Location No Fire With Fire
N’yadach Lair +4 +4
Ice Tunnels 0 +4
Geyser Lake Side-valley -4 0
Ice Lake Side-valley -6 -2
Elsewhere -8 -6

Ice Heights Encounters
N’yadach Lair
The relocated duergar (now n’yadach) lair is here, on the eastern side of the Geyser Lake.
Geothermal activity nearby keeps the old dwarven chambers and tunnels warm even in the
depths of winter. The entrance is an impressively solid but not overly large door just around
the corner of the rock spur from the waterfall down to the Grafenvolk Dale. The door is thick
iron alloy in a substantial stone frame and up a couple of broad steps. It has a key hole by a
large handle but is unlocked as the n’yadach have never possessed the key. Dwarves will
immediately recognise the undecorated but skilful workmanship as dwarven. The door leads
directly to area 39 of the N’yadach Lair Encounters below; there is no longer a concealed door.
Continuing up the valley past the door leads to the geyser and encounter 7.
8. Unsafe Ground (Koalinth Trap)
Note that although the map makes it look much wider the module description states the path
around the lake on this side is only 10 feet wide (3m).
The west side of the Geyser lake in fact extends all the way to the icy cliffs, but being furthest
from the geyser a sheet of ice has formed giving the appearance of a way through. The shifting
ground is a section of this ice with a dusting of snow. The first characters stepping on it must
make a LUCK test or tip into the lake! The water is frigidly cold on this side of the lake and
causes 1 STAMINA damage per round. Characters will have to make a SKILL test to pull
themselves out, with modifiers for any assistance from the rest of the party.
If the party tries to continue here the ice at the lake edge creaks and cracks ominously and if
they persist will break again, plunging them once more into the water.
7. Steam Mephit
If the Director chooses to make this encounter more challenging the mephit will successfully
gate in a second steam mephit when it first sees the party. However it should be kept in mind
that the mephit has dangerous special abilities.
The mephit has a mission to complete and waits to see if the party leave it alone. If threatened
it will use its scalding jet, and then again every second round until killed or the characters leave.
This causes an automatic 1 STAMINA damage (no armour roll or test to avoid) to one target
within 7m and will also stun for 1 round unless the character passes a SKILL/LUCK test. The
mephit stays in the pool unless attacked from more than 7m away or meleed, in which case it
flies into the air. In the pool it is almost covered so that missile attacks against it are at -4, or
flying are at -3 (-2 small target, -1 moving target).
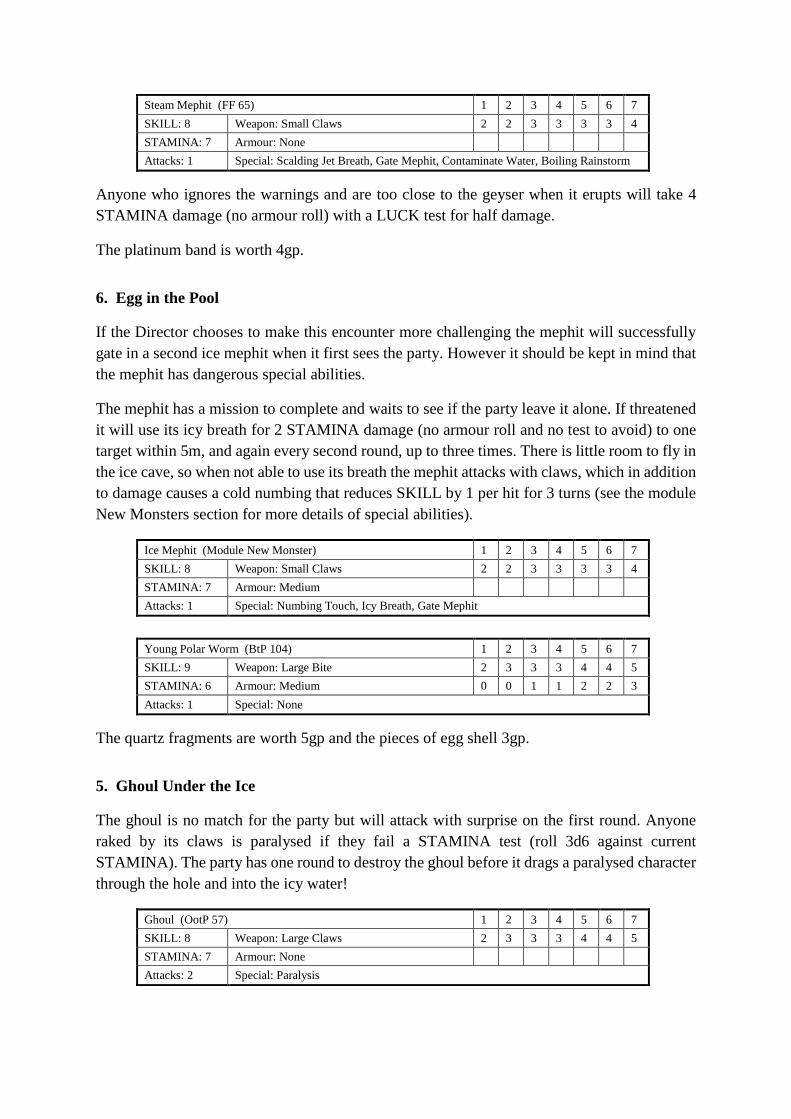
Steam Mephit (FF 65) 1 2 3 4 5 6 7
SKILL: 8 Weapon: Small Claws 2 2 3 3 3 3 4
STAMINA: 7 Armour: None
Attacks: 1 Special: Scalding Jet Breath, Gate Mephit, Contaminate Water, Boiling Rainstorm
Anyone who ignores the warnings and are too close to the geyser when it erupts will take 4
STAMINA damage (no armour roll) with a LUCK test for half damage.
The platinum band is worth 4gp.
6. Egg in the Pool
If the Director chooses to make this encounter more challenging the mephit will successfully
gate in a second ice mephit when it first sees the party. However it should be kept in mind that
the mephit has dangerous special abilities.
The mephit has a mission to complete and waits to see if the party leave it alone. If threatened
it will use its icy breath for 2 STAMINA damage (no armour roll and no test to avoid) to one
target within 5m, and again every second round, up to three times. There is little room to fly in
the ice cave, so when not able to use its breath the mephit attacks with claws, which in addition
to damage causes a cold numbing that reduces SKILL by 1 per hit for 3 turns (see the module
New Monsters section for more details of special abilities).
Ice Mephit (Module New Monster) 1 2 3 4 5 6 7
SKILL: 8 Weapon: Small Claws 2 2 3 3 3 3 4
STAMINA: 7 Armour: Medium
Attacks: 1 Special: Numbing Touch, Icy Breath, Gate Mephit
Young Polar Worm (BtP 104) 1 2 3 4 5 6 7
SKILL: 9 Weapon: Large Bite 2 3 3 3 4 4 5
STAMINA: 6 Armour: Medium 0 0 1 1 2 2 3
Attacks: 1 Special: None
The quartz fragments are worth 5gp and the pieces of egg shell 3gp.
5. Ghoul Under the Ice
The ghoul is no match for the party but will attack with surprise on the first round. Anyone
raked by its claws is paralysed if they fail a STAMINA test (roll 3d6 against current
STAMINA). The party has one round to destroy the ghoul before it drags a paralysed character
through the hole and into the icy water!
Ghoul (OotP 57) 1 2 3 4 5 6 7
SKILL: 8 Weapon: Large Claws 2 3 3 3 4 4 5
STAMINA: 7 Armour: None
Attacks: 2 Special: Paralysis

The bracelets are worth 2gp each. The dagger is non-magical and corroded, with no gems on
the scabbard.
4. Musk Oxen
4 Musk Oxen Males 1 2 3 4 5 6 7
SKILL: 8 Weapon: Large Horns/Trample 2 3 3 3 4 4 5
STAMINA: 8 Armour: Light 0 0 0 1 1 1 2
Attacks: 2 Special: Charge (+2 damage roll with run up)
3. Snow Cat
If the party stands their ground the hungry big cat will stop some distance away, eyeing them
cautiously. Yelling at it or missile attacks (even ones that miss) will cause it to snarl angrily
and disappear into the snow as quickly as it came. Otherwise it does the same after a short
standoff.
As long as it has not been wounded the snow tiger then stalks the party. They will catch
occasional sight of it but always at long range for missiles. It will not attack unless it can take
a character alone. The snow tiger will not follow them into a tunnel or below the snow line. As
noted in the module, throwing meat to it will cause it to leave the party alone, as will wounding
it with a missile or anything that startles it, such as a Flash or Thunder spell.
Snow Tiger (BtP 143) 1 2 3 4 5 6 7
SKILL: 8 Weapon: Large Claw/Bite 2 3 3 3 4 4 5
STAMINA: 10 Armour: None
Attacks: 1 Special: None
The snow tiger pelt could be sold for 3gp but will take a while to skin and then fills an entire
equipment slot.
2. Boulder Beast Attack (Vilstrak Attack)
Boulder Beast (BtP 143) 1 2 3 4 5 6 7
SKILL: 8 Weapon: Large Fists 2 3 3 3 4 4 5
STAMINA: 11 Armour: Heavy 0 1 2 2 3 3 4
Attacks: 1 Special: +1 Damage Roll, Takes 1 point from edged weapon
The nugget is worth 2gp. There is no shield here.
1. The Summit (Rocs’ Nest)
Do not use the first boxed text describing the Rocs’ nest. Amend the second boxed text to not
include the first line mentioning the Rocs flying away and once again the nest. The peak is
rocky with patches of snow. As the PCs reach the summit the clouds break to show an
impressive view of the plain below and the river. They may have seen the river from elsewhere
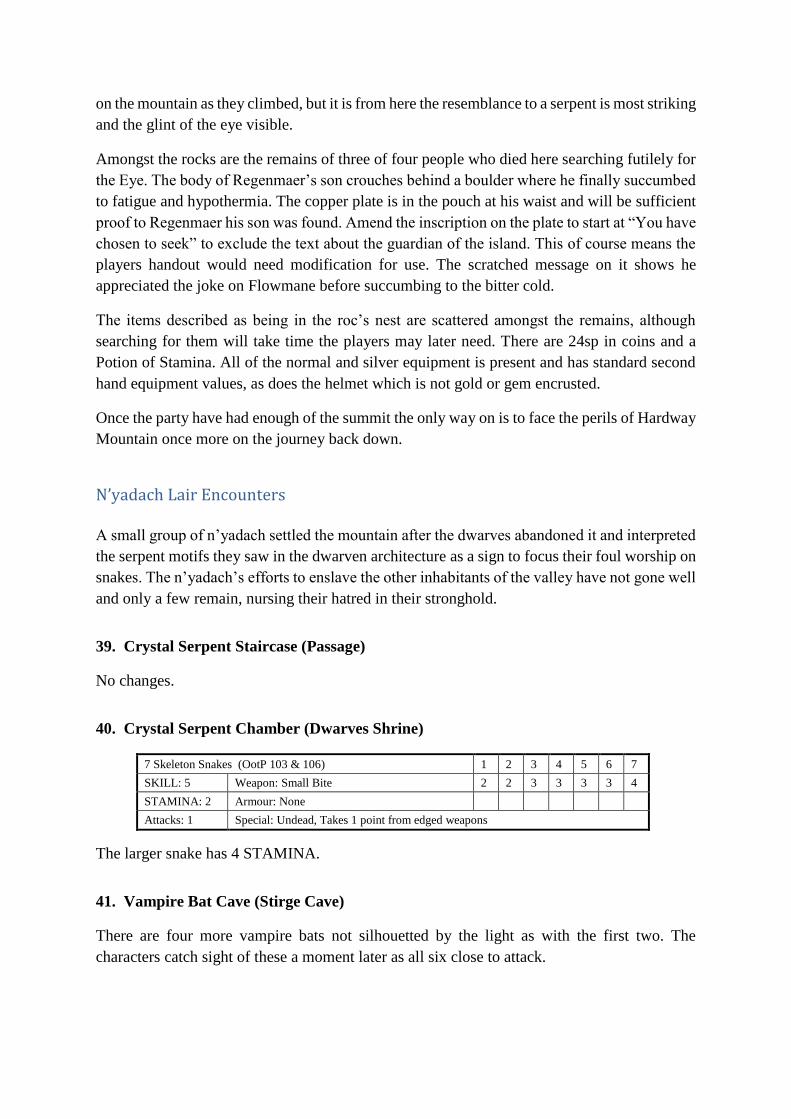
on the mountain as they climbed, but it is from here the resemblance to a serpent is most striking
and the glint of the eye visible.
Amongst the rocks are the remains of three of four people who died here searching futilely for
the Eye. The body of Regenmaer’s son crouches behind a boulder where he finally succumbed
to fatigue and hypothermia. The copper plate is in the pouch at his waist and will be sufficient
proof to Regenmaer his son was found. Amend the inscription on the plate to start at “You have
chosen to seek” to exclude the text about the guardian of the island. This of course means the
players handout would need modification for use. The scratched message on it shows he
appreciated the joke on Flowmane before succumbing to the bitter cold.
The items described as being in the roc’s nest are scattered amongst the remains, although
searching for them will take time the players may later need. There are 24sp in coins and a
Potion of Stamina. All of the normal and silver equipment is present and has standard second
hand equipment values, as does the helmet which is not gold or gem encrusted.
Once the party have had enough of the summit the only way on is to face the perils of Hardway
Mountain once more on the journey back down.
N’yadach Lair Encounters
A small group of n’yadach settled the mountain after the dwarves abandoned it and interpreted
the serpent motifs they saw in the dwarven architecture as a sign to focus their foul worship on
snakes. The n’yadach’s efforts to enslave the other inhabitants of the valley have not gone well
and only a few remain, nursing their hatred in their stronghold.
39. Crystal Serpent Staircase (Passage)
No changes.
40. Crystal Serpent Chamber (Dwarves Shrine)
7 Skeleton Snakes (OotP 103 & 106) 1 2 3 4 5 6 7
SKILL: 5 Weapon: Small Bite 2 2 3 3 3 3 4
STAMINA: 2 Armour: None
Attacks: 1 Special: Undead, Takes 1 point from edged weapons
The larger snake has 4 STAMINA.
41. Vampire Bat Cave (Stirge Cave)
There are four more vampire bats not silhouetted by the light as with the first two. The
characters catch sight of these a moment later as all six close to attack.

6 Vampire Bats (OotP 19) 1 2 3 4 5 6 7
SKILL: 5 Weapon: Small Bite 2 2 3 3 3 3 4
STAMINA: 4 Armour: None
Attacks: 1 Special: Blood drain
42. Snake Pit
20 Poisonous Snakes (OotP 107) 1 2 3 4 5 6 7
SKILL: 5 Weapon: Small Bite 2 2 3 3 3 3 4
STAMINA: 2 Armour: Light 0 0 0 1 1 1 2
Attacks: 1 Special: Poison +2 Damage Roll
43. Dark Shrine
Great Serpent Skeleton (OotP 103 & 106) 1 2 3 4 5 6 7
SKILL: 9 Weapon: Very Large Bite/Coils 3 3 4 4 5 6 7
STAMINA: 12 Armour: None
Attacks: 2 Special: Undead, Takes 1 point from edged weapons
Linden has his hands bound behind his back with rope and stands frozen in fear as the skeletal
great serpent sways over him.
Linden - Pixie (BtP 94) 1 2 3 4 5 6 7
SKILL: 9 Weapon: Weapon ? ? ? ? ? ? ?
STAMINA: 6 Armour: None
Attacks: 1 Special: -2 Damage Roll
The statue is worth 3gp and contains a Potion of Fire Resistance, giving 1 turn of immunity to
normal fire and half damage from intense fire such as magic or dragon breath.
44. School for N’yadach (School for Duergar)
Amend the description of the inhabitants to match that of n’yadach. The n’yadach whelps also
snatch up weapons and attack enthusiastically.
2 N’yadach Females (OotP 89) 1 2 3 4 5 6 7
SKILL: 5 Weapon: Club 1 2 2 2 3 3 4
STAMINA: 6 Armour: Chainmail Cuirass 0 0 0 1 2 2 3
Attacks: 1 Special: None
5 N’yadach Whelps (OotP 89) 1 2 3 4 5 6 7
SKILL: 5 Weapon: Club 1 2 2 2 3 3 4
STAMINA: 4 Armour: Chainmail Cuirass 0 0 0 1 2 2 3
Attacks: 1 Special: -1 Damage Roll
The earrings are worth 4gp and the belt 4gp. All are of fine dwarven workmanship.

45. Store and Workshop
No changes.
46. N’yadach Warriors (Duergar Warriors)
Amend the description of the inhabitants to match that of n’yadach. The injured n’yadach is
STAMINA 6. There is one more n’yadach male and three females watching the duel the
characters interrupted. All rush to the attack.
3 N’yadach (OotP 89) 1 2 3 4 5 6 7
SKILL: 6 Weapon: Club 1 2 2 2 3 3 4
STAMINA: 8 Armour: Chainmail Cuirass & Small Shield 0 0 0 1 3 3 5
Attacks: 1 Special: None
3 N’yadach Females (OotP 89) 1 2 3 4 5 6 7
SKILL: 5 Weapon: Club 1 2 2 2 3 3 4
STAMINA: 6 Armour: Chainmail Cuirass 0 0 0 1 2 2 3
Attacks: 1 Special: None
The jewellery described is worn by the females and worth 4gp each. The spear is dwarven
make of exceptional quality. It counts as superior equipment and adds +1 to the damage roll.
47. Treasury
The trap can be avoided with a LUCK test but otherwise causes normal crossbow damage with
an armour roll.
The coins are in stacks of ten, a total of 13gp and 62sp. The sapphire is worth 20gp.
48. Exit to the Forest
The secret door leads to the Grafenvolk Dale, hidden by scrubby trees just to the east of the
waterfall.
The Eye of the Serpent Encounters
Leaving the Mountain
The party will no doubt be elated and somewhat relieved to have made it off Hardway
Mountain in one piece. Each character may be awarded a LUCK point and they are able to
continue onwards with a spring in their step. The journey back to the village is uneventful
and takes about a day, so there will be a night to get a good rest on the way.
Trenhurst Village
On reaching the village of Trenhurst again they will probably either confront Flowmane
directly (he is in the village square berating the locals) or will tell Regenmaer the truth of the
Eye, in which case he will confront Flowmane. The villagers will be incensed that their friends
and relatives were sent to their deaths on an impossible quest, and Flowmane flees to his
sanctuary screaming insults and curses. This sanctuary is Rushmede Rock, the same island that
they saw the red sparkle emanating from. The PCs will be encouraged to go to the island to
discover once and for all what “The Eye” truly is. If necessary Regenmaer will offer to pay
them another gold piece each to do so. He will privately tell them that were Flowmane to die
preventing them in this he will make sure they are not held responsible.
The Island
The Rushmede River was once known to the dwarves as the Serpent River, or at least that is
what it translated to. Rushmede Rock is slightly downstream of Trenhurst, just before an
impressive waterfall. They can hear the rushing water crashing on the rocks below before they
see the spray from it. Use the details under Reaching the Island to describe Rushmede but do
not read the boxed text. There are no skulls hanging from the trees and Flowmane sits by the
obelisk with his hounds, intending to wait there until the party leaves and he can once again
assert his authority over the village. However if the PCs seek him on the island, Flowmane will
do everything in his power to kill them.
35. Council Ring
Flowmane’s neglected wooden house is in the trees just north of the council ring clearing, down
a narrow path. It contains nothing of value.
36. Spiked Fence
Forcing their way over the fence of brambles and stakes causes 3 STAMINA damage minus
an armour roll.
37. Obelisk (Snake and Obelisk)
Amend the boxed description to leave out the last part about the snake. Flowmane keeps a pair
of huge black hounds here to guard what he considers a sacred site, which he will loose on the
party as they approach the obelisk.
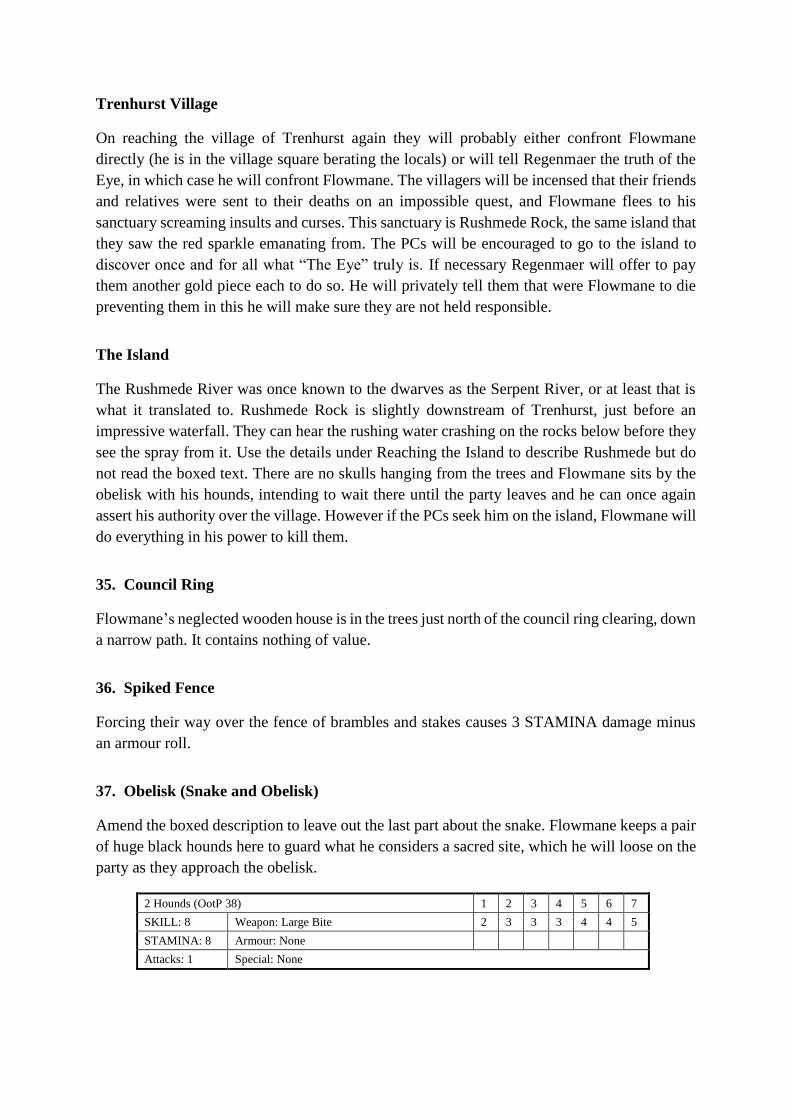
2 Hounds (OotP 38) 1 2 3 4 5 6 7
SKILL: 8 Weapon: Large Bite 2 3 3 3 4 4 5
STAMINA: 8 Armour: None
Attacks: 1 Special: None
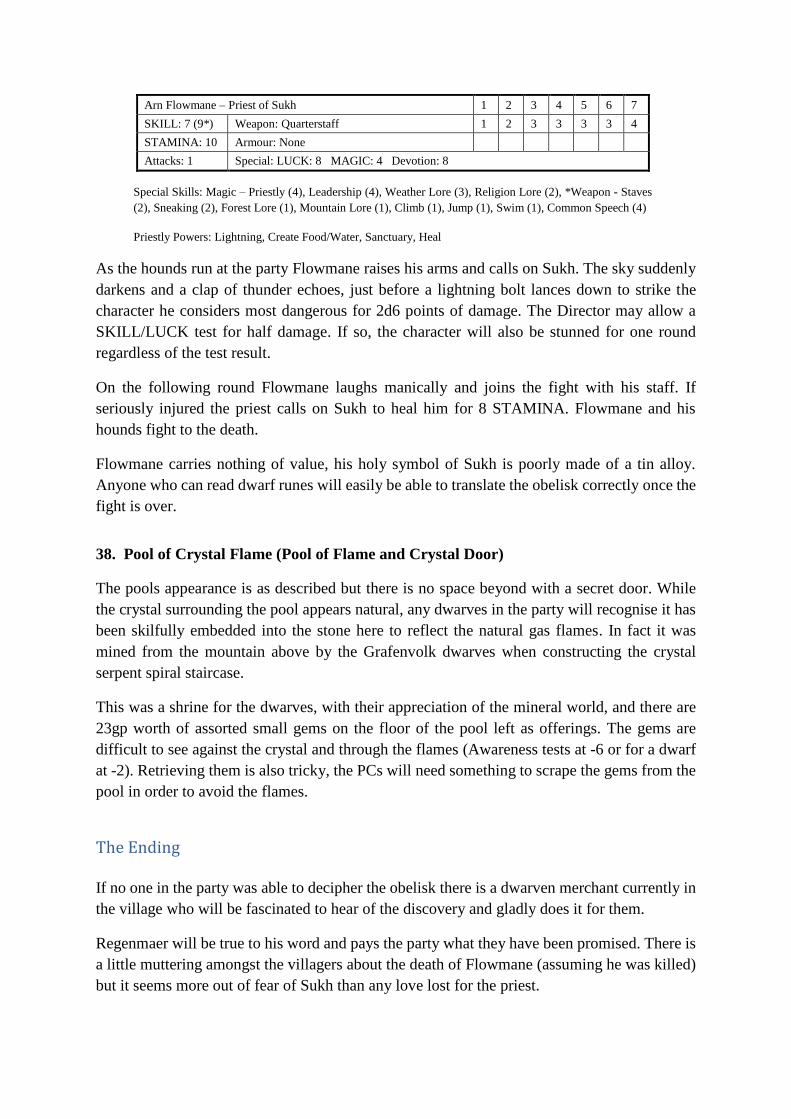
Arn Flowmane – Priest of Sukh 1 2 3 4 5 6 7
SKILL: 7 (9*) Weapon: Quarterstaff 1 2 3 3 3 3 4
STAMINA: 10 Armour: None
Attacks: 1 Special: LUCK: 8 MAGIC: 4 Devotion: 8
Special Skills: Magic – Priestly (4), Leadership (4), Weather Lore (3), Religion Lore (2), *Weapon - Staves
(2), Sneaking (2), Forest Lore (1), Mountain Lore (1), Climb (1), Jump (1), Swim (1), Common Speech (4)
Priestly Powers: Lightning, Create Food/Water, Sanctuary, Heal
As the hounds run at the party Flowmane raises his arms and calls on Sukh. The sky suddenly
darkens and a clap of thunder echoes, just before a lightning bolt lances down to strike the
character he considers most dangerous for 2d6 points of damage. The Director may allow a
SKILL/LUCK test for half damage. If so, the character will also be stunned for one round
regardless of the test result.
On the following round Flowmane laughs manically and joins the fight with his staff. If
seriously injured the priest calls on Sukh to heal him for 8 STAMINA. Flowmane and his
hounds fight to the death.
Flowmane carries nothing of value, his holy symbol of Sukh is poorly made of a tin alloy.
Anyone who can read dwarf runes will easily be able to translate the obelisk correctly once the
fight is over.
38. Pool of Crystal Flame (Pool of Flame and Crystal Door)
The pools appearance is as described but there is no space beyond with a secret door. While
the crystal surrounding the pool appears natural, any dwarves in the party will recognise it has
been skilfully embedded into the stone here to reflect the natural gas flames. In fact it was
mined from the mountain above by the Grafenvolk dwarves when constructing the crystal
serpent spiral staircase.
This was a shrine for the dwarves, with their appreciation of the mineral world, and there are
23gp worth of assorted small gems on the floor of the pool left as offerings. The gems are
difficult to see against the crystal and through the flames (Awareness tests at -6 or for a dwarf
at -2). Retrieving them is also tricky, the PCs will need something to scrape the gems from the
pool in order to avoid the flames.
The Ending
If no one in the party was able to decipher the obelisk there is a dwarven merchant currently in
the village who will be fascinated to hear of the discovery and gladly does it for them.
Regenmaer will be true to his word and pays the party what they have been promised. There is
a little muttering amongst the villagers about the death of Flowmane (assuming he was killed)
but it seems more out of fear of Sukh than any love lost for the priest.
Experience Awards
The experience awards are higher than those suggested in the rulebook due to the length of
the adventure.
Found Regenmaer’s son 30 XP to all
First to realise the Serpent’s Eye is not a gem 10 XP to character
Made friends with Swilbosh 10 XP to character
Both leaders of the goblin band killed 10 XP to all
Defeated the n’yadach 10 XP to all
Delivered proof of son’s fate to Regenmaer 30 XP to all
Brought Flowmane to justice 20 XP to all
Award additional experience to characters where the player was responsible for a memorable
moment, had a smart idea or roleplayed their character particularly well.


