19
EZClaim 8 ANSI 837 User Guide Last Updated: March 2012 Copyright 2003 EZClaim Medical Billing Software
| Date post: | 07-Feb-2018 |
| Category: |
Documents |
| Upload: | nguyenthien |
| View: | 217 times |
| Download: | 1 times |
EZClaim 8 ANSI 837
User Guide
Last Updated: March 2012 Copyright 2003
EZClaim Medical Billing Software
2
Electronic Claims Using the ANSI 837 Format – User Guide
NPI Numbers –Billing and Rendering NPI numbers must be correct on your claims. If incomplete or incorrect provider/NPI numbers are entered on your claims, the claim will be rejected by the Payer.
Please verify with the insurance company if you are unsure of your NPI and/or Provider/Group numbers for a specific payer. https://nppes.cms.hhs.gov/
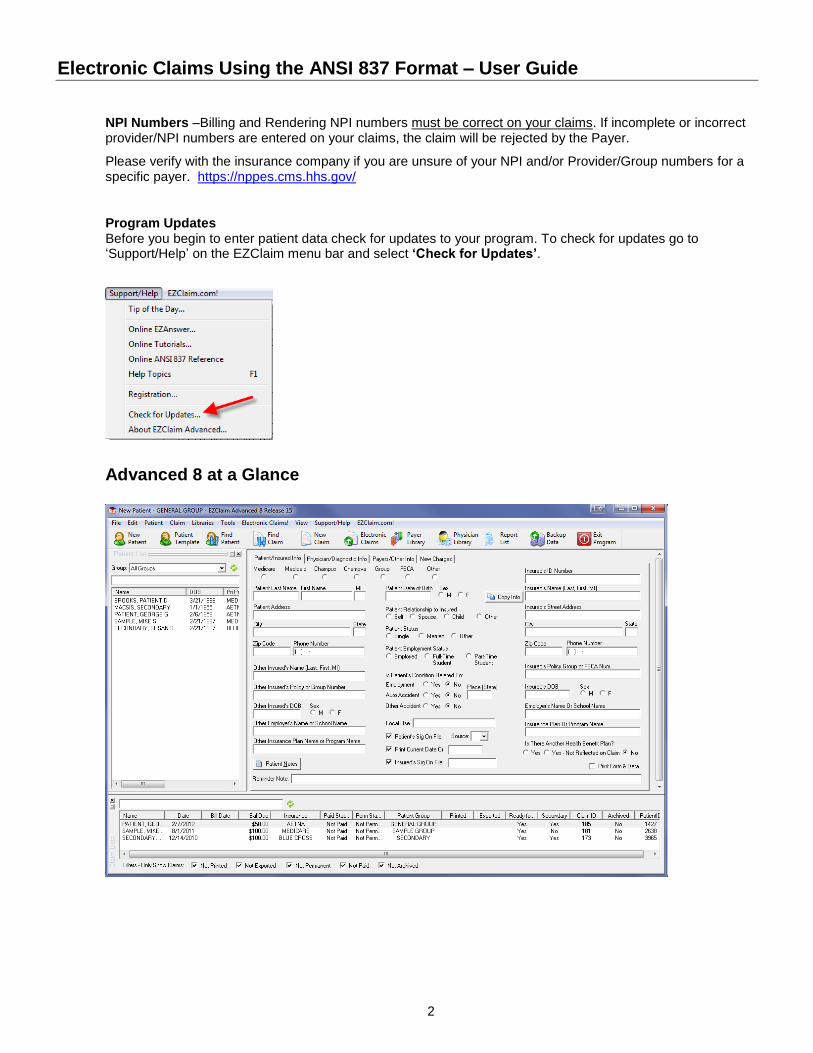
Program Updates Before you begin to enter patient data check for updates to your program. To check for updates go to ‘Support/Help’ on the EZClaim menu bar and select ‘Check for Updates’.
Advanced 8 at a Glance
3
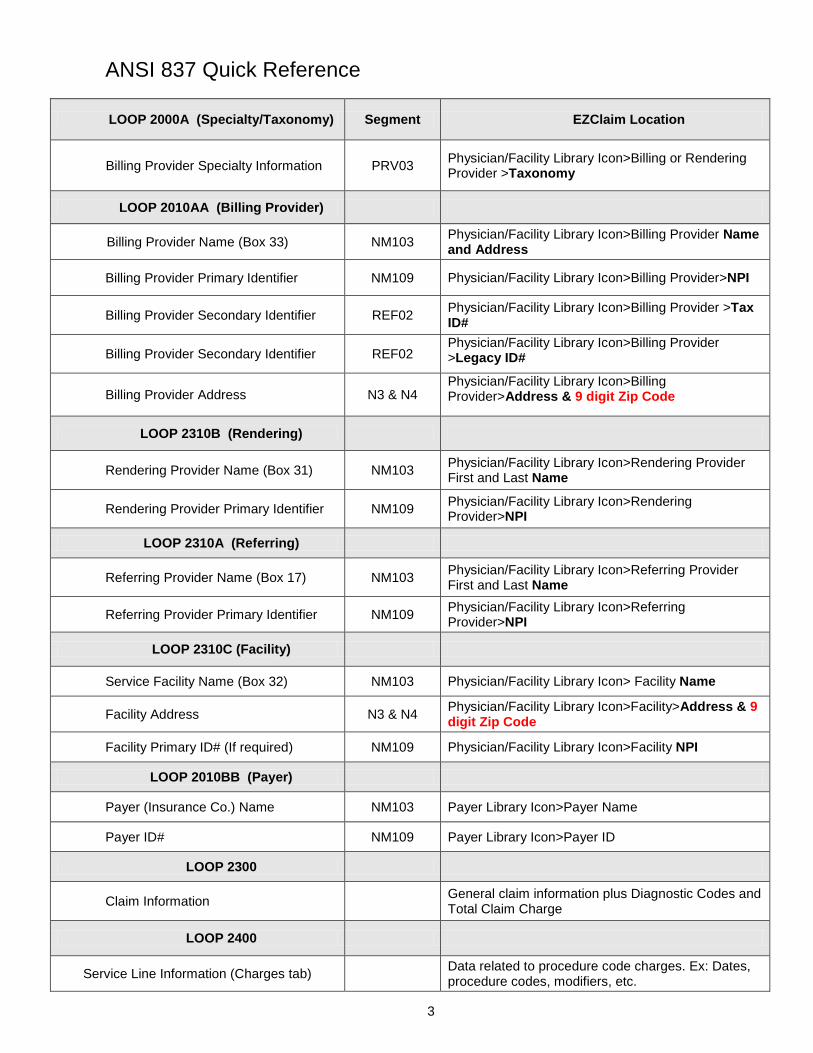
ANSI 837 Quick Reference
LOOP 2000A (Specialty/Taxonomy) Segment EZClaim Location
Billing Provider Specialty Information PRV03 Physician/Facility Library Icon>Billing or Rendering Provider >Taxonomy
LOOP 2010AA (Billing Provider)
Billing Provider Name (Box 33) NM103 Physician/Facility Library Icon>Billing Provider Name and Address
Billing Provider Primary Identifier NM109 Physician/Facility Library Icon>Billing Provider>NPI
Billing Provider Secondary Identifier REF02 Physician/Facility Library Icon>Billing Provider >Tax ID#
Billing Provider Secondary Identifier REF02 Physician/Facility Library Icon>Billing Provider >Legacy ID#
Billing Provider Address N3 & N4 Physician/Facility Library Icon>Billing Provider>Address & 9 digit Zip Code
LOOP 2310B (Rendering)
Rendering Provider Name (Box 31) NM103 Physician/Facility Library Icon>Rendering Provider First and Last Name
Rendering Provider Primary Identifier NM109 Physician/Facility Library Icon>Rendering Provider>NPI
LOOP 2310A (Referring)
Referring Provider Name (Box 17) NM103 Physician/Facility Library Icon>Referring Provider First and Last Name
Referring Provider Primary Identifier NM109 Physician/Facility Library Icon>Referring Provider>NPI
LOOP 2310C (Facility)
Service Facility Name (Box 32) NM103 Physician/Facility Library Icon> Facility Name
Facility Address N3 & N4 Physician/Facility Library Icon>Facility>Address & 9 digit Zip Code
Facility Primary ID# (If required) NM109 Physician/Facility Library Icon>Facility NPI
LOOP 2010BB (Payer)
Payer (Insurance Co.) Name NM103 Payer Library Icon>Payer Name
Payer ID# NM109 Payer Library Icon>Payer ID
LOOP 2300
Claim Information General claim information plus Diagnostic Codes and Total Claim Charge
LOOP 2400
Service Line Information (Charges tab) Data related to procedure code charges. Ex: Dates, procedure codes, modifiers, etc.
4
ANSI 837 Electronic Claims Data Entry
Note: Entering the following data will result in ANSI 837 errors!
Do not use words such as “Same” “None” or “N/A”. Use only valid data in fields.
Do not use MR., MS. or other prefixes. Do not use DR. MD, OD etc. A provider is identified by their NPI or Provider number.
Unless required by your payers do not use any special characters such as hyphens, commas, apostrophes, etc.
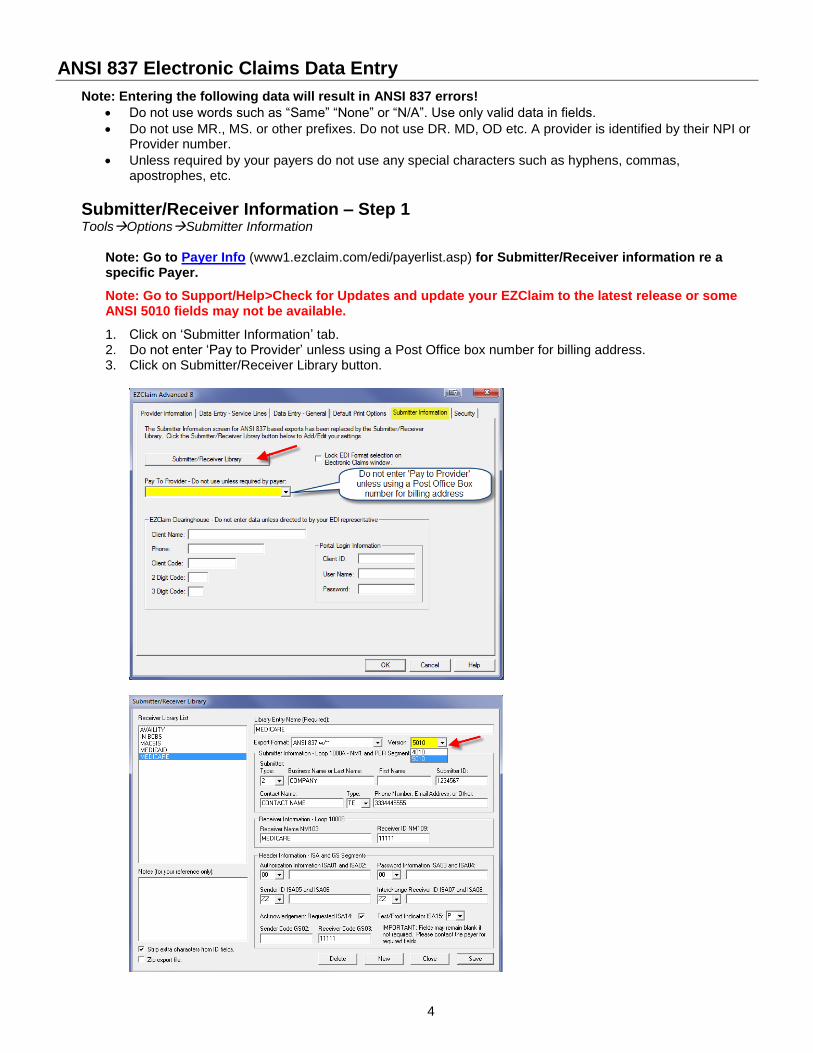
Submitter/Receiver Information – Step 1 ToolsOptionsSubmitter Information
Note: Go to Payer Info (www1.ezclaim.com/edi/payerlist.asp) for Submitter/Receiver information re a specific Payer.
Note: Go to Support/Help>Check for Updates and update your EZClaim to the latest release or some ANSI 5010 fields may not be available.
1. Click on ‘Submitter Information’ tab. 2. Do not enter ‘Pay to Provider’ unless using a Post Office box number for billing address. 3. Click on Submitter/Receiver Library button.
5
4. To ‘Add’ a new Library entry, click on ‘New’, enter all required data and then click on ‘Save’. Go to Payer Info (see above) for the following Payer specific information.
Library Entry Name - Enter a name to identify the library entry.
Export Format and Version- Use the drop down to choose the export format and the version.
Submitter Type - Use the drop down box to choose a Person or Non-Person type.
Submitter Name - Enter the business name or name of the person submitting the file.
Submitter Identifier - Enter the EDI submitter number provided by the insurance carrier that identifies the submitter of the file. Contact your insurance carrier for your EDI submitter ID#.
Contact - Enter the name of the contact person (ie. First space last name).
Telephone Number - Enter the phone number of the contact person in this format, 5556667777.
Receiver Name (NM103) - Information is provided by your insurance carrier.
Receiver ID (NM109) - Information is provided by your insurance carrier.
Interchange Receiver ID (ISA08) - Information is provided by your insurance carrier.
Test/Production Indicator – Using the dropdown box chose ‘P’ for Production or ‘T’ for Test.
Receiver Code (GS03) - Information is provided by your insurance carrier. 5. Using the dropdown, assign either the 5010 or 4010 format specific to the selected payer. 6. To ‘Edit’ an entry, highlight the entry on the left, make changes and then click on ‘Save’. 7. When finished, click on ‘Save’ and then ‘Close’. Once Saved, the entry will be listed on the left.
Situational Fields
NOTE: Do not enter Situational fields unless required by insurance carrier or errors will be generated!
‘Strip extra characters from ID fields’ - Usually checked, uncheck only if the insurance company requires a dash in your Tax ID# for electronic claims.
Sender ID – Enter only if a different number than the Submitter ID number.
Sender Code – Enter only if different number than the Submitter ID number.
Password – Do not enter unless required by your insurance company for electronic claims.
Acknowledgment Requested - Usually left checked.
Zip Export File – Usually left unchecked unless requested by your insurance company.
Payer Library – Step 2 Payer Library Icon
Note: This information must be entered before entering ‘Physician Library’ data.
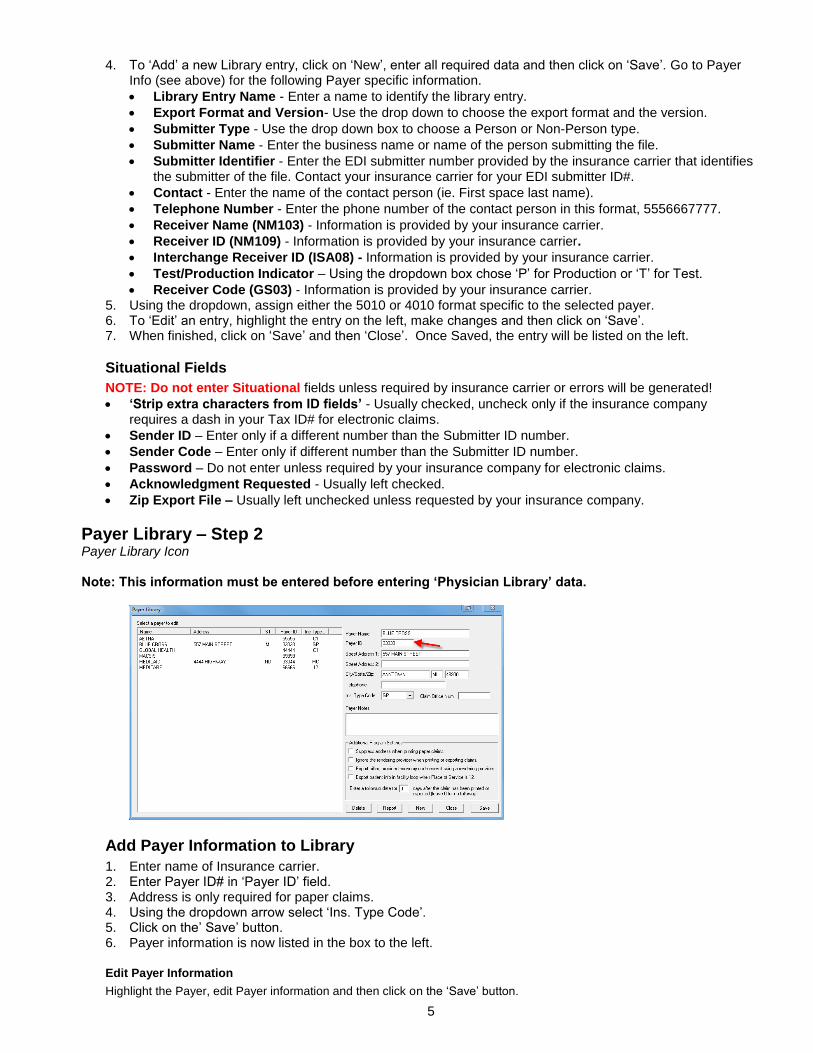
Add Payer Information to Library
1. Enter name of Insurance carrier. 2. Enter Payer ID# in ‘Payer ID’ field. 3. Address is only required for paper claims. 4. Using the dropdown arrow select ‘Ins. Type Code’. 5. Click on the’ Save’ button. 6. Payer information is now listed in the box to the left.
Edit Payer Information
Highlight the Payer, edit Payer information and then click on the ‘Save’ button.
6
Physician, Organization and Facility Library – Step 3 Physician/Facility Library Icon
Library information must be completed before entering patient data. Once the entries are completed in the library, they will be selected on EZClaim data entry screens. Correct set-up of the Library is important for error free claims.
Classification
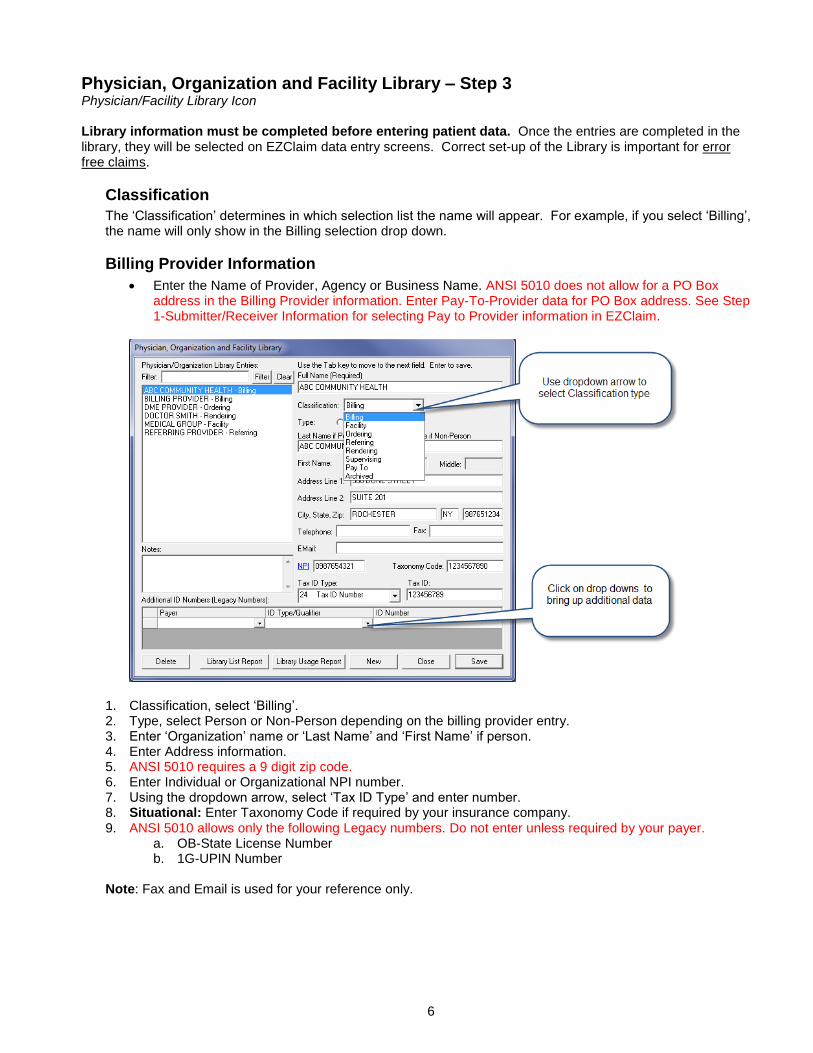
The ‘Classification’ determines in which selection list the name will appear. For example, if you select ‘Billing’, the name will only show in the Billing selection drop down.
Billing Provider Information
Enter the Name of Provider, Agency or Business Name. ANSI 5010 does not allow for a PO Box address in the Billing Provider information. Enter Pay-To-Provider data for PO Box address. See Step 1-Submitter/Receiver Information for selecting Pay to Provider information in EZClaim.
1. Classification, select ‘Billing’. 2. Type, select Person or Non-Person depending on the billing provider entry. 3. Enter ‘Organization’ name or ‘Last Name’ and ‘First Name’ if person. 4. Enter Address information. 5. ANSI 5010 requires a 9 digit zip code. 6. Enter Individual or Organizational NPI number. 7. Using the dropdown arrow, select ‘Tax ID Type’ and enter number. 8. Situational: Enter Taxonomy Code if required by your insurance company. 9. ANSI 5010 allows only the following Legacy numbers. Do not enter unless required by your payer.
a. OB-State License Number b. 1G-UPIN Number
Note: Fax and Email is used for your reference only.
7
Rendering Provider Information
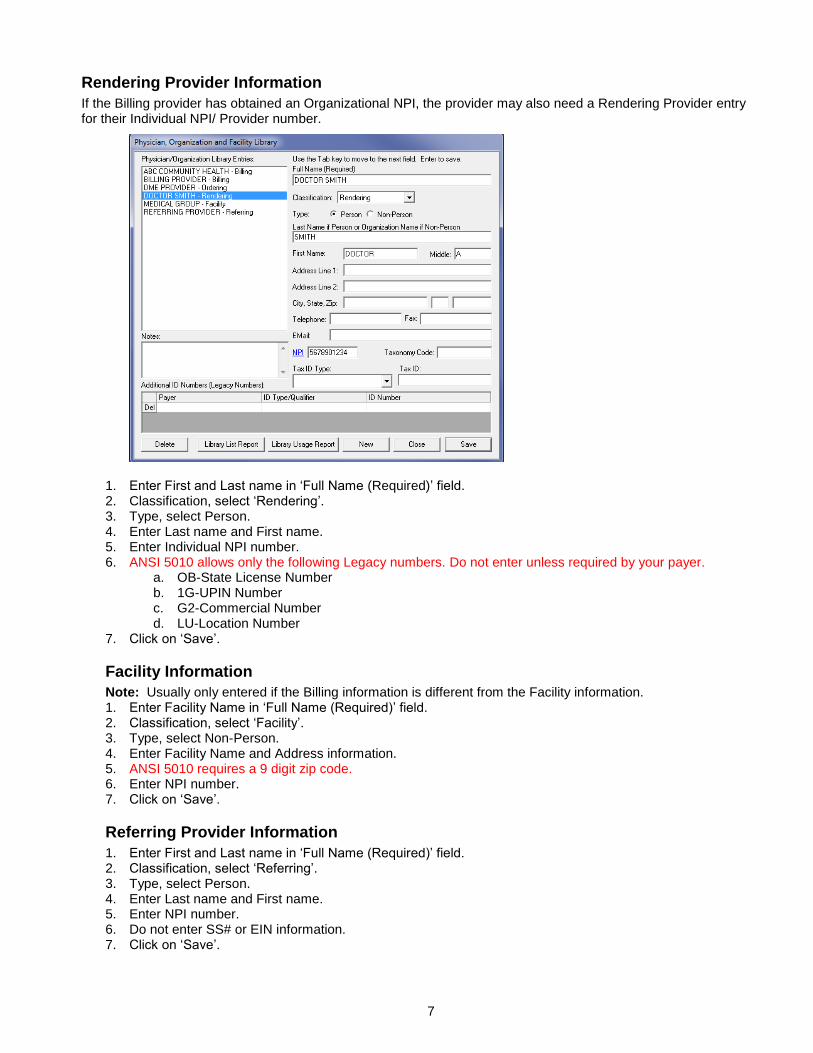
If the Billing provider has obtained an Organizational NPI, the provider may also need a Rendering Provider entry for their Individual NPI/ Provider number.
1. Enter First and Last name in ‘Full Name (Required)’ field. 2. Classification, select ‘Rendering’. 3. Type, select Person. 4. Enter Last name and First name. 5. Enter Individual NPI number. 6. ANSI 5010 allows only the following Legacy numbers. Do not enter unless required by your payer.
a. OB-State License Number b. 1G-UPIN Number c. G2-Commercial Number d. LU-Location Number
7. Click on ‘Save’.
Facility Information
Note: Usually only entered if the Billing information is different from the Facility information. 1. Enter Facility Name in ‘Full Name (Required)’ field. 2. Classification, select ‘Facility’. 3. Type, select Non-Person. 4. Enter Facility Name and Address information. 5. ANSI 5010 requires a 9 digit zip code. 6. Enter NPI number. 7. Click on ‘Save’.
Referring Provider Information
1. Enter First and Last name in ‘Full Name (Required)’ field. 2. Classification, select ‘Referring’. 3. Type, select Person. 4. Enter Last name and First name. 5. Enter NPI number. 6. Do not enter SS# or EIN information. 7. Click on ‘Save’.
8
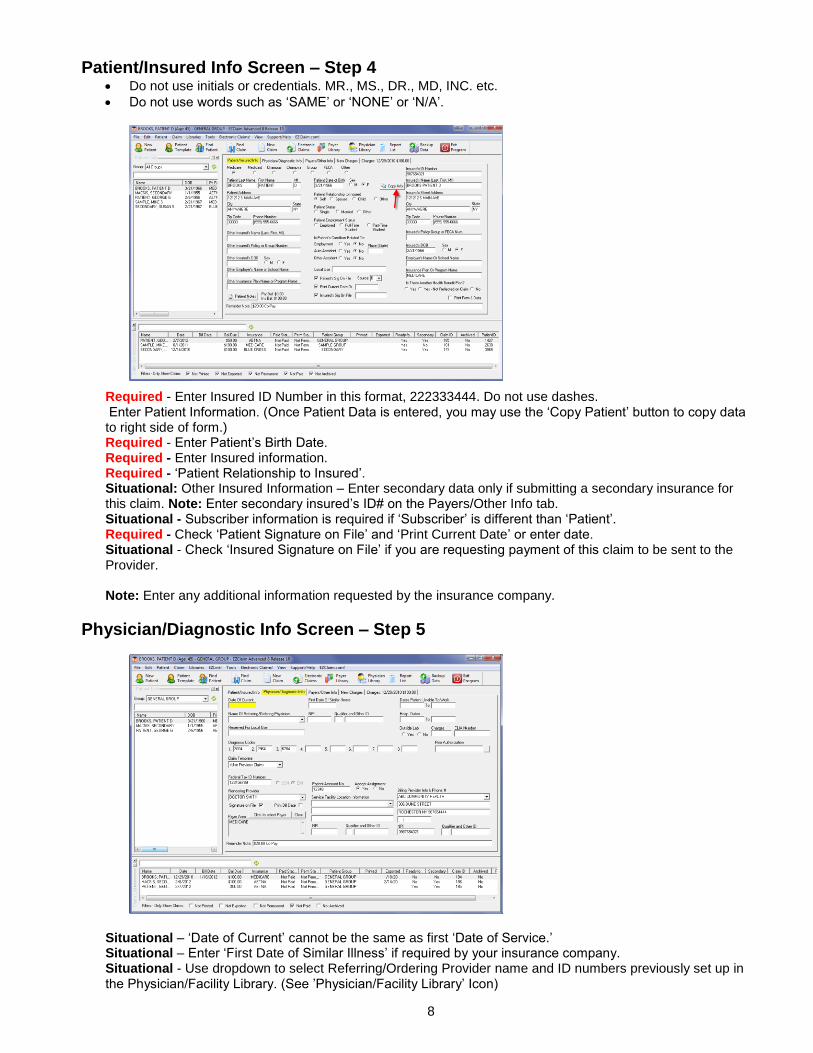
Patient/Insured Info Screen – Step 4 Do not use initials or credentials. MR., MS., DR., MD, INC. etc.
Do not use words such as ‘SAME’ or ‘NONE’ or ‘N/A’.
Required - Enter Insured ID Number in this format, 222333444. Do not use dashes. Enter Patient Information. (Once Patient Data is entered, you may use the ‘Copy Patient’ button to copy data to right side of form.) Required - Enter Patient’s Birth Date. Required - Enter Insured information. Required - ‘Patient Relationship to Insured’. Situational: Other Insured Information – Enter secondary data only if submitting a secondary insurance for this claim. Note: Enter secondary insured’s ID# on the Payers/Other Info tab. Situational - Subscriber information is required if ‘Subscriber’ is different than ‘Patient’. Required - Check ‘Patient Signature on File’ and ‘Print Current Date’ or enter date. Situational - Check ‘Insured Signature on File’ if you are requesting payment of this claim to be sent to the Provider. Note: Enter any additional information requested by the insurance company.
Physician/Diagnostic Info Screen – Step 5
Situational – ‘Date of Current’ cannot be the same as first ‘Date of Service.’ Situational – Enter ‘First Date of Similar Illness’ if required by your insurance company. Situational - Use dropdown to select Referring/Ordering Provider name and ID numbers previously set up in the Physician/Facility Library. (See ’Physician/Facility Library’ Icon)
9
Claim Templates: Use dropdown to select a template for all claims for this patient. 1. ‘Use Initial Charge Values’ – Data entered into these fields will be used when clicking calendar dates
on the Charges screen. 2. ‘Use Previous Service Line’ - Service line data from last claim will be carried over to Charges screen.
This data may then be edited on service line if necessary. 3. ‘Use Previous Claim’ - Service line and Diagnostic codes will be carried over to Charges screen. This
data may be edited on Charges tab if necessary. Situational - Enter ‘Patient Account Number’. You may use a number of your choice or go to Tools>Options>Data Entry General and check the box for ‘Automatically enter a Patient Acct. #’. Required - Check ‘Accept Assignment’ indicator ‘yes’ or ‘no.’ Required – Check ‘Signature on File’, select name of Rendering Provider if required. Note: DME Companies do not use Rendering Providers. Leave the rendering provider field blank. Situational - Enter ‘Facility’ information only if the Facility address and NPI is different than the Billing information unless required by your insurance company. Required - Using the dropdown arrow, enter Billing Provider Info & Phone # previously set up in the Physician/Facility Library.
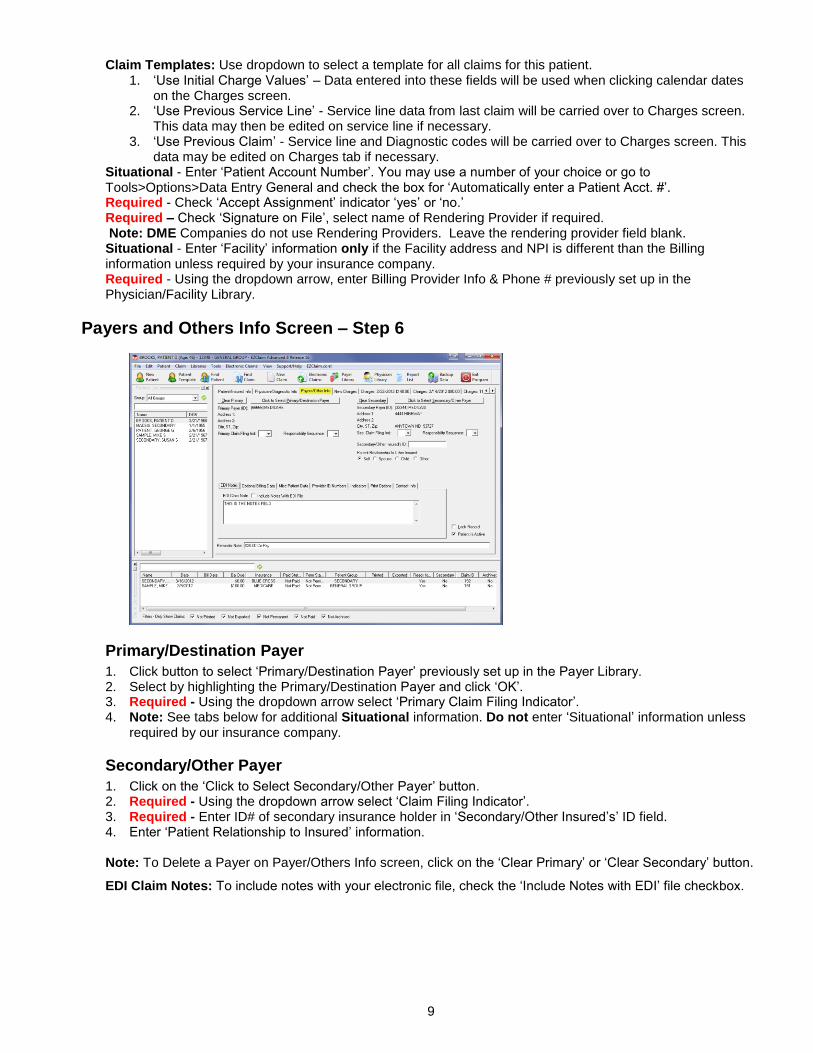
Payers and Others Info Screen – Step 6
Primary/Destination Payer
1. Click button to select ‘Primary/Destination Payer’ previously set up in the Payer Library. 2. Select by highlighting the Primary/Destination Payer and click ‘OK’. 3. Required - Using the dropdown arrow select ‘Primary Claim Filing Indicator’. 4. Note: See tabs below for additional Situational information. Do not enter ‘Situational’ information unless
required by our insurance company.
Secondary/Other Payer
1. Click on the ‘Click to Select Secondary/Other Payer’ button. 2. Required - Using the dropdown arrow select ‘Claim Filing Indicator’. 3. Required - Enter ID# of secondary insurance holder in ‘Secondary/Other Insured’s’ ID field. 4. Enter ‘Patient Relationship to Insured’ information.
Note: To Delete a Payer on Payer/Others Info screen, click on the ‘Clear Primary’ or ‘Clear Secondary’ button.
EDI Claim Notes: To include notes with your electronic file, check the ‘Include Notes with EDI’ file checkbox.

10
New Charges Screen – Step 7
Required - Diagnostic codes. Required - Click on the calendar to select ‘Date of Service’. Enter charges and other service line information. Required - Place of Service: below are the most commonly used values. Contact your Payer for additional codes.
11 - Office 12 - Home 21 - Inpatient Hospital 22 - Outpatient Hospital 23 - Emergency Room - Hospital 24 - Ambulatory Surgical Center 53 - Community Mental Health Center 81 - Independent Laboratory 99 - Other Unlisted Facility
Situational - Enter EMG only if requested by your insurance company. Usually left blank. Required - Enter Procedure Code Required - Enter the diagnostic code line number (POINTER) on the charges line. Do not use the actual diagnosis code in this box, only pointers. Enter no more than four DX pointers on each service line. Situational: Rendering Provider - This data is pulled from the Rendering Provider information which has been selected on the Physician/Diagnostic Info tab. If Rendering Provider information has not been selected on the Physician/ Diagnostic Info tab, use the dropdown arrow on the Charges tab to select Rendering Provider previously set up in the Physician/Facility Library.
NOTE: DME Companies do not use Rendering Providers. Leave the rendering provider fields blank.
DME, Ambulance and Chiropractic ANSI 837 Screens
DME, Ambulance and Chiropractic screens require an extended features registration number. Contact EZClaim if you require one of these screens.
Ambulance
Chiropractic
DME/CMNs
11
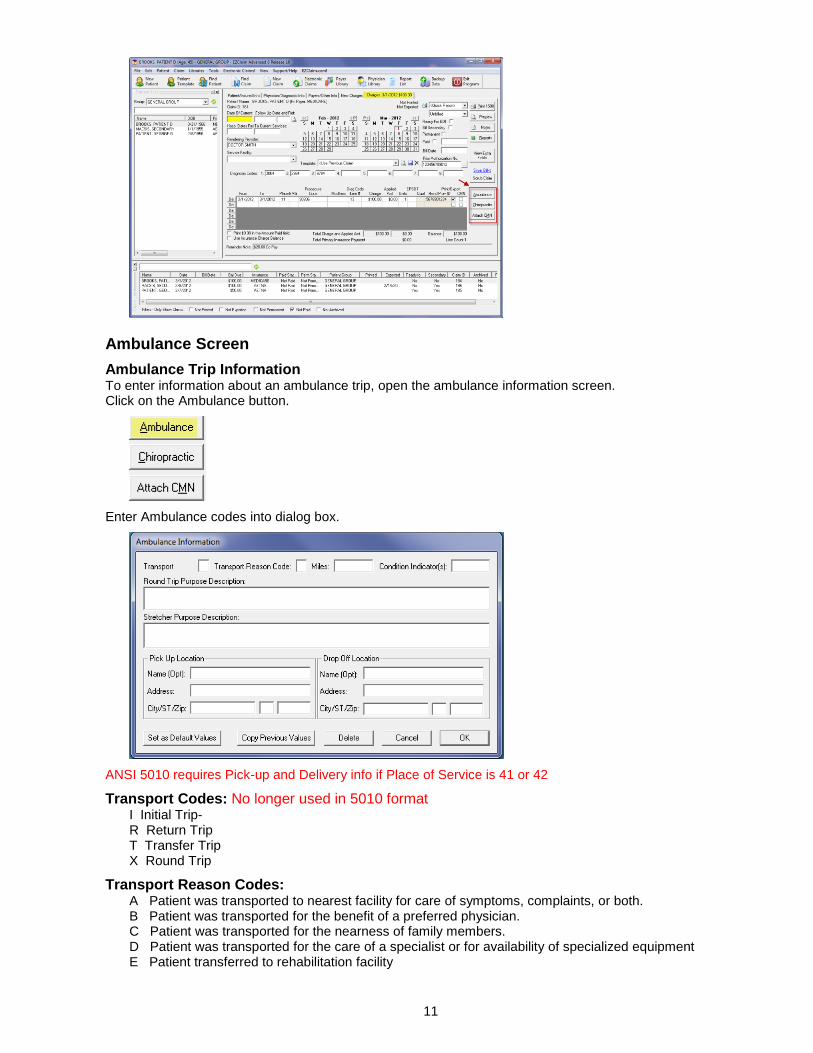
Ambulance Screen
Ambulance Trip Information To enter information about an ambulance trip, open the ambulance information screen. Click on the Ambulance button.
Enter Ambulance codes into dialog box.
ANSI 5010 requires Pick-up and Delivery info if Place of Service is 41 or 42
Transport Codes: No longer used in 5010 format I Initial Trip- R Return Trip T Transfer Trip X Round Trip
Transport Reason Codes: A Patient was transported to nearest facility for care of symptoms, complaints, or both. B Patient was transported for the benefit of a preferred physician. C Patient was transported for the nearness of family members. D Patient was transported for the care of a specialist or for availability of specialized equipment E Patient transferred to rehabilitation facility
12
Condition Indicators: 01/01/2012 - New indicator codes 01 Patient was admitted to a hospital 04 Patient was moved by stretcher 05 Patient was unconscious or in shock 06 Patient was transported in an emergency situation 07 Patient had to be physically restrained 08 Patient had visible hemorrhaging 09 Ambulance service was medically necessary 12 Patient is confined to bed or chair
Round Trip Purpose Description A free form description to clarify the purpose for the round trip ambulance service.
Stretcher Purpose Description A free form description to clarify the purpose for the usage of a stretcher during ambulance service.
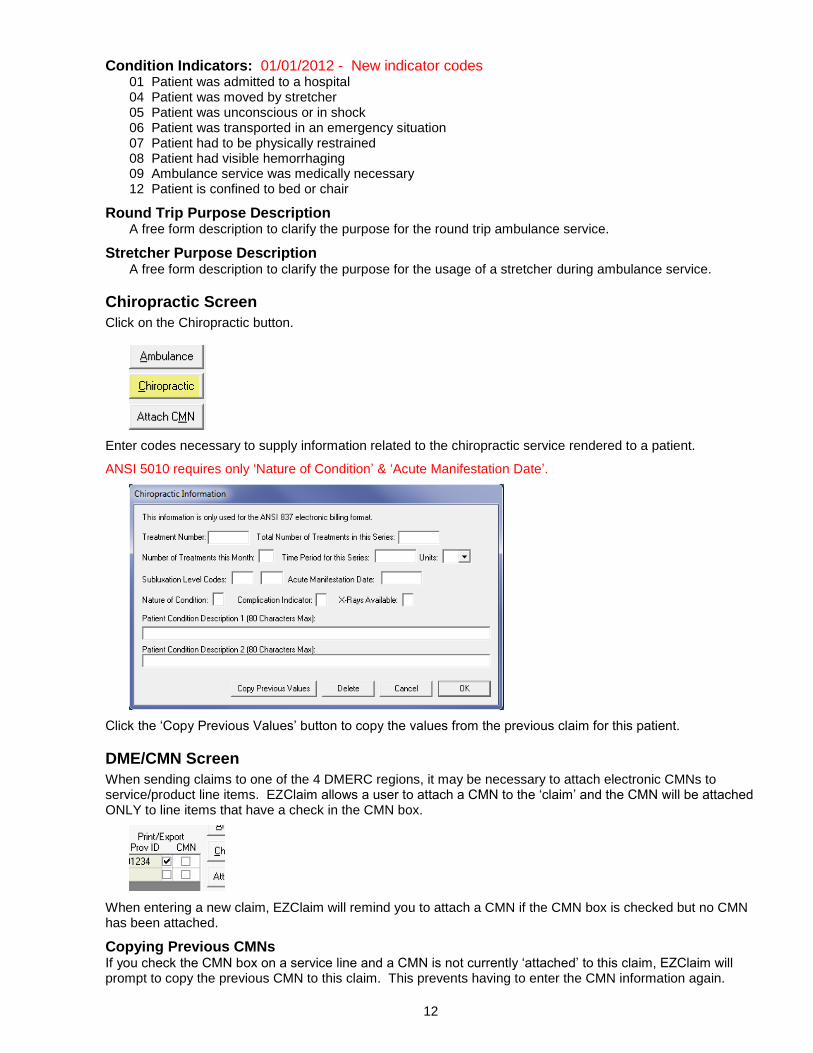
Chiropractic Screen
Click on the Chiropractic button.
Enter codes necessary to supply information related to the chiropractic service rendered to a patient.
ANSI 5010 requires only ‘Nature of Condition’ & ‘Acute Manifestation Date’.
Click the ‘Copy Previous Values’ button to copy the values from the previous claim for this patient.
DME/CMN Screen
When sending claims to one of the 4 DMERC regions, it may be necessary to attach electronic CMNs to service/product line items. EZClaim allows a user to attach a CMN to the ‘claim’ and the CMN will be attached ONLY to line items that have a check in the CMN box.
When entering a new claim, EZClaim will remind you to attach a CMN if the CMN box is checked but no CMN has been attached.
Copying Previous CMNs If you check the CMN box on a service line and a CMN is not currently ‘attached’ to this claim, EZClaim will prompt to copy the previous CMN to this claim. This prevents having to enter the CMN information again.

13
Attaching a CMN to a Claim Click on the ‘Attach CMN’ screen.
Select by highlighting the CMN for this claim and click the OK button.
Enter Data into the CMN screen. The CMN screens represent Section B of the CMN. Please note the Length of Need, Initial Date, and Signed Date are all required fields. EZClaim will not let you close the CMN screen until those fields are entered.
Printing CMNs
How do I print CMNs?
Once service lines have been entered onto a claim, you can print a CMN. Click the ‘Attach CMN Form’ or the button labeled with the CMN name (i.e. ‘Hospital Beds CMN’). There will be a ‘Print’ button available to print the CMN. The CMN printed will contain both sides of the CMN form.
Section A – Patient Name – Data is pulled from the Patient information on the left hand side of the Patient/Insured Info screen (Box 1a, 2, and 5 on the CMS-1500).
Section A – Supplier Name – Data is pulled from the Physician/Supplier information on the bottom right of the Physician/Diagnostic Info screen (Box 33 on the CMS-1500).
Section A – Place of Service – Data is pulled from the first service line’s place of service value.
Section A – HCPCS Codes – Data is pulled from the CPT/HCPCS column on the charges screen. IMPORTANT: Only HCPCS codes from service lines that have the ‘CMN’ box checked will print in this area.

14
Section A – Patient DOB, etc – Patient DOB, and Sex is pulled from the patient info on the Patient/Insured Info screen. Height and Weight is pulled from the Patient Height and Patient Weight fields on the Payers/Other Info screen.
Section A – Physician Name and UPIN – Data is pulled from the Referring/Ordering drop down box on the Physician/Diagnostic Info screen, the UPIN from the ‘ID of Referring Physician’ field. The address and phone number are pulled from the physician’s entry in the Physician Library.
Note: – Narrative – Other information may be printed depending on CMN selected and information required. Up to 10 service lines of information can be printed. The CPT/HCPCS and Units information is pulled from the service lines. The Description, Charges, and Allowed Amounts are pulled from the Procedure Code Library.
15
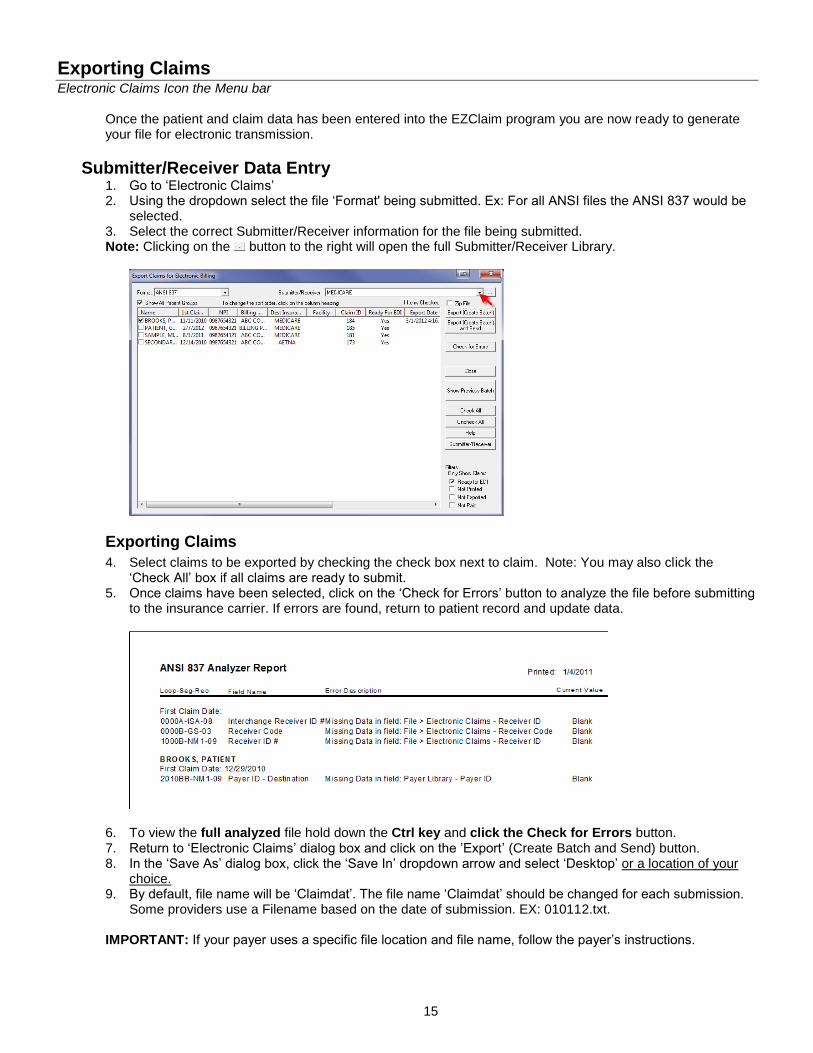
Exporting Claims Electronic Claims Icon the Menu bar
Once the patient and claim data has been entered into the EZClaim program you are now ready to generate your file for electronic transmission.
Submitter/Receiver Data Entry 1. Go to ‘Electronic Claims’ 2. Using the dropdown select the file ‘Format' being submitted. Ex: For all ANSI files the ANSI 837 would be
selected. 3. Select the correct Submitter/Receiver information for the file being submitted. Note: Clicking on the button to the right will open the full Submitter/Receiver Library.
Exporting Claims
4. Select claims to be exported by checking the check box next to claim. Note: You may also click the ‘Check All’ box if all claims are ready to submit.
5. Once claims have been selected, click on the ‘Check for Errors’ button to analyze the file before submitting to the insurance carrier. If errors are found, return to patient record and update data.
6. To view the full analyzed file hold down the Ctrl key and click the Check for Errors button. 7. Return to ‘Electronic Claims’ dialog box and click on the ’Export’ (Create Batch and Send) button. 8. In the ‘Save As’ dialog box, click the ‘Save In’ dropdown arrow and select ‘Desktop’ or a location of your
choice. 9. By default, file name will be ‘Claimdat’. The file name ‘Claimdat’ should be changed for each submission.
Some providers use a Filename based on the date of submission. EX: 010112.txt.
IMPORTANT: If your payer uses a specific file location and file name, follow the payer’s instructions.
16
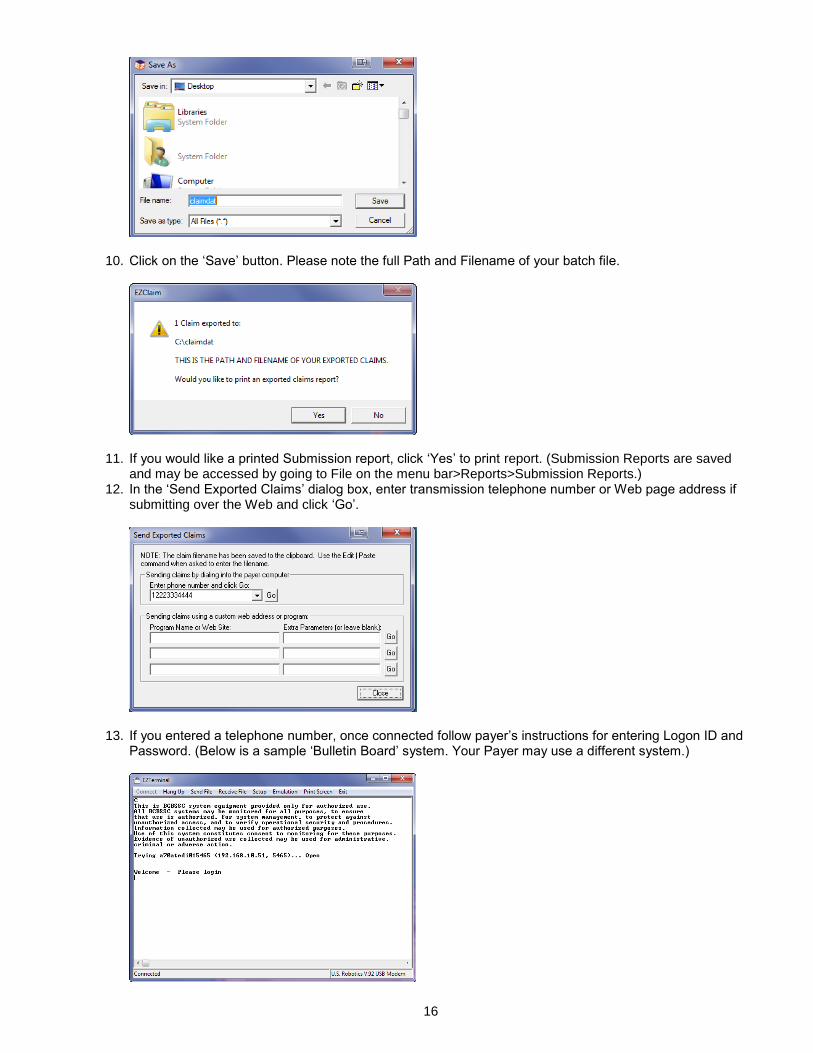
10. Click on the ‘Save’ button. Please note the full Path and Filename of your batch file.
11. If you would like a printed Submission report, click ‘Yes’ to print report. (Submission Reports are saved and may be accessed by going to File on the menu bar>Reports>Submission Reports.)
12. In the ‘Send Exported Claims’ dialog box, enter transmission telephone number or Web page address if submitting over the Web and click ‘Go’.
13. If you entered a telephone number, once connected follow payer’s instructions for entering Logon ID and Password. (Below is a sample ‘Bulletin Board’ system. Your Payer may use a different system.)
17
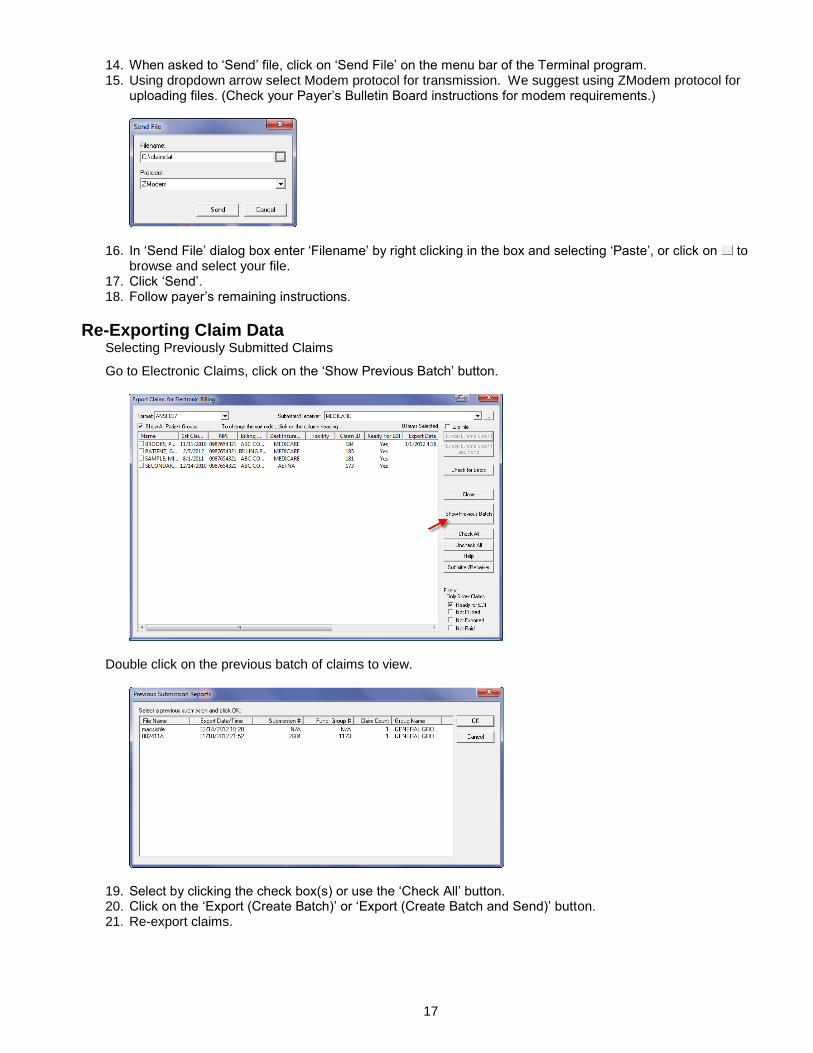
14. When asked to ‘Send’ file, click on ‘Send File’ on the menu bar of the Terminal program. 15. Using dropdown arrow select Modem protocol for transmission. We suggest using ZModem protocol for
uploading files. (Check your Payer’s Bulletin Board instructions for modem requirements.)
16. In ‘Send File’ dialog box enter ‘Filename’ by right clicking in the box and selecting ‘Paste’, or click on to browse and select your file.
17. Click ‘Send’. 18. Follow payer’s remaining instructions.
Re-Exporting Claim Data Selecting Previously Submitted Claims
Go to Electronic Claims, click on the ‘Show Previous Batch’ button.
Double click on the previous batch of claims to view.
19. Select by clicking the check box(s) or use the ‘Check All’ button. 20. Click on the ‘Export (Create Batch)’ or ‘Export (Create Batch and Send)’ button. 21. Re-export claims.
18
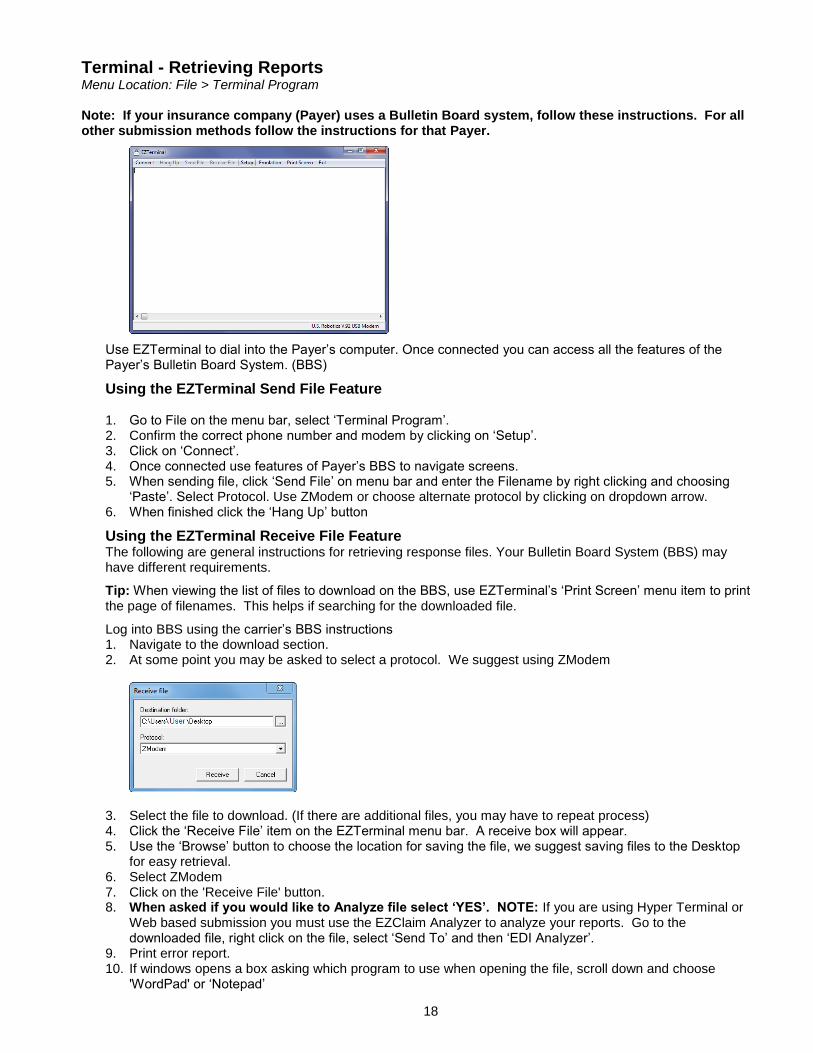
Terminal - Retrieving Reports Menu Location: File > Terminal Program
Note: If your insurance company (Payer) uses a Bulletin Board system, follow these instructions. For all other submission methods follow the instructions for that Payer.
Use EZTerminal to dial into the Payer’s computer. Once connected you can access all the features of the Payer’s Bulletin Board System. (BBS)
Using the EZTerminal Send File Feature 1. Go to File on the menu bar, select ‘Terminal Program’. 2. Confirm the correct phone number and modem by clicking on ‘Setup’. 3. Click on ‘Connect’. 4. Once connected use features of Payer’s BBS to navigate screens. 5. When sending file, click ‘Send File’ on menu bar and enter the Filename by right clicking and choosing
‘Paste’. Select Protocol. Use ZModem or choose alternate protocol by clicking on dropdown arrow. 6. When finished click the ‘Hang Up’ button
Using the EZTerminal Receive File Feature The following are general instructions for retrieving response files. Your Bulletin Board System (BBS) may have different requirements.
Tip: When viewing the list of files to download on the BBS, use EZTerminal’s ‘Print Screen’ menu item to print the page of filenames. This helps if searching for the downloaded file.
Log into BBS using the carrier’s BBS instructions 1. Navigate to the download section. 2. At some point you may be asked to select a protocol. We suggest using ZModem
3. Select the file to download. (If there are additional files, you may have to repeat process) 4. Click the ‘Receive File’ item on the EZTerminal menu bar. A receive box will appear. 5. Use the ‘Browse’ button to choose the location for saving the file, we suggest saving files to the Desktop
for easy retrieval. 6. Select ZModem 7. Click on the 'Receive File' button. 8. When asked if you would like to Analyze file select ‘YES’. NOTE: If you are using Hyper Terminal or
Web based submission you must use the EZClaim Analyzer to analyze your reports. Go to the downloaded file, right click on the file, select ‘Send To’ and then ‘EDI Analyzer’.
9. Print error report. 10. If windows opens a box asking which program to use when opening the file, scroll down and choose
'WordPad' or ‘Notepad’
19
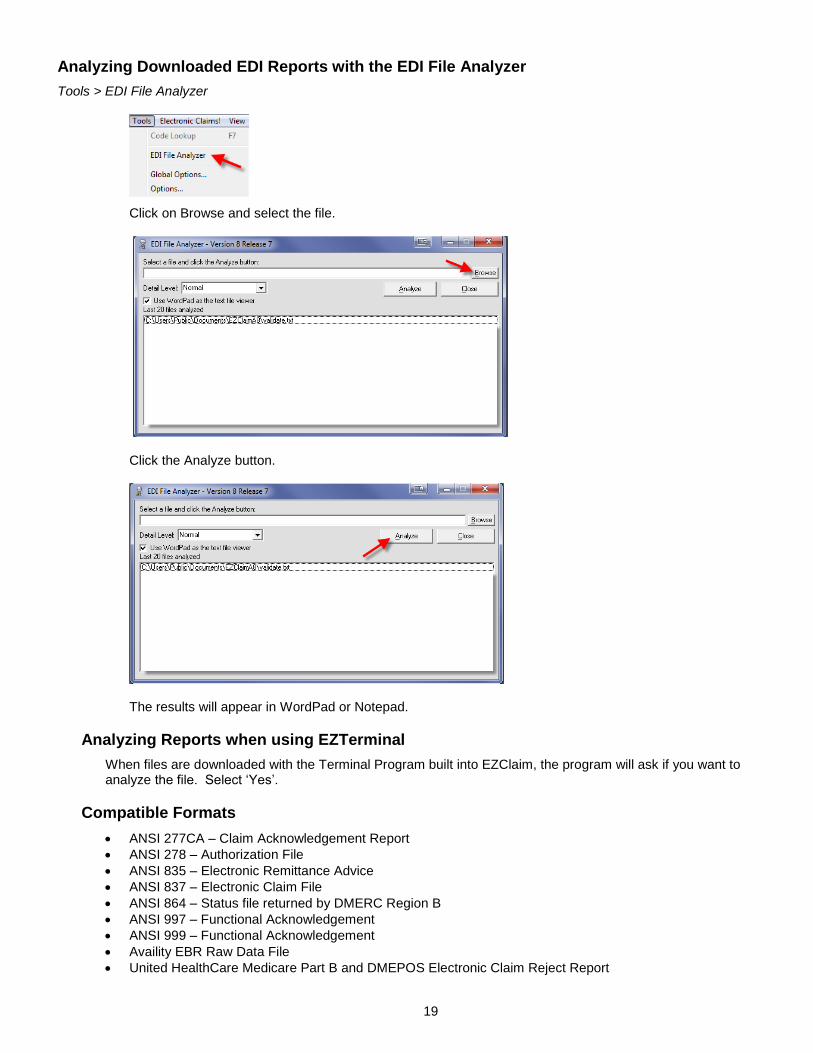
Analyzing Downloaded EDI Reports with the EDI File Analyzer
Tools > EDI File Analyzer
Click on Browse and select the file.
Click the Analyze button.
The results will appear in WordPad or Notepad.
Analyzing Reports when using EZTerminal
When files are downloaded with the Terminal Program built into EZClaim, the program will ask if you want to analyze the file. Select ‘Yes’.
Compatible Formats
ANSI 277CA – Claim Acknowledgement Report
ANSI 278 – Authorization File
ANSI 835 – Electronic Remittance Advice
ANSI 837 – Electronic Claim File
ANSI 864 – Status file returned by DMERC Region B
ANSI 997 – Functional Acknowledgement
ANSI 999 – Functional Acknowledgement
Availity EBR Raw Data File
United HealthCare Medicare Part B and DMEPOS Electronic Claim Reject Report


![[2003] 1 A.C. 837](https://static.documents.pub/doc/80x56/577d20b11a28ab4e1e938966/2003-1-ac-837.jpg)


