13
F5 BIG-IP nShield® HSM Integration Guide

F5 BIG-IPnShield® HSM Integration Guide

Version: 1.0
Date: Friday, July 23, 2021
Copyright © 2021 nCipher Security Limited. All rights reserved.
Copyright in this document is the property of nCipher Security Limited. It is not to be
reproduced modified, adapted, published, translated in any material form (including
storage in any medium by electronic means whether or not transiently or incidentally) in
whole or in part nor disclosed to any third party without the prior written permission of
nCipher Security Limited neither shall it be used otherwise than for the purpose for
which it is supplied.
Words and logos marked with ® or ™ are trademarks of nCipher Security Limited or its
affiliates in the EU and other countries.
Docker and the Docker logo are trademarks or registered trademarks of Docker, Inc. in
the United States and/or other countries.
Information in this document is subject to change without notice.
nCipher Security Limited makes no warranty of any kind with regard to this information,
including, but not limited to, the implied warranties of merchantability and fitness for a
particular purpose. nCipher Security Limited shall not be liable for errors contained
herein or for incidental or consequential damages concerned with the furnishing,
performance or use of this material.
Where translations have been made in this document English is the canonical language.
nCipher Security Limited
Registered Office: One Station Square
Cambridge, UK CB1 2GA
Registered in England No. 11673268
nCipher is an Entrust company.
Entrust, Datacard, and the Hexagon Logo are trademarks, registered trademarks, and/or
service marks of Entrust Corporation in the U.S. and/or other countries. All other brand
or product names are the property of their respective owners. Because we are
continuously improving our products and services, Entrust Corporation reserves the right
to change specifications without prior notice. Entrust is an equal opportunity employer.
2 of 12 F5 BIG-IP nShield® HSM Integration Guide

Contents1. Introduction. . . . . . . . . . . . . . . . . . . . . . . . . . . . . . . . . . . . . . . . . . . . . . . . . . . . . . . . . . . . . . . . . . . 4
1.1. Product configurations. . . . . . . . . . . . . . . . . . . . . . . . . . . . . . . . . . . . . . . . . . . . . . . . . . . . . 4
1.2. Supported nShield hardware and software versions . . . . . . . . . . . . . . . . . . . . . . . . . . 4
1.3. Supported nShield HSM functionality . . . . . . . . . . . . . . . . . . . . . . . . . . . . . . . . . . . . . . . 5
1.4. Requirements . . . . . . . . . . . . . . . . . . . . . . . . . . . . . . . . . . . . . . . . . . . . . . . . . . . . . . . . . . . . 5
1.5. More information . . . . . . . . . . . . . . . . . . . . . . . . . . . . . . . . . . . . . . . . . . . . . . . . . . . . . . . . . 6
2. Procedures . . . . . . . . . . . . . . . . . . . . . . . . . . . . . . . . . . . . . . . . . . . . . . . . . . . . . . . . . . . . . . . . . . . 7
2.1. Prerequisites . . . . . . . . . . . . . . . . . . . . . . . . . . . . . . . . . . . . . . . . . . . . . . . . . . . . . . . . . . . . . 7
2.2. Install the Security World software . . . . . . . . . . . . . . . . . . . . . . . . . . . . . . . . . . . . . . . . . 7
2.3. Configure the Security World . . . . . . . . . . . . . . . . . . . . . . . . . . . . . . . . . . . . . . . . . . . . . . 8
2.4. Configure HSM connectivity to Big-IP . . . . . . . . . . . . . . . . . . . . . . . . . . . . . . . . . . . . . . 8
2.5. Manage HSM keys for LTM. . . . . . . . . . . . . . . . . . . . . . . . . . . . . . . . . . . . . . . . . . . . . . . . . 9
Contact Us . . . . . . . . . . . . . . . . . . . . . . . . . . . . . . . . . . . . . . . . . . . . . . . . . . . . . . . . . . . . . . . . . . . . . 12
F5 BIG-IP nShield® HSM Integration Guide 3 of 12

1. IntroductionThe nShield Hardware Security Module (HSM) can generate and store a Root of Trust
(RoT) that protects security objects used by F5 Big-IP LTM to safeguard users' keys and
credentials. The HSM in FIPS 140-2 Level 2 or Level 3 mode meets compliance
requirements.
More than one HSM can enroll to a F5 BIG-IP machine if all HSMs are in the same Security
World.
1.1. Product configurations
We have successfully tested nShield HSM integration with F5 BIG-IP in the following
configurations:
Software Version
Operating System CentOS 7.3
BIG-IP 16.0.1
1.2. Supported nShield hardware and software versions
We have successfully tested with the following nShield hardware and software versions:
1.2.1. Connect XC
Security WorldSoftware
Firmware Image OCS Softcard Module
12.60.11 12.50.11 12.60.10 ✓ ✓
✓
1.2.2. Connect +
Security WorldSoftware
Firmware Image OCS Softcard Module
12.60.11 12.50.8 12.60.10 ✓ ✓
✓
4 of 12 F5 BIG-IP nShield® HSM Integration Guide
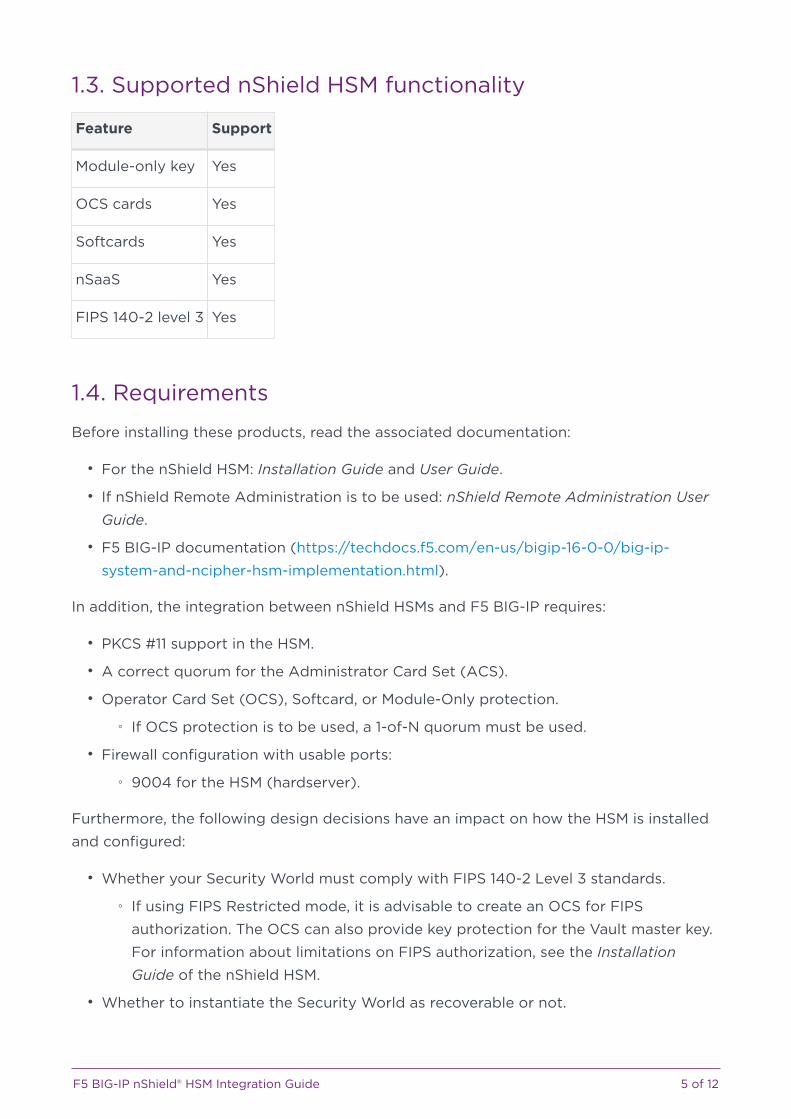
1.3. Supported nShield HSM functionality
Feature Support
Module-only key Yes
OCS cards Yes
Softcards Yes
nSaaS Yes
FIPS 140-2 level 3 Yes
1.4. Requirements
Before installing these products, read the associated documentation:
• For the nShield HSM: Installation Guide and User Guide.
• If nShield Remote Administration is to be used: nShield Remote Administration User
Guide.
• F5 BIG-IP documentation (https://techdocs.f5.com/en-us/bigip-16-0-0/big-ip-
system-and-ncipher-hsm-implementation.html).
In addition, the integration between nShield HSMs and F5 BIG-IP requires:
• PKCS #11 support in the HSM.
• A correct quorum for the Administrator Card Set (ACS).
• Operator Card Set (OCS), Softcard, or Module-Only protection.
◦ If OCS protection is to be used, a 1-of-N quorum must be used.
• Firewall configuration with usable ports:
◦ 9004 for the HSM (hardserver).
Furthermore, the following design decisions have an impact on how the HSM is installed
and configured:
• Whether your Security World must comply with FIPS 140-2 Level 3 standards.
◦ If using FIPS Restricted mode, it is advisable to create an OCS for FIPS
authorization. The OCS can also provide key protection for the Vault master key.
For information about limitations on FIPS authorization, see the Installation
Guide of the nShield HSM.
• Whether to instantiate the Security World as recoverable or not.
F5 BIG-IP nShield® HSM Integration Guide 5 of 12

1.5. More information
For more information about OS support, contact your F5 sales representative or Entrust
nShield Support, https://nshieldsupport.entrust.com.
6 of 12 F5 BIG-IP nShield® HSM Integration Guide

2. Procedures
2.1. Prerequisites
1. A Big-IP system must be deployed before following the steps in this guide. Big-IP
Virtual Edition was tested but the procedures can be applied to other deployments.
2. The BIG-IP system must be licensed for External Interface and Network HSM.
3. Access is required to the command line interface of the Big-IP machine and the
Configuration utility web interface.
4. A Security World iso file is required for installing the nShield Security World
software.
2.2. Install the Security World software
The following steps will be a manual installation of Security World on the BIG-IP machine.
Automatic installation steps exist for older versions of Security World software. See the
F5 documentation for more information.
1. Mount the Security World iso file.
% cd /shared% mkdir SecWorld-12.60.11% mount -o loop SecWorld_Lin64-12.60.11.iso SecWorld-12.60.11
2. Untar the Security World files.
% cd /shared% sudo tar -zxvf /shared/SecWorld-12.60.11/linux/amd64/ctd.tar.gz
Repeat for all tar.gz files in the amd64 directory.
3. Fix installation directory paths.
% mv /shared/opt/nfast/ /shared% rmdir /shared/opt
4. Create a link from /opt/nfast to /shared/nfast.
% cd /opt% ln -s /shared/nfast% ls -al
5. Run the installation.
F5 BIG-IP nShield® HSM Integration Guide 7 of 12

% /opt/nfast/sbin/install
6. Run the enquiry utility to see if the hardserver is up and running.
% /opt/nfast/bin/enquiry
2.3. Configure the Security World
1. Enroll the HSM onto the Big-IP machine. The machine has to be a client of the HSM.
For more information, see the User Guide for the HSM.
% /opt/nfast/bin/nethsmenroll <HSM_IP_Address>% /opt/nfast/bin/enquiry
2. Create or import the Security World. For more information, see the User Guide for
the HSM.
3. Edit cknfastrc in /opt/nfast and update it to contain one of the following
configurations:
a. For module protection:
CKNFAST_FAKE_ACCELERATOR_LOGIN=1
b. For OCS or Softcard protection:
CKNFAST_LOADSHARING=1CKNFAST_NO_ACCELERATOR_SLOTS=1
4. Add * to end of /shared/opt/nfast/kmdata/config/cardlist.
2.4. Configure HSM connectivity to Big-IP
1. Use the following command to check the name of the partition to be used. For OCS
or Softcard protection, this is typically the name of the cardset.
% /opt/nfast/bin/cklist
2. Take note of the partition name. This integration uses module protection, so the
partition name was accelerator.
3. Log in to the Configuration utility using an account with the administrator role.
4. Add the following information under System > Certificate Management > HSMManagement > External HSM.
8 of 12 F5 BIG-IP nShield® HSM Integration Guide

Vendor Auto
PKCS11 Library Path /opt/nfast/toolkits/pkcs11/libcknfast.so
Partition <partition_name>
Password <cardset_passphrase>
5. Select Add to add the partition.
6. Select Update.
7. Restart the pkcs11d service to apply the new settings to the system.
% tmsh restart sys service pkcs11d% tmsh restart sys service tmm
8. Confirm that pkcs11d is running.
% bigstart status pkcs11d
2.5. Manage HSM keys for LTM
2.5.1. Generate an HSM key
The Traffic Management Shell tmsh can be used to generate a key or certificate on the
HSM.
F5 BIG-IP nShield® HSM Integration Guide 9 of 12

1. Generate the key.
% tmsh create sys crypto key <key_name> gen-certificate common-name <cert_name> security-type nethsm
2. Verify that the key was created.
% tmsh list sys crypto key test_key
2.5.2. Generate a self-signed digital certificate
1. Log in to the Configuration utility using an account with the administrator role.
2. On the Main tab, select System > Certificate Management > Traffic CertificateManagement. The Traffic Certificate Management screen opens.
3. Select Create.
4. In the Name field, enter a unique name for the SSL certificate.
5. From the Issuer list, select Self.
6. In the Common Name field, enter a name. This is typically the name of a web site,
such as www.siterequest.com.
7. Enter the other certificate details.
8. From the Security Type list, select NetHSM.
9. From the NetHSM Partition list, select a partition to use.
10. From the Key Type list, RSA is selected as the default key type.
11. From the Size list, select a size, in bits.
12. Select Finished.
2.5.3. Request a certificate from a Certificate Authority
Generate a certificate signing request (CSR) that can then be submitted to a third-party
trusted certificate authority (CA).
1. Log in to the Configuration utility using an account with the administrator role.
2. On the Main tab, select System > Certificate Management > Traffic CertificateManagement. The Traffic Certificate Management screen opens.
3. Select Create.
4. In the Name field, enter a unique name for the SSL certificate.
5. From the Issuer list, select Certificate Authority.
6. Enter the other certificate details.
7. Select Finished.
10 of 12 F5 BIG-IP nShield® HSM Integration Guide
8. The Certificate Signing Request screen displays.
9. Do one of the following to download the request into a file on your system.
a. In the Request Text field, copy the certificate.
b. For Request File, select the download button.
10. Submit the request to a certificate authority to be signed.
11. Select Finished.
12. An option will be displayed to import the signed certificate.
2.5.4. Delete a key from the BIG-IP system
1. On the Main tab, select System > Certificate Management > Traffic CertificateManagement. The Traffic Certificate Management screen opens.
2. The Traffic Certificate Management screen opens.
3. From the SSL Certificate List, select the key to delete.
4. Select Delete.
5. The key you selected is deleted from BIG-IP.
6. The key stored in NetHSM is not deleted. To do this, find the key file in
/opt/nfast/kmdata/local and delete it.
2.5.5. Import a pre-existing NetHSM key to the BIG-IP system
1. Log in to the command-line interface of the system using an account with
administrator privileges.
% tmsh install sys crypto key <nethsm_key_label> from-nethsm security-type nethsm
This step can be completed on the Configuration utility. See the F5 documentation for
more information.
F5 BIG-IP nShield® HSM Integration Guide 11 of 12

Contact Us
Web site https://www.entrust.com
Support https://nshieldsupport.entrust.com
Email Support [email protected]
Online documentation: Available from the Support site listed
above.
You can also contact our Support teams by telephone, using the following numbers:
Europe, Middle East, and Africa
United Kingdom: +44 1223 622444
One Station Square
Cambridge, UK CB1 2GA
Americas
Toll Free: +1 833 425 1990
Fort Lauderdale: +1 954 953 5229
Sawgrass Commerce Center – A
Suite 130
13800 NW 14 Street
Sunrise, FL 33323 USA
Asia Pacific
Australia: +61 8 9126 9070
World Trade Centre Northbank Wharf
Siddeley St
Melbourne VIC 3005 Australia
Japan: +81 50 3196 4994
Hong Kong: +852 3008 3188
31/F, Hysan Place,
500 Hennessy Road,
Causeway Bay
12 of 12 F5 BIG-IP nShield® HSM Integration Guide

ABOUT ENTRUST CORPORATION
Entrust keeps the world moving safely by enabling trustedidentities, payments, and data protection. Today more than ever,people demand seamless, secure experiences, whether they’recrossing borders, making a purchase, accessing e-governmentservices, or logging into corporate networks. Entrust offers anunmatched breadth of digital security and credential issuancesolutions at the very heart of all these interactions.Withmorethan 2,500 colleagues, a network of global partners, andcustomers in over 150 countries, it’s no wonder the world’s mostentrusted organizations trust us.
To get help withEntrust nShield HSMs
nshieldsupport.entrust.com


