24
FABRICATION GUIDE
FABRICATION GUIDE

- 2 -

TABLE OF CONTENTS 1 Introduction……………………………………………………………………2 2 Properties……………………………………………………….....................3 3 General Design Considerations……………………………………………5 4 Handling and Storage…………………………………………………….….6 5 Fabricating……………………………………………………………………..7 6 Layout…………………………………………………………………………..8 7 Cutting………………………………………………………………………….8 8 Routing………………………………………………………………………...10 9 Laser…………………………………………………………………………...11 10 Drilling…………………………………………………………………………14 11 Threading and Tapping…………………………………………………….15 12 Blanking and Punching…………………………………………………….15 13 Cementing…………………………………………………………………….15 14 Mechanical Joining…….……………………………………………………20 15 Painting and Decorating……………………………………………………21 16 Finishing………………………………………………………………………21
For Your Protection
The information and recommendations in this publication are, to the best of our knowledge, reliable. Users should make their own tests to determine the suitability of these products for their own particular purposes. Lucite International, Inc. MAKES NO WARRANTY OF ANY KIND, EXPRESSED OR IMPLIED, INCLUDING THOSE OF MERCHANTABILITY AND FITNESS FOR A PARTICULAR PURPOSE, other than that the material conforms to its applicable current Standard Specifications. Statements, herein, therefore, should not be construed as representations or warranties. The responsibility of Lucite International, Inc., for claims arising out of breach or warranty, negligence, strict liability, or otherwise, is limited to the purchase price of the material. Statements concerning the use of the products or formulations described herein are not to be construed as recommending the infringement of any patent, and Lucite International, Inc. assumes no liability for infringement arising out of any such use.
- 3 -
- 4 -
1. Introduction The data and information presented in this manual are concerned primarily with the design and fabrication of structures and components produced from LuciteLux™ cast acrylic sheet. This manual also presents concepts and principles necessary to develop functionally sound and economically attractive applications. Properties Acrylic plastics have an unusual combination of properties…outstanding weather resistance, brilliant clarity, “light-piping” and “edge-lighting” qualities, chemical resistance, smooth, easy-clean surface, and ease of forming and machining. Compared to all other types of transparent thermoplastics, LuciteLux™ cast acrylic sheet has outstanding resistance to the damaging effects of sunlight and outdoor weathering. LuciteLux™ cast acrylic sheet also offers excellent caliper control for critical applications. Applications The desirable properties of LuciteLux™ cast acrylic sheet amount for its wide acceptance for many end-uses.
• Optical Qualities - Used as safety glazing in
buildings and vehicles, in instrument and equipment covers and machinery guards.
• Decorative – LuciteLux™ cast acrylic sheet enhances the functional and aesthetic beauty of such products as exterior panels for appliances, exterior and trim for automobiles, and household and business accessories.
• Light Stability and Weather Resistance – With its excellent UV light stability and resistance to weathering, LuciteLux™ cast acrylic sheet is used extensively as safety glazing in outdoor signs and lighting fixtures as well as for indoor fluorescent lighting shields and diffusers.
Ease of Fabrication LuciteLux™ cast acrylic sheet can be easily fabricated using techniques currently practiced in the plastic industry. Parts made from LuciteLux™ cast acrylic sheet can be machined, drilled, threaded and routed with standard wood and metal-working equipment. In addition, simple shapes can be formed to many configurations by thermoforming.

2. PROPERTIES LuciteLux™ Cast Acrylic Sheet/Physical Properties
LuciteLux™ cast acrylic sheet is combustible like many other synthetic and natural building materials. Small scale test are not intended to reflect hazards under actual fire conditions. *This value changes with thickness. Value given is for 0.236” thickness or where otherwise indicated. All values are for the clear product. 1. These are typical or average values and should not be used for specification purposes. 2. Change in dimensions = coefficient x (dimension of sheet) x (change in temperature.)
5

LuciteLux™ Cast Acrylic Sheet/Physical Properties (cont’d)
6
7
3. GENERAL DESIGN CONSIDERATIONS Proper design will have a major effect on product appearance, performance, and production cost. Perfectly flat surfaces should be avoided when practical. A very slight degree of curvature prevents minor aberrations which cause distorted reflections and related phenomena. Use of curved surfaces and/or ribs significantly increases the rigidity of a formed part. This added stiffness can be of significant advantages in minimizing the support needed to hold the sheet in the end use application and also during any secondary processing step (especially rigidizing). Acrylic sheet will normally have a high gloss appearance. If desired, textured or matte finishes can be obtained by modifying the mold finish or by embossing the acrylic sheet in the forming operation. Although rigidized or reinforced acrylic components can contribute to supporting loads, unreinforced acrylic sheet should not be used as a contributing support in a large or heavy structure. Constant exposure to high stress could result in eventual failure of the acrylic support. In designing methods of assembly, force or pressure on the acrylic sheet or component should be minimized. For example, this may be accomplished by oversizing drill holes, or by the use of special fasteners utilizing plastic or rubber grommets. A common assembly method uses a floating mount which allows the acrylic sheet to expand and contract without distortion, providing the mount is not clamped too tightly. Such a design, avoiding the use of holes and allowing the acrylic part to retain maximum strength, is the preferred method if it can be adapted to the particular application. With unrigidized acrylic sheet, supports are sometimes used to minimize deflection caused by wind loads. Large sections may require several supports to distribute stress more evenly. In designing unreinforced or reinforced acrylic structures, standard methods of analysis may be applied. However, it is important to
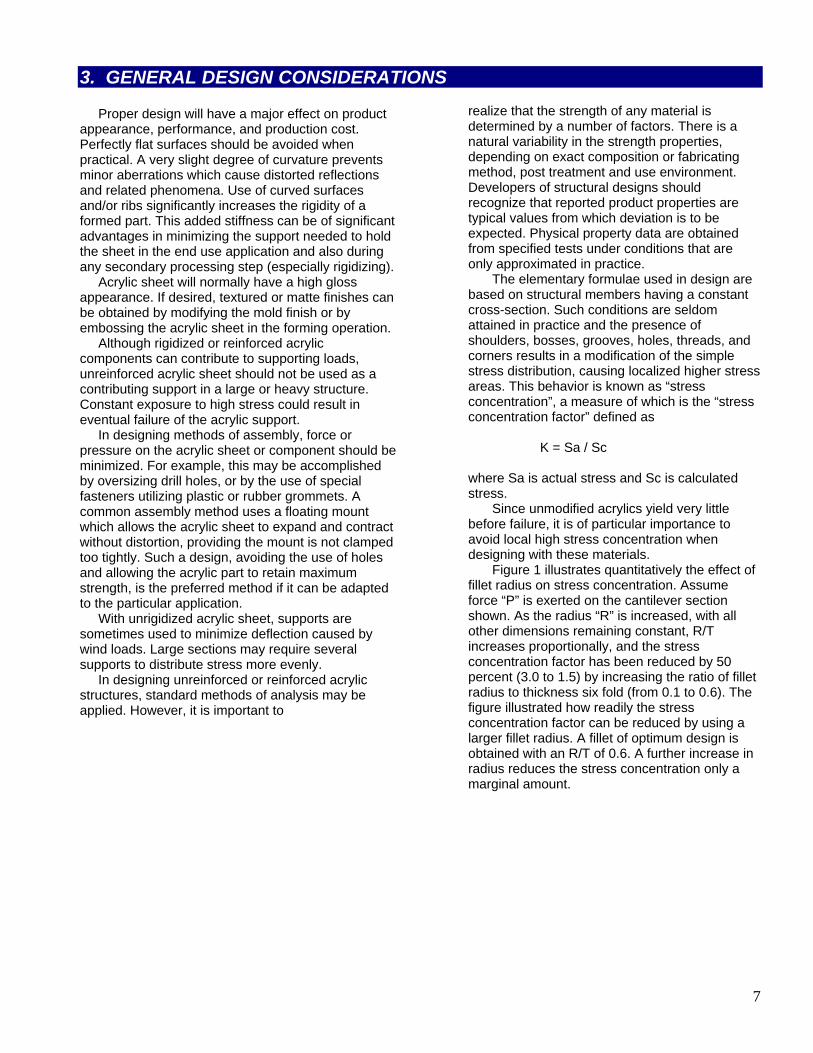
realize that the strength of any material is determined by a number of factors. There is a natural variability in the strength properties, depending on exact composition or fabricating method, post treatment and use environment. Developers of structural designs should recognize that reported product properties are typical values from which deviation is to be expected. Physical property data are obtained from specified tests under conditions that are only approximated in practice. The elementary formulae used in design are based on structural members having a constant cross-section. Such conditions are seldom attained in practice and the presence of shoulders, bosses, grooves, holes, threads, and corners results in a modification of the simple stress distribution, causing localized higher stress areas. This behavior is known as “stress concentration”, a measure of which is the “stress concentration factor” defined as K = Sa / Sc where Sa is actual stress and Sc is calculated stress. Since unmodified acrylics yield very little before failure, it is of particular importance to avoid local high stress concentration when designing with these materials. Figure 1 illustrates quantitatively the effect of fillet radius on stress concentration. Assume force “P” is exerted on the cantilever section shown. As the radius “R” is increased, with all other dimensions remaining constant, R/T increases proportionally, and the stress concentration factor has been reduced by 50 percent (3.0 to 1.5) by increasing the ratio of fillet radius to thickness six fold (from 0.1 to 0.6). The figure illustrated how readily the stress concentration factor can be reduced by using a larger fillet radius. A fillet of optimum design is obtained with an R/T of 0.6. A further increase in radius reduces the stress concentration only a marginal amount.
8
4. HANDLING AND STORAGE
Stress concentration factors of the same order of magnitude, as shown in figure 1, have also been determined for grooves, notches, holes, screw thread, bosses, etc., in tensions and bending as well as in torsion.
A prototype is a good practical check on the design. Aesthetic aspects are usually the most important in working with parts fabricated from LuciteLux™ cast acrylic sheet. Generally, however, some mechanical or structural considerations are also required, usually in connection with assembly or fastening. In working with prototypes, it should be kept in mind that roughness varies with thickness and may be significantly lowered by the addition of dyes or pigments.
Masking To provide protection during shipping, handling and storage, sheets of acrylic are sometimes covered with a tough masking paper secured with a flexible adhesive. This protective paper may be applied by the acrylic sheet manufacturer of the fabricator. It is convenient for penciling in guidelines for sawing, drilling and other machining operations, and should be kept on the acrylic sheet through as many of the processing stages as possible. Masking paper must, however, be removed before heating and forming operations are started. Masking paper can be removed by loosening one corner with a fingernail and peeling back the paper with a slow and steady pull or by rolling the paper off on a tubular support. Acrylic sheet may be remasked with the used masking paper which has been rolled up as a tube and kept clean and free from grit. The pressure-sensitive adhesive on the masking paper will retain its tackiness for several applications. If necessary, the masked sheets can be heated in an oven at 300°F (149°) for one minute or less in order to facilitate the removal of masking paper. Particles of adhesive which adhere to the acrylic sheet can often be removed by dabbing them with a wad of masking paper or by wiping the sheet with a soft, grit-free cloth containing naphtha or isopropanol. Paper masking becomes difficult to remove when exposed to the elements or when left on the product for long periods of time. Caution: Both naphtha and isopropanol are very flammable, have relatively low flash points, and are easily ignited. Use only in a well-ventilated area & away from open flames and sparks. Follow the manufacturer’s directions for safe handling.

9
5. FABRICATING Storing LuciteLux™ cast acrylic sheet may be stored flat or stacked vertically in racks. The latter method eliminates the possibility that hard particles such as sharp-edged pieces of plastic, metal chips, sand or cinders will become lodged between the sheets. When stacked horizontally, the pressure of the sheets will force such particles into the plastic. If, as a result of improper storage, an acrylic sheet bows, it can be straitened. Heat the sheet to just below the forming temperature 275°F - 290°F (135°C - 143°C) and place it on a smooth, flat surface. The flat surface should be covered with a nonlinting, soft cloth to prevent the marring of the heated acrylic sheet and to promote uniformity of cooling to reduce the risk of future warping. LuciteLux™ cast acrylic sheet will absorb moisture from the air. The absorption may cause the LuciteLux™ cast acrylic sheet to develop a temporary wavy appearance. Waviness will be relieved once the masking is removed and the product becomes fully acclimated. Cleaning Abrasive cleaners and some window cleaning compounds will scratch the surface of acrylic sheet. Do not use solvent such as methyl alcohol, toluene, acetone, chlorinated solvents, dry-cleaning solutions, lacquer thinners, gasoline, etc. since they may damage the surface. Ordinarily, dust and dirt can be removed with a soft, grit-free, nonlinting cloth damped with clean water. Grease and oil deposits usually can be removed with naphtha or isopropyl alcohol. Caution: Both naphtha and isopropyl alcohol are very flammable, have relatively low flash points, and are easily ignited. Use only in a well-ventilated area & away from open flames and sparks. Follow the manufacturer’s directions for safe handling.
Safety Safety goggles, gloves and other protective clothing should be worn when cutting, routing, drilling, threading, tapping, blanking or punching acrylic sheet. Acrylic sheet can be machined in much the same manner as wood or soft metals such as brass, and can be hand-worked and cut with files, scrapers and hacksaws. Heated acrylic sheet can be stamped, punched or sheared, limited by thickness requirements. The following general rules should be applied when acrylic is machined. • Tools must be kept sharp, with nicks and
burns eliminated from all cutting edges. Cutting tools and the acrylic part should always be supported firmly to prevent chattering and chipping. Machined areas of acrylic which are ragged or chipped will provide notches where fracture or crazing can easily occur.
• Hard, wear resistant tools, such as those with tungsten carbide tips, are preferred because they retain their sharpness longer and provide better machined finished.
• In general, cutting tools for acrylic sheet should have a scraping rather than a shearing action.
• Cleanliness of machine and materials is very important in producing satisfactory work. It is often desirable to protect the surface of acrylic sheet with masking paper during machining operations. Working areas should be kept free of sawdust, dirt, and chips which can scratch the sheets. Compressed air or vacuum can be used to remove such particles. Tables covered with a smooth hard material such as “Formica” are easy to keep clean and provide good working surfaces.
• Since plastics have much lower thermal conductivity values than metals, thermoplastics tend to soften if excessive heat is generated during machining. Therefore, a coolant or a blast of air is sometimes required to dissipate heat from the acrylic piece during machining operations.
10
6. LAYOUT Cutting lines may be penciled directly on masking paper or may be marked on the surface of unmasked acrylic sheets with a china-marking pencil. If the acrylic sheet is to be heated, the china markings must be removed because the wax can melt and dye the sheet. Patterns can be traced directly on the acrylic sheet with a pencil and carbon paper. For close tolerances, a cutting scribe or razor blade can be used to outline the work directly on the surface of the sheet. When many identical pieces are to be cut out, templates made of plastic, wood or metal are useful for guiding the scribe. Masking paper should be removed from the surface before scribing and then replaced 0.250 in. (0.635 cm) from the scribed markings prior to cutting. Naturally, fabricators can take full advantage of CNC routers to ensure the highest productivity on repetitive shapes. 7. CUTTING Choice of cutting equipment depends on the type of work to be done. For example, circular saws can be used for making long, straight cuts through acrylic sheets of all thicknesses. Band saws can be used for cutting large radius curves and for strait cuts. Jigsaws can be used for light work and for cutting curves of small radii. Generally, the cutting speed should be faster as the acrylic sheet gets thinner. Cutting blades must be kept clean and sharp. A blade in continual use often accumulates a residue which may cause chipping, binding and a whipping action during sawing. Cutting blades should be cleaned at the end of each day or at the end of each long run. Strong solvents for acrylic resins such as acetone or toluene can be used to clean the blades. Cutting blades and mandrels should always be kept free of any play or wobble. The use of a lubricant such as soap and water, mineral oil, or a coolant such as a blend of one part Johnson M-54* in forty parts water will help to dissipate frictional heat, extend blade life, and reduce the tendency of the acrylic to gum up along the blade edge. The application of masking tape over the area to be cut will reduce the tendency for the edge of acrylic sheet to chip during cutting. Colored acrylic sheet which contains slightly abrasive pigments will dull cutting blades faster than will clear acrylic sheet.
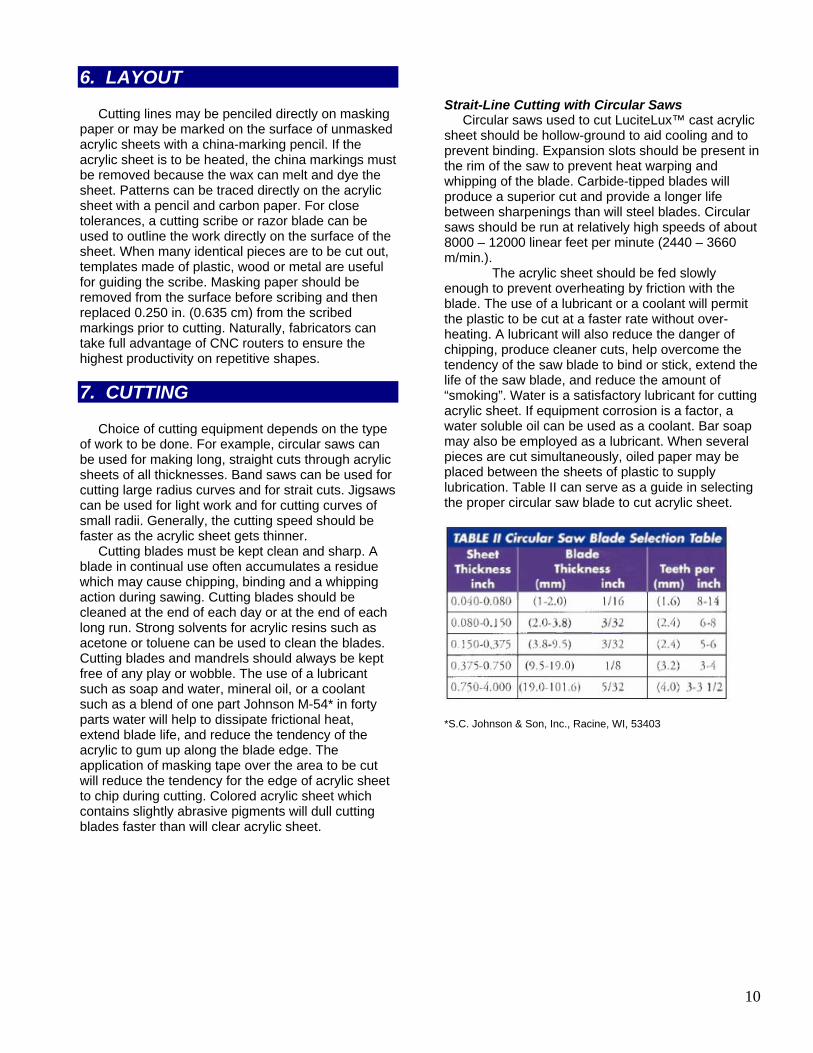
Strait-Line Cutting with Circular Saws Circular saws used to cut LuciteLux™ cast acrylic sheet should be hollow-ground to aid cooling and to prevent binding. Expansion slots should be present in the rim of the saw to prevent heat warping and whipping of the blade. Carbide-tipped blades will produce a superior cut and provide a longer life between sharpenings than will steel blades. Circular saws should be run at relatively high speeds of about 8000 – 12000 linear feet per minute (2440 – 3660 m/min.). The acrylic sheet should be fed slowly enough to prevent overheating by friction with the blade. The use of a lubricant or a coolant will permit the plastic to be cut at a faster rate without over-heating. A lubricant will also reduce the danger of chipping, produce cleaner cuts, help overcome the tendency of the saw blade to bind or stick, extend the life of the saw blade, and reduce the amount of “smoking”. Water is a satisfactory lubricant for cutting acrylic sheet. If equipment corrosion is a factor, a water soluble oil can be used as a coolant. Bar soap may also be employed as a lubricant. When several pieces are cut simultaneously, oiled paper may be placed between the sheets of plastic to supply lubrication. Table II can serve as a guide in selecting the proper circular saw blade to cut acrylic sheet.
*S.C. Johnson & Son, Inc., Racine, WI, 53403

All the saw teeth should have a uniform height, the same shape, a uniform hook or “rake” between 0° and 5° to avoid chipping and a slight set to give clearance of 0.010 to 0.015 inch (0.254 mm to 0.375 mm). An 8 – inch (20.3 cm) diameter blade is suggested for lighter work, while a 12 – inch (30.5 cm) diameter heavy gauge blade should be used for heavier work. A large – diameter blade provides a greater cooling surface and a thicker blade will conduct away more surface frictional heat.
The circular saw blade should be set at a height slightly greater than the thickness of the section to be cut. The acrylic piece should be held firmly and placed in a strait line parallel with the saw blade to prevent chipping. A separator blade directly behind the saw blade can be used to prevent the kerf from closing in on or reknitting the edge. A sliding jig to provide an even and steady feed of the acrylic sheets will result in smoother cuts and longer blade life. (1372m/min.) for material 1/16 to 1/8 inch (0.16 to
0.32 cm) thick, about 3750 ft./min. (1143m/min.) for material 1/8 to 1 inch (0.32 cm to 2.54 cm) thick, and about 3000 ft./min. (915 m/min) for material thicker than 1 inch (2.54 cm).
Important: As the blade is entering or leaving the cut acrylic piece, the feed rate should be reduced to avoid chipping at the corners. When cutting masked sheet, the adhesive can build up between adjacent teeth of the saw blade. This gumming of the blade can be reduced by applying a small amount of lubricant to the blade.
Fine teeth with no set will produce a smooth cut if the work is fed slowly. Generally, tooth size should be larger with the increasing thickness of the acrylic sheet. Traveling saws are suggested for cutting stacks of
acrylic sheet or for making strait cuts longer than three feet. The plastic remains stationary, positioned with a hold-down bar to prevent chattering while the saw is power-driven or is hand-cranked through the acrylic sheet at a rate of 10-25 ft./min. (3-7.6 m/min.). A traveling saw is also desirable for cutting unmasked acrylic sheets since the unprotected surfaces need not slide across a saw table.
Suitable saw guides should be adjusted close to the work, since any blade weaving or whipping will create additional frictional heat and will cause a ragged cut. The acrylic sheets must be kept in continuous motion and the feed pressure must be applied evenly to minimize gumming tendencies and to prevent the blade from binding and breaking. The cutting blade should always enter and leave the acrylic sheet slowly to prevent chipping at the corners. As with the circular saw blades, band saws must be periodically cleaned with a solvent which will remove the gum accumulation.
Curved Line Cutting with Band Saws Band saws are useful for cutting curves in flat acrylic sheets, for trimming formed parts, and for cutting thick sections or stacked acrylic sheets. Variable speed band saws, which can run at 5000 ft. /min. (1524 m/min.), and have a 28 to 36 inch (71 to 91 cm) throat are best suited for production work. Metal-cutting blades are generally the best type for cutting acrylic sheet. The selection of the blade width and thickness and the number of teeth depends on the radius and the thickness of the acrylic sheet to be cut. Table III can serve as a guide for selection of a band saw blade.
11
12
Tight Cutting with Jigsaws Jigsaws should be used for small-diameter curves and for interior cuts in acrylic sheet. The blades are narrow and can easily be inserted through a drilled hole. The jigsaw blades should be the metal-cutting type. Saw guides should be adjusted as closely to the work as possible in order to minimize the weave of the blade. Because the working stroke is short, frictional heat can build up quickly during cutting. Often all of the chips do not have a chance to clear the blade, which can result in gumming. To prevent the acrylic sheet from overheating and gumming, and the fresh cut from reknitting, the feed must be slow and steady. Jigsaws with integral blowers are useful to remove sawdust from the work. Other Saws and Cutting Devices Portable Circular Saws Portable, high-speed circular saws are useful for trimming large formed parts of acrylic where it is more convenient to bring the tool to the work than the work to the tool. Extreme care must be exercised in their use. The tool must be well balanced and run without vibration. The acrylic part to be trimmed should be secured in a jig and well supported. Hole-cutting Tubular blades mounted in a drill press are convenient for cutting large round holes in LuciteLux™ cast acrylic sheet. Score-cutting The same method of scoring and breaking used for cutting glass can be used for strait-cutting acrylic sheets. A simple holding device to provide both an edge over which to break the scored acrylic sheet and a means of applying a uniform bending pressure can be used. In general, the thicker the acrylic sheet to be cut, the deeper the score should be made. 8. ROUTING Wood shavers or routers can be used to cut edges and slots of various shapes into pieces of acrylic sheet. The type of cutter used is determined by the desired shape of the cut. In general, the greater the speed of the router, the fewer the cutting edges required to produce a clean, smooth cut. For example, square routing templates can best be accomplished with six to ten-bladed cutters operating at peripheral speed of 2000 to 5000 ft./min. (608 to 1525m/min.). Cutters with only two or three cutting edges and 2-3 inches (5.08-7.62 cm) in diameter would require speeds of 5000 to 9000 ft. /min. (1524 to 2744 m/min.) for acceptable routing of acrylic sheet.
Blades should be kept sharp. The cutter should be ground with a back clearance of about 10°, and rake angle between 0° and 15°. For rabbet or step routes in acrylic sheet, the cutting teeth should be backed off on the underside to avoid drag and burn marks. Whenever possible, the corners of the routing cutters should be ground to a slight radius in order to produce a fillet at the bottom of the rout. The elimination of sharp corners prevents the concentration of stresses where failure of an acrylic part can result. The acrylic sheet should be fed slowly and continuously. A suction system or an air blast will remove chips and help cool the cutter. Portable hand routers are useful for trimming edges of acrylic sheets and for surface routing of intricate designs.

13
9. LASER General
CO2 laser systems provide an ideal, non-contact method for cutting and engraving of LuciteLux™. Both processes can be combined into a single manufacturing step, and run without the need for tool cleaning or sharpening and without cutting fluids or polishing compounds.
The 10.6 micron wavelength emitted from the CO2 laser is absorbed very efficiently by polymeric materials such as LuciteLux™. The absorbed laser light is converted to heat, and the heat causes material that is directly in the laser's path to vaporize (ablation). Higher laser power densities can be used to cut through LuciteLux™ sheets leaving a clean, square and polished edge. Lower laser power densities can be used to engrave a high definition, permanent mark into the surface of the material for branding or serializing parts. Figure 1 shows a sheet of LuciteLux™ that was cut and engraved using a CO2 laser in a single, continuous operation.
Figure 1. Raster Engraving, Vector Engraving and Cutting LuciteLux™ in a single laser processing operation.
Laser Cutting
A 2.0 lens (two inch focal length) is suitable for most cutting applications. Air assist with back sweep is recommended for cuts of greater than 0.250". The back sweep will allow direction of the high pressure air across the surface of the work piece instead of down the cut where it could cause frosting of the cut edge. Gas assist with nitrogen is recommended for thicknesses greater than 0.500". For gas assist, a cone will provide better direction of the low pressure nitrogen to the cut. Since the nitrogen pressure is low, frosting of the edge due to rapid cooling is not an
issue. Also, for thicknesses greater than 0.500", switching to a 3.0 lens will provide a more uniform cut through the thickness of the work piece due to reduced beam divergence.
When cutting, it is best to remove the masking from the top side of the work piece so that it will not interfere with the laser cut. Leave the masking on the bottom side of the work piece to protect it from reflections off the cutting table. For applications where edge quality is critical, the work piece should be elevated about an inch above the cutting table to avoid all reflections.
For cutting, the laser is usually run at 100% of its rated power. Lower cut speeds are used for thicker materials. Figure 2 provides guidance on laser power selection and laser cutting speed respectively.
0.3
0.35
0.4
0.45
0.5
0.55
0.6
0.65
0.7
0.75
0 50 100 150 200
Laser Power (Watts)
Max
. Cut
Thk
. (in
ches
)
0.0
0.2
0.4
0.6
0.8
1.0
1.2
1.4
1.6
1.8
0.000 0.200 0.400 0.600 0.800
Material Thickness (in)
Cut
Spe
ed (i
n./s
ec.)
Figure 2. Maximum thickness that can be cut as a function of laser power (left), and maximum cut speed as a function of material thickness (right).

Laser Engraving Laser engraving can be done in raster mode as
well as vector mode as demonstrated in Figure 1. In each case, the engraving depth is a function of the laser power density. Figure 3 provides information on raster engraving depth and vector engraving depth as a function of laser power at constant engraving speed.
A 2.0 lens (two inch focal length) is suitable for most laser engraving applications. For applications that require very fine detail, High Power Density Focusing Optics (HPDFO) is recommended. This will provide a much smaller laser spot size than the 2.0 lens.
For most applications, the masking should be removed from the top side of the work piece. The top side masking should be left in place for deep raster engraving (depths of greater than 0.010") in order to avoid hazing of adjacent surfaces due to re-deposition of ablated material. Leave the masking on the bottom side of the work piece to protect it from mechanical damage (scratches).
0.000
0.005
0.010
0.015
0.020
0.025
0.030
0.035
0 50 100 150 200
Laser Power (Watts)
Ras
ter
Engr
avin
g D
epth
(in
ches
)
0.0000.010
0.0200.0300.040
0.0500.060
0.0700.080
0 50 100 150
Laser Power (Watts)
Vec
tor E
ngra
ving
Dep
th
(inch
es)
Figure 3. Raster engraving depth as a function of laser power (left), and vector engraving depth as a function of laser power (right).
High Volume Manufacturing For cutting operations, increasing the laser power
will improve the throughput of the laser system. A dual laser system allows the beams from two lasers to be combined into a single beam, thus providing the maximum cutting power. For engraving, the two beams can be operated in parallel so that two identical parts can be processed simultaneously. Work surfaces as small as 16” x 12” are available for smaller work pieces, and sizes range up to 48” x 24” for larger work pieces. Options are also available for longer work pieces (i.e. 24” x unlimited length).
Caution
Acrylic materials such as LuciteLux™ are flammable. Laser systems should not be left unattended when processing any acrylic material.
Universal Laser Systems offers a unique configuration that combines the two beams in a complimentary manner for superior cutting uniformity
14

15
10. DRILLING Both sides of the acrylic sheet being drilled should be firmly supported using a specially designed jig or by clamping to wood. This will minimize chipping. Standard vertical-spindle drill presses as well as portable hand drills may be used for drilling acrylic sheet. Twist drills can be used if their cutting edges are “dubbed off” to a zero degree rake angle. Standard metal drills will pull and grab the acrylic sheet unless the cutting edge is “dubbed off” to a zero degree rake angle. Standard drills will perform well with acrylic sheet if they are modified to the following specifications (see figure 2):
Deep and polished flutes facilitate the removal of chips. Nicks or scratches on the drill will mar the surface of the hole. If the proper drill, drill speed, and feed rate are being used, continuous spiral chips or ribbons will form. For larger diameter drills, slower rotating speeds will give the best results. Drill lubricants aid in chip removal, carry away heat, and improve surface finish of a hole. Good lubricants for drilling acrylic parts are a soap-in-water solution of mineral oil. The use of mineral oil alone will require an extra cleaning operation. In some cases, one may wish to add one part of mineral oil to as much as ten parts of soap in water solution. Or, the commercial coolant solution described in the “cutting” section may be used. In drilling deep holes, it is most desirable to immerse the part in the coolant lubricant. A steady stream of lubricant directed at the drill may also be used if the drill is withdrawn about every 0.5 inch (1.27 cm) to allow the chips to be
cleared and the hole to be filled with lubricant. Compressed air can often be used as a coolant for holes with a depth-to-diameter ratio of less than 5 to 1. Shallow holes can usually be drilled into acrylic sheet without a lubricant if care is exercised to avoid overheating. Hole saws and fly cutters are useful for cutting holes greater than 1 inch (2.54 cm) in diameter. A modified long-lead twist drill with a sharp lip is particularly useful for drilling thin sheets of acrylic.

16
11. THREADING AND TAPPING It is possible to thread or tap LuciteLux™ cast acrylics sheet satisfactorily with standard thread forms. The following recommendations should be followed. Such thread as the United States Standard (American Coarse Thread Series), Whirworth Standard (British Standard Series), and Acme are generally satisfactory. Sharp “V” threads are to be avoided due to the ease with which the apex fractures. Coarse pitch threads are preferred because of their added strength. When threading or tapping LuciteLux™ cast acrylic sheet to fit a metal bolt or nut, allowance should be made for the different thermal expansion coefficients of the two materials. A slight increase over normal metal clearance is usually ample. In addition, when a number of bolt holes are drilled in line, the holes should be elongated to allow for lateral movement resulting from temperature changes. If service temperature variations are to be extreme, dimensional changes will be too great and threading is not recommended. Also, where the internal threads may be subjected to excessive shock or torque-loading or where it may be necessary to remove and reinsert the bolt frequently with the potential for wear or cross-threading, threaded metal inserts or fittings should be used. Such components can be inserted into the acrylic piece by ultrasonic welding. Either hand or machine methods may be employed for threading or tapping LuciteLux™ cast acrylic sheet. The material also can be worked well in lathes or automatic screw machines. Standard taps and dies should be operated at 25% slower speed than is used for brass. Higher speeds cause excessive frictional heat and gumming of the chips. Taps should be backed out frequently to clear chips and avoid jamming. In hand-tapping small holes [0.200 in. (5.1 mm) or less] it may not necessary to use a lubricant if care is exercised. On larger holes, a lubricant such as mineral oil is recommended for drilling. For machine-tapping or threading, the work should be flooded with the proper lubricant. 12. BLANKING AND PUNCHING Acrylic sheets which have been heated may be cut or blanked with steel rule or open-faced dies. The thicker the acrylic sheet, the longer should be the heating time. Overheating of the acrylic sheet will cause edge “drag” by the die to give irregular, concave edges.
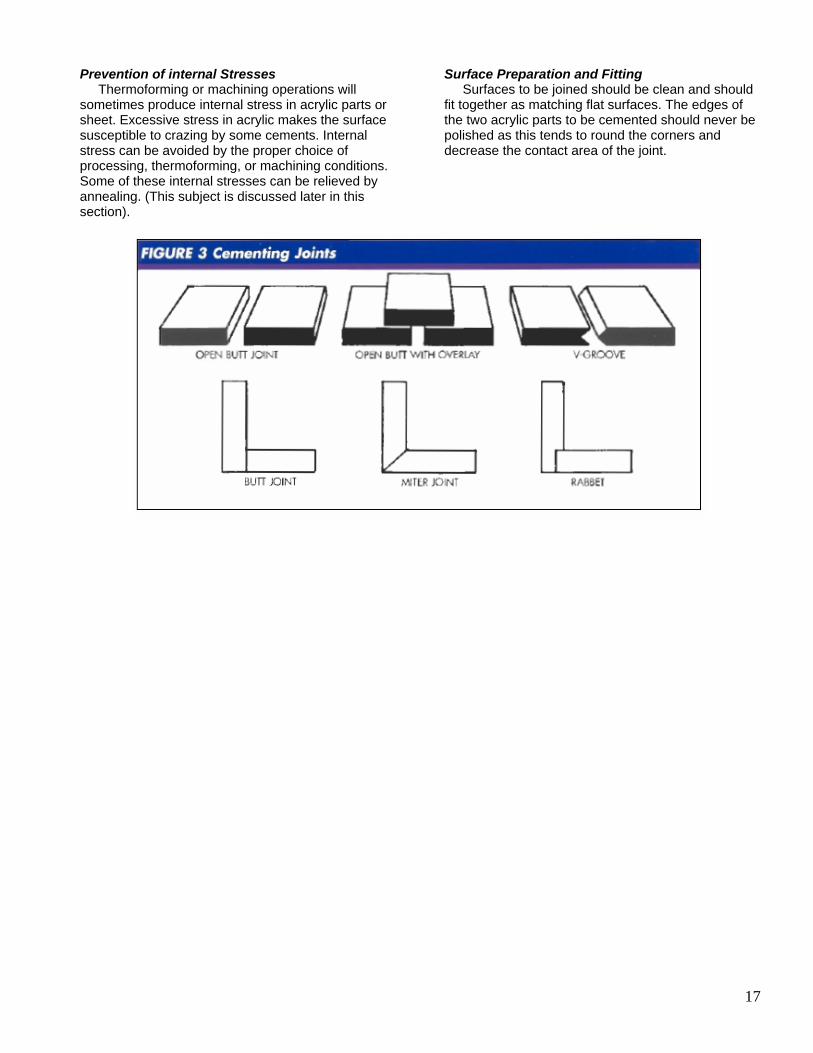
13. CEMENTING Acrylic panels or flat acrylic sheets can be fastened together with pother materials by mechanical means or with cements or adhesives. Acrylic parts with certain geometry limitations can be welded together using heat developed by frictional or vibrational motion. Some typical methods of joining together acrylic sheets are illustrated in Figure 3. For large area constructions, as in glazing which would involve the joining of many acrylic sheets, the use of formed flanges or extruded channels will provide a strong construction and joints of low visibility. Gaskets are sometimes used with this method of assembly. Acrylic sheet can be bonded together with strong, transparent joints. Strength, appearance and performance of a cement joint depends on the elimination of internal stresses, the proper preparation of the mating surfaces, the choice of a proper cement of adhesive and the use of good technique. Safety Precautions Many types of cement used for bonding acrylic sheets are toxic if ingested or inhaled for extended periods, and can irritate the skin after repeated contact. Some of the cements are flammable. When working with them, adequate ventilation should always be provided, and contact with the skin, eyes, and clothing should be avoided. Recommended procedures and precautions of cement manufacturers should be considered as minimum requirements.
Surface Preparation and Fitting Prevention of internal Stresses Surfaces to be joined should be clean and should fit together as matching flat surfaces. The edges of the two acrylic parts to be cemented should never be polished as this tends to round the corners and decrease the contact area of the joint.
Thermoforming or machining operations will sometimes produce internal stress in acrylic parts or sheet. Excessive stress in acrylic makes the surface susceptible to crazing by some cements. Internal stress can be avoided by the proper choice of processing, thermoforming, or machining conditions. Some of these internal stresses can be relieved by annealing. (This subject is discussed later in this section).
17
Cementing Acrylics to Acrylics Types of Cements Parts of LuciteLux™ cast acrylic sheet can be joined or bonded together with several general types of commercially available cements or adhesives. They are the solvent, polymer-solvent and polymerizable types. Examples and sources of supply for the various types are listed in Table IV. Solvent-type cements are the easiest, most economical and convenient types to use. The solvent softens the mating surfaces so that complete fusion can be achieved at the interface of the joint’s surfaces. The joint then hardens as the solvent diffuses and evaporates. Ordinarily, the joints require no post-treatment. Solvent cements are best applied at temperatures above 75°F (24°C). Lower temperatures slow the cure process.
Lower temperatures slow down the solvent action on the acrylic resin. Conditions of high relative humidity can produce cloudy joints due to the condensation of moisture from the air onto the area of the joint cooled by the evaporating solvent. Types of solvent cement which generally provide bonds with greater strength and are not subject to weather problems are mixtures of lower and higher boiling solvents such as methyl methacrylate monomer, acetic acid and a fast evaporating solvent. Some solvent cements have been modified to make them useful on lower molecular weight melt processed acrylic sheet. These cements will not yield satisfactory bounds on high molecular weight sheet such as LuciteLux™ continuous cast acrylic sheet. Be certain to select a cement formulated for the type of sheet you wish to bond. Polymer-solvent type cements are, as the name implies a solvent in which acrylic polymer has been dissolved. This cement has advantages of the solvent-type cements. Also, since they are more viscous, they can be used where the surfaces to be joined are not smooth or do not fit together well. The polymer-solvent type cement may also be prepared by the fabricator. He dissolves chips or shavings of LuciteLux™ cast acrylic sheet in the solvent system of his choice to obtain the viscosity which best suits his methods of cementing. Polymerizable-type cements consist primarily of two components, methyl methacrylate monomer and a catalyst which serves to convert the monomer into polymer when the bond sets. The monomer usually has polymer dissolved in it to increase its viscosity and to improve the handling characteristics of the cement. An accelerator may also be added as a third ingredient to shorten the polymerization period. Polymerizable cements give the advantage of fast initial set, and the cemented joints are usually sufficiently hard and strong for machining within four hours after assembly. The disadvantages are that once the components have been mixed, the polymerization reaction begins and continues until the cement is hardened. The cement generally remains in a useful condition for one-half hour to one hour after mixing. The pot life of the mixture may be extended by keeping the mixture cool. Cements of cyanoacrylate base polymerize on application to the joint. However, the surfaces to be joined must be smooth and fit together perfectly if a good bond is to be achieved. These types of cements do not result in a cohesive bond.
18
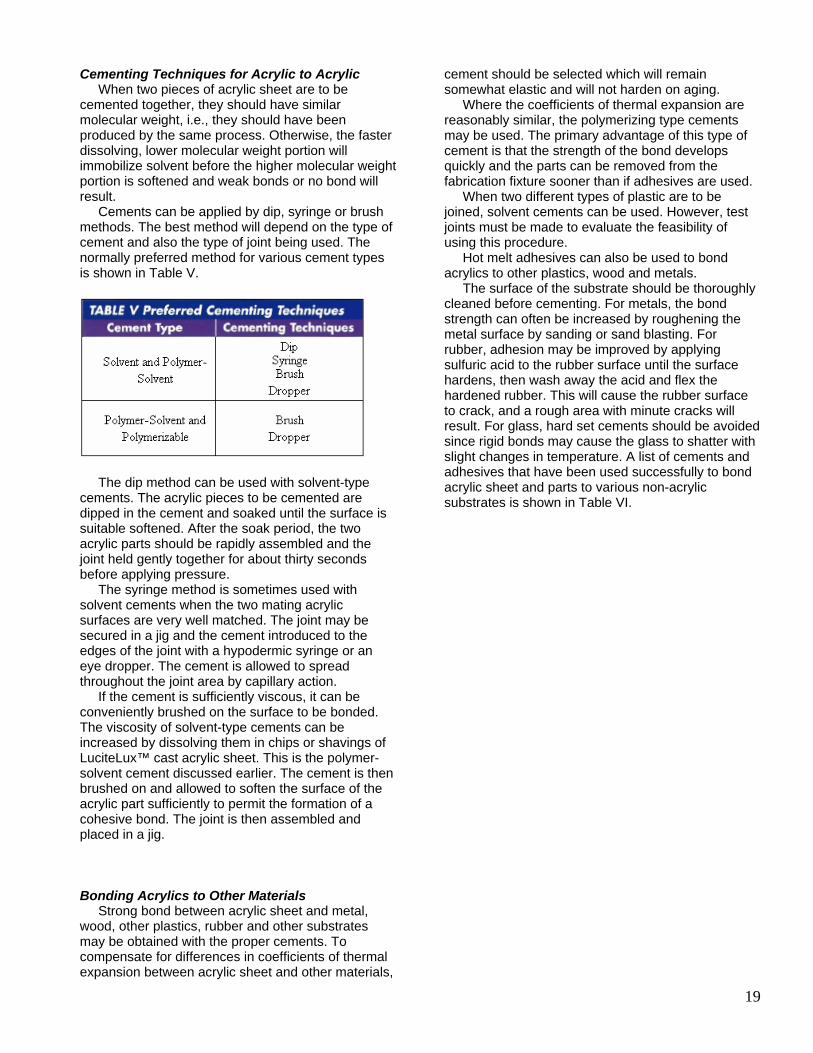
Cementing Techniques for Acrylic to Acrylic When two pieces of acrylic sheet are to be cemented together, they should have similar molecular weight, i.e., they should have been produced by the same process. Otherwise, the faster dissolving, lower molecular weight portion will immobilize solvent before the higher molecular weight portion is softened and weak bonds or no bond will result. Cements can be applied by dip, syringe or brush methods. The best method will depend on the type of cement and also the type of joint being used. The normally preferred method for various cement types is shown in Table V.
The dip method can be used with solvent-type cements. The acrylic pieces to be cemented are dipped in the cement and soaked until the surface is suitable softened. After the soak period, the two acrylic parts should be rapidly assembled and the joint held gently together for about thirty seconds before applying pressure. The syringe method is sometimes used with solvent cements when the two mating acrylic surfaces are very well matched. The joint may be secured in a jig and the cement introduced to the edges of the joint with a hypodermic syringe or an eye dropper. The cement is allowed to spread throughout the joint area by capillary action. If the cement is sufficiently viscous, it can be conveniently brushed on the surface to be bonded. The viscosity of solvent-type cements can be increased by dissolving them in chips or shavings of LuciteLux™ cast acrylic sheet. This is the polymer-solvent cement discussed earlier. The cement is then brushed on and allowed to soften the surface of the acrylic part sufficiently to permit the formation of a cohesive bond. The joint is then assembled and placed in a jig. Bonding Acrylics to Other Materials Strong bond between acrylic sheet and metal, wood, other plastics, rubber and other substrates may be obtained with the proper cements. To compensate for differences in coefficients of thermal expansion between acrylic sheet and other materials,
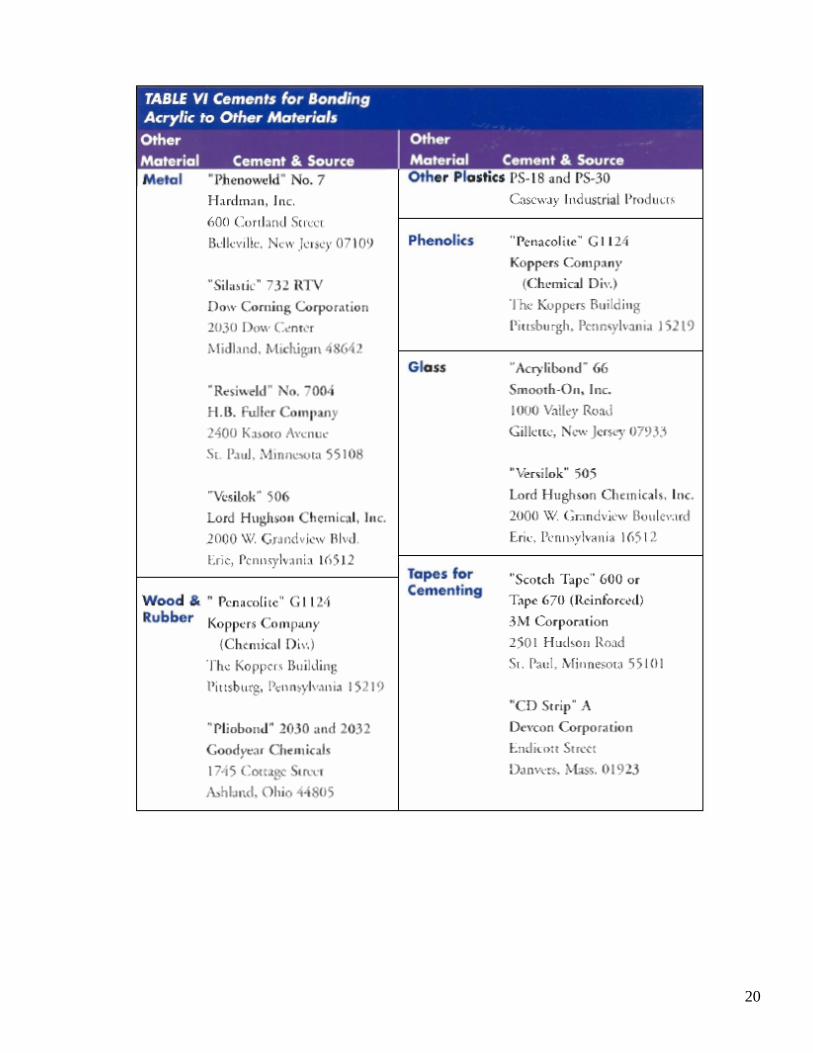
cement should be selected which will remain somewhat elastic and will not harden on aging. Where the coefficients of thermal expansion are reasonably similar, the polymerizing type cements may be used. The primary advantage of this type of cement is that the strength of the bond develops quickly and the parts can be removed from the fabrication fixture sooner than if adhesives are used. When two different types of plastic are to be joined, solvent cements can be used. However, test joints must be made to evaluate the feasibility of using this procedure. Hot melt adhesives can also be used to bond acrylics to other plastics, wood and metals. The surface of the substrate should be thoroughly cleaned before cementing. For metals, the bond strength can often be increased by roughening the metal surface by sanding or sand blasting. For rubber, adhesion may be improved by applying sulfuric acid to the rubber surface until the surface hardens, then wash away the acid and flex the hardened rubber. This will cause the rubber surface to crack, and a rough area with minute cracks will result. For glass, hard set cements should be avoided since rigid bonds may cause the glass to shatter with slight changes in temperature. A list of cements and adhesives that have been used successfully to bond acrylic sheet and parts to various non-acrylic substrates is shown in Table VI.
19
20
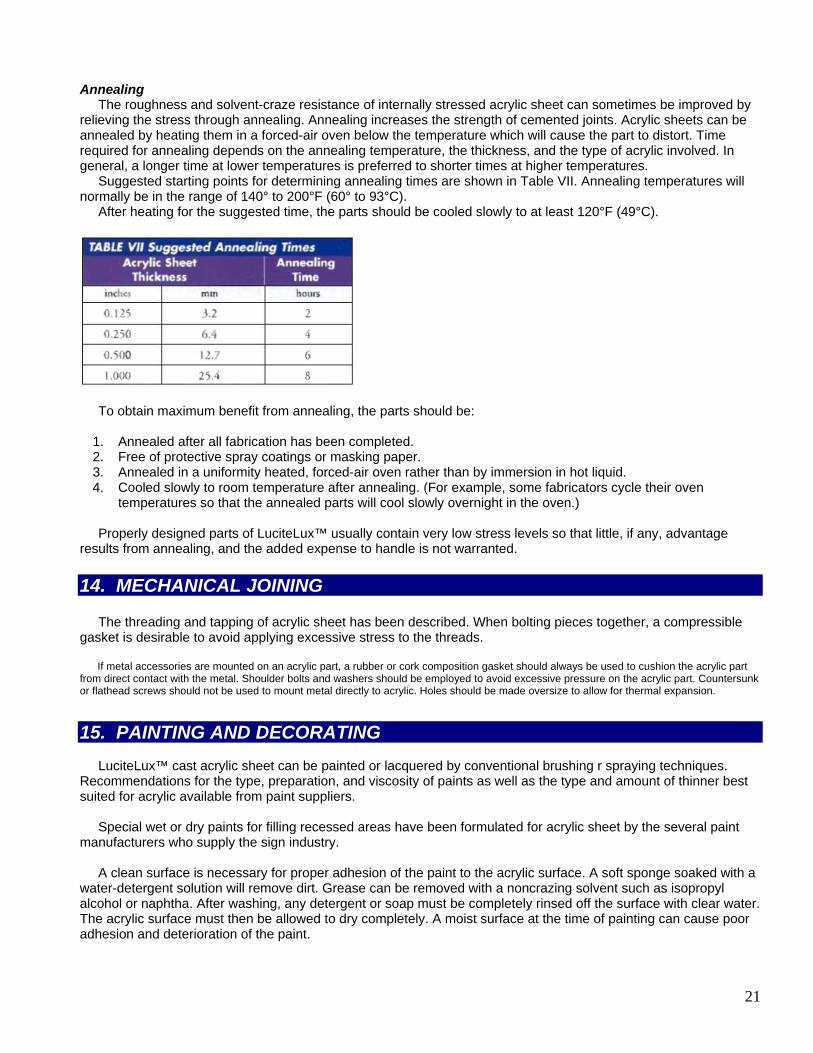
Annealing The roughness and solvent-craze resistance of internally stressed acrylic sheet can sometimes be improved by relieving the stress through annealing. Annealing increases the strength of cemented joints. Acrylic sheets can be annealed by heating them in a forced-air oven below the temperature which will cause the part to distort. Time required for annealing depends on the annealing temperature, the thickness, and the type of acrylic involved. In general, a longer time at lower temperatures is preferred to shorter times at higher temperatures. Suggested starting points for determining annealing times are shown in Table VII. Annealing temperatures will normally be in the range of 140° to 200°F (60° to 93°C). After heating for the suggested time, the parts should be cooled slowly to at least 120°F (49°C).
To obtain maximum benefit from annealing, the parts should be:
1. Annealed after all fabrication has been completed. 2. Free of protective spray coatings or masking paper. 3. Annealed in a uniformity heated, forced-air oven rather than by immersion in hot liquid. 4. Cooled slowly to room temperature after annealing. (For example, some fabricators cycle their oven
temperatures so that the annealed parts will cool slowly overnight in the oven.)
Properly designed parts of LuciteLux™ usually contain very low stress levels so that little, if any, advantage results from annealing, and the added expense to handle is not warranted. 14. MECHANICAL JOINING The threading and tapping of acrylic sheet has been described. When bolting pieces together, a compressible gasket is desirable to avoid applying excessive stress to the threads. If metal accessories are mounted on an acrylic part, a rubber or cork composition gasket should always be used to cushion the acrylic part from direct contact with the metal. Shoulder bolts and washers should be employed to avoid excessive pressure on the acrylic part. Countersunk or flathead screws should not be used to mount metal directly to acrylic. Holes should be made oversize to allow for thermal expansion.
15. PAINTING AND DECORATING LuciteLux™ cast acrylic sheet can be painted or lacquered by conventional brushing r spraying techniques. Recommendations for the type, preparation, and viscosity of paints as well as the type and amount of thinner best suited for acrylic available from paint suppliers. Special wet or dry paints for filling recessed areas have been formulated for acrylic sheet by the several paint manufacturers who supply the sign industry. A clean surface is necessary for proper adhesion of the paint to the acrylic surface. A soft sponge soaked with a water-detergent solution will remove dirt. Grease can be removed with a noncrazing solvent such as isopropyl alcohol or naphtha. After washing, any detergent or soap must be completely rinsed off the surface with clear water. The acrylic surface must then be allowed to dry completely. A moist surface at the time of painting can cause poor adhesion and deterioration of the paint.
21

22
Static charges on the acrylic sheet which cause uneven paint patterns can be avoided by wiping the surface with a sponge dampened with naptha. Paint should never be applied over films of antistatic detergents. Non-acrylic paints or freshly applied acrylic paints can be removed by soaking the painted acrylic sheet or part in a 15% solution of caustic soda or trisodium phosphate or a solution of “Trialene” soap*, then thoroughly rinsing the surface with water. These solutions have little tendency to attack or craze the acrylic surface. However, these caustic solutions will very quickly attack human skin, and caution must be exercised when using this method. The operator’s hands should always be protected with rubber gloves and eye goggles should be worn at all times. Follow the manufacturer’s directions for safe handling. 16. FINISHING The cost of decorating a product prior to forming is usually far less than the cost of decorating a formed product. Flat acrylic sheet can often be predecorated prior to forming. The pattern or decoration applied to the flat acrylic sheet must be properly distorted so that the desired pattern is produced after the acrylic sheet has been formed. The grid and the snap-back methods are two methods which have been successfully used to design properly distorted patterns on acrylic sheet. Acrylic sheet can be decorated by a combination of pre-silk screening and pre-printing followed by further decoration or painting of the formed article. For example, in decorating a sign formed or assembled from acrylic sheet, silk screening could be used to apply the solid colors to the sheet, printing could be used to apply the white colors or delicate shading to the sheet, and brush or roller painting could be used to finish the flat, even top of formed letters. Designs can be carved or engraved on the surface of acrylic sheet. Small electric hand grinders with flexible shafts similar to those used by dentists can be used. The grinders can be ground to a very sharp point since the actual carving is accomplished with the side of the grinder. The grinder should be made of high-speed steel in order to withstand the frictional heat created. Colored and metallic coils can be hot-stamped onto the surface of acrylic sheet. This technique requires stamping tools which can be carefully regulated to give proper and consistent stamping temperatures and pressures. By a series of finishing operations, the original high-gloss surface of acrylic sheet can usually be restored to an area that has been machined or scratched. Finishing normally involves an initial sanding operation, followed by buffing, and finally a polishing operation. During all these operations, heat must be avoided. The acrylic sheet should be kept in constant motion with a minimum of pressure against the finishing wheels. Air or water cooling devices can be used to reduce frictional heat. Sanding An acrylic part should not be sanded unless the surface imperfections are too deep to be removed by buffing. The finest grit sandpaper which can remove the deepest imperfections should be selected. A waterproof “wet-or-dry” sandpaper should be used. The waterproof sandpaper should be soaked in water before use and kept wet while sanding. For hand sanding, the paper should be wrapped around a wooden block, and a wide enough area should be sanded to minimize the formation of a recessed sink or uneven area. Machine sanding of acrylic sheet can be done with many types of equipment. Belt and vibrator sanders are suitable for sanding flat surfaces. Disc sanders work well for removing material from strait edges and outside curves. Drum sanders are suitable for grooved edges. Air-

23
driven or electric hand sanders work well for sanding small areas of large pieces of acrylic sheet which are too awkward to manipulate around a fixed machine. In all cases, the use of cooling water between the acrylic surface and the sanding paper is recommended. Water permits the use of finer sandpaper, produces a finer finish because of the decreased frictional heat, and retards clogging of the sanding belt or disc. In general, sanding machines are run at slower speeds for acrylic sheet than for wood and metal. With adequate water cooling, sanding wheels, discs, drums and belts can operate at speeds up to 3000 surface feet per minute (915m/min.). Sandpaper with a silicon carbide abrasive of grit size No. 180 to 240 can be used for pre-roughing and general-purpose jobs, and grit sizes No. 230 to 600 should be used for fine work. Ashing Ashing is a coarse buffing operation useful for removing rough spots and scratches that are left after sanding acrylic sheet. In some cases, an ashing operation can be used in place of the sanding. Moderately hard abrasive wheels made of stitched cotton of flannel are usually operated at speeds of 2000 to 2500 surface feet per minute (610 to 762 m/min.). Usually a slurry consisting of 0 or FFF4 pumice and water is used for ashing. The water in the slurry acts as a coolant, and care must be taken to prevent the buff from becoming dry. A dry wheel can produce drag marks and cause overheating of the acrylic surface. Polishing Acrylic polishing is done with softer buffing wheels and less abrasive polishing compounds. Initial polishing can be done with cotton or Domet flannel stitched buffs and polishing compounds such as very fine aluminum oxide or cerium oxide combined with wax, tallow or grease binders. Finer polishing can be accomplished with a softer buffing wheel containing little or no stitching and where only tallow has been applied. Soft buffing wheels made of imitation chamois or bleached muslin can also be used. The hardness of these buffs is decreased by the use of spaces which are smaller discs of the same material as that used in the wheel. The spacers are mounted between the face plates of the wheel. After sanding or ashing to remove scratches from the acrylic surface, a final coating of wax applied by hand with a pad of soft flannel will complete the finishing operation. To minimize the attraction of dust to the acrylic, an antistatic cleaner may be applied to the surface with a soft cloth. Polishing the surfaces of acrylic parts with a flame generally is not recommended. This technique will usually leave the polished area in a highly stressed condition which can cause future crazing or failure of the part. Flame polishing is sometimes used to finish the areas which are inaccessible to ordinary buffing methods. In these cases, an oxy-hydrogen flame should be used rather than an oxy-acetylene flame, which can deposit carbon on the surface. The nozzle, held at 4-6 inches (10.2-15.2 cm) from the surface, should be moved across the plastic at the rate of approximately 4 inches (10.2 cm) per second. If the flame is moved too slowly, overheating, bubbling or ignition of the surface can occur. After the acrylic surface has cooled, a second application of the flame often will improve the surface. Flame polished parts should be annealed to relieve the stress. The use of solvents to polish the surface or edges of acrylic is not recommended. Antistatic Coatings During handling, acrylic sheet can accumulate static charges which attract and cause accumulation of dust on the surface. These charges can be dissipated by wiping the surface with a water-dampened cloth. Static charges can be removed from surfaces to be painted by wiping the acrylic sheet with a clean, soft cloth slightly damp with a light grade of naphtha. Many commercially available antistatic sprays work well with acrylic parts, but should not be used for surfaces to be painted. If further information is required on design data or processing techniques, contact the appropriate Lucite International, Inc. office (see back cover).
LEADING THE WORLD OF ACRYLICS
Lucite International, Inc. * 7275 Goodlett Farms Parkway, * Cordova, TN 38016-4909
PLEASE CALL LUCITE® CUSTOMER SERVICE * U.S. 800-4-LUCITE * CANADA 800-387-4880 * WWW.LUCITEINTERNATIONAL.COM
The information and recommendations in this publication are, to the best of our knowledge, reliable. Users should make their own tests to determine the suitability of these products for their own particular purposes. Lucite International, Inc. MAKES NO WARRANTY OF ANY KIND, EXPRESSED OR IMPLIED, INCLUDING THOSE OF MERCHANTABILITY OR FITNESS FOR A PARTICULAR PURPOSE, other than that the material conforms to its applicable current Standard Specifications. Statements herein, therefore, should not be construed as representation or warranties. The responsibility of Lucite International, Inc. for claims arising out of breach of warranty, negligence, and strict liability or otherwise is limited to the purchase price of the material. Statements concerning the use of the products or formulations described herein are not to be construed as recommending the infringement of any patent, and Lucite International, Inc. assumes no liability for infringement arising out of such use. Lucite® and LuciteLux™ are registered trademarks of Lucite International, Inc.,
24


