The Journal of Prosthetic Dentistry Alfano and Lemus The fabrication of a unilateral device to treat microstomia after trauma is presented. Maximum opening was recorded before treatment. A dual arch impression that captured the dentition and commissure on the affected side was made with vinyl polysiloxane (VPS) impression material. A 1 mm vacuum formed template (VF T) was fabricated over the maxillary dentition, and a 2 mm VF T was fabricated around the commissure. A 0.9 mm (0.036”) stainless steel wire was attached with acrylic resin to both templates in order to apply a constant force to the commissure. The use of a helix in the wire allowed for flexibility and adjustment of the retractor. The patient was instructed to wear the retrac- tor for 6 hours per day, and, during a 10-week period, the maximum opening increased from 30 mm to 45 mm. ( J Prosthet Dent 2012;108:398-400) Fabrication of a unilateral oral commissure retractor Stephen G. Alfano, DDS, MS a and Frank E. Lemus b Naval Medical Center, San Diego, Calif Presented at the American Academy of Maxillofacial Prosthetics Annual Meeting, Scottsdale, Ariz, October 2011. Disclaimer The views expressed in this article are those of the authors and do not necessarily reflect the official policy or position of the De- partment of the Navy, Department of Defense, or the U.S. Government. a Chairman, Dental Department, Captain, DC, USN, Naval Medical Center, San Diego. b Maxillofacial Laboratory Technician, HM1, USN, Naval Medical Center, San Diego. 1 Initial presentation. 2 Initial opening. Scar contracture resulting from trauma, burns, or surgery can pres- ent frustrating esthetic and functional insufficiencies. Numerous devices have been fabricated and reported to increase function and reduce the amount of scar contracture. 1 These techniques and clinical reports de- scribe treatment options that apply force to both commissures 2-7 and in a vertical 3,4 or horizontal 2,7 direction. The purpose of this article was to describe the fabrication and use of a unilateral commissure retractor with a horizontal force. The patient presented with a de- fect to the right commissure and was referred to a dental clinic for commis- sure splint therapy after seeking surgi- cal options (Fig. 1). The scarring was secondary to trauma received from an improvised explosive device, and ini- tial wound debridement and closure in a field hospital was the only treat- ment he had received. The evaluating surgeon recommended that splint therapy be attempted before surgical intervention. The patient’s chief com-
Transcript
The Journal of Prosthetic Dentistry Alfano and Lemus
The fabrication of a unilateral device to treat microstomia after trauma is presented. Maximum opening was recorded before treatment. A dual arch impression that captured the dentition and commissure on the affected side was made with vinyl polysiloxane (VPS) impression material. A 1 mm vacuum formed template (VFT) was fabricated over the maxillary dentition, and a 2 mm VFT was fabricated around the commissure. A 0.9 mm (0.036”) stainless steel wire was attached with acrylic resin to both templates in order to apply a constant force to the commissure. The use of a helix in the wire allowed for flexibility and adjustment of the retractor. The patient was instructed to wear the retrac-tor for 6 hours per day, and, during a 10-week period, the maximum opening increased from 30 mm to 45 mm. (J Prosthet Dent 2012;108:398-400)
Fabrication of a unilateral oral commissure retractor
Stephen G. Alfano, DDS, MSa and Frank E. Lemusb Naval Medical Center, San Diego, Calif
Presented at the American Academy of Maxillofacial Prosthetics Annual Meeting, Scottsdale, Ariz, October 2011.
Disclaimer The views expressed in this article are those of the authors and do not necessarily reflect the official policy or position of the De-partment of the Navy, Department of Defense, or the U.S. Government.
aChairman, Dental Department, Captain, DC, USN, Naval Medical Center, San Diego.bMaxillofacial Laboratory Technician, HM1, USN, Naval Medical Center, San Diego.
1 Initial presentation.
2 Initial opening.
Scar contracture resulting from trauma, burns, or surgery can pres-ent frustrating esthetic and functional insufficiencies. Numerous devices have been fabricated and reported to increase function and reduce the amount of scar contracture.1 These techniques and clinical reports de-scribe treatment options that apply force to both commissures2-7 and in a vertical3,4 or horizontal2,7 direction. The purpose of this article was to describe the fabrication and use of a unilateral commissure retractor with a horizontal force.
The patient presented with a de-fect to the right commissure and was referred to a dental clinic for commis-sure splint therapy after seeking surgi-cal options (Fig. 1). The scarring was secondary to trauma received from an improvised explosive device, and ini-tial wound debridement and closure in a field hospital was the only treat-ment he had received. The evaluating surgeon recommended that splint therapy be attempted before surgical intervention. The patient’s chief com-
399December 2012
Alfano and Lemus
plaint was that his food choices were limited by the size of his oral opening. His initial opening measured approxi-mately 30 mm (Fig. 2). The patient also stated that he was hoping for a more esthetic outcome.
TECHNIQUE
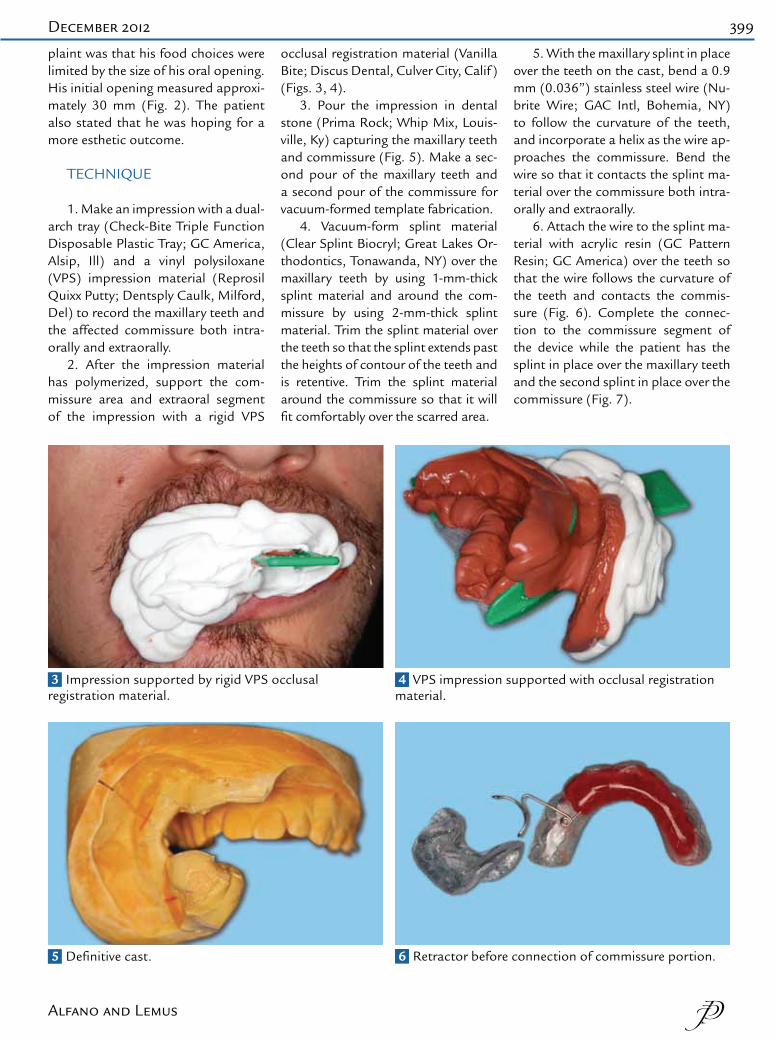
1. Make an impression with a dual-arch tray (Check-Bite Triple Function Disposable Plastic Tray; GC America, Alsip, Ill) and a vinyl polysiloxane (VPS) impression material (Reprosil Quixx Putty; Dentsply Caulk, Milford, Del) to record the maxillary teeth and the affected commissure both intra-orally and extraorally.
2. After the impression material has polymerized, support the com-missure area and extraoral segment of the impression with a rigid VPS
occlusal registration material (Vanilla Bite; Discus Dental, Culver City, Calif ) (Figs. 3, 4).
3. Pour the impression in dental stone (Prima Rock; Whip Mix, Louis-ville, Ky) capturing the maxillary teeth and commissure (Fig. 5). Make a sec-ond pour of the maxillary teeth and a second pour of the commissure for vacuum-formed template fabrication.
4. Vacuum-form splint material (Clear Splint Biocryl; Great Lakes Or-thodontics, Tonawanda, NY) over the maxillary teeth by using 1-mm-thick splint material and around the com-missure by using 2-mm-thick splint material. Trim the splint material over the teeth so that the splint extends past the heights of contour of the teeth and is retentive. Trim the splint material around the commissure so that it will fit comfortably over the scarred area.
5. With the maxillary splint in place over the teeth on the cast, bend a 0.9 mm (0.036”) stainless steel wire (Nu-brite Wire; GAC Intl, Bohemia, NY) to follow the curvature of the teeth, and incorporate a helix as the wire ap-proaches the commissure. Bend the wire so that it contacts the splint ma-terial over the commissure both intra-orally and extraorally.
6. Attach the wire to the splint ma-terial with acrylic resin (GC Pattern Resin; GC America) over the teeth so that the wire follows the curvature of the teeth and contacts the commis-sure (Fig. 6). Complete the connec-tion to the commissure segment of the device while the patient has the splint in place over the maxillary teeth and the second splint in place over the commissure (Fig. 7).
5 Definitive cast.
3 Impression supported by rigid VPS occlusal registration material.
6 Retractor before connection of commissure portion.
4 VPS impression supported with occlusal registration material.
400 Volume 108 Issue 6
The Journal of Prosthetic Dentistry Alfano and Lemus
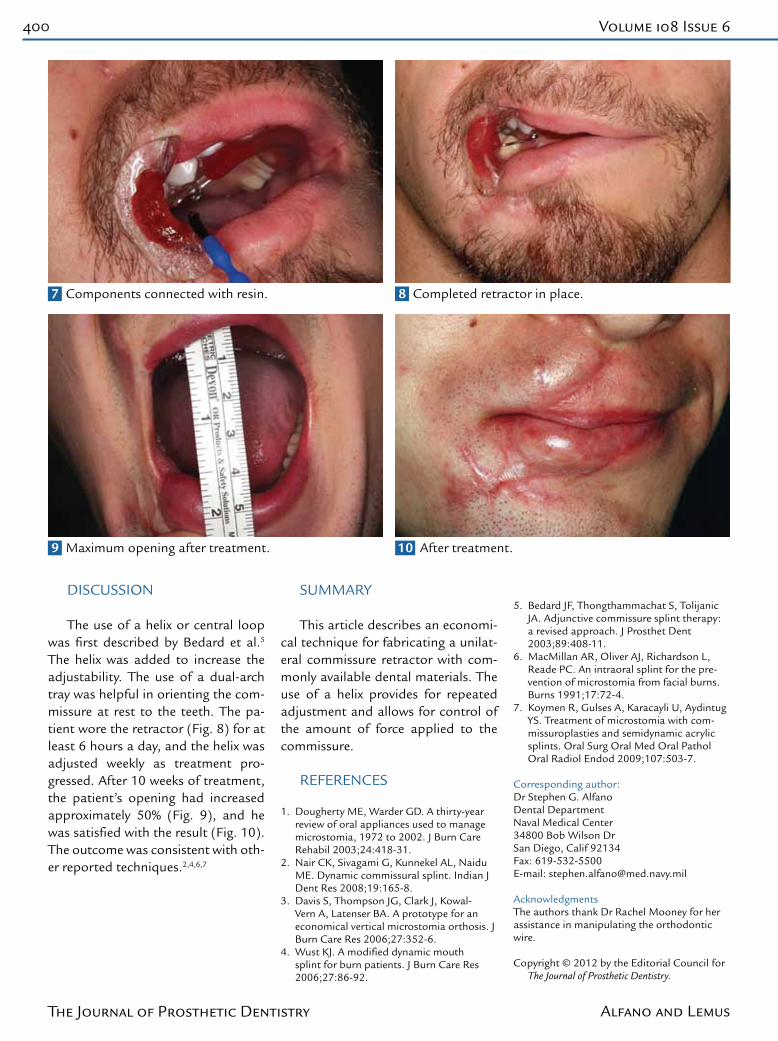
DISCUSSION The use of a helix or central loop
was first described by Bedard et al.5 The helix was added to increase the adjustability. The use of a dual-arch tray was helpful in orienting the com-missure at rest to the teeth. The pa-tient wore the retractor (Fig. 8) for at least 6 hours a day, and the helix was adjusted weekly as treatment pro-gressed. After 10 weeks of treatment, the patient’s opening had increased approximately 50% (Fig. 9), and he was satisfied with the result (Fig. 10). The outcome was consistent with oth-er reported techniques.2,4,6,7
SUMMARY This article describes an economi-
cal technique for fabricating a unilat-eral commissure retractor with com-monly available dental materials. The use of a helix provides for repeated adjustment and allows for control of the amount of force applied to the commissure.
REFERENCES
1. Dougherty ME, Warder GD. A thirty-year review of oral appliances used to manage microstomia, 1972 to 2002. J Burn Care Rehabil 2003;24:418-31.
2. Nair CK, Sivagami G, Kunnekel AL, Naidu ME. Dynamic commissural splint. Indian J Dent Res 2008;19:165-8.
3. Davis S, Thompson JG, Clark J, Kowal-Vern A, Latenser BA. A prototype for an economical vertical microstomia orthosis. J Burn Care Res 2006;27:352-6.
4. Wust KJ. A modified dynamic mouth splint for burn patients. J Burn Care Res 2006;27:86-92.
6. MacMillan AR, Oliver AJ, Richardson L, Reade PC. An intraoral splint for the pre-vention of microstomia from facial burns. Burns 1991;17:72-4.
7. Koymen R, Gulses A, Karacayli U, Aydintug YS. Treatment of microstomia with com-missuroplasties and semidynamic acrylic splints. Oral Surg Oral Med Oral Pathol Oral Radiol Endod 2009;107:503-7.
Corresponding author:Dr Stephen G. AlfanoDental DepartmentNaval Medical Center34800 Bob Wilson DrSan Diego, Calif 92134Fax: 619-532-5500E-mail: [email protected]
AcknowledgmentsThe authors thank Dr Rachel Mooney for her assistance in manipulating the orthodontic wire.