© 2016 HP Development Company, L.P. HP Confidential – For training purposes only 1
Session Handouts
HP Elite x3 – Support vILT (Day 1)
This document contains reference materials that can be used as job aids, and will help you to follow
the live video demonstrations that are included in the training.
Your instructor will direct you to the handouts at relevant points in the training.
© 2016 HP Development Company, L.P. HP Confidential – For training purposes only 2
Legal notice
© Copyright 2016 HP Development Company, L.P.
The information contained herein is subject to change without notice. The only warranties for HP products and services are
set forth in the express warranty statements accompanying such products and services. Nothing herein should be construed
as constituting an additional warranty. HP shall not be liable for technical or editorial errors or omissions contained herein.
This is an HP copyrighted work that may not be reproduced without the written permission of HP. You may not use these
materials to deliver training to any person outside of your organization without the written permission of HP.
Session Handouts
HP Elite x3 – Support vILT (Day 1)
June 2016
HP Confidential – For training purposes only
© 2016 HP Development Company, L.P. HP Confidential – For training purposes only 3
Contents
Recap .......................................................................................................................... 4
Pre-awareness training questions and answers ................................................................ 4
Tour of the product ....................................................................................................... 7
HP Elite x3 hardware specifications ................................................................................... 7
Walkaround ................................................................................................................. 9
What’s in the box? ............................................................................................................... 9
External features ..............................................................................................................10
Inserting a SIM/SD card .....................................................................................................12
Out-of-box-experience (OOBE) ........................................................................................14
Navigating Windows 10 Mobile ........................................................................................17
Getting started ........................................................................................................... 26
Enabling WLAN ..................................................................................................................26
Adding a Wi-Fi network .....................................................................................................26
Expanding your phablet .............................................................................................. 27
Accessories........................................................................................................................27
Connect to a wired display with the HP Elite x3 Desk Dock .............................................28
Continuum set up screens ................................................................................................29
Running apps on the external display ..............................................................................31
Connect to a wireless display ...........................................................................................33
© 2016 HP Development Company, L.P. HP Confidential – For training purposes only 4
Recap
Pre-awareness training questions and answers
We asked you to consider the following questions in the pre-awareness training.
USB-C
Q: A USB-C port has a number of benefits over say, a micro-USB port. Can you think of what those are?
A: Physically, a USB-C port is a lot more robust than a micro-USB port. Its increased bandwidth can support
simultaneous video, power, and data transfer. When you combine the phablet with the HP Elite x3 Lap
Dock and HP Elite x3 Desktop Dock, this one port is actually all you need to expand to a full range of uses.
Q: Customers may have questions or concerns about whether functionality is limited because the device
just has this one port. How would they expand the device if they don’t have a desk dock?
A: There are several accessories that can be used to expand the productivity of the HP Elite x3, including a
range of USB-C adapters. The phablet also supports several different wireless technologies that can be
used to connect to peripheral devices or to share data online.
Storage capacity
Q: What if you wanted to switch between two phone numbers, but also needed to expand the storage
capacity of the phone at the same time?
A: Customers can use Microsoft OneDrive to upload their files to the cloud, or use Windows 10 Mobile to sync
files to their notebook.
Cameras
Q: If you look carefully, you’ll see there’s actually a third lens here. Can you think what that might be for?
For example, is it a sensor, or a LED?
A: The phablet has the following sensors, LEDs, and lenses on the front of the device:
- Status LED
- Iris LED
- Ambient light sensor
- Front-facing camera
- Infrared camera
Q: The lens at the back of the phablet is for the rear-facing camera, which is a 16 MP camera. This is a
great feature for a range of mobile professionals – can you think of some of the ways a customer
might try to use this camera?
A: A customer might use the rear-facing camera to:
- Share their surroundings with others during Skype video calls
- Take quality photos and videos, even in low light
© 2016 HP Development Company, L.P. HP Confidential – For training purposes only 5
Q: This phablet is designed for business, so can you think what security benefits an IR camera on a device
would have?
A: The phablet is compatible with Windows Hello, and supports biometric login, which makes it a secure
option for business. The infrared camera scans the user’s iris to authenticate that they are allowed to use
the phablet.
Q: If you needed to help a customer set up iris scan in Windows Hello, could you help them with each of
the steps to do that?
A: To set up biometric login on the phablet, customers can navigate to Settings Accounts Sign-in
options. The customer must first set up a PIN before the biometric options will become available.
Note: At launch, customers will only have the iris scan biometric login option on the phablet. The fingerprint reader
will only be functional after the 2016 Windows 10 Mobile update, available from Fall 2016, has been installed on the
phablet.
Windows 10 Mobile
Phone setup
Q: You can easily import your contacts (including phone numbers, email addresses, and Skype handles)
from your old phone if it was an iPhone, a Windows phone, or an Android phone. Do you remember
from your Windows 10 Mobile training how to do that?
A: Log in to your phablet using your Microsoft account during the OOBE to import all of your contacts.
Q: But what about importing phone numbers from other phones, such as Blackberry? Or from other email
accounts, such as Hotmail?
A: Windows 10 Mobile enables customers to add several email accounts to the People app to import contacts
from each account. If their previous phone supported nano SIM cards, customers can save phone contacts
to the SIM before transferring it to the HP Elite x3. Several third-party apps are also available to transfer
contacts between different devices.
Navigating the Start screen
Q: In Start there are also shortcuts to the Microsoft Office Suite, and a few other apps. Can you think of
other things a customer might need to do on the device? If a customer said, “I use Skype all the time,
how do I add it to the Start menu?” – would you know how to answer the question?
A: Customers should navigate to the All apps menu and find the app they want to pin to the Start menu. Tap
and hold the app until a menu appears. Tap “Pin to Start” from the menu to add a tile to the Start menu.
You can access online resources like the MS Windows 10 support pages
(http://windows.microsoft.com/en-us/windows-10/support) for answers to frequently asked questions
about Windows 10 Mobile.
© 2016 HP Development Company, L.P. HP Confidential – For training purposes only 6
Elite x3 Desk Dock
Q: On the right side here we have a security lock slot. Can you think why this might be important for
business, even though there’s no data stored on the actual dock?
A: The dock is not very big and is easy to pick up and move, so it might be stolen or misplaced, especially if
several people in the workplace are using it.
Windows Continuum
Q: Remember, you’ll need to launch Continuum on the device itself to expand the desktop wirelessly with
the Lap Dock and other external wireless displays, for example, a boardroom screen. Are you familiar
with Continuum? Would you be able to explain to a customer how to do this, if they called in a panic?
A: To launch the Continuum app, navigate to the All apps menu and tap Continuum. When you are asked
which type of connection you would like to use to connect to an external monitor, select the “Wireless
adapter” option. The phablet will search for wireless display devices that are within range and display
them on the screen. For more information about setting up Continuum, refer to the Microsoft support
pages: http://windows.microsoft.com/en-za/windows-10/getstarted-continuum-mobile.
Q: Or what about a customer who was totally new to Windows 10, or to Windows 10 mobile?
A: Whether the customer is upgrading from Windows 7 or 8, or migrating from another OS, you will need to
be able to recall your Windows10 and Windows 10 Mobile training. Make sure you have revised this
recently.
© 2016 HP Development Company, L.P. HP Confidential – For training purposes only 7
Tour of the product
HP Elite x3 hardware specifications
The HP Elite x3 supports the following features.
Feature Specification
Industrial design Phablet with a plastic cover in one of the following colors:
HP Graphite and Chrome
Rose Gold
The phone is designed for MIL-STD 810G and IP67 compliance.
Processor Qualcomm Snapdragon 820 (2.15 GHz) quad-core processor
Chipset Qualcomm MSM 8996
Graphics Integrated Adreno 530 graphics controller
Memory 4 GB LPDDR4 on-board, dual-channel system memory
Storage Up to 64 GB eMMC 5.1 (24 GB reserved for system recovery software)
Display panel Features a 15.14 cm (5.96 inch) display with the following specifications:
Wide QHD (2560 x 1440) resolution – 494 PPI
Active Matrix OLED (AMOLED) (https://en.wikipedia.org/wiki/AMOLED)
10-point multi-touch with passive stylus support
Gorilla Glass with an anti-reflective coating.
85 degree viewing angle
Typical brightness of 350 nits, and up to 550 nits in High Brightness
Mode
Expansion Supports microSD card up to 2 TB
Ports and slots USB-C 3.0 port—Supports DisplayPort video output
3-in-2 card tray that supports two nanoSIM cards, or a nanoSIM card and
a microSD card (some regions support a single nanoSIM only)
Headphone/microphone combo port (3.5 mm)
Pogo-pin connectors to connect to peripheral device
Note: The pogo-pin connectors are for future expansion, to attach
accessories like a barcode scanner or battery booster to the phablet.
Wireless WLAN—Dual band 802.11 a/b/g/n/ac 2x2 antenna diversity support with
Bluetooth 4.0 and support for Miracast/Wi-Fi Direct mirroring
WWAN—2G/3G/4G, LTE-A with carrier aggregation, up to CAT 6
NFC—NXP (NQ210)
© 2016 HP Development Company, L.P. HP Confidential – For training purposes only 8
Audio Stereo speakers, three internal microphones, Qualcomm Fluence Pro.
Snapdragon Audio+ with B&O branding
Camera Front-facing cameras:
2.4 MP infrared camera for iris scan biometric login
8 MP RGB camera, supports FHD video at 28.4 frames per second (fps)
Rear-facing 16 MP RGB camera with phase detection auto focus (PDAF)
and an LED flash; supports FHD video at 30 fps
Both RGB cameras support low light capabilities.
Security Windows 10 Mobile Enhanced Security with UEFI secure boot, on-device
encryption, TrustZone
Dual biometric login support with iris recognition and a fingerprint
reader
NOTE: The fingerprint reader is not supported on the preinstalled
version of the OS, and will only be available after the 2016 Windows 10
Mobile update (Redstone 1) has been installed on the phablet.
FIPS 140-2 encryption
The processor supports:
– Secure boot
– 128-bit key Unified Image Encryption
– 256-bit key Full Disk Encryption
– Anti-rollback protection
– Firmware-based TPM 2.0
Windows 10 Mobile supports:
– 128 key Bitlocker encryption
– Enterprise-grade VPN
Power
requirements
Battery—3.85 V (max 15.98Wh, 4150 mAh) lithium-ion polymer Long
Life Battery
AC adapter—10 W (5 V, 2 A) USB-C wall-mount AC adapter, or HP Elite x3
Wireless Charger
Sensors Ambient Light Sensor (ALS) and proximity combo sensor
Accelerometer and gyroscope
e-Compass
Pressure sensor
Hall sensor
NFC
Sensor hub on processor
GPS
Docking stations HP Elite x3 Desk Dock, HP Elite x3 Lap Dock
© 2016 HP Development Company, L.P. HP Confidential – For training purposes only 9
Walkaround
What’s in the box?
The following items are DIB with the HP Elite x3:
HP Elite x3
AC adapter
USB cable
Headset (ships with phablets purchased through HP.com or the Microsoft Store)
© 2016 HP Development Company, L.P. HP Confidential – For training purposes only 10
External features
The HP Elite x3 has the following external features:
Front view
Back view
© 2016 HP Development Company, L.P. HP Confidential – For training purposes only 11
Right view
Left view
Bottom view
Top view
© 2016 HP Development Company, L.P. HP Confidential – For training purposes only 12
Inserting a SIM/SD card To insert a SIM card, and optional SD card:
1. Make sure the phone is switched off.
2. Remove the card tray from the left edge of the device. You may have to use a fingernail or sharp object to
pry the tray out of its slot.
3. Insert a nanoSIM card into Slot 1.
4. Optional: Insert a nanoSIM card (dual SIM configurations only) or microSD card into Slot 2.
A microSD card and nanoSIM card. Two nanoSIM cards.
© 2016 HP Development Company, L.P. HP Confidential – For training purposes only 13
5. Insert the tray back into its slot, with the installed SD/SIM cards
facing upwards.
Supported WWAN bands
The phablet supports two SKUs—one for NA and LA, and one for the rest of the world (ROW). Phablets
shipping to NA and LA support fewer WWAN bands than those shipping to the rest of the world.
Notes:
1. Chile will be using the ROW SKU only, not the configuration leveraged by other LA countries.
2. Phablets shipping to NA are not compatible with Verizon or Sprint mobile carriers.
The different phablet configurations support the following WWAN bands:
WWAN bands ROW—including Chile NA and LA—excluding Chile
2G 850/900/1800/1900 MHz 850/900/1800/1900 MHz
3G B5/8/2/1/4 B5/8/2/1/4
4G FDD B1/3/5/7/8/19/20/26/28
TDD B38/39/40/41
FDD B2/4/5/7/12/17/29/30
2DL CA: B3+B20, B3+B7, B20+B7, B7+B28,
B1+B3, B3+B5, B3+B8, B1+B5,
B3+B28, TDD Intra CA
B2+B29, B4+B29, B2+B17, B4+B17,
B2+B12, B4+B12, B4+B7
Frequency
ranges
LB 703-960MHz
MB 1710-2170MHz
HB 2300-2400MHz, 2496-2690MHz
LB 699-960MHz
MB 1710-2170MHz
HB 2496-2690MHz
© 2016 HP Development Company, L.P. HP Confidential – For training purposes only 14
Out-of-box-experience (OOBE)
Windows 10 Mobile has a similar OOBE to the desktop version of the operating system. The following
screenshots outline the OOBE for Version 1511 (Threshold 2) of Windows 10 Mobile that is preinstalled on the
phablet.
The following screens display in the order provided.
1. Choose a language. 2. Choose a country. 3. If two SIMs are inserted, you
will be asked to select one
to use for cellular data.
A SIM error message
displays if there are no SIM
cards inserted.
© 2016 HP Development Company, L.P. HP Confidential – For training purposes only 15
Note: Users can only connect to Wi-Fi networks that are open or have a security key during the OOBE. If you need to
connect to a network through a proxy, you will have to skip the Connect to Wi-Fi step in the OOBE and wait until you have
logged into the OS to set up the connection.
4. Accept the legal
agreement
5. Set the date and time 6. Connect to Wi-Fi
© 2016 HP Development Company, L.P. HP Confidential – For training purposes only 16
7. Choose your settings 8. Sign in to your Microsoft
account, or a work account
9. Wait for all of the apps to
finish installing
10. Allow HP OOBE to access
your information
11. Create your HP profile
© 2016 HP Development Company, L.P. HP Confidential – For training purposes only 17
Navigating Windows 10 Mobile Note: The following screenshots are from Version 1511 (Threshold 2), the preinstalled version of Windows 10 Mobile.
There may be some changes in Version 1607 (Windows 10 Anniversary Update), which will be available after the launch
of the phablet.
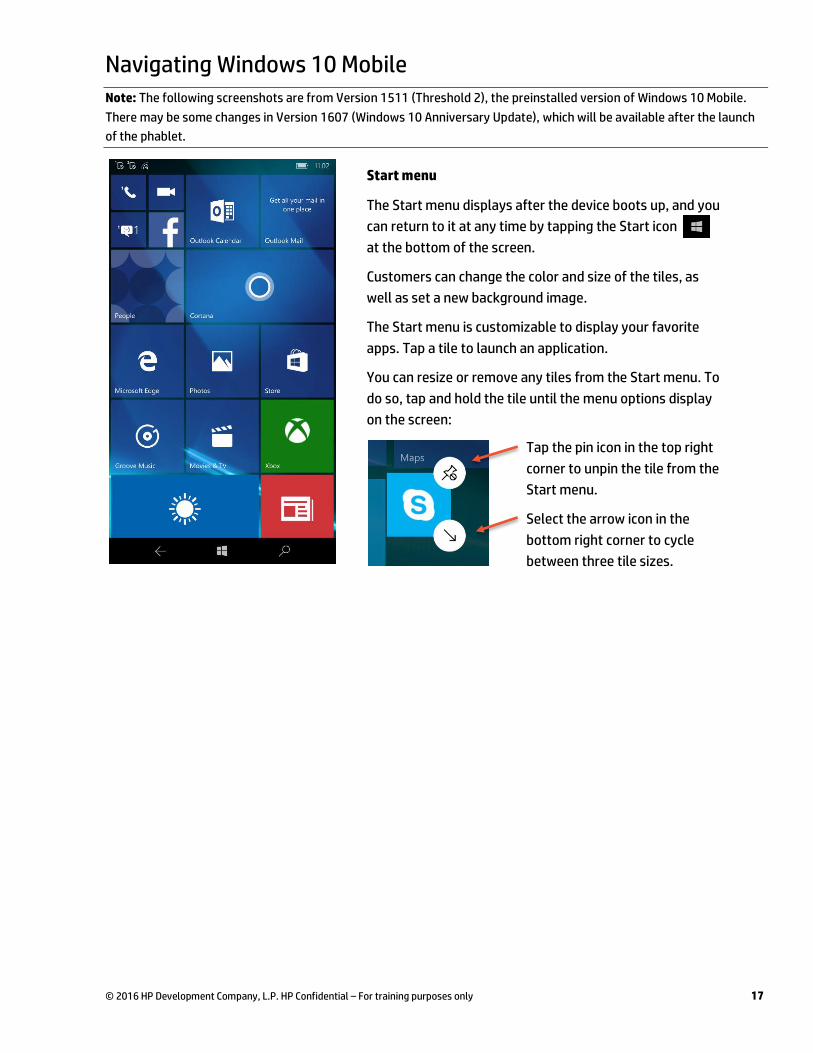
Start menu
The Start menu displays after the device boots up, and you
can return to it at any time by tapping the Start icon
at the bottom of the screen.
Customers can change the color and size of the tiles, as
well as set a new background image.
The Start menu is customizable to display your favorite
apps. Tap a tile to launch an application.
You can resize or remove any tiles from the Start menu. To
do so, tap and hold the tile until the menu options display
on the screen:
Tap the pin icon in the top right
corner to unpin the tile from the
Start menu.
Select the arrow icon in the
bottom right corner to cycle
between three tile sizes.
© 2016 HP Development Company, L.P. HP Confidential – For training purposes only 18
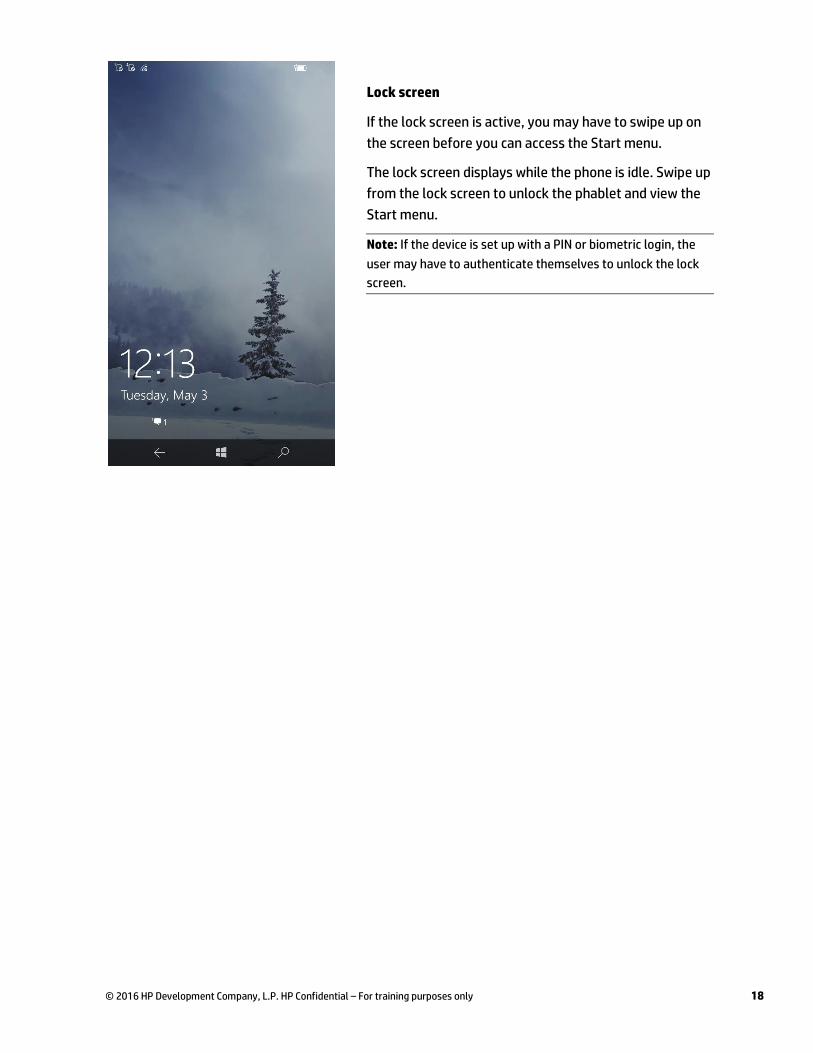
Lock screen
If the lock screen is active, you may have to swipe up on
the screen before you can access the Start menu.
The lock screen displays while the phone is idle. Swipe up
from the lock screen to unlock the phablet and view the
Start menu.
Note: If the device is set up with a PIN or biometric login, the
user may have to authenticate themselves to unlock the lock
screen.
© 2016 HP Development Company, L.P. HP Confidential – For training purposes only 19
All apps menu
Swipe right from the Start menu to access the All apps
menu. The All apps menu lists all of the apps that are
installed on the device, in alphabetical order.
Scroll down to view more apps, or use the Search bar at
the top of the screen to find a specific app.
Tap an app to launch it.
Pin apps to Start menu
From the All apps menu, tap and hold an app to view
more options. Select the Pin to Start option to add a tile
for the selected app to the Start menu.
You can resize or remove any tiles from the Start menu.
To do so, tap and hold the tile until the menu options
display on the screen. Select the arrow icon in the
bottom right corner to cycle between three tile sizes, or
tap the pin icon in the top right corner to unpin the tile
from the Start menu.
© 2016 HP Development Company, L.P. HP Confidential – For training purposes only 20
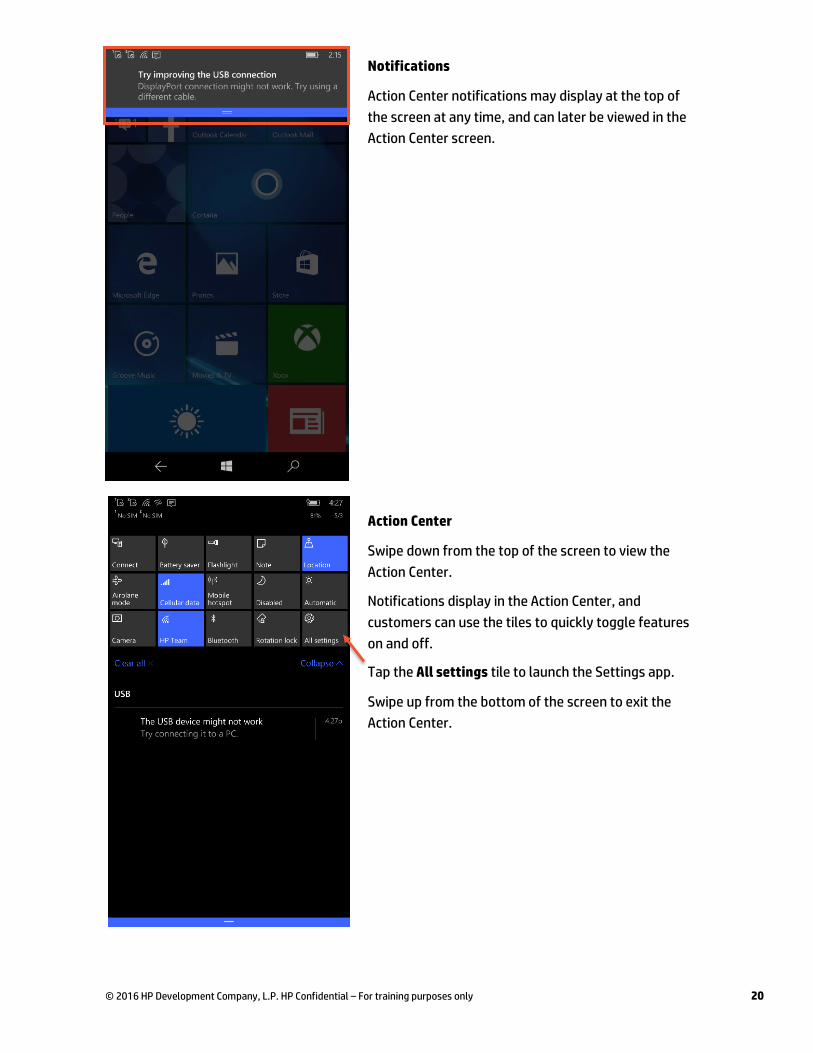
Action Center
Swipe down from the top of the screen to view the
Action Center.
Notifications display in the Action Center, and
customers can use the tiles to quickly toggle features
on and off.
Tap the All settings tile to launch the Settings app.
Swipe up from the bottom of the screen to exit the
Action Center.
Notifications
Action Center notifications may display at the top of
the screen at any time, and can later be viewed in the
Action Center screen.
© 2016 HP Development Company, L.P. HP Confidential – For training purposes only 21
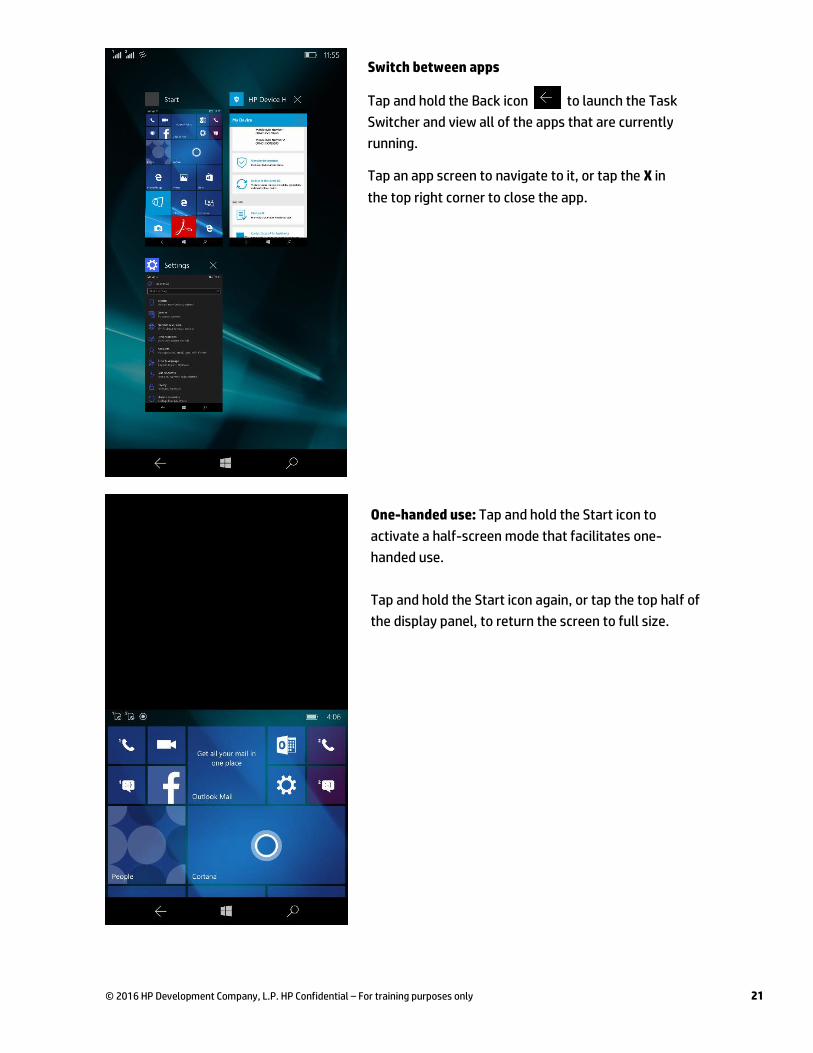
One-handed use: Tap and hold the Start icon to
activate a half-screen mode that facilitates one-
handed use.
Tap and hold the Start icon again, or tap the top half of
the display panel, to return the screen to full size.
Switch between apps
Tap and hold the Back icon to launch the Task
Switcher and view all of the apps that are currently
running.
Tap an app screen to navigate to it, or tap the X in
the top right corner to close the app.
© 2016 HP Development Company, L.P. HP Confidential – For training purposes only 22
Troubleshooting
Resets
A common troubleshooting step is to perform a reset. Before you begin troubleshooting you should know
how to do the following:
Restart the phablet: A restart turns the phablet off and then on again.
Reset the phablet: A reset reinstalls the latest version of the OS that was downloaded to the phablet.
It wipes all data from the phablet and restores it to the default factory settings.
Important! You should advise the customer to back up their data before performing a reset.
Reset What it does How to do it
Restart Reboots the phablet. Restart from the OS:
1. Press and hold the power button until the “slide down to
power off” prompt appears.
2. Swipe down on the screen to power down the phablet.
3. After the unit has powered down, wait a few seconds.
Press and hold the power button until the phablet
vibrates and turns on.
If the phablet is unresponsive/does not boot into the OS:
1. Press and hold the power button until the phablet turns
off.
2. Turn the device on as usual.
Reset Reinstalls the latest
version of the OS
downloaded to the
phablet, wipes all data,
and restores the default
factory settings.
You should advise the customer to perform a backup before a
reset.
Reset from the OS:
1. Swipe right from the Start screen to access the All apps
menu. Select Settings.
2. Navigate to System About.
3. Tap Reset my phone and select Yes in the following two
prompts that display. The reset should start, and may
take a few minutes to complete.
© 2016 HP Development Company, L.P. HP Confidential – For training purposes only 23
If the phablet is unresponsive/does not boot into the OS:
1. Press and hold the power and volume downs buttons for
about 10 to 15 seconds until the phablet vibrates.
2. Release both buttons, and then immediately press and
hold the volume down button until an exclamation mark
(!) displays on the screen.
3. Release the volume down button, then press and release
the following buttons in order:
a. Volume up
b. Volume down
c. Power
d. Volume down
The reset should start, and may take a few minutes to
complete.
Common issues and suggested troubleshooting steps
The following are issues that customers may experience on their HP Elite x3. You should guide the customer
through the recommended troubleshooting steps if they are experiencing one of these issues.
Issue Possible solutions
Updates fail to
install
Check the following, and then try to install the updates again:
The phablet is fully charged.
The phablet is connected to Wi-Fi (you can also choose to download
updates over 3G, 4G, or LTE mobile data connection).
The phablet has enough free storage space to support the update.
If the device is frozen, reboot the phablet and try to install the update again.
If the phablet does not start after a failed update:
1. Restart the unresponsive phablet.
2. Reinstall the operating system using a Windows PC and the Windows
Device Recovery Tool.
Device stops
responding
Restart the phablet.
System does not
power on
1. Charge the battery for at least 15 minutes using the DIB charger and then
attempt to power on again.
© 2016 HP Development Company, L.P. HP Confidential – For training purposes only 24
Power button
does not work
2. Remove AC adapter and try to boot from battery.
3. Perform a restart.
If the battery does not appear to be charging:
1. Check that you are using the correct charger for the phablet.
2. Try a different power outlet.
3. Check for signs of physical damage to the USB-C port.
4. If the customer has just received the unit and it does not power on when
they press the power button, advise them to let it charge for 24 hours
and then try to power it on again.
Device does not
charge properly
Speakers produce
a crackling sound.
1. Restart the phablet.
2. Reset the phablet.
Microphone does
not work and
cannot be used to
record audio.
1. Use the camera to record audio.
2. Restart the phablet.
3. Reset the phablet.
Tablet does not
produce any
sound.
1. Adjust the volume.
2. Insert or remove the headphones.
3. Restart the phablet.
4. Reset the phablet.
Volume button
does not work.
1. Check that the phablet is turned on.
2. Insert or remove the headphones.
3. Disconnect the phablet from all wireless, Miracast, and Bluetooth
devices.
Webcams do not
turn on.
1. Restart the phablet.
2. Reset the phablet.
Touch panel does
not work.
1. If you are using a stylus with the screen, check that it is a passive stylus.
2. Restart the phablet.
3. Remove any physical barriers, such as gloves on the user’s hands or a
screen protector on the phablet.
4. If you can still navigate the screen, run the Touch test in HP Mobile
Hardware Diagnostics app.
5. If the issue is not resolved after following each of the previous steps,
perform a reset.
6. If the issue persists after a reset, the phablet must be replaced.
The phablet does
not connect to an
external monitor.
1. Check that the adapter/docks being used are compatible with the
phablet.
2. Check that the monitor is connected to a power source.
3. Check that the dock (if applicable) is connected to an external power
source.
© 2016 HP Development Company, L.P. HP Confidential – For training purposes only 25
USB connection
does not work. 1. Check that the peripheral device being used is compatible with the HP
Elite x3.
2. To check if the USB port or USB cable is faulty, connect the USB cable and
reboot the device.
Wi-Fi/Bluetooth
connection does
not work.
1. Make sure that Wi-Fi and Bluetooth are enabled on the phablet.
2. Make sure that there are Wi-Fi networks/Bluetooth devices within range,
and that Bluetooth devices are set to discoverable.
3. Perform a restart on the phablet.
4. Reset the router or access point.
5. If the Wi-Fi network/Bluetooth device details are already saved on the
phablet, delete the profile and then add it again.
6. Update the firmware on the wireless router.
7. Try connecting the phablet to the network using a different router.
8. Use the HP Mobile Hardware Diagnostics app to run the Wi-Fi Network
test.
9. Perform a reset on the phablet.
Phablet does not
detect the
microSD card.
1. Insert or remove the SD card.
2. Check if the SD card is supported (maximum of 2 TB).
3. Check if the phablet supports the file formatting on the SD card.
4. Restart the phablet.
5. Reset the phablet.
An app stops
responding.
Press and hold the back button on the phablet until the Task Switcher
appears; select the x next to the app to close it.
If the issue persists the next time you launch the app:
1. If the app causing issues has been sideloaded—installed manually
instead of through the Windows 10 Store—it may not have passed the
same quality checks as those in the Store, and should be uninstalled.
2. Check for app updates in the Store.
3. Uninstall the app, then download it from the Store and reinstall it.
4. Clear app’s cache.
5. Clear the app’s data.
6. Check for system updates.
7. Check in with app developer for support.
8. Restart the phablet.
© 2016 HP Development Company, L.P. HP Confidential – For training purposes only 26
Getting started
Enabling WLAN
To ensure that WLAN is enabled, you:
1. Swipe down from the top of the screen to launch
Action Center. You may need to select Expand to
view all the tiles.
2. Ensure that the Wi-Fi tile is highlighted, indicating
that it is enabled. The tiles can be identified by
their respective icons.
Adding a Wi-Fi network The phablet will not detect hidden networks. To connect to a hidden network, the customer must manually
add the network profile. To add a Wi-Fi network, you perform the following steps:
1. In the Wi-Fi menu, scroll down to the bottom of the page and tap Manage.
2. From the menu at the bottom of the Manage screen, select Add.
3. Enter the network name in the screen that appears, and follow the on-screen instructions.
2 1
3
2
1
© 2016 HP Development Company, L.P. HP Confidential – For training purposes only 27
Expanding your phablet
Accessories
The HP Elite x3 may be compatible with the following accessories that are either available dropped-in-the-
box (DIB) or as after-market options (AMO).
Compatible display adapters and docks AMO DIB
Docks
HP Elite x3 Desk Dock
HP Elite x3 Lap Dock
Covers
Anti-fingerprint Screen Protector
Anti-shatter Glass Screen Protector
Privacy Screen
Privacy Screen for the HP Elite x3 Lap Dock
Cases
Rugged case
Slim Folio Case with wallet and stylus holder
Silicone case
Elite Top Load Colombian Leather Case
Stylus
Passive Stylus
Adapters
HP Micro HDMI to HDMI/VGA adapter
HP USB-C to RJ-45, USB 3.0 and USB-C Adapter
HP USB-C to 3.0 mm and 4.5 mm Power Adapter
HP USB-C to VGA Adapter
HP USB-C to HDMI Adapter
HP USB-C to DisplayPort Adapter
USB-C to USB-A
USB-C to RJ-45 adapter
HP Display Port to VGA Adapter
HP DisplayPort to HDMI 1.4 Adapter
Power
USB-A power adapter (10 W)
USB-C power adapter (15 W)
© 2016 HP Development Company, L.P. HP Confidential – For training purposes only 28
12 W USB auto adapter
HP Elite x3 Wireless Charger
Audio
Wired headphones H2310
1More EH001 Headset
UC wireless duo headset
UC wireless mono headset
Input devices
HP Slim Bluetooth Mouse
HP Touch to Pair Bluetooth Mouse
HP Ultrathin Bluetooth Wireless Mouse SE
HP Ultrathin Bluetooth Wireless Mouse
Connect to a wired display with the HP Elite x3 Desk Dock
Refer to the white paper for the HP Elite x3 Desk Dock for more information about how to connect the HP Elite
x3 to the desk dock.
© 2016 HP Development Company, L.P. HP Confidential – For training purposes only 29
Continuum set up screens
1. After you have linked the phone to an external monitor for the first time, you should see a welcome
screen on your external monitor. If you do not see the welcome screen on the external monitor, you
should check that all of the cables linking the device to the monitor are securely connected.
2. If you see the Welcome to Continuum screen on the
external display, tap I see it on the phone to move on.
NOTE: If you have checked your cable connections and still don’t
see the screen on your external monitor, tap the Get help option
to troubleshoot the display connection. You must have a working
Internet connection to access help.
1
2
© 2016 HP Development Company, L.P. HP Confidential – For training purposes only 30
3. An introductory video begins to play on the external monitor to introduce the first-time user to
Continuum. Select Skip video on the HP Elite x3 display if you want to skip the introduction and start
working.
4. Next, the You’re all connected! Screen displays. Select Done to start using Continuum.
3
4
© 2016 HP Development Company, L.P. HP Confidential – For training purposes only 31
Running apps on the external display
1. After the Continuum setup has
completed, the screen on the
phone automatically changes to
a touchpad, and the Continuum
desktop displays on the
external monitor. Use the
‘touchpad’ to navigate on the
external screen, or press the
back arrow to exit the
Continuum app and continue to
use the phone normally.
2. While you are connected to an
external monitor, you can
return to the Continuum app
touchpad by tapping the “Tap to
control… ” prompt at the top of
the screen.
3. To run apps on the external monitor, select the Start icon on the desktop to launch the Start menu. The
interface should be similar to Windows 10 desktop. Tap a tile to launch an app, or select All apps to view
more apps.
Notes: If an app is greyed out on the Start menu, this means it does not support Continuum. If you try to run one of
these apps on the external display, it will launch on the phablet.
3
1
2
© 2016 HP Development Company, L.P. HP Confidential – For training purposes only 32
4. After you select an app, it displays full-screen on the external monitor. To close the app, move the cursor
to the top right corner of the full screen app. Click the “x” that appears on hover to close the window.
Note: Apps that are launched from the phone will display on the phone’s screen. Apps must be launched from the
external display interface to run on the external display.
5. To navigate between or close running apps:
a. Select the Task View icon at the bottom of the screen. A thumbnail of each running app
displays on the screen.
b. Select a thumbnail in the Task View to navigate to an app.
c. Select the X in the top right corner of an app’s thumbnail to close the running app.
A
B
C
© 2016 HP Development Company, L.P. HP Confidential – For training purposes only 33
Connect to a wireless display
To wirelessly connect the device to an external monitor, customers should follow these steps.
1. From the All apps menu, scroll down to Continuum, and tap it to launch the app.
2. The Continuum app launches. A welcome screen appears if this is the first time you have used the app.
Tap Set up, at the bottom of the screen, to proceed.
3. The How will you connect? screen appears. To set up a wireless connection, select Wireless adapter.
4. Tap Connect.
5. Any wireless devices that are detected within range display on the screen. Select your display, dock, or
adapter from the selection.
6. The device should automatically connect to the display after you select it from the list.
7. After the HP Elite x3 has connected to the monitor, the Continuum set up sequence begins.
If the customer does not see their wireless external display on the screen, they should check that the
peripheral device is
- set to discoverable, if applicable
- within range of the HP Elite x3
- connected to a power source, if applicable
1
2 4
3