146
Factura ™ Feature Identification Software User’s Manual
Factura
™
Feature Identification Software
User’s Manual
© Copyright 2001, Applied Biosystems. All rights reserved.
For Research Use Only. Not for use in diagnostic procedures.
Notice to Purchaser: License Disclaimer
Purchase of this product alone does not imply any license under any process, instrument or other apparatus, system, composition, reagent or kit rights under patent claims owned or otherwise controlled by PE Corporation (NY), either expressly, or by estoppel.
ABI P
RISM
and its design and Applied Biosystems are registered trademarks of Applera Corporation or its subsidiaries in the U.S. and certain other countries. ABI, AutoAssembler, GeneAssist and Sequence Navigator are trademarks of Applera Corporation or its subsidiaries in the U.S. and certain other countries.
All other trademarks are the sole property of their respective owners.
Applied Biosystems
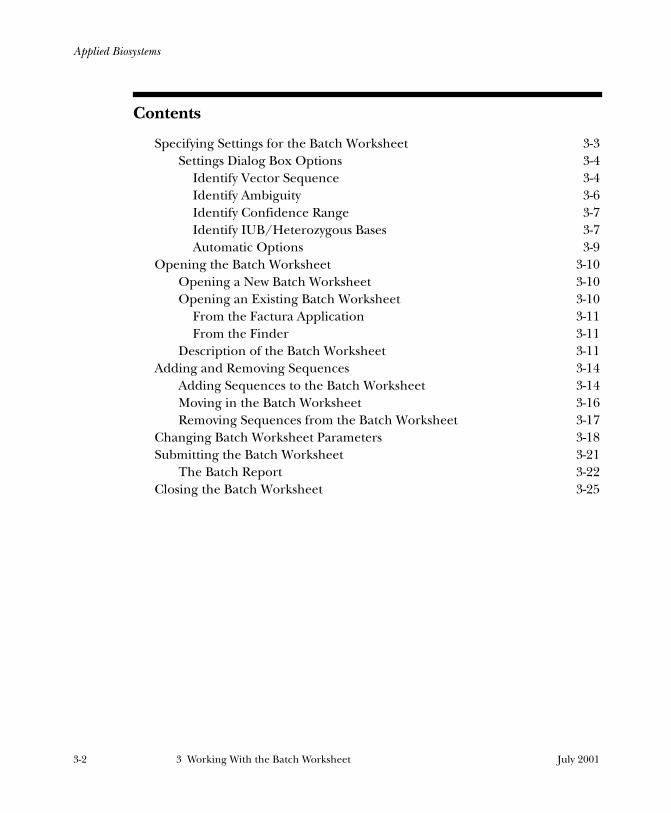
Contents
1 IntroductionAbout the Factura Software User’s Manual 1-3What is Factura Software? 1-4Special Text Usage 1-5Technical Support 1-6
2 Getting StartedFactura Macintosh Installation 2-3Factura Program Files 2-3Factura Input and Output Files 2-4Factura Windows and Views 2-7
3 Working With the Batch WorksheetSpecifying Settings for the Batch Worksheet 3-3Opening the Batch Worksheet 3-10Adding and Removing Sequences 3-14Changing Batch Worksheet Parameters 3-18Submitting the Batch Worksheet 3-21Closing the Batch Worksheet 3-25
4 Working With Sequences in FacturaOpening the Sequence Window 4-3Description of the Sequence Window 4-8Editing in the Sequence Window 4-14Viewing Options in the Sequence Window 4-21Closing the Sequence Window 4-42
July 2001 Contents iii
Applied Biosystems
5 Printing and Saving in FacturaPrinting Batch Reports & Electropherograms 5-3Saving the Batch Worksheet 5-5Saving Results in a Batch Report 5-7Saving Results to Sequence Data Source Files 5-9Saving Changes Made in the Sequence Window 5-12Exporting Results to Other Formats 5-13
6 Setting up Factura LibrariesLibrary Files 6-3Setting Up the Libraries 6-5
7 Overview—Factura Menu CommandsFactura Main Menu 7-3Apple Menu 7-3File Menu 7-4Edit Menu 7-6Library Menu 7-7Sequence Menu 7-8Worksheet Menu 7-10Window Menu 7-12
iv Contents July 2001
000 I'M INVISIBLE
Applied Biosystems
1 Introduction
This section, Introduction, provides a general introduction to Factura Software. It also provides information about the organization of this manual, about special text usage in the manual, and instructions on how get help from Applied Biosystems.July 2001 1 Introduction 1-1

Applied Biosystems
Contents
About the Factura Software User’s Manual 1-3What is Factura Software? 1-4
Factura (Feature Identification) 1-4Factura Dataflow 1-4Factura Setup 1-4
Special Text Usage 1-5Attention Users 1-5
Technical Support 1-6Contacting Technical Support 1-6To Contact Technical Support by E-Mail 1-6Hours for Telephone Technical Support 1-6To Contact Technical Support by Telephone or Fax 1-7To Reach Technical Support Through the Internet 1-11To Obtain Documents on Demand 1-12
1-2 1 Introduction July 2001

Applied Biosystems
About the Factura Software User’s Manual
This manual provides you with detailed information about the Factura application program. For information on how to use Factura, consult Tutorial 6, Using the Factura Program in the GeneAssist Applications Tutorials manual.
• This section, Introduction, provides a general introduction to Factura. It also provides information about the organization of this manual, about special text usage in the manual, and instructions on how get help from Applied Biosystems.
• Section 2, Getting Started, lists the files provided with the Factura application. It also describes Factura input and output files, and Factura windows and views.
• Section 3, Working With the Batch Worksheet, explains the use of the batch worksheet. This section provides information on how to open, close, and set up the batch worksheet, as well as how to add and remove sequences, change the processing parameters, and submit the batch of sequences for processing.
• Section 4, Working With Sequences in Factura, provides descriptions of several ways to open a sequence window. It includes a brief description of the sequence window and its various views and provides procedures for editing and changing the appearance of a sequence in the sequence window.
• Section 5, Printing and Saving in Factura, explains how to save the batch worksheet, view and save results in a batch report, save Factura-identified features to the individual sequence files, and export the contents of a sequence file into other formats.
• Section 6, Setting up Factura Libraries, explains the difference between Main and Custom libraries and describes how to set up custom libraries of vectors, enzymes, and primers to be used with your Factura processing.
• Section 7, Overview—Factura Menu Commands, provides tables with brief descriptions of the Factura main menus along with cross references to other sections that provide more detail.
• The Factura Software User’s Manual concludes with an index.
July 2001 1 Introduction 1-3
Applied Biosystems
What is Factura Software?
Factura (Feature Identification)The Factura application enables you to clean up ABI 373 or ABI PRISM 377 or 310 Sequencer sample files or other data prior to assembly or prior to analysis. Factura does this by automatically identifying designated sequence features, such as vector sequences on both ends of the sequence fragment and ambiguous regions at the ends of the fragment. After identification of features, Factura takes advantage of the 373, 377, or 310 sample files (Applied Biosystems automated sequencer integrated data files—ABI 373 or ABI PRISM 377 or 310) to add identified features to sequence files for use by the AutoAssembler and GeneAssist applications.
Factura DataflowFactura is used to clean up sample files or other data. Input data often contains vector sequences and might have ambiguously called bases at both ends of the sequence that the user has to remove prior to assembly or analysis. Factura functions by identifying designated features, such as vectors and ambiguous regions, and flagging the features in the sequence file. This allows the AutoAssembler and GeneAssist applications to ignore designated sequence features, effectively cleaning up the data.
Factura SetupTo enable you to clean up data input from ABI 373 or ABI PRISM 377 or 310 sequencer files, Factura allows you to specify information needed to quickly access the location of the vector sequence as well as the information needed to remove ambiguous regions. Information required to locate the vector sequence includes the names of the vector, primer, and the cloning site. Information needed to remove ambiguities includes the specification of the amount of ambiguity acceptable at both the 5´ and 3´ ends and the number of Ns acceptable in the sequence. You can also specify the valid length of the sequence (possible maximum range of base positions).
1-4 1 Introduction July 2001
Applied Biosystems
Special Text Usage
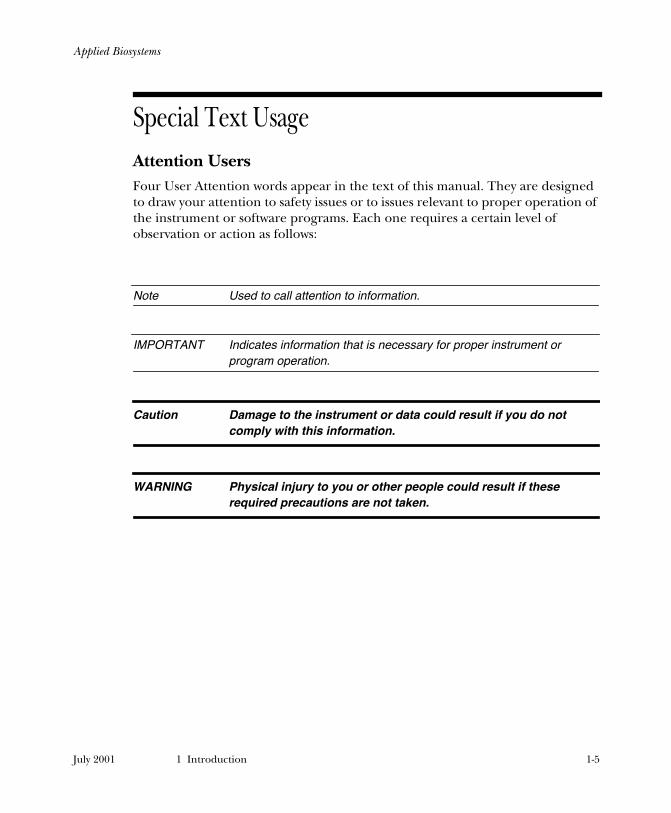
Attention Users Four User Attention words appear in the text of this manual. They are designed to draw your attention to safety issues or to issues relevant to proper operation of the instrument or software programs. Each one requires a certain level of observation or action as follows:
Note Used to call attention to information.
IMPORTANT Indicates information that is necessary for proper instrument or program operation.
Caution Damage to the instrument or data could result if you do not comply with this information.
WARNING Physical injury to you or other people could result if these required precautions are not taken.
July 2001 1 Introduction 1-5
Applied Biosystems
Technical Support
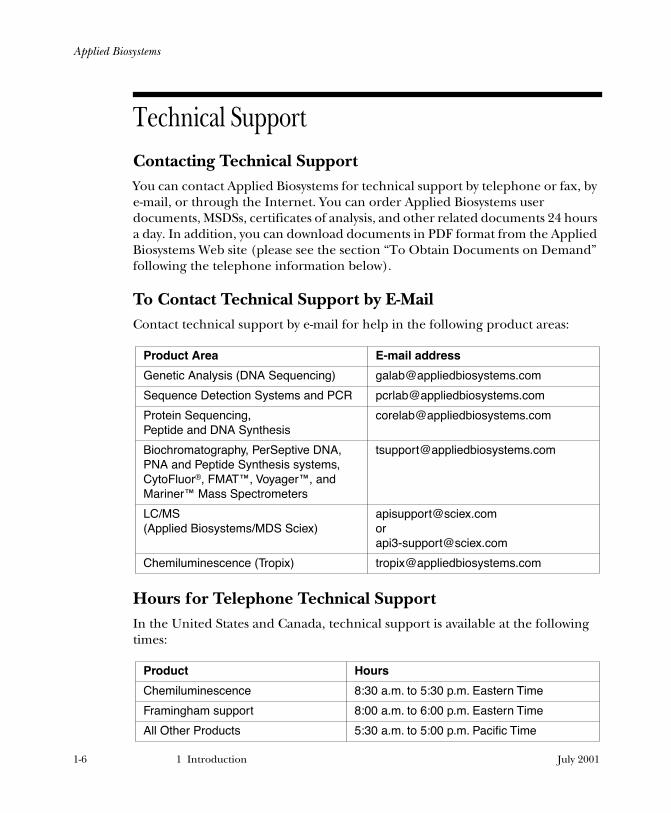
Contacting Technical SupportYou can contact Applied Biosystems for technical support by telephone or fax, by e-mail, or through the Internet. You can order Applied Biosystems user documents, MSDSs, certificates of analysis, and other related documents 24 hours a day. In addition, you can download documents in PDF format from the Applied Biosystems Web site (please see the section “To Obtain Documents on Demand” following the telephone information below).
To Contact Technical Support by E-MailContact technical support by e-mail for help in the following product areas:
Hours for Telephone Technical SupportIn the United States and Canada, technical support is available at the following times:
Product Area E-mail address
Genetic Analysis (DNA Sequencing) [email protected]
Sequence Detection Systems and PCR [email protected]
Protein Sequencing, Peptide and DNA Synthesis
Biochromatography, PerSeptive DNA, PNA and Peptide Synthesis systems, CytoFluor®, FMAT™, Voyager™, and Mariner™ Mass Spectrometers
LC/MS(Applied Biosystems/MDS Sciex)
[email protected]@sciex.com
Chemiluminescence (Tropix) [email protected]
Product Hours
Chemiluminescence 8:30 a.m. to 5:30 p.m. Eastern Time
Framingham support 8:00 a.m. to 6:00 p.m. Eastern Time
All Other Products 5:30 a.m. to 5:00 p.m. Pacific Time
1-6 1 Introduction July 2001
Applied Biosystems
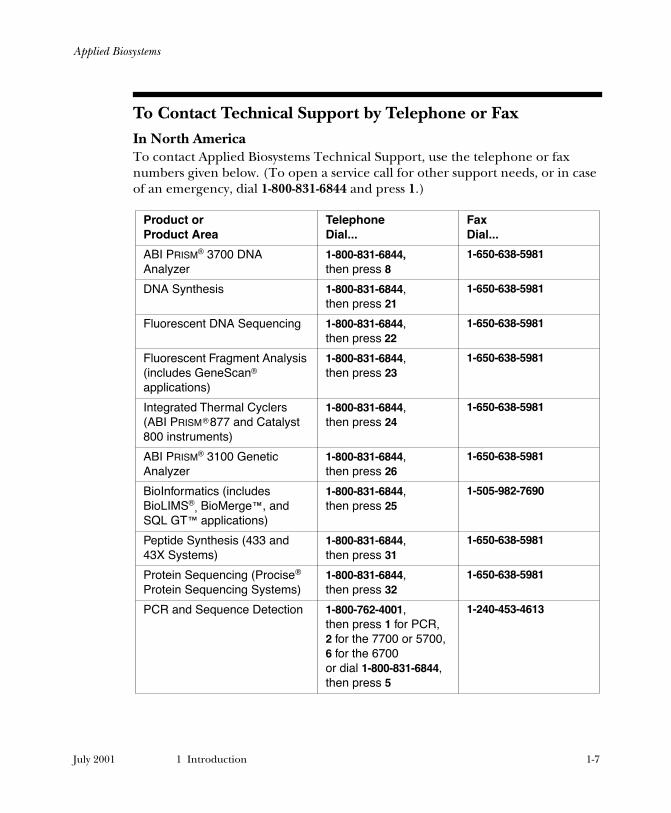
To Contact Technical Support by Telephone or FaxIn North AmericaTo contact Applied Biosystems Technical Support, use the telephone or fax numbers given below. (To open a service call for other support needs, or in case of an emergency, dial 1-800-831-6844 and press 1.)
Product orProduct Area
TelephoneDial...
FaxDial...
ABI PRISM® 3700 DNA Analyzer
1-800-831-6844,then press 8
1-650-638-5981
DNA Synthesis 1-800-831-6844,then press 21
1-650-638-5981
Fluorescent DNA Sequencing 1-800-831-6844,then press 22
1-650-638-5981
Fluorescent Fragment Analysis (includes GeneScan® applications)
1-800-831-6844,then press 23
1-650-638-5981
Integrated Thermal Cyclers (ABI PRISM® 877 and Catalyst 800 instruments)
1-800-831-6844,then press 24
1-650-638-5981
ABI PRISM® 3100 Genetic Analyzer
1-800-831-6844,then press 26
1-650-638-5981
BioInformatics (includes BioLIMS®, BioMerge™, and SQL GT™ applications)
1-800-831-6844,then press 25
1-505-982-7690
Peptide Synthesis (433 and 43X Systems)
1-800-831-6844,then press 31
1-650-638-5981
Protein Sequencing (Procise Protein Sequencing Systems)
1-800-831-6844,then press 32
1-650-638-5981
PCR and Sequence Detection 1-800-762-4001,then press 1 for PCR,2 for the 7700 or 5700,6 for the 6700or dial 1-800-831-6844, then press 5
1-240-453-4613
July 2001 1 Introduction 1-7
Applied Biosystems
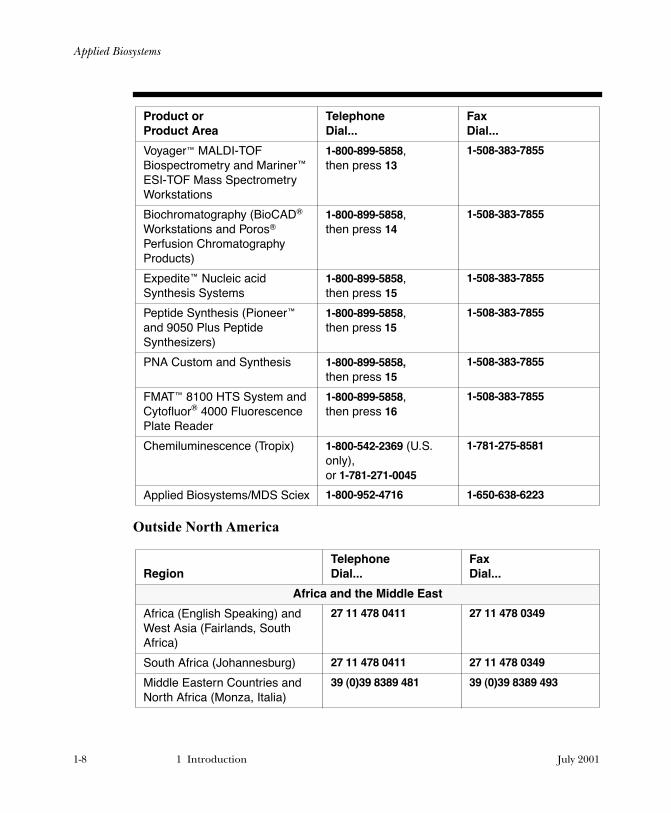
Outside North America
Voyager MALDI-TOF Biospectrometry and Mariner ESI-TOF Mass Spectrometry Workstations
1-800-899-5858,then press 13
1-508-383-7855
Biochromatography (BioCAD Workstations and Poros Perfusion Chromatography Products)
1-800-899-5858,then press 14
1-508-383-7855
Expedite Nucleic acid Synthesis Systems
1-800-899-5858,then press 15
1-508-383-7855
Peptide Synthesis (Pioneer and 9050 Plus Peptide Synthesizers)
1-800-899-5858,then press 15
1-508-383-7855
PNA Custom and Synthesis 1-800-899-5858,then press 15
1-508-383-7855
FMAT 8100 HTS System and Cytofluor 4000 Fluorescence Plate Reader
1-800-899-5858,then press 16
1-508-383-7855
Chemiluminescence (Tropix) 1-800-542-2369 (U.S. only),or 1-781-271-0045
1-781-275-8581
Applied Biosystems/MDS Sciex 1-800-952-4716 1-650-638-6223
RegionTelephoneDial...
FaxDial...
Africa and the Middle East
Africa (English Speaking) and West Asia (Fairlands, South Africa)
27 11 478 0411 27 11 478 0349
South Africa (Johannesburg) 27 11 478 0411 27 11 478 0349
Middle Eastern Countries and North Africa (Monza, Italia)
39 (0)39 8389 481 39 (0)39 8389 493
Product orProduct Area
TelephoneDial...
FaxDial...
1-8 1 Introduction July 2001
Applied Biosystems
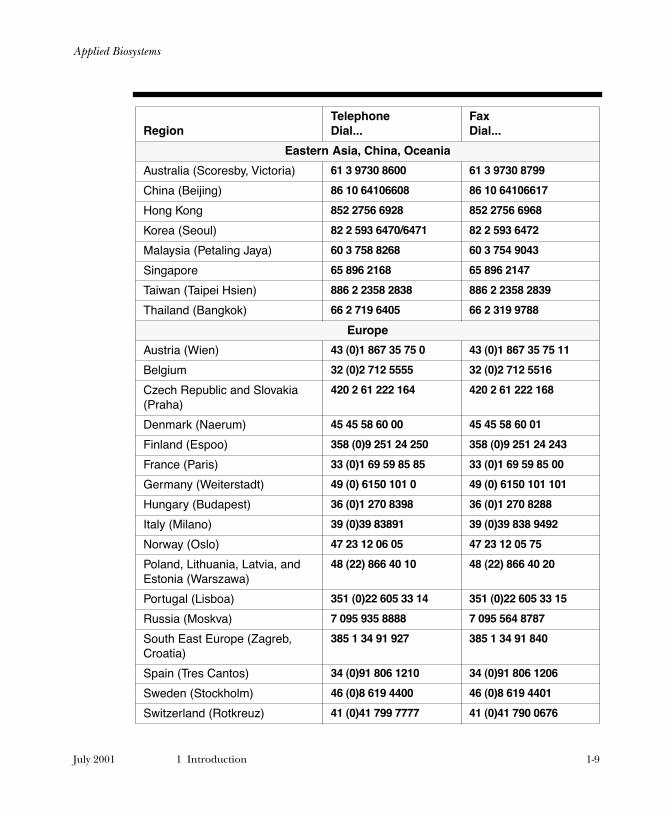
Eastern Asia, China, Oceania
Australia (Scoresby, Victoria) 61 3 9730 8600 61 3 9730 8799
China (Beijing) 86 10 64106608 86 10 64106617
Hong Kong 852 2756 6928 852 2756 6968
Korea (Seoul) 82 2 593 6470/6471 82 2 593 6472
Malaysia (Petaling Jaya) 60 3 758 8268 60 3 754 9043
Singapore 65 896 2168 65 896 2147
Taiwan (Taipei Hsien) 886 2 2358 2838 886 2 2358 2839
Thailand (Bangkok) 66 2 719 6405 66 2 319 9788
Europe
Austria (Wien) 43 (0)1 867 35 75 0 43 (0)1 867 35 75 11
Belgium 32 (0)2 712 5555 32 (0)2 712 5516
Czech Republic and Slovakia (Praha)
420 2 61 222 164 420 2 61 222 168
Denmark (Naerum) 45 45 58 60 00 45 45 58 60 01
Finland (Espoo) 358 (0)9 251 24 250 358 (0)9 251 24 243
France (Paris) 33 (0)1 69 59 85 85 33 (0)1 69 59 85 00
Germany (Weiterstadt) 49 (0) 6150 101 0 49 (0) 6150 101 101
Hungary (Budapest) 36 (0)1 270 8398 36 (0)1 270 8288
Italy (Milano) 39 (0)39 83891 39 (0)39 838 9492
Norway (Oslo) 47 23 12 06 05 47 23 12 05 75
Poland, Lithuania, Latvia, and Estonia (Warszawa)
48 (22) 866 40 10 48 (22) 866 40 20
Portugal (Lisboa) 351 (0)22 605 33 14 351 (0)22 605 33 15
Russia (Moskva) 7 095 935 8888 7 095 564 8787
South East Europe (Zagreb, Croatia)
385 1 34 91 927 385 1 34 91 840
Spain (Tres Cantos) 34 (0)91 806 1210 34 (0)91 806 1206
Sweden (Stockholm) 46 (0)8 619 4400 46 (0)8 619 4401
Switzerland (Rotkreuz) 41 (0)41 799 7777 41 (0)41 790 0676
RegionTelephoneDial...
FaxDial...
July 2001 1 Introduction 1-9
Applied Biosystems
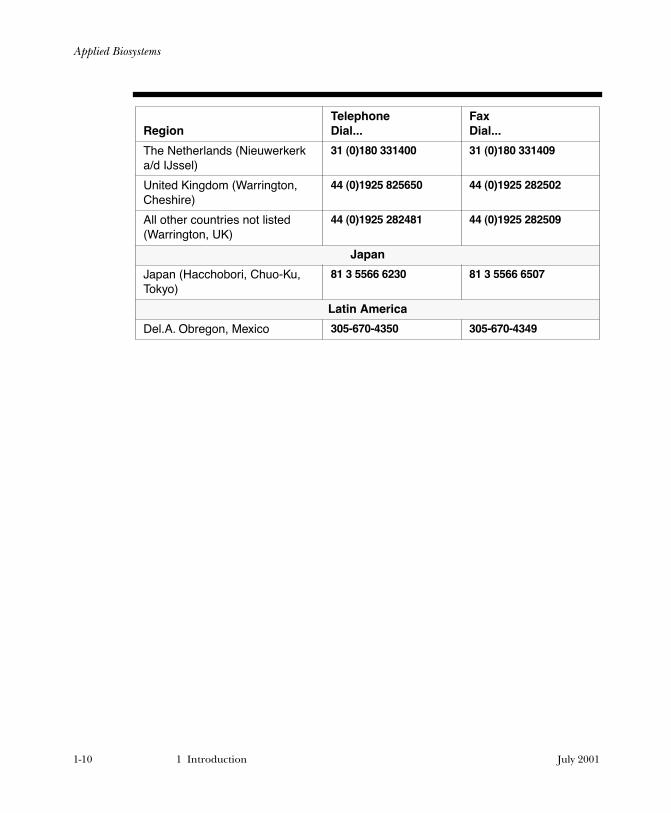
The Netherlands (Nieuwerkerk a/d IJssel)
31 (0)180 331400 31 (0)180 331409
United Kingdom (Warrington, Cheshire)
44 (0)1925 825650 44 (0)1925 282502
All other countries not listed (Warrington, UK)
44 (0)1925 282481 44 (0)1925 282509
Japan
Japan (Hacchobori, Chuo-Ku, Tokyo)
81 3 5566 6230 81 3 5566 6507
Latin America
Del.A. Obregon, Mexico 305-670-4350 305-670-4349
RegionTelephoneDial...
FaxDial...
1-10 1 Introduction July 2001
Applied Biosystems
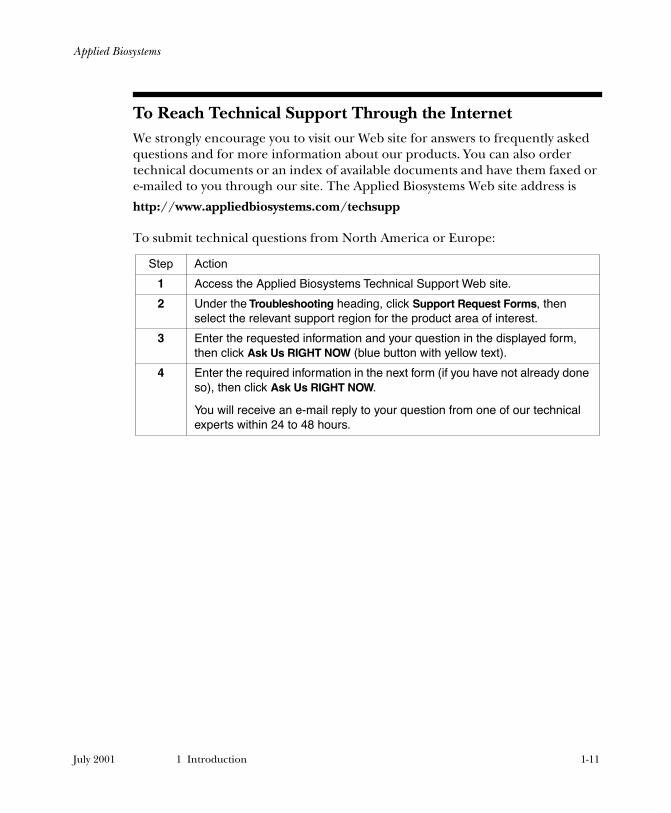
To Reach Technical Support Through the InternetWe strongly encourage you to visit our Web site for answers to frequently asked questions and for more information about our products. You can also order technical documents or an index of available documents and have them faxed or e-mailed to you through our site. The Applied Biosystems Web site address is
http://www.appliedbiosystems.com/techsupp
To submit technical questions from North America or Europe:
Step Action
1 Access the Applied Biosystems Technical Support Web site.
2 Under the Troubleshooting heading, click Support Request Forms, then select the relevant support region for the product area of interest.
3 Enter the requested information and your question in the displayed form, then click Ask Us RIGHT NOW (blue button with yellow text).
4 Enter the required information in the next form (if you have not already done so), then click Ask Us RIGHT NOW.
You will receive an e-mail reply to your question from one of our technical experts within 24 to 48 hours.
July 2001 1 Introduction 1-11
Applied Biosystems
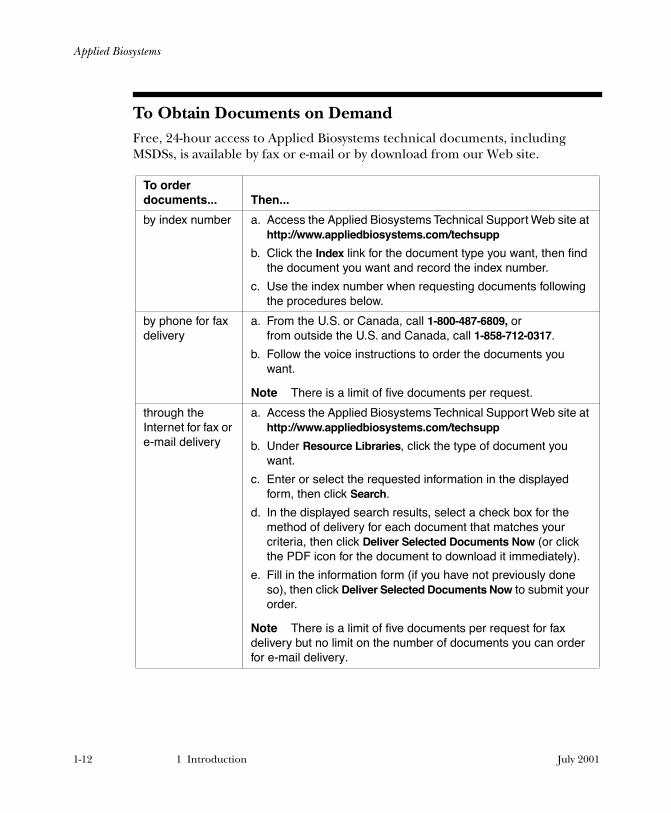
To Obtain Documents on DemandFree, 24-hour access to Applied Biosystems technical documents, including MSDSs, is available by fax or e-mail or by download from our Web site.
To order documents... Then...
by index number a. Access the Applied Biosystems Technical Support Web site at http://www.appliedbiosystems.com/techsupp
b. Click the Index link for the document type you want, then find the document you want and record the index number.
c. Use the index number when requesting documents following the procedures below.
by phone for fax delivery
a. From the U.S. or Canada, call 1-800-487-6809, orfrom outside the U.S. and Canada, call 1-858-712-0317.
b. Follow the voice instructions to order the documents you want.
Note There is a limit of five documents per request.
through the Internet for fax or e-mail delivery
a. Access the Applied Biosystems Technical Support Web site at http://www.appliedbiosystems.com/techsupp
b. Under Resource Libraries, click the type of document you want.
c. Enter or select the requested information in the displayed form, then click Search.
d. In the displayed search results, select a check box for the method of delivery for each document that matches your criteria, then click Deliver Selected Documents Now (or click the PDF icon for the document to download it immediately).
e. Fill in the information form (if you have not previously done so), then click Deliver Selected Documents Now to submit your order.
Note There is a limit of five documents per request for fax delivery but no limit on the number of documents you can order for e-mail delivery.
1-12 1 Introduction July 2001
100 I'M INVISIBLE
Applied Biosystems
2 Getting Started
This section provides:• A list of the files provided with the Factura application
• Descriptions of Factura input and output files
• Descriptions of Factura windows and views
These descriptions do not walk you through the use of the Factura application. See Section 3, Working With the Batch Worksheet through Section 6, Setting up Factura Libraries for more detail.
July 2001 2 Getting Started 2-1
Applied Biosystems
Contents
Factura Macintosh Installation 2-3Factura Program Files 2-3Factura Input and Output Files 2-4
The Sequence File 2-4The Batch Worksheet File 2-5The Batch Report File 2-5Diagram of File Input And Output 2-5
Factura Windows and Views 2-7The Batch Worksheet Window 2-7The Batch Report Window 2-7The Sequence Window 2-7
Sequence View 2-8Annotation View 2-9Feature View 2-10Electropherogram View 2-11
2-2 2 Getting Started July 2001
Applied Biosystems
Factura Macintosh Installation
To install the Factura application and related tutorial files, refer to the User’s Manual that accompanies this software.
Factura Program Files
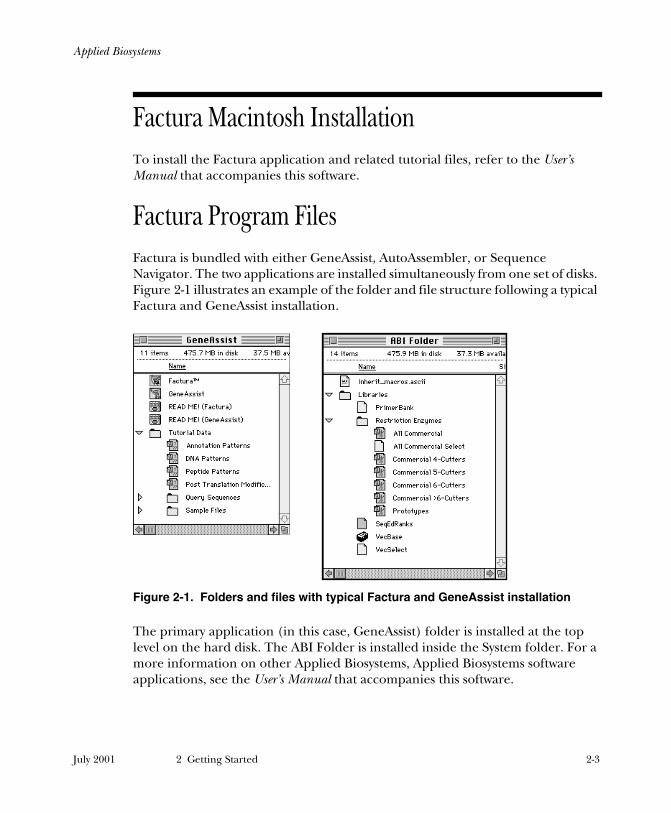
Factura is bundled with either GeneAssist, AutoAssembler, or Sequence Navigator. The two applications are installed simultaneously from one set of disks. Figure 2-1 illustrates an example of the folder and file structure following a typical Factura and GeneAssist installation.
The primary application (in this case, GeneAssist) folder is installed at the top level on the hard disk. The ABI Folder is installed inside the System folder. For a more information on other Applied Biosystems, Applied Biosystems software applications, see the User’s Manual that accompanies this software.
Figure 2-1. Folders and files with typical Factura and GeneAssist installation
July 2001 2 Getting Started 2-3
Applied Biosystems
Factura Input and Output Files
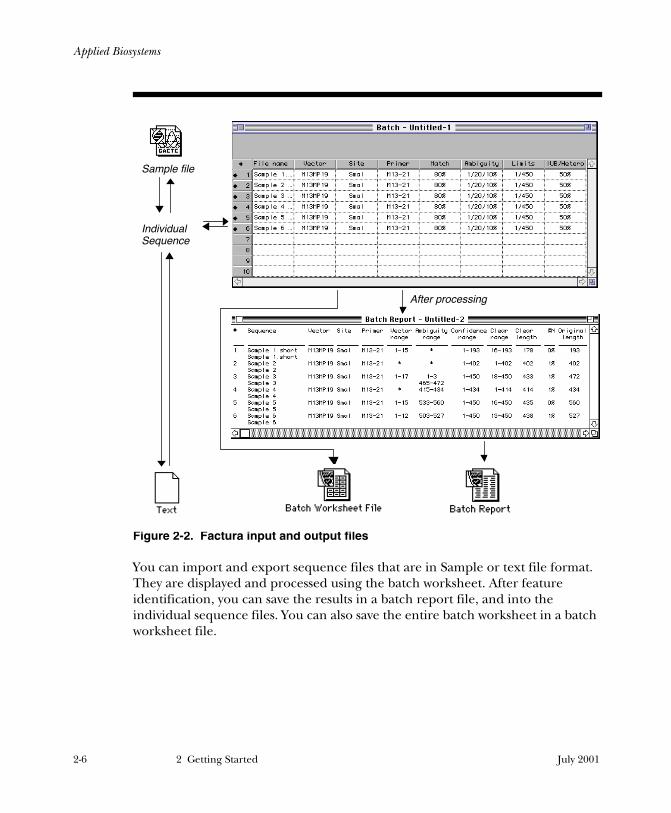
The Sequence FileA sequence file contains the nucleic acid characters of a sequence and any annotation associated with the sequence.
Factura uses sequence files as input and creates them as output. Sequences processed in the batch worksheet can be created externally or created within the Factura application. Factura accepts several different types of sequence files as input and can create the same types as output:
• Sample files are data files created by the ABI 373 Sequencing Analysis application. They contain base calls, peak locations, electropherograms, and other information. After a sequence is processed in Factura, you can save the identified features (vector, ambiguity, confidence range, heterozygote positions, and so on) to a feature table in the sample file.
Note The original ABI 373/377/310-produced sequence data is maintained in its unmodified state in a sample file. A copy of the data is stored in the file as editable data. When you save a sequence, only the editable data is changed. The Factura sequence windows display the editable data. The Settings dialog box in Factura allows you to revert sequences to the original data for feature identification. If you choose to revert them, the editable data is overwritten with original data, and any editing you have performed is lost.
• Text files contain a string of characters. An input sequence can be a standard word processing text file or any of the standard text formats for sequences, such as Staden or GCG. You can also type a new text sequence manually in Factura application. Sequences output by Factura as text files are created in this format for easy export into other applications.
Individual sequence files can be viewed on the screen in the sequence window (see page 2-7).
2-4 2 Getting Started July 2001
Applied Biosystems
The Batch Worksheet FileThe batch worksheet is the main file created by Factura. It summarizes a batch of sequences and the feature identification parameters you have applied to them using the application. You can save this information in a batch worksheet file, and import the batch of sequences into another application, such as the Sequence Navigator application.
When you open a batch worksheet file, the contents are displayed on the screen in a batch worksheet window (described on page 2-7). Information about working with a batch worksheet is provided in Section 3.
The Batch Report FileThe batch report is created by Factura to summarize the results of processing. For each sequence the report describes the identified features (vector range, ambiguity range, confidence range), and details the clear range of data, the number of bases in the clear range, the percentage of ambiguities in the clear data, and the original length of the sequence. This report is a text file that can be opened in any word processor or in Factura.
The batch report appears on the screen in the batch report window.
For a description of the batch report, refer to Section 3. To print or save a batch report, refer to Section 5.
Diagram of File Input And Output Figure 2-2 shows the relationship of the Factura input and output files.
July 2001 2 Getting Started 2-5
Applied Biosystems
Figure 2-2. Factura input and output files
You can import and export sequence files that are in Sample or text file format. They are displayed and processed using the batch worksheet. After feature identification, you can save the results in a batch report file, and into the individual sequence files. You can also save the entire batch worksheet in a batch worksheet file.
After processing
Sample file
Individual Sequence
2-6 2 Getting Started July 2001
Applied Biosystems
Factura Windows and Views
The Batch Worksheet WindowThe batch worksheet window displays a worksheet that summarizes the sequences and feature identification parameters you have chosen to work with in Factura. It allows you quick access to the sequence files for editing and display. In it you can easily edit the identification parameters either individually for each sequence or for the entire batch of sequences prior to processing.
Information about working with a batch worksheet is provided in Section 3.
The Batch Report WindowAfter Factura processing, you can choose to display the batch report, detailing the results of processing. It appears on the screen in a batch report window.
For a description of the batch report, refer to Section 3. To print or save a batch report, refer to Section 5.
The Sequence WindowThe sequence window displays the contents of a single sequence file. Sequences from Applied Biosystems genetic analyzer instruments produce information in four views, described under the headings below. You can change to the different views by clicking the appropriate buttons in the bottom left corner of the window.
When you open a sequence window sample file, a sequence created using the New Sequence command, or a text sequence entered on a word processor, information in the sequence window is only available in three views (Sequence, Annotation, and Feature). Electropherogram View is available only for sequences that have electropherograms.
For a full description of the Factura sequence window, refer to Section 4.
July 2001 2 Getting Started 2-7
Applied Biosystems
Sequence ViewSequence View displays the listing of individual bases in the sequence (see Figure 2-3). To change to Sequence View from any of the other views, click the button shown here.
Figure 2-3. Sequence View of the sequence window
In sequence view you can search for specified patterns, modify features, and edit the sequence. To learn more about finding patterns, refer to page 4-21. For information about modifying features and editing, refer to page 4-14.
2-8 2 Getting Started July 2001
Applied Biosystems
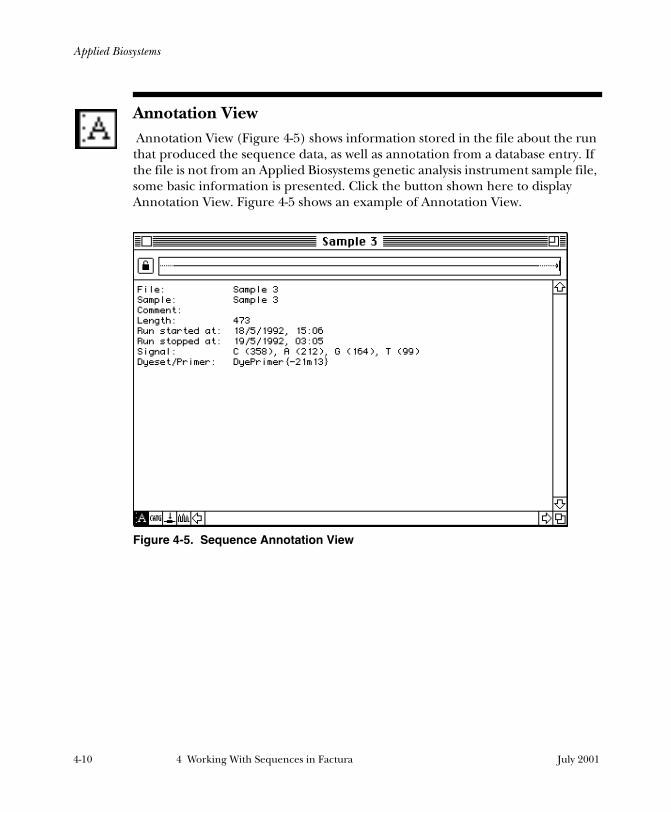
Annotation ViewAnnotation View shows information stored in the file about the run that produced the sequence data, as well as annotation from a database entry. If the file is not an Applied Biosystems genetic analyzer instrument sample file, some basic information is presented. Click the button shown here to display Annotation View. Figure 2-4 shows an example of Annotation View.
Figure 2-4. Annotation View of the sequence window
July 2001 2 Getting Started 2-9
Applied Biosystems
Feature ViewFeature View allows you to view identified features in sequences produced by an Applied Biosystems genetic analyzer and database sequences. To display Feature View, click the button shown here.
Figure 2-5 shows an example of Feature View.
Figure 2-5. Feature View of the sequence window
In Feature View you can add, modify, and remove features.
Features identified by Factura might include vector segments, ambiguous regions, and positions that represent multiple bases (IUB code calls).
2-10 2 Getting Started July 2001
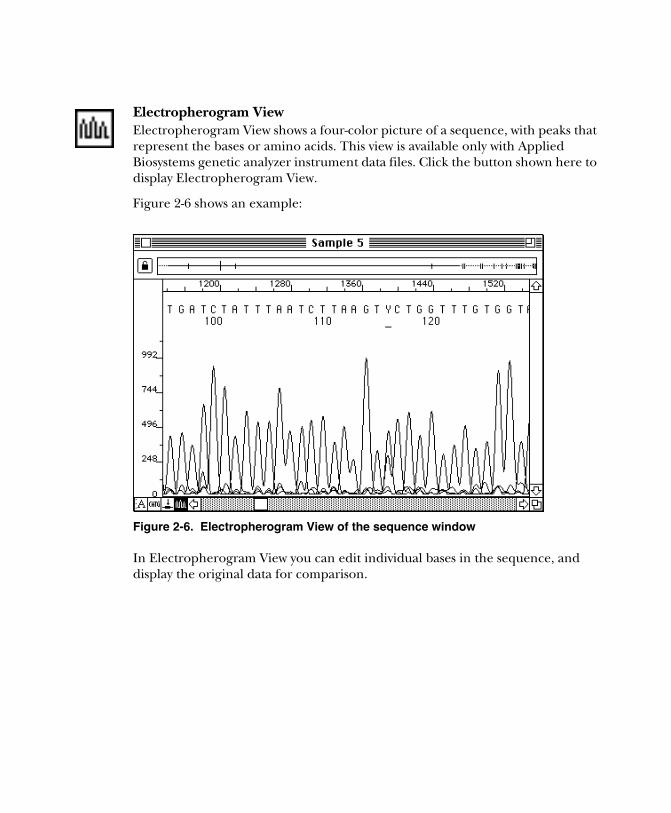
Electropherogram ViewElectropherogram View shows a four-color picture of a sequence, with peaks that represent the bases or amino acids. This view is available only with Applied Biosystems genetic analyzer instrument data files. Click the button shown here to display Electropherogram View.
Figure 2-6 shows an example:
Figure 2-6. Electropherogram View of the sequence window
In Electropherogram View you can edit individual bases in the sequence, and display the original data for comparison.


200 I'M INVISIBLE
Applied Biosystems
3 Working With the Batch Worksheet
The batch worksheet is the main window in the Factura application. It summarizes the sequences and feature-identification parameters you have chosen to work with and allows you quick access to the sequences for editing and display. On the batch worksheet you can easily edit the identification parameters prior to processing, either individually or for the entire batch of sequences.This section provides the following information about the batch worksheet.
• How to open it, close it, and set it up
• What it looks like
• How to add and remove sequences
• How to change the processing parameters displayed on it
• How to submit the batch of sequences for processing
July 2001 3 Working With the Batch Worksheet 3-1
Applied Biosystems
Contents
Specifying Settings for the Batch Worksheet 3-3Settings Dialog Box Options 3-4
Identify Vector Sequence 3-4Identify Ambiguity 3-6Identify Confidence Range 3-7Identify IUB/Heterozygous Bases 3-7Automatic Options 3-9
Opening the Batch Worksheet 3-10Opening a New Batch Worksheet 3-10Opening an Existing Batch Worksheet 3-10
From the Factura Application 3-11From the Finder 3-11
Description of the Batch Worksheet 3-11Adding and Removing Sequences 3-14
Adding Sequences to the Batch Worksheet 3-14Moving in the Batch Worksheet 3-16Removing Sequences from the Batch Worksheet 3-17
Changing Batch Worksheet Parameters 3-18Submitting the Batch Worksheet 3-21
The Batch Report 3-22Closing the Batch Worksheet 3-25
3-2 3 Working With the Batch Worksheet July 2001
Applied Biosystems
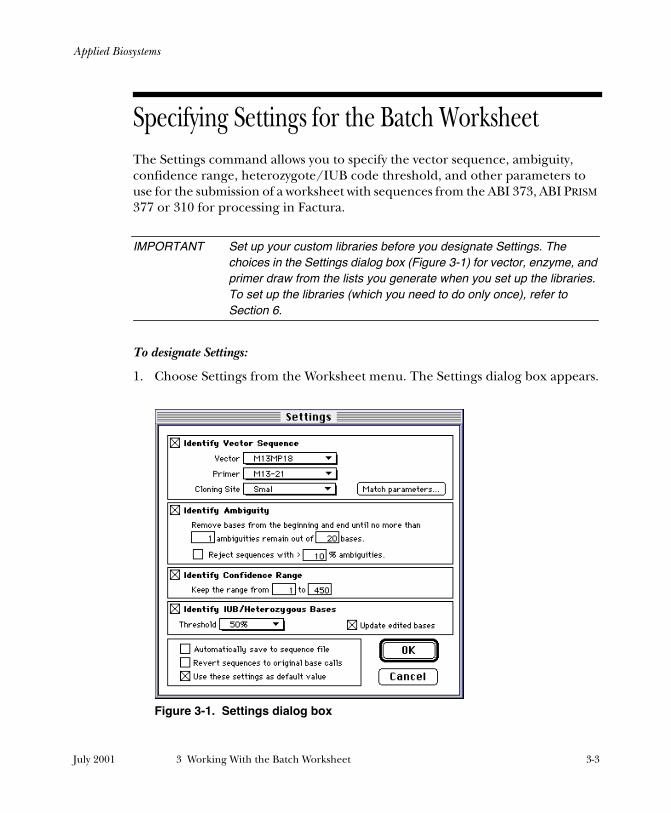
Specifying Settings for the Batch Worksheet
The Settings command allows you to specify the vector sequence, ambiguity, confidence range, heterozygote/IUB code threshold, and other parameters to use for the submission of a worksheet with sequences from the ABI 373, ABI PRISM 377 or 310 for processing in Factura.
IMPORTANT Set up your custom libraries before you designate Settings. The choices in the Settings dialog box (Figure 3-1) for vector, enzyme, and primer draw from the lists you generate when you set up the libraries. To set up the libraries (which you need to do only once), refer to Section 6.
To designate Settings:
1. Choose Settings from the Worksheet menu. The Settings dialog box appears.
Figure 3-1. Settings dialog box
July 2001 3 Working With the Batch Worksheet 3-3
Applied Biosystems
Note The names listed for vector and cloning site initially reflect the top names in the Vectors Used and Cloning Sites Used list in each library (see Setting Up the Libraries on page 6-5). The name listed for primer is the default or top name in the Primer library list (see Setting up the Primer Library on page 6-10).
2. Enter the proper parameters (descriptions are provided below).
3. Click OK to accept your settings.
Settings Dialog Box OptionsThe identification parameters you choose in the Settings dialog box (except Vector, Primer and Closing Site) depend on the quality of the data you plan to analyze. Familiarize yourself with the descriptions in this section, and try various settings to determine what values give the best results.
Identify Vector Sequence
This checkbox is selected by default. It allows you to specify the vector, cloning site, primer, and match parameters. Deselecting the box disables vector identification.
• Use the Vector, Primer, and Cloning Site pop-up menus to choose parameter settings from the respective libraries.
• Click the Match Parameters button to display the dialog box shown in Figure 3-2.
3-4 3 Working With the Batch Worksheet July 2001
Applied Biosystems
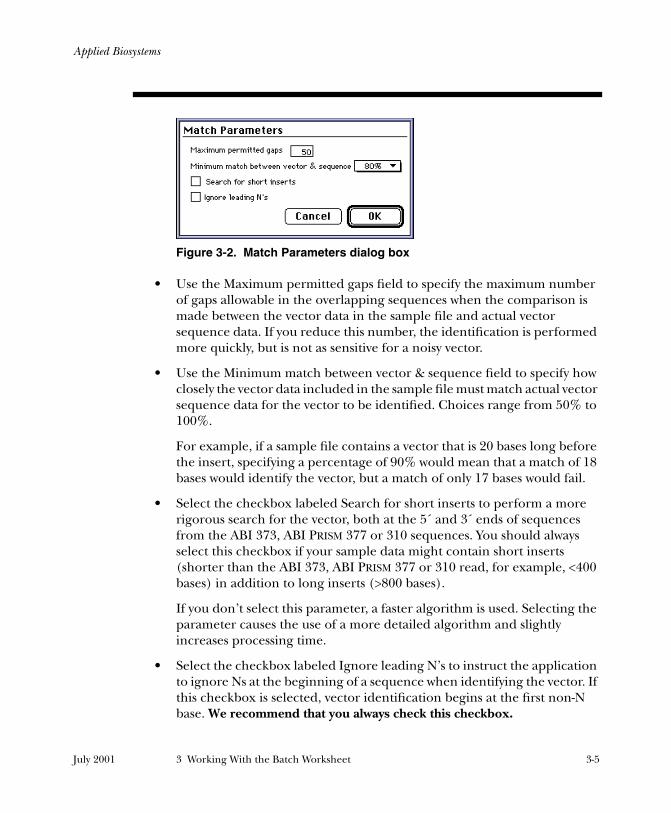
Figure 3-2. Match Parameters dialog box
• Use the Maximum permitted gaps field to specify the maximum number of gaps allowable in the overlapping sequences when the comparison is made between the vector data in the sample file and actual vector sequence data. If you reduce this number, the identification is performed more quickly, but is not as sensitive for a noisy vector.
• Use the Minimum match between vector & sequence field to specify how closely the vector data included in the sample file must match actual vector sequence data for the vector to be identified. Choices range from 50% to 100%.
For example, if a sample file contains a vector that is 20 bases long before the insert, specifying a percentage of 90% would mean that a match of 18 bases would identify the vector, but a match of only 17 bases would fail.
• Select the checkbox labeled Search for short inserts to perform a more rigorous search for the vector, both at the 5´ and 3´ ends of sequences from the ABI 373, ABI PRISM 377 or 310 sequences. You should always select this checkbox if your sample data might contain short inserts (shorter than the ABI 373, ABI PRISM 377 or 310 read, for example, <400 bases) in addition to long inserts (>800 bases).
If you don’t select this parameter, a faster algorithm is used. Selecting the parameter causes the use of a more detailed algorithm and slightly increases processing time.
• Select the checkbox labeled Ignore leading N’s to instruct the application to ignore Ns at the beginning of a sequence when identifying the vector. If this checkbox is selected, vector identification begins at the first non-N base. We recommend that you always check this checkbox.
July 2001 3 Working With the Batch Worksheet 3-5
Applied Biosystems
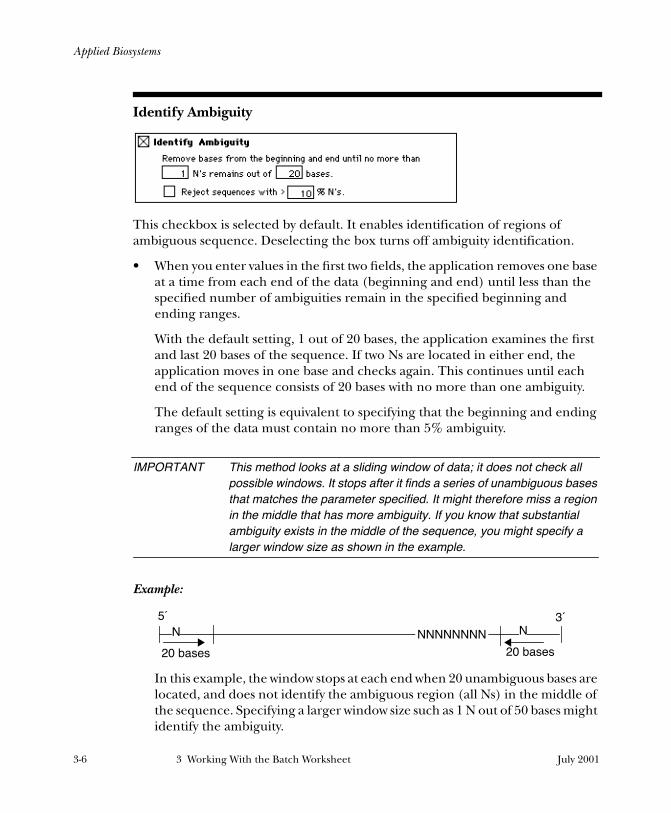
Identify Ambiguity
This checkbox is selected by default. It enables identification of regions of ambiguous sequence. Deselecting the box turns off ambiguity identification.
• When you enter values in the first two fields, the application removes one base at a time from each end of the data (beginning and end) until less than the specified number of ambiguities remain in the specified beginning and ending ranges.
With the default setting, 1 out of 20 bases, the application examines the first and last 20 bases of the sequence. If two Ns are located in either end, the application moves in one base and checks again. This continues until each end of the sequence consists of 20 bases with no more than one ambiguity.
The default setting is equivalent to specifying that the beginning and ending ranges of the data must contain no more than 5% ambiguity.
IMPORTANT This method looks at a sliding window of data; it does not check all possible windows. It stops after it finds a series of unambiguous bases that matches the parameter specified. It might therefore miss a region in the middle that has more ambiguity. If you know that substantial ambiguity exists in the middle of the sequence, you might specify a larger window size as shown in the example.
Example:
In this example, the window stops at each end when 20 unambiguous bases are located, and does not identify the ambiguous region (all Ns) in the middle of the sequence. Specifying a larger window size such as 1 N out of 50 bases might identify the ambiguity.
3´NNNNNNNN N
20 bases20 bases
5´N
3-6 3 Working With the Batch Worksheet July 2001
Applied Biosystems
• Select the checkbox and enter a value in the third entry field to specify the total percentage of ambiguity to be allowed in the data after the beginning and ending range specification (immediately above) is met.
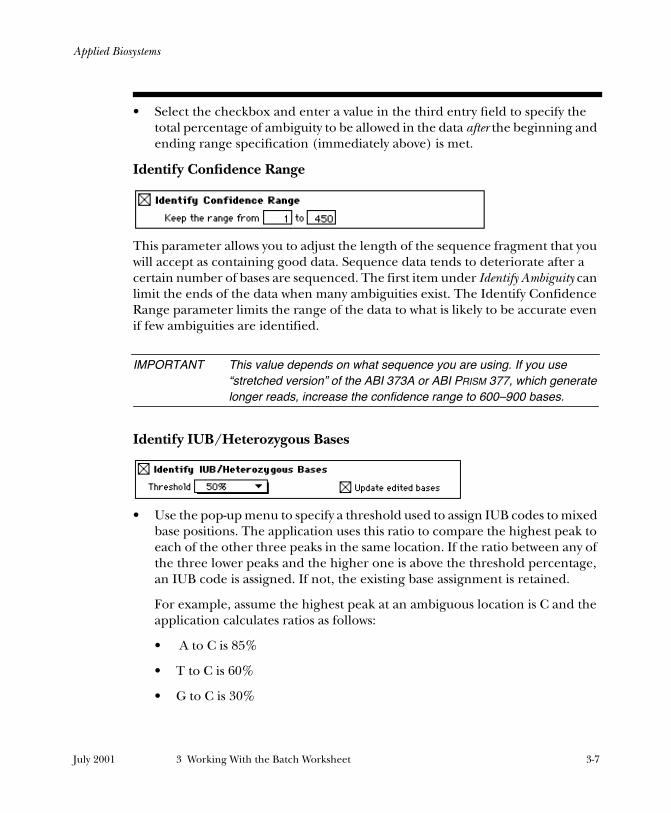
Identify Confidence Range
This parameter allows you to adjust the length of the sequence fragment that you will accept as containing good data. Sequence data tends to deteriorate after a certain number of bases are sequenced. The first item under Identify Ambiguity can limit the ends of the data when many ambiguities exist. The Identify Confidence Range parameter limits the range of the data to what is likely to be accurate even if few ambiguities are identified.
IMPORTANT This value depends on what sequence you are using. If you use “stretched version” of the ABI 373A or ABI PRISM 377, which generate longer reads, increase the confidence range to 600–900 bases.
Identify IUB/Heterozygous Bases
• Use the pop-up menu to specify a threshold used to assign IUB codes to mixed base positions. The application uses this ratio to compare the highest peak to each of the other three peaks in the same location. If the ratio between any of the three lower peaks and the higher one is above the threshold percentage, an IUB code is assigned. If not, the existing base assignment is retained.
For example, assume the highest peak at an ambiguous location is C and the application calculates ratios as follows:
• A to C is 85%
• T to C is 60%
• G to C is 30%
July 2001 3 Working With the Batch Worksheet 3-7

Applied Biosystems
If the threshold parameter is set at 80%, the IUB code assigned is M (representing A or C). If the threshold is set at 60%, the IUB code assigned is H (indicating A, C, or T).
• Select the checkbox labeled Update edited bases to store the IUB codes in the sequence files when you use the Save to Sequence Files command in the Worksheet menu (refer to page 5-9). If you deselect this option, you must manually edit the data in the sequence files to clarify ambiguities.
Note IUB/heterozygote identification operates with sequences from ABI PRISM 310, ABI 373, and ABI PRISM 377 sample files, since it requires four-color electropherogram data.
3-8 3 Working With the Batch Worksheet July 2001
Applied Biosystems
Automatic Options
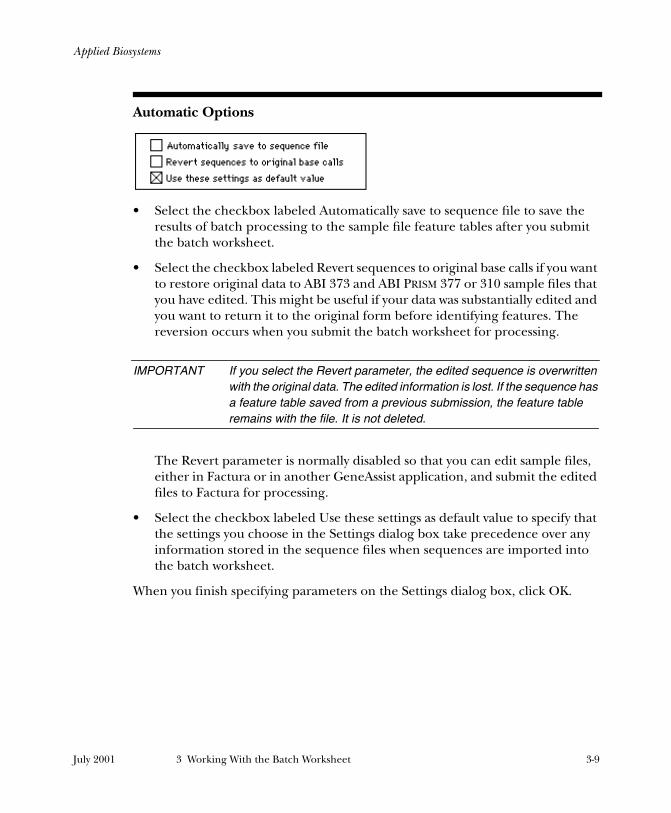
• Select the checkbox labeled Automatically save to sequence file to save the results of batch processing to the sample file feature tables after you submit the batch worksheet.
• Select the checkbox labeled Revert sequences to original base calls if you want to restore original data to ABI 373 and ABI PRISM 377 or 310 sample files that you have edited. This might be useful if your data was substantially edited and you want to return it to the original form before identifying features. The reversion occurs when you submit the batch worksheet for processing.
IMPORTANT If you select the Revert parameter, the edited sequence is overwritten with the original data. The edited information is lost. If the sequence has a feature table saved from a previous submission, the feature table remains with the file. It is not deleted.
The Revert parameter is normally disabled so that you can edit sample files, either in Factura or in another GeneAssist application, and submit the edited files to Factura for processing.
• Select the checkbox labeled Use these settings as default value to specify that the settings you choose in the Settings dialog box take precedence over any information stored in the sequence files when sequences are imported into the batch worksheet.
When you finish specifying parameters on the Settings dialog box, click OK.
July 2001 3 Working With the Batch Worksheet 3-9
Applied Biosystems
Opening the Batch Worksheet
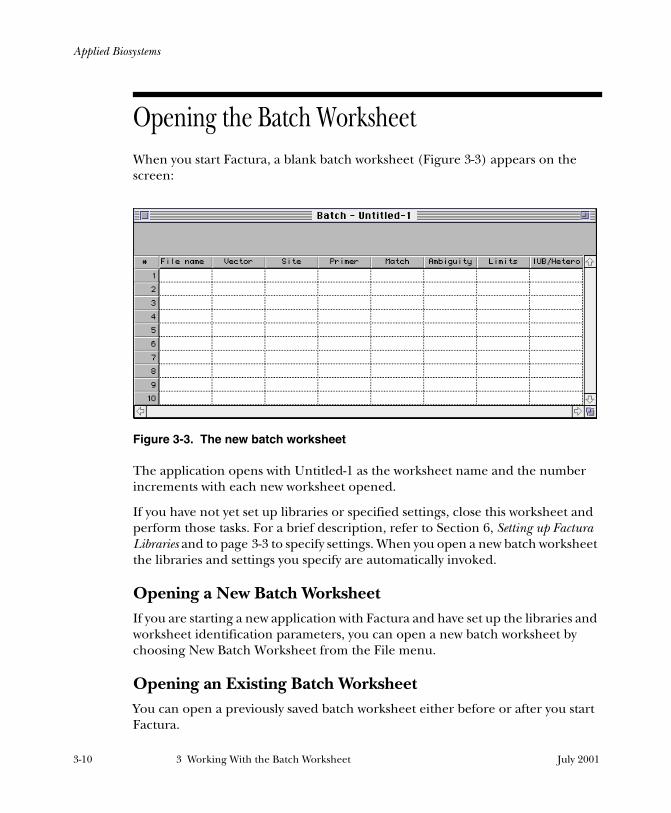
When you start Factura, a blank batch worksheet (Figure 3-3) appears on the screen:
Figure 3-3. The new batch worksheet
The application opens with Untitled-1 as the worksheet name and the number increments with each new worksheet opened.
If you have not yet set up libraries or specified settings, close this worksheet and perform those tasks. For a brief description, refer to Section 6, Setting up Factura Libraries and to page 3-3 to specify settings. When you open a new batch worksheet the libraries and settings you specify are automatically invoked.
Opening a New Batch WorksheetIf you are starting a new application with Factura and have set up the libraries and worksheet identification parameters, you can open a new batch worksheet by choosing New Batch Worksheet from the File menu.
Opening an Existing Batch WorksheetYou can open a previously saved batch worksheet either before or after you start Factura.
3-10 3 Working With the Batch Worksheet July 2001
Applied Biosystems
From the Factura ApplicationTo open an existing batch worksheet, choose Open Batch Worksheet from the File menu. A standard file dialog box appears. Select the file you wish to open. The file dialog box shows folders at different levels but shows only batch worksheet file names.
From the Finder
Batch worksheet files are identified by the icon shown here. When you double-click a batch worksheet icon, Factura starts automatically and displays the batch worksheet just as it was saved to the file after you were last using it.
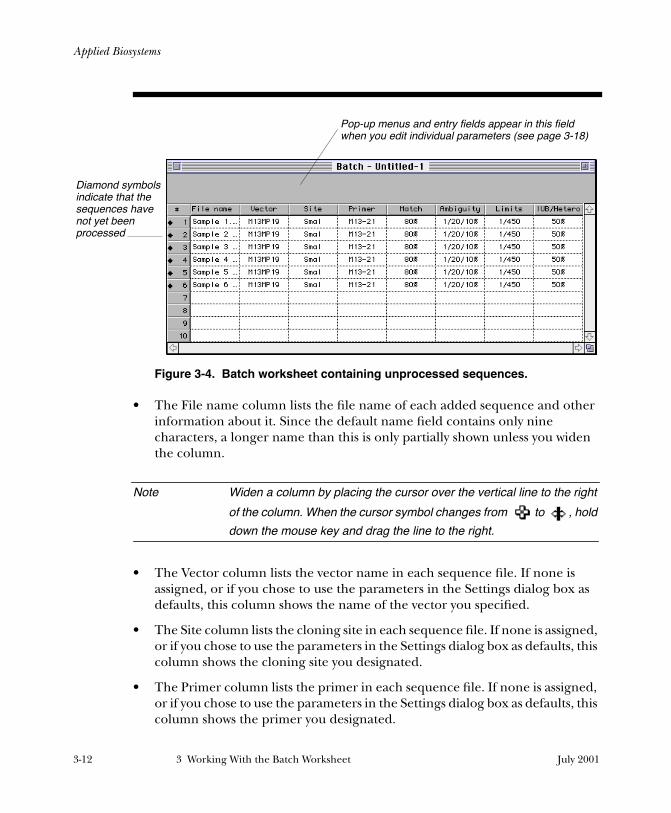
Description of the Batch WorksheetThe gray area of the batch worksheet beneath the standard Macintosh title line displays pop-up menus and entry fields when you want to change the parameters in the columns of the worksheet. It is more fully described in Changing Batch Worksheet Parameters on page 3-18.
The nine columns of the batch worksheet reflect information about the sequences and identifications you are working with. Use the Tab key to move from field to field or click on a field to select it. The columns are described as follows:
• The first column of the worksheet lists the numerical order (1–10) in which sequences were added. Once you have added sequences (detailed on page 3-14), this column displays a symbol that indicates the present state of the project. A diamond symbol (♦) next to a sequence number indicates that the sequence is not processed. When the sequences are processed, a triangle symbol ( ) appears next to each of the sequence numbers.
Figure 3-4 shows an example of a batch worksheet with unprocessed sequences on it.
Batch Worksheet File icon
July 2001 3 Working With the Batch Worksheet 3-11
Applied Biosystems
Figure 3-4. Batch worksheet containing unprocessed sequences.
• The File name column lists the file name of each added sequence and other information about it. Since the default name field contains only nine characters, a longer name than this is only partially shown unless you widen the column.
Note Widen a column by placing the cursor over the vertical line to the right
of the column. When the cursor symbol changes from to , hold
down the mouse key and drag the line to the right.
• The Vector column lists the vector name in each sequence file. If none is assigned, or if you chose to use the parameters in the Settings dialog box as defaults, this column shows the name of the vector you specified.
• The Site column lists the cloning site in each sequence file. If none is assigned, or if you chose to use the parameters in the Settings dialog box as defaults, this column shows the cloning site you designated.
• The Primer column lists the primer in each sequence file. If none is assigned, or if you chose to use the parameters in the Settings dialog box as defaults, this column shows the primer you designated.
Pop-up menus and entry fields appear in this field when you edit individual parameters (see page 3-18)
Diamond symbols indicate that the sequences have not yet been processed
3-12 3 Working With the Batch Worksheet July 2001
Applied Biosystems
• The Match column shows the current match parameters value you specified in the Settings dialog box.
• The Ambiguity column lists the three current ambiguity values you specified in the Settings dialog box.
• The Limits column shows the current limits of the confidence range you specified in the Settings dialog box.
• The IUB/Hetero column shows the threshold percentage you chose for heterozygote identification in the Settings dialog box. This identification operates only with sequences from ABI 373 and ABI PRISM 377 or 310 sample files, since it requires electropherogram data.
Note If you save results to a sample file after processing, the settings saved with it are those used for processing.
July 2001 3 Working With the Batch Worksheet 3-13
Applied Biosystems
Adding and Removing Sequences
Note To see the contents of a sequence file before adding it to the batch worksheet, choose one of the Open Sequence commands or the New Sequence command from the File menu (refer to page 4-4).
Adding Sequences to the Batch WorksheetAdding sequences to a batch worksheet fills out the worksheet with sequence and Settings information (see Figure 3-4 on page 3-12). The parameters you specified when you set up the libraries and chose settings for the batch worksheet are reflected.
To add sequences to a new batch worksheet:
1. Choose Add Sequences from the Worksheet menu.
A file dialog box appears.
Figure 3-5. Add Sequences file dialog box
2. Open the folder containing your sequences.
To limit the file list, select and deselect the checkboxes under the heading File Type. The file list only shows files of the type you select.
Open folder
3-14 3 Working With the Batch Worksheet July 2001

Applied Biosystems
3. Add files in one of the following ways:
• Add any single file by selecting it and clicking Add.
• With one file selected, click Add All to add all the files in the folder.
If you add multiple sequences using Add All, the following dialog box appears while the sequences are loading into the batch worksheet:
If you have deselected the Exclude Files Already in List checkbox (see Figure 3-5) and attempt to add a sequence already in your batch worksheet, a dialog box appears that allows you to reconsider.
If you like the default parameters on the worksheet after you have added sequences, the worksheet is ready to submit (described on page 3-21). If you want to change the parameters, see Changing Batch Worksheet Parameters on page 3-18.
July 2001 3 Working With the Batch Worksheet 3-15
Applied Biosystems
Moving in the Batch Worksheet
You can click any field in the batch worksheet to select it for editing. Click the number column on the left to select an entire sequence row.
To move from column to column within one row:
Press the Tab key or the Right Arrow key (→) to move to the right one field. Press the Left Arrow key (←) to move to the left one field.
To move from row to row within one column:
Press the Return key or the Down Arrow key (↓) to move down one field. Press the Up Arrow key (↑) to move up one field.
To select sequences:
When you select a sequence in the batch worksheet, the row containing the sequence is shown against a reversed background (highlighted). Select sequences as follows:
• To select a specific sequence and to deselect all other sequences, click the number of the sequence you wish to select.
Click any field to edit it, or click the title to select an entire columnClick the number to select a sequence
Click the number column of an empty row to de-select sequences
When the cursor is this symbol, drag it to widen a column
Use the scroll bar to scroll and the size box to stretch the window
3-16 3 Working With the Batch Worksheet July 2001
Applied Biosystems
• To select a consecutive range of sequences, click the number of the first sequence in the group, then hold down the shift key and click the number of the last sequence in the group.
• To select a sequence and leave other (discontinuous) sequences selected, hold down the command (z) key and click the sequence.
• To deselect sequences, click the number column of an empty row.
To select entire columns:
You might want to quickly select an entire column to use the Fill Down command, which is described on page 3-19. To do so, click the title of the column.
To change column width:
Place the cursor over the vertical line to the right of the column. When the cursor symbol changes from to , hold down the mouse button and drag the line to the right to widen the column or to the left to decrease the column width.
You can widen the File name column to see more information about the sequence.
To see more of the sequences in the worksheet:
If some of the rows are not visible on the worksheet, you can use the size box ( ) in the bottom right corner of the worksheet to stretch the window, or click the scroll bar on the right of the worksheet to move down the worksheet.
To scroll one window at a time, click in the gray region of the scroll bar. The window shifts so the top sequence becomes the bottom sequence or vice versa. If you click on an arrow at the end of the scroll bar, the window shifts one sequence at a time.
Removing Sequences from the Batch WorksheetTo remove a sequence from the batch worksheet, select the sequence on the worksheet by clicking in the left column between the diamond and the assigned sequence number. With the sequence highlighted, choose Remove Sequence from the Worksheet menu.
July 2001 3 Working With the Batch Worksheet 3-17
Applied Biosystems
Changing Batch Worksheet Parameters
You can apply changes in the batch worksheet to either a single sequence or the entire batch of sequences you plan to process. The procedure is described first in this section, followed by more detail about the individual parameters.
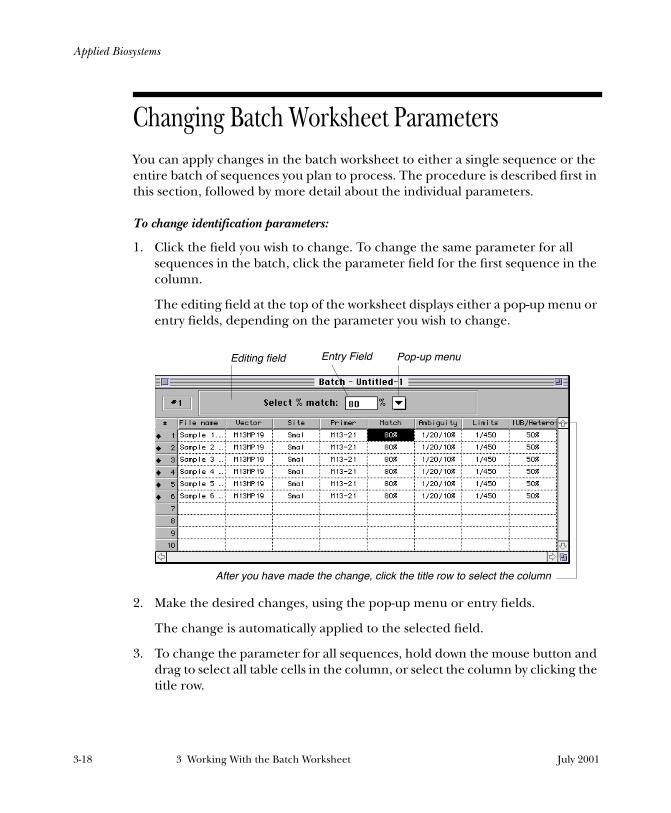
To change identification parameters:
1. Click the field you wish to change. To change the same parameter for all sequences in the batch, click the parameter field for the first sequence in the column.
The editing field at the top of the worksheet displays either a pop-up menu or entry fields, depending on the parameter you wish to change.
2. Make the desired changes, using the pop-up menu or entry fields.
The change is automatically applied to the selected field.
3. To change the parameter for all sequences, hold down the mouse button and drag to select all table cells in the column, or select the column by clicking the title row.
After you have made the change, click the title row to select the column
Editing field Pop-up menuEntry Field
3-18 3 Working With the Batch Worksheet July 2001

Applied Biosystems
Note To make the change for selected sequences, hold down the command (x) key and click the cells to change.
4. Choose Fill Down from the Worksheet menu.
Fill Down applies the change to all the selected cells in the column.
Note Skip Step 3 and Step 4 to apply the change to only a single table cell.
The following describes each of the pop-up menus and fields that can appear in the editing field at the top of the batch worksheet.
• When you click a cell in the Vector column, the following pop-up menu appears in the editing field:
Change the vector in the selected cell by clicking the menu and choosing a vector from the pop-up list, which shows all the vectors in your custom library.
• When you click a cell in the Site column, the following pop-up menu appears in the editing field:
Change the site in the selected cell by clicking the menu and choosing a cloning site from the pop-up list, which shows all the cloning sites in your custom library.
• When you click a cell in the Primer column, the following pop-up menu appears in the editing field:
Change the primer in the selected cell by clicking the menu and choosing a primer from the pop-up list, which shows all primers in the primer library.
• When you click a cell in the Match column, the following appears in the
July 2001 3 Working With the Batch Worksheet 3-19
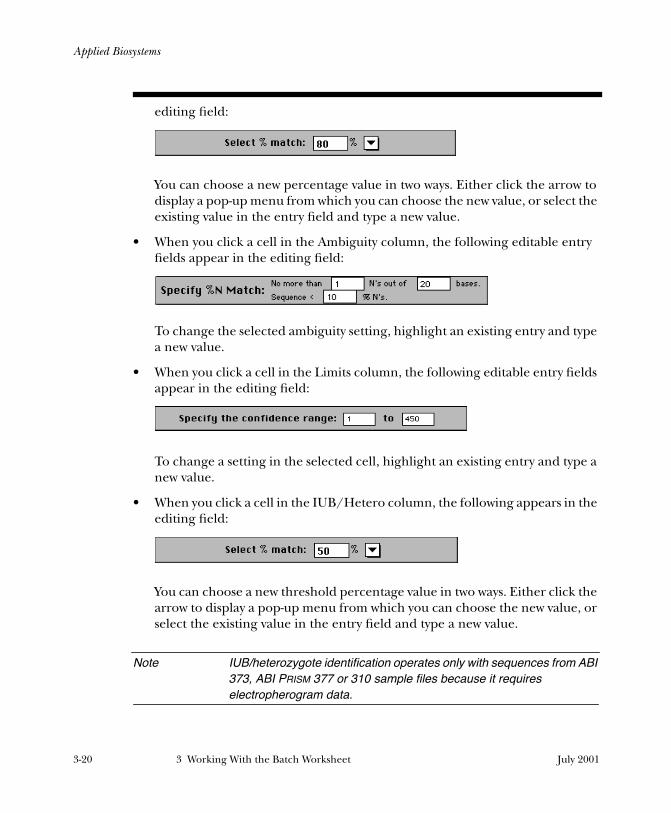
Applied Biosystems
editing field:
You can choose a new percentage value in two ways. Either click the arrow to display a pop-up menu from which you can choose the new value, or select the existing value in the entry field and type a new value.
• When you click a cell in the Ambiguity column, the following editable entry fields appear in the editing field:
To change the selected ambiguity setting, highlight an existing entry and type a new value.
• When you click a cell in the Limits column, the following editable entry fields appear in the editing field:
To change a setting in the selected cell, highlight an existing entry and type a new value.
• When you click a cell in the IUB/Hetero column, the following appears in the editing field:
You can choose a new threshold percentage value in two ways. Either click the arrow to display a pop-up menu from which you can choose the new value, or select the existing value in the entry field and type a new value.
Note IUB/heterozygote identification operates only with sequences from ABI 373, ABI PRISM 377 or 310 sample files because it requires electropherogram data.
3-20 3 Working With the Batch Worksheet July 2001
Applied Biosystems
Submitting the Batch Worksheet
When you submit a batch worksheet in Factura, all sequences on the worksheet are processed according to the parameters shown. For each sequence, Factura identifies the vector sequence, ambiguity, confidence range, and heterozygote features, and calculates the clear range, clear length and percentage of ambiguities. To store this information in the feature tables of the sequences, you must save the information to the sample files (see Section 5).
Note IUB/heterozygote identification operates only with sequences from ABI genetic analyzer instrument sample files because it requires electropherogram data.
To process a batch worksheet in Factura:
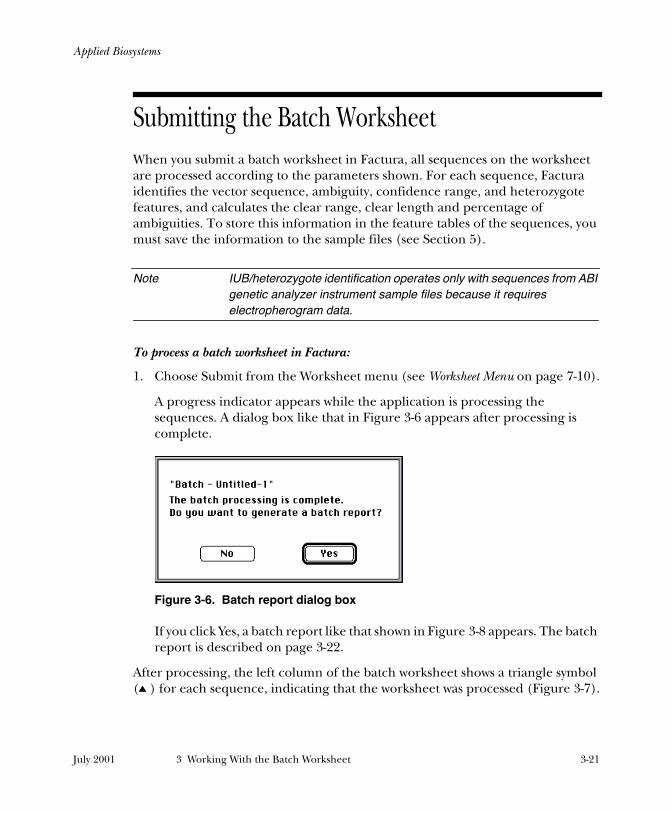
1. Choose Submit from the Worksheet menu (see Worksheet Menu on page 7-10).
A progress indicator appears while the application is processing the sequences. A dialog box like that in Figure 3-6 appears after processing is complete.
Figure 3-6. Batch report dialog box
If you click Yes, a batch report like that shown in Figure 3-8 appears. The batch report is described on page 3-22.
After processing, the left column of the batch worksheet shows a triangle symbol ( ) for each sequence, indicating that the worksheet was processed (Figure 3-7).
July 2001 3 Working With the Batch Worksheet 3-21
Applied Biosystems
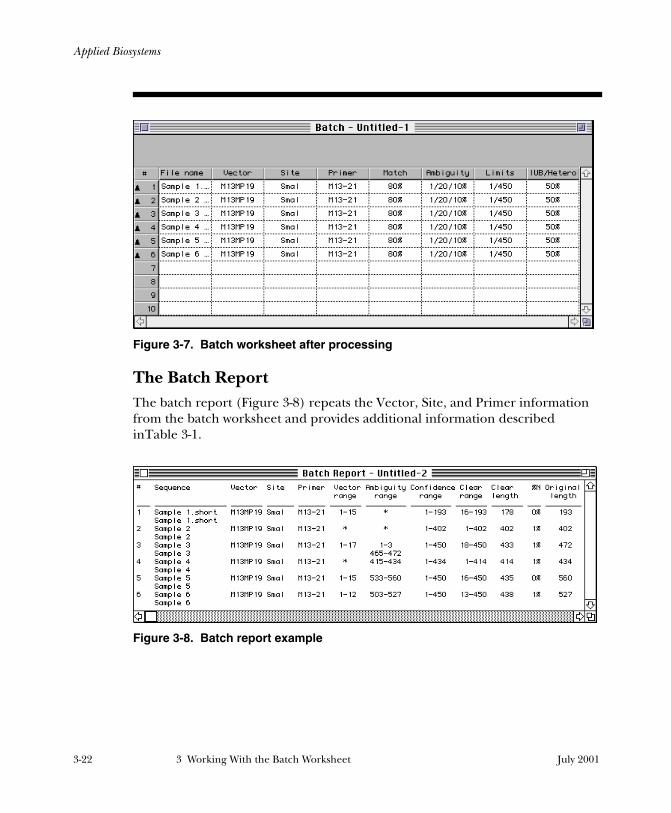
Figure 3-7. Batch worksheet after processing
The Batch ReportThe batch report (Figure 3-8) repeats the Vector, Site, and Primer information from the batch worksheet and provides additional information described inTable 3-1.
Figure 3-8. Batch report example
3-22 3 Working With the Batch Worksheet July 2001
Applied Biosystems
Table 3-1. Batch Report Columns
You can also observe the results of Factura processing by opening individual sequence windows and examining the Sequence and Feature Views. For more information about viewing results in sequence windows, refer to Section 4.
To save the batch report:
You can save the batch report by making the batch report window active and choosing any of the three Save commands from the File menu (see Saving the Batch Worksheet on page 5-5).
To close the batch report window:
You can close a batch report window by clicking the close box in the upper left corner or by choosing Close from the File menu.
Note It is a good idea to save the batch report in a different folder from the sequences. This allows you to use the Add All button when adding sequences to a new batch worksheet without accidentally adding the batch report.
Column Heading Description
Vector range The portion or portions of the sequence data that correspond to the vector. As shown in the example report, one or two vector ranges might exist for any one sequence.
Ambiguity range The portion or portions of the sequence data containing ambiguously called bases.
Confidence range The largest sequence fragment that you will accept as containing good data. This parameter addresses the fact that sequence data tends to deteriorate after a certain number of bases are sequenced.
Clear range A range of bases in the sequence data that represents clear data, that is, data not containing portions identified as vector or ambiguous and which is within the confidence range.
Clear length The number of clear bases in the Clear range.
%N The percentage of Ns (ambiguities) remaining in the clear data.
Original length The length of the sequence data.
July 2001 3 Working With the Batch Worksheet 3-23
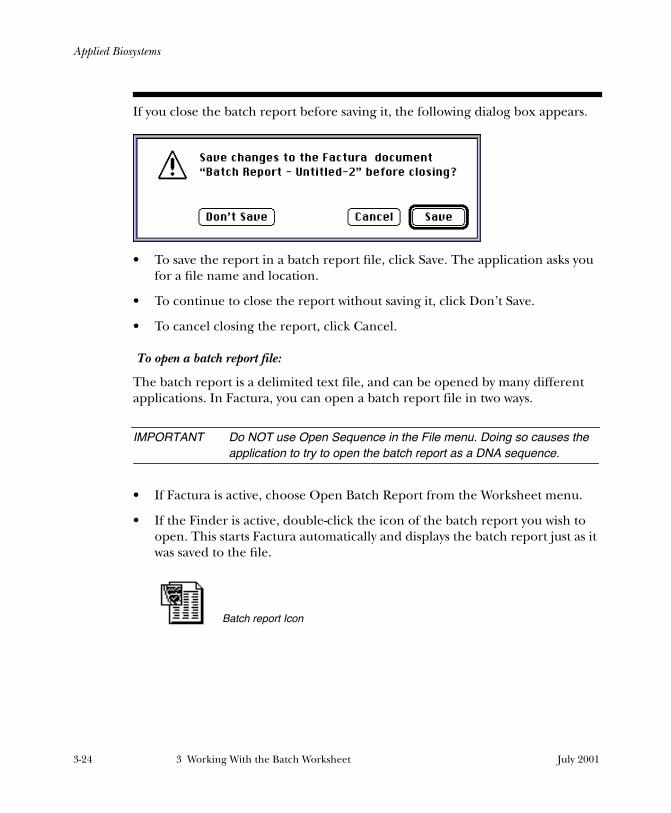
Applied Biosystems
If you close the batch report before saving it, the following dialog box appears.
• To save the report in a batch report file, click Save. The application asks you for a file name and location.
• To continue to close the report without saving it, click Don’t Save.
• To cancel closing the report, click Cancel.
To open a batch report file:
The batch report is a delimited text file, and can be opened by many different applications. In Factura, you can open a batch report file in two ways.
IMPORTANT Do NOT use Open Sequence in the File menu. Doing so causes the application to try to open the batch report as a DNA sequence.
• If Factura is active, choose Open Batch Report from the Worksheet menu.
• If the Finder is active, double-click the icon of the batch report you wish to open. This starts Factura automatically and displays the batch report just as it was saved to the file.
Batch report Icon
3-24 3 Working With the Batch Worksheet July 2001
Applied Biosystems
Closing the Batch Worksheet
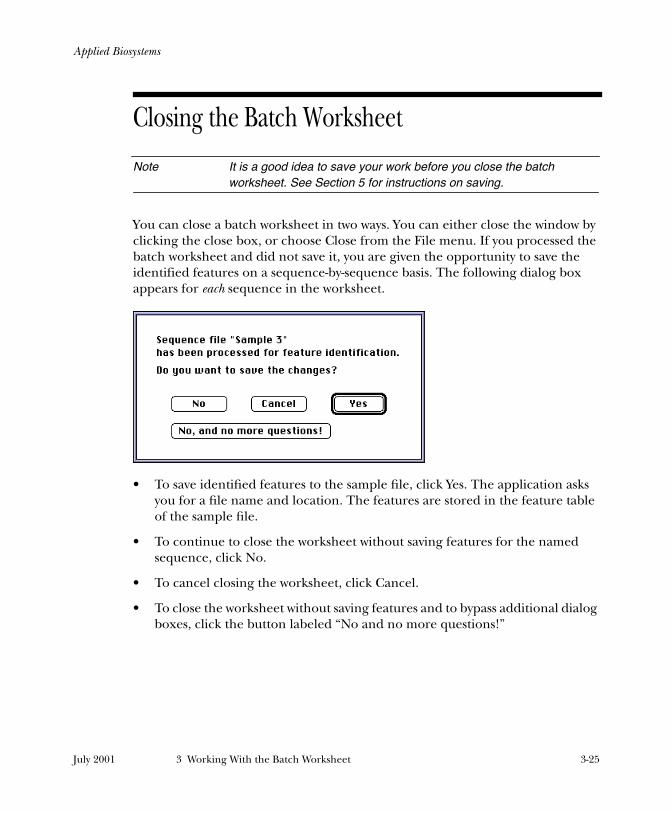
Note It is a good idea to save your work before you close the batch worksheet. See Section 5 for instructions on saving.
You can close a batch worksheet in two ways. You can either close the window by clicking the close box, or choose Close from the File menu. If you processed the batch worksheet and did not save it, you are given the opportunity to save the identified features on a sequence-by-sequence basis. The following dialog box appears for each sequence in the worksheet.
• To save identified features to the sample file, click Yes. The application asks you for a file name and location. The features are stored in the feature table of the sample file.
• To continue to close the worksheet without saving features for the named sequence, click No.
• To cancel closing the worksheet, click Cancel.
• To close the worksheet without saving features and to bypass additional dialog boxes, click the button labeled “No and no more questions!”
July 2001 3 Working With the Batch Worksheet 3-25
Applied Biosystems
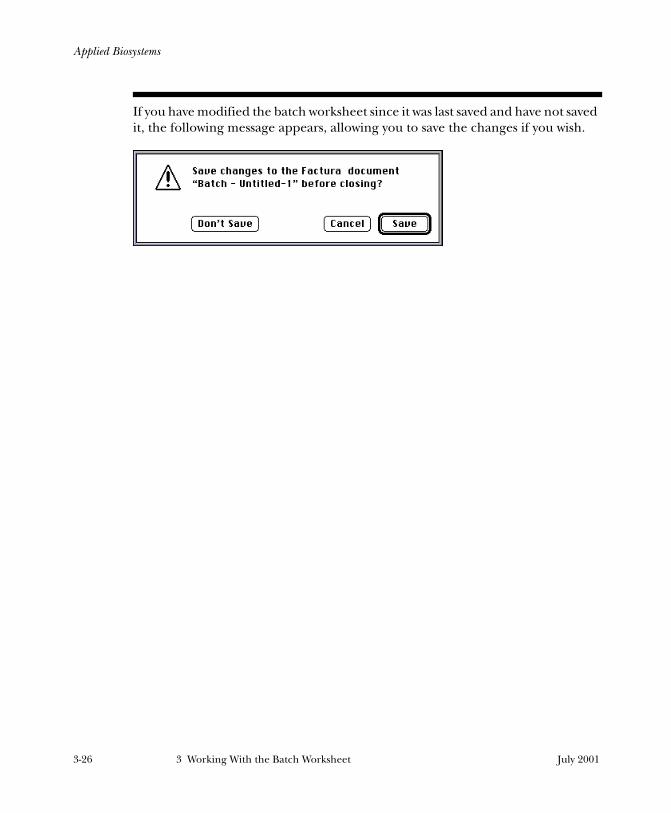
If you have modified the batch worksheet since it was last saved and have not saved it, the following message appears, allowing you to save the changes if you wish.
3-26 3 Working With the Batch Worksheet July 2001
300 I'M INVISIBLE`
Applied Biosystems
4 Working With Sequences in Factura
The Factura sequence window allows you to display information from your sequence files in four different formats. The window can be opened in several different ways, with or without a batch worksheet displayed.This section provides:
• Descriptions of several ways to open a sequence window
• A brief description of the sequence window and its various views
• Procedures for editing and changing the appearance of a sequence in the sequence window
July 2001 4 Working With Sequences in Factura 4-1
Applied Biosystems
Contents
Opening the Sequence Window 4-3Opening a Sequence File Independent of the Batch Worksheet 4-4
Opening an Existing Sequence File 4-4Creating a New Sequence File 4-5
Opening a Sequence File from the Batch Worksheet 4-7Description of the Sequence Window 4-8
Sequence View 4-9Annotation View 4-10Feature View 4-11Electropherogram View 4-13
Editing in the Sequence Window 4-14Adding, Deleting or Changing Bases 4-14
Editing Bases In Sequence View 4-14Editing Bases In Electropherogram View 4-15
Adding, Removing, or Changing Features 4-16Joining Features 4-20
Viewing Options in the Sequence Window 4-21Finding Patterns in a Sequence 4-21Displaying the Complement of a Sequence 4-25Changing the Font and Grouping of a Sequence 4-26Changing the Appearance of Features 4-27
Applying a Marking Style to a Feature 4-27Changing the Definition of A Marking Style 4-28Marking Features Automatically by Renaming Mark Styles 4-31
Changing the Appearance of Electropherogram View 4-32Closing the Sequence Window 4-42
4-2 4 Working With Sequences in Factura July 2001
Applied Biosystems
Opening the Sequence Window
Open a sequence window to view or edit the contents of an individual sequence file, or to see the results of batch processing on an individual sequence. You can open the window in several ways, as described below.
Two menus become available whenever a sequence window is active. The Edit menu allows you to undo your last action, manipulate text and graphics, and select the entire contents of a window view. The Sequence menu allows you to change the visual display of the information in the sequence window.
Note The Edit menu and the Sequence menu are only available when a sequence window is active. You cannot use either menu when the batch worksheet is the active window.
Sequences open in the Sequence View (Figure 4-1). Other possible views are discussed beginning on page 4-9.
Figure 4-1. Sequence View
July 2001 4 Working With Sequences in Factura 4-3
Applied Biosystems
You can create a new sequence file or open and work with sequence files that already exist, whether or not you have a batch worksheet open.
Opening a Sequence File Independent of the Batch WorksheetYou might wish to open sequence files independent of the batch worksheet to examine the contents of the files or to copy information from text files into new sequence files.
Because Factura does not save feature table information into text files, your text files must be copied to a different format so that Factura-identified features can be stored in them (for a procedure, see page 4-7).
Opening an Existing Sequence FileTwo Open Sequence commands are provided in Factura. The first command, which is followed by an ellipsis (…), displays the standard dialog box allowing you to open sequence files of all three types (Sample, Inherit, and Text).
If you have a large number of different types of sequence files, the second Open Sequence command can simplify file selection by filtering for the selected file type. It displays a submenu, as shown in Figure 4-2.
Figure 4-2. Open Sequence submenu
4-4 4 Working With Sequences in Factura July 2001
Applied Biosystems
You must choose the type of sequence file (Sample, Inherit, Text) while selecting the command. Only files of the chosen type appear in the standard file dialog box.
The file types are as follows:
• Sample files contain sequence data in four different formats: Sequence View presents a listing of data; Annotation View may contain annotation from an automated sequencer; Feature View conveys the Factura-generated results to the Sequence Navigator application in the form of defined vector, ambiguity, confidence range, and IUB/heterozygote features; and Electropherogram View displays 373 sequence data in electropherogram format.
• Inherit files are files exported from any of the applications of the INHERIT sequence analysis system. When opened within Factura they contain only Sequence, Annotation and Feature Views.
• Text files contain the same views as the INHERIT type files when you open them in Factura. When you save from Factura to a text file and open it in a word processor, only the sequence listing view is available.
Creating a New Sequence FileCreating a new sequence file is a useful tool that enables Factura to process information you have drawn from a text file and store the results in a file with a feature table. Since Factura does not save feature table information into text files, your text files must be copied to a different format so that Factura-identified features can be stored in them. The new sequence file created by Factura is like an ABI 373 sample file except that it contains no electropherogram data.
July 2001 4 Working With Sequences in Factura 4-5
Applied Biosystems
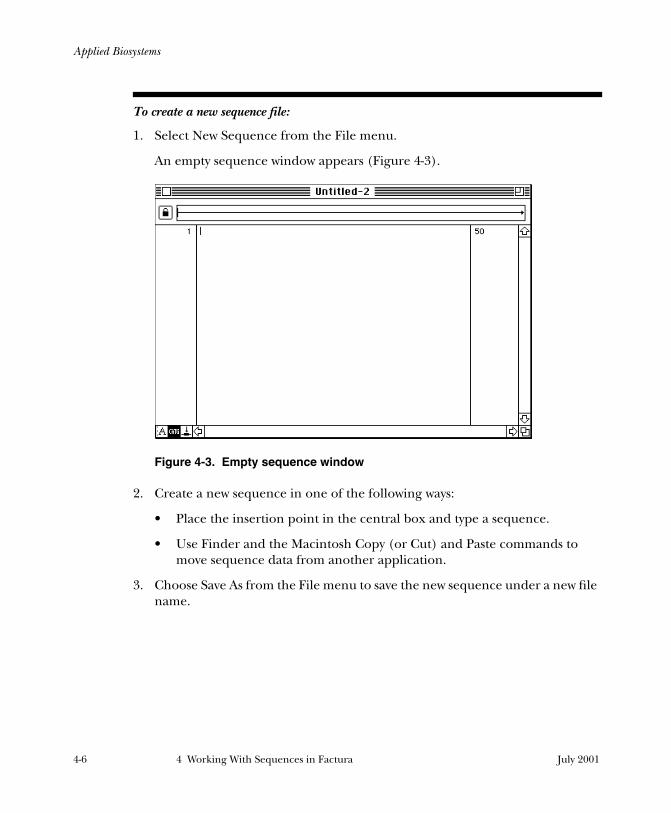
To create a new sequence file:
1. Select New Sequence from the File menu.
An empty sequence window appears (Figure 4-3).
Figure 4-3. Empty sequence window
2. Create a new sequence in one of the following ways:
• Place the insertion point in the central box and type a sequence.
• Use Finder and the Macintosh Copy (or Cut) and Paste commands to move sequence data from another application.
3. Choose Save As from the File menu to save the new sequence under a new file name.
4-6 4 Working With Sequences in Factura July 2001
Applied Biosystems
To copy a sequence from a text file into a new sequence file:
1. Open the existing text file using Open Sequence, as described on page 4-4.
This opens a sequence window containing the sequence data stored in the text file.
2. Choose New Sequence from the File menu.
A new, blank sequence window appears.
3. Click the sequence window containing the text file to make it active.
4. Choose Select All from the Edit menu.
The entire sequence is highlighted.
5. Choose Copy (c-C) from the Edit menu.
6. Click the new (empty) sequence window to make it active.
7. Choose Paste (c-V) from the Edit menu.
8. Choose Save As from the File menu.
9. Enter a name for the new sequence.
10. Click Save (c-S).
Opening a Sequence File from the Batch WorksheetYou can open sequence windows for any number of selected sequences in the batch worksheet.
To open a sequence window from the batch worksheet:
1. Select a sequence.
2. Choose Show Sequence from the Worksheet menu.
A sequence window appears for the selected sequence.
Note If you select more than one sequence before choosing the command, a sequence window appears for each selected sequence.
July 2001 4 Working With Sequences in Factura 4-7
Applied Biosystems
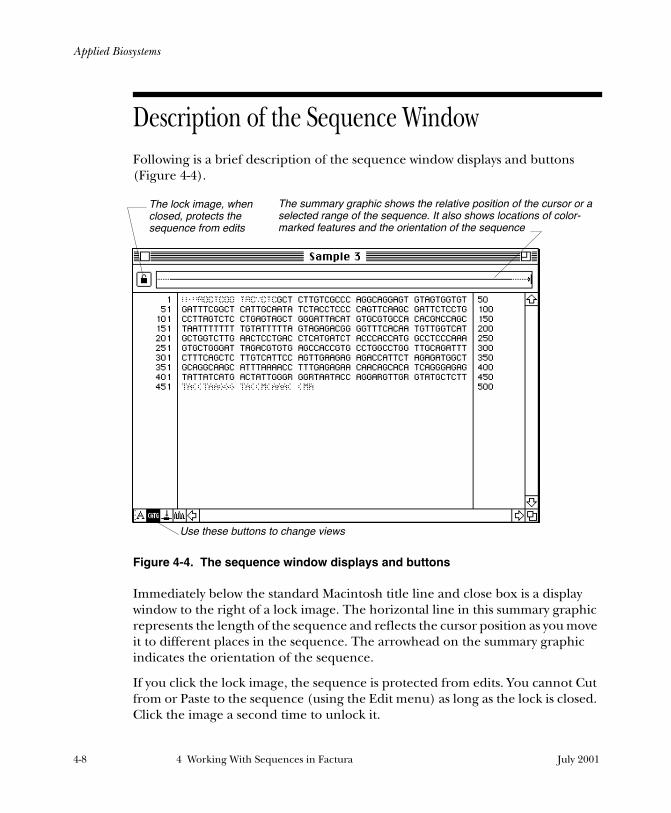
Description of the Sequence Window
Following is a brief description of the sequence window displays and buttons (Figure 4-4).
Figure 4-4. The sequence window displays and buttons
Immediately below the standard Macintosh title line and close box is a display window to the right of a lock image. The horizontal line in this summary graphic represents the length of the sequence and reflects the cursor position as you move it to different places in the sequence. The arrowhead on the summary graphic indicates the orientation of the sequence.
If you click the lock image, the sequence is protected from edits. You cannot Cut from or Paste to the sequence (using the Edit menu) as long as the lock is closed. Click the image a second time to unlock it.
Use these buttons to change views
The lock image, when closed, protects the sequence from edits
The summary graphic shows the relative position of the cursor or a selected range of the sequence. It also shows locations of color-marked features and the orientation of the sequence
4-8 4 Working With Sequences in Factura July 2001
Applied Biosystems
The main portion of the sequence window contains the information from the sequence file. You can display up to four different views using the buttons located in the bottom left corner of the window. The function of each button is described under a heading below.
Note If you open a database sequence saved in the GeneAssist application, a sequence created with the New Sequence command, or a Text sequence entered on a word processor, the sequence window shows only three of the views. Electropherogram View is available only for sequences produced by Applied Biosystems genetic analysis instruments.
Sequence ViewSequence View (Figure 4-4) is the default view when you open a sequence window in Factura. The center column contains the sequence list. The left and right columns show the base positions at the beginning and end of each row. To change to Sequence View from any of the other views, click the button shown here.
In sequence view you can search for specified patterns, show the complement of the sequence, add features, and change the way the sequence shows on the screen. More information about these options is available as follows:
• To find a specified pattern, see page 4-21
• To complement the sequence, see page 4-25.
• To add or remove features, see page 4-16.
• To edit the display of the sequence, see page 4-26.
July 2001 4 Working With Sequences in Factura 4-9
Applied Biosystems
Annotation View Annotation View (Figure 4-5) shows information stored in the file about the run that produced the sequence data, as well as annotation from a database entry. If the file is not from an Applied Biosystems genetic analysis instrument sample file, some basic information is presented. Click the button shown here to display Annotation View. Figure 4-5 shows an example of Annotation View.
Figure 4-5. Sequence Annotation View
4-10 4 Working With Sequences in Factura July 2001
Applied Biosystems
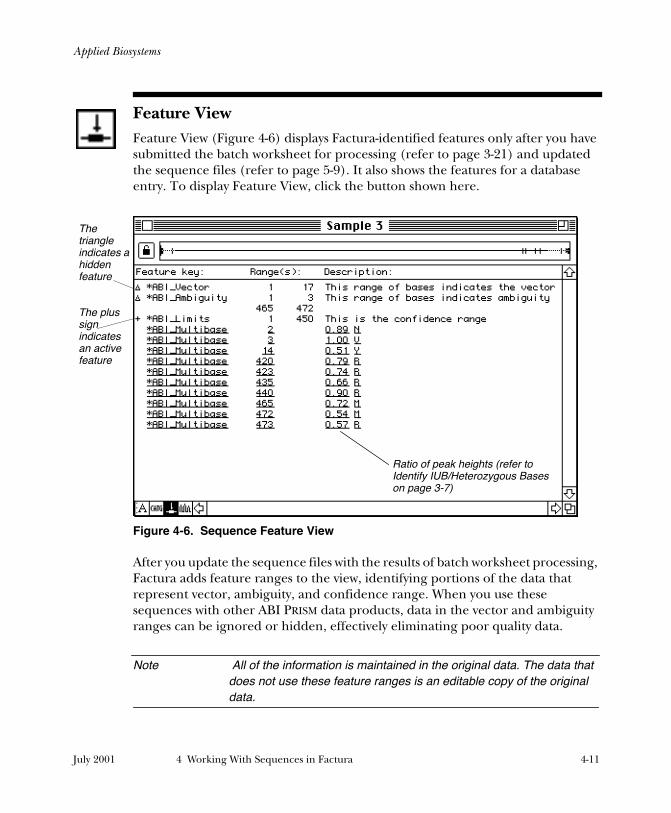
Feature View Feature View (Figure 4-6) displays Factura-identified features only after you have submitted the batch worksheet for processing (refer to page 3-21) and updated the sequence files (refer to page 5-9). It also shows the features for a database entry. To display Feature View, click the button shown here.
Figure 4-6. Sequence Feature View
After you update the sequence files with the results of batch worksheet processing, Factura adds feature ranges to the view, identifying portions of the data that represent vector, ambiguity, and confidence range. When you use these sequences with other ABI PRISM data products, data in the vector and ambiguity ranges can be ignored or hidden, effectively eliminating poor quality data.
Note All of the information is maintained in the original data. The data that does not use these feature ranges is an editable copy of the original data.
The triangle indicates a hidden feature
The plus sign indicates an active feature
Ratio of peak heights (refer to Identify IUB/Heterozygous Bases on page 3-7)
July 2001 4 Working With Sequences in Factura 4-11
Applied Biosystems
In Feature View you can add, change, or remove features, and change the colors or borders that mark the features. For more information about these procedures, see the following references:
• To add, remove, or edit features, see page 4-16.
• To change colors or borders that mark the features, see page 4-27.
Note Factura does not save feature table information to text files. Feature View for text files does not display Factura-identified features. To change a text file so that it can display Factura-identified features, see the copying procedure on page 4-7.
4-12 4 Working With Sequences in Factura July 2001
Applied Biosystems
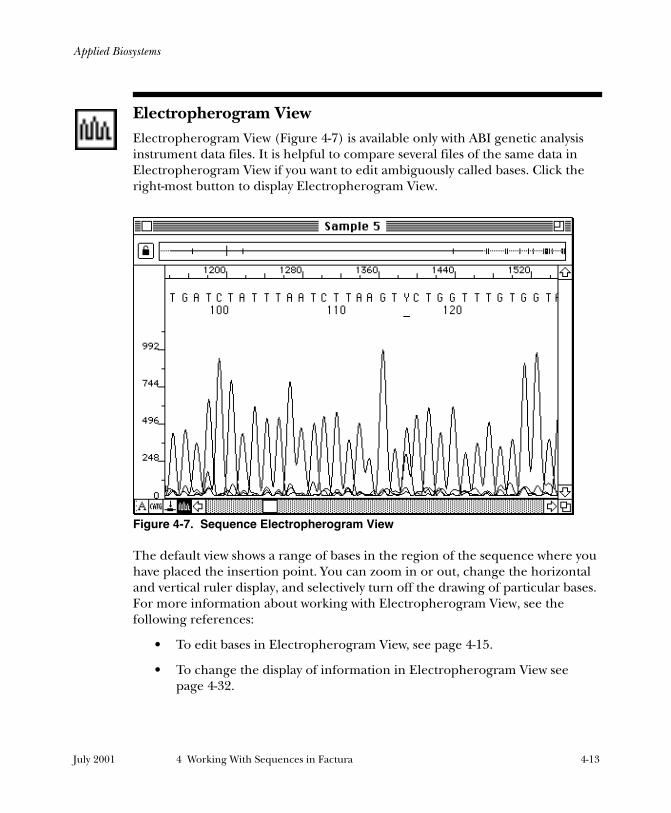
Electropherogram View Electropherogram View (Figure 4-7) is available only with ABI genetic analysis instrument data files. It is helpful to compare several files of the same data in Electropherogram View if you want to edit ambiguously called bases. Click the right-most button to display Electropherogram View.
Figure 4-7. Sequence Electropherogram View
The default view shows a range of bases in the region of the sequence where you have placed the insertion point. You can zoom in or out, change the horizontal and vertical ruler display, and selectively turn off the drawing of particular bases. For more information about working with Electropherogram View, see the following references:
• To edit bases in Electropherogram View, see page 4-15.
• To change the display of information in Electropherogram View see page 4-32.
July 2001 4 Working With Sequences in Factura 4-13
Applied Biosystems
Editing in the Sequence Window
You can perform editing functions in a sequence window, including:
• Adding, deleting, or changing bases in the sequence
• Adding, removing, or changing the features of the sequence.
You can edit individual bases in Sequence View or Electropherogram View. You must be in Feature View to remove or change features.
For information about complementing the sequence, finding patterns, and changing how the sequence displays on the screen, see Viewing Options in the Sequence Window on page 4-21.
Adding, Deleting or Changing BasesYou can add, delete, or change bases in both Electropherogram View and Sequence View. For information about changing how the sequence appears on the screen, see page 4-26.
Editing Bases In Sequence ViewIn Sequence View you can use the standard Edit menu commands to cut, copy, paste, and clear bases or ranges of the sequence in the active window. You can select the entire sequence (including marked features) with Select All in the Edit menu. The Edit menu commands operate as described in the Apple System Software User’s Guide.
Following are brief descriptions of how to add, delete, and replace bases.
Note Editing bases in Electropherogram View (see below) is more precise than editing in Sequence View. If you edit ABI PRISM sample files in Sequence View, you should check Electropherogram View when you are finished.
To add a base or range of bases to the sequence:
1. Place the insertion point at the position in the sequence where you wish to add a base.
2. Type the characters you wish to insert.
4-14 4 Working With Sequences in Factura July 2001
Applied Biosystems
To delete a base or range of bases from the sequence:
1. Select the base or range of bases.
2. Press the Delete key or choose Clear from the Edit menu.
To change a base in the sequence:
1. Select the base you wish to change.
2. Type the new character you wish to be in that position.
Note You can also place the insertion point to the right of the character you wish to replace, press the Delete key, then type the character you want in that position.
Editing Bases In Electropherogram ViewIn Electropherogram View the Edit menu commands are not available and you can edit only one base at a time. You can add, delete, or change bases in much the same way as described above for Sequence View; however, the spacing of the characters is much more precise.
Multiple base positions (approximately ten) are available between the displayed bases in Electropherogram View. If you place the insertion point between two characters and click, a position is selected. Following are some hints about moving the selection from one position to another:
• To move from base to base, use the Left Arrow and Right Arrow keys.
• To move from position to position (often pixel-by-pixel) hold down the Option key while you use the Left and Right Arrow keys.
IMPORTANT Because the available base positions are so close together, it is possible to select a position very close to one of the bases when you are actually trying to select the base itself. If you do so, you might insert a character when you intend to change an existing character. To be sure you are selecting the base, use the following procedure.
July 2001 4 Working With Sequences in Factura 4-15
Applied Biosystems
To select a base in Electropherogram View to delete or change it:
1. Place the insertion point to the left or the right of the character you wish to select and click.
2. Press the Right Arrow key or Left Arrow key to move to the base you wish to select.
This procedure ensures that you have selected the base, not a position only one pixel away from it. Once you have selected the base, you can delete it by pressing Delete or replace it by typing a new character.
To add a base in Electropherogram View:
1. Place the insertion point between bases where you wish to insert the character and click.
2. To move the insertion point closer to one of the flanking bases, hold down the Option key and use the Left or Right Arrow key to move to the position where you wish to insert the base.
3. Type the new character.
Note If you add bases in Sequence View then change to Electropherogram View, the new bases are spaced as evenly as possible between the two previously existing bases.
Adding, Removing, or Changing FeaturesAfter you have processed a batch worksheet and saved the features identified by Factura into the feature tables of the individual sequences, you can add other specialized features, and change or delete the features identified by Factura. You can add a feature in Sequence View, but you must be in Feature View to remove or change a feature, or to specify how it is marked for display.
Note For information about how to mark features with color and borders, see page 4-27.
4-16 4 Working With Sequences in Factura July 2001
Applied Biosystems
To add a feature to the feature table of a sequence:
1. Select a feature, if you are in Feature View. If you are in Sequence View, select a range of characters.
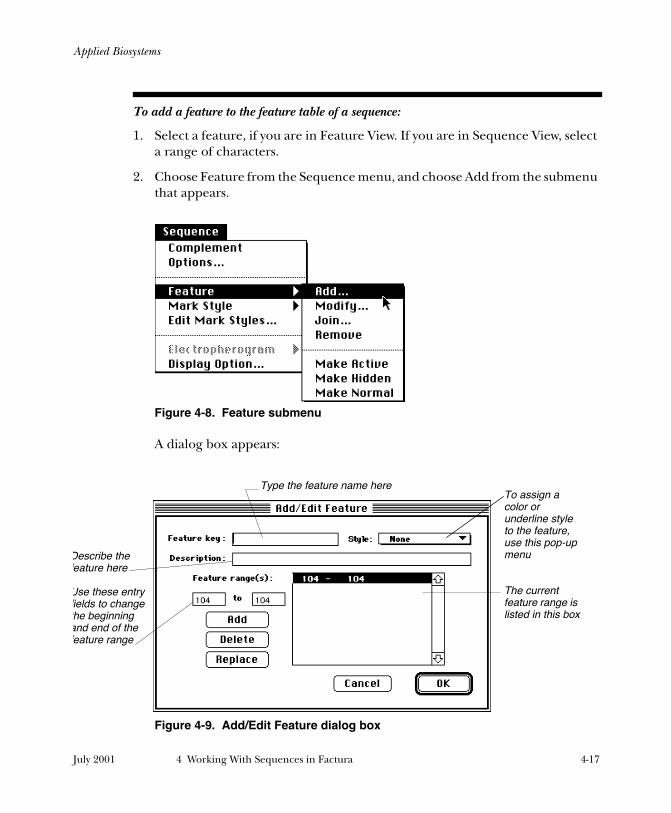
2. Choose Feature from the Sequence menu, and choose Add from the submenu that appears.
Figure 4-8. Feature submenu
A dialog box appears:
Figure 4-9. Add/Edit Feature dialog box
Describe the feature here
Use these entry fields to change the beginning and end of the feature range
Type the feature name hereTo assign a color or underline style to the feature, use this pop-up menu
The current feature range is listed in this box
July 2001 4 Working With Sequences in Factura 4-17
Applied Biosystems
Note If you chose a range of characters in Sequence view, it is entered as a default in the Feature range table.
3. Type a name for the new feature (up to 15 characters long) in the Feature Key entry field.
Note To comply with the GenBank feature table definition the name should start with an asterisk (*).
4. Enter text describing the new feature in the Description entry field.
5. Choose a marking style from the Style pull-down menu.
Using the Style menu, you can choose one of eight marking styles to help you identify your feature. The color of the style you choose identifies your feature in Sequence View and Feature View, and in the summary graphic in all views. For information about defining the marking styles, see page 4-28.
6. Check the range of your new feature.
If you selected a range prior to opening the dialog box, it shows as the default range. You can change the range using the two entry fields under Feature Range(s). Select either the beginning or ending value in the appropriate entry field, type a new value, and click Replace.
7. Note the following, and perform any of the options you wish:
• You can add multiple ranges to your feature. For each new range, enter the beginning and ending values in the entry fields and click Add. If you do not change the Feature Key and Description entry fields, the new range is added to the same feature.
• If you wish to remove a range, select it in the feature window on the right side of the dialog box, and click Delete.
• If you wish to replace a range with a different one, select the range you wish to replace, type a new range in the Feature Range(s) entry fields, and click Replace.
8. When you are finished defining the feature, click OK.
4-18 4 Working With Sequences in Factura July 2001
Applied Biosystems
IMPORTANT If you reprocess the batch worksheet and save the reprocessed features to the sequence files, the new features overwrite the feature tables. Any special features you added disappear. You must add them again after reprocessing. Refer also to Saving Results to Sequence Data Source Files on page 5-9.
To remove a feature from the feature table of a sequence:
1. Be sure you are in Feature View.
2. Select the feature you wish to remove.
3. Choose Feature from the Sequence menu, and choose Remove from the submenu that appears (see Figure 4-8 on page 4-17).
To change a feature in the feature table of a sequence:
1. Be sure you are in Feature View.
2. Select the feature you wish to change.
3. Choose Feature from the Sequence menu, and choose Modify from the submenu that appears (Figure 4-8 on page 4-17).
The Add/Edit Feature dialog box (shown in Figure 4-9 on page 4-17) appears.
4. Make changes as described in Step 5 through Step 7 under To add a feature to the feature table of a sequence: (the steps are on page 4-18).
You can remove one or more of multiple ranges, add additional ranges, change the values of existing ranges, or change the style that marks the feature. You can also change the name or description of the feature by typing new information in the Feature Key or Description entry fields.
5. Click OK to implement the changes.
July 2001 4 Working With Sequences in Factura 4-19
Applied Biosystems
Joining FeaturesYou can join two or more individual features in the feature table into a single feature with multiple ranges. The following procedure creates a new feature that contains all the ranges included in the individual features you select. The original features remain in the feature table. If you wish to delete any of them, see the procedure under To remove a feature from the feature table of a sequence: on page 4-19.
To join features in the feature table of a sequence:
1. In Feature View select the features you wish to join by clicking each while holding down the command key (z) key.
Note To select contiguous features, click the first feature in the group, then hold down the shift key and click the last feature in the group.
2. Choose Feature from the Sequence menu, and choose Join from the submenu that appears.
The Add/Edit dialog box appears, with blank Feature Key and Description entry fields. The Feature Ranges box at the right shows all ranges from the features you selected.
3. Type a new name for the joined feature in the Feature Key entry field.
Note To comply with the GenBank feature table definition the name should start with an asterisk (*).
4. Type text describing the joined feature in the Description entry field.
5. Choose a new marking style from the Style pull-down menu.
6. Click OK.
4-20 4 Working With Sequences in Factura July 2001
Applied Biosystems
Viewing Options in the Sequence Window
Among the viewing options available when the sequence window is active are:
• Finding patterns in the sequence
• Displaying the complement of the sequence
• Changing how the sequence appears on the screen
You must be in Sequence View to find patterns and display the complement of the sequence. You can change the appearance of the screen in Electropherogram View and Feature View as well as in Sequence View.
Finding Patterns in a SequenceIn addition to the standard Apple commands, the Edit menu contains commands for the following tasks.
• Finding a particular pattern of bases in the Sequence view of an active sequence window.
• Finding the same pattern again as many times as necessary.
Note You cannot use the Find and Find Again commands in Electropherogram View. Use the Find command in Sequence view, and when the pattern is highlighted, switch to Electropherogram View. The electropherogram shows a range of bases in the highlighted region of the sequence.
July 2001 4 Working With Sequences in Factura 4-21
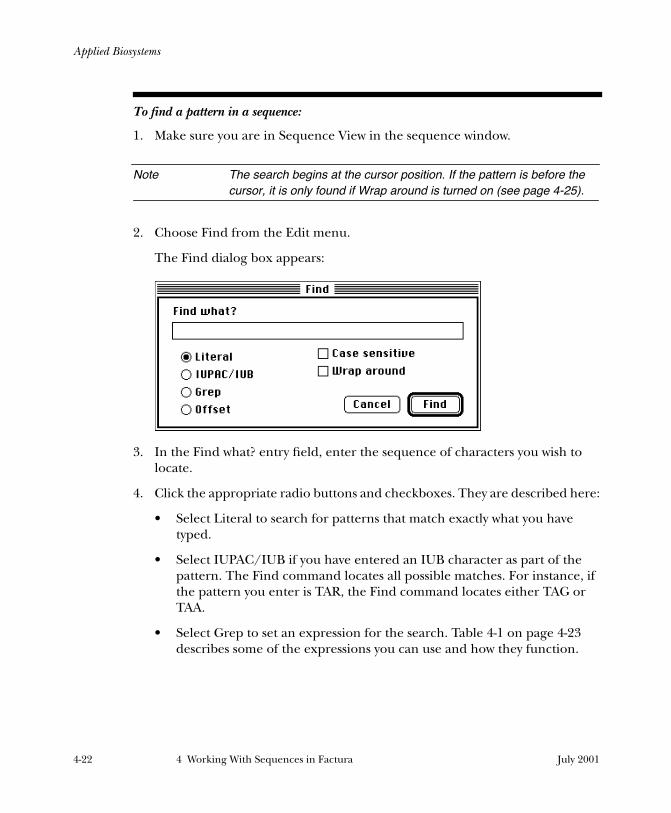
Applied Biosystems
To find a pattern in a sequence:
1. Make sure you are in Sequence View in the sequence window.
Note The search begins at the cursor position. If the pattern is before the cursor, it is only found if Wrap around is turned on (see page 4-25).
2. Choose Find from the Edit menu.
The Find dialog box appears:
3. In the Find what? entry field, enter the sequence of characters you wish to locate.
4. Click the appropriate radio buttons and checkboxes. They are described here:
• Select Literal to search for patterns that match exactly what you have typed.
• Select IUPAC/IUB if you have entered an IUB character as part of the pattern. The Find command locates all possible matches. For instance, if the pattern you enter is TAR, the Find command locates either TAG or TAA.
• Select Grep to set an expression for the search. Table 4-1 on page 4-23 describes some of the expressions you can use and how they function.
4-22 4 Working With Sequences in Factura July 2001
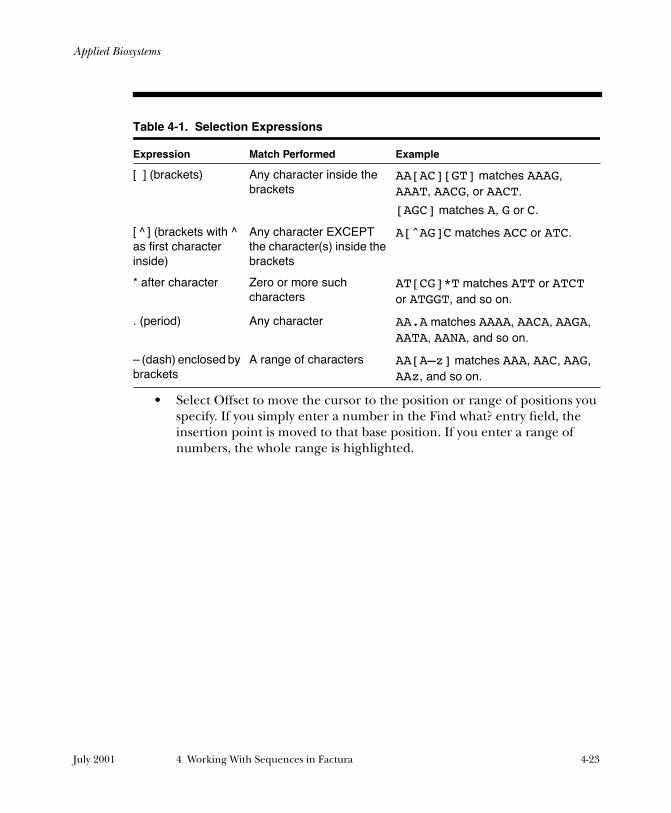
Applied Biosystems
• Select Offset to move the cursor to the position or range of positions you specify. If you simply enter a number in the Find what? entry field, the insertion point is moved to that base position. If you enter a range of numbers, the whole range is highlighted.
Table 4-1. Selection Expressions
Expression Match Performed Example
[a] (brackets) Any character inside the brackets
AA[AC][GT] matches AAAG, AAAT, AACG, or AACT.
[AGC] matches A, G or C.
[l^l] (brackets with ^ as first character inside)
Any character EXCEPT the character(s) inside the brackets
A[^AG]C matches ACC or ATC.
* after character Zero or more such characters
AT[CG]*T matches ATT or ATCT or ATGGT, and so on.
. (period) Any character AA.A matches AAAA, AACA, AAGA, AATA, AANA, and so on.
– (dash) enclosed by brackets
A range of characters AA[A–z] matches AAA, AAC, AAG, AAz, and so on.
July 2001 4 Working With Sequences in Factura 4-23
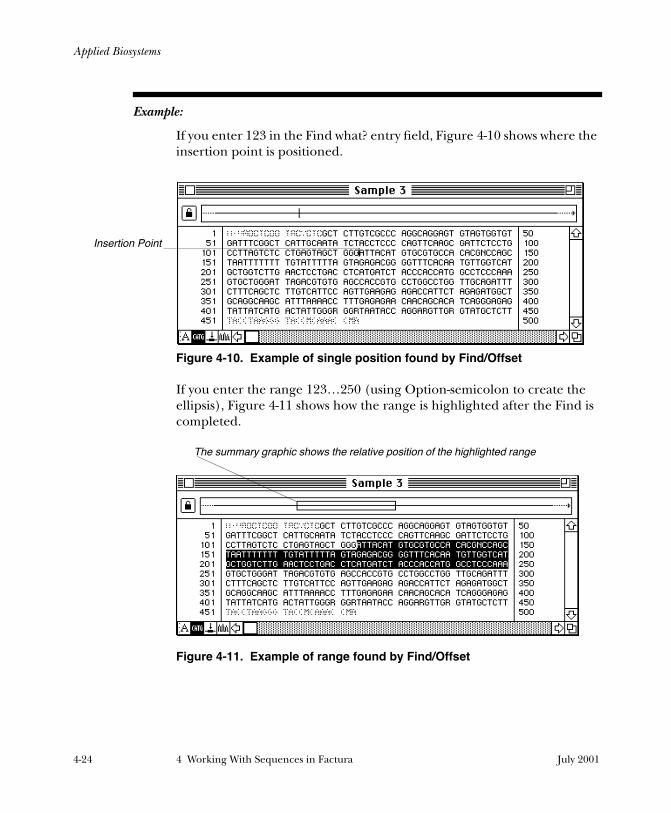
Applied Biosystems
Example:
If you enter 123 in the Find what? entry field, Figure 4-10 shows where the insertion point is positioned.
Figure 4-10. Example of single position found by Find/Offset
If you enter the range 123…250 (using Option-semicolon to create the ellipsis), Figure 4-11 shows how the range is highlighted after the Find is completed.
Figure 4-11. Example of range found by Find/Offset
Insertion Point
The summary graphic shows the relative position of the highlighted range
4-24 4 Working With Sequences in Factura July 2001
Applied Biosystems
• Select Case sensitive if you want upper- and lower-case variants of a letter to be recognized as different symbols.
• Select Wrap around if you want the search to start again at the beginning of the sequence after it has reached the end. If the Wrap around checkbox is not selected, the search stops at the end of the sequence.
5. Click Find to perform the search.
The first instance of the specified pattern is highlighted and its position is marked in the summary graphic at the top of the sequence window (note examples on page 4-24).
Note If you only want to find a pattern in the valid range, place the insertion point just before this range in the sequence.
To find other occurrences of the same pattern:
Choose Find Again (c-G) from the Edit menu to bypass the dialog box and use the pattern defined in the previous Find command. Each time you use it, the next occurrence of the specified pattern is located.
Displaying the Complement of a SequenceYou can display the complement of a sequence in all sequence window views. When vector and ambiguity features have been identified, the characters in these features as well as feature locations in the Feature table are changed to reflect the complement. The display of original data in the electropherogram is complemented as well (see Changing the Appearance of Electropherogram View on page 4-32).
To display the complement of a sequence:
1. Make sure the relevant sequence window is active.
2. Choose Complement from the Sequence menu.
If you wish to return to the original data, simply choose Complement a second time.
July 2001 4 Working With Sequences in Factura 4-25
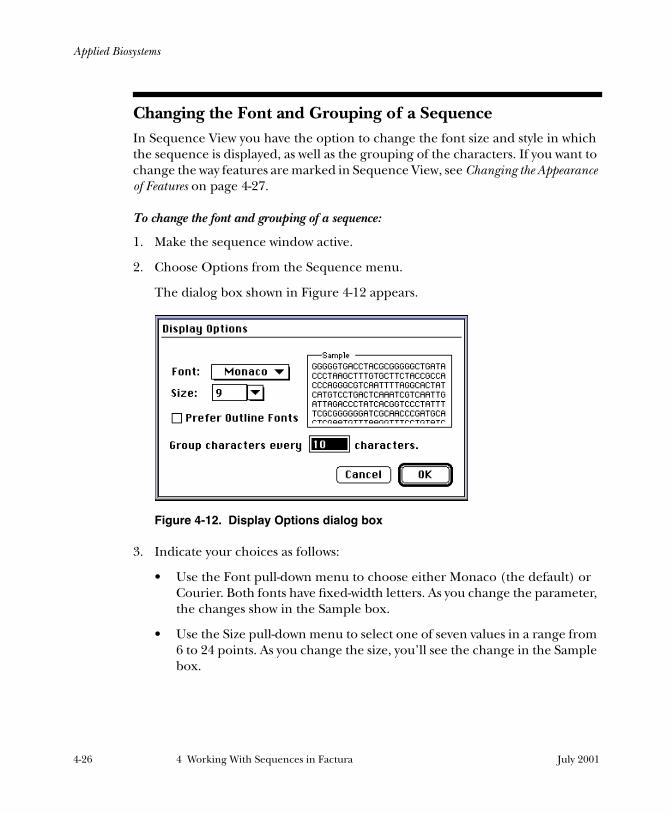
Applied Biosystems
Changing the Font and Grouping of a SequenceIn Sequence View you have the option to change the font size and style in which the sequence is displayed, as well as the grouping of the characters. If you want to change the way features are marked in Sequence View, see Changing the Appearance of Features on page 4-27.
To change the font and grouping of a sequence:
1. Make the sequence window active.
2. Choose Options from the Sequence menu.
The dialog box shown in Figure 4-12 appears.
Figure 4-12. Display Options dialog box
3. Indicate your choices as follows:
• Use the Font pull-down menu to choose either Monaco (the default) or Courier. Both fonts have fixed-width letters. As you change the parameter, the changes show in the Sample box.
• Use the Size pull-down menu to select one of seven values in a range from 6 to 24 points. As you change the size, you’ll see the change in the Sample box.
4-26 4 Working With Sequences in Factura July 2001
Applied Biosystems
• You do not need to select Prefer Outline Fonts unless you plan to increase the font size substantially (to the point it would otherwise look jagged). It specifies that dynamically scaled fonts be used.
• The last entry field allows you to specify the number of characters displayed in each group in Sequence view.
4. Click OK to accept your choices.
Changing the Appearance of FeaturesTo easily locate the features identified by Factura and the special features you add to sequence feature tables, you can mark them with defined styles. The marking appears in Sequence View, in Feature View, and in the summary graphic at the top of all views. The styles specify colors and borders that mark the features to identify them (the borders appear only in Sequence View). You can change the way features are marked and the definitions of the marking styles when you are in Feature View of a sequence window.
Applying a Marking Style to a FeatureYou can apply any of eight styles to a previously created feature. Each style has a default color and border, but you can assign new parameters using the Edit Mark Styles command (see page 4-28).
Table 4-2 shows the defaults for the eight marking styles.
Table 4-2. Default Marking Styles
Style Name Color Border
Blue Blue No Underline
*ABI_Multibase Red Light Underline
Green Bold Bright Green Heavy Underline
Gray Double Gray Double Underline
Brown Brown No Underline
D Green Single Dark Green Light Underline
D Blue Bold Dark Blue Heavy Underline
Purple Double Purple Double Underline
July 2001 4 Working With Sequences in Factura 4-27
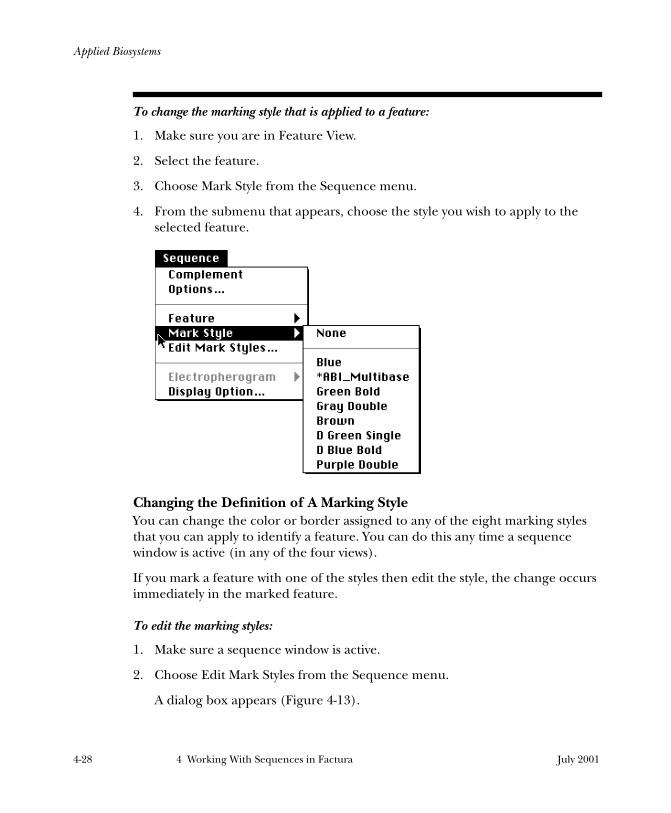
Applied Biosystems
To change the marking style that is applied to a feature:
1. Make sure you are in Feature View.
2. Select the feature.
3. Choose Mark Style from the Sequence menu.
4. From the submenu that appears, choose the style you wish to apply to the selected feature.
Changing the Definition of A Marking StyleYou can change the color or border assigned to any of the eight marking styles that you can apply to identify a feature. You can do this any time a sequence window is active (in any of the four views).
If you mark a feature with one of the styles then edit the style, the change occurs immediately in the marked feature.
To edit the marking styles:
1. Make sure a sequence window is active.
2. Choose Edit Mark Styles from the Sequence menu.
A dialog box appears (Figure 4-13).
4-28 4 Working With Sequences in Factura July 2001
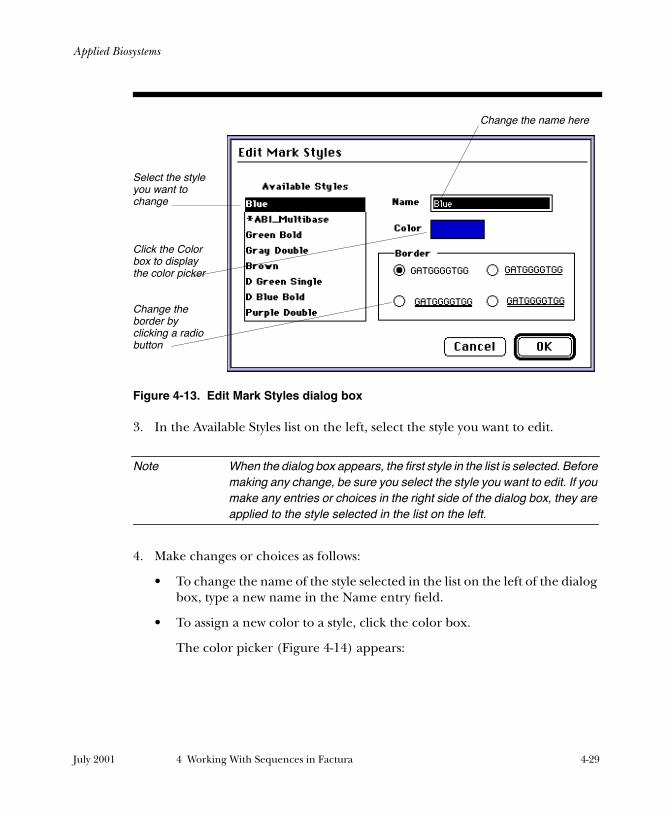
Applied Biosystems
Figure 4-13. Edit Mark Styles dialog box
3. In the Available Styles list on the left, select the style you want to edit.
Note When the dialog box appears, the first style in the list is selected. Before making any change, be sure you select the style you want to edit. If you make any entries or choices in the right side of the dialog box, they are applied to the style selected in the list on the left.
4. Make changes or choices as follows:
• To change the name of the style selected in the list on the left of the dialog box, type a new name in the Name entry field.
• To assign a new color to a style, click the color box.
The color picker (Figure 4-14) appears:
Select the style you want to change
Click the Color box to display the color picker
Change the border by clicking a radio button
Change the name here
July 2001 4 Working With Sequences in Factura 4-29
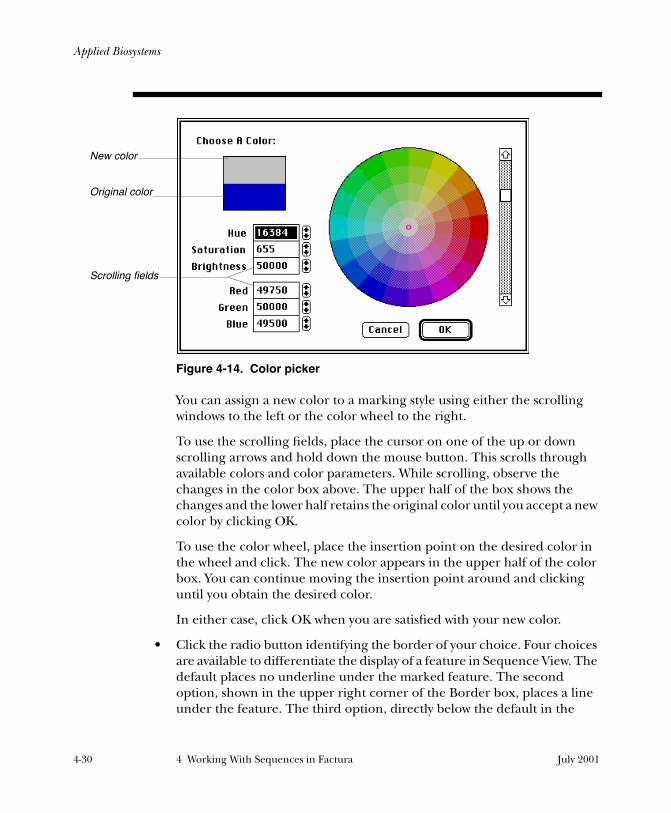
Applied Biosystems
Figure 4-14. Color picker
You can assign a new color to a marking style using either the scrolling windows to the left or the color wheel to the right.
To use the scrolling fields, place the cursor on one of the up or down scrolling arrows and hold down the mouse button. This scrolls through available colors and color parameters. While scrolling, observe the changes in the color box above. The upper half of the box shows the changes and the lower half retains the original color until you accept a new color by clicking OK.
To use the color wheel, place the insertion point on the desired color in the wheel and click. The new color appears in the upper half of the color box. You can continue moving the insertion point around and clicking until you obtain the desired color.
In either case, click OK when you are satisfied with your new color.
• Click the radio button identifying the border of your choice. Four choices are available to differentiate the display of a feature in Sequence View. The default places no underline under the marked feature. The second option, shown in the upper right corner of the Border box, places a line under the feature. The third option, directly below the default in the
New color
Original color
Scrolling fields
4-30 4 Working With Sequences in Factura July 2001
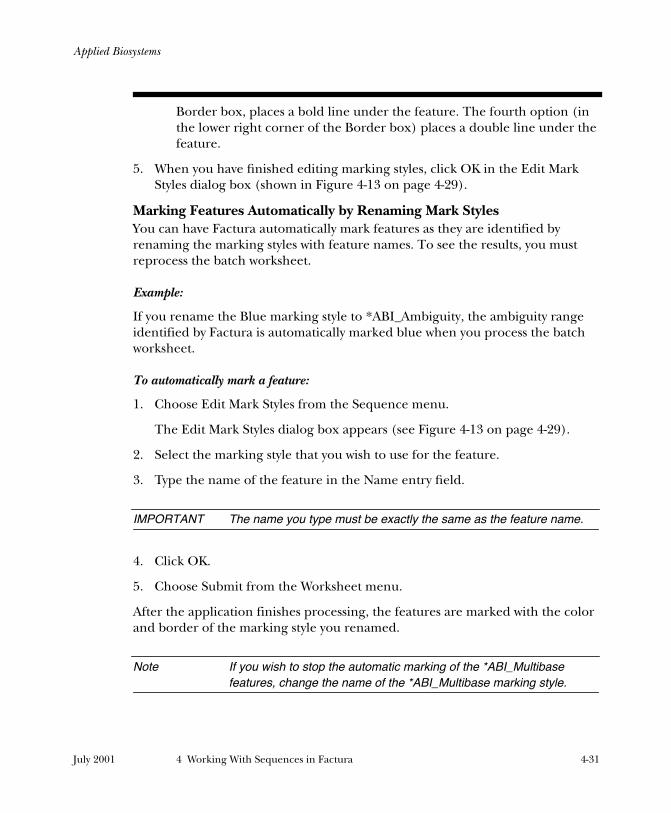
Applied Biosystems
Border box, places a bold line under the feature. The fourth option (in the lower right corner of the Border box) places a double line under the feature.
5. When you have finished editing marking styles, click OK in the Edit Mark Styles dialog box (shown in Figure 4-13 on page 4-29).
Marking Features Automatically by Renaming Mark StylesYou can have Factura automatically mark features as they are identified by renaming the marking styles with feature names. To see the results, you must reprocess the batch worksheet.
Example:
If you rename the Blue marking style to *ABI_Ambiguity, the ambiguity range identified by Factura is automatically marked blue when you process the batch worksheet.
To automatically mark a feature:
1. Choose Edit Mark Styles from the Sequence menu.
The Edit Mark Styles dialog box appears (see Figure 4-13 on page 4-29).
2. Select the marking style that you wish to use for the feature.
3. Type the name of the feature in the Name entry field.
IMPORTANT The name you type must be exactly the same as the feature name.
4. Click OK.
5. Choose Submit from the Worksheet menu.
After the application finishes processing, the features are marked with the color and border of the marking style you renamed.
Note If you wish to stop the automatic marking of the *ABI_Multibase features, change the name of the *ABI_Multibase marking style.
July 2001 4 Working With Sequences in Factura 4-31
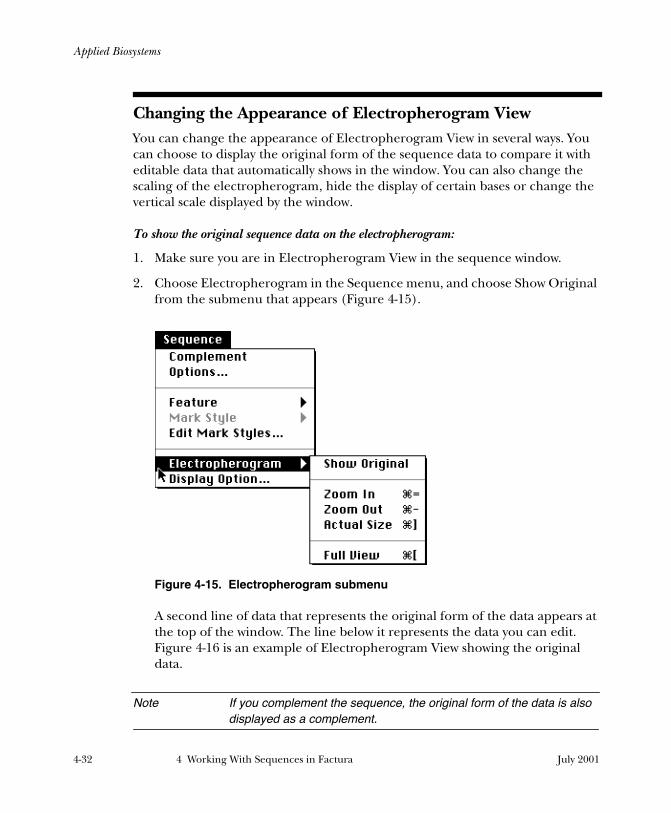
Applied Biosystems
Changing the Appearance of Electropherogram ViewYou can change the appearance of Electropherogram View in several ways. You can choose to display the original form of the sequence data to compare it with editable data that automatically shows in the window. You can also change the scaling of the electropherogram, hide the display of certain bases or change the vertical scale displayed by the window.
To show the original sequence data on the electropherogram:
1. Make sure you are in Electropherogram View in the sequence window.
2. Choose Electropherogram in the Sequence menu, and choose Show Original from the submenu that appears (Figure 4-15).
Figure 4-15. Electropherogram submenu
A second line of data that represents the original form of the data appears at the top of the window. The line below it represents the data you can edit. Figure 4-16 is an example of Electropherogram View showing the original data.
Note If you complement the sequence, the original form of the data is also displayed as a complement.
4-32 4 Working With Sequences in Factura July 2001
Applied Biosystems
Figure 4-16. Electropherogram View with original data
By comparing the two lines of data, you can keep track of any edits you make to the sequence.
To change the scaling of the electropherogram:
1. Choose Electropherogram from the Sequence menu.
The submenu choices other than Show Original are related to scaling of the electropherogram (see Figure 4-15).
Compare Figure 4-17, which shows the actual size electropherogram, to Figure 4-18, Figure 4-19, and Figure 4-20 to see the results of the scaling options.
Original data
Editable data
July 2001 4 Working With Sequences in Factura 4-33
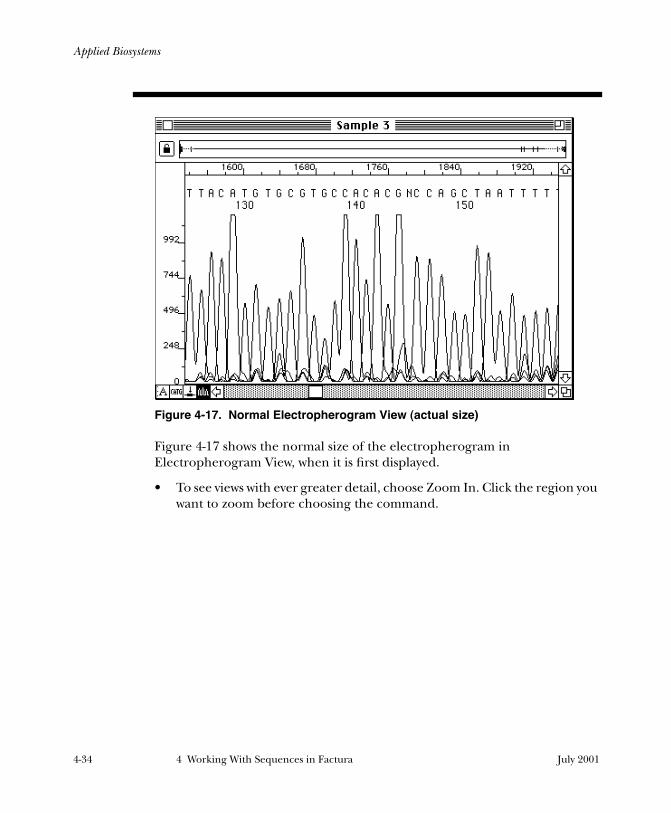
Applied Biosystems
Figure 4-17. Normal Electropherogram View (actual size)
Figure 4-17 shows the normal size of the electropherogram in Electropherogram View, when it is first displayed.
• To see views with ever greater detail, choose Zoom In. Click the region you want to zoom before choosing the command.
4-34 4 Working With Sequences in Factura July 2001
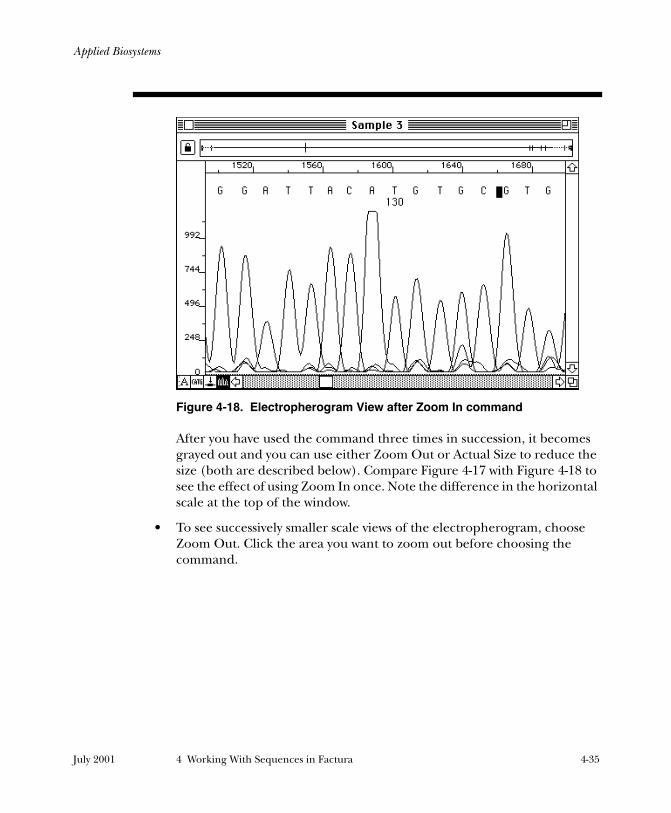
Applied Biosystems
Figure 4-18. Electropherogram View after Zoom In command
After you have used the command three times in succession, it becomes grayed out and you can use either Zoom Out or Actual Size to reduce the size (both are described below). Compare Figure 4-17 with Figure 4-18 to see the effect of using Zoom In once. Note the difference in the horizontal scale at the top of the window.
• To see successively smaller scale views of the electropherogram, choose Zoom Out. Click the area you want to zoom out before choosing the command.
July 2001 4 Working With Sequences in Factura 4-35
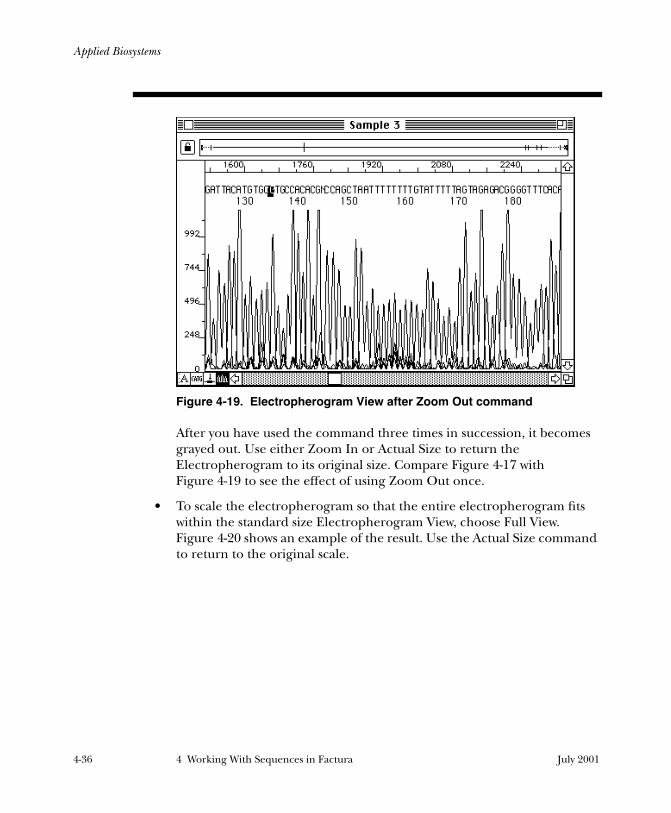
Applied Biosystems
Figure 4-19. Electropherogram View after Zoom Out command
After you have used the command three times in succession, it becomes grayed out. Use either Zoom In or Actual Size to return the Electropherogram to its original size. Compare Figure 4-17 with Figure 4-19 to see the effect of using Zoom Out once.
• To scale the electropherogram so that the entire electropherogram fits within the standard size Electropherogram View, choose Full View. Figure 4-20 shows an example of the result. Use the Actual Size command to return to the original scale.
4-36 4 Working With Sequences in Factura July 2001
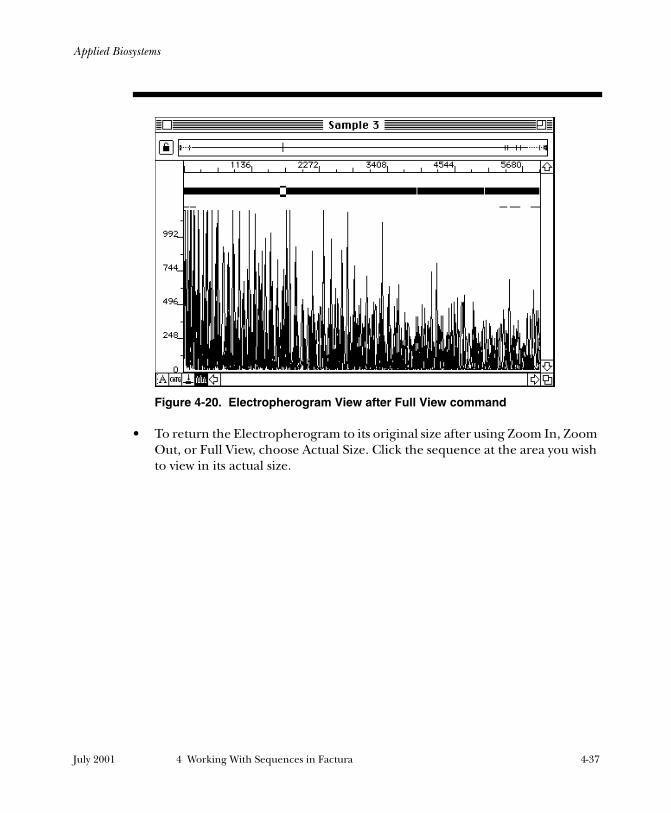
Applied Biosystems
Figure 4-20. Electropherogram View after Full View command
• To return the Electropherogram to its original size after using Zoom In, Zoom Out, or Full View, choose Actual Size. Click the sequence at the area you wish to view in its actual size.
July 2001 4 Working With Sequences in Factura 4-37
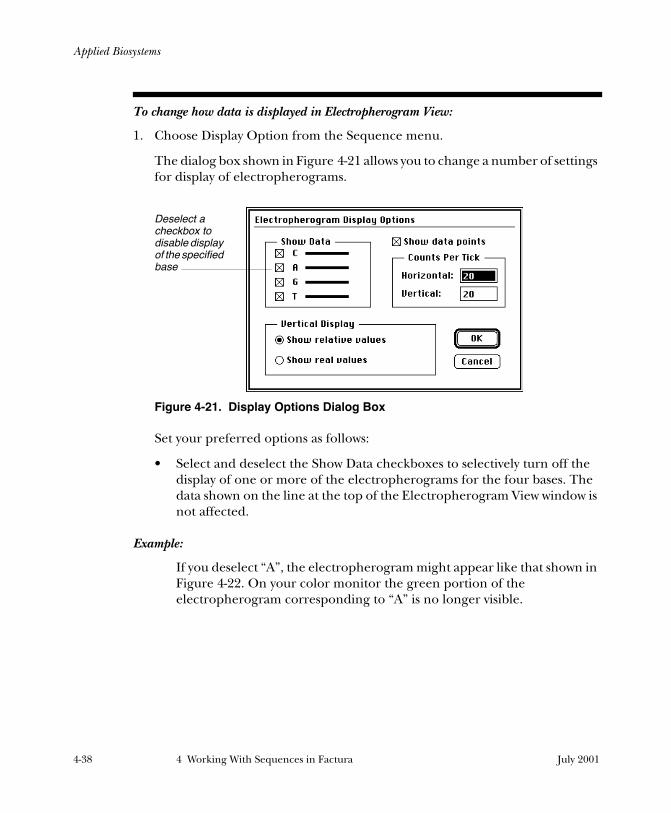
Applied Biosystems
To change how data is displayed in Electropherogram View:
1. Choose Display Option from the Sequence menu.
The dialog box shown in Figure 4-21 allows you to change a number of settings for display of electropherograms.
Figure 4-21. Display Options Dialog Box
Set your preferred options as follows:
• Select and deselect the Show Data checkboxes to selectively turn off the display of one or more of the electropherograms for the four bases. The data shown on the line at the top of the Electropherogram View window is not affected.
Example:
If you deselect “A”, the electropherogram might appear like that shown in Figure 4-22. On your color monitor the green portion of the electropherogram corresponding to “A” is no longer visible.
Deselect a checkbox to disable display of the specified base
4-38 4 Working With Sequences in Factura July 2001
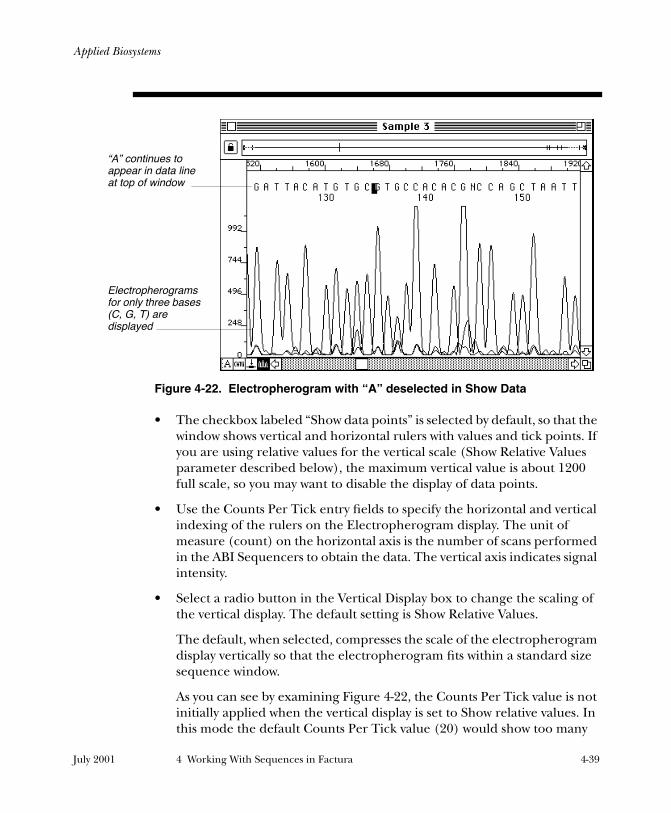
Applied Biosystems
Figure 4-22. Electropherogram with “A” deselected in Show Data
• The checkbox labeled “Show data points” is selected by default, so that the window shows vertical and horizontal rulers with values and tick points. If you are using relative values for the vertical scale (Show Relative Values parameter described below), the maximum vertical value is about 1200 full scale, so you may want to disable the display of data points.
• Use the Counts Per Tick entry fields to specify the horizontal and vertical indexing of the rulers on the Electropherogram display. The unit of measure (count) on the horizontal axis is the number of scans performed in the ABI Sequencers to obtain the data. The vertical axis indicates signal intensity.
• Select a radio button in the Vertical Display box to change the scaling of the vertical display. The default setting is Show Relative Values.
The default, when selected, compresses the scale of the electropherogram display vertically so that the electropherogram fits within a standard size sequence window.
As you can see by examining Figure 4-22, the Counts Per Tick value is not initially applied when the vertical display is set to Show relative values. In this mode the default Counts Per Tick value (20) would show too many
“A” continues to appear in data line at top of window
Electropherograms for only three bases (C, G, T) are displayed
July 2001 4 Working With Sequences in Factura 4-39
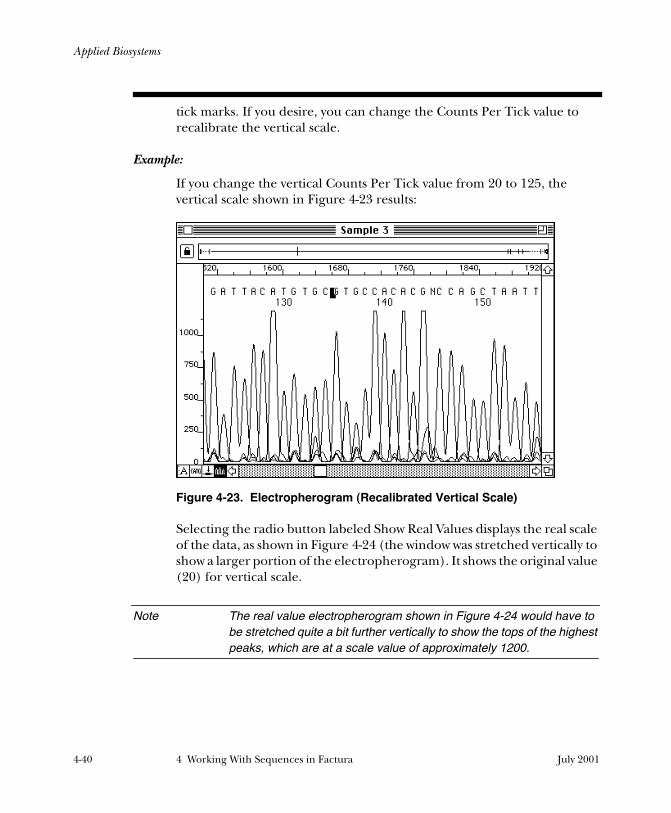
Applied Biosystems
tick marks. If you desire, you can change the Counts Per Tick value to recalibrate the vertical scale.
Example:
If you change the vertical Counts Per Tick value from 20 to 125, the vertical scale shown in Figure 4-23 results:
Figure 4-23. Electropherogram (Recalibrated Vertical Scale)
Selecting the radio button labeled Show Real Values displays the real scale of the data, as shown in Figure 4-24 (the window was stretched vertically to show a larger portion of the electropherogram). It shows the original value (20) for vertical scale.
Note The real value electropherogram shown in Figure 4-24 would have to be stretched quite a bit further vertically to show the tops of the highest peaks, which are at a scale value of approximately 1200.
4-40 4 Working With Sequences in Factura July 2001
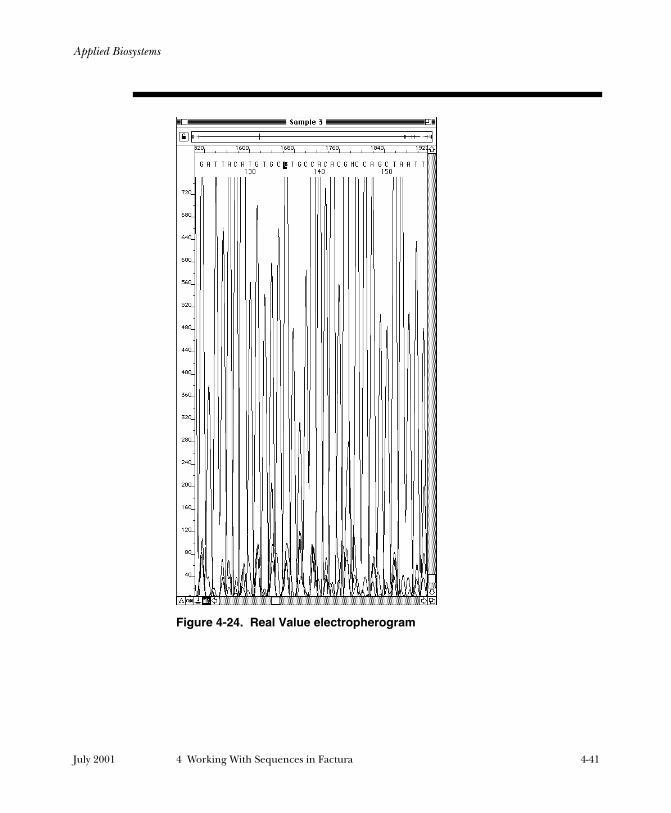
Applied Biosystems
Figure 4-24. Real Value electropherogram
July 2001 4 Working With Sequences in Factura 4-41
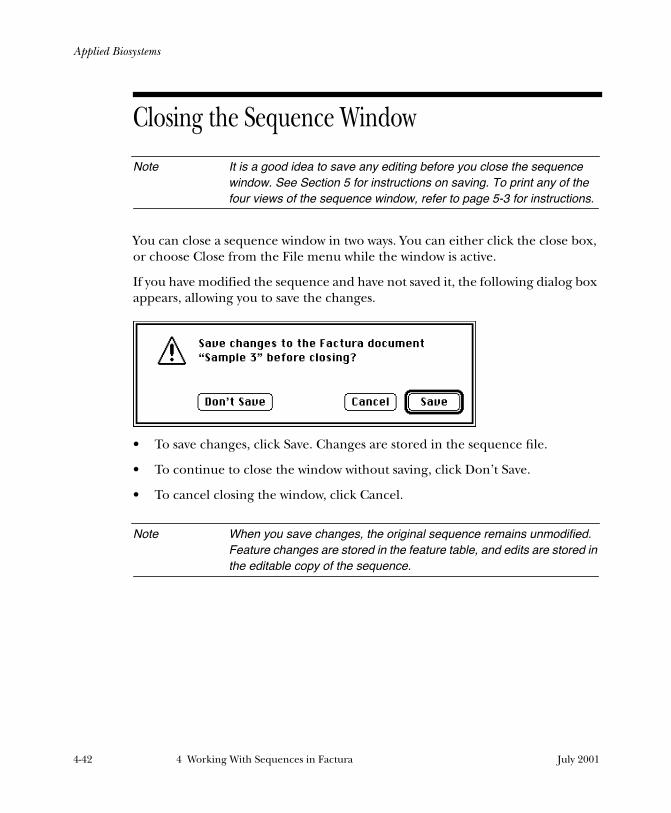
Applied Biosystems
Closing the Sequence Window
Note It is a good idea to save any editing before you close the sequence window. See Section 5 for instructions on saving. To print any of the four views of the sequence window, refer to page 5-3 for instructions.
You can close a sequence window in two ways. You can either click the close box, or choose Close from the File menu while the window is active.
If you have modified the sequence and have not saved it, the following dialog box appears, allowing you to save the changes.
• To save changes, click Save. Changes are stored in the sequence file.
• To continue to close the window without saving, click Don’t Save.
• To cancel closing the window, click Cancel.
Note When you save changes, the original sequence remains unmodified. Feature changes are stored in the feature table, and edits are stored in the editable copy of the sequence.
4-42 4 Working With Sequences in Factura July 2001
400 I'M INVISIBLE
Applied Biosystems
5 Printing and Saving in Factura
This section describes:• How to save the batch worksheet
• How to view and save results in a batch report
• How to save Factura-identified features to the individual sequence files
• How to export the contents of a sequence file into other formats
July 2001 5 Printing and Saving in Factura 5-1

Applied Biosystems
Contents
Printing Batch Reports & Electropherograms 5-3Saving the Batch Worksheet 5-5
Saving a New Worksheet 5-5Saving As a Different File Name 5-5Saving a Copy 5-5
Saving Results in a Batch Report 5-7Saving Results to Sequence Data Source Files 5-9Saving Changes Made in the Sequence Window 5-12Exporting Results to Other Formats 5-13
5-2 5 Printing and Saving in Factura July 2001
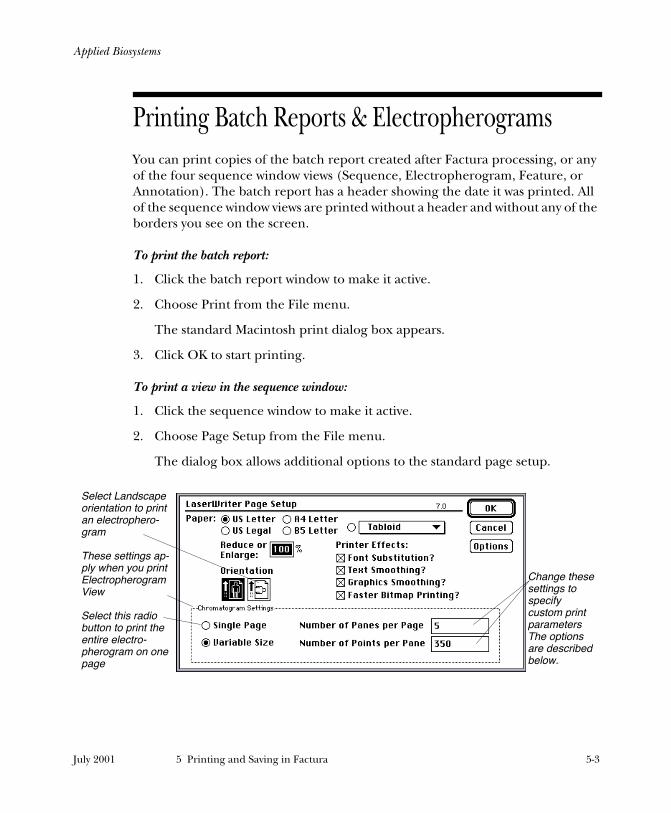
Applied Biosystems
Printing Batch Reports & Electropherograms
You can print copies of the batch report created after Factura processing, or any of the four sequence window views (Sequence, Electropherogram, Feature, or Annotation). The batch report has a header showing the date it was printed. All of the sequence window views are printed without a header and without any of the borders you see on the screen.
To print the batch report:
1. Click the batch report window to make it active.
2. Choose Print from the File menu.
The standard Macintosh print dialog box appears.
3. Click OK to start printing.
To print a view in the sequence window:
1. Click the sequence window to make it active.
2. Choose Page Setup from the File menu.
The dialog box allows additional options to the standard page setup.
Select Landscape orientation to print an electrophero-gram
These settings ap-ply when you print Electropherogram View
Select this radio button to print the entire electro-pherogram on one page
Change these settings to specify custom print parameters The options are described below.
July 2001 5 Printing and Saving in Factura 5-3
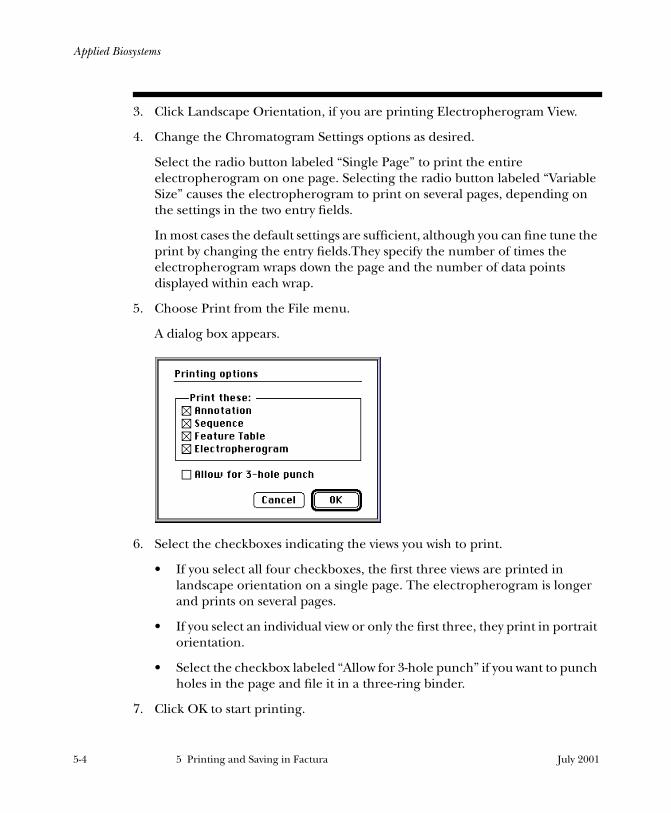
Applied Biosystems
3. Click Landscape Orientation, if you are printing Electropherogram View.
4. Change the Chromatogram Settings options as desired.
Select the radio button labeled “Single Page” to print the entire electropherogram on one page. Selecting the radio button labeled “Variable Size” causes the electropherogram to print on several pages, depending on the settings in the two entry fields.
In most cases the default settings are sufficient, although you can fine tune the print by changing the entry fields.They specify the number of times the electropherogram wraps down the page and the number of data points displayed within each wrap.
5. Choose Print from the File menu.
A dialog box appears.
6. Select the checkboxes indicating the views you wish to print.
• If you select all four checkboxes, the first three views are printed in landscape orientation on a single page. The electropherogram is longer and prints on several pages.
• If you select an individual view or only the first three, they print in portrait orientation.
• Select the checkbox labeled “Allow for 3-hole punch” if you want to punch holes in the page and file it in a three-ring binder.
7. Click OK to start printing.
5-4 5 Printing and Saving in Factura July 2001
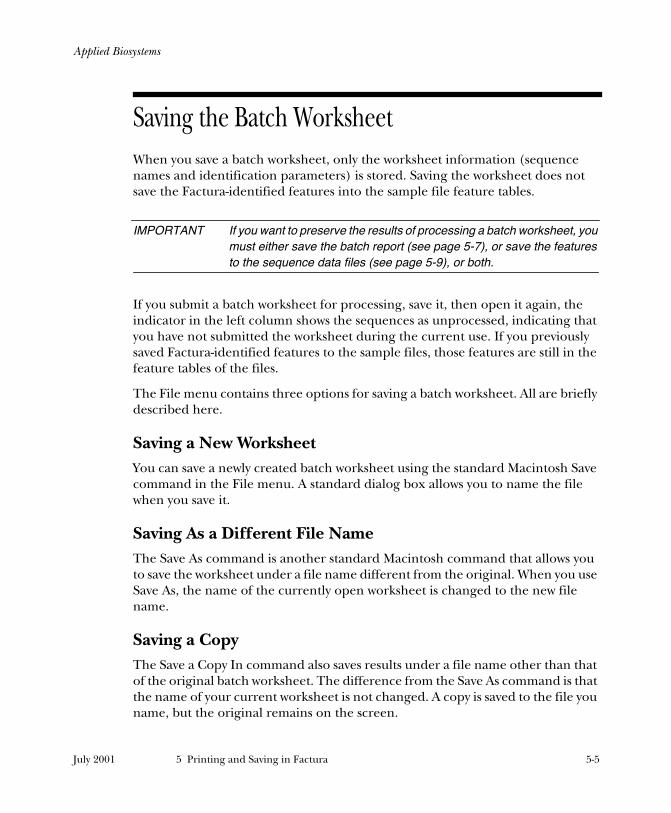
Applied Biosystems
Saving the Batch Worksheet
When you save a batch worksheet, only the worksheet information (sequence names and identification parameters) is stored. Saving the worksheet does not save the Factura-identified features into the sample file feature tables.
IMPORTANT If you want to preserve the results of processing a batch worksheet, you must either save the batch report (see page 5-7), or save the features to the sequence data files (see page 5-9), or both.
If you submit a batch worksheet for processing, save it, then open it again, the indicator in the left column shows the sequences as unprocessed, indicating that you have not submitted the worksheet during the current use. If you previously saved Factura-identified features to the sample files, those features are still in the feature tables of the files.
The File menu contains three options for saving a batch worksheet. All are briefly described here.
Saving a New WorksheetYou can save a newly created batch worksheet using the standard Macintosh Save command in the File menu. A standard dialog box allows you to name the file when you save it.
Saving As a Different File NameThe Save As command is another standard Macintosh command that allows you to save the worksheet under a file name different from the original. When you use Save As, the name of the currently open worksheet is changed to the new file name.
Saving a CopyThe Save a Copy In command also saves results under a file name other than that of the original batch worksheet. The difference from the Save As command is that the name of your current worksheet is not changed. A copy is saved to the file you name, but the original remains on the screen.
July 2001 5 Printing and Saving in Factura 5-5
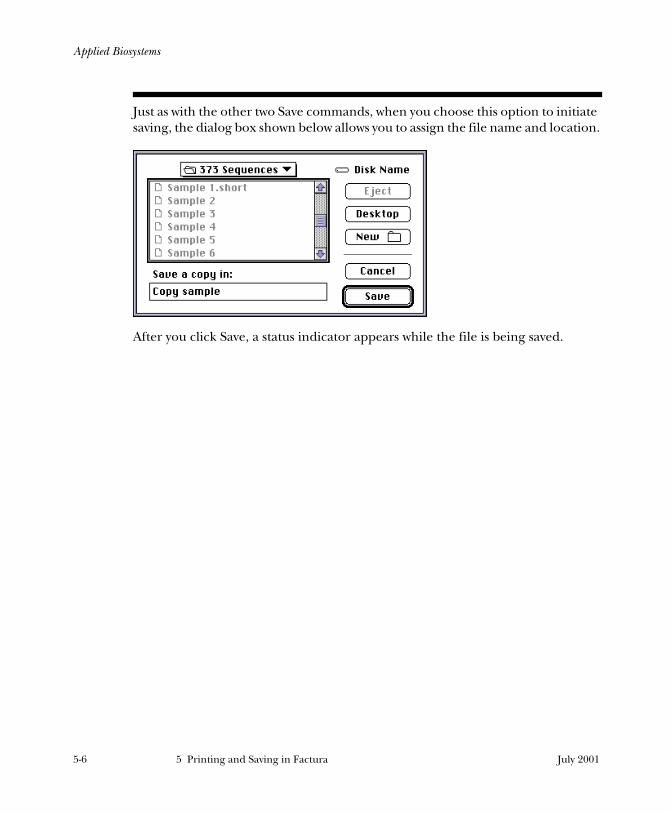
Applied Biosystems
Just as with the other two Save commands, when you choose this option to initiate saving, the dialog box shown below allows you to assign the file name and location.
After you click Save, a status indicator appears while the file is being saved.
5-6 5 Printing and Saving in Factura July 2001
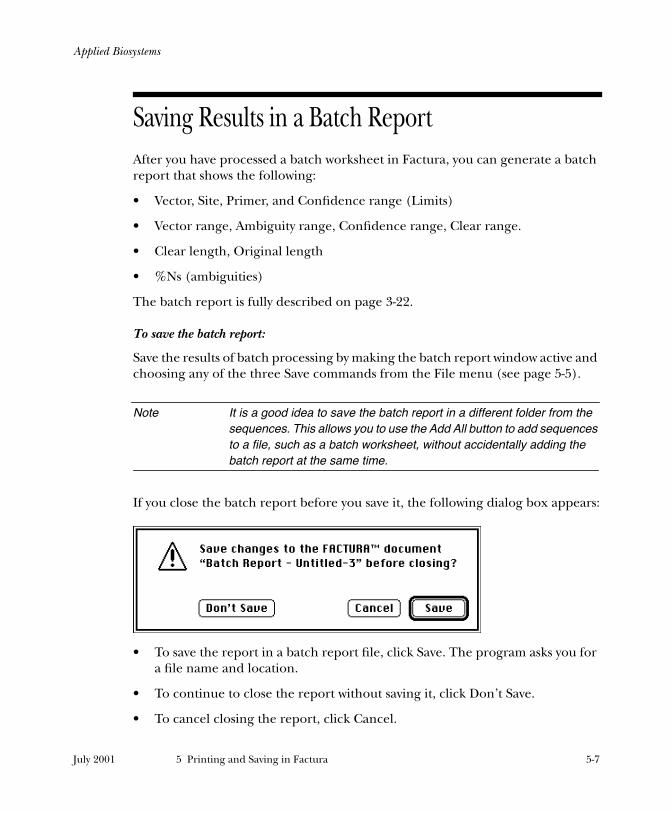
Applied Biosystems
Saving Results in a Batch Report
After you have processed a batch worksheet in Factura, you can generate a batch report that shows the following:
• Vector, Site, Primer, and Confidence range (Limits)
• Vector range, Ambiguity range, Confidence range, Clear range.
• Clear length, Original length
• %Ns (ambiguities)
The batch report is fully described on page 3-22.
To save the batch report:
Save the results of batch processing by making the batch report window active and choosing any of the three Save commands from the File menu (see page 5-5).
Note It is a good idea to save the batch report in a different folder from the sequences. This allows you to use the Add All button to add sequences to a file, such as a batch worksheet, without accidentally adding the batch report at the same time.
If you close the batch report before you save it, the following dialog box appears:
• To save the report in a batch report file, click Save. The program asks you for a file name and location.
• To continue to close the report without saving it, click Don’t Save.
• To cancel closing the report, click Cancel.
July 2001 5 Printing and Saving in Factura 5-7
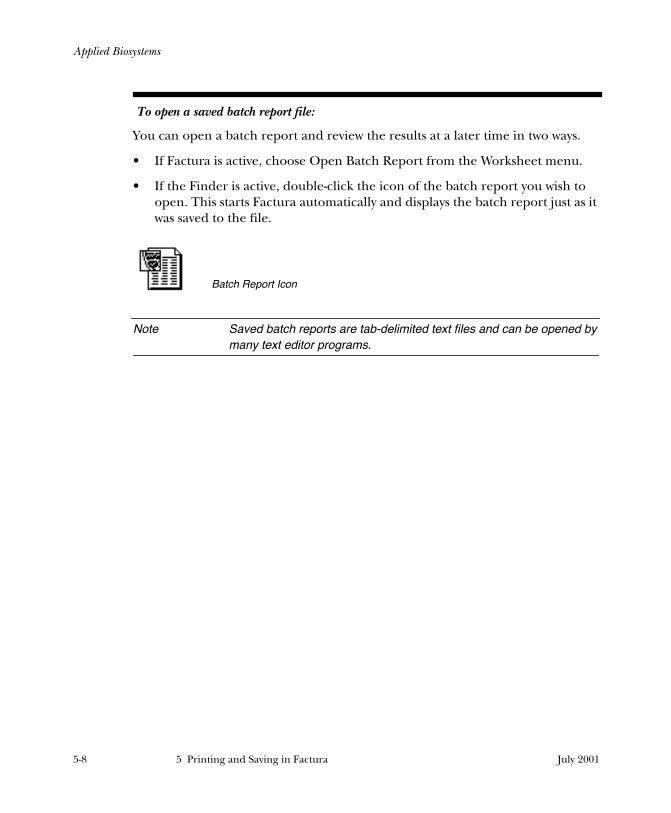
Applied Biosystems
To open a saved batch report file:
You can open a batch report and review the results at a later time in two ways.
• If Factura is active, choose Open Batch Report from the Worksheet menu.
• If the Finder is active, double-click the icon of the batch report you wish to open. This starts Factura automatically and displays the batch report just as it was saved to the file.
Note Saved batch reports are tab-delimited text files and can be opened by many text editor programs.
Batch Report Icon
5-8 5 Printing and Saving in Factura July 2001
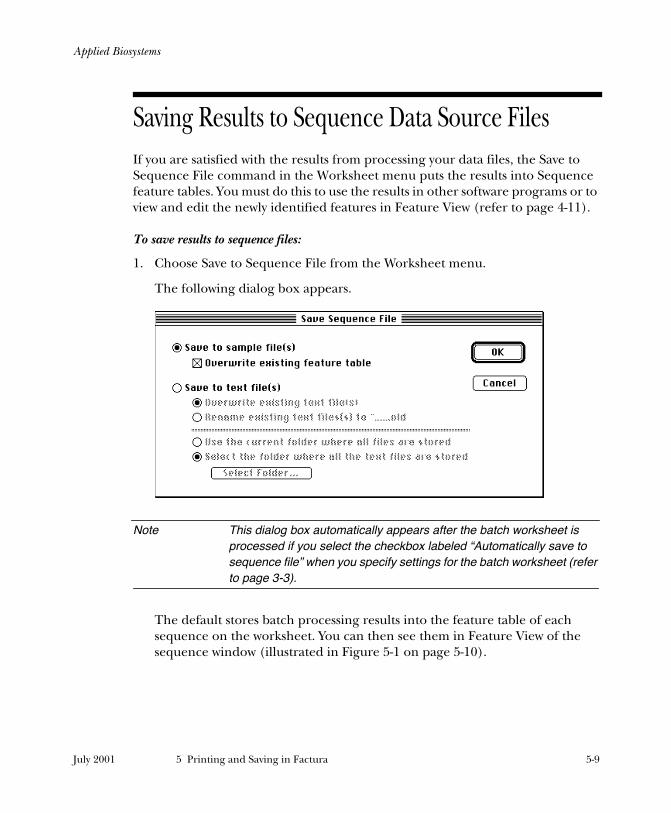
Applied Biosystems
Saving Results to Sequence Data Source Files
If you are satisfied with the results from processing your data files, the Save to Sequence File command in the Worksheet menu puts the results into Sequence feature tables. You must do this to use the results in other software programs or to view and edit the newly identified features in Feature View (refer to page 4-11).
To save results to sequence files:
1. Choose Save to Sequence File from the Worksheet menu.
The following dialog box appears.
Note This dialog box automatically appears after the batch worksheet is processed if you select the checkbox labeled “Automatically save to sequence file” when you specify settings for the batch worksheet (refer to page 3-3).
The default stores batch processing results into the feature table of each sequence on the worksheet. You can then see them in Feature View of the sequence window (illustrated in Figure 5-1 on page 5-10).
July 2001 5 Printing and Saving in Factura 5-9
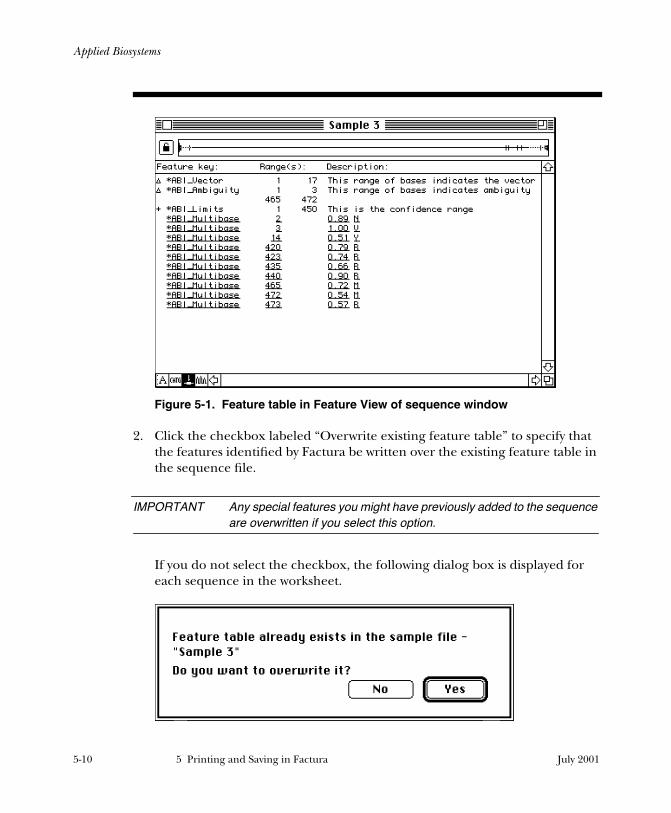
Applied Biosystems
Figure 5-1. Feature table in Feature View of sequence window
2. Click the checkbox labeled “Overwrite existing feature table” to specify that the features identified by Factura be written over the existing feature table in the sequence file.
IMPORTANT Any special features you might have previously added to the sequence are overwritten if you select this option.
If you do not select the checkbox, the following dialog box is displayed for each sequence in the worksheet.
5-10 5 Printing and Saving in Factura July 2001
Applied Biosystems
This dialog box allows you to overwrite the feature tables of specific sequences, while maintaining the existing information in others. The option is useful if you have added special features to a sequence, then reprocessed the batch worksheet using the same parameters as for a previous submission (for instance, if you have added more sequences to the worksheet). You can choose not to overwrite the sequence containing the special feature, because the Factura-identified features already exist in it from a previous submission.
Note Overwriting the feature table does not destroy your original data. The original data and electropherogram are stored separately from edited versions and can be easily retrieved.
3. Select the radio button labeled “Save to text file(s)” to save the data in each sequence to a text file.
If you save to text files when your original data is in sample files, text files are created that start with the original name and have “.seq” appended. These text files contain only the text of the sequence; they do not contain feature tables, electropherograms, or annotation data.
IMPORTANT When you save data to a text file, the portions of the sequence outside of the confidence range are deleted. Only confidence range data is saved to a text file.
The options allow you to (in order):
• Store the information in the original text files, overwriting the previous information.
• Rename the existing text files by adding “.old” to the file name, and save the data to a file with the same name as the existing file.
• Save the file in the current folder, where the existing text files are stored.
• Select a different folder, if the text files are not stored in the current one.
July 2001 5 Printing and Saving in Factura 5-11
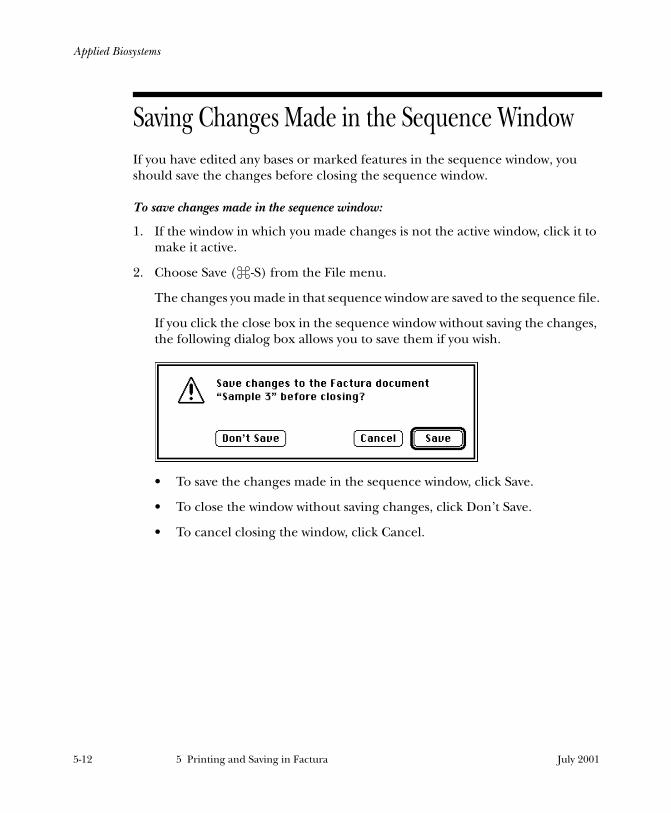
Applied Biosystems
Saving Changes Made in the Sequence Window
If you have edited any bases or marked features in the sequence window, you should save the changes before closing the sequence window.
To save changes made in the sequence window:
1. If the window in which you made changes is not the active window, click it to make it active.
2. Choose Save (z-S) from the File menu.
The changes you made in that sequence window are saved to the sequence file.
If you click the close box in the sequence window without saving the changes, the following dialog box allows you to save them if you wish.
• To save the changes made in the sequence window, click Save.
• To close the window without saving changes, click Don’t Save.
• To cancel closing the window, click Cancel.
5-12 5 Printing and Saving in Factura July 2001
Applied Biosystems
Exporting Results to Other Formats
You should use the Export command (z-E) only after you have saved the results of Factura processing into the source files (see Saving Results to Sequence Data Source Files on page 5-9). The command is available when a sequence window is the active window.
The Export command exports the contents of the sequence file displayed in the active window into any of three formats:
• Sample files contain sequence data in four different formats: Sequence View presents a listing of data; Annotation View may contain annotation from an ABI PRISM sequencer; Feature View conveys the Factura-generated results to downstream programs in the form of defined vector, ambiguity, confidence range, and heterozygote/IUB code features; and Electropherogram View displays ABI PRISM sequence data in electropherogram format.
• Inherit files are compatible with the INHERIT software. When opened within Factura they contain only Sequence, Annotation and Feature Views.
• Text files contain the same views as the INHERIT type files when you open them in Factura. When you export from Factura to a text file, the file contains only the text of the sequence; it does not contain a feature table, electropherogram information, or annotations.
Note When you export to a text file using Export in the File menu, the entire sequence is exported. If you save to a text file using Save to Sequence Files in the Worksheet menu, the portions of the sequence outside of the confidence range are deleted.
July 2001 5 Printing and Saving in Factura 5-13

500 I'M INVISIBLE
Applied Biosystems
6 Setting up Factura Libraries
This section explains the difference between Main and Custom libraries and describes how to set up custom libraries of vectors, enzymes, and primers to be used with your Factura processing.Note If you have previously set up libraries using an earlier version of Factura, they are still valid. You need not repeat the setup.
July 2001 6 Setting up Factura Libraries 6-1
Applied Biosystems
Contents
Library Files 6-3Main Libraries 6-4Customized Libraries 6-4
Setting Up the Libraries 6-5Setting up the Vector Library 6-5Setting up the Enzyme Library 6-7Setting up the Primer Library 6-10
6-2 6 Setting up Factura Libraries July 2001
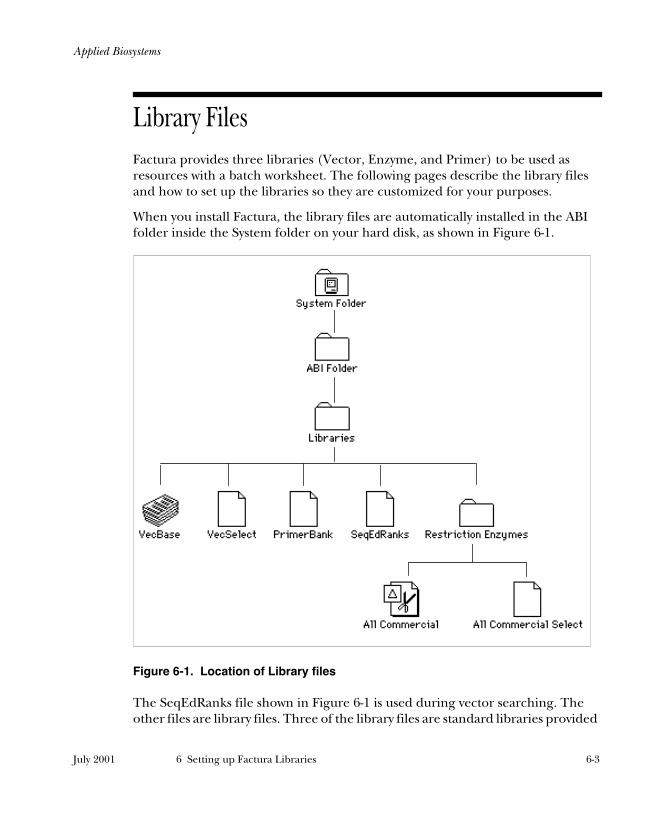
Applied Biosystems
Library Files
Factura provides three libraries (Vector, Enzyme, and Primer) to be used as resources with a batch worksheet. The following pages describe the library files and how to set up the libraries so they are customized for your purposes.
When you install Factura, the library files are automatically installed in the ABI folder inside the System folder on your hard disk, as shown in Figure 6-1.
Figure 6-1. Location of Library files
The SeqEdRanks file shown in Figure 6-1 is used during vector searching. The other files are library files. Three of the library files are standard libraries provided
July 2001 6 Setting up Factura Libraries 6-3
Applied Biosystems
with Factura. The other two are files that will contain only the libraries you choose to have immediately available to you.
IMPORTANT If you remove, rename or replace any of the library files, the sequences in those files are no longer available for use with Factura.
Main LibrariesThe following files contain the main libraries provided with Factura:
• VecBase contains the Factura-provided library of vectors, which consists of more than 140 vectors. From it you can choose the subset that becomes your customized library.
• PrimerBank contains the library of primers provided with Factura. The Primer library is small, so it requires no set up unless you wish to add your own special primers.
• All Commercial contains the Factura-provided list of over 300 enzymes. From it you can choose the subset that becomes your customized enzyme library.
Using Factura with the large vector and enzyme libraries can be cumbersome, so you are allowed to set up customized vector and enzyme libraries, choosing small subsets that represent the options you use most frequently.
Customized LibrariesBy setting up libraries in Factura, you create customized libraries that contain only the vectors and enzymes you use most frequently. The subsets you select provide the alternatives in the Settings dialog box when you specify Factura settings (see Section 3). Because the primer library is small, you need only set it up if you wish to add primers to it.
When you set up the Vector and Enzyme libraries, the following files hold your specified choices:
• VecSelect in the Libraries folder stores the sequences you choose to be a part of your customized vector library.
• All Commercial Select in the Restriction Enzymes folder stores the enzymes you choose for your customized enzyme library.
6-4 6 Setting up Factura Libraries July 2001
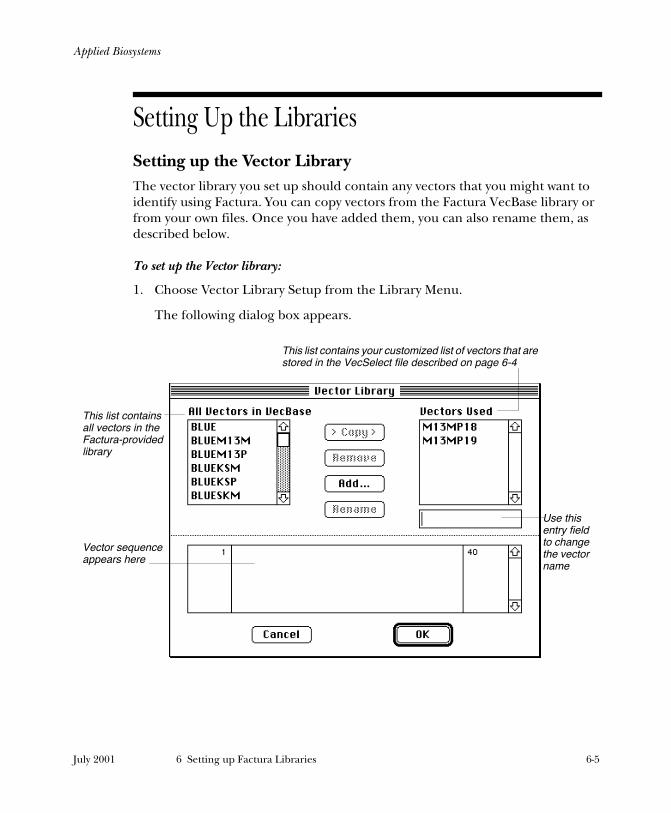
Applied Biosystems
Setting Up the Libraries
Setting up the Vector LibraryThe vector library you set up should contain any vectors that you might want to identify using Factura. You can copy vectors from the Factura VecBase library or from your own files. Once you have added them, you can also rename them, as described below.
To set up the Vector library:
1. Choose Vector Library Setup from the Library Menu.
The following dialog box appears.
This list contains all vectors in the Factura-provided library
Vector sequence appears here
This list contains your customized list of vectors that are stored in the VecSelect file described on page 6-4
Use this entry field to change the vector name
July 2001 6 Setting up Factura Libraries 6-5
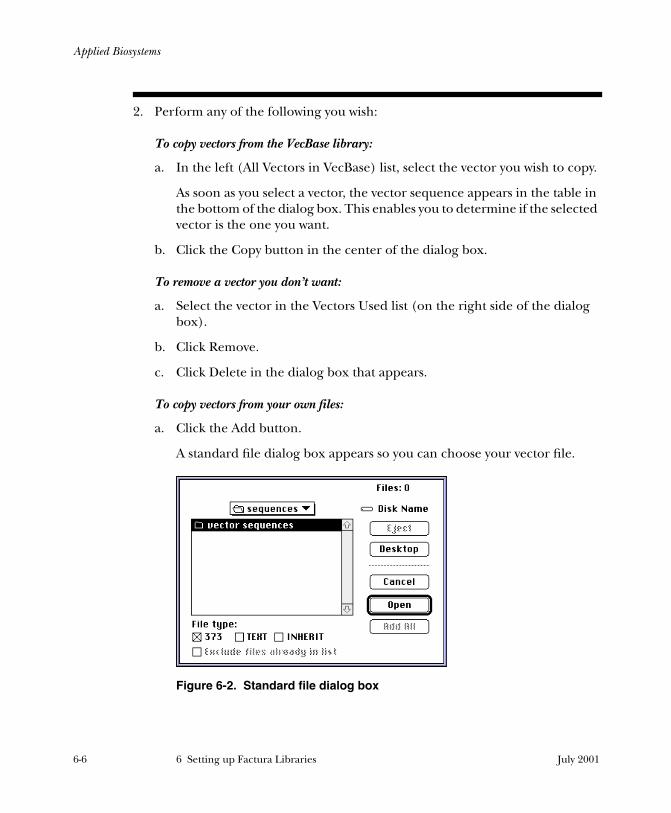
Applied Biosystems
2. Perform any of the following you wish:
To copy vectors from the VecBase library:
a. In the left (All Vectors in VecBase) list, select the vector you wish to copy.
As soon as you select a vector, the vector sequence appears in the table in the bottom of the dialog box. This enables you to determine if the selected vector is the one you want.
b. Click the Copy button in the center of the dialog box.
To remove a vector you don’t want:
a. Select the vector in the Vectors Used list (on the right side of the dialog box).
b. Click Remove.
c. Click Delete in the dialog box that appears.
To copy vectors from your own files:
a. Click the Add button.
A standard file dialog box appears so you can choose your vector file.
Figure 6-2. Standard file dialog box
6-6 6 Setting up Factura Libraries July 2001
Applied Biosystems
Note that this dialog box allows you to filter for a specific file type. Only the selected file types show in the dialog box.
b. Open the folder that contains the vector you wish to add.
c. Click the vector in the dialog box to select it.
d. Click Add to add it to the Vectors Used list.
To rename a vector in the Vectors Used list:
a. Select the vector you wish to rename.
The current name appears in the entry field under the Vectors Used list.
b. Select the existing name in the entry field and type a new name.
You may enter a name with up to 20 characters.
c. Click Rename.
3. When you have finished, click OK to accept your customized library.
Setting up the Enzyme LibraryUse Enzyme Library Setup to set up a list of the enzymes you plan to use with the batch worksheet. You can add enzymes from the All Commercial library listed in Factura. Your customized library is stored in the All Commercial Select file described on page 6-4.
July 2001 6 Setting up Factura Libraries 6-7
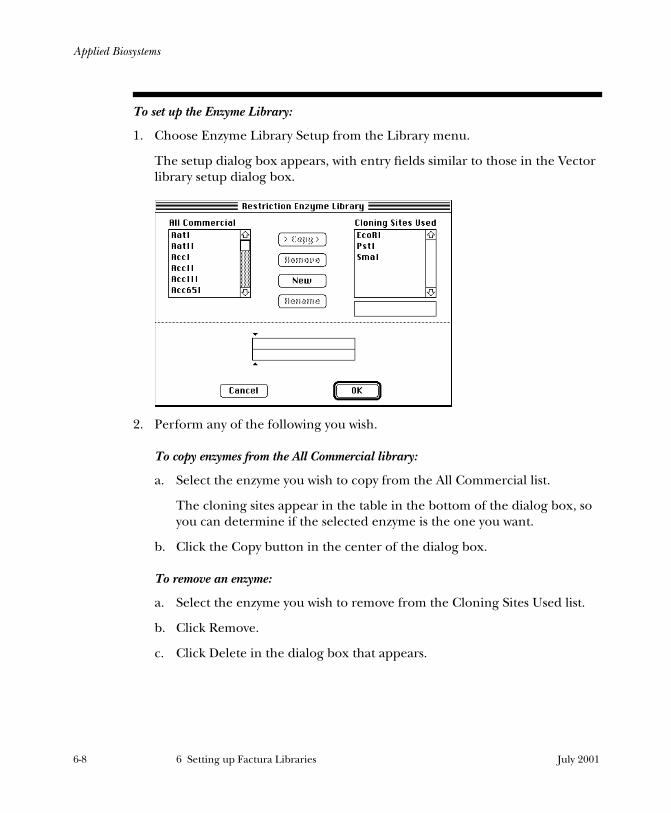
Applied Biosystems
To set up the Enzyme Library:
1. Choose Enzyme Library Setup from the Library menu.
The setup dialog box appears, with entry fields similar to those in the Vector library setup dialog box.
2. Perform any of the following you wish.
To copy enzymes from the All Commercial library:
a. Select the enzyme you wish to copy from the All Commercial list.
The cloning sites appear in the table in the bottom of the dialog box, so you can determine if the selected enzyme is the one you want.
b. Click the Copy button in the center of the dialog box.
To remove an enzyme:
a. Select the enzyme you wish to remove from the Cloning Sites Used list.
b. Click Remove.
c. Click Delete in the dialog box that appears.
6-8 6 Setting up Factura Libraries July 2001
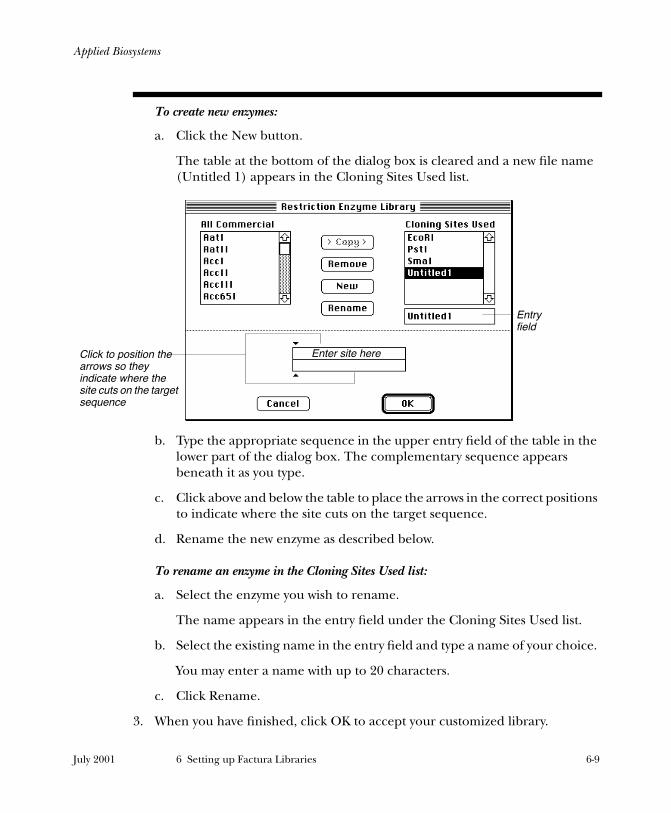
Applied Biosystems
To create new enzymes:
a. Click the New button.
The table at the bottom of the dialog box is cleared and a new file name (Untitled 1) appears in the Cloning Sites Used list.
b. Type the appropriate sequence in the upper entry field of the table in the lower part of the dialog box. The complementary sequence appears beneath it as you type.
c. Click above and below the table to place the arrows in the correct positions to indicate where the site cuts on the target sequence.
d. Rename the new enzyme as described below.
To rename an enzyme in the Cloning Sites Used list:
a. Select the enzyme you wish to rename.
The name appears in the entry field under the Cloning Sites Used list.
b. Select the existing name in the entry field and type a name of your choice.
You may enter a name with up to 20 characters.
c. Click Rename.
3. When you have finished, click OK to accept your customized library.
Enter site here
Entry field
Click to position the arrows so they indicate where the site cuts on the target sequence
July 2001 6 Setting up Factura Libraries 6-9
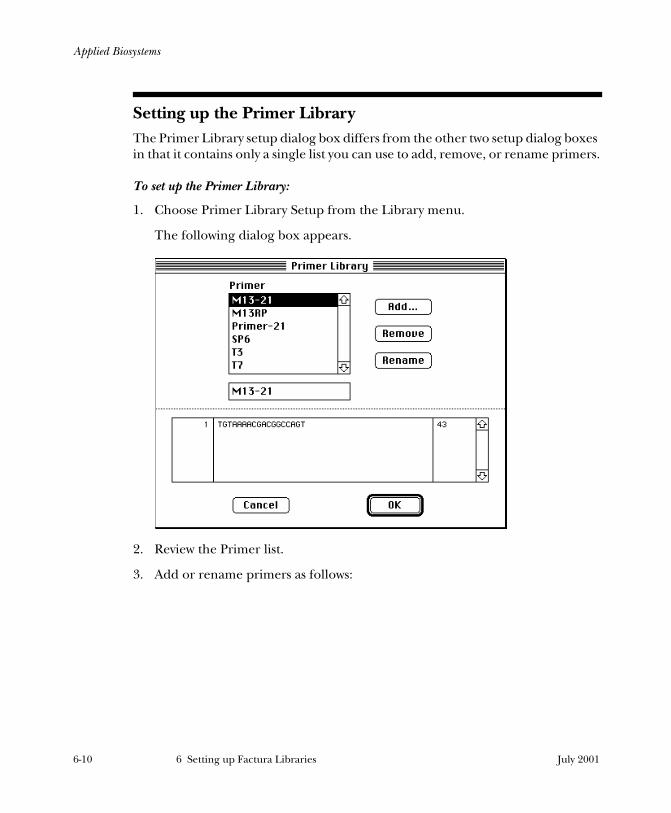
Applied Biosystems
Setting up the Primer LibraryThe Primer Library setup dialog box differs from the other two setup dialog boxes in that it contains only a single list you can use to add, remove, or rename primers.
To set up the Primer Library:
1. Choose Primer Library Setup from the Library menu.
The following dialog box appears.
2. Review the Primer list.
3. Add or rename primers as follows:
6-10 6 Setting up Factura Libraries July 2001
Applied Biosystems
To add a primer:
a. Click the Add button.
A standard file dialog box like the one shown in Figure 6-2 on page 6-6 appears. Note that the dialog box allows you to filter for the type of file you add. Only the selected file types show in the dialog box.
b. Open the folder that contains the desired primer file.
c. Click the primer you wish to add so it is highlighted.
d. Click Add.
Note If you add a primer you don’t want, select the primer in the list, click Remove, then click Delete in the dialog box that appears.
To rename a primer:
a. Choose Primer Library Setup from the Library menu.
b. Select the primer you wish to rename.
The current name appears in the entry field under the Primer list.
c. Select the existing name in the entry field and type a new name of your choice.
You may enter a name with up to 20 characters.
d. Click Rename.
4. When you have finished, click OK to accept your customized library.
July 2001 6 Setting up Factura Libraries 6-11


600 I'M INVISIBLE
Applied Biosystems
7 Overview—Factura Menu Commands
This section provides:• Tables with brief descriptions of the Factura main menus
• Cross references to other sections with more detail
These descriptions do not walk you through the use of the Factura program. See Section 3, Working With the Batch Worksheet through Section 6, Setting up Factura Libraries for more detail.
July 2001 7 Overview—Factura Menu Commands 7-1
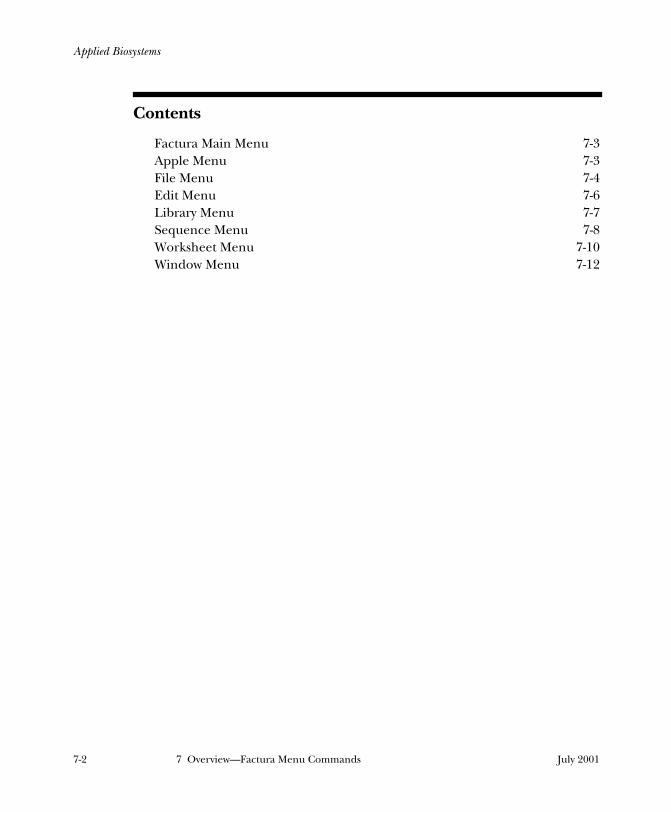
Applied Biosystems
Contents
Factura Main Menu 7-3Apple Menu 7-3File Menu 7-4Edit Menu 7-6Library Menu 7-7Sequence Menu 7-8Worksheet Menu 7-10Window Menu 7-12
7-2 7 Overview—Factura Menu Commands July 2001
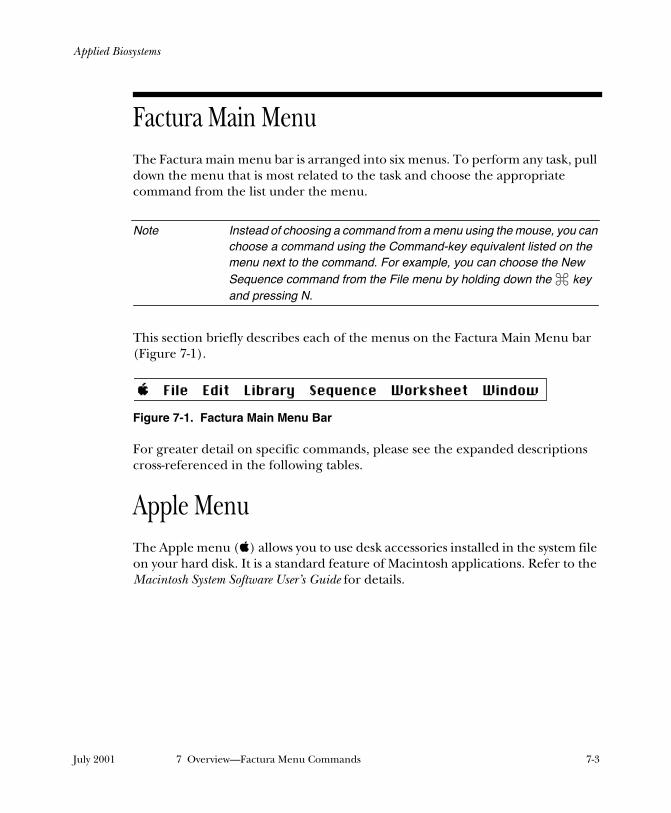
Applied Biosystems
Factura Main Menu
The Factura main menu bar is arranged into six menus. To perform any task, pull down the menu that is most related to the task and choose the appropriate command from the list under the menu.
Note Instead of choosing a command from a menu using the mouse, you can choose a command using the Command-key equivalent listed on the menu next to the command. For example, you can choose the New Sequence command from the File menu by holding down the z key and pressing N.
This section briefly describes each of the menus on the Factura Main Menu bar (Figure 7-1).
Figure 7-1. Factura Main Menu Bar
For greater detail on specific commands, please see the expanded descriptions cross-referenced in the following tables.
Apple Menu
The Apple menu () allows you to use desk accessories installed in the system file on your hard disk. It is a standard feature of Macintosh applications. Refer to the Macintosh System Software User’s Guide for details.
July 2001 7 Overview—Factura Menu Commands 7-3
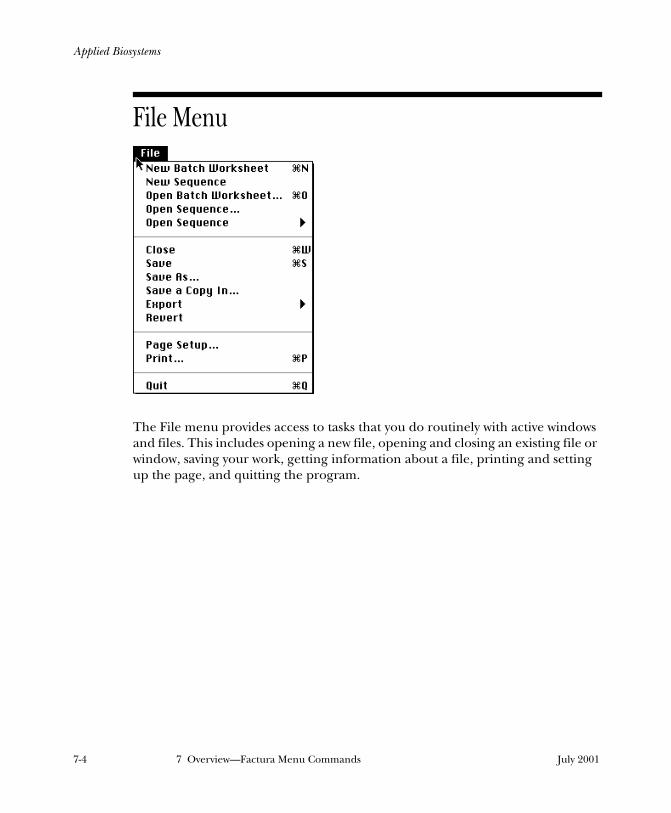
Applied Biosystems
File Menu
The File menu provides access to tasks that you do routinely with active windows and files. This includes opening a new file, opening and closing an existing file or window, saving your work, getting information about a file, printing and setting up the page, and quitting the program.
7-4 7 Overview—Factura Menu Commands July 2001
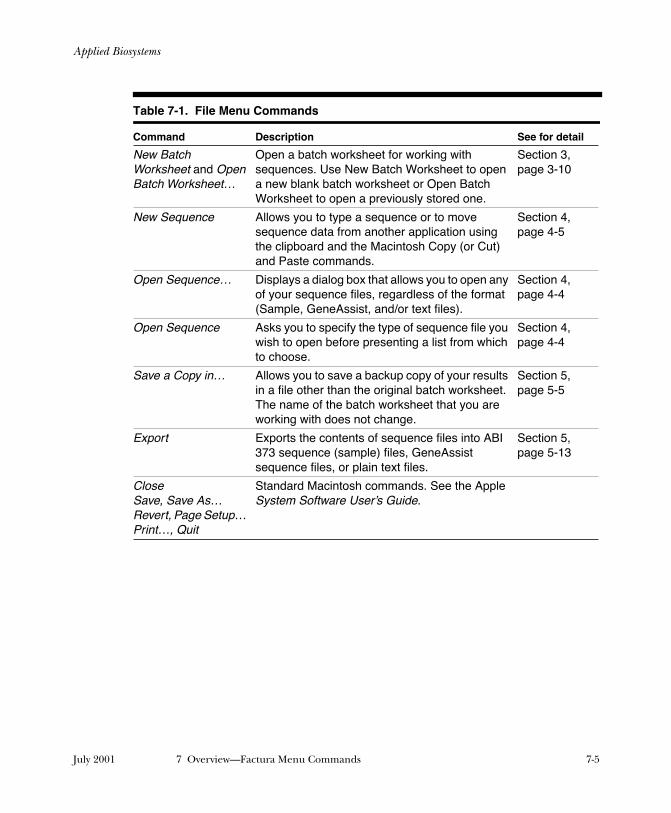
Applied Biosystems
Table 7-1. File Menu Commands
Command Description See for detail
New Batch Worksheet and Open Batch Worksheet…
Open a batch worksheet for working with sequences. Use New Batch Worksheet to open a new blank batch worksheet or Open Batch Worksheet to open a previously stored one.
Section 3, page 3-10
New Sequence Allows you to type a sequence or to move sequence data from another application using the clipboard and the Macintosh Copy (or Cut) and Paste commands.
Section 4, page 4-5
Open Sequence… Displays a dialog box that allows you to open any of your sequence files, regardless of the format (Sample, GeneAssist, and/or text files).
Section 4, page 4-4
Open Sequence Asks you to specify the type of sequence file you wish to open before presenting a list from which to choose.
Section 4, page 4-4
Save a Copy in… Allows you to save a backup copy of your results in a file other than the original batch worksheet. The name of the batch worksheet that you are working with does not change.
Section 5, page 5-5
Export Exports the contents of sequence files into ABI 373 sequence (sample) files, GeneAssist sequence files, or plain text files.
Section 5, page 5-13
CloseSave, Save As…Revert, Page Setup… Print…, Quit
Standard Macintosh commands. See the Apple System Software User’s Guide.
July 2001 7 Overview—Factura Menu Commands 7-5
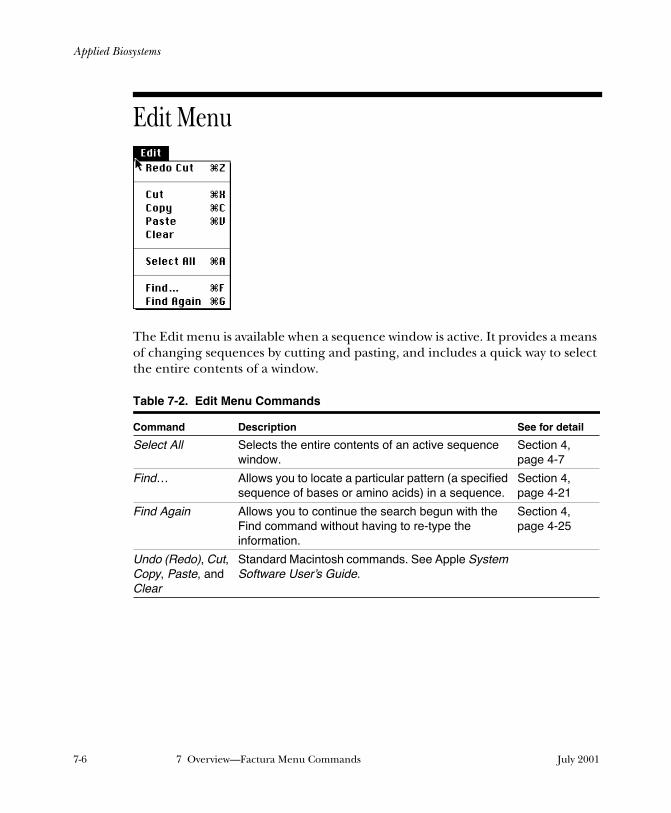
Applied Biosystems
Edit Menu
The Edit menu is available when a sequence window is active. It provides a means of changing sequences by cutting and pasting, and includes a quick way to select the entire contents of a window.
Table 7-2. Edit Menu Commands
Command Description See for detail
Select All Selects the entire contents of an active sequence window.
Section 4, page 4-7
Find… Allows you to locate a particular pattern (a specified sequence of bases or amino acids) in a sequence.
Section 4, page 4-21
Find Again Allows you to continue the search begun with the Find command without having to re-type the information.
Section 4, page 4-25
Undo (Redo), Cut, Copy, Paste, and Clear
Standard Macintosh commands. See Apple System Software User’s Guide.
7-6 7 Overview—Factura Menu Commands July 2001
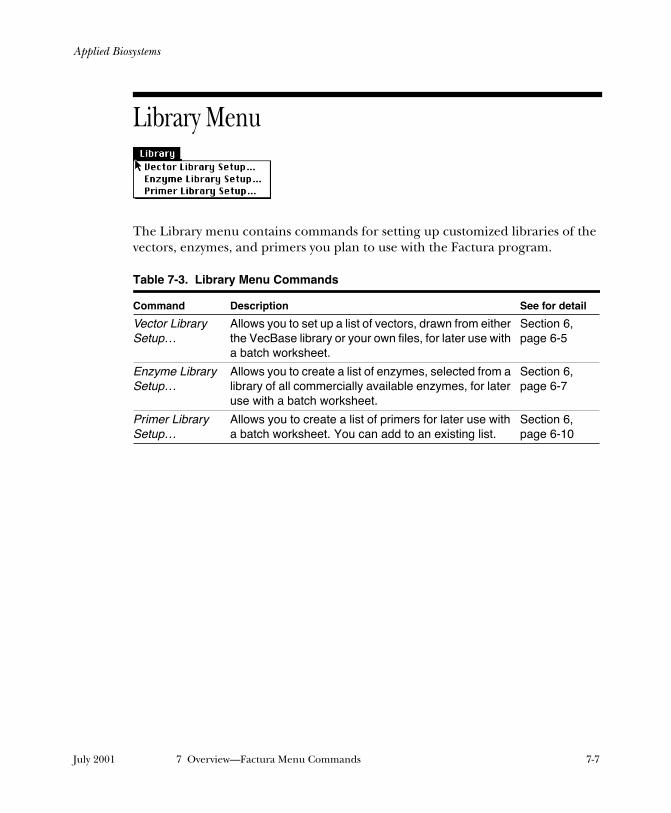
Applied Biosystems
Library Menu
The Library menu contains commands for setting up customized libraries of the vectors, enzymes, and primers you plan to use with the Factura program.
Table 7-3. Library Menu Commands
Command Description See for detail
Vector Library Setup…
Allows you to set up a list of vectors, drawn from either the VecBase library or your own files, for later use with a batch worksheet.
Section 6, page 6-5
Enzyme Library Setup…
Allows you to create a list of enzymes, selected from a library of all commercially available enzymes, for later use with a batch worksheet.
Section 6, page 6-7
Primer Library Setup…
Allows you to create a list of primers for later use with a batch worksheet. You can add to an existing list.
Section 6, page 6-10
July 2001 7 Overview—Factura Menu Commands 7-7
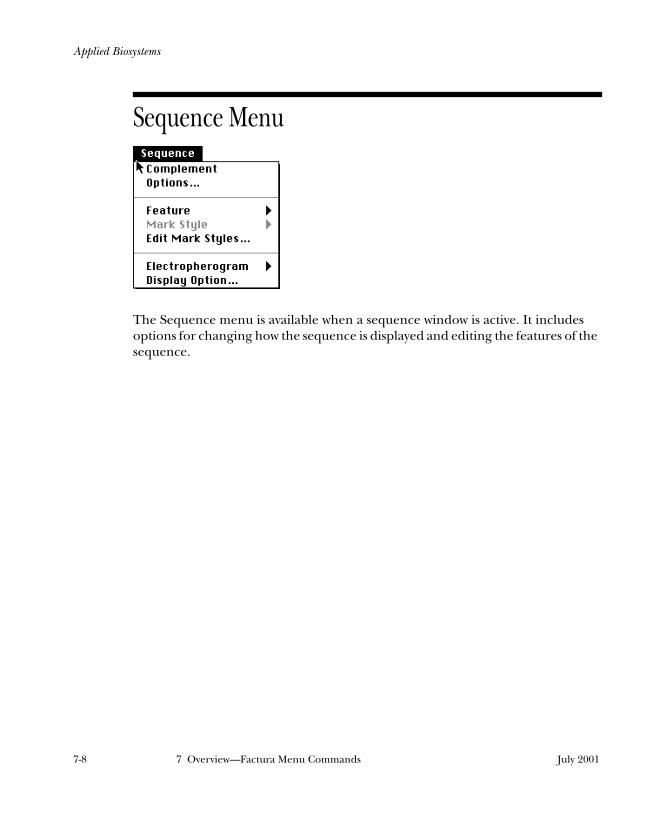
Applied Biosystems
Sequence Menu
The Sequence menu is available when a sequence window is active. It includes options for changing how the sequence is displayed and editing the features of the sequence.
7-8 7 Overview—Factura Menu Commands July 2001
Applied Biosystems
Table 7-4. Sequence Menu Commands
Command Description See for detail
Complement Replaces the sequence in the selected sequence window with its complement.
Section 4, page 4-25
Options… Provides pull-down menus for changing the character display (font, size, grouping) in the sequence window.
Section 4, page 4-26
Feature Allows you to add, modify, join, or remove features in the feature table of the displayed sequence.
Section 4, page 4-16
Mark Style Enables you to change the style (color and border) applied to a feature or to assign a style for the first time.
Section 4, page 4-27
Edit Mark Styles… Lets you change the name, color, or border assigned to any of the eight styles that can be applied to features.
Section 4, page 4-28
Electropherogram Is only available when a sequence window is active and the electropherogram is displayed. The command allows you to zoom in or out, display the original sequence as a reference for edits, or display a full view of the electropherogram.
Section 4, page 4-32
Display Option… Lets you change the display parameters for the electropherogram view. You can change the ruler indexing, show relative or real values for the vertical display, and selectively turn off the display of individual base electropherograms.
Section 4, page 4-38
July 2001 7 Overview—Factura Menu Commands 7-9
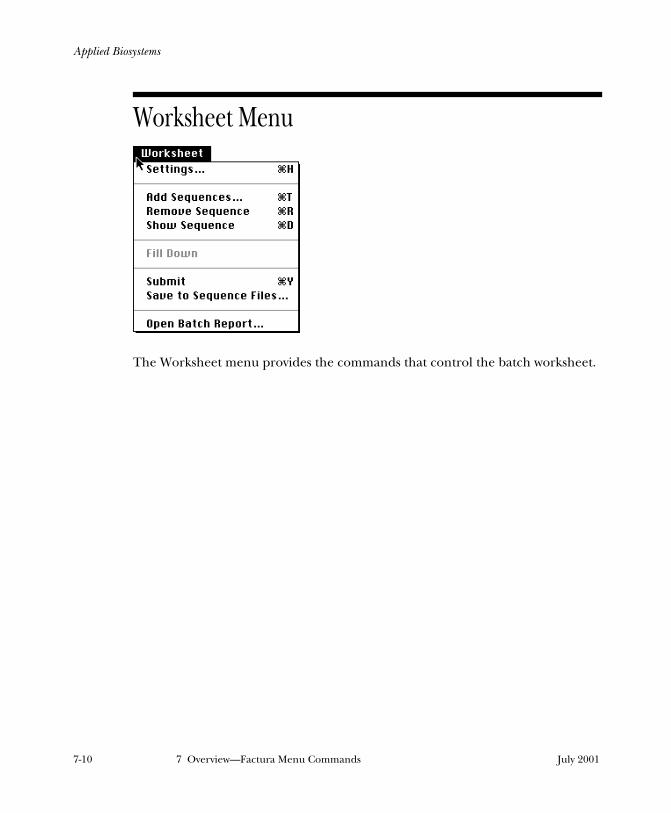
Applied Biosystems
Worksheet Menu
The Worksheet menu provides the commands that control the batch worksheet.
7-10 7 Overview—Factura Menu Commands July 2001
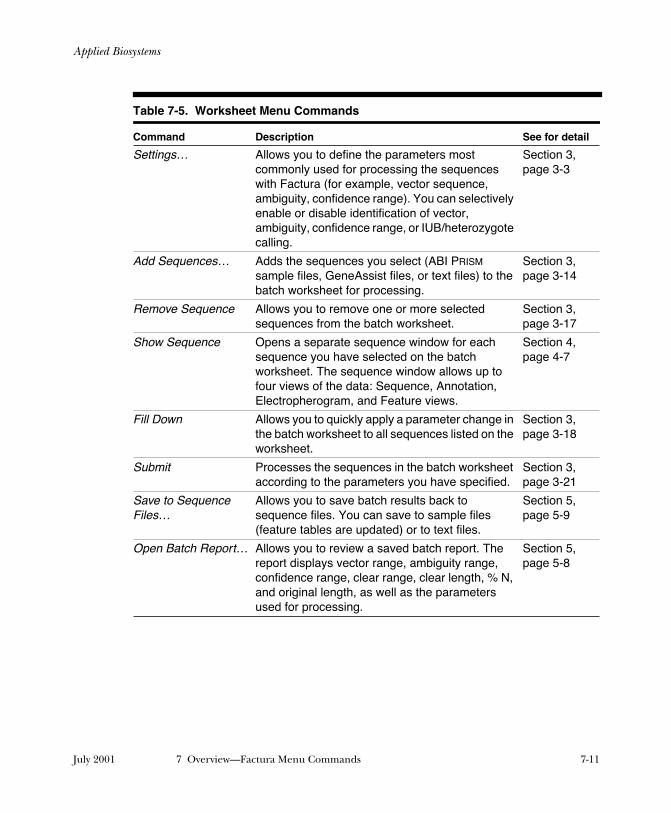
Applied Biosystems
Table 7-5. Worksheet Menu Commands
Command Description See for detail
Settings… Allows you to define the parameters most commonly used for processing the sequences with Factura (for example, vector sequence, ambiguity, confidence range). You can selectively enable or disable identification of vector, ambiguity, confidence range, or IUB/heterozygote calling.
Section 3, page 3-3
Add Sequences… Adds the sequences you select (ABI PRISM sample files, GeneAssist files, or text files) to the batch worksheet for processing.
Section 3, page 3-14
Remove Sequence Allows you to remove one or more selected sequences from the batch worksheet.
Section 3, page 3-17
Show Sequence Opens a separate sequence window for each sequence you have selected on the batch worksheet. The sequence window allows up to four views of the data: Sequence, Annotation, Electropherogram, and Feature views.
Section 4, page 4-7
Fill Down Allows you to quickly apply a parameter change in the batch worksheet to all sequences listed on the worksheet.
Section 3, page 3-18
Submit Processes the sequences in the batch worksheet according to the parameters you have specified.
Section 3, page 3-21
Save to Sequence Files…
Allows you to save batch results back to sequence files. You can save to sample files (feature tables are updated) or to text files.
Section 5, page 5-9
Open Batch Report… Allows you to review a saved batch report. The report displays vector range, ambiguity range, confidence range, clear range, clear length, % N, and original length, as well as the parameters used for processing.
Section 5, page 5-8
July 2001 7 Overview—Factura Menu Commands 7-11
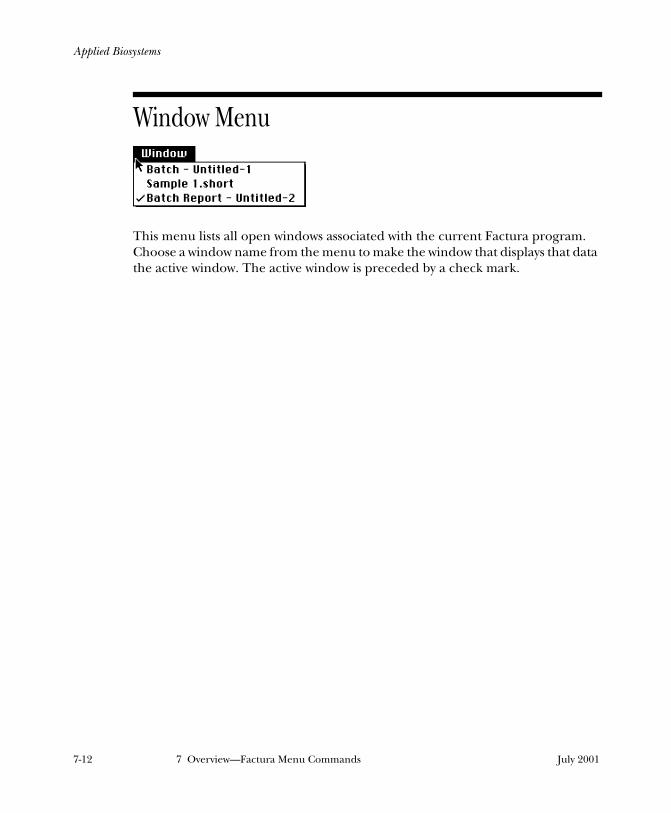
Applied Biosystems
Window Menu
This menu lists all open windows associated with the current Factura program. Choose a window name from the menu to make the window that displays that data the active window. The active window is preceded by a check mark.
7-12 7 Overview—Factura Menu Commands July 2001
Applied Biosystems.
Index
AABI folder 2-3, 6-3Add Sequence(s) command 7-11adding
bases in Electropherogram View 4-16 features 4-16 primers to primer library 6-11 ranges to features 4-18 sequences to batch
worksheet 3-14, 7-11All Commercial (Primers) library 6-7All Commercial file 6-4All Commercial Select file 6-4ambiguity
designating in settings 3-3, 3-6 editing on batch worksheet 3-20
ambiguous bases, editing using Electropherogram View 4-13
Annotation View button to display 2-9 described 2-9, 4-10 example 2-9 in text, Inherit, new sequences 4-9
Apple menu 7-3automatic options
Revert the sequences 3-9 Save to Sequence File 3-9
Bbases
adding in Sequence View 4-14 changing in Electropherogram
View 4-16 changing in Sequence View 4-14 deleting in Electropherogram View 4-16 deleting in Sequence View 4-14
editing in sequence window 4-14 to 4-16 multiple positions in
electropherograms 4-15 selecting in electropherograms 4-15 to
4-16batch report
closing 3-23 described 2-5, 3-23 example 3-22 icon 3-24, 5-8 opening 3-24, 5-8, 7-11 printing 5-3 saving 3-23, 5-7 viewing 3-21
batch worksheet adding sequences 3-14, 7-11 changing column width 3-17 closing 3-25 column description 3-11 column selection 3-16 description of 2-5, 3-1, 3-11 editing parameters 7-11 icon 3-11 moving around 3-16 opening 3-10, 7-5 opening sequence windows from 4-7 removing sequences 3-14, 3-17, 7-11 reprocessing 4-19 saving 3-26, 5-5, 7-5 selecting sequences 3-16 setting parameters 3-3, 3-10, 7-11 submitting for processing 3-21, 7-11 Worksheet menu commands 7-10
borders, marking features 4-27
July 2001 Index 1
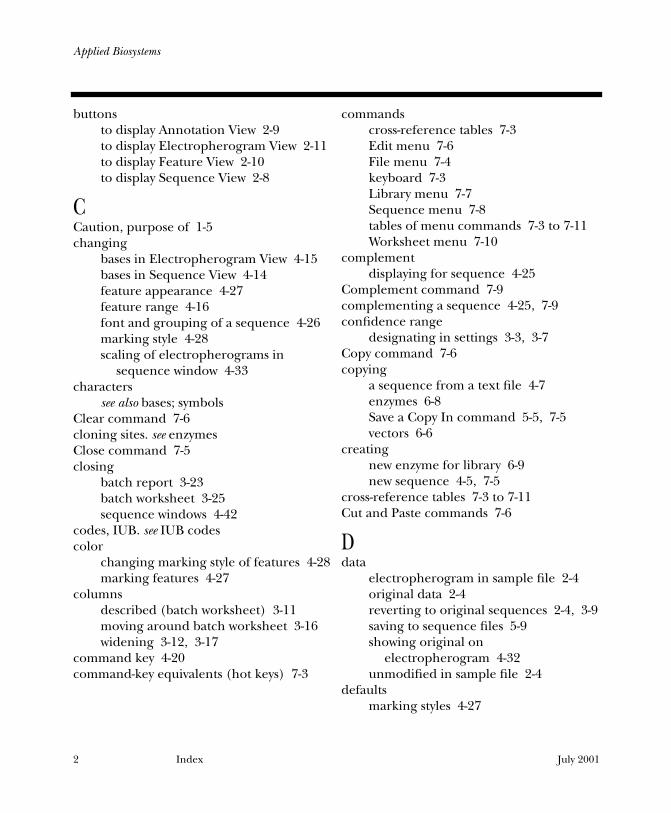
Applied Biosystems
buttons to display Annotation View 2-9 to display Electropherogram View 2-11 to display Feature View 2-10 to display Sequence View 2-8
CCaution, purpose of 1-5changing
bases in Electropherogram View 4-15 bases in Sequence View 4-14 feature appearance 4-27 feature range 4-16 font and grouping of a sequence 4-26 marking style 4-28 scaling of electropherograms in
sequence window 4-33characters
see also bases; symbolsClear command 7-6cloning sites. see enzymesClose command 7-5closing
batch report 3-23 batch worksheet 3-25 sequence windows 4-42
codes, IUB. see IUB codescolor
changing marking style of features 4-28 marking features 4-27
columns described (batch worksheet) 3-11 moving around batch worksheet 3-16 widening 3-12, 3-17
command key 4-20command-key equivalents (hot keys) 7-3
commands cross-reference tables 7-3 Edit menu 7-6 File menu 7-4 keyboard 7-3 Library menu 7-7 Sequence menu 7-8 tables of menu commands 7-3 to 7-11 Worksheet menu 7-10
complement displaying for sequence 4-25
Complement command 7-9complementing a sequence 4-25, 7-9confidence range
designating in settings 3-3, 3-7Copy command 7-6copying
a sequence from a text file 4-7 enzymes 6-8 Save a Copy In command 5-5, 7-5 vectors 6-6
creating new enzyme for library 6-9 new sequence 4-5, 7-5
cross-reference tables 7-3 to 7-11Cut and Paste commands 7-6
Ddata
electropherogram in sample file 2-4 original data 2-4 reverting to original sequences 2-4, 3-9 saving to sequence files 5-9 showing original on
electropherogram 4-32 unmodified in sample file 2-4
defaults marking styles 4-27
2 Index July 2001
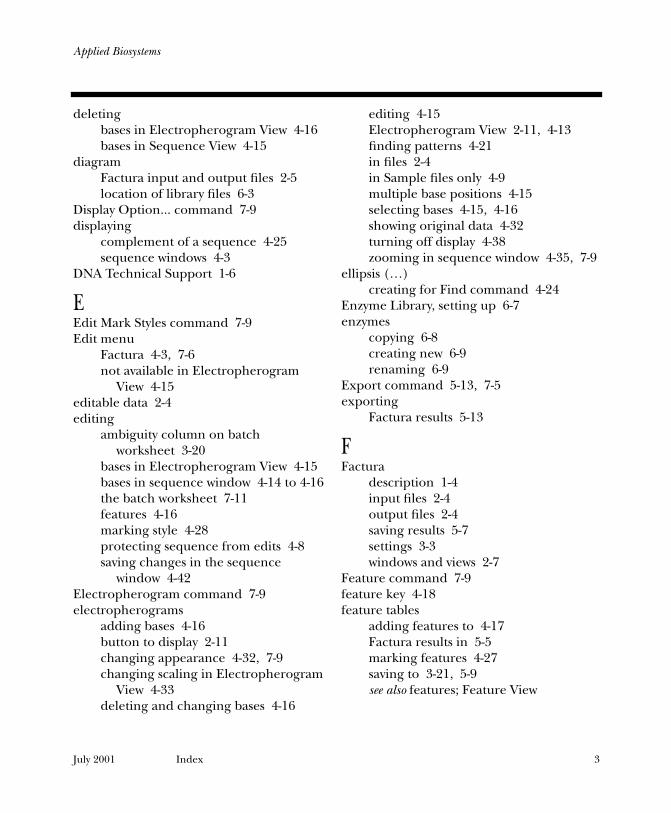
Applied Biosystems
deleting bases in Electropherogram View 4-16 bases in Sequence View 4-15
diagram Factura input and output files 2-5 location of library files 6-3
Display Option... command 7-9displaying
complement of a sequence 4-25 sequence windows 4-3
DNA Technical Support 1-6
EEdit Mark Styles command 7-9Edit menu
Factura 4-3, 7-6 not available in Electropherogram
View 4-15editable data 2-4editing
ambiguity column on batch worksheet 3-20
bases in Electropherogram View 4-15 bases in sequence window 4-14 to 4-16 the batch worksheet 7-11 features 4-16 marking style 4-28 protecting sequence from edits 4-8 saving changes in the sequence
window 4-42Electropherogram command 7-9electropherograms
adding bases 4-16 button to display 2-11 changing appearance 4-32, 7-9 changing scaling in Electropherogram
View 4-33 deleting and changing bases 4-16
editing 4-15 Electropherogram View 2-11, 4-13 finding patterns 4-21 in files 2-4 in Sample files only 4-9 multiple base positions 4-15 selecting bases 4-15, 4-16 showing original data 4-32 turning off display 4-38 zooming in sequence window 4-35, 7-9
ellipsis (…) creating for Find command 4-24
Enzyme Library, setting up 6-7enzymes
copying 6-8 creating new 6-9 renaming 6-9
Export command 5-13, 7-5exporting
Factura results 5-13
FFactura
description 1-4 input files 2-4 output files 2-4 saving results 5-7 settings 3-3 windows and views 2-7
Feature command 7-9feature key 4-18feature tables
adding features to 4-17 Factura results in 5-5 marking features 4-27 saving to 3-21, 5-9 see also features; Feature View
July 2001 Index 3
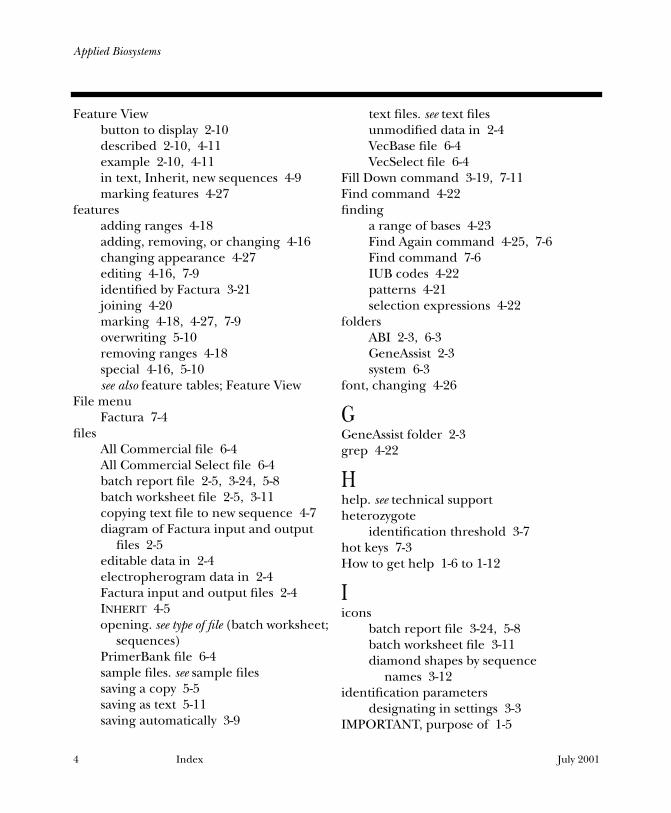
Applied Biosystems
Feature View button to display 2-10 described 2-10, 4-11 example 2-10, 4-11 in text, Inherit, new sequences 4-9 marking features 4-27
features adding ranges 4-18 adding, removing, or changing 4-16 changing appearance 4-27 editing 4-16, 7-9 identified by Factura 3-21 joining 4-20 marking 4-18, 4-27, 7-9 overwriting 5-10 removing ranges 4-18 special 4-16, 5-10 see also feature tables; Feature View
File menu Factura 7-4
files All Commercial file 6-4 All Commercial Select file 6-4 batch report file 2-5, 3-24, 5-8 batch worksheet file 2-5, 3-11 copying text file to new sequence 4-7 diagram of Factura input and output
files 2-5 editable data in 2-4 electropherogram data in 2-4 Factura input and output files 2-4 INHERIT 4-5 opening. see type of file (batch worksheet;
sequences) PrimerBank file 6-4 sample files. see sample files saving a copy 5-5 saving as text 5-11 saving automatically 3-9
text files. see text files unmodified data in 2-4 VecBase file 6-4 VecSelect file 6-4
Fill Down command 3-19, 7-11Find command 4-22finding
a range of bases 4-23 Find Again command 4-25, 7-6 Find command 7-6 IUB codes 4-22 patterns 4-21 selection expressions 4-22
folders ABI 2-3, 6-3 GeneAssist 2-3 system 6-3
font, changing 4-26
GGeneAssist folder 2-3grep 4-22
Hhelp. see technical supportheterozygote
identification threshold 3-7hot keys 7-3How to get help 1-6 to 1-12
Iicons
batch report file 3-24, 5-8 batch worksheet file 3-11 diamond shapes by sequence
names 3-12identification parameters
designating in settings 3-3IMPORTANT, purpose of 1-5
4 Index July 2001
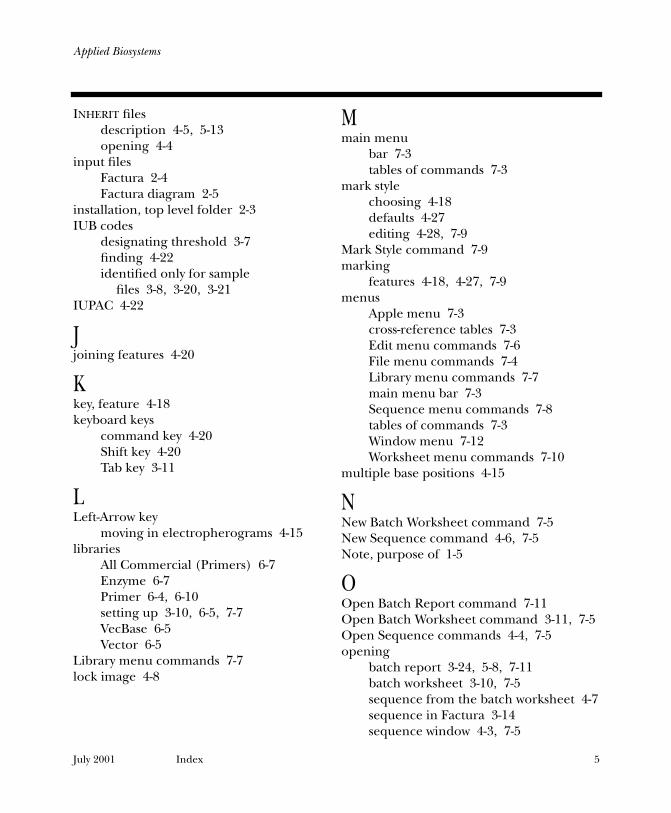
Applied Biosystems
INHERIT files description 4-5, 5-13 opening 4-4
input files Factura 2-4 Factura diagram 2-5
installation, top level folder 2-3IUB codes
designating threshold 3-7 finding 4-22 identified only for sample
files 3-8, 3-20, 3-21IUPAC 4-22
Jjoining features 4-20
Kkey, feature 4-18keyboard keys
command key 4-20 Shift key 4-20 Tab key 3-11
LLeft-Arrow key
moving in electropherograms 4-15libraries
All Commercial (Primers) 6-7 Enzyme 6-7 Primer 6-4, 6-10 setting up 3-10, 6-5, 7-7 VecBase 6-5 Vector 6-5
Library menu commands 7-7lock image 4-8
Mmain menu
bar 7-3 tables of commands 7-3
mark style choosing 4-18 defaults 4-27 editing 4-28, 7-9
Mark Style command 7-9marking
features 4-18, 4-27, 7-9menus
Apple menu 7-3 cross-reference tables 7-3 Edit menu commands 7-6 File menu commands 7-4 Library menu commands 7-7 main menu bar 7-3 Sequence menu commands 7-8 tables of commands 7-3 Window menu 7-12 Worksheet menu commands 7-10
multiple base positions 4-15
NNew Batch Worksheet command 7-5New Sequence command 4-6, 7-5Note, purpose of 1-5
OOpen Batch Report command 7-11Open Batch Worksheet command 3-11, 7-5Open Sequence commands 4-4, 7-5opening
batch report 3-24, 5-8, 7-11 batch worksheet 3-10, 7-5 sequence from the batch worksheet 4-7 sequence in Factura 3-14 sequence window 4-3, 7-5
July 2001 Index 5
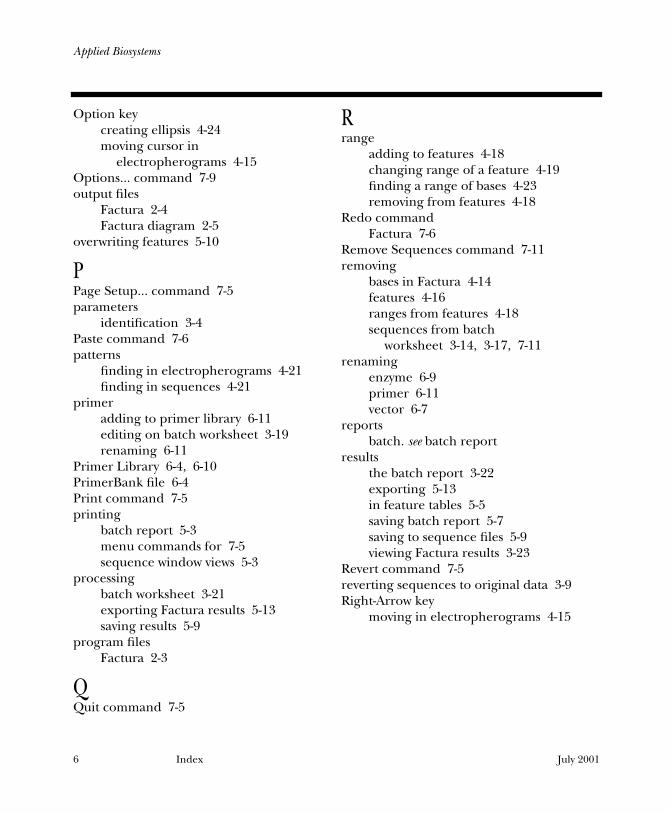
Applied Biosystems
Option key creating ellipsis 4-24 moving cursor in
electropherograms 4-15Options... command 7-9output files
Factura 2-4 Factura diagram 2-5
overwriting features 5-10
PPage Setup... command 7-5parameters
identification 3-4Paste command 7-6patterns
finding in electropherograms 4-21 finding in sequences 4-21
primer adding to primer library 6-11 editing on batch worksheet 3-19 renaming 6-11
Primer Library 6-4, 6-10PrimerBank file 6-4Print command 7-5printing
batch report 5-3 menu commands for 7-5 sequence window views 5-3
processing batch worksheet 3-21 exporting Factura results 5-13 saving results 5-9
program files Factura 2-3
QQuit command 7-5
Rrange
adding to features 4-18 changing range of a feature 4-19 finding a range of bases 4-23 removing from features 4-18
Redo command Factura 7-6
Remove Sequences command 7-11removing
bases in Factura 4-14 features 4-16 ranges from features 4-18 sequences from batch
worksheet 3-14, 3-17, 7-11renaming
enzyme 6-9 primer 6-11 vector 6-7
reports batch. see batch report
results the batch report 3-22 exporting 5-13 in feature tables 5-5 saving batch report 5-7 saving to sequence files 5-9 viewing Factura results 3-23
Revert command 7-5reverting sequences to original data 3-9Right-Arrow key
moving in electropherograms 4-15
6 Index July 2001
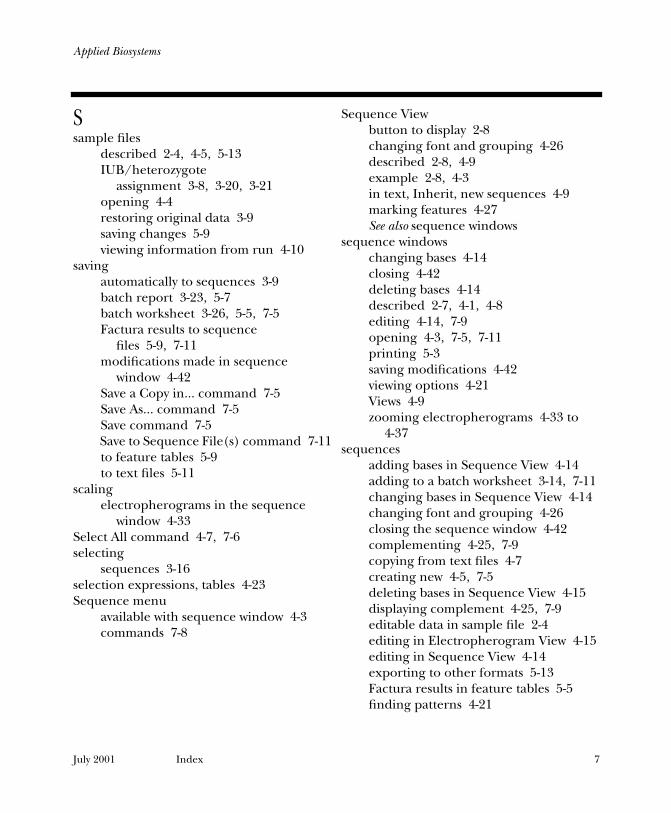
Applied Biosystems
Ssample files
described 2-4, 4-5, 5-13 IUB/heterozygote
assignment 3-8, 3-20, 3-21 opening 4-4 restoring original data 3-9 saving changes 5-9 viewing information from run 4-10
saving automatically to sequences 3-9 batch report 3-23, 5-7 batch worksheet 3-26, 5-5, 7-5 Factura results to sequence
files 5-9, 7-11 modifications made in sequence
window 4-42 Save a Copy in... command 7-5 Save As... command 7-5 Save command 7-5 Save to Sequence File(s) command 7-11 to feature tables 5-9 to text files 5-11
scaling electropherograms in the sequence
window 4-33Select All command 4-7, 7-6selecting
sequences 3-16selection expressions, tables 4-23Sequence menu
available with sequence window 4-3 commands 7-8
Sequence View button to display 2-8 changing font and grouping 4-26 described 2-8, 4-9 example 2-8, 4-3 in text, Inherit, new sequences 4-9 marking features 4-27 See also sequence windows
sequence windows changing bases 4-14 closing 4-42 deleting bases 4-14 described 2-7, 4-1, 4-8 editing 4-14, 7-9 opening 4-3, 7-5, 7-11 printing 5-3 saving modifications 4-42 viewing options 4-21 Views 4-9 zooming electropherograms 4-33 to
4-37sequences
adding bases in Sequence View 4-14 adding to a batch worksheet 3-14, 7-11 changing bases in Sequence View 4-14 changing font and grouping 4-26 closing the sequence window 4-42 complementing 4-25, 7-9 copying from text files 4-7 creating new 4-5, 7-5 deleting bases in Sequence View 4-15 displaying complement 4-25, 7-9 editable data in sample file 2-4 editing in Electropherogram View 4-15 editing in Sequence View 4-14 exporting to other formats 5-13 Factura results in feature tables 5-5 finding patterns 4-21
July 2001 Index 7
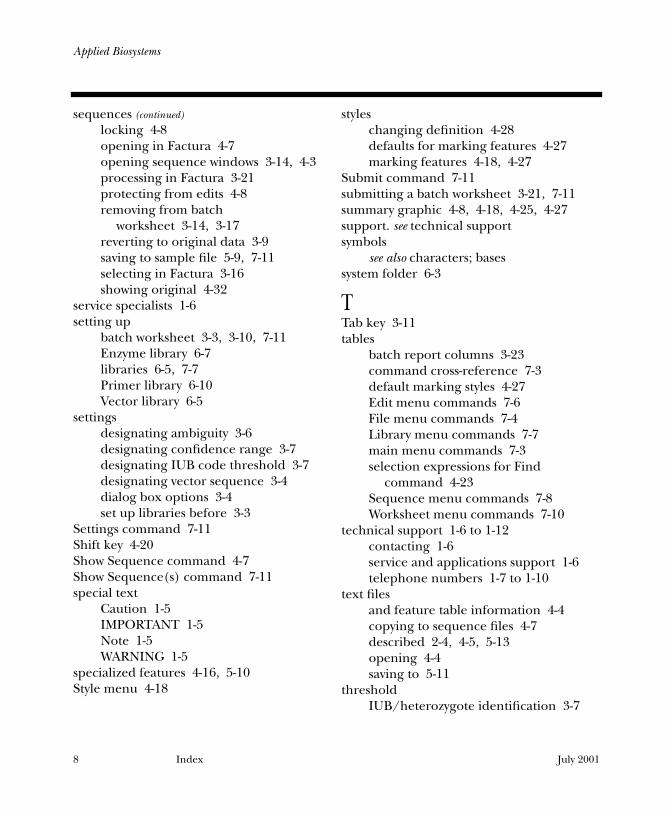
Applied Biosystems
sequences (continued)
locking 4-8 opening in Factura 4-7 opening sequence windows 3-14, 4-3 processing in Factura 3-21 protecting from edits 4-8 removing from batch
worksheet 3-14, 3-17 reverting to original data 3-9 saving to sample file 5-9, 7-11 selecting in Factura 3-16 showing original 4-32
service specialists 1-6setting up
batch worksheet 3-3, 3-10, 7-11 Enzyme library 6-7 libraries 6-5, 7-7 Primer library 6-10 Vector library 6-5
settings designating ambiguity 3-6 designating confidence range 3-7 designating IUB code threshold 3-7 designating vector sequence 3-4 dialog box options 3-4 set up libraries before 3-3
Settings command 7-11Shift key 4-20Show Sequence command 4-7Show Sequence(s) command 7-11special text
Caution 1-5 IMPORTANT 1-5 Note 1-5 WARNING 1-5
specialized features 4-16, 5-10Style menu 4-18
styles changing definition 4-28 defaults for marking features 4-27 marking features 4-18, 4-27
Submit command 7-11submitting a batch worksheet 3-21, 7-11summary graphic 4-8, 4-18, 4-25, 4-27support. see technical supportsymbols
see also characters; basessystem folder 6-3
TTab key 3-11tables
batch report columns 3-23 command cross-reference 7-3 default marking styles 4-27 Edit menu commands 7-6 File menu commands 7-4 Library menu commands 7-7 main menu commands 7-3 selection expressions for Find
command 4-23 Sequence menu commands 7-8 Worksheet menu commands 7-10
technical support 1-6 to 1-12 contacting 1-6 service and applications support 1-6 telephone numbers 1-7 to 1-10
text files and feature table information 4-4 copying to sequence files 4-7 described 2-4, 4-5, 5-13 opening 4-4 saving to 5-11
threshold IUB/heterozygote identification 3-7
8 Index July 2001
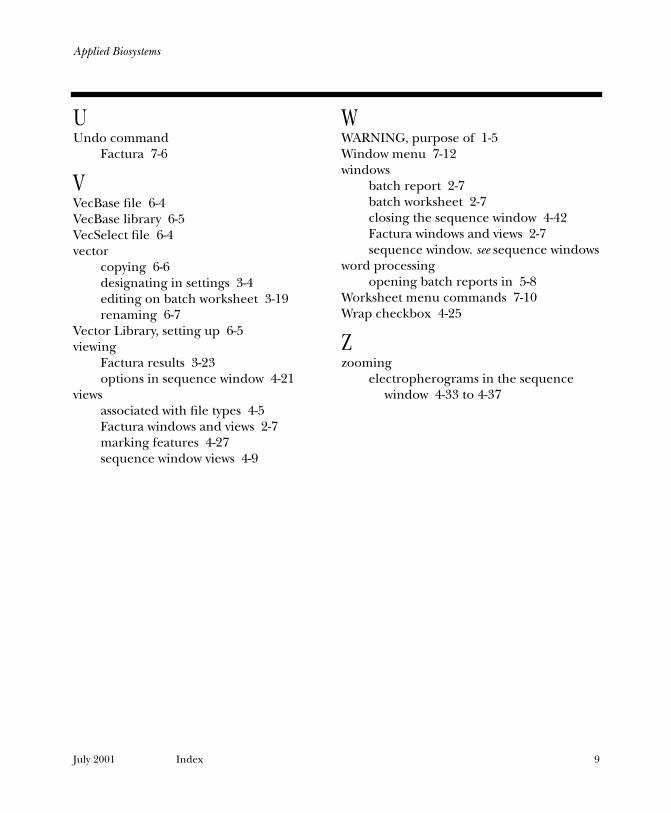
Applied Biosystems
UUndo command
Factura 7-6
VVecBase file 6-4VecBase library 6-5VecSelect file 6-4vector
copying 6-6 designating in settings 3-4 editing on batch worksheet 3-19 renaming 6-7
Vector Library, setting up 6-5viewing
Factura results 3-23 options in sequence window 4-21
views associated with file types 4-5 Factura windows and views 2-7 marking features 4-27 sequence window views 4-9
WWARNING, purpose of 1-5Window menu 7-12windows
batch report 2-7 batch worksheet 2-7 closing the sequence window 4-42 Factura windows and views 2-7 sequence window. see sequence windows
word processing opening batch reports in 5-8
Worksheet menu commands 7-10Wrap checkbox 4-25
Zzooming
electropherograms in the sequence window 4-33 to 4-37
July 2001 Index 9


Headquarters850 Lincoln Centre DriveFoster City, CA 94404 USAPhone: +1 650.638.5800Toll Free: +1 800.345.5224Fax: +1 650.638.5884
Worldwide Sales OfficesApplied Biosystems vast distribution and service network, composed of highly trained support and applications personnel, reaches into 150 countries on six continents. For international office locations, please call our local office or refer to our web site at www.appliedbiosystems.com.
www.appliedbiosystems.com
Applera Corporation is committed to providing the world’s leading technology and information for life scientists. Applera Corporation consists of the Applied Biosystems and Celera Genomics businesses.
Printed in the USA, 07/2001Part Number 903696 Rev. B
an Applera business


