Fashion Studies 55 2.1 PATTERN MAKING 2.1.1 Introduction: Pattern Development& its origin Pattern Designing is an extensive subject that covers principles of constructions and techniques in a wider perspective rather than style details. It opens opportunities for creating infinite styles. Pattern construction can be divided in two parts: i) Measuring correctly ii) Knowledge of technique with which they are applied. Learning pattern-making by trial and error is like learning to play music by ear. The earlier methods of pattern making generally used shapes by copying and reconstructing them. Several systems of pattern constructions were devised in the early days of tailoring, long before clothing industry came in existence. They served the needs of a busy tailor who generally required a guide for drafting garments directly on to the cloth. As each garment was cut individually to varying measurements, pattern drafting had to be simple and speedy in operation. Since speed was an important factor, systems were devised to include necessary seam allowances. The system now used for pattern development is called Block Method where seam allowances are calculated at the time of cutting the final pattern. The human form comprises complex geometric shapes and presents problems in pattern construction. The accuracy of any cutting system depends largely on relevant and correct measurements. On the other hand, Proportionate Systems seem to offer a ready solution to the problem of unreliable or incorrect measurements. The Proportionate Systems work on the principles that the whole body is divided into eight heads and the girth measurements are in proportion to each other. Pattern makers generally tried to find an ideal system and did not realize that a system laid down by one method may not fully satisfy the needs of another human figure since no two human forms can be identical. Pattern construction systems are largely dependent and influenced by the particular fashion of their period. Seam placement and suppression are an integral part of a draft wherein design cannot be altered without disturbing the garment balance. However experienced pattern makers invariably took the precaution of adding sufficient inlays or allowance in the main seam of garment as a safeguard against error of judgment. Basic Pattern Development Chapter 2
Transcript
Fashion Studies
55
2.1 PATTERN MAKING
2.1.1 Introduction:
Pattern Development& its origin
Pattern Designing is an extensive subject that covers principles of constructions and
techniques in a wider perspective rather than style details. It opens opportunities for
creating infinite styles. Pattern construction can be divided in two parts:
i) Measuring correctly
ii) Knowledge of technique with which they are applied.
Learning pattern-making by trial and error is like learning to play music by ear. The
earlier methods of pattern making generally used shapes by copying and reconstructing
them.
Several systems of pattern constructions were devised in the early days of tailoring, long
before clothing industry came in existence. They served the needs of a busy tailor who
generally required a guide for drafting garments directly on to the cloth. As each
garment was cut individually to varying measurements, pattern drafting had to be
simple and speedy in operation. Since speed was an important factor, systems were
devised to include necessary seam allowances. The system now used for pattern
development is called Block Method where seam allowances are calculated at the time of
cutting the final pattern.
The human form comprises complex geometric shapes and presents problems in pattern
construction. The accuracy of any cutting system depends largely on relevant and correct
measurements. On the other hand, Proportionate Systems seem to offer a ready solution
to the problem of unreliable or incorrect measurements. The Proportionate Systems
work on the principles that the whole body is divided into eight heads and the girth
measurements are in proportion to each other. Pattern makers generally tried to find an
ideal system and did not realize that a system laid down by one method may not fully
satisfy the needs of another human figure since no two human forms can be identical.
Pattern construction systems are largely dependent and influenced by the particular
fashion of their period. Seam placement and suppression are an integral part of a draft
wherein design cannot be altered without disturbing the garment balance. However
experienced pattern makers invariably took the precaution of adding sufficient inlays or
allowance in the main seam of garment as a safeguard against error of judgment.
Basic Pattern DevelopmentChapter 2
Fashion Studies
56
Lack of reliable data on body measurements has, to a large extent, has been responsible
for the continued used of systems based on theoretical proportional measurements. W. H.
Hulme wrote in his book "The Practice of Garment Pattern Making wrote:
"The clothing industry has been prolific in systematic methods of applying descriptive
data and it is fair to say that in many of these pattern systems the principles involved have
not been too obvious, or even clearly stated. Several years of study of English. American
and European pattern systems suggest that method may be unrelated to, or divorced from,
principles. The widest variations exist in that large group of systems which not only do not
state the principles applied, but which seem to proceed on the assumption that none exists,
and that the whole operation is empirical".
"At the beginning let it be said that the word 'system' connotes something soundly based
and rooted in reason, capable of being demonstrated and the results applied. If a point is
fixed, or a part located for a sound reason, that reason can and should be given. If the
working of a law is detected in a number of similar instances, that law should be capable
of statement and proof".
Philip Kunick in his book 'Modern Sizing and Pattern Making for Womens and Childrens
Garments' writes that it is still a common practice to teach pattern construction for the
wholesale trade by means of a drafting scale based on a girth measurement, not only for
fixing points or locating parts, but also for drafting a garment of any size. This is rarely
done in the wholesale trade, where it is the general practice to cut a pattern in a standard
size, indication that the exact dimensions are not known and proportionate
measurements must be used as substitutes; with the result that extreme sizes, drafted to
a hypothetical scale, rarely give a satisfactory fit.
Due to unreliability of cutting systems, many pattern designers started draping their
patterns on a dress form. A skillful designer can achieve good results but this method is
inefficient and time-consuming for the ready to wear market. The modern methods base
their foundations on principles of draping in the two-dimension form balance. Balance is
the underlying objective while manipulating pattern balance is a vertical relationship
between the front and back. If the balance of a pattern is faulty it means that accuracy of
all vertical measurements is lost.
There were just 18 pattern cutting books including that of Alcega published from the
16th century to the 19th century in Europe. This can be attributed largely to lack of
literacy and numeracy prevalent amongst pattern makers, tailors and dress makers at
that time. Traditionally the skills were passed to the apprentices through demonstration
and verbal instructions.
Fashion Studies
57
2.1.2 Pattern Making
Pattern making is the process of transforming a design into its constituent flat pattern
pieces and then drafting them out. The job of a pattern-maker is to interpret the designs
into sample pattern pieces and then drafting them. Arm strong Pattern making covers
principles of constructions and techniques in a wider sense rather than style details in a
narrow sense (Armstrong, 2000). It opens scope for infinite variety of styles both for
regular designs and innovative patterns. Pattern making can be divided in two parts
namely measuring correctly & knowledge of technique devised to include necessary
seam allowances. Measuring the human body is the precursor to developing garments to
fit the body. Measuring scales range from simple measuring tape to complex body
scanners and low to high tech.
Pattern for a garment is the blue print on the basis of which the fabric is cut and the same
is achieved by two methods:
Flat Pattern Method
Draping Method
Flat Pattern Method is a method where in body or dress form measurements are taken
for developing a pattern. Following a logical stepwise procedure, the measurements are
then converted into a pattern. In other words this system depends on accurate
measurements to complete the paper pattern. There are limitless designs, which can be
achieved for workable garments. Flat pattern making should be done in conjunction with
a dress form so that as the design evolves, proportion and balance in the garment can be
checked side by side. It is important to transfer the pattern on to a muslin (toile
pronounced as 'twall') to test the fit, on a dress form or a human figure.
Flat Pattern cutting is now widely used because of its accuracy of sizing and the speed
with which complicated designs are made. It is a system of creating patterns by
manipulating a basic block. It is widely used for the following reasons:
1. The basic block includesease allowance which allows the body to perform a variety
of normal body functions requiring movement of various body parts.
2. The method is logical and easy to understand.
3. It brings consistency and accuracy of both size and fit of mass-produced garments
4. It is also the fastest and most efficient pattern design method even for complicated
designs.
Draping method is the oldest pattern making method and is generally regarded as a
creative approach. In this method a piece of two-dimensional fabric is draped directly on
a dress form or figure and made to fit on the dress form to achieve the desired look or
shape. The fabric may conform to the basic shape of the form or be arranged artistically
B
B
Fashion Studies
58
in folds for a specific design. This muslin pattern is then transferred on the paper, and
corrections are made, if any, and then the same are converted into a final pattern.
I. Block/sloper
Sloper is a term given to a very basic set of pattern pieces used to make additional
patterns of any style. It refers to paper cutting of basic bodice, skirt, sleeve or any
such basic pattern from which all the other designs are developed. The Block
normally represents the dimensions of a specific form or figure. It has darts to fit to
the contours of the body but has neither any design features nor seam allowances.
It is the foundation used to make the pattern of a design.
It is important that the correct block is chosen for the design; this not only saves
time during adaptation but can affect the final shape. The basic blocks can be
drafted to fit individual figures by using personal measurements instead of the
standard measurements listed in the size chart.
Name of the block e.g. skirts front, bodice back etc.
Grain line
Size e.g. 32, 34, 36 or S, M, L
The block should carry the following information:-
2.1.3 Terminology
B
B
One Dart BodiceFrontSIZE #34
Basic BodiceBackSize #34
Basic BodiceBackSize #34
Fashion Studies
59
ii) Pattern
Pattern is developed from the block that includes all the information needed for
cutting and production of the garment including seam allowance.
SleeveSize #34
Back Front
Basic SkirtBackSize #34
Basic SkirtFrontSize #34
Ab02
BASIC BACK
SIZE#34
CUT-1
C.B
.
C.F.
Ab01
BASIC
FRONT
SIZE#34
CUT-1
Fashion Studies
60
The following should be included on a pattern:
Grain line
Centre Front or Centre Back
Style number or Code number of the pattern set may which be evolved e.g.
AB 01 here AB identifies type of the garment and 01 identifies the piece number of
complete set. If there are 5 pattern pieces in a garment, the pieces will be numbered
as AB 01, AB 02, AB 03, AB 04 and AB 05.
Pattern piece e.g. skirt front, skirt back, side front etc.
Size as 32, 34, 36, or S, M, L etc.
Cutting information - It should be clearly mentioned as to how many pieces are
to be cut e.g. Cut 1, Cut 2, Cut on fold.
Notches - Marks that are needed to help assemble garment sections correctly.
Directional Fabrics - For fabrics which have designs in one direction such as
floral print, stripes, plaid, velvet, fur etc. A symbol "cut one way" or (?) is indicated
on the pattern.
Date - Indicated as a reference point.
Seam Allowances
B
B
B
B
B
B
B
B
B
B
AB05
Basic Sleeve
Size #34
Cut-2
Back Front
AB04
Skirt Back
Size #34
Cut-2
C.B
. C.F.
AB03
Skirt Front
Size #34
Cut-2
Fashion Studies
61
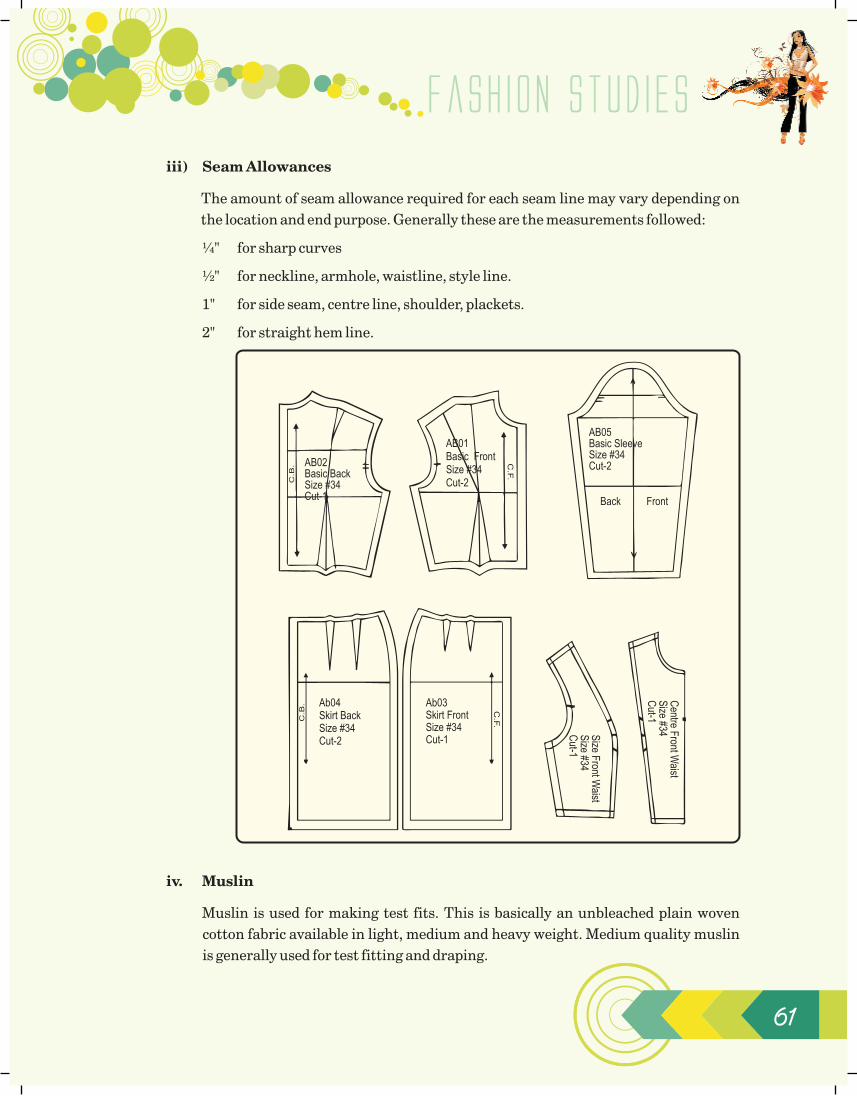
iii) Seam Allowances
The amount of seam allowance required for each seam line may vary depending on
the location and end purpose. Generally these are the measurements followed:
¼" for sharp curves
½" for neckline, armhole, waistline, style line.
1" for side seam, centre line, shoulder, plackets.
2" for straight hem line.
iv. Muslin
Muslin is used for making test fits. This is basically an unbleached plain woven
cotton fabric available in light, medium and heavy weight. Medium quality muslin
is generally used for test fitting and draping.
C.B
. AB02Basic BackSize #34Cut-1
AB01Basic FrontSize #34Cut-2
C.F
.
AB05Basic SleeveSize #34Cut-2
Back Front
Ab04Skirt BackSize #34Cut-2
C.B
.
C.F
.
Ab03Skirt FrontSize #34Cut-1
Size F
ront Waist
Size #34
Cut-1
Centre F
ront Waist
Size #34
Cut-1
Fashion Studies
62
v. Grain line
Grain line is a line drawn from end to end on each pattern piece to indicate how the
pattern should align with the lengthwise grain of the fabric. Whichever be the
direction in which the grain line is drawn on the pattern, it will always be placed
parallel to the selvedge on the fabric.
vi. Balance
Refers to hang and also proportions in garments. Fashion dictates balance to a
certain extent, for example long tops over short skirts. Where flat pattern cutting is
concerned it is often difficult to judge correct balance until the garment is actually
made in fabric.
vii. Balance Marks
These are marks made on edges of pattern pieces that show where they are to be
matched. They are a useful construction guide on all seams but where edges of
different shapes are to be joined or where one edge is fuller than another, balance
marks are vital. In pattern cutting make short pencil marks at the edge of the
paper, copying them through all stages to the final pattern. On bought paper
patterns balance marks are indicated by indicated by triangles and are referred to
as notches
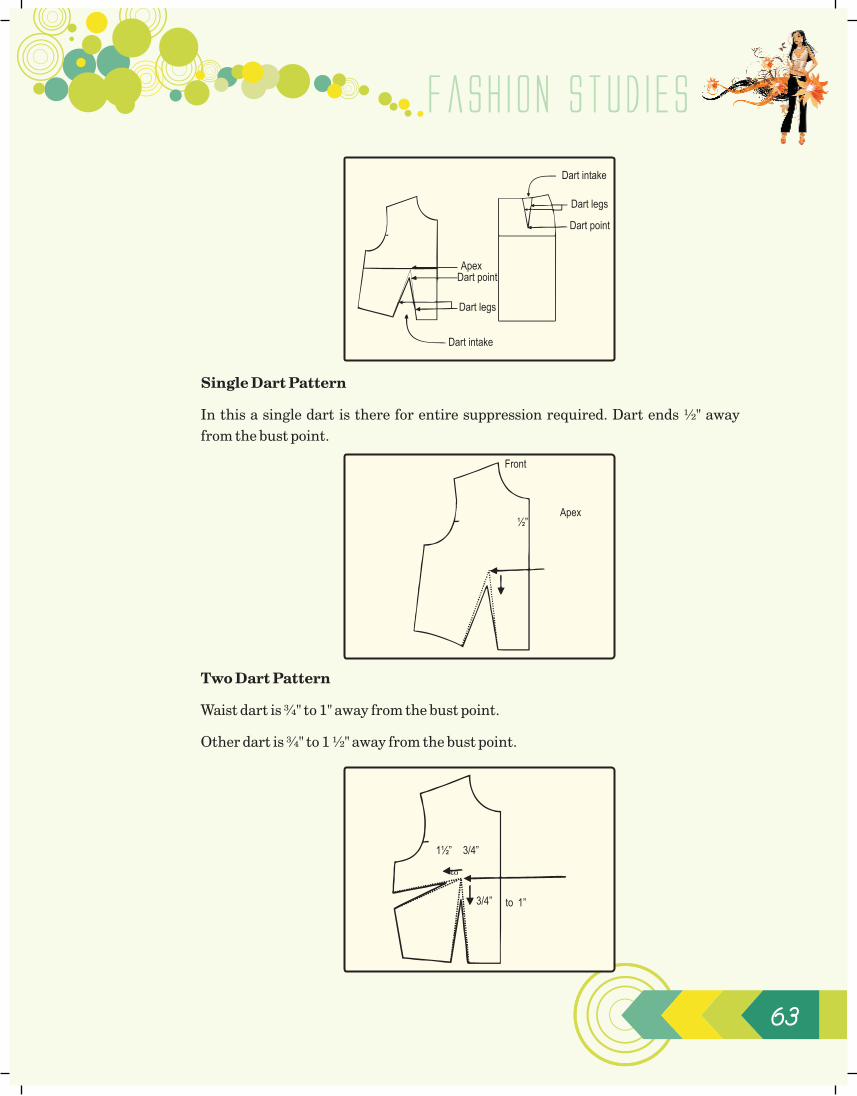
viii. Dart
Dart is a wedge-shape or triangular shape marked on the pattern that controls the
fit of the garment.
Dart legs-The two sides of the triangular shape &should be of the same length.
Dart point - The point at which the dart ends.
Dart intake - The amount of suppression taken between the dart legs.
Apex - The highest point on the bust.
Darts radiate from the highest point of a mount on a body, these mounts are
generally rounded. If the darts on front bodice are stitched till the apex they would
create a point on the apex and strain the garment. The body is rounded and not
pointed hence to avoid these strains or pulls on the garment the darts need to be
finished away from apex.
Fashion Studies
63
Single Dart Pattern
In this a single dart is there for entire suppression required. Dart ends ½" away
from the bust point.
Two Dart Pattern
Waist dart is ¾" to 1" away from the bust point.
Other dart is ¾" to 1 ½" away from the bust point.
Dart intake
Dart legs
Dart point
ApexDart point
Dart legs
Dart intake
Front
Apex½”
1½”
to
3/4”
3/4” to 1”
Fashion Studies
64
2.1.4 Symbols and Abbreviations
Centre Front - CF
Centre Back - CB
Grain line - ↕↔
Notches - ┬ ∏ < ö
Buttons - Q
Button hole - ¾ ½½
Front - F
Back - B
Waist line - Wl
Arm hole - Ah
Side Seam - SS
Neck line - NI
Shoulder - Sh
Grain line on fold -
Gathering -
Pleat (arrows indicates - «
direction of fold)
Box pleat -
Two way grainline - ?
One way grainline - ↓↑
Collect pictures of womenswear garments and create a folder/ style file.
Identify the type of darts and seams used in the garments.
Fill in the blanks
a. A pattern can be cut by ____________ method and ____________ method.
b. Pattern is a ______________ of a garment.
c. The author of the book 'Modern Sizing and Pattern Making for Womens and Childrens
Garments' is _____________________.
d. The dart is a _________ wedge that gives ______ to the flat piece of _______.
e. Waist dart is _______inch away from the bust and side seam dart is ______ away.
Activity
Fashion Studies
65
f. Balance refers to ________ and __________ in a garment.
g. Muslin is used for __________ a pattern and is also called a ____________.
h. Pattern is placed ____________ on the ___________ ___________ of the fabric.
i. _________ is a term given to ______ set of pattern piece used to make patterns of
________ style.
j. ___________ method is the oldest patter making method and is regarded as a
__________ approach.
Review Questions
1. What is Pattern Making?
2. Describe two methods of Pattern making
3. Why is it important to choose a correct block for design development?
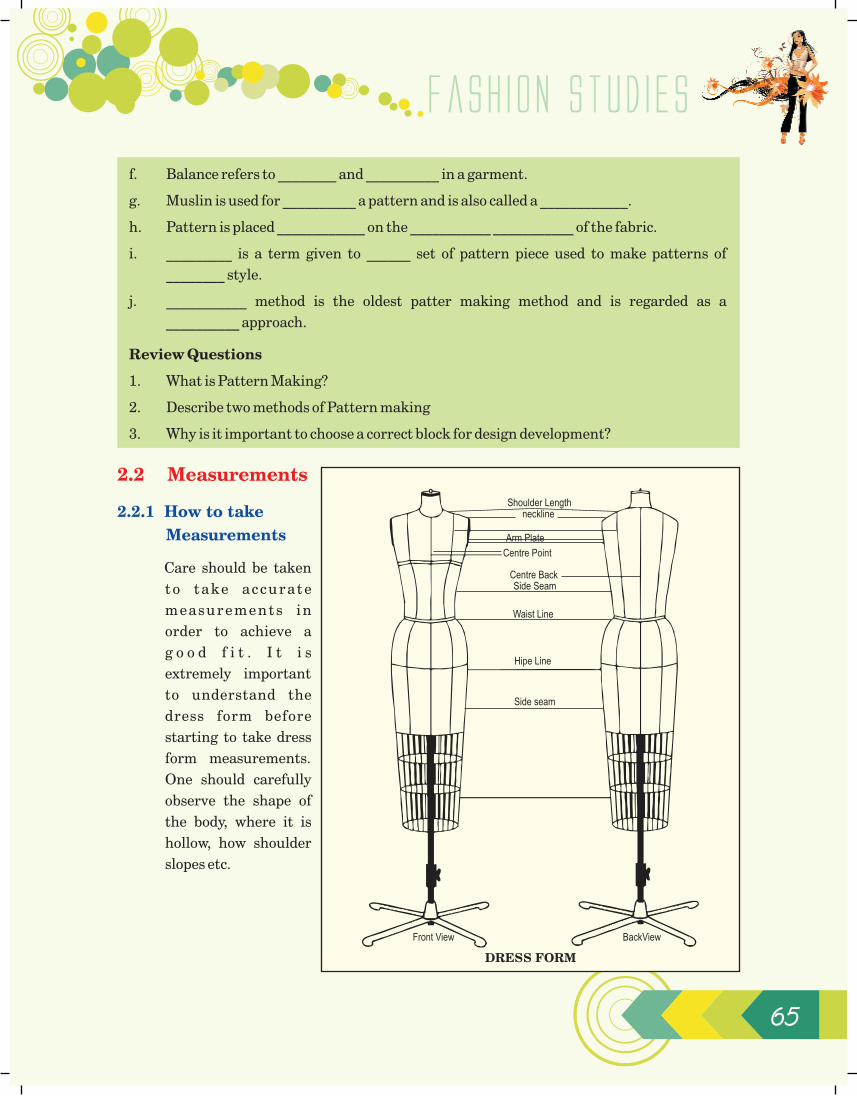
Care should be taken
to take accurate
measurements in
order to achieve a
g o o d f i t . I t i s
extremely important
to understand the
dress form before
starting to take dress
form measurements.
One should carefully
observe the shape of
the body, where it is
hollow, how shoulder
slopes etc.
2.2 Measurements
2.2.1 How to take
Measurements
Shoulder Lengthneckline
Arm Plate
Centre Point
Centre BackSide Seam
Waist Line
Hipe Line
Side seam
Front View BackView
DRESS FORM
Fashion Studies
66
Measurements
1. Front length - Shoulder neck intersection to waistline over the bust, take care to
measure with a hand under the bust.
2. Centre front length - Centre front neck intersection to centre front waist
intersection.
3. Shoulder to waistline - Shoulder tip to side seam waistline intersection (over the
sides)
4. Underarm seam - From a point X, 1" below the armhole to waistline intersection
at the side seam.
5. Shoulder length - From shoulder neck intersection to princess line and from
princess line to shoulder tip.
6. Width of bust - Width of bust measurement is from centre front over the bust to
point X on side seam.
7. Front waistline - From center front waistline intersection to side seam waist line
intersection.
8. Front hipline - Place a pin at 7" below the waistline on centre front line.
Using this measurement as a guide, from the floor, mark horizontally on the dress
form, starting at center front and continue to side seam (keeping it uniform
throughout). Put a style tape for reference and this is the hip line. On this line
marked by style tape, take measurement from center front intersection to side
seam intersection.
9. Apex measurement - From the centre front to the high bust point keeping the
tape parallel to the floor.
10. Centre Front to the Princess line - From centre front intersection to princess
line intersection at waistline.
1 2 3 4
5
6
7 10
9
Fashion Studies
67
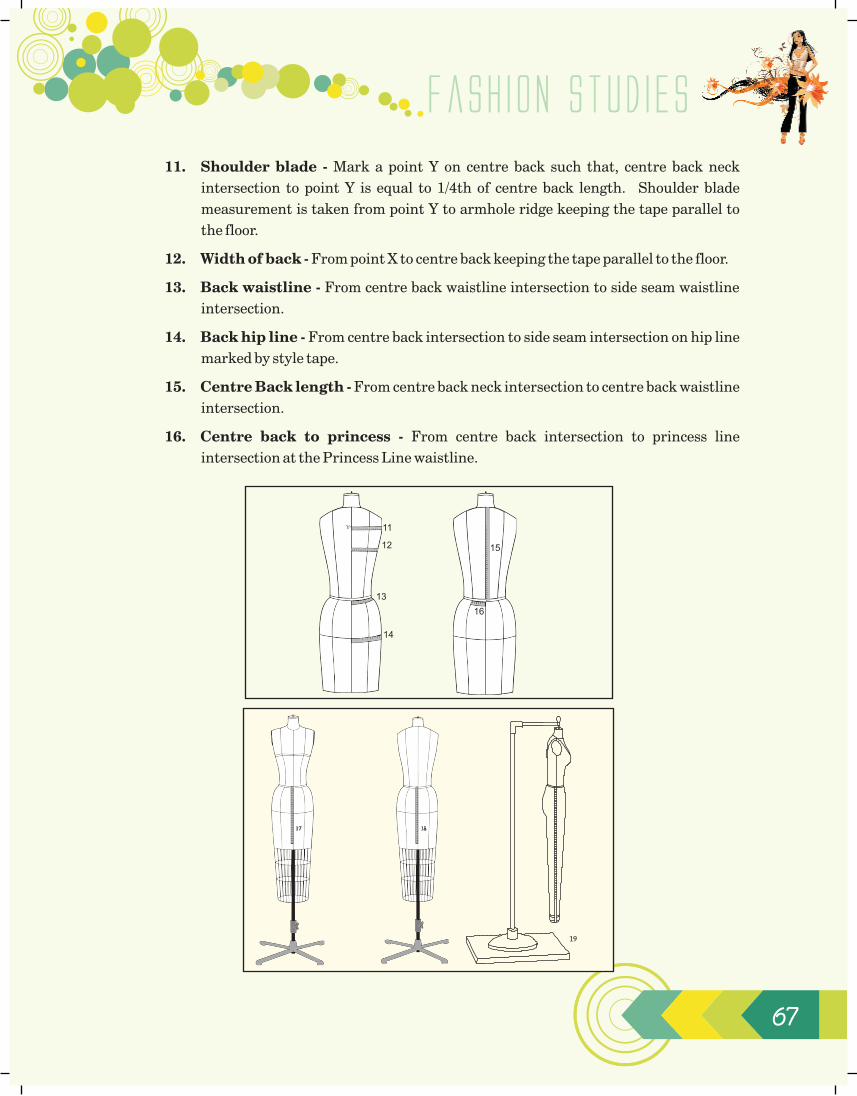
11. Shoulder blade - Mark a point Y on centre back such that, centre back neck
intersection to point Y is equal to 1/4th of centre back length. Shoulder blade
measurement is taken from point Y to armhole ridge keeping the tape parallel to
the floor.
12. Width of back - From point X to centre back keeping the tape parallel to the floor.
13. Back waistline - From centre back waistline intersection to side seam waistline
intersection.
14. Back hip line - From centre back intersection to side seam intersection on hip line
marked by style tape.
15. Centre Back length - From centre back neck intersection to centre back waistline
intersection.
16. Centre back to princess - From centre back intersection to princess line
intersection at the Princess Line waistline.
11
12
13
14
15
16
19
Fashion Studies
68
17. Centre Front length for lower garment - From centre front waistline
intersection at centre front down to the desired length.
18. Centre Back length for lower garment - From centre back waistline
intersection at centre back down to the desired length.
19. Side Seam Length - From waistline intersection at side seam over the hip to
ankle.
20. Crotch depth
(a) On dress form - Place an L-square between legs of form and note the
measurement at waistline. This measurement includes 1 ¼" ease as the L-
square is generally 1 ¼" wide.
(b) On body - In seated position, measure from waistline intersection at side seam
over the figure to the seat of the chair. (One needs to add ease here.)
21. Knee Circumference - Round measurement over the knee bone.
22. Ankle Circumference - Round measurement over the ankle bone.
20 (a) 20 (b)
21
22
Fashion Studies
69
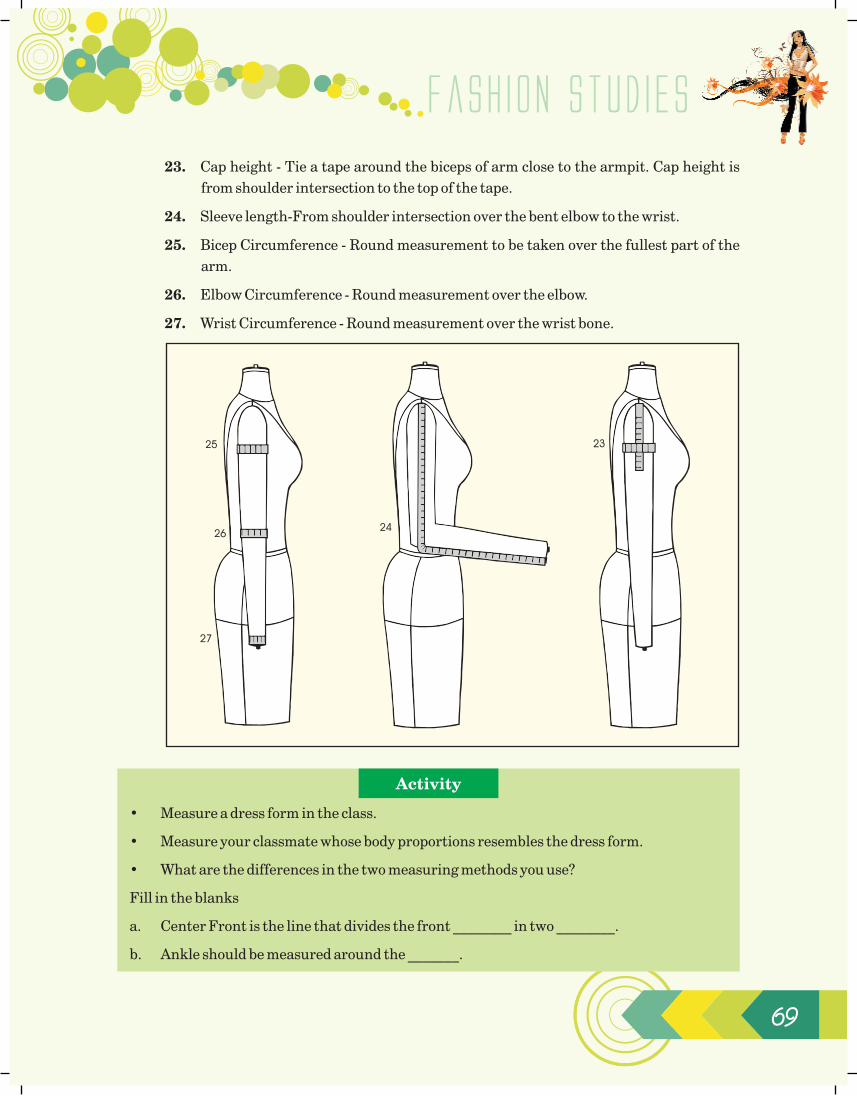
23. Cap height - Tie a tape around the biceps of arm close to the armpit. Cap height is
from shoulder intersection to the top of the tape.
24. Sleeve length-From shoulder intersection over the bent elbow to the wrist.
25. Bicep Circumference - Round measurement to be taken over the fullest part of the
arm.
26. Elbow Circumference - Round measurement over the elbow.
27. Wrist Circumference - Round measurement over the wrist bone.
• Measure a dress form in the class.
• Measure your classmate whose body proportions resembles the dress form.
• What are the differences in the two measuring methods you use?
Fill in the blanks
a. Center Front is the line that divides the front ________ in two ________.
b. Ankle should be measured around the _______.
Activity
23
24
25
26
27
Fashion Studies
70
c. Correct sleeve length is taken by measuring over a _______ _______.
d. Bodice length is measured by measuring from neck ____ to apex and waist by placing a
_________ _______ _________.
e. Crotch depth on a body is measured by making the ________ sit on a _______ surface and
it is measured from ___________ to ____________.
f. Apex is measured by taking the measurement from shoulder ________ __________ to the
apex point.
g. Distance between the apex and center ________ is measured by ________the distance
between _________ points in ________.
h. Shoulder blade level is measured at _______ of __________ ___________.
Review Questions
1. What are the 2 ways of measuring the Crotch Length?
2. How do you measure bust and shoulder length on the dress?
2.2.2 Standard Dress Form Measurement Chart For Bodice & Skirt (in inches)
5/82
SIZES
FRONT LENGTH
WIDTH OF BUST(1" below arm plate includes an ease of ½'')
CENTRE FRONT LENGTH
APEX
UNDER ARM SEAM
FRONT WAISTLINE(includes an ease of ¼'')
WAISTLINE TO SHOULDER(includes an ease of ¾'')
SHOULDER LENGTH
CENTRE FRONT TO PRINCESS LINE
WIDTH OF BACK(1" below arm plate includes an ease of ½'')
CENTRE BACK LENGTH
BACK WAIST LINE(includes an ease of ¼'')
SHOULDER BLADE
CENTRE BACK TO PRINCESS LINE
32
1/417
1/29
3/8145/837/87
3/86
3/414
7/845/82
1/28
1/216
5/85
7/861/22
34
1/217
10
1/2143/43
8
3/46
7/814
5
3/42
9
3/416
6
7
36
3/417
1/210
5/8147/831/88
1/87
15
1/857/82
1/29
17
3/86
1/873/42
38
18
11
3/414
4
1/48
1/27
1/815
1/45
3
10
1/417
3/46
1/477/82
40
1/418
1/211
7/8141/843/88
7/87
1/415
3/851/83
1/210
1/217
1/87
3/87
3
42
1/218
12
15
1/441/28
1/48
3/815
1/251/43
11
3/417
1/27
1/271/83
44
1/43
5/87
7/87
18
1/211
3/83
5/85
1/215
5/88
5/88
3/84
1/815
1/212
3/418
Fashion Studies
71
2.2.3 Sizes and Measurement
After learning how to measure a body and dress form, the next question that comes to
mind is what is the size of an individual or dress form based on the measurements and
secondly what size of the garment should be made that would fit the person properly.
A general sizing system for clothing production for a region or country is based ideally on
the body measurements taken on a cross section of the population.
In earlier times everyone went to a tailor to get clothes made to ones own measurements.
It is in modern times due to changing economy, society and the world, that there is
growing demand for' ready to wear apparel or RTW, which has made sizes and sizing
systems very important.
Sizing systems are generally developed by the Government or standardization
organizations that need to work out the standard sizes for the country. A large cross
section of the population is measured to establish the standardized sizing system for the
country. For example it is British standards with BS3666, which has established the
sizing system for the British clothing Industry. All the shops selling garments or
manufacturers for clothes for the UK market adhere to the BS3666. The size is suffixed
with S or T denotes whether for a short or tall person. The buyer in UK can easily buy
clothes of their size if one is sure of which size would fit, as generally all the garments in
that particular size would fit the person.
Women have different sizes and shapes and the sizes are so varied that the extent of two
women with equal hip girth can have a difference of as much as 12" in their bust
measurement. On the other hand, two women of equal bust girth can be completely
shaped differently. Most of the sizing systems are based on bust measurements for
women.
A good sizing system incorporates the variation in figure shapes to be able to meet the
requirement of the population of the country.
Apart from the bust and hip girth variation another factor that influences sizes is height.
Most small manufacturers tend to ignore the difference in height and produce garments
3/89
3/89
6
1/491/223
1/89
1/89
6
9
23
5/89
5/89
6
1/29
24
7/89
7/89
6
3/491/224
1/810
1/810
1/86
10
1/224
3/810
3/810
1/861/210
25 25
3/410
1/86
5/810
5/810FRONT HIPLINE(7" below waistline)(includes an ease of ¼'')
BACK HIPLINE(7" below waistline) (includes an ease of ¼'')
CAP HEIGHT
SHORT SLEEVE LENGTH
SLEEVE LENGTH
Fashion Studies
72
for above average height women so that most of the shorter women can reduce the length
as desired.
The country that has maximum size variation available in the market is United States.
The number of the sizes in a sizing system depends on the body structure of the
population. In country like India and US the body types of people in various parts (in
India ) and different ethnic groups (in US) is so varied that the number of sized in sizing
system need to be much more than three usual ones - small (S), Medium (M) and Large
(L). Some countries work with Extra Small (XS) and Extra Large (XL) and sometimes
even XXL. In United States the womenswear sizes are numerical like 2, 4, 6,
8,10,12,14,16,18, 20, 22, 24, 26 etc. Apart from these sizes being available in the market
there is 'Misses' and 'Petite' which cater to the medium and shorter women while 'Tall and
Big' cater to taller and bigger sizes.
In India currently there is no single standard measurement chart available. Several
organizations have been trying to work out the sizing and measurements. Individual
companies or businesses work out their own set of measurement charts based on their
customers or on the demand of the stores where they sell their products. This sometimes
leads to confusion among customers as to what size to buy.
EASE
Ease or tolerance in a pattern means acceptable margin but there is a difference of 'ease
of pattern' and 'ease of comfort'. Each garment is made for a purpose, an outerwear needs
more allowance as it is to be worn over other garments where as a foundation or inner
garment like a bra needs to be fitted like a second skin over the body. Ease added in a
pattern for both these garments would vary greatly.
The size that one belongs to depends on the bust and hip measurement. Someone with
abnormally large hip or bust in comparison to the other would need to pick up a size that
accommodates larger measurement and would have to alter the garment in the other
part. For example a women with 36" bust and 48" hip would need to buy either a size
which fits 48" hip or may select A-line, flared or tent silhouettes which accommodate the
girth of the hip.
Visit the market and check various womenswear brands what are the different sizes you can
identify. Try out garments in different styles and brands do you fit into same size of different
brands or is there a difference.
Activity
Fashion Studies
73
Visit the market and check various womens wear brands. Check the following:
i. What are the different sizes you can identify.
ii. Try out garments in different styles and brands. Does the same size of different
brands/labelsfit the same way or is there a difference?
Fill in the blanks
a. Standard measurements are ________ in a ________ chart.
b. Country that has the most elaborate _________ ____is ______.
c. Sizing systems are ___________ by the __________ or standardization organization for a
country.
d. The standard sizes for the country are established by _________a ________ cross section
of the__________.
e. In UK sizing system was established by ________ ______for the ________ Industry.
f. All garments manufacturers in UK market adhere to the___________.
g. The size is suffixed with S to denote _______and T for a ______ person.
h. Countries have different sizes and __________.
I. Two women with ________ hip girth can have a difference of ________ in their bust
measurement.
j. Generally_____ systems are based on _______ measurements for women.
Review Questions
1. What is a General Sizing System?
2. Who is responsible for developing the Sizing System?
2.3 TOOLS
2.3.1 Basic Equipment Required
All pines to pine fabric pieces together
Pin Cushion or Pin holder to keep
needles and pins in place.
Push pins to hold paper in place.
Fashion Studies
74
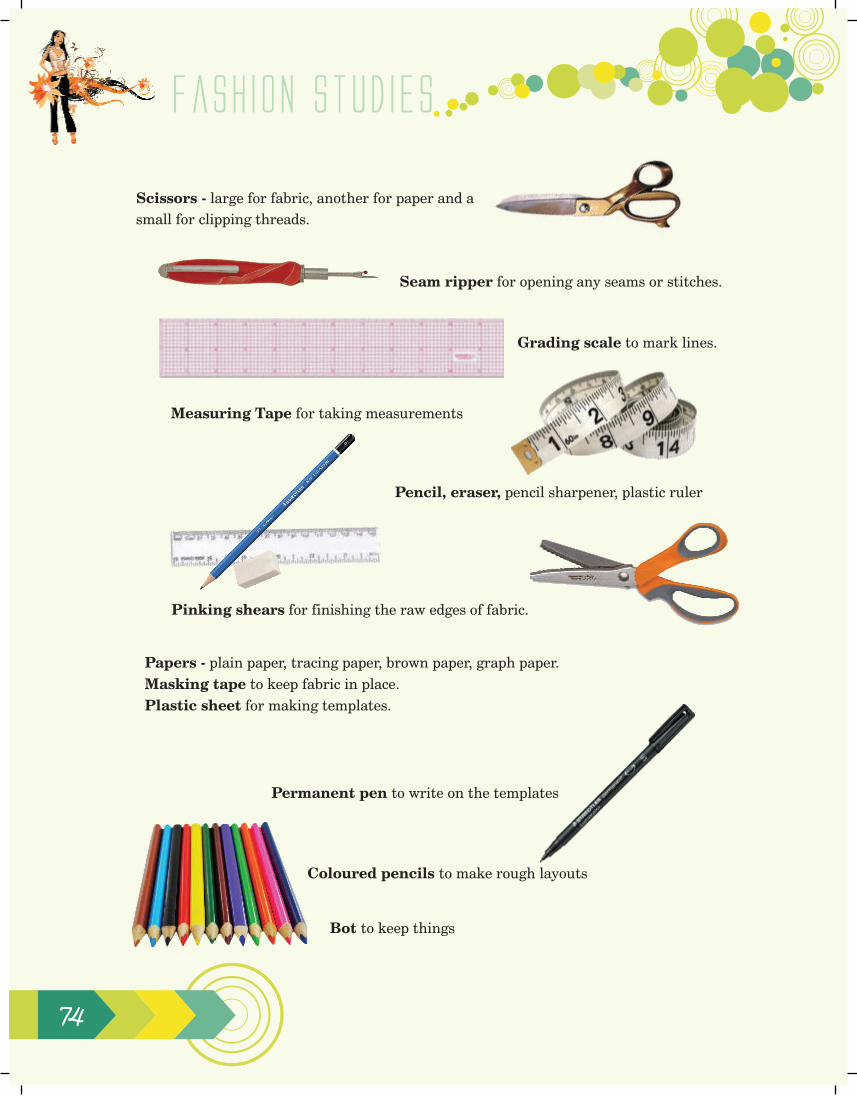
Scissors - large for fabric, another for paper and a
small for clipping threads.
Seam ripper for opening any seams or stitches.
Grading scale to mark lines.
Measuring Tape for taking measurements
Pencil, eraser, pencil sharpener, plastic ruler
Papers - plain paper, tracing paper, brown paper, graph paper.
Masking tape to keep fabric in place.
Plastic sheet for making templates.
Pinking shears for finishing the raw edges of fabric.
Permanent pen to write on the templates
Coloured pencils to make rough layouts
Bot to keep things
Fashion Studies
75
Activity
Visit the school library and refer to books on pattern making.
See the different kinds of pattern making tools you can identify.
Try to find the tools on internet also.
In your scrap book state uses of various tools
B
B
B
Steam iron to iron out wrinkles.
Awl to make holes in paper
Cutter for cutting paper
Tailors chalk for marking on fabric
Tracing paper for tracing
Tracing wheel for transferring the markings
Notcher to mark a paper
Styling tape for marking on dress form
Fashion Studies
76
Fill in the blanks
a. Grading ruler is used for drawing ________ ______ & _____ _____ in making a pattern.
b. The _________ curve is used for drawing the ________seam in a pattern.
c. _______ ___________is used for marking a seam line on a pattern.
d. The pattern is made on _________ paper and test fitted on ____________.
e. __________is used for marking notches on ______________.
Review Questions
1. Explain the use of French Curve as a Patternmaking tool
2. Explain the use of Tracing Wheel as a Patternmaking tool
Apparel fit is the relationship between the size and contour of garment and those of the
human body. A well fitted garment is a garment that hangs smoothly and evenly on the
body, with no pulls or distortion of the fabric, straight seams, pleasing proportions, no
gaping, no constriction of the body and adequate ease for movement. Hems are parallel to
the floor unless otherwise intended, and the garment armhole and crotch seam do not
constrict the body. It can be defined as a simple matter of length and width in each part of
the pattern is correct for the human figure.
Fit refers to how well a garment conforms to the three-dimensional human body. Good fit
is crucial to customer satisfaction. However, it is often easier to find clothes in the right
colours, prices and style that one likes, than a well-fitted garment. The effect of a
stunning design, gorgeous fabric and exquisite workmanship are minimized if the
finished garment does not fit well on the intended wearer. Fit problems may be caused
due to careless design, construction or may be the result of characteristics of an
individual's body. No two bodies are alike, and sometimes even the left and right halves of
the same body are not mirror images of each other.
New technology promises to overcome these problems; a new computer system can
optically measure an individual's body in three dimensions. This data is then converted
to a computerized, individual pattern, a man's suit designed by this method is ready to be
cut out and ready to sew within 7 minutes of receipt of the measurement data. The
resultant garments fit accurately as the computerized scanner detects subtle nuances in
the shape of the body that normal measurement systems are unable to read. These
2.4 Fit
2.4.1 Garment Fitting
Fashion Studies
77
systems are on the stage of trial; but they would be costly and would take a long time to be
readily available.
There are varying opinions on what comprises a good fit. Personal preferences regarding
fit are governed by current fashion trends, cultural influences, age, sex, figure type, and
lifestyle. The intended end use of the garment also affects the desired fit. For example, a
person needs more ease for active sportswear than for spectator sportswear like in a
tracksuit.
The relation between the size charts and body dimensions is not constant because of the
changes that occur in the human population. Recent body surveys in UK, US, China,
Germany and other countries proved that a garment sizing system for a certain body type
does not cover more than the 25 per cent of the population for which it is addressed.
Correct sizing is a prerequisite to good fit and customer satisfaction. Fit is a function of
sizing and it affects comfort, durability of a garment. Sizing is often over looked as an
important issue
Elements of Fit: The evaluation of Fit is based on five classical elements:
Grain: For a good fit the garment should be cut on the right grain or in other words on
grain. An on grain garment hangs evenly and appears symmetrical. If the garment is off-
grain, it will not hang straight. The garment and seam lines may twist or hang crooked
because the fabric on each half of the garment behaves differently. Deviation in the grain
line is a result of wrong cutting or stitching or even due to a poor posture of the wearer or
figure irregularities that may interfere with the grain of the garment as it hangs on the
body.
Set: This refers to a smooth fit without any undesirable wrinkles. Wrinkles caused by
poor set cannot be ironed out, but result from the way the garment fits the wearer. Set
wrinkles usually occur because the garment is too large or too small for the wearer and
the garment hangs or sags when worn.
Line: This refers to the alignment of the structural lines of the garment with the natural
lines of the body. Side seams of the garment should hang like a plumb line down the
centre of the side of the body. It should be perpendicular to the floor. Centre front and
centre back likewise should fall centre of the front and back of the body and be
perpendicular to the floor. Darts and seams such as shoulder seams should visually
appear to be straight lines that follow the body part they are intended to fit. Other seam
lines should be gradually curving lines like necklines, waistlines, hiplines and armholes.
Poor design or construction can result in an out of line garment. Even figure
irregularities can distort the lines of the garment.
Fashion Studies
78
Balance: This occurs when the garment is in equilibrium. The right and left side of the
garment appear evenly balanced or symmetrical, when viewed from front, back or side of
the garment. A skirt is balanced if the legs of the wearer are in the centre and are not
touching the front or back of the skirt. Balance relates to grain and line in the garment. A
garment is out of balance when it is cut off grain, causing it to hang unevenly. Also if the
line of the garment does not follow the line of the body, it will hang out of balance. Poor
posture or lack of symmetry in the wearer's body is another likely cause of it.
Ease: This refers to the amount of roominess in a garment. Ease is the difference
between the measurements of the body of the intended wearer and the measurements of
the garment. There are two kinds of ease:
Fitting ease
Design ease
Fit ease is in direct contact with the body and is responsible for the comfort factor and
design ease of the garment is for aesthetic appearance. A garment must contain adequate
ease beyond the actual measurements of the wearer, to allow room for ordinary
movements like walking, sitting, reaching out and even breathing. Ease in this context is
called Fitting ease. Design ease is the extra style fullness added to the fitting ease. All the
garments have fitting ease but design ease is optional as it is added purely for the sake of
appearance and giving the garment its style.
In evaluating the fit of the garment, all the sides of the garment must be examined. The
fitting should start from the top and move downwards. The analysis of fit is a complex
process and remains a challenge, for both industry and customers. Apparel fit is a
complex issue but of great importance for judging perfect clothing appearance, and the
various technologies used, such as a 3D simulated form, may lead to more efficient
decision making in the process of product development and quality control.
The following body parts should appear as:
Shoulders: The shoulders should appear smooth and feel comfortable. Seam should lie
on top of the shoulder. In regular styles the arm-scye seam should fall on edge of the
wearers shoulder. The shoulders of the garment should be wide enough so that the
sleeves hang smoothly. If the shoulders are too narrow, the sleeves will pull across the
upper arm and cause wrinkles. If fashion trends require the shoulders to be narrow or
wider the pattern still should allow sufficient movement. The shoulder slope of the
garment should match the shoulder slope of the wearer.
B
B
2.4.2 Evaluating fit
Fashion Studies
79
Bust/Chest: If the garment is too small, the seams or closures that are at the centre
front or back are going to pull and gape open. A larger bust or highly developed chest
often causes the button closure to gape open at centre front or back, also the garment
may ride up because the larger bust curves takes up more length. A well-fitted dart
always points towards the fullest part of the of the body curve it is intended to fit. The tip
of the dart should end about an inch before the fullest part of the curve. Darts that are too
short or darts that extend beyond the fullest part of the curve result in a bubble at the
dart tip. Darts occurring anywhere in the garment follow the same principle. The
practice of eliminating darts to speed construction creates diagonal wrinkles on the
bodice front.
Neckline: Necklines should be large enough to fit without pulling or chafing but not so
large that it doesn't lie flat against the body in front and back. The front of the basic
neckline should always be lower than that of the back.
Collar: The most important factor in the fit of the collar is the neck circumference. The
circumference of the collar should be at least 1/4th of an inch bigger than that of the
neckline or just large enough for one to insert two fingers between the neck and collar. A
properly fitted collar should be smooth and stays in place when the wearer moves. It
should not be so tight that it pulls. A tight collar is uncomfortable and makes the neck
look large. But neither should it be so loose that it gapes.
Armscye: The arm-scye must fit well for the garment to be comfortable and attractive.
The circumference of the (arm-scye) should be large enough so they do not pull at the
front and back of the garment, but not so large that it gapes. In a well-fitted arm-scye, the
base of the (arm-scye) is cut close to the armpit, but not so close that it bites into the
armpit. It should be cut about an inch below the armpit. This provides adequate comfort,
room for movement, and close fit without wrinkles in the - area. If the arm-scyeares too
tight they are usually denote comfort and uncomfortable. Arm-scye in the front should
be more deeply cut than at the back as most of the movements are in the front.
Sleeves: Well-fitting sleeves are attractive and comfortable. The circumference of the
basic sleeve should be loose enough so that it does not bind nor has wrinkles horizontally
around the arm. A tight sleeve apart from being uncomfortable makes normal arm
movements impossible. Sleeves can be as loose as one wants but the only problem would
be to wear the garment under a fitted jacket. A well-set jacket sleeve hangs with a slight
angle towards the front. The crosswise grain at the bicep should lie parallel to the floor.
Waistline: Fit is essential for comfort. The waistline of the garment should not be so
tight that it binds and rolls. It should have plenty of room for breathing and eating and it
should return to its position after the arms are raised or lowered. It should not be so loose
Fashion Studies
80
that it stands away from the body, droops, or adds bulk when a top or shirt is tucked in or
worn under another garment. The narrowest part of the garment should fall at the
wearer's waist. If there are buttons at the waist the garment should not pull or strain at
the closure. A jacket should be big enough at the waist so that a person can sit even when
it is buttoned.
Hips: The fit of the hip area is critical when fitting skirts or trousers. If there is adequate
room in the hip area other parts of the garment can easily be altered to fit. Garments with
enough room in the hip, thigh and abdomen area fit smoothly without pulling, wrinkling
or riding up. Pocket, pleats or vents that open up indicate that garment is tight in the hip
or abdomen area. If the garment has excess ease in hip or thigh area it will result in
vertical folds.
Crotch/seat: Trousers and other bifurcated garments require a well-fitted crotch for
comfort or durability. A properly fitted crotch does not cut or bind the wearer between
the legs and conforms to the shape of the buttocks. There should be slight but not
excessive ease in the crotch area. Crotch length generally has one inch of ease in the
crotch area. The back of the crotch seam should be longer and more deeply curved than
the front as the backside of the buttocks are more curved than the front. Bigger sizes
require longer and deeper curved crotch lengths at the back. Diagonal wrinkles radiating
from the crotch area are the result of, crotch curve not long enough to accommodate the
size of the buttocks. Diagonal wrinkles in the front may also be due to the wearer's big
abdomen. Wrinkles emanating upward from the crotch area indicate a too tight and high
crotch, resulting in chafing and discomfort. Wrinkles emanating downwards from the
crotch area indicate a low and loose crotch; it bags and sags, restricts walking and has
increased probability of ripping from strain of movement. If the rise needs to be
lengthened or shortened, the waistband should also be raised or lowered. Rise should not
be lengthened or shortened in the crotch length as the same may lead to problems where
none existed.
Another important rule of the fitting apart from knowing how to fit, is when not to fit.
Clothes must not only fit but need to flatter as well. There is absolutely no need to fit a
garment so close to the body that it looks too tight. The real expertise lies in the fact that
one is able to strike a balance between the lines of the design and the lines of the figure.
The ability to do this is a skill that one learns by training the eye to see and judge as to
what flatters the body.
Fitting is like sculpturing it creates a three dimension form. Another question that is
frequently asked is how many times one should fit. The answer to this is as many times as
it takes to fit well.
Fashion Studies
81
2.4.3 Need to fit
Mathematical calculations and pattern corrections alone cannot guarantee the fine fit of
the garment. They can only provide an approximation of the needs of the figure. The
other points to be considered are:
The style of the garment whether it suits oneself or not.
The necessary and sufficient ease in the garment.
The posture and the individual shape of the wearer.
These can truly be evaluated only on a fabric test fit, since only minor changes can be
made once the garment has been cut on the fabric. Hence a test fit can save lot of wastage.
There are times when test fit is not necessary, those are when one is sure of the style,
knows from experience how to adjust the pattern, has sufficient material to re-cut if
necessary and has sufficient seam allowances to borrow in emergencies. But if one has
any doubts whatsoever, then test fitting is a must.
Commonly used test material is muslin, bleached or unbleached should be used in a
similar weight to that of the final fabric. Any other solid coloured, plain weave fabric like
poplin in a similar weight to final fabric would do. A plain surface is recommended as this
clearly shows all seams, darts and other style details. Layout the pattern cut and mark
your test fit fabric with equal amount of care as you would your final garment fabric.
Put the trial muslin together. The quickest way to get the effect of the finished garment
without actual stitching is to overlap and pin all the seams lines. Pinning gives the same
result and information, that one wants without going to the machine. It is so much faster
and easier to unpin and then re-pin than to rip stitching and re-stitching.
Pins should be placed at right angle to the seam line, as in this method there is least
amount of strain or pull on the seam, and it does not gape. While test-fitting trousers
remember to baste stitch the crotch seam instead of pinning.
Check the test fit muslin and make corrections till completely satisfied. Mark all the
corrections and the same should be transferred on the pattern for it is the paper pattern
that one should use to cut the final fabric and not the test fit muslin. Mark new notches as
the old ones may not hold good after the alterations. Check the lengths of two matching
seams to ensure that the alterations have not created more problems, e.g. if you have
corrected the dart intake of side seam dart in the front, check to ensure that both the side
seams are still equal and if required make the necessary changes.
B
B
B
Fashion Studies
82
2.4.4 Methods of fit
There are two kinds of fitting:
One is the first test fit that is done on muslin at the time when the pattern is made. A
basic test fit is done to check the pattern fitting; the pattern is cut with relevant seam
allowances and pinned in place for test fitting. Make sure that seams and darts are in
place. This fitting is always done from the right side of the garment, as it is easier to make
changes and corrections. These corrections become the new seam lines for the garment.
Check the garment for ease and fullness. It is important to mark buttons and
buttonholes at right places in this fit.
The second is after the garment has been stitched before final finishing. Stitch the
garment with relevant interfacing/ or underlining in place. Press it well and test fit to
check the position of darts, seams, puckers if any and locate the position of outer seams.
This type of fitting refines and perfects the fit of the garment.
Other times when refitting becomes necessary are if the garment has been purchased
readymade from the market. Some alterations may be required for it to be fitted to an
individuals size. If there are changes in the body size, for instance if some one has grown
thin or has put on weight or if a child has gained height, refitting may become necessary.
The methods by which each pattern seam or area is to be corrected and altered depends
on the type of problems and nature of the fitting defect.
Check your own wardrobe. What are the various fit issues you can identify? Try out
garments and see if you can identify methods of correcting fit.
Fill in the blanks
a. Fitting is like ____________it creates a _____ form.
b. Five elements of fit are _________, ________, ________, _________& __________.
c. Ease is of _____ kinds, i.e. _______ & _________ ease.
d. ____________ occurs when _________ is in equilibrium.
e. The garment is called _______ grain if it is not cut on the ________ grain of the fabric and
it would not _______ well.
f. The side seam of the garment should ____________ straight on the _______ of the ______
_______ .
Activity – 1
Activity – 2
Fashion Studies
83
g. There are ________ methods of evaluating the ____ of the garment.
h. Pins should be placed ______ to the ____ line, as there is _______ _______ of strain or pull
on the ________.
I. Check the ______ muslin and make corrections till ______ satisfied, ______ all the
__________corrections and ________ on the pattern.
j. _______ pulls in a garment indicate that the garment is __________ and _______ folds
indicate that it is _________.
Review Questions
1. Define Fit and identify elements of Fit
2. Differentiate between Test Fit and Garment Fit.
To develop pattern for basic Bodice for women wear use measurements from the given
chart or measure a dress form or a body. Take a paper, whose length is centre front length
plus 3" and width is half of the bust width plus 4". Fold the paper lengthwise and with fold
on the left hand side (away from you) mark a guideline 1" down from the top edge, mark A
as illustrated.
A to B = front length
A to C = B to D = front width (+1/2"ease to be added
if measured on dress form/body)
Join C to D
Mark D to E = centre front length
CE is front neck depth.
For neck width mark
CF = CE-1/8"
Square out lines from E &F.
Draw the neckline curveas illustrated,
using a French curve.
G = mid point of DE
GH = apex measurement
2.5 Pattern Development
2.5.1 Basic Bodice
Fashion Studies
84
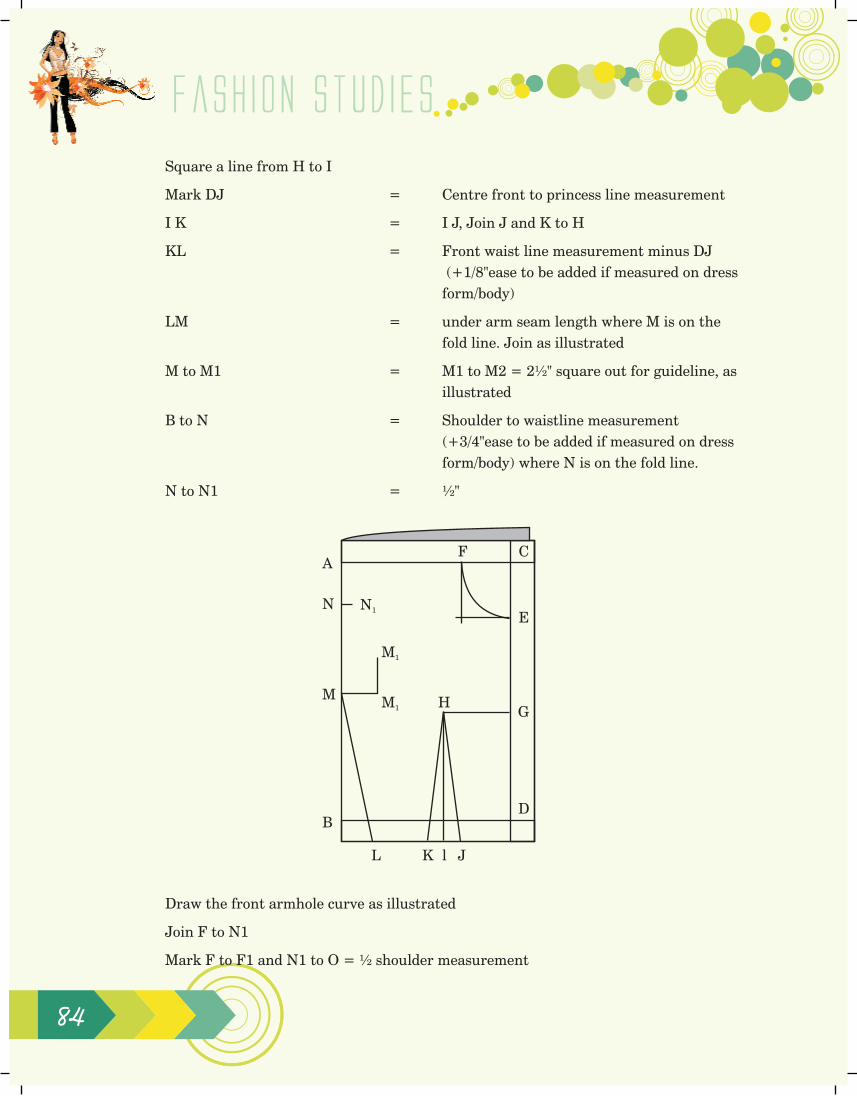
Square a line from H to I
Mark DJ = Centre front to princess line measurement
I K = I J, Join J and K to H
KL = Front waist line measurement minus DJ
(+1/8"ease to be added if measured on dress
form/body)
LM = under arm seam length where M is on the
fold line. Join as illustrated
M to M1 = M1 to M2 = 2½" square out for guideline, as
illustrated
B to N = Shoulder to waistline measurement
(+3/4"ease to be added if measured on dress
form/body) where N is on the fold line.
N to N1 = ½"
Draw the front armhole curve as illustrated
Join F to N1
Mark F to F1 and N1 to O = ½ shoulder measurement
A
N
M
B
F C
EN1
M1
M1 HG
D
L K l J
Fashion Studies
85
Join F1 to H and O to H.
Trace BD line, L M line and M M1 line on the other half of the paper.
Extend M M1 line on the second half of the paper.
Mark B to Z = Back width (+1/2"ease to be added if measured on dress
form/body)
Z to Y = Centre Back Length
Y to X = C F
X to W = 7/8", draw the back neck line curve as illustrated.
Measures Z to L1 and from this measurement subtract back waistline measurement
(+1/8"ease to be added if measured on dress form/body).The difference is dart
intake at U.
Z to U = Centre back to princess line measurement.
Mark U to V = Dart intake, T is mid point of U and V
Square out from T to S, Join S to U and V.
Mark Y R = ¼ Centre back length
R Q = Back shoulder blade measurement.
QQ1 = Draw 1" guideline, as illustrated.
A
N
M
B
F C
EN1
M1
M1
H G
D
L K l J
O
F1
Fashion Studies
86
Join W to N1 in front
W to P = ½ shoulder + 1/8”
P to P1 = ¾"
P1 to P2 = W to P (½ shoulder + 1/8")
Joint P to S.
Join P1 to P3 such that P3 is 1"above the shoulder blade line (RQ).
Draw the armhole as illustrated.
Y
R
Z
W
X
Q
Q1
SM
B
T
U V L1
Y
R
Z
T L1 B L K I J
U V
D
G
E
CFF1
H
S
P3
X
W P P1 P2 N1
Q
M1
M2
O
Fashion Studies
87
Truing or correcting the lines or darts to conform to body shape or aligning the dart legs
and seams.
Front shoulder
Fold the shoulder dart at the apex, matching the two dart legs keeping the folded edge
towards the neckline. Join the neck edge with the armhole edge with the straight line at
the dart ends. Use a tracing wheel to trace out the folded edge.
Back shoulder
Fold the shoulder dart matching the two dart legs keeping the folded edge towards the
neckline. Draw the shoulder line with the help of the French curve as illustrated,
dropping 1/8" on the armhole edge.
H
Fashion Studies
88
Waist line
Fold both the waist line darts (by matching the dart legs) and also close the side seam,
keeping the pattern folded at the apex line. True the waist with help of a french curve,
blending the waist line darts and side seam. The side seam should be dropped ¼" at the
side seam, as illustrated.
For a sleeveless bodice trace the basic bodice block is used. Change the armhole as
follows:
Go up ½" on the armhole level i.e. E and F and redraw the curves, as illustrated.
2.5.2 Sleeveless bodice
S H
M
C
½"
LA
J
DE
IH
OMF
P
G B
G' B'
Fashion Studies
89
Activity
Collect pictures of garments which have been made using a basic bodice block. How many
have two darts and how many are without any dart? Maintain this information in your scrap
book.
Fill in the blanks
a. The waist of the bodice is ________ by closing _____ darts and then a ________ is drawn
using a French curve.
b. The back shoulder line is drawn with help of ________ _______ by dropping _____ on the
_____ line.
c. The apex is marked at _____ of _______ ________.
d. Waist dart at the back is calculated by ________ the _______ _________ measurement from
_______ _________.
e. Front waist dart is obtained by _________ out a line from _____ to ______ and the distance
between this point and center front to _______ is half of the dart.
f. For sleeveless garment go ½"_______ on the _____________ level.
There are number of variation in necklines that are possible to make once the basic block
has been drafted.
The measurement required for any neckline is the depth of the neck measured from the
nape of the neck point to the center front diagonally. (Neckline measurement A)
2.6 Neckline
2.6.1 Neckline & its variations
Neckline measurement A Neckline measurement B
Fashion Studies
90
In case of necklines like square, glass neck, sweet heart measure in a straight line on the
body for the length and for the width of the neckline at that point to the center front is
also measured. (Neckline measurement B)
Points to be kept in mind for Necklines
1. If a neckline is made wider in the front, the same needs to be done for the back.
2. Try avoiding deeper neckline for both front and back at the same time. In case one
decides to keep the neckline deeper in both front and back then an ease of about ½"
needs to be taken out on the centre front neck.
3. The measurement which is taken diagonally should be marked diagonally on the
pattern and a measurement taken straight should be marked straight.
4. For curved neckline, always square out ¼" either side at center back and center
front and on shoulder level.
V-Neck Broad V Round
U Square Glass
Sweet Heart Sweet Heart Variation
Fashion Studies
91
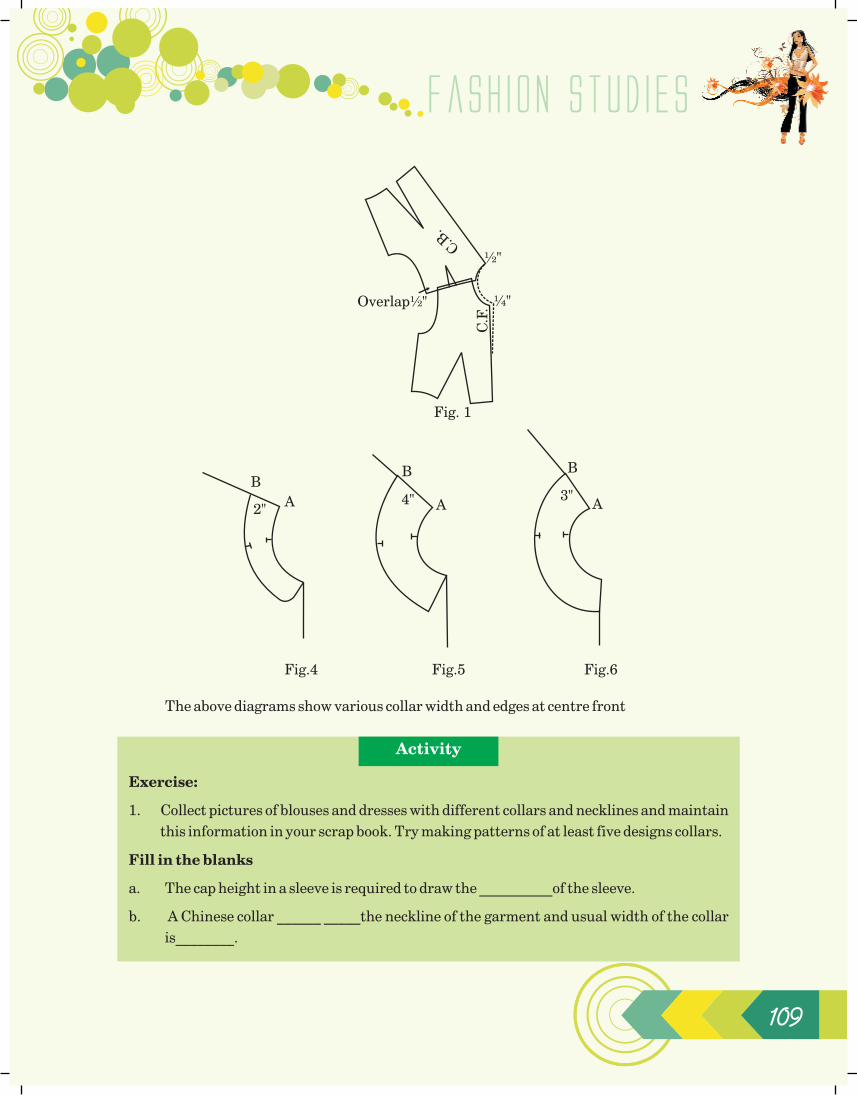
V-Neckline
Trace the neckline of bodice block with dotted line as illustrated.
Extend the centre front line up to A.
From point A square out lines so that they touch the shoulder and neckline intersection
at B.
From B, mark BC = 7" down or as required diagonally.
BC is the new V neckline join with a slight curve.
Broad V-Neckline
In case, one needs a wider neckline mark BB' =1" or as desired and join B'C for front neck
with a slight curve.
If you want a deeper neck at the back mark BB' = 1 or as desired and draw B'C' as the new
back neck.
The neckline can be finished with either piping or facing.
U- Neckline
Trace the neckline of bodice block with dotted line as illustrated.
Mark the points AB as for V neckline.
From B measure diagonally down for the neck depth at centre front as required and mark
it as C.
B A
C
B A
C
B A
C
B'
B A
B'
Fashion Studies
92
From point C square out ¼".
From point B square down ¼". Join BC for a U neck as illustrated.
Finish the neckline as desired.
Round Neckline
Round neck is a variation of U neck. It is cut wider at the shoulder and deeper at the
back.
Trace the front or back neck of the bodice as illustrated.
Mark the points AB as for V neckline.
For the front neckline, from B measure the neck depth as required and mark it as C.
From point B go out 2" or as desired to B'.
For the back neckline, from A mark C as desired for the neck depth. B B' is same as front.
Square ¼" down from B' and square ¼" in from C.
Join B'C for the round back and front neckline as illustrated. Finish the neckline as
desired.
Square Neckline
Trace the neckline of bodice block with dotted line as illustrated.
Mark the points AB as for V neckline.
Square down from B to D as the side depth of the neck required or 5½". Square out from D
to C on the center front.
B A
C
B A
C
B'
AB
C'B'
Fashion Studies
93
This is a basic square neck.
Finish the neckline as desired.
The neck can be widened as in the round neck.
If one feels that neckline is too wide, reduce CD as shown.
CD should be taken as ½ of the neckline width desired.
Glass Neckline
Trace the neckline of bodice block with dotted line as illustrated.
Mark the points AB as for V neckline.
Square out 1" or as desired from C to D.
Join BD and DC with a straight line for the Glass neckline.
Finish the neckline as desired.
Sweet Heart Neckline
Trace the neckline of bodice block with dotted line as illustrated.
Mark the points AB as for V neckline.
From point B square down to D for the side depth of the neck required or 5".
Mark E on centre front, where CE = 3½" or as desired.
Join BD and DE with straight lines, for basic sweet heart neck.
AB
CD
AB
DC
AB
DC
Fashion Studies
94
Variation of Sweet Heart Neckline
Square a line at D about 1" on either side as shown.
Join BD' and D'E with curved lines for a curved variation.
Piping is a bias strip of fabric 1¼" wide and is attached to the neckline on the seam line
after stretching. The piping is finished either by hemming or machine stitch. It is
finished to about 1/8" - 1/4" wide ready on the right side of the garment. It is a popular
finish for blouses and other Indian garments.
Facings are of two kinds - bias facing and shaped facing.
Bias facing is a similar strip of fabric like piping but is attached to the neckline without
stretching. The same is finished completely on the wrong side.
Shaped facing - A shaped facing is cut following the shape of the neckline and is
attached on the right side and then is completely turned in. The width of this facing
varies for each design but is generally 1½" wide.
Collect pictures of various necklines and maintain this information in your scrap book. Try
making patterns of these necklines.
Draft a Sweetheart Neckline
Fill in the blanks
a. To ensure that the neckline doesn't end in a point go out _____ on _______ ____________
of the bodice.
b. While making a neckline deep in front it is ________ not to make the neckline _____ and
________at back.
2.6.2 Finishing of neckline
Activity
Activity
B A
DC
D
C
B A
Fashion Studies
95
c. A _______neckline is drawn using a French curve.
d. The __________ facing is cut keeping the pattern of the _________ of the desired piece.
e. The measurement required for any neckline is the depth of the neck measured from the
______ of the _____ point to the center front of the ____________.
Review Questions
1. What are the measurements required to draft a neckline?
2. What are the different necklines that can be finished with Bias Facing?
Dart manipulation is a useful and interesting tool for pattern maker for creating
interesting, innovative dart placements and style lines. The change in the position of the
darts creates interest in the garments in different dart positions. The same can be
magnified by using similar technology on striped fabric where a dart gives a new
dimension to the striped pattern. The darts can be stitched as new darts, as style lines,
can be converted into tucks, pleats, gathers, yokes, etc. The basic fit of the garment is not
altered by these manipulations.
2.7 Dart Manipulation
2.7.1 Introduction
1. Waistline Dart
2. Shoulder Dart
3. Neck Dart
4. Neckline and C.F. Intersection C
5. C.F. Dart
6. C.F. Dart
7. C.F. Dart
8. C.F. Waistline intersection Dart
9. French Dart
10. Side Seam Dart
11. Side Seam Dart
12. Armhole Dart
13. Flange
2
3
4
5
6
7
81
9
11
10
12
13
Fashion Studies
96
There are two methods of dart manipulation
1. Pivot Method
2. Slash and spread method
Pivot Method
In the pivot method, the dart is pivoted on apex and dart is closed and pattern/sloper
opens on new desired line, the pattern itself spreads on the new position, to create the
new design.
In the slash and spread method, as the name implies the pattern/sloper is slashed or cut
on the desired line and as the old dart or excess is closed, the pattern itself spreads on the
new position, to create the new design. Some of the new dart positions are illustrated
here.
Shoulder dart to waist
Take two dart basic block, slash the new dart position i.e. the waist dart. Fold and close
the shoulder dart. Trace the new pattern on separate sheet.
2.7.2 Slash and Spread Method
Design Basic Block
Step - 1Step - 2
Fashion Studies
97
Waist dart to centre front
Take one dart bodice block. Slash the new dart position, close the old dart. Trace the
pattern on separate sheet.
Shoulder dart to armhole side seam intersection
Take two darted basic bodice block. Slash the new dart position, close the old dart.
Trace the pattern on separate sheet. Shoulder dart to armhole side seam intersection?
Design One Dart Block
Step-1 Step-2 Step-3
Design Basic Block
Step-1 Step-2 Step-3
Fashion Studies
98
Darts into a Princess line
Take a one dart sloper. Shift the dart away from the princess line desired. Draw the
princess line as required. Mark the notches and grainline on both the pieces as
illustrated. Slash on the princess line and close the dart. Trace the patterns on another
sheet of paper. Ensure that the notches are transferred on the final pattern.
Fill in the blanks
a. Dart manipulation is _________ _________ for pattern maker to create ____________
and ___________ designs for ___________ ___________.
b. A Dart is named after the __________________ it __________________.
c. A waist dart is a dart that starts from ____________ _________________.
d. Two methods of dart manipulation are _____________ & _____________.
e. In this method the old dart is ___________ and its suppression folded and the new dart
position is _________ and opened.
Review Questions
1. What is Dart Manipulation? Why is it important?
2. What are the different methods of Dart Manipulation?
Activity
Design
Step-1 Step-2
One Dart Block
Step-3
Fashion Studies
99
2.8 Skirt
2.8.1 Basic Skirt
To develop patterns for the basic skirt for women wear, use measurements from the given
chart or measure a dress form or a body. Take a paper, whose length is the desired length
of the skirt plus 3" and width is half of the hip plus 4".
Make a block A B C D E F, where
A to B = back hip (+1/4"ease to be added if measured on dress
form/body)
B to C = front hip (+1/4"ease to be added if measured on dress
form/body)
A to D and C to F = Desired length, e.g. 21".
A to G = C to H = 7", hip level
Joint G to H. Mark I at side seam
B to B1 and B to B2 = ¾”
Mark I1, 2" above I.
Passing through B2 and B1, join I1 J and I1 K extending it 3/8" above the waistline, as
illustrated using hip curve.
A to A1 = ¼”
Join J to C, K to A1 as illustrated, using the hip curve ruler.
Measure J to C, K to A1 and note the measurement on paper, from this measurement
subtract the front and back waistline measurement respectively. The difference is the
dart intake for both front and back.
Fashion Studies
100
Divide this excess into two darts for both front and back.
Draw a guide line parallel to the waist line at adistance of 3½" for front and 5 ½" for the
back,
Mark C to L = Centre front to princessline measurement
L to L1 = 1st dart (½ of the total dart intake for front)
L2 is midpoint of L, L1.
L1 to M = 1 ½"
M M1, = 2nd dart (½ of the total dart intake)
Mark A1 N = Centre back to princessline measurement
N to N1 = 1st dart (½ of the total dart intake for the back)
N1 O = 1 ½"
O to O1 = 2nd dart (½ of the total dart intake
)Find the midpoint of all the darts and draw a perpendicular line till the guideline. Join
these points to the dart point to form the dart legs.
BACK FRONTC.
F.
C.
B.
A1A N N1 B1 B2
1M M
I
1I
1 L2 L L
K B JO O1 C
G H
D E F
Fashion Studies
101
2.8.2 One dart basic skirt
Trueing
Fold the dart at vanishing point and true the waistline as illustrated raising the waistline
by ¼" -½" (when you true the waistline with the help of French curve it automatically
goes up) at the side seams. Drop back waist line by 1/8" at centre back.
Use a basic skirt sloper that has two darts. Measure the dart towards the side seam and
add the measurement to the 1st dart i.e. towards the centre front or back and eliminate
the 2nd dart. Note that the length of new waistline dart in the front is 5 ½"same as the
back dart length. Find the mid point of the new dart and mark the centre and true the
waistline. This method is called measurement method and can only be used in
skirts/trousers, as there is no apex in lower half of the body.
C.F
C.B
Fig.1
C.
B.
C.
F.Back Front
C.
B.Back
C.
B.Back
Fig.2 (a) Fig.3 (a)
Fashion Studies
102
2.8.3 A-Line skirt
Take a one dart skirt sloper, draw a slash line as illustrated (fig.2). Slash the line and close
a part of the waist dart, so that the ease is shifted to the hem. Add 1" - 1 ½" on the side
seam at hem line for A-line shape in the skirt as illustrated. Blend till the hip level for
both front and back and also blend the hem line.
C.
F.Front
Fig. 2(b) Fig. 3(b)
C.
F.Front
C.
B.Back
C.
F.Front
Fig. 4
One Dart Basic Skirt
A-Line Skirt
Back
Fig. 3
Back Front
C.
B.
Fig. 4
C.
F.
1 2
1½"
C.
B. BackC.
F.Front
Fig. 1
1Back
2
Fig. 2
Fashion Studies
103
2.8.4 Flared skirt
Take a two dart basic skirt sloper, draw the slash lines as illustrated (fig. 2). Slash on the
line and close the darts. Add 1½" -2" on the side seam blending the same at the hip level
(fig. 3)
Balancing the hem
As the lengths and width of the front and back dart are different, the hem of the front and
back skirt after closing the darts would also be different. Measure the difference between
the two at the hem. Subtract half of the difference from the larger side and add half of the
difference to the smaller side to match the hemlines, as an unbalanced hemline would
make the skirt swing forward or backwards, towards the side that is smaller. This method
is necessary for a professional pattern.
C.
B.
C.
F.C.
B.
C.
F.
1 2 3 3 2 1
Fig. 1 Fig. 2
Fig. 3
1 2 3
C.B
. /
C.F
.
1½"
Fig. 4Flared Skirt
New
Lin
e
C.B
. /
C.F
.
Fashion Studies
104
Collect pictures of skirts with different hemlines and maintain this information in your scrap
book.
Fill in the blanks
a. Balancing the hem of a flared skirt is required due to _________ and ___________ in the
pattern.
b. A-line skirt has ________ fullness added to the _____ ______ of the skirt.
c. A single dart skirt is made by combining the _______ of the _____ dart skirt.
d. The length of the dart in the front in a single dart skirt pattern _______is in a two dart
skirt pattern is __________________
e. The difference in ________ of dart in a single and two dart skirts is because if a dart is
________and bigger it will result in a __________________ at the dart point.
Review Questions
1. What is Balancing?
2. How do you balance a skirt hemline?
To develop a pattern for a basic sleeve for women wear, use measurements from the given
chart. Take a paper, whose length is the desired length of the sleeve plus 3" and width is
half of the bicep plus 2" Fold it lengthwise and place there paper with its fold towards you.
Mark a guide line 1" away from the edge and label A.
A to B = Cap height
A to C = Full length
B to D = ½ bicep circumference
B to E = ½ BC-1½”
E to F = ½ elbow circumference (that includes ease of ½" minimum)
Activity
2.9 Sleeve
2.9.1 Sleeve Block
Fashion Studies
105
Join D to F extending to a line squared from C.
Extend D to G
Find mid point of B D line and A G by folding the paper lengthwise.
On this line mark H to I = ½ cap height + ¾"
Mark A to A1 = ¼" and D to D1=1"
Join A1 to I and I to D1 with dotted lines.
Draw the armhole curve with the help of French curve keeping the guide line in
perspective as illustrated in the diagram.
Trace all the lines for front sleeves on the other side of paper. Open the paper.
ABC
D
E
FG
HI
1"
1D
GD1D
H
B A
A1
A
J
D B L
M
K
Fashion Studies
106
Find the mid point of A to B by folding the paper and draw the line JK.
Find the mid point M of KL line and on M go in ¼". Redraw the front curve as illustrated.
Mark the notches
For front mark one notch = ½" below point K.
For back mark two notches, one at ½" below J and next ½" away from the first notch.
Exercise
1. Collect pictures of sleeves and its variations and maintain this information in your scrap
book. Try naming these sleeves.
The Collar is an added feature onto the neckline and it frames the face. It is one of the
most important details of the garment as it draws maximum attention. There are three
kinds of collars
Activity
2.10 Collar
2.10.1Principles of Collar Development
J K
SLEEVE
SIZE#34
BACK FRONT
FINISHED PATTERN
Fashion Studies
107
B
B
B
B
B
B
B
Stand collar
Flat collar
Roll collar
Stand collar stands around the neck, like Chinese or mandarin. These are cut after
measuring the neck edge of the pattern.
Flat collar lies nearly flat on the shoulder, like Peter Pan and is cut by tracing around the
neck edge of the basic bodice.
Roll collar is the variation of stand and fall collars where the collar stands around the
neck and then rolls over to frame the face, like a turtle neck.
Collars are always cut double. The collar that comes on the top is called Top collar and the
collar that comes under it is called Under collar. The Under collar is always cut smaller,
instructions are given later in the chapter.
Neckline Edge - the edge of the collar that is stitched to the neckline.
Collar Edge - the outer edge of the collar also called leaf edge.
Collar Stand - the part of the collar that stands especially at the center back.
Roll Line - the line of the collar on which the collar folds or rolls.
Measurements needed:
Back neck - measure center back to shoulder at the neck edge.
Front neck - measure center front to shoulder at the neck edge.
A-B = 1½" is the collar stand
B-C = back neck
C-D = front neck
D-E = ½".
Stand collar
Flat collar
Roll collar
Terminology for collars
2.10.2 Mandarin collar
Fashion Studies
108
Draw a curved line from E to C
Square 1½" line at right angles to the curved line at E. Mark it as F.
Draw a line from A to F parallel to neck edge.
Trace back pattern. Place front pattern on traced copy touching the neckline and over
lapping the shoulder tips 2 inch for a roll of ¼".
This overlap can vary depending upon the roll desired. Lower the back and front neck by
desired amount as illustrated
Redraw the neckline and copy again along with part of the center lines.
A-B = desired collar width,
Draw a line starting from the centre back till centre front as shown in diagram. Shape the
front as desired.
2.10.3 Peter Pan collar
A
B C D
1½"
Neck Edge
Fig. 1
B C D
Fig. 2
A
½"
B C D
E
1½"
E
FCollar Edge
Fig. 3
On
Fold
A
On
Fold
Rounded Edge Collar
Overlapr
Fig. 1
C.F
.
C.B.
½"
¼"
C.B.
C.F
.Overlapr
Fig. 2
¼"
½"
Fashion Studies
109
The above diagrams show various collar width and edges at centre front
Exercise:
1. Collect pictures of blouses and dresses with different collars and necklines and maintain
this information in your scrap book. Try making patterns of at least five designs collars.
Fill in the blanks
a. The cap height in a sleeve is required to draw the __________of the sleeve.
b. A Chinese collar ______ _____the neckline of the garment and usual width of the collar
is________.
Activity
Overlap½"
Fig. 1
C.F
.
C.B.
½"
¼"
B
A2"
Fig.4
B
A4"
Fig.5 Fig.6
3"
B
A
Fashion Studies
110
c. Peter Pan collar ________ at the shoulder. This is achieved by overlapping __________ &
_____________ shoulder by at least ______.
d. Outer edge of the collar is called _______ edge or _______edge.
Review Questions
1. How is the Neckline Edge different from a Collar Edge?