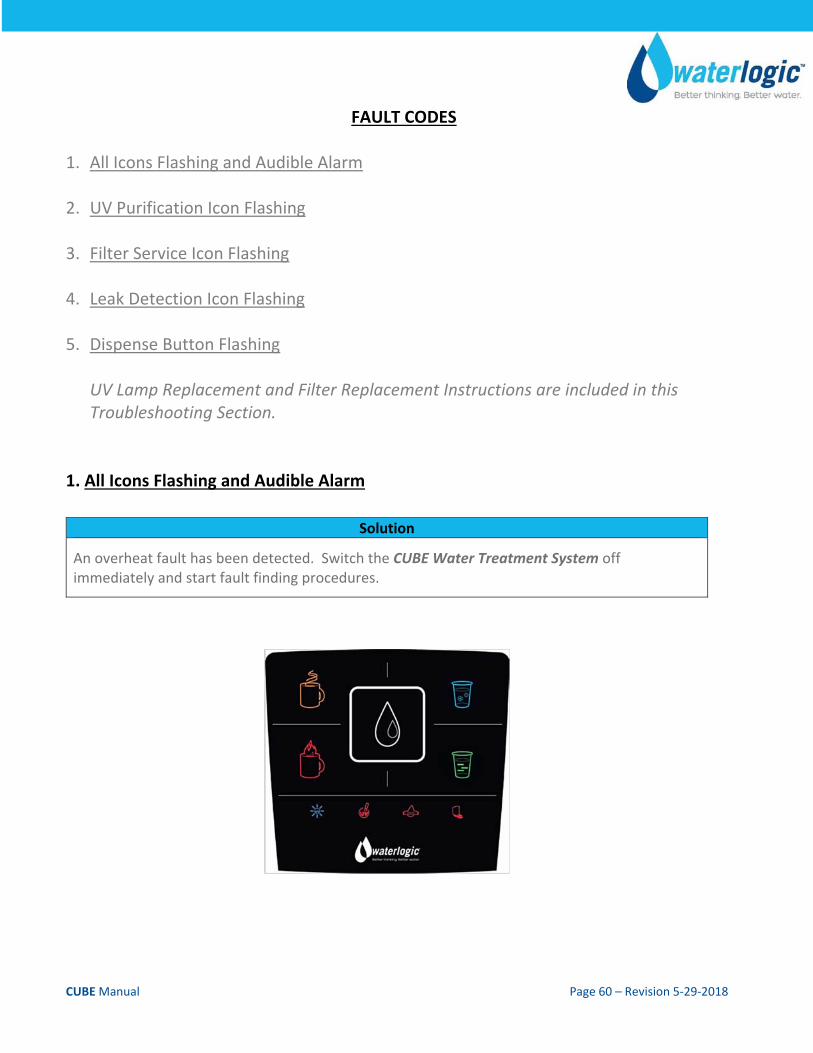
CUBE Manual Page 60 – Revision 5‐29‐2018 FAULT CODES 1. All Icons Flashing and Audible Alarm 2. UV Purification Icon Flashing 3. Filter Service Icon Flashing 4. Leak Detection Icon Flashing 5. Dispense Button Flashing UV Lamp Replacement and Filter Replacement Instructions are included in this Troubleshooting Section. 1. All Icons Flashing and Audible Alarm Solution An overheat fault has been detected. Switch the CUBE Water Treatment System off immediately and start fault finding procedures.
Transcript
CUBE Manual Page 60 – Revision 5‐29‐2018
FAULT CODES
1. All Icons Flashing and Audible Alarm 2. UV Purification Icon Flashing 3. Filter Service Icon Flashing 4. Leak Detection Icon Flashing
5. Dispense Button Flashing
UV Lamp Replacement and Filter Replacement Instructions are included in this Troubleshooting Section.
1. All Icons Flashing and Audible Alarm
Solution
An overheat fault has been detected. Switch the CUBE Water Treatment System off immediately and start fault finding procedures.
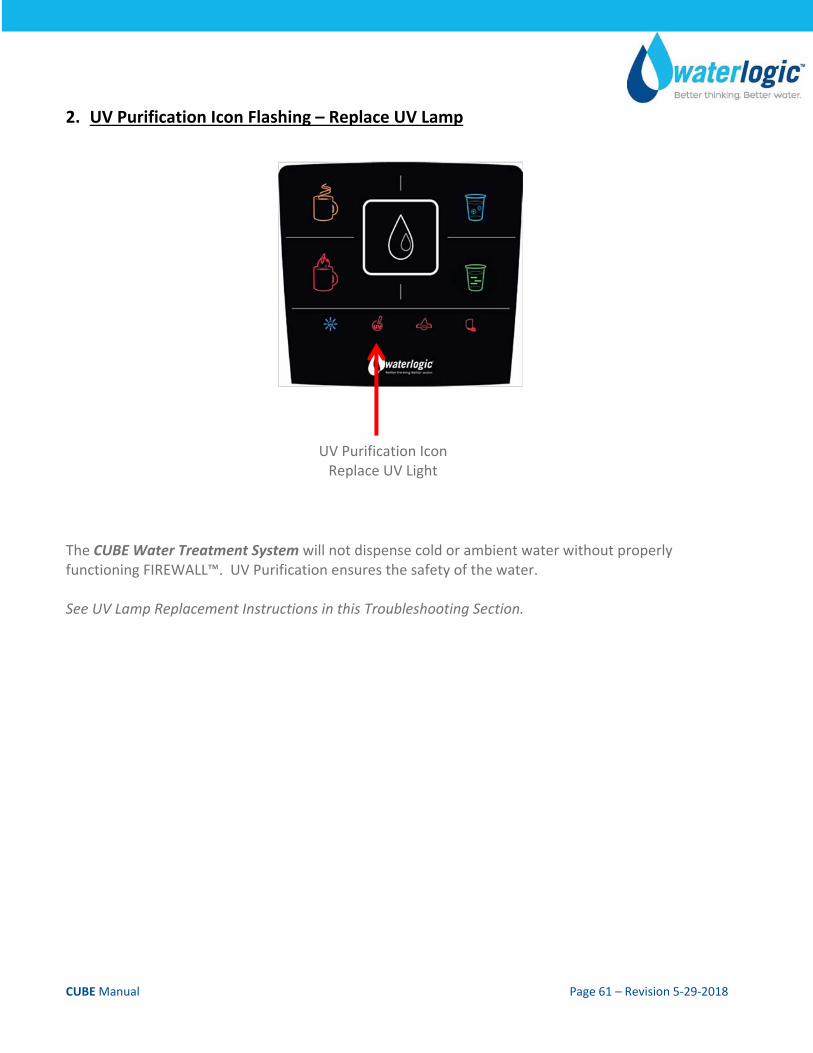
The CUBE Water Treatment System will not dispense cold or ambient water without properly functioning FIREWALL™. UV Purification ensures the safety of the water. See UV Lamp Replacement Instructions in this Troubleshooting Section.
UV Purification Icon Replace UV Light
CUBE Manual Page 62 – Revision 5‐29‐2018
3. Filter Service Icon Flashing
Solution Change filter. See Filter Replacement Instructions in this Troubleshooting Section
Reset Filter Service Timer. Reset by selecting the Hot and Cold icons simultaneously and holding them for 10 seconds. The CUBE Water Treatment System will beep and the filter service indicator light will turn off once reset is complete
Reset Filter Service Timer. Reset by selecting the hot and cold icons simultaneously and holding them for 10 seconds. The unit will beep and the filter service indicator light will turn off once reset is complete.
Filter Timer is enabled and has reached the designated service schedule (3, 6, or 12 months). Audible alarm will sound for 15 seconds and Filter Service Light will flash until reset. Water will continue to dispense unless filter is completely fouled and restricts output.
HOT COLD
Hold simultaneously for ten seconds
CUBE Manual Page 63 – Revision 5‐29‐2018
4. Leak Detection Icon Flashing
Most leaks will be detected by either the internal leak detection system that will trigger an alarm, or will trip the Waterlogic block located in the installation kit.
Solution
1. Turn off both the Green Heater/Compressor Switch and Red Power Switch. O = OFF
2. Unplug unit.
3. Remove Top Cover.
4. Remove Right Side Panel (Left Side Panel if standing behind unit).
5. Dry inside of the CUBE.
6. Replace Top Cover (leave Side Panel off).
7. Connect power cord.
8. Turn on Red Power Switch I = ON
9. Dispense water and check for leak.
10. Once leak is located, correct issue.
11. Remove Top Cover.
12. Replace Side Panel.
13. Replace Top Cover.
14. Turn on Green Heater/Compressor Switch. I = ON
Leak Detection Indicator
CUBE Manual Page 64 – Revision 5‐29‐2018
5. Dispense Button Light Flashing
The Hot Tank “rate‐of‐rise” heat detector has a maximum rate in which the hot tank gets hot, irrespective of the starting temperature. Dispense Button LED flashing indicates that the hot tank temperature rose faster than the criteria established.
Solution: Dispense for one minute, the flashing lights will stop.
Dispense as normal.
Dispense Flashing
CUBE Manual Page 65 – Revision 5‐29‐2018
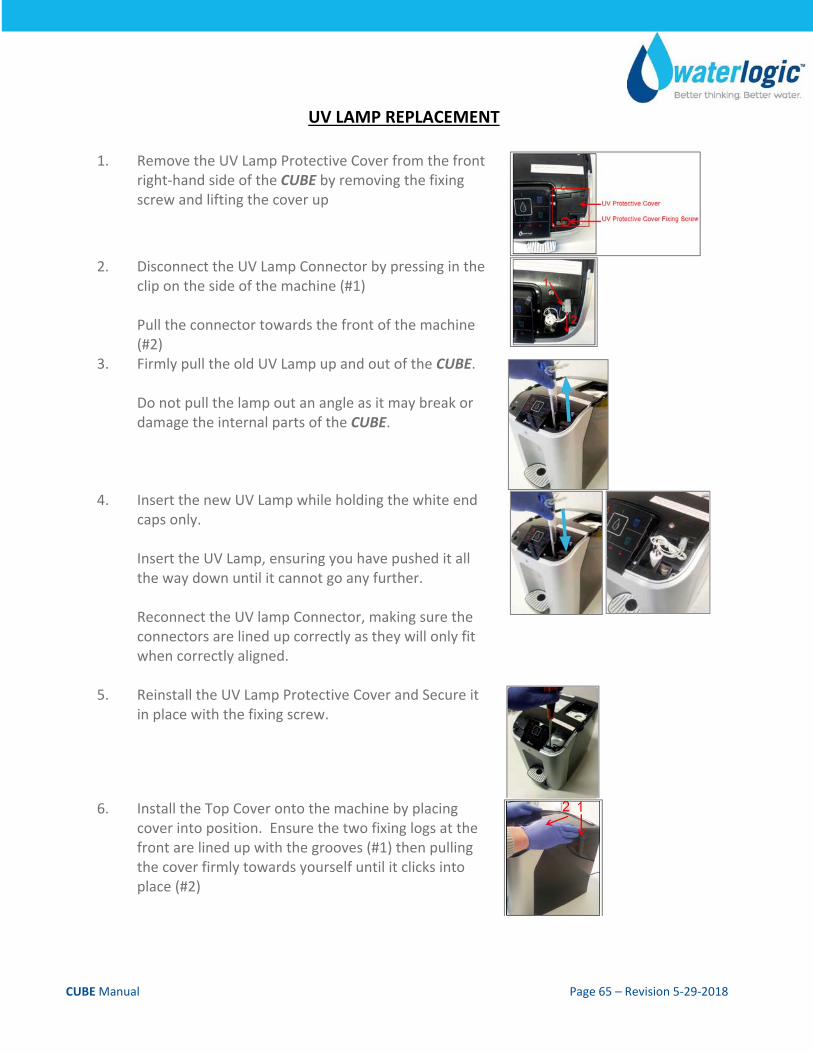
UV LAMP REPLACEMENT
1. Remove the UV Lamp Protective Cover from the front right‐hand side of the CUBE by removing the fixing screw and lifting the cover up
2. Disconnect the UV Lamp Connector by pressing in the clip on the side of the machine (#1) Pull the connector towards the front of the machine (#2)
3. Firmly pull the old UV Lamp up and out of the CUBE. Do not pull the lamp out an angle as it may break or damage the internal parts of the CUBE.
4. Insert the new UV Lamp while holding the white end caps only. Insert the UV Lamp, ensuring you have pushed it all the way down until it cannot go any further. Reconnect the UV lamp Connector, making sure the connectors are lined up correctly as they will only fit when correctly aligned.
5. Reinstall the UV Lamp Protective Cover and Secure it in place with the fixing screw.
6. Install the Top Cover onto the machine by placing cover into position. Ensure the two fixing logs at the front are lined up with the grooves (#1) then pulling the cover firmly towards yourself until it clicks into place (#2)
CUBE Manual Page 66 – Revision 5‐29‐2018
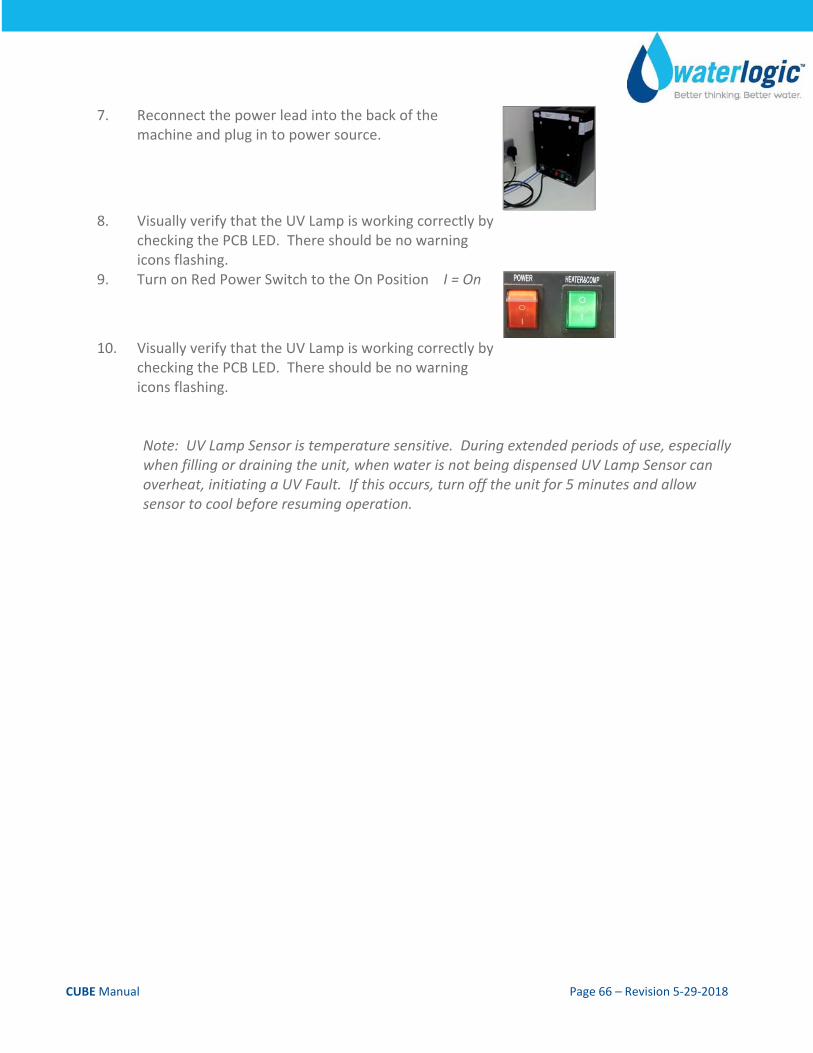
7. Reconnect the power lead into the back of the machine and plug in to power source.
8. Visually verify that the UV Lamp is working correctly by checking the PCB LED. There should be no warning icons flashing.
9. Turn on Red Power Switch to the On Position I = On
10. Visually verify that the UV Lamp is working correctly by checking the PCB LED. There should be no warning icons flashing.
Note: UV Lamp Sensor is temperature sensitive. During extended periods of use, especially when filling or draining the unit, when water is not being dispensed UV Lamp Sensor can overheat, initiating a UV Fault. If this occurs, turn off the unit for 5 minutes and allow sensor to cool before resuming operation.
CUBE Manual Page 67 – Revision 5‐29‐2018
FILTER REPLACEMENT
Filters should be configured to optimize your system. Filters need to be configured and specified to do the job given the local water conditions, usage, maintenance schedule, and placement restrictions.
In order for our filters to perform as represented and to provide the best quality water possible, it is essential that filters be replaced periodically. The frequency of filter changes depends on your water quality and your water usage. For example, if there is a lot of sediment and/or particles in your water, then you will have to change your filters more frequently than a location with little to no sediment. Be sure to replace your filters whenever you notice a decline in the performance, whether it is a drop‐in flow rate and/or pressure or an unusual taste in the water.
WARNING! Read and understand the contents of this manual before attempting to service CUBE. Failure to follow the instructions in this manual could result in death, serious personal injury, or severe property damage. Only trained and qualified technicians should attempt to install, maintain, or service Waterlogic Equipment.
Materials Needed:
Phillips Screwdriver.
Replacement filter cartridge(s)
Water Pitcher or Container to collect water from the faucet
5‐gallon container or drain basin
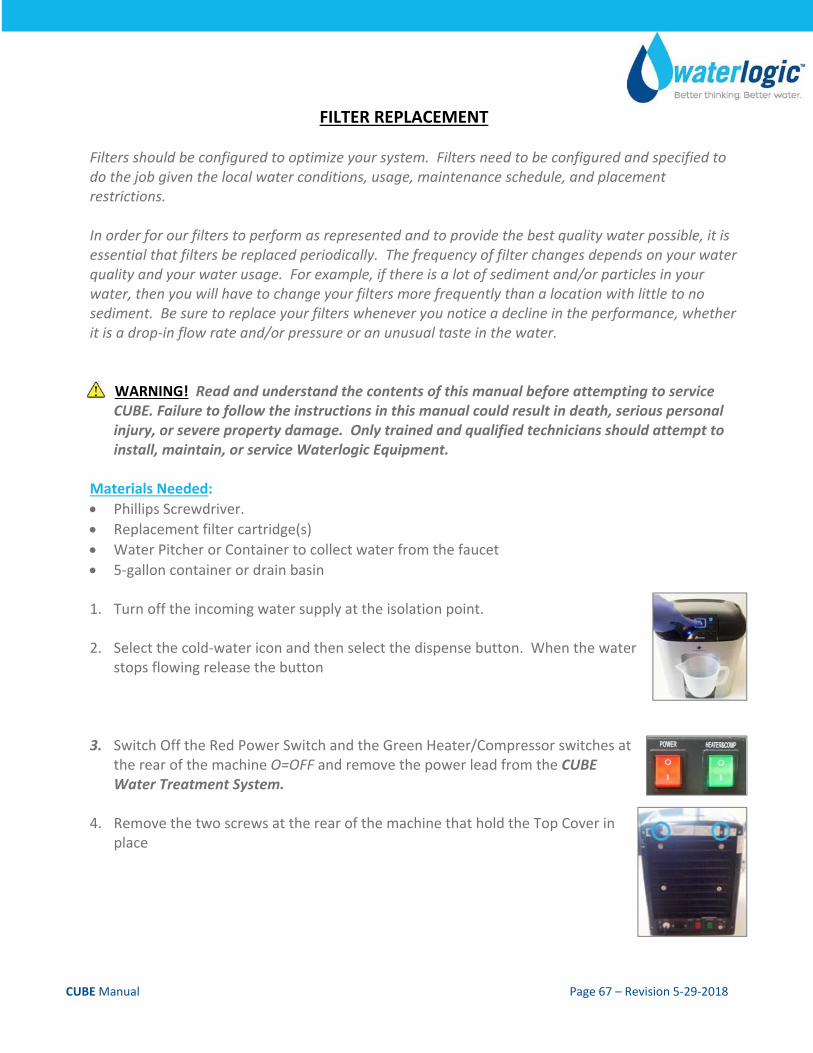
1. Turn off the incoming water supply at the isolation point.
2. Select the cold‐water icon and then select the dispense button. When the water stops flowing release the button
3. Switch Off the Red Power Switch and the Green Heater/Compressor switches at the rear of the machine O=OFF and remove the power lead from the CUBE Water Treatment System.
4. Remove the two screws at the rear of the machine that hold the Top Cover in place
CUBE Manual Page 68 – Revision 5‐29‐2018
5. Remove the Top Cover by placing your hands on the Top in the picture
and push it backwards and then lift it up to remove.
6. Replace the Carbon Block Filter. Insert your finger into the top of the carbon block filter (the filter that is closer to the front of the machine) and pull the lever up to the vertical position.
7. Pull the lever straight up to remove the filter assembly (slight force may be required).
8. Remove the Filter Body from the filter head by turning the base in a clockwise direction.
9. Remove the Filter Cartridge from the Filter Head by pulling it out.
10. Remove the new Filter Cartridge from the packaging and fit it by firmly pushing it into the Filter Head, making sure it is firmly and securely fitted.
CUBE Manual Page 69 – Revision 5‐29‐2018
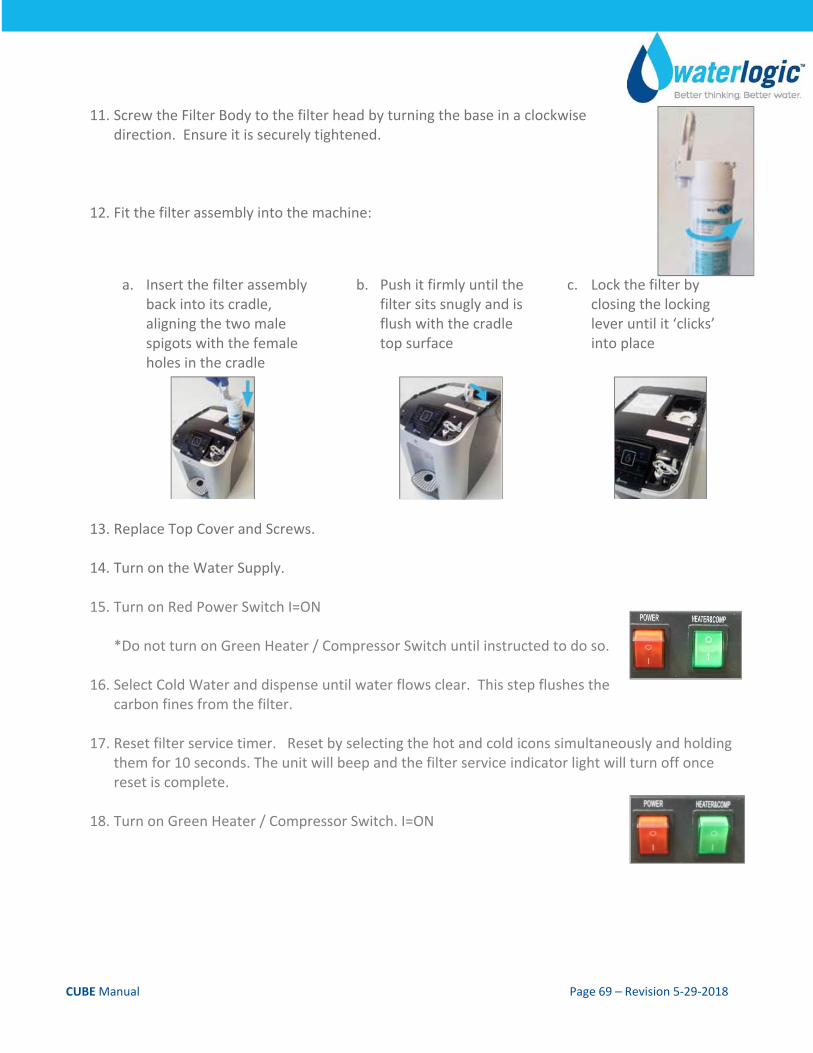
11. Screw the Filter Body to the filter head by turning the base in a clockwise direction. Ensure it is securely tightened.
12. Fit the filter assembly into the machine:
a. Insert the filter assembly back into its cradle, aligning the two male spigots with the female holes in the cradle
b. Push it firmly until the filter sits snugly and is flush with the cradle top surface
c. Lock the filter by closing the locking lever until it ‘clicks’ into place
13. Replace Top Cover and Screws.
14. Turn on the Water Supply.
15. Turn on Red Power Switch I=ON
*Do not turn on Green Heater / Compressor Switch until instructed to do so.
16. Select Cold Water and dispense until water flows clear. This step flushes the carbon fines from the filter.
17. Reset filter service timer. Reset by selecting the hot and cold icons simultaneously and holding them for 10 seconds. The unit will beep and the filter service indicator light will turn off once reset is complete.
18. Turn on Green Heater / Compressor Switch. I=ON
CUBE Manual Page 70 – Revision 5‐29‐2018
UV LAMP REPLACEMENT
1. Remove the UV Lamp Protective Cover from the front right‐hand side of the CUBE by removing the fixing screw and lifting the cover up
2. Disconnect the UV Lamp Connector by pressing in the clip on the side of the machine. Pull the connector towards the front of the machine.
3. Firmly pull the old UV Lamp up and out of the CUBE. Do not pull the lamp out an angle as it may break or damage the internal parts of the CUBE.
4. Insert the new UV Lamp while holding the white end caps only. Insert the UV Lamp, ensuring you have pushed it all the way down until it cannot go any further. Reconnect the UV lamp Connector, making sure the connectors are lined up correctly as they will only fit when correctly aligned.
5. Reinstall the UV Lamp Protective Cover and Secure it in place with the fixing screw.
6. Install the Top Cover onto the machine by placing cover into position. Ensure the two fixing logs at the front are lined up with the grooves, then pulling the cover firmly towards yourself until it clicks into place.
CUBE Manual Page 71 – Revision 5‐29‐2018
7. Reconnect the power lead into the back of the machine and plug in to power source.
8. Turn on Red Power Switch to the On Position I = On
9. Visually verify that the UV Lamp is working correctly by checking the PCB LED. There should be no warning icons flashing.
Note: UV Lamp Sensor is temperature sensitive. During extended periods of use, especially when filling or draining the unit, when water is not being dispensed UV Lamp Sensor can overheat, initiating a UV Fault. If this occurs, turn off the unit for 5 minutes and allow sensor to cool before resuming operation.