Oregon Death Report Instructions Oregon Vital Events Registration System (OVERS) Chapter 2: Completing an Oregon Death Report Funeral Director Edition Revised April 2018 Public Health Division Center for Public Health Practice Center for Health Statistics OREGON DEATH REPORT INSTRUCTIONS
Transcript
Oregon Death Report Instructions
Oregon Vital Events Registration System (OVERS)
Chapter 2: Completing an Oregon Death Report
Funeral Director Edition Revised April 2018
Public Health Division Center for Public Health Practice Center for Health Statistics O
REG
ON
DEA
TH R
EPO
RT
INST
RU
CTI
ON
S
OVERS Death Report Instructions Funeral Director Edition
Table of Contents Chapter 2: Completing an Oregon Death Report...................................................... 14
Introduction ................................................................................................................ 14 Starting a New Case .................................................................................................. 14
Start/Edit New Case ............................................................................................... 14 Completing the Death Report ..................................................................................... 16
Death Registration Sub-Menus ............................................................................... 16 Personal Information ........................................................................................... 16 Medical Certification ............................................................................................ 16
Completing the Funeral Director’s Pages ............................................................... 17 Decedent Page .................................................................................................... 17 Resident Address ................................................................................................ 22 Family Members .................................................................................................. 23 Informant ............................................................................................................. 25 Disposition ........................................................................................................... 26 Decedent Attributes ............................................................................................. 28 Place of Death ..................................................................................................... 31 Validate Page ...................................................................................................... 32
Request Medical Certification .................................................................................... 36
Completing an Oregon Death Report Introduction This chapter explains the process for retrieving, completing and certifying death reports in the OVERS application. It also provides guidance about how to properly complete the information on the report. Certain laws applicable to reporting these data can be found in Appendix C.
These instructions provide answers to frequently asked questions for special circumstances. These items are identified by the logo to the left to help you locate the information.
Occasionally, information is provided that is not necessary for you to complete a death report but may help you understand why the information is collected. This information is marked with the logo to the left.
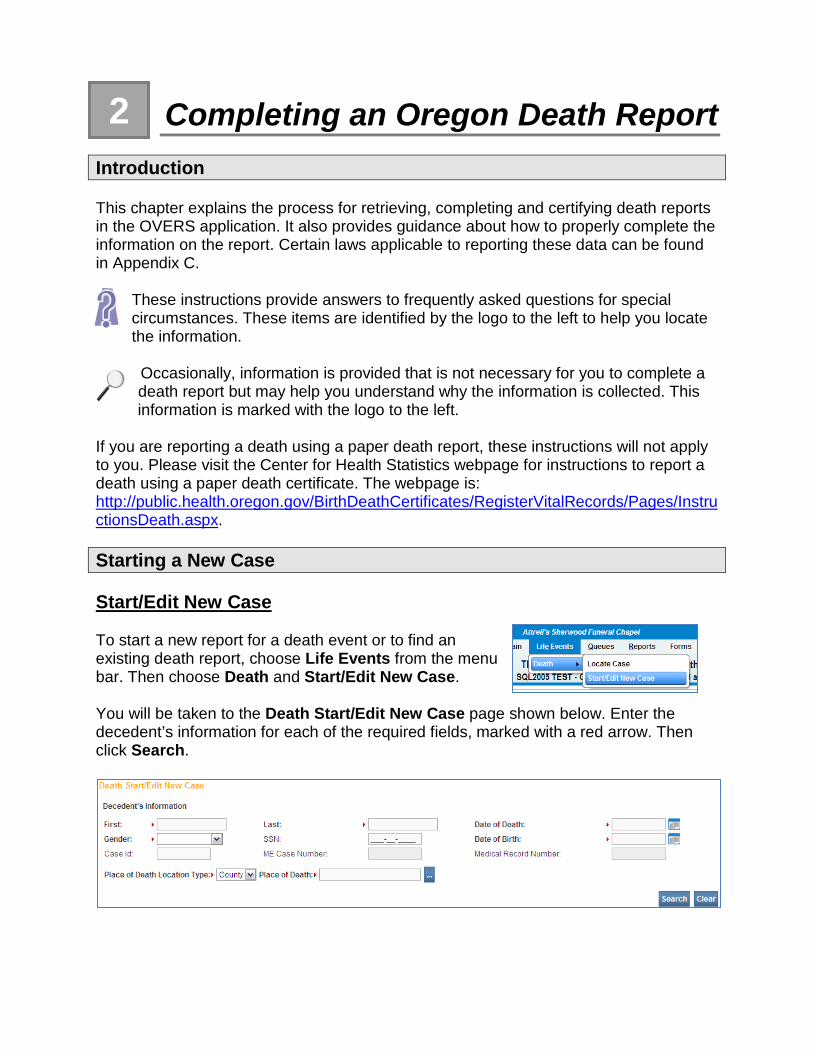
If you are reporting a death using a paper death report, these instructions will not apply to you. Please visit the Center for Health Statistics webpage for instructions to report a death using a paper death certificate. The webpage is: http://public.health.oregon.gov/BirthDeathCertificates/RegisterVitalRecords/Pages/InstructionsDeath.aspx. Starting a New Case Start/Edit New Case To start a new report for a death event or to find an existing death report, choose Life Events from the menu bar. Then choose Death and Start/Edit New Case. You will be taken to the Death Start/Edit New Case page shown below. Enter the decedent’s information for each of the required fields, marked with a red arrow. Then click Search.
OVERS Death Report Instructions Funeral Director Edition
The following two items are entered on this page and may not be edited by the Funeral Director. Any changes to these two items can only be made by the medical certifier. County of Death Enter the name of the county where death occurred. For the purposes of ORS 146.003 to 146.189 (Medical Examiner Cases), if the county where death occurs is unknown, the death shall be deemed to have occurred in the county where the body is found, except that if in an emergency the deceased is moved by conveyance to another county and is dead on arrival, the death shall be deemed to have occurred in the county from which the body was originally removed.
If the death occurred on a moving conveyance in international waters, international airspace, or in a foreign country or its airspace and the body was first removed from the conveyance in this state, register the death in this state but enter the ACTUAL place of death insofar as it can be determined. Date of Death Enter the exact month, day, and year that death occurred. Pay particular attention to the entry of month, day, or year when the death occurs around midnight. Consider a death at midnight to have occurred at the beginning of one day rather than the end of the previous. For instance, a death that occurs at midnight between December 1 and December 2 occurred on December 2. This item is used in conjunction with the hour of death to establish the exact time of death of the decedent. Epidemiologists also use date of death in conjunction with the cause of death information for research on intervals between injuries, onset of conditions, and death. If there is no death report in OVERS that matches your search, the following page will appear. Click If case does not appear above, start new case.
If your search results display a matching death report, click on the Decedent’s Name to open the case. Confirm it is the correct decedent before editing the report.
Appendices 16
OVERS Death Report Instructions Funeral Director Edition
For this example, we chose If case does not appear above, start new case. Completing the Death Report The Death Registration Menu contains a series of pages that are used for gathering the information needed to register a new death record. Death Registration Sub-Menus Personal Information The Personal Information sub-menu collects legal and personal information about the decedent. The Funeral Director completes these pages. Medical Certification The Medical Certification sub-menu is primarily completed by medical certifiers and state staff members who have a need to review and/or edit the information found on these pages. However, it is the Funeral Directors’ responsibility to complete the Place of Death page within this menu. Funeral Directors are able to view the other pages, but are not able to edit the information.
Appendices 17
OVERS Death Report Instructions Funeral Director Edition
Completing the Funeral Director’s Pages Decedent Page The Decedent page automatically fills in with the information entered on the Death Start/Edit New Case page.
Will Medical Examiner be completing personal information? This dropdown list is disabled for funeral directors. Decedent’s Legal Name Type or print the full first, middle, and last names of the decedent. DO NOT abbreviate. If the deceased identity is not known you should enter Male or Female for the first name and Unknown for the last name. More than one name may be entered into any of the name fields by separating the two names with a space or a hyphen. This item is used to identify the decedent.
Appendices 18
OVERS Death Report Instructions Funeral Director Edition
Maiden Name If the decedent was female, enter her last name prior to her first marriage if applicable. Aliases If the decedent has any alias names, click on Add/Edit Alias Names. The Aliases box will appear. Click on New Alias. Enter the alias name, then click Save. When you have entered all alias(es), click Close.
Sex Designation Choose the appropriate option from the dropdown list. X, indicating nonbinary, is used for individuals whose gender identity is not exclusively male or female. If sex cannot be determined after verification with medical records, inspection of the body, or other sources, enter Unknown. Undetermined is used in cases where the sex cannot be determined due to a medical condition. DO NOT leave this item blank. This item aids in the identification of the decedent. It is also used in research and statistical analysis to determine sex-specific mortality rates. Social Security Number Enter the social security number of the decedent. If the decedent does not have a social security number, select None. If the decedent’s social security number is not known, choose Unknown. This item is useful in identifying the decedent and facilitates the filing of social security claims. Date of Birth Enter the exact month, day, and year that the decedent was born. This item is useful in identification of the decedent for legal purposes. It also helps verify the accuracy of the age item.
Appendices 19
OVERS Death Report Instructions Funeral Director Edition
Age
Enter the exact age of the decedent. To calculate the decedent’s age, you may click the blue arrow circled above. This will automatically calculate the decedent’s age and enter it in the correct Age field(s)
Years is used for a decedent who is age one or older at his/her last birthday. Months and Days are used for a decedent who is under on year of age and more than one day old. Hours and Minutes are used for a decedent who is under one day old, or who survived less than 24 hours, enter the exact number of hours or minutes, the infant lived.
Information for this item is used to study differences in age-specific mortality and in planning and evaluating public health programs. Verify SSN To the right of the age boxes, there are two controls for Social Security number verification: a Verify SSN link and a notification message. The Verify SSN link is used to notify the Social Security Administration (SSA) that the decedent has passed and that any benefits currently being paid should be discontinued. Click Verify SSN to begin the notification process. Initially, the message displayed to the right will be Unverified (0) with the number in parenthesis representing the number of attempts that have been made to contact the SSA. A maximum of 5 attempts can be made. After 5 attempts are made, the Verify SSN link will be disabled. Once verification has been completed, the message will change to Verified.
Occasionally, the message will change to something other than Verified. The table below shows other possible messages and the actions to be taken if the message is shown.
Appendices 20
OVERS Death Report Instructions Funeral Director Edition
Message Action
VERIFIED/PASSED SSN verification was successful. Proceed with completing the death report.
FAILSSN FAILGENDER FAILDOB FAILDOBGENDER FAILNAME
The SSN verification was not successful. You may choose to change the information provided and attempt verification again. Repeated attempts are permissible but not required.
If the status does not change to Verified, you may complete the Social Security 721 form with the information you have and submit the form to the SSA as a courtesy to the family.
AUTHUNAVAIL INVALID TRANIDERROR BU01LINKFAIL
The SSN is not being sent to the SSA. Call the OVERS Help Desk at 971-673-1352 to notify the staff of the issue.
Decedent’s Birth Place City or Town If the decedent was born in the United States, enter the name of the city, town or county. If it cannot be obtained, enter Unknown. State If the decedent was born in the United States, enter the name of the state. Do not use an abbreviation for the state. If it cannot be obtained, enter Unknown. If the decedent was not born in the United States, enter the name of the province or state, if known.
This item is used to match birth and death certificates of a deceased individual. Federal law requires matching birth and death records, to avoid issuance of a birth certificate for a deceased individual without notation on the record. In addition, matching theses records provides information from the birth certificate that is not contained on the death certificate and may give insight into which conditions led to death. Information from the birth certificate is especially important in examining the causes of infant mortality. Country Enter the Country in which the decedent was born. If it cannot be obtained, enter Unknown. Ever in US Armed Forces? If the decedent ever served in the U.S. Armed Forces, choose Yes from the dropdown list. If not, choose No. If you are unable to determine if the decedent served in the US Armed Forces, choose Unknown.
Appendices 21
OVERS Death Report Instructions Funeral Director Edition
Served in Combat? This dropdown list will only be available if you chose Yes to the prior question. If the decedent served in a Combat Zone, choose Yes from the dropdown list. If not, choose No. If you are unable to determine if the decent served in combat, choose Unknown. Location of Combat? If you chose Yes to the Served in Combat question, the Location of Combat box will appear. Enter the combat zone(s) where the decedent served. You must use a semi-colon (;) between the combat locations.
The informant may select the Location(s) of Combat Zone that apply from the list found below or they may provide another location. The Center for Health Statistics will accept any location provided, regardless of whether the location appears in the attached list if the informant believes the decedent was in combat.
Veteran’s Status – Location of Combat
The following is a list of combat zones as defined by the U.S. Department of Veterans Affairs. Please list any or all locations from the left column that the decedent served while in the U.S. Armed Forces. You are free to report any locations not named at the bottom of this form.
Location of Combat Zone
Details and Time Period Check if Served
World War II (or name country below if desired)
European-African-Middle Eastern Campaign, from 12/7/1941 to 11/8/1945
Asiatic-Pacific Campaign, from 12/7/1941 to 3/2/1946
American Campaign, from 12/7/1941 to 3/2/1946 American Merchant Marines, in oceangoing service from 12/7/1941 to 8/15/1946
Korea From 6/27/1950 to 7/27/1954 Vietnam From 2/28/1961 to 5/7/1975 Lebanon From 8/25/1982 to 2/26/1984 Grenada From 10/23/1983 to 11/21/1983 Panama From 12/20/1989 to 1/31/1990
Persian Gulf Beginning 8/2/1990, ongoing Somalia Beginning 9/17/1992, ongoing Bosnia From 11/21/1995 to 11/1/2007
Appendices 22
OVERS Death Report Instructions Funeral Director Edition
Yugoslavia (now Bosnia-Herzegovina)
& Croatia
Operations Joint Endeavor, Joint Guard, or Joint Forge, aboard U.S. Naval vessels in the Adriatic Sea, or air spaces above these areas, from 12/20/1995 to 12/2/2004
Kosovo Beginning 3/24/1999, ongoing Operations Joint Endeavor, Joint Guard, or Joint Forge, either in its waters or airspace, beginning 3/24/1999, ongoing
Iraq Operation Iraqi Freedom, from 3/19/2003 to 2/17/2010
Operation New Dawn, beginning 02/17/2010, ongoing
Global War on Terrorism
(name below)
Military expeditions to combat terrorism, beginning 9/11/2001, ongoing
Name other locations here
Effective January 1, 2012, after the passage of Oregon House Bill 3611, this item is used to identify decedents who were veterans. This information is of interest to veterans' groups studying cause of death among veterans and whether deployment to a combat zone has any relationship to cause of death. Veteran status data will be analyzed to determine if certain factors put veterans at higher risk of suicide. Resident Address Report the place where the decedent actually resided, not the postal address. Do not enter addresses that are post office boxes or rural route numbers. Get the building number and Street name. Because you are reporting the location where the decedent lived, information on this page may differ from the decedent’s mailing address.
If the street has a Pre-Directional indicator, i.e. East 42nd St., then indicate that by
Appendices 23
OVERS Death Report Instructions Funeral Director Edition
selecting E from the Pre-Directional dropdown list. Similarly, if the street address has a Post-Directional indicator, i.e. 42nd St. Southwest, then indicate that by selecting SW from the Post-Directional dropdown list. Do not type the pre-directional or post-directional indicators in the Street Name box. The place of residence is not necessarily the same as “home state” or “legal residence.” Never enter a temporary residence such as one used during a visit, business trip, or vacation on this page.
Place of residence during a tour of military duty or during attendance at college is considered permanent and should be entered as the place of residence. If the decedent had been living in a facility where an individual usually resides for a long period of time, such as a group home, mental institution, nursing home, penitentiary, or hospital for the chronically ill, report the location of that facility as the residence.
If the decedent was an infant who never resided at home, the place of residence is that of the parent(s) or legal guardian. Never use an acute care hospital’s location as the place of residence for any infant. If the decedent was a child, residence is the same as that of the parent(s), legal guardian, or custodian. If the child was living in an institution where individuals usually reside for long periods of time, the residence of the child is reported as the facility. Mortality data by residence is used with population data to compute death rates for detailed geographic areas. This data is important in environmental studies. Data on deaths by place of residence of the decedent are also used to prepare population estimates and projections. Local officials use this information to evaluate the availability and use of services in their area.
Information on residence inside city limits is used to properly assign events within a county. Information on zip code and whether the decedent lived inside city limits is valuable for studies of deaths for small areas. Family Members
Appendices 24
OVERS Death Report Instructions Funeral Director Edition
Marital Status Choose the decedent’s marital status at the time of death from the dropdown list as it is reported by the informant. Documentation of marital status is not required. Note that a legal separation requires a court order and is different than living separately. If marital status cannot be determined, choose Unknown. This information is used to determine differences in mortality by marital status. Spouse’s Name If the decedent was married, widowed, or in a registered domestic partnership at the time of death, enter the full name of his or her spouse. Otherwise, leave this item blank. If the spouse is the wife, enter her maiden name, regardless of whether she changed her name at the time of marriage. If name of spouse cannot be obtained, enter Unknown for both the First Name and Last Name. This item is used in genealogical studies and in establishing proper insurance settlement and other survivor benefits. Father’s Name
Type or print the first, middle, last name, and suffix if applicable of the legal father of the decedent. If the name of the father cannot be obtained, enter Unknown for the Last Name. Mother’s Name Prior to First Marriage Type or print the first, middle, and maiden surname of the mother of the decedent. This is the name given at birth or adoption, not a name acquired by marriage. If the name of the mother cannot be obtained, enter Unknown for the Last Name. The names of the decedent’s mother and father aid in identification of the
Appendices 25
OVERS Death Report Instructions Funeral Director Edition
decedent’s death record. The maiden surname is important for matching the record with other records because it remains constant throughout a lifetime, in contrast to other names, which may change because of marriage or divorce. These items are also of importance in genealogical studies. Informant
Informant Name Enter the name of the person who supplied the personal facts about the decedent. This could be a police officer, medical examiner or other person if an informant who knew the decedent personally is not available. Relationship to Decedent Choose the informant’s relationship to the deceased from the dropdown list. If an appropriate relationship option is not listed, choose Other and specify the relationship in the Other specify box. Address Enter the mailing address of the informant. This information may be used to contact the informant for additional information as needed.
Appendices 26
OVERS Death Report Instructions Funeral Director Edition
Disposition
Method of Disposition Choose the method of disposition corresponding to the method of disposition of the decedent’s body from the dropdown list. If the method used does not appear on the list, then select Other from the dropdown list and type the method in the Other specify box. Donation refers only to the entire body, not to individual organs. If the body is used by a hospital, medical, or mortuary school for scientific or educational purposes, choose Donation and specify the name and location of the institution in the Place of Disposition below.
If a body is removed from Oregon, even if only for the convenience of the nearest crematorium, the death report should indicate Removal From State.
Appendices 27
OVERS Death Report Instructions Funeral Director Edition
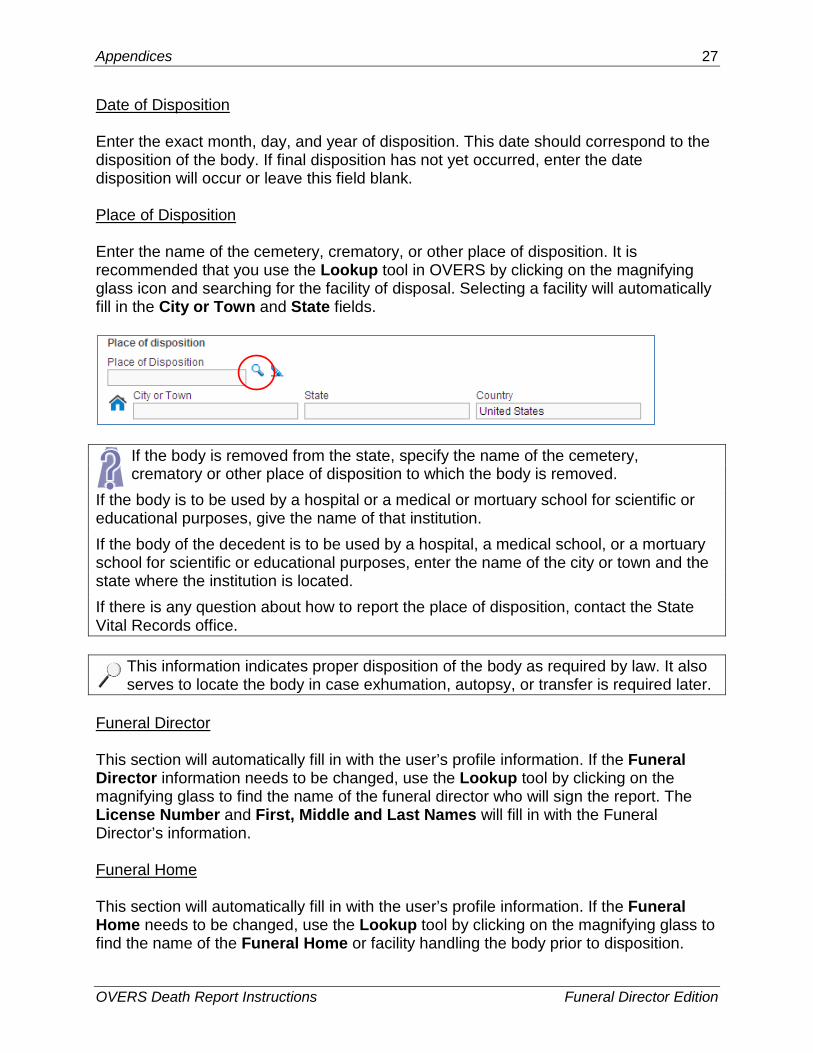
Date of Disposition Enter the exact month, day, and year of disposition. This date should correspond to the disposition of the body. If final disposition has not yet occurred, enter the date disposition will occur or leave this field blank. Place of Disposition Enter the name of the cemetery, crematory, or other place of disposition. It is recommended that you use the Lookup tool in OVERS by clicking on the magnifying glass icon and searching for the facility of disposal. Selecting a facility will automatically fill in the City or Town and State fields.
If the body is removed from the state, specify the name of the cemetery, crematory or other place of disposition to which the body is removed.
If the body is to be used by a hospital or a medical or mortuary school for scientific or educational purposes, give the name of that institution.
If the body of the decedent is to be used by a hospital, a medical school, or a mortuary school for scientific or educational purposes, enter the name of the city or town and the state where the institution is located.
If there is any question about how to report the place of disposition, contact the State Vital Records office. This information indicates proper disposition of the body as required by law. It also serves to locate the body in case exhumation, autopsy, or transfer is required later. Funeral Director This section will automatically fill in with the user’s profile information. If the Funeral Director information needs to be changed, use the Lookup tool by clicking on the magnifying glass to find the name of the funeral director who will sign the report. The License Number and First, Middle and Last Names will fill in with the Funeral Director’s information. Funeral Home This section will automatically fill in with the user’s profile information. If the Funeral Home needs to be changed, use the Lookup tool by clicking on the magnifying glass to find the name of the Funeral Home or facility handling the body prior to disposition.
Appendices 28
OVERS Death Report Instructions Funeral Director Edition
This item assists in quality control in completing and filing death reports, as well as fiscal tracking. They identify the person who is responsible for filing the report with the registrar. Disposition Permit Enter the date the disposition permit was printed and the ID Tag number that will accompany the remains. Decedent Attributes
Decedent’s Occupation Enter the usual occupation of the decedent. Occupation is the kind of work the decedent did during most of his or her working life, such as claim adjuster, farmhand, janitor, store manager, college professor or civil engineer. Give the kind of work done during most of the decedent’s working life, not necessarily the last occupation of the decedent. Do not enter Retired. If the decedent was a homemaker at the time of death but had worked outside the household during his or her working life, enter that occupation. If the decedent was a homemaker during most of his or her working life, and never worked outside the household, enter Homemaker.
(continued on next page)
Appendices 29
OVERS Death Report Instructions Funeral Director Edition
Enter Student if the decedent was a student at the time of death and was never regularly employed during his or her working life.
Enter Infant if the decedent was less than one year old at the time of death and enter Child if the decedent was less than school age at the time of death. Decedent’s Industry Enter the kind of business or industry to which the Occupation is related, such as insurance, farming, hardware store, retail clothing, university, or government. Do not enter firm, organization or company names. If the decedent was a homemaker during his or her working life, and Homemaker is entered as the decedent’s usual occupation, enter Own Home as industry.
If the decedent was a student or a teacher, enter the level of school, such as high school or college.
Enter Infant if the decedent was less than one year old at the time of death and enter Child if the decedent was less than school age at the time of death. These Items are useful in studying occupationally related mortality and in identifying job-related risk areas. For example, correlating asbestos used in particular occupations in the shipbuilding industry to respiratory cancer was possible with this information. Decedent’s Education Choose the category that best describes the highest degree or level of school completed by the decedent. Report only those years of school that were completed. For example, for a child who dies while a freshman (9th grade) in high school, report 8th grade or less. This item is used in studies of the relationship between education and mortality and provides an indicator of socioeconomic status, which is also closely associated with mortality. This information is valuable in medical studies of causes of death and in prevention programs. Ancestry Choose the correct option from the options in OVERS. The entry in this item should reflect the response of the informant. If the informant reports that the decedent was of multiple Hispanic origins, enter all of the origins reported (for example, Mexican-Puerto Rican).
Appendices 30
OVERS Death Report Instructions Funeral Director Edition
This item is not a part of the Race Item. A decedent of Hispanic origin may be of any race. Each question, Race and Hispanic origin, should be asked independently. For the purposes of this item, “Hispanic” refers to people whose origins are from Spain, Mexico, Central or South American. Origin can be viewed as the ancestry, nationality, lineage, or country in which the person or his or her ancestors were born before their arrival in the United States.
The response should reflect what the decedent considered himself or herself to be and should not be based on percentages of ancestry. If the decedent was a child, the parent(s) should determine the Hispanic origin based on their own origin. There is no set rule as to how many generations are to be taken into account in determining Hispanic origin. A person’s Hispanic origin may be reported based on the country of origin of a parent, a grandparent, or some far-removed ancestor. Hispanics comprise the second largest ethnic minority in this country. Reliable data is needed to identify and assess public health problems of Hispanics and to target efforts to their specific needs. This Information will permit the production of mortality data for the Hispanic community. Race Enter all of the races of the decedent as reported by the informant. This should NOT be determined by observation. If the informant indicates that the decedent was of mixed race, choose all that apply. The image below shows the Race screen when American Indian or Alaska Native, Other Asian, Other Pacific Islander or Other is chosen. If any of these are chosen, describe the selection in the box(es) below.
Race is essential for identifying specific mortality patterns and leading causes of death among different racial groups. It is also used to determine whether specific health programs are needed in particular areas, as well as to make population estimates.
Appendices 31
OVERS Death Report Instructions Funeral Director Edition
Place of Death The Place of Death page is used to capture the location where the decedent died. In OVERS, the page is listed under the Medical Certification sub-menu. It is the Funeral Director’s responsibility to complete this page. The page must be completed before the case is referred to the Medical Examiner or sent to the Medical Certifier. Information on place of death is needed to determine who has jurisdiction for deaths that legally require investigation by a Medical Examiner. These items are also used for research and statistics comparing hospital and non-hospital deaths. Valuable information is provided for health planning and research on the utilization of health facilities.
Type of Place of Death Choose the Type of place of death from the dropdown list. Other should be used if the death was pronounced at a licensed ambulatory/surgical center or birthing center, a house or apartment other than the decedent’s home, physician’s office, the highway where a traffic accident occurred, a vessel, or at work. If the decedent’s body was found, Other should be entered and the place where the body was found should be entered as the place of death. Always specify the type of place when Other is chosen.
Decedent’s Residence should be entered when the death occurs at the decedent’s home and may include retirement homes but not nursing facilities, adult foster care, assisted living or other residential care facilities. In these cases, choose the other appropriate option from the dropdown list.
(continued on next page)
Appendices 32
OVERS Death Report Instructions Funeral Director Edition
If the death occurred on a moving conveyance in the United States and the body was first removed from the conveyance in this state, enter as the place of death the address where the body was first removed from the conveyance.
If the death occurred on a moving conveyance in international waters, international airspace, or in a foreign country or its airspace and the body was first removed from the conveyance in this state, register the death in this state but enter the actual place of death insofar as it can be determined.
Facility Name The selection you made for Type of Place of Death determines what you can enter for Facility Name.
If the death occurred at the facility with which your account is located, the Facility Name and Address will be populated based on this selection. If you select Decedent’s Residence or Decedent’s Residence – Hospice for Type of Place of Death, OVERS will automatically populate the Facility Name and Address from the Resident Address page entered by the Funeral Director. Of you select Hospital, Hospice Facility, Nursing Facility, Licensed Assisted Living Facility or Licensed Residential Care Facility for Type of Place of Death, it is recommended that you select the lookup tool (magnifying glass icon) to search for the facility to be listed on the death report. If you select Licensed Adult Foster Home or Other, type the Facility Name and Address into the fields on this page.
Address If you used the lookup tool to find the Facility Name, the Address will automatically be filled in. If you did not use the lookup tool, type the address in the boxes provided. Medical Record Number This is not a mandatory field. This is usually completed by medical certifiers. A medical record may be entered. Validate Page After you have entered information on all pages necessary, click the Validate Page button. This function checks for errors on all off the Personal Information pages.
Appendices 33
OVERS Death Report Instructions Funeral Director Edition
The page will refresh. Look at the Death Registration Menu under the Personal Information sub-menu. A color-coded arrow has appeared next to each page. These arrows indicate whether the information entered contains errors that must be corrected before signing the report. Error Types There are two types of errors in OVERS: hard edits and soft edits. Below is an example of a Hard Edit on the Resident Address page. The Error Message at the bottom of the page tells you what needs to be corrected. In this case, you must enter the State of the decedent’s residence in order to complete the report. Clicking the List All Errors button will display all errors for every page of the report in the Error Message section of the page.
Below is an example of a Soft Edit on the Family Members page. The Error Message at the bottom of the page tells you what needs to be corrected. If the information is accurate, you may click the Override check box and then Save Overrides.
Red=Hard Edit: Shows pages containing non-overridable errors are marked by red arrows. These errors must be corrected.
Yellow=Soft Edit: Shows pages containing overridable errors are marked by yellow arrows. Correct the information or override the error.
Green=No Edit: Pages containing no errors are marked by green arrows. No further action is necessary.
Appendices 34
OVERS Death Report Instructions Funeral Director Edition
In this case, the error message is notifying us that the maiden name of the decedent’s spouse is the same as the decedent’s last name. The validation process is checking to make sure that we didn’t accidentally report the spouse’s married name.
After all edits have been corrected or overridden, click Validate Page again. If the errors on the page have been corrected, the arrows will turn green. If you override a Soft Edit, the arrow next to the page will remain yellow. In the example to the right, the Hard Edit on the Decedent page has been corrected and Soft Edits on the Decedent and Family Members pages were overridden. Notice that the Sign page is now listed. This means that the information provided has passed the validation rules built into OVERS and the report can be signed Sign
After the report is completed and all validation edits are cleared or overridden, the Sign link will appear in the Personal Information sub-menu. The system does not automatically open the Sign page. Click on the Sign link to open the Affirmations page shown
Appendices 35
OVERS Death Report Instructions Funeral Director Edition
below. To sign a death report, read the affirmation statement and place a check mark in the check boxes next to the affirmation statement. An example is provided below. Then click the Affirm button in the lower right-hand corner.
You will be prompted to place your finger on the biometric reader attached to your computer. Place an enrolled finger on the fingerprint scanner.
After your fingerprint is recognized, the screen will show Authentication Successful. You have completed the report. If you experience any problems with the biometric fingerprint scanner, call the OVERS Help Desk at 971-673-0279.
Appendices 36
OVERS Death Report Instructions Funeral Director Edition
Request Medical Certification Request Medical Certification is used by the funeral home director to notify the decedent’s physician that the death report requires medical certification. Do not use this feature to send a case to a Medical Examiner. If the report will instead be referred to a Medical Examiner, see Chapter 3 for instructions. In the Other Links sub-menu of the Death Registration Menu, click Request Medical Certification. You will be taken to the Request Medical Certification page shown below. Notice that the Message box is pre-filled with information about the case. This message can be left as is, or you may add your own message at the end of the pre-filled message. It is common practice for funeral directors to add the time of death to this message before sending it to the doctor.
First, search for the Certifier Name then for the Facility/Office Name by clicking on the magnifying glass icons. Enter the first part of the name you are looking for, followed by the wildcard symbol, %. Choose the Certifier Name or Facility/Office Name by clicking on the Select link. Click Save to complete the referral and send a message to the Medical Certifier. As a courtesy to the Medical Certifier, you may want to call to confirm the certifier is ready and available to certify the death report.


![[PPT]Implementation of EDR - salem hospital - Oregon · Web view2014/11/18 · Oregon’s Electronic Death Registration System:An Update Oregon Mortuary and Cemetery Board November](https://static.documents.pub/doc/80x56/5b199fa17f8b9a3c258cba70/pptimplementation-of-edr-salem-hospital-web-view20141118-oregons.jpg)


