1 August 2013 | 1725-47090-001 Rev D Using Feature Synchronized Automatic Call Distribution with Polycom ® Phones Feature Profile 57216 Feature synchronized Automatic Call Distribution (ACD) enables organizations to manage a large number of phone calls on an individual basis. ACD enables use of your Polycom ® phones in a call center role by automatically directing incoming calls to available persons, or agents. The ACD feature is available on Polycom phones as either a Standard or Premium service. The Standard ACD service is available on the following Polycom phones: SoundPoint ® IP 320, 321, 330, 331, 335, 450, 550, 560, 650, and 670 desktop phones running Polycom ® UC Software 3.3.1 or later VVX ® 300/310 and VVX ® 400/410 business media phones running UC Software 4.1.4 or later VVX ® 500 business media phones running UC Software 4.0.1B or later VVX ® 600 business media phones running UC Software 4.1.2 or later VVX ® 1500 business media phones running UC Software 5.0.0 or later The Premium ACD service is available on the following Polycom phones: SoundPoint IP 450, 550, 560, 650, and 670 desktop phones running UC Software 3.3.1 or later VVX 300/310 and VVX 400/410 business media phones running UC Software 4.1.4 or later VVX 500 and VVX 600 business media phones running UC Software 4.1.2 or later VVX 1500 business media phones running UC Software 5.0.0 or later Web Info: Using ACD with Earlier Software Versions If your phones are running a software version earlier than UC Software 3.3.1, see Technical Bulletin 34787: Using Feature Synchronized Automatic Call Distribution with Polycom SoundPoint IP Phones to find out how to configure ACD for earlier software versions. ACD handles incoming calls by automatically queuing and directing calls to available agents. The primary benefit of ACD is to reduce customer wait times and improve your organization’s quality of service. The ACD feature requires support from the BroadSoft BroadWorks ® R17 Server. Choose from BroadSoft’s Standard or Premium service. Each package offers a distinct level of support and functional capabilities that can be customized for the needs of your organization. Learn more about the different capabilities of the BroadWorks ® Call Center application by visiting the BroadSoft Web site. After you enable ACD on your phone, an ASignIn/ASignOut soft key displays on the phone’s idle screen. Press the ASignIn soft key to sign in and start receiving calls. After you sign in as an agent, your status is set to Available and incoming calls are directed to your ACD line. When your status is set to Available, the ASignOut soft key displays. Press this key to sign out. You can change your agent state—sign in, sign
Transcript
1 August 2013 | 1725-47090-001 Rev D
Using Feature Synchronized Automatic Call
Distribution with Polycom® Phones
Feature Profile 57216
Feature synchronized Automatic Call Distribution (ACD) enables organizations to manage a large number
of phone calls on an individual basis. ACD enables use of your Polycom® phones in a call center role by
automatically directing incoming calls to available persons, or agents.
The ACD feature is available on Polycom phones as either a Standard or Premium service.
The Standard ACD service is available on the following Polycom phones:
SoundPoint® IP 320, 321, 330, 331, 335, 450, 550, 560, 650, and 670 desktop phones running
Polycom® UC Software 3.3.1 or later
VVX® 300/310 and VVX
® 400/410 business media phones running UC Software 4.1.4 or later
VVX® 500 business media phones running UC Software 4.0.1B or later
VVX® 600 business media phones running UC Software 4.1.2 or later
VVX® 1500 business media phones running UC Software 5.0.0 or later
The Premium ACD service is available on the following Polycom phones:
SoundPoint IP 450, 550, 560, 650, and 670 desktop phones running UC Software 3.3.1 or later
VVX 300/310 and VVX 400/410 business media phones running UC Software 4.1.4 or later
VVX 500 and VVX 600 business media phones running UC Software 4.1.2 or later
VVX 1500 business media phones running UC Software 5.0.0 or later
Web Info: Using ACD with Earlier Software Versions
If your phones are running a software version earlier than UC Software 3.3.1, see Technical Bulletin 34787: Using Feature Synchronized Automatic Call Distribution with Polycom SoundPoint IP Phones to find out how to configure ACD for earlier software versions.
ACD handles incoming calls by automatically queuing and directing calls to available agents. The primary
benefit of ACD is to reduce customer wait times and improve your organization’s quality of service.
The ACD feature requires support from the BroadSoft BroadWorks® R17 Server. Choose from
BroadSoft’s Standard or Premium service. Each package offers a distinct level of support and functional
capabilities that can be customized for the needs of your organization. Learn more about the different
capabilities of the BroadWorks® Call Center application by visiting the BroadSoft Web site.
After you enable ACD on your phone, an ASignIn/ASignOut soft key displays on the phone’s idle screen.
Press the ASignIn soft key to sign in and start receiving calls. After you sign in as an agent, your status is
set to Available and incoming calls are directed to your ACD line. When your status is set to Available, the
ASignOut soft key displays. Press this key to sign out. You can change your agent state—sign in, sign
Feature Profile 57216: Using Feature Synchronized Automatic Call Distribution with Polycom Phones
Polycom, Inc. 2
out, and wrap-up—using soft keys or through the phone menus. The ACD state shown on your phone is
synchronized with the BroadSoft BroadWorks Server and any ACD computer-based soft clients.
This feature profile explains how to set up and use the feature synchronized ACD feature. The topics
include the following:
Setting Up the Feature Synchronized ACD Feature
Using the Feature Synchronized ACD Feature
Using Premium Feature Synchronized ACD Capabilities
Note: Screenshots Shown in This Feature Profile
Screenshots from the SoundPoint IP 450 and IP 650, and the VVX 600 phones are used to show the user interface. The user interface on the VVX 300/310, VVX 400/410, VVX 500, and VVX 1500 phones are similar to those shown for the VVX 600.
Setting Up the Feature Synchronized ACD Feature
When setting up the feature synchronized ACD feature, ensure that each phone has a registered line.
Then enable the line with the Call Center – Standard or Call Center – Premium service on the BroadSoft
BroadWorks Server. After you have enabled the ACD feature on the BroadWorks Server, enable the
feature synchronized ACD feature on the phone.
Enabling the Feature Synchronized ACD Feature on the BroadWorks
Server
This section describes the steps that enable the feature synchronized ACD feature on the BroadWorks
Server. On the BroadWorks Server, you must set up a Standard or Premium Call Center.
To enable the Call Center Standard or Premium service on the BroadWorks Server:
1 Log onto the BroadWorks Server.
2 In the Profile Menu, click Users.
3 Click Search to display all available users.
4 Select the user you wish to enable the Call Center service with.
5 Under Advanced, click Assign Services.
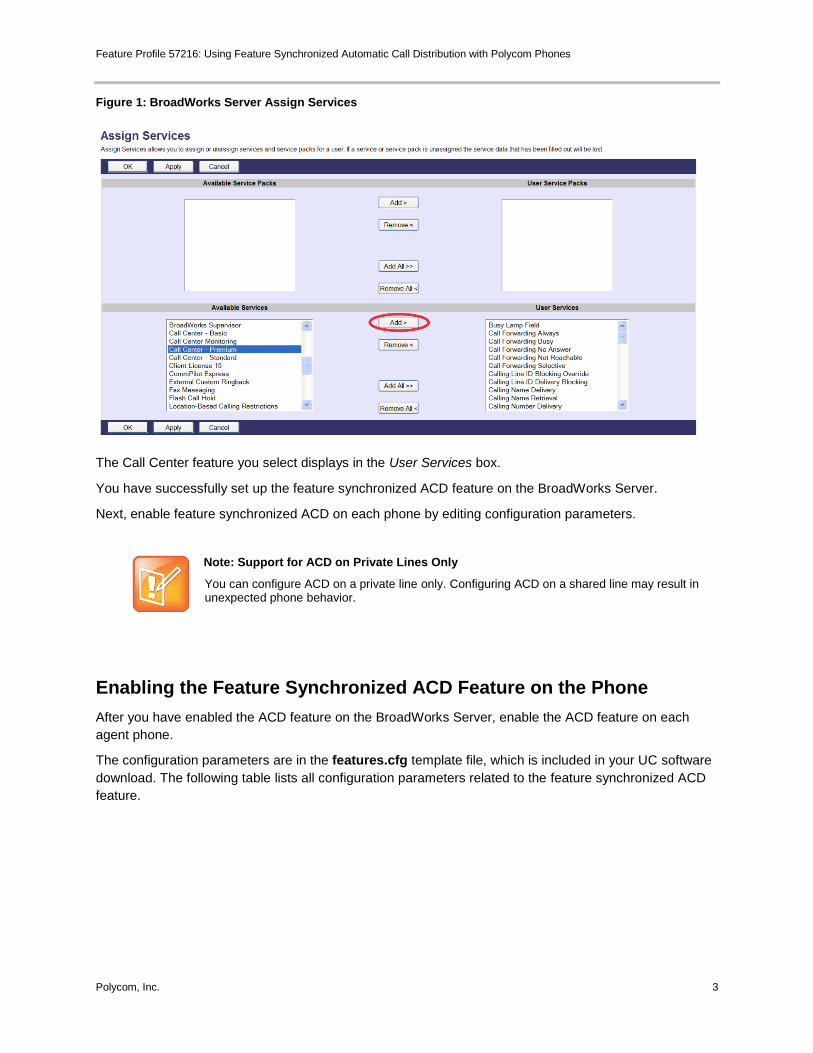
6 In the Available Services box, scroll to Call Center – Premium or Call Center – Standard and click
Add >, as shown in Figure 1.
Feature Profile 57216: Using Feature Synchronized Automatic Call Distribution with Polycom Phones
Polycom, Inc. 3
Figure 1: BroadWorks Server Assign Services
The Call Center feature you select displays in the User Services box.
You have successfully set up the feature synchronized ACD feature on the BroadWorks Server.
Next, enable feature synchronized ACD on each phone by editing configuration parameters.
Note: Support for ACD on Private Lines Only
You can configure ACD on a private line only. Configuring ACD on a shared line may result in unexpected phone behavior.
Enabling the Feature Synchronized ACD Feature on the Phone
After you have enabled the ACD feature on the BroadWorks Server, enable the ACD feature on each
agent phone.
The configuration parameters are in the features.cfg template file, which is included in your UC software
download. The following table lists all configuration parameters related to the feature synchronized ACD
feature.
Feature Profile 57216: Using Feature Synchronized Automatic Call Distribution with Polycom Phones
Polycom, Inc. 4
Table 1: Configuration Parameters for the Feature Synchronized ACD Feature
Central Provisioning Server ................................................................................................ template > parameter
To turn Feature Synchronized ACD on or off .................................. features.cfg > feature.acdLoginLogout.enabled
To turn ACD Agent Availability on or off...................................... features.cfg > feature.acdAgentAvailable.enabled
To turn Premium Feature Synchronized ACD on or off... features.cfg > feature.acdPremiumUnavailability.enabled
To turn Feature Synchronized ACD Control URI on or off ..... features.cfg > feature.acdServiceControlUri.enabled
To set the registration to use for Feature Synchronized ACD and the users’ sign-in state ........ features.cfg > acd.*
To enable or disable Feature Synchronized ACD .................... sip-interop.cfg > voIpProt.SIP.acd.signalingMethod
Web Info: Feature Synchronized ACD Configuration Parameters
For a detailed description of these parameters, see the latest Polycom UC Software Administrators’ Guide on the Polycom Support Web site.
Using the Feature Synchronized ACD Feature
Using Standard feature synchronized ACD, you can do the following:
Sign in or sign out as an agent
Change your agent state to unavailable or available using the phone’s soft keys or menu
Using Premium feature synchronized ACD, you can do the following:
Sign in or sign out as an agent
Change your agent state to unavailable or available using the phone’s soft keys or menu
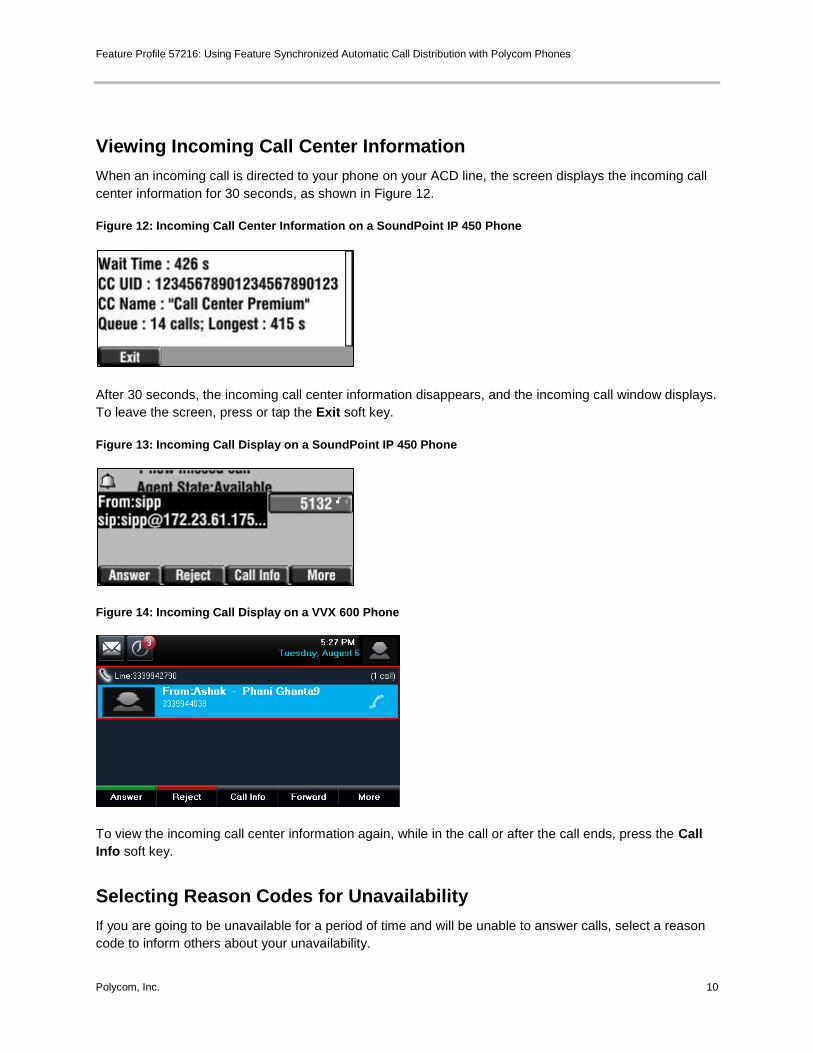
View incoming call center information
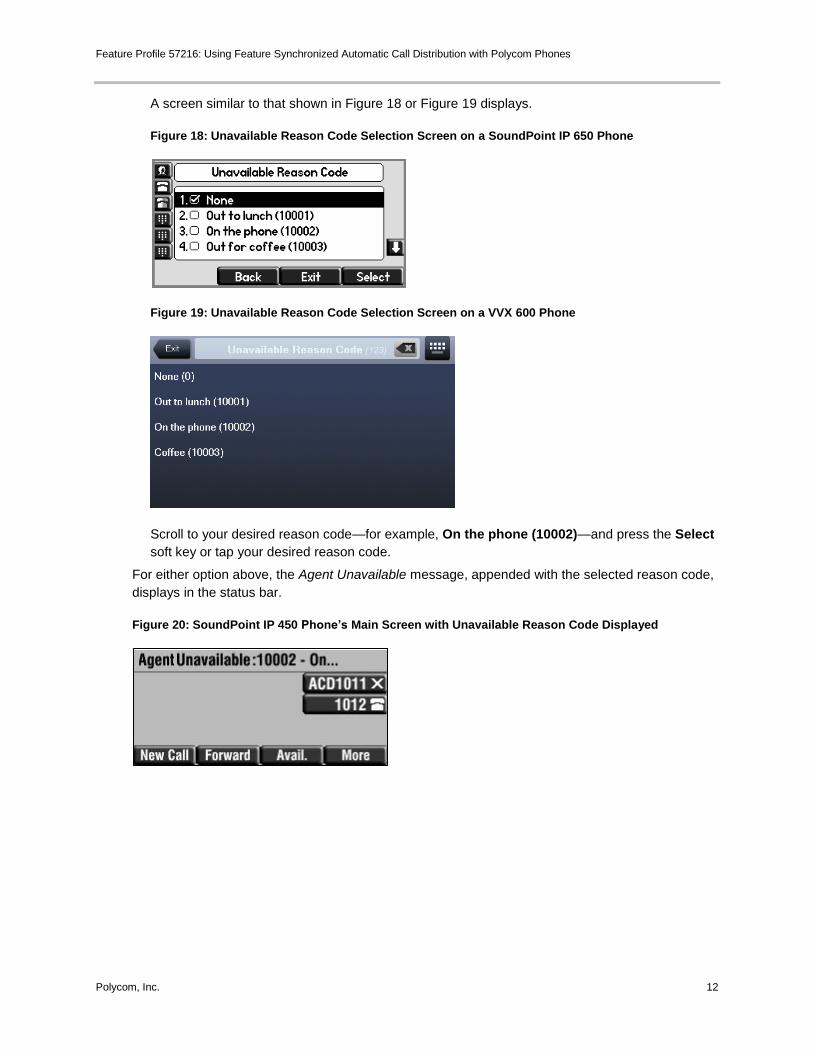
Select a reason code for agent unavailability
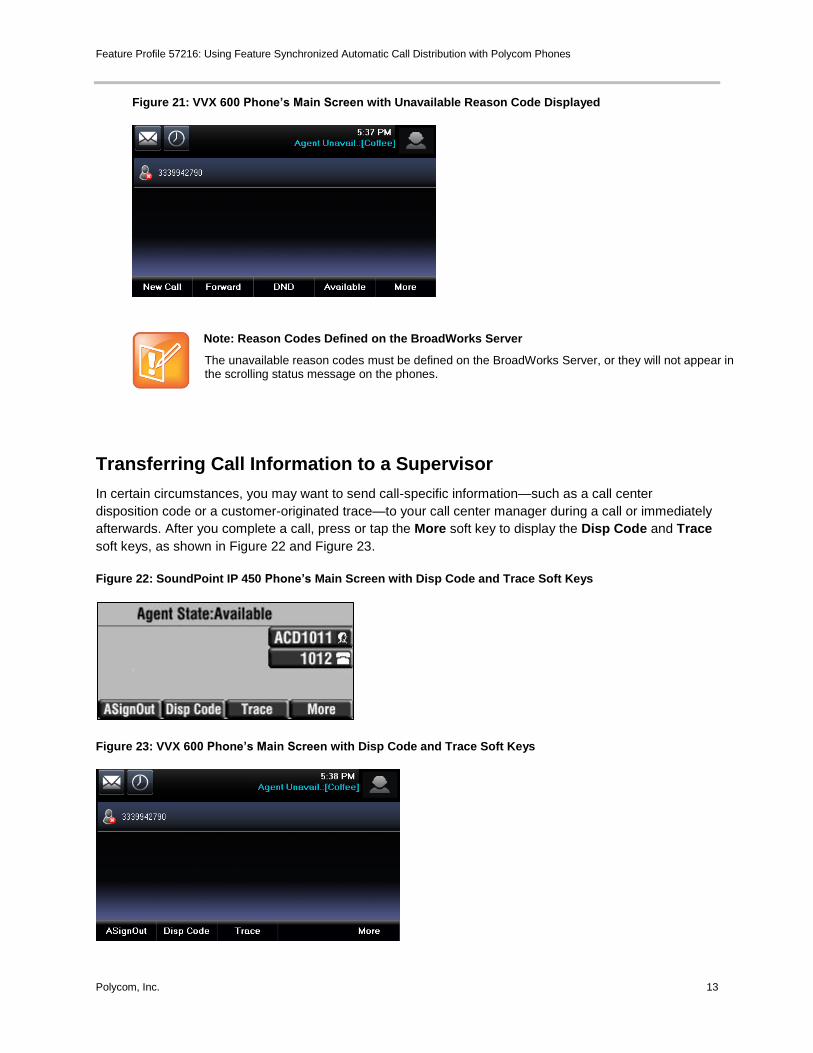
Transfer call information to a supervisor
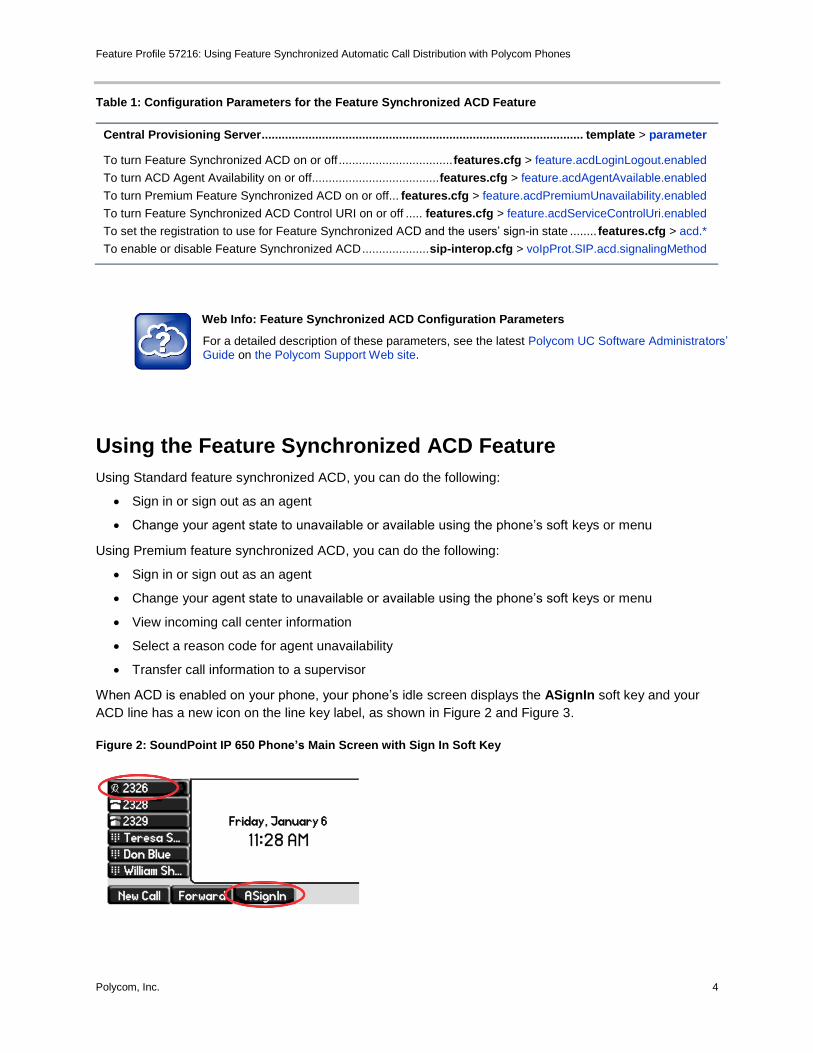
When ACD is enabled on your phone, your phone’s idle screen displays the ASignIn soft key and your
ACD line has a new icon on the line key label, as shown in Figure 2 and Figure 3.
Figure 2: SoundPoint IP 650 Phone’s Main Screen with Sign In Soft Key
Feature Profile 57216: Using Feature Synchronized Automatic Call Distribution with Polycom Phones
Polycom, Inc. 5
Figure 3: VVX 600 Phone’s Main Screen with Sign In Soft Key
The icon on the line label represents your agent state. Use Table 2: Understanding the Agent States to
match an agent state to its corresponding line icon.
Table 2: Understanding the Agent States
Agent State Line Icon for
SoundPoint IP
Line Icon for VVX
300/310
Line Icon for VVX
400/410, VVX 500, VVX
600, VVX 1500
Description
Sign Out
Indicates an agent is not
using the ACD feature.
Calls will not be directed
to the agent.
Sign In,
Available
Indicates an agent is
available to take calls.
Calls will be directed to
the agent.
Sign In,
Unavailable
Alternating
and
Indicates an agent is
unavailable to take calls.
Calls will not be directed
to the agent.
Wrap-up
Indicates an agent has
just finished a call and is
doing post-call work.
Calls will not be directed
to the agent.
Setting the Initial Agent State
When you sign in, your agent state is automatically set to an initial state. By default, the initial state is
Available. You can also set the initial state using the phone menu.
To set the initial agent state:
1 Press or tap Menu > Features > ACD > Initial ACD State.
Feature Profile 57216: Using Feature Synchronized Automatic Call Distribution with Polycom Phones
Polycom, Inc. 6
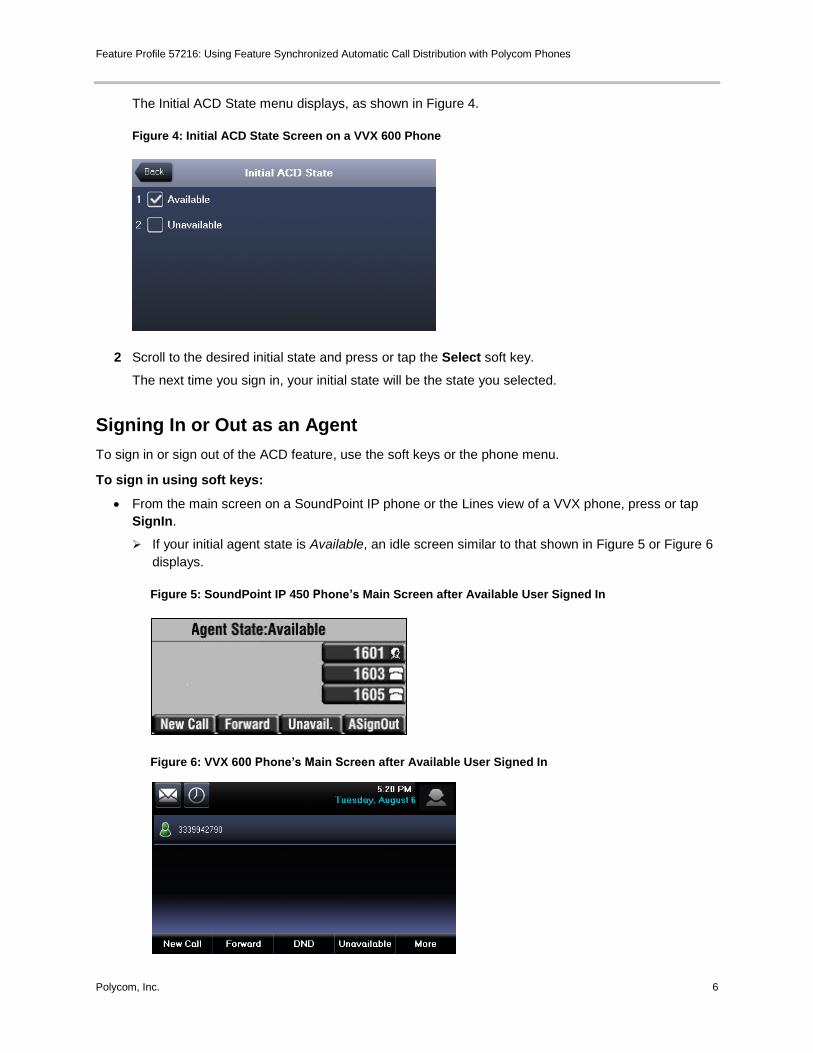
The Initial ACD State menu displays, as shown in Figure 4.
Figure 4: Initial ACD State Screen on a VVX 600 Phone
2 Scroll to the desired initial state and press or tap the Select soft key.
The next time you sign in, your initial state will be the state you selected.
Signing In or Out as an Agent
To sign in or sign out of the ACD feature, use the soft keys or the phone menu.
To sign in using soft keys:
From the main screen on a SoundPoint IP phone or the Lines view of a VVX phone, press or tap
SignIn.
If your initial agent state is Available, an idle screen similar to that shown in Figure 5 or Figure 6
displays.
Figure 5: SoundPoint IP 450 Phone’s Main Screen after Available User Signed In
Figure 6: VVX 600 Phone’s Main Screen after Available User Signed In
Feature Profile 57216: Using Feature Synchronized Automatic Call Distribution with Polycom Phones
Polycom, Inc. 7
In Figure 5, the line key labeled 1601 is enabled with ACD. The line icon changes to the
icon and the ASignOut and Unavail. soft keys display. If Premium ACD is enabled, a More soft
key displays instead of the ASignOut soft key. The Agent State: Available message displays in
the status bar and calls are directed to your phone on the line associated with the icon.
If your initial agent state is Unavailable, an idle screen similar to that shown in Figure 7 or Figure
8 displays.
Figure 7: SoundPoint IP 450 Phone’s Main Screen after Unavailable User Signed In
Figure 8: VVX 600 Phone’s Main Screen after Unavailable User Signed In
On the SoundPoint IP phones, the line icon changes to alternating and and the Avail.
soft key displays. The Agent State: Unavailable message displays in the status bar and calls are
not directed to your phone.
To sign in using the phone menu:
1 Press or tap Menu > Features > ACD > ACD SignIn/SignOut.
2 Scroll to Agent SignIn and press or tap the Select soft key.
To sign out using soft keys:
» Press or tap the ASignOut soft key.
An idle screen similar to that shown in Figure 9 or Figure 10 displays.
Feature Profile 57216: Using Feature Synchronized Automatic Call Distribution with Polycom Phones
Polycom, Inc. 8
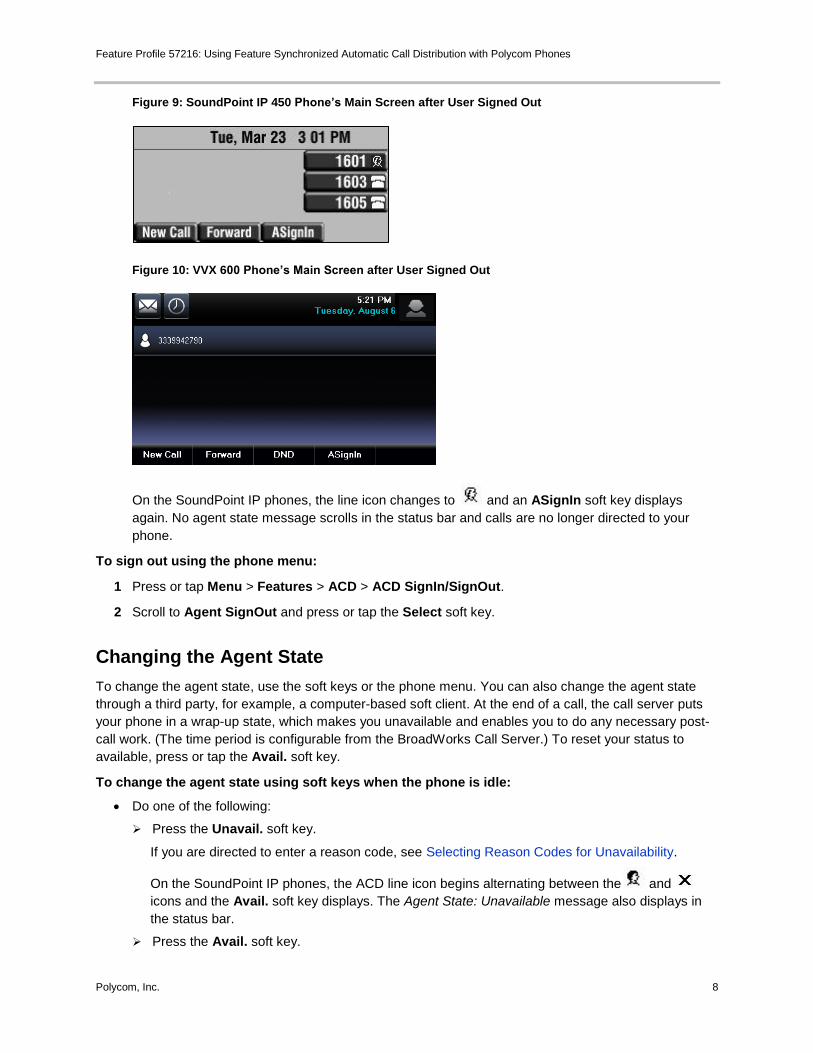
Figure 9: SoundPoint IP 450 Phone’s Main Screen after User Signed Out
Figure 10: VVX 600 Phone’s Main Screen after User Signed Out
On the SoundPoint IP phones, the line icon changes to and an ASignIn soft key displays
again. No agent state message scrolls in the status bar and calls are no longer directed to your
phone.
To sign out using the phone menu:
1 Press or tap Menu > Features > ACD > ACD SignIn/SignOut.
2 Scroll to Agent SignOut and press or tap the Select soft key.
Changing the Agent State
To change the agent state, use the soft keys or the phone menu. You can also change the agent state
through a third party, for example, a computer-based soft client. At the end of a call, the call server puts
your phone in a wrap-up state, which makes you unavailable and enables you to do any necessary post-
call work. (The time period is configurable from the BroadWorks Call Server.) To reset your status to
available, press or tap the Avail. soft key.
To change the agent state using soft keys when the phone is idle:
Do one of the following:
Press the Unavail. soft key.
If you are directed to enter a reason code, see Selecting Reason Codes for Unavailability.
On the SoundPoint IP phones, the ACD line icon begins alternating between the and
icons and the Avail. soft key displays. The Agent State: Unavailable message also displays in
the status bar.
Press the Avail. soft key.
Feature Profile 57216: Using Feature Synchronized Automatic Call Distribution with Polycom Phones
Polycom, Inc. 9
On the SoundPoint IP phones , the line icon changes to and the Unavail. soft key displays.
The Agent Available message also displays in the status bar.
To change the agent state using the phone menu when the phone is idle:
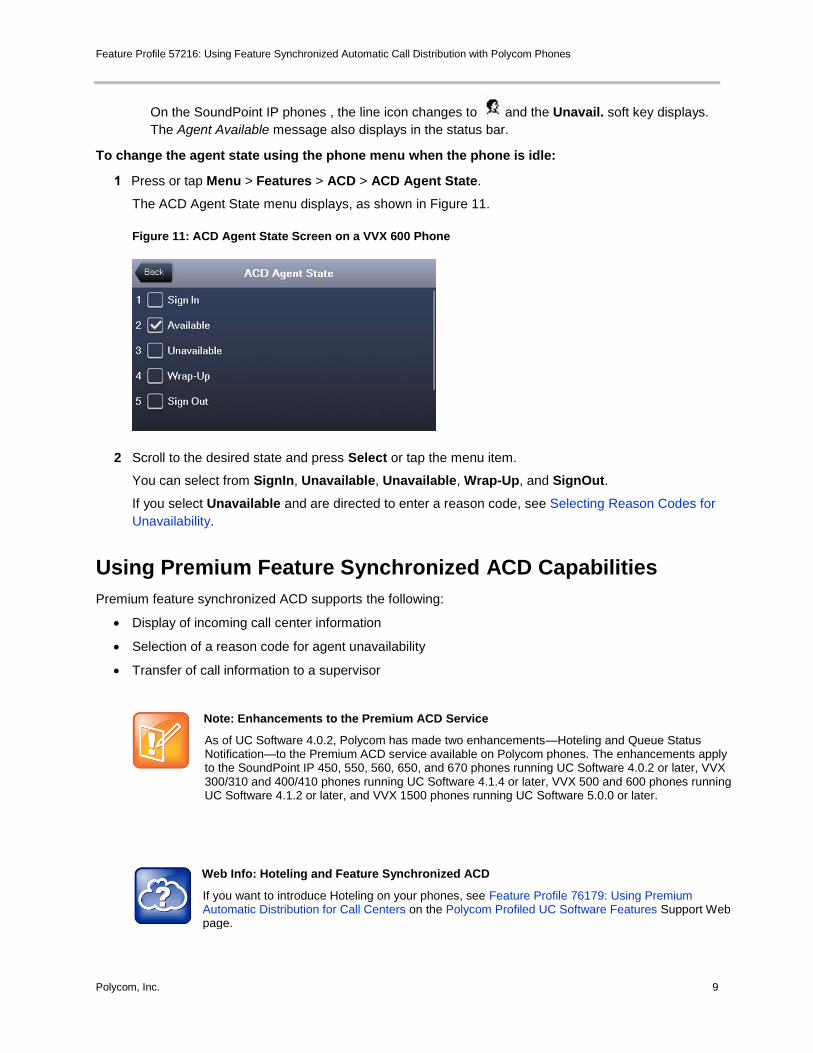
1 Press or tap Menu > Features > ACD > ACD Agent State.
The ACD Agent State menu displays, as shown in Figure 11.
Figure 11: ACD Agent State Screen on a VVX 600 Phone
2 Scroll to the desired state and press Select or tap the menu item.
You can select from SignIn, Unavailable, Unavailable, Wrap-Up, and SignOut.
If you select Unavailable and are directed to enter a reason code, see Selecting Reason Codes for
Unavailability.
Using Premium Feature Synchronized ACD Capabilities
Premium feature synchronized ACD supports the following:
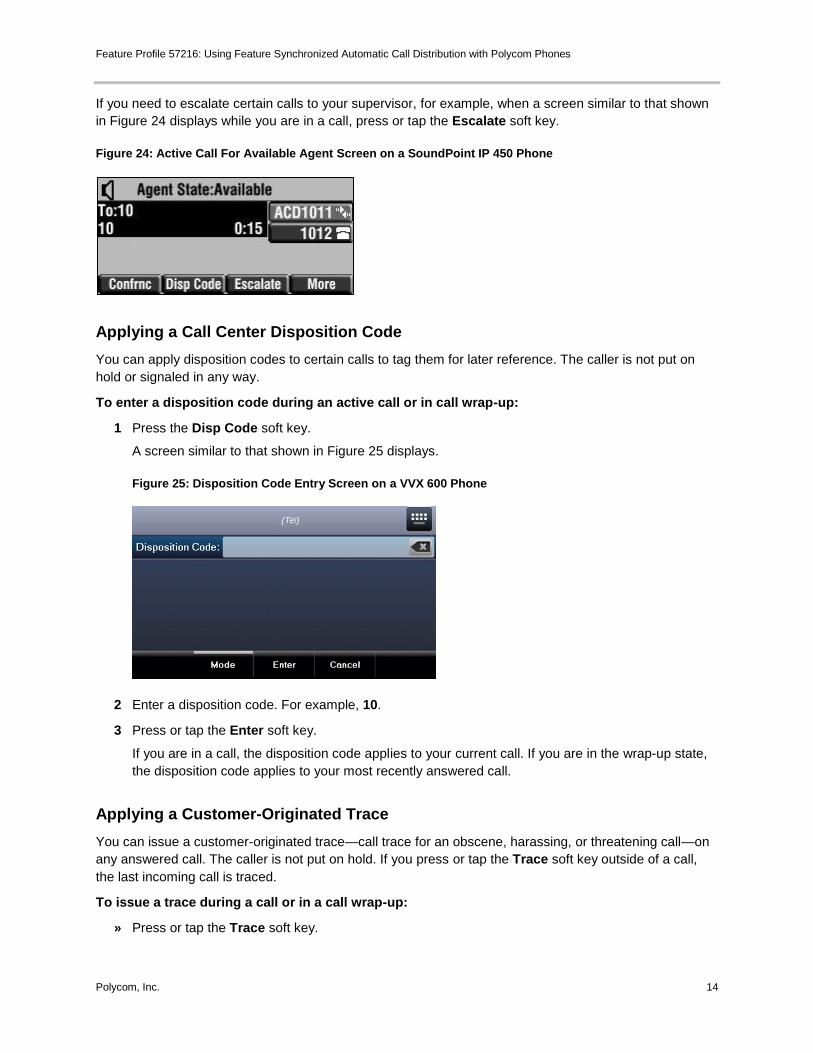
Display of incoming call center information
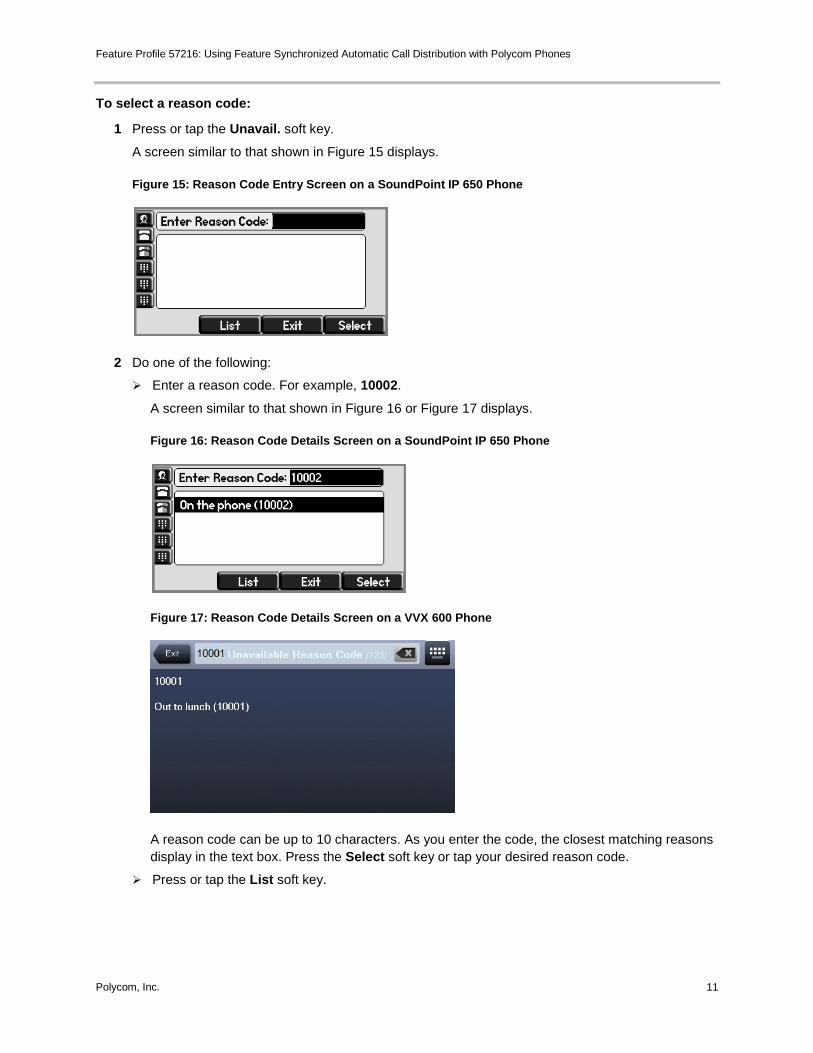
Selection of a reason code for agent unavailability
Transfer of call information to a supervisor
Note: Enhancements to the Premium ACD Service
As of UC Software 4.0.2, Polycom has made two enhancements—Hoteling and Queue Status Notification—to the Premium ACD service available on Polycom phones. The enhancements apply to the SoundPoint IP 450, 550, 560, 650, and 670 phones running UC Software 4.0.2 or later, VVX 300/310 and 400/410 phones running UC Software 4.1.4 or later, VVX 500 and 600 phones running UC Software 4.1.2 or later, and VVX 1500 phones running UC Software 5.0.0 or later.
Web Info: Hoteling and Feature Synchronized ACD
If you want to introduce Hoteling on your phones, see Feature Profile 76179: Using Premium Automatic Distribution for Call Centers on the Polycom Profiled UC Software Features Support Web page.
POLYCOM®, the Polycom logo and the names and marks associated with Polycom products are trademarks and/or service marks of Polycom, Inc. and are registered and/or common law marks in the United States and various other countries. All other trademarks are property of their respective owners. No portion hereof may be reproduced or transmitted in any form or by any means, for any purpose other than the recipient's personal use, without the express written permission of Polycom.
Disclaimer
While Polycom uses reasonable efforts to include accurate and up-to-date information in this document, Polycom makes no warranties or representations as to its accuracy. Polycom assumes no liability or responsibility for any typographical or other errors or omissions in the content of this document.
Limitation of Liability
Polycom and/or its respective suppliers make no representations about the suitability of the information contained in this document for any purpose. Information is provided "as is" without warranty of any kind and is subject to change without notice. The entire risk arising out of its use remains with the recipient. In no event shall Polycom and/or its respective suppliers be liable for any direct, consequential, incidental, special, punitive or other damages whatsoever (including without limitation, damages for loss of business profits, business interruption, or loss of business information), even if Polycom has been advised of the possibility of such damages.
Customer Feedback
We are striving to improve our documentation quality and we appreciate your feedback. Email your opinions and comments to [email protected].
Visit Polycom Voice Support for software downloads, product documents, product licenses, troubleshooting tips, service requests, and more.