115
FGTP Facially Generated Treatment Planning SECTION 1 Presentation Notes SECTION 2 Decision Tree SECTION 3 Handouts

FGTP
Facially Generated Treatment Planning
SECTION 1
Presentation Notes
SECTION 2
Decision Tree
SECTION 3
Handouts

Dr. Lee Ann Brady earned her DMD degree from the University Of Florida College Of Dentistry. She practiced in several private restorative practice models for seventeen years before leaving to devote her time to teaching. While in private practice, Dr. Brady taught part-time at the Santa Fe Community College Dental Hygiene program. In January of 2005 she joined The Pankey Institute as a full time faculty member, and became Clinical Director in 2006. Dr. Brady joined the Spear Institute as VP of clinical education in September of this year. In addition to her teaching responsibilities she maintains a limited clinical practice focused on comprehensive restorative dentistry. Dr. Brady is a member of the American Dental Association, American Equilibration Society, Academy of General Dentistry, American Academy of Cosmetic Dentistry, American Academy of Fixed Prosthodontics, American Association of Women Dentists and is a Fellow in the American College of Dentists.
Dr. Gary DeWood
Dr. Lee Ann Brady
Vice President, Clinical Education Office: 480.588.9108 [email protected]
Vice President, Clinical Education Office: 480.588.9103 [email protected]
Resident Faculty
Dr. DeWood earned his DDS from Case Western Reserve University and a Master of Science degree in Biomedical Sciences at the University of Toledo College of Medicine. He maintained a private restorative general dental practice for 22 years then left full time private practice to devote time to teaching. He holds or has held appointments as Assistant Professor at the University of Tennessee College of Dentistry, Clinical Director at The Pankey Institute and Director of Marketing and Publications at The Pankey Institute. He currently serves as Vice President of Clinical Education at the Spear Institute.
Contacts Frank Spear Curriculum Endodontic Curriculum Manu Robertson Benjamin Newcomb Education Advisor Education Advisor Office: 480.588.9152 Office: 480.588.9040 Fax: 805.565.2747 Fax: 805.565.2796 [email protected] [email protected] Brittany Palma Office Design Education Advisor Office: 480.471.5529 Jeff Stapleton Fax: 480.471.5509 Education Advisor [email protected] Office: 480.588.9063 Fax: 805.456.6232 Jeanina Pizzano [email protected] Education Advisor Office: 206.328.5447 CERECdoctors.com Fax: 206.322.0370 [email protected] Elizabeth Davison Website Administrator CEREC Curriculum Office: 818.998.7474 Fax: 818.462.9060 Shayna Phipps [email protected] Education Advisor Office: 480.588.9101 Fax: 805.565.2696 [email protected]

Facially Generated Treatment Planning Workshop 2009 1
Facially Generated Treatment Planning
Esthetics / Function / Structure / Biology 2 Digital Photography …………………… 24 Facial Evaluation ………………………. 33 Developing the Occlusion ……………. 40 Clinical Examination ………………….. 56 Evaluating Occlusion …………………. 64 Occl Planning Flow ……………………. 65
Facially Generated Treatment Planning Workshop 2009 2
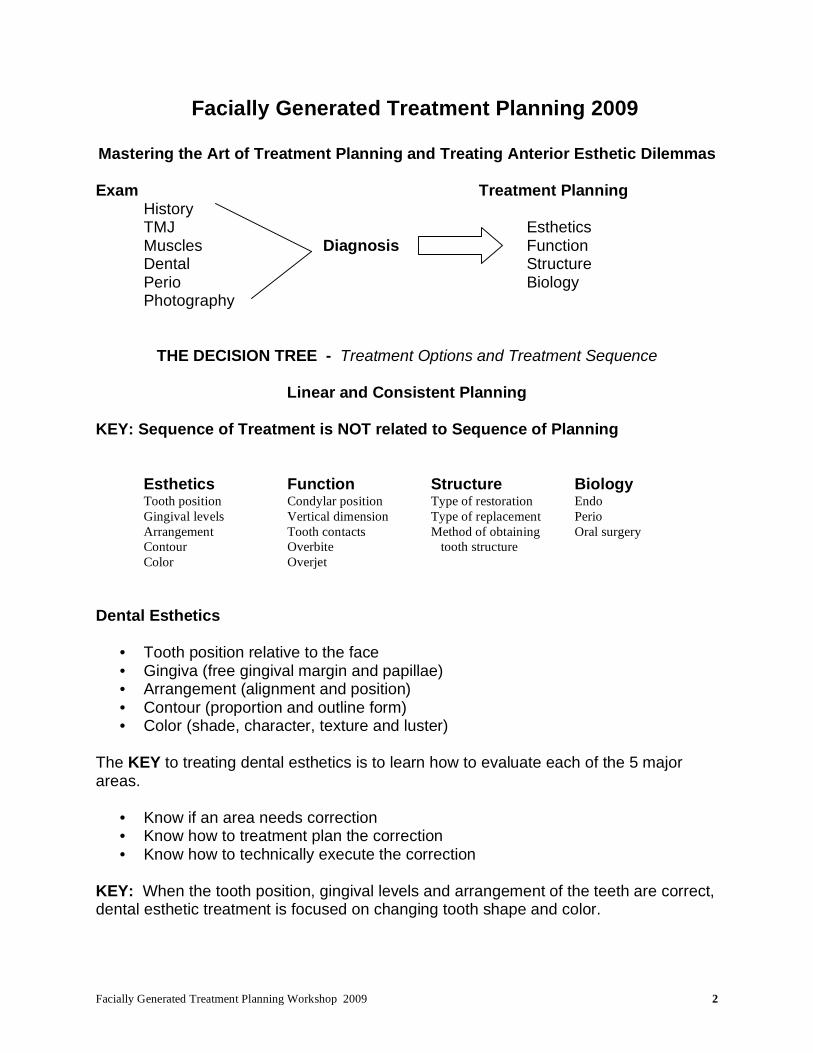
Facially Generated Treatment Planning 2009
Mastering the Art of Treatment Planning and Treating Anterior Esthetic Dilemmas Exam Treatment Planning
History TMJ Esthetics Muscles Diagnosis Function Dental Structure Perio Biology Photography
THE DECISION TREE - Treatment Options and Treatment Sequence
Linear and Consistent Planning
KEY: Sequence of Treatment is NOT related to Sequence of Planning
Esthetics Function Structure Biology Tooth position Condylar position Type of restoration Endo Gingival levels Vertical dimension Type of replacement Perio Arrangement Tooth contacts Method of obtaining Oral surgery Contour Overbite tooth structure Color Overjet Dental Esthetics
• Tooth position relative to the face • Gingiva (free gingival margin and papillae) • Arrangement (alignment and position) • Contour (proportion and outline form) • Color (shade, character, texture and luster)
The KEY to treating dental esthetics is to learn how to evaluate each of the 5 major areas.
• Know if an area needs correction • Know how to treatment plan the correction • Know how to technically execute the correction
KEY: When the tooth position, gingival levels and arrangement of the teeth are correct, dental esthetic treatment is focused on changing tooth shape and color.

Facially Generated Treatment Planning Workshop 2009 3
KEY: When tooth position, gingival levels and arrangement are not acceptable, treatment is much more complicated and often involves the occlusion. DEVELOPING THE ESTHETIC TREATMENT PLAN Requirements for Planning
• Photographs • Radiographs • Charting • Mounted models
Any of these that are left out inhibits your ability to plan and present treatment.
Diagnosis and Treatment Planning Challenging Anterior Relationships

Facially Generated Treatment Planning Workshop 2009 4
The Most Complicated Plans Always Involve Aberrant Tooth Eruption from:
• Wear • Tooth loss • Excess overjet • Inadequate overjet
Possibilities for Aberrant Eruption
• Excess eruption • Under eruption • Proclined • Retroclined
How do I Know what to Do? Establish maxillary tooth position esthetically Establish maxillary gingival levels to correct tooth size Alter mandibular tooth position to correct the occlusion and esthetics
Patient desiring longer incisors and has an end-to-end occlusion What Do We Use To Evaluate Eruption:
Facially Generated Treatment Planning Workshop 2009 5
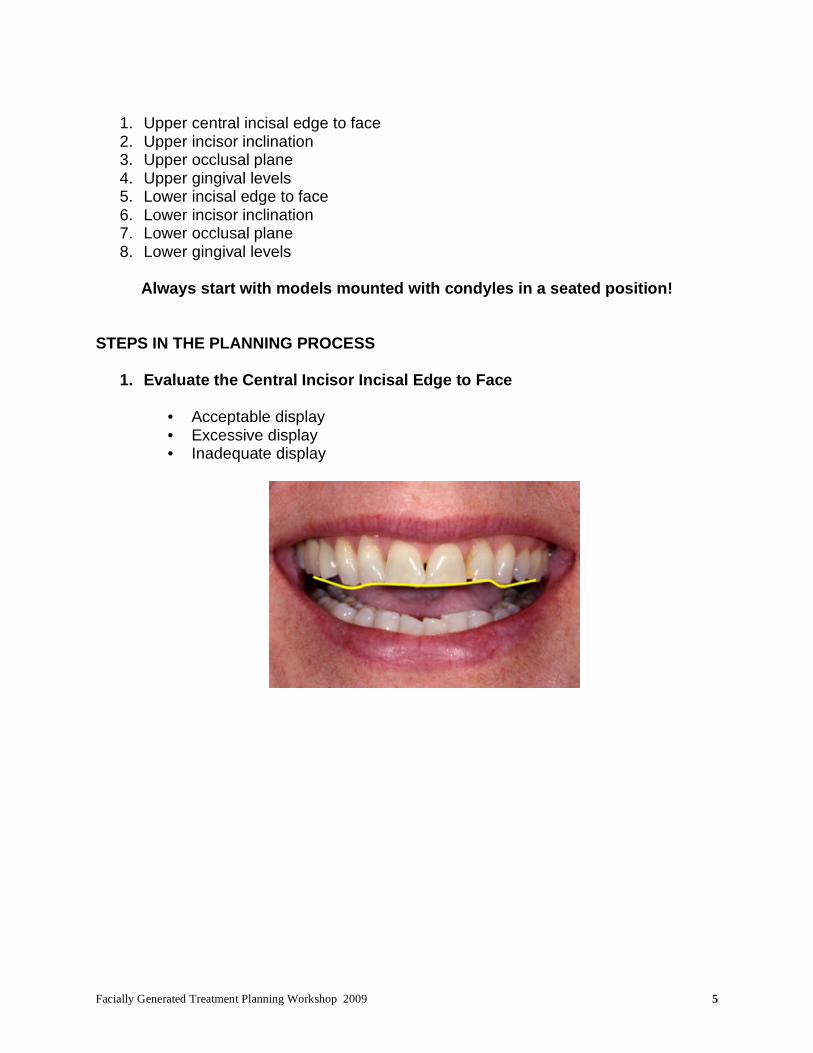
1. Upper central incisal edge to face 2. Upper incisor inclination 3. Upper occlusal plane 4. Upper gingival levels 5. Lower incisal edge to face 6. Lower incisor inclination 7. Lower occlusal plane 8. Lower gingival levels
Always start with models mounted with condyles in a seated position!
STEPS IN THE PLANNING PROCESS
1. Evaluate the Central Incisor Incisal Edge to Face
• Acceptable display • Excessive display • Inadequate display

Facially Generated Treatment Planning Workshop 2009 6
2. Maxillary Incisor Inclination
• Correct • Proclined • Reclined
3. Evaluate the Maxillary Occlusal Plane Relative to the Ideal Maxillary Central Incisor Position
• Level • Incisor coronal to posterior • Incisor apical to posterior
Treatment Options to Level Plane
• Alter anteriors • Alter posteriors

Facially Generated Treatment Planning Workshop 2009 7
4. Determine Ideal Gingival Levels
• Correct tooth proportion • Acceptable tissue display • Symmetry
Once the fundamental parameters of tooth position and gingival levels are determined for the maxillary arch, it is now time to correct the esthetics and function of the mandibular arch.
5. Evaluate the Mandibular Central Incisal Edge To Face
• Acceptable display • Excessive display • Not visible

Facially Generated Treatment Planning Workshop 2009 8
KEY: On the mandibular arch, the incisors can be positioned at several levels and be acceptable. This means in the mandibular arch it is often possible to level the occlusal plane acceptably with either option.
6. Mandibular Incisor Inclination
• Correct • Proclined • Reclined
7. Evaluate the Mandibular Occlusal Plane
• Level • Incisor coronal to posterior • Incisor apical to posterior
Facially Generated Treatment Planning Workshop 2009 9
Treatment Options
• Alter anteriors • Alter posteriors
How Will We Decide? • Crown length • Which teeth need restorations
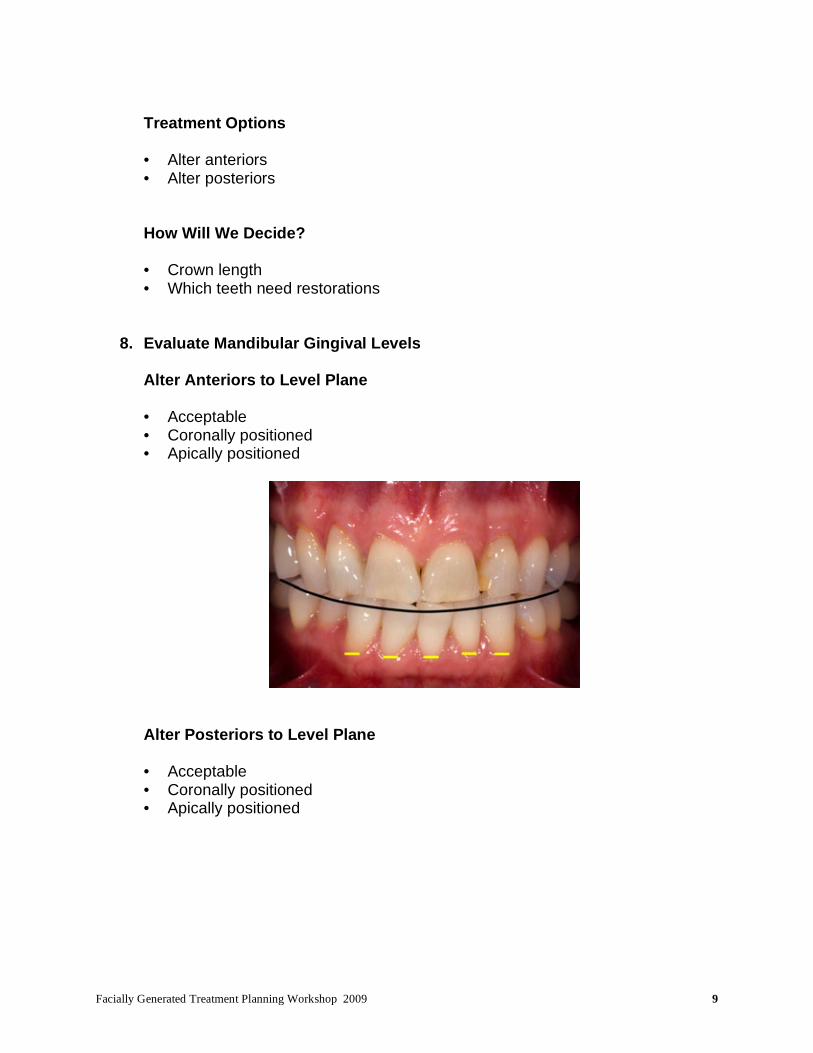
8. Evaluate Mandibular Gingival Levels
Alter Anteriors to Level Plane
• Acceptable • Coronally positioned • Apically positioned
Alter Posteriors to Level Plane
• Acceptable • Coronally positioned • Apically positioned

Facially Generated Treatment Planning Workshop 2009 10
How will the gingival levels need to change when the different options for leveling the occlusal plane are considered:
• Alter anteriors to match posteriors • Alter posteriors to match anteriors
Often evaluating which teeth need or do not need restoration will clarify the choice of how to level the mandibular plane, i.e. alter anterior teeth vs. posterior teeth. Always start with models mounted with condyles in a seated position!
9. Evaluate Which Teeth Need Restorations?
• Maxillary anteriors • Maxillary posteriors • Mandibular anteriors • Mandibular posteriors
Does knowing which teeth need restoration, aid in determining how to level the occlusal plane?
10. Once the Occlusal Planes are Level, Determine How to Create an Acceptable Occlusal Relationship Between the Arches
Our focus so far has been primarily on leveling occlusal planes and correcting crown length. Now let’s integrate all the areas of dentistry into our planning.

Facially Generated Treatment Planning Workshop 2009 11
DEEP OVERBITE ON A PATIENT REQUIRING RESTORATION OF HIS ANTERIOR TEETH
NO OVERBITE ON A PATIENT REQUIRING RESTORATION OF HIS ANTERIOR TEETH

Facially Generated Treatment Planning Workshop 2009 12
PHASING TREATMENT
The most common challenge to phasing is tooth position The most common solution is to correct tooth position transitionally
SEQUENCING THE PLANNING PROCESS
Esthetics - Function - Structure - Biology 1a. Evaluate the Central Incisor Incisal Edge to Face
• Acceptable • Excessive display • Inadequate display
1b. Midline
• Acceptable • Canted

Facially Generated Treatment Planning Workshop 2009 13
2. Maxillary Inclination of the Anterior Teeth
• Acceptable • Proclined • Reclined
Nasolabial Angle
• Acceptable (85° - 105°) • Acute • Obtuse
3a. Evaluate the Maxillary Occlusal Plane Relative to the Ideal Maxillary Central Position:
• Level • Incisor coronal to posterior • Incisor apical to posterior
3b. After identification of the central incisor position, decide where to place the lateral

Facially Generated Treatment Planning Workshop 2009 14
incisors, cuspids, premolars, and molars, buccal cusps only. The position of the laterals, cuspids, and buccal cusps of premolars and molars is an esthetic decision (Smile Line).
4a. Gingival Levels
• Acceptable • Coronal to ideal • Apical to ideal
Using the desired incisal edge position as a reference, evaluate the gingival margins. KEY: the gingival margins are positioned to create the desired tooth size relative to the incisal edge. KEY: the incisal edge is not positioned to create the correct tooth size relative to free gingival margin levels. Using gingiva as a reference to position the incisal edges is dangerous because gingiva can move with eruption or recession. 4b. Determine Ideal Gingival Levels:
• Width/length ratio of teeth • Desired gingival display • Symmetry
Facially Generated Treatment Planning Workshop 2009 15
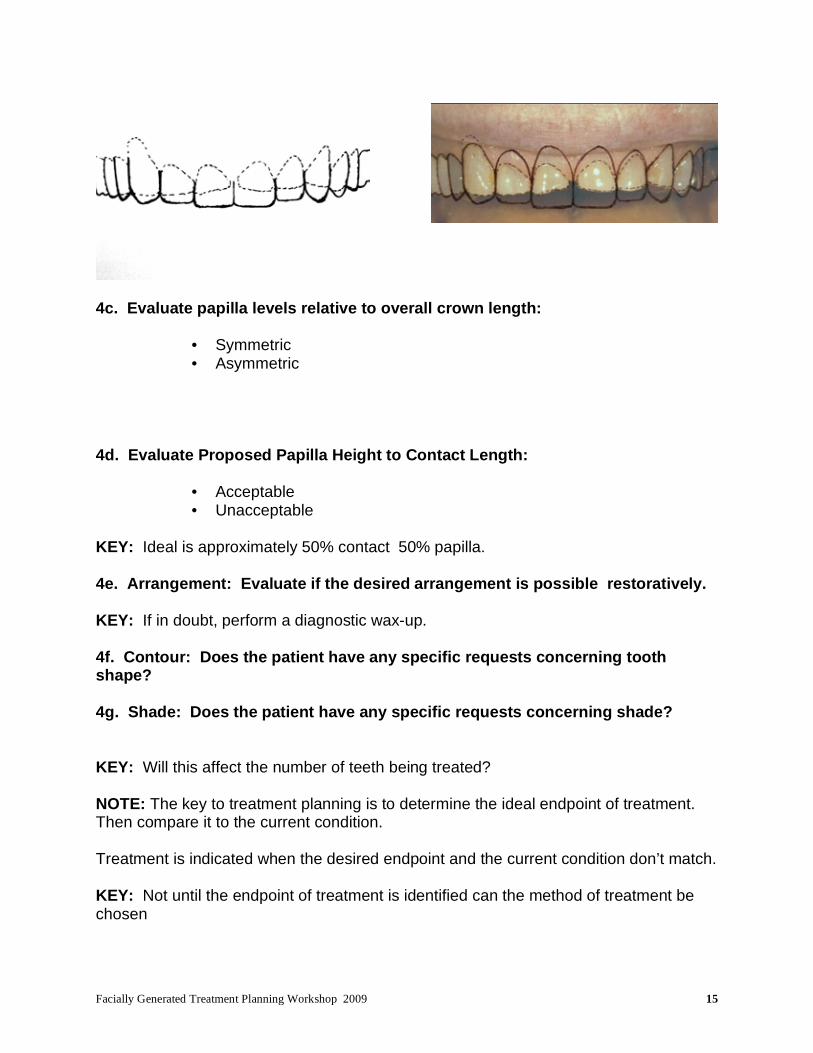
4c. Evaluate papilla levels relative to overall crown length:
• Symmetric • Asymmetric
4d. Evaluate Proposed Papilla Height to Contact Length:
• Acceptable • Unacceptable
KEY: Ideal is approximately 50% contact 50% papilla. 4e. Arrangement: Evaluate if the desired arrangement is possible restoratively. KEY: If in doubt, perform a diagnostic wax-up. 4f. Contour: Does the patient have any specific requests concerning tooth shape?
4g. Shade: Does the patient have any specific requests concerning shade? KEY: Will this affect the number of teeth being treated? NOTE: The key to treatment planning is to determine the ideal endpoint of treatment. Then compare it to the current condition. Treatment is indicated when the desired endpoint and the current condition don’t match. KEY: Not until the endpoint of treatment is identified can the method of treatment be chosen
Facially Generated Treatment Planning Workshop 2009 16
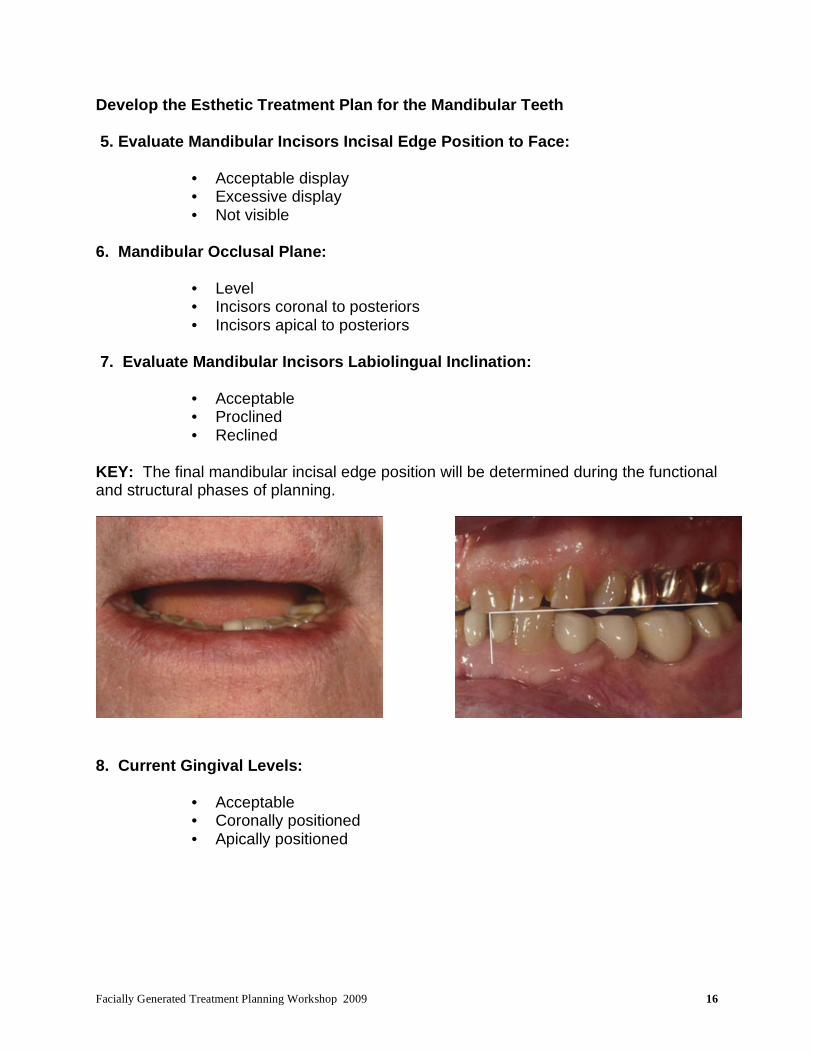
Develop the Esthetic Treatment Plan for the Mandibular Teeth 5. Evaluate Mandibular Incisors Incisal Edge Position to Face:
• Acceptable display • Excessive display • Not visible
6. Mandibular Occlusal Plane:
• Level • Incisors coronal to posteriors • Incisors apical to posteriors
7. Evaluate Mandibular Incisors Labiolingual Inclination:
• Acceptable • Proclined • Reclined
KEY: The final mandibular incisal edge position will be determined during the functional and structural phases of planning.
8. Current Gingival Levels:
• Acceptable • Coronally positioned • Apically positioned

Facially Generated Treatment Planning Workshop 2009 17
How Will the Gingival Margins Need to Change when the Different Options for Leveling the Occlusal Plane are Considered?
a. Altering anteriors to level occlusal plane
• Acceptable • Coronally positioned • Apically positioned
b. Altering posterior to level occlusal plane
• Acceptable • Coronally positioned • Apically positioned
9. Which Teeth Need Restoration?
• Maxillary anteriors • Maxillary posteriors • Mandibular anteriors • Mandibular posteriors
10. Once the Occlusal Planes are Level, Determine how to Create an Acceptable Occlusal Relationship Between the Arches
Facially Generated Treatment Planning Workshop 2009 18
Steps to Integrating Function and Esthetics
Evaluate TMJ’s and muscles
• Make centric relation record and mount models My definition of centric relation: The positions of the condyle when the lateral pterygoid is relaxed and the elevator muscles contract with the disk properly aligned. KEY: Can the desired esthetic changes be made without altering the occlusion? Steps in Correcting the Occlusion Transfer the Esthetic Changes in Maxillary Tooth Position to the Upper Model.
a. Level the mandibular occlusal plane
• Alter mandibular incisor position • Alter mandibular posterior position
KEY: Will leveling the occlusal planes create an acceptable anterior relationship?
• If the answer is yes and the leveling involved only the mandibular incisors then the existing vertical dimension can be retained.
• If the answer is no or the leveling involved mandibular posterior teeth, the existing vertical dimension may need to be altered.
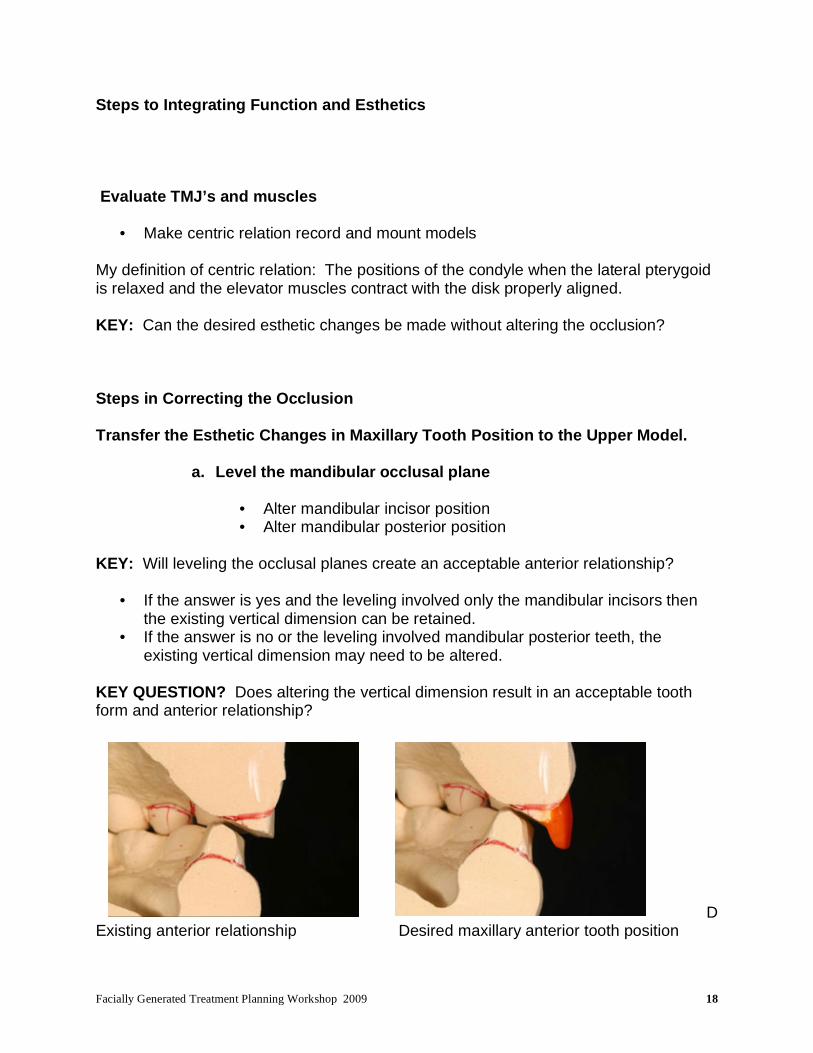
KEY QUESTION? Does altering the vertical dimension result in an acceptable tooth form and anterior relationship?
D
Existing anterior relationship Desired maxillary anterior tooth position

Facially Generated Treatment Planning Workshop 2009 19
Open vertical Wax lingual to contact. Unacceptable lingual tooth form
Reshape lingual Close vertical and add to facial of lower
to correct entire contact
Final corrected anterior relationship showing how much posterior teeth will need to be altered

Facially Generated Treatment Planning Workshop 2009 20
STRUCTURE Choose the type of restoration for restoring teeth and tooth replacement. Anterior Teeth
• Bonding • Veneers • Bonded all ceramic crowns • Luted all ceramic crowns • Metal ceramic crowns
Posterior Teeth • Direct • Inlays • Onlays • Crowns
Missing Teeth
• Implants • Fixed partial dentures • Removable partial dentures
Criteria to Evaluate Structurally
• Current crown length • Crown length after any gingival changes are performed for esthetics • Current ferrule amount • Does space exist for a build-up? • How will any crown lengthening for structural purposes alter the esthetics?

Facially Generated Treatment Planning Workshop 2009 21
Methods for Increasing the Retention of Restorations
• Build-up • Crown lengthen • Forced eruption • Bond the restoration
Crown length after gingival alterations for esthetics
Space does exist for a build-up of acceptable prep length
Facially Generated Treatment Planning Workshop 2009 22
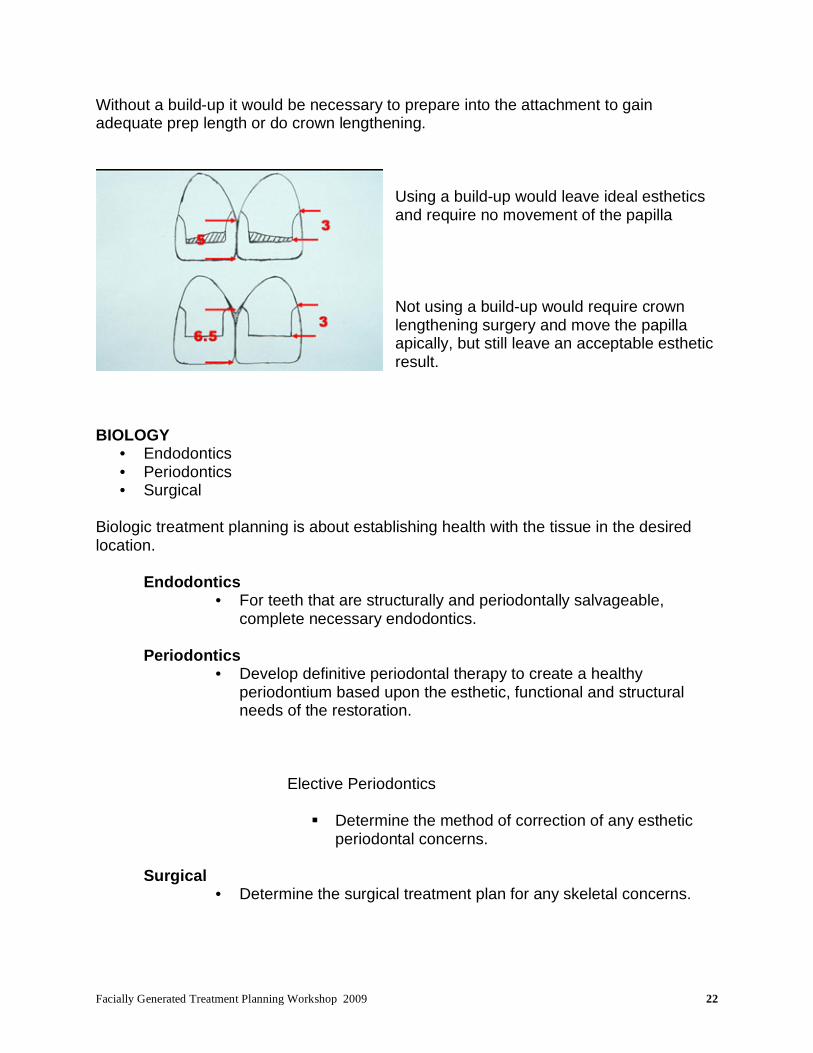
Without a build-up it would be necessary to prepare into the attachment to gain adequate prep length or do crown lengthening.
Using a build-up would leave ideal esthetics and require no movement of the papilla Not using a build-up would require crown lengthening surgery and move the papilla apically, but still leave an acceptable esthetic result.
BIOLOGY
• Endodontics • Periodontics • Surgical
Biologic treatment planning is about establishing health with the tissue in the desired location.
Endodontics
• For teeth that are structurally and periodontally salvageable, complete necessary endodontics.
Periodontics
• Develop definitive periodontal therapy to create a healthy periodontium based upon the esthetic, functional and structural needs of the restoration.
Elective Periodontics
Determine the method of correction of any esthetic periodontal concerns.
Surgical
• Determine the surgical treatment plan for any skeletal concerns.

Facially Generated Treatment Planning Workshop 2009 23
SEQUENCING OF THERAPY 1. Acute problems first 2. Whichever component seems most logical and facilitates the next phase of treatment, provided the result can be clearly identified, communicated and achieved for the pertinent phase.

Facially Generated Treatment Planning Workshop 2009 24
THE ESTHETIC EXAMINATION DIGITAL PHOTOGRAPHY Choosing and Setting Your Digital Camera Choosing a Camera
Nikon D-100 and D-70 and D-50
• 6 megapixel • Nikon 105 mm macro • Nikon SB-29S
Exposure control is all manual, SB-29S doesn’t work TTL on Nikon bodies Fuji S-2 Pro
• 6 megapixel sensor (12 megapixel interpolated resolution) • Nikon 105 mm macro • Nikon SB-29S
Flash does work TTL Canon EOS-20D
• 8 megapixel • Canon 100 mm macro • Canon MR 14-EX • Canon MT 24-EX
Excellent white balance control for color Canon EOS (Digital Rebel)
• 8 megapixel • Canon 100 mm macro • Canon MR 14-EX • Canon MT 24-EX
White Balance
• Auto AWB

Facially Generated Treatment Planning Workshop 2009 25
• Manual (Sun 5500K, Shade 7500K, Cloudy 6500K, Incandescent 2800K, Fluorescent 3800K, Flash 5500K)
• Custom (6000K) Setting the white balance on Flash is always safe. Setting Exposure (Manually vs. ETTL) Setting Exposures Manually
• Adjust the histogram by adjusting the F-stop • Point and shoot cameras are unable to shoot at F-stops that provide great depth
of field Setting Exposure Electronically with TTL Metering
• Adjust the histogram with exposure compensation Shade Selection
• Hue • Chroma • Value • Texture • Character

Facially Generated Treatment Planning Workshop 2009 26
Color Correcting Digital The digital workspace has several problems which must be managed to correct color. First, monitors all vary in their color, and in fact change while in use. To correct this, a monitor calibration software and spider must be used, and redone every few months.
Products: GretagMacBeth – Eye-One Display Next, your printers ability to reproduce the colors on your monitor must be corrected. This is done by creating ICC profiles which are used during the printing process.

Facially Generated Treatment Planning Workshop 2009 27
Steps for Profiling Your Printer
• Get profile for your printer and paper from printer manufacturer or have one made (Chromix at www.Chromix.com) call Rick Hatmaker at Chromix 206-985-6837 extension 7.
• Print from a color aware program such as Adobe Photoshop Go to file – print preview – select print space and apply profile for your printer and paper – print – correct settings on your printers driver and select no color management – print . PHOTOGRAPHIC VIEWS
Facially Generated Treatment Planning Workshop 2009 28
Views 1, 2, 4, and 4: Full face view - lips at rest and full smile, Profile view - lips at rest and full smile
• Patient is standing or sitting in office type chair. • Head upright and level. • Position camera at patient’s eye level. • Place a black background four to six feet behind patient (matte black foam
core poster board held by assistant). • Hold camera horizontal. • Adjust the focus on the patient’s eyes so the magnification shows to the
top of the head and two to three inches below the chin. • Place the patient’s nose in the center of the photograph vertically and
horizontally. • Turn patient 90 degrees for profile views.
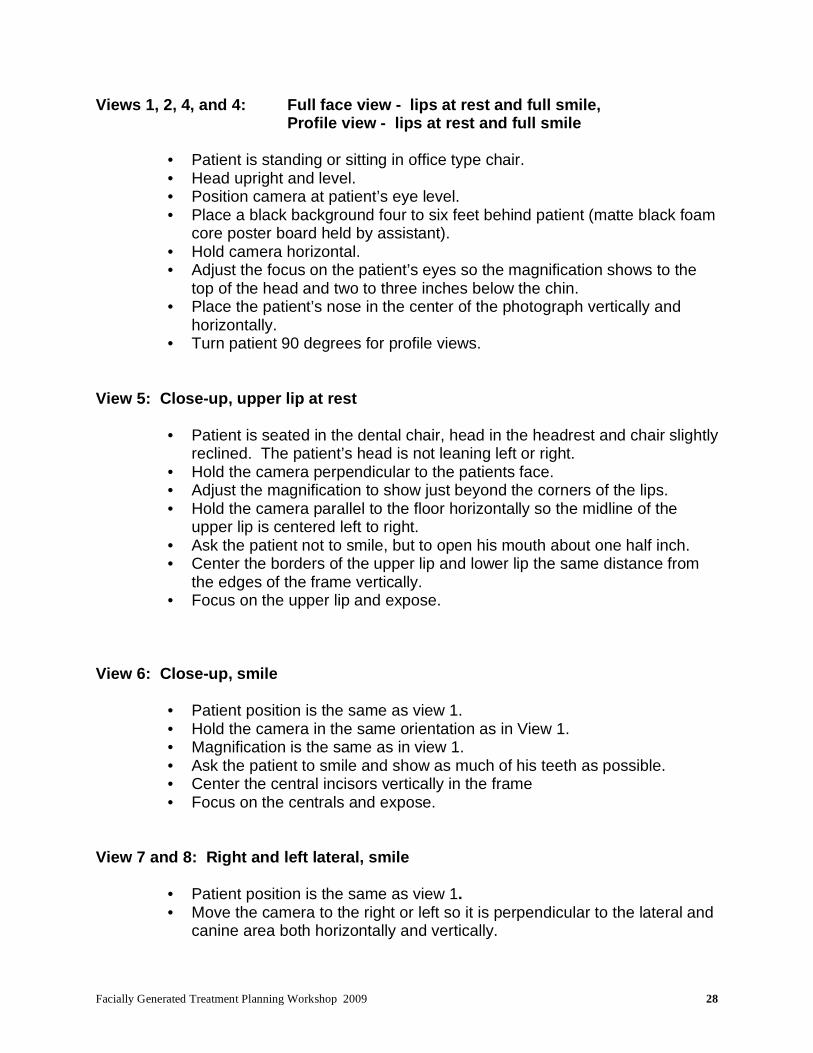
View 5: Close-up, upper lip at rest
• Patient is seated in the dental chair, head in the headrest and chair slightly reclined. The patient’s head is not leaning left or right.
• Hold the camera perpendicular to the patients face. • Adjust the magnification to show just beyond the corners of the lips. • Hold the camera parallel to the floor horizontally so the midline of the
upper lip is centered left to right. • Ask the patient not to smile, but to open his mouth about one half inch. • Center the borders of the upper lip and lower lip the same distance from
the edges of the frame vertically. • Focus on the upper lip and expose.
View 6: Close-up, smile
• Patient position is the same as view 1. • Hold the camera in the same orientation as in View 1. • Magnification is the same as in view 1. • Ask the patient to smile and show as much of his teeth as possible. • Center the central incisors vertically in the frame • Focus on the centrals and expose.
View 7 and 8: Right and left lateral, smile
• Patient position is the same as view 1. • Move the camera to the right or left so it is perpendicular to the lateral and
canine area both horizontally and vertically.

Facially Generated Treatment Planning Workshop 2009 29
• Adjust the magnification so that corner of the mouth to the opposite central is visible.
• Center the embrasure between the lateral and cuspid in the middle of the frame horizontally.
• Adjust the framing so the middle of the centrals is in the center of the frame vertically at one border and the corner of the mouth is in the vertical center of the frame at the other border.
• Ask the patient to smile fully • Focus on the lateral and cuspid and expose.
Intraoral Views With The Lips Retracted KEYS:
• Use the largest end of the wire retractors as possible. • Gently but firmly pull retractors out laterally and forward away from the
face. This pulls the cheeks away from the teeth. • Do not pull the retractors back towards the ears, as this pulls the lips and
cheeks against the teeth. • For occlusal views with mirrors, rotate the retractor to pull the lip away
from the arch being photographed. • For lateral views with mirrors, after placing the mirror, remove the retractor
on the mirror side, and relax the stretch on the remaining retractor, so the mirror can adequately retract the lip.
Views 9 and 10: Retracted view of upper and lower teeth
• Position dental chair and patient, with head in headrest, as in previous photos.
• Camera is perpendicular to the patient’s face and the horizontal axis is parallel to the floor.
• Magnification adjusted so the posterior teeth are visible back to the molars.
• Midline centered horizontally. • Center the midpoint of the central incisors vertically. • Focus on the cuspids and expose. • For view 10, have the patient open until there is a 4 mm space between
upper and lower teeth. View 11: Close-up view of the maxillary anterior teeth

Facially Generated Treatment Planning Workshop 2009 30
• Patient position is the same as previous photos. • Have patient open mouth one half inch, or until lower teeth are out of view. • Use retractors to lift upper lip vertically, exposing maxillary incisors and
gingival. • Adjust magnification to show just maxillary six anteriors. • Hold camera perpendicular to face. • Center midline horizontally. • Focus on the centrals and expose.
View 12: Close-up view of mandibular anterior teeth
• Patient position is the same as in previous photos. • Have patient open mouth one half inch, or until maxillary teeth are out of
view. • Use retractors to move lower lip down, exposing mandibular incisors and
gingival. • Adjust magnification to show just mandibular six anteriors. • Center midline horizontally. • Place the incisal edges of the mandibular anteriors just above the middle
of the frame vertically. • Focus on the centrals and expose.
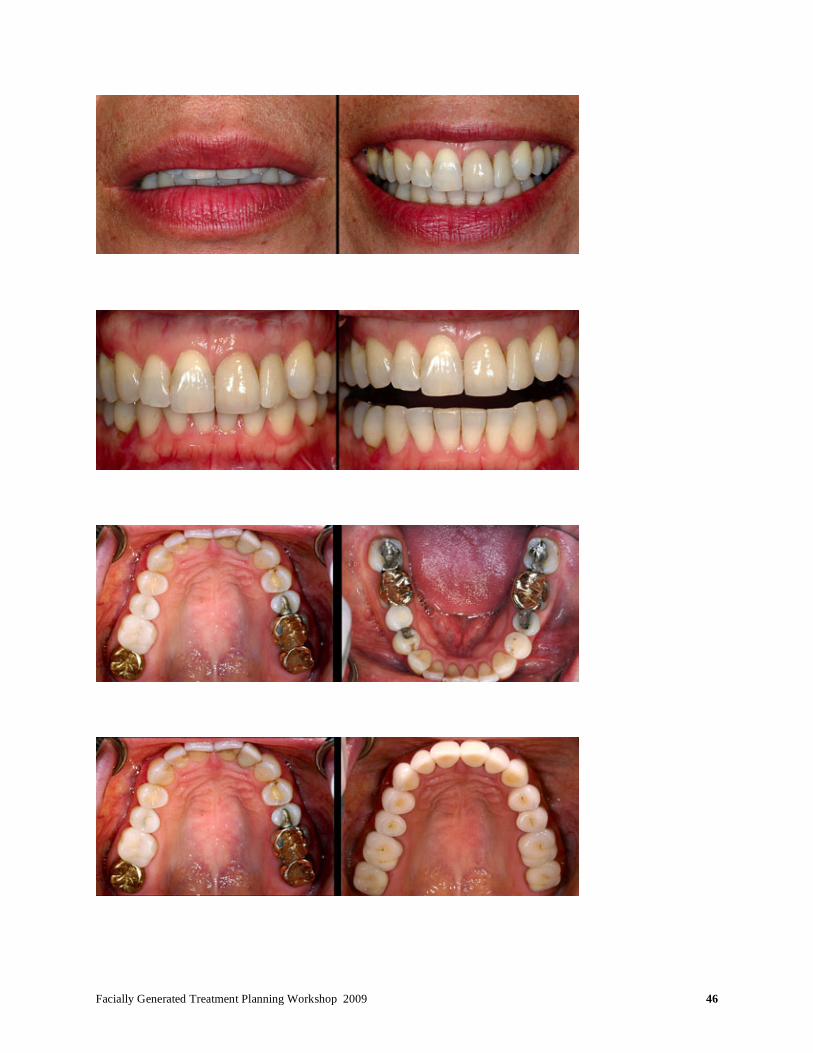
View 13: Mirror view maxillary occlusal
• Patient position is the same as in previous photos. • Place retractors. • Warm occlusal mirror in water and dry to prevent fogging. • Place mirror with far edge distal to second molars and hold off occlusal
surfaces of second molars. • Ask patient to open wide. • Ideally, the mirror is at a 45 degree angle to the occlusal plane of the arch. • Adjust the magnification to get the buccal of molars and labial of centrals,
but as little of the lips or retractors as possible. • Have the assistant roll the retractors so the upper lip is away from the
anterior teeth. • Center the arch in the frame. • Focus on the premolars and expose.

Facially Generated Treatment Planning Workshop 2009 31
• In some instances, the maxillary occlusal view is easier with the patient fully reclined and the photographer standing behind the patient’s head shooting into the mirror.
View 14: Mirror view mandibular occlusal
• Position patient, head tilted back in headrest, so dental chair is reclined 45 degrees.
• Retractors placed. • Warm mirror and dry to prevent fogging. • Place mirror so far edge is distal to second molar and hold mirror off
occlusal surface of molar. • Ask patient to open wide. • Ideally, adjust mirror so it is at a 45 degree angle to the occlusal plane of
the mandibular arch. • Adjust magnification to get buccal of molars and labial of anteriors, but as
little of the retractors or cheeks as possible. • Have the assistant roll the retractors to pull the lower lip away from the
mandibular anteriors. • Center the arch in the frame. • Focus on the premolars and expose.
View 15, 16, 17 and 18: Left and right lateral views in occlusion, teeth separated
• Patient seated in standard photo position, with head in headrest. • Place retractors. • Warm and dry lateral mirrors. • Pull retractors on side to be photographed so cheek is stretched out, while
at the same time relaxing the opposite retractors. • Insert mirror back to second molar and remove the retractor on mirror
side. • Use mirror to retract cheek. Ideally, place mirror 45 degrees to posterior
teeth and hold it away from buccal of second molars. • Adjust magnification to show from second molar to central incisor. • Hold camera perpendicular to buccal surfaces of posterior teeth. • Center occlusal plane of molars vertically on one edge of the frame and
the center of the maxillary central incisors vertically on the other end of the frame.
• Focus on the premolars and expose. • Have patient open 3-4 mm and re-shoot both right and left sides.

Facially Generated Treatment Planning Workshop 2009 32
View 19: Close-up view of End-to-End and/or Crossover
• Position dental chair and patient, with head in headrest, as in previous photos.
• Camera is perpendicular to the patient’s face and the horizontal axis is parallel to the floor.
• Magnification adjusted so the posterior teeth are visible back to the molars.
• Midline centered horizontally. • Center the midpoint of the central incisors vertically. • Ask patient to move teeth to desired position • Focus on the cuspids and expose.
View 20 and 21: Other Views (taken as needed) – Max & Mand Marked Occlusals
• Patient seated in standard photo position, with head in headrest. • Place retractors. • Warm mirror and dry to prevent fogging. • Place mirror so far edge is distal to second molar and hold mirror off
occlusal surface of molar. • Ask patient to open wide. • Ideally, adjust mirror so it is at a 45 degree angle to the occlusal plane of
the arch being captured. • Adjust magnification to get buccal of molars and labial of anteriors, but as
little of the retractors or cheeks as possible. • Have the assistant roll the retractors to pull the lip away from the anteriors. • Center the arch in the frame. • Focus on the premolars and expose.
View 22: Close-up, exaggerated “E”
• Patient position is the same as view 1. • Hold the camera in the same orientation as in View 1. • Magnification is the same as in view 1. • Ask the patient to say and hold the “EEEEEEEEEE” sound • Center the central incisors vertically in the frame • Focus on the centrals and expose.

Facially Generated Treatment Planning Workshop 2009 33
Helpful Hints
• Magnification: Use the focus adjustment to set the magnification before framing and exposing each photograph.
• Focus: Once the magnification is set, adjust the actual focus by moving in and out with the camera, not by changing the camera focus. Be sure to stabilize the patient’s head in the headrest.
• Framing: Try to keep the camera perpendicular to the frontal plane of the patient’s face for all views so that the photos show the same perspective you see in a normal conversation with the patient.
• Retraction: The goal is to always keep retractors, mirrors, lips, cheeks, etc. out of the borders of the pictures. Before exposing each photo, check the borders for any extraneous items.
• Flash Location:
1. For ring lights, dual flash, or fixed flash cameras, no adjustment is necessary.
2. For single point rotating bracket cameras:
• Full face: flash at 12 o’clock • Close-up smile: flash at 3 or 9 o’clock • Retracted frontal view: flash at 3 or 9 o’clock • Any retracted lateral view: flash toward anterior • Any mirror view: flash toward mirror

Facially Generated Treatment Planning Workshop 2009 34
FACIAL EVALUATION Facial Proportion
• Glabella to base of nose • Base of nose to chin
In an ideal face Mid-face 52%, Lower face 48%
• If the lower face is shorter than the midface, the patient may benefit esthetically from the chin moving inferiorly
• If the lower face is longer than the midface, the patient may benefit esthetically from the chin moving superiorly
Lip Fullness and Symmetry
• Upper lip symmetry - an asymmetric upper lip will result in an asymmetric tooth and gingival display
• Upper lip fullness - a full upper lip makes the teeth look smaller and darker - a thin upper lip makes the teeth look larger and whiter
• Lower lip symmetry - an asymmetric lower lip results in an incisal plane that
may look canted • Lower lip fullness -a full lower lip makes the teeth look smaller
-a thin lower lip makes the teeth look larger a. Thin lips, convex profile, high lip line, tendency toward smaller teeth:
• 9.0 to 10.5 mm
b. Thick lips, flat profile, long lip, tendency toward larger teeth: • 10.5 to 12.0 mm.
Esthetic Plane (Rickets “E” Plane) – Tip of nose to chin
• Ideal: Upper lip 4 mm behind plane, lower lip 2 mm behind plane Useful for determining if problem is soft tissue, dental or both.
• Concave profile (nose and chin dominate) teeth can be made larger

Facially Generated Treatment Planning Workshop 2009 35
• Convex profile (lips and teeth dominate) teeth may need to me made smaller Facial Changes with Age
• Decreased maxillary tooth display • Increased mandibular tooth display
TOOTH POSITION The Five Esthetic Keys1:
• Midline • Incisal edge position • Incisal plane/smile line • Occlusal plane • Gingival level
MIDLINE
• Location to face • Philtrum = midline of face • Papilla = midline of teeth • Contact = most variable and visible of midline elements Causes of midline asymmetries:
• Missing teeth • Skeletal asymmetries
KEY: All facial embrasures parallel the facial midline

Facially Generated Treatment Planning Workshop 2009 36
INCISAL EDGE POSITION OF CENTRALS
Evaluate Tooth Display with Lip At Rest Average tooth display at rest of 1-3 mm is pleasing in most people.
Caucasian females2
o Age 30 3.37 mm maxillary incisor display at rest
0.50 mm mandibular incisor o Age 50 0.95 mm maxillary incisor display at rest
2.00 mm mandibular incisor o Age 70 0.00 mm maxillary incisor display at rest
2.95 mm mandibular incisor Evaluate maximum lip movement with laughing or “E” sound. Average lip moves 6-8 mm from rest to full smile. A 1-3 mm tooth display at rest and 6-8 mm lip movement give a range of 7-11 mm of tooth and tissue exposure on the average. Ideal Goal: During full smile, show free gingival margin of centrals that are 9.5-11 mm. The less the lip moves during a smile, the more tooth will have to show at rest to achieve enough tooth display when smiling. • The greater the lip movement during a smile, the less tooth can show at rest to avoid excessive tooth and tissue display when smiling.
Tooth Position and Phonetics
• “F and V” sounds – to evaluate maxillary anterior incisal edge position to lower lip • “S” sounds – to evaluate relationship of maxillary anterior teeth to mandibular
incisors • “Th” sounds – to evaluate cingulum contour to tongue relationship

Facially Generated Treatment Planning Workshop 2009 37
TOOTH SHADING AND COLOR
• Desired changes? SMILE APPEARANCE
• Reverse smile line • Excessive
INCISAL PLANE The line formed by the tips of the canines and the incisal edges of the anterior teeth. Ideal Goal: A harmonious relationship should exist between the curvature of the lower lip and the line of the teeth. Incisal Plane Evaluation: 1. Step I: Incisal plane to face: (lower lip)
• Acceptable • Unacceptabel
2. Step II: Incisal plane to molars
• Level • Not level
3. Step III: Molars to eyes
• Acceptable • Unacceptable
4. Step IV: Crown length
• Acceptable • Unacceptable

Facially Generated Treatment Planning Workshop 2009 38
If the incisal plane is incorrect and the molars are correct, treatment can be limited to the anterior teeth, consider: 1. Orthodontics 2. Periodontal surgery and restoration If the incisal plane is incorrect and the occlusal plane is incorrect, it means the entire maxilla is canted, consider: Causes of incisal plane problems:
1. Trauma 2. Tooth wear 3. Skeletal OCCLUSAL PLANE The line formed by the tips of the canines and the buccal cusps of the posterior teeth. ARCH FORM – BUCCAL CORRIDOR
Medio-lateral position of posterior teeth (negative space, buccal corridor).
Ideal Goal: “U” shaped arch.

Facially Generated Treatment Planning Workshop 2009 39
The posterior teeth play an important role in filling out the buccal corridor during a smile. However, there is not one correct look. Evaluate arch form by using negative space from canine back during a smile and by looking at occlusal view of maxillary arch. GINGIVAL LEVELS
• Gingiva to lip relationship • Gingival symmetry
Differential diagnosis for a gummy smile: 1. Short upper lip 2. Hypermobile lip
3. Vertical maxillary excess (VME) 4. Anterior over-eruption 5. Wear and compensatory eruption 6. Altered active eruption 7. Altered passive eruption
• If tooth display at rest is normal and crown length is normal, but the patient has a gummy smile, patient has a hypermobile lip. • If patient has excessive tooth display at rest, VME, short upper lip or anterior over-eruption. E. Evaluate FACIAL HEIGHT • From glabella to base of nose and from base of nose to bottom of chin with face at rest and teeth in occlusion, should be equal distance.
• If excess tooth display exists at rest and lower facial height, is greater than mid facial height, probably VME and maxilla can be impacted if facial proportion of width to length will be acceptable.
• If excess tooth display at rest but mid and lower facial heights are equal, probably short upper lip or anterior over-eruption.

Facially Generated Treatment Planning Workshop 2009 40
DEVELOPING THE OCCLUSION
1. Evaluate the TMJs
Load Test
Translation
Stability
2. Evaluate the muscles
History
Palpation
Test against load
3. Evaluate the teeth
Wear
Fractures
Mobility
Attrition - Erosion - Abrasion - Unknown
4. Mount models

Facially Generated Treatment Planning Workshop 2009 41
5. Develop the occlusion
Maxillary anteriors esthetically
Maxillary posteriors esthetically
Mandibular anteriors esthetically and end-to-end protrusive and lateral
Mandibular anteriors at canine end-to-end end-to-end
Develop centric contacts
Alter lingual of maxillary anteriors
Alter occlusals of posterior teeth
Correct pathways of guidance to desired pattern

Facially Generated Treatment Planning Workshop 2009 42

Facially Generated Treatment Planning Workshop 2009 43
Patients with no attrition CR = ICP (MIP)
Anterior guidance
No posterior contacts in excursive movements
PATTERNS OF WEAR AND OCCLUSAL DESIGN
Attrition can only occur when the mandible is moving
Your choices in occlusal design
• Design the guidance to alter mandibular movement
• Tolerate the guidance through force distribution on multiple teeth
Rationale for “Anterior Guidance”
Separate the posterior teeth during eccentric movements
“Weak link” of Anterior Guidance
All force concentrated on very few teeth

Facially Generated Treatment Planning Workshop 2009 44
Rationale for “Group Function”
Distribution of forces over multiple teeth
“Weak link” of Group Function
Increased muscle activity due to more posterior tooth contact
Attrition Patients
Occlusion with anterior guidance will not stop bruxism - some patients will
however change their pattern of behavior with a change in occlusion so test it in
plastic -
If attrition continues: distribute load on multiple teeth
Trial therapy
• Appliance
• Equilibration
• Restoration (Bonding)
• Provisionals

Facially Generated Treatment Planning Workshop 2009 45
Evaluate for
• Wear facets
• Fractures
• Tooth mobility
• Muscle symptoms
If the patient grinds in trail therapy identify the patterns and positions the patient
grinds and design the occlusion accordingly
POSITIONS to CONSIDER
Retruded (CR) Wear - wear on molars, less on premolars, may be minimal or non-
existent on anteriors
Did the patient continue to grind during trial therapy?
Facially Generated Treatment Planning Workshop 2009 46

Facially Generated Treatment Planning Workshop 2009 47
Pathway wear (restricted) - patient doesn’t reach end-to-end positions
Look at facets on lower anteriors
Lack of horizontal facest = restricted wear
Design using custom incisal guide table
Broad shared contacts in excursions
Check mounted models in ICP - if occlusion fits without anteriors contacting wear
facets it is unlikely that a CR interference is responsible for the wear
Possible etiologies
• Functional wear during chewing
• Neurologic behavior
Test the etiology with a mandibular appliance to see if a similar wear
pattern is revealed

Facially Generated Treatment Planning Workshop 2009 48
Patient reaches end-to-end but not crossover
Use group function for lateral and protrusive guidance
Protrusive only
Use distal of maxillary canines and first premolar against mesial of lower
premolars in group function protrusive guidance
Lateral but not crossover
Use group function on canines and premolars in lateral excursions

Facially Generated Treatment Planning Workshop 2009 49
Pathway but not cross-over

Facially Generated Treatment Planning Workshop 2009 50

Facially Generated Treatment Planning Workshop 2009 51
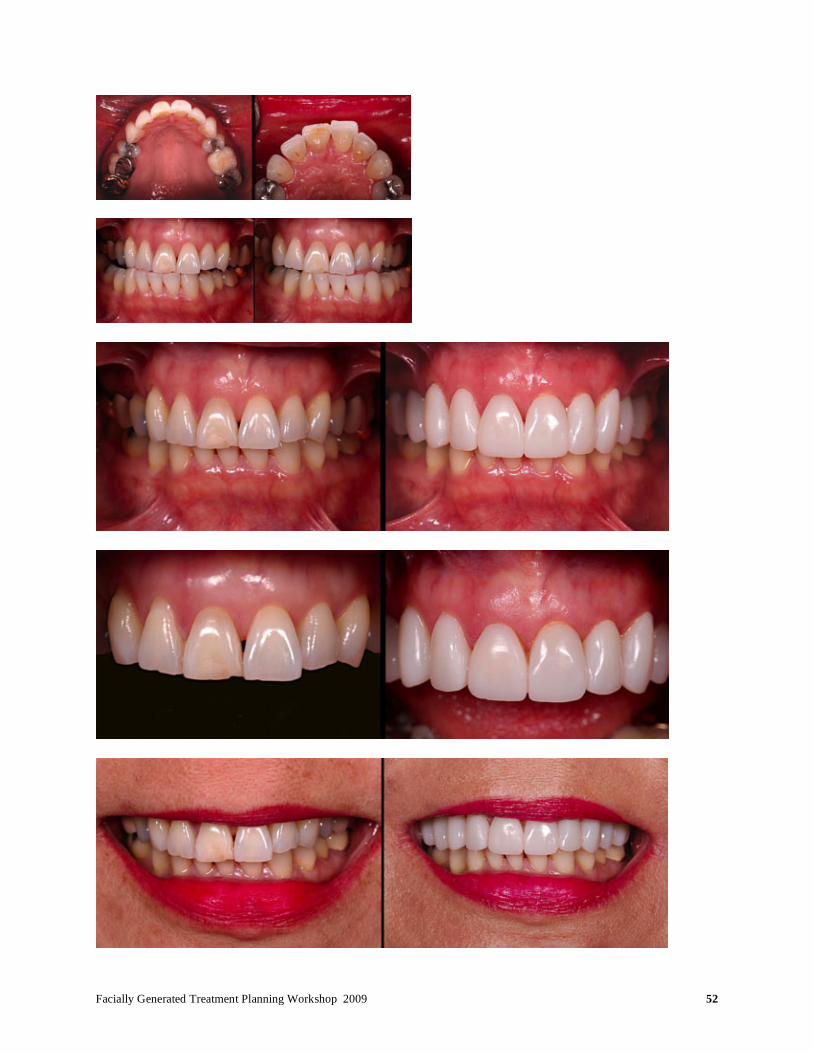
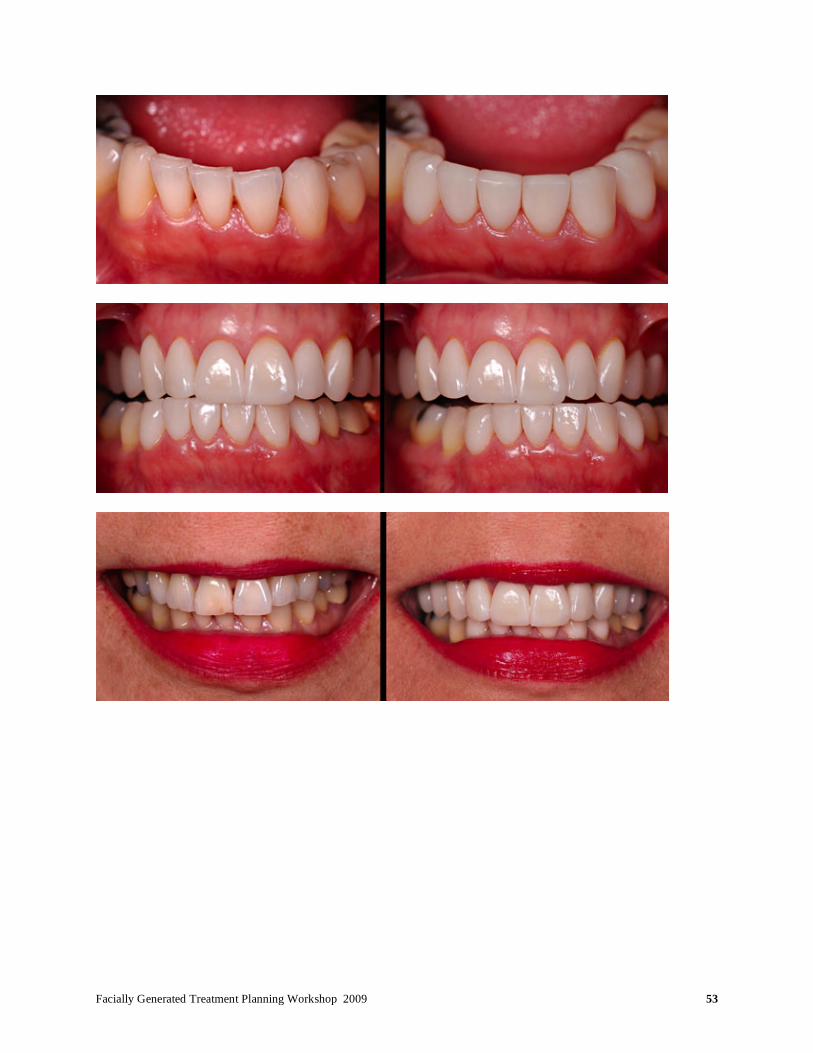
Cross-over - beyond canines
Maxillary centrals notched on mesial or mesial shorter than distal
Facially Generated Treatment Planning Workshop 2009 52
Facially Generated Treatment Planning Workshop 2009 53

Facially Generated Treatment Planning Workshop 2009 54
End-to-End ONLY wear
NO wear on any pathways or posteriors

Facially Generated Treatment Planning Workshop 2009 55

Facially Generated Treatment Planning Workshop 2009 56
The Clinical Exam - TMJ and Muscle Screening
Clinical Failure
• Clinical techniques and materials • Patient response
We can’t control the patient response, but we must try and predict it. What Patients are at the Highest Risk for Clinical Failure?
• Bruxers • TMJ problems • Multiple structurally or periodontally compromised teeth • Psychologically challenging
It is critical to the well being of your practice that you identify these patients prior to treatment and make a conscious decision as to whether you want to treat them. After the Exam
• Treat as is • Mount models • Alter occlusion • Refer
Exam Findings which Indicate a Need to Mount Models or Alter the Occlusion Assuming the exam findings of the TMJ’s to be acceptable. i.e.) if any pain on loading was present, it was decreased with an anterior deprogrammer.
1. Anterior deprogrammer decreased tension or tenderness.
Indicated lateral pterygoid involvement
• Mount models • Consider occlusal correction
2. Muscle palpation tenderness
May be occlusally related

Facially Generated Treatment Planning Workshop 2009 57
Temporalis Muscle
Trapezius
Suboccipital
SCM

Facially Generated Treatment Planning Workshop 2009 58
Digastrics
Hyoids

Facially Generated Treatment Planning Workshop 2009 59
Masseter
Medial Pterygoid Muscle
Lateral Pterygoid Muscle

Facially Generated Treatment Planning Workshop 2009 60
PALPATE JOINTS PALPATE CAPSULE
PALPATE CAPSULE UPON C;LOSURE
TESTING SOURCE OF PAIN BILATERAL MANIPULATION

Facially Generated Treatment Planning Workshop 2009 61
LOAD TEST Leaf Gauge
If the Load Test is Positive: Lateral pterygoid Retrodiscal tissue Internal derangement Cotton rolls - Lucia jig
If the patient is comfortable with load following it is most likely muscle If the patient is not comfortable use a bite plane

Facially Generated Treatment Planning Workshop 2009 62
Initial point of contact in centric relation Functional occlusion
Anterior coupling
Contacts in excursions
Posterior clearance in protrusive

Facially Generated Treatment Planning Workshop 2009 63
TEETH
Is the current occlusion physiologic or pathologic?
PHYSIOLOGIC are you going to alter it? WHERE are you going to alter it?
PATHOLOGIC HOW are you going to alter it?
4 mandibular positions of tooth contact
• Maximum intercuspation (MIP, ICP ……................. not CO unless coincident)
• Excursive pathways anterior and lateral to MIP
• End to End and crossover
• Retruded from MIP Lateral pterygoid muscles are programmed by posterior teeth to permit closure into MIP CHARTING PATTERNS OF WEAR Anterior - Posterior Right - Left - Forward Flat - Cupped Shiny - Satin Sharp - Rounded Areas of Occlusion - Areas NOT in Occlusion Have teeth erupted Has VDO changed

Facially Generated Treatment Planning Workshop 2009 64
Occlusion Diagnosis and treatment Planning JOINTS
Where is the disk? MUSCLES
Are any muscles sore or tender to palpation? TEETH
Is the current occlusion physiologic or pathologic?
PHYSIOLOGIC WHY are you going to alter it? WHERE are you going to alter it?
PATHOLOGIC HOW are you going to alter it?
4 mandibular positions of tooth contact
• Maximum intercuspation (MIP, ICP ……................. not CO unless coincident)
• Excursive pathways anterior and lateral to MIP
• End to End and crossover
• Retruded from MIP
The Masseter, Medial Pterygoid, and Temporalis are ELEVATOR
muscles which seat the condyle when contracted.
The Lateral Pterygoid POSITIONS the condyle by pulling forward producing translation movements.

Facially Generated Treatment Planning Workshop 2009 65
Occlusal Treatment Planning Flow
Based on joint diagnosis
Facially Generated Treatment Planning Workshop 2009 66
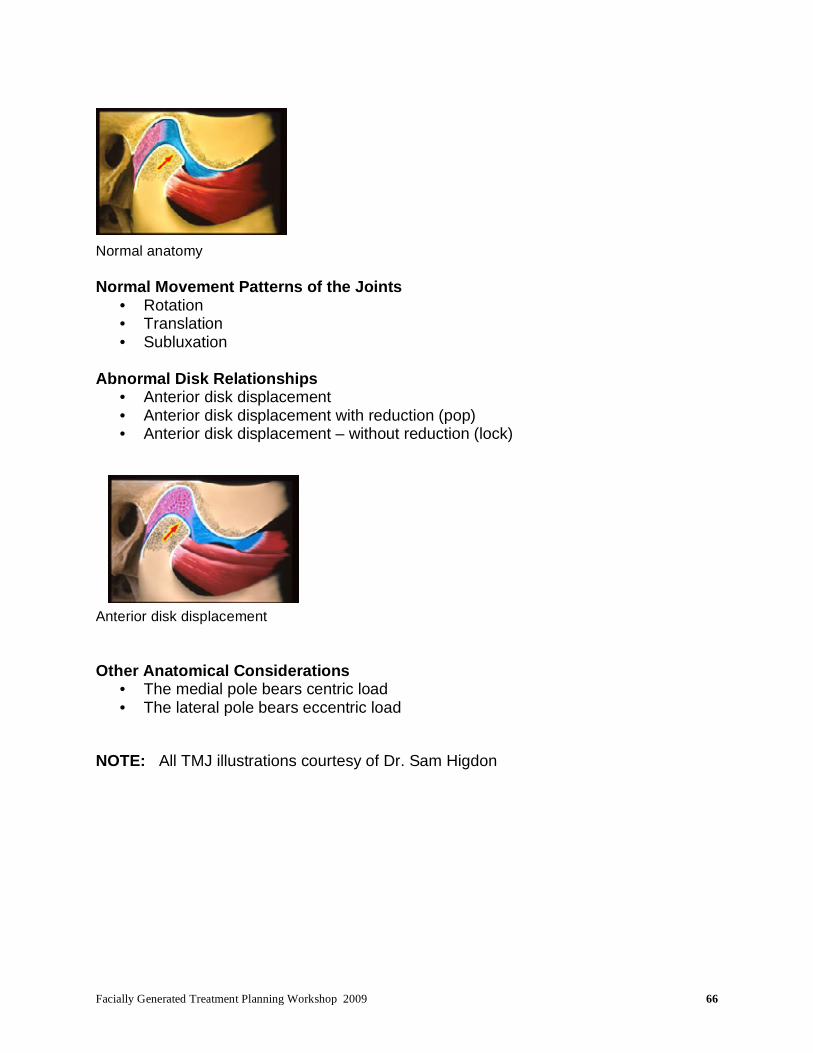
Normal anatomy Normal Movement Patterns of the Joints
• Rotation • Translation • Subluxation
Abnormal Disk Relationships
• Anterior disk displacement • Anterior disk displacement with reduction (pop) • Anterior disk displacement – without reduction (lock)
Anterior disk displacement Other Anatomical Considerations
• The medial pole bears centric load • The lateral pole bears eccentric load
NOTE: All TMJ illustrations courtesy of Dr. Sam Higdon

Facially Generated Treatment Planning Workshop 2009 67
The key to the TMJ exam is to identify if the patients joints have any alterations from normal, and if so, will the alteration make them unpredictable to treat In addition, if the patient is experiencing any discomfort or pain, it is important to identify whether the pain is from the joint or other sources, most commonly muscle. Normal Joint (Stage 1) No joint sounds
• Medial and lateral pole of the disk are in place Diagnosis
• No history of joint sounds • Doppler is quiet on rotation and translation
Occlusal design
• MIP or anterior guidance Intermittent Click (Stage 2)
• Lateral pole is displaced intermittently Diagnosis
• Intermittent history of click • Exam may or may not find click • Doppler will be quiet on rotation but may have noise on translation
Occlusal design
• MIP or anterior guidance

Facially Generated Treatment Planning Workshop 2009 68
Lateral Pole Displacement with Reduction (Stage 3a) Diagnosis
• History of consistent click • Exam will find click or pop • Doppler will be quiet on rotation but will have noise on translation and click
Symptoms Depend Upon Timing of Click
• Late opening click or early closing click most likely to have symptoms Diagnosis if Pain with Movement
• Pain will decrease with stabilization test Occlusal design
• Appliance therapy if joint inflammation present • Once stable - evaluate alteration produced by appliance and match
Lateral Pole Displacement Without Reduction (Stage 3b) Diagnosis
• History of no click or click that went away • Exam will not find click or pop • Doppler will be quiet on rotation but will have noise on translation and no click
Symptoms May Be Likely
• Pain on chewing or movement • Comfortable to loading in centric
Diagnosis if Pain with Movement
• Pain will decrease with stabilization test Occlusal design
• Appliance therapy if joint inflammation present • Once stable - evaluate alteration produced by appliance and match
Facially Generated Treatment Planning Workshop 2009 69
Medial Pole Displacement with Reduction (Stage 4a) Diagnosis
• History of click or pop • Exam will find click or pop • Doppler will have noise on rotation and translation and click
Symptoms Depend Upon Level of Adaptation
• Pain on loading • Pain with movement
Diagnosis if Pain is Present
• Pain will not decrease with stabilization test • Pain will not decrease with Lucia jig
Occlusal design
• Appliance therapy • Once stable - evaluate alteration produced by splint and match
Medial Pole Displacement Without Reduction (Stage 4b) Diagnosis
• History of no click or pop • Exam will not find click or pop • Doppler will have noise on rotation and translation and no click
Symptoms May be Likely
• Pain on chewing or movement • Pain upon loading • Limited opening
Occlusal design
• Appliance therapy • Once stable - evaluate alteration produced by appliance and match

Facially Generated Treatment Planning Workshop 2009 70
Perforation with Acute Degenerative Joint Disease (Stage 5a) Diagnosis Noise - There may be a rough variety of coarse crepitation. This level of crepitus can be palpated and can be heard with a stethoscope. Range - May be normal or reduced. Manipulation - May or may not be painful manipulation. Doppler - There will be a rough degree of coarse crepitation with possible ronchi in the articular space.
• History of crepitus • Exam will find crepitus • Doppler will be noisy at all times • Imaging shows lack of cortical plate
Symptoms Depend Upon Rate of Degeneration
• Joint pain likely as changes occur • Bite changes common
Occlusal Design
• Appliance therapy • Once stable - evaluate alteration produced by appliance and match
Perforation with Chronic Degenerative Joint Disease (Stage 5b) Diagnosis
• History of crepitus • Exam will find crepitus
Symptoms Depend Upon Rate of Degeneration
• Joints may be comfortable or sporadically painful • Bite changes may be present or adapted
Occlusal Design
• Appliance therapy • Once stable - evaluate alteration produced by appliance and match

1
Table of Contents Diagnosis to Treatment Planning
Tooth Position Midline………………………………………………… 3 Incisal Edge Position Excess Display………………………………… 4 Inadequate Display…………………………… 5 Incisal Plane…………………………………..……… 6 Labio-Lingual Position Reclined………………………………………… 7 Proclined……………………………………….. 8 Malalignment of Teeth General Malalignment………………………… 9
Anterior Open Bite…………………………….. 10 Mediolateral Arch Form ……….…………………… 11 Muscle and Joints……………………………………… 12 Appliance Therapy…………………………………… 14 Equilibration…………………………………………… 15 Worn Dentition…………………………………………… 16 Gingival Levels Apically Positioned…………………………………… 17 Coronally Positioned… …………………………….. 18 Excess Gingival Display ……………………………… 19 Black Triangle(s) …………………………………… 21 Ridge Augmentation…………………………………. 22

2
Missing Teeth Single Anterior Tooth……………………………….. 23 Unacceptable Single Tooth Implants……………. 24 Missing Teeth –Cont. Multiple Missing Anterior Teeth Fixed /Removable……………………………… 25
Implants………………………………………… 25 Structural Considerations with Missing Teeth…… 26 Inflammation Around Restorations……………… 29 Anterior Restorations………………………………… 30 Posterior Restorations………………………………… 31 Endodontically Treated Teeth……………………… 32
3
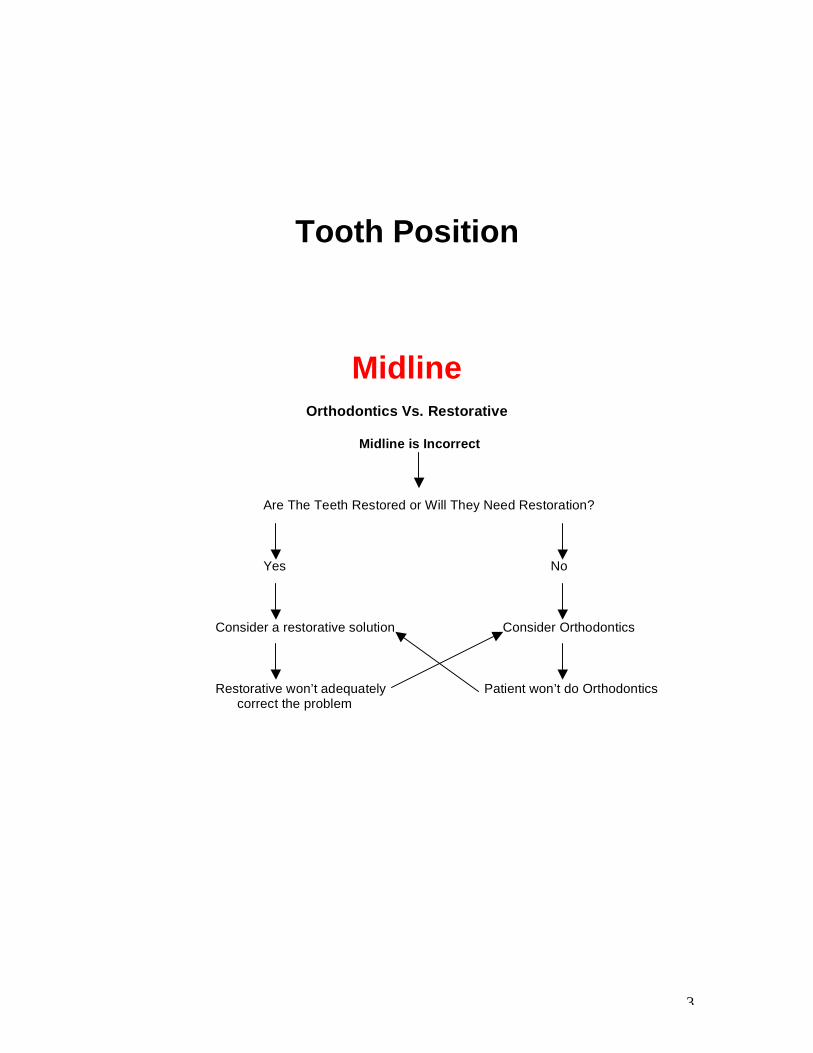
Tooth Position
Midline
Orthodontics Vs. Restorative
Midline is Incorrect
Are The Teeth Restored or Will They Need Restoration?
Yes No
Consider a restorative solution Consider Orthodontics Restorative won’t adequately Patient won’t do Orthodontics correct the problem

4
Incisal Edge Position
Excess Tooth Display
Evaluate Occlusal Plane Occlusal plane and incisal plane Incisors are coronal to posteriors are level Evaluate for maxillary impaction Evaluate if teeth need restoration
Yes No Consider crown lengthening Consider Ortho intrusion and restoration Patient has short roots Patient won’t do ortho
5
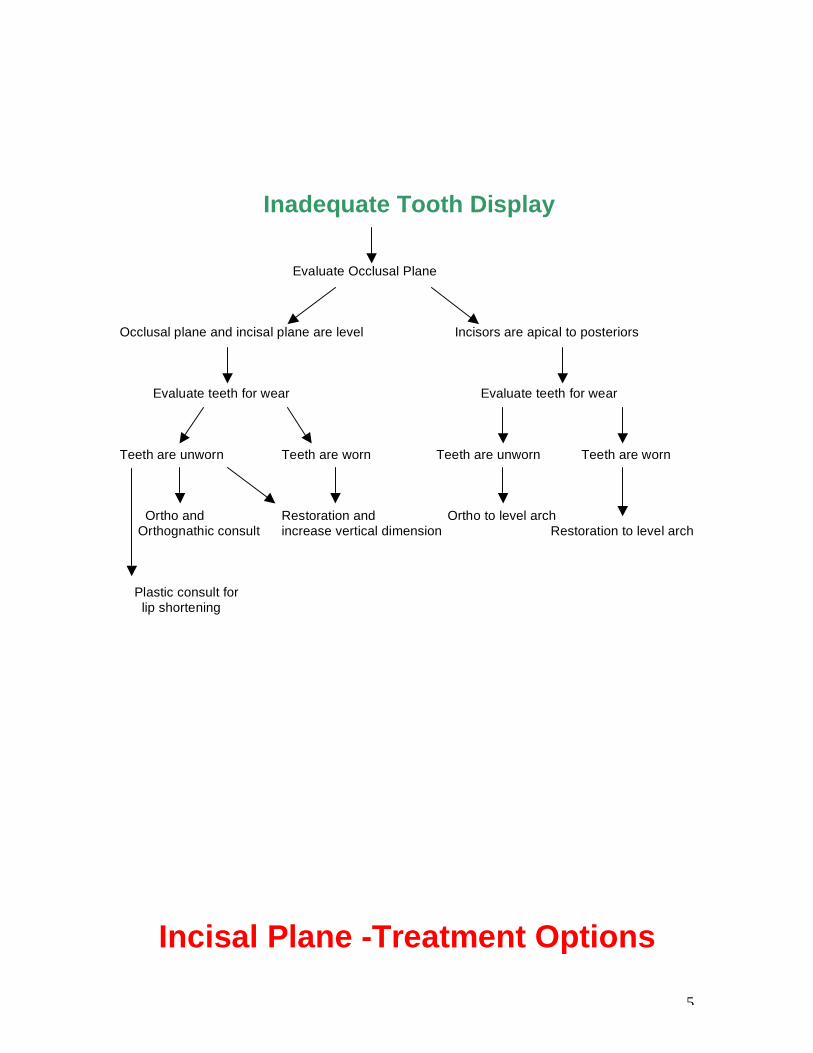
Inadequate Tooth Display
Evaluate Occlusal Plane Occlusal plane and incisal plane are level Incisors are apical to posteriors Evaluate teeth for wear Evaluate teeth for wear Teeth are unworn Teeth are worn Teeth are unworn Teeth are worn Ortho and Restoration and Ortho to level arch Orthognathic consult increase vertical dimension Restoration to level arch Plastic consult for lip shortening
Incisal Plane -Treatment Options

6
Incisal Plane is Incorrect Evaluate incisal plane to occlusal plane Incisal plane and occlusal plane Incisal plane and occlusal plane are continuous aren’t continuous Evaluate level of posteriors to face Consider orthognathic surgery Posteriors aren’t correct Posteriors are correct Evaluate if anteriors need restoration Yes No Consider restoration Ortho
7
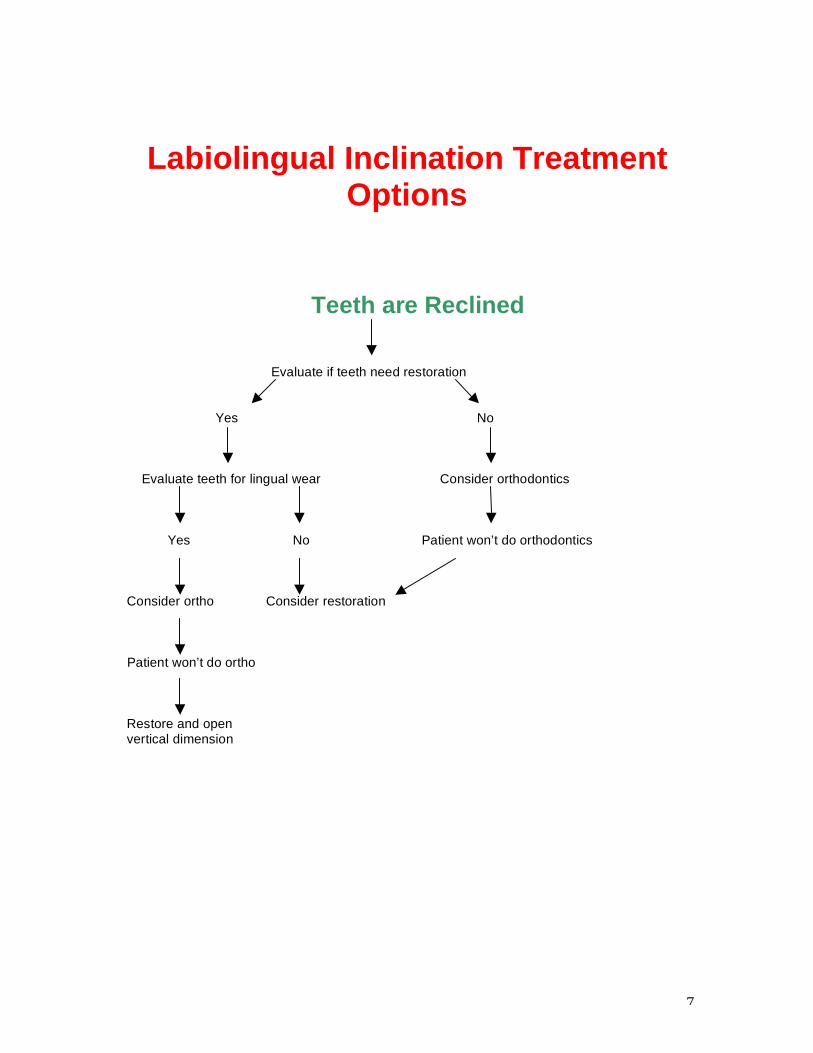
Labiolingual Inclination Treatment Options
Teeth are Reclined
Evaluate if teeth need restoration
Yes No
Evaluate teeth for lingual wear Consider orthodontics
Yes No Patient won’t do orthodontics Consider ortho Consider restoration Patient won’t do ortho Restore and open vertical dimension

8
Teeth are Proclined Evaluate if teeth need restoration
Yes No
Can inclination be corrected without endo? Orthodontics Yes No
Restore Patient won’t do orthodontics

9
Malalignment of Teeth
General Malalignment Teeth are Malaligned Do Teeth Need Restoration? Yes No Can occlusion be managed without ortho? Orthodontics Yes No Patient won’t do Ortho Are the existing papilla levels acceptable? Treat with patients understanding of compromises Yes No Is the most apical gingival margin acceptable? No Ortho
Yes No Is root exposed? Yes Graft Can an acceptable contour and arrangement be created without ortho? Yes No Can the teeth be restored without ortho and without structural or biologic compromise? Yes No Restorative Ortho

10
Anterior Open Bites
Treatment Planning Anterior Open Bites, Treatment Options (Class II Malocclusions) Posture Forward, Build in CR with Open Bite, Dual Bite, Orthognathic, Orthodontics Evaluate Current Habitual Occlusion for Anterior Contact Open bite Anterior contact Evaluate posterior teeth for wear, Evaluate posterior teeth for wear, fracture or mobility fractures or mobility None None Posterior breakdown Build in habitual position Posterior breakdown Dual bite or orthodontics or Orthognathic
11
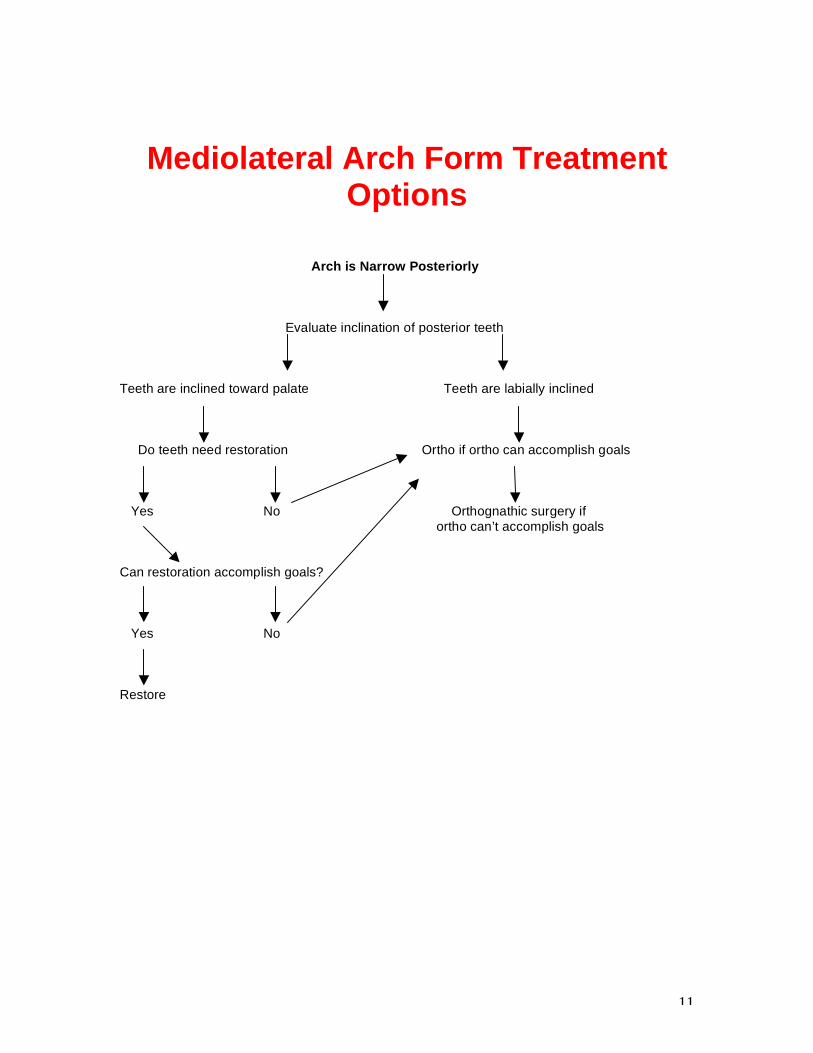
Mediolateral Arch Form Treatment Options
Arch is Narrow Posteriorly Evaluate inclination of posterior teeth Teeth are inclined toward palate Teeth are labially inclined Do teeth need restoration Ortho if ortho can accomplish goals Yes No Orthognathic surgery if ortho can’t accomplish goals Can restoration accomplish goals? Yes No Restore

12
Muscle and Joint Evaluation
Muscle and Joint Evaluation (part A) Palpate Temporalis Pain Will require treatment Palpate Masseter Pain Will require treatment Palpate Medial Pterygoid Pain Will require treatment Palpate Lateral Pole of Joint Pain Will require treatment Palpate Retrodiscal Tissue Pain Will require treatment Palpate Joint during Click or pop Internal derangement is present opening and closing is present Crepitus is present Yes Unstable joint Is bite changing? No Potentially stable joint Press forward in ear canal Click occurs where there Patient has lax ligament while opening and closing wasn’t one before may be disposed to future clicking or popping Evaluate range of motion Limited Muscle or joint may be limiting factor

13
Muscle and Joint Evaluation (part B)
Patient has pain with movement Stabilize mandible and ask them to move No pain means a joint problem Pain means Lateral Pterygoid is is likely likely involved
Manipulation Easy Proceed to treat Difficult May need deprogramming or appliance therapy to get correct bite
Load test for tension or tenderness None Proceed Present
Place deprogrammer on anterior teeth Tension eliminated Lateral Pterygoid was involved
Tension remains Doppler Noise on translation Lateral pole may be displaced Noise on rotation Medial pole may be displaced Appliance therapy

14
Appliance Therapy Appliance Therapy Treatment Options Anterior Bite Plane Posterior Pivot Full Coverage Repositioning
Place Lucia Jig and Deprogram Patient has no discomfort Patient has tension Patient has acute pain
Evaluate joint and joint history Place short term posterior pivot (equalizer)
No negative joint findings Patient has abnormal joint findings Convert to full coverage or history Anterior bite plane Full coverage appliance

15
Equilibration Treatment Planning Equilibration Evaluate Current Occlusion TMJ, Muscle and Joints
Asymptomatic Symptomatic
Evaluate teeth to be restored Appliance if necessary and equilibration More than 4 posteriors, Less than 4 posterior and not altering all anteriors, altering point of point of initial contact initial contact
Equilibration Use habitual position

16
Worn Dentition
Evaluate Non Occluding Areas for Evidence of Erosion
Wear in non occluding areas Wear in areas of occlusion only Evaluate location of wear Attrition is present
Determine most likely source of acid Evaluate restorations for
evidence of attrition(facets) Facets present Trial therapy to correct occlusion None present Evaluate muscle activity with corrected occlusion
Normal, no grinding Patient is still grinding Treat patient Correct occlusion Assess envelopes of function Create treatment plan to incorporate envelope of grinding
Equilibration Refer Back to PAGE 15

17
Gingival Levels
Apically Positioned Gingiva is Apically Positioned
Evaluate Root Exposure None Root is exposed Evaluate tooth inclination Surgical root coverage Tooth is upright Tooth is proclined Ortho extrusion Ortho to upright, followed by extrusion
18
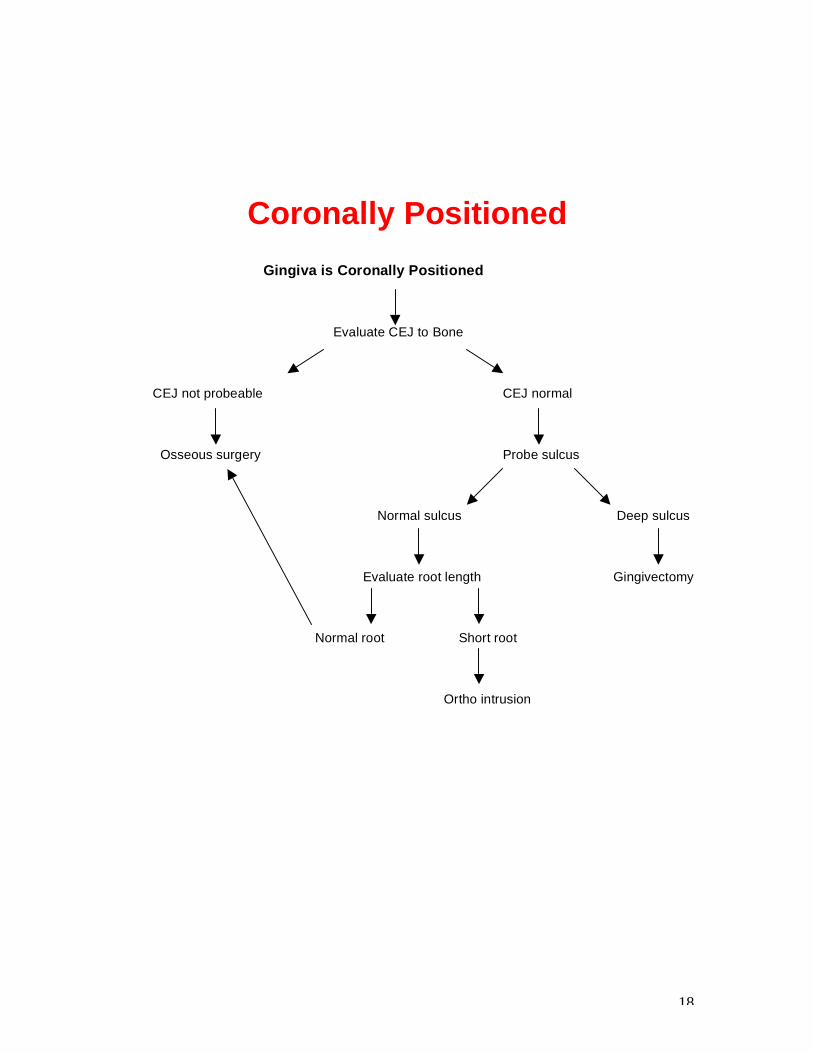
Coronally Positioned
Gingiva is Coronally Positioned Evaluate CEJ to Bone CEJ not probeable CEJ normal Osseous surgery Probe sulcus Normal sulcus Deep sulcus Evaluate root length Gingivectomy Normal root Short root Ortho intrusion

19
Excessive Gingival Display (Gummy Smile)
Excess Gingival Display (Part A) Evaluate Crown Length
Normal
Evaluate if excess gingiva is visible anterior or posterior Anterior only Anterior and posterior Evaluate incisal plane to occlusal plane Evaluate incisal plane to occlusal plane Incisors coronal to posteriors Incisors level with posteriors Do teeth need restoration? Evaluate tooth display at rest Yes No Normal Excessive Ortho intrusion of Ortho intrusion of No tx Evaluate facial anteriors and restore anteriors proportions Perio surgery and restore Normal Long No tx Maxillary impaction

20
Excessive Gingival Display (Part B) Evaluate Crown Length Short Evaluate Teeth for Wear
Yes No Evaluate root length Evaluate active eruption Short roots Normal roots CEJ is in normal CEJ can’t be location probed Ortho intrusion Perio surgery Probe sulcus Radiograph and restore and restore
Deep sulcus Normal sulcus CEJ and bone at the same level Gingivectomy No treatment Osseous surgery

21
Black Triangle
A Black Space Exists Evaluate problem area papillary height to adjacent papilla levels Papilla in question is apical All papilla are at same level to adjacent papilla Radiograph area and compare bone in Problem is inadequate contact length problem area to bone in other areas Bone is apical to Bone at same level other areas as other areas Erupt teeth Embrasure is too large Evaluate root angulation Divergent Parallel Ortho to upright roots Crown form is too tapered Alter crown forms

22
Ridge Augmentation Treatment Planning The Need for Eruption or Ridge Augmentation Treatment Options Orthodontic Eruption Surgical Ridge Aumentation Evaluate the Facial Bone and Interproximal Bone on the Tooth to be Extracted
Interproximal bone adequate Facial inadequate Adequate Evaluate interproximal bone on Extract and augment Erupt tooth No eruption adjacent teeth to be extracted or augmentation required Inadequate Adequate Erupt adjacent teeth Extract without eruption

23
Missing Teeth
Single Anterior Tooth Replacement Treatment Options Bonded Bridge, Cantilevered Bridge, Fixed Bridge, Implant Biologic Treatment Planning Evaluate Age of Patient Growth is complete Growth is incomplete Evaluate bone Temporary restoration Bone is adequate Inadequate for implants Augmentation
Evaluate space for implant Adequate Inadequate Orthodontics Fixed bridge Consider implant
24
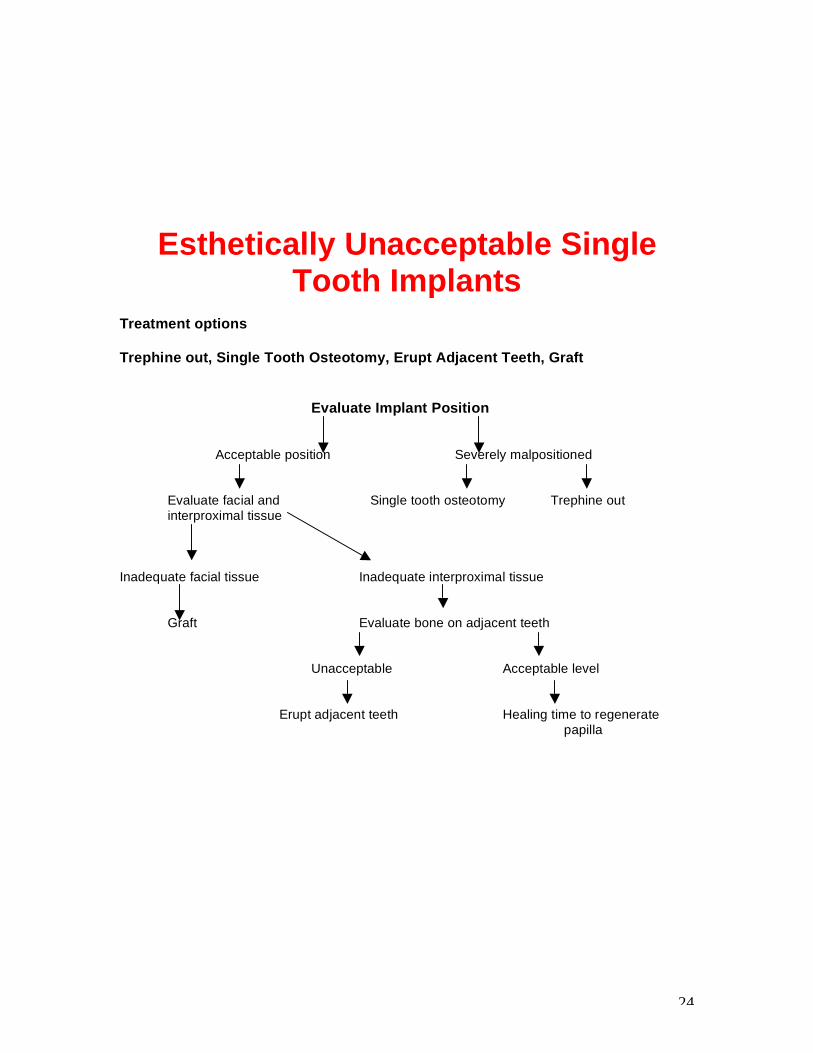
Esthetically Unacceptable Single Tooth Implants
Treatment options Trephine out, Single Tooth Osteotomy, Erupt Adjacent Teeth, Graft Evaluate Implant Position Acceptable position Severely malpositioned Evaluate facial and Single tooth osteotomy Trephine out
interproximal tissue Inadequate facial tissue Inadequate interproximal tissue
Graft Evaluate bone on adjacent teeth Unacceptable Acceptable level
Erupt adjacent teeth Healing time to regenerate papilla

25
Multiple Missing Anterior Teeth
Fixed Prosthesis, Removable Prosthesis Evaluate High Lip Line Ridge is visible Ridge is not visible Evaluate if surgery can produce Evaluate if a labial flange is necessary acceptable ridge height and form
No Yes Yes No Removable appliance Fixed appliance Removable appliance with Fixed appliance with prosthetic tissue with prosthetic tissue with prosthetic replacement replacement tissue replacement
Implant/ Pontic Adjacent Implant Separated by a Pontic Evaluate which Teeth are Missing All incisors 2 centrals and laterals 2 centrals Central implants Lateral implants Central implant Central implant Adjacent
26
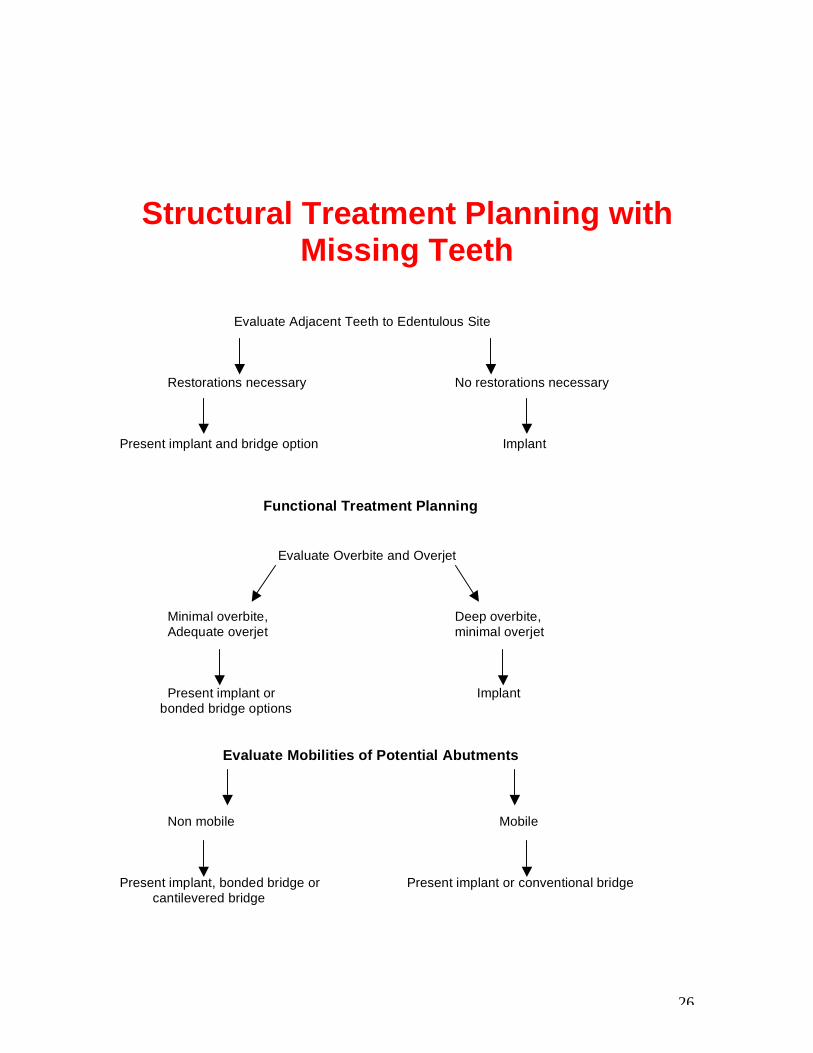
Structural Treatment Planning with Missing Teeth
Evaluate Adjacent Teeth to Edentulous Site
Restorations necessary No restorations necessary Present implant and bridge option Implant Functional Treatment Planning Evaluate Overbite and Overjet Minimal overbite, Deep overbite, Adequate overjet minimal overjet Present implant or Implant bonded bridge options Evaluate Mobilities of Potential Abutments Non mobile Mobile Present implant, bonded bridge or Present implant or conventional bridge cantilevered bridge
27
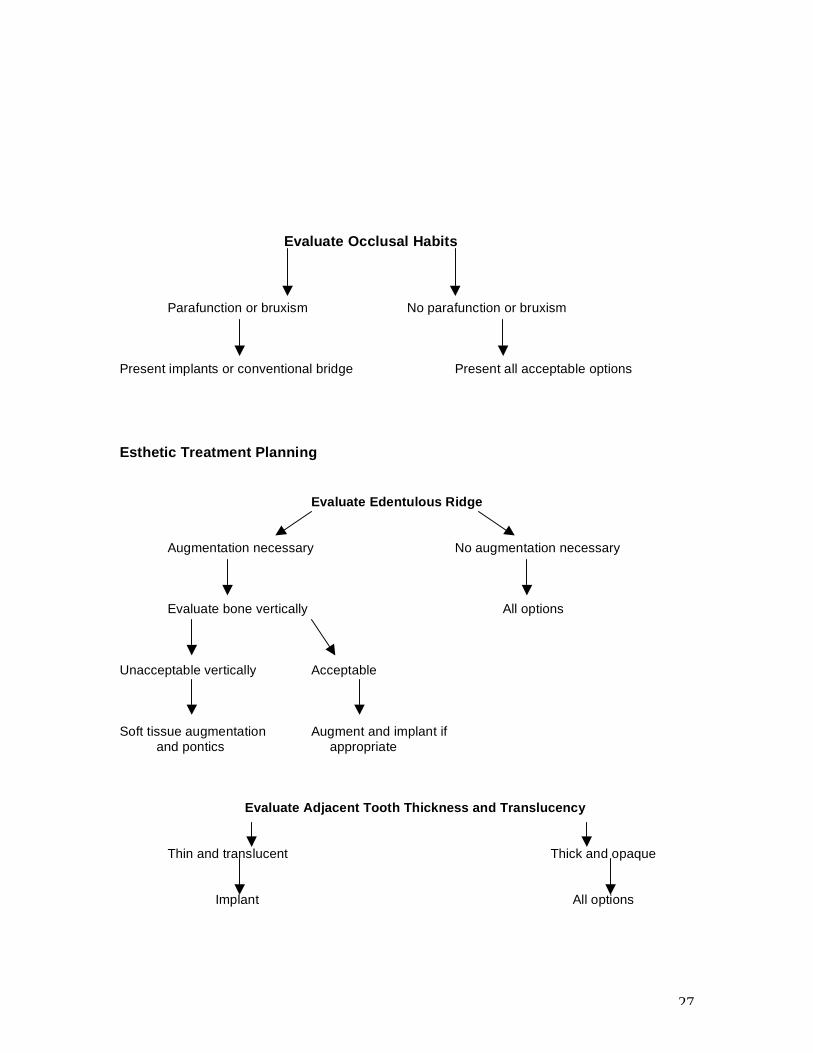
Evaluate Occlusal Habits Parafunction or bruxism No parafunction or bruxism Present implants or conventional bridge Present all acceptable options Esthetic Treatment Planning Evaluate Edentulous Ridge Augmentation necessary No augmentation necessary Evaluate bone vertically All options Unacceptable vertically Acceptable Soft tissue augmentation Augment and implant if and pontics appropriate Evaluate Adjacent Tooth Thickness and Translucency Thin and translucent Thick and opaque Implant All options

28
Changes Planned for the Adjacent Teeth Esthetically
Veneers or crowns None
Present implant or bridge Implant

29
Inflammation Around Restoration Treatment Options
Oral Hygiene Replace Restoration Correct Biologic Width Evaluate Gingiva on Adjacent Natural Teeth
Not inflamed Inflamed Oral hygiene Evaluate margin Good fit Poor fit Evaluate contour Replace crown Poor contour Good contour Allergic history Allergy possible Allergy unlikely Evaluate distance from Adequate margin to bone Inadequate
Evaluate location of inadequacy Facial Interproximal
Osseous surgery Ortho extrusion

30
Anterior Restorations Evaluate Condition of Existing Teeth Structurally healthy but unesthetic Structurally poor and unesthetic Evaluate tooth color Evaluate tooth color Acceptable Discolored Acceptable Discolored Enamel replacement veneer Enamel and dentin Full crown using Full crown using using homogenous material replacement using translucent materials opaque materials
homogenous and heterogenous materials

31
Posterior Restorations Direct Inlays Onlays Crowns Evaluate Existing Tooth Gingival Margins in Proximal Box are in Enamel Direct Yes No Indirect Isthmus < ½ intercuspal width Yes No Evaluate cusps and support Occlusion is tooth supported No cracks and cusps Weak cusps are supported by dentin Yes No Inlays Onlay or crown Heavy function No Yes

32
Restoration of Endodontically Treated Teeth
Bleach Post Build-up Veneer Crown Evaluate Existing Tooth Condition Structurally sound Breaking down Evaluate color Evaluate internal access size Discolored Acceptable Conservative Large Bleach No treatment Prep for crown Evaluate color or veneer Evaluate prep length Acceptable 2mm or less 3mm or more Restore with veneer Discolored or conservative crown Evaluate ferrule Complete w/o post Less than 1mm 1mm or more Bleach
Create ferrule Place post build-up Place tooth colored post and finish core and conservative
translucent crown

1
The Restorative Connection:
Facially Generated Treatment Planning
Esthetics
a. Tooth position
Changes desired________________________________________
b. Gingival levels
Changes desired________________________________________
c. Arrangement
Changes desired________________________________________
d. Contour
Changes desired________________________________________
e. Shade
Changes desired________________________________________ Function
a. Is the occlusion pathologic?
Joint______ Muscle_____ Teeth_____
b. If yes, what treatment will be necessary to create a more ideal occlusal relationship? ___________________________________ _____________________________________________________ c. Are you planning any treatment that may destabilize the occlusion?
d. If yes, what treatment will be necessary to correct the occlusion as part treatment? _________________________________________
_____________________________________________________ Structure
2
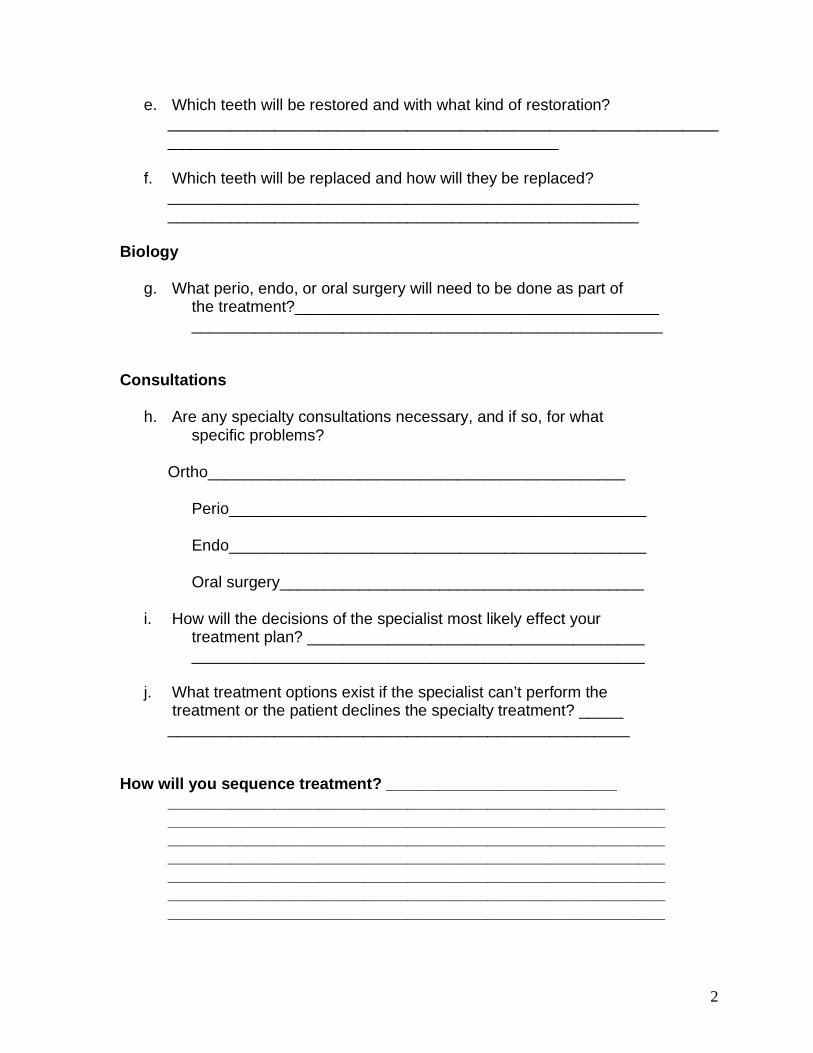
e. Which teeth will be restored and with what kind of restoration? __________________________________________________________________________________________________________
f. Which teeth will be replaced and how will they be replaced?
_____________________________________________________ _____________________________________________________
Biology
g. What perio, endo, or oral surgery will need to be done as part of the treatment?_________________________________________ _____________________________________________________
Consultations
h. Are any specialty consultations necessary, and if so, for what specific problems?
Ortho_______________________________________________ Perio_______________________________________________ Endo_______________________________________________ Oral surgery_________________________________________ i. How will the decisions of the specialist most likely effect your treatment plan? ______________________________________ ___________________________________________________ j. What treatment options exist if the specialist can’t perform the
treatment or the patient declines the specialty treatment? _____ ____________________________________________________
How will you sequence treatment? __________________________
________________________________________________________ ________________________________________________________ ________________________________________________________ ________________________________________________________ ________________________________________________________ ________________________________________________________ ________________________________________________________

Facially Generated Treatment Planning
Photographic Views
Full views
1) Teeth apart / lips at rest 2) Smile 3) Lateral profile teeth apart / lips at rest 4) Lateral profile smile
Close-up views
5) Teeth apart / lips at rest 6) Smile 7) R lateral smile 8) L lateral smiles
Retracted views
9) Teeth together 10) Teeth slightly parted 11) Upper anterior teeth 12) Lower anterior teeth
Mirror views
13) Upper occlusal 14) Lower occlusal 15) R lateral – teeth together 16) R lateral – teeth slightly parted 17) L lateral – teeth together 18) L lateral – teeth slightly parted
Other views
19) Retracted view - End to end and/or cross-over 20) Mirror view - Marked Upper Occlusal 21) Mirror view - Marked lower occlusal

22) Close-up view - Exaggerated “E”
1) Upper Incisor to Face
Images 1,3,5,6, & 16
_________________________________________________________________________
2) Upper Incisor Inclination
Images 13,16 &18 _________________________________________________________________________ 3) Upper Occlusal Plane
Images 5,10, 16 &18
_________________________________________________________________________
4) Upper Gingival Levels
Images 2,6,7,8,9 & 11
_________________________________________________________________________
5) Lower Incisor to Face
Images 2,6,10 & 12
_________________________________________________________________________
6) Lower Incisor Inclination
Images 14,16 &18
_________________________________________________________________________
7) Lower Occlusal Plane
Images 5,10, 16 &18 _________________________________________________________________________ 8) Lower Incisor Gingival Levels
Images 6,9,10, & 12
_________________________________________________________________________
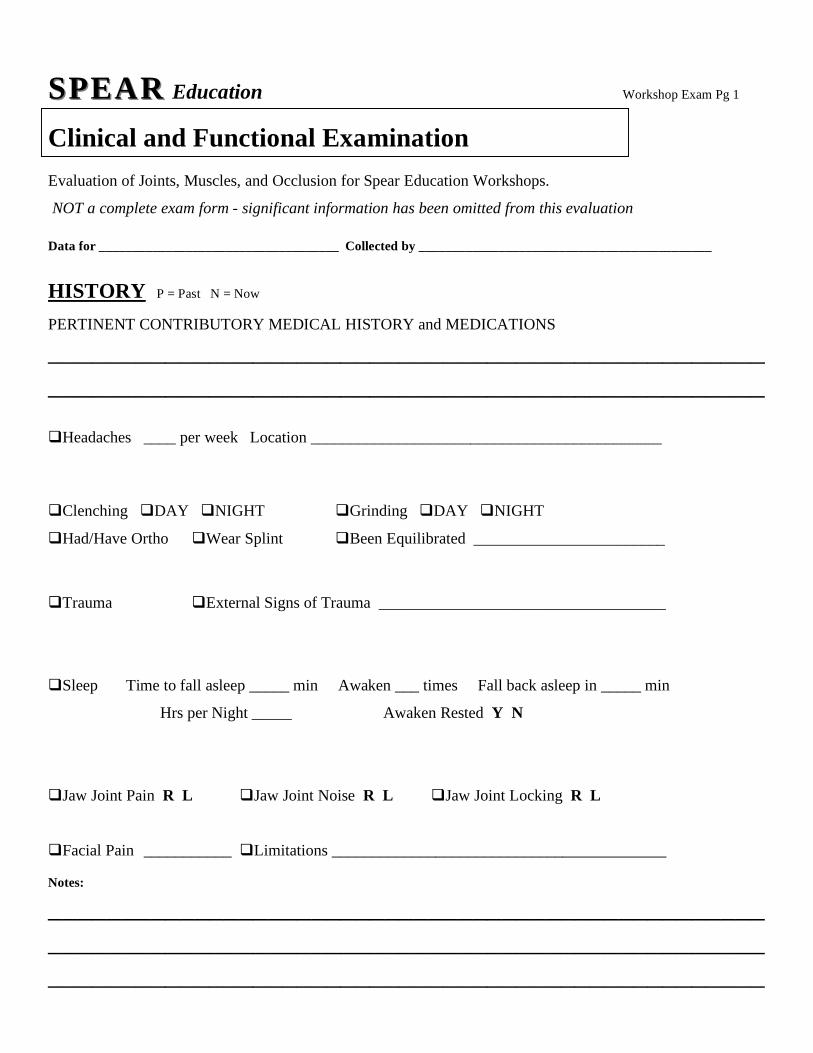
SPEARSPEAR Education Workshop Exam Pg 1
Clinical and Functional Examination
Evaluation of Joints, Muscles, and Occlusion for Spear Education Workshops.
NOT a complete exam form - significant information has been omitted from this evaluation Data for ____________________________________ Collected by ____________________________________________
HISTORY P = Past N = Now PERTINENT CONTRIBUTORY MEDICAL HISTORY and MEDICATIONS
__________________________________________________________________________________________________ Headaches ____ per week Location ____________________________________________ Clenching DAY NIGHT Grinding DAY NIGHT
Had/Have Ortho Wear Splint Been Equilibrated ________________________
Trauma External Signs of Trauma ____________________________________
Sleep Time to fall asleep _____ min Awaken ___ times Fall back asleep in _____ min
Hrs per Night _____ Awaken Rested Y N
Jaw Joint Pain R L Jaw Joint Noise R L Jaw Joint Locking R L Facial Pain ___________ Limitations __________________________________________ Notes:
__________________________________________________________________________________________________
_________________________________________________

CLINICAL FUNCTIONAL EXAMINATION Workshop Exam Pg 2 MUSCLE ASSESSMENT Score Muscle as 0 = NO PAIN 10 = WORST PAIN IMAGINABLE NOTES
Temporalis Anterior L___ R___ __________________________
Temporalis Posterior L___ R___ __________________________
Trapezius L___ R___ __________________________
Suboccipital L___ R___ __________________________
Sternocleidomastoid L___ R___ __________________________
Digastrics L___ R___ __________________________
Hyoids L___ R___ __________________________
Masseter L___ R___ __________________________
Medial Pterygoid L___ R___ __________________________
Lateral Pterygoid* L___ R___ __________________________ Other ____________________ L___ R___ __________________________
TMJ EXAMINATION Palpation Lateral pole ___R ___L ___R ___L
Retrodiscal tissue ___R ___L ___R ___L
MANDIBULAR RANGE OF MOTION Mandibular deviation with opening NO YES ___________________________
Mandibular deviation in protrusion NO YES ___________________________
Overbite ____ mm Overjet ___mm
Maximum opening _____ mm
Movement measurement to R _____mm to L _____mm Protrusive ___mm
PAIN with movement Location ___________________________________
PAIN present with mandibular stabilization YES NO MANIPULATION Easy Difficult Impossible AUSCULTATION (manual / stethoscope / Doppler) PAIN
Noise with Rotation ___R ___L ___R ___L
Noise with Translation ___R ___L ___R ___L

LOAD TEST Workshop Exam Pg 3 Leaf Gauge R - + L - + Load Test NOT appropriate
Cotton Rolls Placed After Cotton Rolls R - + L - +
Lucia Jig Placed After Lucia Jig R - + L - + CENTRIC RELATION
Unable to Verify CR with Load Test
First Tooth Contact ALL Teeth Contact Right Left Teeth ___/___ ___/___ ___/___
Degree and Direction of slide Right ___ Left ___ Anterior ___ Posterior___ Vertical ___
FUNCTIONAL OCCLUSION
Anterior Coupling YES NO … most ANT teeth in contact _______________
Posterior Interferences in Excursions ____________________________________________________
Posterior Clearance in Protrusive End-to-End L ___ R ___ (Condylar Inclination Setting)
WEAR Anterior teeth Posterior teeth Left side Right side
Worn areas flat Worn areas cupped
Worn surfaces shiny Worn surfaces satiny
Worn areas sharp Worn areas rounded
Worn areas in occl Worn areas NOT in occl
Teeth have erupted in areas of wear
Teeth have NOT erupted in areas of wear Vertical dimension appears closed OCCLUSAL SIGNS
Thermal WNL __________ Fracture WNL __________ Mobility WNL __________
Fremitus WNL __________ NCCL WNL __________ Crazing WNL __________
Cracks WNL __________ Percuss WNL __________
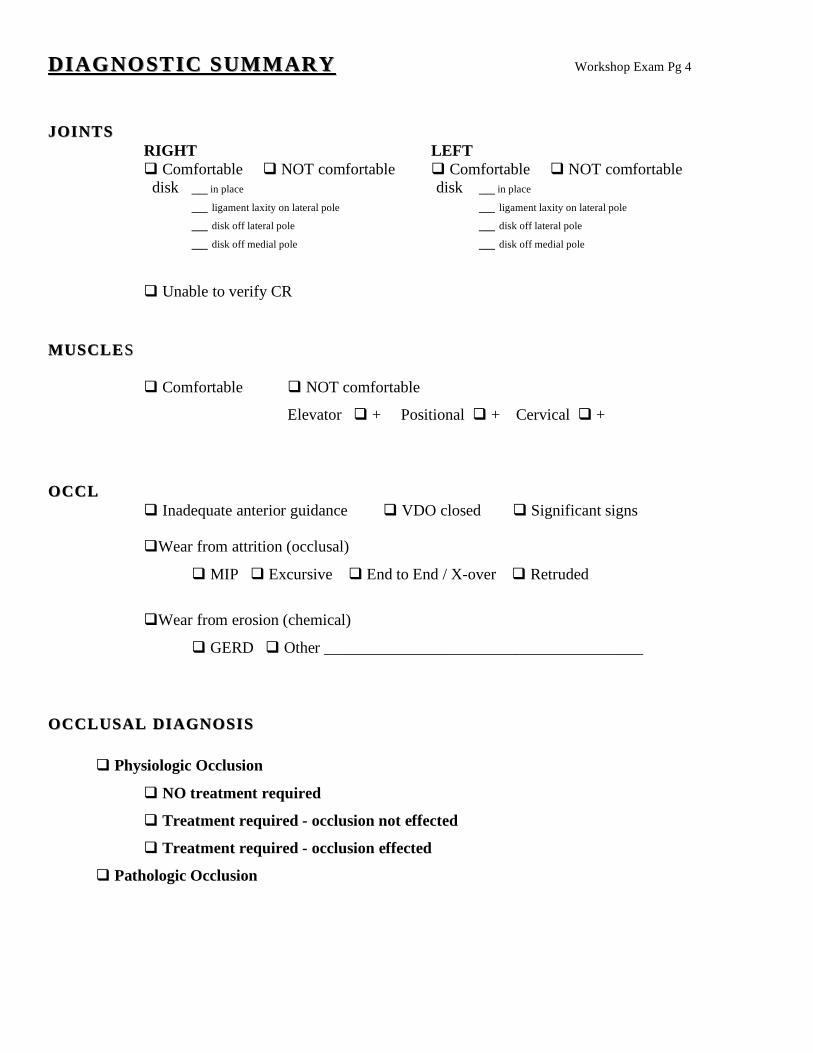
DIAGNOSTIC SUMMARYDIAGNOSTIC SUMMARY Workshop Exam Pg 4 JOINTSJOINTS RIGHT LEFT Comfortable NOT comfortable Comfortable NOT comfortable disk __ in place disk __ in place
__ ligament laxity on lateral pole __ ligament laxity on lateral pole __ disk off lateral pole __ disk off lateral pole __ disk off medial pole __ disk off medial pole Unable to verify CR MUSCLEMUSCLE SS Comfortable NOT comfortable
Elevator + Positional + Cervical +
OCCLOCCL Inadequate anterior guidance VDO closed Significant signs
Wear from attrition (occlusal)
MIP Excursive End to End / X-over Retruded
Wear from erosion (chemical)
GERD Other ________________________________________ OCCLUSAL DIAGNOSISOCCLUSAL DIAGNOSIS Physiologic Occlusion
NO treatment required
Treatment required - occlusion not effected
Treatment required - occlusion effected
Pathologic Occlusion

Facially Generated Treatment Planning 2005
Exam Findings which Indicate a Need to Mount Models or Alter the Occlusion Assuming the exam findings of the TMJ’s to be acceptable. i.e.) if any pain on loading was present, it was decreased with an anterior deprogrammer.
1. Pain upon loading that was decreased with the anterior deprogrammer.
Indicated lateral pterygoid involvement
Mount models Consider occlusal correction
2. Muscle palpation tenderness
May be occlusally related
Mount models Consider occlusal correction
3. Dental findings
□ Pathologic wear □ Fractures □ Mobility
Mount models Consider occlusal correction
4. Evaluate initial point of contact in centric relation
• Tooth #’s _____________________ • Evaluate how close other teeth are to contact in CR □ Several other teeth within .1 to .2 mm from contact □ No teeth within .5 to 1 mm of contact in centric relation except initial point of contact
□ If you are planning to restore the point of initial contact and no other teeth are within .5 mm of contact in CR
Mount models Consider occlusal correction

Facially Generated Treatment Planning 2005
5. Evaluate slide from CR – CO
• Lateral shift measured at midline from CR – CO ____mm R or L • Anterior shift measured as overjet change between maxillary and
mandibular incisors from CR – CO _________mm • Vertical change measure in overbite change from CR – CO _____mm
□ If a lateral shift greater than .5 mm exists □ If an anterior shift greater than 1 mm exists □ If a vertical shift greater than 1.5 mm exists
• Mount models • Consider occlusal alteration
6. Evaluate teeth to be restored
□ Initial point of contact in CR is being restored □ More than 3 – 4 posterior teeth are being restored □ All anteriors are being restored
o Mount models o Consider occlusal correction


