98
Fiery ® EX Print Server/Fiery ® Controller for Xerox Color 550/560 Production Printer Color Printing

Fiery® EX Print Server/Fiery® Controller for Xerox Color 550/560 Production Printer
Color Printing

© 2010 Electronics for Imaging, Inc. The information in this publication is covered under Legal Notices for this product.
45093941 10 August 2010
CONTENTS 3
CONTENTS
INTRODUCTION 7
Terminology and conventions 7
About this document 8
Key features of ColorWise 9
Color management in Command WorkStation 10
COLORWISE PRINT OPTIONS 12
About this chapter 12
Managing color on the Fiery 13
Descriptions of ColorWise print options 14
Auto Trapping 14
Black Detection 15
Black Overprint 15
Black Text and Graphics 16
CMYK/Grayscale Processing Method 17
CMYK/Grayscale Source or Device Link 18
Combine Separations 19
Composite Overprint 20
Gray (RGB) and Gray (CMYK) 21
Output Profile 21
PDF/X Output Intent 22
RGB/Lab Rendering Intent 23
RGB Source or Device Link 24
Separate RGB/Lab to CMYK Source 25
Spot Color Matching 26
Substitute Colors 27
Use Embedded Profile If Present (RGB and CMYK) 27
CONTENTS

CONTENTS 4
Specifying ColorWise print options 27
Setting default values in Command WorkStation 29
Setting print options in the printer driver 30
COLOR PROFILES 37
Color files 37
Installing additional ICC profiles on your computer 38
Other color files 43
Managing profiles on the Fiery 46
CALIBRATION 47
Calibration methods 47
Calibrating with Command WorkStation 48
Calibrating with ColorCal 49
Enabling the Device Color Space setting for ColorCal 49
Performing a ColorCal scan 50
Calibrating from the copier touch panel 51
Managing calibration sets 53
Using the output profiles and calibration sets 53
Adding custom calibration sets 55
Adding custom calibration sets and output profiles 55
Understanding calibration 62
An overview of calibration 62
How calibration works 62
Scheduling calibration 63
Checking calibration status 64
SPOT-ON 65
Using Spot-On 65
CONTENTS 5
CONFIGURABLE AUTO TRAPPING 68
Configurable Auto Trapping workflow 68
Printing with default Auto Trapping 68
Setting up configurable Auto Trapping 69
Printing with configurable Auto Trapping 69
IMAGEVIEWER 70
Accessing ImageViewer 71
CONTROL BAR 73
Control Bar workflow 73
Printing with the default Control Bar 74
Setting up a custom Control Bar 75
Printing with a custom Control Bar 75
PAPER SIMULATION WHITE POINT EDITING 76
Paper simulation workflow 76
Printing with default Paper Simulation 77
Paper Simulation print option 77
Paper Simulation White Point editing 78
Printing with custom paper simulation values 78

CONTENTS 6
POSTFLIGHT 80
About Postflight 81
Postflight Test Page 81
Postflight color-coded pages 81
Postflight reports 82
Postflight print option 84
Postflight workflow 84
Scenario 1: Diagnose an unexpected color 86
Scenario 2: Check the calibration status 88
Scenario 3: Check the quality of the output profile 89
Scenario 4: Diagnose a color problem of a specific object 90
IMPORTING DENSITY MEASUREMENTS 91
Simple ASCII Import File Format 91
Example of 1D Status T density for EFI 21 patch page 92
Example of 1D Status T density for EFI 34 patch page 92
Example of 1D Status T density for an arbitrary page 93
INDEX 95
INTRODUCTION 7
INTRODUCTION
This document explains how to manage color output on the Fiery EX Print Server/Fiery Controller for Xerox Color 550/560 Production Printer and provides information about calibration and color profiles.
This document is part of a set that includes documentation for users and system administrators. For a complete description of your Fiery EX Print Server/Fiery Controller for Xerox Color 550/560 Production Printer, see the other documents available at your site.
For more information about supported operating systems and system requirements, see Welcome.
Terminology and conventionsThis document uses the following terminology and conventions.
Term or convention Refers to
Aero Fiery (in illustrations and examples)
Copier Xerox Color 550/560
Fiery Fiery EX Print Server/Fiery Controller for Xerox Color 550/560 Production Printer
Mac OS Apple Mac OS X
Titles in italics Other documents in this set
Windows Microsoft Windows 2000, Windows XP, Windows Vista, Windows Server 2003/2008/2008 R2, Windows 7
Topics for which additional information is available by starting Help in the software
Tips and information
A warning concerning operations that may lead to death or injury to persons if not performed correctly. To use the equipment safely, always pay attention to these warnings.

INTRODUCTION 8
About this documentThis document is organized to supply you with key information about managing the color output of your Fiery. To manage color in general, you use Command WorkStation. You can also manage color for a specific job by setting print options in the printer driver or in the job properties in Command WorkStation and Hot Folders.
This document covers the following topics:
• Setting values for ColorWise print options
• Managing color profiles and other color files
• Calibrating the Fiery to achieve consistent color output
• Using the Spot-On spot color editor in Command WorkStation. This feature is standard on the Fiery EX Print Server and is part of the Productivity Package option on the Fiery Controller.
• Using Auto Trapping in Command WorkStation. This feature is available with the Fiery Graphic Arts Package, Premium Edition option on the Fiery EX Print Server and is part of the Productivity Package option on the Fiery Controller.
• Using ImageViewer in Command WorkStation. This feature is available with the Fiery Graphic Arts Package, Premium Edition option on the Fiery EX Print Server and is part of the Productivity Package option on the Fiery Controller.
• Using the Control Bar feature in Command WorkStation. This feature is available with the Fiery Graphic Arts Package, Premium Edition option on the Fiery EX Print Server and is part of the Productivity Package option on the Fiery Controller.
• Using the Paper Simulation print option, with white point editing in Command WorkStation. This feature is available with the Fiery Graphic Arts Package, Premium Edition option on the Fiery EX Print Server and is part of the Productivity Package option on the Fiery Controller.
• Using the Postflight print option. This feature is available with the Fiery Graphic Arts Package, Premium Edition option on the Fiery EX Print Server and is part of the Productivity Package option on the Fiery Controller.
• Importing calibration measurement data from a text file
A caution concerning operations that may lead to injury to persons if not performed correctly. To use the equipment safely, always pay attention to these cautions.
Operational requirements and restrictions. Be sure to read these items carefully to operate the equipment correctly, and avoid damage to the equipment or property.
Term or convention Refers to

INTRODUCTION 9
NOTE: For more information about the Fiery Graphic Arts Package, see Fiery Graphic Arts Package.
NOTE: The Glossary in the Fiery Color Reference defines words in bold, for example, output profile, that appear throughout this document. Color terms and concepts, such as “color space,” “spot color,” “gamut,” and “source profile,” are used throughout this document. If you are new to desktop color, or if any terms are unfamiliar, see the Fiery Color Reference.
Key features of ColorWiseColorWise is the color management system (CMS) built into the Fiery and designed to provide both casual and expert users with the best color output for a variety of purposes. The ColorWise default settings provide high-quality, out-of-box color from many Windows and Mac OS applications. This allows casual users to achieve quality output without knowing about or changing any color settings on the Fiery. ColorWise also allows expert users to obtain the best color output.
ColorWise features allow you to modify printing results. Depending on your particular needs, you can:
• Set the behavior of CMYK printing to emulate offset press standards.
• Match PANTONE and other spot colors for the best match when printing using four-color press conditions or presses with extra, custom plates.
• Select a rendering intent for RGB printing. Rendering intents allow for rich, saturated printing of presentation graphics, smooth, accurate printing of photographs, and relative or absolute colorimetric rendering for specialized needs.
• Define the source of incoming RGB color data for better color conversion of RGB data with no source information.
• Determine whether RGB data is converted into the full gamut of the copier or is first converted into the gamut of another device, such as a press standard. This feature is useful for making one device behave like another for RGB data. It also allows you to evaluate the appearance of an RGB file under different printing conditions without having to convert the RGB file to CMYK first.
ColorWise color management (ColorWise) offers an open color architecture, allowing users to customize the Fiery to meet new printing needs as they arise. ColorWise supports ICC profiles, which are industry standard color profiles that describe the color behavior of a device. Note that ICC specification version 4 profiles (profile version 4.2.0.0) are supported as well as version 2. Downloading ICC profiles to the Fiery enables the Fiery to simulate a custom press (or another copier), as well as accurately print colors from a particular monitor or scanner. In addition, you can create customized ICC profiles for the copier.
INTRODUCTION 10
Color management in Command WorkStationDesigned to give flexible control of color printing, Command WorkStation includes the following color management and color-related tools:
• Color management
Command WorkStation allows you to set the default settings of the ColorWise print options for the Fiery. These default settings are applied to all print jobs sent to the Fiery, unless a user overrides them for an individual job by changing settings in the printer driver or in Job Properties.
• Profiles
Command WorkStation allows you to manage all of the ICC profiles used in Fiery workflows. You can also create custom profiles by editing existing CMYK source or output profiles and saving them as new profiles. The AutoGray feature allows you to adjust the gray balance of output profiles.
• Calibrator
For consistent color, calibrate the Fiery on a regular basis. Command WorkStation includes an easy-to-use calibrator, which allows you to calibrate using either the scanning unit that is part of the copier or an optional spectrophotometer or densitometer (see “Calibration” on page 47).
Command WorkStation also allows you to use any Status T densitometer by importing data in a standard file format (see “Importing Density Measurements” on page 91). In this case, it is important to note that the quality of the instrument used determines the quality of the calibration.
• Spot-On (spot colors)
Spot-On is offered as part of the optional Productivity Package.
Spot-On is a spot color (named color) manager. If Spot-On is available for your Fiery and is enabled, you can adjust and manage lists of spot colors and their CMYK equivalents. The matching lists of spot colors and CMYK values are known as spot color dictionaries. Spot-On allows you to edit spot color definitions on the Fiery and create custom spot color definitions and dictionaries.
• ImageViewer
ImageViewer is offered as part of the optional Productivity Package.
ImageViewer allows you to soft proof and adjust colors in a job before it is printed. You can use the preview in ImageViewer to verify job placement, orientation, and content, as well as general color accuracy.

INTRODUCTION 11
• Auto Trapping
Auto Trapping is offered as part of the optional Productivity Package.
The configurable Auto Trapping feature provides you with advanced settings for the Auto Trapping print option. The Fiery is shipped with values that are optimized for the copier using regular paper, but if these values do not provide the results necessary for the media that you use, you can modify the values to meet your requirements.
• Control Bar
Control Bar is offered as part of the optional Productivity Package.
The Control Bar feature allows you to add a static color bar and dynamic job information to each printed page at a user-defined location. The feature can be set as a server default or overridden on a per-job basis.
• Paper Simulation with White Point Editing
Paper Simulation is offered as part of the optional Productivity Package.
The white point editing feature allows you to allows you to perceptually adjust the hue, brightness, and saturation of the simulated paper white defined in an ICC profile.
Installing and starting Command WorkStation on a Windows or Mac OS computer is described in Utilities. Command WorkStation can be installed from the User Software DVD or, if you have a Fiery EX Print Server, from the Fiery EX Print Server over the network.
COLORWISE PRINT OPTIONS 12
COLORWISE PRINT OPTIONS
The ColorWise color management system provides print options that affect the output of objects in various color spaces. By specifying the appropriate settings for each print option, you can obtain the expected results for your jobs.
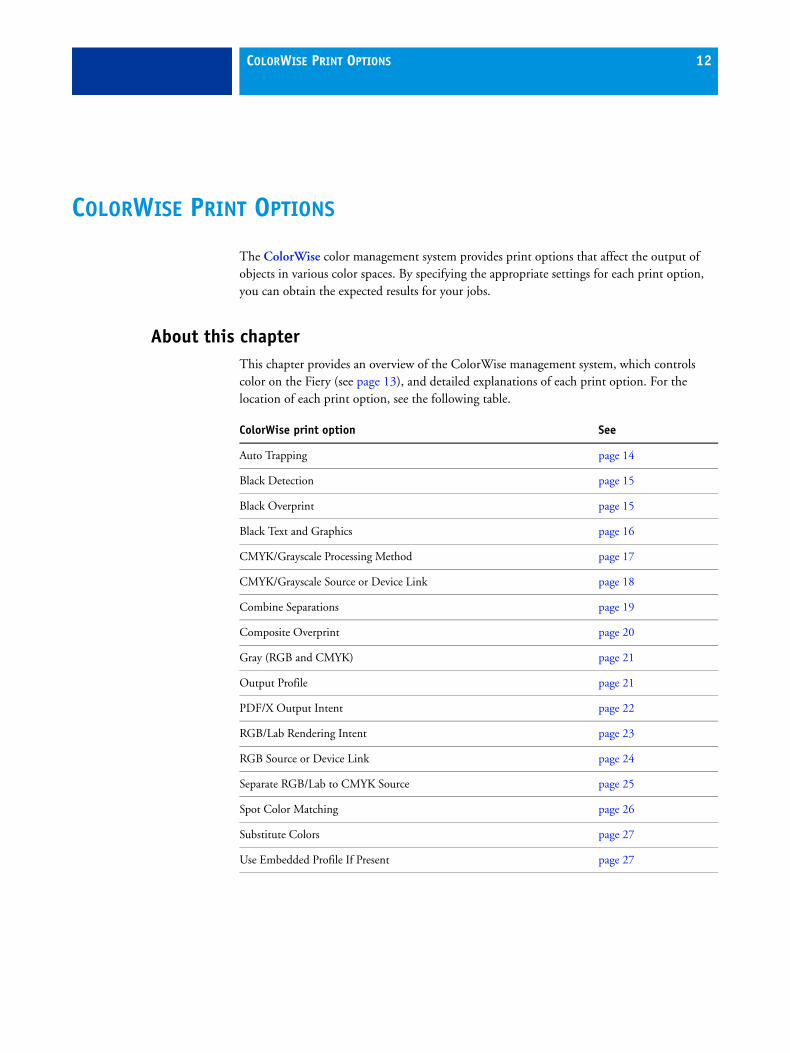
About this chapterThis chapter provides an overview of the ColorWise management system, which controls color on the Fiery (see page 13), and detailed explanations of each print option. For the location of each print option, see the following table.
ColorWise print option See
Auto Trapping page 14
Black Detection page 15
Black Overprint page 15
Black Text and Graphics page 16
CMYK/Grayscale Processing Method page 17
CMYK/Grayscale Source or Device Link page 18
Combine Separations page 19
Composite Overprint page 20
Gray (RGB and CMYK) page 21
Output Profile page 21
PDF/X Output Intent page 22
RGB/Lab Rendering Intent page 23
RGB Source or Device Link page 24
Separate RGB/Lab to CMYK Source page 25
Spot Color Matching page 26
Substitute Colors page 27
Use Embedded Profile If Present page 27

COLORWISE PRINT OPTIONS 13
This chapter also provides information about PostScript printer drivers and instructions for setting the ColorWise print options for Windows and Mac OS computers. For information about printer drivers, see page 30.
Managing color on the FieryApplications allow you to generate color data for the Fiery in many different color spaces. The most common type of color data produced from office applications is RGB, while prepress applications generally produce CMYK data. Desktop applications also generate spot colors, such as PANTONE colors. To complicate matters, a single page may contain a mix of RGB, CMYK, and spot colors. The Fiery allows you to control the printing of mixed-color documents with features that apply specifically to RGB, CMYK, or spot color data.
The following diagram illustrates the print options in the Fiery color management process that affect color data conversions. You can access these print options when you send a print job to the Fiery. Most of these options and settings are described in subsequent sections of this chapter.
RGB Source or Device Link is the only color option that applies strictly to RGB color data. The other options that affect RGB color also affect the more rarely used Lab, XYZ, and other calibrated color spaces.
NOTE: With PostScript 3, a PostScript job can include calibrated CMYK (or CIEBasedDEFG) data. The RGB/Lab Rendering Intent print option, which normally affects only RGB data, affects calibrated CMYK data as well. The RGB Source or Device Link setting does not affect calibrated CMYK data.
RGB data ➪ RGB Source
Gray (RGB)
RGB/Lab Rendering Intent
Brightness
Black Text and Graphics
Separate RGB/Lab to CMYK Source
Output Profile
CMYK data ➪ CMYK/Grayscale Source
CMYK/Grayscale Processing Method
Gray (CMYK)
Brightness
Black Text and Graphics
Combine Separations
Output Profile
➪ ➪
Spot color data ➪ Spot Color Matching
Fiery color processor
Color datasent to copier

COLORWISE PRINT OPTIONS 14
Descriptions of ColorWise print optionsThe following sections provide detailed explanations of the ColorWise print options and how these options affect print jobs.
NOTE: For information about the following print options, see Fiery Graphic Arts Package.
• Halftone Simulation
• Paper Simulation
• 2-Color Print Mapping
Auto Trapping
Trapping is a technique where the size of objects is modified so that colors printed next to each other overlap slightly, to prevent white spaces between two colors. These white spaces, or “halos,” can be caused by factors such as misregistration, the physical properties of the dry inks, and the stiffness of the media. This illustration shows the same image with and without trapping.
If you enable the Auto Trapping option, trapping is applied to all of the objects in a job.
The Fiery is shipped with trapping values that are optimized for a Fiery-driven print device using regular paper. If these values do not provide the results necessary for the media that you use, you can modify the values to meet your requirements, if you have the Fiery Graphic Arts Package, Premium Edition option on the Fiery EX Print Server or the Productivity Package option on the Fiery Controller. For more information about the Fiery Graphic Arts Package, Premium Edition option, see Fiery Graphic Arts Package. For more information about the Productivity Package option, see Configurable Auto Trapping.
COLORWISE PRINT OPTIONS 15
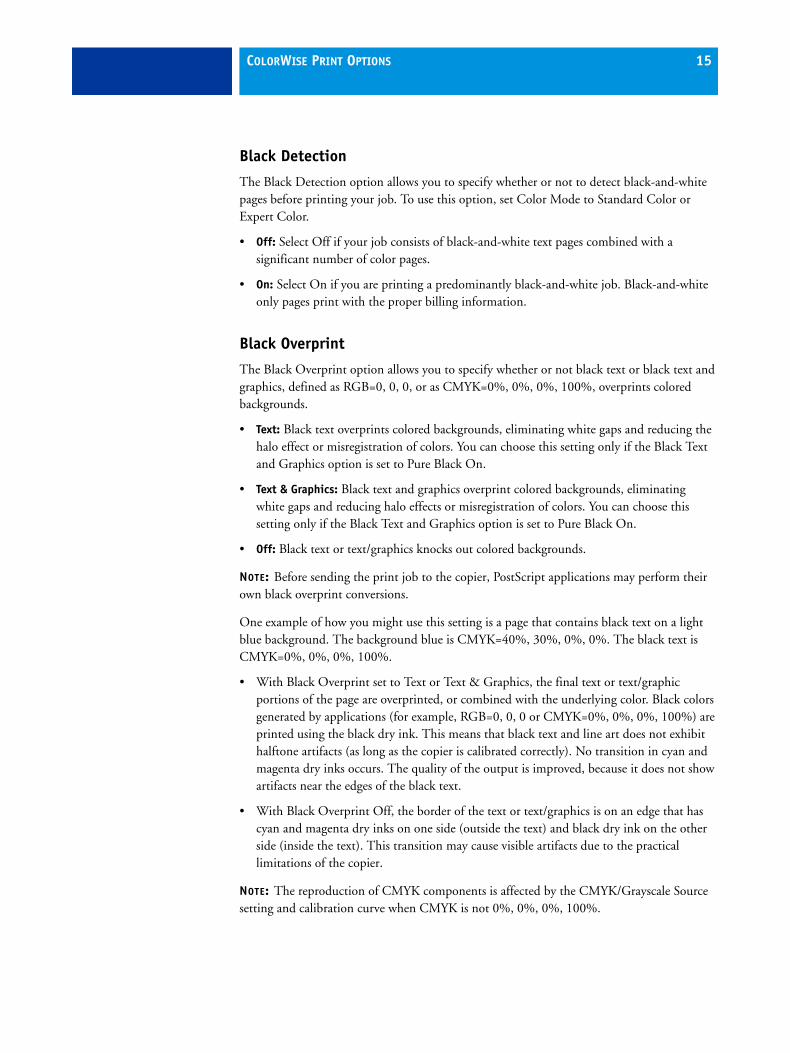
Black Detection
The Black Detection option allows you to specify whether or not to detect black-and-white pages before printing your job. To use this option, set Color Mode to Standard Color or Expert Color.
• Off: Select Off if your job consists of black-and-white text pages combined with a significant number of color pages.
• On: Select On if you are printing a predominantly black-and-white job. Black-and-white only pages print with the proper billing information.
Black Overprint
The Black Overprint option allows you to specify whether or not black text or black text and graphics, defined as RGB=0, 0, 0, or as CMYK=0%, 0%, 0%, 100%, overprints colored backgrounds.
• Text: Black text overprints colored backgrounds, eliminating white gaps and reducing the halo effect or misregistration of colors. You can choose this setting only if the Black Text and Graphics option is set to Pure Black On.
• Text & Graphics: Black text and graphics overprint colored backgrounds, eliminating white gaps and reducing halo effects or misregistration of colors. You can choose this setting only if the Black Text and Graphics option is set to Pure Black On.
• Off: Black text or text/graphics knocks out colored backgrounds.
NOTE: Before sending the print job to the copier, PostScript applications may perform their own black overprint conversions.
One example of how you might use this setting is a page that contains black text on a light blue background. The background blue is CMYK=40%, 30%, 0%, 0%. The black text is CMYK=0%, 0%, 0%, 100%.
• With Black Overprint set to Text or Text & Graphics, the final text or text/graphic portions of the page are overprinted, or combined with the underlying color. Black colors generated by applications (for example, RGB=0, 0, 0 or CMYK=0%, 0%, 0%, 100%) are printed using the black dry ink. This means that black text and line art does not exhibit halftone artifacts (as long as the copier is calibrated correctly). No transition in cyan and magenta dry inks occurs. The quality of the output is improved, because it does not show artifacts near the edges of the black text.
• With Black Overprint Off, the border of the text or text/graphics is on an edge that has cyan and magenta dry inks on one side (outside the text) and black dry ink on the other side (inside the text). This transition may cause visible artifacts due to the practical limitations of the copier.
NOTE: The reproduction of CMYK components is affected by the CMYK/Grayscale Source setting and calibration curve when CMYK is not 0%, 0%, 0%, 100%.

COLORWISE PRINT OPTIONS 16
Black Text and Graphics
The Black Text and Graphics option affects black text and vector graphics. Under most circumstances, set this option to Pure Black On. When Black Text and Graphics is set to Pure Black On, black colors generated by applications (for example, RGB=0, 0, 0 or CMYK=0%, 0%, 0%, 100%) are printed using black dry ink only. The black text and line art do not exhibit halftone artifacts (as long as the copier is calibrated correctly) and are not misregistered, since one dry ink is used. In addition, this setting eliminates blasting. This option must be set to Pure Black On if you want to set the Black Overprint option to Text or Text/Graphics.
For some jobs, it is preferable to set this option to Normal, for example, if the page includes gradient fills that use black. The following table describes the behavior of the Black Text and Graphics option with black data defined in different color spaces.
NOTE: Use the Black Text and Graphics option only when printing composites, not when printing separations.
NOTE: PostScript applications, such as QuarkXPress, may convert elements defined as RGB=0, 0, 0 to four-color CMYK black before sending the job to the Fiery. These elements are not affected by the Black Text and Graphics option. For more information, see Fiery Color Reference.
Color Black Text and Graphics = Normal Black Text and Graphics = Pure Black On or Rich Black On
RGB=0,0,0
(all other RGB values are unaffected by the Black Text and Graphics setting)
RGB=0,0,0 is printed according to the definition for RGB=0,0,0 in the output profile. This may be a rich black using all dry inks if the output profile specifies a rich black, or may be K-only if the output profile specifies K-only for RGB=0,0,0. The output is affected by the calibration curve.
RGB=0,0,0 is printed as K-only, using the black dry ink (Pure Black On) or 100% K plus 50% Cyan (Rich Black On) using black and cyan dry inks. All other RGB values are unaffected by the Black Text and Graphics setting.
CMYK=0%,0%,0%,100%
(all other CMYK values are unaffected by the Black Text and Graphics setting)
CMYK=0%,0%,0%,100% may be printed as K-only or as a rich black using all dry inks, depending on the CMYK/Grayscale Source setting.
If CMYK/Grayscale Source is set to a specific profile, CMYK=0%,0%,0%,100% prints as K-only and the amount of black dry ink is limited by the CMYK Source profile and the calibration curve.
Setting CMYK/Grayscale Source to ColorWise Off disables the CMYK Source profile and the calibration curve. In this case, the black dry ink is not limited by the calibration curve.
CMYK=0%,0%,0%,100% is printed as K-only, using the black dry ink (Pure Black On) or 100% K plus 50% Cyan (Rich Black On) using black and cyan dry inks, regardless of the CMYK/Grayscale Source and CMYK/Grayscale Processing Method settings. All other CMYK values are unaffected by the Black Text and Graphics setting.
Setting CMYK/Grayscale Source to ColorWise Off disables the CMYK source profile and the calibration curve. In this case, the black dry ink is not limited by the calibration curve.
Spot Colors
(unaffected by the Black Text and Graphics setting)
Standard spot color processing Standard spot color processing

COLORWISE PRINT OPTIONS 17
CMYK/Grayscale Processing Method
The CMYK/Grayscale Processing Method allows you to define your preferred CMYK-to-CMYK conversion technique.
• Pure Primaries prints primary colors in a job (C only, M only, or Y only) as primary colors, using only a single colorant. Secondary colors (M+Y, C+Y, and C+M) are printed as secondary colors, using only two colorants. The result is pure looking primary and secondary colors, with minimal banding in gradients.
Pure Primaries compromises overall color accuracy. Do not use Pure Primaries if color accuracy is important, such as when printing press proofs.
• Full (Source GCR) provides a complete and accurate simulation based on colorimetric transformations. Hues are preserved, even for primary colors. The Gray Component Replacement level specified in the original (source) document is preserved. Process black expressed in CMY is reproduced using CMY dry ink. Full (Source GCR) is recommended for the highest quality press proofing applications.
• Full (Output GCR) is a complete and accurate simulation method based on colorimetric transformations. Hues are preserved, even for primary colors. With this method, the Gray Component Replacement (GCR) level that was specified in the original document is not preserved. Instead, all CMYK data is reseparated using the GCR level specified by the output profile. This simulation technique is similar to traditional ICC color matching methods and is more appropriate than Full (Source GCR) for full color printing designed for the press, but reproduced on your copier.
NOTE: When you specify Pure Black On for Black Text and Graphics and Full (Output GCR) or Full (Source GCR) for CMYK/Grayscale Processing Method, the black text and graphics in your document are printed with 100% black-only dry ink.

COLORWISE PRINT OPTIONS 18
CMYK/Grayscale Source or Device Link
The CMYK/Grayscale Source or Device Link print option allows you to print press proofs or simulations. This setting specifies the offset press standard or other color printing device that you want to simulate. This option affects CMYK data only.
When you specify a setting other than Bypass Conversion or ColorWise Off for the CMYK/Grayscale Source, the Fiery overrides source color space definitions or profiles that other color management systems may have specified. In cases where you do not want this setting to override another specified source color space, choose Bypass Conversion.
If your document contains an embedded CMYK profile that you want to use, select the Use Embedded Profile If Present (CMYK) option (see “Use Embedded Profile If Present (RGB and CMYK)” on page 27. In this case, the CMYK/Grayscale Source setting is ignored and the embedded profile is used instead.
In the printer driver, you can view an unlimited number of custom Full simulations created using Command WorkStation. The number of custom simulations is limited by the available disk space on the Fiery.
The CMYK/Grayscale Source setting you specify depends on the press standard for which the CMYK data was separated.
• For images that were separated using a custom separation (such as a separation produced with an ICC profile), choose the corresponding profile on the Fiery with the CMYK/Grayscale Source setting.
• For images that were separated for SWOP, choose SWOP as the CMYK/Grayscale Source setting.
To properly simulate a printed image that was separated using an ICC profile, the same profile must be present on the Fiery. For more information about importing ICC profiles to the Fiery, see Command WorkStation Help.
Two settings are available if you want no CMYK simulation:
• The Bypass Conversion setting sends your original CMYK data to the copier with calibration applied, but without conversions to simulate another printer.
The Bypass Conversion setting is recommended if you use another color management system instead of ColorWise (for example, ColorSync or Adobe Photoshop). In this case, the Fiery is expecting to receive CMYK data already in the device color space of the Fiery. The Fiery will not convert the data, but it will apply calibration.
• The ColorWise Off setting sends your original CMYK data to the copier without calibration applied and without conversions to simulate another printer. The CMYK data is still subject to maximum density constraints, however.
The ColorWise Off setting is not available as a setting in Command WorkStation and cannot be the default CMYK/Grayscale Source setting. You choose this setting for a specific job.
COLORWISE PRINT OPTIONS 19
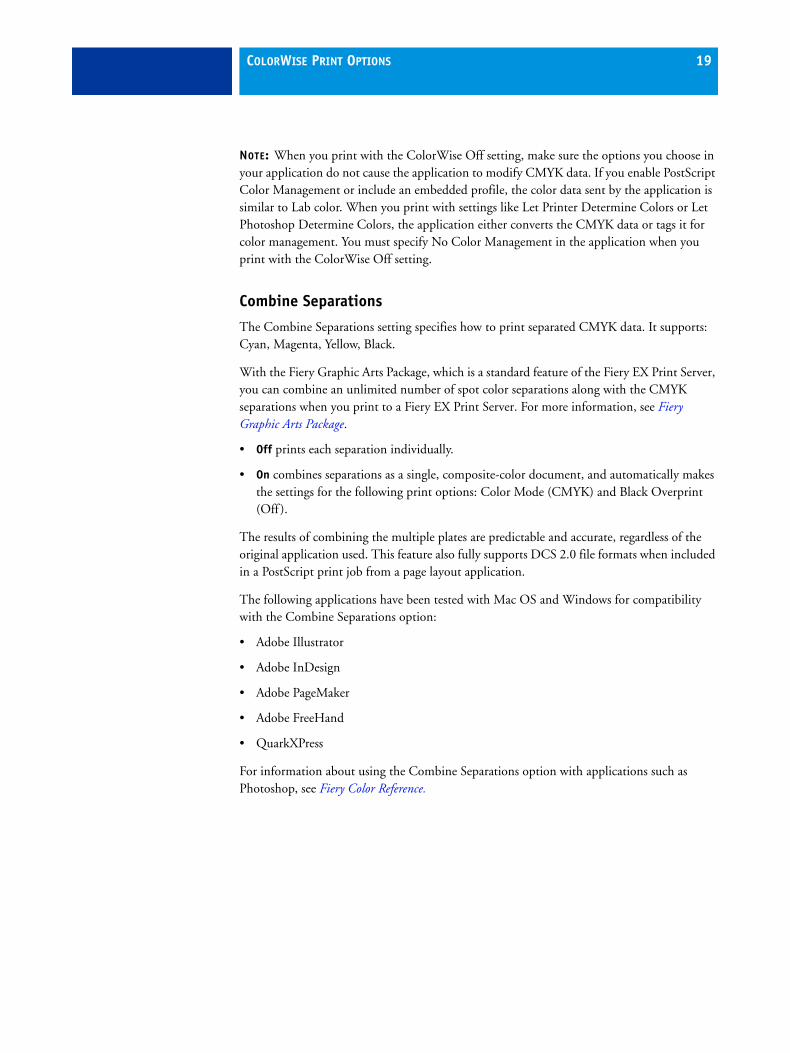
NOTE: When you print with the ColorWise Off setting, make sure the options you choose in your application do not cause the application to modify CMYK data. If you enable PostScript Color Management or include an embedded profile, the color data sent by the application is similar to Lab color. When you print with settings like Let Printer Determine Colors or Let Photoshop Determine Colors, the application either converts the CMYK data or tags it for color management. You must specify No Color Management in the application when you print with the ColorWise Off setting.
Combine Separations
The Combine Separations setting specifies how to print separated CMYK data. It supports: Cyan, Magenta, Yellow, Black.
With the Fiery Graphic Arts Package, which is a standard feature of the Fiery EX Print Server, you can combine an unlimited number of spot color separations along with the CMYK separations when you print to a Fiery EX Print Server. For more information, see Fiery Graphic Arts Package.
• Off prints each separation individually.
• On combines separations as a single, composite-color document, and automatically makes the settings for the following print options: Color Mode (CMYK) and Black Overprint (Off ).
The results of combining the multiple plates are predictable and accurate, regardless of the original application used. This feature also fully supports DCS 2.0 file formats when included in a PostScript print job from a page layout application.
The following applications have been tested with Mac OS and Windows for compatibility with the Combine Separations option:
• Adobe Illustrator
• Adobe InDesign
• Adobe PageMaker
• Adobe FreeHand
• QuarkXPress
For information about using the Combine Separations option with applications such as Photoshop, see Fiery Color Reference.

COLORWISE PRINT OPTIONS 20
Composite Overprint
When overlapping objects are printed, the foreground object can either overprint or knock out the background object. With overprinting, the color of the background object shows through the foreground object where they overlap, and the resulting color is a combination of the colors of the two objects. With a knock-out, the foreground object hides the background object where they overlap.
The Composite Overprint print option allows you to print overprinted objects as specified in the source file. By default, the Composite Overprint print option is off and overlapping objects print as knockouts.
NOTE: The Composite Overprint option does not overprint the foreground object if it is an RGB object.
The Composite Overprint print option is supported for PostScript and PDF jobs produced by the following applications:
• Adobe Acrobat
• Adobe Illustrator
• Adobe InDesign
• Adobe FreeHand
• QuarkXPress
• CorelDRAW
The 2-Color Print Mapping option is ignored when Composite Overprint is enabled. The 2-Color Print Mapping option is a feature of the Fiery Graphic Arts Package, Premium Edition, which is an option to the Fiery EX Print Server.
If Composite Overprint is enabled for a job that contains spot colors, Spot-On must be enabled on the Fiery.

COLORWISE PRINT OPTIONS 21
Gray (RGB) and Gray (CMYK)
When Gray (RGB) is enabled, any RGB color where R=G=B is printed using only black dry ink instead of processed black. Similarly, when Gray (CMYK) is enabled, any CMYK color where C=M=Y=0 and K=any value is printed using only black dry ink instead of processed black.
You can choose to apply the Gray (RGB) or Gray (CMYK) option to either Text and Graphics or to Text, Graphics, and Images.
The following limitations apply:
• The Gray (RGB) or Gray (CMYK) option has no effect on a job that is pre-separated.
• If CMYK/Grayscale Processing Method is set to Pure Primaries, the Gray (CMYK) setting does not affect the output.
• If Separate RGB/Lab to CMYK Source is enabled, the Gray (RGB) option is set to Off. Likewise, if the Gray (RGB) option is not set to Off, you cannot enable Separate RGB/Lab to CMYK Source.
• If Black Text and Graphics is set to Pure Black On or Rich Black On, it takes precedence over Gray (RGB) or Gray (CMYK) for 100% black text and graphics.
• If a gray is specified as a spot color, the Gray (RGB) or Gray (CMYK) option does not affect that gray.
Output Profile
Because the output profile is applied to all data in the print job, make sure that the profile you select is the right one for your job. The default output profile consists of a profile for your copier that describes its color characteristics and a calibration target that describes the expected behavior of the copier.
Use Command WorkStation to import your own output profile to the Fiery. Imported output profiles that do not already include a calibration target are at first associated with the calibration target that is tied to the default output profile. You can edit calibration target D-Max values separately.
Select the Use Media Defined Profile setting to automatically apply the output profile associated with the media type used in a print job, rather than setting a specific output profile. For more information, see Command WorkStation Help.

COLORWISE PRINT OPTIONS 22
PDF/X Output Intent
The PDF/X Output Intent option is available on the Fiery EX Print Server, but not on the Fiery Controller.
PDF/X is a subset of the PDF specification. PDF files can contain a variety of elements (text, graphics, even animations) and it is not always obvious how these elements should be displayed or printed. PDF/X was designed with a focus on high-quality printing. It excludes the use of PDF features that are not appropriate for graphic arts and adds features that prevent ambiguities related to printing. A PDF/X compliant document contains embedded information about the intended printing conditions for the document.
The PDF/X Output Intent option, when enabled for a PDF/X job, specifies that the Fiery use the PDF/X output intent embedded in the PDF/X document. Typically, whether you use this option depends on whether you are using the Fiery for proofing or production (final) printing.
Prints for proofing are expected to look exactly like the output of the final production device, regardless of the capabilities of the Fiery or copier. For instance, when proofing Newsprint, you want the color gamut of the copier to be very limited compared to its capabilities. In production, you usually want to maximize the use of the copier gamut by applying specific color features of the Fiery or copier. Even in production, however, you might choose to limit the color gamut in order to achieve consistency in the color produced by different devices.
The PDF/X Output Intent option only affects PDF/X files (conforming to the PDF/X3 or PDF/X-1a standard). It has no effect on non-PDF files or PDF files that are not PDF/X compliant. Profiles specified by PDF/X files must be embedded in the files, not referenced from an external locations.
NOTE: With the Fiery Graphic Arts Package, Premium Edition option on the Fiery EX Print Server, you can use a Hot Folders filter to determine if a PDF file is PDF/X compliant. For information about this Hot Folders filter, see Hot Folders Help.
When PDF/X Output Intent is enabled and no other setting conflicts, the Fiery processes a PDF/X compliant file in a way that produces results defined by the intents and source color spaces embedded in the file. The Fiery ignores the CMYK/Grayscale Processing Method and CMYK/Grayscale Source options. The rendering intents in the PDF/X file are used and the printed output is limited to the color gamut specified by the output profile embedded in the file.
When PDF/X Output Intent is disabled, the Fiery ignores the PDF/X output intent.
You can specify the PDF/X Output Intent print option for a job in Job Properties in Command WorkStation, but not when you print from the printer driver. PDF/X files can be imported directly to the Fiery using Command WorkStation or Hot Folders, but printer drivers always convert PDF before sending a job to the Fiery. The PDF/X Output Intent option does not appear in the printer driver.
COLORWISE PRINT OPTIONS 23
When you enable PDF/X Output Intent, you must set select the Use Embedded Profile When Present (RGB) option so that the rendering intent embedded in the PDF/X file is used. The PDF/X Output Intent and Use Embedded Profile When Present (RGB) options are accessible from Expert Settings in the Color icon of Job Properties.
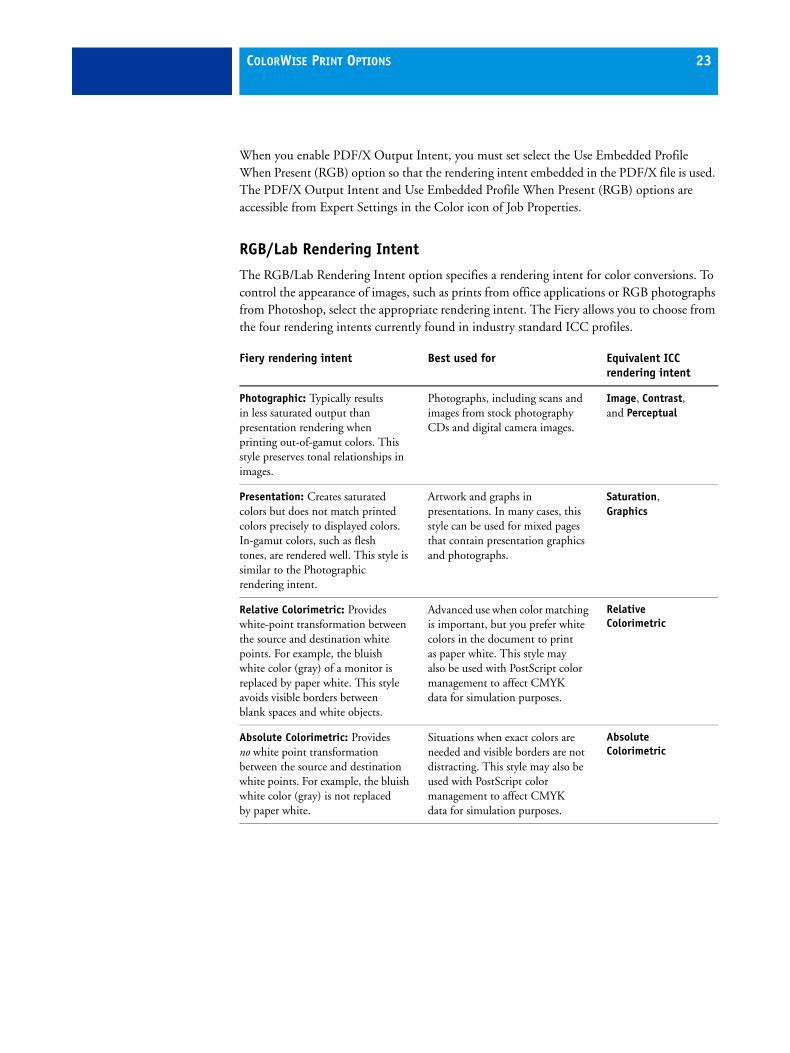
RGB/Lab Rendering Intent
The RGB/Lab Rendering Intent option specifies a rendering intent for color conversions. To control the appearance of images, such as prints from office applications or RGB photographs from Photoshop, select the appropriate rendering intent. The Fiery allows you to choose from the four rendering intents currently found in industry standard ICC profiles.
Fiery rendering intent Best used for Equivalent ICC rendering intent
Photographic: Typically results in less saturated output than presentation rendering when printing out-of-gamut colors. This style preserves tonal relationships in images.
Photographs, including scans and images from stock photography CDs and digital camera images.
Image, Contrast, and Perceptual
Presentation: Creates saturated colors but does not match printed colors precisely to displayed colors. In-gamut colors, such as flesh tones, are rendered well. This style is similar to the Photographic rendering intent.
Artwork and graphs in presentations. In many cases, this style can be used for mixed pages that contain presentation graphics and photographs.
Saturation, Graphics
Relative Colorimetric: Provides white-point transformation between the source and destination white points. For example, the bluish white color (gray) of a monitor is replaced by paper white. This style avoids visible borders between blank spaces and white objects.
Advanced use when color matching is important, but you prefer white colors in the document to print as paper white. This style may also be used with PostScript color management to affect CMYK data for simulation purposes.
Relative Colorimetric
Absolute Colorimetric: Provides no white point transformation between the source and destination white points. For example, the bluish white color (gray) is not replaced by paper white.
Situations when exact colors are needed and visible borders are not distracting. This style may also be used with PostScript color management to affect CMYK data for simulation purposes.
Absolute Colorimetric
COLORWISE PRINT OPTIONS 24
RGB Source or Device Link
The RGB Source or Device Link setting allows you to define the characteristics of the RGB data in your document so that the appropriate color conversion occurs on the Fiery. Commonly used monitor color spaces are available from the printer driver and the Fiery. For others, use Command WorkStation to download custom monitor or scanner profiles.
When you specify a setting for the RGB Source, the Fiery overrides source color space definitions or profiles that other color management systems may have specified. Because the color space definitions are overridden, the output from the Fiery is consistent across platforms.
If your document contains an embedded RGB profile that you want to use, select the Use Embedded Profile If Present (RGB) option (see “Use Embedded Profile If Present (RGB and CMYK)” on page 27). In this case, the RGB Source setting is ignored and the embedded profile is used instead.
The Fiery RGB Source options are as follows:
• EFIRGB specifies an EFI-defined color space recommended for users who have no detailed information about their RGB data.
• sRGB (PC) specifies the definition of a Windows computer monitor profile used as the default.
• Apple Standard specifies the definition of a Mac OS computer monitor profile used as the default.
• Adobe RGB (1998) is an Adobe-defined color space, used in pre-press as the default working space in Photoshop 5.
• eciRGB is the European Color Initiative (ECI) recommended space for use as an RGB working color space and color data exchange format for ad agencies, publishers, reproduction and printing houses.
• Fiery RGB is an EFI-defined color space recommended for users of office applications. This color space is similar to EFIRGB but is larger and can provide a more desirable blue output.
With the Use Embedded Profile When Present (RGB) option enabled, PostScript RGB data that contains a source color space definition is converted using the RGB/Lab Rendering Intent option (see “RGB/Lab Rendering Intent” on page 23). Non-PostScript RGB data and PostScript RGB data that does not contain a source color space definition are converted using the EFIRGB source profile and Presentation rendering intent.
COLORWISE PRINT OPTIONS 25
Separate RGB/Lab to CMYK Source
The Separate RGB/Lab to CMYK Source option determines how RGB colors (as well as Lab and XYZ colors) are converted to CMYK. The name of this option is meant to be descriptive, because the option defines the color spaces that are used by the Fiery to “separate” the RGB data into CMYK values.
The two choices available for this option determine whether RGB data is converted into the full gamut of the copier (Separate RGB/Lab to CMYK Source disabled) or is first converted into the gamut of another digital printer or press standard (Separate RGB/Lab to CMYK Source enabled). This feature helps make one device behave like another for RGB data. For example, if a high-quality ICC profile is available for another print device, the copier can simulate the behavior of that device.
Separate RGB/Lab to CMYK Source is also useful for prepress applications. For example, it allows you to experiment with the appearance of an RGB scan under different press printing conditions, without having to convert the RGB data to CMYK data for each condition. When the desired printing condition is found, convert the file to CMYK, using the same CMYK/Grayscale Source that you used during the experimentation.
NOTE: Use the Separate RGB/Lab to CMYK Source print option in conjunction with the Output Profile or CMYK/Grayscale Source print options.
• Enabled converts all RGB colors into the CMYK color space for a specified simulation (select the desired simulation with the CMYK/Grayscale Source print option).
• Disabled converts all RGB colors into the CMYK color space of your copier.

COLORWISE PRINT OPTIONS 26
Spot Color Matching
The Spot Color Matching option provides automatic matching of spot colors with their best CMYK equivalents.
• On: The Fiery uses a built-in table to generate the closest CMYK matches of spot colors your copier can produce. (New tables are generated when you add new output profiles.)
With Spot-On, the Fiery uses the CMYK matches determined through Spot-On (see page 65).
NOTE: Spot-On is available as part of the Productivity Package on the Fiery Controller and is a standard feature of the Fiery EX Print Server.
• Off: The Fiery processes the spot color as CMYK data and uses CMYK equivalents defined by the spot color manufacturer, such as PANTONE. These are the same CMYK equivalents used by applications that include spot color libraries.
NOTE: Spot colors that are not included in the built-in table are treated as CMYK.
For jobs that include spot colors, set Spot Color Matching to On unless you are printing press simulations. In that case, set Spot Color Matching to Off and choose the appropriate CMYK/Grayscale Source (see page 18).
For a PDF job that includes spot colors that are not included in the built-in table, setting Spot Color Matching to On retains the original spot colors. The Fiery references the built-in table to generate the closest CMYK matches of the original spot color.
NOTE: Use Spot Color Matching only when printing composites, not when printing separations.
Spot Color Matching and the PANTONE Coated Color Reference
The PANTONE Coated Color Reference prints differently depending on the Spot Color Matching setting (see Fiery Color Reference).
• On: The Fiery uses a built-in table or, with Spot-On, the Spot-On color dictionaries to generate the best matches for the PANTONE colors that your copier can produce. The PANTONE number is displayed below each swatch.
For more information about Spot-On, see page 65.
• Off: The Fiery prints swatches using the CMYK values recommended by Pantone, Inc. (and used by applications that provide PANTONE color libraries). The CMYK values used to generate the color, as well as the PANTONE number of the color, are printed below each swatch. These CMYK values are printed through the selected CMYK/Grayscale Source and Output Profile settings.

COLORWISE PRINT OPTIONS 27
Substitute Colors
Spot-On allows you to create a list of substitute colors. These are colors that, when called for in a document by their RGB or CMYK values, are substituted with a different color having the CMYK values from the Spot-On color dictionary. This permits exact color control and overrides individual RGB and CMYK colors.
NOTE: Spot-On is available as part of the Productivity Package on the Fiery Controller and is a standard feature of the Fiery EX Print Server.
To enable substitute colors for a job, select the Substitute Colors option.
For more information about creating and using substitute colors, see Command WorkStation Help.
Use Embedded Profile If Present (RGB and CMYK)
If the Use Embedded Profile If Present (RGB) option is enabled, the Fiery ignores the RGB Source option and uses the RGB profile embedded in the print job as the RGB source profile. If the Use Embedded Profile If Present (RGB) option is disabled, the Fiery uses the profile specified in the RGB Source option.
Similarly, if the Use Embedded Profile If Present (CMYK) option is enabled, the Fiery ignores the CMYK/Grayscale Source option and uses the CMYK profile embedded in the print job as the CMYK source profile. If the Use Embedded Profile If Present (CMYK) option is disabled, the Fiery uses the profile specified in the CMYK/Grayscale Source option.
Specifying ColorWise print optionsTo modify Fiery printing behavior, do any of the following:
• Specify default values for ColorWise options in Color Setup in Command WorkStation. You can also set default values from Fiery Setup, as described in Configuration and Setup. The defaults apply to all subsequent print jobs unless you override them.
A job uses the Fiery default settings (unless otherwise specified) at the time it is processed for printing, and not at the time it is sent to the Fiery Hold queue.
• Specify ColorWise options for an individual print job using the menus that appear in the printer driver.
• Specify ColorWise options for a job printed through Hot Folders using the Job Properties settings in Hot Folders.
• Specify ColorWise options for a job already submitted and held at the Fiery using the Job Properties settings in Command WorkStation.
COLORWISE PRINT OPTIONS 28
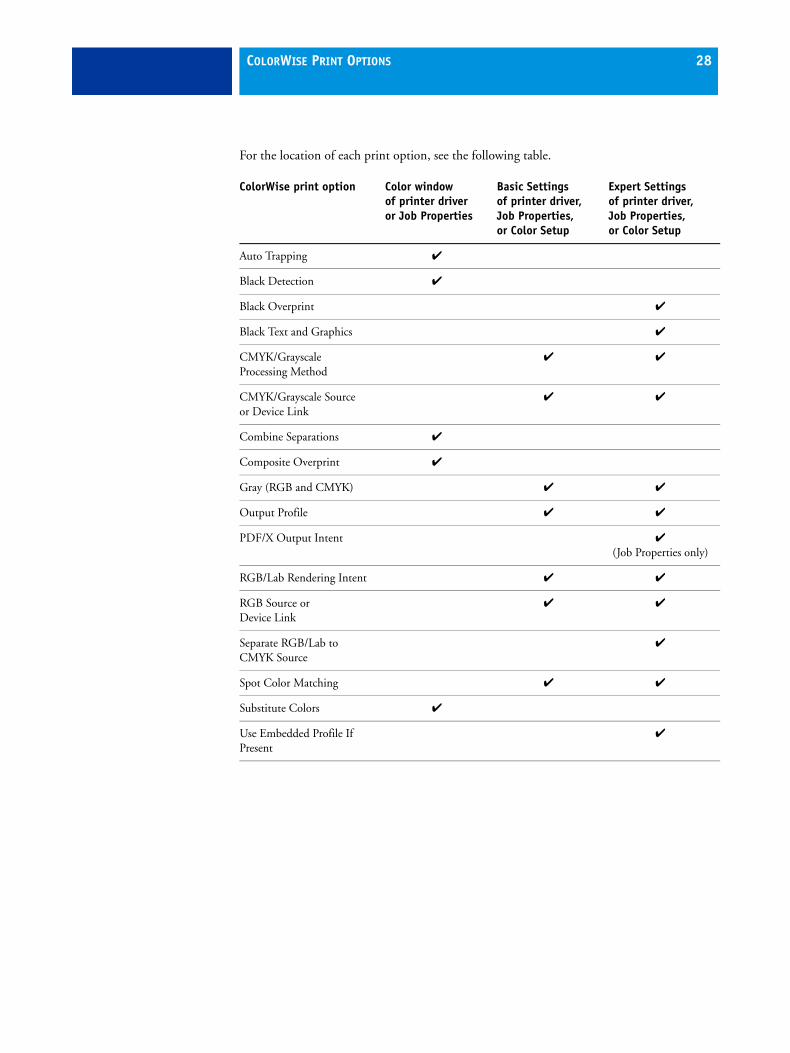
For the location of each print option, see the following table.
ColorWise print option Color window of printer driver or Job Properties
Basic Settings of printer driver, Job Properties, or Color Setup
Expert Settings of printer driver, Job Properties, or Color Setup
Auto Trapping ✔
Black Detection ✔
Black Overprint ✔
Black Text and Graphics ✔
CMYK/Grayscale Processing Method
✔ ✔
CMYK/Grayscale Source or Device Link
✔ ✔
Combine Separations ✔
Composite Overprint ✔
Gray (RGB and CMYK) ✔ ✔
Output Profile ✔ ✔
PDF/X Output Intent ✔
(Job Properties only)
RGB/Lab Rendering Intent ✔ ✔
RGB Source or Device Link
✔ ✔
Separate RGB/Lab to CMYK Source
✔
Spot Color Matching ✔ ✔
Substitute Colors ✔
Use Embedded Profile If Present
✔

COLORWISE PRINT OPTIONS 29
Setting default values in Command WorkStation
Command WorkStation allows you to set the default values for the ColorWise print options and print settings for the Fiery.
These settings are applied to all print jobs sent to the Fiery, unless a user overrides them for an individual job by changing settings in the printer driver. These default settings can also be overridden using Command WorkStation Job Properties. In addition, the defaults set in Command WorkStation are automatically reflected in the printer driver and in Fiery Setup (for those options that can be set in Setup).
The ColorWise print option settings are in the Color Management tab under the Color Setup tab in the Device Center. For more information, see Command WorkStation Help.

COLORWISE PRINT OPTIONS 30
Setting print options in the printer driver
The printer driver writes a PostScript file containing the instructions generated by your application and the settings for the ColorWise print options you selected. The printer driver then sends the PostScript file to the Fiery. The Fiery performs PostScript processing and color conversions and sends raster color data to the copier.
Setting print options for Windows
This section explains how to set color management print options with the Adobe and Microsoft PostScript printer drivers for Windows, PostScript 3 printer drivers that take full advantage of the color features of the Fiery.
Before you proceed, do the following:
• Install the printer driver and the Fiery PPD (see Printing).
• Set up the Fiery for printing (see Printing).
NOTE: The following illustrations and instructions do not apply to all applications. Many applications, such as Adobe PageMaker, Photoshop, Adobe Illustrator, QuarkXPress, and CorelDRAW, have other color management options in addition to those presented in the printer driver. For information about specific applications, see Fiery Color Reference.
Use the following procedure to set the color options for Windows computers.
COLORWISE PRINT OPTIONS 31
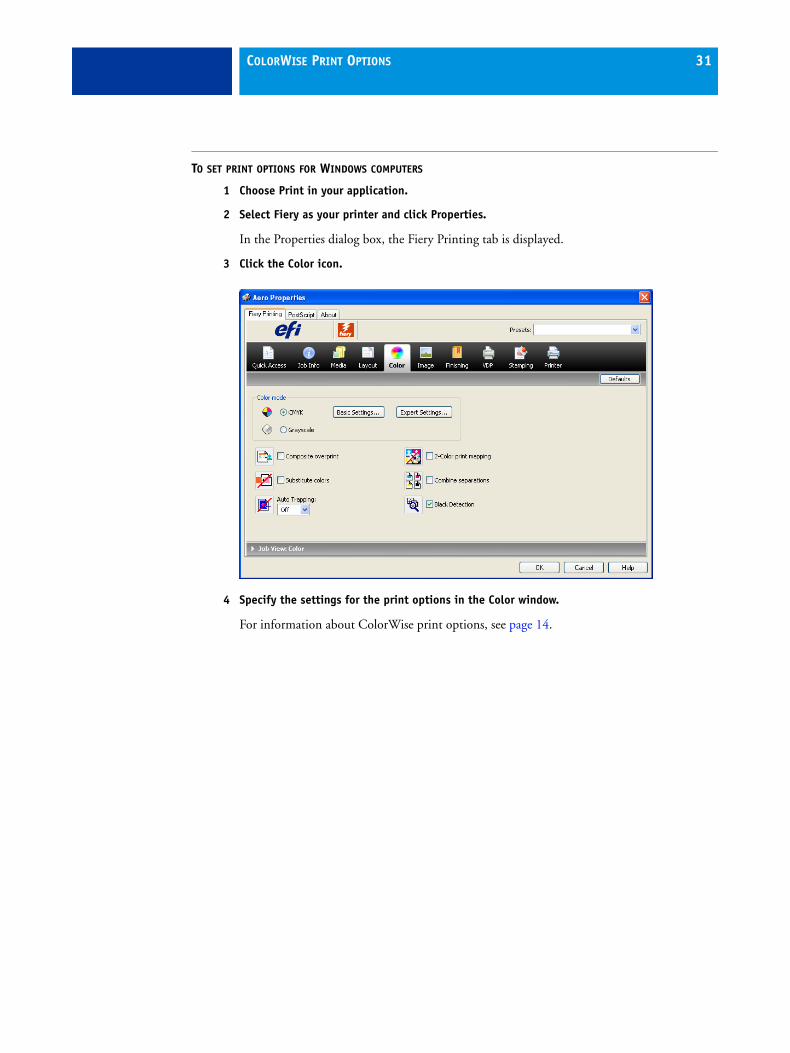
TO SET PRINT OPTIONS FOR WINDOWS COMPUTERS
1 Choose Print in your application.
2 Select Fiery as your printer and click Properties.
In the Properties dialog box, the Fiery Printing tab is displayed.
3 Click the Color icon.
4 Specify the settings for the print options in the Color window.
For information about ColorWise print options, see page 14.
COLORWISE PRINT OPTIONS 32
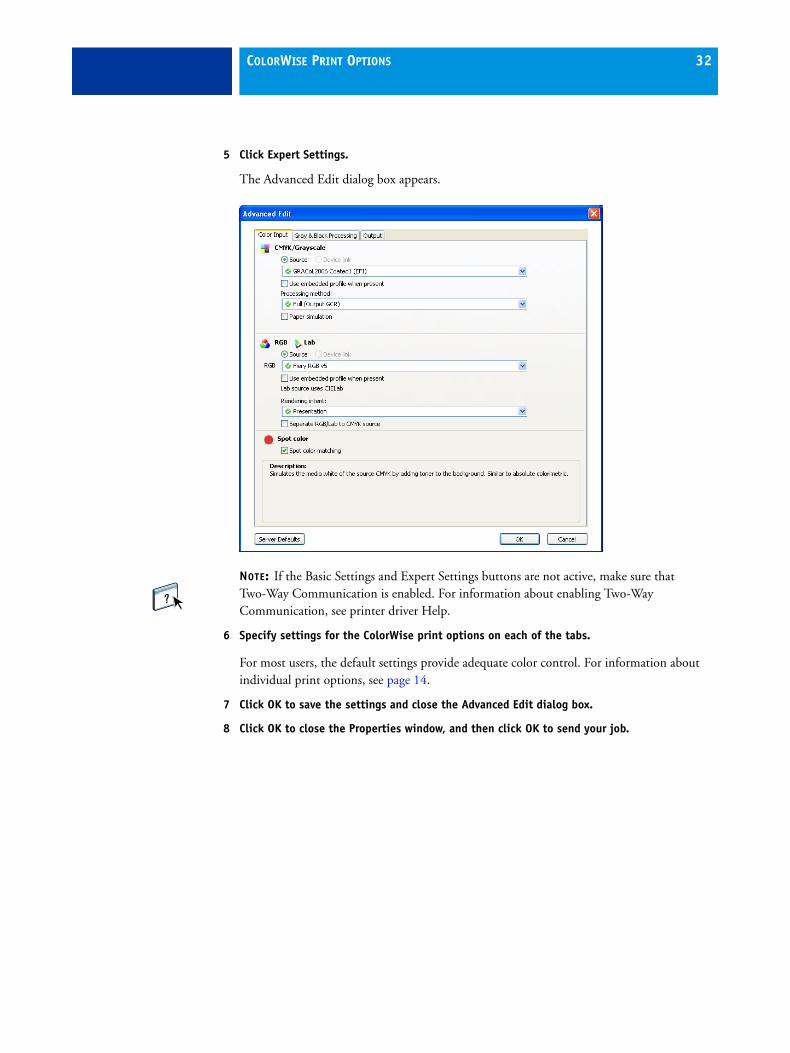
5 Click Expert Settings.
The Advanced Edit dialog box appears.
NOTE: If the Basic Settings and Expert Settings buttons are not active, make sure that Two-Way Communication is enabled. For information about enabling Two-Way Communication, see printer driver Help.
6 Specify settings for the ColorWise print options on each of the tabs.
For most users, the default settings provide adequate color control. For information about individual print options, see page 14.
7 Click OK to save the settings and close the Advanced Edit dialog box.
8 Click OK to close the Properties window, and then click OK to send your job.

COLORWISE PRINT OPTIONS 33
Setting print options in Mac OS
This section explains how to set color management print options with the printer drivers for Mac OS.
Before you proceed, do the following:
• Install the Fiery PPD (see Printing).
• Set up the Fiery for printing (see Printing).
TO SET PRINT OPTIONS FOR MAC OS X COMPUTERS
1 Choose Print in your application.
The Print dialog box appears.
2 Mac OS X v10.5 and v10.6: Expand the dialog box, if necessary, by clicking the arrow next to the Printer name.
3 Mac OS X v10.3.9 and 10.4.x: Click Copies & Pages, choose ColorSync from the drop-down list, and then choose In Printer from the Color Conversion list.
COLORWISE PRINT OPTIONS 34
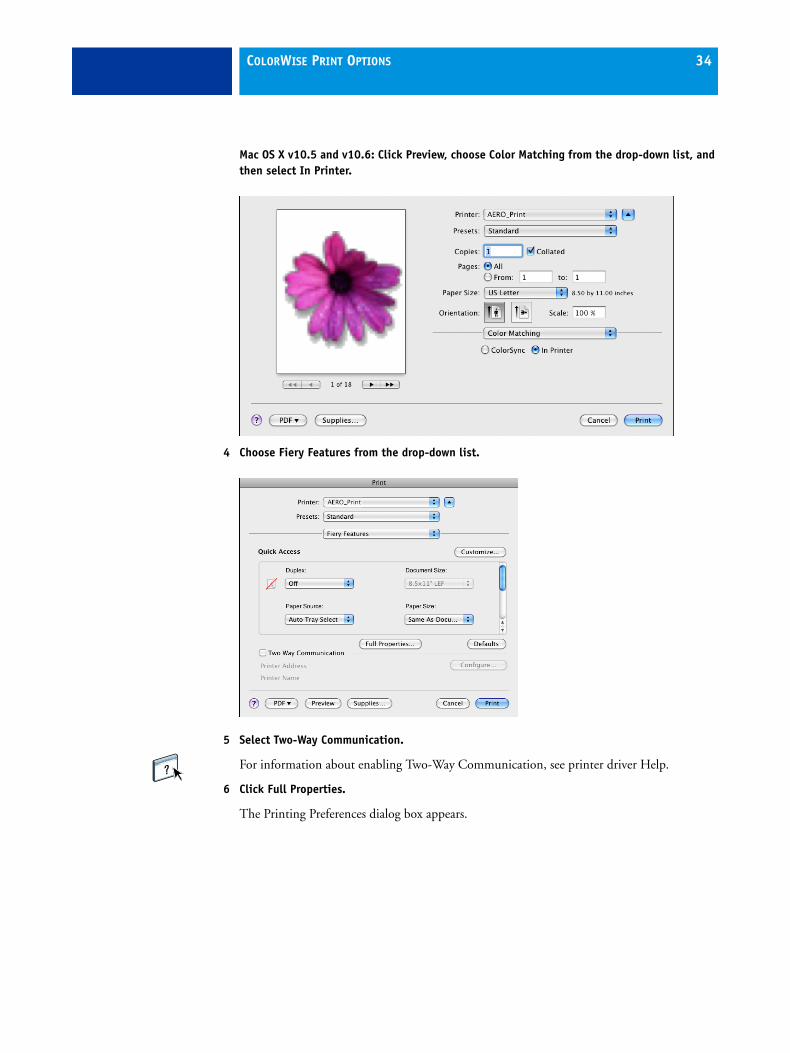
Mac OS X v10.5 and v10.6: Click Preview, choose Color Matching from the drop-down list, and then select In Printer.
4 Choose Fiery Features from the drop-down list.
5 Select Two-Way Communication.
For information about enabling Two-Way Communication, see printer driver Help.
6 Click Full Properties.
The Printing Preferences dialog box appears.

COLORWISE PRINT OPTIONS 35
7 Click the Color icon.
The Color pane appears.
8 Specify settings for the print options on the Color pane.
For information about ColorWise print options, see page 14.

COLORWISE PRINT OPTIONS 36
9 Click Expert Settings.
The Advanced Edit dialog box appears.
NOTE: Alternatively, you can click Basic Settings to display the Color Management dialog box, which also displays ColorWise print options. However, not all of the print options appear in the dialog box.
10 Specify settings for the ColorWise print options on each of the tabs.
For most users, the default settings provide adequate color control. For information about individual print options, see page 27.
11 Click OK to save the settings and close the Advanced Edit dialog box.
The Color pane reappears.
12 Click OK to close the Printing Preferences dialog box, and then click Print to send your job.

COLOR PROFILES 37
COLOR PROFILES
The Fiery includes by default a number of RGB and CMYK profiles that you can use for printing through the RGB Source, CMYK/Grayscale Source, and Output Profile settings for a job. For more information about these options, see ColorWise Print Options.
You can manage the profiles on the Fiery using Command WorkStation. You can import or delete other profiles, as well.
Color filesThe User Software DVD includes a number of files, including color profiles, that are useful for color management. To add color profiles to the Fiery:
• Install them on your computer.
• Use Command WorkStation to import them to the Fiery.
For information about importing profiles to the Fiery using Command WorkStation, see Command WorkStation Help.
COLOR PROFILES 38
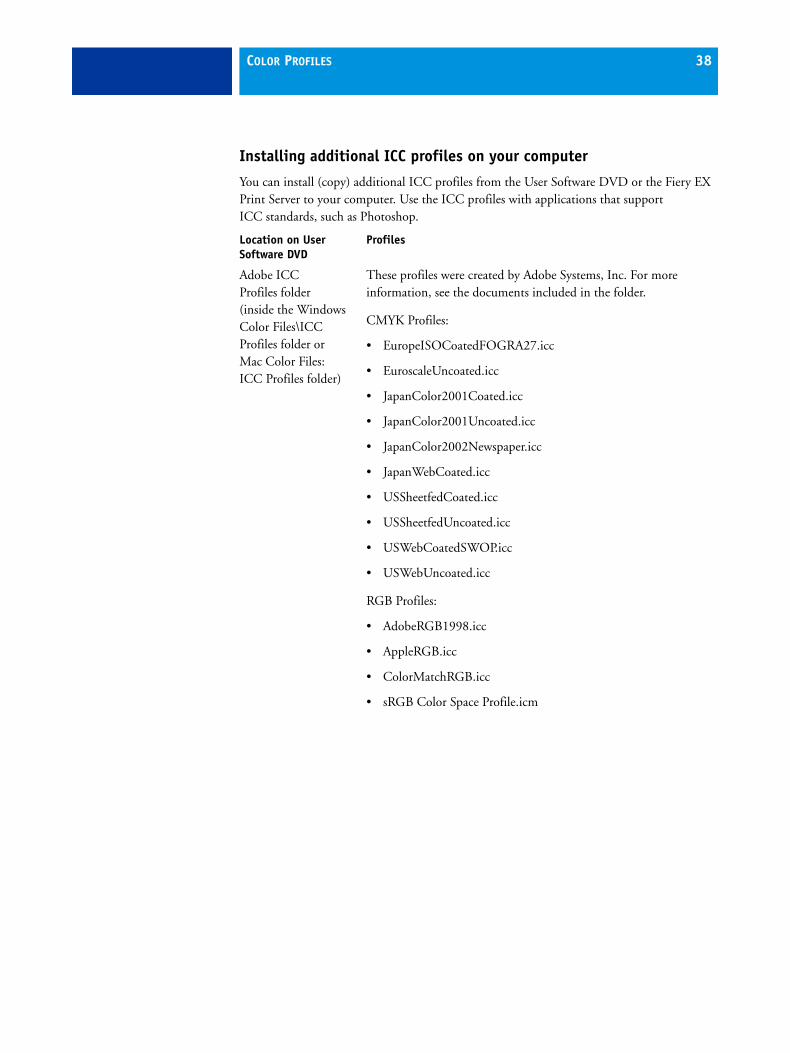
Installing additional ICC profiles on your computer
You can install (copy) additional ICC profiles from the User Software DVD or the Fiery EX Print Server to your computer. Use the ICC profiles with applications that support ICC standards, such as Photoshop.
Location on User Software DVD
Profiles
Adobe ICC Profiles folder (inside the Windows Color Files\ICC Profiles folder or Mac Color Files: ICC Profiles folder)
These profiles were created by Adobe Systems, Inc. For more information, see the documents included in the folder.
CMYK Profiles:
• EuropeISOCoatedFOGRA27.icc
• EuroscaleUncoated.icc
• JapanColor2001Coated.icc
• JapanColor2001Uncoated.icc
• JapanColor2002Newspaper.icc
• JapanWebCoated.icc
• USSheetfedCoated.icc
• USSheetfedUncoated.icc
• USWebCoatedSWOP.icc
• USWebUncoated.icc
RGB Profiles:
• AdobeRGB1998.icc
• AppleRGB.icc
• ColorMatchRGB.icc
• sRGB Color Space Profile.icm

COLOR PROFILES 39
ECI folder (inside the Windows Color Files\ICC Profiles folder or Mac Color Files: ICC Profiles folder)
These profiles were created by the European Color Initiative (ECI). For more information, see the documents included in the CMYK Profiles and RGB Profiles folders, as well as the ECI web site at www.eci.org.
CMYK Profiles:
• ISOcoated_v2_300_eci.icc
• ISOcoated_v2_eci.icc
• ISOuncoated.icc
• ISOuncoatedyellowish.icc
• ISOwebcoated.icc
• SC_paper_eci.icc
RGB Profiles:
• ECI-RGB.V1.0.icc
• eciRGB_v2.icc
• eciRGB_v2_ICCv4.icc
Location on User Software DVD
Profiles
COLOR PROFILES 40
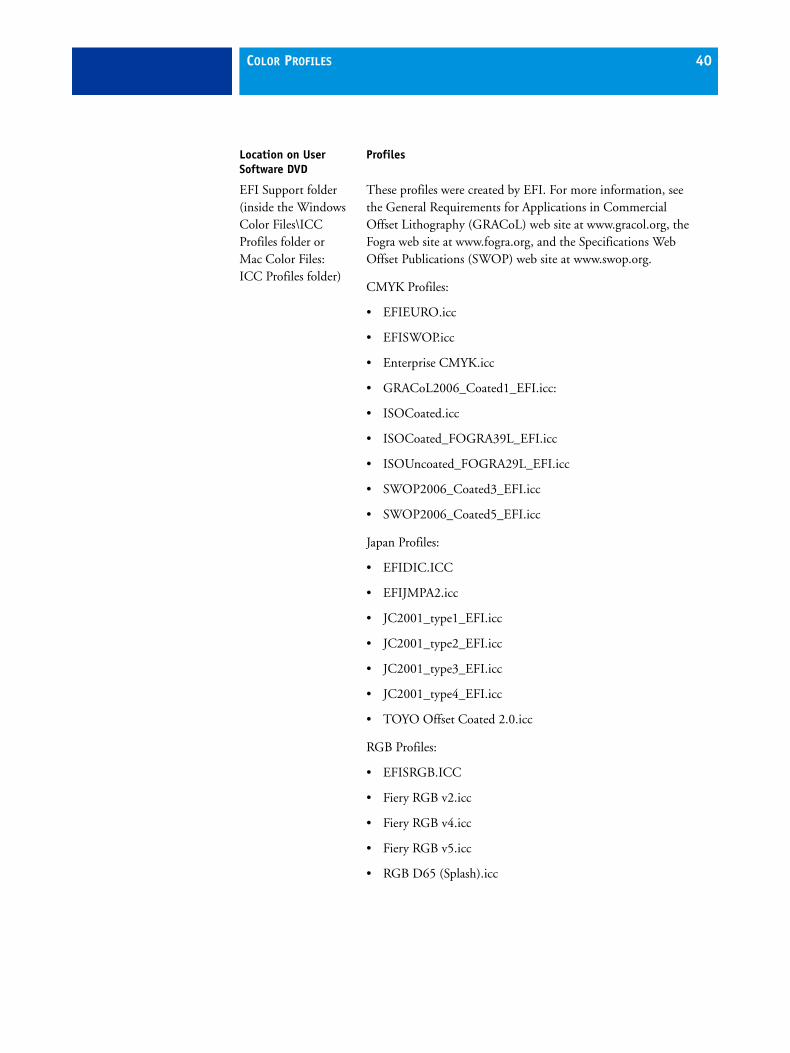
EFI Support folder (inside the Windows Color Files\ICC Profiles folder or Mac Color Files: ICC Profiles folder)
These profiles were created by EFI. For more information, see the General Requirements for Applications in Commercial Offset Lithography (GRACoL) web site at www.gracol.org, the Fogra web site at www.fogra.org, and the Specifications Web Offset Publications (SWOP) web site at www.swop.org.
CMYK Profiles:
• EFIEURO.icc
• EFISWOP.icc
• Enterprise CMYK.icc
• GRACoL2006_Coated1_EFI.icc:
• ISOCoated.icc
• ISOCoated_FOGRA39L_EFI.icc
• ISOUncoated_FOGRA29L_EFI.icc
• SWOP2006_Coated3_EFI.icc
• SWOP2006_Coated5_EFI.icc
Japan Profiles:
• EFIDIC.ICC
• EFIJMPA2.icc
• JC2001_type1_EFI.icc
• JC2001_type2_EFI.icc
• JC2001_type3_EFI.icc
• JC2001_type4_EFI.icc
• TOYO Offset Coated 2.0.icc
RGB Profiles:
• EFISRGB.ICC
• Fiery RGB v2.icc
• Fiery RGB v4.icc
• Fiery RGB v5.icc
• RGB D65 (Splash).icc
Location on User Software DVD
Profiles

COLOR PROFILES 41
For most ICC-aware applications, you must install the files in a folder named Color (Windows) or a folder named Profiles in the Library: ColorSync folder (Mac OS). For use with the Fiery, you can copy the files to a folder of your choice.
TO INSTALL ICC PROFILES ON A WINDOWS COMPUTER FROM THE USER SOFTWARE DVD
1 Insert the User Software DVD into the DVD drive.
2 Open the folder containing the profile.
3 Right-click the profile that you want, and then click Install Profile.
The profiles are installed automatically to the Windows\System32\spool\drivers\color folder on your computer.
TO INSTALL ICC PROFILES ON A MAC OS COMPUTER FROM THE USER SOFTWARE DVD
1 Insert the User Software DVD into the DVD drive.
2 Open the folder containing the profile.
3 Copy the profiles into Library: ColorSync: Profiles.
NOTE: You must log on with Administrator privileges.
TO INSTALL ICC PROFILES ON A WINDOWS COMPUTER FROM THE FIERY EX PRINT SERVER OVER THE NETWORK
1 Browse for the Fiery EX Print Server over the network, using either the IP address or the DNS server name.
2 Type the user name and password, if required.
Ask your administrator if this information is required.
3 Double-click the PC_User_SW directory.
4 Open the ICC folder.
5 Right-click the profile that you want, and then click Install Profile.
The profiles are installed automatically to the Windows\System32\spool\drivers\color folder on your computer.

COLOR PROFILES 42
TO INSTALL COLORSYNC PROFILES ON A MAC OS COMPUTER FROM THE FIERY EX PRINT SERVER OVER THE NETWORK
1 Choose Connect to Server from the Go menu.
2 Type smb:// followed by the IP address of the Fiery EX Print Server and click Connect.
If you cannot locate your Fiery EX Print Server, contact your administrator.
3 Type the user name and password, if required.
Ask your administrator if this information is required.
4 Double-click the Mac_User_SW directory.
5 Open the ColorSync folder.
6 Copy the profiles into Library: ColorSync: Profiles.
NOTE: You must log on with Administrator privileges.
On Mac OS, see the ColorSync documentation for setting ColorSync profiles, such as EFIRGB.

COLOR PROFILES 43
Other color files
You can copy additional color files from the User Software DVD or the Fiery EX Print Server. These files are useful for color matching and for calibration.
Windows Color Files folderor Mac Color Files folder
CMYK Color Reference.ps: An 11-page, Letter-size PostScript file used for reference when defining CMYK colors in applications.
PANTONE Book.ps: A 20-page, Letter-size PostScript file that indicates the closest equivalent of PANTONE coated colors that the Fiery and your copier model can produce. The method used to print the PANTONE Book.ps file differs, depending on the Spot Color Matching setting. For more information, see “Spot Color Matching” on page 26.
RGB page 01.doc: A Microsoft Word file that you can print to view available RGB colors.
RGB page 02.ppt: A Microsoft PowerPoint file you can print to view available RGB colors.
Color Bars folder (inside the Windows Color Files folder or Mac Color Files folder)
FieryColorBar.eps: Used for the Control Bar feature. For more information about Control Bar on the Fiery EX Print Server, see Fiery Graphic Arts Package. For more information about Control Bar on the Fiery Controller, see Control Bar.
Ugra Fogra-MediaWedge V2.2x_EFIv1.eps: Used for the Ugra/FOGRA Media Wedge feature. For more information about this feature on the Fiery EX Print Server, see Fiery Graphic Arts Package.
PS Files folder (inside the Windows Color Files\Calibration Files folderorMac Color Files: Calibration Files folder)
Custom21.ps, Custom34.ps, Standard21.ps, and Standard34.ps: PostScript files of color patches for obtaining measurements.
The numbers in the file names refer to the number of patches on the page. The Custom files allow you to download measurement patches that incorporate the current calibration set of the copier. The Standard files allow you to download standard measurement patches that bypass the current calibration set of the copier.
NOTE: These files are provided for expert users and should not be
used for day-to-day calibration.

COLOR PROFILES 44
Halftone Calibration Files folder (inside the Windows Color Files\Calibration Files folderorMac Color Files: Calibration Files folder)
Images of measurement pages for various calibration instruments and page sizes, used for calibrating the Fiery for different halftone screens. Files are provided for Photoshop and other applications. For more information about halftone calibration on the Fiery EX Print Server, see Fiery Graphic Arts Package.
NOTE: For the X-Rite DTP32 Series II densitometer, use the
calibration file for the X-Rite DTP32 densitometer.
NOTE: Files for the ED-100 densitometer are provided.
However, the ED-100 is not a supported measurement device.
Photoshop folder (inside the Windows Color Files\Calibration Files \Halftone Calibration Files folderorMac Color Files:Calibration Files: Halftone Calibration Files folder)
The following halftone calibration files are provided for Photoshop:
DTP32_A3.psdDTP32_A4.psdDTP32_Letters.psdDTP32_Tabloid.psdDTP41_A3.psdDTP41_A4.psdDTP41_Letters.psdDTP41_Tabloid.psdED100_A3.psdED100_A4.psdED100_Letters.psdED100_Tabloid.psdES1000_A3.psdES1000_A4.psdES1000_Letters.psdES1000_Tabloid.psd
NOTE: For the X-Rite DTP32 Series II densitometer, use the
calibration file for the X-Rite DTP32 densitometer.
NOTE: Files for the ED-100 densitometer are provided. However,
the ED-100 is not a supported measurement device.

COLOR PROFILES 45
Other Applications folder (inside the Windows Color Files\Calibration Files\Halftone Calibration Files folderorMac Color Files:Calibration Files: Halftone Calibration Files folder)
The following halftone calibration files are provided for other applications (besides Photoshop):
DTP32_A3.epsDTP32_A4.epsDTP32_Letters.epsDTP32_Tabloid.epsDTP41_A3.epsDTP41_A4.epsDTP41_Letters.epsDTP41_Tabloid.epsED100_A3.epsED100_A4.epsED100_Letters.epsED100_Tabloid.epsES1000_A3.epsES1000_A4.epsES1000_Letters.epsES1000_Tabloid.eps
NOTE: For the X-Rite DTP32 Series II densitometer, use the
calibration file for the X-Rite DTP32 densitometer.
NOTE: Files for the ED-100 densitometer are provided. However,
the ED-100 is not a supported measurement device.

COLOR PROFILES 46
Managing profiles on the FieryCommand WorkStation allows you to import ICC profiles to the Fiery, export profiles, delete profiles (except for default profiles), and set the properties of profiles. You can also create custom CMYK source or output profiles by editing an existing profile and then saving it as a new profile. These features are in the Profiles tab under the Resources tab in the Device Center. For more information, see Command WorkStation Help.

CALIBRATION 47
CALIBRATION
Calibrating the Fiery ensures consistent and reliable color output. Calibrate the Fiery using the Calibrate feature in Command WorkStation with the copier’s built-in scanner, a densitometer, or a spectrophotometer.
On a Fiery EX Print Server, If you defined a custom halftone screen, you must calibrate the Fiery EX Print Server for that halftone screen before you print a job with it. For more information, see Fiery Graphic Arts Package.
Changing calibration has the potential to affect all jobs for all users, so consider limiting the number of people authorized to perform calibration. Set an Administrator password to control access to calibration (see Configuration and Setup).
Calibration methodsYou can calibrate the Fiery using the following methods:
All of these calibration methods, except for ColorCal from the copier touch panel, are performed through Command WorkStation. For more information about each of these methods, see Command WorkStation Help.
Term Refers to
ColorCal (in Command WorkStation)
Calibration method that uses the copier’s built-in scanner to measure dry ink density values
ColorCal from the copier touch panel
Calibration method that uses the copier’s built-in scanner to measure dry ink density values
DTP32 or DTP32 Series II X-Rite DTP32 or DTP32 Series II automatic densitometer
DTP41 X-Rite DTP41 automatic spectrophotometer
ES-1000 Spectrophotometer ES-1000 hand-held spectrophotometer
CALIBRATION 48
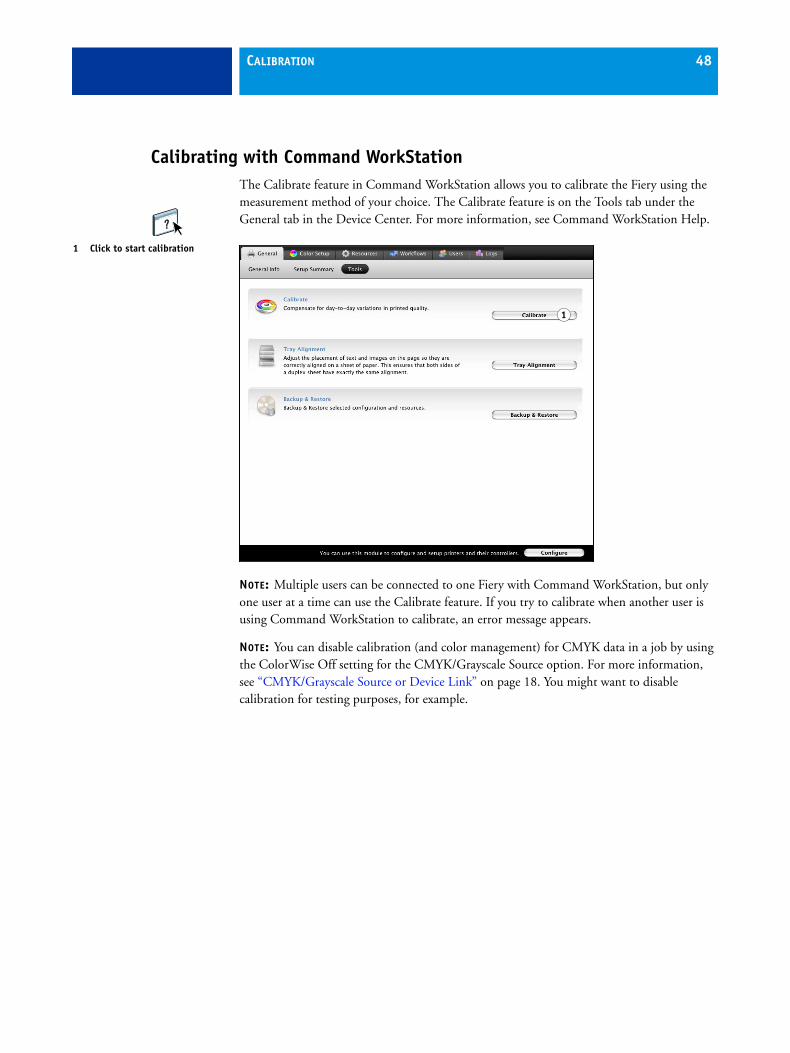
Calibrating with Command WorkStationThe Calibrate feature in Command WorkStation allows you to calibrate the Fiery using the measurement method of your choice. The Calibrate feature is on the Tools tab under the General tab in the Device Center. For more information, see Command WorkStation Help.
NOTE: Multiple users can be connected to one Fiery with Command WorkStation, but only one user at a time can use the Calibrate feature. If you try to calibrate when another user is using Command WorkStation to calibrate, an error message appears.
NOTE: You can disable calibration (and color management) for CMYK data in a job by using the ColorWise Off setting for the CMYK/Grayscale Source option. For more information, see “CMYK/Grayscale Source or Device Link” on page 18. You might want to disable calibration for testing purposes, for example.
1 Click to start calibration
1
CALIBRATION 49
Calibrating with ColorCalCalibrating with ColorCal in Command WorkStation is described in Command WorkStation Help. In addition, there are some tasks you must perform at the copier touch panel.
• You must enable the Device Color Space setting on the copier. You perform this task only once, before calibrating with ColorCal for the first time.
• You must initiate the ColorCal scan at the copier each time you scan a measurement page.
Enabling the Device Color Space setting for ColorCal
To enable the Xerox Color 550/560 to perform ColorCal calibration, you must enable the Device Color Space setting on the copier.
NOTE: You perform this task only once, not every time you calibrate. Once the copier is enabled, it remains enabled unless the copier is reset to its default state.
TO ENABLE THE DEVICE COLOR SPACE SETTING
1 At the copier touch panel, log on with Administrator privileges.
2 Press Machine Status.
3 Press the Tools tab.
4 Under Group, select Scan/Fax Service Settings. Under Features, select Other Settings.
5 Select Color Space, select Enabled, and then press Save.

CALIBRATION 50
Performing a ColorCal scan
When you calibrate the Fiery using ColorCal, whether from Command WorkStation or from the copier touch panel, there are some manual steps that you must perform at the copier to initiate a scan:
• During scanner calibration, after placing the scanner calibration page, Color Control Patches strip, and grayscale strip on the glass platen, and before you start the measurement.
• During calibration of the Fiery, after placing the ColorCal page and grayscale strip on the glass platen, and before you start the measurement.
TO INITIATE A SCAN BEFORE STARTING MEASUREMENT
1 If service icons are not currently displayed on the copier touch panel, press Services Home.
2 Press Network Scanning.
3 Press the Network Scanning tab, and select the Color Calibration template.
4 Press the Advanced Settings tab, select Color Space, select Device Color Space, and then press Save.
NOTE: If Device Color Space is not selectable, you must first enable the Color Space setting. See “Enabling the Device Color Space setting for ColorCal” on page 49.
5 Press the green Start button on the keypad to begin scanning.
Wait for the scan job to be completed.
6 Return to the Calibrator and proceed with the measurement.

CALIBRATION 51
Calibrating from the copier touch panelYou can calibrate the Fiery from the copier touch panel using ColorCal, without using Command WorkStation.
If an Administrator password has been set, you will need it to perform calibration from the copier touch panel. For instructions on using the copier touch panel, see Configuration and Setup.
TO USE COLORCAL FROM THE COPIER TOUCH PANEL
1 Press Services Home on the copier touch panel.
2 Press Fiery.
3 On the main Fiery screen, press Tools, and then press Calibrate.
If you are not already logged on as an administrator or operator, a log-in screen appears.
4 Log on as Administrator or Operator, if required.
5 Choose the calibration set from the list, press Update, and then press Continue.
6 For Tray, choose the paper source for the measurement page.
7 To print the instruction page, as well as the measurement page, select Print Instructions.
If you already have the instruction page, clear this option.
8 To print the scanner measurement page and calibrate the scanner before calibrating the Fiery, select Scanner Measurement Page.
If you clear this option, only the ColorCal measurement page is printed, and the scanner calibration is skipped.
We recommend that you always calibrate the scanner before calibrating the Fiery.
9 Press Print to print the measurement pages and instructions.
The ColorCal measurement page is comprised of swatches of color that will be measured by the copier’s scanner and then compared to the target color values.
10 Follow the instructions on the instruction page to scan the scanner measurement page.
11 Press Measure Page.
Status messages display the progress of retrieving the scan data and calculating measurements.

CALIBRATION 52
12 Follow the instructions on the instruction page to scan the ColorCal measurement page.
Place the grayscale strip face-down on the copier glass (platen). Place the strip along the top edge of the copier so that it is centered between the paper width marks on the copier.
Place the color measurement page face-down over the grayscale strip. Make sure the patches on the grayscale strip do not overlap the color patches. Close the platen glass cover, being careful not to move the grayscale strip and color measurement page.
13 Press Measure Page.
Status messages display the progress of retrieving the scan data and calculating measurements.
14 When the measurement is complete, press Print to print a Comparison Page.
You can examine the Comparison Page to decide if the calibration is successful.
15 If the calibration is successful, press Apply to save the measurements.
16 At the screen stating that calibration was successfully applied, press OK.
17 Press Logout to return to the main Fiery screen.
1 Place grayscale strip face down
2 Place color measurement page face down over grayscale strip
1 2

CALIBRATION 53
Managing calibration setsEvery output profile on the Fiery must be associated with a calibration set. The calibration set provides the Fiery with measurements of the density response of the copier dry inks for specific printing conditions (for example, media type). This data, along with the expected density response of the copier, allows the Fiery to apply corrections to color values that are sent to the copier, to achieve the calibrated output. For more information, see “An overview of calibration” on page 62.
An output profile can be associated with only one calibration set, but the same calibration set can be used by more than one output profile.
A calibration set must be associated with at least one output profile, otherwise the calibration set will never be used for printing.
Using the output profiles and calibration sets
The Fiery is shipped with one or more output profiles. You may obtain good color quality with the factory-supplied output profiles and their associated calibration sets (see scenarios 1 and 2 in the table below). However, you may need to create custom calibration sets and output profiles depending on your situation (see scenarios 3 and 4 in the table below).
Your paper Action See
1 Recommended paper for a factory-supplied output profile (the paper that the profile is based on)
You will obtain acceptable color when you print with the output profile. You do not need to create a calibration set or custom profile.
See “Recommended paper and print settings” on page 54 to find out the recommended paper for an output profile.
2 Paper similar to a factory-supplied profile’s recommended paper
You might be able to use the output profile. The print settings required for your paper (for example, media type and media weight) must match the print settings required by the recommended paper. If the color quality is sufficient, you do not need to create a calibration set or custom profile.
The output profile name usually indicates the general type of paper (for example, plain, coated, or heavy). To find out the print settings required for the recommended paper, see “Recommended paper and print settings” on page 54.
3 Paper that is similar to a factory-supplied profile’s recommended paper but uses different print settings
You might still be able to use a factory-supplied output profile, if you create a custom calibration set and use it to calibrate the Fiery with your paper.
For more information, see “Adding custom calibration sets” on page 55.
4 Paper that does not yield acceptable color with any factory-supplied profile
You must create a custom calibration set and custom profile.
For more information, see “Adding custom calibration sets and output profiles” on page 55.

CALIBRATION 54
NOTE: Recommended papers are chosen for color quality as well as other factors, such as feeding reliability and quality of transfer.
Recommended paper and print settings
You can check the recommended paper and print settings for a particular output profile using Profile Manager and Calibrator.
TO FIND THE RECOMMENDED PAPER AND PRINT SETTINGS FOR AN OUTPUT PROFILE
1 In Command WorkStation, in Device Center, choose Color Setup > Color Management.
2 Select the Output Profile and note the name of the calibration set displayed to the right.
3 In Device Center, choose General > Tools and click Calibrate.
Calibrator starts in a separate window.
4 Under Calibration Set, select Manage.
The Manage Calibration Settings dialog box appears.
5 Select the calibration set from the list.
The recommended paper and the required print settings are displayed.
6 Click Cancel to close the window.

CALIBRATION 55
Adding custom calibration sets
If you are printing on a paper that is similar to the recommended paper but uses different print settings, you might still be able to use the output profile, but you must create a custom calibration set. If the color quality is sufficient, you do not need to create a custom profile (see scenario 3 in the table under “Using the output profiles and calibration sets” on page 53).
You can add a new calibration set that you can then select when performing calibration. You can delete a custom calibration set. You cannot delete a factory-supplied calibration set.
For instructions on adding a custom calibration set, see Command WorkStation Help.
Adding custom calibration sets and output profiles
If you determine that none of the factory-supplied output profiles yields acceptable color with your paper, you must create a custom calibration set in Calibrator and a custom profile using profile-generating software such as Fiery Color Profiler Suite (see scenario 4 in the table under “Using the output profiles and calibration sets” on page 53).
NOTE: Before creating a custom calibration set and custom output profile, make sure that the copier is calibrated (if calibration is supported on the copier). For information about performing copier calibration, see the documentation that accompanies the copier.
Calibration on the Fiery requires that each output profile contains a calibration target. If an output profile does not contain a calibration target, when you import the output profile to the Fiery, the calibration target from the default output profile is added to the imported profile. The procedures in this section describe how to make sure that an appropriate calibration target is added to your custom output profile when you import it to the Fiery and associate it with a custom calibration set.
Using Fiery Color Profiler Suite
If you use Fiery Color Profiler Suite to create a custom output profile, you do not have to perform any procedures to add a calibration target to the output profile. Color Profiler Suite can create a profile that contains a calibration target.
• First, create a custom calibration set using Calibrator in Command WorkStation.
• Next, create a custom output profile using Color Profiler Suite and install it on the Fiery.
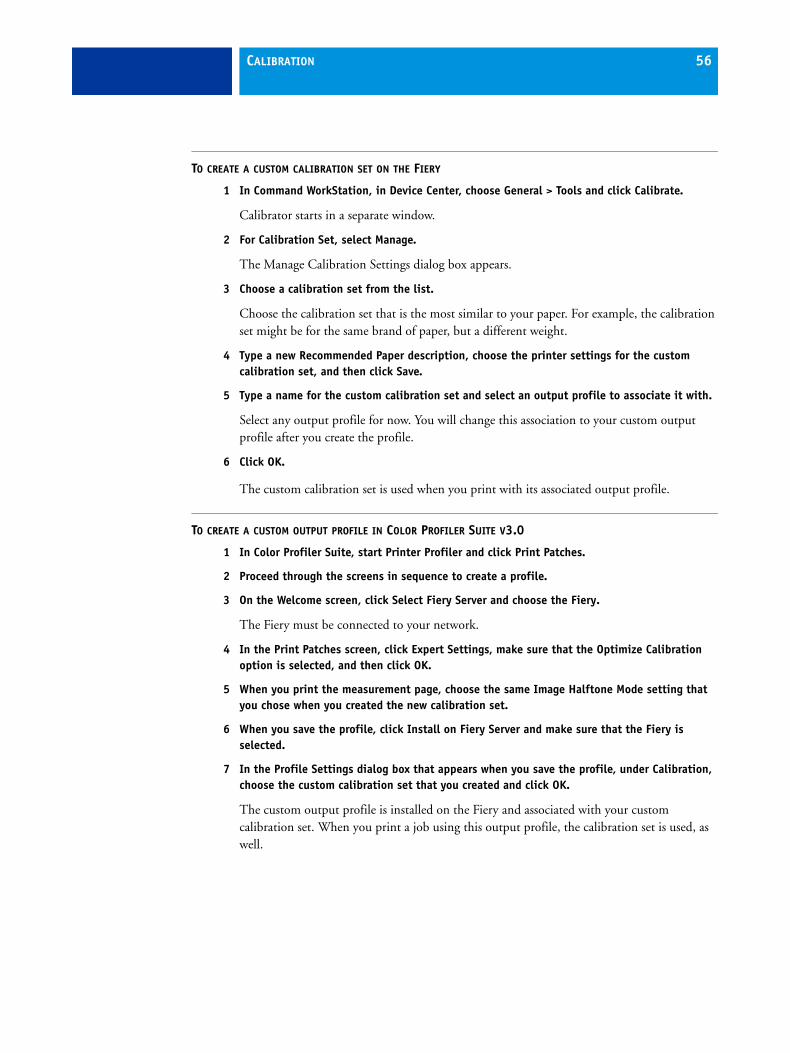
CALIBRATION 56
TO CREATE A CUSTOM CALIBRATION SET ON THE FIERY
1 In Command WorkStation, in Device Center, choose General > Tools and click Calibrate.
Calibrator starts in a separate window.
2 For Calibration Set, select Manage.
The Manage Calibration Settings dialog box appears.
3 Choose a calibration set from the list.
Choose the calibration set that is the most similar to your paper. For example, the calibration set might be for the same brand of paper, but a different weight.
4 Type a new Recommended Paper description, choose the printer settings for the custom calibration set, and then click Save.
5 Type a name for the custom calibration set and select an output profile to associate it with.
Select any output profile for now. You will change this association to your custom output profile after you create the profile.
6 Click OK.
The custom calibration set is used when you print with its associated output profile.
TO CREATE A CUSTOM OUTPUT PROFILE IN COLOR PROFILER SUITE V3.0
1 In Color Profiler Suite, start Printer Profiler and click Print Patches.
2 Proceed through the screens in sequence to create a profile.
3 On the Welcome screen, click Select Fiery Server and choose the Fiery.
The Fiery must be connected to your network.
4 In the Print Patches screen, click Expert Settings, make sure that the Optimize Calibration option is selected, and then click OK.
5 When you print the measurement page, choose the same Image Halftone Mode setting that you chose when you created the new calibration set.
6 When you save the profile, click Install on Fiery Server and make sure that the Fiery is selected.
7 In the Profile Settings dialog box that appears when you save the profile, under Calibration, choose the custom calibration set that you created and click OK.
The custom output profile is installed on the Fiery and associated with your custom calibration set. When you print a job using this output profile, the calibration set is used, as well.

CALIBRATION 57
Using a profile-generating application other than Fiery Color Profiler Suite
If you use a profile-generating application other than Fiery Color Profiler Suite to create a custom output profile, follow the instruction in this section.
To create the calibration target, you print a page of color patches on the Fiery using your paper and measure the page using Calibrator. Next, you copy the calibration target to a temporary output profile and set this profile as the default output profile. When you import your custom output profile, the calibration target is added from the temporary output profile.
Follow these procedures to use custom calibration sets and output profiles.
• Print a measurement page.
• Measure the measurement page.
• Create a custom calibration set and a temporary output profile.
• Set up the calibration target in the temporary output profile.
• Create a custom output profile and save it to your computer.
• Import the custom output profile to the Fiery.
• Delete the temporary output profile.
TO PRINT THE MEASUREMENT PAGE
1 Load paper into the copier.
2 Locate the file for the measurement page on the User Software DVD.
Choose the file for your page size and measurement instrument. The files are located in the Photoshop and Other Applications folders inside the following folders on the User Software DVD:
• Windows Color Files\Calibration Files\Halftone Calibration Files
• Mac Color Files: Calibration Files: Halftone Calibration Files
3 Start Command WorkStation and connect to the Fiery.
4 Import the measurement page file to the Hold queue of the Fiery.
For instructions, see Command WorkStation Help.

CALIBRATION 58
5 Double-click the job in the Job Center window.
The Job Properties window appears.
6 Select the following print settings and click OK.
• Set the media settings appropriate for your paper.
For example, choose the media type that corresponds to your paper and the input tray that contains your paper.
• Set the CMYK/Grayscale Source option to ColorWise OFF.
With this setting, the job is printed without calibration.
• Set the desired halftone setting, if available.
7 Right-click the job and choose Print.
The measurement page is printed.
TO MEASURE THE MEASUREMENT PAGE
1 In Command WorkStation, in Device Center, choose General > Tools and click Calibrate.
2 Make a note of the selected calibration set.
For this procedure, you can use any existing calibration set.
3 Select Expert mode, click Save to File, and save the measurements for the currently selected calibration set to a file on your computer.
If you do not need to preserve the existing measurements (for example, you have not calibrated the Fiery using this calibration set), you can skip this step.
4 Measure the measurement page.
For instructions, see the section in Command WorkStation Help for your measurement device. Do not print the measurement page in Calibrator. Use the measurement page that you already printed.
5 Click Apply to save the measurements.

CALIBRATION 59
TO CREATE A CUSTOM CALIBRATION SET AND TEMPORARY DEFAULT OUTPUT PROFILE
1 In Calibrator, create a custom calibration set.
For instructions, see Command WorkStation Help. For the calibration set, select the same calibration set you used to measure the measurement page. The measurements are copied to the custom calibration set you create.
When you create a custom calibration set, you associate it with a copy of an existing output profile. You can choose any output profile; this association is temporary. You will not use the copied output profile to print.
2 If you saved the current measurements to a file in the previous procedure, you can restore the measurements.
• Select the correct calibration set.
• Click From File under Get Measurements, select the file, and then click Open.
• Click Apply to save the measurements.
Alternatively, you can restore the factory default measurements.
• Select the correct calibration set.
• Click Restore Device, and then click OK.
TO SET UP THE CALIBRATION TARGET USING A TEMPORARY DEFAULT OUTPUT PROFILE
1 In Calibrator, select Expert mode.
2 Make sure that your custom calibration set is selected.
3 Choose Measurements vs. Target under View Measurements (optional) and click View.
4 Make a note of the Measured D-Max values for C, M, Y, and K.
Be sure to note the Measured values, not the Target values.
5 In Command WorkStation, in Device Center, choose Resources > Profiles.
6 Select the output profile that you created when you created the custom calibration set and click Edit.
You will use this profile as a temporary profile to set the D-Max values of your custom output profile.

CALIBRATION 60
7 Change the D-Max values to the values that you recorded in step 4.
8 Click Save, type the name if needed, and then click Save again to save the edited profile.
9 In Device Center, choose Color Setup > Color Management.
10 For the Output Profile option, select the profile that you just edited.
The profile becomes the default output profile.
TO CREATE A CUSTOM OUTPUT PROFILE
1 Print the color profiling patches.
Before printing the color profiling patches:
• Set the same print settings as in your custom calibration set.
• Set the output profile to be the temporary default output profile (the one you saved in the previous procedure).
• Set the CMYK/Grayscale Source option to Bypass Conversion. This ensures that your patches print only with the proper correction from calibration, without any other CMYK conversions.
2 Measure the color profiling patches and create the new output profile using a profile-generating application.
For the procedures to create output profiles, see the documentation that accompanies the application.
3 Save the custom output profile to the default folder for profiles on your computer.
Windows XP/Server 2003/Vista/Server 2008: Windows\System32\spool\drivers\color Mac OS X: Library: ColorSync: Profiles

CALIBRATION 61
TO IMPORT THE CUSTOM OUTPUT PROFILE TO THE FIERY
1 In Device Center, choose Resources > Profiles.
2 Click Import and go to the location of your custom output profile.
3 Select your custom output profile, choose Output next to Import Profile As and then click Import.
The profile is imported to the Fiery, and the Output Profile Settings dialog box appears.
The calibration target from the default output profile is copied to the custom output profile.
4 In the Output Profile Settings window, confirm that your custom calibration set is selected.
When the custom output profile is imported, the calibration set from the default output profile is associated with the custom output profile.
5 Click OK to save changes and close the Output Profile Settings dialog box.
Your custom output profile now has the correct calibration target and is associated with your custom calibration set. You no longer need the temporary default output profile and can delete it from the Fiery.
TO DELETE THE TEMPORARY DEFAULT OUTPUT PROFILE
1 In Device Center, choose Color Setup > Color Management.
2 For the Output Profile option, select a profile that is not the temporary default output profile you are going to delete.
The profile becomes the default output profile.
3 In Device Center, choose Resources > Profiles.
4 Select the temporary output profile and click Delete.
5 Click Yes.
CALIBRATION 62
Understanding calibrationThe following sections describe important concepts and suggestions for understanding calibration.
An overview of calibration
Calibration generates curves that adjust for the difference between the actual dry ink densities (measurements) and the response expected by the output profile.
• Measurements represent the actual color behavior of the copier.
• Calibration sets are sets of measurements that represent the output of specific combinations of media-related options.
• Each output profile contains a calibration target that describes the expected behavior of the copier.
After you calibrate the Fiery, a calibration set is stored. This calibration set is used when it is associated with an output profile. Every output profile has an associated calibration set. If you have not specified one, the calibration set associated with the default output profile is used.
If you change the calibration after a saved job has been processed (RIPped), you do not have to reprocess (reRIP) the job. The new calibration affects the job without reprocessing.
How calibration works
Although the needs of most users are met by the default calibration set, the Fiery allows you to choose a calibration set to customize calibration for specialized jobs.
Calibration allows you to:
• Maximize the color reproduction capabilities of the Fiery.
• Ensure consistent color quality over time.
• Produce consistent output across Fiery servers.
• Achieve better color matches when reproducing spot colors, such as PANTONE colors or other named color systems.
• Optimize the Fiery for using ColorWise rendering intents, CMYK simulations, and ICC profiles.
Success in obtaining satisfactory print quality from the Fiery depends on many factors. Among the most important are establishing and maintaining optimal dry ink densities. The density is the measure of the light absorbed by a surface. By carefully regulating dry ink densities, you obtain consistent printed color.
CALIBRATION 63
Even with a calibrated system, dry ink density is affected by the settings of copier, humidity, and temperature. Density also tends to drift over time. Uneven dry ink density on paper affects calibration results. Regular measurement detects day-to-day variations in density, gradation, and color reproduction, and calibration corrects them.
Calibration works by creating calibration curves on the Fiery that compensate for the difference between actual (measured) and desired (target) density values. These calibration curves are the graphic equivalent of transfer functions, which are mathematical descriptions of changes that are made to the initial data. Transfer functions are often graphed as input or output curves.
The Fiery generates calibration curves after comparing measured values to the final target values for each of the four dry ink colors. The target values are based on the output profile specified.
Measurements
Measurement files contain numerical values that correspond to the dry ink density produced by the copier when it prints solid cyan, magenta, yellow, and black, and graduated tints of those colors.
To create a measurement file, print a page of color patches. Measure the patches using a color measurement instrument connected to a computer on the network, or if it is available, the print device’s scanner. The new measurements are automatically downloaded to the Fiery.
Output profiles and calibration sets
Output profiles and calibration sets define desired calibration results. One or more output profiles and calibration sets are provided with the Fiery. When you calibrate the Fiery, select the calibration set that corresponds to the typical printing jobs at your site. This same calibration set can be associated with one or more output profiles. For more information about output profiles, see page 21.
Scheduling calibration
Calibrate the Fiery at least once a day, depending on the volume of print jobs. If it is very important to maintain consistent color, or your copier is subject to wide fluctuations in temperature or humidity, calibrate every few hours. For optimal performance, calibrate whenever there is a noticeable change in print quality or printing results are not as expected.
If you must split a print job into two or more batches to print at different times, it is important to calibrate before you print each batch. You should also calibrate the Fiery after copier maintenance. However, because the copier may be less stable immediately after maintenance, wait until you have printed approximately 50 pages before you calibrate.
CALIBRATION 64
NOTE: Because printed output from the copier is very sensitive to changes in temperature and humidity, do not install the copier near a window, in direct sunlight, or near a heater or air conditioner. Paper is also sensitive to climate changes. Store it in a cool, dry, stable environment, and keep reams sealed until they are used.
To monitor print quality, print the following color pages:
• Color Charts (from Command WorkStation or the copier touch panel)
• Color reference pages included in the User Software DVD (see page 43)
These pages include fully saturated color patches and pale tints of cyan, magenta, yellow, and black. Images with skin tones offer a good basis for comparison. Save and periodically compare the pages you print. If a noticeable change in appearance occurs, calibrate the Fiery.
When you examine the Test Page, all color patches should be visible, even though they may be very faint in the five to two percent range. Each patch set should show uniform gradation from patch to patch as the color lightens from 100% to zero.
If the solid density patches (100% cyan, magenta, yellow, or black) look less saturated over time, show the pages to your copier service technician to determine whether adjusting the copier can improve output.
Checking calibration status
To verify whether the Fiery is calibrated, which calibration set and output profile were used, and when the copier was last calibrated, perform the following:
• Print a Configuration page or Test Page from the copier touch panel or Command WorkStation.
For instructions on printing the Configuration page, see Configuration and Setup.
• In the Calibrate feature of Command WorkStation, select a calibration set. The last calibration and the user who performed it are displayed.

SPOT-ON 65
SPOT-ON
The Spot Color Matching print option automatically matches spot colors with their best CMYK equivalents so that spot colors can be simulated using the CMYK dry ink of the copier. However, you may want to adjust the default CMYK equivalents to achieve a better match for your specific printing conditions. You can modify spot colors using the Spot-On spot color editor in Command WorkStation.
Spot-On in Command WorkStation is standard on the Fiery EX Print Server and is part of the Productivity Package option on the Fiery Controller.
In addition to managing “named” colors, Spot-On allows you to create a list of “substitute” colors. These are colors that, when called for in a document by their RGB or CMYK values, are substituted with a different color with the CMYK values from the Spot-On color dictionary. This permits exact color control and overrides individual RGB and CMYK colors.
On the Fiery EX Print Server, if the Fiery Graphic Arts Package, Premium Edition option is enabled, the Two-Color Print Mapping feature is available in Spot-On. This feature allows you to assign spot colors and process colors to the generic colors that are used in a job. The Two-Color Print Mapping feature is designed for print shop operators to do the proofing for a two-color press. You can print a two-color job to a two-color device by mapping the colors in a job to the colors that are already created on the device. For information about Two-Color Print Mapping, see Fiery Graphic Arts Package.
Using Spot-On Spot-On allows you to adjust and manage lists of spot colors and their CMYK equivalents. The matching lists of spot colors and CMYK values are known as Spot Color Dictionaries. Spot-On allows you to maintain multiple Spot Color Dictionaries for each output profile on the Fiery.
To use Spot-On, you must specify the output profile associated with the Spot Color Dictionary that you want to edit.
If you select Output profile X and redefine PANTONE 123 from 30%M to 50%M using Spot-On, you will get 50%M when you print a job with Output profile X. If you print a job with Output profile Y, you will get the original value.

SPOT-ON 66
If you select Output profile X and create a custom color named “My Purple” and define it as 80%C 40%M, ColorWise automatically calculates the Lab values using Output profile X and creates new CMYK values for use with Output profile Y.
The Spot-On feature is on the Spot Colors tab under the Resources tab in the Device Center. For more information about using Spot-On, see Command WorkStation Help.
NOTE: To use the Spot-On features with named colors, you must enable the Spot Color Matching print option. For more information about this option, see page 26.
NOTE: Spot colors identified by names are printed with their defined CMYK values. Edits to an output profile made in Command WorkStation do not affect how spot colors print.
Some Spot-On features require that a job be displayed with correct colors on your monitor. To display the colors correctly on your monitor, you must set up the monitor display according to the manufacturer’s recommendations, and specify the correct monitor profile for your monitor.
SPOT-ON 67
Specify the following settings for the monitor display:
• At the monitor: Brightness, Contrast, and Color Temperature
• From the control panel of the operating system: Resolution, Refresh rate, and Number of colors
For more information about setting up your monitor and the monitor profile, see the documentation that accompanies the monitor.
NOTE: The edits to a job made with the color adjustment features in ImageViewer affect all colors in the job, including spot colors. For more information about ImageViewer, see Fiery Graphic Arts Package.
NOTE: You cannot use the Substitute Colors and Postflight features at the same time. These print options are constrained from the printer driver.
CONFIGURABLE AUTO TRAPPING 68
CONFIGURABLE AUTO TRAPPING
Trapping is a technique where some objects are printed slightly larger or smaller than you have specified in an application, in order to prevent white edges around the objects. These white edges, or “halos,” can be caused by factors such as misregistration, the physical properties of the dry inks, and the stiffness of the media.
The configurable Auto Trapping feature provides you with advanced trapping settings and gives you full control over their values. The Fiery is shipped with values that are optimized for the print device using regular paper, but if these values do not provide the results necessary for the media that you use, you can modify the values to meet your requirements.
The configurable Auto Trapping feature is available with the Fiery Graphic Arts Package, Premium Edition option on the Fiery EX Print Server and is part of the Productivity Package option on the Fiery Controller.
NOTE: For more information about the Fiery Graphic Arts Package, see Fiery Graphic Arts Package.
Configurable Auto Trapping workflowThe fixed values are set as default for Auto Trapping. The Fiery applies these fixed values when you set Auto Trapping to On, with generally good results. However, to customize the values for Auto Trapping, define the values in the Auto Trapping pane in Color Setup. After you define the values, print a job with Auto Trapping set to On from the printer driver.
Printing with default Auto TrappingYou can print a job with default Auto Trapping by setting the Auto Trapping print option to On from the printer driver.
TO PRINT A JOB WITH DEFAULT AUTO TRAPPING
1 Choose Print from your application.
2 Select Fiery as your printer and click Properties.
The Properties dialog box appears with the Fiery Printing tab selected.
3 Click the Color icon.

CONFIGURABLE AUTO TRAPPING 69
4 Select On for the Auto Trapping print option.
5 Click OK.
6 Click Print.
The job is printed with the default Auto Trapping values.
Setting up configurable Auto TrappingIn Command WorkStation, the configurable Auto Trapping feature is on the Trapping tab under the Color Setup tab in Device Center. For more information about using Trapping, see Command WorkStation Help.
Printing with configurable Auto TrappingAfter you define the Auto Trapping values, print a job with the Auto Trapping feature by setting the Auto Trapping print option to On from the printer driver. You can also change the setting for this print option in a job using Command WorkStation Job Properties.
NOTE: If the Auto Trapping values are changed, reRIPping is required to print a job with the new values.
Use the procedure on page 68 to print a job with custom Auto Trapping values from the printer driver. The job is printed with the Auto Trapping values defined in the Auto Trapping pane.

IMAGEVIEWER 70
IMAGEVIEWER
ImageViewer allows you to soft proof and adjust colors in a job before it is printed. You can use the preview in ImageViewer to verify job placement, orientation, and content, as well as general color accuracy. If the job contains halftone screened settings, the preview shows a composite view of all separations at the dot level. You can select to display the plate data for each process color independently or in combination with the other colors, allowing inspection of individual plate data or a combination of any range of plates.
ImageViewer is available with the Fiery Graphic Arts Package, Premium Edition option on the Fiery EX Print Server and is part of the Productivity Package option on the Fiery Controller.
NOTE: For more information about the Fiery Graphic Arts Package, see Fiery Graphic Arts Package.

IMAGEVIEWER 71
Accessing ImageViewerStart ImageViewer from the Actions menu or Preview window of Command WorkStation.
TO START IMAGEVIEWER FROM THE ACTIONS MENU
1 In Job Center in Command WorkStation, select the job that you want to preview.
NOTE: ImageViewer recognizes only jobs that show processed/held (dark yellow) status. Processed/held jobs are also indicated by the raster job icon (page icon ringed with a halo).
2 If needed, choose Process and Hold from the Actions menu to move the job to processed/held status.
3 To start ImageViewer, do one of the following:
• Choose ImageViewer from the Actions menu.
• Right-click the selected job and choose ImageViewer from the menu that appears.
The ImageViewer main window appears.
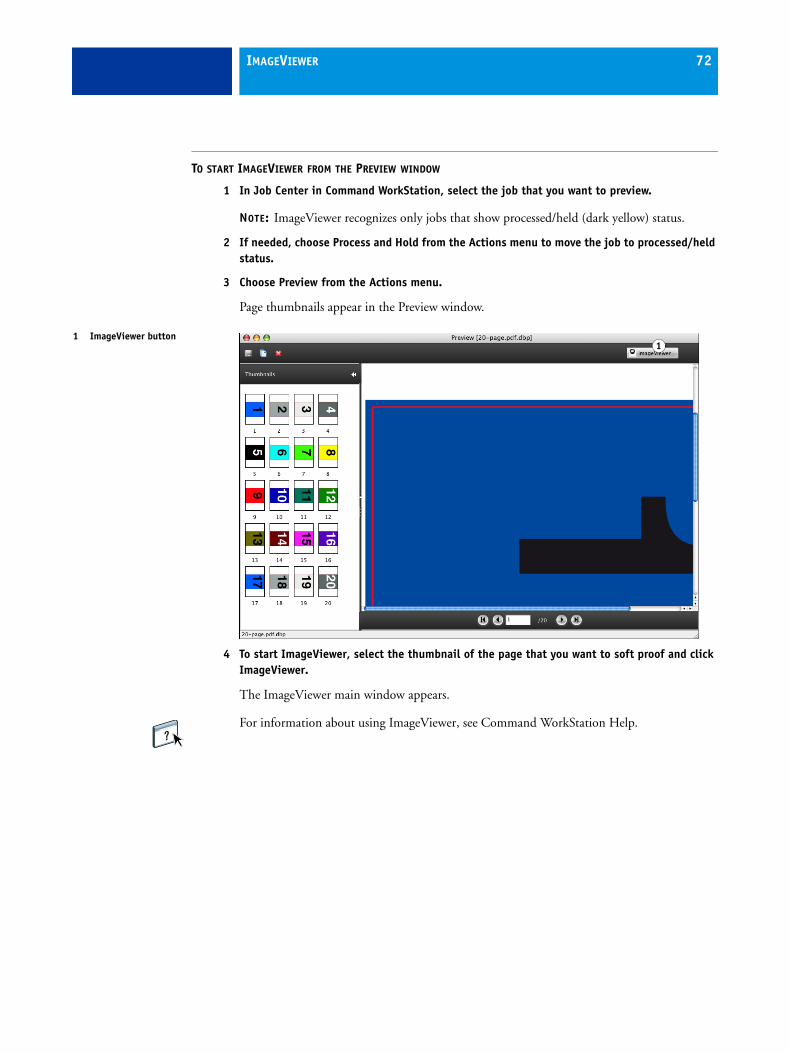
IMAGEVIEWER 72
TO START IMAGEVIEWER FROM THE PREVIEW WINDOW
1 In Job Center in Command WorkStation, select the job that you want to preview.
NOTE: ImageViewer recognizes only jobs that show processed/held (dark yellow) status.
2 If needed, choose Process and Hold from the Actions menu to move the job to processed/held status.
3 Choose Preview from the Actions menu.
Page thumbnails appear in the Preview window.
4 To start ImageViewer, select the thumbnail of the page that you want to soft proof and click ImageViewer.
The ImageViewer main window appears.
For information about using ImageViewer, see Command WorkStation Help.
1 ImageViewer button1
CONTROL BAR 73
CONTROL BAR
Control Bar allows you to add a static color bar and dynamic job information to each printed page at a user-defined location. The feature can be set as a server default or overridden on a per-job basis.
The Control Bar feature is available with the Fiery Graphic Arts Package, Premium Edition option on the Fiery EX Print Server and is part of the Productivity Package option on the Fiery Controller.
NOTE: For more information about the Fiery Graphic Arts Package, see Fiery Graphic Arts Package.
The default Control Bar is designed to fit the Fiery default paper size, Letter/A4, or larger. You can create Control Bars for other paper sizes.
NOTE: If a Control Bar does not fit on the page, it will be clipped.
NOTE: If a background color is defined as “white” for a user-defined Control Bar, it must be defined in the CMYK color space for the Paper Simulation feature to take effect. For more information about Paper Simulation, see page 76.
Control Bar workflowThe default Control Bar provides a color bar and dynamic job information. Print a job with the default Control Bar by setting the Control Bar print option to On from the printer driver. Many jobs print satisfactorily with the default Control Bar, but if you require your own color bars, create them by defining custom values in the Control Bar Definition dialog box. After you define a custom Control Bar in the Control Bar pane in Color Setup, you can print a job with the custom Control Bar from the printer driver.
To print a job with the default Control Bar, see the following section. To print a job with a custom Control Bar, see page 75.
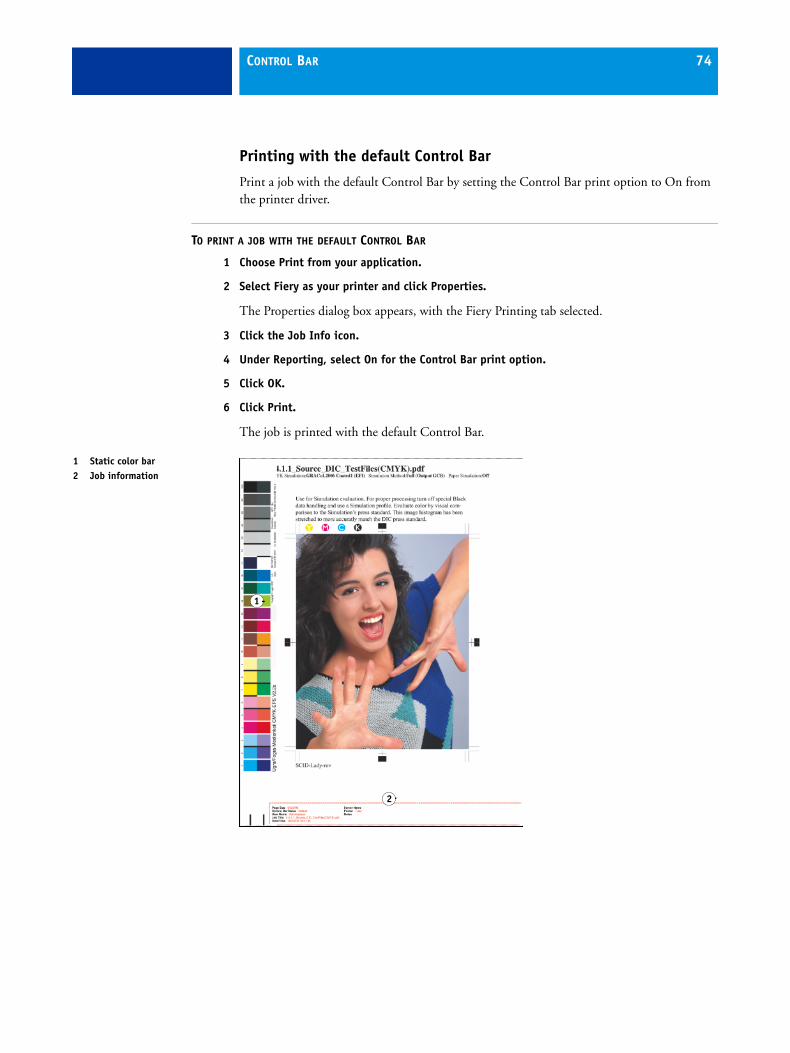
CONTROL BAR 74
Printing with the default Control Bar
Print a job with the default Control Bar by setting the Control Bar print option to On from the printer driver.
TO PRINT A JOB WITH THE DEFAULT CONTROL BAR
1 Choose Print from your application.
2 Select Fiery as your printer and click Properties.
The Properties dialog box appears, with the Fiery Printing tab selected.
3 Click the Job Info icon.
4 Under Reporting, select On for the Control Bar print option.
5 Click OK.
6 Click Print.
The job is printed with the default Control Bar.
1 Static color bar2 Job information
1
2
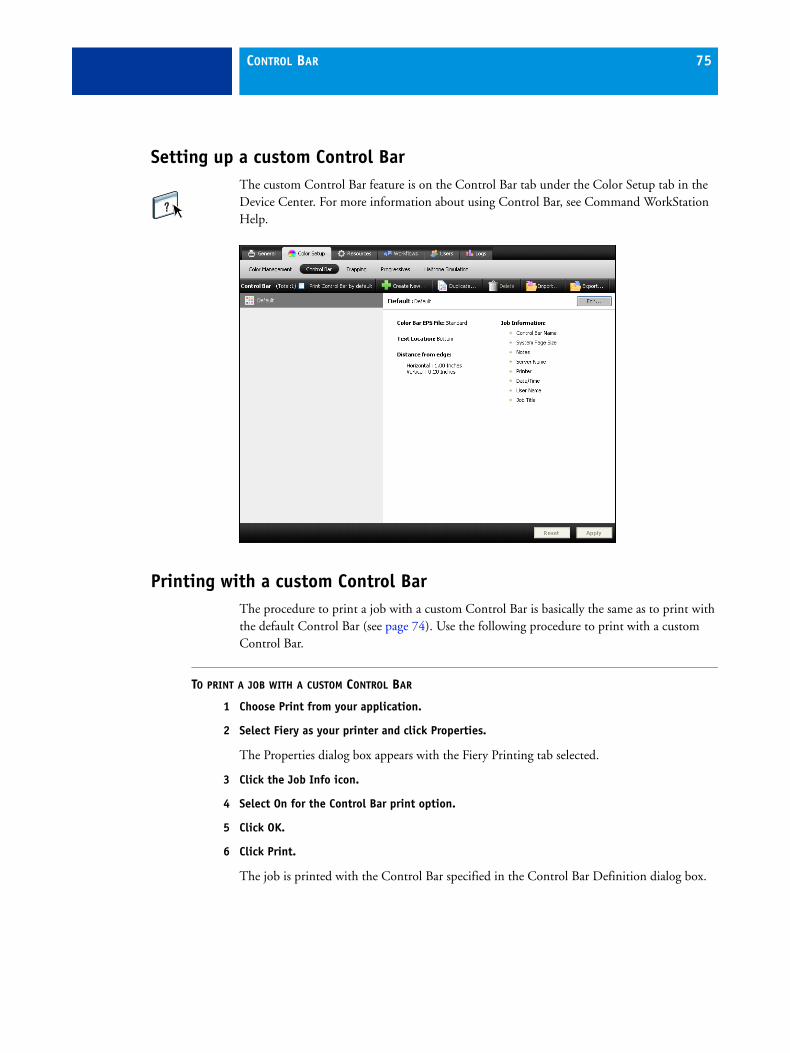
CONTROL BAR 75
Setting up a custom Control BarThe custom Control Bar feature is on the Control Bar tab under the Color Setup tab in the Device Center. For more information about using Control Bar, see Command WorkStation Help.
Printing with a custom Control BarThe procedure to print a job with a custom Control Bar is basically the same as to print with the default Control Bar (see page 74). Use the following procedure to print with a custom Control Bar.
TO PRINT A JOB WITH A CUSTOM CONTROL BAR
1 Choose Print from your application.
2 Select Fiery as your printer and click Properties.
The Properties dialog box appears with the Fiery Printing tab selected.
3 Click the Job Info icon.
4 Select On for the Control Bar print option.
5 Click OK.
6 Click Print.
The job is printed with the Control Bar specified in the Control Bar Definition dialog box.

PAPER SIMULATION WHITE POINT EDITING 76
PAPER SIMULATION WHITE POINT EDITING
The Paper Simulation feature gives you the benefit of the absolute colorimetric rendering that renders the white point of the source color space as a visible color in the output profile color space.
Although an ICC profile contains a definition of “white,” the white may not always visually match the human eye, requiring a perceptual adjustment. The Paper Simulation White Point editing feature allows you to perceptually adjust the hue, brightness, and saturation of the simulated paper white defined in the ICC profile.
The Paper Simulation feature is available with the Fiery Graphic Arts Package, Premium Edition option on the Fiery EX Print Server and is part of the Productivity Package option on the Fiery Controller.
NOTE: For more information about the Fiery Graphic Arts Package, see Fiery Graphic Arts Package.
Paper simulation workflowYou can print a job with the Paper Simulation feature set to On from the printer driver without customizing paper simulation. Many jobs may print satisfactorily with the fixed default Paper Simulation setting. However, you can customize the paper simulation by editing the white point values with Command WorkStation. After you customize the values, print the job with the custom paper simulation values from the printer driver by setting the Paper Simulation print option to On.
To print a job with the fixed Paper Simulation setting, use the procedure on page 77. For more information about editing Paper Simulation White Point values and printing with custom paper simulation values, see page 78.

PAPER SIMULATION WHITE POINT EDITING 77
Printing with default Paper SimulationUse the following procedure to print a job with the fixed Paper Simulation value.
NOTE: The procedures for printing a job from a Mac OS or a Windows computer are similar.
TO PRINT A JOB WITH DEFAULT PAPER SIMULATION
1 Choose Print from your application.
2 Select Fiery as your printer and click Properties.
The Properties dialog box appears with the Fiery Printing tab selected.
3 Click the Color icon.
4 Click Expert Settings.
The Advanced Edit dialog box appears.
5 Under the Color Input tab, select Paper Simulation.
6 Click OK to close the Advanced Edit dialog box.
7 Click OK to close the Properties dialog box.
8 Click Print.
The job prints with the default Paper Simulation White Point setting.
Paper Simulation print option
The following values are available for the Paper Simulation print option:
• Off (Default)
• On
NOTE: If you have not edited the Paper Simulation White Point values with Command WorkStation and selected On for this option, your job is printed with the default Paper Simulation values. If you edited the values, your job is printed with the custom Paper Simulation values.

PAPER SIMULATION WHITE POINT EDITING 78
Paper Simulation White Point editingYour job may print satisfactorily with the fixed Paper Simulation setting. However, you can customize the Paper Simulation setting by editing the Paper Simulation White Point values with Command WorkStation.
NOTE: To display the colors correctly with your monitor, you must set the monitor and monitor settings correctly. For more information, see the section on Preferences in Command WorkStation Help.
To edit a custom profile, do the following:
• Select a CMYK Source Profile.
• Link the CMYK source profile to an output profile.
To access the Paper Simulation White Point dialog box, see the section on Paper Simulation in Command WorkStation Help.
NOTE: If Paper Simulation is set to On, and you have defined a substitute color as C=0, M=0, Y=0, K=0, the values defined in Substitute Colors override those for Paper Simulation. For information about Substitute Colors, see Command WorkStation Help.
Printing with custom paper simulation valuesAfter you edit the paper simulation values in Command WorkStation, you can print a document with the custom paper simulation values from the printer driver. You can also override the setting in Job Properties.
NOTE: The procedures for printing a job from a Windows or Mac OS computer are fundamentally the same. The following procedure uses illustrations from a Mac OS computer.
Use the following procedure to print a job with the custom paper simulation values.
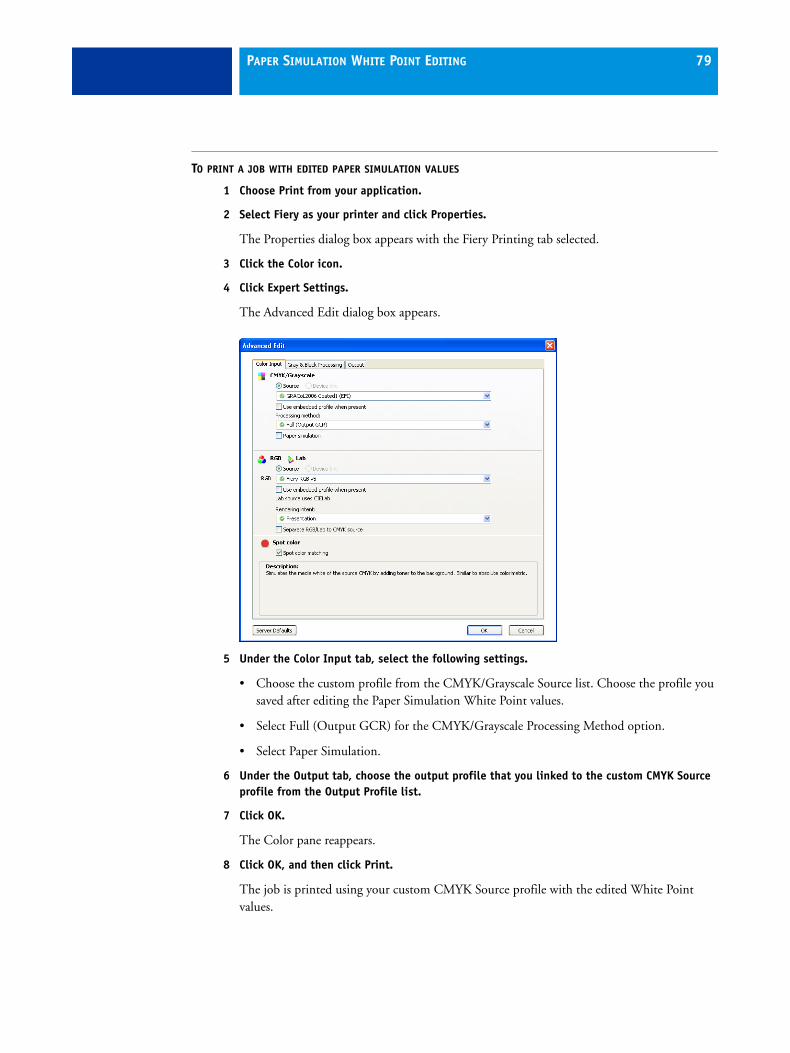
PAPER SIMULATION WHITE POINT EDITING 79
TO PRINT A JOB WITH EDITED PAPER SIMULATION VALUES
1 Choose Print from your application.
2 Select Fiery as your printer and click Properties.
The Properties dialog box appears with the Fiery Printing tab selected.
3 Click the Color icon.
4 Click Expert Settings.
The Advanced Edit dialog box appears.
5 Under the Color Input tab, select the following settings.
• Choose the custom profile from the CMYK/Grayscale Source list. Choose the profile you saved after editing the Paper Simulation White Point values.
• Select Full (Output GCR) for the CMYK/Grayscale Processing Method option.
• Select Paper Simulation.
6 Under the Output tab, choose the output profile that you linked to the custom CMYK Source profile from the Output Profile list.
7 Click OK.
The Color pane reappears.
8 Click OK, and then click Print.
The job is printed using your custom CMYK Source profile with the edited White Point values.

POSTFLIGHT 80
POSTFLIGHT
The Postflight feature helps you determine why some printed jobs may not deliver expected color. Acting as a diagnostic and training tool for all users, it provides helpful global and object-specific information about how a job is actually received and processed by the Fiery.
The Postflight feature is available with the Fiery Graphic Arts Package, Premium Edition option on the Fiery EX Print Server and is part of the Productivity Package option on the Fiery Controller.
NOTE: For more information about the Fiery Graphic Arts Package, see Fiery Graphic Arts Package.
Use Postflight to troubleshoot color problems with a previously printed job or as a preventive measure. You can print the original document (or RIPped and previewed) with all objects (images, graphics, and text) color-coded. A report explains what color spaces are used in the job and what print options affect those spaces. The report also provides information about the printing environment, such as calibration date, time, and method. Print a Test Page to verify the condition of the printing environment.
Postflight is a powerful analysis tool that enumerates in its reports not only those color spaces that are used by visible objects, but any color space called by a job. This can be very useful in diagnosing puzzling situations that may require correction. For example: using one specific combination of a printer driver, an OS, and a desktop publishing application emitting separations for plates, you might find that: 1) the Postflight color-coded pages show the Cyan, Magenta, and Yellow separations in the “DeviceGray” color space, while the Black separation is shown in the “DeviceCMYK” color space and 2) the Postflight report enumerates: DeviceGray, DeviceCMYK and DeviceRGB. What once required a PostScript expert to decipher can now be interpreted in minutes using Postflight reports. The Cyan, Magenta, and Yellow pages are defined in “DeviceGray”, the Black page is using the “K” channel of DeviceCMYK, and the job is calling for the RGB color space, without applying it on any user-visible object.

POSTFLIGHT 81
About PostflightWhen the Postflight print option is set to values other than Off, it provides the following information to help you identify possible problems: Postflight Test Page, Postflight color-coded pages, and Postflight reports.
Postflight Test Page
You can print the Postflight Test Page alone or in combination with the color-coded pages. The Test Page is printed using the exact same media and global settings (such as calibration) as your job. However, color objects on this page are printed independently of the user-specified source color definitions (such as CMYK simulation and RGB).
If the color on this page is not accurate, the problem lies with the printing environment(such as the calibration, output profile, or print device).
If the color on this page prints correctly but objects in your job do not print in expected colors, it is likely that the problem lies with the color setting specific to these objects. Problems with objects can be: wrong color values for text and graphics, bad quality images, or out-of-gamut colors.
Postflight color-coded pages
With this option, Postflight prepares a color-coded version of the original document that displays each object with a color corresponding to the color space that the Fiery received for the object.
The colors used to represent the color spaces for objects are as follows:
• Gray objects: Gray
• CMYK objects: Cyan
• RGB objects: Red
• Device-Independent objects: Indigo
• Spot color objects: Yellow
By reviewing the colors for all objects, you can identify the print option settings that affect the color conversion of the objects and make appropriate modifications.

POSTFLIGHT 82
Postflight reports
You can print reports on color-coded pages, either alone or combined with the color-coded document. These reports are printed on the Fiery default paper size (Letter for US, A4 for metric) and use the default calibrated color mode.
The reports provide a document header with information (such as job name, date and time printed, and user name), a ColorWise global settings page, and object-specific settings pages. All pages include the job name, postflight date/time, and pagination in the bottom margin.
• ColorWise global settings page provides information that affects every object in a job, such as Calibration Set, the date the Fiery was calibrated, the method used for calibration, and the output profile that was used.
• Object-specific settings pages provide a list of the settings that were used to process every object in each color space, thus suggesting the locations to correct problems. For example, if you see a problem with an object that is displayed in Cyan in a color-coded page, review the settings listed in the CMYK Objects page and try changing those settings.
• Spot colors page lists all spot colors.
For spot colors, the Postflight report lists the colors that are used in a job. It also indicates whether these colors are defined in the Fiery. When a spot color is defined in the Fiery, a patch is printed next to the color name. When a color is not defined in the Fiery, a white patch with an X is printed.

POSTFLIGHT 83
Important notes on Postflight reports
The main purpose of Postflight is to help you detect, diagnose, and prevent color-related problems. In contrast to generic preflight software, which attempts to predict how a job would be processed, a postflighted job is fully processed by the Fiery, allowing accurate reporting on the settings with which the job processed.
This Postflight feature is especially useful in cases where a workflow that was used to submit a job inadvertently converts colors. This conversion occurs with some printer drivers, printing options, and conversions to PDF.
This report focuses on color processing and does not list every printing option that affects your job. For more information about the ColorWise print options, see ColorWise Print Options.
NOTE: Postflight reports list only those color spaces that were submitted to the Fiery with your job. You may occasionally find that a job produces a Postflight report that includes information about color spaces that you cannot locate in the job’s color-coded pages. This occurs when an object in the color space is used in the job but is masked by another object, when an object is very light (for example, 0% of a spot color), or when the specific application or printer driver asks the Fiery to process a particular color space but does not use it for user-visible objects.
NOTE: A Postflight report contains only one page on global settings, and it can include only one Test Page. Therefore, Postflight cannot describe an entire job accurately unless all pages are printed with the same options and on the same media. This is the case, for instance, with Mixed Media jobs, because they can use multiple output profiles, up to one profile per media in the job. If the page range is set to the pages that use one media only, Postflight produces reliable results for the specified range.
NOTE: Postflight is a “reporting” feature that is designed for diagnostic purposes. It is not designed for use with production features such as VDP and Imposition. For high-volume applications in production environments, use Postflight only on the individual pages that need testing.

POSTFLIGHT 84
Postflight print optionAccess the Postflight feature through the Postflight print option. The following values are available for the Postflight print option:
• Off (Default)
• Concise Report
• Test Page
• Color-Coded Pages
• All Components (Color-Coded document pages, Test Page, and Concise Report)
NOTE: Select a portion of a job to print the Postflight pages by selecting the appropriate page range of a job from the printer driver.
Postflight workflowThe default settings in the ColorWise print options are such that in most cases you should not have to change them. However, there may be times when you receive unexpected colors for your job. Postflight is a procedure performed after you print a document and receive unexpected or inadequate color. If you have access to Command WorkStation, Postflight also helps you catch color problems before you actually print. Postflight processes your job and collects information about the color objects throughout. The information is then displayed in Color-Coded document pages, a Test Page, and a Concise Report.
NOTE: The background defined in the Paper Simulation is not indicated as a CMYK object in the Postflight reports. For more information about Paper Simulation, see page 76.
NOTE: You cannot use Postflight at the same time that you use the following features: Progressives, Substitute Colors, or Combine Separations. Constraints are set for these print options from the printer driver.
POSTFLIGHT 85
The follows scenarios show how Postflight can be helpful to users who demand high color quality.
To diagnose an unexpected color (see page 86)
Use Postflight to diagnose unexpected color in a job, or determine which print or calibration settings apply to a job.
To check the calibration status prior to printing a job (see page 88)
Consider the following before printing a job:
• The Fiery may include many Calibration Sets. Which Calibration Set applies to my job?
• When was the Fiery last calibrated?
• Which instrument was used for the last calibration?
To check the quality of the output profile (see page 89)
If you are considering using a new paper for which you do not have a custom profile, or if you suspect that the output profile for your print device may not precisely describe its color behavior, check your output profile by printing the Postflight Test Page.
To diagnose a color problem of a specific object (see page 90)
When experts have verified that the calibration is correct and that the global settings, including the output profile, are correct, but the color of a specific object is still not as intended, you can print a color-coded document and diagnose the problem.
The detailed procedures of these scenarios are described in the following sections.
NOTE: For each of the following procedures, instead of printing the report to the Fiery, you can also send it to the Hold queue of the Fiery and preview the information (of a job with raster data) in ImageViewer. For more information about ImageViewer, see ImageViewer. To view the color of a job correctly, you must set your monitor and monitor profile correctly. For more information about the monitor and monitor profiles, see the section about Preferences in Command WorkStation Help.
NOTE: The procedures for printing a job from a Windows and a Mac OS computer are similar.

POSTFLIGHT 86
Scenario 1: Diagnose an unexpected color
Use the following procedure to print a job with Postflight set to Off.
TO PRINT A JOB
1 Open a job from your application.
2 Choose Print.
3 Select Fiery as your printer and click Properties.
The Properties dialog box appears with the Fiery Printing tab selected.
4 Click each option icon, and specify the values for each print option.
5 Click the Job Info icon.
6 Choose Off from the Postflight menu.
7 Click OK to close the Properties dialog box.
8 Click Print.
The job is printed to the Fiery.
After you print a job, use the following procedure to diagnose an unexpected color and print the job with edited color settings.

POSTFLIGHT 87
TO DIAGNOSE AN UNEXPECTED COLOR AND PRINT WITH EDITED COLOR SETTINGS
1 Click the Job Info icon.
2 Choose All Components from the Postflight menu.
For information about the components of Postflight, see page 81.
3 Click OK to close the Properties dialog box.
4 Click Print.
Postflight Test Page, color-coded document pages, and Postflight Reports are printed.
5 Review all Postflight pages.
For information about the Postflight pages, see page 81.
6 Make appropriate changes based on all Postflight pages.
For more information about the changes, see the following section.
7 Choose Off from the Postflight menu.
8 Click OK.
9 Click Print.
The job with the edited color settings is printed to the Fiery.
10 Return to Step 1, if needed.
Repeat the steps until you get satisfactory color results.
Making changes
After reviewing the Postflight information, determine what changes are necessary and apply the changes. Depending on your printing environment, the condition of the print device, and the color settings, possible changes are as follows:
• Correct problems with the print device (see the documentation that accompanies the print device).
• Calibrate the Fiery (see Calibration).
• Edit the colors of the output profile with Command WorkStation (see Command WorkStation Help).
• Change the default settings in Command WorkStation (see Command WorkStation Help).
• Change the job specific print option settings using Command WorkStation Job Properties.

POSTFLIGHT 88
Scenario 2: Check the calibration status
Use the following procedure to check the calibration status prior to printing a job.
TO CHECK THE CALIBRATION STATUS AND PRINT WITH THE OPTIMUM CALIBRATION CONDITION
1 Click the Job Info icon.
2 Choose Concise Report from the Postflight menu.
For information about Postflight reports, see page 82.
3 Click OK.
4 Click Print.
The Concise Report page is printed.
5 Review the information in the ColorWise global settings page.
6 Perform calibration, if needed.
If service has been performed on the print device since the last calibration, or calibration has not been performed, perform calibration using the Calibration Set specified in the Postflight report.
For more information about calibration, see Calibration.
7 Choose Off from the Postflight menu.
8 Click OK.
9 Click Print.
The job is printed to the newly calibrated Fiery.

POSTFLIGHT 89
Scenario 3: Check the quality of the output profile
Use the following procedure to check the quality of the output profile of the print device.
TO CHECK THE QUALITY OF OUTPUT PROFILE AND PRINT WITH THE OPTIMUM OUTPUT PROFILE
1 Click the Job Info icon.
2 Choose Test Page from the Postflight menu.
For information about the Postflight Test Page, see page 81.
3 Click OK.
4 Click Print.
The Postflight Test Page is printed to the Fiery.
5 Review the quality of the color on the Postflight Test Page.
NOTE: Make sure that this page was printed with the same media and print option settings as the job.
6 Review the instructions on the Postflight Test Page.
7 Edit the color of the output profile, or create a profile, if needed.
It may be necessary to customize the output profile or create one to get optimal results on the media the job is using.
8 Choose Off from the Postflight menu.
9 Click OK.
10 Click Print.
The job is printed to the Fiery with the edited or newly created output profile.
POSTFLIGHT 90
Scenario 4: Diagnose a color problem of a specific object
Use the following procedure to diagnose a color problem.
TO DIAGNOSE A COLOR PROBLEM OF A SPECIFIC OBJECT AND PRINT WITH THE EDITED COLOR SETTINGS
1 Click the Job Info icon.
2 Choose Color-Coded Pages from the Postflight menu.
For information about Postflight color-coded pages, see page 81.
3 Click OK.
4 Click Print.
Postflight color-coded pages are printed to the Fiery.
NOTE: Alternatively, you can send the Postflight color-coded pages to the Hold queue of the Fiery and preview them using ImageViewer. To preview the pages using ImageViewer, make sure that your monitor is set up according to the manufacturer’s recommendations and that the correct monitor profile is specified for your monitor. For information about monitor profiles, see the section about Preferences in Command WorkStation Help.
5 Review the Postflight color-coded pages.
6 Make changes to the color settings, if needed.
For information about the ColorWise print options for various color spaces, see ColorWise Print Options.
NOTE: Use the Color-Coded Pages Only setting to send a job to another print device that has a specific color-space requirement. For example, a document targeted to a CMYK-only press must have only Cyan-colored objects.
7 Choose Off from the Postflight menu.
8 Click OK.
9 Click Print.
The job is printed to the Fiery with the edited color settings.
IMPORTING DENSITY MEASUREMENTS 91
IMPORTING DENSITY MEASUREMENTS
This chapter describes Simple ASCII File Format (SAIFF), which you can use to import density measurements from measurement devices into Command WorkStation for calibration. To use your own measurement data from an alternate measurement instrument, rather than make measurements directly in Command WorkStation, record your individual readings in a text file, structured as described in this chapter. You can then import the data by clicking From File under Get Measurements in the Calibrate feature of Command WorkStation.
Simple ASCII Import File FormatThis format describes Status T measurement data for import into Command WorkStation. The three possible file formats are:
• 1D Status T density for EFI 21 patch page
• 1D Status T density for EFI 34 patch page
• 1D Status T density for other pages (maximum of 256 patches per dry ink)
The file format is ASCII and has no tabs. A single space or multiple spaces are used as delimiters. Blank lines are not allowed. Each line in the file represents four patches (C, M, Y, K) of a specific dry ink value. Comments may be on any line in the file. Comment lines must start with a pound sign (#) followed by a space. (A line with a pound sign followed by any character other than a space has been reserved.) Comments must be on a line by themselves.
Each line of data contains five values. The first number is the sequential patch number (for EFI 21 and EFI 34 pages) or the dry ink value percentage (for other pages). The four values that follow are the density values of C, M, Y, and K of the corresponding patch. Lines are ordered either by increasing sequential patch numbers, or by increasing the dry ink percentage.
For Windows computers, the file extension must be .cm0 or cm1. For Mac OS computers, the file type must be ‘TEXT’.
Measurement data in EFI 21 and EFI 34 are paper-relative. For other pages, if the first line corresponds to zero dry ink value, Command WorkStation assumes that the measurement data is absolute and adjusts it to become paper-relative by subtracting the density values of the first line from the remaining patches.
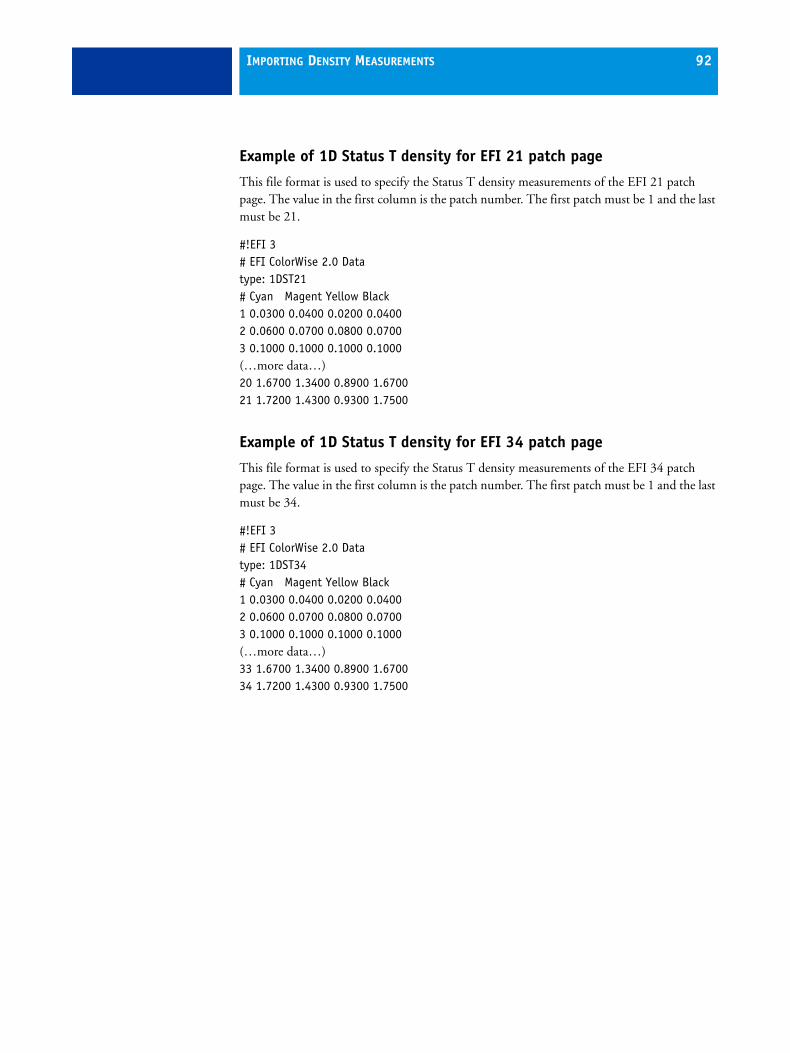
IMPORTING DENSITY MEASUREMENTS 92
Example of 1D Status T density for EFI 21 patch page
This file format is used to specify the Status T density measurements of the EFI 21 patch page. The value in the first column is the patch number. The first patch must be 1 and the last must be 21.
#!EFI 3# EFI ColorWise 2.0 Datatype: 1DST21# Cyan Magent Yellow Black1 0.0300 0.0400 0.0200 0.04002 0.0600 0.0700 0.0800 0.07003 0.1000 0.1000 0.1000 0.1000(…more data…)20 1.6700 1.3400 0.8900 1.670021 1.7200 1.4300 0.9300 1.7500
Example of 1D Status T density for EFI 34 patch page
This file format is used to specify the Status T density measurements of the EFI 34 patch page. The value in the first column is the patch number. The first patch must be 1 and the last must be 34.
#!EFI 3# EFI ColorWise 2.0 Datatype: 1DST34# Cyan Magent Yellow Black1 0.0300 0.0400 0.0200 0.04002 0.0600 0.0700 0.0800 0.07003 0.1000 0.1000 0.1000 0.1000(…more data…)33 1.6700 1.3400 0.8900 1.670034 1.7200 1.4300 0.9300 1.7500
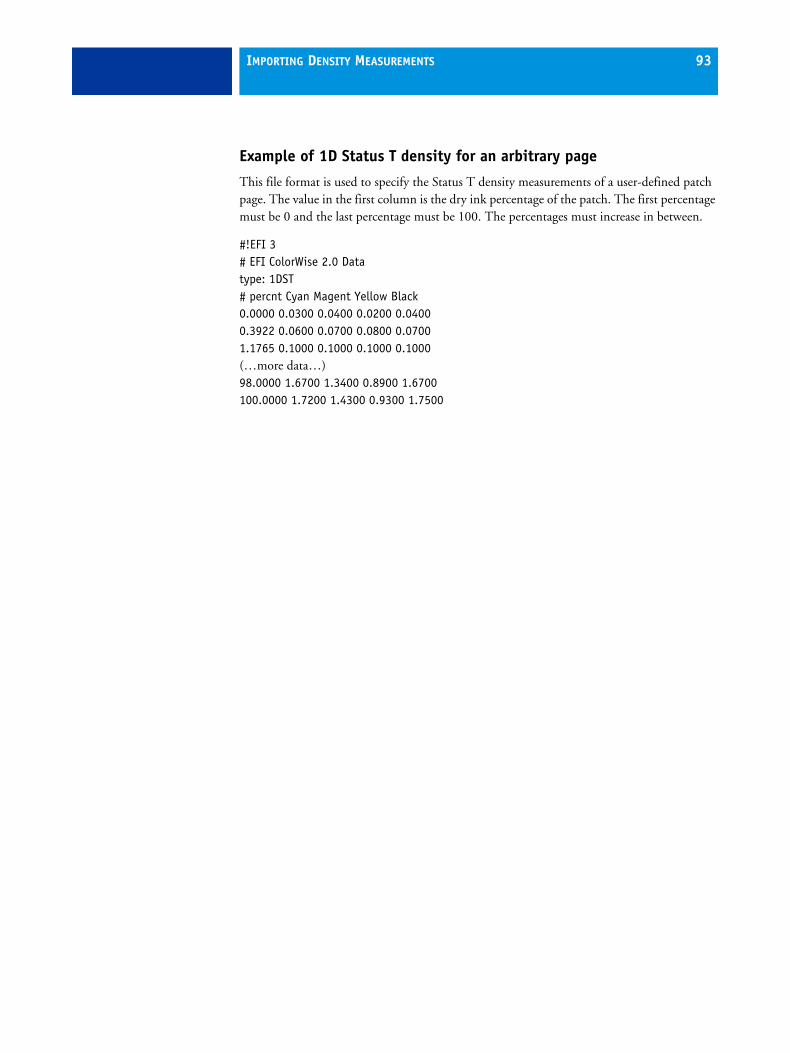
IMPORTING DENSITY MEASUREMENTS 93
Example of 1D Status T density for an arbitrary page
This file format is used to specify the Status T density measurements of a user-defined patch page. The value in the first column is the dry ink percentage of the patch. The first percentage must be 0 and the last percentage must be 100. The percentages must increase in between.
#!EFI 3# EFI ColorWise 2.0 Datatype: 1DST# percnt Cyan Magent Yellow Black0.0000 0.0300 0.0400 0.0200 0.04000.3922 0.0600 0.0700 0.0800 0.07001.1765 0.1000 0.1000 0.1000 0.1000(…more data…)98.0000 1.6700 1.3400 0.8900 1.6700100.0000 1.7200 1.4300 0.9300 1.7500


INDEX 95
AAbsolute Colorimetric rendering intent 23Adobe RGB setting, RGB Source
or Device Link option 24Apple Standard setting, RGB Source
or Device Link option 24Auto Trapping
about 68configurable 68configuring 69default 68printing 69workflow 68
Auto Trapping option 14
BBlack Detection option 15Black Overprint option 15Black Text and Graphics option 16
Ccalibration
See also ColorCal, measurementschecking status of 64ColorCal 49curves 63from print device panel 51importing density measurements 91measurement file, creating 63measurement page 63measurements 62overview 62scheduling 63target 55, 62, 63
Calibration Files folder 43calibration set 53
custom 53, 55print settings 54recommended paper 54
CMYK Color Reference.ps 43CMYK/Grayscale Processing Method
option 17CMYK/Grayscale Source or Device Link
option 18Color Bars folder 43Color Chart 64color files 43color management system (CMS) 9color patches
in Test Page 64measuring 63PostScript files of 43
color profiles See ICC profilescolor reference files 43color reference pages 64color space 13ColorCal
calibrationfrom print device panel 51with Calibrator 49
colors, proofing 71ColorWise color management system
ICC profile support 9key features 9workflow diagram 13
ColorWise Off 18ColorWise options, specifying 27Combine Separations option 19Command WorkStation
Auto Trapping configuration 69Calibrate feature 48Control Bar feature 75Paper Simulation white point editing 78Spot-On feature 66
Composite Overprint option 20composites, printing 16, 19, 26Configuration page 64Contrast ICC rendering intent 23
INDEX

INDEX 96
Control Barabout 73custom 75default control bar 74print option 74printing 75workflow 73
custom calibration set 53, 55custom Control Bar 75custom output profile 53, 55custom simulations 18Custom21.ps 43Custom34.ps 43
Ddensity 62, 64density measurements, importing 91DTP32 or DTP32 Series II densitometer
terminology 47DTP41 spectrophotometer
terminology 47
EeciRGB setting, RGB Source or Device Link
option 24EFIRGB, RGB Source or Device Link option 24ES-1000 spectrophotometer
terminology 47
FFiery RGB setting, RGB Source or Device Link
option 24FieryColorBar.eps 43Full (Output GCR) setting, CMYK/Grayscale
Processing Method option 17Full (Source GCR) setting, CMYK/Grayscale
Processing Method option 17
GGraphics ICC rendering intent 23Gray (RGB) and Gray (CMYK) options 21
HHalftone Calibration Files folder 44
IICC profiles
described 9installing 38rendering intents 23
Image ICC rendering intent 23ImageViewer, accessing 71
Jjobs, viewing soft proof of 71
MMac Color Files folder 43Mac OS color management options 33measurements page 63
OOther Applications folder 45output profile
calibration set 53custom 53, 55Paper Simulation 76, 78, 79Postflight 85, 87, 89Spot-On 65
Output Profile option 21output profiles 63
PPANTONE Book.ps 43PANTONE Coated Color Reference 26Paper Simulation
fixed values 77Full (Output GCR) 79print option 77printing 78white point editing 78workflow 76
passwords, for calibration 47patches page 63PDF/X 22PDF/X Output Intent option 22Perceptual ICC rendering intent 23Photographic rendering intent 23Photoshop folder 44
INDEX 97
Postflightabout 81accurate reporting 83calibration status 85, 88color problems 85, 90color-coded pages 81, 90ColorWise global settings page 82ColorWise print options 83Concise Report 88global settings page 88Hold queue 90ImageViewer 90information 87making changes 87monitor profile 90Object-specific settings pages 82Paper Simulation 84print option 84quality of output profile 85, 89Spot colors 82Test Page 81, 89unexpected colors 85, 86vs. Combine Separations 84vs. Progressives 84vs. Substitute Colors 84workflow 84
PostScript color issues 13, 15, 16, 24PowerPoint, RGB color reference file 43PPD 30, 33Presentation rendering intent 23print options
Mac OS 33Windows 30
printer driversMac OS 33Windows 30
Productivity Package 8, 65, 68, 70, 73, 76, 80profiles
described 9installing 38rendering intents 23
proofing colors 71Pure Primaries setting, CMYK/Grayscale
Processing Method option 17
RRelative Colorimetric rendering intent 23rendering intents 13RGB images
defining source profiles for 24PostScript and non-PostScript
conversion 24RGB page 01 43RGB page 02 43RGB Source or Device Link option 24RGB/Lab Rendering Intent option 23
SSAIFF format 91Saturation ICC rendering intent 23Separate RGB/Lab to CMYK Source
option 25separations
printing 16, 19, 26target color space 25
separations, unlimited 19simulations, custom 18Spot Color Dictionaries 65Spot Color Matching option 26spot colors, CMYK equivalents 26, 65Spot-On 65
named colors 66RGB or CMYK values 65Spot Color Matching 66substitute colors 65
sRGB, RGB Source or Device Link option 24
Standard21.ps 43Standard34.ps 43Status T 91Substitute Colors vs. Postflight 67Substitute Colors option 27SWOP 18
Ttarget, for calibration 63terminology 7Test Page 64transfer functions 63

INDEX 98
UUgra Fogra-MediaWedge V2.2x_EFIv1.eps 43unlimited separations 19Use Embedded Profile If Present option 27
WWindows Color Files folder 43Windows, print options 30Word, RGB color reference file 43


