21
Arch 101 Final Humberto J. Gonzalez Fall 2011
| Date post: | 23-Mar-2016 |
| Category: |
Documents |
| Upload: | humberto-gonzalez |
| View: | 217 times |
| Download: | 1 times |

Arch 101 Final
Humberto J. Gonzalez Fall 2011

Moving Sculptures that Express Self, Place and time.
These are some examples of mobiles created and posted on the web. I really had no idea what or how to research, build and ultimately present a thing of beauty such as these. I began by studying some of the mobiles that were on the web. I have always had an affinity for flying objects. More specifically, hot air balloons.
The idea that something could hover above ground defying gravity and yet maintain its location was appealing. So I began with a iteration of a hot air balloon. The cardboard tubes to my right were notched with a small craft saw. I joined them together with a small amount of glue. I used a tiny amount of aluminum foil (approx 4” square) and rapped it around 4 small bendable straws. I removed several tea light candles from their containers to lessen the weight. I placed a plastic bag to capture hot air from the candles. I got this idea from a you tube video clip of a father teaching his son. Having attempted this several times, I found it to be difficult and dangerous.Kids, do not try this at home.

Needless to say I moved on from the use of fire.Having drawn a little inspiration from the international Space Station, I created a small iteration using small pieces of glass wrapped with a black cloth like tape and coat hangers to join them together. This iteration broke on the first day.The good lesson here was that I was not documenting the steps necessary to show my process.My question now was, do I continue with this project or start anew?

I decided to start from scratch. Drawing more inspiration from one of my classmates, who was designing a windmill type of project using sticks and sails. I attempted to use chopsticks but they proved to be inferior to nails, tacks or otherwise because they kept splitting the chopsticks. I scrounged in the Dept.s scrap corner, and found some plastic square sticks that had previously drilled holes through them. This was a good opportunity to utilize already prepped materials for a prototype. Using square hooks screwed into a 1 ¼ inch wooden dowel in a cascading fashion, I applied the plastic sticks onto the opposite side of the square hooks. I used previously printed scratch paper as sails to spin the prototype. Attached below a ceiling fan it spun like a wild top.

I now had an idea and a working prototype. The idea now was to create a mobile that would spin. Sometimes I feel that in order to move forward in life, we need to address the past, or so I feel. So I thought, what if I created a spinning mobile that could spin in opposite directions within one system. Representing both the past and the future. How?I drew up a diagram of the essentials. A tube that would fit almost snuggly on each end of the 1 ¼ inch wooden dowel and a way to attach the dowels together on the inside of the tube.
Using a sturdy saran wrap cardboard tube just slightly wider than the dowel, it overlapped the edges of each dowel on both ends creating independent action for each section, allowing them to spin in whatever direction I designed that section to spin. The trick here was to use a light switch chain in between the dowels. These chains are a great example of how each section (ball) of chain moves independently of the next ball. I found this type of chain to work better than a swivel because of the many parts that are independent of each other creating even more freedom than a swivel.

The Idea of how to put the sections all together was easier than I expected. Using screw tops from juice bottles, I found that they fit perfectly inside the cardboard tube, hardly needing the use of any glue. I continued by punching a hole through the juice top, large enough to fit the peg in between each ball, and then sawing from the edge inward towards the hole, allowing me space to insert the chain into the top that will support the dowel below inside the tube.To attach it to the dowel above and below, I modified what is called a “sex bolt”. Taking the femaie end of the sex bolt, I sawed it in half through to the center point of the bolt. Again, allowing me space to slip the chain through the female end of the bolt.
I now had all my connection figured out. After drilling a whole in the center of the dowel, I Used a tiny bit of hot glue in the hole, and then hammered in the female part of the bolt, with the chain already installed, leaving three Balls inside the dowel for a better hold. This proved to be an ideal method for securing the bolts to the dowels.

Still working on the prototype, I used faux wood paneling obtained from the scrap corner in the Arch dept. and hot glued the paneling to the cardboard saran wrap tube so that it appeared to look like wood. Although I liked the look of the all wood appearance, I wanted something with a little more variety.

Moving on to the actual project, I found at Scraps Many useful items.I found the perfect tubes for the project. These tubes were perfect because they contained tops as well as the bottoms. They also were just as sturdy as the saran wrap tube. The soft plastic caps were much easier to manipulate than the juice tops. I was able to punch a hole in the center and instead of cutting from the edge inward, I simply cut a groove from the center hole out, leaving the perimeter of the cap completely intact. This gave me just enough space to pull the chain through without breaking the chain. I also altered the look of the tubes by covering them with faux aluminum shelving paper. With this shelving paper, I was able to bend inward the paper inside of the tube essentially sealing the edge of the tube against water damage.

This view shows the inside of the completed tube and how the dowels on each end are linked together
The connections for the wooden sticks and sails were a bit more challenging. Nails and carpet tacks split the wooden chopsticks, even with pilot holes drilled the sticks proved to be to fragile. I then used modular phone wire clips hammered into the dowels which worked fine. A problem arose when I inserted the chopsticks and plastic square sticks through the clips and found it to be extremely weak.

Knowing that the wooden sticks (chopsticks or small dowels) could be attached to the dowels by drilling a small hole in it, I decided instead to drill straight through the dowel to the other side. I then used longer ¼ inch bass wood dowels and pushed them through the hole discarding the chopsticks altogether.So we used square hooks as one type of connector. We drilled straight through the 1 ¼ inch dowels to drive the ¼ inch dowels through eliminating the need for “connections”. For the faux aluminum/cardboard tubes, I wanted to utilize a different method. Here what I did was simply cut a notch diagonally on both sides of the tube and glued the dowels into the notch.

Attaching the sails was a difficult process. The paper that I found at Scrap’s to use as sails would not stick to any of the wood surfaces. I tried Elmer’s glue, hot glue, tacks and nails to no avail. This was excellent material to use non-the-less because of how strong the paper was. It seemed to be a fiberglass type paper. It proved also to be water proof after leaving a small piece in water for several days. In fact, it was harder to rip than when it was dry.I planned on bringing in the paper to consult with the class but alas; I was at Walgreen’s and saw “super glue” on sale at a very cheap price. So cheap I could not resist trying it. It worked beautifully.
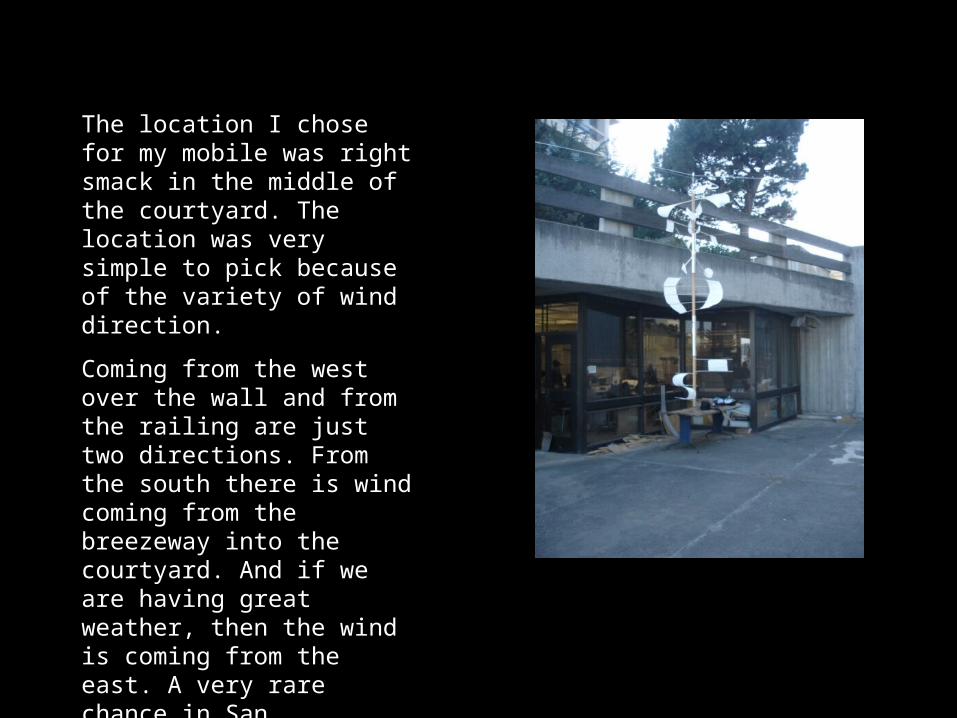
The location I chose for my mobile was right smack in the middle of the courtyard. The location was very simple to pick because of the variety of wind direction.Coming from the west over the wall and from the railing are just two directions. From the south there is wind coming from the breezeway into the courtyard. And if we are having great weather, then the wind is coming from the east. A very rare chance in San Francisco. Either way, there is plenty of wind to spin the mobile in opposite directions within the same system.

I used a 50’ Galvanized cable, wrapped around a 2x2 inch block of wood. I pried the wood block behind two plates on the wall to anchor one end of the cable. I attached a piece of kite string to the other end of the cable to lift the cable up to the railing on the other side of the courtyard and pulled it until I could wedge it between the wooden rails

Now, you might be asking yourself why I used the cable instead of just hanging the mobile off the rail. After all there is still plenty of wind.The idea again is kind of like life. Do you move forward and forget the past or do you go back and address issues that need addressing.To represent this idea further, I slipped the cable through a clothes line reel and attached the mobile to the reel allowing for movement across the courtyard. Whether it moves forward or backwards depends again on which direction the wind is blowing.

I have always considered myself pretty resourceful. This piece of hardware is what I used to attach the top of the mobile to the clothes line reel. It is the female end of a quick release key chain. Making placement and removal of the mobile very simple.

This view is from above behind the railing.
This is a view from the underside of the mobile.
This is a view of the mobile from the courtyard.


