Bhat, Ashwin Kosarek, Matthew EN.530.420 Fall 2017 Final Project Introduction There is increasing demand for both autonomous devices and convenient human- computer interaction. Large remote controls or computers for controlling devices is less desirable as people move to cellphones or even camera-based operation of devices. The goal of our project was to build an obstacle-avoiding, Bluetooth-controlled robot car. How this is achieved shall be described in the next section. Description To build our obstacle-avoiding, Bluetooth-operated car we used an Arduino UNO for the microcontroller. Obstacle-avoidance/detection was achieved using two ultrasonic distance sensors (a.k.a PING sensors). One distance sensor was forward facing while the other distance sensor was at a right angle to the first one and faced to the right. This gave us readings in two directions at any given moment and helped in making more robust navigation decisions. We used a Bluetooth Serial Pass-Through Module that would enable communication between a Bluetooth-enabled device and the Arduino UNO. This allowed us to connect a cellphone to the Bluetooth module and send commands to the microcontroller. The car would then move with the ultrasonic distance sensors alerting the microcontroller whenever an object was detected within a given distance. The two motors of the car (one for each wheel) were controlled using a dual H-bridge chip that was also wired to the microcontroller. Based on either the user input or the detection of an obstacle, the microcontroller would send commands on how the wheels should move and direct the car. The entire system was powered by a 9V battery. Operation The operation of the car has been made simple. Once the car is turned on, the red LED on the Bluetooth module blinks until a device is connected. We used an existing Android app called “Bluetooth terminal” that simply creates a text interface. Using an Android cellphone, we connected to the Bluetooth module on our car and typed commands into the “Bluetooth terminal” app. Communication from the Arduino UNO to our phone is also displayed inside the app. Our car has three modes that can be selected by sending a “0”, “1”, “2”. The car starts in idle mode which can also be returned to at any point by sending a 0 through the app. Sending a 1 puts the car in automatic mode, where the car drives around and avoids obstacles. Sending a 2 puts the car in manual mode. In manual mode, the car no longer avoids obstacles because the user can choose how to drive the car. A “w” moves the car forward, “a” moves the car left, “d” moves the car right, and “s” has the car reverse straight backwards.
Transcript
Bhat, Ashwin Kosarek, Matthew
EN.530.420 Fall 2017
Final Project
Introduction
There is increasing demand for both autonomous devices and convenient human-
computer interaction. Large remote controls or computers for controlling devices is less
desirable as people move to cellphones or even camera-based operation of devices. The goal of
our project was to build an obstacle-avoiding, Bluetooth-controlled robot car. How this is
achieved shall be described in the next section.
Description
To build our obstacle-avoiding, Bluetooth-operated car we used an Arduino UNO for the
microcontroller. Obstacle-avoidance/detection was achieved using two ultrasonic distance
sensors (a.k.a PING sensors). One distance sensor was forward facing while the other distance
sensor was at a right angle to the first one and faced to the right. This gave us readings in two
directions at any given moment and helped in making more robust navigation decisions. We
used a Bluetooth Serial Pass-Through Module that would enable communication between a
Bluetooth-enabled device and the Arduino UNO. This allowed us to connect a cellphone to the
Bluetooth module and send commands to the microcontroller. The car would then move with
the ultrasonic distance sensors alerting the microcontroller whenever an object was detected
within a given distance.
The two motors of the car (one for each wheel) were controlled using a dual H-bridge
chip that was also wired to the microcontroller. Based on either the user input or the detection
of an obstacle, the microcontroller would send commands on how the wheels should move and
direct the car. The entire system was powered by a 9V battery.
Operation
The operation of the car has been made simple. Once the car is turned on, the red LED
on the Bluetooth module blinks until a device is connected. We used an existing Android app
called “Bluetooth terminal” that simply creates a text interface. Using an Android cellphone, we
connected to the Bluetooth module on our car and typed commands into the “Bluetooth
terminal” app. Communication from the Arduino UNO to our phone is also displayed inside the
app.
Our car has three modes that can be selected by sending a “0”, “1”, “2”. The car starts in
idle mode which can also be returned to at any point by sending a 0 through the app. Sending a
1 puts the car in automatic mode, where the car drives around and avoids obstacles. Sending a
2 puts the car in manual mode. In manual mode, the car no longer avoids obstacles because the
user can choose how to drive the car. A “w” moves the car forward, “a” moves the car left, “d”
moves the car right, and “s” has the car reverse straight backwards.
Bhat, Ashwin Kosarek, Matthew
EN.530.420 Fall 2017
Sensors and Actuators
1. Ultrasonic Distance Sensors (x2) – emits an ultrasound that then moves through the air
and can potentially bounce off objects. If any sound bounces back to the receiver of the
distance sensor, the distance of the object can be calculated based on the speed of
sound in air and the time it took to emit and received the sound.
We specifically used knockoff HC-SR04 ultrasonic distance sensors.
2. Bluetooth Serial Pass-Through Module – a Bluetooth module that can send and receive
data. Data is received from a Bluetooth enabled devices given to the Arduino UNO and
the data can also be given to the module by the UNO and sent to the connected
Bluetooth-enabled device.
For this we used an HC-06 Bluetooth module.
3. DC Gear Motor 48:1 ratio (x2) – a simple DC gear motor that takes 3 to 9V.
These motors are very cheap and were bought as part of set that included a chassis and
wheels.
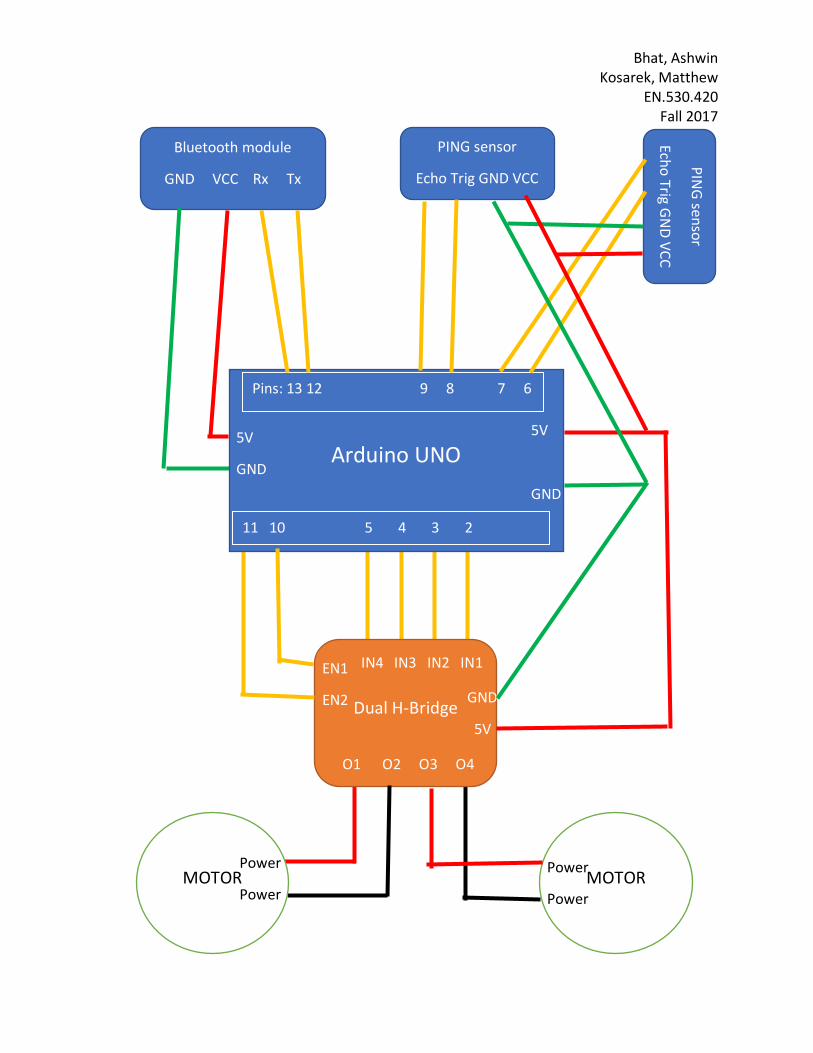
Circuit Diagrams (Pin Layout moved around for cleaner diagram)
*Note: The Arduino UNO only has one 5V that was used for all of the 5V in diagram. We have
multiple 5V locations to clean the diagram, real wiring is more complicated.
Diagram on next page.
Bhat, Ashwin Kosarek, Matthew
EN.530.420 Fall 2017
PING sensor
Echo Trig GND VCC
PIN
G sen
sor
Echo
Trig GN
D V
CC
Bluetooth module
GND VCC Rx Tx
Arduino UNO
Dual H-Bridge
Pins: 13 12 9 8 7 6
11 10 5 4 3 2
EN1
EN2
IN4 IN3 IN2 IN1
GND
5V
5V
GND
5V
GND
O1 O2 O3 O4
MOTOR Power
Power MOTOR
Power
Power
Bhat, Ashwin Kosarek, Matthew
EN.530.420 Fall 2017
Build Photograph
Bhat, Ashwin Kosarek, Matthew
EN.530.420 Fall 2017
Arduino Code
Bhat, Ashwin Kosarek, Matthew
EN.530.420 Fall 2017
Bhat, Ashwin Kosarek, Matthew
EN.530.420 Fall 2017
Bhat, Ashwin Kosarek, Matthew
EN.530.420 Fall 2017
Bhat, Ashwin Kosarek, Matthew
EN.530.420 Fall 2017
Bhat, Ashwin Kosarek, Matthew
EN.530.420 Fall 2017
Budget
Part (# of Units) $ Cost Purpose
Arduino UNO (1) $20 Microcontroller for controlling everything
Mini Breadboards (2) $1.16 Wiring/connecting components together
Dual H-Bridge/Motor Driver (1) $1.81 Interfaces between UNO and motor for control of motor direction
Chassis kit – Base, motors (2), wheels (2) $11.97 Mount for car parts and wheels, movement