Finite Element Analysis for the Casual User in Inventor JD Mather – Pennsylvania College of Technology MD6583 This is an introductory class into the advanced topic of finite element analysis (FEA). This class will be application-oriented rather than theory oriented, and it is intended for those of us who can gain design value from some basic FEA techniques without having to have a PhD in mathematics. The goal is to bring the accessibility of advanced Digital Prototyping tools to the casual user. Each year, the "expert systems" software development brings practical accessibility to more and more users. You should jump in here and start learning these tools - now is the time. You can leave your calculator at home. Learning Objectives At the end of this class, you will be able to: Learning objective 1 – Consider the meaning of life: How do you know you have the answer? Learning objective 2 – Learn how to identify the scope and limitations of FEA in Inventor software. Learning objective 3 - Setting up FEA of simple assemblies in Autodesk Inventor. Learning objective 4 – Learn how to do a parametric dimension FEA test of part iterations in Inventor software. About the Speaker Dr. J. D. Mather is an assistant professor of engineering design technology at Pennsylvania College of Technology, Williamsport, PA. He previously worked in industry positions for 15 years, including as a journeyman machinist, a research and development technician, and an industrial engineering technician. J.D. is an Autodesk Inventor Certified Professional and an Autodesk AutoCAD Certified Professional, as well as a Certified SolidWorks Professional. He also serves as an Autodesk Expert Elite on the Autodesk Community Forums. J.D. received the 2010 Autodesk Manufacturing Community Achievement Award. Contact him at [email protected].
Transcript
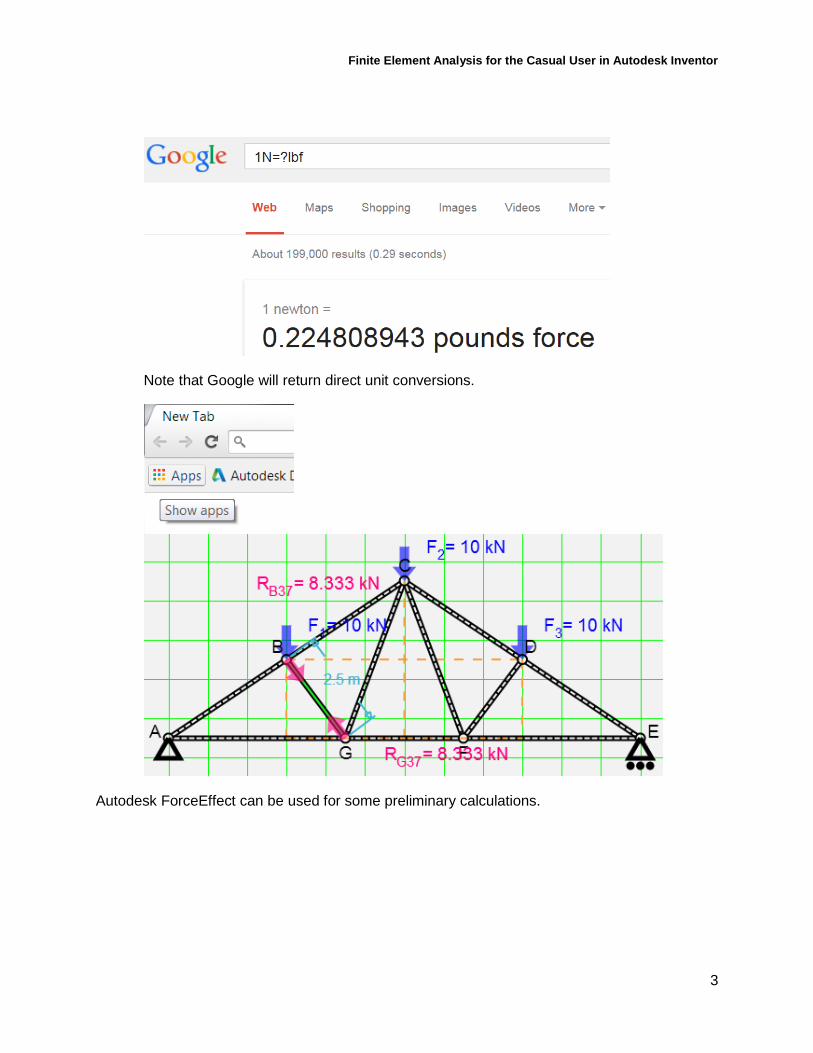
Finite Element Analysis for the Casual User in
Inventor JD Mather – Pennsylvania College of Technology
MD6583 This is an introductory class into the advanced topic of finite element analysis (FEA). This class will
be application-oriented rather than theory oriented, and it is intended for those of us who can gain design value from some basic FEA techniques without having to have a PhD in mathematics. The goal is to bring the accessibility of advanced Digital Prototyping tools to the casual user. Each year, the "expert systems" software development brings practical accessibility to more and more users. You should jump in here and start learning these tools - now is the time. You can leave your calculator at home.
Learning Objectives At the end of this class, you will be able to:
Learning objective 1 – Consider the meaning of life: How do you know you have the answer?
Learning objective 2 – Learn how to identify the scope and limitations of FEA in Inventor software.
Learning objective 3 - Setting up FEA of simple assemblies in Autodesk Inventor.
Learning objective 4 – Learn how to do a parametric dimension FEA test of part iterations in Inventor software.
About the Speaker
Dr. J. D. Mather is an assistant professor of engineering design technology at Pennsylvania
College of Technology, Williamsport, PA. He previously worked in industry positions for 15
years, including as a journeyman machinist, a research and development technician, and an
industrial engineering technician. J.D. is an Autodesk Inventor Certified Professional and an
Autodesk AutoCAD Certified Professional, as well as a Certified SolidWorks Professional. He
also serves as an Autodesk Expert Elite on the Autodesk Community Forums. J.D. received
the 2010 Autodesk Manufacturing Community Achievement Award. Contact him at
Finite Element Analysis for the Casual User in Autodesk Inventor
7
There is a Beam/Column and Plate Calculator in the
Inventor Design Accelerators. Simply start a new
assembly file (*.aim) and go to the Design tab.
An existing Object (*.ipt) can be selected from the graphics
window, or select from the Section profiles.
For a nominal size 1” pipe.
Finite Element Analysis for the Casual User in Autodesk Inventor
8
If you click on User Material - there are thousands of Materials in the Design Accelerator.
In this case – I entered the Material properties manually.
Finite Element Analysis for the Casual User in Autodesk Inventor
9
(Do not use Gravity/Mass/Density of part unless you consider that in the hand calculations).
Note in the dialog box, the Use density (for the hand calculation – this would have to be added
to the load).
For a pipe this short – it has little effect.
Finite Element Analysis for the Casual User in Autodesk Inventor
10
568937 micro inch = .569 inch
2% difference than hand calculation (if I did the math right).
Q. Did I use gravity? If so, then I have added the weight of the beam in addition to F1 into the analysis. Approximately 105lbf rather than the 100lbf specified in the hand calcs problem. (see Appendix)
Finite Element Analysis for the Casual User in Autodesk Inventor
11
Next I place the same component from Content Center. Equivalent results from Content Center part.
Finite Element Analysis for the Casual User in Autodesk Inventor
12
Placing from the Frame Generator.
Running Analysis from Frame Analysis. Inventor Frame Analysis can only be used with components created using the Frame Generator – all other components will be ignored.
Finite Element Analysis for the Casual User in Autodesk Inventor
13
Finite Element Analysis for the Casual User in Autodesk Inventor
14
Running Analysis from Stress Analysis.
Finite Element Analysis for the Casual User in Autodesk Inventor
15
Equivalent results with 4 different techniques.
Finite Element Analysis for the Casual User in Autodesk Inventor
16
Experience-based Validation
Validate your digital analysis model with empirical data for predictive purposes.
Demonstration – Hook Example (split faces)
We often need to define faces on which to apply our
loads and/or constraints.
Demonstration – Carabiner
How we present our analysis to non-experts is important.
We can show animations as illustrations.
We can create reports to establish a chain-of-evidence.
Finite Element Analysis for the Casual User in Autodesk Inventor
17
Demonstration – Automobile Jack Lift Plate (what does our experience tell us?)
Notes on applying loads/constraints.
Adding pressure load to internal faces – watch out for face
seams.
Location of the glyphs is not important.
There was an issue in 2015 SP0 with the arrow glyphs not showing correct direction.
Finite Element Analysis for the Casual User in Autodesk Inventor
18
Learning Objective 3 – Setting up FEA of simple assemblies in Autodesk
Inventor. Frame Analysis – the Crane problem – a word about modeling technique.
Contacts
Validate your digital analysis model with empirical data for predictive purposes.
What is the important parameter to us? Calculated Stress? Displacement? Safety
Factor? I would argue that it is almost always Displacement while most FEA users
would pick one of the other two.
Demonstration – Latch Bolt Example (split faces)
Local yielding can occur initially until the load is transmitted at lower stress by the full joint.
(Younis, pg. 135 2014).
Finite Element Analysis for the Casual User in Autodesk Inventor
19
Dynamic Simulation
Exporting Motion Loads from Dynamic Simulation to the FEA environment.
Demonstration – Car Jack Handle
What implication do these twisting forces suggest for the Carabiner analysis from above?
Learning Objective 4 – Learn how to do parametric dimension FEA test of part
iterations in Inventor software.
Optimizing a Part.
You can set up semi-automatic testing of iterations of your design. With cloud-based
computing – I predict that this will become real-time and transparent in the future. With
the setting of a few base parameters – expert systems will be continually analyzing our
design in the background. The opportunity to get in on the ground flow is now – that is
why you should be learning this stuff.
Demonstration – Thumb Slide Example
Finite Element Analysis for the Casual User in Autodesk Inventor
20
Notice that the part has features that are not relevant to our design analysis. Including these
non-relevant features in the mesh would only increase the analysis time without any value.
Finite Element Analysis for the Casual User in Autodesk Inventor
21
Final Thoughts… …do we know what we think we know?
Conclusion: What have we learned?
Recognize that units are important.
Recognize when differences are important.
Recognize the limits of the “ball field” in which we are operating.
o Isotropic material properties.
o Relatively rigid materials (not highly elastic, not brittle*).
o In the linear portion of the stress/strain curve.
o Relatively small deformations.
o Slowly applied loads. (not impact loads)
Recognize that Safety Factor is not a test of “breaking”.
o Cannot “extrapolate” information with SF<0 because this is a non-linear portion
of the curve, outside of the limits of Inventor linear static stress analysis.
And my final thought.
Parse* these statements:
“Hand calculations serve as a “sanity check” for our digital analysis.”
“Good correlation between the FEA and the hand calculation gives us a high degree of
confidence in the FEA solution.”
*Parse
verb
3. …to analyze (something, as a speech or behavior) to discover its implications or
uncover a deeper meaning.
If you have some good hand calculation examples of other than trivial geometry – please