26
FIONA FRASER INTERIOR DESIGN PORTFOLIO
| Date post: | 23-Mar-2016 |
| Category: |
Documents |
| Upload: | fiona-fraser |
| View: | 214 times |
| Download: | 1 times |

FIONA FRASER INTERIOR DESIGN PORTFOLIO

CONTENTS
DESIGN DETAIL SWIMMING POOL DRAINAGE AND FILTERING SYSTEM
EN.TO.MOFORENSIC ENTOMOLOGY LAB + ARCHIVE + EXHIBITION SPACE
THE ART OF REHABILITATIONDAY CENTRE FOR INJURED SOLDIERS
BEAUTE DAY SPA CAD PROJECT WITH PLANS, 3D BUILDING AND RENDERING

Inspired by the Entomology department at Manchester Museum we were asked to cre-ate an educational environment into which the collection, from the museum, would be placed.
After researching various aspects of entomol-ogy, the topic of forensic entomology, which is the use of insects and their arthropod relatives that inhabit decomposing remains to aid legal investigations, provided a basis for a concept.
The aim was to create a visual space that can combine two professions together in a research and education facility. The building is divided into research labs, archives and exhibition space with areas of interaction and learning.
The interior of the space is driven by the dark concept and has been achieved through the use of lighting effects and material choice.
CHESTERMAN
EN.TO.MO
Bloat. Active Decay. Advanced Decay.
Dry Remains.
The period after death, no sign of physical change although bacteria has begun to digest organ tissue.
First insects to arrive are blowflies, which arrive within minutes of death and lay eggs, within one to three hours, in openings/wounds. Ants too may be present.
Fresh.
First sign of bloat stage is a slight inflation of the abdo-men and blood bubbles at the nose. An odour will begin to appear as the organs begin to liquefy.
Insects present: blowflies, flesh flies, cheese and fungal flies. The first species of beetle arrive and eat larvae and flies eggs.
The beginning part of this stage is marked by the defla-tion of the carcass as feeding larvae pierce the skin and internal gases are released. The carcass at this stage ap-pears ‘wet’ due to the liquefaction of tissue. Very strong odour is present.
More flies and beetles begin to arrive.
Most of the flesh is removed and the strong odour begins to fade.
Many of the flies leave and skin beetles arrive.
The final stage of decomposition is dry remains where lit-tle of the carcass is left; bones, dry skin and cartilage. The odour too has gone.
Migration of insects; most flies have left, have too the beetles to make way for centipedes, millipedes, snails and cockroaches.
There are five stages of decomposition. The stages are defined by the observable physical changes to the state of the carcass.
Archive visual,Second floor

Floor PlansVectorworks
Building Zoning
Void
Archive
Laboratory
Services
Cafe
Exhibition
Lower Ground Mezzanine Floor Ground Floor
Hand Drawing through centre of the building showing concrete wall, staircase & Laboratory.
EN.TO.MO

First Floor Second Floor Third Floor Fourth Floor
Lower Basement: exhibition space
Ground Floor: Cafe and Reception
Ground Floor: Cafe and stairs
EN.TO.MO

SectionsVectorworks
Section BB
Section AA
Design DetailVectorworks
Rebar and concrete wall structure
Ground to First floor plan
Front Elevation Side Elevation
EN.TO.MO

Third Floor: Archives Second Floor: Laboratory
Third Floor: LaboratorySecond Floor: LaboratoryForth Floor: ArchivesForth Floor: Projection Suite
Mezzanine: Live Exhibition
EN.TO.MO

Floor PlansVectorworks
Lower Ground Mezzanine
Location MapKnott Mill Chapel, Deansgate
In memory of the fallen
The Artof
Rehabilitation
British soldiers have been battling against terror in Afghanistan for the past 10 years. On a daily basis the media reports on the war but they have failed to highlight that the effect of war does not end on the battlefield. Everyday the wounded battle with the challenges of life with either a physical disability or the emotional scars of war.
The objective was to create a re-habilitation centre, for the injured soldiers; an environment designed to ensure recovery through deter-mination, creativity and teamwork.
Nobody wants to suffer in silence yet the stigma of rehabilitation sadly means many do. By creat-ing a space that fulfils their needs and bridges the gap between so-cial and rehabilitation individuals can heal and start building a future.
The Art of Rehabilitation

Ground Floor First Floor Second Floor
Reception
Lounge
Rehabilitation Stairs
Medical
The A
rt of Rehabilitation

SectionsVectorworks
Section AA
Section BB
Simulation Room
Contemplation Pool
Gym Mat Area
The A
rt of Rehabilitation

Creative Space Pool Area
EducationSocial: Cafe and Gaming
A journey to recovery through determination, creativity and team support...
The A
rt of Rehabilitation

Swimming pool detail
Looking at the pool filtering system
The drainage – pool and showers
How a pool works
How it is constructed
Materials
Pool dimensions – 60ft x 21ft
Average depth 5ft
7 main components
basinpumpfilterchemical feederdrains – main and skimmerreturnspvc plumbing
Pool filtering system
Pool area Plan
Detailed Design
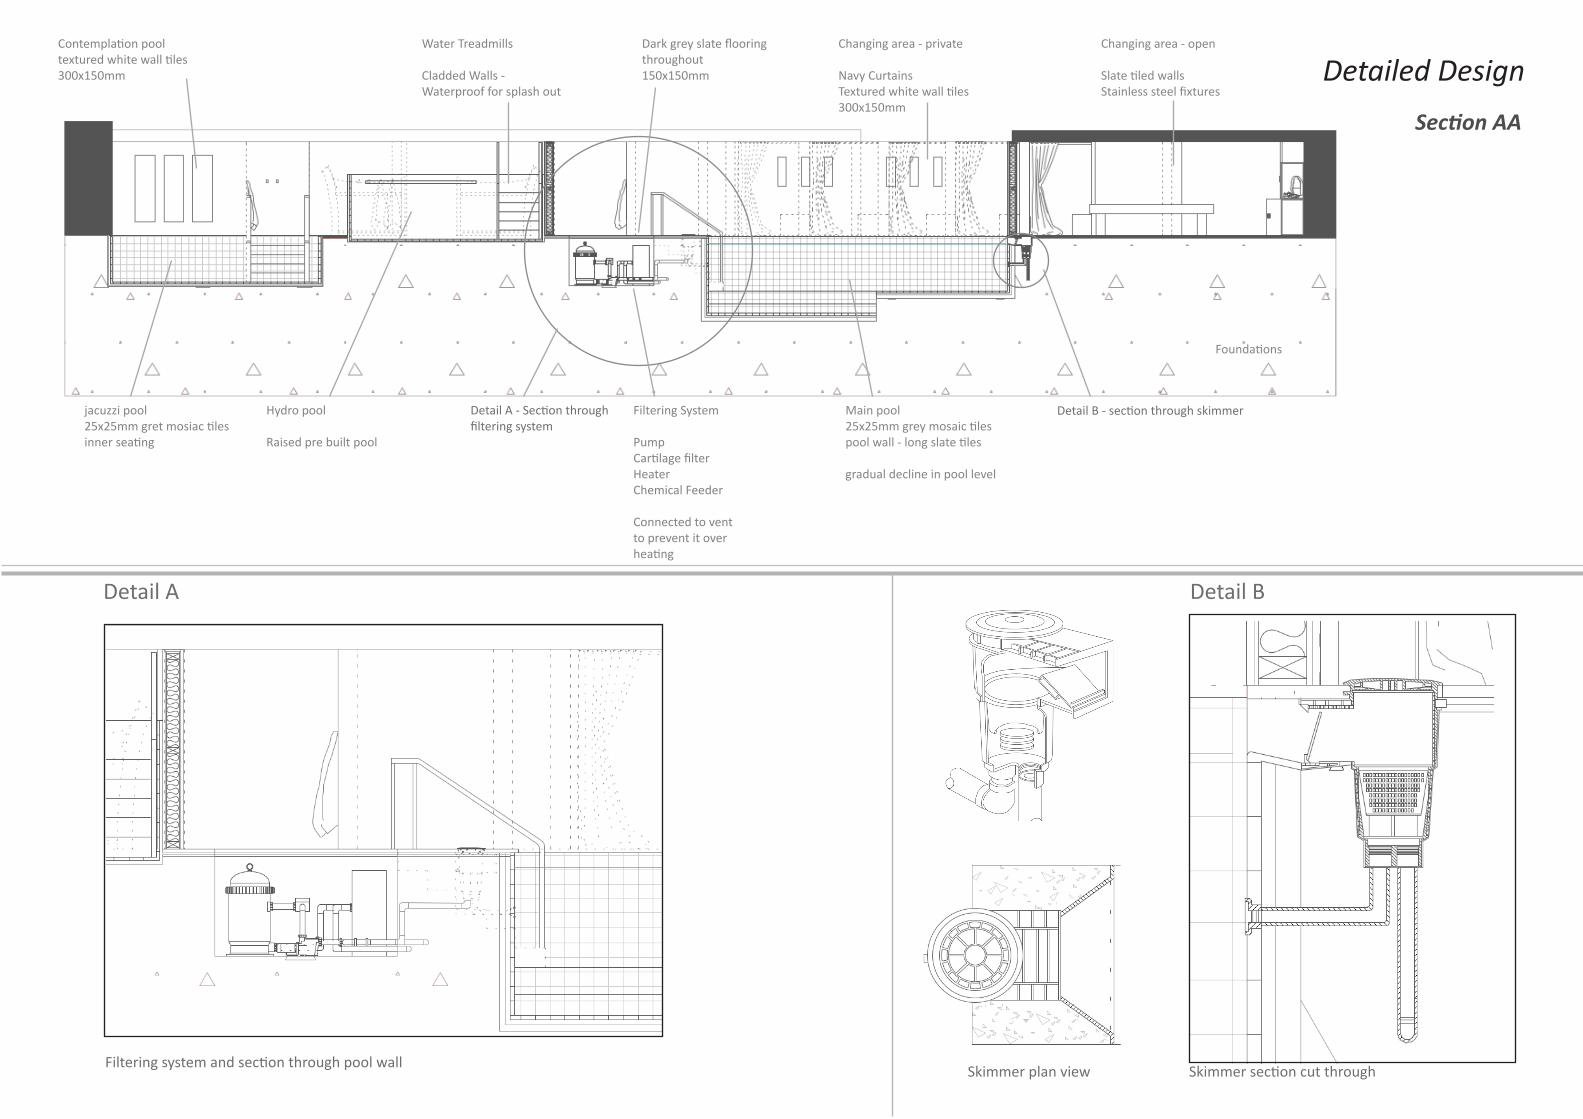
Section AA
Contemplation pool textured white wall tiles 300x150mm
jacuzzi pool 25x25mm gret mosiac tiles inner seating
Foundations
Hydro pool Raised pre built pool
Water Treadmills Cladded Walls - Waterproof for splash out
Dark grey slate flooring throughout 150x150mm
Filtering System Pump Cartilage filter Heater Chemical Feeder Connected to vent to prevent it over heating
Main pool 25x25mm grey mosaic tiles pool wall - long slate tiles
gradual decline in pool level
Changing area - private Navy Curtains Textured white wall tiles 300x150mm
Changing area - open Slate tiled walls Stainless steel fixtures
Skimmer section cut throughFiltering system and section through pool wall Skimmer plan view
Detail A
Detail A - Section through filtering system
Detail B
Detail B - section through skimmer
Detailed Design

Exit to outside drain under ground drainage PVC plumbing
Extention onto canal side Bi-folding glazed doors
Outside
Main Drain Pool gradient1200mm - 2000mm
Foundations
Showers Tiled Slate Walls
Gym - Mezzanine level Glass Wall - divide space
Water Treadmills
Seating Navy acrylic
Hydro pool Behind seating
Insulated wall - 150mm with water proof membrane - 3mm Cladded wall tile - 300x150x10mm
Section BB
Filter system underground and skimmer. Cut through pool Shower area in section Shower drainage long section view
Shower drainage short section view
Detail C Detail D
Detail C - Under floor filter system Detail D - Section of shower drainage system
Detailed Design

The basic idea of a pool filtering system is to pump water in a con-tinual cycle, from the pool through the filtering and chemical treating systems and back to the pool within a certain time frame. This keeps the water free of dirt, debris and bacteria.
How it works
filtering system
The system works by a motor pump spinning an impeller, which drives the water from the various drains through a filter and back out the water outlets (returns)
During the process the water is passed through a metal strainer be-fore it reaches the pump to ensure the system doesn’t clog. It is then taken to the filters.
During filtering, dirty water from the pool come in through the inlet pipes, it is pulled through the filter – in this case a cartilage filter – which catches the dirt. At the bot-tom of the tank the filtered water flows through the pick up unit and out the outlet pipe.
At this point it is passed into the heater and chemical feeder before being returned to the pool.
Water flow direction diagram
To filter from main drain
Waste - to outside drain
Return to pool
To filter from skimmer
Filter system labelled
To outside drain
Depth 4ft
Depth 6.5ft
Drop in pool
Drop in pool
Skimmer - access from changing area
Return Return
line to drain - connects to shower drainage
Main drain
GutterSkimmer
Return
Filter
Heater
Shower gutter
Pump
Detailed Design

Pool construction
The process starts with digging into the concrete foundations to create the basic shape of the pool. The hole is then lined with 5mm rebar (a steel reinforcing rod)
The drains, skimmers, returns and cleaning system are set in place before the hole is shot with 3mm gunite (a combination of cement, sand and water applied though a press hose)
The pool can then be tiled (or painted) and plastered. Coping stones are set around the edging to hide where the tiles meet and frame the pool edge.
Coping StoneGutter - Drainage
Pool
TileGrout
Hydro Ban - Water proof
Gunite (concrete) 3mmNo.5 Rebar - 2mmFoundation
Section through swimming pool
Pool seat
Tiled
Coping
Rebar
Rebar Plan
Concrete
Detailed Design

Detailed DesignVisual and Materials
Textured coal black tile 600x600mm
Dovedale slate cladding 500x 300mm
Capua Cream tile 250x500mm
Brazilian grey riven slate mosaic tile 300x300mm
Riven Slate rio black tile 150x150 mm
applstone Honed Straight edge tile 406x406mm
Riven Slate Dovedale grey tile 150x150 mm

Beauté building exterior
Beauté Day SpaAutoCAD Project
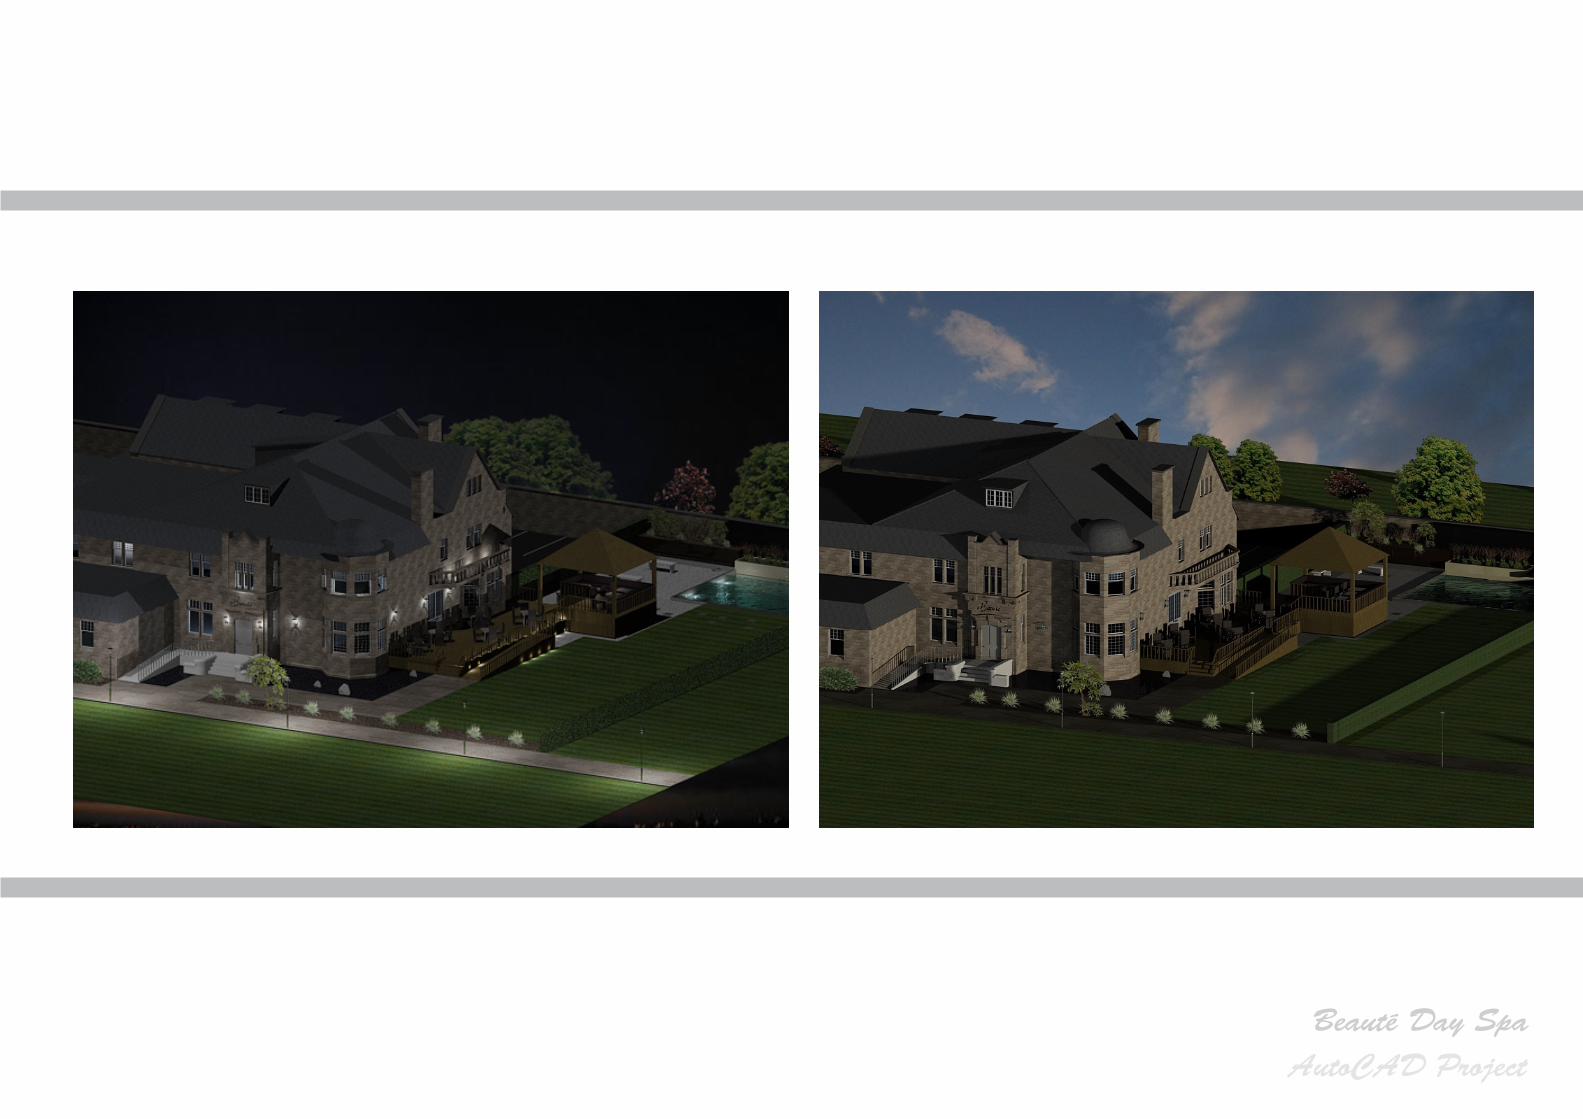
Beauté Day SpaAutoCAD Project

Beauté Main Reception
Beauté Day SpaAutoCAD Project

Beauté Therapy
Beauté Day SpaAutoCAD Project

Beauté Spa
Beauté Day SpaAutoCAD Project

Beauté Day SpaAutoCAD Project

Beauté Hair Salon
Beauté Day SpaAutoCAD Project

Beauté Hand and foot therapy
Beauté Day SpaAutoCAD Project

Beauté Plans
Ground Floor First Floor Second Floor
Beauté Day SpaAutoCAD Project


