Important General Notes:When UL is referred to in this document, it represents UL/ULC. This installation instruction applies to Fire Dampers (static, dynamic, curtain, single and multi-blade types) mounted in the plane of an UL approved fire partition. The dampers are designed for operation in the vertical or horizontal position with blades running horizontal. The dampers are to be installed square and free from twisting or racking.
The dampers shall not be compressed or stretched into the opening. Transportation and installation of the dampers shall be handled with the sleeve or frame. Do not lift the damper with the blades or actuator. Special care shall be given to the damper before instal-lation and after to insure it is protected against dirt, weather, mortar and drywall dust, wall texture and paint. Any of these conditions could cause the damper not to operate correctly and void the warranty. Suitable access to inside duct is to be provided for inspection and replacement of parts such as heat response devices and actuators per NFPA 90A and local authority having jurisdiction. As with all joints, contractor must seal duct-collar connections in the field after installation. PRICE Model numbers which are UL approved to utilize this installation are FD, FD-SL, FD-USL, FD-MB-3V, FD-MB-AF, FD-SB, FDD, FDD-SL, FDD-MB-3V, FDD-MB-AF.�. Opening Preparation/Clearances:The fire barrier opening shall be larger than the damper to allow for thermal expansion and ease of installation. When steel stud/gypsum or wood stud/gypsum partitions are being used then refer to Fig. 1-3 for additional information and details.
A. Dampers Assemblies Using � Angles Methods (see note 4a) shall be a minimum of 1/8"(3mm) per linear foot (305mm) of height and width of sleeved assembly up to a maximum of 11/2“(38mm) and a minimum of 1/4 “(6mm). For Static Systems the maximum single section curtain damper is 60"x60" (1524mm x 1524mm) for vertical mounting and 40" x 40" (1016mm x 1016mm) for horizontal mountings, based on type “A” dampers. The maximum single section multi-blade damper is 36" x 48" (914mm x1219mm) in vertical or horizontal mountings For Dynamic Systems the maximum single section curtain damper is 36" x 36" (914mm x 914mm) in verti-cal mountings and 18" x 18" (457mm x 457mm) in horizontal mountings, based on type “A” dampers. The maximum single section multi-blade damper is 36"x48" (914mm x 1219mm) in vertical or horizontal mountings. This method is acceptable for 11/2 and 3 hour fire dampers. See Underwriter’s Laboratories Listings for maximum multiple assembly sizes.
B. Dampers Assemblies Using � Angle Methods (see note 4b) shall be a minimum of 1/8" (3mm) per linear foot (305mm) of height and width of sleeved assembly up to a maximum of 11/2“ (38mm) and a minimum of 1/4“ (6mm). The maximum single section is the same as in A above. The maximum multi-section is 108"w and 108"h (2743mm x 2743mm) up to 36 square feet (3.345 sq. meters). This method is acceptable for 11/2 hour fire dampers mounted in a masonry/concrete or steel stud/ gypsum wall only.
C. Dampers Assemblies Using No Angles Methods (see note 4c) shall be a minimum of 1/4" (6mm) and a maximum of 1/2 “(13mm). The maximum single section is the same as in A above. The maximum multi-section is 42"w x 48"h (1067mm x 1219mm). This method is acceptable for 11/2 hour fire dampers mounted in a masonry/concrete or steel stud/gypsum wall only.
�. Damper Sleeves and Breakaway Connections:Sleeves shall be of the SAME GAUGE or heavier as the duct to which it is attached, if one of the breakaway connection is used as de-fined in the SMACNA Fire, Smoke and Radiation Damper Guide for HVAC Systems (Fig. 4-6) and in NFPA 90A. Gauges shall conform to SMACNA or ASHRAE duct standards. Sleeves shall not extend beyond the fire barrier more than 6" (152mm) unless an actuator or factory installed access door is supplied, then the sleeve may extend up to 16" (406mm). Sleeve shall terminate at both sides of wall within dimensions shown. If a rigid connection is used, then the sleeve shall be a minimum of 16 gage for dampers up to 36" (914mm) wide by 24" (610mm) high and 14 gage for dampers exceeding 36"(914mm) wide by 24" (610mm) high.
Round and oval breakaway connections must use either a 4" (102mm) wide draw band or #10 (M5) sheet metal screws spaced equally around the circumference of the duct as follows: 3 screws for duct sizes 22" (559mm) and smaller; 5 screws for duct sizes greater than 22" (559mm) and up to and including 36" (914mm): 8 screws for duct sizes greater than 36" (914mm). Refer to SMACNA Fire, Smoke and Radiation Damper Guide for HVAC Systems for information on Ductmate, Nexus, Ward, TDC and TDF systems and any additional information (Fig. 5-6). A sleeve may not be required if the damper frame is of sufficient size and shape so the mounting angles can be directly fastened to it.
3. Multi-Section and “Damper to Sleeve” Connections:Damper shall be secured to the sleeve and to each other (when joined to make multiple damper assemblies) with #10 sheet metal screws, 1/4“(6mm) nut and bolts, 1/4“(6mm) tack welds, 3/16”(5mm) steel rivets, spot welds, or clinching (toggle) on 6" (152mm) centers.
Fire Dampers (Static & Dynamic)Installation Instructions
a. Two Angle (Two Sided) Method: This method is the oldest and most commonly used. This method is approved for use in UL approved concrete/masonry partitions, steel stud/gypsum walls, and wood stud/gypsum walls. In this method 2 sets of angles are used to secure the damper in the opening, one on each side of the partition (See Fig. 7). Two Angle Method is approved for 1 1/2 and 3 hour dampers, vertical or horizontal orienta-tion, and any maximum size multi-section UL approved damper (see Underwriter’s Laboratories Listings for maximum assem-bly sizes). Angles shall be a minimum of 1 1/2“ x 1 1/2 “ (38mm x 38mm) x 16 gauge. Angles are to be fastened to the sleeve on 6" (152mm) centers with #10 (M5) sheet metal screws, 3/16" (5mm) steel pop rivets, 1/2“ (13mm) tack welds, or 1/4“ (6mm) di-ameter nut and bolts with not more than 2" (51mm) from each end with a minimum of two connections per side/leg. The angles are to overlap the partition a minimum of 1" (25mm). These angles may be of a unit type construction and may or may not be fastened to each other at the corners. When the duct work terminates at the damper or installa-tion prohibits angles from turning out/away from the wall, the retaining angle shall be reversed (leg turned into the opening) pro-viding the size of the opening is increased by an amount equal to twice the combined thickness of the angle and the height of the screw or bolthead to maintain expansion clearances. See note 1A for information on clearances. See Fig. 7 for detailed drawings of installations.b. One Angle (Single Sided) Method: In this method 1 set of angles are used to secure the damper in the opening. This method is approved for use in UL approved concrete/masonry partitions and steel stud/gypsum walls. Only one side of the fire parti-tion will have the angles installed (see Fig. 8). One Angle Method is approved for 11/2
hour dampers only, vertical and horizontal (angles on top side only) orientations, and the maximum size shall be 108” (2743mm) wide or 108” (2743mm) high up to 36 square feet (3.345 sq. meters) and up to the maximum multi-section. UL approved damper size (see Underwriter’s Laboratories Listings for maximum assembly sizes). Angle shall be a minimum of 11/2” x 11/2” (38mm x 38mm) by 16 gauge. Angles are to be fastened to the sleeve on 6” (152mm) centers with #10 (M5) sheet metal screws, 3/16” (5mm) steel pop rivets, 1/2” (13mm) tack welds, or 1/4” (6mm) diameter nut and bolts with not more than 2” (51mm) from each end with a minimum of two connections on each side/leg top and bottom. The angles are also to be fastened to the fire partition with: in concrete/masonry partitions with #10 (M5) self-tapping concrete anchors or concrete screws on 6” (152mm)
centers and must engage the fire partition a minimum of 11/2” (38mm); in steel stud/gypsum partitions secure the angles to the partition with #10 (M5) screws long enough to penetrate the J-Runners and E-Stud by a minimum of 3/8” (10mm). Use a minimum of two fasteners per side. The angles are to overlap the partition a minimum of 1” (25mm). These angles may be of a unit type construction and may or may not be fastened to each other at the corners. When the duct work terminates at the damper or installa-tion prohibits angles from turning out/away from the wall, the retaining angle shall be reversed (leg turned into the opening) pro-viding the size of the opening is increased by an amount equal to twice the combined thickness of the angle and the height of the screw or bolt head to maintain expansion clearances. Angles can be placed in front of or behind the drywall attaching directly to the steel studs or masonry. PRICE’s Frame Retaining Angles (FRA) can be used in place of the angle mentioned above. See note 1B for information on clearances. See Fig. 8 for detailed drawings of installations.c. No Angle Method: In this method No angles are used to secure the damper in the opening. This method is approved for use in UL approved concrete/masonry partitions and steel stud/gypsum walls. This method uses a minimum 3/4” (19mm) flange is on one end of the sleeve. The damper/sleeve assembly is placed in the opening so that the flange rest flush up to the partition, then the fasteners are placed through the sleeve into the partition (see Fig. 9). No Angle Method is approved for 11/2 hour dampers only, verti-
cal and horizontal (flange on top side only) orientations, and the maximum size shall be 42” (1067mm) wide by 48” (1219mm) high up to the maximum multi-section UL approved damper size (see Underwriter’s Laboratories Listings for maximum assembly sizes). The sleeve flange shall be a minimum of 3/4” (19mm) high by 20 gauge steel. If a flange/angle is added, it shall be a minimum of 1” x 1” (25mm x 25mm) by 18 gauge steel and fastened with #10 (M5) bolts or screws, 1/2” (13mm) welds, or 3/16” (5mm) rivets to the sleeve, at a maximum spacing of 6” (152mm) o.c., not more than 2” (51mm) from each end with a minimum of two fasteners per side. The sleeve is to be fastened to the fire partition with: in concrete/masonry partitions with #10 self-tapping concrete anchors or concrete screws on 6” (152mm) centers and must engage the fire partition a minimum of 11/2” (38mm); in steel stud/gypsum partitions secure the angles to the partition with #10 (M5) screws long enough to penetrate the J-Runners and E-Stud by a minimum of 3/8” (10mm). Use a minimum of two fasteners per side. The sleeve flange can be placed in front of or behind the drywall attaching directly to the steel studs or masonry. Be sure to not stretch the damper when securing it into the partition. Stretching the damper can cause it to bind up and prevent it from operating properly. PRICE’s Frame Retaining Angles (FRA) can be used in place of the angle mentioned above. See note 1C for information on clearances. See Fig. 9 for detailed drawings of installations.
Fire Dampers (Static & Dynamic)Installation Instructions
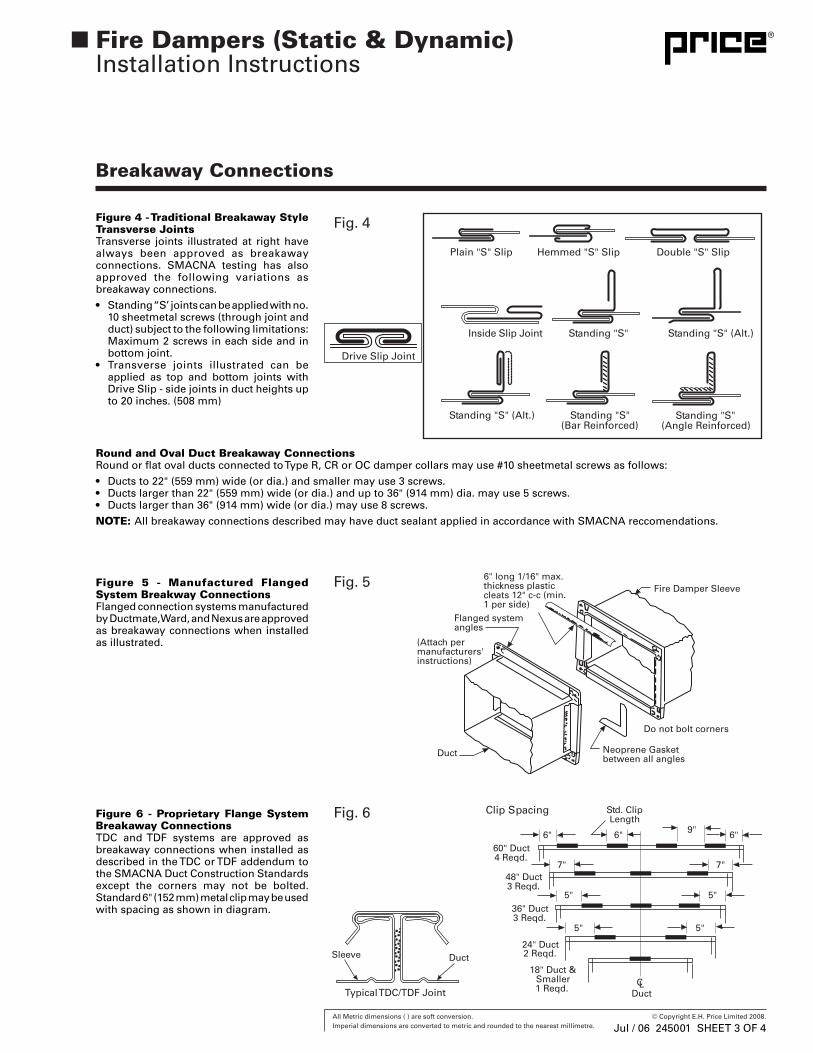
Figure � - Traditional Breakaway Style Transverse JointsTransverse joints illustrated at right have always been approved as breakaway connections. SMACNA testing has also approved the following variations as breakaway connections.
• Standing “S’ joints can be applied with no. 10 sheetmetal screws (through joint and duct) subject to the following limitations: Maximum 2 screws in each side and in bottom joint.
• Transverse joints illustrated can be applied as top and bottom joints with Drive Slip - side joints in duct heights up to 20 inches. (508 mm)
Breakaway Connections
Round and Oval Duct Breakaway ConnectionsRound or flat oval ducts connected to Type R, CR or OC damper collars may use #10 sheetmetal screws as follows:
• Ducts to 22" (559 mm) wide (or dia.) and smaller may use 3 screws.• Ducts larger than 22" (559 mm) wide (or dia.) and up to 36" (914 mm) dia. may use 5 screws.• Ducts larger than 36" (914 mm) wide (or dia.) may use 8 screws.
NOTE: All breakaway connections described may have duct sealant applied in accordance with SMACNA reccomendations.
Figure � - Manufactured Flanged System Breakway ConnectionsFlanged connection systems manufactured by Ductmate, Ward, and Nexus are approved as breakaway connections when installed as illustrated.
Figure � - Proprietary Flange System Breakaway ConnectionsTDC and TDF systems are approved as breakaway connections when installed as described in the TDC or TDF addendum to the SMACNA Duct Construction Standards except the corners may not be bolted. Standard 6" (152 mm) metal clip may be used with spacing as shown in diagram.
Fire Dampers (Static & Dynamic)Installation Instructions
Fire Dampers (Static & Dynamic)Installation Instructions
Manufacturer's RecommendationsAll moving parts of the damper must be inspected and cycled at intervals not greater than every six months and in accordance with the latest edition of NFPA 90A, 92A, local codes and the actuator manufacturer. In addition, fuse links shall be removed and inspected for corrosion. Dry lubricants are recommended. When UL is referred to in this document, it represents UL/ULC.
1. 20 gauge galvanized steel integral sleeve shall be of the SAME GAUGE or heavier as the duct to which it is attached. Gauges shall conform to SMACNA or ASHRAE duct standards. The length of the sleeve extend-ing beyond the wall opening shall not exceed 16” (406 mm) on the operator side or 6” (152 mm) on the opposite side.
2. The connecting duct shall terminate at the integral sleeve and is connected by using either:
(a) a minimum of 3 - #10 sheet metal screws spaced equidistant around the sleeve for 22” (559mm)and smaller duct.
(b) a minimum of 5 - #10 sheet metal screws spaced equidistant around the sleeve for greater than 22” (559mm) duct.
(c) a 4” (102mm) drawband.
3. Clearance between the damper sleeve and the round or square wall opening shall be a minimum of 1/2” (13 mm) and a maximum of 1” (25 mm).
4. Damper will be factory supplied with one retaining plate secured to the damper sleeve on the operator side of the damper.
5. A minimum of 4 equally spaced 20 gauge galvanized steel clip angles shall be attached to both the integral sleeve and the retaining plate. The clip angles shall be attached with 1/8” (3mm) rivets, #10 x 1/2” (13mm) sheet-metal screws, bolts or welds. In metal stud/gypsum applications, the retaining plate may be in front of or behind the gypsum, directly against the metal studs.
6A. Option �: The damper may be installed in a wood/gypsum, steel stud/gypsum, or masonry fire partitition in the vertical or horizontal position (blade shaft running hori-zontal) with a retaining plate flush against each side of the fire partition. Installation: with the factory installed retaining plate flush to the fire partition, place another retaining plate on the opposite side of the damper sleeve and slide it forward until it becomes flush with the opposite side of the partition. Place the Splice Clip over the cut portion of the retaining plate. Secure it with 4 - #10 sheet metal screws or rivets. Secure the clip angles to the retaining plate and damper sleeve as illustrated.
Fire Dampers (Static & Dynamic)Installation Instructions
6B. Option �: The damper may also be installed in a steel stud/gypsum, or masonry wall, in a vertical position (blade running horizontal), with a retaining plate on one side of the wall. Installation: with the factory installed retaining plate flush to the fire wall, place 8 screws (#10 sheet metal for steel studs long enough to penetrate the metal stud by 1/2” (13mm) minimum or #10 x 11/4” (32mm) masonry screws) equidistant around the perimeter of the retaining plate. Screws are placed in each corner and halfway between the corners as shown.
7. Electrical and/or pneumatic connections to damper actuators (if applicable) should be made in accordance with wiring and piping diagrams developed in compliance with applicable codes, ordinances and regulations.
8. Refer to the installation instruction for Drywall Type Construction for the material and opening framing details.
Manufacturer’s RecommendationsAll moving parts of the damper must be inspected and cycled at intervals not greater than every six months and in accordance with the latest edition of NFPA 90A, 92A, local codes and the actuator manufacturer. In addition, fuse links shall be removed and inspected for corrosion. Dry lubricants are recommended.
FD-RD and FDD-RD Fire Dampers
Fire Dampers (Static & Dynamic)Installation Instructions
This Installation sheet has been reviewed and accepted by Underwriters Laboratories.
When UL is referred to in this document, it represents UL/ULC.
Out of Wall Partitions for Fire Dampers (Static & Dynamic)and Fire Smoke DampersInstallation Instructions
Important General Notes:When UL is referred to in this document, it represents UL/ULC. This installation instruction applies to Fire Dampers and Com-bination Fire/Smoke Dampers mounted outside the plane of an UL approved fire partition. Combination Fire /Smoke Dampers are approved for use in Static or Dynamic Systems. The dampers are designed for operation in the vertical or horizontal position with blades running horizontal. The dampers are to be installed square and free from twisting or racking. The dampers shall not be compressed or stretched into the opening. Transportation and installation of the dampers shall be handled with the sleeve or frame. Do not lift the damper with the blades or actuator. Special care shall be given to the damper before installation and after to insure it is protected against dirt, weather, mortar and drywall dust, wall texture and paint. Any of these conditions could cause the damper not to operate correctly and void the warranty. Suitable access to inside duct is to be provided for inspection and replacement of parts such as heat response devices and actuators per NFPA 90A and local authority having jurisdiction. The need to seal the damper in the penetration is not required by Underwriters Laboratories. PRICE dampers have been tested and approved to be mounted without the use of sealants around the perimeter space between the damper and the penetration. As with all joints, contractor must seal duct-collar connections in the field after installation. These dampers must be ordered as an assembly from the factory with the proper PRICE insulation applied to the dampers. PRICE Model numbers which are UL approved to utilize this installation are FD-OW, FDD-OW, FSD-3V-OW-���, -���, FSD-AF-OW-���, -���, FSD-3V-FA-���, -���, FSD-AF-FA-���, -���.�. Opening Preparation/Clearances:The fire barrier opening shall be larger than the damper to allow for thermal expansion and ease of installation. When a steel stud/gyp-sum partition is being used then refer to Figs. � and � for additional information and details. The opening shall be a minimum of 1/4” (6mm) and a maximum of 1/2” (13mm). The maximum multi-section is 42”w x 48”h (1067mm x 1219mm). This method is acceptable for 11/2 hour fire dampers mounted in a masonry/concrete or steel stud/gypsum wall only.
�. Damper Sleeves and Breakaway Connections:Sleeves shall be of the SAME GAUGE or heavier as the duct to which it is attached, if one of the breakaway connections is used as defined in the SMACNA Fire, Smoke and Radiation Damper Guide for HVAC Systems (Figs. 3, �, and �) and in NFPA 90A. Gauges shall conform to SMACNA or ASHRAE duct standards. Sleeves shall not extend beyond the fire barrier more than 6”(152mm) unless an actuator or factory installed access door is supplied, then the sleeve may extend up to 16”(406mm). Sleeve shall terminate at both sides of wall within dimensions shown. If a rigid connection is used, then the sleeve shall be a minimum of 16 gage for dampers up to 36”(914mm) wide by 24”(610mm) high and 14 gage for dampers exceeding 36”(914mm) wide by 24”(610mm) high. Round and oval breakaway connections must use either a 4”(102mm) wide draw band or #10 (M5) sheet metal screws spaced equally around the circumference of the duct as follows: 3 screws for duct sizes 22”(559mm) and smaller; 5 screws for duct sizes greater than 22”(559mm) and up to and including 36”(914mm): 8 screws for duct sizes greater than 36”(914mm). Refer to SMACNA Fire, Smoke and Radiation Damper Guide for HVAC Systems for information on Ductmate, Nexus, Ward, TDC and TDF systems and any additional information (Figs. � and �). A sleeve may not be required if the damper frame is of sufficient size and shape so the mounting angles can be directly fastened to it.
Manufacturer's RecommendationsAll moving parts of the damper must be inspected and cycled at intervals not greater than every six months and in accordance with the latest edition of NFPA 90A, 92A, local codes and the actuator manufacturer. In addition, fuse links shall be removed and inspected for corrosion. Dry lubricants are recommended.
3. Methods of Securing Damper in Opening:a. Grille Mount Method: In this method No angles are used to secure the damper in the opening. This method is approved for use in UL approved concrete/masonry partitions and steel stud/gypsum walls. This method uses a minimum 3/4” (19mm) flange is on one end of the sleeve. The damper/sleeve assembly is placed in the opening so that the flange rests flush up to the partition, then the fasteners are placed through the sleeve into the partition (see Fig. �). No Angle Method is approved for 11/2 hour damp-ers only, vertical and horizontal (flange on top side only) orientations, and the maximum size shall be 42” (1067mm) wide by 48” (1219mm) high up to the maximum multi-section UL approved damper size (see Underwriter’s Laboratories Listings for maximum assembly sizes). The sleeve flange shall be a minimum of 3/4” (19mm) high by 20 gauge steel. If a flange/angle is added, it shall be a minimum of 1” x 1” (25mm x 25mm) by 18 gauge steel and fastened with #10 (M5) bolts or screws, 1/2” (13mm) welds, or 3/16” (5mm) rivets to the sleeve, at a maximum spacing of 6” (152mm) o.c., not more than 2” (51mm) from each end with a minimum of two fasteners per side. The sleeve is to be fastened to the fire partition with: in concrete/ masonry partitions with #10 self-tapping concrete anchors or concrete screws on 6” (152mm) centers and must engage the fire partition a minimum of 11/2” (38mm); in steel stud/gypsum partitions secure the angles to the partition with #10 (M5) screws long enough to penetrate the J-Runners and E-Stud by a minimum of 3/8” (10mm). Use a minimum of two fasteners per side. The sleeve flange can be placed in front of or behind the drywall attaching directly to the steel studs or masonry. Be sure to not stretch the damper when securing it into the partition. Stretching the damper can cause it to bind up and prevent it from operating properly. PRICE’s Frame Retaining Angles (FRA) can be used in place of the angle mentioned above. See note 1 for information on clearances. See Fig. � for detailed drawings of installations.
b. Continuous Duct Method: In this method 1 set of angles are used to secure the damper in the opening. This method is approved for use in UL approved concrete/masonry partitions and steel stud/gypsum walls. Only one side of the fire partition will have the angles installed (see Fig. �). One Angle Method is approved for 11/2 hour dampers only, vertical and horizontal (angles on top side only) orien-tations, and the maximum size shall be 42” wide x 48” high (1067mm x 1219mm) and up to the maximum multi-section UL approved damper size (see Underwriter’s Laboratories Listings for maximum assembly sizes). Angle shall be a minimum of 11/2” x 11/2” (38mm x 38mm) by 16 gauge. Angles are to be fastened to the sleeve on 6” (152mm) centers with #10 (M5) sheet metal screws, 3/16” (5mm) steel pop rivets, 1/2” (13mm) tack welds, or 1/4” (6mm) diameter nut and bolts with not more than 2” (51mm) from each end with a minimum of two connections on each side/leg top and bottom. The angles are also to be fastened to the fire partition with: in concrete/masonry partitions with #10 (M5) self-tapping concrete anchors or concrete screws on 6” (152mm) centers and must engage the fire partition a minimum of 11/2” (38mm); in steel stud/gypsum partitions secure the angles to the partition with #10 (M5) screws long enough to penetrate the J-Runners and E-Stud by a minimum of 3/8” (10mm). Use a minimum of two fasteners per side. The angles are to overlap the partition a minimum of 1” (25mm). These angles may be of a unit type construction and may or may not be fastened to each other at the corners. When the duct work terminates at the damper or installation prohibits angles from turning out away from the wall, the retaining angle shall be reversed (leg turned into the opening) providing the size of the opening is increased by an amount equal to twice the combined thickness of the angle and the height of the screw or bolt head to maintain expansion clearances. Angles can be placed in front of or behind the drywall attaching directly to the steel studs or masonry. PRICE’s Frame Retaining Angles (FRA) can be used in place of the angle mentioned above. See note 1 for information on clearances. See Fig. � for detailed drawings of installations.
�. Actuator Connections (if applicable):Electrical and/or pneumatic connections to damper actuators (if provided) should be made in accordance with wiring and piping diagrams developed in compliance with applicable codes, ordinances and regulations. Be sure to check actuator for proper voltage and current draw. Tampering with the actuator’s installation or connecting the actuator to an improper voltage and current may void the warranty.
Note: Gypsum panels screwed to all studs and runner flanges, 12” (305mm) oc maxi-mum surrounding opening. All fasteners are to be UL approved per UL design.
Out of wall partitions / Breakaway connections
Out of Wall Partitions for Fire Dampers (Static & Dynamic)and Fire Smoke DampersInstallation Instructions
Out of Wall Partitions for Fire Dampers (Static & Dynamic)and Fire Smoke DampersInstallation Instructions
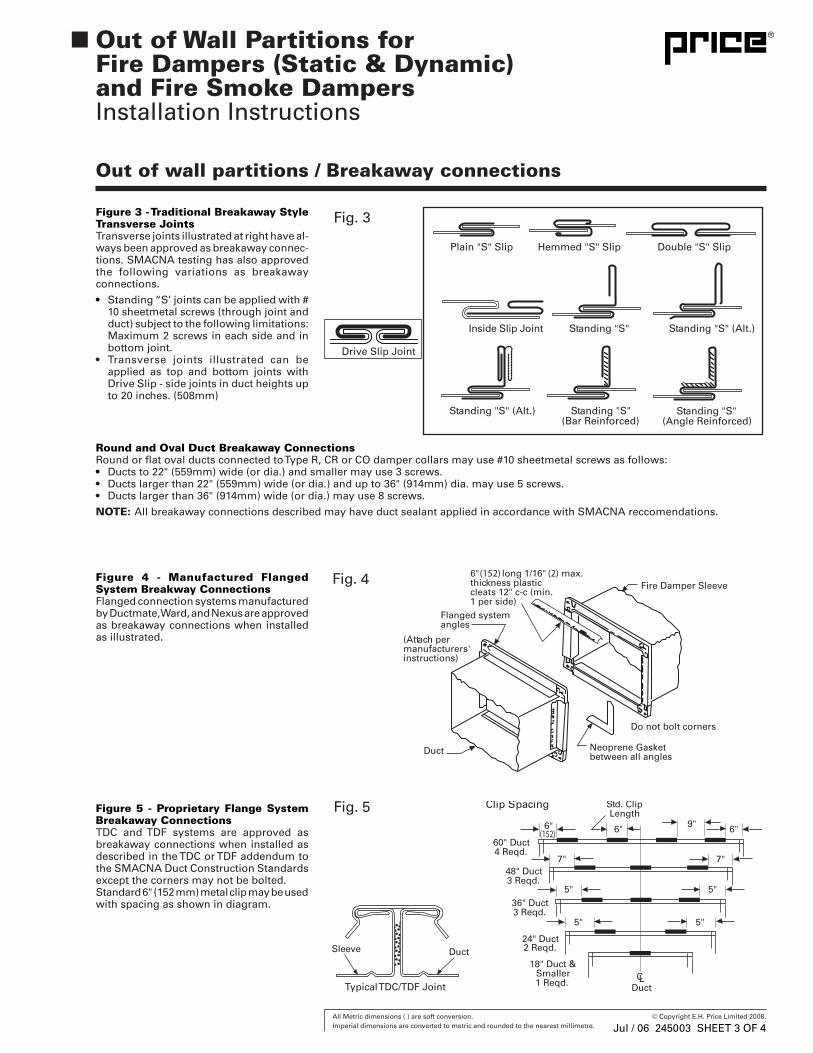
Figure 3 - Traditional Breakaway Style Transverse JointsTransverse joints illustrated at right have al-ways been approved as breakaway connec-tions. SMACNA testing has also approved the following variations as breakaway connections.
• Standing “S’ joints can be applied with # 10 sheetmetal screws (through joint and duct) subject to the following limitations: Maximum 2 screws in each side and in bottom joint.
• Transverse joints illustrated can be applied as top and bottom joints with Drive Slip - side joints in duct heights up to 20 inches. (508mm)
Round and Oval Duct Breakaway ConnectionsRound or flat oval ducts connected to Type R, CR or CO damper collars may use #10 sheetmetal screws as follows:• Ducts to 22" (559mm) wide (or dia.) and smaller may use 3 screws.• Ducts larger than 22" (559mm) wide (or dia.) and up to 36" (914mm) dia. may use 5 screws.• Ducts larger than 36" (914mm) wide (or dia.) may use 8 screws.
NOTE: All breakaway connections described may have duct sealant applied in accordance with SMACNA reccomendations.
Figure � - Manufactured Flanged System Breakway ConnectionsFlanged connection systems manufactured by Ductmate, Ward, and Nexus are approved as breakaway connections when installed as illustrated.
Figure � - Proprietary Flange System Breakaway ConnectionsTDC and TDF systems are approved as breakaway connections when installed as described in the TDC or TDF addendum to the SMACNA Duct Construction Standards except the corners may not be bolted.Standard 6" (152 mm) metal clip may be used with spacing as shown in diagram.
These installation instructions apply to the fabrication and construction of generic sup-port mullions. Support mullions are neces-sary whenever fire dampers are installed into an opening that is larger than the largest UL rated size for that damper. The mullions allow construction of a fire barrier that is larger than the maximum available size.
The opening must not exceed 120" (3048mm) high, but can be any width provided a verti-cal support mullion is used a maximum of every 120" (3048mm).
To properly use support mullions they must be fabricated and installed according to these instructions.
This generic support mullion is permitted by UL to only be used in static systems. A static system is one in which the fan shuts down in the event of a fire or smoke alarm.
ApplicationGeneric steel mullions can be used to sepa-rate vertically mounted galvanized steel fire dampers in wall openings larger
than the UL permitted multiple damper assembly size. Mullions can either be used vertically, horizontally or both to split up a vertical wall opening requiring use of a damper having a 11/2 hour fire resistance rating. Maximum mullion span is 120" (3048mm) plus expansion allowance when used either horizontally or vertically.
Sleeves are to be around each damper as-sembly. Mullions are not intended to be in the airstream, (i.e. exposed to flow) or to be a part of the ductwork.
Wall OpeningSteel mullions are intended for use in a concrete block or solid concrete wall. Hollow concrete blocks are to be filled with concrete (minimum 3500 psi) to permit proper mul-lion anchoring.
Wall thickness is to be 7" (178mm) minimum, 12" (305mm) maximum.
Support Mullions for Fire Dampers and Fire Smoke DampersFabrication and Installation Instructions
Manufacturer's RecommendationsAll moving parts of the damper must be inspected and cycled at intervals not greater than every six months and in accordance with the latest edition of NFPA 90A, 92A, local codes and the actuator manufacturer. In addition, fuse links shall be removed and inspected for corrosion. Dry lubricants are recommended. When UL is referred to in this document, it represents UL/ULC.
3/16” (5) blind rivet (std.) or 3/4” (19) long intermittent welds 12” (305) on center, 6” (152) max. from both ends, both sides of assembly
Support mullion assemblies consist of three basic parts: the wall mullion cap, the horizontal to vertical mullion cap and the mullion sections. Determine the number of each piece required to complete the installation.
Fabrication of Wall Mullion Caps (Fig. A-A)Wall mullion caps must be constructed from 12 ga. steel with a minimum yield strength of 42,000 psi.
1. Fabricate the formed section as shown below.2. Shear the cap end plate to required dimensions.
3. Weld the cap end plates to the formed section with 1/8" (3mm) fillet welds completely around the top edges of the formed section.
4. Drill and countersink 8 holes (4 on each side for 1/4" -20 flat head machine screws.
Fabrication of Mullion Sections (Fig. B-B)Mullions must be constructed from 16 ga. steel with a minimum yield strength of 42,000 psi.
Important: The “D” dimension shown has been calculated to include the necessary clearances required for thermal expansion in the mullions. The values can be found using the wall opening dimensions and tables on this page.
1. Form two identical pieces of mullion section as shown.
2. Connect the two mullion sections together. Use 3/16" (5mm) steel bind rivets or 3/4" (19mm) long stitch welds 12" (305mm) on center and a 6" (152m) maximum from both ends.
Important: Both sides of the mullion piece should be fastened using the method de-scribed above.
Support Mullions for Fire Dampers and Fire Smoke DampersFabrication and Installation Instructions
Fabrication of Mullion Sections (Fig. C-C)Horizontal to vertical mullion caps must be constructed from 12 ga. steel with a mini-mum yield strength of 42,000 psi. Important: The H, E and F dimensions shown have been calculated to provide the correct performance. The values can be found by using the wall opening dimensions and the tables on page 2.
1. Form the horizontal mullion channel as shown.
2. Drill 12, 3/16" (5mm) dia. holes into the horizontal mullion channel using the dimen-sions shown.
3. Form the center channel as shown.
NOTE: If the center channel is to be made from two pieces, weld them together with an 1/8"
(3mm) fillet weld.
4. Shear the end plates to the dimensions required.
5. Weld the end plates to the center channel with 1/8" (3mm) fillet welds completely around the top edges of the center section.
Support Mullions for Fire Dampers and Fire Smoke DampersFabrication and Installation and Instructions
Mullion InstallationBefore the fire dampers are installed into the wall the anchored into the wall. The fire dampers may then be installed into the mullion assembly.
To correctly attach the mullions to the wall follow these steps:
1. Anchor wall mullion caps to wall using 1/4"-20 x 5/16" long flat head steel bolts and 3/8" (10mm) diameter by 1" (25mm) long concrete expansion anchors (Hilti). If steel lintels are present, use two 1" (25mm) long welds on each side of mullion caps. Note: End caps must be inserted into the ends of the mullions before they are anchored to the wall.
2. Anchor horizontal mullion caps to vertical mullion caps with 3/16" (5mm) diameter steel blind rivets in 12 places. Note: Mullion caps must be inserted into the ends of the mullions before they are anchored to the vertical mullions or wall.
Fire Damper InstallationGalvanized steel fire dampers must be UL classified for 11/2 hour fire resistance. They must be installed in galvanized steel sleeves and be retained by minimum 11/2" x 11/2" 1" (38mm x 38mm), 16 ga. retaining angles on each side of the wall. Retaining angles must overlap mullions or wall by 1" minimum. Fasten to sleeve using 1/4" 1" (6mm) dia. bolts, 3/16" (5mm) steel rivets, welding, or #10 sheet metal screws. All must be attached 6" 1" (152mm) on centers, 2" (51mm) maximum from corners. Do not fasten retaining angles to the wall or mullions. Mullions must be free to float. Total expansion clearance between sleeve and wall/mullion of 1/8" per foot of wall opening or mullion span should be allowed. Maximum clearance is 11/4" 1" (32mm).
Support Mullions for Fire Dampers and Fire Smoke DampersFabrication and Installation Instructions
Manufacturer's RecommendationsAll moving parts of the damper must be inspected and cycled at intervals not greater than every six months and in accordance with the latest edition of NFPA 90A, 92A, local codes and the actuator manufacturer. In addition, fuse links shall be removed and inspected for corrosion. Dry lubricants are recommended.
Only if required by the authority having jurisdiction
Application:The need to seal the damper in the penetration is not required by Underwriters Laboratories.PRICE dampers have been tested and approved to be mounted without the use of sealants around the perimeter space between the damper and the penetration. In certain cases, local codes request that this space be sealed to try and keep the integrity of the smoke barrier. These instructions have been produced to give direction where to apply caulk, if required by local codes. Suggested brands of caulk to use are Dow Corning 999, Dow Corning Silastic 732, Nuflex 302 and GE RTV 108 Sealant. Read and follow the sealant manu-facturer’s directions. Apply a continuous bead of caulk in the areas shown below. Do Not Apply sealant within the required expansion gap between the damper and the fire rated wall or floor. Allow the sealant to set up and become tack-free before operating the damper. See PRICE’s standard installation instructions for the basic installation of the damper. These instructions are for use following damper installation. Permission from the local codes inspector should be acquired before use of these instructions, to insure conformity with the local codes.
Manufacturer’s RecommendationsAll moving parts of the damper must be inspected and cycled at intervals not greater than every six months and in accordance with the latest edition of NFPA 90A, 92A, local codes and the actuator manufacturer. In addition, fuse links shall be removed and inspected for corrosion. Dry lubricants are recommended.
Procedure:1. Follow PRICE’s standard/general installation instructions for proper installation of the damper in the wall / floor.2. Clean all areas where the sealant is going to be applied. Remove dirt, oil, grease, or moisture from surface to be sealed. Allow to dry
thoroughly.3. Using G.E. RTV 108, Dow Corning Silastic 732 RTV, Nuflex 302 or Dow Corning 999 Silicone Caulk, apply a continuous bead around
the outside perimeter of the retaining angle, sealing them to the fire wall/floor (6). Do not apply caulk between angle and wall/floor. Also apply a continuous bead between the retaining angle and the damper sleeve(7). Be sure to seal the joints/corners of the retain-ing angles.
4. Be sure not to apply or get sealant within the required expansion gap between the sleeve and the fire wall/floor penetration. This gap is necessary for thermal expansion in the event of a fire.
5. After sealant is applied and before it sets-up, press the surface of the sealant in place to dispel any air. Do not operate the damper until the sealant has become tack-free.
This instruction sheet has been reviewed and accepted by Underwriters Laboratories due to test performed by PRICE.
Optional Sealing of Dampers in Fire & Smoke Rated Walls or Floor OpeningsInstallation Instructions
Width (W) = same as duct Height (H) = same as duct
e.g. Duct = 40” x 36” (1016 x 914) Damper* = 40” x 36” (1016 x 914) Opening** = 401/2” x 363/8” (1029 x 924)
Type B:
Width (W) = same as duct Height (H) = same as duct Damper Height (X) = H + B (see chart on page 1)
e.g. FD-B-V, 1½ hour Duct = 40” x 36” (1016 x 914) Maximum single section height is 55” (1397) for FD-B-V, 1½ hour From chart for single section high damper, B = 4” (102) Damper* = 40” x 40” (1016 x 1016) Opening** = 40½” x 40½” (1029 x 1029)
e.g. FDD-B-H, 3 hour Duct = 24” x 24” (610 x 610) Maximum single section height is 21” (533) for FDD-B-H From chart for horizontal 2 section high damper, B = 4” (102) Damper* = 24” x 28” (610 x 711) Opening** = 24¼” x 283/8” (616 x 721)
Type C (square or oval inlet):
Width (W) = same as duct Height (H) = same as duct Damper Width = W + 1” (25) Damper Height (X) = H + C (see chart on page 2)
e.g. Duct = 15” x 6” (381 x 152) From chart, for 6” (152) height, C = 3” (76) Damper* = 16” x 9” (406 x 229) Opening** = 16¼” x 9¼” (413 x 235)
Type C (round inlet):
Diameter (D) = same as duct Damper Width = D + 1” (25) Damper Height (X) = D + C (see chart on page 2)
e.g. Duct = 12” dia. (305) From chart, for 12” (305) height, C = 3” (76) Damper* = 13” x 15” (330 x 381) Opening** = 13¼” x 15¼” (337 x 387)
Notes: * - Dampers are ordered by nominal duct size. Actual damper dimension will be ¼” (6) undersized on both height and width. ** - For exact opening sizes applicable see installation instructions.*** - Damper sizing may vary slightly by model. See charts on submittal drawing for each model.
Although the primary purpose of a fire damper is to maintain the fire resistance of a fire separation, its inclusion in the HVAC system of a building necessarily affects the air handling characteristics of the system during the normal operating mode. Fire dampers impose some resistance to air flow and therefore must be considered by the designer in determining the required flow rate (cfm) to each space. The main design considerations are: Free Area, Flow and Pressure Drop.
FREE AREA:The total minimum area of the openings in the air outlet or inlet through which air can pass.
The Controversy By offering two frame styles, A and B, to accommodate low and medium velocity duct systems, respectively, the fire damper industry has attempted to serve the needs of the HVAC designer. However, this accommodation has inadvertently caused some conflict of interest. To explain, most contractors prefer to use Type A fire dampers whenever possible because of their low cost and ease of installation (a further cost savings versus Type B). Engi-neers, on the other hand, prefer the more expensive Type B fire dampers because of their superior air handling characteristics.
Rule of Thumb As a natural result of these different interests, an industry “Rule of Thumb” developed:
For low and medium velocity duct up to 12" (305mm) height, use Type B.
For low and medium velocity ducts over 13" (330mm) height, use Type A.
For high velocity duct systems, use Type C.
Third Generation PRICE’s third generation fire damper permits improvement in this guideline. By virtue of our narrow blade profile, we are able to offer greater free area than ordinary Type A’s. We are also able to offer a less costly fire damper than the wide blade A’s which use more material. In summary, our third generation Type A offers the least costly fire damper with the greatest free area.
SI Units To convert cubic feet per minute (cfm) to cubic meters per second (m3/s) multiply by 0.000 471 947.
To convert feet per minute (fpm) to meters per second (m/s) multiply by 0.005 080.
To convert inches of water to pascals (Pa) or newtons per square meter (N/m2), multiply by 249.082.
To convert square inches to square meters, multiply by 0.000 645 16.
To convert inches to meters, multiply by 0.0254.
Type A vs. Type B
Fire DampersEngineering & Performance Data Curtain Style Fire Dampers
ModelFrame Retaining Angles FRAStandard Construction:16 ga. 1 1/2" x 1 1/2" (38 mm x 38 mm) Formed Galvanized Steel with staked corners.
Sizes: Maximum and minimum sizes cor-respond to the individual damper model. Check the appropriate submittal sheet or size chart.
Installation:1. Install damper within fire separation as
detailed in the appropriate damper instal-lation instruction sheet. Omit the normal perimeter angles.
2. Place the model FRA angle around the damper sleeve on both sides of the fire separation as shown below.
3. The FRA angles must be attached to the sleeve with #10 sheet metal screws, tack or spot welds, 1/4" (6 mm) bolts and nuts, or 3/16" (5 mm) steel pop rivets.
The fasteners must be spaced 6" (152mm) on centers and be a maximum of 2" (51 mm) from the corners.
A minimum of two fasteners is required on each top, bottom or side of the damper sleeve.
Application:PRICE Model FRA Framed Retaining Angles may be used instead of the normal mount-ing angles being used at present. The model FRA retaining angles can be installed on PRICE curtain fire dampers, multi-bladed fire dampers and combination fire/smoke dampers with 11/2 hr. or 3 hr. vertical or horizontal fire ratings. FRA angles are fac-tory supplied two per damper.
Manufacturer’s RecommendationsAll moving parts of the damper must be inspected and cycled at intervals not greater than every six months and in accordance with the latest edition of NFPA 90A, 92A, local codes and the actuator manufacturer. In addition, fuse links shall be removed and inspected for corrosion. Dry lubricants are recommended.
Specifications are correct at time of printing. However, as part of our ‘continuous improve-ment program,’ we reserve the right to make further improvements without notice.