1/14/2016 1 Fire Scene Documentation Fire Marshal Inservice Training January 2016 Detective Richard Gregory #1380 Detective Paul Makuc #885 Connecticut State Police Fire & Explosion Investigation Unit FIRE SCENE DOCUMENTATION WHY DO WE DOCUMENT? • Document the scene in order to recall observations at a later date. • Document conditions of the scene. • Compile factual data which will support opinions and conclusions.
Transcript
1/14/2016
1
Fire Scene Documentation
Fire Marshal Inservice Training
January 2016
Detective Richard Gregory #1380
Detective Paul Makuc #885
Connecticut State Police
Fire & Explosion Investigation Unit
FIRE SCENE DOCUMENTATION
WHY DO WE DOCUMENT?
• Document the scene in order to recall observations at a later date.
• Document conditions of the scene.
• Compile factual data which will support opinions and conclusions.
1/14/2016
2
FIRE SCENE DOCUMENTATION
Compilation of factual data from a thorough & accurate documentation
of the scene is critical.
This is where the investigative opinions and conclusions will be developed and
supported.
QUESTIONS
• Date and Time of the Incident/Investigation• Location of the Incident• Description of Fire Scene• Exterior to Interior • Least to Most• Room of Origin• Area of Origin• Potential Ignition Sources
1/14/2016
3
FIRE SCENE DOCUMENTATION
Common methods for
documenting the scene include:
Written Notes
Photographs
Video
Sketch Maps
NOTE TAKING
Written notes should document:
• Activities at the scene
• Observations you made at the scene
• Anyone you encounter at the scene (Witnesses/Occupants/First in Firefighters, etc.)
1/14/2016
4
NOTE TAKING
Written Notes Help to:
• Write your report
• Answer questions about the incident and how the investigation was conducted
• Recall the case and prepare for testimony
NOTE TAKING
• WitnessesNameDate of BirthAddress Phone NumberInformation they provide
• Structure Description
• Scene Examination
1/14/2016
5
NOTE TAKING
Written Field Notes
Save or Destroy?
Retain?
Where?
How Long?
PHOTOGRAPHS
Why Photograph?
To document the fire scene and provide a TRUE and ACCURATE
representation of the scene that will allow investigators to recall and
communicate their observations at a later date.
1/14/2016
6
PHOTOGRAPHS
• Still photographs are the most effective and reliable method to document a scene
• Still photographs can be brought into the court room and shown to the jury as evidence and documentation of the condition and exact location of evidence
PHOTOGRAPHS
• A picture is worth 1000 words
• Visual images can portray the scene better than words
• Patterns and items overlooked at the scene may become more evident in photographs
• Photographs can substantiate reports and statements of the investigator
1/14/2016
7
PHOTOGRAPHS
WHAT TO PHOTOGRAPH
Overall Scene View from Various Angles to identify:
– Suspicious Vehicles– Onlookers or Spectators
In larger fires that may draw a crowd of onlookers or spectators, take photographs of the crowd to later identify persons who may
have knowledge of the fire
PHOTOGRAPHS
WHEN TO PHOTOGRAPH
The fire scene should be photographed
PRIOR TO, DURING and AFTER
the scene examination
1/14/2016
8
PHOTOGRAPHS
How Many Photos Should We Take?
• As many photographs as are necessary to adequately document the scene
• More are better than less…Remember, once you leave the scene you may never be able to go back.
PHOTOGRAPHS
Take photographs DURING or AS SOON AS POSSIBLE after the fire.
Important because the scene may become altered, disturbed or destroyed:
1. Building in danger of collapse/demolition
2. Conditions may create an environmental hazard that will hinder the investigation
3. Evidence/Fire Debris should be documented in layers as it is discovered (Archaeological Dig Theory)
1/14/2016
9
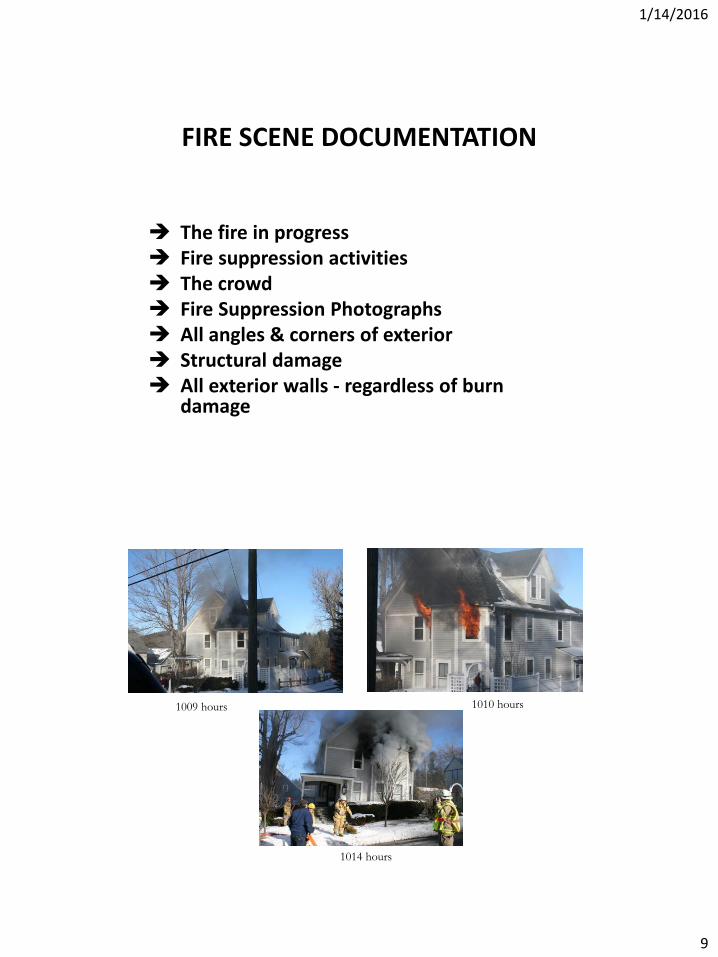
FIRE SCENE DOCUMENTATION
The fire in progress Fire suppression activities The crowd Fire Suppression Photographs All angles & corners of exterior Structural damage All exterior walls - regardless of burn
damage
1009 hours 1010 hours
1014 hours
1/14/2016
10
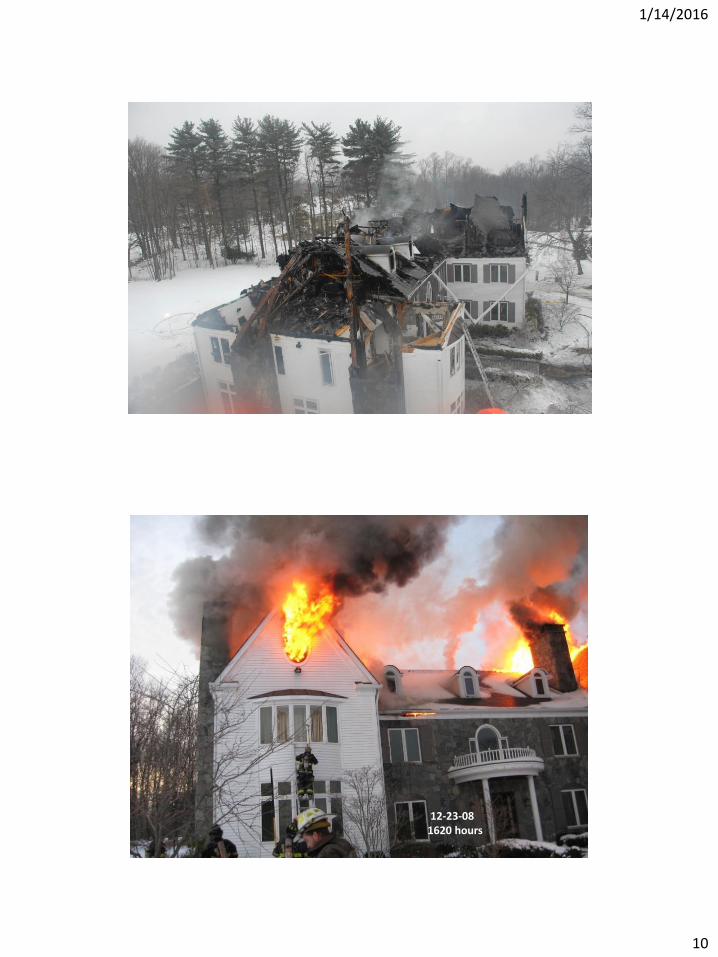
12-23-081620 hours
1/14/2016
11
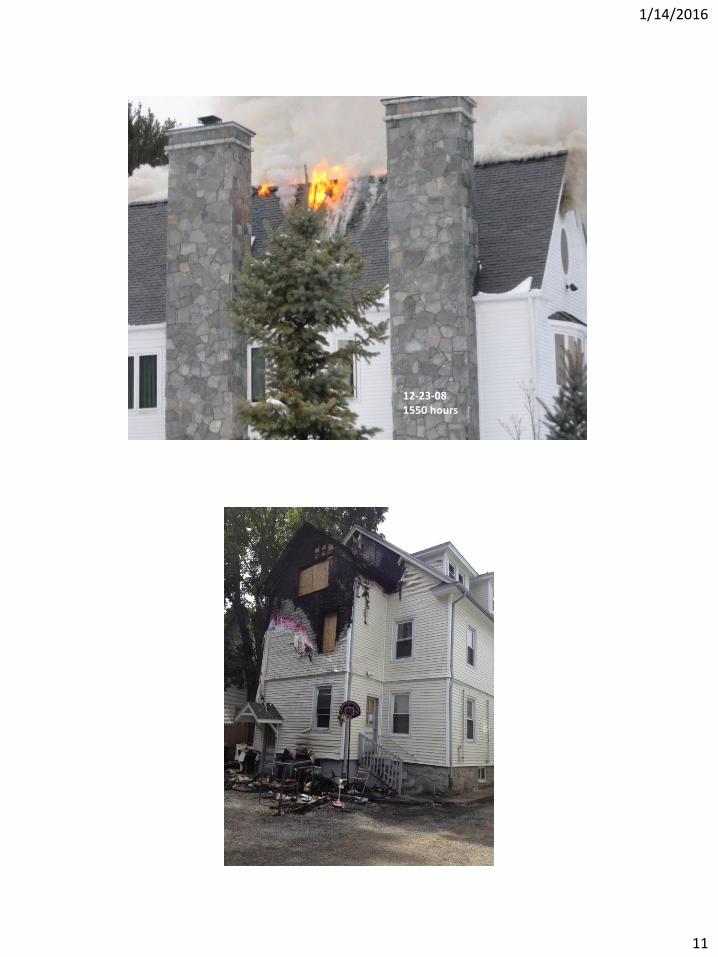
12-23-08 1550 hours
1/14/2016
12
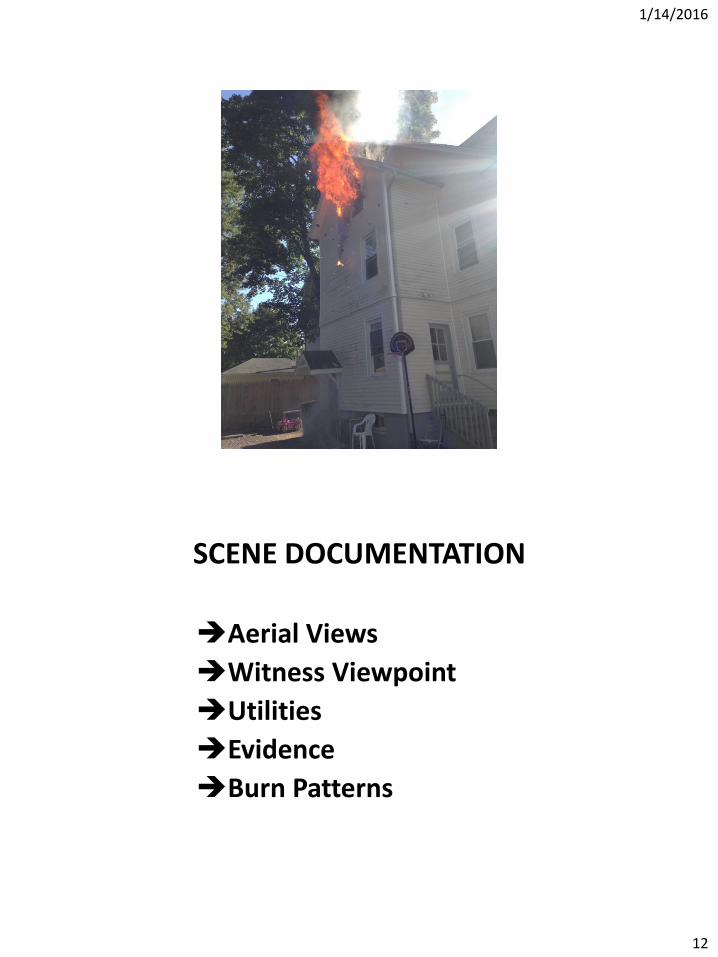
SCENE DOCUMENTATION
Aerial Views
Witness Viewpoint
Utilities
Evidence
Burn Patterns
1/14/2016
13
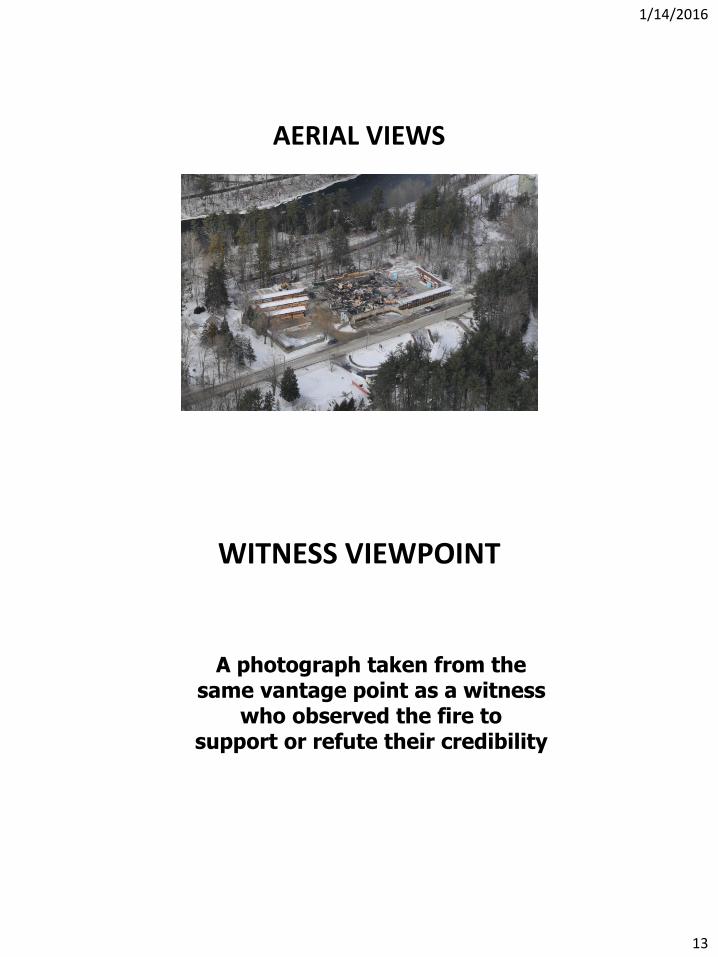
AERIAL VIEWS
WITNESS VIEWPOINT
A photograph taken from the same vantage point as a witness
who observed the fire to support or refute their credibility
1/14/2016
14
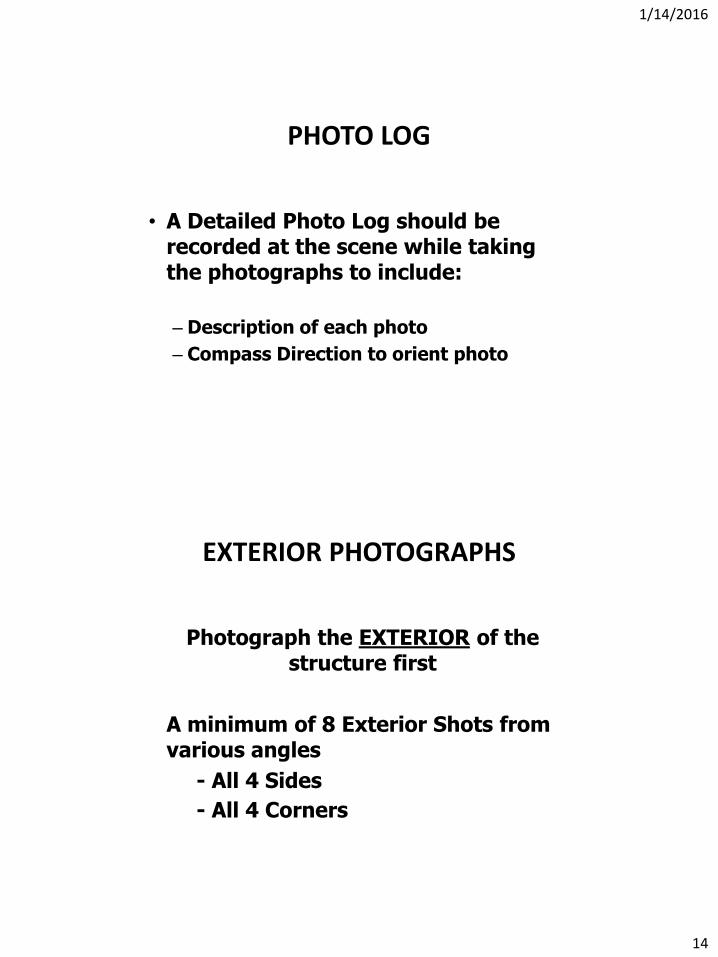
PHOTO LOG
• A Detailed Photo Log should be recorded at the scene while taking the photographs to include:
– Description of each photo
– Compass Direction to orient photo
EXTERIOR PHOTOGRAPHS
Photograph the EXTERIOR of the structure first
A minimum of 8 Exterior Shots from various angles
- All 4 Sides
- All 4 Corners
1/14/2016
15
EXTERIOR PHOTOGRAPHS
Start at front of structure and move in a clockwise or counterclockwise direction and work back to the
starting point
Move in the same direction
each and every time
EXTERIOR PHOTOGRAPHS
Fire Damage to Exterior
- Burn Patterns/Damage/Lack of Damage
- Last exterior Photograph should bepoint of entry
1/14/2016
16
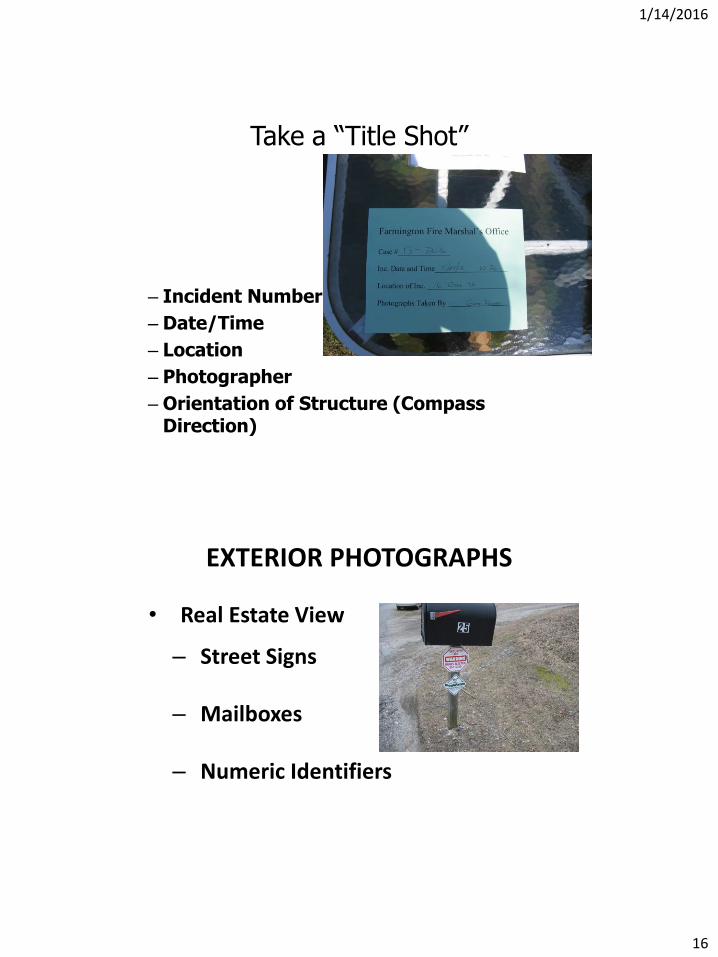
Take a “Title Shot”
– Incident Number
– Date/Time
– Location
– Photographer
– Orientation of Structure (Compass Direction)
EXTERIOR PHOTOGRAPHS
• Real Estate View
– Street Signs
– Mailboxes
– Numeric Identifiers
1/14/2016
17
EXTERIOR PHOTOGRAPHS
Photograph utilities on the
exterior of the structure
– Overhead Electric Service Drops
– Electric Service Meters
– Gas Meters
– Propane/Gas Tanks
EXTERIOR PHOTOGRAPHS
Photograph any physical evidence that may be located on the exterior of the structure
– Graffiti or Tagging
– Broken Glass from Doors or Windows
– Burn or Pour Patterns
– Evidence of Incendiary Devices
1/14/2016
18
EXTERIOR PHOTOGRAPHS
Photograph surrounding areas that may represent remote evidence or explain prolonged / hindered fire
suppression activities
– Limited Scene Access
– Exposure Damage
EXTERIOR PHOTOGRAPHS
The Conditions of Doors and Windows should be documented
- Open / Closed
– Locked / Unlocked• Locking/Latching Mechanisms
– Intact / Broken
– Forced Entry / Pre-Existing Damage
1/14/2016
19
EXTERIOR PHOTOGRAPHS
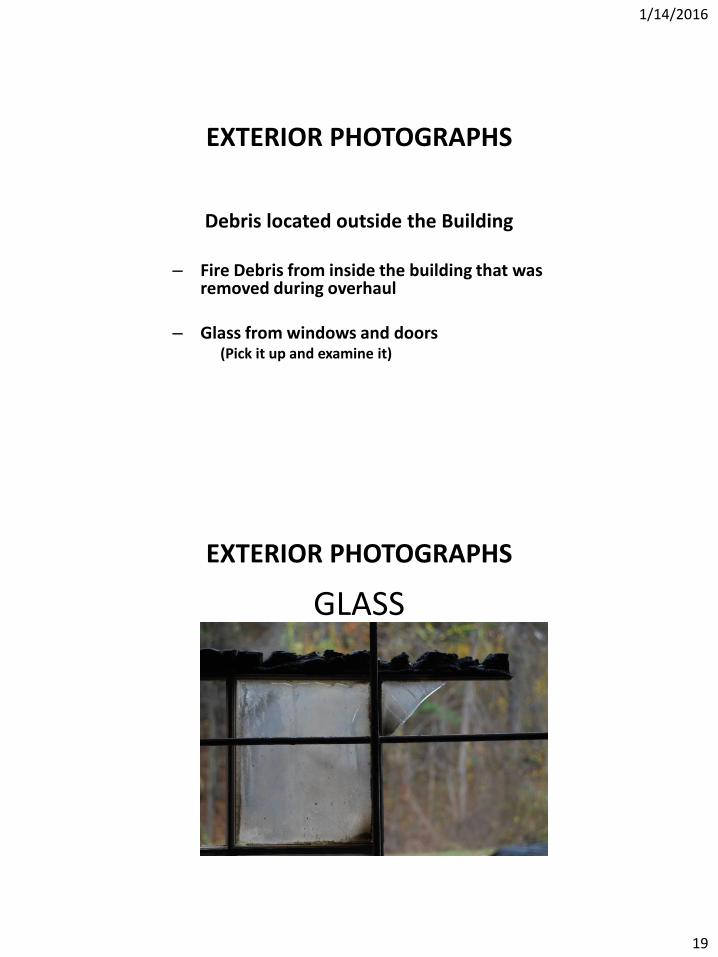
Debris located outside the Building
– Fire Debris from inside the building that was removed during overhaul
– Glass from windows and doors(Pick it up and examine it)
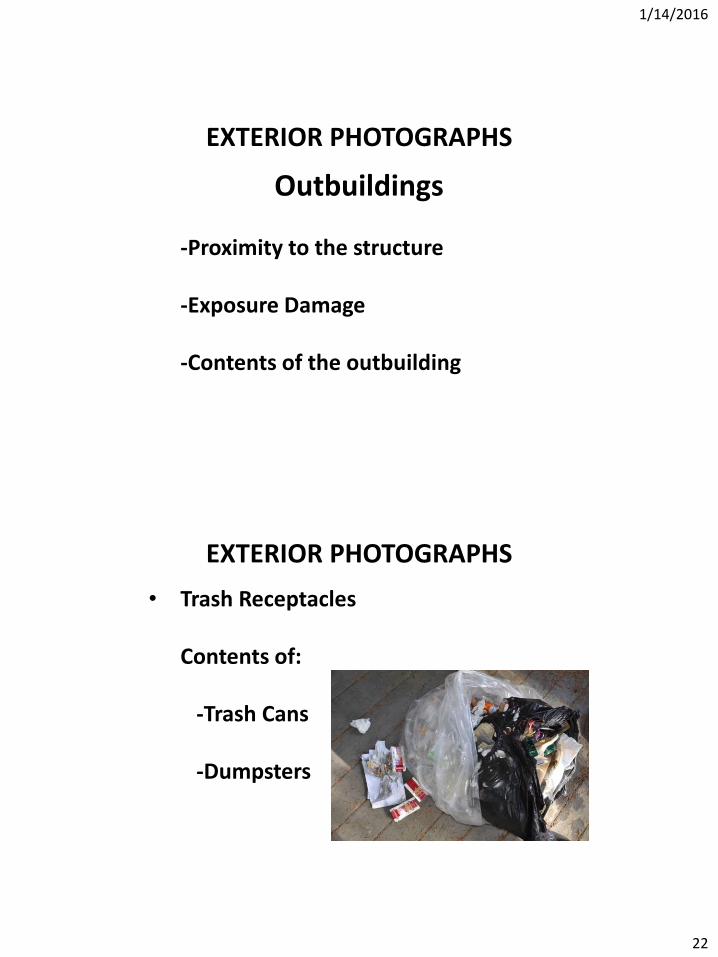
EXTERIOR PHOTOGRAPHS
GLASS
1/14/2016
20
EXTERIOR PHOTOGRAPHS
• Physical Evidence– Containers
– Ignition Sources
– Incendiary Devices
– Footprints
– Tire Tread Impressions
EXTERIOR PHOTOGRAPHS
Physical Evidence
Any other physical evidence that may have been left by a suspect or anyone
after the fire suppression activities have concluded, prior to any major
overhaul or a layered scene examination begins
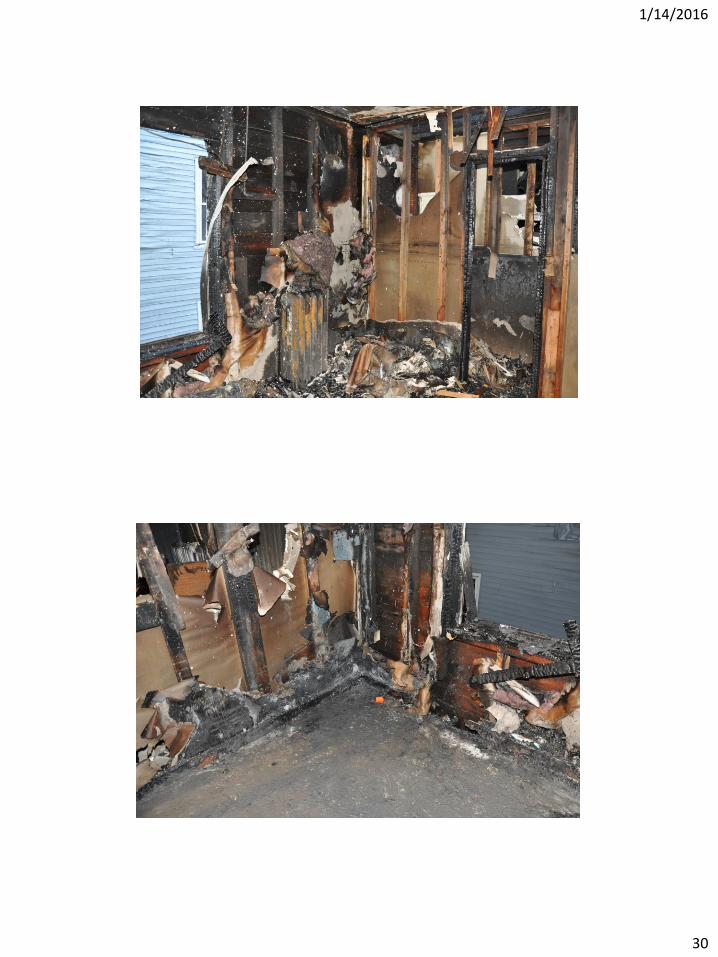
INTERIOR PHOTOGRAPHS
REMEMBER…
Photograph 6 sides of a room
to include the walls, floor
and ceiling and 2 sides of each door
1/14/2016
25
INTERIOR PHOTOGRAPHS
Photographs should be taken throughout the entire structure to document:
– The condition of the structure after fire suppression
– The remaining contents and their condition
– Undamaged Areas
– Smoke and Burn Patterns to show the progression of the fire
– Area of Origin
INTERIOR PHOTOGRAPHS
In an undamaged room, it is only necessary to document that the room did not receive
smoke, fire or water damage.
2 photographs may be sufficient
1/14/2016
26
INTERIOR PHOTOGRAPHS
Photographs should be taken:
– Prior to the removal of debris and furnishings
– During the layered removal of debris
– After debris has been cleared the floor is
exposed / washed down
– After the room has been reconstructed with remaining furnishings
INTERIOR PHOTOGRAPHS
SEQUENTIAL PHOTOGRAPHS
When an Area of Origin is identified, photographs should be taken in sequential
order, first from a distance and then increasing closer until possible ignition
sources are identified and documented with a close-up photograph
1/14/2016
27
INTERIOR PHOTOGRAPHS
Possible Ignition Sources that are
identified in the Area of Origin
that have been considered and ELIMINATED should be documented with photographs
INTERIOR PHOTOGRAPHS
Close-up photographs of suspected ignition sources should be taken
– From various angles
– With and Without a Scale
1/14/2016
28
INTERIOR PHOTOGRAPHS
Photograph Utilities and Appliances
– Circuit Breaker Panel
– Heating System / Positions of Switches
– Water Heater
– Electrical Appliances / Outlets
INTERIOR PHOTOGRAPHS
Photograph Fire Protection Systems
– Smoke Detectors
– Alarm Systems
– Sprinkler Systems
– Fire Extinguishers
1/14/2016
29
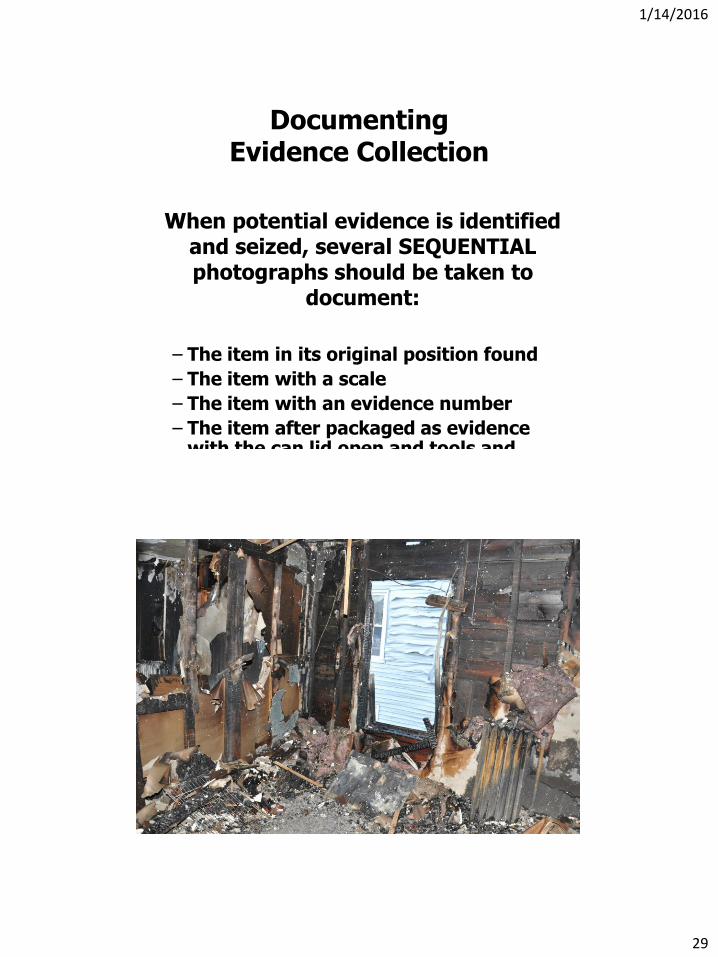
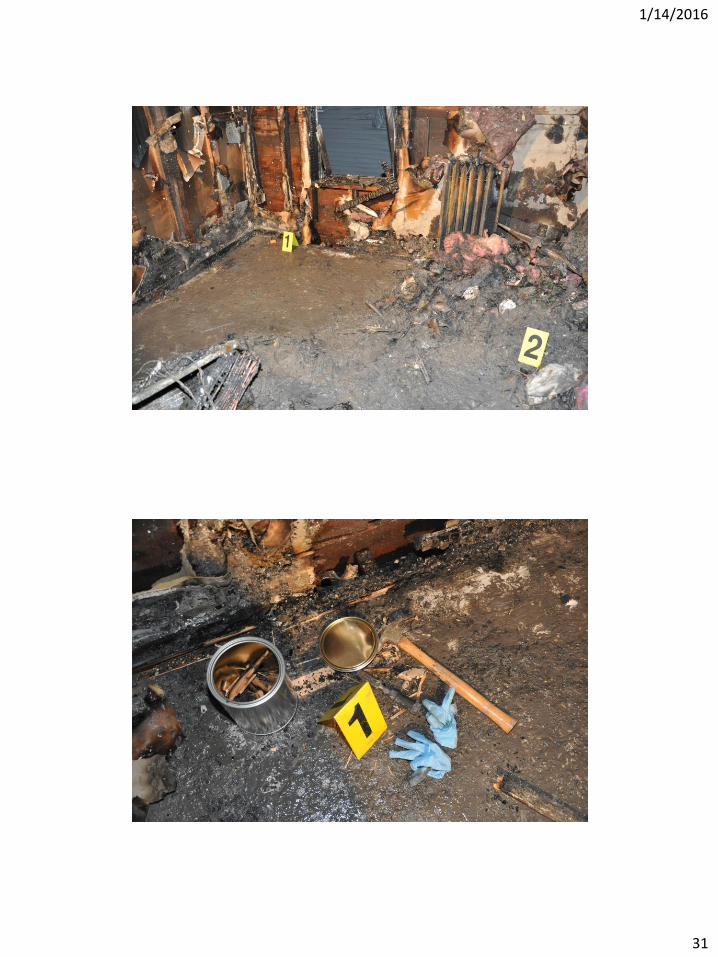
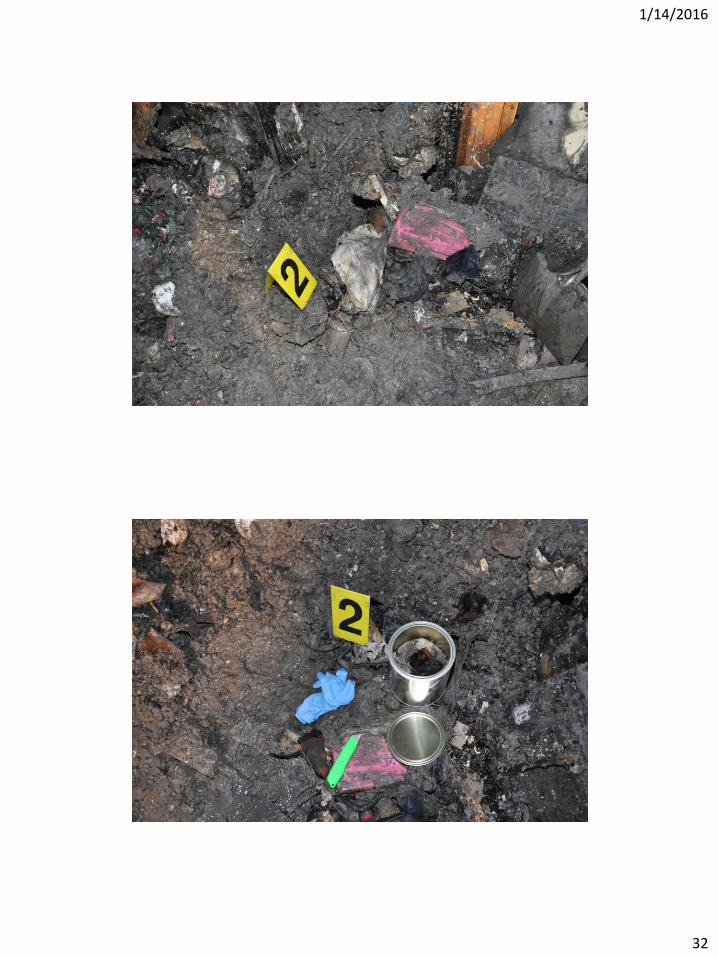
Documenting Evidence Collection
When potential evidence is identified and seized, several SEQUENTIAL photographs should be taken to
document:
– The item in its original position found
– The item with a scale
– The item with an evidence number
– The item after packaged as evidence with the can lid open and tools and gloves
1/14/2016
30
1/14/2016
31
1/14/2016
32
1/14/2016
33
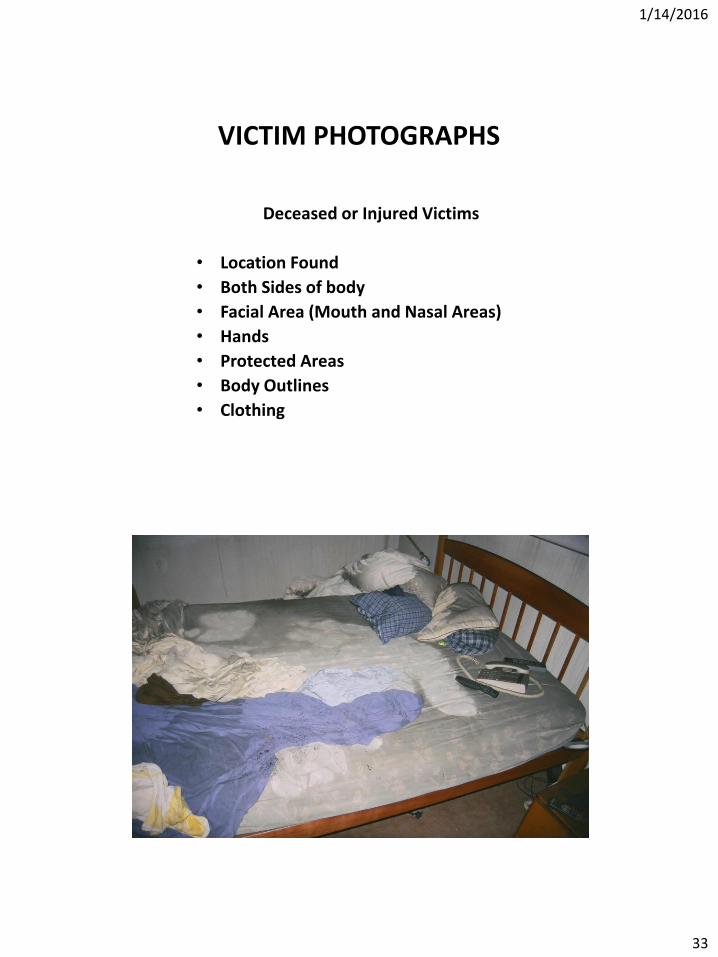
VICTIM PHOTOGRAPHS
Deceased or Injured Victims
• Location Found
• Both Sides of body
• Facial Area (Mouth and Nasal Areas)
• Hands
• Protected Areas
• Body Outlines
• Clothing
1/14/2016
34
PHOTOGRAPHY CAUTIONS
Avoid photographing people inside the actual fire scene
– Other Investigators
– Fire Personnel
– Police Personnel
– Occupants
– Witnesses
PHOTOGRAPHY CAUTIONS
Avoid photographing items that do not belong in the scene and that were
not there at the time of the fire
– Fire Suppression Equipment
– Investigation Tools
1/14/2016
35
PHOTO REPORT
Upon return of the photographs, a detailed photograph report should be
completed and submitted with the actual photographs:
– Photographer
– Date / Time / Location Photos Taken
– Camera Used
– Refer to Photograph Numbers
– Describe the Photograph in Detail
– “TRUE and ACCURATE REPRESENTATION”
VIDEO
VIDEO CAN BE VERY USEFUL. HOWEVER, VIDEO SHOULD ALWAYS BE USED IN CONJUNCTION
WITH STILL PHOTOGRAPHY
• Video documentation should not replace still photography because it is considered:
–Less Objective
–Less Reliable
1/14/2016
36
VIDEO CAUTION
• Clear the scene prior to videotaping
– Eliminate all background noise and other people talking.
• Someone may say something that should not be said.
• Mark CD (Case #, Address, Name, Date)
• Prevent over-recording (Use CD-R)
• Videotape process similar to that of photography (Exterior to Interior, Least to Most)
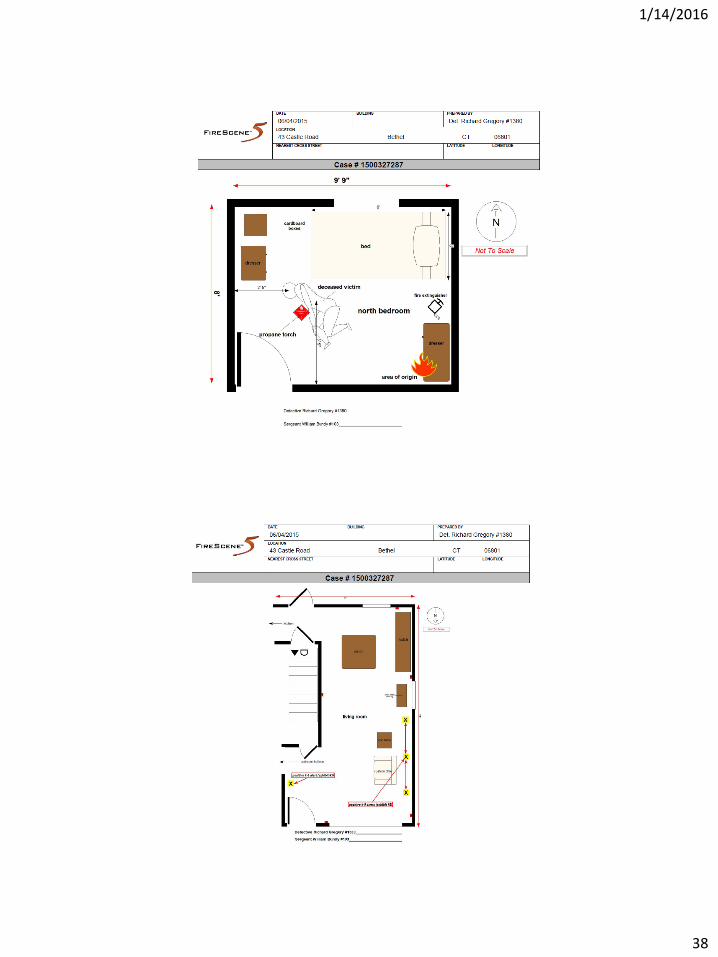
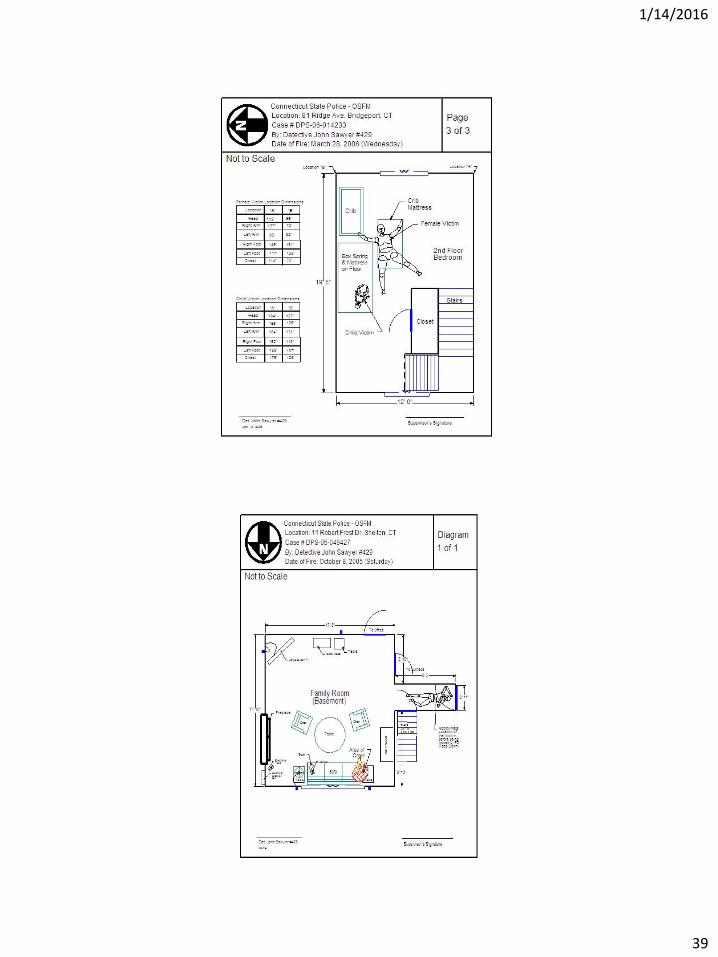
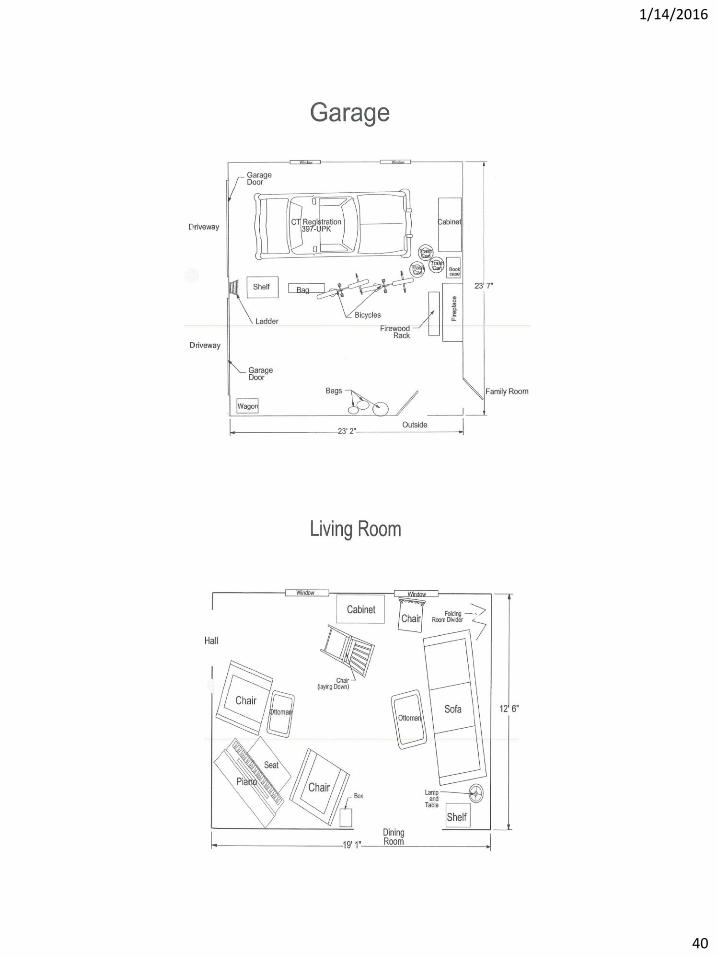
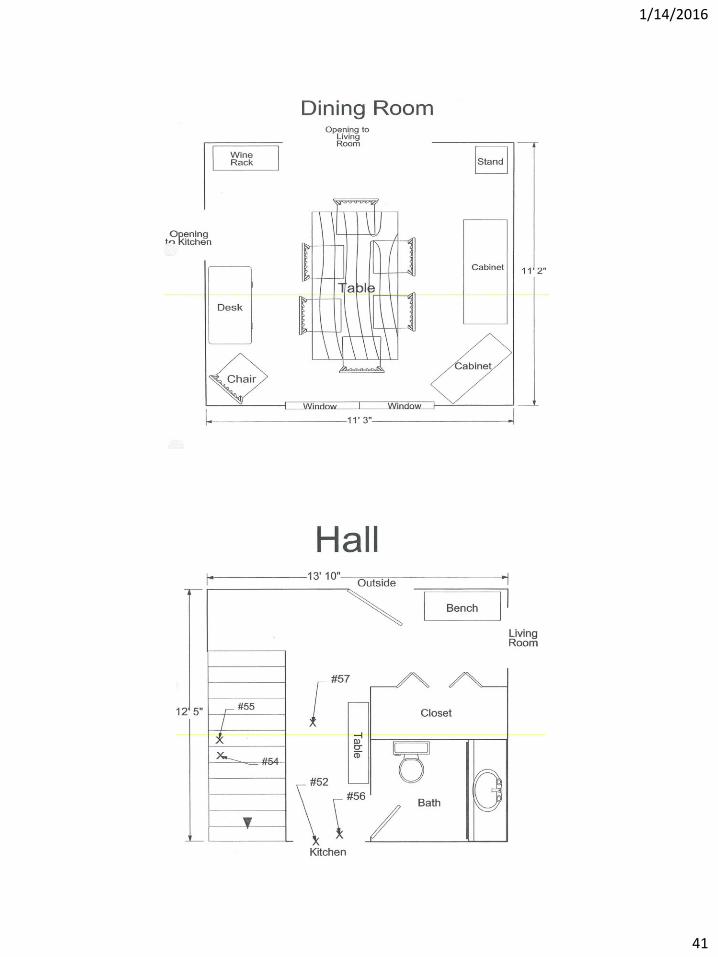
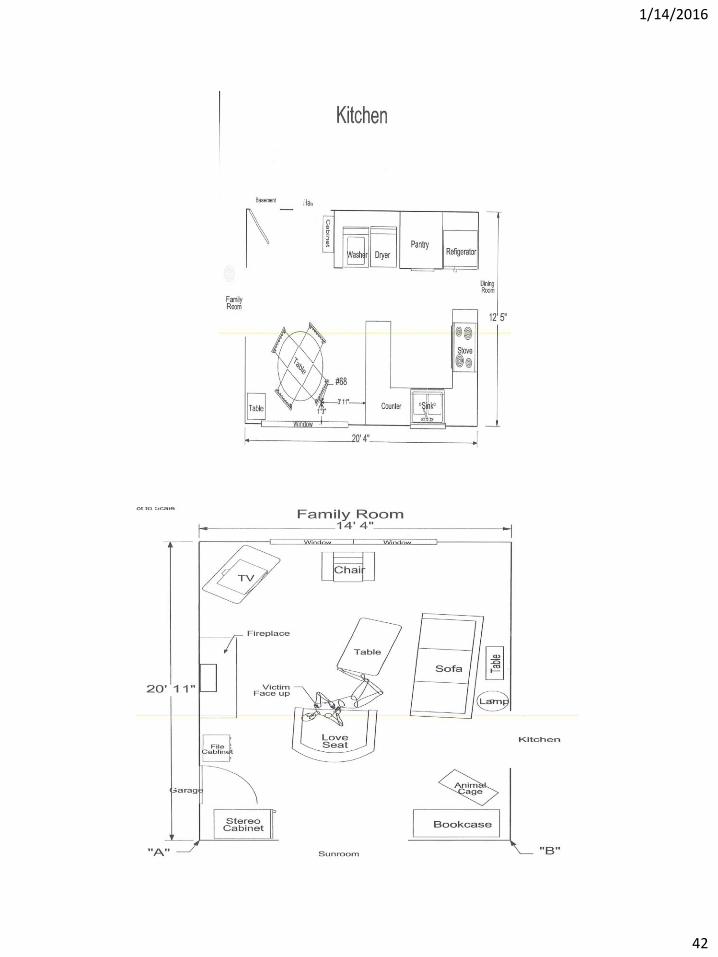
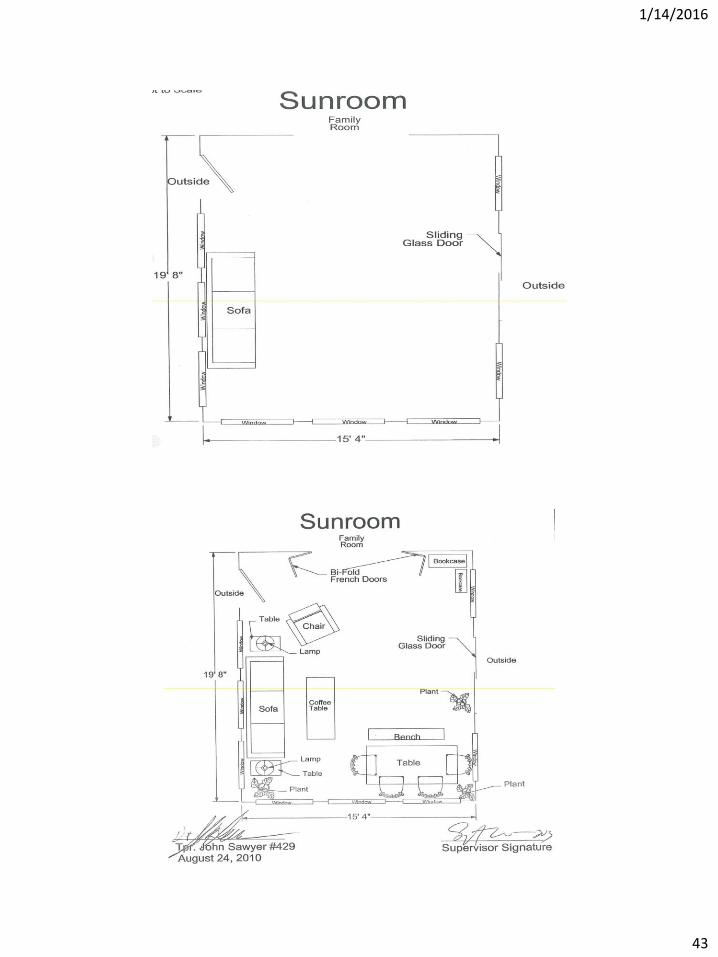
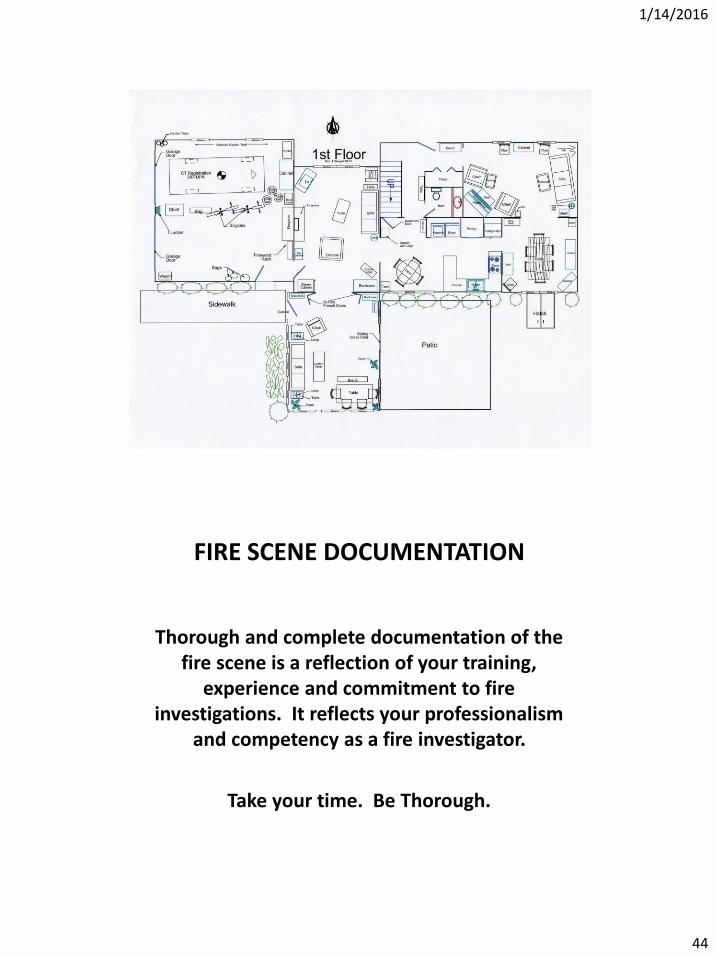
SKETCH MAPS
The most common sketch of a fire scene used by a fire investigator is a
top view/projection plan
BIRD’S EYE VIEW
1/14/2016
37
MEASUREMENTS
• Measurements should be accurate and taken with a standard unit of measure
– Feet and Inches
– Meters and Centimeters
• Methods of Measurement can include
– Coordinate System
– Baseline System
– Angular Displacement System
To ensure intelligibility & acceptability as evidence every sketch must include:
• Investigators name, rank, agency, & date & time the sketch was prepared.
• Case Number of incident• Names of all persons involved in making the sketch or
assisting in measurements.• Address or location of the crime scene• Geographical orientation (compass marking)• Legend that includes: meaning of all symbols used,
– a numbered list of numbers or letters used to denote items of interest & their meanings, and
– a scale of the drawing, or “Not to Scale”
1/14/2016
38
1/14/2016
39
1/14/2016
40
1/14/2016
41
1/14/2016
42
1/14/2016
43
1/14/2016
44
FIRE SCENE DOCUMENTATION
Thorough and complete documentation of the fire scene is a reflection of your training,
experience and commitment to fire investigations. It reflects your professionalism