First Time Off-Campus Remote Desktop Connection iPad Edition General: This guide is a step-by-step guide for configuring and using an iPad to remotely connect to a work computer from off campus. This guide assumes you have already completed the Initial Remote Access Setup guide. This is guide covers the following sections: x Installing the VPN App x Configuring the VPN App x Using the VPN App x Installing the Remote Desktop App x Configuring the Remote Desktop App x Using the Remote Desktop App o Deleting Remote Desktop Profiles o Troubleshooting Novell Issues (If you can’t access the U or Q Drive) Guide Requirements: x Completed Initial Remote Access Setup guide x Internet access.
Transcript
First Time Off-Campus Remote Desktop Connection
iPad Edition
General:
This guide is a step-by-step guide for configuring and using an iPad to remotely connect to a work computer from off campus. This guide assumes you have already completed the Initial Remote Access Setup guide. This is guide covers the following sections:
Installing the VPN App Configuring the VPN App Using the VPN App Installing the Remote Desktop App Configuring the Remote Desktop App Using the Remote Desktop App
o Deleting Remote Desktop Profiles o Troubleshooting Novell Issues (If you can’t access the U or Q Drive)
Guide Requirements:
Completed Initial Remote Access Setup guide Internet access.
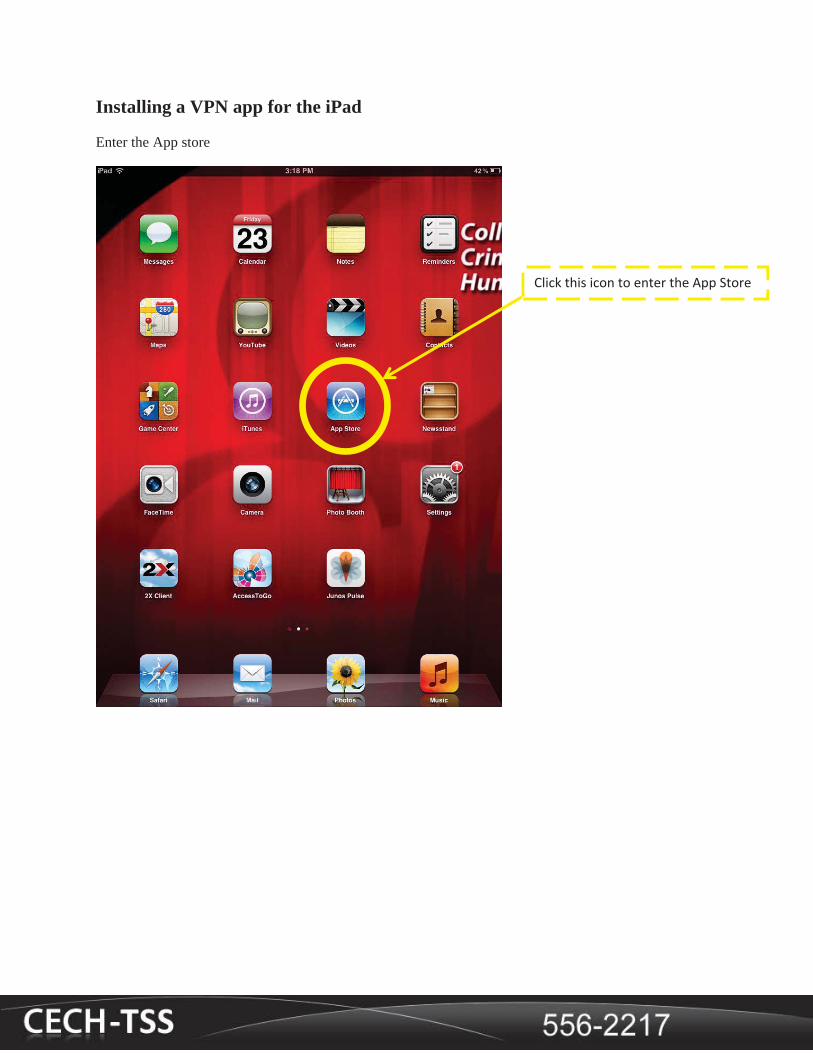
Installing a VPN app for the iPad
Enter the App store
Click this icon to enter the App Store
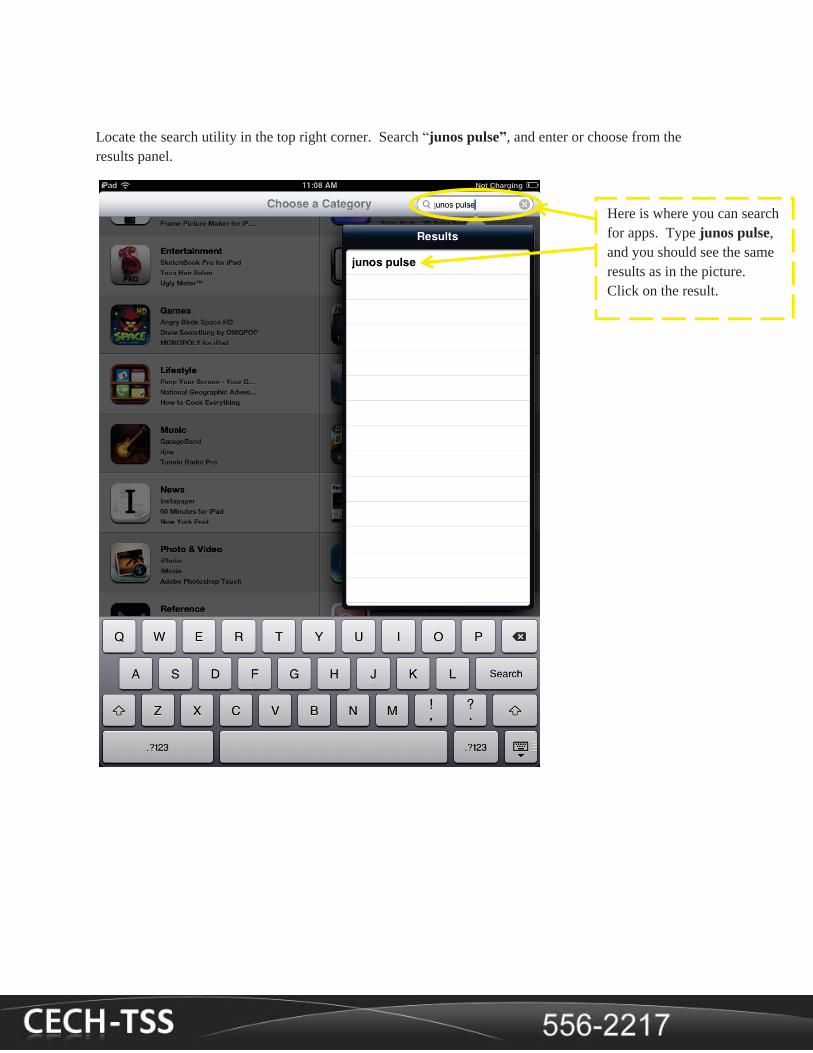
Locate the search utility in the top right corner. Search “junos pulse”, and enter or choose from the results panel.
Here is where you can search for apps. Type junos pulse, and you should see the same results as in the picture. Click on the result.
Now we should see the results from our search. You should now click the button labled, “INSTALL”. On your iPad, it may say, “FREE” instead. Either way, it will be free, and you will want to click this button. If you have an App store account, it will ask for your password. If you do not have an account, one will need to be setup. A credit card is required to created an App Store account, but this card won’t be charged because Junos Pulse is free!
Click on the button labeled, INSTALL. However, it may say FREE. Click this button either way, and enter your App Store password.
Click on the Juno Pulse app.
Here is the icon for the Junos Pulse app that was just installed. Click on the app.
Configure the VPN App
Since we just installed the app, we need to setup the profile for the UC VPN connection. Click the arrowhead on the right hand side of the screen as shown in the picture below.
Click here to setup a new profile.
A window like the one below should appear. Click Add new configuration
Click here to create a new VPN profile
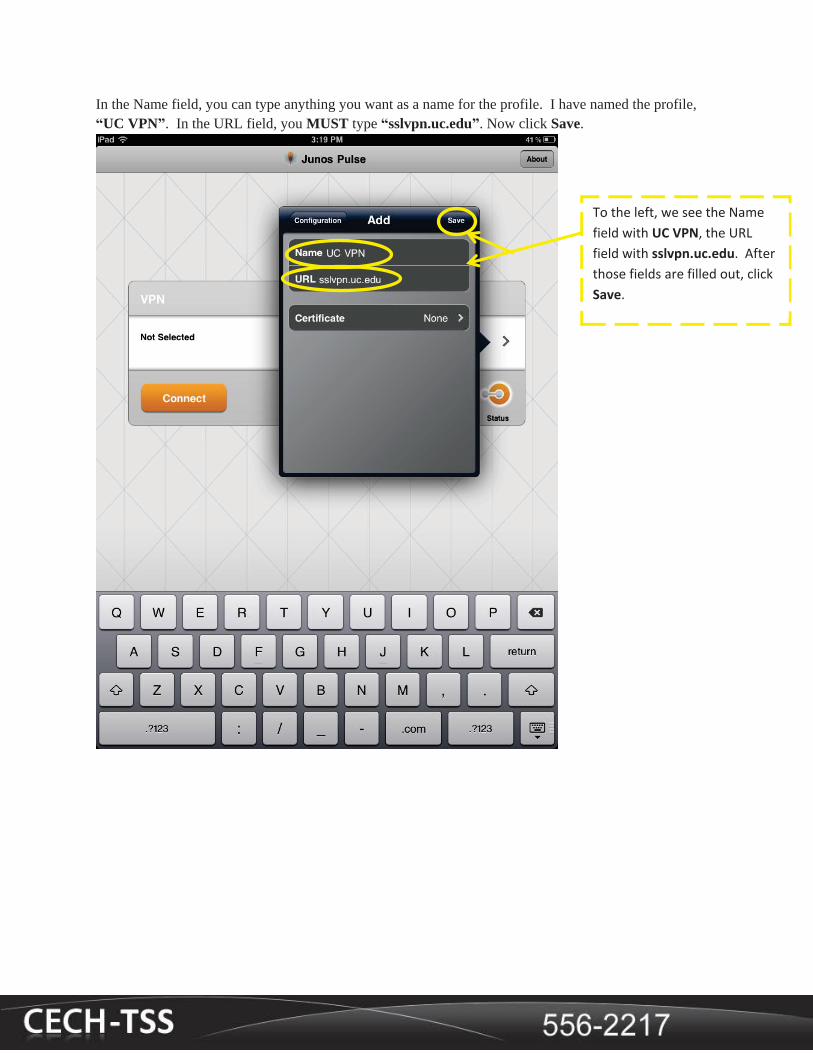
In the Name field, you can type anything you want as a name for the profile. I have named the profile, “UC VPN”. In the URL field, you MUST type “sslvpn.uc.edu”. Now click Save.
To the left, we see the Name field with UC VPN, the URL field with sslvpn.uc.edu. After those fields are filled out, click Save.
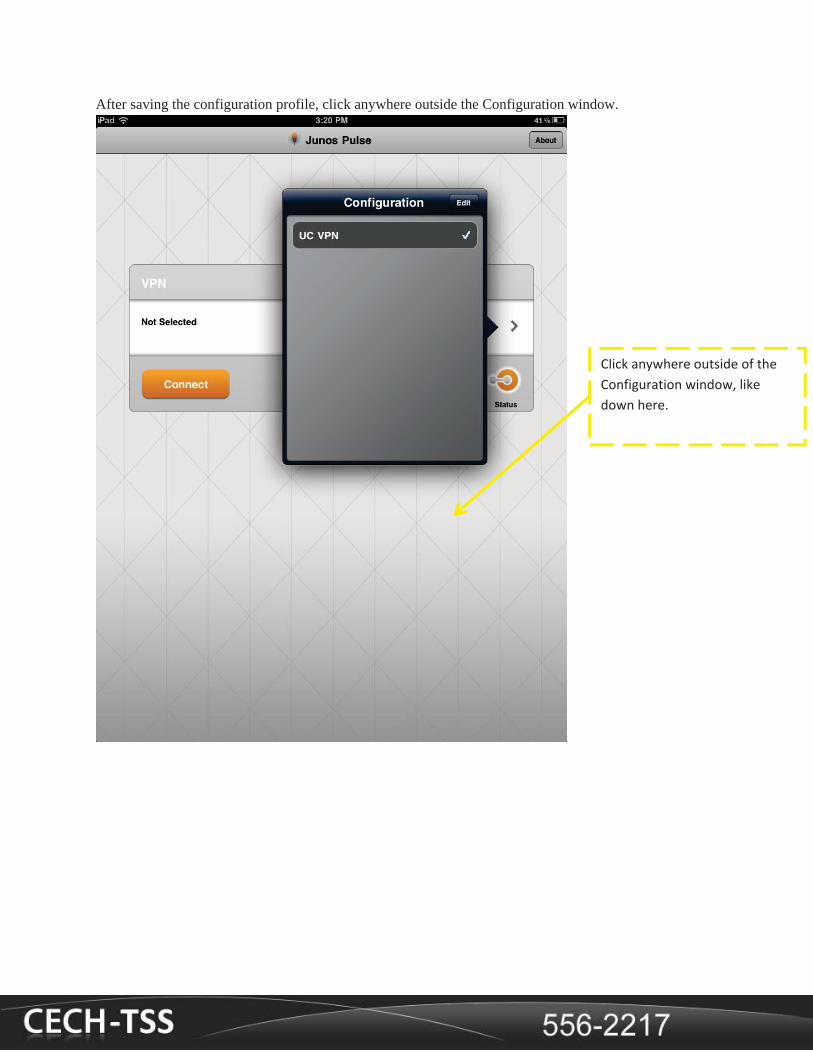
After saving the configuration profile, click anywhere outside the Configuration window.
Click anywhere outside of the Configuration window, like down here.
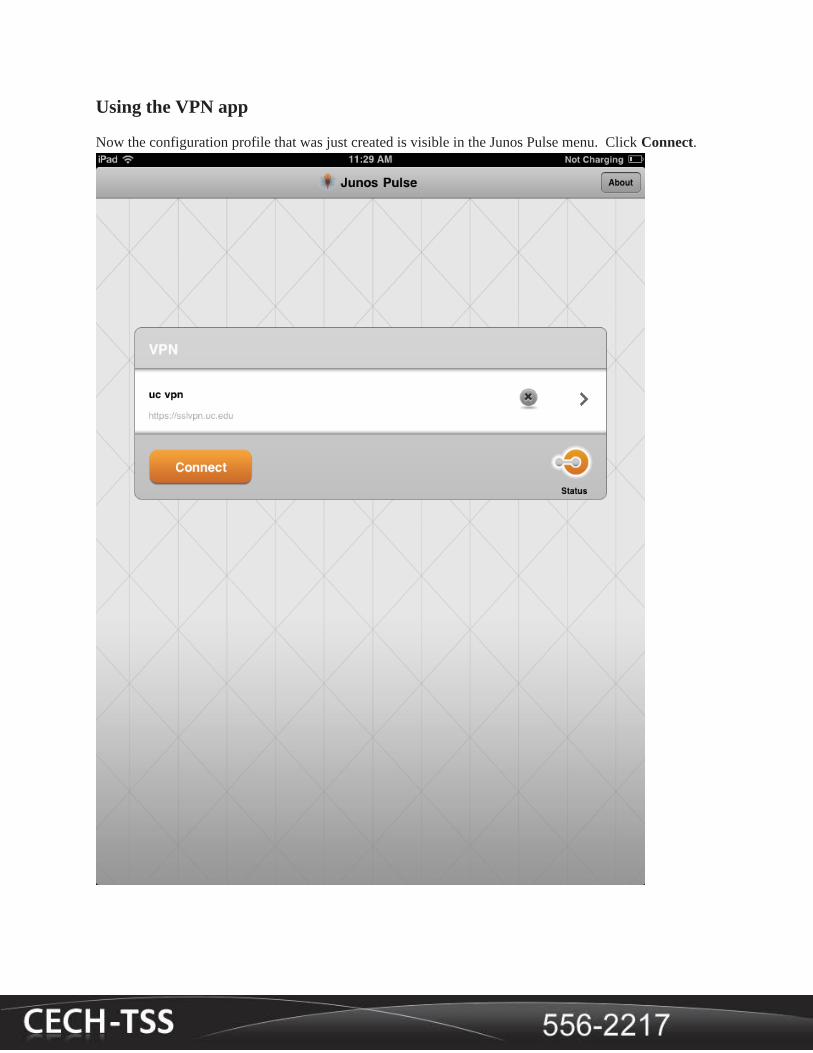
Using the VPN app
Now the configuration profile that was just created is visible in the Junos Pulse menu. Click Connect.
A Login window will appear. If you have used UC’s VPN before, you will recognize this window. Sign in using your UC 6+2 credentials (as used on Blackboard, Onestop, and UCMail).
Enter your UC username and password here, and then click Sign in
Congratulations! You have successfully created a VPN connection to UC’s network. You can end the VPN connection at any time by clicking the Disconnect button.
By clicking the Status button, we can view information about our connection.
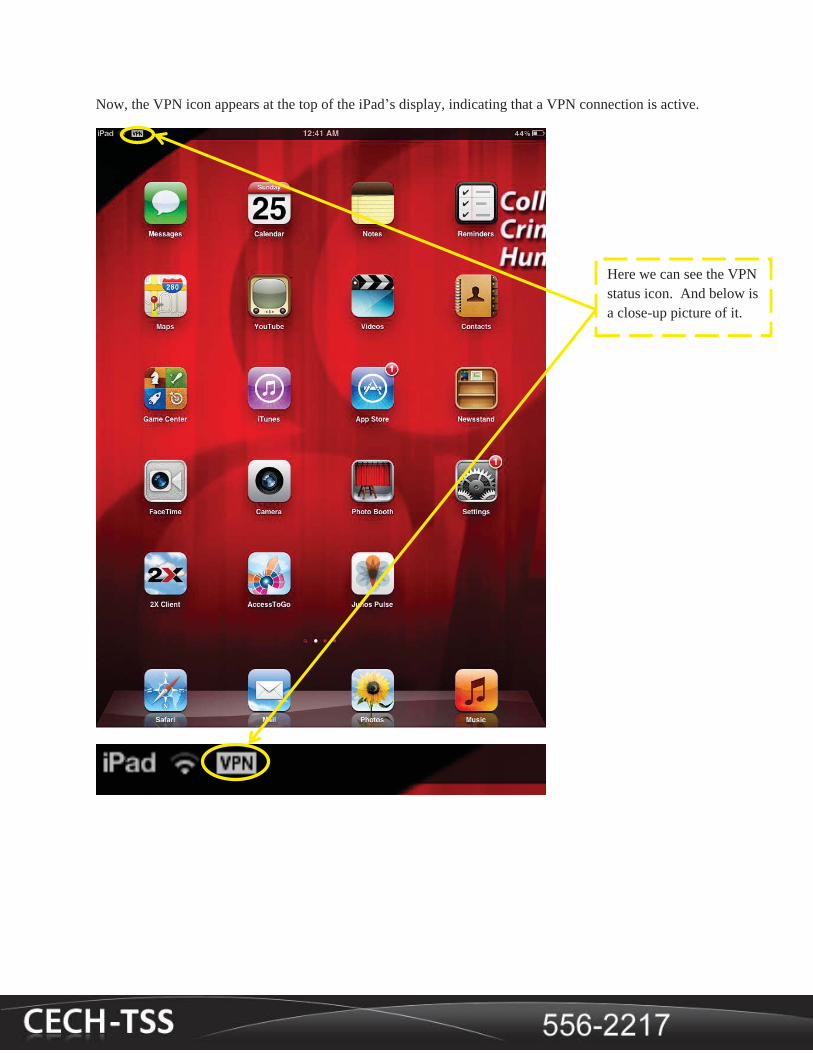
Now, the VPN icon appears at the top of the iPad’s display, indicating that a VPN connection is active.
Here we can see the VPN status icon. And below is a close-up picture of it.
Installing the Remote Desktop App
Click the circled icon on your iPad Home screen to enter the App store, as shown in the screenshot.
Click this icon to enter the App Store
Locate the search utility in the top right corner, as shown below. Type “accesstogo” (without the quotes), and enter or choose from the results panel.
Search for accesstogo and then choose Fastest RDP - AccessToGo.
Now we should see the results from our search. Click the button labeled, “INSTALL”. On your iPad, it may say “FREE” instead. Either way, it will be free, and you need to click this button. If you have an App store account, it will ask for your password. If you do not have an account, one will need to be setup.
NOTE: A credit card is required to created an App Store account, but this card will not be charged in this case because AccessToGo is free!
Click here to install the App
Configuring the Remote Desktop App
On one of your iPad Homescreens, click on our newly installed app- AccessToGo.
Click AccessToGo
The first time you use it, you will be asked to view the license agreement. You can click View Full License Agreement to view the contract, and if you agree, click Accept.
If you’d like, you can view the license. When you’re ready,click Accept.
This is the main menu of AccessToGo. We need to setup a profile to access our work computer. Click New Connection.
NOTE: By default, two demo profiles are set up. These really do nothing for us. If you’d prefer, you can delete these profiles (instructions to do this are presented at the end of this guide).
Click New Connection
Click RDP (Free Client)
Click RDP (Free Client)
The field labeled “Connection Name” can be any name you want to identify the computer that you will be remotely accessing. The field labeled “Computer” is where you need to put the IP address. The “User Name” field requires your University username (UC 6+2) . You should leave the password blank; so if the iPad is lost or stolen, someone using this profile won’t be able to gain access to your work computer.
If you fill in your password, it will automatically log you in. This means anyone with access to the iPad has access to your Work PC. It’s suggested you DO NOT type in your password here.
This is just a name for the new profile.
This is the IP address of your Work computer.
This is the UC 6+2 username
After you have filled out the information, click OK.
Using the Remote Desktop App
Now the profile you createed appears on the Main Menu. Click on your newly created profile named “My Work Computer”
Click here
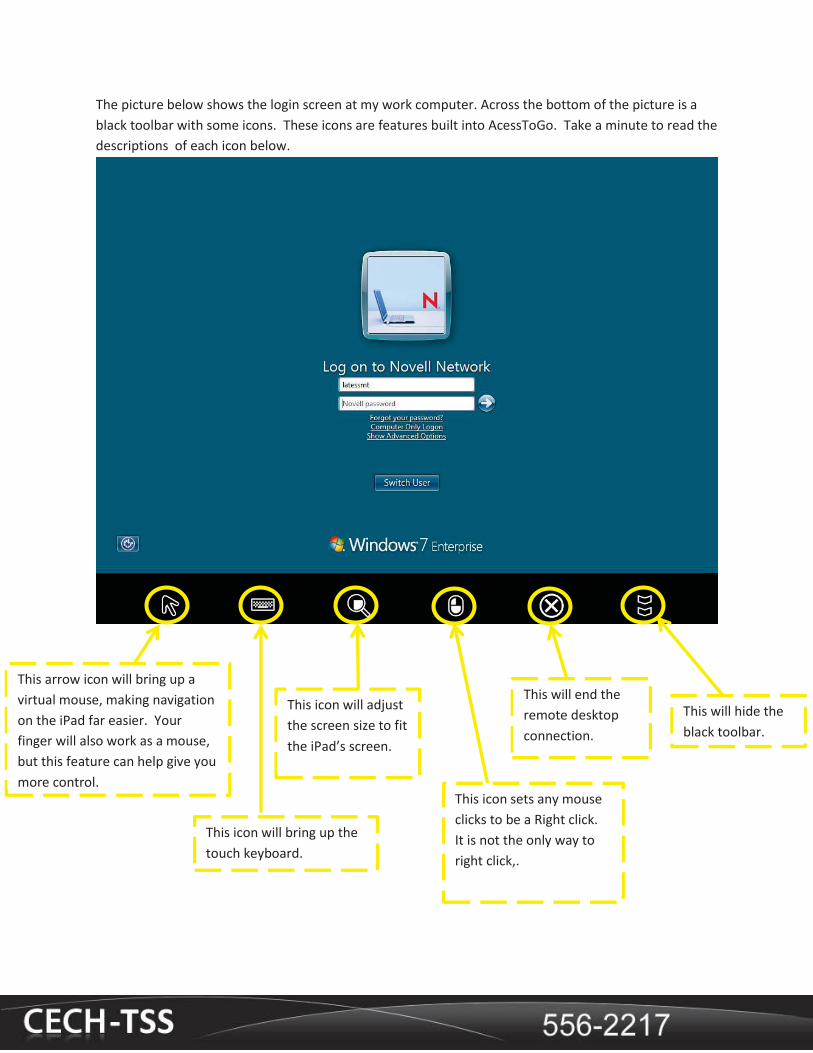
The picture below shows the login screen at my work computer. Across the bottom of the picture is a black toolbar with some icons. These icons are features built into AcessToGo. Take a minute to read the descriptions of each icon below.
This arrow icon will bring up a virtual mouse, making navigation on the iPad far easier. Your finger will also work as a mouse, but this feature can help give you more control.
This icon will bring up the touch keyboard.
This icon will adjust the screen size to fit the iPad’s screen.
This icon sets any mouse clicks to be a Right click. It is not the only way to right click,.
This will end the remote desktop connection.
This will hide the black toolbar.
The picture below shows that the virtual mouse is active. This is indicated by the icon highlighted blue. Click the password texbox, and then hit the keyboard icon.
Use the virtual mouse to click the password textbox
After clicking the textbox, click the keyboard icon.
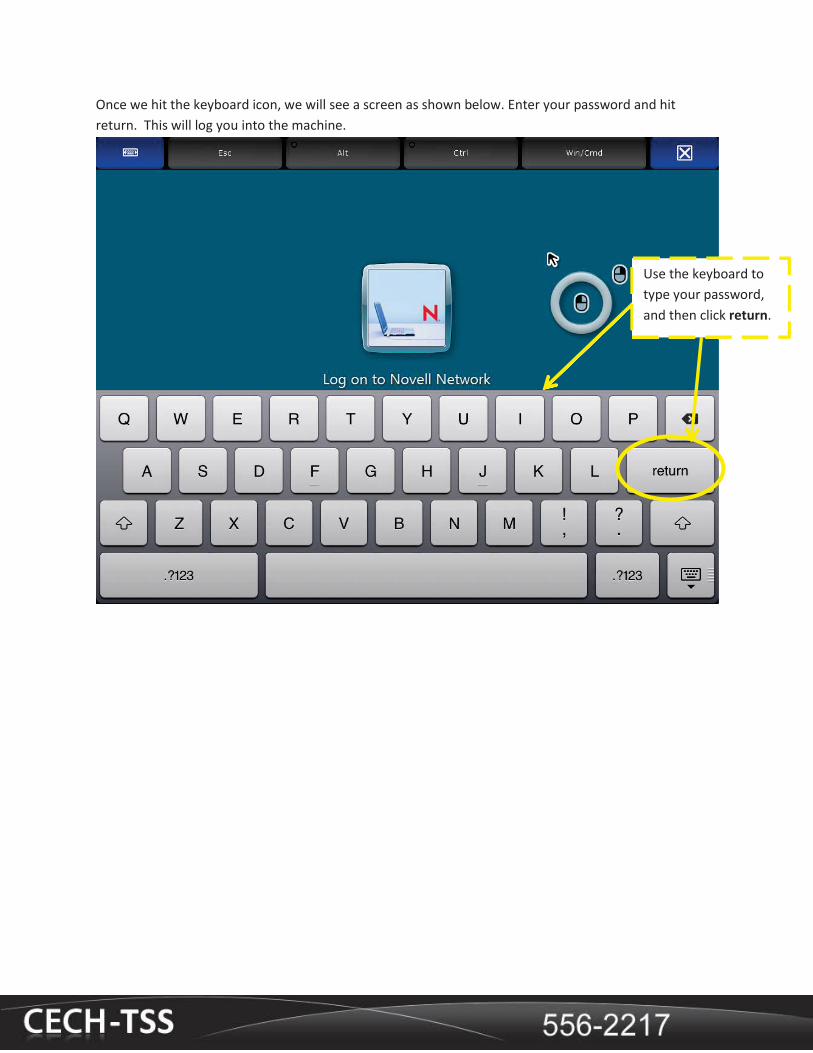
Once we hit the keyboard icon, we will see a screen as shown below. Enter your password and hit return. This will log you into the machine.
Use the keyboard to type your password, and then click return.
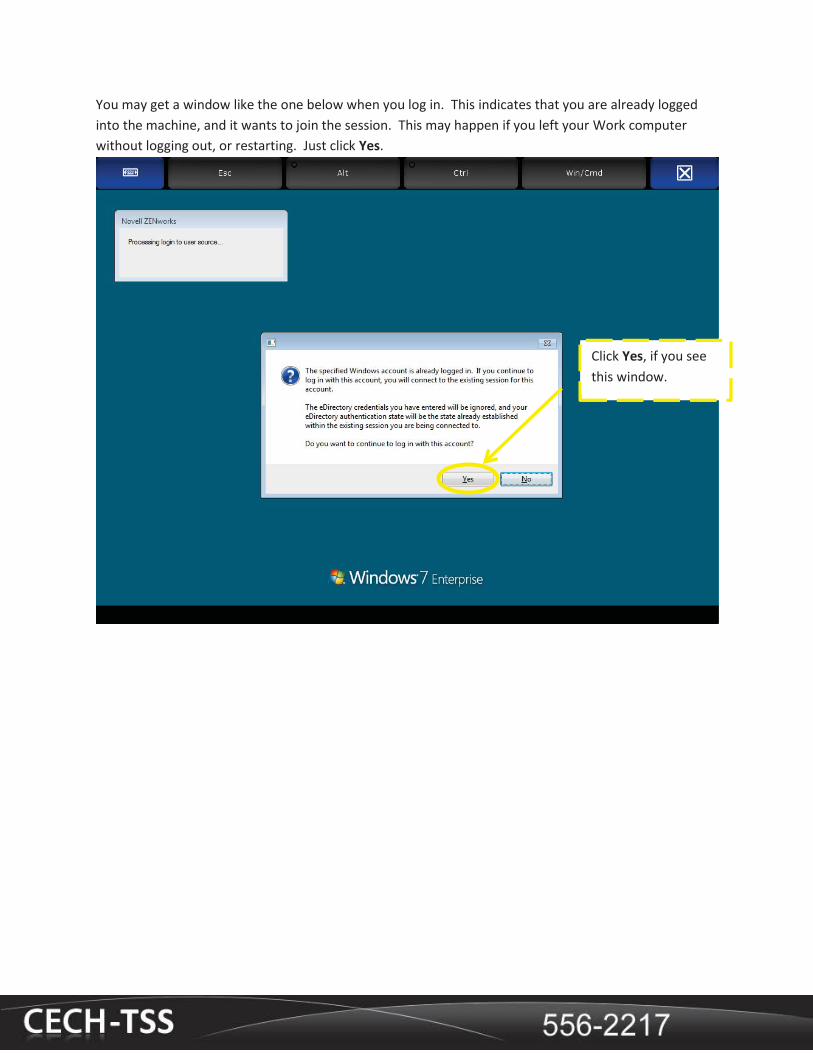
You may get a window like the one below when you log in. This indicates that you are already logged into the machine, and it wants to join the session. This may happen if you left your Work computer without logging out, or restarting. Just click Yes.
Click Yes, if you see this window.
Now you have successfully created a Remote Desktop Session from your iPad!
Let’s go over some quick tips for using AccessToGo. Take a look at the virtual mouse. When you click on it, it will turn blue indicating a click. Holding down on the virtual mouse will allow you to simulate holding down the mouse. Clicking outside of the circle will simulate a right click. The mouse outside of the circle (with a black button on the RIGHT) will light up when you perform a right click. If you have any trouble using this feature, you can always right click icon from the black toolbar on the bottom of the screen.
The arrow represents the computer cursor.
This circle is where your finger should be while controlling the virtual mouse. Clicking inside of it is the same as making a normal left click on the mouse. The circle will appear blue when a click is made. Click outside the circle,
near this icon simulates a right click.
When you click the keyboard icon on the black toolbar, the screen will appear similar to the picture below. Across the top of the screen are some extra buttons. Also at the top right corner of the screen is a blue button with an ‘X’ on it. This will close the keyboard. Another important thing to remember is that sometimes when you have both the keyboard and virtual mouse active, the virtual mouse may have some issues. Closing the keyboard will fix any issues you may have.
This closes the keyboard These are additional keyboard inputs not found on the iPad keyboard
To find more keyboard symbols, click this icon.
This hides, but doesn’t close the keyboard.
To log out of the computer, use the virtual mouse to click the Start icon on the Windows toolbar and
then click Log off. After this, click the icon in the black toolbar to end the AccessToGo connection.
This logs the user out of the computer.
This disconnects AccessToGo from the remote desktop session.
Removing a Profile
Click the blue arrow of the profile you want to delete. In this example, the Regular RDP demo profile.
Click this arrow.
Click Delete.
Clicking this will delete the profile.
Now click OK. You have now removed the profile.
.
Click OK to confirm the deletion.
Novell Problems
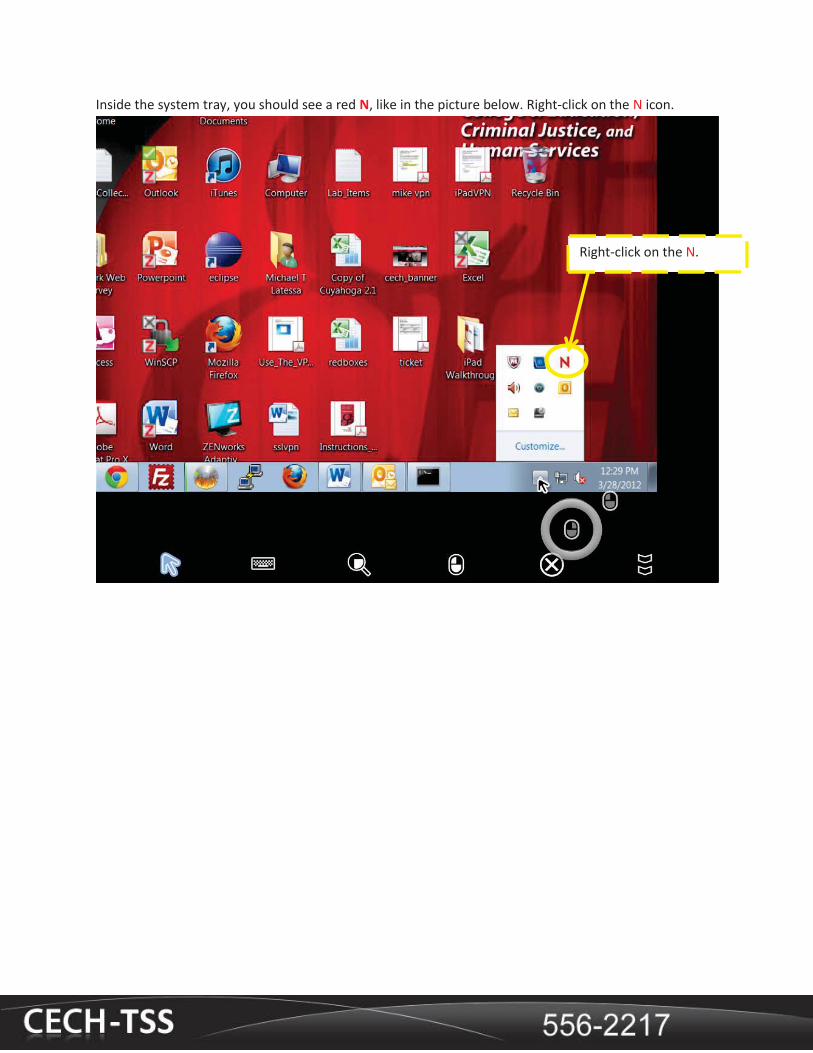
Locate the system tray in the bottom right corner of the windows toolbar. Click the arrow to expand the tray.
Click this arrow to expand the system tray.
Inside the system tray, you should see a red N, like in the picture below. Right-click on the N icon.
Right-click on the N.
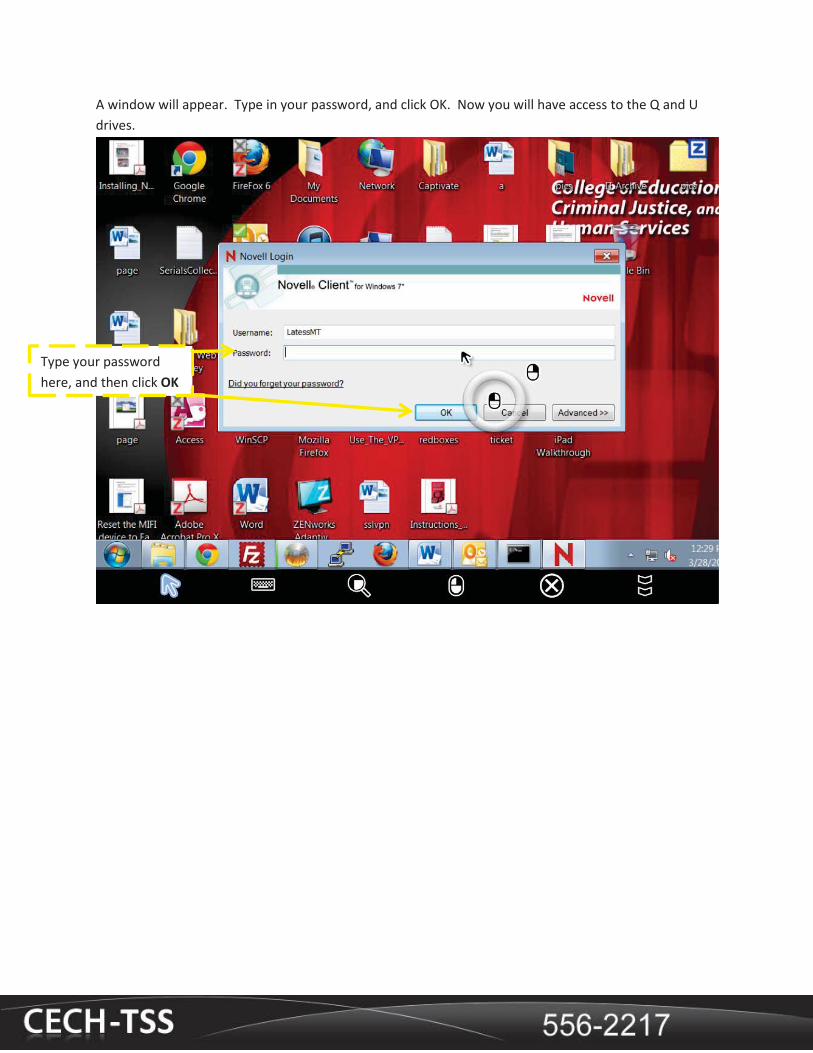
Choose the top option, Novell Login…
Click Novell Login…
A window will appear. Type in your password, and click OK. Now you will have access to the Q and U drives.