flair flair for FLUKA for FLUKA /fle (r)/ ə n [U,C] 1 natural or instinctive ability (to do something well, to select or recognize what is best, more useful, etc. [Oxford Advanced Dictionary of Current English] author: Vasilis Vlachoudis email: [email protected]www: http://www.fluka.org/flair version: 0.7 last change: September 2008 date: May 2006 1 n: noun, U=Uncountable, C=Countable - 1 -
Transcript
f lairf lair for FLUKAfor FLUKA
/fle (r)/ə n [U,C]1 natural or instinctive ability (to do something well,to select or recognize what is best, more useful, etc.[Oxford Advanced Dictionary of Current English]
author: Vasilis Vlachoudisemail: [email protected]: http://www.fluka.org/flairversion: 0.7last change: September 2008date: May 2006
2.1. Download..............................................................................................................32.2. Requirements.........................................................................................................32.3. Version numbering.................................................................................................42.4. Installation Methods...............................................................................................4
2.4.1. RPM Installation:............................................................................................42.4.2. Tarball Installation..........................................................................................42.4.3. CVS Installation:.............................................................................................52.4.4. Finalization of the Installation (tar or CVS).......................................................5
4. Quick Start....................................................................................................................84.1. Start a flair Project.................................................................................................84.2. Edit the input file..................................................................................................104.3. Debugging the input file.......................................................................................164.4. Geometry Plotting................................................................................................174.5. Running the simulation.........................................................................................194.6. Viewing Output Files.............................................................................................204.7. Data Merging.......................................................................................................224.8. Data Plotting........................................................................................................23
4.8.1. USRBIN Plotting............................................................................................244.8.2. Single Differential Quantities Plot...................................................................264.8.3. Residual Nuclei Plot.......................................................................................29
B.Legal...........................................................................................................................35Copyright....................................................................................................................35Disclaimer...................................................................................................................35Limitation of Liability...................................................................................................35
- 2 -
1. Introduction
1. 1. IntroductionIntroductionf lair is an advanced user interface for FLUKA (http://www.fluka.org) to facilitate the editing of FLUKA input files, execution of the code and visualization of the output files. It is based entirely on python and Tkinter. Flair provides the following functionality:
1. front-end interface for an easy and almost error free editing as well as validation and error correction, of the input file during editing;
2. compiling, debugging, running and monitoring of the status during a run;3. back-end interface for post-processing of the output files and plot generation through
an interface with gnuplot (http://www.gnuplot.info) or 3D photorealistic images with povray (http://www.povray.org);
4. l ibrary of materials and geometrical objects, for easier editing, storing and sharing among other users and projects;
5. python API for manipulating the input files, post processing of the results and interfacing to gnuplot;
The philosophy of flair was to work on an intermediate level of user interface. Not too high, that hides the inner functionality of FLUKA from the user, and not so low that the user is in constant need of the FLUKA manual to verify the options needed for each card. Flair works directly with the input file of FLUKA and is able to read/write all acceptable FLUKA input formats. Inside the flair editor the user is working directly with the FLUKA cards having a small dialog for each card that displayes the card information in an interpreted human readable way. The only exception is that the cards in flair are called “extended cards” where each card is not composed only by 6 whats and 1 sdum, but rather it contains all related information in one unit (comments preceding the card, continuation cards, titles etc).
2. 2. InstallationInstallation
2.1. DownloadThe program can be downloaded either from the website http://www.fluka.org/flair in the download section, either as a .tgz (tar gzipped) archive or as rpm. It is possible to checkout always the latest development version directly from the CVS server using anonymous access, using the following commands:
2.2. RequirementsFlair, apart from the latest version of FLUKA, requires the following programs:
● Python interpreter V2.3+. Python usually comes pre-installed in most of the linux distributions, otherwise it can be downloaded from http://www.python.org
● Tkinter toolkit, this is the default graphical toolkit for python and usually it is shipped together with the interpreter. In some Linux distributions like Fedora (V3+) it has to
be installed separately. In this case install it with the command (as superuser)$ yum -y install tkinter
● Tcl/Tk V8.4+. Usually installed on all linux systems, while for MS-Windows it comes together with the python distribution.
Optionally, for the plot creation● gnuplot version V4.0 or greater (http://www.gnuplot.info)● PovRay version V3.6 or greater (http://www.povray.org)
2.3. Version numberingFlair version numbering, consists of 3 numbers starting from 0, in the form: flair-M.m-R
● M: Major version, this number is increased by one only when a major modification in the structure of the program takes place. During the initial phase of development is 0.
● m: Minor version, this number is increased by one every time a addition in the program functionality is made. e.g. Adding new plotting forms, mechanism, databases etc.
● R: Release, this number is increased every time when bug fixes take place or minor changes in the functionality. e.g. Addition of extra fields in a form etc.
The About Dialog of the program displays the Major and minor version as well the CVS release number, every time changes in the program are committed to the CVS server. It is recommended the user to pay attention on the date of the last change as well the date when the program is uploaded on the web site.
2.4. Installation Methods
2.4.1. RPM Installation:
For Linux systems that uses the rpm installer like Fedora or SuSE, the recommended way of installation is to use the rpm package from flair web site. As super user then you can issue the command:
$ rpm -ivh flair-X-XX.noarch.rpm
The rpm installer, will install the program in the /usr/local/f lair directory and the executable launcher programs in the /usr/local/bin. It will also create all necessary files, modify the system mime database to add the program in the educational/science/physics category menu. Finally it will generate the following mime types text/x-flair and text/x-fluka and define the appropriate file associations for the file types .flair, .fluka and .inp.
2.4.2. Tarball Installation
For a manual installation download the latest version tar archive from flair web site the latest version and expand to the an appropriate directory using the following commands:
$ tar xzvf flair-X-XX.tgz
or$ gunzip -c flair-X-XX.tgz | tar xvf -
Note the tar file will not create any association of the extensions .flair, .fluka and .inp, and it would neither create links in the Desktop start menu. This have to be created manually
For a CVS installation, download from the flair CVS Repository as it is described in the “Download section” using Anonymous access, or get directly the latest version in a form of .tar.gz from the CVS Web interface from the following addresses:
2.4.4. Finalization of the Installation (tar or CVS)
For the moment the installation is not preparing automatically any launch script. Therefore it is recommended to create an alias in your login script to easier accessing of the program
alias flair=/path-where-you-install-flair/flair
Most of the programs in flair can be run as stand alone via the python interpreter. It could be quite useful to create a alias for the manual browser and for the Nuclear Wallet Cards like
alias pt='PYTHONPATH=/path-where-you-install-flair/lib python /path-where-you-install-flair/PeriodicTable.py'alias fm='PYTHONPATH=/path-where-you-install-flair/lib python /path-where-you-install-flair/Manual.py'
Optionally one can copy also the flair.desktop quick launcher from the flair directory to the KDE or GNOME desktop. Edit the file and change the path to correspond to the one where flair is installed. Then by double-clicking on the flair icon the program will start.
3. 3. ConceptsConcepts
3.1. Project FileFlair is operating with the concept of the "FLUKA projects". A flair FLUKA project contains the following information: 1. general project information like: title, notes, override formating options for the input file;2. links to the filenames for the default input, optional geometry files and executable;3. it will maintain a list of debugging regions;4. links to auxiliary Fortran files and libraries for compiling a user FLUKA executable if
necessary;5. list of runs; For each run the user can change the input name, override the default
preprocessor defines, title, random seed, number of start particles, run cycles and executable file;
6. list of output files and rules for merging the output of scoring cards;7. list of user defined plots, for Geometry, all USRxxx cards, RESNUCLEi and visualization
of the input file information i.e. graphical representation of the beam profile, particle thresholds, weight-windows etc.
All the above information is stored in an text file with the extension .flair, and is editable with the flair program.
3.2. Input FileFlair is able to read and write all formats recognized by FLUKA, but internally it works always in the names format, and treats the input as a list of extended cards. The default format for saving is always fixed with names for the input and free with names for the geometry. The user can override the default exporting format either by the appropriate use FLUKA cards
(like FREE, GLOBAL, GEOBEGIN) or by overriding the format in the project definition.
The positioning of the input cards is not so important, flair will try to reorganize the input file during saving and move all the geometry cards in the correct position. The only exception is that geometry cards (bodies, regions and lattices) controlled by the preprocessor outside the GEOBEGIN .. GEOEND block while be moved inside the geometry definition. While the preprocessor cards if any will remain at their initial position. All geometry cards that are correctly placed inside the GEOBEGIN .. GEOEND block while not be affected.
3.3. Extended input cardsAll FLUKA cards in flair, are described by the extended input card (class Input.Card). Each extended card is composed by:1. comment l ines, the ones preceding the card definition, as well the in-line comments2. a tag, which corresponds to the FLUKA card name. With a few additions: regions are
defined with the REGION card. All preprocessor cards have tag names like #define, #undef, #if, ...
3. a variable number of whats. Starting from what[0] which corresponds to the sdum, what[1]..what[6] are the same with the FLUKA whats, what[7]-what[12] correspond to the what(1)-what(6) of the first continuation line etc.
4. Some cards what an extra field of information called extra or accessible as what[-1]. This is used to store long strings event multi-line information used by some cards, like TITLE, GEOBEGIN, PLOTGEOM or REGION
5. state of the card can be either enabled or disabled. Since cards cannot be commented with flair, the only way of excluding them from the input without deleting them is to disable. The program while place the card around an #if 0 .. #endif block. On the contrary all commented cards present in the input file, (with no space between the * and the card tag) will be converted to disabled cards.
6. All obsolete cards present in the input will be converted to the closest match if any, otherwise will be treated as error
7. All unknown cards will be converted to the card “error” and be disabled.
3.4. Card Grouping FLUKA cards in flair are grouped into the following categories for easier accessing and more flexible editing of the input file:
Category Description
General Cards of general purpose (like TITLE, DEFAULTS, GLOBAL, etc..)
Primary Cards dealing with the definition of the primary starting particles
Geometry Cards related to the definition of the geometry bodies/regions/lattices plotting and rotations/translations
Media Cards for the definition of materials
Physics Cards defining physics properties for the simulation
Transport Cards that modify the way particles are transported in FLUKA
Biasing Cards for importance biasing definition
Scoring Cards related to scoring
- 6 -
3. Concepts
Category Description
Developers Cards reserved by the developers
Preprocessor Preprocessor definitions for creating conditional input files
The user is encouraged to give a look first on the menu “Add” and browse the various categories to become familiar with the grouping.
- 7 -
3. Concepts
4. 4. Quick StartQuick StartIn the present section we will go through a step-by-step example and we will build from scratch, run and analyze the results of a simple FLUKA example. We will simulate the neutron production and energy deposition of a lead target like n_TOF at CERN (http://cern.ch/n_TOF). The target has a rectangular shape of 80x80x60 cm3 and is submerged in a water container with a ~5 cm layer of water that is used both for cooling and moderation. The neutrons are produced by a 20 GeV a proton beam, impacting with 10º angle on the horizontal plane.To follow this tutorial, basic knowledge of FLUKA is required.
The user must make a choice on the coordinate system. The general tendency is to use the Z-axis collinear with the beam axis (usually lying on the horizontal plane), and then select the vertical and horizontal axis. In this example we will use the following convention:X – horizontal axis, pointing to the left, with respect to beam directionY – vertical axis, pointing upwardsZ – beam axis, usually horizontal
4.1. Start a flair Project
Launch flair by typing the following command, or by clicking the flair icon
$ flair
The flair main window and the output window will appear:
On the flair main window one can find:● a menu bar on top● a tool-bar with icons for fast access of the most common commands● a status bar at the bottom to display some useful information for the
current frame● and two frames in the center separated by a horizontal splitter:
1. on the left frame, there is a tree browser for the various sections of the project. By expanding and clicking on the appropriate node of the tree a different frame appears on the right side.
2. the right frame encapsulates all the project frames used for editing the information stored in the project file.
The window-title displays the program name, version and the name of the project we are currently are working on. Since we didn't specify any name it will show the word *Untitled*.
The Output window displays all information that are printed on the standard output and standard error unit.
If you want to start flair without the output window, use the -x as command line argument flair -x
We start by selecting the root node on the left frame (it should be already selected). The right frame should show the general FLUKA project information, like title, input, geometry and executable filenames and notes.
In the title entry field, type a title like:
add also a small note describing the present project
Click on the button with the new icon (on the right of the Input Filename field) to create a new input file. The new icon on the toolbox creates a new project. A list box will pop up to select one of the various standard templates. Select the basic by double clicking on it.
The dialog will show the default templates that exist in the flair package prefixed with the label “D:” and all the user defined templates with the label “U:”. The user defined templates are located in the user directory ~/.flair/templates
- 9 -
4. Quick Start
An information dialog box will appear asking if you want to update the TITLE and GEOBEGIN cards inside the FLUKA input using the title that was entered in the project. Click yes and automatically all FLUKA cards that require a title string will be set with the project title.
4.2. Edit the input file
Next we move the Input editor by selecting and clicking on the tree the Input node . The right frame will change and the input editor will appear.
The editor and all the project frames can be accessed with various ways:i. by selecting the appropriate node in the project tree;ii. with the function F2 – F9 keys. F3 is for the Input editor;
iii. with the tool bar buttons
iv. From the menu item View
During input editing there are two modes:i. Card mode where you can manipulate the cards as a single object i.e. Drag and drop, move, delete, insert, copy, paste...,ii. Field editing mode, to modify the contents of a card.To start editing the fields of a card, first select the card with the Up/Down arrows or Ctrl-F (Find) and press ENTER-key to start the field editing mode. To exit editing press ESCAPE-key, and you will return to Card mode.
WARNING: The present version of flair doesn't have a fully featured undo/redo mechanism. Therefore is wise to save the project from time to time while editing or before any major modification.
The editor now contains the default template, with the TITLE and GEOBEGIN card filled with our Project title. The selected cards are highlighted with a Light Yellow background color, while the active card has a thick black border around it.
We start editing the file by going through one by one the input cards:
- 10 -
4. Quick Start
We skip the cards TITLE, GLOBAL and DEFAULTS they are already filled with the default values to enable the input in Fixed format with Names and Free format for the geometry.
- 11 -
4. Quick Start
Select the BEAM card and start editing either by pressing ENTER-key or by clicking with the mouse on the appropriate field. Use the TAB-key to move to the next field:● Select Energy on beam type. They next label will change to “E:”● Type 20 at the beam energy labeled “E:”
You will notice that the card display at the bottom of the screen will start to fill in with the values you typed, highlighting with yellow the changes from the previous state. Flair always converted the numbers into floating point format using the best representation of the number to ensure the maximum accuracy.
● Select PROTON as particle type.In all flair list boxes you can key-in the starting characters of the item you are searching and the closest match will be selected
● Select Gauss as momentum distribution from the field labeled “Δp”● Type 0.082425 in the “Δp(FWHM)” as momentum spread (GeV/c)● Select Gauss as angular distribution from the field labeled “Δφ”● Type 1.7 in the next field “Δφ” as angular spread in mrad● Type 1 in the field of the particle “Weight”. The particle weight is omitted
by FLUKA but the sign is important. Therefore is wise to set it always to one.
The card should look like the following:
At any time you can hit F1 to browse the FLUKA manual for the active card
Fill up the BEAMPOS card with the following values:
Next we start building the geometry. To de-clatter the display expand the
project tree (Left frame) and select the Geometry node . Now the right frame will show only the cards belonging to the geometry group.
The template generated a default geometry consisting of two concentric huge spheres named blkbody and void, and a cylindrical target named target. We will replace the target by a right parallelepiped named watercnt and add two parallelepipeds named pbtarget and niche
Select the card RCC target either by clicking on it or using the up/down keys
Select from the menu the command:Add Change To Geometry Bodies Rpp
WARNING: Change To commands change the type of card, while at the same time trying to keep as much as possible from the whats. All exceeding whats in the new type will be discarded.
The above command will convert the RCC to RPP
Start editing the card by pressing the ENTER-key.● Change the comment to Water container● Press tab to move to next field and change the body name to watercnt.
- 12 -
4. Quick Start
The program will ask you to change the name of all references to body target renamed to watercnt. Click Yes.
When changing a body name, region name, material, or detector all cards that refer to this name will be changed also.
Create two new RPP bodies. Either by right clicking and selectingAdd Bodies Rpp
or from the menu barAdd Geometry Bodies Rpp
or even by hitting Ctrl-Enter and selecting againBodies Rpp
or by clicking the icon in the tool bar
To add a comment on a card, right click the card and select Insert Comment or from the Input menu select the Insert Comment. From the configuration panel you can change the default behavior and add a comment line by default on every newly inserted card.
Is always a good practice to avoid touching (co-planar) bodies in FLUKA. Either try to cut the bodies with the use of infinite planes, or slightly overlap the bodies and then performing the appropriate logical operation in the region definition.
Now modify the TARGET region to WATERCNT. Click on Yes to the pop up dialog requesting a name change, and type the expression as shown in the next image. Create also a new REGION named TARGET as shown below.
Hitting the +, -, "Insert" keys or the icon while editing a REGION's expression shows a list of bodies to select from. Press the ESCape key if you are not interested in adding any body. This behavior can change from the configuration panel.Lists in flair are search-able. Type the beginning of the item you are looking for and the closest match will be highlighted. Ctrl-N or Ctrl-G repeats the last search
Now is time to create the water material. There are two ways:
- 13 -
4. Quick Start
● create manually the necessary MATERIAL and COMPOUND cards, directly in the input editor;
● use directly the material from the Material Database and then import it to the input editor (recommended). Using the Material Database you can benefit from the pre-existing materials, and create or store your own materials to be exchanged between various input files.
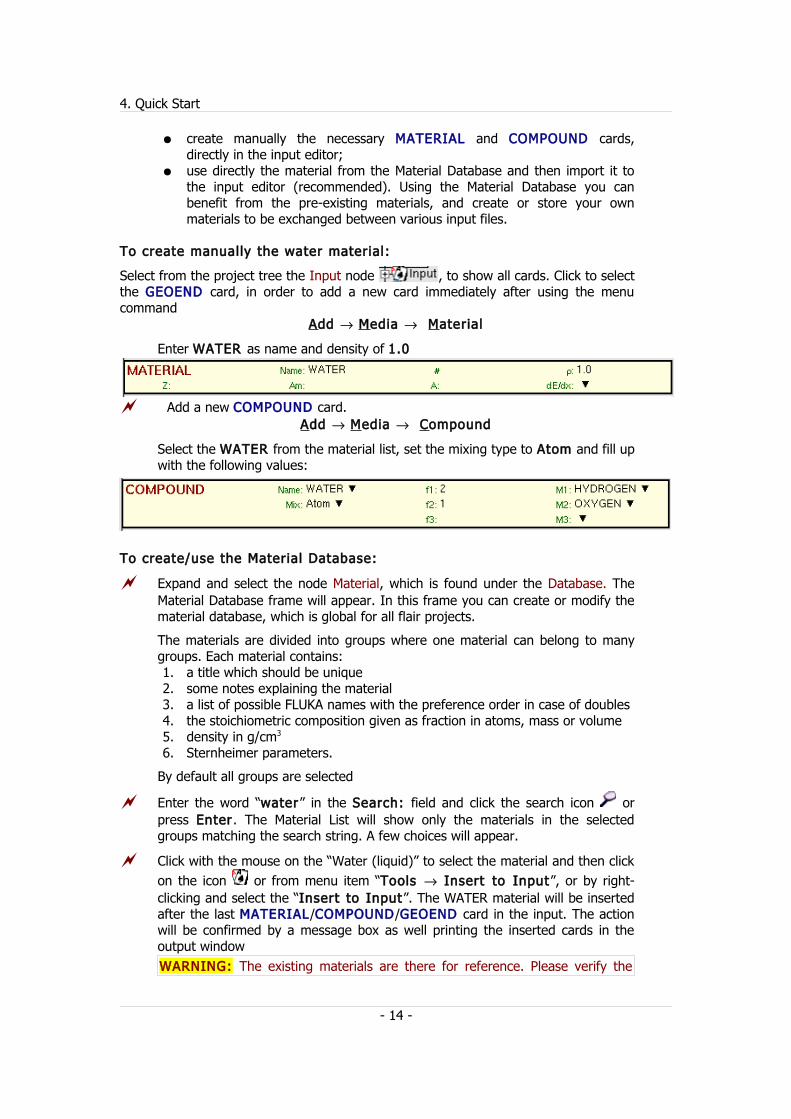
To create manually the water material:
Select from the project tree the Input node , to show all cards. Click to select the GEOEND card, in order to add a new card immediately after using the menu command
Add Media Material
Enter WATER as name and density of 1.0
Add a new COMPOUND card.Add Media Compound
Select the WATER from the material list, set the mixing type to Atom and fill up with the following values:
To create/use the Material Database:
Expand and select the node Material, which is found under the Database. The Material Database frame will appear. In this frame you can create or modify the material database, which is global for all flair projects.
The materials are divided into groups where one material can belong to many groups. Each material contains:1. a title which should be unique2. some notes explaining the material3. a list of possible FLUKA names with the preference order in case of doubles4. the stoichiometric composition given as fraction in atoms, mass or volume5. density in g/cm3
6. Sternheimer parameters.
By default all groups are selected
Enter the word “water” in the Search: field and click the search icon or press Enter. The Material List will show only the materials in the selected groups matching the search string. A few choices will appear.
Click with the mouse on the “Water (liquid)” to select the material and then click on the icon or from menu item “Tools Insert to Input”, or by right-clicking and select the “Insert to Input”. The WATER material will be inserted after the last MATERIAL/COMPOUND/GEOEND card in the input. The action will be confirmed by a message box as well printing the inserted cards in the output windowWARNING: The existing materials are there for reference. Please verify the
- 14 -
4. Quick Start
correctness of the information.
To assign the materials to the regions we need to modify and add the necessary ASSIGNMAt cards as shown below
After the COMPOUND card add a LOW-MAT card from the Media group, to specify that we want to use Self Shielded Lead for the low-energy neutron cross section.
Add a few scoring cards, a USRBIN, USRCOLL and RESNUCLEi as shown below
Set some primary particles in the START card for a test run
- 15 -
4. Quick Start
Finally click on the save icon from the tool bar. Flair will ask you first to save the input file, use tutorial.inp; and then the project file, use tutorial.f lair.
4.3. Debugging the input file
Select the Debug node which is under the Process or by clicking directly the F4 key. The Geometry Debugger will appear. This frame is composed by a listbox and a few entry fields where the user can add various debugging regions. Debugging regions in flair have nothing to do with the regions defined in the geometry of FLUKA. They refer to a volume in the geometry to be scanned for geometry errors with means of the GEOEND card.
Start by adding a new debugging region by clicking the add button or the Insert key.
The region will be automatically named as Region #1. Select it and enter the following information in the fields below. To define a region around our target scanned in a grid of 51x51x51 steps.
It is always a good practice to use odd numbers in the number of steps, to decrease the probability of checking a position falling directly on a region boundary.
When ready click the DEBUG button (or Ctrl-Enter) to start debugging. Flair will build a temporary input file containing only the geometry information and launch a FLUKA run. A dialog will pop up to monitor the progress of debugging. The dialog will show the current region being debugged elapsed time and status. When the run is finished, if there are errors in the geometry, click the View button to display the output of the Run, otherwise if the geometry is error free, the only available option will be to close the window.
- 16 -
4. Quick Start
4.4. Geometry Plotting
Select the Plot node under Fluka, or by clicking directly the F9 key. The Plot List frame will appear.
The frame contains a list of all the plots that are associated with the project.
To create a new plot click on the button. Now the Title will contain the string “Plot #1” and the the File will be “plot001” with format .eps.
Change the title field “nTOF Target Geometry”
Click on the save icon after the File field at the bottom of the frame, to change the filename to “geometry”. This filename will be used for all auxiliary files that will be created during the plot.
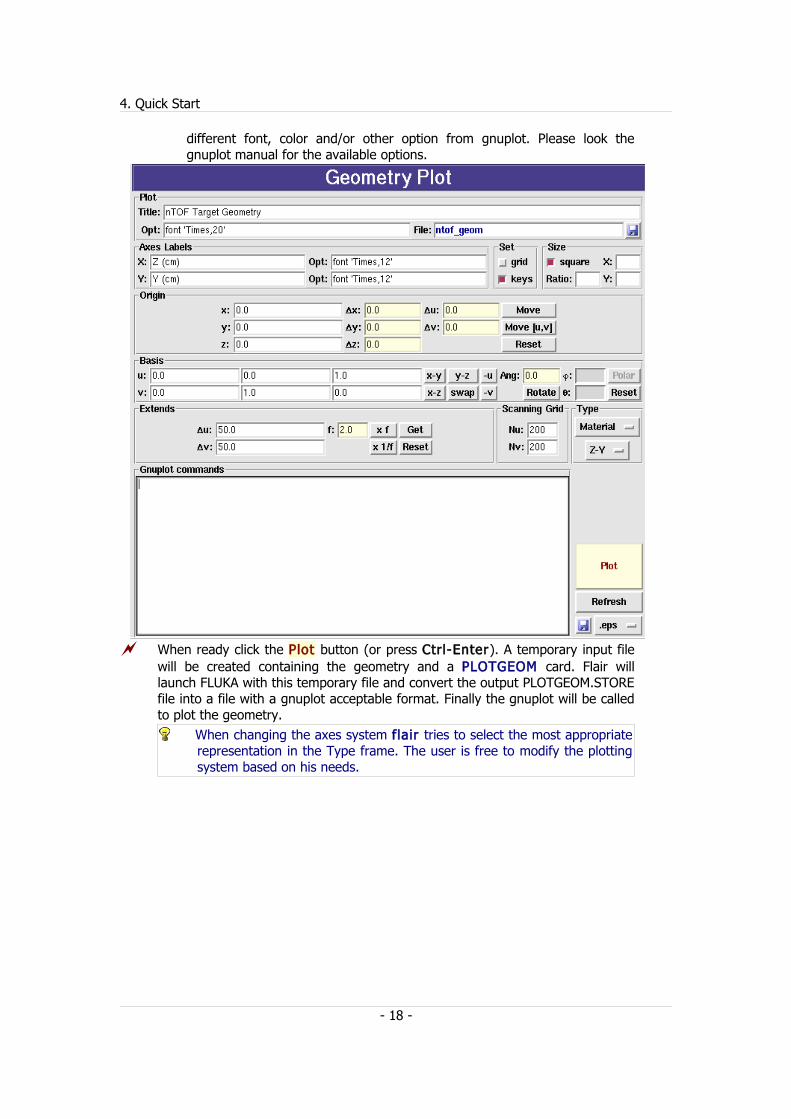
Select and double click the geometry plot entry from the listbox, or from the project tree on the left frame. The Geometry Plot frame will appear.
The title and the filename should be already filled and the coordinates are set to the axes origin.● Click on the Size frame “square” to get a square aspect ratio● Click on the button labeled Y-Z in the Basis frame● and then click on the Swap button. This will set the plotting axis to Z for
horizontal and Y for vertical.● Set the value 2 in the f: field of the Extends frame and click the 1/f
button to reduce the plot extends to 50 cm.● Select the Type Material to be used for the coloring of the regions. The
dialog should resemble like the following figure● Optionally fill the Axes labels and the “Opt:” fields on the labels to select a
- 17 -
4. Quick Start
different font, color and/or other option from gnuplot. Please look the gnuplot manual for the available options.
When ready click the Plot button (or press Ctrl-Enter). A temporary input file will be created containing the geometry and a PLOTGEOM card. Flair will launch FLUKA with this temporary file and convert the output PLOTGEOM.STORE file into a file with a gnuplot acceptable format. Finally the gnuplot will be called to plot the geometry.
When changing the axes system flair tries to select the most appropriate representation in the Type frame. The user is free to modify the plotting system based on his needs.
- 18 -
4. Quick Start
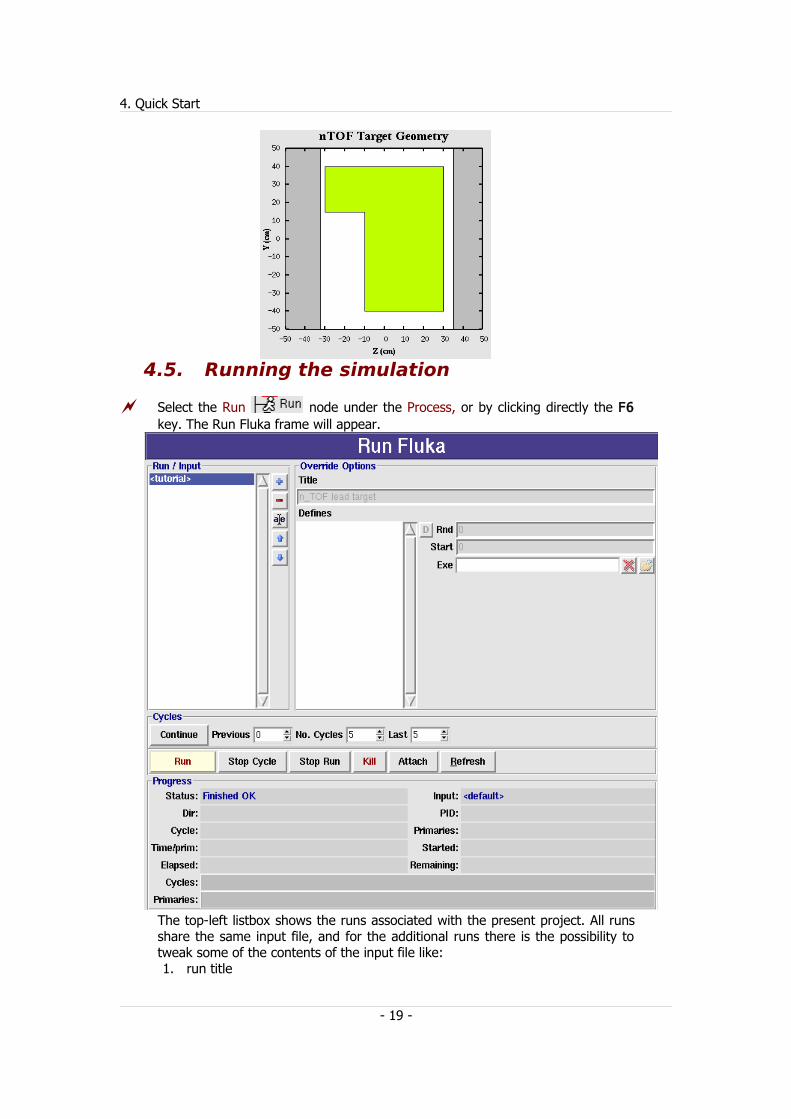
4.5. Running the simulation
Select the Run node under the Process, or by clicking directly the F6 key. The Run Fluka frame will appear.
The top-left listbox shows the runs associated with the present project. All runs share the same input file, and for the additional runs there is the possibility to tweak some of the contents of the input file like:1. run title
- 19 -
4. Quick Start
2. preprocessor defines to enable/disable blocks of cards3. random seed4. number of starting primaries5. executable file to use
There is already a <tutorial> Run, in which we cannot override any option. This is the run using the input file as it described directly in the Input editor.
Click the Run button (or Ctrl-Enter) to start the run with the default 5 cycles.
The dialog below the control buttons while change and it will be refreshed every half a minute. During the execution the “Status” will change, initially to Waiting to attach, followed by Running and finally in Finished OK. You can even click on the Refresh button to refresh at any time the progress information. The run is submitted using the defined submit program (the default is nohup). The program is running decoupled from the flair editor, therefore if you click save on the project and exit the program. The next time you will open the program, flair will try to attach and display the current run status.
Flair is trying to peek the run information only by looking the status of the output fi les. It doesn't make use of the system process information. This way it increases portability across different platforms, and batch systems (see the qfluka example for a substitution of the submit command). Flair will be able to monitor the status only if the run takes place on the same directory. The drawback of this method is that takes some time to attach.
The Stop Cycle/Run button will try to make a clean stop by creating a fluka.stop or rfluka.stop file in the running directory.The Kil l button will try to issue a kil l -SIGHUP command to the running process. If the user is using a batch system he has to substitute the kill command with the appropriate programThe Attach button tries to re-attach to the running process in the case that flair failed to attach correctly, or lost the running status.The Refresh button can be used to update the progress information at any interval.
4.6. Viewing Output Files
During the FLUKA run or when a cycle is completed, the user can inspect and/or delete the output files generated by FLUKA from the “Files” frame.
- 20 -
4. Quick Start
Select the Files node under the Process, or by clicking directly the F7 key. The Output Files frame will appear.
The frame is composed by 3 list-boxes and a couple of action buttons on the side. The first listbox with the label “Run”, contains a list of the different runs present in this project. In our case only one run will appear named “<tutorial>” which is the default run with the input filename as it is described in the input editor.
By selecting a run from the list (The <tutorial> is already selected) the other two list will be updated accordingly. The second list called “Cycles” contains all the cycles that are performed and output files exists for the specific run. The last cycle called “data” contains all the files that are generated by mering the output files (see the section on processing the data). By selecting one or multiple cycles the files are updated accordingly.
Shortcuts in listboxes: Ctrl-A selects everything; Ctrl-I inverses the selection; Ctrl-C clears the selection; typing the beginning of an item the listbox will highlight the closest match. Ctrl-G or Ctrl-N repeats the last search. In the multi-column listboxes by clicking on the header sorts the current column Ascending or Descending.
The last multi-listbox contains a list of files for the run & cycles selected in the previous listboxes.
By double clicking on any of the files i.e. tutorial001.out, the file will be opened in the internal viewer of flair for inspection. The action is equivalent to selecting
- 21 -
4. Quick Start
one or several files and clicking the eyes icon . By clicking on the editor icon the file will be opened on the user defined external editor. The button [R]
(hotkey Ctrl-R) is used to refresh the display.WARNING: Do not try to open binary files. Could be rather huge for the editor
or viewer and in any case incomprehensible.
4.7. Data Merging
The next step before is to merge the output data files of the run in order to create the files contain the average values and the statistical error.
One would expect that the simulation is equivalent to a counting experiment, therefore the data will follow a Poisson distribution and the error will be the square root of the number of events collected. This is true provided that no biasing is used in the simulation. When importance scoring is involved (quite typical and recommended way of working) to calculate correctly the statistical error, apart from the final value one has to record also the square number of events/hits for every value needed. This doubles the memory and increases the complexity for special estimators. Therefore, FLUKA is making use of the Central Limit Theorem for calculating the mean value of a quantity scored and the error on the determination of the mean. The theorem states:
The distribution of an average tends to be Normal, even when the distribution from which the average is computed is decidedly non-Normal.
This is the main reason we have to perform several cycles, minimum 5 is recommended to simulate correctly a Normal distribution, and then sum-up and average the results. In FLUKA this is done automatically with the us?suw utilities (where ? can be: b=USRBIN, r=RESNUCLEi, t=USRTRACK or USRCOLL, x=USRBDX, y=USRYIELD). These programs expect as input a list of binary files generated from FLUKA with the respective card and using as unit a negative number, and in the end they generate a set of output files both binary, text and tabulated with the results.
Flair makes this process transparent to the user with the Process Data frame.
Select the Data node under the Process, or by clicking directly the F8 key. The following frame will appear.
The frame is composed with the following:1. a listbox for the runs described in the flair project2. the list of scoring units (Usrxxx) requested for each run. Automatically a
default name will be assigned in the form of “input-name”_”card”_”unit”. The user with the buttons on the right can delete the file, create a new one or rename it.
3. Radial selection buttons (Type) for changing the type of the card that the file is referring to. Normally the program selects the correct one based on the input file. A multi-column listbox with the list of files corresponding to each summary file in the Usrxxx listbox.
4. With the side buttons the user can add/remove or set a multiple filter rule to modify the list of data files.
- 22 -
4. Quick Start
By pressing the Process button (or clicking Ctrl-Enter) flair will run the appropriate FLUKA utilities to merge the data files. A dialog will confirm the outcome of the operation.
The FLUKA utilities usually generate more than one output files. Typically the merge binary data file has the requested name while for a text file is generated with the extension _sum.lis, and a tabulated one with the extension _tab.l is
4.8. Data Plotting
The last step is to plot the data, we will create 3 plots one for the USRBIN file that contains the energy deposition on the spallation target, one for the USRCOLL estimators with the particle fluences and one with the RESNUCLEi card containing the residual nuclei produced. We start by creating a plot in the “Plot” frame (F9) like what we did for the geometry plotting.
Click on the button, a new plot will be added to the list with Tit le “Plot #2” and the File will be “plot002” with format .eps, and type “Geometry”.
Change the title to “Deposited Energy”
the file to “enedep”. The filename is important since all auxiliary files and the final plot will share the same filename. The extension will only change.
- 23 -
4. Quick Start
Finally set the type to “USRBIN”
Repeat the process until you have create the following plots:● File: geometry Title: nTOF Target Geometry Type: Geometry● File: enedep Title: Deposited Energy Type: USR-1D● File: resnuc Title: Residual Nuclei Type: RESNUCLE
4.8.1. USRBIN Plotting
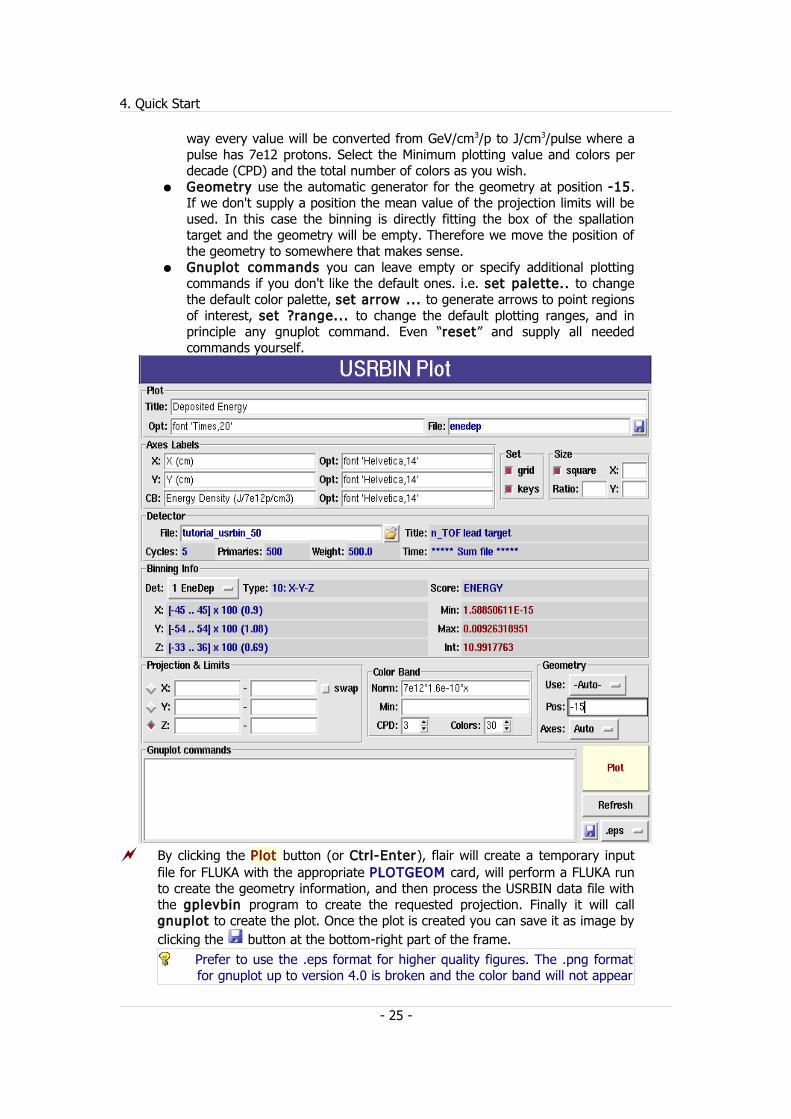
By double clicking on the list or clicking the edit icon, the USRBIN Plot frame will appear. By default the Title, and File will be filled in with the values we filled in the Plot List frame.
Fill in the values as you see in the following image.● Opt: under the title to supply additional gnuplot options to the title like
changing the default font, color etc.● Axes Labels, supply axes labels and additional options if needed● Size, click on the square to have a square aspect ratio● Detector click on the button and select the “tutorial_usrbin_50” file we
created in the Process frame. Automatically the run and detector information in the file will be filled.
● Binning Info select from the drop down list box the first detector● Projection & Limits select projection on the Z-axis without suppling any
limits. This will generate a projection from -33 to +36cm on the XY plane.● Color Band select as normalization the formula “7e12*1.6e-10*x”, this
- 24 -
4. Quick Start
way every value will be converted from GeV/cm3/p to J/cm3/pulse where a pulse has 7e12 protons. Select the Minimum plotting value and colors per decade (CPD) and the total number of colors as you wish.
● Geometry use the automatic generator for the geometry at position -15. If we don't supply a position the mean value of the projection limits will be used. In this case the binning is directly fitting the box of the spallation target and the geometry will be empty. Therefore we move the position of the geometry to somewhere that makes sense.
● Gnuplot commands you can leave empty or specify additional plotting commands if you don't like the default ones. i.e. set palette.. to change the default color palette, set arrow ... to generate arrows to point regions of interest, set ?range... to change the default plotting ranges, and in principle any gnuplot command. Even “reset” and supply all needed commands yourself.
By clicking the Plot button (or Ctrl-Enter), flair will create a temporary input file for FLUKA with the appropriate PLOTGEOM card, will perform a FLUKA run to create the geometry information, and then process the USRBIN data file with the gplevbin program to create the requested projection. Finally it will call gnuplot to create the plot. Once the plot is created you can save it as image by clicking the button at the bottom-right part of the frame.
Prefer to use the .eps format for higher quality figures. The .png format for gnuplot up to version 4.0 is broken and the color band will not appear
- 25 -
4. Quick Start
properly.
4.8.2. Single Differential Quantities Plot
The scoring cards USRBDX, USRCOLL, USRTRACK, USRYIELD after the data merging are producing a single differential quantities that can be plotted with the “USR-1D” plot frame in flair. This frame is using the _tab.l is file and many data can be super imposed one on top of the other.
Select the “fluence” plot from the Plot List or from the Project Tree.
Fill in the values as you see in the following image.● Opt: under the title to supply additional gnuplot options to the title like
changing the default font● Axes Labels: supply axes labels and additional options if needed● Axes Range: click on the “log X” and “log Y”
To add now the detectors click on the inside the Detectors frame. The File Dialog will appear with all the Fluka _tab.l is files. Select the “tutorial_usrcoll_51_tab.l is” file. Now the Detectors listbox will contain an entry named “#Detector 1” and the “Detector Info” frame will be filled with some basic values.
Select from the “Det:” drop-down box the “Proton” detector
Rename the detector to “Proton” with no (#) symbol in front. The (#) symbol is used as a comment not to display the label of the detector in the plot.
Select from X: the “Low [xl]” value to plot and on the Y: leave the default “Yx<Xgeo>” which will plot the isolethargic fluence.
Finally for the proton detector, set the normalization to 7e12, select as style
- 26 -
4. Quick Start
with: “steps”
You can already see the plot by clicking the Plot button (or Ctrl-Enter). It will show a red histogram of the proton fluence.
To add the statistical error bars and the neutron fluence you will have to create a couple of other detectors.
Clone the “Proton” detector by selecting in the Detector listbox the “Proton”
- 27 -
4. Quick Start
detector and clicking the icon or the Ctrl-D button.
Insert the # character in the name (#Proton), to avoid having a duplicate label on the plot, and then fill the values as shown in the following figure
Click on the inside the Detectors frame to add an extra detector. Select again the same file “tutorial_usrcoll_51_tab.l is” and from the “Det:” select the number “2 Neutron”. Or even you can clone the first detector “Proton” and change the corresponding fields.
Change the name of the detector to “Neutron” use on X: “Low [xl]”, Style with: “steps” Type: 3.
Clone the “Neutron” detector as before with the Protons to add the errorbars. Name the new detector as “#Neutron” X: “GeoMean [sqrt(xl*xh)]”, and style with: “errorbars”, Type: 0.
Clicking on the Plot button you can see the plot.
Optionally to make it even nicer you can add a custom x-scale and a label, in the Gnuplot commands:set xtics ('1meV' 1e-12, '10m' 1e-11, '100m' 1e-10, '1eV' 1e-9, '10' 1e-8,'100' 1e-7,'1keV' 1e-6, '10k' 1e-5, '100k' 1e-4, '1MeV' 1e-3, '10M' 0.01, '100M' 0.1, '1GeV' 1, '10G' 10, '100G' 100, '1TeV' 1000, '10T' 1e4, '100T' 1e5)set label 'Evaporation peak' at 1e-6,5e16 font 'Arial,14'
- 28 -
4. Quick Start
4.8.3. Residual Nuclei Plot
As a last example we will make a plot of the residual nuclei scored with the RESNUCLEi card. The Residual Nuclei Plot frame is able to do two dimensional plots of Z/A, Z/N or histograms of Z or A. Click on the “resnuc” plot from the Plot List or from the Project Tree, and fill the fields with the information as it is shown on the following figure
We are requesting a 2-dimensional Z/A plot of the first detector using a normalization factor of 7E12 primary particles. Clicking the Plot will generate the following plot:
- 29 -
4. Quick Start
A. A.AppendixAppendix
Abbreviations
Mouse abbreviations used in this manual
LMB Left Mouse Button click
MMB Middle Mouse Button click
RMB Right Mouse Button click
LMB-double Left Mouse Button double click
MMB-double Middle Mouse Button double click
RMB-double Right Mouse Button double click
LMB-drag Left Mouse Button click and drag
MMB-drag Middle Mouse Button click and drag
RMB-drag Right Mouse Button click and drag
Flair Commands
Menu Shortcut Icon Action
Menu bar F10 Access the menu bar
File Alt-F Open the File menu
... New Window Alt-F W Opens a new flair window, for working on multiple flair projects and exchanging information
... New Alt-F N Create a new flair project
... Open Ctrl-O Open an existing flair project
... Open Recent Alt-F R Opens the recent project files sub menu
... Save Ctrl-S Save project and input files
... Save As Alt-F S Save project and input under a different name
... Change Dir Alt-F C Change current working directory
... Print Ctrl-P Print current frame
... Close Ctrl-W Close current window
... Exit Ctrl-Q Exit program
File / Input Open the FLUKA input file menu
... New Create a new input file.Accessible from Project Frame from the Input field.
...Open Load an existing input file from disk.Accessible from Project Frame from the Input
- 30 -
4. Quick Start
Menu Shortcut Icon Action
field.
... Save Save the input file
... Save As Save the input file under a different name.Accessible from Project Frame from the Input field.
File / Database Open the database import/export submenu
File / Import Alt-F I Open the file import menu
... Fluka Import the entire input file or parts by category from one input file to current project
File / Export Alt-F E Open the file export menu
... Gnuplot Alt-F E N Save active plot as a gnuplot script file
... Makefile Alt-F E A Create a makefile from the Build frame information
... Mcnp Alt-F E M Create a MCNP input file from the FLUKA input
... Povray Alt-F E P Export the FLUKA geometry to povray 3D ray tracing format
Edit Alt-E Open the Edit sub menu
... Undo Ctrl-Z Undo the last action
... Redo Ctrl-Y Redo the last undo action
... Cut Ctrl-X Cut selected text or cards
... Copy Ctrl-C Copy selected text or cards
... Paste Ctrl-V Paste previously cut/copied text or cards
... Paste Special Ctrl-Shift-V Opens the special paste dialog
... Select All Ctrl-ACtrl-/
Select all text, cards, items in listboxes etc.
... Add Ins Add extra items:Input Editor: in REGION editing pops up a body selection list to insert a new body.Input Editor everywhere else: Insert a new cardCompile: Adds a new Fortran program library or objectDebug: Adds a new debugging regionRun: Adds a new runData: Adds a new output data filePlot: Adds a new plotUSR-1D: Adds a new _tab.lis file
... Delete Del Delete item, reverse action from “Add”
... Clone Ctrl-D Clone selected items
... Find Ctrl-F Search text in editor
... Find Next Ctrl-G Search for next match in editorList boxes: Find next match
- 31 -
4. Quick Start
Menu Shortcut Icon Action
... Replace Ctrl-H Search and replace text
... Filter Ctrl-L Input editor: shows the filter dialog to selected cards based on the filter criteria. Data: Modify filter for selecting filesPlot: Scans input for scoring cards and automatically insert default plots
Move Up Ctrl-Up Move selected items one item upward
Move Down Ctrl-Down Move selected items one item downward
Card Alt-C Open the Card menu, available only in the Input editing mode.
... [Categories] Alt-C # Select card to insert grouped in categories
... [Alphabetic] Select card to insert sorted in alphabetical order
... [Change To] Alt-C C Change type of selected card to another type.
Input Alt-I Open the Input card sub menu
... Insert Comment
Alt-I I Add comment to the selected cards
... Delete Comment
Alt-I D Delete the comments from he selected cards
... Enable Card Alt-I E Enable the selected cards
... Disable Card Alt-I D Disable the selected cards. Add #if 0 ... #endif before and after the selected cards
... Show Cards Alt-I S Show in editor the hidden cards
... Hide Cards Alt-I H Hide from the editor the selected cards
... Edit Alt-I T Edit the contents of a card with a dialog
... Filter Invalid Alt-I F Hide valid cards from the active display
... Show Errors Alt-I R Show the error message for the invalid cards
... Remove Unused
Alt-I U Remove unused cards from the input
... Order Cards Alt-I O Sort all input cards according to the specified template
... Transform Geometry
Ctrl-T Apply geometrical transformations (translations / rotations / scaling) to the selected bodies
... Expand Geometry
Expand a parenthesized geometrical expression to the normal form.
... Optimize Geometry
Optimize a geometrical description, by removing unnecessary terms.
View Alt-V Open the view sub menu
... Project F2 Display the FLUKA Project Information frame
... Input F3 Display the Input Editor
- 32 -
4. Quick Start
Menu Shortcut Icon Action
... Process Alt-V R Display the Process Summary frame
... Compile F4 Display the Compile Executable frame
... Debug F5 Display the Geometry Debugger frame
... Run F6 Display the Run Fluka frame
... Files F7 Display the Output Files frame
... Data F8 Display the Merge Data Files frame
... Plot F9 Display the Plot List frame
... Material Alt-V M Display the Materials Database
... Periodic Table Alt-V T Open Periodic table with Nuclear Wallet Cards information
... Backward Alt-V B Show the previously displayed input cards.
... Forward Alt-V F Move forward in the list of the displayed input cards.
... Refresh Alt-V R R Redraw/refresh display.Input Editor: Useful when the display gets corrupted for some reason.Output Files: Update file listMerge Data Files: Update file list
... Toggle Tree F11 Show/Hide the project browser tree
... Toggle Height F12 Toggles height of window to maximum or previous setting
Tools Alt-T Open the Options sub menu
... Viewer Alt-T V Open file in the external or internal viewerInput Editor: Open input fileCompile: Open the source codeOutput Files: Open the selected filesPlot List: Display the plots one by one
... Editor Alt-T E Open file in an external editorInput Editor: Open input fileCompile: Open the source codeOutput Files: Open the selected filesPlot List: Open the dialog to edit the plot
... Terminal Alt-T T Open terminal with console at project directory
... File Explorer Alt-T F Open file explorer at project directory
... Preferences Alt-T P Open the settings dialog to change fonts/colors and default behavior of the program.
Help Alt-H Open the Help sub menu
... Help F1 Show the interactive help dialog for the selected card, dialog, option
- 33 -
4. Quick Start
Menu Shortcut Icon Action
... Check Installation
Alt-H I Check the FLUKA and flair installation for missing programs
... Check Updates Alt-H U Check the FLUKA and flair web site for new versions
... Tip Alt-H T Open the random tips dialog
... About Alt-H A Open out nice about dialog with information on the program
Keyboard short cuts without a menu item
F10 Access the menu bar
Ctrl-Enter Execute highlighted command of each frameInput Editor: Insert new cardCompile: Build the executableDebug: Run the debuggerRun: Run the simulationData: Merge data filesPlot: Show the plot
Ctrl-Space Open the popup menu
Ctrl-I List boxes: Invert selected list
Ctrl-G List boxes: Find next match
Ctrl-N List boxes: Find next match
Ctrl-C List boxes: Clear selection
Space List boxes: Select current item
Input editor special keyboard and mouse commands
Enter Input editor: Start editing fieldor Commit changes and move to next field
Esc Input editor: Commit changes and the leave the card editing mode
CopyrightCopyright Vasilis Vlachoudis <[email protected]> for the European Organization for Nuclear Research (CERN)
All rights not expressly granted under this license are reserved.
Installation, use, reproduction, display of the software ("flair"), in source and binary forms, are permitted free of charge on a non-exclusive basis for internal scientific, non-commercial and non-weapon-related use by non-profit organizations only.
For commercial use of the software please contact the main author [email protected] for further information.
Redistribution and use in source and binary forms, with or without modification, are permitted provided that the following conditions are met:
1. Redistributions of source code must retain the above copyright notice, this list of conditions and the following disclaimer.
2. Redistributions in binary form must reproduce the above copyright notice, this list of conditions and the following disclaimer in the documentation and/or other materials provided with the distribution.
DisclaimerTHIS SOFTWARE IS PROVIDED BY THE AUTHOR "AS IS" AND ANY EXPRESS OR IMPLIED WARRANTIES, INCLUDING, BUT NOT LIMITED TO, IMPLIED WARRANTIES OF MERCHANTABILITY, OF SATISFACTORY QUALITY, AND FITNESS FOR A PARTICULAR PURPOSE OR USE ARE DISCLAIMED. THE COPYRIGHT HOLDERS AND THE AUTHORS MAKE NO REPRESENTATION THAT THE SOFTWARE AND MODIFICATIONS THEREOF, WILL NOT INFRINGE ANY PATENT, COPYRIGHT, TRADE SECRET OR OTHER PROPRIETARY RIGHT.
Limitation of LiabilityTHE COPYRIGHT HOLDERS AND THE AUTHORS SHALL HAVE NO LIABILITY FOR DIRECT, INDIRECT, SPECIAL, INCIDENTAL, CONSEQUENTIAL, EXEMPLARY, OR PUNITIVE DAMAGES OF ANY CHARACTER INCLUDING, WITHOUT LIMITATION, PROCUREMENT OF SUBSTITUTE GOODS OR SERVICES, LOSS OF USE, DATA OR PROFITS, OR BUSINESS INTERRUPTION, HOWEVER CAUSED AND ON ANY THEORY OF CONTRACT, WARRANTY, TORT (INCLUDING NEGLIGENCE), PRODUCT LIABILITY OR OTHERWISE, ARISING IN ANY WAY OUT OF THE USE OF THIS SOFTWARE, EVEN IF ADVISED OF THE POSSIBILITY OF SUCH DAMAGES.
THE SOFTWARE REFERENCED IS MADE AVAILABLE AS - IS. THE AUTHOR MAKES NO WARRANTY ABOUT THE SOFTWARE AND ITS CONFORMITY TO ANY APPLICATION. THE AUTHOR IS NOT RESPONSIBLE FOR ANY DAMAGE, LOSS OF DATA, OR LOSS OF MONEY CAUSED BY THIS PROGRAM.
Central Limit Theorem......................................................................................................22comment..........................................................................................................................6coordinate system.............................................................................................................8Copyright........................................................................................................................35CVS..................................................................................................................................5Data...............................................................................................................................22