PREFACE.................................................................................................................................................5 RELATED DOCUMENTS.............................................................................................................................5 SOFTWARE INFORMATION ........................................................................................................................5 CONVENTIONS ........................................................................................................................................5 MOUSE CONVENTIONS.............................................................................................................................5
2 USING THE FLEX.TELNET PROGRAM..........................................................................................5 2.1 STARTING THE FLEX.TELNET PROGRAM.........................................................................................5 2.2 FLEX.TELNET APPLICATION WINDOW..............................................................................................5
2.2.1 Flex.Telnet Title bar ............................................................................................................5 2.2.2 Status Bar ...........................................................................................................................5 2.2.3 Using Flex.Telnet windows .................................................................................................5
2.2.3.1 About moving windows .................................................................................................................5 2.2.3.2 About using scroll bars .................................................................................................................5 2.2.3.3 About minimizing and restoring the application window................................................................5 2.2.3.4 About entering data and making choices......................................................................................5
2.2.5 Setting the font....................................................................................................................5 2.2.6 Setting the Language..........................................................................................................5
2.2.7 Toolbars ..............................................................................................................................5 2.2.7.1 Opening and closing toolbars .......................................................................................................5 2.2.7.2 Moving Toolbars ...........................................................................................................................5 2.2.7.3 Selecting a Font size using the Toolbar........................................................................................5
2.2.8 Exiting Flex.Telnet ..............................................................................................................5 2.3 HOST CONNECTION AND DISCONNECTION ......................................................................................5
2.3.1 Connecting to the remote Host ...........................................................................................5 2.3.1.1 Logging on....................................................................................................................................5
2.3.2 Recent Hosts ......................................................................................................................5 2.3.3 Confirming connection to FTP ............................................................................................5 2.3.4 Disconnecting from the remote Host ..................................................................................5 2.3.5 Logging the Flex.Telnet session.........................................................................................5 2.3.6 Executing a Script file .........................................................................................................5 2.3.7 Resetting the Terminal........................................................................................................5 2.3.8 Clearing the screen.............................................................................................................5 2.3.9 Flex.Telnet Usage options ..................................................................................................5
2.3.9.1 List of Usage options ....................................................................................................................5 2.4 PRINT FUNCTIONS ........................................................................................................................5
2.6.1 Copying screen contents to the Clipboard..........................................................................5 2.6.2 Pasting contents of Clipboard.............................................................................................5
2.7 HELP INFORMATION ......................................................................................................................5 2.7.1 Help.....................................................................................................................................5 2.7.2 About Flex.Telnet................................................................................................................5
3 MENUS .............................................................................................................................................5 3.1 FILE MENU ...................................................................................................................................5 3.2 EDIT MENU...................................................................................................................................5 3.3 VIEW MENU ..................................................................................................................................5 3.4 CONTROL MENU ...........................................................................................................................5 3.5 TOOLS MENU................................................................................................................................5 3.6 OPTIONS MENU ............................................................................................................................5 3.7 HELP MENU..................................................................................................................................5
Preface Flex.Telnet is part of the Flex.Win suite of programs and allows you to connect to and gain access to the operating environment of a remote RealFlex QNX server (Host). Related documents The following documents are related to the use of the Flex.Telnet program.
Flex.View Getting Started. Flex.View Help Manual, document reference 5000-0001-0040. Flex.Builder Help Manual. Document reference number 5000-0001-0041. Flex.Gallery Help Manual. Document reference number 5000-0001-0042. Flex.Start Help Manual. Document reference number 5000-0001-0043. Flex.Language Help Manual. Document reference number 5000-0001-0044. Flex.Converter Help Manual. Document reference number 5000-0001-0045. Flex.CFE Help Manual. Document reference number 5000-0001-0060.
Software information This Help Manual describes facilities contained in the Flex.Telnet application program, version 3.1.
Flex.Telnet V3.1 Help Manual
5000-0001-0049-B
Page 6 of 46
Conventions The following conventions are used throughout this document:
The beginning of a sequence of instructions: 1, 2, 3 etc. A set of steps in a sequence of instructions.
A single step in an instruction. Highlight This term defines the action of moving the cursor to illuminate an alphabetic or numeric
character, word or phrase to initiate a procedure. OR: In a sequence of instructions the text OR: is used to indicate a choice of steps. Either execute
the one step before the OR: or the one step after it. Mouse conventions Within the text the left mouse button is assumed for all mouse operations unless otherwise stated. Click Press and release the mouse button without moving the pointer. This action is used to
select an object or perform an action. Double-click Press and release the mouse button twice in quick succession. Drag Press the mouse button without releasing it and then move the pointer. This action
tracks the position of the mouse pointer. The action ends when the mouse button is released.
Press Press the mouse button without releasing it. This action is generally used to select an
object for action. Release Release the mouse button after pressing it. This action is generally used to conclude
an action initiated by a press or a drag.
Flex.Telnet V3.1 Help Manual
5000-0001-0049-B
Page 7 of 46
1 Introduction
Flex.Telnet is part of the Flex.Win suite of programs and allows you to connect to and gain access to the operating environment of a remote RealFlex QNX server (Host). The Flex.Telnet program can be run on any Microsoft® Windows PC located anywhere in the world, requiring only a TCP/IP connection to the RealFlex QNX server. The File menu: The selections available from the "File" menu provide the primary methods for connecting to and disconnecting from the remote Host, Print functions and the ability to exit from the Flex.Telnet program. The Edit menu: The selections available from the "Edit" menu allow you to copy the content of the entire screen onto the Clipboard and paste a copy of the Clipboard contents into the Flex.Telnet screen. The View menu: Options from the "View" menu allow you to show or hide the Toolbars and Status bar. The Control menu: Options from the "Control" menu allow you to clear the contents of the screen, send a "logical" break to the FTP session, check to see if the "IP address" and "Port" you are using is able to connect to FTP and reset communication settings. The Tools menu: Options from the "Tools" menu provide the primary methods for viewing and editing files. Options available allow you to copy, rename and search for files and folders on the remote Host or on your PC, retrieve a file from the remote Host and place the contents of the file into your chosen External Editor program ready for viewing and editing, record the current Flex.Telnet session to a file on your hard drive and execute a "Script file" or "QNX command instruction file". The Options menu: Options from the "Options" menu allow you to set the general properties of the Flex.Telnet application window, set the default font size and color and the screen background color, choose and specify a product specific language translation for use within Flex.Telnet. The Help menu: Options from the "Help" menu allow you to link to the on-line Help topics and display Flex.Telnet program information.
Flex.Telnet V3.1 Help Manual
5000-0001-0049-B
Page 8 of 46
Flex.Telnet V3.1 Help Manual
5000-0001-0049-B
Page 9 of 46
2 Using the Flex.Telnet program
2.1 Starting the Flex.Telnet program
Note: You must be connected to your Internet Service Provider (ISP) before starting the Flex.Telnet program.
To start Flex.Telnet:
Double-click on the Flex.Telnet icon on your Desktop.
OR:
1. Click on the button. 2. Select Programs, then Flex.View, and then click on Flex.Telnet. OR:
From Windows Explorer, double-click on the FTN.exe file in the C:\Program Files\Datac\Flex.View directory.
When Flex.Telnet has started the "Flex.Telnet application window" is displayed.
Flex.Telnet V3.1 Help Manual
5000-0001-0049-B
Page 10 of 46
2.2 Flex.Telnet application window
When Flex.Telnet has started, the Flex.Telnet application window is displayed where all operations are centred:
2.2.1 Flex.Telnet Title bar
The Title bar is located along the top of a Flex.Telnet application window. It contains the name of the application program and the connection details, either "<disconnected>" when there is no connection, or the Host name or IP address and port number of the Host you are connected to. On the right-hand side of the title bar there are the following buttons:
Minimize button
Maximize button. Note: This button is disabled. See Section 2.2.3.3, "About minimizing and maximizing the application window".
Close button
Flex.Telnet V3.1 Help Manual
5000-0001-0049-B
Page 11 of 46
2.2.2 Status Bar The "Status Bar" option from the "View" menu allows you to display or hide the Status Bar. The status bar is displayed at the bottom of the Flex.Telnet application window.
The left area of the status bar describes actions of menu items as you use the arrow keys to navigate through menus. This area similarly shows messages that describe the actions of toolbar buttons as the pointer is moved over them. The area on the right of the status bar displays the following information:
Indicates the Caps Lock mode status. Press the Caps Lock key to turn the mode on or off. When this mode is on, CAP is displayed.
Indicates the Number Lock key status. Press the NUM LOCK key to turn the mode on or off. When this is on, NUM is displayed.
To display or hide the status bar:
From the View menu, select the Status Bar option. A check mark appears next to the menu item when the Status Bar is displayed.
2.2.3 Using Flex.Telnet windows Depending on the tasks you do, you may need know about the basic window operations when using Flex.Telnet. The following subjects can help you. 2.2.3.1 About moving windows During the operation of Flex.Telnet, you may find it useful to move a dialog box or window to a different location on the screen.
To move a window:
Click on and drag the window title bar. 2.2.3.2 About using scroll bars
Some of the windows or drop-down lists used by Flex.Telnet have scroll bars. These are graphical objects along the side and/or bottom of a window, which can be used to move the contents of the window so that a different portion of the contents may be viewed. To scroll a line or column at a time, click on one of the small triangles in the control button of the scroll bar. To scroll a page at a time, click on the bar itself. To scroll to a specific portion of the display, place the cursor on the slider in the middle of the bar, press and hold down the select button on the mouse, and drag the slider button along the scroll bar, releasing the select button when the desired location is reached.
Flex.Telnet V3.1 Help Manual
5000-0001-0049-B
Page 12 of 46
2.2.3.3 About minimizing and restoring the application window
To minimize the Flex.Telnet application window:
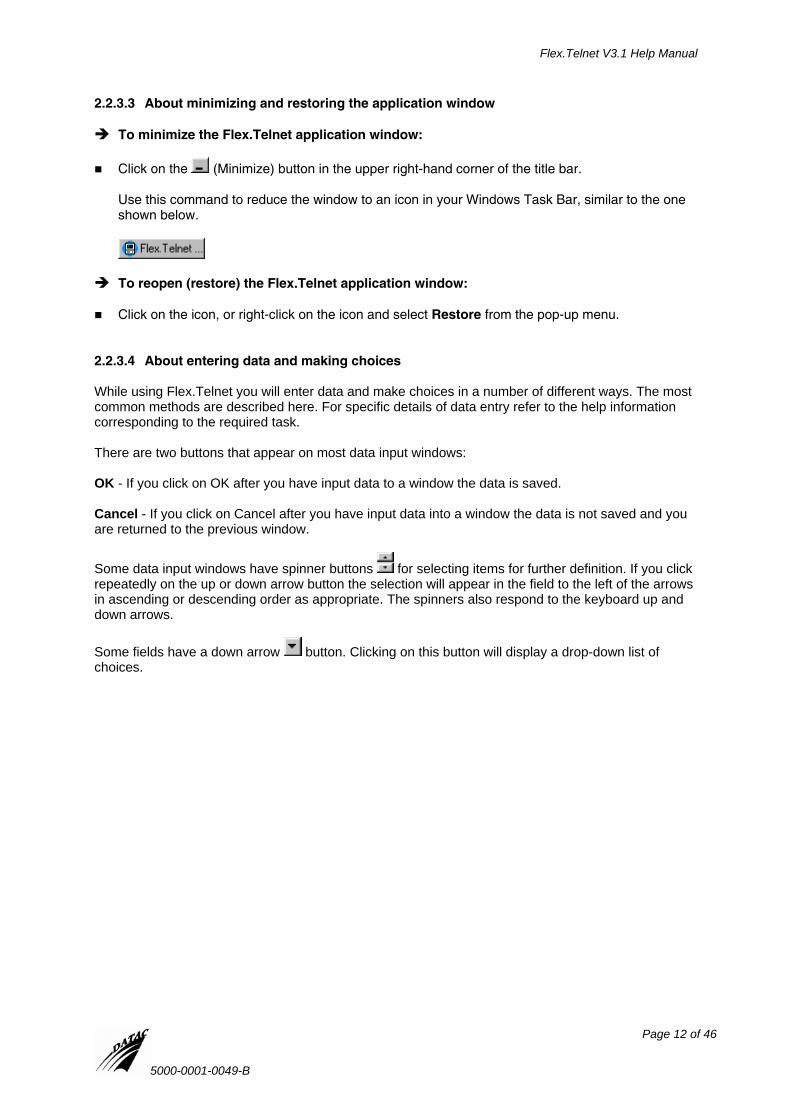
Click on the (Minimize) button in the upper right-hand corner of the title bar. Use this command to reduce the window to an icon in your Windows Task Bar, similar to the one shown below.
To reopen (restore) the Flex.Telnet application window:
Click on the icon, or right-click on the icon and select Restore from the pop-up menu. 2.2.3.4 About entering data and making choices While using Flex.Telnet you will enter data and make choices in a number of different ways. The most common methods are described here. For specific details of data entry refer to the help information corresponding to the required task. There are two buttons that appear on most data input windows: OK - If you click on OK after you have input data to a window the data is saved. Cancel - If you click on Cancel after you have input data into a window the data is not saved and you are returned to the previous window.
Some data input windows have spinner buttons for selecting items for further definition. If you click repeatedly on the up or down arrow button the selection will appear in the field to the left of the arrows in ascending or descending order as appropriate. The spinners also respond to the keyboard up and down arrows. Some fields have a down arrow button. Clicking on this button will display a drop-down list of choices.
Flex.Telnet V3.1 Help Manual
5000-0001-0049-B
Page 13 of 46
2.2.4 Configuring the application window The "General..." option from the "Options" menu allows you to set the general properties of the Flex.Telnet application window.
To access the General Options window:
From the Options menu, select the General... option.
Shortcuts: Toolbar Keypad Alt+Shift+O The "General Options" window will appear:
The "General Options" window is divided into three sections; "Screen size", "Terminal-specific options" and "Application options".
2.2.4.1 Screen size section The significance of each field is as follows: Number of rows - Sets the number of visible lines of data. May be set between 25 and 128 (Default 25). Number of columns - Sets the number of visible columns. May be set between 80 and 160 (Default 80).
To change the number of rows or columns:
Double-click on and highlight the current figure in the required field and type in the new figure. OR:
Click on the spinner buttons to select a new figure.
Flex.Telnet V3.1 Help Manual
5000-0001-0049-B
Page 14 of 46
2.2.4.2 Terminal-specific options section The significance of each field is as follows: Number of history lines: - During a session, this is the number of commands that can be retrieved by hitting the "up arrow" key. May be set between 0 and 999 (Default 100).
To change number of history lines:
Double-click on and highlight the current figure in the field and type in the new figure. OR:
Click on the spinner buttons to select a new figure. Terminal type: - Defines the windows functionality and look. This is fixed and cannot be changed. 2.2.4.3 Application options section The significance of each option is as follows: Set fixed terminal window size: - Allows you to resize the Flex.Telnet application window so that it fits within the viewing area of your monitor. Click on the check-box to activate. A tick will appear when enabled. Click again to disable (no tick). MRU file list count: - Allows you to define the number of Host names or addresses in the "File" menu, "Most Recently Used" list. May be set between 0 and 16 (Default 4).
To change number of names
Double-click on and highlight the current figure in the field and type in the new figure. OR:
Click on the spinner buttons to select a new figure. After all changes have been made to the "General Options" window, click on the OK button to save your changes, or click on the Cancel button to close window and not save changes.
Flex.Telnet V3.1 Help Manual
5000-0001-0049-B
Page 15 of 46
2.2.5 Setting the font The "Font..." option from the "Options" menu allows you to set the default font size and color and the screen background color.
To access the Font window:
From the Options menu, select the Font... option.
Shortcuts: Toolbar Keypad Alt+Shift+T The "Font" dialog box will be displayed:
Setting the default font:
Select required Font type, style and size (Default; Courier New, Regular, 14pt). Selections will be displayed in the fields above and an example will be displayed in the "Sample" field.
Setting the font color:
Click on the button of the " Default text color:" field and select the required color from the drop-down palette of colors. An example will be displayed in the "Sample" field.
Setting the screen background color:
Click on the button of the "Background color:" field and select the required color from the drop-
down palette of colors. An example will be displayed in the "Sample" field.
Setting the font Y/X ratio: This option allows you to set the width ratio of the character against its height.
In the "Font Y/X ratio:" field, enter a ratio figure (Default 2). An example will be displayed in the "Sample" field.
After all changes have been made to the "Font" window, click on the OK button to save your changes, or click on the Cancel button to close window and not save changes.
Flex.Telnet V3.1 Help Manual
5000-0001-0049-B
Page 16 of 46
2.2.6 Setting the Language The "Language" window, as shown below, allows you to choose and specify a product specific language translation for use within Flex.Telnet. These language translations are produced using the Flex.Language program.
To access the Language window:
From the Options menu, select the Language... option. The "Language" window will appear:
The "Language" window is divided into two sections, "Enable product interface language translation" and "Advanced settings".
2.2.6.1 Enable product interface language translation section Product specific language translations are produced using the "Flex.Language" program and saved on your Windows PC. For details, please refer to the Flex.Language program Help documentation.
To enable a Product specific language: 1. Click on the Enable product interface language translation check-box. A tick will appear when
enabled and the "Use product specific language:" option listed below will become active. Click again to disable (no tick). The "Use product specific language:" option allows you to choose a user specified language setting for use within Flex.Telnet.
2. Select required language by clicking on the button to the right of the "Use product specific
language:" field and choosing required language from the drop-down list. 3. Click on the OK button.
The following massage will appear:
Flex.Telnet V3.1 Help Manual
5000-0001-0049-B
Page 17 of 46
You will need to restart the program before the changes can take effect.
The character set on your PC will change to the selected language. For example, if you have "Spanish" and "English" character sets installed on your PC, you will be able to choose "Spanish" from the drop-down list. Now the character set used will be "Spanish". You are then able to construct a new menu or edit an existing menu in "Spanish". The same applies to all other aspects, e.g., a new text box in a display will be in the "Spanish" character set. Note: The "Flex.Language" program can be used to remotely set or override the "Enable product interface language translation" settings. 2.2.6.2 Advanced settings section Selecting the Advanced settings option, tick in check-box, will reveal the I want language settings to affect current Windows® user only option. Selecting the I want language settings to affect current Windows® user only option, tick in check-box, allows you to set the Flex.Telnet character set for the user currently logged onto the Windows PC. For example, if you were to log onto a Windows 2000 PC as "John" and opened Flex.Telnet (logged in as "USERA") and have selected "Spanish" as the chosen language, then the character set in Flex.Telnet will be Spanish. If you were to log off the Windows 2000 PC and another user logged on as "David", and opens Flex.Start (logged in as "USERA"), the character set will revert to the default character set of "English" and not your preferred language of "Spanish". After all changes have been made to the "Language" window, click on the OK button to save your changes, or click on the Cancel button to close window and not save changes.
Flex.Telnet V3.1 Help Manual
5000-0001-0049-B
Page 18 of 46
2.2.7 Toolbars Toolbars are displayed along the top of the Flex.Telnet application window. The toolbars provide quick mouse access to many tools used in Flex.Telnet.
Button Function
New Connection
Disconnect from server
Clear Screen
Copy All to Clipboard
Paste contents of Clipboard
Print
Print Preview
Execute Script
FTP Explorer
FTP Editor
Font Options
General Options
About
Select Font Size
2.2.7.1 Opening and closing toolbars By default, all toolbars are open. You can open and close these toolbars whenever necessary.
To display the toolbars:
From the View menu, select the Toolbar option. (Open toolbars display a check mark at the left side).
To hide the toolbars:
From the View menu, select the Toolbar option. (Closed toolbars do not display a check mark at
the left side).
Flex.Telnet V3.1 Help Manual
5000-0001-0049-B
Page 19 of 46
2.2.7.2 Moving Toolbars You can move a toolbar to make a second toolbar row or you can swap the position of the Standard toolbar and the Font toolbar.
To move a toolbar: 1. Position the pointer somewhere over an area of the toolbar that does not display a button or drop-
down list as shown below.
2. Press and hold the mouse button while you drag the toolbar to a suitable location in your window. 3. Release the mouse button to drop the toolbar to its new location. It will remain in this new place
until you move it again or close it. 2.2.7.3 Selecting a Font size using the Toolbar You can select/change the font size in the Flex.Telnet display by using the Toolbar.
To change the font size:
In the "Font:" toolbar, click on the button and select required Font size from the drop-down list. Use the scroll bar if required Font size is not visible. The size for the font in the "Font" options window will be updated automatically.
2.2.8 Exiting Flex.Telnet
To end your Flex.Telnet session: From the File menu, select the Exit option. Note: Alternative methods of quitting the Flex.Telnet program are:
Right-click on the application's Control menu button or on the icon in the Taskbar and select Exit from the pop-up menu.
Double-click the application's Control menu button.
Click the button on the right-hand side of the title bar.
With the "Flex.Telnet" application window active, key Alt+Shift+X.
Flex.Telnet V3.1 Help Manual
5000-0001-0049-B
Page 20 of 46
2.3 Host connection and disconnection
2.3.1 Connecting to the remote Host The "New Connection..." option from the "File" menu allows you to connect to and gain access to the operating environment of a remote RealFlex QNX server (Host). If you want to record the current Flex.Telnet session to a file on your hard drive, activate the "Log Session..." option from the "Tools" menu before connecting to the Host. For details, please refer to Section 2.3.5.
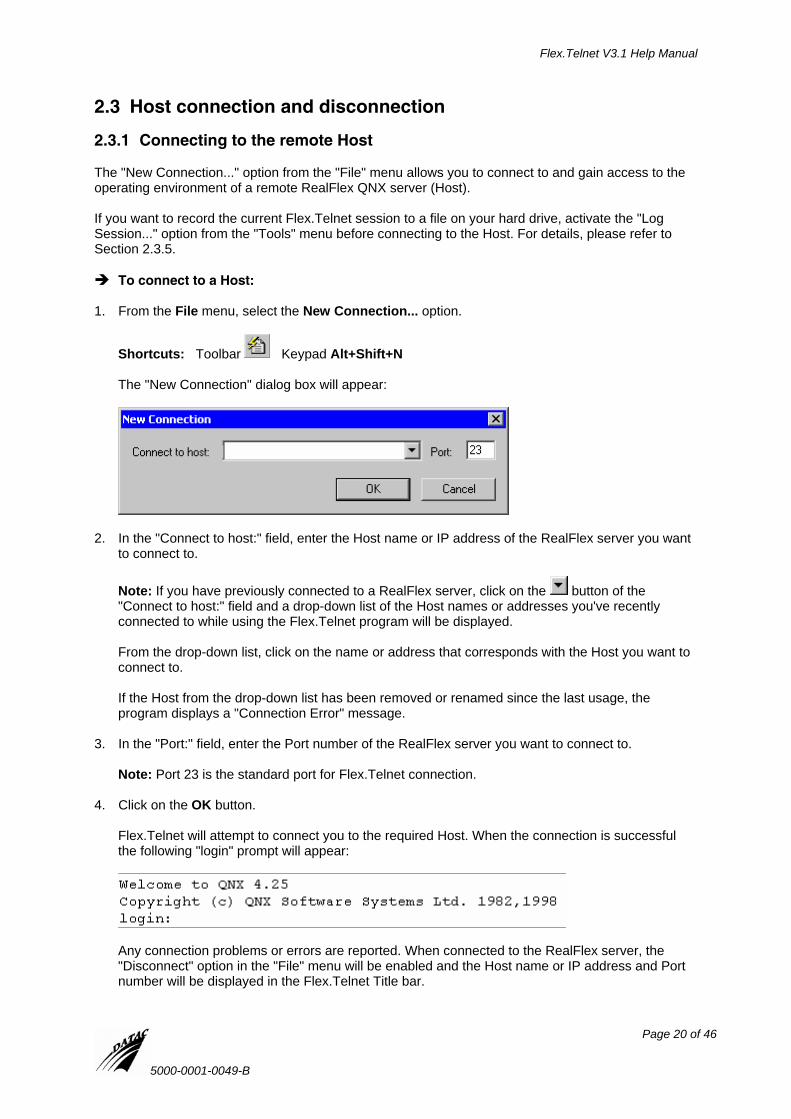
To connect to a Host: 1. From the File menu, select the New Connection... option.
Shortcuts: Toolbar Keypad Alt+Shift+N The "New Connection" dialog box will appear:
2. In the "Connect to host:" field, enter the Host name or IP address of the RealFlex server you want
to connect to. Note: If you have previously connected to a RealFlex server, click on the button of the "Connect to host:" field and a drop-down list of the Host names or addresses you've recently connected to while using the Flex.Telnet program will be displayed. From the drop-down list, click on the name or address that corresponds with the Host you want to connect to. If the Host from the drop-down list has been removed or renamed since the last usage, the program displays a "Connection Error" message.
3. In the "Port:" field, enter the Port number of the RealFlex server you want to connect to.
Note: Port 23 is the standard port for Flex.Telnet connection.
4. Click on the OK button.
Flex.Telnet will attempt to connect you to the required Host. When the connection is successful the following "login" prompt will appear:
Any connection problems or errors are reported. When connected to the RealFlex server, the "Disconnect" option in the "File" menu will be enabled and the Host name or IP address and Port number will be displayed in the Flex.Telnet Title bar.
Flex.Telnet V3.1 Help Manual
5000-0001-0049-B
Page 21 of 46
2.3.1.1 Logging on 1. At the flashing cursor of the "login" prompt, enter root as the login name and press Enter.
Flex.Telnet will then request a Password.
2. At the flashing cursor of the "Password" prompt, enter your Password and press Enter.
Passwords are case sensitive and will not be echoed to the screen while being entered. After the Password has been accepted, the following information will be displayed:
The first line displays the date and time the system was last logged onto and what you were connected to. In the example above, this is Node 1 using a session called a "ttyp0". In the second line, the current logon date and time is displayed.
2.3.2 Recent Hosts When you initially start to use the Flex.Telnet program, a "No Sessions..." option will be listed in the "File" menu between the "Print..." and "Exit" options. Once you start using Flex.Telnet and connect to RealFlex servers, the "No Sessions..." option will be replaced by a list of the "Most Recently Used" Host names or addresses you've recently connected to while using the Flex.Telnet program as shown below.
To connect to a Host using the MRU list:
From the File menu, click on the name or address that corresponds with the Host you want to connect to. If the Host from the list has been removed or renamed since the last usage, the program displays a "Connection Error" message. Flex.Telnet will attempt to connect you to the required Host.
Note: You can set the number of entries in the Most Recently Used Host names or addresses list via the "General Options" window. For details, please refer to Section 2.2.4.3. Please refer to Section 2.3.1.1 for details on how to login.
Flex.Telnet V3.1 Help Manual
5000-0001-0049-B
Page 22 of 46
2.3.3 Confirming connection to FTP The "Send AYT" option from the "Control" menu checks to see if the "IP address" and "Port" you are using is able to connect to FTP. "AYT" stands for "Are You There".
To send AYT:
From the Control menu, select the Send AYT option. Shortcut: Keypad Alt+Shift+A If the return response is "YES", then it supports FTP. If there is no response, then it does not support FTP.
2.3.4 Disconnecting from the remote Host
To disconnect from the RealFlex server:
From the File menu, select the Disconnect option.
Shortcuts: Toolbar Keypad Alt+Shift+D When disconnected from the RealFlex server, the "Disconnect" option in the "File" menu will be disabled and "<disconnected>" will be displayed in the Flex.Telnet Title bar. 2.3.5 Logging the Flex.Telnet session The "Log Session..." option from the "Tools" menu allows you to record the current Flex.Telnet session to a file on your hard drive. These files can be opened in Microsoft Word allowing you to view or print off the log details.
To log the session: 1. From the Tools menu, select the Log Session... option.
Shortcut: Keypad Alt+Shift+L The "Log Session" dialog box will appear.
2. Specify the location and the name for the Log file to be saved. The "Save as type" will always be
"Telnet Log Files (*.ftn)". For details on how to use this dialog box, please refer to Section 4.2. 3. Click on the Save button.
When the "Log Session" option is active, a check mark will be displayed at the left side of the "Log Session..." option in the "Tools" menu. All information displayed in the Working Area of the Flex.Telnet application window will now be recorded to file.
Flex.Telnet V3.1 Help Manual
5000-0001-0049-B
Page 23 of 46
2.3.6 Executing a Script file The "Execute Script..." option from the "Tools" menu allows you to run a "Script" or "QNX command instruction" file that has been saved on your hard drive.
To execute a Script: 1. Create your Script in Notepad. (This script should be arranged so that it connects to the Realflex
server, logs on and changes the working directory to /tmp). Save your Script with an ".fts" extension.
2. Open Flex.Telnet. 3. From the Tools menu, select the Execute Script... option.
Shortcuts: Toolbar Keypad Alt+Shift+S The "Execute Script" dialog box will appear.
4. Locate the required Script file. The "Files of type" will always be "Telnet Script Files (*.fts)". For
details on how to use this dialog box, please refer to Section 4.1. 5. Click on the Open button.
The selected script file will run making Flex.Telnet connect and log into the RealFlex server and change the "pwd" (present working directory) to "/tmp".
2.3.7 Resetting the Terminal Sometimes files you are editing in Flex.Telnet can get out of synchronization with the "actual" file on the remote system due to communication errors. The "Reset Terminal" option from the "Control" menu resets communication settings and in the process updates and differences that might have occurred between the local and remote version of the file.
To reset the terminal:
From the Control menu, select the Reset Terminal option. 2.3.8 Clearing the screen The "Clear Screen" option from the "Control" menu allows you to clear the contents of the Flex.Telnet screen.
To clear the screen:
From the Control menu, select the Clear Screen option.
Shortcuts: Toolbar Keypad Alt+Shift+C The contents of the Flex.Telnet screen will be cleared.
Flex.Telnet V3.1 Help Manual
5000-0001-0049-B
Page 24 of 46
2.3.9 Flex.Telnet Usage options The Flex.Telnet Usage Options as listed in the "About Flex.Telnet" window, are used to allow you to log into a remote file system and execute selected commands automatically. For example, if a user frequently logs into a system and carries out the same command each time, he/she can automate this process by creating a Desktop Shortcut using these options.
To create a shortcut: Example 1: shows how you can create a shortcut to automatically check a file in the "reports" directory. 1. On your desktop, create a shortcut to Flex.Telnet. Please refer to the Windows Help topics for
details on how to create a shortcut. 2. Right-click on the shortcut and select Properties from the pop-up menu. The "Flex.Telnet
Properties" window, "Shortcut" tab will appear. 3. Within the "target" field the following command will exist "C:\Program
Files\DATAC\Flex.View\FTN.exe". Add to this command line to automate the procedure: "C:\Program Files\DATAC\Flex.View\FTN.exe" -h"192.168.0.51" -p"23" -l"root" -s"tuscan" -e"cd reports" -e"more TodayReport where: -h = Host name or IP address -p = port number -l = login name -s = password -e execute command.
Now when you click on this shortcut to Flex.Telnet, it will automatically connect you to the remote Host, log in and bring up today’s report from the reports folder. Example 2: shows how you can automatically run a "script file" (Some commands saved in a text file). 1. On your desktop, create a shortcut to Flex.Telnet. Please refer to the Windows Help topics for
details on how to create a shortcut. 2. Right-click on the shortcut and select Properties from the pop-up menu. The "Flex.Telnet
Properties" window, "Shortcut" tab will appear. 3. Within the "target" field the following command will exist "C:\Program
Files\DATAC\Flex.View\FTN.exe". Add to this command line to automate the procedure: "C:\Program Files\DATAC\Flex.View\FTN.exe" -i"first.txt". where: -i = script file
Now when you click on this shortcut to Flex.Telnet, it will automatically run the script file "first text".
Flex.Telnet V3.1 Help Manual
5000-0001-0049-B
Page 25 of 46
2.3.9.1 List of Usage options Option
-h or -host = <host name or IP address>
-p or -port = <port number>
-l or -login = <login name>
-s or -password = <password>
-e or -exec = "command"
-i or -script = <file>
-n or -nouserinput =
Flex.Telnet V3.1 Help Manual
5000-0001-0049-B
Page 26 of 46
2.4 Print functions
2.4.1 Printing The "Print..." option from the "File - Print" sub-menu, allows you to print the contents of the Flex.Telnet screen.
To print the contents of the screen:
From the File menu, select the Print option and choose Print... from the resulting sub-menu.
Shortcut: Toolbar The "Print" dialog box will appear where you may specify the destination printer, the range of pages to be printed, the number of copies, and other printer setup options.
2.4.2 Print Preview The "Print Preview" option from the "File - Print" sub-menu, allows you to display the contents of the screen as it would appear when printed.
To preview the screen contents before printing:
From the File menu, select the Print option and choose Print Preview from the resulting sub-menu.
Shortcuts: Toolbar Keypad Alt+Shift+P The main window will be replaced with a print preview window in which a page or pages will be displayed in their printed format. The buttons on the print preview toolbar, shown below, offers you options to move back and forth through the pages; zoom in and out of pages; initiate a print job; close the print preview window. Print Preview toolbar
Brings up the Print dialog box, to start a print job.
Preview the next printed page.
Preview the previous printed page.
Preview two printed pages.
Take a closer look at the printed page.
Take a larger look at the printed page.
Exits Print Preview and returns you to the previous Flex.Telnet window.
2.4.3 Printer setup The "Print Setup" option from the "File - Print" sub-menu, allows you to change your printing preferences. This command presents a Print Setup dialog box, where you may specify the destination printer, the page size and orientation and other printer setup options.
Flex.Telnet V3.1 Help Manual
5000-0001-0049-B
Page 27 of 46
2.5 Downloading and Uploading files
2.5.1 Editing FTP files The "FTP Editor..." option from the "Tools" menu allows you to retrieve a file from the remote Host and place the contents of the file into your chosen External Editor program ready for viewing and editing.
To edit a remote file: 1. From the Tools menu, select the FTP Editor... option.
Shortcuts: Toolbar Keypad Alt+Shift+E The "FTP Session Authority" dialog box will appear:
2. Complete fields as follows:
Field Enter
Host name IP: Enter the IP address of the RealFlex server you want to connect to.
Port: The port will always be "21".
Login name: The Login name may depend on the system you are connecting to. (Default name "ftp").
Password: Enter your Password. Note: Passwords are case sensitive and will not be echoed to the screen while being entered.
Root directory: Leave the forward slash "/" in this field. Once connected to the Host file system, you will be able to search for the required file.
3. When you have completed all fields, click on the OK button.
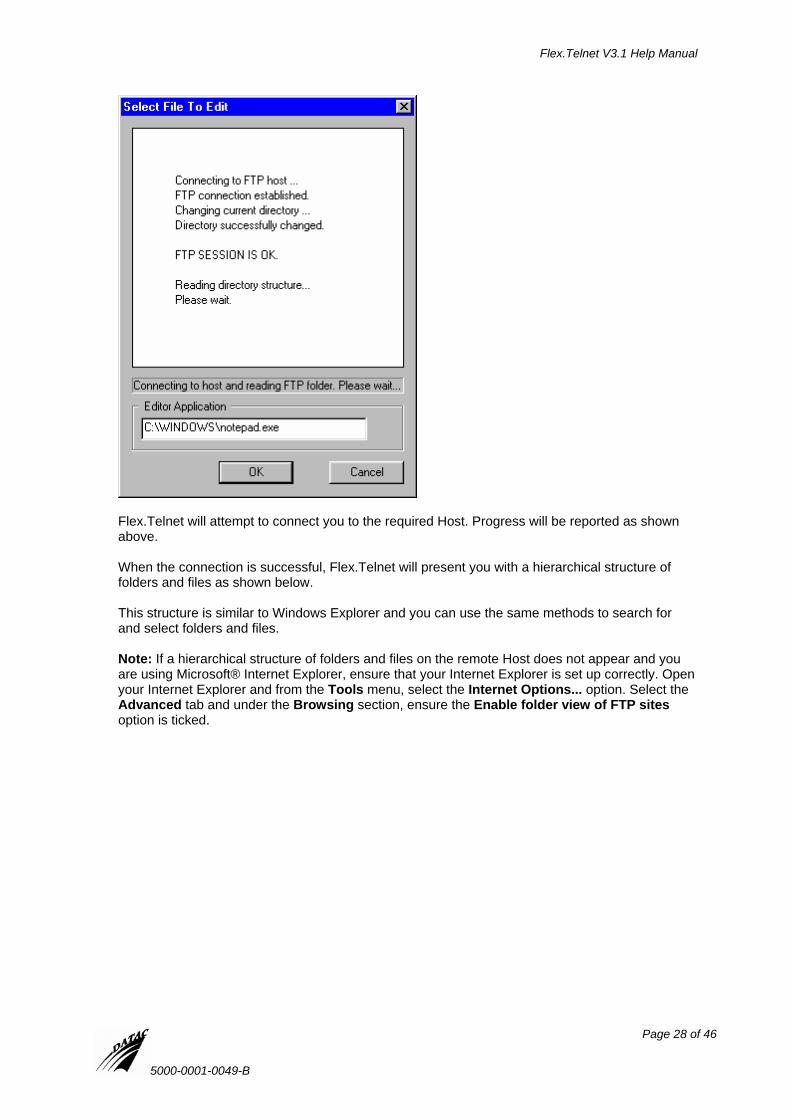
The "Select File To Edit" dialog box will appear:
Flex.Telnet V3.1 Help Manual
5000-0001-0049-B
Page 28 of 46
Flex.Telnet will attempt to connect you to the required Host. Progress will be reported as shown above. When the connection is successful, Flex.Telnet will present you with a hierarchical structure of folders and files as shown below. This structure is similar to Windows Explorer and you can use the same methods to search for and select folders and files. Note: If a hierarchical structure of folders and files on the remote Host does not appear and you are using Microsoft® Internet Explorer, ensure that your Internet Explorer is set up correctly. Open your Internet Explorer and from the Tools menu, select the Internet Options... option. Select the Advanced tab and under the Browsing section, ensure the Enable folder view of FTP sites option is ticked.
Flex.Telnet V3.1 Help Manual
5000-0001-0049-B
Page 29 of 46
In the "Editor Application" section, the path to your Microsoft® Notepad application is displayed. If required, you can choose a different application to edit your files, for example, WordPad, Word etc. Type in the full path and file name to your chosen application.
4. In the "Select File To Edit" dialog box, search for and select the file you wish to edit, then click on
the OK button. Your chosen External Editor program will open and the contents of the selected file will be displayed.
5. Edit the file as required, then Save the file and close down the External Editor program.
The following message will be displayed:
6. Click on the Yes button to Upload the changes to the Host, or click on the No button to abort the
operation.
Flex.Telnet V3.1 Help Manual
5000-0001-0049-B
Page 30 of 46
2.5.2 Exploring FTP Folders and Files The "FTP Explorer..." option from the "Tools" menu allows you to copy, rename, and search for files and folders on the remote Host or on your PC. For example, you can open a folder that contains a file you want to copy, and then drag it to another folder or even another drive.
To access the FTP explorer: 1. From the Tools menu, select the FTP Explorer... option.
Shortcuts: Toolbar Keypad Alt+Shift+F The "FTP Session Authority" dialog box will appear:
2. Complete fields as follows:
Field Enter
Host name IP: Enter the IP address of the RealFlex server you want to connect to.
Port: The port will always be "21".
Login name: The Login name may depend on the system you are connecting to. (Default name "ftp").
Password: Enter your Password. Note: Passwords are case sensitive and will not be echoed to the screen while being entered.
Root directory: Leave the forward slash "/" in this field. Once connected to the Host file system, you will be able to search for folders and files.
3. When you have completed all fields, click on the OK button.
The "FTP Explorer" dialog box will appear:
Flex.Telnet V3.1 Help Manual
5000-0001-0049-B
Page 31 of 46
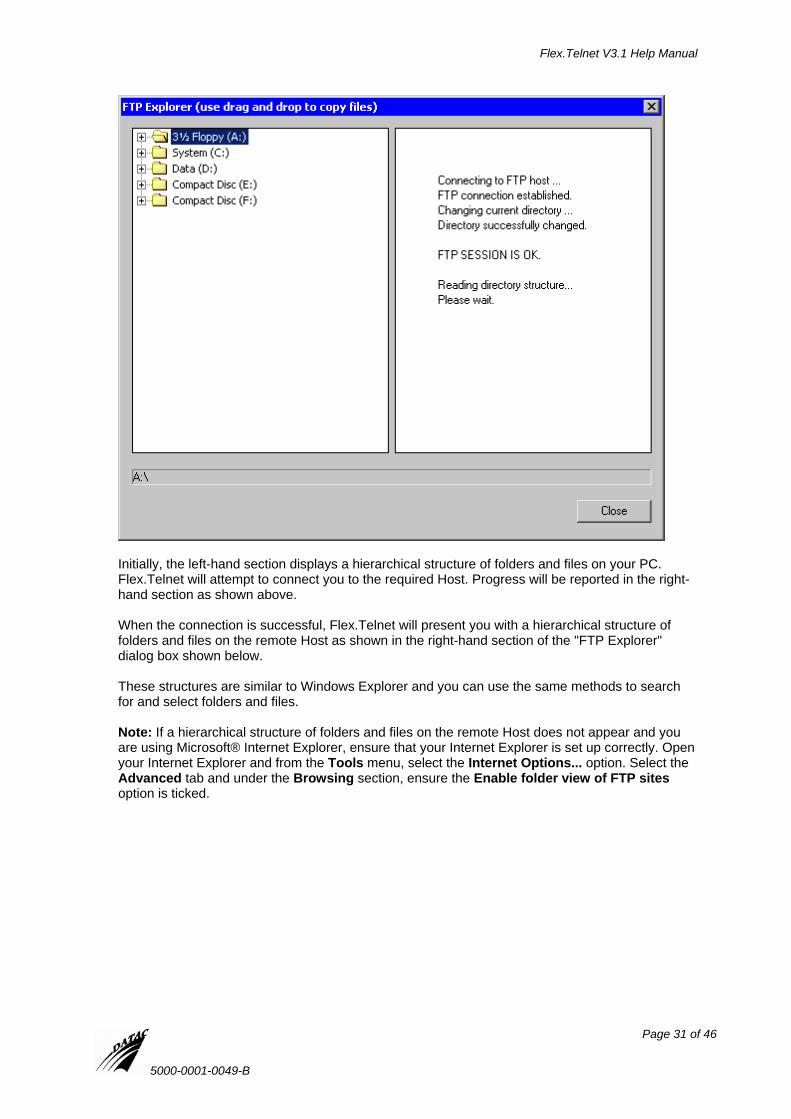
Initially, the left-hand section displays a hierarchical structure of folders and files on your PC. Flex.Telnet will attempt to connect you to the required Host. Progress will be reported in the right-hand section as shown above. When the connection is successful, Flex.Telnet will present you with a hierarchical structure of folders and files on the remote Host as shown in the right-hand section of the "FTP Explorer" dialog box shown below. These structures are similar to Windows Explorer and you can use the same methods to search for and select folders and files. Note: If a hierarchical structure of folders and files on the remote Host does not appear and you are using Microsoft® Internet Explorer, ensure that your Internet Explorer is set up correctly. Open your Internet Explorer and from the Tools menu, select the Internet Options... option. Select the Advanced tab and under the Browsing section, ensure the Enable folder view of FTP sites option is ticked.
Flex.Telnet V3.1 Help Manual
5000-0001-0049-B
Page 32 of 46
From the "FTP Explorer" dialog box, you can: Browse for files or folders: 1. Select the folder you want to browse. 2. Click right-mouse then select Browse from the pop-up menu. Open a file: 1. Select the file you want to open. 2. Click right-mouse then select Open from the pop-up menu. Rename folders or files: 1. Select the folder or file you want to rename. 2. With the pointer positioned over the selected folder or file, click right-mouse then select Rename
from the pop-up menu. The "Enter New Name For Object" dialog box will appear:
Flex.Telnet V3.1 Help Manual
5000-0001-0049-B
Page 33 of 46
3. Edit or type in the new name for the folder or file, and then click on the OK button. Delete files or folders: 1. Select the folder or file you want to delete. 2. With the pointer positioned over the selected folder or file, click right-mouse then select Delete
from the pop-up menu. The following prompt will appear asking for your confirmation:
3. Click on the Yes button to delete the folder or file, or click on the No button to abort the operation. Add a new folder: 1. Click on the drive or folder in which you want to create a new folder. 2. Click right-mouse then select New Folder or New in Selected from the pop-up menu.
The "Enter New Folder Name" dialog box will appear:
3. Type in the name for the folder, and then click on the OK button. Copy files: 1. Open the folder where you want to copy the item to. 2. Select the file you want to copy, and then drag it to the required folder.
Flex.Telnet V3.1 Help Manual
5000-0001-0049-B
Page 34 of 46
2.6 Editing remote files
2.6.1 Copying screen contents to the Clipboard The "Copy All" option from the "Edit" menu allows you to copy the content of the entire screen onto the Clipboard. After the contents have been copied to the Clipboard, you may then Paste it into your chosen External Editor application.
To copy the entire screen:
From the Edit menu, select the Copy All option.
Shortcuts: Toolbar Keypad Ctrl+Alt+Ins The contents of the Flex.Telnet screen will be copied to the Clipboard.
2.6.2 Pasting contents of Clipboard The "Paste" option from the "Edit" menu allows you to paste the contents of the Clipboard into the screen at the cursor position. This could be used to run a "Script file" or "QNX command instructions" created in another application and copied to the Clipboard.
To paste the contents of the Clipboard:
From the Edit menu, select the Paste option.
Shortcuts: Toolbar Keypad Shift+Alt+Ins The contents of the Clipboard will be pasted into the screen at the cursor position.
Note: If the contents of the Clipboard contain data that may be interpreted as commands, Flex.Telnet will display a "Warning" dialog box similar to the one shown below.
If you are satisfied with the contents of the Clipboard, click on the OK button to proceed, or click on the Cancel button to abort the operation.
Flex.Telnet V3.1 Help Manual
5000-0001-0049-B
Page 35 of 46
2.7 Help information
2.7.1 Help The "Help" option from the "Help" menu links you to the on-line Help and provides topics and tips to help you accomplish your tasks.
To access the on-line Help:
From the Help menu, select the Help option. Shortcut: Keypad F1
2.7.2 About Flex.Telnet Selecting "About Flex.Telnet" from the "Help" menu will display Flex.Telnet program information similar to the display below. Use this command to display information about the Flex.Telnet software you are using, such as software version number and build number. This information can be given to the support engineer in the event of a problem with Flex.Telnet.
From the Help menu, select the About Flex.Telnet option.
Shortcut: Toolbar The "About Flex.Telnet" window will appear:
The "About Flex.Telnet" window also displays a list of Flex.Telnet Usage options. For information on how these options are used, please refer to Section 2.3.9.
Flex.Telnet V3.1 Help Manual
5000-0001-0049-B
Page 36 of 46
Flex.Telnet V3.1 Help Manual
5000-0001-0049-B
Page 37 of 46
3 Menus
3.1 File menu
The "File" menu offers the following commands: New Connection… - Connects you to the RealFlex server. For details, please refer to Section 2.3.1. Disconnect - Disconnects you from the RealFlex server. For details, please refer to Section 2.3.4. Print... - Leads you to the Print Sub-menu:
Print... - Allows you to print the contents of the Flex.Telnet screen. For details, please refer to Section 2.4.1. Print Preview - Allows you to display the contents of the screen as it would appear when printed. For details, please refer to Section 2.4.2. Print Setup... - Allows you to change your printing preferences. For details, please refer to Section 2.4.3.
No Sessions... - The "No Sessions..." option will be replaced by a list of the last four Host names or addresses you've recently connected to while using the Flex.Telnet program. For details, please refer to Section 2.3.2. Exit - Exits the Flex.Telnet program. For details, please refer to Section 2.2.8. 3.2 Edit menu
The "Edit" menu offers the following commands: Copy All - Allows you to copy the content of the entire screen onto the Clipboard. For details, please refer to Section 2.6.1. Paste - Allows you to insert a copy of the Clipboard contents into the Flex.Telnet screen. For details, please refer to Section 2.6.2. 3.3 View menu
The "View" menu offers the following commands: Toolbar - Show or Hide the Toolbar. For details, please refer to Section 2.2.7. Status Bar - Show or Hide the Status bar. For details, please refer to Section 2.2.2.
Flex.Telnet V3.1 Help Manual
5000-0001-0049-B
Page 38 of 46
3.4 Control menu
The "Control" menu offers the following commands: Clear Screen - Allows you to clear the contents of the Flex.Telnet screen. For details, please refer to Section 2.3.8. Send Break - Sends a "logical" break to the FTP session and disconnects you from the RealFlex server. Note: This option is currently not supported by QNX. Send AYT - Checks to see if the "IP address" and "Port" you are using is able to connect to FTP. For details, please refer to Section 2.3.3. Reset Terminal - Resets communication settings and updates and differences that might have occurred between the local and remote version of the file. For details, please refer to Section 2.3.7. 3.5 Tools menu
The "Tools" menu offers the following commands: Log Session... - Allows you to record the current Flex.Telnet session to a file on your hard drive. For details, please refer to Section 2.3.5. Execute Script... - Allows you to run a "Script file" or "QNX command instruction file" stored on your hard drive. For details, please refer to Section 2.3.6. FTP Explorer... - Allows you to copy, rename, and search for files and folders on the remote Host or on your PC. For details, please refer to Section 2.5.2. FTP Editor... - Allows you to retrieve a file from the remote Host and place the contents of the file into your chosen External Editor program ready for viewing and editing. For details, please refer to Section 2.5.1. 3.6 Options menu
The "Options" menu offers the following commands: General... - Allows you to set the general properties of the Flex.Telnet application window. For details, please refer to Section 2.2.4. Font... - Allows you to set the default font size and color and the screen background color. For details, please refer to Section 2.2.5. Language... - Allows you to choose and specify a product specific language translation for use within Flex.Telnet. For details, please refer to Section 2.2.6. 3.7 Help menu
The "Help" menu offers the following commands: Help - Links you to the on-line Help. For details, please refer to Section 2.7.1. About Flex.Telnet - Displays Flex.Telnet program information and list of Flex.Telnet "Usage options". For details, please refer to Section 2.7.2.
Flex.Telnet V3.1 Help Manual
5000-0001-0049-B
Page 39 of 46
4 Dialog boxes
4.1 Execute Script dialog box
The following options allow you to specify the name and location of the file you're about to open: Look in: Displays the current folder and its list of available folders and files. Double-click on the folder you want to open. To see where the current folder is located in the hierarchy of folders, click on the button. The resulting drop-down box displays folders above the selected location.
Go To Last Folder Visited: Moves to the last folder you visited.
Up One Level: Moves the "Look in" folder up one level in the directory hierarchy.
Create New Folder: Creates a new folder in the current directory hierarchy.
View Menu: Allows you to change the appearance of items in a folder. Click the View menu button, and then click on Large Icons, Small Icons, List, Details, or Thumbnails as required from the drop-down list. File name: Displays files of the type specified in the "Files of type" field. To open a file, choose from the list, or type a path and filename in the box. Files of type: Displays the file types you can open, identified by their filename extension. To change the type, choose from the drop-down list. The "Files of type" will normally be "Telnet Script files (*.fts)". Open button: Opens the selected file.
Flex.Telnet V3.1 Help Manual
5000-0001-0049-B
Page 40 of 46
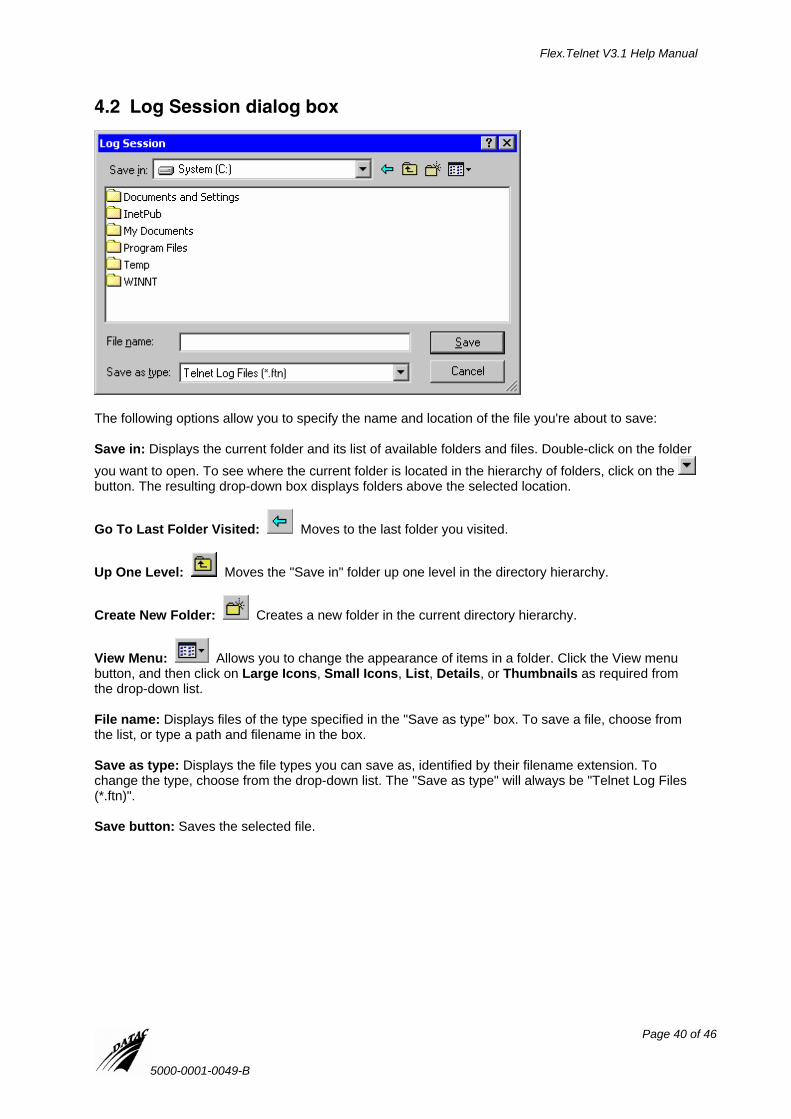
4.2 Log Session dialog box
The following options allow you to specify the name and location of the file you're about to save: Save in: Displays the current folder and its list of available folders and files. Double-click on the folder you want to open. To see where the current folder is located in the hierarchy of folders, click on the button. The resulting drop-down box displays folders above the selected location.
Go To Last Folder Visited: Moves to the last folder you visited.
Up One Level: Moves the "Save in" folder up one level in the directory hierarchy.
Create New Folder: Creates a new folder in the current directory hierarchy.
View Menu: Allows you to change the appearance of items in a folder. Click the View menu button, and then click on Large Icons, Small Icons, List, Details, or Thumbnails as required from the drop-down list. File name: Displays files of the type specified in the "Save as type" box. To save a file, choose from the list, or type a path and filename in the box. Save as type: Displays the file types you can save as, identified by their filename extension. To change the type, choose from the drop-down list. The "Save as type" will always be "Telnet Log Files (*.ftn)". Save button: Saves the selected file.
Flex.Telnet V3.1 Help Manual
5000-0001-0049-B
Page 41 of 46
Index .ftn Log file ............................................................................................................................................. 22 .fts files................................................................................................................................................... 23
A About Flex.Telnet .................................................................................................................................. 35
B Background color of screen................................................................................................................... 15 Browse - For files on the remote Host................................................................................................... 27
For folders and files ........................................................................................................................... 30
C Cancel button ........................................................................................................................................ 11 CAP ....................................................................................................................................................... 11 Caps Lock key - Indicates ..................................................................................................................... 11 Change - Font size using the Toolbar ................................................................................................... 19 Clear Screen (Control menu)................................................................................................................. 23 Clipboard - Copying the contents of the screen .................................................................................... 34
Pasting contents to the screen .......................................................................................................... 34 Close - Flex.Telnet application program................................................................................................ 19
Button................................................................................................................................................. 10 Color - Font............................................................................................................................................ 15
Screen background............................................................................................................................ 15 Columns - Number in screen................................................................................................................. 13 Connecting - To the RealFlex server..................................................................................................... 20
MRU list.............................................................................................................................................. 21 To FTP ............................................................................................................................................... 22 Using Recent Hosts ........................................................................................................................... 21
Control menu - Commands ................................................................................................................... 38 Clear Screen ...................................................................................................................................... 23 Reset Terminal................................................................................................................................... 23 Send AYT........................................................................................................................................... 22
Copy - Contents of screen to the Clipboard .......................................................................................... 34 Copy All (Edit menu).............................................................................................................................. 34 Create New Folder .......................................................................................................................... 39, 40 Creating - Desktop Shortcut .................................................................................................................. 24 Ctrl+Alt+Ins - Copy All shortcut ............................................................................................................. 34
Flex.Telnet V3.1 Help Manual
5000-0001-0049-B
Page 42 of 46
D Delete - Folders and files....................................................................................................................... 30 Desktop Shortcut - Creating .................................................................................................................. 24 Dialog boxes - Enter New Folder Name................................................................................................ 30
Enter New Name For Object.............................................................................................................. 30 Execute Script.................................................................................................................................... 39 FTP Explorer...................................................................................................................................... 30 FTP Session Authority ....................................................................................................................... 27 General Options................................................................................................................................. 13 Log Session ....................................................................................................................................... 40 New Connection................................................................................................................................. 20 Select File To Edit.............................................................................................................................. 27
Disconnect from the RealFlex server .................................................................................................... 22 Display - Status bar ............................................................................................................................... 11
E Edit - A file from the remote Host .......................................................................................................... 27 Edit menu - Commands......................................................................................................................... 37
Enter New Folder Name dialog box ...................................................................................................... 30 Enter New Name For Object dialog box................................................................................................ 30 Entering data ......................................................................................................................................... 11 Execute Script (Tools menu) ................................................................................................................. 23 Execute Script dialog box...................................................................................................................... 39 Exit the Flex.Telnet application program............................................................................................... 19 External Editor ....................................................................................................................................... 27
F F1 - On-line Help shortcut ..................................................................................................................... 35 File menu - Commands ......................................................................................................................... 37
Disconnect ......................................................................................................................................... 22 Exit ..................................................................................................................................................... 19 Most Recently Used list ..................................................................................................................... 21 New Connection................................................................................................................................. 20 No Sessions....................................................................................................................................... 21 Print - Print ......................................................................................................................................... 26 Print - Print Preview ........................................................................................................................... 26 Print - Print Setup............................................................................................................................... 26
File name......................................................................................................................................... 39, 40 Files of type ..................................................................................................................................... 39, 40 Flex.Telnet - Application window........................................................................................................... 10
Exiting ................................................................................................................................................ 19 Overview .............................................................................................................................................. 7 Session Log file.................................................................................................................................. 22 Starting the program ............................................................................................................................ 9 Title bar .............................................................................................................................................. 10 Usage options .................................................................................................................................... 24
Folder - Selecting and viewing .............................................................................................................. 30 Font - Changing size via the Toolbar .................................................................................................... 19 Font (Options menu).............................................................................................................................. 15
Background color ............................................................................................................................... 15 Default color....................................................................................................................................... 15 Type, style and size ........................................................................................................................... 15 Y/X ratio ............................................................................................................................................. 15
Font window .......................................................................................................................................... 15 FTN.exe file ............................................................................................................................................. 9
G General Options window ....................................................................................................................... 13 General... (Options menu) ..................................................................................................................... 13 Go To Last Folder Visited................................................................................................................ 39, 40
H Help menu - Commands........................................................................................................................ 38
About Flex.Telnet............................................................................................................................... 35 Help.................................................................................................................................................... 35
Help topics............................................................................................................................................. 35 Hide - Status Bar ................................................................................................................................... 11
Connect to recent Hosts .................................................................................................................... 21
I IP address - Connecting to Host ........................................................................................................... 20
L Language setting ................................................................................................................................... 16 Language window (Options menu)........................................................................................................ 16 Log - Flex.Telnet Session...................................................................................................................... 22 Log Session (Tools menu)..................................................................................................................... 22 Log Session dialog box ......................................................................................................................... 40 Logging onto the RealFlex server ......................................................................................................... 20 Look in ............................................................................................................................................. 39, 40
M Maximize - Button.................................................................................................................................. 10 Minimize - Button............................................................................................................................. 10, 11
Flex.Telnet window ............................................................................................................................ 11 Most Recently Used list ......................................................................................................................... 21
Define number of entries.................................................................................................................... 13 Move - Flex.Telnet windows and dialog boxes ..................................................................................... 11
Toolbars ............................................................................................................................................. 19 MRU list ................................................................................................................................................. 21
Define number of entries.................................................................................................................... 13
N New - Folder .......................................................................................................................................... 30 New Connection (File menu) ................................................................................................................. 20 No Sessions (File menu) ....................................................................................................................... 21 Notepad - Editing Remote File .............................................................................................................. 27 NUM LOCK key - Indicates ................................................................................................................... 11 Number of history lines.......................................................................................................................... 13
O OK button............................................................................................................................................... 11 Open - Files ........................................................................................................................................... 30 Options menu - Commands................................................................................................................... 38
Font .................................................................................................................................................... 15 General .............................................................................................................................................. 13 Language ........................................................................................................................................... 16
P Password - Logging onto the RealFlex server ...................................................................................... 20 Paste (Edit menu).................................................................................................................................. 34 Port - Connecting to Host ...................................................................................................................... 20 Print ....................................................................................................................................................... 26
Via Print Preview window................................................................................................................... 26 Print Preview ......................................................................................................................................... 26 Print Setup............................................................................................................................................. 26 PWD (Present working directory) .......................................................................................................... 23
R Ratio - Font Y/X ration ........................................................................................................................... 15 RealFlex - Connecting to ....................................................................................................................... 20
Flex.Telnet window ............................................................................................................................ 11 Rows - Number in screen...................................................................................................................... 13
S Scoll bars............................................................................................................................................... 11 Screen - Background color .................................................................................................................... 15
Script files .............................................................................................................................................. 23 Select File To Edit dialog box................................................................................................................ 27 Select/change - Font size via the Toolbar ............................................................................................. 19 Send AYT (Control menu) ..................................................................................................................... 22 Setting - Screen background color ........................................................................................................ 15
Fixed terminal window size................................................................................................................ 13 Font color ........................................................................................................................................... 15 Font type, style and size .................................................................................................................... 15 Font Y/X ratio ..................................................................................................................................... 15 Language ........................................................................................................................................... 16
Setup - Printer ....................................................................................................................................... 26 Shift+Alt+Ins - Paste shortcut................................................................................................................ 34 Show - Status Bar.................................................................................................................................. 11
Toolbars ............................................................................................................................................. 18 Size - Flex.Telnet screen....................................................................................................................... 13 Starting the Flex.Telnet program............................................................................................................. 9 Status Bar - Show or hide...................................................................................................................... 11 Synchronization ..................................................................................................................................... 23
T Telnet Script files ................................................................................................................................... 23 Terminal type......................................................................................................................................... 13 Terminal-specific options....................................................................................................................... 13 Title bar.................................................................................................................................................. 10 Tmp........................................................................................................................................................ 23 Toolbars - Displaying and Hiding .......................................................................................................... 18
Font size............................................................................................................................................. 19 Moving................................................................................................................................................ 19 Print Preview...................................................................................................................................... 26
U Up One Level................................................................................................................................... 39, 40 Upload - Files to the remote Host.......................................................................................................... 27 Usage options.................................................................................................................................. 24, 35
V View Menu....................................................................................................................................... 39, 40 View menu - Commands ....................................................................................................................... 37
Status bar........................................................................................................................................... 11 Toolbars ............................................................................................................................................. 18
W Window - Minimizing and Restoring ...................................................................................................... 11
Y Y/X ratio of Font..................................................................................................................................... 15