24
FLEXware Integrated Combiner Solution Plus Owner’s Manual
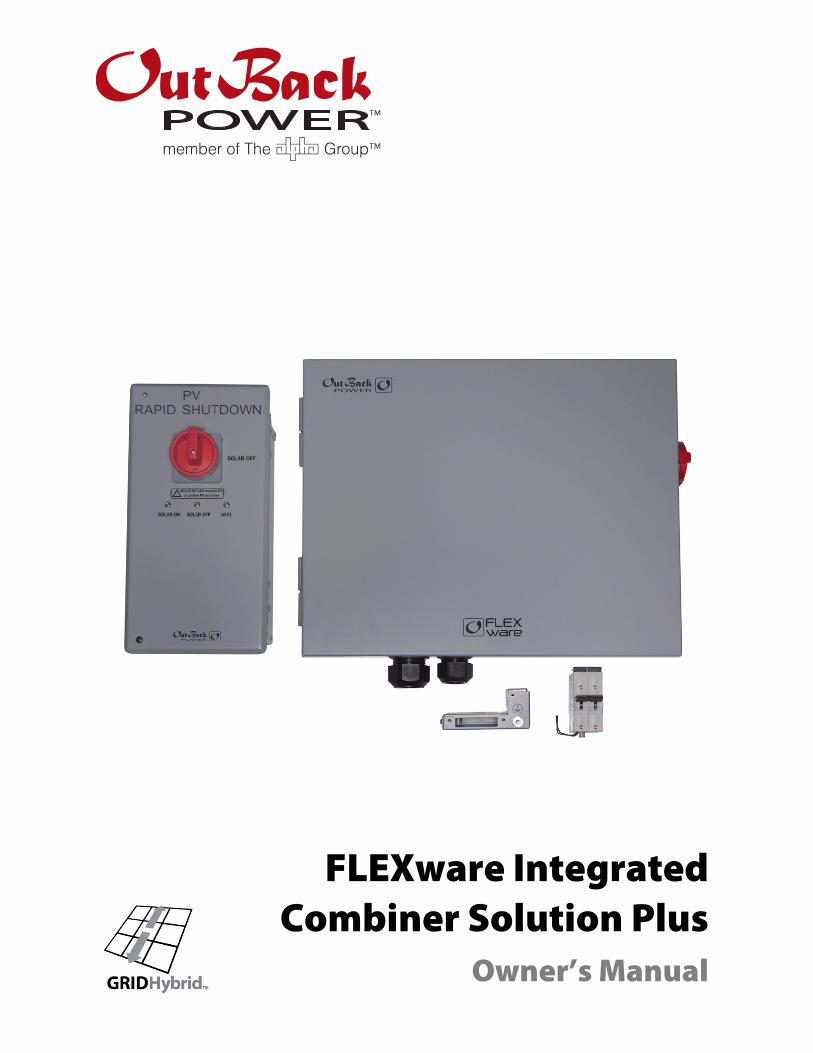
FLEXware Integrated Combiner Solution Plus
Owner’s Manual

About OutBack Power Technologies OutBack Power Technologies is a leader in advanced energy conversion technology. OutBack products include true sine wave inverter/chargers, maximum power point tracking charge controllers, and system communication components, as well as circuit breakers, batteries, accessories, and assembled systems.
Grid/Hybrid™ As a leader in off-grid energy systems designed around energy storage, OutBack Power is an innovator in Grid/Hybrid system technology, providing the best of both worlds: grid-tied system savings during normal or daylight operation, and off-grid independence during peak energy times or in the event of a power outage or an emergency. Grid/Hybrid systems have the intelligence, agility and interoperability to operate in multiple energy modes quickly, efficiently, and seamlessly, in order to deliver clean, continuous and reliable power to residential and commercial users while maintaining grid stability.
Contact Information Address: Corporate Headquarters
17825 – 59th Avenue N.E. Suite B Arlington, WA 98223 USA
European Office Hansastrasse 8 D-91126 Schwabach, Germany
Telephone:
+1.360.435.6030 +1.360.618.4363 (Technical Support) +1.360.435.6019 (Fax)
+49.9122.79889.0 +49.9122.79889.21 (Fax)
Email: [email protected]
Website: http://www.outbackpower.com
Disclaimer UNLESS SPECIFICALLY AGREED TO IN WRITING, OUTBACK POWER TECHNOLOGIES:
(a) MAKES NO WARRANTY AS TO THE ACCURACY, SUFFICIENCY OR SUITABILITY OF ANY TECHNICAL OR OTHER INFORMATION PROVIDED IN ITS MANUALS OR OTHER DOCUMENTATION.
(b) ASSUMES NO RESPONSIBILITY OR LIABILITY FOR LOSS OR DAMAGE, WHETHER DIRECT, INDIRECT, CONSEQUENTIAL OR INCIDENTAL, WHICH MIGHT ARISE OUT OF THE USE OF SUCH INFORMATION. THE USE OF ANY SUCH INFORMATION WILL BE ENTIRELY AT THE USER’S RISK.
OutBack Power Technologies cannot be responsible for system failure, damages, or injury resulting from improper installation of their products.
Information included in this manual is subject to change without notice.
Notice of Copyright Integrated Combiner Solution Plus Owner’s Manual © 2016 by OutBack Power Technologies. All Rights Reserved.
Trademarks OutBack Power, FLEXware, and the OutBack Power logo are trademarks owned and used by OutBack Power Technologies, Inc. The ALPHA logo and the phrase “member of the Alpha Group” are trademarks owned and used by Alpha Technologies Inc. These trademarks may be registered in the United States and other countries.
Date and Revision June 2016, Revision A
Part Number 900-0184-01-00 Rev A

900-0184-01-00 Rev A 3
Table of Contents Important Safety Instructions .................................................................................. 4
Symbols Used ........................................................................................................................................................................ 4 General Safety ....................................................................................................................................................................... 4
Introduction .......................................................................................................... 5 Audience ................................................................................................................................................................................. 5 Welcome to OutBack Power Technologies ................................................................................................................. 5 Product Overview ................................................................................................................................................................. 5
Features ............................................................................................................................................................................................... 5 Components ...................................................................................................................................................................................... 6 Packages ............................................................................................................................................................................................. 6
Components .......................................................................................................................................................................... 8 Combiner ............................................................................................................................................................................................ 8 RSI .......................................................................................................................................................................................................... 9
Functions ............................................................................................................ 11
Arc Fault Circuit Interruption ........................................................................................................................................ 11 Detection .......................................................................................................................................................................................... 11 Reset ................................................................................................................................................................................................... 11 Arc Fault Self-Test .......................................................................................................................................................................... 12
Rapid Shutdown ................................................................................................................................................................ 12 Rapid Shutdown Self-Test ........................................................................................................................................................... 12 Verification ....................................................................................................................................................................................... 12
PV Combiner Disconnect ................................................................................................................................................ 12
Installation .......................................................................................................... 13
Mounting Information ..................................................................................................................................................... 13 Connection Information ................................................................................................................................................. 14
Other Applications ............................................................................................... 17 Alternative System Requirements ............................................................................................................................... 17 Positive Ground ................................................................................................................................................................. 18
Troubleshooting .................................................................................................. 19 LED Indicators ..................................................................................................................................................................... 19 Basic Troubleshooting ..................................................................................................................................................... 19
Specifications ...................................................................................................... 21
Device Specifications ....................................................................................................................................................... 21 Regulatory Specifications ............................................................................................................................................... 22
Listings ............................................................................................................................................................................................... 22 Compliance ...................................................................................................................................................................................... 22 Component Compliance ............................................................................................................................................................. 23
Definitions ............................................................................................................................................................................ 23

Table of Contents
4 900-0184-01-00 Rev A
Important Safety Instructions READ AND SAVE THESE INSTRUCTIONS!
This manual contains important safety instructions for the Integrated Combiner Solution Plus (ICS Plus) product.
Symbols Used WARNING: Hazard to Human Life
This type of notation indicates that the hazard could be harmful to human life.
CAUTION: Hazard to Equipment This type of notation indicates that the hazard may cause damage to the equipment.
IMPORTANT: This type of notation indicates that the information provided is important to the installation, operation and/or maintenance of the equipment. Failure to follow the recommendations in such a notation could result in voiding the equipment warranty.
NOTE: This type of notation indicates that the information provided is important to understanding the operation and limits of the equipment. Failure to follow the recommendations in such a notation could result in improper or failed operation.
MORE INFORMATION When this symbol appears next to text, it means that more information is available in other manuals relating to the subject. The most common reference is to the ICS Plus Quick Start Guide.
General Safety WARNING: Limitations on Use
This equipment is NOT intended for use with life support equipment or other medical equipment or devices.
WARNING: Reduced Protection If this product is used in a manner not specified by ICS Plus product literature, the product’s internal safety protection may be impaired.
CAUTION: Equipment Damage Only use components or accessories recommended or sold by OutBack Power Technologies or its authorized agents.

900-0184-01-00 Rev A 5
Introduction Audience This manual provides instructions for installation, setup, and operation of the product. These instructions are for use by qualified personnel who meet all local and governmental code requirements for licensing and training for the installation of electrical power systems with AC and DC voltage up to 600 volts. This product is only serviceable by qualified personnel.
Welcome to OutBack Power Technologies Thank you for purchasing the OutBack Integrated Combiner Solution Plus (ICS Plus). It provides comprehensive PV rapid shutdown and arc fault protection. This product allows a system to meet the 2014 National Electric Code requirements for PV systems.
NEC 690.11 — Arc fault protection (protects against arc faults due to loose connections, damaged wires, or other DC component failures)
NEC 690.12 — Rapid shutdown (allows first responders to safely de-energize controlled conductors)
NEC 690.15 — DC combiner disconnect (opens all ungrounded circuit conductors from all energy sources)
Product Overview
Features First end-to-end solution listed to UL1741 with PV rapid shutdown systems (PVRSS)
Arc fault circuit interrupter (AFCI) listed to UL1699B with local and remote indication
Type 3R enclosures rated for indoor or outdoor installation
Flexible design — install the combiner box vertically, horizontally, or at any intermediate angle; mount to racking or under the PV array
Interoperability with compatible third-party PV rapid shutdown system equipment (PVRSE) with a dry contact input
Three complete packages simplify the design and ordering process
Combiner box has removable component panel for ease of wire management and for serviceability
Combiner box has easy-to-install DIN-mount fuses for bi-directional overcurrent protection
Lockable disconnects on combiner and rapid shutdown boxes
Communications use building wire commonly available in the field (THHN/THWN-2)
Ground lug and grounding terminal bus bar for system and equipment grounding
Internal factory prewiring to save time during installation

Introduction
6 900-0184-01-00 Rev A
Components The primary component in the ICS Plus system is the DC combiner box. This combines up to six PV source circuits and provides an overcurrent protective device (OCPD) for each circuit. The AFCI device is located here.
The combiner provides a local disconnecting means. It also provides a contactor for PV rapid shutdown functionality to de-energize PV circuits within 10 feet of the PV array.
Other components include:
Rapid Shutdown Initiator (RSI) which works with the combiner box to induce the rapid shutdown function
Relay-Trip Breaker (RTB) which physically opens the circuits near the charge controller(s)
Breaker control and power supply (BRK-CTRL-DC) which powers the RSI, RTB, and combiner
Packages The ICS Plus has three prepackaged solutions for battery-based systems.
Table 1 Packaged Systems Package ICSPLUS-1 ICSPLUS-2 ICSPLUS-3
FWPV6-FH600-SDA combiner 1 2 4
Compatibility 6 PV strings 1 charge controller
12 PV strings 2 charge controllers
24 PV strings 4 charge controllers
RSI Standard
BKR-CTRL-DC Standard
Relay-Trip Breaker PNL-75-DC-RT PNL-75D-DC-RT PNL-75Q-DC-RT
Introduction
900-0184-01-00 Rev A 7
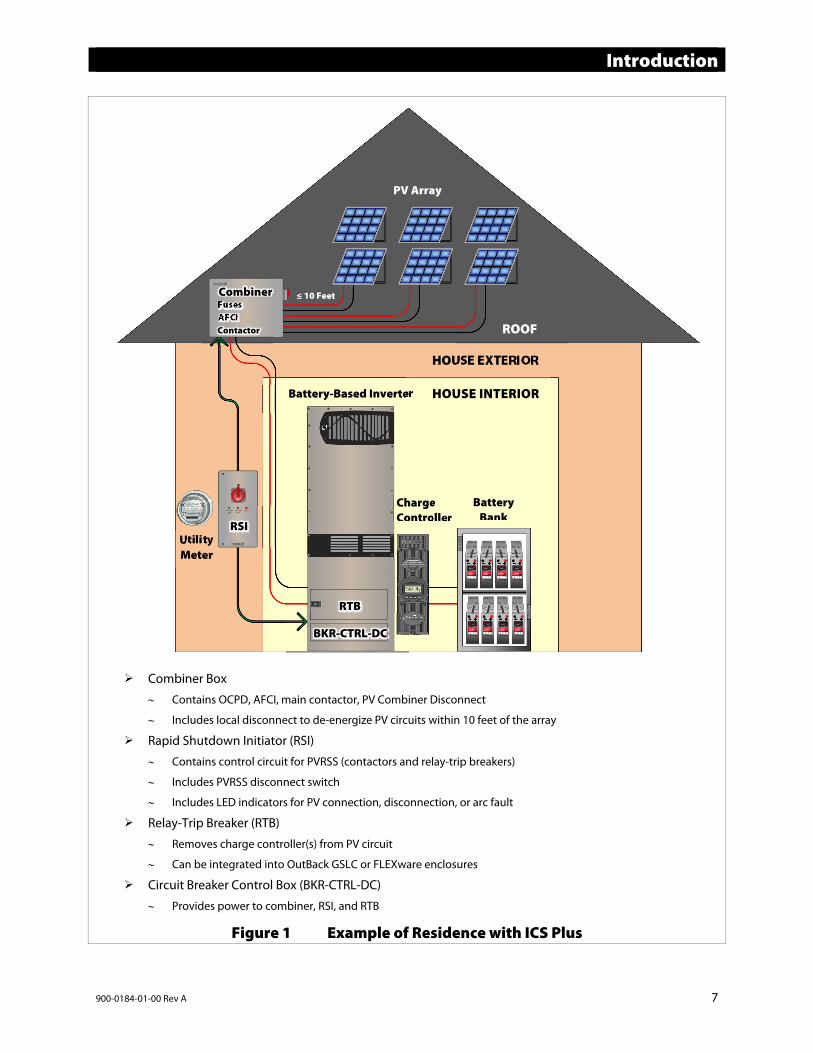
Figure 1 Example of Residence with ICS Plus
Fuses AFCI Contactor
PV Array
≤ 10 Feet
Utility Meter
Combiner
RSI
Battery-Based Inverter
Charge Controller
Battery Bank
RTB
BKR-CTRL-DC
Combiner Box
Contains OCPD, AFCI, main contactor, PV Combiner Disconnect
Includes local disconnect to de-energize PV circuits within 10 feet of the array
Rapid Shutdown Initiator (RSI)
Contains control circuit for PVRSS (contactors and relay-trip breakers)
Includes PVRSS disconnect switch
Includes LED indicators for PV connection, disconnection, or arc fault
Relay-Trip Breaker (RTB)
Removes charge controller(s) from PV circuit
Can be integrated into OutBack GSLC or FLEXware enclosures
Circuit Breaker Control Box (BKR-CTRL-DC)
Provides power to combiner, RSI, and RTB
HOUSE EXTERIOR
HOUSE INTERIOR
ROOF

Introduction
8 900-0184-01-00 Rev A
Components NOTE:
This manual depicts the use of a negative-grounded system. For positive grounding, see page 18.
Combiner
Figure 2 Components of Combiner Box
1 2 3
4 5 6 7 8
9 10
11
8
10
1 Gasketed Door/ Type 3R Enclosure Protects from the environment 12 Ground Cable
Terminal Provides “lay-in” lug for optional pass-through ground wire
2 Component Panel (Removable)
For ease of wire management and for serviceability 13 Fuse Holders
PV source overcurrent protection; fuses provided by user
3 Bidirectional PV Contactor
Opens PV circuits for AFCI and for local or remote disconnect 14 Combiner Control
Board Controls all functions within the combiner; commands the contactor
4 Ground Terminal Bus Bar
Provides a means for system and equipment grounding 15 Arc Fault
Self-Test Button Allows AFCI to be tested without opening the combiner box
5 Negative Terminal Bus Bar
Combines negative PV source circuits 16 PV Input
Connections Connections for positive PV source circuits
6 PV Positive Output Terminal
Connection for PV positive output circuit 17 Communications
Terminals Communicates with RSI and additional combiner boxes
7 Internal Prewiring
Factory-installed for ease of installation 18 AFCI
Annunciator Illuminates during an arc fault event or test
8 PV Combiner Disconnect
Activates the contactor for disconnection; can be padlocked in the OFF position
19 2” EKO (PV Output)
Accommodates conduit and a UL 514-compliant fitting for PV output circuits
9 Arc Fault Detection Device
Detects series DC arc fault events 20 Cable Glands
(PV Input) Provide waterproof strain relief for PV source circuits
10 Secure Latch
Fastens door; can be padlocked 21
½” EKO (optional)
For installation of a third-party surge protection device (provided by user)
11 Securing Screw Secures door in place if padlock is not used 22 ½” and ¾” (2 ea) EKO
(Communications)
Accommodate conduit and a UL 514-compliant fitting for communication wires
22
13 14 1515
16 17 18 18
20
12
19 21NOTE: All external wires are provided by installer

Introduction
900-0184-01-00 Rev A 9
RSI
Figure 3 Components of RSI
1 Rapid Shutdown switch Initiates the PVRSS function; disconnects RTB and main contactor in combiner.
2 SOLAR ON indicator Green LED indicator; illuminates when DC voltage is present and Rapid Shutdown switch is in the ON position.
3 SOLAR OFF indicator Red LED indicator. SOLAR OFF must be illuminated to confirm PV shutdown. This indicator tells responders that the Rapid Shutdown switch is in the OFF position to create a “safe” condition.
4 AFCI indicator Red LED indicator; illuminates when receiving an “arc fault” signal from the combiner.
5 ½” (3) EKO These accommodate conduit and a UL 514-compliant fitting for communication wires
NOTE: SOLAR ON does not necessarily indicate that the PV system is active. See the Troubleshooting section on page 19 .
1
2 3 4
5 55

Introduction
10 900-0184-01-00 Rev A
This page intentionally left blank.

900-0184-01-00 Rev A 11
Functions Arc Fault Circuit Interruption In a PV system, an electrical arc occurs when current bridges a gap between conductive surfaces. Gaps can occur due to conductor damage, or can be caused by inadequate system connections. An “arc fault” is a safety concern for several reasons: Risk of electric shock if the mounting system or other components become electrified. Fire hazard due to heat buildup from the current flow.
A series arc occurs across open connections in a single conductor. A parallel arc occurs if the current bridges multiple conductors that were meant to remain separate. The arc fault circuit interrupter (AFCI) in the ICS Plus is intended to protect against series arcs.
Detection The combiner has a dedicated arc fault detection device. The device operates by detecting the distinct electrical noise created by an arc. The detector has two current transducers, each of which monitors up to three PV circuits. If an arc is detected, the detector sends a signal to the main control board in the combiner box. The control board sends a signal to open the combiner’s main contactor. The AFCI Annunciator turns on. The control board also sends a signal to the RSI and turns on the “arc fault detected” indicator.
NOTES: This is a simple alarm indicating that an arc fault has occurred somewhere in the system. If
multiple combiners are in use, the RSI cannot specify which combiner triggered it. Only the combiner with the detected arc will open its contactor. Any other combiners in the
system will continue to operate. Relay-trip breakers will continue to operate.
If an arc fault occurs, see the Troubleshooting section on page 19.
Upon an arc fault event, the system is required by NEC 690.11 to be reset manually. The manual reset also resets the RSI AFCI indicator and the combiner AFCI Annunciator.
Reset To reset the detector following an arc fault:
1. Turn the PV Combiner Disconnect switch (or the Rapid Shutdown switch) to the OFF position. The AFCI Annunciator and AFCI indicator should turn off. All combiner box contactors will open.
2. Turn the same switch to the ON position. The AFCI Annunciator and AFCI indicator should remain off. All combiner box contactors will close.
NOTES: The Rapid Shutdown switch can be used to reset all combiners at once from a central location. If the Rapid Shutdown switch is used, the relay-trip breakers will turn off at the same time.
Make certain to turn them back on when this step is performed.
An arc fault can also be reset by disconnecting all DC power from the system, including the batteries.
The ICS Plus arc fault detector has been evaluated to have a low instance of nuisance tripping. However, installing external DC components in the system may increase the risk of nuisance tripping.
Functions
12 900-0184-01-00 Rev A
Arc Fault Self-Test The arc fault function can be manually tested. The arc fault self-test mimics the conditions of an arc fault. The combiner and RSI give the same indications as described on page 11.
To perform the arc fault self-test: 1. Ensure the system is functioning and all indicators are normal.
2. Push the arc fault self-test button as shown in Figure 2 on page 8.
3. Listen for an audible click as the contactor opens.
4. Check the AFCI Annunciator on the combiner. It should be illuminated.
5. Optional (if installed): Check the AFCI indicator on the RSI. It should be illuminated.
Reset the system by the same method as described on page 11.
Rapid Shutdown The rapid shutdown requirement is intended for firefighters or first responders. In an emergency, a responder may need to set the PV system in a “safe” (de-energized) state according to NEC 690.12.
For this reason, the RSI is required to be mounted close to the main utility meter. The RSI must be easily visible.
The RSI includes a Rapid Shutdown switch that initiates a disconnection of all elements of the PV system. Opening this switch sends a signal to all combiners to open the main contactor on each.
Opening this switch also sends a signal to all relay-trip breakers, ordering them to open. According to NEC 690.12, the rapid shutdown must reduce the DC circuit to less than 30 Vdc and 240 VA within ten seconds of initiation. Because many charge controllers have capacitors which may not discharge quickly enough, the RTB function removes the controller from the circuit to make it safe.
Rapid Shutdown Self-Test The rapid shutdown should be tested every six months. This test should be performed as described in the Verification section.
Verification Turning the Rapid Shutdown switch to the right (clockwise) puts it in the OFF position. The SOLAR OFF LED indicator will illuminate upon successful shutdown. If this does not occur, see the Troubleshooting section on page 19.
PV Combiner Disconnect
Each combiner has a PV Combiner Disconnect switch which is used to turn off a particular array. This is used if the array or circuit needs to be serviced. The switch can be padlocked in the OFF position as a “lockout/tagout” procedure to prevent a shock hazard.

900-0184-01-00 Rev A 13
Installation This section assumes the use of the combiner, the RSI, the BKR-CTRL-DC and the RTB. The combiner box is a required part of all ICS Plus systems. All examples in OutBack literature show one or more combiners in use, including the ICS Plus Quick Start Guide.
The RSI is required for all ICS Plus systems utilizing the PVRSS function. For examples of systems which may not require the use of the RSI, see page 17. Also see page 17 for examples of systems which may not require the use of the BKR-CTRL-DC or the RTB.
Mounting Information The ICS Plus combiner box accommodates multiple mounting types.
It can be mounted horizontally, vertically, or at any intermediate angle. It has slotted mounting feet which allow a variety of positions. It is capable of being mounted directly under the PV array if necessary. It must be mounted at least 36” (91.4 cm) above the ground. The combiner box has a latch which should be padlocked to limit internal access. The main disconnect can also be padlocked in the OFF position for safety.
NOTE: If the box is not padlocked, the securing screw must be used to secure the door. See Figure 2 on page 8.
The RSI has mounting brackets at the top and bottom.
It should be installed near the service meter. It must be mounted vertically and must be at least 36” (91.4 cm) above the ground. The Rapid Shutdown switch can be padlocked in the OFF position for safety.
NOTE: If the structure where the RSI is installed is also equipped with utility service, the structure must have a permanent sign or plaque reading “PHOTOVOLTAIC [or PV] SYSTEM EQUIPPED WITH RAPID SHUTDOWN”. This plaque must be reflective, with all letters capitalized and having a minimum height of ⅜” (9.5 mm) in white on red background.
The BKR-CTRL-DC is intended to be installed in the load center in most cases.
When using the FLEXware 500 or 1000, it is installed in one slot in the DC enclosure. When using the FLEXware 250, it is not installed inside the enclosure. It is installed externally using the
included bracket. It connects alongside the FLEXnet DC Battery Monitor. When using the GSLC, it is installed in one circuit breaker slot on the DC rail. If necessary, the slotted holes on the included bracket allow it to be installed in various external locations on
the GSLC or the Radian inverter.
The RTB is intended to be installed in the load center.
Each RTB takes the place of a PV input circuit breaker. Note that each RTB assembly requires an additional circuit breaker slot. For example, PNL-75D-DC-RT
requires three slots. PNL-75Q-DC-RT requires five slots.

Installation
14 900-0184-01-00 Rev A
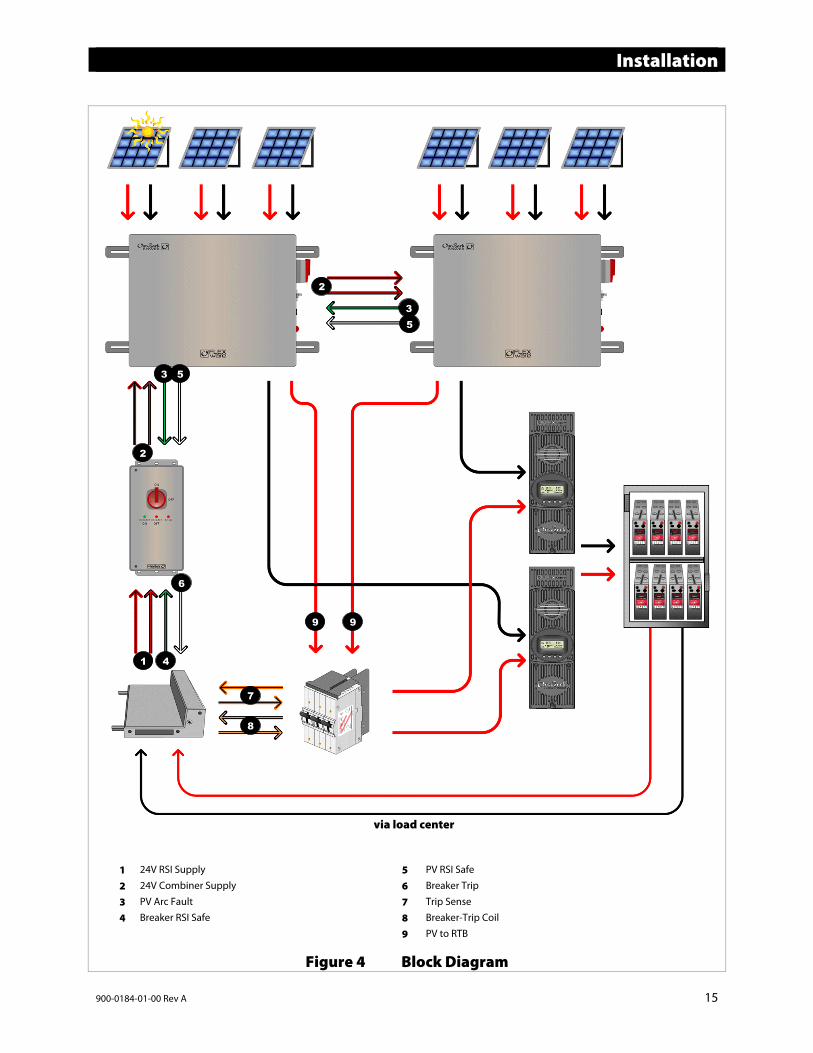
Connection Information Combiner The combiner box can take input circuits from up to six PV subarrays. It provides a single PV output which is connected to the load center and one pole of the RTB. See Figure 4 on page 15. The combiner’s control board receives power from the RSI (2). It also sends status information to the RSI (3).
Both sets of wires must be connected for correct PVRSS operation. The communication wires may be run in the same conduit as the PV wire only if the communication wiring
is rated for the highest system voltage. Up to six combiners can be used in a single system with a single RSI. The control wires must be placed in
series (“daisy chained”) between combiners. Regardless of the number in use, the last combiner must have a jumper placed across its sensing terminals
to close the circuit. If only one combiner is present, the jumper must be placed there.
RSI The RSI communicates with the combiner box (and with any additional combiners connected to it). It also communicates with the Circuit Breaker Control box, BKR-CTRL-DC, and RTB connected to it. See Figure 4 on page 15. It receives power (1) from the BKR-CTRL-DC or a similar power supply. It sends power (2) to the combiner(s) control board. It receives AFCI (3) status information from the combiner(s). It receives PVRSS status information from the BKR-CTRL-DC (4) and the combiner(s) (5). It sends RTB disconnect commands (6) to the BKR-CTRL-DC.
Both sets of wires must be connected for correct PVRSS operation.
BKR-CTRL-DC The BKR-CTRL-DC connects to the battery bus in the load center. See Figure 4 on page 15. It sends 24-volt power to the RTB (8) and the RSI (1) (which in turn powers the combiner). The positive wire to the load center must be protected with the following fuse type:
3AG Cartridge, 3A slow-blow, 10kA@125VDC. This box receives a plug which must be manually wired in advance with the appropriate conductors.
CAUTION: Equipment DamageThe 24-volt conductor is not grounded and is not to be connected to chassis or any other grounding system.
RTB The remote-trip breaker facilitates part of the PVRSS function by removing the charge controller from the PV circuit. It has connections for the trip sense function (7), the breaker-trip coil (8), and the PV input (9). See Figure 4 on page 15. The RTB takes the place of the PV input disconnect which is normally installed in the load center. When multiple combiners are in use, multiple RTB poles may be required. PNL-75D-DC-RT has dual poles for
two combiners. PNL-75Q-DC-RT has quadruple poles for four combiners. When six combiners are in use, PNL-75D-DC-RT and PNL-75Q-DC-RT should both be installed. For this
installation, the RTB control and coil connections should be wired in parallel.
Installation
900-0184-01-00 Rev A 15
Figure 4 Block Diagram
1
3
2
via load center
5
7
8
4
2
3
1 24V RSI Supply 5 PV RSI Safe
2 24V Combiner Supply 6 Breaker Trip
3 PV Arc Fault 7 Trip Sense
4 Breaker RSI Safe 8 Breaker-Trip Coil
9 PV to RTB
9
5
6
9
Installation
16 900-0184-01-00 Rev A
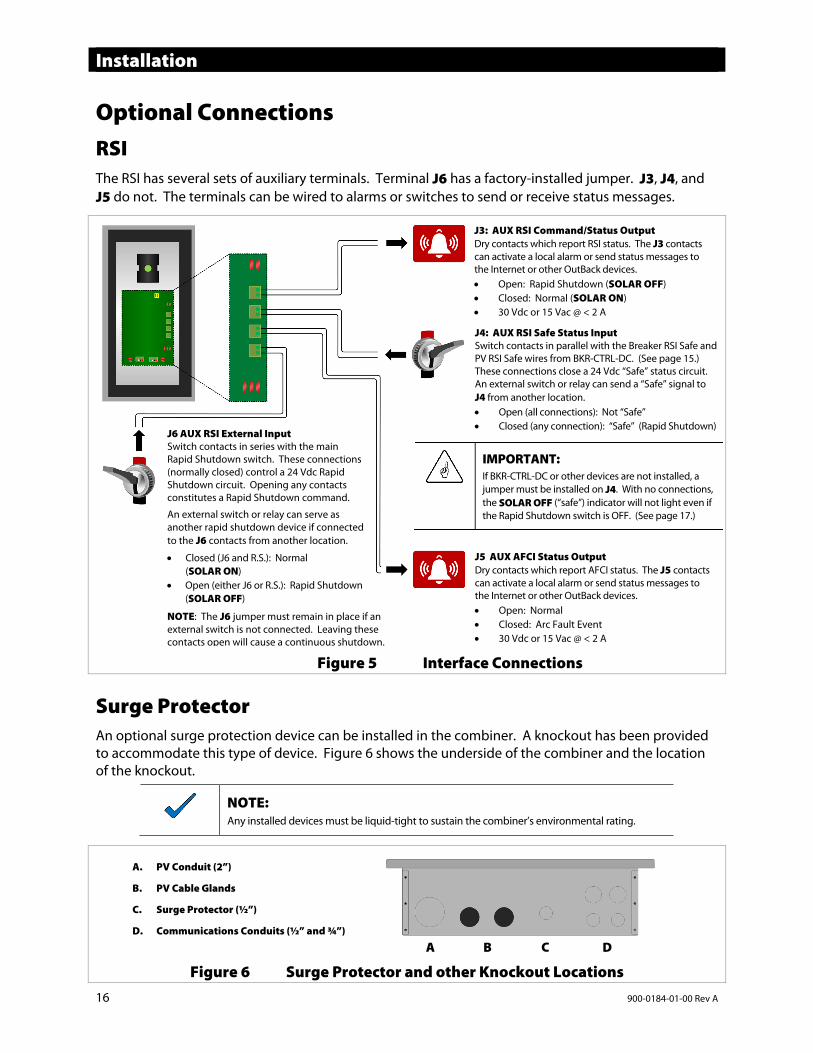
Optional Connections RSI The RSI has several sets of auxiliary terminals. Terminal J6 has a factory-installed jumper. J3, J4, and J5 do not. The terminals can be wired to alarms or switches to send or receive status messages.
Figure 5 Interface Connections
Surge Protector An optional surge protection device can be installed in the combiner. A knockout has been provided to accommodate this type of device. Figure 6 shows the underside of the combiner and the location of the knockout.
NOTE: Any installed devices must be liquid-tight to sustain the combiner’s environmental rating.
Figure 6 Surge Protector and other Knockout Locations
J5 AUX AFCI Status Output Dry contacts which report AFCI status. The J5 contacts can activate a local alarm or send status messages to the Internet or other OutBack devices. Open: Normal Closed: Arc Fault Event 30 Vdc or 15 Vac @ < 2 A
J3: AUX RSI Command/Status Output Dry contacts which report RSI status. The J3 contacts can activate a local alarm or send status messages to the Internet or other OutBack devices. Open: Rapid Shutdown (SOLAR OFF) Closed: Normal (SOLAR ON) 30 Vdc or 15 Vac @ < 2 A
J4: AUX RSI Safe Status Input Switch contacts in parallel with the Breaker RSI Safe and PV RSI Safe wires from BKR-CTRL-DC. (See page 15.) These connections close a 24 Vdc “Safe” status circuit. An external switch or relay can send a “Safe” signal to J4 from another location. Open (all connections): Not “Safe” Closed (any connection): “Safe” (Rapid Shutdown)
IMPORTANT: If BKR-CTRL-DC or other devices are not installed, a jumper must be installed on J4. With no connections, the SOLAR OFF (“safe”) indicator will not light even if the Rapid Shutdown switch is OFF. (See page 17.)
J6 AUX RSI External Input Switch contacts in series with the main Rapid Shutdown switch. These connections (normally closed) control a 24 Vdc Rapid Shutdown circuit. Opening any contacts constitutes a Rapid Shutdown command.
An external switch or relay can serve as another rapid shutdown device if connected to the J6 contacts from another location.
Closed (J6 and R.S.): Normal (SOLAR ON)
Open (either J6 or R.S.): Rapid Shutdown (SOLAR OFF)
NOTE: The J6 jumper must remain in place if an external switch is not connected. Leaving these contacts open will cause a continuous shutdown.
A. PV Conduit (2”)
B. PV Cable Glands
C. Surge Protector (½”)
D. Communications Conduits (½” and ¾”)
A B C D

900-0184-01-00 Rev A 17
Other Applications Alternative System Requirements The ICS Plus can be used in systems with varying requirements, or with third-party equipment. Some systems may only need certain ICS Plus components, rather than the entire system. This may depend on the applicable codes.
NOTE: All systems depicted here assume the use of a PV combiner with AFCI protection required.
Table 2 Applications PV Application Combiner
and AFCI PVRSS
InitiatorSystem Power Load Center
Disconnect
These battery-based applications use OutBack equipment, or equipment which operates in the equivalent voltage range.
300 Vdc max array
24 to 48 Vdc battery bank
PVRSS required
FWPV6-FH600-SDA RSI BKR-CTRL-DC PNL-75*-DC-RT * 75, 75D, or 75Q
300 Vdc max array
24 to 48 Vdc battery bank
PVRSS NOT required
FWPV6-FH600-SDA — BKR-CTRL-DC —
These battery-based applications may require third-party equipment which operates in higher voltage ranges.
300 to 600 Vdc max array
24 to 48 Vdc battery bank
PVRSS required
FWPV6-FH600-SDA RSI BKR-CTRL-DC Third-party PVRSE rated for 600Vdc
300 to 600 Vdc max array
24 to 48 Vdc battery bank
PVRSS NOT required
FWPV6-FH600-SDA — BKR-CTRL-DC —
These non-battery-based applications may require third-party equipment which operates in higher voltage ranges.
600 Vdc max array
Non-battery-based system
PVRSS required
FWPV6-FH600-SDA RSI Isolated Class 2 DC supply Up to 15 Adc 24 Vdc ± 3% maximum
(over operating conditions)
PVRSE rated for 600Vdc
600 Vdc max array
Non-battery-based system
PVRSS NOT required
FWPV6-FH600-SDA — —
IMPORTANT: When BKR-CTRL-DC is not used and no J4 input is provided to the RSI, J4 must have pins 1 and 2 connected together with a jumper. (See page 16.) This provides the RSI Safe signal that otherwise would not be present.

Other Applications
18 900-0184-01-00 Rev A
Positive Ground The ICS Plus can be used in positive-grounded installations. For these solutions, the ungrounded PV negative (–) conductors should be connected to the fuse holders. The grounded PV positive (+) conductors should be connected to the white bus bar. Other connections, such as the combined PV output, should be similarly reversed. The remaining combiner box connections are made as normal.
Figure 7 Positive-Grounded Combiner Box
IMPORTANT: Some positive-grounded solutions require the disconnection of both the grounded and ungrounded conductors. The ICS Plus product depicted here has only a single contactor. It will not suffice for these applications.
IMPORTANT: The ICS Plus product depicted here cannot be used in ungrounded systems.
The relay-trip breaker is wired differently from the method in the ICS Plus Quick Start Guide.
Figure 8 Positive-Grounded RTB
1 2
3
1 Positive Terminal Bus Bar Combines grounded (positive [+]) PV source and output circuits
2 PV Negative Output Terminal Connection for ungrounded (negative [–]) PV output circuit
3 PV Input Connections Connections for ungrounded (negative [–]) PV source circuits
LOAD (+)
LINE (–) Combiner box PV negative (–)
Charge controller PV negative (–)
900-0184-01-00 Rev A 19
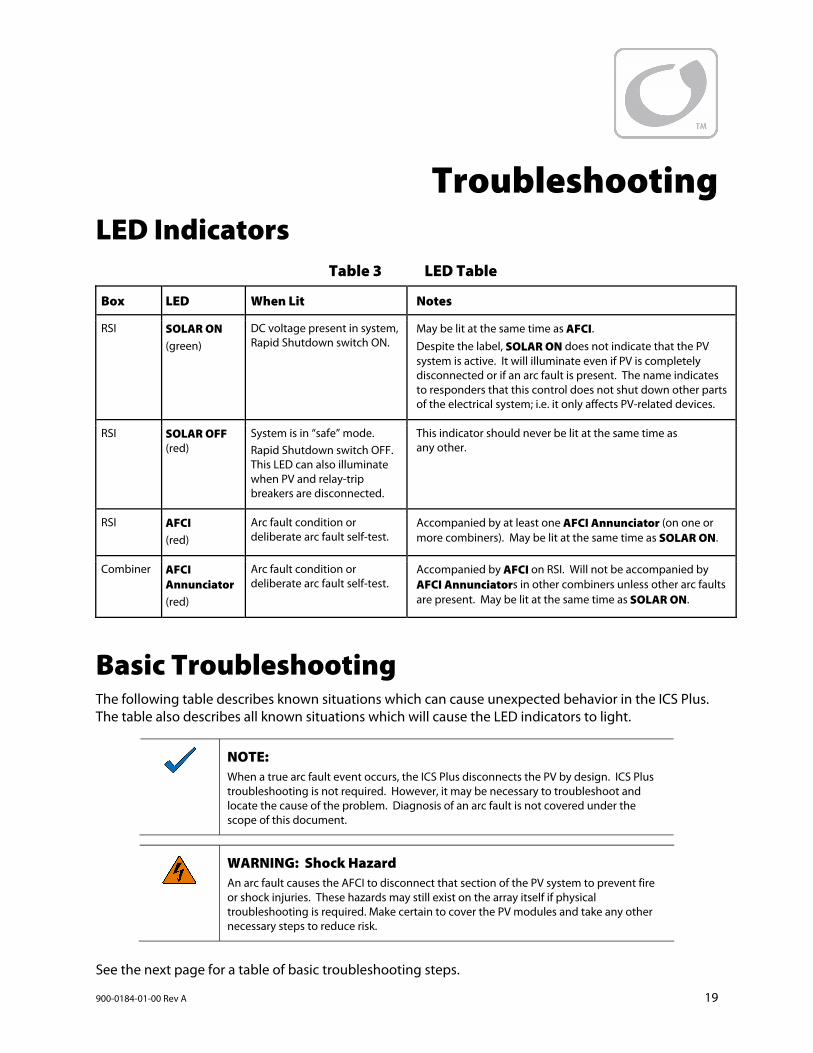
Troubleshooting LED Indicators
Table 3 LED Table
Box LED When Lit Notes
RSI SOLAR ON (green)
DC voltage present in system, Rapid Shutdown switch ON.
May be lit at the same time as AFCI. Despite the label, SOLAR ON does not indicate that the PV system is active. It will illuminate even if PV is completely disconnected or if an arc fault is present. The name indicates to responders that this control does not shut down other parts of the electrical system; i.e. it only affects PV-related devices.
RSI SOLAR OFF (red)
System is in “safe” mode. Rapid Shutdown switch OFF. This LED can also illuminate when PV and relay-trip breakers are disconnected.
This indicator should never be lit at the same time as any other.
RSI AFCI (red)
Arc fault condition or deliberate arc fault self-test.
Accompanied by at least one AFCI Annunciator (on one or more combiners). May be lit at the same time as SOLAR ON.
Combiner AFCI Annunciator (red)
Arc fault condition or deliberate arc fault self-test.
Accompanied by AFCI on RSI. Will not be accompanied by AFCI Annunciators in other combiners unless other arc faults are present. May be lit at the same time as SOLAR ON.
Basic Troubleshooting The following table describes known situations which can cause unexpected behavior in the ICS Plus. The table also describes all known situations which will cause the LED indicators to light.
NOTE: When a true arc fault event occurs, the ICS Plus disconnects the PV by design. ICS Plus troubleshooting is not required. However, it may be necessary to troubleshoot and locate the cause of the problem. Diagnosis of an arc fault is not covered under the scope of this document.
WARNING: Shock Hazard An arc fault causes the AFCI to disconnect that section of the PV system to prevent fire or shock injuries. These hazards may still exist on the array itself if physical troubleshooting is required. Make certain to cover the PV modules and take any other necessary steps to reduce risk.
See the next page for a table of basic troubleshooting steps.

Troubleshooting
20 900-0184-01-00 Rev A
Table 4 Troubleshooting
Symptom Possible Cause Possible Remedy
AFCI indicator and combiner AFCI Annunciator lit.
Arc fault event. NOTE: The SOLAR ON indicator remains lit.
If an arc fault is present, the shutdown of the system constitutes correct operation. The ICS Plus does not need troubleshooting. Investigate any potential causes throughout the PV system.
Arc fault self-test button was pressed. Turn combiner disconnect switch or Rapid Disconnect switch off, then on. Reset all RTB devices.
AFCI indicator lit. Combiner AFCI Annunciator not lit.
Arc fault in another combiner (multiple combiner system only). NOTE: The SOLAR ON indicator remains lit.
Check all combiners. An arc fault will activate the AFCI Annunciator in that combiner only.
SOLAR OFF indicator lit. RTB cannot be turned on.
Rapid Shutdown switch is in off position. System is in “safe” condition with PV contactors disconnected and RTB forced to the off position.
Turn Rapid Shutdown switch on. Once it is on, turn on the RTB.
SOLAR OFF indicator and another indicator both lit.
RSI miswired. Check all wiring between RSI and combiner.
SOLAR ON indicator lit, but charge controller does not register PV input.
Combiner disconnect switch turned off. Turn on combiner disconnect switch.
SOLAR ON indicator lit, but charge controller registers reduced PV input.
Array wiring error or poor connection. Check all PV wiring to combiner. Use DVM to confirm voltage of each subarray at combiner input terminals.
Fuses blown in combiner box. Check all fuses.
No indicators lit. RTB off. Turning RTB on does not enable PV.
Battery or DC source is disconnected. Loss of combiner box control voltage caused the PV contactor to disconnect. System is not in the formal “safe” condition, although PV array is still forced to be off.
Check all DC disconnect devices. Check BKR-CTRL-DC fuse. Use DVM to confirm voltage at BKR-CTRL-DC terminals. NOTE: Once voltage is established, RTB must be manually turned on (if not already on).
SOLAR OFF indicator does not light when Rapid Shutdown switch is turned off.
Battery or DC source is disconnected. System is not in the formal “safe” condition, although PV array is still forced to be off.
Check all DC disconnect devices. Check the BKR-CTRL-DC fuse. Use DVM to confirm voltage at BKR-CTRL-DC terminals. NOTE: Once voltage is established and RTB is off, SOLAR OFF indicator should light. See below.
SOLAR OFF indicator does not light when Rapid Shutdown switch is turned off after DC reconnection.
RTB is turned on. System is not in “safe” condition. Rapid Shutdown switch was not able to turn the RTB off due to DC loss. NOTE: This may not be a valid test. Wait at least one minute after DC reconnection.
Turn RTB off if necessary, or wait. Within 30 seconds, the RSI will turn the RTB to the off position automatically to force a “safe” condition. The SOLAR OFF indicator should light.

900-0184-01-00 Rev A 21
Specifications Device Specifications
Table 5 Electrical and General Specifications
Device ICS Plus Combiner Box
Rapid Shutdown Initiator
Circuit Breaker Control
Relay Trip Breakers
Designation FWPV6-FH600-SDA RSI BKR-CTRL-DC PNL-75-DC-RT PNL-75D-DC-RT PNL-75Q-DC-RT
Description 6-string combiner box with PV rapid shutdown, AFCI, and manual disconnect
Initiates a PV rapid shutdown event; provides indication for PV status and AFCI
DC breaker control and power supply; provides isolated 24 Vdc from batteries
1- to 4-pole breakers that open controlled conductors in a PV rapid shutdown event
Compatibility Can accommodate 6 PV input strings per combiner
Can control up to 6 combiner boxes and 2 relay-trip breakers
Can power up to 6 combiner boxes and 2 relay-trip breakers
Can control 1 to 4 poles 1 pole: PNL-75-DC-RT 2 poles: PNL-75D-DC-RT 4 poles: PNL-75Q-DC-RT
Terminals:
Input #14 to #8 AWG (2.5 to 10 mm2) (Cable glands) #24 to #16 AWG
(0.25 to 1.5 mm2) ¼” stud #14 to 2/0 AWG (2.5 to 70 mm2) (PV input)
Output #14 to 2/0 AWG 10-32 screw (trip sense)
LED indicators AFCI Annunciator SOLAR ON SOLAR OFF AFCI
N/A N/A
Overcurrent Protection
(6) 600 Vdc DIN rail fuse holders N/APNL 3AG Cartridge, 3A
slow-blow, 10kA@125VDC N/A
Voltage Rating 600 Vdc 24 Vdc ± 3% N/A 300 Vdc per pole
Total Current (maximum) 96 Adc N/A N/A 75 Adc per pole
DC input 24 Vdc ± 3% 24 Vdc ± 3% 24, 32, 36, 48 Vdc (battery nominal)
Supplied from Circuit Breaker Control box
Normal Operation Power Draw 0.10 Adc 0.06 Adc 0.05 Adc N/A
Table 6 Mechanical and Environmental Specifications
Device ICS Plus Combiner Box
Rapid Shutdown Initiator
Circuit Breaker Control
Relay Trip Breakers
Enclosure Material
Powder-coated aluminum N/A
Enclosure Rating UL Type 3R UL Type 3R UL Type 1 with
connector enclosure UL Open Type RH noncondensing
Operating Temperature –25 to 60°C –25 to 60°C –25 to 50°C –25 to 50°C
Security Lockable Switch is lockable
in OFF position
Switch is lockable in OFF position N/A N/A
Mounting Vertical to horizontal (adjustable feet)
Vertical only (brackets)
Panel slot or bracket
Panel slot(s)
Specifications
22 900-0184-01-00 Rev A
Table 6 Mechanical and Environmental Specifications
Device ICS Plus Combiner Box
Rapid Shutdown Initiator
Circuit Breaker Control
Relay Trip Breakers
Knockouts 2”, ½”, and ¾” ½” N/A N/A
Dimensions (H x W x D)
15.5 × 19.5 × 4.5” (39.4 × 49.5 × 11.4 cm)
14.1 ×7.3 × 3.75” (30.5 × 17.8 × 12.7cm)
2.0 × 5.25 × 4.4” (5.1 × 13.3 × 11.2 cm)
Width only: PNL-75-DC-RT: 1.5” (3.9 cm) PNL-75D-DC-RT: 2.2” (5.7 cm)PNL-75Q-DC-RT: 3.8” (9.6 cm)
Weight ~ 12 lb (5.4 kg) ~ 4 lb (1.8 kg) 0.8 lb (0.36 kg)
PNL-75-DC-RT: 0.7 lb (0.32 kg) PNL-75D-DC-RT: 1.15 lb (0.52 kg) PNL-75Q-DC-RT: 2.05 (0.93 kg)
Regulatory Specifications
Listings This product carries a listing report by UL. It is listed to the following standards:
UL 1741 — Inverters, Converters, Controllers and Interconnection System Equipment for Use With Distributed Energy Resources (2nd Edition, 1/28/2010, with revisions through 3/23/2016) with PV Rapid Shutdown
UL1699 — Standard for Arc-Fault Circuit Interrupters (2nd Edition, revised 11/08/2013)
UL1699B — Photovoltaic (PV) DC Arc-Fault Circuit Protection (2nd Edition, 1/14/2014)
CSA C22.2 — General Use Power Supplies, No. 107.1-3 Issue: 2001/09/01 Ed:3 (R2011) with PV Rapid Shutdown
Compliance This product has been tested to comply with the following standards:
FCC Part 15, Class B
FCC Information to the User This equipment has been tested and found to comply with the limits for a Class B digital device when powered by a DC source, pursuant to part 15 of the FCC Rules. These limits are designed to provide reasonable protection against harmful interference in a residential installation. This equipment generates, uses, and can radiate radio frequency energy and, if not installed and used in accordance with the instructions, may cause harmful interference to radio communications. However, there is no guarantee that interference will not occur in a particular installation. If this equipment does cause harmful interference to radio or television reception, which can be determined by turning the equipment off and on, the user is encouraged to try to correct the interference by one or more of the following measures:
Reorient or relocate the receiving antenna.
Increase the separation between the equipment and the receiver.
Consult the dealer or an experienced radio/TV technician for help.

Specifications
900-0184-01-00 Rev A 23
Component Compliance The following individual components have been tested to comply with the following standards:
Relay-Trip Breakers UL1077
Definitions The following is a list of initials, terms, and definitions used in conjunction with this product.
Table 7 Terms and Definitions
Term Definition
AFCI Arc Fault Circuit Interruption
Combiner An enclosure which combines multiple PV circuits, using individual circuit protection
Controlled conductor A section of wire between the combiner and either the RTB or the PVRSE device
CSA Canadian Standards Association; establishes Canadian national standards and the Canadian Electrical Code, including C22.1 and C22.2
Dry contact A relay contact with no source voltage; switches the continuity to be used by an external device
DVM Digital Voltmeter
EKO Electrical Knockout
Grounded Conductor The DC conductor (negative or positive) which is mechanically bonded to ground in one place
NEC National Electric Code
PVRSS Photovoltaic Rapid Shutdown System
PVRSE Photovoltaic Rapid Shutdown (System) Equipment
RSI Rapid Shutdown Initiator
RTB Relay-Trip Breaker
GSLC GS Load Center; the DC and AC load center for Radian series inverters
UL Underwriters Laboratories; refers to a set of safety standards governing electrical products

900-0184-01-00 Rev A
Masters of the Off-Grid.™ First Choice for the New Grid.
Corporate Headquarters 17825 – 59th Avenue N.E. Suite B Arlington, WA 98223 USA +1.360.435.6030
European Office Hansastrasse 8 D-91126 Schwabach, Germany +49.9122.79889.0


