EVIEW FOR JAWS USERS: OVERVIEW VS-01 TABLE OF CONTENTS TABLE OF CONTENTS.............................................. 1 OBJECTIVE 1:................................................... 3 Background and Configuration.................................3 Background..............................................3 Starting eView..........................................3 JAWS and eView Configuration............................4 OBJECTIVE 2:................................................... 7 Open and Navigate a Claim....................................7 Opening a Claim.........................................7 The Common Header Frames................................9 eView Tabs.............................................10 Closing eView..........................................16 OBJECTIVE 3:.................................................. 18 Reading eView Documents.....................................18 OCR....................................................18 OL Visually Impaired Curriculum Page 1 November 2013
Transcript
EVIEW FOR JAWS USERS: OVERVIEW VS-01
TABLE OF CONTENTS
TABLE OF CONTENTS..................................................................................................1
OL Visually Impaired Curriculum Page 2 November 2013
EVIEW FOR JAWS USERS: OVERVIEW VS-01
OBJECTIVE 1:
Background and Configuration
Background
eView is a Web-based application used to view information stored electronically as part of the eDib process. Employees also use eView to query case information or to view attached documents and exhibits. In addition to using eView as a stand-alone application, many employees use eView in conjunction with other SSA applications, such as CHIP and EDCS.
Starting eView
If the Web eView icon is on your desktop:
1. Access your desktop by pressing WINDOWS KEY + D, and then press W until you hear JAWS say, "Web eView."
2. Alternatively, you can use your ARROW KEYS to move through your desktop icons until you hear JAWS say, "Web eView."
3. Press ENTER.
If the Web eView icon is not on your desktop:
1. Access your desktop by pressing WINDOWS KEY + D.
2. Press S until you get to the SSA WEB INDEX-PAGE icon.
OL Visually Impaired Curriculum Page 3 November 2013
EVIEW FOR JAWS USERS: OVERVIEW VS-01
3. Press ENTER.
4. Press INSERT + F7 to open the Links List dialog box.
5. Press E until you hear JAWS announce, "eView Production."
6. Press ENTER.
JAWS and eView Configuration
Configure eView
To configure eView, do the following:
1. To ensure you have enabled JAWS Mode in eView, press INSERT + F7 to open the Links List dialog box.
2. Use the UP/DOWN ARROW KEYS, or first letter navigation to navigate through the links.
3. If JAWS announces, "Enable JAWS Mode," press ENTER on the Enable JAWS Mode link.
4. Press ENTER to activate the OK button and close the message.
5. If you hear JAWS say, "Disable JAWS Mode," this means that you have already enabled JAWS Mode. Press the ESCAPE KEY to close the Links List dialog box.
Personalize JAWS Settings for eView
Document Automatically Reads
OL Visually Impaired Curriculum Page 4 November 2013
EVIEW FOR JAWS USERS: OVERVIEW VS-01
1. With your focus in eView, press INSERT + V to open the JAWS Quick Settings dialog box.
2. Type "Document."
3. DOWN ARROW to the second instance of Document automatically reads. JAWS will say, "Document automatically reads" and then indicate whether the feature is on (checkbox checked) or off (checkbox not checked). JAWS will then say, "Personalize Web Settings General Options."
4. If the feature is on, press SPACEBAR to uncheck the checkbox and disable automatic reading.
5. Press ENTER to clear the search and save the setting.
Text Links Show Using
JAWS USER NOTE:
We recommend the following Text Links Show Using setting to maximize the way JAWS reads in the Case Documents tab of eView. You should note, however, that this setting is not necessarily optimal for the other tabs in eView. You should experiment with your Text Links Show Using option to determine which setting is optimal for you.
1. SHIFT + TAB to the Search Box edit field. Type "Text Link."
2. DOWN ARROW to the second instance of Text Links Show Using. JAWS will say, "Text Links Show Using" and indicate whether the feature is set to Title, Screen Text, On Mouse Over, Longest, or Custom Search. JAWS will then say, "Personalize Web Settings Web Links."
3. If the Text Links Show Using setting is not set to Screen Text, press SPACEBAR until the option is set to Screen Text.
OL Visually Impaired Curriculum Page 5 November 2013
EVIEW FOR JAWS USERS: OVERVIEW VS-01
4. Press ENTER to clear the search and save the setting.
5. Press ENTER again to close the Quick Settings dialog box.
JAWS TECHNICAL NOTE:
At the time we created this document, Personalized Web Settings were not working properly. The settings held, but did not actually change the way JAWS responded. To correct this issue and get JAWS to read properly, you may also need to make changes to Quick Settings options. To do this, take the following steps:
1. With your focus in eView, press INSERT + V to open the JAWS Quick Settings dialog box.
2. Type "Document."
3. DOWN ARROW to the first instance of Document automatically reads. JAWS will say, "Document automatically reads" and then indicate whether the feature is on (checkbox checked) or off (checkbox not checked). JAWS will then say, "Virtual Cursor Options, General Options."
4. If the feature is on, press SPACEBAR to uncheck the checkbox and disable automatic reading.
5. Press ENTER to clear the search and save the setting.
6. SHIFT + TAB to the Search Box edit field. Type "Text Link."
7. DOWN ARROW to the first instance of Text Links Show Using. JAWS will say, "Text Links Show Using" and indicate whether the feature is set to Title, Screen Text, On Mouse Over, Longest, or Custom Search. JAWS will then say, "Virtual Cursor Options, Links Options."
8. If the Text Links Show Using setting is not set to Screen Text, press SPACEBAR until the option is set to Screen Text.
OL Visually Impaired Curriculum Page 6 November 2013
EVIEW FOR JAWS USERS: OVERVIEW VS-01
9. Press ENTER to clear the search and save the setting.
10.Press ENTER again to close the Quick Settings dialog box.
OL Visually Impaired Curriculum Page 7 November 2013
EVIEW FOR JAWS USERS: OVERVIEW VS-01
OBJECTIVE 2:
Open and Navigate a Claim
Opening a Claim
Search
When you open eView from the Desktop or through SSA WEB INDEX-PAGE, your focus will generally be in the SSN edit field.
1. By default, eView will search by Client SSN. If Forms Mode is not on, press ENTER; you should hear the sound indicating that Forms Mode is on.
2. If your focus is not in the SSN edit field, press F (Form Field) until you hear SSN edit. Press ENTER to activate Forms Mode.
3. Enter the client's Social Security Number and then press ENTER or ALT + S to activate the Search button.
4. To search by something other than the Client's SSN, you can press SHIFT + TAB or press SHIFT + F (Form Field) until you move to the Search by combo box. If you moved to the combo box with F or SHIFT + F, press ENTER to activate Forms Mode. Press DOWN ARROW to move through the alternate search options in the combo box:
Client Name
Number Holder SSN EDCS Folder Number
OL Visually Impaired Curriculum Page 8 November 2013
EVIEW FOR JAWS USERS: OVERVIEW VS-01
Once you hear the search option you want, press TAB to move to the Search edit field. Enter the required search information and press ENTER or ALT + S.
Select Claim
eView displays the search results in a table. The first column of the table displays the Client name(s) and is a link. To open the case, choose one of the following options:
1. Press INSERT + F7 to open the Links List dialog box and then press the END KEY to navigate to the name of the claimant. If the claimant has more than one case, the most recent case appears at the top of the list. Use the UP or DOWN ARROW KEYS to move through the links to get to the case you wish to review and press ENTER.
2. Press T to move to the Table; JAWS says the description of the table followed by the Column Heading Client Name. Press CONTROL + ALT + DOWN ARROW to move through the client names. Press ENTER to activate the link for the desired case.
JAWS USER TIP:
If your Text Links Show Using setting is set to Screen Text, the Links List dialog box displays the Client name without any additional information. If your Text Links Show Using setting is set to Title, the Links List dialog box displays Open: Client Name: Last Name, First Name, Date of Birth, Case Level and CEF, and Claim Information. While Screen Text gives you less speech, you may prefer to have the additional information provided with the Title setting.
3. After opening a case, if you wish to review a different SSN, press INSERT + F7 to open the Links List dialog box, press F until you hear JAWS say, "Folder Search," and then press ENTER.
OL Visually Impaired Curriculum Page 9 November 2013
EVIEW FOR JAWS USERS: OVERVIEW VS-01
4. Follow Search steps 1 through 4 in the preceding section, and then follow Select a Claim step 1, as shown above.
The Common Header Frames
Case Information Header Frame
The Case Information Header frame is at the beginning of each screen in eView. It contains Client information, whether there are Flags on the case, whether there are images, the OQP, CEF, and DCPS codes, and the following links:
Edit (Lock Case) Unlock Case Folder Search (to open a different claim number) Print Forms (print SSA-3368 and SSA-3367 disability reports, SSA-
3369 Work History Report, and SSA-827 Medical Release) Help View Details/Edit (to view and edit Flags on the case) QDD Compassionate Allowance (CAL) status eCAT SNO
Tabs Header Frame
The Tabs Header frame follows the Case Information Header frame. You will use the Tabs Header frame as your primary means of navigating through the different components of eView. The Tabs Header frame includes links for the following:
Alerts & Message (ALT + G)
OL Visually Impaired Curriculum Page 10 November 2013
EVIEW FOR JAWS USERS: OVERVIEW VS-01
Case Data (ALT + T) Case Documents (ALT + U) Status/History (ALT + I)
You determine the remaining content of the screen depending on which eView tab you select: Alerts & Messages, Case Data, Case Documents, or Status/History.
eView Tabs
Alerts & Messages (ALT + G)
1. The Alerts &Messages tab is the first tab for the case. Press ALT + G to go to the Alerts & Messages tab.
2. Alerts &Messages, if any, each display in a table.
a. Press T to move between the Alerts table and the Messages table. The description is in the first column. Use your Table Reading keys to read the information for the Alert or Message: Description, dates, Office Type and Office Code.
b. Press ENTER on the Description link to open the Alert or Message.
c. After you have read the Alert or Message, press ALT + C to activate the Cancel button and close the Alert or Message.
3. To add a new Message:
a. Activate the Edit (Lock Case) link (INSERT + F7, E, ENTER).
OL Visually Impaired Curriculum Page 11 November 2013
EVIEW FOR JAWS USERS: OVERVIEW VS-01
b. Activate the Add Message button with ALT + A, or press B (button) until you move to the Add Message button and press ENTER.
c. Move to the Expiration Date (MM/DD/YY) field by pressing F (field) or E (edit); press ENTER to turn on Forms Mode. Type the expiration date.
d. Press TAB to move to the Description text box. Type the message.
e. Press TAB or ALT + O to move to the OK button.
f. Alternatively, TAB to the Delete button (ALT + L), Add Another button (ALT + A), Cancel button (ALT + C), or Help button (ALT + H).
g. Press ENTER to activate the button you have selected.
h. The new message will now appear in the Messages table of the Alerts & Messages tab.
i. Remember to activate the Unlock Case link (INSERT + F7, U, ENTER) after you have completed your edits.
Case Data (ALT + T)
1. Press ALT + T to go to the Case Data tab. The Case Data tab includes all of the information entered for the claim: Case Data, Record of Change, and Forms.
2. The TreeView frame, located on the left side of the screen, contains links to each section of the claim. For example, a few of the Case Data heading links are:
Case Info
OL Visually Impaired Curriculum Page 12 November 2013
EVIEW FOR JAWS USERS: OVERVIEW VS-01
Allegations Medications Prior Claim Info FO Determination(s)
a. Press INSERT + F7 (Links List dialog box) to select a link from the TreeView frame. Alternatively, press M (Frame) to move to the TreeView frame and then DOWN ARROW through the links for the sections of the claim.
b. Case Data, Record of Change, and Forms are links that expand and contract folders in the TreeView frame. Each of these folders contains sub-links. The folders are also Headings. Press H or use INSERT + F6 (Headings List dialog box) to move between headings.
JAWS User Tip:
As discussed above, the TreeView frame contains folders, Case Data, Record of Change, and Forms, that expand and collapse to display sub-links for each folder. Depending on your JAWS settings, JAWS may or may not tell you if you have expanded these eView folders.
To make this determination quickly, press INSERT + F7 (Links List dialog box), and then press R for Record of Change. If your JAWS settings for eView are set to read Text Links as Screen Text, JAWS will only say, “Record of Change.” If your JAWS settings for eView are set to read Text Links by Title, JAWS will say, “Record of Change open” or “Record of Change closed.” See Personalize JAWS Settings for eView above for directions on modifying your JAWS settings.
3. The Servlet Data Case frame, which takes up the remainder of the screen, displays the content for each link chosen in the TreeView frame. Using the Previous Page or Next Page link, also located in
OL Visually Impaired Curriculum Page 13 November 2013
EVIEW FOR JAWS USERS: OVERVIEW VS-01
the Servlet Data Case frame, moves you sequentially through all sections of the case and the corresponding links located in the TreeView frame. The Expand All and Collapse All links expand or collapse the data located under each Heading in the Servlet Data Case frame.
a. Press INSERT + F7 (Links List), and then use the UP or DOWN ARROW KEYS to navigate through the Case Data links.
b. Press ENTER on the desired Case Data link to display information for the section in the Servlet Data Case frame. Headings, which are also links that expand and collapse each section of the data, organize the data.
c. Press H to move through the Headings, or press INSERT + F6 (Headings List dialog box), and then press ENTER when you hear JAWS say the name of the heading you wish to review.
d. Use the Links List dialog box (INSERT + F7) and first letter navigation to access the Expand All (E), Collapse All (C), Previous Page (P) and Next Page (N) links, and then press ENTER to activate the link.
Case Documents (ALT + U)
The Case Documents tab contains nine expandable sections. The first six sections represent the Modular Disability Folder:
Payment Documents/Decisions Jurisdictional Documents/Notices Current Development/Temporary Non-Disability Development Disability Related Development Medical Records
OL Visually Impaired Curriculum Page 14 November 2013
EVIEW FOR JAWS USERS: OVERVIEW VS-01
The names of the first six sections begin with a section designator, A through F, followed by the type of document included in that section. The section name also includes a color designation, representing a section color from the traditional paper folder, and an item and page count. For example, the complete label for the portion of the electronic folder that contains medical records is “F. Medical Records (Yellow Back) – Items: # – Page Count: #.”
There are three additional sections:
Queries Multimedia Files Private
JAWS USER NOTE:
If your JAWS settings for eView are set to read Text Links by Title, JAWS will precede each section name with “Expand Section.” For example, the complete label for the medical records section, discussed above, would be “Expand Section F. Medical Records (Yellow Back) – Items: # – Page Count: #.”
If your JAWS settings for eView are set to read Text Links as Screen Text, JAWS will just read each section name without the words “Expand Section.” See Personalize JAWS Settings for eView above for directions on modifying your JAWS settings.
Once you expand the folder section (by pressing ENTER on the folder name link, as described below), eView displays all documents in the expanded folder table. Each document name is a link that opens the document in the DMA Viewer. Each document row also includes a checkbox allowing you to select multiple documents for a particular task.
JAWS USER TIP:
Selecting more than one document to view in the Document Management Architecture (DMA) Viewer uses significant system
OL Visually Impaired Curriculum Page 15 November 2013
EVIEW FOR JAWS USERS: OVERVIEW VS-01
resources and may cause your system to become sluggish or freeze, especially when using JAWS and/or MAGic. For this reason, we suggest you open one document at a time.
In addition to the expandable folders, the Case Documents tab contains a number of additional links and buttons.
Case Documents Links: You can perform a variety of related tasks utilizing the links located on the Case Documents tab.
Expand All and Collapse All : These two links expand and collapse all nine Case Documents sections.
Select All , Deselect All , and Deselect All Sensitive : The Select All link expands all Case Documents sections and selects (checks) the checkbox for all documents. The Deselect All link deselects (unchecks) the checkbox for all documents; it does not collapse any of the sections. The Deselect All Sensitive link deselects (unchecks) the checkbox for all documents marked as Sensitive.
JAWS USER TIP:
Important! Each section of Case Documents has associated Select All and Deselect All links that select and deselect only the documents in that section. The general Select All and Deselect All links are the first ones in the Links List dialog box. Press HOME and then press S or press D to move to the link. Section-specific Select All and Deselect All links immediately follow the link for the name of the section (e.g., F. Medical Records).
ORS : The ORS link opens a screen from which you can search the Online Retrieval System. From this screen, you can also open and view the retrieved documents and, if desired, add them to Case Documents.
OL Visually Impaired Curriculum Page 16 November 2013
EVIEW FOR JAWS USERS: OVERVIEW VS-01
Queries : The Queries link opens a Query Selection Screen --Webpage Dialog box from which you can view, or view and save to the Electronic Folder (EF), details from the DEQY, SEQY, and NDNH queries.
Locate Docs : The Locate Docs link opens a Locate Documents -- Webpage Dialog box from which you can view documents in other folder(s) for the same SSN.
Case Documents Buttons: You can perform a variety of additional tasks utilizing the buttons located on the Case Documents tab.
1. For document specific tasks, select the items by marking the checkbox (press SPACEBAR) for each item or use the appropriate Select All link. Once you select the items, press INSERT + F5 (Select a Form Field dialog box), CONTROL + INSERT + B (Select a Button dialog box), or press B to move to one of the following buttons to complete the task:
O pen (ALT + O)
Create CD Move Copy Docs (ALT + Y) P rint (ALT + P)
2. For general tasks, use the buttons noted below:
C reate e827 (ALT + C)
H elp (ALT + H) Update Page Numbers (ALT + M) Outstanding Requests (ALT + N) Create Barcode (ALT + B) Bookmarks (ALT + K) Categories
3. ODAR and DDS offices may have additional buttons:
OL Visually Impaired Curriculum Page 17 November 2013
EVIEW FOR JAWS USERS: OVERVIEW VS-01
Add to CAR
Add to Exhibit List
Case Documents Navigation:
1. Press ALT + U to go to the Case Documents tab.
2. Press INSERT + F7 to open the Links List dialog box.
3. Depending upon your JAWS settings and your familiarity with the folder sections, you can use first letter navigation to move directly to the desired folder. For example:
If your JAWS settings are set to read Text Links by Title, press E (Expand) until you reach the link to expand the section of the folder you want to view.
If your JAWS settings are set to read Text Links as Screen Text, press the alpha character designation (A – F) for the desired folder section or, in the case of the Queries and Multimedia Files sections, press Q for Queries or M for Multimedia Files.
4. Once you expand a folder section, document information displays in a table. Press T to move to the table. eView displays each document for the section on a different row. Use your table reading keys to navigate the table.
JAWS User Tip:
Table Layer Keystrokes are helpful here:
INSERT + SPACEBAR, followed by T, then use ARROW KEYS or other navigation keys to move between columns and rows.
OL Visually Impaired Curriculum Page 18 November 2013
EVIEW FOR JAWS USERS: OVERVIEW VS-01
5. Press ENTER on the Document Name link to open the document in the DMA Viewer.
6. After you finish reading the document, press ALT + F4 to exit the DMA viewer or press CONTROL + W to close the document without exiting the DMA viewer.
See OBJECTIVE 3: Reading eView Documents for more information on working with documents in the DMA viewer.
Status/History (ALT + I)
1. Press ALT + I to go to the Status/History tab.
2. Case Status information displays in a table or tables for each level: Initial, Recon, and Hearing Level. Press T to move to the first table. Press T again to move to the next table.
3. Use your Table Reading Commands to move between the columns and rows for each table. For example, at the Initial Level, you can read the Claim Type, Level, Date Filed, Current Status, Office, Decision Date, Decision, Reg Basis, and Deciding Office fields.
Closing eView
1. Press ALT + F4 to close eView.
2. Press ENTER to activate the OK button in the Internet Explorer confirmation dialog box and exit the application.
OL Visually Impaired Curriculum Page 19 November 2013
EVIEW FOR JAWS USERS: OVERVIEW VS-01
OBJECTIVE 3:
Reading eView Documents
OCR
Background
Reading documents opened through eView presents particular challenges to JAWS users because the documents are stored as images. Optical Character Recognition (OCR) is a process that converts images into text. OCR is currently the only option JAWS users have to read eView documents (without the aid of a Reader Assistant).
It is important to note that while OCR bridges a gap and allows a JAWS user to "read" imaged documents, its utility is limited. OCR does not recognize handwritten information and has limited utility in reading forms. It also requires a clear image with standard fonts and sufficient zoom. Further, there is no way for the JAWS user to determine which portions of a document OCR has properly recognized and which portions of the document have been skipped or misrecognized.
The DMA Viewer, which is the program used to view eView documents, has its own integrated OCR program. The September 2013 release of the DMA Viewer introduced a new version of the OCR program. As of the date of this document, this new version is not accessible with JAWS.
OL Visually Impaired Curriculum Page 20 November 2013
EVIEW FOR JAWS USERS: OVERVIEW VS-01
KESI Virtual Printer
The KESI Virtual Printer is a component of Kurzweil 1000 ("Kurzweil") and is currently the best option for OCR in eView. With Kurzweil, a user can scan a print document and then Kurzweil recognizes the scanned image with OCR.
As an alternative to printing and scanning each document, you can print to the KESI Virtual Printer. The KESI Virtual Printer performs a "virtual" scan of the onscreen document and then Kurzweil recognizes the "virtually scanned" image with OCR.
The following provides directions for using the KESI Virtual Printer to OCR eView documents:
1. Press CONTROL + P (Print).
2. Your focus should be in the printer Name combo box. If it is not, TAB to the printer Name combo box.
3. UP ARROW to the KESI Virtual Printer.
4. Press ENTER.
5. Kurzweil 1000 opens. Please be patient as this may take some time.
6. Kurzweil "recognizes" the pages of the document.
7. Press F5 to start and stop reading of the document.
8. You can also copy text from the document to paste into another document (e.g., decision, medical documentation).
9. Close Kurzweil by pressing ALT + F4.
OL Visually Impaired Curriculum Page 21 November 2013
EVIEW FOR JAWS USERS: OVERVIEW VS-01
APPENDIX A
eView Keyboard Functionality
You can perform certain eView functions by pressing a particular keystroke (Function Keys) or key combination (Accelerator Keys). The tables below, extracted from the eView Help system, describe the keys and their corresponding functionalities.
JAWS User Note: Some key combinations may conflict with JAWS keystrokes.
Function Keys
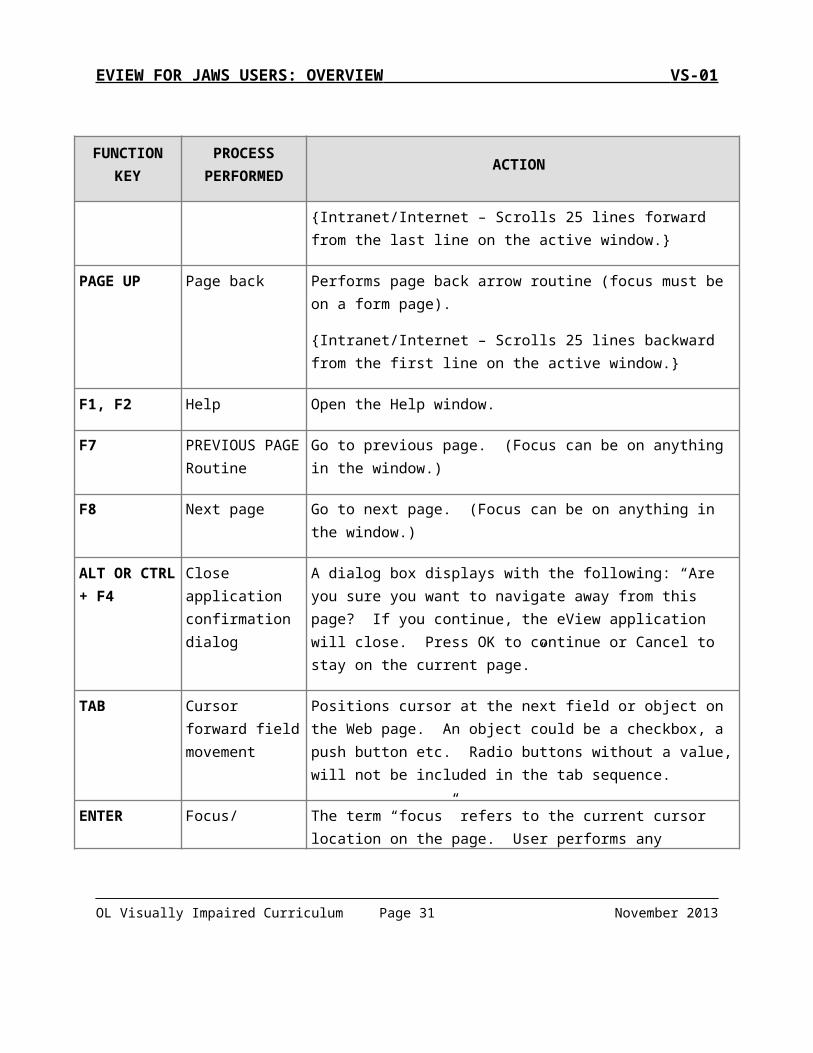
FUNCTION KEY
PROCESS PERFORMED ACTION
ESC CANCEL Routine Performs the cancel routine, closes the current Web page, and returns to previous page. This is active in modal dialog boxes only. (Focus can be on anything in Web page.)
ALT Switch cursor Switch cursor to and from menu bar (focus can be on anything in window). This is not active from modal dialog boxes.
PAGE DOWN Page forward Performs page forward arrow routine (focus must be on a form page).
{Intranet/Internet – Scrolls 25 lines forward from the last line on the active window.}
PAGE UP Page back Performs page back arrow routine (focus must be on a form page).
{Intranet/Internet – Scrolls 25 lines backward from the first line on the active window.}
F1, F2 Help Open the Help window.
OL Visually Impaired Curriculum Page 22 November 2013
EVIEW FOR JAWS USERS: OVERVIEW VS-01
FUNCTION KEY
PROCESS PERFORMED ACTION
F7 PREVIOUS PAGE Routine
Go to previous page. (Focus can be on anything in the window.)
F8 Next page Go to next page. (Focus can be on anything in the window.)
ALT OR CTRL + F4
Close application confirmation dialog
A dialog box displays with the following: “Are you sure you want to navigate away from this page? If you continue, the eView application will close. Press OK to continue or Cancel to stay on the current page.”
TAB Cursor forward field movement
Positions cursor at the next field or object on the Web page. An object could be a checkbox, a push button etc. Radio buttons without a value, will not be included in the tab sequence.
ENTER Focus/
Activation
The term “focus” refers to the current cursor location on the page. User performs any subsequent action here.
“Activation” is the execution of a desired action/function. The Enter key generally initiates "activation.
SHIFT + TAB Cursor backward field movement
Positions cursor at the previous field or object on the Web page. An object could be a radio button, a checkbox, a push button etc. Radio buttons without a value, will not be included in the tab sequence.
ALT + UNDERLINED LETTER OF MENU ITEM
Menu item selection
Drops list down from menu bar, allowing arrow keys to traverse the menu items and the enter key to select menu items (focus can be on anything in the window, but a letter of each menu item must currently be underlined.)
In general, assign the first available letter to items, in the following sequence:
OL Visually Impaired Curriculum Page 23 November 2013
EVIEW FOR JAWS USERS: OVERVIEW VS-01
FUNCTION KEY
PROCESS PERFORMED ACTION
First letter, if available First available consonant First available vowel Additional letter shown in parentheses
ALT + ESC Window switching Switch between unassociated/non-related windows (windows in the eView application and other application windows already opened.)
HOME See Action cell at right for description of process performed
In Case Data, with focus on the navigation menu, view is positioned at the top of the menu.
With focus on the selected menu item page, view is positioned at the top of the page.
END See Action cell at right for description of process performed
In Case Data, with focus on the navigation menu, view is positioned at the bottom of the menu.
With focus on the selected menu item page, view is positioned at the bottom of the page.
OL Visually Impaired Curriculum Page 24 November 2013
EVIEW FOR JAWS USERS: OVERVIEW VS-01
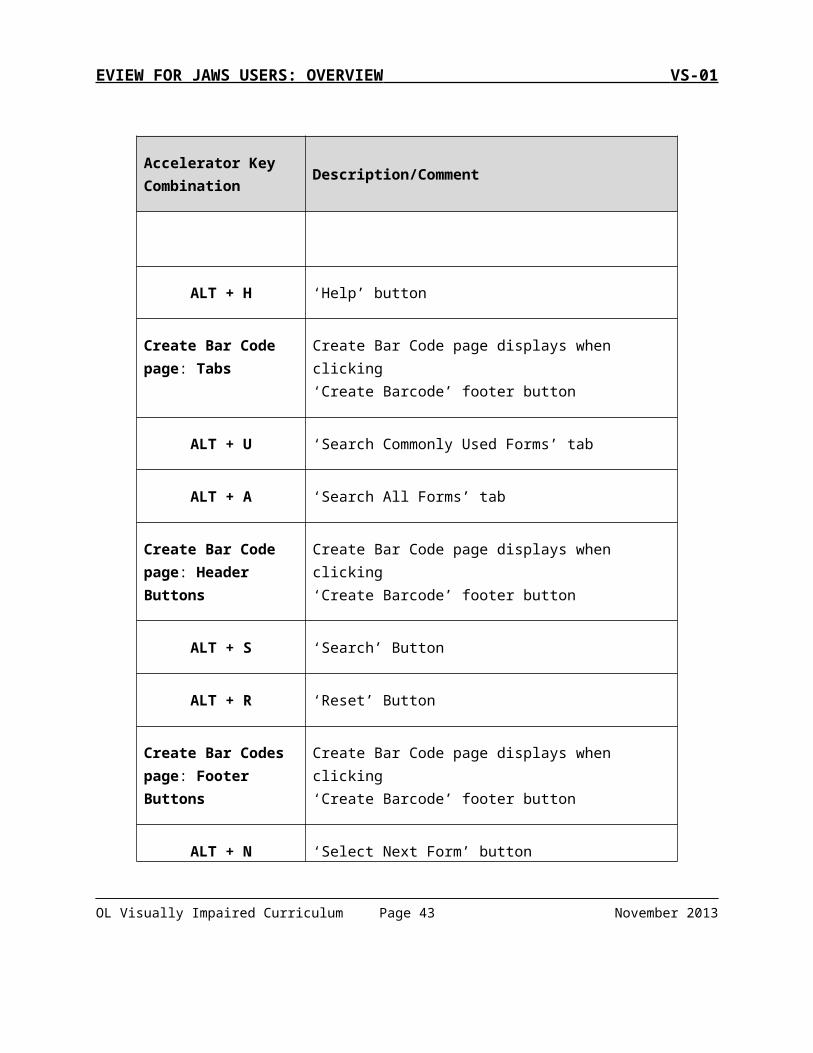
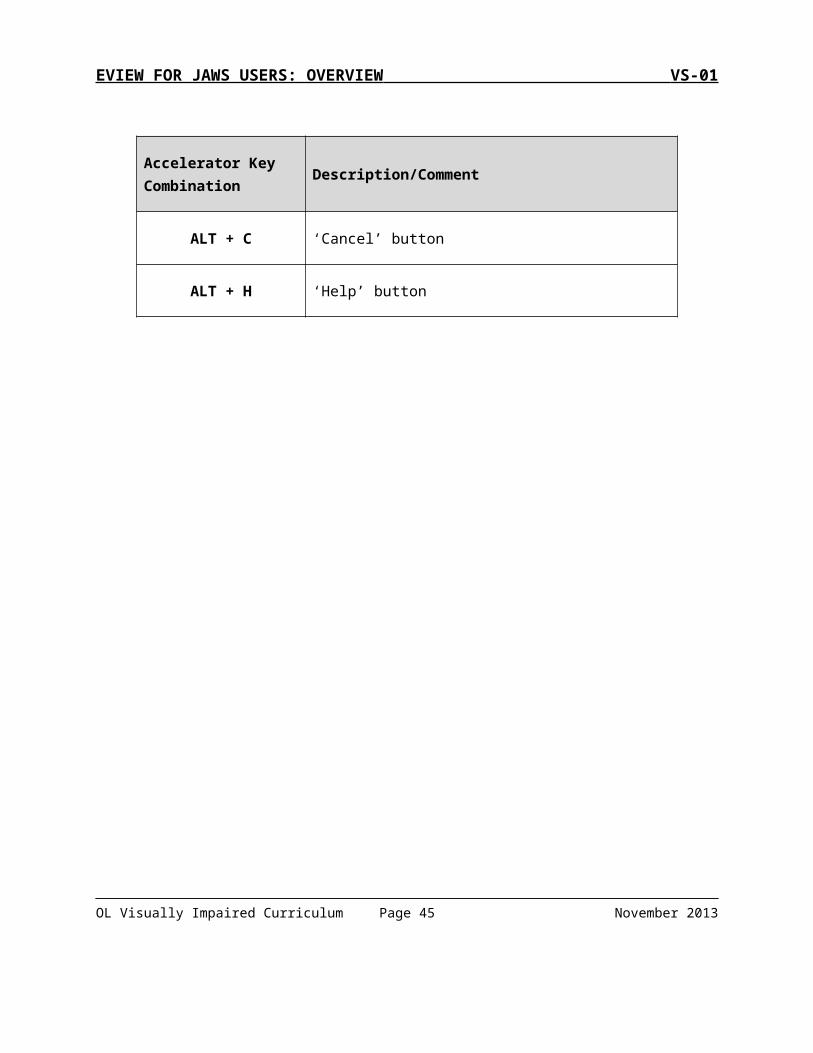
Accelerator Keys
Header 1 and Header 2 Hypertext Links
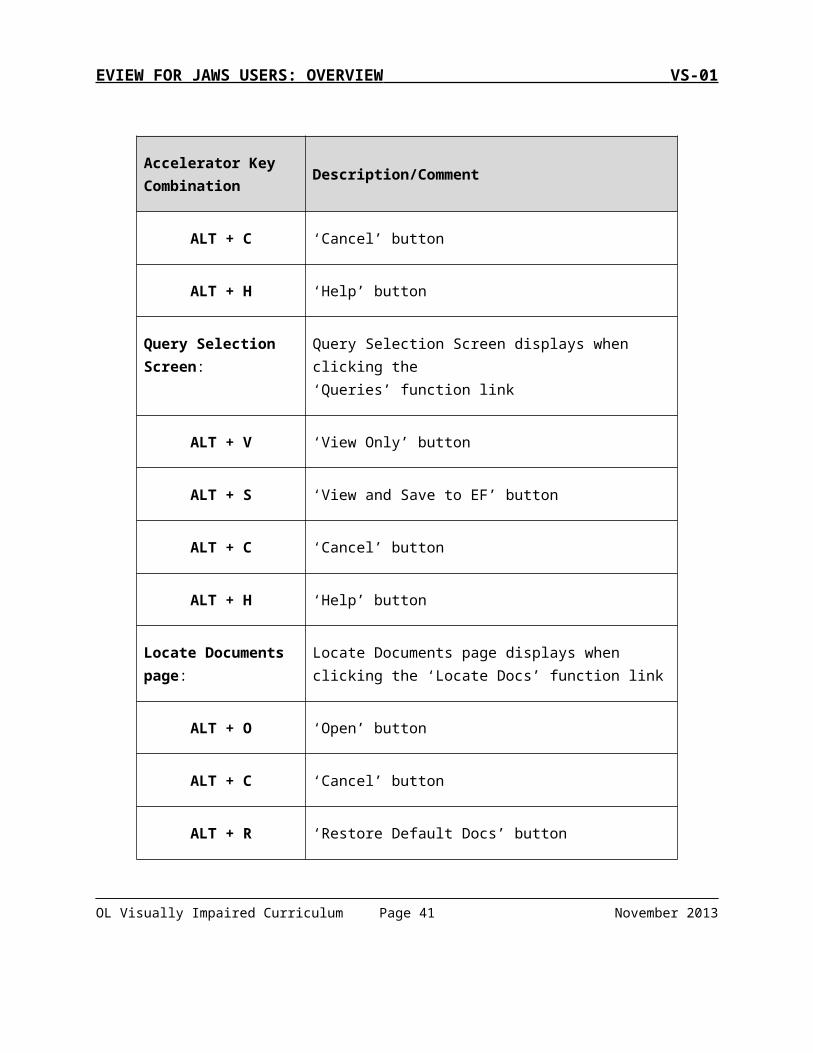
Accelerator Key Combination Description/Comment
Folder Search Page (header 1)
ALT + O ‘OK’ button
ALT + S ‘Search’ button
ALT + C ‘Clear’ button
Print Forms Page (header 1)
ALT + P ‘Print and Exit’ button
ALT + R ‘Print and Return’ button
ALT + C ‘Cancel’ button
ALT + H ‘Help’ button
Flags Page (header 2): Flags Information page displays when clicking
OL Visually Impaired Curriculum Page 25 November 2013
EVIEW FOR JAWS USERS: OVERVIEW VS-01
Accelerator Key Combination Description/Comment
‘Add Flag’ button or selecting a Flag Type on the ‘Flags’ page
ALT + A ‘Add Flag’ button. Enabled only when Edit (Lock Case) link is selected.
ALT + N ‘Cancel’ button
ALT + H ‘Help’ button
ALT + O ‘OK’ button
ALT + L ‘Delete’ button. Enabled when selecting a flag from the ‘Flags’ page.
ALT + A ‘Add Another’ button
ALT + C ‘Cancel’ button
ALT + H ‘Help’ button
OL Visually Impaired Curriculum Page 26 November 2013
EVIEW FOR JAWS USERS: OVERVIEW VS-01
Navigational Tabs
Accelerator Key Combination Description/Comment
ALT + G ‘Alerts & Messages’ tab
ALT + T ‘Case Data’ tab
ALT + U ‘Case Documents’ tab
ALT + I ‘Status/History’ tab
ALT + X ‘Exhibit List’ tab. Tab is displayed only at the Hearing, Appeals Council or Federal Court level
ALT + C ‘CAR’ tab. Tab is displayed if the case is in non-pending status at the Hearing, Appeals Council, or Federal Court level or there is a finalized eCAR on the folder at any level
Alerts & Messages
Accelerator Key Combination Description/Comment
Footer Buttons: Alerts & Messages Footer Buttons
ALT + A ‘Add Message’ button. Enabled only when Edit (Lock Case) link is selected.
OL Visually Impaired Curriculum Page 27 November 2013
EVIEW FOR JAWS USERS: OVERVIEW VS-01
Accelerator Key Combination Description/Comment
ALT + H ‘Help’ button
Messages Information Page:
Messages Information page displays when clicking ‘Add Message’ button or selecting a message on the ‘Alerts & Messages’ page
ALT + O ‘OK’ button
ALT + L ‘Delete’ button. Enabled when selecting a message from the ‘Alerts & Messages’ page.
ALT + A ‘Add Another’ button
ALT + C ‘Cancel’ button
Alt + H ‘Help’ button
Case Documents
Accelerator Key Combination Description/Comment
Function Links: Case Documents function links
ALT + E ‘Expand All’ link
OL Visually Impaired Curriculum Page 28 November 2013
EVIEW FOR JAWS USERS: OVERVIEW VS-01
Accelerator Key Combination Description/Comment
ALT + S ‘Collapse All’ link
ALT + L ‘Select All’ link
ALT + A 'Deselect All'
ALT + V ‘Deselect All Sensitive’ link
ALT + M ‘Refresh Documents’ link
ALT + R 'ORS' link
ALT + Q ‘Queries’ link
ALT + F ‘Link Folders’ link. Displayed only on CDR Classification cases.
Footer Buttons: Case Documents Footer Buttons
ALT + O ‘Open’ button
ALT + Y ‘Copy Docs’ button. Enabled only when Edit (Lock Case) link is selected and a document is selected. Access requirement: Received dialog box “Copy Docs is not available to the FO”.
ALT + P ‘Print’ button
OL Visually Impaired Curriculum Page 29 November 2013
EVIEW FOR JAWS USERS: OVERVIEW VS-01
Accelerator Key Combination Description/Comment
ALT + H ‘Help’ button
ALT + N ‘Outstanding Requests’ button
ALT + B ‘Create Barcode’ button
ALT + K ‘Bookmarks’ button
Link Folders page Footer Buttons:
Link folders page displays after selecting the ‘Link Folders’ link on the Case Documents tab
ALT + O ‘OK’ button
ALT + C ‘Cancel’ button
ALT + H ‘Help’ button
Online Retrieval System Documents page:
Online Retrieval System Documents page displays when clicking on the ‘ORS’ function link
ALT + O ‘Open’ button
ALT + A ‘Add to Case’ button
ALT + C ‘Cancel’ button
ALT + H ‘Help’ button
OL Visually Impaired Curriculum Page 30 November 2013
EVIEW FOR JAWS USERS: OVERVIEW VS-01
Accelerator Key Combination Description/Comment
Query Selection Screen: Query Selection Screen displays when clicking the‘Queries’ function link
ALT + V ‘View Only’ button
ALT + S ‘View and Save to EF’ button
ALT + C ‘Cancel’ button
ALT + H ‘Help’ button
Locate Documents page: Locate Documents page displays when clicking the ‘Locate Docs’ function link
ALT + O ‘Open’ button
ALT + C ‘Cancel’ button
ALT + R ‘Restore Default Docs’ button
ALT + H ‘Help’ button
Potential Duplicates page: Function Links
Potential Duplicates page displays when clicking‘Find Duplicates’ footer button
OL Visually Impaired Curriculum Page 31 November 2013
EVIEW FOR JAWS USERS: OVERVIEW VS-01
Accelerator Key Combination Description/Comment
ALT + E ‘Expands All’ link
ALT + S ‘Collapses All’ link
Potential Duplicates page: Footer Buttons
Potential Duplicates page displays when clicking‘Find Duplicates’ footer button
OL Visually Impaired Curriculum Page 59 November 2013
EVIEW FOR JAWS USERS: OVERVIEW VS-01
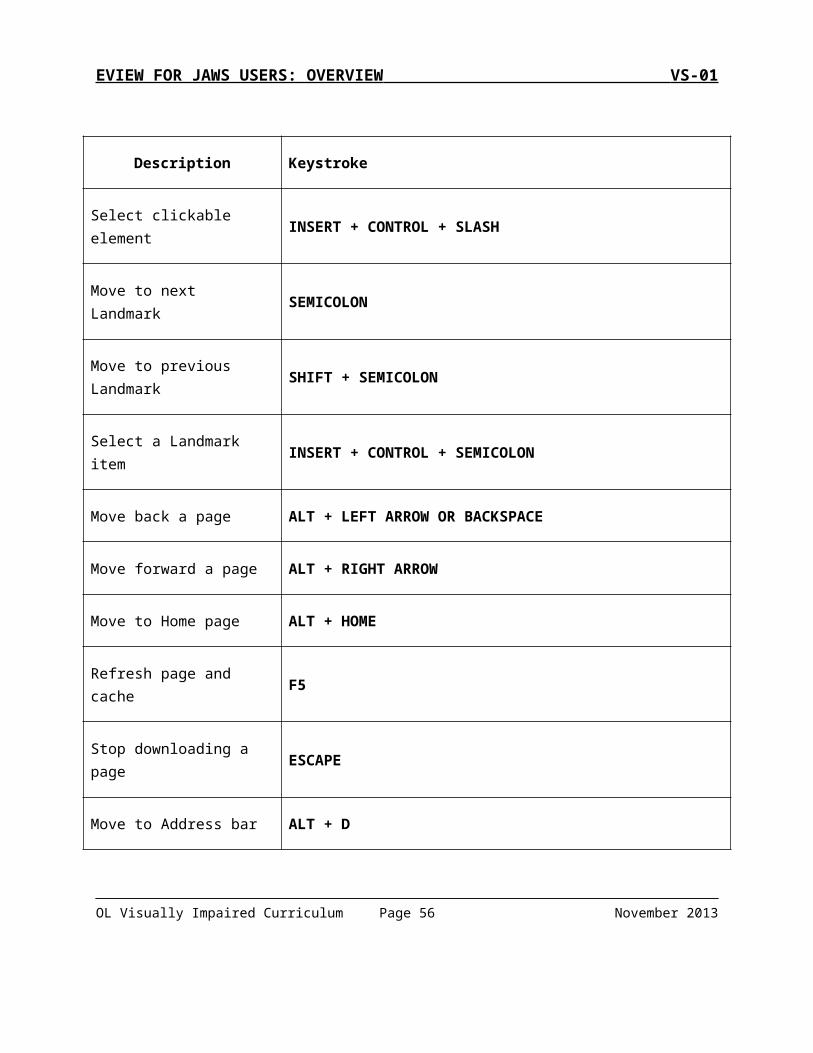
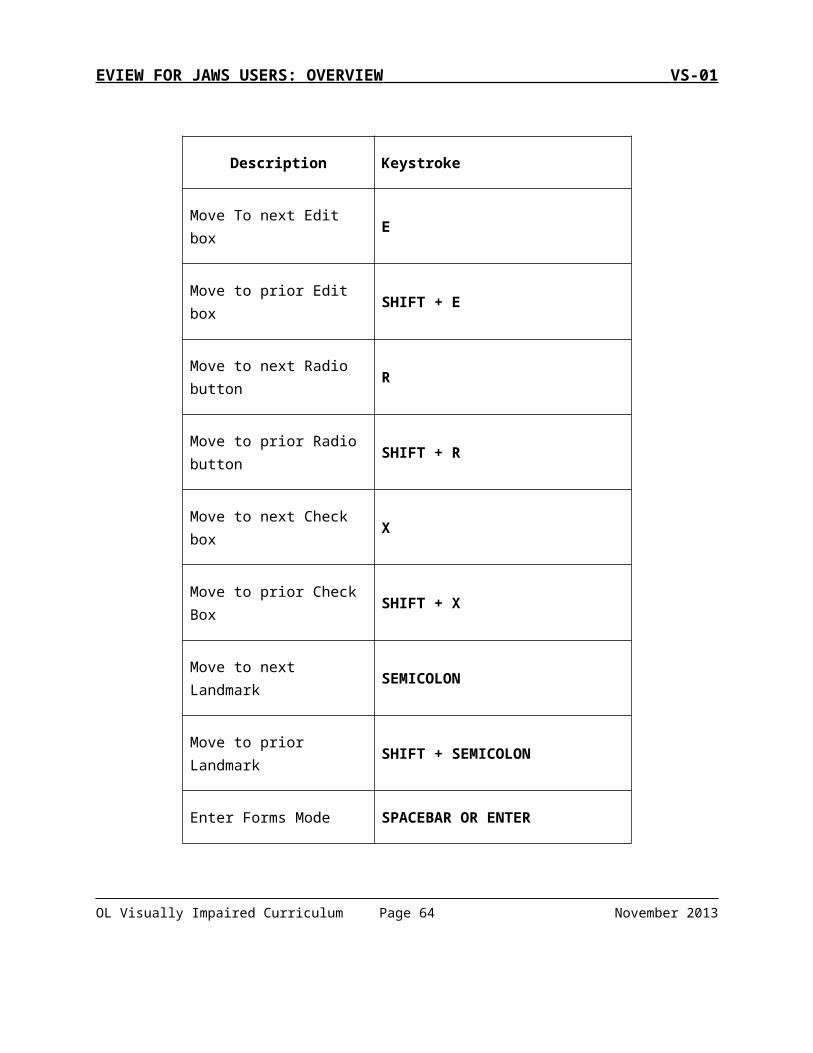
Lists of Elements
Note: You can also press INSERT + F3 to select the type of HTML element list you want to view.
ElementKeystroke
Form fields INSERT + F5
Headings INSERT + F6
Links INSERT + F7
Frames INSERT + F9
Anchors CONTROL + INSERT + A
Buttons CONTROL + INSERT + B
Combo boxes CONTROL + INSERT + C
Edit boxes CONTROL + INSERT + E
Lists CONTROL + INSERT + L
Graphics CONTROL + INSERT + G
Paragraphs CONTROL + INSERT + P
OL Visually Impaired Curriculum Page 60 November 2013
EVIEW FOR JAWS USERS: OVERVIEW VS-01
ElementKeystroke
Block quotes CONTROL + INSERT + Q
Radio buttons CONTROL + INSERT + R
Tables CONTROL + INSERT + T
Check boxes CONTROL + INSERT + X
Divisions CONTROL + INSERT + Z
LandmarksCONTROL + INSERT + SEMICOLON
OL Visually Impaired Curriculum Page 61 November 2013
EVIEW FOR JAWS USERS: OVERVIEW VS-01
FEEDBACK SHEET
Request to the instructor:
As you use this training package, please document errors, omissions, and revisions and notify us of any revisions. At the completion of this segment, you should mail this form to the address on the next page.
Source of report:
Location of training: _______________________________
Your name: _____________________________________
Your phone number: ______________________________
Timeframes:
How much time did it take to present this material?
Topics:
Is there any material in this lesson that is covered but not relevant to your position that we should remove? If so, what?
Can you identify any topic not covered in this lesson that should be included?
Complexity level:
OL Visually Impaired Curriculum Page 62 November 2013
EVIEW FOR JAWS USERS: OVERVIEW VS-01
Are there any lessons that appear either too simple or too complex? Which ones? Why?
Testing:
How would you rate the usefulness of the tests and exercises?
1 2 3 4 5
Irrelevant Adequate Quite helpful
Please note your corrections below or attach a photocopy of corrected pages.
Page # Correction Needed
Comments:
Use the space below for your comments on how we can improve this material.
OL Visually Impaired Curriculum Page 63 November 2013
EVIEW FOR JAWS USERS: OVERVIEW VS-01
Mail to:
Gregory Gill
Social Security Administration
EHR Ste 100
6401 Security Blvd.
Baltimore, MD 21235
OL Visually Impaired Curriculum Page 64 November 2013


![[EWD]class02 0315](https://static.documents.pub/doc/80x56/555e0ca7d8b42a99188b4be3/ewdclass02-0315.jpg)


