12
Gateway Fast-Boot Manual For Nintendo 2DS/3DS Systems Version 1.0 – © Gateway Team 2016
| Date post: | 12-Feb-2018 |
| Category: |
Documents |
| Upload: | trinhhuong |
| View: | 215 times |
| Download: | 1 times |
Gateway Fast-Boot Manual For Nintendo 2DS/3DS Systems
Version 1.0 – © Gateway Team 2016
P a g e | 1
Table of Contents
2. Prerequisites and Requirements
3. Pre-Setup
4. O3DS Installation
6. N3DS Installation
8. Troubleshooting
9. Preventing System Updates

P a g e | 2
Requirements:
- A 2DS/3DS system with Gateway and EmuNAND already set up. If you are not at this point,
please follow the installation manual HERE first
- At least 8GB of free space on your MicroSD and a clean SD with fresh EmuNAND install is
recommended
- The latest software package from HERE including the Gateway_TimeMachine.3ds
- The appropriate Gateway Time-Machine downgrade .bin package for your specific console
- A configured and working WiFi connection with NO proxy settings (Be sure to remove
TubeHax DNS if you have it set up)
If you already have ARM9 Loader Hax (A9LH) installed on your system, you
can instead choose to use just the Gateway “arm9loaderhax.bin” with your
existing launcher.
P a g e | 3
Pre-Setup
This is a potentially dangerous operation, please be sure you understand the
risks before continuing and be sure to have your 3DS plugged into the outlet
during the entire procedure.
Step 1: Copy the contents of the “Red Card uSD” to the MicroSD card inside your Gateway
Red Cart, which will be just the “Gateway_TM.3ds” file.
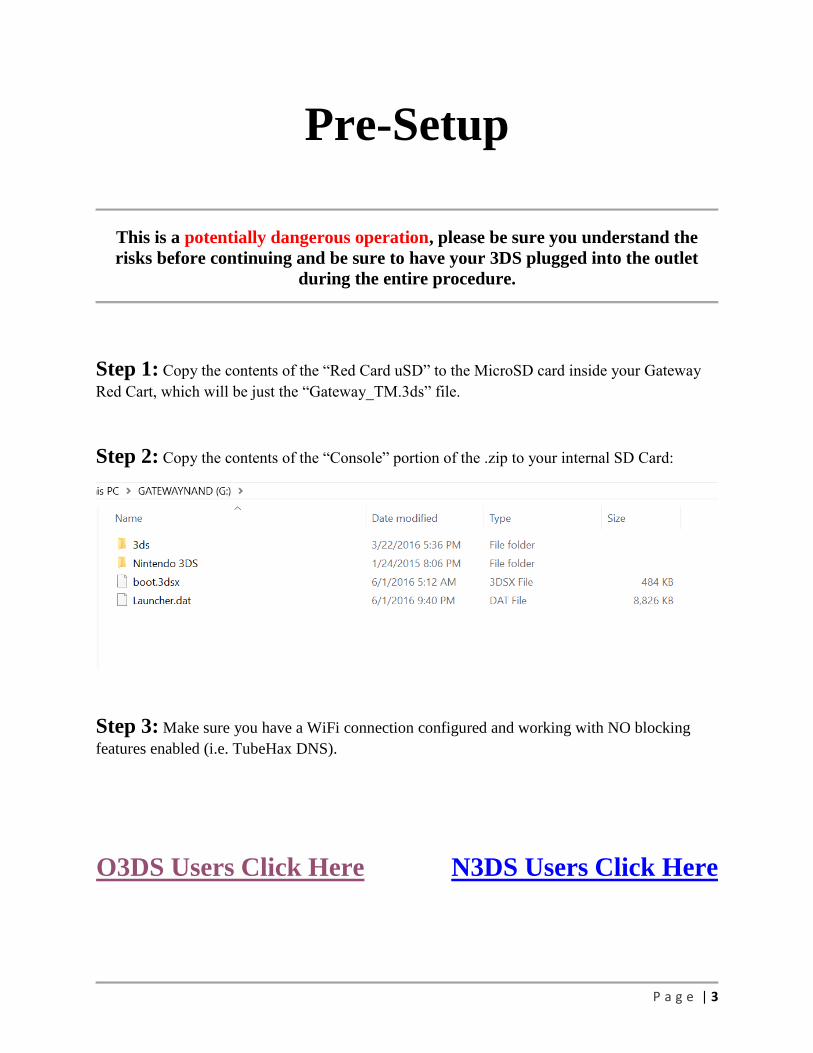
Step 2: Copy the contents of the “Console” portion of the .zip to your internal SD Card:
Step 3: Make sure you have a WiFi connection configured and working with NO blocking
features enabled (i.e. TubeHax DNS).
O3DS Users Click Here N3DS Users Click Here
P a g e | 4
O3DS Installation
Your O3DS must be on 10.3.0-28, if you get stuck during the update, please visit
the support forums for additional help.
Step 1: Copy the appropriate Time-Machine downgrade .bin pack to your internal SD Card.
For O3DS users, this includes the naming schema of “tm_o3ds_xxx.bin” where xxx is your
consoles region. Do not try to downgrade to another region or use the n3ds files as this may
result in a non-working console.
Step 2: Hold L while booting Gateway to access the Gateway Menu and choose “Backup
System NAND”. Copy this file to your PC for safe-keeping, but leave it on your SD card as
well, as this will be used later on in the process.
Step 3a: Hold L while booting Gateway to access the Gateway Menu, then Hold B and Press
A on ”Gateway Mode” and Press X to enter SysNAND. Finally, Press Select to bring up the
ROM selection window and choose “Gateway Time Machine” and launch it from the Home
Menu.
Step 3b: Boot to HBL using MenuHax (or your preferred loading method) and select
“Gateway Time Machine” from the HBL menu list.
P a g e | 5
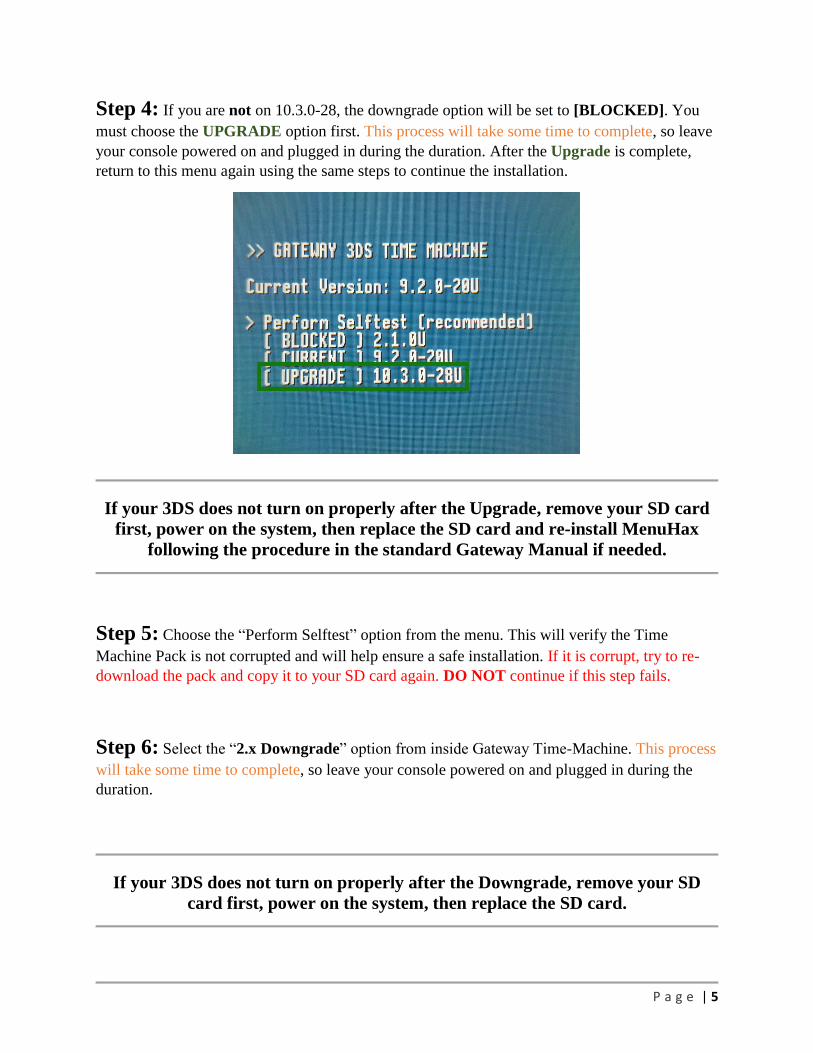
Step 4: If you are not on 10.3.0-28, the downgrade option will be set to [BLOCKED]. You
must choose the UPGRADE option first. This process will take some time to complete, so leave
your console powered on and plugged in during the duration. After the Upgrade is complete,
return to this menu again using the same steps to continue the installation.
If your 3DS does not turn on properly after the Upgrade, remove your SD card
first, power on the system, then replace the SD card and re-install MenuHax
following the procedure in the standard Gateway Manual if needed.
Step 5: Choose the “Perform Selftest” option from the menu. This will verify the Time
Machine Pack is not corrupted and will help ensure a safe installation. If it is corrupt, try to re-
download the pack and copy it to your SD card again. DO NOT continue if this step fails.
Step 6: Select the “2.x Downgrade” option from inside Gateway Time-Machine. This process
will take some time to complete, so leave your console powered on and plugged in during the
duration.
If your 3DS does not turn on properly after the Downgrade, remove your SD
card first, power on the system, then replace the SD card.
P a g e | 6
Step 7: Your 3DS should now boot to firmware 2.x. Open the web browser and navigate to
http://go.gateway-3ds.com/ -- This will trigger the Gateway Menu to appear. If your system
crashes or doesn’t respond after 60 seconds, power off the console and try again.
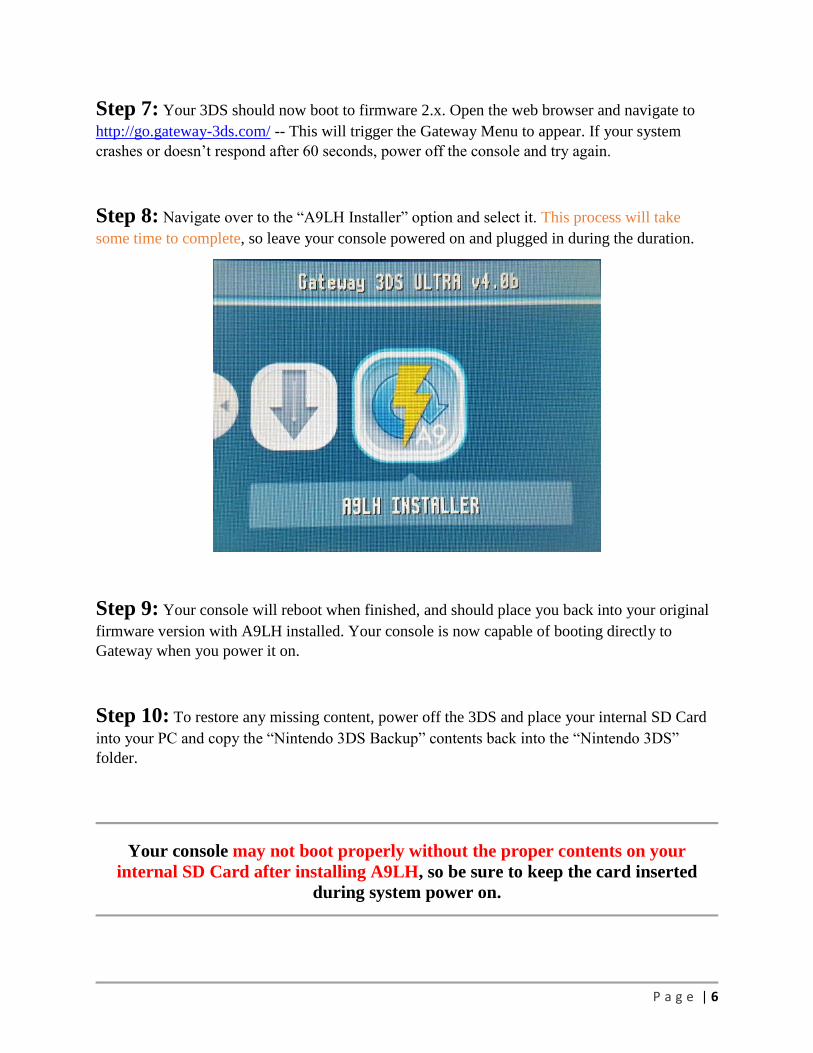
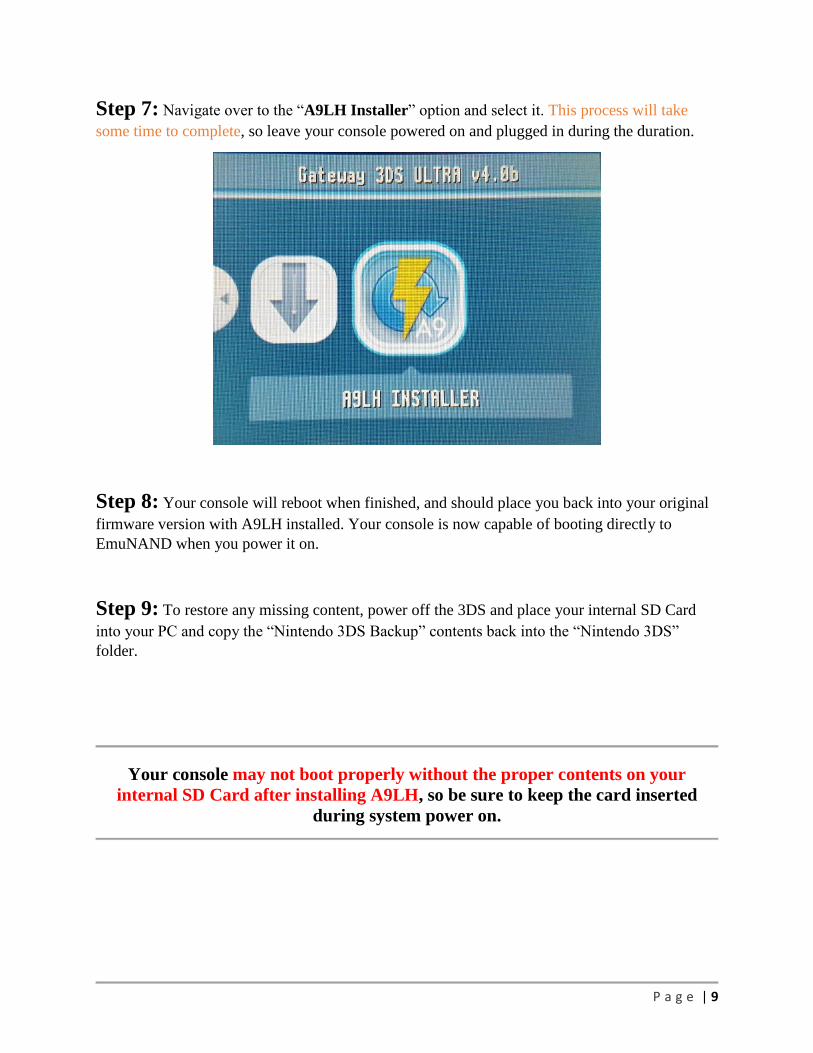
Step 8: Navigate over to the “A9LH Installer” option and select it. This process will take
some time to complete, so leave your console powered on and plugged in during the duration.
Step 9: Your console will reboot when finished, and should place you back into your original
firmware version with A9LH installed. Your console is now capable of booting directly to
Gateway when you power it on.
Step 10: To restore any missing content, power off the 3DS and place your internal SD Card
into your PC and copy the “Nintendo 3DS Backup” contents back into the “Nintendo 3DS”
folder.
Your console may not boot properly without the proper contents on your
internal SD Card after installing A9LH, so be sure to keep the card inserted
during system power on.
P a g e | 7
N3DS Installation
If You Are NOT On 9.2.0-20
Step 1: Copy the appropriate Time-Machine downgrade .bin pack to your internal SD Card.
For N3DS users, this includes the naming schema of “tm_n3ds_xxx.bin” where xxx is your
consoles region. Do not try to downgrade to another region or use the o3ds files as this may
result in a non-working console.
Step 2: Hold L while booting Gateway to access the Gateway Menu and choose “Backup
System NAND”. Copy this file to your PC for safe-keeping, but leave it on your SD card as
well, as this will be used later on in the process.
Step 3a: Hold L while booting Gateway to access the Gateway Menu, then Hold B and Press
A on ”Gateway Mode” and Press X to enter SysNAND. Finally, Press Select to bring up the
ROM selection window and choose “Gateway Time Machine” and launch it from the Home
Menu.
Step 3b: Boot to HBL using MenuHax (or your preferred loading method) and select
“Gateway Time Machine” from the HBL menu list.
Step 4: Choose the “Perform Selftest” option from the menu. This will verify the Time
Machine Pack is not corrupted and will help ensure a safe installation. If it is corrupt, try to re-
download the pack and copy it to your SD card again. DO NOT continue if this step fails.
Step 5: Select the “9.2 Downgrade” option from inside Gateway Time-Machine. This process
will take some time to complete, so leave your console powered on and plugged in during the
duration.
If your N3DS does not turn on properly after the Downgrade, remove your SD
card first, power on the system, then replace the SD card.
P a g e | 8
If You ARE On 9.2.0-20
Step 1: Copy the appropriate Time-Machine downgrade .bin pack to your internal SD Card.
For N3DS users, this includes the naming schema of “tm_n3ds_xxx.bin” where xxx is your
consoles region. Do not try to downgrade to another region or use the o3ds files as this may
result in a non-working console.
Step 2: Hold L while booting Gateway to access the Gateway Menu and choose “Backup
System NAND” if you have not already done this in a previous step. Copy this file to your PC
for safe-keeping, but leave it on your SD card as well, as this will be used later on in the process.
Step 3: Hold L while booting Gateway to access the Gateway Menu and choose “Format
EmuNAND”. This will ERASE THE CONTENTS OF YOUR EMUNAND/SD CARD, so
make sure you have backed up anything you wish to save or use a fresh SD card for the process.
Step 4: Boot into the Gateway EmuNAND mode and Press Select to bring up the ROM
selection window and choose “Gateway Time Machine” and launch it from the Home Menu.
Select the “2.x Downgrade” option. This process will take some time to complete, so leave your
console powered on and plugged in during the duration.
Step 5: Hold L while booting Gateway to access the Gateway Menu and choose “A9LH
Installer”. Follow the instructions on screen to complete this step.
Step 6: Your 3DS should now boot to firmware 2.x. Open the web browser and navigate to
http://go.gateway-3ds.com/ -- This will trigger the Gateway Menu to appear. If your system
crashes or doesn’t respond after 60 seconds, power off the console and try again.
P a g e | 9
Step 7: Navigate over to the “A9LH Installer” option and select it. This process will take
some time to complete, so leave your console powered on and plugged in during the duration.
Step 8: Your console will reboot when finished, and should place you back into your original
firmware version with A9LH installed. Your console is now capable of booting directly to
EmuNAND when you power it on.
Step 9: To restore any missing content, power off the 3DS and place your internal SD Card
into your PC and copy the “Nintendo 3DS Backup” contents back into the “Nintendo 3DS”
folder.
Your console may not boot properly without the proper contents on your
internal SD Card after installing A9LH, so be sure to keep the card inserted
during system power on.
P a g e | 10
Troubleshooting and Tips
Problem: 3DS won’t turn on after using Gateway Time-Machine to downgrade to 2.x
Solution: Remove the internal SD Card and power on your system, then re-insert it after it boots
and continue the guide
Problem: Gateway Time-Machine says WiFi is not connected even though it is.
Solution: Make sure your O3DS is on the proper firmware (10.0.0-27 or 10.1.0-27) before you
try to initiate the A9LH install process. Also be sure you don’t have any Custom DNS entries.
Additionally, try deleting your WiFi profile and re-creating it.
Problem: I had my WiFi switched off on my N3DS when performing the Gateway Time-
Machine downgrade and now I cannot turn it back on
Solution: Carefully remove the back plate and remove the battery from inside for a few minutes,
then replace it and power the system back on. This will re-enable WiFi.
For additional help, please visit the support forums and open a new topic with
your issue: http://www.maxconsole.com/maxcon_forums/forums/108-Official-
Gateway-3DS-Support-Forum
P a g e | 11
Preventing System Updates
Step 1: Prevent updates and Browser Lockout by entering your System Settings and going to
Internet Settings > Connection Settings > (Existing Connection) > Change Settings > Tap the
Right Arrow on the screen > and finally choose DNS.
Step 2: Set the Auto-Obtain to “No” and then press Detailed Setup. Finally, set the Primary
and Secondary DNS to 107.211.140.065 then press OK and Save the connection. You do not
need to test the connection if it worked for you previously. If you are making a connection for
the first time, be sure to set the DNS settings when it asks during the connection setup.


