226
N152598 September 2005 VERITAS NetBackup TM 6.0 System Administrator’s Guide, Volume II for Windows nbu_win_print_II.book Page i Tuesday, August 16, 2005 12:53 PM
N152598
September 2005
VERITAS NetBackupTM 6.0
System Administrator’s Guide, Volume II
for Windows
nbu_win_print_II.book Page i Tuesday, August 16, 2005 12:53 PM
ii NetBackup System Administrator’s Guide for Windows, Volume II
Disclaimer
The information contained in this publication is subject to change without notice. VERITAS Software Corporation makes no warranty of any kind with regard to this manual, including, but not limited to, the implied warranties of merchantability and fitness for a particular purpose. VERITAS Software Corporation shall not be liable for errors contained herein or for incidental or consequential damages in connection with the furnishing, performance, or use of this manual.
VERITAS Legal Notice
Copyright © 1993-2005 VERITAS Software Corporation. All rights reserved. VERITAS, the VERITAS Logo, and NetBackup are trademarks or registered trademarks of VERITAS Software Corporation or its affiliates in the U.S. and other countries. Other names may be trademarks of their respective owners.
Portions of this software are derived from the RSA Data Security, Inc. MD5 Message-Digest Algorithm. Copyright 1991-92, RSA Data Security, Inc. Created 1991. All rights reserved.
VERITAS Software Corporation350 Ellis StreetMountain View, CA 94043USAPhone 650-527-8000Fax 650-527-2908www.veritas.com
Third-Party Copyrights
For a list of third-party copyrights, see the NetBackup Release Notes appendix.
nbu_win_print_II.book Page ii Tuesday, August 16, 2005 12:53 PM
iii
Contents
Preface . . . . . . . . . . . . . . . . . . . . . . . . . . . . . . . . . . . . . . . . . . . . . . . . . . . . . . . . . . . . . xiii
Getting Help . . . . . . . . . . . . . . . . . . . . . . . . . . . . . . . . . . . . . . . . . . . . . . . . . . . . . . . . . . . . . xiii
Finding NetBackup Documentation . . . . . . . . . . . . . . . . . . . . . . . . . . . . . . . . . . . . . . xiii
▼ To access the NetBackup online glossary . . . . . . . . . . . . . . . . . . . . . . . . . . . . . . . xiv
Accessing the VERITAS Technical Support Web Site . . . . . . . . . . . . . . . . . . . . . . . . xiv
Contacting VERITAS Licensing . . . . . . . . . . . . . . . . . . . . . . . . . . . . . . . . . . . . . . . . . . .xv
Accessibility Features . . . . . . . . . . . . . . . . . . . . . . . . . . . . . . . . . . . . . . . . . . . . . . . . . . . . . .xv
Comment on the Documentation . . . . . . . . . . . . . . . . . . . . . . . . . . . . . . . . . . . . . . . . . . . xvi
Chapter 1. Access Management . . . . . . . . . . . . . . . . . . . . . . . . . . . . . . . . . . . . . . . . . .1
NetBackup Access Management Components . . . . . . . . . . . . . . . . . . . . . . . . . . . . . . . . . . 2
VxSS Components . . . . . . . . . . . . . . . . . . . . . . . . . . . . . . . . . . . . . . . . . . . . . . . . . . . . . . . 2
Root Broker . . . . . . . . . . . . . . . . . . . . . . . . . . . . . . . . . . . . . . . . . . . . . . . . . . . . . . . . . . . . . 3
Authentication Brokers . . . . . . . . . . . . . . . . . . . . . . . . . . . . . . . . . . . . . . . . . . . . . . . . . . . 3
Security Administrator . . . . . . . . . . . . . . . . . . . . . . . . . . . . . . . . . . . . . . . . . . . . . . . . . . . 4
Installation Overview . . . . . . . . . . . . . . . . . . . . . . . . . . . . . . . . . . . . . . . . . . . . . . . . . . . . . . . 5
Order for Installation . . . . . . . . . . . . . . . . . . . . . . . . . . . . . . . . . . . . . . . . . . . . . . . . . . . . . 5
Order for Upgrade . . . . . . . . . . . . . . . . . . . . . . . . . . . . . . . . . . . . . . . . . . . . . . . . . . . . . . . 5
Including VxSS Databases in the NetBackup Catalog Backup . . . . . . . . . . . . . . . . . . 6
VxSS Component Distribution . . . . . . . . . . . . . . . . . . . . . . . . . . . . . . . . . . . . . . . . . . . . . 6
Installing and Configuring Access Control for Master Servers . . . . . . . . . . . . . . . . . . . . 8
Installing and Configuring Access Control for Media Servers . . . . . . . . . . . . . . . . . . . . 12
Installing and Configuring Access Control for Clients . . . . . . . . . . . . . . . . . . . . . . . . . . 15
Establishing a Trust Relationship Between the Broker and the Windows Remote
nbu_win_print_II.book Page iii Tuesday, August 16, 2005 12:53 PM
iv NetBackup System Administrator’s Guide for Windows, Volume II
Console . . . . . . . . . . . . . . . . . . . . . . . . . . . . . . . . . . . . . . . . . . . . . . . . . . . . . . . . . . . . . . . 17
Installing the Authentication Service Root Broker (Root + AB) . . . . . . . . . . . . . . . . . . . 18
Configuring Authentication on the Root Broker for Use with NetBackup . . . . . . 19
Installing the Authorization Server . . . . . . . . . . . . . . . . . . . . . . . . . . . . . . . . . . . . . . . . . . 21
Configuring the Authorization Server . . . . . . . . . . . . . . . . . . . . . . . . . . . . . . . . . . . . . 21
Configuring Access Control Host Properties . . . . . . . . . . . . . . . . . . . . . . . . . . . . . . . . . . 23
Master Server and Media Server Host Properties . . . . . . . . . . . . . . . . . . . . . . . . . . . 23
Access Control Host Properties Dialog . . . . . . . . . . . . . . . . . . . . . . . . . . . . . . . . . 23
VxSS Tab . . . . . . . . . . . . . . . . . . . . . . . . . . . . . . . . . . . . . . . . . . . . . . . . . . . . . . . . . . . 24
Authentication Domain Tab . . . . . . . . . . . . . . . . . . . . . . . . . . . . . . . . . . . . . . . . . . 24
Authorization Service Tab . . . . . . . . . . . . . . . . . . . . . . . . . . . . . . . . . . . . . . . . . . . 26
Verifying Master Server Settings . . . . . . . . . . . . . . . . . . . . . . . . . . . . . . . . . . . . . . . 26
Client Host Properties . . . . . . . . . . . . . . . . . . . . . . . . . . . . . . . . . . . . . . . . . . . . . . . . . . . 27
Access Control Host Properties Dialog . . . . . . . . . . . . . . . . . . . . . . . . . . . . . . . . . 27
VxSS Tab . . . . . . . . . . . . . . . . . . . . . . . . . . . . . . . . . . . . . . . . . . . . . . . . . . . . . . . . . . 27
Authentication Domain Tab . . . . . . . . . . . . . . . . . . . . . . . . . . . . . . . . . . . . . . . . . . 27
Access Management Troubleshooting Guidelines . . . . . . . . . . . . . . . . . . . . . . . . . . . . . . 28
Windows Verification Points . . . . . . . . . . . . . . . . . . . . . . . . . . . . . . . . . . . . . . . . . . . . . 28
Master Server Verification Points . . . . . . . . . . . . . . . . . . . . . . . . . . . . . . . . . . . . . . 30
Media Server Verification Points . . . . . . . . . . . . . . . . . . . . . . . . . . . . . . . . . . . . . . 32
Client Verification Points . . . . . . . . . . . . . . . . . . . . . . . . . . . . . . . . . . . . . . . . . . . . . 33
UNIX Verification Points . . . . . . . . . . . . . . . . . . . . . . . . . . . . . . . . . . . . . . . . . . . . . . . . 35
Master Server Verification Points . . . . . . . . . . . . . . . . . . . . . . . . . . . . . . . . . . . . . . 36
Media Server Verification Points . . . . . . . . . . . . . . . . . . . . . . . . . . . . . . . . . . . . . . 38
Client Verification Points . . . . . . . . . . . . . . . . . . . . . . . . . . . . . . . . . . . . . . . . . . . . . 39
Verification Points in a Mixed Environment with a UNIX Master Server . . . . . . . 41
Master Server Verification Points . . . . . . . . . . . . . . . . . . . . . . . . . . . . . . . . . . . . . . 43
Media Server Verification Points . . . . . . . . . . . . . . . . . . . . . . . . . . . . . . . . . . . . . . 43
Client Verification Points . . . . . . . . . . . . . . . . . . . . . . . . . . . . . . . . . . . . . . . . . . . . . 44
Verification Points in a Mixed Environment with a Windows Master Server . . . . 46
nbu_win_print_II.book Page iv Tuesday, August 16, 2005 12:53 PM
Contents v
Master Server Verification Points . . . . . . . . . . . . . . . . . . . . . . . . . . . . . . . . . . . . . . 48
Media Server Verification Points . . . . . . . . . . . . . . . . . . . . . . . . . . . . . . . . . . . . . . 48
Client Verification Points . . . . . . . . . . . . . . . . . . . . . . . . . . . . . . . . . . . . . . . . . . . . . 49
Other Troubleshooting Topics . . . . . . . . . . . . . . . . . . . . . . . . . . . . . . . . . . . . . . . . . . . . 51
Expired Credentials Message . . . . . . . . . . . . . . . . . . . . . . . . . . . . . . . . . . . . . . . . . . 51
Useful Debug Logs . . . . . . . . . . . . . . . . . . . . . . . . . . . . . . . . . . . . . . . . . . . . . . . . . . . 51
If Uninstalling VxSS . . . . . . . . . . . . . . . . . . . . . . . . . . . . . . . . . . . . . . . . . . . . . . . . . . 51
Where Credentials Are Stored . . . . . . . . . . . . . . . . . . . . . . . . . . . . . . . . . . . . . . . . . 51
How System Time Affects Access Control . . . . . . . . . . . . . . . . . . . . . . . . . . . . . . . 52
VxSS Ports . . . . . . . . . . . . . . . . . . . . . . . . . . . . . . . . . . . . . . . . . . . . . . . . . . . . . . . . . . 52
Stopping VxSS Services . . . . . . . . . . . . . . . . . . . . . . . . . . . . . . . . . . . . . . . . . . . . . . . 52
If You Lock Yourself Out of NetBackup . . . . . . . . . . . . . . . . . . . . . . . . . . . . . . . . . 52
nbac_cron Utility . . . . . . . . . . . . . . . . . . . . . . . . . . . . . . . . . . . . . . . . . . . . . . . . . . . . 53
Using the Access Management Utility . . . . . . . . . . . . . . . . . . . . . . . . . . . . . . . . . . . . . . . . 54
Access Management Menus . . . . . . . . . . . . . . . . . . . . . . . . . . . . . . . . . . . . . . . . . . . . . . 54
Determining Who Can Access NetBackup . . . . . . . . . . . . . . . . . . . . . . . . . . . . . . . . . . . . . 56
Individual Users . . . . . . . . . . . . . . . . . . . . . . . . . . . . . . . . . . . . . . . . . . . . . . . . . . . . . . . . 56
User Groups . . . . . . . . . . . . . . . . . . . . . . . . . . . . . . . . . . . . . . . . . . . . . . . . . . . . . . . . . . . 58
Default User Groups . . . . . . . . . . . . . . . . . . . . . . . . . . . . . . . . . . . . . . . . . . . . . . . . . 58
Additional User Groups . . . . . . . . . . . . . . . . . . . . . . . . . . . . . . . . . . . . . . . . . . . . . . 60
User Group Configuration . . . . . . . . . . . . . . . . . . . . . . . . . . . . . . . . . . . . . . . . . . . . . . . 60
▼ To create a new user group . . . . . . . . . . . . . . . . . . . . . . . . . . . . . . . . . . . . . . . . . . . 60
▼ To create a new user group by copying an existing user group . . . . . . . . . . . . . . . 60
Renaming User Groups . . . . . . . . . . . . . . . . . . . . . . . . . . . . . . . . . . . . . . . . . . . . . . . 61
General Tab . . . . . . . . . . . . . . . . . . . . . . . . . . . . . . . . . . . . . . . . . . . . . . . . . . . . . . . . 61
Users Tab . . . . . . . . . . . . . . . . . . . . . . . . . . . . . . . . . . . . . . . . . . . . . . . . . . . . . . . . . . 62
Defining User Groups and Users . . . . . . . . . . . . . . . . . . . . . . . . . . . . . . . . . . . . . . . . . . 62
Defining a User Group . . . . . . . . . . . . . . . . . . . . . . . . . . . . . . . . . . . . . . . . . . . . . . . 63
Logging in as a New User . . . . . . . . . . . . . . . . . . . . . . . . . . . . . . . . . . . . . . . . . . . . . 63
▼ To add a new user to a user group . . . . . . . . . . . . . . . . . . . . . . . . . . . . . . . . . . . . . . 63
nbu_win_print_II.book Page v Tuesday, August 16, 2005 12:53 PM
vi NetBackup System Administrator’s Guide for Windows, Volume II
Permissions Tab . . . . . . . . . . . . . . . . . . . . . . . . . . . . . . . . . . . . . . . . . . . . . . . . . . . . 64
Authorization Objects and Permissions List . . . . . . . . . . . . . . . . . . . . . . . . . . . . . 64
Permissions for Default NetBackup User Groups . . . . . . . . . . . . . . . . . . . . . . . . . . . 66
Backup, Archive, and Restore (BAR) Client Interface . . . . . . . . . . . . . . . . . . . . . 66
License Permissions . . . . . . . . . . . . . . . . . . . . . . . . . . . . . . . . . . . . . . . . . . . . . . . . . . 67
Jobs Tab in the Activity Monitor Permissions . . . . . . . . . . . . . . . . . . . . . . . . . . . . 67
Drives Tab Permissions in the Activity Monitor . . . . . . . . . . . . . . . . . . . . . . . . . . 68
Services Tab Permissions in the Activity Monitor . . . . . . . . . . . . . . . . . . . . . . . . 69
Reports Permissions . . . . . . . . . . . . . . . . . . . . . . . . . . . . . . . . . . . . . . . . . . . . . . . . . 70
Policy Permissions . . . . . . . . . . . . . . . . . . . . . . . . . . . . . . . . . . . . . . . . . . . . . . . . . . . 70
Storage Units Permissions . . . . . . . . . . . . . . . . . . . . . . . . . . . . . . . . . . . . . . . . . . . . 71
Storage Unit Groups Permissions . . . . . . . . . . . . . . . . . . . . . . . . . . . . . . . . . . . . . . 71
Catalog Permissions . . . . . . . . . . . . . . . . . . . . . . . . . . . . . . . . . . . . . . . . . . . . . . . . . 72
Host Properties Permissions . . . . . . . . . . . . . . . . . . . . . . . . . . . . . . . . . . . . . . . . . . 73
Media Permissions . . . . . . . . . . . . . . . . . . . . . . . . . . . . . . . . . . . . . . . . . . . . . . . . . . . 73
Volume Group Permissions . . . . . . . . . . . . . . . . . . . . . . . . . . . . . . . . . . . . . . . . . . . 74
Volume Pools Permissions . . . . . . . . . . . . . . . . . . . . . . . . . . . . . . . . . . . . . . . . . . . . 74
Robots Permissions . . . . . . . . . . . . . . . . . . . . . . . . . . . . . . . . . . . . . . . . . . . . . . . . . . 75
Device Host Permissions . . . . . . . . . . . . . . . . . . . . . . . . . . . . . . . . . . . . . . . . . . . . . 75
Chapter 2. Enhanced Authentication and Authorization . . . . . . . . . . . . . . . . . . . . . 77
Common Configuration Elements . . . . . . . . . . . . . . . . . . . . . . . . . . . . . . . . . . . . . . . . . . . 77
Configuration Files . . . . . . . . . . . . . . . . . . . . . . . . . . . . . . . . . . . . . . . . . . . . . . . . . . . . . 78
methods.txt . . . . . . . . . . . . . . . . . . . . . . . . . . . . . . . . . . . . . . . . . . . . . . . . . . . . . . . . . 78
methods_allow.txt . . . . . . . . . . . . . . . . . . . . . . . . . . . . . . . . . . . . . . . . . . . . . . . . . . . 79
methods_deny.txt . . . . . . . . . . . . . . . . . . . . . . . . . . . . . . . . . . . . . . . . . . . . . . . . . . . 80
names_allow.txt . . . . . . . . . . . . . . . . . . . . . . . . . . . . . . . . . . . . . . . . . . . . . . . . . . . . . 81
names_deny.txt . . . . . . . . . . . . . . . . . . . . . . . . . . . . . . . . . . . . . . . . . . . . . . . . . . . . . 82
authorize.txt . . . . . . . . . . . . . . . . . . . . . . . . . . . . . . . . . . . . . . . . . . . . . . . . . . . . . . . . 82
Library Files . . . . . . . . . . . . . . . . . . . . . . . . . . . . . . . . . . . . . . . . . . . . . . . . . . . . . . . . . . . 84
nbu_win_print_II.book Page vi Tuesday, August 16, 2005 12:53 PM
Contents vii
Commands . . . . . . . . . . . . . . . . . . . . . . . . . . . . . . . . . . . . . . . . . . . . . . . . . . . . . . . . . . . . 84
bpauthorize . . . . . . . . . . . . . . . . . . . . . . . . . . . . . . . . . . . . . . . . . . . . . . . . . . . . . . . . . 84
bpauthsync . . . . . . . . . . . . . . . . . . . . . . . . . . . . . . . . . . . . . . . . . . . . . . . . . . . . . . . . . 85
vopie_util . . . . . . . . . . . . . . . . . . . . . . . . . . . . . . . . . . . . . . . . . . . . . . . . . . . . . . . . . . . 85
Processes: vopied Daemon . . . . . . . . . . . . . . . . . . . . . . . . . . . . . . . . . . . . . . . . . . . . . . . 85
Files . . . . . . . . . . . . . . . . . . . . . . . . . . . . . . . . . . . . . . . . . . . . . . . . . . . . . . . . . . . . . . . . . . . 86
vopie Files . . . . . . . . . . . . . . . . . . . . . . . . . . . . . . . . . . . . . . . . . . . . . . . . . . . . . . . . . . 86
temp File . . . . . . . . . . . . . . . . . . . . . . . . . . . . . . . . . . . . . . . . . . . . . . . . . . . . . . . . . . . 87
Enhanced Authentication . . . . . . . . . . . . . . . . . . . . . . . . . . . . . . . . . . . . . . . . . . . . . . . . . . . 89
Using vopie Enhanced Authentication . . . . . . . . . . . . . . . . . . . . . . . . . . . . . . . . . . . . . 89
▼ To use the vopie enhanced authentication method . . . . . . . . . . . . . . . . . . . . . . . . . 89
vopie Enhanced Authentication Examples . . . . . . . . . . . . . . . . . . . . . . . . . . . . . . . 90
Using noauth Rather than vopie Authentication . . . . . . . . . . . . . . . . . . . . . . . . . . . . 94
noauth Authentication Examples . . . . . . . . . . . . . . . . . . . . . . . . . . . . . . . . . . . . . . . 94
Troubleshooting Authentication . . . . . . . . . . . . . . . . . . . . . . . . . . . . . . . . . . . . . . . . . . 98
Enhanced Authorization . . . . . . . . . . . . . . . . . . . . . . . . . . . . . . . . . . . . . . . . . . . . . . . . . . . . 98
Enhanced Authorization Process . . . . . . . . . . . . . . . . . . . . . . . . . . . . . . . . . . . . . . . . . . 98
Gaining Access to a Server . . . . . . . . . . . . . . . . . . . . . . . . . . . . . . . . . . . . . . . . . . . . 99
Gaining Access to a Client . . . . . . . . . . . . . . . . . . . . . . . . . . . . . . . . . . . . . . . . . . . . 100
Configuring NetBackup Enhanced Authorization . . . . . . . . . . . . . . . . . . . . . . . . . . 100
Enabling NetBackup Enhanced Authentication . . . . . . . . . . . . . . . . . . . . . . . . . 101
Adding an Authorized User . . . . . . . . . . . . . . . . . . . . . . . . . . . . . . . . . . . . . . . . . . 101
▼ To create a list of authorized users . . . . . . . . . . . . . . . . . . . . . . . . . . . . . . . . . . . . 101
Using the Administration Console to Specify Preferred Groups (Optional) . . 102
▼ To specify a preferred group . . . . . . . . . . . . . . . . . . . . . . . . . . . . . . . . . . . . . . . . . 102
Chapter 3. Additional Configuration . . . . . . . . . . . . . . . . . . . . . . . . . . . . . . . . . . . . .105
Multiplexing . . . . . . . . . . . . . . . . . . . . . . . . . . . . . . . . . . . . . . . . . . . . . . . . . . . . . . . . . . . . . 106
When to Use Multiplexing . . . . . . . . . . . . . . . . . . . . . . . . . . . . . . . . . . . . . . . . . . . . . . 106
How to Configure Multiplexing . . . . . . . . . . . . . . . . . . . . . . . . . . . . . . . . . . . . . . . . . 107
nbu_win_print_II.book Page vii Tuesday, August 16, 2005 12:53 PM
viii NetBackup System Administrator’s Guide for Windows, Volume II
Maximum Multiplexing Per Drive for Storage Unit . . . . . . . . . . . . . . . . . . . . . 107
Media Multiplexing for a Schedule . . . . . . . . . . . . . . . . . . . . . . . . . . . . . . . . . . . 107
Other Configuration Settings to Consider Using Multiplexing . . . . . . . . . . . . 110
Demultiplexing . . . . . . . . . . . . . . . . . . . . . . . . . . . . . . . . . . . . . . . . . . . . . . . . . . . . . . . 111
Using Multiple NetBackup Servers . . . . . . . . . . . . . . . . . . . . . . . . . . . . . . . . . . . . . . . . . 112
Configuring a Master and Media Server Grouping . . . . . . . . . . . . . . . . . . . . . . . . . . . . 113
Software on Each Server . . . . . . . . . . . . . . . . . . . . . . . . . . . . . . . . . . . . . . . . . . . . . . . . 114
NetBackup Catalogs . . . . . . . . . . . . . . . . . . . . . . . . . . . . . . . . . . . . . . . . . . . . . . . . . . . 115
Adding a Media Server . . . . . . . . . . . . . . . . . . . . . . . . . . . . . . . . . . . . . . . . . . . . . . . . . . . 116
▼ To add a media server . . . . . . . . . . . . . . . . . . . . . . . . . . . . . . . . . . . . . . . . . . . . . . 116
NetBackup Configuration Options . . . . . . . . . . . . . . . . . . . . . . . . . . . . . . . . . . . . . . . . . . 119
NBRB_CLEANUP_OBSOLETE_DBINFO . . . . . . . . . . . . . . . . . . . . . . . . . . . . . 119
NBRB_ENABLE_OPTIMIZATIONS . . . . . . . . . . . . . . . . . . . . . . . . . . . . . . . . . . 119
NBRB_FORCE_FULL_EVAL . . . . . . . . . . . . . . . . . . . . . . . . . . . . . . . . . . . . . . . . . 119
NBRB_REEVAL_PENDING . . . . . . . . . . . . . . . . . . . . . . . . . . . . . . . . . . . . . . . . . 119
NBRB_REEVAL_PERIOD . . . . . . . . . . . . . . . . . . . . . . . . . . . . . . . . . . . . . . . . . . . 120
NBRB_RETRY_DELAY_AFTER_EMM_ERR . . . . . . . . . . . . . . . . . . . . . . . . . . . 120
NBRB_MPX_GROUP_UNLOAD_DELAY . . . . . . . . . . . . . . . . . . . . . . . . . . . . . 120
REQUIRED_NETWORK . . . . . . . . . . . . . . . . . . . . . . . . . . . . . . . . . . . . . . . . . . . . 120
Dynamic Host Name and IP Addressing . . . . . . . . . . . . . . . . . . . . . . . . . . . . . . . . . . . . 122
Setting up Dynamic IP Addresses and Host Names . . . . . . . . . . . . . . . . . . . . . . . . 123
Configuring the NetBackup Master Server . . . . . . . . . . . . . . . . . . . . . . . . . . . . . . . . 124
Configuring a Dynamic Microsoft Windows Client . . . . . . . . . . . . . . . . . . . . . . . . 126
Configuring a Dynamic UNIX NetBackup Client . . . . . . . . . . . . . . . . . . . . . . . . . . 126
Configuring E-mail Notifications . . . . . . . . . . . . . . . . . . . . . . . . . . . . . . . . . . . . . . . . . . . 128
Specifying the Locale of the NetBackup Installation . . . . . . . . . . . . . . . . . . . . . . . . . . . 129
Chapter 4. Reference Topics . . . . . . . . . . . . . . . . . . . . . . . . . . . . . . . . . . . . . . . . . . . 131
Rules for Using Host Names in NetBackup . . . . . . . . . . . . . . . . . . . . . . . . . . . . . . . . . . 132
Qualifying Host Names . . . . . . . . . . . . . . . . . . . . . . . . . . . . . . . . . . . . . . . . . . . . . . . . 132
nbu_win_print_II.book Page viii Tuesday, August 16, 2005 12:53 PM
Contents ix
How NetBackup Uses Host Names . . . . . . . . . . . . . . . . . . . . . . . . . . . . . . . . . . . . . . . 132
Policy Configuration . . . . . . . . . . . . . . . . . . . . . . . . . . . . . . . . . . . . . . . . . . . . . . . . 132
Image Catalog . . . . . . . . . . . . . . . . . . . . . . . . . . . . . . . . . . . . . . . . . . . . . . . . . . . . . . 133
Error Catalog . . . . . . . . . . . . . . . . . . . . . . . . . . . . . . . . . . . . . . . . . . . . . . . . . . . . . . . 133
Catalog Backup Information . . . . . . . . . . . . . . . . . . . . . . . . . . . . . . . . . . . . . . . . . . 133
How to Update NetBackup After a Host Name Changes . . . . . . . . . . . . . . . . . . . . 133
Special Considerations For Domain Name Service (DNS) . . . . . . . . . . . . . . . . . . . 134
Reading Backup Images with tar . . . . . . . . . . . . . . . . . . . . . . . . . . . . . . . . . . . . . . . . . . . . 136
Effects of Using a Non-NetBackup tar . . . . . . . . . . . . . . . . . . . . . . . . . . . . . . . . . 136
Factors Affecting Backup Time . . . . . . . . . . . . . . . . . . . . . . . . . . . . . . . . . . . . . . . . . . . . . 137
Total Data . . . . . . . . . . . . . . . . . . . . . . . . . . . . . . . . . . . . . . . . . . . . . . . . . . . . . . . . . . . . 137
Transfer Rate . . . . . . . . . . . . . . . . . . . . . . . . . . . . . . . . . . . . . . . . . . . . . . . . . . . . . . . . . . 137
Device Delays . . . . . . . . . . . . . . . . . . . . . . . . . . . . . . . . . . . . . . . . . . . . . . . . . . . . . . . . . 138
Determining NetBackup Transfer Rate . . . . . . . . . . . . . . . . . . . . . . . . . . . . . . . . . . . . . . 138
Network Transfer Rate . . . . . . . . . . . . . . . . . . . . . . . . . . . . . . . . . . . . . . . . . . . . . . . . . 139
Network Transfer Plus End-of-Backup-Processing Rate . . . . . . . . . . . . . . . . . . . . . 139
Total Transfer Rate . . . . . . . . . . . . . . . . . . . . . . . . . . . . . . . . . . . . . . . . . . . . . . . . . . . . . 139
Examples . . . . . . . . . . . . . . . . . . . . . . . . . . . . . . . . . . . . . . . . . . . . . . . . . . . . . . . . . . . . . 139
Using the System Monitor . . . . . . . . . . . . . . . . . . . . . . . . . . . . . . . . . . . . . . . . . . . . . . 140
▼ To use the System Monitor with NetBackup . . . . . . . . . . . . . . . . . . . . . . . . . . . . 141
How NetBackup Builds a Worklist . . . . . . . . . . . . . . . . . . . . . . . . . . . . . . . . . . . . . . . . . . 142
Building the Worklist (Queue) . . . . . . . . . . . . . . . . . . . . . . . . . . . . . . . . . . . . . . . . . . . 142
Prioritizing Queued Jobs . . . . . . . . . . . . . . . . . . . . . . . . . . . . . . . . . . . . . . . . . . . . . . . 143
Determining Backup Media Requirements . . . . . . . . . . . . . . . . . . . . . . . . . . . . . . . . . . . 144
NetBackup Notify Scripts . . . . . . . . . . . . . . . . . . . . . . . . . . . . . . . . . . . . . . . . . . . . . . . . . . 146
backup_notify.cmd . . . . . . . . . . . . . . . . . . . . . . . . . . . . . . . . . . . . . . . . . . . . . . . . . . 147
backup_exit_notify.cmd . . . . . . . . . . . . . . . . . . . . . . . . . . . . . . . . . . . . . . . . . . . . . 147
bpstart_notify (UNIX clients only) . . . . . . . . . . . . . . . . . . . . . . . . . . . . . . . . . . . . . 148
bpstart_notify.bat (Microsoft Windows clients only) . . . . . . . . . . . . . . . . . . . . . 150
bpend_notify (UNIX clients only) . . . . . . . . . . . . . . . . . . . . . . . . . . . . . . . . . . . . . 152
nbu_win_print_II.book Page ix Tuesday, August 16, 2005 12:53 PM
x NetBackup System Administrator’s Guide for Windows, Volume II
bpend_notify.bat (Microsoft Windows clients only) . . . . . . . . . . . . . . . . . . . . . 155
dbbackup_notify.cmd . . . . . . . . . . . . . . . . . . . . . . . . . . . . . . . . . . . . . . . . . . . . . . . 157
diskfull_notify.cmd . . . . . . . . . . . . . . . . . . . . . . . . . . . . . . . . . . . . . . . . . . . . . . . . . 158
mail_dr_info.cmd . . . . . . . . . . . . . . . . . . . . . . . . . . . . . . . . . . . . . . . . . . . . . . . . . . 158
nbmail.cmd . . . . . . . . . . . . . . . . . . . . . . . . . . . . . . . . . . . . . . . . . . . . . . . . . . . . . . . 159
parent_end_notify.cmd . . . . . . . . . . . . . . . . . . . . . . . . . . . . . . . . . . . . . . . . . . . . . . 160
parent_start_notify.cmd . . . . . . . . . . . . . . . . . . . . . . . . . . . . . . . . . . . . . . . . . . . . . 160
restore_notify.cmd . . . . . . . . . . . . . . . . . . . . . . . . . . . . . . . . . . . . . . . . . . . . . . . . . . 161
session_notify.cmd . . . . . . . . . . . . . . . . . . . . . . . . . . . . . . . . . . . . . . . . . . . . . . . . . 162
session_start_notify.cmd . . . . . . . . . . . . . . . . . . . . . . . . . . . . . . . . . . . . . . . . . . . . 162
userreq_notify.cmd . . . . . . . . . . . . . . . . . . . . . . . . . . . . . . . . . . . . . . . . . . . . . . . . . 162
Chapter 5. UNIX Reference Topics . . . . . . . . . . . . . . . . . . . . . . . . . . . . . . . . . . . . . . 163
Cross Mount Points . . . . . . . . . . . . . . . . . . . . . . . . . . . . . . . . . . . . . . . . . . . . . . . . . . . . . . . 164
Exclude and Include Lists on UNIX Clients . . . . . . . . . . . . . . . . . . . . . . . . . . . . . . . . . . 166
Creating an Exclude List on a UNIX Client . . . . . . . . . . . . . . . . . . . . . . . . . . . . . 166
Creating an Include List on a UNIX Client . . . . . . . . . . . . . . . . . . . . . . . . . . . . . 170
Schedules for User Backups or Archives . . . . . . . . . . . . . . . . . . . . . . . . . . . . . . . . . . . . . 170
Chapter 6. Using NetBackup With AFS . . . . . . . . . . . . . . . . . . . . . . . . . . . . . . . . . . 173
Installation . . . . . . . . . . . . . . . . . . . . . . . . . . . . . . . . . . . . . . . . . . . . . . . . . . . . . . . . . . . . . . 173
System Requirements . . . . . . . . . . . . . . . . . . . . . . . . . . . . . . . . . . . . . . . . . . . . . . . . . . 173
Server and Client Installation . . . . . . . . . . . . . . . . . . . . . . . . . . . . . . . . . . . . . . . . . . . 173
Configuration . . . . . . . . . . . . . . . . . . . . . . . . . . . . . . . . . . . . . . . . . . . . . . . . . . . . . . . . . . . . 173
General Policy Attributes . . . . . . . . . . . . . . . . . . . . . . . . . . . . . . . . . . . . . . . . . . . . . . . 174
Client List . . . . . . . . . . . . . . . . . . . . . . . . . . . . . . . . . . . . . . . . . . . . . . . . . . . . . . . . . . . . 174
Backup Selections . . . . . . . . . . . . . . . . . . . . . . . . . . . . . . . . . . . . . . . . . . . . . . . . . . . . . 174
Backup Selection List Directives . . . . . . . . . . . . . . . . . . . . . . . . . . . . . . . . . . . . . . . . . 174
Regular Expressions . . . . . . . . . . . . . . . . . . . . . . . . . . . . . . . . . . . . . . . . . . . . . . . . . . . 175
Exclude and Include Lists . . . . . . . . . . . . . . . . . . . . . . . . . . . . . . . . . . . . . . . . . . . . . . 176
Backups and Restores . . . . . . . . . . . . . . . . . . . . . . . . . . . . . . . . . . . . . . . . . . . . . . . . . . . . . 176
nbu_win_print_II.book Page x Tuesday, August 16, 2005 12:53 PM
Contents xi
Backups . . . . . . . . . . . . . . . . . . . . . . . . . . . . . . . . . . . . . . . . . . . . . . . . . . . . . . . . . . . . . . 176
Automatic Backup . . . . . . . . . . . . . . . . . . . . . . . . . . . . . . . . . . . . . . . . . . . . . . . . . . 176
Manual Backup . . . . . . . . . . . . . . . . . . . . . . . . . . . . . . . . . . . . . . . . . . . . . . . . . . . . . 176
Restores . . . . . . . . . . . . . . . . . . . . . . . . . . . . . . . . . . . . . . . . . . . . . . . . . . . . . . . . . . . . . . 176
Restore From the NetBackup for AFS Client . . . . . . . . . . . . . . . . . . . . . . . . . . . . 177
Restore From the NetBackup Master Server . . . . . . . . . . . . . . . . . . . . . . . . . . . . 177
Notes About Restores . . . . . . . . . . . . . . . . . . . . . . . . . . . . . . . . . . . . . . . . . . . . . . . 177
Troubleshooting . . . . . . . . . . . . . . . . . . . . . . . . . . . . . . . . . . . . . . . . . . . . . . . . . . . . . . . . . . 178
Troubleshooting Backups . . . . . . . . . . . . . . . . . . . . . . . . . . . . . . . . . . . . . . . . . . . . . . . 178
Troubleshooting Restores . . . . . . . . . . . . . . . . . . . . . . . . . . . . . . . . . . . . . . . . . . . . . . . 178
Chapter 7. Intelligent Disaster Recovery . . . . . . . . . . . . . . . . . . . . . . . . . . . . . . . . . .179
Changes for NetBackup 6.0 . . . . . . . . . . . . . . . . . . . . . . . . . . . . . . . . . . . . . . . . . . . . . . . . 180
Supported Windows Editions . . . . . . . . . . . . . . . . . . . . . . . . . . . . . . . . . . . . . . . . . . . . . . 180
Requirements for IDR . . . . . . . . . . . . . . . . . . . . . . . . . . . . . . . . . . . . . . . . . . . . . . . . . . . . . 180
Overview of IDR Use . . . . . . . . . . . . . . . . . . . . . . . . . . . . . . . . . . . . . . . . . . . . . . . . . . . . . . 181
About the DR Files . . . . . . . . . . . . . . . . . . . . . . . . . . . . . . . . . . . . . . . . . . . . . . . . . . . . . . . . 182
Configuring NetBackup Policies for IDR . . . . . . . . . . . . . . . . . . . . . . . . . . . . . . . . . . . . . 183
Backing Up the System to be Protected . . . . . . . . . . . . . . . . . . . . . . . . . . . . . . . . . . . . . . 184
Creating IDR Media . . . . . . . . . . . . . . . . . . . . . . . . . . . . . . . . . . . . . . . . . . . . . . . . . . . . . . . 184
Choosing the Bootable Media . . . . . . . . . . . . . . . . . . . . . . . . . . . . . . . . . . . . . . . . . . . . 185
Creating Bootable Diskettes . . . . . . . . . . . . . . . . . . . . . . . . . . . . . . . . . . . . . . . . . . . . . 186
▼ To create bootable diskettes . . . . . . . . . . . . . . . . . . . . . . . . . . . . . . . . . . . . . . . . . . 186
Modifying Diskette Sets for Use with Multiple Windows 2000 Computers . . 187
Creating a Bootable CD Image . . . . . . . . . . . . . . . . . . . . . . . . . . . . . . . . . . . . . . . . . . . 188
▼ To create a bootable CD image . . . . . . . . . . . . . . . . . . . . . . . . . . . . . . . . . . . . . . . 188
Creating IDR Diskettes . . . . . . . . . . . . . . . . . . . . . . . . . . . . . . . . . . . . . . . . . . . . . . . . . 189
▼ To create IDR diskettes . . . . . . . . . . . . . . . . . . . . . . . . . . . . . . . . . . . . . . . . . . . . . 190
Updating IDR Media . . . . . . . . . . . . . . . . . . . . . . . . . . . . . . . . . . . . . . . . . . . . . . . . . . . . . . 190
Updating a Bootable CD . . . . . . . . . . . . . . . . . . . . . . . . . . . . . . . . . . . . . . . . . . . . . . . . 191
nbu_win_print_II.book Page xi Tuesday, August 16, 2005 12:53 PM
xii NetBackup System Administrator’s Guide for Windows, Volume II
Updating Bootable Diskettes . . . . . . . . . . . . . . . . . . . . . . . . . . . . . . . . . . . . . . . . . . . . 191
▼ To update IDR bootable diskettes . . . . . . . . . . . . . . . . . . . . . . . . . . . . . . . . . . . . . 191
Updating IDR Diskettes Only . . . . . . . . . . . . . . . . . . . . . . . . . . . . . . . . . . . . . . . . . . . 192
▼ To update IDR diskettes using IDR Preparation Wizard . . . . . . . . . . . . . . . . . . 192
Using drfile.exe to Create or Update a DR File . . . . . . . . . . . . . . . . . . . . . . . . . . . . . 193
Recovering Your Computer . . . . . . . . . . . . . . . . . . . . . . . . . . . . . . . . . . . . . . . . . . . . . . . . 193
Step 1: Boot Your Computer . . . . . . . . . . . . . . . . . . . . . . . . . . . . . . . . . . . . . . . . . . . . 194
▼ To boot a computer using a bootable diskette . . . . . . . . . . . . . . . . . . . . . . . . . . . . 194
▼ To boot from a bootable CD . . . . . . . . . . . . . . . . . . . . . . . . . . . . . . . . . . . . . . . . . 195
Step 2: Windows Setup in IDR Recovery . . . . . . . . . . . . . . . . . . . . . . . . . . . . . . . . . . 195
▼ To use Windows setup in IDR recovery . . . . . . . . . . . . . . . . . . . . . . . . . . . . . . . . 195
Step 3: Disaster Recovery Wizard . . . . . . . . . . . . . . . . . . . . . . . . . . . . . . . . . . . . . . . . 196
▼ To use the Disaster Recovery Wizard . . . . . . . . . . . . . . . . . . . . . . . . . . . . . . . . . . 196
Notes on Altering Hard Drive Partition Sizes . . . . . . . . . . . . . . . . . . . . . . . . . . . . . . 200
Notes on Recovering Specific Platforms . . . . . . . . . . . . . . . . . . . . . . . . . . . . . . . . . . . . . 200
Recovering the Dell PowerEdge 6100/200 with RAID . . . . . . . . . . . . . . . . . . . . . . 200
▼ Use the following steps with your IDR recovery diskette set . . . . . . . . . . . . . . . . 200
Recovering IBM Computers . . . . . . . . . . . . . . . . . . . . . . . . . . . . . . . . . . . . . . . . . . . . 201
Recovering Compaq Computers . . . . . . . . . . . . . . . . . . . . . . . . . . . . . . . . . . . . . . . . . 201
IDR Frequently Asked Questions . . . . . . . . . . . . . . . . . . . . . . . . . . . . . . . . . . . . . . . . . . . 201
Index . . . . . . . . . . . . . . . . . . . . . . . . . . . . . . . . . . . . . . . . . . . . . . . . . . . . . . . . . . . . . . 205
nbu_win_print_II.book Page xii Tuesday, August 16, 2005 12:53 PM
xiii
Preface
This guide describes how to configure and manage the operation of VERITAS NetBackup Server and VERITAS NetBackup Enterprise Server for Windows and applies to all supported platforms and operating systems. See the NetBackup Release Notes for a list of the hardware and operating system levels that NetBackup supports.
To determine the version of installed software, check the install_path\NetBackup\Version.txt file. Where install_path is the directory where NetBackup is installed (C:\Program Files\VERITAS by default).
This guide is intended for system administrators and assumes that the reader has a good working knowledge of the Windows operating system on the platform where the product is used. In this guide, a system administrator is defined as a person with system administrator privileges and responsibilities. A client user is defined as anyone that uses the client interfaces to back up, archive, or restore files.
Getting HelpYou can find answers to questions and get help from the NetBackup documentation and from the VERITAS technical support web site.
Finding NetBackup DocumentationA list of the entire NetBackup documentation set appears as an appendix in the NetBackup Release Notes. All NetBackup documents are included in PDF format on the NetBackup Documentation CD.
For definitions of NetBackup terms, consult the online glossary.
nbu_win_print_II.book Page xiii Tuesday, August 16, 2005 12:53 PM
Getting Help
xiv NetBackup System Administrator’s Guide for Windows, Volume II
▼ To access the NetBackup online glossary
1. In the NetBackup Administration Console, click Help > Help Topics.
2. Click the Contents tab.
3. Click Glossary of NetBackup Terms.
Use the scroll function to navigate through the glossary.
Accessing the VERITAS Technical Support Web SiteThe address for the VERITAS Technical Support Web site is http://support.veritas.com.
The VERITAS Support Web site lets you do any of the following:
◆ Obtain updated information about NetBackup, including system requirements, supported platforms, and supported peripherals
◆ Contact the VERITAS Technical Support staff and post questions to them
◆ Get the latest patches, upgrades, and utilities
◆ View the NetBackup Frequently Asked Questions (FAQ) page
◆ Search the knowledge base for answers to technical support questions
◆ Receive automatic notice of product updates
◆ Find out about NetBackup training
◆ Read current white papers related to NetBackup
From http://support.veritas.com, you can complete various tasks to obtain specific types of support for NetBackup:
1. Subscribe to the VERITAS Email notification service to be informed of software alerts, newly published documentation, Beta programs, and other services.
a. From the main http://support.veritas.com page, select a product family and a product.
b. Under Support Resources, click Email Notifications.
Your customer profile ensures you receive the latest VERITAS technical information pertaining to your specific interests.
2. Locate the telephone support directory at http://support.veritas.com by clicking the Phone Support icon. A page appears that contains VERITAS support numbers from around the world.
nbu_win_print_II.book Page xiv Tuesday, August 16, 2005 12:53 PM

Preface xv
Accessibility Features
Note Telephone support for NetBackup is only available with a valid support contract. To contact VERITAS for technical support, dial the appropriate phone number listed on the Technical Support Guide included in the product box and have your product license information ready for quick navigation to the proper support group.
3. Contact technical support using e-mail.
a. From the main http://support.veritas.com page, click the E-mail Support icon.
A wizard guides you to do the following:
◆ Select a language of your preference
◆ Select a product and a platform
◆ Provide additional contact and product information, and your message
◆ Associate your message with an existing technical support case
b. After providing the required information, click Send Message.
Contacting VERITAS LicensingFor license information, you can contact us as follows:
◆ Call 1-800-634-4747 and select option 3
◆ Fax questions to 1-650-527-0952
◆ In the Americas, send e-mail to [email protected].
In the Asia and Pacific areas, send email to [email protected].
In all other areas, send email to [email protected].
Accessibility FeaturesNetBackup contains features that make the user interface easier to use by people who are visually impaired and by people who have limited dexterity. Accessibility features include:
◆ Support for assistive technologies such as screen readers and voice input (Windows servers only)
◆ Support for keyboard (mouseless) navigation using accelerator keys and mnemonic keys
nbu_win_print_II.book Page xv Tuesday, August 16, 2005 12:53 PM

Comment on the Documentation
xvi NetBackup System Administrator’s Guide for Windows, Volume II
For more information, see the NetBackup Installation Guide.
Comment on the DocumentationLet us know what you like and dislike about the documentation. Were you able to find the information you needed quickly? Was the information clearly presented? You can report errors and omissions or tell us what you would find useful in future versions of our manuals and online help.
Please include the following information with your comment:
◆ The title and product version of the manual on which you are commenting
◆ The topic (if relevant) on which you are commenting
◆ Your comment
◆ Your name
Email your comment to [email protected].
Please only use this address to comment on product documentation. See “Getting Help” in this preface for information on how to contact Technical Support about our software.
We appreciate your feedback.
nbu_win_print_II.book Page xvi Tuesday, August 16, 2005 12:53 PM
1
Access Management 1Access to NetBackup can be controlled by defining user groups and granting explicit permissions to these groups. Configuring user groups and assigning permissions is done using Access Management in the NetBackup Administration Console.
Note In order for the NetBackup-Java Administration Console to function, the user must have permission to log in to the system remotely.
This chapter discusses how to set up and manage access to NetBackup. It contains the following sections:
◆ “NetBackup Access Management Components” on page 2
◆ “Installation Overview” on page 5
◆ “Installing and Configuring Access Control for Master Servers” on page 8
◆ “Installing and Configuring Access Control for Media Servers” on page 12
◆ “Installing and Configuring Access Control for Clients” on page 15
◆ “Installing the Authentication Service Root Broker (Root + AB)” on page 18
◆ “Installing the Authorization Server” on page 21
◆ “Configuring Access Control Host Properties” on page 23
◆ “Access Management Troubleshooting Guidelines” on page 28
◆ “Using the Access Management Utility” on page 54
◆ “Determining Who Can Access NetBackup” on page 56
Note Access Management and Enhanced Authorization and Authentication (see Chapter 2) are independent methods of Access Control. Access Management is the newest and will be the preferred method in future NetBackup releases. If both Access Management and Enhanced Authorization and Authentication are configured, Access Management takes precedence.
nbu_win_print_II.book Page 1 Tuesday, August 16, 2005 12:53 PM
NetBackup Access Management Components
2 NetBackup System Administrator’s Guide for Windows, Volume II
Note If some media servers are not configured with access control, non-root/non-administrator users will not be able to manage those servers.
NetBackup Access Management Components NetBackup uses the VERITAS Security Services (VxSS) to help implement core security. VxSS is a set of shared VERITAS infrastructure services, installed from one of the infrastructure common services CDs containing VxSS for your platform. The CDs are packaged as part of NetBackup.
Note NetBackup Access Management relies on the use of home directories. Please see the documentation for your operating system for more information on home directories.
Note In order for members of the NBU_Operator user group to continue viewing media and device information, run the following command: bpnbaz -UpGrade60 Running this command brings the NetBackup 5.x permissions for the NBU_Operator user group up to the expected configuration for 6.0.
VxSS ComponentsWhen you install VxSS, you’re installing and configuring the following services and client software:
◆ Authentication (At Server, At Client)
Authentication is the process of proving your identity to the VxSS system. Authentication is accomplished by communicating with the service which, in turn, validates your identity with the operating system.
For more information on authentication or the authentication service (vxatd), see the VERITAS Security Services Administrator’s Guide found on one of the infrastructure common services CDs containing VxSS for your platform.
◆ Authorization (Az Server, Az Client)
Authorization is the process of verifying that an identity has permission to perform the desired action. NetBackup verifies permissions with the authorization service for most actions. In many cases, NetBackup alters what information is accessible from the command line and Administration Console.
nbu_win_print_II.book Page 2 Tuesday, August 16, 2005 12:53 PM
Chapter 1, Access Management
NetBackup Access Management Components
3
For more information on authorization or the authorization service (vxazd), see the VERITAS Security Services Administrator’s Guide found on one of the infrastructure common services CDs containing VxSS for your platform.
Root BrokerA Root Broker is a NetBackup server that has VxSS Authentication Server installed and is configured to be a Root Broker. There is always one Root Broker in every NetBackup Access Management configuration.
The Root Broker acts as the most trusted certificate authority, implementing a registration authority for Authentication Brokers, as well as itself.
While a Root Broker can authenticate an Authentication Broker, an Authentication Broker cannot authenticate a Root Broker.
In many cases, the Root Broker will also be an Authentication Broker. This chapter describes installing VxSS services, then it describes configuring the NetBackup server to be a Root Broker and an Authentication Broker (Root Broker + AB). For more information on the authentication Root Broker, see the VERITAS Security Services Administrator’s Guide found on one of the infrastructure common services CDs containing VxSS for your platform.
Authentication BrokersAn Authentication Broker is a server that has VxSS Authentication Server installed. This machine is part of the Root Broker’s private Access Management domain. An Authentication Broker can authenticate clients, but not other brokers.
The member of the NetBackup Security Administrator user group can choose which Authentication Broker a client should contact for authentication. (See “Example Configuration Containing Windows Systems Only” on page 29 and “Example Configuration Containing UNIX Systems Only” on page 35 for a depiction of this configuration.)
For example:
◆ A Windows 2000 client uses a Windows Authentication Broker for authentication.
◆ A UNIX client uses a UNIX Authentication Broker for authentication.
◆ For more information on authentication brokers, see the VERITAS Security Services Administrator’s Guide found on one of the infrastructure common services CDs containing VxSS for your platform.
nbu_win_print_II.book Page 3 Tuesday, August 16, 2005 12:53 PM
NetBackup Access Management Components
4 NetBackup System Administrator’s Guide for Windows, Volume II
Security AdministratorThe user who installs and configures VxSS software for use with NetBackup Access Management is, by default, a member of the NBU_Security Admin user group. This chapter will refer to a member of the NBU_Security Admin group as a Security Administrator. Users can be added to the group, but there are usually few members.
Members of the NBU_Security Admin user group are the only users who can view the contents of Access Management > Users and Access Management > NBU User Groups in the NetBackup Administration Console. Security Administrators are the only users allowed to create user groups, assign users to the groups, and define permissions for the groups. However, Security Administrators, by default, do not have permission to perform any other NetBackup administration activities. (See “Security Administrator (NBU_Security Admin)” on page 58.)
nbu_win_print_II.book Page 4 Tuesday, August 16, 2005 12:53 PM
Chapter 1, Access Management
Installation Overview
5
Installation OverviewFor a detailed installation description, see “Installing and Configuring Access Control for Master Servers” on page 8.
Order for Installation
1. Complete all NetBackup master server installations:
a. Complete Root + AB installation of VxSS Authentication server.
b. Complete VxSS Authorization server installation.
c. Configure master servers for NetBackup Access Control. See “Installing and Configuring Access Control for Master Servers” on page 8.
2. Complete all NetBackup media server installations, then configure media servers for NetBackup Access Control. See “Installing and Configuring Access Control for Media Servers” on page 12.
3. Complete all NetBackup client installations, then configure clients for NetBackup Access Control. See “Installing and Configuring Access Control for Clients” on page 15.
Order for UpgradeUse the following order for upgrading any NetBackup machine that uses NetBackup Access Control.
1. Stop NetBackup.
2. Upgrade VxSS.
3. Configure Access Control on the NetBackup machines. See:
◆ “Installing and Configuring Access Control for Master Servers” on page 8.
◆ “Installing and Configuring Access Control for Media Servers” on page 12.
◆ “Installing and Configuring Access Control for Clients” on page 15.
nbu_win_print_II.book Page 5 Tuesday, August 16, 2005 12:53 PM
Installation Overview
6 NetBackup System Administrator’s Guide for Windows, Volume II
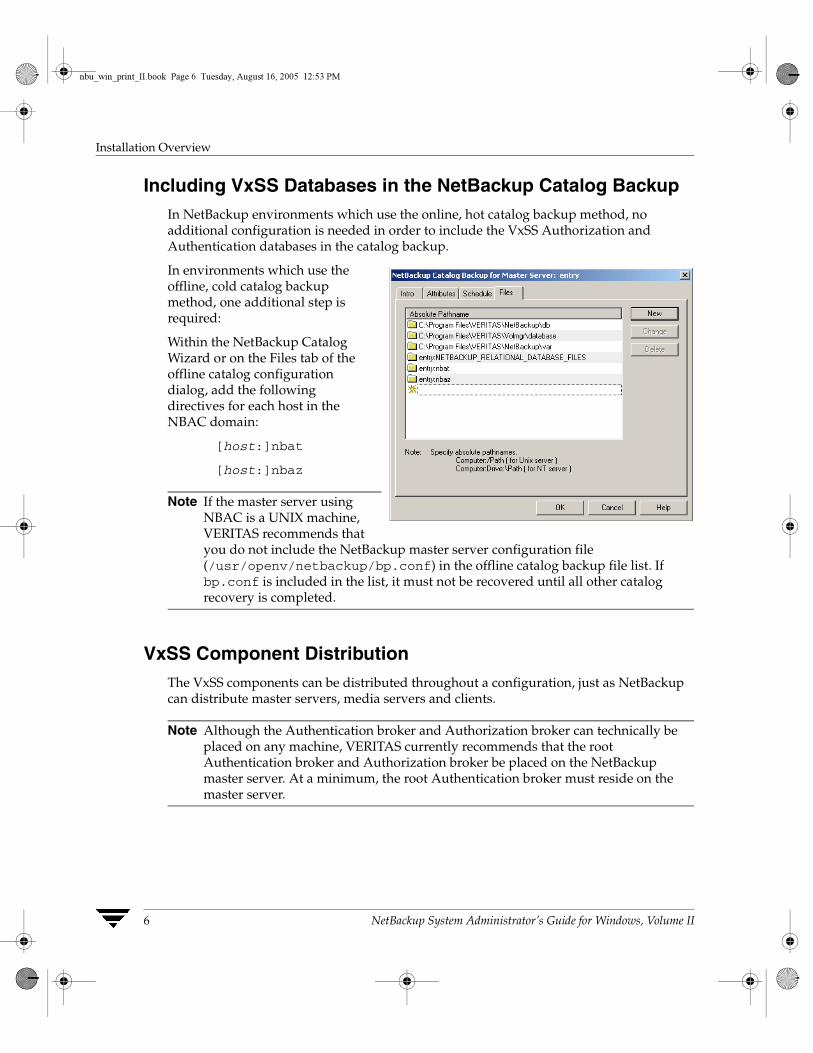
Including VxSS Databases in the NetBackup Catalog BackupIn NetBackup environments which use the online, hot catalog backup method, no additional configuration is needed in order to include the VxSS Authorization and Authentication databases in the catalog backup.
In environments which use the offline, cold catalog backup method, one additional step is required:
Within the NetBackup Catalog Wizard or on the Files tab of the offline catalog configuration dialog, add the following directives for each host in the NBAC domain:
[host:]nbat
[host:]nbaz
Note If the master server using NBAC is a UNIX machine, VERITAS recommends that you do not include the NetBackup master server configuration file (/usr/openv/netbackup/bp.conf) in the offline catalog backup file list. If bp.conf is included in the list, it must not be recovered until all other catalog recovery is completed.
VxSS Component Distribution The VxSS components can be distributed throughout a configuration, just as NetBackup can distribute master servers, media servers and clients.
Note Although the Authentication broker and Authorization broker can technically be placed on any machine, VERITAS currently recommends that the root Authentication broker and Authorization broker be placed on the NetBackup master server. At a minimum, the root Authentication broker must reside on the master server.
nbu_win_print_II.book Page 6 Tuesday, August 16, 2005 12:53 PM
Chapter 1, Access Management
Installation Overview
7
For specific VxSS installation information, refer to the VERITAS Security Services Installation Guide, found on the VxSS installation CD.
Note While it is possible to share the Enterprise Media Manager server between multiple master servers, this configuration is not supported when using Access Control. The EMM server must be bound to one master server.
The following sections describe some actions you can take to verify that the components are correctly installed in a mixed environment:
◆ “Windows Verification Points” on page 28
◆ “UNIX Verification Points” on page 35
◆ “Verification Points in a Mixed Environment with a UNIX Master Server” on page 41
◆ “Verification Points in a Mixed Environment with a Windows Master Server” on page 46
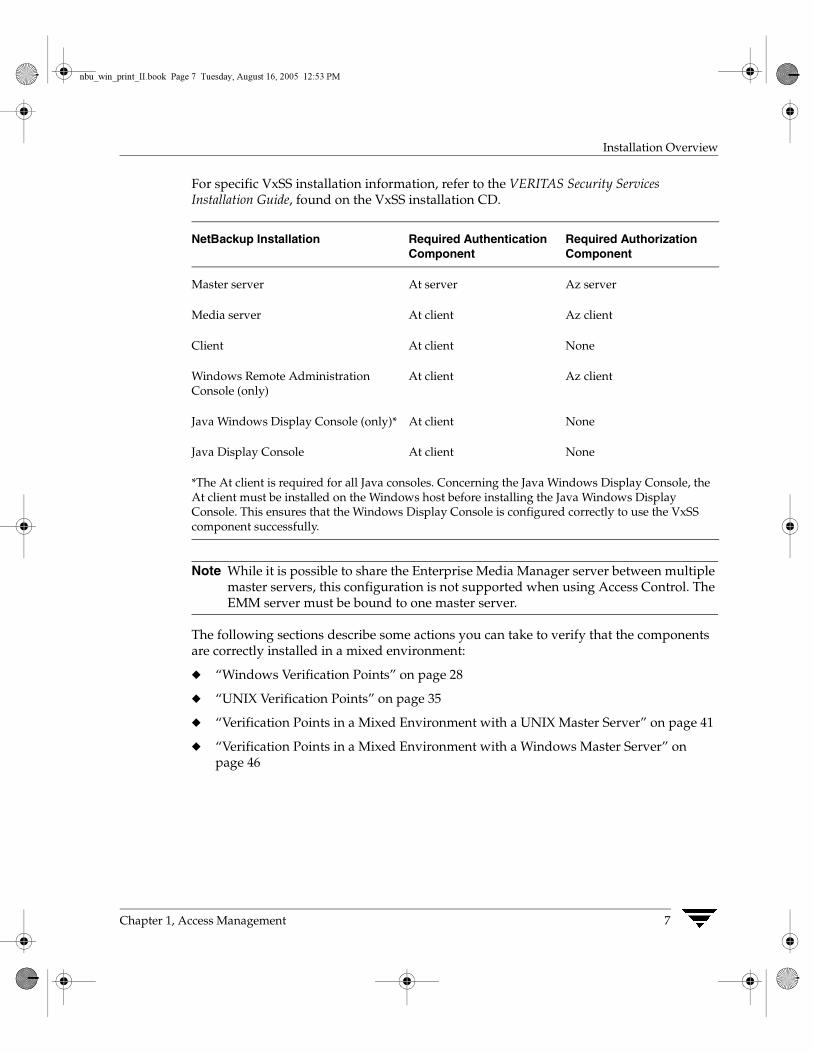
NetBackup Installation Required Authentication Component
Required Authorization Component
Master server At server Az server
Media server At client Az client
Client At client None
Windows Remote Administration Console (only)
At client Az client
Java Windows Display Console (only)* At client None
Java Display Console At client None
*The At client is required for all Java consoles. Concerning the Java Windows Display Console, the At client must be installed on the Windows host before installing the Java Windows Display Console. This ensures that the Windows Display Console is configured correctly to use the VxSS component successfully.
nbu_win_print_II.book Page 7 Tuesday, August 16, 2005 12:53 PM
Installing and Configuring Access Control for Master Servers
8 NetBackup System Administrator’s Guide for Windows, Volume II
Installing and Configuring Access Control for Master Servers
The following steps describe configuring NetBackup Access Control for the master server in a NetBackup configuration. A master server requires Authentication Server and Client software and Authorization Server and Client software.
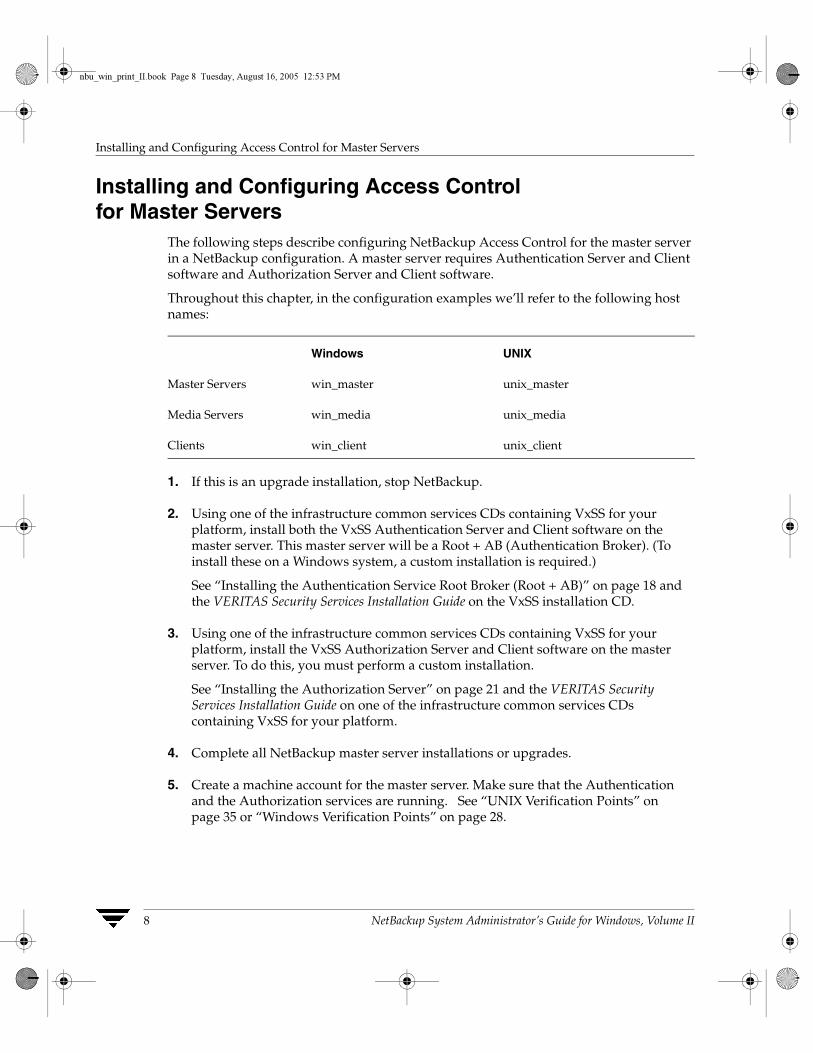
Throughout this chapter, in the configuration examples we’ll refer to the following host names:
1. If this is an upgrade installation, stop NetBackup.
2. Using one of the infrastructure common services CDs containing VxSS for your platform, install both the VxSS Authentication Server and Client software on the master server. This master server will be a Root + AB (Authentication Broker). (To install these on a Windows system, a custom installation is required.)
See “Installing the Authentication Service Root Broker (Root + AB)” on page 18 and the VERITAS Security Services Installation Guide on the VxSS installation CD.
3. Using one of the infrastructure common services CDs containing VxSS for your platform, install the VxSS Authorization Server and Client software on the master server. To do this, you must perform a custom installation.
See “Installing the Authorization Server” on page 21 and the VERITAS Security Services Installation Guide on one of the infrastructure common services CDs containing VxSS for your platform.
4. Complete all NetBackup master server installations or upgrades.
5. Create a machine account for the master server. Make sure that the Authentication and the Authorization services are running. See “UNIX Verification Points” on page 35 or “Windows Verification Points” on page 28.
Windows UNIX
Master Servers win_master unix_master
Media Servers win_media unix_media
Clients win_client unix_client
nbu_win_print_II.book Page 8 Tuesday, August 16, 2005 12:53 PM
Chapter 1, Access Management
Installing and Configuring Access Control for Master Servers
9
The command in this step must be run as either root (UNIX) or as a member of the local Administrator group (Windows) on the Root+AB Authentication broker. For more information about this step, see “Configuring Authentication on the Root Broker for Use with NetBackup” on page 19.
To add the master server locally to the private domain, run the following command on the master server:
bpnbat is located in directory Install_path\NetBackup\bin\
bpnbat -addmachineDoes this machine use Dynamic Host Configuration Protocol (DHCP)? (y/n) nAuthentication Broker: win_masterAuthentication port[ Enter = default]:Machine Name: win_masterPassword: *******Password: *******Operation completed successfully.
Note The default Authentication port is 2821.
6. Log in to the machine account for the master server.
To create a credential for the master server, run the following command on the master server:
bpnbat -LoginMachineDoes this machine use Dynamic Host Configuration Protocol (DHCP)? (y/n) nAuthentication Broker: win_masterAuthentication port[ Enter = default]:Machine Name: win_masterPassword: *******Operation completed successfully.
Note Repeat this step for each alias used by NetBackup.
For more information about this step, see “Configuring Authentication on the Root Broker for Use with NetBackup” on page 19.
7. Create the first Security Administrator (bootstrapping security).
bpnbaz is located in directory Install_path\NetBackup\bin\admincmd
bpnbaz -setupsecurity win_masterPlease enter the login information for the first SecurityAdministrator other than root/Administrator. This identity
nbu_win_print_II.book Page 9 Tuesday, August 16, 2005 12:53 PM
Installing and Configuring Access Control for Master Servers
10 NetBackup System Administrator’s Guide for Windows, Volume II
will be added to the security administrators group(NBU_Security Admin), and to the netbackup administratorsgroup (NBU_Admin). It will also be used to build the initialsecurity information.Authentication Broker: win_masterAuthentication port[ Enter = default]:Authentication type (NIS, NIS+, WINDOWS, vx, unixpwd: WINDOWSDomain: domain1Login Name: admin1Password: ******Processing - please be patientOperation completed successfully.
For more information about this step, see “Configuring the Authorization Server” on page 21.
8. Add the master server as a host that is authorized to perform Authorization checks.
bpnbaz -AllowAuthorization win_masterOperation completed successfully.
For more information about this step, see “Configuring the Authorization Server” on page 21.
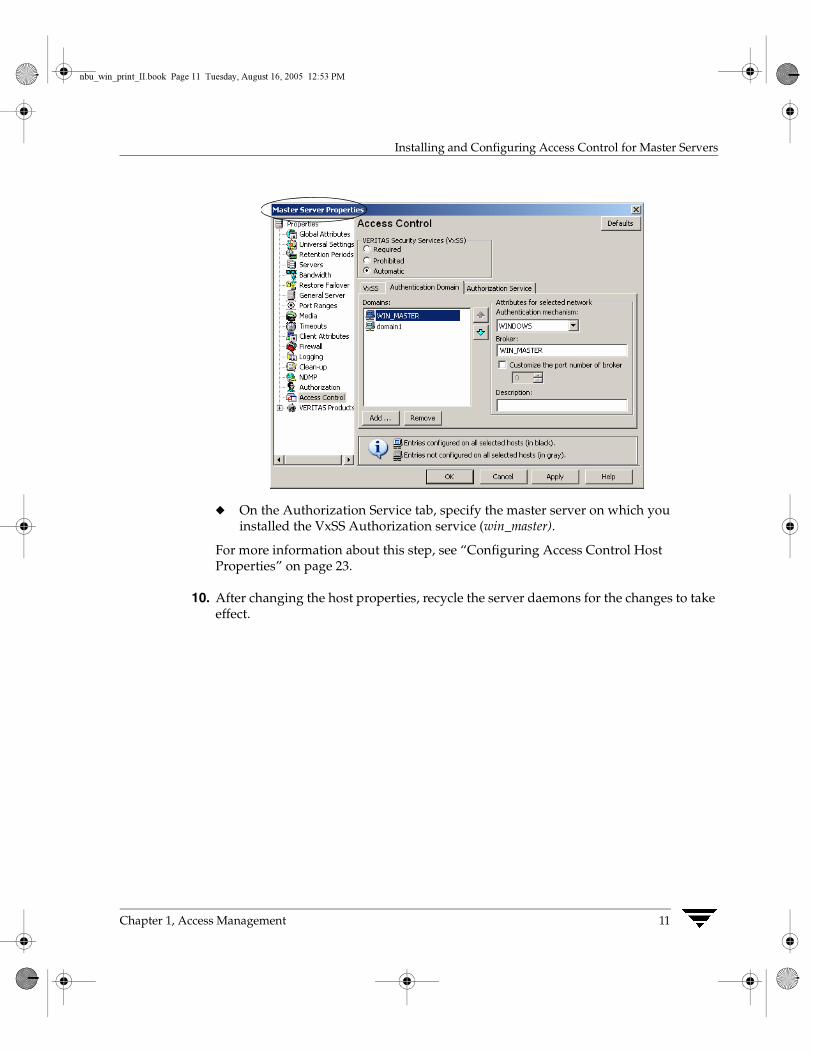
9. Configure the Access Control host properties of the master server.
◆ Set VERITAS Security Services to Automatic or Required. (If some clients or media servers will not use NetBackup Access Control, set to Automatic.)
◆ On the Authentication Domain tab, add authentication domain(s) and the host that will act as the broker for the domain (domain1).
The broker is a machine using an operating system supporting the domain type and the specific domain that has the VxSS Authentication service installed on it.
nbu_win_print_II.book Page 10 Tuesday, August 16, 2005 12:53 PM
Chapter 1, Access Management
Installing and Configuring Access Control for Master Servers
11
◆ On the Authorization Service tab, specify the master server on which you installed the VxSS Authorization service (win_master).
For more information about this step, see “Configuring Access Control Host Properties” on page 23.
10. After changing the host properties, recycle the server daemons for the changes to take effect.
nbu_win_print_II.book Page 11 Tuesday, August 16, 2005 12:53 PM
Installing and Configuring Access Control for Media Servers
12 NetBackup System Administrator’s Guide for Windows, Volume II
Installing and Configuring Access Control for Media Servers
The following steps describe configuring NetBackup Access Control for a media server in a NetBackup configuration. A media server requires Authentication Client software and Authorization Client software.
1. If this is an upgrade installation, stop NetBackup.
2. Using one of the infrastructure common services CDs containing VxSS for your platform, install Authentication Client software on the system.
3. Using one of the infrastructure common services CDs containing VxSS for your platform,install the Authorization Client software on the media server.
4. Complete all NetBackup media server installations or upgrades.
5. On the master server, create a machine account for the media server. Make sure that the Authentication and the Authorization services are running. See “UNIX Verification Points” on page 35 or “Windows Verification Points” on page 28.
The command in this step must be run as either root (UNIX) or as a member of the local Administrator group (Windows) on the Root+AB Authentication broker.
To add the media server locally to the private domain, run the following command on the master server:
bpnbat is located in directory Install_path\NetBackup\bin
bpnbat -addmachineDoes this machine use Dynamic Host Configuration Protocol (DHCP)? (y/n) nAuthentication Broker: win_masterAuthentication port[ Enter = default]:Machine Name: win_mediaPassword: *******Password: *******Operation completed successfully.
For more information about this step, see “Configuring Authentication on the Root Broker for Use with NetBackup” on page 19.
6. Log in to the machine account for the media server.
To create a credential for the media server, run the following command on the media server:
bpnbat -LoginMachine
nbu_win_print_II.book Page 12 Tuesday, August 16, 2005 12:53 PM
Chapter 1, Access Management
Installing and Configuring Access Control for Media Servers
13
Does this machine use Dynamic Host Configuration Protocol (DHCP)? (y/n) nAuthentication Broker: win_masterAuthentication port[ Enter = default]:Machine Name: win_mediaPassword: *******Operation completed successfully.
Note Repeat this step for each alias used by NetBackup.
For more information about this step, see “Configuring Authentication on the Root Broker for Use with NetBackup” on page 19.
7. Add the media server as a host authorized to perform Authorization checks.
bpnbaz is located in directory Install_path\NetBackup\bin\admincmd
On the master server, run:
bpnbaz -AllowAuthorization win_mediaOperation completed successfully.
For more information about this step, see “Configuring the Authorization Server” on page 21.
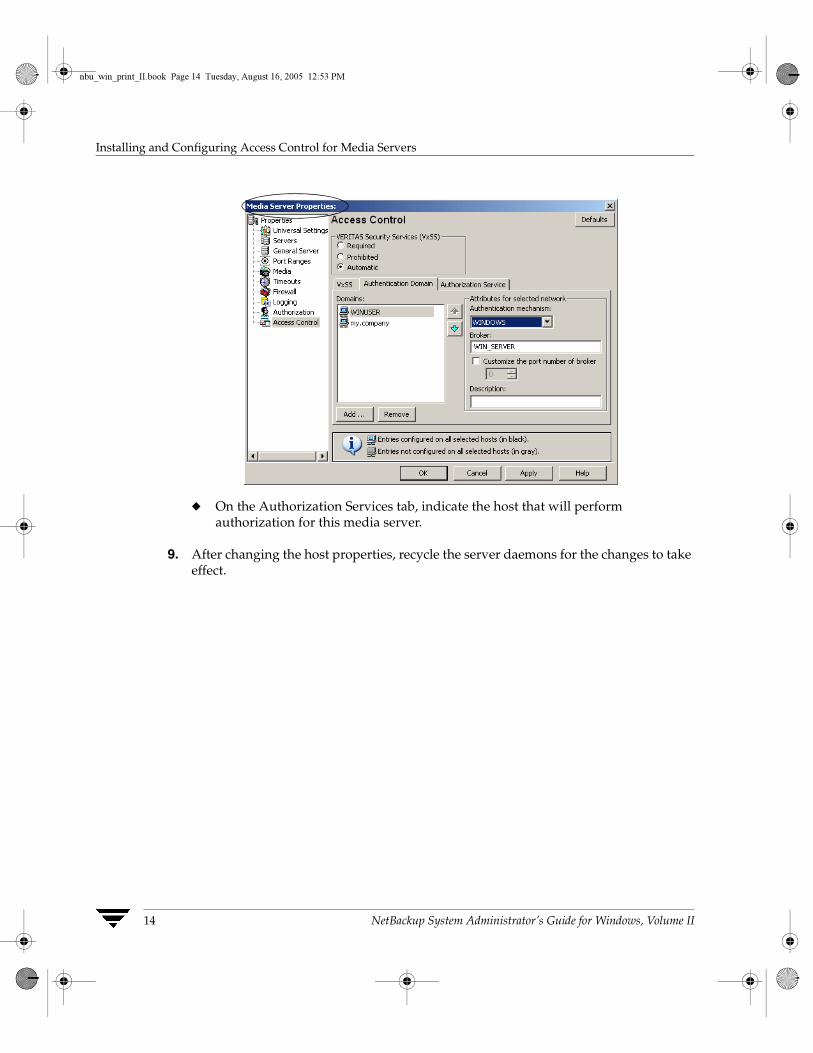
8. Set up the proper Access Control host properties for the media server. The properties are described in “Configuring Access Control Host Properties” on page 23.
Open Access Control host properties for the media server (win_media) through the master server. In the NetBackup Administration Console, select NetBackup Management > Host Properties > Media Server > Select media server win_media > Access Control.
◆ Set VxSS mode to Required. If some clients or media servers will not use NetBackup Access Control, set to Automatic.
◆ Add authentication domains based on the systems where you have installed Authentication servers and the Authentication methods supported. For example, given a Windows system configured for Authentication using domain WINUSER, and a UNIX system configured for Authentication using the NIS domain my.company, the tab would look like the following:
nbu_win_print_II.book Page 13 Tuesday, August 16, 2005 12:53 PM
Installing and Configuring Access Control for Media Servers
14 NetBackup System Administrator’s Guide for Windows, Volume II
◆ On the Authorization Services tab, indicate the host that will perform authorization for this media server.
9. After changing the host properties, recycle the server daemons for the changes to take effect.
nbu_win_print_II.book Page 14 Tuesday, August 16, 2005 12:53 PM

Chapter 1, Access Management
Installing and Configuring Access Control for Clients
15
Installing and Configuring Access Control for Clients The following steps describe configuring NetBackup Access Control for a client in a NetBackup configuration. A client requires Authentication Client software.
1. If this is an upgrade installation, stop NetBackup.
2. Using one of the infrastructure common services CDs containing VxSS for your platform, install Authentication Client software on the system.
3. Using one of the infrastructure common services CDs containing VxSS for your platform, install Authentication client software on the system.
4. Using bpnbat, register the client with the Authentication Broker, as described in step 2 on page 19.
For example, if registering a machine (win_client) with the Authentication Broker (win_master), run the following command on the At server (win_master).
To add the client locally to the private domain, run the following command on the master server:
bpnbat -AddMachineDoes the machine use Dynamic Host Configuration Protocol (DHCP)? (y/n) nAuthentication Broker: win_master.min.comAuthentication Port: [Enter = Default]:Name: win_client.min.comPassword: [any password]Password: [enter password again]Operation completed successfully.
5. To create a credential for the client, run the following command on the client (win_client):
bpnbat -loginmachineDoes this machine use Dynamic Host Configuration Protocol (DHCP)? (y/n) nAuthentication Broker: win_master.min.comAuthentication port[ Enter = default]:Name: win_client.min.comPassword: [same password as in step a]Operation completed successfully.
6. Set up the proper Access Control host properties for the client. The properties are described in “Configuring Access Control Host Properties” on page 23.
nbu_win_print_II.book Page 15 Tuesday, August 16, 2005 12:53 PM

Installing and Configuring Access Control for Clients
16 NetBackup System Administrator’s Guide for Windows, Volume II
a. Open Access Control host properties for the client (win_client) through the master server. In the NetBackup Administration Console, select NetBackup Management > Host Properties > Clients > Select client win_master > Access Control.
◆ Set VxSS mode to Required.
◆ Add authentication domains based on the systems where you have installed Authentication servers and the Authentication methods supported. For example, given a Windows system configured for Authentication using domain WINUSER, and a UNIX system configured for Authentication using the NIS domain my.company, the tab would look like the following:
b. Set up Access Control on the master server (win_master) for the client:
On the VxSS tab, add win_client.min.com to the VxSS Network list as Required.
nbu_win_print_II.book Page 16 Tuesday, August 16, 2005 12:53 PM
Chapter 1, Access Management
Installing and Configuring Access Control for Clients
17
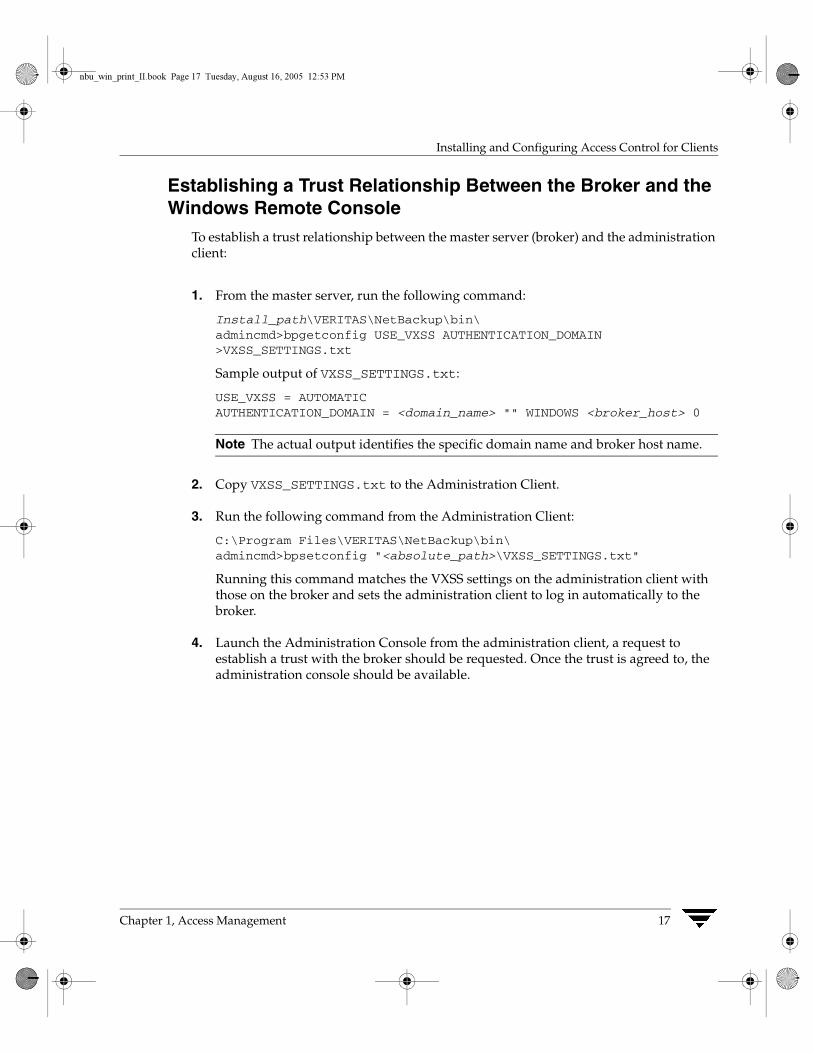
Establishing a Trust Relationship Between the Broker and the Windows Remote Console
To establish a trust relationship between the master server (broker) and the administration client:
1. From the master server, run the following command:
Install_path\VERITAS\NetBackup\bin\admincmd>bpgetconfig USE_VXSS AUTHENTICATION_DOMAIN >VXSS_SETTINGS.txt
Sample output of VXSS_SETTINGS.txt:
USE_VXSS = AUTOMATICAUTHENTICATION_DOMAIN = <domain_name> "" WINDOWS <broker_host> 0
Note The actual output identifies the specific domain name and broker host name.
2. Copy VXSS_SETTINGS.txt to the Administration Client.
3. Run the following command from the Administration Client:
C:\Program Files\VERITAS\NetBackup\bin\admincmd>bpsetconfig "<absolute_path>\VXSS_SETTINGS.txt"
Running this command matches the VXSS settings on the administration client with those on the broker and sets the administration client to log in automatically to the broker.
4. Launch the Administration Console from the administration client, a request to establish a trust with the broker should be requested. Once the trust is agreed to, the administration console should be available.
nbu_win_print_II.book Page 17 Tuesday, August 16, 2005 12:53 PM
Installing the Authentication Service Root Broker (Root + AB)
18 NetBackup System Administrator’s Guide for Windows, Volume II
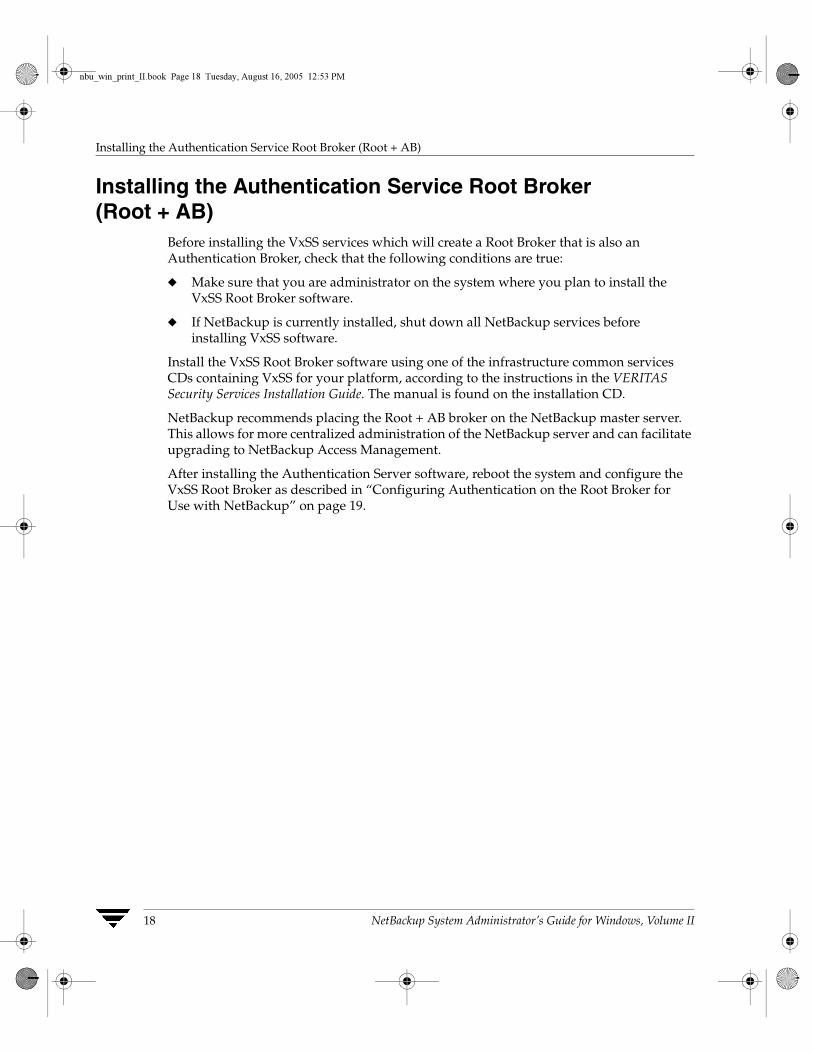
Installing the Authentication Service Root Broker (Root + AB)
Before installing the VxSS services which will create a Root Broker that is also an Authentication Broker, check that the following conditions are true:
◆ Make sure that you are administrator on the system where you plan to install the VxSS Root Broker software.
◆ If NetBackup is currently installed, shut down all NetBackup services before installing VxSS software.
Install the VxSS Root Broker software using one of the infrastructure common services CDs containing VxSS for your platform, according to the instructions in the VERITAS Security Services Installation Guide. The manual is found on the installation CD.
NetBackup recommends placing the Root + AB broker on the NetBackup master server. This allows for more centralized administration of the NetBackup server and can facilitate upgrading to NetBackup Access Management.
After installing the Authentication Server software, reboot the system and configure the VxSS Root Broker as described in “Configuring Authentication on the Root Broker for Use with NetBackup” on page 19.
nbu_win_print_II.book Page 18 Tuesday, August 16, 2005 12:53 PM
Chapter 1, Access Management
Installing the Authentication Service Root Broker (Root + AB)
19
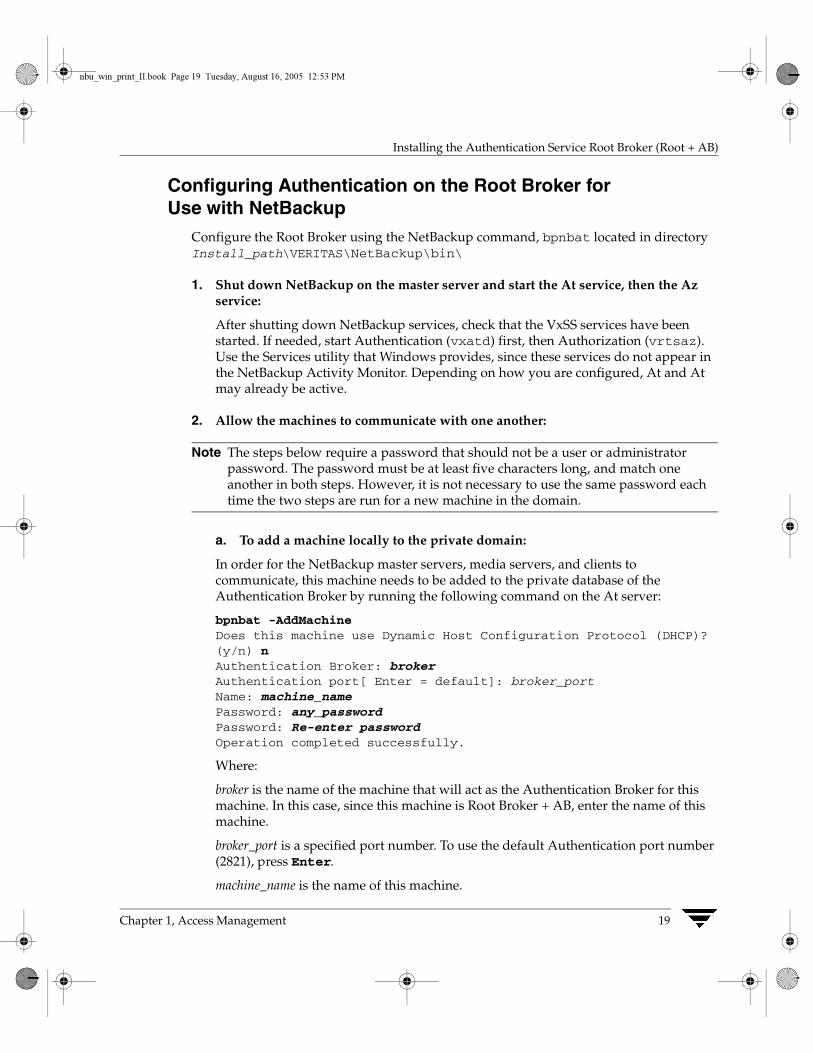
Configuring Authentication on the Root Broker for Use with NetBackup
Configure the Root Broker using the NetBackup command, bpnbat located in directory Install_path\VERITAS\NetBackup\bin\
1. Shut down NetBackup on the master server and start the At service, then the Az service:
After shutting down NetBackup services, check that the VxSS services have been started. If needed, start Authentication (vxatd) first, then Authorization (vrtsaz). Use the Services utility that Windows provides, since these services do not appear in the NetBackup Activity Monitor. Depending on how you are configured, At and At may already be active.
2. Allow the machines to communicate with one another:
Note The steps below require a password that should not be a user or administrator password. The password must be at least five characters long, and match one another in both steps. However, it is not necessary to use the same password each time the two steps are run for a new machine in the domain.
a. To add a machine locally to the private domain:
In order for the NetBackup master servers, media servers, and clients to communicate, this machine needs to be added to the private database of the Authentication Broker by running the following command on the At server:
bpnbat -AddMachineDoes this machine use Dynamic Host Configuration Protocol (DHCP)? (y/n) nAuthentication Broker: brokerAuthentication port[ Enter = default]: broker_portName: machine_namePassword: any_passwordPassword: Re-enter passwordOperation completed successfully.
Where:
broker is the name of the machine that will act as the Authentication Broker for this machine. In this case, since this machine is Root Broker + AB, enter the name of this machine.
broker_port is a specified port number. To use the default Authentication port number (2821), press Enter.
machine_name is the name of this machine.
nbu_win_print_II.book Page 19 Tuesday, August 16, 2005 12:53 PM
Installing the Authentication Service Root Broker (Root + AB)
20 NetBackup System Administrator’s Guide for Windows, Volume II
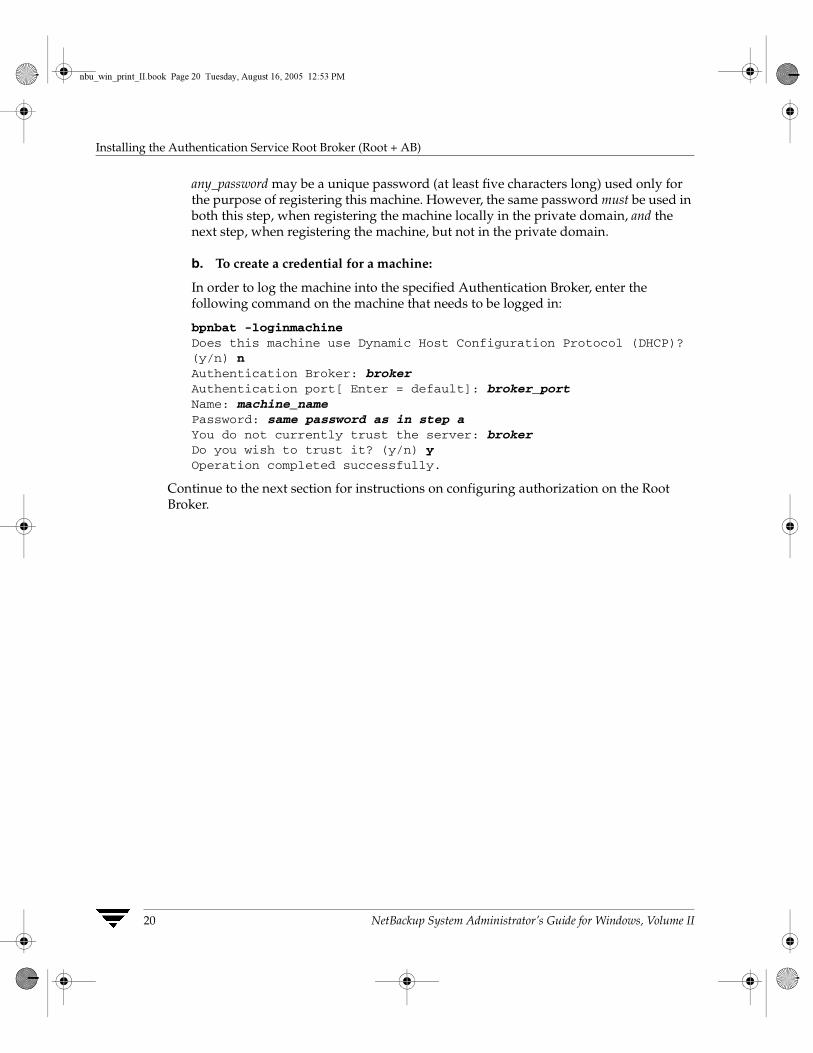
any_password may be a unique password (at least five characters long) used only for the purpose of registering this machine. However, the same password must be used in both this step, when registering the machine locally in the private domain, and the next step, when registering the machine, but not in the private domain.
b. To create a credential for a machine:
In order to log the machine into the specified Authentication Broker, enter the following command on the machine that needs to be logged in:
bpnbat -loginmachineDoes this machine use Dynamic Host Configuration Protocol (DHCP)? (y/n) nAuthentication Broker: brokerAuthentication port[ Enter = default]: broker_portName: machine_namePassword: same password as in step aYou do not currently trust the server: broker Do you wish to trust it? (y/n) yOperation completed successfully.
Continue to the next section for instructions on configuring authorization on the Root Broker.
nbu_win_print_II.book Page 20 Tuesday, August 16, 2005 12:53 PM
Chapter 1, Access Management
Installing the Authorization Server
21
Installing the Authorization ServerInstall the VxSS Authorization software from one of the infrastructure common services CDs containing VxSS for your platform, according to the instructions in the VERITAS Security Services Installation Guide. The manual is found on the installation CD.
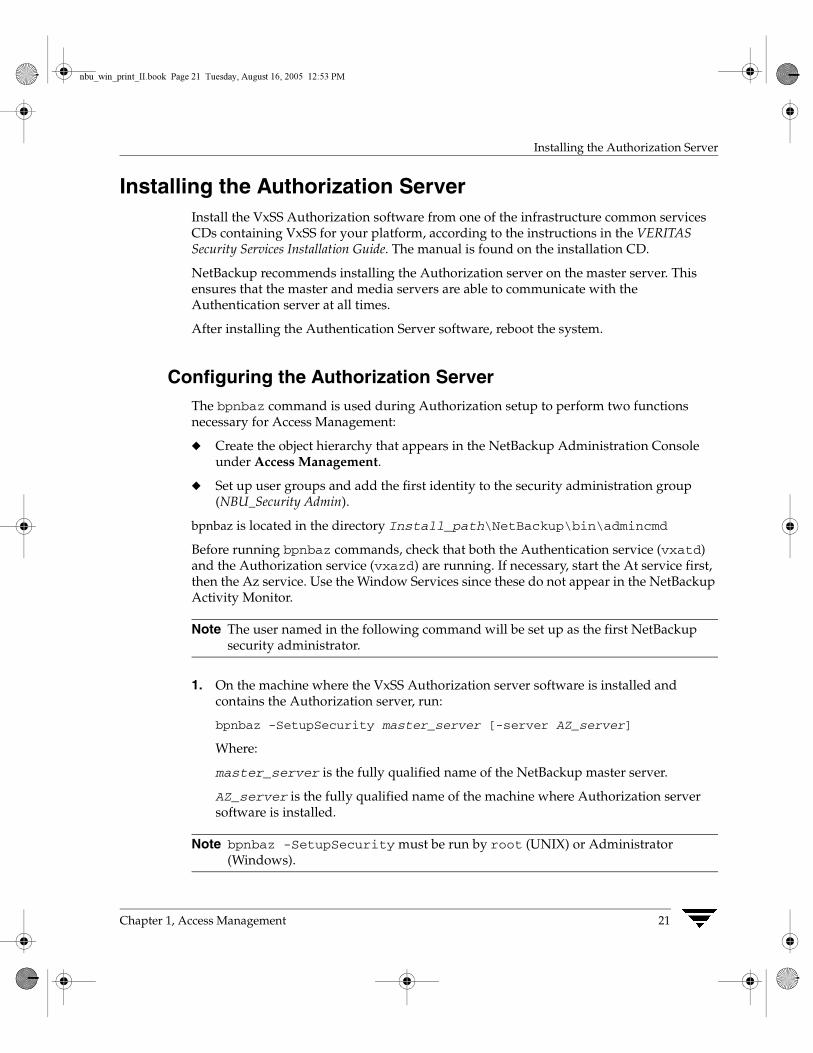
NetBackup recommends installing the Authorization server on the master server. This ensures that the master and media servers are able to communicate with the Authentication server at all times.
After installing the Authentication Server software, reboot the system.
Configuring the Authorization ServerThe bpnbaz command is used during Authorization setup to perform two functions necessary for Access Management:
◆ Create the object hierarchy that appears in the NetBackup Administration Console under Access Management.
◆ Set up user groups and add the first identity to the security administration group (NBU_Security Admin).
bpnbaz is located in the directory Install_path\NetBackup\bin\admincmd
Before running bpnbaz commands, check that both the Authentication service (vxatd) and the Authorization service (vxazd) are running. If necessary, start the At service first, then the Az service. Use the Window Services since these do not appear in the NetBackup Activity Monitor.
Note The user named in the following command will be set up as the first NetBackup security administrator.
1. On the machine where the VxSS Authorization server software is installed and contains the Authorization server, run:
bpnbaz -SetupSecurity master_server [-server AZ_server]
Where:
master_server is the fully qualified name of the NetBackup master server.
AZ_server is the fully qualified name of the machine where Authorization server software is installed.
Note bpnbaz -SetupSecurity must be run by root (UNIX) or Administrator (Windows).
nbu_win_print_II.book Page 21 Tuesday, August 16, 2005 12:53 PM
Installing the Authorization Server
22 NetBackup System Administrator’s Guide for Windows, Volume II
This process may take a number of minutes.
See step 7 on page 9 for an example of this command.
2. Allow authorization:
Run the following command on the Authorization server:
bpnbaz -AllowAuthorization server
This command must be run on the Az server for each master or media server that will utilize NetBackup Access Control.
Note bpnbaz -AllowAuthorization server must be run by root (UNIX) or Administrator (Windows).
Where:
server is the fully qualified name of the machine where the Authorization client software is installed. (Typically a media or master server.)
3. Start NetBackup services on the machine(s).
4. Continue with “Configuring Access Control Host Properties” on page 23 for instructions on configuring NetBackup Access Control host properties for the master server (Root Broker).
nbu_win_print_II.book Page 22 Tuesday, August 16, 2005 12:53 PM
Chapter 1, Access Management
Configuring Access Control Host Properties
23
Configuring Access Control Host PropertiesUntil host properties configuration on the master server is complete, NetBackup Access Control is not enforced. As such, UNIX users must temporarily load the Java NetBackup Administration Console (jnbSA) as root and Windows users must load the NetBackup Administration Console as Administrator.
Note VERITAS recommends setting master server VxSS property to Automatic until the clients are configured for Access Control. Then, if desired, change the VxSS property on the master server to Required.
Master Server and Media Server Host PropertiesThe Access Control host properties are described fully in Chapter 7 of the NetBackup System Administrator’s Guide, Volume I, but the following sections describe some points to double-check.
To get to the master and media server host properties in the NetBackup Administration Console, open NetBackup Management > Host Properties > Master Server or Media Server > Select server > Access Control.
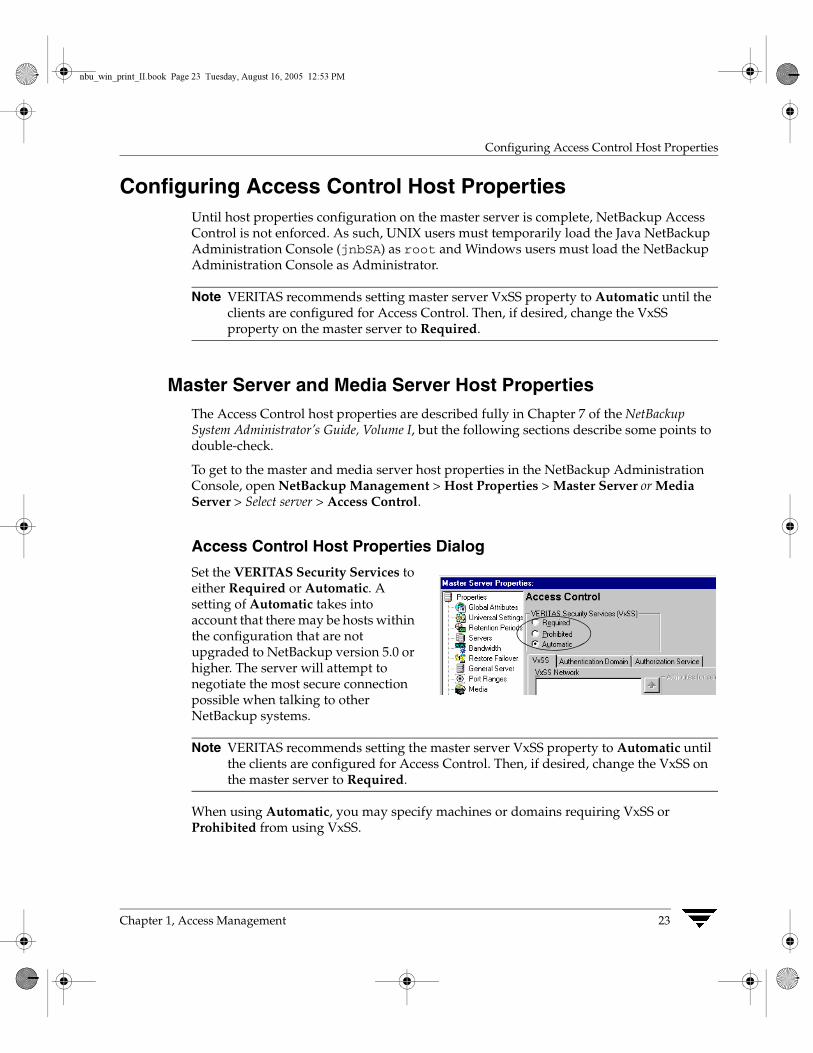
Access Control Host Properties Dialog
Set the VERITAS Security Services to either Required or Automatic. A setting of Automatic takes into account that there may be hosts within the configuration that are not upgraded to NetBackup version 5.0 or higher. The server will attempt to negotiate the most secure connection possible when talking to other NetBackup systems.
Note VERITAS recommends setting the master server VxSS property to Automatic until the clients are configured for Access Control. Then, if desired, change the VxSS on the master server to Required.
When using Automatic, you may specify machines or domains requiring VxSS or Prohibited from using VxSS.
nbu_win_print_II.book Page 23 Tuesday, August 16, 2005 12:53 PM

Configuring Access Control Host Properties
24 NetBackup System Administrator’s Guide for Windows, Volume II
VxSS Tab
Within the Access Control host properties, on the VxSS tab, add the master server to the VxSS Network list and set VERITAS Security Services to Required.
Each new NetBackup client or media server (version 5.0 or higher), added to the NetBackup master, needs to have the Access Control properties configured on both itself and the master. This can be done through the host properties on the master server.
Note VERITAS recommends setting the master server VxSS property to Automatic until the clients are configured for Access Control. Then, if desired, change the VxSS on the master server to Required.
Authentication Domain Tab
The Authentication Domain tab is used to define the following:
◆ which Authentication servers support which authentication mechanisms, and
◆ what domains each supports.
Add the domain you wish users to authenticate against. Be sure to select the proper authentication mechanism.
The following examples contain three authentication domains and three authentication types, two hosted on the authentication server UNIXBOX, and a Windows AD/PDC (Active Directory/Primary Domain Controller) hosted on WINMACHINE.
nbu_win_print_II.book Page 24 Tuesday, August 16, 2005 12:53 PM
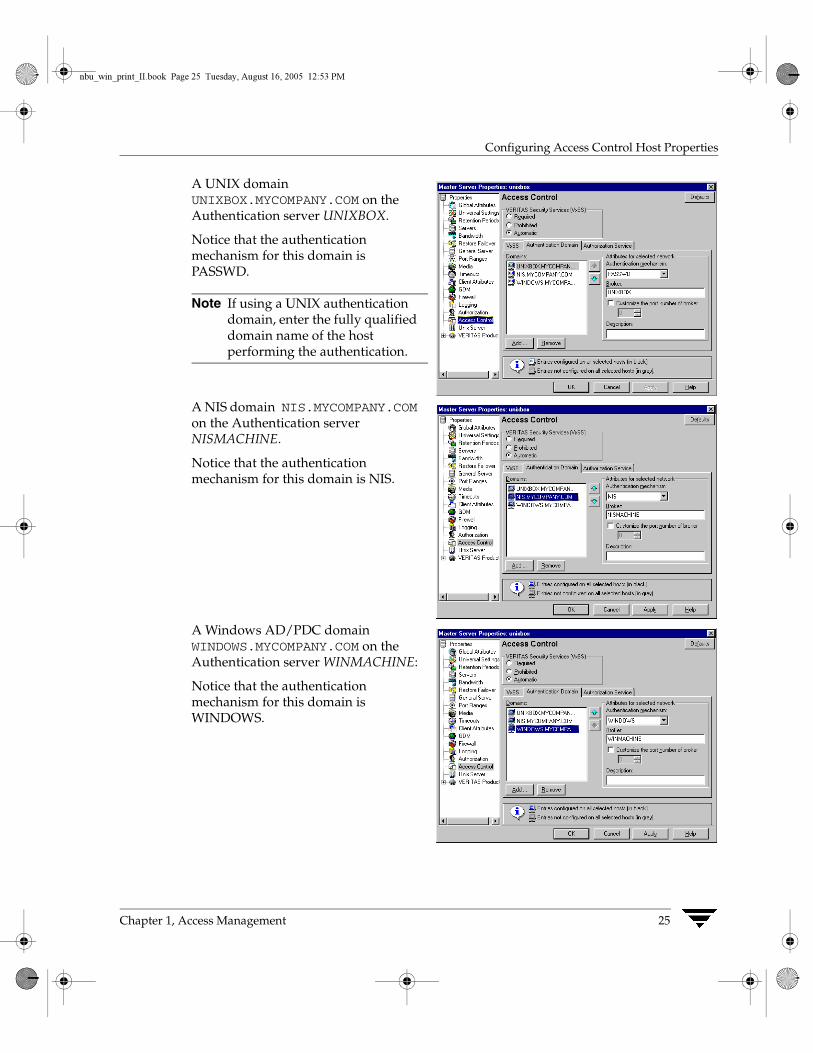
Chapter 1, Access Management
Configuring Access Control Host Properties
25
A UNIX domain UNIXBOX.MYCOMPANY.COM on the Authentication server UNIXBOX.
Notice that the authentication mechanism for this domain is PASSWD.
Note If using a UNIX authentication domain, enter the fully qualified domain name of the host performing the authentication.
A NIS domain NIS.MYCOMPANY.COM on the Authentication server NISMACHINE.
Notice that the authentication mechanism for this domain is NIS.
A Windows AD/PDC domain WINDOWS.MYCOMPANY.COM on the Authentication server WINMACHINE:
Notice that the authentication mechanism for this domain is WINDOWS.
nbu_win_print_II.book Page 25 Tuesday, August 16, 2005 12:53 PM
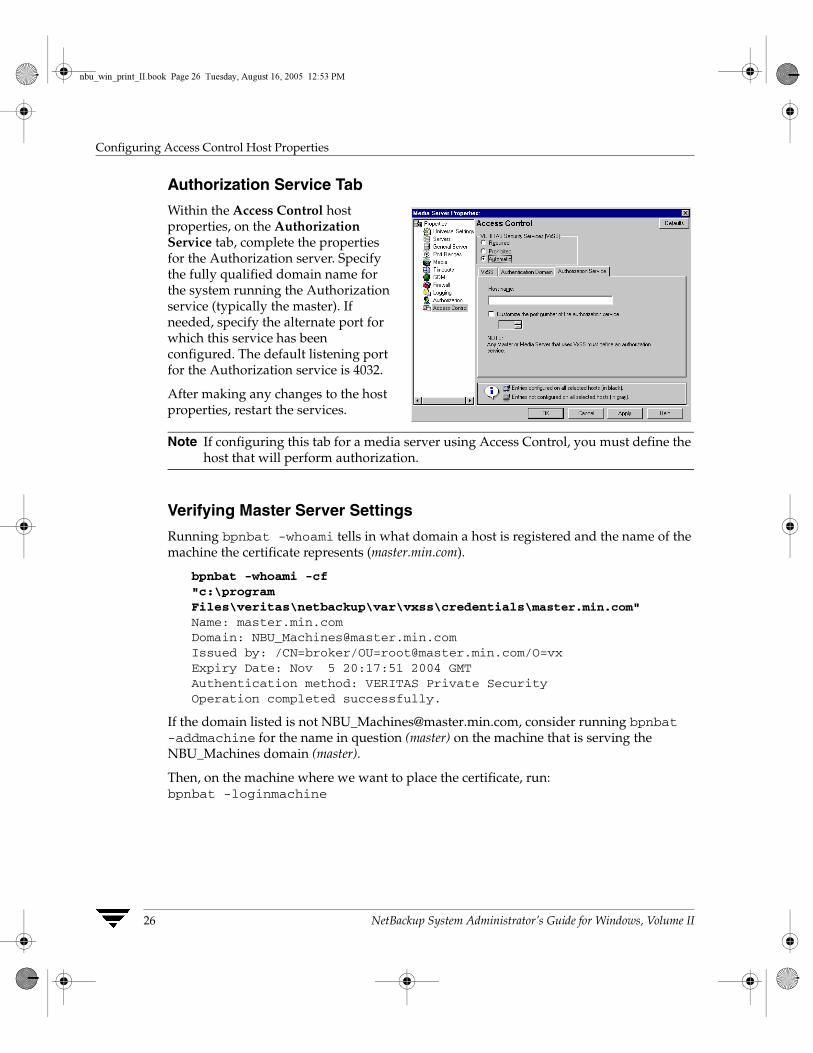
Configuring Access Control Host Properties
26 NetBackup System Administrator’s Guide for Windows, Volume II
Authorization Service Tab
Within the Access Control host properties, on the Authorization Service tab, complete the properties for the Authorization server. Specify the fully qualified domain name for the system running the Authorization service (typically the master). If needed, specify the alternate port for which this service has been configured. The default listening port for the Authorization service is 4032.
After making any changes to the host properties, restart the services.
Note If configuring this tab for a media server using Access Control, you must define the host that will perform authorization.
Verifying Master Server Settings
Running bpnbat -whoami tells in what domain a host is registered and the name of the machine the certificate represents (master.min.com).
bpnbat -whoami -cf "c:\program Files\veritas\netbackup\var\vxss\credentials\master.min.com"Name: master.min.comDomain: [email protected] by: /CN=broker/[email protected]/O=vxExpiry Date: Nov 5 20:17:51 2004 GMTAuthentication method: VERITAS Private SecurityOperation completed successfully.
If the domain listed is not [email protected], consider running bpnbat -addmachine for the name in question (master) on the machine that is serving the NBU_Machines domain (master).
Then, on the machine where we want to place the certificate, run: bpnbat -loginmachine
nbu_win_print_II.book Page 26 Tuesday, August 16, 2005 12:53 PM

Chapter 1, Access Management
Configuring Access Control Host Properties
27
Client Host PropertiesTo get to the client host properties in the NetBackup Administration Console, open NetBackup Management > Host Properties > Master Server or Media Server > Select client(s) > Access Control.
Access Control Host Properties Dialog
Select the NetBackup client in the host properties. (On the master server, in the NetBackup Administration Console, open NetBackup Management > Host Properties > Clients > Selected clients > Access Control.)
Set the VERITAS Security Services to Required or Automatic.
VxSS Tab
Select the NetBackup client in the host properties. This tab is only enabled in Automatic mode and can be used to control which systems require or prohibit the use of VxSS on a per-machine basis. Note that both systems must have matching settings in order to have communicate.
Authentication Domain Tab
Within the Access Control host properties, on the Authentication Domain tab, add the domain in which the NetBackup client resides and select the proper authentication mechanism.
nbu_win_print_II.book Page 27 Tuesday, August 16, 2005 12:53 PM
Access Management Troubleshooting Guidelines
28 NetBackup System Administrator’s Guide for Windows, Volume II
Access Management Troubleshooting GuidelinesIn the configuration examples we’ll refer to the following host names:
Note While it is possible to share the Enterprise Media Manager server between multiple master servers, this configuration is not supported when using Access Control. The EMM server must be bound to one master server.
Windows Verification PointsThere are procedures that help you verify that the master server, media server and client are configured correctly for Access Control.
Windows UNIX
Master Servers win_master unix_master
Media Servers win_media unix_media
Clients win_client unix_client
nbu_win_print_II.book Page 28 Tuesday, August 16, 2005 12:53 PM
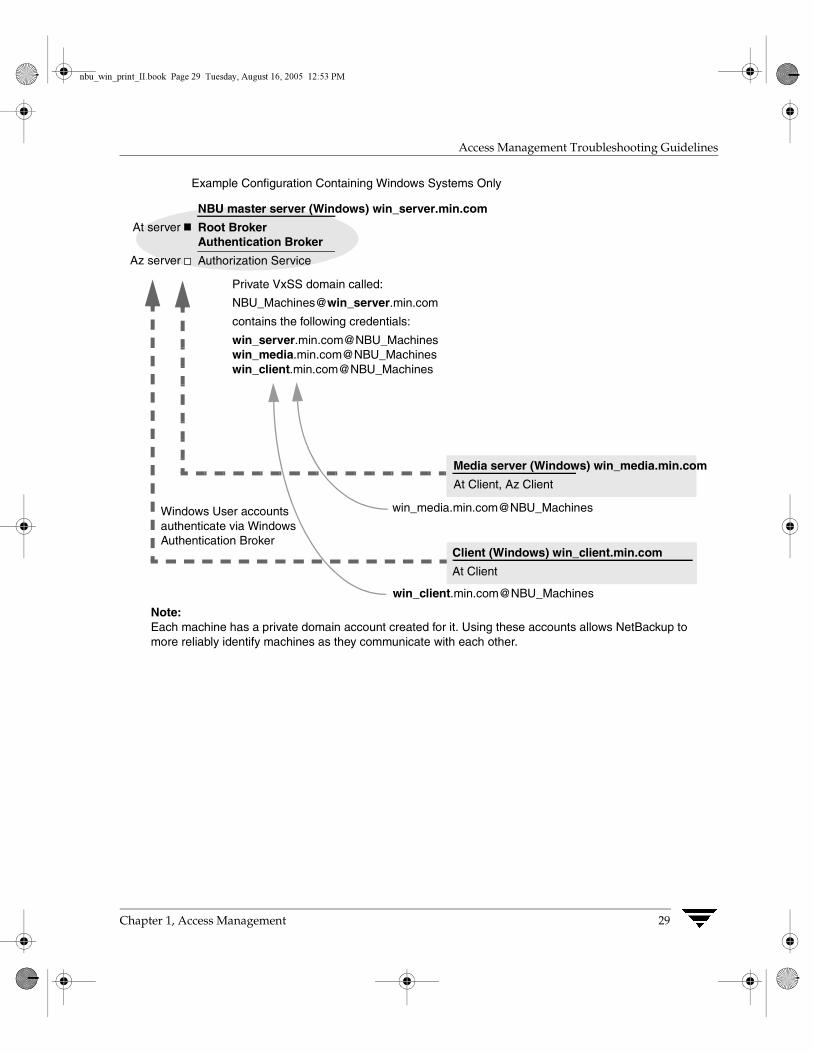
Chapter 1, Access Management
Access Management Troubleshooting Guidelines
29
Example Configuration Containing Windows Systems Only
Client (Windows) win_client.min.com
At Client
NBU master server (Windows) win_server.min.com
Root BrokerAuthentication Broker
Authorization Service
At server
Az server
Media server (Windows) win_media.min.com
At Client, Az Client
Private VxSS domain called:
NBU_Machines@win_server.min.com
contains the following credentials:
win_server.min.com@NBU_Machineswin_media.min.com@NBU_Machineswin_client.min.com@NBU_Machines
win_media.min.com@NBU_MachinesWindows User accounts authenticate via Windows Authentication Broker
Note: Each machine has a private domain account created for it. Using these accounts allows NetBackup to more reliably identify machines as they communicate with each other.
win_client.min.com@NBU_Machines
nbu_win_print_II.book Page 29 Tuesday, August 16, 2005 12:53 PM
Access Management Troubleshooting Guidelines
30 NetBackup System Administrator’s Guide for Windows, Volume II
Master Server Verification Points
The following sections describe procedures for Windows master server verification.
Verify Windows Master Server Settings
To determine in what domain a host is registered (where the primary Authentication broker resides), and the name of the machine the certificate represents, run bpnbat with -whoami. For example:
bpnbat -whoami -cf "c:\program Files\veritas\netbackup\var\vxss\credentials\win_master"Name: win_master.min.comDomain: NBU_Machines@win_master.min.comIssued by: /CN=broker/OU=root@win_master.min.com/O=vxExpiry Date: Nov 5 20:17:51 2004 GMTAuthentication method: VERITAS Private SecurityOperation completed successfully.
If the domain listed is not NBU_Machines@win_master.min.com, consider running bpnbat -addmachine for the name in question (win_master) on the machine that is serving the NBU_Machines domain (win_master).
Then, on the machine where we want to place the certificate, run: bpnbat -loginmachine
Note When determining if a user’s credentials have expired, keep in mind that the output displays the expiration time in GMT, not local time.
Note For the remaining procedures in this verification section, we assume that the commands are performed from an operating system window in which the user identity in question has run bpnbat -login using an identity that is a member of NBU_Security Admin. This is usually the first identity with which the security was set up.
Verify which Machines are Permitted to Perform Authorization Lookups
Logged in as a member of the Administrators group run the following command:
bpnbaz -ShowAuthorizers
This command shows that win_master and win_media (media server) are permitted to perform Authorization lookups. Note that both servers are authenticated against the same vx (VERITAS Private Domain) Domain, NBU_Machines@win_master.min.com.
nbu_win_print_II.book Page 30 Tuesday, August 16, 2005 12:53 PM

Chapter 1, Access Management
Access Management Troubleshooting Guidelines
31
Note This command must be run by a local administrator or by root. The local administrator must be a member of the NBU_Security Admin user group.
bpnbaz -ShowAuthorizers==========Type: UserDomain Type: vxDomain:NBU_Machines@win_master.min.comName: win_master.min.com==========Type: UserDomain Type: vxDomain:NBU_Machines@win_master.min.comName: win_media.min.comOperation completed successfully.
If a master or media server is missing from the list of Authorized machines, run bpnbaz -allowauthorization to add the missing machine.
Verify that the Database is Configured Correctly
To make sure that the database is configured correctly, run bpnbaz -listgroups:
bpnbaz -listgroupsNBU_UserNBU_OperatorNBU_Security AdminVault_OperatorNBU_AdminOperation completed successfully.
If the groups do not appear, or if bpnbaz -listmainobjects does not return data, run bpnbaz -SetupSecurity.
Verify that the vxatd and vxazd Processes are Running
Use the Windows Task Manager to make sure that vxatd.exe and vxazd.exe are running on the designated host. If necessary, start them.
Verify that the Host Properties are Configured Correctly
In the Access Control host properties, verify that the VERITAS Security Services property is set correctly. (The setting should be either Automatic or Required, depending on whether all machines are using VxSS or not. If all machines are not using VxSS, set it to Automatic.
This can also be verified by viewing USE_VXSS in the registry at:
nbu_win_print_II.book Page 31 Tuesday, August 16, 2005 12:53 PM
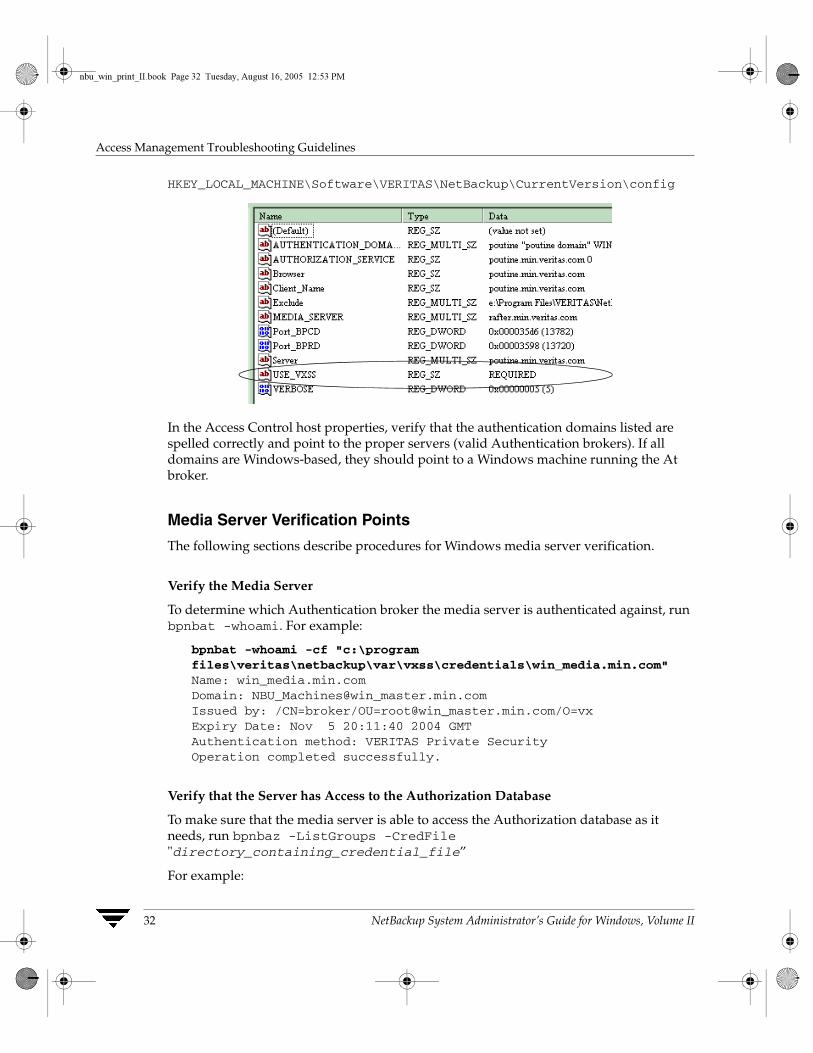
Access Management Troubleshooting Guidelines
32 NetBackup System Administrator’s Guide for Windows, Volume II
HKEY_LOCAL_MACHINE\Software\VERITAS\NetBackup\CurrentVersion\config
In the Access Control host properties, verify that the authentication domains listed are spelled correctly and point to the proper servers (valid Authentication brokers). If all domains are Windows-based, they should point to a Windows machine running the At broker.
Media Server Verification Points
The following sections describe procedures for Windows media server verification.
Verify the Media Server
To determine which Authentication broker the media server is authenticated against, run bpnbat -whoami. For example:
bpnbat -whoami -cf "c:\program files\veritas\netbackup\var\vxss\credentials\win_media.min.com"Name: win_media.min.comDomain: NBU_Machines@win_master.min.comIssued by: /CN=broker/OU=root@win_master.min.com/O=vxExpiry Date: Nov 5 20:11:40 2004 GMTAuthentication method: VERITAS Private SecurityOperation completed successfully.
Verify that the Server has Access to the Authorization Database
To make sure that the media server is able to access the Authorization database as it needs, run bpnbaz -ListGroups -CredFile "directory_containing_credential_file”
For example:
nbu_win_print_II.book Page 32 Tuesday, August 16, 2005 12:53 PM
Chapter 1, Access Management
Access Management Troubleshooting Guidelines
33
bpnbaz -ListGroups -CredFile "C:\Program Files\VERITAS\NetBackup\var\vxss\credentials\win_media.min.com"NBU_UserNBU_OperatorNBU_Security AdminVault_OperatorNBU_AdminOperation completed successfully.
If this command fails, run bpnbaz -AllowAuthorization on the master server that is the Authorization broker (win_master.min.com).
Unable to Load Library Message
Verifying the media server and verifying that the media server has access to the proper database indirectly informs us that the VxSS client libraries for both At and Az are properly installed. If either of these procedures fail with messages pertaining to “unable to load libraries,” check to make certain the Authentication and Authorization client libraries are installed. See the VERITAS Security Services Installation Guide on the VxSS installation CD for proper installation procedures.
You may also verify that the Authentication domains are correct by viewing the Access Control host properties for this media server, or by using regedit directly on the media server.
Client Verification Points
The following sections describe procedures for Windows client verification.
Verify the Credential for the Client
To check that the credential for the client is indeed for the correct client and comes from the correct domain, run bpnbat -whoami. For example:
bpnbat -whoami -cf "c:\program files\veritas\netbackup\var\vxss\credentials\win_client.min.com"Name: win_client.min.comDomain: NBU_Machines@win_master.min.comIssued by: /CN=broker/OU=root@win_master.min.com/O=vxExpiry Date: Nov 5 20:11:45 2004 GMTAuthentication method: VERITAS Private SecurityOperation completed successfully.
nbu_win_print_II.book Page 33 Tuesday, August 16, 2005 12:53 PM
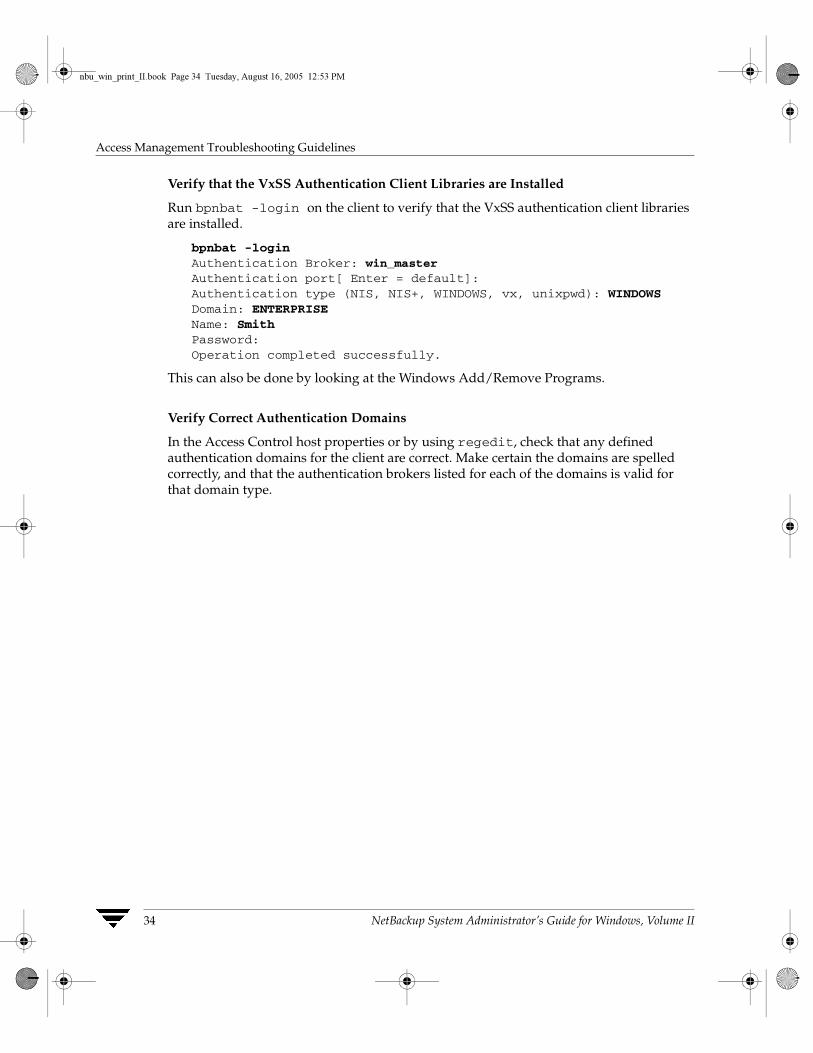
Access Management Troubleshooting Guidelines
34 NetBackup System Administrator’s Guide for Windows, Volume II
Verify that the VxSS Authentication Client Libraries are Installed
Run bpnbat -login on the client to verify that the VxSS authentication client libraries are installed.
bpnbat -loginAuthentication Broker: win_masterAuthentication port[ Enter = default]:Authentication type (NIS, NIS+, WINDOWS, vx, unixpwd): WINDOWSDomain: ENTERPRISEName: SmithPassword:Operation completed successfully.
This can also be done by looking at the Windows Add/Remove Programs.
Verify Correct Authentication Domains
In the Access Control host properties or by using regedit, check that any defined authentication domains for the client are correct. Make certain the domains are spelled correctly, and that the authentication brokers listed for each of the domains is valid for that domain type.
nbu_win_print_II.book Page 34 Tuesday, August 16, 2005 12:53 PM
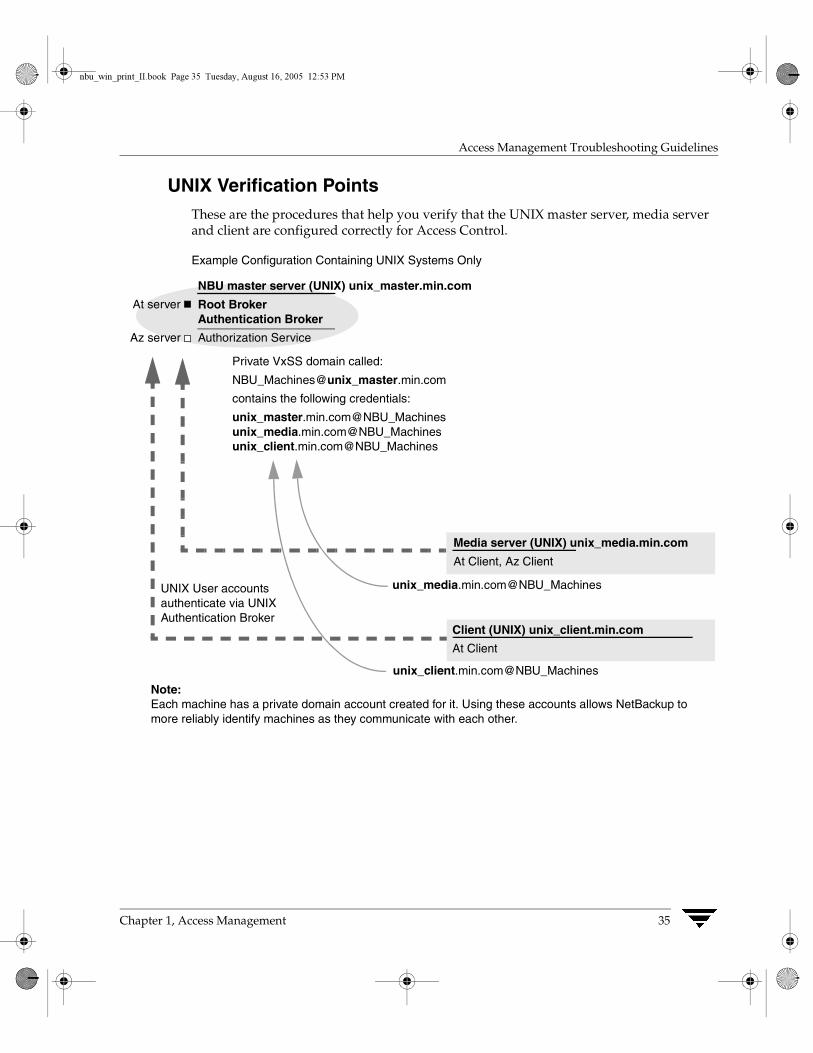
Chapter 1, Access Management
Access Management Troubleshooting Guidelines
35
UNIX Verification PointsThese are the procedures that help you verify that the UNIX master server, media server and client are configured correctly for Access Control.
Example Configuration Containing UNIX Systems Only
Client (UNIX) unix_client.min.com
At Client
NBU master server (UNIX) unix_master.min.com
Root BrokerAuthentication Broker
Authorization Service
At server
Az server
Media server (UNIX) unix_media.min.com
At Client, Az Client
Private VxSS domain called:
NBU_Machines@unix_master.min.com
contains the following credentials:
unix_master.min.com@NBU_Machinesunix_media.min.com@NBU_Machinesunix_client.min.com@NBU_Machines
unix_media.min.com@NBU_MachinesUNIX User accounts authenticate via UNIX Authentication Broker
Note: Each machine has a private domain account created for it. Using these accounts allows NetBackup to more reliably identify machines as they communicate with each other.
unix_client.min.com@NBU_Machines
nbu_win_print_II.book Page 35 Tuesday, August 16, 2005 12:53 PM
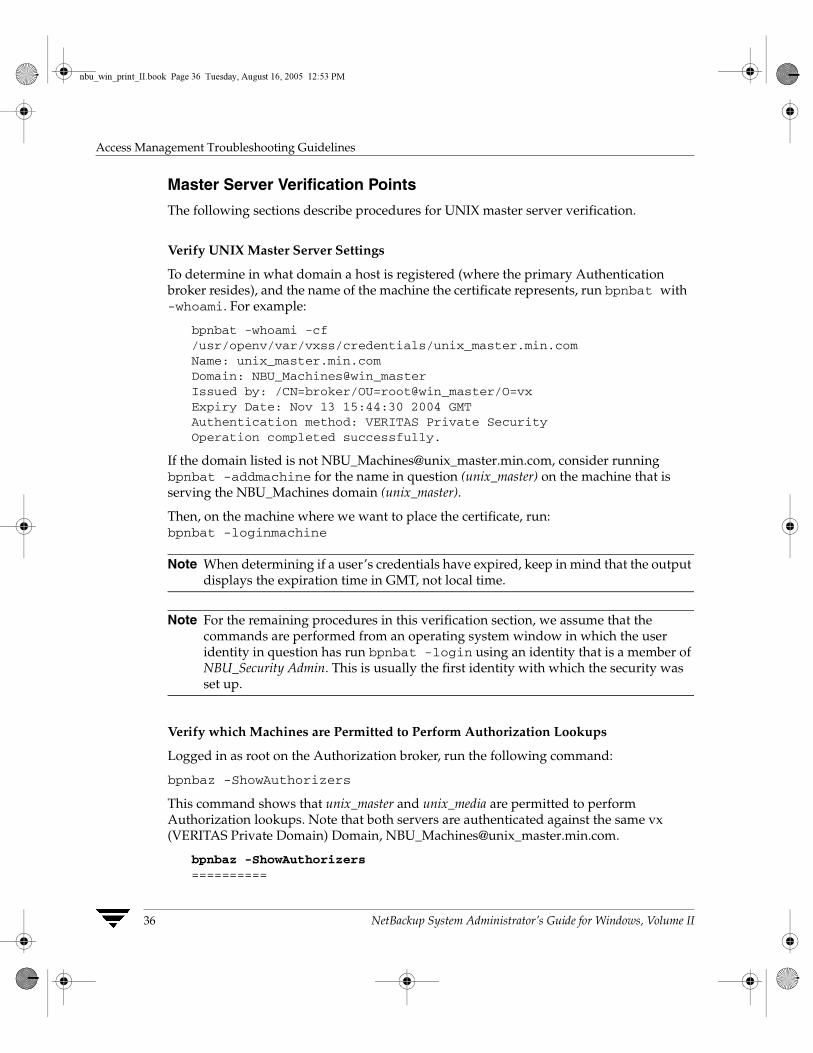
Access Management Troubleshooting Guidelines
36 NetBackup System Administrator’s Guide for Windows, Volume II
Master Server Verification Points
The following sections describe procedures for UNIX master server verification.
Verify UNIX Master Server Settings
To determine in what domain a host is registered (where the primary Authentication broker resides), and the name of the machine the certificate represents, run bpnbat with -whoami. For example:
bpnbat -whoami -cf /usr/openv/var/vxss/credentials/unix_master.min.comName: unix_master.min.comDomain: NBU_Machines@win_masterIssued by: /CN=broker/OU=root@win_master/O=vxExpiry Date: Nov 13 15:44:30 2004 GMTAuthentication method: VERITAS Private SecurityOperation completed successfully.
If the domain listed is not NBU_Machines@unix_master.min.com, consider running bpnbat -addmachine for the name in question (unix_master) on the machine that is serving the NBU_Machines domain (unix_master).
Then, on the machine where we want to place the certificate, run: bpnbat -loginmachine
Note When determining if a user’s credentials have expired, keep in mind that the output displays the expiration time in GMT, not local time.
Note For the remaining procedures in this verification section, we assume that the commands are performed from an operating system window in which the user identity in question has run bpnbat -login using an identity that is a member of NBU_Security Admin. This is usually the first identity with which the security was set up.
Verify which Machines are Permitted to Perform Authorization Lookups
Logged in as root on the Authorization broker, run the following command:
bpnbaz -ShowAuthorizers
This command shows that unix_master and unix_media are permitted to perform Authorization lookups. Note that both servers are authenticated against the same vx (VERITAS Private Domain) Domain, NBU_Machines@unix_master.min.com.
bpnbaz -ShowAuthorizers==========
nbu_win_print_II.book Page 36 Tuesday, August 16, 2005 12:53 PM
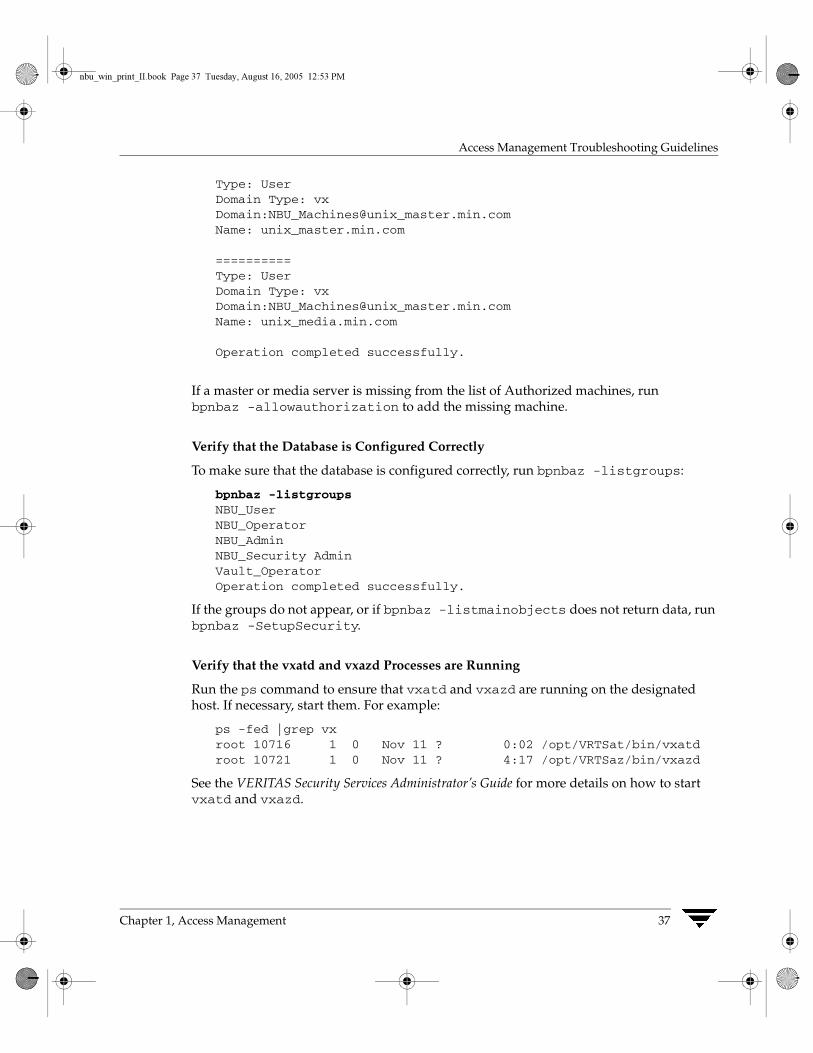
Chapter 1, Access Management
Access Management Troubleshooting Guidelines
37
Type: UserDomain Type: vxDomain:NBU_Machines@unix_master.min.comName: unix_master.min.com
==========Type: UserDomain Type: vxDomain:NBU_Machines@unix_master.min.comName: unix_media.min.com
Operation completed successfully.
If a master or media server is missing from the list of Authorized machines, run bpnbaz -allowauthorization to add the missing machine.
Verify that the Database is Configured Correctly
To make sure that the database is configured correctly, run bpnbaz -listgroups:
bpnbaz -listgroupsNBU_UserNBU_OperatorNBU_AdminNBU_Security AdminVault_OperatorOperation completed successfully.
If the groups do not appear, or if bpnbaz -listmainobjects does not return data, run bpnbaz -SetupSecurity.
Verify that the vxatd and vxazd Processes are Running
Run the ps command to ensure that vxatd and vxazd are running on the designated host. If necessary, start them. For example:
ps -fed |grep vxroot 10716 1 0 Nov 11 ? 0:02 /opt/VRTSat/bin/vxatdroot 10721 1 0 Nov 11 ? 4:17 /opt/VRTSaz/bin/vxazd
See the VERITAS Security Services Administrator’s Guide for more details on how to start vxatd and vxazd.
nbu_win_print_II.book Page 37 Tuesday, August 16, 2005 12:53 PM
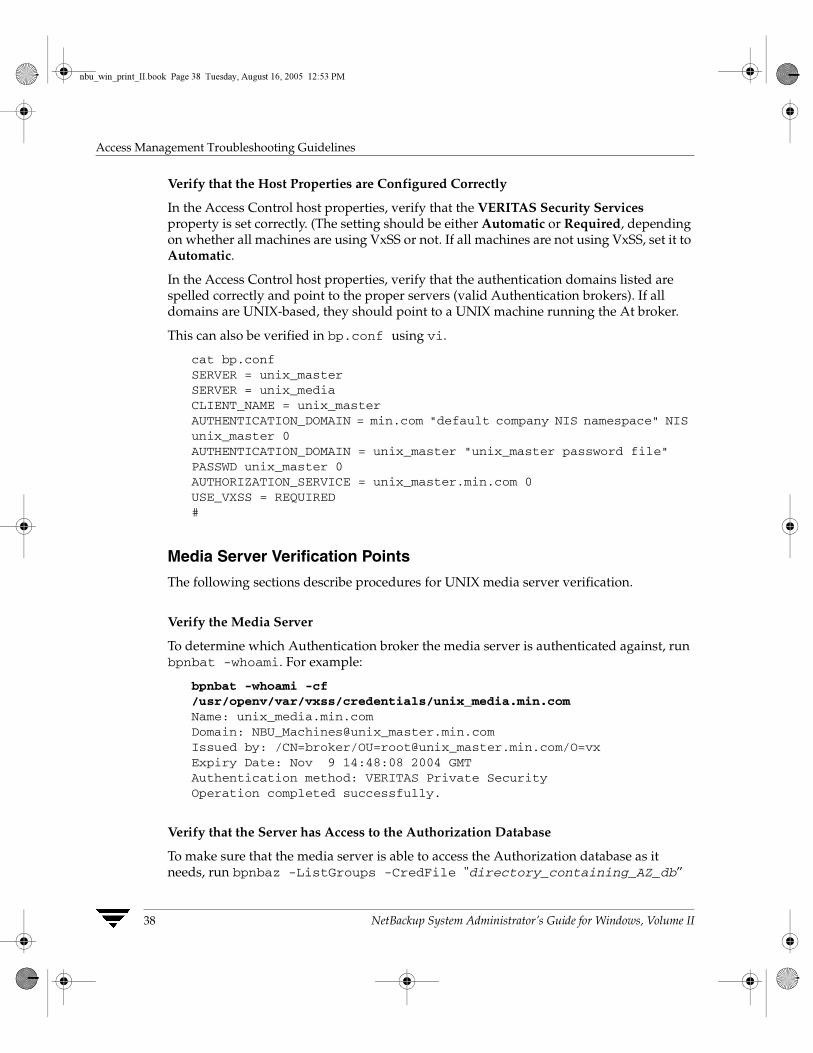
Access Management Troubleshooting Guidelines
38 NetBackup System Administrator’s Guide for Windows, Volume II
Verify that the Host Properties are Configured Correctly
In the Access Control host properties, verify that the VERITAS Security Services property is set correctly. (The setting should be either Automatic or Required, depending on whether all machines are using VxSS or not. If all machines are not using VxSS, set it to Automatic.
In the Access Control host properties, verify that the authentication domains listed are spelled correctly and point to the proper servers (valid Authentication brokers). If all domains are UNIX-based, they should point to a UNIX machine running the At broker.
This can also be verified in bp.conf using vi.
cat bp.confSERVER = unix_masterSERVER = unix_mediaCLIENT_NAME = unix_masterAUTHENTICATION_DOMAIN = min.com "default company NIS namespace" NIS unix_master 0AUTHENTICATION_DOMAIN = unix_master "unix_master password file" PASSWD unix_master 0AUTHORIZATION_SERVICE = unix_master.min.com 0USE_VXSS = REQUIRED#
Media Server Verification Points
The following sections describe procedures for UNIX media server verification.
Verify the Media Server
To determine which Authentication broker the media server is authenticated against, run bpnbat -whoami. For example:
bpnbat -whoami -cf /usr/openv/var/vxss/credentials/unix_media.min.comName: unix_media.min.comDomain: NBU_Machines@unix_master.min.comIssued by: /CN=broker/OU=root@unix_master.min.com/O=vxExpiry Date: Nov 9 14:48:08 2004 GMTAuthentication method: VERITAS Private SecurityOperation completed successfully.
Verify that the Server has Access to the Authorization Database
To make sure that the media server is able to access the Authorization database as it needs, run bpnbaz -ListGroups -CredFile "directory_containing_AZ_db”
nbu_win_print_II.book Page 38 Tuesday, August 16, 2005 12:53 PM
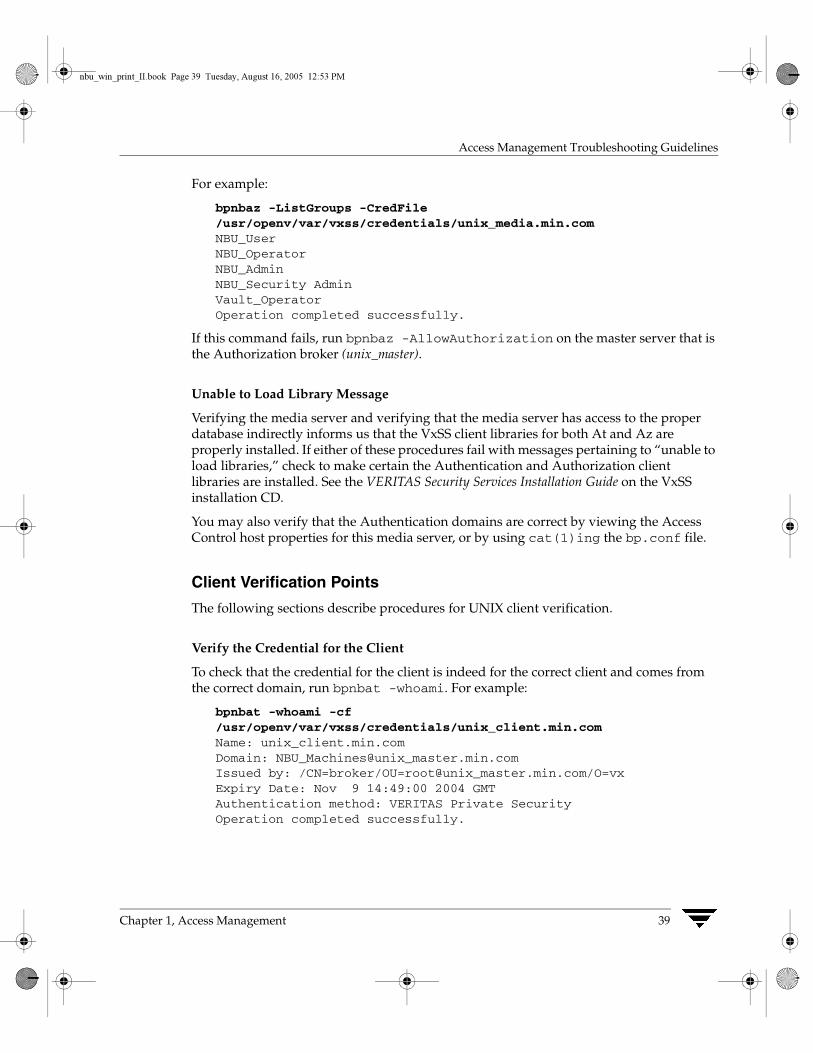
Chapter 1, Access Management
Access Management Troubleshooting Guidelines
39
For example:
bpnbaz -ListGroups -CredFile/usr/openv/var/vxss/credentials/unix_media.min.comNBU_UserNBU_OperatorNBU_AdminNBU_Security AdminVault_OperatorOperation completed successfully.
If this command fails, run bpnbaz -AllowAuthorization on the master server that is the Authorization broker (unix_master).
Unable to Load Library Message
Verifying the media server and verifying that the media server has access to the proper database indirectly informs us that the VxSS client libraries for both At and Az are properly installed. If either of these procedures fail with messages pertaining to “unable to load libraries,” check to make certain the Authentication and Authorization client libraries are installed. See the VERITAS Security Services Installation Guide on the VxSS installation CD.
You may also verify that the Authentication domains are correct by viewing the Access Control host properties for this media server, or by using cat(1)ing the bp.conf file.
Client Verification Points
The following sections describe procedures for UNIX client verification.
Verify the Credential for the Client
To check that the credential for the client is indeed for the correct client and comes from the correct domain, run bpnbat -whoami. For example:
bpnbat -whoami -cf /usr/openv/var/vxss/credentials/unix_client.min.comName: unix_client.min.comDomain: NBU_Machines@unix_master.min.comIssued by: /CN=broker/OU=root@unix_master.min.com/O=vxExpiry Date: Nov 9 14:49:00 2004 GMTAuthentication method: VERITAS Private SecurityOperation completed successfully.
nbu_win_print_II.book Page 39 Tuesday, August 16, 2005 12:53 PM
Access Management Troubleshooting Guidelines
40 NetBackup System Administrator’s Guide for Windows, Volume II
Verify that the VxSS Authentication Client Libraries are Installed
Run bpnbat -login on the client to verify that the VxSS authentication client libraries are installed.
bpnbat -loginAuthentication Broker: unix_master.min.comAuthentication port[ Enter = default]:Authentication type (NIS, NIS+, WINDOWS, vx, unixpwd): NISDomain: min.comName: SmithPassword:Operation completed successfully.
This can also be done by looking at /etc/vx/vss/*.loc to see where the libraries are installed, and verify they are in the location indicated:
cat /etc/vx/vss/*.locProductInstallDir=/opt/VRTSatProductInstallDir=/opt/VRTSazls -l /opt/VRTSat/*/opt/VRTSaz/*
Verify Correct Authentication Domains
In the Access Control host properties or by using vi, check that any defined authentication domains for the client are correct. Make certain the domains are spelled correctly, and that the authentication brokers listed for each of the domains is valid for that domain type.
This can also be verified in bp.conf using vi.
cat bp.confSERVER = unix_masterSERVER = unix_mediaCLIENT_NAME = unix_masterAUTHENTICATION_DOMAIN = min.com "default company NIS namespace" NIS unix_master 0AUTHENTICATION_DOMAIN = unix_master "unix_master password file" PASSWD unix_master 0AUTHORIZATION_SERVICE = unix_master.min.com 0USE_VXSS = REQUIRED
nbu_win_print_II.book Page 40 Tuesday, August 16, 2005 12:53 PM
Chapter 1, Access Management
Access Management Troubleshooting Guidelines
41
Verification Points in a Mixed Environment with a UNIX Master Server
The following procedures can help you verify that the master server, media server and client are configured correctly for a heterogeneous NetBackup Access Control environment, where the master server is a UNIX machine.
nbu_win_print_II.book Page 41 Tuesday, August 16, 2005 12:53 PM
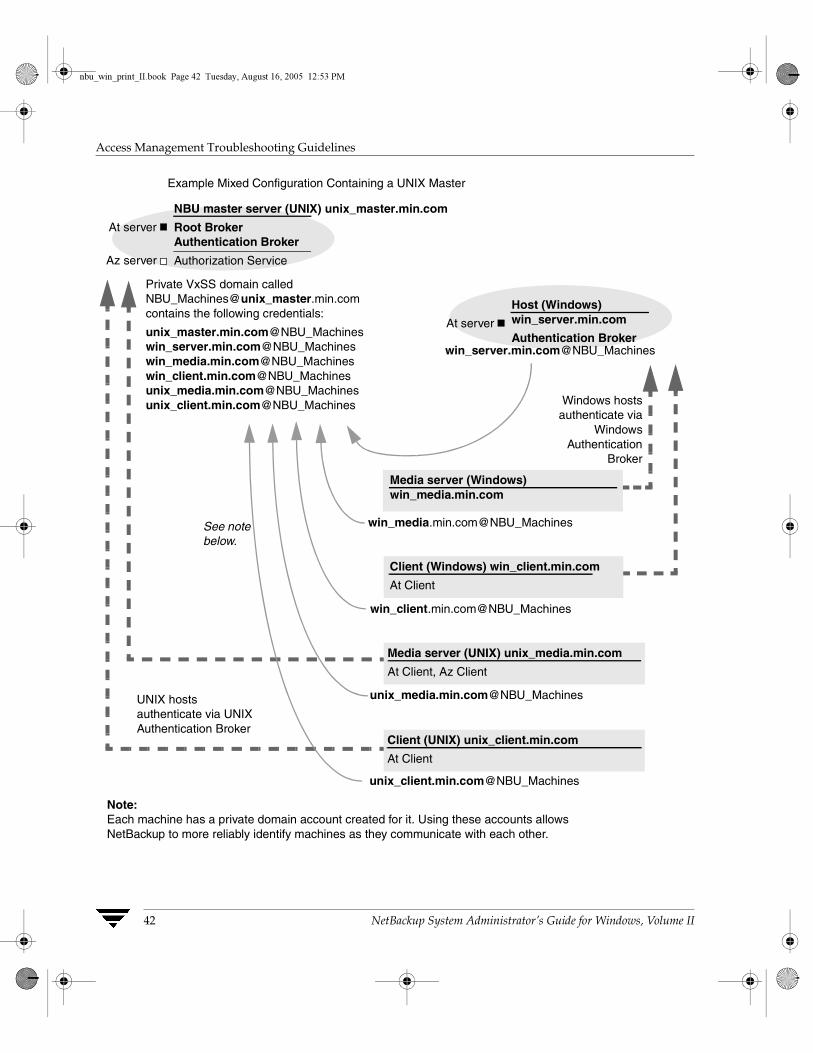
Access Management Troubleshooting Guidelines
42 NetBackup System Administrator’s Guide for Windows, Volume II
Example Mixed Configuration Containing a UNIX Master
win_media.min.com@NBU_Machines
NBU master server (UNIX) unix_master.min.com
Root BrokerAuthentication Broker
Authorization Service
At server
Az server
Media server (UNIX) unix_media.min.com
At Client, Az Client
Client (UNIX) unix_client.min.com
At Client
Client (Windows) win_client.min.com
At Client
Media server (Windows) win_media.min.com
Private VxSS domain called NBU_Machines@unix_master.min.comcontains the following credentials:
unix_master.min.com@NBU_Machineswin_server.min.com@NBU_Machineswin_media.min.com@NBU_Machineswin_client.min.com@NBU_Machinesunix_media.min.com@NBU_Machinesunix_client.min.com@NBU_Machines
Host (Windows) win_server.min.com
Authentication BrokerAt server
win_client.min.com@NBU_Machines
unix_media.min.com@NBU_Machines
unix_client.min.com@NBU_Machines
Windows hostsauthenticate via
WindowsAuthentication
Broker
UNIX hosts authenticate via UNIX Authentication Broker
Note: Each machine has a private domain account created for it. Using these accounts allows NetBackup to more reliably identify machines as they communicate with each other.
See note below.
win_server.min.com@NBU_Machines
nbu_win_print_II.book Page 42 Tuesday, August 16, 2005 12:53 PM
Chapter 1, Access Management
Access Management Troubleshooting Guidelines
43
Master Server Verification Points
Follow the same procedures as those listed in “Master Server Verification Points” on page 36.
Media Server Verification Points
Verify the UNIX Media Server
For UNIX media servers, follow the same procedures as those listed in “Media Server Verification Points” on page 38.
Verify the Windows Media Server
Check the machine certificate comes from the root Authentication broker, which is found on the UNIX master server (unix_master).
If the certificate is missing, run the following commands to correct the problem:
◆ bpnbat -addmachine on the root Authentication broker (in this example, unix_master)
◆ bpnbat -loginmachine (in this example, win_media)
For example:
bpnbat -whoami -cf "C:\program files\veritas\netbackup\var\vxss\credentials\win_media.min.com"Name: win_media.min.comDomain: NBU_Machines@unix_master.min.comIssued by: /CN=broker/OU=root@unix_master.min.com/O=vxExpiry Date: Nov 13 20:11:04 2004 GMTAuthentication method: VERITAS Private SecurityOperation completed successfully.
Verify that a Media Server is Permitted to Perform Authorization Lookups
Make sure the media server is allowed to perform authorization checks by running bpnbaz -listgroups -CredFile. For example:
bpnbaz -listgroups -CredFile "C:\program files\veritas\netbackup\var\vxss\credentials\win_media.min.com"NBU_UserNBU_OperatorNBU_AdminNBU_Security AdminVault_OperatorOperation completed successfully.
nbu_win_print_II.book Page 43 Tuesday, August 16, 2005 12:53 PM
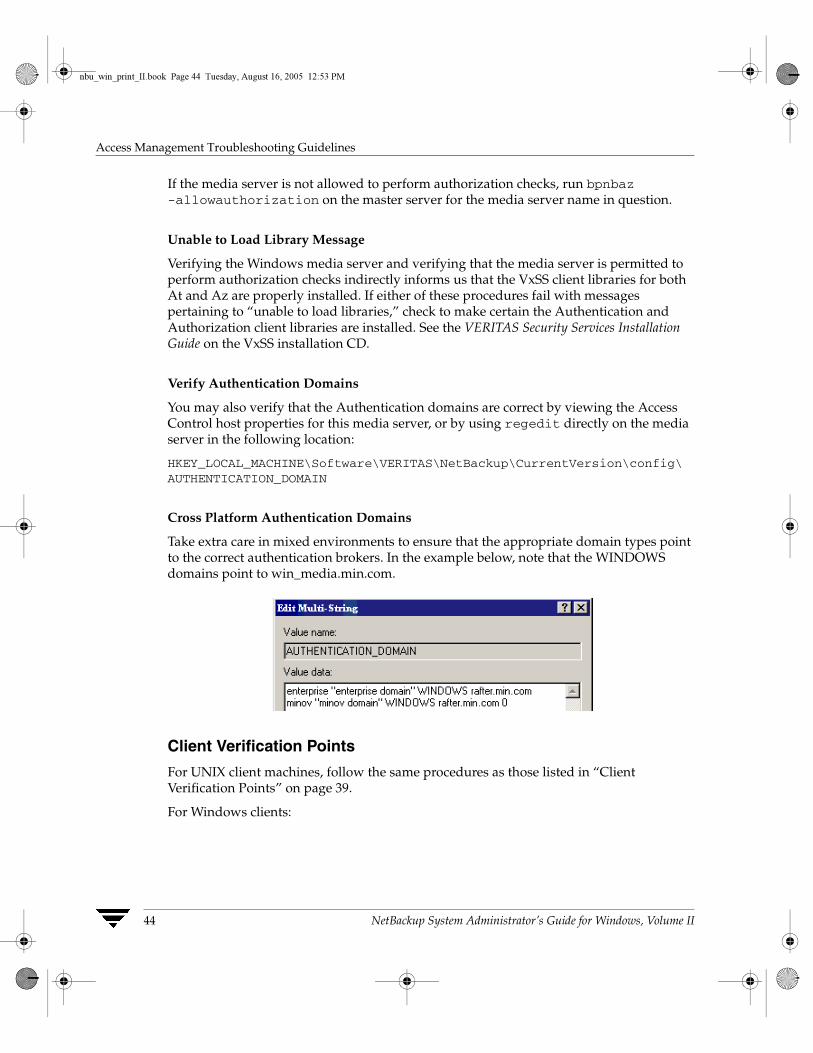
Access Management Troubleshooting Guidelines
44 NetBackup System Administrator’s Guide for Windows, Volume II
If the media server is not allowed to perform authorization checks, run bpnbaz -allowauthorization on the master server for the media server name in question.
Unable to Load Library Message
Verifying the Windows media server and verifying that the media server is permitted to perform authorization checks indirectly informs us that the VxSS client libraries for both At and Az are properly installed. If either of these procedures fail with messages pertaining to “unable to load libraries,” check to make certain the Authentication and Authorization client libraries are installed. See the VERITAS Security Services Installation Guide on the VxSS installation CD.
Verify Authentication Domains
You may also verify that the Authentication domains are correct by viewing the Access Control host properties for this media server, or by using regedit directly on the media server in the following location:
HKEY_LOCAL_MACHINE\Software\VERITAS\NetBackup\CurrentVersion\config\AUTHENTICATION_DOMAIN
Cross Platform Authentication Domains
Take extra care in mixed environments to ensure that the appropriate domain types point to the correct authentication brokers. In the example below, note that the WINDOWS domains point to win_media.min.com.
Client Verification Points
For UNIX client machines, follow the same procedures as those listed in “Client Verification Points” on page 39.
For Windows clients:
nbu_win_print_II.book Page 44 Tuesday, August 16, 2005 12:53 PM
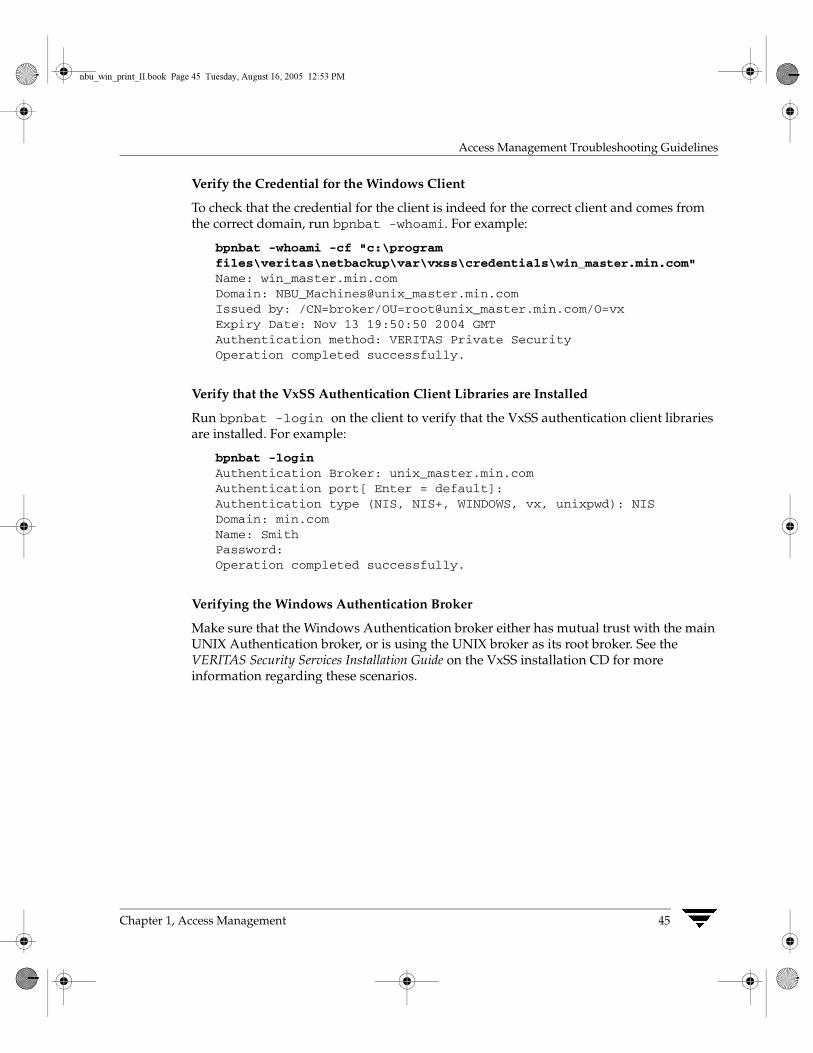
Chapter 1, Access Management
Access Management Troubleshooting Guidelines
45
Verify the Credential for the Windows Client
To check that the credential for the client is indeed for the correct client and comes from the correct domain, run bpnbat -whoami. For example:
bpnbat -whoami -cf "c:\program files\veritas\netbackup\var\vxss\credentials\win_master.min.com"Name: win_master.min.comDomain: NBU_Machines@unix_master.min.comIssued by: /CN=broker/OU=root@unix_master.min.com/O=vxExpiry Date: Nov 13 19:50:50 2004 GMTAuthentication method: VERITAS Private SecurityOperation completed successfully.
Verify that the VxSS Authentication Client Libraries are Installed
Run bpnbat -login on the client to verify that the VxSS authentication client libraries are installed. For example:
bpnbat -loginAuthentication Broker: unix_master.min.comAuthentication port[ Enter = default]:Authentication type (NIS, NIS+, WINDOWS, vx, unixpwd): NISDomain: min.comName: SmithPassword:Operation completed successfully.
Verifying the Windows Authentication Broker
Make sure that the Windows Authentication broker either has mutual trust with the main UNIX Authentication broker, or is using the UNIX broker as its root broker. See the VERITAS Security Services Installation Guide on the VxSS installation CD for more information regarding these scenarios.
nbu_win_print_II.book Page 45 Tuesday, August 16, 2005 12:53 PM
Access Management Troubleshooting Guidelines
46 NetBackup System Administrator’s Guide for Windows, Volume II
Verification Points in a Mixed Environment with a Windows Master Server
The following procedures can help you verify that the master server, media server and client are configured correctly for a heterogeneous NetBackup Access Control environment, where the master server is a Windows machine.
nbu_win_print_II.book Page 46 Tuesday, August 16, 2005 12:53 PM
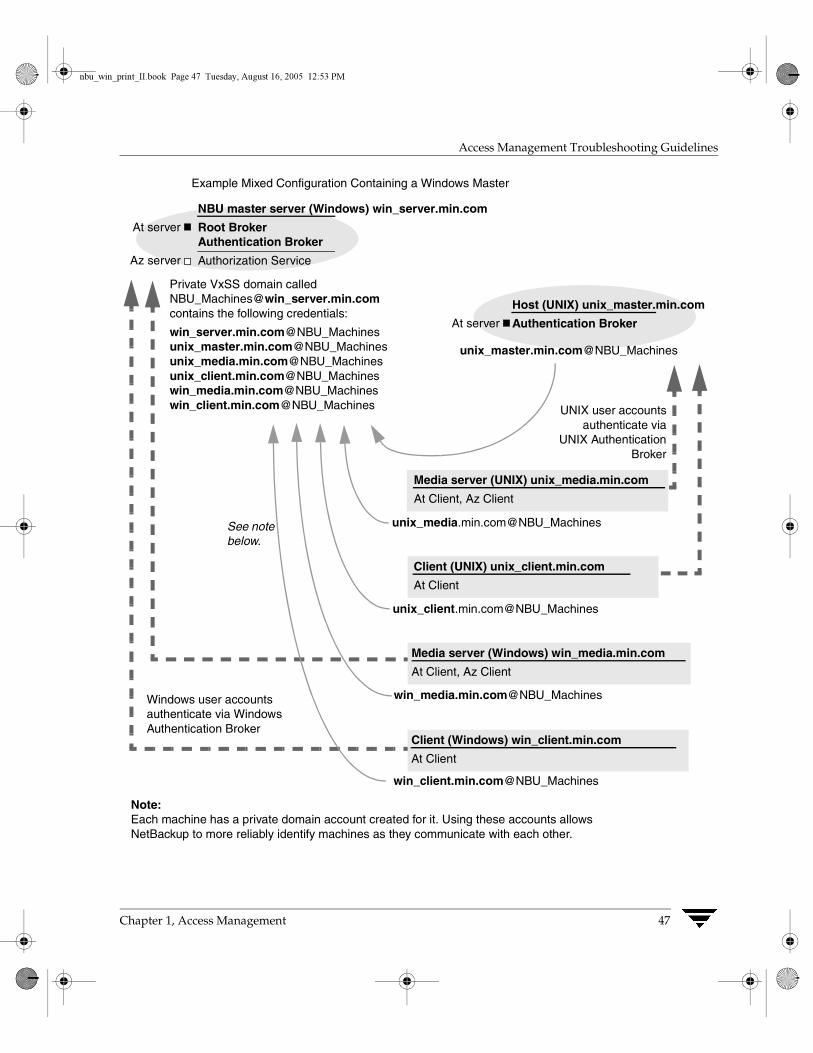
Chapter 1, Access Management
Access Management Troubleshooting Guidelines
47
Example Mixed Configuration Containing a Windows Master
unix_media.min.com@NBU_Machines
NBU master server (Windows) win_server.min.com
Root BrokerAuthentication Broker
Authorization Service
At server
Az server
Media server (Windows) win_media.min.com
At Client, Az Client
Client (Windows) win_client.min.com
At Client
Client (UNIX) unix_client.min.com
At Client
Media server (UNIX) unix_media.min.com
At Client, Az Client
Private VxSS domain called NBU_Machines@win_server.min.comcontains the following credentials:
win_server.min.com@NBU_Machinesunix_master.min.com@NBU_Machinesunix_media.min.com@NBU_Machinesunix_client.min.com@NBU_Machineswin_media.min.com@NBU_Machineswin_client.min.com@NBU_Machines
Host (UNIX) unix_master.min.com
Authentication BrokerAt server
unix_client.min.com@NBU_Machines
win_media.min.com@NBU_Machines
win_client.min.com@NBU_Machines
UNIX user accountsauthenticate via
UNIX AuthenticationBroker
Windows user accounts authenticate via Windows Authentication Broker
Note: Each machine has a private domain account created for it. Using these accounts allows NetBackup to more reliably identify machines as they communicate with each other.
See note below.
unix_master.min.com@NBU_Machines
nbu_win_print_II.book Page 47 Tuesday, August 16, 2005 12:53 PM
Access Management Troubleshooting Guidelines
48 NetBackup System Administrator’s Guide for Windows, Volume II
Master Server Verification Points
Follow the same procedures as those listed in “Master Server Verification Points” on page 30.
Media Server Verification Points
Verify the Windows Media Server
For Windows media servers, follow the same procedures as those listed in “Media Server Verification Points” on page 32.
Verify the UNIX Media Server
Check that the machine certificate is issued from the root Authentication broker, found on the Windows master server (win_master). To determine which Authentication broker the media server is authenticated against, run bpnbat -whoami. For example:
bpnbat -whoami -cf /usr/openv/var/vxss/credentials/unix_media.min.comName: unix_media.min.comDomain: NBU_Machines@win_master.min.comIssued by: /CN=broker/OU=root@win_master.min.com/O=vxExpiry Date: Nov 9 14:48:08 2004 GMTAuthentication method: VERITAS Private SecurityOperation completed successfully.
Verify that the Server has Access to the Authorization Database
To make sure that the media server is able to access the Authorization database as it needs to perform authorization checks, run bpnbaz -ListGroups -CredFile "/usr/openv/var/vxss/credentials/<hostname>”
For example:
bpnbaz -ListGroups -CredFile\/usr/openv/var/vxss/credentials/unix_media.min.comNBU_UserNBU_OperatorNBU_AdminNBU_Security AdminVault_OperatorOperation completed successfully.
If the media server is not allowed to perform authorization checks, run bpnbaz -allowauthorization on the master server for the media server name in question.
nbu_win_print_II.book Page 48 Tuesday, August 16, 2005 12:53 PM
Chapter 1, Access Management
Access Management Troubleshooting Guidelines
49
Unable to Load Library Message
Verifying the media server and verifying that the media server has access to the proper database indirectly informs us that the VxSS client libraries for both At and Az are properly installed. If either of these procedures fail with messages pertaining to “unable to load libraries,” check to make certain the Authentication and Authorization client libraries are installed. See the VERITAS Security Services Installation Guide on the VxSS installation CD.
Cross Platform Authentication Domains
You may also verify that the Authentication domains are correct by viewing the Access Control host properties for this media server, or by using cat(1)ing the bp.conf file.
Take extra care in mixed environments to ensure that the appropriate domain types point to the correct authentication brokers. In the example below, note that the PASSWD and NIS domains point to unix_media.min.com, which, in this example, is the UNIX Authentication broker:
cat bp.confSERVER = win_master.min.comMEDIA_SERVER = unix_media.min.comCLIENT_NAME = unix_mediaAUTHENTICATION_DOMAIN = win_master "win_master domain" WINDOWS win_master.min.com 0AUTHENTICATION_DOMAIN = enterprise "enterprise domain" WINDOWS win_master.min.com 0AUTHENTICATION_DOMAIN = unix_media.min.com "local unix_media domain" PASSWD unix_media.min.com 0AUTHENTICATION_DOMAIN = min.com "NIS domain" NIS unix_media.min.com 0AUTHORIZATION_SERVICE = win_master.min.com 0USE_VXSS = REQUIRED
Client Verification Points
Verify the Credential for the Windows Client
For Windows clients, follow the same procedures as those listed in “Client Verification Points” on page 33.
Verify the Credential for the UNIX Client
To check that the credential for the client is indeed for the correct client and comes from the correct domain, run bpnbat -whoami. For example:
nbu_win_print_II.book Page 49 Tuesday, August 16, 2005 12:53 PM
Access Management Troubleshooting Guidelines
50 NetBackup System Administrator’s Guide for Windows, Volume II
bpnbat -whoami -cf \"/usr/openv/var/vxss/credentials/unix_client.min.com"Name: unix_client.min.comDomain: NBU_Machines@win_master.min.comIssued by: /CN=broker/OU=root@win_master.min.com/O=vxExpiry Date: Nov 6 21:16:01 2004 GMTAuthentication method: VERITAS Private SecurityOperation completed successfully.
Verify that the VxSS Authentication Client Libraries are Installed
Run bpnbat -login on the client to verify that the VxSS authentication client libraries are installed.
bpnbat -loginAuthentication Broker: unix_media.min.comAuthentication port[ Enter = default]:Authentication type (NIS, NIS+, WINDOWS, vx, unixpwd): NISDomain: min.comName: SmithPassword:You do not currently trust the server: unix_media.min.com, do you wish to trust it? (y/n):yOperation completed successfully.
Verify the UNIX Authentication Broker
Make sure that the UNIX Authentication broker either has mutual trust with the main Windows Authentication broker, or is using the Windows broker as its root broker. See the VERITAS Security Services Installation Guide on the VxSS installation CD for more information regarding this scenario.
nbu_win_print_II.book Page 50 Tuesday, August 16, 2005 12:53 PM
Chapter 1, Access Management
Access Management Troubleshooting Guidelines
51
Other Troubleshooting TopicsThe following sections describe topics that may be helpful when configuring VxSS with NetBackup.
Expired Credentials Message
If your credential has expired or is incorrect, you may receive the following message while running a bpnbaz or bpnbat command:
Supplied credential is expired or incorrect. Please reauthenticate and try again.
Run bpnbat -Login to update an expired credential.
Useful Debug Logs
The following logs are useful when debugging NetBackup Access Control:
On the master: admin, bpcd, bprd, bpdbm, bpjobd
On the client: admin, bpcd, bprd, bpdbjobs
See the NetBackup Troubleshooting Guide for instructions on implementing proper logging.
If Uninstalling VxSS
On UNIX:
Using installvss, select the option for uninstalling Authentication and Authorization. The following directories should be empty after uninstalling:
/opt/etc/vx/vss/var/
On Windows:
Use the Windows Add/Remove Programs panel from the Control Menu to uninstall Authentication and Authorization. The \Veritas\Security directory should be empty after uninstalling.
Where Credentials Are Stored
NetBackup VxSS credentials are stored in the following UNIX directories:
User credentials: $HOME/.vxss
Machine credentials: /usr/openv/var/vxss/credentials/
nbu_win_print_II.book Page 51 Tuesday, August 16, 2005 12:53 PM
Access Management Troubleshooting Guidelines
52 NetBackup System Administrator’s Guide for Windows, Volume II
How System Time Affects Access Control
Credentials have a birth and death time. Machines with large discrepancies in time may see credentials as being created in the future or may prematurely consider a credential to be expired. Consider synchronizing system time if you have trouble communicating between systems.
VxSS Ports
VxSS services listen at the following ports:
Authentication:
netstat -a -n | find "2821"
Authorization:
netstat -a -n | find "4032"
Stopping VxSS Services
When stopping the VxSS services, stop Az first, then stop At.
When stopping the VxSS services, stop Authorization first, then stop Authentication.
UNIX: Use the following commands.
To stop Az: /opt/VRTSaz/bin/vrtsaz -stop
To stop At: Use the term signal as shown in the example below:
# ps -fed |grep vxatd root 16018 1 4 08:47:35 ? 0:01 ./vxatd root 16019 16011 0 08:47:39 pts/2 0:00 grep vxatd# kill 16018# ps -fed |grep vxard root 16021 16011 0 08:47:48 pts/2 0:00 grep vxard
Windows:
Use the Services utility that Windows provides, since these services do not appear in the NetBackup Activity Monitor.
If You Lock Yourself Out of NetBackup
It is possible to lock yourself out of the NetBackup Administration Console if Access Control is incorrectly configured.
If this occurs, use vi to read the bp.conf entries (UNIX) or regedit (Windows) to view the Windows registry in the following location:
nbu_win_print_II.book Page 52 Tuesday, August 16, 2005 12:53 PM
Chapter 1, Access Management
Access Management Troubleshooting Guidelines
53
HKEY_LOCAL_MACHINE\Software\VERITAS\NetBackup\CurrentVersion\config
You’ll look to see if he following entries are set correctly: AUTHORIZATION_SERVICE, AUTHENTICATION_DOMAIN, and USE_VXSS.
If the administrator does not wish to use NetBackup Access Control or does not have the VxSS libraries installed, make certain that the USE_VXSS entry is set to Prohibited, or is deleted entirely.
nbac_cron Utility
Use the nbac_cron.exe utility to create identities under which to run cron or at jobs.
nbac_cron.exe is found in the following location:
UNIX: /opt/openv/netbackup/bin/goodies/nbac_cron
Windows: Install_path\netbackup\bin\goodies\nbac_cron.exe
nbac_cron options:
◆ -SetupAt [-Port #] -SetupCron [-Port #]
Either option sets up an Authentication account. Optionally, specify a port number to use for authentication.
◆ -AddAt
Create an at account for a user.
◆ -AddCron
Create a cron account for a user.
nbu_win_print_II.book Page 53 Tuesday, August 16, 2005 12:53 PM
Using the Access Management Utility
54 NetBackup System Administrator’s Guide for Windows, Volume II
Using the Access Management Utility Users assigned to the NetBackup Security Administrator user group have access to Access Management. Users assigned to any other user group, including NetBackup Administrator, can see the Access Management node in the NetBackup Administration Console, but cannot expand it.
If a user other than a Security Administrator tries to select Access Management, an error message displays. Toolbar buttons and menu items specific to Access Management are not displayed.
Upon successful completion, the default NetBackup user groups should display in the NetBackup Administration Console under Access Management > NBU User Groups.
To list the groups on the command line, run bpnbaz -ListGroups on the machine where the VxSS Authorization server software is installed.
bpnbaz is located in directory Install_path\NetBackup\bin\admincmd
(You must be logged in as the Security Administrator by using bpnbat -login)
bpnbaz -ListGroupsNBU_UserNBU_OperatorNBU_AdminNBU_Security AdminVault_OperatorOperation completed successfully.
The NetBackup user groups are listed. This verifies that the Security Administrator can access the user groups.
Access Management MenusThe Menu bar consists of the following menu items:
Option Description
File Options Change Server, New Console, New Window from Here, Login as New User, Backup, Archive, and Restore, Print Setup, Print Preview, Print, Send, Export, Close, and Exit are described in Chapter 1 of the NetBackup System Administrator’s Guide for Windows, Volume I.
nbu_win_print_II.book Page 54 Tuesday, August 16, 2005 12:53 PM
Chapter 1, Access Management
Using the Access Management Utility
55
Edit Options Undo, Cut, Copy, Paste, New, Change, Delete, Find, Find Next, Find Previous, and Find All are described in Chapter 1 of NetBackup System Administrator’s Guide, Volume I.
The Change option is available when a user or NBU user group is selected in the details pane.
View Options Toolbar, Status Bar, Tree, Previous Pane, Next Pane, Customize, Options, Refresh, Refresh All, Large Icons, Small Icons, List, Details, Columns, Sort, Filter, and Clear Filter are described in Chapter 1 of NetBackup System Administrator’s Guide, Volume I.
Actions The Actions menu contains the following options when Access Management is selected:
◆ New Group: Click to create a new NetBackup user group.
◆ Copy to New Group: Use to create a new user group based on an existing user group. Users and permissions can be changed as needed for the new user group.
Help Options Help Topics, Troubleshooter, VERITAS Web Page, License Keys, Current NBAC User, and About NetBackup Administration Console are described in Chapter 1 of NetBackup System Administrator’s Guide, Volume I.
Option Description
nbu_win_print_II.book Page 55 Tuesday, August 16, 2005 12:53 PM
Determining Who Can Access NetBackup
56 NetBackup System Administrator’s Guide for Windows, Volume II
Determining Who Can Access NetBackup Access Management allows only one user group, by default, the NBU_Security Admin user group, to define the following aspects of NetBackup Access Management:
◆ The permissions of individual users.
◆ The creation of user groups.
First, determine which NetBackup resources your users will need to access. (See “Permissions for Default NetBackup User Groups” on page 66 for resources and associated permissions.)
The Security Administrator may want to first consider what different users have in common, then create user groups with the permissions that these users require. User groups generally correspond to a role, such as administrators, operators, or end-users.
Consider basing user groups on one or more of the following criteria:
◆ Functional units in your organization (UNIX administration, for example)
◆ NetBackup resources (drives, policies, for example)
◆ Location (East Coast or West coast, for example)
◆ Individual responsibilities (tape operator, for example)
Note Permissions are granted to individuals in user groups, not to individuals on a per-host basis. If a machine is authenticated within the configuration, any individual in the user group can operate NetBackup to the extent that they are authorized to do so. There are no restrictions based on a machine name.
Individual UsersNetBackup Access Management uses your existing OS-defined users, groups, and domains. As such, Access Management maintains no list of users and passwords. When defining members of groups, the Security Administrator is specifying existing OS level users as members of user groups.
Every authenticated user belongs to at least one authorization user group. By default, every user belongs to the user group NBU_Users, which contains all authenticated users.
nbu_win_print_II.book Page 56 Tuesday, August 16, 2005 12:53 PM
Chapter 1, Access Management
Determining Who Can Access NetBackup
57
There are two types of users that are implicit members of groups:
◆ On the server hosting the Authorization services, members of the Administrator group are implicit members of the NBU_Security Admin user group
◆ All authenticated users are implicit members of the NBU_Users user group
All other groups must have members defined explicitly. The NetBackup Security Administrator can delete members added manually to other groups; however, the Security Administrator may not delete the predefined implicit members of the NBU_Users and NBU_Security Admin groups. OS groups and OS users may be added to an authorization group.
Note Although root (UNIX) or administrator (Windows) on the master server are added to the NetBackup Administrators user group and get NetBackup Administrator permissions, root and administrator are not predefined users.)
Note: Contents of Access Management visible only to members of the NBU_Security Admin user group.
Only users and OS groups display in the console, not domains.
nbu_win_print_II.book Page 57 Tuesday, August 16, 2005 12:53 PM
Determining Who Can Access NetBackup
58 NetBackup System Administrator’s Guide for Windows, Volume II
User GroupsRather than assigning permissions directly to individual users, NetBackup Access Management is configured by assigning permissions to user groups, then assigning users to the user groups.
Upon successful installation, NetBackup provides five default user groups that complement how sites often manage the duties of NetBackup operation. The user groups are listed under Access Management > User Groups. Keep in mind that the contents of Access Management are visible to members of the NBU_Security Admin group only.
The Security Administrator may choose to use the default NetBackup user groups, or may choose to create custom user groups.
Default User Groups
The permissions granted to users in each of the five default user groups correlate to the group name. Essentially, an authorization object correlates to a node in the NetBackup Administration Console tree.
The following sections describe each NetBackup default user group:
Security Administrator (NBU_Security Admin)
There are usually very few members in the NBU_Security Admin user group. The only permission that the Security Administrator possesses by default is that of configuring Access Control within Access Management. Configuring Access Control includes the following permissions:
◆ Ability to see the contents of Access Management in the NetBackup Administration Console
◆ Ability to create, modify and delete users and user groups
◆ Ability to assign users to user groups
Note: Contents of Access Management visible only to members of the NBU_Security Admin user group.
nbu_win_print_II.book Page 58 Tuesday, August 16, 2005 12:53 PM
Chapter 1, Access Management
Determining Who Can Access NetBackup
59
◆ Ability to assign permissions to user groups
Administrator (NBU_Admin)
By default, members of the NBU_Admin user group have full permission to access, configure, and operate any NetBackup authorization object. In other words, members have all the capabilities that are currently available to administrators without Access Management in place. However, as members of this group, it is not necessary to log on as root or administrator at the OS level.
Note Members of the NBU_Admin user group cannot see the contents of Access Management, and therefore, cannot ascribe permissions to other user groups.
Operator (NBU_Operator)
The main task of the NBU_Operator user group is to monitor jobs. For example, members of the NBU_Operator user group might monitor jobs and notify a NetBackup administrator if there is a problem so the problem can be addressed by the administrator. Using the default permissions, a member of the NBU_Operator user group would probably not have enough access to be address larger problems.
Members of the NBU_Operator user group have permissions that allow them to perform some tasks such as moving tapes, operating drives, and inventorying robots.
Note In order for members of the NBU_Operator user group to continue viewing media and device information, run the command bpnbaz -UpGrade60. Running this command brings the NetBackup 5.x permissions for the NBU_Operator user group up to the expected configuration for 6.0.
Default User (NBU_User)
The NBU_User user group is the default NetBackup user group with the fewest permissions. Members of the NBU_User user group can only backup, restore, and archive files. NBU_User user group members have access to the functionality of the NetBackup client interface (BAR).
Vault Operator (Vault_Operator)
The Vault_Operator user group is the default user group that contains permissions to perform the operator actions necessary for the Vault process.
nbu_win_print_II.book Page 59 Tuesday, August 16, 2005 12:53 PM
Determining Who Can Access NetBackup
60 NetBackup System Administrator’s Guide for Windows, Volume II
Additional User Groups
The Security Administrator (member of NBU_Security Admin or equivalent) can create user groups as needed. Although the default user groups can be selected, changed and saved, NetBackup recommends that the groups be copied, renamed, then saved in order to retain the default settings for future reference.
User Group ConfigurationThe Security Administrator can create a new user groups by clicking Actions > New Group or by selecting an existing user group and selecting Actions > Copy to New Group.
▼ To create a new user group
1. As a member of the NBU_Security Admin user group (or equivalent), expand Access Management > NBU User Groups.
2. Select Actions > New Group. The New Group dialog displays, opened to the General tab.
3. Type the name of the new group in the Name field, then click the Users tab. For more on users, see “Users Tab” on page 62.
4. Select the defined users that you wish to assign to this new user group, then click Assign. Or, to include all the defined users in the group, click Assign All. To remove users from the assigned users list, select the user name, then click Remove.
5. Click the Permissions tab. For more on permissions, see “Permissions Tab” on page 64.
6. Select an Authorization Object, then select the permissions for the object.
7. Click OK to save the user group and the group permissions.
▼ To create a new user group by copying an existing user group
1. As a member of the NBU_Security Admin user group (or equivalent), expand Access Management > NBU User Groups.
2. Select an existing user group in the Details pane. (The pane on the left side of the NetBackup Administration Console.)
nbu_win_print_II.book Page 60 Tuesday, August 16, 2005 12:53 PM
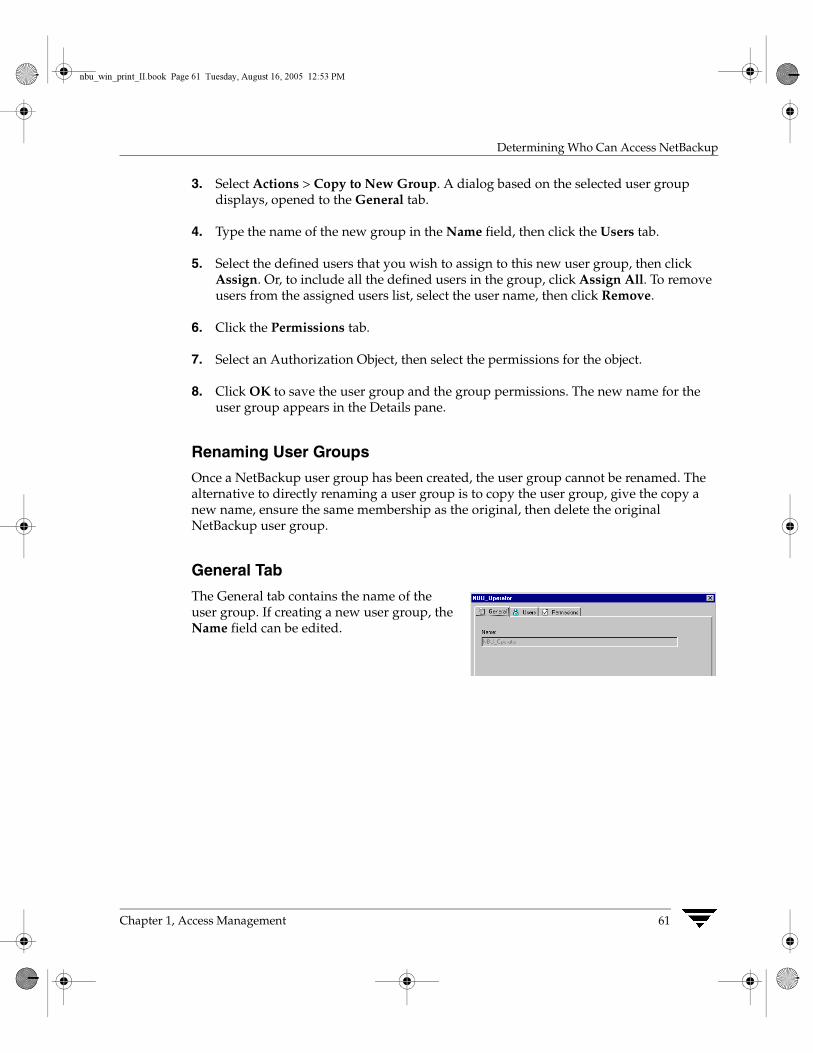
Chapter 1, Access Management
Determining Who Can Access NetBackup
61
3. Select Actions > Copy to New Group. A dialog based on the selected user group displays, opened to the General tab.
4. Type the name of the new group in the Name field, then click the Users tab.
5. Select the defined users that you wish to assign to this new user group, then click Assign. Or, to include all the defined users in the group, click Assign All. To remove users from the assigned users list, select the user name, then click Remove.
6. Click the Permissions tab.
7. Select an Authorization Object, then select the permissions for the object.
8. Click OK to save the user group and the group permissions. The new name for the user group appears in the Details pane.
Renaming User Groups
Once a NetBackup user group has been created, the user group cannot be renamed. The alternative to directly renaming a user group is to copy the user group, give the copy a new name, ensure the same membership as the original, then delete the original NetBackup user group.
General Tab
The General tab contains the name of the user group. If creating a new user group, the Name field can be edited.
nbu_win_print_II.book Page 61 Tuesday, August 16, 2005 12:53 PM
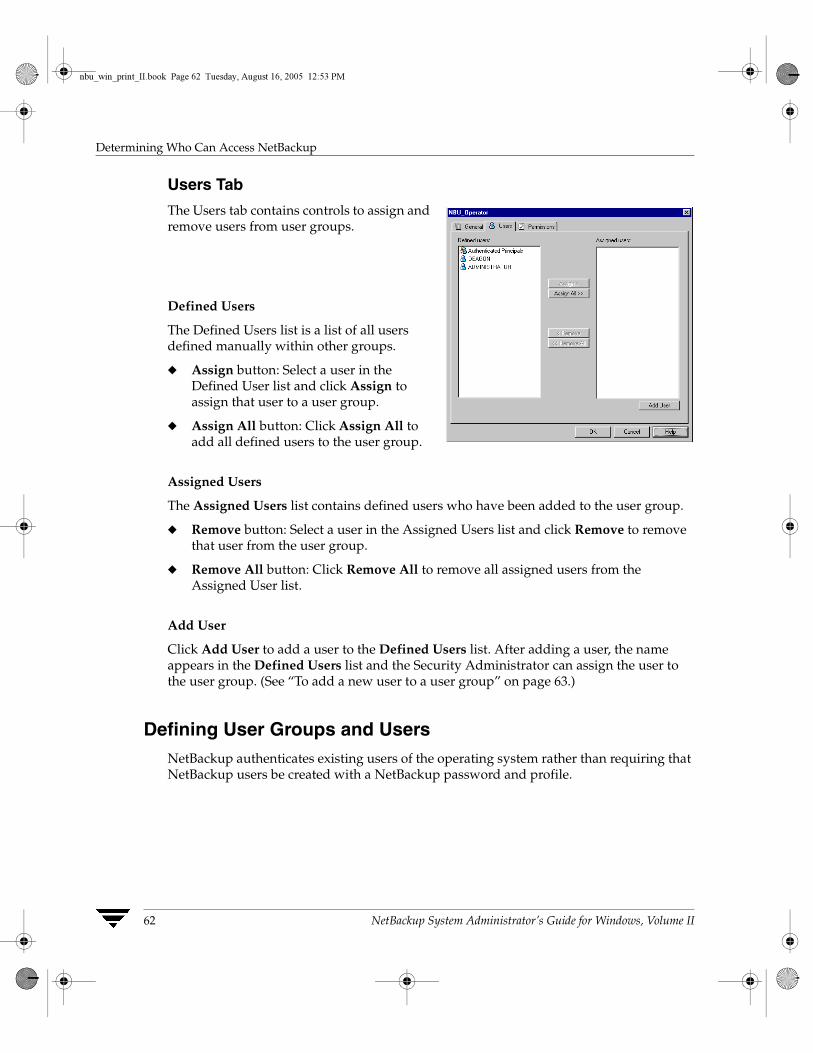
Determining Who Can Access NetBackup
62 NetBackup System Administrator’s Guide for Windows, Volume II
Users Tab
The Users tab contains controls to assign and remove users from user groups.
Defined Users
The Defined Users list is a list of all users defined manually within other groups.
◆ Assign button: Select a user in the Defined User list and click Assign to assign that user to a user group.
◆ Assign All button: Click Assign All to add all defined users to the user group.
Assigned Users
The Assigned Users list contains defined users who have been added to the user group.
◆ Remove button: Select a user in the Assigned Users list and click Remove to remove that user from the user group.
◆ Remove All button: Click Remove All to remove all assigned users from the Assigned User list.
Add User
Click Add User to add a user to the Defined Users list. After adding a user, the name appears in the Defined Users list and the Security Administrator can assign the user to the user group. (See “To add a new user to a user group” on page 63.)
Defining User Groups and UsersNetBackup authenticates existing users of the operating system rather than requiring that NetBackup users be created with a NetBackup password and profile.
nbu_win_print_II.book Page 62 Tuesday, August 16, 2005 12:53 PM
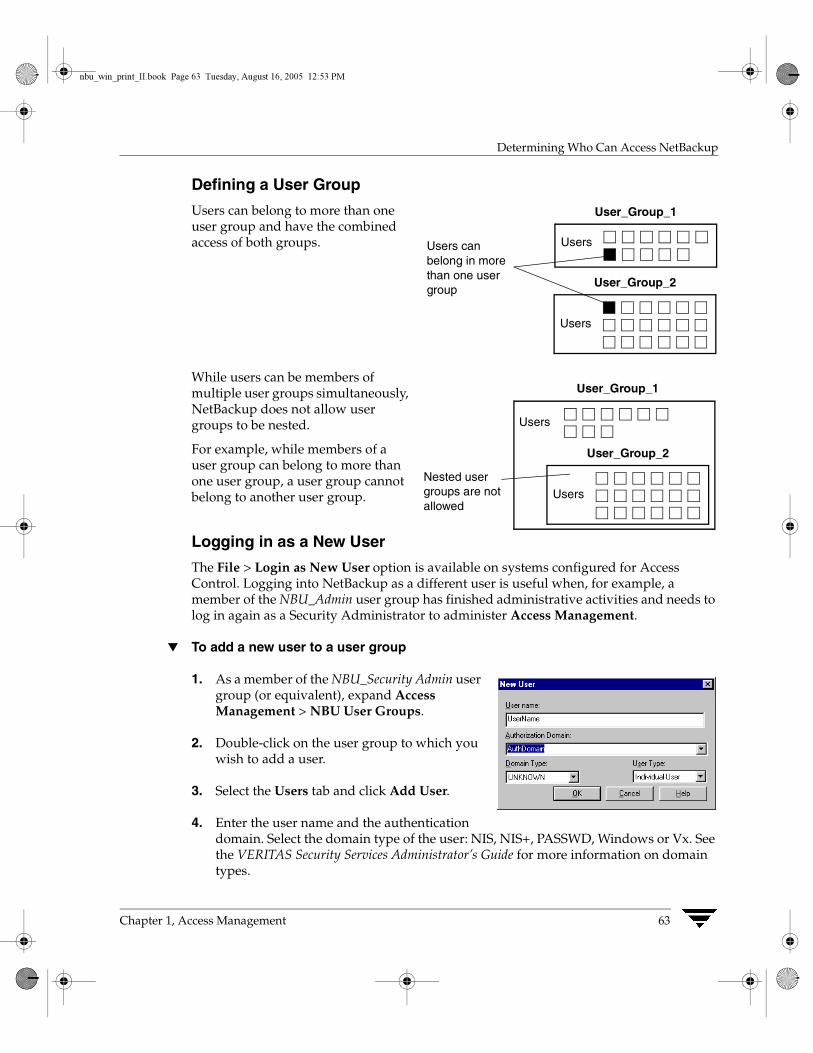
Chapter 1, Access Management
Determining Who Can Access NetBackup
63
Defining a User Group
Users can belong to more than one user group and have the combined access of both groups.
While users can be members of multiple user groups simultaneously, NetBackup does not allow user groups to be nested.
For example, while members of a user group can belong to more than one user group, a user group cannot belong to another user group.
Logging in as a New User
The File > Login as New User option is available on systems configured for Access Control. Logging into NetBackup as a different user is useful when, for example, a member of the NBU_Admin user group has finished administrative activities and needs to log in again as a Security Administrator to administer Access Management.
▼ To add a new user to a user group
1. As a member of the NBU_Security Admin user group (or equivalent), expand Access Management > NBU User Groups.
2. Double-click on the user group to which you wish to add a user.
3. Select the Users tab and click Add User.
4. Enter the user name and the authentication domain. Select the domain type of the user: NIS, NIS+, PASSWD, Windows or Vx. See the VERITAS Security Services Administrator’s Guide for more information on domain types.
Users can belong in more than one user group
Users
User_Group_2
Users
User_Group_1
Nested user groups are not allowed
Users
User_Group_1
User_Group_2
Users
nbu_win_print_II.book Page 63 Tuesday, August 16, 2005 12:53 PM
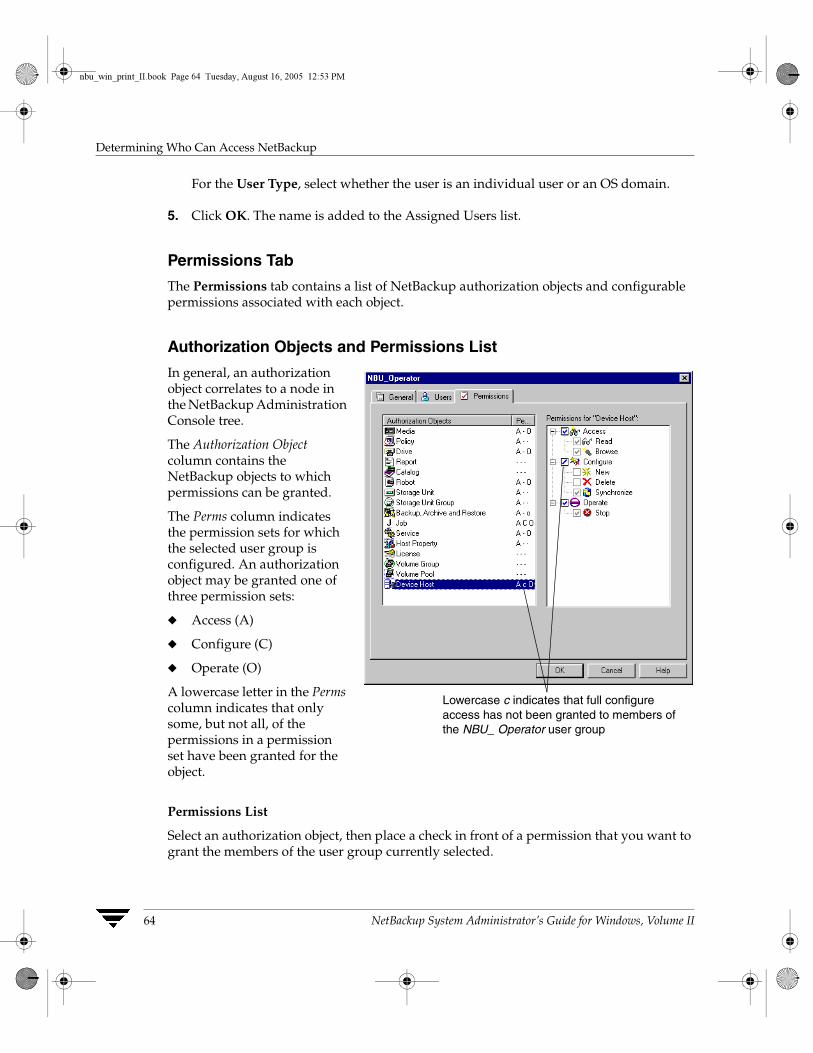
Determining Who Can Access NetBackup
64 NetBackup System Administrator’s Guide for Windows, Volume II
For the User Type, select whether the user is an individual user or an OS domain.
5. Click OK. The name is added to the Assigned Users list.
Permissions Tab
The Permissions tab contains a list of NetBackup authorization objects and configurable permissions associated with each object.
Authorization Objects and Permissions List
In general, an authorization object correlates to a node in the NetBackup Administration Console tree.
The Authorization Object column contains the NetBackup objects to which permissions can be granted.
The Perms column indicates the permission sets for which the selected user group is configured. An authorization object may be granted one of three permission sets:
◆ Access (A)
◆ Configure (C)
◆ Operate (O)
A lowercase letter in the Perms column indicates that only some, but not all, of the permissions in a permission set have been granted for the object.
Permissions List
Select an authorization object, then place a check in front of a permission that you want to grant the members of the user group currently selected.
Lowercase c indicates that full configure access has not been granted to members of the NBU_ Operator user group
nbu_win_print_II.book Page 64 Tuesday, August 16, 2005 12:53 PM

Chapter 1, Access Management
Determining Who Can Access NetBackup
65
When a user group is copied to create a new user group, the permission settings are copied as well.
nbu_win_print_II.book Page 65 Tuesday, August 16, 2005 12:53 PM
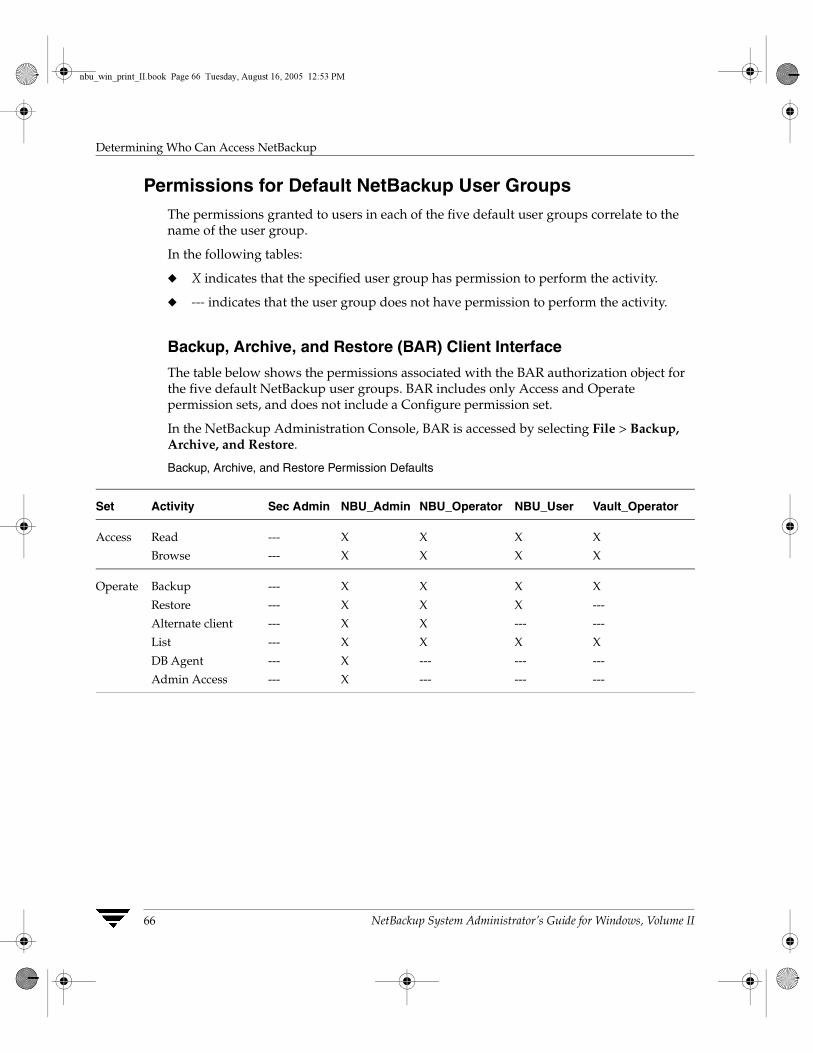
Determining Who Can Access NetBackup
66 NetBackup System Administrator’s Guide for Windows, Volume II
Permissions for Default NetBackup User GroupsThe permissions granted to users in each of the five default user groups correlate to the name of the user group.
In the following tables:
◆ X indicates that the specified user group has permission to perform the activity.
◆ --- indicates that the user group does not have permission to perform the activity.
Backup, Archive, and Restore (BAR) Client Interface
The table below shows the permissions associated with the BAR authorization object for the five default NetBackup user groups. BAR includes only Access and Operate permission sets, and does not include a Configure permission set.
In the NetBackup Administration Console, BAR is accessed by selecting File > Backup, Archive, and Restore.
Backup, Archive, and Restore Permission Defaults
Set Activity Sec Admin NBU_Admin NBU_Operator NBU_User Vault_Operator
Access Read
Browse
---
---
X
X
X
X
X
X
X
X
Operate Backup
Restore
Alternate client
List
DB Agent
Admin Access
---
---
---
---
---
---
X
X
X
X
X
X
X
X
X
X
---
---
X
X
---
X
---
---
X
---
---
X
---
---
nbu_win_print_II.book Page 66 Tuesday, August 16, 2005 12:53 PM
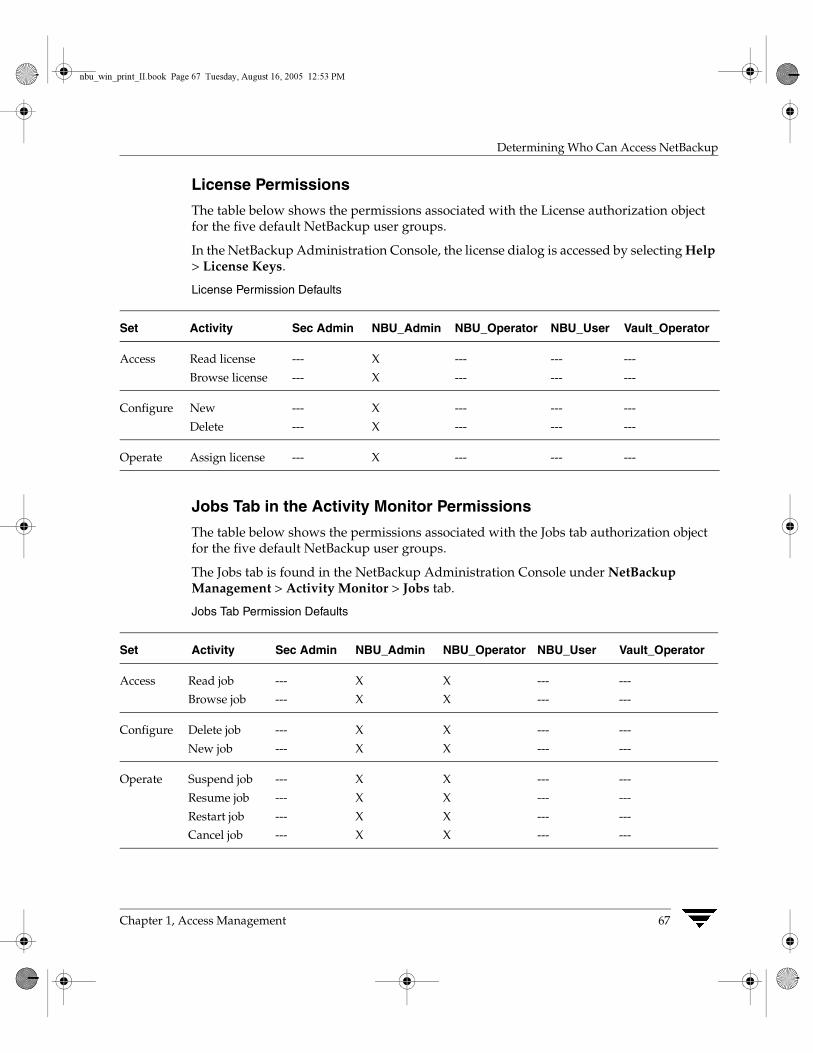
Chapter 1, Access Management
Determining Who Can Access NetBackup
67
License Permissions
The table below shows the permissions associated with the License authorization object for the five default NetBackup user groups.
In the NetBackup Administration Console, the license dialog is accessed by selecting Help > License Keys.
License Permission Defaults
Jobs Tab in the Activity Monitor Permissions
The table below shows the permissions associated with the Jobs tab authorization object for the five default NetBackup user groups.
The Jobs tab is found in the NetBackup Administration Console under NetBackup Management > Activity Monitor > Jobs tab.
Jobs Tab Permission Defaults
Set Activity Sec Admin NBU_Admin NBU_Operator NBU_User Vault_Operator
Access Read license
Browse license
---
---
X
X
---
---
---
---
---
---
Configure New
Delete
---
---
X
X
---
---
---
---
---
---
Operate Assign license --- X --- --- ---
Set Activity Sec Admin NBU_Admin NBU_Operator NBU_User Vault_Operator
Access Read job
Browse job
---
---
X
X
X
X
---
---
---
---
Configure Delete job
New job
---
---
X
X
X
X
---
---
---
---
Operate Suspend job
Resume job
Restart job
Cancel job
---
---
---
---
X
X
X
X
X
X
X
X
---
---
---
---
---
---
---
---
nbu_win_print_II.book Page 67 Tuesday, August 16, 2005 12:53 PM
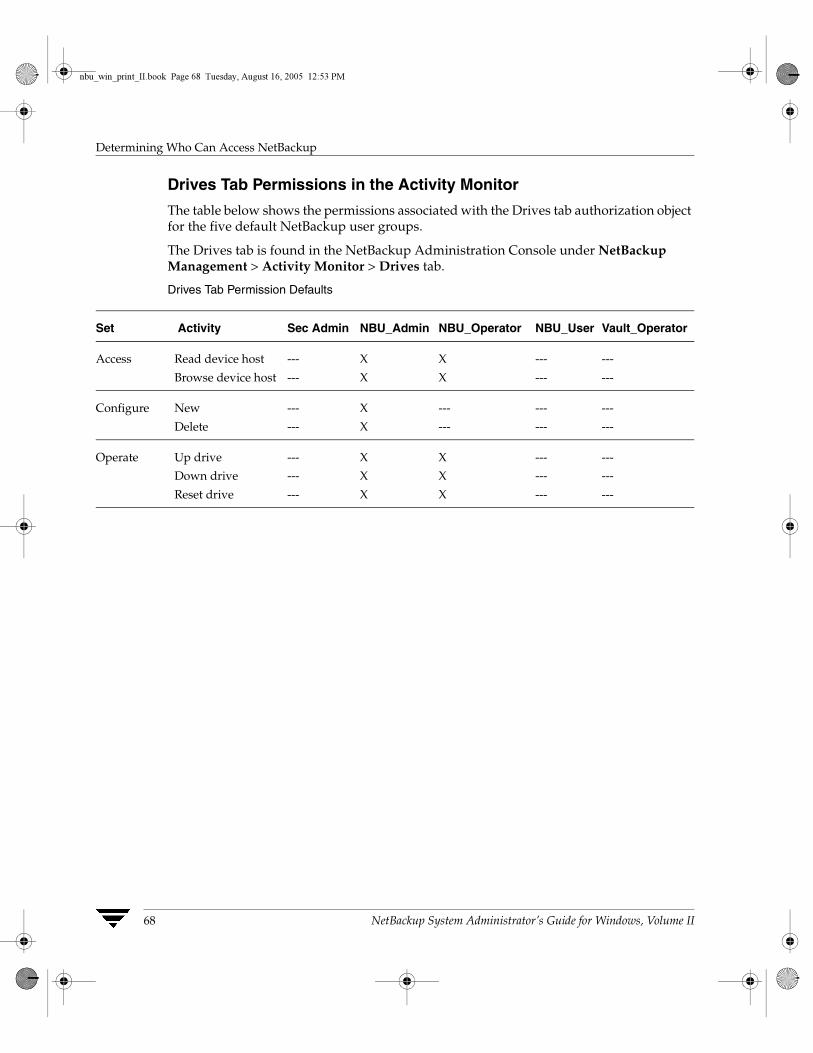
Determining Who Can Access NetBackup
68 NetBackup System Administrator’s Guide for Windows, Volume II
Drives Tab Permissions in the Activity Monitor
The table below shows the permissions associated with the Drives tab authorization object for the five default NetBackup user groups.
The Drives tab is found in the NetBackup Administration Console under NetBackup Management > Activity Monitor > Drives tab.
Drives Tab Permission Defaults
Set Activity Sec Admin NBU_Admin NBU_Operator NBU_User Vault_Operator
Access Read device host
Browse device host
---
---
X
X
X
X
---
---
---
---
Configure New
Delete
---
---
X
X
---
---
---
---
---
---
Operate Up drive
Down drive
Reset drive
---
---
---
X
X
X
X
X
X
---
---
---
---
---
---
nbu_win_print_II.book Page 68 Tuesday, August 16, 2005 12:53 PM

Chapter 1, Access Management
Determining Who Can Access NetBackup
69
Services Tab Permissions in the Activity Monitor
The table below shows the permissions associated with the Services tab authorization object for the five default NetBackup user groups. The Services tab includes only Access and Operate permission sets, and does not include a Configure permission set.
The Services tab is found in the NetBackup Administration Console under NetBackup Management > Activity Monitor > Services tab.
Services Tab Permission Defaults
* The Read and Browse permissions do not have an affect on the Services tab. This information is harvested from the server using user level calls to access the task list and is displayed to all users for informational purposes.
** If a user is not a member of the NBU_Admin user group, but is logged on as an OS administrator (Administrator), then:
◆ The user will be able to restart a service from within the NetBackup Administration Console or from the command line.
◆ The user will be able to stop a service from within the NetBackup Administration Console but not from the command line.
If a user is a member of the NBU_Admin user group, but is not logged on as an OS administrator (Administrator), then:
◆ The user will not be able to restart a service from within the NetBackup Administration Console or from the command line.
◆ The user will not be able to stop a service from within the NetBackup Administration Console but the user can use the command line. (For example, bprdreq -terminate, bpdbm -terminate, or stopltid.)
Set Activity Sec Admin NBU_Admin NBU_Operator NBU_User Vault_Operator
Access Read
Browse
---
---
X*
X*
X
X
---
---
---
---
Operate Stop service --- X** X --- ---
nbu_win_print_II.book Page 69 Tuesday, August 16, 2005 12:53 PM
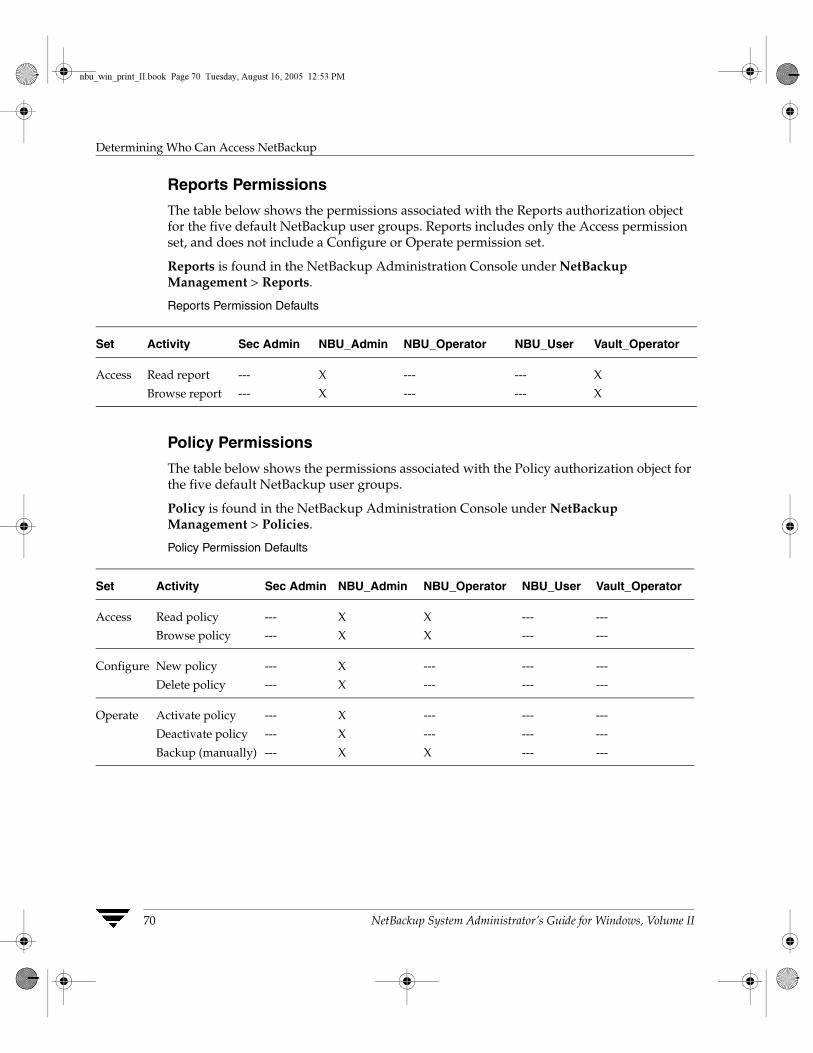
Determining Who Can Access NetBackup
70 NetBackup System Administrator’s Guide for Windows, Volume II
Reports Permissions
The table below shows the permissions associated with the Reports authorization object for the five default NetBackup user groups. Reports includes only the Access permission set, and does not include a Configure or Operate permission set.
Reports is found in the NetBackup Administration Console under NetBackup Management > Reports.
Reports Permission Defaults
Policy Permissions
The table below shows the permissions associated with the Policy authorization object for the five default NetBackup user groups.
Policy is found in the NetBackup Administration Console under NetBackup Management > Policies.
Policy Permission Defaults
Set Activity Sec Admin NBU_Admin NBU_Operator NBU_User Vault_Operator
Access Read report
Browse report
---
---
X
X
---
---
---
---
X
X
Set Activity Sec Admin NBU_Admin NBU_Operator NBU_User Vault_Operator
Access Read policy
Browse policy
---
---
X
X
X
X
---
---
---
---
Configure New policy
Delete policy
---
---
X
X
---
---
---
---
---
---
Operate Activate policy
Deactivate policy
Backup (manually)
---
---
---
X
X
X
---
---
X
---
---
---
---
---
---
nbu_win_print_II.book Page 70 Tuesday, August 16, 2005 12:53 PM
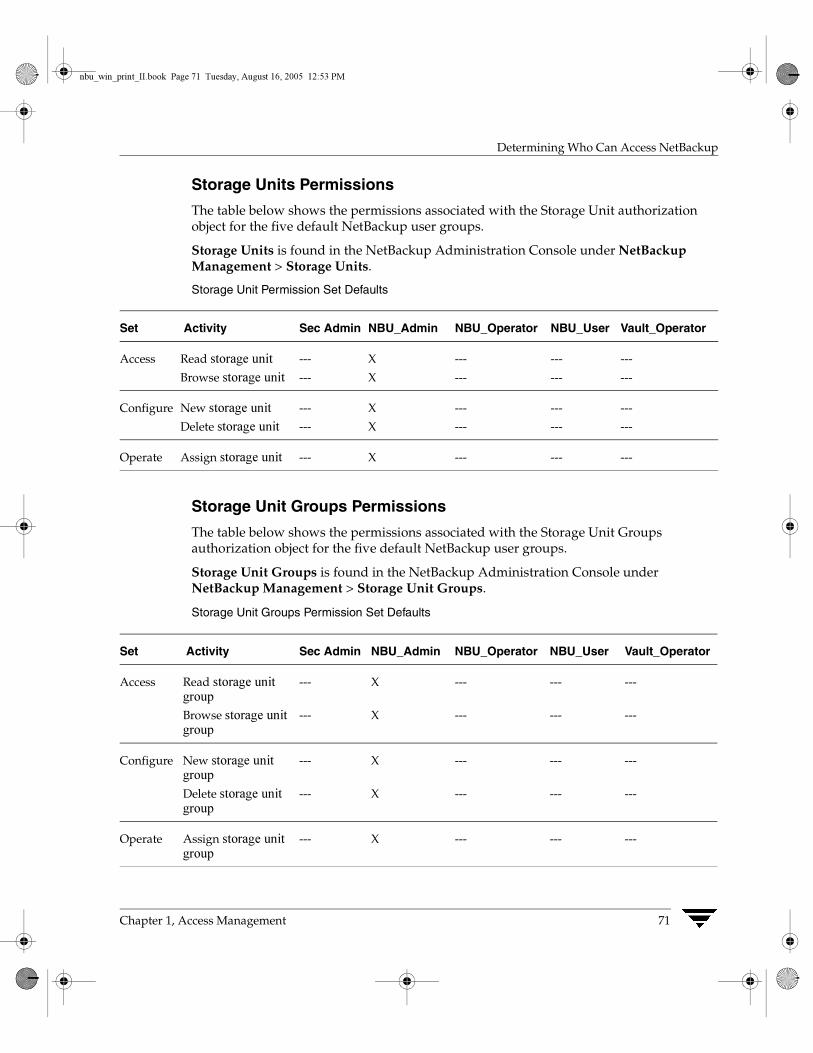
Chapter 1, Access Management
Determining Who Can Access NetBackup
71
Storage Units Permissions
The table below shows the permissions associated with the Storage Unit authorization object for the five default NetBackup user groups.
Storage Units is found in the NetBackup Administration Console under NetBackup Management > Storage Units.
Storage Unit Permission Set Defaults
Storage Unit Groups Permissions
The table below shows the permissions associated with the Storage Unit Groups authorization object for the five default NetBackup user groups.
Storage Unit Groups is found in the NetBackup Administration Console under NetBackup Management > Storage Unit Groups.
Storage Unit Groups Permission Set Defaults
Set Activity Sec Admin NBU_Admin NBU_Operator NBU_User Vault_Operator
Access Read storage unit
Browse storage unit
---
---
X
X
---
---
---
---
---
---
Configure New storage unit
Delete storage unit
---
---
X
X
---
---
---
---
---
---
Operate Assign storage unit --- X --- --- ---
Set Activity Sec Admin NBU_Admin NBU_Operator NBU_User Vault_Operator
Access Read storage unit group
Browse storage unit group
---
---
X
X
---
---
---
---
---
---
Configure New storage unit group
Delete storage unit group
---
---
X
X
---
---
---
---
---
---
Operate Assign storage unit group
--- X --- --- ---
nbu_win_print_II.book Page 71 Tuesday, August 16, 2005 12:53 PM
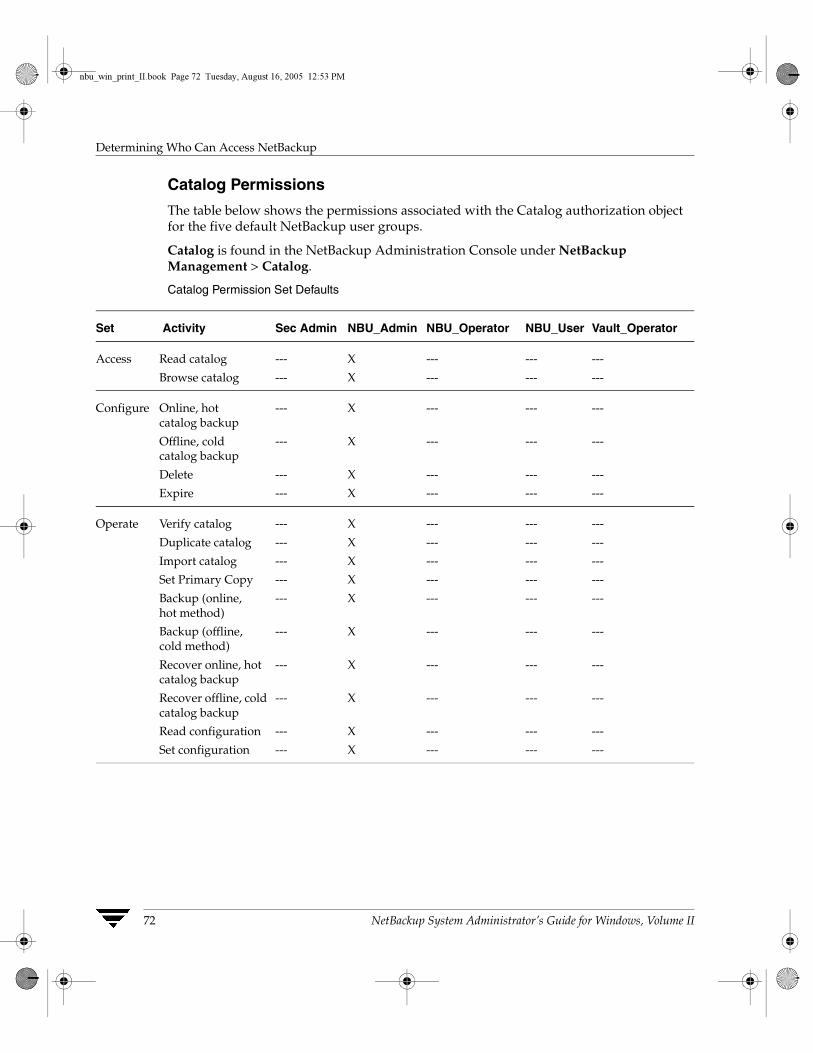
Determining Who Can Access NetBackup
72 NetBackup System Administrator’s Guide for Windows, Volume II
Catalog Permissions
The table below shows the permissions associated with the Catalog authorization object for the five default NetBackup user groups.
Catalog is found in the NetBackup Administration Console under NetBackup Management > Catalog.
Catalog Permission Set Defaults
Set Activity Sec Admin NBU_Admin NBU_Operator NBU_User Vault_Operator
Access Read catalog
Browse catalog
---
---
X
X
---
---
---
---
---
---
Configure Online, hot catalog backup
Offline, cold catalog backup
Delete
Expire
---
---
---
---
X
X
X
X
---
---
---
---
---
---
---
---
---
---
---
---
Operate Verify catalog
Duplicate catalog
Import catalog
Set Primary Copy
Backup (online, hot method)
Backup (offline, cold method)
Recover online, hot catalog backup
Recover offline, cold catalog backup
Read configuration
Set configuration
---
---
---
---
---
---
---
---
---
---
X
X
X
X
X
X
X
X
X
X
---
---
---
---
---
---
---
---
---
---
---
---
---
---
---
---
---
---
---
---
---
---
---
---
---
---
---
---
---
---
nbu_win_print_II.book Page 72 Tuesday, August 16, 2005 12:53 PM
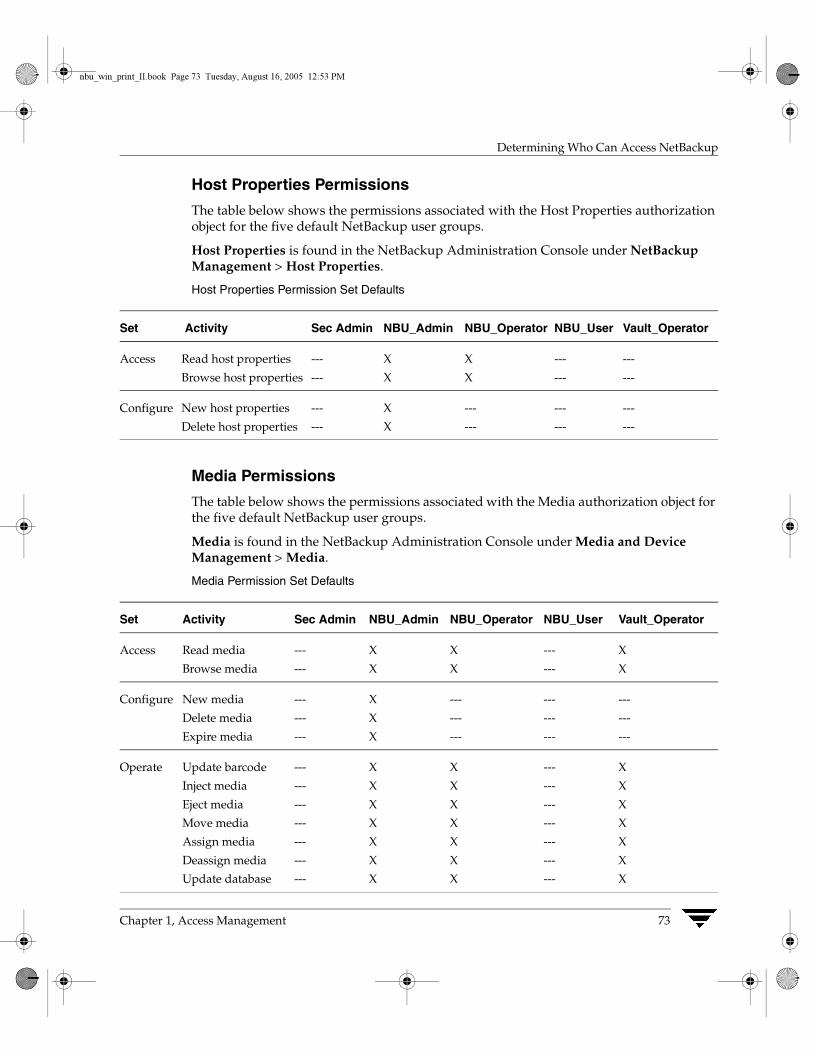
Chapter 1, Access Management
Determining Who Can Access NetBackup
73
Host Properties Permissions
The table below shows the permissions associated with the Host Properties authorization object for the five default NetBackup user groups.
Host Properties is found in the NetBackup Administration Console under NetBackup Management > Host Properties.
Host Properties Permission Set Defaults
Media Permissions
The table below shows the permissions associated with the Media authorization object for the five default NetBackup user groups.
Media is found in the NetBackup Administration Console under Media and Device Management > Media.
Media Permission Set Defaults
Set Activity Sec Admin NBU_Admin NBU_Operator NBU_User Vault_Operator
Access Read host properties
Browse host properties
---
---
X
X
X
X
---
---
---
---
Configure New host properties
Delete host properties
---
---
X
X
---
---
---
---
---
---
Set Activity Sec Admin NBU_Admin NBU_Operator NBU_User Vault_Operator
Access Read media
Browse media
---
---
X
X
X
X
---
---
X
X
Configure New media
Delete media
Expire media
---
---
---
X
X
X
---
---
---
---
---
---
---
---
---
Operate Update barcode
Inject media
Eject media
Move media
Assign media
Deassign media
Update database
---
---
---
---
---
---
---
X
X
X
X
X
X
X
X
X
X
X
X
X
X
---
---
---
---
---
---
---
X
X
X
X
X
X
X
nbu_win_print_II.book Page 73 Tuesday, August 16, 2005 12:53 PM
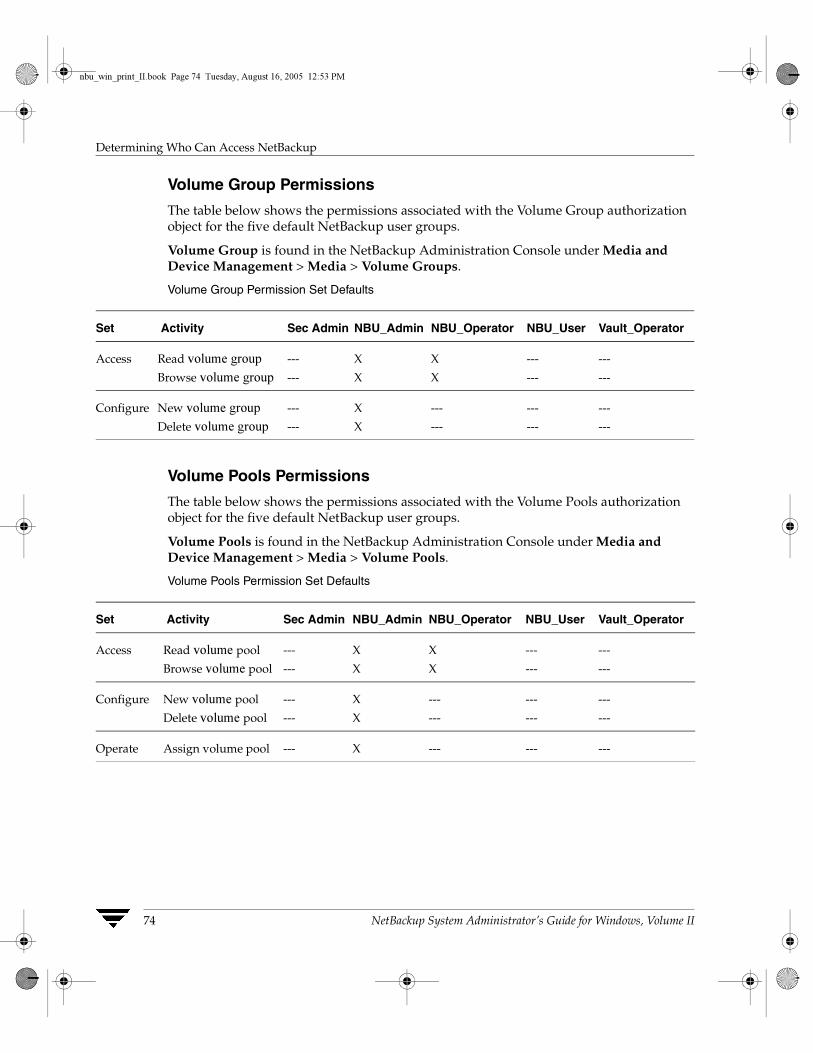
Determining Who Can Access NetBackup
74 NetBackup System Administrator’s Guide for Windows, Volume II
Volume Group Permissions
The table below shows the permissions associated with the Volume Group authorization object for the five default NetBackup user groups.
Volume Group is found in the NetBackup Administration Console under Media and Device Management > Media > Volume Groups.
Volume Group Permission Set Defaults
Volume Pools Permissions
The table below shows the permissions associated with the Volume Pools authorization object for the five default NetBackup user groups.
Volume Pools is found in the NetBackup Administration Console under Media and Device Management > Media > Volume Pools.
Volume Pools Permission Set Defaults
Set Activity Sec Admin NBU_Admin NBU_Operator NBU_User Vault_Operator
Access Read volume group
Browse volume group
---
---
X
X
X
X
---
---
---
---
Configure New volume group
Delete volume group
---
---
X
X
---
---
---
---
---
---
Set Activity Sec Admin NBU_Admin NBU_Operator NBU_User Vault_Operator
Access Read volume pool
Browse volume pool
---
---
X
X
X
X
---
---
---
---
Configure New volume pool
Delete volume pool
---
---
X
X
---
---
---
---
---
---
Operate Assign volume pool --- X --- --- ---
nbu_win_print_II.book Page 74 Tuesday, August 16, 2005 12:53 PM

Chapter 1, Access Management
Determining Who Can Access NetBackup
75
Robots Permissions
The table below shows the permissions associated with the Robots authorization object for the five default NetBackup user groups.
Robots is found in the NetBackup Administration Console under Media and Device Management > Media > Robots.
Volume Robots Permission Set Defaults
Device Host Permissions
The table below shows the permissions associated with the Device Host authorization object for the five default NetBackup user groups.
Device Host is found in the NetBackup Administration Console under Media and Device Management > Devices > Hosts.
Device Host Permission Set Defaults
Set Activity Sec Admin NBU_Admin NBU_Operator NBU_User Vault_Operator
Access Read robot
Browse robot
---
---
X
X
X
X
---
---
X
X
Configure New robot
Delete robot
---
---
X
X
---
---
---
---
---
---
Operate Inventory robot --- X X --- X
Set Activity Sec Admin NBU_Admin NBU_Operator NBU_User Vault_Operator
Access Read device host
Browse device host
---
---
X
X
X
X
---
---
---
---
Configure New device host
Delete device host
Synchronize device host
---
---
---
X
X
X
---
---
X
---
---
---
---
---
---
Operate Stop device host --- X X --- ---
nbu_win_print_II.book Page 75 Tuesday, August 16, 2005 12:53 PM

Determining Who Can Access NetBackup
76 NetBackup System Administrator’s Guide for Windows, Volume II
nbu_win_print_II.book Page 76 Tuesday, August 16, 2005 12:53 PM
77
Enhanced Authentication and Authorization 2Enhanced authentication allows each side of a NetBackup connection to verify the host and user on the other side of the connection. By default, NetBackup runs without enhanced authentication.
Enhanced authorization determines if authenticated users (or groups of users) have NetBackup administrative privileges. By default, NetBackup provides administrative privileges to UNIX root administrators or Windows system administrators on NetBackup servers. In order to use the enhanced authorization, you must configure and enable it.
This chapter contains the following sections:
◆ “Common Configuration Elements” on page 77
◆ “Enhanced Authentication” on page 89
◆ “Enhanced Authorization” on page 98
Note Access Management and Enhanced Authorization and Authentication are independent methods of access control. Access Management is the newest method and will be the preferred method in future NetBackup releases. If both Access Management and Enhanced Authorization and Authentication are configured, Access Management takes precedence.
Note Please note that Enhanced Authorization and Authentication will be removed from the next major release of NetBackup.
Common Configuration ElementsThe following sections describe elements involved in configuring enhanced authentication and enhanced authorization.
nbu_win_print_II.book Page 77 Tuesday, August 16, 2005 12:53 PM
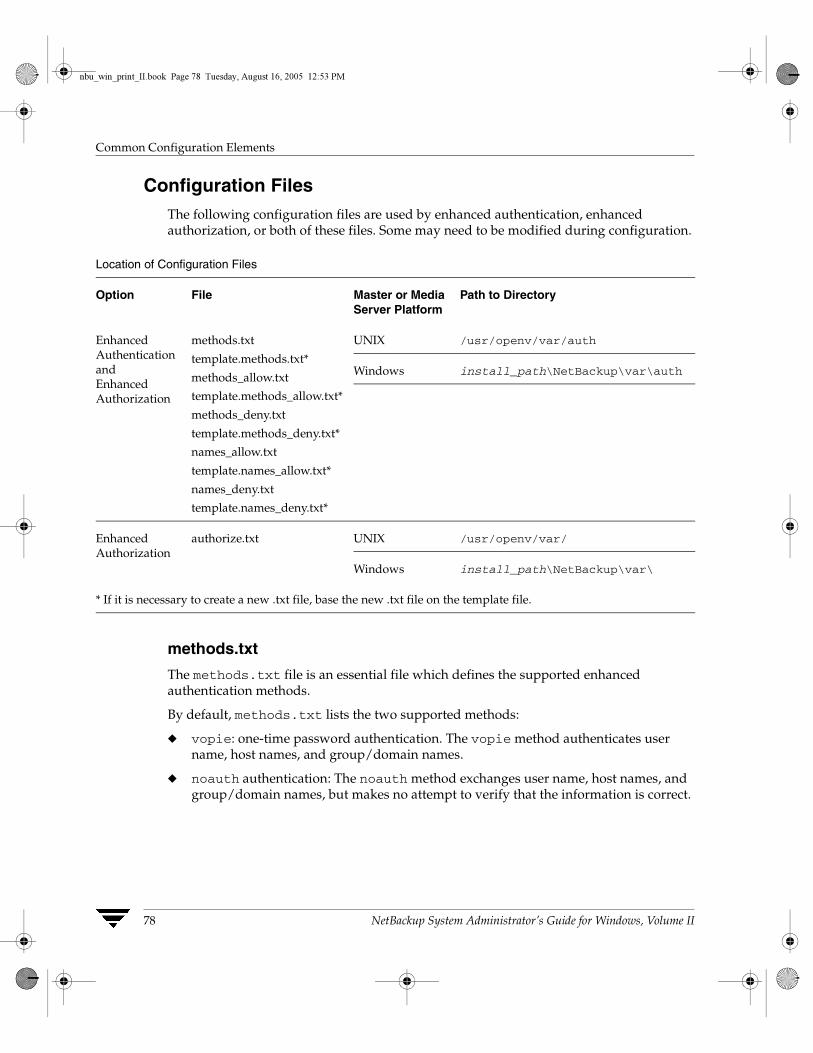
Common Configuration Elements
78 NetBackup System Administrator’s Guide for Windows, Volume II
Configuration FilesThe following configuration files are used by enhanced authentication, enhanced authorization, or both of these files. Some may need to be modified during configuration.
methods.txt
The methods.txt file is an essential file which defines the supported enhanced authentication methods.
By default, methods.txt lists the two supported methods:
◆ vopie: one-time password authentication. The vopie method authenticates user name, host names, and group/domain names.
◆ noauth authentication: The noauth method exchanges user name, host names, and group/domain names, but makes no attempt to verify that the information is correct.
Location of Configuration Files
Option File Master or Media Server Platform
Path to Directory
Enhanced AuthenticationandEnhanced Authorization
methods.txt
template.methods.txt*
methods_allow.txt
template.methods_allow.txt*
methods_deny.txt
template.methods_deny.txt*
names_allow.txt
template.names_allow.txt*
names_deny.txt
template.names_deny.txt*
UNIX /usr/openv/var/auth
Windows install_path\NetBackup\var\auth
Enhanced Authorization
authorize.txt UNIX /usr/openv/var/
Windows install_path\NetBackup\var\
* If it is necessary to create a new .txt file, base the new .txt file on the template file.
nbu_win_print_II.book Page 78 Tuesday, August 16, 2005 12:53 PM
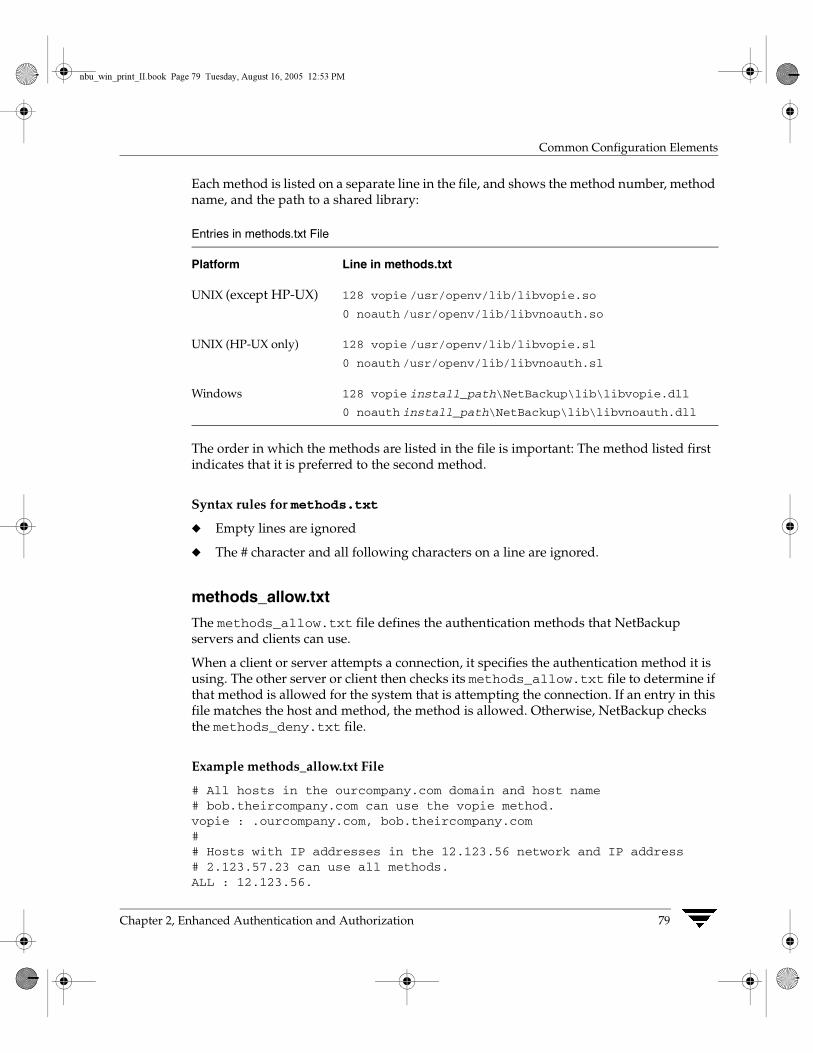
Chapter 2, Enhanced Authentication and Authorization
Common Configuration Elements
79
Each method is listed on a separate line in the file, and shows the method number, method name, and the path to a shared library:
The order in which the methods are listed in the file is important: The method listed first indicates that it is preferred to the second method.
Syntax rules for methods.txt
◆ Empty lines are ignored
◆ The # character and all following characters on a line are ignored.
methods_allow.txt
The methods_allow.txt file defines the authentication methods that NetBackup servers and clients can use.
When a client or server attempts a connection, it specifies the authentication method it is using. The other server or client then checks its methods_allow.txt file to determine if that method is allowed for the system that is attempting the connection. If an entry in this file matches the host and method, the method is allowed. Otherwise, NetBackup checks the methods_deny.txt file.
Example methods_allow.txt File
# All hosts in the ourcompany.com domain and host name # bob.theircompany.com can use the vopie method.vopie : .ourcompany.com, bob.theircompany.com## Hosts with IP addresses in the 12.123.56 network and IP address# 2.123.57.23 can use all methods.ALL : 12.123.56.
Entries in methods.txt File
Platform Line in methods.txt
UNIX (except HP-UX) 128 vopie /usr/openv/lib/libvopie.so
0 noauth /usr/openv/lib/libvnoauth.so
UNIX (HP-UX only) 128 vopie /usr/openv/lib/libvopie.sl
0 noauth /usr/openv/lib/libvnoauth.sl
Windows 128 vopie install_path\NetBackup\lib\libvopie.dll
0 noauth install_path\NetBackup\lib\libvnoauth.dll
nbu_win_print_II.book Page 79 Tuesday, August 16, 2005 12:53 PM
Common Configuration Elements
80 NetBackup System Administrator’s Guide for Windows, Volume II
ALL : 12.123.57.23
The keyword ALL is used to specify all valid methods, as in the previous example, or all possible hosts.
The default file is empty.
◆ Each entry must be on a separate line.
◆ Empty lines are ignored.
◆ The # character and all following characters on a line are ignored.
◆ If a domain name is preceded by a dot (.), all hosts in that domain will match.
◆ If a network number is followed by a dot (.), all IP numbers in that network will match.
◆ A comma-separated list of domain name patterns and network number patterns can be specified on a single line.
methods_deny.txt
The methods_deny.txt file defines the authentication methods that NetBackup servers and clients cannot use.
NetBackup checks this file only if the methods_allow.txt file does not have a matching entry for the host and method. If a matching entry is found in methods_deny.txt the method is not allowed and authentication is not used. Otherwise, the method is used and authentication proceeds.
Example methods_deny.txt File
# All hosts in the ourcompany.com domain cannot use the vopie method.vopie : .ourcompany.com## Hosts with IP addresses in the 12.123.56 network cannot use all# methods.ALL : 12.123.56.
The default file contains only the following entry:
ALL : ALL
This means that all methods are denied for all hosts, unless it is specified otherwise in the methods_allow.txt file.
nbu_win_print_II.book Page 80 Tuesday, August 16, 2005 12:53 PM
Chapter 2, Enhanced Authentication and Authorization
Common Configuration Elements
81
Syntax Rules for methods_deny.txt
The syntax rules for methods_deny.txt are the same as for methods_allow.txt.(See “Syntax rules for methods.txt” on page 79.)
names_allow.txt
The names_allow.txt file defines the network host names that a NetBackup client or server can use when establishing connections. This file is required when NetBackup client or server names do not correlate to their host names and IP addresses.
For example, when:
◆ NetBackup clients are using DHCP or another dynamic addressing scheme. Here, a client probably uses a different IP address each time it attempts a connection.
◆ A NetBackup server or client has more than one network interface. Here, the host name associated with the IP address can be different than the NetBackup server or client name.
◆ A NetBackup server or client connects through a gateway. Here, the peername for the gateway can be different than the NetBackup server or client name.
In the above instances, when a client or server attempts a connection, NetBackup checks the names_allow.txt file to determine if the network-host name for the connection correlates to a NetBackup name. If a match is found, the connection is allowed. Otherwise, NetBackup checks the names_deny.txt file.
If NetBackup client and server names correlate to their host names and IP addresses, then neither the names_allow.txt file or the names_deny.txt file are used.
Each line in names_allow.txt contains a logical name (usually, a NetBackup client name) followed by a colon and then a list of comma-separated host names or IP addresses.
Example names_allow.txt File
# The next three client entries can match IP numbers in the# 123.123.56 network.client1 : 123.123.56.client2 : 123.123.56.client3 : 123.123.56.## The entry below permits the name fred to be used for hosts# dhcp0 and dhcp1 in the ourcompany.com domain.fred : dhcp0.ourcompany.com, dhcp1.ourcompany.com
The default file is empty.
nbu_win_print_II.book Page 81 Tuesday, August 16, 2005 12:53 PM
Common Configuration Elements
82 NetBackup System Administrator’s Guide for Windows, Volume II
Syntax Rules for names_allow.txt
The syntax rules for names_allow.txt are the same as for methods_allow.txt. The only variation is the ALL keyword, which in this case specifies all valid names or all possible hosts. (See “Syntax rules for methods.txt” on page 79.)
names_deny.txt
The names_deny.txt file defines the NetBackup client or server names that hosts cannot use. NetBackup checks this file only if the names_allow.txt file does not have a matching entry for the host and name. If a matching entry is found in names_deny.txt the name is not allowed and authentication fails. Otherwise, the name is used and authentication proceeds.
Example names_deny.txt File
# The entry below prevents the name fred to be used for hosts# in the theircompany.com domain.fred : .theircompany.com## The entry below prevents any names from being used for hosts# with IP addresses in the 12.123.53 network.ALL : 123.123.53.
The default file contains only the following entry:
ALL : ALL
This means that all names are denied for all hosts, unless it is specified otherwise in the names_allow.txt file.
Syntax Rules for names_deny.txt
The syntax rules for names_deny.txt are the same as for names_allow.txt (See “Syntax rules for methods.txt” on page 79.)
authorize.txt
The authorize.txt file is created when a user is added to the list of authorized users. (See “To create a list of authorized users” on page 101.)
File Location of authorize.txt
Platform Path
UNIX /usr/openv/var/authorize.txt
nbu_win_print_II.book Page 82 Tuesday, August 16, 2005 12:53 PM
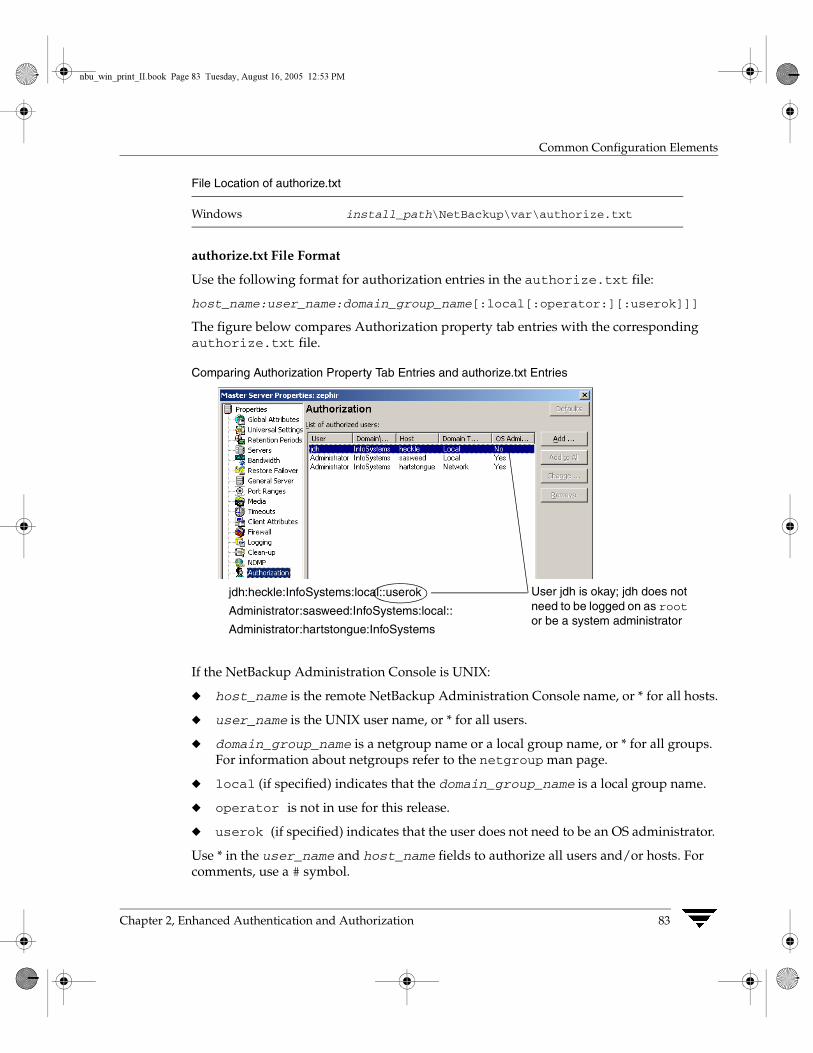
Chapter 2, Enhanced Authentication and Authorization
Common Configuration Elements
83
authorize.txt File Format
Use the following format for authorization entries in the authorize.txt file:
host_name:user_name:domain_group_name[:local[:operator:][:userok]]]
The figure below compares Authorization property tab entries with the corresponding authorize.txt file.
Comparing Authorization Property Tab Entries and authorize.txt Entries
If the NetBackup Administration Console is UNIX:
◆ host_name is the remote NetBackup Administration Console name, or * for all hosts.
◆ user_name is the UNIX user name, or * for all users.
◆ domain_group_name is a netgroup name or a local group name, or * for all groups. For information about netgroups refer to the netgroup man page.
◆ local (if specified) indicates that the domain_group_name is a local group name.
◆ operator is not in use for this release.
◆ userok (if specified) indicates that the user does not need to be an OS administrator.
Use * in the user_name and host_name fields to authorize all users and/or hosts. For comments, use a # symbol.
Windows install_path\NetBackup\var\authorize.txt
File Location of authorize.txt
jdh:heckle:InfoSystems:local::userok
Administrator:sasweed:InfoSystems:local::
Administrator:hartstongue:InfoSystems
User jdh is okay; jdh does not need to be logged on as root or be a system administrator
nbu_win_print_II.book Page 83 Tuesday, August 16, 2005 12:53 PM
Common Configuration Elements
84 NetBackup System Administrator’s Guide for Windows, Volume II
If the NetBackup Administration Console is Windows:
◆ user_name is the Windows Administrator name, or * for all users.
◆ host_name is the remote NetBackup Administration Console host name, or * for all hosts.
◆ domain_group_name is the Windows domain and group name in the form domain\group. Or, use * to indicate all domains/groups.
◆ local (if specified) indicates the group is not a domain group, but is local to the host specified by host_name.
◆ operator is not in use for this release.
◆ userok (if specified) indicates that the user does not need to be an OS administrator.
For comments, use a # symbol.
Example authorize.txt File Entries
# Authorize ‘root’ with a local group name # of ‘admin’ on the UNIX server root:dog:admin:local## Authorize all Windows Administrators that are #members of NETBACKUP\Domain Admins*:*:NETBACKUP\Domain Admins
Library FilesThe library files that are required for authentication depend on the platform. (See “methods.txt” on page 78.)
CommandsThe following commands are used to configure and manage authentication. For more information on these commands, see NetBackup Commands for Windows.
bpauthorize
Use bpauthorize to manage the authorize.txt files on remote machines for enhanced authorization. Or, make changes in the NetBackup Administration Console of the master server. (See “To create a list of authorized users” on page 101.)
nbu_win_print_II.book Page 84 Tuesday, August 16, 2005 12:53 PM
Chapter 2, Enhanced Authentication and Authorization
Common Configuration Elements
85
bpauthsync
Run bpauthsync on the master server to set up enhanced authentication for one or more clients and media servers. bpauthsync ensures that the hashed and unhashed files contain the correct information.
vopie_util
Run vopie_util on NetBackup servers and clients to update the hashed (public) and unhashed (secret) key files for the vopie authentication method on the local system. Typically, vopie_util is used to synchronize the vopie key files between two systems.
Processes: vopied DaemonThe vopied daemon manages the authentication of nonroot users on Windows and UNIX clients and servers. By default, NetBackup configures the system to automatically start vopied when the system is started.
To start vopied directly, run vopied from the following directory on the client or server:
Location of bpauthsync and bpauthorize commands
Platform Path
UNIX /usr/openv/netbackup/bin/admincmd/
Windows install_path\NetBackup\bin\admincmd\
Location of vopied_util command
Platform Path
UNIX /usr/openv/bin/
Windows install_path\NetBackup\bin\
Location of vopied Daemon
Platform Path
UNIX /usr/openv/bin/vopied
Windows install_path\NetBackup\bin\vopied
nbu_win_print_II.book Page 85 Tuesday, August 16, 2005 12:53 PM
Common Configuration Elements
86 NetBackup System Administrator’s Guide for Windows, Volume II
FilesThe vopie processes use public and secret files during authentication. In addition, a temp file is created that contains challenges and responses to the system. The following sections describe those files.
vopie Files
The vopie processes use public (hashed) and secret (unhashed) files:
hashed (public key) Files
The hashed files contain the authentication challenges that the local system presents to remote systems.
◆ The localhost is the host name of the local system. There will be a local host directory for every possible local host name.
◆ The remotehost contains the hashed or public key for the remote system named remotehost.
There is a remotehost.txt file for each remote system that can be authenticated. Only root on the local system can read or write these files.
unhashed (secret key) Files
The unhashed files contains the secret key that NetBackup uses when it responds to challenges from remote systems.
Location of hashed Files
Platform Path
UNIX /usr/openv/var/auth/vopie/hashed/localhost/remotehost.txt
Windows install_path\NetBackup\var\auth\vopie\hashed\localhost\remotehost.txt
Location of Unhashed Files
Platform Path
UNIX /usr/openv/var/auth/vopie/unhashed/localhost/remotehost.txt
nbu_win_print_II.book Page 86 Tuesday, August 16, 2005 12:53 PM
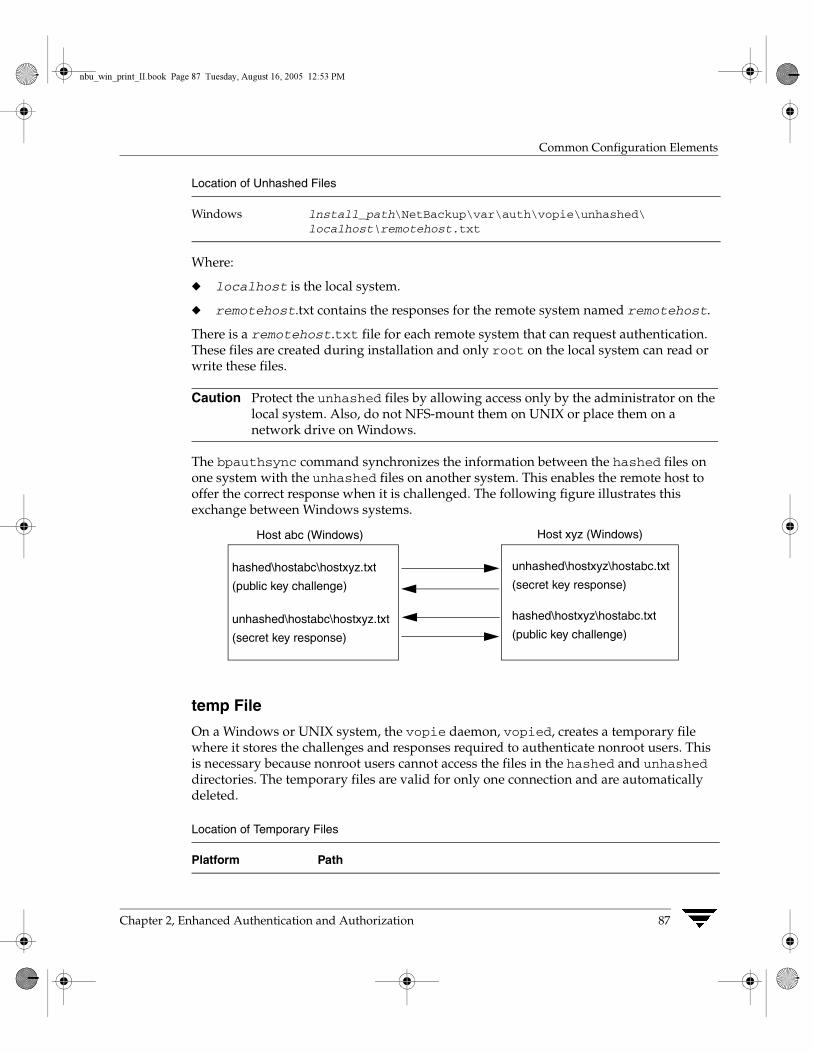
Chapter 2, Enhanced Authentication and Authorization
Common Configuration Elements
87
Where:
◆ localhost is the local system.
◆ remotehost.txt contains the responses for the remote system named remotehost.
There is a remotehost.txt file for each remote system that can request authentication. These files are created during installation and only root on the local system can read or write these files.
Caution Protect the unhashed files by allowing access only by the administrator on the local system. Also, do not NFS-mount them on UNIX or place them on a network drive on Windows.
The bpauthsync command synchronizes the information between the hashed files on one system with the unhashed files on another system. This enables the remote host to offer the correct response when it is challenged. The following figure illustrates this exchange between Windows systems.
temp File
On a Windows or UNIX system, the vopie daemon, vopied, creates a temporary file where it stores the challenges and responses required to authenticate nonroot users. This is necessary because nonroot users cannot access the files in the hashed and unhashed directories. The temporary files are valid for only one connection and are automatically deleted.
Windows lnstall_path\NetBackup\var\auth\vopie\unhashed\localhost\remotehost.txt
Location of Temporary Files
Platform Path
Location of Unhashed Files
Host abc (Windows) Host xyz (Windows)
hashed\hostabc\hostxyz.txt
(public key challenge)
unhashed\hostxyz\hostabc.txt
(secret key response)
unhashed\hostabc\hostxyz.txt
(secret key response)
hashed\hostxyz\hostabc.txt
(public key challenge)
nbu_win_print_II.book Page 87 Tuesday, August 16, 2005 12:53 PM

Common Configuration Elements
88 NetBackup System Administrator’s Guide for Windows, Volume II
UNIX /usr/openv/var/auth/vopie/temp/username/tempname.txt
Windows install_path\NetBackup\var\auth\vopie\temp\username\tempname.txt
Location of Temporary Files
nbu_win_print_II.book Page 88 Tuesday, August 16, 2005 12:53 PM
Chapter 2, Enhanced Authentication and Authorization
Enhanced Authentication
89
Enhanced Authentication The standard authentication that NetBackup uses is based on the network address of the connecting machine. NetBackup trusts that the connecting machine is who it says it is.
Enhanced authentication is additional authentication for NetBackup programs that communicate through sockets. It allows each side of a NetBackup connection to verify the host and user on the other side of the connection, taking place after a NetBackup connection has been established, but before any NetBackup transactions have taken place. For example, enhanced authentication could be enforced when a backup or restore operation is started from a client or during remote administration.
Enhanced authentication is performed through a series of challenges and responses that require the exchange of secret password information. Passwords are defined during installation and configuration so users do not have to enter passwords each time they start a backup, archive, or restore.
Note Enhanced authentication can be used without enhanced authorization.
There are two supported enhanced authentication methods:
◆ vopie – (VERITAS One-time Passwords In Everything) The vopie method authenticates user name, host names, and group/domain names.
◆ noauth authentication – (“No authorization” authorization)The noauth method exchanges user name, host names, and group/domain names, but makes no attempt to verify that the information is correct.
Using vopie Enhanced Authenticationvopie authenticates at two levels:
◆ At the host level: The hosts authenticate one another.
◆ At the user level: If the user attempting the connection is a nonroot user on UNIX or a non-administrator on Windows, the user is authenticated as well.
▼ To use the vopie enhanced authentication method
1. Install NetBackup on each system requiring authentication.
The NetBackup installation process installs the necessary files and commands. The administrator then uses commands to set up the files so they contain the proper authentication information.
2. Configure NetBackup policies and add clients to the policies.
nbu_win_print_II.book Page 89 Tuesday, August 16, 2005 12:53 PM
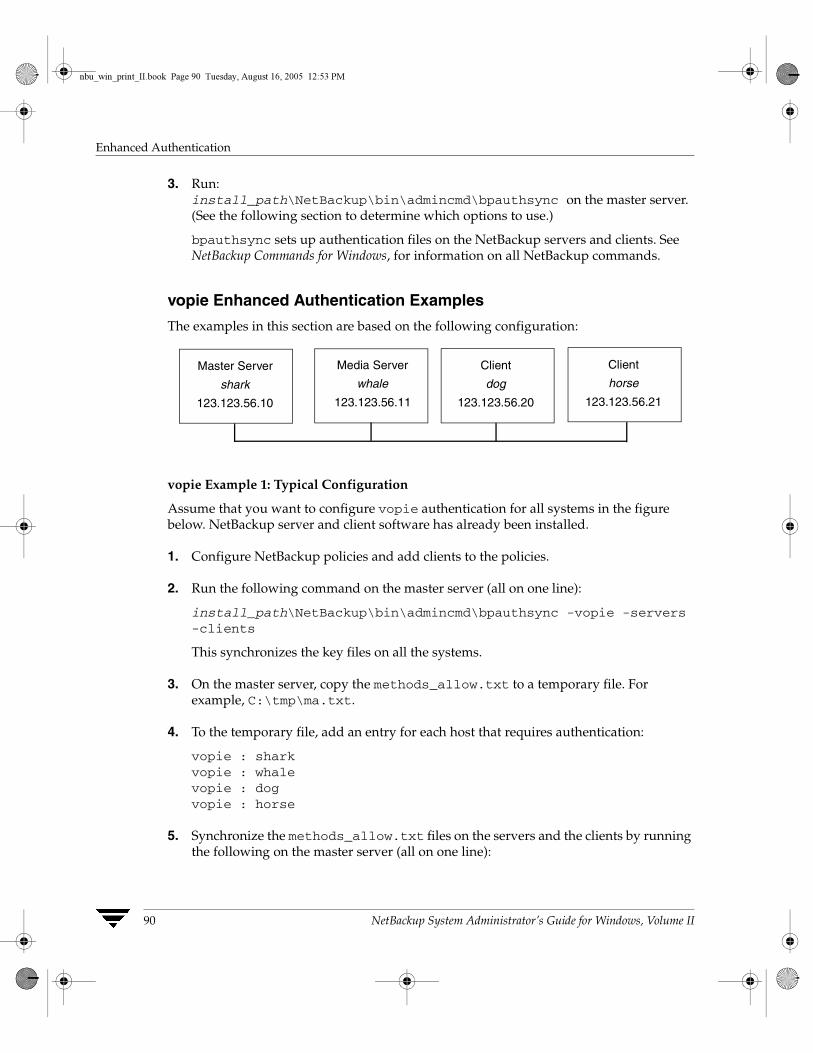
Enhanced Authentication
90 NetBackup System Administrator’s Guide for Windows, Volume II
3. Run:install_path\NetBackup\bin\admincmd\bpauthsync on the master server. (See the following section to determine which options to use.)
bpauthsync sets up authentication files on the NetBackup servers and clients. See NetBackup Commands for Windows, for information on all NetBackup commands.
vopie Enhanced Authentication Examples
The examples in this section are based on the following configuration:
vopie Example 1: Typical Configuration
Assume that you want to configure vopie authentication for all systems in the figure below. NetBackup server and client software has already been installed.
1. Configure NetBackup policies and add clients to the policies.
2. Run the following command on the master server (all on one line):
install_path\NetBackup\bin\admincmd\bpauthsync -vopie -servers -clients
This synchronizes the key files on all the systems.
3. On the master server, copy the methods_allow.txt to a temporary file. For example, C:\tmp\ma.txt.
4. To the temporary file, add an entry for each host that requires authentication:
vopie : sharkvopie : whalevopie : dogvopie : horse
5. Synchronize the methods_allow.txt files on the servers and the clients by running the following on the master server (all on one line):
Master Server
shark
123.123.56.10
Client
dog
123.123.56.20
Client
horse
123.123.56.21
Media Server
whale
123.123.56.11
nbu_win_print_II.book Page 90 Tuesday, August 16, 2005 12:53 PM
Chapter 2, Enhanced Authentication and Authorization
Enhanced Authentication
91
install_path\NetBackup\bin\admincmd\bpauthsync -methods -methods_allow C:\tmp\ma.txt -servers -clients
The information in C:\tmp\ma.txt is written in the methods_allow.txt files on the servers and clients.
vopie Example 2: Disable Authentication for a Client
To disable authentication for client horse in the previous figure:
1. Push an empty methods_allow.txt file to the client by running the following on the master server (all on one line):
install_path\NetBackup\bin\admincmd\bpauthsync -methods -methods_allow NUL -clients horse
This disables authentication on the client.
2. On the master server, remove the entry for horse from the install_path\NetBackup\var\auth\methods_allow.txt file.
3. Synchronize the methods files on all servers by running the following on the master server (all on one line):
install_path\NetBackup\bin\admincmd\bpauthsync -methods -servers
Authentication is no longer performed when communicating with client horse.
vopie Example 3: Adding a Client
Assume that all systems are configured for authentication, except for client horse. To add authentication for client horse:
1. On the master server, copy the methods_allow.txt to a temporary file. For example, C:\tmp\ma.txt.
2. Add an entry for the new client to the temporary file:
vopie : horse
3. Synchronize the methods files on the servers and the new client by running the following on the master server (all on one line):
install_path\NetBackup\bin\admincmd\bpauthsync -vopie -methods -methods_allow C:\tmp\ma.txt -servers -clients horse
The information in C:\tmp\ma.txt is written in the methods_allow.txt files on the servers and the client.
nbu_win_print_II.book Page 91 Tuesday, August 16, 2005 12:53 PM
Enhanced Authentication
92 NetBackup System Administrator’s Guide for Windows, Volume II
vopie Example 4: Restoring Authentication After Client Disk Crash
Assume that horse was configured for authentication and the disk failed. To restore authentication so all files can be recovered:
1. On the master server, copy the current methods_allow.txt file to another file. For example, copy it to:
C:\install_path\NetBackup\var\auth\methods_allow.txt.save
2. Remove the entry for the failed client from methods_allow.txt on the master server.
3. Push the modified methods_allow.txt file to the other servers by running the following (all on one line):
install_path\NetBackup\bin\admincmd\bpauthsync -methods -servers
This disables authentication for the failed client so the servers can communicate with it during recovery.
4. Reinstall the operating system (Windows or UNIX) and NetBackup on the failed client by following the instructions in Chapter 7, “Disaster Recovery,” of the Troubleshooting Guide for UNIX and Windows. However, do not restore any NetBackup or user files at this time.
5. On the master server, run the following command to synchronize and push the original methods to the servers and the failed client. The command is on one line:
install_path\NetBackup\bin\admincmd\bpauthsync -vopie -methods -servers -clients horse -methods_allow
install_path\NetBackup\var\auth\methods_allow.txt.save
The information in methods_allow.txt.save is written in the methods_allow.txt files on servers and the client. The original authentication methods are now restored.
Note Do not restore the files in the install_path\NetBackup\var\auth directory on the client or authentication will have to be resynchronized.
6. Complete the client recovery by restoring the original NetBackup and user files as explained in Chapter 7, “Disaster Recovery,” of the Troubleshooting Guide for UNIX and Windows.
nbu_win_print_II.book Page 92 Tuesday, August 16, 2005 12:53 PM
Chapter 2, Enhanced Authentication and Authorization
Enhanced Authentication
93
vopie Example 5: Restoring Authentication on NetBackup Master Server
Assume that authentication was configured on all servers and clients and the disk fails on the master server shark. If the NetBackup catalog backup was written to a storage unit on the master server shark:
1. On the master server, recover the disk as explained in Chapter 7, “Disaster Recovery” of the Troubleshooting Guide for UNIX and Windows and reinstall NetBackup.
2. Restore all files to the master server.
3. Synchronize all clients and servers by running the following on the master server (all on one line):
install_path\NetBackup\bin\admincmd\bpauthsync -vopie -servers -clients
If the NetBackup catalog backup was written to a storage unit on whale, shark cannot recover the catalogs because the two servers cannot authenticate one another. In this instance, the following steps are required:
1. Install NetBackup on the master server (do not restore any files at this time).
2. Disable authentication between the master server and the media server where the catalog backup was written, by modifying their methods_allow.txt files:
a. On the master server, remove the entry for the media server from the methods_allow.txt file (if an entry is present).
b. On the media server, remove the entry for the master server from the methods_allow.txt file.
3. On the master server, run bprecover to restore the catalog files.
4. Restore all files to the master server, including those in the \NetBackup\var\auth directory.
5. On the media server, add back the entry for the master server from the methods_allow.txt file.
6. Synchronize all servers and clients by running the following on the master server (all on one line):
install_path\NetBackup\bin\admincmd\bpauthsync -vopie -servers -clients
The original configuration is now restored.
nbu_win_print_II.book Page 93 Tuesday, August 16, 2005 12:53 PM
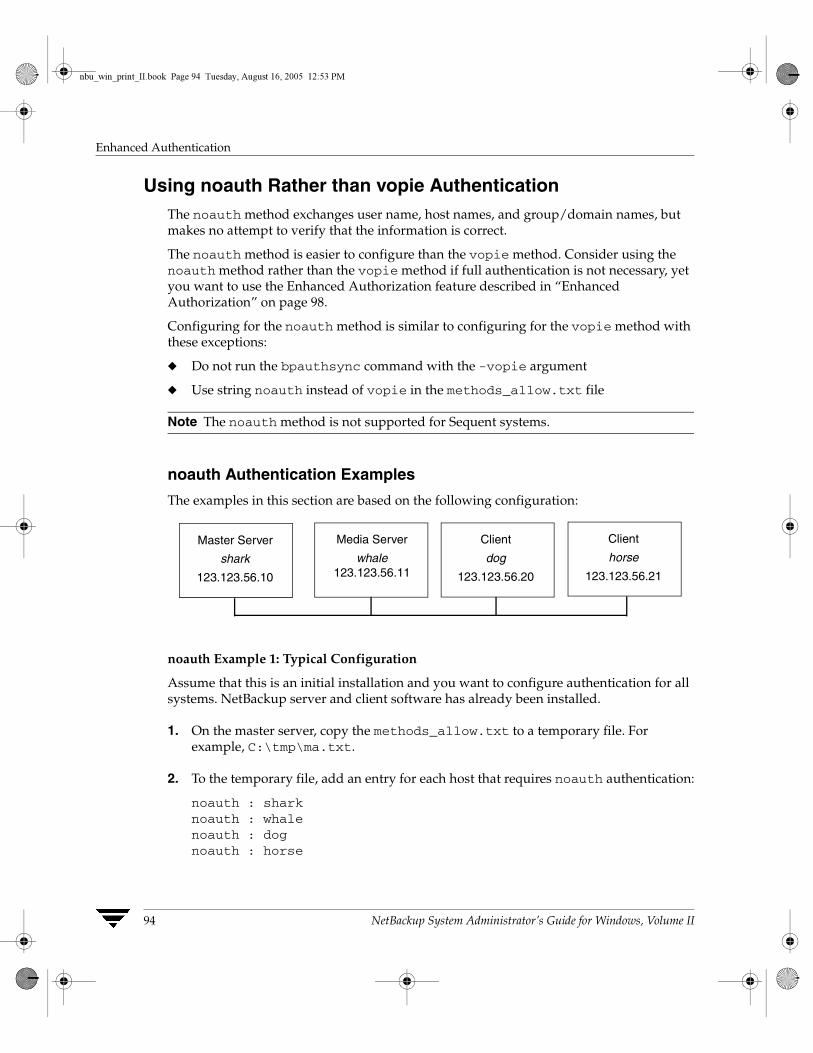
Enhanced Authentication
94 NetBackup System Administrator’s Guide for Windows, Volume II
Using noauth Rather than vopie AuthenticationThe noauth method exchanges user name, host names, and group/domain names, but makes no attempt to verify that the information is correct.
The noauth method is easier to configure than the vopie method. Consider using the noauth method rather than the vopie method if full authentication is not necessary, yet you want to use the Enhanced Authorization feature described in “Enhanced Authorization” on page 98.
Configuring for the noauth method is similar to configuring for the vopie method with these exceptions:
◆ Do not run the bpauthsync command with the -vopie argument
◆ Use string noauth instead of vopie in the methods_allow.txt file
Note The noauth method is not supported for Sequent systems.
noauth Authentication Examples
The examples in this section are based on the following configuration:
noauth Example 1: Typical Configuration
Assume that this is an initial installation and you want to configure authentication for all systems. NetBackup server and client software has already been installed.
1. On the master server, copy the methods_allow.txt to a temporary file. For example, C:\tmp\ma.txt.
2. To the temporary file, add an entry for each host that requires noauth authentication:
noauth : sharknoauth : whalenoauth : dognoauth : horse
Master Server
shark
123.123.56.10
Client
dog
123.123.56.20
Client
horse
123.123.56.21
Media Server
whale 123.123.56.11
nbu_win_print_II.book Page 94 Tuesday, August 16, 2005 12:53 PM
Chapter 2, Enhanced Authentication and Authorization
Enhanced Authentication
95
3. Synchronize the methods_allow.txt files on the servers and the clients by running the following on the master server (all on one line):
install_path\NetBackup\bin\admincmd\bpauthsync -methods -methods_allow C:\tmp\ma.txt -servers -clients
The information in C:\tmp\ma.txt is written to methods_allow.txt on the servers and clients.
noauth Example 2: Authentication for a Client
To disable authentication for client horse:
1. Push an empty methods_allow.txt file to the client by running the following on the master server (all on one line):
install_path\NetBackup\bin\admincmd\bpauthsync -methods -methods_allow NUL -clients horse
This disables authentication on the client.
2. On the master server, remove the entry for horse from the install_path\NetBackup\var\auth\methods_allow.txt file.
3. Synchronize the methods files on all servers by running the following on the master server (all on one line):
install_path\NetBackup\bin\admincmd\bpauthsync -methods -servers
Authentication is no longer performed when communicating with this client.
noauth Example 3: Adding a Client
Assume that all systems are configured for authentication, except for client horse.
To add authentication for client horse:
1. On the master server, copy the methods_allow.txt to a temporary file. For example, C:\tmp\ma.txt.
2. Add an entry for the new client to the temporary file:
noauth : horse
3. Synchronize the methods_allow.txt files on the servers and the new client by running the following on the master server (all on one line):
nbu_win_print_II.book Page 95 Tuesday, August 16, 2005 12:53 PM
Enhanced Authentication
96 NetBackup System Administrator’s Guide for Windows, Volume II
install_path\NetBackup\bin\admincmd\bpauthsync -methods -methods_allow.txt C:\tmp\ma.txt -servers -clients horse
The information in C:\tmp\ma.txt is written to methods_allow.txt files on the servers and the client.
noauth Example 4: Restoring Authentication after Client Disk Crash
Assume that client horse was configured for authentication and the disk failed.
To restore authentication so all files can be recovered:
1. On the master server, copy the current methods_allow.txt file to another file. For example, copy it to C:\install_path\NetBackup\var\auth\methods_allow.txt.save
2. Remove the entry for the failed client from methods_allow.txt on the master server.
3. Push the modified methods_allow.txt file to the other servers by running the following (all on one line):
install_path\NetBackup\bin\admincmd\bpauthsync -methods -servers
This disables authentication for the failed client so the servers can communicate with it during recovery.
4. Reinstall the operating system (Windows or UNIX) and NetBackup on the failed client by following the instructions in Chapter 7, “Disaster Recovery” of the Troubleshooting Guide for UNIX and Windows. However, do not restore any NetBackup or user files at this time.
5. On the master server, run the following command to push the original methods to the servers and the failed client (the command is all on one line):
install_path\NetBackup\bin\admincmd\bpauthsync -methods -servers -clients horse -methods_allow install_path\NetBackup\var\auth\methods_allow.txt.save
The information in methods_allow.txt.save is written in methods_allow.txt on the servers and the client. The original authentication methods are restored.
6. Complete the client recovery by restoring the original NetBackup and user files as explained in Chapter 7, “Disaster Recovery” of the Troubleshooting Guide for UNIX and Windows.
nbu_win_print_II.book Page 96 Tuesday, August 16, 2005 12:53 PM

Chapter 2, Enhanced Authentication and Authorization
Enhanced Authentication
97
noauth Example 5: Restoring Authentication on NetBackup Master Server
Assume that authentication was configured on all servers and clients and the disk fails on master server shark.
If the NetBackup catalog backup was written to a storage unit on the master server shark:
1. On the master server, recover the disk as explained in Chapter 7, “Disaster Recovery” of the Troubleshooting Guide for UNIX and Windows and reinstall NetBackup.
2. Restore all files to the master server.
3. Synchronize all clients and servers by running the following on the master server (all on one line):
install_path\NetBackup\bin\admincmd\bpauthsync -servers -clients
If the NetBackup catalog backup was written to a storage unit on whale, shark cannot recover the catalogs because the two servers cannot authenticate one another. In this instance, the following steps are required:
1. Install NetBackup on the master server (do not restore any files at this time).
2. Disable authentication between the master server and the media server where the catalog backup was written, by modifying their methods_allow.txt files:
a. On the master server, remove the entry for the media server from the methods_allow.txt file (if an entry is present).
b. On the media server, remove the entry for the master server from the methods_allow.txt file.
3. On the master server, run bprecover to restore the catalog files.
4. Restore all files to the master server, including those in the install_path\NetBackup\var\auth directory.
5. On the media server, add back the entry for the master server from the methods_allow.txt file.
nbu_win_print_II.book Page 97 Tuesday, August 16, 2005 12:53 PM
Enhanced Authorization
98 NetBackup System Administrator’s Guide for Windows, Volume II
Troubleshooting AuthenticationIf you have problems with authentication, perform the following steps:
1. Look for status code 160 (authentication failed). If you see this status code, go to Chapter 5, “NetBackup Status Codes and Messages” of the Troubleshooting Guide for UNIX and Windows for corrective actions.
2. Create debug log directories for the processes involved in communication between NetBackup systems. These include:
◆ On the server, create debug log directories for bprd, bpdbm, bpcd and vopied
◆ On the client, create debug log directories for bpcd, bpbackup, bprestore, bplist and vopied
See Chapter 3, “Using Logs and Reports,” of the Troubleshooting Guide for UNIX and Windows for the location of the debug log directories.
3. Retry the operation and check the logs.
Enhanced AuthorizationThe standard authorization that NetBackup runs is based on listing the connecting server in the server list, and the user having root or administrator privileges.
Enhanced authorization provides a platform-independent mechanism for selected users (or groups of users) to administer a NetBackup server from a remote NetBackup Administration Console.
The user(s) can be given privileges to act as a NetBackup administrator, while not having system administrator or UNIX root privileges. Using enhanced authorization, a user can be given the following roles:
◆ NetBackup administrator on a NetBackup server with administration privileges
◆ Non-administrator with no administrative privileges
Note Enhanced authorization can only be used with enhanced authentication.
Enhanced Authorization ProcessThe following describes the flow for a request from a remote NetBackup Administration Console to a NetBackup master server.
nbu_win_print_II.book Page 98 Tuesday, August 16, 2005 12:53 PM
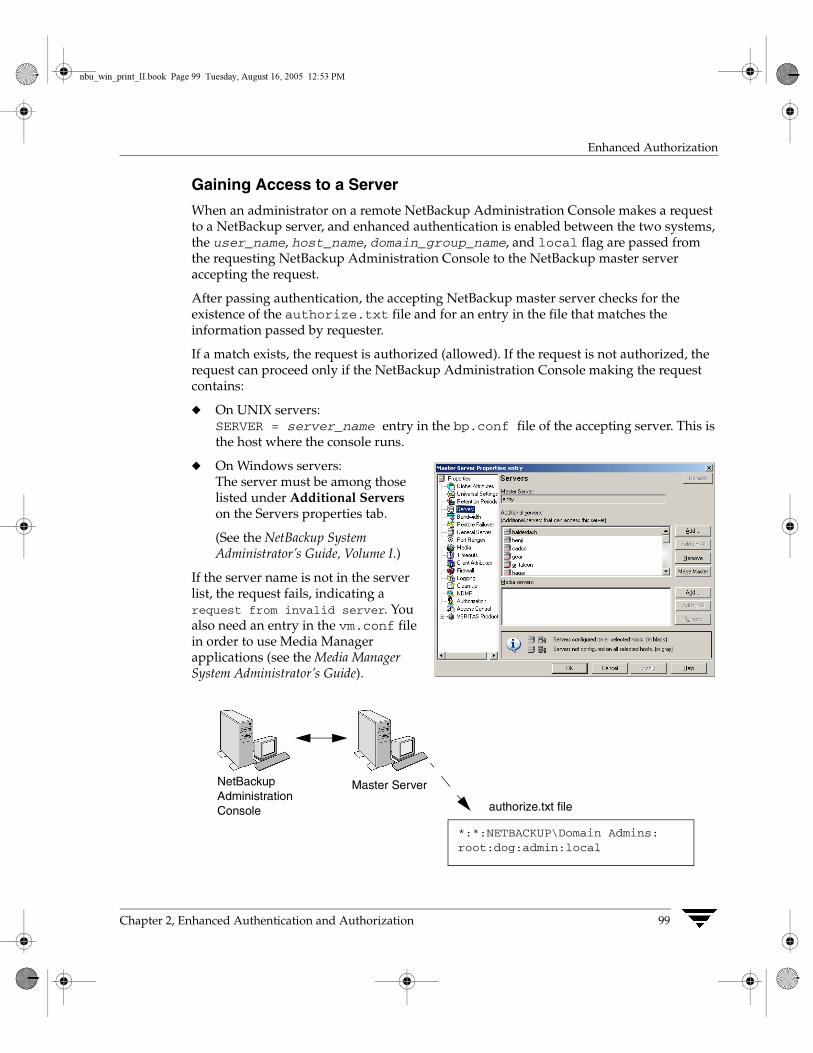
Chapter 2, Enhanced Authentication and Authorization
Enhanced Authorization
99
Gaining Access to a Server
When an administrator on a remote NetBackup Administration Console makes a request to a NetBackup server, and enhanced authentication is enabled between the two systems, the user_name, host_name, domain_group_name, and local flag are passed from the requesting NetBackup Administration Console to the NetBackup master server accepting the request.
After passing authentication, the accepting NetBackup master server checks for the existence of the authorize.txt file and for an entry in the file that matches the information passed by requester.
If a match exists, the request is authorized (allowed). If the request is not authorized, the request can proceed only if the NetBackup Administration Console making the request contains:
◆ On UNIX servers: SERVER = server_name entry in the bp.conf file of the accepting server. This is the host where the console runs.
◆ On Windows servers: The server must be among those listed under Additional Servers on the Servers properties tab.
(See the NetBackup System Administrator’s Guide, Volume I.)
If the server name is not in the server list, the request fails, indicating a request from invalid server. You also need an entry in the vm.conf file in order to use Media Manager applications (see the Media Manager System Administrator’s Guide).
Master Server
authorize.txt file
NetBackup Administration Console
*:*:NETBACKUP\Domain Admins:root:dog:admin:local
nbu_win_print_II.book Page 99 Tuesday, August 16, 2005 12:53 PM
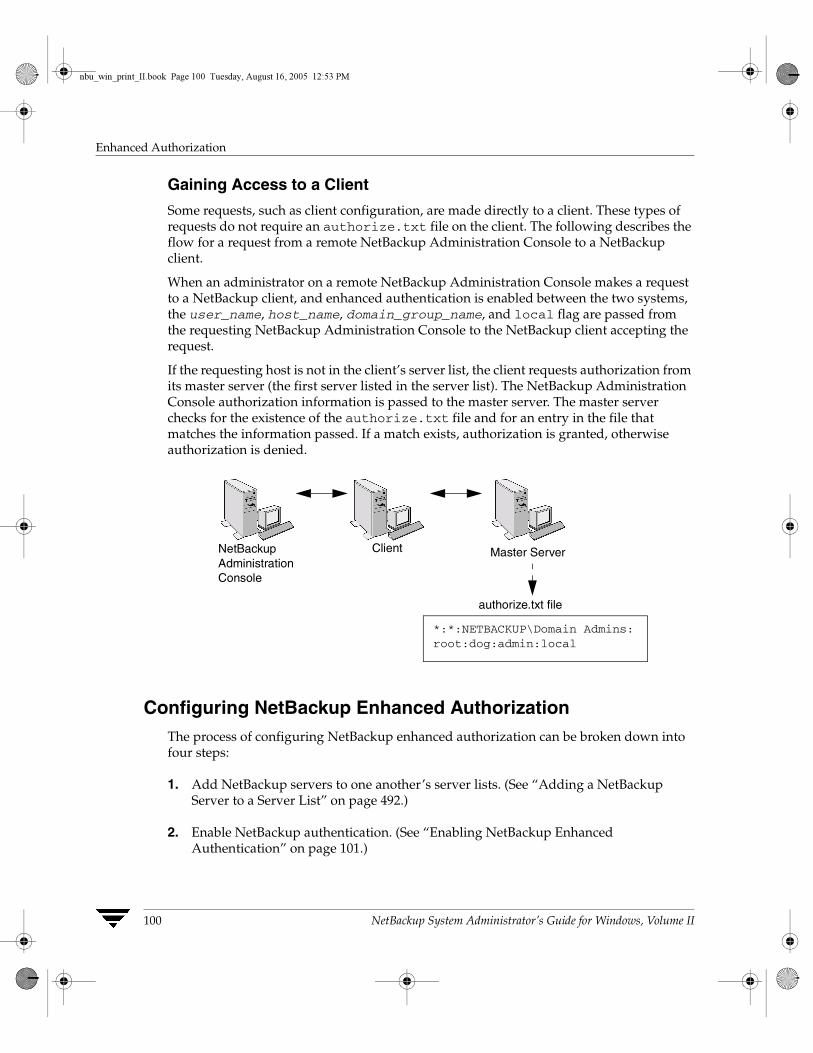
Enhanced Authorization
100 NetBackup System Administrator’s Guide for Windows, Volume II
Gaining Access to a Client
Some requests, such as client configuration, are made directly to a client. These types of requests do not require an authorize.txt file on the client. The following describes the flow for a request from a remote NetBackup Administration Console to a NetBackup client.
When an administrator on a remote NetBackup Administration Console makes a request to a NetBackup client, and enhanced authentication is enabled between the two systems, the user_name, host_name, domain_group_name, and local flag are passed from the requesting NetBackup Administration Console to the NetBackup client accepting the request.
If the requesting host is not in the client’s server list, the client requests authorization from its master server (the first server listed in the server list). The NetBackup Administration Console authorization information is passed to the master server. The master server checks for the existence of the authorize.txt file and for an entry in the file that matches the information passed. If a match exists, authorization is granted, otherwise authorization is denied.
Configuring NetBackup Enhanced AuthorizationThe process of configuring NetBackup enhanced authorization can be broken down into four steps:
1. Add NetBackup servers to one another’s server lists. (See “Adding a NetBackup Server to a Server List” on page 492.)
2. Enable NetBackup authentication. (See “Enabling NetBackup Enhanced Authentication” on page 101.)
Client
authorize.txt file
NetBackup Administration Console
Master Server
*:*:NETBACKUP\Domain Admins:root:dog:admin:local
nbu_win_print_II.book Page 100 Tuesday, August 16, 2005 12:53 PM
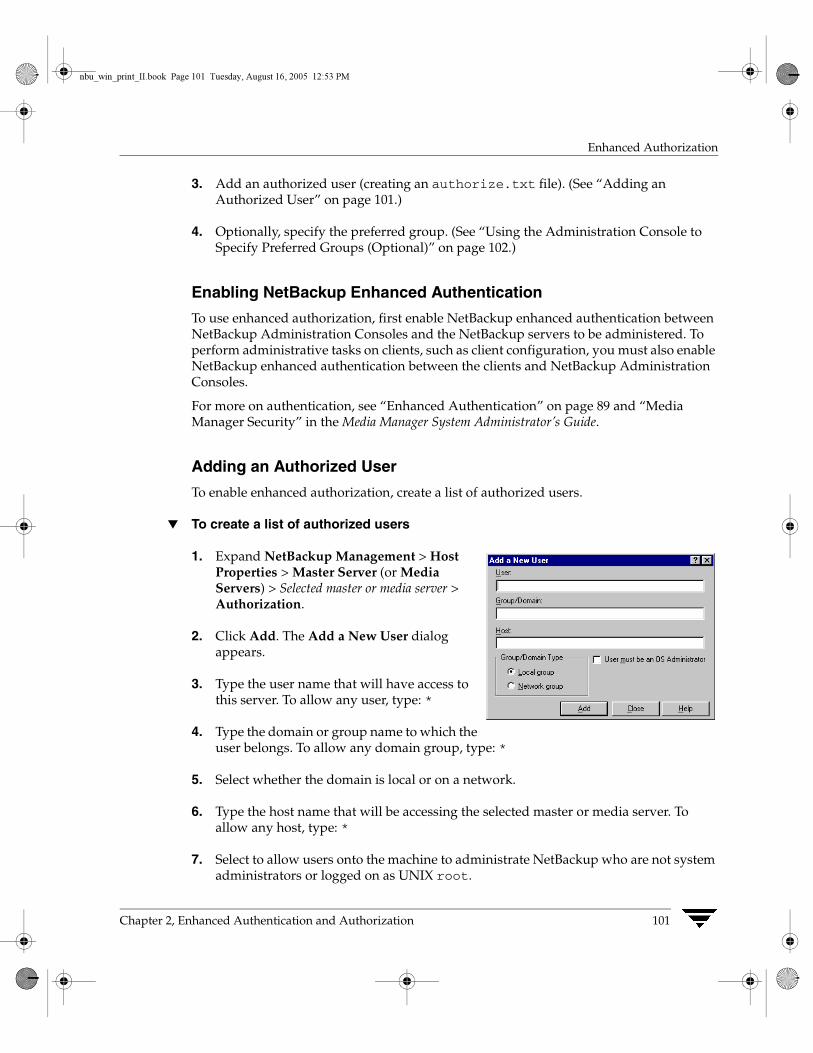
Chapter 2, Enhanced Authentication and Authorization
Enhanced Authorization
101
3. Add an authorized user (creating an authorize.txt file). (See “Adding an Authorized User” on page 101.)
4. Optionally, specify the preferred group. (See “Using the Administration Console to Specify Preferred Groups (Optional)” on page 102.)
Enabling NetBackup Enhanced Authentication
To use enhanced authorization, first enable NetBackup enhanced authentication between NetBackup Administration Consoles and the NetBackup servers to be administered. To perform administrative tasks on clients, such as client configuration, you must also enable NetBackup enhanced authentication between the clients and NetBackup Administration Consoles.
For more on authentication, see “Enhanced Authentication” on page 89 and “Media Manager Security” in the Media Manager System Administrator’s Guide.
Adding an Authorized User
To enable enhanced authorization, create a list of authorized users.
▼ To create a list of authorized users
1. Expand NetBackup Management > Host Properties > Master Server (or Media Servers) > Selected master or media server > Authorization.
2. Click Add. The Add a New User dialog appears.
3. Type the user name that will have access to this server. To allow any user, type: *
4. Type the domain or group name to which the user belongs. To allow any domain group, type: *
5. Select whether the domain is local or on a network.
6. Type the host name that will be accessing the selected master or media server. To allow any host, type: *
7. Select to allow users onto the machine to administrate NetBackup who are not system administrators or logged on as UNIX root.
nbu_win_print_II.book Page 101 Tuesday, August 16, 2005 12:53 PM
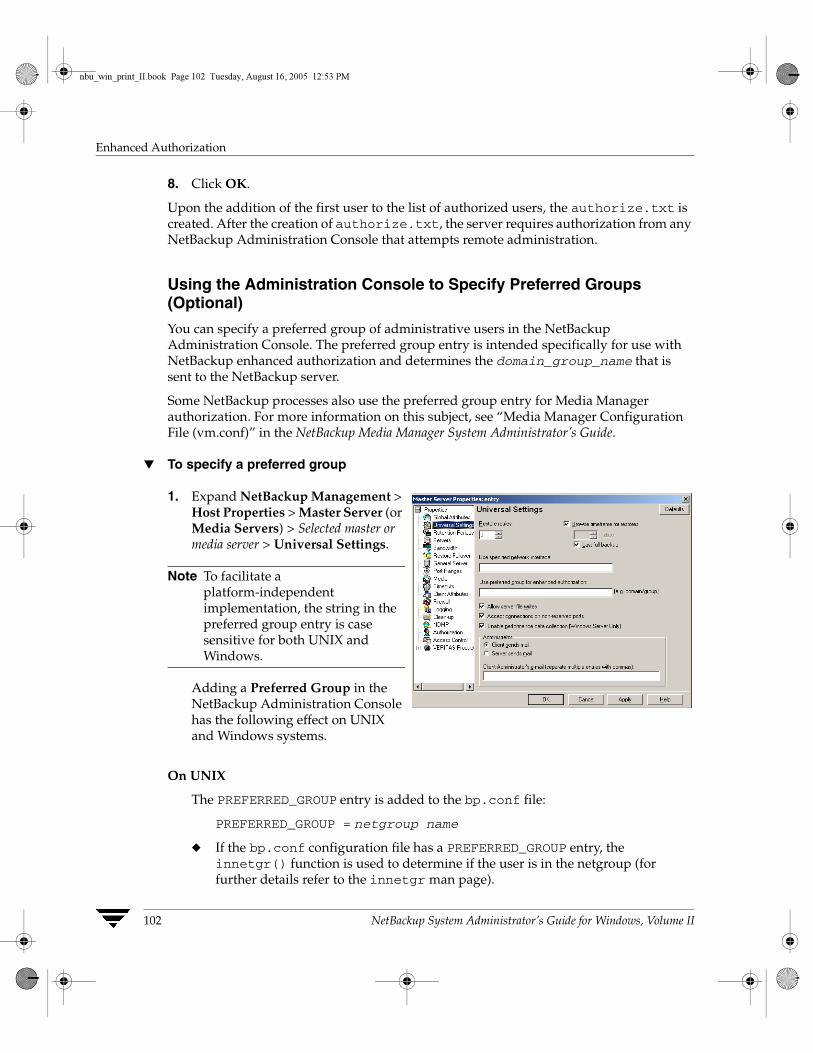
Enhanced Authorization
102 NetBackup System Administrator’s Guide for Windows, Volume II
8. Click OK.
Upon the addition of the first user to the list of authorized users, the authorize.txt is created. After the creation of authorize.txt, the server requires authorization from any NetBackup Administration Console that attempts remote administration.
Using the Administration Console to Specify Preferred Groups (Optional)
You can specify a preferred group of administrative users in the NetBackup Administration Console. The preferred group entry is intended specifically for use with NetBackup enhanced authorization and determines the domain_group_name that is sent to the NetBackup server.
Some NetBackup processes also use the preferred group entry for Media Manager authorization. For more information on this subject, see “Media Manager Configuration File (vm.conf)” in the NetBackup Media Manager System Administrator’s Guide.
▼ To specify a preferred group
1. Expand NetBackup Management > Host Properties > Master Server (or Media Servers) > Selected master or media server > Universal Settings.
Note To facilitate a platform-independent implementation, the string in the preferred group entry is case sensitive for both UNIX and Windows.
Adding a Preferred Group in the NetBackup Administration Console has the following effect on UNIX and Windows systems.
On UNIX
The PREFERRED_GROUP entry is added to the bp.conf file:
PREFERRED_GROUP = netgroup name
◆ If the bp.conf configuration file has a PREFERRED_GROUP entry, the innetgr() function is used to determine if the user is in the netgroup (for further details refer to the innetgr man page).
nbu_win_print_II.book Page 102 Tuesday, August 16, 2005 12:53 PM
Chapter 2, Enhanced Authentication and Authorization
Enhanced Authorization
103
◆ If the PREFERRED_GROUP entry does not exist or the user is not a member of the netgroup, the local group name is obtained.
Note Netgroups are not supported for Sequent systems.
On Windows
The PREFERRED_GROUP NetBackup configuration is added to theKEY_LOCAL_MACHINE\SOFTWARE\VERITAS\NetBackup\CurrentVersion\Config registry key.
A check is made to determine if the user is a member of domain\group. This check is limited to Windows global groups. In other words, if PREFERRED_GROUP is set to a domain local group, a match will not occur and the user’s primary domain\group will be used.
If the PREFERRED_GROUP configuration option does not exist or the user is not a member of the domain\group, the user’s primary domain\group is obtained. When the domain name is an empty string or is the name of the local machine, it is considered to be local.
2. Click OK.
nbu_win_print_II.book Page 103 Tuesday, August 16, 2005 12:53 PM

Enhanced Authorization
104 NetBackup System Administrator’s Guide for Windows, Volume II
nbu_win_print_II.book Page 104 Tuesday, August 16, 2005 12:53 PM
105
Additional Configuration 3This chapter explains settings that, in most instances, are optional. The sections in this chapter include the following:
◆ “Multiplexing” on page 106
◆ “Using Multiple NetBackup Servers” on page 112
◆ “Configuring a Master and Media Server Grouping” on page 113
◆ “Adding a Media Server” on page 116
◆ “NetBackup Configuration Options” on page 119
◆ “Dynamic Host Name and IP Addressing” on page 122
◆ “Configuring E-mail Notifications” on page 128
◆ “Specifying the Locale of the NetBackup Installation” on page 129
nbu_win_print_II.book Page 105 Tuesday, August 16, 2005 12:53 PM
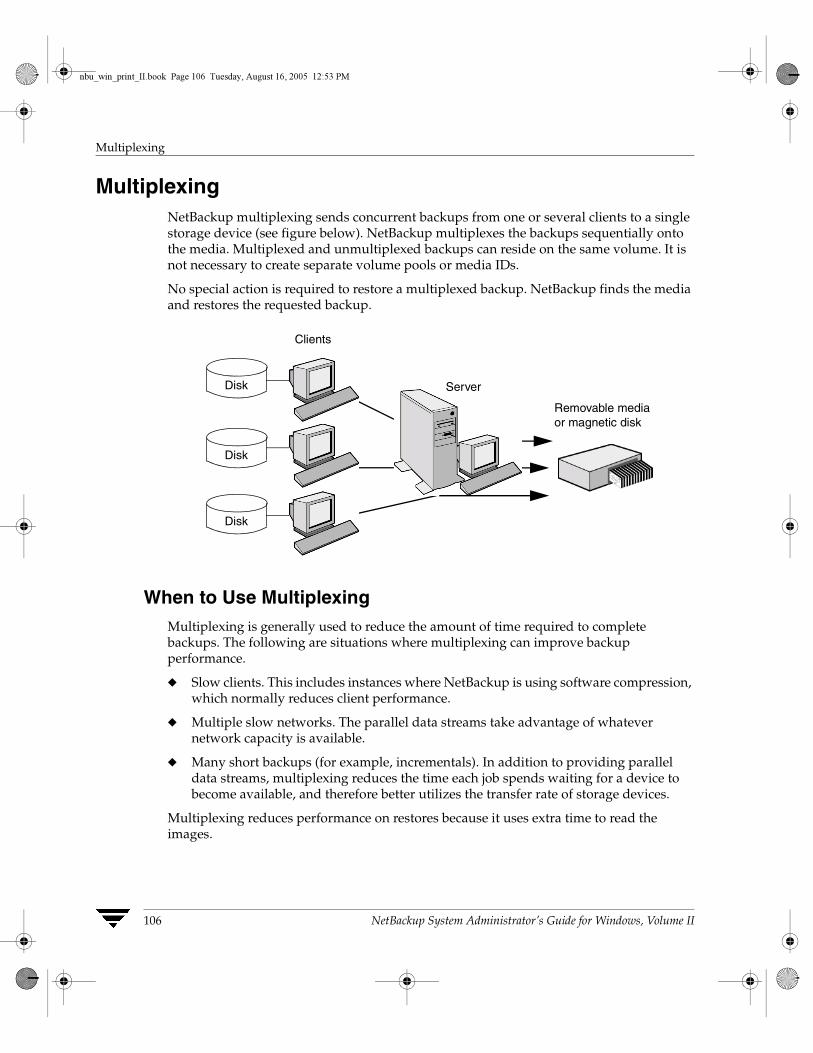
Multiplexing
106 NetBackup System Administrator’s Guide for Windows, Volume II
MultiplexingNetBackup multiplexing sends concurrent backups from one or several clients to a single storage device (see figure below). NetBackup multiplexes the backups sequentially onto the media. Multiplexed and unmultiplexed backups can reside on the same volume. It is not necessary to create separate volume pools or media IDs.
No special action is required to restore a multiplexed backup. NetBackup finds the media and restores the requested backup.
When to Use MultiplexingMultiplexing is generally used to reduce the amount of time required to complete backups. The following are situations where multiplexing can improve backup performance.
◆ Slow clients. This includes instances where NetBackup is using software compression, which normally reduces client performance.
◆ Multiple slow networks. The parallel data streams take advantage of whatever network capacity is available.
◆ Many short backups (for example, incrementals). In addition to providing parallel data streams, multiplexing reduces the time each job spends waiting for a device to become available, and therefore better utilizes the transfer rate of storage devices.
Multiplexing reduces performance on restores because it uses extra time to read the images.
Clients
Disk Server
Removable media or magnetic disk
Disk
Disk
nbu_win_print_II.book Page 106 Tuesday, August 16, 2005 12:53 PM
Chapter 3, Additional Configuration
Multiplexing
107
Note To reduce the impact of multiplexing on restore times, set maximum fragment size for the storage units to a value smaller than the largest allowed value.
How to Configure MultiplexingMultiplexing must be set in two places in the NetBackup configuration:
◆ Storage unit
◆ Schedule
Note If you change these values, it does not take effect until the next time a schedule runs.
Maximum Multiplexing Per Drive for Storage Unit
The Maximum Multiplexing Per Drive setting for a storage unit specifies how many backups NetBackup can multiplex onto any single drive in the storage unit. You set this value for each storage unit. (See “Enable Multiplexing” on page 44 in the System Administrator’s Guide, Volume I.) The number can range from 1 through 32, where 1 is the default and specifies no multiplexing.
Choose a value based on the ability of your central processing unit to handle parallel jobs. Because extra buffers are required, memory is also important. If the server cannot perform other tasks or runs out of memory or processes, reduce the Maximum Multiplexing Per Drive setting for the storage unit. Consider the following when estimating the load that multiplexing can potentially put on your central processing unit:
◆ The maximum number of concurrent backup jobs that NetBackup is allowed to attempt is equal to the sum, for all storage units, of the concurrent backup jobs that can run on each storage unit.
◆ The maximum number of concurrent backup jobs that can run on a single storage unit is equal to the Maximum Multiplexing per drive, multiplied by the number of drives.
Media Multiplexing for a Schedule
In addition to the Maximum Multiplexing Per Drive setting for a storage unit, you specify a Media Multiplexing value for each schedule. This setting is discussed in the section “Media Multiplexing” on page 123 in the System Administrator’s Guide, Volume I. This setting specifies the maximum number of backups from the schedule that you can multiplex onto any single drive in the configuration.
nbu_win_print_II.book Page 107 Tuesday, August 16, 2005 12:53 PM
Multiplexing
108 NetBackup System Administrator’s Guide for Windows, Volume II
The Media multiplexing setting can range from 1 through 32, where 1 is the default and specifies no multiplexing. Regardless of the setting on a schedule, the maximum jobs that NetBackup starts never exceeds the storage unit’s Maximum Multiplexing Per Drive. When adding jobs to drives, NetBackup attempts to add multiplex jobs to drives that are already using multiplexing. This leaves other drives available for non-multiplex jobs.
When NetBackup multiplexes jobs, it continues to add jobs to a drive until the number of jobs on the drive matches either of the following:
◆ This schedule’s Media Multiplexing setting.
If the limit is reached for a drive, NetBackup starts sending jobs to another drive. In the following figure, when the Schedule A limit is reached on Drive 1, NetBackup starts adding Schedule A jobs to Drive 2.
◆ The storage unit’s Maximum multiplexing per drive setting. NetBackup can add jobs from more than one schedule to a drive.
In the following figure, unshaded numbers denote job starting. Shaded numbers denote job completion. For example, denotes the start of job A1 on Drive 1.
denotes the completion of job A1 on Drive 1.1
9
nbu_win_print_II.book Page 108 Tuesday, August 16, 2005 12:53 PM
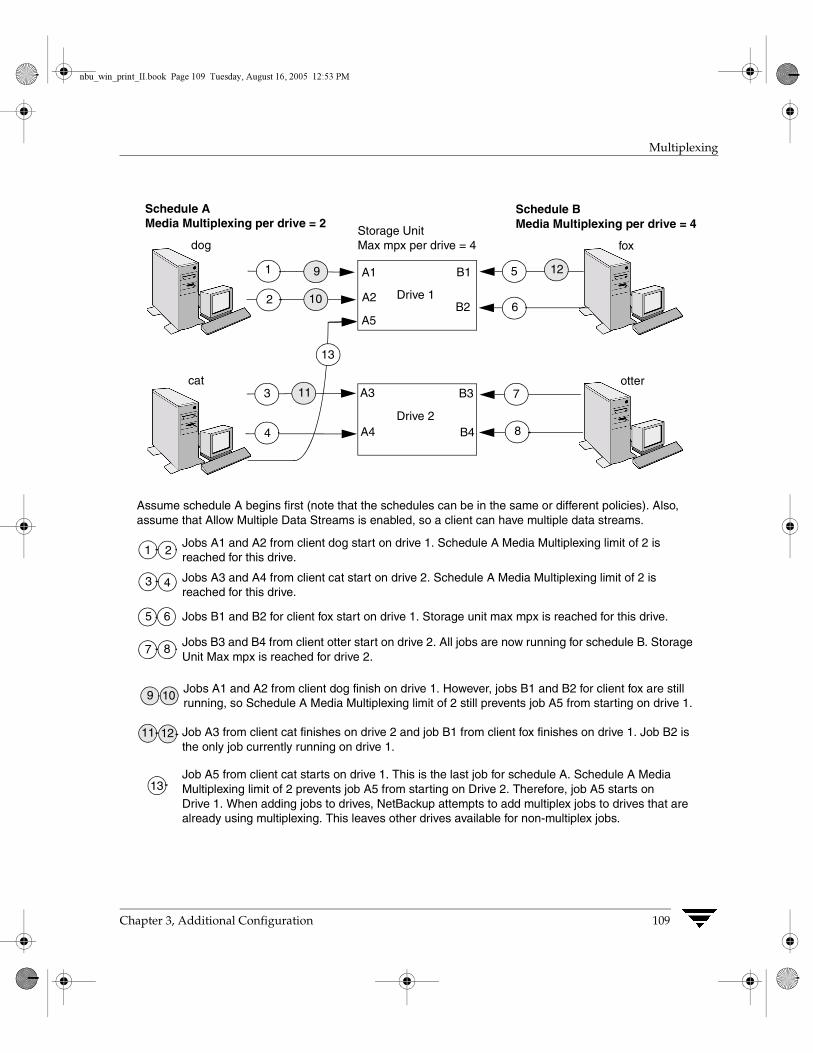
Chapter 3, Additional Configuration
Multiplexing
109
Schedule AMedia Multiplexing per drive = 2
Schedule BMedia Multiplexing per drive = 4
dog
cat
fox
otter
Storage UnitMax mpx per drive = 4
Drive 1
Drive 2
A1
A2
B1
B2
A3
A4
A5
B3
B4
1
2 10
3
4
11
5
6
12
7
8
1 2
3 4
5 6
7 8
9 10
1211
13
Assume schedule A begins first (note that the schedules can be in the same or different policies). Also, assume that Allow Multiple Data Streams is enabled, so a client can have multiple data streams.
Jobs A1 and A2 from client dog start on drive 1. Schedule A Media Multiplexing limit of 2 is reached for this drive.
Jobs A3 and A4 from client cat start on drive 2. Schedule A Media Multiplexing limit of 2 is reached for this drive.
Jobs B1 and B2 for client fox start on drive 1. Storage unit max mpx is reached for this drive.
Jobs B3 and B4 from client otter start on drive 2. All jobs are now running for schedule B. Storage Unit Max mpx is reached for drive 2.
Jobs A1 and A2 from client dog finish on drive 1. However, jobs B1 and B2 for client fox are still running, so Schedule A Media Multiplexing limit of 2 still prevents job A5 from starting on drive 1.
Job A3 from client cat finishes on drive 2 and job B1 from client fox finishes on drive 1. Job B2 is the only job currently running on drive 1.
Job A5 from client cat starts on drive 1. This is the last job for schedule A. Schedule A Media Multiplexing limit of 2 prevents job A5 from starting on Drive 2. Therefore, job A5 starts on Drive 1. When adding jobs to drives, NetBackup attempts to add multiplex jobs to drives that are already using multiplexing. This leaves other drives available for non-multiplex jobs.
13
9
nbu_win_print_II.book Page 109 Tuesday, August 16, 2005 12:53 PM
Multiplexing
110 NetBackup System Administrator’s Guide for Windows, Volume II
Note If the backup window closes before NetBackup can start all the jobs in a multiplexing set, NetBackup completes only the jobs that have actually started. For example, on the figure above, assume that the Activity Monitor shows A1 through A5 as queued and active. If only A1 and A2 start before the window closes, NetBackup does not perform the other jobs that are in the set. If the window closes before any jobs have started, then only the first queued and active job starts and completes. (A1 in this example.)
Other Configuration Settings to Consider Using Multiplexing
Limit Jobs per Policy
Set Limit Jobs Per Policy high enough to support the specified level of multiplexing. (See “Limit Jobs Per Policy” on page 84 in the System Administrator’s Guide, Volume I.)
Maximum Jobs per Client
The Maximum Jobs Per Client global attribute limits the number of backup jobs that can run concurrently on any NetBackup client. Usually, its setting does not affect multiplexing. However, to illustrate its effect, consider a case where there are jobs from different schedules on the same client and all are going to the same storage unit. In this case, it is possible for the maximum number of jobs permitted on the client to be reached before the multiplexing limit is reached for the storage unit. If this occurs, it prevents NetBackup from fully utilizing the storage unit’s multiplexing capabilities.
Maximum Jobs this Client
You can also set the maximum number of jobs that are allowed on a specific client without affecting other clients. (See “Maximum Data Streams” on page 379 in the System Administrator’s Guide, Volume I.)
MPX Restore Delay
The NetBackup configuration option, Delay On Multiplexed Restores, applies to multiplexed restores. The option specifies how long (in seconds) the server waits for additional restore requests of files and (or) raw partitions that are in a set of multiplexed images on the same tape. The Delay On Multiplexed Restores option appears on the General Server properties dialog.
nbu_win_print_II.book Page 110 Tuesday, August 16, 2005 12:53 PM

Chapter 3, Additional Configuration
Multiplexing
111
DemultiplexingDemultiplexing speeds up future restores and is also useful for creating a copy for off-site storage. Use duplication to demultiplex a backup. Duplication lets you copy one multiplexed backup at a time from the source media to the target media. When duplication is complete, the target contains a single demultiplexed copy of each duplicated backup. (The target can also have other backups.) If desired, you can make the duplicate copy the primary copy. Do not select Preserve Multiplexing when duplicating the backups.
Note If you use the bpduplicate command instead of the NetBackup Administration Console, do not include the -mpx option on that command.
nbu_win_print_II.book Page 111 Tuesday, August 16, 2005 12:53 PM
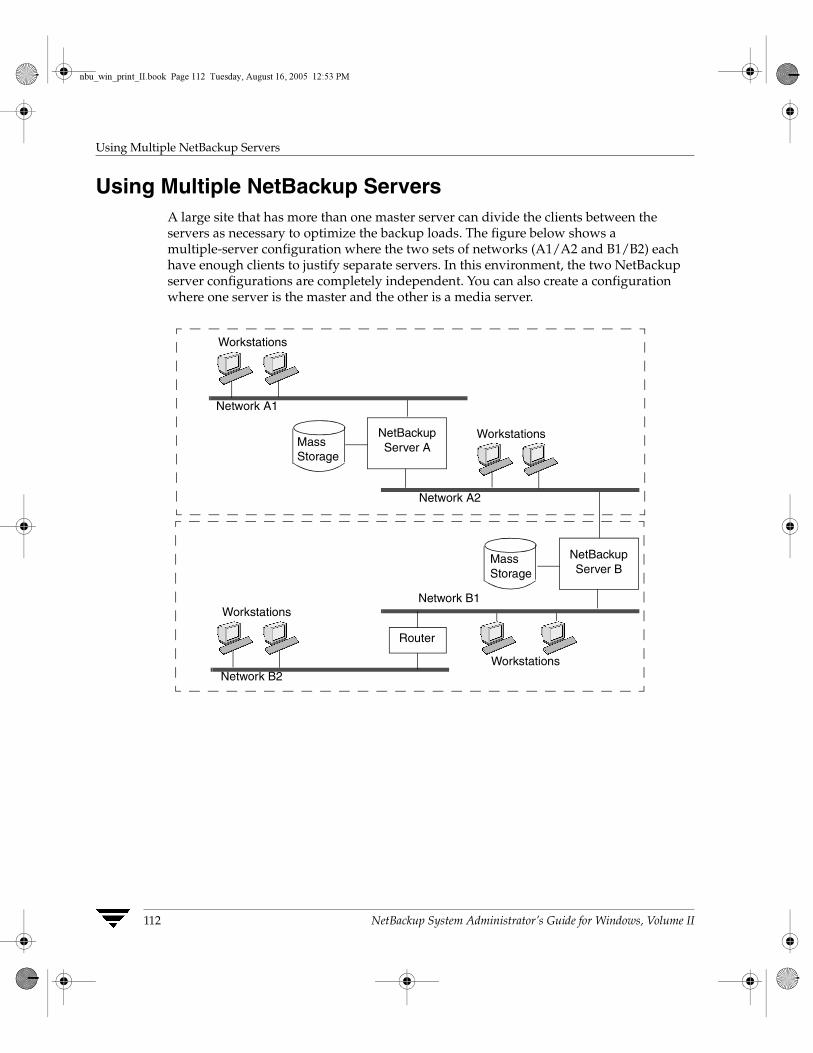
Using Multiple NetBackup Servers
112 NetBackup System Administrator’s Guide for Windows, Volume II
Using Multiple NetBackup ServersA large site that has more than one master server can divide the clients between the servers as necessary to optimize the backup loads. The figure below shows a multiple-server configuration where the two sets of networks (A1/A2 and B1/B2) each have enough clients to justify separate servers. In this environment, the two NetBackup server configurations are completely independent. You can also create a configuration where one server is the master and the other is a media server.
Workstations
Workstations
Workstations
Workstations
Network A1
Network A2
Network B1
Network B2
Mass Storage
Mass Storage
Router
NetBackup Server A
NetBackup Server B
nbu_win_print_II.book Page 112 Tuesday, August 16, 2005 12:53 PM
Chapter 3, Additional Configuration
Configuring a Master and Media Server Grouping
113
Configuring a Master and Media Server GroupingNetBackup lets you set up a group of NetBackup servers where one server is the master and the others are used only as media servers and have peripherals to provide additional storage. The master server controls all backup scheduling and the other media servers provide additional storage.
Grouping refers collectively to the master and its media servers. In a grouping of NetBackup servers, a client can have its backup directed to any device on any server in the grouping.
A common strategy is to install extra peripherals on clients that produce large amounts of data and make them media servers. The data from the client is then directed to the client’s own peripherals. This reduces network traffic by allowing the data to be backed up without transferring it over the network. It also distributes the backup load between the master and the media servers.
Two important points to remember about master and media servers:
◆ There can be only one master server in a grouping.
◆ A NetBackup server is a media server for itself but cannot be a media server for another master.
nbu_win_print_II.book Page 113 Tuesday, August 16, 2005 12:53 PM

Configuring a Master and Media Server Grouping
114 NetBackup System Administrator’s Guide for Windows, Volume II
The following figure shows where software is installed and where the NetBackup catalogs are located (by default). The following topics provide more details on master and media servers along with a procedure to configure them.
Software on Each ServerApplies to NetBackup Enterprise Server only.
Install NetBackup server software on each NetBackup server that has a peripheral that you want to include in a storage unit. The NetBackup install program has choices for master and media server installation.
StorageDevice
StorageDevice
NetBackup Catalogs
Image database
* You can also use the Backup, Archive, and Restore NetBackup user interface from a Windows client that has the Remote Administration Console installed.
Master Server
Remote Admin Console*
Configuration files
Information in relational
databases (about devices, volumes)
User Interface (BAR)
StorageDevice
Remote Admin Console*
User Interface
NetBackup
Media Manager
Media Server
NetBackup
Media Manager
Media Server
NetBackupClient
User Interface (BAR)
AdministrationInterface*
AdministrationInterface*
User Interface (BAR)
nbu_win_print_II.book Page 114 Tuesday, August 16, 2005 12:53 PM

Chapter 3, Additional Configuration
Configuring a Master and Media Server Grouping
115
NetBackup CatalogsApplies to NetBackup Enterprise Server only.
The master server is the default location for the NetBackup catalogs. This includes the media and volume database (emm_data.db), containing media usage and volume information which is used during the backups.
nbu_win_print_II.book Page 115 Tuesday, August 16, 2005 12:53 PM

Adding a Media Server
116 NetBackup System Administrator’s Guide for Windows, Volume II
Adding a Media Server The following section applies to NetBackup Enterprise Server only:
▼ To add a media server
1. Install the following software packages on the media server as explained in the vendor’s documentation:
◆ Any software required to drive the storage devices.
◆ NetBackup server software as explained in the NetBackup Installation Guide.
Note To make a UNIX media server a client, install the client software from the master server, not from the distribution media. When the installation script asks if the host is the master server, reply no and enter the name of the master server when prompted for it.
2. Configure the drives and robots as explained in the Media Manager System Administrator’s Guide.
3. Add the volumes for each robot or nonrobotic drive configured in the previous step.
Always add the volumes on the server that you specified as the Enterprise Media Manager Server for the devices in the previous step. See the Media Manager System Administrator’s Guide for instructions on adding volumes.
Note Use only one server as an EMM server and add all volumes to that host. .
Note Defining a separate volume pool for volumes used on the media server can simplify administration.
4. On the master server, make the following changes to the NetBackup configuration:
a. Add storage units to the media server. Always specify the media server as the media server for the storage unit.
b. Enter the catalog paths if necessary:
If using the online, hot catalog backup method:
NetBackup enters the paths automatically.
If using the offline, cold catalog backup method:
nbu_win_print_II.book Page 116 Tuesday, August 16, 2005 12:53 PM
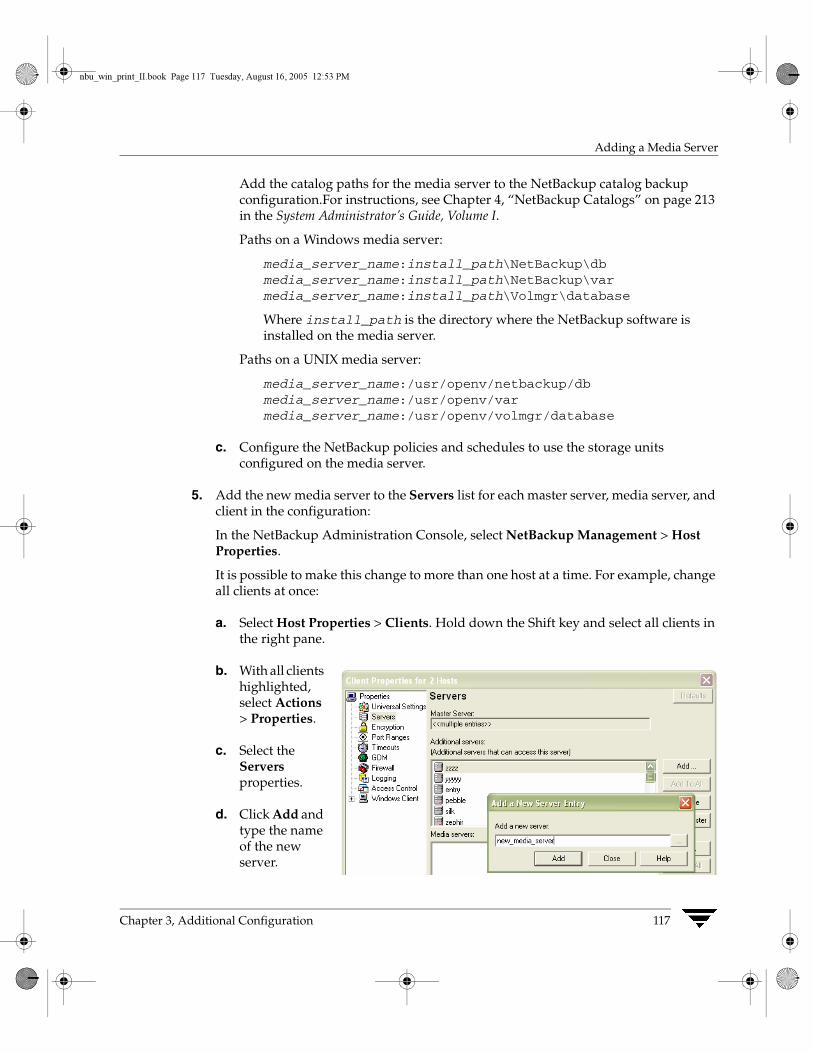
Chapter 3, Additional Configuration
Adding a Media Server
117
Add the catalog paths for the media server to the NetBackup catalog backup configuration.For instructions, see Chapter 4, “NetBackup Catalogs” on page 213 in the System Administrator’s Guide, Volume I.
Paths on a Windows media server:
media_server_name:install_path\NetBackup\dbmedia_server_name:install_path\NetBackup\varmedia_server_name:install_path\Volmgr\database
Where install_path is the directory where the NetBackup software is installed on the media server.
Paths on a UNIX media server:
media_server_name:/usr/openv/netbackup/dbmedia_server_name:/usr/openv/varmedia_server_name:/usr/openv/volmgr/database
c. Configure the NetBackup policies and schedules to use the storage units configured on the media server.
5. Add the new media server to the Servers list for each master server, media server, and client in the configuration:
In the NetBackup Administration Console, select NetBackup Management > Host Properties.
It is possible to make this change to more than one host at a time. For example, change all clients at once:
a. Select Host Properties > Clients. Hold down the Shift key and select all clients in the right pane.
b. With all clients highlighted, select Actions > Properties.
c. Select the Servers properties.
d. Click Add and type the name of the new server.
nbu_win_print_II.book Page 117 Tuesday, August 16, 2005 12:53 PM
Adding a Media Server
118 NetBackup System Administrator’s Guide for Windows, Volume II
e. Click Add to add the server to the server list for all selected clients.
For more information, see “Servers Properties” on page 457 in the System Administrator’s Guide, Volume I.
◆ On NetWare target clients, add a SERVER entry to the bp.ini file.
Note Ensure that the host names match throughout your network’s TCP/IP configuration or you will encounter problems with NetBackup.
Note The host names in the bp.conf file must match those shown in the /etc/hosts file (or appropriate NIS, or DNS file).The host names must also match throughout the network. If you are using NIS, this applies to the NIS hosts file. See “Rules for Using Host Names in NetBackup” on page 328, for more information on choosing host names for NetBackup hosts and clients.In addition, the SERVER entries MUST be the same on all servers in a master and media server grouping. It is recommended (but not mandatory) that all other bp.conf entries, except CLIENT_NAME, also match on all servers.
6. Test your configuration by performing a user backup or a manual backup that uses a schedule specifying a storage unit on the media server.
nbu_win_print_II.book Page 118 Tuesday, August 16, 2005 12:53 PM
Chapter 3, Additional Configuration
NetBackup Configuration Options
119
NetBackup Configuration OptionsNetBackup configuration options allow an administrator to customize NetBackup to meet specific site preferences and requirements. Generally, these options are configured in the NetBackup Administration Console, under Host Properties.
However, the following configuration options are not configurable within the Administration Console. If you wish to change a default value, use the bpgetconfig command to obtain a list of configuration entries, then use bpsetconfig to change the entries as desired. The commands are described in NetBackup Commands for Windows.
NBRB_CLEANUP_OBSOLETE_DBINFO
The NBRB_CLEANUP_OBSOLETE_DBINFO entry serves as a performance tuning option for the Intelligent Resource Manager. This entry indicates the number of seconds (default: 60) that can elapse between the cleanup of obsolete information in the NetBackup Resource Broker (nbrb.exe) database.
NBRB_ENABLE_OPTIMIZATIONS
The NBRB_ENABLE_OPTIMIZATIONS entry serves as a performance tuning option for the Intelligent Resource Manager. This entry indicates whether the Resource Broker caches states of resource requests. Default: 1 (true).
NBRB_FORCE_FULL_EVAL
The NBRB_FORCE_FULL_EVAL entry serves as a performance tuning option for the Intelligent Resource Manager. This entry indicates the number of seconds (default: 1800 seconds/30 minutes) that can elapse between full evaluations of all NetBackup Resource Broker (nbrb.exe) queues, using no cached EMM information. Full evaluations include, for example, matching job resource requests with available resources.
NBRB_REEVAL_PENDING
The NBRB_REEVAL_PENDING entry serves as a performance tuning option for the Intelligent Resource Manager. This entry indicates the number of seconds (default: 60) that can elapse between evaluations of the pending request queue. A pending request queue can include, for example, jobs awaiting resources.
nbu_win_print_II.book Page 119 Tuesday, August 16, 2005 12:53 PM

NetBackup Configuration Options
120 NetBackup System Administrator’s Guide for Windows, Volume II
NBRB_REEVAL_PERIOD
The NBRB_REEVAL_PERIOD entry serves as a performance tuning option for the Intelligent Resource Manager and NetBackup Resource Broker (nbrb.exe). This entry indicates the number of seconds/minutes that will elapse between evaluations if there is an outstanding request that was not satisfied, and if there have been no other requests or no resources released. Default: 5 minutes will pass before the initial request is reevaluated.
NBRB_RETRY_DELAY_AFTER_EMM_ERR
The NBRB_RETRY_DELAY_AFTER_EMM_ERR entry serves as a performance tuning option for the Intelligent Resource Manager. This entry indicates the number of seconds (default: 60) NetBackup waits after an EMM error before attempting again. The error must be one where a retry is possible. For example, if a media server is down.
NBRB_MPX_GROUP_UNLOAD_DELAY
The NBRB_MPX_GROUP_UNLOAD_DELAY entry serves as a performance tuning option for the Intelligent Resource Manager. This entry indicates the number of seconds (default: 10) that the NetBackup Resource Broker (nbrb.exe) will wait for a new job to appear before unloading a tape. This setting can help avoid unnecessary reloading of tapes and applies to all backup jobs.
During user backups, nbrb.exe uses the maximum value of NBRB_MPX_GROUP_UNLOAD_DELAY and the Media Mount Timeout host property setting when unmounting the tape. (This host property is found in the NetBackup Administration Console under NetBackup Management > Host Properties > Select master server > Timeouts > Media Mount Timeout. See Chapter 7 in the System Administrator’s Guide, Volume I for more details.)
During restores, Media Mount Timeout is used, not NBRB_MPX_GROUP_UNLOAD_DELAY.
REQUIRED_NETWORK
The REQUIRED_NETWORK entry specifies the required route for backup traffic in an environment where the network traffic is segregated.
For example, an environment may contain a production network at 145.21.14.0 and a backup network at 192.132.28.0. To indicate that NetBackup should use only the backup network, add the following entry:
REQUIRED_NETWORK = 192.132.28.0
Note If the variable is set and the network is not available, all connections fail and no backups are performed.
nbu_win_print_II.book Page 120 Tuesday, August 16, 2005 12:53 PM

Chapter 3, Additional Configuration
NetBackup Configuration Options
121
nbu_win_print_II.book Page 121 Tuesday, August 16, 2005 12:53 PM
Dynamic Host Name and IP Addressing
122 NetBackup System Administrator’s Guide for Windows, Volume II
Dynamic Host Name and IP AddressingBy default, a NetBackup server assumes that a NetBackup client name is the same as the network host name of the client machine. This makes it difficult to back up clients that have network host names that might change; examples of this are portable machines that plug into a LAN and obtain IP addresses from a DHCP server or remote machines that dial into a PPP server. NetBackup dynamic host name and IP addressing allows you to define NetBackup clients that do not have fixed IP addresses and host names.
Note If you use dynamic addressing, remember that the NetBackup servers still require fixed IP addresses and host names.
Note All clients configured to use dynamic addressing and host names must trust each other in a way similar to that provided by the NetBackup altnames feature.
The following steps are required to support configurations that use dynamic IP addressing for NetBackup. Read all sections of this topic prior to making any changes to your configuration.
1. Configure your network to use a dynamic IP addressing protocol like DHCP.
NetBackup requires that IP addresses of clients have a network host name. Be sure to define network host names for the range of dynamic IP addresses in the hosts file and (or) DNS on your network.
2. Determine the NetBackup client names for the machines that have dynamic IP addresses and network host names.
You will use these NetBackup client names in step 3 and step 6 of this procedure. Each NetBackup client must have a unique NetBackup client name. The NetBackup client name assigned to a client is permanent—do not change it.
3. Make changes on the master server:
a. Create NetBackup policies with client lists that include the names from step 2.
b. Create entries in the NetBackup client database for the client names from step 2.
Create the entries by using the bpclient command.
4. Make changes on each dynamic NetBackup Windows client:
Start the Backup, Archive, and Restore user interface on the client and select File > NetBackup Client Properties. The NetBackup Client Properties dialog appears. Select the General tab. Change the Client Name to the correct NetBackup client name for the machine.
nbu_win_print_II.book Page 122 Tuesday, August 16, 2005 12:53 PM
Chapter 3, Additional Configuration
Dynamic Host Name and IP Addressing
123
5. On the master server, enable the Announce DHCP Interval option:
Open the NetBackup Administration Console and navigate to the Host Properties for clients. (To do this, select NetBackup Management > Host Properties > Clients.) Open the client properties for the Windows client(s). Under the Windows Client host properties, select Network. Check the Announce DHCP Interval checkbox.
6. Make changes on each dynamic NetBackup UNIX client:
a. Modify the bp.conf file to include a CLIENT_NAME entry with the correct NetBackup client name for the machine.
b. Configure the system to notify the master server of the machine's NetBackup client name and current network host name during startup. The bpdynamicclient command is used to notify the master server.
c. Configure the system to periodically notify the master server of the machine's NetBackup client name and current network host name.
Setting up Dynamic IP Addresses and Host NamesConfigure your network to use a dynamic IP addressing protocol. A protocol like DHCP will have a server and several clients. For example, when a DHCP client starts up, it requests an IP address from the DHCP server. The server then assigns an IP address to the client from a range of predefined addresses.
NetBackup requires that the IP addresses of NetBackup clients have corresponding network host names. Ensure that each IP address that could be assigned to NetBackup clients has a network host name defined in the host file, NIS, and (or) DNS on your network.
As an example, suppose that you have 10 dynamic IP addresses and host names available. The dynamic IP addresses and host names might be:
123.123.123.70 dynamic00123.123.123.71 dynamic01123.123.123.72 dynamic02123.123.123.73 dynamic03...123.123.123.79 dynamic09
Assign a unique NetBackup client name to each NetBackup client that might use one of these dynamic IP addresses. The NetBackup client name assigned to a client is permanent and should not be changed. The client name assigned to NetBackup clients with dynamic
nbu_win_print_II.book Page 123 Tuesday, August 16, 2005 12:53 PM
Dynamic Host Name and IP Addressing
124 NetBackup System Administrator’s Guide for Windows, Volume II
IP addressing must not be the same as any network host names on your network. If the NetBackup client names are changed or are not unique, backup and restore results are unpredictable.
For example, suppose you have 20 machines that will share the IP addresses defined above. If you want these machines to be NetBackup clients, you might assign them these NetBackup client names as follows:
nbclient01nbclient02nbclient03nbclient04...nbclient20
Configuring the NetBackup Master ServerOn the master server, create your NetBackup backup policies as you would otherwise. For client name lists, use the NetBackup client names (for example, nbclient01) rather than the dynamic network host names (for example, dynamic01).
Next, create the client database on the master server. The client database consists of directories and files in the following directory:
install_path\NetBackup\db\client
You can create, update, list, and delete client entries with the bpclient command. The bpclient command is in the following directory:
install_path\NetBackup\bin\admincmd
◆ To create a dynamic client entry:
bpclient.exe -add -client client_name -dynamic_address 1
where client_name is the NetBackup client name. The -dynamic_address 1 argument indicates that the client uses dynamic IP addressing. You can create entries with -dynamic_address 0 for static IP addressing, but that is unnecessary and will adversely affect performance.
◆ To delete a client entry:
bpclient.exe -delete -client client_name
◆ To list a client entry:
bpclient.exe -L -client client_name
◆ To list all client entries:
nbu_win_print_II.book Page 124 Tuesday, August 16, 2005 12:53 PM
Chapter 3, Additional Configuration
Dynamic Host Name and IP Addressing
125
bpclient.exe -L -All
In our example, you can enter these commands to create the 20 clients:
cd install_path\NetBackup\bin\admincmdbpclient -add -client nbclient01 -dynamic_address 1bpclient -add -client nbclient02 -dynamic_address 1bpclient -add -client nbclient03 -dynamic_address 1bpclient -add -client nbclient04 -dynamic_address 1...bpclient -add -client nbclient20 -dynamic_address 1
To see what is currently in the client database, run bpclient as follows:
install_path\NetBackup\bin\admincmd\bpclient -L -All
The output is similar to the following:
Client Name: nbclient01Current Host:Hostname: *NULL*IP Address: 0.0.0.0Connect on non-reserved port: noDynamic Address: yes
Client Name: nbclient02Current Host:Hostname: *NULL*IP Address: 0.0.0.0Connect on non-reserved port: noDynamic Address: yes...Client Name: nbclient20Current Host:Hostname: *NULL*IP Address: 0.0.0.0Connect on non-reserved port: noDynamic Address: yes
After the NetBackup client notifies the NetBackup server of its NetBackup client name and network host name, the Current Host, Hostname, and IP Address fields will display the values for that NetBackup client.
nbu_win_print_II.book Page 125 Tuesday, August 16, 2005 12:53 PM
Dynamic Host Name and IP Addressing
126 NetBackup System Administrator’s Guide for Windows, Volume II
Configuring a Dynamic Microsoft Windows ClientIf it is not already installed, install NetBackup on the Windows client.
Start the Backup, Archive, and Restore user interface on the client and select File > NetBackup Client Properties. The NetBackup Client Properties dialog appears. Select the General tab. Change the Client Name to specify the NetBackup client name for the Windows client.
In the NetBackup Administration Console, set Announce DHCP Interval to specify how many minutes the client waits before announcing that it is using a different IP address. (See “Announce DHCP Interval” on page 446 in the System Administrator’s Guide, Volume I.)
The server is not notified if the default value of 0 is used. For a DHCP client, a good value to use is one-half of the lease period.
On the client, stop and restart the NetBackup Client service to have the changes take effect.
Configuring a Dynamic UNIX NetBackup ClientIf not already installed, install the NetBackup client software.
Edit the /usr/openv/netbackup/bp.conf file. Use the CLIENT_NAME entry to specify the NetBackup client name for the machine, as follows:
CLIENT_NAME = nbclient00
You must run the bpdynamicclient command once when the system first starts up. bpdynamicclient notifies the NetBackup server of the machine's NetBackup client name and current network host name. The bpdynamicclient command is in the directory:
/usr/openv/netbackup/bin
The format of the bpdynamicclient command is as follows:
bpdynamicclient -last_successful_hostname file_name
When bpdynamicclient starts up, it checks for the existence of file_name. If file_name does exist, bpdynamicclient determines if the host name written in the file is the same as the current network host name of the machine. If the host names match, bpdynamicclient exits and does not connect to the master server. If the host names do not match, bpdynamicclient connects to the master server and informs the server of its NetBackup client name and host name. If bpdynamicclient successfully informs the server, bpdynamicclient writes the current network host name into file_name. If bpdynamicclient cannot inform the server, bpdynamicclient deletes file_name.
nbu_win_print_II.book Page 126 Tuesday, August 16, 2005 12:53 PM
Chapter 3, Additional Configuration
Dynamic Host Name and IP Addressing
127
Most UNIX systems provide a facility to define startup scripts. For example, on a Solaris system, you can create a script in the /etc/rc2.d directory:
# cat > /etc/rc2.d/S99nbdynamicclient <<EOF#! /bin/sh rm /usr/openv/netbackup/last_successful_hostname/usr/openv/netbackup/bin/bpdynamicclient -last_successful_hostname \/usr/openv/netbackup/last_successful_hostnameEOF# chmod 544 /etc/rc2.d/S99nbdynamicclient
Ensure that the dynamic client startup script is called after the machine obtains its IP address.
You must also create a root crontab entry to periodically call the bpdynamicclient command. For example, the following entry (one line) calls bpdynamicclient at seven minutes after each hour:
7 * * * * /usr/openv/netbackup/bin/bpdynamicclient -last_successful_hostname /usr/openv/netbackup/last_successful_hostname
If you are using DHCP, a good interval to use between calls to bpdynamicclient is one-half of the lease period.
nbu_win_print_II.book Page 127 Tuesday, August 16, 2005 12:53 PM
Configuring E-mail Notifications
128 NetBackup System Administrator’s Guide for Windows, Volume II
Configuring E-mail NotificationsYou can configure NetBackup to send e-mail notifications to users and administrators with the results of backup, archive, and restore operations.
Notify server administrators when a scheduled backup, administrator-directed manual backup, or a backup of the NetBackup databases occurs.
Configure NetBackup to E-mail these notifications by specifying the server administrator’s address with the NetBackup master server Global Attribute property, Administrator’s E-mail Address. (See the NetBackup System Administrator’s Guide for Windows, Volume I.)
nbu_win_print_II.book Page 128 Tuesday, August 16, 2005 12:53 PM
Chapter 3, Additional Configuration
Specifying the Locale of the NetBackup Installation
129
Specifying the Locale of the NetBackup InstallationNetBackup applications can display a wide range of international date and time formats as determined by the locale of the installation. To help ensure consistency among the applications, NetBackup uses a single, configurable source to define the locale conventions.
To Specify the Locale of a NetBackup Installation
Platform Directions
Windows To access the regional settings, double-click Regional Settings in the Windows Control Panel. This provides access to the predefined Number and Date/Time formats.
See the Microsoft Help pages for further assistance.
UNIX The /usr/openv/msg/.conf file contains information on the supported locales. This file defines the date and time formats for each supported locale.
The .conf file contains very specific instructions on how to add or modify the list of supported locales and formats. However, the format of the file is summarized here.
The .conf file is divided into two parts, the TL lines and the TM lines.
TL Lines
The third field of the TL lines defines the case-sensitive locales that the NetBackup applications support. The fourth and fifth fields define the date and time fields and associated separators for that supported locale is as follows:
You can modify the existing formats to change the default output. For example, the TL line for the C locale is:
TL 1 C :hh:mn:ss/mm/dd/yyyy
An alternate specification to the order of months, days, and years could be as follows:
TL 1 C :hh:mn:ss -yyyy-mm-dd
or:
TL 1 C :hh:mn:ss/dd/mm/yy
You can add more TL lines; see the comments in the .conf file.
If the .conf file is not accessible, the default locales (TL lines) are:
TL 1 C :hh:mn:ss /mm/dd/yyyy
TL 2 ov :hh:mn:ss/mm/dd/yyyy
Note that C and ov are synonymous.
nbu_win_print_II.book Page 129 Tuesday, August 16, 2005 12:53 PM
Specifying the Locale of the NetBackup Installation
130 NetBackup System Administrator’s Guide for Windows, Volume II
TM Lines
The TM lines define a mapping from unrecognized locales to those supported by NetBackup, as defined by the TL lines.
The third field of the TM lines defines the unrecognized locale and the fifth field defines the supported equivalent identified in the TL lines.
For example, use the following TM line to map the unrecognized locale french to the supported locale fr, the TM line is:
TM 6 french 2 fr
To map french to C
TM 6 french 1 C
To add more TM lines, see the specific instructions in the .conf file.
If the .conf file is not accessible, there are no default TM lines as the default locale will be C (ov).
To Specify the Locale of a NetBackup Installation (continued)
Platform Directions
nbu_win_print_II.book Page 130 Tuesday, August 16, 2005 12:53 PM
131
Reference Topics 4The topics in this chapter provide additional information about various aspects of NetBackup configuration and management:
◆ “Rules for Using Host Names in NetBackup” on page 132
◆ “Reading Backup Images with tar” on page 136
◆ “Factors Affecting Backup Time” on page 137
◆ “Determining NetBackup Transfer Rate” on page 138
◆ “How NetBackup Builds a Worklist” on page 142
◆ “Determining Backup Media Requirements” on page 144
◆ “NetBackup Notify Scripts” on page 146
nbu_win_print_II.book Page 131 Tuesday, August 16, 2005 12:53 PM
Rules for Using Host Names in NetBackup
132 NetBackup System Administrator’s Guide for Windows, Volume II
Rules for Using Host Names in NetBackupNetBackup uses host names to identify, communicate with, and initiate processes on NetBackup client and server computers. The correct use of host names during configuration is essential to the proper operation of NetBackup. (See “Dynamic Host Name and IP Addressing” on page 122.)
NetBackup uses TCP/IP host names to connect to NetBackup servers and clients. NetBackup validates its connections by performing a reverse host name lookup. That is, NetBackup determines the IP address of a connection and then uses the IP address to look up the host name with gethostbyaddr(). For this to work reliably, the host name and address resolution must be set up correctly in DNS, WINS, or the local %Systemroot%\system32\drivers\etc\hosts file (if necessary).
Note Sometimes placing the system host name and IP address in the %Systemroot%\system32\drivers\etc\hosts file accelerates name lookups.
Qualifying Host NamesA major consideration when configuring host names is the extent to which you qualify them. In many cases, using the short host name of a computer is adequate. If the network environment is or will eventually be multi-domain, qualify host names to the extent that servers and clients can identify each other in a multi-domain environment.
For example, use a name such as mercury.bdev.null.com or mercury.bdev rather than just mercury.
How NetBackup Uses Host NamesThe following discussions explain where NetBackup stores host names and how it uses them. These discussions also mention factors to consider when choosing host names.
Note Do not change the host name of a NetBackup server. This practice is not recommended because it can be necessary to import all previously used media to the server before you can use it under the new host name.
Policy Configuration
The host name that you specify for a client when adding it to a policy is called the configured name of the client, and is the client’s host name as it appears in the NetBackup configuration.
nbu_win_print_II.book Page 132 Tuesday, August 16, 2005 12:53 PM
Chapter 4, Reference Topics
Rules for Using Host Names in NetBackup
133
The server uses the client’s configured name to connect to the client and start the processes that satisfy client requests. When adding clients to a policy always use host names that are qualified to the extent that all NetBackup servers can connect to the clients.
When a client makes a user backup, archive, or restore request to the NetBackup server, the server uses the peername of the client (identified from its TCP connection) to determine the client’s configured name.
If you add a client to more than one policy, always use the same configured name in all cases. Otherwise, the client cannot view all files backed up on its behalf and file restores are complicated because both user and administrator action is required to restore from some of the backups.
Image Catalog
A subdirectory in the image catalog is created for a client when a backup is first created for that client. The subdirectory’s name is the client’s configured name.
Every backup for a client has a separate file in this subdirectory. Each of these backup records contains the host name of the server on which the backup was written.
Error Catalog
NetBackup uses entries in the error catalog for generating reports. These entries contain the host name of the server generating the entry and the client’s configured name, if applicable. The server host name is normally the server’s short host name. (For example, shark instead of shark.null.com.)
Catalog Backup Information
Applies to NetBackup Enterprise Server only.
If you configure media servers and include catalog files from the media server in your NetBackup catalog backups, qualify the host name portion of the media server’s catalog file path to the extent necessary to allow the master server to make a connection to the media server.
How to Update NetBackup After a Host Name Changes
Note Do not change the host name of a NetBackup server. This practice is not recommended because it can be necessary to import all previously used media to the server before you can use it under the new host name.
nbu_win_print_II.book Page 133 Tuesday, August 16, 2005 12:53 PM
Rules for Using Host Names in NetBackup
134 NetBackup System Administrator’s Guide for Windows, Volume II
Follow these steps to update the NetBackup configuration if a client’s host name is changed.
1. On the master server:
◆ Delete the client’s old name from all policies in which it exists and add the client’s new name to those policies. You do not have to reinstall NetBackup software on the client. The client also still has access to all previous backups.
◆ Create a symbolic link from the client’s old image directory to its new image directory. For example,
cd /usr/openv/netbackup/db/imagesln -s old_client_name new_client_name
2. On the client:
◆ On PC clients, you can change the client name setting either through the user interface or in a configuration file. (See the online help in the Backup, Archive, and Restore client interface.)
◆ On UNIX clients, change the CLIENT_NAME value in the bp.conf file to the new name.
Note If users on UNIX clients have a bp.conf file in their $HOME directory, they must change CLIENT_NAME in that file to the new name.
Special Considerations For Domain Name Service (DNS)In some requests to the master server, client software sends the name that it obtains through its gethostname library function. If this (possibly unqualified) name is unknown to the Domain Name Service (DNS) on the master server, it is possible that the master server cannot reply to client requests.
Whether this situation exists, depends on how the client and the server are configured. If gethostname on the client returns host names that are not qualified to the extent that DNS on the master server can resolve them, you will encounter problems.
A possible solution is to reconfigure the client or the master server DNS hosts file. However, because this is not always desirable, NetBackup allows you to create a special file in the altnames directory on the master server in order to force the desired translation of NetBackup client host names.
install_path\NetBackup\db\altnames\host.xlate
Each line in the host.xlate file has three elements, a numeric key and two host names. Each line is left-justified, and each element of the line is separated by a space character.
nbu_win_print_II.book Page 134 Tuesday, August 16, 2005 12:53 PM
Chapter 4, Reference Topics
Rules for Using Host Names in NetBackup
135
key hostname_from_ client client_as_known_by_server
Where
◆ key is a numeric value used by NetBackup to specify the cases where translation is to be done. Currently this value must always be 0, indicating a configured name translation.
◆ hostname_from_client is the value to translate. This must correspond to the name obtained by the client’s gethostname and be sent to the server in the request.
◆ client_as_known_by_server is the name to substitute for hostname_from_client when responding to requests. This name must be the name configured in the NetBackup configuration on the master server and must also be known to the master server’s network services.
For example, the line
0 danr danr.eng.aaa.com
specifies that when the master server receives a request for a configured client name (numeric key 0), the name danr is always replaced by the name danr.eng.aaa.com. This resolves the problem mentioned above, assuming that:
◆ The client’s gethostname returned danr.
◆ The master server’s network services gethostbyname library function did not recognize the name danr.
◆ The client was configured and named in the NetBackup configuration as danr.eng.aaa.com and this name is also known to network services on the master server.
nbu_win_print_II.book Page 135 Tuesday, August 16, 2005 12:53 PM
Reading Backup Images with tar
136 NetBackup System Administrator’s Guide for Windows, Volume II
Reading Backup Images with tarNetBackup uses a modified GNU tar for reading backup images. By using the modified tar, NetBackup can understand compressed files, sparse files, long pathnames, ACL information. It offers features similar to those in cpio.
Although non-NetBackup versions of tar can be used to restore files, they provide only limited restore capabilities.
Note It is not possible to use the NetBackup modified-GNU tar on UNIX, or tar32.exe on Windows, to directly extract files from a NetBackup for Windows backup image.
Effects of Using a Non-NetBackup tar
Non-NetBackup versions of tar do not supply all of the restore capabilities that the NetBackup /usr/openv/netbackup/bin/tar provides, resulting in possible problems.
The following is a list of some effects that a non-NetBackup tar may encounter in certain situations:
◆ Compressed backups cannot be recovered.
◆ Multiplexed backups cannot be recovered.
◆ Image files greater than 2 gigabytes cannot be restored. Image files of this size must be restored from a NetBackup media server.
◆ Solaris 9 extended attributes cannot be restored to a client.
◆ VxFS 4.0 named data streams cannot be restored to a client.
◆ Backups containing raw partitions cannot be recovered. (Includes FlashBackup images.)
◆ NDMP client backup images cannot be restored, though NDMP vendors may have tools or utilities which could perform a restore directly from the media.
◆ Non-NetBackup versions of tar may have trouble with sparse files and often skip sparse files.
◆ HP CDFs are restored with non-NetBackup versions of tar, but the directory is no longer hidden and the name of the directory has a + appended to it.
◆ If the backup spans more than one piece of media, you must read the fragments from the media and concatenate the fragments to give to tar. To accomplish this, the system’s dd command may be useful.
nbu_win_print_II.book Page 136 Tuesday, August 16, 2005 12:53 PM
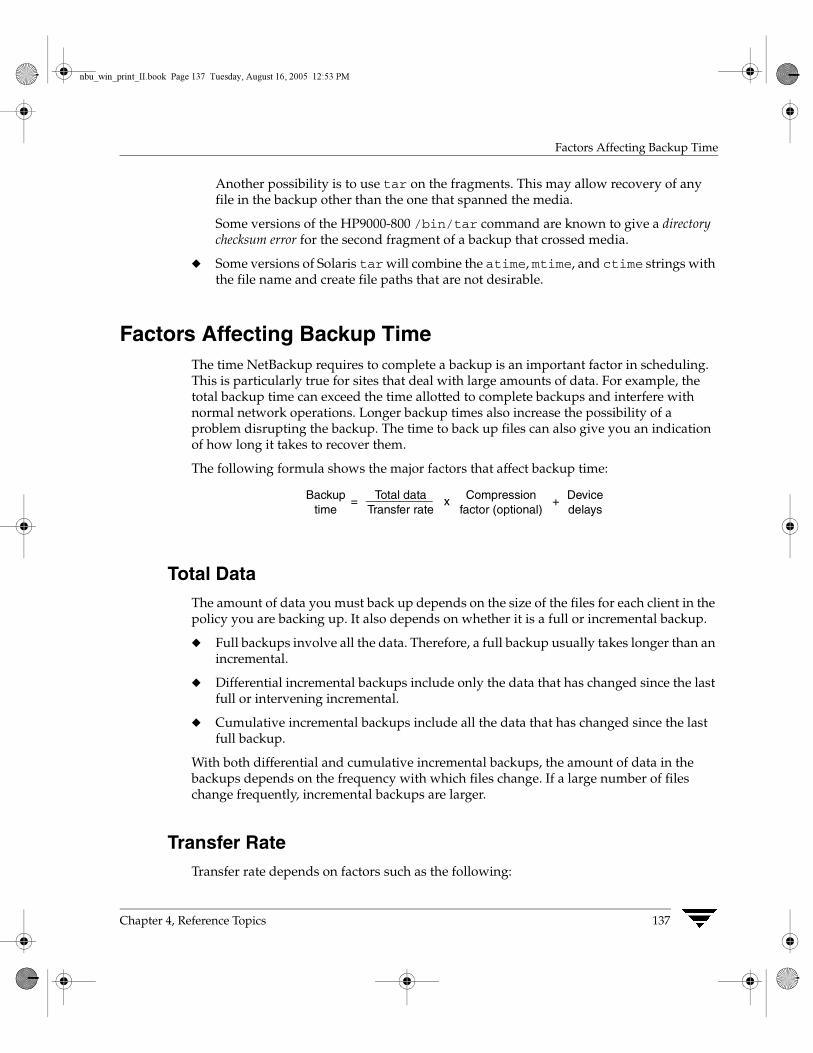
Chapter 4, Reference Topics
Factors Affecting Backup Time
137
Another possibility is to use tar on the fragments. This may allow recovery of any file in the backup other than the one that spanned the media.
Some versions of the HP9000-800 /bin/tar command are known to give a directory checksum error for the second fragment of a backup that crossed media.
◆ Some versions of Solaris tar will combine the atime, mtime, and ctime strings with the file name and create file paths that are not desirable.
Factors Affecting Backup TimeThe time NetBackup requires to complete a backup is an important factor in scheduling. This is particularly true for sites that deal with large amounts of data. For example, the total backup time can exceed the time allotted to complete backups and interfere with normal network operations. Longer backup times also increase the possibility of a problem disrupting the backup. The time to back up files can also give you an indication of how long it takes to recover them.
The following formula shows the major factors that affect backup time:
Total DataThe amount of data you must back up depends on the size of the files for each client in the policy you are backing up. It also depends on whether it is a full or incremental backup.
◆ Full backups involve all the data. Therefore, a full backup usually takes longer than an incremental.
◆ Differential incremental backups include only the data that has changed since the last full or intervening incremental.
◆ Cumulative incremental backups include all the data that has changed since the last full backup.
With both differential and cumulative incremental backups, the amount of data in the backups depends on the frequency with which files change. If a large number of files change frequently, incremental backups are larger.
Transfer RateTransfer rate depends on factors such as the following:
Backuptime
Total dataTransfer rate
Compression factor (optional)
Devicedelays
= x +
nbu_win_print_II.book Page 137 Tuesday, August 16, 2005 12:53 PM
Determining NetBackup Transfer Rate
138 NetBackup System Administrator’s Guide for Windows, Volume II
◆ Speed of the backup device. For example, sending backups to a tape having a maximum transfer rate of 800 kilobytes per second normally takes less time than to a tape that transfers at only 400 kilobytes per second (assuming other factors allow taking advantage of the faster transfer rate).
◆ Available network bandwidth. The available bandwidth is less than the theoretical network bandwidth and depends on how much other network traffic is present. For example, multiple backups occurring on the same network compete for bandwidth.
◆ Speed with which the client can process the data. This varies with the hardware platform and depends on the other applications running on the platform. File size is also an important factor. Clients can process larger files faster than smaller ones. You can back up 20 files that are 1 megabyte in size faster than 20,000 files that are 1 kilobyte in size.
◆ Speed with which the server can process the data. Like client speed, server speed also varies with the hardware platform and depends on the other applications running on the platform. The number of concurrent backups being performed also affects server speed.
◆ Network configuration can affect performance. For example, in an Ethernet environment, having some machines running full-duplex and some running half-duplex will significantly reduce throughput.
See “Determining NetBackup Transfer Rate” on page 138 for methods to compute the transfer rate for your clients.
Device DelaysDevice delays are due to factors such as the device being busy, loading the media, and finding the place on the media at which to start writing the backup. These delays depend on the devices and computing environments and can vary widely.
Determining NetBackup Transfer RateCalculate three variations of the backup transfer rate by using the data provided in NetBackup reports. The three rates and calculation methods are as follows:
◆ “Network Transfer Rate” (see below)
◆ “Network Transfer Plus End-of-Backup-Processing Rate” on page 139
◆ “Network Transfer Plus End-of-Backup-Processing Rate” on page 139
The Microsoft Windows System Monitor also displays the NetBackup transfer rate. (See “Using the System Monitor” on page 140.)
nbu_win_print_II.book Page 138 Tuesday, August 16, 2005 12:53 PM
Chapter 4, Reference Topics
Determining NetBackup Transfer Rate
139
Network Transfer RateThe network transfer rate considers only the time required to transfer data over the network from client to server. This rate ignores the following:
◆ Time to load and position media before a backup.
◆ Time to gracefully close the tape file and write an additional NetBackup information record to the tape.
The network transfer rate is the rate provided in the All Log Entries report.
Network Transfer Plus End-of-Backup-Processing RateThis rate ignores the time it takes to load and position media before a backup, but includes the end-of-backup processing that is ignored in the network transfer rate. To determine this rate, use the All Log Entries report and calculate the time from the message:
begin writing backup id xxx
to the message
successfully wrote backup id xxx
Then, divide this time (in seconds) into the total bytes transferred (as recorded in the All Log Entries report) to calculate the transfer rate.
Total Transfer RateThis transfer rate includes the time for loading and positioning the media as well as the end-of-backup processing. Using the List Client Backups report, calculate the transfer rate by dividing Kilobytes by Elapsed Time (converted to seconds).
ExamplesAssume that the reports provide the following data.
All Log Entries Report
TIME SERVER/CLIENT TEXT 04/28/05 23:10:37 windows giskard begin writing backup id giskard_0767592458, fragment 1 to media id TL8033 on device 1 . . .04/29/05 00:35:07 windows giskard successfully wrote backup id giskard_0767592458, fragment 1, 1161824 Kbytes at 230.325 Kbytes/sec
nbu_win_print_II.book Page 139 Tuesday, August 16, 2005 12:53 PM
Determining NetBackup Transfer Rate
140 NetBackup System Administrator’s Guide for Windows, Volume II
List Client Backups Report
Client: giskard Backup ID: giskard_0767592458 Policy: production_servers Client Type: Standard Sched Label: testing_add_files Schedule Type: Full Backup Retention Level: one week (0) Backup Time: 04/28/05 23:07:38 Elapsed Time: 001:27:32 Expiration Time: 05/05/05 23:07:38 Compressed: no Kilobytes: 1161824 Number of Files: 78210
The following three rates were compiled using the backup data from the example reports above:
Network transfer rate:
1161824 Kbytes at 230.325 Kbytes per second
Network transfer plus end-of-backup processing rate:
23:10:30 - 00:35:07 = 01:24:30 = 5070 seconds
1161824 Kbytes/5070 = 229.157 Kbytes per second
Total transfer rate:
Elapsed time = 01:27:32 = 5252 seconds
1161824 Kbytes/5252 = 221.216 Kbytes per second
Using the System MonitorNetBackup adds the NetBackup Disk/Tape performance object to the list of objects monitored by the Windows System Monitor. Four counters are available for the NetBackup Disk/Tape performance object:
◆ Disk/Tape Read Bytes (GB)
◆ Disk/Tape Read Bytes/sec (KB)
◆ Disk/Tape Write Bytes (GB)
◆ Disk/Tape Write Bytes/sec (KB)
The NetBackup performance object supports instances in the System Monitor. The instances can be drive names, in the case of tape drives, or absolute paths in the case of disks, to which NetBackup is writing, or from which NetBackup is reading.
nbu_win_print_II.book Page 140 Tuesday, August 16, 2005 12:53 PM
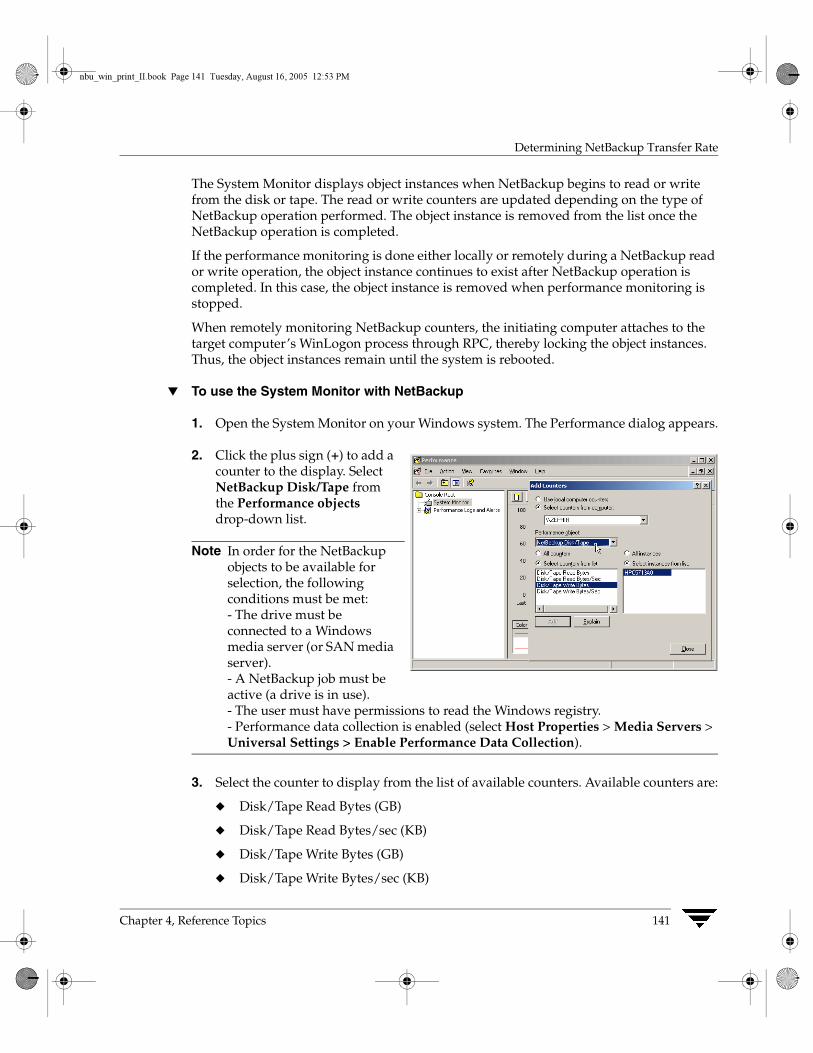
Chapter 4, Reference Topics
Determining NetBackup Transfer Rate
141
The System Monitor displays object instances when NetBackup begins to read or write from the disk or tape. The read or write counters are updated depending on the type of NetBackup operation performed. The object instance is removed from the list once the NetBackup operation is completed.
If the performance monitoring is done either locally or remotely during a NetBackup read or write operation, the object instance continues to exist after NetBackup operation is completed. In this case, the object instance is removed when performance monitoring is stopped.
When remotely monitoring NetBackup counters, the initiating computer attaches to the target computer’s WinLogon process through RPC, thereby locking the object instances. Thus, the object instances remain until the system is rebooted.
▼ To use the System Monitor with NetBackup
1. Open the System Monitor on your Windows system. The Performance dialog appears.
2. Click the plus sign (+) to add a counter to the display. Select NetBackup Disk/Tape from the Performance objects drop-down list.
Note In order for the NetBackup objects to be available for selection, the following conditions must be met:- The drive must be connected to a Windows media server (or SAN media server).- A NetBackup job must be active (a drive is in use).- The user must have permissions to read the Windows registry.- Performance data collection is enabled (select Host Properties > Media Servers > Universal Settings > Enable Performance Data Collection).
3. Select the counter to display from the list of available counters. Available counters are:
◆ Disk/Tape Read Bytes (GB)
◆ Disk/Tape Read Bytes/sec (KB)
◆ Disk/Tape Write Bytes (GB)
◆ Disk/Tape Write Bytes/sec (KB)
nbu_win_print_II.book Page 141 Tuesday, August 16, 2005 12:53 PM
How NetBackup Builds a Worklist
142 NetBackup System Administrator’s Guide for Windows, Volume II
4. Select one or more object instances from the list of instances. Instances are displayed when NetBackup begins to read or write from the disk or tape drives.
5. Click Add.
The NetBackup counter you selected is displayed in the Performance dialog. The number of bytes read or written and the rate is updated dynamically.
How NetBackup Builds a WorklistThe following topics explain how NetBackup determines the order in which automatic backups occur for each client. This information is for reference only but is useful in evaluating problems with schedules.
Building the Worklist (Queue)NetBackup builds an internal worklist that contains all scheduled, active jobs. NetBackup calculates the due time for each job, then sorts all the jobs in the worklist in the order that the jobs are due:
a. NetBackup builds a worklist consisting of jobs for every client in every policy.
b. NetBackup evaluates each job and determines when it is due, based on the following factors:
◆ When did the job last run?
◆ How often is the job scheduled to run (the frequency of the job)?
◆ How long until the next scheduled window is open for the job (if the window is not currently open)?
c. NetBackup sorts the worklist based on the due time of each job.
While a job is waiting for resources (devices) to become available, the job is considered Queued, and appears on the Jobs tab of the Activity Monitor.
Once a job receives the resources it needs, the job becomes Active and begins. When the job completes, NetBackup computes the next due time for the job, thus perpetually calculating and reordering the worklist.
The order of the jobs on the worklist is dynamic, taking into account many factors. The following items are examples of factors that could effect the order of jobs on the worklist:
nbu_win_print_II.book Page 142 Tuesday, August 16, 2005 12:53 PM
Chapter 4, Reference Topics
How NetBackup Builds a Worklist
143
◆ Whether the job finished successfully or whether it failed and is Waiting for Retry. (The time NetBackup waits before trying the job again is a configurable master server property found under Host Properties > Global Attributes > Job Retry Delay.)
A job that is retried will retain its original job ID. If the job does not succeed after the configured number of attempts allowed, the job is considered Done. The status of the job indicates that the job was not successful. The number of attempts counts toward the Schedule Backup Attempts limit. (Found under Host Properties > Global Attributes > Schedule Backup Attempts.)
◆ Whether attempts to run the job have exceeded the number allowed by the Schedule Backup Attempts host property.
◆ Whether the job is a child job. When a parent job is Active, all of the children from that parent job have precedence over other jobs, including the children of another parent job.
Prioritizing Queued Jobs The worklist typically contains jobs from different policies and schedules. NetBackup checks for the following items when determining the order in which to run the backups that are in the worklist:
1. If multiplexing is enabled, a job will join an existing multiplexed group if allowed, even if a job of higher priority is on the worklist.
2. Highest priority backup as determined by the policy Job Priority setting.
Backup jobs from the policy with the highest priority run first.
For example, assume that clients ant and beetle are in different policies and that ant is in the policy with the highest priority. Here, the jobs for client ant always run before the client beetle jobs.
3. Backup with a retention level that is the same as a tape that is currently mounted.
If policy priorities are equal, NetBackup tries to start a backup job that has the same retention period as a tape that is currently mounted. This reduces delays in waiting for tape mounts.
For example, assume that clients ant and beetle are in the same policy but their schedules have different retention periods. Also, assume that the ant job is the most overdue. However, a tape is mounted that has the same retention level as client beetle.
Here, the client beetle job runs first because it can be stored on a tape that is already mounted, thus making the most efficient use of resources. If there is another drive of the correct type available, a tape will be mounted on that drive for the client ant job.
nbu_win_print_II.book Page 143 Tuesday, August 16, 2005 12:53 PM
Determining Backup Media Requirements
144 NetBackup System Administrator’s Guide for Windows, Volume II
4. Most overdue backup job.
If the priorities and retention level are equal, NetBackup prioritizes backups according to how long they are overdue. The clients that are the most overdue have the highest priority.
NetBackup determines how long a backup is overdue by subtracting the backup frequency (on the schedule) from the length of time since the last successful backup for that client.
For example, assume that clients ant and beetle have backup jobs that are in the same policy and have the same retention level. Also assume that the schedules for these backup jobs both have a frequency of 1 day. If the last backup for client ant ran 25 hours ago and the last backup for client beetle ran 26 hours ago, then both clients are overdue for a backup. However, the client beetle job is the most overdue and will run first.
This approach ensures that a backup that was not successful during its previous backup window has priority over backups that were successful. This is important on a busy system where the backup window can sometimes close before all backups can begin.
Determining Backup Media RequirementsTo efficiently manage your backup environment, you must know the amount of media that is required for both daily and long-term use. The daily requirement must be known to ensure that enough tape volumes and disk space are available for each backup session. The long-term requirements are necessary to assess costs for acquisition of new media, storage devices, and offsite storage (if required).
For daily requirements, you must first determine the approximate amount of data in the files that you will back up to each type of media each day. Then, you can check the Media Summary report to verify that enough media IDs and disk space are available.
For long term planning, review the following considerations:
◆ How long you want to retain the data. A related consideration is that all backups on a given tape or optical disk have the same retention level unless the Allow Multiple Retentions per Media property is enabled. If not enabled, additional media is required for each different retention level.
◆ Duplicates for offsite storage or extra security.
◆ New software releases and other special backups.
◆ Replacing worn out media.
◆ Changes in disk usage patterns over the time period under consideration. If your disk usage and capacity increase, your backup needs will also probably increase.
nbu_win_print_II.book Page 144 Tuesday, August 16, 2005 12:53 PM

Chapter 4, Reference Topics
Determining Backup Media Requirements
145
◆ Number of backups that are on a tape. Because tape marks are created between backups, a tape with many small backups (as with incremental backups) contains less real data than if it contains fewer large backups. The size of the tape marks vary depending on the media type. A large number of small files will also have a higher percentage of overhead in the backup because each file requires an extra 512 bytes for catalog information on the tape or disk.
◆ If you have many different volume pools, ensure that enough media is defined in each one to accommodate the data.
nbu_win_print_II.book Page 145 Tuesday, August 16, 2005 12:53 PM
NetBackup Notify Scripts
146 NetBackup System Administrator’s Guide for Windows, Volume II
NetBackup Notify ScriptsNetBackup uses the following scripts or batch files for collecting information and providing notification of events.
The following scripts are active on the master server:
Install_path\VERITAS\NetBackup\bin\backup_notify.cmd
Install_path\VERITAS\NetBackup\bin\backup_exit_notify.cmd
Install_path\VERITAS\NetBackup\bin\dbbackup_notify.cmd
Install_path\VERITAS\NetBackup\bin\diskfull_notify.cmd
Install_path\VERITAS\NetBackup\bin\mail_dr_info.cmd
Install_path\VERITAS\NetBackup\bin\nbmail.cmd
Install_path\VERITAS\NetBackup\bin\restore_notify.cmd
Install_path\VERITAS\NetBackup\bin\session_notify.cmd
Install_path\VERITAS\NetBackup\bin\session_start_notify.cmd
Install_path\VERITAS\NetBackup\bin\userreq_notify.cmd
Scripts that run on clients:
Install_path\VERITAS\NetBackup\bin\goodies\bpstart_notify.bat
Install_path\VERITAS\NetBackup\bin\goodies\bpend_notify.bat
Install_path\VERITAS\NetBackup\bin\goodies\parent_end_notify.cmd
Install_path\VERITAS\NetBackup\bin\goodies\parent_start_notify.cmd
In order to use the client scripts, the scripts must first be created on the client. Use the procedures described in “bpstart_notify.bat (Microsoft Windows clients only)” on page 150 and “bpend_notify.bat (Microsoft Windows clients only)” on page 155.
For further information, refer to the comments in the scripts.
Caution Applies to NetBackup Enterprise Server only.If you use either the bpstart_notify or bpend_notify scripts, do not include commands that write to stdout. If written to stdout, NetBackup sends this output to the server as part of the backup and the resulting backup can abort with an error message pertaining to block sizes. Also, ensure that all commands in the scripts are appropriate to the client platform. For example, the
nbu_win_print_II.book Page 146 Tuesday, August 16, 2005 12:53 PM
Chapter 4, Reference Topics
NetBackup Notify Scripts
147
-s parameter is invalid for the UNIX mail command on some UNIX platforms and its use can cause data to be written to stdout or stderr, resulting in the same problem noted above.
backup_notify.cmd
The backup_notify.cmd script runs on the NetBackup server where the storage unit is located and is called each time a backup is successfully written to media. The parameters that NetBackup passes to this script are:
◆ The name of the program doing the backup
◆ The backup-image name or path
For example:
backup_notify.cmd bptm bilbo_0695316589
Note Applies to NetBackup Enterprise Server only.If NetBackup backed up files to a UNIX disk storage unit that is being managed by Storage Migrator, the backup_notify script notifies Storage Migrator to perform migration as quickly as possible. The released script does not, however, have commands to force a backup of the managed file system after NetBackup has stored its backups. To back up the managed file system, modify the script as necessary to meet site requirements for backup.
backup_exit_notify.cmd
The backup_exit_notify.cmd script runs on the master server. The NetBackup master server calls this script to do site specific processing when an individual backup has completed.
NetBackup passes the following parameters to the script:
Parameter Description
clientname Name of the client from the NetBackup catalog.
policyname Policy name from the NetBackup catalog.
schedname Schedule name from the NetBackup catalog.
schedtype One of the following: FULL, INCR (differential incremental), CINC (cumulative incremental), UBAK, UARC
nbu_win_print_II.book Page 147 Tuesday, August 16, 2005 12:53 PM
NetBackup Notify Scripts
148 NetBackup System Administrator’s Guide for Windows, Volume II
For example:
backup_exit_notify.cmd freddie production fulls FULL 0
backup_exit_notify.cmd danr production incrementals INCR 73
bpstart_notify (UNIX clients only)
Note Before using this script, ensure that it is executable by other on the client. Do this by running chmod 755 script_name. Where script_name is the name of the script.
On UNIX clients, NetBackup calls the bpstart_notify script each time the client starts a backup or archive operation. To use this script, copy
Install_path\VERITAS\NetBackup\bin\goodies\bpstart_notify.bat
from the server to
/usr/openv/netbackup/bin/
on the UNIX client. Then, modify the script as desired and ensure that you have permission to run the script.
The bpstart_notify script runs each time a backup or archive starts and initialization is completed (but before the tape positioning). This script must exit with a status of 0 for the calling program to continue and for the backup or archive to proceed. A nonzero status causes the client backup or archive to exit with a status of bpstart_notify failed.
If the /usr/openv/netbackup/bin/bpstart_notify script exists, it runs in the foreground and the bpbkar process on the client waits for it to complete before continuing. Any commands in the script that do not end with an & character run serially.
The server expects the client to respond with a continue message within the period of time specified by the NetBackup BPSTART_TIMEOUT option on the server.
The default for BPSTART_TIMEOUT is 300. If the script needs more time than 300 seconds, increase the value to allow more time.
exitstatus Exit code for the entire backup job.
Parameter Description
nbu_win_print_II.book Page 148 Tuesday, August 16, 2005 12:53 PM

Chapter 4, Reference Topics
NetBackup Notify Scripts
149
NetBackup passes the following parameters to the script:
Caution The bpstart_notify script also runs for NetBackup catalog backups if a .policyname[.schedule] is not specified.
For example:
bpstart_notify freddie cd4000s fulls FULL
bpstart_notify danr cd4000s incrementals INCR
bpstart_notify hare cd4000s fulls FULL
bpstart_notify freddie cd4000s user_backups UBAK
bpstart_notify danr cd4000s user_archive UARC
To create a bpstart_notify script for a specific policy or policy and schedule combination, create script files with a .policyname or .policyname.schedulename suffix. The following are two examples of script names for a policy named production that has a schedule named fulls:
/usr/openv/netbackup/bin/bpstart_notify.production
/usr/openv/netbackup/bin/bpstart_notify.production.fulls
The first script affects all scheduled backups in the policy named production. The second script affects scheduled backups in the policy named production only when the schedule is named fulls.
Note For a given backup, NetBackup uses only one bpstart_notify script and that is the one with the most specific name. For example, if there are both bpstart_notify.production and bpstart_notify.production.fulls scripts, NetBackup uses only bpstart_notify.production.fulls.
The bpstart_notify script can use the following environment variables:
Parameter Description
clientname Name of the client from the NetBackup catalog.
policyname Policy name from the NetBackup catalog.
schedname Schedule name from the NetBackup catalog.
schedtype One of the following: FULL, INCR (differential incremental), CINC (cumulative incremental), UBAK, UARC
nbu_win_print_II.book Page 149 Tuesday, August 16, 2005 12:53 PM
NetBackup Notify Scripts
150 NetBackup System Administrator’s Guide for Windows, Volume II
BACKUPID
UNIXBACKUPTIME
BACKUPTIME
The NetBackup bpbkar process creates these variables. The following are examples of strings that are available to the script for use in recording information about a backup:
BACKUPID=freddie_0857340526
UNIXBACKUPTIME=0857340526
BACKUPTIME=Sun Mar 2 16:08:46 2004
In addition to the above, the following environment variables can be used for the support of multiple data streams:
STREAM_NUMBER indicates the stream number. The first stream started from a policy, client, and schedule will be 1. A value of 0 indicates that multiple data streams is not enabled.
STREAM_COUNT specifies the total number of streams to be generated from this policy, client, and schedule.
STREAM_PID is the pid (process ID) number of bpbkar.
RESTARTED can be used for checkpointed restarts or checkpointed backup jobs. A value of 0 indicates that the job was not resumed. (For example, upon first initiation.) A value of 1 indicates that the job was resumed.
bpstart_notify.bat (Microsoft Windows clients only)
For all Windows clients, you can create batch scripts that provide notification whenever the client starts a backup or archive. To use this script, copy:
Install_path\VERITAS\NetBackup\bin\goodies\bpstart_notify.bat
from the server to the client, in the same directory as the NetBackup client binaries:
Install_path\NetBackup\bin\
Where Install_path is the directory where NetBackup is installed.
You can create bpstart_notify scripts that provide notification for all backups or just for backups of a specific policy or schedule.
To create a script that applies to all backups, name the script bpstart_notify.bat
To create a bpstart_notify script that applies only to a specific policy or policy and schedule combination, add a .policyname or .policyname.schedulename suffix to the script name.
◆ The following script applies only to a policy named days:
nbu_win_print_II.book Page 150 Tuesday, August 16, 2005 12:53 PM
Chapter 4, Reference Topics
NetBackup Notify Scripts
151
install_path\netbackup\bin\bpstart_notify.days.bat
◆ The following script applies only to a schedule named fulls that is in a policy named days:
install_path\netbackup\bin\bpstart_notify.days.fulls.bat
Caution The bpstart_notify script also runs for NetBackup catalog backups if a .policyname[.schedule] is not specified.
The first script affects all scheduled backups in the policy named days. The second script affects scheduled backups in the policy named days only when the schedule is named fulls.
For a given backup, NetBackup calls only one bpstart_notify script and checks for them in the following order:
bpstart_notify.policy.schedule.bat
bpstart_notify.policy.bat
bpstart_notify.bat
For example, if there are both bpstart_notify.policy.bat and bpstart_notify.policy.schedule.bat scripts, NetBackup uses only the bpstart_notify.policy.schedule.bat script.
Note If you are also using bpend_notify scripts, they can provide a different level of notification than the bpstart_notify scripts. For example, if you had one of each, they could be bpstart_notify.policy.bat and bpend_notify.policy.schedule.bat.
When the backup starts, NetBackup passes the following parameters to the script:
Parameter Description
%1 Name of the client from the NetBackup catalog.
%2 Policy name from the NetBackup catalog.
%3 Schedule name from the NetBackup catalog.
%4 One of the following: FULL, INCR, CINC, UBAK, UARC
%5 Status of the operation is always 0 for bpstart_notify.
nbu_win_print_II.book Page 151 Tuesday, August 16, 2005 12:53 PM
NetBackup Notify Scripts
152 NetBackup System Administrator’s Guide for Windows, Volume II
The server expects the client to respond with a continue message within the period of time specified by the NetBackup BPSTART_TIMEOUT option on the server. The default for BPSTART_TIMEOUT is 300. If the script needs more than 300 seconds, increase the value to allow more time.
For Windows 2000 clients, the bpstart_notify script can use the following environment variables for the support of multiple data streams:
STREAM_NUMBER indicates the stream number. The first stream started from a policy, client, and schedule will be 1. A value of 0, indicates that multiple data streams is not enabled.
STREAM_COUNT specifies the total number of streams to be generated from this policy, client, and schedule.
STREAM_PID is the pid (process ID) number of bpbkar.
bpend_notify (UNIX clients only)
Caution The bpend_notify script is run when the client is finished sending data, but the server has not yet completed writing to media.
Note Before using this script, ensure that it is executable by other on the client. Do this by running chmod 755 script_name. Where script_name is the name of the script.
%6 Results file that NetBackup checks for a return code from the script. NetBackup uses %6 to pass the file name and then expects the script to create the file in the same directory as the script.
If the script applies to a specific policy and schedule, the results file must be named
install_path\netbackup\bin\BPSTART_RES.policy.schedule
If the script applies to a specific policy, the results file must be named
install_path\netbackup\bin\BPSTART_RES.policy
If the script applies to all backups, the results file must be named
install_path\netbackup\bin\BPSTART_RES
An echo 0> %6 statement is one way for the script to create the file.
NetBackup deletes the existing results file before calling the script. After the script runs, NetBackup checks the new results file for the status. The status must be 0 for the script to be considered successful. If the results file does not exist, NetBackup assumes that the script was successful.
Parameter Description
nbu_win_print_II.book Page 152 Tuesday, August 16, 2005 12:53 PM
Chapter 4, Reference Topics
NetBackup Notify Scripts
153
For a UNIX client, if you need notification whenever the client completes a backup or archive operation, copy
Install_path\VERITAS\NetBackup\bin\goodies\bpend_notify
from the server to
/usr/openv/netbackup/bin/bpend_notify
on the UNIX client. Then, modify the script as desired, and ensure that you have permission to run the script.
The bpend_notify script runs each time a backup or archive completes. For archives, it runs after the backup but before the files are removed.
If bpend_notify exists, it runs in the foreground and bpbkar on the client waits until it completes. Any commands that do not end with an & character run serially.
The server expects the client to respond within the period of time specified by the BPEND_TIMEOUT NetBackup configuration option on the server. The default for BPEND_TIMEOUT is 300.
If the script needs more than 300 seconds, set BPEND_TIMEOUT to a larger value. Avoid too large a value or you will delay the server from servicing other clients.
NetBackup passes the following parameters to the bpend_notify script:
Caution The bpend_notify script also runs for NetBackup catalog backups if a .policyname[.schedule] is not specified.
For example:
Parameter Description
clientname Name of the client from the NetBackup catalog.
policyname Policy name from the NetBackup catalog.
schedname Schedule name from the NetBackup catalog.
schedtype One of the following: FULL, INCR (differential incremental), CINC (cumulative incremental), UBAK, UARC
exitstatus Exit code from bpbkar. This is only client status and does not mean that the backup is complete and successful.
For example, the client can show a status 0 when, due to a failure on the server, the All Log Entries report shows a status 84.
nbu_win_print_II.book Page 153 Tuesday, August 16, 2005 12:53 PM
NetBackup Notify Scripts
154 NetBackup System Administrator’s Guide for Windows, Volume II
bpend_notify freddie pol_1 fulls FULL 0
bpend_notify danr pol_1 incrementals INCR 73
To create a bpend_notify script for a specific policy or policy and schedule combination, create script files with a .policyname or .policyname.schedulename suffix. The following are two examples of script names for a policy named production that has a schedule named fulls:
/usr/openv/netbackup/bin/bpend_notify.production
/usr/openv/netbackup/bin/bpend_notify.production.fulls
The first script affects all scheduled backups in the policy named production. The second script affects scheduled backups in the policy named production only when the schedule is named fulls.
Note For a given backup, NetBackup uses only one bpend_notify script and that is the one with the most specific name. For example, if there are both bpend_notify.production and bpend_notify.production.fulls scripts, NetBackup uses only bpend_notify.production.fulls.
If the UNIX client is running NetBackup 3.0 or later software, the bpend_notify script can use the following environment variables:
BACKUPID
UNIXBACKUPTIME
BACKUPTIME
The NetBackup bpbkar process creates these variables. The following are examples of strings that are available to the script for use in recording information about a backup:
BACKUPID=freddie_0857340526
UNIXBACKUPTIME=0857340526
BACKUPTIME=Sun Mar 2 16:08:46 2005
In addition to the above, the following environment variables can be used for the support of multiple data streams:
STREAM_NUMBER indicates the stream number. The first stream started from a policy, client, and schedule will be 1. A value of 0, indicates that multiple data streams is not enabled.
STREAM_COUNT specifies the total number of streams to be generated from this policy, client, and schedule.
STREAM_PID is the pid (process ID) number of bpbkar.
nbu_win_print_II.book Page 154 Tuesday, August 16, 2005 12:53 PM
Chapter 4, Reference Topics
NetBackup Notify Scripts
155
FINISHED can be used for checkpointed restarts of backup jobs. A value of 0 indicates that the client was not finished sending all of the data. A value of 1 indicates that the client was finished sending all the of data.
bpend_notify.bat (Microsoft Windows clients only)
For Windows clients, you can create batch scripts that provide notification whenever the client completes a backup or archive. These scripts must reside on the client and in the same directory as the NetBackup client binaries:
Install_path\NetBackup\bin\bpend_notify.bat
Where Install_path is the directory where NetBackup is installed.
You can create bpend_notify scripts that provide notification for all backups or just for backups of a specific policy or schedule.
To create a bpend_notify script that applies to all backups, name the script bpend_notify.bat
To create a script that applies only to a specific policy or policy and schedule combination, add a .policyname or .policyname.schedulename suffix to the script name.
◆ The following script applies only to a policy named days:
Install_path\netbackup\bin\bpend_notify.days.bat
◆ The following script applies only to a schedule named fulls that is in a policy named days:
Install_path\netbackup\bin\bpend_notify.days.fulls.bat
Caution The bpend_notify script also runs for NetBackup catalog backups if a .policyname[.schedule] is not specified.
The first script affects all scheduled backups in the policy named days. The second script affects scheduled backups in the policy named days only when the schedule is named fulls.
For a given backup, NetBackup calls only one bpend_notify script and checks for them in the following order:
bpend_notify.policy.schedule.bat
bpend_notify.policy.bat
bpend_notify.bat
For example, if there are both bpend_notify.policy.bat and bpend_notify.policy.schedule.bat scripts, NetBackup uses only bpend_notify.policy.schedule.bat.
nbu_win_print_II.book Page 155 Tuesday, August 16, 2005 12:53 PM
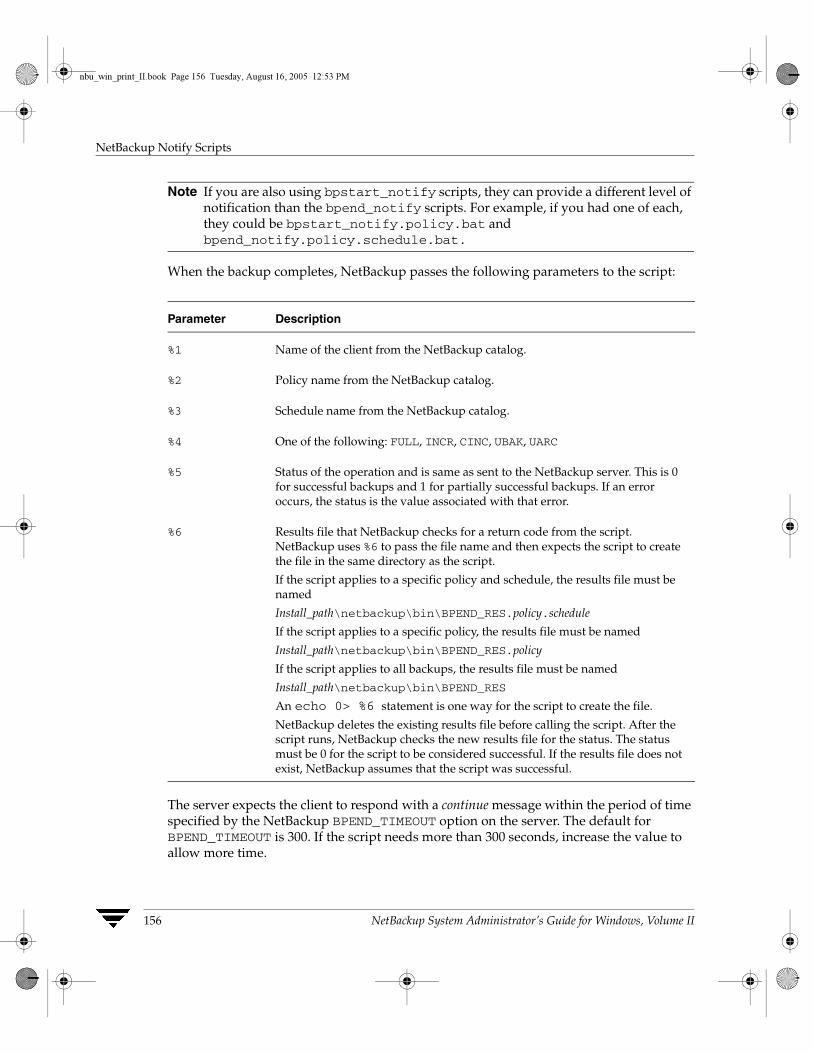
NetBackup Notify Scripts
156 NetBackup System Administrator’s Guide for Windows, Volume II
Note If you are also using bpstart_notify scripts, they can provide a different level of notification than the bpend_notify scripts. For example, if you had one of each, they could be bpstart_notify.policy.bat and bpend_notify.policy.schedule.bat.
When the backup completes, NetBackup passes the following parameters to the script:
The server expects the client to respond with a continue message within the period of time specified by the NetBackup BPEND_TIMEOUT option on the server. The default for BPEND_TIMEOUT is 300. If the script needs more than 300 seconds, increase the value to allow more time.
Parameter Description
%1 Name of the client from the NetBackup catalog.
%2 Policy name from the NetBackup catalog.
%3 Schedule name from the NetBackup catalog.
%4 One of the following: FULL, INCR, CINC, UBAK, UARC
%5 Status of the operation and is same as sent to the NetBackup server. This is 0 for successful backups and 1 for partially successful backups. If an error occurs, the status is the value associated with that error.
%6 Results file that NetBackup checks for a return code from the script. NetBackup uses %6 to pass the file name and then expects the script to create the file in the same directory as the script.
If the script applies to a specific policy and schedule, the results file must be named
Install_path\netbackup\bin\BPEND_RES.policy.schedule
If the script applies to a specific policy, the results file must be named
Install_path\netbackup\bin\BPEND_RES.policy
If the script applies to all backups, the results file must be named
Install_path\netbackup\bin\BPEND_RES
An echo 0> %6 statement is one way for the script to create the file.
NetBackup deletes the existing results file before calling the script. After the script runs, NetBackup checks the new results file for the status. The status must be 0 for the script to be considered successful. If the results file does not exist, NetBackup assumes that the script was successful.
nbu_win_print_II.book Page 156 Tuesday, August 16, 2005 12:53 PM

Chapter 4, Reference Topics
NetBackup Notify Scripts
157
For Windows 2000 clients, the bpend_notify script can use the following environment variables for the support of multiple data streams:
STREAM_NUMBER indicates the stream number. The first stream started from a policy, client, and schedule will be 1. A value of 0, indicates that multiple data streams is not enabled.
STREAM_COUNT specifies the total number of streams to be generated from this policy, client, and schedule.
STREAM_PID is the pid (process ID) number of bpbkar.
dbbackup_notify.cmd
The dbbackup_notify.cmd script is called each time NetBackup completes an offline, cold catalog backup. The script runs on the server which receives the data for the offline catalog backup. NetBackup passes the following parameters to this script:
For example:
dbbackup_notify.cmd DISK /disk1/bpsync1 SUCCESS
dbbackup_notify.cmd OPTICAL AA0001 FAIL
dbbackup_notify.cmd TAPE XYZ047 SUCCESS
You must be able to identify the most recent catalog backup. Therefore, consider modifying this script to produce a printed copy of the media ID to which the catalog backup was done.
Note Applies to NetBackup Enterprise Server only.If the NetBackup catalog files are backed up to a UNIX disk storage unit that is being managed by Storage Migrator, the dbbackup_notify script notifies Storage Migrator to perform migration as quickly as possible. The script does not, however, have commands to force Storage Migrator to back up its own catalog after a backup of the NetBackup catalog. You must modify the script to meet site requirements for backup of the Storage Migrator catalog.
Parameter Description
device Device type the backup was written to.
vsn_or_path Volume serial number (for tape) or path (for disk) used for the backup.
status Specifies whether the backup was successful and must have a value of either SUCCESS or FAIL.
nbu_win_print_II.book Page 157 Tuesday, August 16, 2005 12:53 PM
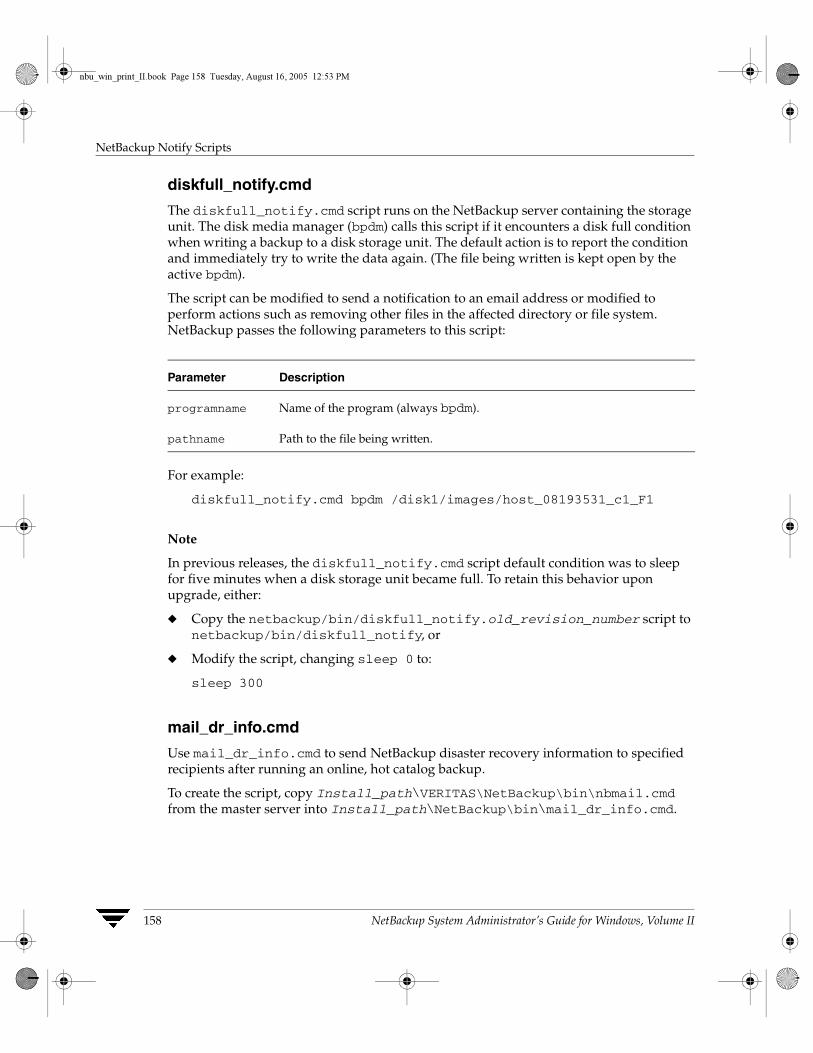
NetBackup Notify Scripts
158 NetBackup System Administrator’s Guide for Windows, Volume II
diskfull_notify.cmd
The diskfull_notify.cmd script runs on the NetBackup server containing the storage unit. The disk media manager (bpdm) calls this script if it encounters a disk full condition when writing a backup to a disk storage unit. The default action is to report the condition and immediately try to write the data again. (The file being written is kept open by the active bpdm).
The script can be modified to send a notification to an email address or modified to perform actions such as removing other files in the affected directory or file system. NetBackup passes the following parameters to this script:
For example:
diskfull_notify.cmd bpdm /disk1/images/host_08193531_c1_F1
Note
In previous releases, the diskfull_notify.cmd script default condition was to sleep for five minutes when a disk storage unit became full. To retain this behavior upon upgrade, either:
◆ Copy the netbackup/bin/diskfull_notify.old_revision_number script to netbackup/bin/diskfull_notify, or
◆ Modify the script, changing sleep 0 to:
sleep 300
mail_dr_info.cmd
Use mail_dr_info.cmd to send NetBackup disaster recovery information to specified recipients after running an online, hot catalog backup.
To create the script, copy Install_path\VERITAS\NetBackup\bin\nbmail.cmd from the master server into Install_path\NetBackup\bin\mail_dr_info.cmd.
Parameter Description
programname Name of the program (always bpdm).
pathname Path to the file being written.
nbu_win_print_II.book Page 158 Tuesday, August 16, 2005 12:53 PM
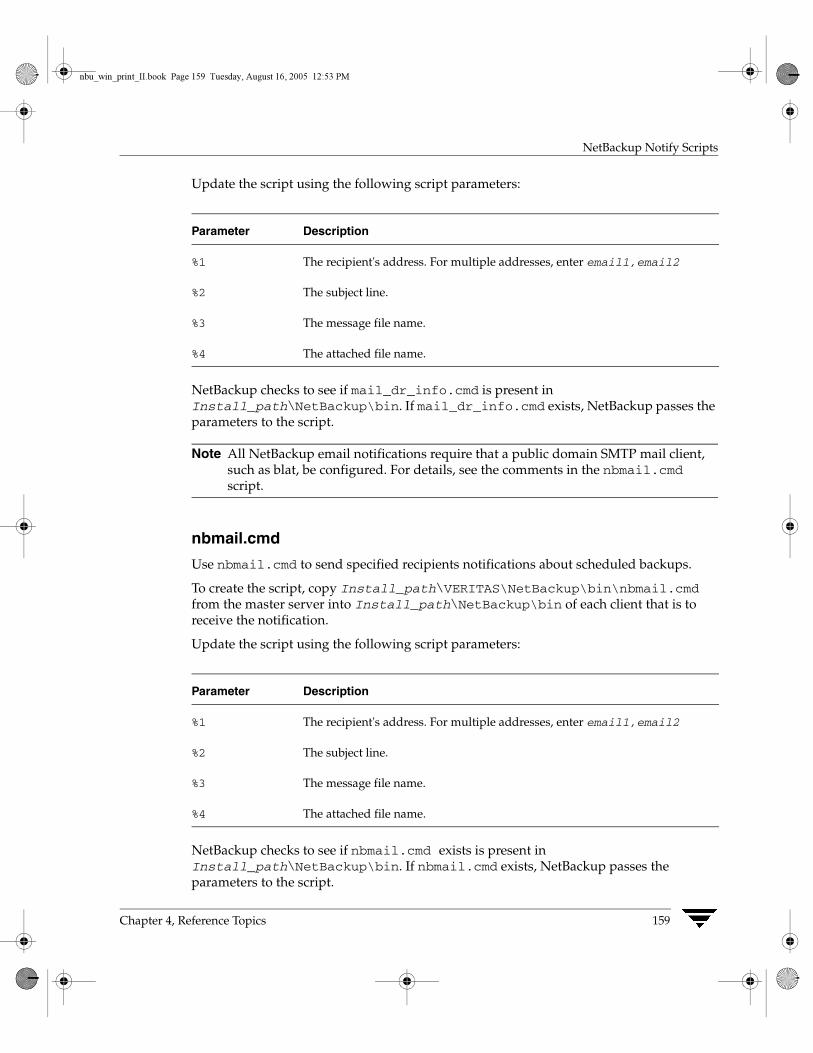
Chapter 4, Reference Topics
NetBackup Notify Scripts
159
Update the script using the following script parameters:
NetBackup checks to see if mail_dr_info.cmd is present in Install_path\NetBackup\bin. If mail_dr_info.cmd exists, NetBackup passes the parameters to the script.
Note All NetBackup email notifications require that a public domain SMTP mail client, such as blat, be configured. For details, see the comments in the nbmail.cmd script.
nbmail.cmd
Use nbmail.cmd to send specified recipients notifications about scheduled backups.
To create the script, copy Install_path\VERITAS\NetBackup\bin\nbmail.cmd from the master server into Install_path\NetBackup\bin of each client that is to receive the notification.
Update the script using the following script parameters:
NetBackup checks to see if nbmail.cmd exists is present in Install_path\NetBackup\bin. If nbmail.cmd exists, NetBackup passes the parameters to the script.
Parameter Description
%1 The recipient's address. For multiple addresses, enter email1,email2
%2 The subject line.
%3 The message file name.
%4 The attached file name.
Parameter Description
%1 The recipient's address. For multiple addresses, enter email1,email2
%2 The subject line.
%3 The message file name.
%4 The attached file name.
nbu_win_print_II.book Page 159 Tuesday, August 16, 2005 12:53 PM
NetBackup Notify Scripts
160 NetBackup System Administrator’s Guide for Windows, Volume II
Note All NetBackup email notifications require that a public domain SMTP mail client, such as blat, be configured. For details, see the comments in the nbmail.cmd script.
parent_end_notify.cmd
NetBackup calls the parent_end_notify.cmd script each time a parent job ends.
To create the script, copy Install_path\VERITAS\NetBackup\bin\goodies\parent_end_notify.cmd from the master server into Install_path\NetBackup\bin on the client.
Update the script using the following parameters:
parent_start_notify.cmd
NetBackup calls the parent_start_notify.cmd script each time a parent job starts.
To create the script, copy Install_path\VERITAS\NetBackup\bin\goodies\parent_start_notify.cmd from the master server into Install_path\NetBackup\bin on the client.
Update the script using the following parameters:
Parameter Description
clientname Name of the client from the NetBackup catalog.
policyname Policy name from the NetBackup catalog.
schedname Schedule name from the NetBackup catalog.
schedtype One of the following: FULL, INCR (differential incremental), CINC (cumulative incremental), UBAK, UARC
status Exit code for the entire backup job.
streamnumber The stream number for a parent job is always -1.
Parameter Description
clientname Name of the client from the NetBackup catalog.
nbu_win_print_II.book Page 160 Tuesday, August 16, 2005 12:53 PM
Chapter 4, Reference Topics
NetBackup Notify Scripts
161
restore_notify.cmd
Note Applies to NetBackup Enterprise Server only.If the files are restored to a UNIX disk storage unit that is being managed by Storage Migrator, the restore_notify script notifies Storage Migrator to perform migration as quickly as possible after the restore is complete.
The restore_notify.cmd script runs on the server that has the storage unit. The NetBackup tape or disk manager (bptm or bpdm) calls the script when it is finished sending data to the client during a restore (regardless of whether data is actually sent). NetBackup passes the following parameters to this script:
For example:
restore_notify.cmd bptm bilbo_0695316589 duplication
policyname Policy name from the NetBackup catalog.
schedname Schedule name from the NetBackup catalog.
schedtype One of the following: FULL, INCR (differential incremental), CINC (cumulative incremental), UBAK, UARC
status Exit code for the entire backup job.
streamnumber The stream number for a parent job is always -1.
Parameter Description
programname Name of the program doing the restore or other read operation.
pathname Path to the backup name or path.
operation One of the following: restore, verify, duplication, import
Parameter Description
nbu_win_print_II.book Page 161 Tuesday, August 16, 2005 12:53 PM
NetBackup Notify Scripts
162 NetBackup System Administrator’s Guide for Windows, Volume II
session_notify.cmd
The session_notify.cmd script runs on the master server and is called at the end of a backup session if at least one scheduled backup has succeeded. NetBackup passes no parameters to this script. Scheduling is suspended until this script completes, thus no other backups can start until that time.
session_start_notify.cmd
The session_start_notify.cmd script runs on the master server. When a set of backups is due to run, NetBackup calls this script to do any site specific processing prior to starting the first backup. NetBackup passes no parameters to this script.
userreq_notify.cmd
The userreq_notify.cmd script runs on the master server and is called by NetBackup each time a request is made to:
◆ List files that are in backups or archives
◆ Start a backup, archive, or restore
You can alter this script to gather information about user requests to NetBackup. NetBackup passes the following parameters to this script.
For example:
userreq_notif.cmd backup mercury jdoe
userreq_notify.cmd archive mercury jdoe
userreq_notify.cmd manual_backup mercury jdoe
userreq_notify.cmd restore mercury jdoe
userreq_notify.cmd list mercury jdoe
Parameter Description
action Defines the action and can have the following values: backup, archive, manual_backup, restore, list
clientname Defines the client name.
userid Defines the user ID.
nbu_win_print_II.book Page 162 Tuesday, August 16, 2005 12:53 PM
163
UNIX Reference Topics 5This chapter contains information that pertains specifically to administering UNIX NetBackup clients or media servers from a Windows NetBackup master server.
Most administrative tasks on the UNIX systems can be performed by using the NetBackup administration interface on a Windows NetBackup server or administration client.
This chapter includes the following sections:
◆ “Cross Mount Points” on page 164
◆ “Exclude and Include Lists on UNIX Clients” on page 166
◆ “Schedules for User Backups or Archives” on page 170
nbu_win_print_II.book Page 163 Tuesday, August 16, 2005 12:53 PM
Cross Mount Points
164 NetBackup System Administrator’s Guide for Windows, Volume II
Cross Mount PointsThe following information applies specifically to UNIX clients.
Note The Cross Mount Points option applies only to certain policy types and NetBackup allows you to select it in only those instances.
The Cross Mount Points option controls whether NetBackup will cross file system boundaries during a backup or archive on UNIX clients or whether NetBackup enters volume mount points during a backup or archive on Windows clients.
◆ If you select Cross Mount Points, NetBackup backs up or archives all files and directories in the selected path, regardless of the file system. For example, if you specify root (/) as the file path, NetBackup backs up root (/) and all files and directories under it in the tree. Usually, this means all the client’s files, other than those available through NFS.
◆ If you clear Cross Mount Points, NetBackup backs up or archives only files and directories that are in the same file system as the selected file path. This lets you back up a file path such as root (/) without backing up all the file systems that are mounted on it (for example, /usr and /home).
Notes on Cross Mount Points
◆ Cross Mount Points has no effect on UNIX raw partitions. If the raw partition that is being backed up is the root partition and has mount points for other file systems, the other file systems are not backed up even if you select Cross Mount Points.
◆ Do not use Cross Mount Points in policies where you use the ALL_LOCAL_DRIVES directive in the backup selection list.
nbu_win_print_II.book Page 164 Tuesday, August 16, 2005 12:53 PM
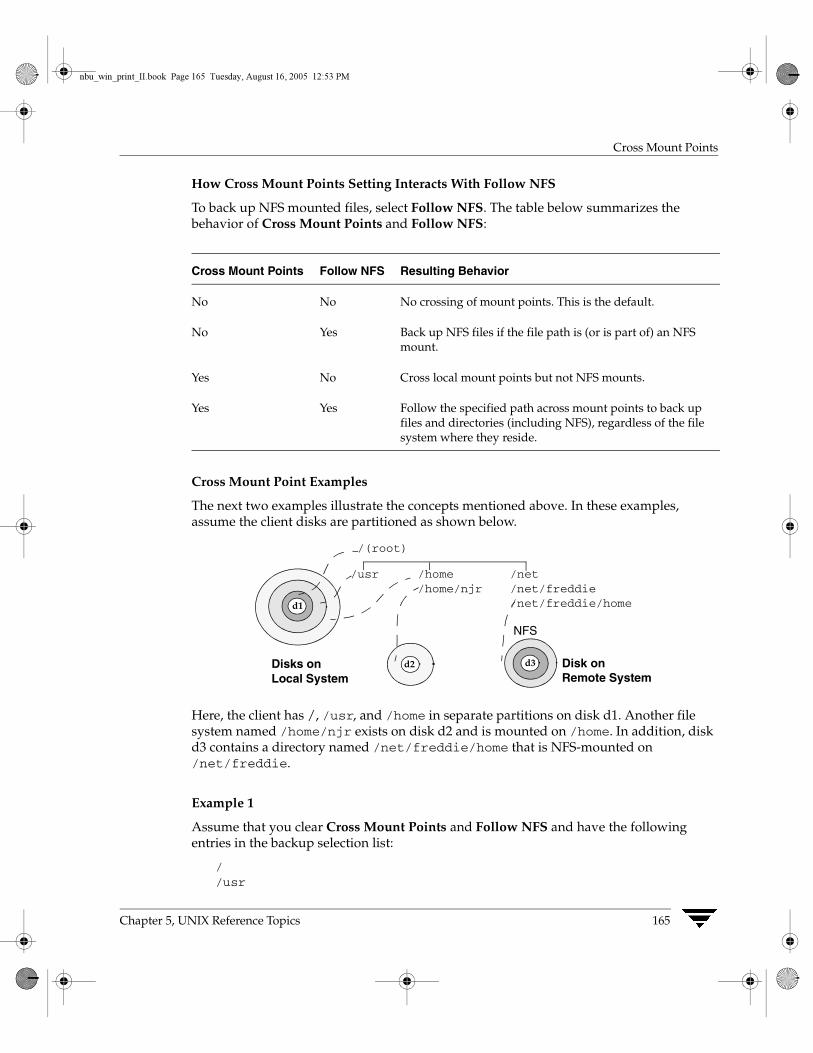
Chapter 5, UNIX Reference Topics
Cross Mount Points
165
How Cross Mount Points Setting Interacts With Follow NFS
To back up NFS mounted files, select Follow NFS. The table below summarizes the behavior of Cross Mount Points and Follow NFS:
Cross Mount Point Examples
The next two examples illustrate the concepts mentioned above. In these examples, assume the client disks are partitioned as shown below.
Here, the client has /, /usr, and /home in separate partitions on disk d1. Another file system named /home/njr exists on disk d2 and is mounted on /home. In addition, disk d3 contains a directory named /net/freddie/home that is NFS-mounted on /net/freddie.
Example 1
Assume that you clear Cross Mount Points and Follow NFS and have the following entries in the backup selection list:
//usr
Cross Mount Points Follow NFS Resulting Behavior
No No No crossing of mount points. This is the default.
No Yes Back up NFS files if the file path is (or is part of) an NFS mount.
Yes No Cross local mount points but not NFS mounts.
Yes Yes Follow the specified path across mount points to back up files and directories (including NFS), regardless of the file system where they reside.
d1
d2 d3Disks on Local System
Disk on Remote System
/(root)
/usr /home/home/njr
/net/net/freddie/net/freddie/home
NFS
nbu_win_print_II.book Page 165 Tuesday, August 16, 2005 12:53 PM

Exclude and Include Lists on UNIX Clients
166 NetBackup System Administrator’s Guide for Windows, Volume II
/home
In this case, NetBackup considers only the directories and files that are in the same file system as the backup selection list entry it is processing. It does not back up /home/njr or /net/freddie/home.
Example 2
Assume that you select Cross Mount Points and Follow NFS and include only / in the backup selection list.
In this case, NetBackup backs up all the files and directories in the tree, including those under /home/njr and /net/freddie/home.
To not back up everything, leave / out of the list and separately list the files and directories you want to include. The following backup selection list backs up only /usr and individual files under /:
/usr/individual_files_under_root
Exclude and Include Lists on UNIX Clients
Note Exclude and include lists do not apply to user backups and archives.
On UNIX clients, you create the exclude and include lists in the following files on the client:
/usr/openv/netbackup/exclude_list
/usr/openv/netbackup/include_list
The following topics explain the rules for creating these lists on UNIX clients.
Creating an Exclude List on a UNIX Client
If you create a /usr/openv/netbackup/exclude_list file on a UNIX client, NetBackup uses the contents of the file as a list of patterns to skip during automatic full and incremental backups.
Note Exclude and include lists do not apply to user backups and archives.
The following types of files typically appear in an exclude list:
◆ *.o files
◆ core files
nbu_win_print_II.book Page 166 Tuesday, August 16, 2005 12:53 PM

Chapter 5, UNIX Reference Topics
Exclude and Include Lists on UNIX Clients
167
◆ a.out files
◆ Files prefixed or suffixed by ~ (backups for editors)
◆ Files and directories under /tmp, /usr/tmp
◆ Man pages
◆ Software that you can restore from original installation tapes
◆ Automounted directories
◆ CD-ROM file systems
◆ NetBackup automatically excludes the following file system types:
◆ mntfs (Solaris)
◆ proc (all UNIX platforms)
◆ cdrom (all UNIX platforms)
◆ cachefs (AIX, Solaris, SGI, UnixWare)
Note VERITAS suggests that you always specify automounted directories and CD-ROM file systems in the exclude list. Otherwise, if they are not mounted at the time of a backup, NetBackup must wait for a timeout before proceeding.
Check with users before excluding any files from their backups.
Syntax Rules
The following syntax rules apply to exclude lists:
◆ Blank lines or lines beginning with a pound sign (#) are ignored.
◆ Only one pattern per line is allowed.
◆ The following special or wildcard characters are recognized:
[ ]
?
*
{ }
◆ To use special or wildcard characters literally (that is, as non-wildcard characters), precede them with a backslash (\). For example, assume the brackets in the following are to be used literally
/home/abc/fun[ny]name
In the exclude list, precede them with a backslash as in
nbu_win_print_II.book Page 167 Tuesday, August 16, 2005 12:53 PM
Exclude and Include Lists on UNIX Clients
168 NetBackup System Administrator’s Guide for Windows, Volume II
/home/abc/fun\[ny\]name
Note A backslash (\) acts as an escape character only when it precedes a special or wildcard character as in the above example. This means that NetBackup normally interprets a backslash literally and it is a legal character to use in pathnames.
◆ If you exclude all files in the backup selections list by using / or * or both symbols together (/*), NetBackup backs up only what is specified by full path names in the include list.
◆ Spaces are considered legal characters. Do not include extra spaces unless they are part of the file name.
For example, if you want to exclude a file named
/home/testfile (with no extra space character at the end)
and your exclude list entry is
/home/testfile (with an extra space character at the end)
NetBackup cannot find the file until you delete the extra space from the end of the file name.
◆ End a file path with / to exclude only directories with that path name (for example, /home/test/). If the pattern does not end in / (for example, /usr/test), NetBackup excludes both files and directories with that path name.
◆ To exclude all files with a given name, regardless of their directory path, just enter the name without a preceding slash. For example:
test
rather than
/test
This is equivalent to prefixing the file pattern with
/
/*/
/*/*/
/*/*/*/
and so on.
◆ Do not use patterns with links in the names. For example, assume /home is a link to /usr/home and /home/doc is in the exclude list. The file is still backed up in this case because the actual directory path, /usr/home/doc, does not match the exclude list entry, /home/doc.
nbu_win_print_II.book Page 168 Tuesday, August 16, 2005 12:53 PM
Chapter 5, UNIX Reference Topics
Exclude and Include Lists on UNIX Clients
169
Example of an Exclude List
In this example, an exclude list contains the following entries:
# this is a comment line
/home/doe/john
/home/doe/abc/
/home/*/test
/*/temp
core
Given the exclude list above, the following files and directories are excluded from automatic backups:
◆ The file or directory named /home/doe/john.
◆ The directory /home/doe/abc (because the exclude entry ends with /).
◆ All files or directories named test that are two levels below home.
◆ All files or directories named temp that are two levels below the root directory.
◆ All files or directories named core at any level.
Exclude Lists for Specific Policies or Schedules
NetBackup allows you to create an exclude list for a specific policy or a policy and schedule combination. To do this, create an exclude_list file with a .policyname or .policyname.schedulename suffix. The following are two examples for a policy named wkstations that contains a schedule named fulls:
/usr/openv/netbackup/exclude_list.wkstations/usr/openv/netbackup/exclude_list.wkstations.fulls
The first file affects all scheduled backups in the policy named wkstations. The second file affects backups only when the schedule is named fulls.
For a given backup, NetBackup uses a single exclude list—the list containing the most specific name. For example, if there are files named:
exclude_list.wkstations and exclude_list.wkstations.fulls
NetBackup uses only:
exclude_list.wkstations.fulls
nbu_win_print_II.book Page 169 Tuesday, August 16, 2005 12:53 PM

Schedules for User Backups or Archives
170 NetBackup System Administrator’s Guide for Windows, Volume II
Creating an Include List on a UNIX Client
To add back in files that you eliminate with the exclude list, create a /usr/openv/netbackup/include_list file. The same syntax rules apply as explained previously for the exclude list.
Note Exclude and include lists do not apply to user backups and archives.
To illustrate the use of an include list, we use the example from the previous discussion. The exclude list in that example causes NetBackup to omit all files or directories named test from all directories beneath /home/*/test.
In this case, add back in a file named /home/jdoe/test by creating a /usr/openv/netbackup/include_list file on the client and adding the following to it:
# this is a comment line/home/jdoe/test
To create an include list for a specific policy or policy and schedule combination, use a .policyname or .policyname.schedulename suffix. The following are two examples of include list names for a policy named wkstations that contains a schedule named fulls.
/usr/openv/netbackup/include_list.workstations/usr/openv/netbackup/include_list.workstations.fulls
The first file affects all scheduled backups in the policy named workstations. The second file affects backups only when the schedule is named fulls.
For a given backup, NetBackup uses only one include list and that is the one with the most specific name. For example, assume there are files such as the following:
include_list.workstations and include_list.workstations.fulls
In such a case, NetBackup uses only the following:
include_list.workstations.fulls
Schedules for User Backups or ArchivesTo have NetBackup use a specific policy and schedule for user backups or archives of a UNIX client, add the following options to the /usr/openv/NetBackup/bp.conf file.
◆ BPARCHIVE_POLICY
◆ BPARCHIVE_SCHED
◆ BPBACKUP_POLICY
◆ BPBACKUP_SCHED
nbu_win_print_II.book Page 170 Tuesday, August 16, 2005 12:53 PM

Chapter 5, UNIX Reference Topics
Schedules for User Backups or Archives
171
These options can also be added to a user’s $HOME/bp.conf file on the client.
nbu_win_print_II.book Page 171 Tuesday, August 16, 2005 12:53 PM

Schedules for User Backups or Archives
172 NetBackup System Administrator’s Guide for Windows, Volume II
nbu_win_print_II.book Page 172 Tuesday, August 16, 2005 12:53 PM
173
Using NetBackup With AFS 6This chapter explains how to install, configure, and use NetBackup to back up AFS file servers. (AFS is an acronym for Andrew File System.)
Note AFS is no longer available from IBM and IBM has announced that AFS support will end on April 30, 2006. AFS was not tested with NetBackup 6.0 clients and will not be supported. AFS will continue to be supported with NetBackup 5.x clients running under 5.x or 6.0 servers.
Installation
System Requirements◆ AFS file servers that can be NetBackup AFS clients:
◆ Solaris 7 and HP-UX 11.0, or IBM AIX 4.3.3 platforms
◆ NetBackup 5.0 or 5.1 clients
◆ AFS level 3.6 or later installed
Server and Client InstallationThe NetBackup software needed to support AFS is automatically installed with the server and client.
ConfigurationTo configure backups for NetBackup AFS clients, add an AFS policy to the NetBackup configuration on the master server. Except for the differences mentioned here, the requirements are the same as for other NetBackup policies. To back up files and directories that are not in AFS volumes, create separate policies.
nbu_win_print_II.book Page 173 Tuesday, August 16, 2005 12:53 PM
Configuration
174 NetBackup System Administrator’s Guide for Windows, Volume II
General Policy AttributesWhen selecting the general attributes for the policy, specify AFS as the policy type.
Client ListIn the client list, specify the names of the AFS file servers to be backed up. These systems must have the NetBackup client installed.
Backup Selections In the backup selection list for the AFS policy, specify the AFS volumes and (or) vice partitions to be backed up by the schedules in this policy. The following example shows both volumes and vice partitions:
user.abc
/vicepb
/vicepc/user.*
In this instance, NetBackup backs up the following:
◆ The volume user.abc
◆ All volumes in vice partition vicepb
◆ All volumes in vicepc that begin with user.
When the list includes a vice partition, all the volumes in the partition are backed up one at a time.
Note NetBackup supports the maximum AFS 3.6 volume size of 8 GB.
Backup Selection List DirectivesThe following directives can be in the backup selection list in an AFS policy:
◆ CREATE_BACKUP_VOLUMES
This directive causes NetBackup to create .backup volumes prior to performing the backup. If a .backup volume already exists, NetBackup overwrites it, thus creating a more recent copy.
Because NetBackup backs up only the .backup copy of AFS volumes, this directive is useful if an automated mechanism is not in place to create .backup copies. Creating .backup copies also ensures that the backups include the latest changes.
nbu_win_print_II.book Page 174 Tuesday, August 16, 2005 12:53 PM
Chapter 6, Using NetBackup With AFS
Configuration
175
Caution If an automated mechanism is not in place to create .backup copies, include the CREATE_BACKUP_VOLUMES directive in the backup selection list or AFS volumes are not backed up.
◆ REMOVE_BACKUP_VOLUMES
This directive causes NetBackup to remove .backup volumes after performing the backup. The directive removes .backup volumes created using the CREATE_BACKUP_VOLUMES directive or created by another mechanism.
◆ SKIP_SMALL_VOLUMES
This directive allows skipping small or empty volumes during backups. For example:
SKIP_SMALL_VOLUMES=5
(do not include spaces on either side of the = sign)
In this example, NetBackup skips volumes ≤ 5 KB. Specify any number for the volume size.
If no number is specified, the size defaults to 2 KB. For example:
SKIP_SMALL_VOLUMES
The following rules also apply to the directives:
◆ Directives must be all upper case.
◆ Directives can be anywhere in the backup selection list but it is best to place directives at the top. For example:
CREATE_BACKUP_VOLUMES
SKIP_SMALL_VOLUMES
/user.abc
/vicepb
Regular ExpressionsNetBackup supports regular expressions in backup selection list entries. These are useful in order to perform the following actions:
◆ Add or move volumes without having to change the backup selection list.
◆ Add vice partitions without having to change the backup selection list.
◆ Split volumes and (or) vice partitions on AFS file servers into groups that can be backed up by separate policies. This allows concurrent backups or multiplexing.
The following examples use regular expressions:
nbu_win_print_II.book Page 175 Tuesday, August 16, 2005 12:53 PM
Backups and Restores
176 NetBackup System Administrator’s Guide for Windows, Volume II
user.[a-m]*
/vicep[a-c]
Exclude and Include ListsExclude lists can be created on the client in order to exclude certain specific volumes from automatic backups. An exclude list cannot contain vice partitions but it can contain individual volumes within a vice partition.
An include list adds back volumes specified in the exclude list. For example, if a range of volumes is excluded, the include list can add back specific volumes within the range.
Backups and Restores
Backups
Note User backups or archives of AFS volumes are not allowed.
Automatic Backup
The most convenient way to back up NetBackup for AFS clients is to configure an AFS policy and set up schedules for automatic, unattended backups.
Manual Backup
The administrator on the master server can use the NetBackup Administration Console to manually run a backup for an AFS policy. For information about manual backups, see Chapter 3 of the NetBackup System Administrator’s Guide, Volume I.
RestoresAll restores must be performed by the administrator either on the NetBackup AFS client or the master server. Restores are performed on the basis of volumes. To restore a vice partition, the administrator must select all the volumes in that partition.
Caution If the Overwrite Existing Files option is selected, the volumes are overwritten and all changes or files created since the last backup are lost.
nbu_win_print_II.book Page 176 Tuesday, August 16, 2005 12:53 PM
Chapter 6, Using NetBackup With AFS
Backups and Restores
177
Restore From the NetBackup for AFS Client
An administrator on a NetBackup AFS client (AFS file server) can use the NetBackup Backup, Archive, and Restore interface to restore volumes to that client. It is also possible to perform a redirected restore. A redirected restore will restore a volume to another volume or vice partition.
Restore From the NetBackup Master Server
The administrator can use the NetBackup Backup, Archive, and Restore interface on the master server to restore volumes to the same NetBackup AFS client (AFS file server), or do a redirected restore. This is called a server-directed restore. For instructions, see the online help in the Backup, Archive, and Restore interface.
Notes About Restores
◆ If the administrator does not specify Overwrite Existing Files or an alternate name for the volume, then NetBackup adds an R to the name of the restored volume as follows:
◆ If the volume name is less than 22 characters long, NetBackup adds a leading R to the name of the restored volume. For example:
If the volume name is:
/AFS/shark/vicepa/user.abc
The restored name is:
/AFS/shark/vicepa/Ruser.abc
◆ If the volume name is 22 characters long (maximum allowable length for a volume name), the first character of the original volume name is replaced with an R. For example:
If the volume name is:
/AFS/shark/vicepa/engineering.documents1
The restored name is:
/AFS/shark/vicepa/Rngineering.documents1
◆ If restoring to an alternate path and specify an existing volume, select the Overwrite Existing Files option for the restore to succeed. In this case, the entire volume is overwritten. If Overwrite Existing Files option is not selected, the restore fails.
◆ When restoring a volume to an alternate vice partition, the vice partition must exist or the restore fails.
nbu_win_print_II.book Page 177 Tuesday, August 16, 2005 12:53 PM
Troubleshooting
178 NetBackup System Administrator’s Guide for Windows, Volume II
TroubleshootingThe following sections provide tips and information for troubleshooting problems with NetBackup for AFS. See the NetBackup Troubleshooting Guide for UNIX and Windows for overall troubleshooting information.
Troubleshooting BackupsTo increase the level of detail in the logs:
◆ Add the VERBOSE option to the /usr/openv/netbackup/bp.conf file on the NetBackup for AFS client.
◆ Create the following debug log directory on the NetBackup for AFS client:
/usr/openv/netbackup/logs/bpbkar
If the AFS backup terminates with a status code of 9 (an extension package is needed, but was not installed), it means that NetBackup AFS client software was not properly installed on the client.
If the AFS backup terminates with a status code of 78 (afs/dfs command failed), it indicates an AFS vos command failure. The NetBackup Problems Report provides additional information on why the command failed. The bpbkar debug log shows the command that was run. Run the vos command manually to attempt to duplicate the problem.
Also, examine the /usr/openv/netbackup/listvol file on the NetBackup client for irregularities. The vos listvol command can be very demanding on system resources so NetBackup caches the output of the vos listvol command in this file. If the cached listvol file was created less than four hours prior to the backup, NetBackup uses it to obtain the list of volumes instead of running another vos listvol command.
Troubleshooting RestoresIf the restore of an AFS volume fails, check the restore process log for additional information. If a vos restore command failure is indicated, create a /usr/openv/netbackup/logs/tar debug log directory, retry the operation, and check the resulting log to see that the vos restore command was run.
nbu_win_print_II.book Page 178 Tuesday, August 16, 2005 12:53 PM
179
Intelligent Disaster Recovery 7Intelligent Disaster Recovery (IDR) for Windows is a fully-automated disaster recovery solution that allows you to recover your Windows computers quickly and efficiently after a disaster. The IDR wizards guide you in preparing for disaster recovery and in recovering your computer to its pre-disaster state.
This chapter contains the following sections:
◆ “Changes for NetBackup 6.0” on page 180 explains the limited supported for IDR in NetBackup 6.0.
◆ “Supported Windows Editions” on page 180 documents the Windows versions supported by IDR.
◆ “Overview of IDR Use” on page 181 explains the main steps involved in using the disaster recovery software.
◆ “About the DR Files” on page 182 introduces the DR (Disaster Recovery) files and explains their importance in disaster recovery.
◆ “Configuring NetBackup Policies for IDR” on page 183 explains how to configure policies that contain clients that are using IDR.
◆ “Backing Up the System to be Protected” on page 184 explains that you must backup the system before you create the bootable media used in recovery.
◆ “Creating IDR Media” on page 184 explains how to use this wizard to prepare the bootable media that is used to recover your data.
◆ “Updating IDR Media” on page 190 explains how and when to update the IDR media so it is always ready when you need it.
◆ “Recovering Your Computer” on page 193 explains how to perform disaster recovery.
◆ “Notes on Recovering Specific Platforms” on page 200 provide information on recovering data on specific types of platforms.
◆ “IDR Frequently Asked Questions” on page 201 answers questions that are frequently asked about IDR.
nbu_win_print_II.book Page 179 Tuesday, August 16, 2005 12:53 PM
Changes for NetBackup 6.0
180 NetBackup System Administrator’s Guide for Windows, Volume II
Changes for NetBackup 6.0Bare Metal Restore replaces Intelligent Disaster Recovery for NetBackup 6.0. To protect NetBackup 6.0 clients, use the Bare Metal Restore option for NetBackup.
Intelligent Disaster Recovery cannot be used to protect or recover NetBackup 6.0 client systems. However, you can use Intelligent Disaster Recovery on NetBackup 6.0 master servers as follows:
◆ To protect NetBackup 5.1, 5.0, and 4.5 clients.
◆ To generate bootable media (except for NetBackup 4.5 clients).
If policies on NetBackup 6.0 master servers are configured to collect disaster recovery information and those policies protect NetBackup 6.0 clients, the jobs of those clients will complete with a status of 1 (partially successful) because the NetBackup server will attempt to collect disaster recovery information from those clients and will not be able to do so.
If you use IDR with NetBackup 6.0 to protect NetBackup 5.1, 5.0 and 4.5 clients, the NetBackup master server must be licensed for IDR.
Supported Windows EditionsIDR allows you to protect and recover the following Windows systems:
◆ Windows NT 4.0 Enterprise Server, Small Business Server, and Workstation editions with Service Pack 3 or later
◆ Windows 2000 Server, Advanced Server, and Professional
◆ Windows XP 32-bit versions
◆ Windows Server 2003 (Standard Edition, Enterprise Edition, and Web Edition)
Requirements for IDRThe following are the requirements for IDR:
◆ NetBackup 5.1, 5.0, or 4.5 client software must be installed on the Windows systems that you want to protect. The IDR software is installed automatically when that client software is installed. IDR is not installed on NetBackup 6.0 client systems. The IDR software is not required (and cannot be installed) on UNIX systems.
◆ The NetBackup master server that collects the disaster recovery information must be licensed for IDR. The NetBackup master server that collects the disaster recovery information can reside on either a Windows or UNIX system.
nbu_win_print_II.book Page 180 Tuesday, August 16, 2005 12:53 PM
Chapter 7, Intelligent Disaster Recovery
Overview of IDR Use
181
◆ The IDR Preparation Wizard that runs on the client system can only be used to generate recovery media for systems that have the same version of IDR software installed.
◆ The machine to be protected must be an Intel system running a supported Windows operating system. See “Supported Windows Editions” on page 180.
◆ At least 40 MB of hard drive space to hold the minimal recovery system on the machine to be protected.
◆ Sufficient space on the machine to be protected for the data that is being restored.
◆ Sufficient swap space on the machine to be protected to support your system’s RAM.
For example, if you have 128 MB of RAM, the minimum swap used is 128 MB. For a 2 GB partition that stores 1.8 GB of data, the required hard drive space for that partition is 1.8 GB plus 128 MB plus 40 MB, for a total of 1.97 GB.
◆ The partition on the first physical drive on the machine to be protected must be the boot partition and must also be labeled c:\.
◆ A protected computer must use a network card that does not require a Windows service pack to be installed. For a list of cards that have passed Microsoft compatibility tests without service packs, see the “Network LAN Adapters” section of the “Hardware Compatibility List” that comes with the Microsoft Windows software.
◆ The driver required by the CD-ROM drive on a protected computer must be supported by Windows. Windows NT systems: If the IDR Preparation Wizard detects that the driver on the system being protected is different than the driver on the Windows NT installation CD, you can choose which driver to use. VERITAS recommends that you use the SCSI drivers currently installed on the computer being protected because the drivers on the Windows CD may not be up to date. If you have an IDE hard disk greater than 8 GBs you must use the SCSI driver currently installed on the system.
Overview of IDR UseUsing IDR involves the following steps:
◆ NetBackup 5.1, 5.0, or 4.5 client software must be installed on the Windows systems that you want to protect. The IDR software is installed automatically when that client software is installed. IDR is not installed on NetBackup 6.0 client systems. The IDR software is not required (and cannot be installed) on UNIX systems.
◆ Licensing. To activate IDR for backups, you must enter an IDR license key on the master server.
nbu_win_print_II.book Page 181 Tuesday, August 16, 2005 12:53 PM
About the DR Files
182 NetBackup System Administrator’s Guide for Windows, Volume II
◆ Configuration. On the NetBackup master server, select the Collect disaster recovery information general attribute when setting up the policy configuration for protected clients. You can use a NetBackup master server on either a Windows or UNIX system to collect disaster recovery information.
◆ Backup. An initial full backup must be completed of a protected system before you create IDR media. Also, you should backup your computer frequently and update the DR files often.
◆ Preparing the IDR media. The IDR Preparation Wizard on the client system guides you through the preparation of media used to recover protected systems.
◆ Recovery. A Disaster Recovery Wizard guides you through the steps for rebuilding the protected system and then restoring data to that system. The systems to be protected should have their data backed up regularly by NetBackup.
The installation, configuration, backup, and media preparation steps are prerequisites for successfully recovering a Windows system through a network connection to a NetBackup server.
About the DR FilesThe disaster recovery (DR) files are mentioned frequently in this chapter and in the screens that you see in the wizards. A DR file contains specific information about the computer you are protecting, including:
◆ Hard disk partition information.
◆ Network interface card information.
◆ NetBackup configuration information required to restore data files.
To fully automate the recovery of an IDR-protected computer, you need a copy of the DR file for that computer. If IDR software is installed on the server and client and the server is configured to collect disaster recovery information, NetBackup creates a DR file and stores a copy on the client and the master server after every:
◆ Full backup
◆ Incremental (differential or cumulative) backup
◆ User backup
◆ User archive
NetBackup stores the DR file for each client in the install_path\NetBackup\Idr\data directory on the client. The DR files generated after a backup are named in the format netbackup_client_name.dr. For example, if the client name is bison, the DR file is bison.dr.
nbu_win_print_II.book Page 182 Tuesday, August 16, 2005 12:53 PM
Chapter 7, Intelligent Disaster Recovery
Configuring NetBackup Policies for IDR
183
Note IDR requires that the DR file name match the computer name of the client. That is, if the computer name is recognized by the network as bison, then the DR file must be named bison.dr. If the NetBackup client name is different for some reason, you must manually rename a DR file created after each backup to computer_name.dr before you can use it in a recovery.
On the NetBackup master server, the DR files for all clients are stored in the NetBackup catalog on the server.
Configuring NetBackup Policies for IDRSet up the policy configuration on the NetBackup master server as follows:
◆ Ensure that each protected client is in an MS-Windows-NT type policy.
◆ Select the Collect disaster recovery information policy attribute for at least one of the MS-Windows-NT policies that are backing up protected clients.
◆ The NetBackup master server that collects disaster recovery information must be licensed for IDR; otherwise, you cannot select the Collect disaster recovery information attribute.
◆ Ensure that all the clients in this policy have IDR installed. If a client in a policy that is collecting disaster recovery information does not have IDR installed, backups performed for that client by this policy will never end with a status of 0. A successful backup in this instance shows a status of 1 (partially successful). This is a result of NetBackup not finding a DR file to store in its catalog after each backup.
◆ NetBackup 6.0 will collect the DR information from clients that have versions of NetBackup earlier than 6.0. However, you must use the IDR software revision on the client to prepare the bootable media for that client (for example, if the client software is NetBackup 5.1, you must use that version of IDR to prepare the IDR media).
◆ Ensure that the client names used in the NetBackup policy configuration match the client’s computer name. If these names do not match, you must manually rename the DR file that is created after each backup to computer_name.dr before you can use it in a recovery.
nbu_win_print_II.book Page 183 Tuesday, August 16, 2005 12:53 PM

Backing Up the System to be Protected
184 NetBackup System Administrator’s Guide for Windows, Volume II
Backing Up the System to be ProtectedBefore you prepare the IDR media, which includes the DR file used in recovery, you must perform at least one full backup of the system to be protected. The NetBackup master server that performs the backup must be configured to collect disaster recovery information. The backup information collected is used when creating the DR file.
You can prepare IDR bootable media if differential or incremental backups have occurred since the full backup.
Ensure that all local drives are backed up, and, for Windows 2000, ensure that System State is backed up.
Ensure that any utility partitions are backed up. Utility partitions are small partitions created on the hard drive, usually by the computer vendor, that may contain system configuration and diagnostic utilities.
Creating IDR MediaThe IDR Preparation Wizard guides you in creating the IDR media used in recovery. A set of IDR media includes the following:
◆ Bootable media used to boot the computer and install and configure the operating system.
◆ System specific drivers and the Disaster Recovery Wizard.
◆ The disaster recovery (DR) file.
◆ For Windows XP and Windows Server 2003 systems, Windows Automated System Recovery files.
To create IDR media, you must have:
◆ At least one full backup of the system to be protected.
◆ The Windows installation CD for the version and language installed on the protected system.
◆ The license key for your Windows 2000, Windows XP, or Windows Server 2003 operating system.
◆ Administrative privileges for the protected system.
◆ A device capable of creating bootable media:
◆ CD-R drive (CD Recordable CD-ROM)
◆ CD-RW drive (CD Rewritable CD-ROM)
nbu_win_print_II.book Page 184 Tuesday, August 16, 2005 12:53 PM
Chapter 7, Intelligent Disaster Recovery
Creating IDR Media
185
◆ Diskette drive (IDR does not support bootable diskette media for Windows XP or Windows Server 2003)
More information about media is provided later in this chapter.
You must prepare the media before a disaster. For CD-R or CD-RW, you should also try booting from the media before a disaster occurs to ensure that your hardware can boot from it. (See “Step 1: Boot Your Computer” on page 194.)
Choosing the Bootable MediaFor Windows NT and Windows 2000, the IDR Preparation Wizard can create both bootable diskettes and bootable CD-Recordable (CR-R) or CD-Rewritable (CR-RW) media.
Note IDR does not support bootable diskette media for Windows XP or Windows Server 2003.
When choosing between diskettes and CD-ROM media, consider the following:
◆ Diskettes work on most systems but require more time for preparation and recovery than CDs.
◆ Diskettes require the Windows installation CD during recovery.
◆ Diskettes will hold SCSI driver information for only one computer (because of space limitations). If you want to use one set of diskettes to protect more than one computer, you must choose one computer that represents all the other computers and create bootable media for it. If you have computers with different SCSI drivers, you must create a set of diskettes for each computer with a different driver.
◆ CDs require less time for preparation and recovery than diskettes.
◆ CD media has enough space to store SCSI driver information for multiple systems, so you can use a single CD for multiple systems during disaster recovery.
◆ CD media requires that the computer being protected has BIOS that supports booting from a CD.
◆ CD media requires CD writing hardware. The computer to be protected does not have to have a CD writer; the IDR Preparation Wizard creates a bootable image that you can write to a CD on any computer that has a CD writer.
◆ For CD media, third party CD writing software is required if the computer being protected does not have a CD writer or if the IDR Preparation Wizard cannot detect the CD writer attached to the system being protected. The CD hardware and software must be able to write ISO 9660 CD images.
nbu_win_print_II.book Page 185 Tuesday, August 16, 2005 12:53 PM
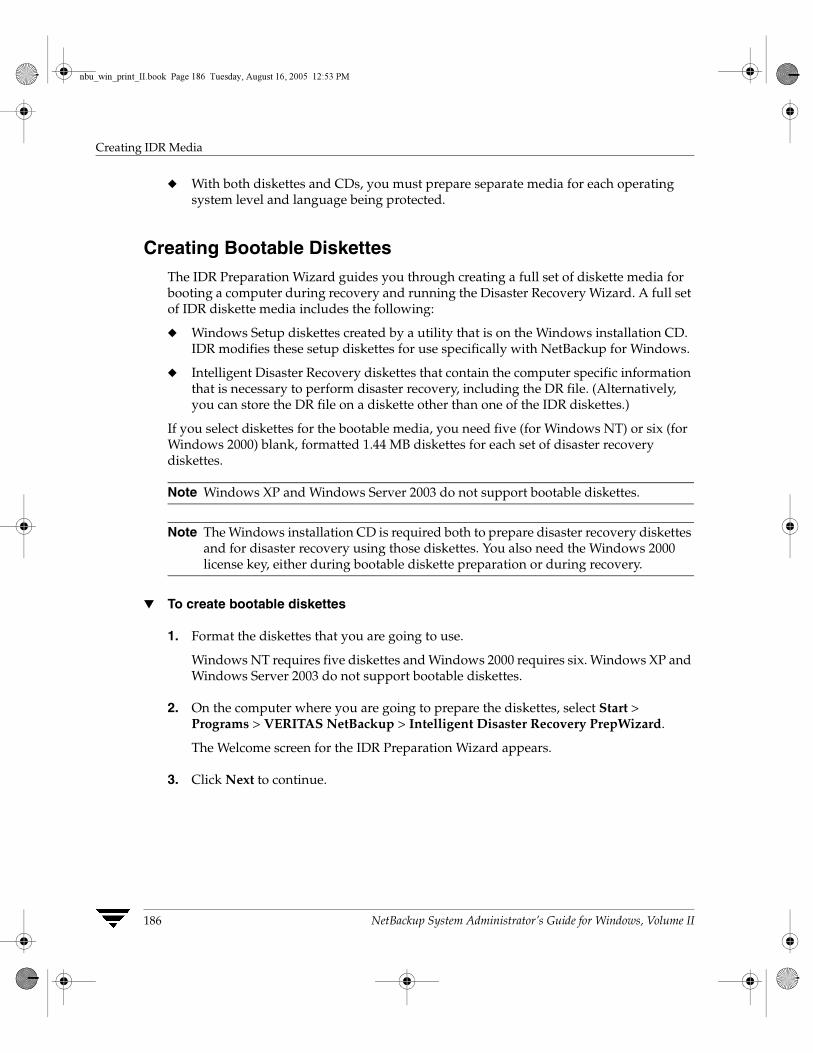
Creating IDR Media
186 NetBackup System Administrator’s Guide for Windows, Volume II
◆ With both diskettes and CDs, you must prepare separate media for each operating system level and language being protected.
Creating Bootable DiskettesThe IDR Preparation Wizard guides you through creating a full set of diskette media for booting a computer during recovery and running the Disaster Recovery Wizard. A full set of IDR diskette media includes the following:
◆ Windows Setup diskettes created by a utility that is on the Windows installation CD. IDR modifies these setup diskettes for use specifically with NetBackup for Windows.
◆ Intelligent Disaster Recovery diskettes that contain the computer specific information that is necessary to perform disaster recovery, including the DR file. (Alternatively, you can store the DR file on a diskette other than one of the IDR diskettes.)
If you select diskettes for the bootable media, you need five (for Windows NT) or six (for Windows 2000) blank, formatted 1.44 MB diskettes for each set of disaster recovery diskettes.
Note Windows XP and Windows Server 2003 do not support bootable diskettes.
Note The Windows installation CD is required both to prepare disaster recovery diskettes and for disaster recovery using those diskettes. You also need the Windows 2000 license key, either during bootable diskette preparation or during recovery.
▼ To create bootable diskettes
1. Format the diskettes that you are going to use.
Windows NT requires five diskettes and Windows 2000 requires six. Windows XP and Windows Server 2003 do not support bootable diskettes.
2. On the computer where you are going to prepare the diskettes, select Start > Programs > VERITAS NetBackup > Intelligent Disaster Recovery PrepWizard.
The Welcome screen for the IDR Preparation Wizard appears.
3. Click Next to continue.
nbu_win_print_II.book Page 186 Tuesday, August 16, 2005 12:53 PM
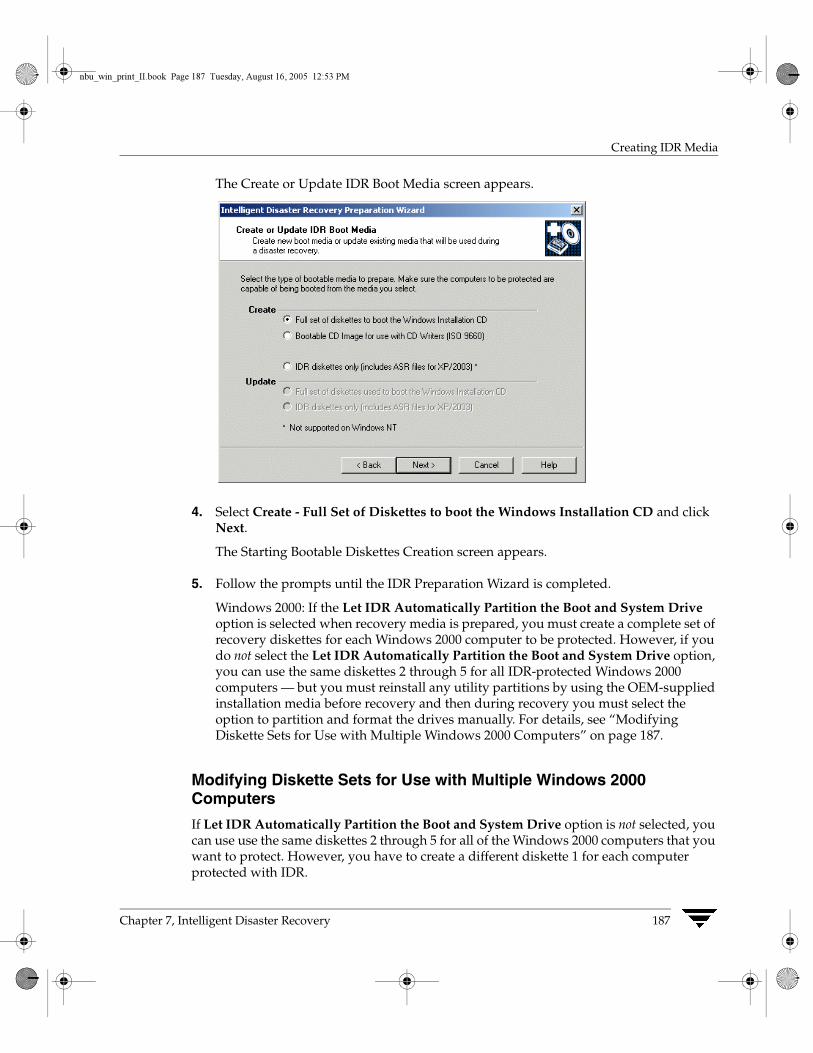
Chapter 7, Intelligent Disaster Recovery
Creating IDR Media
187
The Create or Update IDR Boot Media screen appears.
4. Select Create - Full Set of Diskettes to boot the Windows Installation CD and click Next.
The Starting Bootable Diskettes Creation screen appears.
5. Follow the prompts until the IDR Preparation Wizard is completed.
Windows 2000: If the Let IDR Automatically Partition the Boot and System Drive option is selected when recovery media is prepared, you must create a complete set of recovery diskettes for each Windows 2000 computer to be protected. However, if you do not select the Let IDR Automatically Partition the Boot and System Drive option, you can use the same diskettes 2 through 5 for all IDR-protected Windows 2000 computers — but you must reinstall any utility partitions by using the OEM-supplied installation media before recovery and then during recovery you must select the option to partition and format the drives manually. For details, see “Modifying Diskette Sets for Use with Multiple Windows 2000 Computers” on page 187.
Modifying Diskette Sets for Use with Multiple Windows 2000 Computers
If Let IDR Automatically Partition the Boot and System Drive option is not selected, you can use use the same diskettes 2 through 5 for all of the Windows 2000 computers that you want to protect. However, you have to create a different diskette 1 for each computer protected with IDR.
nbu_win_print_II.book Page 187 Tuesday, August 16, 2005 12:53 PM
Creating IDR Media
188 NetBackup System Administrator’s Guide for Windows, Volume II
Diskette 1 contains a file named winnt.sif, which is the script used to automate the installation of Windows 2000 for disaster recovery when using the IDR option. This scripted installation of Windows 2000 requires that the name of the computer being recovered be listed in the winnt.sif file.
Therefore, for each Windows 2000 computer that will share diskettes 2 through 5, make a copy of diskette 1 (and its files). For each copy of diskette 1, edit the winnt.sif file and change the computer name to that of the machine to be protected. If the computer name is not modified, duplicate computer names on the network may occur and may prevent the recovered system from participating on the network.
Creating a Bootable CD ImageThe IDR Preparation Wizard guides you through creating a bootable CD image. You then can write that image to a CD using the IDR Preparation Wizard or other writing software. If the system on which you are running the IDR Preparation Wizard does not have a CD-R or CD-RW drive, you can write the image onto a CD on a different machine using third-party CD writing software.
The CD image contains all the necessary IDR files unless you choose to store the Windows Server 2003 Automated System Recovery files on a diskette. If stored on the CD, the ASR files will always be read from the CD even if a more recent version is on an IDR diskette. For example, if you create IDR diskettes after you create the bootable CD, the ASR files will be read from the CD during recovery even though more recent versions may be on the IDR diskettes.
The Windows installation CD is required only during media preparation.
The license key for your Windows 2000, Windows XP, or Windows Server 2003 operating system is required. If you do not enter the license key while creating the bootable CD, you must enter it during recovery.
Note On Windows NT 4.0 systems, the IDR software cannot write to a CD; therefore, you must use other CD writing software to create the CD.
▼ To create a bootable CD image
1. On the computer where you are going to prepare the bootable CD image, select Start > Programs > VERITAS NetBackup > Intelligent Disaster Recovery PrepWizard.
The Welcome screen for the IDR Preparation Wizard appears.
2. Click Next to continue.
nbu_win_print_II.book Page 188 Tuesday, August 16, 2005 12:53 PM
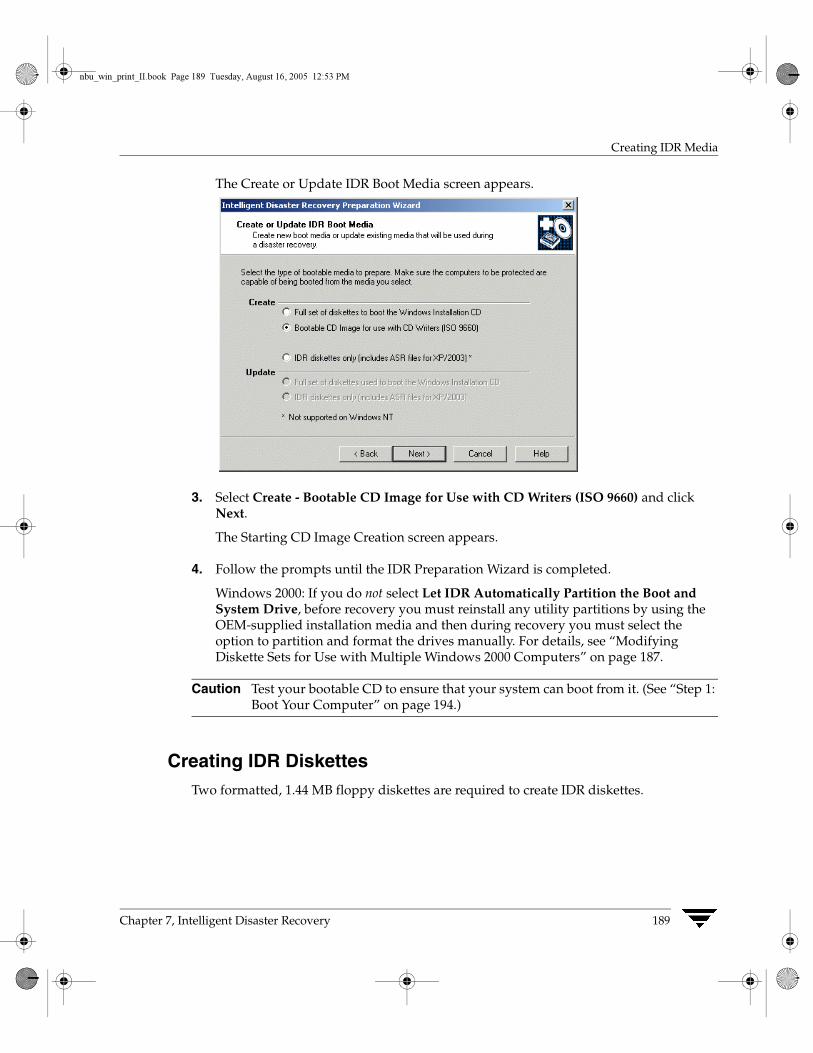
Chapter 7, Intelligent Disaster Recovery
Creating IDR Media
189
The Create or Update IDR Boot Media screen appears.
3. Select Create - Bootable CD Image for Use with CD Writers (ISO 9660) and click Next.
The Starting CD Image Creation screen appears.
4. Follow the prompts until the IDR Preparation Wizard is completed.
Windows 2000: If you do not select Let IDR Automatically Partition the Boot and System Drive, before recovery you must reinstall any utility partitions by using the OEM-supplied installation media and then during recovery you must select the option to partition and format the drives manually. For details, see “Modifying Diskette Sets for Use with Multiple Windows 2000 Computers” on page 187.
Caution Test your bootable CD to ensure that your system can boot from it. (See “Step 1: Boot Your Computer” on page 194.)
Creating IDR DiskettesTwo formatted, 1.44 MB floppy diskettes are required to create IDR diskettes.
nbu_win_print_II.book Page 189 Tuesday, August 16, 2005 12:53 PM
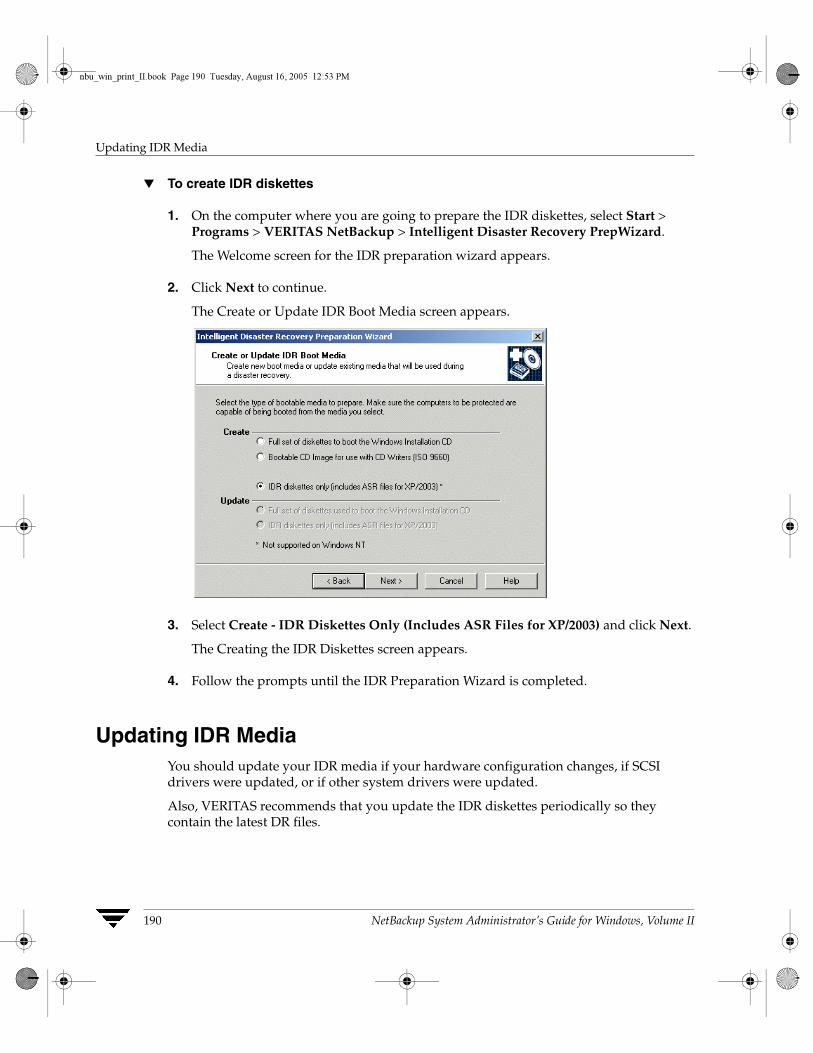
Updating IDR Media
190 NetBackup System Administrator’s Guide for Windows, Volume II
▼ To create IDR diskettes
1. On the computer where you are going to prepare the IDR diskettes, select Start > Programs > VERITAS NetBackup > Intelligent Disaster Recovery PrepWizard.
The Welcome screen for the IDR preparation wizard appears.
2. Click Next to continue.
The Create or Update IDR Boot Media screen appears.
3. Select Create - IDR Diskettes Only (Includes ASR Files for XP/2003) and click Next.
The Creating the IDR Diskettes screen appears.
4. Follow the prompts until the IDR Preparation Wizard is completed.
Updating IDR MediaYou should update your IDR media if your hardware configuration changes, if SCSI drivers were updated, or if other system drivers were updated.
Also, VERITAS recommends that you update the IDR diskettes periodically so they contain the latest DR files.
nbu_win_print_II.book Page 190 Tuesday, August 16, 2005 12:53 PM
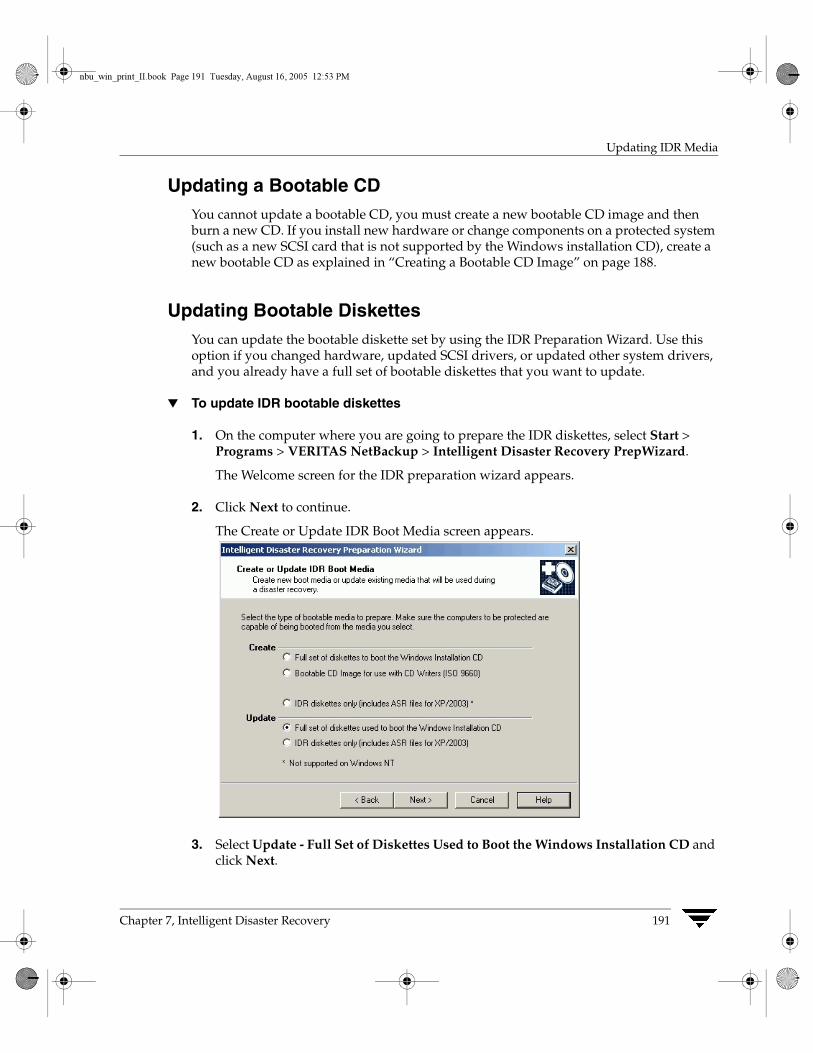
Chapter 7, Intelligent Disaster Recovery
Updating IDR Media
191
Updating a Bootable CDYou cannot update a bootable CD, you must create a new bootable CD image and then burn a new CD. If you install new hardware or change components on a protected system (such as a new SCSI card that is not supported by the Windows installation CD), create a new bootable CD as explained in “Creating a Bootable CD Image” on page 188.
Updating Bootable DiskettesYou can update the bootable diskette set by using the IDR Preparation Wizard. Use this option if you changed hardware, updated SCSI drivers, or updated other system drivers, and you already have a full set of bootable diskettes that you want to update.
▼ To update IDR bootable diskettes
1. On the computer where you are going to prepare the IDR diskettes, select Start > Programs > VERITAS NetBackup > Intelligent Disaster Recovery PrepWizard.
The Welcome screen for the IDR preparation wizard appears.
2. Click Next to continue.
The Create or Update IDR Boot Media screen appears.
3. Select Update - Full Set of Diskettes Used to Boot the Windows Installation CD and click Next.
nbu_win_print_II.book Page 191 Tuesday, August 16, 2005 12:53 PM
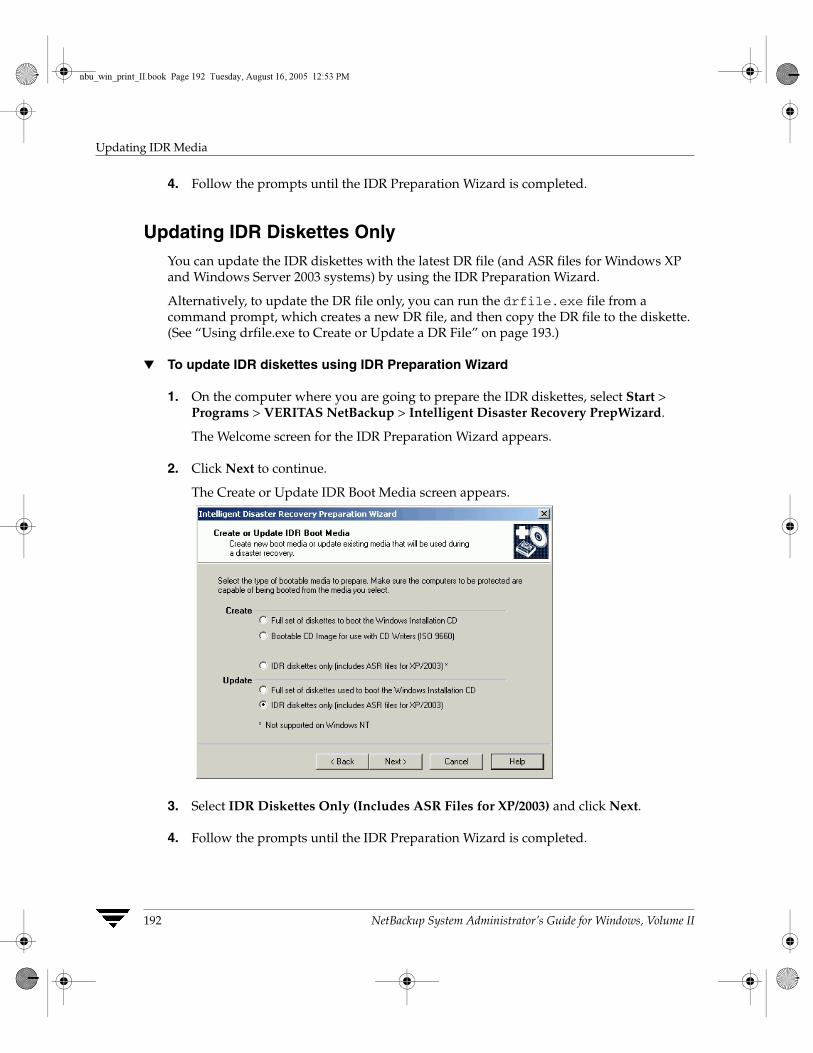
Updating IDR Media
192 NetBackup System Administrator’s Guide for Windows, Volume II
4. Follow the prompts until the IDR Preparation Wizard is completed.
Updating IDR Diskettes OnlyYou can update the IDR diskettes with the latest DR file (and ASR files for Windows XP and Windows Server 2003 systems) by using the IDR Preparation Wizard.
Alternatively, to update the DR file only, you can run the drfile.exe file from a command prompt, which creates a new DR file, and then copy the DR file to the diskette. (See “Using drfile.exe to Create or Update a DR File” on page 193.)
▼ To update IDR diskettes using IDR Preparation Wizard
1. On the computer where you are going to prepare the IDR diskettes, select Start > Programs > VERITAS NetBackup > Intelligent Disaster Recovery PrepWizard.
The Welcome screen for the IDR Preparation Wizard appears.
2. Click Next to continue.
The Create or Update IDR Boot Media screen appears.
3. Select IDR Diskettes Only (Includes ASR Files for XP/2003) and click Next.
4. Follow the prompts until the IDR Preparation Wizard is completed.
nbu_win_print_II.book Page 192 Tuesday, August 16, 2005 12:53 PM
Chapter 7, Intelligent Disaster Recovery
Recovering Your Computer
193
Using drfile.exe to Create or Update a DR FileIf IDR diskettes have already been created, you can update the DR file only by running the drfile.exe program on the client and then copying the DR file to the diskette that contains the DR file. The name of the DR file should always match the computer name of the client (which is the name required by IDR), even if this name happens to be different than the one used in the NetBackup policy configuration.
1. Go to the install_path\NetBackup\bin folder and double-click drfile.exe (install_path is C:\Program Files\VERITAS by default). This creates (or updates) the DR file that is located in the install_path\NetBackup\Idr\Data directory on your computer.
The DR file name is of the form computer_name.dr, as in bison.dr. The name of the DR file will match the computer name of the client, which is the name required by IDR, even if the name is different from the one used in the NetBackup policy configuration.
2. Insert the diskette that contains the DR file into your drive and copy the DR file to it.
The diskette can be one of the IDR diskettes or a separate diskette. If using a separate diskette, insert the other diskette when prompted for the DR file during disaster recovery.
Recovering Your ComputerRestoring the computer to its pre-disaster status with IDR includes the following steps:
◆ Step 1: Boot Your Computer. Use the previously prepared IDR bootable media to boot the computer being recovered.
◆ Step 2: Windows Setup in IDR Recovery. Use the Windows Setup program to partition and format the system drive on the computer being recovered. The IDR bootstrap process loads and runs the Windows Setup program from the Windows installation CD.
◆ Step 3: Disaster Recovery Wizard. Use the NetBackup IDR Disaster Recovery wizard to restore your system to its pre-disaster state and restore your data files.
Automating the recovery with the Disaster Recovery wizard requires the following:
◆ A NetBackup server that can restore the latest backups to the computer being recovered.
◆ The latest DR file for the machine being recovered.
If you have not updated the DR file since the last backup, it may contain out-of-date hard disk partition, network-interface-card driver, or backup set information.
nbu_win_print_II.book Page 193 Tuesday, August 16, 2005 12:53 PM
Recovering Your Computer
194 NetBackup System Administrator’s Guide for Windows, Volume II
◆ Bootable IDR CD media or the original Windows installation CD.
◆ The license key for your Windows operating system (if you did not enter the license key during preparation of the IDR bootable media).
◆ For Windows XP and Windows Server 2003 systems, the ASR files for the machine being recovered.
◆ If your network adapter requires special driver software, you need the installation media provided by the CD manufacturer. Special drivers are ones that are not on the operating system installation media, such as a driver for a network interface card (NIC) supplied by the manufacturer.
Note For Windows 2000 systems, if Let IDR Automatically Partition the Boot and System Drives was not selected during IDR preparation, before beginning the recovery process you must reinstall any utility partitions by using the OEM-supplied installation media. Then, during recovery, you must select the option to partition and format the drives manually.
Step 1: Boot Your Computer You can recover a Windows system by using the bootable diskettes or CD created during disaster preparation. The computer being recovered must have a device capable of booting from the bootable media.
Caution Disconnect any storage area network or cluster systems that are attached to the computer being recovered; if you do not, the hard drives on those computers may also be repartitioned and reformatted.
▼ To boot a computer using a bootable diskette
1. Insert the bootable diskette.
2. Start the computer.
3. Follow the boot process instructions on screen and continue with “Step 2: Windows Setup in IDR Recovery” on page 195.
nbu_win_print_II.book Page 194 Tuesday, August 16, 2005 12:53 PM
Chapter 7, Intelligent Disaster Recovery
Recovering Your Computer
195
▼ To boot from a bootable CD
1. Insert the bootable CD.
2. Start the computer and perform the tasks necessary to boot from the CD. For example, depending on the BIOS in the computer, you may have to press a function key to boot from the CD drive.
The NetBackup Intelligent Disaster Recovery Bootstrap screen appears.
3. Do one of the following:
◆ If you are testing the CD to determine if it can boot the computer, press Esc to exit and then remove the CD from the drive.
◆ If you are performing disaster recovery, press Enter to continue with the boot process.
4. Depending on the system, do one of the following:
◆ For Windows NT and Windows 2000, go to “Step 2: Windows Setup in IDR Recovery” on page 195.
◆ For Windows XP and Windows Server 2003, press F2 to load the ASR files when prompted by the boot process. If you have an ASR diskette, place it in the floppy disk drive so the ASR files can be loaded.
5. Continue by going to “Step 2: Windows Setup in IDR Recovery” on page 195.
Step 2: Windows Setup in IDR RecoveryDuring the recovery process, the DR boot process uses the Windows Setup program to partition and format the system drive on the computer being recovered. If you booted from the IDR bootable CD, Windows Setup is started from that CD; if you booted from diskette, you will be prompted to insert the Windows installation CD so the Windows Setup can be started.
▼ To use Windows setup in IDR recovery
1. Follow the instructions on screen to continue the boot process.
If you booted from diskette, you will be prompted to insert the Windows installation CD.
At this point of the recovery, the Windows Setup program is loaded and performs the tasks necessary to partition and format drives and install a limited version of the operating system.
nbu_win_print_II.book Page 195 Tuesday, August 16, 2005 12:53 PM
Recovering Your Computer
196 NetBackup System Administrator’s Guide for Windows, Volume II
2. During Windows Setup, you may have to make choices about the following:
◆ For Windows NT, Express Setup or Custom Setup. Usually, Express Setup is the best choice. Use Custom Setup if SCSI drivers are not present on the boot media or if you have RAID hardware that needs to be reconfigured.
◆ For Windows NT, FAT or NTFS file system. If a new hard drive is detected on your system, you will be asked which file system format to use. Select FAT format for the C drive. IDR cannot repartition to the old layout if you build the partition as NTFS.
3. When prompted to reboot, ensure that no diskettes or CDs are in the drives and press Enter to reboot the system.
After the reboot, the Disaster Recovery Wizard starts automatically.
4. Go to “Step 3: Disaster Recovery Wizard” on page 196.
Step 3: Disaster Recovery WizardAfter Windows Setup finishes its tasks, the Disaster Recovery Wizard is started as part of the recovery process. Follow the instructions to recover the computer; although these instructions do not provide a step-by-step procedure because different conditions affect the process, the process will be similar to the following.
▼ To use the Disaster Recovery Wizard
1. If you have a DR file, when prompted select the DR file for the computer you are recovering and click Next.
The name of a DR file matches the computer for which it was created. For example, if the computer is named carrot look for a file named carrot.dr.
Note If you do not have a DR file, click Next to proceed. A message stating that the recovery file was not selected appears. Click Yes to continue in manual mode.
2. One or more screens about hard disk layout may appear:
◆ You may be prompted about replacing the current hard drive partition with the partition information contained in the DR file or to keep the current hard drive partitions.
nbu_win_print_II.book Page 196 Tuesday, August 16, 2005 12:53 PM
Chapter 7, Intelligent Disaster Recovery
Recovering Your Computer
197
◆ You may to prompted to run the Windows Disk Administrator (or Disk Manager) program, which allows you to make additional changes to your partition information. To make partition changes, click Run Disk Administrator (or Run Disk Manager). (See “Notes on Altering Hard Drive Partition Sizes” on page 200.) Otherwise, click Next to continue the recovery process.
For more information about Disk Administrator and fault tolerant configurations, see the operating system documentation.
3. For Windows 2000, a Completed IDR Phase 1 dialog appears. Do one of the following:
◆ If your network adapter requires special driver software, click Pre-install Custom Network Driver and then follow the prompts to find and install the appropriate driver software. Special drivers are ones that are not on the operating system installation media, such as a driver for a network interface card (NIC) supplied by the NIC manufacturer.
◆ To continue, click Next and go to step 5 to continue the recovery.
4. For Windows NT only, you will be asked to select either Automatic Restore or Manual Restore for network installation. Do one of the following:
◆ If your network adapters use the drivers and software included with the operating system, select Automatic Restore, click Finish to complete the network installation, and then go to step 5 to continue the recovery.
◆ If your network adapters require special drivers and software, select Manual Restore, select Wired to the Network, click Next, and proceed to step a.
a. To select your network adapter, do one of the following:
◆ If your network adapter requires a manufacturer supplied setup diskette, click Select from list, then click Have Disk.
◆ If your network adapter does not require a manufacturer supplied setup diskette, either click Select from list or Start search.
A list of network adapters appears.
Note If your network adapter is not listed on the screen that appears, click Select from list, then click Have Disk add an adapter to the Network Adapter List. For automatic network installation to succeed, the Windows NT setup program must be able to recognize the network interface card being used.
b. The next screen lists the default network protocols. Select the networking protocols used on your network and click Next.
nbu_win_print_II.book Page 197 Tuesday, August 16, 2005 12:53 PM

Recovering Your Computer
198 NetBackup System Administrator’s Guide for Windows, Volume II
c. Windows NT is ready to install the networking components. Insert your Windows NT installation CD or the IDR bootable CD into the CD-ROM drive and click Next to continue. (If you created a bootable CD, it may include the appropriate network drivers if they were found during the IDR preparation process.)
Note If additional screens about setting up your network interface card appear, respond as appropriate.
d. If TCP/IP is selected as the network protocol, you are prompted to use DHCP. If you do not want to use DHCP, enter a TCP/IP number.
The Windows NT Networking Installation dialog appears.
e. Click Next to start the network and complete the installation of the networking components.
f. Enter the name of the workgroup or domain for your computer and click Next.
Note VERITAS recommends that you enter the name of a temporary workgroup rather than the name of a domain. When the recovery is complete, the system will be restored to its original workgroup or domain.
g. Click Finish to complete the network installation and continue with recovery.
5. Select either Automatic or Manual:
◆ If you selected Automatic, click Next and proceed to step 6.
◆ If you select Manual, click Next and proceed to step 8.
6. When recovering the registry, normally the restore process merges hardware information from the current live version of the registry into the saved version of the registry. (The saved version is the registry version that was backed up.) This ensures that the machine will reboot after the restore if the hardware changed.
If the hardware changed, select the server from which you want to restore files, then click Start Restore to submit the restore request to the selected server. By clicking Start Restore, the files will be restored and the hardware information from the current live version of the registry will be merged with the saved version of the registry. Go to step 7.
If the hardware on the machine that is being recovered has not changed, the live version and the saved version of the registry do not need to be merged because the hardware registry settings will be identical to what they were in the saved version of the registry. If you do not want to merge the registries, continue with step a:
nbu_win_print_II.book Page 198 Tuesday, August 16, 2005 12:53 PM
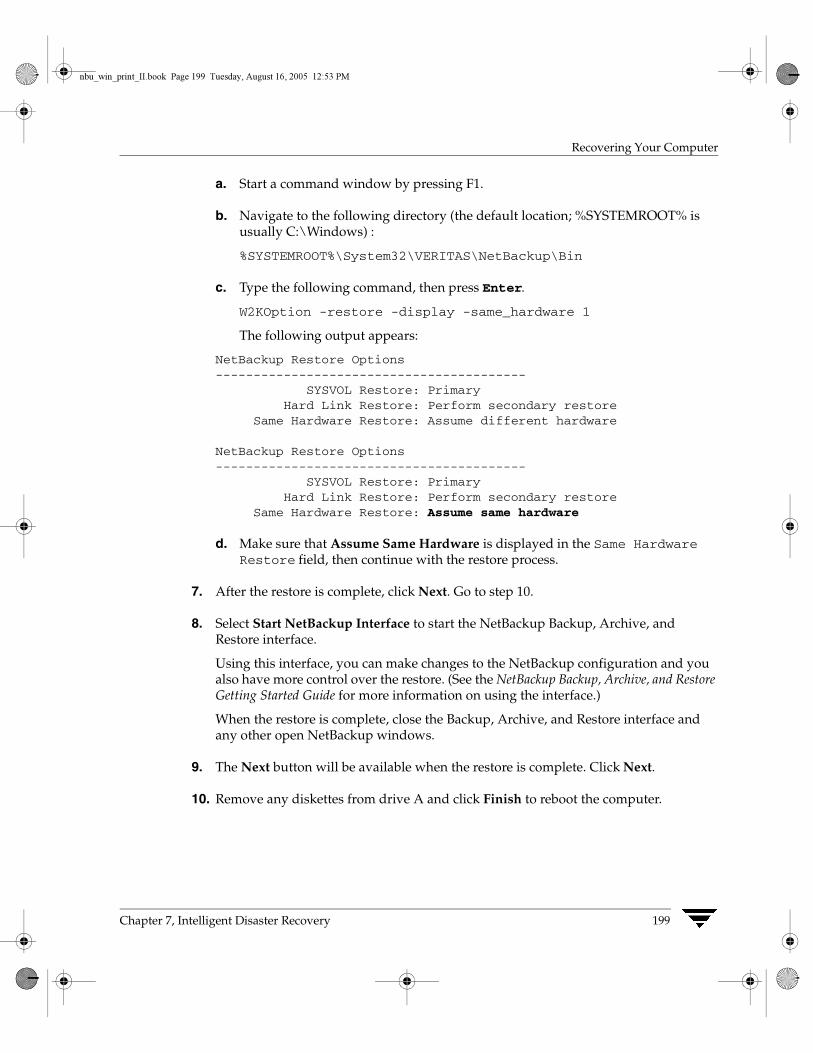
Chapter 7, Intelligent Disaster Recovery
Recovering Your Computer
199
a. Start a command window by pressing F1.
b. Navigate to the following directory (the default location; %SYSTEMROOT% is usually C:\Windows) :
%SYSTEMROOT%\System32\VERITAS\NetBackup\Bin
c. Type the following command, then press Enter.
W2KOption -restore -display -same_hardware 1
The following output appears:
NetBackup Restore Options----------------------------------------- SYSVOL Restore: Primary Hard Link Restore: Perform secondary restore Same Hardware Restore: Assume different hardware
NetBackup Restore Options----------------------------------------- SYSVOL Restore: Primary Hard Link Restore: Perform secondary restore Same Hardware Restore: Assume same hardware
d. Make sure that Assume Same Hardware is displayed in the Same Hardware Restore field, then continue with the restore process.
7. After the restore is complete, click Next. Go to step 10.
8. Select Start NetBackup Interface to start the NetBackup Backup, Archive, and Restore interface.
Using this interface, you can make changes to the NetBackup configuration and you also have more control over the restore. (See the NetBackup Backup, Archive, and Restore Getting Started Guide for more information on using the interface.)
When the restore is complete, close the Backup, Archive, and Restore interface and any other open NetBackup windows.
9. The Next button will be available when the restore is complete. Click Next.
10. Remove any diskettes from drive A and click Finish to reboot the computer.
nbu_win_print_II.book Page 199 Tuesday, August 16, 2005 12:53 PM
Notes on Recovering Specific Platforms
200 NetBackup System Administrator’s Guide for Windows, Volume II
Notes on Altering Hard Drive Partition Sizes
Note This section applies only to Windows NT and Windows NT 4.0. Reformatting and repartitioning is not supported on Windows 2000, Windows XP, or Windows Server 2003.
IDR defaults to restoring hard drive partitions to the same sizes they were before recovery. If the computer being recovered has a larger hard drive than before the recovery (for example, a larger hard drive was installed or the DR file is from a computer with a smaller hard drive), there will be unused and unallocated hard drive space. If so, you can run the Windows NT Disk Administrator program (during the IDR recovery process from within the Recovery Wizard) to alter the partition sizes to match the larger hard drive size. For information about fault tolerant configurations, please refer to the Windows NT Server 4.0 Resource Kit.
Notes on Recovering Specific Platforms
Recovering the Dell PowerEdge 6100/200 with RAID
Note Although this section discusses restoring a Dell system, the steps outlined can be used with any system that requires the use of third party drivers.
Recovering a Dell PowerEdge 6100/200 with RAID configuration is different than recovering a regular system with one hard drive.
In order to load Windows on this type of machine, you must load the PowerRaid II driver manually, which is not bundled with the Windows operating system.
After loading the PowerRaid II driver, you must load the Adaptec controller driver manually. Failure to follow these steps results in Windows not recognizing any hard drive partitions on the system.
▼ Use the following steps with your IDR recovery diskette set
1. When the Windows blue Setup screen appears after booting with the IDR boot diskette, press and hold down the F6 key.
Windows prompts for IDR diskette 2.
2. Insert IDR diskette 2 and press and hold the F6 key again.
After loading additional drivers, a Setup screen appears that allows you to specify additional devices.
nbu_win_print_II.book Page 200 Tuesday, August 16, 2005 12:53 PM
Chapter 7, Intelligent Disaster Recovery
IDR Frequently Asked Questions
201
3. Release the F6 key and press the S key.
4. Follow the on-screen instructions to load the PowerEdge RAID II controller software.
5. After loading the PowerEdge RAID software, press S again to specify loading another device.
6. Follow the on-screen instructions to load the Adaptec controller software next.
7. After loading both pieces of third party software, press Enter and proceed as normal to recover your system.
Recovering IBM ComputersIf you are using an IBM computer and the drive containing the system’s configuration information fails, you must reconfigure the system using the IBM Reference Diskette before performing recovery.
Recovering Compaq ComputersIf you are using a Compaq computer and the drive that contains the System Configuration Partition fails, Intelligent Disaster Recovery will recreate the partition on the new hard disk; however, you must use the Compaq SmartStart utilities to update the system partition.
IDR Frequently Asked Questions
Can I restore boot managers such as System Commander or OS/2 Boot Manager with Intelligent Disaster Recovery for Windows?
No, because boot managers usually are installed at a very low level that NetBackup cannot protect.
For example, the OS/2 boot manager resides in its own hard drive partition that NetBackup cannot access. In fact, because of the many different boot managers on the market, an Intelligent Disaster Recovery restore may render your system unbootable, even though your operating system has been restored. In this case, re-installing the boot manager should fix the problem.
nbu_win_print_II.book Page 201 Tuesday, August 16, 2005 12:53 PM
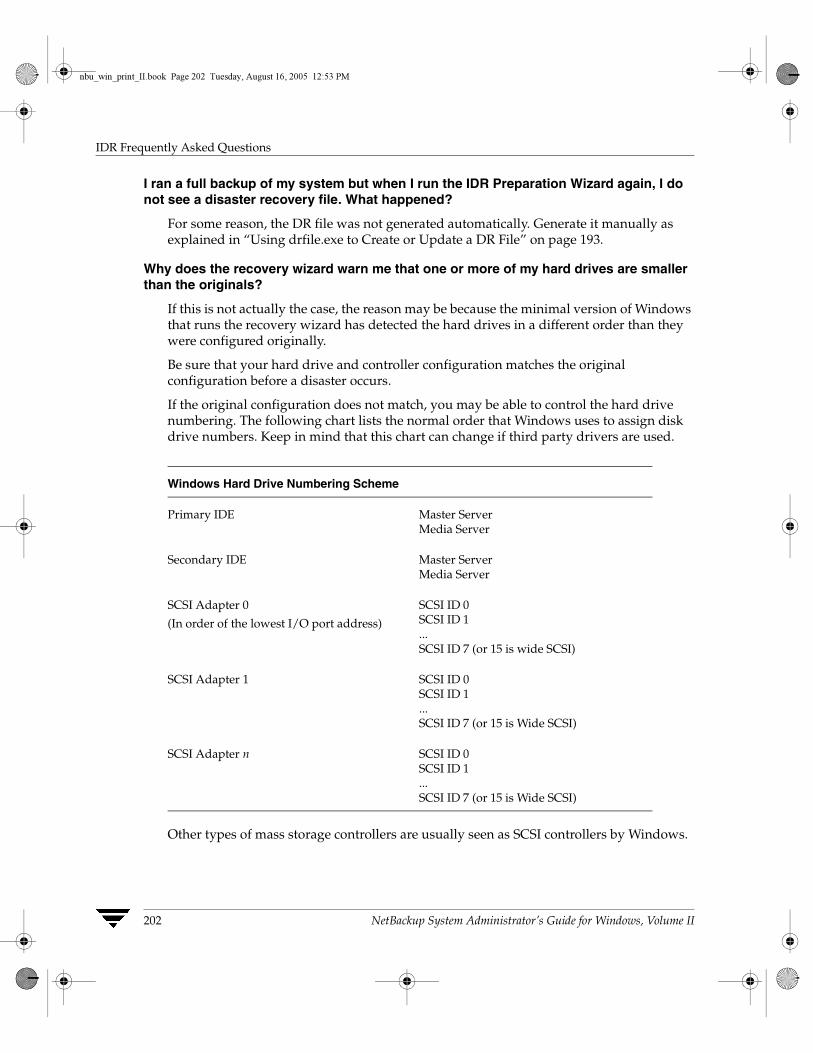
IDR Frequently Asked Questions
202 NetBackup System Administrator’s Guide for Windows, Volume II
I ran a full backup of my system but when I run the IDR Preparation Wizard again, I do not see a disaster recovery file. What happened?
For some reason, the DR file was not generated automatically. Generate it manually as explained in “Using drfile.exe to Create or Update a DR File” on page 193.
Why does the recovery wizard warn me that one or more of my hard drives are smaller than the originals?
If this is not actually the case, the reason may be because the minimal version of Windows that runs the recovery wizard has detected the hard drives in a different order than they were configured originally.
Be sure that your hard drive and controller configuration matches the original configuration before a disaster occurs.
If the original configuration does not match, you may be able to control the hard drive numbering. The following chart lists the normal order that Windows uses to assign disk drive numbers. Keep in mind that this chart can change if third party drivers are used.
Other types of mass storage controllers are usually seen as SCSI controllers by Windows.
Windows Hard Drive Numbering Scheme
Primary IDE Master ServerMedia Server
Secondary IDE Master ServerMedia Server
SCSI Adapter 0
(In order of the lowest I/O port address)
SCSI ID 0SCSI ID 1...SCSI ID 7 (or 15 is wide SCSI)
SCSI Adapter 1 SCSI ID 0SCSI ID 1...SCSI ID 7 (or 15 is Wide SCSI)
SCSI Adapter n SCSI ID 0SCSI ID 1...SCSI ID 7 (or 15 is Wide SCSI)
nbu_win_print_II.book Page 202 Tuesday, August 16, 2005 12:53 PM

Chapter 7, Intelligent Disaster Recovery
IDR Frequently Asked Questions
203
Note On Windows NT only: If you cannot get the IDR Recovery Wizard to properly detect the hard drive order, you can still set up hard drive partitions manually by using the Windows NT Disk Administrator option within the Disaster Recovery Wizard. Then, you can continue with automated restore of your backup media.
If you have drives greater than eight GBs and the recovery wizard reports them as being only eight GBs, you must create bootable diskettes with the option Use SCSI drivers currently installed on this system.
nbu_win_print_II.book Page 203 Tuesday, August 16, 2005 12:53 PM

IDR Frequently Asked Questions
204 NetBackup System Administrator’s Guide for Windows, Volume II
nbu_win_print_II.book Page 204 Tuesday, August 16, 2005 12:53 PM

205
Index
AAccess Control
nbac_cron.exe 53access control
user groupsAdministrator 59configuration 60Default User 59description 58Operator 59renaming user groups 61Security Administrator 58Vault Operator 59
accessibility features xvActivity Monitor jobs database 106Administrator Access Control user group 59Administrator’s E-mail Address
property 128AIX cachefs file system 167alternate client restores, host.xlate file 134Andrew File System (AFS)
backup selection list 174directives 174installing 173regular expressions 175restores 176troubleshooting 178
Announce DHCP Interval property 123authentication
commands 84configuration files 78configuring enhanced 89port 9, 52procedure 89
authorization port 52authorize.txt file 102
Bbackup selection list, AFS 174, 175
backup_exit_notify script 147backup_notify script 147backups
backup_exit_notify script 147backup_notify script 147bpend_notify script
UNIX client 153windows client 155
bpstart_notify scriptUNIX client 148windows client 150
compressed 136diskfull_notify script 158estimating time required 137media requirements 144multiplexed 136session_notify script 162session_start_notify script 162
boot managers and IDR 201booting a computer
with IDR bootable media 194bp.conf entries
NBRB_CLEANUP_OBSOLETE_DBINFO 119NBRB_ENABLE_OPTIMIZATIONS 119NBRB_FORCE_FULL_EVAL 119NBRB_MPX_GROUP_UNLOAD_DELAY 120NBRB_REEVAL_PENDING 119NBRB_REEVAL_PERIOD 120NBRB_RETRY_DELAY_AFTER_EMM_ERR 120REQUIRED_NETWORK 120
bpdynamicclient 126bpend_notify script
UNIX client 153windows client 155
bpstart_notify script
nbu_win_print_II.book Page 205 Tuesday, August 16, 2005 12:53 PM
206 NetBackup System Administrator’s Guide for Windows, Volume II
UNIX client 148Windows client 150
Ccatalog backups
offline, cold 157catalogs
backup notification script 157cdrom file system 167clients
changing host names 134dynamic UNIX client 126exclude files list
UNIX 166include files list 170
collecting disaster recovery information 164Compaq computers
recovering with IDR 201compressed backups 136configuration
host names 132Intelligent Disaster Recovery (IDR) 183mail notifications 128
CREATE_BACKUP_VOLUMES 174cross mount points
effect with UNIX raw partitions 164examples 165setting 164
custom setup, when to use in IDR 196
Ddbbackup_notify script 157Default User Access Control user group 59Dell PowerEdge 6100/200 with RAID
recovering with IDR 200device delays 138DHCP server 122directives for AFS 174disaster recovery
collect information for 164diskettes, updating 191, 192procedure 193
Disk Administrator 200disk overhead, for catalogs 145diskfull_notify script 158Domain Name Service (DNS)
hostnames 134drfile.exe command 193
Ee-mail notifications 128EMM server 7, 28Enable Performance Data Collection
property 141Enterprise Media Manager server 7, 28escape character
on UNIX 168Exclude files list
UNIX 166exclude files list 166exclude lists
creating 166example 169for specific policies and schedules 169syntax rules 167wildcards in 167
extended attribute filesSolaris 9 136
Ffile systems 164files
catalog space requirements 145host.xlate 134
FlashBackup 136follow NFS mounts
with cross mount points 165
GGNU tar 136
Hhashed file 86host names
changing client name 134changing server name 132, 133client peername 133correct use 132short 133
host.xlate file 134
IIBM computers, recovering with IDR 201IDR preparation wizard
preparing bootable media 184updating disaster recovery diskettes 191, 192
includefiles list 170
Intelligent Disaster Recovery
nbu_win_print_II.book Page 206 Tuesday, August 16, 2005 12:53 PM

Index 207
collect information for 164Intelligent Disaster Recovery (IDR)
bootable mediachoosing type 185creating CD image 188creating diskettes 186preparing 184
configuration 183custom setup, when to use 196diskettes, preparing 184diskettes, updating 191, 192DR files
obtaining from server 183overview 182update with drfile.exe 193
frequently asked questions 201hard disk partition changes 196hard drive partition, altering sizes 200overview 181preparation wizard 184recovery wizard 193requirements for using 180supported Windows editions 180updating IDR media
disaster recovery CD 191recovery diskettes 191, 192using drfile.exe 193when to update 190
using boot managers 201Windows
Disk Administrator 197editions supported 180setup 195
wizardsdisaster recovery 193IDR preparation 184
Mmail_dr_info.cmd 158Media
determining requirements 144using tar to read images 136
media servers, configuring 113methods.txt file 78methods_allow.txt file 79methods_deny.txt file 80mntfs file system 167mount points 164multiple servers 112
multiplexing (MPX)demultiplexing 111Maximum Jobs per Client property 110recovering backups 136schedule media multiplexing 107storage unit max per drive 107
Nnamed data streams
VxFS 4.0 136names_allow.txt file 81names_deny.txt file 82nbac_cron.exe 53nbmail.cmd 159NBRB_CLEANUP_OBSOLETE_DBINFO
bp.conf entry 119NBRB_ENABLE_OPTIMIZATIONS
bp.conf entry 119NBRB_FORCE_FULL_EVAL
bp.conf entry 119NBRB_MPX_GROUP_UNLOAD_DELAY
bp.conf entry 120NBRB_REEVAL_PENDING
bp.conf entry 119NBRB_REEVAL_PERIOD
bp.conf entry 120NBRB_RETRY_DELAY_AFTER_EMM_ER
Rbp.conf entry 120
NBU_Admin Access Control user group 59NBU_Operator Access Control user
group 59NBU_Security Admin Access Control user
group 58NBU_User Access Control user group 59NDMP 136NetBackup
authorization, process description 98configuration options 119
NetBackup Access Control (NBAC)nbac_cron.exe 53user groups 58
Administrator 59configuration 60Default User 59Operator 59renaming user groups 61Security Administrator 58Vault Operator 59
nbu_win_print_II.book Page 207 Tuesday, August 16, 2005 12:53 PM
208 NetBackup System Administrator’s Guide for Windows, Volume II
network transfer rate 139notification scripts 146
OOperator Access Control user group 59OS/2, boot manager and IDR 201overhead, for catalogs 145
Ppeername, client 133Performance Monitor, using with
NetBackup 141ports
authentication 9, 52authorization 52
preferred group, specify 102PREFERRED_GROUP 102priority for jobs in worklist 143proc file system 167
RRANDOM_PORTS 119, 120raw partitions 136regular expressions, AFS file list 175REMOVE_BACKUP_VOLUMES 175REQUIRED_INTERFACE 120REQUIRED_NETWORK
bp.conf entry 120restore_notify script 161restores
AFS clients 176restore_notify script 161
Sschedules
automatic, how processed 142scripts
backup_exit_notify 146backup_notify 146bpend_notify 146bpstart_notify 146, 148dbbackup_notify 146diskfull_notify 146mail_dr_info.cmd 146nbmail.cmd 146notification 146parent_end_notify 146parent_start_notify 146restore_notify 146session_notify 146session_start_notify 146
userreq_notify 146Security Administrator Access Control user
group 58Sequent 103servers
changing host names 132, 133NetBackup
master 113media 113multiple 112
session_notify script 162session_start_notify script 162SGI cachefs file system 167SKIP_SMALL_VOLUMES 175Solaris
file systems 167Solaris 9 extended attributes 136specify a preferred group 102System Commander and IDR 201System Monitor, using with NetBackup 140,
141
Ttape marks 145tape overhead, for catalogs 145tar
GNU 136to read backup images 136
transfer rate 137, 138troubleshooting
AFS backups 178
Uunhashed file 86UnixWare cachefs file system 167updating IDR bootable media 190user groups
Administrator 59Default User 59description 58Operator 59renaming user groups 61Security Administrator 58Vault Operator 59
userreq_notify script 162
VVault Operator User Access Control user
group 59Vault_Operator Access Control user
nbu_win_print_II.book Page 208 Tuesday, August 16, 2005 12:53 PM

Index 209
group 59Version, NetBackup
determining xiiivopie method of authentication 89vopie, definition 89vopied 85VxFS 4.0 named data streams 136VxSS authentication port 52VxSS authorization port 52
Wwildcard characters
in AFS file list 175in exclude lists 167UNIX
escape character 168wizards
disaster recovery 193IDR preparation 184
worklist, prioritizing 143
nbu_win_print_II.book Page 209 Tuesday, August 16, 2005 12:53 PM

210 NetBackup System Administrator’s Guide for Windows, Volume II
nbu_win_print_II.book Page 210 Tuesday, August 16, 2005 12:53 PM


