38
ForenSeq ™ mtDNA Control Region Kit Reference Guide VEROGEN PROPRIETARY Document # VD2019001 Rev. A June 2019
ForenSeq™ mtDNA Control Region Kit
Reference Guide
VEROGEN PROPRIETARY Document # VD2019001 Rev. A
June 2019

2 ForenSeq mtDNA Control Region Kit Reference Guide
Document # VD2019001 Rev. A
This document and its contents are proprietary to Verogen, Inc. and its affiliates, and are intended solely for the
contractual use of its customer in connection with the use of the product(s) described herein and for no other
purpose. This document and its contents shall not be used or distributed for any other purpose and/or otherwise
communicated, disclosed, or reproduced in any way whatsoever without the prior written consent of Verogen.
Verogen does not convey any license under its patent, trademark, copyright, or common-law rights nor similar
rights of any third parties by this document.
The instructions in this document must be strictly and explicitly followed by qualified and properly trained
personnel in order to ensure the proper and safe use of the product(s) described herein. All of the contents of this
document must be fully read and understood prior to using such product(s).
FAILURE TO COMPLETELY READ AND EXPLICITLY FOLLOW ALL OF THE INSTRUCTIONS CONTAINED
HEREIN MAY RESULT IN DAMAGE TO THE PRODUCT(S), INJURY TO PERSONS, INCLUDING TO USERS OR
OTHERS, AND DAMAGE TO OTHER PROPERTY.
VEROGEN DOES NOT ASSUME ANY LIABILITY ARISING OUT OF THE IMPROPER USE OF THE PRODUCT(S)
DESCRIBED HEREIN (INCLUDING PARTS THEREOF OR SOFTWARE).
© 2019 Verogen, Inc. All rights reserved.
All other names, logos, and other trademarks are the property of their respective owners.
For Research, Forensic, or Paternity Use Only. Not for any clinical or therapeutic use in humans or animals.
Notice to Purchaser: Limited License
The purchase price of the Product includes a limited, non-transferable license under U.S. and foreign patents owned
by BIO-RAD Laboratories, Inc., to use this Product. No other license under these patents is conveyed expressly or by
implication to the purchaser by the purchase of this Product.
The Product is sold under license from Affibody AB, Sweden.
Phusion DNA Polymerase is manufactured by Thermo Fisher Scientific. Phusion is a trademark or registered
trademark of Thermo Fisher Scientific, or its subsidiaries.

ForenSeq mtDNA Control Region Kit Reference Guide
Document # VD2019001 Rev. A 3
Table of Contents
Revision History ............................................................................................. 4
Introduction .................................................................................................... 5
DNA Input Recommendations ........................................................................ 7
Protocol Introduction ...................................................................................... 8
Tips and Techniques ...................................................................................... 9
Library Prep Workflow .................................................................................. 10
Amplify and Tag Targets .............................................................................. 11
Enrich Targets ............................................................................................. 15
Purify Libraries ............................................................................................. 18
Normalize Libraries (Bead-Based Procedure) .............................................. 21
Normalize Libraries (Manual Quantification Procedure) ............................... 24
Pool Libraries ............................................................................................... 25
Denature and Dilute Libraries (Bead-Normalized Procedure) ....................... 26
Denature and Dilute Libraries (Manual Quant Procedure) ............................ 28
Supporting Kit Information ............................................................................ 30
Acronyms ..................................................................................................... 33
Consumables and Equipment ...................................................................... 34
Technical Assistance ................................................................................... 37
4 ForenSeq mtDNA Control Region Kit Reference Guide
Document # VD2019001 Rev. A
Revision History
Document # Date Description of Change
VD2019001 Rev. A June 2019 Initial release.
ForenSeq mtDNA Control Region Kit Reference Guide
Document # VD2019001 Rev. A 5
Introduction
This protocol explains how to prepare DNA libraries using reagents provided in the Verogen
ForenSeq™ mtDNA Control Region Kit to type, database, casework or research samples for
sequencing on the MiSeq FGx instrument.
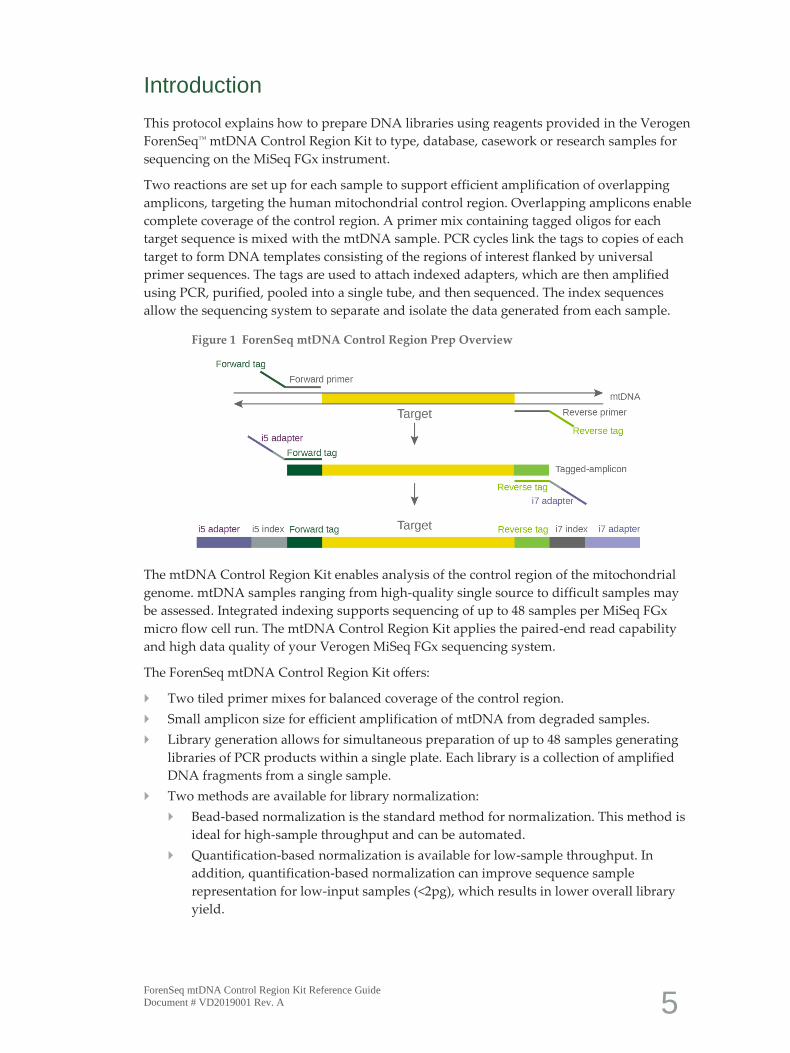
Two reactions are set up for each sample to support efficient amplification of overlapping
amplicons, targeting the human mitochondrial control region. Overlapping amplicons enable
complete coverage of the control region. A primer mix containing tagged oligos for each
target sequence is mixed with the mtDNA sample. PCR cycles link the tags to copies of each
target to form DNA templates consisting of the regions of interest flanked by universal
primer sequences. The tags are used to attach indexed adapters, which are then amplified
using PCR, purified, pooled into a single tube, and then sequenced. The index sequences
allow the sequencing system to separate and isolate the data generated from each sample.
Figure 1 ForenSeq mtDNA Control Region Prep Overview
The mtDNA Control Region Kit enables analysis of the control region of the mitochondrial
genome. mtDNA samples ranging from high-quality single source to difficult samples may
be assessed. Integrated indexing supports sequencing of up to 48 samples per MiSeq FGx
micro flow cell run. The mtDNA Control Region Kit applies the paired-end read capability
and high data quality of your Verogen MiSeq FGx sequencing system.
The ForenSeq mtDNA Control Region Kit offers:
Two tiled primer mixes for balanced coverage of the control region.
Small amplicon size for efficient amplification of mtDNA from degraded samples.
Library generation allows for simultaneous preparation of up to 48 samples generating
libraries of PCR products within a single plate. Each library is a collection of amplified
DNA fragments from a single sample.
Two methods are available for library normalization:
Bead-based normalization is the standard method for normalization. This method is
ideal for high-sample throughput and can be automated.
Quantification-based normalization is available for low-sample throughput. In
addition, quantification-based normalization can improve sequence sample
representation for low-input samples (<2pg), which results in lower overall library
yield.

6 ForenSeq mtDNA Control Region Kit Reference Guide
Document # VD2019001 Rev. A
Figure 2 Schematic of Tiled Amplicons for Complete Coverage Across the Control Region
Overlapping primary amplicons (< 150 bp) for complete coverage under primer binding
sites
3 bp spacing between primary amplicons to mitigate end of read trimming during
analysis
18 primer pairs comprised of 122 primers to efficiently amplify degenerate bases within
the mitochondrial genome

ForenSeq mtDNA Control Region Kit Reference Guide
Document # VD2019001 Rev. A 7
DNA Input Recommendations
It is important to quantify the input gDNA and assess the DNA quality before beginning the
mtDNA Control Region Kit protocol. Follow these DNA input recommendations:
50 pg of human genomic DNA (gDNA) input is recommended per reaction. Two
reactions are set up for each sample for a total input of 100 pg gDNA per sample.
Use a fluorometric-based method or qPCR for quantification.
The ForenSeq mtDNA Control Region Kit protocol is compatible with extracted mtDNA
from hair, bone, tooth and buccal samples.
If using hair, successful profiles can be obtained from 0.5 cm of hair shaft.
The assay can accommodate up to 12 µl per sample to support low input samples.
8 ForenSeq mtDNA Control Region Kit Reference Guide
Document # VD2019001 Rev. A
Protocol Introduction
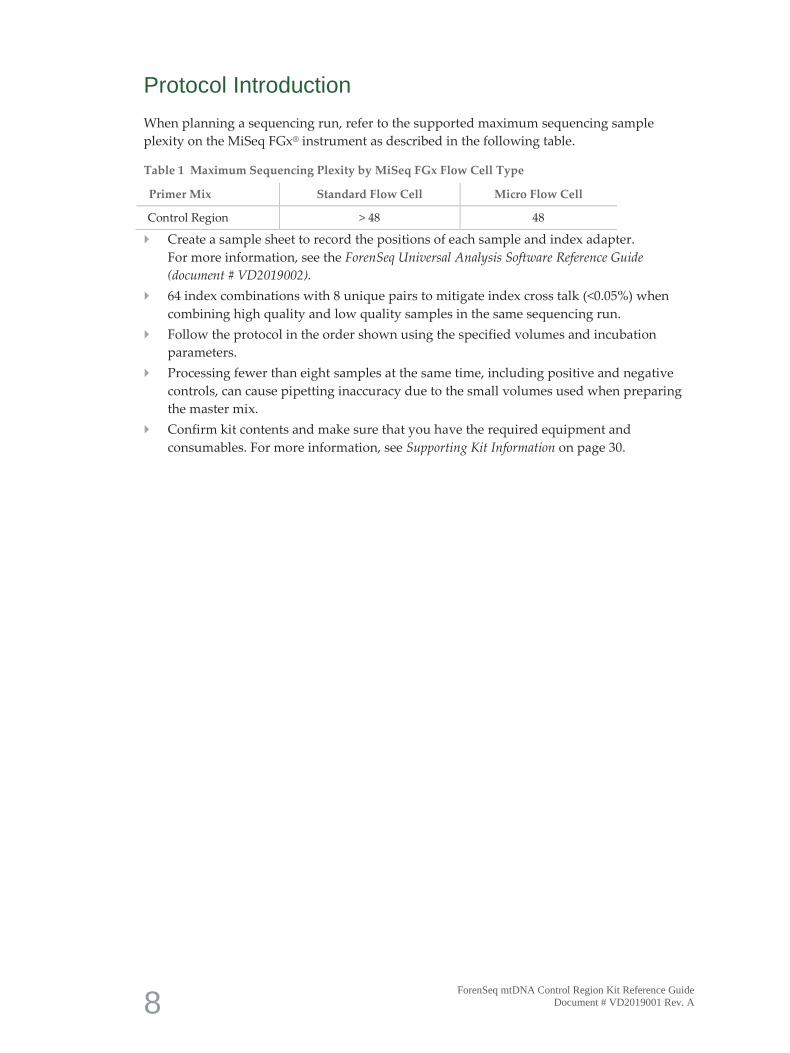
When planning a sequencing run, refer to the supported maximum sequencing sample
plexity on the MiSeq FGx® instrument as described in the following table.
Table 1 Maximum Sequencing Plexity by MiSeq FGx Flow Cell Type
Primer Mix Standard Flow Cell Micro Flow Cell
Control Region > 48 48
Create a sample sheet to record the positions of each sample and index adapter.
For more information, see the ForenSeq Universal Analysis Software Reference Guide
(document # VD2019002).
64 index combinations with 8 unique pairs to mitigate index cross talk (<0.05%) when
combining high quality and low quality samples in the same sequencing run.
Follow the protocol in the order shown using the specified volumes and incubation
parameters.
Processing fewer than eight samples at the same time, including positive and negative
controls, can cause pipetting inaccuracy due to the small volumes used when preparing
the master mix.
Confirm kit contents and make sure that you have the required equipment and
consumables. For more information, see Supporting Kit Information on page 30.
ForenSeq mtDNA Control Region Kit Reference Guide
Document # VD2019001 Rev. A 9
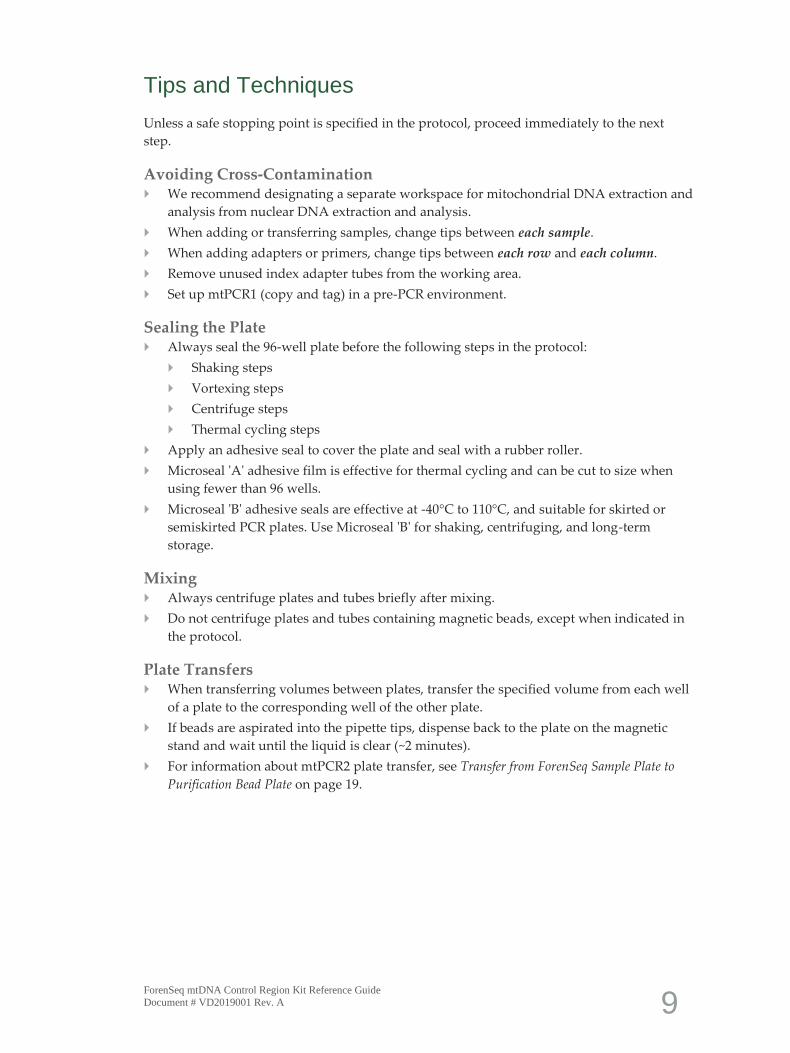
Tips and Techniques
Unless a safe stopping point is specified in the protocol, proceed immediately to the next
step.
Avoiding Cross-Contamination We recommend designating a separate workspace for mitochondrial DNA extraction and
analysis from nuclear DNA extraction and analysis.
When adding or transferring samples, change tips between each sample.
When adding adapters or primers, change tips between each row and each column.
Remove unused index adapter tubes from the working area.
Set up mtPCR1 (copy and tag) in a pre-PCR environment.
Sealing the Plate Always seal the 96-well plate before the following steps in the protocol:
Shaking steps
Vortexing steps
Centrifuge steps
Thermal cycling steps
Apply an adhesive seal to cover the plate and seal with a rubber roller.
Microseal 'A' adhesive film is effective for thermal cycling and can be cut to size when
using fewer than 96 wells.
Microseal 'B' adhesive seals are effective at -40°C to 110°C, and suitable for skirted or
semiskirted PCR plates. Use Microseal 'B' for shaking, centrifuging, and long-term
storage.
Mixing Always centrifuge plates and tubes briefly after mixing.
Do not centrifuge plates and tubes containing magnetic beads, except when indicated in
the protocol.
Plate Transfers When transferring volumes between plates, transfer the specified volume from each well
of a plate to the corresponding well of the other plate.
If beads are aspirated into the pipette tips, dispense back to the plate on the magnetic
stand and wait until the liquid is clear (~2 minutes).
For information about mtPCR2 plate transfer, see Transfer from ForenSeq Sample Plate to
Purification Bead Plate on page 19.
10 ForenSeq mtDNA Control Region Kit Reference Guide
Document # VD2019001 Rev. A
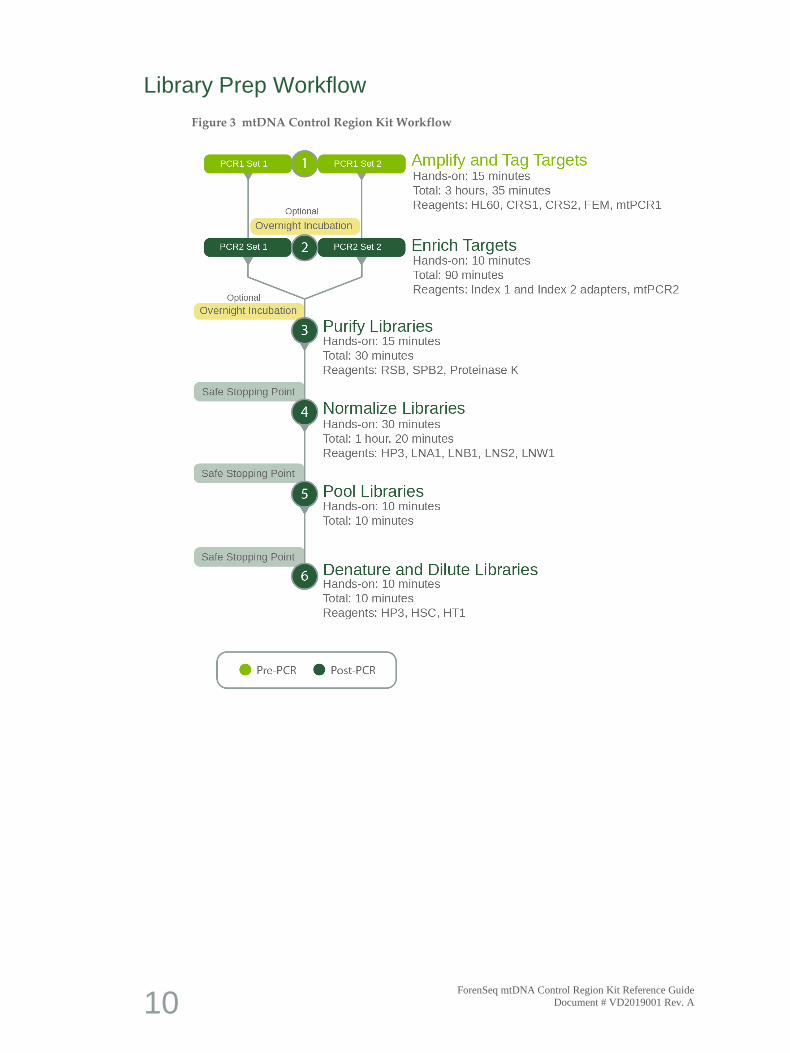
Library Prep Workflow
Figure 3 mtDNA Control Region Kit Workflow

ForenSeq mtDNA Control Region Kit Reference Guide
Document # VD2019001 Rev. A 11
Amplify and Tag Targets
This process amplifies and tags regions specific to DNA sequences of the mitochondrial
control region, using a ForenSeq oligonucleotide primer mix.
This protocol requires Control DNA HL60 and a negative PCR amplification control
(nuclease-free water) in each preparation. If these controls are not included, troubleshooting
support is limited.
NOTE
Processing fewer than eight samples at the same time, including positive and negative controls,
can affect pipetting accuracy due to the small volumes used when preparing the master mix.
Consumables HL60 (Control DNA)
CRS1 (Control Region Set 1)
CRS2 (Control Region Set 2)
FEM (ForenSeq Enzyme Mix)
mtPCR1 (mtPCR1 Reaction Mix)
1.5 ml microcentrifuge tubes (2)
96-well 0.3 ml PCR plate, skirted or semiskirted
DNA input:
Purified gDNA (100 pg per sample)
(Split across two mtPCR1 reactions: Set 1 and Set 2)
Hair (DNA extracted from 0.5–2 cm of hair shaft; Gallimore JM, McElhoe JA, Holland
MM, (2018) Assessing heteroplasmic variant drift in the mtDNA control region of
human hairs using an MPS approach Forensic Science International: Genetics 32 7-17)
For bone and teeth up to 12 µl of sample can be used to maximize input
Microseal 'A' film
Nuclease-free water
[Optional] RNase/DNase-free eight-tube strip and caps
NOTE
Use Microseal 'A' when sealing the plate before placing on the thermal cycler. Use Microseal 'B'
for other steps that require a sealed plate.
About Reagents Dispense mtPCR1 slowly to avoid creating air bubbles.
12 ForenSeq mtDNA Control Region Kit Reference Guide
Document # VD2019001 Rev. A
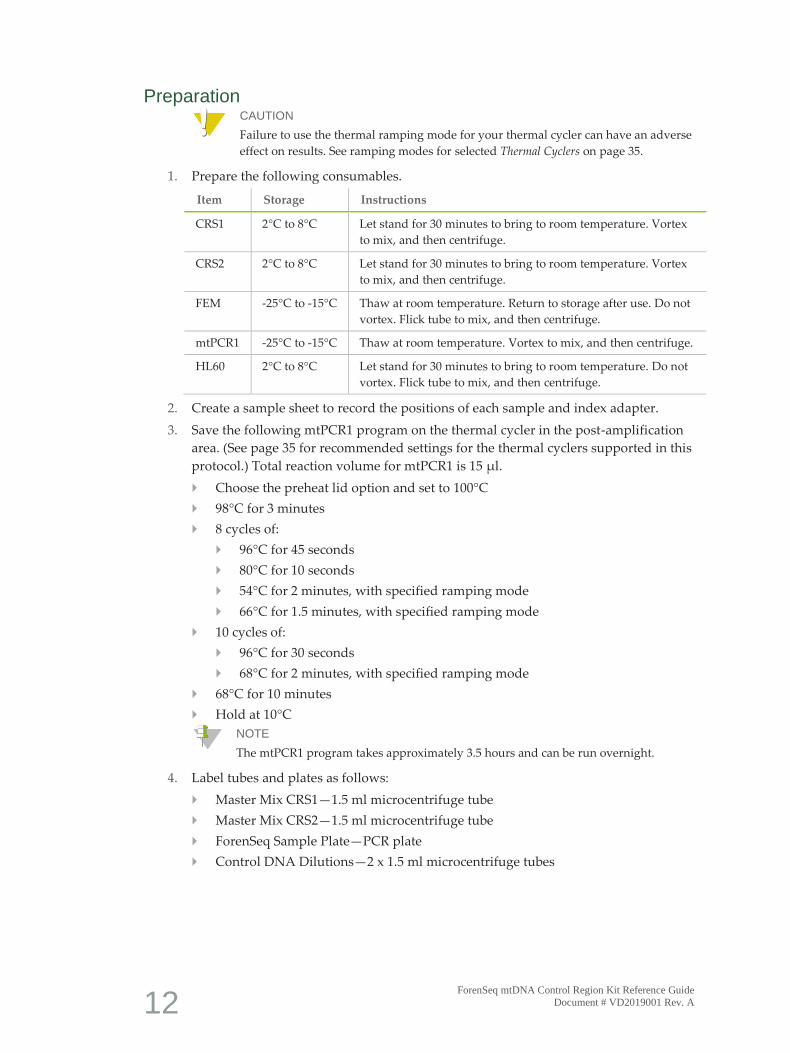
Preparation
CAUTION
Failure to use the thermal ramping mode for your thermal cycler can have an adverse
effect on results. See ramping modes for selected Thermal Cyclers on page 35.
1. Prepare the following consumables.
Item Storage Instructions
CRS1 2°C to 8°C Let stand for 30 minutes to bring to room temperature. Vortex
to mix, and then centrifuge.
CRS2 2°C to 8°C Let stand for 30 minutes to bring to room temperature. Vortex
to mix, and then centrifuge.
FEM -25°C to -15°C Thaw at room temperature. Return to storage after use. Do not
vortex. Flick tube to mix, and then centrifuge.
mtPCR1 -25°C to -15°C Thaw at room temperature. Vortex to mix, and then centrifuge.
HL60 2°C to 8°C Let stand for 30 minutes to bring to room temperature. Do not
vortex. Flick tube to mix, and then centrifuge.
2. Create a sample sheet to record the positions of each sample and index adapter.
3. Save the following mtPCR1 program on the thermal cycler in the post-amplification
area. (See page 35 for recommended settings for the thermal cyclers supported in this
protocol.) Total reaction volume for mtPCR1 is 15 µl.
Choose the preheat lid option and set to 100°C
98°C for 3 minutes
8 cycles of:
96°C for 45 seconds
80°C for 10 seconds
54°C for 2 minutes, with specified ramping mode
66°C for 1.5 minutes, with specified ramping mode
10 cycles of:
96°C for 30 seconds
68°C for 2 minutes, with specified ramping mode
68°C for 10 minutes
Hold at 10°C
NOTE
The mtPCR1 program takes approximately 3.5 hours and can be run overnight.
4. Label tubes and plates as follows:
Master Mix CRS1—1.5 ml microcentrifuge tube
Master Mix CRS2—1.5 ml microcentrifuge tube
ForenSeq Sample Plate—PCR plate
Control DNA Dilutions—2 x 1.5 ml microcentrifuge tubes
ForenSeq mtDNA Control Region Kit Reference Guide
Document # VD2019001 Rev. A 13
Procedure 1. Quantify gDNA using a fluorometric-based method or qPCR.
2. Dilute 100 pg purified gDNA input material to 8.33 pg/µl with nuclease-free water.
3. Create a master mix for eight or more reactions in the Master Mix CRS1 tube.
Multiply each reagent volume by the number of reactions being prepared. Make 10%
extra reagent for overage. (9 µl master mix required per sample.)
mtPCR1 (3.7 µl per sample) for example, eight reactions require 32.6 µl
FEM (0.3 µl per sample) for example, eight reactions require 2.64 µl
CRS1 (5.0 µl per sample) for example, eight reactions require 44 µl
4. Pipette to mix and then centrifuge briefly.
5. Create a master mix for eight or more reactions in the Master Mix CRS2 tube.
Multiply each reagent volume by the number of reactions being prepared. Make 10%
extra reagent for overage. (9 µl master mix required per sample.)
mtPCR1 (3.7 µl per sample) for example, eight reactions require 32.6 µl
FEM (0.3 µl per sample) for example, eight reactions require 2.64 µl
CRS2 (5.0 µl per sample) for example, eight reactions require 44 µl
6. Pipette to mix and then centrifuge briefly.
7. If processing more than eight samples, evenly distribute the master mix into each
well of an eight-tube strip, and then use a multichannel pipette to dispense.
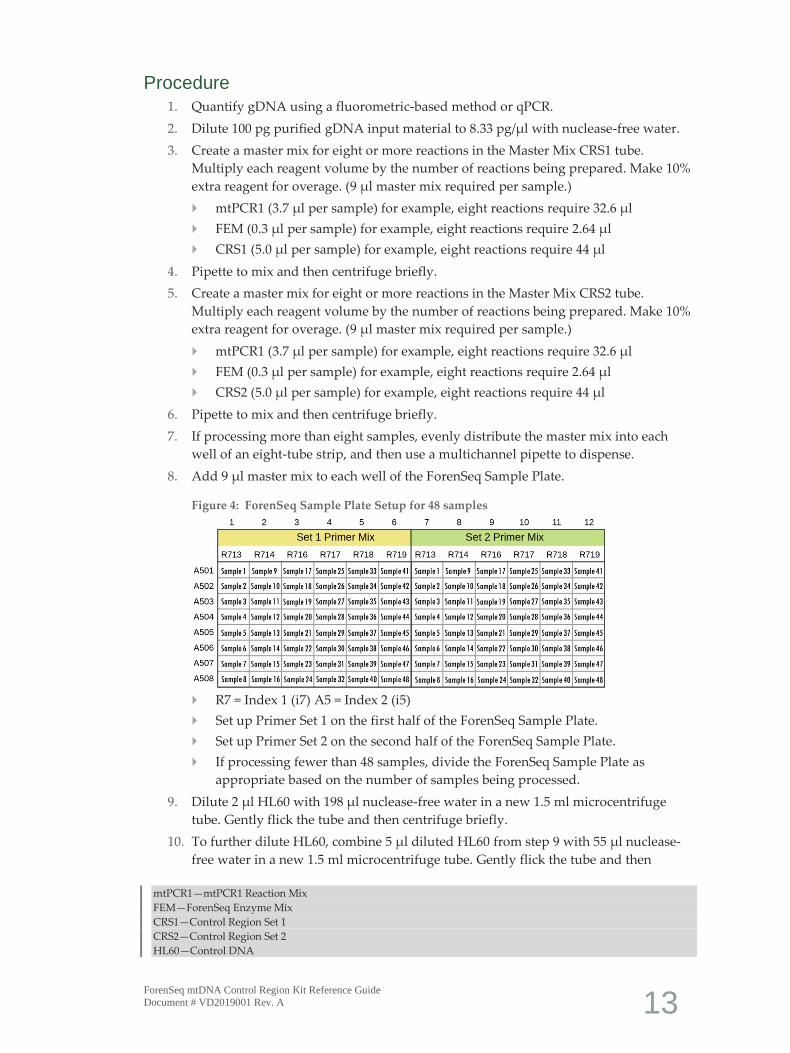
8. Add 9 µl master mix to each well of the ForenSeq Sample Plate.
Figure 4: ForenSeq Sample Plate Setup for 48 samples
R7 = Index 1 (i7) A5 = Index 2 (i5)
Set up Primer Set 1 on the first half of the ForenSeq Sample Plate.
Set up Primer Set 2 on the second half of the ForenSeq Sample Plate.
If processing fewer than 48 samples, divide the ForenSeq Sample Plate as
appropriate based on the number of samples being processed.
9. Dilute 2 µl HL60 with 198 µl nuclease-free water in a new 1.5 ml microcentrifuge
tube. Gently flick the tube and then centrifuge briefly.
10. To further dilute HL60, combine 5 µl diluted HL60 from step 9 with 55 µl nuclease-
free water in a new 1.5 ml microcentrifuge tube. Gently flick the tube and then
mtPCR1—mtPCR1 Reaction Mix
FEM—ForenSeq Enzyme Mix
CRS1—Control Region Set 1
CRS2—Control Region Set 2
HL60—Control DNA

14 ForenSeq mtDNA Control Region Kit Reference Guide
Document # VD2019001 Rev. A
centrifuge briefly.
11. Add 6 µl diluted HL60 (as a positive template control) to the appropriate wells
according to the sample sheet.
12. Add 6 µl nuclease-free water (as a negative PCR amplification control) to the
appropriate wells according to the sample sheet.
13. Add 6 µl diluted purified gDNA (8.33 pg/µl) sample to the appropriate wells
according to the sample sheet. Pipette to mix.
14. Seal the plate with Microseal ‘A’ and centrifuge at 1000 × g for 30 seconds.
15. Transport to the post-PCR area.
16. Place the plate on the thermal cycler and run the mtPCR1 program.
Safe Stopping Point If you are stopping, seal the plate and store at 2°C to 8°C for up to 2 days. Alternatively, leave
on the thermal cycler overnight.
ForenSeq mtDNA Control Region Kit Reference Guide
Document # VD2019001 Rev. A 15
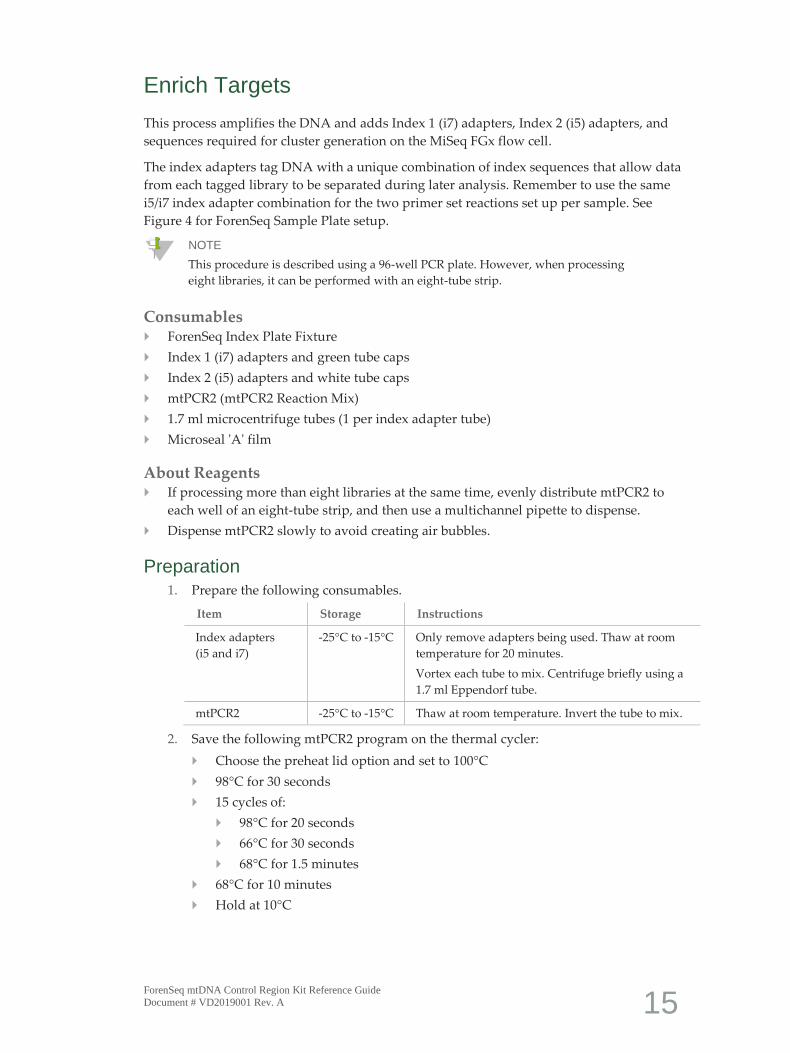
Enrich Targets
This process amplifies the DNA and adds Index 1 (i7) adapters, Index 2 (i5) adapters, and
sequences required for cluster generation on the MiSeq FGx flow cell.
The index adapters tag DNA with a unique combination of index sequences that allow data
from each tagged library to be separated during later analysis. Remember to use the same
i5/i7 index adapter combination for the two primer set reactions set up per sample. See
Figure 4 for ForenSeq Sample Plate setup.
NOTE
This procedure is described using a 96-well PCR plate. However, when processing
eight libraries, it can be performed with an eight-tube strip.
Consumables ForenSeq Index Plate Fixture
Index 1 (i7) adapters and green tube caps
Index 2 (i5) adapters and white tube caps
mtPCR2 (mtPCR2 Reaction Mix)
1.7 ml microcentrifuge tubes (1 per index adapter tube)
Microseal 'A' film
About Reagents If processing more than eight libraries at the same time, evenly distribute mtPCR2 to
each well of an eight-tube strip, and then use a multichannel pipette to dispense.
Dispense mtPCR2 slowly to avoid creating air bubbles.
Preparation 1. Prepare the following consumables.
Item Storage Instructions
Index adapters
(i5 and i7)
-25°C to -15°C Only remove adapters being used. Thaw at room
temperature for 20 minutes.
Vortex each tube to mix. Centrifuge briefly using a
1.7 ml Eppendorf tube.
mtPCR2 -25°C to -15°C Thaw at room temperature. Invert the tube to mix.
2. Save the following mtPCR2 program on the thermal cycler:
Choose the preheat lid option and set to 100°C
98°C for 30 seconds
15 cycles of:
98°C for 20 seconds
66°C for 30 seconds
68°C for 1.5 minutes
68°C for 10 minutes
Hold at 10°C
16 ForenSeq mtDNA Control Region Kit Reference Guide
Document # VD2019001 Rev. A
NOTE
The mtPCR2 program takes approximately 1 hour and can be run overnight.
Procedure
1. Centrifuge the ForenSeq Sample Plate at 1000 × g for 30 seconds.
2. Arrange Index 1 (i7) adapters in columns 1–6 of the ForenSeq Index Plate Fixture.
3. Arrange Index 2 (i5) adapters in rows A–H of the ForenSeq Index Plate Fixture.
4. Place the plate on the ForenSeq Index Plate Fixture.
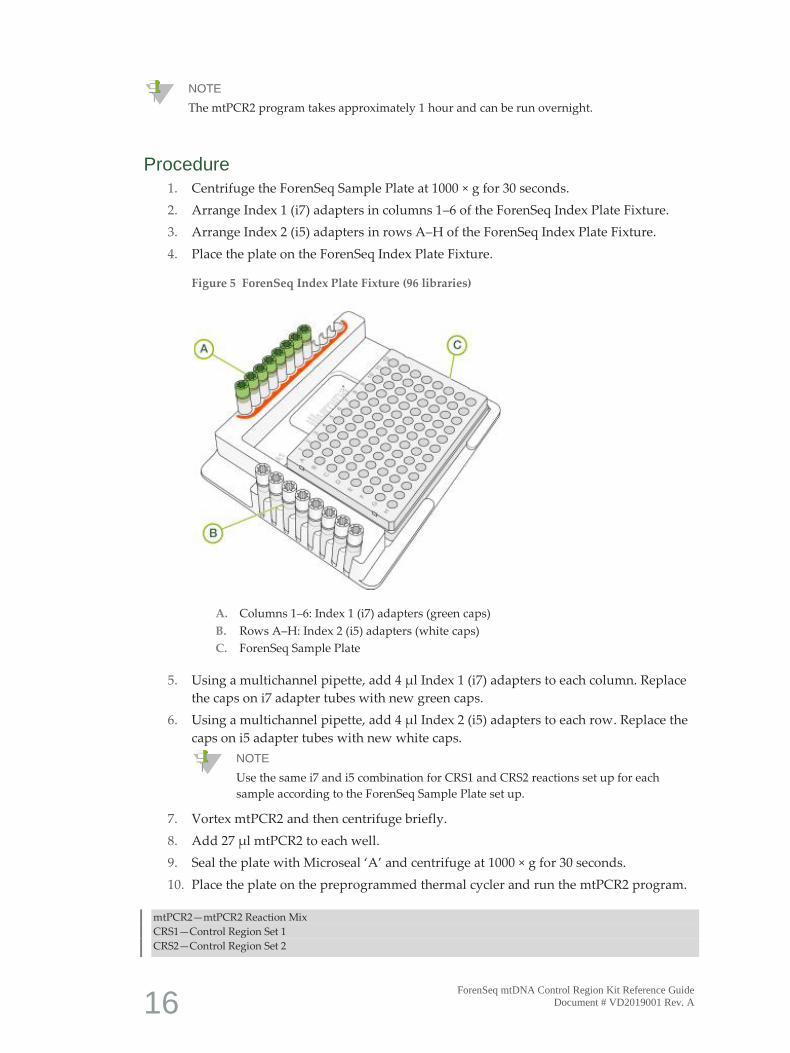
Figure 5 ForenSeq Index Plate Fixture (96 libraries)
A. Columns 1–6: Index 1 (i7) adapters (green caps)
B. Rows A–H: Index 2 (i5) adapters (white caps)
C. ForenSeq Sample Plate
5. Using a multichannel pipette, add 4 µl Index 1 (i7) adapters to each column. Replace
the caps on i7 adapter tubes with new green caps.
6. Using a multichannel pipette, add 4 µl Index 2 (i5) adapters to each row. Replace the
caps on i5 adapter tubes with new white caps.
NOTE
Use the same i7 and i5 combination for CRS1 and CRS2 reactions set up for each
sample according to the ForenSeq Sample Plate set up.
7. Vortex mtPCR2 and then centrifuge briefly.
8. Add 27 µl mtPCR2 to each well.
9. Seal the plate with Microseal ‘A’ and centrifuge at 1000 × g for 30 seconds.
10. Place the plate on the preprogrammed thermal cycler and run the mtPCR2 program.
mtPCR2—mtPCR2 Reaction Mix
CRS1—Control Region Set 1
CRS2—Control Region Set 2

ForenSeq mtDNA Control Region Kit Reference Guide
Document # VD2019001 Rev. A 17
Safe Stopping Point If you are stopping, seal the plate and store at 2°C to 8°C for up to 7 days. Alternatively, leave
on the thermal cycler overnight.
18 ForenSeq mtDNA Control Region Kit Reference Guide
Document # VD2019001 Rev. A
Purify Libraries
This process uses SPB2/ProK (Sample Purification Beads 2 with Proteinase K) to purify the
amplified libraries from the other reaction components.
Consumables RSB (Resuspension Buffer)
SPB2 (Sample Purification Beads 2)
ProK (Proteinase K)
96-well 0.3 ml PCR plate, skirted or semiskirted
96-well midi plates
Freshly prepared 80% ethanol (EtOH)
2 ml microcentrifuge tube
Microseal 'B' adhesive seals
RNase/DNase-free reagent reservoirs
About Reagents Before first use of SPB2, add 25 µl ProK.
Mark the checkbox on the SPB2 label to indicate the addition of ProK.
Vortex SPB2/ProK before each use.
Vortex SPB2/ProK frequently to make sure that beads are evenly distributed.
Aspirate and dispense SPB2/ProK slowly due to the viscosity of the solution.
Preparation
NOTE
To ensure optimal performance and library yield, make sure that the SPB2/ProK beads are
brought to room temperature fully before use.
1. Prepare the following consumables.
Item Storage Instructions
RSB 2°C to 8°C Let stand for 30 minutes to bring to room temperature.
SPB2/ProK 2°C to 8°C Let stand for 30 minutes to bring to room temperature.
2. Label plates as follows:
Purification Bead Plate—midi plate
Purified Library Plate—PCR plate
ForenSeq mtDNA Control Region Kit Reference Guide
Document # VD2019001 Rev. A 19
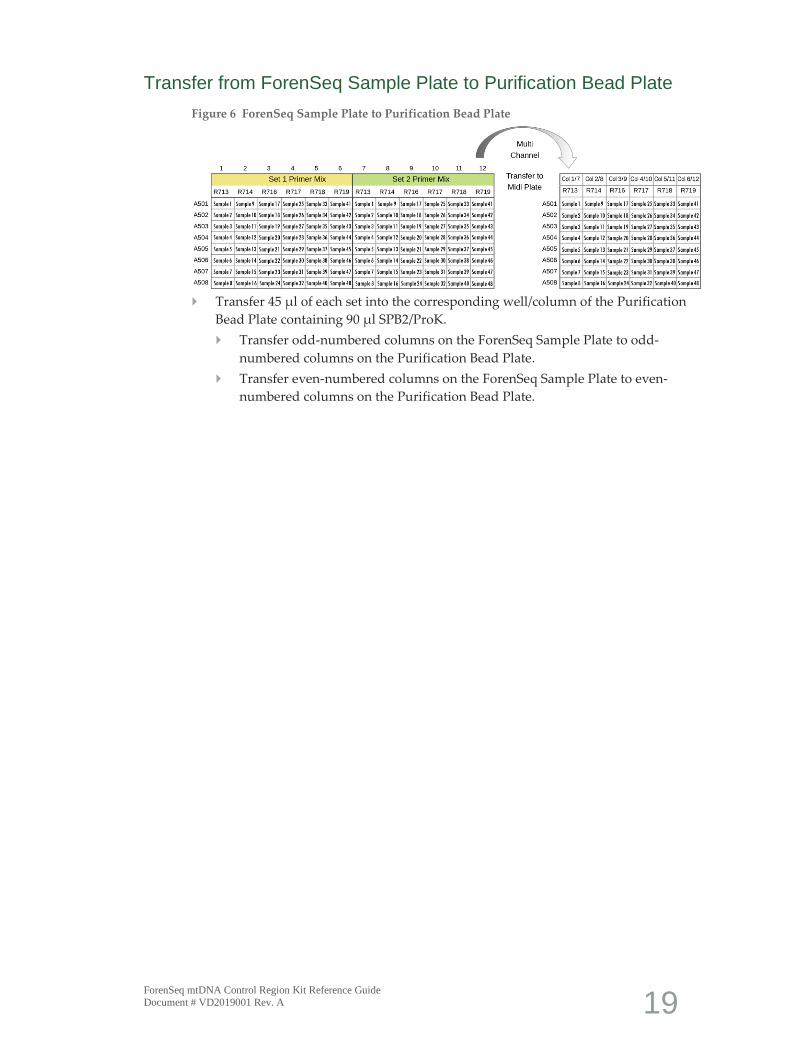
Transfer from ForenSeq Sample Plate to Purification Bead Plate
Figure 6 ForenSeq Sample Plate to Purification Bead Plate
Transfer 45 µl of each set into the corresponding well/column of the Purification
Bead Plate containing 90 µl SPB2/ProK.
Transfer odd-numbered columns on the ForenSeq Sample Plate to odd-
numbered columns on the Purification Bead Plate.
Transfer even-numbered columns on the ForenSeq Sample Plate to even-
numbered columns on the Purification Bead Plate.
20 ForenSeq mtDNA Control Region Kit Reference Guide
Document # VD2019001 Rev. A
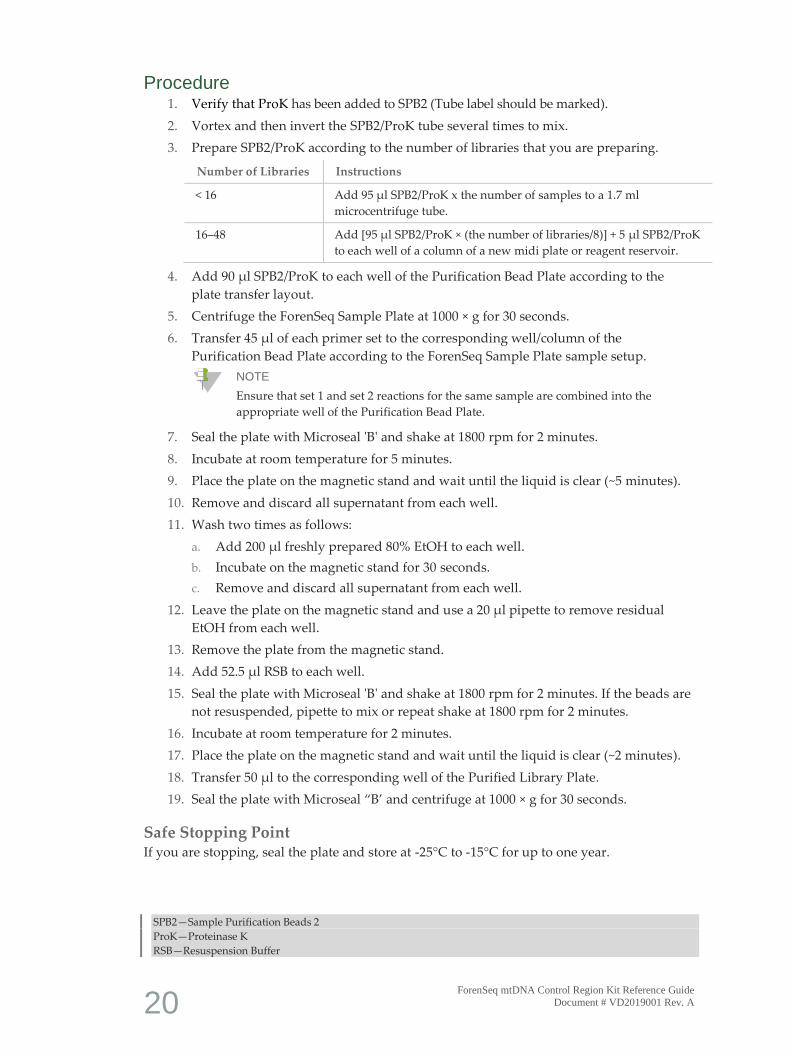
Procedure 1. Verify that ProK has been added to SPB2 (Tube label should be marked).
2. Vortex and then invert the SPB2/ProK tube several times to mix.
3. Prepare SPB2/ProK according to the number of libraries that you are preparing.
Number of Libraries Instructions
< 16 Add 95 µl SPB2/ProK x the number of samples to a 1.7 ml
microcentrifuge tube.
16–48 Add [95 µl SPB2/ProK × (the number of libraries/8)] + 5 µl SPB2/ProK
to each well of a column of a new midi plate or reagent reservoir.
4. Add 90 µl SPB2/ProK to each well of the Purification Bead Plate according to the
plate transfer layout.
5. Centrifuge the ForenSeq Sample Plate at 1000 × g for 30 seconds.
6. Transfer 45 µl of each primer set to the corresponding well/column of the
Purification Bead Plate according to the ForenSeq Sample Plate sample setup.
NOTE
Ensure that set 1 and set 2 reactions for the same sample are combined into the
appropriate well of the Purification Bead Plate.
7. Seal the plate with Microseal 'B' and shake at 1800 rpm for 2 minutes.
8. Incubate at room temperature for 5 minutes.
9. Place the plate on the magnetic stand and wait until the liquid is clear (~5 minutes).
10. Remove and discard all supernatant from each well.
11. Wash two times as follows:
a. Add 200 µl freshly prepared 80% EtOH to each well.
b. Incubate on the magnetic stand for 30 seconds.
c. Remove and discard all supernatant from each well.
12. Leave the plate on the magnetic stand and use a 20 µl pipette to remove residual
EtOH from each well.
13. Remove the plate from the magnetic stand.
14. Add 52.5 µl RSB to each well.
15. Seal the plate with Microseal 'B' and shake at 1800 rpm for 2 minutes. If the beads are
not resuspended, pipette to mix or repeat shake at 1800 rpm for 2 minutes.
16. Incubate at room temperature for 2 minutes.
17. Place the plate on the magnetic stand and wait until the liquid is clear (~2 minutes).
18. Transfer 50 µl to the corresponding well of the Purified Library Plate.
19. Seal the plate with Microseal “B’ and centrifuge at 1000 × g for 30 seconds.
Safe Stopping Point If you are stopping, seal the plate and store at -25°C to -15°C for up to one year.
SPB2—Sample Purification Beads 2
ProK—Proteinase K
RSB—Resuspension Buffer
ForenSeq mtDNA Control Region Kit Reference Guide
Document # VD2019001 Rev. A 21
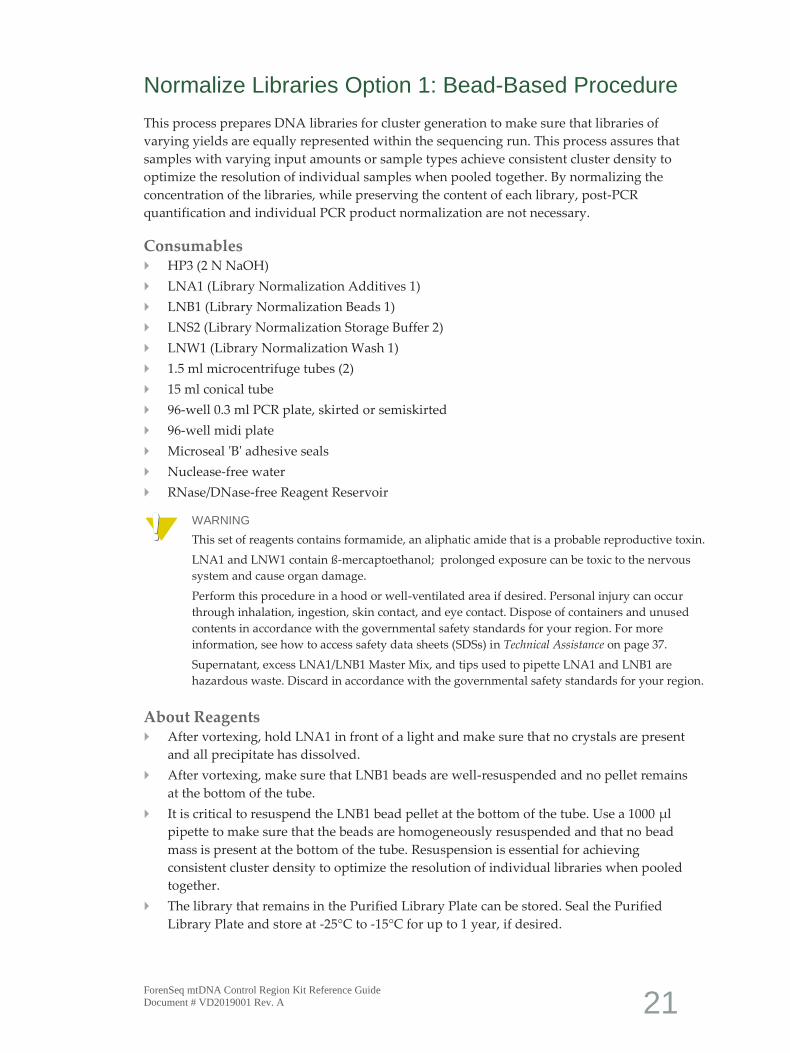
Normalize Libraries Option 1: Bead-Based Procedure
This process prepares DNA libraries for cluster generation to make sure that libraries of
varying yields are equally represented within the sequencing run. This process assures that
samples with varying input amounts or sample types achieve consistent cluster density to
optimize the resolution of individual samples when pooled together. By normalizing the
concentration of the libraries, while preserving the content of each library, post-PCR
quantification and individual PCR product normalization are not necessary.
Consumables HP3 (2 N NaOH)
LNA1 (Library Normalization Additives 1)
LNB1 (Library Normalization Beads 1)
LNS2 (Library Normalization Storage Buffer 2)
LNW1 (Library Normalization Wash 1)
1.5 ml microcentrifuge tubes (2)
15 ml conical tube
96-well 0.3 ml PCR plate, skirted or semiskirted
96-well midi plate
Microseal 'B' adhesive seals
Nuclease-free water
RNase/DNase-free Reagent Reservoir
WARNING
This set of reagents contains formamide, an aliphatic amide that is a probable reproductive toxin.
LNA1 and LNW1 contain ß-mercaptoethanol; prolonged exposure can be toxic to the nervous
system and cause organ damage.
Perform this procedure in a hood or well-ventilated area if desired. Personal injury can occur
through inhalation, ingestion, skin contact, and eye contact. Dispose of containers and unused
contents in accordance with the governmental safety standards for your region. For more
information, see how to access safety data sheets (SDSs) in Technical Assistance on page 37.
Supernatant, excess LNA1/LNB1 Master Mix, and tips used to pipette LNA1 and LNB1 are
hazardous waste. Discard in accordance with the governmental safety standards for your region.
About Reagents After vortexing, hold LNA1 in front of a light and make sure that no crystals are present
and all precipitate has dissolved.
After vortexing, make sure that LNB1 beads are well-resuspended and no pellet remains
at the bottom of the tube.
It is critical to resuspend the LNB1 bead pellet at the bottom of the tube. Use a 1000 µl
pipette to make sure that the beads are homogeneously resuspended and that no bead
mass is present at the bottom of the tube. Resuspension is essential for achieving
consistent cluster density to optimize the resolution of individual libraries when pooled
together.
The library that remains in the Purified Library Plate can be stored. Seal the Purified
Library Plate and store at -25°C to -15°C for up to 1 year, if desired.

22 ForenSeq mtDNA Control Region Kit Reference Guide
Document # VD2019001 Rev. A
Preparation 1. Prepare the following consumables.
Item Storage Instructions
HP3 -25°C to -15°C Thaw at room temperature.
LNA1 -25°C to -15°C Thaw at room temperature. Vortex with intermittent inversion.
LNB1 2°C to 8°C Let stand for 30 minutes to bring to room temperature. Vortex for
at least 1 minute, inverting 5 times every 15 seconds. Pipette to
mix until the bead pellet at the bottom is resuspended.
LNW1 2°C to 8°C Let stand for 30 minutes to bring to room temperature.
LNS2 15°C to 30°C Remove from storage.
2. Label tubes and plates as follows:
0.1 N HP3—1.5 ml microcentrifuge tube or a 2.0 ml microcentrifuge tube
LNA1/LNB1 Master Mix—1.5 ml microcentrifuge tube or 15 ml conical tube
Normalization Working Plate—midi plate
Normalization Library Plate—PCR plate
3. Dedicate separate hazardous waste disposal containers for liquids and solids.
Procedure 1. Create a master mix in the LNA1/LNB1 Master Mix tube.
LNA1 (46.8 µl per sample) for example, eight reactions require 374 µl.
LNB1 (8.5 µl per sample) for example, eight reactions require 68 µl.
2. Vortex and then invert the tube several times to mix.
3. Pour into a reagent reservoir.
4. Transfer 45 µl to each well of the Normalization Working Plate that will contain a
library according to the sample sheet.
5. To clear beads that might have aspirated, place the Purified Library Plate on the
magnetic stand and wait until the liquid is clear (~2 minutes).
6. Transfer 20 µl from each well of the Purified Library Plate to the corresponding well
of the Normalization Working Plate.
7. Seal the plate with Microseal 'B' and shake at 1800 rpm for 30 minutes.
8. While the plate is shaking, perform the following steps:
a. Prepare the 0.1 N HP3 tube, as follows:
Nuclease-free water (33.3 µl per sample)
For example, eight reactions require 266.4 µl.
HP3 (1.8 µl per sample) For example, eight reactions require 14.4 µl.
Invert the tube several times to mix.
Set aside.
b. Add 30 µl LNS2 to each well of the Normalization Library Plate that will contain
a library according to the sample sheet.
HP3—2 N NaOH
LNA1—Library Normalization Additives 1
LNB1—Library Normalization Beads 1
LNS2—Library Normalization Storage Buffer 2

ForenSeq mtDNA Control Region Kit Reference Guide
Document # VD2019001 Rev. A 23
9. Immediately after the Normalization Working Plate has finished shaking, place the
Normalization Working Plate on the magnetic stand and wait until the liquid is clear
(~2 minutes).
10. Remove and discard all supernatant from each well.
11. Remove the plate from the magnetic stand.
12. Wash two times with 45 µl LNW1 as follows:
a. Add 45 µl LNW1 to each well.
b. Seal the plate with Microseal 'B' and shake at 1800 rpm for 5 minutes.
c. Place the plate on the magnetic stand and wait until the liquid is clear
(~2 minutes).
d. Remove and discard all supernatant from each well.
13. Remove the plate from the magnetic stand.
14. Seal the plate with Microseal ‘B’ and centrifuge at 1000 × g for 30 seconds.
15. Place the plate on the magnetic stand and wait until the liquid is clear (~2 minutes).
16. Use a 20 µl pipette to remove residual supernatant from each well.
17. Remove the plate from the magnetic stand.
18. Add 32 µl freshly prepared 0.1 N HP3 (from step 8a) to each well.
19. Seal the plate with Microseal 'B' and shake at 1800 rpm for 5 minutes. If the beads are
not resuspended, pipette to mix or repeat shake at 1800 rpm for 5 minutes.
20. Place the plate on the magnetic stand and wait until the liquid is clear (~2 minutes).
21. Transfer 30 µl to the corresponding well of the Normalization Library Plate (from
step 8b). Pipette to mix.
22. Seal the plate with Microseal ‘B’ and centrifuge at 1000 × g for 30 seconds.
Safe Stopping Point If you are stopping, seal the plate and store at -25°C to -15°C for up to 30 days.
Go to Page 25 to Pool Normalized Libraries
LNW1—Library Normalization Wash 1
HP3—2 N NaOH
24 ForenSeq mtDNA Control Region Kit Reference Guide
Document # VD2019001 Rev. A
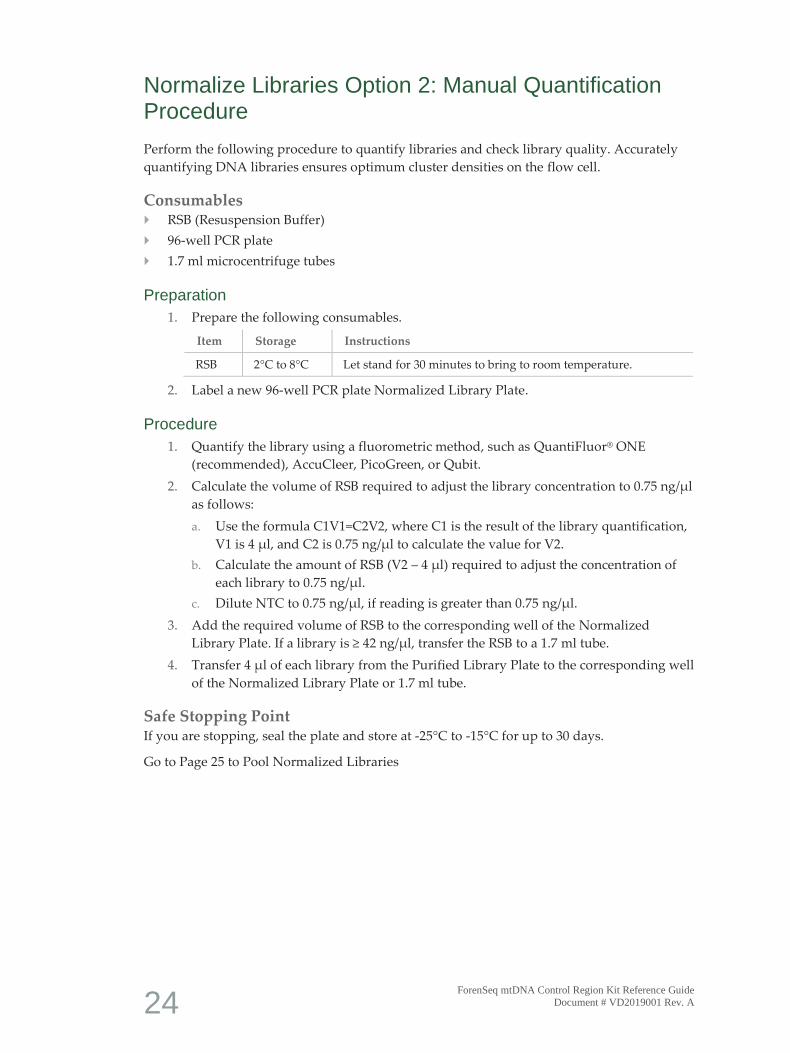
Normalize Libraries Option 2: Manual Quantification Procedure
Perform the following procedure to quantify libraries and check library quality. Accurately
quantifying DNA libraries ensures optimum cluster densities on the flow cell.
Consumables RSB (Resuspension Buffer)
96-well PCR plate
1.7 ml microcentrifuge tubes
Preparation
1. Prepare the following consumables.
Item Storage Instructions
RSB 2°C to 8°C Let stand for 30 minutes to bring to room temperature.
2. Label a new 96-well PCR plate Normalized Library Plate.
Procedure
1. Quantify the library using a fluorometric method, such as QuantiFluor® ONE
(recommended), AccuCleer, PicoGreen, or Qubit.
2. Calculate the volume of RSB required to adjust the library concentration to 0.75 ng/µl
as follows:
a. Use the formula C1V1=C2V2, where C1 is the result of the library quantification,
V1 is 4 µl, and C2 is 0.75 ng/µl to calculate the value for V2.
b. Calculate the amount of RSB (V2 – 4 µl) required to adjust the concentration of
each library to 0.75 ng/µl.
c. Dilute NTC to 0.75 ng/µl, if reading is greater than 0.75 ng/µl.
3. Add the required volume of RSB to the corresponding well of the Normalized
Library Plate. If a library is ≥ 42 ng/µl, transfer the RSB to a 1.7 ml tube.
4. Transfer 4 µl of each library from the Purified Library Plate to the corresponding well
of the Normalized Library Plate or 1.7 ml tube.
Safe Stopping Point If you are stopping, seal the plate and store at -25°C to -15°C for up to 30 days.
Go to Page 25 to Pool Normalized Libraries
ForenSeq mtDNA Control Region Kit Reference Guide
Document # VD2019001 Rev. A 25
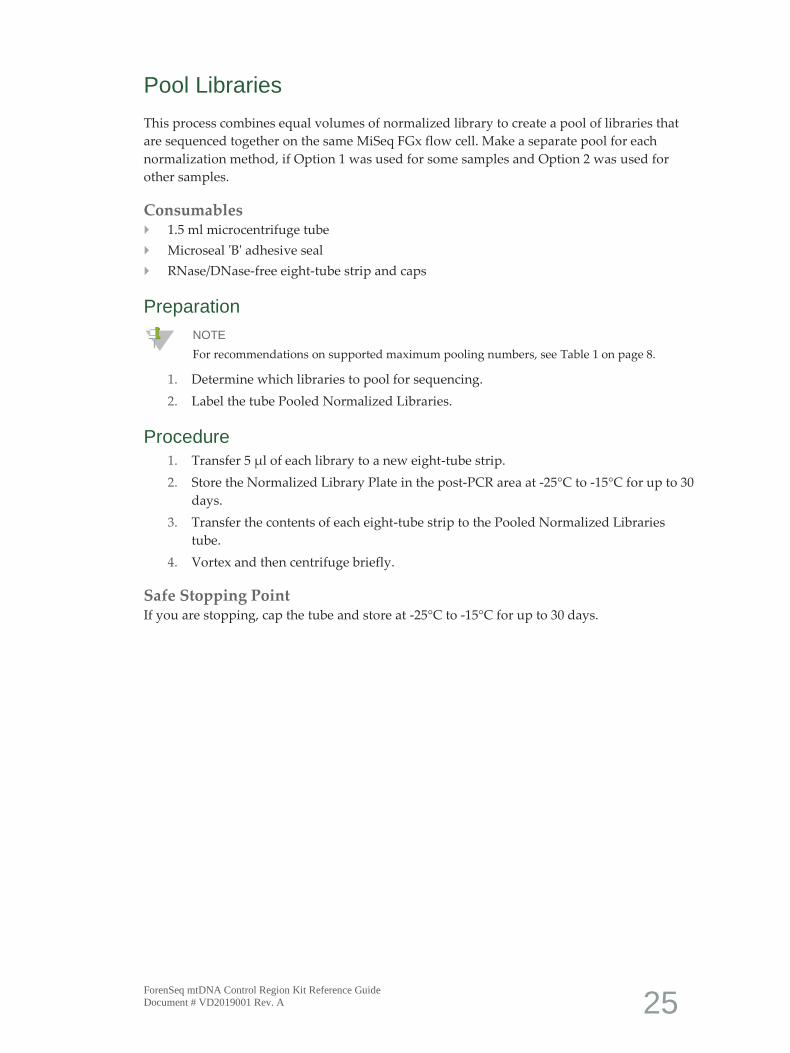
Pool Libraries
This process combines equal volumes of normalized library to create a pool of libraries that
are sequenced together on the same MiSeq FGx flow cell. Make a separate pool for each
normalization method, if Option 1 was used for some samples and Option 2 was used for
other samples.
Consumables 1.5 ml microcentrifuge tube
Microseal 'B' adhesive seal
RNase/DNase-free eight-tube strip and caps
Preparation
NOTE
For recommendations on supported maximum pooling numbers, see Table 1 on page 8.
1. Determine which libraries to pool for sequencing.
2. Label the tube Pooled Normalized Libraries.
Procedure 1. Transfer 5 µl of each library to a new eight-tube strip.
2. Store the Normalized Library Plate in the post-PCR area at -25°C to -15°C for up to 30
days.
3. Transfer the contents of each eight-tube strip to the Pooled Normalized Libraries
tube.
4. Vortex and then centrifuge briefly.
Safe Stopping Point If you are stopping, cap the tube and store at -25°C to -15°C for up to 30 days.

26 ForenSeq mtDNA Control Region Kit Reference Guide
Document # VD2019001 Rev. A
Option 1 Bead-Normalized Procedure: Denature and Dilute Libraries
This process dilutes bead-normalized libraries in HT1 (Hybridization Buffer), adds HSC
(Human Sequencing Control), and heat denatures the libraries in preparation for sequencing.
NOTE
Perform this process immediately before loading the library onto the MiSeq FGx reagent
cartridge to ensure efficient template loading on the MiSeq FGx flow cell.
Consumables ForenSeq mtDNA Control Region Kit contents:
HP3 (2 N NaOH)
HSC (Human Sequencing Control)
1.5 ml microcentrifuge tubes (2)
MiSeq FGx (micro or standard flow cell) Reagent Kit contents:
HT1 (Hybridization Buffer)
Reagent cartridge
Nuclease-free water
Pooled Bead-Normalized Libraries
About Reagents Follow the instructions to prepare the reagent cartridge in the MiSeq FGx Instrument
Reference Guide (document # VD2018006).
Preparation 1. Prepare the following consumables.
Item Storage Instructions
HP3 -25°C to -15°C Thaw at room temperature.
HSC -25°C to -15°C Thaw at room temperature.
HT1 -25°C to -15°C Thaw at room temperature.
Reagent cartridge -25°C to -15°C Thaw at room temperature.
2. Preheat the heat block to 96°C.
3. Label tubes as follows:
HSC denaturation
Denatured Normalized Libraries
ForenSeq mtDNA Control Region Kit Reference Guide
Document # VD2019001 Rev. A 27
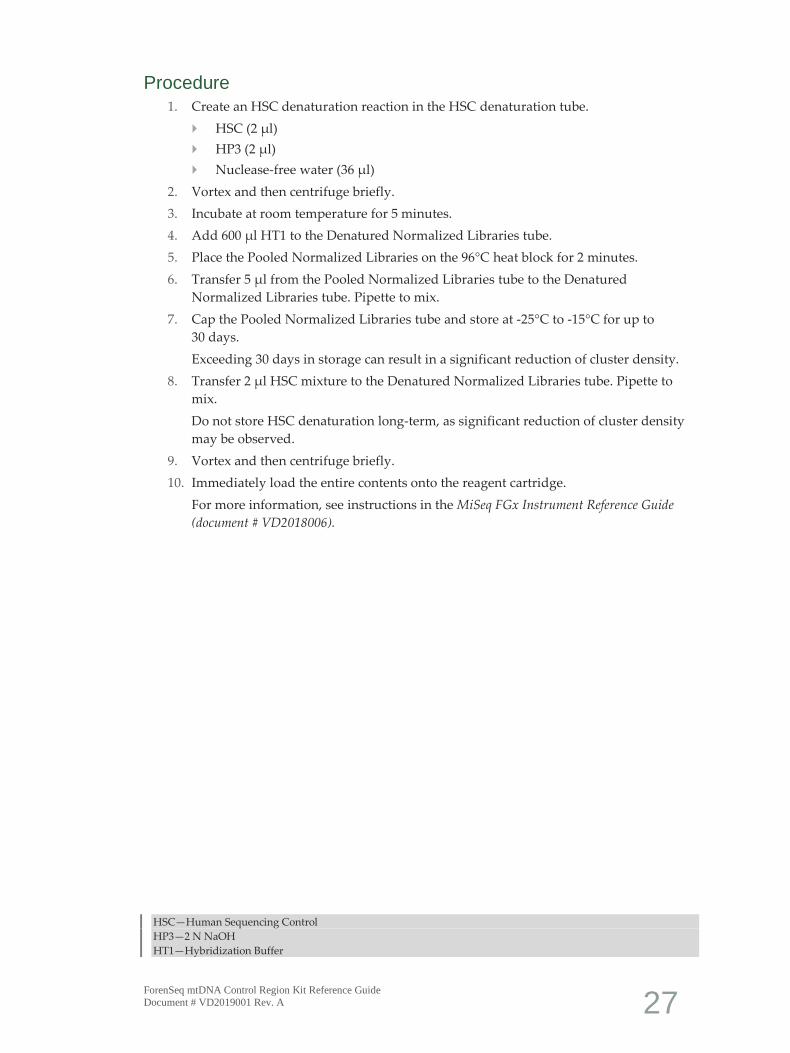
Procedure 1. Create an HSC denaturation reaction in the HSC denaturation tube.
HSC (2 µl)
HP3 (2 µl)
Nuclease-free water (36 µl)
2. Vortex and then centrifuge briefly.
3. Incubate at room temperature for 5 minutes.
4. Add 600 µl HT1 to the Denatured Normalized Libraries tube.
5. Place the Pooled Normalized Libraries on the 96°C heat block for 2 minutes.
6. Transfer 5 µl from the Pooled Normalized Libraries tube to the Denatured
Normalized Libraries tube. Pipette to mix.
7. Cap the Pooled Normalized Libraries tube and store at -25°C to -15°C for up to
30 days.
Exceeding 30 days in storage can result in a significant reduction of cluster density.
8. Transfer 2 µl HSC mixture to the Denatured Normalized Libraries tube. Pipette to
mix.
Do not store HSC denaturation long-term, as significant reduction of cluster density
may be observed.
9. Vortex and then centrifuge briefly.
10. Immediately load the entire contents onto the reagent cartridge.
For more information, see instructions in the MiSeq FGx Instrument Reference Guide
(document # VD2018006).
HSC—Human Sequencing Control
HP3—2 N NaOH
HT1—Hybridization Buffer
28 ForenSeq mtDNA Control Region Kit Reference Guide
Document # VD2019001 Rev. A
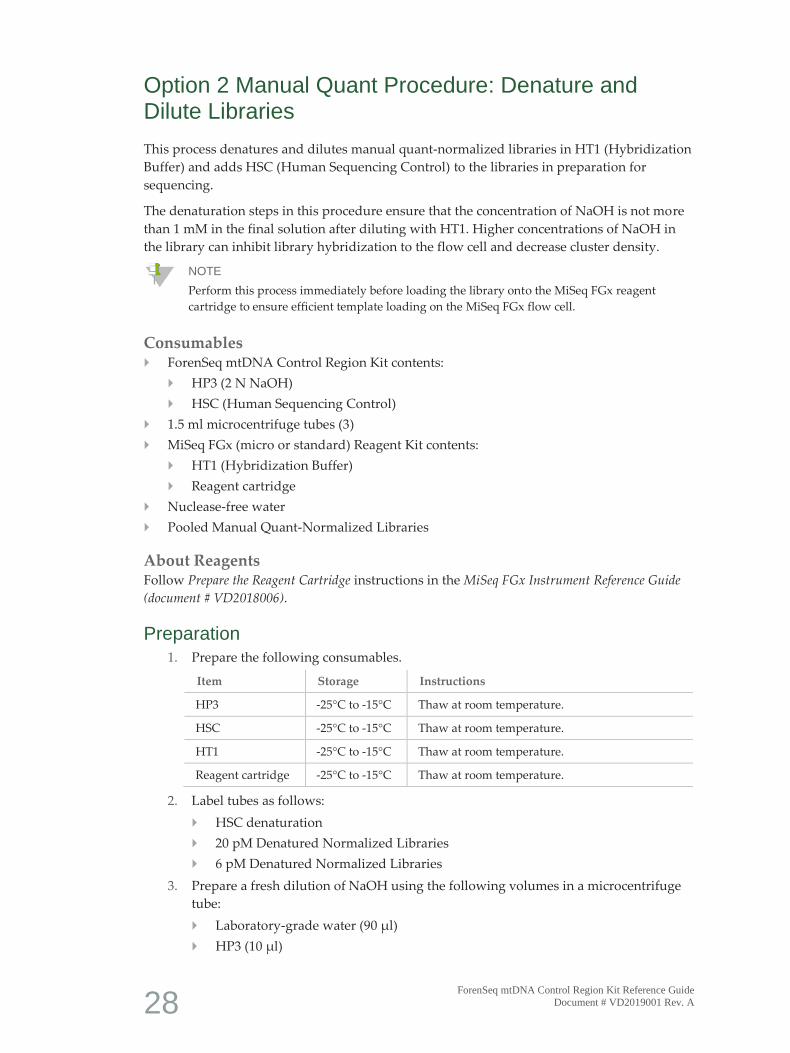
Option 2 Manual Quant Procedure: Denature and Dilute Libraries
This process denatures and dilutes manual quant-normalized libraries in HT1 (Hybridization
Buffer) and adds HSC (Human Sequencing Control) to the libraries in preparation for
sequencing.
The denaturation steps in this procedure ensure that the concentration of NaOH is not more
than 1 mM in the final solution after diluting with HT1. Higher concentrations of NaOH in
the library can inhibit library hybridization to the flow cell and decrease cluster density.
NOTE
Perform this process immediately before loading the library onto the MiSeq FGx reagent
cartridge to ensure efficient template loading on the MiSeq FGx flow cell.
Consumables ForenSeq mtDNA Control Region Kit contents:
HP3 (2 N NaOH)
HSC (Human Sequencing Control)
1.5 ml microcentrifuge tubes (3)
MiSeq FGx (micro or standard) Reagent Kit contents:
HT1 (Hybridization Buffer)
Reagent cartridge
Nuclease-free water
Pooled Manual Quant-Normalized Libraries
About Reagents Follow Prepare the Reagent Cartridge instructions in the MiSeq FGx Instrument Reference Guide
(document # VD2018006).
Preparation 1. Prepare the following consumables.
Item Storage Instructions
HP3 -25°C to -15°C Thaw at room temperature.
HSC -25°C to -15°C Thaw at room temperature.
HT1 -25°C to -15°C Thaw at room temperature.
Reagent cartridge -25°C to -15°C Thaw at room temperature.
2. Label tubes as follows:
HSC denaturation
20 pM Denatured Normalized Libraries
6 pM Denatured Normalized Libraries
3. Prepare a fresh dilution of NaOH using the following volumes in a microcentrifuge
tube:
Laboratory-grade water (90 µl)
HP3 (10 µl)
ForenSeq mtDNA Control Region Kit Reference Guide
Document # VD2019001 Rev. A 29
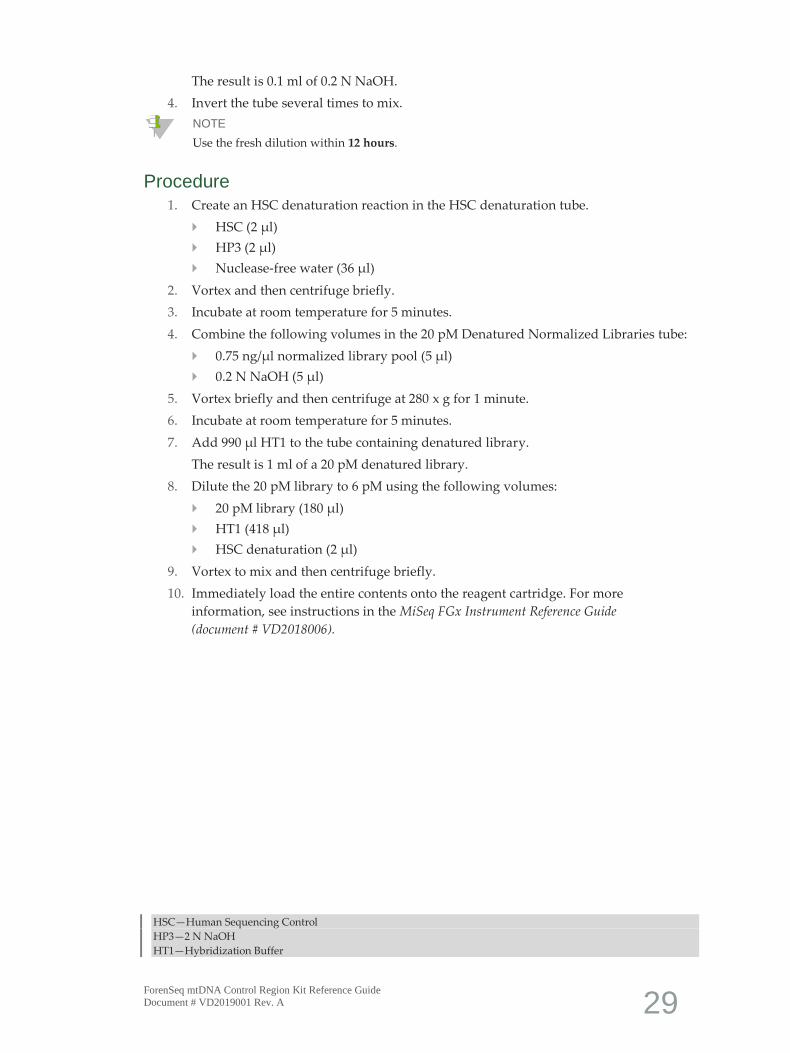
The result is 0.1 ml of 0.2 N NaOH.
4. Invert the tube several times to mix.
NOTE
Use the fresh dilution within 12 hours.
Procedure 1. Create an HSC denaturation reaction in the HSC denaturation tube.
HSC (2 µl)
HP3 (2 µl)
Nuclease-free water (36 µl)
2. Vortex and then centrifuge briefly.
3. Incubate at room temperature for 5 minutes.
4. Combine the following volumes in the 20 pM Denatured Normalized Libraries tube:
0.75 ng/µl normalized library pool (5 µl)
0.2 N NaOH (5 µl)
5. Vortex briefly and then centrifuge at 280 x g for 1 minute.
6. Incubate at room temperature for 5 minutes.
7. Add 990 µl HT1 to the tube containing denatured library.
The result is 1 ml of a 20 pM denatured library.
8. Dilute the 20 pM library to 6 pM using the following volumes:
20 pM library (180 µl)
HT1 (418 µl)
HSC denaturation (2 µl)
9. Vortex to mix and then centrifuge briefly.
10. Immediately load the entire contents onto the reagent cartridge. For more
information, see instructions in the MiSeq FGx Instrument Reference Guide
(document # VD2018006).
HSC—Human Sequencing Control
HP3—2 N NaOH
HT1—Hybridization Buffer
30 ForenSeq mtDNA Control Region Kit Reference Guide
Document # VD2019001 Rev. A
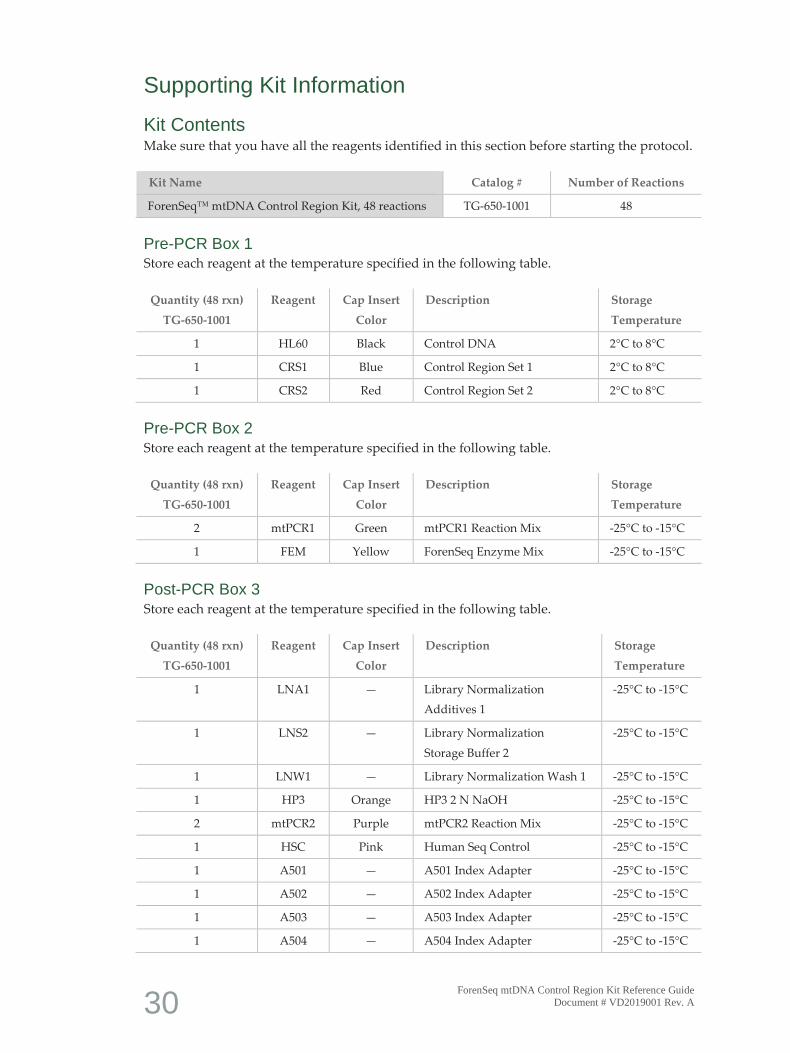
Supporting Kit Information
Kit Contents Make sure that you have all the reagents identified in this section before starting the protocol.
Kit Name Catalog # Number of Reactions
ForenSeq™ mtDNA Control Region Kit, 48 reactions TG-650-1001 48
Pre-PCR Box 1 Store each reagent at the temperature specified in the following table.
Quantity (48 rxn)
TG-650-1001
Reagent Cap Insert
Color
Description Storage
Temperature
1 HL60 Black Control DNA 2°C to 8°C
1 CRS1 Blue Control Region Set 1 2°C to 8°C
1 CRS2 Red Control Region Set 2 2°C to 8°C
Pre-PCR Box 2 Store each reagent at the temperature specified in the following table.
Quantity (48 rxn)
TG-650-1001
Reagent Cap Insert
Color
Description Storage
Temperature
2 mtPCR1 Green mtPCR1 Reaction Mix -25°C to -15°C
1 FEM Yellow ForenSeq Enzyme Mix -25°C to -15°C
Post-PCR Box 3 Store each reagent at the temperature specified in the following table.
Quantity (48 rxn)
TG-650-1001
Reagent Cap Insert
Color
Description Storage
Temperature
1 LNA1 — Library Normalization
Additives 1
-25°C to -15°C
1 LNS2 — Library Normalization
Storage Buffer 2
-25°C to -15°C
1 LNW1 — Library Normalization Wash 1 -25°C to -15°C
1 HP3 Orange HP3 2 N NaOH -25°C to -15°C
2 mtPCR2 Purple mtPCR2 Reaction Mix -25°C to -15°C
1 HSC Pink Human Seq Control -25°C to -15°C
1 A501 — A501 Index Adapter -25°C to -15°C
1 A502 — A502 Index Adapter -25°C to -15°C
1 A503 — A503 Index Adapter -25°C to -15°C
1 A504 — A504 Index Adapter -25°C to -15°C
ForenSeq mtDNA Control Region Kit Reference Guide
Document # VD2019001 Rev. A 31
Quantity (48 rxn)
TG-650-1001
Reagent Cap Insert
Color
Description Storage
Temperature
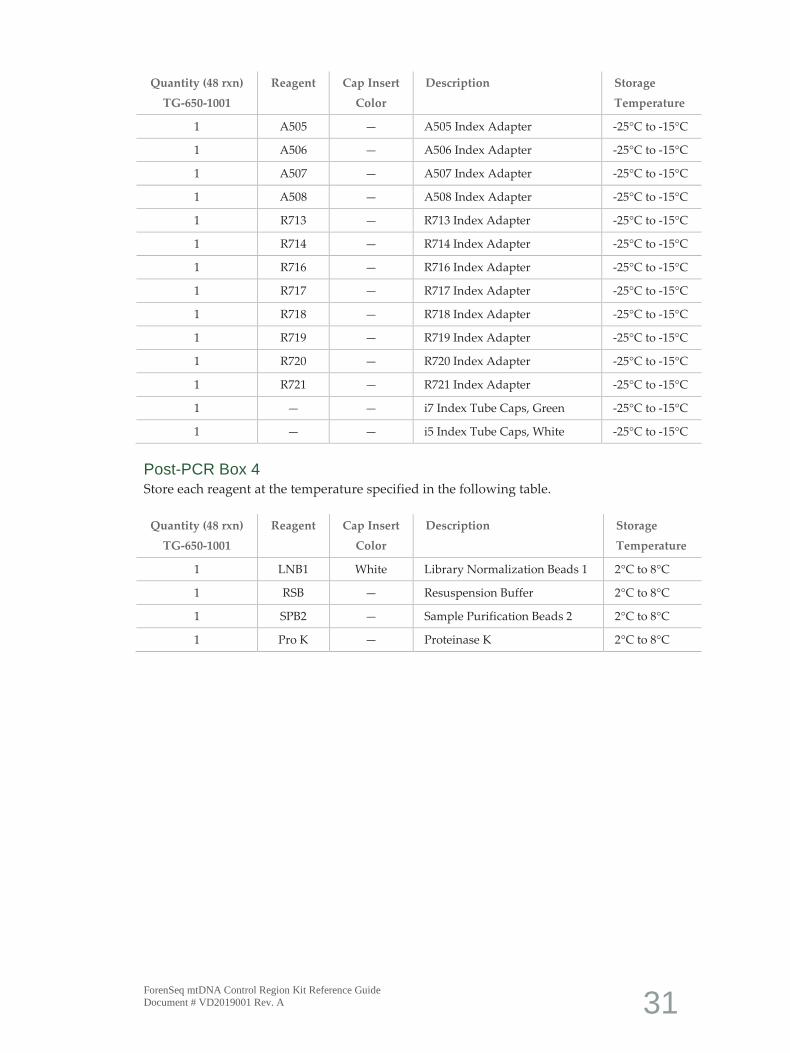
1 A505 — A505 Index Adapter -25°C to -15°C
1 A506 — A506 Index Adapter -25°C to -15°C
1 A507 — A507 Index Adapter -25°C to -15°C
1 A508 — A508 Index Adapter -25°C to -15°C
1 R713 — R713 Index Adapter -25°C to -15°C
1 R714 — R714 Index Adapter -25°C to -15°C
1 R716 — R716 Index Adapter -25°C to -15°C
1 R717 — R717 Index Adapter -25°C to -15°C
1 R718 — R718 Index Adapter -25°C to -15°C
1 R719 — R719 Index Adapter -25°C to -15°C
1 R720 — R720 Index Adapter -25°C to -15°C
1 R721 — R721 Index Adapter -25°C to -15°C
1 — — i7 Index Tube Caps, Green -25°C to -15°C
1 — — i5 Index Tube Caps, White -25°C to -15°C
Post-PCR Box 4 Store each reagent at the temperature specified in the following table.
Quantity (48 rxn)
TG-650-1001
Reagent Cap Insert
Color
Description Storage
Temperature
1 LNB1 White Library Normalization Beads 1 2°C to 8°C
1 RSB — Resuspension Buffer 2°C to 8°C
1 SPB2 — Sample Purification Beads 2 2°C to 8°C
1 Pro K — Proteinase K 2°C to 8°C
32 ForenSeq mtDNA Control Region Kit Reference Guide
Document # VD2019001 Rev. A
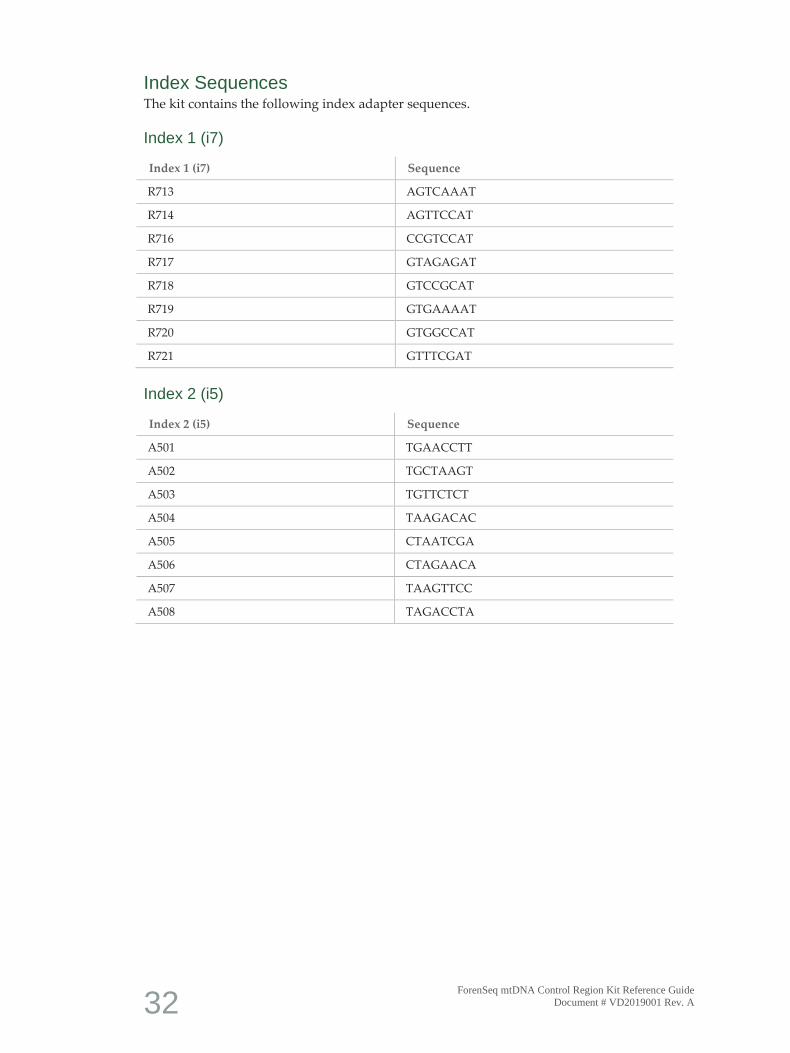
Index Sequences The kit contains the following index adapter sequences.
Index 1 (i7)
Index 1 (i7) Sequence
R713 AGTCAAAT
R714 AGTTCCAT
R716 CCGTCCAT
R717 GTAGAGAT
R718 GTCCGCAT
R719 GTGAAAAT
R720 GTGGCCAT
R721 GTTTCGAT
Index 2 (i5)
Index 2 (i5) Sequence
A501 TGAACCTT
A502 TGCTAAGT
A503 TGTTCTCT
A504 TAAGACAC
A505 CTAATCGA
A506 CTAGAACA
A507 TAAGTTCC
A508 TAGACCTA

ForenSeq mtDNA Control Region Kit Reference Guide
Document # VD2019001 Rev. A 33
Acronyms
Acronym Definition
HL60 Control DNA
R7XX i7 Index Adapter
A50X i5 Index Adapter
CRS1 Control Region Set 1
CRS2 Control Region Set 2
FEM ForenSeq Enzyme Mix
HP3 2 N NaOH
HSC Human Sequencing Control
HT1 Hybridization Buffer
LNA1 Library Normalization Additives 1
LNB1 Library Normalization Beads 1
LNS2 Library Normalization Storage Buffer 2
LNW1 Library Normalization Wash 1
mtPCR1 mtPCR1 Reaction Mix
mtPCR2 mtPCR2 Reaction Mix
ProK Proteinase K
RSB Resuspension Buffer
SPB2 Sample Purification Beads 2

34 ForenSeq mtDNA Control Region Kit Reference Guide
Document # VD2019001 Rev. A
Consumables and Equipment
The protocol has been optimized using the items listed. Comparable performance is not
guaranteed when using alternate consumables or equipment.
Consumables Make sure that you have the required user-supplied consumables before starting the
protocol.
Consumable Supplier
1.5 ml microcentrifuge tubes General lab supplier
1.7 ml microcentrifuge tubes General lab supplier
2.0 ml microcentrifuge tubes General lab supplier
15 ml conical tube General lab supplier
20 µl barrier pipette tips General lab supplier
200 µl barrier pipette tips General lab supplier
96-well 0.3 ml semiskirted PCR plates Eppendorf Twin-Tec, part # 951020303 or
VWR, part # 89136-706
96-well storage plates, round well,
0.8 ml ('midi' plate)
Fisher Scientific, part # AB-0859
Ethanol 200 proof (absolute) for molecular
biology (500 ml)
Sigma-Aldrich, part # E7023
MiSeq disposable wash tube Verogen, part # MS-102-9999
Microseal 'A' film Bio-Rad, part # MSA-5001
Microseal 'B' adhesive seals Bio-Rad, part # MSB-1001
MiSeq FGx Reagent Kit
MiSeq FGx Reagent Micro Kit
Verogen, catalog # TG-143-1001 or
Verogen, catalog # TG-143-1002
Nuclease-free water General lab supplier
RNase/DNase-free eight-tube strips and caps General lab supplier
RNase/DNase-free multichannel reagent
reservoirs, disposable
Labcor, part # 730-001
QuantiFluor® ONE dsDNA System Promega catalog # E4870, E4871
Thin-walled 0.5 ml PCR tubes Axygen cantalog # PCR-05-C
ForenSeq mtDNA Control Region Kit Reference Guide
Document # VD2019001 Rev. A 35
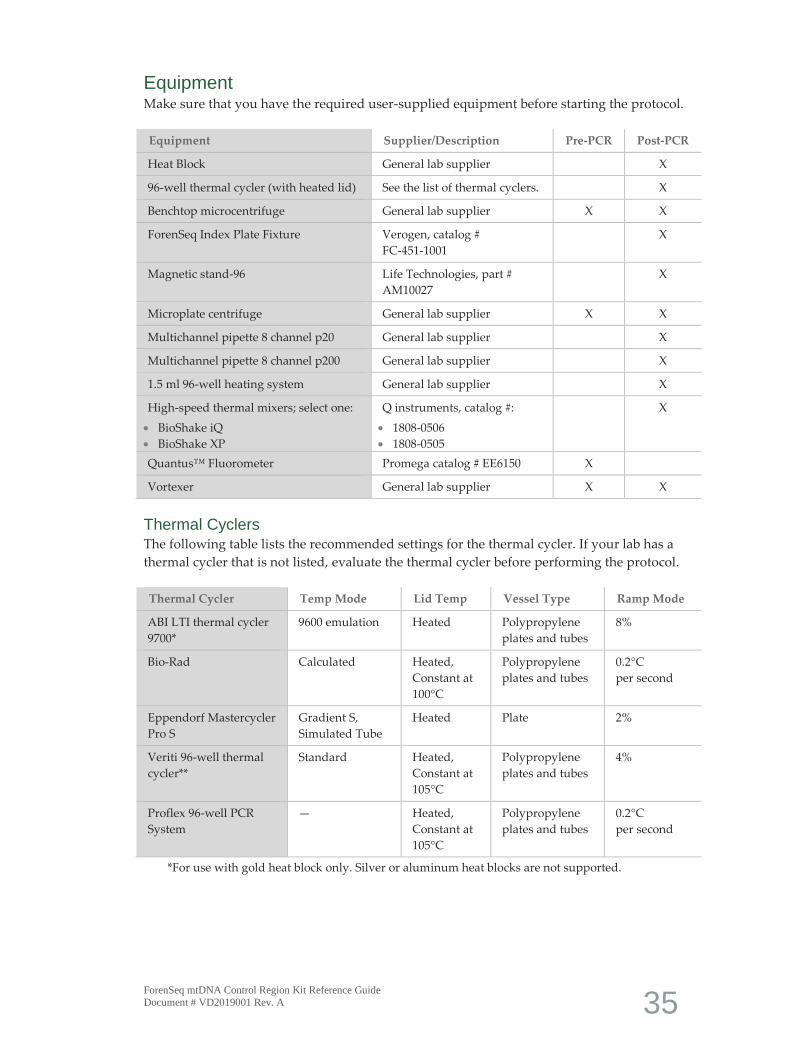
Equipment Make sure that you have the required user-supplied equipment before starting the protocol.
Equipment Supplier/Description Pre-PCR Post-PCR
Heat Block General lab supplier X
96-well thermal cycler (with heated lid) See the list of thermal cyclers. X
Benchtop microcentrifuge General lab supplier X X
ForenSeq Index Plate Fixture Verogen, catalog #
FC-451-1001
X
Magnetic stand-96 Life Technologies, part #
AM10027
X
Microplate centrifuge General lab supplier X X
Multichannel pipette 8 channel p20 General lab supplier X
Multichannel pipette 8 channel p200 General lab supplier X
1.5 ml 96-well heating system General lab supplier X
High-speed thermal mixers; select one:
• BioShake iQ
• BioShake XP
Q instruments, catalog #:
• 1808-0506
• 1808-0505
X
Quantus™ Fluorometer Promega catalog # EE6150 X
Vortexer General lab supplier X X
Thermal Cyclers The following table lists the recommended settings for the thermal cycler. If your lab has a
thermal cycler that is not listed, evaluate the thermal cycler before performing the protocol.
Thermal Cycler Temp Mode Lid Temp Vessel Type Ramp Mode
ABI LTI thermal cycler
9700*
9600 emulation Heated Polypropylene
plates and tubes
8%
Bio-Rad Calculated Heated,
Constant at
100°C
Polypropylene
plates and tubes
0.2°C
per second
Eppendorf Mastercycler
Pro S
Gradient S,
Simulated Tube
Heated Plate 2%
Veriti 96-well thermal
cycler**
Standard Heated,
Constant at
105°C
Polypropylene
plates and tubes
4%
Proflex 96-well PCR
System
— Heated,
Constant at
105°C
Polypropylene
plates and tubes
0.2°C
per second
*For use with gold heat block only. Silver or aluminum heat blocks are not supported.

36 ForenSeq mtDNA Control Region Kit Reference Guide
Document # VD2019001 Rev. A

Technical Assistance
For technical assistance, contact Verogen Technical Support.
Table 2 General Information
Address 11111 Flintkote Avenue
San Diego CA 92121 USA
Website www.verogen.com
Email [email protected]
Phone +1.833.837.6436 toll-free (North America)
+1.858.285.4101 (outside North America)
Safety data sheets (SDSs)
For MiSeq FGx sequencing kit safety data sheets, visit www.verogen.com/sds.
Product documentation—Available for download in PDF from the Verogen website. Go to
www.verogen.com/support and select the appropriate document.

Verogen +1.833.837.6436 toll-free (North America) +1.858.285.4101 (outside North America) [email protected] www.verogen.com


