Sun Microsystems, Inc. 901 San Antonio Road Palo Alto, CA 94303-4900 U.S.A. 650-960-1300 Send comments about this document to: [email protected]Building Web Components Forte ™ for Java ™ Programming Series Part No. 816-1410-10 August 2001, Revision A
Transcript
Sun Microsystems, Inc.901 San Antonio RoadPalo Alto, CA 94303-4900 U.S.A.650-960-1300
Sun Microsystems, Inc. détient des droits de propriété intellectuelle sur la technologie représentée par ce produit. Ces droits de propriété
intellectuelle peuvent s’appliquer en particulier, sans toutefois s’y limiter, à un ou plusieurs des brevets américains répertoriés à l’adresse
http://www.sun.com/patents et à un ou plusieurs brevets supplémentaires ou brevets en instance aux Etats-Unis et dans d’autres pays.
Ce produit est distribué avec des licences qui en restreignent l’utilisation, la copie, la distribution et la décompilation. Aucune partie de ce
produit ne peut être reproduite sous aucune forme, par quelque moyen que ce soit, sans l’autorisation préalable et écrite de Sun et de ses
concédants, le cas échéant.
Le logiciel détenu par des tiers, et qui comprend la technologie relative aux polices de caractère, est protégé par un copyright et licencié par des
fournisseurs de Sun. Le logiciel PointBase est destiné au développement interne uniquement et ne peut être mis sur le marché que sous une
licence distincte é mise par PointBase.
Sun, Sun Microsystems, le logo Sun, Forte, Java, Jini, Jiro, Solaris, iPlanet et NetBeans sont des marques commerciales ou des marques déposées
de Sun Microsystems, Inc. aux Etats-Unis et dans d’autres pays.
Toutes les marques SPARC sont utilisées sous licence et sont des marques commerciales ou des marques déposées de SPARC International, Inc.
aux Etats-Unis et dans d’autres pays. Les produits portant les marques SPARC sont basés sur une architecture développée par Sun
Microsystems, Inc.
Acquisitions fédérales : logiciels commerciaux. Les utilisateurs du gouvernement sont soumis aux termes et conditions standard.
Contents
Preface 1
1. J2EE Web Component Fundamentals 7
About the J2EE Architecture 7
Web Components 8
Web Containers 8
Web Modules 8
Servlets 10
JSP Pages 11
JSP Custom Tag Libraries 18
Supporting Classes, Beans, and Other Files 20
2. Programming a Web Application 21
Web Module Programming Work Flow 21
Creating a Web Module 22
Web Modules in the Forte for Java IDE 23
Creating JSP Pages 25
Creating Servlets, Classes, and Beans 26
iii
Developing a Custom Tag Library 27
Developing Custom Tags and Tag Handlers 29
Generating Tag Handlers 35
Packaging and Deploying a Custom Tag Library 41
3. Running, Debugging, and Deploying Web Applications 47
Web Module Running and Debugging Work Flow 47
Configuring the Web Module Deployment Descriptor 48
Editing the web.xml File in the Source Editor 50
Testing Web Modules 50
Debugging Web Applications 54
Using Source-Level Debugging on JSPs and Servlets 54
Monitoring Data Flow on the Web Server 57
Viewing Monitor Data Records 58
Deleting HTTP Monitor Data Records 61
Replaying Requests 62
Packaging and Deploying a Web Module 66
A. Working With Dreamweaver Templates 67
Opening and Editing Dreamweaver Templates in the Source Editor 67
B. Custom Tag Library Tutorials 69
Adding an Attribute to a Tag Handler 72
Packaging a Tag Library and Gaining Access to the JAR 74
Glossary 77
Index 81
iv Building Web Components • August 2001
Preface
Building Web Components provides essential information for anyone involved in
creating web applications with Java™ 2 Platform, Enterprise Edition (J2EE™) web
components. As part of the Forte™ for Java™ programming series, this book focuses
on web application development in the context of the J2EE and its supporting
technologies, including the Java servlet and JSP (JavaServer Pages™) technologies.
In particular, this book describes how web applications typically use JSP pages, Java
servlets, JSP tag libraries, and supporting classes and files. These web applications
might use persistent data, for example, a database. They can be independent
applications whose features are managed by a web container. Or, they might provide
a user interface while depending on components in a J2EE Enterprise JavaBeans
(EJB™) container for other services, such as execution of business logic and access to
persistent data.
Who Should Use the Book
The book assumes you are a either web application developer who writes the
application code or a web application designer who specifies the way users interact
with an application, chooses the interface components, and lays them out in a set of
views. (Unless otherwise stated, this book uses the term web application to refer to a
J2EE web application.) The web application developer might or might not be the
same person as the web application designer. In either case, it is assumed you have
a general knowledge of Java programming, JSP page programming, and HTML
coding. Information in this book might also prove useful for technical writers,
graphic artists, production and marketing specialists, and testers who participate in
the creation of applications based on web components.
1
What Is in This Book
Building Web Components contains the following information:
Chapter 1 provides an overview of the core J2EE technologies used in building the
components of web applications.
Chapter 2 describes the process of programming a web application using the Forte
for Java IDE.
Chapter 3 describes the process of test running, debugging, and deploying a web
application using the Forte for Java IDE.
Appendix A tells how to work with Dreamweaver™ templates and JSP pages.
Appendix B contains short tutorials describing how to program custom tag libraries
using the Forte for Java IDE.
The Glossary defines important words and phrases found in the book. Glossary
terms appear in italics throughout the book.
What Is Not in This Book
This book does not provide detailed discussions of how to architect your application
nor does it delve into how to develop EJB components. See “Related Information” on
page 3 for suggested readings.
Before You Read This Book
Be sure to go through the CD Shopcart Tutorial, which is built-in to the IDE. It
provides step-by-step instructions for building a simple web application using tools
in the Forte for Java IDE.
2 Building Web Components • August 2001
Typographic Conventions
Related Information
These useful references are available on topics related to web application design and
implementation.
■ Alur, Deepak, Crupi, John, and Malks, Dan, Core J2EE Patterns, Sun Microsystems
Press, Prentice Hall, 2001. This is an excellent book on web application
architecture and models. It provides recurring solutions to problems in a context,
including J2EE-based solutions to common problems, reflecting the collective
experience of Java architects and the Sun Java Center.
■ Kassem, Nicholas, Designing Enterprise Applications With the Java 2 Platform,Enterprise Edition, (The Java Series), Addison-Wesley, 2001. Written by various
members of the Sun Enterprise Team, this book is the official blueprint for
building distributed web applications using Java.
Typeface Meaning Examples
AaBbCc123 The names of commands, files,
and directories; on-screen
computer output
Edit your.login file.
Use ls -a to list all files.
% You have mail .
AaBbCc123 What you type, when
contrasted with on-screen
computer output
% su
Password:
AaBbCc123 Book titles, new words or terms,
words to be emphasized,
command-line variables
Read Chapter 6 in the User’s Guide.
These are called class options.
You must be superuser to do this.
To delete a file, type rm filename.
Preface 3
Official Documents From the Java 2 Platform
The following documents provide detailed background on the technologies
Please include the part number (for example, 816-1410-10) of your document in the
subject line of your email.
6 Building Web Components • August 2001
CHAPTER 1
J2EE Web ComponentFundamentals
This chapter provides an overview of the core technologies used in J2EE web
applications, including:
■ Web containers
■ Web modules
■ Servlets
■ JSP pages
■ Custom Tag libraries
About the J2EE Architecture
The J2EE specification defines a broad architecture that encompasses numerous
component types and runtime environments for those components. The specification
defines three runtime environments: the web container, the EJB container, and the
application client container.
Component types are classified into categories corresponding to the containers in
which they run: web components, EJB components, and application client
components.
This chapter discusses concepts that are fundamental only to the web container and
its web components. It also gives consideration to supporting classes and files not
directly managed by the web container but that are logically part of the web
application and are deployed together with the web components.
7
Web Components
Web components are server-side J2EE components. They are managed by and
communicate directly with a web container. They are capable of receiving HTTP
requests through the web container, processing them, and returning HTTP
responses. The J2EE platform defines two web component types: servlets and JSP
pages.
Web Containers
Web containers provides runtime services that support the execution of the web
components of a web application. These services include:
■ Life-cycle management
■ Network services (by which requests and responses are sent)
■ Decoding of requests and formatting of responses
■ Interpreting and processing of JSP pages into servlets
■ Access to the J2EE service and communication APIs, which provide for security,
concurrency, transaction, and deployment
Web containers forward client requests from a web server to web components in the
application and forward the client-bound responses from the web components to the
web server. Web containers typically run in a web server process (as a web server
plug-in) or in a J2EE application server process.
Web Modules
A web module is the smallest deployable and usable unit of web resources in a J2EE
application. Web modules can be packaged and deployed as web archive (WAR)
files. The format of a WAR file is identical to that of a JAR file. However, because the
contents and use of a WAR file differ from that of a JAR file, WAR file names use a
.war extension.
Note – A J2EE web module corresponds to a “web application” as defined in the
Java Servlet Specification version 2.2. In the Forte™ for Java™ IDE, several web modules
deployed together are referred to as a web module group. See “To Create and Execute
a Web Module Group” on page 51 for more information.
8 Building Web Components • August 2001
Web Module Structure
A web module might contain:
■ Java class files for the servlets and the classes that they depend on, optionally
packaged as a JAR file
■ JSP pages and their helper Java classes
■ JSP tag libraries (typically packaged as a JAR file)
■ Static documents (for example, HTML, images, sound files, and so on)
■ Applets and their class files
A web module must contain:
■ A web deployment descriptor (the web.xml file)
Web modules use a hierarchical structure for storing their resources. This structure
can be represented at development time as a filesystem. The following diagram
illustrates the web module hierarchy.
FIGURE 1-1 Web Module Hierarchical Structure
Chapter 1 J2EE Web Component Fundamentals 9
Web Module Runtime Representation
A web module is represented at runtime by an object implementing the
ServletContext interface. The ServletContext instance provides web
components with access to resources available within the web module. For example,
it enables web components to log events, obtain URL references to resources, and set
and store attributes that other web components in the web module can use.
A ServletContext instance is unique within a nondistributed web module and is
shared by all web components within the web module. This object is implicitly
available in JSP pages as the application instance variable. (This variable is
always available; it does not need to be declared.)
A ServletContext instance (and the web module it represents) is rooted at a
specific path within a web server. It could, for example, be rooted at
http://www.myStore.com/productList . In this case, all requests starting with
the /productList request path, known as the context path, would be routed to the
ServletContext instance.
Servlets
Strictly speaking, a servlet is any Java class that implements
javax.servlet.Servlet . However, servlets typically are subclasses of
javax.servlet.http.HttpServlet .
Servlets execute within a web container and are used to extend the capability of web
servers and web-enabled application servers. The Servlet API enables programmers,
within their servlet code, to use HTTP requests and to generate HTTP responses as
Java objects and provides many useful methods for manipulating these objects. For
example, you can retrieve and set request and response parameters through simple
method calls. You can also use HTTP cookies and manage user sessions through Java
objects.
Servlets are typically used to provide services such as generating dynamic content in
response to a request generated by an HTML form, often using a data source to do
so. They are also used to control application flow by enabling and disabling access to
certain web resources, depending on a particular state that the servlet tracks.
Another common use for servlets is tracking user sessions, for example, adding and
deleting items from a user’s shopping cart.
10 Building Web Components • August 2001
JSP Pages
A JSP page is a text-based web component that is dynamically translated into a
servlet by the web container before execution.
This book uses the following terms:
■ JSP file – the JSP text-based source file that a developer creates and edits
■ JSP implementation class – a Java class that the web container creates by translating
a JSP file
■ JSP page – a logical term that includes both of the previous concepts and that is
used when it is not important or desirable to differentiate between them
From a user’s perspective, a JSP page is the same as a servlet class—it describes how
to process an HTTP request and generate an HTTP response in a presentation- and
document-centric way rather than a logic-centric way. Physically, a JSP page is
somewhat like a servlet turned inside out; whereas a servlet source file is typically
programming code with embedded HTML, a JSP file is typically HTML with
embedded programming code.
JSP Page Life Cycle
A JSP page is processed by its runtime environment—the web container—and in
turn performs processing on an HTTP request and generates an HTTP response. The
processes involved in this phase are JSP page translation and instantiation, request
processing, and JSP page destruction.
Translation
JSP page translation refers to the process by which the web container converts a JSP
file into a servlet class. The details of this process are implementation specific. In the
reference implementation, the JSP file is converted to a Java servlet source file and
then compiled to a class file.
The web container translates a JSP file the first time it receives a request for it. On
subsequent requests for the same JSP page, the web container typically bypasses this
phase. However, translation could also occur if the date on the JSP implementation
class is older than the date on the JSP file.
Instantiation
When the web container receives a request for a particular JSP page, it first attempts
to locate a corresponding JSP instance. If it cannot find one, it instantiates one; as
part of this process, it translates the JSP file if the implementation class does not yet
Chapter 1 J2EE Web Component Fundamentals 11
exist. It then calls the instance’s jspInit method, which corresponds to the
jspInit method of the JSP file. You can use the jspInit method to prepare
resources that your JSP pages might require.
Request Processing
The JSP page receives client requests from the web container, processes the request
according to its programmed logic, and sends a response to the container. By default,
each request executes in its own thread.
Destruction
The web container can reclaim resources by destroying a JSP instance. Before doing
so, it calls the instance’s jspDestroy method, which corresponds to the
jspDestroy method of the JSP file. You can use the jspDestroy method to close
resources that are no longer needed.
Web containers typically provide a way to limit how long a JSP instance can persist
without receiving a request. After the user-specified limit, the web container calls the
jspDestroy method.
Code Constructs in JSP Pages
A JSP page can contain template data and elements. Elements are constructs
recognized by the web container that provide dynamic capabilities. Template data are
unrecognized constructs, such as HTML and XML code, that are passed through to
the HTTP response word for word. Template data is generally used to provide static
content and to format dynamic data. Because HTML is passed through literally,
coding presentation content is very natural for a web page designer.
JSP elements are grouped into three categories: directive elements, action elements,
and scripting elements.
Directive Elements
Directive elements provide global declarative information about a JSP page that is
unrelated to any particular request. For example, you use a directive to import
packages into a page. You also use a directive to associate a page with the current
HTTP session. Directives are processed at translation time. They do not write output
to the HTTP response object (output written to the HTTP response object appears as
text in the generated web page).
12 Building Web Components • August 2001
Directives are placed between <%@and %>symbols. For example, the following pagedirective imports the java.util package and associates the JSP page with the
current HTTP session.
The JSP Specification defines the page , include , and taglib directives.
Action Elements
Action elements are XML-style tags that provide a means of working with Java
objects without writing Java code. For example, you can use actions to locate and
instantiate objects, and to get and set an object’s properties. Actions are processed at
request time. Some actions write output to the HTTP response object.
Because actions use XML syntax, they provide web page designers with a familiar
paradigm for working with dynamic data. (Even though they might not code the
actions themselves, web page designers need to understand actions enough to work
in a file that contains them; they might have to provide HTML formatting for actions
that produce output to a web page.) Unlike Java code, actions are also potentially
easy for tools to analyze.
Standard actions are actions defined by the JSP specification and implemented by the
web container. The standard actions are: forward , include , useBean ,
getProperty , setProperty , param , and plugin .
The JSP specification also supports the development of custom actions to provide
features not available through standard actions. You define custom actions in an
XML document called a tag library descriptor (TLD) and implement them as
JavaBeans™ components. The TLD and implementing beans are conceptually one
component—called a tag library. See “JSP Custom Tag Libraries” on page 18 for more
information.
Actions are placed between < and /> symbols. The following example shows the
include action being used to insert a JSP page named header.jsp into the current
JSP page.
In the example, the prefix (jsp ) before the colon indicates that this is a standard
action. The string after the colon, in this case include , is the name of the action. The
name-value pairs (page="header.jsp" and flush="true" ) are attributes of the
action.
<%@ page import="java.util.*" session="true"%>
<jsp:include page="header.jsp" flush="true"/>
Chapter 1 J2EE Web Component Fundamentals 13
Some actions can contain a body, that is, they have beginning and ending tags that
can enclose another action, scripting elements, or template data. For example, in the
following code, the useBean action attempts to locate an object available by the
reference cBean in the application scope and make it available locally through a
scripting variable also named cBean . (For more information about scopes, see
“Scopes and Implicit Objects” on page 15.) If the object cannot be located, the action
instantiates it, using the specified Expns.CBean class, and makes it locally
available. The two method calls contained in the body of the action (getConnectedand getEngine ) are invoked only if the action instantiates the Expns.CBean class.
If the action locates an already existing instance, the two methods are not called.
Scripting Elements
Scripting elements enable you to embed Java code within a JSP file. You can use
these elements for programming logic and for writing output to the HTTP response
object. Three syntactically distinct types of scripting elements are described in this
section: declarations, scriptlets, and expressions.
Declarations let you declare and initialize variables, instantiate objects, and declare
methods. Declarations are processed at translation time and do not write output to
the HTTP response object. Declarations are placed between <%! and %>symbols.
The following example declares and initializes two String variables:
Scriptlets enable you to enter any piece of valid Java code. Variables and methods
declared in a declaration element are available to scriptlets in the same JSP page. A
Java statement can begin in one scriptlet and end in another (interspersed, for
example, with HTML code). Scriptlets are processed at request time and write
output to the HTTP response object if you code them to do so. Scriptlets are placed
As described in “Action Elements” on page 13, the JSP specification defines a way to
extend the standard set of actions by creating your own custom actions. By creating
custom actions, you can modularize and encapsulate functional units of code within
your application and make your code more reusable. With proper design, you can
also cleanly separate logic from formatting, thereby eliminating, or at least reducing,
the amount of Java code used in your JSP pages.
Custom actions are also commonly referred to as custom tags. However, the term
custom action generally refers to the code construct used in a JSP page, whereas the
term custom tag generally refers to the code that implements the functions of a
custom action.
A tag library is a collection of related custom tags. A tag library consists of a tag
library descriptor (TLD), which is an XML document that describes the tags in the
library, and the tag handlers that implement the tag library’s features. A tag handleris a bean that implements the features of a single tag. The TLD maps each tag to its
implementing tag handler. FIGURE 1-2 illustrates the tag library architecture.
FIGURE 1-2 Tag Library Architecture
A tag library is typically packaged as a JAR file and made available to a JSP page
through a taglib directive in the page. You can develop your own tag libraries or
obtain them from a vendor (they could, for example, be provided as part of some
vendor’s implementation of a web container). For more information about
programming custom actions and tag libraries, see “Developing a Custom Tag
Library” on page 27 and Appendix B.
18 Building Web Components • August 2001
Tag Library Descriptors
A tag library descriptor (TLD) is an XML document that defines a tag library. The
web container uses a tag library’s TLD to interpret custom actions on JSP pages that
reference that tag library through a taglib directive. At the highest level, the TLD
defines specifics of the tag library as a whole, such as its version number and the
version number of its intended web container. At a lower level, it defines each tag in
the library.
The Forte for Java IDE enables you to create and edit TLDs without writing XML
code. You create a TLD from the tag library template provided by the IDE. After you
have created a TLD, you can edit it from the Explorer through menu commands and
through the customizer windows of the TLD and its elements. You should not delete
or modify the TLD file directly. For example, you can define a tag in a TLD by selecting
the TLD in the Explorer and choosing the Add Tag menu item from its contextual
menu. You can then define an attribute of that tag by selecting the tag and choosing
Add Attribute from its contextual menu. These actions create tag and attribute
elements with default values. After creating such elements, you can use the
appropriate customizer dialog boxes to edit them. See “Developing Custom Tags
and Tag Handlers” on page 29 for more information about creating and editing a
TLD.
Tag Handlers
A tag handler is a bean that implements the features of a custom action. A one-to-
one correspondence exists between a custom action and a tag handler. See “Inserting
Custom Actions Using Tag Libraries” on page 35 for more information on this topic.
Forte for Java Built-In Tag Libraries
In addition to supporting the development of tag libraries, the Forte for Java IDE lets
you import third-party tag libraries and view and edit them from your JSP pages.
Forte for Java also provides several built-in tag libraries. These built-in tag libraries
let you:
■ Gain access to and perform operations on data sources using JDBC or TP
■ Iterate through rows and fields in:
■ a JDBC ResultSet
■ Objects and their fields in a Vector , Collection , List , Iterator , or
Enumeration
■ Elements (and their fields, if the element is an object) of a Java array
■ Conditionalize parts of a JSP page (using if/else logic)
Chapter 1 J2EE Web Component Fundamentals 19
For more information on the built-in tag libraries, refer to the JSP and Servlet
module online help.
Supporting Classes, Beans, and Other Files
Web components generally require additional classes, beans, HTML files, and other
files to provide supporting features. For example, a servlet could delegate complex
tasks such as screen flow management or session control to a supporting bean. A
servlet could also use a bean for gaining access to a remote resource, such as an EJB
or database, and for caching results returned by calls to such resources. Also, the JSP
pages and HTML files often reference image files, sound files, and video files.
20 Building Web Components • August 2001
CHAPTER 2
Programming a Web Application
J2EE web applications can consist of one or more web modules. This chapter
provides an overview of how to program web modules using the Forte for Java IDE.
This high-level view ties together the tasks you perform in creating your application
and provides some details on individual programming tasks.
See Chapter 3 for a description of the process of configuring, running, debugging,
and deploying a web application.
See the CD Shopcart Tutorial for more information on many aspects of the web
module development process.
Web Module Programming Work Flow
This section gives you an overview of the work flow involved in programming a
web module using the Forte for Java IDE. The overview does not attempt to describe
iterations of coding and testing. Rather, it lists the major development tasks and
assigns a logical order to their performance. Each task refers to a section later in the
chapter that provides more detailed information on the task. Forte for Java online
help for the JSP and Servlets module also provides information on these tasks.
To program a web module using the Forte for Java IDE:
1. Create a web module (see “Creating a Web Module” on page 22).
2. Create the web components you plan to use. This process might include:
■ Creating the JSP pages required by your web module (see “Creating JSP Pages”
on page 25).
21
■ Creating or importing the servlets, classes, and beans required for your web
module.
The servlets, classes, and beans go in the /WEB-INF/Classes directory of the
web module unless they are packaged as JAR files, in which case they go in the
/WEB-INF/lib directory (see “Creating Servlets, Classes, and Beans” on
page 26).
Classes developed using TP are an exception. You must develop any
persistence-capable classes that your web module requires outside the web
module. After you package the persistence-capable classes as a JAR file, place
them in your web module’s /WEB-INF/lib directory. You can then test your
application or package it as a WAR file.
For information on TP, see Programming Persistence in the Forte for Java
programming series. For information on packaging web modules, see
“Packaging and Deploying a Web Module” on page 66.
■ The creation and addition of any tag libraries your JSP pages require.
You typically develop a tag library within a separate web module and
filesystem specifically for that purpose. You then package the library as a JAR
file and place it in the lib directory of the web module containing the
dependent JSP pages (see “Developing a Custom Tag Library” on page 27).
Creating a Web Module
A web module is a J2EE deployment construct. When you develop web applications
using the Forte for Java IDE, the IDE creates the necessary web module structure for
you. By enforcing the web module structure, the IDE ensures that web modules can
be packaged as WAR files, and that they contain the deployment descriptor
information (the web.xml file) required for deployment on most servers. Also, the
Java Servlet 2.2 Specification and JSP 1.1 Specification require that JSP pages be
executed inside a web module.
22 Building Web Components • August 2001
Web Modules in the Forte for Java IDE
In the Forte for Java IDE, a web module is represented in the Explorer window as a
mounted filesystem that conforms to the structure of a WAR file (for more
information on this structure, see “Web Module Structure” on page 9).
FIGURE 2-1 Web Module Mounted in the Explorer
You mount a web module in the Explorer exactly as you would mount any other
filesystem (see the online help for information on mounting filesystems). However,
you must mount the web module itself. If you mount a directory that contains a web
module, rather than the web module itself (in other words, if you mount a web
module in such a way that it is a subdirectory of a mounted file system), the IDE
does not properly recognize the web module. In this situation, you cannot perform
some operations usually associated with a web module.
Although a web module is not an object type in a programming sense, it is treated as
an object type in the Explorer. For instance, a web module object type has attributes
you can set in its Properties window and a set of pertinent commands available in its
contextual menu. Furthermore, like any other object type in the Explorer, you create
a web module from a template.
You can create a web module in one of two ways:
■ By creating a new directory as a web module
■ By converting an already existing directory into a web module
Note – If you have an existing directory structure that conforms to that of a web
module, you can mount and use it in the Explorer as a web module without
converting it. The IDE recognizes such a directory as a web module by its structure.
Chapter 2 Programming a Web Application 23
▼ To Create a New Directory as a Web Module
1. From the main menu bar, chose File > New.
The New From Template wizard opens.
FIGURE 2-2 New From Template Wizard
2. From the JSP & Servlet template category, select the Web Module template, andclick Next.
The Web Module dialog box opens.
3. Click the ellipsis button (…).
A file chooser opens.
4. Navigate to the location where you want to create the new directory, and click thenew folder icon.
Note that the New Folder directory is physically created in the location you choose.
It is not created under the Development directory unless that is the location you
choose.
5. Locate the new folder (it is entitled New Folder, but it is not selected; you mighthave to scroll to find it).
6. Click to select the New Folder directory, and click the new folder’s title to make iteditable.
7. Type a name for the folder, and press Enter.
The name you type must not include spaces.
24 Building Web Components • August 2001
8. Verify that the File Name field indicates the folder’s new name (if it does not, tryselecting a different folder, then re-selecting the new folder).
9. Re-select the folder (if you have not already done so), then click Add.
Focus returns to the Web Module dialog box.
10. Verify that the Directory field in the Web Module dialog box indicates the chosenfolder, and click Finish.
The web module is created and mounted in the Explorer in either the Filesystem or
Project pane.
▼ To Convert an Existing Directory Into a Web
Module
1. From the main menu bar, choose File > Mount Filesystem to mount the filesystemroot directory to be converted.
2. In the Explorer, select the newly mounted filesystem.
3. From the main menu bar, choose Tools > Convert to Web Module.
The directory is converted to a web module. Note that the directory has not moved,
but is now recognized by the IDE as a web module directory. When a web module
containing .jar files in its WEB-INF/lib directory is mounted, some of the .jarfiles in the lib directory are mounted as well. For more information about
converting existing directories into web modules, see the online help.
Note – When a .jar file in the WEB-INF/lib directory has its corresponding
jarContent file next to it, the IDE assumes that the source classes for the .jar file
are mounted and doesn’t mount the .jar in addition.
Creating JSP Pages
You can create a JSP page in one of two ways:
■ Using the template chooser
■ Generating it from a Dreamweaver template. For information on this topic, see
Appendix A.
Chapter 2 Programming a Web Application 25
▼ To Create a JSP Page
1. In the Explorer, select the root directory of the filesystem in which you want tocreate the JSP page.
In most situations, you should create your JSP pages in the root directory of your
web module or in a subdirectory that you have created within the root directory. If
you place JSP pages in the WEB-INF directory (or any of its subdirectories), they will
not be accessible directly from a client browser. However, they will be accessible as
resources from a servlet, for example, for jsp:include or jsp:forward . This
feature is often used in conjunction with a front controller architecture to control
access to JSP pages that need to be accessed in a specific order or according to
security constraints, such as the pages in the middle of a checkout procedure.
FIGURE 2-3 Proper Location of JSP Within Web Module Structure
2. From the directory’s contextual menu, choose New > JSP & Servlet > JSP.
3. In the Name field of the wizard, type a name for your JSP page, and click Finish.
The JSP page is created and appears in the Source Editor.
Creating Servlets, Classes, and Beans
As with other object types, the IDE provides templates for creating servlets, classes,
and beans. This section describes how to create a servlet; refer to the online help for
more information about creating classes and beans. You should create servlets,
classes, and beans in the WEB-INF/classes directory of your web module. This
directory is included in the IDE’s internal classpath when the web module is
mounted in the Explorer.
26 Building Web Components • August 2001
▼ To Create a Servlet
1. In the Explorer, select the WEB-INF/classes directory.
2. From the contextual menu, choose New > JSP & Servlet > Servlet.
3. In the Name field of the wizard, type a name for your servlet, and click Finish.
The servlet is created and appears in the Source Editor.
Developing a Custom Tag Library
Once you have created a web module and added the necessary JSP pages, servlets,
classes, and beans, you are ready to develop any custom tag libraries upon which
your JSP pages depend. In some cases, the necessary tag libraries already exist and
simply need to be added to the web module. For more information on adding a tag
library to a web module, see “Packaging and Deploying a Custom Tag Library” on
page 41. For a short tutorial describing how to create and use a sample tag library,
see Appendix B.
▼ To Create a Custom Tag Library
1. In the Explorer, select the root directory of the web module in which you want tocreate the tag library.
You can create a tag library in a new or existing web module or filesystem.
2. Right-click the root directory of the web module or filesystem.
3. From the contextual menu, choose New > JSP & Servlet > Tag Library.
This operation creates a TLD file and opens the Tag Library Customizer where you
define the properties of your custom tag library.
Chapter 2 Programming a Web Application 27
FIGURE 2-4 Tag Library Customizer
In the Tag Library Customizer, you can specify the name, version, and URI for your
tag library, as well as set code generation options and provide descriptive
information about the tag library’s functionality. For more information about the
properties in the Tag Library Customizer, please see the online help.
▼ To Customize a Tag Library
1. If the Tag Library Customizer is not already open, in the Explorer, right-click theTag Library Descriptor of the tag library to be customized.
FIGURE 2-5 TLD in the Explorer
28 Building Web Components • August 2001
2. Choose Customize from the Contextual menu.
Alternatively, you can double-click the tag library to customized. The contents of the
Tag Library Customizer reflect the properties of the selected tag library. Once a Tag
Library Customizer is displayed, it will track the selection and show the properties
of any tag library you select.
3. In the Tag Library Customizer, edit the tag library.
4. Click OK to have the changes take effect immediately and dismiss the Tag LibraryCustomizer, or click Apply to apply the changes without dismissing thecustomizer.
When you have specified the properties for your tag library, you can now add and
customize tags.
Developing Custom Tags and Tag Handlers
This section describes how to develop custom tags and generate tag handlers.
▼ To Add and Customize a Tag
A custom tag consists of a tag signature plus a tag handler, which is a body of Java
code. The IDE generates skeleton code for tag handlers based on specifications you
supply in the Tag Customizer dialog box. You then edit the tag handler code directly
to insert the logic that implements the features of the tag.
1. In the Explorer, right click the Tag Library descriptor to which you want to add atag.
2. Choose Add Tag from the contextual menu.
The Add New Tag dialog box appears.
Chapter 2 Programming a Web Application 29
FIGURE 2-6 Add New Tag Dialog Box
3. In the Tag Name text field, type a unique tag element name for the new tag.
The tag element name must conform to Java language naming standards. For
example, the name cannot start with a digit, cannot contain spaces, and cannot
contain special character such as !, #, or +. Multibyte tag names are allowed;
however, tag libraries that contain such tag names might not run well in some web
servers.
4. In the Tag Class Name field, type a class name for the new tag.
The tag class name must conform to Java language naming standards and must be a
valid Java classname.
5. From the Body Content combo box, choose the type of content that will occur inthe body of the tag.
See “To Specify How the Body of a Custom Action Is Handled” on page 37 for
descriptions of possible options.
6. Specify the name of the Java package for the generated tag handler classes.
The default value is the tag library’s Short Name.
30 Building Web Components • August 2001
7. To indicate that the generated tag handler will contain code to find the parent (thatis, enclosing) tag, click the Find Parent checkbox.
The type is determined by the Of Type property. The parent’s tag handler instance (if
found) will be placed in the variable specified by the As Variable property. If
checked, Find Parent enables the Of Type and As Variable properties. The default
value is unchecked. If Find Parent is checked, Of Type and As Variable must have
values entered.
8. To specify the class type of the parent tag, enter a class name or choose one fromthe Of Type combo box.
9. In the As Variable text field, type the variable name that will be used for theparent.
The variable name must be a valid Java language variable name.
10. In the Description (Info String) text box, type descriptive information about thetag.
11. Click OK to have the changes take effect immediately and to dismiss the AddNew Tag dialog box.
The new tag is added to the TLD, and the Tag Customizer dialog box is displayed.
You can edit the Tag Customizer, and click OK to have the changes take effect
immediately and to dismiss the customizer.
▼ To Customize an Existing Tag
1. In the Explorer, right-click the tag element you want to customize.
2. Choose Customize from the contextual menu.
3. In the Tag Customizer, edit the tag.
The properties in the Tag Customizer are described in “To Add and Customize a
Tag” on page 29 and in the online help.
4. Click OK to have the changes take effect immediately and to dismiss the TagCustomizer. Click Apply to apply the changes without dismissing the TagCustomizer.
Chapter 2 Programming a Web Application 31
▼ To Add and Customize a Tag Attribute
Use the Add New Tag Attribute dialog box to create tag attributes, and the Tag
Attribute Customizer dialog box to edit existing tag attributes.
1. In the Explorer, right-click the tag element to which you want to add an attribute.
2. Choose Add Tag Attribute from the contextual menu.
3. In the Add New Tag Attribute dialog box, specify the attribute.
FIGURE 2-7 Add New Tag Attribute Dialog Box
In the Add New Tag Attribute dialog, you can specify various properties for your
new tag attribute. For more information about the properties in the New Tag
Attribute (and the Tag Attribute Customizer), please see the online help.
4. Click OK.
The new tag attribute is added to the tag, and the Tag Attribute Customizer is
displayed. You can edit the customizer and click OK to have the changes take effect
immediately and to dismiss the customizer.
32 Building Web Components • August 2001
▼ To Customize an Existing Tag Attribute
1. In the Explorer, right-click the attribute and choose Customize from the contextualmenu.
2. In the Tag Attribute Customizer, edit the attribute properties.
In the Tag Attribute Customizer, you can specify various properties for your tag
attribute. For more information about the properties in the Tag Attribute
Customizer, please see the online help.
3. Click OK to have the changes take effect immediately and dismiss the TagAttribute Customizer, or click Apply to apply the changes without dismissing thecustomizer.
The contents of the Tag Attribute Customizer reflect the properties of the selected
attribute. Once the Tag Attribute Customizer is displayed, it will track the selection
and show the properties of any attribute that is selected.
4. If you choose, generate the tag handlers.
See “To Generate Tag Handlers” on page 39 for instructions.
▼ To Add and Customize Scripting Variables
A scripting variable is a value that a tag exports to a JSP page. This value can then
be used in a scriptlet or expression. See Appendix B for more information.
Use the Add Tag Scripting Variable dialog box to create new scripting variables, and
the Tag Scripting Variable Customizer to edit the properties of scripting variables.
1. In the Explorer, right-click the tag element to which you want to add a scriptingvariable.
2. Choose Add Scripting Variable from the contextual menu.
3. In the Add New Tag Scripting Variable dialog box, specify the properties of thescripting variable.
Chapter 2 Programming a Web Application 33
FIGURE 2-8 Add New Tag Scripting Variable Dialog Box
In the Add New Tag Scripting Variable dialog, you can specify various properties for
your new scripting variable. For more information about the properties in the Add
New Scripting Variable dialog (and the Tag Scripting Variable Customizer), see the
online help.
4. Click OK to have the changes take effect immediately and dismiss the Add NewScripting Variable dialog box.
The new scripting variable is added, and the Tag Scripting Variable Customizer
appears. You can edit the customizer, and then click OK to have the changes take
effect immediately and to dismiss the customizer.
▼ To Customize an Existing Tag Scripting Variable
1. In the Explorer, right-click the scripting variable and choose Customize from thecontextual menu.
2. In the Tag Scripting Variable Customizer, edit the scripting variable properties.
In the Tag Scripting Variable Customizer, you can specify various properties for your
scripting variable. For more information about the properties in the Tag Scripting
Variable Customizer, please see the online help.
3. Click OK to have the changes take effect immediately and dismiss the TagScripting Variable Customizer, or click Apply to apply the changes withoutdismissing the customizer.
The contents of the Tag Scripting Variable Customizer reflect the properties of the
selected scripting variable. Once the Tag Scripting Variable Customizer is displayed,
it will track the selection and show the properties of any scripting variable that is
selected.
34 Building Web Components • August 2001
4. If you choose, generate the tag handlers, as described in the next section.
Generating Tag Handlers
As you develop your tag library, you add code to the tag handler classes to
implement the features your custom actions require. As you define new attributes
and scripting variables, you must generate your tag handlers so that the
corresponding class members and interfaces are created.
You have two options when you generate tag handlers:
■ Generate Tag Handlers. You can choose to generate only the handlers that have
changed since the last time you generated handlers. This provides a quick means
of checking your most recent work. The names of tags with handlers that have
changed since last generated are appended by a (G) in the Explorer, as in
FIGURE 2-9.
■ Generate All Tag Handlers. You can choose to generate all tag handlers, whether
or not they require it. This provides you with a refreshed version of all the
handlers in your tag library, but can be time-consuming depending on the
number of tags your library contains.
FIGURE 2-9 Tag Whose Handlers Changed Since Last Generated
Inserting Custom Actions Using Tag Libraries
You use the features of a tag library by coding custom actions in a JSP page. For the
custom actions to use the tag library, the JSP page must declare the tag library with
The mapping between the tag name (in this case, table ) and the tag handler bean is
specified in the TLD file. You can edit this mapping in the Tag Customizer window,
which is accessible in the Explorer from the tag’s contextual menu.
Custom actions can create objects and make them available in the JSP page as
scripting variables. Scripting variables can be used by other actions and scripting
elements on the JSP page.
Tag Handlers and Custom Actions
A one-to-one correspondence exists between a custom action and a tag handler.
Custom Actions With Bodies
Custom actions, in principle, can contain bodies. That is, they can have beginning
and ending tags that enclose other actions, scripting elements, or plain text.
For example, this sample custom action contains a body composed of plain text:
Whether a particular custom action contains a body depends on how it is defined in
the TLD.
▼ To Specify How the Body of a Custom Action Is
Handled
The Body Content field in the Tag Customizer dialog box lets you specify how the
body is handled (you can display this window from the contextual menu of the
custom action’s tag handler). As shown in FIGURE 2-10, you can choose one of these
values: JSP, empty , or tagdependent .
<mt:convertToTable>type distance / a 30,000 / g 5,500 / z 200</mt:convertToTable>
Chapter 2 Programming a Web Application 37
FIGURE 2-10 Tag Customizer Dialog Box
TABLE 2-1 explains the meaning of each choice.
All tag handlers implement javax.servlet.jsp.tagext.Tag . Tag handlers that
do not accept or process a body need only implement this interface. Tag handlers
that process a body must also implement javax.servlet.jsp.tagext.BodyTag .
This interface provides additional methods for handling this processing.
TABLE 2-1 Meaning of Body Content Field in Tag Customizer Dialog Box
Body Content Field Meaning
JSP Body content is optional. The web container evaluates JSP elements and
then passes the body to the tag handler. The tag handler processes the
body and writes output to the out object according to your
programming logic.
empty Body content is not permitted.
tagdependent Body content is optional. The web container does not evaluate JSPelements, but does pass the body to the tag handler. The tag handler
processes the body and writes output to the out object according to
your programming logic.
38 Building Web Components • August 2001
▼ To Generate Tag Handlers
1. In the Explorer, right-click the tag library descriptor containing the handlers to begenerated.
2. From the contextual menu, choose either Generate Tag Handlers or Generate AllTag Handlers, depending on which option is appropriate.
Generated code appears in a package directory determined by the tag library’s Tag
Handler Generation Root, a code generation property you set in the Tag Customizer.
If the value is blank, the Generation Root defaults to the root of the filesystem
containing the tag library.
Generated Tag Handlers
As described in the previous section, you generate tag handlers from a TLD. These
generated tag handlers implement the interfaces appropriate for their corresponding
custom actions, as defined in the TLD (either the Tag interface or both the Tag and
BodyTag interfaces). Additionally, all the tag handlers’ required class members
(fields, methods, and properties) are generated. The exact list of class members
depends on your TLD, but always includes the methods required by the interfaces
that your tag handler implements.
The specific class members generated depend on the interfaces your tag handlers
implement, and on the attributes and scripting variables you have declared in your
TLD. For example, if you declare an attribute called myAttribute , a property called
myAttribute is generated in the tag handler.
Methods Generated
TABLE 2-2 lists the methods that the IDE creates when you generate tag handlers.
Methods used to get and set properties are not listed. Some of the methods are
marked with an asterisk (*) to denote that they are part of the Tag and BodyTaginterfaces. These methods call the others, which are helper methods, defined
according to the template design pattern.
Chapter 2 Programming a Web Application 39
Not all methods in the Tag and BodyTag interfaces are generated because this class
is generated as extending the TagSupport or BodyTagSupport helper classes,
which implement all the methods in their respective interfaces. Only the methods
that need to be overridden are generated. If you need to override any other methods
for the Tag or BodyTag interfaces, simply include them in the TagHandler file.
Regenerating Tag Handlers
To develop your tag library, you add programming logic to the tag handlers to
provide the features your custom actions require. During your development, you
might need to add additional attributes or scripting variables to your TLD. If so, you
need to regenerate your tag handlers so the corresponding class members are
created. In this case, some of the tag handler’s methods are regenerated, and some
are left untouched.
The Forte for Java IDE regenerates the methods doStartTag , doEndTag , and
doAfterBody . The Source Editor does not permit you to edit these methods because
your changes would be overwritten when you regenerate tag handlers.
Instead of editing the methods that get regenerated, place your custom code in
methods that these regenerated methods call. For example, the doStartTag method
calls the otherDoStartTagOperations and theBodyShouldBeEvaluatedmethods. The JSP specification indicates that you should use the doStartTagmethod for processing that needs to be performed at the beginning of the tag, before
the body of the tag is evaluated.
The doStartTag method also returns an int code value to indicate whether the
body should be evaluated. In Forte for Java, use the otherDoStartTagOperationsmethod for the processing that needs to be performed at the beginning of the tag,
TABLE 2-2 Generated Methods in Tag Handlers
Interface Method
Tag *doEndTag*doStartTagotherDoEndTagOperationsotherDoStartTagOperationsshouldEvaluateRestOfPageAfterEndTagtheBodyShouldBeEvaluatedtheBodyShouldBeEvaluatedAgain
BodyTag All the methods generated for the Tag interface plus the following:
*doAfterBodywriteTagBodyContent
40 Building Web Components • August 2001
and use the theBodyShouldBeEvaluated method to return a boolean that is
translated into the correct code value. Code that you place in these two methods is
not affected by regeneration.
The following table indicates which methods are regenerated and which methods
you can edit.
Packaging and Deploying a Custom Tag Library
For a JSP page to reference a custom tag library, that tag library must exist within the
web module containing the JSP page. To deploy a tag library for use in a web
module, you must first package it as a JAR file. Once packaged, the tag library can
be added to a web module in any of four ways:
■ By putting the tag library into the tag library repository, then adding it to the
desired web module. Note that the Forte for Java built-in custom tag libraries
already reside in the tag library repository and can be added to any web module.
For more information about using the built-in tag libraries, see the online help.
■ By adding the JAR file to a web module from the filesystem.
■ By cutting and pasting the JAR file into the appropriate WEB-INF/lib directory
and modifying the Taglib element in the deployment descriptor (see
“Configuring the Web Module Deployment Descriptor” on page 48 for more
information about editing the deployment descriptor) so that it maps to the JAR
file containing the desired tag library.
■ By testing the tag library in place. This method is convenient for testing your tag
library as you develop it.
Note that adding a tab library JAR file to a web module will also cause it to be
mounted in the Filesystems pane of the Explorer (that is, if its development directory
is not already mounted).
TABLE 2-3 Editable Methods in Tag Handlers
Do Not Edit TheseMethods Put Your Custom Code in These Methods Instead
1. In the Explorer, right-click the tag library descriptor to be packaged.
2. From the contextual menu, choose Create Tag Library JAR.
This action creates a file with a .jar extension. It also creates an associated
jarContent (recipe) file that can be used to add additional classes or packages to
the library.
Note – Be sure that your tag handlers are generated and compiled before creating
the tag library JAR file.
▼ To Deploy a Tag Library Using the Tag Library
Repository
1. In the Explorer, right-click the icon for the appropriate custom tag library JAR file.
2. Choose Tools > Add Tag Library to Repository.
The tag library is now available from the Tag Library Repository and can be added
to a web module.
3. In the Explorer, right click the WEB-INF node for the web module to which youwant to add the tag library.
4. From the contextual menu, choose Add JSP Tag Library. Then choose Find in TagLibrary Repository.
5. In the JSP Tag Library Repository Browser, select the desired tag library.
42 Building Web Components • August 2001
FIGURE 2-11 JSP Tag Library Repository Browser
6. Click OK.
▼ To Deploy a Tag Library by Adding a JAR File
from the Filesystem
1. In the Explorer, right-click the WEB-INF node for the web module to which youwant to add the tag library.
2. From the contextual menu, choose Add JSP Tag Library. Then choose Find InFilesystem
3. In the JSP Tag Library Browser, browse to and select the appropriate JAR file.
FIGURE 2-12 JSP Tag Library Browser in Filesystem
Chapter 2 Programming a Web Application 43
4. Click OK.
When you add a tag library to a web module using the Add JSP Tag Library
command, the web module’s deployment descriptor is automatically updated to
include an entry for the tag library. This entry maps the tag library to a URI that
your JSP pages can use to get the tags.
▼ To Deploy a Tag Library by Copying and
Pasting the JAR File
1. In the Explorer, right-click the JAR file to be cut.
2. From the contextual menu, choose Copy or Cut.
3. Right-click the WEB-INF/lib directory into which you want to the paste the JARfile.
4. From the contextual menu, choose Paste > Copy.
Next, you it might be necessary to modify the Taglib element in the deployment
descriptor so that it maps to the JAR file containing the desired tag library. This
procedure is not usually necessary. In most cases, the IDE adds the Taglib element
automatically. To verify that the correct information is there, follow the instructions
in Steps 5 through 8.
5. In the Explorer, navigate to and select the web.xml file (deployment descriptor),and click the Tag Libraries field.
44 Building Web Components • August 2001
FIGURE 2-13 Tag Libraries Field of the Deployment Descriptor
6. Click the Browse button to display the Tag Libraries Property Window.
FIGURE 2-14 Tag Libraries Property Window
Tag Librariesfield
Chapter 2 Programming a Web Application 45
7. In the properties window, click Edit to display the Edit Taglib dialog box in whichyou can verify the desired taglib location as /WEB-INF/lib/<yourTagLib>.jar .
FIGURE 2-15 Edit Taglib Dialog Box
8. If necessary, edit the URI, taglib location, or click the Browse button to navigate toa new taglib location, then close the dialog box.
▼ To Test a Tag Library In Place
1. If the tag library is not already in a web module, convert the filesystem containingthe tag library into a web module using the steps shown in “To Convert anExisting Directory Into a Web Module” on page 25.
Leave the .tld file and the generated and compiled Java tag handler classes in
place.
2. Modify the Taglibs element in the deployment descriptor to/<yourTagLib>.tld .
See Step 5 in the procedure above for more information about modifying the Taglibelement.
3. Create a JSP page, and add references to your new tags.
4. Execute your JSP.
46 Building Web Components • August 2001
CHAPTER 3
Running, Debugging, andDeploying Web Applications
This chapter assumes that you have considered how to program your application
and are now ready to begin running, debugging, and deploying.
This chapter provides an overview of the running, debugging, and deploying of web
modules using the Forte for Java IDE. This high-level view ties together the tasks
you perform in test running and correcting your application and provides some
details on individual programming tasks.
See Chapter 2 for a description of the process of creating a web application and its
standard web components, including JSP pages, servlets, and beans.
See the CD Shopcart Tutorial for more information on many aspects of the web
module development process.
Web Module Running and DebuggingWork Flow
This section gives you an overview of the work flow involved in running and
debugging a web module using the Forte for Java IDE. The overview does not
attempt to describe iterations of coding and testing. Rather, it lists the major
development tasks and assigns a logical order to their performance. Each task refers
to a section later in the chapter that provides more detailed information on the task.
Forte for Java online help for the JSP and Servlets module also provides information
on these tasks.
To run and debug a web module using the Forte for Java IDE:
1. Configure the web module (see “Configuring the Web Module Deployment
Descriptor” on page 48). You need to configure the deployment descriptor in
order to execute the application correctly.
47
2. Test run your application in the IDE, (for information on test running an
application, see “Testing Web Modules” on page 50).
■ In order to test run your application, select either the built-in Tomcat server or
the iPlanet Application Server. In either case, make sure database drivers are
available.
■ If your web module requires a JDBC™ database driver, copy it to the lib/extdirectory of your Forte for Java installation directory.
■ Placing the driver in this directory adds it to the Forte for Java internal
classpath, which enables you to test your application with your database.
Adding the database driver to your system classpath variable is not an
alternative to this step. You must add the driver to the lib/ext directory.
3. Debug your JSP pages, servlets, and web module, optionally monitoring record
data with the HTTP monitor. For additional information on using the HTTP
monitor, see “Monitoring Data Flow on the Web Server” on page 57. For more on
source-level debugging, see “Using Source-Level Debugging on JSPs and
Servlets” on page 54.
4. Package the web module as a WAR file and deploy it (see “Packaging and
Deploying a Web Module” on page 66).
Configuring the Web ModuleDeployment Descriptor
All web modules contain a deployment descriptor in the form of an XML file named
web.xml located in the web module’s WEB-INF directory. The deployment
descriptor provides configuration information to the web module’s deployment
environment—the web container. It provides information such as:
■ Initialization parameters for the ServletContext object (which is the runtime
representation of the web module)
■ Definitions of servlets and JSP pages and their mapping to URIs
■ Mapping of tag libraries to URIs
■ MIME type mappings
■ Session time-out interval
■ A list of welcome files
■ Mappings of error codes and exceptions to resources
■ Security configuration
48 Building Web Components • August 2001
In the Forte for Java IDE, you can configure the deployment descriptor in two ways:
■ You can browse the elements of the deployment descriptor in the Explorer and
edit them through property editors. This method is described extensively in the
online help; please refer to the online help for specific information about each
property in the deployment descriptor.
■ You can open the deployment descriptor file (web.xml ) in the source editor and
edit it manually.
▼ To Edit the web.xml Using Property Editors
1. In the Explorer, locate the web module directory, and open its WEB-INF/subdirectory.
2. Right-click the web.xml node, then choose Properties.
The web.xml properties sheet is displayed.
FIGURE 3-1 The web.xml Properties Sheet
3. In the web.xml properties sheet, select the category of information you want toedit (for instance, servlet mappings).
4. Click the ellipses (…) in the value field of the category of interest to display itsproperty editor.
5. In the property editor, make your changes.
■ When you have completed your changes, close the web.xml properties sheet.
Chapter 3 Running, Debugging, and Deploying Web Applications 49
Editing the web.xml File in the Source Editor
Expert users can edit the web.xml file directly by double clicking the web.xml icon.
You can also edit it using an external text editor. When you save your changes, the
IDE automatically parses the file and displays any errors in the Output window on
the XML Parser pane.
Testing Web Modules
You can test run a single web module in the IDE by deploying it to the internal
Tomcat 3.2 web server upon execution. The IDE makes iterative testing during the
development cycle quick and easy by performing the configuration setup work for
you.
If you have several of the web modules that you want to execute as a group, you
must first create a web module group, as described in “To Create and Execute a Web
Module Group” on page 51. A web module group is an IDE-specific object that is
similar (but not identical) to a J2EE Application that only contains web modules.
As you execute web modules and web module groups, you can use the HTTP
Monitor to examine the flow of record data. See “Monitoring Data Flow on the Web
Server” on page 57 for more information.
You can set execution properties for a web module by right-clicking on the WEB-INFdirectory (on the Filesystems tab of the Explorer) of the web module to be executed,
then choosing Properties from the contextual menu.
Note – There are additional steps required to configure web modules and web
module groups for deployment on the iPlanet Application Server. For more
information, see the online help for the iPlanet Application Server Plug-in.
▼ To Execute a Single Web Module
1. Select the appropriate web module by clicking on its WEB-INF node in theFilesystems tab of the Explorer, and choose Build All from the contextual menu.
Building the web module ensures that you have saved all the files and compiled all
the classes and components in your web module.
2. Right-click the WEB-INF node for the web module to be executed.
50 Building Web Components • August 2001
3. Choose Execute or Execute (Force Reload) from the contextual menu.
The web module executes and is displayed in your selected default browser. If
problems occur, check the Output window that appears upon execution for more
information.
Classpath Construction
The order of web module elements in the classpath for servlet execution is:
1. WEB-INF/classes
2. Any JAR files in WEB-INF/lib
3. The web module’s root directory
4. The rest of the IDE’s mounted filesystems
▼ To Create and Execute a Web Module Group
To create and execute a web module group, you perform three main tasks:
1. Create a web module group.
2. Set a URL mapping for each of the web modules to be loaded as part of the web
module group.
3. Specify a target server for the web module group.
▼ To Create a Web Module Group
1. From the main window, choose File > New to open the Template Chooser.
2. From the JSP & Servlet template category, select the Web Module Group template.
3. Type a name to help you identify the web module group file and select a locationfor the file.
The web module group file should not be placed inside a web module directory
where it might inadvertently be included when packaging for deployment.
4. Click Finish to create the web module group file, then close the dialog box.
Chapter 3 Running, Debugging, and Deploying Web Applications 51
▼ To Set a URL Mapping for Each of the Web Modules to BeLoaded as Part of the Web Module Group
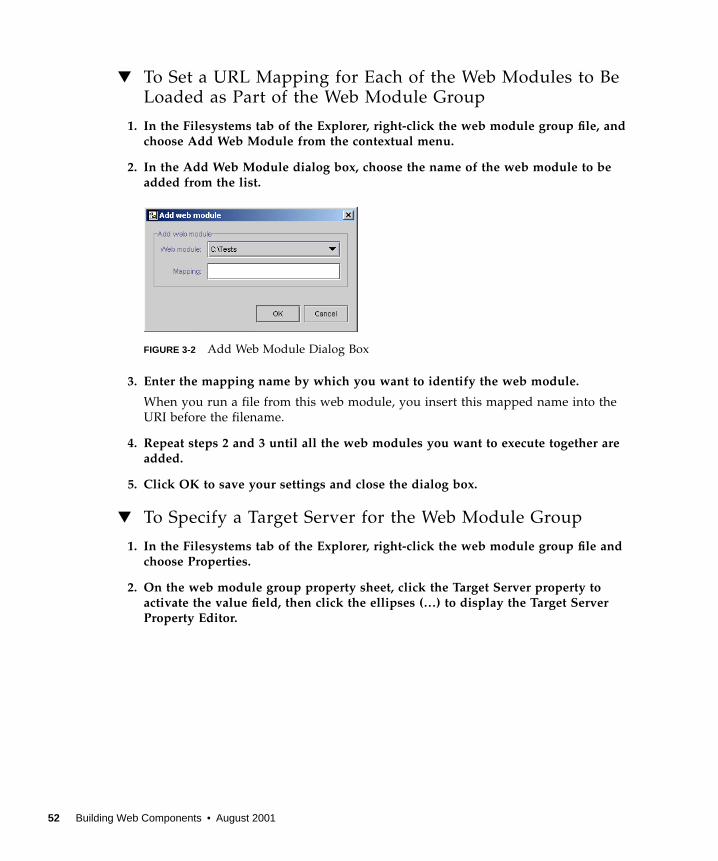
1. In the Filesystems tab of the Explorer, right-click the web module group file, andchoose Add Web Module from the contextual menu.
2. In the Add Web Module dialog box, choose the name of the web module to beadded from the list.
FIGURE 3-2 Add Web Module Dialog Box
3. Enter the mapping name by which you want to identify the web module.
When you run a file from this web module, you insert this mapped name into the
URI before the filename.
4. Repeat steps 2 and 3 until all the web modules you want to execute together areadded.
5. Click OK to save your settings and close the dialog box.
▼ To Specify a Target Server for the Web Module Group
1. In the Filesystems tab of the Explorer, right-click the web module group file andchoose Properties.
2. On the web module group property sheet, click the Target Server property toactivate the value field, then click the ellipses (…) to display the Target ServerProperty Editor.
52 Building Web Components • August 2001
FIGURE 3-3 Target Server Property Editor
3. In the Target Server Property Editor, select a server, then click OK to close theproperty editor.
You can set a target server for an individual web module by editing the Target
Server property for that web module. However, if a component of that web module
is executed while the web module is running as part of a web module group, then
the web module runs within the server specified by the Target Server property for
the web module group.
Note – Note that specifying a target server is optional. If no target server is
specified, the default server from the server registry is used.
▼ To Specify a Default Server In the Server
Registry
1. On the Runtime tab of the Explorer, expand the Server Registry node, then right-click the node representing the desired server under the Installed Servers node.
2. From the contextual menu, choose Set as Default.
3. Alternatively, on the Runtime tab of the Explorer, right-click the Web ModuleGroups node under the Default Servers node. From the contextual menu, chooseSet Default Server. In the Select Default Web Server dialog box, select the desiredserver from the list, then click OK. Regardless of which procedure is used, theWeb Module Group node changes to indicate the default web server.
Chapter 3 Running, Debugging, and Deploying Web Applications 53
FIGURE 3-4 Default Server for Web Module Group
Debugging Web Applications
The Forte for Java IDE provides two tools for debugging web applications:
■ Source-level debugging for both JSPs and servlets
■ The HTTP monitor, a lightweight debugging component for troubleshooting
servlet resource problems prior to using source-level debugging
Using Source-Level Debugging on JSPs and
Servlets
Source-level debugging consists of several enhancements to the standard IDE
debugging environment. These enhancements enable JSP and generated servlet files
to be viewed simultaneously. Breakpoints set in one are automatically reflected in
the other. (However, breakpoints removed from the generated servlet are not
removed from the corresponding JSP source file.)
A JSP file, with all its included files, maps to a single servlet file. Specifically, one
line in the JSP file maps to one or more lines in the servlet file. The reverse is not
true; there are some lines in the servlet file that do not map to any single line in the
JSP file.
54 Building Web Components • August 2001
▼ To Start the Debugger
■ To call JSP compilation explicitly, choose Build > Compile from the main menu
bar.
■ To trigger compilation automatically, choose Debug > Start from the main menu
bar.
■ To debug a web module group, select the WEB-INF directory from any of the web
modules within the web module group, and choose Debug > Start.
Note – If you have selected iWS or RI as your default or target server, you will be
unable to debug JSP pages or the servlets generated from them. You can only debug
JSP files using the Tomcat 3.2 web server (that is, the built-in IDE web server).
For more information about standard debugging in the Forte for Java IDE, see the
online help.
When you start the debugger, the HTTP Monitor window appears. See “Monitoring
Data Flow on the Web Server” on page 57 for more information about how to use the
HTTP Monitor to aid the debugging process.
▼ To Set JSP Debugger Options
You can customize your JSP debugging sessions through the IDE’s global options.
You can specify the files in which you want errors shown (when debugging with
both the JSP source file and generated servlet file open). You can also specify
whether to skip static HTML lines when debugging. Static HTML lines are lines that
don’t contain any JSP element or scripting language.
1. From the main menu, choose Tools > Options.
The Options window opens.
2. In the Option window, select JSP & Servlets (Advanced). The Properties pane isdisplayed.
Chapter 3 Running, Debugging, and Deploying Web Applications 55
FIGURE 3-5 Debugging Options Properties
3. To instruct the IDE to skip HTML lines between JSP tags in the JSP source (andthe corresponding lines in the generated servlet source) when stepping throughthe code, set Skip Static Lines to True .
4. To display JSP compiler errors in your JSP source files, set JSP Compiler Errors toShow in JSP Source . To display JSP compiler errors in the servlet source files,set JSP Compiler Errors to Show in servlet source .
▼ To View Both JSP and Servlet Files During
Debugging
1. On the Filesystems tab of the Explorer, select the JSP source file to be debuggedand right-click to display the contextual menu.
2. If the JSP file has not yet been compiled (that is, the View Servlet action is notenabled), choose Compile from the contextual menu.
3. Once the JSP file has been compiled, choose View Servlet from the contextualmenu.
The Source Editor opens with a view of the generated servlet code.
56 Building Web Components • August 2001
4. With the JSP file still selected in the Explorer window, choose Open from thecontextual menu.
By default, the JSP source file code appears in a new tabbed pane of the Source
Editor. At this point, you can see the servlet code or the JSP code, but not both at the
same time.
5. Right-click the current view in the editor and choose Clone View from thecontextual menu.
This action causes a new Source Editor window to open with a view on the same
code (JSP).
6. In the original Source Editor window, click the tab to switch to the alternate view(servlet).
Now you have two editor windows side by side, one with a view on the JSP code,
one with a view onto the servlet code. Now when you mark changes in one view,
you can see the changed reflected in the other view.
FIGURE 3-6 Views of JSP and Servlet Code
Note – Debug commands apply to the view (file) that has focus at the time the
command is issued. To issue a command on the alternate view, simply click in that
window to set focus and then proceed with your command.
Monitoring Data Flow on the Web Server
The HTTP monitor is a debugging tool for servlet components that gathers data
about the execution of JSP and servlet files in the servlet engine. This information is
not available anywhere else in the Forte for Java IDE. For each HTTP request that is
processed, the monitor records data about the incoming request (for example GETand POSTmethods), the data states maintained on the server, and the servlet
environment. You can view data, store data for future sessions, and replay and edit
previous requests. The HTTP monitor enables you to figure out which resource
contains problems before you go on to use the source-level debugger described in
the previous section.
Chapter 3 Running, Debugging, and Deploying Web Applications 57
The HTTP Monitor requires the internal web server to run to receive data from the
execution server. In other words, the HTTP Monitor does not record data unless the
IDE’s internal HTTP service is running. If the internal HTTP service is not running,
you can view previously recorded data, but not any new data. Information about
data flow on the web server (called an HTTP monitor data record or transaction in
the IDE’s GUI) is stored until you exit the IDE unless you explicitly request
otherwise.
▼ To Display the HTTP Monitor
● To start the HTTP Monitor from the main menu bar, choose Debug > HTTPMonitor or View > HTTP Monitor.
While in the debugging workspace, the HTTP Monitor can also be displayed by
clicking the HTTP Monitor button on the right side of the full debugging toolbar.
Viewing Monitor Data Records
The HTTP Monitor consists of two panels. The HTTP request records panel contains
a tree view of known transactions. The Transaction data display panel presents the
data associated with the monitor data information recorded in the current session.
FIGURE 3-7 HTTP Monitor With Request Transaction Data Displayed
58 Building Web Components • August 2001
In the tree view, the All transactions category contains two subcategories: Current
Transactions and Saved Transactions. Individual monitor data records reside in
either of these subcategories. Entries in Current Transactions are available only
during the current IDE session. Current monitor data records persist across restarts
of the server. They are only cleared on a restart of the IDE or when you delete them.
Entries in Saved Transactions persist until you delete them. Monitor data records in
all categories can be sorted according to various criteria using the buttons above the
tree view. For details on sorting criteria, see the online help.
When a monitor data record is selected in the HTTP request records panel, the
information corresponding to that transaction appears in the Transaction data
display panel. The data display panel consists of these panes:
Request Pane
The Request pane displays the request URI, method, query string, parameters,
protocol, client IP status, scheme, and the exit status of the request, as shown in the
FIGURE 3-7.
Cookies Pane
The Cookies pane displays a list of incoming and outgoing cookies, including cookie
name, cookie value, and for outgoing cookies, how long until the cookie expires, and
whether the cookie requires a secure protocol.
Session Pane
The Session pane displays the status of any HTTP session associated with the
request before and after the request was processed. It states whether the session was
created or destroyed as a result of the request being processed. Session properties
include session ID and date and time. Access data after the transaction is also
provided, including session attributes and the maximum inactive interval.
Chapter 3 Running, Debugging, and Deploying Web Applications 59
FIGURE 3-8 Session Pane on the HTTP Monitor
Servlet and Server Pane
The Servlet and Server pane displays the name of the servlet as configured, its class
name, its package name, optional servlet information, the relative path to the servlet,
and the translated path. Also included are the servlet context (that is, the absolute
path to the context), relevant initialization parameters, and servlet engine properties
such as the Java platform, the Java version, the host name of the servlet engine, and
the port number of the HTTP service.
Client Pane
The Client pane lists the protocol, the client IP address, the software used, the
locales, and encoding, file formats, and character sets accepted.
Headers Pane
The Headers pane displays the HTTP headers that came in with the request. The
headers are constructed by the HTTP client (for instance, a browser), and typically
contain information such as the nature of the client (software and OS), language
preferences, as well as file formats that the browser accepts. It also provides
connection information.
60 Building Web Components • August 2001
▼ To Save HTTP Monitor Data Records
You can save monitor data records in the Current Transactions subcategory of the All
transactions tree view. This action enables you to view or replay the monitor data
records in a future IDE session.
1. Right-click the monitor data record to be saved.
You can select multiple transactions at one time by using the Shift or Control key.
2. Choose Save from the contextual menu.
The selected monitor data records are moved (not copied) to the Saved Transactions
subcategory.
Deleting HTTP Monitor Data Records
You can delete current monitor data records or saved records in the Saved
Transactions subcategory of the All transactions tree view.
▼ To Delete a Saved or an Individual Monitor Data Record
1. Right-click the monitor record to be deleted. You can delete multiple data recordsat one time by using the Shift or Control key.
2. Choose Delete from the contextual menu.
▼ To Delete All Current Monitor Data Records
1. Right-click the Current Transactions folder.
2. Choose Delete current transactions from the contextual menu.
▼ To Delete All Saved Monitor Data Records
1. Right-click the Saved Transactions folder.
2. Choose Delete saved transactions from the contextual menu.
▼ To Delete All Monitor Data Records
1. Right-click the All Transactions folder.
2. Choose Delete all transactions from the contextual menu.
Chapter 3 Running, Debugging, and Deploying Web Applications 61
Replaying Requests
You can replay HTTP requests associated with both the Current Transactions and
Saved Transactions subcategories of the All transactions tree view. The executor re-
sends the original HTTP request.
▼ To Resend the Original Transaction to the Server
1. Right-click the monitor data record representing the transaction to be replayed.
2. Choose Replay from the contextual menu.
The transaction appears in the browser or server you chose.
▼ To Edit and Resend a Specified Transaction
1. Right-click the monitor data record representing the transaction to be edited.
2. Choose Edit and Replay from the contextual menu.
The Edit and Replay dialog box appears. This dialog lets you edit one or more
parameters, requests, server information, and headers prior to resending the request
information.
FIGURE 3-9 Edit and Replay Dialog Box
▼ To Edit Query Parameters and Replay
1. To add a query parameter, click the Query tab and then click the Add parameterbutton.
62 Building Web Components • August 2001
The Add Parameter dialog box appears.
FIGURE 3-10 Add Parameter Dialog Box
2. Type in a name and value and click OK.
The query parameters appear in the Edit and Replay dialog box.
3. To delete a query parameter, select the parameter and then click Deleteparameters.
Use the Shift or Control key to delete multiple parameters.
▼ To Edit Request Information and Replay
1. To edit a request parameter, such as Request URI or Protocol, click the Request taband then click the ellipsis (…) button next to the desired request parameter.
The Edit Value dialog box appears.
FIGURE 3-11 Edit Value Dialog Box
Chapter 3 Running, Debugging, and Deploying Web Applications 63
2. Type in a name and value and click OK.
The edited request parameter values appear in the Edit and Replay dialog box.
3. To change a request method, select the desired method from the combo box in theMethod field.
For instance, change GETto POST.
Note – Since cookie names depend on the server, if the request to be replayed does
not contain a cookie with an HttpSession ID (for instance, a JSESSIONID on the
Tomcat server), then the component performing the processing obtains a fresh one
(that is, a new HttpSession ID is created). If the request to be replayed does
contain a cookie with a HttpSession ID , then the component performing the
processing obtains the HttpSession of that ID with its current attributes, unless it
has timed out (in which case a new one is created). The IDE does not reset the
session’s attributes to what they were prior to the request. In this way, you can use
the monitor to track multiple sessions.
▼ To Edit Server Information and Replay
1. To edit server information, such as hostname of servlet engine or port number ofHTTP service, click the Server tab and then click the ellipsis button (…) next tothe desired server parameter.
The Edit Value dialog box appears.
2. Type in a value and click OK.
The edited server parameter values appear in the Edit and Replay dialog box.
▼ To Add and Delete Headers and Replay
1. To add a header, click the Headers tab and then click the Add header button.
The Add Header dialog box appears.
64 Building Web Components • August 2001
FIGURE 3-12 Add Header Dialog Box
1. Type in a value and click OK.
2. To delete a header, select it and then click Delete headers.
A confirmation dialog appears. Use the Shift or Control key in conjunction with the
Delete Headers button to delete multiple headers.
3. To edit a header parameter such as Accept, Connection, Host, or user-Agent, clickthe ellipsis button (…) next to the desired parameter. (Note that you can also editparameters directly.)
The Edit header dialog box appears.
FIGURE 3-13 Edit Header Dialog Box
4. Type in the new name and value, and click OK.
The new information is reflected in the Edit and Replay dialog box
Chapter 3 Running, Debugging, and Deploying Web Applications 65
Packaging and Deploying a Web Module
During development, a web module is typically run from its directory structure (that
is, its unpacked form) to facilitate frequent and direct updates. However, once the
contents of the web module are ready for deployment, the web module can be
packaged into Web ARchive (WAR) form for easy transfer. The WAR file format
helps to simplify archival and deployment of your applications. All J2EE-compliant
web containers are capable of running web modules in this format.
For an explanation of the files needed to deploy a TP application, see the online help
(specifically the “Creating a JAR File” page in the Transparent Persistence section of
the Getting Started folder).
Note – If your web module is to include persistence-capable classes, make sure that
any persistence-capable classes are packaged in a JAR file and placed in the WEB-
INF/lib directory of the web module. The sources used to create the JAR content file
must be available in the mounted file system.
▼ To Package a Web Module as a WAR File
1. In the Explorer, right-click the WEB-INF node, and choose Export WAR from thecontextual menu.
If the Export WAR file command does not appear on the contextual menu, check that
you have mounted the filesystem containing the web module to be packaged.
Alternatively, choose Tools > Export WAR File from the main menu bar.
2. In the Choose WAR File Name dialog box, type a name for the WAR file.
3. Click OK.
A WAR file is created. By default, all files under the web module file system are
included.
Note – Web module packaging is affected by the properties set on the Archive tab of
the WEB-INF property sheet. For more information about editing web module
archive properties, please see the online help.
You are now ready to deploy your web module to the external web server of your
choice. Refer to the documentation related to your target web server.
66 Building Web Components • August 2001
APPENDIX A
Working With DreamweaverTemplates
The Forte for Java IDE enables you to work with Macromedia Dreamweaver
templates. You can:
■ Open and edit Dreamweaver templates in the Source Editor
■ Configure the IDE to open Dreamweaver templates in an editor of your choice
■ Generate a JSP page from a Dreamweaver template
Opening and Editing Dreamweaver Templates in
the Source Editor
Since the IDE recognizes Dreamweaver templates as an individual file type
(Dreamweaver templates use a .dwt extension), you can open and edit
Dreamweaver templates in the Source Editor. By default, a Dreamweaver template
opens in the Source Editor when you double-click it in the Explorer.
▼ To Configure the IDE to Open Dreamweaver
Templates in the Dreamweaver Application
You can reconfigure the IDE to open Dreamweaver templates in an external editor of
your choice.
1. Click Tools > Options.
2. In the left pane of the Options window, open the node entitled JSP & Servlets(Advanced)
67
3. Click the Dreamweaver Template icon.
FIGURE A-1 Dreamweaver Template Icon in the Options Window
4. In the right pane, click the Editor field and choose External Editor from the combobox.
5. Click the External Editor Executable field, and the ellipsis (…).
6. In the file browser that opens, navigate to and select your external editorexecutable and click Select.
7. Close the Options window.
When you double-click a Dreamweaver template, the Dreamweaver application
launches and opens the template.
▼ To Generate a JSP Page From a Dreamweaver
Template
1. In the Explorer, select the Dreamweaver template.
2. From its contextual menu, choose Save Template as JSP.
3. In the dialog box that appears, select the filesystem to which you want to save,type a name for the JSP page in the File Name field, and click OK.
The resulting JSP page has the same contents as the Dreamweaver template.
68 Building Web Components • August 2001
APPENDIX B
Custom Tag Library Tutorials
Using short tutorials, this appendix describes how to:
■ Create a simple “Hello World” tag library and view and edit it from a JSP page
■ Add an attribute to your tag library and regenerate the tag handler bean
■ Package your tag library as a JAR file and then view and edit it from a JSP page
▼ To Create the Tag Library
1. Create a new web module. For more information, see “Creating a Web Module”on p. 65.
This operation creates a web module directory structure, as shown in the following
figure:
FIGURE B-1 Web Module Directory Structure
2. Create a TLD in your web module, and name it MyTagLib .
To do this, select the web module’s root directory in the Explorer, and choose New >
JSP & Servlet > Tag Library from its contextual menu. Type MyTagLib into the name
field of the New From Template wizard, and click Finish.
Web module root directorymounted as a filesystem
Web module deploymentdescriptor (web.xml )
69
This operation creates a TLD, as shown in the following figure:
FIGURE B-2 Newly Created TLD in Web Module
3. Add a tag element named HelloWorld to your TLD, and specify HelloWorldTagas its handler class.
To do this, select your TLD in the Explorer (the MyTagLib node), and choose Add
Tag from its contextual menu. In the Add New Tag dialog box, type HelloWorld in
the Tag Name field. In the Tag Class Name field, type HelloWorldTag . Click OK.
The following figure shows the newly created tag element:
FIGURE B-3 Tag Element
The G in parentheses following the tag name indicates that changes have been made
to the tag since the last time its tag handler was generated (because you have not yet
generated the tag handler).
4. Generate a tag handler bean.
To do this, select your TLD in the Explorer, and choose Generate Tag Handlers from
its contextual menu.
This operation generates a package named MyTagLib in the root directory of the
web module. This package contains the tag handler bean HelloWorldTag , as
shown in the following figure:
Tag element
Tag librarydescriptor
70 Building Web Components • August 2001
FIGURE B-4 Tag Handler Bean
5. Modify the otherDoStartTagOperations method of the HelloWorldTag beanby adding this code to it and then compiling:
6. Add a taglib element to your web module deployment descriptor (web.xml ).
To do this, open the web.xml properties window, then click the Browse button to
the right of the Tag Libraries field in the properties window. The Tag Libraries
Property Window appears. Click Add to display the Add TagLib dialog box.
FIGURE B-5 Add Taglib Dialog Box
7. Map the location of the tag library descriptor to the URI myTags.
To do this, open the properties window for the Taglib element you created in the
previous step. Set the Taglib Location field to /MyTagLib.tld and the Taglib URI
field to myTags.
This operation makes the tag library accessible to a JSP page through the URI
myTags.
try{ JspWriter out = pageContext.getOut(); out.println("Hello World");}catch (Exception e){ System.out.println(e);}
Tag handlerbean
Appendix B Custom Tag Library Tutorials 71
Note – The leading slash in the Taglib Location field (/MyTagLib.tld ) denotes
the root of the web module.
8. Create a new JSP page and name it TestCustomTag .
To do this, select the root directory of your web module in the Explorer and choose
New > JSP & Servlet > JSP from its contextual menu. Type TestCustomTag in the
name field of the New From Template wizard. Click Finish.
9. Add the following code to your JSP page on the line after the HTML <body> tag:
10. Restart the server, and execute the JSP page.
To perform this operation, choose Execute (restart server) from the contextual menu
of the JSP page.
The web browser should display a page that reads Hello World .
Adding an Attribute to a Tag Handler
The following tutorial describes how to add an attribute to your “Hello World” tag
that controls the color in which its output is displayed by your web browser. As part
of the procedure, you learn how to regenerate tag handler beans.
▼ To Add an Attribute to Your Tag Handler
1. Add an attribute named color to your HelloWorld tag.
To do this, select the HelloWorld tag in the Explorer and choose Add Tag Attribute
from its contextual menu. When the Add New Tag Attribute dialog box opens, type
To do this, select the MyTagLib tag library descriptor in the Explorer, and choose
Generate Tag Handlers from its contextual menu.
This operation generates a property named color on the tag handler, and three
corresponding class members: a field named color and methods named getColorand setColor .
3. Modify the otherDoStartTagOperations method of the tag handler so the textit outputs is colored according to the value assigned to the color attribute.
To do this, modify the println statement to read as follows, and then compile the
class:
4. Modify the HelloWorld action in the TestCustomTag JSP page so its output iscolored red.
To do this, change the action to read as follows, and then compile the JSP page:
To do this, choose Execute (restart server) from the contextual menu of the JSP page.
Your web browser should display Hello World in red.
Packaging a Tag Library and Gaining Access to
the JAR
The following section describes how to package the tag library you developed in the
previous sections and then view and edit it from your JSP page.
▼ To Package and Gain Access to Your Tag Library
1. From the contextual menu for the MyTagLib TLD, choose Create Tab Library JAR.
This operation creates a JAR file named MyTagLib.jar in the web module’s root
directory (the file extension is not displayed by the Explorer).
2. Use the Cut and Paste menu items from the contextual menu for the JAR file tomove the JAR file into the WEB-INF/lib directory.
FIGURE B-6 JAR File in the WEB-INF/lib Directory
74 Building Web Components • August 2001
3. Modify the Taglib element in the deployment descriptor so it maps to theMyTagLib JAR file rather than the MyTagLib directory in which you developedthe tag library.
To do this, select the web.xml file in the WEB-INF directory that contains the
MyTagLib JAR file. Select Properties from its contextual menu, then click the ellipses
to the right of the Tag Libraries field to display the Tag Libraries Property Editor.
Select MyTagLib, then click the Edit button. In the Edit TagLib dialog box, type
/WEB-INF/lib/MyTagLib.jar into the Taglib Location field, as shown in the
following figure, click OK, then click OK in the Tag Libraries Property Editor and
close the web.xml properties window.
FIGURE B-7 Mapping the Taglib Element to the JAR File
Note – When mapping a taglib element to a tag library that is packaged as a JAR
file, do not specify the location of the tag library descriptor. Specify only the location
of the JAR file. The location of the tag library descriptor within the JAR file is known
by the web container.
4. Restart the server, and execute the JSP page.
To do this, choose Execute (restart server) from the contextual menu of the JSP page.
As in the previous tutorial, your web browser should display Hello World in red.
Appendix B Custom Tag Library Tutorials 75
76 Building Web Components • August 2001
Glossary
bean A reusable software component written to the JavaBeans specification. See also
JavaBeans.
browser An application that enables users to view, navigate through, and interact with
HTML documents and applets. Also called a web browser.
client In the client-server model of communications, a process that requests the
resources of a remote server, such as computation and storage space. See also
server.
custom tag A text element within a document that represents format information or
processing logic contained in an external library. By using tags, you can avoidincluding Java code in the JSP page. See also JSP tag libraries.
deployment The process of installing software into an operational environment.
deploymentdescriptor An XML file that describes how a web module should be deployed. The
deployment descriptor describes the components that make up the web
module, such as init parameters for JSP pages and servlets, servlet wrappers,
and the custom tag libraries available to the JSP pages.
EJB (Enterprise JavaBeans) A component architecture for development and
deployment of object-oriented, distributed, enterprise-level applications.
Applications written using the Enterprise JavaBeans architecture are scalable,
transactional, multiuser, and secure. See also JavaBeans and bean.
HTTP (Hypertext Transfer Protocol) An application protocol that governs the
exchange of files (including text, images, sound, and video) on the World Wide
Web.
HTTP monitor A mechanism for the collection of data about the execution of JSP and servlet
files in the servlet engine. For each transaction associated with a JSP or servlet
object, the monitor records data about the incoming request, the data states
maintained on the server, and the servlet environment.
Glossary-77
J2EE (Java 2 Platform, Enterprise Edition) The edition of the Java 2 platform that
combines a number of technologies (such as enterprise beans, JSP pages, and
XML) in one architecture with a comprehensive application programming
model and compatibility test suite for building enterprise-class server-side
applications. See also EJB, JSP.
J2EE application An application that consists of J2EE components (application clients, applets,
HTML pages, servlets, and enterprise beans) that run on the J2EE platform.
J2EE applications are typically designed for distribution across multiple
computing tiers. For deployment, a J2EE application is packaged in an .ear(Enterprise Archive) file. See also J2EE.
JAR (Java Archive file) A platform-independent file format that bundles classes,
images, and other files into one compressed file, speeding download time.
JavaBeans An architecture that defines a portable, platform-independent reusable
component model. Beans are the basic unit in this model. You can deploy
beans in a network on any major operating system. See also EJB.
JDBC (Java Database Connectivity) An industry standard for database-independent
connectivity between the Java platform and a wide range of databases. The
JDBC interface provides a call-level API for SQL-based database access.
JSP (JavaServer Pages) Extensible web technology that uses template data, custom
elements, scripting languages, and server-side Java objects to return dynamic
content to a client. Typically, the content consists of HTML or XML elements,
and, in many cases, the client is a web browser. JSP technology is an extension
of servlet technology. It facilitates the addition of dynamic data to an otherwise
static web page. JSP pages are text-based web components that are
dynamically translated into servlets by the web container before execution. See
also servlet.
JSP tag libraries Collections of tags that encapsulate dynamic content or processes so that they
can be called through a tag in a JSP page. JSP tag libraries are part of the JSP
specification and can be used on any J2EE-compliant server. See also customtag.
MIME (Multipurpose Internet Mail Extensions) An Internet standard for sending and
receiving non-ASCII email attachments (including video, audio, and graphics).
Web browsers also use MIME types to assign applications that interpret and
display files that are not formatted in HTML.)
Persistence-capableJava classes Classes that contain data from a persistent data store and eliminate the need
for SQL or data-store-specific coding. You can insert business logic into these
Java programming language classes by defining additional methods and
extending the automatically generated methods.
scriptlet A scripting element that enables you to enter any piece of valid Java code.
Variables and methods declared in a declaration element are available to
scriptlets in the same JSP page.
Glossary-78 Building Web Components • August 2001
server A network device that manages resources and supplies services to a client. See
also client.
servlet Any class that implements javax.servlet , typically subclasses of
javax.servlet.http.HttpServlet . Used to extend the features of web
servers and web-enabled application servers, servlets execute within a web
container. Servlets can generate dynamic content in response to a request
created by an HTML form, often using a data source; control application flow
by enabling and disabling access to certain web resources; and track user
sessions, for example, adding and deleting items from a user’s shopping cart.
tag See custom tag.
TLD (tag library descriptor). An XML file that describes a tag library. A JSP
container uses the TLD file to interpret pages that include taglib directives
referring to that tag library. The TLD file contains documentation on the library
as a whole and on its individual tags, version information on the JSP container
and on the tag library, and information about each of the actions defined in the
tag library. The TLD file is generated when you create a custom tag library.
TP (Transparent Persistence) A module of the Forte for Java IDE that enables you
to gain access to information in data stored as Java objects, making possible the
separation of Java programming from database programming.
URI (Uniform Resource Indicator) The property used when a servlet is executed (or
debugged) to build the URL that is to be displayed in browser. The URI has the
following syntax: http:// <web-server-name>:<web-server-port>/<web-module-URI>/<servlet-URI>&<servlet-query-params> .
The <web-module-URI> is typically presented as the context root.
WAR (Web Archive file). A specialized JAR file with a .war extension. Web modules
must be packaged as WAR files for deployment onto J2EE-compliant servers.
See also JAR.
web browser See browser.
web component A server-side J2EE component that is an executable file contained in aWAR file. It is managed by and communicates directly with a webcontainer. It is capable of receiving HTTP requests through the webcontainer, processing them, and returning HTTP responses through theweb container. The J2EE platform defines two web component types:servlets and JSP pages. See also JSP, servlet, and WAR.
web container A provider of runtime services that supports the execution of the web
components of a web application. Web containers forward client requestsfrom a web server to web components in the application and forward theclient-bound responses from the web components to the web server. Webcontainers typically run in a web server process (as a web server plug-in)or in a J2EE application server process.
Glossary-79
web module The smallest deployable and usable unit of web resources in a J2EE
application. Web modules can be packaged and deployed as web archive
(WAR) files. In the Forte for Java IDE, several web modules deployed together
are referred to as a web module group. See also WAR files.