115


2
Acknowledgments
I want to thank (Dr.) Adam (remotecontact) “Bottleneck” Bercu, Tony Castley, Zachary Rubin and his Awesome Roundup Diagram, Ed Fargo, Terry Hershner, Brian Wismann (Brammo) my ad-hoc editor (in absentia), Harry Mallin and all the guys on ElMoto.net for their help, patience, generosity, coffee and cheerios! I’ve called 2010 the “Year of the Electric Motorcycle”- it was, and in large part because of them.
Dedication
This book is dedicated to my Mother- Bernardette Stein Dillard- 1926-2010.
A special shout goes to Noah Podolefsky, for the inspiration, support, enthusiasm for evangelizing electric vehicles and the final technical edit.
If you see anything technically wrong, it’s his fault. I kid - I kid.
See more of Noah’s work at www.gsx-e.com
©Ted Dillard, 2012- All rights reserved.

3
…from Fossils to Flux (A Basic Guide to Building an Electric Motorcycle)
Second Edition
fossil [fos-uhl] fuels: fuels formed by anaerobic decomposition of buried dead organisms, the age of which is typically millions of years.
(magnetic) flux [fluhks]: a measure of the magnetic field strength used by an electric motor to produce mechanical energy
Ted Dillard
Technical Editor: Noah Podolefsky
Editor in absentia: Harry Mallin

4

5
Contents The Parts
The Batteries, 15 Lead, 16 Mobility Batteries, 16 Odyssey “Dry Cell” Batteries, 16 “Orbital” Batteries, 17 Lithium Batteries, 17 Zachary Rubin and the Awesome Battery Roundup, 20 The Peukert Effect, 21 Battery Management Systems, 21
Controllers, Contactors and Converters (oh my!), 24 The Controller, 24 Sensorless Controllers, 28 The Contactor, 29 The Converter, 29
Random Thoughts and Observations, 30 Random Thoughts: Regenerative Braking (from Brammo), 30 Random Thoughts: Motors- Axial vs. Radial air gap motors, 31 Random Thoughts: A Short Primer on the History of the Etek Motor, 32 Random Thoughts: Hub Motors, 34 Random Thoughts: Motor Cooling, 38 Motor Cooling Questions ANSWERED, 39 Random Thoughts: Transmissions?, 40
The Plan Understanding the System, Balance and Bottlenecks, 43 Picking the Parts and Pieces- (decisions, decisions…), 45 Battery Systems- Some Examples, 50 Lead-Acid, 50
Lithium “Prismatic”: GBS, Thundersky, 50 Cylindrical Cells – Headway, 51 Lipo, 52
The Motor Lineup- the Tried and True, 52 Permanent Magnet DC, 53 Series-wound DC, 53 AC Induction, 54 Sepex (Separately Excited) DC, 55
The Other Parts Figuring the Gear Ratio, 56 Switches Made Simple, 56 The Charger Choice, 57 The On-Board Mounting Decision, 59

6
Buying a Rolling Chassis, 60 Interlude: The Secrets of the Universe- KWh, 63 Interlude Part 2: Bigass Hub Motors, 63
The Motor Mount, 64 Mounting the Batteries, 66 Mounting the Batteries- Part Two: Essentials, 69 Battery Connections… or, “24s4p? Huh?, 72 The Wiring Diagram, 73 Grounding and Fusing the System, 75 More Random Thoughts: The “Recycle” Angle, 76
Cool Tools- Essentials for the Builder Making Connections, 77 Cutting, 79 Hand Tools, 80 Air Tools, 81 Meters, 82 The BFH, 83 The Co-op Shop / VocTech Angle, 83 The Ride
Ride Safe, 85 Epilogue: The Second Build, 87
Conclusion, 91 Appendix: The Shopping Lists, 92 The Zombie Fembot, 93 The GSX-E, 94 The dirt bike, 94 The Juiced Café, 95 Glossary, 97 Bibliography, Links and Resources, 113

7
Preface
In 1967 or so, my Dad was working for Massachusetts Electric, and there was a Home Show in Worcester. There they had an electric car. It was a Renault Mars II, and he got to bring it home for the weekend after the show. He gave us all a ride in it, and it was, to my 11-year old mind, an obvious solution to the problems of fossil fuels and the internal combustion engine. (One of the things that amazed me- and continues to surprise people- was the fact that when you stop, the motor is off. When you’re sitting in traffic, the car is simply off.)
My Dad said that the problem was the batteries- the weight of the lead-acid. He said that it was “up to your generation to develop a brand-new battery technology”. 40 years later we are finally on the brink of that breakthrough, and though I had nothing personally to do with it I’m proud to be part of the generation that has, in fact, done exactly that. The development of several new battery technologies, especially lithium, has, as an enabling technology, opened up an entirely new world for electric vehicles.
Besides the battery technology, the machine itself is fundamentally simple, the principles of which are common knowledge. I built an electric motorcycle. I’m not an engineer. I’m not a mechanic, yet the system is so inherently simple I can assemble one out of readily available parts, with average fabrication skills. On one hand, it’s the cutting edge of future technology. On the other, it’s something that’s essentially the same as the very first electric vehicles from the early 20th century.
I’ve been trying to remember when my interest in electric motorcycles became an obsession… when it went from “this is a cool idea” to “I’ve GOT to have one of these things!”, and I began to recall... it was a leisurely walk down Newbury Street on the way to a coffee. This young guy had a weird looking bicycle- I stopped and talked to him. He was a natural salesman- this was an electric bike, and his excitement and enthusiasm was infectious. He rented and sold them in the Back Bay area. He offered, no, he insisted that I take it for a spin around the block.
The feeling of riding that bike was unique, the way the power was applied, the effortless, quiet and smooth drive- and from that moment on, I was hooked. I started dreaming about what a full-sized motorcycle with all the power it could handle would feel like.
So, bringing me back to the reason I started building this thing, it really was about seeing what that would feel like. It was as simple as that. Honestly, there was so much that went into actually building the bike, I

8
kind of lost sight of that. Then, finally I took my first open-road, full-throttle ride on a quiet morning in Maine… “The feeling you get when you can just screw the bike up to speed with an absolutely flat power curve is just remarkable- and something you have to feel for yourself.” – I posted. Once my pulse got back down to normal, I realized I had an answer to my question.
I’m not the only one. I’ve seen it many times now, for the short time I’ve had the bike on the road. Two times in particular- one guy was an old Harley dude- very interested in the thing. After talking for a while, I said, aw, hell, just get on the thing and take it for a spin. After he got back he was all wound up- seems he squirted the throttle on it and got his eyes opened. He couldn’t believe the instant power. Another guy, after lots of questions and conversation, and finally seeing me blast to 60 past him, was practically shouting “I HAVE to build one of these things!”
Electric motorcycling is so similar to what I saw throughout the '90s and '00s "digital revolution" of photography. The cameras were incredibly expensive. They were notoriously flakey... fairly reliable, but constant coaxing was necessary. The performance in many cases really wasn't that great, especially compared to today. The photographers who bought the systems were convinced it was the future, and that they wanted to get into it sooner rather than later. They, after making the switch, became evangelists themselves.
Ultimately, everyone I've ever talked to has converted to digital photography... but it starts with the actual experience- whether we're talking shooting a digital photo or riding an electric bike. All the "green-carbon-save-money" talk in the world won't grab someone by the soul. I really didn’t get involved in this for the “green” aspect, or the EV angle, although that’s a very exciting side of the whole thing. I got into it because I wanted to know what a handful of throttle with a powerplant with a straight power curve, no powerband and full torque at zero RPM rode like. The easiest way to get that was to build it myself…
…and in over 40 years of riding I’ve never experienced anything else like it.

9
Introduction
I wish I could attribute the quote, “…a teacher teaches not how to do, but how to learn.” I can attribute this one, though: "Telling Isn't Teaching." That’s from John Caswell "Smitty" Smith by way of Lee Kane.
That is my goal with this book, to give you the lay of the land, outline the basic principles and practices of electric vehicles and electric motorcycle conversions, and point you in the direction of some good resources and good advice. The purpose of this book is to get you started down the path, and help you know where to find the signposts to guide you along the way.
I can’t give you specific instructions on how to build your bike, I can only give you examples from my experience and the considerable experience of others who have helped me along the way. With some basic mechanical aptitude and fabrication resources, anybody can convert a motorcycle. I’m hoping this will be an inspiration to you, a big push, if you’re tottering on the edge of starting the search for a good donor frame.
So many teachers and resources dive into specific details, technical minutia, without telling us where we are in the forest. Where I resist the urge to describe extreme technical principles and processes, I strive to give you a clear idea of where we are and what we’re trying to do.
To quote that famous chopper and hot-rod builder, Kelsey Martin’s advice to my son: “Be patient, take your time, do it right”. And, the equally famous home-brewing adage: “Relax. Sit down. Have a beer.”
As far as the bike goes, though… my all-time favorite advice, from my windsurfing days: “Sheet in and Sail Ugly!”. It will never be perfect, nor complete, but it will be a complete blast to ride, however it looks.
…and that, what your face is doing as a result of your first ride, my friend, is what’s known as the “EV grin”. It doesn’t go away.
10
Preamble
It’s been a long, interesting trip. To keep track of the information I started posting on a blog, “The Electric Chronicles” at www.evmc2.com. Just to set the stage, here’s an edited entry from around the time that I started actually collecting parts. As you’ll see- in the few years of research I’d done, I’d gone around in more than a few circles. You may feel much the same as I did at this point, and you shouldn’t feel alone.
Ultimately, a lot of the questions and confusion I had got simplified right down to some really basic concepts and realities. Most of that was with the help of some good friends and great advice- Ed Fargo, Terry Hershner and a whole bunch of people contributing on the ElMoto.net site- and as a result, this book was written.
So here it is, a retrospective, but from the middle of the project:
Stuff I’ve learned, decisions I’ve made…
First, I’m back to where I started for motor choices. Originally I picked the Agni, as a permanent magnet DC motor, and because it was fairly impossible to get information from Agni, and then getting some information from one of their resellers that said there were no controllers for PM motors that could do regen, I started looking at the separately excited DC motors, and then AC induction, based on the same resellers suggestion. As a result of contacting Sevcon directly (a controller manufacturer) and then Mars Electric, I got some considered advice and detailed answers. I’m back to the PM/regen controller configuration thanks to that. Thanks, John and Steve!
…
So, even now, I’d suggest doing all the research you can, read the books, (VERY helpful) talk to friends (VERY very helpful) read the forums (not so helpful- note- this was before I discovered ElMoto.net-), but most important, and most helpful, is look at what’s out there and what they’re using, if you can. Then you start asking questions. The questions and concerns I had about the Mars motor, as well as my battery choices were answered immediately once I learned, through John at Mars, that it was used in more than a couple of bikes that did what I needed to do.
I’d say the best advice I could give you in designing the bike is to understand, clearly, what you need the thing to do and design it specifically for that, or, look at a bike that is doing what you want, and copy it. Unlike when I started this research, now there are several production machines out there to look at. This solves more than a few problems, most importantly, issues like motor size and type. For me, I want to get as much efficiency and reliability as I can. It looks like the Mars PMDC motor will give me that.

11
I think the thing you have to also keep in mind is that there are no hard and fast answers out there, in spite of the attitude that many have when discussing this. This is a new field, there’s a lot that needs to be separated between theory and practice. When you’re getting advice, it feels like everybody has an agenda. They do, with the exception of a few, mostly because they firmly believe they made the right decisions for their project. And they probably did. They can’t insist, though, that those are the right decisions for your project. Again, the solution is to look at what’s been done, and what works, and weigh that against the advice you’re getting.
…
It will be interesting to see where this whole thing is in another 10 years… will the EV component resellers still be around, will people still be building their own? I’m thinking not so much, as off-the-shelf products become available. Even now, they’re selling complete conversion kits- a smart move, especially since reducing repetitive questions from wingnuts like me is a problem… but when you can get a good road bike for normal money without having to build your own? We’ll see.
One more bit of advice I learned from building a boat. The thinkin’ stool. According to the bible of boatbuilding, Howard Chapelle, you need to have a stool to sit, stare, and think, right next to the boat. There are many times you have to simply step back and try to distance yourself from the task at hand, to give yourself a little rest and a bit of perspective. Luckily, for example, I didn’t run out at any given moment and buy a motor and controller- I would have bought 4 by now. There have been more than a few things that I should have given a little more thought to before diving in. It’s a learning process, and sometimes having a little set-down within sight of the project makes a world of difference.
Now, reading through that, I think a lot of the conclusions I came to have held up. To follow up, look at Part 2- some points I’ve learned about specific details. These little tidbits were what turned on the light bulb for me- the conclusions I made that led to understanding the actual details of the build. I’m going to offer them to you here- before I even go into the systems these observations are about. Don’t worry if you don’t really know what these are about… I’ll go into detail later… but maybe you’ve had the same questions, maybe it’s a review of the basic facts- or maybe it will just make you feel a little better to see you’re not the only one trying to get their head around these basic concepts.
Stuff I’ve learned, Part 2
Honestly, I didn’t really realize I was approaching this milestone until after I’d passed it, but getting a few good runs on the bike this week really means one major thing. I got it running. It ain’t too pretty right now, but it works, and in the words of the old windsurfing advice- sheet in and sail ugly!

12
I have, especially in the last few months, learned some important things.
Motors.
I think everyone kind of obsesses about what motor to get, and really, it’s not too difficult a decision. My vote was to go for tried and true, and simple. The Mars motor is pretty much the standard- a legend in EV circles, really, and ultimately the simplest to implement. I’m not at all sure it’s the ultimate, but in comparing all the specs it’s only percentage points away from the top end. The motor/controller package is really the most important part of the equation, and there is just a ton of information out there on running this motor with any number of controllers.
Maybe on my second or third build I’ll go with some hugely high-tech option, but this thing is a simple, permanent magnet, tried and true solution. It’s sincerely badass too.
Motor Primer 101.
Understanding the motor/battery combo is actually very simple. Here’s how it works. First, forget about everything you know about gas motors, and trying to apply that to electric. Deep breath. Ready?
1. Voltage = RPM. Simple as that. You give a motor more voltage, it spins faster.
2. Torque = power. And torque, in electric motors, basically comes from size.
You can’t forget all that other stuff, watts, amps, you know, but that’s the basic equation. Some discussion.
You can feed a little tiny motor a ton of volts, as long as it can take it, and it will spin really, really fast. It won’t, however, pull you at any kind of speed, because it doesn’t have the torque. If you feed a nice big motor a ton of volts, it will spin really, really fast and drive you really, really fast, too, because it has gobs of torque. If you have a really big motor but it can’t take a lot of voltage, it may pull a moose, but it won’t pull it very fast- volts = RPM.
Of course, this begs many questions, some interesting, some not so much, but here are a few.
Take a few motors of roughly the same size and output. You’ll get different RPMs per volt out of them. The differences amount to the efficiency of the motor- but that said, my feeling is that they aren’t so different as to say one is hugely better than another. Likewise torque- some are better than others, but overall the performance within a size/weight class are pretty much the same. Honestly, you have a few standard solutions- but if you take a good hard look at the specs and the tradeoffs, you could basically close your eyes and pick.
One more thing. Amps. Electric motors draw as much power as they need to turn- to apply torque- so if you have a big load they’re going to draw as many amps as you give them. What you “give” them depends on how much your batteries can provide (and for how long), the wiring that feeds the motor, your controller - basically the whole energy

13
“train”. The motor has a maximum it can draw, but again, the bigger the motor the more it will draw (to apply the torque it is capable of… starting to see how this all fits?). You have a little bitty motor like it will only draw a small amount of amperage, you got a big nasty old Mars, it may pull as much as 400amps.
How to blow motors up.
Overload them. Then they draw more amps than they can handle, if you feed them enough. Give them too many volts. Then they spin too fast, and the electrical parts, like the brushes and stuff, burn up. Motors run most efficiently at about 80-90% of their rated load. Motor ratings, by the way, are not particularly nebulous. They are derived from very specific build criteria, basically what you can do to the thing without it blowing up, and the engineers know what they’re doing. Although you can boost the voltage, for example, about 20% and the motor will run, it won’t run for long.
The Contactor.
I didn’t really understand what the contactor did, but it’s basically a big relay that allows the controller to shut everything down if things go horribly wrong. Yes, you can make the thing run without it, but you’re risking the health of the controller at the very least.
Batteries- weight = power. There’s more energy density in various battery technology, like lithium you get more power/weight than lead, but within a technology “group”, you want to go fast (or go long) you need weight. Maybe this will help. Batteries make electricity as a result of chemical reactions. More chemicals = more electricity.
Finally, a personal observation on projects like this. I find it most rewarding to take things a bite at a time. There are a few major steps in the process, like actually buying the motor, but dive in and plunk away. Building my BMX bike Sparky, for example, was incredibly rewarding and instructional. I was at kind of a standstill on the big bike, but I got this little minibike running, and blew up a few cheap controllers, batteries and brushes in the process- what’s more educational than blowing stuff up?

14

15
The Parts
The Batteries
Getting an overview of what makes up an electric bike is a good place to start, and it makes the most sense to start with the batteries. I’m going to go out on a limb and say the batteries you use on your bike will, more than any other factor, determine how the bike will perform. The batteries determine how far you ride, how much acceleration you have and the weight of the bike. They’re also likely the biggest single expense.
The ideal battery for a bike is compact, since we don’t have a lot of room. We want a battery with a lot of capacity, so we have good range, and we need something that can discharge (for acceleration) and recharge fast. We want as little weight as possible, since weight sucks horsepower and affects handling and range. We also need a battery that’s safe, and won’t spill. Also we have to keep in mind the cost. There’s a huge range, as well as the costs amortized over the life of the batteries.
Here are the ratings we need to look at- there’s more technical info in the Glossary (p87):
Ah, or amp-hours, shows the capacity of the battery. It’s based on a number of amps discharging over a period of time, and the more amp-hours, the longer the battery can power your ride.
C-rate. This is the charge/discharge rate, which tells you how much the battery can dump to your motor, and how fast. It’s based on the internal resistance of the battery, and is a function of the battery design and construction. The way the rating is determined is to load the battery at a specific rate, like 100% discharge over 5 minutes. If the battery stresses, by heating, for example, it’s not capable of that discharge rate. If it stays cool, it is then loaded at a higher rate, and on until you find the breaking point. Discharge testing is carried on over many cycles, to find how the discharge rate affects the lifespan of the battery. When you have a battery that can withstand a certain C-rate without causing substantial decay of it’s life, it earns that rating.
Naturally this is something that the manufacturers do to establish the performance of their products. It’s also something that is manipulated more than a little by the marketing guys. Add to that the fact that various battery types use different standards of loading, that is, not all C-rate loads and times are the same, and you have a pretty confusing “actual” rating.
There’s a lot of other stuff- weight and size. Cost. Construction. Voltage. …other things to make the system run, like if the battery type requires a
16
BMS. Of all the things I went around in circles on, the battery choice was, and remains, the hardest decision.
The real choices for batteries, especially for bikes, comes down to only a few options, and frankly, there aren’t any silver bullets here. Trust me, there’s nothing out there that hasn’t been thought of, or tried, and there are some really good reasons why the vast majority of builders have settled on what they use. Here’s the list.
Lead
There are a few choices in lead batteries that are safe and good, and the old flooded acid batteries, and even the sealed flooded batteries aren’t
among them. Basically, if you can hear acid sloshing around when you shake the battery, you want to put it back on the shelf, it’s just too risky to have liquid sulfuric acid potentially running all over your bike and your body. This narrows it down to the AGM type, which are sealed, (actually, “valve regulated” or VRLA)
and the acid is absorbed in a fiberglass matt. There are a few variations on the theme, but any of them need to be “deep cycle”- batteries that can withstand repeated cycles of nearly full discharge and recharge. If they are deep cycle, they’ll say it.
Mobility Batteries (more lead)
These are for wheelchairs and scooters, they’re typically kind of small, and they’re probably the cheapest option for a bike. They’re pretty hard to find locally, although a few distributors who allow walk-in customers do stock them, so you’re going to pay shipping.
These are certainly a good option for getting the bike up and running for short money, but don’t expect to get either distance from them or fast discharge. So, what we have here are small, deep cycle AGM batteries with fairly low Ah ratings (usually from 7.5 up to 35) that have fairly low C ratings.
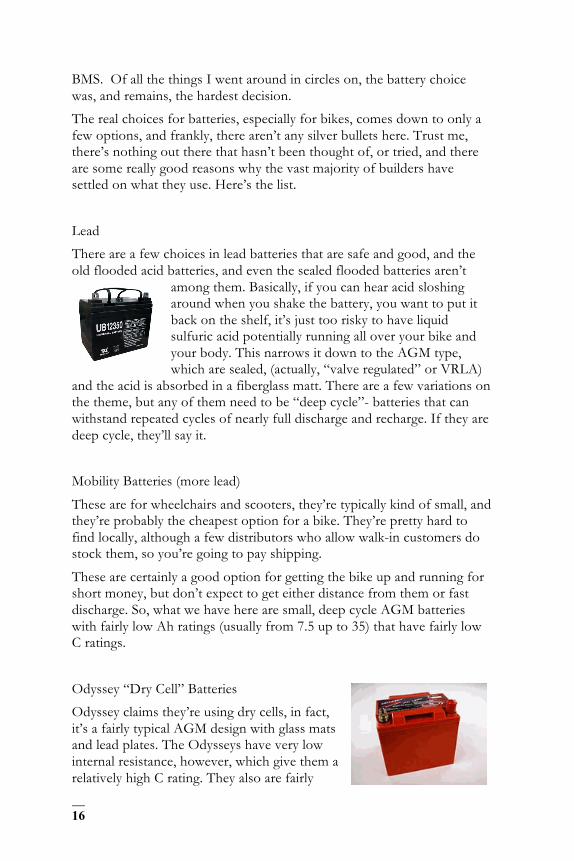
Odyssey “Dry Cell” Batteries
Odyssey claims they’re using dry cells, in fact, it’s a fairly typical AGM design with glass mats and lead plates. The Odysseys have very low internal resistance, however, which give them a relatively high C rating. They also are fairly

17
high-priced, certainly at the top end of the AGM price scale.
“Orbital” Batteries
I’m calling these orbital batteries for lack of a better term. Exide and Optima batteries are still AGM lead batteries, sealed, but they’re a different construction from the standard lead plate array. They’re put together with spiral wraps of lead, essentially, which gives you more surface area. As a result, they have a good C rating, and they’re on the higher end of the cost scale.
They are still going to be heavy- the basic physics of the lead/acid equation is pretty much a given there’s not much you can do about it, but the advantages they give you over a standard plate array make them a popular option.
Lithium Batteries
Lithium batteries have a much higher Ah rating for their weight and size than lead. There are several brands- A123, Headway, Valence, Sky Energy
(now CALB), Thundersky and GBS are the most popular variations on lithium technology, but they’re also more money than lead. Lithium cells are smaller, at around 3.2v each, so you have to gang them together to
get your voltage. When you have a gang of individual cells, you then have to make sure each cell is charged at the same amount and rate, and discharges likewise. Enter the BMS.
The Battery Management System, or BMS, is a device that monitors and regulates each individual cell. (You can use a BMS on lead, but usually not- lead batteries are more forgiving, and cheaper, generally.) Its basic function is to protect the cells from the stresses of overcharging or too-rapid discharge. If a cell drops too low it shuts the system down, if the cell is overcharging it shuts the charge off. It’s a simple concept, but when you multiply it out over a lot of individual cells it gets to be quite an electronic handful. At this stage in the game, the BMS is the hardest nut to crack in the system.
Let’s take a common example. Thundersky lithium batteries have been, for the last few years, a common choice. They sell for around $50 for one

18
40Ah 3.2V cell, without the BMS. Let’s say, for the sake of argument, a BMS is going to cost you $300, you’re at around $1500 for 72V, 40Ah, and 80 lbs. (And a C rating of around 3, I think- pretty respectable).
Let’s compare that to the Optimas. A pretty typical price is around $150 for the D51 packs rated at 38Ah. We get six of them to get to 72V, and we don’t need a BMS, so the total is $900, and the
weight is 156 lbs. …almost half the money, but twice the weight. Added weight will cut down your range- it’s simply more work to push.
See how this works? Like anything else, if you want to dance, you have to pay the piper.
The tricky part of this is in understanding how the weight difference will affect your performance, and what you want, and what you can live with. There, you’re pretty much taking a guess, unless you’re an experienced builder, because so much depends on the overall picture- the type of bike, the type of riding you do, what you want and need, all those factors, even your physical weight. Knowing exactly how the weight difference of lead is going to affect your overall riding satisfaction is something only you can decide, and usually after you’ve made the build. You can, of course, talk to people, look at builds, and now, even look at commercially available products to see what works and what people claim for numbers. Ultimately, though, you have to see for yourself.
Add to this the fact that battery technology is, thankfully, moving at a pretty fast clip, and you get to my personal strategy (OK, I stole this from a comment that Brian Wismann of Brammo made…) of making the bike “battery agnostic”, to allow you to adapt easily to new types and configurations of batteries in the future. You really can simply build a bike and, once the motor and controller are there, just plug the required voltage into the controller. The key is designing a way of holding the batteries that’s versatile- set it up for what you want to use now, and make it so you can change later. Even now, there’s a new version of lithium chemistry which has been tossed around in the RC helicopter and Battlebot circles, Lithium Polymer, or LiPo, which is interesting, about twice as energy-dense as other chemistries, and can be used without a BMS with relatively good results. They are, however, extremely volatile if misused… but they could be the chemistry of future battery systems.
One little note that it seems nobody really explains. The cell voltage of any particular chemistry is determined by the potential between the anode and cathode. Lead, for example, has a potential of 2V, thus, a cell is rated

19
at 2V and when you put six of them together, you get your 12V battery. Most lithium are in the 3V range, but it will vary by chemistry.
Here are some general descriptions of a few Lithium-Ion battery types. First, the general physical designs for what we’re using fall into three main types:
• Large cylindrical (solid body with large threaded terminals)
• Pouch (soft, flat body, such as those used in cell phones)
• Prismatic (semi-hard plastic case with large threaded terminals
Now, here’s the basic chemistry:
Lithium Iron Phosphate (LiFePO4), which uses LiFePO4 as a cathode material. Typically these are large prismatics starting at around a 40Ah rating. The nominal voltage on these is 3.2V. Brands like CALB, Thundersky and others use this chemistry.
GBS uses a slightly different chemistry- LiFeMnPO4. Adding a touch of Magnesium (for a 50/50 mix of Fe and Mg) you have a (claimed) 10% improvement on energy density, among other advantages. These are also large prismatics, and they’re generally sold as complete turnkey systems with BMS and chargers.
The Headway cells are also LiFePO4, but are a cylindrical construction. These are capable of a much higher discharge rate, due to the decreased resistance of the cylindrical construction (more surface area = less resistance).
Nanophosphate® lithium ion, as in the A123 cells, provides long cycle life, high discharge rates but are only now becoming available to the builder. These cells are LiFePO4, but have nanoscopic carbon… very cool technology. It’s no mistake these cells are used in race and drag-race bikes, first appearing in the legendary KillaCycle. They are stable, they last a long time and they have an astronomical discharge rate.
Lithium Iron Magnesium Phosphate (LiFeMgPO4) is another chemistry used in EV batteries, mostly by Valence. These claim higher cycle life, a big consideration when looking at an EV battery investment.
Lithium polymer batteries (Li-poly, LiPo) are a pouch cell, usually sold in packs, and very common in the RC and robotic scene. They’re very energy-dense, but are also very unforgiving. They respond to extremes of charge and discharge dramatically catastrophically… (aka, they explode). They also have a fairly short cycle life, reputed to be only around 300 cycles. They do have a fairly astounding discharge rate, a little better, it seems, than the A123.

20
For the final word, and everything you’d ever want to know about batteries, look at the Battery University site: www.batteryuniversity.com
Zachary Rubin and the Awesome (Lithium) Battery Roundup Diagram
Want a little help visualizing battery data? Enter, Stage Left, Zachary Rubin’s Awesome Roundup Diagram.
Zachary started with the premise that you want to compare five basic characteristics of batteries: Specific Energy, Energy Density, Cost, Nominal Discharge and Pulse Discharge. Putting all this together on one graphic gives you this:
(Awesome Battery Roundup courtesy of Zach Rubin, www.hardwarewasteland.net)
I’d encourage you to take a look at his site to read the complete details on his work, but this shows pretty clearly how the batteries stack up. For example: Thundersky, long a favorite, looks like it’s not as much a great deal compared to Headway, since the Headways cost about the same, have higher peak discharge and more energy density. Turnigy nano-tech lipo looks downright awesome. Like any comparison of specs, take a good look at all the details, like actual mounting space, and manufacturer claimed capacity, but this is a good start to understanding the different chemistries.

21
The Peukert Effect
“Peukert’s Law, presented by the German scientist W. Peukert in 1897, expresses the capacity of a lead-acid battery in terms of the rate at which it is discharged. As the rate increases, the battery’s available capacity decreases.” (And as the rate decreases, the capacity increases…) Wikipedia
Peukert’s Law comes into play in some pretty big ways. It’s better to have, oh, say, 60Ah, (at two 30Ah) of batteries in a pack, than just one 30Ah because you are drawing less from each individual battery. (Not counting the weight factor, we’re just looking at battery capacity here.)
It explains why doubling your battery pack will more than double the range. This is also why you have so much more range when you’re riding slow (say 30mph) and not accelerating hard as you have at higher speeds and doing hole-shots. The rate that you’re pulling amps out of the battery is higher, so the capacity decreases.
Simply put, the harder you hit the batteries, the less total capacity they can give you.
One note. Peukert’s Law applies to virtually all battery chemistries in varying degrees, but is arguably most useful in talking about lead-acid batteries. Lithium chemistries do, in fact, exhibit the same behavior, but to a significantly lesser degree. Plus, sure, there are always other factors – if you add more batteries, you have weight to haul, and aerodynamic force always is a big part of higher speeds… but you’ve got to figure in how much you’re taxing each battery and you’ll get better results if you’re staying on the good side of Mr. Peukert.
Battery Management Systems (…or, “What the HECK is a BMS anyway?”)
If you look into other non-lead battery chemistries you’re going to see the term BMS, or Battery Management System. The function of a BMS is very simply to protect the individual cells of a pack from damage. This damage can come from overcharging, or, when running the pack, discharging an individual cell too quickly, or too deeply. You’ll see the terms HVC (High Voltage

22
Cutoff) and LVC (Low Voltage Cutoff), and it’s simply there to shut the charging off, or shut the discharging off if one or more of the cells is getting overly stressed.
Here’s the issue. In any electric vehicle you’re building up battery packs from cells with low voltage- lets keep it simple and say you’re using six 12V batteries- and wiring them together in series to add up the voltage. Six 12V batteries in series will add up to 72V. Nice. Keep in the back of your mind- wiring the batteries in series adds the voltage but not the capacity. If you want to add up the capacity- say you’re working with 20aH batteries, then you have to wire them in parallel. Two 12V 20 aH batteries wired in parallel gives you 12V, with 40 aH.
I want high voltage so I have six 12V batteries in series giving me 72V. Let’s charge them up. I can do it two ways- with a 12V charger, doing each battery separately, and the charger will monitor the battery, top it up, and shut off at a prescribed, and constant, voltage. If I use the same charger on every battery, every battery will be exactly at the same state of charge.
The other approach is to charge the whole pack with one 72V charger. This is easier, but you may or may not hit the same state of charge for each battery. This is because every battery has a different set of characteristics- internal resistance, capacity, like that. When you hook up a bunch of batteries in parallel to a charger, the charger gets access to both ends of each battery. It can charge and monitor each battery directly. In series, it’s more like a bucket brigade- the charge goes through each battery and on to the next. Because each battery is different, (for example, each battery holds different amounts of “water”, they fill up faster or slower) each battery will find it’s own level, and not necessarily the level of the pack.
This doesn’t only apply to charging, it works for discharging too. If you start with a bunch of cells at identical states of charge, they discharge at different rates and they charge at different rates, sooner or later you’re going to have a pack with wildly varying voltage between batteries. If the individual batteries get too far off, either overcharged or over-discharged, it can damage the battery. For six lead batteries, it’s not so much of a big deal. You can check and charge them individually pretty easily, and if you accidentally cook a battery, they’re cheap enough to replace. Not so with lithium and other battery types. These things are both delicate and expensive. Dangerous, too. Discharging or charging at too high a rate can be damaging, or even catastrophic. Enter the BMS.
The Battery Management System is set up to monitor the state of charge and discharge of each cell. It will see if one cell is low, and ask for more

23
charge. When a cell reaches a certain point, it will shunt the charge to the rest of the system. It does the reverse on the discharge leg of the cycle, if the cell drops too low it will shut it off.
On a “miniBMS” you get small modules on every cell. The diagram on the previous page is a conventional BMS with individual leads going to each cell, then connecting to the charger/controller circuits.
There are two basic reasons that you see a BMS on a lithium pack. First, the packs are expensive. You don’t want to break them, and overcharging or overdrawing them will do exactly that. Second, lithium doesn’t drop in voltage the way lead does. Lead shows a gradual drop in voltage as the SOC drops (State of Charge), so you can use that as a pretty good indication of how your batteries are doing. Lithium will drop slightly, then fall off a cliff. Once the cells have dropped to that point, you’ve done some significant damage. This is a very important point, and one that we’ll revisit when we talk about your instruments, on page 47.
This is all fine, but the one issue is that there’s a lot of development going on in the BMS segment, and that’s because, well, they blow up a lot. They’re expensive, too. Within a year or two, the BMS concept may well be the biggest area of development and change you’ll see in the EV market.
One approach, by the way, is to avoid the BMS issue altogether- as per Ed “Juiced” Fargo’s “Non-BMS BMS” solution. Ed drag-races electric motorcycles, and has melted more than his share of BMSs. He’s stuffing enormous amounts of current through the system, and the normal BMS is just not designed for it. His answer? Forget about the discharge rate, and just make sure you’re starting with a constant state of charge- by using individual chargers. He’ll have several Headway cells wired together in parallel- a total voltage of 3.2V, but a capacity of maybe 40aH, and have one charger wired to that sub-pack. Then all the sub-packs are wired in series to get his voltage up to 72V. All told, he has 24 individual, inexpensive chargers feeding his 24 parallel clusters.
Probably the single biggest reason, besides the cost, I decided to go with cheap AGM batteries rather than spring for the Headways I really want was the BMS issue. I feel like this is something that just isn’t quite there yet. There’s constant discussion on the forums about trouble with BMS, and besides that, I wasn’t ready to add the cost and complexity of that kind of system. I first started on this project a year ago, as of this writing, the landscape has changed dramatically, even now. We’re seeing some experimental new battery systems and BMSs that are getting a lot more reliable.

24
Several manufacturers incorporate the BMS into the battery, (Valence, notably, the company that first supplied Brammo) thus giving you a system that has some warranty protection for both the batteries and the BMS- as it is now, if you pull one battery and another BMS and one, or both, fail- both the battery manufacturer and the BMS guys can point at each other and say it was the other product’s fault. (They don’t call it the bleeding edge of technology for nothin’!) All that said, in recent years it seems BMS technology has produced some products that are now reliable and well-supported – but it’s a moving target for sure.
Unfortunately, you’re not going to get specific information or wiring for a BMS that can be used for any general application. The best choices are to look at systems that are incorporated or sold with the batteries themselves, either through the battery manufacturer directly, or through your battery source. Manzanita Micro and Mavizen are two examples of vendors or distributors who will design and package complete systems. Besides knowing they’ll be designed well, that also gives you a fallback if you have problems. If they designed the system, they sold it to you, and you followed their instructions setting it up, then they will stand behind it.
If you decide to go it on your own and design or configure a BMS yourself, your best bet for information will probably be forums like www.elmoto.net or www.endless-sphere.com. In some cases, you have folks there who’ve even designed their own BMS, or their own alternatives.
Let me make this point clear, though. If you think you (or your lithium batteries) can live without a BMS, or some system that provides the protection that a BMS does, you’re about to make a very costly mistake.
Controllers, Contactors and Converters (oh my!)
The Controller
The controller is the brain of the system. Essentially the controller is for determining the motor speed. As a byproduct, you get all sorts of other features, but that’s the root purpose of the device. Rather than simply acting as a rheostat, changing the

25
voltage, and thus the RPM of the motor, it does this by giving the motor pulses of full voltage- the longer the pulses last, the faster the motor will spin. This is called Pulse Width Modulation, or PWM. You feed the controller with a small throttle control, usually a simple potentiometer or Hall-effect control working in the 0-5000 ohm range, and the controller takes that information and converts it into pulses or varying duration along the entire RPM range.
Controllers work by feeding pulses to the motor- full voltage, on/off, really fast. This is “Pulse Width Modulation”. Now, if you want to see that, you have to set up an oscilloscope, and thanks to the work of Noah Podolefsky, we can see both the oscilloscope and the controller monitor in these screen shots.
Let’s look at the numbers on the Alltrax readout, especially the throttle setting. Now, watch the oscilloscope lines- the lower line is zero voltage, the upper line is 100% voltage, and the length of the lines shows the width of the pulses. With no throttle, you get a solid line a 0 voltage, right? The more the throttle feeds the controller, the longer the line at 100% gets, until it’s solid… You can’t really see the “curve”, or, by that I mean the vertical lines connecting the 0 value to the 100%- don’t let that throw you.
First, starting out at dead stop, the line you see is the “0″ voltage, indicating no pulse.

26
This is at 12% throttle, and you start to see the little “100%” pulse line.
This is at 67% throttle, the “100%” line gets longer, indicating the pulse’s duration at 100% voltage is increasing.
Since it’s a signal-response type of control, that is, you give it a signal from your throttle, and it gives you a digital on/off response, you get the benefit of dialing in the curve of the response. You can be very specific about how fast, and how much the throttle input will affect the resulting RPM of the motor, from the very start- 0 RPM, to the top of the range-

27
usually around 3500 RPM. This is one of the unique things about electric drive. On a gas motor, you control this, or try to, with various injection, valve and ignition timing settings. With an electric motor you just
program the curve into the controller.
Here, for example, is what the programming on my Alltrax controller looks like- a very simple WinXP application you hook up to the controller with a serial cable.
Choosing the right controller is a little tricky. Naturally, since the controller and the motor have to play nice with each other, you need to pick a controller that is designed for
the type of motor you’re using. Any of the controller product listings will separate their products into types for each type of motor, as well as the current ratings and voltage of the various applications of every motor they support. I’ve seen several builders have less than satisfying performance, and it often is because of a poor matchup between the controller and the motor. One problem with a few controller manufacturers is that they tend to over-rate their specifications, making it pretty difficult to know exactly what you’re designing. Ultimately, you need to get a good fit. Too big a controller, and you’re going to spend more money and carry more weight than you need. Too small, and it won’t supply enough to the motor. (By the way, controllers are rated as what they can deliver- not, as I thought, what they can handle before failing. A 400amp controller will be able to deliver 400 amps.)
My advice, as you probably can predict, is to go with a proven combination. I decided on the standard Motenergy ME0709 motor, so my next step was to find out what people were using, and what seemed to work best. The controller I chose was the Alltrax AXE 7245. All the programming and support information is right on the Alltrax website, and their tech support has been really fast to respond to questions- another reason to pick a reputable and common model. The key here is to decide on the motor, then pick a controller that works well with that motor. I should note- if you’re running an AC motor or a sepex, (“separately excited”- a specific motor type) very often the controller company will program the controller for you- specifically for the motor type and model you request.
28
The gravy- that is, the stuff you get that’s extra- with controllers are features like enhanced programming, data logging and regenerative braking, or “regen”. If you’re running a motor type and model that can do regen well, you can get a controller that will allow you to program your regen performance. If you need data logging- that is, the ability to record and download the performance and control that your controller has fed the motor over a period of time- you can do that too, with certain models of controllers.
Sensorless Controllers
In the process of doing my hub motor repair, someone mentioned something that I’d never heard of- a sensorless controller. That is, a controller that doesn’t rely on Hall sensors to determine where the rotor is, and when to feed what to where to make the motor spin.
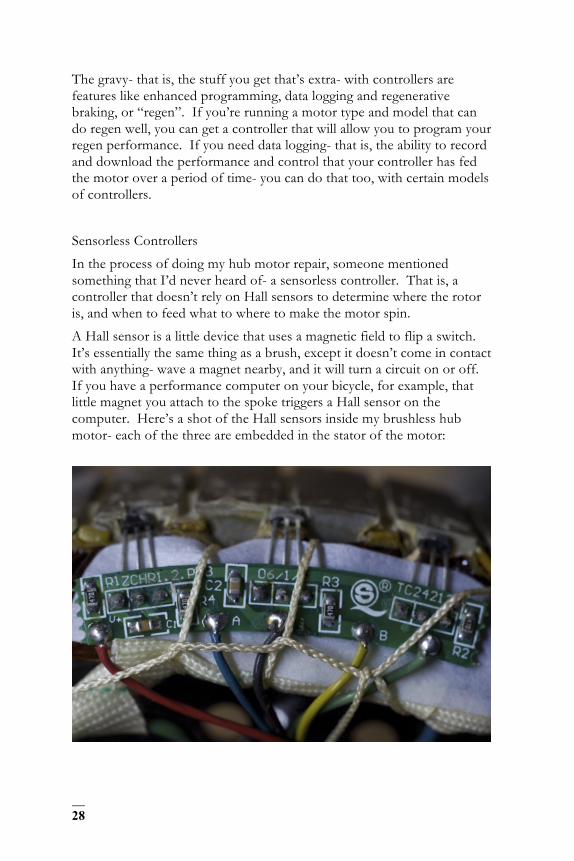
A Hall sensor is a little device that uses a magnetic field to flip a switch. It’s essentially the same thing as a brush, except it doesn’t come in contact with anything- wave a magnet nearby, and it will turn a circuit on or off. If you have a performance computer on your bicycle, for example, that little magnet you attach to the spoke triggers a Hall sensor on the computer. Here’s a shot of the Hall sensors inside my brushless hub motor- each of the three are embedded in the stator of the motor:
29
With a sensorless controller, the controller can tell where the rotor is directly from the drive wires. To quote Bruce in the ElMoto thread: “They either look at the third leg while driving the other two if it is a two phase at a time type or they can measure the back EMF on all three to infer the position of the rotor. This type of controller could care less if you originally had sensors, the more complicated circuit internal to the controller makes the sensor unnecessary.” (EMF = electromotive force, or, the effect of the electromagnetic field).
The one drawback of the sensorless controllers seems to be that they don’t develop any torque when they’re stopped. They’re great for e-bikes, where you can get them rolling with pedals first, then the motor takes over, but for doing hole-shots on a motorcycle, they’re not going to do too well. In some cases, they can overload the motor quite dramatically if they don’t get spinning fast enough. With this in mind, the sensorless controllers are perfect for no-load starts- the RC plane and helicopter guys, from whence they come- and maybe the e-bike and push-scooter crowd.
The Contactor
The contactor is your safety valve- not only your controller’s, but your entire system’s. You can wire in a main power cutoff switch, but that switch is going to be handling the entire pack current. the contactor allows you to shut itself off from the main battery pack if something catastrophic is happening, using a switch that though it may be handling the pack voltage, is not handling the pack current.
It’s a big relay that’s wired to the full pack voltage (or lower voltage, depending on the model), turning it on or off. The contactor has a threshold voltage usually, a voltage it needs to hold the contacts in position, so if the pack voltage drops, the contactors will pull apart. It’s usually set up on it’s own switch- a “kill” switch that either has to be able to handle the high voltage of the pack or, with the Tyco LEM200, for example (which uses 12V for the coils), the key switch that is on the bike - and then wired to the controller. If the controller needs to shut off the incoming high pack power, it can with a simple flip of a switch.
You may be tempted to run the system without a contactor. It’s a very unsafe, bad idea.
The Converter
OK, so you’re running your pack voltage, what, 72V maybe? How are you going to power your horn and lights? This is where a lot of people

30
use what’s called a DC to DC converter. (I used to use just use a separate 12V battery, because I had some extras and the room to mount them, but now switched over to a tiny Vicor DC/DC), but the DC/DC converter just takes your pack voltage and steps it down to 12V. It simplifies the charging (you only have one pack, and one voltage to charge), takes up almost no space, and weighs a few ounces.
The one golden rule with DC-DC converters is, make sure you’re getting a converter that’s an “isolated” converter. That is, it isolates your 12V positive and negative, and there’s no chance that you’re going to pull your whole pack voltage through your 12V components. The cheap ones aren’t generally isolated.
Random Thoughts and Observations
Random Thoughts: Regenerative Braking (from Brammo)
One of the big, eternal questions is that of regen- regenerative braking. Energy from your braking can, in theory, be fed back into the battery packs rather than being dissipated by heat, as it normally is. This is done with some motors better than others- sepex being probably the best for the application, and it’s handled by the controller.
Surprisingly, there’s precious little actual data about what you can really expect to get back from regen braking. It is used in many hybrid cars, and you’d think you could get some real numbers from that market- even so, the argument is that a motorcycle has considerably less inertia- thus less benefit from regen braking. From what I could gather, a workable number may be in the 10-15% neighborhood- that is, you get back about 10-15% of your range if you use regen. Naturally, it totally depends on your riding style. So, round numbers, if you have a range of 30 miles, you’re going to get 3 or so more miles from regen.
I had the chance to ask a pro why he opted out of regen. Here’s what Brian Wismann, Brammo Director of Product Development, had to say.
1. There’s not enough energy to be regenerated off the rear wheel of a lightweight motorcycle. Most braking force is applied to the front wheel of a motorcycle (some 70%) – and applying braking force to the rear wheel is a tricky deal without knowing traction conditions. All of this at the maximum benefit of much less than 10% increase in range.

31
2. Regen turns your motor into a generator – which means it’s working when it might otherwise be resting. This adds heat to the motor and can reduce the service life of the motor by increasing the duty cycle.
3. Control – Regen is a variable parameter and probably requires an additional hand control to be done properly. Vectrix did this by twisting the throttle forward, which was elegant but also presented problems. New riders were slowing only with regen and failed to learn how to apply the true mechanical brakes properly when they needed to stop fast.
3a. Control Part 2 (my comment) – Regen systems work off the rear wheel. The front wheel is where you want most of your braking, both for stopping power and for control.
4. Range – in most cases, you’ll experience greater range by “free wheeling” and coasting with no regen than you would if regen kicked in when you let off the throttle.
My conclusions were that in my “keep it simple” strategy, regen simply didn’t yield enough to make it worthwhile. It was one more thing to set up, and one more system that could break. If we were talking a much larger yield- maybe 30-50% increases, I’d consider it, but for just a few miles, I opted out.
Random Thoughts: Motors- Axial vs. Radial air gap motors
One little thing sparked my curiosity- the difference between an axial air gap motor (the Agni and Lynch design) and a radial air gap motor like the Motenergy.
In the process of trying to learn the difference, I stumbled on this blog: myownhybrid.wordpress.com,
the tortured tale of a guy, Vasco Névoa, building a car from the ground up. I’m using his amazing drawings to show the difference between an axial and radial air gap. Interestingly, what threw me, was the “air gap” part. What they’re describing as axial or radial is the space between the rotors.
Axial means, essentially, on the same axis. Radial means perpendicular to the axis… take a look above. This is an axial motor …well, an axial air

32
gap motor. Note that the space between the two rotors is, well, axial- if it was a rotor, it would be rotating on the same plane, from the same center, as the other rotors.
Now, here’s a radial air gap motor.
See the gap? It’s now perpendicular to the rotors- simple as that.
The big deal with the Agni motors, if you go and try to order one, is the issue of ordering a reinforced motor or not. I had no idea what this meant. As you can see from the drawing, in an axial design the force on the rotor wants to pull it in, together, and so there’s all sorts of funky torque acting on it. The solution is to bridge it, as much as possible, to keep it from twisting. The radial is, by design, a more balanced structure. The force to pull the rotors together is pulling directly outward from the center.
Random Thoughts: Motors- A Short Primer on the History of the Etek Motor, and Other Tales
It doesn’t take more than a few hours of looking into building your own electric vehicle before you see the name Etek. The original Etek motor seems almost legendary, and the fact that the Briggs and Stratton name is associated with it makes it all the more interesting. After a while, though, a few things become apparent… the original Etek is pretty much not available, it seems to have been replaced by two newer models, the Etek R and RT, and as you delve a little deeper the confusion mounts.
Cedric Lynch designed the original Lynch motor, started LMC, which appears to still be around, went on to found Agni Motors, and there are rumors about technology from Lynch’s design being licensed to Briggs and Stratton for the new Etek R and RT. Depending where you look, you can find Lynch “LEM” motors listed, Agni motors, original Etek motors, new Etek replacements, even listings on Ebay in the Briggs and Stratton Outlet store for Etek motors. Then, there’s Motenergy.
Through a conversation with Steve Lorenz at Sevcon, I got in touch with John Fiorenza at Motenergy Electric LLC. John was a great help in answering some of my more pointed questions- in particular, solutions to the old “permanent magnet DC motors running regen and blowing up” issue- (John’s answer- “Sevcon MilliPak 4Q control was developed for PM motors. It will not blow up.” ) but in the meantime, we got into a

33
conversation about the history of the Etek motor and the current situation. Yeah, I can’t stop myself from making that pun. But here’s the deal.
The original Etek motors were developed by Briggs and Stratton for OEM use, and actually, they were not allowing sales of the motors to any 2 or 3 wheeled vehicles capable of over 20mph for some reason known only, probably, to the lawyers. The early motors were purchased by EV guys resourcefully, through the Service channels. This is how legends are born.
The so-called Etek R and RT are actually Motenergy motors, designed by Motenergy (John, actually) without Briggs and Stratton or Cedric Lynch, either. There’s no licensing from Agni going on. Originally there was licensing from Lynch to Briggs and Stratton for the original Etek design- obviously a major source of the confusion.
The Agni, as well as the original Etek, by the way, is an axial air gap motor- see the previous post. The Motenergy is a radial air gap- a much more traditional basic design. The names, Etek R and Etek RT are names coined by some of the resellers- actually discouraged by Motenergy and probably an infringement of the Briggs and Stratton trademark.
The bottom line is that the Motenergy ME0708 and ME0709 motors are what you want, and what you’re going to be sold, if you’re looking for a new motor of “Etek” design. You want the best deal on them? Buy them from John, at Motenergy . If you want a kit or a package, and the support that comes with that, and are willing to pay a bit extra (usually only $25-50 more) then go with the resellers. (I’m a big supporter of dealers, and the service they provide- but you should know what you’re buying.)
As a little aside- you have, no doubt, heard about the Perm PMG 132 motors? Well, there’s a dirty little tale there, too- that company started as Cupex and was working to help act as supplier for Lynch. Instead, the company got their hand into the cookie jar- they started producing their own motor, the 132- an axial air gap design- and have been accused of infringing Lynch’s patent. The story goes that they don’t deny the design, they argue that the patent is invalid. As far as I’ve heard, it was never resolved in court, and they continue to produce the motor. (Update from Travis: the patent ran out in April of this year…)
From John:
“As to Motenergy, we are a niche motor designer and distributor for low voltage, high efficiency motors and controls. We design the motors in the USA, and have them made in China to reduce the product and tooling costs. We have been in business since 1997. Our core focus is to develop specialty motors for OEM applications, but we also sell

34
motors to a few dealers in the EV markets. Our warehouse is located in Mequon, Wisconsin, and most of our orders are drop-shipped directly to the customer.”
Oh, and those motors on Ebay sold as Briggs and Stratton or other names? Those are motors with some fairly sketchy history, and with some questionable specs listed, to boot.
Random Thoughts: Motors- Hub Motors
My recent obsession with hub motors started in a funny way as a result of seeing, and starting a conversation with ZEV scooters about their Trail model scooter-something. (It looks like a Honda Ruckus, kind of, but is a completely different frame.) My first interest in them, however, started a while ago with Sparky- my first electric conversion- my son’s BMX bicycle. He still hasn’t really forgiven me.
1. First thing I’ve learned: Ask your son before you chop up his bicycle.
I picked up a cheapo, not working, Chinese scooter for short money on CraigsList, and ripped it apart. It actually was a great project that taught me a whole lot about motors and EVs in general, mostly, what voltage does. I took the basic 36V scooter motor, I think rated at 500W, and added batteries. I got the thing up to 84V, and over 30mph.
2. More volts makes the motor spin faster.
3. Too many volts makes the motor burn up.
I’d been messing with trying to fit this little BMX frame with a motor and batteries and really, there’s just no way to do it and make it pretty. Then it dawned on me. Take the hub motor from the scooter and put it into the BMX. Problem solved.
4. Hub motors are easy to install, for the most part, and take up very little space in the build.

35
The only hitch was the wheel diameter. On a scooter, or BMX frame, those little tiny wheels- 8-13″ or so- are what you get, game over. On the one hand, gearing becomes a moot point, because you have none. The diameter of the tire acts as your final gear reduction- and that’s a fixed size. The performance of the bike will ultimately be a function of how much load the motor can take, how much torque it can muster, and what it will spin at- the RPM/volt rating. So you have a few factors at play that make the predictions pretty much impossible- weight, load, aerodynamics, and the inherent gearing. In a lot of ways a conventional motor has most of these unknowns as well, but you can, by tweaking the final gearing of the chain or belt drive, fine tune stuff after.
For instance- My project bike- a Honda VF500F with a Motenergy ME0709 running at 72V- accelerates really well, but just stops pulling at about 65mph. The calculations suggest that it’s because it’s simply reaching the top RPM limit of the Motenergy ’09 motor I have. This leads me to think that it could handle more load, and if I geared it a bit higher I could go faster- not as quickly, but the top end could, maybe, pull around 80mph. Like that. With a hub motor, I don’t have that option.
Enter the EnerTrac. EnerTrac suggests the use of a 110/90 X 18 tire- that is, an 18″ wheel. Keep in mind, what we’re talking about is the outer diameter of the tire- about 23″-25″ actual, depending. However, you can mount the motor in a range of a 16″ to 18″ wheel- give them your wheel, or spec the size, and they’ll string it up for you. Want to mess with different builds and ratios? Change the diameters.
The EnerTrac hub motor- photo courtesy Hammarhead Industries, hammarhead.com.

36
In the real world, that’s where working with the EnerTrac guys can save you a lot of time and money. Work with them, try to figure out what you want to do, and they can help you plan out the build. (Before I get slammed for only mentioning EnerTrac’s willingness to advise you, ZEV does the same thing, but really all they can help you with is the other specs of the motor- voltage, controllers, like that because they can’t change the tire or wheel diameter. You have only one choice- a 130/60-13.)
5. But still… with a hub motor, the thing you have to understand is you have very little control over the ultimate gearing of the bike- and controlling the performance is about controlling the other factors of the build.
In making the decision between the only three products that I can find available right now, the EnerTrac, the ZEV and the Kelly, I’m back to my basic decision process that I used making the choice of my Motenergy motor. It’s my first build. There are a whole lot of people that have done it before me. I’m not lucky enough to think I’m going to out-think and out-engineer a bunch of guys who actually know what they’re doing. So, my basic advise for anyone thinking about using a hub wheel?
6. Don’t try to re-invent the wheel. Go with a tried-and-true.
The Hammarhead Volta - photo courtesy Hammarhead Industries, hammarhead.com.
Take a look at what’s out there and work with what you see actually works. The EV Album site is great for this, although you’ll need a few days to go through the enormous pile of stuff there, but you want to see

37
what works? Look at what’s been done. For me, building a motorcycle, that means EnerTrac. I want to run a standard wheel-frame-geometry configuration. Although I suspect that the ZEV 130/60-13 scooter wheel with a big-wide patch and a slightly larger wheel in the front on a road-racing frame may work, I’m certainly not going to bet a few thousand dollars and hundreds of hours on it. I’m going to look at the Volta or any of the (many) amateur builds and start there. If you’re looking at something that looks more like a scooter, it only makes sense to start with a scooter motor- the ZEV. Same for the Kelly- there are more than a couple builds on blogs and groups using those motors.
At this stage in the game, I’d go out on a limb and say that these motors are three different animals. It’s not like you can say you’d like to build a bike and then look at 12 different types and models to choose from. Someday, maybe you will, but at this point you choose your motor based on what you want to build- motorcycle, scooter or, uh, something else. By the way- having more to choose from, and that being some bigger, more powerful options, or different diameter drive diameter is, literally, right around the corner.
7. My Final Conclusion on hub motors? Well. I can’t decide. I originally wanted to do my next build with a hub motor.
I’d like to make it modular, as I’ve discussed here, to the extent that’s possible, as I’ve discussed here, and I’m looking for a mid ’70s vintage 250-350 frame- ideally a Yamaha TZ350, or a TZ aftermarket, but I’m looking at Rickman frames too. All that aside, the hub motor might be the core of the build.
Why? It’s more efficient. (No power loss through bearings and drive train.) It gives you crap tons of space in the frame for batteries. (More range.) It’s simple.
So why can’t I decide? Unsprung weight. Unsprung weight is the part of the wheel and suspension that meets the road, and has to be handled by the shocks and springs. Almost every effort in improving the handling of any vehicle is to reduce the unsprung weight so there is less mass to try to manage. A hub motor adds the entire mass of the motor to your suspension. Does it matter? It’s hard to say. My basic belief is that it does, and my idea to test that theory was to strap about thirty pounds onto my swingarm to see the effects.
Just thinking about it made me nervous, so I took that as a pretty good indication. I may do the test yet, but for the moment I’ve tabled the hub motor idea.

38
Random Thoughts: Motor Cooling
When you increase the temperature of a conductor, you increase the resistance. When you increase the resistance of the windings in a motor, the motor becomes less efficient. Here’s where I’m going. If a motor is loaded and starts heating up, the windings heat up and the motor becomes less efficient. Your range drops, your speed drops- essentially, the load gets higher on the motor for a maintaining a given speed. So the motor heats up more. And things get progressively worse. It would seem that cooling a motor isn’t just about keeping from burning itself up- it’s about keeping it running as efficiently (due to minimizing resistance buildup due to heat) as possible. More speed, more range.
The big question seems to me to be, how much effect does this have, real world? I’d guess a great deal- considering the cooling fan on the Enertia and the water cooled motors we’re seeing. I’ve got to think that the overhead of the cooling system pays for itself in maintaining higher efficiency. The thing about it that gets interesting is the motor size issue. If you’re running a motor at, oh, say, 85% load, it’s going to run hotter than a motor that can do the same work at, oh, say 50% of it’s load. Am I right? If so, it changes the way I was thinking about motor size in general… in terms of real world range.
My conclusions? First, run a bigger motor at a lower load. It stays cooler, it’s not working as hard. It runs more efficiently- maybe not on the bench, but in real-world. Second, look into active cooling.
Interestingly, back a couple of years ago when I first started asking about this, I got no answers. Then I noticed Brammo was running a cooling fan on the Enertia. Efficiency really didn’t come into the discussion, it seemed it was more about keeping things from blowing up. Hearing Azhar Hussain talk about the swell of innovation and development that has been happening with the TTXGP bikes, it seems there’s one common thread where motors are concerned- liquid cooling is trumping air cooling.
Now that I had all these conclusions, my buddy Rob cleared some stuff up for me, with some math. If only I could figure out what it means.
“… losses due to resistance are equal to the motor current squared x resistance. Copper resistance increases about 40 percent per 100 degC (and hence do the losses!) A typical armature resistance is about 0.04 ohms at 20 degC So losses from 20 degC to 120 degC at .. 10A go from 10A x 10A x 0.04R = 4 watts to 5.6 watts 100A go from 100 x 100 x 0.04 = 400 watts to 560 watts 200A go from 200 x 200 x 0.04 = 1600 watts to 2240 watts”

39
(Random Speculation) Motor Cooling Questions: ANSWERED
When Brammo announced the Empulse with a liquid cooled motor I started to suspect I was onto something with all this cooling hoo-haa I’ve
been obsessed with. It was Brammo, with their little cooling fan, that got me thinking it was a good idea in the first place. Add to that what I learned about motor heating and building resistance and decreasing efficiency. The reaction I got from people who actually understand this was, well, YEAH… heat is bad. duh!
That’s all good, but I want proof.
It was pretty much unimaginable to me that this wasn’t a known quantity, and one of the guys on ElMoto.net rattled off an equation that sort of explained it- the numbers are pretty simple. An engineer really doesn’t need to run a test Iike I would, they can run the numbers. Then, I saw the Parker Electromechanical Automation blog. More specifically, the Parker MPP motor used for the Brammo. To wit: The MPP powering the bike features Parker’s patent-pending internal cooling – a technology that increases the continuous torque output that virtually eliminates the peak region of the motor.
MOST importantly, I got me a graph. (speed/torque graph from Parker Hannifin)
And HERE, my friends, is the key to the Secrets of the Motor Cooling Universe:
http://tinyurl.com/3lwv4dz
“Calculating Winding Temperature“, with numbers and graphs. There, buried in the data and calculations, is the secret of the awesomeness of
the cooling system designed into these motors. In a normal motor the heat goes from the winding to the case, then to “ambient”- the outside environment. Even if you wrap coils around the case, you’re going through the entire assembly. These motors cool from the windings directly, eliminating the case. That makes it cool faster. If it cools faster, it doesn’t build up so much thermal momentum. Also, your ambient temperature is having a direct, not intermediate, effect on the windings. They’re staying cooler- more even- at the outset.

40
The MPP series motors on the Parker Hannifin site are listed as liquid cooled rotary servo motors… could this be the Holy Grail? An off-the shelf servo motor for the next generation of awesome awesomeness?
And here is my wild guess on the motor in the Brammo Empulse. The Parker Haniifin MPP SERIES MPP2708N- 1600 RPM, 20.3 kW, 26.6 HP. Or not. “Parker will customize any MPP/MPJ motor to meet your specifi c system requirements. Parker does customs like no one else. We are specialists at customs, offering unrivaled custom motor solutions and support.” (Brammo: “Gimme a 20kW motor that runs at 6000 RM. About a thousand of them, how’s that?”) Of course, at the time of this writing, (early 2012) Brammo still has not actually put the Empulse into production with any motor at all…
At this point I don’t know of any liquid cooled motors available to us small builders, but who knows? Maybe we’ll see some trickle-down from the manufacturers, or even kits or components available from companies who’ve developed this stuff.
Random Thoughts: Transmissions?
Crimping connections vs. soldering, the benefits of regenerative braking, and the use of transmissions seem to be the Holy Trinity of stuff-that-gets-discussed/argued/wars-fought-over until Hell Freezes Over on just about any group you care to look at. After all is said and done I’ve come to some pretty basic conclusions.
A transmission is basically for distributing a narrow powerband. The more the powerband broadens, the less a transmission is necessary. When the powerband is in the realm of an electric motor, a transmission becomes almost academic- that is, there may be an advantage, but it’s very small at best. Some motors will benefit more, because of the nature of their powerband, and some, not at all- and it’s really not a point of discussion, it’s demonstrable by mathematical models testing, as we’ve seen (see the thread for those numbers).
Add to that the mechanical problems of designing, building and installing a transmission, and the slight benefits get even slighter. What we saw here is that in actual use, it was heavy and inefficient. In theory, at best, it adds weight, takes up space, and saps energy.
There seems to be a lingering belief that you can make the best out of a weak system with a transmission. My vote is to apply the fix directly to the problem. For example- My bike is light- 250lbs- and is running a healthy controller and motor- Motenergy ME0709/Alltrax AXE 7245. I need more power from my batteries to go faster, quicker. My top speed is

41
also slow, at 65mph. I can gear it up, to get 85mph out of it, but again, because my discharge is limited to 2C, the motor will not get enough to pull well in the lower end… it may not get enough to even pull at the high end.
In my specific case, the simple way to get my bike to perform better is to upgrade the batteries. Not put in a transmission.
The best example of how a transmission benefits you is a bicycle. The source of power- you- on a bicycle, has a very narrow RPM range at peak
power (known as your “cadence” to bike racers). Thus, the gears. They keep you running at your optimum cadence. The flatter your power curve, the less you need the transmission, and the more your parasitic power loss cuts into the benefits of it.
Here’s your powerband, on a bike, at the rear wheel with a single-speed.
With a three-speed transmission, you’re able to spread that narrow power peak over a much broader RPM range,
So the flatter the power curve (it’s about HP, not torque) the more critically you have to look
at the tradeoffs of running a transmission. It’s not about getting more power out of the system, it’s about getting the power you want out of where you want it. As the differences in result get smaller, the mathematical models, first, and real world testing, second, will become more important. (It’s easy to tell the difference between a 250 and a 600 with the seat of your pants, but not so much the difference between, say, a bored and ported 600 than a stock bike, without running it and timing it- or using a dyno, right?)
The bottom line comes straight out of Physics class. Anything in the system that doesn’t contribute more energy, by either supplying it, like batteries, or making the system more efficient, is going to reduce the output of the system. That will, ultimately, be demonstrated by reducing the range, or, all else equal, reducing the top speed.

42
Now. If a transmission lets a drive system work more efficiently, then it will save energy and increase range, regardless of the comparative acceleration (that is, compare two systems accelerating equally). …and heat is how the system loses energy. If the motor or batteries are heating up, the system is losing energy. If the tranny keeps them cool, under the same load, then it’s paying the rent. Whether it’s paying for its entire overhead is the question, I guess.
That is, is the energy saved (from loss as heat from overloading) equal or greater than the energy it takes to carry it. This all may sound like I’ve come to a conclusion on transmissions. I have not. One theme I see repeated over and over is the gearing question, and the post always starts with, “My bike pulls really well at low speeds, but my top speed is not as high as I expected. When I gear it up for a higher top speed, it’s overheating when I’m accelerating.” This is where a simple two-speed transmission would possibly solve the problem.
If one was available.

43
The Plan
Understanding the System, Balance and Bottlenecks
There are a couple of things to understand about your system design that may be a little hard to get your head around, especially if you’ve worked on high-performance gasoline motors.
A lot of people going into planning a system think in terms of the electric motor delivering the sum total of the power. That’s a little off the mark. The electric drivetrain, from the batteries to the motor, is your powerplant. If you take that whole system together, then you get a good idea of the power system – not just the motor.
Think of the electric motor – just the electric motor - like the piston in a gasoline engine. You can have a huge piston, (or a large displacement motor), but if you can’t feed the piston and the combustion chamber air and fuel, (through the intake and fuel system) and then exhaust that combustion efficiently, then you’re not going to get a big explosion - you’re not going to get power out of it. It’s the same thing with electric motors. If you have a huge motor, but can’t feed it current (through the batteries and the controller) it’s not going to be producing power.
Let’s look at some common scenarios with unbalanced systems.
Here’s an example of a nicely balanced system. The batteries provide your current. Your controller modulates that current, and the motor converts the modulated current to torque.
Here’s an example of a type of unbalanced system that I’ve had personal experience with. If your batteries can’t deliver the current, you’re going to overload them, as with my scooter SLA batteries that I had on my very first build.
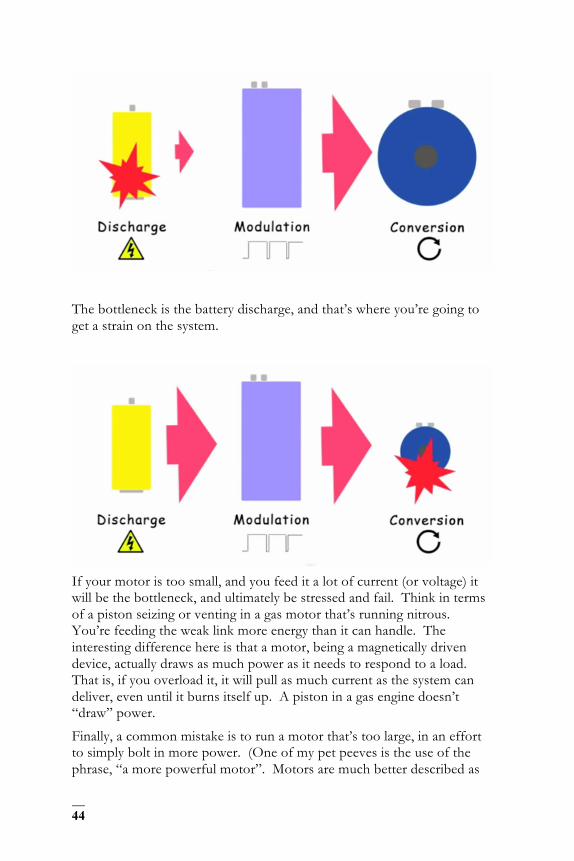
44
The bottleneck is the battery discharge, and that’s where you’re going to get a strain on the system.
If your motor is too small, and you feed it a lot of current (or voltage) it will be the bottleneck, and ultimately be stressed and fail. Think in terms of a piston seizing or venting in a gas motor that’s running nitrous. You’re feeding the weak link more energy than it can handle. The interesting difference here is that a motor, being a magnetically driven device, actually draws as much power as it needs to respond to a load. That is, if you overload it, it will pull as much current as the system can deliver, even until it burns itself up. A piston in a gas engine doesn’t “draw” power.
Finally, a common mistake is to run a motor that’s too large, in an effort to simply bolt in more power. (One of my pet peeves is the use of the phrase, “a more powerful motor”. Motors are much better described as

45
“more efficient”, to describe how they utilize power, or having more capacity, to describe their ability to handle more load. “More powerful” is just a little misleading, especially if you come from a gas-building background.)
Here’s what happens. The motor is running at a fraction of its capacity. Since most motors run at peak efficiency near their top load (or capacity), they’re getting wasted, and are being wasteful as well.
Not only that, big motors are heavy, and add needless weight if they’re not well matched.
Putting together a good plan is about finding balance between the battery discharge rate, the motor capacity, what the controller can handle, and then tuning those relationships. You can start with a good example of a build to get a feel for what works well, but ultimately you’re probably going to have to do some fine-tuning (AKA “trial-and-error” to really get yourself a well-balanced drivetrain. Of course, that’s the fun part, isn’t it?
Picking the Parts and Pieces- (decisions, decisions…)
First, let’s take a look at some examples of some various builds. I’m going to put them into some relatively general categories, sorted mostly by weight : The e-bikes, scooters, trail bikes, crotch rockets, superbikes and lead sleds.
You saw my little e-bike, the BMX project, and it’s typical of the species. They’re usually pedal assist, running a hub motor of between 250W and 1000W. They’re running small battery packs and inexpensive controllers.
Scooters seem to be a natural platform for a conversion, since you have a big area in the floor for battery storage. They’re usually hub motors. That said, you don’t see all too many scooter conversions.

46
The trail bikes are usually built on pretty current off-road frame chassis, around the 125 – 250cc range and weight. They often will have removable batteries, since you’re generally riding close to a base, where you can keep a fresh pack in your truck.
(photo courtesy Noah Podolefsky)
The crotch rockets fall into the 250cc-600cc sport bike donor bike range, and I’d include my vintage bike in there too. The Ninja 250 is a really popular bike to convert, as are the Honda Interceptor models. Few people build these to be fast and light with limited range, as I do, but they aim for a range of around 40 miles with decent performance. They’re often fairly heavy, actually, at 350 – 500 lbs. Within this you have some interesting sub-species- the vintage, like mine, the streetfighter, like several builds lately, and a lot of stylistic statements in between. In this weight class I’d also throw in the lightweight cruisers, a rare breed.
The superbikes are what you’re going to see racing at TTXGP. They are running dual motors often, now AC watercooled is the trend (with very high RPM and often a gear reduction box) lots of batteries (I think 7.5kW and around 550 lbs right now is the TTXGP maximum allowed, the MotoElectra shown below has over 10kW.) they’re heavy but they go really, really fast. They can hold their own against many gas bikes.
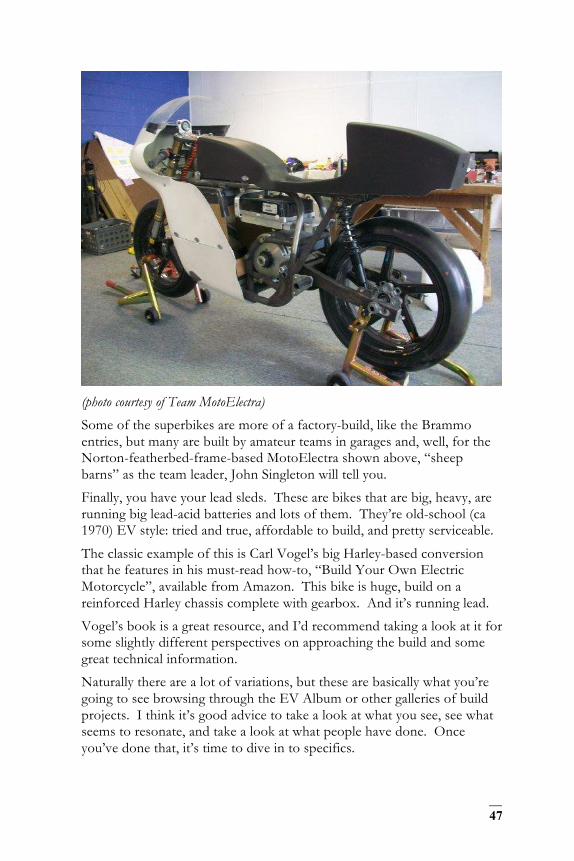
47
(photo courtesy of Team MotoElectra)
Some of the superbikes are more of a factory-build, like the Brammo entries, but many are built by amateur teams in garages and, well, for the Norton-featherbed-frame-based MotoElectra shown above, “sheep barns” as the team leader, John Singleton will tell you.
Finally, you have your lead sleds. These are bikes that are big, heavy, are running big lead-acid batteries and lots of them. They’re old-school (ca 1970) EV style: tried and true, affordable to build, and pretty serviceable.
The classic example of this is Carl Vogel’s big Harley-based conversion that he features in his must-read how-to, “Build Your Own Electric Motorcycle”, available from Amazon. This bike is huge, build on a reinforced Harley chassis complete with gearbox. And it’s running lead.
Vogel’s book is a great resource, and I’d recommend taking a look at it for some slightly different perspectives on approaching the build and some great technical information.
Naturally there are a lot of variations, but these are basically what you’re going to see browsing through the EV Album or other galleries of build projects. I think it’s good advice to take a look at what you see, see what seems to resonate, and take a look at what people have done. Once you’ve done that, it’s time to dive in to specifics.

48
The devil’s in the details, as the saying goes… all the theory is fine, but when it gets down to putting the rig together, how do you chose which bits and pieces are going to do the best for you? Let’s look at one example of the planning and thought process that goes into planning a build – just as an example, mind you, but it will give you an idea of how things have to fit together.
I’d like to build a fairly small, light bike that goes fast. I don’t really care much about the range, I’m going to use it for blasting around on quiet Sunday mornings, terrorizing the curves on the local “loop”.
The first decision I’ll make is the motor. Let’s, for the sake of discussion, say we want something light and fast, like the Agni 95R- a pretty standard motor in any of the faster bikes out there. If you go to the
performance specifications, you’ll see it’s rated at 220 amp continuous. Based on that, and what other bikes and builders are running, it seems like a good idea to run a system capable of handling 400 amps or so (for the overkill factor). This will determine the rating of the controller, the fusing and the cabling. In a similar system, I run 4 AWG welding cable and a 300 amp fuse. My controller is rated at 400 amps. This is also based on running a specific voltage- in most cases, for a bike, you’re looking at 72V or 96V- at least for a PMDC motor. From the claims on their site the Agni can handle up to 96V, so let’s figure on that.
Let’s consider the controller. On the FAQ page, Agni talks about the various applications and suggestions for controllers- that’s a great place to start. Another resource is the EV Album page- just about everyone who’s built anything is here- and you can see what they’ve used. You can even
do a search via Google specifying your motor limited to the EV Album site, and see every listing. Another little trail of breadcrumbs you can follow is to look at suppliers’ pages. For example, look the Electric Motorsport page, where they list a kit that includes the motor, controller, even the throttle and other stuff.
Let’s say I want to look at something that I haven’t found out there… I can go to the Alltrax AXE page, for example, and go through
the specs- I don’t find anything that’s over 72V. A quick look at the Kelly site gives you what they have too- nothing that is 96V, and 400 amp capacity. (News Flash: as of this printing, they now do have a 96V 400-600A product, but let the example continue.) At this point, I even start reconsidering
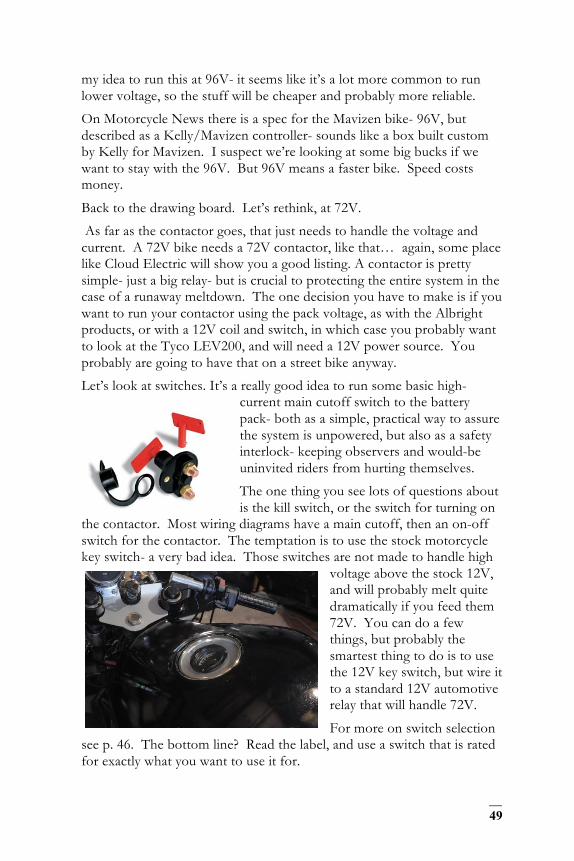
49
my idea to run this at 96V- it seems like it’s a lot more common to run lower voltage, so the stuff will be cheaper and probably more reliable.
On Motorcycle News there is a spec for the Mavizen bike- 96V, but described as a Kelly/Mavizen controller- sounds like a box built custom by Kelly for Mavizen. I suspect we’re looking at some big bucks if we want to stay with the 96V. But 96V means a faster bike. Speed costs money.
Back to the drawing board. Let’s rethink, at 72V.
As far as the contactor goes, that just needs to handle the voltage and current. A 72V bike needs a 72V contactor, like that… again, some place like Cloud Electric will show you a good listing. A contactor is pretty simple- just a big relay- but is crucial to protecting the entire system in the case of a runaway meltdown. The one decision you have to make is if you want to run your contactor using the pack voltage, as with the Albright products, or with a 12V coil and switch, in which case you probably want to look at the Tyco LEV200, and will need a 12V power source. You probably are going to have that on a street bike anyway.
Let’s look at switches. It’s a really good idea to run some basic high-current main cutoff switch to the battery pack- both as a simple, practical way to assure the system is unpowered, but also as a safety interlock- keeping observers and would-be uninvited riders from hurting themselves.
The one thing you see lots of questions about is the kill switch, or the switch for turning on
the contactor. Most wiring diagrams have a main cutoff, then an on-off switch for the contactor. The temptation is to use the stock motorcycle key switch- a very bad idea. Those switches are not made to handle high
voltage above the stock 12V, and will probably melt quite dramatically if you feed them 72V. You can do a few things, but probably the smartest thing to do is to use the 12V key switch, but wire it to a standard 12V automotive relay that will handle 72V.
For more on switch selection see p. 46. The bottom line? Read the label, and use a switch that is rated for exactly what you want to use it for.

50
The startup procedure goes like this- flip the main cutoff switch on. Turn on my 12V lights and horn switch. Then hit my handlebar kill switch, and via the relay the contactor snaps closed. That feeds my battery pack to the controller, so the controller can feed my motor. I’m ready to roll.
One other basic thing- a volt meter. The voltage of the battery packs, and especially the voltage drop as you load the motor, is the best way to see the state of charge of the pack. You honk on the pack, the volts drop
dangerously low, then you know you’re running on empty. I use a vintage panel-gauge style volt meter that runs up to 150V- the 72V pack runs it with the needle pointing to noon- it works fine, and has a kind of Steampunky look to it. I have a standard digital LED panel
meter, but it changes numbers so fast it’s a little hard to track.
I also added a little LED that winks on when the pack voltage drops below about 40V, as a warning, that my friend David O’Brien designed for me. I like kind of a minimalist traditional motorcycle approach, but if you want to go all tech, it seems like the Cycle Analyst is the favorite panel of most builders. The Cycle Analyst will show you volts, watts, amps, amp-hours, watt hours, speed, distance, time, regen, peak currents, voltage sag, total battery cycles and amp-hours. And more. If you’re running lead it may be way too much information, but, if you’re running a touchy battery chemistry like LiPo, it would be a very different story. This information would be absolutely necessary.
With lithium batteries your voltage doesn’t work so well to tell you the state of charge (SOC). Lithium batteries don’t drop so gradually, they stay at around 3.4 to 2.8V, and then plummet. Once they plummet you’re in trouble, so with a lithium system you want a full meter array that shows you your Ah usage, calculating what you’ve got left by looking at what your capacity is and what you’ve used. The Cycle Analyst does this nicely, and there are add-ons for some BMSs and standalone meters as well.
Not to overstate this, but it all depends on your goals. Start with an idea of what you want to accomplish, look at similar builds, go through the combinations that others seem to have found, then make it your own.
With the goals of the build and the other systems fleshed out, let’s take a look at probably the most important part, in terms of overall performance, speed, range and practicality – some examples of the batteries.
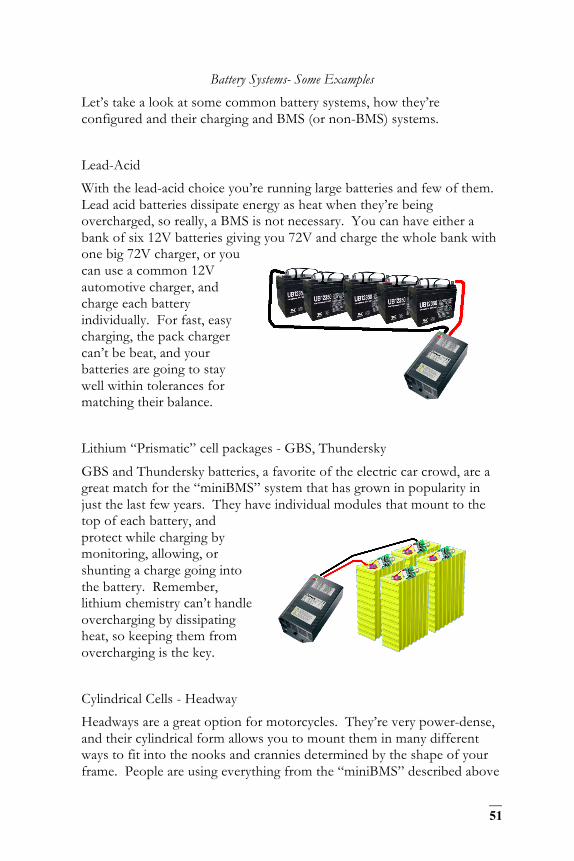
51
Battery Systems- Some Examples
Let’s take a look at some common battery systems, how they’re configured and their charging and BMS (or non-BMS) systems.
Lead-Acid
With the lead-acid choice you’re running large batteries and few of them. Lead acid batteries dissipate energy as heat when they’re being overcharged, so really, a BMS is not necessary. You can have either a bank of six 12V batteries giving you 72V and charge the whole bank with one big 72V charger, or you can use a common 12V automotive charger, and charge each battery individually. For fast, easy charging, the pack charger can’t be beat, and your batteries are going to stay well within tolerances for matching their balance.
Lithium “Prismatic” cell packages - GBS, Thundersky
GBS and Thundersky batteries, a favorite of the electric car crowd, are a great match for the “miniBMS” system that has grown in popularity in just the last few years. They have individual modules that mount to the top of each battery, and protect while charging by monitoring, allowing, or shunting a charge going into the battery. Remember, lithium chemistry can’t handle overcharging by dissipating heat, so keeping them from overcharging is the key.
Cylindrical Cells - Headway
Headways are a great option for motorcycles. They’re very power-dense, and their cylindrical form allows you to mount them in many different ways to fit into the nooks and crannies determined by the shape of your frame. People are using everything from the “miniBMS” described above

52
to a full-on BMS system like the Manzanita Micro BMS, with a central control, complete monitoring and additional plug-in features.
Another solution possible with Headways is the use of individual chargers for each bank of paralleled cells. This is a really simple, effective solution, and ensures your cells are going to be evenly charged, and protected against overcharging.
Lipo
Lithium-Polymer chemistry is notoriously volatile- explosively so, actually. If you puncture the foil pouch of a cell, overcharge it or over-discharge it you risk not only fire, but explosion. Go to YouTube and search “lipo explosion” if you want to see how that goes.
You can certainly use a full-on BMS with lipo, but because they are primarily for the radio-control crowd you can also take advantage of several “RC” balancing chargers on the market. Each pack has a main positive and negative lead, but also small balance leads coming from each individual cell in the pack. The chargers hook up to the main + and -, but also monitor each cell, and can balance them and shunt power if they’re out of sync.
The Motor Lineup- the Tried and True
If you’re an engineering student, Research Physicist, or like tampering with the Elemental Forces of the Universe, you’re not going to agree with me, but if you’re looking to get a bike rolling in a reasonable amount of time with a reasonable investment, and with a good chance of success, I figure you want to see what everyone else is using, see how well it works and go with that.
I know. Playing it safe is so boring. Well, until you get on the (working) bike in months, rather than years, and go for a ride…

53
The easy way to do this is to simply look at what a supplier is putting up for sale. Thunderstruck Motors, Cloud Electric and Electric Motorsports probably have the most common and complete lineup of good stuff… all great companies to deal with, from what I’ve heard too. They also all sell complete packages- the motors and controllers to match- a very helpful thing, especially when you consider warranty issues. If you buy the package from one place, you get someone who’s going to stand behind what they recommend.
Here’s the basic breakdown. First, the PMDC lineup.
Permanent Magnet DC
Permanent Magnet DC motors fall into two basic classes- brushed and brushless. The brushed models, like the Motenergy motors, are probably the most basic motor design you can go with, reasonably priced, and well proven in the light motorcycle/robot market. You’re looking at around $500 for a 72V brushed model. The controllers are in the $600 range. Brushless motors are basically very similar, but rely on the controller more since the controller performs the same function as the brushes. You don’t, however, have to worry about maintenance- there are no brushes to wear out.
The Agni and Perm are called a “pancake” design- an axial design that gives you high efficiency, more RPMs per volt, more RPMs period (the Agni spins up at 6500RPM) and a really handy shape for an electric motorcycle. (When did they start calling the shape the “form factor”? Around the same time that curtains became “window treatments”?) With the increased efficiency you get a higher price- around $1000 to $1400 for the Perm, and around $1400 for the Agni. Many of the race bikes run the Agni- some run two.
(Shown above- Motenergy ME0709, Agni 95R, and Perm 132)
Series-wound DC
Probably the second most common motor type is the series-wound DC design. These things are the workhorses of the EV industry- very common on car and truck conversions. They’re big, heavy, but strong as

54
an ox- and well tested in the field. They have, as far as I understand it, huge amounts of low-end torque, but a limited high-RPM… great for
lifting loads and getting you rolling. They also can take higher voltage- the D&D motors shown on Cloud Electric can handle up to 144V- way higher than a PMDC. You’ll see them used in the bigger bikes, as well as the drag racers and experimental bikes- they’re a lot more common as simple industrial motors.
I’m showing a Netgain WarP 9″ “ImPulse” here. These are usually found in cars, they sell for around $1500 and the biggest issue with them is that they’re long- sometimes a little tough to fit into a frame and line up with the drive sprocket. You’ll also see guys pulling motors out of various salvage applications- forklifts being a popular one- and modifying them for bikes and cars. This can be a tricky row to hoe- you can assume you’re going to have to do some modification to the motor, like the output shaft- and it may be a job getting the controller to work well for a bike. It’s not a solution I’d use, but I can see how it’d be a fun challenge if I had the time and resources.
AC Induction
AC motors may be where we see the most development in the coming years- it seems to be where everyone is going, especially in the racing community. AC motors have higher RPM capability although less torque
and you can control the performance more, due to the nature of the physics of the motors and the controllers. You’re going to see this in the better regenerative braking performance- “regen” of the motor- something we really haven’t talked about, and, honestly, something I don’t feel, after everything is said and done, is worth the extra overhead. For more on that
see p. 25, but if you’re looking for regen, you probably want to look at an AC induction motor.
The standard package seems to be the AC-15 ($3200 with controller and kit) or the AC-20 ($3800 with controller and kit). The AC-20 pulls 72-108V, 550A, ~50HP and 110FT-LBS . They call it the “RACE MOTOR”. In capital letters. It’s a little more pricey than what we’ve looked at, but I think you can pull more out of it if you know what you’re doing, or want to learn.

55
As I’ve said, AC motors seem to be where people are heading- in particular, liquid cooled AC motors. Several of the newest models of motors we’re seeing are offering a liquid cooling option, with various levels of benefits. See more about that in my motor cooling stories.
Sepex (Separately Excited) DC
Finally, you’ve got your Sepex motors. Sepex means “separately excited”, or that, well, I’m just going to rip a quote right from the Electric Motorsport page:
“Sepex motors are almost identical to traditional Series motors except for the way their field is wired and controlled. Unlike the Series motor whose armature and field windings are wired together in series, the SepEx motors field and armature windings are excited separately by special SepEx controllers
that have wire leads to both the armature and the field. Separate control of the armature and field creates distinct advantages over a standard series wound motor, notably adjustable regenerative braking, higher rpm, longer power band, higher efficiency, and easy reversing.“ As far as I understand it, they’re also the top end of the efficiency range of any motor. You do, again, have a problematic “form factor” to wrestle with- maybe not a great solution for a small bike, but certainly workable for a bigger one.
With the Sevcon PowerPak controller, the D&D runs at 425 A, 84V, 25 hp, gives you 4500RPM and sells complete for around $1500. Honestly, it seems like a great price for a very versatile package- something you could set up to run easily, and then spend countless happy hours tweaking away to your heart’s content…
All in all, the motor decision is, in my opinion at least, not ultimately about performance. The performance comparisons between any of these options is going to be offset by the other various factors of the build- the weight, the fit, and I come right back to motor basics. That is, the motor you choose has to be able to handle the load you want to give it, that is the bottom line. The ultimate performance of the thing has more to do with the batteries- how much current and voltage you can feed it for how long, and how fast- and other things like the weight of the bike. You figure that out, then pick a motor that can handle it. You chose a motor to fit your build, you don’t build a bike around a motor. You build a bike around the entire system. That’s where you look at what’s been done, what works, how it performs and how much you can afford.

56
The Other Parts
Figuring the Gear Ratio
So, we’ve picked our motor based on the RPM it can muster with our given pack voltage. How do we figure out what the gear ratio needs to be? It’s a pretty simple bit of figuring, as figuring goes. Figure out what the circumference of the tire is, and that’s your distance per round. Convert that from inches or feet, to miles. Now, figure what the RPM of the wheel has to be to get your target MPH. Then figure the reduction from the RPM of the motor to get to the RPM of the wheel.
The formula I came up with looks like this:
(motor RPM) x (tire diameter) x 0.003 = reduction factor (target MPH) Plug in the motor RPM when loaded, the tire diameter and the MPH you’re looking to get. That gives your reduction factor. Take your front sprocket tooth count, multiply it by that factor, you’ll get the number of teeth you need on the rear.
Give up? Go here: www.compgoparts.com/TechnicalResources/SprocketCalculator.asp CompGoCarts.com has a great interactive calculator. For the record, I did the math and my motor, with my wheel and tire, came out to almost exactly what I had on there from the stock configuration- a 13 tooth front and a 45 tooth rear. It calculated out to a 65mph top speed at the RPM maximum of my motor- 3000, with load. The actual top speed of my bike? About 63mph- not bad. It always is a pleasant surprise when math actually works.
Switches Made Simple
Trying to match up a switch? If you’re trying to figure out what switch rating to use for which purpose, you really don’t have to look past one simple thing. The manufacturer rating.
For some reason I thought there was some way you could take a switch rating and calculate it out to see if it could handle different currents and voltages. I had a cutoff switch that is rated 12V DC and 300 amps. Is that going to be OK for 72V DC and 300 amps? There’s no telling… no real way to be sure. Thanks to a thread at www. electro-tech-online.com, I think I finally get it. Nigel: “No, you just need to consult the manufacturers ratings. Essentially there are two problems, one is the current handling capacity of the

57
switch – too much current through the contacts will make them overheat, leading to failure of the switch. Secondly is the breaking capacity of the switch, as the contacts open current will arc across the gap, burning the contacts – too much current and the arc won’t stop – this is why switches generally have a much higher AC rating than DC.” (note: AC goes through 0V for every cycle, right? That tends to “quench” the arc. …and something to keep in mind here- we’re talking mostly about the “breaking” capacity, that is, the ability of the contacts to break the current. That’s when you start the arc, and that’s also when you run the danger of not being able to stop the arc- thus, not being able to stop the flow. Very scary.
I’m back to the drawing board. I’m going to wire my contactor on/off circuit to a relay that can handle 72V at at least 10 amps. For some really interesting information on what a relay does, how it works, and how to wire it up, check this page describing the Bosch automotive relay: ww.bcae1.com/relays.htm If a switch seems like it has a huge current rating, but a low voltage rating, can you use it? Not recommended. The current rating has little to do with the arc-handling ability of the switch, and if it could safely handle higher voltage, you can be sure the manufacturer would say so. So there you have it. Bottom line? Read the label, and don’t cheat.
The Charger Choice
I think, by the time I’m done, I should put together a collection of all the wonderful puns that the whole electric vehicle thing uh, “sparks”. I’ve already nixed about 4 charger-related ones in the last 2 minutes… but I digress.
The charger is a pretty basic component in the system, a fairly simple tradeoff to get your head around, and one of the less exciting decisions you’ll be making. In fact,
one article I read said that many builders leave this to the last, and get a build put together without any good way to charge it. (Guilty as, uh, “charged”.)
If you want the final word on battery charging, look no further than Battery University’s section on charging, battery types and principles. Go here, about halfway down the page: www.batteryuniversity.com/partone.htm

58
The basic realities of battery charging go like this.
1. Match the voltage and battery type to the charger. The voltage part is pretty obvious, but the battery type is crucial Every battery chemistry wants to be charged with a different profile- metering out the charge you’re feeding to the state of charge of the battery, over the charging time period. Some chargers are programmable, and in come cases you can use one charger for different batteries- but you really need to confirm the charger will match up with the batteries you’re intending to use. You could kill your battery investment in short order if it doesn’t.
2. Speed of charge is everything. Small, light, inexpensive chargers are low current- that takes longer to charge your pack. If you want fast charging, you’re going to pay more money, and the thing is going to be bigger and heavier. Fast charging also strains the batteries more, too. Simple enough… fast charging = more money, weight, size and stress.
Variations: If you’re running a pack with a lot of little lithium cells and a BMS, you can run a big charger for the pack voltage- say, 72V. If you want to experiment, don’t want a BMS for your charging, or are running a pack with, say, six 12V batteries, you can try using individual chargers on each cell. In that case, you’d use one of these, for example- this is a 3.2V charger for lithium cells, and you’d wire this to each paralleled cluster of cells in your pack. Or, you can use the lead battery version, and you’d have six of them- also a common scenario. Since each charger is set up to top each cell group up to the standard target voltage, you get a really even state of charge across the pack.
In the case of lead packs, this is a pretty common solution. The chargers are pretty small and cheap, they take some time to charge, but since lead packs rarely run a BMS it’s a good way to even out the charges. In the case of lower voltage cells like lithium (usually 3.2V)
where you generally are running a BMS to protect the batteries on discharge as well as charge, it’s not as common.
Another interesting variation is the solar charging option. SunForce has a huge array of what is now pretty affordable solar battery charging products. Solar panels are a very basic cost/capacity tradeoff as well, so if you’re willing to spend some money and get some big
panels you can get enough current to charge the bike in pretty short order. If you want to keep the size and cost down, that’s fine, and you’re going to get a longer charge cycle. Just one thing- you’re not likely to get

59
enough charge out of anything that you can carry onboard the bike. We’ve tossed around all sorts of ideas about incorporating panels into bike covers or foldout deals, but the bottom line is they’re just not big enough to be practical.
These products can come with their own converters and charge controllers, so it’s a project of it’s own- but running the bike 100% off the grid? Priceless- as the saying goes.
The On-Board Mounting Decision
This is an interesting question… do you want to mount the charger on the bike? Here’s how this plays out. If you have a small charger, it will fit on the bike easily. It will, however, take a long time to charge. If you have a bigger charger, it will take up more room, weigh more, but charge faster. If you have a huge charger, it won’t fit on the bike. If you want to have a charger onboard so you can make your daily commute, for example, and charge up at work, then it’s not as tough a decision- you can settle for a nice small charger. If, however, you want a charger for backup, one that, if you get stranded and need to recharge fast, you can plug in for a half-hour and make it home, then, you’re in a kind of a pickle. You’ve got to figure if the added size and weight of the charger offsets the range of batteries it displaces.
For my rig, I started out running no on-board charger so the bike would be as light as possible. I figured with a short range anyway I am charging at home mostly all the time- I go out, hammer on the bike for a few miles, then charge it up in the garage. I figured I could carry the chargers (I run one for the 72V pack, and one for the 12V batteries- a disadvantage of using a separate battery pack for the 12V system) in a courier bag if I needed them.
Within a month of riding, I had them mounted on the bike. It’s just more convenient.
Some mounting notes, though… chargers are not at all waterproof. Your controller may be, your motor may be, and your wiring will be if you do it right, but the charger can’t get wet. It also needs cooling, so anyplace you mount it to keep it protected and dry may make it overheat. Those little brick-type chargers, though, are a lot more weather-resistant. Also, keep in mind, the chargers really weren’t built for a high-vibration environment. If you’re doing lots of miles on rough terrain, then you may want to consider keeping your charger off the bike.
Here’s an interesting story that illustrates the charging conundrum. I wanted to build a bike that could go 200 miles in one day. The frontal

60
assault on that is to run a ton of batteries. More batteries is more range, but takes a really long time to charge with a small charger. So, if I have a pack that that can hold out for 200 miles, I have very little room on the bike, and my little charger will take 12 hours to recharge it.
A pretty creative option is to run a smaller pack, and instead of the batteries run a charger that can recharge my pack in a short time. For the sake of discussion, let’s say I run a pack that goes 50 miles, and a big charger that recharges it in 1 hour. I ride 50 miles, stop for breakfast, recharge. I ride, stop for an hour, ride, stop for an hour, like that. In an 8-hour day, I get 4 hours of riding 50 miles- there’s my 200 miles, and I get 4 one-hour rest stops.
There’s one thing you have to consider, as well- that’s how you’re going to connect the charger. You want to disconnect the charger when you’re not charging the pack, and when you’re running a BMS you have to connect through that. The simplest solution is what they use on forklifts- you have a big Anderson-type connector coming from the pack. When you’re
charging, you plug that into the charger. When you’re running, you unplug it from the charger and plug it into your controller circuit. It’s a little, well, manual, but it’s safe and simple.
Want to see what the big boys use? Here’s the charger from the Brammo race team’s first year.
Buying a Rolling Chassis
One of the common questions you see is about what to start with for a donor chassis on a conversion project. Having bought a couple, I’ve had a bit of experience with good, and not so good choices.
You can find bikes on Ebay or Craigslist by searching “frame” or “rolling chassis”. I usually look under the motorcycle category, but I’ve found bikes in the free section. There are a couple of things you have to watch out for when you consider a donor.
First, clear ownership. Most of the laws of most of the states have something in place to deal with stolen bikes being parted out. The one traceable part is the frame, since that has the serial number and VIN. Even for off-road bikes, in some states, you need a clean title or bill of

61
sale to get an off-road permit regardless of what the seller will tell you. My personal opinion is that it’s well worth the extra dollars to get a bike with a legal title that I know will be register-able in my state, than to try to save a buck and risk never having a legal bike.
Second- mechanical condition. The bike you see below seemed good, but in fact, it needed all new brakes, hydraulics, bearings and even suspension to make it run… forget about safe. I’m starting my project out with a complete rebuild of a bike- really, making it into two projects. If you get a bike that is in pretty good shape, with basically operational systems, you’re saving yourself a crap-ton of work.
Also, and in particular with a trail bike, keep in mind the bike has likely seen a few crashes or laydowns. Check for frame dents, twisted forks, scrapes on bar-ends, dents in tanks. See that the forks move smoothly. Check contact points for telltales of crashes- control levers, mirrors (or lack of), turn signals and footpegs are all things that get scraped, ground or broken off in a laydown. Not to say a bike that has been crashed won’t be OK, but it definitely needs close scrutiny.
Third, is the bike style itself. This may seem obvious, but get a bike that is close to the bike you want to end up with. I wanted a street bike, cafe-racer streetfighter type of bike. This trail bike, free or not, was a waste of time- it wasn’t the bike I wanted to end up with, by the time I made it into the street bike I was envisioning it would be 5 years from now, and a total hack job. Keep in mind how much space the batteries you want to run

62
take up- as well as the motor. On a small frame, you’re going to be limited in how much weight and volume you can carry. A hub motor gives you some more room in the frame, too- the motor is in the wheel itself. A big frame with lots of room is going to be heavy… especially when you load it with batteries. All stuff to keep in mind when you’re fleshing out the kind of build you want to do… but decide on the build and buy the frame to match, rather than letting the frame dictate the build.
One point on frame materials- an aluminum frame is going to take a bit more to have welded properly. The fabrication part of aluminum is a lot less challenging than steel since it’s softer and easier to cut, but you’re going to have to pay more to get it welded, or pay more for a welding rig (as well as put a lot more practice in when trying to learn) than steel. The weight difference is probably not enough to justify one way or another- it’s more about the overall frame design than the materials. (i.e.: give me a good vintage ’70s tube steel frame any day of the week… )
One thing you may overlook in all this- the shop manual for the original chassis. Don’t neglect the mechanics of the rolling chassis, and to do it right you really want the original shop manual. I’ve used it to figure out how the 1984 vintage anti-dive brakes were supposed to work, to adjust the rear suspension, even to help rewire the 12V system. Whether you’re an experienced mechanic or not, get yourself the shop manual.
Finally, don’t forget about reselling parts- but don’t count on it either. Here’s the problem. If you find a cheap bike, chances are it has a blown motor or something. Blown motors are hard to sell, you have to rip them down to parts. That takes time. If you have a good motor, you’re going to pay more but you’re also can get more for the motor. At first I figured I’d resell the bits I didn’t need- ultimately it wasn’t worth the time.
You may luck out, but ultimately you get what you pay for. With a conversion like this, you’ll find that the parts you get- the motor, controller, batteries and chargers- are pretty interchangeable. If you want to grab what you can for a chassis and slap parts in to make it go- that’s one approach. But if you have a clear idea in mind, I’d suggest holding out for the frame that you really want and biting the bullet. You’ll have a good condition, pretty, safe and legal build after all your hard work.

63
Interlude: The Secrets of the Universe- KWh
How do you calculate your KWh?
Ah x Volts equals Wh
Wh/1000 = KWh
(This Secret of the Universe was brought to you by Terry Hershner, of GasFreeEarth.com. Thanks Terry!)
…for more definitions and conversions, see the Glossary, p.87
Interlude Part 2: Motor prOn- Bigass Hub Motors
Well, really, the biggest-ass hub motor I could find, from Proteon Electric.
Enjoy.

64
The Motor Mount
Here’s my motor- note the upper and lower mounts, and the sprocket.
Now, here’s my final electric motor, all mounted in the frame.

65
The motor mount is one of the two big fabrication concerns when you’re building a bike- the other being the battery rack or box. It actually was a lot easier to figure out that I’d expected it would be. If you look at it from the gas motor standpoint, you’ve got to figure the stress points on the frame are going to be the same. The sprocket is going to want to be in the same place, too, so that the chain routes properly- not off-axis with the swingarm. All you need to do is take a good look at how the original motor bolted in. Essentially, I just duplicated the position of the motor mount holes, then moved the NEMA C-face standard bolt pattern from my motor into position so the sprocket would be as close as possible to the original position.
I did most of it using mockups with MDF and cardboard (CAD means “Cardboard Aided Design”, contrary to popular belief)- like this top photo…
…and originally planned it as one welded assembly with buttresses, like the lower photo.
…and as you can see, at that point I was planning for a larger sepex motor. In my excitement to run the bike, I just bolted the one plate that I’d had cut with the tubing I’d used to mock up with, and it was a perfect fit. It was also incredibly strong, even without the welding. I’ve run it like that all summer with not even the slightest indication of stress. I will, of course, finish it up properly, but at this point I’m going to wait until next winter to tear it apart.
The point being, it’s a heck of a lot stronger, and suffers a lot less stress than I’d thought it would. I often see guys building motor mounts that look like they could withstand a Titan rocket. Having seen this one, and several others that experienced builders have made, I’d definitely go with the basic, lighter weight approach and watch it carefully for the first few runs. The mount I made
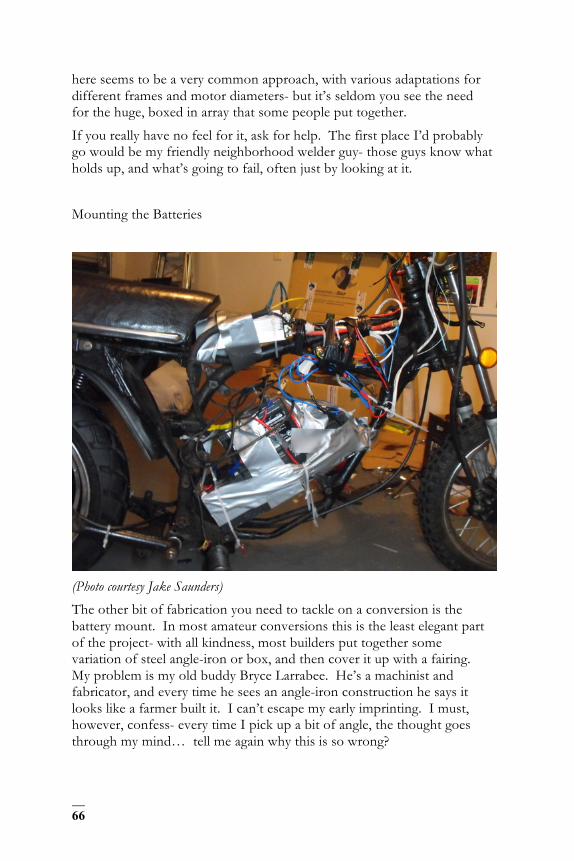
66
here seems to be a very common approach, with various adaptations for different frames and motor diameters- but it’s seldom you see the need for the huge, boxed in array that some people put together.
If you really have no feel for it, ask for help. The first place I’d probably go would be my friendly neighborhood welder guy- those guys know what holds up, and what’s going to fail, often just by looking at it.
Mounting the Batteries
(Photo courtesy Jake Saunders)
The other bit of fabrication you need to tackle on a conversion is the battery mount. In most amateur conversions this is the least elegant part of the project- with all kindness, most builders put together some variation of steel angle-iron or box, and then cover it up with a fairing. My problem is my old buddy Bryce Larrabee. He’s a machinist and fabricator, and every time he sees an angle-iron construction he says it looks like a farmer built it. I can’t escape my early imprinting. I must, however, confess- every time I pick up a bit of angle, the thought goes through my mind… tell me again why this is so wrong?
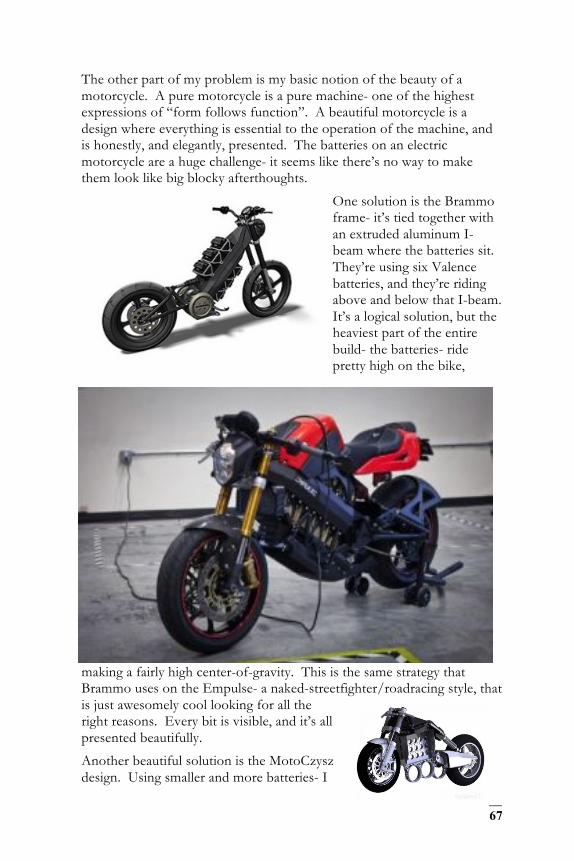
67
The other part of my problem is my basic notion of the beauty of a motorcycle. A pure motorcycle is a pure machine- one of the highest expressions of “form follows function”. A beautiful motorcycle is a design where everything is essential to the operation of the machine, and is honestly, and elegantly, presented. The batteries on an electric motorcycle are a huge challenge- it seems like there’s no way to make them look like big blocky afterthoughts.
One solution is the Brammo frame- it’s tied together with an extruded aluminum I-beam where the batteries sit. They’re using six Valence batteries, and they’re riding above and below that I-beam. It’s a logical solution, but the heaviest part of the entire build- the batteries- ride pretty high on the bike,
making a fairly high center-of-gravity. This is the same strategy that Brammo uses on the Empulse- a naked-streetfighter/roadracing style, that is just awesomely cool looking for all the right reasons. Every bit is visible, and it’s all presented beautifully.
Another beautiful solution is the MotoCzysz design. Using smaller and more batteries- I

68
believe they’re using the A123 cells- they assemble packs that attach to the main central core member, shown here.
This gives you something that looks like this, in full race trim:
(Image: AmadeusPhotography.com)
Construction like this may be beyond the scope of an amateur builder- indeed, conceptualizing something like this is beyond the scope of normal mortals- something I don’t consider the designer, Michael Czysz, to be. There is simply nothing that I’ve seen that this guy hasn’t touched that isn’t brilliant- including his riding prowess, as demonstrated at the TTXGP this summer. But I digress.
The Czysz design inspired my own drawings to make modular battery packs center mounted, that could take various sizes and shapes of
batteries, depending on what I decided to run at a future point. Here’s my mockup.
This array of four packs could hold 96 Headway 10aH cells, 24 40aH Thundersky cells, even about 22aH of AGM scooter batteries, in theory.
In practice, I made a rudimentary rack on my tube frame that allows me to clamp
batteries in place. It’s made of aluminum, and can handle shelves, as

69
shown here, that hold these AGM batteries, or lithium cells like Thundersky. It could also handle the packs I showed above, or an array of Headways. That said, it carries the batteries really high in the frame- although this bike weighs in at 250 lbs, (very, very light) the center of gravity is really high. If I added another 100lbs of batteries in this configuration, you’re looking at a really nasty handling problem.
I think one of the things we’re going to see in the coming years are some really resourceful designs for battery housings. Things like fast-switch packs, like what Zero is running, ultra-low battery mounts, integrated battery/frame designs- it’s of critical importance, and there’s a whole lot of room for improvement.
Oh, by the way- if you talk to any builder and they say they’ve never used zip-ties, duct tape and bungee cords to hold batteries in for the “test run”, as shown above from Jake Saunders’ creation… they’re lying. And duct-taping batteries? …an art all of it’s own.
Mounting the Batteries- Part Two: Essentials
Elegant design notwithstanding, there are some fundamental realities of mounting batteries you have to be aware of.

70
First, batteries are heavy. …and dangerous. Whatever you do, you have to make sure that the batteries are supported adequately. They’re corrosive. They, in the case of lithium, will catch fire under certain circumstances, one of which being if the lithium is exposed to water. Besides that, there’s the obvious- you have them wired together to produce high voltage and high current. This is all fine for normal running, but you also have to consider a design that will be as safe as possible in a collision or accident. What may be fine in a normal upright position may kill you, or an EMT, in the event of an impact.
Individual battery design will dictate how the mount is designed. Specific considerations:
Flooded lead acid batteries (in my humble opinion, although a very cheap option, also an incredibly dangerous one) MUST be run in the upright position only. They, of all designs, should be enclosed in some sort of spashproof box, and the design of the boxes should be totally overkill- anticipating the worst accident considerations.
Sealed AGM batteries can be run in almost every position except upside down. See the manufacturer’s specs, but they give you a lot more flexibility in designing an enclosure. They won’t splash or spill, even if the case is cracked open in an impact.
Most lithium batteries, like Thundersky or CALB, can also be run in almost any position except upside down or with their large side down, but they want to be bound pretty tightly. They expand and contract, and the cases aren’t really designed to withstand that stress without support. Many resellers will configure packs for you, with your configuration specs, and strap them accordingly for your safety. This is all good, but you have to know what you’re doing, and what will work in your configuration.
Many lithium batteries are running their outside shell as a positive, or, at least, very close to the positive- as in the Headways. It’s a really bad idea to use a conductive material for holding these things together- a little abrasion and you’re direct to positive of the pack. Keep in mind- carbon fiber, however strong and light, is made of carbon- one of the best conductors on the planet.
I’ve tossed around a few ideas for modular rack systems for mounting the cylindrical Headways- I figure a high strength plastic like Delrin might be the best material to cut them out of- here’s what they look like.

71
Here’s an absolutely elegant battery mounting for Headways by Tony Castley, AKA SplinterOz:
(Photo courtesy Tony Castley via www.rgelectric.wordpress.com)
My best advice, though, is to get the batteries in hand before you commit to a mounting system. It’s one thing to toss around theory and design something- it’s quite another to be holding over 100lbs of batteries in your hands, and imagining what would happen in a 50mph crash. In the motor mount chapter I suggest designing only for the minimum stresses. In this case, I don’t think you can overkill the design enough.
Keep all this in mind in your fabrication, too. If you’re not trained in this stuff, don’t have a feel for it, new to welding, or considering a light-weight frame or box structure held together with bolts, or looking at an exotic or
72
untested material, you’d be wise to look to some experienced help- either a motorcycle frame guy or a good builder- and listen carefully to their advice.
Battery Connections… or, “24s4p? Huh?”
How you connect your batteries together is crucial in determining your final voltage and how well your cells will stay even on charge and discharge. The first simple step is to understand the difference between a series and a parallel connection.
For all the times I get confused on this, it’s really pretty simple. Series connections are just that- putting your batteries in a line, connecting them end-to-end, positive to negative. Series connections add voltage, but don’t add your aH rating. Take 6 12V 20 aH batteries and put them together in series and you get 72V, at 20 aH.
Parallel batteries are, well, in parallel. They sit side-by-side, if you’ll allow me my visuals, they connect positive to positive, negative to negative, and they don’t add the voltage. They do, however, add up the capacity, the aH rating. Four 3.2V 10 aH lithium cells – like Headways – in parallel give you 40 aH but still only 3.2V.
To get to the voltage and capacity you’re looking for, you can connect the cells up in several different ways but the best is to set up your cells to hit your aH target within your base cell voltage. For example, if I have 48 3.2V 10 aH Headway cells, the best way to connect them is to make groups of two cells in parallel, then connect all of them together in series. I get 24 “clusters” of 3.2V 20 aH, then together get 76V or so. The reason behind this strategy is just the fact that the individual cells charge and discharge more evenly when they’re in parallel. The more cells you can buddy up with each other, the more even the BMS and charger can keep the pack overall.
The description you’ll see for this is a “_s_p” term- for the pack above it would be 24s2p, or 24 series, 2 parallel. A little baffling when you first see it, but it makes perfect sense.
As you’d expect, the final word on this, with some slick illustrations, is at the Battery University site: http://www.batteryuniversity.com/partone-24.htm

73
Wiring Diagram
Here’s a basic wiring drawing I used to help me layout the wiring, for the Alltrax I have with the Motenergy (and the old brushed ETEK) motor. (Use at your own risk.)
The way you put this whole thing together depends not only on the type of motor you use and the controller you’ve chosen, but also the decisions you’ve made about chargers and converters, fuses and safety switches. If you’re unsure about it, absolutely look for some advice on the various online groups, and test wire the system with small test leads that you don’t mind melting. Also, I found it incredibly helpful to label my connections, however obvious their place was… but that didn’t keep me from making some mistakes resulting in some fairly dramatic, uh, effects.
After a few builds, I realized that it’s a whole lot easier if you lay out your diagram in the same orientation as your actual parts. You can then look at the diagram, look at the bike, look back at the diagram and you get a great key to catching little mistakes and omissions… and little mistakes are the ones that lead to smoke.
Here’s my revised diagram, as it’s laid out on the bike.

74
…a lot neater too. I’ve added a DC/DC converter, some gauges and fuses, and it’s been a while since my first wiring exercise. It gave me a very good indication of what I’d left out and how hard it is to trace stuff you’ve done months ago, without good documentation.
Now. That was mine. Here’s what Alex Tang, working with a mini-BMS system on the Electriceptor, put together:
(Courtesy Alex Tang: electriceptor.wordpress.com)

75
First, this shows what some skills using a proper design or CAD application can give you. Second, this shows a complete wiring diagram, including the 12V system and the BMS, something I prefer to take piecemeal as separate systems, but to each his own. It’s a well organized, well thought-out system that can be checked and double-checked without blowing components up.
Let me underscore this point. Every motor and controller combination is going to need a very specific wiring strategy, and it’s not something that you should leave to trial and error… making mistakes putting this part of the system together can be expensive. Even fatal. Seriously. To repeat the advice of Ed “Juiced” Fargo, “…make if fast, make it fun- but make it safe!”
Grounding and Fusing the System
You have two different voltages running in your bike- the high-voltage battery pack for the motor, and the old 12V system that runs your lights and horn and such. The question often comes up- how do you ground these systems? More important, how do you ground these safely?
This question comes up because of a few issues. First, in most cases the 12V system on a bike uses the frame as a common ground. Second is the question of where your 12V supply is coming from on your new design.
The options for the 12V supply come down to a separate 12V battery pack- what I did, because it’s simple, and I had some spare batteries around- you can use a battery, or a few if the battery voltage is less than 12V, off your main powerpack- (not a really good idea- it loads batteries unevenly in the pack) or you can use a DC-DC converter. That is a device that takes your pack voltage and drops it down to 12V.
The DC-DC converter is probably the best way to go- they’re not too expensive, you only need one voltage to charge, it’s by far a more professional solution… but in any case, you have to watch where your ground is.
On an isolated 12V battery, you can run the standard frame-ground. The 12V system isn’t going to kill anyone, and it is pretty much already in place. On a 12V system that’s part of the high-voltage battery pack, running a frame ground is a seriously dangerous proposition. First, there’s the possibility of part of the high-voltage coming into accidental contact with any part of the frame… especially, through any body parts that happen to be in the vicinity. Second, and a mistake I made, if you don’t wire the 12V and the 72V system using the same ground (I wired

76
the 12V to a battery in the middle of the pack) you get some pretty scary potential differences going on. If my 12V ground has a couple of batteries between it and the high-voltage ground, then the ground-to-ground connection is 48V. Bad mojo. (…and, I might add, as I type this, an incredibly obvious and dumb mistake- but that didn’t stop me from making it…)
On the DC-DC converters, you get the choice of a cheap one that is not isolated- that is, there’s a connection between the high-voltage ground and the 12V ground. The more expensive ones are isolated- there’s no connection between the two grounds. Spend the money, get the isolated converter. With an isolated converter you can use the standard frame-grounding of your stock 12V system, and it’s safer in general for all the reasons we talked about above. With one that’s not isolated, you always have the potential for shorting your high voltage through your 12V components.
One note about your bike’s stock wiring… I spent a lot of time trying to figure out what I needed and what I didn’t need on the stock wiring harness, and finally I just tossed the whole thing, except for cutting out some of the cooler connectors. Without the ignition system to worry about, your bike’s wiring is pretty simple. You have a ground, and wires running to each light and switch- if you have a wiring diagram for the bike, it’s pretty easy to trace, and reconstruct the parts you need. You get a nice, new harness, you can add things, like a wired ground instead of a frame ground, and, as a side-benefit, you understand what each part is for and how it works. The shop manual was invaluable for this job.
Don’t neglect the fusing of the system either. Besides protecting yourself, fusing the system in all the appropriate places will protect your components, too. If I told you I didn’t fry a half-dozen fuses when I first wired the rig up, I’d be lying. There are plenty of various fuses and holders available from most auto parts stores. If in doubt, throw a fuse in, and err to the side of a smaller fuse rather than a bigger one. I’ve fried a few wires and fuse holders too, just because the fuse was too big.
More Random Thoughts: The “Recycle” Angle…
Bad puns aside… the fact is, converting a rolling chassis is keeping a pile of crap out of the landfill. In general, you want to pick up a bike that has a title and a blown motor. If you’re made of money, you could buy a new or good working bike and strip the motor out and resell it. The bike I bought was an ’84

77
Honda with over 135,000 miles on it and a blown motor. The thing went an unreasonably long time before blowing up- I’ve never heard of a bike with that many miles on it- but still, it was headed for the junkyard.
I pulled a whole bunch of stuff off it and sold it as parts- going to help keeping other bikes out of the junkyard as well- and the only thing I had left that I couldn’t sell was the block. The way I figure it, I kept about 150lbs of steel from becoming trash.
I bought many of the parts used, or salvage. The gauges were all from eBay, off bikes being parted out. Most of the aluminum and steel was scrap from other projects. The motor, controller, contactor and the first set of batteries were bought used. I’d say about 5% of the entire build was new parts.
Cool Tools- Essentials for the Builder
Making Connections
Let’s be honest. Any decent project is really a thinly veiled excuse to buy new, fun tools, right? If you have your own shop, you may have some basics already, but there are a few tools that I used constantly. In some cases I had them, and used what I had, but in others I replaced old, worn items or had to find a source for some specialized tools.
The first, and probably most frequently used tool was the soldering iron. I had an old, dirty pencil iron around of unknown power, and just could not solder up a good connection with it. I tried cleaning the tip with a file, I tried replacing the tip. Then I gave up and tossed it.
I picked up a basic 40W pencil iron with one of these brass sponge tip cleaners, and it worked great. I found, especially since I rewired my

78
12V harness, I used this constantly soldering splices together, then heat shrinking insulation on them. With a new, clean and sufficiently powerful
iron I was able to make fast, solid splices at record speed.
The second tool you need for the splicing is a good heat gun. You can try using matches, lighters, or some other heat source to heat heat-shrink insulation, but it’s a waste of time. You need high heat, applied evenly, with control to avoid over-heating. A decent heat gun is essential.
Funny- I never got into using a wire stripper or a crimping tool for my smaller wires. I just use a knife, and crimp the connectors with a pliers that has a little bump on the inside of the jaws, but if you want to do it fast and right, one of those wire connector/crimping kits would be a great thing.
Some notes on soldering, first. Remember the importance of “tinning” the iron. Tinning starts you off with a nice clean coating of liquid solder. When you have some liquid solder the heat transmits to the work faster, and the work heats more completely. I’ll often load a little drop of solder on the tip, and let that drop envelop and heat the work, until it simply flows into the splice making a perfect soldered joint. Second, on those crimp connectors, I cut off the plastic insulation on them and replace it with heat shrink. I also solder them. It’s obsessive, probably, but it makes a good, clean, positive connection that looks neat. I started doing this because of the many times I thought I had a good crimped connection that fell apart in my hands.
On the question of which is better: crimping, soldering, and crimping with soldering- in particular your bigger cables. Wars have been fought over less. The smaller connections I do solder and crimp. The bigger ones I
just crimp. A good crimp is a fine connection, and it’s easy to see that it’s positive on a big cable. Soldering it is a tricky job. You run the risk of making a bad joint since it’s so big, and you can melt the insulation. I opted out of the additional work

79
and risks, but a good soldered and crimped joint is at least equal to a good crimped connector.
The crimp tool I used for the big, 4 Gauge cables was this little thing from a supplier on eBay.
The fancy one on the previous page, from West Marine, is considerably more expensive, but also works really well. This shot also shows the heat shrink in position for final assembly after the crimp is made.
Cutting
One of the common jobs in this kind of project is cutting metal. If you have a nice metal-bladed bandsaw, that’s certainly the way to go, but there are two hand power tools that work really well. The first is a small jigsaw- usually under $50, you can fit these with a metal cutting blade, and running them a slow speed with some good, solid force applied they do a fine job, and will fill in admirably for their big band saw brother, especially for cutting curves. (One thing about cutting metal- using high speed with light pressure will actually work-harden steel. Whatever you’re doing, whether cutting or drilling, you want to use low speed and high pressure to let the blade cut the steel without heating and hardening it. Using oil or cutting fluid helps as well.)
The other tool I used, and in particular in the process of taking the old motor out of the frame, was none other than my big old Sawzall. A Sawzall with a metal blade can cut virtually anything. A blessing, yes, but also a curse. With great cutting power comes great responsibility.
As far as my basic shop setup goes, the most important tool there is my drill press, outfitted with a good, solid vise. I use it constantly, and I even have it outfitted with bores, milling bits and taps. If you’ve never seen someone use a drill press to tap a hole, you’ve missed one of the great bits

80
of style and grace in the workshop. You drill the hole. You switch out the drill with a tap without moving the work. You spin up the tap, cut the power and feed it into the hole with just enough pressure to start the tap and let it pull itself into the hole. You get a perfect thread, if you do it right, and it’s fast.
One thing I feel you don’t need is a welder. Although you may want a welder, (and who doesn’t), welding is a skill that takes years to learn. Making joints, and understanding if a joint is solid and will stand the vibrations and twisting forces of use and time, is something that only experience can tell you. Welds in critical applications are tested in ways a home builder can only dream of, and welding anything that is critical to the safety of the bike needs to be done by someone who knows what they’re doing. Beyond that, a good, state-of-the-art welder is a few thousand dollars, and anything else is, well, “working in the Stone Age” as my (motorcycle frame fabricator) friend Keith Loomer will tell you. It’s tempting to go pick up a cheap little stick or wire-feed MIG welder, and I think you should. And use it on your lawn sculpture. For steel, the best “welder” for you bike is the guy down the street who’s a certified professional. If your frame is aluminum, I can’t be too emphatic. Professional welding is your only reasonable choice.
Hand tools
There’s a good reason why electrician’s tools have rubber handles. When you can, get them with rubber, and with pliers and screwdrivers it’s not a
problem. With wrenches it’s not going to be possible. The problem is when you have one end of a tool completing a circuit through the other end- the wrench becomes part of the circuit, and you along with it. It’s certainly a good idea to wrap the handle of the wrench with a rubber or vinyl tape or cover it with a heat-shrink, but I’d go one
step further and cover up one whole end of the wrench. This is going to limit you to one-ended wrenches, but it’s the safest way to go.
The tape you can use for wrapping the tools, as well as general electrical use, should be the 3M Scotch 33+ Professional Grade Vinyl. There is also liquid rubber-type insulation- dip the handles into the stuff, or paint it
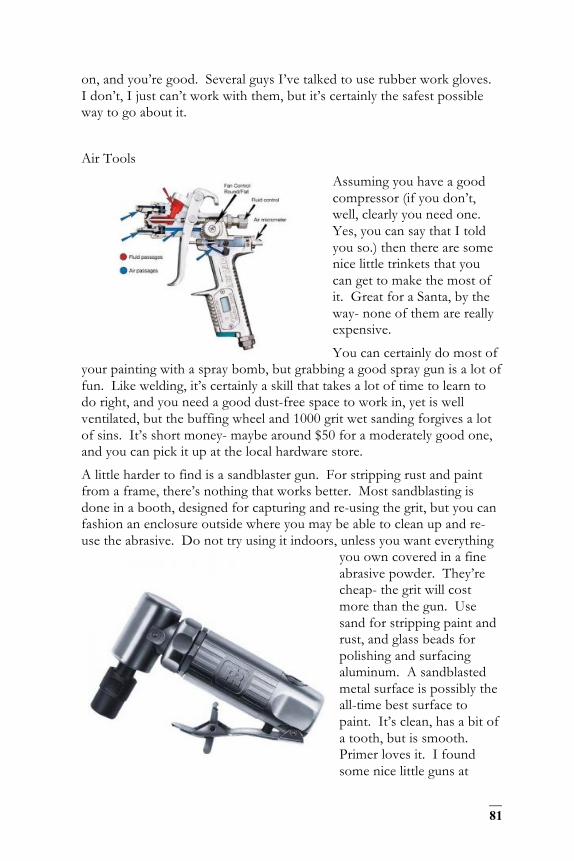
81
on, and you’re good. Several guys I’ve talked to use rubber work gloves. I don’t, I just can’t work with them, but it’s certainly the safest possible way to go about it.
Air Tools
Assuming you have a good compressor (if you don’t, well, clearly you need one. Yes, you can say that I told you so.) then there are some nice little trinkets that you can get to make the most of it. Great for a Santa, by the way- none of them are really expensive.
You can certainly do most of your painting with a spray bomb, but grabbing a good spray gun is a lot of fun. Like welding, it’s certainly a skill that takes a lot of time to learn to do right, and you need a good dust-free space to work in, yet is well ventilated, but the buffing wheel and 1000 grit wet sanding forgives a lot of sins. It’s short money- maybe around $50 for a moderately good one, and you can pick it up at the local hardware store.
A little harder to find is a sandblaster gun. For stripping rust and paint from a frame, there’s nothing that works better. Most sandblasting is done in a booth, designed for capturing and re-using the grit, but you can fashion an enclosure outside where you may be able to clean up and re-use the abrasive. Do not try using it indoors, unless you want everything
you own covered in a fine abrasive powder. They’re cheap- the grit will cost more than the gun. Use sand for stripping paint and rust, and glass beads for polishing and surfacing aluminum. A sandblasted metal surface is possibly the all-time best surface to paint. It’s clean, has a bit of a tooth, but is smooth. Primer loves it. I found some nice little guns at

82
Harbor Freight and Northern Tool.
The right-angle die grinder is one of the sweetest little metal-working tools in existence. It takes a little abrasive disk that is easily changed, and ranges from light sandpaper to heavy grinding. You could use it to strip an entire frame if you don’t have a sandblaster, or grind down welds, cut brackets, buff out tight spots or strip rust. They’re designed for polishing and shaping, usually steel dies for molding, so they’re unbelievably versatile.
Fair warning. If you have one of these, and you have a teenage boy in the shop, lock this up.
Don’t forget, by the way, the importance of a good water and particle filter/trap in your air lines as well as your periodic lubrication of all your rotary tools. It’s easy to overlook, but will shorten the life of anything that spins dramatically. Use the correct air-tool lubricant, too.
Meters
Let’s talk meters. A decent voltmeter is essential, both for troubleshooting and for simple double-checking. Most all meters measure ohms, or resistance, too, as well has having a continuity tester that simply beeps or lights when you have a good circuit. They’re called Multimeters, Volt-Ohm Meters, or VOM, and you needs.
Another nice meter is called an inductive amp meter, or “clamp meter”. Measuring your amp draw under load is a little tricky- you have to actually
measure it in-line with the circuit and use a shunt to keep the meter from overloading. An easy way to get around that is to use an inductive meter that measures the field around a wire to gauge the amps in the wire. Here’s what they look like- the lobster claw affairs clamp
around the cable you’re reading. It’s a really good idea to rig one of these up on your bike at least once when you’re first riding it. It will tell you volumes about how much you’re tapping the battery pack when you’re honking on the throttle. I don’t run it all the time, but the few times I had it rigged taught me a lot about how to ride for range. It can also be used to figure out how much your lights draw, whether HID lights, for

83
example, are worth it, like that. They come in DC only, or AC/DC, you want AC/DC.
The BFH
No discussion of tools is complete without mention of the BFH.
The BFH stands for Big (insert favorite f-word here- “Fine”? “Fabulous”?) Hammer. The BFH is derived from the legendary premise that, “If brute force can’t fix it, you’re not applying enough…” Jokes aside, there’s no substitute for the mass of a nice hand sledge, brass hammer or the like. Here’s how this works. If you need to give something a good, but tactful pop, and you’re using a small hammer, you have to swing it hard. Swinging it hard makes you have less control. Applying force with a nice, heavy (read: lots of mass) hammer means you can tap it ever so lightly, very precisely, and yet get enough force to get the job done.
Brass hammers are for pounding on steel without denting it, brass being softer than steel. Rubber mallets are good for when you’re pounding on soft material like plastics, aluminum or wood, but they don’t have much weight, usually.
Oh yeah, and that teenager? Chances are, he’s already stolen it from your toolbox.
The Co-op Shop / VocTech Angle
If you don’t have the tools or the room for a shop, there are some other options. Almost every High School and College, not to mention Vocational/Technical school has an adult-ed program that has some form of metal fabrication class. A lot of these are project-oriented. It would probably be good to contact the instructor or school to run the project by them first, but the idea of bringing in this sort of a fabrication job as a general introduction to metal work would, in most cases, be welcomed. Don’t forget the local press angle, either. ”Local Voc-Tech class builds Electric Motorcycle” is a headline any school PR guy would kill for.
The other approach would be to try to find a co-op shop. This is a tough one, there are a lot of things that can torpedo an idea like this, but you often see these shops spring up around artist collaboratives. In Providence, RI, they have the Steelyard in Oakland there’s the Crucible and the San Francisco TechShop. It seems like these programs come and go- not surprising, considering the expense, liability and expertise that

84
come into play to make it safe and viable. I’ve read stories about the Car-Talk guys starting one, only to give it up within a year or so due to the hassles involved.
Now, if you’re still in school, don’t forget the club angle. Purdue just formed, via Tony Coiro, an EV club that allows these guys to pool resources, get some support from the school in the form of a place to work and some complimentary supplies, as well as some attention, as Tony discovered in short order.
Any of these programs require some classes to get access to the equipment, but that’s a good thing. If you’re starting out, you really need to learn the ins and outs of working with these materials and tools. If you’ve been hacking away at this stuff like I have, a refresher is a really good thing. There are probably dozens of things you’re not doing quite right. Even if you’ve got a lot of experience there’s always something new to learn. Once you gain the confidence of the shop supervisors or teachers and prove yourself reliable and responsible, don’t be at all surprised if you get some additional access to the facilities. Every place is different, of course, but these guys are doing programs like this for the love of it, and they like to share the love. If you go the extra mile, and try to make a contribution to the effort, you might be surprised at the doors that open for you.
Just a little caution. If you have a friend who has a machine shop, bike shop or garage, be really, really polite. Although a lot of guys love to have projects going in their shop, have buddies hanging around, or do little favors for their friends, never lose sight of the fact that this facility costs them a ton of dough. They’re running a business. If you’re lucky enough to have a friend that lets you use their shop, use your best manners no matter how good a friend they are, it will be much appreciated. Don’t leave your stuff around, take up as little space as you possibly can, and do your best to make some sort of contribution to the shop- even chipping in to do piecework if they need it. It will be much appreciated.
Oh, and beer. Always bring beer.

85
The Ride
In the Steinbeck's "Cannery Row" there’s a character known as Henri the painter. Henri was neither French, nor a painter actually, and Henri was building a boat. Henri had, however, a profound fear of the water. As Henri would approach the completion of his boat, he’d find some reason to dismantle the boat and start rebuilding it all over again- assuring he could avoid confronting his mortal fears. It’s a great Sisyphusian character from a great book- and I bring it up because in every project like this there’s a little bit of Henri in all of us. Not really from fear, maybe, but certainly because a project has two phases- the project, and after the project.
I actually experienced this when I built my first boat- ironically. Immediately I took to planning my next boat. The same thing happened when I went to build a bike.
Where this has to come into focus is in the safety and training considerations. It’s one thing to build a bike, even a safe bike. It’s something else entirely to ride a motorcycle, especially in traffic. My best advice would be to take a good weekend class and learn to ride safely before even starting the build, if you’re a novice. It will give you some great understanding and appreciation for many of the factors you’ll have to consider in the build process. Probably the best nation-wide resource for motorcycle safety courses is the Motorcycle Safety Foundation at www.msf-usa.org.
My one editorial on motorcycle safety is about the “Loud Pipes Save Lives” myth and how it plays out on an electric bike.
First. Running loud pipes is not safer. It doesn’t get you noticed and it doesn’t reduce the chance of you getting into an accident. Just look at the statistics, and the reports on the AMA sites and studies like the Hurt Report. Safer riding is primarily about being seen, not heard, and if you’re riding around with loud pipes thinking that’s the only thing you have to do to be safe, then you’re in deep trouble.
Second, that’s not to say that sound can’t help you stay out of trouble. Sound can help you stay safe, very, very loud sound, and that comes by way of an aftermarket horn. A really loud aftermarket horn, and getting into the habit of using it. I run a standard dual automotive horn setup, and have for over 40 years. (The motorcycle industry should be tarred and feathered for using those ridiculously lame beepy horns that come stock on most bikes.)
86
Third, if you’re in an intersection and you need use your horn, or pipes, or anything else to “get noticed”, then you’re in trouble. As someone put it, “If you’re depending on someone hearing or seeing you to avoid an accident, then you’re already f***ed”. To stay safe on the street you need to “ride large”- that is, ride like you’re as big as a car, and you have the right to as much real estate on the road as a car has. Because you do. If you don’t take up a full lane, you cower to the side of the road, or snake in and out of slots and spaces, you’re going to get treated like you don’t belong there.
Loud pipes don’t save lives. Smart riders save lives.
Want to read some more?
Here’s a great interview on Roadracing World:
http://www.roadracingworld.com/news/article/?article=35547
Here’s the official AMA position statement:
http://www.amadirectlink.com/legisltn/positions/sound.asp
And here is the summary of the “Hurt Report”, officially, “Motorcycle Accident Cause Factors and Identification of Countermeasures”, on WebBikeWorld:
http://www.webbikeworld.com/Motorcycle-Safety/Hurt-study-summary.htm
On the subject of sound… the funny thing is, most people think electric bikes are silent. They certainly don’t make as much noise as most street bikes, and at slow speeds they’re really quiet, but I’d suggest you take a look at a few TTXGP race clips, or other videos of some of these bikes ramping through the RPMs, if you think electric bikes don’t make any noise. Listen to the Chip Yates 190mph run video and tell me that’s not the coolest sound you ever heard coming from a motorcycle.

87
Epilogue: The Second Build
As I said above, as soon as I built my first boat, I immediately started planning my next. It’s a natural thing, I think, with anyone who’d build something like this, and the bike was no different. You immediately see things you’d do differently, changes you’d make, and usually they’re changes that go right to the basic design.
The Honda VF500F was a great chassis for a build, in fact it’s one of the most popular for a conversion. I’m not much into the frame design though, and it’s more a product of my breeding in motorcycling. I’m stuck in the ’70s. I like tube steel frames. I love me a good double downtube, and I immediately started thinking about a frame I’d like to mess with more than the ’84 VF500F square-tube monoshock. I came right back to my first build, a bored, ported, blueprinted 1975 Yamaha RD350. So, in my random travels, I kept an eye out for an R5, TS, TZ, or RD250, 350 or 400 chassis- all pretty much the same thing. And light.
What I found is a 1971 R5 frame, for $40, covered in rust, with no title and precious few parts.
The process of building this bike is completely different than what I went through with the Honda. First, it is a restoration of sorts. I didn’t have to strip the frame, it was already bare. I sandblasted it, painted it, and started the search on EBay for bits and pieces. I’ve pulled
together enough to get the thing rolling, actually safely, too. I know all about the handling modifications on this frame so I could pick and choose what I felt was most effective. Bronze swingarm bushings, roller bearings in the steering head, like that… all well known and time-proven.
Unlike the first build, the electric part of this was a no-brainer.
I don’t have a ton of money, and I love this frame. It’s light and nimble and it seems a natural for the motor and controller I had. For that matter, it was all wired up. It’s painful to say it, but I scavenged most of the parts from the VF500F, stripping it pretty much bare, electrically. The motor mount just needed a little tweaking, and even on that score I’d learned a lot from the first bike.

88
It was really a totally different process. The first build started when I got the bike, which immersed me in the project. From there I developed the concept, researched the components and designed as I built. For the second bike, I started with the final concept fully formed in my mind. I have a pretty clear idea of what it will be, and what it will do. I also know what I want to do differently, and mostly, that’s about the batteries. I’m still determined to develop a battery system that’s somewhat universal, or, at least, versatile.
There’s another side of this, and that’s the fact that I have no title. The truth is, I could probably get it registered by some sleight of hand, but building a bike that’s not intended to be street legal is completely liberating. There are so many things on a bike that you tolerate, or build on, or try to get around, that are about making the thing meet the requirements of the DOT. When you let that all go, you can do simply whatever you want. You can cut off anything at will, you can configure the bike just as you want, with no constraints. It’s a joy. Granted… it’s going to be a challenge actually finding a place to ride this thing, especially at it’s hoped-for top speed, but it’s well worth it.
This time, I’m not so much converting a gas bike. It’s more like I’m building a motorcycle, and it happens to be electric.
One of the other cool things about it is that the motor and associated components are pretty much interchangeable. I literally pulled them off the Honda and put them on the Yamaha. It’s a point worth remembering when you’re looking at a system for your first build: look at the purchase as something that could have a life beyond that first project.
Interesting, too has been the aspect of the tools. I don’t have to run out and pick up all the sundry tools that I didn’t have, or couldn’t find, although buying tools is one of the fun things about projects like this. The only thing I needed to add to my tool collection was the sandblaster, something I now wonder how I lived without. I’ve been there, sorted out the fabrication processes, got the tools together and now don’t have to spend all that time and effort trying to figure out how to get something done. Partly it’s being equipped, and partly it’s having a little experience.
I don’t want to give the impression that I have it all sorted out though… there are a few things that seem like they’re never solved particularly well.
Yes. I’m talking the batteries.
Last year at this time I was all torn about running what everyone else was running – Thundersky – and maybe trying Headways. Headways were the big unknown, and seemed to be more stable, capable of higher discharge rates, and overall cooler looking than the blocky, slow Thundersky. As

89
winter moved into spring, it became clear that the newly branded CALB were slightly better than Thundersky, and that the Headways were getting used, proving reliable, if problematic from a BMS standpoint. My big anguish was where to put my money, and a not inconsiderable amount of money. This anguish spawned my second big anguish- how to build a battery mount. Thus, my idea to build a bracket arrangement that would allow me to use several different sizes and styles of battery.
When it came time to buy the batteries, I made the decision to go with cheap lead-acid AGM 22ah mobility batteries for my first bike. I did this for a few reasons. First, they were cheap, at about $300 for the whole thing, second, at 95 pounds they were about the same weight as what I wanted to run in lithium. I also felt that prices and technology were moving pretty fast in batteries and whatever I bought would be obsolete pretty soon, and that since this was my first build, the chances of blowing up or melting whatever I had were pretty high.
All of those reasons turned out to be pretty much on target.
Even Brammo, with the release of the Enertia 2, has introduced a new battery with twice the range. Enter LiPo- lithium polymer, around for a while in the RC and robot circles. LiPo seems to be right where Headway was last year, a little new, not really tried and proven, but with such compelling advantages they seem certainly worth considering. So. I’m back to not being quite sure exactly what packs I’m running, so torn about how to configure the mounting system.
The good news is I could fit the same capacity of LiPo in half the space of the Headways. The weight savings is considerable- almost a third. So it’s a lot less of a challenge, but still. I’d love to be certain of what the technology will look like by this summer, and know how to build the
packs.
But then, what fun is certainty?
Here’s how it sits right now… within a couple of months, a sandblasted and painted frame, all the bits to make it work, a “tank” and seat pan fabricated, a rough paint job to
help decide the color… add batteries and we have a functional machine.

90

91
Conclusion
We are standing at the threshold of a new era in motorcycling- in fact, in Motorsports and transportation in general. The very near future will see advances in battery technology- there are a host of experimental designs that, even if only a few of them reach the market, will change the game entirely. Motor technology, in particular hub motor development and motor cooling, will give us more capacity for both drive and regenerative braking. Controller refinements may be some of the most interesting areas we’ll see- even now, on some TTXGP race bikes we have GPS-linked on-board logging and display that meters out power based on the position, range, capacity and stage of a bike on the course. Power drain, time and range remaining, controlling output based on state-of-charge, even locations of nearest charging stations- this is all technology that is in use today.
Both Craig Bramscher, of Brammo, and Azhar Hussain, founder of the TTXGP describe what we’re seeing as the “rebooting” of motorcycling. I have to agree- after riding a motorcycle for over 40 years, the electric ride has given me a completely new motorcycling experience. This ride- life without a power band- will redefine what the sport of motorcycling is about.
The best part is that you can experience this today. Yes, you can save up your pennies and spring for a bike built by some of the best builders in the world, with all the cutting edge technology, or you can build one yourself using the same technology they’re using, or some variation or experimental approach you’ve conceived and designed. Or, you can, as I did, buy an old frame, a basic motor and controller, some lead batteries and feel it for yourself, for under a thousand dollars. For some, it’s about making everything perfect and creating a beautiful bike, with no compromise. For others, it’s about getting the thing together just well enough to try it out- as I’ve said before, “sheeting in and sailing ugly”.
Even advice and technology that we were all calling gospel a year ago is changing. Hard, cold answers to basic questions may not be possible, and at the very least need to be reconsidered. Resources have to be constantly re-evaluated.
It’s often hard to understand exactly where we are in the bigger picture, but make no mistake.
We’re writing motorcycle history.

92

93
Appendix: The Shopping Lists
I get a lot of requests for itemized shopping lists, which I resist because of my belief that your build should be, well, your build. Everybody has different expectations and desires in what they’re building, and I’ve tried to lay out strategies for achieving those goals.
That said, it’s helpful to take a look at some specific “shopping lists”, the costs, and the resulting performance. The EV Album is a fantastic resource for that: www.evalbum.com, but there’s a lot to sift through. Here are some simplified lists from some of my favorite builds, and a fairly broad spectrum of types, purposes and budgets.
For the sake of leveling the field, we’re just looking at the electric drivetrain components here. The type, condition and cost of a donor chassis is a huge variable, and doesn’t really help to clarify the shopping list. I’m going to assume you are going with a basic switch, fusing and contactor- look at around $150 for that, regardless of what you get. I’m not talking about chargers here, either, since there’s such a range of charging rates and costs, except in the case of the Turnigy lipo example, where the chargers are a key part of the BMS strategy.
Also, there’s a whole lot of room between buying new from a dealer and buying used from a buddy or from eBay. If you are looking for support and warranties, the dealer route is the best way to go, but by far the most expensive. Buying from a buddy, depending on their knowledge and willingness to help you out, may or may not be a great way to get support. Buying from eBay is, for sure, a “buyer beware” situation, and one where I’d hesitate to make any major investments in pricey components.
First off, my “Zombie Fembot”- a low-budget SLA powered conversion of a 1984 Honda VF500F:

94
Now, let’s take a look at a newer, higher performance and more practical build- Noah Podelefsky’s GSX-E. This is a bike that’s clearly been built to be a daily rider, with a very usable range and fun, and performance figures that rival gas bikes.
Here’s the GSK-E:
Just for fun, let’s take a look at a little dirt bike project. It doesn’t have to be street legal, it doesn’t need a 12V system for lights, it doesn’t need a huge top speed or range. What would be nice is to have some sort of small, light, removable battery pack so you could take it to the pit, throw a couple of packs into the truck and pop-switch them as needed. Turnigy lipo with a balance charger system would be perfect.
Starting with a 125 – 250cc chassis, this might look something like this:

95
Finally, let’s look at the costs for Ed Fargo’s “Juiced Café” project. Ed did a “period correct” restoration/conversion of a factory Honda roadracer, and had the goal of “breaking the ton” – British café-racing slang for making a top speed of over 100mph.
Ed’s been building these things for quite a while now, and so he has some extra parts and pieces lying around (something to keep in mind when you start in on this madness… many of the parts will find their way into future projects, so when you’re shopping, think “flexible” and think to where you may want to take the next build).
To keep things simple I’ve priced this at “new” current market prices.

96

97
Glossary
A
Accumulator – A rechargeable battery or cell (see also Secondary battery).
Actual Capacity or Available Capacity – The total battery capacity, usually expressed in ampere-hours or milliampere-hours, available to perform work. The actual capacity of a particular battery is determined by a number of factors, including the cut-off voltage, discharge rate, temperature, method of charge and the age and life history of the battery.
Actuator: A device that creates mechanical motion by converting various forms of energy to rotating or linear mechanical energy.
Alternate Fuel Vehicle A vehicle powered by fuel other than gasoline or diesel. Examples of alternative fuels are electricity, hydrogen, and CNG.
Alternating Current: The standard type of electricity in homes and the most effective way of powering an EV. In AC circuit the voltage swings between positive and negative meaning current flows in both directions (hence ‘alternating’)
Ambient Temperature (AMB): The temperature of the space (air) around the motor. Most motors are designed to operate in an ambient not to exceed 40C (104F).
Amp Hour or Ampere-Hour – A unit of measurement of a battery’s electrical storage capacity. Current multiplied by time in hours equals ampere-hours. One amp hour is equal to a current of one ampere flowing for one hour. Also, 1 amp hour is equal to 1,000 mAh
Ampere or Amp – An Ampere or an Amp is a unit of measurement for an electrical current. One amp is the amount of current produced by an electromotive force of one volt acting through the resistance of one ohm. Named for the French physicist Andre Marie Ampere. The abbreviation for Amp is A but its mathematical symbol is “I”. Small currents are measured in milli-Amps or thousandths of an Amp.
Ampere-Hour Capacity – The number of ampere-hours which can be delivered by a battery on a single discharge.
Anode – During discharge, the negative electrode of the cell is the anode. During charge, that reverses and the positive electrode of the cell is the anode. The anode gives up electrons to the load circuit and dissolves into the electrolyte.

98
Aqueous Batteries – Batteries with water-based electrolytes. The electrolyte may not appear to be liquid since it can be absorbed by the battery’s separator.
Armature: The rotating part of a brush type direct current (DC) motor. In an induction motor, the rotating part is called a rotor.
B
Battery – An electrochemical device used to store energy. The term is usually applied to a group of two or more electric cells connected together electrically. In common usage, the term “battery” is also applied to a single cell, such as a AA battery.
Battery Capacity – The electric output of a cell or battery on a service test delivered before the cell reaches a specified final electrical condition and may be expressed in ampere-hours, watt- hours, or similar units. The capacity in watt-hours is equal to the capacity in ampere-hours multiplied by the battery voltage.
Battery Charger – A device capable of supplying electrical energy to a battery.
Battery Electric Vehicle: See EV below, An electric vehicle whose electricity is exclusively stored in batteries rather than a fuel cell or generator.
Battery Management System: mini onboard computer to monitor entire battery system and each individual battery. Also may be built into charging system.
Battery-Charge Rate – The current expressed in amperes (A) or milli amps (mA) at which a battery is charged.
Breakdown Torque: the maximum torque a motor will develop under increasing load conditions without an abrupt drop in speed and power. Sometimes called pull-out torque.
Brush: Current conducting material in a DC motor, usually graphite, or a combination of graphite and other materials. The brush rides on the commutator of a motor and forms an electrical connection between the armature and the power source.
C
C – Used to signify a charge or discharge rate equal to the capacity of a battery divided by 1 hour. Thus C for a 1600 mAh battery would be 1.6 A, C/5 for the same battery would be 320 mA and C/10 would be 160 mA. Because C is dependent on the capacity of a battery the C rate for batteries of different capacities must also be different.

99
Canadian Standards Association (CSA): The agency that sets safety standards for motors and other electric equipment used in Canada.
Capacitance: As the measure of electrical storage potential of a capacitor, the unit of capacitance is the farad, but typical values are expressed in microfarads (MFD).
Capacitor Start Motor: Or more specifically, Capacitor-Start, induction-run. Provides high starting and break-down torque, medium starting current. Used on hard starting applications such as compressors, positive displacement pumps, farm equipment, etc.
Capacitor-Start, capacitor-run: Similar to capacitor-start, except have higher efficiency. Generally used in higher HP single phase ratings.
Capacitor: A device that stores electrical energy. Used on single phase motors.
Capacity – The capacity of a battery is a measure of the amount of energy that it can deliver in a single discharge. Battery capacity is normally listed as amp-hours (or milli amp-hours) or as watt-hours.
Cathode – Is an electrode that, in effect, oxidizes the anode or absorbs the electrons. During discharge, the positive electrode of a voltaic cell is the cathode. When charging, that reverses and the negative electrode of the cell is the cathode.
Cell – An electrochemical device, composed of positive and negative plates and electrolyte, which is capable of storing electrical energy. It is the basic “building block” of a battery.
Centrifugal Start Switch: A mechanism that disconnects the starting circuit (start winding) when the rotor reaches approximately 75% of operating speed (usually in 2 or 3 seconds).
Charge – The conversion of electric energy, provided in the form of a current, into chemical energy within the cell or battery.
Charge Rate – The amount of current applied to battery during the charging process. This rate is commonly expressed as a fraction of the capacity of the battery. For example, the C/2 or C/5.
Charging – The process of supplying electrical energy for conversion to stored chemical energy.
Commutator: The part of a DC motor armature that causes the electrical current to be switched to various armature windings. Properly sequenced switching creates the motor torque. The commutator also provides the means to transmit the electrical current to the moving armature through the brushes that ride on the commutator.

100
Constant-Current Charge – A charging process in which the current applied to the battery is maintained at a constant value.
Constant-Voltage Charge – A charging process in which the voltage applied to a battery is held at a constant value.
Continuous Duty: The operation of loads for over one hour.
Cutoff Voltage, final – The prescribed lower-limit voltage at which battery discharge is considered complete. The cutoff or final voltage is usually chosen so that the maximum useful capacity of the battery is realized. The cutoff voltage varies with the type of battery and the kind of service in which the battery is used. When testing the capacity of a NiMH or NiCD battery a cutoff voltage of 1.0 V is normally used. 0.9V is normally used as the cutoff voltage of an alkaline cell. A device that is designed with too high a cutoff voltage may stop operating while the battery still has significant capacity remaining.
Cycle – One sequence of charge and discharge.
Cycle Life – For rechargeable batteries, the total number of charge/discharge cycles the cell can sustain before it’s capacity is significantly reduced. End of life is usually considered to be reached when the cell or battery delivers only 80% of rated ampere- hour capacity. NiMH batteries typically have a cycle life of 500 cycles, NiCd batteries can have a cycle life of over 1,000 cycles. The cycle of a battery is greatly influenced by the type depth of the cycle (deep or shallow) and the method of recharging. Improper charge cycle cutoff can greatly reduce the cycle life of a battery.
D
DC Current: The power supply available from batteries, generators (not alternators), or a rectified source used for special purpose applications.
Deep Cycle – A cycle in which the discharge is continued until the battery reaches it’s cut-off voltage, usually 80% of discharge.
Depth of Discharge: A measure of how much energy has been withdrawn from a battery. It is expressed as a percentage of the total battery capacity. For example – if you use 25ah of a 100ah battery, that is running the battery to 25% DOD.
Direct Current (DC) – The type of electrical current that a battery can supply. One terminal is always positive and another is always negative.
Discharge – The conversion of the chemical energy of the battery into electric energy.

101
Discharge, deep – Withdrawal of all electrical energy to the end-point voltage before the cell or battery is recharged.
Discharge, high-rate – Withdrawal of large currents for short intervals of time, usually at a rate that would completely discharge a cell or battery in less than one hour.
Discharge, low-rate – Withdrawal of small currents for long periods of time, usually longer than one hour.
Drain – Withdrawal of current from a cell.
Dry Cell – A primary cell in which the electrolyte is absorbed in a porous medium, or is otherwise restrained from flowing. Common practice limits the term “dry cell” to the Leclanch‚ cell, which is the common commercial type.
Duty Cycle: The relationship between operating time and the resting time of an electric motor.
E
Efficiency: The ration of the useful work performed and the energy expended in producing it.
Electrochemical Couple – The system of active materials within a cell that provides electrical energy storage through an electrochemical reaction.
Electrode – An electrical conductor through which an electric current enters or leaves a conducting medium, whether it be an electrolytic solution, solid, molten mass, gas, or vacuum. For electrolytic solutions, many solids, and molten masses, an electrode is an electrical conductor at the surface of which a change occurs from conduction by electrons to conduction by ions. For gases and vacuum, the electrodes merely serve to conduct electricity to and from the medium.
Electrolyte – A chemical compound which, when fused or dissolved in certain solvents, usually water, will conduct an electric current. All electrolytes in the fused state or in solution give rise to ions which conduct the electric current.
Electropositivity – The degree to which an element in a galvanic cell will function as the positive element of the cell. An element with a large electropositivity will oxidize faster than an element with a smaller electropositivity.
End-of-Discharge Voltage – The voltage of the battery at termination of a discharge.

102
Endshield: Also referred to as “End Bell”. The part of the motor that houses the bearing supporting the rotor and acts as a protective guard to the internal parts of the motor.
Energy – the capacity to perform work – expressed as capacity times voltage, or watt-hours.
Energy Density – Ratio of cell energy to weight or volume (watt-hours per pound, or watt-hours per cubic inch).
Excitation: The act of creating magnetic lines of force from a motor winding by applying voltage.
F
Field: The stationary part of a DC motor, commonly consisting of permanent magnets. Sometimes used also to describe the stator of an AC motor.
Final Voltage (see Cutoff voltage)
Float Charging – Method of recharging in which a secondary cell is continuously connected to a constant-voltage supply that maintains the cell in fully charged condition. Typically applied to lead acid batteries.
Force- any influence that causes a free body to undergo an acceleration.
Frame: Standardized motor mounting and shaft dimensions as established by NEMA or IEC.
Frequency: An expression of how often a complete cycle occurs. Cycles per second describe how many complete cycles occur in a given time increment. Hertz (hz) has been adopted to describe cycles per second so that time as well as number of cycles is specified. The standard power supply in North America is 60hz. Most of the rest of the world has 50hz power.
Fuel Cell Vehicle: A vehicle powered by a fuel cell, usually hydrogen. This is essentially an electric vehicle but using a liquid to store energy rather than a battery.
Full Load Amperes (FLA): Line current (amperage) drawn by a motor when operating at rated load and voltage on motor nameplate. Important for proper wire size selection, and motor starter or drive selection. Also called full load current.
Full-Load Torque: The force produced by a motor running at rated full-load speed at rated horsepower.
Fuse: A piece of metal, connected in the circuit to be protected, that melts and interrupts the circuit when excess current flows.

103
G
Galvanic Cell – A combination of electrodes, separated by electrolyte, that is capable of producing electrical energy by electrochemical action.
Gassing – The evolution of gas from one or both of the electrodes in a cell. Gassing commonly results from self-discharge or from the electrolysis of water in the electrolyte during charging.
Generator: Any machine that converts mechanical energy into electrical energy.
H
Hertz: Frequency, in cycles per second, of AC power. Named after H.R. Hertz, the German scientist who discovered electrical oscillations.
High Voltage Test: Application of a voltage greater than the working voltage to test the adequacy of motor insulation. Often referred to as high potential test or “hi-pot”.
Horsepower (HP): A measure of the rate of work. 33,000 pounds lifted one foot in one minute, or 550 pounds lifted one foot in one second. Exactly 746 watts of electrical power equals one horsepower.
Hybrid Electric Vehicle A vehicle that combines conventional power production (e.g. an ICE) and an electric motor.
Hybrid Electric Vehicle: A vehicle which is powered by both electricity and another fuel, usually petrol/gas (eg Toyota Prius). This is usually just a more efficient way of using the standard fuel as there is no external source of electricity.
I
Impedance: The total opposition in an electric circuit to the flow of an alternating current. Expressed in ohms.
Induction Motor: The simplest and most rugged electric motor, it consists of a wound stator and a rotor assembly. The AC induction motor is named because the electric current flowing in its secondary member (the rotor) is induced by the alternating current flowing in its primary member (stator). the power supply is connected only to the stator. The combined electromagnetic effects of the two currents produce the force to create rotation.
Insulation: In motors, classified by maximum allowable operating temperature. NEMA Classifications include:

104
Integral Horsepower Motor: A motor rated one horsepower or larger at 1800RPM. By NEMA definitions, this is any motor having a three digit frame, for example 143T.
Intermittent Duty: The operation during alternate periods of load and rest. Usually expressed as 5 minutes, 30 minutes or
Internal Combustion Engine: the standard way to power a vehicle, this part is removed when converting to an electric car.
Internal Resistance – The resistance to the flow of an electric current within the cell or battery.
International Electrotechnical Commission (IEC): The worldwide organization that promotes international unification of standards or norms. Its formal decisions on technical matters express, as nearly as possible, an international consensus.
J
Joule- The work required to continuously produce one watt of power for one second; or one watt second (W·s) (compare kilowatt hour). This relationship can be used to define the watt.
K
Kilowatt: A unit of power equal to 1000 watts and approximately equal to 1.34 horsepower.
L
Lithium Ion Or Lithium-ion polymer battery. are a type of rechargeable battery in which lithium ions move from the negative electrode (anode) to the positive electrode (cathode) during discharge, and from the cathode to the anode when charged.
Load: The work required of a motor to drive attached equipment. Expressed in horsepower or torque at a certain motor speed.
Locked Rotor Current: Measured current with the rotor locked and with rated voltage and frequency applied to the motor.
Locked Rotor Torque: Measured torque with the rotor locked and with rated voltage and frequency applied to the motor.
M
Magnetic Polarity: Distinguishes the location of North and South poles of a magnet. Magnetic lines of force emanate from the North pole of a magnet and terminate at the South pole.
Memory Effect – A phenomenon in which a cell, operated in successive cycles to less than full, depth of discharge, temporarily loses the remainder

105
of its capacity at normal voltage levels (usually applies only to Ni-Cd cells). Note, memory effect can be induced in NiCd cells even if the level of discharge is not the same during each cycle. Memory effect is reversable.
Mounting, Basic Types: The most common motor mounts include: rigid base, resilient base C face or D flange, and extended through bolts.
Mush Coil: A coil made with round wire.
N
Nano Crystalline Motor – Conducts energy approx 10 times more efficiently than Iron core motors.
National Electric Code (NEC): A safety code regarding the use of electricity. The NEC is sponsored by the National Fire Protection Institute. It is also used by insurance inspectors and by many government bodies regulating building codes.
Negative Terminal – The terminal of a battery from which electrons flow in the external circuit when the cell discharges. See Positive Terminal.
Neighborhood Electric Vehicle. Used for short trips around ones community. Church, School, meeting, etc
NEMA (National Electrical Manufactures Association): A non-profit trade organization, supported by manufacturers of electrical apparatus and supplies in the United States. Its standards alleviate misunderstandings and help buyers select the proper products. NEMA standards for motors cover frame sizes and dimensions, horsepower ratings, service factors, temperature rises and performance characteristics.
Nonaqueous Batteries – Cells that do not contain water, such as those with molten salts or organic electrolytes.
O
Ohm’s Law – The formula that describes the amount of current flowing through a circuit. Ohm’s Law – In a given electrical circuit, the amount of current in amperes (I) is equal to the pressure in volts (V) divided by the resistance, in ohms (R). Ohm’s law can be shown by three different formulas:
Open Circuit – Condition of a battery which is neither on charge nor on discharge (i.e., disconnected from a circuit).
Open-Circuit Voltage – The difference in potential between the terminals of a cell when the circuit is open (i.e., a no-load condition).

106
Output Shaft: The shaft of a speed reducer assembly that is connected to the load. This may also be called the drive shaft or the slow speed shaft.
Overhung load: Is the perpendicular force pushing against the side of an output shaft. This force is either from a weight hanging on the output shaft or from a sprocket, pulley or gear being used on the shaft.
Oxidation – A chemical reaction that results in the release of electrons by an electrode’s active material.
P
Parallel Connection – The arrangement of cells in a battery made by connecting all positive terminals together and all negative terminals together. The voltage of the group remains the same as the voltage of the individual cell. The capacity is increased in proportion to the number of cells.
Partial Zero Emissions Vehicle PZEVs meet SULEV tailpipe emission standards, have zero evaporative emissions and a 15 year / 150,000 mile warranty. No evaporative emissions means that they have fewer emissions while being driven than a typical gasoline car has while just idling.
Permanent Split Capacitor (PSC): (Single Phase) Performance and applications similar to shaded pole motors, but more efficient, with lower line current and higher horsepower capabilities.
Phase: The number of individual voltages applied to an AC motor. A single-phase motor has one voltage in the shape of a sine wave applied to it. A three-phase motor has three individual voltages applied to it. The three phases are at 120 degrees with respect to each other so that peaks of voltage occur at even time intervals to balance the power received and delivered by the motor throughout its 360 degrees of rotation.
Plug-in Hybrid Electric Vehicle: A hybrid electric vehicle with a substantial battery pack which is able to be charged by an external source other than its fossil fuel (i.e. plugged into household electricity). These vehicles often have the ability to travel is a ‘pure electric mode’ without using any conventional fuels.
Plugging: A method of braking a motor that involves applying partial or full voltage in reverse in order to bring the motor to zero speed.
Polarity: As applied to electric circuits, polarity indicates which terminal is positive and which is negative. As applied to magnets, it indicates which pole is North and which pole is South.
Poles: Magnetic devices set up inside the motor by the placement and connection of the windings. Divide the number of poles into 7200 to

107
determine the motor’s normal speed. For example, 7200 divided by 2 poles equals 3600RPM.
Positive Terminal – The terminal of a battery toward which electrons flow through the external circuit when the cell discharges. See Negative Terminal.
Power – the rate at which work is performed or energy is converted.
Primary Battery – A battery made up of primary cells. See Primary Cell.
Primary Cell – A cell designed to produce electric current through an electrochemical reaction that is not efficiently reversible. The cell, when discharged, cannot be efficiently recharged by an electric current. Alakline, lithium, and zinc air are common types of primary cells.
Pull-Up Torque: The minimum torque delivered by a motor between zero and the rated RPM, equal to the maximum load a motor can accelerate to rated RPM.
Pulse Width Modulation: a high-efficiency technique for controlling voltage output in a motor controller.
R
Rated Capacity – The number of ampere-hours a cell can deliver under specific conditions (rate of discharge, end voltage, temperature); usually the manufacturer’s rating.
Rechargeable – Capable of being recharged; refers to secondary cells or batteries.
Recombination – State in which the gases normally formed within the battery cell during its operation, are recombined to form water.
Reduction – A chemical process that results in the acceptance of electrons by an electrode’s active material.
Regenerative Braking Systems – An EV with a braking system that uses the braking RPM load to charge the onboard batteries.
Relay: A device have two separate circuits, it is constructed so that a small current in one of the circuits controls a large current in the other circuit. A motor starting relay opens or closes the starting circuit under predetermined electrical conditions in the main circuit (run winding).
Reluctance: The characteristics of a magnetic field which resists the flow of magnetic lines of force through it.
Resistor: A device that resists the flow of electrical current for the purpose of operation, protection or control. There are two types of

108
resistors-fixed and variable. A fixed resistor has a fixed value of ohms while a variable resistor is adjustable.
Rotation: The direction in which a shaft turns is either clockwise (CW) or counterclockwise (CCW). When specifying rotation, also state if viewed from the shaft end or the opposite shaft end of the motor.
Rotor: The rotating component of an induction AC motor. It is typically constructed of a laminated, cylindrical iron core with slots of cast-aluminum conductors. Short-circuiting end rings complete the “squirrel cage,” which rotates when the moving magnetic field induces current in the shorted conductors.
S
Seal – The structural part of a galvanic cell that restricts the escape of solvent or electrolyte from the cell and limits the ingress of air into the cell (the air may dry out the electrolyte or interfere with the chemical reactions).
Secondary Battery – A battery made up of secondary cells. See Storage Battery; Storage Cell.
Self Discharge – Discharge that takes place while the battery is in an open-circuit condition.
Separator – The permeable membrane that allows the passage of ions, but prevents electrical contact between the anode and the cathode.
Series Connection – The arrangement of cells in a battery configured by connecting the positive terminal of each successive cell to the negative terminal of the next adjacent cell so that their voltages are cumulative. See Parallel Connection.
Service Factor: A measure of the overload capacity built into a motor. A 1.15 SF means the motor can deliver 15% more than the rated horsepower without injurious overheating. A 1.10 SF motor should not be loaded beyond its rated horsepower. Service factors will vary for different horsepower motors and for different speeds.
Shaded Pole Motor: (Single Phase) Motor has low starting torque, low cost. Usually used in direct-drive fans and small blowers, and in small gearmotors.
Shallow Cycling – Charge and discharge cycles which do not allow the battery to approach it’s cutoff voltage. Shallow cycling of NiCd cells lead to “memory effect”. Shallow cycling is not detrimental to NiMH cells and it is the most beneficial for lead acid batteries.

109
Shelf Life – For a dry cell, the period of time (measured from date of manufacture), at a storage temperature of 21 degrees C (69 degrees F), after which the cell retains a specified percentage (usually 90%) of its original energy content.
Short-Ciruit – A condition that occurs when a short electrical path is unintentionally created. Batteries can supply hundreds of amps if short-circuited, potentially melting the terminals and creating sparks.
Split Phase (or more specifically Split-Phase start-induction run): (Single Phase) Motor has moderate starting torque, high breakdown torque. Used on easy-starting equipment, such as belt-driven fans and blowers, grinders, centrifugal pumps, gearmotors, ect.
Starting Torque: Force produced by a motor as it begins to turn from standstill and accelerate (sometimes called locked rotor torque).
Starting-Lighting-Ignition (SLI) Battery – A battery designed to start internal combustion engines and to power the electrical systems in automobiles when the engine is not running. SLI batteries can be used in emergency lighting situations.
Stationary Battery – A secondary battery designed for use in a fixed location.
Stator: The fixed part of an AC motor, consisting of copper windings within steel laminations.
Storage Battery – An assembly of identical cells in which the electrochemical action is reversible so that the battery may be recharged by passing a current through the cells in the opposite direction to that of discharge. While many non-storage batteries have a reversible process, only those that are economically rechargeable are classified as storage batteries. Synonym: Accumulator; Secondary Battery. See Secondary Cell.
Storage Cell – An electrolytic cell for the generation of electric energy in which the cell after being discharged may be restored to a charged condition by an electric current flowing in a direction opposite the flow of current when the cell discharges. Synonym: Secondary Cell. See Storage Battery.
T
Taper Charge – A charge regime delivering moderately high-rate charging current when the battery is at a low state of charge and tapering the current to lower rates as the battery becomes more fully charged.
Temperature Rise: The amount by which a motor, operating under rated conditions, is hotter than its surrounding ambient temperature.

110
Temperature Tests: These determine the temperature of certain parts of a motor, above the ambient temperature, while operating under specific environmental conditions.
Terminals – The parts of a battery to which the external electric circuit is connected.
Thermal Protector: A device, sensitive to current and heat, which protects the motor against overheating due to overload or failure to start. Basic types include automatic rest, manual reset and resistance temperature detectors.
Thermal Runaway – A condition whereby a cell on charge or discharge will destroy itself through internal heat generation caused by high overcharge or high rate of discharge or other abusive conditions.
Thermocouple: A pair of dissimilar conductors joined to produce a thermoelectric effect and used to accurately determine temperature. Thermocouples are used in laboratory testing of motors to determine the internal temperature of the motor winding.
Thermostat: A protector, which is temperature-sensing only, that is mounted on the stator winding. Two leads from the device must be connected to control circuit, which initiates corrective action. The customer must specify if the thermostats are to be normally closed or normally open.
Torque: The turning effort or force applied to a shaft, usually expressed in inch-pounds or inch-ounces for fractional and sub-fractional HP motors.
Transformer: Used to isolate line voltage from a circuit or to change voltage and current to lower or higher values. Constructed of primary and secondary windings around a common magnetic core.
Trickle Charging – A method of recharging in which a secondary cell is either continuously or intermittently connected to a constant-current supply that maintains the cell in fully charged condition.
U
Underwriters Laboratories (UL): Independent United States testing organization that sets safety standards for motors and other electrical equipment.
V
Vent – A normally sealed mechanism that allows for the controlled escape of gases from within a cell.
Volt – The unit of measurement of electromotive force, or difference of potential, which will cause a current of one ampere to flow through a

111
resistance of one ohm. Named for Italian physicist Alessandro Volta (1745-1827).
Voltage, cutoff – Voltage at the end of useful discharge. (See Voltage, end-point.)
Voltage, end-point – Cell voltage below which the connected equipment will not operate or below which operation is not recommended.
Voltage, nominal – Voltage of a fully charged cell when delivering rated current.
Voltage: A unit of electromotive force that, when applied to conductors, will produce current in the conductors.
W
Watt: The amount of power required to maintain a current of 1 ampere at a pressure of one volt when the two are in phase with each other. One horsepower is equal to 746 watts. Watts = amperes multiplied by volts. 120 volt @ 1 amp = 12 volts @ 10 amps.
Wet Cell – A cell, the electrolyte of which is in liquid form and free to flow and move.
Winding: Typically refers to the process of wrapping coils of copper wire around a core, usually of steel. In an AC induction motor, the primary winding is a stator consisting of wire coils inserted into slots within steel laminations. The secondary winding of an AC induction motor is usually not a winding at all, but rather a cast rotor assembly. In a permanent magnet DC motor, the winding is the rotating armature.
Work – the amount of energy transferred by a force acting through a distance.
Compiled via The Electric Motor Warehouse, The Environmentally Friendly Store and Green Batteries.

112

113
Bibliography, Links and Resources
Reference and Inspiration: * Noah Podolefsky’s GSX-E site: www.gsx-e.com * EV Album: www.evalbum.com * Battery University: www.batteryuniversity.com * Lennon Rodgers’ “DIY Electric Motorcycle Project” (with EV calculator): www.electricmotion.org * Juiced Drag Racing (How-To Guide): 74.52.154.242/~etracing/Main.html * CompGoCarts’ Sprocket Calculator: www.compgoparts.com/TechnicalResources/SprocketCalculator.asp * BikeExif: www.bikeexif.com * Knucklebuster: www.knucklebusterinc.com Suppliers (with Reference Info): * Cloud Electric LLC: www.cloudelectric.com * Electric Motorsport: www.electricmotorsport.com * Thunderstruck Motors: www.thunderstruck-ev.com * EvolveElectrics: www.evolveelectrics.com * EV Parts: www.evparts.com * Elite Power Systems (GBS packages) www.elitepowersolutions.com Classifieds and Used Parts: * EV Tradin’ Post: www.evtradinpost.com * The Electric Motorcycle Trader: www.electricmotorcycletrader.com Groups and Forums: * ElMoto: www.elmoto.net * Endless Sphere Technology Forums: endless-sphere.com/forums Blogs and Magazines: * PlugBike: plugbike.com * Hell for Leather: hellforleathermagazine.com * Asphalt and Rubber: www.asphaltandrubber.com Books: * Build Your Own Electric Motorcycle – Carl Vogel * Electric Vehicle Technology Explained - Larminie J. * Motorcycle Handling and Chassis Design, the art and science – Tony Foale (www.tonyfoale.com)

114

115
Index
A123,17,68AGM,16,17,23,68,69,70Agni,10,31,32,33,48,53amp‐hours,15,50,99anode,18,97,99,104,108BMS,16,17,18,21,22,23,58,60boatbuilding,11Crating,16,17,18CALB,17,70CardboardAidedDesign,65CarlVogel,47cathode,18,19,99,104,108CedricLynch,32,33charge/dischargerate,15crotchrockets,45,46Cupex,33CycleAnalyst,50DavidO’Brien,50ducttape,69ElementalForcesoftheUniverse,52EMF,29Etek,5,32,33EVgrin,9Floodedleadacid,70Hallsensor,28Hallsensors,28HammarheadVolta,36Headway,17,23,68Henrithepainter,85HowardChapelle,11HurtReport,86Juiced",75Juiced",23KelseyMartin’s,9KWh?,63
LiFePO4,19LiPo,18,19,50,89lossesduetoresistance,38MarsElectric,10,32Mavizen,24,49mini‐BMS,23MotoCzysz,67MotoElectra,46,47MotorcycleSafetyFoundation,85Nanophosphate,19Non‐BMS,23Optima,17ParkerElectromechanical,39ParkerMPPmotor,39Peukert’sLaw,21programming,27PulseWidthModulation,25,107pun,33,76puns,57regen,10,28,30,31,32,50,54regenerativebraking,28,30,54,55,91
RenaultMarsII,7servomotor,40SkyEnergy,17SOC,23,50solarcharging,58Sparky,13,34StateofCharge,23streetfighter,46,61,67Thesittin’stool,11Thundersky,17,68,69,70TTXGP,38,68,91Valence,17,24,67VRLA,16


