139
foundationConnect Grantee Community Configuration Guide @salesforcedocs Last updated: May 3, 2019 1
foundationConnect Grantee Community Configuration Guide
@salesforcedocs Last updated: May 3, 2019
1

© Copyright 2000–2017 salesforce.com, inc. All rights reserved. Salesforce is a registered trademark of
salesforce.com, inc., as are other names and marks. Other marks appearing herein may be trademarks of their respective owners.
2

Note: This is a legacy document and may not be accurate. Please visit the foundationConnect Knowledge page for up-to-date content.
3
Contents
Welcome to foundationConnect
Installation
Prerequisites for Installation
Install the Grantee Community
Configuration
Custom Settings
Virus Scanning
Create a Community
Create a Guest User Profile
Configure User Registration Field Sets
Create a Community User Profile
Configure OWD Settings
Restrict User Access to Internal SFDC Pages
Override Default Pages - Standard Objects
Create URL Redirects - Standard Objects
Create URL Redirects - Custom Objects
Custom Settings
Community Rules
Community Administration
Members
Tabs for Salesforce Tabs and Visualforce Template
Branding
To change the logo on the sign in and registration pages:
To change the dashboard header, footer and color scheme:
Login and Registration
Emails
Deactivate default “welcome” email
Configure User Verification and Activation Emails
Prerequisites
Email Verification
Account Activation
Configure Auto-Activation for User Registration
Implement
Email Services
Portal Account Administration
To enable this feature:
To grant a portal user this permission:
Configure Profile Tabs
Contact and Organization Tabs
4

Make Organization Name Editable
Configure Contact Field Sets
Add the Contact and Organization Profile Tabs to Applications
Create a Custom Profile Tab
Enable Attachments for Submitted Applications
Community Manager
Create an Inquiry or Request
Create a Portal Tab
Create a Question
Post Attachments to Chatter Feeds
Create an Attachment Question
Create a Related List with Tab
Create a Grantee Budget Tab
Create a Grantee Budget Update Tab
Create an IFrame Tab
Create a Contact or Organization Profile Tab
Designing Page Layouts
Grantee Budget Module
Overview
Grantee Budget Categories
Create a Grantee Budget Tab
Configure
Create a Grantee Budget Update Tab
Configure
Define the Grantee Report Sort Order
If the value of the Grantee Report Order By field is updated on a record, Expenditures to Date will not recalculate on any Grantee Reports until an edit is made on the Budget Update record.
Create a Campaign
To Create a Docket with a Single LOI or Request Quiz
To Create a Docket with Multiple LOI and/or Request Quizzes:
Define Default Field Values on a Campaign for LOIs (Leads) and Requests (Opportunities)
Optional Configuration for Handing Expired Dockets
Using Custom Campaign Fields on LOIs (Leads) and Requests (Opportunities)
Implement
Configure Explore Grant Opportunities
Enable the Functionality:
To Display the Tab on the Dashboard:
To Edit the Sidebar Text:
To Translate Description and Instructions:
Configure GuideStar
Pre-requisites
Configure
5
Registration and Sign In Pages
Instructional Text
CustomHTML
To create a CustomHTML record:
Hide Organization/Individual Toggle on Registration
Custom Labels
Implement
Hiding GuideStar Buttons from Registration Pages
Map Portal User Fields
Sync Portal User, Contact, and User Fields
Custom Validation Rule for Registration Process
Enable Community Collaboration
Defining Team and Contact Roles
To Set Team Roles
To Set Contact Roles
To Set or Remove a Default Contact Role:
Create the Portal Tab
Create the Email Template
Create the Workflow
Create an Eligibility Quiz
Create a Question
Create Question Responses
Create a Quiz
Associate Questions with a Quiz
Create a Quiz URL
Customize the footer text on the Eligibility Quiz Page
Configure Custom Object Tab on the Profile Tab
Configuring Amendments for Organizations and Requests
Formula Fields
Request Configuration
Create custom fields to capture the amended data
Create a page layout
Enable Amendments for Requests
Organization Configuration
Create custom fields to capture the amended data
Create a Page Layout
Update the Community User Profile
Configure Amendments for Custom Objects
Custom Object Duration
Amendment Configuration
Formula Fields
Community Manager
6
Configure Recommendation Portal
Key Considerations
Prerequisites
Customize the Recommendation Object
Create Page Layout - Applicant
Create Page Layouts - Recommender
Configure a Recommendation Notification
Configure a Recommendation Receipt
Modify Custom Levels
Use Centralized CSS to Customize Portal Pages
Update the default foundationConnect Static Resource
Create a New Static Resource
Create a “Community Static Resource” Custom Setting
Update the “Community_Static_Resource_Record_Label” Custom Label
Example: Show/Hide Inbox ‘Compose button’
Additional Text Customization
Hiding pre-text and post-text after submission
Hiding pre-text and post-text after Application or LOI submission
Hiding pre-text and post-text after Grantee Report, Benchmark or Amendment submission
Adding Instructional Text on Dashboard
Adding Color Alters on Dashboard
Adding Instructional text for Profile tab
Adding Instructional text for Review & Submit page
Setup a Multi-Language Portal
Custom Settings
Translate Applications
Translate Labels and Buttons
Deployment and End User Instructions
Activate the Community
Registration for Individuals
Creating Portal Users Manually using the SFDC Interface
Create an Account
Create a Contact
Create a Portal User
Update the User
Other Considerations
Grantee Registration
Resetting a Password
Using the Grantee Dashboard
Explore Grant Opportunities
Benchmark Updates in Grantee Reports
7
Implement:
Populate a Grantee Budget
Send an Email Via the Portal
Welcome to foundationConnect This guide was designed for Salesforce.com (SFDC) Enterprise instances without any foundationConnect (fC) managed packages installed. All instructions are only applicable to Communities (not .NET) and reference Salesforce Classic setup (not Lightning).
Note: Trialforce Configuration Highlights
For those SFDC instances created from the foundationConnect Trialforce template (in which the Grantee Portal managed package is already installed and configured), please see the Trialforce Configuration Highlights throughout this document. These instructions allow for further customization based on an organization’s specific needs.
To request an fC Trialforce instance please contact foundationConnect support.
Installation
Note: Trialforce Configuration Highlights
Trialforce Prerequisites:
● Salesforce.com (SFDC) Enterprise instance created from an fC Community Trialforce template
● System administrator access to the instance ● Basic proficiency with SFDC and fC configuration
Prerequisites for Installation
These instructions presume the following:
● Salesforce.com (SFDC) Enterprise instance without any foundationConnect (fC) managed packages installed
● System administrator access to the instance ● Basic proficiency with SFDC and fC configuration ● Communities has been enabled in your instance
○ Go to Customize > Communities > Settings and select (check) “Enable communities” ○ Enter a value into “Domain name” - this will enable the Check Availability button. ○ Click Check Availability to ensure the value you entered isn’t already in use. If so, enter
another value and repeat this step until you are successful. ○ Click the Save button
● Translation Workbench has been enabled in your instance. ○ Go to Setup > Administer > Translation Workbench > Translation Settings.
8
○ On the welcome page click Enable. ○ For additional instructions search Salesforce.com for “Setting Up the Translation
Workbench”.
Install the Grantee Community
Note: Trialforce Configuration Highlights
The Trialforce template may be a few versions behind the most current packages. If applicable:
● Upgrade to the latest Base managed package ● Upgrade to the latest Grantee Portal managed package for Communities. ● Rename the following pre-configured record types to values that are more appropriate for
your implementation: ● Account: Master ● Campaign: Grant Application
○ NOTE: This value is displayed on the Grantee Portal ● Grantee Report: Sample Report
○ NOTE: This value is displayed on the Grantee Portal ● Once upgrades are completed please proceed to Configuration > Custom Settings.
The following steps must occur before attempting to install the Communities package:
1. Create one Campaign record type 2. Create one Account record type 3. Enable Opportunity Team Selling 4. Go to Setup > Customize > Opportunities > Opportunity Team > Settings 5. Select (check) “ Enable Team Selling ” and click the Save button. 6. Enable Partner Relationship Management 7. Go to Setup > Customize > Partners > Settings 8. Click the Edit button. 9. Select (check) “ Enable Partner Relationship Management ”. 10. When the warning dialog opens click the OK button. 11. When Sharing wizard opens, click Continue , then Cancel . 12. Click the Save button. 13. Install the latest Base managed package. 14. Create one Grantee Report record type. 15. Go to Setup > Create > Objects > Grantee Report > Edit 16. Scroll down to the Record Type list and click New 17. Create a new record type, name can be anything that describes its use, such as “Interim Report,”
“Financial Report,” etc. 18. Set Organization Wide Defaults to Private for Leads and Opportunities 19. Go to Setup > Security Controls > Sharing Settings > Edit Organization Wide Defaults 20. Update Lead to Private 21. Update Opportunity to Private 22. Click Save 23. Install the latest Grantee Portal managed package for Communities.
9
24. Assign a Role to the logged in User (in case he/she doesn't have any Role assigned) 25. An account owner must be associated with a role to enable portal users or transfer portal users to
his or her account.
Configuration
Custom Settings
Note: Trialforce Configuration Highlights
The Portal Configuration custom setting has been lightly configured. Please review the instructions below for an understanding of the feature set before proceeding to the next Trialforce Configuration Highlight.
1. Navigate to Setup > Develop > Custom Settings > Portal Configuration > Manage . 2. Click the New button - this will create a new record. 3. When the new record opens populate the following fields:
a. Name : Enter a name that reflects the community and, if applicable, the language. For example, “Grantee Community - English”.
i. As a best practice, Name should reflect the portal type and language, e.g. “Grantee Community - English”, “Reviewer Community - Spanish”, etc.
b. Customize Dashboard: Leave unchecked. c. Amendment Name : If applicable, enter the dashboard caption for your grantee report, e.g.
“Amendments”. If left blank, the Amendment tab will not appear in the Grantee Dashboard. d. Benchmark Name : If applicable, enter the dashboard caption for your grantee report, e.g.
“Goals”. If left blank, the Benchmark tab will not appear in the Grantee Dashboard. e. Grantee Inbox Tab Label : If applicable, enter the dashboard caption for the inbox, e.g.
“Messages”. Populating this field makes the inbox visible in your Community’s dashboard. As of version 8.32, leaving it blank will hide the inbox in its entirety . If you want to display the inbox but limit users’ ability to create messages see the Use Centralized CSS to Customize Portal Pages > Example: Show/Hide Inbox ‘Compose button' section in this guide.
f. GranteeReportName : If applicable, enter the dashboard caption for your grantee report, e.g. “Status Reports”. If left blank, the Grantee Reports tab will not appear in the Grantee Dashboard.
g. Grantee Report field for default sorting : Enter the API name of the Grantee Report field by which you want all the records to be sorted. For example "FGM_Base__Due_Date__c" for the Due Date field.
h. Grantee Report Field Sort Order : Enter "Ascending" or "Descending". i. InquiryName : If applicable, enter the dashboard caption for your inquiries, e.g. “LOIs.” If
left blank, the Inquiry tab will not appear in the Grantee Dashboard. j. RequestName : If applicable, enter the dashboard caption for your requests, e.g.
“Applications”. If left blank, the Request tab will not appear in the Grantee Dashboard. k. Post attachments to chatter feeds : If checked, attachments submitted through this portal
will be uploaded as Salesforce Files instead of in the Notes and Attachments related list
10
i. Attaching files as Salesforce Files allows users to upload files up to 2 GB, compared to a 25 MB limit for standard Salesforce Attachments
ii. IMPORTANT NOTE: As of Winter ‘18, Salesforce will no longer support uploading to the Notes and Attachments related list. In preparation for this change, this option is highly recommended for all foundationConnect customers.
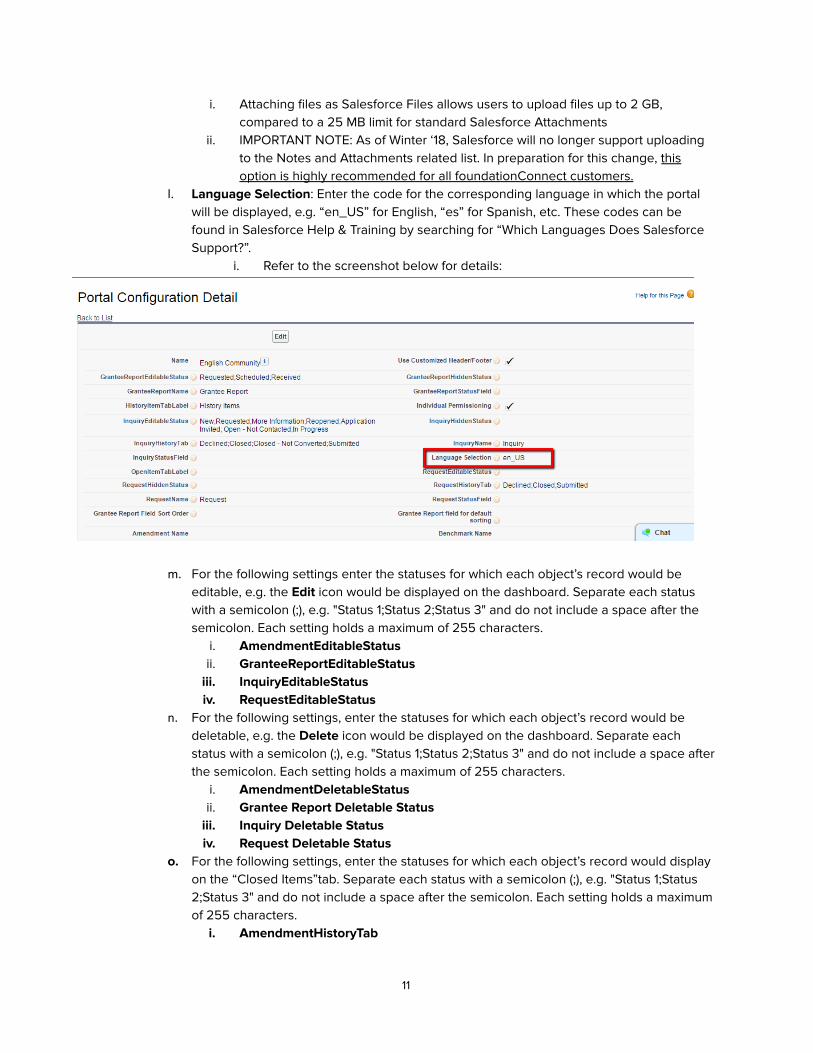
l. Language Selection : Enter the code for the corresponding language in which the portal will be displayed, e.g. “en_US” for English, “es” for Spanish, etc. These codes can be found in Salesforce Help & Training by searching for “Which Languages Does Salesforce Support?”.
i. Refer to the screenshot below for details:
m. For the following settings enter the statuses for which each object’s record would be editable, e.g. the Edit icon would be displayed on the dashboard. Separate each status with a semicolon (;), e.g. "Status 1;Status 2;Status 3" and do not include a space after the semicolon. Each setting holds a maximum of 255 characters.
i. AmendmentEditableStatus ii. GranteeReportEditableStatus
iii. InquiryEditableStatus iv. RequestEditableStatus
n. For the following settings, enter the statuses for which each object’s record would be deletable, e.g. the Delete icon would be displayed on the dashboard. Separate each status with a semicolon (;), e.g. "Status 1;Status 2;Status 3" and do not include a space after the semicolon. Each setting holds a maximum of 255 characters.
i. AmendmentDeletableStatus ii. Grantee Report Deletable Status
iii. Inquiry Deletable Status iv. Request Deletable Status
o. For the following settings, enter the statuses for which each object’s record would display on the “Closed Items”tab. Separate each status with a semicolon (;), e.g. "Status 1;Status 2;Status 3" and do not include a space after the semicolon. Each setting holds a maximum of 255 characters.
i. AmendmentHistoryTab
11
ii. Grantee Report History Tab iii. InquiryHistoryTab iv. RequestHistoryTab
p. For the following settings, enter the statuses for which each object’s record would be hidden on the dashboard from the portal user. Separate each status with a semicolon (;), e.g. "Status 1;Status 2;Status 3" and do not include a space after the semicolon. Each setting holds a maximum of 255 characters.
i. AmendmentHiddenStatus ii. GranteeReportHiddenStatus iii. InquiryHiddenStatus iv. RequestHiddenStatus
4. Click the Save button.
Note: Trialforce Configuration Highlights ● If applicable, modify the following values to ones that are more appropriate for your
implementation: ○ Name ○ Likewise you can clear any existing value(s) to hide the related tab(s):
■ Amendment Name ■ Benchmark Name ■ Grantee Inbox Tab Label ■ GranteeReportName ■ InquiryName ■ RequestName
● If applicable, identify the field on which Grantee Reports will be sorted on the Grantee dashboard as well as the sort order
■ Grantee Report field for default sorting ■ Grantee Report Field Sort Order
● If applicable, select (check) Post attachments to chatter feeds to enable this feature ● Once statuses have been defined for Leads , Opportunities , Grantee Reports and
Amendments update the following settings: ○ Inquiries (Leads)
■ InquiryEditableStatus ■ Inquiry Deletable Status ■ InquiryHistoryTab ■ InquiryHiddenStatus
○ Requests (Opportunities) ■ RequestEditableStatus ■ Request Deletable Status ■ RequestHistoryTab ■ RequestHiddenStatus
○ Grantee Reports ■ GranteeReportEditableStatus ■ Grantee Report Deletable Status ■ Grantee Report History Tab ■ GranteeReportHiddenStatus
○ Amendments ■ AmendmentEditableStatus
12
■ AmendmentDeletableStatus ■ AmendmentHistoryTab ■ AmendmentHiddenStatus
Virus Scanning
Note: Trialforce Configuration Highlights
Virus Scanning is not configured in the Trialforce template. Please see the instructions below on how to enable this feature.
Foundations may elect to use virus scanning on attachments submitted through the portal. If they choose to use virus scan through foundationConnect, there are additional setup steps to enable it. A note about virus scanning through foundationConnect: foundationConnect does not provide public documentation detailing virus scan functionality as that could constitute a security risk; however, we are happy to discuss specifics with individual customers. foundationConnect employees are not experts in cyber security and therefore do not officially recommend a particular approach to security. The foundationConnect virus scan option is offered in partnership with a third party cyber security vendor for customers who would like to use it. All questions regarding virus scan may be directed to your foundationConnect point of contact.
Create a Community
Note: Trialforce Configuration Highlights
The Grantee Community has been created in the Trialforce Template. Please proceed to Configure User Registration Field Sets.
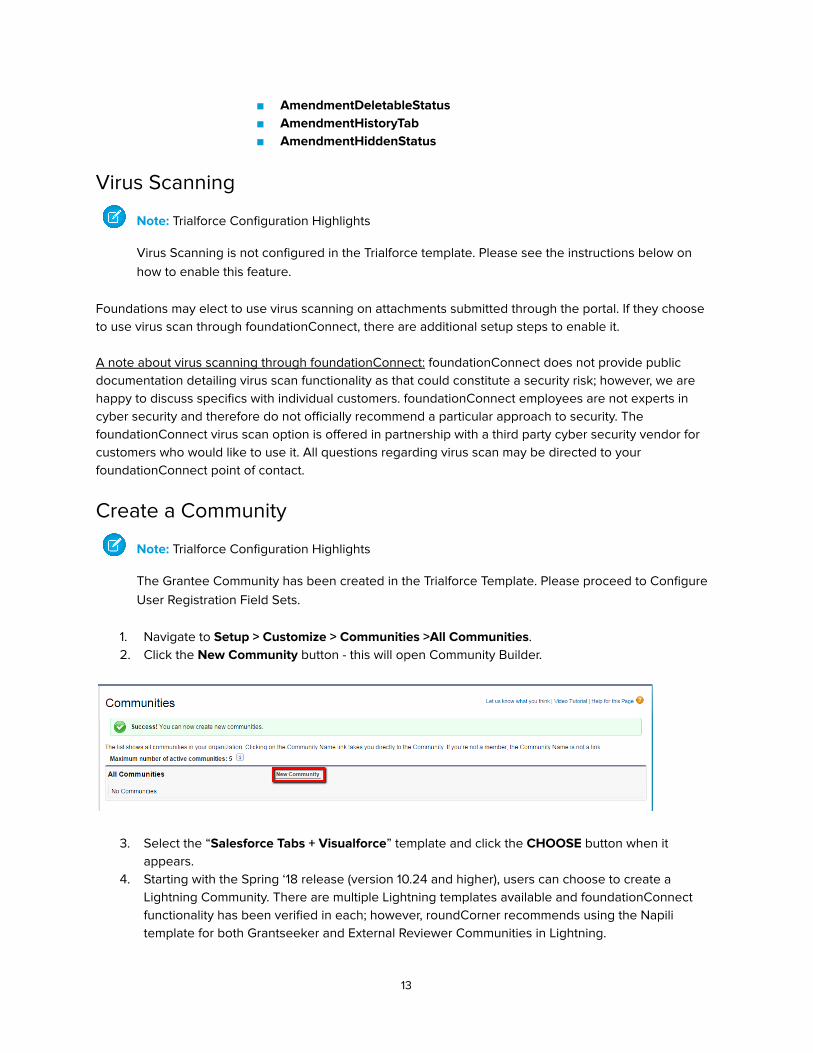
1. Navigate to Setup > Customize > Communities >All Communities . 2. Click the New Community button - this will open Community Builder.
3. Select the “ Salesforce Tabs + Visualforce ” template and click the CHOOSE button when it appears.
4. Starting with the Spring ‘18 release (version 10.24 and higher), users can choose to create a Lightning Community. There are multiple Lightning templates available and foundationConnect functionality has been verified in each; however, roundCorner recommends using the Napili template for both Grantseeker and External Reviewer Communities in Lightning.
13
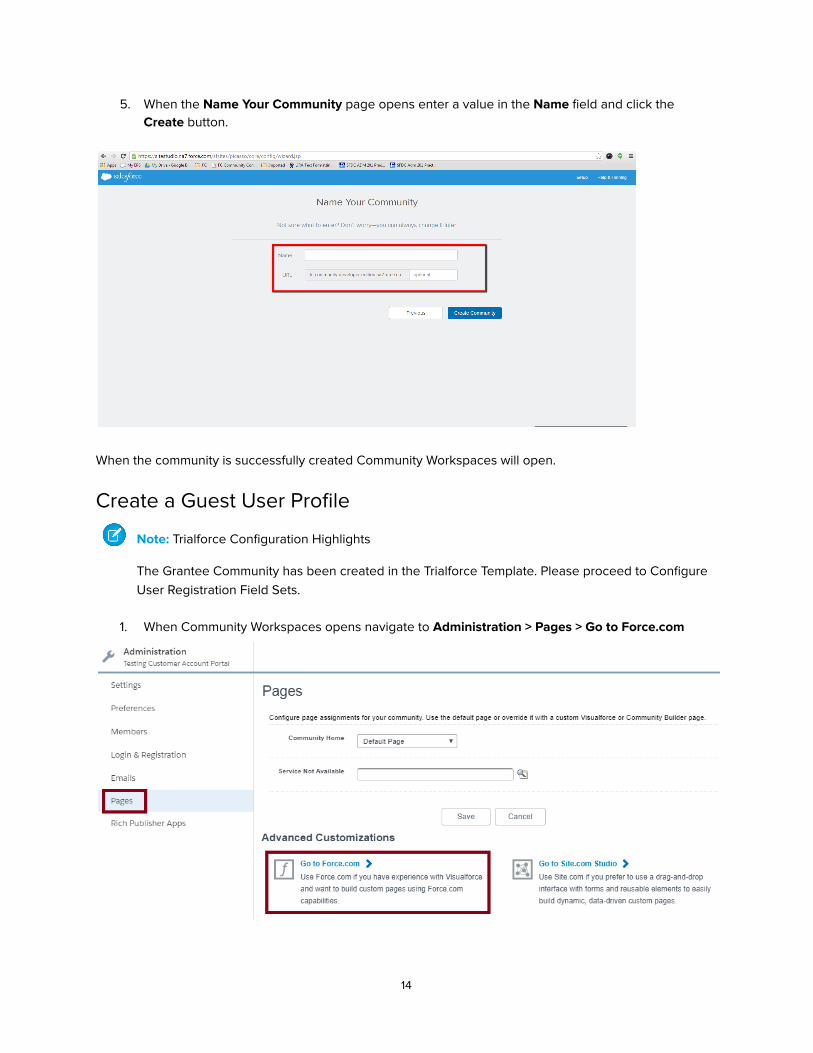
5. When the Name Your Community page opens enter a value in the Name field and click the Create button.
When the community is successfully created Community Workspaces will open.
Create a Guest User Profile
Note: Trialforce Configuration Highlights
The Grantee Community has been created in the Trialforce Template. Please proceed to Configure User Registration Field Sets.
1. When Community Workspaces opens navigate to Administration > Pages > Go to Force.com
14
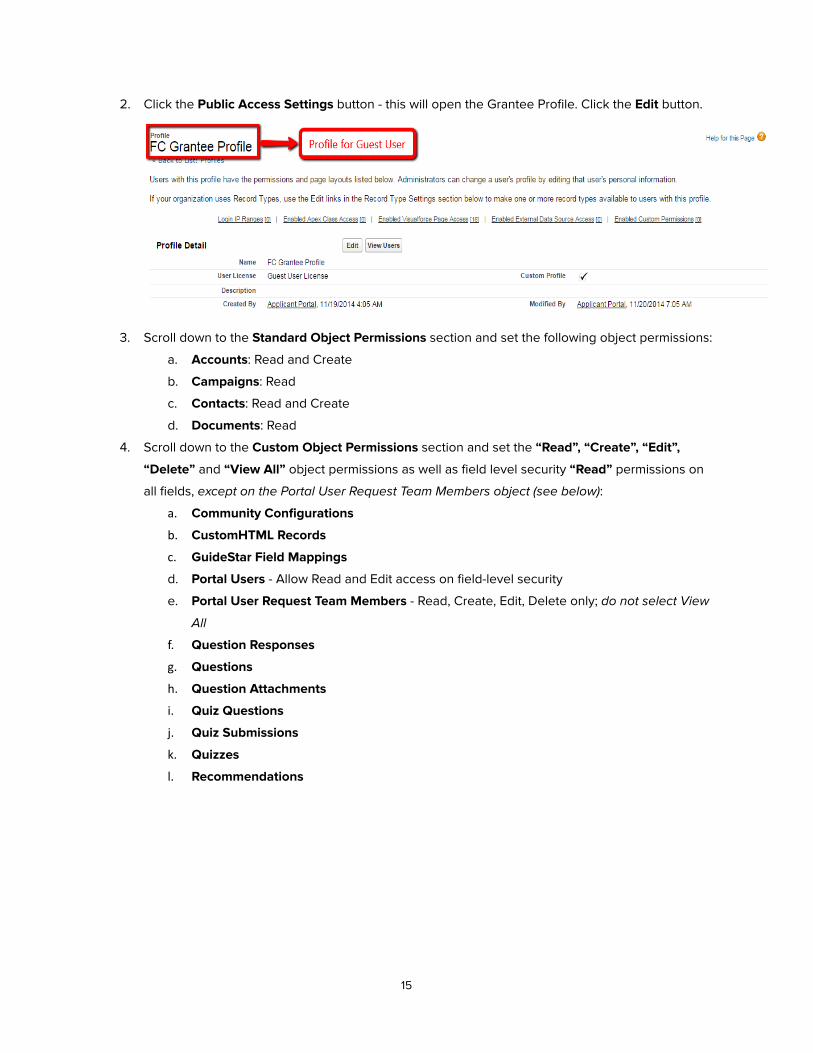
2. Click the Public Access Settings button - this will open the Grantee Profile. Click the Edit button.
3. Scroll down to the Standard Object Permissions section and set the following object permissions:
a. Accounts : Read and Create
b. Campaigns : Read
c. Contacts : Read and Create
d. Documents : Read
4. Scroll down to the Custom Object Permissions section and set the “Read”, “Create”, “Edit”,
“Delete” and “View All” object permissions as well as field level security “Read” permissions on
all fields, except on the Portal User Request Team Members object (see below) :
a. Community Configurations
b. CustomHTML Records
c. GuideStar Field Mappings
d. Portal Users - Allow Read and Edit access on field-level security
e. Portal User Request Team Members - Read, Create, Edit, Delete only; do not select View
All
f. Question Responses
g. Questions
h. Question Attachments
i. Quiz Questions
j. Quiz Submissions
k. Quizzes
l. Recommendations
15
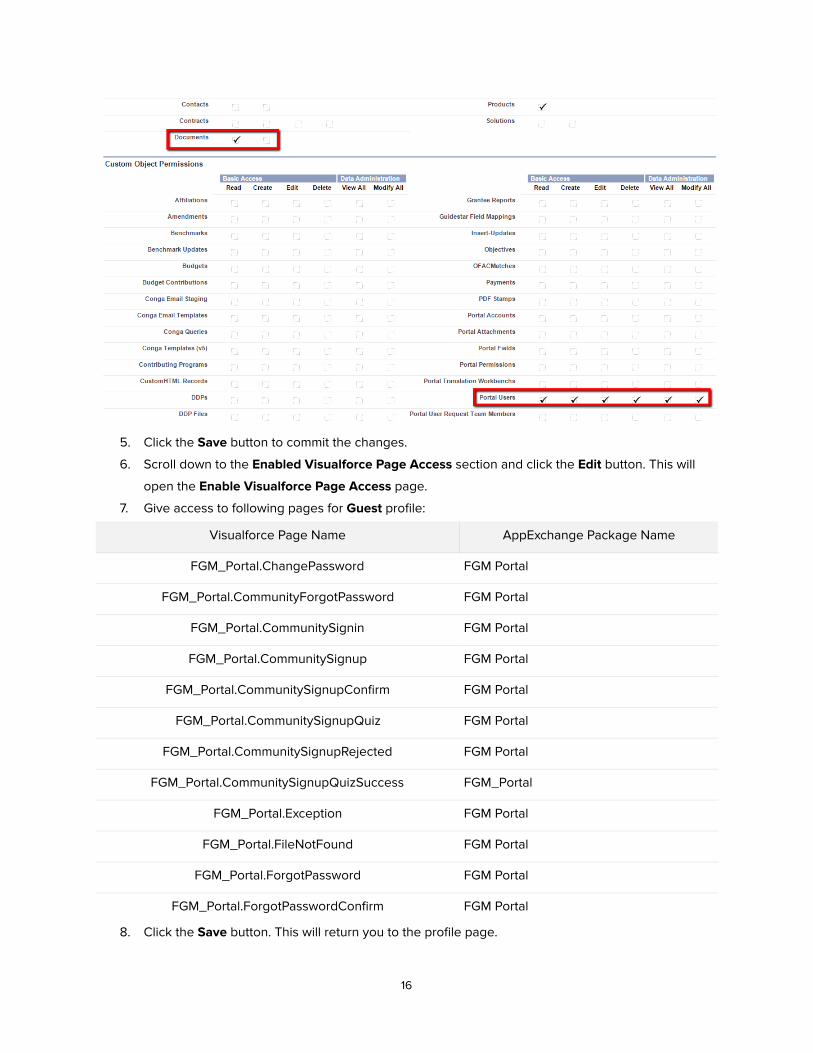
5. Click the Save button to commit the changes.
6. Scroll down to the Enabled Visualforce Page Access section and click the Edit button. This will
open the Enable Visualforce Page Access page.
7. Give access to following pages for Guest profile:
Visualforce Page Name AppExchange Package Name
FGM_Portal.ChangePassword FGM Portal
FGM_Portal.CommunityForgotPassword FGM Portal
FGM_Portal.CommunitySignin FGM Portal
FGM_Portal.CommunitySignup FGM Portal
FGM_Portal.CommunitySignupConfirm FGM Portal
FGM_Portal.CommunitySignupQuiz FGM Portal
FGM_Portal.CommunitySignupRejected FGM Portal
FGM_Portal. CommunitySignupQuizSuccess FGM_Portal
FGM_Portal.Exception FGM Portal
FGM_Portal.FileNotFound FGM Portal
FGM_Portal.ForgotPassword FGM Portal
FGM_Portal.ForgotPasswordConfirm FGM Portal
8. Click the Save button. This will return you to the profile page.
16
9. Navigate to Customize > Communities > All Communities . Click the Workspaces hyperlink next to
the community you just created.
10. When Community Management opens navigate to Community Management (at the top of the
window) > Go to Force.com
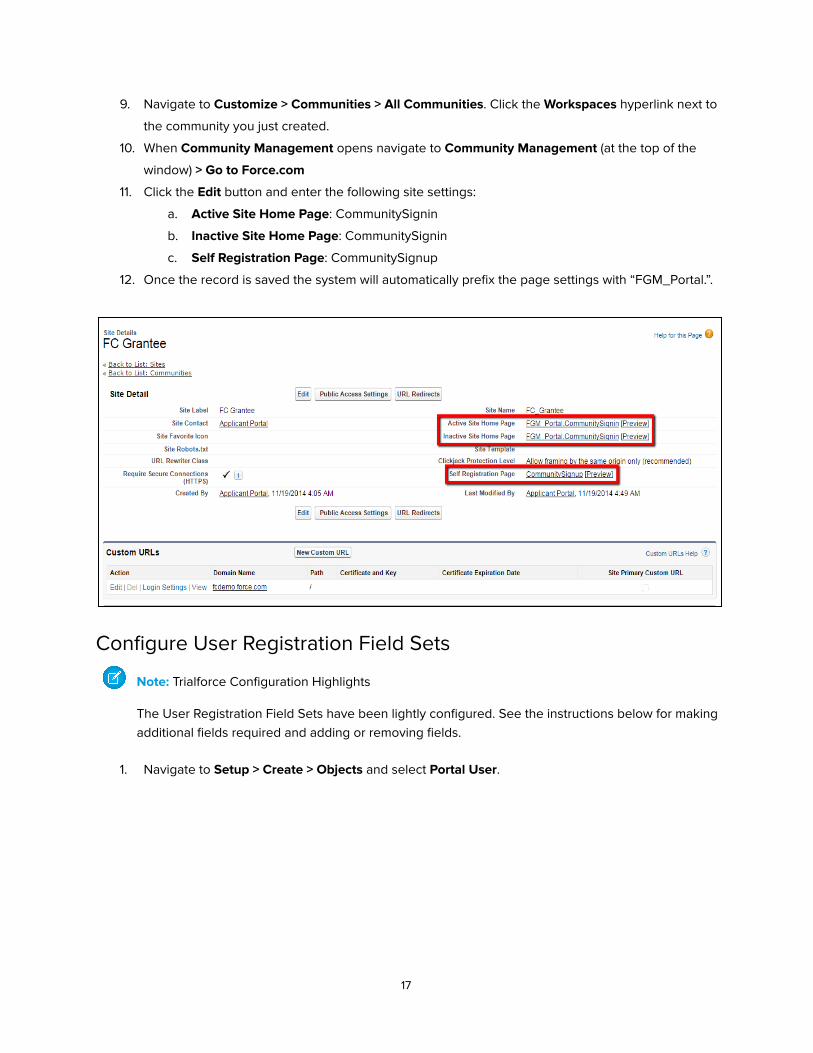
11. Click the Edit button and enter the following site settings:
a. Active Site Home Page : CommunitySignin
b. Inactive Site Home Page : CommunitySignin
c. Self Registration Page : CommunitySignup
12. Once the record is saved the system will automatically prefix the page settings with “FGM_Portal.”.
Configure User Registration Field Sets
Note: Trialforce Configuration Highlights
The User Registration Field Sets have been lightly configured. See the instructions below for making additional fields required and adding or removing fields.
1. Navigate to Setup > Create > Objects and select Portal User .
17
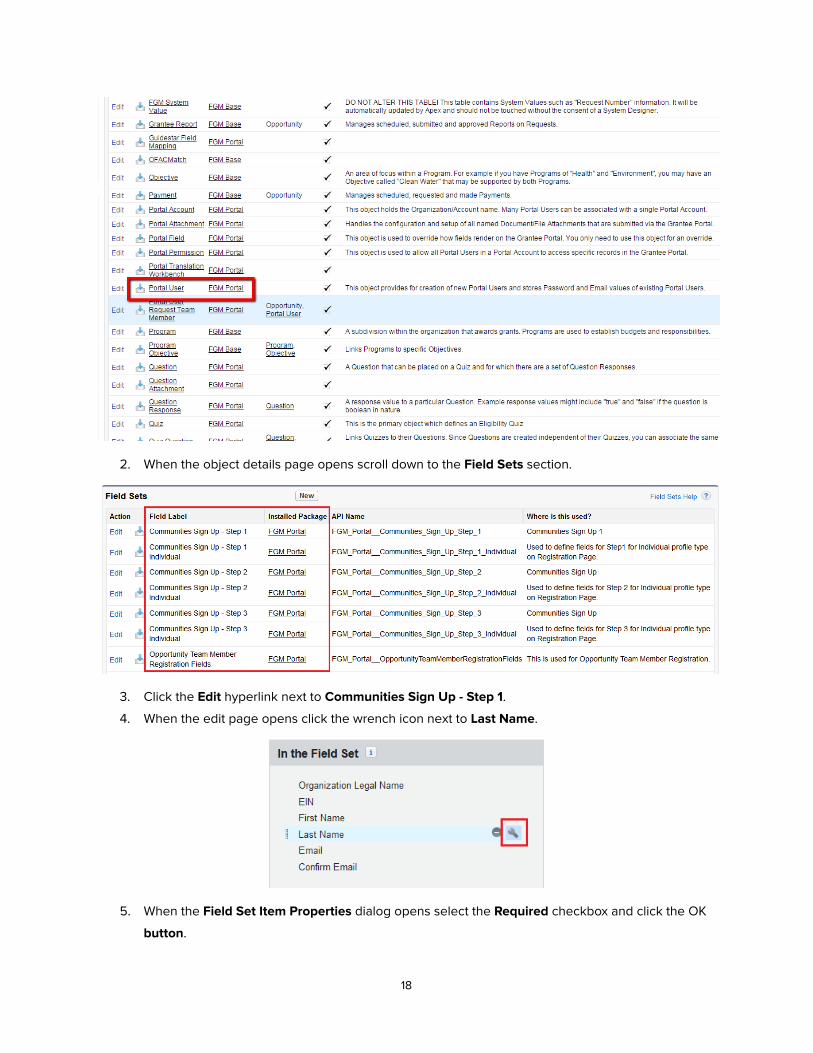
2. When the object details page opens scroll down to the Field Sets section.
3. Click the Edit hyperlink next to Communities Sign Up - Step 1 .
4. When the edit page opens click the wrench icon next to Last Name .
5. When the Field Set Item Properties dialog opens select the Required checkbox and click the OK
button .
18
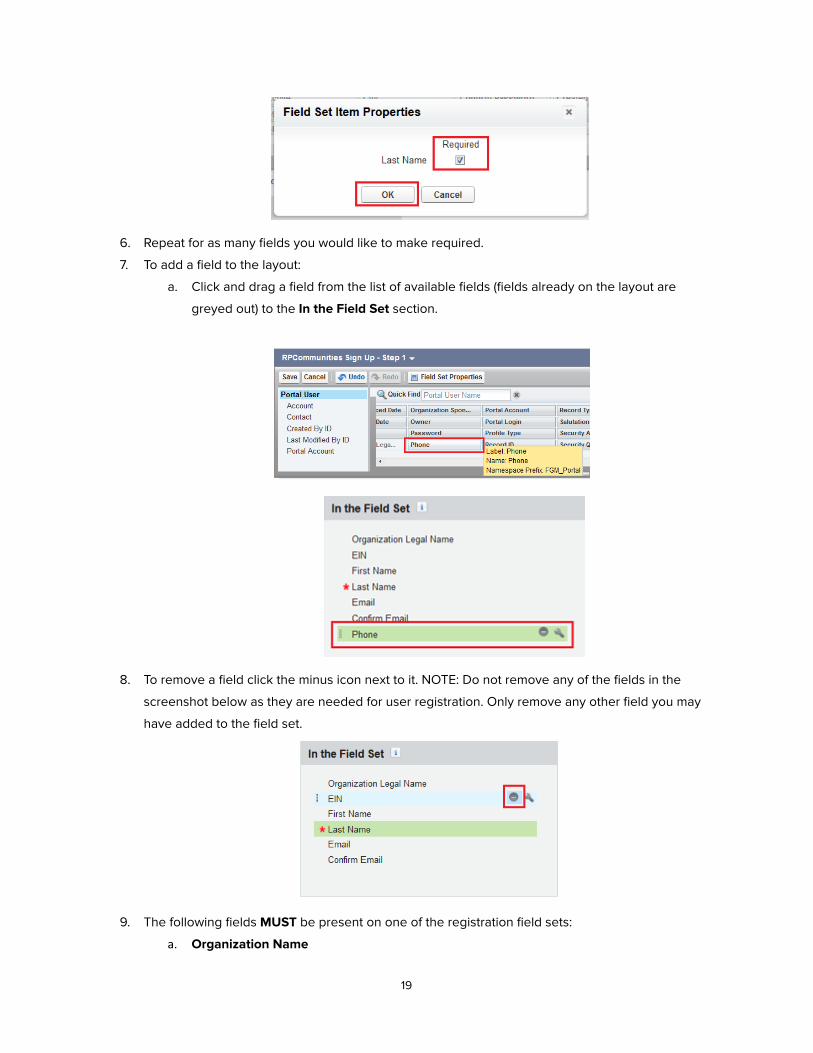
6. Repeat for as many fields you would like to make required.
7. To add a field to the layout:
a. Click and drag a field from the list of available fields (fields already on the layout are
greyed out) to the In the Field Set section.
8. To remove a field click the minus icon next to it. NOTE: Do not remove any of the fields in the
screenshot below as they are needed for user registration. Only remove any other field you may
have added to the field set.
9. The following fields MUST be present on one of the registration field sets:
a. Organization Name
19
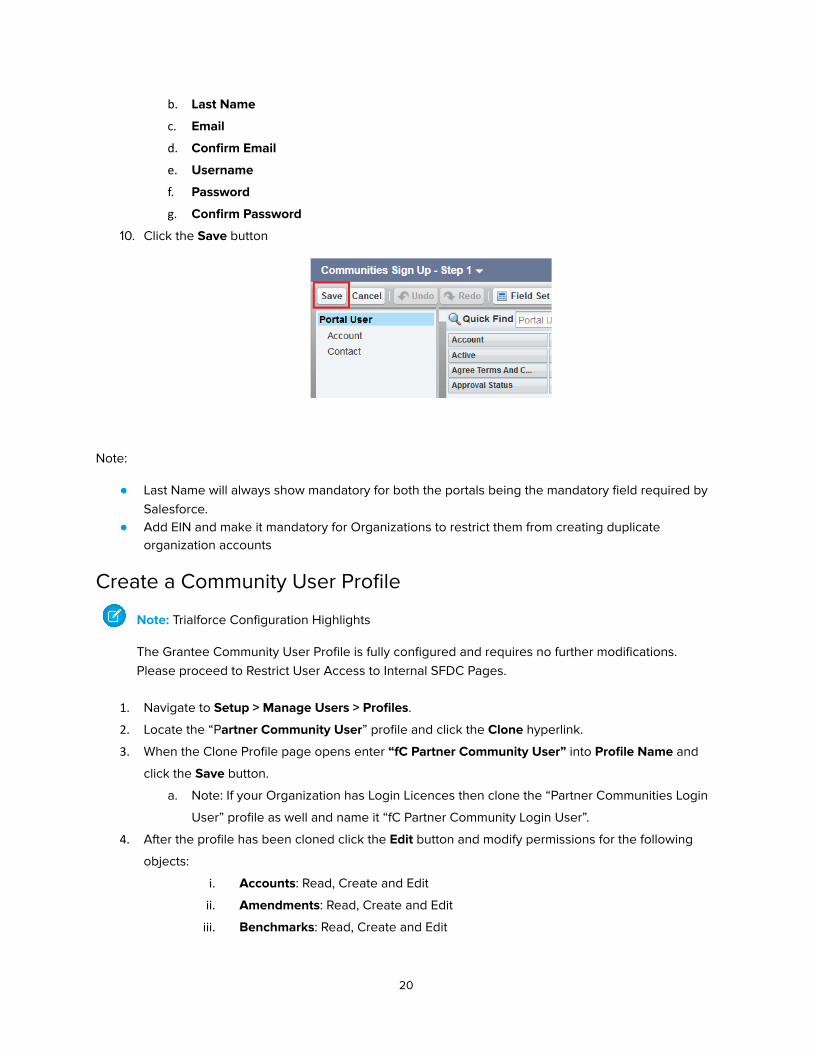
b. Last Name
c. Email
d. Confirm Email
e. Username
f. Password
g. Confirm Password
10. Click the Save button
Note:
● Last Name will always show mandatory for both the portals being the mandatory field required by Salesforce.
● Add EIN and make it mandatory for Organizations to restrict them from creating duplicate organization accounts
Create a Community User Profile
Note: Trialforce Configuration Highlights
The Grantee Community User Profile is fully configured and requires no further modifications. Please proceed to Restrict User Access to Internal SFDC Pages.
1. Navigate to Setup > Manage Users > Profiles .
2. Locate the “P artner Community User ” profile and click the Clone hyperlink.
3. When the Clone Profile page opens enter “fC Partner Community User” into Profile Name and
click the Save button.
a. Note: If your Organization has Login Licences then clone the “Partner Communities Login
User” profile as well and name it “fC Partner Community Login User”.
4. After the profile has been cloned click the Edit button and modify permissions for the following
objects:
i. Accounts : Read, Create and Edit
ii. Amendments : Read, Create and Edit
iii. Benchmarks : Read, Create and Edit
20
iv. Benchmark Updates : Read, Create and Edit
v. Contacts : Read, Create and Edit
vi. Documents : Read
vii. Grantee Reports : Read, Create and Edit
viii. Grantee Budget Categories : Read, Create and Edit
ix. Grantee Budget Update by Categories : Read, Create and Edit
x. Grantee Budget Line Items: Read, Create and Edit
xi. Grantee Budgets : Read, Create and Edit
xii. Grantee Budget Update : Read, Create and Edit
xiii. Leads : Read, Create and Edit
xiv. Opportunities : Read, Create and Edit
xv. Portal User Request Team Members : Read, Create and Edit
xvi. Recommendations : Read, Create and Edit
5. You must also grant “Read” and “Edit” field-level permissions (FLS) on above objects. Scroll down
to the Custom Field-Level Security section.
6. Locate the Account object and click the [ View ] hyperlink to open the field-level security page.
7. Click the Edit button and check the Edit box for all the fields. NOTE: System fields flagged as
Read-Only are not editable.
8. Click the Save button to commit the changes. Repeat for the remaining custom objects.
9. Click the Save button to commit the changes.
10. For other objects and Visualforce pages permissions we have permission set Community Grantee
Permission set User/Login License which automatically gets assigned when new community user
is created and activated.
Configure OWD Settings
Note: Trialforce Configuration Highlights
The OWD Settings (Sharing Settings) are fully configured and require no further modifications. Please proceed to Restrict User Access to Internal SFDC Pages.
To configure/verify OWD settings for your organization go to Setup > Sharing Settings .
Object Default Internal Access Default External Access
Lead Private Private
Account, Contract and Asset Public Read/Write Public Read/Write
Contact Controlled by Parent Controlled by Parent
21
Opportunity Private Private
Campaign Public Full Access Public Full Access
Amendment Public Read/Write Public Read/Write
Benchmark Controlled by Parent Controlled by Parent
Benchmark Update Public Read/Write Public Read/Write
Budget Public Read/Write Public Read/Write
CustomHTML Public Read/Write Public Read/Write
External Review Public Read/Write Public Read/Write
Grantee Budget Public Read/Write Public Read/Write
Grantee Budget Category Public Read/Write Public Read/Write
Grantee Report Controlled by Parent Controlled by Parent
Guidestar Field Mapping Public Read/Write Public Read/Write
Guidestar Field Mapping for Salesforce Public Read/Write Public Read/Write
Payment Controlled by Parent Controlled by Parent
Portal Account Public Read/Write Public Read/Write
Portal Attachment Public Read/Write Public Read/Write
Portal Field Public Read/Write Public Read/Write
Portal Permission Public Read/Write Public Read/Write
Portal Translation Workbench Public Read/Write Public Read/Write
Portal User Public Read/Write Public Read/Write
Recommendation Public Read/Write Public Read/Write
Related List Controller Public Read/Write Public Read/Write
Secure Message Public Read/Write Public Read/Write
Restrict User Access to Internal SFDC Pages
Note: Trialforce Configuration Highlights
The following Restricted access to internal SFDC page settings have been fully configured and require no further modifications:
22
● Override Default Pages - Standard Objects ● Override Default Pages - Custom Objects ● Create URL Redirects - Standard Objects ● Create URL Redirects - Custom Objects
Please proceed to Custom Settings in this section to complete configuration of this feature.
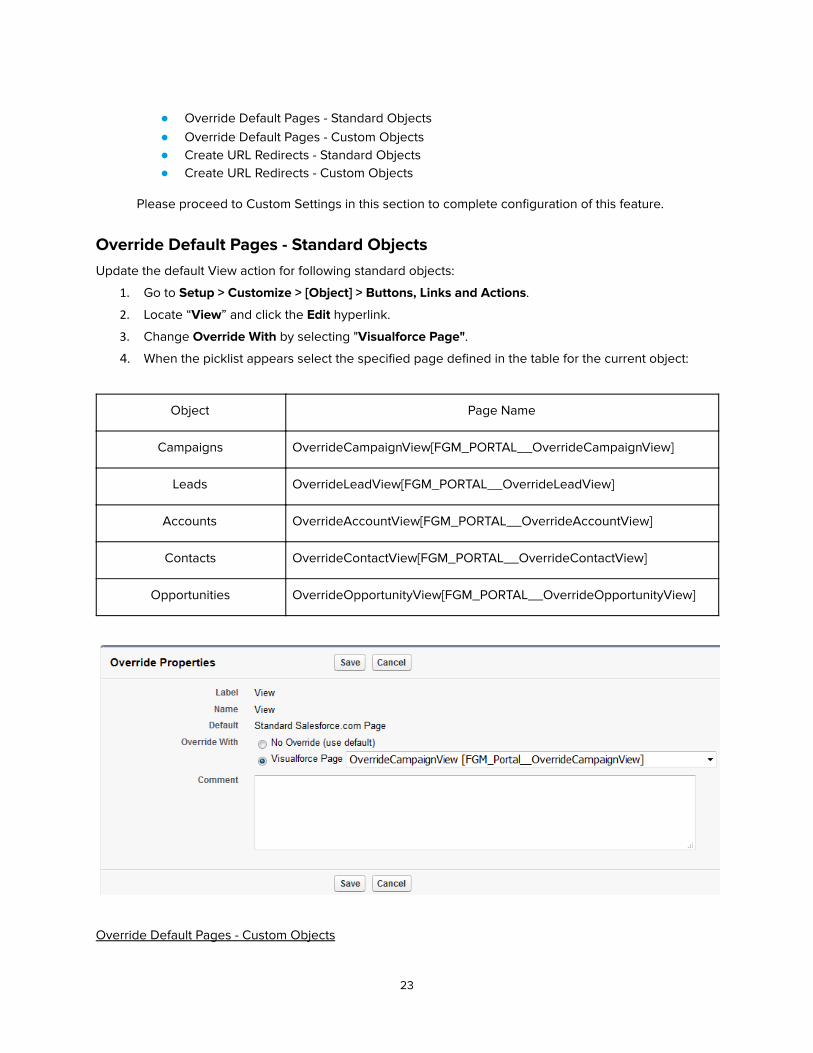
Override Default Pages - Standard Objects Update the default View action for following standard objects:
1. Go to Setup > Customize > [Object] > Buttons, Links and Actions .
2. Locate “ View ” and click the Edit hyperlink.
3. Change Override With by selecting " Visualforce Page" .
4. When the picklist appears select the specified page defined in the table for the current object:
Object Page Name
Campaigns OverrideCampaignView[FGM_PORTAL__OverrideCampaignView]
Leads OverrideLeadView[FGM_PORTAL__OverrideLeadView]
Accounts OverrideAccountView[FGM_PORTAL__OverrideAccountView]
Contacts OverrideContactView[FGM_PORTAL__OverrideContactView]
Opportunities OverrideOpportunityView[FGM_PORTAL__OverrideOpportunityView]
Override Default Pages - Custom Objects
23
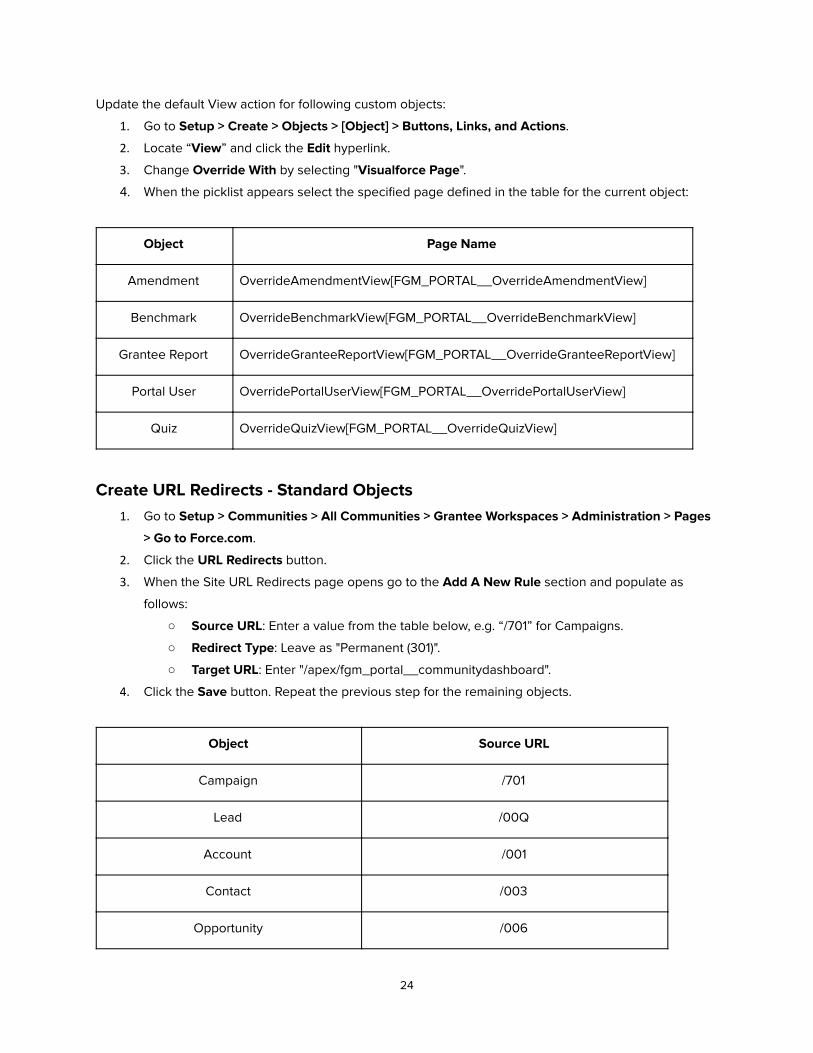
Update the default View action for following custom objects:
1. Go to Setup > Create > Objects > [Object] > Buttons, Links, and Actions .
2. Locate “ View ” and click the Edit hyperlink.
3. Change Override With by selecting " Visualforce Page ".
4. When the picklist appears select the specified page defined in the table for the current object:
Object Page Name
Amendment OverrideAmendmentView[FGM_PORTAL__OverrideAmendmentView]
Benchmark OverrideBenchmarkView[FGM_PORTAL__OverrideBenchmarkView]
Grantee Report OverrideGranteeReportView[FGM_PORTAL__OverrideGranteeReportView]
Portal User OverridePortalUserView[FGM_PORTAL__OverridePortalUserView]
Quiz OverrideQuizView[FGM_PORTAL__OverrideQuizView]
Create URL Redirects - Standard Objects 1. Go to Setup > Communities > All Communities > Grantee Workspaces > Administration > Pages
> Go to Force.com .
2. Click the URL Redirects button.
3. When the Site URL Redirects page opens go to the Add A New Rule section and populate as
follows:
○ Source URL : Enter a value from the table below, e.g. “/701” for Campaigns.
○ Redirect Type : Leave as "Permanent (301)".
○ Target URL : Enter "/apex/fgm_portal__communitydashboard".
4. Click the Save button. Repeat the previous step for the remaining objects.
Object Source URL
Campaign /701
Lead /00Q
Account /001
Contact /003
Opportunity /006
24
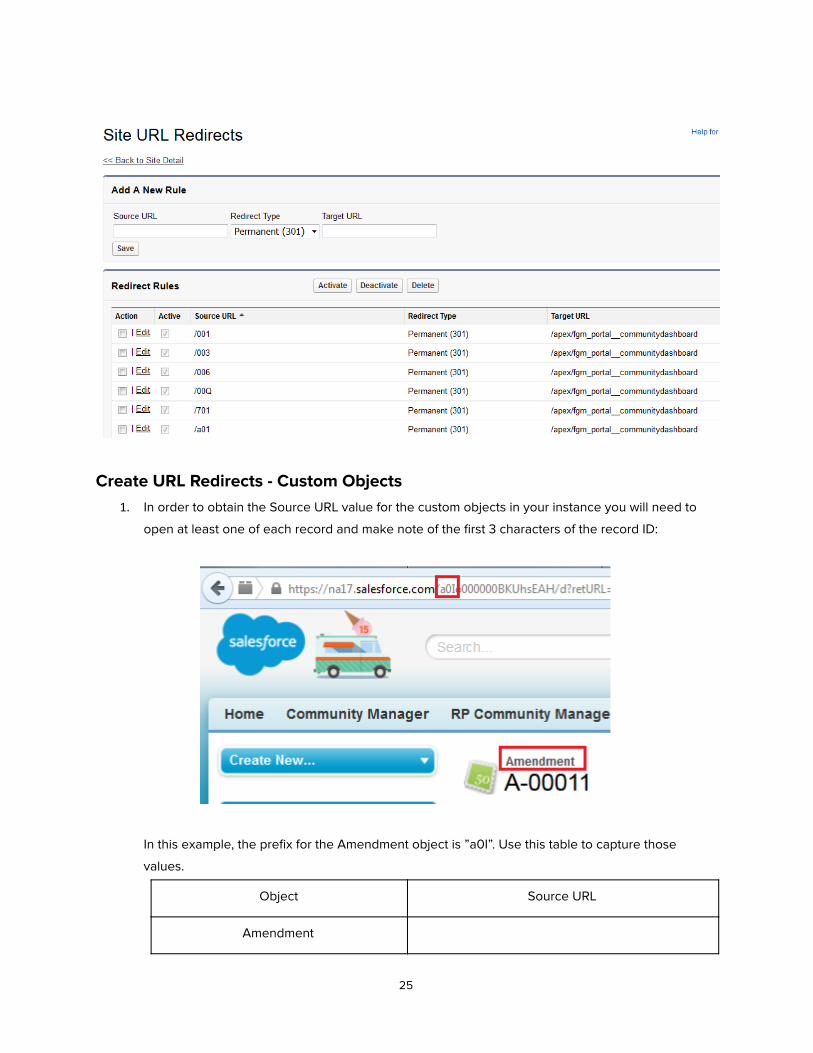
Create URL Redirects - Custom Objects 1. In order to obtain the Source URL value for the custom objects in your instance you will need to
open at least one of each record and make note of the first 3 characters of the record ID:
In this example, the prefix for the Amendment object is ”a0I”. Use this table to capture those
values.
Object Source URL
Amendment
25
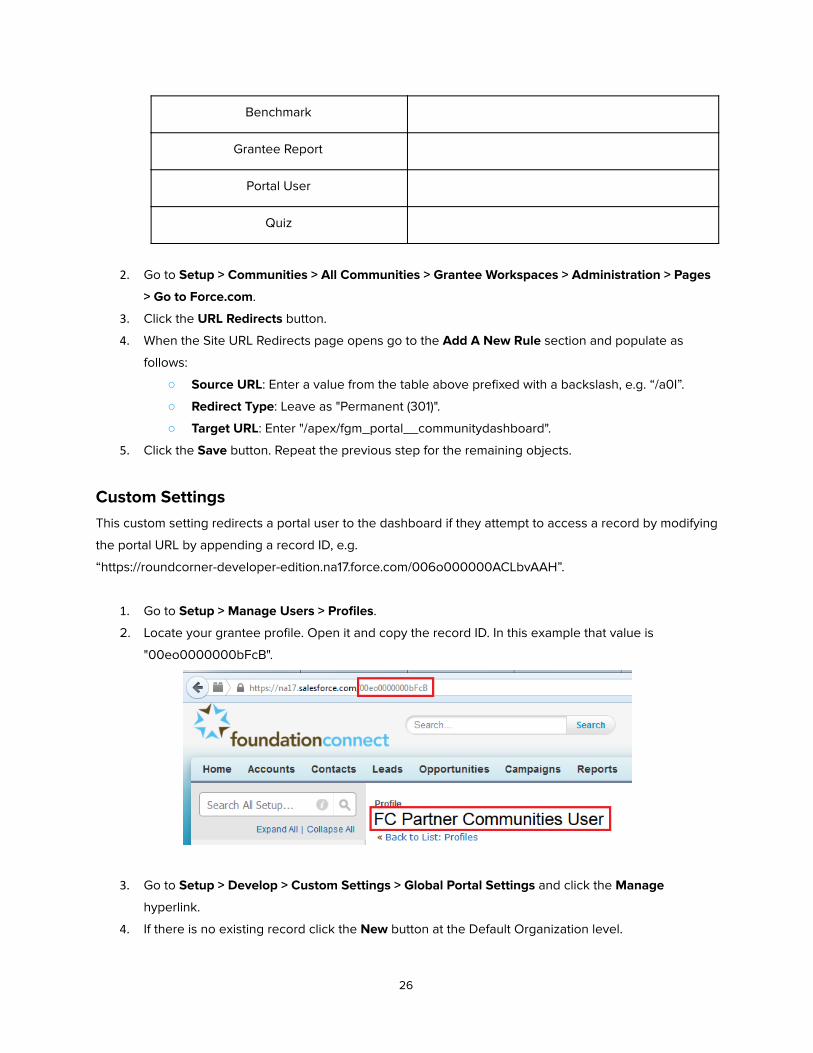
Benchmark
Grantee Report
Portal User
Quiz
2. Go to Setup > Communities > All Communities > Grantee Workspaces > Administration > Pages
> Go to Force.com .
3. Click the URL Redirects button.
4. When the Site URL Redirects page opens go to the Add A New Rule section and populate as
follows:
○ Source URL : Enter a value from the table above prefixed with a backslash, e.g. “/a0I”.
○ Redirect Type : Leave as "Permanent (301)".
○ Target URL : Enter "/apex/fgm_portal__communitydashboard".
5. Click the Save button. Repeat the previous step for the remaining objects.
Custom Settings This custom setting redirects a portal user to the dashboard if they attempt to access a record by modifying
the portal URL by appending a record ID, e.g.
“https://roundcorner-developer-edition.na17.force.com/006o000000ACLbvAAH”.
1. Go to Setup > Manage Users > Profiles .
2. Locate your grantee profile. Open it and copy the record ID. In this example that value is
"00eo0000000bFcB".
3. Go to Setup > Develop > Custom Settings > Global Portal Settings and click the Manage
hyperlink.
4. If there is no existing record click the New button at the Default Organization level.
26
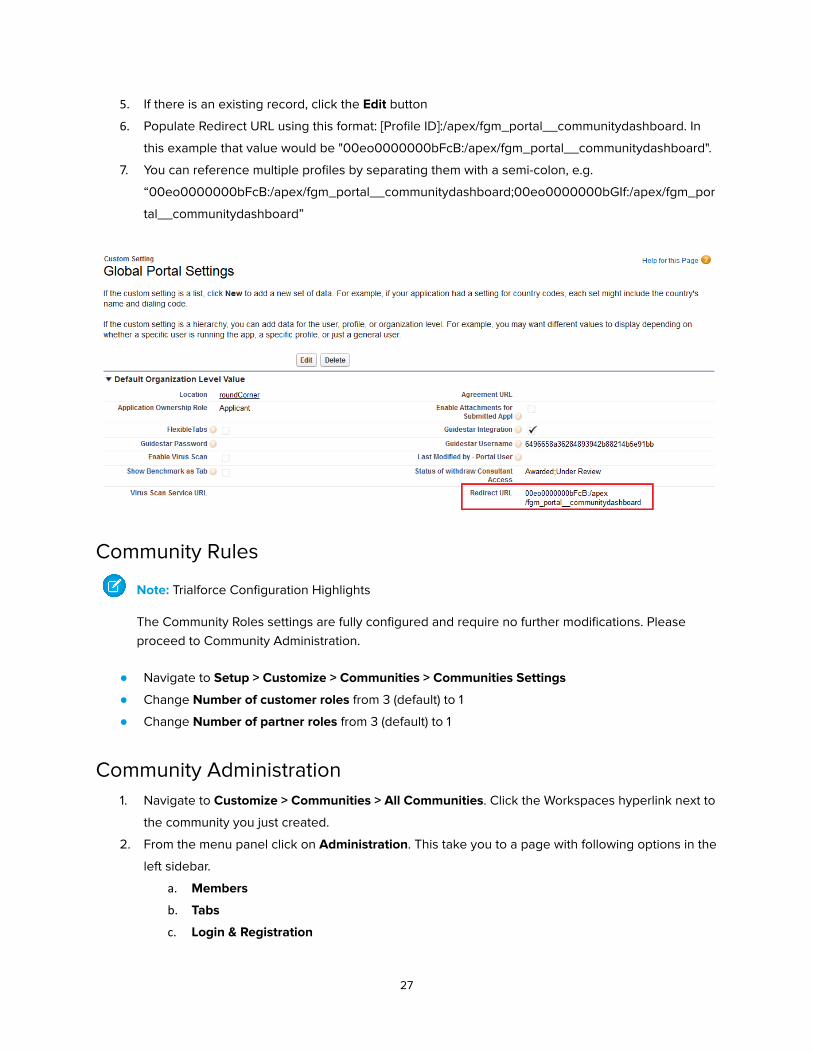
5. If there is an existing record, click the Edit button
6. Populate Redirect URL using this format: [Profile ID]:/apex/fgm_portal__communitydashboard. In
this example that value would be "00eo0000000bFcB:/apex/fgm_portal__communitydashboard".
7. You can reference multiple profiles by separating them with a semi-colon, e.g.
“00eo0000000bFcB:/apex/fgm_portal__communitydashboard;00eo0000000bGIf:/apex/fgm_por
tal__communitydashboard”
Community Rules
Note: Trialforce Configuration Highlights
The Community Roles settings are fully configured and require no further modifications. Please proceed to Community Administration.
● Navigate to Setup > Customize > Communities > Communities Settings
● Change Number of customer roles from 3 (default) to 1
● Change Number of partner roles from 3 (default) to 1
Community Administration 1. Navigate to Customize > Communities > All Communities . Click the Workspaces hyperlink next to
the community you just created.
2. From the menu panel click on Administration . This take you to a page with following options in the
left sidebar.
a. Members
b. Tabs
c. Login & Registration
27
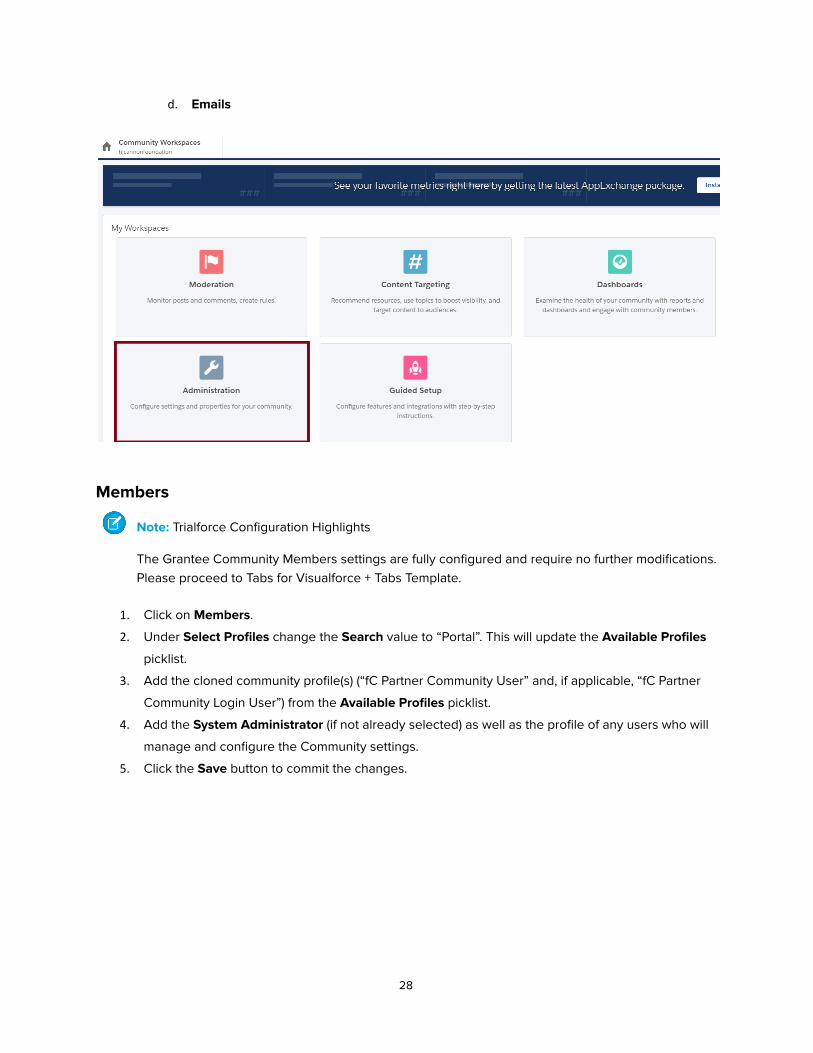
d. Emails
Members
Note: Trialforce Configuration Highlights
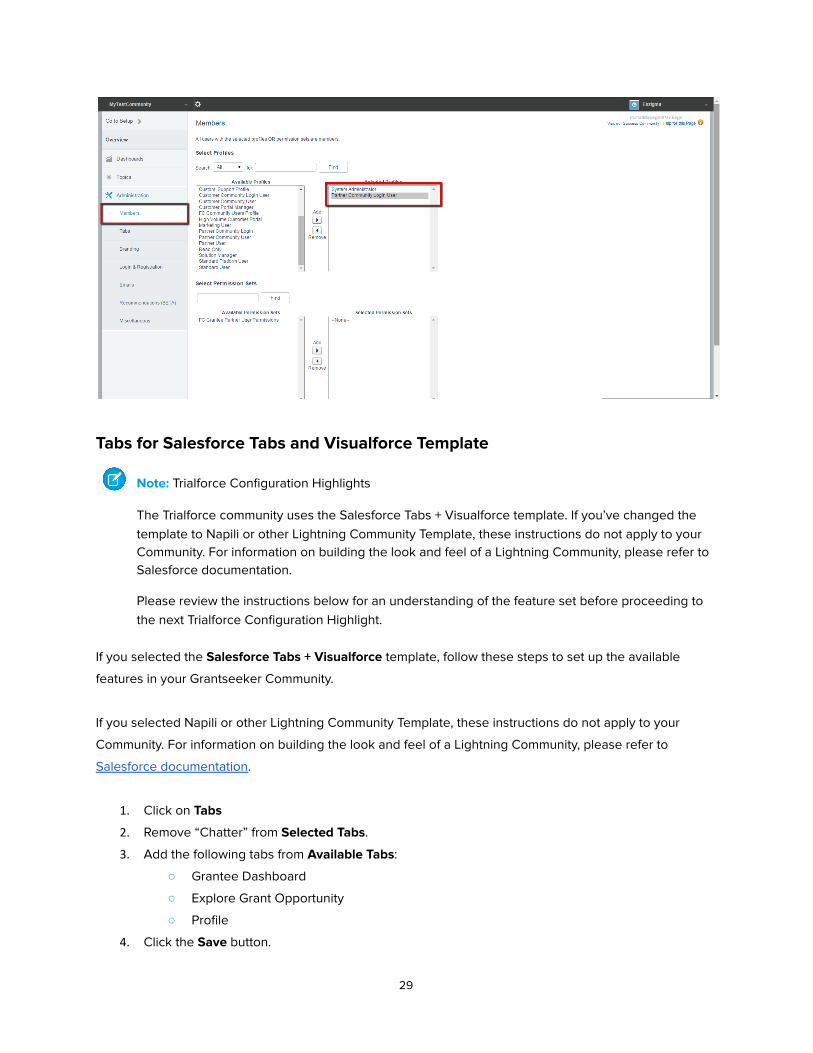
The Grantee Community Members settings are fully configured and require no further modifications. Please proceed to Tabs for Visualforce + Tabs Template.
1. Click on Members .
2. Under Select Profiles change the Search value to “Portal”. This will update the Available Profiles
picklist.
3. Add the cloned community profile(s) (“fC Partner Community User” and, if applicable, “fC Partner
Community Login User”) from the Available Profiles picklist.
4. Add the System Administrator (if not already selected) as well as the profile of any users who will
manage and configure the Community settings.
5. Click the Save button to commit the changes.
28
Tabs for Salesforce Tabs and Visualforce Template
Note: Trialforce Configuration Highlights
The Trialforce community uses the Salesforce Tabs + Visualforce template. If you’ve changed the template to Napili or other Lightning Community Template, these instructions do not apply to your Community. For information on building the look and feel of a Lightning Community, please refer to Salesforce documentation.
Please review the instructions below for an understanding of the feature set before proceeding to the next Trialforce Configuration Highlight.
If you selected the Salesforce Tabs + Visualforce template, follow these steps to set up the available
features in your Grantseeker Community.
If you selected Napili or other Lightning Community Template, these instructions do not apply to your
Community. For information on building the look and feel of a Lightning Community, please refer to
Salesforce documentation .
1. Click on Tabs
2. Remove “Chatter” from Selected Tabs .
3. Add the following tabs from Available Tabs :
○ Grantee Dashboard
○ Explore Grant Opportunity
○ Profile
4. Click the Save button.
29
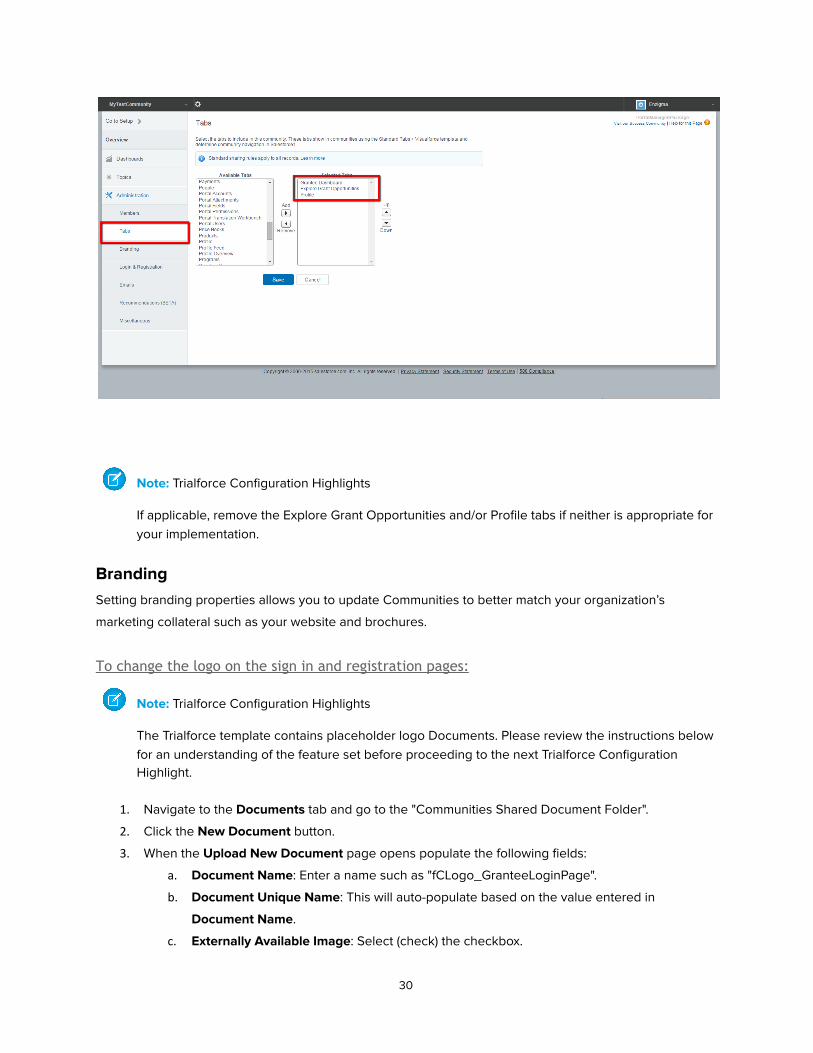
Note: Trialforce Configuration Highlights
If applicable, remove the Explore Grant Opportunities and/or Profile tabs if neither is appropriate for your implementation.
Branding Setting branding properties allows you to update Communities to better match your organization’s
marketing collateral such as your website and brochures.
To change the logo on the sign in and registration pages:
Note: Trialforce Configuration Highlights
The Trialforce template contains placeholder logo Documents. Please review the instructions below for an understanding of the feature set before proceeding to the next Trialforce Configuration Highlight.
1. Navigate to the Documents tab and go to the "Communities Shared Document Folder".
2. Click the New Document button.
3. When the Upload New Document page opens populate the following fields:
a. Document Name : Enter a name such as "fCLogo_GranteeLoginPage".
b. Document Unique Name : This will auto-populate based on the value entered in
Document Name .
c. Externally Available Image : Select (check) the checkbox.
30
4. Click the Browse… button and select the replacement image.
5. Click the Save button.
6. Go to Setup > Create > Custom Labels and open "fC_Logo_Name".
7. Click the New Local/Translations/Overrides button.
8. Populate the following fields:
a. Language : Select “English”
b. Translation Text : Enter the name of the new document, e.g. “fCLogo_GranteeLoginPage”.
9. Click the Save button.
Note: Trialforce Configuration Highlights
Update the placeholder Documents for the following logo:
Sign in and registration pages: LogoPlaceholder_GranteeLoginPage (png). NOTE: This is the same logo used on the Reviewer Portal login page.
To change the dashboard header, footer and color scheme:
Note: Trialforce Configuration Highlights
The Trialforce community uses the Salesforce Tabs + Visualforce template. If you’ve changed the template to Napili or other Lightning Community Template, these instructions do not apply to your Community. For information on building the look and feel of a Lightning Community, please refer to Salesforce documentation.
Please review the instructions below for an understanding of the feature set before proceeding to the next Trialforce Configuration Highlight.
If you selected the Salesforce Tabs + Visualforce template, follow these steps to set up the header, footer,
and color scheme in your Grantseeker Community.
If you selected Napili or other Lightning Community Template, these instructions do not apply to your
Community. For information on building the look and feel of a Lightning Community, please refer to
Salesforce documentation .
1. Go to Branding and select files to replace the Header and/or Footer
a. The files used for the Header and Footer must be uploaded to Documents as publicly
available files.
b. The header can be .html, .gif, .jpg, or .png.
c. The footer must be an .html file.
d. The maximum file size for .html files is 100 KB combined. So, if you have a header .html file
that is 70 KB and you want to use an .html file for the footer as well, it can only be 30 KB.
e. The maximum file size for .gif, .jpg, or .png files is 20 KB.
31

f. The header you choose replaces the Salesforce logo below the global header.
g. The footer you choose replaces the standard Salesforce copyright and privacy footer.
2. Modify the color scheme to match your organization’s branding
Note: Trialforce Configuration Highlights
Update the placeholder Documents for the following logo:
● Grantee Dashboard: Your Logo Here - Branding Header (png). NOTE: This is the same logo used on the Reviewer Portal Dashboard.
Login and Registration
Note: Trialforce Configuration Highlights
The community Login & Registration settings have been lightly configured. Please review the instructions below for an understanding of the feature set before proceeding to the next Trialforce Configuration Highlight.
1. In the Login section
a. In the picklist select “Visualforce Page”
b. Click on the lookup icon (magnifying glass), enter “CommunitySignIn” in the search box
and click the Go! button.
c. Select the form associated with the “FGM_Portal” Namespace Prefix. This will return to
you Community Management .
2. In the Registration section
a. If you want to allow visitors to self-register for access to the community then
32

i. check (select) Allow external users to self-register . This will display several
registration properties.
ii. Set the following properties
1. Choose a self-registration page
a. In the picklist select “Visualforce Page”
b. Click on the lookup icon (magnifying glass), enter
“CommunitySignup” in the search box and click the Go! button.
c. Select the form associated with the “FGM_Portal” Namespace
Prefix. This will return to you Community Management .
2. Assign registering users to
a. Profile: Enter “fC Partner Community User”
b. Account: Leave blank
3. Click the Save button to commit the changes.
Note: Trialforce Configuration Highlights
● If applicable, uncheck (de-select) Allow external users to self-register in the Registration section if you do not want to allow visitors to self-register.
● Assign registering users to is set to the "fC Partner Community User" profile which uses the Partner Community license type. If applicable, change that setting to “fC Partner Community Login User” which uses the Partner Community Login license type.
33
Emails
Deactivate default “welcome” email
Note: Trialforce Configuration Highlights
The Deactivate default “Welcome” email setting is fully configured and requires no further modifications. Please proceed to Configure User Verification and Activation Emails.
1. Navigate to Customize > Communities > All Communities . Click the Workspaces hyperlink next to
the community you just created.
2. In the left-hand menu click navigate to Administration > Emails .
3. In the Email Templates section deselect (uncheck) the Send welcome email checkbox.
4. Click the Save button.
Configure User Verification and Activation Emails
Note: Trialforce Configuration Highlights
The User Verification and Activation Emails templates, workflow rules and email alerts have been lightly configured. Please review the instructions below for an understanding of the feature set before proceeding to the next Trialforce Configuration Highlight.
Before configuring the verification and activation emails you will need to create the following Email
Templates:
● Email Verification - Grantee : This is sent to prospects who self-register on the site
● Account Activation - Grantee : This is sent to prospects whose accounts have been approved and
set to Active by foundation staff.
Prerequisites
● These instructions presume a basic proficiency with creating Email Templates, Letterheads,
Workflow Rules and Email Alerts.
● If you want your organization’s logo to appear in any of these templates it must be uploaded first
as a Letterhead .
Email Verification
1. Navigate to Setup > Communication Templates > Email Templates and go to the FGM Portal
Email Templates folder. Click the New Template button.
2. Select HTML (using Letterhead) and click the Next button.
3. When the New Template page opens populate the following values:
a. Folder : Change this if you want to store the template in a different folder
34
b. Available for Use : Check (select) this box.
c. Email Template Name : Enter “Email Verification - Grantee”
d. Template Unique Name : Will automatically populate based on the value entered into
Email Template Name .
e. Letterhead : If using a letterhead select it from the picklist
f. Email Layou t: Select “Free Form Letter”
g. Description : Optionally enter a description for the template
4. Click the Next button - this will open the template edit page.
5. Enter a Subject value that will clearly identify to the recipient that the email is coming from your
organization. For example, “Ford Foundation Grantee Community - Email Verification”.
6. Copy and paste the following into the content field:
Hi {!FGM_Portal__Portal_User__c.FGM_Portal__FirstName__c},
Thank you for registering! Before you can get started,
please confirm your email address by clicking the link
below:
https://{!FGM_Portal__Portal_User__c.FGM_Portal__Domain__c}/
FGM_Portal__CommunitySignupConfirm?id={!FGM_Portal__Portal_U
ser__c.Id}&code={!FGM_Portal__Portal_User__c.FGM_Portal__Con
firmation_Code__c}
Thanks,
{!Organization.Name}
7. If necessary, modify the content to meet your organization’s specific needs, e.g. include the
community moderator’s contact information. Click the Next button.
8. If you want to create a text-only version of this template click the Copy text from HTML version
button.
9. Click the Save button.
In addition to the template you must create a workflow rule and email alert that will send the email to the
intended recipient.
1. Navigate to Setup > Create > Workflow & Approvals > Workflow Rules .
2. Click the New Rule button - this will open Step 1 of the new workflow rule wizard. Select “Portal
User” as the Object and click the Next button.
3. In Step 2 enter “Email Verification - Grantee“ as the Rule Name and optionally enter a description.
4. Under Evaluation Criteria select “created, and every time it’s edited”
35
5. Under Rule Criteria change the picklist to “formula evaluates to true” and paste the following into
the formula field:
AND(NOT(ISBLANK(FGM_Portal__Email__c)),
NOT(ISBLANK(FGM_Portal__Confirmation_Code__c)), OR(ISNEW(),
ISCHANGED(FGM_Portal__Confirmation_Code__c)),NOT(INCLUDES(FGM_Portal_
_User_Profile__c ,'Reviewer')),RecordType.Name != 'Opportunity Team Member')
6. Click the Check Syntax button to ensure there are no errors in the formula.
a. If you get this error “Function ISNEW may not be used in this type of formula” go back to
Evaluation Criteria and ensure “created, and every time it’s edited” is selected.
7. Click the Save & Next button to go to Step 3 .
8. At Step 3 expand the Add Workflow Action picklist and select “New Email Alert”.
9. When the New Email Alert page opens populate the following fields:
a. Description : Email Verification - Grantee
b. Unique Name : This will auto-populate based on the value entered into Description .
c. Email Template : Enter or select the email verification template you just created, “Email
Verification - Grantee”.
d. Recipient Type
i. Change the Search value to “Email Field”. This will update the values in the
Available Recipients picklist.
e. Selected Recipients : Add “Email Field: Email”
f. Additional Emails (if applicable)
10. Click the Save button to return to Step 3 . Click the Done button.
11. When the workflow rule detail page opens click the Activate button. The Active checkbox should
now be selected.
Note: Trialforce Configuration Highlights
● If applicable, modify the description and/or content of the Email Verification - Grantee
email template. ● If applicable, modify the description and/or criteria of the Email Verification - Grantee
workflow rule. ● If applicable, add additional recipients to the Email Verification - Grantee email alert.
Account Activation 1) Navigate to Setup > Communication Templates > Email Templates and go to the FGM Portal
Email Templates folder. Click the New Template button.
2) Select HTML (using Letterhead) and click the Next button.
3) When the New Template page opens populate the following values:
a) Folder : Change this if you want to store the template in a different folder
36
b) Available for Use : Check (select) this box.
c) Email Template Name : Enter “Account Activation - Grantee”
d) Template Unique Name : Will automatically populate based on the value entered into
Email Template Name .
e) Letterhead : If using a letterhead select it from the picklist
f) Email Layou t: Select “Free Form Letter”
g) Description : Optionally enter a description for the template
4) Click the Next button - this will open the template edit page.
5) Enter a Subject value that will clearly identify to the recipient that the email is coming from your
organization. For example, “Activate Your Ford Foundation Grantee Community Account!” or “Ford
Foundation - Grantee Community Account Activation”.
6) Copy and paste the following into the content field:
Hi {!FGM_Portal__Portal_User__c.FGM_Portal__FirstName__c},
Your registration request has been approved! The next (and
final) step is to activate your registration by clicking the
link below.
https://{!FGM_Portal__Portal_User__c.FGM_Portal__Domain__c}/
FGM_Portal__CommunitySignupConfirm?id={!FGM_Portal__Portal_U
ser__c.Id}&code={!FGM_Portal__Portal_User__c.FGM_Portal__Con
firmation_Code__c}
Thanks,
{! Organization.Name }
7) If necessary, modify the content to meet your organization’s specific needs, e.g. include the
community moderator’s contact information. Click the Next button.
8) If you want to create a text-only version of this template click the Copy text from HTML version
button.
9) Click the Save button.
In addition to the template you must create a workflow rule and email alert that will send the email to the
intended recipient.
1. Navigate to Setup > Create > Workflow & Approvals > Workflow Rules .
2. Click the New Rule button - this will open Step 1 of the new workflow rule wizard. Select “Portal
User” as the Object and click the Next button.
37
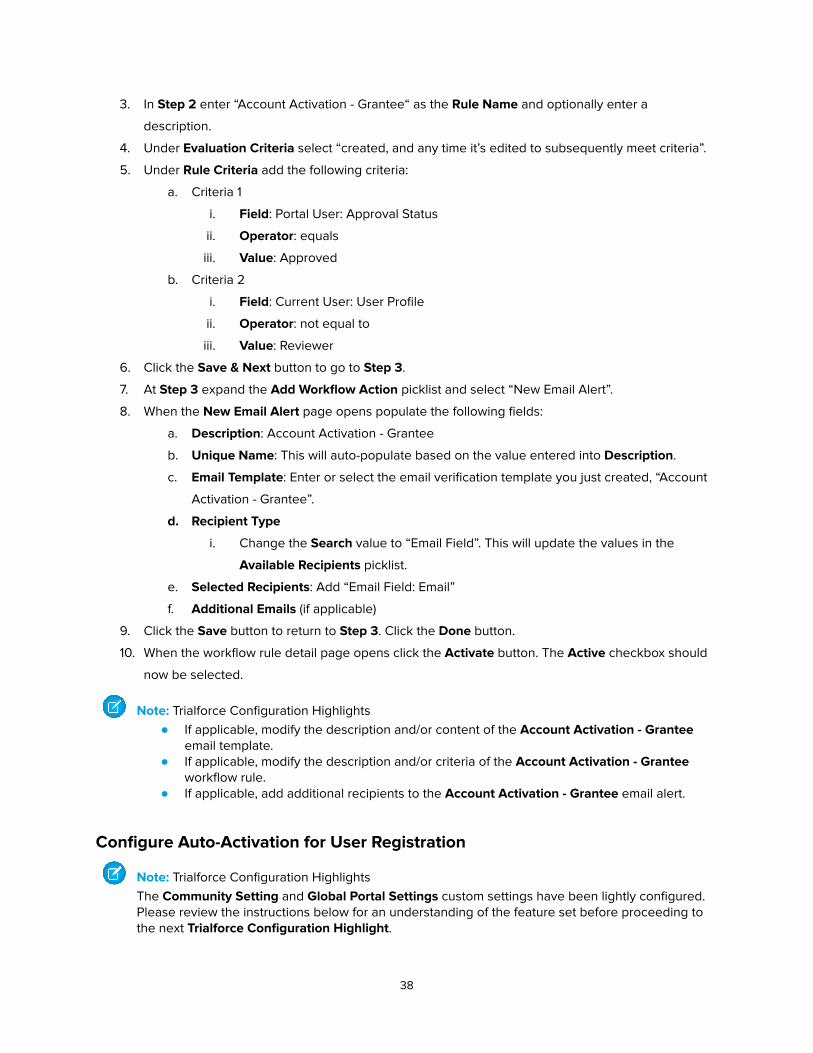
3. In Step 2 enter “Account Activation - Grantee“ as the Rule Name and optionally enter a
description.
4. Under Evaluation Criteria select “created, and any time it’s edited to subsequently meet criteria”.
5. Under Rule Criteria add the following criteria:
a. Criteria 1
i. Field : Portal User: Approval Status
ii. Operator : equals
iii. Value : Approved
b. Criteria 2
i. Field : Current User: User Profile
ii. Operator : not equal to
iii. Value : Reviewer
6. Click the Save & Next button to go to Step 3 .
7. At Step 3 expand the Add Workflow Action picklist and select “New Email Alert”.
8. When the New Email Alert page opens populate the following fields:
a. Description : Account Activation - Grantee
b. Unique Name : This will auto-populate based on the value entered into Description .
c. Email Template : Enter or select the email verification template you just created, “Account
Activation - Grantee”.
d. Recipient Type
i. Change the Search value to “Email Field”. This will update the values in the
Available Recipients picklist.
e. Selected Recipients : Add “Email Field: Email”
f. Additional Emails (if applicable)
9. Click the Save button to return to Step 3 . Click the Done button.
10. When the workflow rule detail page opens click the Activate button. The Active checkbox should
now be selected.
Note: Trialforce Configuration Highlights ● If applicable, modify the description and/or content of the Account Activation - Grantee
email template. ● If applicable, modify the description and/or criteria of the Account Activation - Grantee
workflow rule. ● If applicable, add additional recipients to the Account Activation - Grantee email alert.
Configure Auto-Activation for User Registration
Note: Trialforce Configuration Highlights The Community Setting and Global Portal Settings custom settings have been lightly configured. Please review the instructions below for an understanding of the feature set before proceeding to the next Trialforce Configuration Highlight .
38
In the standard user registration process outlined in the Grantee Registration section, once the system
administrator sets the Approval Status to “Approved” on a new registrant’s Portal User record the
registrant is directed to a web page where they must click the Activate button. This activation process
creates an account (if one doesn’t already exist), a contact record and corresponding Salesforce user. They
are then directed to a web page with a Go to Login Page button that directs them to the portal’s home
page.
The auto-activation feature automatically executes the activation and approval process. The registrant is no
longer directed to the page with the Activate button; instead they go directly to the web page where they
can click the Go to Login Page button.
Implement ● Navigate to Setup > Develop > Custom Settings > Community Setting and click the Manage link.
● Click the New button for the Organizational default setting (not the specific User/Profile location)
● When the new record opens populate the following fields:
○ Name : Enter “AutoActivateGrantee”.
○ IsEnabled : Check (select) the box.
● Click the Save button.
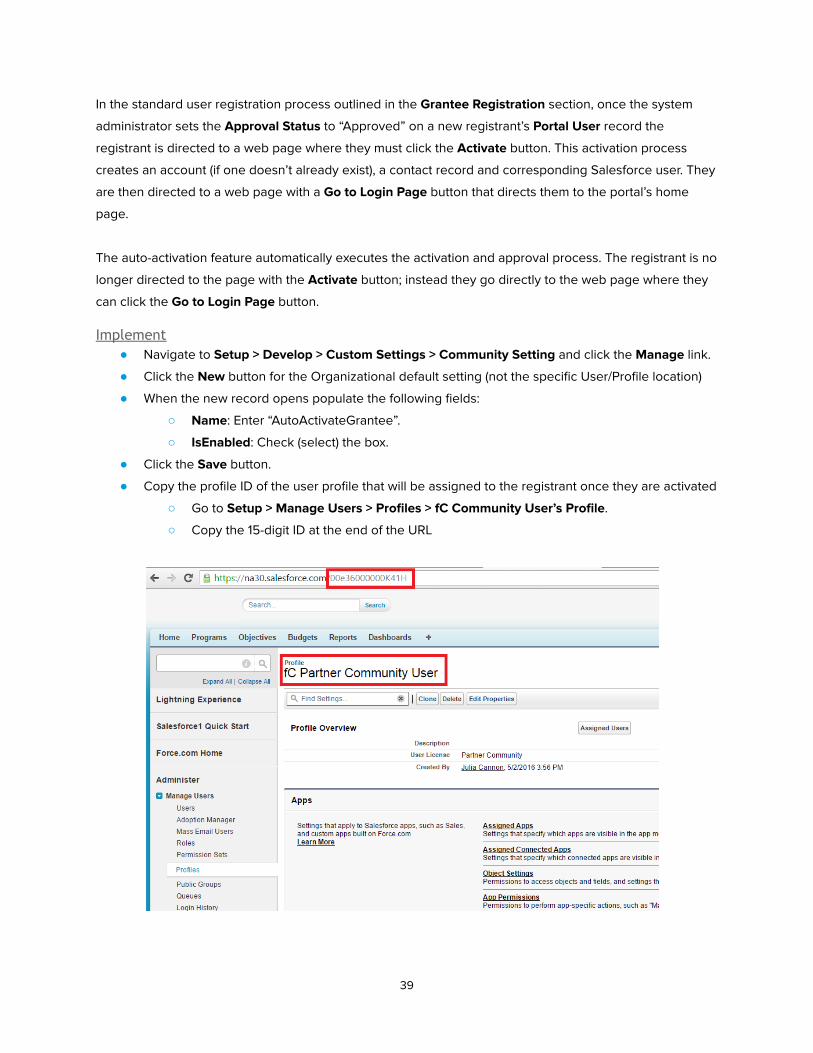
● Copy the profile ID of the user profile that will be assigned to the registrant once they are activated
○ Go to Setup > Manage Users > Profiles > fC Community User’s Profile .
○ Copy the 15-digit ID at the end of the URL
39
● Navigate to Setup > Develop > Custom Settings > Global Portal Settings and click the Manage
link.
● Click the Edit button.
● When the record opens in edit mode populate the following fields:
○ Grantee Community ProfileID : Paste the profile ID of the user profile that will be assigned
to the registrant
■ NOTE: This is a required field for auto-activation. The system will throw an error
when the portal user is approved if this field is not populated and auto-activation
is enabled.
○ Grantee Site ContactID : Set to the contact ID of the Site Contact associated with your
grantee portal ( Communities > Pages > Go to Force.com > Site Contact ).
NOTE
● If auto-activation is not enabled and a registrant's Approval Status is changed to "Approved" they
will be directed to the landing page with the Activate button.
● If the user associated with the Site Contact is deactivated (the contact whose ID is referenced in
Grantee Site ContactID ) then the current system admin will be the owner of the registrant’s
account and contact records.
● The IsAutoActivated field on the Portal User object will remain unchecked after conversion and
any corresponding workflow rules have fired - this is not a bug.
Note: Trialforce Configuration Highlights If applicable, check (select) AutoActivateGrantee in the Community Setting custom setting to enable auto-activation and populate Grantee Community ProfileID and Grantee Site ContactID in the Global Portal Settings .
Email Services
Note: Trialforce Configuration Highlights Email Services have been fully configured and require no further modifications. Please proceed to Portal Account Administration .
Note: If email services are not set up, grantees will encounter a Visualforce error when sending a message
from the Grantee Portal Inbox
1. Go to Setup > Develop > Email Services
2. Click New Email Service
3. Populate the Email Service Name with "InboxEmailHandler"
4. Click the magnifying glass beside Apex Class and search and select "InboxEmailHandler"
5. Select “All” for Accept Attachments
6. Keep the Accept Email From field blank
7. Check (select) the checkbox for Active
8. In Failure Response Settings , change all picklists to “Bounce message”
40
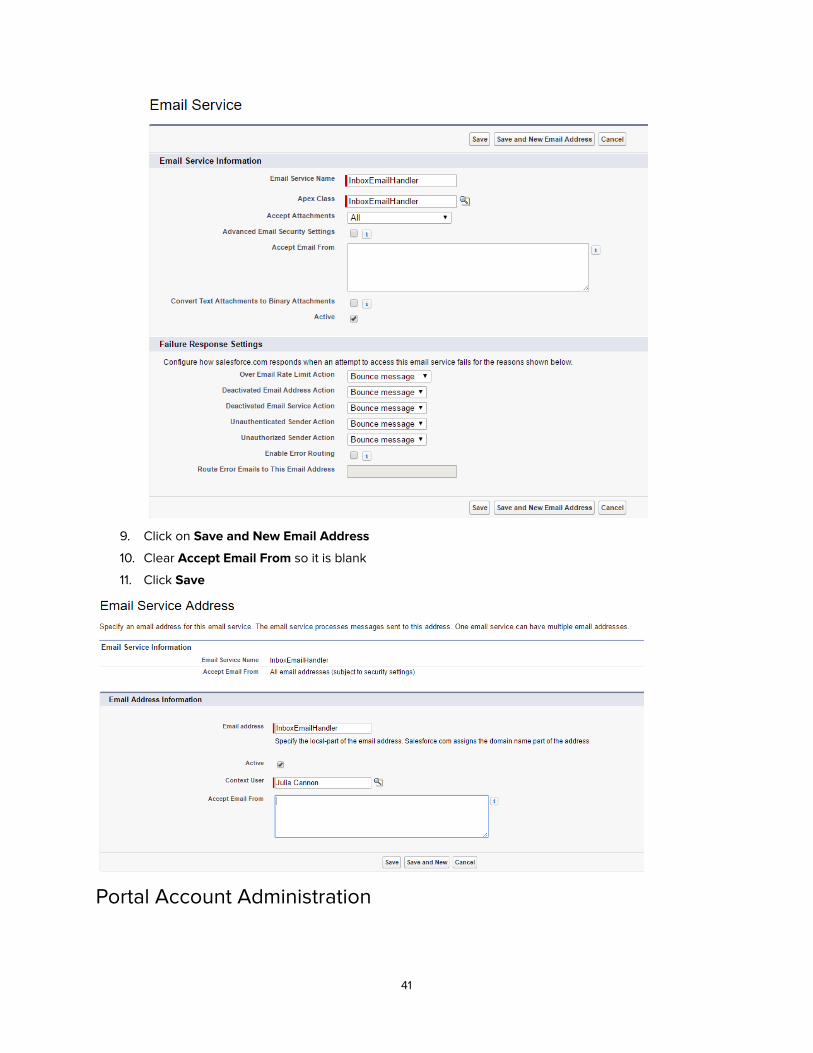
9. Click on Save and New Email Address
10. Clear Accept Email From so it is blank
11. Click Save
Portal Account Administration
41
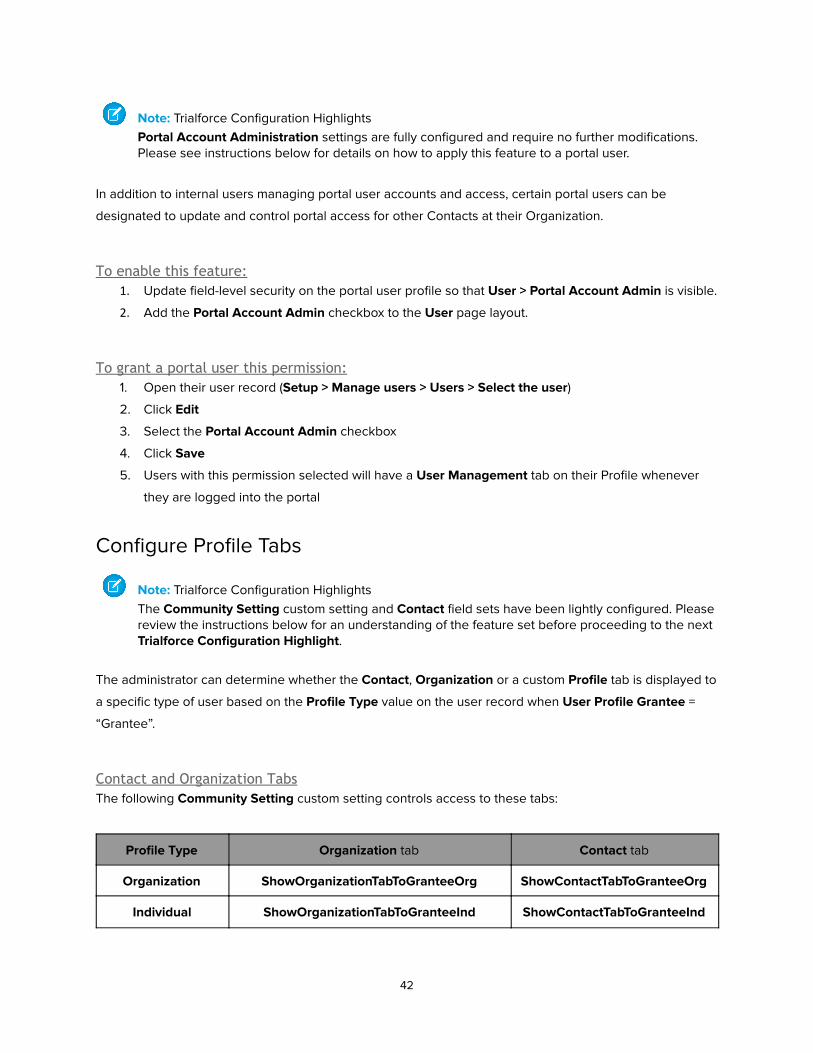
Note: Trialforce Configuration Highlights Portal Account Administration settings are fully configured and require no further modifications. Please see instructions below for details on how to apply this feature to a portal user.
In addition to internal users managing portal user accounts and access, certain portal users can be
designated to update and control portal access for other Contacts at their Organization.
To enable this feature: 1. Update field-level security on the portal user profile so that User > Portal Account Admin is visible.
2. Add the Portal Account Admin checkbox to the User page layout.
To grant a portal user this permission: 1. Open their user record ( Setup > Manage users > Users > Select the user )
2. Click Edit
3. Select the Portal Account Admin checkbox
4. Click Save
5. Users with this permission selected will have a User Management tab on their Profile whenever
they are logged into the portal
Configure Profile Tabs
Note: Trialforce Configuration Highlights The Community Setting custom setting and Contact field sets have been lightly configured. Please review the instructions below for an understanding of the feature set before proceeding to the next Trialforce Configuration Highlight .
The administrator can determine whether the Contact , Organization or a custom Profile tab is displayed to
a specific type of user based on the Profile Type value on the user record when User Profile Grantee =
“Grantee”.
Contact and Organization Tabs The following Community Setting custom setting controls access to these tabs:
Profile Type Organization tab Contact tab
Organization ShowOrganizationTabToGranteeOrg ShowContactTabToGranteeOrg
Individual ShowOrganizationTabToGranteeInd ShowContactTabToGranteeInd
42
1. Navigate to Setup > Develop > Custom Settings > Community Setting and click the Manage link.
2. Click the New button - this will create a new record.
3. When the new record opens populate the following fields:
○ Name : Enter the applicable setting from the table above.
○ IsEnabled : Check (select) the box.
4. Click the Save button.
5. Repeat as necessary.
Make Organization Name Editable Salesforce by default does not allow Community Users to edit the Organization Name. Foundations can
override this default with a Community Setting .
1. Go to Setup > Build > Develop > Custom Settings
2. Click the Manage link beside Community Settings
3. Click New
4. Type “IsOrgNameEditable” in the Name field
5. Check (select) the IsEnabled checkbox
6. Click Save
Configure Contact Field Sets Contact field sets determine which fields are shown on the Contact tab for Organization and Individual
users.
1. Navigate to Setup > Customize > Contacts > Field Set s.
2. Click the Edit hyperlink next to field set you want to edit.
a. CommunityContactFieldSet : Organization
b. CommunityIndividualFieldset : Individual
3. To add a field to the layout click and drag a field from the list of available fields (fields already on
the layout are greyed out) to the In the Field Set section.
4. To remove a field click the minus icon next to it.
5. Click the Save button.
Add the Contact and Organization Profile Tabs to Applications See Community Manager > Create a Contact or Organization Profile Tab for instructions for configuring
the tabs.
Create a Custom Profile Tab 1. Click on the Community Manager tab. If this tab is not visible, click the + at the end of your tabs
and search for Community Manager in the full tab list
43
2. Click the Add/Edit Profile Tab link
3. Select the Portal Type , Tab Type , and Language
4. Type the name of your custom profile tab in the Enter New Tab name field
5. Click Create New
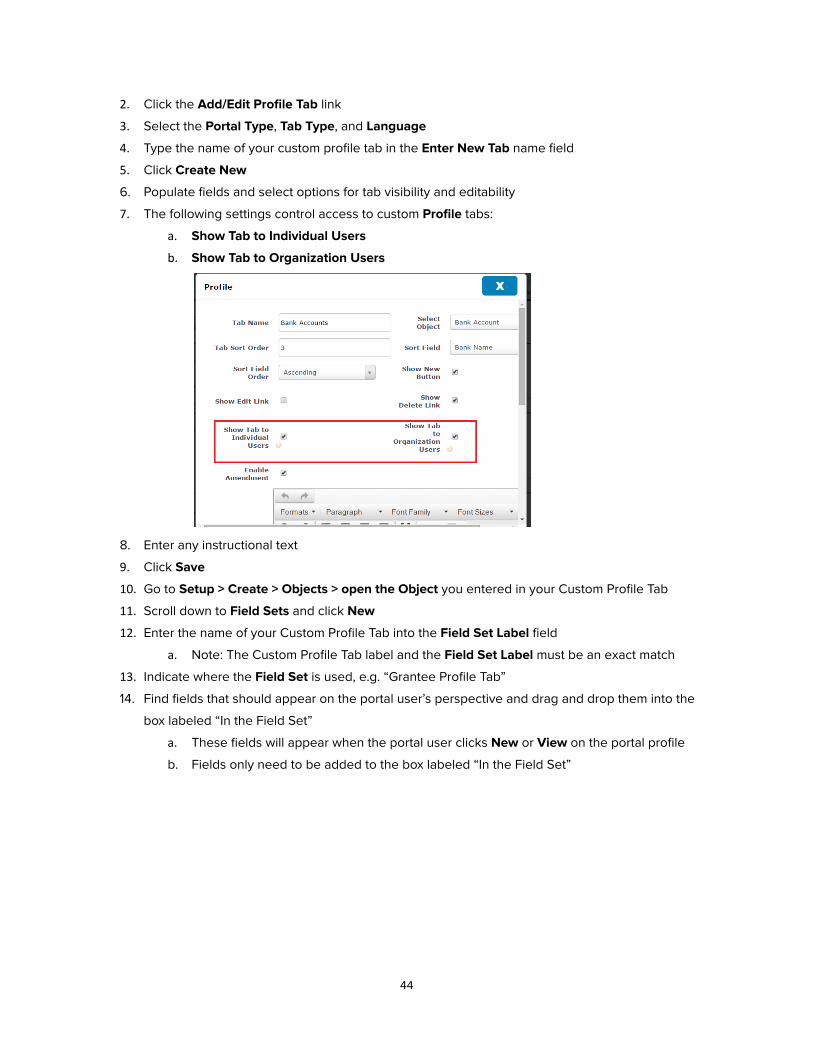
6. Populate fields and select options for tab visibility and editability
7. The following settings control access to custom Profile tabs:
a. Show Tab to Individual Users
b. Show Tab to Organization Users
8. Enter any instructional text
9. Click Save
10. Go to Setup > Create > Objects > open the Object you entered in your Custom Profile Tab
11. Scroll down to Field Sets and click New
12. Enter the name of your Custom Profile Tab into the Field Set Label field
a. Note: The Custom Profile Tab label and the Field Set Label must be an exact match
13. Indicate where the Field Set is used, e.g. “Grantee Profile Tab”
14. Find fields that should appear on the portal user’s perspective and drag and drop them into the
box labeled “In the Field Set”
a. These fields will appear when the portal user clicks New or View on the portal profile
b. Fields only need to be added to the box labeled “In the Field Set”
44
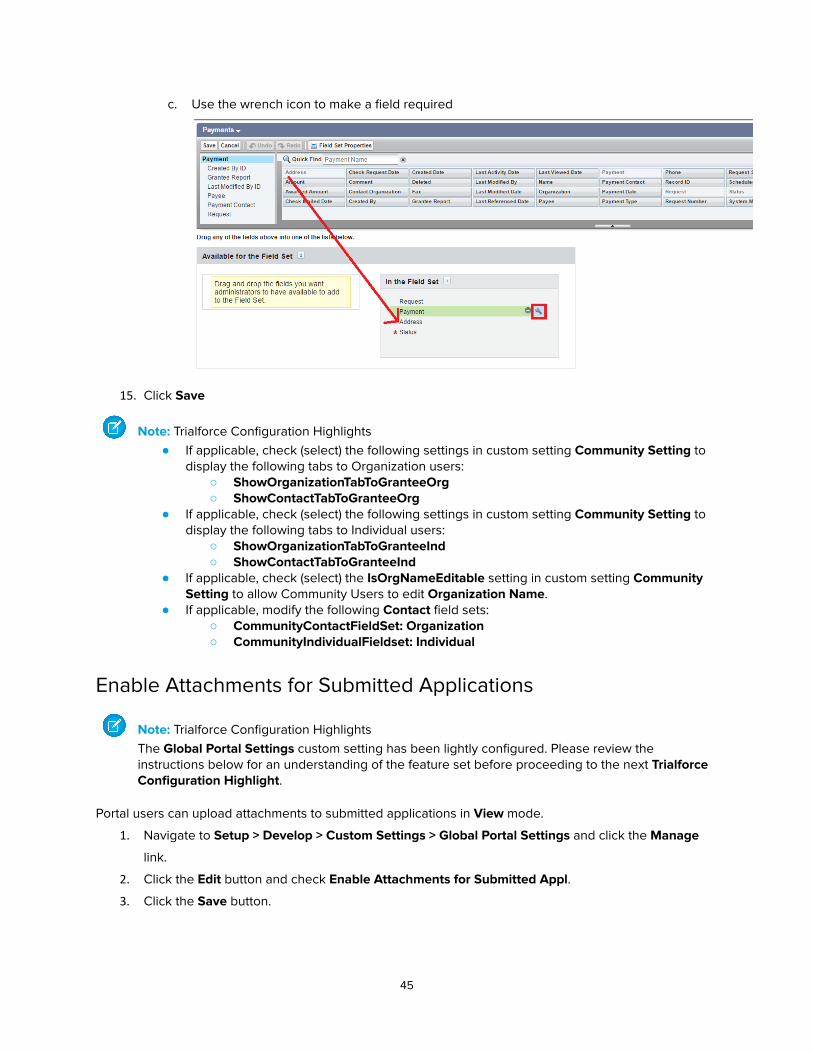
c. Use the wrench icon to make a field required
15. Click Save
Note: Trialforce Configuration Highlights ● If applicable, check (select) the following settings in custom setting Community Setting to
display the following tabs to Organization users: ○ ShowOrganizationTabToGranteeOrg ○ ShowContactTabToGranteeOrg
● If applicable, check (select) the following settings in custom setting Community Setting to display the following tabs to Individual users:
○ ShowOrganizationTabToGranteeInd ○ ShowContactTabToGranteeInd
● If applicable, check (select) the IsOrgNameEditable setting in custom setting Community Setting to allow Community Users to edit Organization Name .
● If applicable, modify the following Contact field sets: ○ CommunityContactFieldSet: Organization ○ CommunityIndividualFieldset: Individual
Enable Attachments for Submitted Applications
Note: Trialforce Configuration Highlights The Global Portal Settings custom setting has been lightly configured. Please review the instructions below for an understanding of the feature set before proceeding to the next Trialforce Configuration Highlight .
Portal users can upload attachments to submitted applications in View mode.
1. Navigate to Setup > Develop > Custom Settings > Global Portal Settings and click the Manage
link.
2. Click the Edit button and check Enable Attachments for Submitted Appl .
3. Click the Save button.
45
4. Go to Setup > Manage Users > Profiles > select your Grantee Portal user profile e.g., "fC Partner
Community Login User", "fC Partner Community User".
5. Locate the Quiz Question custom object
6. Select Read and Edit field level security for the field “Can upload after submission”
7. Save
Note: Trialforce Configuration Highlights If applicable, check (select) the Enable Attachments for Submitted Appl setting in custom setting Global Portal Settings to allow portal users to upload attachments to submitted applications in View mode.
Community Manager Now that the basic Community configuration has been completed you can construct/design the inquiries,
requests and/or reports applicants and grantees will see in the community.
Note: Trialforce Configuration Highlights Please review the instructions below for an understanding of the feature set before proceeding to the next Trialforce Configuration Highlight .
The Community Manager allows you to control the following functionality:
● Page Layout Configuration
○ Add/Edit Profile Tabs
○ Design PageLayout/View existing page layout
○ Design an Application/View existing Application
● Global Portal Configuration
○ Configure GuideStar Field Mapping
○ Global Configuration of Community
○ Portal User Field Mapping
To access Community Manager :
● Click the + sign on the tab bar (if not available in the tabs)
● When the All Tabs page opens scroll down to Community Manager and click on the hyperlink.
Create an Inquiry or Request
Note: Trialforce Configuration Highlights There are two sample applications in the Trialforce template:
● Sample Inquiry (Lead) ● Sample Application (Opportunity)
1. Open Community Manager .
2. Click on Design an Application/View existing Application to open the Design Form page.
46
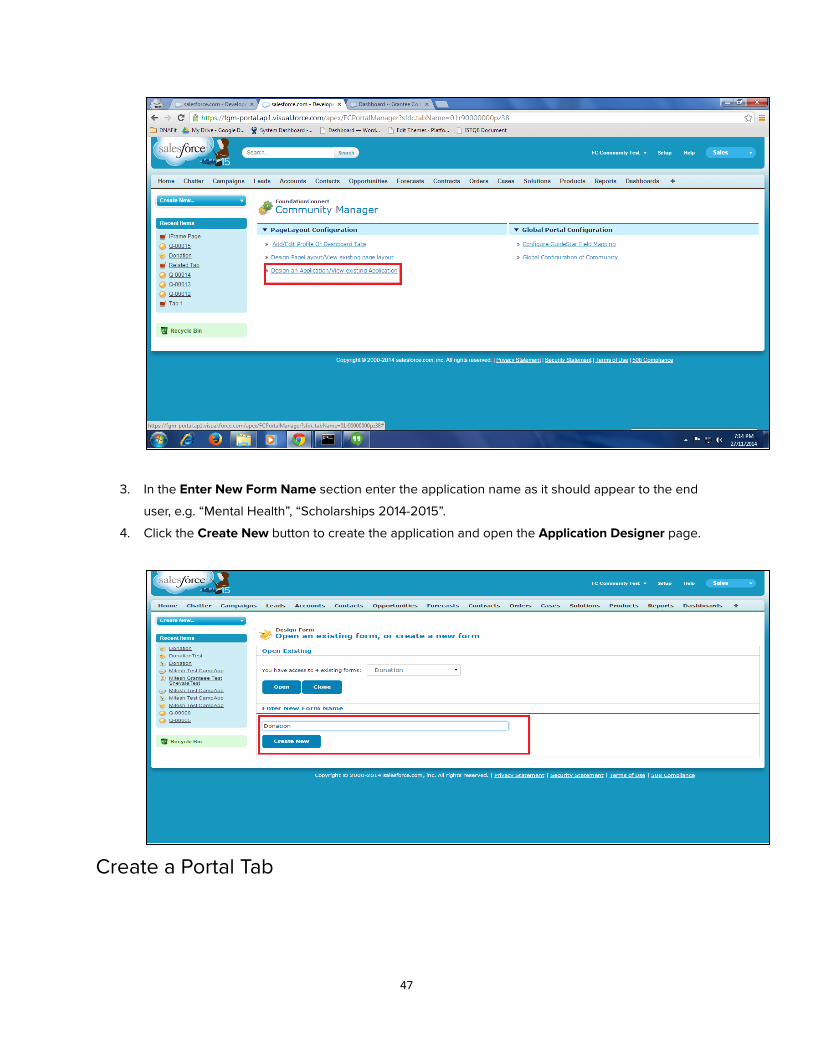
3. In the Enter New Form Name section enter the application name as it should appear to the end
user, e.g. “Mental Health”, “Scholarships 2014-2015”.
4. Click the Create New button to create the application and open the Application Designer page.
Create a Portal Tab
47
Note: Trialforce Configuration Highlights There are several Portal Tab samples in the Trialforce template:
● Sample Application > Application Details ● Sample Inquiry > Sample Inquiry ● Sample Inquiry > Project Details ● Sample Scholarship Application > Application Details
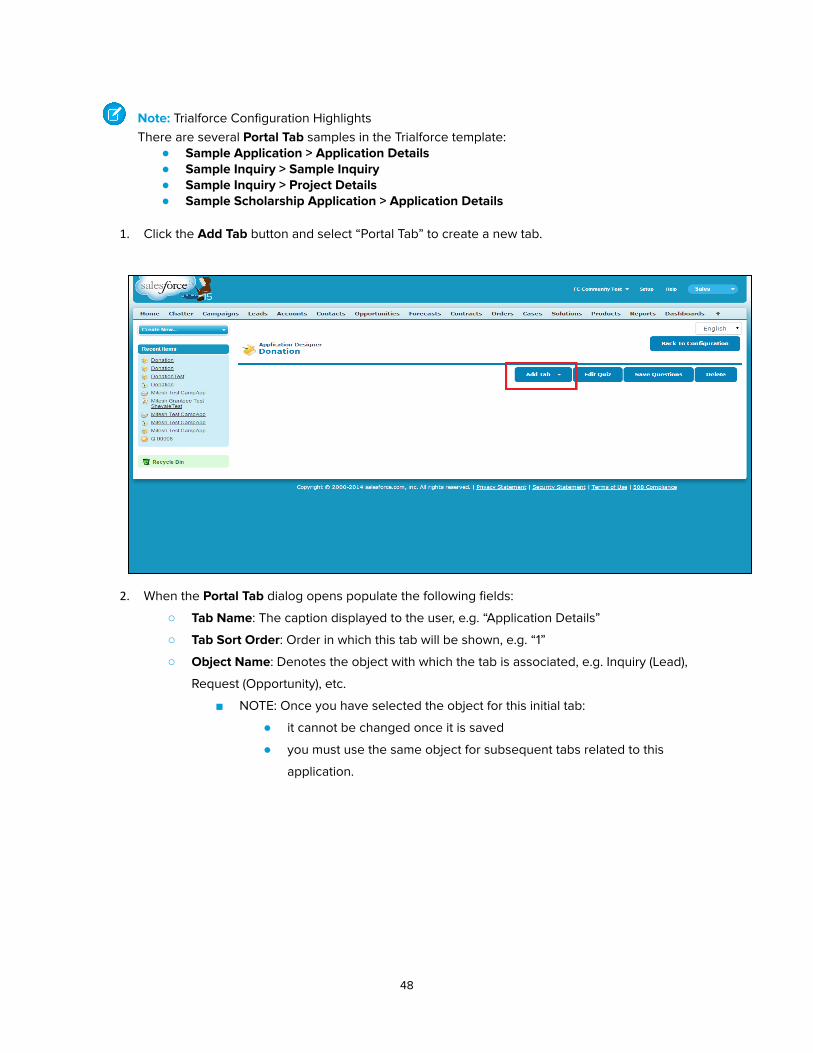
1. Click the Add Tab button and select “Portal Tab” to create a new tab.
2. When the Portal Tab dialog opens populate the following fields:
○ Tab Name : The caption displayed to the user, e.g. “Application Details”
○ Tab Sort Order : Order in which this tab will be shown, e.g. “1”
○ Object Name : Denotes the object with which the tab is associated, e.g. Inquiry (Lead),
Request (Opportunity), etc.
■ NOTE: Once you have selected the object for this initial tab:
● it cannot be changed once it is saved
● you must use the same object for subsequent tabs related to this
application.
48

● Click the Save button to return to the Application Designer . Note that the tab is now displayed.
Create a Question 1. To add a question to the application select the New option to open a new question record.
2. Populate the following fields:
a. Question : Text of the question, e.g. How much funding is your organization requesting?
b. Pre-Text (optional): Text that will appear above the question.
c. Post-Text (optional): Text that will appear below the question.
d. Required? : Will make field required.
e. Hide PreText after submission? : Will hide the Pre text on the Review and Submit screen
and after the application is submitted.
f. Hide PostText after submission? : Will hide the Post text on the Review and Submit screen
and after the application is submitted.
g. Hide question from Reviewers? : Will hide the question or attachment from an External
Reviewer’s view of the application. Only available on Salesforce Data Type and
Attachment questions.
h. Type
i. Salesforce Data Type : The value entered by the end user will be automatically
populated into a specified Inquiry (Lead) or Request (Opportunity) field.
ii. Instruction : Used to display instructional text to the end user and does not accept
any input.
iii. Attachment : Allows the user to upload a single attachment.
1. NOTE: This type of question is not supported on the Related List with
Tab .
49
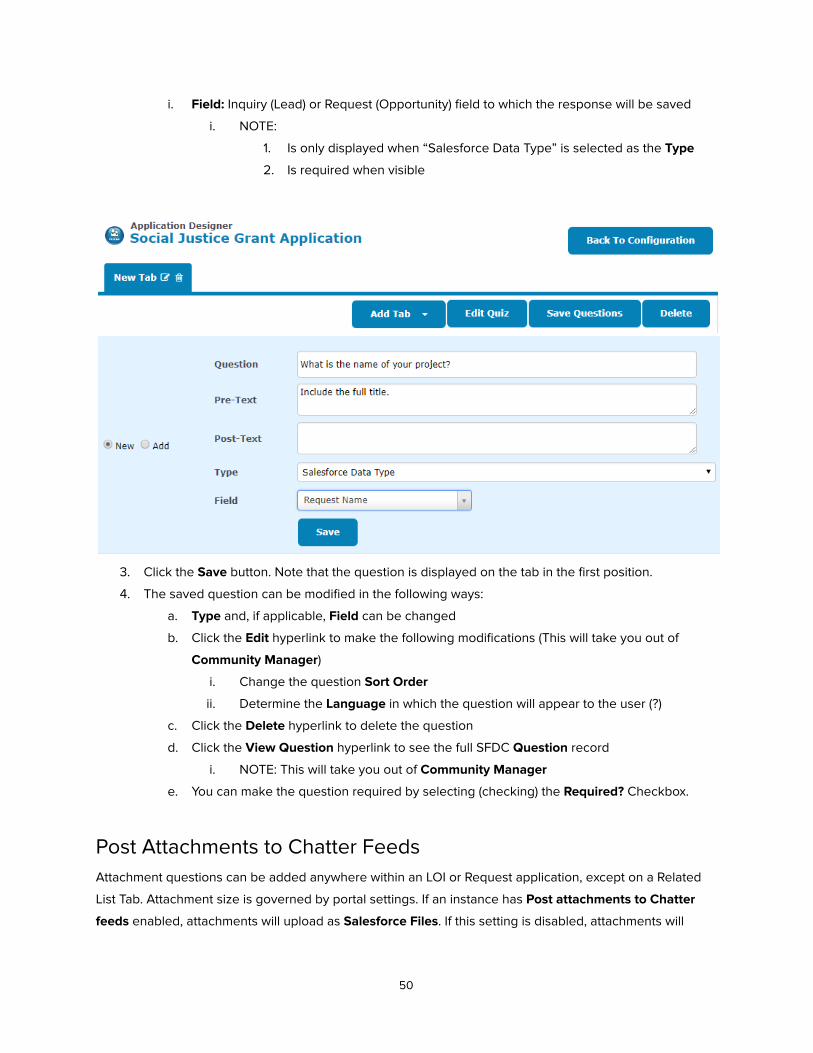
i. Field: Inquiry (Lead) or Request (Opportunity) field to which the response will be saved
i. NOTE:
1. Is only displayed when “Salesforce Data Type” is selected as the Type
2. Is required when visible
3. Click the Save button. Note that the question is displayed on the tab in the first position.
4. The saved question can be modified in the following ways:
a. Type and, if applicable, Field can be changed
b. Click the Edit hyperlink to make the following modifications (This will take you out of
Community Manager )
i. Change the question Sort Order
ii. Determine the Language in which the question will appear to the user (?)
c. Click the Delete hyperlink to delete the question
d. Click the View Question hyperlink to see the full SFDC Question record
i. NOTE: This will take you out of Community Manager
e. You can make the question required by selecting (checking) the Required? Checkbox.
Post Attachments to Chatter Feeds Attachment questions can be added anywhere within an LOI or Request application, except on a Related
List Tab. Attachment size is governed by portal settings. If an instance has Post attachments to Chatter
feeds enabled, attachments will upload as Salesforce Files . If this setting is disabled, attachments will
50
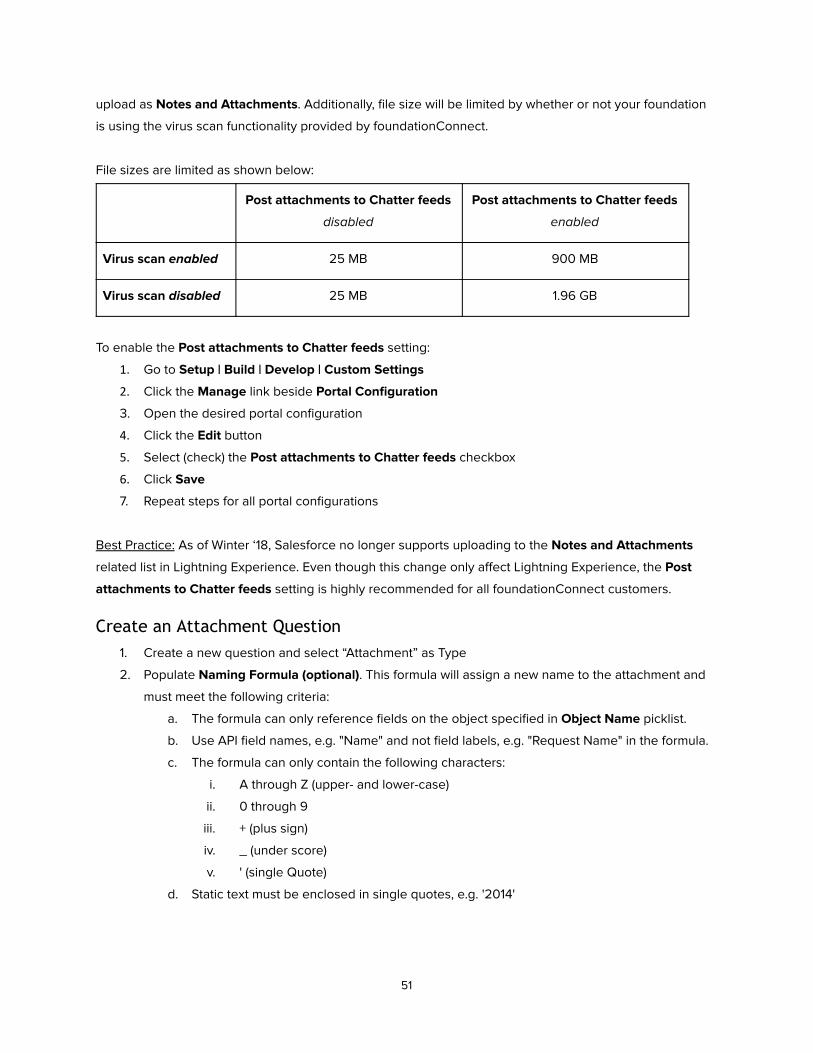
upload as Notes and Attachments . Additionally, file size will be limited by whether or not your foundation
is using the virus scan functionality provided by foundationConnect.
File sizes are limited as shown below:
Post attachments to Chatter feeds
disabled
Post attachments to Chatter feeds
enabled
Virus scan enabled 25 MB 900 MB
Virus scan disabled 25 MB 1.96 GB
To enable the Post attachments to Chatter feeds setting:
1. Go to Setup | Build | Develop | Custom Settings
2. Click the Manage link beside Portal Configuration
3. Open the desired portal configuration
4. Click the Edit button
5. Select (check) the Post attachments to Chatter feeds checkbox
6. Click Save
7. Repeat steps for all portal configurations
Best Practice: As of Winter ‘18, Salesforce no longer supports uploading to the Notes and Attachments
related list in Lightning Experience. Even though this change only affect Lightning Experience, the Post
attachments to Chatter feeds setting is highly recommended for all foundationConnect customers.
Create an Attachment Question 1. Create a new question and select “Attachment” as Type
2. Populate Naming Formula (optional) . This formula will assign a new name to the attachment and
must meet the following criteria:
a. The formula can only reference fields on the object specified in Object Name picklist.
b. Use API field names, e.g. "Name" and not field labels, e.g. "Request Name" in the formula.
c. The formula can only contain the following characters:
i. A through Z (upper- and lower-case)
ii. 0 through 9
iii. + (plus sign)
iv. _ (under score)
v. ' (single Quote)
d. Static text must be enclosed in single quotes, e.g. '2014'
51
e. Use the plus sign (+) concatenate the formula components. For example, if the file name
must include the request number and static text "_2014", enter
"FGM_Base__Request_Number__c+'_2014'" into the formula field.
i. NOTE: The plus sign (+) will not appear in the computed attachment name.
f. Add +FileName - it will incorporate the original name of the file including the extension so
your computer will recognize the right program to open the file.
g. The formula cannot contain any standard Salesforce functions, e.g. TODAY().
h. The formula should not contain any spacing between parameters:
i. WRONG: 'Board Member_' + FGM_Base__Request_Number__c + FileName
ii. CORRECT: 'Board Member_'+FGM_Base__Request_Number__c+FileName
i. Example
i. Object Name : Request
ii. Naming Formula :
1. 'Board Member List '+FGM_Base__Request_Number__c+ FileName
iii. Original File Name : MyAttachment.doc
iv. Computed Attachment Name : Board Member List+12-00138+MyAttachment.doc
j. Note: Always append +FileName at the end, otherwise formula will not work
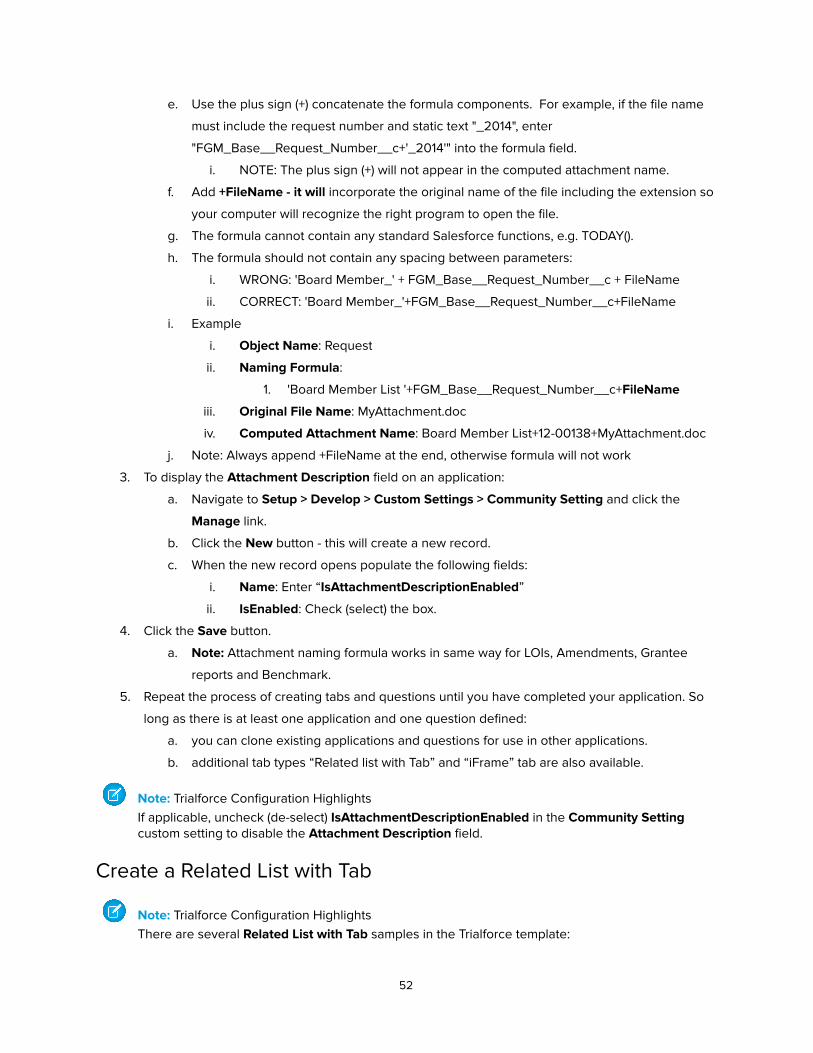
3. To display the Attachment Description field on an application:
a. Navigate to Setup > Develop > Custom Settings > Community Setting and click the
Manage link.
b. Click the New button - this will create a new record.
c. When the new record opens populate the following fields:
i. Name : Enter “ IsAttachmentDescriptionEnabled ”
ii. IsEnabled : Check (select) the box.
4. Click the Save button.
a. Note: Attachment naming formula works in same way for LOIs, Amendments, Grantee
reports and Benchmark.
5. Repeat the process of creating tabs and questions until you have completed your application. So
long as there is at least one application and one question defined:
a. you can clone existing applications and questions for use in other applications.
b. additional tab types “Related list with Tab” and “iFrame” tab are also available.
Note: Trialforce Configuration Highlights If applicable, uncheck (de-select) IsAttachmentDescriptionEnabled in the Community Setting custom setting to disable the Attachment Description field.
Create a Related List with Tab
Note: Trialforce Configuration Highlights There are several Related List with Tab samples in the Trialforce template:
52
● Sample Application > Collaborators ● Sample Scholarship Application > Recommendation
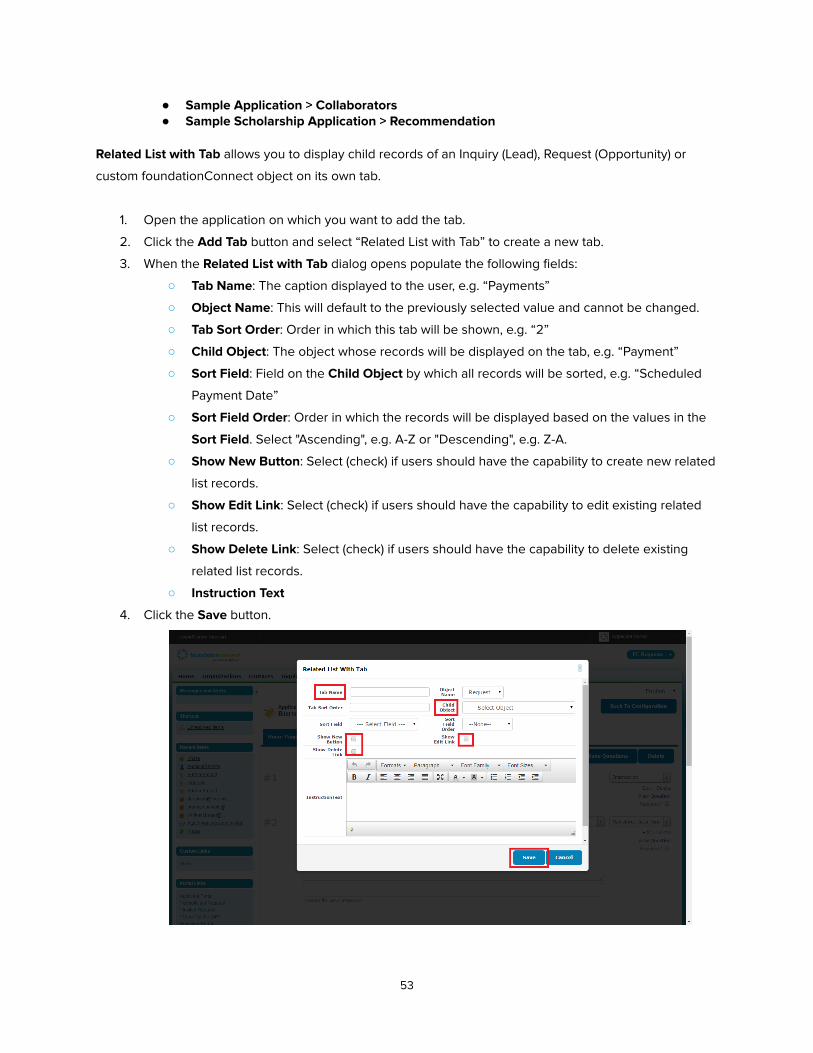
Related List with Tab allows you to display child records of an Inquiry (Lead), Request (Opportunity) or
custom foundationConnect object on its own tab.
1. Open the application on which you want to add the tab.
2. Click the Add Tab button and select “Related List with Tab” to create a new tab.
3. When the Related List with Tab dialog opens populate the following fields:
○ Tab Name : The caption displayed to the user, e.g. “Payments”
○ Object Name : This will default to the previously selected value and cannot be changed.
○ Tab Sort Order : Order in which this tab will be shown, e.g. “2”
○ Child Object : The object whose records will be displayed on the tab, e.g. “Payment”
○ Sort Field : Field on the Child Object by which all records will be sorted, e.g. “Scheduled
Payment Date”
○ Sort Field Order : Order in which the records will be displayed based on the values in the
Sort Field . Select "Ascending", e.g. A-Z or "Descending", e.g. Z-A.
○ Show New Button : Select (check) if users should have the capability to create new related
list records.
○ Show Edit Link : Select (check) if users should have the capability to edit existing related
list records.
○ Show Delete Link : Select (check) if users should have the capability to delete existing
related list records.
○ Instruction Text
4. Click the Save button.
53
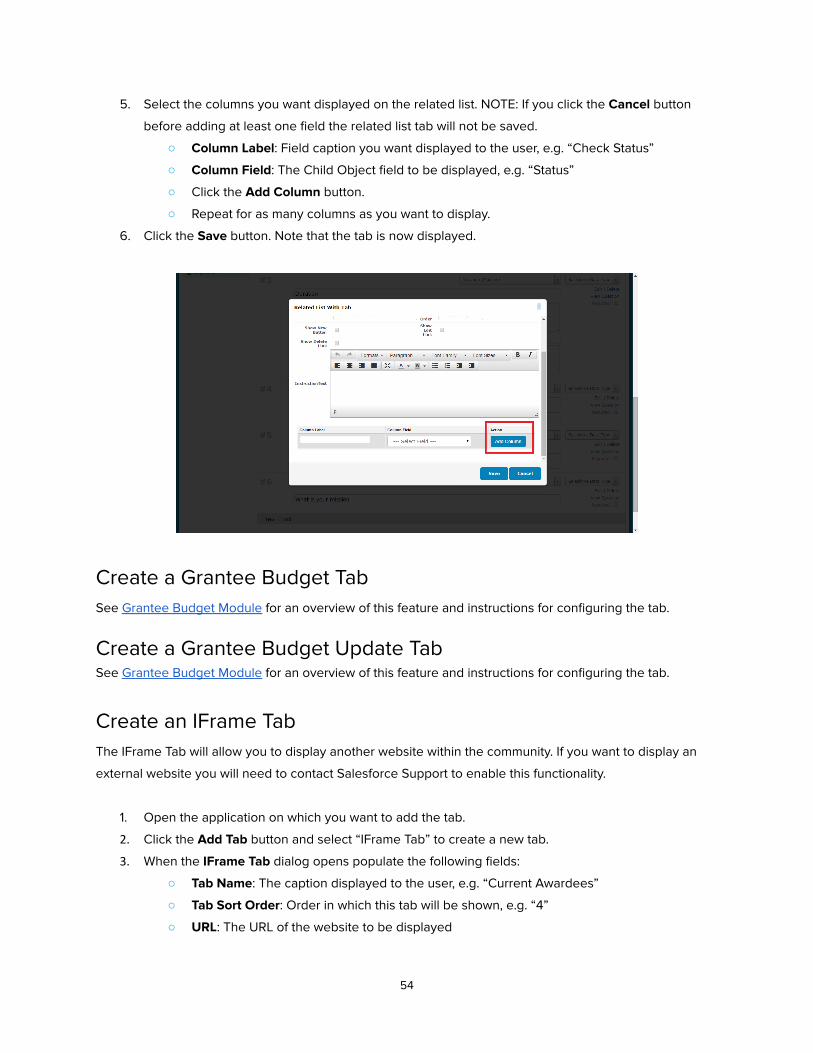
5. Select the columns you want displayed on the related list. NOTE: If you click the Cancel button
before adding at least one field the related list tab will not be saved.
○ Column Label : Field caption you want displayed to the user, e.g. “Check Status”
○ Column Field : The Child Object field to be displayed, e.g. “Status”
○ Click the Add Column button.
○ Repeat for as many columns as you want to display.
6. Click the Save button. Note that the tab is now displayed.
Create a Grantee Budget Tab See Grantee Budget Module for an overview of this feature and instructions for configuring the tab.
Create a Grantee Budget Update Tab See Grantee Budget Module for an overview of this feature and instructions for configuring the tab.
Create an IFrame Tab The IFrame Tab will allow you to display another website within the community. If you want to display an
external website you will need to contact Salesforce Support to enable this functionality.
1. Open the application on which you want to add the tab.
2. Click the Add Tab button and select “IFrame Tab” to create a new tab.
3. When the IFrame Tab dialog opens populate the following fields:
○ Tab Name : The caption displayed to the user, e.g. “Current Awardees”
○ Tab Sort Order : Order in which this tab will be shown, e.g. “4”
○ URL : The URL of the website to be displayed
54
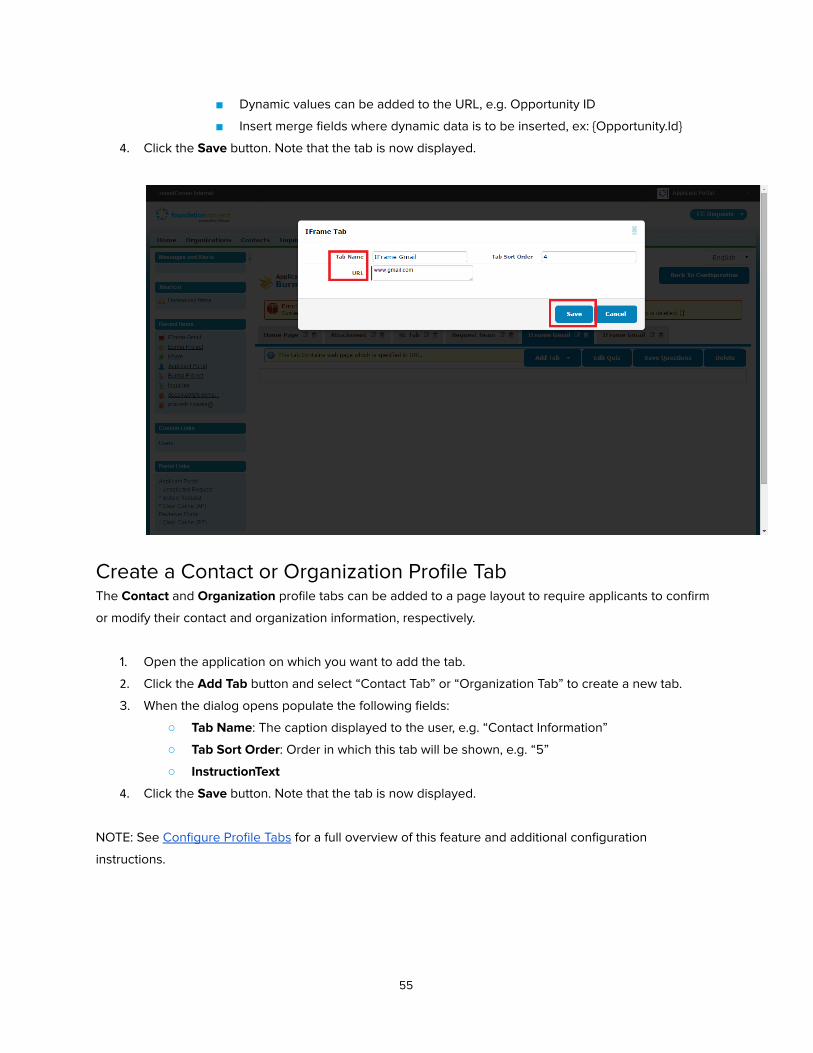
■ Dynamic values can be added to the URL, e.g. Opportunity ID
■ Insert merge fields where dynamic data is to be inserted, ex: {Opportunity.Id}
4. Click the Save button. Note that the tab is now displayed.
Create a Contact or Organization Profile Tab The Contact and Organization profile tabs can be added to a page layout to require applicants to confirm
or modify their contact and organization information, respectively.
1. Open the application on which you want to add the tab.
2. Click the Add Tab button and select “Contact Tab” or “Organization Tab” to create a new tab.
3. When the dialog opens populate the following fields:
○ Tab Name : The caption displayed to the user, e.g. “Contact Information”
○ Tab Sort Order : Order in which this tab will be shown, e.g. “5”
○ InstructionText
4. Click the Save button. Note that the tab is now displayed.
NOTE: See Configure Profile Tabs for a full overview of this feature and additional configuration
instructions.
55
Designing Page Layouts
Note: Trialforce Configuration Highlights There are several Portal Tab samples in the Trialforce template:
● Sample Report > Sample Report ● Amendment - Organization > Change Organization Details ● Amendment - Opportunity > Amendment ● Recommendation > Recommendation
This functionality allows you to create page layouts for custom fC objects such as Benchmarks , Grantee
Reports and Amendments . NOTE: The object must have at least one record type defined
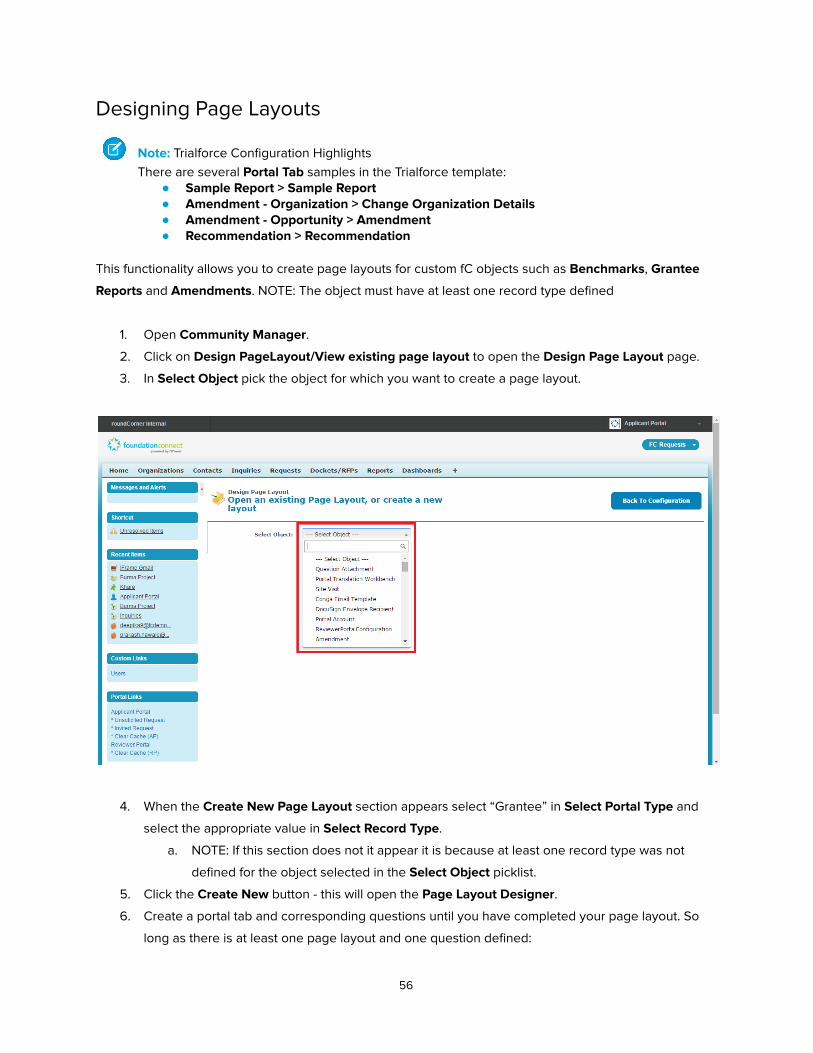
1. Open Community Manager .
2. Click on Design PageLayout/View existing page layout to open the Design Page Layout page.
3. In Select Object pick the object for which you want to create a page layout.
4. When the Create New Page Layout section appears select “Grantee” in Select Portal Type and
select the appropriate value in Select Record Type .
a. NOTE: If this section does not it appear it is because at least one record type was not
defined for the object selected in the Select Object picklist.
5. Click the Create New button - this will open the Page Layout Designer .
6. Create a portal tab and corresponding questions until you have completed your page layout. So
long as there is at least one page layout and one question defined:
56
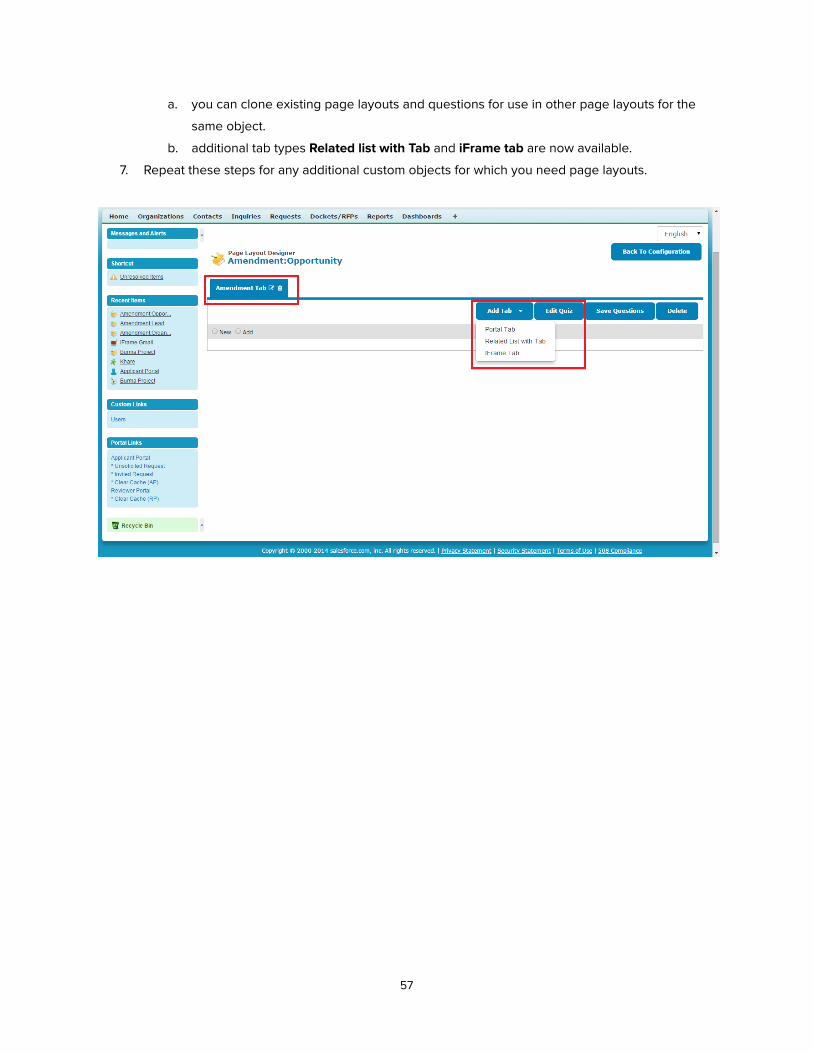
a. you can clone existing page layouts and questions for use in other page layouts for the
same object.
b. additional tab types Related list with Tab and iFrame tab are now available.
7. Repeat these steps for any additional custom objects for which you need page layouts.
57
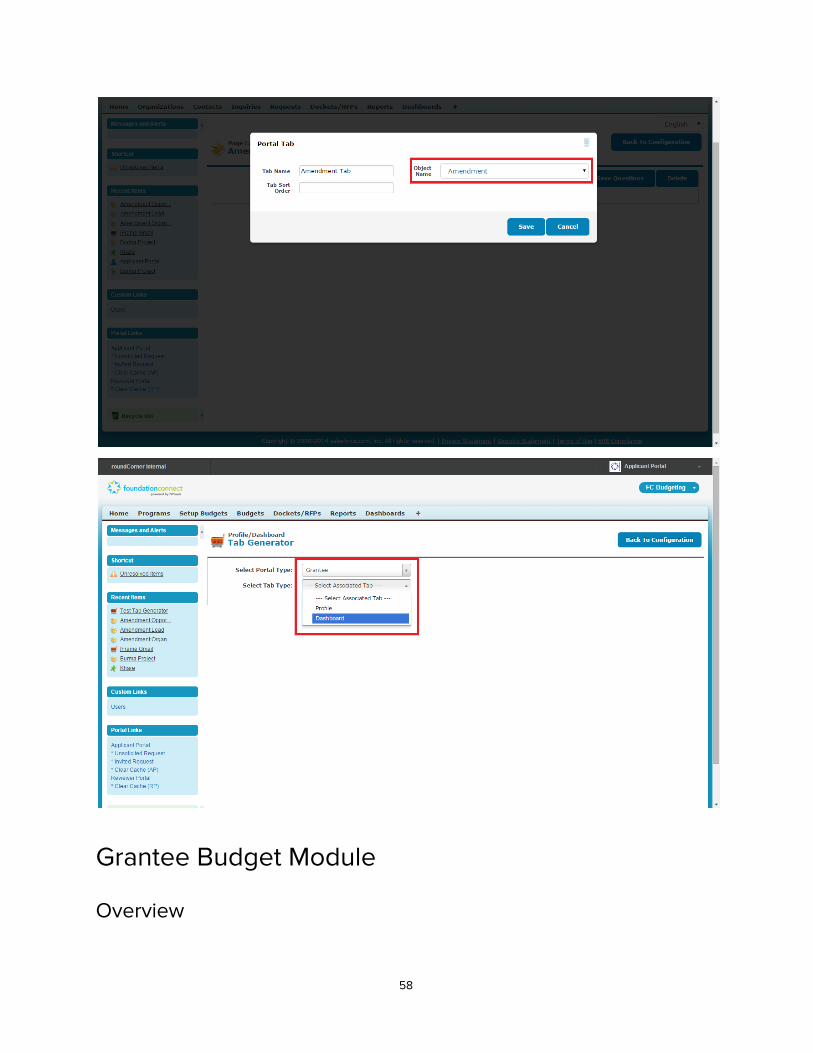
Grantee Budget Module
Overview
58
The Grantee Budget feature allows foundations to capture budgetary requirements from applicants and
budget updates from awardees.
Grant applicants and awardees have the ability to:
● submit a budget for their proposed projects as part of the application process
● define amounts for a yearly time frame that the applicant specifies, e.g. 2015 to 2017, for categories
and sub-categories that are pre-defined by the fC administrator for the specific application
● print budget details as part of the existing Print functionality
● submit updates on awarded grants as part of the existing grantee report process
Grant managers and administrators have the ability to:
● define budget categories and sub-categories
● activate or de-activate categories as needed
● add a budget tab to any given application
● add a budget tab to any given grantee report
External reviewers have the ability to:
● view budget details on the existing Application Details tab
● print budget details as part of the existing Print functionality
NOTE
● This feature was only created for Communities - not .NET
● This feature is only available for applications (opportunities) - not LOIs (leads).
59
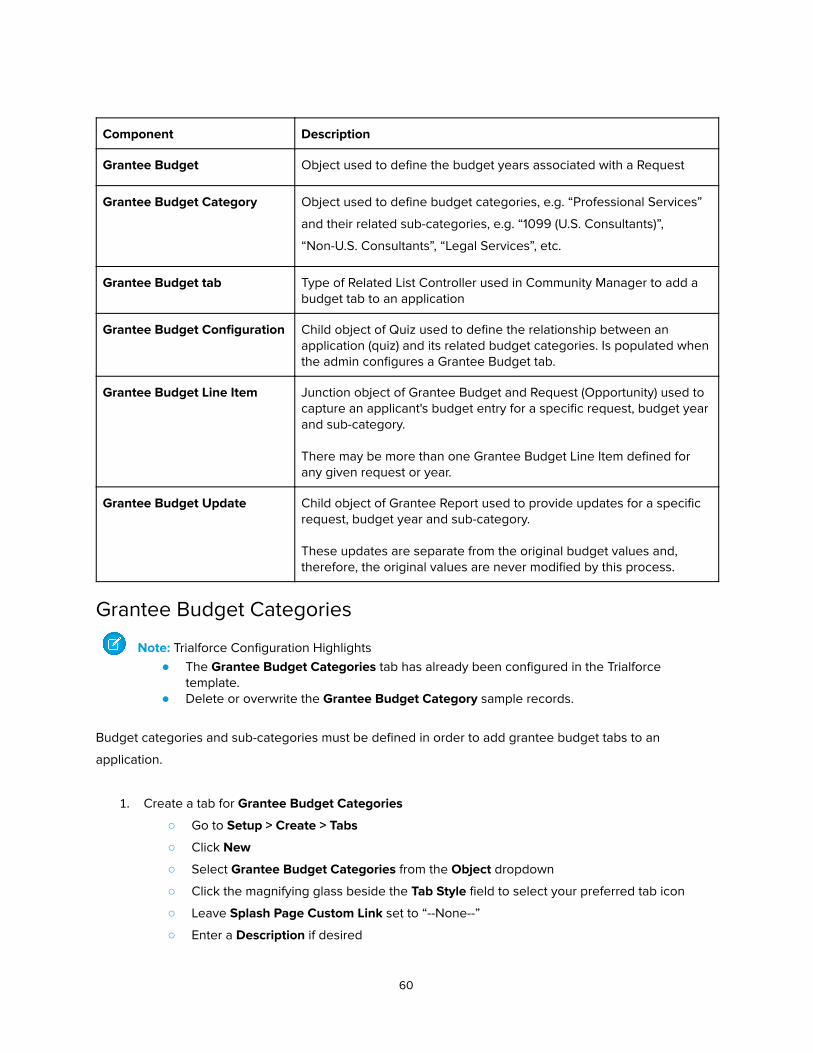
Component Description
Grantee Budget Object used to define the budget years associated with a Request
Grantee Budget Category Object used to define budget categories, e.g. “Professional Services”
and their related sub-categories, e.g. “1099 (U.S. Consultants)”,
“Non-U.S. Consultants”, “Legal Services”, etc.
Grantee Budget tab Type of Related List Controller used in Community Manager to add a budget tab to an application
Grantee Budget Configuration Child object of Quiz used to define the relationship between an application (quiz) and its related budget categories. Is populated when the admin configures a Grantee Budget tab.
Grantee Budget Line Item Junction object of Grantee Budget and Request (Opportunity) used to capture an applicant's budget entry for a specific request, budget year and sub-category. There may be more than one Grantee Budget Line Item defined for any given request or year.
Grantee Budget Update Child object of Grantee Report used to provide updates for a specific request, budget year and sub-category. These updates are separate from the original budget values and, therefore, the original values are never modified by this process.
Grantee Budget Categories
Note: Trialforce Configuration Highlights ● The Grantee Budget Categories tab has already been configured in the Trialforce
template. ● Delete or overwrite the Grantee Budget Category sample records.
Budget categories and sub-categories must be defined in order to add grantee budget tabs to an
application.
1. Create a tab for Grantee Budget Categories
○ Go to Setup > Create > Tabs
○ Click New
○ Select Grantee Budget Categories from the Object dropdown
○ Click the magnifying glass beside the Tab Style field to select your preferred tab icon
○ Leave Splash Page Custom Link set to “--None--”
○ Enter a Description if desired
60
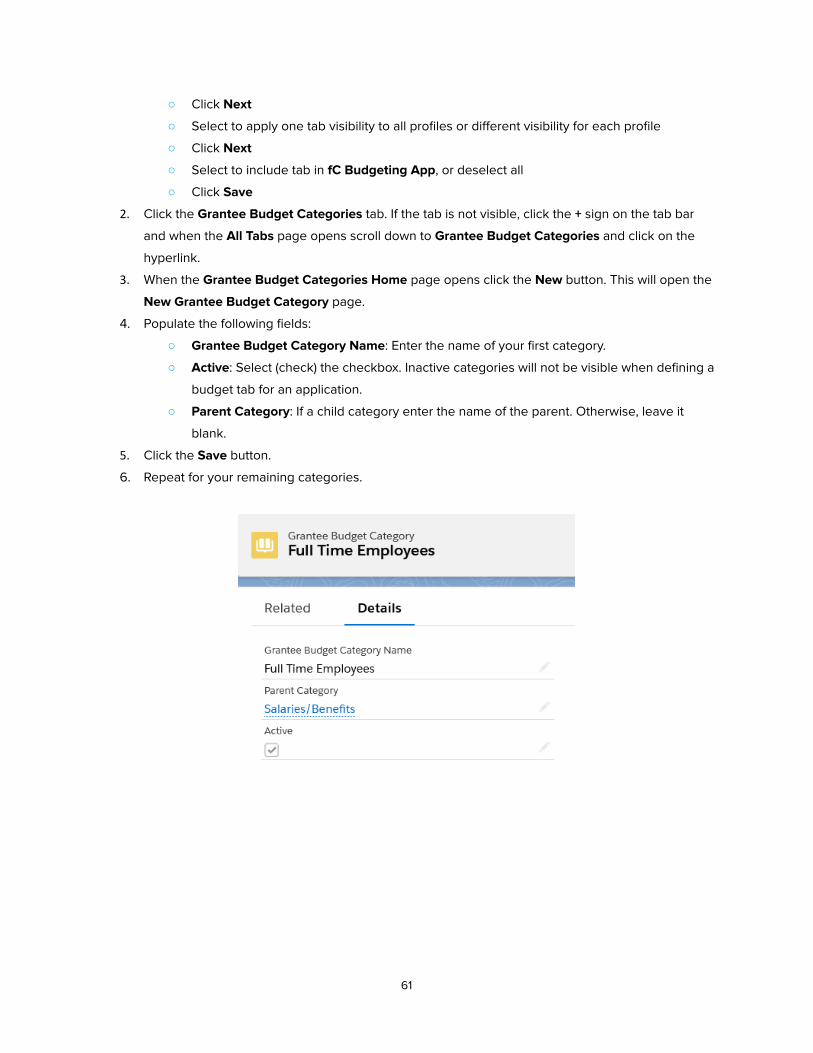
○ Click Next
○ Select to apply one tab visibility to all profiles or different visibility for each profile
○ Click Next
○ Select to include tab in fC Budgeting App , or deselect all
○ Click Save
2. Click the Grantee Budget Categories tab. If the tab is not visible, click the + sign on the tab bar
and when the All Tabs page opens scroll down to Grantee Budget Categories and click on the
hyperlink.
3. When the Grantee Budget Categories Home page opens click the New button. This will open the
New Grantee Budget Category page.
4. Populate the following fields:
○ Grantee Budget Category Name : Enter the name of your first category.
○ Active : Select (check) the checkbox. Inactive categories will not be visible when defining a
budget tab for an application.
○ Parent Category : If a child category enter the name of the parent. Otherwise, leave it
blank.
5. Click the Save button.
6. Repeat for your remaining categories.
61
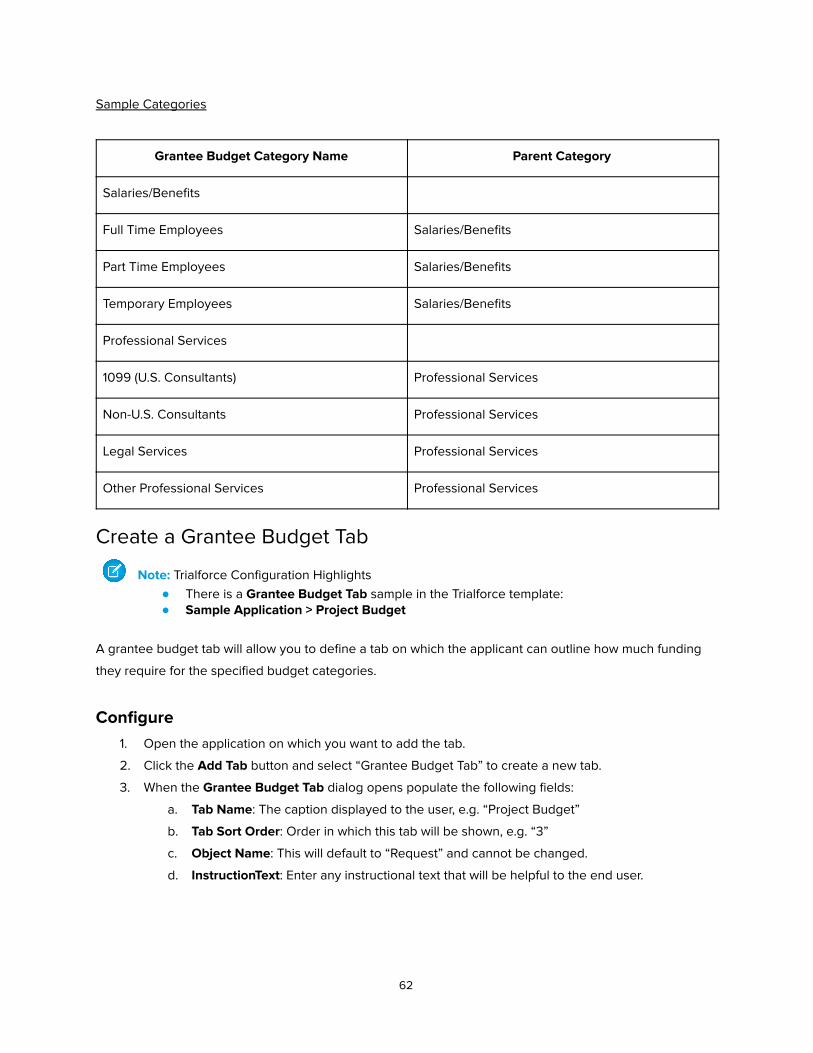
Sample Categories
Grantee Budget Category Name Parent Category
Salaries/Benefits
Full Time Employees Salaries/Benefits
Part Time Employees Salaries/Benefits
Temporary Employees Salaries/Benefits
Professional Services
1099 (U.S. Consultants) Professional Services
Non-U.S. Consultants Professional Services
Legal Services Professional Services
Other Professional Services Professional Services
Create a Grantee Budget Tab
Note: Trialforce Configuration Highlights ● There is a Grantee Budget Tab sample in the Trialforce template: ● Sample Application > Project Budget
A grantee budget tab will allow you to define a tab on which the applicant can outline how much funding
they require for the specified budget categories.
Configure 1. Open the application on which you want to add the tab.
2. Click the Add Tab button and select “Grantee Budget Tab” to create a new tab.
3. When the Grantee Budget Tab dialog opens populate the following fields:
a. Tab Name : The caption displayed to the user, e.g. “Project Budget”
b. Tab Sort Order : Order in which this tab will be shown, e.g. “3”
c. Object Name : This will default to “Request” and cannot be changed.
d. InstructionText : Enter any instructional text that will be helpful to the end user.
62
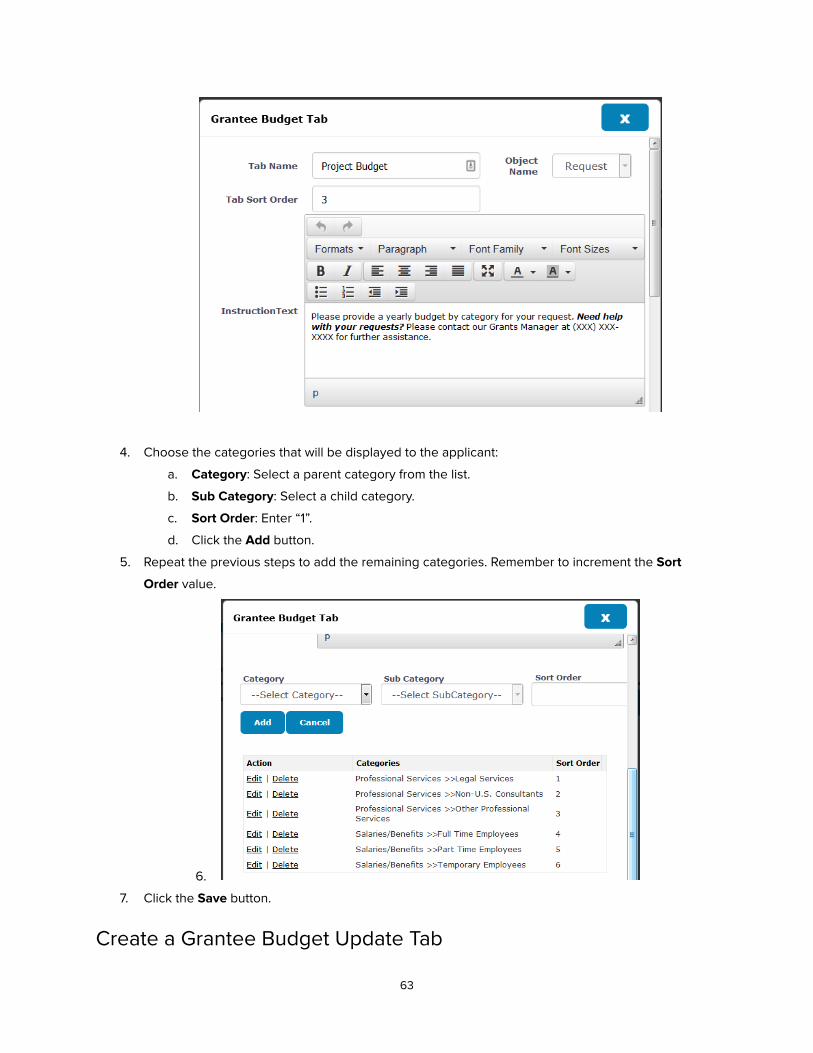
4. Choose the categories that will be displayed to the applicant:
a. Category : Select a parent category from the list.
b. Sub Category : Select a child category.
c. Sort Order : Enter “1”.
d. Click the Add button.
5. Repeat the previous steps to add the remaining categories. Remember to increment the Sort
Order value.
6.
7. Click the Save button.
Create a Grantee Budget Update Tab
63
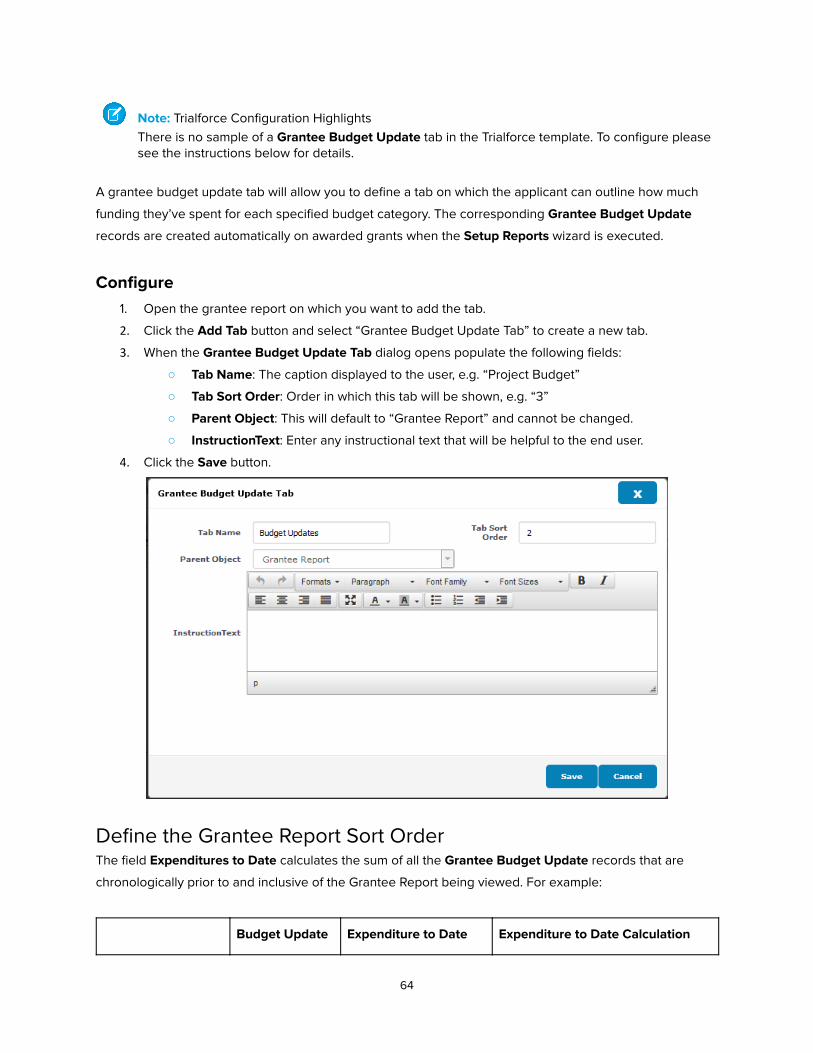
Note: Trialforce Configuration Highlights There is no sample of a Grantee Budget Update tab in the Trialforce template. To configure please see the instructions below for details.
A grantee budget update tab will allow you to define a tab on which the applicant can outline how much
funding they’ve spent for each specified budget category. The corresponding Grantee Budget Update
records are created automatically on awarded grants when the Setup Reports wizard is executed.
Configure 1. Open the grantee report on which you want to add the tab.
2. Click the Add Tab button and select “Grantee Budget Update Tab” to create a new tab.
3. When the Grantee Budget Update Tab dialog opens populate the following fields:
○ Tab Name : The caption displayed to the user, e.g. “Project Budget”
○ Tab Sort Order : Order in which this tab will be shown, e.g. “3”
○ Parent Object : This will default to “Grantee Report” and cannot be changed.
○ InstructionText : Enter any instructional text that will be helpful to the end user.
4. Click the Save button.
Define the Grantee Report Sort Order The field Expenditures to Date calculates the sum of all the Grantee Budget Update records that are
chronologically prior to and inclusive of the Grantee Report being viewed. For example:
Budget Update Expenditure to Date Expenditure to Date Calculation
64
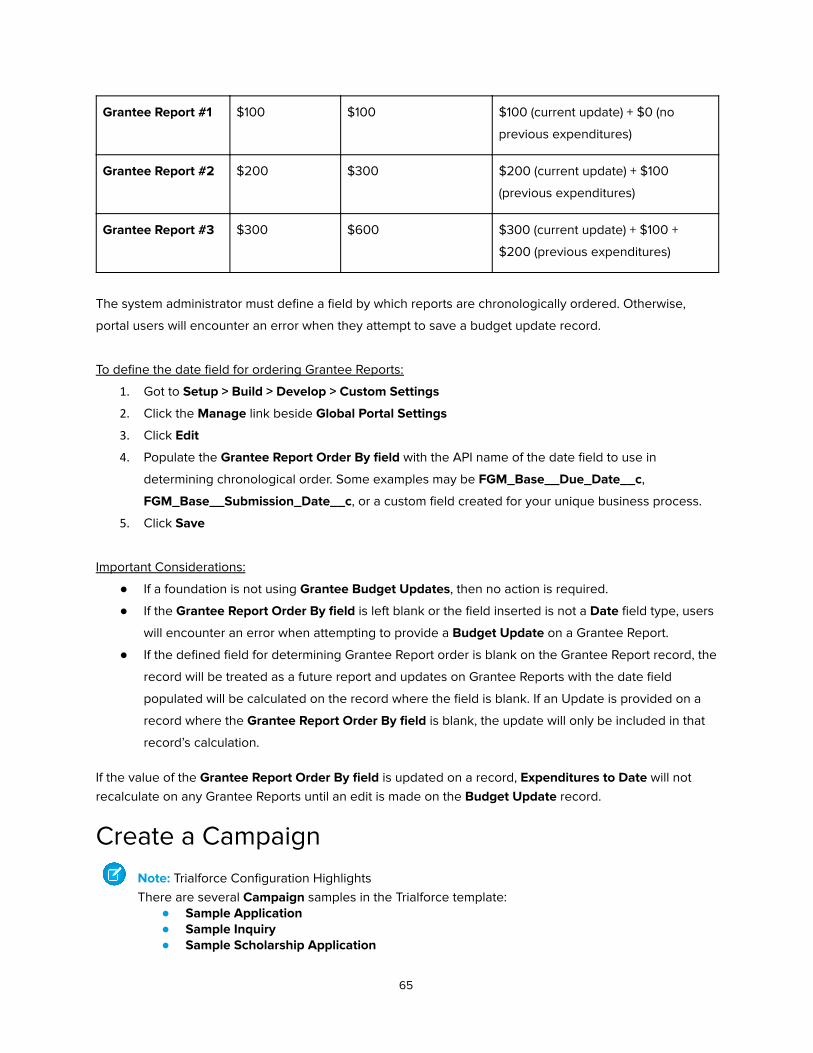
Grantee Report #1 $100 $100 $100 (current update) + $0 (no
previous expenditures)
Grantee Report #2 $200 $300 $200 (current update) + $100
(previous expenditures)
Grantee Report #3 $300 $600 $300 (current update) + $100 +
$200 (previous expenditures)
The system administrator must define a field by which reports are chronologically ordered. Otherwise,
portal users will encounter an error when they attempt to save a budget update record.
To define the date field for ordering Grantee Reports:
1. Got to Setup > Build > Develop > Custom Settings
2. Click the Manage link beside Global Portal Settings
3. Click Edit
4. Populate the Grantee Report Order By field with the API name of the date field to use in
determining chronological order. Some examples may be FGM_Base__Due_Date__c ,
FGM_Base__Submission_Date__c , or a custom field created for your unique business process.
5. Click Save
Important Considerations:
● If a foundation is not using Grantee Budget Updates , then no action is required.
● If the Grantee Report Order By field is left blank or the field inserted is not a Date field type, users
will encounter an error when attempting to provide a Budget Update on a Grantee Report.
● If the defined field for determining Grantee Report order is blank on the Grantee Report record, the
record will be treated as a future report and updates on Grantee Reports with the date field
populated will be calculated on the record where the field is blank. If an Update is provided on a
record where the Grantee Report Order By field is blank, the update will only be included in that
record’s calculation.
If the value of the Grantee Report Order By field is updated on a record, Expenditures to Date will not recalculate on any Grantee Reports until an edit is made on the Budget Update record.
Create a Campaign
Note: Trialforce Configuration Highlights There are several Campaign samples in the Trialforce template:
● Sample Application ● Sample Inquiry ● Sample Scholarship Application
65
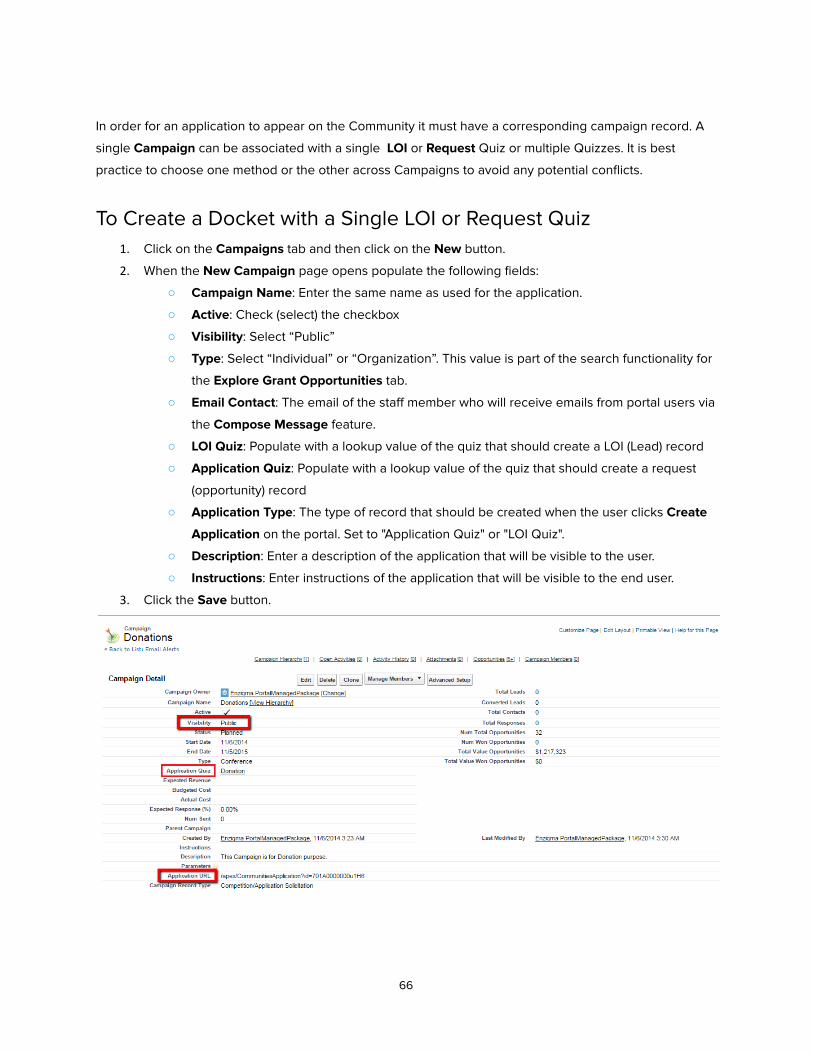
In order for an application to appear on the Community it must have a corresponding campaign record. A
single Campaign can be associated with a single LOI or Request Quiz or multiple Quizzes. It is best
practice to choose one method or the other across Campaigns to avoid any potential conflicts.
To Create a Docket with a Single LOI or Request Quiz 1. Click on the Campaigns tab and then click on the New button.
2. When the New Campaign page opens populate the following fields:
○ Campaign Name : Enter the same name as used for the application.
○ Active : Check (select) the checkbox
○ Visibility : Select “Public”
○ Type : Select “Individual” or “Organization”. This value is part of the search functionality for
the Explore Grant Opportunities tab.
○ Email Contact : The email of the staff member who will receive emails from portal users via
the Compose Message feature.
○ LOI Quiz : Populate with a lookup value of the quiz that should create a LOI (Lead) record
○ Application Quiz : Populate with a lookup value of the quiz that should create a request
(opportunity) record
○ Application Type : The type of record that should be created when the user clicks Create
Application on the portal. Set to "Application Quiz" or "LOI Quiz".
○ Description : Enter a description of the application that will be visible to the user.
○ Instructions : Enter instructions of the application that will be visible to the end user.
3. Click the Save button.
66
If you want to include downloadable documents with the application, e.g. budget template, attach them to
the campaign using Attachments . Adding attachments to a record is standard SFDC functionality so please
see Help & Training in your instance for details on how to create them.
Key Considerations
● Both LOI Quiz and Application Quiz can be populated at the same time but only the type of record
specified in Application Type will be created when the portal user clicks C reate Application .
● Application Type can be changed at any time without impacting existing LOI or application
records.
● New records are associated with the appropriate Campaign related list:
○ LOI: Campaign Members
○ Request: Opportunities
67
To Create a Docket with Multiple LOI and/or Request Quizzes:
Note: Trialforce Configuration Highlights A sample Campaign with multiple quizzes is not configured in the Trialforce template. Please see the instructions below on how to configure this feature.
1. Click on the Campaigns tab and then click on the New button.
2. When the New Campaign page opens populate the following fields:
○ Campaign Name : Enter the same name as used for the application.
○ Active : Check (select) the checkbox
○ Visibility : Select “Public”
○ Type : Select “Individual” or “Organization”. This value is part of the search functionality for
the Explore Grant Opportunities tab.
○ Email Contact : The email of the staff member who will receive emails from portal users via
the Compose Message feature.
○ Description : Enter a description of the application that will be visible to the user.
○ Instructions : Enter instructions of the application that will be visible to the end user.
3. Click the Save button.
If you want to include downloadable documents with the application, e.g. budget template, attach them to
the Docket record using Attachments or Salesforce Files . Adding attachments to a record is standard
SFDC functionality so please see Help & Training in your instance for details on how to create them.
NOTE: As of Salesforce’s Winter ‘18 release (October 2017), users in Lightning Experience cannot add a
new Attachment to Salesforce records. Lightning Experience users should use Salesforce Files
exclusively.
1. Scroll to the Campaign Quizzes related list
2. Click New Campaign Quiz button
3. When the new record opens, populate the following fields:
a. Campaign Quiz Name : This is the name that will be displayed on the Explore Grants
Opportunities page if the Docket is Public
b. Campaign : Should be pre-populated with the name of the Docket you started from
c. Quiz : Look up to the Quiz to be displayed to the applicant when they select this
application
d. Parameters : Include parameters to auto-populate fields on the Request or Inquiry record
when applicants submit this Quiz
e. Active : If selected, this Quiz will be available for selection by applicants. If not selected,
the Quiz will not be visible to applicants from the Explore Grant Opportunities page
4. Click Save
68
5. Repeat to add as many Quizzes as desired
Key Considerations
● Campaign Quiz labels should be updated through Translation Workbench to match your
foundation's terminology
● If an applicant starts two different applications from the same Docket , they will receive the
started-but-not-submitted warning. If your foundation allows for two different applications to be
submitted to the same Docket , it is recommended that you update the language in this pop-up
warning to indicate what is permitted and what is not by the foundation. This text is controlled by
the FC_CommunityApplication_PopupDialogBox custom label
● New records are associated with the appropriate Campaign related list:
○ LOI : Campaign Members
○ Request : Opportunities
● If a URL is provided and relates to a Docket with multiple Campaign Quizzes, the user will receive
an error due to the fact that the specific quiz has not been defined by the grants administrator.
Define Default Field Values on a Campaign for LOIs (Leads) and Requests (Opportunities)
Note: Trialforce Configuration Highlights Default field values on a Campaign are not configured in the Trialforce template. Please see the instructions below on how to enable this feature.
This feature is an extension of existing .NET functionality that allows the admin to define default values for
an LOI or request when it is created using the grantee portal. The objects are stored in the following fields:
● Application Parameters (formerly Parameters )
● LOI Parameters
These fields accept the following values:
● RecordTypeID for a LOI (Lead) or Request (Opportunity)
● API name of a LOI or Request field
Single parameter
● Use a colon (:) as a value separator
● Format : [Field_1_APIName]:[Value for Field 1]
● Example : RecordTypeId:012o0000000Oeba
Multiple parameters
● Use a comma (,) as a field separator
● Do not use spaces
69
● Format : [Field_1_APIName]:[Value for Field 1],[Field_2_APIName]:[Value for Field 2]
● Example : RecordTypeId:012o0000000Oeba,LeadSource:Web,FGM_Base__Renewal__c:True
●
Key Considerations when using the OwnerId parameter
● If an OwnerId is specified
○ a newly created LOI or request is owned by the specified user and the portal user who
created the record will have Read/Write access to the record via record sharing.
○ when the LOI is converted the portal user is added as an opportunity team member with
Read/Write access but this user is not visible on the portal display;
○ the portal user will have the ability to add existing team members (but not invite new team
members);
○ the portal user cannot delete the LOI/request record.
● If no OwnerId is specified, then a newly created LOI or request is owned by the portal user (default
behavior).
Optional Configuration for Handing Expired Dockets
Note: Trialforce Configuration Highlights Optional configuration for handling expired Dockets is not configured in the Trialforce template. Please see the instructions below on how to enable this feature.
1. Add a workflow rule that changes a campaign's Visibility to "Private" so it is not available on the
Explore Grant Opportunities tab once the End Date has passed
2. Create a workflow rule that sends a reminder to the opportunity owner, e.g. 10 days before the due
date [(Due_Date__c - TODAY()) = 10], that the deadline is approaching. This presumes that no step
of the client's process reassigns ownership to anyone but the applicant.
3. If a user opens a new or existing LOI or Request based on an expired docket that was never
submitted they will see a message indicating the due date has passed. This message can be
customized using custom label fC_CommunityApplication_ExpiredCampaignMessage .
a. Go to Setup > Create > Custom Labels and open
"fC_CommunityApplication_ExpiredCampaignMessage".
b. Click the New Local Translations/Overrides button.
c. Populate the following fields:
i. Language : Select “English”
ii. Translation Text : Enter the new text you want to display.
d. Click the Save button.
Using Custom Campaign Fields on LOIs (Leads) and Requests (Opportunities)
70
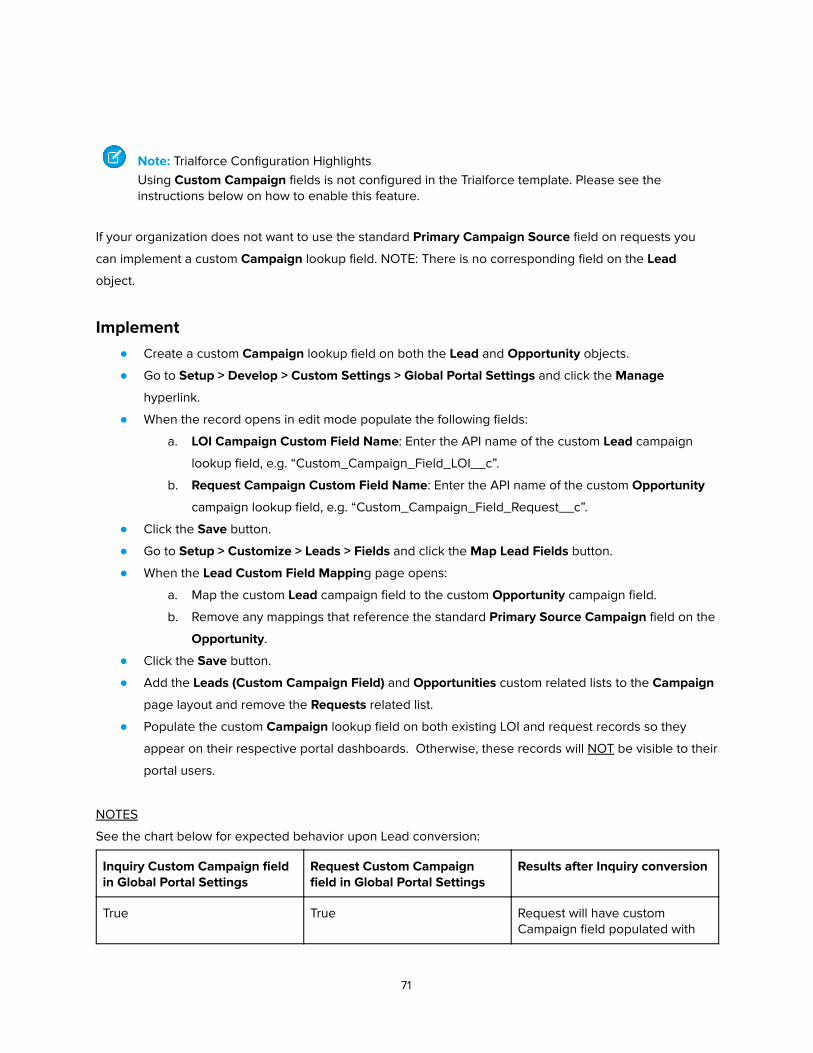
Note: Trialforce Configuration Highlights Using Custom Campaign fields is not configured in the Trialforce template. Please see the instructions below on how to enable this feature.
If your organization does not want to use the standard Primary Campaign Source field on requests you
can implement a custom Campaign lookup field. NOTE: There is no corresponding field on the Lead
object.
Implement ● Create a custom Campaign lookup field on both the Lead and Opportunity objects.
● Go to Setup > Develop > Custom Settings > Global Portal Settings and click the Manage
hyperlink.
● When the record opens in edit mode populate the following fields:
a. LOI Campaign Custom Field Name : Enter the API name of the custom Lead campaign
lookup field, e.g. “Custom_Campaign_Field_LOI__c”.
b. Request Campaign Custom Field Name : Enter the API name of the custom Opportunity
campaign lookup field, e.g. “Custom_Campaign_Field_Request__c”.
● Click the Save button.
● Go to Setup > Customize > Leads > Fields and click the Map Lead Fields button.
● When the Lead Custom Field Mappin g page opens:
a. Map the custom Lead campaign field to the custom Opportunity campaign field.
b. Remove any mappings that reference the standard Primary Source Campaign field on the
Opportunity .
● Click the Save button.
● Add the Leads (Custom Campaign Field) and Opportunities custom related lists to the Campaign
page layout and remove the Requests related list.
● Populate the custom Campaign lookup field on both existing LOI and request records so they
appear on their respective portal dashboards. Otherwise, these records will NOT be visible to their
portal users.
NOTES
See the chart below for expected behavior upon Lead conversion:
Inquiry Custom Campaign field in Global Portal Settings
Request Custom Campaign field in Global Portal Settings
Results after Inquiry conversion
True True Request will have custom Campaign field populated with
71
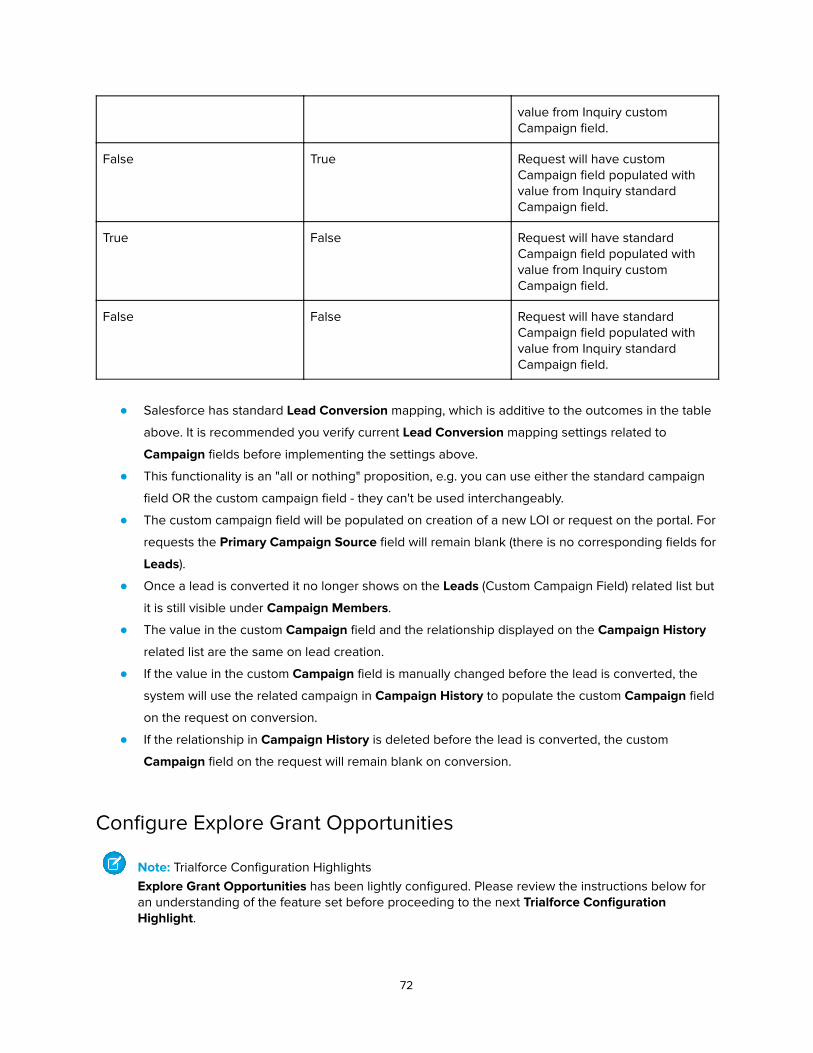
value from Inquiry custom Campaign field.
False True Request will have custom Campaign field populated with value from Inquiry standard Campaign field.
True False Request will have standard Campaign field populated with value from Inquiry custom Campaign field.
False False Request will have standard Campaign field populated with value from Inquiry standard Campaign field.
● Salesforce has standard Lead Conversion mapping, which is additive to the outcomes in the table
above. It is recommended you verify current Lead Conversion mapping settings related to
Campaign fields before implementing the settings above.
● This functionality is an "all or nothing" proposition, e.g. you can use either the standard campaign
field OR the custom campaign field - they can't be used interchangeably.
● The custom campaign field will be populated on creation of a new LOI or request on the portal. For
requests the Primary Campaign Source field will remain blank (there is no corresponding fields for
Leads ).
● Once a lead is converted it no longer shows on the Leads (Custom Campaign Field) related list but
it is still visible under Campaign Members .
● The value in the custom Campaign field and the relationship displayed on the Campaign History
related list are the same on lead creation.
● If the value in the custom Campaign field is manually changed before the lead is converted, the
system will use the related campaign in Campaign History to populate the custom Campaign field
on the request on conversion.
● If the relationship in Campaign History is deleted before the lead is converted, the custom
Campaign field on the request will remain blank on conversion.
Configure Explore Grant Opportunities
Note: Trialforce Configuration Highlights Explore Grant Opportunities has been lightly configured. Please review the instructions below for an understanding of the feature set before proceeding to the next Trialforce Configuration Highlight .
72

If you want applicants to have the ability to search for available applications you will need to enable the
Explore Grant Opportunities functionality.
Enable the Functionality: 1. Navigate to Setup > Develop > Custom Settings > Community Setting and click the Manage link.
2. Click the New button - this will create a new record.
3. When the new record opens populate the following fields:
○ Name : Enter “ShowExploreGrantOpportunitySearch”
■ NOTE: For instances prior to version 8.14 this setting will have to be manually
updated from its previous name - “ExploreGrantOpportunity”.
○ IsEnabled : Check (select) the box.
4. Click the Save button.
Note: Trialforce Configuration Highlights If applicable, uncheck (de-select) ShowExploreGrantOpportunitySearch if you do not want to enable this feature.
To Display the Tab on the Dashboard: 1. Navigate to Customize > Communities > All Communities . Click the Workspaces hyperlink next to
the community you just created.
2. In the left-hand menu click navigate to Administration > Tabs .
3. Add "Explore Grant Opportunities" from Available Tabs .
4. Click the Save button.
Note: Trialforce Configuration Highlights If applicable, remove the Explore Grant Opportunities tab if it is not appropriate for your implementation.
To Edit the Sidebar Text: 1. The sidebar text is governed by a custom label. The ability to edit this custom label requires that
you enable Translation Workbench .
○ Go to Setup > Translation Workbench > Translation Settings and click the Enable button.
2. Once the feature is enabled go to Setup > Create > Custom Labels , locate
“fC_CommunitiesLanding_CustomText” and click on it.
3. Once it opens click on the button called New Local Translations/Overrides .
4. When the New Translation page opens populate the following fields:
○ Language : Select “English”
○ Translation Text : Enter the text you want to see on the “Explore Grant Opportunities”
sidebar. Please note it accepts HTML tags if you’d like to customize the text any further.
5. Click Save to commit the changes.
73
Note: Trialforce Configuration Highlights If applicable, edit the existing custom label text or delete the translation.
To Translate Description and Instructions:
1. Navigate to the Community Manager tab (you may need to click the + to the right of all tabs and
find the Community Manager from the list)
2. In the right column entitled “Global Portal Configuration” click the Object Data Mapping Wizard
link
3. When the page opens, click the Select Object picklist and select “Campaign”
4. Click Select Record and find the Campaign to translate in the picklist
5. Click the Select Language picklist on the right hand side of the screen
6. Click the Select Field picklist on the left hand side of the screen. You will be presented with all
text type fields in the Campaign object. Select the field you would like to translate.
7. When you select a field to translate, the page will load the original text in the left hand column
and the translated text in the right hand column. If a translation has been previously entered,
that text will appear. If this is the first time translating the selected field into the selected
language, the right hand text block will be empty.
8. Enter translated text into the right hand block as it should appear in the grantseeker portal.
9. Click Save
10. To translate another field on the same record in the same language, click the Add New
Translation button in the top right portion of the tool
11. Repeat steps 6-10 until all desired fields are translated.
12. Click Save
Note: All text type fields will appear in the list of available fields to translate, including any custom
fields. Only fields currently displayed in the Explore Grant Opportunities tab will display on the
grantseeker portal, even if an administrator translates additional fields. Fields that currently display in
the grantseeker portal are:
● Description
● Docket Name
● Instructions
74
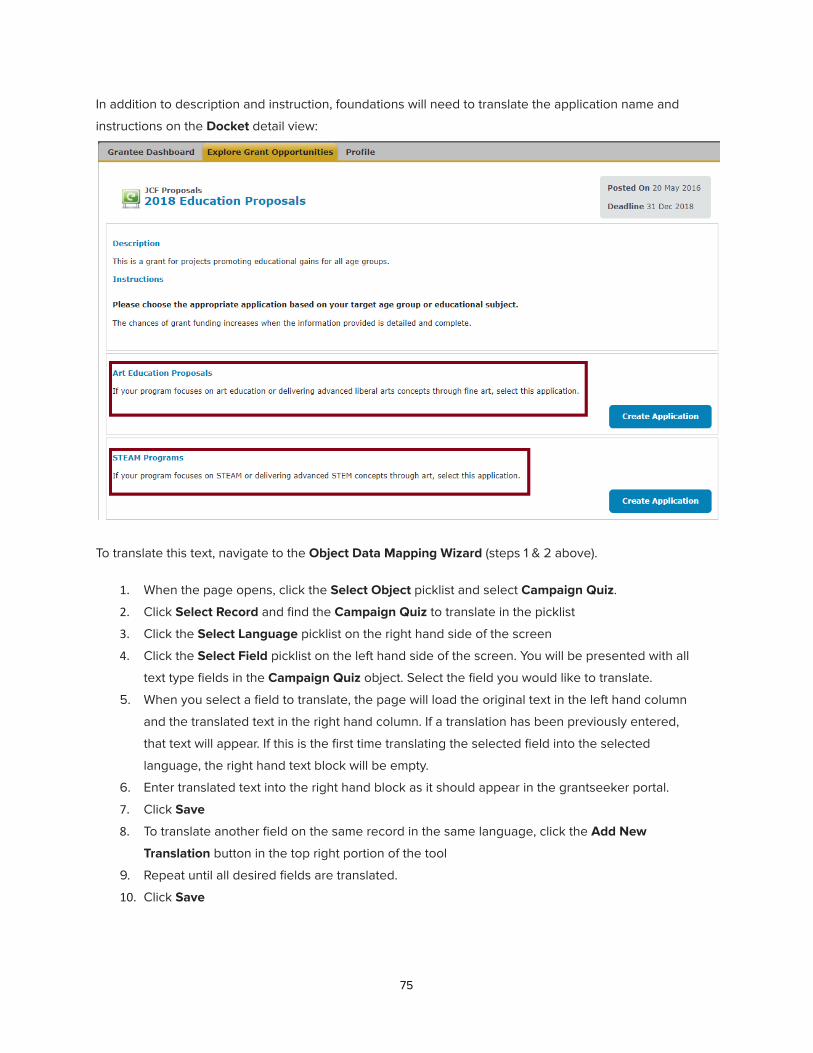
In addition to description and instruction, foundations will need to translate the application name and
instructions on the Docket detail view:
To translate this text, navigate to the Object Data Mapping Wizard (steps 1 & 2 above).
1. When the page opens, click the Select Object picklist and select Campaign Quiz .
2. Click Select Record and find the Campaign Quiz to translate in the picklist
3. Click the Select Language picklist on the right hand side of the screen
4. Click the Select Field picklist on the left hand side of the screen. You will be presented with all
text type fields in the Campaign Quiz object. Select the field you would like to translate.
5. When you select a field to translate, the page will load the original text in the left hand column
and the translated text in the right hand column. If a translation has been previously entered,
that text will appear. If this is the first time translating the selected field into the selected
language, the right hand text block will be empty.
6. Enter translated text into the right hand block as it should appear in the grantseeker portal.
7. Click Save
8. To translate another field on the same record in the same language, click the Add New
Translation button in the top right portion of the tool
9. Repeat until all desired fields are translated.
10. Click Save
75
Configure GuideStar
Note: Trialforce Configuration Highlights GuideStar is not configured in the Trialforce template. Please see the instructions below on how to enable this feature.
Your organization can choose to implement functionality supported by GuideStar that provides
supplemental organization information during the grantee registration process.
Pre-requisites These instructions presume the following:
● The organization has purchased access to GuideStar’s Simplify. To register:
http://www.guidestar.org/
● Salesforce.com (SFDC) Enterprise instance without any foundationConnect (fC) managed packages
installed
● System administrator access to the instance
● Basic proficiency with SFDC and fC configuration
● Communities has been enabled in your instance
a. Go to Customize > Communities > Settings and select (check) “Enable communities”
b. Enter a value into “Domain name” - this will enable the Check Availability button.
c. Click Check Availability to ensure the value you entered isn’t already in use. If so, enter
another value and repeat this step until you are successful.
d. Click the Save button
Configure 1. Navigate to Setup > Develop > Custom Settings > Guidestar Credentials and click the Manage
link.
2. If there is no existing record click the New button.
3. Populate Guidestar Password and Guidestar Username with the credentials provided to you by
GuideStar.
4. Click the Save button.
5. Navigate to Setup > Develop > Custom Settings > Global Portal Settings and click the Manage
link.
6. Populate Guidestar Password and Guidestar Username with the credentials provided to you by
GuideStar and select (check) Guidestar Integration .
7. Click the Save button.
8. Navigate to Community Manager and click Configure GuideStar Field Mapping .
9. Then map the Guidestar Contact, Account, and Organization fields.
76
Registration and Sign In Pages
Note: Trialforce Configuration Highlights Grantee Community Registration and Sign In Pages have been lightly configured. Please review the instructions below for an understanding of the feature set before proceeding to the next Trialforce Configuration Highlight .
Instructional Text Instructional text for the registration and user login pages is managed via CustomHTML and Custom
Labels .
CustomHTML These records will need to be created using the names specified below as they correspond to Field Sets
defined for the Portal User object:
● User Registration
○ Communities Sign Up - Step 1
○ Communities Sign Up - Step 2
○ Communities Sign Up - Step 3
○ Communities Sign Up Step 1 Individual
○ Communities Sign Up Step 2 Individual
○ Communities Sign Up Step 3 Individual
● User Login
○ Grantee Sign In
To create a CustomHTML record: 1. Click the + sign on the tab bar
2. When the All Tabs page opens scroll down to CustomHTML Records and click on the hyperlink.
3. On the CustomHTML Records home page click the New button.
4. When the new record opens populate the following fields:
a. CustomHTML Name : Enter the name using one of the values specified above.
b. Description : Custom text or HTML to be displayed. Begin and end with <style> tags and
add additional code to overwrite the existing class(es).
c. Language : Select the code for the corresponding language in which the portal will be
displayed, e.g. “en_US” for English, “es” for Spanish, etc. These codes can be found in
Salesforce Help & Training by searching for “Which Languages Does Salesforce
Support?”. .
d. Location/Position : Select “Header”
e. Associated fC Portal Type : Select “Grantee”
5. Click the Save button (or Save & New if you need to create additional records).
77
Hide Organization/Individual Toggle on Registration
If your foundation does not accept Individual applicants, the Organization/Individual toggle can optionally
be hidden so that only the Organization registration is available to registrants.
To hide the Organization/Individual toggle:
1. Click the + sign on the tab bar
2. When the All Tabs page opens scroll down to CustomHTML Records and click on the hyperlink.
3. On the CustomHTML Records home page click the New button.
4. When the new record opens populate the following fields:
a. CustomHTML Name : Communities Sign Up - Step 1
b. Description :
<style>
.userType
{ display: none!important; }
</style>
c. Language : Select the code for the corresponding language in which the portal will be
displayed.
d. Location/Position : Select “Header”
e. Associated fC Portal Type : Select “Grantee”
5. Click the Save button
Note: Trialforce Configuration Highlights If applicable, edit the existing CustomHTML Records to text more appropriate for your implementation.
Custom Labels Use Custom Labels to display custom text before and after a new registrant activates their portal account
as well as when activation fails.
Implement 1. Go to Setup > Create > Custom Labels .
2. Locate and click on the appropriate label to open the custom label record:
○ fC_SignupConfirm_ApprovalCustomText (Grantee and Reviewer)
○ fC_SignupConfirm_ConvertedApprovalCustomText (Grantee and Reviewer)
○ fC_SignupConfirm_UnableApproval_CustomText (Grantee)
3. Click the New Local Translations/Overrides button to open the New Translation Page .
4. Populate the following fields:
○ Language : Select "English"
○ Translation Text : Enter the text you want displayed. NOTE: This field supports HTML tags.
78
5. Click the Save button.
Note: Trialforce Configuration Highlights If applicable, edit the existing custom labels text or delete the translations.
Hiding GuideStar Buttons from Registration Pages
Note: Trialforce Configuration Highlights Hiding GuideStar Buttons is not configured in the Trialforce template. Please see the instructions below on how to enable this feature.
To hide the GuideStar buttons associated with the EIN and Organization Legal Name fields, add the
following code to the Description field of the CustomHTML record on which the buttons appear. For
example, if the buttons appear on step 1 then add the code to Communities Sign Up - Step 1 .
Hide EIN button:
<style>
div[data-field-name="FGM_Portal__EIN__c"] span a.guidestar_btn{
display:none;
}
</style>
Hide Organization Legal Name button:
<style>
div[data-field-name="FGM_Portal__Organization_Legal_Name__c"] span
a.guidestar_btn{
display:none;
}
</style>
Note: “en” will not work for the Language setting. If “en_US” is not available in the Language dropdown
follow these instructions to add it to the list:
● Go to Setup > Create > Objects > CustomHTML .
● Scroll down to Custom fields and Relationships and click on Language .
● In the Picklist Values section click on the New button, and type “en_US” into the text box and click
the Save button to close the form.
● Click the Reorder button, select (check) the Sort values alphabetically, not in the order entered.
Values will be displayed alphabetically everywhere. checkbox and click the Save button.
79
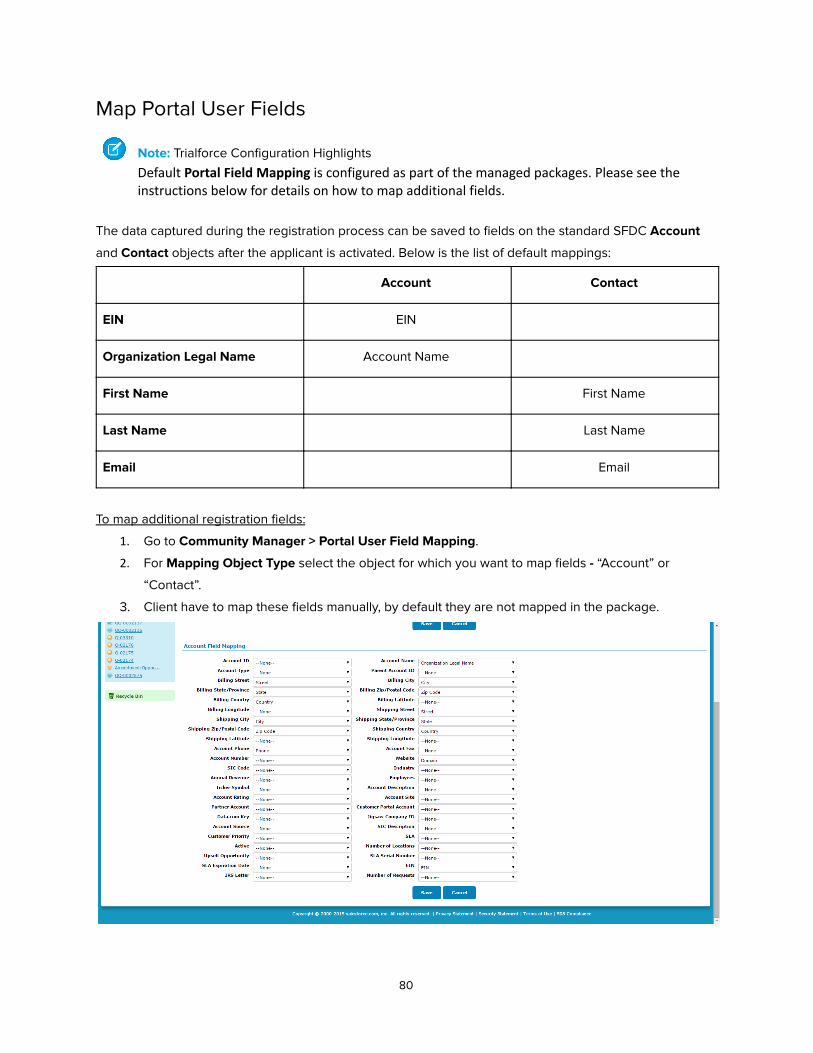
Map Portal User Fields
Note: Trialforce Configuration Highlights
Default Portal Field Mapping is configured as part of the managed packages. Please see the instructions below for details on how to map additional fields.
The data captured during the registration process can be saved to fields on the standard SFDC Account
and Contact objects after the applicant is activated. Below is the list of default mappings:
Account Contact
EIN EIN
Organization Legal Name Account Name
First Name First Name
Last Name Last Name
Email Email
To map additional registration fields:
1. Go to Community Manager > Portal User Field Mapping .
2. For Mapping Object Type select the object for which you want to map fields - “Account” or
“Contact”.
3. Client have to map these fields manually, by default they are not mapped in the package.
80
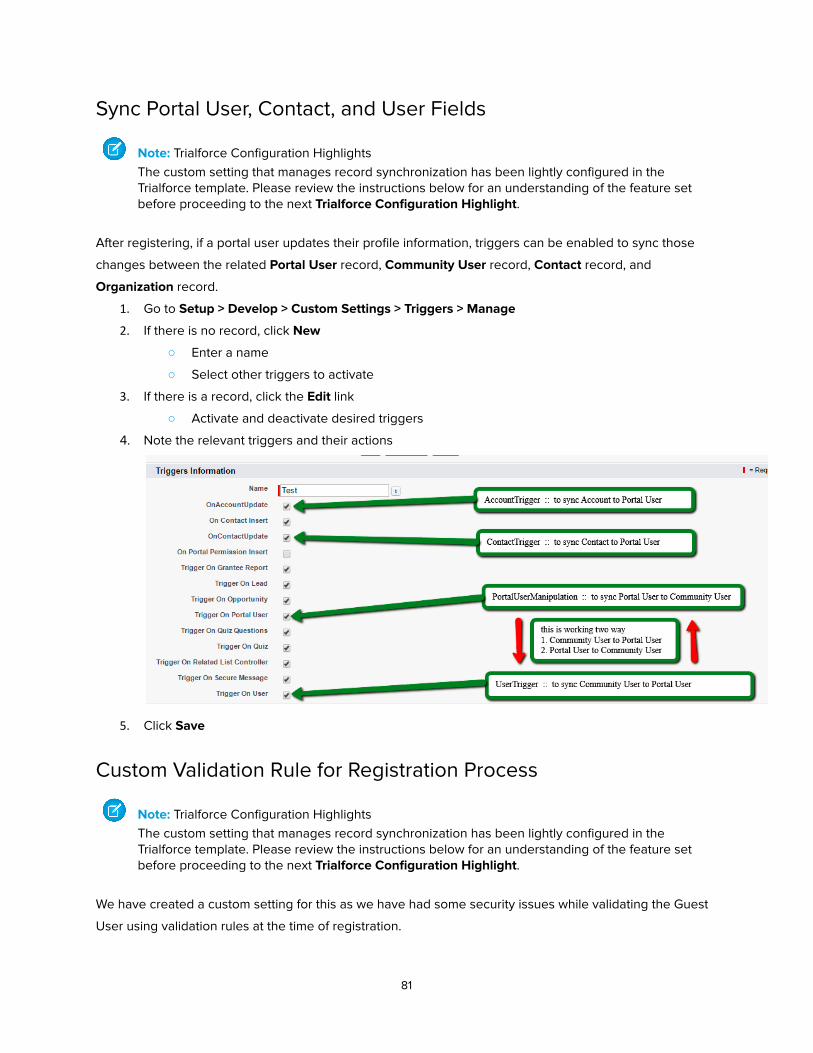
Sync Portal User, Contact, and User Fields
Note: Trialforce Configuration Highlights The custom setting that manages record synchronization has been lightly configured in the Trialforce template. Please review the instructions below for an understanding of the feature set before proceeding to the next Trialforce Configuration Highlight .
After registering, if a portal user updates their profile information, triggers can be enabled to sync those
changes between the related Portal User record, Community User record, Contact record, and
Organization record.
1. Go to Setup > Develop > Custom Settings > Triggers > Manage
2. If there is no record, click New
○ Enter a name
○ Select other triggers to activate
3. If there is a record, click the Edit link
○ Activate and deactivate desired triggers
4. Note the relevant triggers and their actions
5. Click Save
Custom Validation Rule for Registration Process
Note: Trialforce Configuration Highlights The custom setting that manages record synchronization has been lightly configured in the Trialforce template. Please review the instructions below for an understanding of the feature set before proceeding to the next Trialforce Configuration Highlight .
We have created a custom setting for this as we have had some security issues while validating the Guest
User using validation rules at the time of registration.
81
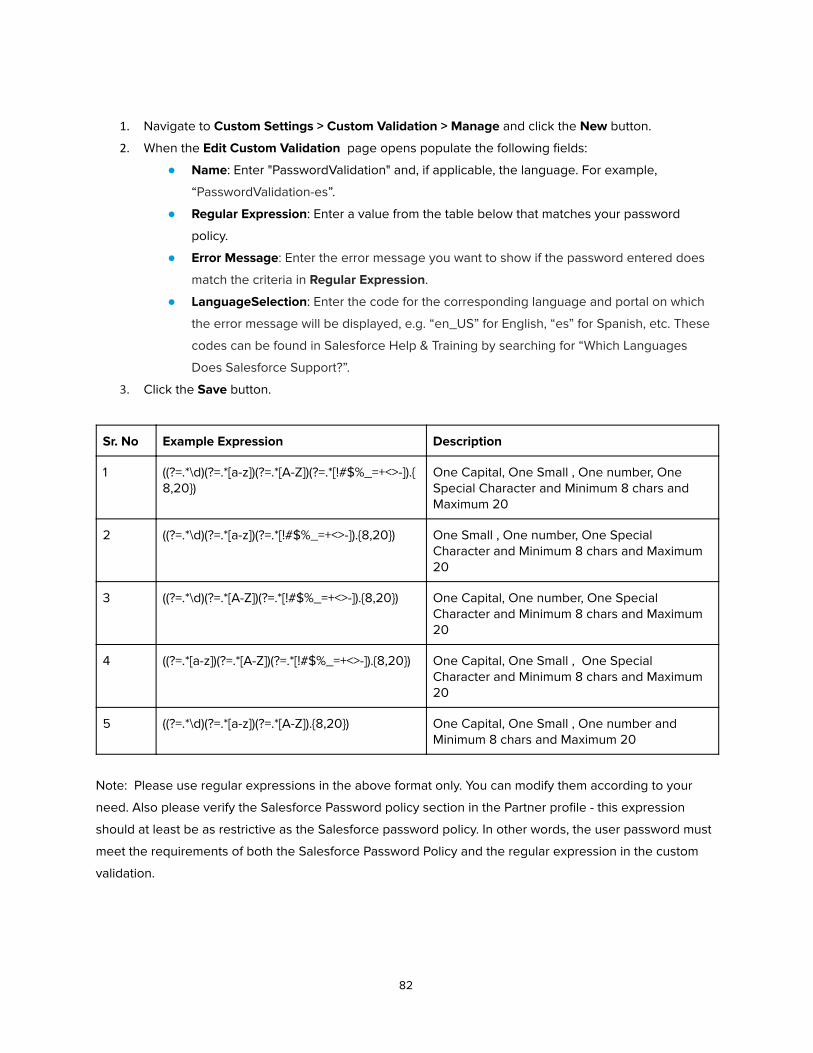
1. Navigate to Custom Settings > Custom Validation > Manage and click the New button.
2. When the Edit Custom Validation page opens populate the following fields:
● Name : Enter "PasswordValidation" and, if applicable, the language. For example,
“ PasswordValidation-es ”.
● Regular Expression : Enter a value from the table below that matches your password
policy.
● Error Message : Enter the error message you want to show if the password entered does
match the criteria in Regular Expression .
● LanguageSelection : Enter the code for the corresponding language and portal on which
the error message will be displayed, e.g. “en_US” for English, “es” for Spanish, etc. These
codes can be found in Salesforce Help & Training by searching for “Which Languages
Does Salesforce Support?”.
3. Click the Save button.
Sr. No Example Expression Description
1 ((?=.*\d)(?=.*[a-z])(?=.*[A-Z])(?=.*[!#$%_=+<>-]).{ 8,20})
One Capital, One Small , One number, One Special Character and Minimum 8 chars and Maximum 20
2 ((?=.*\d)(?=.*[a-z])(?=.*[!#$%_=+<>-]).{8,20}) One Small , One number, One Special Character and Minimum 8 chars and Maximum 20
3 ((?=.*\d)(?=.*[A-Z])(?=.*[!#$%_=+<>-]).{8,20}) One Capital, One number, One Special Character and Minimum 8 chars and Maximum 20
4 ((?=.*[a-z])(?=.*[A-Z])(?=.*[!#$%_=+<>-]).{8,20}) One Capital, One Small , One Special Character and Minimum 8 chars and Maximum 20
5 ((?=.*\d)(?=.*[a-z])(?=.*[A-Z]).{8,20}) One Capital, One Small , One number and Minimum 8 chars and Maximum 20
Note: Please use regular expressions in the above format only. You can modify them according to your
need. Also please verify the Salesforce Password policy section in the Partner profile - this expression
should at least be as restrictive as the Salesforce password policy. In other words, the user password must
meet the requirements of both the Salesforce Password Policy and the regular expression in the custom
validation.
82
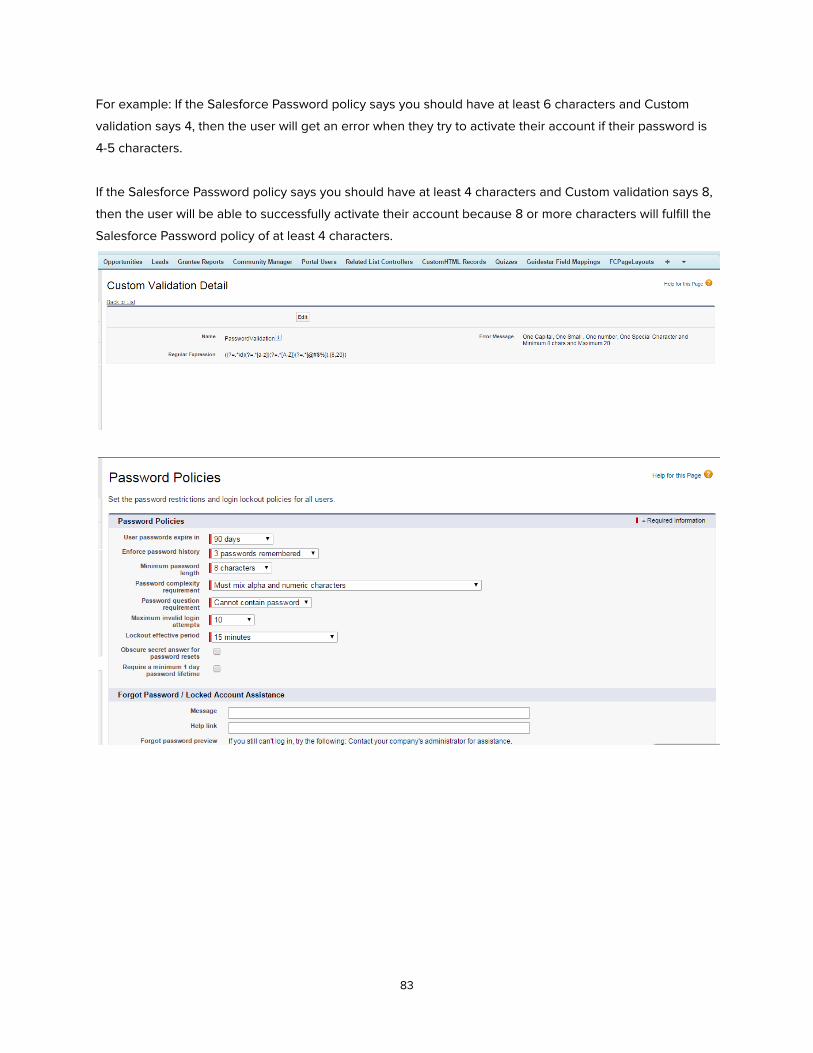
For example: If the Salesforce Password policy says you should have at least 6 characters and Custom
validation says 4, then the user will get an error when they try to activate their account if their password is
4-5 characters.
If the Salesforce Password policy says you should have at least 4 characters and Custom validation says 8,
then the user will be able to successfully activate their account because 8 or more characters will fulfill the
Salesforce Password policy of at least 4 characters.
83
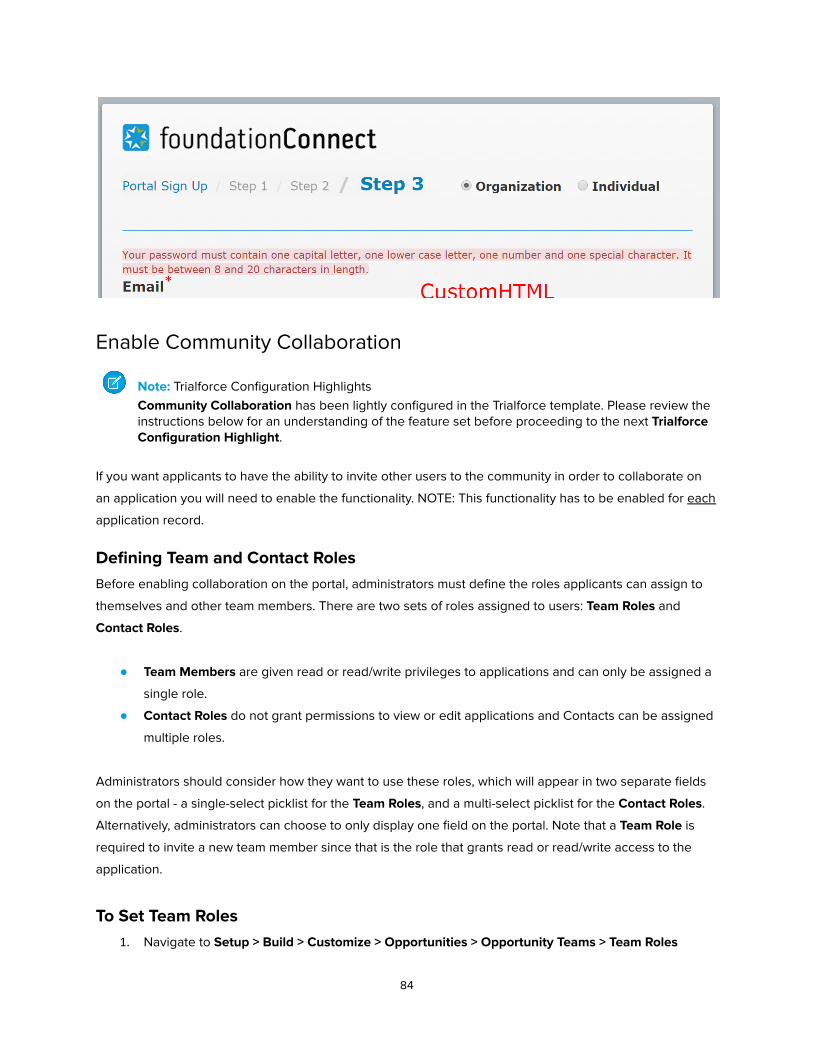
Enable Community Collaboration
Note: Trialforce Configuration Highlights Community Collaboration has been lightly configured in the Trialforce template. Please review the instructions below for an understanding of the feature set before proceeding to the next Trialforce Configuration Highlight .
If you want applicants to have the ability to invite other users to the community in order to collaborate on
an application you will need to enable the functionality. NOTE: This functionality has to be enabled for each
application record.
Defining Team and Contact Roles Before enabling collaboration on the portal, administrators must define the roles applicants can assign to
themselves and other team members. There are two sets of roles assigned to users: Team Roles and
Contact Roles .
● Team Members are given read or read/write privileges to applications and can only be assigned a
single role.
● Contact Roles do not grant permissions to view or edit applications and Contacts can be assigned
multiple roles.
Administrators should consider how they want to use these roles, which will appear in two separate fields
on the portal - a single-select picklist for the Team Roles , and a multi-select picklist for the Contact Roles .
Alternatively, administrators can choose to only display one field on the portal. Note that a Team Role is
required to invite a new team member since that is the role that grants read or read/write access to the
application.
To Set Team Roles 1. Navigate to Setup > Build > Customize > Opportunities > Opportunity Teams > Team Roles
84
2. From this screen you can:
○ Create new Roles
○ Activate/Deactivate existing Roles
○ Rename Roles
○ Delete Roles
○ Search and Replace Roles
○ Reorder Roles
When a new Request is created or a new Team Member is invited, they are assigned the first active Role in
the list as a default value. Administrators can control which Role is the default by reordering the Roles list
so the desired default is the first option. From the portal, applicants can modify and update the Team role
from the assigned default if needed.
To Set Contact Roles 1. Navigate to Setup > Build > Customize > Opportunities > Contact Roles on Opportunities
2. From this screen you can:
○ Create new Roles
○ Activate/Deactivate existing Roles
○ Rename Roles
○ Delete Roles
○ Search and Replace Roles
○ Reorder Roles
When a new Request is created or a new Team Member is invited, a Contact Role is created with either the
first active Role in the list or the set default value.
To Set or Remove a Default Contact Role: 1. Navigate to Setup > Build > Customize > Opportunities > Contact Roles on Opportunities
2. Click the Reorder button
3. Below the list of values is a single-select picklist called Default Value
4. If setting a default, choose the desired default role. If removing the default, select the “--None--”
option.
5. Click Save
From the portal, applicants can modify and update Contact Roles from the assigned default if needed.
Create the Portal Tab
85
Note: Trialforce Configuration Highlights There is a sample page layout in the Trialforce template:
● Sample Application > Collaborators
1. Navigate to Community Manager > Design an Application/View existing Application .
2. In the Open Existing section select the application on which you want to add the functionality and
click the Open button.
3. Click the Add Tab button and select “Related List with Tab” to create a new tab.
4. When the Related List with Tab dialog opens populate the following fields:
a. Tab Name : The caption displayed to the user, e.g. “Collaborators”
b. Object Name : This will default to the previously selected value and cannot be changed.
c. Tab Sort Order : Order in which this tab will be shown, e.g. “4”
d. Child Object : Select “Opportunity Team Member“
e. Sort Field : Field on the Child Object by which all records will be sorted, e.g. “Team Role”.
f. Sort Field Order : Order in which the records will be displayed based on the values in the
Sort Field . Select "Ascending", e.g. A-Z or "Descending", e.g. Z-A.
g. Show New Button : Select (check)
h. Show Edit Link : Select (check)
i. Show Delete Link : Select (check)
j. Instruction Text : Enter any instructional text that will be helpful to the end user.
5. Click the Save button.
86
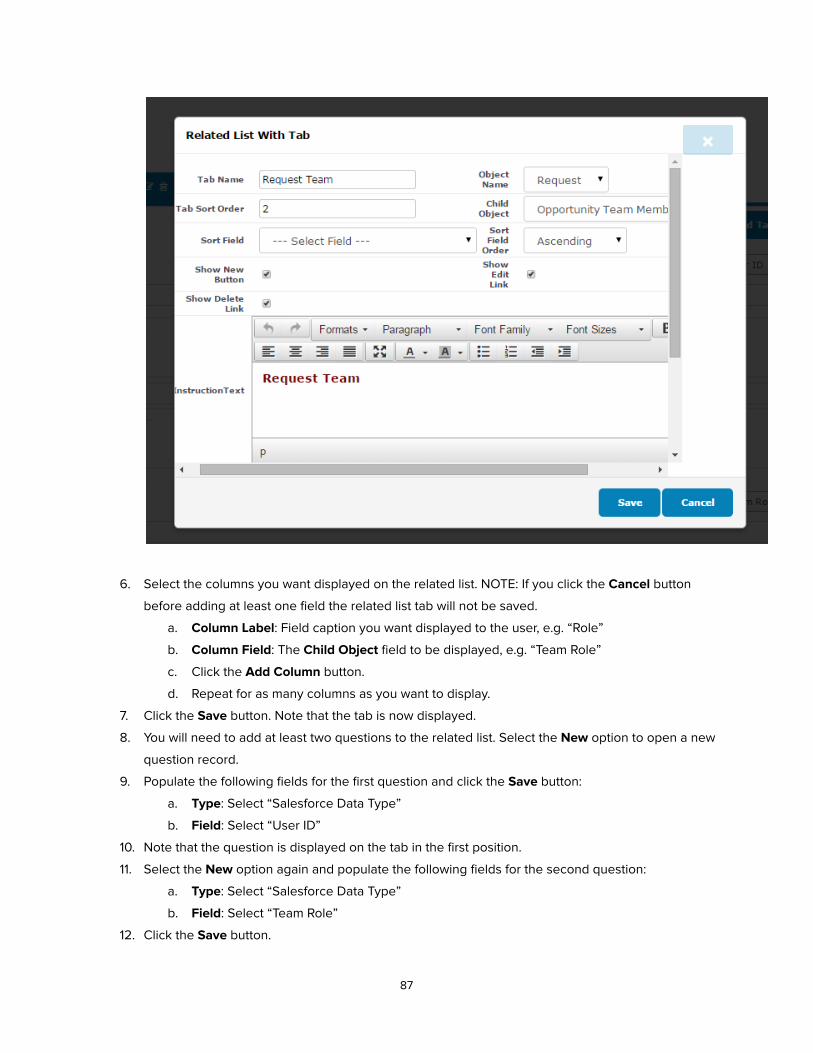
6. Select the columns you want displayed on the related list. NOTE: If you click the Cancel button
before adding at least one field the related list tab will not be saved.
a. Column Label : Field caption you want displayed to the user, e.g. “Role”
b. Column Field : The Child Object field to be displayed, e.g. “Team Role”
c. Click the Add Column button.
d. Repeat for as many columns as you want to display.
7. Click the Save button. Note that the tab is now displayed.
8. You will need to add at least two questions to the related list. Select the New option to open a new
question record.
9. Populate the following fields for the first question and click the Save button:
a. Type : Select “Salesforce Data Type”
b. Field : Select “User ID”
10. Note that the question is displayed on the tab in the first position.
11. Select the New option again and populate the following fields for the second question:
a. Type : Select “Salesforce Data Type”
b. Field : Select “Team Role”
12. Click the Save button.
87
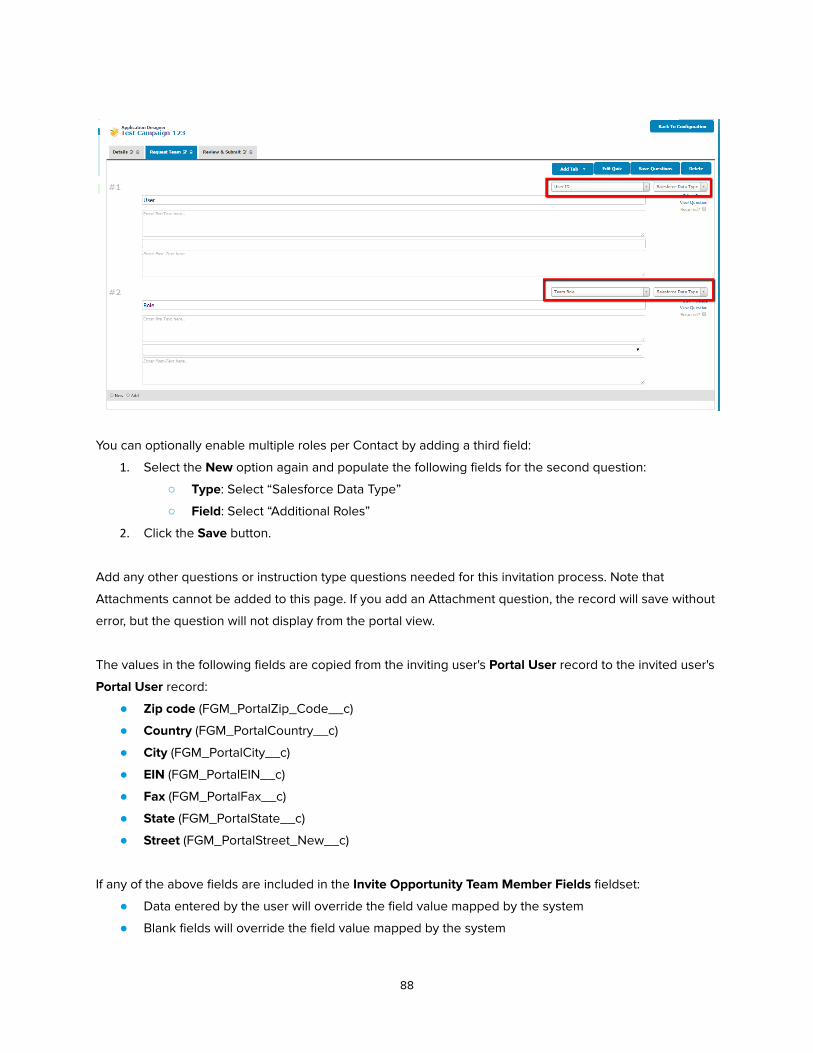
You can optionally enable multiple roles per Contact by adding a third field:
1. Select the New option again and populate the following fields for the second question:
○ Type : Select “Salesforce Data Type”
○ Field : Select “Additional Roles”
2. Click the Save button.
Add any other questions or instruction type questions needed for this invitation process. Note that
Attachments cannot be added to this page. If you add an Attachment question, the record will save without
error, but the question will not display from the portal view.
The values in the following fields are copied from the inviting user's Portal User record to the invited user's
Portal User record:
● Zip code (FGM_PortalZip_Code__c)
● Country (FGM_PortalCountry__c)
● City (FGM_PortalCity__c)
● EIN (FGM_PortalEIN__c)
● Fax (FGM_PortalFax__c)
● State (FGM_PortalState__c)
● Street (FGM_PortalStreet_New__c)
If any of the above fields are included in the Invite Opportunity Team Member Fields fieldset:
● Data entered by the user will override the field value mapped by the system
● Blank fields will override the field value mapped by the system
88
Therefore we expect the following scenarios and results:
● Inviter enters all address data for Invitee : System uses all address data as provided by Inviter at
the time of invitation
● Inviter enters partial address data for invitee (either not all address fields are exposed the the
Inviter or the Inviter leaves some fields blank): System uses whatever data was provided by Inviter
and the remaining data will be filled in using the Inviter's portal user record
● Inviter can populate fields for Invitee's address, but enters no address data for Invitee and
Inviter's address data is null : System writes null data from Inviter's record, e.g. no address values
are populated on the Invitee’s record
● Inviter can populate fields for Invitee's address, but enters partial address data for Invitee and
Inviter's address data is null : System uses whatever data was provided by Inviter and the
remaining fields will be blank
● Inviter does not have access to address fields during invitation and enters no address data for
invitee : System uses all address data from Inviter's portal user record for Invitee's address info.
● If an organization has enabled State and Country Picklists and one of the above scenarios results
in a mismatch in Country and State (for example, State: Arizona Country: China) then an error will
appear upon User activation.
Best practices for the Portal User “Invite Opportunity Team Member Fields” fieldset:
● If any address fields are added then ALL address fields should be added. Otherwise address data
may be populated from two different sources - Invitee data entered by the Inviter and data from
the Inviter’s Portal User record.
● If State is added then Country must be added to avoid the last bullet point in the scenarios and
results list. Otherwise users will not be able to complete portal activation.
● Make address fields required. Otherwise, if the inviter does not enter data into the fields the NULL
values will be considered "user entered data" and will not be overwritten by corresponding data on
the Inviter's Portal User record.
Now check your application on the portal and Invite and add members for your opportunity.
● Click +Invite Team members to invite External team members.
● Click on +Search/Add Members to add internal users.
Here is a view of the Search/Add Members screen with Additional Roles included:
89
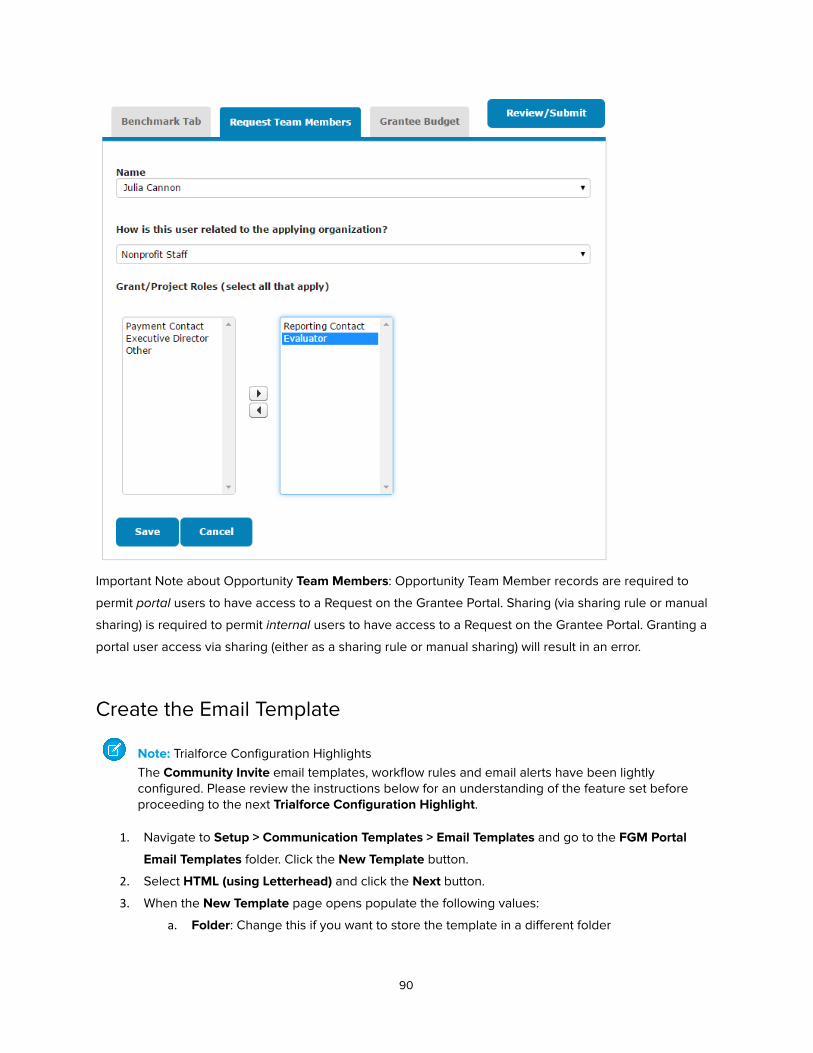
Important Note about Opportunity Team Members : Opportunity Team Member records are required to
permit portal users to have access to a Request on the Grantee Portal. Sharing (via sharing rule or manual
sharing) is required to permit internal users to have access to a Request on the Grantee Portal. Granting a
portal user access via sharing (either as a sharing rule or manual sharing) will result in an error.
Create the Email Template
Note: Trialforce Configuration Highlights The Community Invite email templates, workflow rules and email alerts have been lightly configured. Please review the instructions below for an understanding of the feature set before proceeding to the next Trialforce Configuration Highlight .
1. Navigate to Setup > Communication Templates > Email Templates and go to the FGM Portal
Email Templates folder. Click the New Template button.
2. Select HTML (using Letterhead) and click the Next button.
3. When the New Template page opens populate the following values:
a. Folder : Change this if you want to store the template in a different folder
90
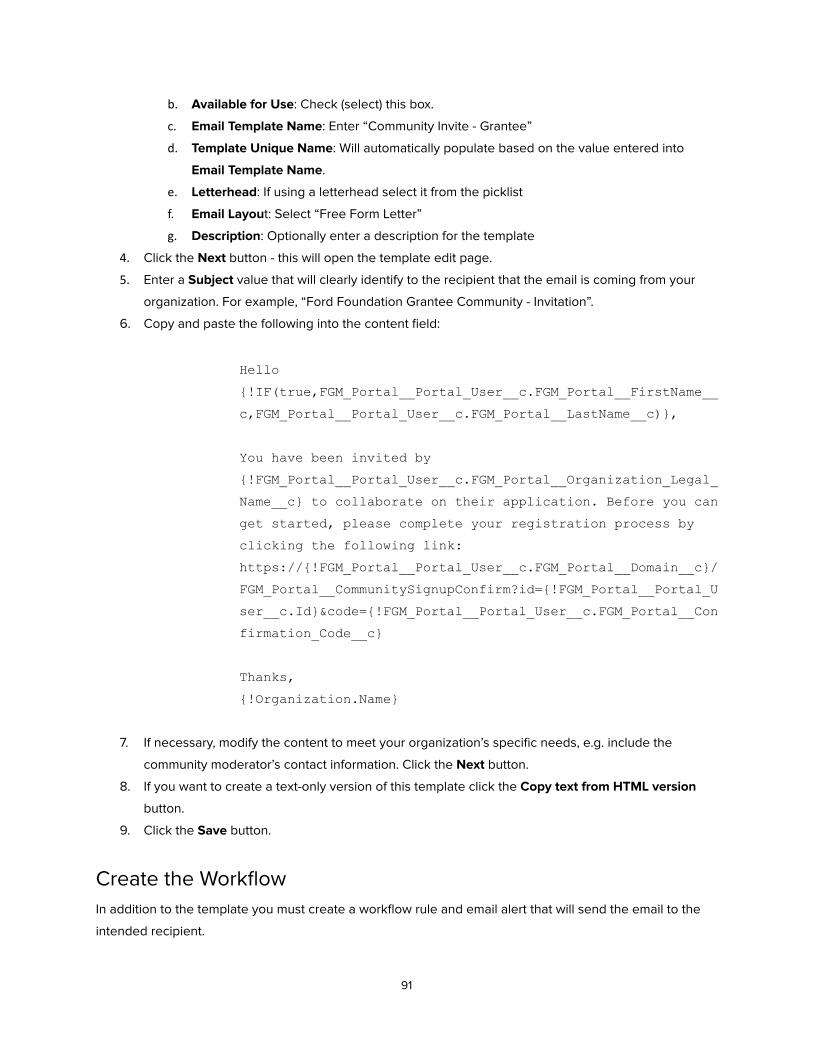
b. Available for Use : Check (select) this box.
c. Email Template Name : Enter “Community Invite - Grantee”
d. Template Unique Name : Will automatically populate based on the value entered into
Email Template Name .
e. Letterhead : If using a letterhead select it from the picklist
f. Email Layou t: Select “Free Form Letter”
g. Description : Optionally enter a description for the template
4. Click the Next button - this will open the template edit page.
5. Enter a Subject value that will clearly identify to the recipient that the email is coming from your
organization. For example, “Ford Foundation Grantee Community - Invitation”.
6. Copy and paste the following into the content field:
Hello
{!IF(true,FGM_Portal__Portal_User__c.FGM_Portal__FirstName__
c,FGM_Portal__Portal_User__c.FGM_Portal__LastName__c)},
You have been invited by
{!FGM_Portal__Portal_User__c.FGM_Portal__Organization_Legal_
Name__c} to collaborate on their application. Before you can
get started, please complete your registration process by
clicking the following link:
https://{!FGM_Portal__Portal_User__c.FGM_Portal__Domain__c}/
FGM_Portal__CommunitySignupConfirm?id={!FGM_Portal__Portal_U
ser__c.Id}&code={!FGM_Portal__Portal_User__c.FGM_Portal__Con
firmation_Code__c}
Thanks,
{!Organization.Name}
7. If necessary, modify the content to meet your organization’s specific needs, e.g. include the
community moderator’s contact information. Click the Next button.
8. If you want to create a text-only version of this template click the Copy text from HTML version
button.
9. Click the Save button.
Create the Workflow In addition to the template you must create a workflow rule and email alert that will send the email to the
intended recipient.
91
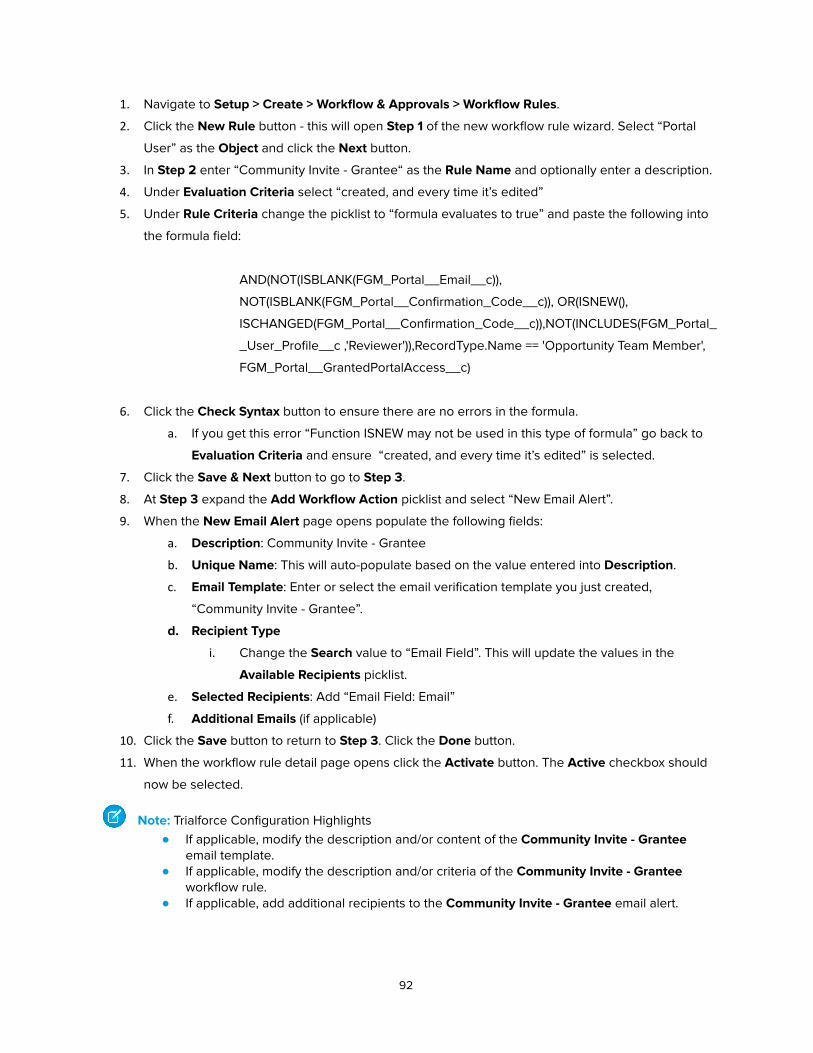
1. Navigate to Setup > Create > Workflow & Approvals > Workflow Rules .
2. Click the New Rule button - this will open Step 1 of the new workflow rule wizard. Select “Portal
User” as the Object and click the Next button.
3. In Step 2 enter “Community Invite - Grantee“ as the Rule Name and optionally enter a description.
4. Under Evaluation Criteria select “created, and every time it’s edited”
5. Under Rule Criteria change the picklist to “formula evaluates to true” and paste the following into
the formula field:
AND(NOT(ISBLANK(FGM_Portal__Email__c)),
NOT(ISBLANK(FGM_Portal__Confirmation_Code__c)), OR(ISNEW(),
ISCHANGED(FGM_Portal__Confirmation_Code__c)),NOT(INCLUDES(FGM_Portal_
_User_Profile__c ,'Reviewer')),RecordType.Name == 'Opportunity Team Member',
FGM_Portal__GrantedPortalAccess__c)
6. Click the Check Syntax button to ensure there are no errors in the formula.
a. If you get this error “Function ISNEW may not be used in this type of formula” go back to
Evaluation Criteria and ensure “created, and every time it’s edited” is selected.
7. Click the Save & Next button to go to Step 3 .
8. At Step 3 expand the Add Workflow Action picklist and select “New Email Alert”.
9. When the New Email Alert page opens populate the following fields:
a. Description : Community Invite - Grantee
b. Unique Name : This will auto-populate based on the value entered into Description .
c. Email Template : Enter or select the email verification template you just created,
“Community Invite - Grantee”.
d. Recipient Type
i. Change the Search value to “Email Field”. This will update the values in the
Available Recipients picklist.
e. Selected Recipients : Add “Email Field: Email”
f. Additional Emails (if applicable)
10. Click the Save button to return to Step 3 . Click the Done button.
11. When the workflow rule detail page opens click the Activate button. The Active checkbox should
now be selected.
Note: Trialforce Configuration Highlights ● If applicable, modify the description and/or content of the Community Invite - Grantee
email template. ● If applicable, modify the description and/or criteria of the Community Invite - Grantee
workflow rule. ● If applicable, add additional recipients to the Community Invite - Grantee email alert.
92
Create an Eligibility Quiz
Note: Trialforce Configuration Highlights Please review the instructions below for an understanding of the feature set before proceeding to the next Trialforce Configuration Highlight .
An Eligibility Quiz (EQ) is a collection of questions that help foundations to filter out prospective applicants
whose organizations or projects do not fit the mission of the foundation. A quiz will be associated with
specific inquiry or application.
Create a Question 1. Click the + sign on the tab bar
2. When the All Tabs page opens scroll down to Questions and click on the hyperlink.
3. On the Questions home page click the New button.
4. When the Select Question Record Type page opens select “ Quiz ” and click the Continue button.
5. When the new record opens populate the following fields:
○ Active : Select (check) the box.
○ Type : Choose either "SingleSelect" (user can select only one answer) or "MultiSelect" (user
can select more than one answer).
○ Pre-Text : Text that will appear above the question.
○ Help Tip : Instructional text that explains the question to the user
○ Question : Text of the question, e.g. Is your organization a recognized 501c3?
○ Post-Text : Text that will appear below the question.
○ Error Text : Question-specific text that is displayed when the user answers the question
incorrectly
6. Click the Save button.
Create Question Responses 1. To define responses to the question scroll down to the Question Responses related list and click
the New Question Response button.
2. When the New Question Response page opens populate the following fields:
○ Active : Select (check) the box.
○ Accepted Response : Select (check) the box if this is an acceptable response that will allow
the user to continue on to the next question. Otherwise, leave blank (unchecked).
○ Sort Order : Order in which the value will appear in the picklist
○ Pre-Text : Text that will appear above the answer.
○ Response : Text of the response, e.g. Yes.
○ Post-Text : Text that will appear below the answer.
3. Click the Save button.
4. Click the Clone button.
93
5. Repeat the previous steps for each additional response for the current question.
Create a Quiz
Note: Trialforce Configuration Highlights ● There is a sample Eligibility Quiz in the Trialforce template:
● Eligibility Quiz - Sample
1. Locate and save the following values to a separate document:
○ Grantee Community URL
■ Navigate to Customize > Communities > All Communities . Click the Workspaces
hyperlink next to the Grantee community.
■ When Community Management opens navigate to Advanced Customizations >
Go to Force.com .
■ Under Custom URLs copy the value in Domain Name .
○ Application URL
■ Click the + sign on the tab bar.
■ When the All Tabs page opens scroll down to Campaigns and click on the
hyperlink.
■ Select the “All Active Campaigns” list view and click the Go! button.
■ Open the campaign associated with the application and copy the value in the
Application URL field, e.g.
/FGM_Portal__CommunitySignin?retUrl=/apex/FGM_Portal__CommunityApplicatio
n?id=701o0000000MMPM.
2. Click the + sign on the tab bar
3. When the All Tabs page opens scroll down to Quizzes and click on the hyperlink.
4. On the Quizzes home page click the New button.
5. When the Select Quiz Record Type page opens select “ Quiz ” and click the Continue button.
6. When the new record opens populate the following fields:
○ Quiz Name : Enter a name that reflects the purpose of the quiz, e.g. New Inquiry-
Healthcare, Renewals
○ Success URL : On successful completion of the quiz this URL will direct the prospect to the
Step 1 page of the registration process. It is a combination of your community URL and the
value from the Application URL field, e.g.
https://roundcorner-developer-edition.na17.force.com/FGM_Portal__CommunitySignin?ret
Url=/apex/FGM_Portal__CommunityApplication?id=701o0000000MMPM
○ Failure URL : This URL is a page on the portal to which the user is directed if they fail to
select an Accepted Response to any question in the quiz. It is a combination of your
community URL and “/FGM_Portal__CommunitySignupRejected”, e.g.
94
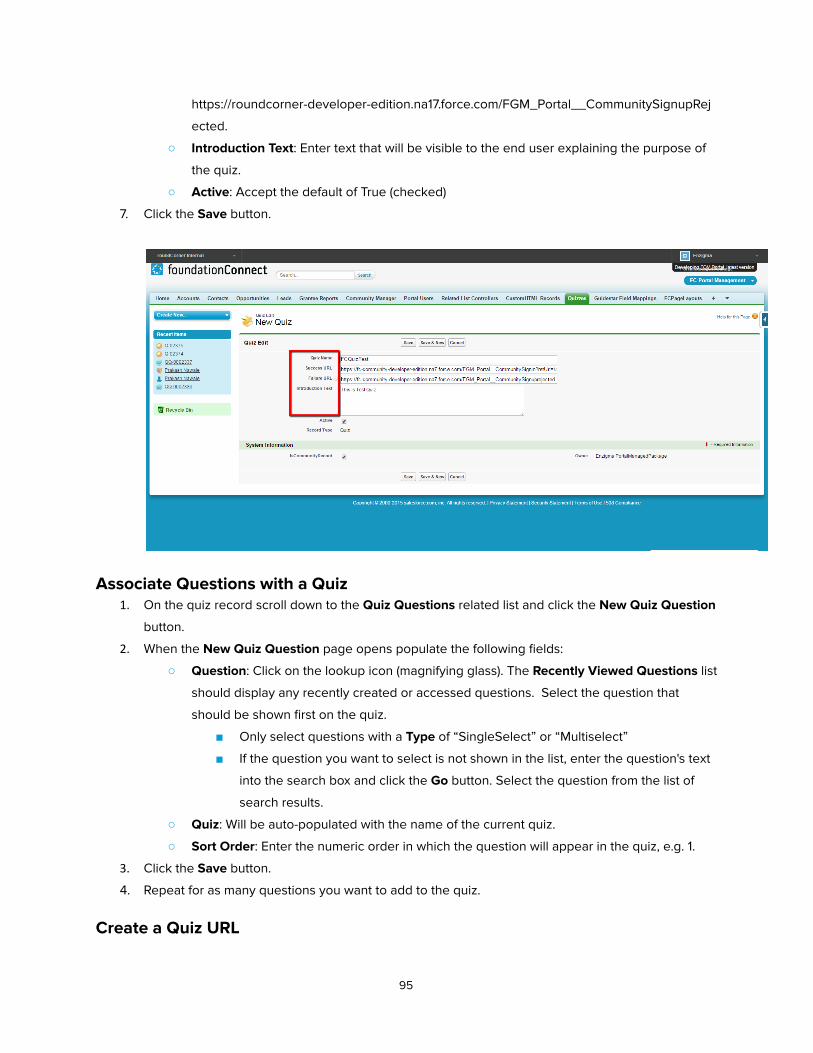
https://roundcorner-developer-edition.na17.force.com /FGM_Portal__CommunitySignupRej
ected.
○ Introduction Text : Enter text that will be visible to the end user explaining the purpose of
the quiz.
○ Active : Accept the default of True (checked)
7. Click the Save button.
Associate Questions with a Quiz 1. On the quiz record scroll down to the Quiz Questions related list and click the New Quiz Question
button.
2. When the New Quiz Question page opens populate the following fields:
○ Question : Click on the lookup icon (magnifying glass). The Recently Viewed Questions list
should display any recently created or accessed questions. Select the question that
should be shown first on the quiz.
■ Only select questions with a Type of “SingleSelect” or “Multiselect”
■ If the question you want to select is not shown in the list, enter the question's text
into the search box and click the Go button. Select the question from the list of
search results.
○ Quiz : Will be auto-populated with the name of the current quiz.
○ Sort Order : Enter the numeric order in which the question will appear in the quiz, e.g. 1.
3. Click the Save button.
4. Repeat for as many questions you want to add to the quiz.
Create a Quiz URL
95
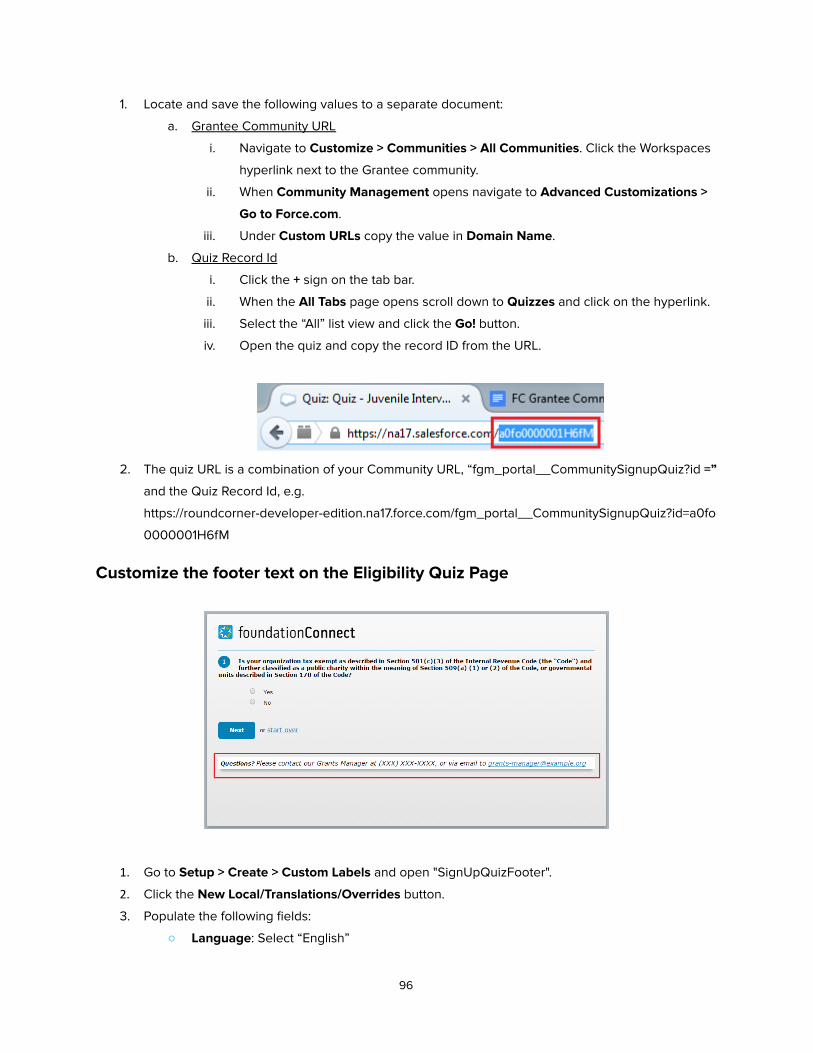
1. Locate and save the following values to a separate document:
a. Grantee Community URL
i. Navigate to Customize > Communities > All Communities . Click the Workspaces
hyperlink next to the Grantee community.
ii. When Community Management opens navigate to Advanced Customizations >
Go to Force.com .
iii. Under Custom URLs copy the value in Domain Name .
b. Quiz Record Id
i. Click the + sign on the tab bar.
ii. When the All Tabs page opens scroll down to Quizzes and click on the hyperlink.
iii. Select the “All” list view and click the Go! button.
iv. Open the quiz and copy the record ID from the URL.
2. The quiz URL is a combination of y our Community URL, “fgm_portal__CommunitySignupQuiz?id =”
and the Quiz Record Id, e.g.
https://roundcorner-developer-edition.na17.force.com/ fgm_portal__CommunitySignupQuiz?id=a0fo
0000001H6fM
Customize the footer text on the Eligibility Quiz Page
1. Go to Setup > Create > Custom Labels and open "SignUpQuizFooter".
2. Click the New Local/Translations/Overrides button.
3. Populate the following fields:
○ Language : Select “English”
96
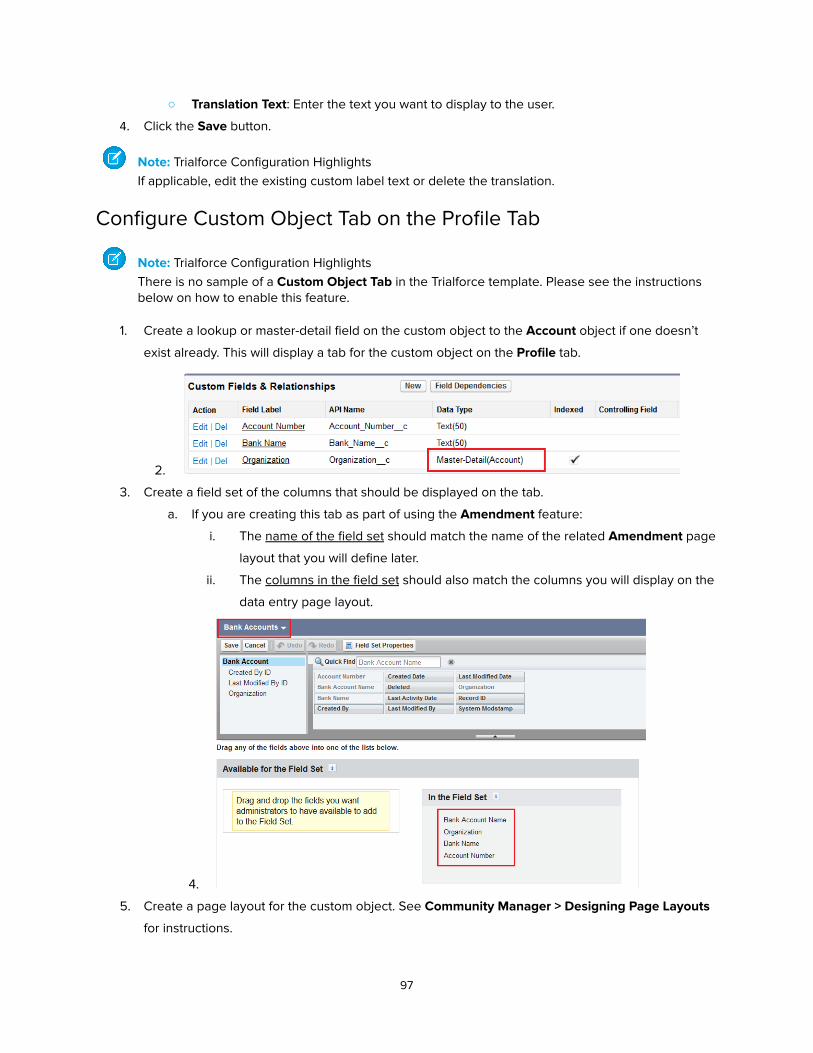
○ Translation Text : Enter the text you want to display to the user.
4. Click the Save button.
Note: Trialforce Configuration Highlights If applicable, edit the existing custom label text or delete the translation.
Configure Custom Object Tab on the Profile Tab
Note: Trialforce Configuration Highlights There is no sample of a Custom Object Tab in the Trialforce template. Please see the instructions below on how to enable this feature.
1. Create a lookup or master-detail field on the custom object to the Account object if one doesn’t
exist already. This will display a tab for the custom object on the Profile tab.
2.
3. Create a field set of the columns that should be displayed on the tab.
a. If you are creating this tab as part of using the Amendment feature:
i. The name of the field set should match the name of the related Amendment page
layout that you will define later.
ii. The columns in the field set should also match the columns you will display on the
data entry page layout.
4.
5. Create a page layout for the custom object. See Community Manager > Designing Page Layouts
for instructions.
97
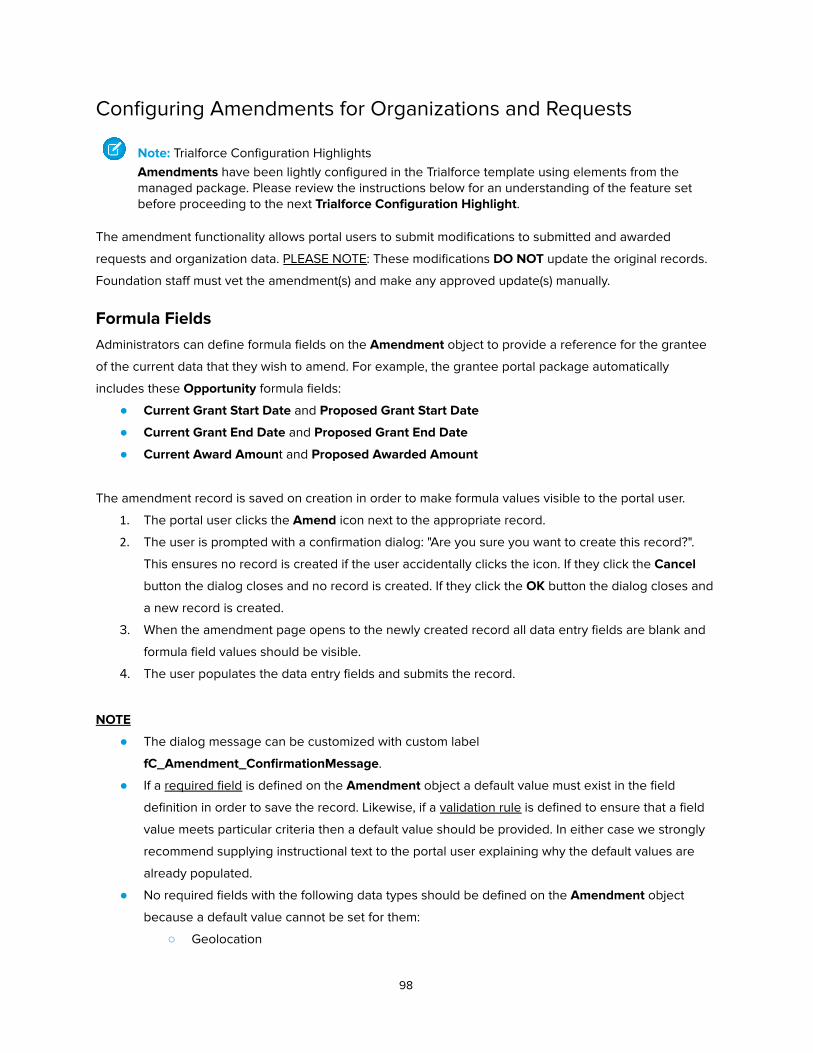
Configuring Amendments for Organizations and Requests
Note: Trialforce Configuration Highlights Amendments have been lightly configured in the Trialforce template using elements from the managed package. Please review the instructions below for an understanding of the feature set before proceeding to the next Trialforce Configuration Highlight .
The amendment functionality allows portal users to submit modifications to submitted and awarded
requests and organization data. PLEASE NOTE : These modifications DO NOT update the original records.
Foundation staff must vet the amendment(s) and make any approved update(s) manually.
Formula Fields Administrators can define formula fields on the Amendment object to provide a reference for the grantee
of the current data that they wish to amend. For example, the grantee portal package automatically
includes these Opportunity formula fields:
● Current Grant Start Date and Proposed Grant Start Date
● Current Grant End Date and Proposed Grant End Date
● Current Award Amoun t and Proposed Awarded Amount
The amendment record is saved on creation in order to make formula values visible to the portal user.
1. The portal user clicks the Amend icon next to the appropriate record.
2. The user is prompted with a confirmation dialog: "Are you sure you want to create this record?".
This ensures no record is created if the user accidentally clicks the icon. If they click the Cancel
button the dialog closes and no record is created. If they click the OK button the dialog closes and
a new record is created.
3. When the amendment page opens to the newly created record all data entry fields are blank and
formula field values should be visible.
4. The user populates the data entry fields and submits the record.
NOTE
● The dialog message can be customized with custom label
fC_Amendment_ConfirmationMessage .
● If a required field is defined on the Amendment object a default value must exist in the field
definition in order to save the record. Likewise, if a validation rule is defined to ensure that a field
value meets particular criteria then a default value should be provided. In either case we strongly
recommend supplying instructional text to the portal user explaining why the default values are
already populated.
● No required fields with the following data types should be defined on the Amendment object
because a default value cannot be set for them:
○ Geolocation
98
○ Text (Encrypted)
○ Lookup Relationship
○ External Lookup Relationship
Note: Trialforce Configuration Highlights If applicable, customize the text for custom label fC_Amendment_ConfirmationMessage .
Request Configuration
Create custom fields to capture the amended data
In order to use amendments, custom fields must be added to the Amendment object to capture the
proposed changes. A field to capture the proposed change should be of the same data type and field
length as the original value. This includes number of decimal places for currency and numeric fields.
Create a page layout
Note: Trialforce Configuration Highlights There are several sample Amendment page layouts in the Trialforce template:
● Amendment > Opportunity ● Amendment > Organization
1. Open Community Manager .
2. Click on Design PageLayout/View existing page layout to open the Design Page Layout page.
3. In the Select Object picklist either select or type "Amendment".
4. In the Create New Page Layout section populate the following fields:
○ Select Portal Type : Select "Grantee"
○ Clone from Existing : Leave unchecked
○ Select Record Type : Select “Opportunity”
5. Click the Create New button - this will open the Page Layout Designer .
6. Add a portal tab. See Community Manager > Create a Portal Tab for detailed instructions.
7. Add a question for each field you want to display to the user. See Community Manager > Create a
Question for detailed instructions.
Enable Amendments for Requests
1. Navigate to Setup > Develop > Custom Settings > Community Setting and click the Manage link.
2. Click the New button - this will create a new record.
3. When the new record opens populate the following fields:
○ Name : Enter “IsAmendmentRequestEnabled”
○ IsEnabled : Check (select) the box.
4. Click the Save button.
5. The Amend icon should now be visible on the dashboard.
99
Note: Trialforce Configuration Highlights If applicable, uncheck (de-select) IsAmendmentRequestEnabled if you do not want to allow amendments on requests.
Organization Configuration
Create custom fields to capture the amended data In order to use amendments, custom fields must be added to the Amendment object to capture the
proposed changes. It is helpful to the end user to also include a formula field that references the original
value for comparison.
For example, the grantee portal package automatically includes these fields:
● Account and New Account Name
A field to capture the proposed change should be of the same data type and field length as the original
value. This includes number of decimal places for currency and numeric fields.
Create a Page Layout
Note: Trialforce Configuration Highlights There are several sample Amendment page layouts in the Trialforce template:
● Amendment > Opportunity ● Amendment > Organization
1. Open Community Manager .
2. Click on Design PageLayout/View existing page layout to open the Design Page Layout page.
3. In the Select Object picklist either select or type "Amendment".
4. In the Create New Page Layout section populate the following fields:
a. Select Portal Type : Select "Grantee"
b. Clone from Existing : Leave unchecked
c. Select Record Type : Select “Organization”
5. Click the Create New button - this will open the Page Layout Designer .
6. Add a portal tab. See Community Manager > Create a Portal Tab for detailed instructions.
7. Add a question for each field you want to display to the user. See Community Manager > Create a
Question for detailed instructions.
Update the Community User Profile 1. Go to Setup > Manage Users > Profiles .
2. Click the Edit hyperlink next to the community user profile, e.g. "fC Partner Community Login User",
"fC Partner Community User".
3. Scroll down to the Standard Object Permissions section and de-select "Edit" on Accounts.
100
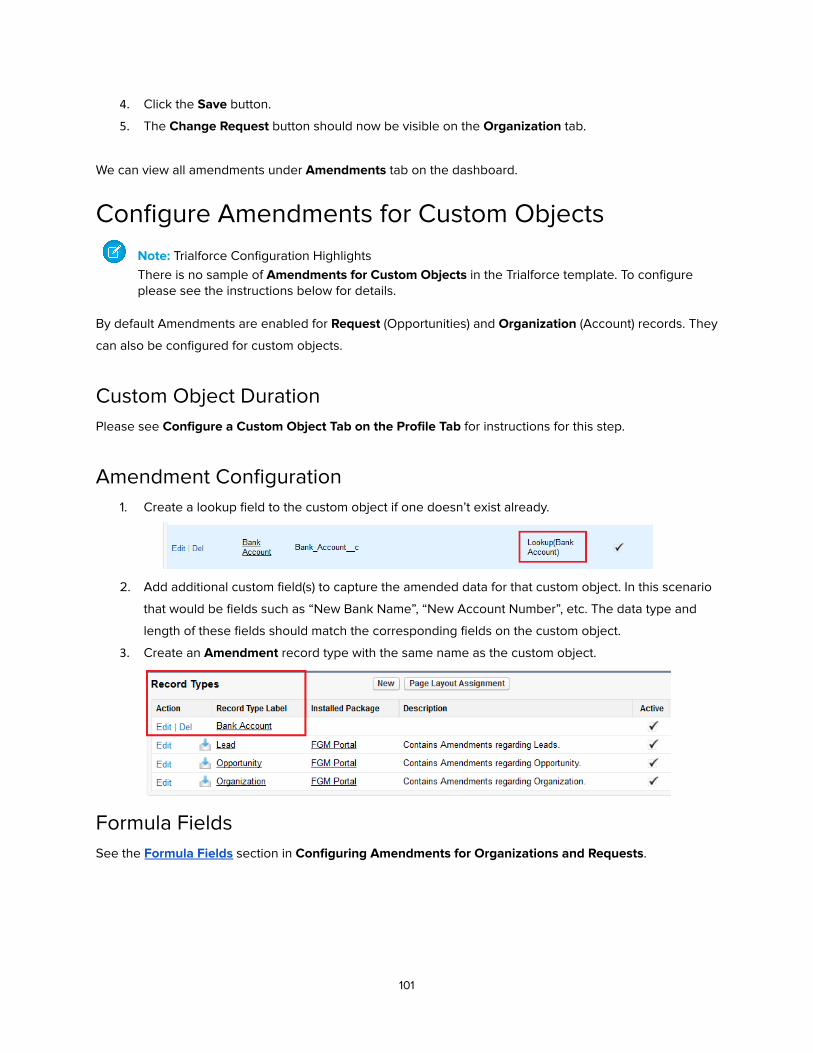
4. Click the Save button.
5. The Change Request button should now be visible on the Organization tab.
We can view all amendments under Amendments tab on the dashboard.
Configure Amendments for Custom Objects
Note: Trialforce Configuration Highlights There is no sample of Amendments for Custom Objects in the Trialforce template. To configure please see the instructions below for details.
By default Amendments are enabled for Request (Opportunities) and Organization (Account) records. They
can also be configured for custom objects.
Custom Object Duration Please see Configure a Custom Object Tab on the Profile Tab for instructions for this step.
Amendment Configuration 1. Create a lookup field to the custom object if one doesn’t exist already.
2. Add additional custom field(s) to capture the amended data for that custom object. In this scenario
that would be fields such as “New Bank Name”, “New Account Number”, etc. The data type and
length of these fields should match the corresponding fields on the custom object.
3. Create an Amendment record type with the same name as the custom object.
Formula Fields See the Formula Fields section in Configuring Amendments for Organizations and Requests .
101
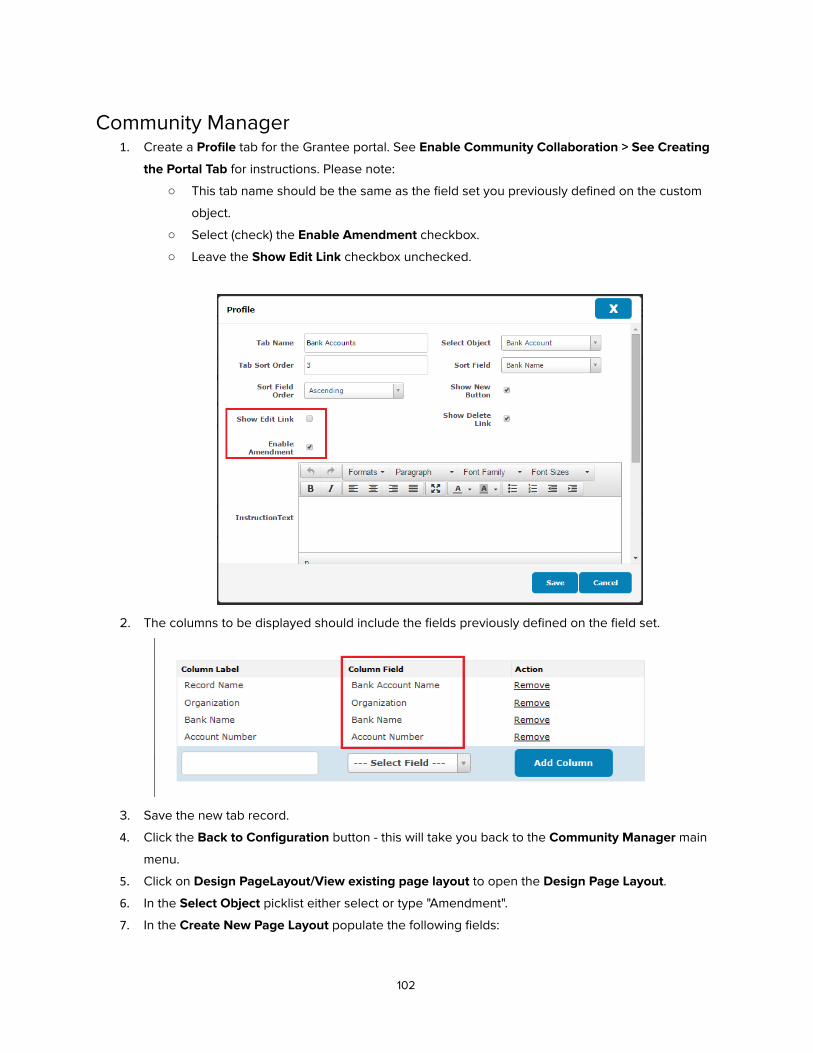
Community Manager 1. Create a Profile tab for the Grantee portal. See Enable Community Collaboration > See Creating
the Portal Tab for instructions. Please note:
○ This tab name should be the same as the field set you previously defined on the custom
object.
○ Select (check) the Enable Amendment checkbox.
○ Leave the Show Edit Link checkbox unchecked.
2. The columns to be displayed should include the fields previously defined on the field set.
3. Save the new tab record.
4. Click the Back to Configuration button - this will take you back to the Community Manager main
menu.
5. Click on Design PageLayout/View existing page layout to open the Design Page Layout .
6. In the Select Object picklist either select or type "Amendment".
7. In the Create New Page Layout populate the following fields:
102
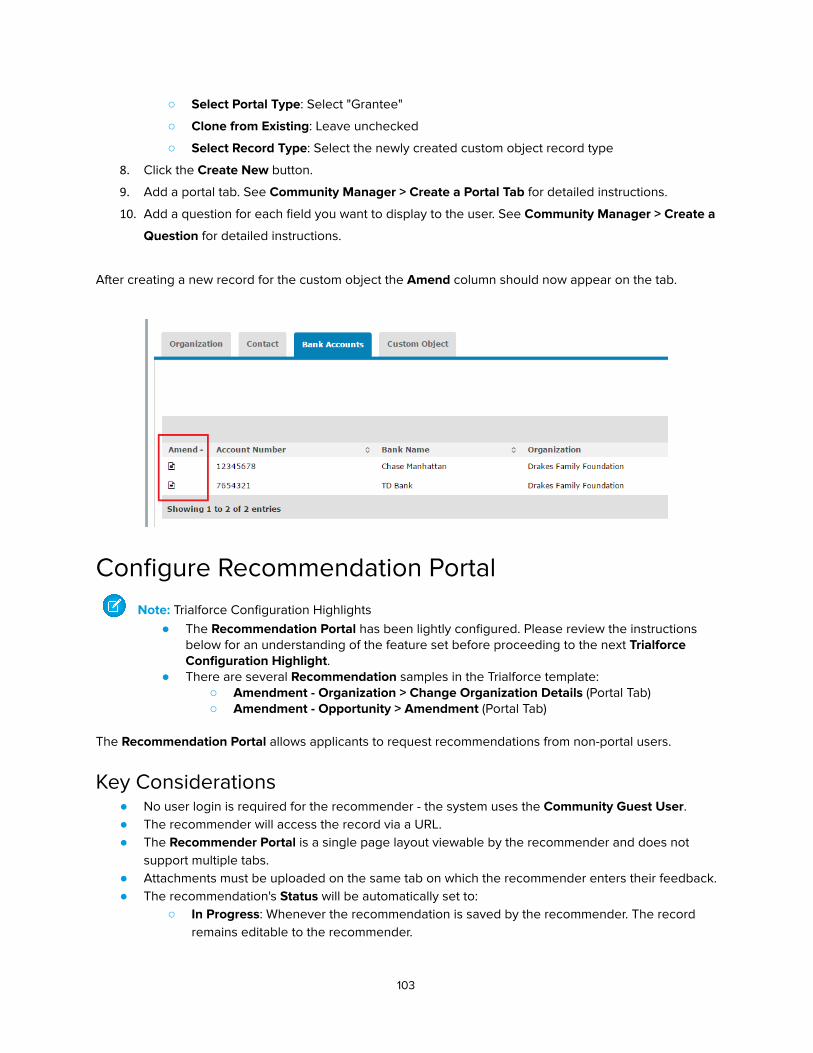
○ Select Portal Type : Select "Grantee"
○ Clone from Existing : Leave unchecked
○ Select Record Type : Select the newly created custom object record type
8. Click the Create New button.
9. Add a portal tab. See Community Manager > Create a Portal Tab for detailed instructions.
10. Add a question for each field you want to display to the user. See Community Manager > Create a
Question for detailed instructions.
After creating a new record for the custom object the Amend column should now appear on the tab.
Configure Recommendation Portal
Note: Trialforce Configuration Highlights ● The Recommendation Portal has been lightly configured. Please review the instructions
below for an understanding of the feature set before proceeding to the next Trialforce Configuration Highlight .
● There are several Recommendation samples in the Trialforce template: ○ Amendment - Organization > Change Organization Details (Portal Tab) ○ Amendment - Opportunity > Amendment (Portal Tab)
The Recommendation Portal allows applicants to request recommendations from non-portal users.
Key Considerations ● No user login is required for the recommender - the system uses the Community Guest User . ● The recommender will access the record via a URL. ● The Recommender Portal is a single page layout viewable by the recommender and does not
support multiple tabs. ● Attachments must be uploaded on the same tab on which the recommender enters their feedback. ● The recommendation's Status will be automatically set to:
○ In Progress : Whenever the recommendation is saved by the recommender. The record remains editable to the recommender.
103
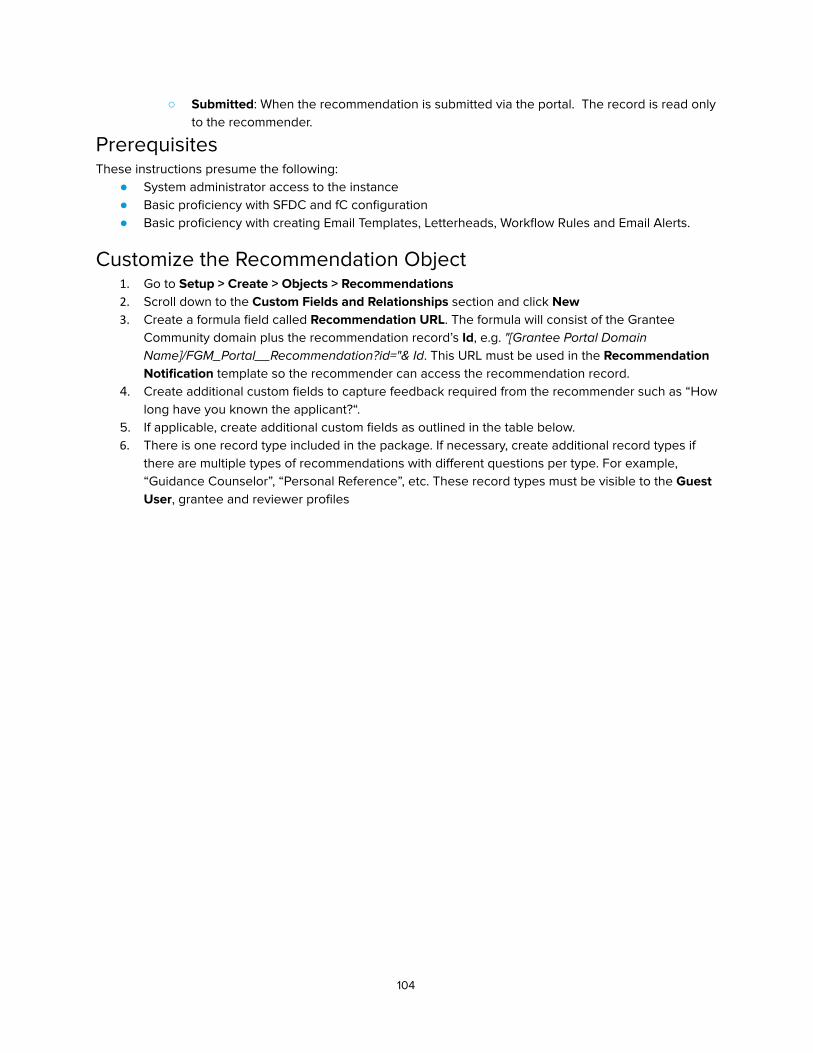
○ Submitted : When the recommendation is submitted via the portal. The record is read only to the recommender.
Prerequisites These instructions presume the following:
● System administrator access to the instance ● Basic proficiency with SFDC and fC configuration ● Basic proficiency with creating Email Templates, Letterheads, Workflow Rules and Email Alerts.
Customize the Recommendation Object 1. Go to Setup > Create > Objects > Recommendations 2. Scroll down to the Custom Fields and Relationships section and click New 3. Create a formula field called Recommendation URL . The formula will consist of the Grantee
Community domain plus the recommendation record’s Id , e.g. "[Grantee Portal Domain Name]/FGM_Portal__Recommendation?id="& Id . This URL must be used in the Recommendation Notification template so the recommender can access the recommendation record.
4. Create additional custom fields to capture feedback required from the recommender such as “How long have you known the applicant?“.
5. If applicable, create additional custom fields as outlined in the table below. 6. There is one record type included in the package. If necessary, create additional record types if
there are multiple types of recommendations with different questions per type. For example, “Guidance Counselor”, “Personal Reference”, etc. These record types must be visible to the Guest User , grantee and reviewer profiles
104
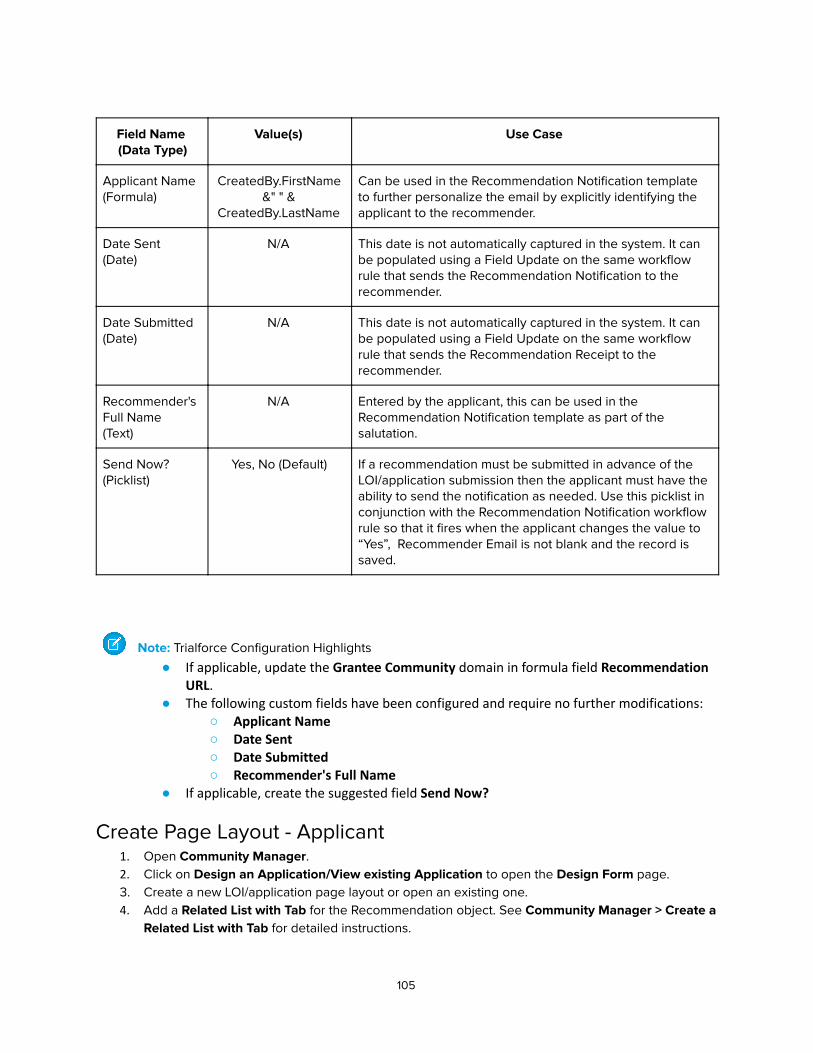
Field Name (Data Type)
Value(s) Use Case
Applicant Name (Formula)
CreatedBy.FirstName &" " &
CreatedBy.LastName
Can be used in the Recommendation Notification template to further personalize the email by explicitly identifying the applicant to the recommender.
Date Sent (Date)
N/A This date is not automatically captured in the system. It can be populated using a Field Update on the same workflow rule that sends the Recommendation Notification to the recommender.
Date Submitted (Date)
N/A This date is not automatically captured in the system. It can be populated using a Field Update on the same workflow rule that sends the Recommendation Receipt to the recommender.
Recommender's Full Name (Text)
N/A Entered by the applicant, this can be used in the Recommendation Notification template as part of the salutation.
Send Now? (Picklist)
Yes, No (Default) If a recommendation must be submitted in advance of the LOI/application submission then the applicant must have the ability to send the notification as needed. Use this picklist in conjunction with the Recommendation Notification workflow rule so that it fires when the applicant changes the value to “Yes”, Recommender Email is not blank and the record is saved.
Note: Trialforce Configuration Highlights
● If applicable, update the Grantee Community domain in formula field Recommendation URL .
● The following custom fields have been configured and require no further modifications: ○ Applicant Name ○ Date Sent ○ Date Submitted ○ Recommender's Full Name
● If applicable, create the suggested field Send Now?
Create Page Layout - Applicant 1. Open Community Manager . 2. Click on Design an Application/View existing Application to open the Design Form page. 3. Create a new LOI/application page layout or open an existing one. 4. Add a Related List with Tab for the Recommendation object. See Community Manager > Create a
Related List with Tab for detailed instructions.
105
5. Add a question for each field you want to display to the applicant. See Community Manager > Create a Question for detailed instructions.
Note: Trialforce Configuration Highlights ● There is a Recommendation sample in the Trialforce template:
○ Sample Scholarship Application > Recommendation (Related List with Tab)
Create Page Layouts - Recommender 1. Open Community Manager . 2. Click on Design PageLayout/View existing page layout to open the Design Page Layout page. 3. In the Select Object picklist either select or type "Recommendation". 4. In the Create New Page Layout section populate the following fields:
a. Select Portal Type : Select "Grantee" b. Select Record Type : Select “Recommendation” or a custom record type.
5. Click the Create New button - this will open the Page Layout Designer . 6. Add a portal tab. See Community Manager > Create a Portal Tab for detailed instructions. 7. Add a question for each field you want to display to the recommender. See Community Manager >
Create a Question for detailed instructions. 8. Repeat for additional record types.
Note: Trialforce Configuration Highlights ● There is a Related List with Tab sample in the Trialforce template:
○ Recommendation > Recommendation
Configure a Recommendation Notification 1. Create an email template that incorporates the Recommendation URL field in the body of the
message. This will allow the contact to open the corresponding recommendation record without a username and credentials. Note that the sample text below references some of the additional custom fields referenced in the table above.
Dear {!FGM_Portal__Recommendation__c.Recommender_s_Full_Name__c}:
{!Organization.Name} has received a grant request from
{!FGM_Portal__Recommendation__c.Applicant_Name__c} on which you have
been listed as a reference.
Our organization uses an online grants management system called
foundationConnect to gather information related to proposals for
funding. Please use the following link to access the recommendation
record (no user name or password required):
{!FGM_Portal__Recommendation__c.Recommendation_URL__c}.
106
Your recommendation will be acknowledged via email as soon as it is
submitted.
If you need assistance in accessing the recommendation or have questions about the application, feel free to contact me at [email protected] or (347) 765-4321. Sincerely, Jane Doe, Grants Manager {!Organization.Name}
2. Create a workflow email alert that will be triggered when the recommendation record is created.
Likewise, the workflow can be triggered using the optional Send Now? field referenced in the table above. In either case use the Recommender Email as the recipient email address.
3. Create and activate a workflow rule that will trigger the workflow email alert. Standard
● Evaluation Criteria : Evaluate the rule when a record is created, and every time it’s edited ● Description : Actions when a recommendation status is "New" and recommender email
field is not blank ● Rule Criteria :
AND(
ISNULL( FGM_Portal__Recommender_Email__c ) = False
,ISPICKVAL(FGM_Portal__Status__c , "New")
,FGM_Portal__Is_Community_Record__c = TRUE
)
Using Send Now? ● Evaluation Criteria : Evaluate the rule when a record is created, and every time it’s edited ● Description : Actions when "Send Now?" value is "Yes" and email is not blank ● Rule Criteria :
AND(
ISPICKVAL( Send_Now__c , 'Yes')
,ISBLANK( FGM_Portal__Recommender_Email__c ) = FALSE
,ISPICKVAL( FGM_Portal__Status__c , 'New')
,FGM_Portal__Is_Community_Record__c = TRUE
)
Note: Trialforce Configuration Highlights ● If applicable, modify the description and/or content of the Recommendation Request
Notification email template. ● If applicable, modify the description and/or criteria of the Recommendation Request
Notification workflow rule. ● If applicable, add additional recipients to the Recommendation Request Notification email
alert.
Configure a Recommendation Receipt
107

1. Create an email template that notifies the recommender their recommendation has been received. Note that the sample text below references some of the additional custom fields referenced in the table above.
Dear {!FGM_Portal__Recommendation__c.Recommender_s_Full_Name__c}:
This email is to confirm receipt of your recommendation on {!Today} for
{!FGM_Portal__Recommendation__c.Applicant_Name__c}.
Sincerely,
Jane Doe, Grants Manager
{!Organization.Name}
2. Create a workflow email alert that will be triggered when the recommendation record is submitted.
Use the Recommender Email as the recipient email address. 3. Create and activate a workflow rule that will trigger the workflow email alert.
○ Evaluation Criteria : Evaluate the rule when a record is created, and every time it’s edited ○ Description : Steps that execute when a recommendation has been submitted and the
recommender email field is not blank ○ Rule Criteria :
AND(
ISNULL( FGM_Portal__Recommender_Email__c ) = False
,ISPICKVAL(FGM_Portal__Status__c , "Submitted")
)
Note: Trialforce Configuration Highlights ● If applicable, modify the description and/or content of the Recommendation Receipt email
template. ● If applicable, modify the description and/or criteria of the Recommendation Receipt
workflow rule. ● If applicable, add additional recipients to the Recommendation Receipt email alert.
Modify Custom Levels If necessary customize fC_RecommendationReview_FeedbackMessage . See the grantee portal text
customization guide for details.
Note: Trialforce Configuration Highlights ● If applicable, customize the text for custom label
fC_RecommendationReview_FeedbackMessage .
Use Centralized CSS to Customize Portal Pages
Note: Trialforce Configuration Highlights Centralized CSS is not configured in the Trialforce template. Please see the instructions below on
108
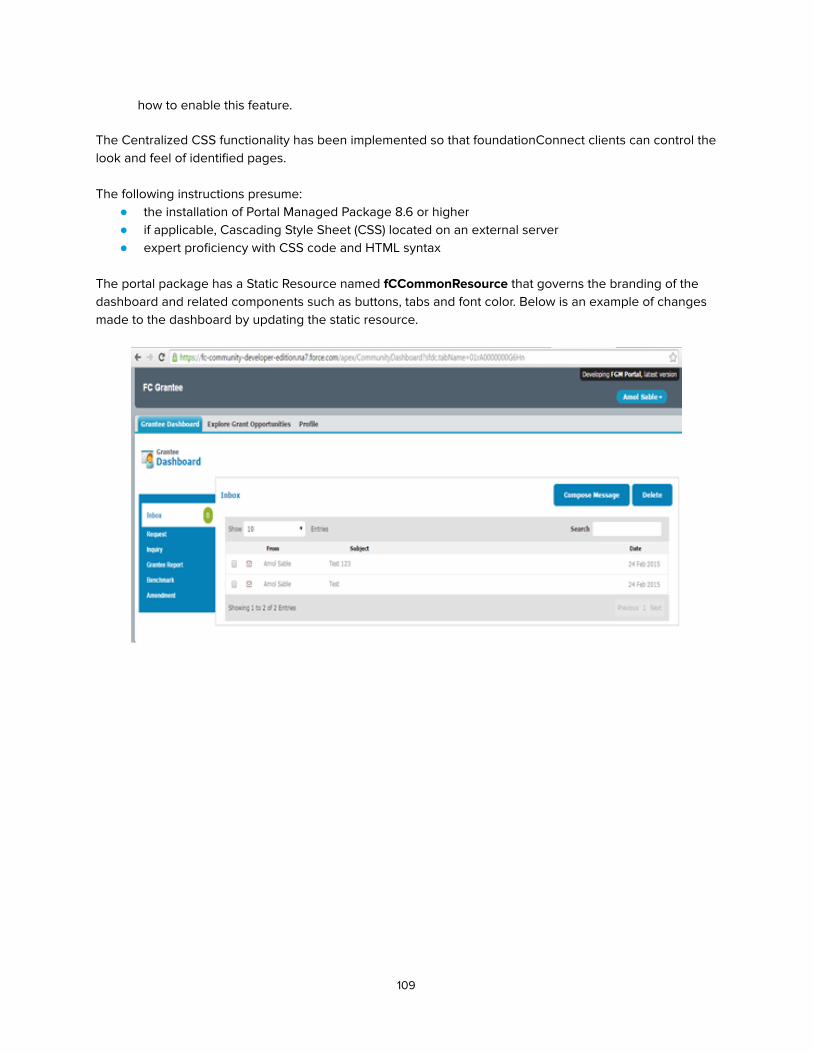
how to enable this feature. The Centralized CSS functionality has been implemented so that foundationConnect clients can control the look and feel of identified pages. The following instructions presume:
● the installation of Portal Managed Package 8.6 or higher ● if applicable, Cascading Style Sheet (CSS) located on an external server ● expert proficiency with CSS code and HTML syntax
The portal package has a Static Resource named fCCommonResource that governs the branding of the dashboard and related components such as buttons, tabs and font color. Below is an example of changes made to the dashboard by updating the static resource.
109
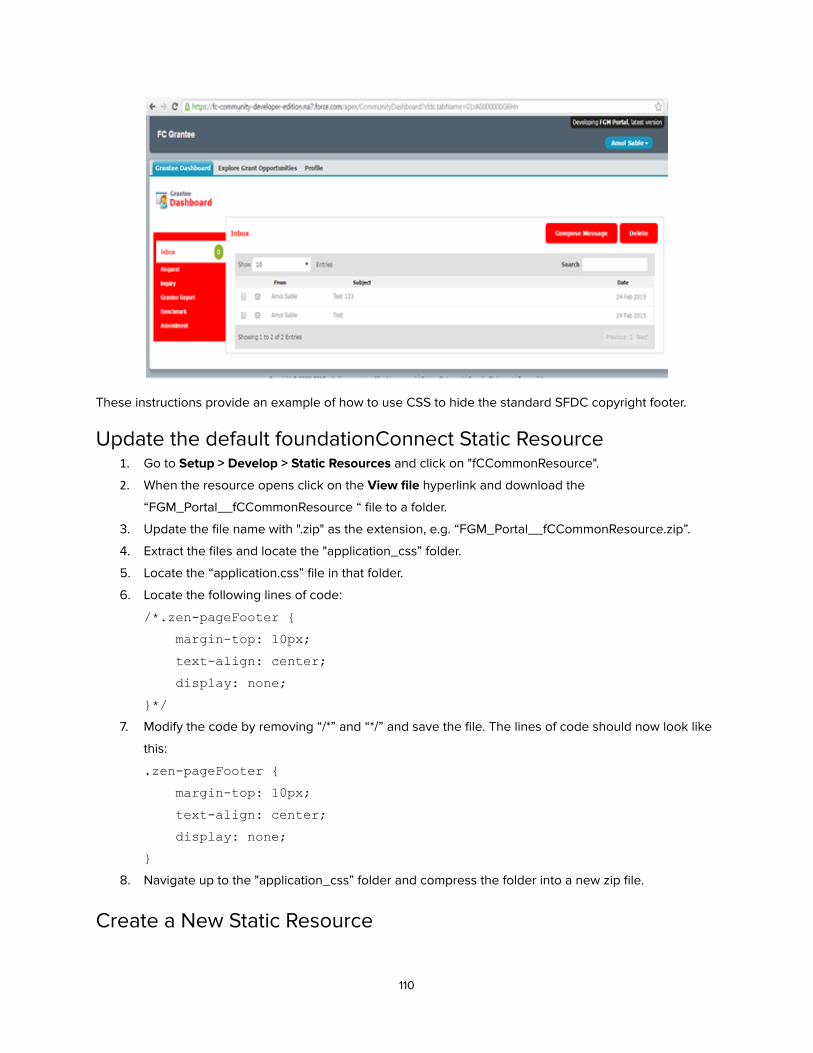
These instructions provide an example of how to use CSS to hide the standard SFDC copyright footer.
Update the default foundationConnect Static Resource 1. Go to Setup > Develop > Static Resources and click on "fCCommonResource".
2. When the resource opens click on the View file hyperlink and download the
“FGM_Portal__fCCommonResource “ file to a folder.
3. Update the file name with ".zip" as the extension, e.g. “FGM_Portal__fCCommonResource.zip”.
4. Extract the files and locate the "application_css” folder.
5. Locate the “application.css” file in that folder.
6. Locate the following lines of code:
/*.zen-pageFooter {
margin-top: 10px;
text-align: center;
display: none;
}*/
7. Modify the code by removing “/*” and “*/” and save the file. The lines of code should now look like
this:
.zen-pageFooter {
margin-top: 10px;
text-align: center;
display: none;
}
8. Navigate up to the "application_css” folder and compress the folder into a new zip file.
Create a New Static Resource
110

1. Log into SFDC and navigate to Setup > Develop > Static Resources and click on the New button.
2. When the Static Resource Edit page opens populate these fields as follows:
● Name : Enter a name such as "fCCommonResource_Modified".
● Cache Control : Select "Public"
3. Click the Browse... button and select the newly created zip file, “application_css.zip”.
4. Click the Save button.
Create a “Community Static Resource” Custom Setting 1. Go to Setup > Develop > Custom Setting and locate “Community Static Resource”.
2. Click on the Manage link.
3. Click the New button to open the Community Static Resource Edit page.
4. Populate the following fields:
● Name : Enter “CommunityResource_GranteePortal”.
● File Relative Path: Enter the file path. In this example that would be
“/application_css/application.css”.
● Static Resource Name : The name of the newly created static resource. In this example
that would be “fCCommonResource_Modified”.
5. Click the Save button.
Update the “Community_Static_Resource_Record_Label” Custom Label
1. Go to Setup > Create > Custom Labels and click on “Community_Static_Resource_Record_Label”.
2. When the record opens click the New Local Translations/Overrides button.
111
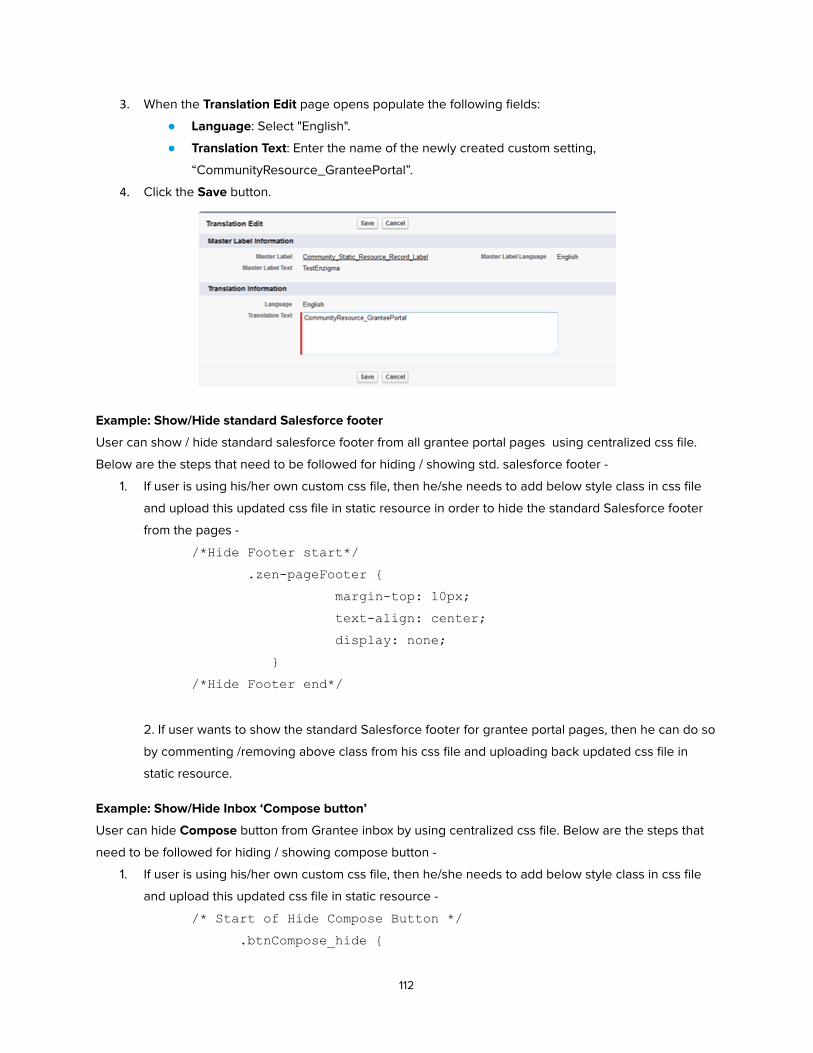
3. When the Translation Edit page opens populate the following fields:
● Language : Select "English".
● Translation Text : Enter the name of the newly created custom setting,
“CommunityResource_GranteePortal”.
4. Click the Save button.
Example: Show/Hide standard Salesforce footer
User can show / hide standard salesforce footer from all grantee portal pages using centralized css file.
Below are the steps that need to be followed for hiding / showing std. salesforce footer -
1. If user is using his/her own custom css file, then he/she needs to add below style class in css file
and upload this updated css file in static resource in order to hide the standard Salesforce footer
from the pages -
/*Hide Footer start*/
.zen-pageFooter {
margin-top: 10px;
text-align: center;
display: none;
}
/*Hide Footer end*/
2. If user wants to show the standard Salesforce footer for grantee portal pages, then he can do so
by commenting /removing above class from his css file and uploading back updated css file in
static resource.
Example: Show/Hide Inbox ‘Compose button’
User can hide Compose button from Grantee inbox by using centralized css file. Below are the steps that
need to be followed for hiding / showing compose button -
1. If user is using his/her own custom css file, then he/she needs to add below style class in css file
and upload this updated css file in static resource -
/* Start of Hide Compose Button */
.btnCompose_hide {
112
display : none !important;
}
/*End of Hide Compose Button */
2. If user wants to show Compose button for grantee inbox, then he can do so by commenting
/removing above class from his css file and uploading back updated css file in static resource.
Additional Text Customization
Hiding pre-text and post-text after submission NOTE: If you are upgrading from a previous version of the Communities portal please make the following
updates after upgrading:
● Set Field Level Security for your grantee profile by checking Visible on the Hide Pre Text and Hide
Post Text check boxes on the Quiz Question object. There are two of each check box - one for the
Grantee and one for the Reviewer portal. Select all four.
● Update any existing questions in the Grantee Community Manager on which you want to hide the
pre- or post text by checking Hide PreText? and/or Hide PostText? .
Hiding pre-text and post-text after Application or LOI submission 1. Go to Community Manager > Design / View Existing Application .
2. Select your application for which you want to show/hide pre-text and/or post-text for the questions.
3. Check Hide Pre-text? checkbox to hide pre-text and Hide Post-text? checkbox to hide post-text.
4. Click the Save Questions button.
Hiding pre-text and post-text after Grantee Report, Benchmark or Amendment
submission 1. Go to Community Manager > Design / View Existing Page layout .
2. Select Object and open its corresponding page layout for which you want to show/hide pre-text
and/or post-text.
3. Check Hide Pre-text? checkbox to hide pre-text and Hide Post-text? checkbox to hide post-text.
4. Click the Save Questions button.
Adding Instructional Text on Dashboard 1. Go to Setup > Develop > Custom Settings .
2. Click the Manage hyperlink next to Community Setting to open the Custom Setting page.
3. Click the New button to open the Custom Setting Edit page.
4. Populate the following fields:
113

○ Name : Enter "GP_DashboardInstructionalTextEnabled".
○ IsEnabled : Check (select) the box.
5. Click the Save button.
6. Go to Setup > Create > Custom Labels .
7. Locate and click on GP_DashBoardInstructionalText to open the custom label record.
8. Click the New Local Translations/Overrides button to open the New Translation Page .
9. Populate the following fields:
○ Language : Select "English"
○ Translation Text : Enter the text you want displayed on the dashboard. NOTE: This field
supports HTML tags.
10. Click the Save button.
Note: Trialforce Configuration Highlights ● If applicable, uncheck (de-select) GP_DashboardInstructionalTextEnabled to disable this
feature. ● If applicable, edit the text for custom label GP_DashBoardInstructionalText or delete the
existing translation.
Adding Color Alters on Dashboard
Note: Trialforce Configuration Highlights Portal Alert Settings are not configured in the Trialforce template. Please see the instructions below on how to enable this feature.
Administrators can color-code items on the Grantee Dashboard according to whether they are due or
overdue. This functionality is available for Inquiries , Requests , Grantee Reports , and External Reviews .
To set up this feature, follow these steps:
1. Navigate to Setup > Develop > Custom Settings > Manage link beside Portal Alert Settings .
2. Click the New button.
3. When the Portal Alert Settings Edit page opens populate the following fields:
○ Name : Enter a descriptive name, e.g. “GranteeReport_DueSoon”. Note that spaces are
not allowed in the name.
○ Color: Color in which the text should display, i.e. “red,” “blue,” “green,” etc.
○ Object: API name of the object on which the alert will be displayed, e.g.
“FGM_Base__Grantee_Report__c”.
○ Status: Statuses that trigger the alert. Separate multiple statuses with a comma, e.g. “In
Progress, Scheduled”.
○ Time Trigger - Number of days off from the due date that the alert color should be
displayed. This field supports positive numbers, negative numbers, and a zero value
4. Click Save
114
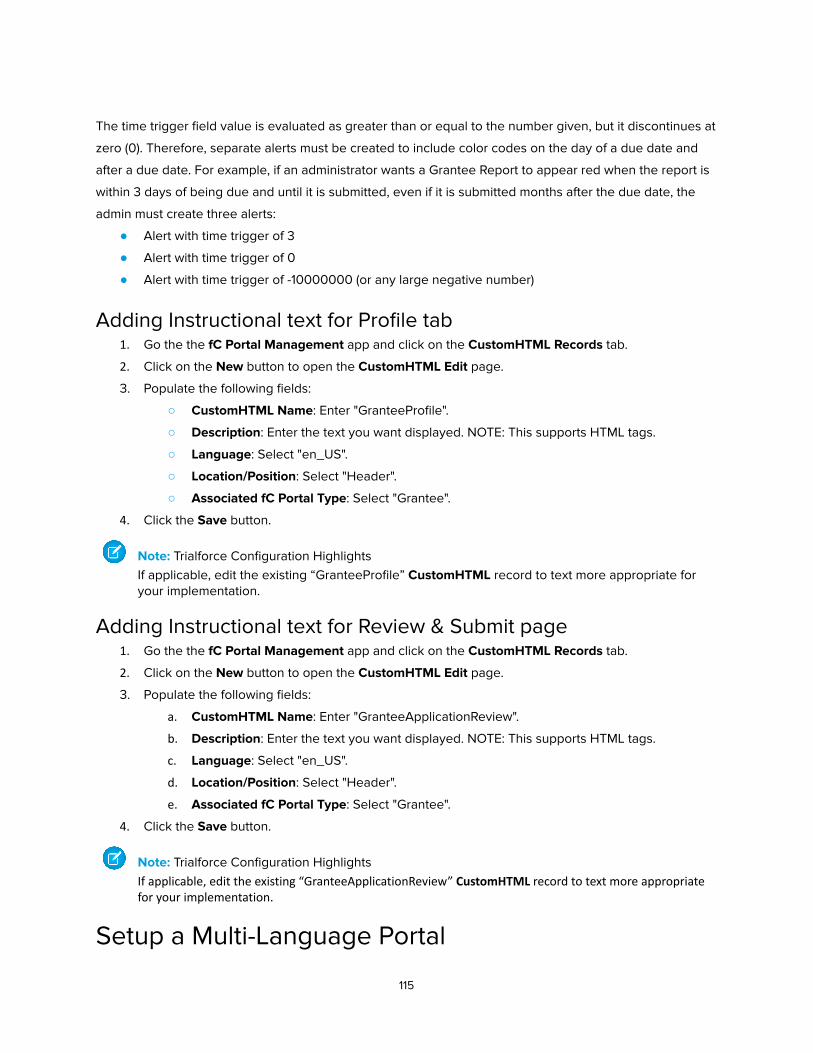
The time trigger field value is evaluated as greater than or equal to the number given, but it discontinues at
zero (0). Therefore, separate alerts must be created to include color codes on the day of a due date and
after a due date. For example, if an administrator wants a Grantee Report to appear red when the report is
within 3 days of being due and until it is submitted, even if it is submitted months after the due date, the
admin must create three alerts:
● Alert with time trigger of 3
● Alert with time trigger of 0
● Alert with time trigger of -10000000 (or any large negative number)
Adding Instructional text for Profile tab 1. Go the the fC Portal Management app and click on the CustomHTML Records tab.
2. Click on the New button to open the CustomHTML Edit page.
3. Populate the following fields:
○ CustomHTML Name : Enter "GranteeProfile".
○ Description : Enter the text you want displayed. NOTE: This supports HTML tags.
○ Language : Select "en_US".
○ Location/Position : Select "Header".
○ Associated fC Portal Type : Select "Grantee".
4. Click the Save button.
Note: Trialforce Configuration Highlights If applicable, edit the existing “GranteeProfile” CustomHTML record to text more appropriate for your implementation.
Adding Instructional text for Review & Submit page 1. Go the the fC Portal Management app and click on the CustomHTML Records tab.
2. Click on the New button to open the CustomHTML Edit page.
3. Populate the following fields:
a. CustomHTML Name : Enter "GranteeApplicationReview".
b. Description : Enter the text you want displayed. NOTE: This supports HTML tags.
c. Language : Select "en_US".
d. Location/Position : Select "Header".
e. Associated fC Portal Type : Select "Grantee".
4. Click the Save button.
Note: Trialforce Configuration Highlights If applicable, edit the existing “GranteeApplicationReview” CustomHTML record to text more appropriate for your implementation.
Setup a Multi-Language Portal
115
Custom Settings Each language your portal supports will have its own Portal Configuration custom setting.
1. Navigate to Setup > Develop > Custom Settings > Portal Configuration > Manage .
2. Click the New button.
3. When the new record opens populate the following fields:
○ Name : Enter a name that reflects the community and, if applicable, the language. For
example, “Grantee Community - Spanish”.
○ Customize Dashboard : Leave unchecked.
○ Amendment Name : If applicable, enter the dashboard caption for your grantee report, e.g.
“Amendments”. If left blank, the Amendment tab will not appear in the Grantee Dashboard.
○ Benchmark Name : If applicable, enter the dashboard caption for your grantee report, e.g.
“Goals”. If left blank, the Benchmark tab will not appear in the Grantee Dashboard.
○ Grantee Inbox Tab Label : If applicable, enter the dashboard caption for the inbox, e.g.
“Messages”. Populating this field makes the inbox visible in your Community’s dashboard.
As of version 8.32, leaving it blank will hide the inbox in its entirety . If you want to display
the inbox but limit users’ ability to create messages see the Use Centralized CSS to
Customize Portal Pages > Example: Show/Hide Inbox ‘Compose button' section in this
guide.
○ GranteeReportName : If applicable, enter the dashboard caption for your grantee report,
e.g. “Status Reports”. If left blank, the Grantee Reports tab will not appear in the Grantee
Dashboard.
○ Grantee Report field for default sorting : Enter the API name of the Grantee Report field
by which you want all the records to be sorted. For example "FGM_Base__Due_Date__c"
for the Due Date field.
○ Grantee Report Field Sort Order : Enter "Ascending" or "Descending".
○ InquiryName : If applicable, enter the dashboard caption for your inquiries, e.g. “LOIs.” If
left blank, the Inquiry tab will not appear in the Grantee Dashboard.
○ RequestName : If applicable, enter the dashboard caption for your requests, e.g.
“Applications”. If left blank, the Request tab will not appear in the Grantee Dashboard.
○ Language Selection : Enter the code for the corresponding language in which the portal
will be displayed, e.g. “en_US” for English, “es” for Spanish, etc. These codes can be
found in Salesforce Help & Training by searching for “Which Languages Does Salesforce
Support?”.
116
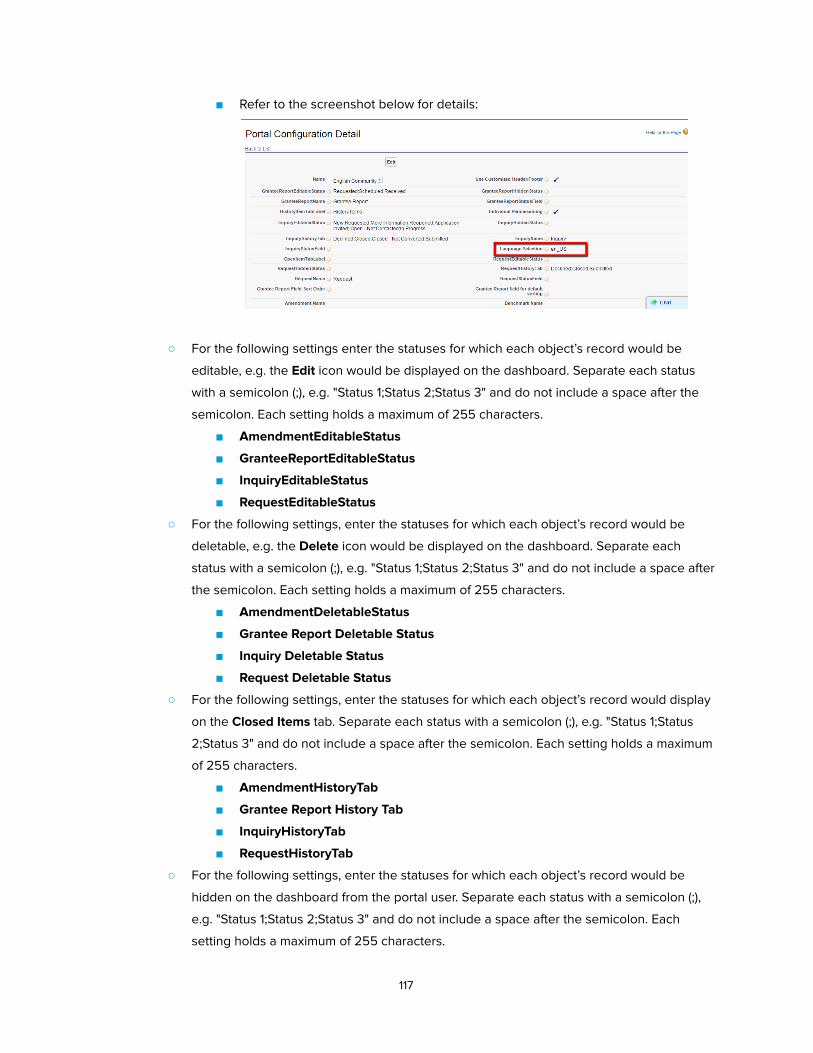
■ Refer to the screenshot below for details:
○ For the following settings enter the statuses for which each object’s record would be
editable, e.g. the Edit icon would be displayed on the dashboard. Separate each status
with a semicolon (;), e.g. "Status 1;Status 2;Status 3" and do not include a space after the
semicolon. Each setting holds a maximum of 255 characters.
■ AmendmentEditableStatus
■ GranteeReportEditableStatus
■ InquiryEditableStatus
■ RequestEditableStatus
○ For the following settings, enter the statuses for which each object’s record would be
deletable, e.g. the Delete icon would be displayed on the dashboard. Separate each
status with a semicolon (;), e.g. "Status 1;Status 2;Status 3" and do not include a space after
the semicolon. Each setting holds a maximum of 255 characters.
■ AmendmentDeletableStatus
■ Grantee Report Deletable Status
■ Inquiry Deletable Status
■ Request Deletable Status
○ For the following settings, enter the statuses for which each object’s record would display
on the Closed Items tab. Separate each status with a semicolon (;), e.g. "Status 1;Status
2;Status 3" and do not include a space after the semicolon. Each setting holds a maximum
of 255 characters.
■ AmendmentHistoryTab
■ Grantee Report History Tab
■ InquiryHistoryTab
■ RequestHistoryTab
○ For the following settings, enter the statuses for which each object’s record would be
hidden on the dashboard from the portal user. Separate each status with a semicolon (;),
e.g. "Status 1;Status 2;Status 3" and do not include a space after the semicolon. Each
setting holds a maximum of 255 characters.
117
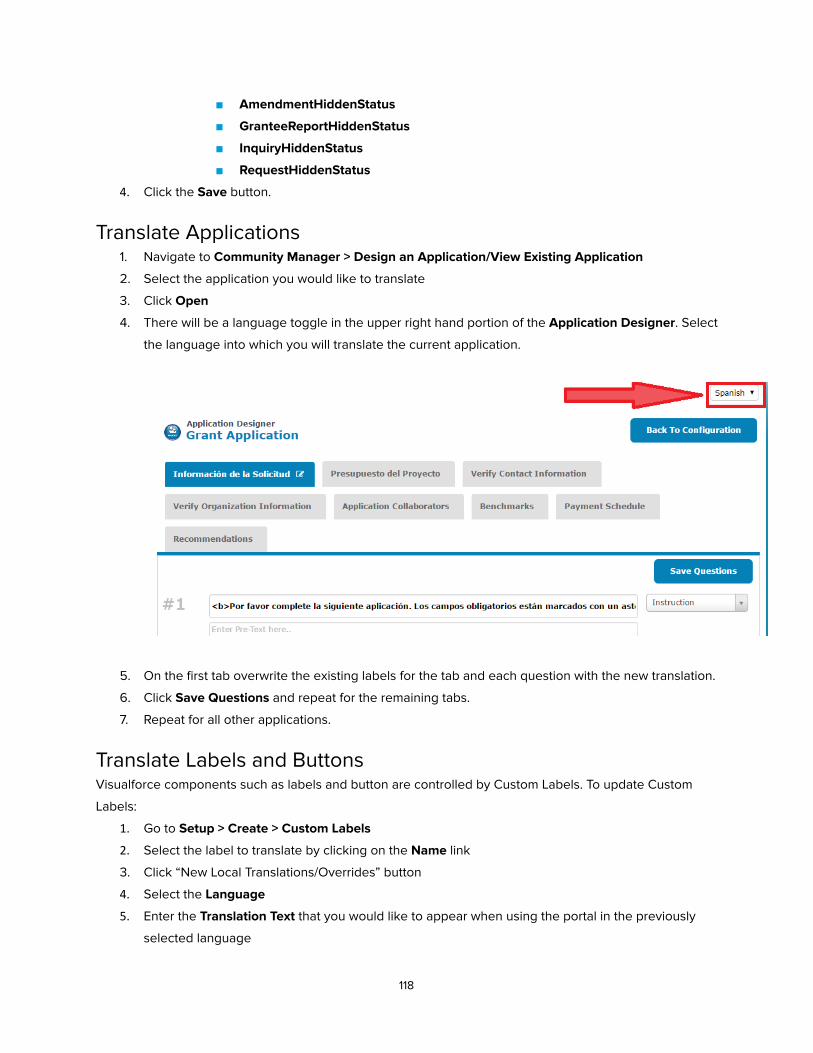
■ AmendmentHiddenStatus
■ GranteeReportHiddenStatus
■ InquiryHiddenStatus
■ RequestHiddenStatus
4. Click the Save button.
Translate Applications 1. Navigate to Community Manager > Design an Application/View Existing Application
2. Select the application you would like to translate
3. Click Open
4. There will be a language toggle in the upper right hand portion of the Application Designer . Select
the language into which you will translate the current application.
5. On the first tab overwrite the existing labels for the tab and each question with the new translation.
6. Click Save Questions and repeat for the remaining tabs.
7. Repeat for all other applications.
Translate Labels and Buttons Visualforce components such as labels and button are controlled by Custom Labels. To update Custom
Labels:
1. Go to Setup > Create > Custom Labels
2. Select the label to translate by clicking on the Name link
3. Click “New Local Translations/Overrides” button
4. Select the Language
5. Enter the Translation Text that you would like to appear when using the portal in the previously
selected language
118
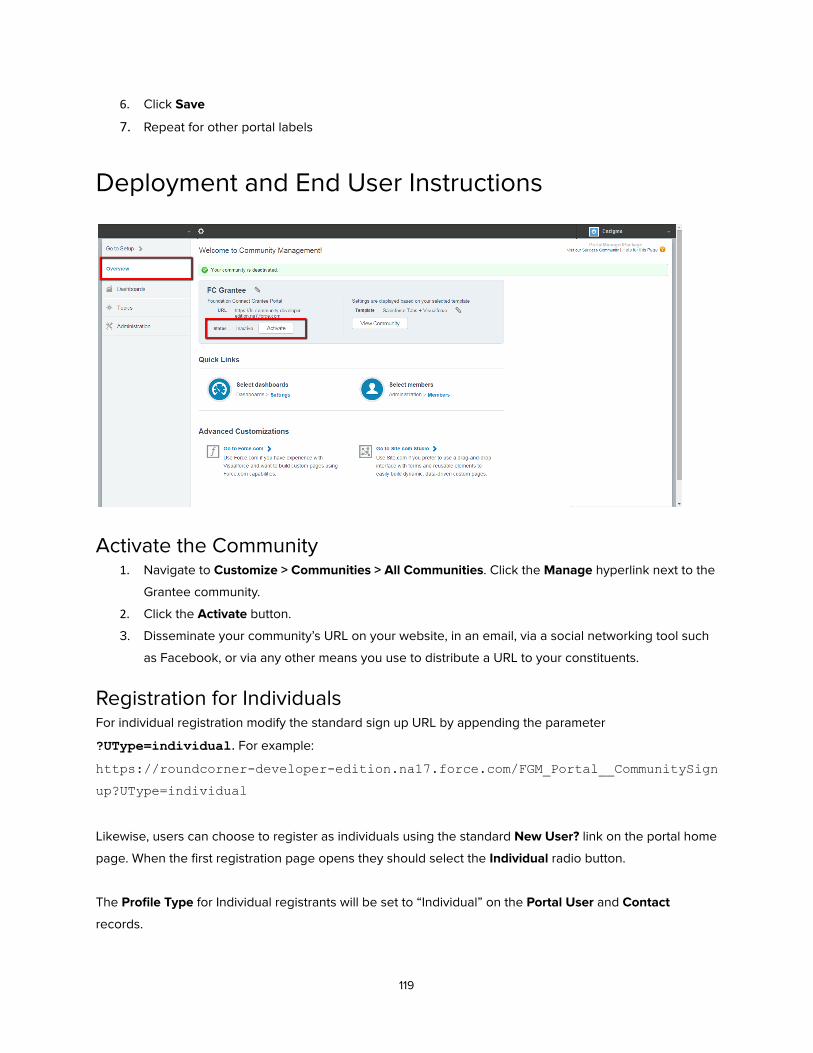
6. Click Save
7. Repeat for other portal labels
Deployment and End User Instructions
Activate the Community 1. Navigate to Customize > Communities > All Communities . Click the Manage hyperlink next to the
Grantee community.
2. Click the Activate button.
3. Disseminate your community’s URL on your website, in an email, via a social networking tool such
as Facebook, or via any other means you use to distribute a URL to your constituents.
Registration for Individuals For individual registration modify the standard sign up URL by appending the parameter
?UType=individual . For example:
https://roundcorner-developer-edition.na17.force.com/FGM_Portal__CommunitySign
up?UType=individual
Likewise, users can choose to register as individuals using the standard New User? link on the portal home
page. When the first registration page opens they should select the Individual radio button.
The Profile Type for Individual registrants will be set to “Individual” on the Portal User and Contact
records.
119
Creating Portal Users Manually using the SFDC Interface
Create an Account 1. Create a new account or navigate to an existing one.
2. Click the Manage External Account button and select “Enable As Partner”. Click OK when the
confirmation dialog opens.
Create a Contact 1. Create a new contact or, for an existing account, open an existing contact.
○ If a new contact and if prompted for a record type: select “Current User” – this is a .NET
requirement and isn’t really used for Communities.
2. Populate the following fields and save the record (you may have to adjust your page layout if not
all fields are displayed):
○ First Name
○ Last Name
○ Account Name : Should be pre-populated.
○ User Profile : Select “Grantee” and/or “Reviewer”
■ NOTE: We currently don’t have the means to allow a user to navigate between the
grantee and reviewer portal as they can in .NET.
3. Click the Manage External User button and select “Enable Partner User”. This will direct you to the
New User page.
4. Populate the following fields:
○ User License : Select “Partner Community” or “Partner Community Login”.
○ Profile : Select the custom grantee or reviewer profile, e.g. “fC Partner Communities User”
○ Email : Use your OWN email address as you will need to set the initial password – it is
needed for the Portal User record.
○ Username : This should follow the same format as if the user registered via the portal,
“username@CommunityURL” e.g.
“ [email protected] ”.
5. Update the fields in the Additional Information section if necessary:
○ Profile Type : Select “Organization” or “Individual”
■ “Individual” would be used for scholarship applicants, etc.
○ User Profile : Select “Grantee” and/or “Reviewer”
6. Select/de-select or update any other user fields as necessary, e.g. Time Zone, whether or not they
should receive SFDC updates, etc.
7. De-select “Generate new password and notify user immediately”.
8. Click the Reset Password button. Once you get the email from SFDC set the user’s password.
120
Create a Portal User 1. Create a portal user.
○ Record type : Select “New User” – this is a .NET requirement and isn’t really used for
Communities.
2. Populate the following fields:
○ Organization Legal Name
○ User Profile : Select “Grantee” and/or “Reviewer”
○ First Name
○ Last Name
○ Email: Use the contact’s email.
○ Confirm Email
○ Approval Status : Set to “Approved”
○ Confirmation Code : Doesn’t matter what this value is but is should be numerical. In my
testing “12345” worked just fine.
○ Domain : Set to the community domain, e.g.
“roundcorner-developer-edition.na17.force.com”
■ NOTE: This value is used in email templates to the user, e.g. activation
○ Profile Type : Select “Belong to an Organization” or “Individual”
○ Username : This is usually their SFDC user name without the domain, e.g. “judy.blume”
○ Password and Confirm Password : Enter the password you assigned to the User.
○ Active : Select (check) it.
○ Account : Link to the existing account
■ NOTE : Ignore Portal Account as that is not used in Communities.
○ Contact : Link it to the existing contact record.
3. Save the record.
Update the User Change the email on the User record to the user’s actual email address.
Other Considerations ● Deactivate the Email Confirmation workflow rule. This fires when the portal user is created.
● You may want to deactivate the standard Community welcome email as well.
● Update the existing activation template
● There is no functionality to make users change their temporary password (as there is in .NET) as
we expected users to self-register anyway
● If LOIs/requests are created in advance for portal users the records will have to be updated to
make the user the owner. For requests, ensure that they are consequently added to the
opportunity team as the Owner and with Read/Write permissions.
121
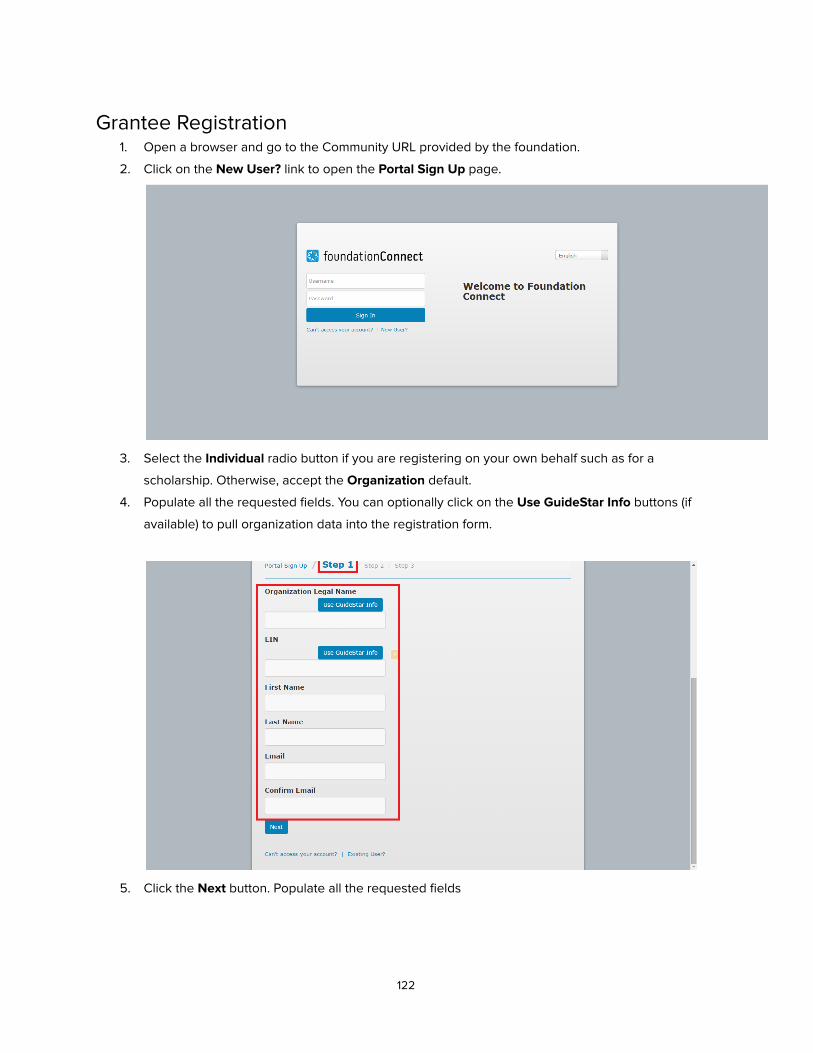
Grantee Registration 1. Open a browser and go to the Community URL provided by the foundation.
2. Click on the New User? link to open the Portal Sign Up page.
3. Select the Individual radio button if you are registering on your own behalf such as for a
scholarship. Otherwise, accept the Organization default.
4. Populate all the requested fields. You can optionally click on the Use GuideStar Info buttons (if
available) to pull organization data into the registration form.
5. Click the Next button. Populate all the requested fields
122
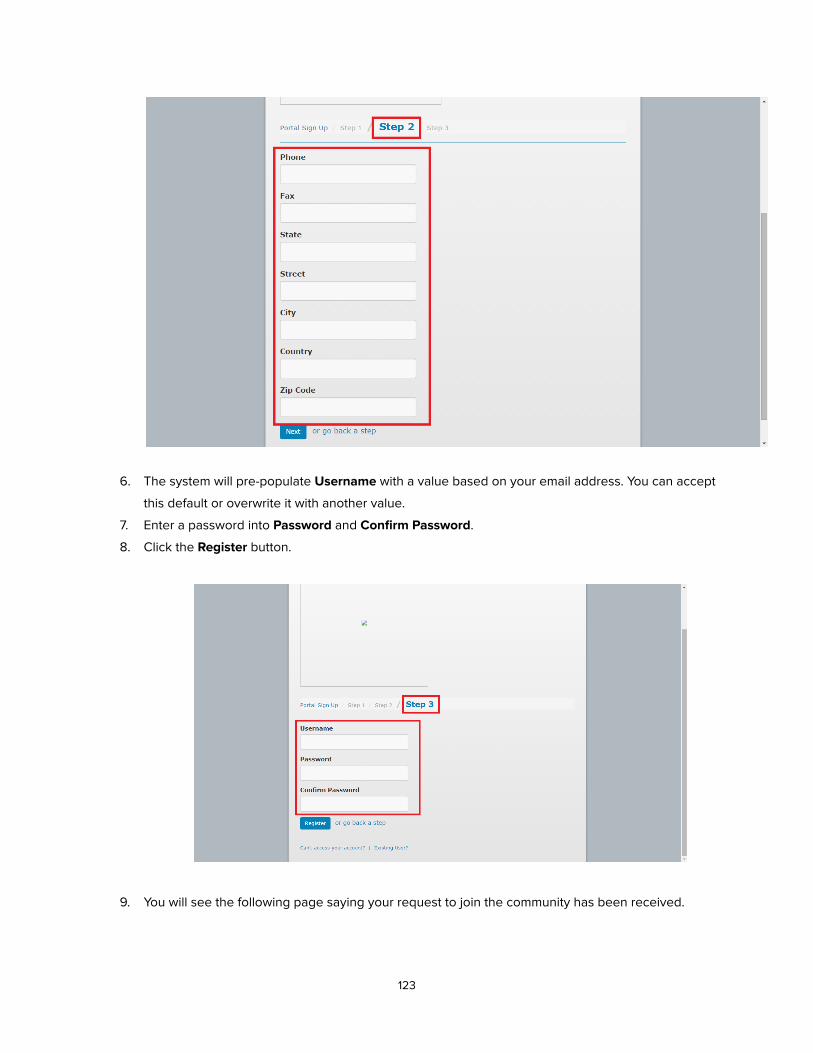
6. The system will pre-populate Username with a value based on your email address. You can accept
this default or overwrite it with another value.
7. Enter a password into Password and Confirm Password .
8. Click the Register button.
9. You will see the following page saying your request to join the community has been received.
123

10. A Portal User record with an Approval Status of “Pending” will be created in the Salesforce.
124
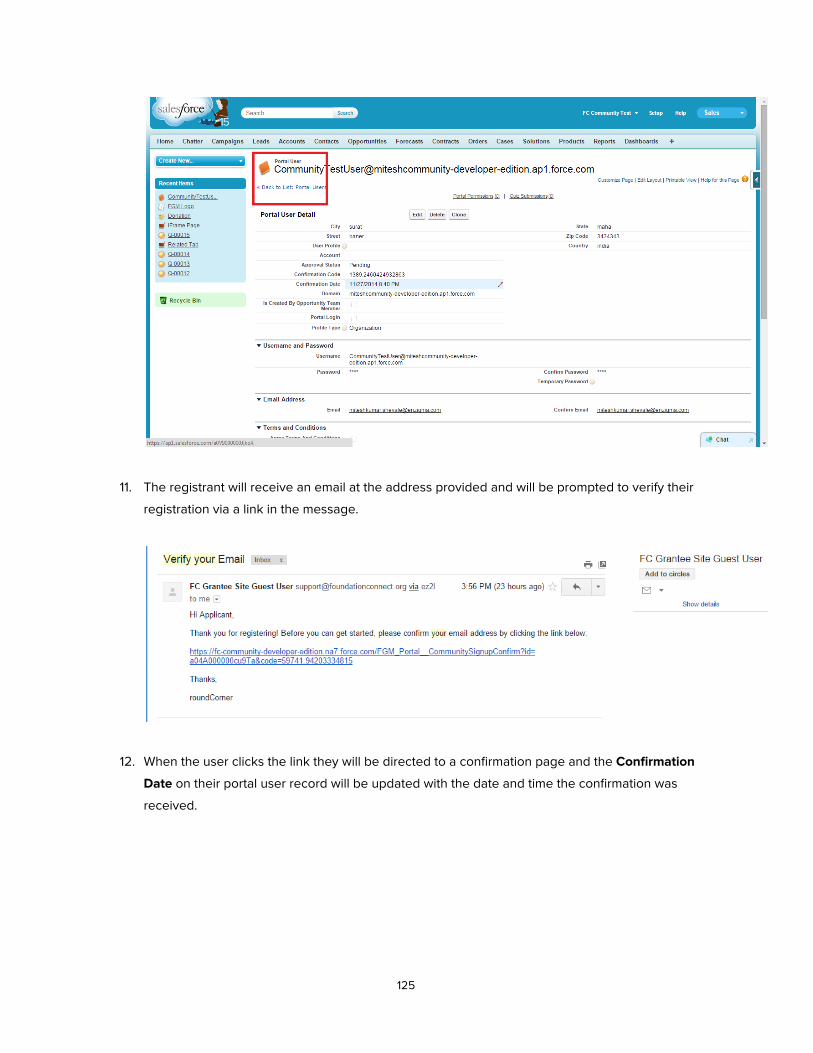
11. The registrant will receive an email at the address provided and will be prompted to verify their
registration via a link in the message.
12. When the user clicks the link they will be directed to a confirmation page and the Confirmation
Date on their portal user record will be updated with the date and time the confirmation was
received.
125
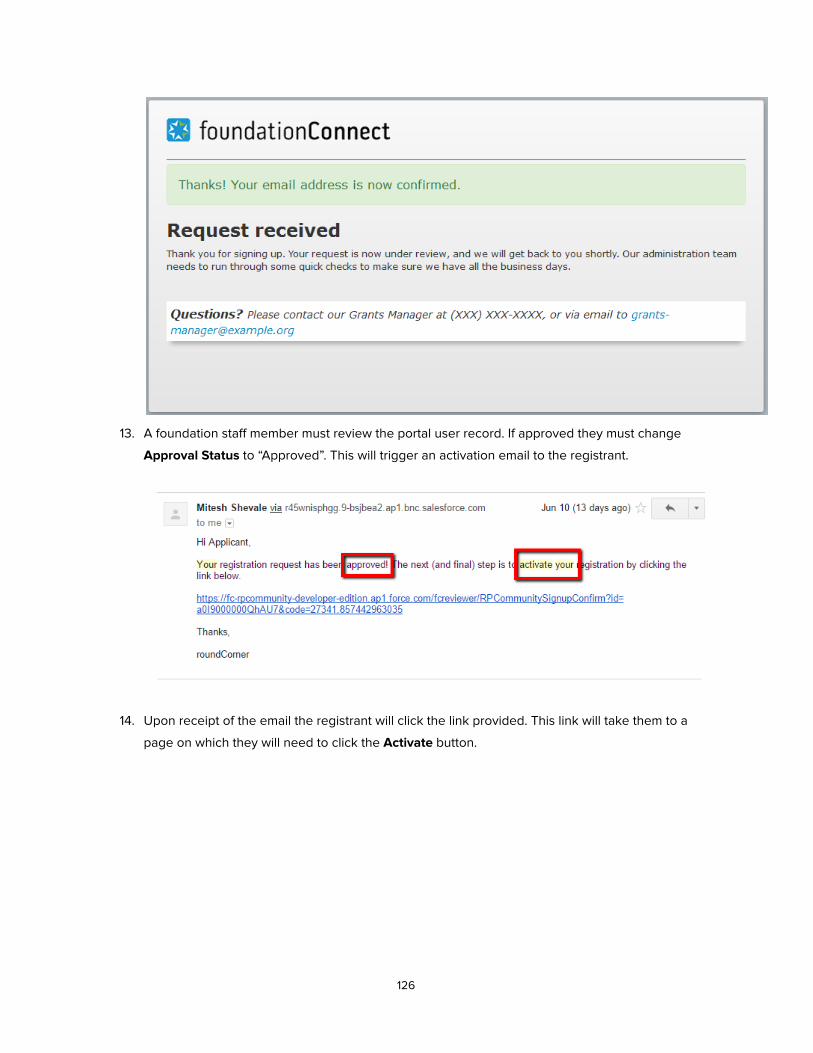
13. A foundation staff member must review the portal user record. If approved they must change
Approval Status to “Approved”. This will trigger an activation email to the registrant.
14. Upon receipt of the email the registrant will click the link provided. This link will take them to a
page on which they will need to click the Activate button.
126
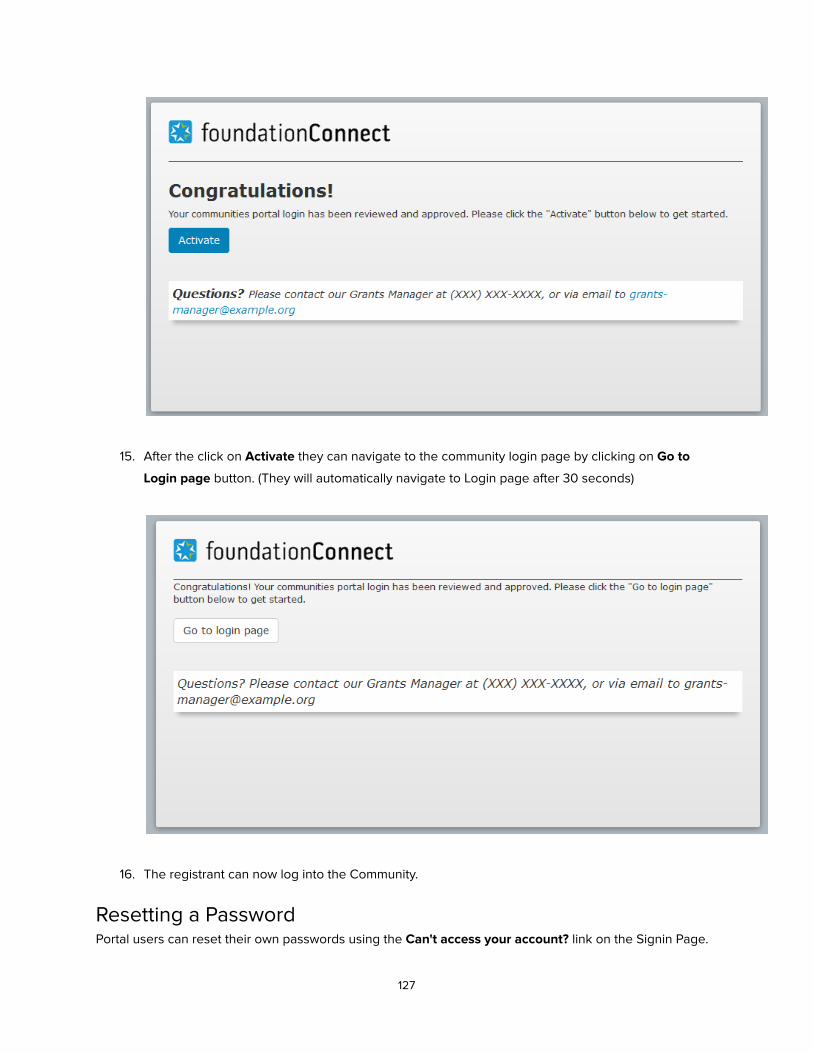
15. After the click on Activate they can navigate to the community login page by clicking on Go to
Login page button. (They will automatically navigate to Login page after 30 seconds)
16. The registrant can now log into the Community.
Resetting a Password Portal users can reset their own passwords using the Can't access your account? link on the Signin Page.
127
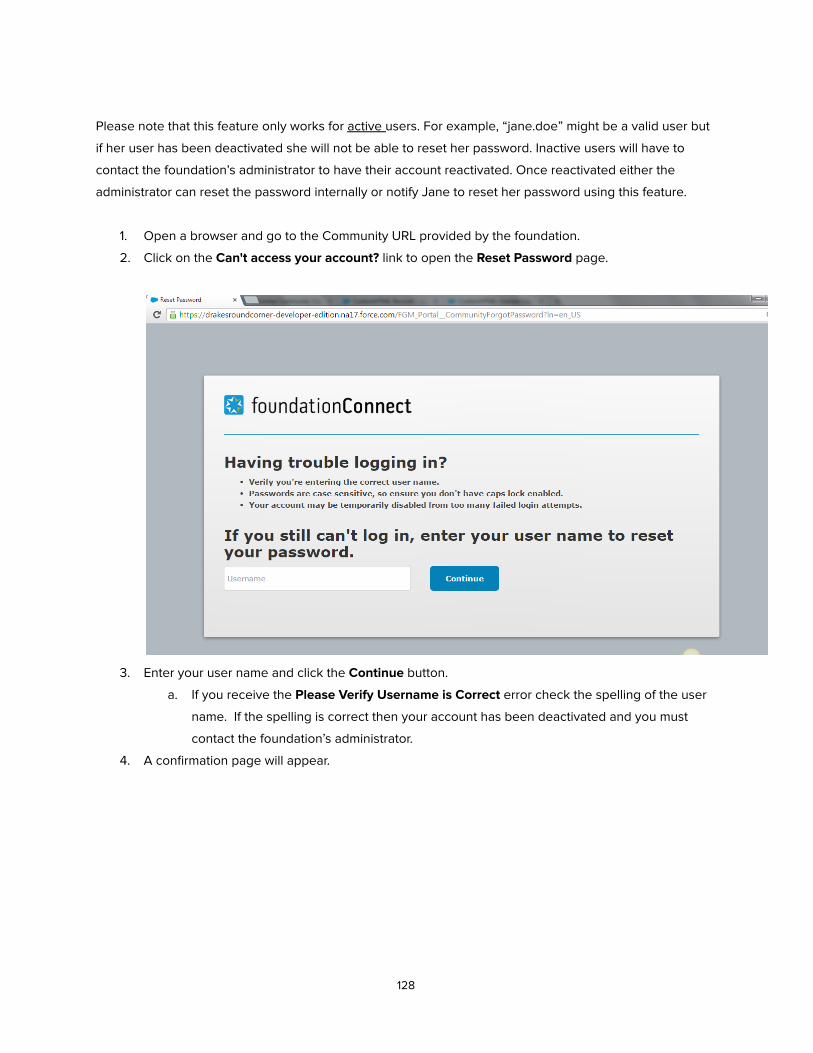
Please note that this feature only works for active users. For example, “jane.doe” might be a valid user but
if her user has been deactivated she will not be able to reset her password. Inactive users will have to
contact the foundation’s administrator to have their account reactivated. Once reactivated either the
administrator can reset the password internally or notify Jane to reset her password using this feature.
1. Open a browser and go to the Community URL provided by the foundation.
2. Click on the Can't access your account? link to open the Reset Password page.
3. Enter your user name and click the Continue button.
a. If you receive the Please Verify Username is Correct error check the spelling of the user
name. If the spelling is correct then your account has been deactivated and you must
contact the foundation’s administrator.
4. A confirmation page will appear.
128
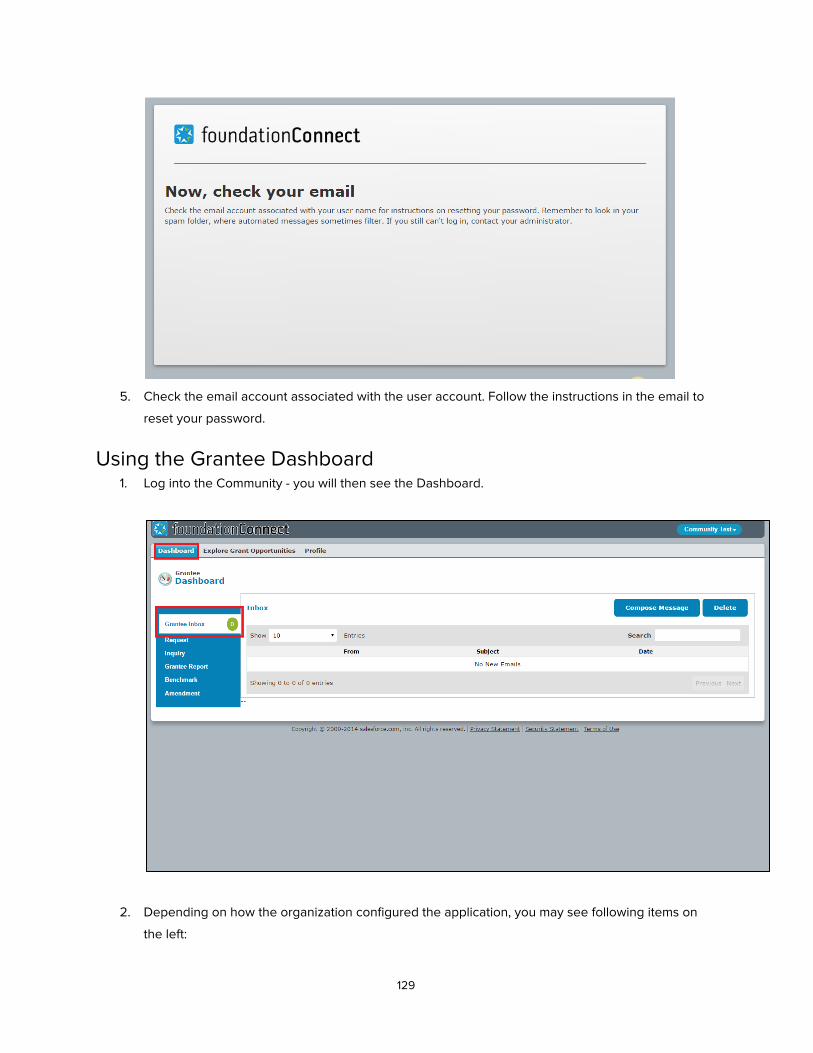
5. Check the email account associated with the user account. Follow the instructions in the email to
reset your password.
Using the Grantee Dashboard 1. Log into the Community - you will then see the Dashboard.
2. Depending on how the organization configured the application, you may see following items on
the left:
129
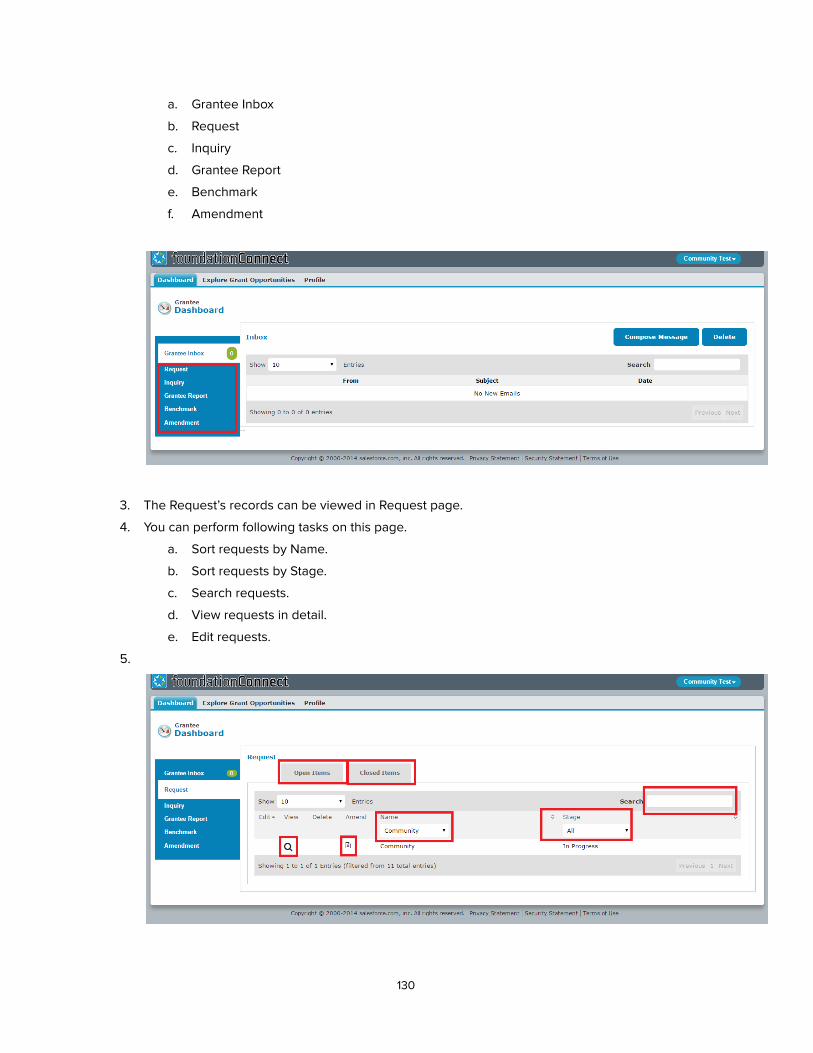
a. Grantee Inbox
b. Request
c. Inquiry
d. Grantee Report
e. Benchmark
f. Amendment
3. The Request’s records can be viewed in Request page.
4. You can perform following tasks on this page.
a. Sort requests by Name.
b. Sort requests by Stage.
c. Search requests.
d. View requests in detail.
e. Edit requests.
5.
130
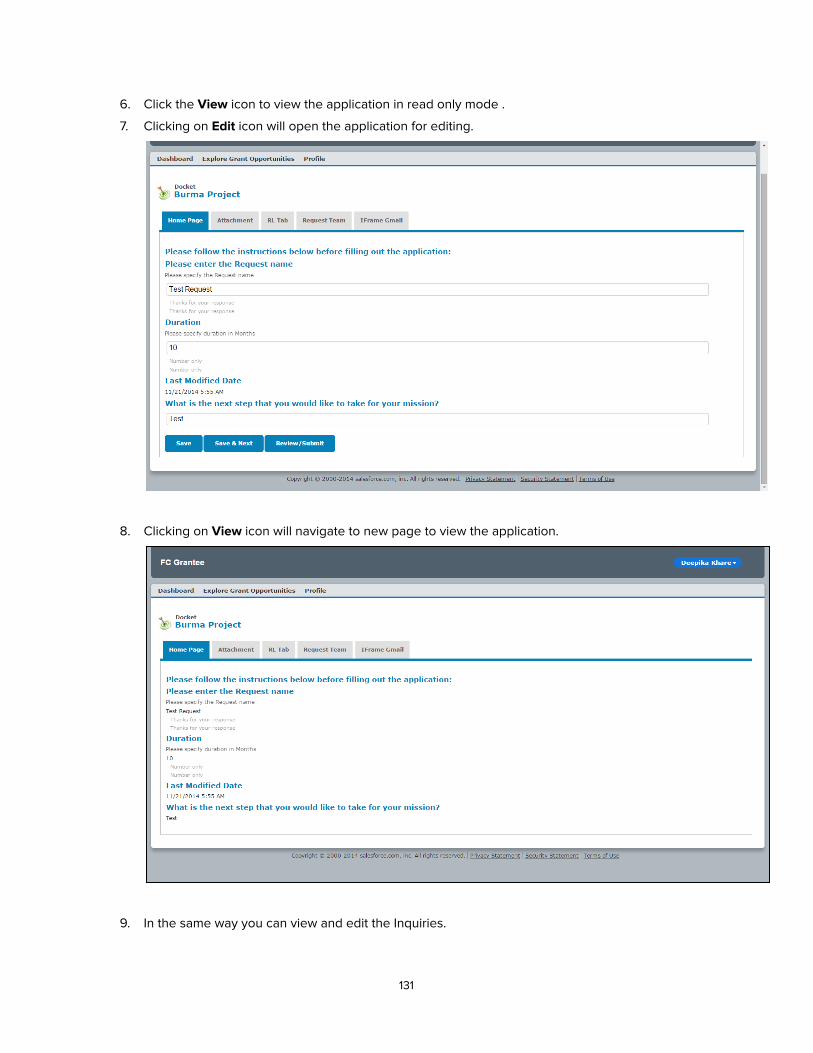
6. Click the View icon to view the application in read only mode .
7. Clicking on Edit icon will open the application for editing.
8. Clicking on View icon will navigate to new page to view the application.
9. In the same way you can view and edit the Inquiries.
131
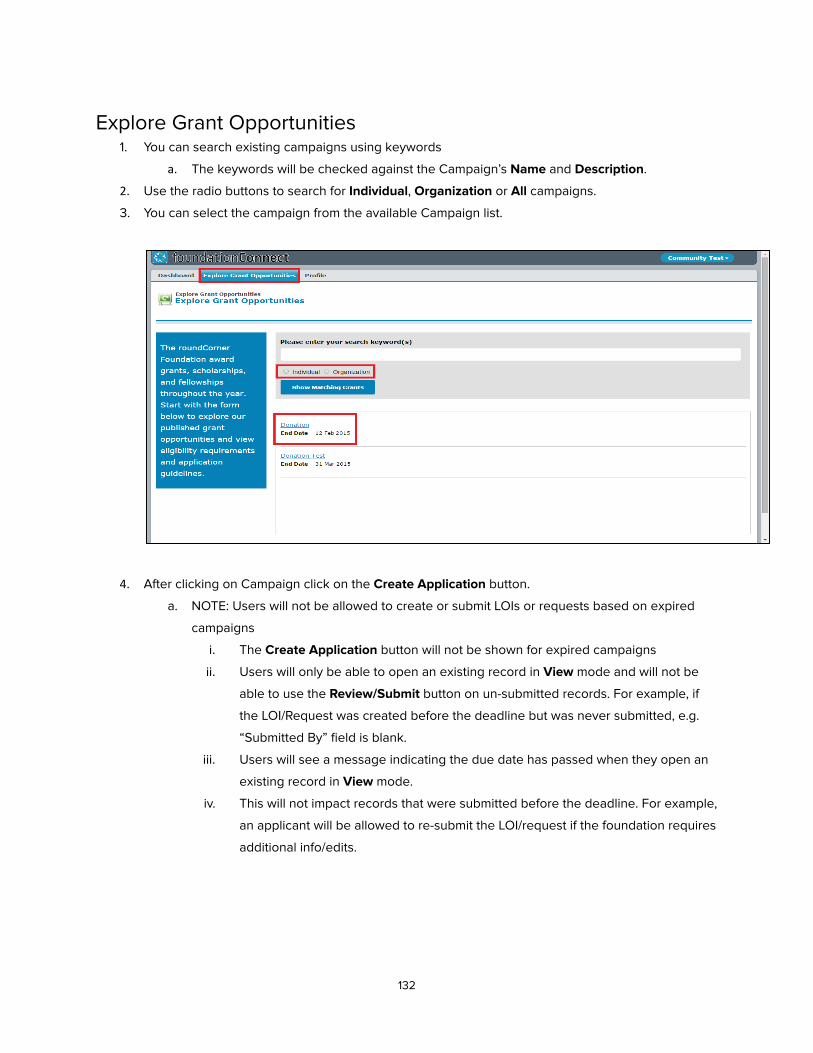
Explore Grant Opportunities 1. You can search existing campaigns using keywords
a. The keywords will be checked against the Campaign’s Name and Description .
2. Use the radio buttons to search for Individual , Organization or All campaigns.
3. You can select the campaign from the available Campaign list.
4. After clicking on Campaign click on the Create Application button.
a. NOTE: Users will not be allowed to create or submit LOIs or requests based on expired
campaigns
i. The Create Application button will not be shown for expired campaigns
ii. Users will only be able to open an existing record in View mode and will not be
able to use the Review/Submit button on un-submitted records. For example, if
the LOI/Request was created before the deadline but was never submitted, e.g.
“Submitted By” field is blank.
iii. Users will see a message indicating the due date has passed when they open an
existing record in View mode.
iv. This will not impact records that were submitted before the deadline. For example,
an applicant will be allowed to re-submit the LOI/request if the foundation requires
additional info/edits.
132
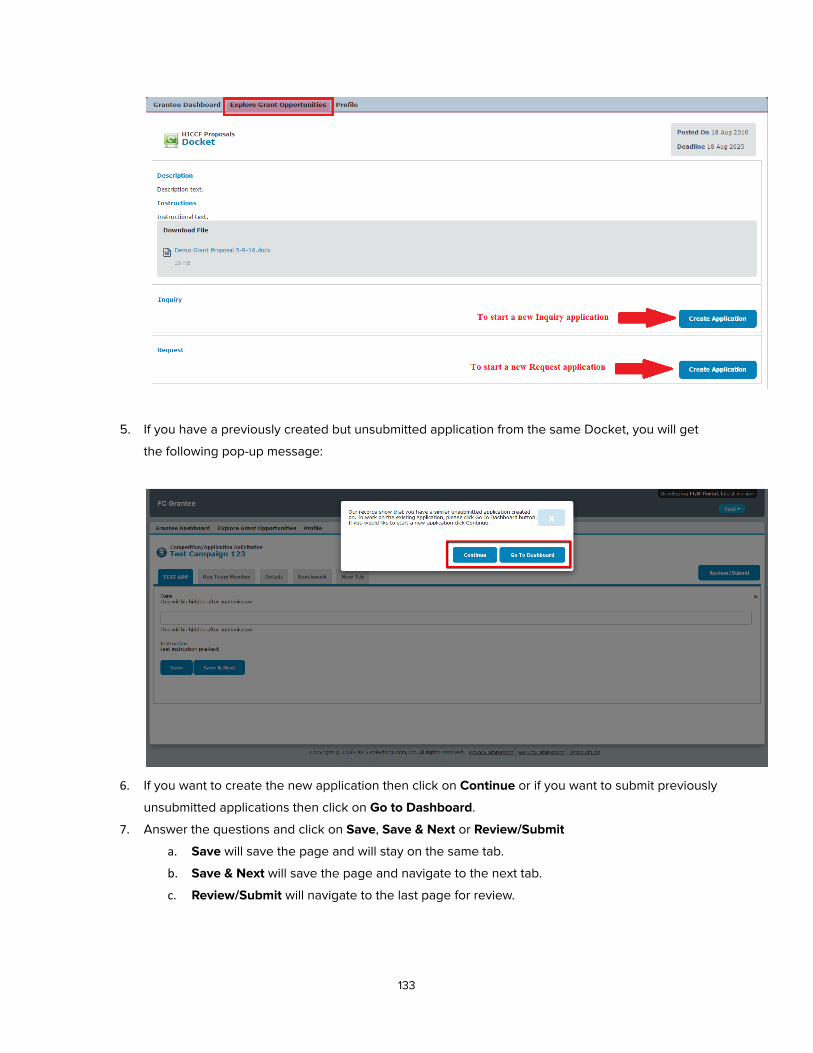
5. If you have a previously created but unsubmitted application from the same Docket, you will get
the following pop-up message:
6. If you want to create the new application then click on Continue or if you want to submit previously
unsubmitted applications then click on Go to Dashboard .
7. Answer the questions and click on Save , Save & Next or Review/Submit
a. Save will save the page and will stay on the same tab.
b. Save & Next will save the page and navigate to the next tab.
c. Review/Submit will navigate to the last page for review.
133
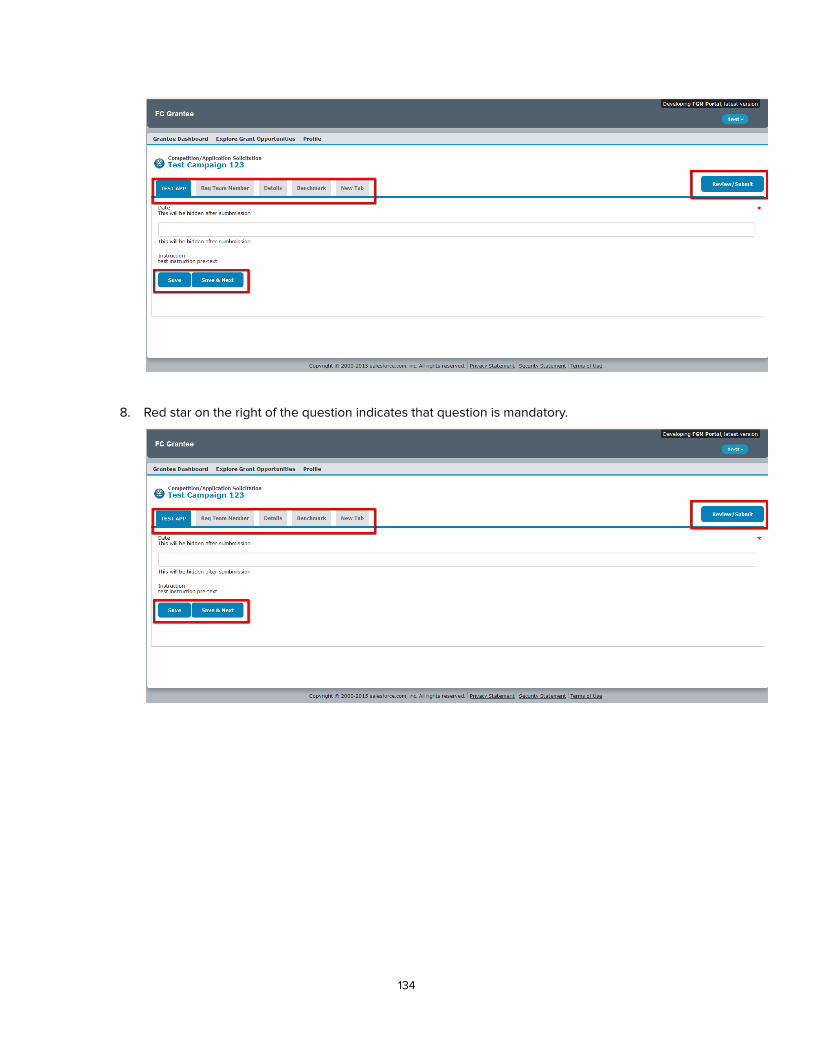
8. Red star on the right of the question indicates that question is mandatory.
134
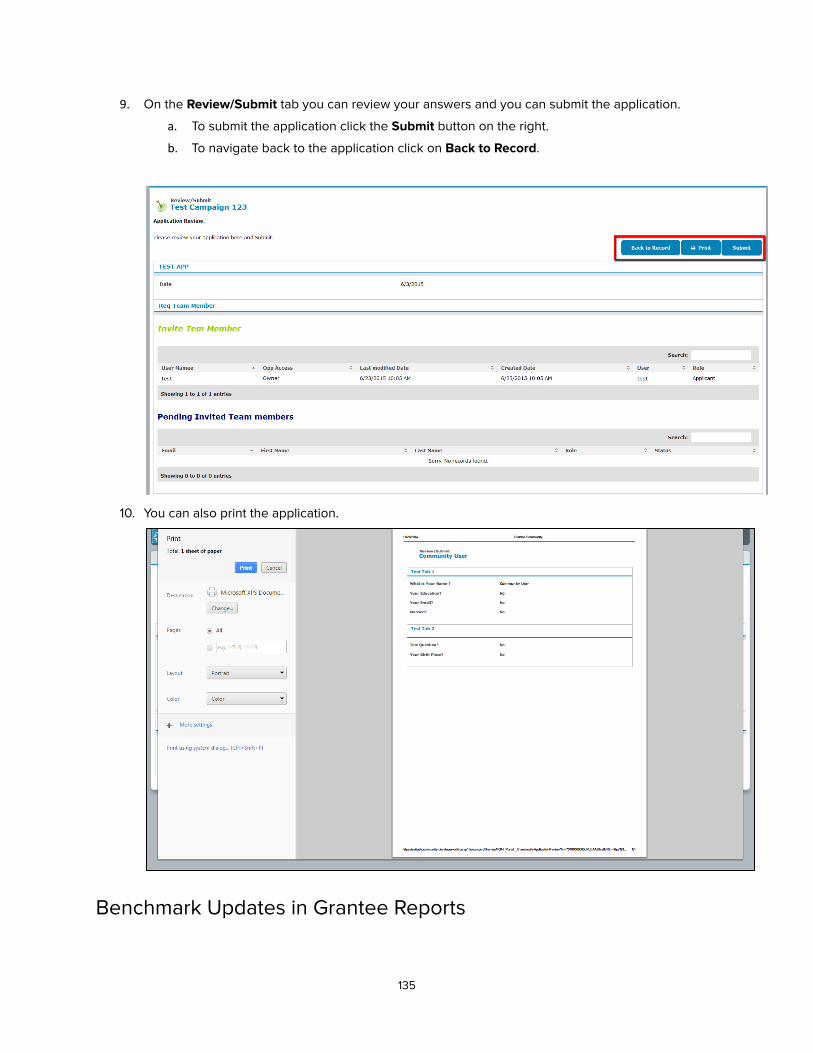
9. On the Review/Submit tab you can review your answers and you can submit the application.
a. To submit the application click the Submit button on the right.
b. To navigate back to the application click on Back to Record .
10. You can also print the application.
Benchmark Updates in Grantee Reports
135
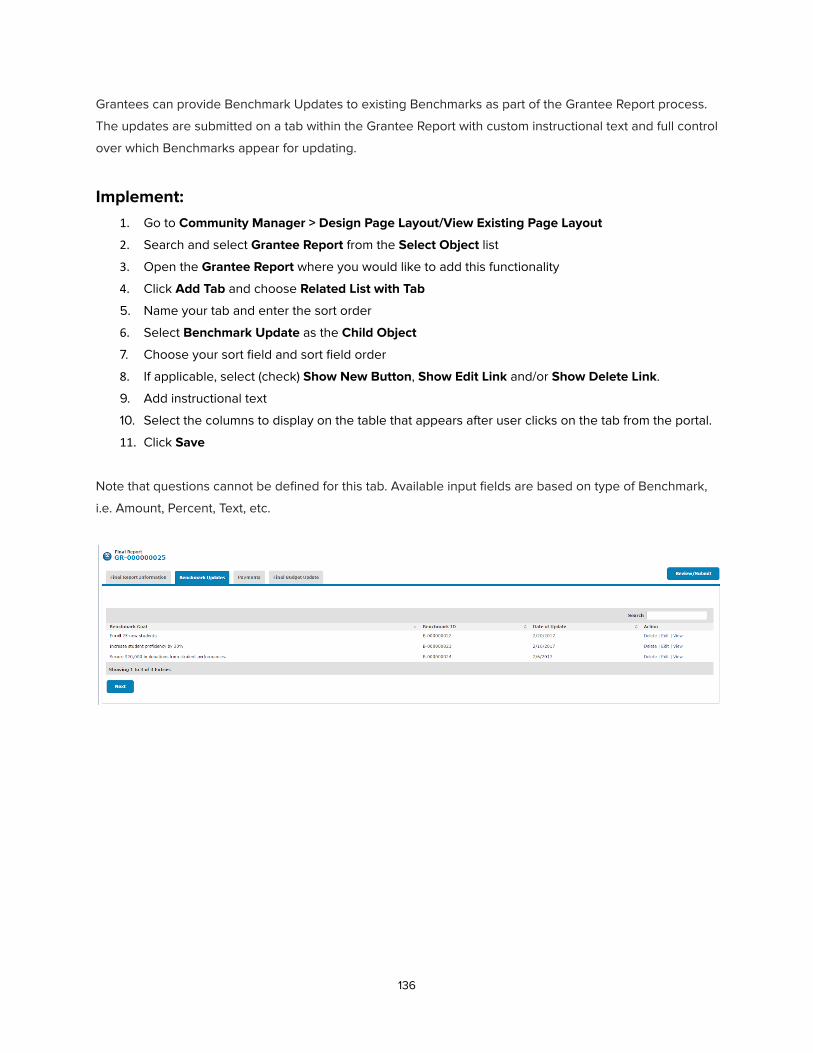
Grantees can provide Benchmark Updates to existing Benchmarks as part of the Grantee Report process.
The updates are submitted on a tab within the Grantee Report with custom instructional text and full control
over which Benchmarks appear for updating.
Implement: 1. Go to Community Manager > Design Page Layout/View Existing Page Layout
2. Search and select Grantee Report from the Select Object list
3. Open the Grantee Report where you would like to add this functionality
4. Click Add Tab and choose Related List with Tab
5. Name your tab and enter the sort order
6. Select Benchmark Update as the Child Object
7. Choose your sort field and sort field order
8. If applicable, select (check) Show New Button , Show Edit Link and/or Show Delete Link .
9. Add instructional text
10. Select the columns to display on the table that appears after user clicks on the tab from the portal.
11. Click Save
Note that questions cannot be defined for this tab. Available input fields are based on type of Benchmark,
i.e. Amount, Percent, Text, etc.
136
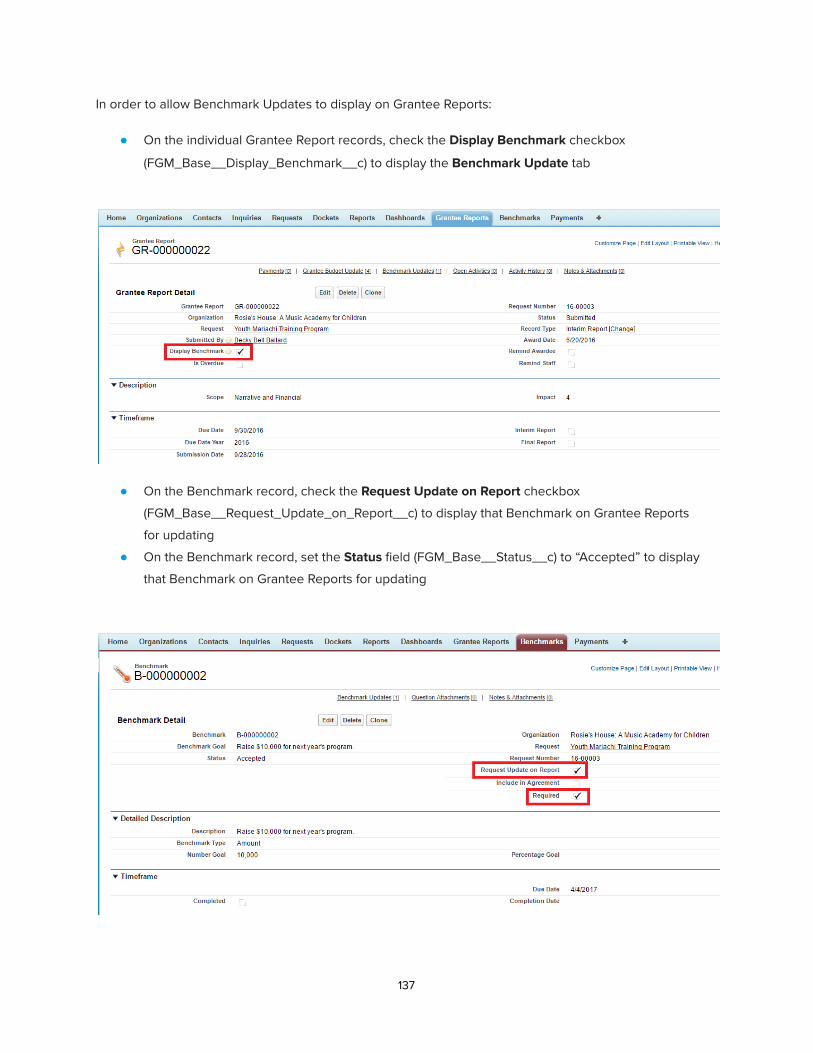
In order to allow Benchmark Updates to display on Grantee Reports:
● On the individual Grantee Report records, check the Display Benchmark checkbox
(FGM_Base__Display_Benchmark__c) to display the Benchmark Update tab
● On the Benchmark record, check the Request Update on Report checkbox
(FGM_Base__Request_Update_on_Report__c) to display that Benchmark on Grantee Reports
for updating
● On the Benchmark record, set the Status field (FGM_Base__Status__c) to “Accepted” to display
that Benchmark on Grantee Reports for updating
137
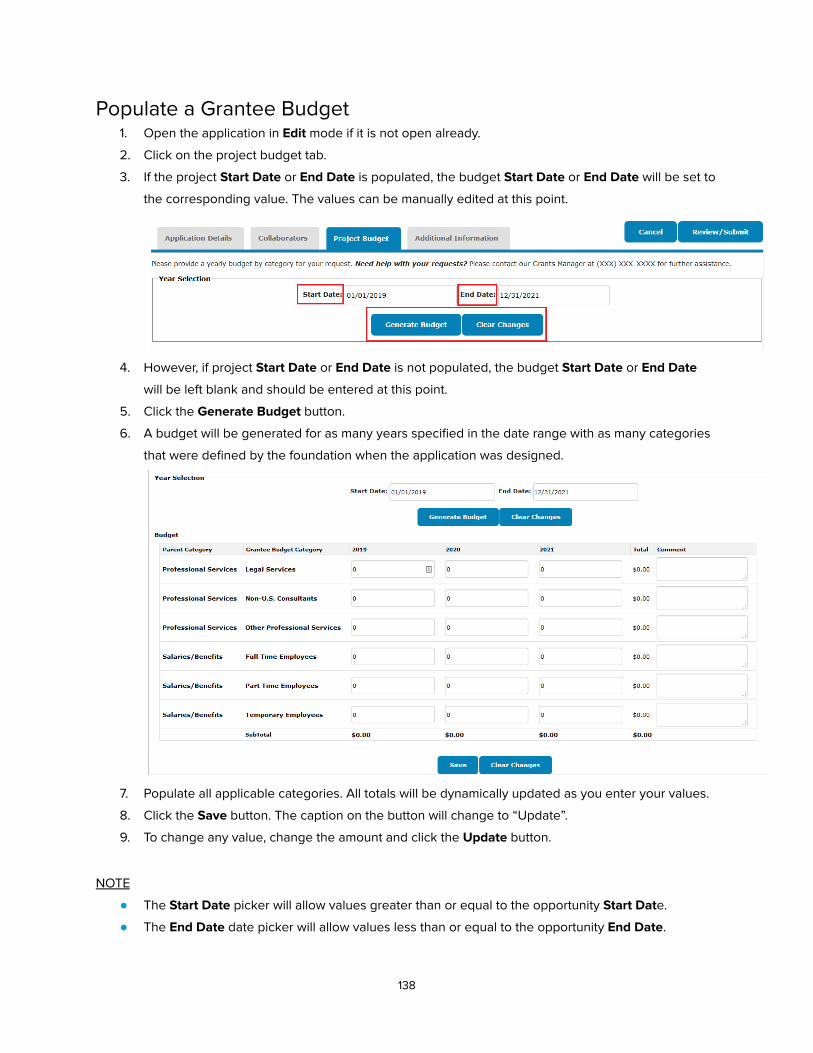
Populate a Grantee Budget 1. Open the application in Edit mode if it is not open already.
2. Click on the project budget tab.
3. If the project Start Date or End Date is populated, the budget Start Date or End Date will be set to
the corresponding value. The values can be manually edited at this point.
4. However, if project Start Date or End Date is not populated, the budget Start Date or End Date
will be left blank and should be entered at this point.
5. Click the Generate Budget button.
6. A budget will be generated for as many years specified in the date range with as many categories
that were defined by the foundation when the application was designed.
7. Populate all applicable categories. All totals will be dynamically updated as you enter your values.
8. Click the Save button. The caption on the button will change to “Update”.
9. To change any value, change the amount and click the Update button.
NOTE
● The Start Date picker will allow values greater than or equal to the opportunity Start Dat e.
● The End Date date picker will allow values less than or equal to the opportunity End Date .
138
● If there are no values in the opportunity Start Date and End Date fields then the user should be
able to pick any budget Start Date and End Date .
Send an Email Via the Portal Portal users can send email messages in regards to specific requests using Compose Message .
1. Click the Compose Message button.
2. Populate the following fields
a. RFP/Competition : Select the Campaign of the request
b. Request : Select the specific request. This will only display requests to which the user has
access.
c. CC : This will automatically populate with the request's collaborators. This cannot be
edited.
d. Subject : Enter the email’s subject
e. Body : Enter the message.
3. Click the SEND button.
4. The email will be sent to the Email Contact defined for the RFP/Competition ; the request
collaborators and to the user sending the message. It will also be attached to the request in the
Activity History related list.
139


