A B F C D E Customer Hotline: 1-866-523-2363 (toll free) MON- FRI, 8am to 5pm (Central) E-mail: [email protected]MON- FRI, 8am to 5pm (Central) Online: www .rapidreel.com 24/7/365 DO NOT contact or return this item to the retailer. Seek factory assistance using the information below. Patent Pending Contents Questions? Problems? Missing Parts? 2375 2099 2100 See Step 6 2594 See Step 5 2587 2538 2537 See Step 13 2367 2589 Inlet Hose Back Flange* Front Flange* Arm & Axle Assembly Brass Swivel Base Assembly Cam-Lever Brake Short Hex Key Wrench Long Hex Key Wrench Hose Clamp Assembly Kink-Free Spring Crank Handle 1 1 1 1 1 1 1 1 1 1 1 1 A B C D E F G H I J K L Ref. Part # Qty. Description * NOTE: Both back and front flanges, have a pre- installed bushing in the center hole. In case one is needed, the replacement part number for that bushing is # 2509. Parts Package Model 1042-GH Serial # ______________________ (Please locate the serial # on your hose reel and write it in the space above) Free-Standing Garden Hose Reel Assembly & Installation Instructions Version 0409 H G J L I K Model 1042-GH
Seek factory assistance using the information below.
Patent Pending
Contents
Questions? Problems? Missing Parts?
2375
2099
2100
See Step 6
2594
See Step 5
2587
2538
2537
See Step 13
2367
2589
Inlet Hose
Back Flange*
Front Flange*
Arm & Axle Assembly
Brass Swivel
Base Assembly
Cam-Lever Brake
Short Hex Key Wrench
Long Hex Key Wrench
Hose Clamp Assembly
Kink-Free Spring
Crank Handle
1
1
1
1
1
1
1
1
1
1
1
1
A
B
C
D
E
F
G
H
I
J
K
L
Ref. Part # Qty. Description
* NOTE: Both back and front flanges, have a pre-
installed bushing in the center hole. In case one is
needed, the replacement part number for that
bushing is # 2509.
PartsPackage
Model 1042-GH
Serial # ______________________(Please locate the serial # on your hose reeland write it in the space above)
Free-Standing Garden
Hose Reel
Assembly & Installation
Instructions
Version 0409
H
GJ
L
I
K
Model 1042-GH
Reel Assembly
Page 2
Back Flange (B)
Long Hex Key
Wrench (I)
Front Flange (C)
1/4-20 x 1/2”
Button Head Screw
(Part # 2524)
Crank
Handle
Assembly
(Part # 2589)
Step 3Using the enclosed
long hex key wrench,
remove the three pre-
installed screws from
the Crank Handle.
Step 4Using the long hex key
wrench and the three
screws you just removed
from the handle, attach the
crank handle to the front
flange. Tighten firmly.
Step 2Using the long hex key wrench
and the three screws & nuts
you just removed, attach the
Front Flange to the back
flange by aligning the three
holes and tightening firmly.
Step 1Using the enclosed Long Hex
Key Wrench, remove the
three pre-installed screws &
nuts from the Back Flange.
1/4-20 x 5/8” Button Head
Screw (Part # 2518)
1/4” Serrated Flange
Lock Nut (Part # 2330)
Long Hex Key
Wrench (I)
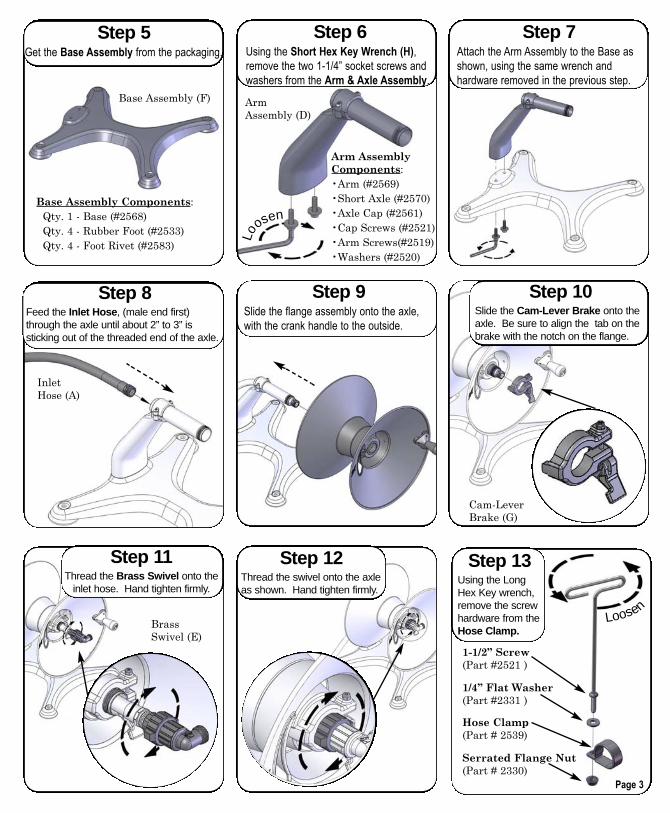
Step 5Get the Base Assembly from the packaging.
Base Assembly Components:
Qty. 1 - Base (#2568)
Qty. 4 - Rubber Foot (#2533)
Qty. 4 - Foot Rivet (#2583)
Base Assembly (F)
Step 6Using the Short Hex Key Wrench (H),
remove the two 1-1/4” socket screws and
washers from the Arm & Axle Assembly.
Step 7Attach the Arm Assembly to the Base as
shown, using the same wrench and
hardware removed in the previous step.
Step 8Feed the Inlet Hose , (male end first)through the axle until about 2” to 3” issticking out of the threaded end of the axle.
Step 9Slide the flange assembly onto the axle,
with the crank handle to the outside.
Step 10Slide the Cam-Lever Brake onto theaxle. Be sure to align the tab on thebrake with the notch on the flange.
Step 11Thread the Brass Swivel onto the
inlet hose. Hand tighten firmly.
Step 12Thread the swivel onto the axleas shown. Hand tighten firmly.
Page 3
Cam-Lever
Brake (G)
Inlet
Hose (A)
Brass
Swivel (E)
1-1/2” Screw
(Part #2521 )
1/4” Flat Washer
(Part #2331 )
Hose Clamp
(Part # 2539)
Serrated Flange Nut
(Part # 2330)
Step 13Using the LongHex Key wrench,remove the screwhardware from theHose Clamp.
Arm Assembly
Components:
•Arm (#2569)
•Short Axle (#2570)
•Axle Cap (#2561)
•Cap Screws (#2521)
•Arm Screws(#2519)
•Washers (#2520)
Loosen
Lo
osen
Arm
Assembly (D)
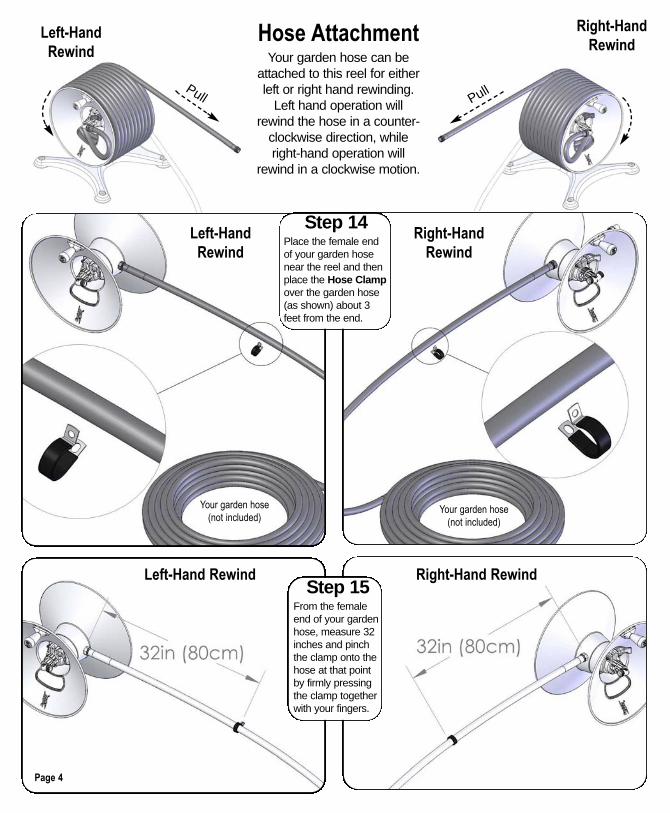
Hose AttachmentYour garden hose can be
attached to this reel for eitherleft or right hand rewinding.
Left hand operation willrewind the hose in a counter-
clockwise direction, whileright-hand operation will
rewind in a clockwise motion.
Step 15From the femaleend of your gardenhose, measure 32inches and pinchthe clamp onto thehose at that pointby firmly pressingthe clamp togetherwith your fingers.
Left-Hand Rewind Right-Hand Rewind
Left-Hand
Rewind
Step 14Place the female endof your garden hosenear the reel and thenplace the Hose Clampover the garden hose(as shown) about 3feet from the end.
Right-Hand
Rewind
Your garden hose
(not included)
Your garden hose
(not included)
Page 4
Left-Hand
Rewind
Right-Hand
Rewind
PullPull
Left-Hand Rewind
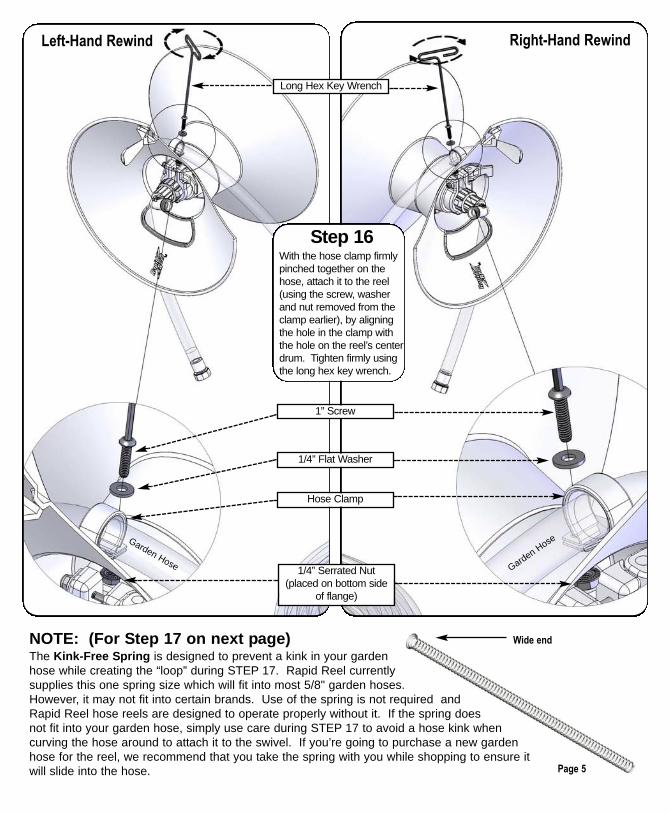
Step 16With the hose clamp firmlypinched together on thehose, attach it to the reel(using the screw, washerand nut removed from theclamp earlier), by aligningthe hole in the clamp withthe hole on the reel’s centerdrum. Tighten firmly usingthe long hex key wrench.
Right-Hand Rewind
1” Screw
1/4” Flat Washer
Hose Clamp
1/4” Serrated Nut(placed on bottom side
of flange)
Garden HoseGarden Hose
Long Hex Key Wrench
NOTE: (For S tep 17 on next p age)The Kink-Free S pring is designed to prevent a kink in your gardenhose while creating the “loop” during STEP 17. Rapid Reel currentlysupplies this one spring size which will fit into most 5/8" garden hoses.However, it may not fit into certain brands. Use of the spring is not required andRapid Reel hose reels are designed to operate properly without it. If the spring doesnot fit into your garden hose, simply use care during STEP 17 to avoid a hose kink whencurving the hose around to attach it to the swivel. If you’re going to purchase a new gardenhose for the reel, we recommend that you take the spring with you while shopping to ensure itwill slide into the hose. Page 5
Wide end
Page 6
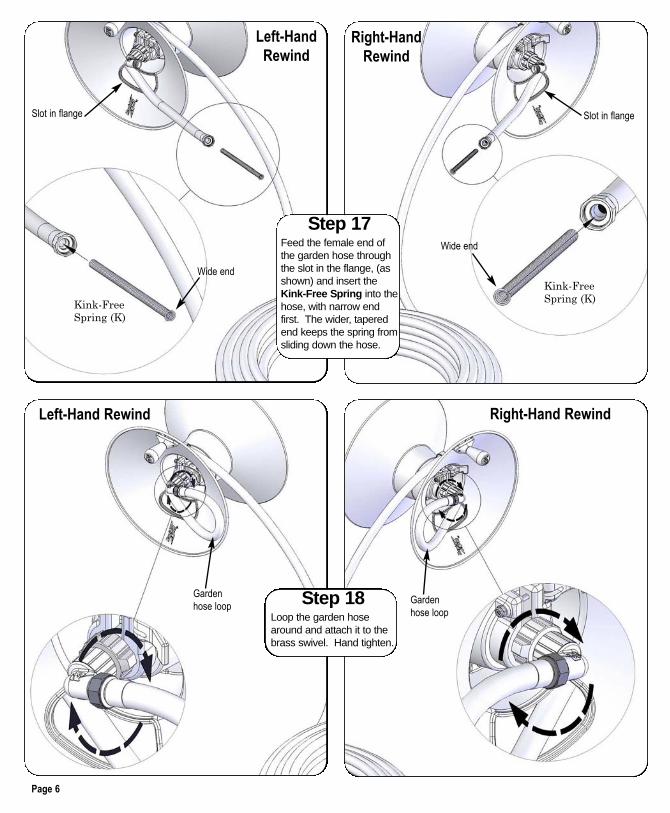
Step 17Feed the female end ofthe garden hose throughthe slot in the flange, (asshown) and insert theKink-Free S pring into thehose, with narrow endfirst. The wider, taperedend keeps the spring fromsliding down the hose.
Left-Hand
RewindRight-Hand
Rewind
Slot in flange Slot in flange
Kink-Free
Spring (K)
Wide end
Wide end
Step 18Loop the garden hosearound and attach it to thebrass swivel. Hand tighten.
Right-Hand Rewind
Garden
hose loopGarden
hose loop
Kink-Free
Spring (K)
Left-Hand Rewind
How to Use the Cam-Lever Brake
Page 7
When you stop pulling out the hose, our innovative Cam-Lever Brake is designed to prevent the reel from free-spinning and unspooling more hose than what you wanted. The brake can be turned ON and OFF with the simpleflick of a finger. Turn the brake ON when pulling the hose out, then flip it to the OFF position for easy rewinding.NOTE: See back p age for instructions on how to adjust the amount of tension, or drag.
Right-Hand
OperationLeft-Hand
Operation
Brake ONTurn the cam-lever braketo the ON position toapply tension, (or drag)to the reel as you pull thehose out.
Right-Hand
OperationLeft-Hand
Operation
Brake OFFTurn the cam-lever braketo the OFF position torelease the tension, (ordrag), as you reel thehose back in.
Pulling theHose Out
Reeling theHose In
10 Year WarrantyCoverage Rapid-Reel® and Eley Corporation, (collectively here after referred to as the "warrantor"), guarantees this hose reel, components and parts, unless otherwise
specified, to be free from defect, malfunction or failure in material, or workmanship, under normal use and service, for a period of 10 years (120 months).
Warranty period starts from original invoice date.
HoseHose supplied by warrantor carries a warranty of 1 year (12 months) from original invoice date of purchase. Hose is selected from reliable commercial sources
and is recommended for application on the basis of data supplied by the manufacturer.
ExemptionsWarranty does not cover leaking due to damage caused by the use of acid, harsh chemicals or mineral deposits. Warranty does not apply when products are
used in excess of their rated capacities and design functions or under abnormal conditions. The effects of corrosion, and normal wear and tear are specifically
excluded from this warranty. This warranty does not cover damage which occurs in shipment or failures which are caused by products not supplied by the
warrantor or failures which result from accidents, mishandling, faulty installation, freezing, misuse or misapplication, abuse or neglect. Warranty is void if the
product or any part thereof has been tampered with, altered or repaired by anyone other than warrantor or damage that is attributable to acts of God. The
warrantor covers the replacement or credit of defective parts only and does not allow for field labor charges for removal, installation, analysis or travel expenses.
In no event shall the warrantor or its suppliers be liable for any damages, whatsoever, arising out of the use of or inability to use this product. (Some states do
not allow the exclusion of limitation of incidental or consequential damages, so the above limitation or exclusion may not apply to you). The warrantor and its
suppliers disclaim all other expressed or implied warranties. Some states do not allow limitations on how long an implied warranty lasts, so the above limitation
may not apply to you. This warranty gives you specific legal rights, and you may also have other rights which vary from state to state.
REMEMBER TO REGISTER YOU PRODUCTTHANK YOU for your purchase! Please take a few moments to secure
your 10 YEAR WARRANTY by registering online. Our brief online form
takes just seconds and can be found at www.rapidreel.com under the
CONSUMER SUPPORT section of the website.
The amount of tension, or drag, of thecam-lever brake can be adjusted with a3/8” wrench . Simply loosen the nut(counter-clockwise) to decrease theamount of drag. Tighten the nut,(clockwise) to increase the amount ofdrag. We strongly recommend that youincrease or decrease the tension by only1/4 turn of the wrench before testing theamount of drag. Keep adjusting at 1/4turn intervals until desired level of tensionis acquired.
3/8” W rench
Located in America’s heartland, ELEY Corporation is a family-owned company that has been producing premium
quality hose reels and related accessories under the Rapid Reel® brand name for both commercial and consumer
users since 1990. Three brothers manage the organization, personally ensuring a Midwestern-style commitment
to product quality and customer service. With deep roots in Nebraska’s farm and ranch country, we understand
the value of being able to depend on high quality tools, equipment and service. We believe our customers
should expect that same level of satisfaction from our products and service. Building upon these principles has
helped Rapid Reel grow into one of the most recognized and respected hose reel brands in North America.