51


FREENAS MINI STORAGE APPLIANCE
IT SAVES YOUR LIFE.
How important is your data?
Years of family photos. Your entire music and movie collection. Office documents you’ve put hours of work into. Backups for every computer you own. We ask again, how important is your data?
now imaGinE LosinG it aLL
Losing one bit - that’s all it takes. One single bit, and your file is gone.
The worst part? You won’t know until you absolutely need that file again.
tHE soLution
The FreeNAS Mini has emerged as the clear choice to save your digital life. No other NAS in its class offers ECC (error correcting code) memory and ZFS bitrot protection to ensure data always reaches disk without corruption and never degrades over time.
No other NAS combines the inherent data integrityand security of the ZFS filesystem with fast on-diskencryption. No other NAS provides comparable power and flexibility. The FreeNAS Mini is, hands-down, the best home and small office storage appliance you can buy on the market. When it comes to saving your important data, there simply is no other solution.
Example of one-bit corruption
the mini boasts these state-of-the-art features:
8-core 2.4GHz Intel® Atom™ processor •Up to 16TB of storage capacity•16GB of ECC memory (with the option to upgrade •to 32GB)2 x 1 Gigabit network controllers•Remote management port (IPMI)•Tool-less design; hot swappable drive trays•FreeNAS installed and configured•
with over six million downloads, Freenas is undisputedly the most popular storage operating system in the world.
Sure, you could build your own FreeNAS system: research every hardware option, order all the parts, wait for everything to ship and arrive, vent at customer service because it hasn’t, and finally build it yourself while hoping everything fits - only to install the software and discover that the system you spent days agonizing over isn’t even compatible. Or...
makE it Easy on yoursELF
As the sponsors and lead developers of the FreeNAS project, iXsystems has combined over 20 years of hardware experience with our FreeNAS expertise to bring you FreeNAS Certified Storage. We make it easy to enjoy all the benefits of FreeNAS without the headache of building, setting up, configuring, and supporting it yourself. As one of the leaders in the storage industry, you know that you’re getting the best combination of hardware designed for optimal performance with FreeNAS.
Every Freenas server we ship is...
Custom built and optimized for your use case »Installed, configured, tested, and guaranteed to work out »of the box Supported by the Silicon Valley team that designed and »built it Backed by a 3 years parts and labor limited warranty »
As one of the leaders in the storage industry, you know that you’re getting the best combination of hardware designed for optimal performance with FreeNAS. Contact us today for a FREE Risk Elimination Consultation with one of our FreeNAS experts. Remember, every purchase directly supports the FreeNAS project so we can continue adding features and improvements to the software for years to come. And really - why would you buy a FreeNAS server from anyone else?
Freenas 1u Intel® Xeon® Processor E3-1200v2 Family •Up to 16TB of storage capacity•16GB ECC memory (upgradable to 32GB)•2 x 10/100/1000 Gigabit Ethernet controllers•Redundant power supply•
Freenas 2u 2x Intel® Xeon® Processors E5-2600v2 Family •Up to 48TB of storage capacity•32GB ECC memory (upgradable to 128GB) •4 x 1GbE Network interface (Onboard) - •(Upgradable to 2 x 10 Gigabit Interface)Redundant Power Supply•
Intel, the Intel logo, the Intel Inside logo and Xeon are trademarks of Intel Corporation in the U.S. and/or other countries.Intel, the Intel logo, Intel Atom and Intel Atom Inside are trademarks of Intel Corporation in the U.S. and/or other countries.
FREENAS CERTIFIED STORAGE
http://www.iXsystems.com/mini http://www.iXsystems.com/storage/freenas-certified-storage/

07/20154
EDITORS’ WORD
Editor in Chief: Ewa Dudzic
Contributing: Michael Shirk, Andrey Vedikhin, Petr Topiarz,
Solène Rapenne, Anton Borisov, Jeroen van Nieuwenhuizen, José B. Alós, Luke Marsden, Salih Khan,
Arkadiusz Majewski, BEng, Toki Winter, Wesley Mouedine Assaby, Rob Somerville
Top Betatesters & Proofreaders:Annie Zhang, Denise Ebery, Eric Geissinger, Luca
Ferrari, Imad Soltani, Olaoluwa Omokanwaye, Radjis Mahangoe, Mani Kanth, Ben Milman, Mark VonFange
Special Thanks:Annie ZhangDenise Ebery
Art Director: Ireneusz Pogroszewski
DTP: Ireneusz Pogroszewski
Senior Consultant/Publisher: Paweł Marciniak
CEO: Ewa Dudzic
Publisher:Hakin9 Media SK
02-676 Warsaw, PolandPostepu 17D
Polandworldwide [email protected]
www.bsdmag.org
Hakin9 Media SK is looking for partners from all over the world. If you are interested in cooperation with us, please
contact us via e-mail: [email protected].
All trademarks presented in the magazine were used only for informative purposes. All rights to trademarks
presented in the magazine are reserved by the companies which own them.
Dear Readers,
The new BSD is released! We would like to present to you the new issue of BSD maga-zine. Inside, you will find articles, stories, inter-
views and much more. Moreover our experts share their knowledge and offer technical tips and tricks for Python programmers. The authors present their own point of view, share opinions and experiences about Transport Layer Switching. In the other articles, you will find all the information you need on how to use the popular tool – WebHTTrack. You will also have opportunity to read more about NetBSD and its ports system. You will learn about Pkgsrc which is the framework that is useful to build third party packages for this system. You will see how to create a package and hopefully submit it. This issue covers the inter-view with Shawn Webb who tells you more about the HardenedBSD Project.
We tried to cover as much as we could in this issue so everyone can benefit from this edition, and I would like to believe that we succeeded. Inside you will find great authors, like David Carlier, Rui Silva, Leonardo Neves Bernardo, Jeremiah Brott, Mervyn Heng, Bob Monroe, Shawn Webb, Luca Ferrari who I also send my thanks to for their dedication and hard work by providing the great articles.
Enjoy Reading,Ewa & BSD Team


07/20156
NetBSDNetBSD and pkgsrc-wip 8David CarlierIn this article, David will tell you more about NetBSD and its ports system. Pkgsrc is the framework to build third party packages for this system. You will see how to create a package and hopefully submit it. Hence, the pkgsrc should already be in your system. Otherwise, a full guide is available in David’s article.
ProgrammingPython Programming. Practical Project – Weather Forecast! 12Rui SilvaIn this article, Rui is going to implement a Python module to read data from an API, process the information and display it, using Python plotting library, in a friendly way.
SecuritySecure Log Server With Rsyslog 18Leonardo Neves BernardoLeonardo will discuss how to create a secure syslog server using rsyslog and how to protect syslog messages with Transport Layer Switching (TLS). Some advanced rsyslog configurations will be covered.
Raspberry Pi Hacking 26Jeremiah BrottThe Raspberry Pi is a credit-card sized computer that plugs into your TV and a keyboard. It’s a capable little PC which can be used for many of the things that your desktop PC does, like spreadsheets, word-processing and games. It also plays high-
CONTENTS
definition video. We want to see it being used by kids all over the world to learn programming. If you love your Pi you’ll definitely love to hack it.
ReviewsWebHTTrack 42Mervyn HengThis tool is simple to install and use yet incredibly useful in supporting Application Security testing to find vulnerabilities and also facilitating offline analysis of malicious code, as well as malware embedded in websites. It is supported on multiple platforms so try it today.
Banana Pi Pro 44Bob MonroeWhat happens when you take the popular Raspberry Pi (RPi) microcomputer and hand it over to a Chinese company? You get an even more powerful and feature packed microcomputer with a similar name, the Banana Pi Pro. I guess “Blueberry” must have been taken already. The Banana Pi Pro is slightly larger than the RPi but it sure has more items added on. This board is a super-sized microcomputer if you look at the specs alone.
Interview with ... Shawn Webb Tells You All About HardenedBSD Project 46Luca Ferrari & BSD Team

September 9-10-11, 2015Rio, Las Vegas
www.InterDrone.com
A BZ Media Event
Meet with 80+ exhibitors!Demos! Panels! Keynotes!
The Zipline!
For Builders More than 35 classes, tutorials and panels for hardware and embedded engineers, designers andsoftware developers building commercial drones and thesoftware that controls them.
For Flyers and BuyersMore than 35 tutorials andclasses on drone operations, flying tips and tricks, range, navigation, payloads, stability,avoiding crashes, power, environmental considerations,which drone is for you, and more!
For Business Owners, Entrepreneurs & Dealers
Classes will focus on running a dronebusiness, the latest FAA requirementsand restrictions, supporting and educating drone buyers, marketingdrone services, and where the nexthot opportunities are likely to be!
InterDrone is Three Awesome Conferences:

*BSD CORNER
07/20158
NETBSD
It is recommended to install pkglint which will serve to produce a better package. Indeed, as its suffix sug-gests (lint, the historical C code analyser), it will check
the whole package structure, the Makefile, the checksum and so on.
Secondly, you need to choose a main category for your li-brary or application, even if your future package can possi-bly recover several. For the article, we will choose security/yara, the popular malware searcher library, as an example.
Makefile
# $NetBSD: Makefile,v 1.2 2015/06/06 08:57:18 pettai Exp $
=> This comment is mandatory but when you create for the first time the package it’s simply
# $NetBSD$
PKGNAME= yara-${YAVER} => The name of the pack-age and its version
CATEGORIES= security => Its categories, can have several
COMMENT= Pattern matching swiss knife for malware
researchers
=> Describes briefly the package, more explanations in DESCR file
WRKSRC= ${WRKDIR}/yara-${YAVER}
=> WRKDIR represents where the source port will be extracted (generally it is work/<package name>-<version>)
USE_TOOLS+= pkg-config automake autoreconf
=> Necessary tools to build the package. Could be cmake, perl. They will be installed if not present
USE _ LIBTOOL= yes
GNU_CONFIGURE= yes => Uses GNU version of con-figure scriptPKGCONFIG_OVERRIDE+= libyara/yara.pc.in
pre-configure:
cd ${WRKSRC} && autoreconf -fiv => We can override many sub tasks, related to different steps, be-fore, after the archive extraction, configure, build, instal-lation and so on
.include „../../security/yara/Makefile.common” => Makefile.common is used by at least two packages
NetBSD and pkgsrc-wipDAVID CARLIER
For this mid-summer, we will approach a lighter subject, NetBSD and its ports system. Pkgsrc is the framework to build third party packages for this system. We will see how to create a package and hopefully submit it. Hence, the pkgsrc should already be installed on your system.

www.bsdmag.org 9
(in our case py-yara) and it regroups common informa-tion, could be the dependencies, the version ...
.include „../../mk/bsd.pkg.mk” => Mandatory file to in-clude, it contains the main necessary variables
Now, let’s have a look at the Makefile.common
# $NetBSD: Makefile.common,v 1.3 2015/06/14 21:28:44 pettai Exp $
#
# used by security/yara/Makefile
# used by security/py-yara/Makefile
DISTNAME= v3.3.0 => In case the archive does not have the same name as the package when it is down-loaded from the MASTER_SITES set below, this vari-able needs to be set
YAVER= ${DISTNAME:S/v//} => Simply defining the version, in this case we just subtract the v prefix
MASTER _ SITES= ${MASTER _ SITE _ GITHUB:=plusvic/yara/
archive/} => Some predefined popular URLs like github here, or Sourceforge through predefined variables, hence we just need to give the rest
DIST _ SUBDIR= yara
MAINTAINER= [email protected]
HOMEPAGE= https://plusvic.github.io/yara/
LICENSE= apache-2.0 => Likewise, it exists with some predefined licenses, 2 clause BSD, different flavors of GPL ... or we can define a custom one, a simple text file to place inside the licenses subfolder then the user will need to add in its ACCEPTABLE_LICENSES environ-ment variable, hence accepting explicitly this license in order to build the package
DESCR and PLISTWe talked earlier about the DESCR file, it is simply a text file which describes more completely the package in ques-tion like below.
YARA is a tool aimed at (but not limited to) helping mal-ware researchers to identify and classify malware sam-ples. With YARA you can create descriptions of malware families (or whatever you want to describe) based on textual or binary patterns.
We also need to know the list of files to be (un)installed relative to the variable PREFIX (usually /usr/pkg). It is the role of the PLIST file.
@comment $NetBSD: PLIST,v 1.1 2015/06/06 08:18:17 pettai
Exp $
bin/yara
bin/yarac
include/yara.h
include/yara/ahocorasick.h
include/yara/arena.h
include/yara/atoms.h
include/yara/compiler.h
include/yara/error.h
include/yara/exec.h
include/yara/filemap.h
include/yara/hash.h
include/yara/libyara.h
include/yara/limits.h
include/yara/modules.h
include/yara/object.h
include/yara/re.h
include/yara/rules.h
include/yara/scan.h
include/yara/sizedstr.h
include/yara/strutils.h
include/yara/types.h
include/yara/utils.h
lib/libyara.la
lib/pkgconfig/yara.pc
man/man1/yara.1
man/man1/yarac.1
PatchesSometimes, the software in question needs to be patched in order to work properly. The patches subfolder should contain the necessary diff files, by convention named patch-<path to the file, dashes replaces by underscores>. In our case, we have patch-libyara_proc.c which just needs to add NetBSD support ... The patchset is created via make patches ...
$NetBSD: patch-libyara_proc.c,v 1.1 2015/06/06 08:18:17
pettai Exp $
Add NetBSD support
--- libyara/proc.c.orig 2015-06-06 06:50:32.000000000
+0000
+++ libyara/proc.c
@@ -153,7 +153,7 @@ int yr_process_get_memory(
#include <yara/mem.h>
#if defined(__FreeBSD__) || defined(__FreeBSD_kernel__) || \
- defined(__OpenBSD__) || defined(__MACH__)

*BSD CORNER
07/201510
NETBSD
+ defined(__OpenBSD__) || defined(__MACH__) || defined(__
NetBSD__)
#define PTRACE_ATTACH PT_ATTACH
#define PTRACE_DETACH PT_DETACH
#endif
buildlink3.mkEventually, if it’s a library we can create the buildlink3.mk file, if another package needs yara library as a dependen-cy, this package just need to include this file
# $NetBSD: buildlink3.mk,v 1.2 2015/06/06 08:57:18 pettai
Exp $
BUILDLINK_TREE+= yara
.if !defined(YARA_BUILDLINK3_MK)
YARA_BUILDLINK3_MK:=
BUILDLINK_API_DEPENDS.yara+= yara>=3.3.0
BUILDLINK_PKGSRCDIR.yara?= ../../security/yara
.endif # YARA_BUILDLINK3_MK
BUILDLINK_TREE+= -yara
distinfoOnce we have all the pieces needed, we can finally create our distinfo file which stores the checksums of the DIST-FILES and eventually the patches. It is created, ideally, via make makesum.
$NetBSD: distinfo,v 1.2 2015/06/14 21:28:44 pettai Exp $
SHA1 (yara/v3.3.0.tar.gz) =
6f72d80f21336c098f9013212d496d3920d9ef18
RMD160 (yara/v3.3.0.tar.gz) =
330de9de9294953a3a42032ccc5ae849f065ab5e
Size (yara/v3.3.0.tar.gz) = 7634474 bytes
SHA1 (patch-libyara_proc.c) =
b860701d604276c8ccd7596f63aa0d02d01a39bc
Checking the packagepkglint will display every part of the package which is not correct, the FATAL messages must be taken into account, some WARNING messages, too.
> pkglint
looks fine. => Ideal, but a correct package can have few harmless warnings too...
SubmitThere is a project which aims to get more people involved in investing their time to create packages for pkgsrc. It is called pkgsrc-wip and can be found here: http://pkgsrc-wip.sourceforge.net. I hope this article gave you the taste to create yours.
ABOUT THE AUTHOR
David Carlier has been working as a software developer since 2001. He used FreeBSD for more than 10 years and starting from this year, he became involved with the HardenedBSD project and performed serious developments on FreeBSD. He worked for a mobile product company that provides C++ APIs for two years in Ireland. From this, he became completely inspired to develop on FreeBSD.


PROGRAMMING
07/201512
As we should do in any development, we have to de-fine exactly what our module does:
• Read data from an API (http://openweathermap.org)• Save the raw data in a file for safekeeping
• Transform the data, so that it can be fed to the plot module
• Plot a graph with the weather forecast for the next week
Python Programming. Practical Project – Weather Forecast!RUI SILVA
In this article we are going to implement a Python module to read data from an API, process the information and display it, using Python plotting library, in a friendly way.
Listing 1. Print the result for the url
{u’list’: [{u’clouds’: {u’all’: 0}, u’name’: u’Yafran’, u’coord’: {u’lat’: 32.06329, u’lon’: 12.52859}, u’weather’:
[{u’main’: u’Clear’, u’id’: 800, u’icon’: u’01d’, u’description’: u’Sky is Clear’}], u’dt’: 1437555483, u’main’:
{u’temp’: 31.92, u’grnd_level’: 958.15, u’temp_max’: 31.923, u’sea_level’: 1028.38, u’humidity’: 29, u’pressure’:
958.15, u’temp_min’: 31.923}, u’id’: 2208791, u’wind’: {u’speed’: 1.81, u’deg’: 212.001}}, {u’clouds’: {u’all’:
8}, u’name’: u’Zuwarah’, u’coord’: {u’lat’: 32.931198, u’lon’: 12.08199}, u’weather’: [{u’main’: u’Clear’, u’id’:
800, u’icon’: u’02d’, u’description’: u’Sky is Clear’}], u’dt’: 1437555483, u’main’: {u’temp’: 26.62, u’grnd_
level’: 1027.37, u’temp_max’: 26.623, u’sea_level’:
…
u’main’: {u’pressure’: 1013, u’temp_min’: 32, u’temp_max’: 32, u’temp’: 32, u’humidity’: 46}, u’id’: 2524119,
u’wind’: {u’speed’: 1, u’deg’: 110}}, {u’clouds’: {u’all’: 0}, u’name’: u’Rosolini’, u’coord’: {u’lat’:
36.824242, u’lon’: 14.94779}, u’weather’: [{u’main’: u’Clear’, u’id’: 800, u’icon’: u’01d’, u’description’: u’Sky
is Clear’}], u’dt’: 1437555556, u’main’: {u’temp’: 27.82, u’grnd_level’: 1024.46, u’temp_max’: 27.823, u’sea_
level’: 1026.39, u’humidity’: 93, u’pressure’: 1024.46, u’temp_min’: 27.823}, u’id’: 2523581, u’wind’: {u’speed’:
1.61, u’deg’: 277.501}}], u’cnt’: 15, u’calctime’: 0.0059, u’cod’: u’200’}
What you will learn… What you should know…
• Get data from an external API• Transform data to suit your needs• Work with the Python plotting
• Python basics• Programming

www.bsdmag.org 13
Get information from APIWe are going to process the information from the Open Weather Map API. Let’s use this URL to get the forecast for a group of cities: http://api.openweathermap.org/da-ta/2.5/box/city?bbox=12,32,15,37,10&cluster=yes.
Now we need a function to get the json data from this URL. For this we will use the requests library. This library is not a Python built-in module so you have to install it. You still remember how to install packages, using pip?
$ pip install requests
Now that we have all the dependencies we need, let’s create a simple Python file, that will hold all our code for this module. Let’s call it module4.py.
Now we have to import our request dependencies and create a function to get the forecast data in json. Try to do this alone before looking at the example:
import requests
def get_forecast(url):
„”” Return the forecast data in json
„””
r = requests.get(url)
return r.json()
If you print the result for the url above, you get some-thing like on Listing 1. Now, save the data in a file with a datetime in the name (Ex: forecast-2015522.json). You still remember how to do it, right? Now, let’s break down the json structure. You can use any online tool to “pret-ty print” the data you just received, so that you can better understand its current structure: Listing 2.
Data transformationLet’s think a little about the data structure that we need: we want to present, for each city, a bar chart, comparing
Listing 2. The json structure {
“message”: “accurate”,
“cod”: “200”,
“count”: 10,
“list”: [
{
“id”: 495260,
“name”: “Shcherbinka”,
“coord”: {
“lon”: 37.559719,
“lat”: 55.499722
},
“main”: {
“temp”: 294.25,
“pressure”: 1009,
“humidity”: 64,
“temp_min”: 293.15,
“temp_max”: 296.15
},
“dt”: 1437557440,
“wind”: {
“speed”: 6,
“deg”: 280
},
“sys”: {
“country”: “”
},
“clouds”: {
“all”: 75
},
“weather”: [
{
“id”: 520,
“main”: “Rain”,
“description”: “light intensity shower rain”,
“icon”: “09d”
}
]
},
………………….
]
}
Listing 3. Data transformation
def process_data(data):
“”” Return data to be used by the plot lib
“””
info = {
‘cities’: [],
‘temperatures’: [],
‘humidities’: [],
}
cities = data[‘list’]
for city in cities:
main_data = city[‘main’]
info[‘cities’].append(city[‘name’])
info[‘temperatures’].append(main_data[‘temp’])
info[‘humidities’].append(main_data[‘humidity’])
return info

PROGRAMMING
07/201514
Listing 4. Output of data transformation
{‘humidities’: [22, 60, 99, 27, 32, 27, 22, 37, 32, 32, 55, 62, 93, 74, 98], ‘cities’: [u’Yafran’, u’Zuwarah’,
u’Sabratah’, u’Gharyan’, u’Zawiya’, u’Tripoli’, u’Tarhuna’, u’Masallatah’, u’Al Khums’, u’Zlitan’, u’Birkirkara’,
u’Ragusa’, u’Pozzallo’, u’Modica’, u’Rosolini’], ‘temperatures’: [35.31, 30.31, 26.36, 35.63, 35.73, 35.63,
35.91, 33.88, 34.51, 34.51, 31.4, 30.1, 27.51, 31, 27.43]}
Listing 5. Plotting the data
def show_plot(data):
“”” Compute and plot the bar chart
“””
cities = tuple(data[‘cities’])
temperatures = tuple(data[‘temperatures’])
humidities = tuple(data[‘humidities’])
N = len(cities)
# Define the width of each bar, and create a list of
positions
# that will be used to place each bar in the chart
ind = np.arange(N) # the x locations for the groups
width = 0.35 # the width of the bars
_, ax = plt.subplots()
rects1 = ax.bar(ind, temperatures, width, color=’r’)
rects2 = ax.bar(ind+width, humidities, width,
color=’y’)
# Show the bar chart
plt.show()
Listing 6. Creating and running a script
#!/usr/bin/python
import requests
import numpy as np
from matplotlib import pyplot as plt
def get_forecast(url):
“”” Return the forecast data in json
“””
r = requests.get(url)
return r.json()
def process_data(data):
“”” Return data to be used by the plot lib
“””
info = {
‘cities’: [],
‘temperatures’: [],
‘humidities’: [],
}
cities = data[‘list’]
for city in cities:
main_data = city[‘main’]
info[‘cities’].append(city[‘name’])
info[‘temperatures’].append(main_data[‘temp’])
info[‘humidities’].append(main_data[‘humidity’])
return info
def show_plot(data):
“””
“””
cities = tuple(data[‘cities’])
temperatures = tuple(data[‘temperatures’])
humidities = tuple(data[‘humidities’])
N = len(cities)
ind = np.arange(N) # the x locations for the groups
width = 0.35 # the width of the bars
_, ax = plt.subplots()
rects1 = ax.bar(ind, temperatures, width, color=’r’)
rects2 = ax.bar(ind+width, humidities, width,
color=’y’)
plt.show()
# Exec the script
url = ‘http://api.openweathermap.org/data/2.5/box/city?b
box=12,32,15,37,10&cluster=yes’
data = get_forecast(url)
processed_data = process_data(data)
show_plot(processed_data)

www.bsdmag.org 15
the temperature and humidity for each of them. In order to draw a bar chart, we need the information in lists, ordered. So, let’s define the lists that we need:
• cities: the list of city names• temperatures: the list of the temperatures, maintain-
ing the same order of the cities list• humidities: the list of humidities, maintaining the
same order of the cities also
Create a function that receives the raw json data from the API, processes it and returns a dict with the informa-
Figure 1. Full source code on chart
Figure 2. Temperature and humidity in the city
tion in the list above. Again, try to do it yourself before looking at the next example: Listing 3. This will return something like it is shown on Listing 4.
Plotting the dataIn order to visually render our data, we will use an exter-nal library: Matplotlib. You can install it the same way you installed requests, or check other installation formats on http://matplotlib.org/users/installing.html.
Once you have installed the package, you can read a little of the documentation to try plotting the data yourself. Draw a barchart with the city names in the X axis and the humidity and temperature values in the Y axis.
So, let’s make a function to do all that work for us: Listing 5.
Let’s try to break down this function a bit. I will explain each section of the function, so that you can better under-stand what everything does:
_, ax = plt.subplots()
In this case, the underscore indicates that the first argument returned by the function is being deliberately ignored. You can assign the value to a variable, but in this case it would never be used…
Using the ax (Axes object – check the documentation on http://matplotlib.org/api/axes_api.html#matplotlib.axes.Axes), we create a bar for the temperatures and another for the humidities (check the examples for more options too).

PROGRAMMING
07/201516
After that, we only have to display the chart, which should be something like this (if you want the full source code for this graph generation you can get it. See Figure 1.).
Now, this bar chart is too simple and not that informa-tive… You should play a bit with these options to create a chart that is actually useful:
• ax.set_ylabel• ax.set_title• ax.set_xticks• ax.set_xticklabels• ax.legend
Try to create this chart: Figure 2. You can notice that we have the value of each column
above it and labels for the cities. There is also a legend in the upper right corner and a title for the graph, which is much more informative than the previous, don’t you agree?
If you don’t want to bother searching and testing the functions supplied, you can check the code that gener-ated this graph on Listing 7.
ABOUT THE AUTHOR
Rui Silva is a Python developer who loves open source. He started working as a freelancer in 2008, while he finished his degree in Computer Science in Universidade do Minho. After graduation, he started pursuing a master’s degree, choosing the field of parallel computation and mobile and ubiquitous computing. He ended up only finishing the mobile and ubiquitous computing course. In his 3 years of freelancing, he worked mostly with Python, developing django websites, drupal websites and some magento stores. He also had to do some system administration. After that, he started working in Eurotux Informática, S.A. where he develops websites using Plone, django and drupal. He is also an IOS developer and sometimes he performs some system administration tasks. Besides his job, he works as a freelancer using mainly django and other Python frameworks.
Listing 7. The code that generated our graph
#!/usr/bin/python
import requestsimport numpy as npfrom matplotlib import pyplot as plt
def get_forecast(url): “”” Return the forecast data in json “”” r = requests.get(url) return r.json()
def process_data(data): “”” Return data to be used by the plot lib “”” info = { ‘cities’: [], ‘temperatures’: [], ‘humidities’: [], } cities = data[‘list’] for city in cities: main_data = city[‘main’] info[‘cities’].append(city[‘name’]) info[‘temperatures’].append(main_data[‘temp’]) info[‘humidities’].append(main_data[‘humidity’])
return info
def show_plot(data): “”” “”” cities = tuple(data[‘cities’]) temperatures = tuple(data[‘temperatures’]) humidities = tuple(data[‘humidities’]) N = len(cities)
ind = np.arange(N) # the x locations for the groups width = 0.35 # the width of the bars _, ax = plt.subplots() rects1 = ax.bar(ind, temperatures, width, color=’r’) rects2 = ax.bar(ind+width, humidities, width,
color=’y’) # add some text for labels, title and axes ticks ax.set_ylabel(‘Units’) ax.set_title(‘Temperature and humidity by city’) ax.set_xticks(ind+width) ax.set_xticklabels( cities ) ax.legend( (rects1[0], rects2[0]), (‘Temperature’,
‘Humidity’) ) def autolabel(rects): # attach some text labels for rect in rects: height = rect.get_height() ax.text(rect.get_x()+rect.get_width()/2.,
1.05*height, ‘%d’%int(height), ha=’center’, va=’bottom’) autolabel(rects1) autolabel(rects2) plt.show()
# Exec the scripturl = ‘http://api.openweathermap.org/data/2.5/box/city?b
box=12,32,15,37,10&cluster=yes’data = get_forecast(url)processed_data = process_data(data)show_plot(processed_data)


SECURITY
07/201518
Logs are one of the most important security assets inside IT environments. Without logs it’s almost impossible to follow audit trails. There are a lot of
types of logs and some types are very different from oth-ers. Sometimes the sources of logs are different, for ex-ample from a Unix system, Windows system or network appliance. Sometimes logs are generated from operating systems and sometimes they are generated by applica-tions. Moreover, you can generate your own personal log message.
Very often, logs reside only inside one computer. If this computer is compromised, all log information is almost in-stantly invaluable. Therefore, a log server is one of the most important security artifacts inside networks.
Some advanced features and configurations covered in this article are based on the ideas of Rainer Gerhards, creator of rsyslog software and RELP Protocol and author of RFC 5424. Rainer is a visionary and pioneer in modern syslog infrastructure, although it is not possible to assure that his ideas will prevail in the future.
Basics of log and syslogAlmost every software that runs inside a Unix system is a daemon. By definition, a daemon runs in the background
and there is no associated terminal, therefore it isn’t pos-sible to display messages. Firstly, daemons started to write messages inside log files associated with a daemon to allow system administrators to watch messages. Even though the problem of saving important messages perma-nently was solved, system administrators had a lot of log files to take care of, each one with its own format.
In the 1980s, Eric Allman, creator of sendmail software, created syslog as a separate daemon to control the mes-sage flow from sendmail daemon. As syslog is a totally separate daemon, some other Unix daemons started to use it. Gradually, syslog’s popularity increased and nowa-days, almost all Unix daemons use syslog. Although other log formats, like Windows Event Log or Apache Common Log, exist and are used in some market niches, syslog is the most known log format.
Programs send information to syslog, usually by sys-log syscall. The messages can then be logged to vari-ous files, devices, or computers, depending on the sender of the message and its severity. Multiple destinations are permitted.
Format of syslog messagesEach syslog message consists of four parts:
Secure Log Server With RsyslogLEONARDO NEVES BERNARDO
This article will discuss how to create a secure syslog server using rsyslog and how to protect syslog messages with Transport Layer Switching (TLS). Some advanced rsyslog configurations will be covered.
What you will learn… What you should know…
• how to use rsyslog to centralize syslog messages and TLS• how to use advanced techniques of rsyslog
• basic understanding of syslog protocol• basics of Linux shell.

www.bsdmag.org 19
Program nameSpecifies the program source that created the message. Examples are login: and kernel:.
FacilitySpecifies the subsystem that produced the message, for example, all daemons related to mail management send messages to facility mail. Facilities used nowadays are:
• kern – Kernel messages• user – General userland messages• mail – Messages related to e-mail subsystems• daemon – Daemon (server process) messages• auth – Authentication or security messages• security – Alias to auth facility• mark – Used internally• authpriv – Non-system authentication and authoriza-
tion messages• syslog – Messages from syslog daemon• lpr – Printer messages• news – Messages related to Usenet news• uucp – Unix to Unix Copy Protocol messages• cron – Cron messages• ftp – Messages related to FTP subsystems• local0 through local7 – User specified facilities
PriorityPriority specifies the level of the message.
Possible priority values are:emergency, alert, critical, error, warning, notice, info and
debug.
Message itselfThe final part of a syslog message contains the message itself.
Traditional syslog (sysklogd)Traditional syslog, or sysklogd is the most used log dae-mon. The traditional syslog daemon has not had signifi-cant changes during the last decades. The syslog project is focused more on stability than on new features. Syslogd.conf or syslog.conf are the files used to con-
figure syslog daemon. The configuration format is very simple. Each line of syslogd.conf is a set of one or more selectors and an action. A selector is a set of facility and priority joined by period character. Example of selector:
kern.crit
It’s possible to put several selectors together, using com-ma character. Let’s see one example:
user.info, kern.crit
Actions are the destinations of the messages. Actions can be a file or device or the address of a log server.
Examples of actions:
/var/log/messages
/dev/console
@loghost
Let’s see an example of a complete syslogd.conf:
kern.crit /var/log/messages
ftp.none,kernel.*,daemon.* /var/log/messages
*.emerg /dev/console
In the above example, we see that is possible to use as-terisks to get all priorities or to get all facilities. Keyword none stands for no priority of the given facility. It’s possi-ble to use multiple actions for the same selector.
Network UseSyslog has network support, hence syslog is a protocol as well as a daemon. Syslog protocol was standardized by IETF RFC 3164 (The BSD syslog Protocol, August 2001). RFC 3164 becomes obsolete by RFC 5424 (The Syslog Protocol, March 2009). Syslog protocol uses UDP port 514 for communication.
There are some advantages to converting messages from other formats and transferring them via a syslog pro-tocol through networks. The traditional Unix syslog ser-vice allows programs to send log messages over a net-work to a central server that records them.
In general, syslog daemons are compatible with each other. It’s possible to send messages from rsyslog to sys-log-ng or from traditional syslog to rsyslog and so on.
In traditional syslog, the @ character is used at the be-ginning of an action in order to send messages to another host (i.e. @loghost). To start a syslog daemon listening in network, the ‘-r’ argument is used.
Why rsyslog?Traditional syslog lacks of a lot of functionalities. Even though traditional syslog has network support, there is no possibil-ity to secure communication without external software. Af-ter the creation of traditional syslog, some other syslog dae-mons were created, syslog-ng and rsyslog. It’s not possible to make a comparison between traditional syslog and rsys-log or syslog-ng, because there are big differences.
Syslog-ng is a very good and complete software, but some functionalities are enabled only in the paid version.

SECURITY
07/201520
Another minor issue related to syslog-ng is that the configuration file isn’t compatible with traditional syslog and this, depending on the environment, can be a problem.
Rsyslog project is the newer project related to syslog. Rsyslog project is focused on new functionalities and in-tends to maintain all features under a GPL license. The great improvement of rsyslog regarding security concerns is that rsyslog supports Syslog TLS.
Some advantages of rsyslog from syslog-ng are: na-tive support for MySQL and PostgreSQL, TLS/SSL na-tive support, GSS-API and RELP support, and so on. The complete list of differences between syslog-ng and rsys-log can be found at http://www.rsyslog.com/doc/rsyslog_ng_comparison.html.
Considering the above, I recommend using rsyslog in-stead other software. If you are not convinced yet, some Linux distributions are. Nowadays, almost all Linux dis-tributions are using rsyslog as official syslog daemon. Unfortunately, other flavours of Unix aren’t following the same way.
Installing rsyslogFirst of all, remove your legacy syslog daemon. Download the latest rsyslog software from http://www.rsyslog.com/rsyslog-5-8-4-v5-stable/. Extract and install:
# tar -zxvf rsyslog-5.8.4.tar.gz
# cd rsyslog-5.8.4
# ./configure && make && make install
Copy rsyslog example configuration file from source to /etc:
# cp rsyslog.conf /etc
Now, start rsyslog with the following command:
# rsyslogd -c5 -f /etc/rsyslog.conf
With ps command, it’s possible to check if rsyslog is run-ning:
# ps -ef | grep rsyslog | grep -v grep
root 11034 1 0 21:19 ? 00:00:00 rsyslogd
-c5 -f /etc/rsyslog.conf
And inside /var/log/messages rsyslog will print 2 lines to confirm it started:
2011-10-16T21:19:47.916889-02:00 neves-laptop kernel:
imklog 5.8.4, log source = /proc/kmsg started.
2011-10-16T21:19:47.917187-02:00 neves-laptop rsyslogd:
[origin software=”rsyslogd” swVersion=”5.8.4”
x-pid=”11034”
x-info=”http://www.rsyslog.com”] start
At this moment, rsyslog is exactly a replacement to tra-ditional syslog. Even an old syslog.conf can be used di-rectly as a rsyslog.conf. Flag -c specifies the level of compatibility that rsyslog will support and -f points to the configuration file.
With command egrep -v „^#|^$” /etc/rsyslog.conf we see our configured parameters inside rsyslog, shown in Listing 1.
Some other details are shown in Listing 1. Notice the action starting with an asterisk (*.emerg). Actions starting with an asterisk will print messages in all sessions, for all users. Another detail is about file actions starting with mi-nus (-) sign. Minus sign omits the syncing of the file after every logging. Finally, we can see some lines starting with $ModLoad. Module support is rsyslog specific, and other software doesn’t support it. The three modules loaded in Listing 1 are basic and necessary to rsyslog in order to run with the same functionality of traditional syslog.
Listing 1. Minimal rsyslog.conf
$ModLoad immark # provides --MARK-- message capability
$ModLoad imuxsock # provides support for local system logging (e.g. via logger command)
$ModLoad imklog # kernel logging (formerly provided by rklogd)
*.info;mail.none;authpriv.none;cron.none -/var/log/messages
authpriv.* /var/log/secure
mail.* -/var/log/maillog
cron.* -/var/log/cron
*.emerg *
uucp,news.crit -/var/log/spooler
local7.* /var/log/boot.log

www.bsdmag.org 21
Using Network with rsyslogThe @ is used to configure rsyslog to send messages to another syslog over the network, as in traditional syslog.
The following example shows authpriv facility config-ured to send to file and to copy messages to host name logserver over the network:
authpriv.* /var/log/secure
authpriv.* @logserver
To configure rsyslog to receive messages, insert lines of Listing 2 at the bottom of /etc/rsyslogd.conf.
In fact, it’s possible to receive messages only by UDP/514. With UDP/514, it’s possible to configure almost all appliances and servers to send messages to your sys-log. UDP/514 is recommend for all hosts which don’t sup-port other possibilities, as shown:
• Network appliances like routers and switches, and even mailhubs, proxies and network IPS
• Windows servers with some additional software like EventReport or KiwiSyslog
• Legacy/Traditional Unix, used even in recent versions of IBM AIX, HP HP-UX and Sun Solaris. In this case, I recommend the replacement of traditional syslog with rsyslog, if it’s possible.
UDP protocol is not reliable and is not guaranteed that a syslog message will be received by rsyslog server. Even so, it’s better to have a syslog server than nothing.
On the other hand, rsyslog supports TCP communica-tion. To configure rsyslog to receive messages by TCP, in-sert lines of Listing 3 to the bottom of /etc/rsyslogd.conf.
TCP is a more reliable protocol than UDP. However, the use of TCP instead UDP does not guarantee that all the messages will be received. Messages can be discarded if problems arise or processing overcharges happen in both server or client side.
To send messages with TCP from rsyslog client, use double @ (@@), as shown in the following example:
authpriv.* @@logserver
This kind of configuration is rsyslog specific.
Security and capacity considerationsIt is now time to test. Use the logger tool on the client side and verify that messages are logged at server side. An-other very good test is to configure authpriv facility and test with login and/or logout on the client side.
It’s a good idea to verify packages of syslog protocol communication with a sniffer. Dump packages to a file with tcpdump -w file -s 0 and after that examine file with xxd.
Listing 2. Configuration to receive by port UDP/514
# UDP Syslog Server:
$ModLoad imudp.so # provides UDP syslog reception
$UDPServerRun 514 # start a UDP syslog server at standard port 514
After that, restart rsyslog and check that ports UDP/514 is open with netstat:
# netstat -anp -4 | grep 514
udp 0 0 0.0.0.0:514 0.0.0.0:* 2707/rsyslogd
Listing 3. Configuration to Listen port TCP/514
# TCP Syslog Server:
# provides TCP syslog reception and GSS-API (if compiled to support it)
$ModLoad imtcp.so # load module
$InputTCPServerRun 514 # start up TCP listener at port 514
Checkthat now rsyslog opened UDP port 514 and is listening in TCP/514:
# netstat -anp -4 | grep 514
udp 0 0 0.0.0.0:514 0.0.0.0:* 2779/rsyslogd
tcp 0 0 0.0.0.0:514 0.0.0.0:* LISTEN 2770/rsyslogd
SECURITY
07/201522
You will see that, both by UDP and TCP communication, messages will be transferred in plain text. Even though logs aren’t the most confidential information we have in-side networks, this information could be used to enumer-ate users from your environment, and there are some se-curity concerns about this. We will see later a very good solution for this problem.
Another concern about logs is about capacity. If the vol-ume of information from the clients is big, your log server can be flooded very fast. One of the most common prob-lems is the size of storage and perhaps it’s important to evaluate the network capacity and the processing capac-ity in the log server. The processing capacity could be a problem if you have filters, regular expressions, data-bases backends, log correlation and so on. As you can see, rsyslog could do many other tasks beyond only stor-ing log messages from network. Unfortunately, here I do not have the possibility to explain in details all the features listed above.
When you create a log server, your first goal is to have a copy of all important log information from your network. Automatically, you perceive that it is most valuable to cre-ate a backup from the log server rather than from clients, because in fact, the log server is normally more secure than clients. Now, you need to compute backup size, com-pression of log files, purge of files, and so on. If you have to comply to any regulations, such as SOX, PCI DSS, HIPAA, etc., search if your regulation specifies the rules about the minimal age of the log.
I imagine that now logs seem a little more important than when you started to read this article. I think that it’s not necessary to stress why maintaining a good level of security in your log host is essential.
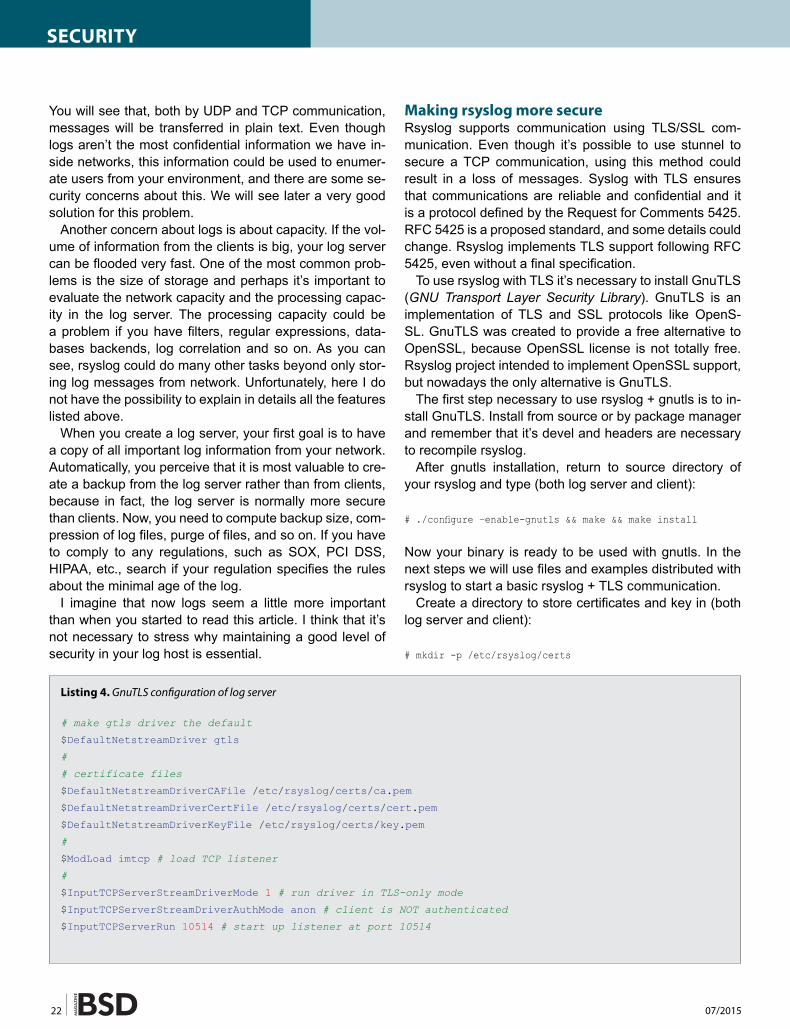
Making rsyslog more secureRsyslog supports communication using TLS/SSL com-munication. Even though it’s possible to use stunnel to secure a TCP communication, using this method could result in a loss of messages. Syslog with TLS ensures that communications are reliable and confidential and it is a protocol defined by the Request for Comments 5425. RFC 5425 is a proposed standard, and some details could change. Rsyslog implements TLS support following RFC 5425, even without a final specification.
To use rsyslog with TLS it’s necessary to install GnuTLS (GNU Transport Layer Security Library). GnuTLS is an implementation of TLS and SSL protocols like OpenS-SL. GnuTLS was created to provide a free alternative to OpenSSL, because OpenSSL license is not totally free. Rsyslog project intended to implement OpenSSL support, but nowadays the only alternative is GnuTLS.
The first step necessary to use rsyslog + gnutls is to in-stall GnuTLS. Install from source or by package manager and remember that it’s devel and headers are necessary to recompile rsyslog.
After gnutls installation, return to source directory of your rsyslog and type (both log server and client):
# ./configure –enable-gnutls && make && make install
Now your binary is ready to be used with gnutls. In the next steps we will use files and examples distributed with rsyslog to start a basic rsyslog + TLS communication.
Create a directory to store certificates and key in (both log server and client):
# mkdir -p /etc/rsyslog/certs
Listing 4. GnuTLS configuration of log server
# make gtls driver the default
$DefaultNetstreamDriver gtls
#
# certificate files
$DefaultNetstreamDriverCAFile /etc/rsyslog/certs/ca.pem
$DefaultNetstreamDriverCertFile /etc/rsyslog/certs/cert.pem
$DefaultNetstreamDriverKeyFile /etc/rsyslog/certs/key.pem
#
$ModLoad imtcp # load TCP listener
#
$InputTCPServerStreamDriverMode 1 # run driver in TLS-only mode
$InputTCPServerStreamDriverAuthMode anon # client is NOT authenticated
$InputTCPServerRun 10514 # start up listener at port 10514

www.bsdmag.org
And copy certificates and key from contrib/gnutls direc-tory in rsyslog source directory to /etc/rsyslog/certs in log server:
# cp contrib/gnutls/ca.pem /etc/rsyslog/certs
# cp contrib/gnutls/cert.pem /etc/rsyslog/certs
# cp contrib/gnutls/key.pem /etc/rsyslog/certs
Copy only ca.pem to /etc/rsyslog/certs at client side. In this example, only the log server needs its own certifi-cate and private key.
Now, change /etc/rsyslog.conf of the log server and include Listing 4 content.
Restart rsyslog in the log server. This configuration will start TCP port 10514. Port 10514 will be TLS only using $InputTCPServerStreamDriverMode configuration, in oth-er words, plain text communication won’t be understood. Check that port 10514 is listening using netstat, after re-start. It’s a good idea to check /var/log/messages to con-firm that problems have not arisen.
If it is all OK, let’s configure the client side. Include Listing 5 content at the bottom of /etc/rsyslog.conf of the client.
Restart rsyslog and verify that no problems are shown in /var/log/messages. As you see, @@(o) at the beginning of the action is used to send messages to another host.@@(o)logserver.localdomain:10514 means send mes-
sages to logserver.localdomain using TCP (@@) and TLS ((o)) and port 10514 (:10514).
Now it’s time to test again, use the logger command on the client side or do a login or logoff and verify if messag-es are being logged in the log server files. If no problems, use tcpdump and xxd again, now the messages are en-crypted. If you can see messages in plain text, it is proba-bly because the messages are duplicated and transmitted in more than one way. Use port 10514 in your tcpdump to verify that only TLS messages are captured or reconfig-ure/remove other channels from your rsyslog.
A good observer might have some concerns about the security of the use of certificates and keys in the rsyslog example. Indeed, it is not secure and not rec-ommended to use it. I used this simplified explanation because of the impossibility of describing all process related to certifications and key creation and signing in this small space.
In a production system, follow these major steps and look through GnuTLS and/or rsyslog documentation to find examples and detailed explanations:
• Create a directory to be a CA (Certificate Authority). It’s possible to use a directory in the log server
• Create a private key of CA

SECURITY
07/201524
• Create a private key of CA of log server • Create a request certificate of log server using pri-
vate key• Sign the request, generating log server certificate
And for each client that will communicate:
• Create a private key of CA of client• Create a request certificate of client using private key• Sign the request, generating client certificate
When you follow the above steps, It’s recommended to change some configurations from our example.
If you intend to accept messages only from clients with certificate, you need to change $InputTCPServerStreamDriverAuthMode anon to $InputTCPServerStreamDriverAuthMode x509/name.
At client side, it’s necessary to include $Default Netstream DriverCertFile and $DefaultNetstreamDriverKeyFile pointing to specific files and to ensure that the log server has a certificate, it’s necessary to change $ActionSendStreamDriverAuthMode anon to $ActionSendStreamDriverAuthMode x509/name.
Finally, we have secure communication between log server and clients. The use of certificates on the client side is additional work, but the effort is valuable in order to achieve the best level of security.
Improving your log serverIn this article, we explored some ideas, configurations and features to create a modern log server. With some other fea-tures, rsyslog can be improved and become a modern log server. Some ideas supported by rsyslog or some additional software that I recommend to research and implement are:
• High Availability of log servers, supported by rsyslog itself
Listing 5. GnuTLS configuration of client side
# certificate files – just CA for a client
$DefaultNetstreamDriverCAFile /etc/rsyslog/certs/ca.pem
#
# set up the action
$DefaultNetstreamDriver gtls # use gtls netstream driver
$ActionSendStreamDriverMode 1 # require TLS for the connection
$ActionSendStreamDriverAuthMode anon # server is NOT authenticated
authpriv.* @@(o)logserver.localdomain:10514 # send (all) messages
• Log separation by source (or another field), also sup-ported by rsyslog
• Log correlation with additional software like ossec or sec
• Reading of any plain file with rsyslog imfile• Database storage and frontend like phplogcon
or phpsyslog-ng• Log server relay to remote networks• Filters and regular expressions based on any mes-
sage field• EventLog to syslog with additional software• History to Syslog in bash (bourn again shell)• Centralized network monitoring from logs in log serv-
er (security monitoring and infrastructure monitoring)
I hope that this article has contributed to a better un-derstanding of logs, syslog and rsyslog. Syslog soft-ware and protocol can be used not only by security pro-fessionals, but also by infrastructure people and even in high level applications. Create your own log server if you don’t have one yet, and implement security. When nec-essary, use one log server instead of logs spread among multiple servers, in this way your environment will be more secure.
ABOUT THE AUTHOR
Leonardo Neves Bernardo got started with Unix in 1996 when considered this operating system more interesting than any other. For more than fifteen years he worked with several IT area and now he is more focused with IT security area. Leonardo is LPIC-3, LPIC-302 and LPIC-303 certified and hold a Bachelor’s degree in Computer Science from Universidade Federal de Santa Catarina, Florianópolis, Santa Catarina Brazil as well as RHCT and ITILv3 Foundation certifications. Visit his linkedin profile at: www.linkedin.com/profile/view?id=24995684.


SECURITY
07/201526
DisclaimerFollow this guide at your own risk. I take/accept no re-sponsibility for any outcome from anything you attempt to do within this guide. Everything is in a “works for me” state. ;)
What are the dimensions?The Raspberry Pi measures 85.60mm x 53.98mm x 17mm, with a little overlap for the SD card and connectors which project over the edges. It weighs 45g (Figure 1).
Raspberry Pi Specs – Model BProcessor / Chipset: Broadcom 700 MHzRAM: Installed Size 256 MBGraphics Controller: VideoCore IVOperating System / Software OS Provided: Debian Linux
Tweaking Raspberry Pi’s PerformanceInitially, I was not planning on covering much hacking of the Pi itself, but it seems that overclocking the Pi, and some OS modifications, can greatly enhance the perfor-mance of the Pi. All of the changes to the Pi here will be software based changes, but be forewarned that mess-ing with CPU settings can result in the death of a Pi if not done properly. Everything in this guide has been tested by me, and confirmed to be working on my Pi.
Performing some of these tweaks or modifications can allow you to see a performance boost of up to 25%. Mul-tiple tips have been cropping up online from cutting down on RAM usage, to tuning the SD card or hacking some bits in the CPU.
RAM UsageBy simply removing unneeded services and disabling daemons, you can greatly increase performance.
Modifying Startup ServicesYou will first need to install sysv-rcocnf onto your Pi before you begin. Do so by issuing the following command: sudo apt-get install sysv-rc-conf.
Raspberry Pi Hacking JEREMIAH BROTT
The Raspberry Pi is a credit-card sized computer that plugs into your TV and a keyboard. It’s a capable little PC which can be used for many of the things that your desktop PC does, like spreadsheets, word-processing and games. It also plays high-definition video. We want to see it being used by kids all over the world to learn programming.
Figure 1. Raspberry Pi Hardware Layout

www.bsdmag.org 27
Once this has been installed, you can begin disabling unneeded services by issuing the following command: sudo sysv-rc-conf.
Ie: samba, nfs etc..
Most services are safe to disable for normal operation of the Pi. If you know you will not be accessing any Win-dows file shares, samba is safe to disable, same goes for NFS with Linux/Unix shares. If you do not know what it is, it’s best to leave it alone. Once you are done you will be required to run the following command to com-plete the configuration: dpkg-reconfigure innserv.
Inittab ModificationsBy default, the Pi will spawn 6 terminals available for use once the Pi boots up. The average user does not need more than one or two at most. We can save some resourc-es by limiting the amount of terminals spawned down from 6 to 2. To do so, edit the /etc/inittab file by issuing the following command: vi /etc/inittab. Once the file has been opened, look for lines matching the following (line 51): Table 1. Once the above changes have been made, you can now save and exit the editor.
Disabling console accessDepending how you use your Pi, you can save more re-sources by disabling console access if you are sure you will not need it. This is useful in cases where you are us-ing your Pi as a Raspbmc media center or something. To disable the console, you will need to edit the file: /boot/cmdline.txt.
Remove the following line and save the file:
console=ttyAMA0,115200 kgdboc=ttyAMA0,115200
Enabling DASHUsing dash as the system shell will improve the system’s overall performance. Configure dash by issuing the fol-lowing command: dpkg-reconfigure dash.
When prompted to use dash as the default system shell, select: <Yes>.
House KeepingAfter time, the Pi will get full of old update archives, etc., or maybe even unused software still left lingering around. To keep things tidy around the Pi, issue the following com-mands every once in awhile:
sudo apt-get autoremove
sudo apt-get autoclean
Removing GnomeIf you never plan on using gnome or maybe you are using your Pi as a Raspbmc media center, you can save some more resources by removing: gnome and gvfs. If you are sure you will never use the two, you can remove them and anything associated with the two by issuing the following commands:
apt-get remove gnome
apt-get remove gvfs
apt-get autoremove
Disk TuningSince the Raspberry Pi uses the SDcard for every-thing, the read and write performance will drop. Have no fear,though, as there are a few things we can do to mini-mize the hidden I/O, thus increasing performance of the SDcard. The good thing about these improvements is that most of them are not based on modifying the kernel in any way.
Tweaking SyslogThe first step we can take to improve the performance on the SDcard is to minimize the logging and remove unnec-essary logs. Edit the syslog file by issuing the following command: vi /etc/rsyslog.conf.
To disable a service from logging, you can put ‘#’ in front of the line.
Once you have disabled the unnecessary log files, you can then restart syslog by issuing the command: sudo /etc/init.d/rsyslog restart.
Table 1. /etc/inittab changes
BEFORE AFTER1:2345:respawn:/sbin/getty 38400 tty12:23:respawn:/sbin/getty 38400 tty23:23:respawn:/sbin/getty 38400 tty34:23:respawn:/sbin/getty 38400 tty45:23:respawn:/sbin/getty 38400 tty56:23:respawn:/sbin/getty 38400 tty6
1:2345:respawn:/sbin/getty 38400 tty12:23:respawn:/sbin/getty 38400 tty2#3:23:respawn:/sbin/getty 38400 tty3#4:23:respawn:/sbin/getty 38400 tty4#5:23:respawn:/sbin/getty 38400 tty5#6:23:respawn:/sbin/getty 38400 tty6

SECURITY
07/201528
Creating partitions aligned with Flash BlockBefore creating this partition, you will need to find the erase block size of your SDcard. Most SDcards have a size of 128k, but you should double check your card be-fore proceeding.
Finding out the size is simple using the python script (Listing 1).
Listing 1. Python script to format SDCard
#!/usr/bin/env pythonimport sysdef unstuff(x, start, size): return (x >> start) & (2**size - 1)def main(name, args): if len(args) != 1: print “Syntax: %s <card>” % (name, ) print “Example: %s mmcblk0” % (name, ) return 100 card = args[0] dev = “/sys/class/block/%s/device/csd” %
(card, ) csd = int(file(dev).read(), 16) write_block_size = 2**unstuff(csd,22,4) erase_block_size = write_block_
size*(unstuff(csd,39,7)+1) print “Erase block size of %s is %d bytes.” %
(card, erase_block_size)sys.exit(main(sys.argv[0], sys.argv[1:]))
Formatting partitions with journaling turned offJournaling ensures the integrity of the filesystem by keep-ing a log of the ongoing disk changes.
However, it is known to have a small overhead. Some people with special requirements and workloads can run without a journal and its integrity advantages. In Ext4 the journaling feature can be disabled, which provides a small performance improvement.
WARNINGMake sure all of the data on the SDcard has been backed up before attempting this. DATA LOSS will occur!
To disable journaling on the SDcard, issue the following command:
mkfs.ext4 -O ^has_journal -L PiBoot /dev/mmcblk0p1
fsck.ext4 -f /dev/mmcblk0p1
Tweaking Disk SchedulerTo further tweak the disk performance, there are a few more things that can be disabled. The first thing you can do is to tell disk scheduler to enable the deadline I/O scheduler.
The Deadline scheduler excels at attempting to reduce the latency of any given single I/O for real-time like envi-ronments, which makes it perfect for the Pi.
To enable the deadline I/O scheduler, you will need to modify the /boot/cmdline.txt file.
sudo vi /boot/cmdline.txt
Change the file to match the following, by adding elevator=deadline.
dwc_otg.lpm_enable=0 root=/dev/mmcblk0p3 rootfs
type=ext4 elevator=deadline rootwait quiet
You can also increase disk performance by disabling Ac-cess Time for files and directories.
You can do so by editing the /boot/cmdline.txt file and editing the rootflags= option to match the following:
rootflags=data=writeback,commit=120
This can also be enabled permanently with a kernel re-build, but for simplicity sake of the guide we are using the command line method for enabling these options.
CPU – Over ClockingUnless you truly understand what you are doing, safely skip this section…
Use This Tweak At Your Own RiskThe CPU on the Pi is quite simple to overclock, you can eas-ily get a 15% performance increase without even over volt-ing the CPU. Since you are not applying any additional volt-age to the CPU, fans or heatsinks should not be required.
Use This Tweak At Your Own RiskBy default the Raspberry Pi comes with the arm_freq set at 800. If you wish to improve performance just a bit and hang out on the safe side, configure your /boot/config.txt file to match the following:
WARNINGWhile these settings have been tested on my Pi, your mileage may vary, use at your own risk. Modification of these settings will greatly increase the risk of causing damage to your Pi.

www.bsdmag.org 29
/boot/config.txt – Safe Bet
/boot/config.txt – Not So Safe Bet
arm _ freq=900gpu _ freq=250sdram _ freq=500
arm _ freq=1000Core _ freq=500sdram _ freq=500over _ voltage=6
**If you are paranoid, use a fan with this config**
Hacking stuff with the PiWhile there is already an extensive list of documentation and guides for getting up and running with your Pi, there have not been many for how to extend the use of your Pi or how to use your Pi for hacking other things or projects you may have in mind. In this document, we will be mainly focusing on the GPIO pins of the Raspberry Pi.
The GPIO pins that can be found available on the PCB of the Pi will allow you to interface with external applica-tions via headers on the side of the board. These GPIO pins are very useful for controlling things like LEDS, Mo-tors or reading from switches.
See Figure 2 of the Pi, the 26 GPIO pins have been highlighted on the bottom right corner.
Figure 2. Raspberry Pi – Pin1 indicated with a red circle
IMPORTANTMake sure to take note of P1, which has been circled in red below. It is important to know which way the pins are asso-ciated on the board as compared to the diagram provided.
GPIO Introduction
What is GPIO?General Purpose Input/Output (a.k.a. GPIO) is a generic pin on a chip whose behavior (including whether it is an in-
put or output pin) can be controlled (programmed) through software.
The Raspberry Pi allows peripherals and expansion boards (such as the upcoming Rpi Gertboard) to access the CPU by exposing the inputs and outputs.
The production Raspberry Pi board has a 26-pin 2.54 mm (100 mil) expansion header, marked as P1, ar-ranged in a 2x13 strip. They provide 8 GPIO pins plus ac-cess to I²C, SPI, UART, as well as +3.3 V, +5 V and GND supply lines. Pin one is the pin in the first column and on the bottom row.
For a complete list of all available pins, see http://elinux.org/RPi_BCM2835_GPIOs.
Raspberry Pi GPIO The Raspberry Pi has a General Purpose Input/Output (GPIO) connector and this carries a set of signals and buses. There are 8 general purpose digital I/O pins – these can be programmed as either digital outputs or in-puts. One of these pins can be designated for PWM out-put too. Additionally there is a 2-wire I2C interface and a 4-wire SPI interface (with a 2nd select line, making it 5 pins in total) and the serial UART with a further 2 pins.
The I2C and SPI interfaces can also be used as general purpose I/O pins when not being used in their bus modes, and the UART pins can also be used if you reboot with the serial console disabled, giving a grand total of 8 + 2 + 5 + 2 = 17 I/O pins (Figure 3).
Figure 3. Close up of the GPIO header
The GPIO header contains 2 rows of pins, with 13 pins on each row as shown above.
Pin Diagram – Names & Alt 0 FunctionsOut of the 26 pins that are provided by the GPIO header, 17 pins can be used as inputs or outputs to external applications. In a Pi’s default state, all of the pins have been configured as inputs except GPIO pins 14 and 15. These pins are initialised as serial data lines TX & RX,

SECURITY
07/201530
these allow you to connect a terminal for logging in. In order to use these pins as Input or Output pins, they will need to first be re-configured (Table 2).
Hardware NotesPIN 2 – Supply through input poly fuse
GPIO 14 – Boot to Alt 0 ->
GPIO 0 – 1k8 pull up resistor GPIO 15 – Boot to Alt 0 ->
GPIO 1 – 1k8 pull up resistor GPIO 4 – GPCLK0
When starting out, ALWAYS make sure to locate P1 first. This will make locating the pins in proper order much easier. Pin 1 will provide 3.3v (50ma) MAX.
Starting at P1 or Pin 1, you should be able to figure out the other pins.
Other Alternative FunctionsGPIO 14 – ALT5 = UART1_TXD GPIO 15 – ALT5 = UART1_RXD
GPIO 18 – ALT4 SPI1_CE0 _N ALT5 = PWM0
GPIO 23 – ALT3 = SD1_CMD ALT4 = ARM_RTCK
GPIO 24 – ALT3 = SD1_DATA0 ALT4 = ARM_TDO
GPIO 25 – ALT4 = ARM_TCK
GPIO 0 – I2C0_SDA GPIO 1 – I2C0_SCL
GPIO 17 – ALT3 = UART0_RTS, ALT5 = UART1_RTS
GPIO 21 – ALT5 = GPCLK1
GPIO 22 – ALT3 = SD1_CLK ALT4 = ARM_TRST
Notes
• Pin 3 (SDA0) and Pin 5 (SCL0) are preset to be used as an I²C interface. So there are 1.8 kilohm pull up resistors on the board for these pins.
• Pin 12 supports PWM.• It is possible to reconfigure GPIO connector pins P1-
7, 15, 16, 18, 22 (chipset GPIOs 4 and 22 to 25) to provide an ARM JTAG interface. However ARM_TMS isn’t available on the GPIO connector (chipset pin 12 or 27 is needed). Chipset pin 27 is available on S5, the CSI camera interface, however.
WARNINGMake sure that you are looking at the pins the correct way. Failure to do so could result in a dead Pi!
The Raspberry Pi is a 3.3 volt device. Do not attempt to connect to any 5V logic application. Failure to adhere to this can result in a dead Pi!
Example Pi Pin DiagramHint: Even numbered pins are on the inner side of the Pi, while the odd number pins reside on the outer side of the Pi (Figure 4).
Table 2. GPIO Pin Names and Functions
Pi Pin Layout Pin Names & Alt 0 Functions23 45 67 89 1011 1213 1415 1617 1819 2021 2223 2425 26
(1)P1 = +3.3v (50mA) (2) = +5v(3) = GPIO0 (I2C0 _ SDA) (4) = (DNC)(5) = GPIO1 (I2C0 _ SCL) (6) = Ground (0v)(7) = GPIO4 (8) = GPIO14 (UART0 _ TxD)(9) = (DNC) (10) = GPIO15 (UART0 _ RxD)(11) = GPIO17 (12) = GPIO18(13) = GPIO21 (PCM _ DIN) (14) = (DNC)(15) = GPIO22 (16) = GPIO23(17) = (DNC) (18) = GPIO24(19) = GPIO10 (SPI0 _ MOSI) (20) = (DNC)(21) = GPIO9 (SPI0 _ MISO) (22) = GPIO25(23) = GPIO11 (SPI0 _ SCLK) (24) = GPIO8 (SPI0 _ CEO)(25) = (DNC) (26) = GPIO7 (SPI0 _ CE1)
[ Legend ]+5 Volt3.3 VoltGround, 0VDNC – Do not connectUARTGPIOSPI


SECURITY
07/201532
Figure 4. GPIO PIN Layout
Power PinsThe GPIO header provides a 5V source on Pin 2 and 3.3V on Pin 1. The 3.3V supply on Pin 1 is limited to a maxi-mum draw of 50mA. The 5V supply on Pin 2 will draw cur-rent directly from the microUSB supply, whatever is left over from the board can be used via this pin. Using a 1A power supply, 300mA can be used once the board has drawn its required 700mA.
Model A: 1000 mA – 500 mA -> max current draw: 500 mA
Model B: 1000 mA – 700 mA -> max current draw: 300 mA
WarningBe very careful with the 5V pin.
If you short it to any other P1 pin you may permanently damage your Pi.
Pro Tip: Strip a short piece of insulation from another wire and push it over the 5V pin so you don’t accidentally touch it with a probe.
The maximum you can draw from the power pin is be-tween: 150-250mA and again this all depends on what you have currently running, this could be much less. See the link below for more information: http://nathan.chant-rell.net/20120610/raspberry-pi-and-i2c-devices-of-differ-ent-voltage#f3fuse.
Protecting your pins and your PiBefore you go connecting stuff up and playing around, make sure you know what you are doing!
Almost all of the GPIO pins located on the header go di-rectly into the Broadcom chip.
A simple short circuit or mistake in wiring can result in the quick death of your Pi.
GPIO – InteractionHaving your way with the Pi’s pins…
WiringPiWiringPi is a Wiring library written in C and should be us-able from C++ and many other languages with suitable wrappers.
If you have ever used an Arduino before, you will know they are composed of two things. One is the hardware
platform, and the other is the software platform. Part of the software side of things is a tool called Wiring. Wiring is the core of the input and output for the Arduino system.
Pin numberingWiringPi supports both an Arduino style pin number-ing scheme which numbers the pins sequentially from 0 through 16, as well as the Raspberry Pi’s native BCM GPIO pin numbering scheme.
Downloading WiringPihttps://projects.drogon.net/raspberry-pi/wiringpi/down-load-and-install/.
Special Pin FunctionsWiringPi defines 17 pins, but some of them and the func-tions we can use may potentially cause problems with oth-er parts of the Raspberry Pi Linux system.
• Pins 0 through 7 (GPIO 17, 18, 21, 22, 23, 24, 25, 4 respectively): These are safe to use at any time and can be set to input or output with or without the inter-nal pull up or pull down resistors enabled.
• PWM: You can change the function of pin 1 (GPIO 18) to be PWM output, however, if you are current-ly playing music or using the audio system via the 3.5mm jack socket, then you’ll find one channel of audio PWM coming through the pin! If you are not using the audio at all (or the audio is going via the HDMI cable), then this pin is free to be used in PWM mode.
• Pins 8 and 9 (GPIO 0 and 1): These are the I2C pins. You may use them for digital IO if you are not using any I2C drivers which use these pins, howev-er, note that they have on-board 1k8 resistors pulling the signals to the 3v3 supply. This feature does make them handy for switch inputs where the switch simply shorts the pin to ground without having to enable the internal pull up resistors
• Pins 10, 11, 12, 13 and 14 (GPIO 8, 7, 10, 9 and 11 re-spectively): These are used for the SPI interface. Like the I2C interface, if you are not using it, then you can freely use them for your own purposes. Unlike I2C, these pins do not have any external pull up (or pull down) resistors.
• Pins 15 and 16 (GPIO 14 and 15): These are used by the UART for Tx and Rx respectively. If you want to use these pins as general purpose I/O pins then you need to make sure that you reboot your Pi with the serial console disabled. See the file /boot/cmdline.txt and edit it appropriately.
www.bsdmag.org 33
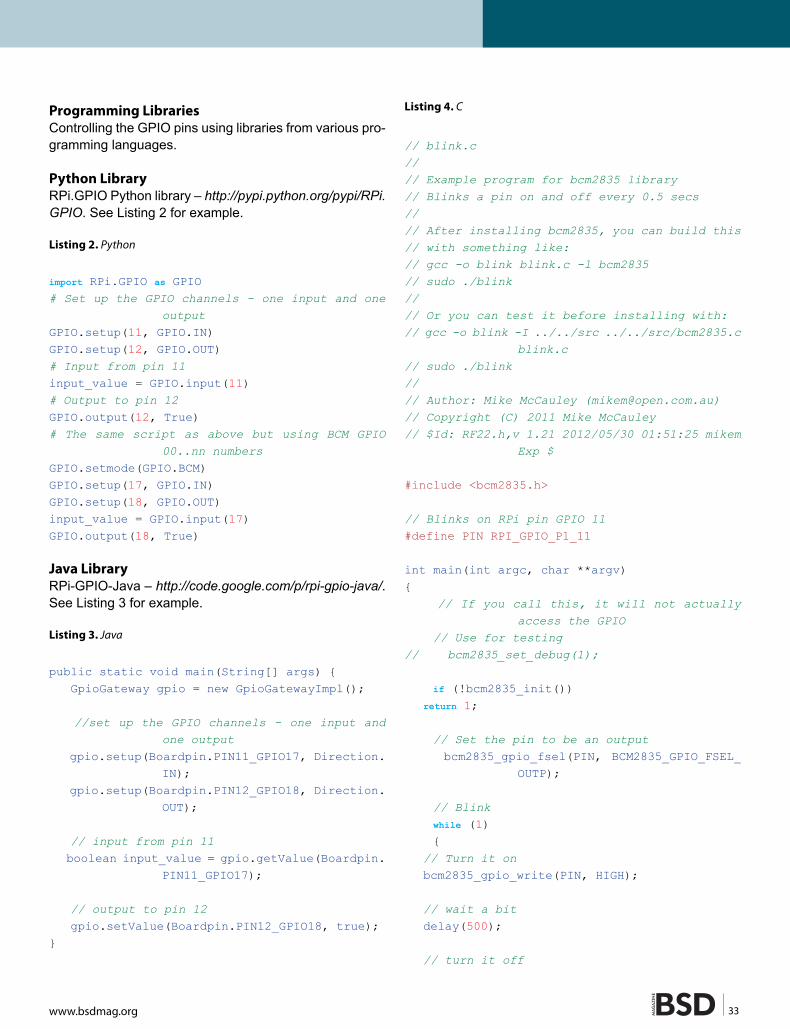
Programming LibrariesControlling the GPIO pins using libraries from various pro-gramming languages.
Python LibraryRPi.GPIO Python library – http://pypi.python.org/pypi/RPi.GPIO. See Listing 2 for example.
Listing 2. Python
import RPi.GPIO as GPIO# Set up the GPIO channels - one input and one
outputGPIO.setup(11, GPIO.IN)GPIO.setup(12, GPIO.OUT)# Input from pin 11input_value = GPIO.input(11)# Output to pin 12GPIO.output(12, True)# The same script as above but using BCM GPIO
00..nn numbersGPIO.setmode(GPIO.BCM)GPIO.setup(17, GPIO.IN)GPIO.setup(18, GPIO.OUT)input_value = GPIO.input(17)GPIO.output(18, True)
Java LibraryRPi-GPIO-Java – http://code.google.com/p/rpi-gpio-java/. See Listing 3 for example.
Listing 3. Java
public static void main(String[] args) { GpioGateway gpio = new GpioGatewayImpl();
//set up the GPIO channels - one input and one output
gpio.setup(Boardpin.PIN11_GPIO17, Direction.IN);
gpio.setup(Boardpin.PIN12_GPIO18, Direction.OUT);
// input from pin 11 boolean input_value = gpio.getValue(Boardpin.
PIN11_GPIO17);
// output to pin 12 gpio.setValue(Boardpin.PIN12_GPIO18, true); }
Listing 4. C
// blink.c//// Example program for bcm2835 library// Blinks a pin on and off every 0.5 secs//// After installing bcm2835, you can build this // with something like:// gcc -o blink blink.c -l bcm2835// sudo ./blink//// Or you can test it before installing with:// gcc -o blink -I ../../src ../../src/bcm2835.c
blink.c// sudo ./blink//// Author: Mike McCauley ([email protected])// Copyright (C) 2011 Mike McCauley// $Id: RF22.h,v 1.21 2012/05/30 01:51:25 mikem
Exp $
#include <bcm2835.h>
// Blinks on RPi pin GPIO 11#define PIN RPI_GPIO_P1_11
int main(int argc, char **argv){ // If you call this, it will not actually
access the GPIO // Use for testing// bcm2835_set_debug(1);
if (!bcm2835_init()) return 1;
// Set the pin to be an output bcm2835_gpio_fsel(PIN, BCM2835_GPIO_FSEL_
OUTP);
// Blink while (1) { // Turn it on bcm2835_gpio_write(PIN, HIGH); // wait a bit delay(500); // turn it off

SECURITY
07/201534
bcm2835_gpio_write(PIN, LOW); // wait a bit delay(500); }
return 0;}
Listing 5. Perl
use Device::BCM2835;use strict;
# call set_debug(1) to do a non-destructive test on non-RPi hardware
#Device::BCM2835::set_debug(1);Device::BCM2835::init() || die “Could not init library”;
# Blink pin 11:# Set RPi pin 11 to be an outputD e v i c e : : B C M 2 8 3 5 : : g p i o _fsel(&Device::BCM2835::RPI_GPIO_P1_11, &Device::BCM2835::BCM2835_
GPIO_FSEL_OUTP);
while (1){ # Turn it on Device::BCM2835::gpio_
write(&Device::BCM2835::RPI_GPIO_P1_11, 1);
Device::BCM2835::delay(500); # Milliseconds # Turn it off Device::BCM2835::gpio_
write(&Device::BCM2835::RPI_GPIO_P1_11, 0);
Device::BCM2835::delay(500); # Milliseconds}
CUsing the bcm2835 Library http://www.open.com.au/mikem/bcm2835. See Listing 4 for example.
PerlUsing the bcm2835 library and Device::BCM2835 module from CPAN. http://www.open.com.au/mikem/bcm2835.
http://search.cpan.org/~mikem/Device-BCM2835-1.0/lib/Device/BCM2835.pm. See Listing 5 for example.
C#RaspberryPiDotNet library – https://github.com/cypher-key/RaspberryPi.Net/. See Listing 6 for example.
Listing 6. C#
using System;using System.Collections.Generic;using System.Linq;using System.Text;using RaspberryPiDotNet;using System.Threading;
namespace RaspPi{ class Program { static void Main(string[] args) { // Access the GPIO pin using a stat-
ic method GPIOFile.Write(GPIO.GPIOPins.GPIO00,
true);
// Create a new GPIO object GPIOMem gpio = new GPIOMem(GPIO.GPI-
OPins.GPIO01); gpio.Write(false); } }
RubyWiringPi Ruby Gem – http://pi.gadgetoid.co.uk/post/015-wiringpi-now-with-serial. See Listing 7 for example.
Listing 7. Ruby
MY_PIN = 1
require ‘wiringpi’io = WiringPi::GPIO.newio.mode(MY_PIN,OUTPUT)io.write(MY_PIN,HIGH)io.read(MY_PIN)

www.bsdmag.org 35
Shell ScriptSee Listing 8 for example.
Listing 8. Shell Script
#!/bin/sh
# GPIO numbers should be from this list# 0, 1, 4, 7, 8, 9, 10, 11, 14, 15, 17, 18, 21,
22, 23, 24, 25
# Note that the GPIO numbers that you program here refer to the pins
# of the BCM2835 and *not* the numbers on the pin header.
# So, if you want to activate GPIO7 on the head-er you should be
# using GPIO4 in this script. Likewise if you want to activate GPIO0
# on the header you should be using GPIO17 here.
# Set up GPIO 4 and set to outputecho “4” > /sys/class/gpio/exportecho “out” > /sys/class/gpio/gpio4/direction
# Set up GPIO 7 and set to inputecho “7” > /sys/class/gpio/exportecho “in” > /sys/class/gpio/gpio7/direction
# Write outputecho “1” > /sys/class/gpio/gpio4/value
# Read from inputcat /sys/class/gpio/gpio7/value
# Clean upecho “4” > /sys/class/gpio/unexportecho “7” > /sys/class/gpio/unexport
GPIO – External Applications
Interfacing With a Teensy KitTeensy Pinout: http://www.pjrc.com/teensy/pinout.html. Logic Level Converter: https://www.sparkfun.com/prod-ucts/8745? (Figure 5).
UART/SerialUsing a logic level converter you can work with the UART / Serial interface to allow a Pi to communicate with a Teen-sy board. The TX from the Teensy should go to the RX on the Raspberry Pi, and vice versa.
Figure 5. Teensy Kit & Logic Converter
To connect up the Pi, connect the following GPIOs to the corresponding pins on the logic level converter.
Raspberry Pi to Logic level converter
Logic level converter to Teensy
GPIO 14 (TXD) connects to TXIGPIO 15 (RXD) connects to RX03v3 Power P1 connects too LVPIN 6 – Ground connects to Ground
HV connects to VCCGND connects to GNDTX0 connects to D2RXI connects to D3Ensure both GND on the Logic Level Converter have been connected to GND.
You should be able to purchase a logic level converter inexpensively, usually under $3.
Interfacing with LCD Displays Hooking the Pi up to a 2x16 HD44780 compatible LCD via GPIO (Figure 6).
Figure 6. HD4770 compatible display
Another cool thing to control with your Pi is an LCD screen. In this example, I will be using a HD44780 compat-ible LCD display. These can be found pretty cheap on ebay for a few dollars. Double check the data sheet for your LCD as pins may vary from vendor to vendor (Figure 7).
Wiring things up to the LCDNormally a HD44780 LCD would require 8 data lines to provide data to bits 0-7. However, you can set this de-vice to operate in “4 bit” mode which will then allow you to send data in two chunks or 4 bits. This is handy as it re-duces the amount of required GPIO connections from the Pi, leaving them free for other things.
The HD44780 LCD will also allow you to control the brightness of the LCD by adjusting the voltage flowing to VO. The voltage must be between the range of 0 and 5volts. In the above example, VO has been connected

SECURITY
07/201536
into ground. Using a potentiometer, you could add an ad-justable knob to control the brightness of the LCD screen in real time (Figure 8).
1 Ground2 VCC (Usually +5V)3 Contrast adjustment (VO)4 Register Select (RS). RS=0: Command, RS=1: Data5 Read/Write (R/W). R/W=0: Write, R/W=1: Read6 Enable7 Bit 0 (Not required in 4-bit operation)8 Bit 1 (Not required in 4-bit operation)9 Bit 2 (Not required in 4-bit operation)10 Bit 3 (Not required in 4-bit operation)11 Bit 412 Bit 513 Bit 614 Bit 715 LED Backlight Anode (+)16 LED Backlight Cathode (-)
Figure 7. LCD Pinout Overview
1 Connect VSS to Ground 2 Connect VCC to 5v+3 Connect VO to Ground (Contrast)4 Connect RS to GPIO7 on pin 265 Connect R/W to Ground.6 Connect E to GPIO8 on pin 24.7 Connect DB4 to GPIO25 on pin 22.8 Connect DB5 to GPIO24 on pin 18.9 Connect DB6 to GPIO23 on pin 16.10 Connect DB7 to GPIO18 on pin 12.11 Connect LEDA to 5v+.12 Connect LEDK to Ground.13 Connect pin 6 to Ground.14 Connect pin 2 to 5v+.
Figure 8. LCD Pin out to Raspberry PI pin connections
NOTE(s)
• pin numbers refer to pins on the Raspberry Pi, whereas names refer to the image on the left.
• LEDA provides 5 volts to the backlight LED of the LCD. HD44780 compatible devices should operate between 2.2 and 5.5 volts. LEDA can be directly con-nected to the 5v source.
• The RW pin allows you to set the LCD in read or write mode, for this example we want to send data to the LCD, but not allow the LCD to send data back to the Pi. The reason for this is that the Pi will not take more than 5V of input on the GPIO header. Do-ing so may result in damage to your Pi. Tying the RW pin into ground will ensure that the LCD will NOT at-tempt to pull the lines over 5volts.
Once you have everything connected up properly, pow-er on and boot up your Pi. If everything was done cor-rectly thus far, the LCD screen should now power on and show either one or two rows of boxes. These boxes will remain until the LCD has been initialized for the first time (Figure 9).
Figure 9. Let there be lights! LCD working..
Using Python to control the LCDNow that everything looks to be up and running, you can now control what is displayed onto the screen.
Using any of the programming language libraries dis-cussed earlier, as an example we will be using some sim-ple Python code with the RPi. GPIO library. Since we will be accessing the GPIO interface, you will need to run Py-thon as root when running the code.
I am not the author of this code, I just hacked it up a bit to better fit the document. The original code was written by: Matt Hawkins (Listing 9).

People are talking about BigData TechCon!Great for quickly coming up to speed in the big data landscape.
—Ben Pollitt, Database Enginee, General Electric
There was a large quantity and variety of educational talkswith very few sales lectures. It was just informative and inspir-
ing. This was the best conference ever! Get a ticket for 2015!—Byron Dover, Big Data Engineer, Rubicon Project
November 2-4, 2015CHICAGOHoliday Inn Chicago Mart Plaza River North
Choose from 55+ classes and tutorials!
Attend Big Data TechCon to get practical training on Hadoop, Spark, YARN, R, HBase, Hive, Predictive Analytics, and much more!
Take a Big Data analytics tutorial, dive deep into machine learning and NoSQL, learn how to masterMongoDB and Cassandra, discover best practices forusing graph databases such as Neo4j and more. You’llget the best Big Data training at Big Data TechCon!
www.BigDataTechCon.comA BZ Media Event Big Data TechCon™ is a trademark of BZ Media LLC.
Learn How To Master Big Data

SECURITY
07/201538
Listing 9. Python script to control the LCD via GPIO
#!/usr/bin/python
import RPi.GPIO as GPIOimport time
# Define GPIO to LCD mappingLCD_RS = 7LCD_D4 = 25 LCD_D5 = 24LCD_D6 = 23LCD_D7 = 18# Define some device constantsLCD_WIDTH = 16 # Maximum characters per lineLCD_CHR = TrueLCD_CMD = FalseLCD_LINE_1 = 0x80 # LCD RAM address for the 1st
lineLCD_LINE_2 = 0xC0 # LCD RAM address for the 2nd
line # Timing constantsE_PULSE = 0.00005E_DELAY = 0.00005def main(): # Main program block GPIO.setmode(GPIO.BCM) # Use BCM GPIO
numbers GPIO.setup(LCD_E, GPIO.OUT) # E GPIO.setup(LCD_RS, GPIO.OUT) # RS GPIO.setup(LCD_D4, GPIO.OUT) # DB4 GPIO.setup(LCD_D5, GPIO.OUT) # DB5 GPIO.setup(LCD_D6, GPIO.OUT) # DB6 GPIO.setup(LCD_D7, GPIO.OUT) # DB7 # Initialise display lcd_init() # Send some test lcd_byte(LCD_LINE_1, LCD_CMD) lcd_string(“Rasbperry Pi”) lcd_byte(LCD_LINE_2, LCD_CMD) lcd_string(“Model B”)
time.sleep(3) # 3 second delay
# Send some text lcd_byte(LCD_LINE_1, LCD_CMD) lcd_string(“magikh0e”) lcd_byte(LCD_LINE_2, LCD_CMD) lcd_string(“DARPAnet”) time.sleep(20)
def lcd_init():
# Initialize display lcd_byte(0x33,LCD_CMD) lcd_byte(0x32,LCD_CMD) lcd_byte(0x28,LCD_CMD) lcd_byte(0x0C,LCD_CMD) lcd_byte(0x06,LCD_CMD) lcd_byte(0x01,LCD_CMD)
# Send string to display message = message.ljust(LCD_WIDTH,” “)
for i in range(LCD_WIDTH): lcd_byte(ord(message[i]),LCD_CHR)def lcd_byte(bits, mode): GPIO.output(LCD_RS, mode) # RS # High bits GPIO.output(LCD_D4, False) GPIO.output(LCD_D5, False) GPIO.output(LCD_D6, False) GPIO.output(LCD_D7, False) if bits&0x10==0x10: GPIO.output(LCD_D4, True) if bits&0x20==0x20: GPIO.output(LCD_D5, True) if bits&0x40==0x40: GPIO.output(LCD_D6, True) if bits&0x80==0x80: GPIO.output(LCD_D7, True) # Toggle ‘Enable’ pin time.sleep(E_DELAY) GPIO.output(LCD_E, True) time.sleep(E_PULSE) GPIO.output(LCD_E, False) time.sleep(E_DELAY) # Low bits GPIO.output(LCD_D4, False) GPIO.output(LCD_D5, False) GPIO.output(LCD_D6, False) GPIO.output(LCD_D7, False) if bits&0x01==0x01: GPIO.output(LCD_D4, True) if bits&0x02==0x02: GPIO.output(LCD_D5, True) if bits&0x04==0x04: GPIO.output(LCD_D6, True) if bits&0x08==0x08: GPIO.output(LCD_D7, True)
# Toggle ‘Enable’ pin time.sleep(E_DELAY) GPIO.output(LCD_E, True)

www.bsdmag.org 39
time.sleep(E_PULSE) GPIO.output(LCD_E, False) time.sleep(E_DELAY) if __name__ == ‘__main__’: main()
If you get an error like “RPi.GPIO.SetupException: No access to /dev/mem.” Make sure you are running Python as root: sudo python testlcd.py.
If everything went well, you should first see “Raspberry Pi Model B” appear, shortly after “magikh0e, DARPAnet” should appear (Figure 10).
Figure 10. Testing out the LCD with text
Common issues I have run into…Only see squares across the LCD: Double check all of
your connections are going to the right place, and ensure good connectivity with the LCD.
Weird characters appearing: Check the connectivity on the LCD.
MCP23017 I2C I/O ExpanderNot enough GPIO pins for you, well not a problem if you have a 16bit MCP23017 I2C I/O Expander kicking around. This will also work with the 8bit model, MCP23008. They both also come in a DIP form, so using them to build your own expansion board for the Pi should be fairly simple. If not, they are simple enough to use on any breadboard as well. The data sheet for the 16bit version of the MCP23017 I2C I/O Expander can be found here: http://ww1.micro-chip.com/downloads/en/DeviceDoc/21952b.pdf.
The 16bit version of the MCP23017 chip has 28 pins that will give you a total of 16 pins that can be used. These pins can be used as either inputs or outputs. Up to 8 of these pins can be used on 1 I2C bus, thus giving you a lot more I/O than the Pi has built in. The best thing about this chip is that you can reduce the risk of damaging your Pi since each pin has a maximum of 25mA for input or output. The expander can also be placed away from the Pi itself, and connecting up using only 4 wires. If space is a concern, go with the 8bit MCP23008 model.
Required drivers and softwareBefore you will be able to control the expander, you will require some drivers and tools first. Keep in mind that the work being done on the I2C drivers are still in pretty early stages. Your Pi will need to be running a kernel with the bitbanging driver, or have the driver available for the ker-nel you are currently running.
After verifying you have a kernel with the bitbanging driver enabled, you will need to install the i2c-tools pack-age by issuing the following command:
sudo apt-get install i2c-tools
The i2c-tools package will give us the ability to scan the I2C bus and send values to I2C addresses and registers using command line tools.
MCP23017Pi GPIO
PIN 9 – VDD PIN 2 – Vcc 5v+
PIN 10 – Vss Ground
PIN 12 – SCL PIN 5 – I2C0_SCL
PIN 13 – SDA PIN 3 – I2C0_SDA
PINS 15,16,17 Ground
PIN 18 PIN 2 – Vcc 5v+
Figure 11. MCP23017

SECURITY
07/201540
Connecting the expander to the PiNow that you have verified all the proper software is in place, you can now wire the expander into the Pi. Using the chart below connect up the pins from the MCP23017 to the pins on your Pi accordingly (Figure 11).
NotesPIN 9: This can be connected to the Pi’s 5v source, or any external source up to 5.5volts.
PINS 15(A0), 16(A1), 17(A2): Setting these pins to ground selects the I2C address as 0×20, other combina-tions can set a different address. See data sheet.
PIN 18: Setting this pin to Vcc turns the expander on.
Testing the Pi and Expander communicationOnce everything has been connected and verified. You can now test your Pi’s communication with the expander you have just connected.
I2cdetect –y 0
If everything is happy, you should see an ASCII repre-sentation of a table with 20 in the first column on the row marked 20. This will show that there is something there with an I2C address of 0x20. As we expect.
Controlling the MCP23017As you read in the data sheet for the MCP23017, the I/O pins are laid out in 2 banks, A and B, and each bank is controlled together. In order to set a pin as an input or out-put, you will need to send a hex value to the correct reg-ister. You can find this in Table 1.4 of the datasheet linked above. IODIRA (0x00) will set the input/output state for bank A and IODIRB (0x01) for bank B. In order to change a pin to be an input, you need to set each of the 8bits to 1. To setup the pin as an output, each bit will need to be set to 0. Keep in mind, in a default state, all of the pins are setup to be inputs.
So if you wish to set pins 0,1, and 7 to be inputs and the rest of the pins as outputs. You would set 10000011 in bi-nary or 0x83 in hex. To set the entire bank as outputs, you can simply use 0x00.
Once the pins have been configured as inputs/outputs, you can turn them on or off by sending a hex value to the register for the particular bank you wish to control. 0x12 for bank A, 0x13 for bank B.
As always 1 is on, 0 is off, using the same form as above. So if you wish to turn pin 0 on, you will send 00000001 as binary, or 0x01 as hex.
I2cset examples
Set all of bank A to be outputs: i2cset –y 0 0x20 0x00
0x00
Set GPA0 as on: i2cset –y 0 0x20 0x12 0x01
Set GPA0 as off: i2cset –y 0 0x20 0x12 0x00
i2cset command format: i2cset i2-cbus i2c-address i2c-
register value
Raspberry Pi Resources
• Raspberry Pi for beginners – Unofficial YouTube Channel: http://www.youtube.com/user/RaspberryPi-Beginners
• Hardware lesson with Gert: make your own rib-bon cable connector: http://www.raspberrypi.org/ar-chives/1404
• Raspberry Pi – How to use the GPIO #23: http://www.youtube.com/watch?v=q_NvDTZIaS4
• Raspberry Pi Quick Start Guide: http://www.raspber-rypi.org/quick-start-guide
• Raspberry Pi Wiki: http://elinux.org/RaspberryP-iBoard
• SSH Phone Home: Using the Raspberry Pi as a proxy/pivot (Shovel a Shell): http://www.iron-geek.com/ i .php?page=secur i ty/raspber r y-p i -recipes#SSH_Phone_Home:_Using_the_Raspber-ry_Pi_as_a_proxy/pivot_(Shovel_a_Shell)
• Raspberry-PWN: https://github.com/pwnieexpress/Raspberry-Pwn
• Raspberry Pi Kernel: http://www.bootc.net/projects/raspberry-pi-kernel/
• Display Interface Specifications: http://www.mipi.org/specifications/display-interface
• Camera Interface Specifications: http://www.mipi.org/specifications/camera-interface
ABOUT THE AUTHOR
Jeremiah Brott currently holds a lead role with Access2Networks Toronto as an Information Security Consultant. In addition to holding numerous certifications, Jeremiah is also the professor for Malicious Code – Design & Defense along with Ethical Hacking at Sheridan Institute for the Applied Information Sciences System Security degree program. Hacker’s do it with all sorts of characters… www.Access2Networks.com


REVIEWS
07/201542
It is a Windows software that spawned WebHTTrack, its Linux/Unix/BSD release. The tool dumps and mir-rors the complete contents of the source website you
specify to a local directory by replicating the exact direc-tory structure, files and links.
This is beneficial for a security practitioner who wants to perform offline security testing against a website without impacting the server hosting it.
Install WebHTTrack on Ubuntu by entering the following command in your Terminal.
sudo apt-get install webhttrack
Launch WebHTTrack by clicking on Applications>Internet>WebHTTrack Website Copier. The web interface is now accessible via your default browser. Select your lan-guage and click Next.
Figure 1. Web interface
Give your new project a name, category name and base path before clicking on Next.
Figure 2. Project details
Enter details of the URL(s) that you want to mirror locally.
Figure 3. URLs
WebHTTrackMERVYN HENG
HTTrack Website Copier is an open source tool to download an entire website from the Internet locally onto your desktop for offline browsing.

www.bsdmag.org 43
Click Start to initiate the mirroring.
Figure 4. Start mirroring
You can monitor the progress of the mirroring. You may opt to skip certain paths or objects and abort the mirror altogether.
Figure 5. Progress
Once the mirroring is completed, you can directly ac-cess the website locally by using the path link at the bot-tom of the page.
Figure 6. Mirror complete
This tool is simple to install and use yet incredibly use-ful in supporting Application Security testing to find vulner-abilities and also facilitating offline analysis of malicious code as well as malware embedded in websites. It is sup-ported on multiple platforms so try it today.
ABOUT THE AUTHOR
Mervyn Heng, CISSP, is into Ubuntu, Comic Universe characters, Pop culture and Art outside of Information Security. If you have any comments or queries, please contact him at [email protected].

REVIEWS
07/201544
What happens when you take the popular Rasp-berry Pi (RPi) microcomputer and hand it over to a Chinese company? You get an even more
powerful and feature packed microcomputer with a similar name, the Banana Pi Pro. I guess “Blueberry” must have been taken already. The Banana Pi Pro is slightly larger than the RPi but it sure has more items added on. This board is a super-sized microcomputer if you look at the specs alone.
The processor is an Allwinner A20 ARM Cortex 7 that uses a quad core system on a chip design (SoC) which is nearly identical to the RPi. The same goes for the operating speed of 1GHz and 1 gig of onboard DDR3 SDRAM. You’ll find the identical 40 pin GPIO header and microSD slot un-derneath as the RPi, along with full HDMI and microUSB power connection. That is where the similarities stop.
Lemaker, backers of the Banana Pi Pro, threw in some great additions that make up for the $10 higher price tag. The Banana has an infrared receiver built onto the board. The Ethernet port is a 10/100/1000 gigabit interface where the RPi is 10/100 megabit. There is an SATA con-nection for your portable hard drives, which makes up for only having two USB ports compared to RPi’s four USB ports. I found the SATA connection to be quite fast on a 2 terabyte Samsung drive I had.
The Banana has three reset/reboot buttons located across the board so you can selectively reset certain parts of the system without restarting the whole board. Some-body decided to add a microphone to this board knowing that I’m a great singer in the shower. My singing makes my dog howl in pain but the microphone makes me sound even better during playback with the 3.5mm AV out jack. The Banana even comes with WiFi enabled so there is no need to plug in a separate USB WiFi. The range is pretty good or as good as my iPad is, I should say. The WiFi chip also comes with a really cool antenna so I can broadcast my vocals across the neighborhood.
I’m keeping all the shoes my neighbors throw at me as I sing.
The SATA connection can accommodate up to 4 tera-bytes of my karaoke songs on a drive so all my hard work on yodeling will pay off someday. For some odd reason, the mi-croSD card won’t take a chip larger than 64 gig but that isn’t
a big deal because the Banana Pi Pro can boot up a large assortment of operating systems, including Android, Fedo-ra, Ubuntu, Debian, Arch, openSUSE and even Raspbian. Lemaker created their own OS version called Bananian.
Many microcomputers have adopted the 40 pin GPIO connectors and the Banana Pi Pro is no different. I found my Sain Smart 3.5” TFT screen fit on the new board and worked perfectly after I updated the frame buffer interface and configured the GPIO to match the Banana Pi. My 7” HDMI display also worked well too, after I swapped out one cheap HDMI cable for a better cable. The Banana, like real fruit can come in bunches; they are stackable. You can even stack the RPi on top of the Banana Pi. The GPIOs are slightly different but that can be corrected on either Pi for wire configuration (remapping pins).
Lemaker is working hard to build up a library of software to support the Banana Pi Pro. You can still run Python, Scratch, Java and other programming languages right out of the box. All the big chips are on the bottom of the board while the topside looks almost naked except for the perim-eter connections. There are two microUSB ports. One for OTG and one for power. You don’t want to confuse the two but since I did, nothing seemed to happen except it didn’t power up. The display interface is opposite compared to the RPi when looking for the camera connection. The con-nections are switched just to keep things interesting.
If you are looking for an alternative to the Raspberry Pi that has a lot of additional accessories, like built in WiFi, IR, SATA and Gigabit Ethernet, then the Banana Pi Pro is your choice. The cost difference more than makes up for the extra features and slightly larger size.
ABOUT THE AUTHOR
Bob Monroe spent each year learning entirely new skills while maintaining his aviation skill set. He spent his spare time learning computer security, counterhacking, computer system hardening, intrusion detection and vulnerability assessments, IT ethics, cryptology, and that the biggest security risk is the human being. He is working as a volunteer for the Institute for Security and Open Methodologies (ISECOM.org), and Hacker High School (hackerhighschool.org) as a researcher and writer.
Banana Pi ProBOB MONROE


*BSD CORNER
07/201546
INTERVIEW
Luca Ferrari: Can you please introduce yourself and explain when and how you got in touch with HardenedBSD project?Shawn Webb: Around two-and-a-half years ago, I had blogged about some of my personal goals and one of them was implementing ASLR (Address Space Layout Randomization) for FreeBSD. An awesome dude from Hungary named Oliver Pinter came across my blog post and suggested we work together. He had the beginnings of a working patch. I added execution base randomization for position-independent executables (PIEs) and per-jail support.
We started the upstreaming process for our ASLR patch nearly two years ago. In order to make our lives easier, we started the HardenedBSD project to serve as a stag-ing area for our development prior to upstreaming. So I got started with HardenedBSD by cofounding it with Oli-ver Pinter.
Luca Ferrari: What are the main innovations of HardenedBSD project with regard to the last year?Shawn Webb: Our ASLR implementation is the strongest ever implemented in any of the BSDs.
We are the only OS in existence that has true stack ran-domization and can achieve 42 bits of entropy introduced into the stack.
All of our enhancements are also per-jail. So if an ap-plication misbehaves with our enhancements, that appli-cation can reside in a jail with the enhancements turned off just for that jail. Those enhancements (ASLR, SEGV-GUARD, PaX PAGEEXEC/MPROTECT, etc.) remain on for the rest of the system.
Additionally, we have the secadm project, allowing you to do that same toggling on a per-binary basis. If jailing the application doesn’t look attractive, then you can use secadm to simply disable the enhancement for just that
Interview with ...
Shawn Webb Tells You All About HardenedBSD ProjectLUCA FERRARI
Shawn Webb is an information security professional who has been involved in opensource information security technologies for the past few years. He fell in love with FreeBSD as a teenager during the 4.x days. He serves as the cofounder of HardenedBSD and is one of the lead security engineers on the project.

www.bsdmag.org 47
application. Rulesets loaded by secadm are also per-jail. We’ve been working with the OPNSense team to help them switch from FreeBSD to HardenedBSD so they can enjoy the same level of protection I enjoy. We’re really ex-cited to see this relationship develop further and for the switch to be made.
Luca Ferrari: What are the main advantages of HardenedBSD project?Shawn Webb: You get the normal awesomeness that FreeBSD delivers along with expert exploit mitigation and security technologies. We’ve done a great job with our current enhancements, but there’s still a lot we’d like to do. This next year will be a great one for us and our users. We have a lot more planned for the next year.
Luca Ferrari: How difficult is it for the average developer/sysadmin to customize HardenedBSD project? (I do not know if it is possible?)Shawn Webb: It’s just as difficult (or easy, if you prefer to think of it that way) as customizing FreeBSD. Hardened-BSD is FreeBSD with our security work on top of it.
Luca Ferrari: How does the HardenedBSD project cope with an enterprise scenario?Shawn Webb: We still have a bit of work to do in this are-na. We still don’t have an official release, though we plan to have our first official release at around the same time FreeBSD releases 11.0.
We provide our own packages for 11-CURRENT/amd64 and 10-STABLE/amd64. However, we don’t provide bi-nary updates for base. We’re waiting on base packaging support in Poudriere/pkg. If that doesn’t happen within the next six or so months, we’ll likely write our own secure bi-nary updating mechanism.
Luca Ferrari: Where do you see the HardenedBSD project growing in the near future?Shawn Webb: We are currently running a fundraiser to help us become a not-for-profit 501(C) (3) organization in the USA, similar to the FreeBSD Foundation. Once that happens, future donations will become tax-deductible. However, becoming a not-for-profit is pretty costly in the USA, so we need support from the community to do so. The classic chicken-and-egg scenario.
We just added a new developer, Brian Salcedo, who is tasked with revamping secadm to be more efficient. He’s doing some great work and we’re excited to see where he takes secadm in the near future. He hopes to add a fea-
ture similar to grsecurity’s TPE (Trusted Path Execution), an addition that would be very much welcomed by Oliver and me.
Luca Ferrari: Who do they see themselves competing with?Shawn Webb: We don’t like to see us as competitors to anything or anyone. We simply like to write great code and make FreeBSD better. With companies like Netflix us-ing FreeBSD to deliver around 36% of peak North Ameri-

*BSD CORNER
07/201548
INTERVIEW
can Internet traffic, these security enhancements are cru-cial. We need to raise the bar for attackers.
We’ll work with anyone and everyone who uses Free-BSD to help them bring in HardenedBSD’s work--making us not competitors but collaborators.
Luca Ferrari: Please tell us more about OPNSense.Shawn Webb: OPNSense is an up-and-coming fork of pfSense. I own a little ASUS wireless router at home and know of its many vulnerabilities. I figured that I really dis-like major vulnerabilities that can allow random people on the Internet to be able to man-in-the-middle (MitM) me, switching to a dedicated firewall/routing appliance would be better.
I used pfSense heavily in the past and grew to love the project. However, I wanted a custom version of it for my own use, but instead of using FreeBSD as the base, I wanted to use HardenedBSD. I like to eat my own dog-food. After a bit of digging, I figured out that it’s near im-possible to do your own builds of pfSense. The documen-tation for the build process doesn’t exist and the pfSense project doesn’t want such documentation to exist.
So I kept looking. I had heard of OPNSense before and that it was a fork of pfSense. Their build documentation is front-and-center. Though pfSense was my first choice, I naturally went with OPNSense. After a bit of digging and some handholding from the OPNSense team, I was able to produce a working build relatively quickly.
I found that I work really well with the OPNSense team and they work well with me. Their interest became piqued as soon as they learned who I was and what I was doing. We began talking about switching OPNSense from Free-BSD to HardenedBSD. We have teamed up to help and support each other in our ventures.
Luca Ferrari: How is the VDSO (Virtual Dynamic Shared Object) integration going?Shawn Webb: Really well! It was completed over the weekend of 04 July 2015. Finishing the Virtual Dynamic Shared Object (VDSO) randomization was the final piece to finishing our ASLR implementation.
Luca Ferrari: Why did you choose FreeBSD?Shawn Webb: I was introduced to FreeBSD as a teenag-er by some cool hackers. I instantly fell in love. I’ve been an advocate of FreeBSD ever since. Choosing FreeBSD as a base for HardenedBSD was a natural choice.
Luca Ferrari: Please tell us more what the basic needs of HardenedBSD project are and how the community can help develop the project?Shawn Webb: What we at HardenedBSD need most is funding. It takes a lot to run a project like HardenedBSD. I’m paying for it all myself out of my own pocket. We really need help in order to become a not-for-profit organization.
Additional donated hosted servers would be great, too. We could make use of another package building server and another nightly build server.
Luca Ferrari: Summing up, please tell our Readers why the HardenedBSD project is so unique and what the users can achieve when they decide to use it?Shawn Webb: HardenedBSD provides expert exploit mitigation and security technologies to FreeBSD. These technologies have proven to make life difficult for would-be attackers. Our goal is to piss off the bad guys.
ABOUT AUTHOR
Luca Ferrari lives in Italy with his wife and son. He received a PhD in Computer Science by University of Modena and Reggio Emilia, has been co-founder, member of the board of directors and president of Italian PostgreSQL Users’ Group (ITPUG). Luca loves Open Source software and Unix culture, uses GNU Emacs, Perl, zsh and FreeBSD along with a lot of other cool tools.

www.balabit.com
Among clouds Performance and
Reliability is critical
syslog-ng log serverThe world’s first High-Speed Reliable LoggingTM technology
HIGH-SPEED RELIABLE LOGGINGabove 500 000 messages per secondzero message loss due to theReliable Log Transfer ProtocolTM
trusted log transfer and storage
Download syslog-ng Premium Editionproduct evaluation here
Attend to a free logging tech webinar here
The High-Speed Reliable LoggingTM (HSRL) and Reliable Log Transfer ProtocolTM (RLTP) names are registered trademarks of BalaBit IT Security.

Enroll to BUILD YOUR OWN PENTEST LAB online course and learn how to create your own pentest lab.
This course covers various virtualization software and penetration testing tools like Kali Linux, Nessus, Metasploit, Metasploitable, Nmap, and others.
Through practical hands-on labs, you will be able to not only identify systems but also identify their vulnerabilities.
All in pure practice.
In case of any questions please contact:

Course Plan:Pre-Course Material
« Why Do I Need a Pen Test Lab « Definitions « Creating Directory Structure For the Course « Download Virtual Images « Acquire Nessus Licenses
Module 1 The Build
« Definitions « Some Basic Linux Commands You Need to Know
Software
« Installation of VMPlayer and Virtual Box. You Decide, We Will Cover Both.
« Setup of Our Penetration Testing System – Kali Linux Distribution
« Setup a Linux Client as a Virtual Machine « Setup Our First Vulnerable Machine
Metasploitable2 « Setup Our Second Vulnerable Machine Bee-box
(BWAMP)
Exercises
« Overview of Virtual Machine Settings « Run the Basic Linux commands « Upgrade Kali Linux Distribution
Module 2 Port Scanning
« Nmap and Zenmap Installation « Nmap Basic Scanning « ZenMap Basic Scanning « Metasploitable Dnmap Scanning
Exercises
« Run Nmap Scans against Ubuntu « Run Zenmap Scans Against Metasploitable2 « Run Dnmap Scans Against Host
Module 3 Vulnerability Scans
« Installation and Licensing of Nessus Vulnerability Scanner
« Installation of Netsparker Web Vulnerability Scanner
« Basic Nessus Scanning « Basic Netsparker Scanning « Intermediate Nmap Scans
Exercises
« Run a Nessus Scan Against Metasploitable2 « Run a Netsparker Scans Against Bee-Box
(BWAMP) « Run a Nessus Scan Against Ubuntu
Module 4 Advanced Scanning and Reporting
« Nessus Advanced Scans « Netsparker Advanced Scans « Nmap Advanced Scans « Metasploit Reporting « Review Other Resources Available to You… « Where Do I Get Virtual Machines
Exercises
« Create a Metasploit Report Combining Nessus and Dnmap Scans
« Run an Advanced Nessus Scan Against Metasploitable 2
« Run an Advanced Netsparker Scan Against Bee-Box (BWAMP)
If you have any questions or just want to get to know us better feel free to contact
me at [email protected] or just answer this email
Get 10% discount on our magazines and online courses. Insert the code and use it at check-out
10eForSe07Code is valid till the end of July


