OWNER’S MANUAL FRENCH DOOR REFRIGERATOR Please read this owner's manual thoroughly before operating and keep it handy for reference at all times. LMX25964 ** P/No.: MFL37933588 www.lg.com ENGLISH FRANÇAIS ESPAÑOL
Transcript
OWNER’S MANUAL
FRENCH DOORREFRIGERATORPlease read this owner's manual thoroughly beforeoperating and keep it handy for reference at all times.
LMX25964**
P/No.: MFL37933588 www.lg.com
ENG
LISH
FRA
NÇ
AIS
ESP
AÑ
OL
2
IMPORTANT SAFETY INFORMATIONBasic Safety Precautions ........................................3CFC Disposal ..........................................................4How to Connect Electricity ......................................5
PARTS AND FEATURESSpecial Features .....................................................6Key Parts and Components ....................................7
INSTALLATIONChoose the Proper Location ...................................8Clearances ..............................................................8Flooring ...................................................................9Handle Removal......................................................9Door and Drawer Removal....................................10Connecting the Water Supply ...............................18Connecting the Water Lines..................................18Leveling the Refrigerator Doors ............................20Starting..................................................................21
HOW TO USEControl Panel Features .........................................22The LED Display ...................................................23Operating the Dispenser ......................................23Adjusting the Temperatures and Display .............24Setting the Functions ...........................................25In-Door Ice Bin .....................................................26Automatic Icemaker .............................................27Storing Foods .......................................................28Location of Foods .................................................29Shelf Height Adjustment .......................................30Utility Bin (Optional) ..............................................30
CARE AND CLEANINGRemoving and Replacing Components ................31Cleaning the Refrigerator .....................................33General Information .............................................33Light Bulb Replacement .......................................34Replacing the Water Filter.....................................35
TROUBLESHOOTINGBefore Calling for Service ....................................36
SPECIFICATIONSKey Dimensions and Specifications .....................40
WARRANTYProduct Registration Information ..........................41
THANK YOU!Congratulations on your purchase
and welcome to the LG family.
Your new LG French Door
Refrigerator combines
advanced cooling technology
with simple operation and high
efficiency. Follow the operating
and care instructions in this
manual and your refrigerator
will provide you with many years
of reliable service.
3
BASIC SAFETY PRECAUTIONS
This guide contains many important safety messages. Always read and obey allsafety messages.
w This is the safety alert symbol. It alerts you to safety messages that inform you of hazards that can kill or hurt you or others or cause damage to the product. All safety messages will be preceded by the safety alert symbol and the hazard signal word DANGER, WARNING, or CAUTION. These words mean:
wDANGER You might be killed or seriously injured if you don’t follow instructions.
wWARNING You can be killed or seriously injured if you don’t follow instructions.
wCAUTION Indicates an imminently hazardous situation which, if not avoided, mayresult in minor or moderate injury, or product damage.
All safety messages will identify the hazard, tell you how to reduce the chance of injury, and tell you what can happen if the instructions are not followed.
wWARNINGTo reduce the risk of fire, electric shock, or injury to persons when using your product, basic safety precautions should be followed,including the following.Read all instructions before using this appliance.• NEVER unplug your refrigerator by pulling on the
power cord. Always grip the plug firmly and pull itstraight out from the outlet.
• Repair or replace immediately all electric servicecords that have become frayed or otherwisedamaged. Do not use a cord that shows cracks orabrasion damage along its length or at either theplug or connector end.
• When moving your refrigerator away from the wall,be careful not to roll over or damage the power cord.
• DO NOT store or use gasoline or other flammablevapors and liquids in the vicinity of this or any otherappliance.
• Do NOT allow children to climb, stand, sit or hangon doors, drawers or shelves of the refrigerator. They could damage the refrigerator and seriouslyinjure themselves.
• Keep fingers out of pinch point areas; clearancesbetween the doors and cabinet are necessarilysmall. Be careful closing doors when children are in the area.
• Unplug your refrigerator before cleaning or makingany repairs.NOTE: Service should be performed by a qualifiedtechnician.
• Before replacing a burned-out light bulb, unplug therefrigerator or turn off power at the circuit breaker or fuse box in order to avoid contact with a live wirefilament. (A burned-out light bulb may break whenbeing replaced.)NOTE: Some models have LED interior lighting andservice should be performed by a qualifiedtechnician.NOTE: Setting either or both controls to the OFFposition does not remove power to the light circuit.
• When you are finished, reconnect the refrigerator tothe electrical source and reset the control(Thermostat Refrigerator Control, or FreezerControl, or Freezer Control, depending on themodel) to the desired setting.
• This refrigerator must be properly installed inaccordance with the Installer Instructions thatwere taped to the front of the refrigerator.
• After your refrigerator is in operation, do not touchthe cold surfaces in the freezer compartment whenhands are damp or wet. Skin may adhere to theextremely cold surfaces.
• In refrigerators with automatic icemakers, avoidcontact with the moving parts of the ejectormechanism or with the heating element thatreleases the cubes. DO NOT place fingers or handson the automatic icemaking mechanism while therefrigerator is plugged in.
• Do not modify or extend the power cord length.It will cause electric shock or fire.
ENG
LISH
4
BASIC SAFETY PRECAUTIONS (CONT.)
• Do not use drier to dry the inside, nor light a candle toremove odor.
• Install in places away from the fire such as the placewhere flammable gas is leaked.
• This appliance is not intended for use by persons(including children) with reduced physical, sensory ormental capabilities, or lack of experience andknowledge, unless they have been given supervisionor instruction concerning use of the appliance by aperson responsible for their safety.
Children should be supervised to ensure that they donot play with the appliance.
• DO NOT refreeze frozen foods which have thawed completely. The United States Department of Agriculture in Home and Garden Bulletin No. 69 says:
…You may safely refreeze frozen foods that havethawed if they still contain ice crystals or if they arestill cold—below 40°F (4°C).
…Thawed ground meats, poultry, or fish that have any off-odor or off-color should not be refrozen and should not be eaten. Thawed ice cream should be discarded. If the odor or color of any food is poor or questionable, dispose of it. The food may be dangerous to eat.
Even partial thawing and refreezing reduces thequality of foods, particularly fruits, vegetables, and prepared foods. The eating quality of red meats is affected less than that of many other foods. Use refrozen foods as soon as possible tosave as much of their quality as you can.
CFC DISPOSAL
Your old refrigerator may have a cooling system that used CFCs (chlorofluorocarbons). CFCs are believed to harm stratospheric ozone.
If you are throwing away your old refrigerator, make sure the CFC refrigerant is removed for proper disposal by a qualified servicer. If you intentionally release this CFC refrigerant, you can be subject to fines and imprisonment under provisions of environmental legislation.
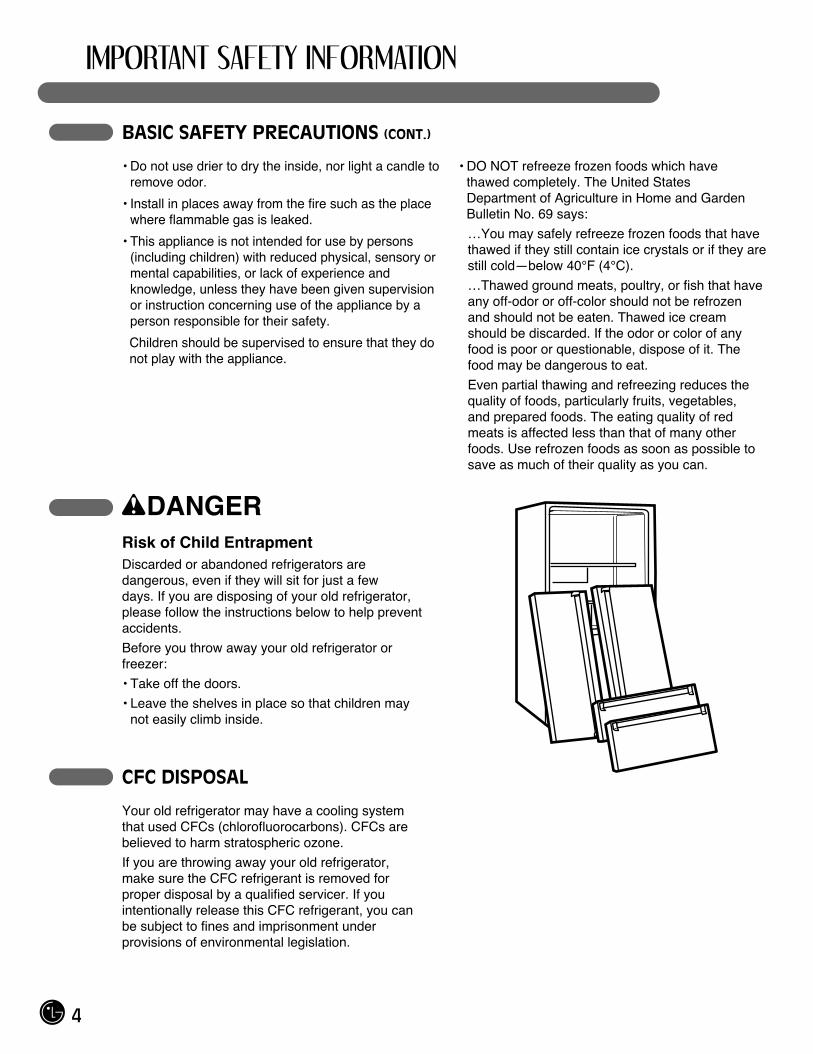
wDANGERRisk of Child EntrapmentDiscarded or abandoned refrigerators are dangerous, even if they will sit for just a few days. If you are disposing of your old refrigerator, please follow the instructions below to help prevent accidents.
Before you throw away your old refrigerator or freezer:
• Take off the doors.
• Leave the shelves in place so that children may not easily climb inside.
5
HOW TO CONNECT ELECTRICITY
IMPORTANT: Please read carefully.
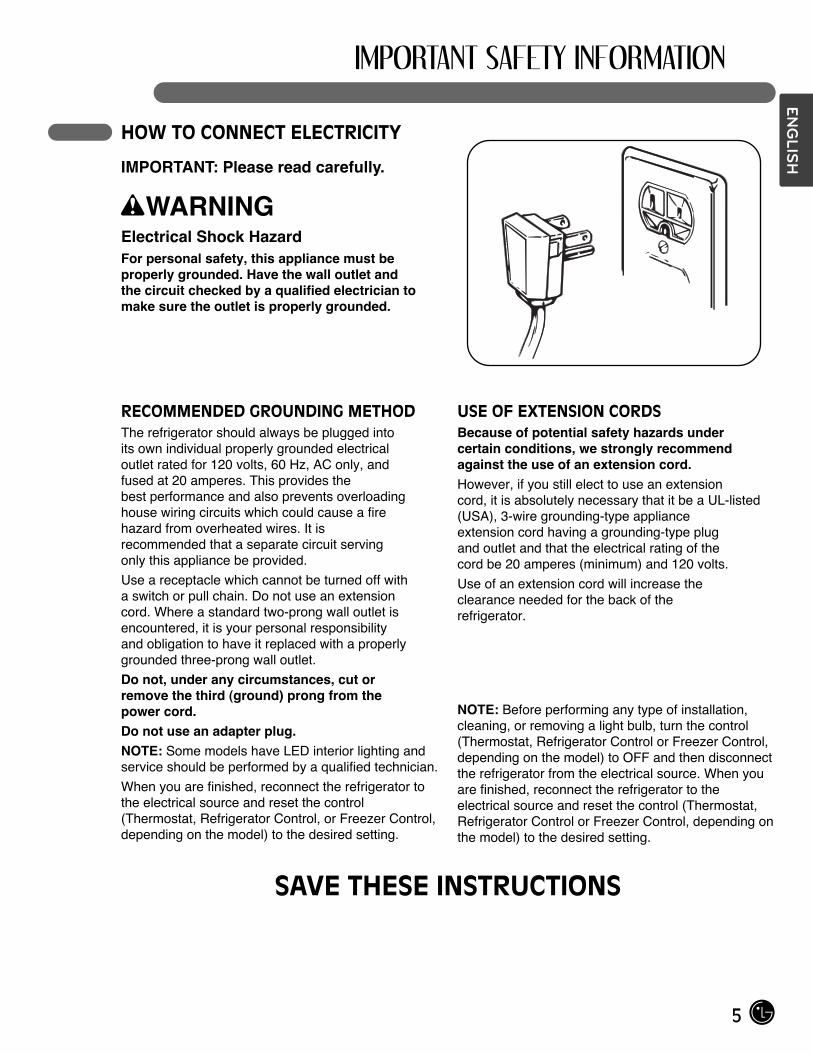
wWARNINGElectrical Shock HazardFor personal safety, this appliance must be properly grounded. Have the wall outlet and the circuit checked by a qualified electrician to make sure the outlet is properly grounded.
RECOMMENDED GROUNDING METHODThe refrigerator should always be plugged into its own individual properly grounded electrical outlet rated for 120 volts, 60 Hz, AC only, and fused at 20 amperes. This provides the best performance and also prevents overloading house wiring circuits which could cause a fire hazard from overheated wires. It is recommended that a separate circuit serving only this appliance be provided.
Use a receptacle which cannot be turned off with a switch or pull chain. Do not use an extension cord. Where a standard two-prong wall outlet is encountered, it is your personal responsibility and obligation to have it replaced with a properly grounded three-prong wall outlet.
Do not, under any circumstances, cut or remove the third (ground) prong from the power cord.Do not use an adapter plug.NOTE: Some models have LED interior lighting andservice should be performed by a qualified technician.
When you are finished, reconnect the refrigerator tothe electrical source and reset the control(Thermostat, Refrigerator Control, or Freezer Control,depending on the model) to the desired setting.
USE OF EXTENSION CORDSBecause of potential safety hazards under certain conditions, we strongly recommend against the use of an extension cord.However, if you still elect to use an extension cord, it is absolutely necessary that it be a UL-listed (USA), 3-wire grounding-type appliance extension cord having a grounding-type plug and outlet and that the electrical rating of the cord be 20 amperes (minimum) and 120 volts.
Use of an extension cord will increase the clearance needed for the back of the refrigerator.
NOTE: Before performing any type of installation,cleaning, or removing a light bulb, turn the control(Thermostat, Refrigerator Control or Freezer Control,depending on the model) to OFF and then disconnectthe refrigerator from the electrical source. When youare finished, reconnect the refrigerator to theelectrical source and reset the control (Thermostat,Refrigerator Control or Freezer Control, depending onthe model) to the desired setting.
SAVE THESE INSTRUCTIONS
ENG
LISH
6
SPECIAL FEATURES
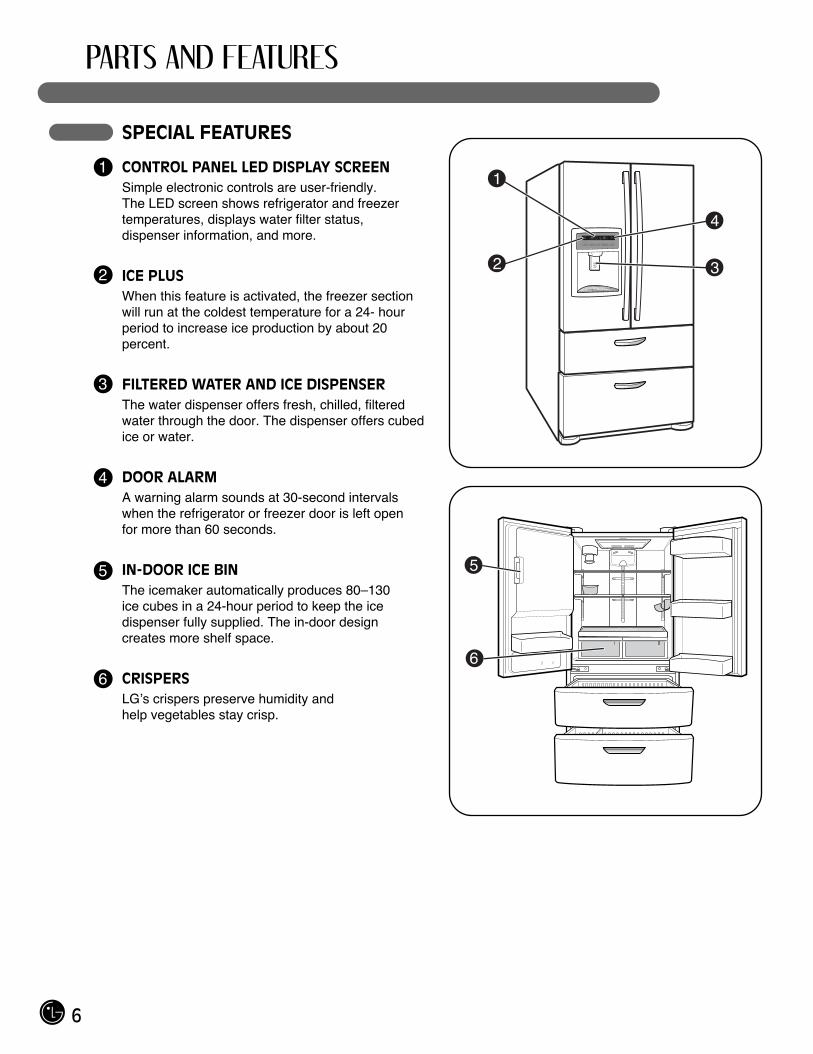
CONTROL PANEL LED DISPLAY SCREENSimple electronic controls are user-friendly.The LED screen shows refrigerator and freezer temperatures, displays water filter status, dispenser information, and more.
ICE PLUSWhen this feature is activated, the freezer section will run at the coldest temperature for a 24- hour period to increase ice production by about 20 percent.
FILTERED WATER AND ICE DISPENSERThe water dispenser offers fresh, chilled, filtered water through the door. The dispenser offers cubedice or water.
DOOR ALARMA warning alarm sounds at 30-second intervals when the refrigerator or freezer door is left open for more than 60 seconds.
IN-DOOR ICE BINThe icemaker automatically produces 80–130 ice cubes in a 24-hour period to keep the ice dispenser fully supplied. The in-door design creates more shelf space.
CRISPERSLG’s crispers preserve humidity and help vegetables stay crisp.
1
2
3
4
5
6
1
2
4
3
5
6
7
KEY PARTS AND COMPONENTS
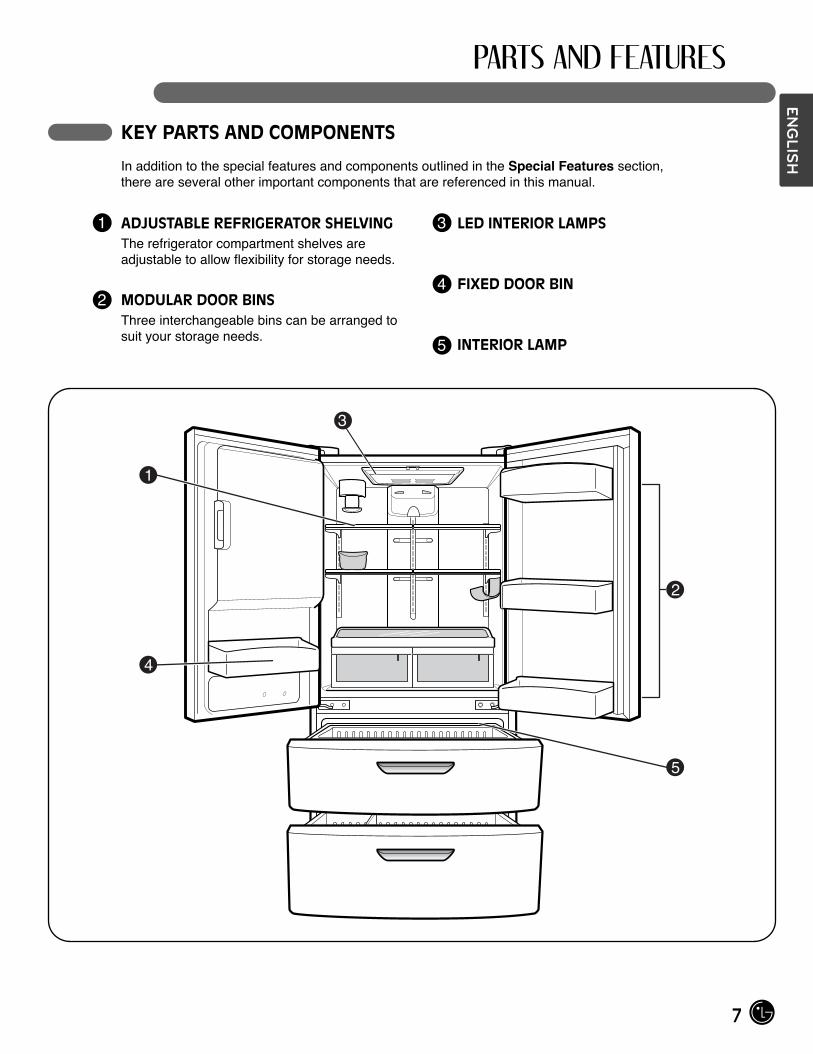
In addition to the special features and components outlined in the Special Features section, there are several other important components that are referenced in this manual.
ADJUSTABLE REFRIGERATOR SHELVINGThe refrigerator compartment shelves are adjustable to allow flexibility for storage needs.
MODULAR DOOR BINSThree interchangeable bins can be arranged to suit your storage needs.
LED INTERIOR LAMPS
FIXED DOOR BIN
INTERIOR LAMP
1
2
3
4
5
4
1
5
2
3
ENG
LISH
8
CHOOSE THE PROPER LOCATION
wWARNINGExcessive Weight HazardTwo or more people are required when moving and unpacking the appliance.• Store and install the refrigerator where it will not
be exposed to temperatures below freezing or exposed to outdoor weather conditions.
• Install this appliance in an area where the temperature is between 55°F (13°C) and 110°F (43°C). If the temperature around the appliance is too low or too high, cooling ability may be adversely affected.
• If this refrigerator is installed where the temperature is above 110°F (43°C), the freezing capacity is compromised and the cost of electricity used increases.
• To reduce the risk of electric shock, do not install the refrigerator in a wet or damp area.
• Select a place where a water supply can be easily connected for the automatic icemaker and dispenser.
• Unstable installation may cause vibration and noise. If the floor is not even, make the refrigerator level by rotating the height adjusting screws.
• Properly ground the refrigerator to conform with all governing codes and ordinances.
wCAUTIONAvoid placing the unit near heat sources, direct sunlight, or moisture.
CLEARANCES
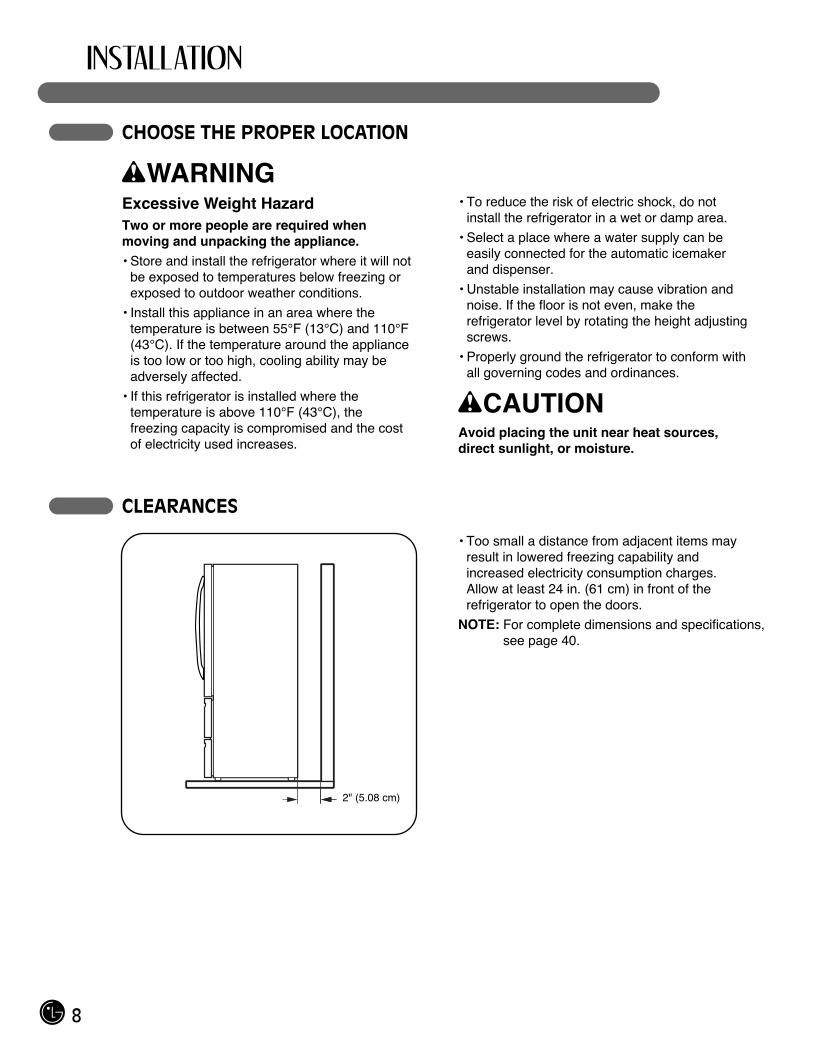
• Too small a distance from adjacent items may result in lowered freezing capability and increased electricity consumption charges.Allow at least 24 in. (61 cm) in front of the refrigerator to open the doors.
NOTE: For complete dimensions and specifications,see page 40.
2" (5.08 cm)
9
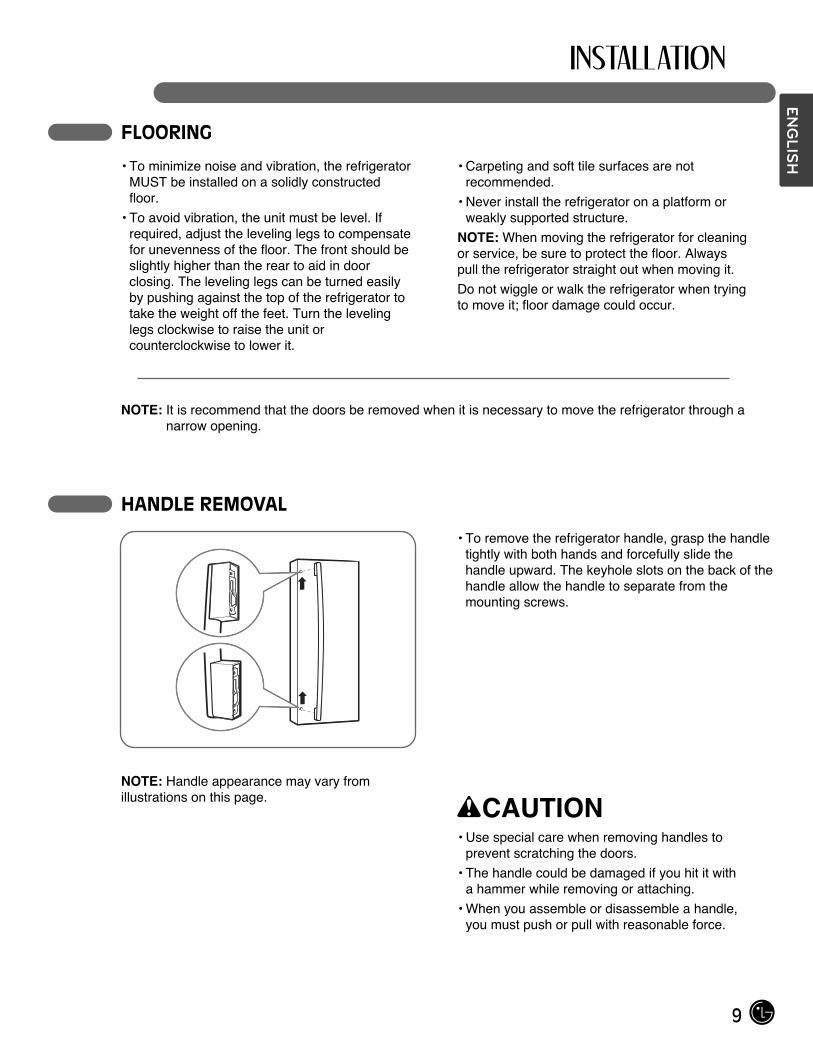
FLOORING
• To minimize noise and vibration, the refrigerator MUST be installed on a solidly constructed floor.
• To avoid vibration, the unit must be level. If required, adjust the leveling legs to compensate for unevenness of the floor. The front should be slightly higher than the rear to aid in door closing. The leveling legs can be turned easily by pushing against the top of the refrigerator to take the weight off the feet. Turn the leveling legs clockwise to raise the unit or counterclockwise to lower it.
• Carpeting and soft tile surfaces are not recommended.
• Never install the refrigerator on a platform or weakly supported structure.
NOTE: When moving the refrigerator for cleaning or service, be sure to protect the floor. Always pull the refrigerator straight out when moving it.
Do not wiggle or walk the refrigerator when trying to move it; floor damage could occur.
HANDLE REMOVAL
NOTE: Handle appearance may vary from illustrations on this page.
wCAUTION• Use special care when removing handles to
prevent scratching the doors.
• The handle could be damaged if you hit it with a hammer while removing or attaching.
• When you assemble or disassemble a handle, you must push or pull with reasonable force.
NOTE: It is recommend that the doors be removed when it is necessary to move the refrigerator through anarrow opening.
• To remove the refrigerator handle, grasp the handletightly with both hands and forcefully slide thehandle upward. The keyhole slots on the back of thehandle allow the handle to separate from themounting screws.
ENG
LISH
10
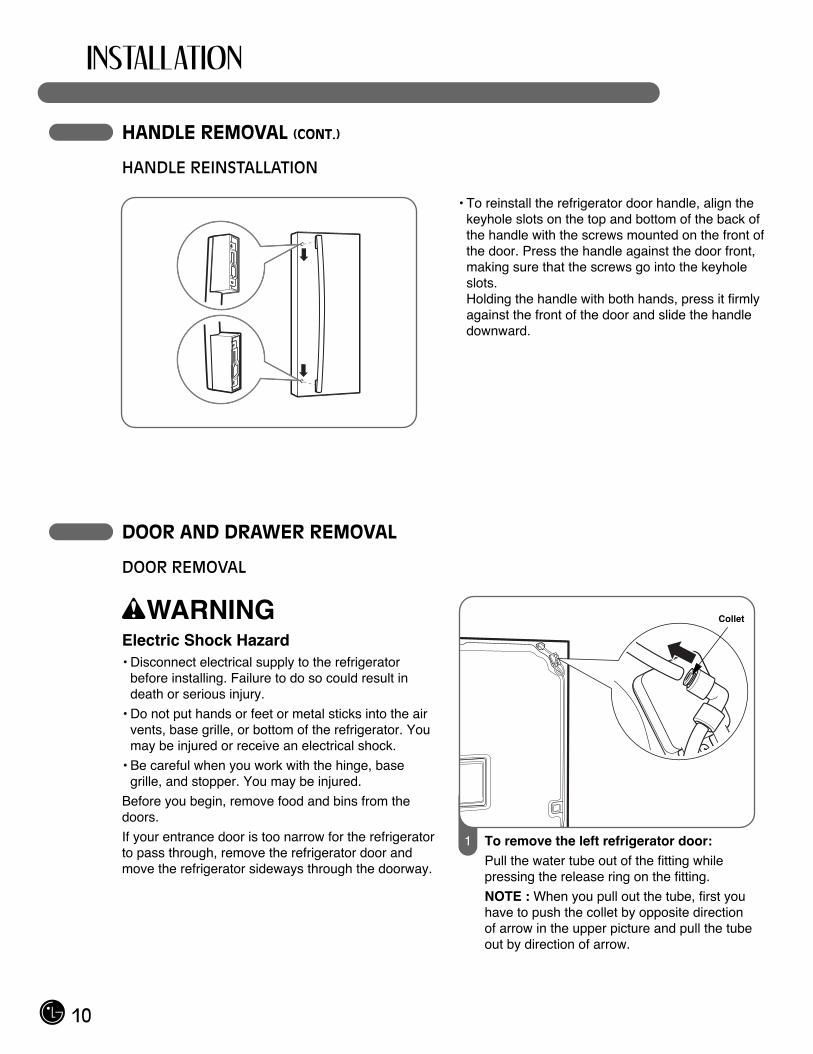
HANDLE REMOVAL (CONT.)
HANDLE REINSTALLATION
DOOR AND DRAWER REMOVAL
DOOR REMOVAL
wWARNINGElectric Shock Hazard• Disconnect electrical supply to the refrigerator
before installing. Failure to do so could result indeath or serious injury.
• Do not put hands or feet or metal sticks into the airvents, base grille, or bottom of the refrigerator. Youmay be injured or receive an electrical shock.
• Be careful when you work with the hinge, basegrille, and stopper. You may be injured.
Before you begin, remove food and bins from thedoors.
If your entrance door is too narrow for the refrigeratorto pass through, remove the refrigerator door andmove the refrigerator sideways through the doorway.
• To reinstall the refrigerator door handle, align thekeyhole slots on the top and bottom of the back ofthe handle with the screws mounted on the front ofthe door. Press the handle against the door front,making sure that the screws go into the keyholeslots. Holding the handle with both hands, press it firmlyagainst the front of the door and slide the handledownward.
To remove the left refrigerator door:Pull the water tube out of the fitting whilepressing the release ring on the fitting.
NOTE : When you pull out the tube, first youhave to push the collet by opposite directionof arrow in the upper picture and pull the tubeout by direction of arrow.
1
Collet
11
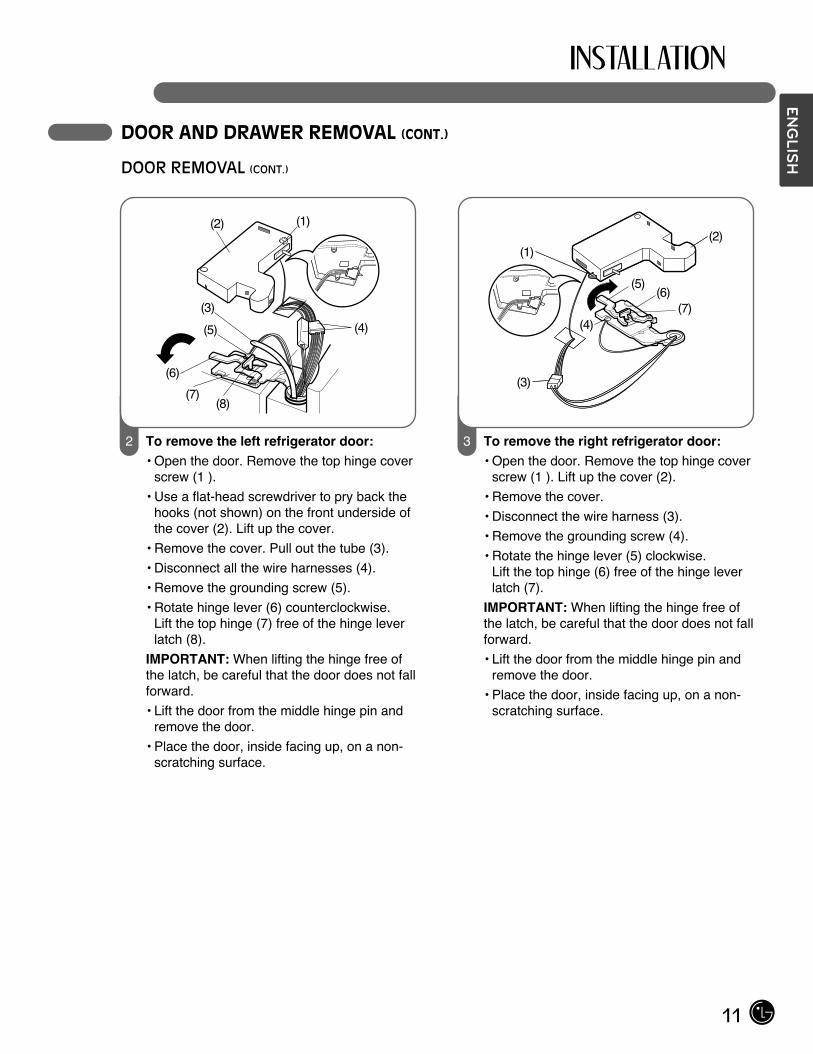
DOOR AND DRAWER REMOVAL (CONT.)
DOOR REMOVAL (CONT.)
To remove the left refrigerator door:• Open the door. Remove the top hinge cover
screw (1 ).
• Use a flat-head screwdriver to pry back thehooks (not shown) on the front underside ofthe cover (2). Lift up the cover.
• Remove the cover. Pull out the tube (3).
• Disconnect all the wire harnesses (4).
• Remove the grounding screw (5).
• Rotate hinge lever (6) counterclockwise. Lift the top hinge (7) free of the hinge leverlatch (8).
IMPORTANT: When lifting the hinge free ofthe latch, be careful that the door does not fallforward.
• Lift the door from the middle hinge pin andremove the door.
• Place the door, inside facing up, on a non-scratching surface.
(1)(2)
(4)
(3)
(6)
(7)(8)
(5)
2 To remove the right refrigerator door:• Open the door. Remove the top hinge cover
screw (1 ). Lift up the cover (2).
• Remove the cover.
• Disconnect the wire harness (3).
• Remove the grounding screw (4).
• Rotate the hinge lever (5) clockwise. Lift the top hinge (6) free of the hinge leverlatch (7).
IMPORTANT: When lifting the hinge free ofthe latch, be careful that the door does not fallforward.
• Lift the door from the middle hinge pin andremove the door.
• Place the door, inside facing up, on a non-scratching surface.
(1)(2)
(3)
(5)(6)
(7)(4)
3
ENG
LISH
12
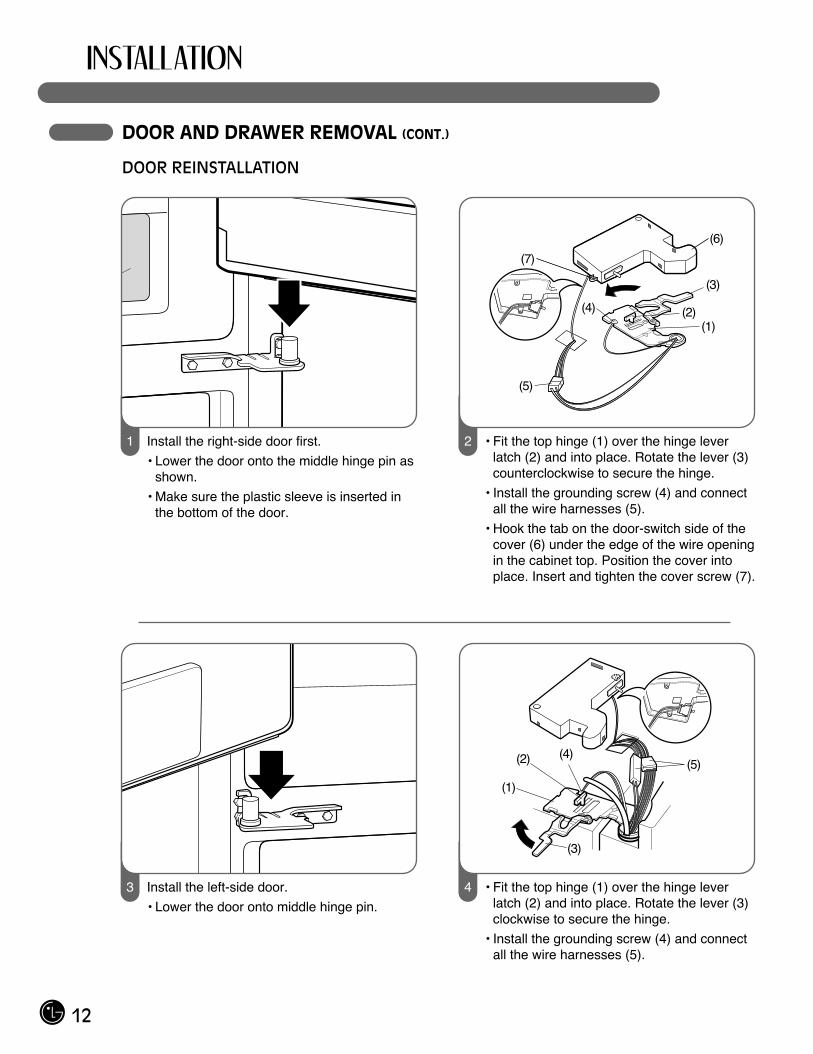
DOOR AND DRAWER REMOVAL (CONT.)
DOOR REINSTALLATION
Install the right-side door first.
• Lower the door onto the middle hinge pin asshown.
• Make sure the plastic sleeve is inserted inthe bottom of the door.
1 • Fit the top hinge (1) over the hinge leverlatch (2) and into place. Rotate the lever (3)counterclockwise to secure the hinge.
• Install the grounding screw (4) and connectall the wire harnesses (5).
• Hook the tab on the door-switch side of thecover (6) under the edge of the wire openingin the cabinet top. Position the cover intoplace. Insert and tighten the cover screw (7).
(7)
(6)
(3)
(2)(1)
(4)
(5)
2
Install the left-side door.
• Lower the door onto middle hinge pin.
3 • Fit the top hinge (1) over the hinge leverlatch (2) and into place. Rotate the lever (3)clockwise to secure the hinge.
• Install the grounding screw (4) and connectall the wire harnesses (5).
(2)
(1)
(3)
(4)(5)
4
13
DOOR AND DRAWER REMOVAL (CONT.)
DOOR REINSTALLATION (CONT.)
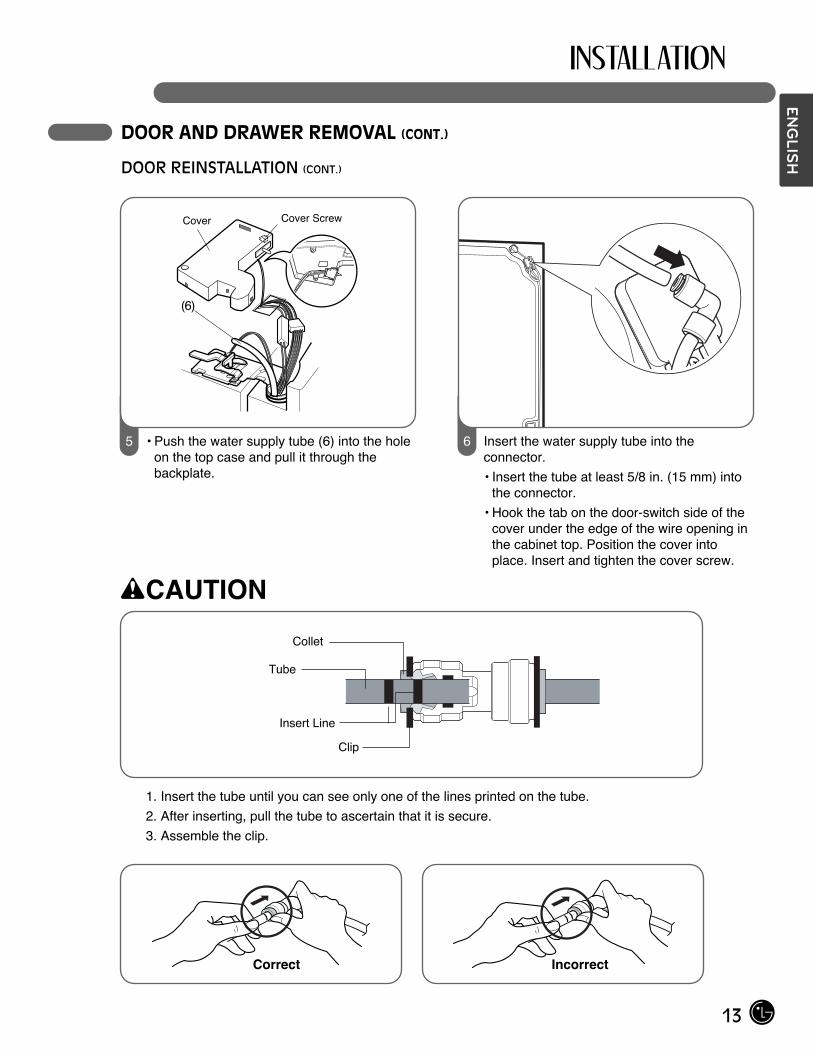
• Push the water supply tube (6) into the holeon the top case and pull it through thebackplate.
(6)
5 Insert the water supply tube into theconnector.
• Insert the tube at least 5/8 in. (15 mm) intothe connector.
• Hook the tab on the door-switch side of thecover under the edge of the wire opening inthe cabinet top. Position the cover intoplace. Insert and tighten the cover screw.
6
Cover Cover Screw
wCAUTION
1. Insert the tube until you can see only one of the lines printed on the tube.
2. After inserting, pull the tube to ascertain that it is secure.
3. Assemble the clip.
Collet
Correct Incorrect
Insert Line
Clip
Tube
ENG
LISH
14
DOOR AND DRAWER REMOVAL (CONT.)
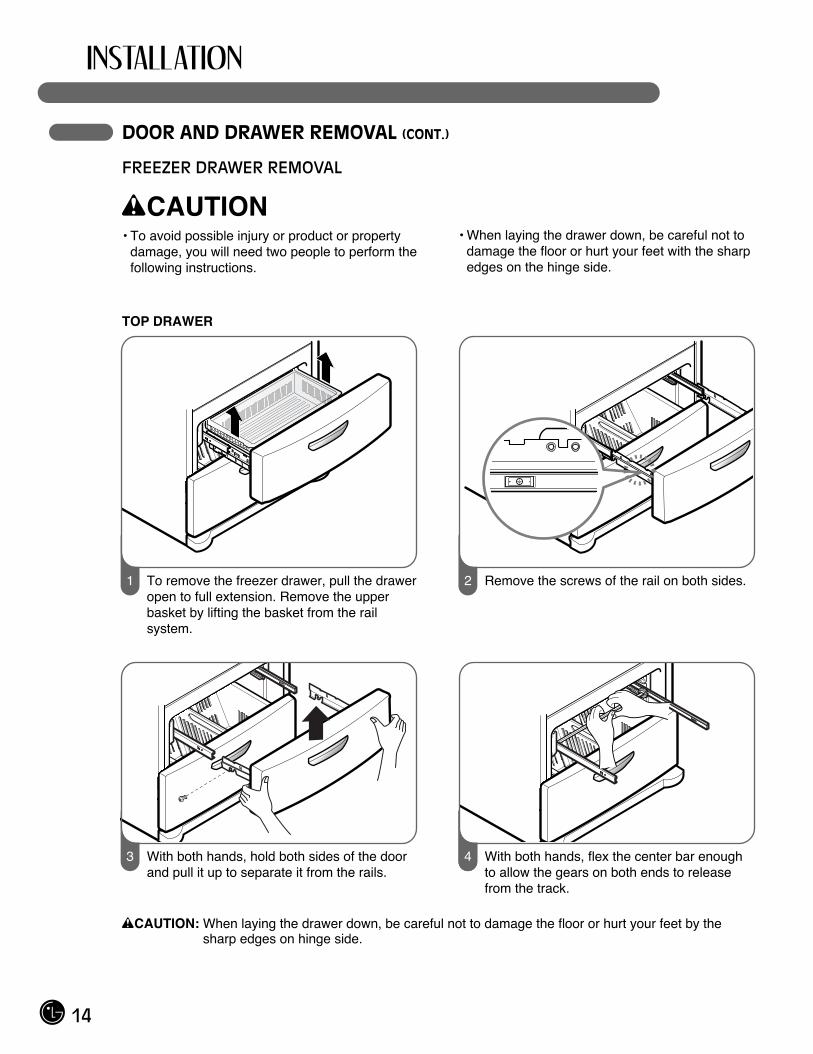
FREEZER DRAWER REMOVAL
wCAUTION• To avoid possible injury or product or property
damage, you will need two people to perform thefollowing instructions.
• When laying the drawer down, be careful not todamage the floor or hurt your feet with the sharpedges on the hinge side.
wCAUTION: When laying the drawer down, be careful not to damage the floor or hurt your feet by thesharp edges on hinge side.
Remove the screws of the rail on both sides.2To remove the freezer drawer, pull the draweropen to full extension. Remove the upperbasket by lifting the basket from the railsystem.
1
With both hands, hold both sides of the doorand pull it up to separate it from the rails.
3 With both hands, flex the center bar enoughto allow the gears on both ends to releasefrom the track.
54
TOP DRAWER
15
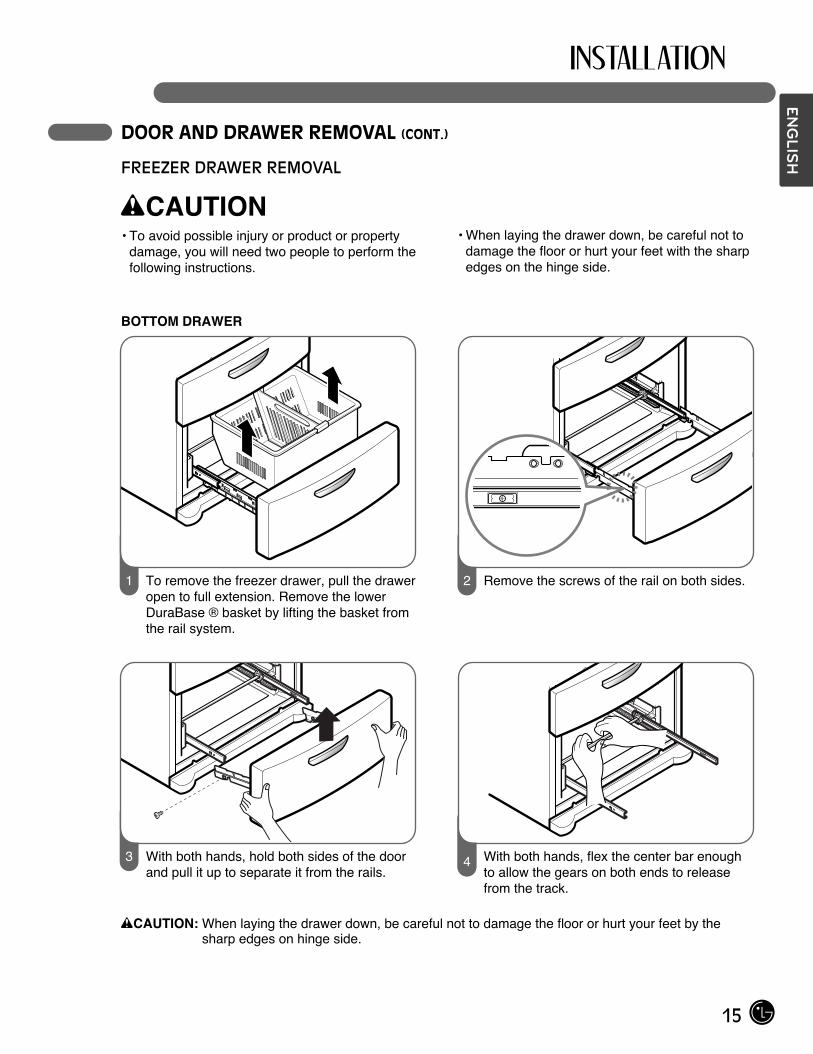
DOOR AND DRAWER REMOVAL (CONT.)
FREEZER DRAWER REMOVAL
wCAUTION• To avoid possible injury or product or property
damage, you will need two people to perform thefollowing instructions.
• When laying the drawer down, be careful not todamage the floor or hurt your feet with the sharpedges on the hinge side.
wCAUTION: When laying the drawer down, be careful not to damage the floor or hurt your feet by thesharp edges on hinge side.
Remove the screws of the rail on both sides.2To remove the freezer drawer, pull the draweropen to full extension. Remove the lowerDuraBase ® basket by lifting the basket fromthe rail system.
1
With both hands, hold both sides of the doorand pull it up to separate it from the rails.
3 With both hands, flex the center bar enoughto allow the gears on both ends to releasefrom the track.
54
BOTTOM DRAWER
ENG
LISH
16
DOOR AND DRAWER REMOVAL (CONT.)
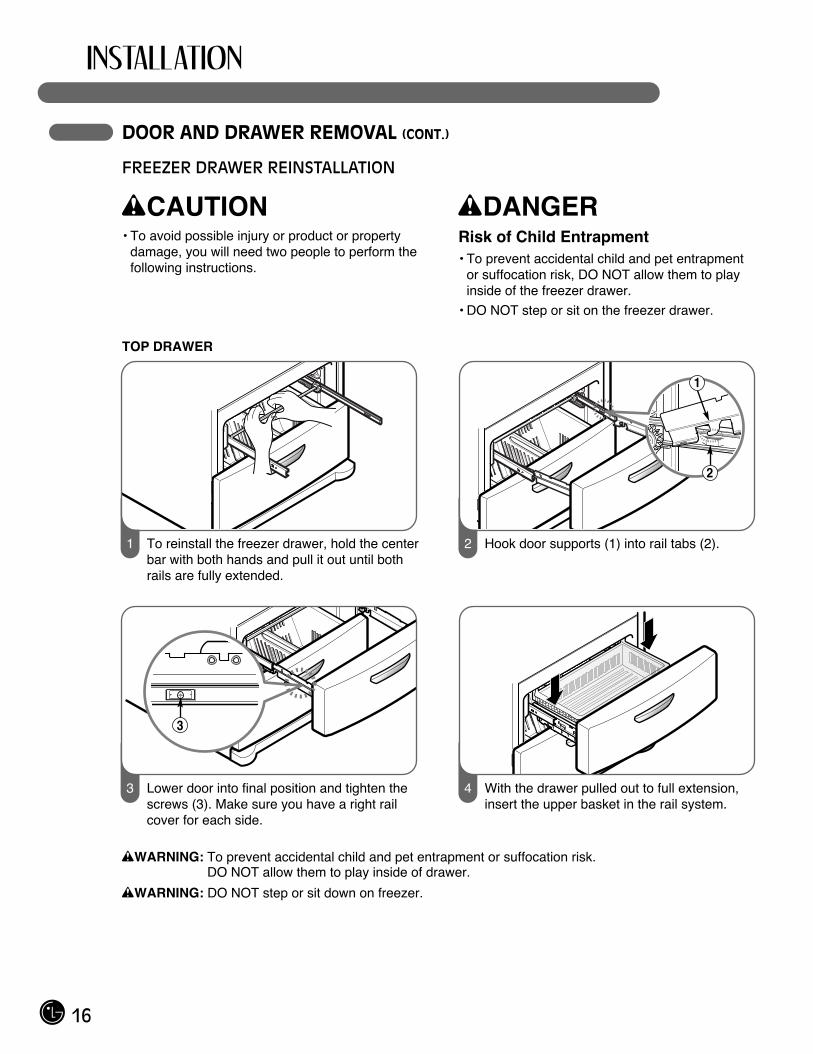
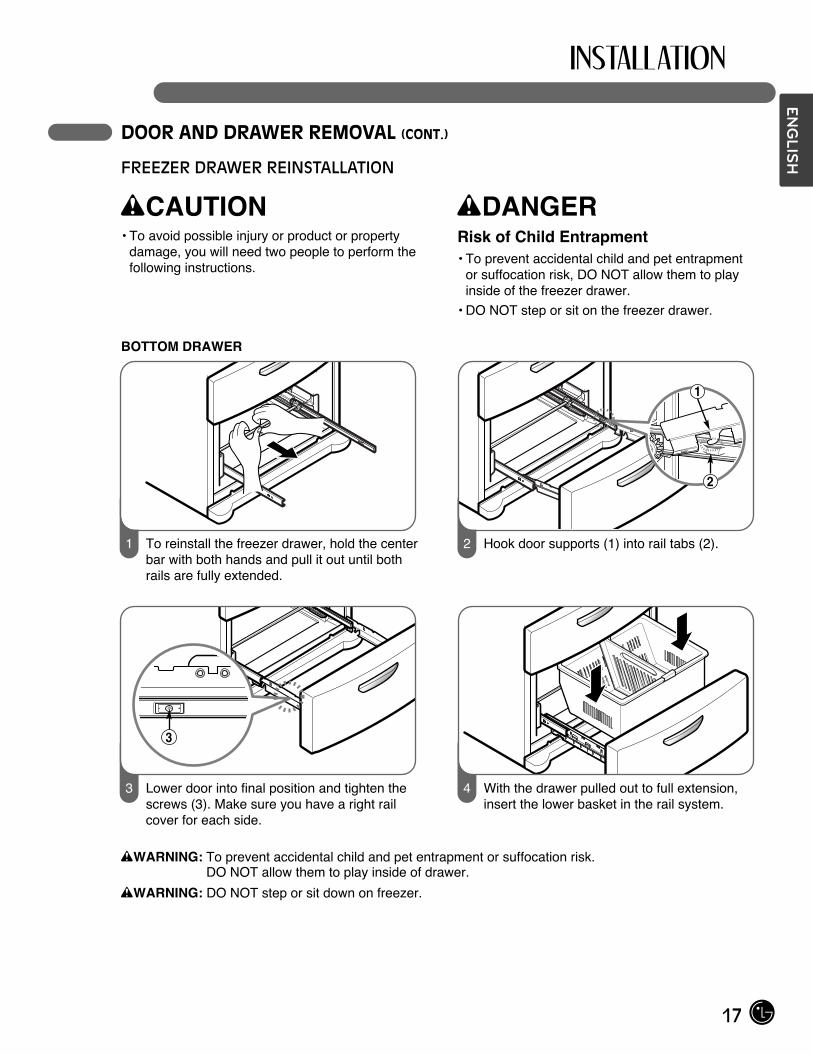
FREEZER DRAWER REINSTALLATION
wWARNING: To prevent accidental child and pet entrapment or suffocation risk. DO NOT allow them to play inside of drawer.
wWARNING: DO NOT step or sit down on freezer.
wCAUTION• To avoid possible injury or product or property
damage, you will need two people to perform thefollowing instructions.
wDANGERRisk of Child Entrapment• To prevent accidental child and pet entrapment
or suffocation risk, DO NOT allow them to playinside of the freezer drawer.
• DO NOT step or sit on the freezer drawer.
To reinstall the freezer drawer, hold the centerbar with both hands and pull it out until bothrails are fully extended.
1 Hook door supports (1) into rail tabs (2).
2
1
2
Lower door into final position and tighten thescrews (3). Make sure you have a right railcover for each side.
3
3 With the drawer pulled out to full extension,insert the upper basket in the rail system.
4
TOP DRAWER
17
DOOR AND DRAWER REMOVAL (CONT.)
FREEZER DRAWER REINSTALLATION
wWARNING: To prevent accidental child and pet entrapment or suffocation risk. DO NOT allow them to play inside of drawer.
wWARNING: DO NOT step or sit down on freezer.
wCAUTION• To avoid possible injury or product or property
damage, you will need two people to perform thefollowing instructions.
wDANGERRisk of Child Entrapment• To prevent accidental child and pet entrapment
or suffocation risk, DO NOT allow them to playinside of the freezer drawer.
• DO NOT step or sit on the freezer drawer.
To reinstall the freezer drawer, hold the centerbar with both hands and pull it out until bothrails are fully extended.
1 Hook door supports (1) into rail tabs (2).
2
1
2
Lower door into final position and tighten thescrews (3). Make sure you have a right railcover for each side.
3
3 With the drawer pulled out to full extension,insert the lower basket in the rail system.
4
BOTTOM DRAWER
ENG
LISH
18
CONNECTING THE WATER SUPPLY
wWARNINGConnect to safe drinking water supply only.• The water pressure must be between 21 and 121 p.s.i.
(1.5~8.5 kgf/cm2 ) on models without a water filter andbetween 43 and 121 p.s.i. (3~8.5 kgf/cm2) on models with awater filter.
• If water pressure does not reach 21 psi (1.5kgf/cm2) or fallsbelow, it is necessary to purchase a separate pressurepump for normal automatic icemaker and water dispensingoperation.
• It is recommended that the total length of the water feedtube does not exceed 26 ft. (8 m).
• Install the water supply line where it will not be affected byheat.
• If a reverse osmosis water filtration system is connected toyour cold water supply, This water line installation is notwarranted by the refrigerator or icemaker manufacturer.Follow next instructions carefully to minimize the risk ofexpensive water damage.
• If a reverse osmosis water filtration system is connected toyour cold water supply, the water pressure to the reverseosmosis system needs to be a minimum of 40 to 60 psi(2.8 kgf/cm2 ~ 4.2 kgf/cm2, less than 2.0~3.0 sec to fill acup of 7oz capacity).
• If the water pressure from the reverse osmosis system isless than 21 psi (1.5 kgf/cm2, more than 4.0sec to fill a cupof 7oz capacity):
• Check to see whether the sediment filter in the reverseosmosis system is blocked. Replace the filter if necessary.
• Allow the storage tank on the reverse osmosis system torefill after heavy usage.
• If the issue about water pressure from reverse osmosisremains, call a licensed, qualified plumber.
IMPORTANT: Read all directions thoroughly before youbegin.
• If operating the refrigerator before installing the waterconnection, turn the icemaker to the OFF position toprevent operation without water.
• All installations must be in accordance with local plumbingcode requirements.
• Use copper tubing and check for leaks.• Install tubing only in areas where temperatures will remain
above freezing.• It may take up to 24 hours for the icemaker to begin
producing ice.
Tools Required• Standard screwdriver• 7/16-in. and 1/2-in. open-end wrenches or two adjustable
wrenches• 1/4-in. nut driver• 1/4-in. drill bit• Hand drill or electric drill (properly grounded)NOTE: Refrigerator dealers offer a kit with a 1/4-in. saddle-type shutoff valve, a union, and copper tubing. Beforepurchasing, make sure a saddle-type valve complies withlocal plumbing codes.Do not use a piercing-type or 3/16-in. saddle valvewhich reduces water flow and clogs more easily.NOTE: The Commonwealth of Massachusetts PlumbingCode 248CMR shall be adhered to. Saddle valves areillegal and use is not permitted in Massachusetts. Consultwith your licensed plumber.
Cold Water Supply• The icemaker water valve contains a flow washer which is
used as a water pressure regulator.• The icemaker needs to be connected to a cold water line
with water pressure between 21~121 psi (1.5~8.5 kgf/cm2)on models without a water filter and between 43 and 121p.s.i. (3~8.5kgf/cm2) on models with a water filter.
CONNECTING THE WATER LINES
IMPORTANT: Before connecting the tubing to the water line,unplug the refrigerator or disconnect the power.• Turn off the main water supply and open the nearest faucet
to relieve pressure in the line. Opening an outside faucet mayhelp drain water from the line in the house.
• Find a 1/2-in. vertical COLD water pipe near the refrigerator.NOTE: A horizontal pipe will work, but the following precautionmust be taken: drill on the top of the pipe, not the bottom. Thiswill help keep water away from the drill and also keep normalsediment from collecting in the valve.
• To determine the length of copper tubing you will need,measure from the connection on the lower left rear of therefrigerator to the water pipe. Add 7 ft. (2.1 m) to allow formoving the refrigerator for cleaning. Use 1/4-in. O.D. (outsidediameter) copper tubing. Be sure both ends of the coppertubing are cut square.
• Using a drill, drill a 1/4-in. hole in the cold water pipe youhave selected.
• Fasten the shutoff valve to the cold water pipe with the pipe clamp. Be sure the outlet end is solidly in the 1/4-in. drilled hole in the water pipe and the washer is under the pipe clamp. Tighten the packing nut. Tighten the pipe clamp screws carefully and evenly so the washer makes a watertight seal. Do not overtighten or you may crush the copper tubing, especially if soft (coiled) copper tubing is used. Now you are ready to connect the copper tubing.
• Slip the compression sleeve and the compression nut onto the copper tubing as shown. Insert the end of the tubing into the outlet end squarely as far as it will go. Screw the compression nut onto the outlet end with a wrench. A flare nut wrench works best, but an open-end wrench will suffice. Do not overtighten.
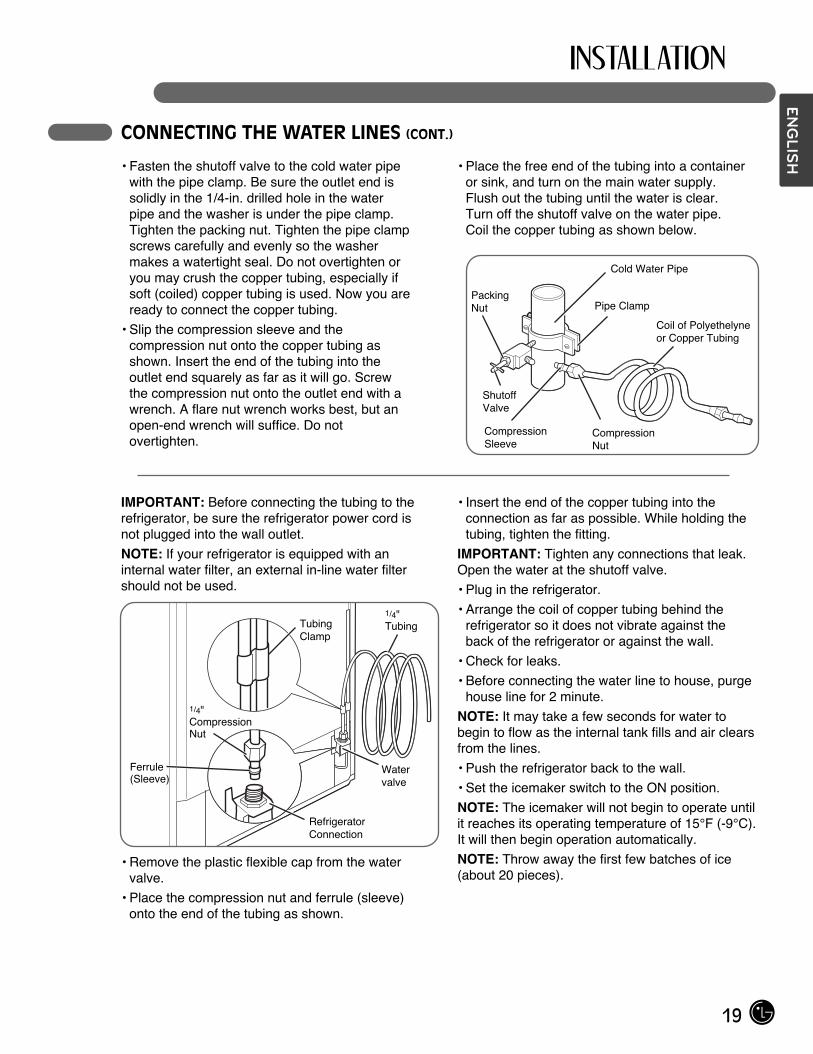
• Place the free end of the tubing into a container or sink, and turn on the main water supply. Flush out the tubing until the water is clear. Turn off the shutoff valve on the water pipe. Coil the copper tubing as shown below.
19
CONNECTING THE WATER LINES (CONT.)
IMPORTANT: Before connecting the tubing to therefrigerator, be sure the refrigerator power cord is not plugged into the wall outlet.
NOTE: If your refrigerator is equipped with an internal water filter, an external in-line water filtershould not be used.
• Remove the plastic flexible cap from the watervalve.
• Place the compression nut and ferrule (sleeve) onto the end of the tubing as shown.
• Insert the end of the copper tubing into theconnection as far as possible. While holding thetubing, tighten the fitting.
IMPORTANT: Tighten any connections that leak. Open the water at the shutoff valve.
• Plug in the refrigerator.
• Arrange the coil of copper tubing behind therefrigerator so it does not vibrate against the back of the refrigerator or against the wall.
• Check for leaks.
• Before connecting the water line to house, purgehouse line for 2 minute.
NOTE: It may take a few seconds for water to begin to flow as the internal tank fills and air clearsfrom the lines.
• Push the refrigerator back to the wall.
• Set the icemaker switch to the ON position.
NOTE: The icemaker will not begin to operate until it reaches its operating temperature of 15°F (-9°C). It will then begin operation automatically.
NOTE: Throw away the first few batches of ice (about 20 pieces).
PackingNut
ShutoffValve
CompressionSleeve
CompressionNut
Cold Water Pipe
Pipe Clamp
Coil of Polyethelyneor Copper Tubing
Ferrule(Sleeve)
RefrigeratorConnection
Watervalve
TubingClamp
1/4"Tubing
1/4"CompressionNut
ENG
LISH
20
LEVELING THE REFRIGERATOR DOORS
wWARNINGElectrical Shock Hazard• Be careful when you work with the hinges,
base grille, and stopper. You may be injured.
• Do not put hands, feet, or metal items into the air vents, base grille, or the bottom of therefrigerator. You may be injured or receive an electrical shock.
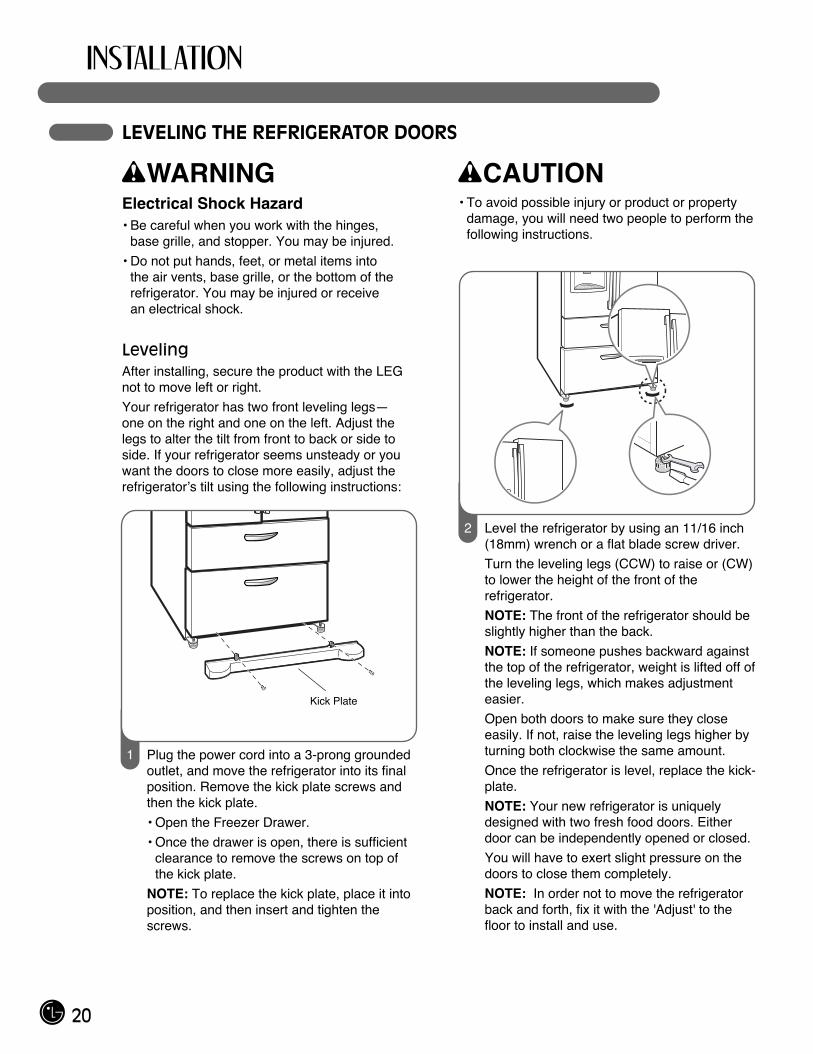
LevelingAfter installing, secure the product with the LEG not to move left or right.
Your refrigerator has two front leveling legs—one on the right and one on the left. Adjust the legs to alter the tilt from front to back or side to side. If your refrigerator seems unsteady or you want the doors to close more easily, adjust therefrigerator’s tilt using the following instructions:
wCAUTION• To avoid possible injury or product or property
damage, you will need two people to perform thefollowing instructions.
Plug the power cord into a 3-prong groundedoutlet, and move the refrigerator into its finalposition. Remove the kick plate screws andthen the kick plate.
• Open the Freezer Drawer.
• Once the drawer is open, there is sufficientclearance to remove the screws on top ofthe kick plate.
NOTE: To replace the kick plate, place it intoposition, and then insert and tighten thescrews.
1
Level the refrigerator by using an 11/16 inch(18mm) wrench or a flat blade screw driver.
Turn the leveling legs (CCW) to raise or (CW)to lower the height of the front of therefrigerator.
NOTE: The front of the refrigerator should beslightly higher than the back.
NOTE: If someone pushes backward againstthe top of the refrigerator, weight is lifted off ofthe leveling legs, which makes adjustmenteasier.
Open both doors to make sure they closeeasily. If not, raise the leveling legs higher byturning both clockwise the same amount.
Once the refrigerator is level, replace the kick-plate.
NOTE: Your new refrigerator is uniquelydesigned with two fresh food doors. Eitherdoor can be independently opened or closed.
You will have to exert slight pressure on thedoors to close them completely.
NOTE: In order not to move the refrigeratorback and forth, fix it with the 'Adjust' to thefloor to install and use.
2
Kick Plate
21
LEVELING THE REFRIGERATOR DOORS (CONT.)
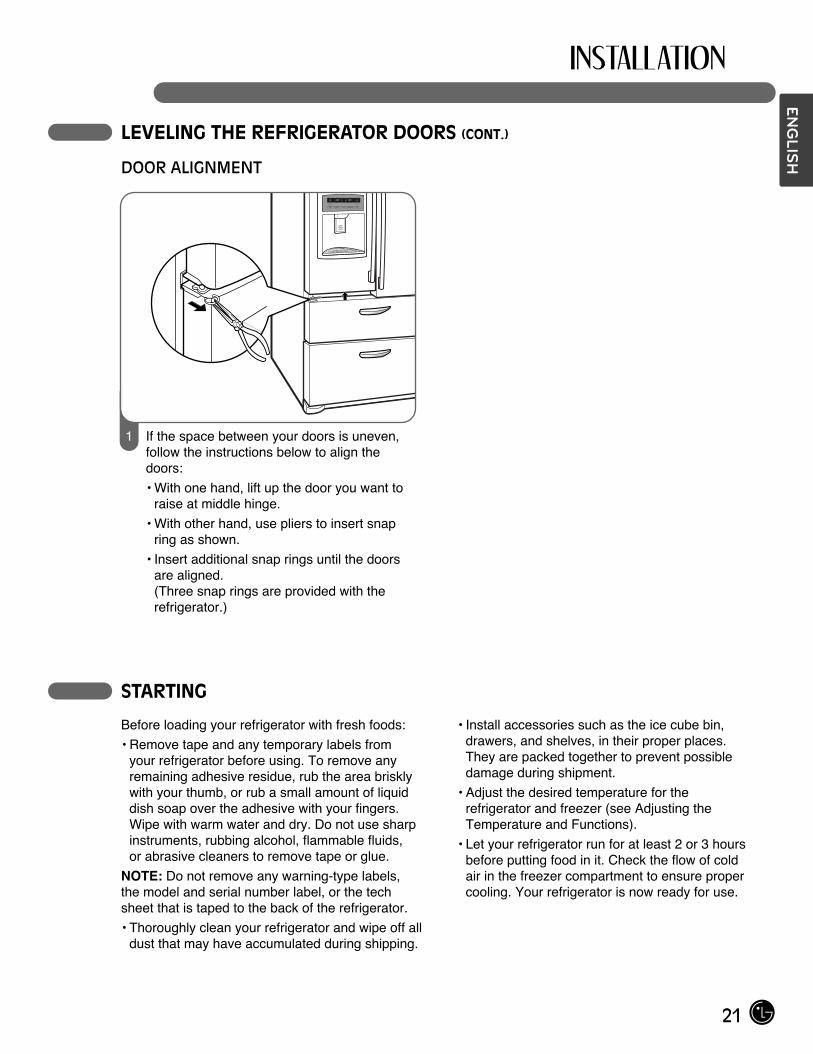
DOOR ALIGNMENT
STARTING
Before loading your refrigerator with fresh foods:
• Remove tape and any temporary labels from your refrigerator before using. To remove anyremaining adhesive residue, rub the area brisklywith your thumb, or rub a small amount of liquid dish soap over the adhesive with your fingers. Wipe with warm water and dry. Do not use sharpinstruments, rubbing alcohol, flammable fluids, or abrasive cleaners to remove tape or glue.
NOTE: Do not remove any warning-type labels, the model and serial number label, or the tech sheet that is taped to the back of the refrigerator.
• Thoroughly clean your refrigerator and wipe off alldust that may have accumulated during shipping.
• Install accessories such as the ice cube bin,drawers, and shelves, in their proper places. They are packed together to prevent possibledamage during shipment.
• Adjust the desired temperature for the refrigerator and freezer (see Adjusting theTemperature and Functions).
• Let your refrigerator run for at least 2 or 3 hoursbefore putting food in it. Check the flow of cold air in the freezer compartment to ensure propercooling. Your refrigerator is now ready for use.
If the space between your doors is uneven,follow the instructions below to align thedoors:
• With one hand, lift up the door you want toraise at middle hinge.
• With other hand, use pliers to insert snapring as shown.
• Insert additional snap rings until the doorsare aligned.(Three snap rings are provided with therefrigerator.)
1
ENG
LISH
22
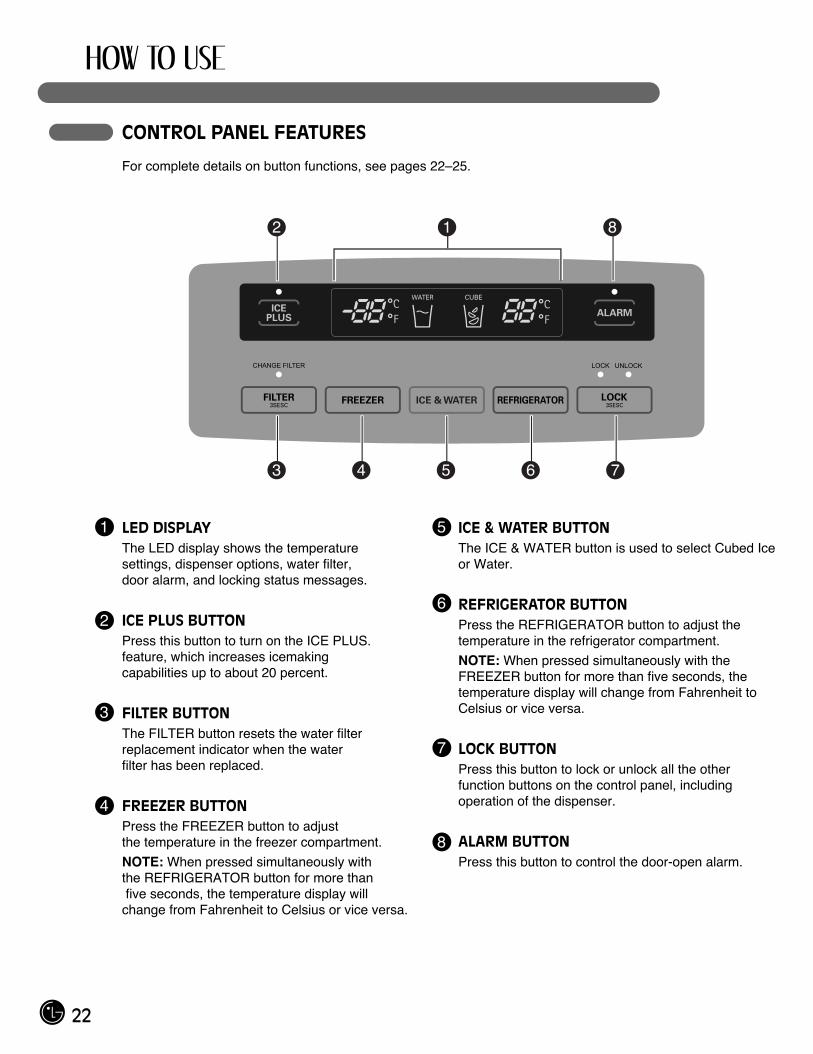
CONTROL PANEL FEATURES
For complete details on button functions, see pages 22–25.
LED DISPLAYThe LED display shows the temperature settings, dispenser options, water filter, door alarm, and locking status messages.
ICE PLUS BUTTONPress this button to turn on the ICE PLUS. feature, which increases icemaking capabilities up to about 20 percent.
FILTER BUTTONThe FILTER button resets the water filter replacement indicator when the water filter has been replaced.
FREEZER BUTTONPress the FREEZER button to adjust the temperature in the freezer compartment.
NOTE: When pressed simultaneously with the REFRIGERATOR button for more thanfive seconds, the temperature display will change from Fahrenheit to Celsius or vice versa.
ICE & WATER BUTTONThe ICE & WATER button is used to select Cubed Iceor Water.
REFRIGERATOR BUTTONPress the REFRIGERATOR button to adjust thetemperature in the refrigerator compartment.
NOTE: When pressed simultaneously with theFREEZER button for more than five seconds, thetemperature display will change from Fahrenheit toCelsius or vice versa.
LOCK BUTTONPress this button to lock or unlock all the otherfunction buttons on the control panel, includingoperation of the dispenser.
ALARM BUTTONPress this button to control the door-open alarm.
2
3
5
2
1
3
4
6
7
8
12 8
3 4 5 6 7
23
THE LED DISPLAY
The LED display shows the temperature settings, dispenser options, water filter, door alarm, and locking status messages.
DISPENSER SELECTION INDICATORShows Cubed ice or Water selection that will bedispensed when the push switch is pressed.
FREEZER TEMPERATUREIndicates the set temperature of the freezercompartment in Celsius or Fahrenheit.
REFRIGERATOR TEMPERATUREIndicates the set temperature of the refrigeratorcompartment in Celsius or Fahrenheit.
2
1
3
12 8
DISPENSING CUBED ICEPress the ICE & WATER button to illuminate the Cubed Ice icon.
Press the push switch with a glass or other container and cubed ice will be dispensed.
NOTE: Hold the glass or other container in place for a couple of seconds after dispensing ice or water to catch the last few cubes or drops. Thedispenser is designed to not operate while eitherrefrigerator door is open.
DISPENSING WATERPress the ICE & WATER button to illuminate the Water icon.
Press the push switch with a glass or other container and water will be dispensed.
OPERATING THE DISPENSER
Water / IceSwitch
Stand
ENG
LISH
24
ADJUSTING THE TEMPERATURES AND DISPLAY
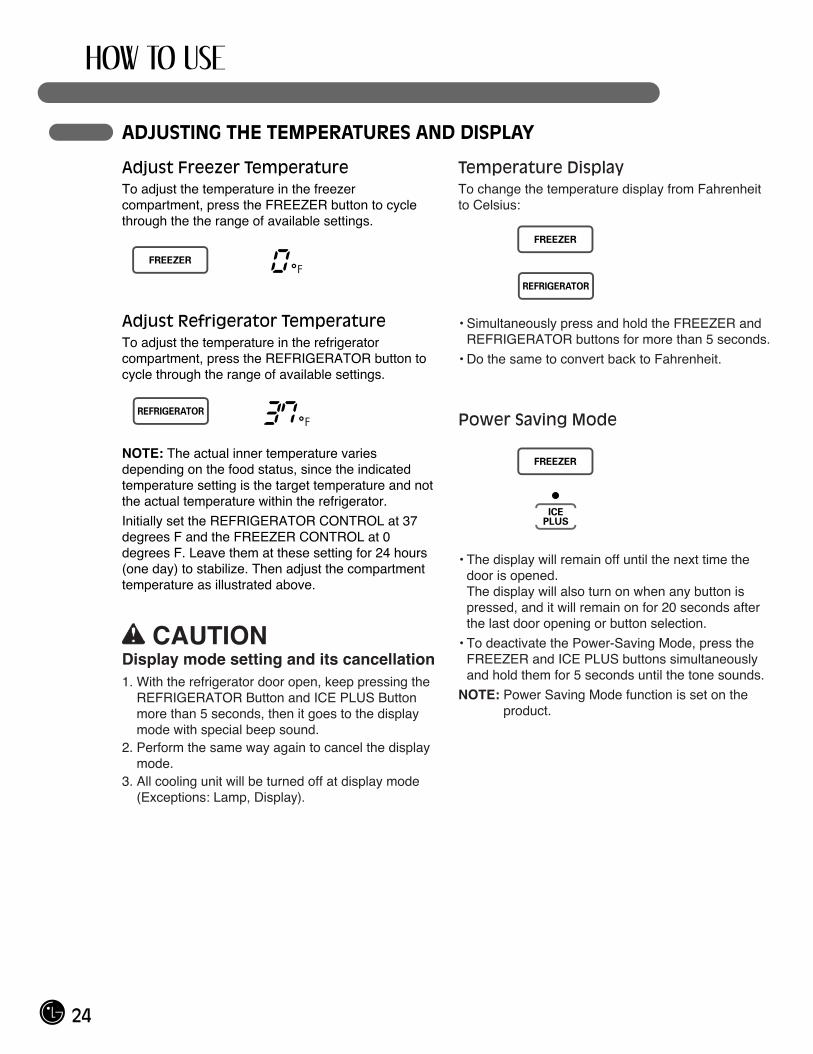
Adjust Freezer TemperatureTo adjust the temperature in the freezercompartment, press the FREEZER button to cyclethrough the the range of available settings.
Adjust Refrigerator TemperatureTo adjust the temperature in the refrigeratorcompartment, press the REFRIGERATOR button tocycle through the range of available settings.
NOTE: The actual inner temperature variesdepending on the food status, since the indicatedtemperature setting is the target temperature and notthe actual temperature within the refrigerator.
Initially set the REFRIGERATOR CONTROL at 37degrees F and the FREEZER CONTROL at 0degrees F. Leave them at these setting for 24 hours(one day) to stabilize. Then adjust the compartmenttemperature as illustrated above.
ww CAUTIONDisplay mode setting and its cancellation1. With the refrigerator door open, keep pressing the
REFRIGERATOR Button and ICE PLUS Buttonmore than 5 seconds, then it goes to the displaymode with special beep sound.
2. Perform the same way again to cancel the displaymode.
3. All cooling unit will be turned off at display mode(Exceptions: Lamp, Display).
Temperature DisplayTo change the temperature display from Fahrenheitto Celsius:
• Simultaneously press and hold the FREEZER andREFRIGERATOR buttons for more than 5 seconds.
• Do the same to convert back to Fahrenheit.
Power Saving Mode
• The display will remain off until the next time thedoor is opened.The display will also turn on when any button ispressed, and it will remain on for 20 seconds afterthe last door opening or button selection.
• To deactivate the Power-Saving Mode, press theFREEZER and ICE PLUS buttons simultaneouslyand hold them for 5 seconds until the tone sounds.
NOTE: Power Saving Mode function is set on theproduct.
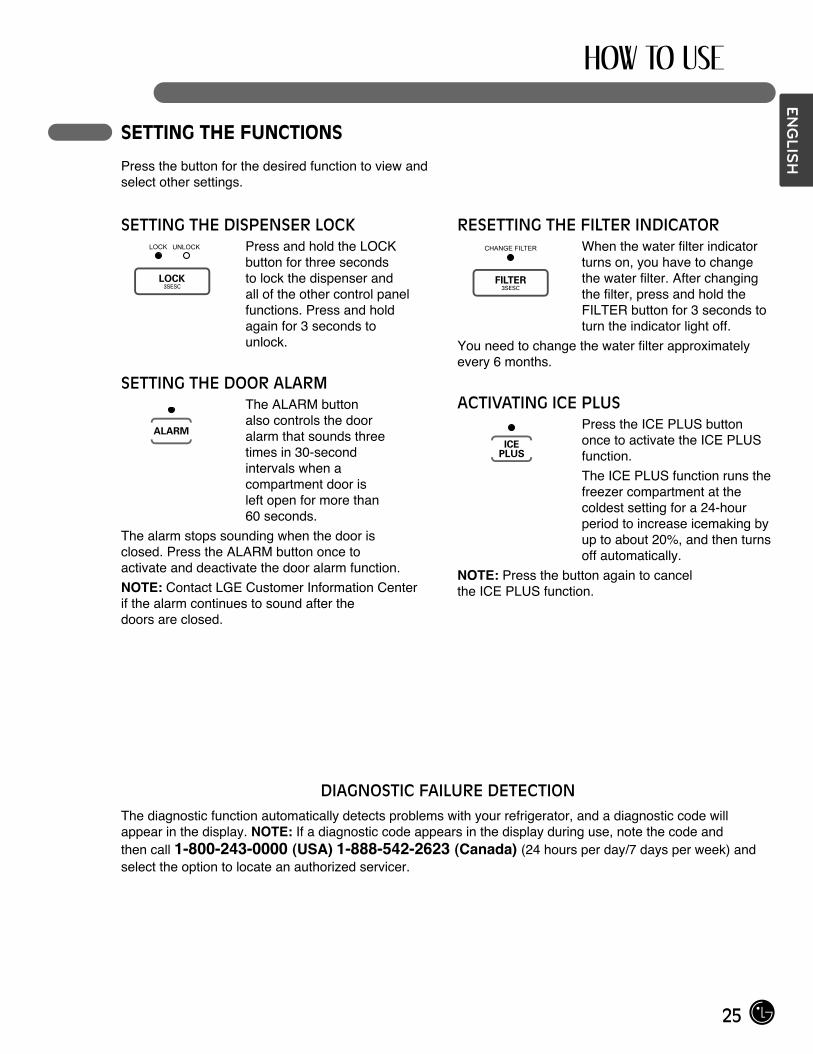
SETTING THE DISPENSER LOCKPress and hold the LOCK button for three seconds to lock the dispenser and all of the other control panelfunctions. Press and hold again for 3 seconds to unlock.
SETTING THE DOOR ALARMThe ALARM button also controls the door alarm that sounds three times in 30-second intervals when a compartment door is left open for more than 60 seconds.
The alarm stops sounding when the door is closed. Press the ALARM button once to activate and deactivate the door alarm function.
NOTE: Contact LGE Customer Information Center if the alarm continues to sound after the doors are closed.
RESETTING THE FILTER INDICATORWhen the water filter indicatorturns on, you have to changethe water filter. After changingthe filter, press and hold theFILTER button for 3 seconds toturn the indicator light off.
You need to change the water filter approximatelyevery 6 months.
ACTIVATING ICE PLUSPress the ICE PLUS buttononce to activate the ICE PLUSfunction.
The ICE PLUS function runs thefreezer compartment at thecoldest setting for a 24-hourperiod to increase icemaking byup to about 20%, and then turnsoff automatically.
NOTE: Press the button again to cancel the ICE PLUS function.
25
SETTING THE FUNCTIONS
Press the button for the desired function to view andselect other settings.
DIAGNOSTIC FAILURE DETECTION
The diagnostic function automatically detects problems with your refrigerator, and a diagnostic code will appear in the display. NOTE: If a diagnostic code appears in the display during use, note the code and then call 1-800-243-0000 (USA) 1-888-542-2623 (Canada) (24 hours per day/7 days per week) andselect the option to locate an authorized servicer.
ENG
LISH
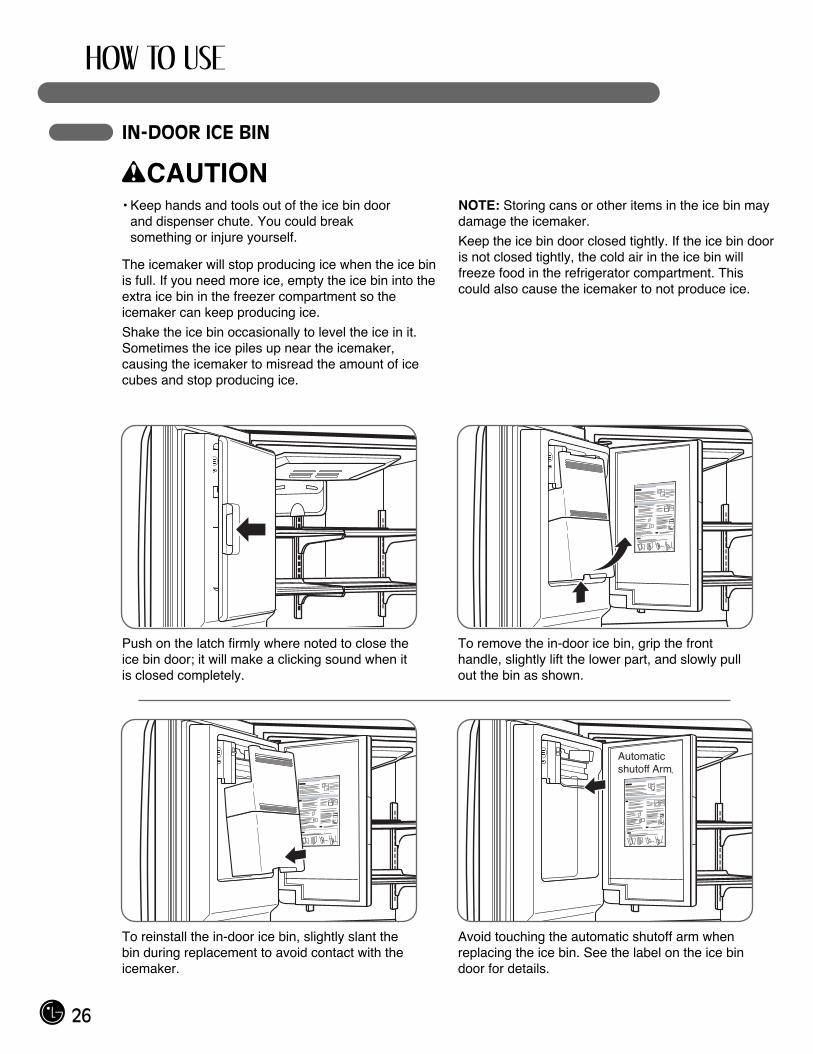
wCAUTION• Keep hands and tools out of the ice bin door
and dispenser chute. You could break something or injure yourself.
The icemaker will stop producing ice when the ice binis full. If you need more ice, empty the ice bin into theextra ice bin in the freezer compartment so theicemaker can keep producing ice.
Shake the ice bin occasionally to level the ice in it.Sometimes the ice piles up near the icemaker,causing the icemaker to misread the amount of icecubes and stop producing ice.
NOTE: Storing cans or other items in the ice bin maydamage the icemaker.
Keep the ice bin door closed tightly. If the ice bin dooris not closed tightly, the cold air in the ice bin willfreeze food in the refrigerator compartment. Thiscould also cause the icemaker to not produce ice.
26
IN-DOOR ICE BIN
Push on the latch firmly where noted to close theice bin door; it will make a clicking sound when itis closed completely.
To remove the in-door ice bin, grip the fronthandle, slightly lift the lower part, and slowly pullout the bin as shown.
To reinstall the in-door ice bin, slightly slant thebin during replacement to avoid contact with theicemaker.
Avoid touching the automatic shutoff arm whenreplacing the ice bin. See the label on the ice bindoor for details.
Automaticshutoff Arm
27
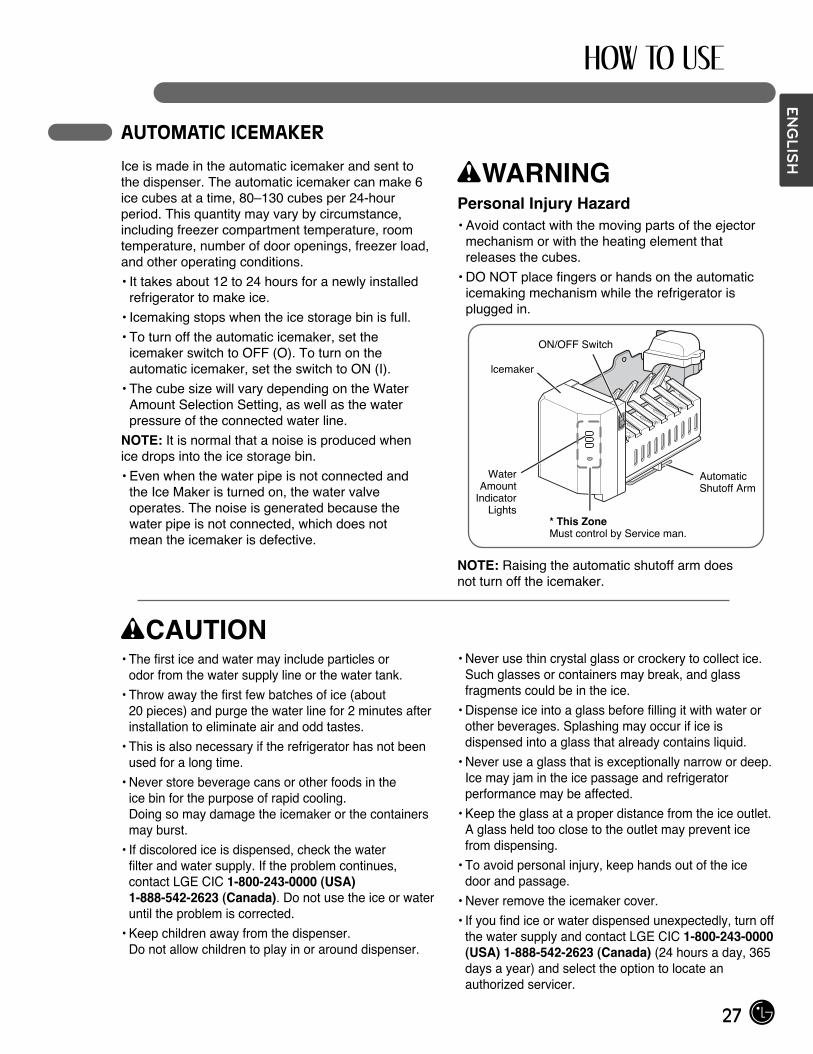
AUTOMATIC ICEMAKER
Ice is made in the automatic icemaker and sent to the dispenser. The automatic icemaker can make 6ice cubes at a time, 80–130 cubes per 24-hourperiod. This quantity may vary by circumstance,including freezer compartment temperature, roomtemperature, number of door openings, freezer load,and other operating conditions.
• It takes about 12 to 24 hours for a newly installedrefrigerator to make ice.
• Icemaking stops when the ice storage bin is full.
• To turn off the automatic icemaker, set the icemaker switch to OFF (O). To turn on theautomatic icemaker, set the switch to ON (I).
• The cube size will vary depending on the WaterAmount Selection Setting, as well as the waterpressure of the connected water line.
NOTE: It is normal that a noise is produced when ice drops into the ice storage bin.
• Even when the water pipe is not connected and the Ice Maker is turned on, the water valveoperates. The noise is generated because the water pipe is not connected, which does not mean the icemaker is defective.
wWARNINGPersonal Injury Hazard• Avoid contact with the moving parts of the ejector
mechanism or with the heating element thatreleases the cubes.
• DO NOT place fingers or hands on the automaticicemaking mechanism while the refrigerator isplugged in.
NOTE: Raising the automatic shutoff arm does not turn off the icemaker.
wCAUTION• The first ice and water may include particles or
odor from the water supply line or the water tank.
• Throw away the first few batches of ice (about 20 pieces) and purge the water line for 2 minutes afterinstallation to eliminate air and odd tastes.
• This is also necessary if the refrigerator has not beenused for a long time.
• Never store beverage cans or other foods in the ice bin for the purpose of rapid cooling. Doing so may damage the icemaker or the containersmay burst.
• If discolored ice is dispensed, check the water filter and water supply. If the problem continues,contact LGE CIC 1-800-243-0000 (USA)1-888-542-2623 (Canada). Do not use the ice or wateruntil the problem is corrected.
• Keep children away from the dispenser. Do not allow children to play in or around dispenser.
• Never use thin crystal glass or crockery to collect ice.Such glasses or containers may break, and glassfragments could be in the ice.
• Dispense ice into a glass before filling it with water orother beverages. Splashing may occur if ice isdispensed into a glass that already contains liquid.
• Never use a glass that is exceptionally narrow or deep.Ice may jam in the ice passage and refrigeratorperformance may be affected.
• Keep the glass at a proper distance from the ice outlet. A glass held too close to the outlet may prevent icefrom dispensing.
• To avoid personal injury, keep hands out of the icedoor and passage.
• Never remove the icemaker cover.
• If you find ice or water dispensed unexpectedly, turn offthe water supply and contact LGE CIC 1-800-243-0000(USA) 1-888-542-2623 (Canada) (24 hours a day, 365days a year) and select the option to locate anauthorized servicer.
lcemaker
WaterAmount
IndicatorLights
* This ZoneMust control by Service man.
ON/OFF Switch
AutomaticShutoff Arm
ENG
LISH
28
STORING FOODS
• Store fresh food in the refrigerator compartment.
• How food is frozen and thawed is an importantfactor in maintaining freshness and flavor.
• Do not store food that spoils easily, such asbananas and melons, at low temperatures.
• Allow hot food to cool prior to storing; placing hotfood in the refrigerator could spoil other food andlead to higher energy consumption.
• When storing food, cover it with vinyl wrap or storein a container with a lid. This prevents moisture fromevaporating and helps food to keep its flavor andnutrition.
• Do not block air vents with food or containers.Smooth circulation of chilled air keeps therefrigerator temperatures even.
• Do not open the doors frequently. Opening thedoors allows warm air to enter the refrigerator andfreezer compartments, which causes temperaturesto rise.
• Never overload the door racks; overloading maypush against the inner racks and prevent the doorsfrom closing correctly.
Freezer compartment• Do not store glass bottles in the freezer
compartment; glass may break when the contentsare frozen.
• Do not refreeze food that has been thawed.This causes loss of flavor and nutrition.
• Do not touch cold foods or containers, especiallythose made of metal, with wet hands or place glassproducts in the freezer compartment.
Refrigerator compartment• Avoid placing moist food on the top refrigerator
shelves; it could freeze from direct contact withchilled air.
• Always clean food prior to refrigeration.Vegetables and fruits should be washed and wipedand packed food should be wiped to preventadjacent food from spoiling.
NOTE: If you keep the refrigerator in a hot and humidplace, frequent opening of the door or storing a lot ofvegetables in the refrigerator may causecondensation to form. Wipe the condensation with aclean cloth or a paper towel.
29
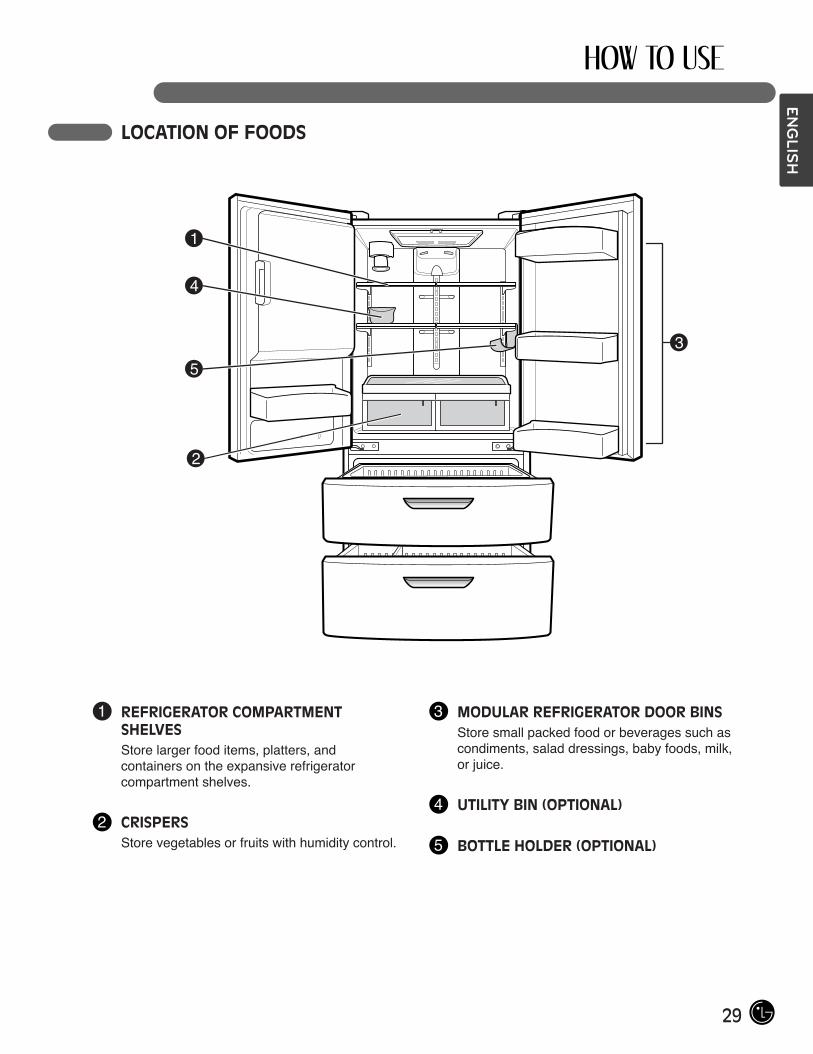
LOCATION OF FOODS
REFRIGERATOR COMPARTMENT SHELVESStore larger food items, platters, and containers on the expansive refrigerator compartment shelves.
CRISPERSStore vegetables or fruits with humidity control.
MODULAR REFRIGERATOR DOOR BINSStore small packed food or beverages such ascondiments, salad dressings, baby foods, milk, or juice.
UTILITY BIN (OPTIONAL)
BOTTLE HOLDER (OPTIONAL)
1
2
3
4
5
2
1
4
5
3
ENG
LISH
30
SHELF HEIGHT ADJUSTMENT
The shelves in your refrigerator are adjustable to meetyour individual storage needs.
Storing similar food items together in your refrigerator and adjusting the shelves to fit different heights of items will make finding the exact item you want easier; it will also reduce the amount of time the refrigerator door is open, savingenergy.
IMPORTANT: Do not clean glass shelves with warm waterwhen they are cold. Shelves may break if exposed tosudden temperature changes or impact, such as bumping.For your protection, glass shelves are made with temperedglass, which will shatter into small, pebble-sized pieces.
NOTE: Glass shelves are heavy. Use special care whenremoving them to avoid dropping them.
Adjusting ShelvesRemove shelves from the shipping position and placeshelves in the position you want.
wCAUTIONMake sure that shelves are level from one side to theother. Failure to do so may result in the shelf’s falling orspilling food.
Remove Shelf Reinstall Shelf
Tilt up the front of the shelf. Lift up the back andpull out the shelf.
Tilt up the front of the shelf and guide the shelf hooksinto the slots at a desired height. Then lower the frontof the shelf so that the hooks drop into the slots.
Tilt up the front of the shelf. Lift up the back andpull out the shelf.
Tilt up the front of the shelf and guide the shelf hooksinto the slots at a desired height. Then lower the frontof the shelf so that the hooks drop into the slots.
Bottle Holder (Optional)
UTILITY BIN (OPTIONAL)
Store the utility bin on interior shelf, not on door shelf. wCAUTION
Do not use the utility bin as an ice storage bin in thefreezer compartment. The utility bin can easily break if itfreezes.
31
REMOVING AND REPLACING COMPONENTS
NOTE: When reinstalling components, reverse the order of steps for removal. To prevent damage,never use excessive force when removing orreinstalling components.
wCAUTION• Crispers, Door Bins and interior shelves are
not dishwasher safe.
wCAUTION• Personal injury can occur if the door bins are not
firmly assembled.NOTE: DO NOT adjust a loaded bin.
• DO NOT allow children to play with baskets. The sharp corners on the baskets could causeinjury.
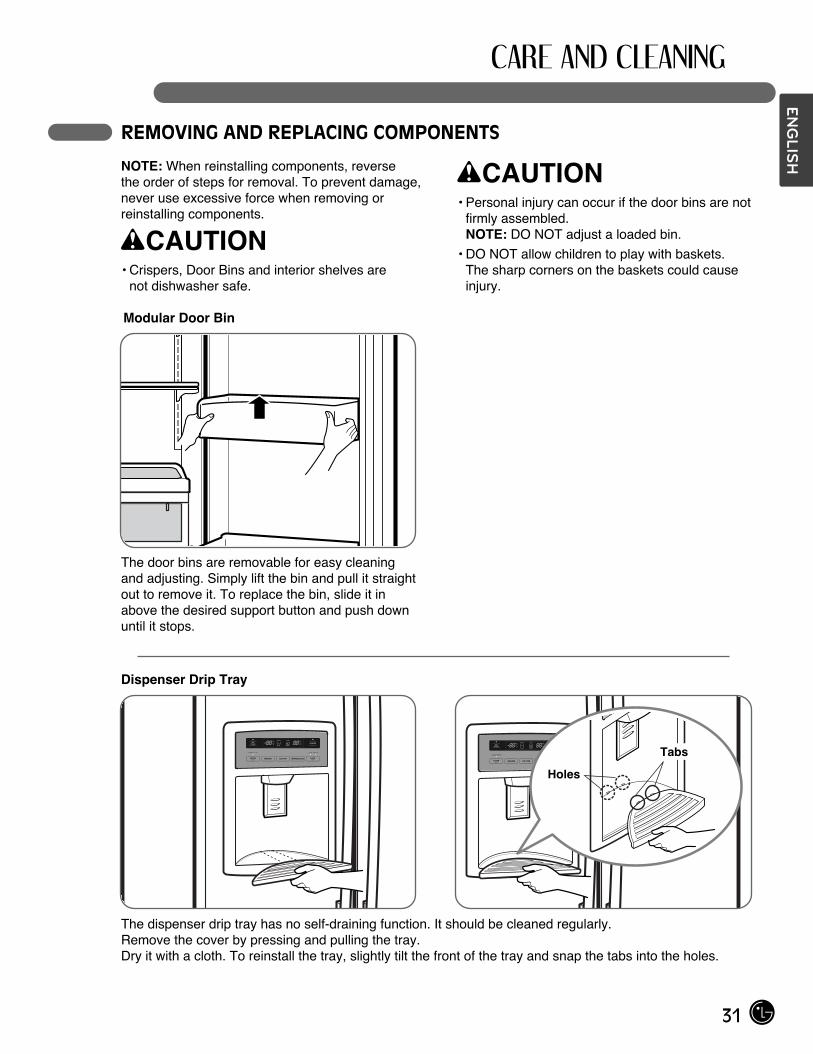
Modular Door Bin
The door bins are removable for easy cleaningand adjusting. Simply lift the bin and pull it straightout to remove it. To replace the bin, slide it inabove the desired support button and push downuntil it stops.
Dispenser Drip Tray
The dispenser drip tray has no self-draining function. It should be cleaned regularly. Remove the cover by pressing and pulling the tray. Dry it with a cloth. To reinstall the tray, slightly tilt the front of the tray and snap the tabs into the holes.
Tabs
Holes
ENG
LISH
32
REMOVING AND REPLACING COMPONENTS (CONT.)
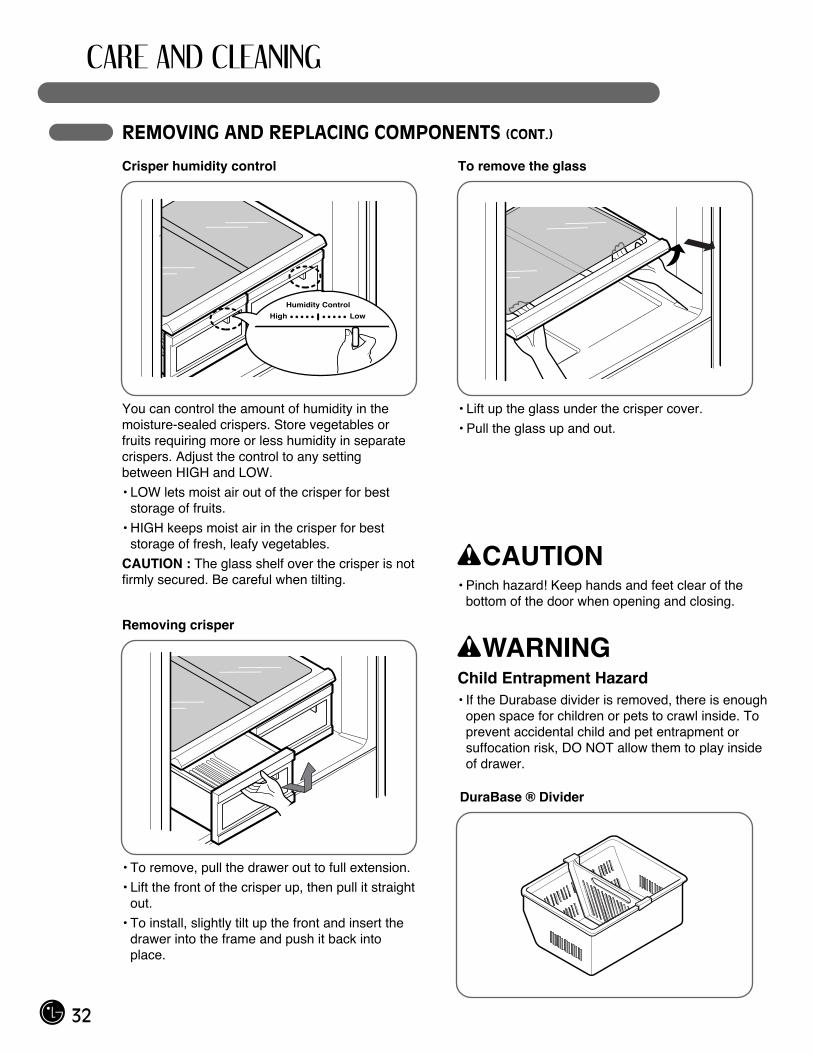
Crisper humidity control
You can control the amount of humidity in themoisture-sealed crispers. Store vegetables orfruits requiring more or less humidity in separatecrispers. Adjust the control to any setting between HIGH and LOW.
• LOW lets moist air out of the crisper for beststorage of fruits.
• HIGH keeps moist air in the crisper for beststorage of fresh, leafy vegetables.
CAUTION : The glass shelf over the crisper is notfirmly secured. Be careful when tilting.
High Low
Humidity Control
To remove the glass
• Lift up the glass under the crisper cover.
• Pull the glass up and out.
Removing crisper
• To remove, pull the drawer out to full extension.
• Lift the front of the crisper up, then pull it straightout.
• To install, slightly tilt up the front and insert thedrawer into the frame and push it back intoplace.
wCAUTION• Pinch hazard! Keep hands and feet clear of the
bottom of the door when opening and closing.
wWARNINGChild Entrapment Hazard• If the Durabase divider is removed, there is enough
open space for children or pets to crawl inside. Toprevent accidental child and pet entrapment orsuffocation risk, DO NOT allow them to play insideof drawer.
DuraBase ® Divider
33
CLEANING THE REFRIGERATOR
wWARNINGExplosion Hazard• Use nonflammable cleaner.• Failure to do so can result in death,
explosion, or fire.
Both the refrigerator and freezer sections defrostautomatically. However, clean both sections aboutonce a month to prevent odors. Wipe up spillsimmediately.
• Unplug the refrigerator.
• Remove all removable parts, such as shelves andcrispers.
• Use a clean sponge or soft cloth and a milddetergent in warm water. Do not use abrasive orharsh cleaners.
• Hand wash, rinse, and thoroughly dry all surfaces.
• Plug in the refrigerator.
NOTE: Window sprays, abrasive cleaners, orflammable fluids can scratch or damage plasticcovers or panels.
Cleaning the ExteriorFor models with a stainless steel exterior, use acommercially available stainless steel cleaner inaccordance with the manufacturer’s instructions.
You may also use a clean sponge or soft cloth and a mild detergent in warm water. Do not use abrasiveor harsh cleaners. Dry thoroughly with a soft cloth.
IMPORTANT: Do not use cleaning waxes,concentrated detergents, or cleaners containingpetroleum on plastic refrigerator parts such as doorliners or gaskets.
Care and Cleaning of the InteriorNOTE: Allow the freezer to warm so the cleaningcloth will not stick.
To help remove odors, you can wash the inside of the refrigerator with a mixture of baking soda andwarm water. Mix 2 tbsp. baking soda to 1 qt. of water(26 g soda to 1 L of water). Be sure the baking sodadissolves completely so it does not scratch thesurfaces of the refrigerator.
IMPORTANT: Do not use a spray nozzle to clean the interior.
GENERAL INFORMATION
StorageDuring average-length vacations, you will probably find it best to leave the refrigerator inoperation. Place freezable items in the freezer forlonger life.
When you plan to store the refrigerator, remove all food, disconnect the power cord, clean the interior thoroughly, and block the doors open toprevent mold and mildew. Be certain the storedrefrigerator does not present a child entrapmentdanger.
MovingUnload the refrigerator to move it. (This is probablynot necessary when pulling it out to clean behind it.)Be sure to let the refrigerator warm up to roomtemperature, and dry the inside before closing thedoors to pack it for moving. To avoid damaging theheight-adjusting screws, turn them all the way into thebase.
Power FailureMost power failures that are corrected within an hour or two will not affect your refrigeratortemperatures. However, you should minimize thenumber of door openings while the power is off.
Water may drip from the ice bin during a poweroutage. To prevent this, remove the ice bin, discardall of the ice, towel dry, and replace.
ENG
LISH
34
LIGHT BULB REPLACEMENT
wWARNINGElectrical Shock Hazard• Before replacing a burned-out light bulb, either
unplug the refrigerator or turn off power at the circuitbreaker or fuse box.
NOTE: Moving the control to the OFF position doesnot remove power to the light circuit.
NOTE:• Not all appliance bulbs will fit your refrigerator. Be
sure to replace the bulb with one of the same size,shape and wattage.
• The light bulbs will turn off if door is left open forseven continuous minutes. Shutting door for onesecond will light bulbs to come back on.
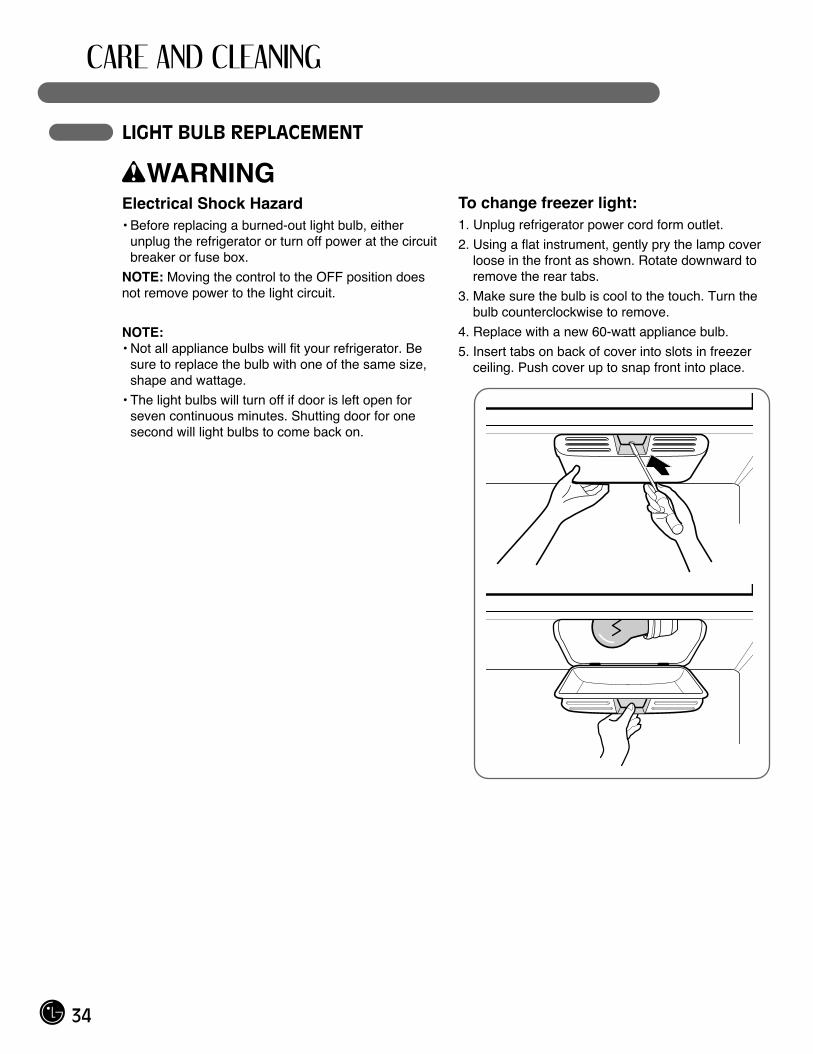
To change freezer light:1. Unplug refrigerator power cord form outlet.
2. Using a flat instrument, gently pry the lamp coverloose in the front as shown. Rotate downward toremove the rear tabs.
3. Make sure the bulb is cool to the touch. Turn thebulb counterclockwise to remove.
4. Replace with a new 60-watt appliance bulb.
5. Insert tabs on back of cover into slots in freezerceiling. Push cover up to snap front into place.
35
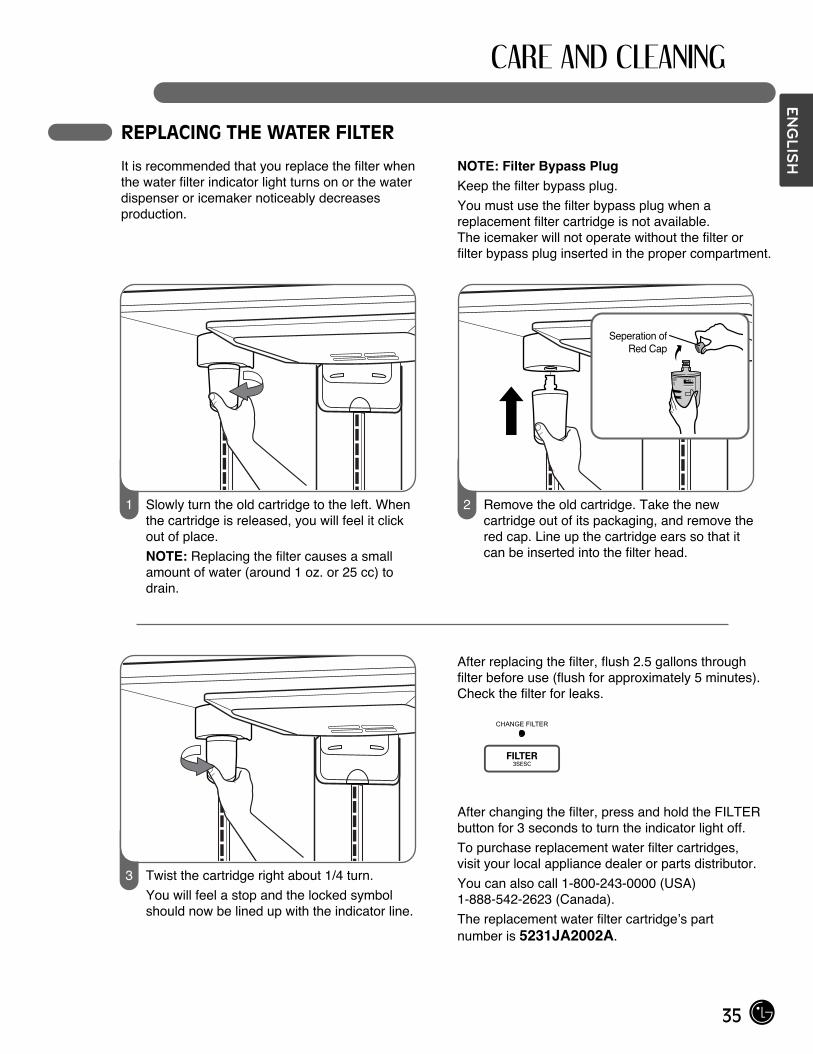
REPLACING THE WATER FILTER
It is recommended that you replace the filter when the water filter indicator light turns on or the waterdispenser or icemaker noticeably decreasesproduction.
NOTE: Filter Bypass PlugKeep the filter bypass plug.
You must use the filter bypass plug when areplacement filter cartridge is not available. The icemaker will not operate without the filter or filter bypass plug inserted in the proper compartment.
After replacing the filter, flush 2.5 gallons throughfilter before use (flush for approximately 5 minutes).Check the filter for leaks.
After changing the filter, press and hold the FILTERbutton for 3 seconds to turn the indicator light off.
To purchase replacement water filter cartridges, visit your local appliance dealer or parts distributor.
You can also call 1-800-243-0000 (USA) 1-888-542-2623 (Canada).
The replacement water filter cartridge’s part number is 5231JA2002A.
Slowly turn the old cartridge to the left. Whenthe cartridge is released, you will feel it clickout of place.
NOTE: Replacing the filter causes a smallamount of water (around 1 oz. or 25 cc) todrain.
1 Remove the old cartridge. Take the newcartridge out of its packaging, and remove thered cap. Line up the cartridge ears so that itcan be inserted into the filter head.
2
Twist the cartridge right about 1/4 turn.
You will feel a stop and the locked symbolshould now be lined up with the indicator line.
3
Seperation ofRed Cap
ENG
LISH
36
BEFORE CALLING FOR SERVICE
Before calling for service, review this list. It may save you both time and expense. This list includescommon occurrences that are not the result of defective workmanship or materials in this appliance.
Temperature inthe freezer is toocold, but therefrigeratortemperature issatisfactory.
Temperature inthe refrigerator istoo cold, but thefreezertemperature issatisfactory.
• Refrigerator control is off.
• Refrigerator is in defrostcycle.
• Plug at the wall outlet isdisconnected.
• Power outage. Check houselights.
• Refrigerator is larger than theprevious one you owned.
• The room or the outdoorweather is hot.
• Refrigerator was recentlydisconnected for a while.
• Large amounts of warm orhot food may have beenstored recently.
• Doors are opened toofrequently or for too long.
• Refrigerator or freezer doormay be slightly open.
• Refrigerator control is set toocold.
• Refrigerator or freezer gasketis dirty, worn, cracked, orpoorly fitted.
• The thermostat is keeping therefrigerator at a constanttemperature.
• Freezer control is set toocold.
• Refrigerator control is set toocold.
• Set the refrigerator control.
• This is normal for a fully automatic defrostingrefrigerator. The defrost cycle occurs periodically.
• Make sure the plug is tightly pushed into theoutlet.
• Call the local electric company.
• This is normal. Larger, more efficient units runlonger.
• It is normal for the refrigerator to work longerunder these conditions.
• It takes a few hours for the refrigerator to reachcooling temperatures.
• Warm food will cause the refrigerator to run longeruntil the desired temperature is reached.
• Warm air entering the refrigerator causes it to runmore. Open the door less often.
• Make sure the refrigerator is level. Keep food andcontainers from blocking the door.
• Adjust the refrigerator control to a warmer settinguntil the refrigerator temperature is satisfactory.
• Clean or change the gasket. Leaks in the doorseal will cause the refrigerator to run longer inorder to maintain desired temperatures.
• This is normal. The refrigerator cycles on and offto keep the temperature constant.
• Adjust the freezer control to a warmer setting untilthe freezer temperature is satisfactory.
• Adjust the refrigerator control to a warmer setting.
37
BEFORE CALLING FOR SERVICE (CONT.)
Problem Possible Causes Solutions
Food stored inrefrigeratordrawers freezes.
Temperatures inthe refrigerator orfreezer are toowarm.
Temperature in the refrigerator is too warm, but the freezertemperature issatisfactory.
Louder soundlevels whencompressor comes on.
Vibrating orrattling noise.
Moisture collectson the inside wallsof the refrigerator.
Moisture forms onthe outside of therefrigerator orbetween the doors.
• Refrigerator control is set toocold.
• Freezer or refrigerator controlis set too warm.
• Doors are opened toofrequently or for too long.
• Door is slightly open.
• Large amounts of warm orhot food may have beenstored recently.
• Refrigerator has recentlybeen disconnected for aperiod of time.
• Refrigerator control is set toowarm.
• Refrigerator operates athigher pressures during thestart of the ON cycle.
• Floor is uneven or weak. Therefrigerator rocks on the floorwhen it is moved slightly.
• Items placed on the top of therefrigerator are vibrating.
• Dishes are vibrating on theshelves in the refrigerator.
• The refrigerator is touchingthe wall or cabinets.
• The weather is hot and humidwhich increases the rate offrost buildup and internalsweating.
• Door is slightly open.
• Door is opened too often orfor too long.
• Weather is humid.
• Door is slightly open.
• Adjust the refrigerator to a warmer setting.
• Adjust the freezer or refrigerator control to a coldersetting until the freezer or refrigerator temperatureis satisfactory.
• Warm air enters the refrigerator/freezer wheneverthe door is opened. Open the door less often.
• Close the door completely.
• Wait until the refrigerator or freezer has had achance to cool food to the set temperature.
• It takes a few hours for the refrigerator to reachthe set temperatures.
• Adjust the refrigerator control to a colder setting.
• This is normal.
• Be sure floor is level and solid and can adequatelysupport the refrigerator.
• Remove items.
• It is normal for dishes to vibrate slightly. Movedishes slightly. Make sure refrigerator is level andfirmly set on floor.
• Move the refrigerator so that it does not touch thewall.
• This is normal.
• Close the door.
• Open the door less often.
• This is normal in humid weather. When humidity islower, the moisture should disappear.
• Close the door completely.
ENG
LISH
38
BEFORE CALLING FOR SERVICE (CONT.)
Problem Possible Causes Solutions
Moisture formson the dispenser.
Odors in therefrigerator.
The door(s) willnot close.
Drawers aredifficult to move.
The dispenserwill not dispensewater.
Water has an oddtaste and/or odor.
• Moisture may form when thetemperature or humidity arehigh.
• Interior needs to be cleaned.
• Food with strong odor is inthe refrigerator.
• Some containers andwrapping materials produceodors.
• Food package is keeping thedoor open.
• Door was closed too hard,causing other door to openslightly.
• Refrigerator is not level. Itrocks on the floor when it ismoved slightly.
• Floor is uneven or weak. Therefrigerator rocks on the floorwhen it is moved slightly.
• Refrigerator is touching thewall or the cabinets.
• Food is touching the shelf ontop of the drawer.
• The drawer track is dirty.
• The Lock function isactivated.
• The household water-linevalve is not open.
• The refrigerator or freezerdoor is not closed.
• When a installed tube is bent.
• When a filter is old.
• The water has been in thetank for too long.
• The unit is not properlyconnected to cold water line.
• When a filter is old.
• Wipe off the moisture.
• Clean interior with sponge, warm water, andbaking soda. Be sure the soda is completelydissolved so it will not act as an abrasivecompound.
• Cover food completely.
• Use a different container or brand of wrappingmaterials.
• Move the packages that keep the door fromclosing.
• Gently close both doors.
• Adjust the height-adjusting screw.
• Be sure the floor is level and can adequatelysupport the refrigerator. Contact a carpenter tocorrect sagging or sloping floor.
• Move the refrigerator.
• Keep less food in the drawer.
• Clean the drawer and the track.
• Release the Lock function. (See the setting thefunctions section on page 25.)
• Open the household water-line valve.
• Be sure both doors are closed.
• Check the installed tube.
• Replace with a new filter.
• Dispense for 2 minutes and discard to freshen thesupply. Dispense and discard for an additional 2minutes to rinse the tank completely.
• Connect the unit to a cold water line that supplieswater to the kitchen faucet.
• Replace with a new filter.
39
BEFORE CALLING FOR SERVICE (CONT.)
Problem Possible Causes Solutions
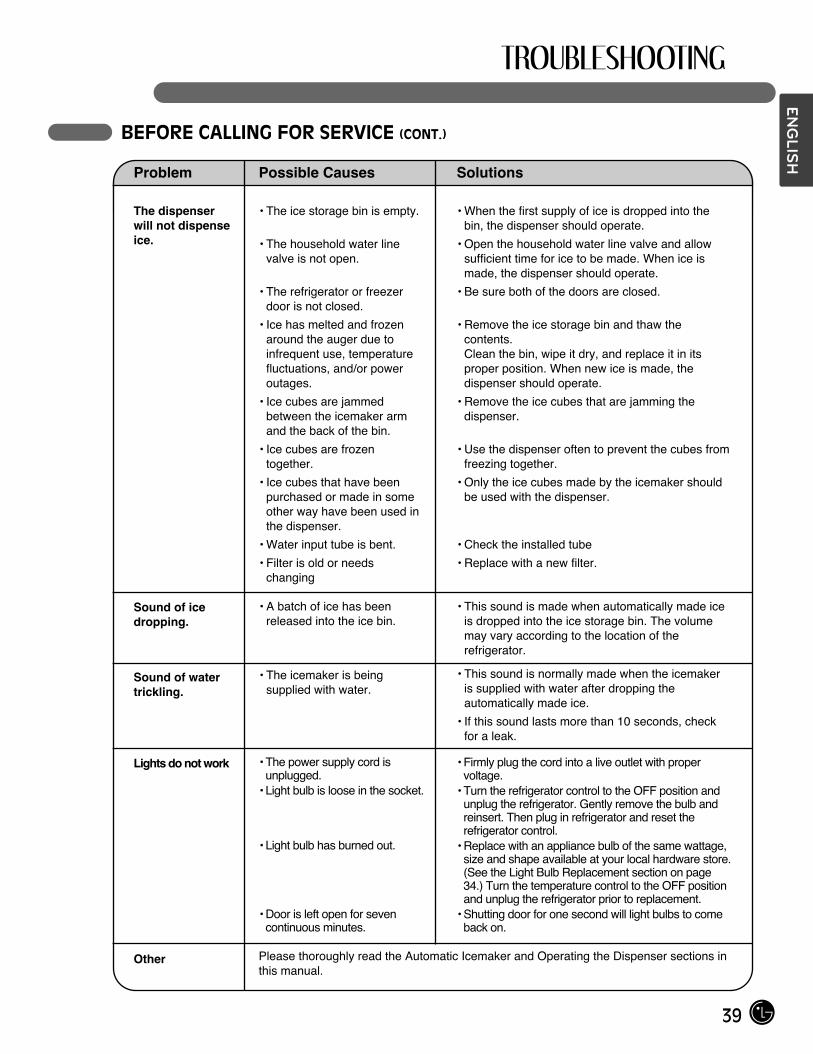
The dispenserwill not dispenseice.
Sound of icedropping.
Sound of watertrickling.
Lights do not work
Other
• The ice storage bin is empty.
• The household water linevalve is not open.
• The refrigerator or freezerdoor is not closed.
• Ice has melted and frozenaround the auger due toinfrequent use, temperaturefluctuations, and/or poweroutages.
• Ice cubes are jammedbetween the icemaker armand the back of the bin.
• Ice cubes are frozentogether.
• Ice cubes that have beenpurchased or made in someother way have been used inthe dispenser.
• Water input tube is bent.
• Filter is old or needschanging
• A batch of ice has beenreleased into the ice bin.
• The icemaker is beingsupplied with water.
• The power supply cord isunplugged.
• Light bulb is loose in the socket.
• Light bulb has burned out.
• Door is left open for sevencontinuous minutes.
Please thoroughly read the Automatic Icemaker and Operating the Dispenser sections inthis manual.
• When the first supply of ice is dropped into thebin, the dispenser should operate.
• Open the household water line valve and allowsufficient time for ice to be made. When ice ismade, the dispenser should operate.
• Be sure both of the doors are closed.
• Remove the ice storage bin and thaw thecontents.Clean the bin, wipe it dry, and replace it in itsproper position. When new ice is made, thedispenser should operate.
• Remove the ice cubes that are jamming thedispenser.
• Use the dispenser often to prevent the cubes fromfreezing together.
• Only the ice cubes made by the icemaker shouldbe used with the dispenser.
• Check the installed tube
• Replace with a new filter.
• This sound is made when automatically made iceis dropped into the ice storage bin. The volumemay vary according to the location of therefrigerator.
• This sound is normally made when the icemakeris supplied with water after dropping theautomatically made ice.
• If this sound lasts more than 10 seconds, checkfor a leak.
• Firmly plug the cord into a live outlet with propervoltage.
• Turn the refrigerator control to the OFF position andunplug the refrigerator. Gently remove the bulb andreinsert. Then plug in refrigerator and reset therefrigerator control.
• Replace with an appliance bulb of the same wattage,size and shape available at your local hardware store.(See the Light Bulb Replacement section on page34.) Turn the temperature control to the OFF positionand unplug the refrigerator prior to replacement.
• Shutting door for one second will light bulbs to comeback on.
ENG
LISH
40
KEY DIMENSIONS AND SPECIFICATIONS
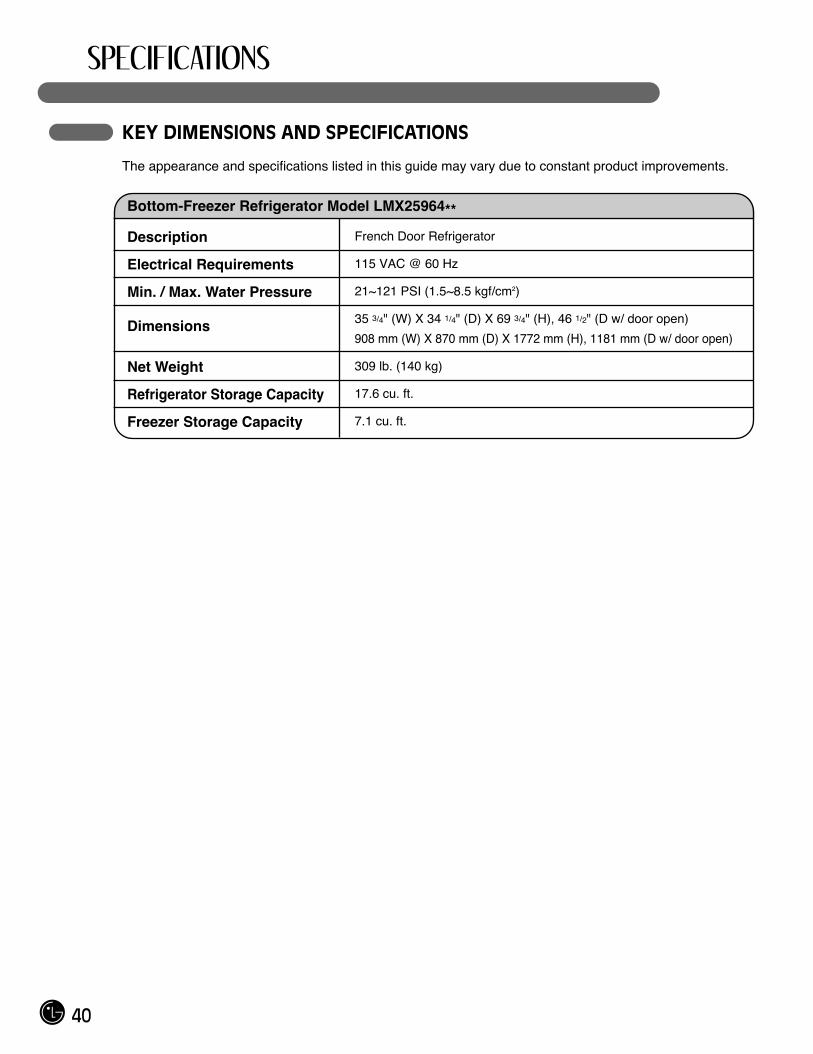
The appearance and specifications listed in this guide may vary due to constant product improvements.
Bottom-Freezer Refrigerator Model LMX25964**
Description
Electrical Requirements
Min. / Max. Water Pressure
Dimensions
Net Weight
Refrigerator Storage Capacity
Freezer Storage Capacity
French Door Refrigerator
115 VAC @ 60 Hz
21~121 PSI (1.5~8.5 kgf/cm2)
35 3/4" (W) X 34 1/4" (D) X 69 3/4" (H), 46 1/2" (D w/ door open)
908 mm (W) X 870 mm (D) X 1772 mm (H), 1181 mm (D w/ door open)
309 lb. (140 kg)
17.6 cu. ft.
7.1 cu. ft.
41
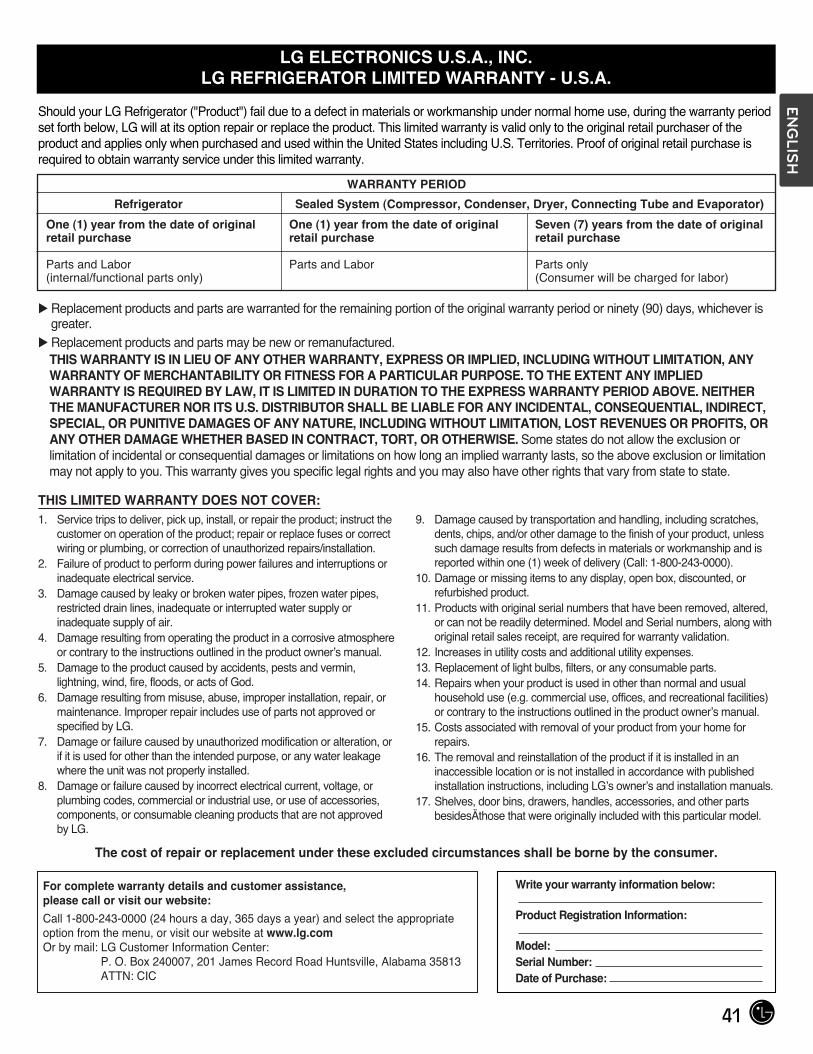
LG ELECTRONICS U.S.A., INC.LG REFRIGERATOR LIMITED WARRANTY - U.S.A.
Should your LG Refrigerator ("Product") fail due to a defect in materials or workmanship under normal home use, during the warranty periodset forth below, LG will at its option repair or replace the product. This limited warranty is valid only to the original retail purchaser of theproduct and applies only when purchased and used within the United States including U.S. Territories. Proof of original retail purchase isrequired to obtain warranty service under this limited warranty.
� Replacement products and parts are warranted for the remaining portion of the original warranty period or ninety (90) days, whichever isgreater.
� Replacement products and parts may be new or remanufactured.THIS WARRANTY IS IN LIEU OF ANY OTHER WARRANTY, EXPRESS OR IMPLIED, INCLUDING WITHOUT LIMITATION, ANYWARRANTY OF MERCHANTABILITY OR FITNESS FOR A PARTICULAR PURPOSE. TO THE EXTENT ANY IMPLIEDWARRANTY IS REQUIRED BY LAW, IT IS LIMITED IN DURATION TO THE EXPRESS WARRANTY PERIOD ABOVE. NEITHERTHE MANUFACTURER NOR ITS U.S. DISTRIBUTOR SHALL BE LIABLE FOR ANY INCIDENTAL, CONSEQUENTIAL, INDIRECT,SPECIAL, OR PUNITIVE DAMAGES OF ANY NATURE, INCLUDING WITHOUT LIMITATION, LOST REVENUES OR PROFITS, ORANY OTHER DAMAGE WHETHER BASED IN CONTRACT, TORT, OR OTHERWISE. Some states do not allow the exclusion orlimitation of incidental or consequential damages or limitations on how long an implied warranty lasts, so the above exclusion or limitationmay not apply to you. This warranty gives you specific legal rights and you may also have other rights that vary from state to state.
The cost of repair or replacement under these excluded circumstances shall be borne by the consumer.
THIS LIMITED WARRANTY DOES NOT COVER:1. Service trips to deliver, pick up, install, or repair the product; instruct the
customer on operation of the product; repair or replace fuses or correctwiring or plumbing, or correction of unauthorized repairs/installation.
2. Failure of product to perform during power failures and interruptions orinadequate electrical service.
3. Damage caused by leaky or broken water pipes, frozen water pipes,restricted drain lines, inadequate or interrupted water supply orinadequate supply of air.
4. Damage resulting from operating the product in a corrosive atmosphereor contrary to the instructions outlined in the product owner’s manual.
5. Damage to the product caused by accidents, pests and vermin,lightning, wind, fire, floods, or acts of God.
6. Damage resulting from misuse, abuse, improper installation, repair, ormaintenance. Improper repair includes use of parts not approved orspecified by LG.
7. Damage or failure caused by unauthorized modification or alteration, orif it is used for other than the intended purpose, or any water leakagewhere the unit was not properly installed.
8. Damage or failure caused by incorrect electrical current, voltage, orplumbing codes, commercial or industrial use, or use of accessories,components, or consumable cleaning products that are not approvedby LG.
9. Damage caused by transportation and handling, including scratches,dents, chips, and/or other damage to the finish of your product, unlesssuch damage results from defects in materials or workmanship and isreported within one (1) week of delivery (Call: 1-800-243-0000).
10. Damage or missing items to any display, open box, discounted, orrefurbished product.
11. Products with original serial numbers that have been removed, altered,or can not be readily determined. Model and Serial numbers, along withoriginal retail sales receipt, are required for warranty validation.
12. Increases in utility costs and additional utility expenses.13. Replacement of light bulbs, filters, or any consumable parts.14. Repairs when your product is used in other than normal and usual
household use (e.g. commercial use, offices, and recreational facilities)or contrary to the instructions outlined in the product owner’s manual.
15. Costs associated with removal of your product from your home forrepairs.
16. The removal and reinstallation of the product if it is installed in aninaccessible location or is not installed in accordance with publishedinstallation instructions, including LG’s owner’s and installation manuals.
17. Shelves, door bins, drawers, handles, accessories, and other partsbesidesÄthose that were originally included with this particular model.
Refrigerator Sealed System (Compressor, Condenser, Dryer, Connecting Tube and Evaporator)
One (1) year from the date of originalretail purchase
Parts and Labor (internal/functional parts only)
One (1) year from the date of originalretail purchase
Parts and Labor
Seven (7) years from the date of originalretail purchase
Parts only (Consumer will be charged for labor)
WARRANTY PERIOD
For complete warranty details and customer assistance, please call or visit our website:
Call 1-800-243-0000 (24 hours a day, 365 days a year) and select the appropriate option from the menu, or visit our website at www.lg.comOr by mail: LG Customer Information Center:
P. O. Box 240007, 201 James Record Road Huntsville, Alabama 35813 ATTN: CIC
Write your warranty information below:
Product Registration Information:
Model:Serial Number:Date of Purchase:
ENG
LISH
42
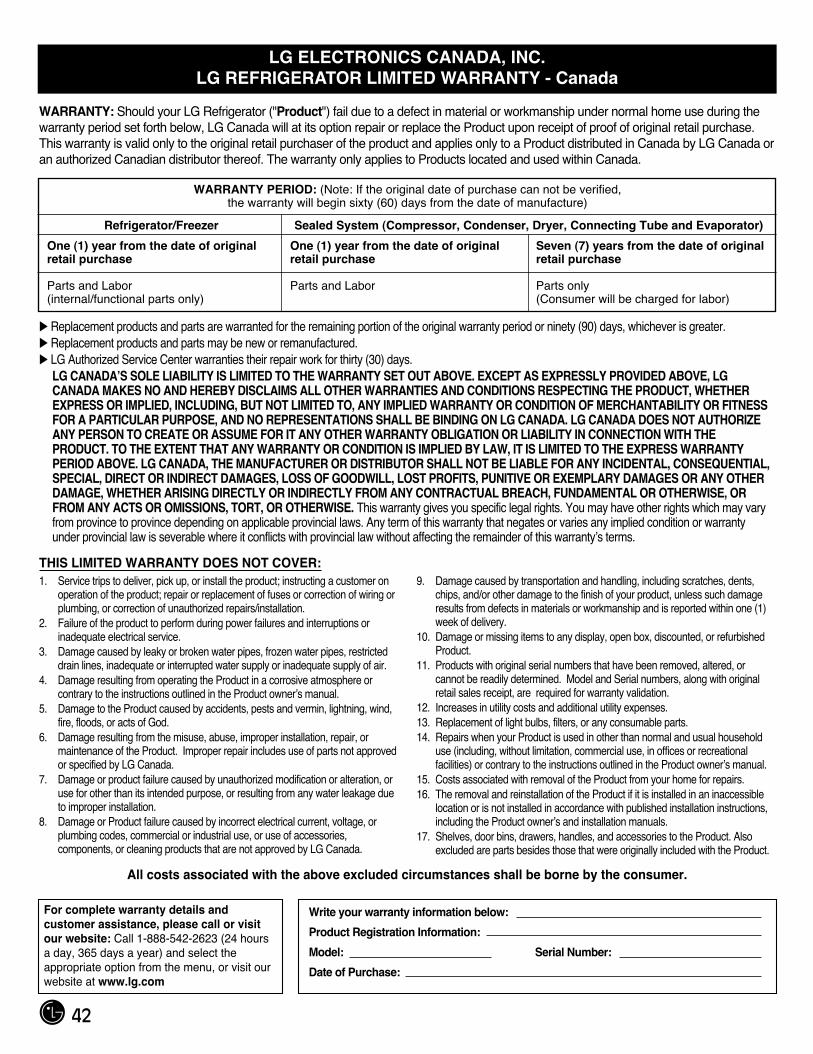
LG ELECTRONICS CANADA, INC.LG REFRIGERATOR LIMITED WARRANTY - Canada
WARRANTY: Should your LG Refrigerator ("Product") fail due to a defect in material or workmanship under normal home use during thewarranty period set forth below, LG Canada will at its option repair or replace the Product upon receipt of proof of original retail purchase.This warranty is valid only to the original retail purchaser of the product and applies only to a Product distributed in Canada by LG Canada oran authorized Canadian distributor thereof. The warranty only applies to Products located and used within Canada.
� Replacement products and parts are warranted for the remaining portion of the original warranty period or ninety (90) days, whichever is greater.� Replacement products and parts may be new or remanufactured.� LG Authorized Service Center warranties their repair work for thirty (30) days.
LG CANADA’S SOLE LIABILITY IS LIMITED TO THE WARRANTY SET OUT ABOVE. EXCEPT AS EXPRESSLY PROVIDED ABOVE, LGCANADA MAKES NO AND HEREBY DISCLAIMS ALL OTHER WARRANTIES AND CONDITIONS RESPECTING THE PRODUCT, WHETHEREXPRESS OR IMPLIED, INCLUDING, BUT NOT LIMITED TO, ANY IMPLIED WARRANTY OR CONDITION OF MERCHANTABILITY OR FITNESSFOR A PARTICULAR PURPOSE, AND NO REPRESENTATIONS SHALL BE BINDING ON LG CANADA. LG CANADA DOES NOT AUTHORIZEANY PERSON TO CREATE OR ASSUME FOR IT ANY OTHER WARRANTY OBLIGATION OR LIABILITY IN CONNECTION WITH THEPRODUCT. TO THE EXTENT THAT ANY WARRANTY OR CONDITION IS IMPLIED BY LAW, IT IS LIMITED TO THE EXPRESS WARRANTYPERIOD ABOVE. LG CANADA, THE MANUFACTURER OR DISTRIBUTOR SHALL NOT BE LIABLE FOR ANY INCIDENTAL, CONSEQUENTIAL,SPECIAL, DIRECT OR INDIRECT DAMAGES, LOSS OF GOODWILL, LOST PROFITS, PUNITIVE OR EXEMPLARY DAMAGES OR ANY OTHERDAMAGE, WHETHER ARISING DIRECTLY OR INDIRECTLY FROM ANY CONTRACTUAL BREACH, FUNDAMENTAL OR OTHERWISE, ORFROM ANY ACTS OR OMISSIONS, TORT, OR OTHERWISE. This warranty gives you specific legal rights. You may have other rights which may varyfrom province to province depending on applicable provincial laws. Any term of this warranty that negates or varies any implied condition or warrantyunder provincial law is severable where it conflicts with provincial law without affecting the remainder of this warranty’s terms.
All costs associated with the above excluded circumstances shall be borne by the consumer.
THIS LIMITED WARRANTY DOES NOT COVER:1. Service trips to deliver, pick up, or install the product; instructing a customer on
operation of the product; repair or replacement of fuses or correction of wiring orplumbing, or correction of unauthorized repairs/installation.
2. Failure of the product to perform during power failures and interruptions orinadequate electrical service.
3. Damage caused by leaky or broken water pipes, frozen water pipes, restricteddrain lines, inadequate or interrupted water supply or inadequate supply of air.
4. Damage resulting from operating the Product in a corrosive atmosphere orcontrary to the instructions outlined in the Product owner’s manual.
5. Damage to the Product caused by accidents, pests and vermin, lightning, wind,fire, floods, or acts of God.
6. Damage resulting from the misuse, abuse, improper installation, repair, ormaintenance of the Product. Improper repair includes use of parts not approvedor specified by LG Canada.
7. Damage or product failure caused by unauthorized modification or alteration, oruse for other than its intended purpose, or resulting from any water leakage dueto improper installation.
8. Damage or Product failure caused by incorrect electrical current, voltage, orplumbing codes, commercial or industrial use, or use of accessories,components, or cleaning products that are not approved by LG Canada.
9. Damage caused by transportation and handling, including scratches, dents,chips, and/or other damage to the finish of your product, unless such damageresults from defects in materials or workmanship and is reported within one (1)week of delivery.
10. Damage or missing items to any display, open box, discounted, or refurbishedProduct.
11. Products with original serial numbers that have been removed, altered, orcannot be readily determined. Model and Serial numbers, along with originalretail sales receipt, are required for warranty validation.
12. Increases in utility costs and additional utility expenses.13. Replacement of light bulbs, filters, or any consumable parts.14. Repairs when your Product is used in other than normal and usual household
use (including, without limitation, commercial use, in offices or recreationalfacilities) or contrary to the instructions outlined in the Product owner’s manual.
15. Costs associated with removal of the Product from your home for repairs.16. The removal and reinstallation of the Product if it is installed in an inaccessible
location or is not installed in accordance with published installation instructions,including the Product owner’s and installation manuals.
17. Shelves, door bins, drawers, handles, and accessories to the Product. Alsoexcluded are parts besides those that were originally included with the Product.
Refrigerator/Freezer Sealed System (Compressor, Condenser, Dryer, Connecting Tube and Evaporator)
One (1) year from the date of originalretail purchase
Parts and Labor(internal/functional parts only)
One (1) year from the date of originalretail purchase
Parts and Labor
Seven (7) years from the date of originalretail purchase
Parts only(Consumer will be charged for labor)
WARRANTY PERIOD: (Note: If the original date of purchase can not be verified, the warranty will begin sixty (60) days from the date of manufacture)
For complete warranty details andcustomer assistance, please call or visitour website: Call 1-888-542-2623 (24 hoursa day, 365 days a year) and select theappropriate option from the menu, or visit ourwebsite at www.lg.com
Write your warranty information below:
Product Registration Information:
Model: Serial Number:
Date of Purchase:
For inquires or comments, visit www.lg.com or call;