Page 1
ETSO: EASA.21O.1304 Rev.A FAA: TSO C37d / TSO C38d
FCC ID: BVYFSG2T
Installation & Operation applies for FSG 2T article no. F10350
Before installing and operating the transceiver, please read this manual thoroughly!
Please observe the Safety Information!
Keep for further use!
Document name: IM 035.00
Document no.: FAV_D10048
Revision: 3.00
Date of Issue June 2014
f.u.n.k.e. AVIONICS GmbH
Heinz-Strachowitz-Str. 4 86807 Buchloe Germany
Telephone +49 (0)8241 / 80066-0 Fax +49 (0)8241 / 8066-99
e-mail: [email protected]
Internet: www.funkeavionics.de
f.u.n.k.e. AVIONICS GmbH is certified to DIN EN ISO 9001:2008. It is an accredited manufacturer of aeronautical equipment DE.21G.0078,
maintenance facility DE.145.0436, and development facility APOA-013.
FSG 2T
5W VHF/AM Aviation Transceiver
118.000 … 136.975 MHz 25 kHz channel spacing
Page 2
VHF/AM RADIO FSG 2T
760 Channel Aviation Transceiver
2 FAV_D10048 June 2014
Manual Revision History
MANUAL IM 035.00 REVISION 3.00
Retain this list in the front of the Installation & Operation Manual as a RECORD OF REVISIONS.
Revision
Dittel
REASON FOR CHANGE Date
01 JTSO/ETSO authorization added 03/07/02
02 RegTP document added 05/08/02
03 DFS document added, approval number D – 0002/2002 completed, rear view revised, FCC ID and FCC document added
18/11/02
04 “Declaration of Conformity in accordance with the Radio and Telecommunications Terminal Equipment Act (FTEG) and Directive 1999/5/EC (R&TTE Directive)” document added, “§ A5, Transmitter Specification“ corrected. 11/02/03
05 “EEC TYPE-APPROVAL CERTIFICATE of Kraftfahrt-Bundesamt, D-24932 Flensburg“ added, „Notifikation einer Funkanlage des Bundesamts für Kommunikation, Biel/Schweiz“, added, type label (page 15) updated. 10/03/03
06 New version of document “Declaration of Conformity appropriate to the German law (FTEG) of radio and telecom terminal equipment”. 12/05/03
07 FAA TSO numbers added at front page 17/09/03
08 Pages 34 and 56 were corrected because of AF External (external audio signal is not reduced)
15/03/04
09 New VOL-knob, type label updated 20/02/08
10 Extension of EC-Type Approval (Kraftfahrt-Bundesamt), type label updated, new Certificates of EC-Type Approval and ETSO, new article numbers for A/C Battery box and Charger DL-50A
28/04/10
11 Amended version of “Declaration of Conformity in accordance with the Radio and Telecommunications Terminal Equipment Act (FTEG) and Directive 1999/5/EC (R&TTE Directive)” document added. Changes due to acquisition of full ownership by MARPOSS S.p.A., Italy
30/04/13
Revision
FAV
REASON FOR CHANGE Datum
1.00 Initial Release after change to Funkwerk Avionics GmbH; 86807 Buchloe – Germany
01.09.2013
2.00 Change of company name to f.u.n.k.e. AVIONICS GmbH 04.02.2014
3.00 FCC document added 25.06.2014
Page 3
VHF/AM Radio FSG 2T
760 Channel Aviation Transceiver
June 2014 FAV_D10048 3
IMPORTANT NOTE!
If installation into an aircraft is made by other than a certified avionics shop, you have to consult your responsible aircraft Avionics Airworthiness Inspector - before the installation – to get authorized certification of your completed installation.
The conditions and tests required for ETSO and FAA-TSO approval of this article are minimum performance standards. It is the responsibility of those desiring to install this article either on or within a specific type or class of aircraft to determine, that the aircraft installation conditions are within the ETSO or FAA-TSO standards. If
not within these standards, the article FSG 2T may be installed only if
further evaluation by the applicant documents an acceptable installation and is approved by the Administrator.
Page 4
VHF/AM RADIO FSG 2T
760 Channel Aviation Transceiver
4 FAV_D10048 June 2014
Table of Contents
Manual Revision History .................................................................................................... 2
Table of Contents ............................................................................................................... 4
List of Illustrations ............................................................................................................. 6
Abbreviations ..................................................................................................................... 7
1 For Your Safety ................................................................................................. 9
1.1 Used Symbols .............................................................................................................10
2 General Description ........................................................................................ 11
2.1 About this document ....................................................................................................11 2.2 General Description .....................................................................................................11 2.2.1 Application .......................................................................................................................... 11 2.2.2 Operation Description ......................................................................................................... 11 2.3 Technical Description ..................................................................................................13 2.4 System and Type Approval Information .......................................................................14 2.5 Re-calibration Information ...........................................................................................15 2.6 Operating License .......................................................................................................15 2.7 Equipment supplied .....................................................................................................15 2.8 Optional Accessories ...................................................................................................16 2.9 Equipment required, but not supplied ..........................................................................17 2.10 Some words about Microphones .................................................................................18
3 Installation ..................................................................................................... 19
3.1 General .......................................................................................................................19 3.2 Unpacking and Inspecting Equipment .........................................................................19 3.3 Pre-installation Test .....................................................................................................19 3.3.1 Particular Remarks to FSG 2T Transmitter Modulation ........................................................ 20 3.4 Mechanical Installation ................................................................................................23 3.4.1 Transceiver installation ....................................................................................................... 23 3.4.2 Compass deviation ............................................................................................................. 23 3.4.3 Antenna installation ............................................................................................................ 25 3.5 Airborne wiring ............................................................................................................27 3.5.1 General recommendations ................................................................................................. 27 3.5.2 Wiring the Microphone(s) ................................................................................................... 34
3.5.2.1 Microphone settings 35 3.5.2.2 Dynamic Microphone(s) 36 3.5.2.3 Standard Carbon, amplified Electret, amplified Dynamic Microphone(s) 37
3.5.3 Intercom (IC) ....................................................................................................................... 38 3.5.4 Loudspeaker / Headset interconnection ............................................................................. 38 3.5.5 OPTIONAL: AF External Operation .................................................................................... 39 3.5.6 Backlighting ........................................................................................................................ 40 3.5.7 Connection to a 28 Vdc airborne system ........................................................................... 40
4 Recommended Set-up Sequence ...................................................................... 41
4.1 General .......................................................................................................................41 4.2 Microphone Set-up ......................................................................................................42 4.2.1 Set-up using Loudspeaker / Junction Box and one (or two parallel, identical) non-amplified
Dynamic Microphone(s) at Mic 1 Input, pin 1. .................................................................... 42 4.2.2 Set-up using two non-amplified Dynamic Microphones separate on Mic 1 input, pin 1, and
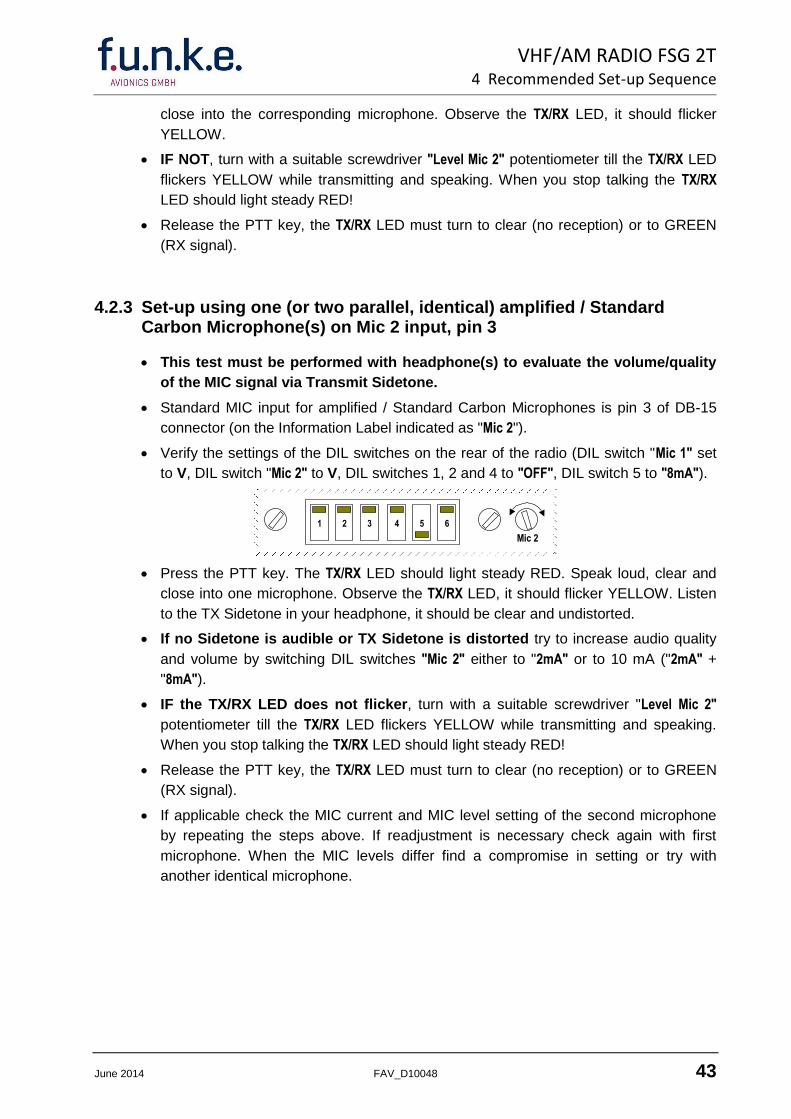
Mic 2 input, pin 3................................................................................................................. 42 4.2.3 Set-up using one (or two parallel, identical) amplified / Standard Carbon Microphone(s) on
Mic 2 input, pin 3................................................................................................................. 43
Page 5
VHF/AM Radio FSG 2T
760 Channel Aviation Transceiver
June 2014 FAV_D10048 5
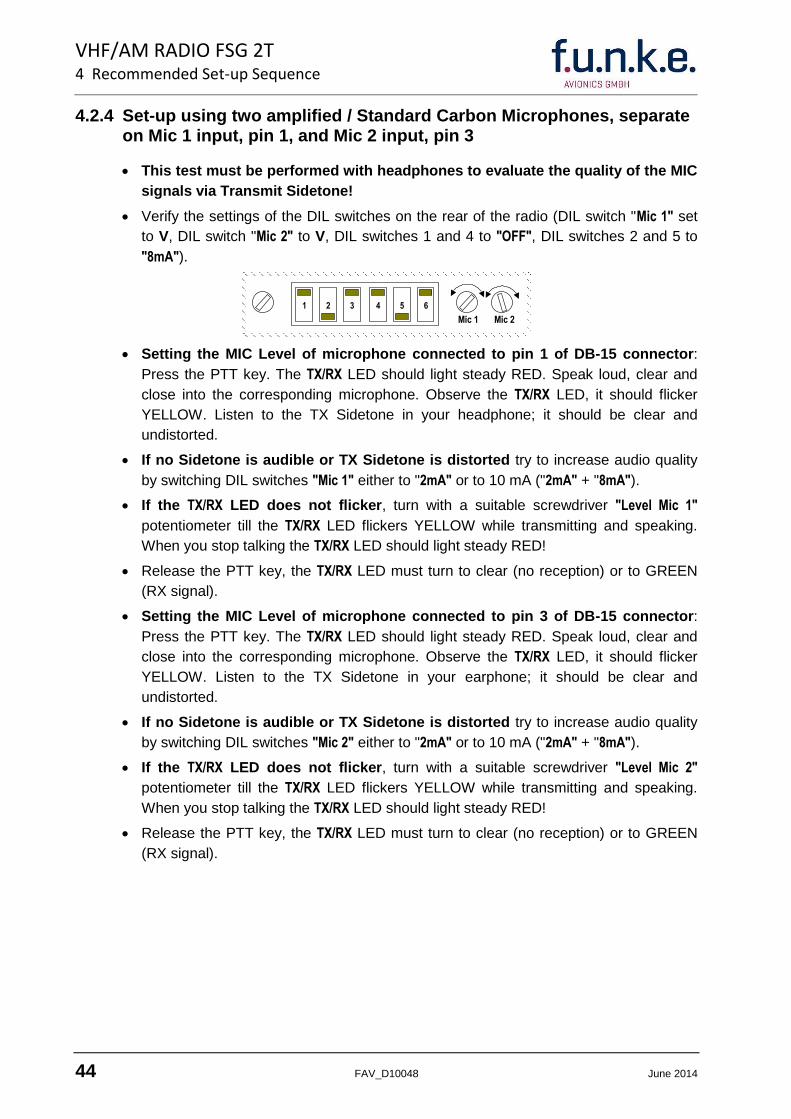
4.2.4 Set-up using two amplified / Standard Carbon Microphones, separate on Mic 1 input, pin 1, and Mic 2 input, pin 3 ..................................................................................................... 44
4.2.5 Set-up using non-amplified microphone(s) on one input and amplified microphones on the other .................................................................................................................................... 45
4.3 Adjusting the Headphone Volume and Transmitter Sidetone ...................................... 46 4.4 If applicable – check the Intercom Mode ..................................................................... 47 4.4.1 FSG 2T without AF External capability:.............................................................................. 47 4.4.2 FSG 2T with AF External capability: ................................................................................... 47 4.5 Check the RX Loudspeaker / Headphone Volume ...................................................... 48 4.6 Fixing the radio ........................................................................................................... 48 4.7 Testing on the Ground with engine Off ........................................................................ 49 4.8 Ground checks with engine running (if applicable) ...................................................... 50
5 Functional Description ..................................................................................... 51
5.1 Introduction ................................................................................................................. 51 5.2 Operator's Controls ..................................................................................................... 51 5.3 Frequency Display, the 5-digit Liquid Crystal Display (LCD) can be back-lit................ 54 5.4 Error Codes ................................................................................................................ 55 5.5 Connectors and controls on the rear side ................................................................... 56 5.6 Reset .......................................................................................................................... 56
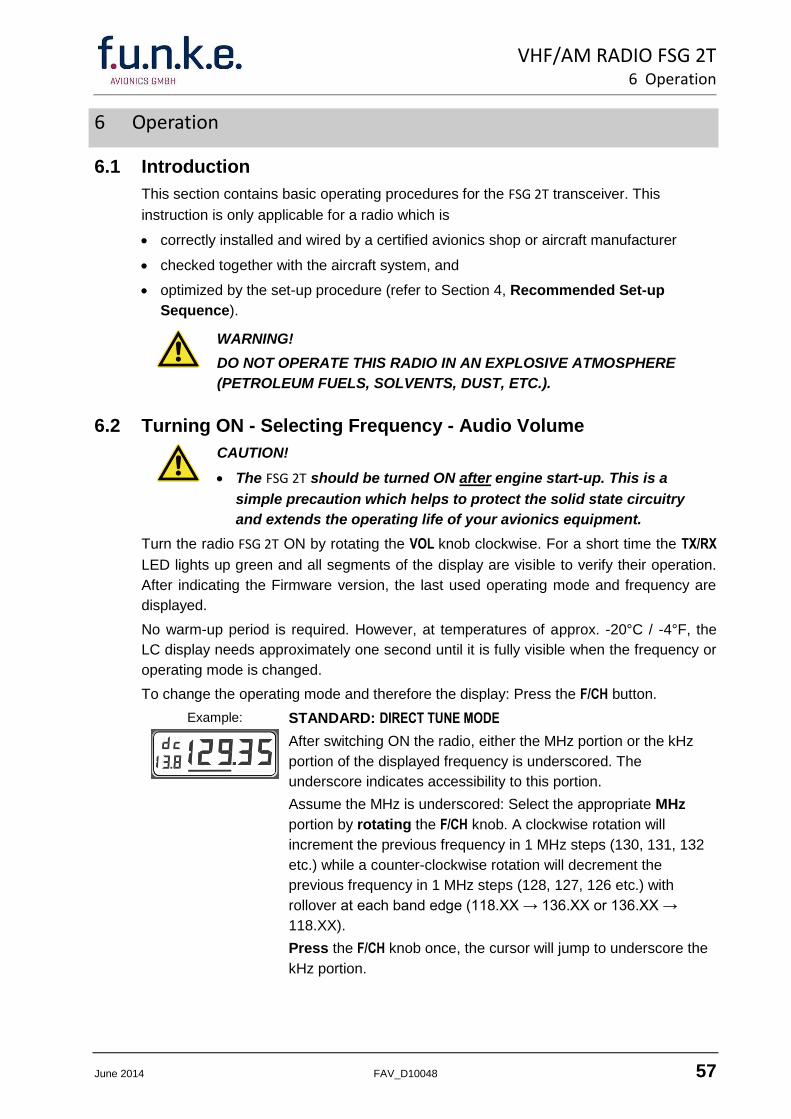
6 Operation ....................................................................................................... 57
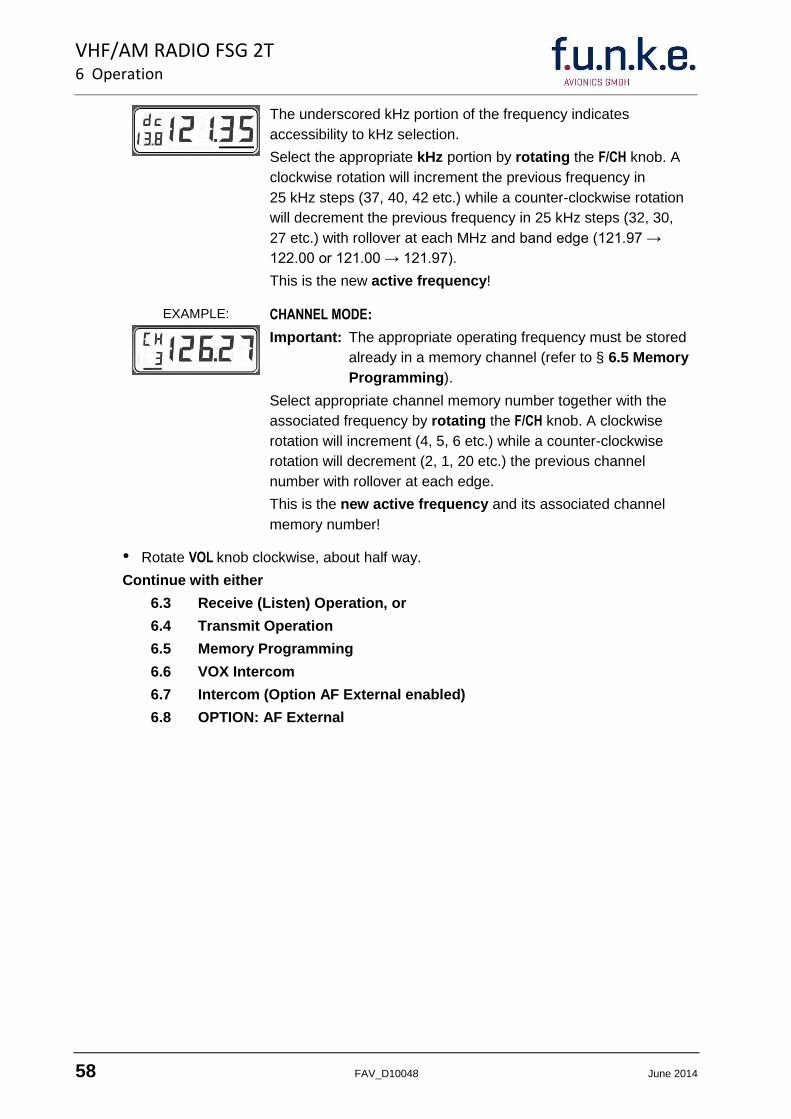
6.1 Introduction ................................................................................................................. 57 6.2 Turning ON - Selecting Frequency - Audio Volume ..................................................... 57 6.3 Receive (Listen) Operation ......................................................................................... 59 6.4 Transmit (Talk) Operation ........................................................................................... 60 6.5 Memory Programming ................................................................................................ 61 6.5.1 Programming while in DIRECT TUNE MODE: ......................................................................... 61 6.5.2 Programming while in CHANNEL MODE: ............................................................................... 62 6.6 VOX Intercom ............................................................................................................. 63 6.7 Intercom (Option AF EXTERNAL enabled) ................................................................. 64 6.8 OPTION: AF External ................................................................................................. 65 6.9 Backlighting ................................................................................................................ 65 6.10 Turning OFF ............................................................................................................... 65 6.11 Monitoring the aircraft onboard supply ........................................................................ 66 6.12 Operating times of FSG 2T supplied from a 12 V battery only .................................... 67 6.13 Emergency Operation ................................................................................................. 67
Appendix A, Technical Data FSG 2T .......................................................................................... 69
A.1 General ....................................................................................................................... 69 A.2 Dimensions, Weight .................................................................................................... 69 A.3 Power Supply, Fuses .................................................................................................. 69 A.4 Receiver Specification ................................................................................................ 70 A.5 Transmitter Specification ............................................................................................ 71
Appendix B, Environmental Performance Classification ............................................................. 72
Appendix C, Certificates ......................................................................................................... 73
Copyright – Service Information ...................................................................................... 77
Page 6
VHF/AM RADIO FSG 2T
760 Channel Aviation Transceiver
6 FAV_D10048 June 2014
List of Illustrations
Fig. Page
3 - 1 Pre-Installation Test Set-up .......................................................................... 22
3 - 2 Deviation of a compass by an operating FSG 2T, depends on
the distance between compass center and contour of transceiver .............. 23
3 - 3 FSG 2T, Dimensions, Installation Drawing ..................................................... 24
3 - 4 Standard Hook-up Diagram using pre-wired cable harness A/N F10028,
one MIC input for 1 - 2 non-amplified Dynamic Microphone(s) .................... 29
3 - 5 INTERCOM Hook-up Diagram for two seat application
using pre-wired cable harness A/N F10029, one MIC input for 2 non-
amplified Dynamic Microphones .................................................................. 30
3 - 6 INTERCOM Hook-up Diagram for two-seat application, using
two MIC inputs for 2 non-amplified Dynamic Microphones (hardwired) ....... 31
3 - 7 INTERCOM Hook-up Diagram for two-seat application, using
two MIC inputs for 2 Amplified / Standard Carbon Microphones ................. 32
3 - 8 INTERCOM + MIC Selector Switch Hook-up Diagram for single or
two seat application, using Amplified/Standard Carbon Microphone(s)
and non-amplified Dynamic Microphone(s) ................................................. 33
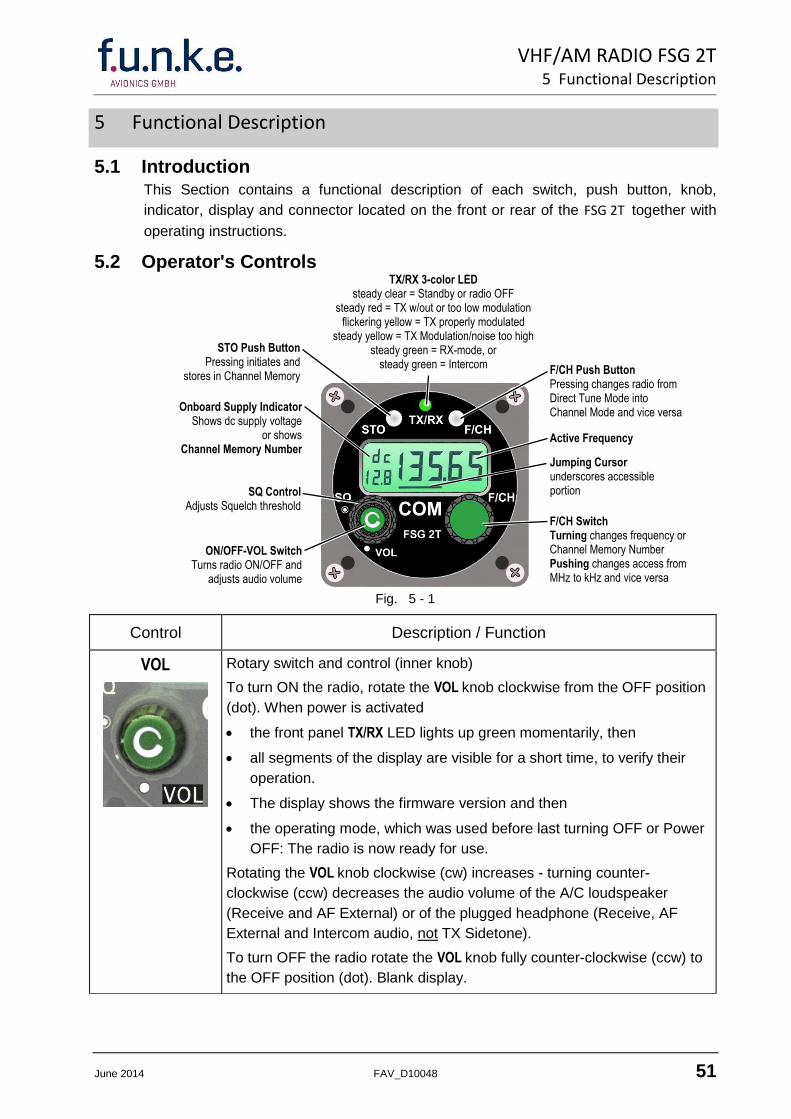
5 - 1 Operator's Controls and Indicators ............................................................... 51
Page 7
VHF/AM Radio FSG 2T
760 Channel Aviation Transceiver
June 2014 FAV_D10048 7
Abbreviations
A/C Aircraft
A/N Article Number
AGC Automatic Gain Control
Ah Ampere hour
AM Amplitude Modulation
ANT Antenna
Ass'y Assembly
AWG American Wire Gauge
ccw Counter-clockwise (turn left )
CH Channel
cw Clockwise (turn right )
dB Decibel
dia. Diameter
EASA European Aviation Safety Agency
EMF Electromotive Force (voltage of an open circuit)
ESTO European Technical Standard Order
F/CH Frequency/Channel
FL Flight Level
g Acceleration due to gravity
GND Ground
HI High Power
Hz Hertz
ICAO International Civil Aviation Organization
IF Intermediate Frequency
kHz Kilohertz
LCD Liquid Crystal Display
LED Light Emitting Diode
LO Low Power
LOS Line-Of-Sight
m Modulation
mA Milliampere
MD Mode
MHz Megahertz
MIC Microphone
mW Milliwatt
NM Nautical mile (1 NM = 1.852 km)
nW Nanowatt (10-9)
PEP Peak Envelope Power
PLL Phase-Locked Loop
ppm Parts per million
PTT Push-To-Talk
pW Picowatt (10-12)
PWR Power
RF Radio Frequency
rms Effective value (root mean square)
RX Receive
S+N/N Signal-to-Noise Ratio
SINAD Ratio: Signal noise distortion
noise distortion
SPKR Loudspeaker
SQ Squelch
STBY Standby
STO Store
SWR Standing-Wave Ratio
THD Total Harmonic Distortion
TOT Time out timer
TX Transmit
VCO Voltage-Controlled Oscillator
Vac Volts, alternating current
Vdc Volts, direct current
VFO Variable-frequency oscillator
VHF Very-High Frequency
VOL Volume
VSWR Voltage Standing-Wave Ratio
W Watt
Ω Ohm
°C Degrees Centigrade
°F Degrees Fahrenheit
Page 8
VHF/AM RADIO FSG 2T
760 Channel Aviation Transceiver
8 FAV_D10048 June 2014
THIS PAGE INTENTIONALLY
LEFT BLANK
Page 9
VHF/AM RADIO FSG 2T
1 For Your Safety
June 2014 FAV_D10048 9
1 For Your Safety
Every radio, when transmitting, radiates energy into the atmosphere that may, under
certain conditions, cause the generation of sparks. All users of our radios should be aware
of the following warning:
Do not operate this radio in an explosive atmosphere (petroleum fuels, solvents,
dust, etc.)!
During normal use, the radio will subject you to radio frequency energy substantially below
the level where any kind of harm is reported.
There are no user replaceable parts inside the FSG 2T! If the radio fails it must be
returned to a f.u.n.k.e. AVIONICS GmbH approved repair facility!
The licensee of a radio station is responsible at all times for the proper operation of the
station. Radio operators should use the following guidelines to make this radio a useful
tool for safe and efficient flight:
DO NOT transmit when the antenna is very close to, or touching, exposed parts of the
body, especially the face and eyes. Persons with pacemakers should be aware that
proper functioning may be affected when in the vicinity of the antenna!
DO NOT transmit without antenna connected.
DO NOT operate the radio on an unprotected power supply. Replace a blown fuse only
against correct type with specified nominal value. Investigate the cause.
DO NOT transmit on a busy channel.
DO NOT press the transmit (PTT) key when not actually desiring to transmit.
DO NOT transmit with the antenna inside aircraft or vehicle. This may cause
malfunction of onboard avionics, trigger the vehicle airbag or interfere onboard
instruments! Always operate the radio FSG 2T with a suitable outdoor / external antenna!
Assure appropriate lightning protection / grounding where (elevated) outdoor antennas
are used.
DO NOT operate the radio whilst driving. It should also be noticed that even the use of
a hand held microphone while driving could constitute an offence under the Road
Traffic Regulations in certain countries.
DO NOT allow children to play with any radio equipment containing a transmitter.
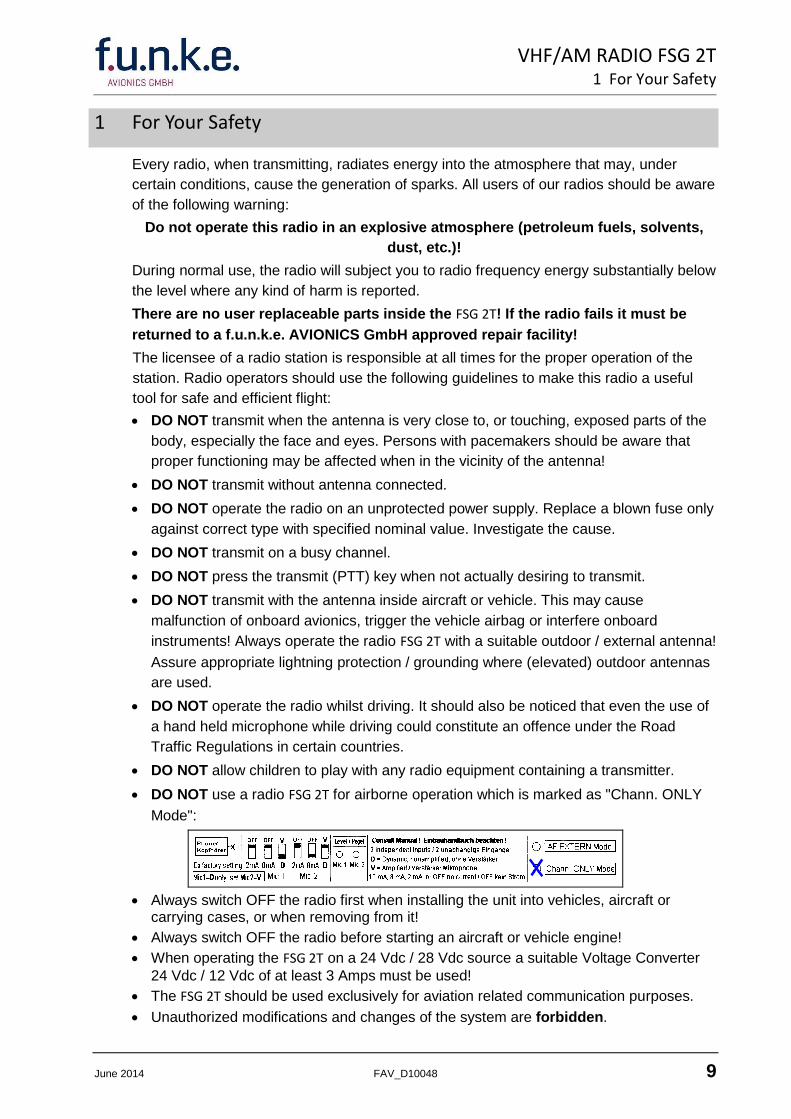
DO NOT use a radio FSG 2T for airborne operation which is marked as "Chann. ONLY
Mode":
Always switch OFF the radio first when installing the unit into vehicles, aircraft or carrying cases, or when removing from it!
Always switch OFF the radio before starting an aircraft or vehicle engine!
When operating the FSG 2T on a 24 Vdc / 28 Vdc source a suitable Voltage Converter
24 Vdc / 12 Vdc of at least 3 Amps must be used!
The FSG 2T should be used exclusively for aviation related communication purposes.
Unauthorized modifications and changes of the system are forbidden.
Page 10
VHF/AM RADIO FSG 2T
1 For Your Safety
10 FAV_D10048 June 2014
Sufficient speech volume is very important. While the lips are very close and facing the
microphone, speak loud and clear. Proper speech level is indicated by the yellow
flickering LED on the FSG 2T front panel.
In aircraft / vehicles a suitable noise canceling microphone or headset shall be used.
A backup microphone should always be carried during any flight. Even new
microphones can fail!
Prior to any flight verify proper FSG 2T functions by means of a short radio check. It has
however to be taken into account that with a faulty antenna or its cable this COM test
may absolutely turn out positive at the airfield or in short distance to the ground station.
But at a distance of 2 to 6 miles, a faulty antenna and / or cables will cause
communication breakdown!
Push-to-Talk keys may stick occasionally.
The transmission signaling RED or flickering YELLOW LED shall be turn to CLEAR or
GREEN when releasing the PTT key.
However, after more than two minutes continuous transmitting (by stuck button or
operator caused), the built-in transmit time-out-timer disables the transmitter in order to
avoid continuous channel blocking. A continuously flashing display warns the user.
Refer to appropriate hints in this manual.
1.1 Used Symbols
In this manual the following symbols are used:
WARNING!
describes an immediate threatening danger! Failing to observe the note
may cause death or heaviest injuries.
CAUTION!
describes a special note for operation. Failing to observe the note may
cause damage of the transceiver and / or stored data may be deleted!
IMPORTANT!
describes explanations and other useful hints. Failing to observe the note
may cause degraded performance and / or unsatisfying operation!
Page 11
VHF/AM RADIO FSG 2T
2 General Description
June 2014 FAV_D10048 11
2 General Description
2.1 About this document
This installation and operation manual IM 035.00 refers to a FSG 2T, Article Number
F10350, and contains instructions and descriptions for application, installation,
presetting, operation and testing, as well as hook-up diagrams for the universal / multi-
use FSG 2T VHF/AM Transceiver of f.u.n.k.e. AVIONICS GmbH, Avionics Division,
86807 Buchloe, Germany.
Additionally, the following Maintenance Manual MRM 035.00 contains Circuit
Description, Overhaul and Maintenance Instructions, Alignment Procedures, Testing
Instructions, and an Illustrated Parts List.
2.2 General Description
The FSG 2T VHF/AM COM is a miniaturized, lightweight, panel mounted (also for
helicopters no shockmounts are required), single block transceiver operating in the
VHF/AM airband radio frequency range 118.000 MHz ... 136.975 MHz, thus providing
760 channels with 25 kHz channel spacing, covering a standard communications
distance of ca. 100 NM (nautical miles) at FL 70.
2.2.1 Application
The equipment is approved for airborne operation as COM 1, COM 2, COM 3 in Fixed
Wing and Helicopter aircraft, and for ground use in any Portable, Fixed Based or Mobile
operation.
Ultra low power consumption in conjunction with extremely wide DC supply voltage
range, small dimensions and wide scope of accessories allow universal airborne
applications in any powered aircraft, motor glider and Ultralight, and in glider and
balloon, for primary or (also battery supplied) backup operation.
Universal use in ground vehicle, as well as for compact portable cases and for desk-top
or rack mounted, local or remote controlled, fixed base primary, or (also battery supplied)
backup operations, are further applications. Please always ensure suitable antenna
solutions!
2.2.2 Operation Description
The transceiver fits into a standard 2¼ in. / 58 mm diameter instrument hole and is fixed
by four (4) screws M4. Installation depth behind the front panel including connectors and
wiring is 240 mm.
Connections on the rear panel to the electrical environment are achieved via a locked
Standard DB-15 male connector using a wiring harness, and a BNC antenna connector.
All operational control and display elements are located on the night-design front panel:
Transmit / Receive Mode, modulation level or Intercom is indicated by a 3-color Status
signaling LED on the front panel.
The back-lit Liquid Crystal Display (LCD) shows the active frequency, onboard supply or
memory channel number as well as ERROR codes (if applicable). During switch-on the
firmware version is shown and a display check is performed.
For airborne and ground application two display modes are user selectable:
Page 12
VHF/AM RADIO FSG 2T
2 General Description
12 FAV_D10048 June 2014
FREQUENCY MODE: Active Frequency and actual onboard voltage are shown on
the display. Turning / pushing the F/CH knob changes Frequency.
CHANNEL MODE: Active Channel Number (1 … 20) and associated Frequency
are shown on the display. Turning the F/CH knob changes preset
Channel Number and associated Frequency. Reprogramming
without restriction.
Only for ground based operation:
Optionally a particular mode can be set where the operation is
limited to use only preset channels. To set this mode the radio has
to be opened. This may only be performed by an approved
repair facility!
20 preset memory channels and the last operating setting remain all stored in a non-
volatile memory. Switching OFF or power failure does not result in loss of memory
information.
Turning the left inner knob adjusts loudspeaker or headset audio level. Full ccw position
turns the radio OFF.
The continuously variable SQ-knob (left, outer ring) adjusts the Squelch threshold. Full
ccw position turns the SQ circuit OFF (full Receiver sensitivity, continuous RX noise is
audible during RX Mode).
On the rear panel a 15-pin SUB-D connector for the aircraft wiring is located. It contains
two independent microphone inputs which can be set individually by (covered) DIL
switches suitable either for
Dynamic non-amplified microphones,
Amplified Dynamic / Electret / Standard Carbon Microphones, with or without DC
supply, or
one input for a Dynamic non-amplified microphone and the other input for an
Amplified Dynamic / Electret / Standard Carbon Microphone.
For each MIC input, the microphone signal can be adjusted by potentiometer #1 and #2
to modulate the transceiver properly. Additionally, supply current for amplified or
Standard Carbon Microphones for each MIC input can be set by DIL switches to 2 mA,
8 mA, 10 mA, or none.
Phone audio output is adjustable by potentiometer #3 on the rear panel.
For two seat aircraft and noisy environment, the voice activated (VOX) Intercom is a long
expected feature. It eliminates constant background noise since it is only active when
you talk.
Page 13
VHF/AM RADIO FSG 2T
2 General Description
June 2014 FAV_D10048 13
2.3 Technical Description
Both Transmitter and Receiver use the same digital frequency synthesizer and an
accurate reference crystal. The transmit frequency is tuned simultaneously with the
Receive frequency (Simplex operation).
The single superhet Receiver offers high immunity against in-band and out-of-band RF
interference, intermodulation and cross modulation, including ICAO Annex 10 FM
immunity / intermodulation.
The automatic Receiver AM / FM noise Squelch threshold is continuously adjustable on
the front panel by the SQ knob. Full cw position of the SQ knob requires maximum
-93 dBm / 5 µV / 50 Ω to open the Squelch. Full ccw position of the SQ knob offers
maximum Receiver gain, the Squelch is always open and RX noise is continuously
audible while in RX Mode.
The transceiver can be supplied directly from any properly fused 9 – 16.1 Vdc power
source (aircraft, vehicle, etc.) with sufficient current supply capability.
As a specific FSG 2T feature, integral controls enable full transceiver operation without
any degradation even during Emergency Supply Condition between 9 Vdc and 11 Vdc.
A suitable DC regulator is required for supply from 28 Vdc-buses.
In Ultralights, Gliders, Balloons or Portables without onboard electric power generation
system, long-term operation from a 12 Vdc battery (min. 6 Ah) is appropriate.
The onboard voltage is monitored continuously. When supply voltage drops below
11 Vdc, the Supply Indication on the LC display starts flashing as a low supply warning.
Below 8.5 to 9 Vdc, the FSG 2T turns OFF itself, but will come back into operation when
the supply voltages increases / returns to more than some 10.3 Vdc. The last used
settings remain however active.
An audio low pass filter for areas using CLIMAX operation with 25 kHz channel spacing
is incorporated in the FSG 2T, to suppress multi-carrier beat audio tones.
The audio amplifier provides AF power to the speaker (4 Watts into 4 Ohms and 50 mW
into 300 Ohms for headphones).
The solid state temperature-controlled transmitter is wideband tuned from 118 to
137 MHz and delivers some 5 Watts transmitter RF carrier power.
A keyed transmitter, without or with too low microphone modulation input voltage, is
indicated RED by the status LED on the FSG 2T front panel. Detailed information
regarding TX modulation, monitoring and setting is given in § 4.2, Microphone Set-up.
In Receive Mode for Intercom purposes (Intercom selector switch), the microphone input
level enables voice activated (VOX) pilot / crew intercommunication. This allows in
Receive Mode a voice activated intercommunication (no additional accessories needed)
between pilot and crew when using the Intercom wiring harness, headsets, proper mike
input setting and sufficient speech volume.
Intercom phone audio volume can be adjusted individually by the VOL knob on the front
panel. In addition, VOX ON is optically indicated by the GREEN TX/RX Status LED on the
front panel.
Page 14
VHF/AM RADIO FSG 2T
2 General Description
14 FAV_D10048 June 2014
During Intercom, as long as a Receive signal exists, the Intercom audio level is reduced
by 6 dB / half level, and the Receiver audio dominates therefore.
The FSG 2T is equipped also with a transmit time-out timer. This avoids blocked channel
after 2 minutes continuous TX (stuck button does not block a channel continuously) and
is indicated by a continuously blinking display. Should such stuck button malfunction
continue, the FSG 2T is ready for another 2 minute transmission period when turning OFF
and ON the unit again (e.g. for emergency or blind transmission).
OPTION: The external AF input allows interconnection of 1 Volt / 600 Ω audio source(s)
especially in aircraft using other COM, VOR / LOC, DME, MKR and / or electric
variometers. This allows signal monitoring during Receive Mode by speaker, and / or
headphone in Intercom Mode. This option can only be enabled by an internal solder
bridge (performed by an approved Avionics Service Shop, marked on the information
label). This increases the Standby current consumption up to 200 mA. In addition the
VOX Intercom Function is then disabled.
External AF input, Receive and Intercom audio listening through headphone(s) is
simultaneously possible in Receive / Standby Mode.
2.4 System and Type Approval Information
The VHF/AM Airband Transceiver FSG 2T complies with ICAO 25 kHz channel spacing
and also meets applicable National and International Type Approval requirements, for
any airborne operation:
JTSO Authorization LBA.O.10.911/103 ETSO (LBA Luftfahrt-Bundesamt), replaced
by ETSO Authorization EASA.21O.1304 RevA, is based on EUROCAE ED-23B
Airborne requirement (25 kHz ONLY CH spacing).
FM Immunity requirements according to ICAO ANNEX 10 against FM Broadcast RF
Interference.
Audio filtering required in areas with CLIMAX operation in 25 kHz channel spacing.
Associated EUROCAE ED-14D / RTCA DO-160D Environmental requirements for
Fixed Wing and Helicopter aircraft.
Associated EUROCAE ED-12B Software requirements based on ED-12B, Level C.
CE Conformity Nr. 0682 requirements for ground operation, meeting ETSI EN 301
489-1 V1.9.2 and ETSI EN 301 489-22 V1.3.1.
FCC Compliance with Part 15 (receiver) and Part 87 (transmitter),
FCC ID: BVYFSG2T.
FAA / TSO Authorization.
Page 15
VHF/AM RADIO FSG 2T
2 General Description
June 2014 FAV_D10048 15
2.5 Re-calibration Information
IMPORTANT!
For airborne applications, no frequency re-calibration is necessary,
since applications in the 25 kHz channel spacing require a frequency
accuracy tolerance of less than ± 20 ppm.
For the first time after three years, FSG 2T equipment for ground
applications requires checking and re-calibration of the high precision
reference frequency (tolerance better than ±10 ppm).
All tolerances include the full operating temperature range of
-20°C ... +55°C / -4°F ... +131°F.
Checking and re-calibration must be performed by the equipment
manufacturer or through authorized and approved avionics services!
2.6 Operating License
IMPORTANT!
Depending on national regulations, VHF/AM airborne and / or VHF/AM
ground operation may require an individual national operating license.
Such license is usually granted by the responsible National Telecom-
munications Authority, through suitable application forms.
Besides aircraft registration, operator's name, address and operating
license payment details, state radio type / model, Serial number, ETSO
number EASA.21O.1304 Rev.A
Example:
2.7 Equipment supplied
Description A/N
5-Watt VHF/AM Transceiver FSG 2T, Installation and Operation Manual,
Operating Instructions, 4 screws M4 x 20 F10350
Page 16
VHF/AM RADIO FSG 2T
2 General Description
16 FAV_D10048 June 2014
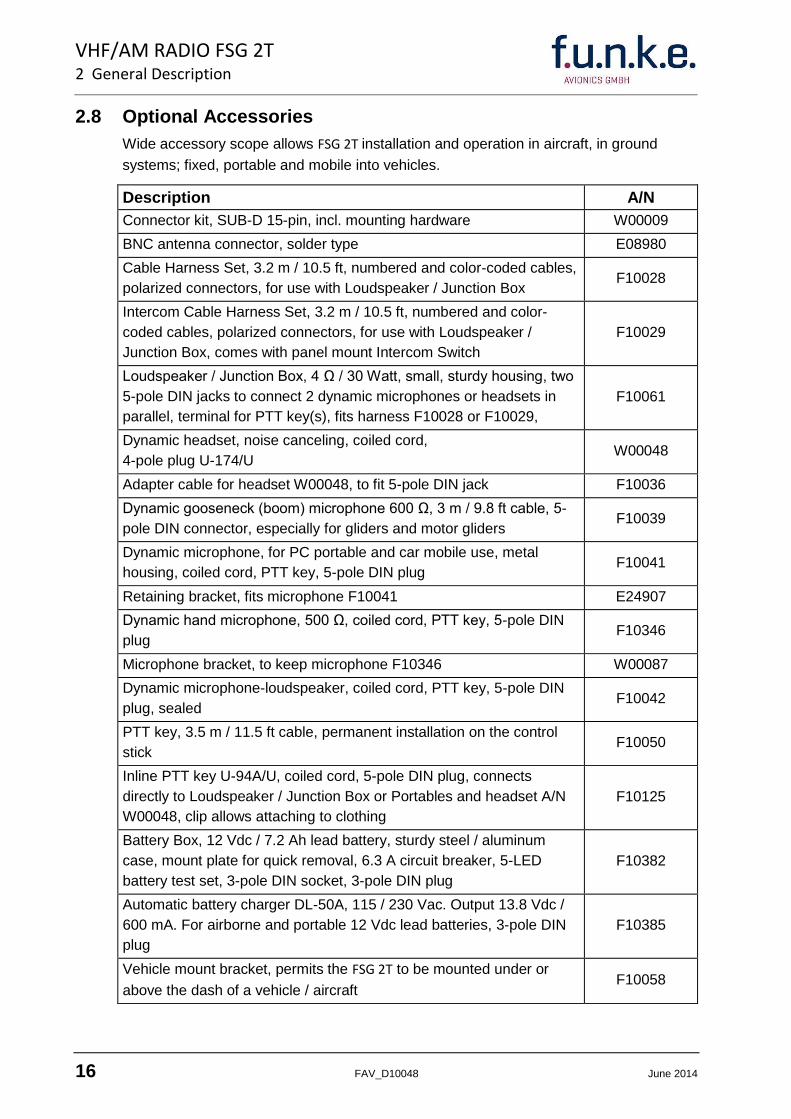
2.8 Optional Accessories
Wide accessory scope allows FSG 2T installation and operation in aircraft, in ground
systems; fixed, portable and mobile into vehicles.
Description A/N
Connector kit, SUB-D 15-pin, incl. mounting hardware W00009
BNC antenna connector, solder type E08980
Cable Harness Set, 3.2 m / 10.5 ft, numbered and color-coded cables,
polarized connectors, for use with Loudspeaker / Junction Box F10028
Intercom Cable Harness Set, 3.2 m / 10.5 ft, numbered and color-
coded cables, polarized connectors, for use with Loudspeaker /
Junction Box, comes with panel mount Intercom Switch
F10029
Loudspeaker / Junction Box, 4 Ω / 30 Watt, small, sturdy housing, two
5-pole DIN jacks to connect 2 dynamic microphones or headsets in
parallel, terminal for PTT key(s), fits harness F10028 or F10029,
F10061
Dynamic headset, noise canceling, coiled cord,
4-pole plug U-174/U W00048
Adapter cable for headset W00048, to fit 5-pole DIN jack F10036
Dynamic gooseneck (boom) microphone 600 Ω, 3 m / 9.8 ft cable, 5-
pole DIN connector, especially for gliders and motor gliders F10039
Dynamic microphone, for PC portable and car mobile use, metal
housing, coiled cord, PTT key, 5-pole DIN plug F10041
Retaining bracket, fits microphone F10041 E24907
Dynamic hand microphone, 500 Ω, coiled cord, PTT key, 5-pole DIN
plug F10346
Microphone bracket, to keep microphone F10346 W00087
Dynamic microphone-loudspeaker, coiled cord, PTT key, 5-pole DIN
plug, sealed F10042
PTT key, 3.5 m / 11.5 ft cable, permanent installation on the control
stick F10050
Inline PTT key U-94A/U, coiled cord, 5-pole DIN plug, connects
directly to Loudspeaker / Junction Box or Portables and headset A/N
W00048, clip allows attaching to clothing
F10125
Battery Box, 12 Vdc / 7.2 Ah lead battery, sturdy steel / aluminum
case, mount plate for quick removal, 6.3 A circuit breaker, 5-LED
battery test set, 3-pole DIN socket, 3-pole DIN plug
F10382
Automatic battery charger DL-50A, 115 / 230 Vac. Output 13.8 Vdc /
600 mA. For airborne and portable 12 Vdc lead batteries, 3-pole DIN
plug
F10385
Vehicle mount bracket, permits the FSG 2T to be mounted under or
above the dash of a vehicle / aircraft F10058
Page 17
VHF/AM RADIO FSG 2T
2 General Description
June 2014 FAV_D10048 17
2.9 Equipment required, but not supplied
a) VHF aircraft antenna with coax cable RG-58 C/U and BNC connector (male)
b) Headphone (8 ... 600 Ohms, typical) and / or loudspeaker (4 ... 16 Ohms)
c) Non-amplified dynamic microphone, (4 ... 600 Ohm), and/or
amplified / Electret / Standard carbon microphone,
with or without PTT key (separate MIC inputs amplified / non-amplified, sensitivity
adjustable)
d) Alternatively to b) and c) headsets with similar specifications
e) Battery power supply unit 12 Vdc, minimum 7.2 Ah, for aircraft without electrical
system
f) Push-to-talk key, e.g. stick mounted (if microphone without PTT key is used)
g) Pre-wired cable harness F10028 or F10029 (Intercom)
h) 15 pole SUB-D connector type DB-15 S and cover, if no pre-wired cable harness is
used.
Page 18
VHF/AM RADIO FSG 2T
2 General Description
18 FAV_D10048 June 2014
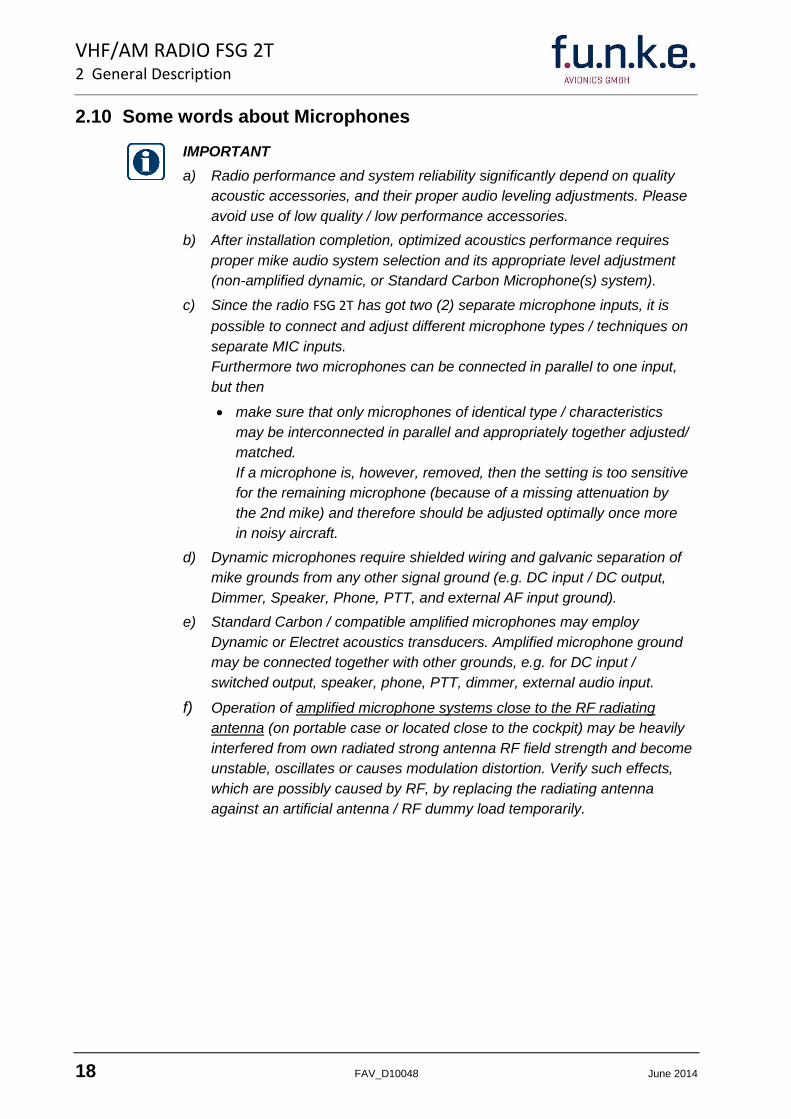
2.10 Some words about Microphones
IMPORTANT
a) Radio performance and system reliability significantly depend on quality
acoustic accessories, and their proper audio leveling adjustments. Please
avoid use of low quality / low performance accessories.
b) After installation completion, optimized acoustics performance requires
proper mike audio system selection and its appropriate level adjustment
(non-amplified dynamic, or Standard Carbon Microphone(s) system).
c) Since the radio FSG 2T has got two (2) separate microphone inputs, it is
possible to connect and adjust different microphone types / techniques on
separate MIC inputs.
Furthermore two microphones can be connected in parallel to one input,
but then
make sure that only microphones of identical type / characteristics
may be interconnected in parallel and appropriately together adjusted/
matched.
If a microphone is, however, removed, then the setting is too sensitive
for the remaining microphone (because of a missing attenuation by
the 2nd mike) and therefore should be adjusted optimally once more
in noisy aircraft.
d) Dynamic microphones require shielded wiring and galvanic separation of
mike grounds from any other signal ground (e.g. DC input / DC output,
Dimmer, Speaker, Phone, PTT, and external AF input ground).
e) Standard Carbon / compatible amplified microphones may employ
Dynamic or Electret acoustics transducers. Amplified microphone ground
may be connected together with other grounds, e.g. for DC input /
switched output, speaker, phone, PTT, dimmer, external audio input.
f) Operation of amplified microphone systems close to the RF radiating
antenna (on portable case or located close to the cockpit) may be heavily
interfered from own radiated strong antenna RF field strength and become
unstable, oscillates or causes modulation distortion. Verify such effects,
which are possibly caused by RF, by replacing the radiating antenna
against an artificial antenna / RF dummy load temporarily.
Page 19
VHF/AM RADIO FSG 2T
3 Installation
June 2014 FAV_D10048 19
3 Installation
3.1 General
This section contains instructions and suggestions to be considered before installing the
radio FSG 2T into an aircraft. Close adherence to these suggestions will assure more
satisfactory performance from the equipment.
Information in this section is intended for certified avionics shops only. Work such as
installation, wiring and testing should only be carried out by a qualified technician!
IMPORTANT!
If installation into an aircraft is made by other than a certified avionics shop,
you have to consult your responsible aircraft Avionics Airworthiness
Inspector - before the installation – to get authorized certification of your
completed installation.
The conditions and tests required for ETSO and FAA-TSO approval of this
article are minimum performance standards. It is the responsibility of those
desiring to install this article either on or within a specific type or class of
aircraft to determine, that the aircraft installation conditions are within the
ETSO or FAA-TSO standards. If not within these standards, the article
FSG 2T may be installed only if further evaluation by the applicant
documents an acceptable installation and is approved by the Administrator.
3.2 Unpacking and Inspecting Equipment
Unpack the equipment carefully and inspect each item for evidence of damage incurred
during shipment. FSG 2T serial number must comply with relevant details mentioned in
Airworthiness Approval Tag and delivery note details attached to the shipment.
If a damage claim must be filed, save the shipping container and all packing materials to
substantiate your claim. The claim should be filed with the transportation company as
soon as possible.
If a damage is noted after the first test, notify the transportation company in writing with
advance e-mail, phone or fax advice about hidden transport damage.
A copy of such a claim including all information from the type label is to be forwarded
without delay also to f.u.n.k.e. AVIONICS GmbH.
3.3 Pre-installation Test
Before installing the radio into an aircraft, vehicle or portable carrying case, a short but
comprehensive functional bench test through a certified avionics shop is recommended.
a) Interconnect the radio with a test wiring harness (according to Figure 3 - 1) to the test
bench setup. For FSG 2T set supply to 13.8 Vdc on radio input terminals. Turn ON the
radio with the VOL switch on front panel. Switch OFF the Squelch by rotating the SQ
knob to fully counter-clockwise position.
Verify, whether on all channels within 118 ... 136.975 MHz almost identical, strong,
Page 20
VHF/AM RADIO FSG 2T
3 Installation
20 FAV_D10048 June 2014
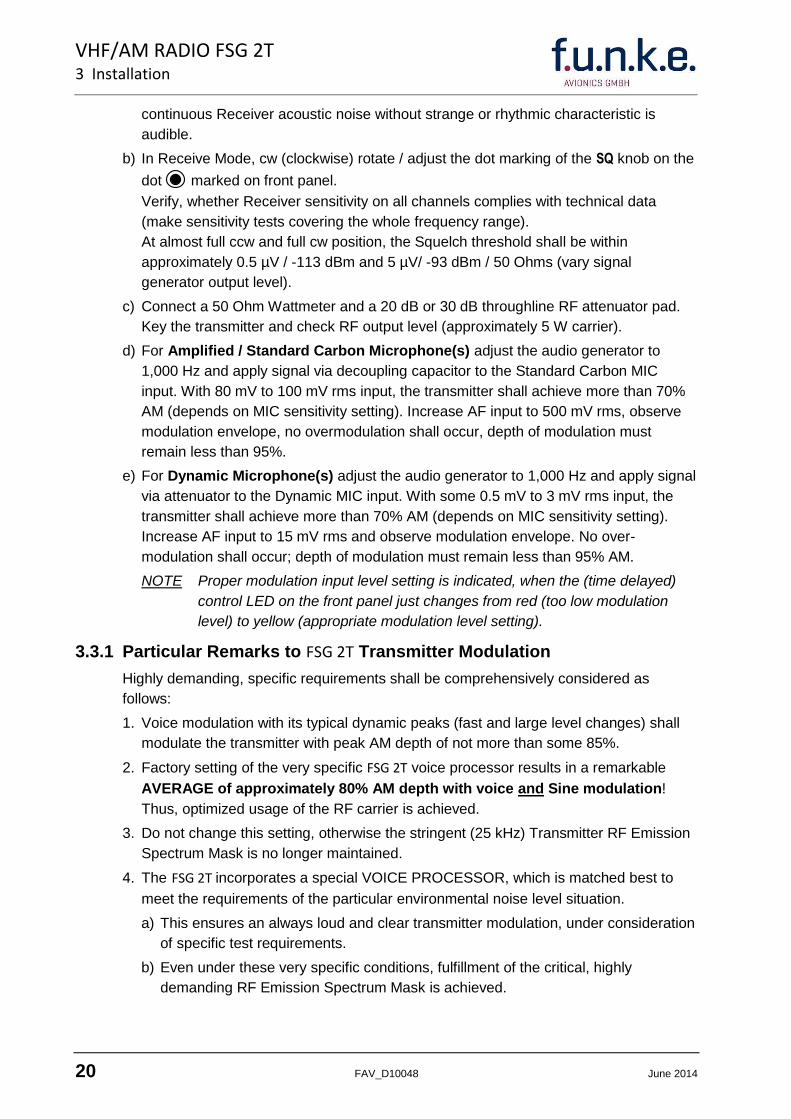
continuous Receiver acoustic noise without strange or rhythmic characteristic is
audible.
b) In Receive Mode, cw (clockwise) rotate / adjust the dot marking of the SQ knob on the
dot marked on front panel.
Verify, whether Receiver sensitivity on all channels complies with technical data
(make sensitivity tests covering the whole frequency range).
At almost full ccw and full cw position, the Squelch threshold shall be within
approximately 0.5 µV / -113 dBm and 5 µV/ -93 dBm / 50 Ohms (vary signal
generator output level).
c) Connect a 50 Ohm Wattmeter and a 20 dB or 30 dB throughline RF attenuator pad.
Key the transmitter and check RF output level (approximately 5 W carrier).
d) For Amplified / Standard Carbon Microphone(s) adjust the audio generator to
1,000 Hz and apply signal via decoupling capacitor to the Standard Carbon MIC
input. With 80 mV to 100 mV rms input, the transmitter shall achieve more than 70%
AM (depends on MIC sensitivity setting). Increase AF input to 500 mV rms, observe
modulation envelope, no overmodulation shall occur, depth of modulation must
remain less than 95%.
e) For Dynamic Microphone(s) adjust the audio generator to 1,000 Hz and apply signal
via attenuator to the Dynamic MIC input. With some 0.5 mV to 3 mV rms input, the
transmitter shall achieve more than 70% AM (depends on MIC sensitivity setting).
Increase AF input to 15 mV rms and observe modulation envelope. No over-
modulation shall occur; depth of modulation must remain less than 95% AM.
NOTE Proper modulation input level setting is indicated, when the (time delayed)
control LED on the front panel just changes from red (too low modulation
level) to yellow (appropriate modulation level setting).
3.3.1 Particular Remarks to FSG 2T Transmitter Modulation
Highly demanding, specific requirements shall be comprehensively considered as
follows:
1. Voice modulation with its typical dynamic peaks (fast and large level changes) shall
modulate the transmitter with peak AM depth of not more than some 85%.
2. Factory setting of the very specific FSG 2T voice processor results in a remarkable
AVERAGE of approximately 80% AM depth with voice and Sine modulation!
Thus, optimized usage of the RF carrier is achieved.
3. Do not change this setting, otherwise the stringent (25 kHz) Transmitter RF Emission
Spectrum Mask is no longer maintained.
4. The FSG 2T incorporates a special VOICE PROCESSOR, which is matched best to
meet the requirements of the particular environmental noise level situation.
a) This ensures an always loud and clear transmitter modulation, under consideration
of specific test requirements.
b) Even under these very specific conditions, fulfillment of the critical, highly
demanding RF Emission Spectrum Mask is achieved.
Page 21
VHF/AM RADIO FSG 2T
3 Installation
June 2014 FAV_D10048 21
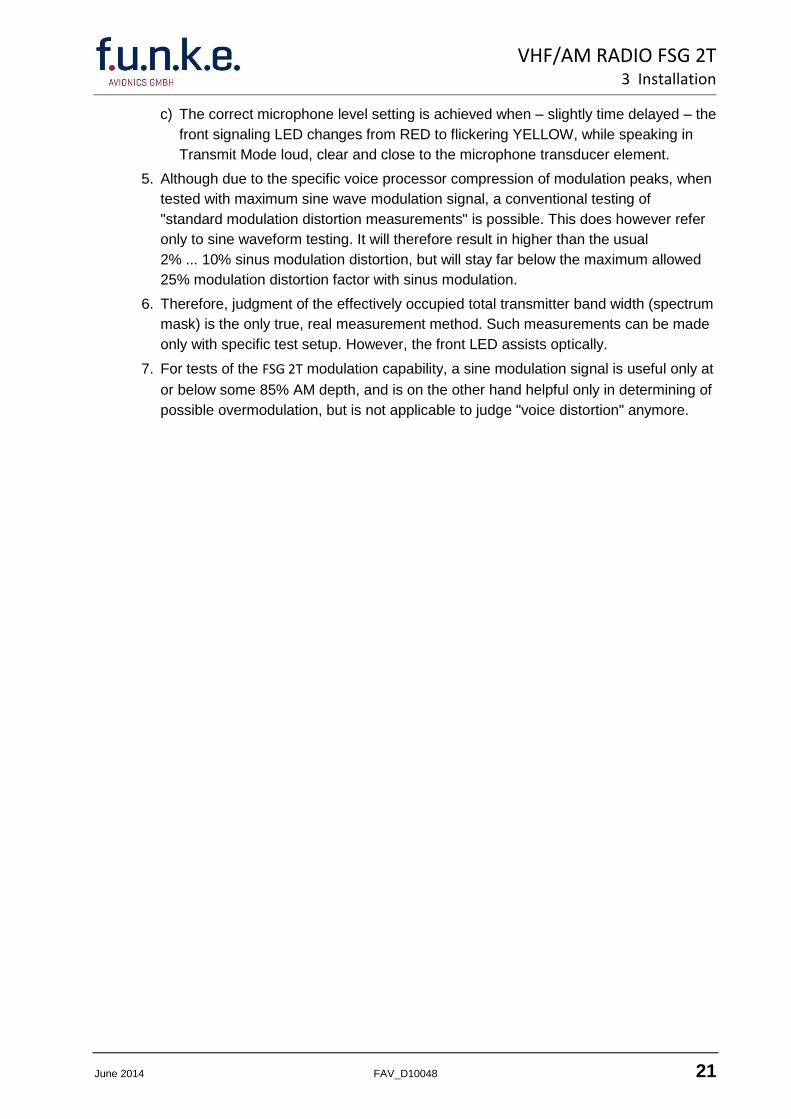
c) The correct microphone level setting is achieved when – slightly time delayed – the
front signaling LED changes from RED to flickering YELLOW, while speaking in
Transmit Mode loud, clear and close to the microphone transducer element.
5. Although due to the specific voice processor compression of modulation peaks, when
tested with maximum sine wave modulation signal, a conventional testing of
"standard modulation distortion measurements" is possible. This does however refer
only to sine waveform testing. It will therefore result in higher than the usual
2% ... 10% sinus modulation distortion, but will stay far below the maximum allowed
25% modulation distortion factor with sinus modulation.
6. Therefore, judgment of the effectively occupied total transmitter band width (spectrum
mask) is the only true, real measurement method. Such measurements can be made
only with specific test setup. However, the front LED assists optically.
7. For tests of the FSG 2T modulation capability, a sine modulation signal is useful only at
or below some 85% AM depth, and is on the other hand helpful only in determining of
possible overmodulation, but is not applicable to judge "voice distortion" anymore.
Page 22
VHF/AM RADIO FSG 2T
3 Installation
22 FAV_D10048 June 2014
100 µF
Audio Gen
Au
dio
Mic
3
1
2
4
15
11
14
7
6
5
8
9
10
12
13
Standard MIC IN
Dynamic MIC IN
Microphone Ground
AF External IN
Loudspeaker OUT
Power Ground
Headphone OUT
Push-to Talk Switch IN
RX Annunciator OUT
Intercom Control IN
LED Backlight IN
+13.8 Vdc Power
+13.8 Vdc Power
Power Ground
+13.8 Vdc switched OUT
FSG 2T
Antenna
Audio Generator
680R
6k8
Scope
Distortion Analyzer and Millivolt Meter
AF Phone
AF Speaker
Power Supply 13.8 Vdc
at least 5 A
VHF Signal Generator R&S, SMG
AF Millivolt Meter
Dynamic microphone/s or Standard carbon microphone/s
Equivalent resistor
4 / 5 Watt
Headphone 4 - 600
+
-
A
V
Audio Mic
AF Ext
STD Mic (open)
Dyn. Mic DB-15S
UG-88C/U
STD Mic
Dyn. Mic
Speaker 4-200
Transmitter Check Receiver Check
Modulation Analyzer
Distortion Analyzer
Scope
Frequency Counter
> 10 W Dummy load,
if required
VHF Wattmeter
or ROHDE & SCHWARZ RADIOCOMMUNICATION
TESTER CMT/CMTA (see below!)
OR
100 µF
Dyn. Microphone/s or Standard microphone/s
Au
dio
Mic
Equivalent resistor 4 Ω / 5 Watt
3
1
2
4
15
11
14
7
6
5
8
9
10
12
13
FSG 2T
Antenna
680R
6k8
Audio Phone
Audio Speaker
Headphone 4 - 600 Ω
Power Supply 13.8 Vdc
at least 5 A
+
-
A
V
Audio Mic
AF Ext
STD Mic (open)
Dyn. Mic DB-15S
UG-88C/U
STD Mic
Dyn. Mic Audio Gen
Speaker 4-200 Ω
ROHDE & SCHWARZ RADIOCOMMUNICATION
TESTER CMT/CMTA
Standard MIC IN
Dynamic MIC IN
Microphone Ground
AF External IN
Loudspeaker OUT
Power Ground
Headphone OUT
Push-to Talk Switch IN
RX Annunciator OUT
Intercom Control IN
LED Backlight IN
+13.8 Vdc Power
+13.8 Vdc Power
Power Ground
+13.8 Vdc switched OUT
for MIC setting, refer to § 3.5.2.1
Fig. 3 - 1 FSG 2T Pre-Installation Test set-up
Page 23
VHF/AM RADIO FSG 2T
3 Installation
June 2014 FAV_D10048 23
3.4 Mechanical Installation
3.4.1 Transceiver installation
Any radio installation into an aircraft shall be coordinated with both the licensed
Inspector who certifies the installation, and with the aircraft manufacturer's installation
instructions.
Certifying the aircraft installation may be subject to specific National Regulations.
The FSG 2T VHF/AM transceiver is designed to be installed rigid into the instrument panel
or operating console from its rear side into a standard 2¼ inch / 58 mm diameter
instrument hole. Shock-mounts are not required, even not for helicopter installation. For
dimensions and positioning of the 4 fixing holes refer to Figure 3 - 3.
Select a radio location distant to heat sources. All equipment controls shall be readily
accessible from the pilot's normal seated position. The appropriate operator / crew
member(s) shall have an unobstructed view of the display and access to the control
knobs when in the normal seated position.
Sufficient room (at least 220 mm / 9 inches) behind front panel must be left for wiring
accommodation. Fixing of the transceiver is achieved by use of 4 cross recessed Pan
head screws M4 x 20 mm (supplied). These screws are sufficient for panel thickness
between 3 mm and 7 mm (1/8 … 5/16 inch).
3.4.2 Compass deviation
Compass deviation caused by FSG 2T is less than 30 cm for 1° deflection.
(Category Z in accordance with EUROCAE ED-14D / RTCA DO-160D environmental
test conditions).
Compass Deviation Distance
0.5° 12 cm / 4.73 in.
1.0° 7 cm / 2.76 in.
1.5° < 7 cm / 2.76 in.
2.0° < 7 cm / 2.76 in.
2.5° < 7 cm / 2.76 in.
3.0° < 7 cm / 2.76 in.
Fig. 3 - 2: Deviation of a compass by a transmitting FSG 2T; depends on the distance
between compass center and contour of transceiver
0 1 2 5 10 13
0.5
1.0
1.5
2.0
2.5
3.0
x
x
Distance
[cm]
CompassDeviation[ ° ]
Page 24
VHF/AM RADIO FSG 2T
3 Installation
24 FAV_D10048 June 2014
Fig. 3 - 3 FSG 2T Dimensions
Installation Drawing
4.5mm
58mm
47mm 0.2
47
mm
0
.2
Cutout to be prepared orStandard 2¼" Instrument Hole
BACK-PANEL MOUNTING
Page 25
VHF/AM RADIO FSG 2T
3 Installation
June 2014 FAV_D10048 25
3.4.3 Antenna installation
Your radio FSG 2T is only as good as the antenna!
For operation, a vertical polarized 50 Ohm broadband aircraft COM antenna is required.
The antenna must be able to radiate RF energy evenly and omni-directional:
First of all, look up the aircraft's manual for antenna installation instructions.
The antenna installation location must be carefully planned. It would be the best to
consult the Aircraft Certifying Inspector. In order to achieve best results into all
directions, installation instructions must be fully complied with.
For aircraft with metal fuselage, we recommend a rod antenna. This antenna is
mounted vertically (as possible) on or under the fuselage. Location should be even
away from horizontally screening metal parts like propeller, undercarriage, vertical
metal fins etc., for maximum radio range into all (horizontal) directions.
Distance to other aircraft antennas, like another COM or NAV antenna, should be at
least 1.5 m / 5 feet. When using two radios FSG 2T, a distance of 1 m / 3.3 feet
between COM antennas is sufficient.
The antenna mounting area should be as flat as possible.
The metallic contact between aircraft surface / structure and the antenna cable outer
conductor (shield) must be durable and robust. The electrical contact shall remain
continuously good and safe against vibration and corrosion.
For wood and fiberglass (GRP) aircraft, 3 or 4 aluminum counter weight strips (ea.
60 cm / 2 feet long - 5 cm / 2 inches wide) are recommended, but shall be placed
(mostly) horizontally in the shape of a star.
These stellate counter weights must be centrally screwed together with the antenna
socket. Care for a permanent good electrical contact.
Alternatively, for aircraft with non-metallic surface structure inside the fuselage, a
metal foil (min. 60 x 60 cm / 2 x 2 feet) can be stuck in. The antenna socket will then
be placed in the foil center, together with a metallic ground contact support plate.
Consult aircraft manufacturer's instructions to verify proper antenna location.
For aircraft with fuselage and / or tail-fin made of non-conductive material, a vertical
folded top antenna is suitable. Installation is made preferably during manufacturing
the tail-fin. IMPORTANT: Carbon fiber is conducting and may shield the antenna!
Careful sealing of all openings of the outer skin is mandatory. Make sure, that
electrical contacts remain permanent good, even under bad environmental conditions.
Use only high quality 50-Ω coax cable type RG-58 C/U. Avoid any sharp cable bend
(radius > 50 mm), mounting pressure, strain, and any excessive coax cable length.
Place all wiring including antenna cable distant to other wiring which carries heavy AC
currents, and distant to any aircraft controls.
Any operating kinematics, trimming and all control handles must be absolutely free in
all directions.
Page 26
VHF/AM RADIO FSG 2T
3 Installation
26 FAV_D10048 June 2014
Ensure the BNC antenna plug is not shortened between inner and outer conductor
(Ohmmeter). Resistance 0.0Ω indicates a short inside the antenna connector, while
some 0.6 to 1Ω indicates the antenna cable resistance while an internally (static)
protected antenna is used. A simple rod antenna is tested for low resistive contact
between inner cable conductor and radiator, and outer conductor to counter weight.
You should possess a reasonable knowledge of antenna installations and the
importance of ground planes before attempting the following: Check the antenna
matching using 50-Ω VSWR meter over the whole frequency range for VSWR less
than 3:1. It may be helpful / necessary to cut slightly the length of the radiator or
counter weight length for optimized antenna efficiency and matching.
REMEMBER: A good antenna is the best RF amplifier!
Page 27
VHF/AM RADIO FSG 2T
3 Installation
June 2014 FAV_D10048 27
3.5 Airborne wiring Refer to Figures 3 - 4 to 3 - 8 of on-board wiring.
3.5.1 General recommendations
Always ensure permanent good, stable electrical contacts, and efficient RF inter-
ference suppression of all electrical systems like generator / alternator, ignition, elec-
tronic variometer, anti-collision light, etc., especially consider vibration and corrosion
effects. Consult the Aircraft Installation Licensing Inspector.
Connect the positive (+12 Vdc) power wire (normally red) to pins 9 and 10. Because
of current requirements it is essential that the connection is made to both pins, other-
wise problems may arise. The positive wire must be connected to the aircraft power
via a circuit breaker (inline fuse 3.15 amps or automatic circuit breaker 3 amp) and
through a radio master switch, not direct to the battery. Do not connect to power until
installation is complete and cross-checked.
Connect the negative (-12 Vdc) ground wire (normally blue or black) to pins 11 and
12. Because of current requirements it is essential that the connection is made to
both pins, otherwise problems may arise. The ground wire must be connected to a
good clean contact that provides a durable path to the aircraft ground. Prefer a
ground wire direct to the battery's negative terminal.
Power bus circuit breakers are to be mounted in the A/C breaker panel or instrument
panel such that they will be accessible in flight and safe from physical damage.
Do not allow the harness to droop between clamps.
Do not allow the wires in the harness to come in contact with sharp surfaces or ride
against any movable part.
Do not install without allowing for service loops / strain relief, this will help to prevent
undue stress on the connectors and allow for easier repair of wire terminations.
Do not allow harness to route through high heat areas without adequate protection.
Do not install harnesses in areas that are subject to chemical damage.
Radio wiring shall be located most distant to other, high AC currents carrying leads.
Route all wiring including antenna cable distant from aircraft control and handling
components. Place DC power lines at least 15 cm (6 inches) away from compass.
Use only aviation grade wiring material (LN 9251 resp. LN 9253) in self-extinguishing
quality, and with > 500 Volt isolation.
Prescribed cable diameters must be complied with.
Ground loops must be avoided. Route shielding of dynamic mike(s) separate from
other grounds or shields.
Cables are soldered to the Standard DB-15 female connector. Solder joints shall be
supported by shrinking or rubber sleeves. Connector back shell must not clamp or
damage the cables.
Secure the radio connector by the sliding lock to avoid unwanted connector
loosening.
Page 28
VHF/AM RADIO FSG 2T
3 Installation
28 FAV_D10048 June 2014
Pre-wired cable harness assemblies are color coded for simple plug-in installations
when used with optional loudspeaker / junction boxes and dynamic microphones for
all kind of aircraft.
Electronic variometers seldom comply with airborne RF environmental type approval
requirements. All of the known models at printing time of this manual have to our
knowledge a (some even far) too high radiated RF interference emission. In FSG 2T
Transmit Mode, the operator may even be faced with radio energy based functional
variometer influence. Slight improvement may be achieved when the variometer
wiring is both shielded and routed not in parallel but distant to the radio wiring.
Eventually, short but bulky grounding contacts between all radio and variometer
cases may improve this E-variometer RF susceptibility capability. Further measures
to improve RF immunity may be obtained from the variometer manufacturer and in
some cases also from the aircraft manufacturer.
Page 29
VHF/AM RADIO FSG 2T
3 Installation
June 2014 FAV_D10048 29
Battery Box
12 V / 7.2 Ah A/N F10382
yel
vio
1
2
3
4
5
Loudspeaker/Junction Box
A/N F10061
1
2
3
4
5
6
1 2 3 4 5
1
2
3
4
5
6
bwn
wht
grn
Alternative stick mounted PTT Key(s)
To connect a second audio set of identical type and characteristics
PTT Key (optional)
Dynamic MIC
Headphone (optional)
Backlight Switch
+
-
AWG 18-20 0.6-0.75 mm² red
AWG 18-20 0.6-0.75 mm²
blue
1
3
On-board wiring using pre-wired cable harness A/N F10028
Dynamic, non-amplified gooseneck or Hand Microphone with PTT Key or a Headset
Antenna Coax RG-58 C/U
COM Antenna
8 9
1
2
3
4
5
6
7
8
9
10
11
12
13
14
15
Dynamic MIC IN
Microphone GND
Standard MIC IN
AF External IN (Option)
Intercom Control IN
RX Annunciator OUT
PTT Key IN (against GND)
LED Backlight +12 Vdc IN
Battery +11 … 16 Vdc
Battery +11 … 16 Vdc
Battery GND
Battery GND
+12 Vdc switched, OUT
Headphone AF OUT
Aircraft Speaker OUT
FSG 2T
COM Antenna
1 8
15 9
Standard DB-15 male connector
30W - 4Ω
DIN Connector
UG-88 C/U
NOTES:
DO NOT wire other pins than noted! Connections which are not required for your installation may be left unterminated!
All wires are #22 AWG (0.3 - 0.4 mm²) unless otherwise noted
For MIC setting, refer to § 3.5.2.1 and § 4.2
Built-in Automatic Circuit Breaker provided when using Battery Box A/N F10382
Length of pre-wired cable harness F10028: 3.2m / 9.5ft
and coax antenna cable are not included in pre-wired cable harness A/N F10028
Fig. 3 - 4 FSG 2T Standard Hook-up Diagram using pre-wired cable harness A/N F10028
one MIC input, for
one non-amplified Dynamic Microphone, or
two non-amplified Dynamic Microphones (identical) in parallel
Page 30
VHF/AM RADIO FSG 2T
3 Installation
30 FAV_D10048 June 2014
COM Antenna
1
2
3
4
5
6
7
8
9
10
11
12
13
14
15
Dynamic MIC IN
MIC GND
Standard MIC IN
AF External IN (Optional)
Intercom Control IN
RX Annunciator OUT
PTT Key IN (against GND)
LED Backlight +12 Vdc IN
Battery +11…16 Vdc
Battery +11…16 Vdc
Battery GND
Battery GND
+12 Vdc switched, OUT
Headphone AF OUT
Aircraft Speaker OUT
FSG 2T
COM Antenna
Battery Box 12 Vdc / 7.2 Ah
A/N F10382
yel
vio
1
2
3
4
5
Loudspeaker/ Junction box A/N F10061
1
2
3
4
5
6
1 2 3 4 5
1
2
3
4
5
6
bwn
wht
grn
Alternative stick mounted PTT Key/s
To connect a second audio set of identical type and characteristics
PTT Key (optional)
Dynamic MIC
Headphone (optional)
Backlight Switch
+
-
AWG 18-20 0.6-0.75mm² red
AWG 18-20 0.6-0.75mm²
blue 1
3
Headset or Hand Microphone with PTT Key
Antenna Coax RG-58 C/U
8 9
Intercom ON OFF
DB-15 female (this plugs into radio)
Pre-wired cable harness, A/N F10029
3.2 Meter / 9.5 ft 1 8
15 9
Standard DB-15 male connector
DIN Connector
30W - 4Ω
UG-88 C/U
NOTES:
DO NOT wire other pins than noted! Connections which are not required for your installation may be left unterminated!
All wires #22 AWG (0.3 - 0.4 mm²) unless otherwise noted
For MIC setting, refer to § 3.5.2.1 and § 4.2
Intercom operation requires microphones which provide audio OUT with the PTT key de-energized (not keyed)
Built-in Automatic Circuit Breaker provided when using Battery Power Supply A/N F10382
Length of pre-wired cable harness F10029: 3.2m / 9.5ft
and coax antenna cable are not included in pre-wired cable harness A/N F10029
Fig. 3 - 5 FSG 2T with INTERCOM
Hook-up Diagram for two-seat application using pre-wired cable harness A/N F10029
one MIC input, for
two non-amplified Dynamic Microphones (identical) in parallel
Page 31
VHF/AM RADIO FSG 2T
3 Installation
June 2014 FAV_D10048 31
COM Antenna
1
2
3
4
5
6
7
8
9
10
11
12
13
14
15
Dynamic MIC IN
MIC GND
Dynamic MIC IN
AF External IN (Optional)
Intercom Control IN
RX Annunciator OUT
PTT Key IN (against GND)
LED Backlight +12 Vdc IN
Battery +11…16 Vdc
Battery +11…16 Vdc
Battery GND
Battery GND
+12 Vdc switched, OUT
Headphone AF OUT
Aircraft Speaker OUT
FSG 2T
COM Antenna
Stick mounted PTT Key/s
Headphone 2
Backlight Switch
Headphone 1
Antenna Coax RG-58 C/U
ON OFF
DB-15 female (this plugs into radio)
1 8
15 9
Standard DB-15 male connector
Loudspeaker
4 to
Battery Box 12 Vdc / 7.2 Ah
A/N F10382
+
-
AWG #18-20 0.6-0.75mm² red
AWG #18-20 0.6-0.75mm²
blue 1
3
1
2
A/N E08639
Headphone Jack
JJ-034
1
2 Headphone Plug
PJ-055, A/N E08941
1
2
A/N E08639
Headphone Jack
JJ-034
1
2 Headphone Plug
PJ-055, A/N E08941
Hardwired, non-amplified Dynamic Microphones e.g. boom MIC INTERCOM Switch
#20 AWG
UG-88 C/U
NOTES:
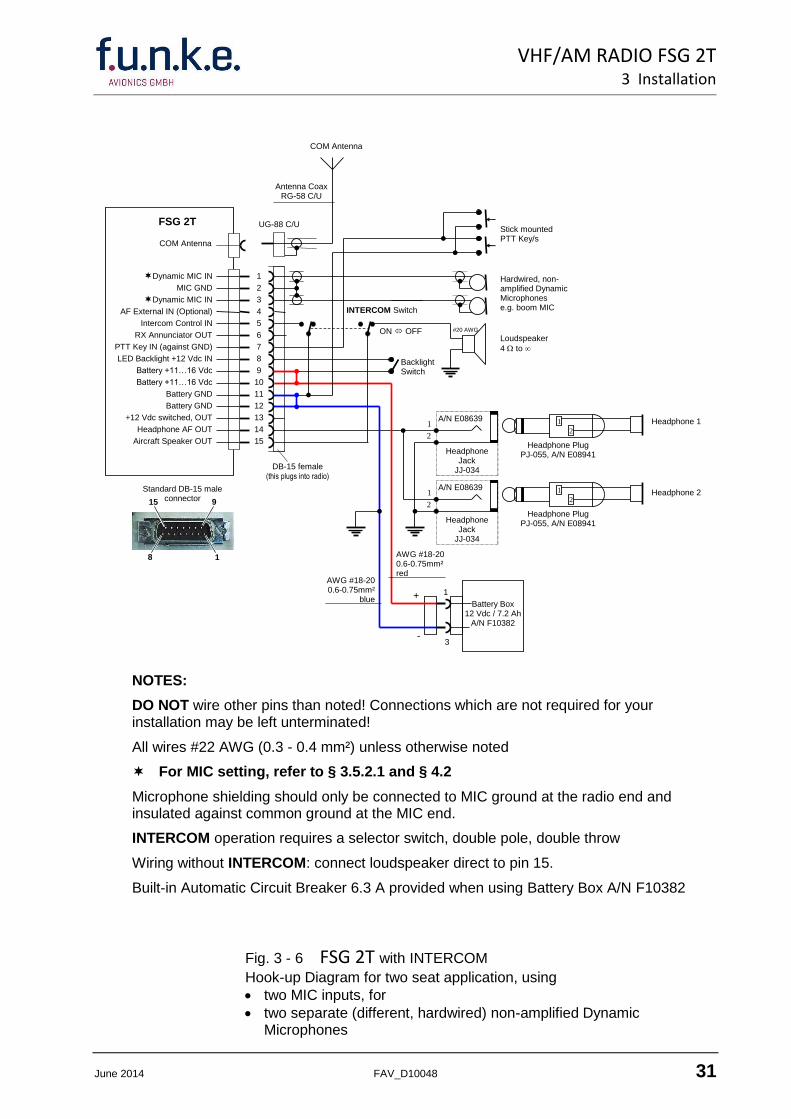
DO NOT wire other pins than noted! Connections which are not required for your installation may be left unterminated!
All wires #22 AWG (0.3 - 0.4 mm²) unless otherwise noted
For MIC setting, refer to § 3.5.2.1 and § 4.2
Microphone shielding should only be connected to MIC ground at the radio end and insulated against common ground at the MIC end.
INTERCOM operation requires a selector switch, double pole, double throw
Wiring without INTERCOM: connect loudspeaker direct to pin 15.
Built-in Automatic Circuit Breaker 6.3 A provided when using Battery Box A/N F10382
Fig. 3 - 6 FSG 2T with INTERCOM
Hook-up Diagram for two seat application, using
two MIC inputs, for
two separate (different, hardwired) non-amplified Dynamic Microphones
Page 32
VHF/AM RADIO FSG 2T
3 Installation
32 FAV_D10048 June 2014
+13.8 Vdcfrom Dimmer or Panel Light Switch
Aircraft Speaker OUT
Headphone AF OUT
+12 Vdc switched, OUT
Power GND
Power GND
A/C Power +11 … 16 Vdc
A/C Power +11 … 16 Vdc
LED Backlight +12 Vdc IN
PTT Key IN (against GND)
RX Annunciator OUT
Intercom Control IN
AF External IN (Optional)
Standard MIC 2 IN
Microphone GND
Standard MIC 1 IN
FSG 2T
Antenna CoaxRG-58 C/U
COM Antenna
15
14
13
12
11
10
9
8
7
6
5
4
3
2
1
COM Antenna
+-
AWG 181 mm² red
AWG 181 mm² blue
Aircraft Power+11 … 16 Vdc
INTERCOM
Switch
AF-External INe.g. NAV, COM2, MKR
Alternative stickmounted PTT Key(s)
1
2
3
MicrophoneJack
JJ-033A/N E08640
12
3
Microphone PlugPJ-068, A/N E08942
Headphone 1
Standard MIC 2with PTT Key
1
2
A/N E08639
HeadphoneJack
JJ-034
1
2
1
2
3Microphone
JackJJ-033
A/N E08640
12
3
Headphone PlugPJ-055, A/N E08941
Microphone PlugPJ-068, A/N E08942
Headphone 2
Audio OUT to Audio Panelif required
Loudspeaker
4 to OFF
ON
470 R
470 R
#20 AWG
#20 AWG
StandardDB-15 female
connector
UG-88 C/U
Standard MIC 1with PTT Key
1
2
A/N E08639
HeadphoneJack
JJ-034
1
2Headphone Plug
PJ-055, A/N E08941
18
15 9
Standard DB-15 maleconnector
OPTION AF-Externalrefer to § 3.5.5
NOTES:
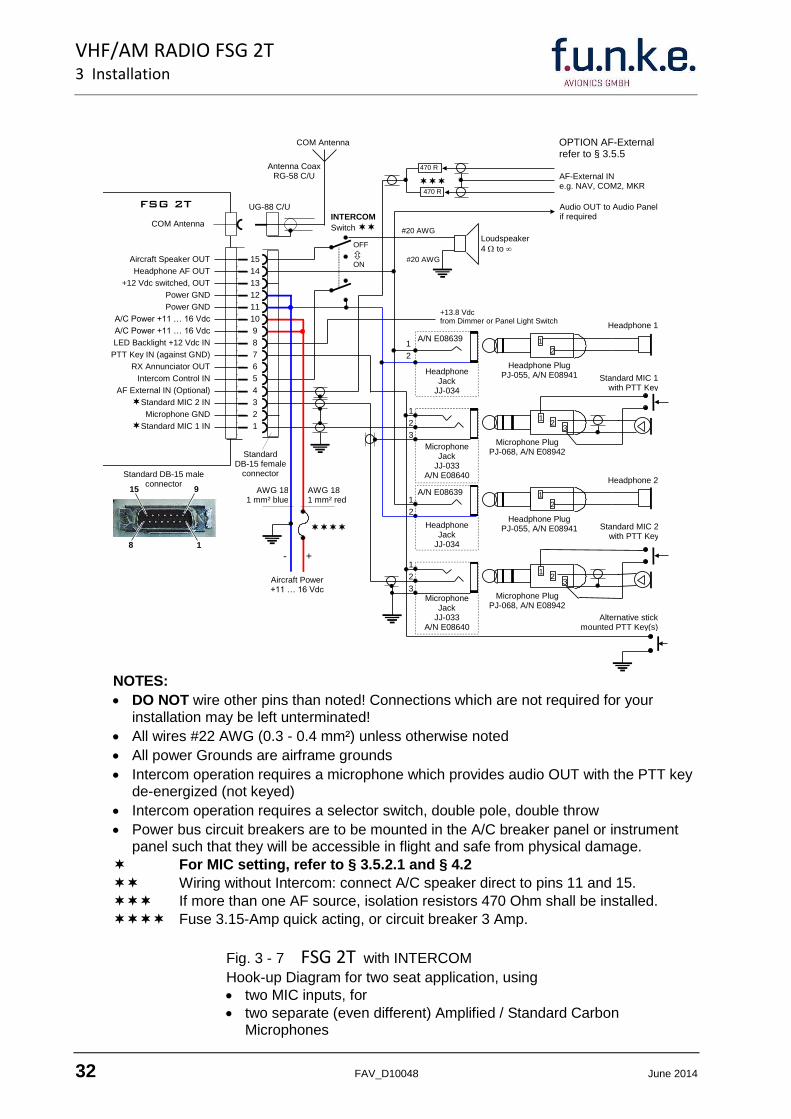
DO NOT wire other pins than noted! Connections which are not required for your installation may be left unterminated!
All wires #22 AWG (0.3 - 0.4 mm²) unless otherwise noted
All power Grounds are airframe grounds
Intercom operation requires a microphone which provides audio OUT with the PTT key de-energized (not keyed)
Intercom operation requires a selector switch, double pole, double throw
Power bus circuit breakers are to be mounted in the A/C breaker panel or instrument panel such that they will be accessible in flight and safe from physical damage.
For MIC setting, refer to § 3.5.2.1 and § 4.2
Wiring without Intercom: connect A/C speaker direct to pins 11 and 15.
If more than one AF source, isolation resistors 470 Ohm shall be installed.
Fuse 3.15-Amp quick acting, or circuit breaker 3 Amp.
Fig. 3 - 7 FSG 2T with INTERCOM
Hook-up Diagram for two seat application, using
two MIC inputs, for
two separate (even different) Amplified / Standard Carbon Microphones
Page 33
VHF/AM RADIO FSG 2T
3 Installation
June 2014 FAV_D10048 33
Aircraft Speaker OUT
Headphone AF OUT
+12 Vdc switched, OUT
Aircraft GND
Aircraft GND
A/C Power +11 … 16 Vdc
A/C Power +11 … 16 Vdc
LED Backlight +12 Vdc IN
PTT Key IN (against GND)
RX Annunciator OUT
Intercom Control IN
AF External IN
Dynamic MIC IN
Microphone GND
Standard MIC IN
FSG 2T
Antenna CoaxRG-58 C/U
COM Antenna
15
14
13
12
11
10
9
8
7
6
5
4
1
2
3
COM Antenna
+-
#18 AWG1 mm² red
#18 AWG1 mm² blue
Aircraft Power +11 … 16 Vdc
AF-External INe.g. NAV, COM2, MKR
Headphone
Audio OUT to Audio Panelif required
Loudspeaker
4 to
silent
noisy
470 R
470 R
#20 AWG
#20 AWG
StandardDB-15 female
connector
UG-88 C/U
18
15 9
Standard DB-15 maleconnector
Standard MICwith PTT Key
1
2
A/N E08639
HeadphoneJack
JJ-034
1
2Headphone Plug
PJ-055, A/N E08941
1
2
3Microphone
JackJJ-033
A/N E08640
12
3
Microphone PlugPJ-068, A/N E08942
Dynamic gooseneck(boom) MIC
Stick mountedPTT Key(s)
INTERCOM
Switch
(only for 2-seat)
OFF
ON
OPTION AF-Externalrefer to § 3.5.5
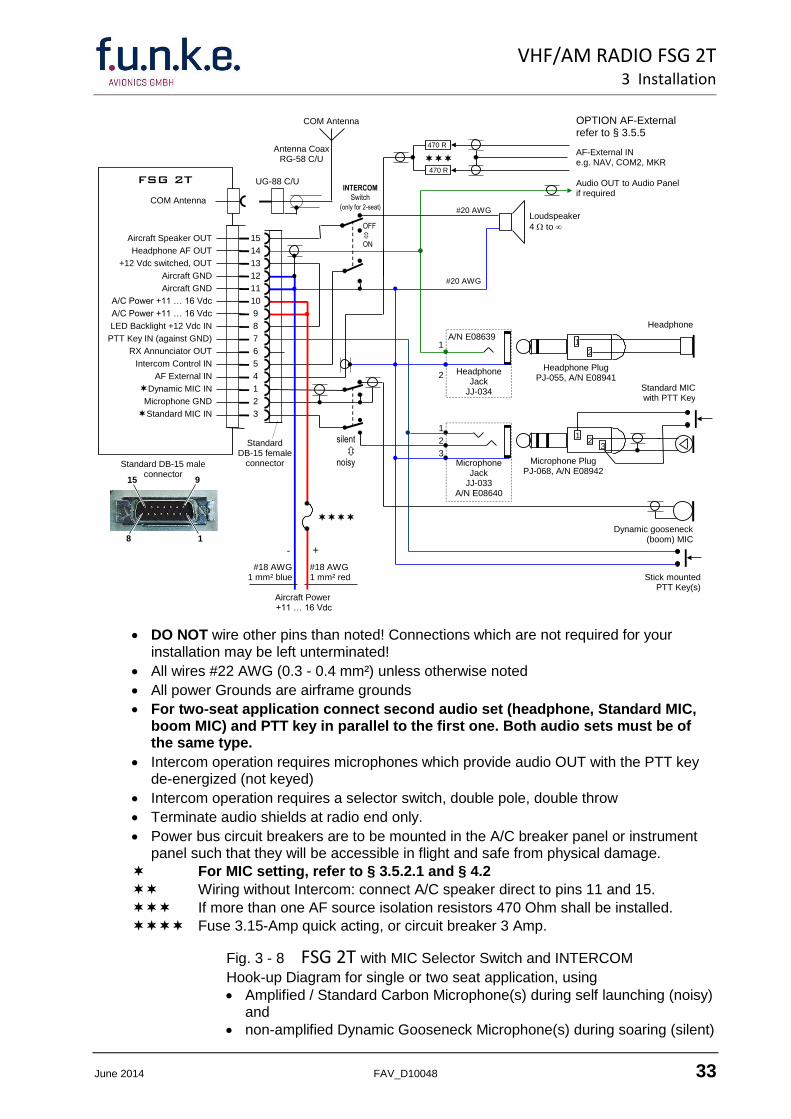
DO NOT wire other pins than noted! Connections which are not required for your installation may be left unterminated!
All wires #22 AWG (0.3 - 0.4 mm²) unless otherwise noted
All power Grounds are airframe grounds
For two-seat application connect second audio set (headphone, Standard MIC, boom MIC) and PTT key in parallel to the first one. Both audio sets must be of the same type.
Intercom operation requires microphones which provide audio OUT with the PTT key de-energized (not keyed)
Intercom operation requires a selector switch, double pole, double throw
Terminate audio shields at radio end only.
Power bus circuit breakers are to be mounted in the A/C breaker panel or instrument panel such that they will be accessible in flight and safe from physical damage.
For MIC setting, refer to § 3.5.2.1 and § 4.2
Wiring without Intercom: connect A/C speaker direct to pins 11 and 15.
If more than one AF source isolation resistors 470 Ohm shall be installed.
Fuse 3.15-Amp quick acting, or circuit breaker 3 Amp.
Fig. 3 - 8 FSG 2T with MIC Selector Switch and INTERCOM
Hook-up Diagram for single or two seat application, using
Amplified / Standard Carbon Microphone(s) during self launching (noisy) and
non-amplified Dynamic Gooseneck Microphone(s) during soaring (silent)
Page 34
VHF/AM RADIO FSG 2T
3 Installation
34 FAV_D10048 June 2014
3.5.2 Wiring the Microphone(s)
IMPORTANT!
Radio performance and system reliability significantly depend on quality
acoustic accessories, and their proper audio leveling adjustments.
After installation completion, optimized acoustics performance requires
proper mike audio system selection and its appropriate initial level
adjustment (non-amplified dynamic, or Standard carbon microphone(s)
system).
It is possible to connect two microphones in parallel, but: make sure that
only microphones of identical type / characteristics may be interconnected
in parallel and appropriately together adjusted / matched. Please avoid use
of low quality / low performance accessories.
Dynamic microphones require shielded wiring and galvanic separation of
mike grounds from any other signal ground (e.g. DC input / DC output,
Speaker, phone, PTT, and external AF input ground). The MIC GND should
only be connected at the radio's end!
Standard Carbon / compatible Amplified microphones may employ Dynamic
or Electret acoustics transducers. Amplified microphone ground may be
connected together with other grounds, e.g. for DC input / switched output,
speaker, phone, PTT, dimmer, external audio input.
Operation of amplified microphone systems close to the RF radiating
antenna (on portable case or located close to the cockpit) may be heavily
interfered from own radiated strong antenna RF field strength and become
unstable, oscillates or causes modulation distortion. Verify such effects,
which are possibly caused by RF, by replacing the radiating antenna
against a temporarily connected artificial antenna / RF dummy load.
Page 35
VHF/AM RADIO FSG 2T
3 Installation
June 2014 FAV_D10048 35
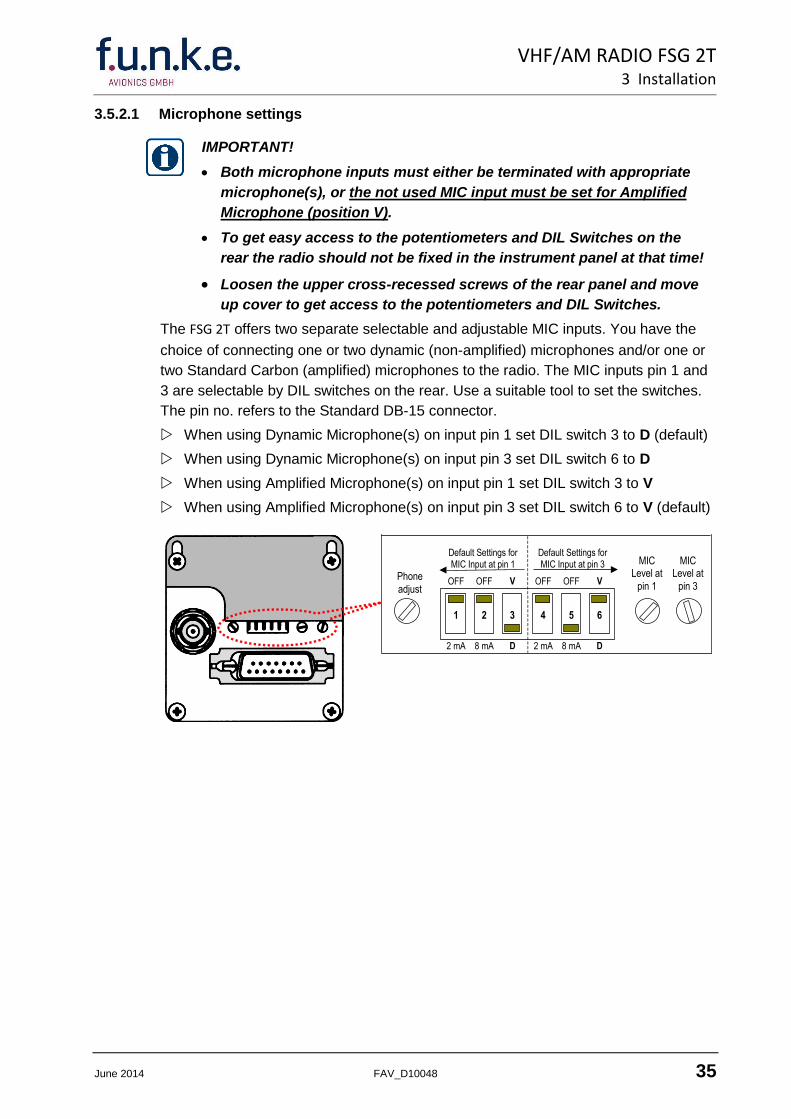
3.5.2.1 Microphone settings
IMPORTANT!
Both microphone inputs must either be terminated with appropriate
microphone(s), or the not used MIC input must be set for Amplified
Microphone (position V).
To get easy access to the potentiometers and DIL Switches on the
rear the radio should not be fixed in the instrument panel at that time!
Loosen the upper cross-recessed screws of the rear panel and move
up cover to get access to the potentiometers and DIL Switches.
The FSG 2T offers two separate selectable and adjustable MIC inputs. You have the
choice of connecting one or two dynamic (non-amplified) microphones and/or one or
two Standard Carbon (amplified) microphones to the radio. The MIC inputs pin 1 and
3 are selectable by DIL switches on the rear. Use a suitable tool to set the switches.
The pin no. refers to the Standard DB-15 connector.
When using Dynamic Microphone(s) on input pin 1 set DIL switch 3 to D (default)
When using Dynamic Microphone(s) on input pin 3 set DIL switch 6 to D
When using Amplified Microphone(s) on input pin 1 set DIL switch 3 to V
When using Amplified Microphone(s) on input pin 3 set DIL switch 6 to V (default)
OFF
2 mA
OFF
8 mA
V
D
OFF
2 mA
OFF
8 mA
V
D
Default Settings forMIC Input at pin 1
Default Settings forMIC Input at pin 3
1 2 3 4 5 6
Phone
adjust
MICLevel at
pin 1
MICLevel at
pin 3
Page 36
VHF/AM RADIO FSG 2T
3 Installation
36 FAV_D10048 June 2014
3.5.2.2 Dynamic Microphone(s)
Due to the extremely wide mike input level adjustment range, it is mandatory to
understand that correctly matched FSG 2T mike input sensitivity will be good ONCE
FOREVER for this configuration. This guarantees a stable operation without audio
feedback and maximum modulation at the best background noise attenuation.
IMPORTANT!
NEVER use a 3-pole mike jack type PJ-068 for non-amplified dynamic
microphones because common ground is used both for mike and for PTT.
This creates a ground loop and causes unstable / distorted modulation.
Dynamic (non-amplified) microphones connected to a Standard Carbon
MIC input will not work on that input!
Dynamic MIC input range = 0.5 mV … 15 mV.
The FSG 2T default input for dynamic microphone(s) is pin 1 of the Standard DB-15
receptacle.
Our pre-wired cable harness assemblies are color coded for simple plug-in
installations when used with optional Loudspeaker / Junction boxes. Up to two
dynamic microphones of identical type and characteristics can be connected by
5-pole DIN jacks to the Loudspeaker / Junction Box (refer to Figures 3 - 4 / 3 - 5).
Up to two dynamic microphones for pilot and copilot can be hardwired to the radio.
Even two low impedance (5 Ohm) dynamic microphones may be connected in
parallel as well. However, for microphones with less than 30 Ohms, it may be
necessary to use a suitable microphone transformer due to their low output level.
When hardwiring two microphones they may be connected to two different inputs of
the radio FSG 2T (refer to § 3.5.2.1, Microphone setting). Use single core shielded
wires, connect the conductor of MIC 1 to pin 1, the conductor of MIC 2 to pin 3 and
the shield of both cables to pin 2 (MIC GND) of the radio's receptacle (refer to Figure
3 - 6). The shielding should only be connected to MIC GND at the radio's end and
insulated against aircraft ground at the microphone end. When the microphones
contain PTT keys two additional wires for each PTT key must be connected to pin 7
and pins 11/12 or against aircraft ground.
Never use the MIC GND as ground for PTT key, Intercom, audio or power!
Page 37
VHF/AM RADIO FSG 2T
3 Installation
June 2014 FAV_D10048 37
3.5.2.3 Standard Carbon, amplified Electret, amplified Dynamic Microphone(s)
IMPORTANT!
Panel jacks of PJ-068 type may only be used with amplified / carbon type
microphones!
Clean the PJ-068/PJ-55 connector system regularly and check contacts for
sufficient spring-loaded force. This is especially mandatory under vibration
operating conditions.
A Standard Carbon (amplified) Microphone connected to a Dynamic MIC
input will dramatically overmodulate the transmitter!
Standard Carbon MIC input range = 80 mV … 500 mV.
The FSG 2T default input for Standard Carbon microphone(s) is pin 3 of the Standard
DB-15 receptacle.
For tandem configuration two Standard Carbon microphones can be connected
parallel to pin 3 of radio FSG 2T. But since matching can be a problem we recommend
to connect the second microphone to pin 1 of the receptacle. Refer to § 3.5.2.1 for
microphone setting! This allows individual adjustment of the MIC sensitivity for each
MIC input (refer to hook-up diagram Figure 3 - 7).
Page 38
VHF/AM RADIO FSG 2T
3 Installation
38 FAV_D10048 June 2014
3.5.3 Intercom (IC)
INTERCOM is suitable for two seat aircraft with noisy cockpit. Intercom as well as radio
operation should employ suitable aircraft headsets and must be matched properly to the
transceiver (refer to § 4.2, Microphone Set-up).
Hand-held microphones in combination with earphones can be used for Intercom as
well, provided that the MIC audio output is not switched by the PTT function. Otherwise
keying the mike audio may cause awful cracks, depending on mike technology, and will
accidentally activate the transmitter.
To control the Intercom capability, aircraft radio wiring must have a double pole toggle
selector switch (refer to Figures 3 - 5 to 3 - 8). The Intercom switch disconnects the
loudspeaker during Intercom operation in the IC ON position. Simultaneously, pin 5 of
the 15-pole connector is set to ground to select Intercom ON by continuously activating
the microphone signal input (amplifier).
There are two operating modes of Intercom:
Voice / VOX controlled: at sufficient voice audio volume (MIC signal) the threshold
opens and intercommunication takes place. The GREEN TX/RX LED indicates
sufficient microphone level. This feature is only available when the AF External input
is disabled (default setting).
Continuously: Intercommunication is possible continuously. Any MIC signal is then
amplified and audible through the headphone, also noise. This Intercom operating
Mode is available when the AF External input is enabled by an approved Avionics
workshop. The GREEN TX/RX LED indicates sufficient microphone level.
During RX the Intercom audio level is reduced by 6 dB (half level).
3.5.4 Loudspeaker / Headset interconnection
Two separate AF outputs are available:
The speaker output pin 15 can supply one 4-Ohm (or two 8-Ohm) speaker.
The headphone audio output Pin 14 can accommodate two (2) or more headphones
each with some 30 to 600 Ohms.
When no loudspeaker is installed, pin 15 may remain open, no spare load is required.
CAUTION!
Your magnet compass may be deflected by the speaker's magnetic
field. Therefore, when using the f.u.n.k.e. Loudspeaker / Junction
Box F10061, a minimum distance of 1.3 m / 4.3 ft. between compass
and Box is required.
Page 39
VHF/AM RADIO FSG 2T
3 Installation
June 2014 FAV_D10048 39
3.5.5 OPTIONAL: AF External Operation
Solder bridge
VO
L/S
Q P
ote
ntio
mete
r
1µF
On the TX/RX module, the optional AF
External Mode is enabled by making a
solder bridge across two small solder
pads, remove one resistor and change
one capacitor. To get access, the radio
FSG 2T must be opened (refer to
Maintenance/ Overhaul Manual FSG 2T)!
Enabling AF EXTERNAL causes
increased current consumption during
Standby, and disables the VOX Intercom
threshold!
IMPORTANT!
The Option AF EXTERNAL can be enabled by an approved Avionics
workshop (see Maintenance/ Overhaul Manual FSG 2T, Circuit Diagram,
Fig. 10-6m and Location of Components, Fig. 10-7) by making a solder
bridge! The Information Label of the radio must then be marked
accordingly.
The AF External Input Pin 4 may be connected to any external (selectable) audio output
of any other audio source. An input of 1 Volt rms (approx. 10 kOhm input impedance) is
required to obtain maximum audio volume. Higher AF input may cause audio distortion.
External AF will be audible only in Receive Mode and in Standby Mode, and may be
heard in the speaker or headphone. During Transmit, the External AF Input is disabled.
Interconnection of external audio source(s) will be suitable especially in aircraft using just
one COM and one NAV. The NAV headphone output may then be connected directly to
the FSG 2T External AF input.
This allows – in addition to the receiving and Intercom function – also simultaneous
listening of COM and NAV audio either by headphones or speaker.
Interconnection of more than one external audio source requires additional external
decoupling / isolation resistors (470 Ohms, refer to Figures 3 - 7 / 3 - 8).
The individual audio volume is set directly at the particular external equipment and may
be reduced by the transceiver's VOL knob.
For audio wiring use only shielded cables to avoid interference from strong electrical
fields. An eventually magnetic interference coupling shall be especially regarded
(distance required from high current carrying wiring).
Page 40
VHF/AM RADIO FSG 2T
3 Installation
40 FAV_D10048 June 2014
3.5.6 Backlighting
IMPORTANT!
Backlighting of the display and front panel is turned ON or OFF via a
separate input, but can be controlled by the radio’s VOL switch, if desired
(refer to Figure 3 - 8).
In order to save current while supplied from a battery an external suitable
illumination switch is suggested.
The FSG 2T includes a LED backlight (night design). Pin 8 may be connected either
directly to the 13.8 Vdc A/C power (perhaps via a suitable dimmer), or to the switched
DC output Pin 13 (refer to Fig. 3 - 8).
3.5.7 Connection to a 28 Vdc airborne system
Interconnection of the FSG 2T transceivers to a 28 Vdc supply requires a capable voltage
converter. Interconnection wiring shall be according to instructions of the DC converter
manufacturer.
For backlighting from a 28 Vdc aircraft supply, insert a 230 Ohm resistor / 1 W,
connected in series.
Page 41
VHF/AM RADIO FSG 2T
4 Recommended Set-up Sequence
June 2014 FAV_D10048 41
4 Recommended Set-up Sequence
IMPORTANT!
To get easy access to the potentiometers and DIL Switches on the
rear the radio should not be fixed in the instrument panel at that time!
Loosen the upper cross-recessed screws of the rear panel and move
up cover to get access to the potentiometers and DIL Switches.
Make all settings in the usual environmental noise (e.g. engine in
cruising rpm)!
During adjustment of Microphone Level and TX Sidetone the
transmitter is keyed. Carry out this setting quickly!
When using two headsets, make sure the second headset is also
connected. If the second headset is not worn, the headset boom mike shall
be moved as far as possible away from earphone transducer and / or well
padded in order to avoid acoustic feedback. It would be even better if a
second person is wearing the second headset during microphone and
phone level adjustment.
Parallel operated microphones and / or earphones must have the same
specifications. The following adjustment has to be repeated when changing
microphones (brand, type or number)
It should be noted that use of two microphones connected in parallel
significantly reduces the microphone(s) output level (particularly important
when in an installation both microphones can be plugged).
4.1 General
CAUTION!
The FSG 2T should be turned ON after engine start-up. This is a
simple precaution which helps to protect the solid state circuitry
and extends the operating life of your avionics equipment.
Turn the radio FSG 2T ON by rotating the VOL knob clockwise. For a short time the
TX/RX LED lights up green and all segments of the display are visible to verify their
operation. After indicating the Firmware version, the last used operating mode and
frequency are displayed.
Select an appropriate (test) frequency, e.g. 122.90 MHz.
Check the SQ control. From the full counter-clockwise position (RX noise, signaling
TX/RX LED lights GREEN) rotate the SQ knob until the noise stops and – without
received signal – the TX/RX LED turns clear. When receiving air traffic communication
the TX/RX LED stays GREEN. Set the RX volume of the aircraft loudspeaker or
headphone to a convenient level by rotating the VOL knob.
Page 42
VHF/AM RADIO FSG 2T
4 Recommended Set-up Sequence
42 FAV_D10048 June 2014
4.2 Microphone Set-up
4.2.1 Set-up using Loudspeaker / Junction Box and one (or two parallel, identical) non-amplified Dynamic Microphone(s) at Mic 1 Input, pin 1.
Verify the settings of the DIL switches on the rear of the radio (DIL switch "Mic 1" set
to D, DIL switch "Mic 2" to V, all others "OFF").
1 2 3 4 5 6
Mic 1
Press the PTT key. The TX/RX LED should light steady RED. Speak loud, clear and
close into one microphone. Observe the TX/RX LED, it should flicker YELLOW.
IF NOT, turn with a suitable screwdriver "Level Mic 1" potentiometer till the TX/RX LED
flickers YELLOW while transmitting and speaking. When you stop talking the TX/RX
LED should light steady RED!
Release the PTT key, the TX/RX LED must turn to clear (no reception) or to GREEN
(RX signal).
If applicable check the MIC level setting of the second microphone by repeating the
steps above. If readjustment is necessary check again with first microphone. When
the MIC levels differ find a compromise in setting or try with another identical
microphone.
4.2.2 Set-up using two non-amplified Dynamic Microphones separate on Mic 1 input, pin 1, and Mic 2 input, pin 3
Verify the settings of the DIL switches on the rear of the radio (DIL switch "Mic 1" set
to D, DIL switch "Mic 2" to D, all others "OFF").
1 2 3 4 5 6
Mic 1 Mic 2
Setting the MIC Level of microphone connected to pin 1 of DB-15 connector:
Press the PTT key. The TX/RX LED should light steady RED. Speak loud, clear and
close into the corresponding microphone. Observe the TX/RX LED, it should flicker
YELLOW.
IF NOT, turn with a suitable screwdriver "Level Mic 1" potentiometer till the TX/RX LED
flickers YELLOW while transmitting and speaking. When you stop talking the TX/RX
LED should light steady RED!
Release the PTT key, the TX/RX LED must turn to clear (no reception) or to GREEN
(RX signal).
Setting the MIC Level of microphone connected to pin 3 of DB-15 connector:
Press the PTT key. The TX/RX LED should light steady RED. Speak loud, clear and
Page 43
VHF/AM RADIO FSG 2T
4 Recommended Set-up Sequence
June 2014 FAV_D10048 43
close into the corresponding microphone. Observe the TX/RX LED, it should flicker
YELLOW.
IF NOT, turn with a suitable screwdriver "Level Mic 2" potentiometer till the TX/RX LED
flickers YELLOW while transmitting and speaking. When you stop talking the TX/RX
LED should light steady RED!
Release the PTT key, the TX/RX LED must turn to clear (no reception) or to GREEN
(RX signal).
4.2.3 Set-up using one (or two parallel, identical) amplified / Standard Carbon Microphone(s) on Mic 2 input, pin 3
This test must be performed with headphone(s) to evaluate the volume/quality
of the MIC signal via Transmit Sidetone.
Standard MIC input for amplified / Standard Carbon Microphones is pin 3 of DB-15
connector (on the Information Label indicated as "Mic 2").
Verify the settings of the DIL switches on the rear of the radio (DIL switch "Mic 1" set
to V, DIL switch "Mic 2" to V, DIL switches 1, 2 and 4 to "OFF", DIL switch 5 to "8mA").
1 2 3 4 5 6
Mic 2
Press the PTT key. The TX/RX LED should light steady RED. Speak loud, clear and
close into one microphone. Observe the TX/RX LED, it should flicker YELLOW. Listen
to the TX Sidetone in your headphone, it should be clear and undistorted.
If no Sidetone is audible or TX Sidetone is distorted try to increase audio quality
and volume by switching DIL switches "Mic 2" either to "2mA" or to 10 mA ("2mA" +
"8mA").
IF the TX/RX LED does not flicker, turn with a suitable screwdriver "Level Mic 2"
potentiometer till the TX/RX LED flickers YELLOW while transmitting and speaking.
When you stop talking the TX/RX LED should light steady RED!
Release the PTT key, the TX/RX LED must turn to clear (no reception) or to GREEN
(RX signal).
If applicable check the MIC current and MIC level setting of the second microphone
by repeating the steps above. If readjustment is necessary check again with first
microphone. When the MIC levels differ find a compromise in setting or try with
another identical microphone.
Page 44
VHF/AM RADIO FSG 2T
4 Recommended Set-up Sequence
44 FAV_D10048 June 2014
4.2.4 Set-up using two amplified / Standard Carbon Microphones, separate on Mic 1 input, pin 1, and Mic 2 input, pin 3
This test must be performed with headphones to evaluate the quality of the MIC
signals via Transmit Sidetone!
Verify the settings of the DIL switches on the rear of the radio (DIL switch "Mic 1" set
to V, DIL switch "Mic 2" to V, DIL switches 1 and 4 to "OFF", DIL switches 2 and 5 to
"8mA").
1 2 3 4 5 6
Mic 1 Mic 2
Setting the MIC Level of microphone connected to pin 1 of DB-15 connector:
Press the PTT key. The TX/RX LED should light steady RED. Speak loud, clear and
close into the corresponding microphone. Observe the TX/RX LED, it should flicker
YELLOW. Listen to the TX Sidetone in your headphone; it should be clear and
undistorted.
If no Sidetone is audible or TX Sidetone is distorted try to increase audio quality
by switching DIL switches "Mic 1" either to "2mA" or to 10 mA ("2mA" + "8mA").
If the TX/RX LED does not flicker, turn with a suitable screwdriver "Level Mic 1"
potentiometer till the TX/RX LED flickers YELLOW while transmitting and speaking.
When you stop talking the TX/RX LED should light steady RED!
Release the PTT key, the TX/RX LED must turn to clear (no reception) or to GREEN
(RX signal).
Setting the MIC Level of microphone connected to pin 3 of DB-15 connector:
Press the PTT key. The TX/RX LED should light steady RED. Speak loud, clear and
close into the corresponding microphone. Observe the TX/RX LED, it should flicker
YELLOW. Listen to the TX Sidetone in your earphone; it should be clear and
undistorted.
If no Sidetone is audible or TX Sidetone is distorted try to increase audio quality
by switching DIL switches "Mic 2" either to "2mA" or to 10 mA ("2mA" + "8mA").
If the TX/RX LED does not flicker, turn with a suitable screwdriver "Level Mic 2"
potentiometer till the TX/RX LED flickers YELLOW while transmitting and speaking.
When you stop talking the TX/RX LED should light steady RED!
Release the PTT key, the TX/RX LED must turn to clear (no reception) or to GREEN
(RX signal).
Page 45
VHF/AM RADIO FSG 2T
4 Recommended Set-up Sequence
June 2014 FAV_D10048 45
4.2.5 Set-up using non-amplified microphone(s) on one input and amplified microphones on the other
Verify the settings of the DIL switches on the rear of the radio according to your configuration.
Set microphone level and microphone current separate for each input according to the individual procedures described above.
Page 46
VHF/AM RADIO FSG 2T
4 Recommended Set-up Sequence
46 FAV_D10048 June 2014
4.3 Adjusting the Headphone Volume and Transmitter Sidetone
IMPORTANT!
This setting determines the maximum headphone audio volume
during Receive, Transmit (Sidetone), Intercom and AF External (if
applicable)!
Transmitter Sidetone is not adjustable by the VOL knob!
Before adjusting the Transmitter Sidetone volume, the microphone
sensitivity should be adjusted correctly (refer to § 4.2).
Only during Transmit TX Sidetone is audible via headphone(s)/headset(s).
When using two headphones their characteristics should be identical,
otherwise their audio volume will differ.
Prior to Sidetone level adjustment set volume control(s) on each headset to
maximum, if applicable.
During this adjustment the transmitter is active. Carry out
adjustment(s) quickly!
Select an appropriate (test) frequency, e.g. 122.90 MHz.
Press the PTT key. The TX/RX LED should light steady RED. Speak loud, clear and
close into one microphone. Observe the TX/RX LED, it should flicker YELLOW. Listen
to the TX Sidetone in your headphone; it should be clear and undistorted.
If the TX Sidetone is too quiet or too loud, turn with a suitable screwdriver "Phone"
level potentiometer till the TX Sidetone audio volume is at a convenient level while
transmitting and speaking.
1 2 3 4 5 6
Phone
If the TX Sidetone is distorted the microphone amplifier may be interfered by the
own radiated transmitting power, especially when the microphone is very close to the
antenna. To find out check the following:
a. Vary the position of the headset/microphone cable(s) against the antenna while
transmitting and listening to the TX Sidetone.
b. Operate the transmitter temporary on a 50-Ohm dummy load instead of the
antenna. No acoustical difference may occur between transmitting with antenna
and transmitting into the dummy load.
c. Check the quality of the TX Sidetone using another type of microphone (first
adjust the microphone sensitivity according § 3.5.2.1 and § 4.2).
Try another type of headphone to find out if the earphone capsules cause the
distortion. Vary the headphone volume by turning the phone level potentiometer at
steady way of speaking.
Page 47
VHF/AM RADIO FSG 2T
4 Recommended Set-up Sequence
June 2014 FAV_D10048 47
4.4 If applicable – check the Intercom Mode
IMPORTANT!
Before testing the Intercom Mode, the microphone sensitivity should be
adjusted correctly (refer to § 4.2).
Intercom is only possible when using headphones/headsets.
The characteristic of the headphones should be identical.
To check the Intercom Mode, switch ON the panel mounted Intercom switch. This
activates the Intercom capability, while the A/C speaker is disabled.
There are two operating modes of Intercom:
4.4.1 FSG 2T without AF External capability:
Intercom Voice / VOX controlled: at a sufficient voice volume (MIC signal) the
threshold opens and intercommunication takes place. This feature is only available when
the optional AF External Function is disabled (default setting).
Without RX signal, speak loud, clear and close into the microphone of the first
headset.
Listen to the earphone of the headset and observe the TX/RX LED on the front panel.
Your voice should be clearly audible in the earphone when the TX/RX LED change
from clear to steady GREEN. Turn VOL knob to adjust Intercom audio volume.
Stop speaking; after approximately one second the radio switches back to Standby
(TX/RX LED is clear).
If signals are received during Intercommunication, the Intercom audio volume is
reduced by half to increase the intelligibility of the reception.
While receiving the TX/RX LED is steady GREEN.
Repeat the test above using microphone of the second headset.
4.4.2 FSG 2T with AF External capability:
Intercom continuously: Both MIC inputs are continuously open. Any MIC signal is
therefore amplified and audible through the headphones, also cabin noise. This Intercom
operating Mode is available when the AF External input is enabled by an approved
Avionics workshop.
Without RX signal, speak loud, clear and close into the microphone of the first
headset.
Listen to the earphone of the headset and observe the TX/RX LED on the front panel.
Your voice should be clearly audible in the earphone and the TX/RX LED should
change from clear to steady GREEN while talking. Turn VOL knob to adjust Intercom
volume.
If signals are received during Intercommunication, the Intercom audio volume is
reduced by half to increase the intelligibility of the reception.
While receiving the TX/RX LED is steady GREEN.
Repeat the test above using microphone of the second headset.
Page 48
VHF/AM RADIO FSG 2T
4 Recommended Set-up Sequence
48 FAV_D10048 June 2014
4.5 Check the RX Loudspeaker / Headphone Volume
IMPORTANT!
When using two headsets the characteristics of both should be identical.
On a busy channel listen to the radio traffic.
Turn the VOL knob from fully counter-clockwise to fully clockwise position. The audio
volume audible in the A/C loudspeaker and/or the headphone should increase
accordingly. Set VOL knob to get a convenient audio level.
This radio contains an audio-leveling circuit. If the audio level is adjusted once it will
keep the volume almost constant when receiving different signals with a modulation
of at least 30% AM.
4.6 Fixing the radio
IMPORTANT!
After finishing all settings move cover to its place and fix the screws!
This shielding is absolutely necessary because of required immunity
against high energy RF interference!
Check for proper fixing of the DB-15 Standard connector (sliding lock).
Check for proper fixing of the UG-88 C/U Antenna Connector (bayonet lock).
Fix the radio on instrument panel using the four cross recessed screws M4 × 20 mm.
Page 49
VHF/AM RADIO FSG 2T
4 Recommended Set-up Sequence
June 2014 FAV_D10048 49
4.7 Testing on the Ground with engine Off
Verification after installation completion.
After installing the unit, check all aircraft control movements to be sure no electrical
cable interfere with their operation. All aircraft and radio functions shall be tested after
installation completion to identify, whether malfunctions caused by mechanical and / or
electrical installation work occurs. Remove all foreign parts.
This verification must be performed by an authorized Aircraft Electronics Inspector.
Testing of antenna matching between the FSG 2T antenna socket (BNC) and the BNC
antenna cable connector is required, using a suitable 50 Ohm VHF Reflectometer
(VSWR meter), or a directional Wattmeter.
The VSWR must be less than 3:1 over the full frequency range, tested at least in 1 MHz
steps (reflected power shall be less than 25% of the forward RF power output). If this
limit is exceeded, this indicates a mismatched antenna and may be caused by wrong
antenna radiator or counter weight length / dimensions, poor contacts, or damaged or
unsuitable (other than 50 Ohm) coaxial cable.
In order to optimize radio range, it is suggested to care for a VSWR of less than 2:1
(reflected power shall be less than 11% of the forward RF power output).
IMPORTANT!
If the antenna is belly mounted, perform antenna matching measurements if
possible in flight, or at least while the fuselage is lifted upwards, using
wood / non metallic supporting material. This avoids antenna mismatch
caused from ground proximity.
Using known, but distant located fixed stations (VOLMET, ATIS) will also help in
determining the radio receiving range, especially in comparison with known radio range
results of another aircraft at the same position on the ground at a known airfield location,
outside of the hangar, trailer or workshop.
Page 50
VHF/AM RADIO FSG 2T
4 Recommended Set-up Sequence
50 FAV_D10048 June 2014
4.8 Ground checks with engine running (if applicable)
Make sure that the aircraft's electrical DC system voltage on the FSG 2T input terminals is
within the tolerances permitted for 14 Vdc systems (or 28 V with DC converter). Systems
supplied only by a battery may operate from 9 to 16.1 Vdc. Such testing requires normal
RPM rated at cruising speed.
This testing evaluates the audio / noise influence, and the RF radio range, at least from
10 to 30 km distance to the ground radio station.
At cruising RPM and properly adjusted microphone sensitivity, cabin noise background
content shall almost not exist. Instead, loud and clear communications shall be achieved.
In both Transmit and Intercom Mode the microphone shall be placed right at the lips in
order to obtain maximum voice level at lowest cabin noise content. Always speak loud
and clear. Verification of proper microphone sensitivity setting can be controlled visually
by observation of the TX/RX LED flickering YELLOW according to the voice modulation.
Adjustments are to be made once while on ground, prior to the first flight.
It is recommended to verify the FSG 2T communications quality as well as Radio Range /
Distance on both the low and high end of the VHF COM frequency band.
If noise (both with Squelch ON and OFF) occurs only with the engine running, and if its
frequency varies with the engine revolutions, this may be caused by an inadequate
suppressed ignition system or alternator / voltage regulator equipment, or by a poorly
stabilized on-board power supply.
In Receive Mode it is easier to determine between RF and AF (interference carried on
the lines) by temporary removing the antenna plug from the transceiver. RF interference,
which usually comes from the ignition or generator / regulator, or which are caused by
other onboard RF emitting sources, or even caused by RF interference emission sources
located in close proximity to the aircraft will then disappear.
According to Section 18 of the ED-14D / RTCA DO-160D environmental power supply
conditions requirements, the Category B limits for ripple voltages at 14 Vdc supplies are
0.28 Vrms at 0.2 ... 1 kHz, or 0.7 Vrms at 1 ... 15 kHz. Double these limits for 28 V systems.
Ripple on the lines can be detected with an oscilloscope. Its source is usually the
generator equipment in conjunction with a poor battery, or poor wiring like bad contacts,
wrong fuse, defective switches, inadequate wiring dimensions, ground loops (more than
one ground connection to the airframe), or from corroded power supply (fuselage
ground) contacts.
Often will bad contacts in the antenna system, or other vibration dependent metal parts
contacts also varying with the engine RPM, cause RF interfering distortion. A noise
attenuating headphone assists in typical acoustic failure characteristics identification.
Page 51
VHF/AM RADIO FSG 2T
5 Functional Description
June 2014 FAV_D10048 51
5 Functional Description
5.1 Introduction This Section contains a functional description of each switch, push button, knob,
indicator, display and connector located on the front or rear of the FSG 2T together with
operating instructions.
5.2 Operator's Controls
F/CH Push Button Pressing changes radio from Direct Tune Mode into Channel Mode and vice versa
Active Frequency
F/CH Switch Turning changes frequency or Channel Memory Number Pushing changes access from MHz to kHz and vice versa
ON/OFF-VOL Switch Turns radio ON/OFF and
adjusts audio volume
SQ Control Adjusts Squelch threshold
Onboard Supply Indicator Shows dc supply voltage
or shows Channel Memory Number
STO Push Button Pressing initiates and
stores in Channel Memory
TX/RX 3-color LED steady clear = Standby or radio OFF
steady red = TX w/out or too low modulation flickering yellow = TX properly modulated
steady yellow = TX Modulation/noise too high steady green = RX-mode, or
steady green = Intercom
Jumping Cursor underscores accessible portion
Fig. 5 - 1
Control Description / Function
VOL
Rotary switch and control (inner knob)
To turn ON the radio, rotate the VOL knob clockwise from the OFF position
(dot). When power is activated
the front panel TX/RX LED lights up green momentarily, then
all segments of the display are visible for a short time, to verify their
operation.
The display shows the firmware version and then
the operating mode, which was used before last turning OFF or Power
OFF: The radio is now ready for use.
Rotating the VOL knob clockwise (cw) increases - turning counter-
clockwise (ccw) decreases the audio volume of the A/C loudspeaker
(Receive and AF External) or of the plugged headphone (Receive, AF
External and Intercom audio, not TX Sidetone).
To turn OFF the radio rotate the VOL knob fully counter-clockwise (ccw) to
the OFF position (dot). Blank display.
Page 52
VHF/AM RADIO FSG 2T
5 Functional Description
52 FAV_D10048 June 2014
SQ (SQUELCH)
Rotary control (outer ring)
After turning ON the radio FSG 2T the automatic squelch is active
depending on the SQ knob position.
Standard Operating Mode: Set the SQ knob to the dot position, the
Squelch (mute) threshold is approximately 1 µV. No Receiver noise
should be audible during Standby. Only received signals above the SQ
threshold are audible.
Rotating the SQ knob fully counter-clockwise (ccw) puts the radio into
the SQ-OFF mode (overrides the automatic squelch). Basic receiving
noise is then audible during Standby. This adjustment gives maximum
receiving range. Slightly increased current consumption.
Rotating the SQ knob clockwise (cw) achieves Receiver muting.
To eliminate ignition noise or RF interference adjust the SQ knob up to
the full clockwise (cw) position. This gradually increases the required
RF signal to exceed the SQ threshold (max. threshold 5 µV / -93 dBm).
F/CH Button
Push button
When pressing the F/CH button
while in DIRECT TUNE MODE (MHz or kHz is underscored), this will
change the radio into CHANNEL MODE, or
while in CHANNEL MODE (Channel number is underscored), this will
change the radio into DIRECT TUNE MODE.
TX/RX LED
The TX/RX 3-color Status LED on the front panel indicates the following:
CLEAR ................... indicates a Standby condition or radio is OFF.
STEADY RED .......... indicates a Transmit condition without or too low
modulation.
FLICKERING
YELLOW ................ indicates a Transmit condition with proper
microphone signal / modulation.
STEADY
YELLOW ................ indicates a Transmit condition with too much
modulation or background noise (microphone sensitivity
too high)
STEADY GREEN ...... indicates a Receive condition; Squelch is open
automatically (or set OFF manually).
STEADY GREEN ...... indicates a sufficient microphone level while in the
Intercom condition
Page 53
VHF/AM RADIO FSG 2T
5 Functional Description
June 2014 FAV_D10048 53
F/CH Knob
Rotary control and push button = dual function
Pressing the F/CH knob once
while in the DIRECT TUNE MODE changes the access from kHz to MHz or
vice versa from MHz to kHz. The active access to MHz or kHz is
underscored by a cursor.
While in the CHANNEL MODE pressing the F/CH knob is without function.
Rotating the F/CH knob
while in the DIRECT TUNE MODE will increment or decrement the MHz or
kHz portion of the active frequency with rollover at each band edge.
while in the CHANNEL MODE changes the channel memory number and
associated frequency. All channel numbers (1 to 20) can be used.
STO (STORE)
Push button
When pressing the STO button (within approx. one minute)
storing of a frequency in one of the memory channels is initiated, or
storing of a frequency is confirmed (at least 1 sec)
20 frequencies may be programmed in non-volatile memory channels. The
channel memory numbers (1 20) are user programmable.
IMPORTANT!
Only ONE control element may be operated at a time. If more
than one element is operated simultaneously, function
change is blocked.
Page 54
VHF/AM RADIO FSG 2T
5 Functional Description
54 FAV_D10048 June 2014
5.3 Frequency Display, the 5-digit Liquid Crystal Display (LCD) can be back-lit.
Frequency display complies with ICAO rules.
a) Initial boot at Switch-ON / Power ON
Displays all segments for 2 seconds
Clear Display for 0.5 seconds
Shows Firmware Version for 0.5 seconds
Goes to last user setting
b) DIRECT TUNE MODE, Normal Operation:
Example:
Display shows an active frequency of 129.350 MHz.
Turning the F/CH knob will either increase or decrease
the MHz-portion of the frequency.
Normal on-board Supply 13.8 Vdc (11 … 16 Vdc)
c) CHANNEL MODE, Normal Operation:
Example:
Display shows Channel no. 3 with its associated
active frequency of 126.275 MHz. Turning the F/CH
knob will either increase or decrease the Channel
number.
d) DIRECT TUNE MODE (continuously flashing Dc value, Emergency Operation):
Example:
Display shows an active frequency of 134.800 MHz.
Turning the F/CH knob will either increase or decrease
the MHz-portion of the frequency.
Low on-board supply: 9.7 Vdc (indicator is flashing!)
e) CHANNEL MODE, Emergency Operation:
Steady display for
25 seconds:
Flashing supply indicator
for 5 seconds:
Example:
Display shows Channel No. 4 with an active
frequency of 118.975 MHz.
Low on-board supply: 9.9 Vdc (indicator is flashing!)
IMPORTANT!
During Emergency Operation (low on-
board supply) no storing of frequency
is possible!
Page 55
VHF/AM RADIO FSG 2T
5 Functional Description
June 2014 FAV_D10048 55
5.4 Error Codes
Display in all Modes
High Voltage: Continuously slightly too high supply
voltage changes value indication into ‘HI’ (above 16.1
Vdc / below 16.5 Vdc).
Above approximately 16.5 Vdc, the radio
automatically switches OFF itself, at no display
indication. When supply is reduced to between
16 Vdc and 10.5 Vdc, the FSG 2T comes back into
operation.
Temperature Error: The whole LC display flashes.
Temperature of the Transmitter Power Amplifier is too
high. The keyed transmitter will be disabled. Switch
OFF the radio, wait a few seconds and switch ON
again.
Process Error: The whole LC display flashes. A
severe process error must have occurred. Try to
revive the radio by switching OFF and ON again.
If the same error occurs contact a f.u.n.k.e.
AVIONICS approved repair facility!
Out-Of-Lock Error: The whole LC display flashes. A
severe frequency error must have occurred. Try to
revive the radio by switching OFF and ON again.
If the same error occurs contact a f.u.n.k.e.
AVIONICS approved repair facility!
2 Minutes TOT Time-Out-Timer: After two minutes
continuous transmitting the transmitter of the FSG 2T
switches OFF itself and the whole LC display flashes
as long as the PTT key is pressed.
When the PTT key stuck accidentally it can be
received with the adjusted frequency although the
display is flashing. After switching the radio OFF and
ON again it can be transmitted for another 2 minutes
followed by receive mode.
Page 56
VHF/AM RADIO FSG 2T
5 Functional Description
56 FAV_D10048 June 2014
5.5 Connectors and controls on the rear side
50-Ω BNC jack,
mating plug: BNC plug, UG-88 C/U
Connects a suitable COM broad-band antenna with a
frequency range of at least 118 - 137 MHz.
Refer to § 3.4.3 for Antenna Installation.
Sliding LockCLOSE OPEN
Standard DB-15 male connector with sliding lock retainer.
Mating plug: 15-pole SUB-D, female, DB-15S, (A/N W00009:
solder type, including back shell and mounting hardware).
Refer to § 3.5 for airborne wiring.
Headphone
adjust
MIC 1 Level
adjust, Pin 1
MIC 2 Level
adjust, Pin 3
MIC select andAmp MIC Current setting
Default setting of DIL switches:
Microphone 1 input, pin 1: Dynamic / non-amplified
Microphone 2 input, pin 3: Standard / Amplified
Current MIC 1: 0 mA
Current MIC 2: 8 mA
Refer to § 3.5.2.1, Microphone setting!
5.6 Reset
CAUTION!
Every RESET to the factory setting deletes all your pre-set memory
channels!
To reset the transceiver proceed as follows:
Turn OFF the radio (VOL knob fully ccw).
For a few seconds PUSH and HOLD simultaneously the buttons F/CH and STO,
then turn ON the radio (rotate VOL knob clockwise, approximately mid position).
All segments of the display appear for a short moment.
Wait till the firmware version is displayed.
Release both buttons.
While in the DIRECT TUNE MODE the last used frequency remains.
While in the CHANNEL MODE the last used memory channel shows "118.00 MHz". All
other memory channels of the FSG 2T are set to 118.00 MHz as well.
IMPORTANT!
The settings for the headphone(s) and microphone(s) by potentiometer(s)
and DIL switches are not concerned by the RESET!
Page 57
VHF/AM RADIO FSG 2T
6 Operation
June 2014 FAV_D10048 57
6 Operation
6.1 Introduction
This section contains basic operating procedures for the FSG 2T transceiver. This
instruction is only applicable for a radio which is
correctly installed and wired by a certified avionics shop or aircraft manufacturer
checked together with the aircraft system, and
optimized by the set-up procedure (refer to Section 4, Recommended Set-up
Sequence).
WARNING!
DO NOT OPERATE THIS RADIO IN AN EXPLOSIVE ATMOSPHERE
(PETROLEUM FUELS, SOLVENTS, DUST, ETC.).
6.2 Turning ON - Selecting Frequency - Audio Volume
CAUTION!
The FSG 2T should be turned ON after engine start-up. This is a
simple precaution which helps to protect the solid state circuitry
and extends the operating life of your avionics equipment.
Turn the radio FSG 2T ON by rotating the VOL knob clockwise. For a short time the TX/RX
LED lights up green and all segments of the display are visible to verify their operation.
After indicating the Firmware version, the last used operating mode and frequency are
displayed.
No warm-up period is required. However, at temperatures of approx. -20°C / -4°F, the
LC display needs approximately one second until it is fully visible when the frequency or
operating mode is changed.
To change the operating mode and therefore the display: Press the F/CH button.
Example:
STANDARD: DIRECT TUNE MODE
After switching ON the radio, either the MHz portion or the kHz
portion of the displayed frequency is underscored. The
underscore indicates accessibility to this portion.
Assume the MHz is underscored: Select the appropriate MHz
portion by rotating the F/CH knob. A clockwise rotation will
increment the previous frequency in 1 MHz steps (130, 131, 132
etc.) while a counter-clockwise rotation will decrement the
previous frequency in 1 MHz steps (128, 127, 126 etc.) with
rollover at each band edge (118.XX → 136.XX or 136.XX →
118.XX).
Press the F/CH knob once, the cursor will jump to underscore the
kHz portion.
Page 58
VHF/AM RADIO FSG 2T
6 Operation
58 FAV_D10048 June 2014
The underscored kHz portion of the frequency indicates
accessibility to kHz selection.
Select the appropriate kHz portion by rotating the F/CH knob. A
clockwise rotation will increment the previous frequency in
25 kHz steps (37, 40, 42 etc.) while a counter-clockwise rotation
will decrement the previous frequency in 25 kHz steps (32, 30,
27 etc.) with rollover at each MHz and band edge (121.97 →
122.00 or 121.00 → 121.97).
This is the new active frequency!
EXAMPLE:
CHANNEL MODE:
Important: The appropriate operating frequency must be stored
already in a memory channel (refer to § 6.5 Memory
Programming).
Select appropriate channel memory number together with the
associated frequency by rotating the F/CH knob. A clockwise
rotation will increment (4, 5, 6 etc.) while a counter-clockwise
rotation will decrement (2, 1, 20 etc.) the previous channel
number with rollover at each edge.
This is the new active frequency and its associated channel
memory number!
• Rotate VOL knob clockwise, about half way.
Continue with either
6.3 Receive (Listen) Operation, or
6.4 Transmit Operation
6.5 Memory Programming
6.6 VOX Intercom
6.7 Intercom (Option AF External enabled)
6.8 OPTION: AF External
Page 59
VHF/AM RADIO FSG 2T
6 Operation
June 2014 FAV_D10048 59
6.3 Receive (Listen) Operation
After turning the radio ON the automatic squelch is either ON or OFF depending on
SQ knob position.
Squelch ON means that – without received signal – the receiver noise is blocked, the
TX/RX LED is clear. When normal signals are received, the TX/RX LED turns to green;
weak signals and interfering pulses are disabled.
Set the RX volume of the aircraft loudspeaker or earphone to a comfortable level by
rotating the VOL knob.
Weak signals can be received if the squelch circuit is switched OFF by rotating the SQ
knob fully counter-clockwise. Then typical RX noise is continuously heard during
communication breaks.
Rotating the SQ knob more cw clockwise switches the squelch circuit ON again.
DO NOT press the PTT (Push-To-Talk) key if you want to receive! During RX the
TX/RX LED must not light RED or flicker YELLOW!
This radio contains an audio-leveling circuit. So if you change the frequency or you
receive another station you should get an almost constant audio volume (the received
signal must be at least modulated by 30% AM).
IMPORTANT!
Switching OFF the Squelch only makes sense if long range reception
shall take place. Thus the radio is noisy during Standby operation,
but no weak signals are suppressed and the full receiving range is
available!
Notice increased current consumption when battery operated!
Page 60
VHF/AM RADIO FSG 2T
6 Operation
60 FAV_D10048 June 2014
6.4 Transmit (Talk) Operation
IMPORTANT!
Please keep radio discipline!
Transmit only on a clear channel.
Do not transmit on 121.50 as this is the international emergency
frequency!
Care for an all-round obstacle free antenna location; the called
station should be within "line-of-sight" distance.
Never place the radio such as the antenna gets very close to, or
touching, exposed parts of the body, especially the face, shoulder or
the eyes.
1. If the operating mode shall be changed: Push the F/CH button.
2. If the active frequency shall be changed: refer to § 6.2 Turning ON - Selecting
Frequency - Audio Volume.
3. Transmitting is normally performed on a clear channel (no communication audible).
4. Press and hold the PTT (Push-To-Talk) key. Talk in a loud, clear voice with the
microphone opening 2 to 4 cm (1" - 2") from your lips. Make each transmission as
brief as possible. As long as the PTT key is pressed the TX/RX LED on the front lights
red! When modulated properly, the red TX/RX LED turns to flickering yellow.
5. Release the PTT key to end transmission and to clear the channel for reception; the
TX/RX LED must turn to clear (Standby) or green (Receive / Intercom).
IMPORTANT!
The radio is equipped with a transmit TOT time out timer. This is used to
limit the duration of transmissions to approximately 2 minutes. When the
transmitter is keyed continuously longer than 2 minutes the display of the
FSG 2T starts flashing and transmission is disabled. Although the display is
flashing receiving on the displayed frequency is possible!
If you have to make calls longer than 2 minutes, momentarily release the
PTT key and press again.
Should the TOT disable the transmitter accidentally (e.g. stuck PTT key)
and you have to transmit, turn radio OFF and ON again. This allows
another 2 minutes to transmit.
Page 61
VHF/AM RADIO FSG 2T
6 Operation
June 2014 FAV_D10048 61
6.5 Memory Programming
IMPORTANT!
Memory programming is disabled at a supply voltage below 11 Vdc.
When storing a frequency into a memory the "old" frequency will be
overwritten without warning!
Up to 20 non-volatile memories can be user-programmed. They are accessible after
calling up the respective CHANNEL MODE.
6.5.1 Programming while in DIRECT TUNE MODE:
Example:
Turn the F/CH knob to change the underscored portion of the
frequency to the desired frequency.
Press the same knob once and note that the cursor has jumped
to underscore the other portion of the frequency. Turn the F/CH
knob to select the desired frequency.
Press the STO button to initialize storing.
Release the STO button. The "dc" display disappears, a flashing
"CH" together with the underscored last used channel number is
shown. The active frequency is now ready within 1 minute to be
stored in any of the 20 memory channels. Use the F/CH knob to
select the desired memory location.
Press and hold the STO button for at least 1 second. The
flashing "CH" should change to steady "St" and the underscore
disappears indicating that it has been stored into memory
successfully.
Release the STO button and the radio returns to DIRECT TUNE
MODE. The stored frequency is now the active frequency.
Page 62
VHF/AM RADIO FSG 2T
6 Operation
62 FAV_D10048 June 2014
6.5.2 Programming while in CHANNEL MODE:
IMPORTANT!
While in the CHANNEL MODE only pre-programmed Channel Numbers
with its corresponding frequencies can be stored in other memory
locations!
Example:
Turn the F/CH knob to change the underscored Channel Number
to the desired Channel Number to be stored in another memory
location.
Press the STO button to initialize storing.
Release the STO button. A flashing "CH" is shown. The active
Channel Number and its frequency is now ready within 1 minute
to be stored in any of the other 19 memory channels. Turn the
F/CH knob to select the desired memory location.
Press and hold the STO button for at least 1 second. The
flashing "CH" should change to steady "St" and the underscore
disappears indicating that it has been stored into the new
memory successfully.
Release the STO button and the radio returns to CHANNEL MODE.
The stored Channel Number is now the active Channel Number
with its corresponding frequency.
Page 63
VHF/AM RADIO FSG 2T
6 Operation
June 2014 FAV_D10048 63
6.6 VOX Intercom
IMPORTANT!
When the Option AF EXTERNAL was activated by an approved
Avionics workshop voice controlled Intercom is not possible!
The built-in VOX voice controlled microphone threshold control will mute
microphones during speech pauses.
Intercom headset audio volume may be adjusted through installation and
should also include, if applicable, the individual earphone volume
adjustments on the headset phone capsule.
1. Switch ON Intercom. This activates the microphone VOX capability, while the
speaker is disabled.
2. In Receive Mode, through acoustic accessories (earphones with microphones), the
FSG 2T allows voice-activated intercommunications between pilot(s) and / or other
crew members. Always speak loud and clear, while the microphone opening is
located close to the lips.
3. The Intercom audio volume may be adjusted by setting the front panel VOL knob.
4. Once a suitable mike signal opens the VOX, it will stay open one further second after
the last spoken syllable, and then closes the mike inputs.
5. When Receiving, the Intercom audio is reduced in volume by 6 dB / half level. This
allows safer listening to the Receive signal.
6. By pressing the PTT key the radio switches to transmit – without switching OFF the
Intercom – but disables the VOX threshold temporarily. The transmitter modulation
Sidetone is audible in all connected headphones. The TX/RX LED on the front panel
flickers according to the speech volume. This also allows optical monitoring of
transmission quality (time constant controlled).
7. Releasing the PTT key turns the radio into VOX Intercom Mode again.
Page 64
VHF/AM RADIO FSG 2T
6 Operation
64 FAV_D10048 June 2014
6.7 Intercom (Option AF EXTERNAL enabled)
IMPORTANT!
When the Option AF EXTERNAL is activated voice controlled Intercom
is not possible!
To achieve best cabin noise suppression, especially during speech pauses,
optimized microphone sensitivity adjustment must be performed once
during Installation Procedure.
Intercom headset audio volume may be adjusted through installation and
should also include, if applicable, the individual earphone volume
adjustments on the headset phone capsule.
1. Switch ON Intercom. This disables the speaker.
2. In Receive Mode, through acoustic accessories (earphones with microphones), the
FSG 2T allows continuous intercommunications between pilot(s) and / or other crew
members. Always speak loud and clear, while the microphone opening is located
close to the lips.
3. The Intercom audio volume may be adjusted by setting the front panel VOL knob.
4. Receive, Intercommunication and External Audio are audible while Intercom is ON.
When Receiving, Intercommunication is reduced by 6 dB / half level in volume. This
allows safer listening to the RX signal.
5. By pressing the PTT key the radio switches to transmit – without switching OFF the
Intercom – but disables the VOX threshold temporarily. The transmitter modulation
Sidetone is audible in all connected headphones. The TX/RX LED on the front panel
flickers according to the speech volume. This also allows optical monitoring of
transmission quality (time constant controlled).
6. Releasing the PTT key turns the radio into Intercom Mode again.
Page 65
VHF/AM RADIO FSG 2T
6 Operation
June 2014 FAV_D10048 65
6.8 OPTION: AF External
IMPORTANT!
The Option AF EXTERNAL can easily be enabled! Refer to FSG 2T
Service Manual, Circuit Diagram, page 10 - 28 and Location of
Components, page 10 - 30, just make a solder bridge across W2001.
Then mark the radio accordingly!
Enabling AF EXTERNAL causes increased current consumption during
Standby!
In Standby, Receive and Intercom Mode, audio signals of additional units (other COM,
VOR, Localizer, Marker, ADF, electric variometer, etc.) are audible simultaneously.
Audio volumes of external audio signals have to be adjusted on the external units
individually but their volume may be reduced by the radio's VOL knob.
The External AF Input is disabled during transmit.
6.9 Backlighting
Depending on aircraft wiring, lighting the frequency display as well as the radio's front
panel (night-design) is either activated by turning ON the panel mounted lighting switch
or dimmer, or by turning ON the FSG 2T radio.
6.10 Turning OFF
Turn OFF the radio by rotating the VOL switch to the full ccw position to prevent
unnecessary discharge of your A/C (or portable case etc.) battery.
If the backlight is wired via panel mounted dimmer or lighting switch remember to turn
this OFF as well, otherwise your battery will go flat.
Page 66
VHF/AM RADIO FSG 2T
6 Operation
66 FAV_D10048 June 2014
6.11 Monitoring the aircraft onboard supply
The transceiver FSG 2T includes a 3 digit display of the actual onboard supply voltage
level. At dc levels below 11 V the voltage digit value starts automatically flashing for low
supply warning!
Radio supplied from a 13.75 Vdc / 7.2 Ah battery bus:
The following operating times may be obtained depending on battery's capacity and
transmitter duty cycle:
Reference: Approximately +20°C / +68°F, battery
7.2 Ah, only radio is supplied.
Duty cycle: 10% Transmit, 20% Receive, 70% STBY
Flashing Dc value only in Transmit: ca. 4 hrs left
Flashing Dc value also during Receive: ca. 45 min. left.
Recommendation: Reduce utmost
transmitting!
Short-time flashing Dc value during
Standby (SQ ON, clear channel)
ca. 45 min. left in Standby.
Cease transmitting!
Continuous flashing Dc value during
Standby (SQ ON, clear channel)
Radio will soon switch OFF itself!
Recharge battery as soon as possible
(refer to § 6.13, Emergency Operation)
Remark: These transitions are fluent. Recovery effect after load reduction
may be possible. Low battery temperature reduces operation time.
Radio supplied from a 13.75 Vdc generator bus (aircraft or vehicle supply):
Flashing Dc value: Urgently check aircraft's or vehicle's
electrical system (generator, battery,
regulator) and / or installation!
Radio supplied from a 28 / 14 V Regulator (28 Vdc aircraft or vehicle supply):
Flashing Dc value: Urgently check 28 / 14 V Regulator,
aircraft's or vehicle's electrical system
(generator, battery, regulator, fuse) and
installation!
Page 67
VHF/AM RADIO FSG 2T
6 Operation
June 2014 FAV_D10048 67
6.12 Operating times of FSG 2T supplied from a 12 V battery only
The following duty cycle of Transmit (TX), Receive (RX) and Standby (STBY) results in
available operating time (hours). Both the worst and the most favorable operation
conditions are considered, e.g. maximum receiver volume combined with maximum
speaker load.
Higher current consumption will degrade the nominally available battery capability, as
well as lower temperatures. The following tables show significant time differences
depending on current consumption during Receive, and at temperatures.
Condition: only headset operated
Max. current drain .05A 1.35A .26A .05A 1.35A .26A .05A 1.35A .26A .05A
Lead Accumulator 12 Volts 7.2 Ah
STBY, w/out RX
5% TX
5% RX
90% STBY
10% TX
20% RX
70% STBY
20% TX
40% RX
40% STBY
Temperature -20°C/-4°F 76 hrs 30 hrs 16 hrs 9 hrs
Temperature +20°C/+68°F 131 hrs 52 hrs 29 hrs 16 hrs
Temperature +50°C/+122°F 139 hrs 55 hrs 30 hrs 16 hrs
Condition: maximum RX audio volume (Loudspeaker)
Max. current drain .05A 1.35A .8A .05A 1.35A .8A .05A 1.35A .8A .05A
Lead Accumulator 12 Volts 7.2 Ah
STBY, w/out RX
5% TX
5% RX
90% STBY
10% TX
20% RX
70% STBY
20% TX
40% RX
40% STBY
Temperature -20°C/-4°F 76 hrs 25 hrs 11 hrs 6 hrs
Temperature +20°C/+68°F 131 hrs 44 hrs 20 hrs 10.5 hrs
Temperature +50°C/+122°F 139 hrs 46 hrs 21 hrs 11 hrs
6.13 Emergency Operation
Without degradation the FSG 2T can be operated on a dc source between 11 Vdc and
nearly 9 Volts. This however will NOT reduce the TX output level, RX sensitivity, and
audio output power, due to internal supply regulation. Below 11 Volts the dc indicator
flashes continuously as a low supply warning.
Since the current drawn from battery will increase with lowered Dc supply voltage, the
automatic shut-down will speed-up.
If the supply voltage drops below 9 Vdc the FSG 2T switches OFF itself. This automatic
feature avoids battery damage due to deep discharging, even if the radio is left switched
ON for months! This is true for all types of 12 Vdc batteries.
If the battery recovers and voltage exceeds approximately 10.5 Vdc, the radio returns to
operation with the last used setting.
Page 68
VHF/AM RADIO FSG 2T
6 Operation
68 FAV_D10048 June 2014
THIS PAGE INTENTIONALLY
LEFT BLANK
Page 69
VHF/AM RADIO FSG 2T
Appendix A
June 2014 FAV_D10048 69
Appendix A, Technical Data FSG 2T
A.1 General
Type: FSG 2T, article-number F10350
Amplitude modulated (AM) VHF Avionics Transceiver
Frequency range: 118.000 … 136.975 MHz
Channels: 760 channels, 25 kHz spacing
Frequency selection: VFO, digital
Frequency display: 5 digit 7-segment LCD display (backlit)
Frequency control: PLL frequency synthesizer, microprocessor controlled
Memories 20, stored in a non-volatile EPROM
A.2 Dimensions, Weight
Exposed dial face 57 mm / 2¼ inches dia, fits into standard instrument hole
Overall dimensions Width = 63 mm, Height = 61 mm, Length = 217.5 mm W = 2.48”, H = 2.4”, L = 8.6”
Installation depth behind panel 240 mm / 9.5 inches incl. 50 mm / 2 inches for harness
Weight 600 grams / 1.32 pounds, without harness and mating plugs
A.3 Power Supply, Fuses
Power supply voltage Nominal 13.8 Vdc (normal 11.0 … 16.1 Vdc)
Emergency Operation 9 Vdc … 11 Vdc (flashing display), no performance degradation
Automatic Turn-OFF At approx. 8.5 … 9 Vdc, comes back at approx. 10.5 Vdc
Current Consumption at: 9 Vdc 11 Vdc 13.8 Vdc 16 Vdc
Squelch ON, no AF volume 80 mA 65 mA 50 mA 40 mA
Receive, Intercom and / or AF External, Headphone
400 mA 330 mA 260 mA 210 mA
Receive, max. volume, Loudspeaker (30% … 85% AM)
1400 mA 1150 mA 800 mA 600 mA
Transmit Mode (carrier /70% AM) 1.8 A 2.2 A 1.45 A 1.7 A 1.1 A 1.35 A 0.9 A 1.2 A
Backlighting add 60 mA
Dc supply voltage metering status
≥ 12.7 Vdc Battery full ≥ 12.0 Vdc Battery ca. ½ capacity
Emergency operation < 11.0 Vdc Battery is nearly flat, display starts flashing between 11 V and 9 Vdc supply
External Fuse Cartridge fuse 3.15 Amp, quick acting, or automatic circuit breaker 3 Amp
Internal Fuse, protects switched Dc Output
315 mAmp, medium time lag, resettable fuse
Page 70
VHF/AM RADIO FSG 2T
Appendix A
70 FAV_D10048 June 2014
A.4 Receiver Specification
Receiver Type Single Superhet
IF Frequency IF 21.4 MHz, high injection
Sensitivity (m = 30% / 1,000 Hz) ≤ 1 µV (≤ -107 dBm / 50 Ω) for 6 dB S+N/N
Selectivity (AGC method) ≤ 6 dB at ± 8 kHz ≥ 60 dB at ± 17 kHz ≥ 70 dB at ± 25 kHz
Squelch Type, manual override Automatic (FM noise /Carrier override), adjustable on front panel
AGC (m = 30% / 1 kHz) ≤ 6 dB, 1 µV (-107 dBm) to 1 V (+13 dBm / 50 Ω)
AGC Delay (RX), m = 30%/1 kHz ≤ 0.2 sec, 5 mV (-33 dBm) to 5 µV (-93 dBm / 50 Ω)
AGC Recovery after TX ≤ 0.1 sec at 5 µV (-93 dBm / 50 Ω), after TX end
Transfer time RX to TX ≤ 50 msec
Modulation distortion ≤ 10%, 350 … 3,400 Hz (m = 85%)
Audio Frequency Response / AF Fidelity
≤ 6 dB (+2 dB / -4 dB), 350 ... 3,400 Hz, ≥ -20 dB at 4 kHz, 25 kHz Ch spacing (Climax Offset Operation)
Nominal AF Output (Speaker) ≥ 4 Watt into 4 Ω (at 9 Vdc …16.1 Vdc supply)
Nominal AF Output (Phone) ≥ 50 mW into 300 Ω (at 9 Vdc …16.1 Vdc supply)
AF Noise Level, normal operation (under environmental conditions)
≥ 35 dB (≥ 25 dB), m = 30% / 1,000 Hz at 100 µV to 5 mV / -67 dBm to -33 dBm / 50 Ω
AF External Input (OPTION) ca. 1 Volt into 600 Ω for rated AF output
Receiver Immunity Spurious Response for ≤ 6 dB S+N/N (m = 30% / 1 kHz)
≥ 5 mV (-33 dBm / 50 Ω) a) 108 - 156 MHz (any 25 kHz Test Channel ≤ ± 8 kHz), except
assigned channel and adjacent channels b) 50 kHz – 1,215 MHz, except 108 - 156 MHz
Cross Modulation Max. AF output level ≥ 10 dB below nominal AF output level: a) Wanted signal 10 µV (-87 dBm) to 250 µV (-59 dBm / 50 Ω),
unmodulated at assigned RX channel, plus additional b) Unwanted signal 5 mV (-33 dBm), m = 30% / 1000 Hz, fre-
quency 100 - 156 MHz (assigned channel ± 2 RX channels)
Intermodulation (FM Immunity) ≤ 6 dB AF Quieting (-5 dBm / 50 Ω, 87.5 - 107.9 MHz), 2 signals
RF Intermodulation within the VHF Frequency Band
≥ 70 dB, for 6 dB AF Quieting (unmodulated test signals) Any VHF / AM Ch +1/+2 Ch, -1/-2 Ch, +1/+2 MHz, -1/-2 MHz
Desensitization ≥ 6 dB S+N/N, at wanted signal 10 µV (-87 dBm), at RX frequency, m = 30% / 1,000 Hz, in the presence of:
Unwanted signal A 5 mV (-33 dBm / 50 Ω), unmodulated, any frequency 108 ... 156 MHz, except used CH and ± 1 RX CH, or
Unwanted signal B 100 mV (-7 dBm / 50 Ω); minimum 5 mV (-87 dBm), unmodulated, frequency 50 kHz – 1,215 MHz, except 87.5 MHz ... 156 MHz, or
Unwanted signal C 125 mV (-5 dBm), unmodulated, frequency 87.5 ... 156 MHz
Receiver Spurious Emission ≤ 141 µV / 400 pW / -64 dBm (50 kHz ... 8 GHz)
Channel Selection Time ≤ 0.4 sec, AF level within 3 dB, max. 20 Memory Channels
Receiver Muting, Squelch (CLIMAX RX Operation)
Simultaneous input of: a) Wanted Signal A: 5 µV (-93 dBm) +8 kHz (m = 30% /
1,000 Hz), Squelch is open. b) Unwanted Signal B: More than 12 µV (-85 dBm), m = 30% /
1000 Hz. While this channel frequency is varied slowly from -8 kHz to +4 kHz, Squelch must remain open.
Page 71
VHF/AM RADIO FSG 2T
Appendix A
June 2014 FAV_D10048 71
A.5 Transmitter Specification
TX RF Output Power (also during emergency operation)
approximately 5 Watts / 50 Ω (carrier), 18 Watts PEP, at 9 Vdc … 16.1 Vdc, -0.5 dB ... + 1,5 dB
TX Duty Cycle 1 : 4 (1 minute TX / 4 minutes RX)
Frequency Tolerance ≤ 10 ppm (-20°C ... + 55°C / -4°F ... + 131°F) ≤ 5 ppm (0°C ... + 40°C / +32°F ... + 104°F)
Modulation Amplitude modulation, AM (7K00A3EJN)
Depth of Modulation 85% ± 2%, approx. 60-70% AM average with Voice modulation
Modulation Distortion ≤ 10%, m = 70% / 1,000 Hz ≤ 15%, m = 70% / 350 ... 3,400 Hz
Modulation Audio Frequency Response
≤ 6 dB (+2 dB / -4 dB), 350 ... 3,400 Hz
Modulation AF Input for m = 70%
Located on the rear panel DIL switches and potentiometers allow proper customized microphone type selection and proper modulation adjustment for each MIC input
Standard factory setting:
Mike 1: Dynamic Microphone: ≤ 1 ... 10 mV symmetrical, sensitivity adjustable.
Mike 2: Amplified / Carbon Microphone: ≤ 80 ... 500 mV unsymmetrical, sensitivity adjustable.
Note: One, or two identical, dynamic or Standard Carbon microphone(s) may be used on each mike input. For Standard Carbon microphone(s) the supply current can be set to 2 mA, 8 mA, 10 mA, or none.
Transmit Audio Sidetone ≥ 50 mW into 300 Ω (at 9 Vdc … 16.1 Vdc supply) average phone volume is adjustable on equipment's rear side
Carrier Noise Level ≥ 35 dB (m = 70% / 1000 Hz)
Emission of RF Energy (≤ 1 GHz) ≤ 0.25 µW (-36 dBm) / 71 dBµV / 3.54 mV / 50 Ω ≤ 25 nW (-46 dBm) / 61 dBµV / 1.12 mV / 50 Ω, from 47 ... 68, 87.5 ... 108, 162 ... 244, 328 ... 336, 470 ... 862 MHz
Emission of RF Energy (≥ 1 GHz) ≪ 1 µW / ≪ -30 dBm / ≪ 77 dBµV / ≪ 7 mV / 50 Ω
Transmitter Spectrum Mask ≥ 70 dB attenuation at 1,250 Hz modulation / m = 60%, + 10 dB
Channel Selection Time ≤ 0.1 sec
Unwanted Frequency Modulation ≤ 1.0 kHz at m = 70% / 1000 Hz
TX Intermodulation ≥ 45 dB
TX Time-Out-Timer (TOT) After 2 minutes in continuous transmit Mode the transmitter is disabled. The LC display flashes as time-out warning. RX now possible.
Antenna Mismatching VSWR ≤ 3 : 1, normal operation
At VSWR 3 : 1 the requirements for modulation distortion, spurious and harmonics output as well as frequency stability are met. In addition, the RF output is ≥ 40 % / ≥ 2 Watt into 50 Ω
At VSWR ≤ 5 : 1 Transmitter is still functional.
Page 72
VHF/AM RADIO FSG 2T
Appendix B
72 FAV_D10048 June 2014
Appendix B, Environmental Performance Classification
Statement of the Level of Compliance with appropriate JAR TSO.
EUROCAE ED-14D / RTCA DO-160D (29 July 1997), including Change 1 December 2000.
ENVIRONMENTAL CONDITIONS AND TEST PROCEDURES FOR AIRBORNE
EQUIPMENT PERFORMANCE STANDARD.
NOTE: The following information provides examples only. It is not intended to be a
comprehensive listing of all test conditions.
Conditions Section Description of Conducted Tests Category
Temperature and Altitude
Low Temperature High Temperature In-flight Loss of Cooling Altitude Decompression Over Pressure
4.3 4.5.1 4.5.2 4.5.4 4.6.1 4.6.2 4.6.3
Equipment tested to Category Operation - 20°C / Storage -55°C
Operation +55°C / Storage +85°C
No auxiliary cooling required 50,000 ft / 15,240 m No test required in Category D1 No test required in Category D1
D1
–
Temperature Variation 5.2 Equipment tested to Category, 5ºC / min. B
Humidity 6.0 Equipment tested to Standard Category A
Shock 7.1.1 7.2 7.3
Equipment tested to Category Operational shocks 6g Crash Safety 20g without damage
B
Vibration (for Helicopter use, the
vibration testing included 4 sets of Unknown Frequencies of Cat. U).
8.5.1 8.5.2 8.8.1
Equipment tested to Fixed Wing Aircraft Category Equipment tested to Fixed Wing Aircraft Category Equipment tested to Helicopter Aircraft Category
S Curve B S Curve M R Curve G
Explosion 9.0 No test required X
Waterproofness 10.0 No test required X
Fluids Susceptibility 11.0 No test required X
Sand and Dust 12.0 No test required X
Fungus 13.0 No test required X
Salt Spray 14.0 No test required X
Magnetic Effect 15.0 Equipment tested to Category Z
Power Input 16.0 Equipment tested to Category B
Voltage Spike 17.0 Equipment tested to Category B
Audio Frequency Susceptibility 18.0 Equipment tested to Category B
Induced Signal Susceptibility 19.0 Equipment tested to Category A
Radio Frequency Susceptibility 20.0 Equipment tested to Category T
Radio Frequency Emission 21.0 Equipment tested to Category H
Lightning Induced Susceptibility 22.0 No test required X
Lightning Effects 23.0 No test required X
Icing 24.0 No test required X
Other Test ---- No test required X
Page 73
VHF/AM RADIO FSG 2T
Appendix C
June 2014 FAV_D10048 73
Appendix C, Certificates
Page 74
VHF/AM RADIO FSG 2T
Appendix C
74 FAV_D10048 June 2014
Page 75
VHF/AM RADIO FSG 2T
Appendix C
June 2014 FAV_D10048 75
Page 76
VHF/AM RADIO FSG 2T
Appendix C
76 FAV_D10048 June 2014
Page 77
VHF/AM RADIO FSG 2T
Copyright - Service Information
June 2014 FAV_D10048 77
Copyright – Service Information
Copyright 2014 f.u.n.k.e. AVIONICS GmbH
All rights reserved. This document contains proprietary information and such information may not be disclosed to others for any purpose nor used for manufacturing purposes without prior written permission of the manufacturer f.u.n.k.e. AVIONICS GmbH, 86807 Buchloe, Germany.
In this document no mention is made of patents, trademark rights, or other proprietary rights which may attach to certain words or entries. The absence of such mention, however, in no way implies that the words or entries in question are exempt from such rights.
Service Information
Should any unusual problem arise or further information be desired, please contact the f.u.n.k.e. AVIONICS GmbH, Avionics Division, Heinz-Strachowitz-Str. 4, 86807 Buchloe, Germany.
The information in this Operator's Manual does not profess to include all the details of design, production, or variation of the equipment, or to cover all the possible contingencies which may arise during operation or maintenance. We welcome your comments concerning this Manual. Although every effort has been made to keep it free of errors, some may occur. When reporting a specific problem, please describe it briefly and include the Operator's Manual article number, paragraph or figure number, and the page number.
Send your comments to Publications Department
f.u.n.k.e. AVIONICS GmbH
Heinz-Strachowitz-Str. 4 86807 Buchloe Germany
or by e-mail to: [email protected]
Subject to technical changes without prior notice Printed in Germany
Page 78
VHF/AM RADIO FSG 2T
Copyright - Service Information
78 FAV_D10048 June 2014
THIS PAGE INTENTIONALLY
LEFT BLANK