29
RFID Locator User Guide Version 3.x 3M Track and Trace Solutions 3M Center, Building 225-4N-14 St. Paul, Minnesota 55144-1000 78-8123-9921-6, Rev. E

RFID Locator
User Guide Version 3.x
3M Track and Trace Solutions 3M Center, Building 225-4N-14
St. Paul, Minnesota 55144-1000 78-8123-9921-6, Rev. E
© 2003-2009, 3M. All rights reserved.
3M™ RFID Locator User Guide
78-8123-9921-6, Rev. E
3M is a trademark of 3M. Microsoft, Windows, and SQL Server are either registered trademarks or trademarks of Microsoft Corporation in the United States and/or other countries. The information contained herewithin is intended for use by 3M customers, agents and employees, and should not be distributed to outside parties.

Copyright © 2003-2009, 3M. All rights reserved. RFID Locator User Guide, Rev. E i
3M™ RFID Locator Table of Contents Overview ................................................................................................... 1
Starting Locator software ..............................................................................................................1 Locator screen components .........................................................................................................1
Computer Configuration............................................................................ 2
Modifying computer settings ........................................................................................................2
Performing Searches ................................................................................ 4
Overview..........................................................................................................................................4 Performing a basic search.............................................................................................................5 Performing an advanced search...................................................................................................6 Search examples ............................................................................................................................7 Locator search settings .................................................................................................................8
Setting the type of search ............................................................................................................8 Defining search criteria ..............................................................................................................10
Search category definitions ........................................................................................................11 Location .....................................................................................................................................11 Checkout from ...........................................................................................................................11 Source........................................................................................................................................11
Other search functions ................................................................................................................12 Using wildcard characters in your searches ..............................................................................12 Using multiple instances of the same search category .............................................................12 Displaying folder histories..........................................................................................................13 Using 3M™ RFID Locator software to generate lists ................................................................14
Checking Out Folders ............................................................................. 15
Setting the check-out location for your computer ....................................................................15 Using 3M™ RFID Locator software to check-out folders .........................................................16 Disabling the Locator Checkout function (Administrator only) ..............................................17
Setting File Alerts ................................................................................... 18
Alerting Basics..............................................................................................................................18 Adding an Alert to a file..............................................................................................................18 Removing an Alert from a file ....................................................................................................19
Reporting................................................................................................. 20
Three Standard Reports...............................................................................................................20 Accessing the Report web page................................................................................................20 Checked In Report.....................................................................................................................20

Copyright © 2003-2009, 3M. All rights reserved. RFID Locator User Guide, Rev. E ii
Checked Out Report ..................................................................................................................21 No Activity Report ......................................................................................................................21
Troubleshooting ...................................................................................... 22
Connectivity Issues......................................................................................................................22 Web Server not available/accessible.........................................................................................22 Database not available/accessible ............................................................................................22 Session time out ........................................................................................................................23 Web Locator Log Files...............................................................................................................24 Locator results do not display correctly in Internet Explorer (IE) 8............................................24
3M Service............................................................................................... 25
Information to gather....................................................................................................................25 3M Service phone numbers.........................................................................................................25 3M Track and Trace Solutions Web Site ....................................................................................25
Copyright © 2003-2009, 3M. All rights reserved. RFID Locator User Guide, Rev. E 1
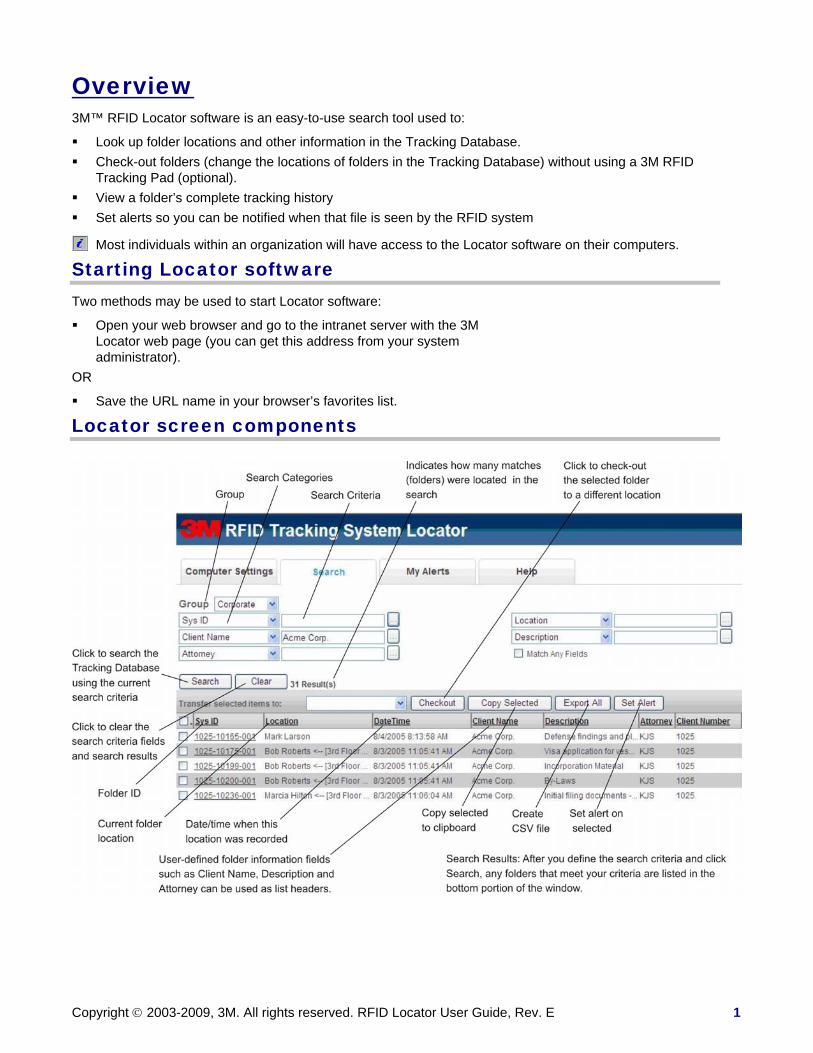
Overview 3M™ RFID Locator software is an easy-to-use search tool used to:
Look up folder locations and other information in the Tracking Database. Check-out folders (change the locations of folders in the Tracking Database) without using a 3M RFID
Tracking Pad (optional). View a folder’s complete tracking history Set alerts so you can be notified when that file is seen by the RFID system
Most individuals within an organization will have access to the Locator software on their computers.
Starting Locator software Two methods may be used to start Locator software:
Open your web browser and go to the intranet server with the 3M Locator web page (you can get this address from your system administrator).
OR
Save the URL name in your browser’s favorites list.
Locator screen components

Copyright © 2003-2009, 3M. All rights reserved. RFID Locator User Guide, Rev. E 2
Computer Configuration Before you can use Locator software, you must assign Allowed Groups and set the computer's Location. Computer settings can be configured locally or remotely:
Remote configuration – A System or Group Administrator can use System Manager Software (running on any computer) to set up the Allowed Groups and Location for any computer.
Local configuration – You can configure computer settings locally by using Locator software or System Manager.
IMPORTANT NOTE — CHANGES EFFECTIVE IN VERSION 3.10 The system now includes support for time zones. All date/time fields are stored in UTC on the database server and are converted to the client time zone and format settings that initiate the update/query. For example, if a file is checked into a pad in Boston at 11:15 AM local time, when a user in San Francisco queries the database for that record, they will see 8:15 AM appear on their screen (Eastern time is 3 hours ahead of Pacific time). Exception: In all reports, the time displayed to users will be for the server time zone only.
Modifying computer settings Step 1 – Display the Modify Computer dialog box
1 From the main page, click Computer Settings. The Enable Admin Features dialog box appears.
2 Use the Enable Admin Features dialog box to enter Admin Mode as a System or Group Administrator. When you are done, click the OK button. The Modify Computer dialog box appears.
Step 2 – Enter a computer description
In the Description text box, type a descriptive name for the computer.
Step 3 – Configure the "Allow Checkout from Locator" feature
Select this check box to allow this user to use Locator software’s Checkout function to change the locations of folders. The Checkout function only works for folders that
belong to one of the computer’s allowed groups.
Clear this check box to disable the Checkout function.
When the Checkout function is disabled, the user will not be able to use Locator software to manually check-out folders.
Step 4 – Configure the "Allow System Manager use" feature
Select this check box to allow the user of this computer to run System Manager software.
Clear this check box to prevent the user of this computer from running System Manager software.

Copyright © 2003-2009, 3M. All rights reserved. RFID Locator User Guide, Rev. E 3
Step 5 – Select "Allowed Groups" for this computer
In the Allowed Groups list, select each group that this computer will be allowed to access. These settings affect the following functions:
Users can only use Locator software to search for folders that belong to one of the allowed groups.
Users can only use Locator software to check-out folders to locations that belong to one of the allowed groups.
If this computer has a Tracking Pad, the Pad Monitor Checkout to function can only check-out folders to locations that belong to one of the allowed groups.
The Allowed Groups settings also affect the computer's Location setting (see Step 6 below).
Step 6 – Select "Location" for this computer
1 From the Location drop-down list, select the location that you want to assign to this computer. Only locations that are members of all the allowed
groups selected for the computer can be assigned to this computer. Any location that does not meet this criterion will not appear in the Location drop-down list.
2 Click OK.
For more information on Locations, Allowed Groups, and Computer Settings, see the 3M™ RFID Tracking System Manager User Guide.

Copyright © 2003-2009, 3M. All rights reserved.
Performing Searches Overview Locator software allows you to search the Tracking Database to identify the locations of specific folders.
Search results include information for each folder, such as client name, description, etc. to help further identify a folder.
If your site has multiple groups… You can search one group at a time. You can search any groups that have
been selected as "allowed groups" in your computer's Modify Computer dialog box.
Basic searches Typical searches involve finding the location of a specific folder using a single Locate by text box (often a folder ID). In these instances, simply type the search criteria in the appropriate text box and click Search.
Advanced searches Advanced searches are usually used if a folder ID is not known. These searches often use multiple search criteria or wildcards.
Examples of searches include:
Searching to find the current location of a folder or groups of folders.
Searching to locate all folders that have been checked out to a specific location (person).
See Search examples on page 7 for more information.
When search results are displayed, you can manipulate the data as follows:
Sort the on-screen search results by clicking the various column headings.
Adjust column widths to show relevant information.
Look at folder histories (a time-and-date-stamped listing of various location transfers). This shows you the locations where a folder has been.
Select and copy rows of search results using the Copy Selected button and paste them into other programs such as Microsoft® Word and Microsoft® Excel.
If the Checkout button is enabled, you can select a row and click Checkout to check-out a folder to a different location.
The Group drop-down list only contains groups that have been designated as "allowed groups" in the Modify Computer dialog box.
Many searches are performed by simply typing the folder ID and clicking Search (or pressing Enter).
Advanced searches are more general and return a number of matches for a broad category.
RFID Locator User Guide, Rev. E 4

Copyright © 2003-2009, 3M. All rights reserved. RFID Locator User Guide, Rev. E 5
Performing a basic search Most searches involve finding the location of a specific folder when you already know the folder’s ID.
1 From the Group drop-down list, select the group that you want to search.
2 Type the folder ID in the ID field.
You can also click the Browse button and select from a list of all the unique values for that column in the selected group.
3 Click Search (or press Enter).
4 View the location information for the folder at the bottom of the screen.
5 You can set the number of items listed on a screen by selecting the Per Page drop-down list at the bottom of the screen
Clearing a search
To clear all the current settings and search results, click the Clear button.
To clear an individual search criteria box:
Double-click in the list box to highlight the text, and then press Delete.
You can also highlight the text, right-click on the highlighted text, and select Delete from a pop-up menu.
1 – Select a group (if your computer belongs to multiple groups)
2 – Enter the folder ID
3 – Click Search (or press Enter)
4 – View the search results
5 – Set the number of items per page

Copyright © 2003-2009, 3M. All rights reserved.
Performing an advanced search Advanced searches are typically used when you do not know a specific folder ID.
1 Enter the search criteria.
a From the Group drop-down list, select the group that you want to search.
b Type or use the Field Search list to enter the search criteria for each search category that you want to use. If you type the first few characters in a search criteria field, the search will include any characters that occur to the right of what you typed. For example, type Reg rather than Regulatory action and appeal).
You can also use wildcard characters. (See Using wildcard characters in your searches on page 12.)
2 Click Search (or press Enter). Search results will appear in the lower
portion of the window.
Each folder found during the search appears on a separate row.
A message next to the Checkout button shows how many rows (folders) were found during the search. (3 rows = 3 folders found.)
In this example, the search returned all “Regulatory action and appeal” matters for the client “Garth & Sons.”
3 If desired, sort the search results. Click on any column heading to sort all
rows by that category. Clearing a search
To clear all the current settings and search results, click the Clear button.
To clear an individual search criteria box:
Double-click in the list box to highlight the text, and then press Delete.
You can also highlight the text, right-click on the highlighted text, and select Delete from a pop-up menu.
1 – Enter search criteria
2 – Click Search (or press Enter)
3 – View Results
RFID Locator User Guide, Rev. E 6

Copyright © 2003-2009, 3M. All rights reserved.
Search examples Example 1 – Exact search criteria
If you know specific search criteria (for example, the folder ID), you can type it directly into the search criteria text box or click the Browse button and select it from the Field Search list.
Example 2 – Partial search criteria
If you type the first few characters in a search criteria field, the search will include any characters that occur to the right of what you typed.
In this example, if you type the first seven characters of a folder ID (1025-10) and click Search:
The search returns 31 items whose folder IDs start with those characters.
To further refine the search, you could type additional characters (e.g., 1025-103) and click Search.
This search example returned two folders (rows) whose folder IDs start with those characters.
Example 3 – Combinations of search criteria
In this example, the user wanted to know which folders for a particular client (Chowen Co.) are in a specific location (Stephanie Field’s office).
You can click on the Date/Time column heading to sort the results to determine when particular folders were checked out/checked in at this location.
RFID Locator User Guide, Rev. E 7

Copyright © 2003-2009, 3M. All rights reserved. RFID Locator User Guide, Rev. E 8
Locator search settings
Setting the type of search This setting determines how a search is performed and ultimately how many search results are returned. Many users leave the Match any fields selection unchecked, especially if most of their searches include specific information (such as a complete folder ID).
To set the type of search
From the Search screen, select the type of search to perform (see description below). Most users leave the Match any
fields selection unchecked.
Fewer search results More search results
“Match Any Fields” NOT SELECTED performs an AND Function Locator software searches the database and displays folders that match all information in all of the Locate by fields. Search results = any folders that include:
Acme Corp at the beginning of the Client Name field
-AND-
Regulatory action and appeal at the beginning
of the Description field
This search uses an AND function that returns fewer, more-specific results.

Copyright © 2003-2009, 3M. All rights reserved. RFID Locator User Guide, Rev. E 9
“Match Any Fields” SELECTED performs an OR Function
Locator software searches the database and displays folders that match any information in any of the Locate by fields. Search results = any folders that include:
Acme Corp at the beginning of the Client Name field
-OR-
Regulatory action and appeal at the beginning
of the Description field
This search uses an OR function that returns more, less-specific results.

Copyright © 2003-2009, 3M. All rights reserved. RFI
Defining search criteria Selecting search categories
Use the drop-down lists to select the search categories you will use for most of your searches.
Each search can include up to five search categories.
Category selections consist of any fields (search categories) defined in the Tracking Database.
Entering search criteria
Each search category has a text box where you enter specific search criteria. You can enter search criteria using one of two methods: Method 1 – Type search criteria
Type search criteria directly into the text box.
If you know the folder ID, you can type it into the folder ID category and get an exact match.
Method 2 – Select search criteria from a list
1 Click the Browse button next to any search-criteria text box. The Field Search list contains all of the
unique database entries for that category.
2 Scroll down the list and select (highlight) the specific search criteria you want to include in your search. You can also type in the text box to scroll
through the list. Example: If you typed G in the text box, the list would scroll and Garth & Sons would be highlighted.
3 Click OK (or double-click the selection) to insert the selected criteria into the text box.
D Locator User Guide, Rev. E 10
Copyright © 2003-2009, 3M. All rights reserved. RFID Locator User Guide, Rev. E 11
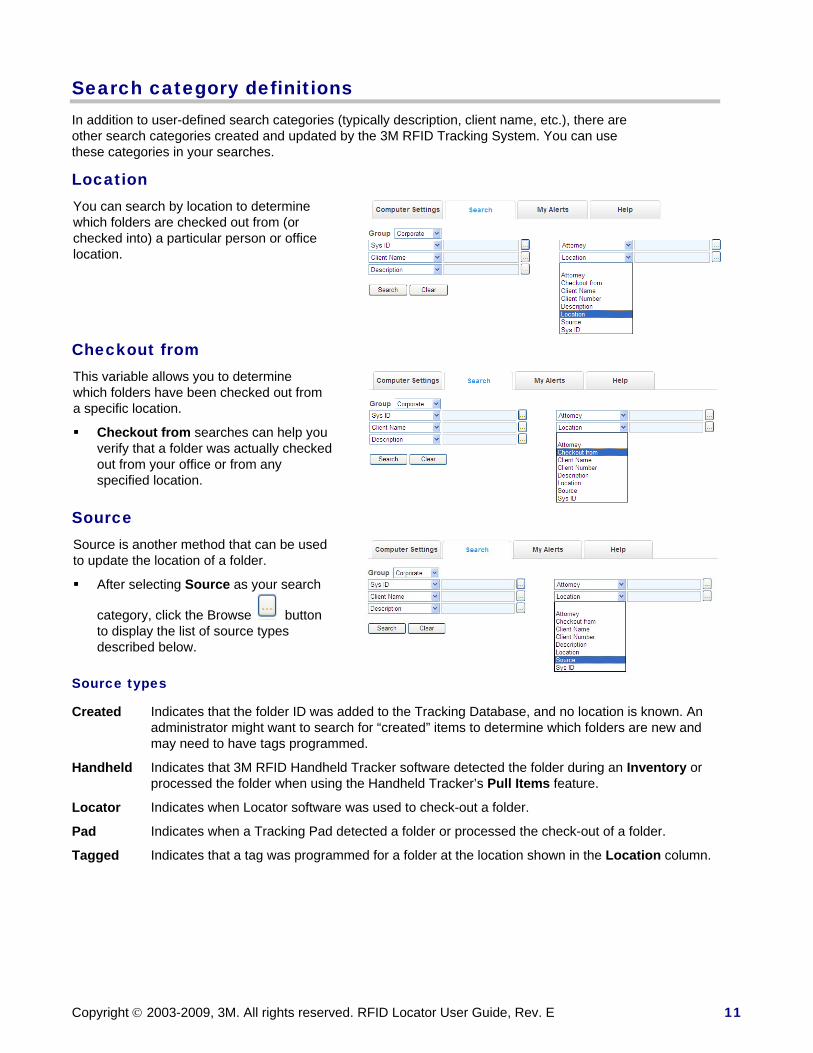
Search category definitions In addition to user-defined search categories (typically description, client name, etc.), there are other search categories created and updated by the 3M RFID Tracking System. You can use these categories in your searches.
Location You can search by location to determine which folders are checked out from (or checked into) a particular person or office location.
Checkout from This variable allows you to determine which folders have been checked out from a specific location.
Checkout from searches can help you verify that a folder was actually checked out from your office or from any specified location.
Source Source is another method that can be used to update the location of a folder.
After selecting Source as your search
category, click the Browse button to display the list of source types described below.
Source types
Created Indicates that the folder ID was added to the Tracking Database, and no location is known. An administrator might want to search for “created” items to determine which folders are new and may need to have tags programmed.
Handheld Indicates that 3M RFID Handheld Tracker software detected the folder during an Inventory or processed the folder when using the Handheld Tracker’s Pull Items feature.
Locator Indicates when Locator software was used to check-out a folder.
Pad Indicates when a Tracking Pad detected a folder or processed the check-out of a folder.
Tagged Indicates that a tag was programmed for a folder at the location shown in the Location column.

Copyright © 2003-2009, 3M. All rights reserved. RFID Lo
Other search functions
Using wildcard characters in your searches You can use wildcard search characters when you do not have enough information to perform a basic search.
Multiple characters - Use the “percent” wildcard character (%) to represent any number of unknown characters.
Single characters - Use the “underscore” wildcard character (_) to represent a single character. You can use multiple underscore characters to represent a specific number of characters.
Example - performing a wildcard (contains) search for multiple characters
In this example, the user wanted to find information about a construction project on Summit Avenue.
The multiple-character wildcard (%) was used in the Description field to return the results shown.
The % character in front of summit matches any number of unknown characters in front of “summit”.
Locator software also matches any number of characters that occur to the right of what you typed.
Using multiple instances of the same search category A search can include the same search category more than once. In these instances, the search will include matches to any duplicate search criteria (an OR function).
In the first example, the search returned matches for any Aim Software OR Chowen Co. folders that are in Allie Johnson's office.
In the second example, the search returned matches for any folders that were located in Janet Billings’ office OR Bob Roberts’ office.
cator User Guide, Rev. E 12

Copyright © 2003-2009, 3M. All rights reserved.
Displaying folder histories The History feature provides a convenient means to track the location of an individual folder. This information is helpful if you want to know about a folder’s previous activity.
To display a folder’s history
1 To view a folder’s movement history, double click on the unique ID for that item in the list. NOTE: You can only view the history for one file at a time.
2 You will see the complete movement history for this file with the most current record at the top of the list.
3 You can optionally export the history records to a text file by clicking Export All on the right side of the window.
4 To close the Folder History window, click the X at the top right of the window.
History notation
The History dialog box includes a chrono-logical record of a folder’s locations.
Start date – the date and time when a folder was first detected at a location.
End date – the date and time when a folder was last detected at a location before the folder’s location was changed.
The start and end dates reflect the dates that item was seen at that location and also tracked by the same source (Pad, Handheld, Locator). So if a file is checked out to a location, both the start and end dates will be the same. If the file is read with the hand-held at the same location, this will create a new history record where the checkout dates are not changed and the start and end dates of the hand- held scan will both be the new time. If you continue to read the file at the same location using the same source (handheld), no new history record will be added but the end date will be updated to reflect the latest date/time that file was read by the handheld.
Check-out notation - The location entries that include brackets and an arrow indicate a check-out event where a folder location was changed using Locator software, using the Pad Monitor Checkout to feature, or using the Handheld Tracker Pull Items feature.
The brackets indicate where the check-out was performed. The arrow points to the new location.
Check-in events (for example, when folders are placed on a Tracking Pad) do not use the bracket notation.
In this example:
1 The folder ID (1025-10200-001) was created (added to the Tracking Database) on 7/22/2005 (see bottom of list).
2 The tag was programmed and applied to the folder in the File Room on 8/3/2005.
3 A Tracking Pad in File Room was used to check-out the folder to the 3rd Floor war Room on 8/3/2005 at 8:40 AM.
4 It was checked out using the Locator software from the 3rd Floor War Room to Bob Roberts on 8/3/2005.
5 The folder was then scanned by a Handheld Inventory in the 3rd Floor War Room on 8/4/2005 at 8:13 AM.
RFID Locator User Guide, Rev. E 13

Copyright © 2003-2009, 3M. All rights reserved.
Using 3M™ RFID Locator software to generate lists The results of various searches can be used to generate lists. You can set the number of rows to display on the web page to a maximum of 50. You can select all of the displayed rows and copy to the clipboard or export them to a text file for use in other software applications. Search results can be copied and used for the following applications: Search results can be pasted into
System Manager software to create search lists for use with the Handheld Tracker.
Search results can also be pasted into other applications, such as Microsoft Excel or Word.
To select a single row Click in the checkbox on the left side of the row. To select multiple (or all) rows Method 1 - Select individual records Click in the box beside each record you want to select it. NOTE: you can only work with the rows that are displayed on the results grid. Selections are not stored if you move to another page of results. Method 2 – Click the Select All box
There is a Select All box in the column header that will select all records displayed on the screen. If you want to remove a record, click in the box to remove the check mark for a record. Clicking the Select All box a second time clears all check boxes. To copy or export rows Once you have selected the row(s) that you want to copy, you can either: 1 Copy the data (including headings) to
the Windows clipboard and paste it into another Windows application.
2 Export the data to a CSV (text) file that can be saved to a drive and folder you select. The first screen you will see will ask if you want to Open or Save the file. If you click Open, a text editor window will show your data. If you select Save, you will be promoted to enter the drive, folder and file name of the text file.
Click on the selection box at the left side of the record to select it.
Once you have selected the records you want, you can copy them to the clipboard or export them to a text file.
RFID Locator User Guide, Rev. E 14

Copyright © 2003-2009, 3M. All rights reserved. RFID
Checking Out Folders If Locator Checkout is enabled (on the Modify Computer dialog box), you can use Locator software to check-out a folder from your computer’s location to any location that belongs to one of your computer's Allowed Groups.
If your File Tracking Administrator has disabled this feature on your computer, you will not be able to use Locator software to check-out folders to other locations.
During Locator check-outs:
The RFID Tracking Database is updated with the new location for each folder that you checked out.
The standard check-out notation is used to show the “from” and “to” locations: to location [from location]
Locator software provides a quick method to check-out a folder without using a Tracking Pad.
Setting the check-out location for your computer Administrators only - Before you can use the Checkout function, a Group or System Administrator must set the check-out location for your computer. This is set in the Modify Computer dialog box (available through the Computer Settings tab).
The check-out location for your computer can also be set using Pad Monitor software (for users who have a Tracking Pad), or System Manager software (if loaded on your computer). Whenever the location is changed in any
of these other software applications, the new location will appear in all 3M RFID software modules.
To change the Location setting
1 Click the Computer Settings tab, and log on as a Group or System Administrator.
2 In the Modify Computer dialog box, select the location from the Location drop-down list. The locations shown are those which belong to all the selected groups.
3 Click OK.
Locator User Guide, Rev. E 15
Copyright © 2003-2009, 3M. All rights reserved. RFID Locator User Guide, Rev. E 16
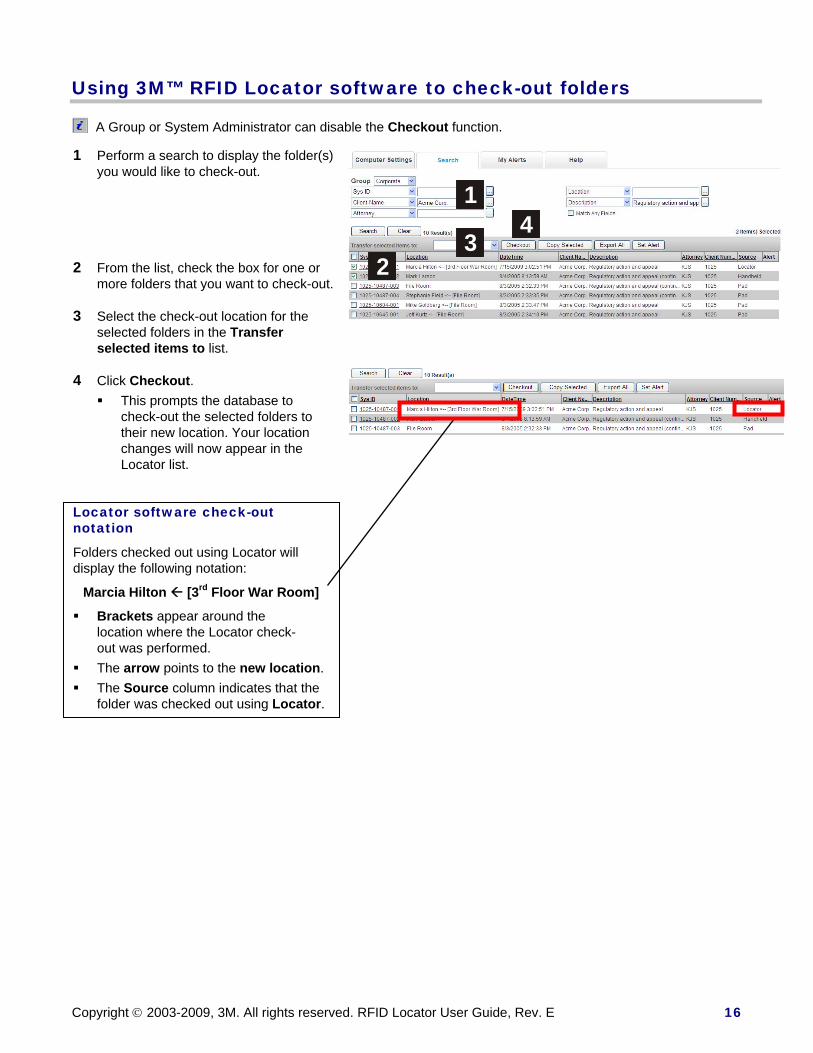
Using 3M™ RFID Locator software to check-out folders
A Group or System Administrator can disable the Checkout function.
1 Perform a search to display the folder(s) you would like to check-out.
2 From the list, check the box for one or more folders that you want to check-out.
3 Select the check-out location for the selected folders in the Transfer selected items to list.
4 Click Checkout. This prompts the database to
check-out the selected folders to their new location. Your location changes will now appear in the Locator list.
Locator software check-out notation
Folders checked out using Locator will display the following notation:
Marcia Hilton [3rd Floor War Room]
Brackets appear around the location where the Locator check-out was performed.
The arrow points to the new location. The Source column indicates that the
folder was checked out using Locator.
14
32

Copyright © 2003-2009, 3M. All rights reserved. RFID Locator User Guide, Rev. E 17
Disabling the Locator Checkout function (Administrator only) Only a System or Group Administrator can enable or disable the Locator Checkout function for each computer.
1 Click on the Computer settings tab.
2 Log on as a Group or System Administrator. The Modify Computer dialog box
appears.
To enable the Locator Checkout function:
Select (check) the Allow Checkout from Locator check box and click OK.
To disable the Locator Checkout function:
Deselect (uncheck) the Allow Checkout from Locator check box and click OK.

Copyright © 2003-2009, 3M. All rights reserved.
Setting File Alerts Alerting Basics
An alert is a one-time email notification that tells you a file (or files) you have specified have been checked in, checked out or been read by the handheld tracker. Once the email has been sent, the alert is removed from the file. Alerts are set in the Locator software and more than one person can have an alert on a file. For the alerting feature to work, the web server for Locator must have access to an SMTP (Simple Mail Transfer Protocol) server.
IMPORTANT: Due to processing overhead, it is not recommended that more than 50 people have an alert on a single file at a time.
Adding an Alert to a file
1 Set your search criteria to list the file(s) you want to put an alert on.
2 Select the file(s) by clicking the check box to the left of each record(s) listed in the results grid.
3 Click the Set Alert button on the toolbar.
4 If this is the first time you have set an alert, you will be prompted for one or more email addresses where you want a message sent when the file(s) are checked in, checked out or scanned with the Handheld. When you click OK, you will receive a confirmation message that the alert is set. NOTE: If you have already set an alert on a file before, your email selections will be remembered. NOTE: Files that you have an alert on will display a clock icon on the far right end of the record. If you move the mouse cursor over the icon it will tell you the total number of alerts on this file (including yours).
RFID Locator User Guide, Rev. E 18

Copyright © 2003-2009, 3M. All rights reserved. RFID Locator User Guide, Rev. E 19
Removing an Alert from a file
Go to the My Alerts tab on the Locator page. You can delete records one of two ways: Click in the selection box on the left side of
one (or more) record(s), then click the Delete Selected button. You can also click the Select All box to select all records that are displayed. You will be prompted to confirm that you want to remove these items from your alert list. Click OK to confirm your choice.
Click the red X on the right side of a record. You will be prompted to confirm that you want to remove this item from your alert list. Click OK to confirm your choice.

Copyright © 2003-2009, 3M. All rights reserved. RFID Locator User Guide, Rev. E 20
Reporting Three Standard Reports
Accessing the Report web page A new feature in version 3.x are three standard reports for the RFID Tracking system. These reports are web-based and can be access under the Locator web page (http://server/Locatorpage/Reporting) where server is the name of the IIS server for Locator and Locatorpage is the name of the Locator web page created during installation (the default name is 3M_Locator). All reports can be printed or exported to a variety of formats, including Excel, CSV (text) and PDF.
IMPORTANT NOTE — CHANGES EFFECTIVE IN VERSION 3.10 The system now includes support for time zones. All date/time fields are stored in UTC on the database server and are converted to the client time zone and format settings that initiate the update/query. For example, if a file is checked into a pad in Boston at 11:15 AM local time, when a user in San Francisco queries the database for that record, they will see 8:15 AM appear on their screen (Eastern time is 3 hours ahead of Pacific time). Exception: In all reports, the time displayed to users will be for the server time zone only.
Checked In Report The Checked In Report provides a list of all items that have been checked in to a selected location for the listed group(s) between two dates. You can also have the report list the files checked in to all locations for that group between the start and end dates.
Copyright © 2003-2009, 3M. All rights reserved. RFID Locator User Guide, Rev. E 21
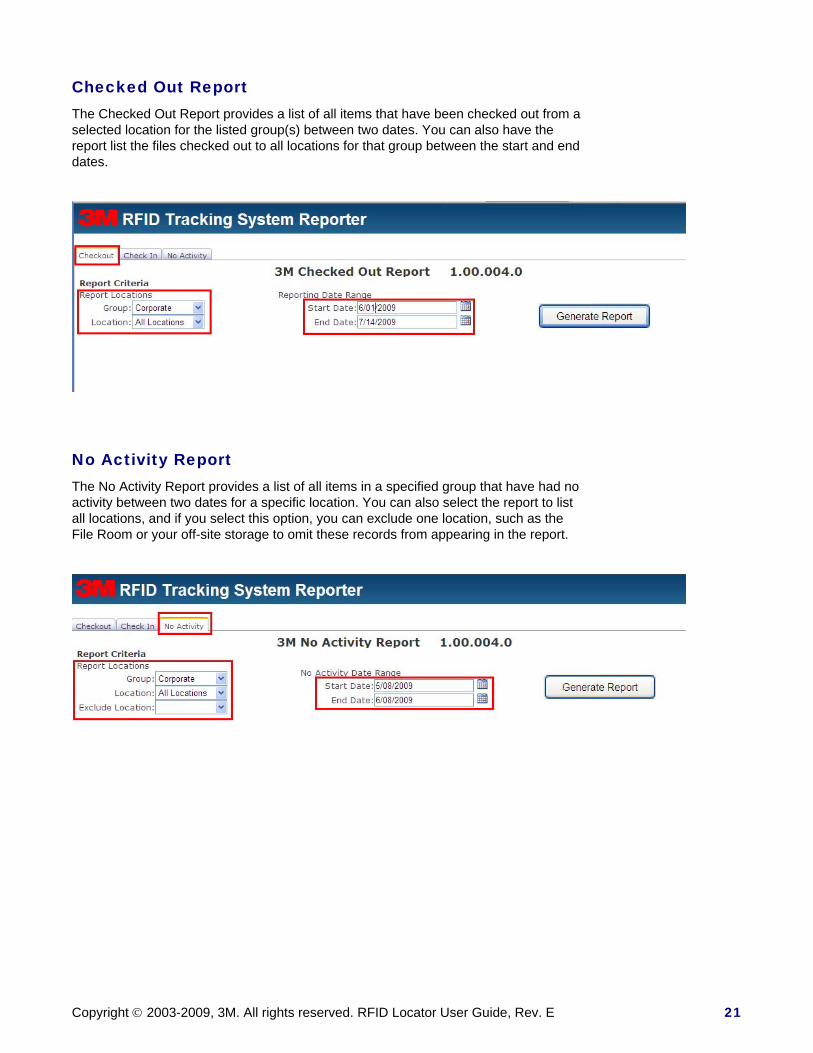
Checked Out Report The Checked Out Report provides a list of all items that have been checked out from a selected location for the listed group(s) between two dates. You can also have the report list the files checked out to all locations for that group between the start and end dates.
No Activity Report The No Activity Report provides a list of all items in a specified group that have had no activity between two dates for a specific location. You can also select the report to list all locations, and if you select this option, you can exclude one location, such as the File Room or your off-site storage to omit these records from appearing in the report.

Copyright © 2003-2009, 3M. All rights reserved. RFID Locator User Guide, Rev. E 22
Troubleshooting Connectivity Issues
Web Server not available/accessible If the web server that Locator is on is unavailable, or if you have entered the web site server or site name incorrectly, you will see this message:
Check the spelling of the server name as well as the name of the Locator web site and try again. If these are correct, contact your network administrator to check the IIS server.
Database not available/accessible If the web server is operational but there is a problem connecting to the database, you will see a screen like this:
Contact your network administrator and let them know that you cannot connect to the RFID database.

Copyright © 2003-2009, 3M. All rights reserved. RFID Locator User Guide, Rev. E 23
Session time out Since the Locator program is a web-based application, if you are connected for more than 8 hours without activity, to save connection resources on the server, your session (connection) will be dropped and you will see this message:
To reestablish the web server connection, click the “Click here to proceed” link on the right side of the page.
For any of the reports, if a session times out, you will see the following message on the screen:
To clear this message, just click the Generate Report button.

Copyright © 2003-2009, 3M. All rights reserved. RFID Locator User Guide, Rev. E 24
Web Locator Log Files For troubleshooting purposes, you can view log files for Locator on the server that has IIS installed and is hosting the web site. On this computer (usually a server) the log files will be located at: x:\Inetpub\wwwroot\<locator website name>\Log
There will also be logs for Alerts in the 3M tracking database. There is a table called AlertNotifyLog that will contain all steps of setting an alert as well as the sending of the email.
Locator results do not display correctly in Internet Explorer (IE) 8 If the search results do not appear to display correctly on the Locator screen when you are using IE 8, you need to set the compatibility mode in the browser.
A button located in the navigation bar just to the right of the address bar (next to the refresh button) controls the Compatibility View feature:
To set advanced configuration of this feature go to the Tools menu:

Copyright © 2003-2009, 3M. All rights reserved. RFID Locator User Guide, Rev. E 25
3M Service Information to gather Before you call for service, please have following information available: • The name, address, and telephone number of your facility • A description of the problem or the issue you want addressed • The model number and serial number of the equipment (located on the serial label), if the call is in regard to a system problem
Model Number _________________________ Serial Number _________________________
3M Service phone numbers For questions regarding your system, call one of the following numbers. In the United States In Canada In other countries 1-800-328-0067 English 1-800-268-6235 Call your local 3M office. Français 1-800-567-3193
3M Track and Trace Solutions Web Site The 3M Track and Trace Solutions Web site can be located at http://www.3M.com/RFID.


